where to find information - download.epson.eu
TRANSCRIPT


Where to Find Information
This User’s Guide
Provides you with all the information you need to use yourEPSON Stylus COLOR 600 and consumable products, fromsetting up to troubleshooting. If you use Microsoft® WindowsNT®, see the Windows NT-based software users guide.
Online Help
Provides you with detailed information and instructions on theprinter software that controls your printer. (Online help will beautomatically installed when you install the printer software.)
EPSON Answers (for Windows 95 and 3.1 only)
Provides Windows 95 and 3.1 users with additionalinformation on using your printer and printing with colors.Here’s what you’ll find in EPSON Answers:
❑ How To displays a step-by-step guide for using yourprinter, information about printer maintenance, andinstructions on replacing consumable products.
❑ Problem Solver helps you fix common printing problemswhen you encounter them.
❑ Test Print lets you print a test page to check the results ofsettings you have made and provides links to other sectionsof EPSON Answers based on the results.
❑ Color Guide explains the ABC’s of color printing andshows you how to get impressive results from your printer. (A printed Color Guide is also included with your printer.)
L Fiji Ref. Guide Rev.bA5 size cover-205-20-97 DR, pass 0

Color Ink Jet Printer
All rights reserved. No part of this publication may be reproduced, stored in a retrievalsystem, or transmitted in any form or by any means, electronic, mechanical, photocopying,recording, or otherwise, without the prior written permission of SEIKO EPSONCORPORATION. The information contained herein is designed only for use with thisEPSON printer. EPSON is not responsible for any use of this information as applied toother printers.
Neither SEIKO EPSON CORPORATION nor its affiliates shall be liable to the purchaser ofthis product or third parties for damages, losses, costs, or expenses incurred by thepurchaser or third parties as a result of: accident, misuse, or abuse of this product orunauthorized modifications, repairs, or alterations to this product, or (excluding the U.S.)failure to strictly comply with SEIKO EPSON CORPORATION’s operating andmaintenance instructions.
SEIKO EPSON CORPORATION shall not be liable for any damages or problems arisingfrom the use of any options or any consumable products other than those designated asOriginal EPSON Products or EPSON Approved Products by SEIKO EPSONCORPORATION.
EPSON and EPSON ESC/P are registered trademarks and EPSON ESC/P 2 and EPSONStylus are trademarks of SEIKO EPSON CORPORATION.
Microsoft and Windows are registered trademarks of Microsoft Corporation.
General Notice: Other product names used herein are for identification purposes only and may betrademarks of their respective owners. EPSON disclaims any and all rights in those marks.
Copyright © 1996 by SEIKO EPSON CORPORATION, Nagano, Japan.
User’s Guide
Proof Sign-off:Ishizaka _______Nomoto _______Keith _______Grady _______ title page
F-R01
recylogo
RFiji2 Ref. Guide Rev.bA5 size Front05-20-97 DR, pass 0

Declaration of ConformityAccording to ISO/IEC Guide 22 and EN 45014
Manufacturer: SEIKO EPSON CORPORATIONAddress: 3-5, Owa 3-chome, Suwa-shi,
Nagano-ken 392 Japan
Representative: EPSON EUROPE B.V.Address: Prof. J. H. Bavincklaan 5 1183
AT AmstelveenThe Netherlands
Declares that the Product:
Product Name: Ink Jet PrinterType Name: EPSON Stylus COLOR 600Model: P954A
Conforms to the following Directive(s) and Norm(s):
Directive 89/336/EEC:EN 55022 Class BEN 61000-3-2EN 61000-3-3EN 50082-1 IEC 801-2 IEC 801-3 IEC 801-4
Directive 73/23/EEC:EN 60950
December 1996
M. HamamotoPresident of EPSON EUROPE B.V.
L Fiji2 Ref. Guide Rev.bA5 size Front05-20-97 DR, pass 0
ii

Contents
Safety Instructions
Important Safety Instructions . . . . . . . . . . . . . . . . . . . 0-1A few precautions . . . . . . . . . . . . . . . . . . . . . . . . 0-2
ENERGY STAR Compliance . . . . . . . . . . . . . . . . . . . . 0-3For United Kingdom Users . . . . . . . . . . . . . . . . . . . . 0-4Warnings, Cautions, and Notes . . . . . . . . . . . . . . . . . . 0-5
Chapter 1 Getting to Know Your Printer
Printer Parts and Control Panel Functions . . . . . . . . . . . . 1-2System Requirements . . . . . . . . . . . . . . . . . . . . . . . . 1-4
When using your printer with a PC . . . . . . . . . . . . . . 1-4When using your printer with a Macintosh . . . . . . . . . 1-5
Options and Consumable Products . . . . . . . . . . . . . . . . 1-7Options . . . . . . . . . . . . . . . . . . . . . . . . . . . . . . 1-7Consumable products . . . . . . . . . . . . . . . . . . . . . . 1-7
Chapter 2 Getting Started
Unpacking the Printer . . . . . . . . . . . . . . . . . . . . . . . 2-2Attaching the Paper Support . . . . . . . . . . . . . . . . . . . . 2-3Choosing a Place for the Printer . . . . . . . . . . . . . . . . . . 2-3
Using a printer stand . . . . . . . . . . . . . . . . . . . . . . 2-4Plugging in the Printer . . . . . . . . . . . . . . . . . . . . . . . 2-5Installing the Ink Cartridges . . . . . . . . . . . . . . . . . . . . 2-6Connecting the Printer to Your PC . . . . . . . . . . . . . . . . 2-11Installing the Printer Software in Your PC . . . . . . . . . . . . 2-12
Installing in Windows 95 . . . . . . . . . . . . . . . . . . . . 2-13Installing in Windows 95 (using plug-and-play) . . . . . . 2-14Installing in Windows 3.1 . . . . . . . . . . . . . . . . . . . 2-18
RFiji2 Ref. Guide Rev.bA5 size Front05-20-97 DR, pass 0
iii

Connecting the Printer to Your Macintosh . . . . . . . . . . . . 2-20Installing the Printer Software in Your Macintosh . . . . . . . . 2-21
Installing the printer software . . . . . . . . . . . . . . . . . . 2-21Printer software components . . . . . . . . . . . . . . . . . . 2-23Using the Chooser to select your printer . . . . . . . . . . . 2-24
Chapter 3 Starting to Print
Loading Paper . . . . . . . . . . . . . . . . . . . . . . . . . . . . . 3-2Printing with Windows . . . . . . . . . . . . . . . . . . . . . . . 3-5Printing with a Macintosh . . . . . . . . . . . . . . . . . . . . . . 3-8
Chapter 4 Using the Printer Software for Windows
Introducing the Printer Software Functions . . . . . . . . . . . . 4-2Accessing the Printer Software . . . . . . . . . . . . . . . . . . . 4-3
From Windows applications . . . . . . . . . . . . . . . . . . 4-3From Windows 95 . . . . . . . . . . . . . . . . . . . . . . . . 4-4From Windows 3.1 . . . . . . . . . . . . . . . . . . . . . . . . 4-5
Using the Automatic Setting . . . . . . . . . . . . . . . . . . . . 4-6Using the Predefined Settings . . . . . . . . . . . . . . . . . . . . 4-7Customizing the Print Settings . . . . . . . . . . . . . . . . . . . 4-9
Saving your settings . . . . . . . . . . . . . . . . . . . . . . . 4-10Making the Media Type Setting . . . . . . . . . . . . . . . . . . 4-11Using EPSON Printer Utilities . . . . . . . . . . . . . . . . . . . 4-13
EPSON Status Monitor . . . . . . . . . . . . . . . . . . . . . . 4-14Nozzle Check . . . . . . . . . . . . . . . . . . . . . . . . . . . 4-15Head Cleaning . . . . . . . . . . . . . . . . . . . . . . . . . . 4-15Print Head Alignment . . . . . . . . . . . . . . . . . . . . . . 4-15
Checking Printer Status . . . . . . . . . . . . . . . . . . . . . . . 4-16Understanding the EPSON Spool Manager . . . . . . . . . . 4-16Understanding the Despooler . . . . . . . . . . . . . . . . . . 4-17
Getting Information Through Online Help . . . . . . . . . . . . 4-18From Windows applications . . . . . . . . . . . . . . . . . . 4-18From Windows 95 . . . . . . . . . . . . . . . . . . . . . . . . 4-18From Windows 3.1 . . . . . . . . . . . . . . . . . . . . . . . . 4-18
L Fiji2 Ref. Guide Rev.bA5 size Front05-20-97 DR, pass 0
iv

Chapter 5 Using the Printer Software for Macintosh
Introducing the Printer Software Functions . . . . . . . . . . . 5-2Using the Automatic Setting . . . . . . . . . . . . . . . . . . . . 5-3Using the Predefined Settings . . . . . . . . . . . . . . . . . . . 5-5Customizing the Print Settings . . . . . . . . . . . . . . . . . . 5-8
Making your settings . . . . . . . . . . . . . . . . . . . . . . 5-8Saving your settings . . . . . . . . . . . . . . . . . . . . . . . 5-9Choosing your settings . . . . . . . . . . . . . . . . . . . . . 5-10Modifying visual effects . . . . . . . . . . . . . . . . . . . . 5-10Controlling the printing quality . . . . . . . . . . . . . . . . 5-15
Changing the Paper Size . . . . . . . . . . . . . . . . . . . . . . 5-18Defining a Custom Paper Size . . . . . . . . . . . . . . . . . . . 5-19Using EPSON Printer Utilities . . . . . . . . . . . . . . . . . . . 5-20
EPSON StatusMonitor . . . . . . . . . . . . . . . . . . . . . 5-21Nozzle Check . . . . . . . . . . . . . . . . . . . . . . . . . . 5-22Head Cleaning . . . . . . . . . . . . . . . . . . . . . . . . . . 5-23Print Head Alignment . . . . . . . . . . . . . . . . . . . . . 5-23
Using the EPSON Monitor2 Utility . . . . . . . . . . . . . . . . 5-24
Chapter 6 Printing on Special Paper
Loading Special Paper and Other Media . . . . . . . . . . . . . 6-2About special media cleaning sheets . . . . . . . . . . . . . 6-5
Loading Envelopes . . . . . . . . . . . . . . . . . . . . . . . . . 6-6Loading Transparencies . . . . . . . . . . . . . . . . . . . . . . 6-7Using EPSON Photo Paper (S041134) . . . . . . . . . . . . . . . 6-8
Loading . . . . . . . . . . . . . . . . . . . . . . . . . . . . . . 6-8Removing the perforated margins . . . . . . . . . . . . . . 6-10Storing EPSON Photo Paper . . . . . . . . . . . . . . . . . . 6-10
Chapter 7 Maintenance and Transportation
Replacing an Ink Cartridge . . . . . . . . . . . . . . . . . . . . . 7-2Cleaning the Printer . . . . . . . . . . . . . . . . . . . . . . . . . 7-8Transporting the Printer . . . . . . . . . . . . . . . . . . . . . . 7-9
RFiji2 Ref. Guide Rev.bA5 size Front05-20-97 DR, pass 0
v

Chapter 8 Troubleshooting
Diagnosing the Problem . . . . . . . . . . . . . . . . . . . . . . . 8-2Error indicators . . . . . . . . . . . . . . . . . . . . . . . . . . 8-2Status Monitor . . . . . . . . . . . . . . . . . . . . . . . . . . 8-4Printer operation check . . . . . . . . . . . . . . . . . . . . . 8-4
Problems and Solutions . . . . . . . . . . . . . . . . . . . . . . . 8-7Power supply . . . . . . . . . . . . . . . . . . . . . . . . . . . 8-7Operation . . . . . . . . . . . . . . . . . . . . . . . . . . . . . 8-8Paper handling . . . . . . . . . . . . . . . . . . . . . . . . . . 8-14Printing quality . . . . . . . . . . . . . . . . . . . . . . . . . . 8-17
Increasing the Print Speed . . . . . . . . . . . . . . . . . . . . . . 8-24Cleaning the Print Head . . . . . . . . . . . . . . . . . . . . . . . 8-26Aligning the Print Head . . . . . . . . . . . . . . . . . . . . . . . 8-29Ink Cartridge Problems . . . . . . . . . . . . . . . . . . . . . . . 8-30Contacting Customer Support . . . . . . . . . . . . . . . . . . . 8-34
For United Kingdom and the Republic of Ireland users . . . 8-34For Australian users . . . . . . . . . . . . . . . . . . . . . . . 8-37For Hong Kong and Singapore users . . . . . . . . . . . . . . 8-39For Philippines users . . . . . . . . . . . . . . . . . . . . . . 8-40
Appendix A Using the Printer with DOS
Installing the Printer Software for DOS Programs . . . . . . . . A-2Using Built-in Fonts and Character Tables . . . . . . . . . . . . A-3
Fonts . . . . . . . . . . . . . . . . . . . . . . . . . . . . . . . . A-4Cleaning the Print Head . . . . . . . . . . . . . . . . . . . . . . . A-6Aligning the Print Head . . . . . . . . . . . . . . . . . . . . . . . A-7Using Power-On Functions . . . . . . . . . . . . . . . . . . . . . A-8
Appendix B Tips for Color Printing
Basics of Color . . . . . . . . . . . . . . . . . . . . . . . . . . . . . B-2Image Resolution and Image Size . . . . . . . . . . . . . . . . . B-5Basics of Color Documents . . . . . . . . . . . . . . . . . . . . . B-7
L Fiji2 Ref. Guide Rev.bA5 size Front05-20-97 DR, pass 0
vi

Appendix C Specifications
Technical Specifications . . . . . . . . . . . . . . . . . . . . . . C-2Printing . . . . . . . . . . . . . . . . . . . . . . . . . . . . . . C-2Paper . . . . . . . . . . . . . . . . . . . . . . . . . . . . . . . C-4Ink cartridges . . . . . . . . . . . . . . . . . . . . . . . . . . C-7Mechanical . . . . . . . . . . . . . . . . . . . . . . . . . . . . C-8Electrical . . . . . . . . . . . . . . . . . . . . . . . . . . . . . C-8Environmental . . . . . . . . . . . . . . . . . . . . . . . . . . C-9Initialization . . . . . . . . . . . . . . . . . . . . . . . . . . . C-9Default settings . . . . . . . . . . . . . . . . . . . . . . . . . C-10Safety approvals . . . . . . . . . . . . . . . . . . . . . . . . . C-11
Interface Specifications . . . . . . . . . . . . . . . . . . . . . . . C-12Parallel interface . . . . . . . . . . . . . . . . . . . . . . . . . C-12Serial interface . . . . . . . . . . . . . . . . . . . . . . . . . . C-13
ESC/P 2 Control Codes . . . . . . . . . . . . . . . . . . . . . . . C-14Character Tables . . . . . . . . . . . . . . . . . . . . . . . . . . . C-15
International character sets . . . . . . . . . . . . . . . . . . . C-19Characters available with ESC ( ^ command . . . . . . . . C-20
Glossary
Index
RFiji2 Ref. Guide Rev.bA5 size Front05-20-97 DR, pass 0
vii

L Fiji2 Ref. Guide Rev.bA5 size Front05-20-97 DR, pass 0
viii
Safety Instructions
Important Safety Instructions
Read all of these instructions and save them for later reference.Follow all warnings and instructions marked on the printer.
❑ Do not place the printer on an unstable surface or near aradiator or heat source.
❑ Place the printer on a flat surface. The printer will notoperate properly if it is tilted or at an angle.
❑ Do not block or cover the openings in the printer’s cabinet.Do not insert objects through the slots.
❑ Use only the type of power source indicated on the printer’slabel.
❑ Connect all equipment to properly grounded poweroutlets. Avoid using outlets on the same circuit asphotocopiers or air control systems that regularly switch on and off.
❑ Do not use a damaged or frayed power cord.
❑ If you use an extension cord with the printer, make sure the total ampere rating of the devices plugged into theextension cord does not exceed the cord’s ampere rating.Also, make sure the total ampere rating of all devicesplugged into the wall outlet does not exceed the walloutlet’s ampere rating.
❑ Unplug the printer before cleaning. Clean with a dampcloth only. Do not spill liquid on the printer.
❑ Except as specifically explained in this guide, do notattempt to service the printer yourself.
Proof Sign-off:Ishizaka _______Nomoto _______Keith _______Grady _______
RFiji2 Ref. Guide Rev.bA5 size Introduction05-20-97 DR, pass 0
Safety Instructions 1
❑ Unplug the printer and refer servicing to qualified servicepersonnel under the following conditions:
If the power cord or plug is damaged; if liquid has entered the printer; if the printer has been dropped or the cabinetdamaged; if the printer does not operate normally orexhibits a distinct change in performance. Adjust only thosecontrols that are covered by the operating instructions.
❑ If you plan to use the printer in Germany, observe thefollowing:
To provide adequate short-circuit protection and over-currentprotection for this printer, the building installation must beprotected by a 16 Amp circuit breaker.
Bei Anschluß des Druckers an die Stromversorgung mußsichergestellt werden, daß die Gebäudeinstallation miteinem 16 A-Überstromschalter abgesichert ist.
A few precautions
Even if you are familiar with other types of printers, be sure toread through the following list of precautions before operatingyour ink jet printer.
❑ Do not put your hand inside the printer or touch the inkcartridges during printing.
❑ Under normal circumstances, ink will not come out of thecartridges. If it does get on your skin, wash it off with soapand water. If it gets in your eyes, flush them immediatelywith water.
❑ Keep ink cartridges out of the reach of children.
❑ Do not dismantle the ink cartridges or try to refill them.This could result in damage to the print head.
L Fiji2 Ref. Guide Rev.bA5 size Introduction05-20-97 DR, pass 0
2 Safety Instructions

❑ Once you install an ink cartridge, do not open the clamp orremove the cartridge except to replace it with a new one.The cartridge may become unusable otherwise.
❑ Install the ink cartridge immediately after you remove itfrom its package. Leaving the cartridge unpacked for a longtime before use may result in reduced print quality.
❑ Do not use an ink cartridge beyond the date printed on thecartridge carton. For best results, use up the ink cartridgeswithin six months of installing them.
❑ Do not shake an ink cartridge; this can cause leakage.
❑ Always turn the printer off using the P power button.When this button is pressed, the P power light flashesbriefly then goes out. Do not unplug the printer or turn offthe power to the outlet until the P power light is off.
❑ Before transporting the printer, make sure the print head iscapped in the far right position and the ink cartridges are inplace.
ENERGY STAR Compliance
As an ENERGY STAR Partner, EPSON hasdetermined that this product meets the ENERGYSTAR guidelines for energy efficiency.
The International ENERGY STAR Office Equipment Programis a voluntary partnership with the computer and officeequipment industry to promote the introduction ofenergy-efficient personal computers, monitors, printers, faxmachines, and copiers in an effort to reduce air pollutioncaused by power generation.
RFiji2 Ref. Guide Rev.bA5 size Introduction05-20-97 DR, pass 0
Safety Instructions 3

For United Kingdom Users
Use of options
Epson (UK) Limited shall not be liable against any damages orproblems arising from the use of any options or consumableproducts other than those designated as Original EPSONProducts or EPSON Approved Products by Epson (UK)Limited.
Safety information
wWarning: This appliance must be earthed. Refer to rating platefor voltage and check that the appliance voltage corresponds tothe supply voltage.
Important: The wires in the mains lead fitted to this applianceare coloured in accordance with the following code:
Green and yellow — EarthBlue — NeutralBrown — Live
If you have to fit a plug:As the colours of the mains lead of this appliance may notmatch coloured markings used to identify the terminals in aplug, please proceed as follows:
The green and yellow wire must be connected to the terminalin the plug which is marked with the letter E or the Earthsymbol (G).
The blue wire must be connected to the terminal in the plugmarked with the letter N.
The brown wire must be connected to the terminal in the plugmarked with the letter L.
L Fiji2 Ref. Guide Rev.bA5 size Introduction05-20-97 DR, pass 0
4 Safety Instructions

If damage occurs to the plug, replace the cord set or consult aqualified electrician.
Replace fuses only with a fuse of the correct size and rating.
Warnings, Cautions, and Notes
wWarnings must be followed carefully to avoid bodily injury.
cCautions must be observed to avoid damage to your equipment.
Notes contain important information and useful tips on the operationof your printer.
RFiji2 Ref. Guide Rev.bA5 size Introduction05-20-97 DR, pass 0
Safety Instructions 5

L Fiji2 Ref. Guide Rev.bA5 size Introduction05-20-97 DR, pass 0
6 Safety Instructions

Chapter 1Getting to Know Your Printer
Proof Sign-off:Ishizaka _______Nomoto _______Keith _______Grady _______
Printer Parts and Control Panel Functions . . . . . . . . . . . . 1-2
System Requirements . . . . . . . . . . . . . . . . . . . . . . . . 1-4When using your printer with a PC . . . . . . . . . . . . . . 1-4When using your printer with a Macintosh . . . . . . . . . 1-5
Options and Consumable Products . . . . . . . . . . . . . . . . 1-6Options . . . . . . . . . . . . . . . . . . . . . . . . . . . . . . 1-6Consumable products . . . . . . . . . . . . . . . . . . . . . 1-6
1
RFiji2 Ref. Guide Rev.bA5 size Chapter 105-20-97 DR, pass 0
Getting to Know Your Printer 1-1

Printer Parts and Control Panel Functions
paper support
edge guides
printer coversheet feeder
paper support extension
output tray
output trayextension
e4
ink cartridge clamps
adjust lever
black ink out light
color ink out light
cleaning button
paper out light
load/eject button
power light and button
e5a
L Fiji2 Ref. Guide Rev.bA5 size Chapter 105-20-97 DR, pass 0
1-2 Getting to Know Your Printer

Buttons
Button Function
Ppower
Turns the printer on and off. Clears the print buffer ifpressed twice while the power is on.
Eload/eject
Loads or ejects paper if pressed and released withintwo seconds. Resumes printing if pressed after apaper out error.
Rcleaning
Moves the print head to the replacement position ifpressed for about three seconds while the B or A inkout light is flashing or on. Returns the print head to itshome position after ink cartridge replacement.Performs print head cleaning if pressed for about threeseconds when both the B and A ink out lights are off.
LightsThe lights on the front of the printer indicate the printer status,such as receiving data, paper jam, or low on ink. The followingtable describes what the lights mean.
P S B A Printer StatusN - - - Printer is on.
F - - -Receiving data, replacing an ink cartridge,charging ink, or cleaning print head.
- N - -Paper out. Load paper in the sheet feeder; then
press the E load/eject button to resume printing.
- F O O
Paper jam. Take all the paper out of the sheet
feeder, reload the paper, then press the Eload/eject button. If the light continues to flash, turnoff the printer and gently pull out any paper thatmay be jammed in the printer.
- - F -Ink low. The black ink cartridge is nearly empty.Obtain a black ink cartridge (S020093).
- - N -Ink out. The black ink cartridge is empty. Replacethe black ink cartridge (S020093).
- - - FInk low. The color ink cartridge is nearly empty.Obtain a color ink cartridge (S020089).
- - - NInk out. The color ink cartridge is empty. Replacethe color ink cartridge (S020089).
N = on, O = off, F = flashing, - = irrelevant
1
RFiji2 Ref. Guide Rev.bA5 size Chapter 105-20-97 DR, pass 0
Getting to Know Your Printer 1-3

System Requirements
When using your printer with a PC
To use your printer, you need Microsoft Windows 3.1,Windows for Workgroups, Windows 95, Windows NT 4.0, orDOS; and a shielded, twisted-pair parallel cable. For systemrequirements and details on using the printer software withWindows NT, see the Windows NT 3.51/4.0 Printer softwareUser’s Guide.
To install and use the printer software (printer driver andutilities) included on the CD-ROM or floppy disk packed withyour printer, the following is required:
Minimum system Recommended system
80386/16 MHz processor Pentium processor
16MB RAM 32MB RAM
20MB hard disk space More than 50MB free hard disk space
VGA monitor VGA or better monitor
If you decide to use the EPSON Answers online guide includedwith your printer software, your system should also meet thefollowing requirements:
❑ At least 20MB of free disk space for full program installation
❑ Double-speed CD-ROM drive (Quad-speed or fasterrecommended)
Your computer dealer can help you update your system if itdoes not meet these requirements.
L Fiji2 Ref. Guide Rev.bA5 size Chapter 105-20-97 DR, pass 0
1-4 Getting to Know Your Printer

When using your printer with a Macintosh
The following are the hardware and system requirements thatmust be met to use this printer with a Macintosh.
Applicable computer models (as of July 1, 1996)
Macintosh LC II, LC III, LC475, LC520, LC575, LC630Macintosh IIcx, IIci, IIsi, IIvi, IIvxMacintosh Quadra SeriesMacintosh Centris SeriesMacintosh PowerBook Series (excluding PowerBook 100)Macintosh PowerBook Duo SeriesMacintosh Performa SeriesPower Macintosh Series
Interface cables
To use your printer with a Macintosh, you need a standardApple System Peripheral-8 cable (8-pin mini-circularconnector) or equivalent.
Environment
Minimum system Recommended system
System 7.1 System 7.5 or later
3MB of available memory 8MB or more of available memory
1
RFiji2 Ref. Guide Rev.bA5 size Chapter 105-20-97 DR, pass 0
Getting to Know Your Printer 1-5

Note:❑ The amount of available memory varies according to the number
and kind of applications that are open. To see how much memoryis available, choose About This Macintosh from the Apple menuand refer to the memory size (listed in kilobytes) under “LargestUnused Block” (1,024K=1MB).
❑ The memory requirements above are for printing on Letter sizepaper. These requirements may vary depending on the size of thepaper, the type of application you are using, and the complexity ofthe document you want to print.
❑ You need an additional 1MB of available memory whenbackground printing is turned on.
In addition to these system and memory requirements, youalso need 6MB of free hard disk space to install your printersoftware. To print, you need extra hard disk space amountingto about double the size of the file you want to print.
L Fiji2 Ref. Guide Rev.bA5 size Chapter 105-20-97 DR, pass 0
1-6 Getting to Know Your Printer

Options and Consumable Products
Options
The following options are available for use with your printer.
Interface cables
EPSON supplies several types of interface cables. You can useany interface cable that meets the specifications listed below.See your computer manual for any additional requirements.
Parallel Interface Cable (shielded) C83602✽ from D-SUB 25-pin(computer) to 36-pin Amphenol 57 series (printer)
Note:The asterisk is a substitute for the last digit of the product number,which varies by country.
Consumable products
Ink cartridges
Black ink cartridge S020093Color ink cartridge S020089
1
RFiji2 Ref. Guide Rev.bA5 size Chapter 105-20-97 DR, pass 0
Getting to Know Your Printer 1-7

EPSON special media
Most plain paper works well in your printer. In addition, paperspecifically designed for ink jet printers such as EPSON’s 360 dpi Ink Jet Paper will meet most high-quality printing needs.
EPSON 360 dpi Ink Jet Paper (A4) S041059S041025
EPSON 360 dpi Ink Jet Paper (Letter) S041060EPSON Photo Quality Ink Jet Paper (A4) S041061
S041026EPSON Photo Quality Ink Jet Paper (Letter) S041062EPSON Photo Quality Ink Jet Paper (Legal) S041067EPSON Photo Quality Ink Jet Card (A6) S041054EPSON Photo Quality Ink Jet Card (5 × 8 in.) S041121EPSON Photo Quality Ink Jet Card (8 × 10 in.) S041122EPSON Photo Quality Glossy Film (A4) S041071EPSON Photo Quality Glossy Film (Letter) S041072EPSON Photo Quality Glossy Film (A6) S041107EPSON Photo Quality Glossy Paper (A4) S041126EPSON Photo Quality Glossy Paper (Letter) S041124EPSON Ink Jet Transparencies (A4) S041063EPSON Ink Jet Transparencies (Letter) S041064EPSON Photo Quality Self Adhesive Sheet (A4) S041106EPSON Photo Paper (4 × 6 in.) S041134
Note:❑ The availability of special media varies by country.
❑ Ink jet printers are particularly sensitive to the condition of yourpaper. Keep unused paper in its original packaging and store it ina cool, dry place.
L Fiji2 Ref. Guide Rev.bA5 size Chapter 105-20-97 DR, pass 0
1-8 Getting to Know Your Printer

Chapter 2Getting Started
Proof Sign-off:Ishizaka _______Nomoto _______Keith _______Grady _______
Unpacking the Printer . . . . . . . . . . . . . . . . . . . . . . . 2-2
Attaching the Paper Support . . . . . . . . . . . . . . . . . . . . 2-3
Choosing a Place for the Printer . . . . . . . . . . . . . . . . . . 2-3Using a printer stand . . . . . . . . . . . . . . . . . . . . . . 2-4
Plugging in the Printer . . . . . . . . . . . . . . . . . . . . . . . 2-5
Installing the Ink Cartridges . . . . . . . . . . . . . . . . . . . . 2-6
Connecting the Printer to Your PC . . . . . . . . . . . . . . . . 2-11
Installing the Printer Software in Your PC . . . . . . . . . . . . 2-12Installing in Windows 95 . . . . . . . . . . . . . . . . . . . . 2-13Installing in Windows 95 (using plug-and-play) . . . . . . 2-14Installing in Windows 3.1 . . . . . . . . . . . . . . . . . . . 2-18
Connecting the Printer to Your Macintosh . . . . . . . . . . . . 2-20
Installing the Printer Software in Your Macintosh . . . . . . . 2-21Installing the printer software . . . . . . . . . . . . . . . . . 2-21Printer software components . . . . . . . . . . . . . . . . . 2-23Using the Chooser to select your printer . . . . . . . . . . . 2-24
2
RFiji2 Ref. Guide Rev.bA5 size Chapter 205-29-97 DR, pass 0
Getting Started 2-1

Unpacking the Printer
Your printer box should contain a CD-ROM, which includesthe printer driver software that runs your printer, and thefollowing items:
In some locations, the power cord comes attached to theprinter. The shape of the AC plug varies by country; be sure the plug included is the right shape for your location.
Remove all protective materials packed with your printerbefore you set it up and turn on the power. Follow theinstructions inserted with the printer to remove these materials.Save all packaging and protective materials in case you need totransport the printer later.
printer
paper support
color ink cartridgeblack ink cartridge
power cord
1nn
L Fiji2 Ref. Guide Rev.bA5 size Chapter 205-29-97 DR, pass 0
2-2 Getting Started

Attaching the Paper Support
Insert the paper support into the slots at the rear of the printeras shown below.
Note:To print on transparencies, you need to reposition the paper supportas described in “Loading Transparencies” in Chapter 6.
Choosing a Place for the Printer
Follow the guidelines listed below when placing your printer.
❑ Place the printer on a flat, stable surface. The printer willnot operate properly if it is tilted or at an angle.
❑ Place the printer close enough to the computer for theinterface cable to reach it easily.
❑ Leave adequate room for easy operation and maintenance.
❑ Leave enough room on the table at the front of the printerto lower the output tray.
e29-e
2
RFiji2 Ref. Guide Rev.bA5 size Chapter 205-29-97 DR, pass 0
Getting Started 2-3
❑ Avoid using or storing the printer in places subject to rapidchanges in temperature and humidity. Also keep it awayfrom direct sunlight, strong light, or heat sources.
❑ Avoid places subject to shocks and vibrations.
❑ Place the printer near a wall outlet where the plug can beeasily unplugged.
Note for French-speaking users:
Placez l’imprimante près d’une prise de contacte où la fiche peut êtredébranchée facilement.
❑ Avoid electrical outlets controlled by wall switches orautomatic timers. Also, avoid outlets on the same circuit aslarge motors or other appliances that can cause fluctuationsin line voltage.
❑ Keep the entire computer system away from potentialsources of electromagnetic interference, such asloudspeakers or the base units of cordless telephones.
❑ Use a grounded power outlet; do not use an adapter plug.
Using a printer stand
When using a printer stand, note the following:
❑ Use a stand that can support at least 11.0 kg (24.3 lb).
❑ Never use a stand that tilts the printer. The printer shouldalways be kept level.
L Fiji2 Ref. Guide Rev.bA5 size Chapter 205-29-97 DR, pass 0
2-4 Getting Started
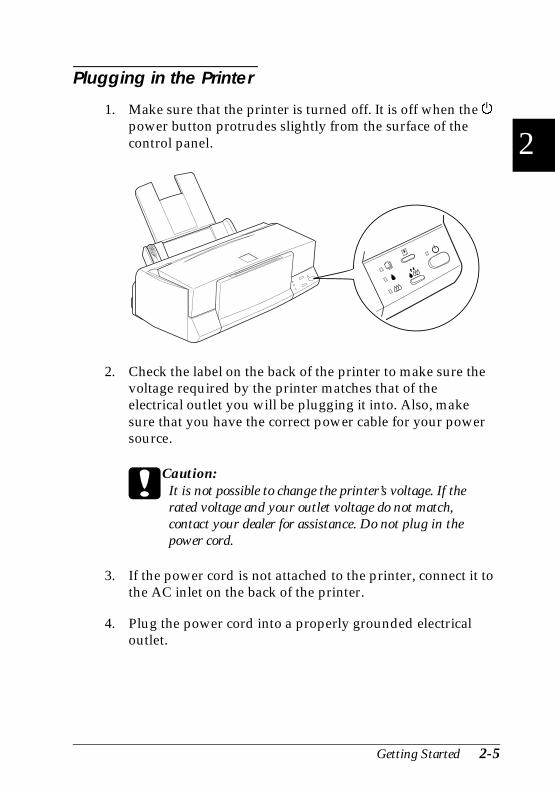
Plugging in the Printer
1. Make sure that the printer is turned off. It is off when the Ppower button protrudes slightly from the surface of thecontrol panel.
2. Check the label on the back of the printer to make sure thevoltage required by the printer matches that of theelectrical outlet you will be plugging it into. Also, makesure that you have the correct power cable for your powersource.
cCaution: It is not possible to change the printer’s voltage. If therated voltage and your outlet voltage do not match,contact your dealer for assistance. Do not plug in thepower cord.
3. If the power cord is not attached to the printer, connect it tothe AC inlet on the back of the printer.
4. Plug the power cord into a properly grounded electricaloutlet.
e3a
2
RFiji2 Ref. Guide Rev.bA5 size Chapter 205-29-97 DR, pass 0
Getting Started 2-5

Installing the Ink Cartridges
wWarning: The ink cartridges are self-contained units. Under ordinaryuse, ink will not leak from a cartridge. If ink does get on yourhands, wash them thoroughly with soap and water. If ink getsinto your eyes, flush them immediately with water.
Install the ink cartridges as follows:
Note:Do not open the ink cartridge packages until just before you install thecartridges, or the ink may dry up.
1. Lower the output tray at the front of the printer; then, holdingthe center edge of the cover, open the printer cover.
e18
L Fiji2 Ref. Guide Rev.bA5 size Chapter 205-29-97 DR, pass 0
2-6 Getting Started

2. Turn on the printer by pressing the P power button.
The print head moves slightly to the left, which is the inkcartridge install position. The P power light flashes and theB and A ink out lights come on.
cCaution:Do not move the print head by hand. Otherwise you maydamage the printer.
e23a
7-2
2
RFiji2 Ref. Guide Rev.bA5 size Chapter 205-29-97 DR, pass 0
Getting Started 2-7

3. Lift up the two ink cartridge clamps.
4. Open the ink cartridge packages. Next, remove only theyellow tape seals from each cartridge as shown below.
cCaution: ❑ You must remove the yellow tape seals from the cartridges.
If you attempt to print using a cartridge with this tape sealstill attached, the cartridge may become unusable.
❑ Do not remove the whole tape seal (especially the whiteportion) from the top of the cartridge. Remove only theyellow portion.
❑ Do not remove the tape seals from the bottom of thecartridges; otherwise, ink will leak.
8
black ink cartridge (S020093)
color ink cartridge (S020089)
36
L Fiji2 Ref. Guide Rev.bA5 size Chapter 205-29-97 DR, pass 0
2-8 Getting Started

5. Lower the cartridges into their holders with the labels face-upand the arrow marks pointing to the rear. The colorcartridge, which is larger, goes on the right and the blackink cartridge goes on the left.
Note:Install both ink cartridges. If either of the cartridges is notinstalled, the printer will not work.
6. Press the ink cartridge clamps down until they lock in place.
cCaution: Once you install the ink cartridges, do not open theirclamps again until you replace the ink cartridges.Otherwise, the cartridges may become unusable.
black
color
24
25
2
RFiji2 Ref. Guide Rev.bA5 size Chapter 205-29-97 DR, pass 0
Getting Started 2-9

7. Press the R cleaning button then close the printer cover.The printer moves the print head and begins charging theink delivery system.
Note:Even if you do not press the R cleaning button, the printermoves the print head and begins the ink charging process about60 seconds after you install the cartridges.
The ink charging process takes about five minutes to complete,during which time the printer produces a variety ofmechanical sounds. These sounds are normal. When the inkdelivery system has been charged, the print head returns toits home (far right) position.
cCaution: During the ink charging process, the P power lightflashes. Never turn off the printer while the P power lightis flashing.
The life of a cartridge depends on the amount of text andgraphics you print. The life of a color ink cartridge depends onthe amount and the number of colors used in your documents.
Note: When ink runs out, see “Replacing an Ink Cartridge” in Chapter 7.
Now you are ready to connect the printer to your computer. Toconnect the printer to your PC, see the following section. Toconnect it to your Macintosh, see page 2-21.
L Fiji2 Ref. Guide Rev.bA5 size Chapter 205-29-97 DR, pass 0
2-10 Getting Started

Connecting the Printer to Your PC
To connect the printer to your computer using the built-inparallel interface, you will need a shielded, twisted-pairparallel cable. To connect the printer to a Macintosh, see page2-20.
Follow the steps below to connect the printer to the computer:
1. Make sure both the printer and computer are turned off.
2. Plug the cable connector securely into the printer’s interfaceconnector. Then squeeze the wire clips together until theylock in place on both sides. If your cable has a ground wire,connect it to the ground connector below the interfaceconnector.
3. Plug the other end of the cable into the computer’s parallelinterface. If there is a ground wire at the computer end ofthe cable, connect it to the ground connector at the back ofthe computer.
Now see the next section for instructions on installing theprinter software. You must install the printer softwarebefore using your printer.
e31-e
2
RFiji2 Ref. Guide Rev.bA5 size Chapter 205-29-97 DR, pass 0
Getting Started 2-11

Installing the Printer Software in Your PC
After connecting the printer to your computer, install theWindows printer software. It is included on the “PrinterSoftware for EPSON Stylus COLOR 600” CD-ROM shippedwith your printer. For installation instructions for the NT-basedprinter software, see the Windows NT 3.51/4.0 Printer SoftwareUser’s Guide.
Your printer software includes:
❑ Printer driverThe printer driver gives you complete control over yourprinter. With it, you can make settings such as PrintQuality, Media Type, and Paper Size.
❑ UtilitiesThe Status Monitor utility allows you to check the currentstatus of your printer. The Nozzle Check, Head Cleaning,and Print Head Alignment utilities help you to keep yourprinter in top operating condition.
❑ EPSON folder or program groupThe EPSON folder (Windows 95) or program group(Windows 3.1) contains the EPSON Stylus COLOR 600Help, Spool Manager 4, and EPSON ReadMe files. Helpgives you instant on-screen access to detailed informationand instructions on how to use your printer and printersoftware, Spool Manager 4 provides you with extra controlover the printing process, and ReadMe contains the mostup-to-date information available regarding your printerand printer software.
❑ EPSON AnswersEPSON Answers provides you with additional informationon using your printer and printing with colors. See thebooklet packed with the CD-ROM for more information.EPSON Answers is not included in the floppy disk version.
L Fiji2 Ref. Guide Rev.bA5 size Chapter 205-29-97 DR, pass 0
2-12 Getting Started

If you are using the floppy disk version of the software, beforeyou begin installation, make a backup copy of the EPSONprinter software disk. If you wish to make a floppy diskversion of the printer software on your CD-ROM, you can usethe driver disk creation utility included on the CD. See page2-15 for Windows 95, or page 2-18 for Windows 3.1.
Installing in Windows 95
Follow the steps below to install the printer software inWindows 95.
1. Make sure Windows 95 is running and the printer is off.
2. Insert the printer software CD shipped with your printer inthe CD-ROM drive. Click Install in the dialog box thatappears, shown below.
If this dialog box does not appear when you insert the printersoftware CD, double-click the My Computer icon, thendouble-click the CD-ROM drive icon (or floppy disk driveicon if using the floppy disk version). If the dialog boxshown above still does not appear, double-click theSetup.exe icon. You may need to use the arrows to scrollthrough the folder to find it.
cdinst1
2
RFiji2 Ref. Guide Rev.bA5 size Chapter 205-29-97 DR, pass 0
Getting Started 2-13

Note:If you wish to make a floppy disk version of the printer softwareincluded on your CD-ROM, click the Driver disk creationutility button and follow the on-screen instructions.
3. Select your printer icon in the EPSON Printer Utility Setupdialog box.
4. Make sure EPSON Stylus COLOR 600 is selected, and clickOK to start the printer software installation. Follow theon-screen messages and when the installation is complete,click OK again.
Your printer software is now installed. For information onopening and using the software, see Chapter 3, “Printing WithWindows.”
Installing in Windows 95 (using plug-and-play)
Follow these steps to install the printer software usingWindows 95 plug-and-play capabilities.
Note: To install the printer software using Windows* 95 plug-and-playcapabilities, your computer’s parallel port must be an IEEE 1284compatible, bidirectional parallel port. See your computerdocumentation for more information.
3102
L Fiji2 Ref. Guide Rev.bA5 size Chapter 205-29-97 DR, pass 0
2-14 Getting Started

1. Make sure the printer is connected to the computer’s parallelport.
2. Turn off your printer and computer, if necessary.
3. Turn on the printer first; then turn on the computer. Yourcomputer begins loading Windows 95.
4. If you defined a password, enter it at the prompt. You see theNew Hardware Found screen.
Note: If you do not see the New Hardware Found screen or if you runinto any kind of problem, click Cancel and follow theinstallation procedure on page 2-13 instead.
5. Make sure your printer model name is displayed on thescreen. Then click the Driver from disk provided byhardware manufacturer button. Do not select any of theother buttons.
6. Click OK. You see the Install From Disk screen.
hard02
2
RFiji2 Ref. Guide Rev.bA5 size Chapter 205-29-97 DR, pass 0
Getting Started 2-15

7. Insert the printer software CD shipped with your printer inthe CD-ROM drive. Depending on the country, theCD-ROM may contain multiple-language versions of theprinter software.
First try typing D:\Win95 and clicking OK. If an errormessage does not appear, proceed to step 8. If an errormessage does appear, you have the multiple-languageversion and you need to click OK to return to the InstallFrom Disk screen. Type D:\ then specify your preferredlanguage by typing English, Francais, German, Italian,Portugal, or Spanish, followed by \Win95. Click OK. (Ifyour CD-ROM drive uses a drive letter other than “D”,substitute the appropriate letter.)
If you use the floppy disk version, insert it in a disk drive. If the drive you are installing from is displayed on the screen,click OK. Otherwise, change the drive letter in the Copymanufacturer’s files from box and click OK.
8. At the next screen you can type a unique name for the printerin the Printer name box. We recommend that you keep themodel name as shown. The program will copy the files toyour hard disk and add an icon to the Printers folder usingthe printer name you assign. To use this printer as thedefault printer for Windows 95 applications, select Yes. (Nois the default setting.)
9. Click the Finish button.
The printer software that controls your printer is now installed.For information on accessing and using the software, seeChapter 3, “Printing With Windows.”
L Fiji2 Ref. Guide Rev.bA5 size Chapter 205-29-97 DR, pass 0
2-16 Getting Started

Using your printer on a network with Windows 95
If you want to use your printer on a network, you need to setup your printer as a network printer. Follow these steps:
1. Double-click the My Computer icon.
2. Double-click the Printers folder.
3. Right-click the icon of your printer, and click Properties. Besure to right-click.
4. Click the Details tab. The following window appears:
5. Click the Add Port button, then specify the network path tothe printer. Click OK.
Note:If you want to print from DOS applications as well as fromWindows applications, click the Capture Printer Port buttoninstead of the Add Port button. Click anywhere in the Devicebox and select the printer port your printer is connected to, thenspecify the network path to the printer. Make sure Reconnectat logon is selected, then click OK.
net600
2
RFiji2 Ref. Guide Rev.bA5 size Chapter 205-29-97 DR, pass 0
Getting Started 2-17

6. After you have made your settings on the Details menu, clickStart, point to Programs and Epson, then click SpoolManager4. The Spool Manager window opens.
7. Select your printer, click the Queue menu, then click Setup.The Queue setup window opens.
8. Make sure the Use Print Manager for this port option is on;it is on if the box contains a check mark. Then click OK.
Now you can use your printer on a network.
Installing in Windows 3.1
Follow these steps to install the software using Windows 3.1:
1. Make sure Windows 3.1 is running and the Program Managerwindow is open.
2. Insert the EPSON printer software CD shipped with yourprinter in the CD-ROM drive. (If you use the floppy diskversion, insert it in a disk drive.)
3. From the File menu, choose Run. You see the Run dialog box. In the Command Line box, type D:\SETUP (If yourCD-ROM drive has a drive letter other than “D” or you areusing the floppy version, substitute the appropriate letter.)
3101
L Fiji2 Ref. Guide Rev.bA5 size Chapter 205-29-97 DR, pass 0
2-18 Getting Started

Note:If you wish to make a floppy disk version of the essential printersoftware (printer driver, utilities, and online help) on yourCD-ROM, type EPSETUP instead of SETUP. In the dialog boxthat appears, click the Driver disk creation utility button andfollow the on-screen instructions.
4. Click OK. You see the EPSON Printer Utility Setup dialog box.
5. Select your printer icon and click OK. The installationprogram begins copying the printer software files.
After a few moments, the installation program creates theEPSON program group in Windows.
6. When the installation is complete, click OK to exit theinstallation program.
The installation program automatically selects this printer asthe default printer for Windows applications.
When installation of the printer driver and utilities iscompleted, EPSON Answers installation begins. Follow theon-screen instructions.
Your printer software is now installed. For information onopening and using the printer driver and utilities, see “Startingto Print with Windows” in Chapter 3.
3102
2
RFiji2 Ref. Guide Rev.bA5 size Chapter 205-29-97 DR, pass 0
Getting Started 2-19

Connecting the Printer to Your Macintosh
To use the printer’s built-in serial interface, you will need an Apple System Peripheral-8 cable. Read the following stepsto connect the printer to your Macintosh.
1. Make sure both your printer and Macintosh are switched off.
2. Connect one end of the interface cable to the serial connectoron the back of the printer.
3. Connect the other end of the interface cable to either themodem port or printer port on the Macintosh. The ports aremarked with the following icons.
4. Turn on the printer by pressing the P power button.
5. Turn on your Macintosh.
See “Installing the Printer Software in Your Macintosh” forinstructions on installing the printer software. You must installthe printer software before using your printer.
new1
modem port printer port
em-17,18
L Fiji2 Ref. Guide Rev.bA5 size Chapter 205-29-97 DR, pass 0
2-20 Getting Started

Installing the Printer Software in Your Macintosh
Always use the EPSON Stylus COLOR 600 Macintosh printersoftware when printing with your printer. This software isspecially designed to allow easy access to all the features of theprinter.
cCaution:Turn off all virus protection programs before you install yourprinter software.
Installing the printer software
Follow the steps below to install your printer software. If youare using the floppy disk version, make a backup copy of theEPSON Macintosh printer software disk before you begininstallation.
1. Turn on your Macintosh and insert the EPSON printersoftware CD shipped with your printer into its CD-ROMdrive. (If you use the floppy disk version, insert it in a diskdrive.)
The EPSON printer software disk opens automatically and,depending on the country, displays either a single installericon or separate folders containing installer icons forseveral languages. Double-click the Installer icon if it isdisplayed, or open the folder for your preferred language,then open the Disk 1 folder and double-click the installericon inside it.
2
RFiji2 Ref. Guide Rev.bA5 size Chapter 205-29-97 DR, pass 0
Getting Started 2-21

2. After the initial screen appears, click Continue to advance tothe following dialog box, where you can choose to install allor some of the software components included on yourprinter software CD. For information on the includedsoftware, see page 2-23.
3. If you want to install all of the printer software included onyour printer software CD-ROM, make sure the disk onwhich you want to install the software is displayed in theDestination Disk box, then click Install.
If you are low on disk space, select Custom Install from thepop-up menu and click EPSON Stylus Printer DriverPackage. Confirm the destination for installation, thenclick Install. (If you later decide you need the PowerMacintosh Extension Module, select and install it using thecustom install procedure described here.)
Note:Click the button to get information on each component.
4. When a message appears informing you that installation isfinished, click Restart to complete the installation andrestart your computer.
install
L Fiji2 Ref. Guide Rev.bA5 size Chapter 205-29-97 DR, pass 0
2-22 Getting Started

Printer software components
Your printer software CD-ROM includes the followingsoftware components:
EPSON Stylus Printer Driver Package
❑ EPSON Stylus (EX)This is the printer driver software that gives you controlover your printer. With it, you can make settings such asPrint Quality, Media Type, and Paper Size.
❑ EPSON Monitor2Monitors and manages background printing jobs. Youmust turn on background printing in the Chooser to usethis utility. For more information, see “Using the EPSONMonitor2 Utility” on page 5-24.
❑ ColorSync 2.0 and ProfilesMatches the colors in your printout with the colorsdisplayed on your screen automatically. Use this whenprinting scanned photographs or computer graphics.
To use this feature, you may need to set the system profile foryour monitor. Access the ColorSync System Profile utilitythrough the Control Panel and click the Set Profile button.Select your monitor from the list of monitors that appears,and then click Select. Close the dialog box.
❑ StatusMonitorKeeps track of the current status of your printer, and alertsyou when printer errors occur. You can open it from theUtility dialog box in the printer software. For moreinformation, see “Using EPSON Printer Utilities” inChapter 5.
2
RFiji2 Ref. Guide Rev.bA5 size Chapter 205-29-97 DR, pass 0
Getting Started 2-23

❑ Nozzle CheckChecks the print head for clogging. You can open thisutility from the Utility dialog box in the printer software.For more information, see “Using EPSON Printer Utilities”in Chapter 5.
❑ Head Cleaning Cleans the print head to maintain the best print quality.You can open this utility from the Utility dialog box in theprinter software. For more information, see “Using EPSONPrinter Utilities” in Chapter 5.
❑ Print Head AlignmentAdjusts the print head so that vertical lines are aligned. Youcan open this utility from the Utility dialog box in theprinter software. For more information, see “Using EPSONPrinter Utilities” in Chapter 5.
Power Macintosh Extension Module
Increases the printing speed, especially when printing CADdocuments or line art. For more information, see yourMacintosh user’s guide.
Using the Chooser to select your printer
After you install the printer software, you need to open theChooser to select your printer. You have to choose the printeronly the first time you use it or whenever you want to switch toanother printer. Your Macintosh will always print using thelast printer selected.
Note:If you are using a Macintosh Quadra 950 or 900, you need to chooseCompatible in the Serial Switch dialog box before selecting yourprinter from the Chooser. To open the Serial Switch dialog box, chooseControl Panel from the Apple menu, then choose Serial Switch.
L Fiji2 Ref. Guide Rev.bA5 size Chapter 205-29-97 DR, pass 0
2-24 Getting Started

1. Make sure the printer is connected to your Macintosh and isturned on.
2. Choose Chooser from the Apple menu. Then click theEPSON Stylus(EX) icon and the port your printer isconnected to.
Note:If you don’t see the EPSON Stylus(EX) icon, use the arrows onthe right to scroll through the available icons.
3. If your printer is connected to the Macintosh’s printer portand you are not using an AppleTalk network, makeAppleTalk inactive by clicking the Inactive radio button.You may also need to restart your Macintosh to makeAppleTalk inactive.
You do not need to make AppleTalk inactive if the printer isconnected to the modem port.
cCaution: Do not make AppleTalk inactive if the Macintosh isconnected to an AppleTalk network.
picture4
2
RFiji2 Ref. Guide Rev.bA5 size Chapter 205-29-97 DR, pass 0
Getting Started 2-25

4. Click the Background Printing radio buttons to turnbackground printing on or off.
When background printing is on, you can use your Macintosh while it is preparing a document for printing.You must turn on background printing to use the EPSONMonitor2 utility to manage print jobs. For moreinformation, see “Using the EPSON Monitor2 Utility” inChapter 5.
5. Close the Chooser.
Your Macintosh will check that the printer is connectedcorrectly. If the following message appears, follow theinstructions on the screen, click OK, and repeat the steps above.
picture5
L Fiji2 Ref. Guide Rev.bA5 size Chapter 205-29-97 DR, pass 0
2-26 Getting Started
Chapter 3Starting to Print
Proof Sign-off:Ishizaka _______Nomoto _______Keith _______Grady _______
Loading Paper . . . . . . . . . . . . . . . . . . . . . . . . . . . . 3-2
Printing with Windows . . . . . . . . . . . . . . . . . . . . . . . 3-5
Printing with a Macintosh . . . . . . . . . . . . . . . . . . . . . 3-8
3
RFiji2 Ref. Guide Rev. bA5 size Chapter 305-20-97 DR, pass 0
Starting to Print 3-1
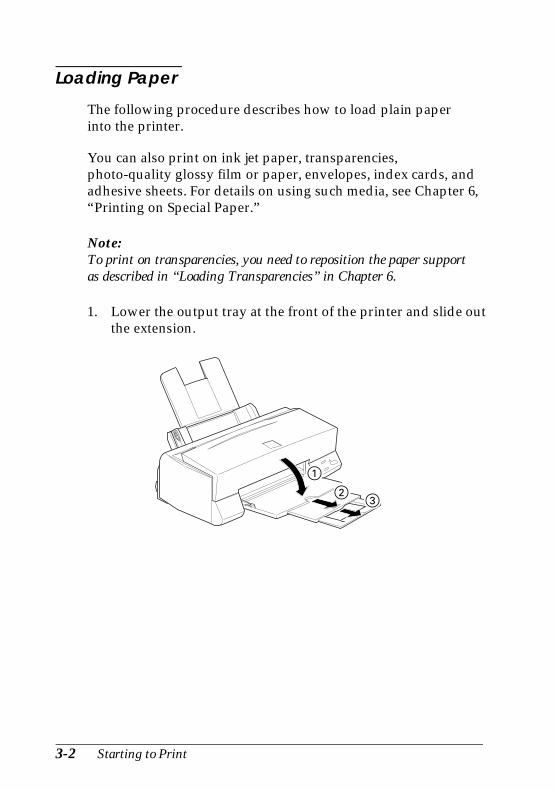
Loading Paper
The following procedure describes how to load plain paperinto the printer.
You can also print on ink jet paper, transparencies,photo-quality glossy film or paper, envelopes, index cards, andadhesive sheets. For details on using such media, see Chapter 6,“Printing on Special Paper.”
Note:To print on transparencies, you need to reposition the paper supportas described in “Loading Transparencies” in Chapter 6.
1. Lower the output tray at the front of the printer and slide outthe extension.
e9
L Fiji2 Ref. Guide Rev. bA5 size Chapter 305-20-97 DR, pass 0
3-2 Starting to Print

2. Slide the left edge guide to the left as far as it will go.
If you load long paper (for example, legal size paper), pull upthe paper support extension.
3. Fan a stack of paper; then tap it on a flat surface to even theedges.
e4-2
new2
3
RFiji2 Ref. Guide Rev. bA5 size Chapter 305-20-97 DR, pass 0
Starting to Print 3-3

4. Load the stack of paper with the printable surface up and theright edge of the paper resting against the right side of thesheet feeder.
Note:❑ Always load paper into the sheet feeder short edge first. Load
envelopes flap edge first with the flap side down.
❑ Load pre-printed forms or letterhead top edge first.
5. Slide the left edge guide against the left edge of the paper.Make sure the paper stack fits under both the edge guidetab and arrow mark as shown below.
new3
new4
L Fiji2 Ref. Guide Rev. bA5 size Chapter 305-20-97 DR, pass 0
3-4 Starting to Print

Printing with Windows
To get started printing right away, follow the printing methodexplained below, which is typical of many Windowsapplications. The actual way you print may vary depending on the application you use. See your application manual fordetails. See page 3-8 for information on printing with aMacintosh.
Note:While many Windows applications override the settings made withthe printer driver, some do not, so you must verify the settings to getthe results you expect.
1. From your application, open the document you want to print.
2. Click Print on the File menu. The Print dialog box (or a similar dialog box) appears.
3. Make sure your printer is selected and then click Printer,Setup, Properties, or Options. You may need to click acombination of these buttons. The printer software windowappears.
slideco
3
RFiji2 Ref. Guide Rev. bA5 size Chapter 305-20-97 DR, pass 0
Starting to Print 3-5

4. Click the Main tab if necessary, and make sure the Modeoption is set to Automatic.
Note:When Automatic is selected, the printer software determinesthe best settings according to the Media Type and Ink settingsyou make.
5. Click anywhere in the Media Type box, and select the mediayou loaded in the printer. If you don’t see your media inthe list, use the arrow on the right to scroll through the list.See “Making the Media Type Setting” on page 4-10 formore information.
6. Select Color as the Ink setting if your document includescolor. Select Black if you are printing black text, a draft, orif you want colors to print as varying shades of gray.
7. Click the Paper tab. The Paper menu appears.
paper
L Fiji2 Ref. Guide Rev. bA5 size Chapter 305-20-97 DR, pass 0
3-6 Starting to Print

8. Select the size of the paper you loaded in the printer from thePaper Size list. If you don’t see your paper size in the list,use the arrow on the right to scroll through the list.
Note:If your paper size is not included in the list, select User Definedand enter the paper size in the dialog box that appears. Forinformation on the User Defined option, see online help.
9. Make the Orientation setting. The effect of your setting isshown in the display to the left.
Note:Always load paper into the sheet feeder short edge first. Loadenvelopes flap edge first with the flap side down.
10. Click OK at the bottom of the window. You return to thePrint dialog box (or a similar dialog box).
11. Click Close, OK, or Print to print. You may need to click acombination of these buttons.
While your document is printing, the EPSON Despooler dialogbox will appear, showing the printing progress and the statusof your printer. If you are printing from Windows 95, thisdialog box also displays the Status Monitor.
See Chapter 4 and online help for detailed information onprinter driver settings, the EPSON Despooler, and the StatusMonitor.
3
RFiji2 Ref. Guide Rev. bA5 size Chapter 305-20-97 DR, pass 0
Starting to Print 3-7

Printing with a Macintosh
To get started printing right away, follow the printing methodexplained below, which is typical of many Macintoshapplications. The actual way you print may vary depending onthe application you use. See your application manual fordetails. If you are printing from Windows applications, see theprevious section.
Note:While many Macintosh applications override the settings made withthe printer driver, some do not, so you must verify the settings to getthe results you expect.
1. From your application, open the document you want to print.
2. Choose Page Setup from the File menu. This brings up thedialog box shown below.
3. Select the paper size you loaded in the printer from the Paper Size list.
4. Check the Orientation option for Portrait or Landscapeorientation.
Note:Always load paper into the sheet feeder short edge first. Loadenvelopes flap edge first with the flap side down.
image4
L Fiji2 Ref. Guide Rev. bA5 size Chapter 305-20-97 DR, pass 0
3-8 Starting to Print

5. After making your settings, click the OK button to close thePage Setup dialog box.
Note:You cannot print from the Page Setup dialog box. You can onlyprint from the Print dialog box.
6. Choose Print from the File menu. This brings up the dialogbox shown below.
7. Make sure the Mode option is set to Automatic.
When Automatic is selected, the printer software determinesthe best settings according to the Media Type and Inksettings you make.
8. Select the type of paper you loaded in the printer from theMedia Type list.
9. Select Color as the Ink option if your document includescolor. Select Black if you are printing black text, a draft, orif you want colors to print as varying shades of gray.
10. Click Print to start printing.
image7
3
RFiji2 Ref. Guide Rev. bA5 size Chapter 305-20-97 DR, pass 0
Starting to Print 3-9

L Fiji2 Ref. Guide Rev. bA5 size Chapter 305-20-97 DR, pass 0
3-10 Starting to Print

Chapter 4Using the Printer Software for Windows
Proof Sign-off:Ishizaka _______Nomoto _______Keith _______Grady _______
Introducing the Printer Software Functions . . . . . . . . . . . 4-2
Accessing the Printer Software . . . . . . . . . . . . . . . . . . 4-3From Windows applications . . . . . . . . . . . . . . . . . . 4-3From Windows 95 . . . . . . . . . . . . . . . . . . . . . . . . 4-4From Windows 3.1 . . . . . . . . . . . . . . . . . . . . . . . 4-5
Using the Automatic Setting . . . . . . . . . . . . . . . . . . . . 4-6
Using the Predefined Settings . . . . . . . . . . . . . . . . . . . 4-7
Customizing the Print Settings . . . . . . . . . . . . . . . . . . 4-9Saving your settings . . . . . . . . . . . . . . . . . . . . . . 4-10
Making the Media Type Setting . . . . . . . . . . . . . . . . . . 4-11
Using EPSON Printer Utilities . . . . . . . . . . . . . . . . . . . 4-13EPSON Status Monitor . . . . . . . . . . . . . . . . . . . . . 4-14Nozzle Check . . . . . . . . . . . . . . . . . . . . . . . . . . 4-15Head Cleaning . . . . . . . . . . . . . . . . . . . . . . . . . . 4-15Print Head Alignment . . . . . . . . . . . . . . . . . . . . . 4-15
Checking Printer Status . . . . . . . . . . . . . . . . . . . . . . . 4-16Understanding the EPSON Spool Manager . . . . . . . . . 4-16Understanding the Despooler . . . . . . . . . . . . . . . . . 4-17
Getting Information Through Online Help . . . . . . . . . . . 4-18From Windows applications . . . . . . . . . . . . . . . . . . 4-18From Windows 95 . . . . . . . . . . . . . . . . . . . . . . . . 4-18From Windows 3.1 . . . . . . . . . . . . . . . . . . . . . . . 4-18
4
RFiji2 Ref. Guide Rev.bA5 size Chapter 405-29-97 DR, pass 0
Using the Printer Software for Windows 4-1

Introducing the Printer Software Functions
The printer software includes a printer driver and printerutilities. The printer driver lets you choose from a wide varietyof settings to get the best results from your printer. The printerutilities help you check the printer and keep it in top condition.
The quickest and easiest way to start printing is to leave theMode option set to Automatic on the printer driver’s Mainmenu. This way you only need to check the Media Type andInk settings, as described on page 3-5.
Basically, there are three levels of settings: the Automaticsetting; the predefined settings, which give you more controlover printer settings; and the custom settings, which you maketo fit your individual needs. To work with predefined andcustom settings, you need to select Advanced as the Modeoption. These settings are described in detail starting on page4-5.
Several printer utilities are provided to help you check thecondition of the printer and perform maintenance procedures.See pages 5-20 through 5-23 for information on the StatusMonitor, Nozzle Check, Head Cleaning, and Print HeadAlignment utilities. For instructions on using the StatusMonitor, see page 5-21, and for instructions on using any of theother utilities, see Chapter 8, “Troubleshooting.”
L Fiji2 Ref. Guide Rev.bA5 size Chapter 405-29-97 DR, pass 0
4-2 Using the Printer Software for Windows

Accessing the Printer Software
As explained on the following pages, you can access the printerdriver settings and printer utilities contained in your printersoftware directly from any Windows application, or from MyComputer in Windows 95 or Program Manager in Windows3.1. The print settings made in many Windows applicationsoverride similar settings made in the printer driver, so in mostcases you should access the printer software from yourapplication to make sure that the settings are appropriate forthe document you want to print.
Note:Online help is available for details about the printer driver settings.
From Windows applications
How you should access the printer software varies dependingon the application, application version, and Windows versionyou are using. Read the following to get a general idea of howto access the software.
From the File menu, choose Print or Print Setup. In the dialogbox that appears click Printer, Setup, Properties, or Options.You may need to click a combination of these buttons.
The Main and Paper menus contain the printer driver settings.The Utility menu contains the printer utilities. Click the tabs atthe top of the menus to open them.
For information on the printer driver settings, see online helpand pages 4-5 to 4-11. See page 4-12 for information on theprinter utilities.
4
RFiji2 Ref. Guide Rev.bA5 size Chapter 405-29-97 DR, pass 0
Using the Printer Software for Windows 4-3
From Windows 95
Follow these steps to access the printer software from MyComputer.
If you are using Windows 3.1, see the next page.
1. Double-click the My Computer icon.
2. Double-click the Printers folder.
3. Right-click the icon of your printer, and click Properties. Besure to right-click. The Properties window appears.
4. Click the menu tabs at the top of the Properties window toopen the printer software menus. The Main and Papermenus contain the printer driver settings. The Utility menucontains the printer utilities.
For information on the printer driver settings, see online helpand pages 4-5 to 4-11. See page 4-12 for information on theprinter utilities.
L Fiji2 Ref. Guide Rev.bA5 size Chapter 405-29-97 DR, pass 0
4-4 Using the Printer Software for Windows

From Windows 3.1
Follow these steps to access the printer software from ProgramManager:
1. Open the Main program group and double-click the ControlPanel icon.
2. Double-click the Printers icon.
3. Choose your printer from the Installed Printers list.
4. Choose Setup. You see the Main menu of the printer softwarewindow. The Main and Paper menus contain the printerdriver settings. The Utility menu contains the printerutilities. Click the tabs at the top of the menus to open them.
For information on the printer driver settings, see online helpand pages 4-5 to 4-11. See page 4-12 for information on theprinter utilities.
4
RFiji2 Ref. Guide Rev.bA5 size Chapter 405-29-97 DR, pass 0
Using the Printer Software for Windows 4-5

Using the Automatic Setting
When Automatic is selected on the Main menu, the printerdriver takes care of all detailed settings according to the MediaType and Ink settings you make (see page 4-10 for details onthe Media Type settings). If you leave Mode set to Automatic,Media Type and Ink are the only settings you need to checkyourself. Most Windows applications feature paper size andpage layout settings which override similar settings on thePaper menu, but if your application does not, you should alsocheck the items on the Paper menu.
Note:If you choose Plain Paper, Photo Quality Ink Jet Paper, PhotoQuality Glossy Paper or Photo Quality Glossy Film as theMedia Type setting while Automatic is selected, a slide bar appears inthe Mode box that lets you choose Quality or Speed. Select Qualitywhen print quality is more important than speed.
Online help provides more information about the printer driversettings. See page 4-17 for instructions on using online help.
slideco
L Fiji2 Ref. Guide Rev.bA5 size Chapter 405-29-97 DR, pass 0
4-6 Using the Printer Software for Windows

Using the Predefined Settings
The predefined settings are provided to help you optimize the print settings for a particular kind of printout, such aspresentation documents or images taken by a video or digitalcamera. You will find the predefined settings in the list belowthe Advanced button on the Main menu.
To choose a predefined setting, click Advanced, then selectthe most appropriate setting from the list according to the typeof document or image you will print.
When you choose a predefined setting, other settings such asPrint Quality, Halftoning, and Color are set automatically.Changes are shown in the Current Settings display at thebottom of the Main menu. Before printing, be sure to verify theMedia Type and Ink settings, as they may be affected by thepredefined setting you select. See page 4-10 for moreinformation on the Media Type settings.
4
RFiji2 Ref. Guide Rev.bA5 size Chapter 405-29-97 DR, pass 0
Using the Printer Software for Windows 4-7

The printer driver provides the following predefined settings:
Photo Good for printing scanned photos
Text/Graph Good for printing presentationdocuments such as graphs and charts
PhotoEnhance Good for printing images capturedusing a video, digital camera, orscanner. EPSON PhotoEnhanceautomatically adjusts the contrast,saturation, and brightness of theoriginal image data to produce sharper,more vivid color printouts.PhotoEnhance does not affect youroriginal image data.
Note:Printing with PhotoEnhance selected maytake longer depending on your computersystem and the amount of data contained inyour image.
Text Good for printing text-only documents
Economy Good for printing drafts of text
ICM ICM means Image Color Matching.This feature automatically adjustsprintout colors to match colors on yourscreen.
Note:❑ ICM is only available for Windows 95.
❑ Selecting PhotoEnhance or ICM automatically sets the Inkoption to Color. Also, some Media Type settings are notavailable depending on the selected predefined setting and on theInk setting if a predefined setting is selected.
L Fiji2 Ref. Guide Rev.bA5 size Chapter 405-29-97 DR, pass 0
4-8 Using the Printer Software for Windows

Customizing the Print Settings
Many users will never need to manually make their own printsettings. However, if you need more control over the driver,want to make the most detailed settings available, or just wantto experiment, click the Advanced button on the Main menuand then click the More Settings button. The More Settingsdialog box appears:
Some settings are enabled or disabled depending on the PrintQuality, Media Type, and Ink settings you make. To save timeand effort, always customize your settings in this order: PrintQuality, Media Type, Ink, and then make other settings. See thenext section for details about making the Media Type setting.
After making your settings, click OK. Your settings will beapplied and you will return to the Main menu. To return to theMain menu without applying your changes, click Cancel. Fordetails on the settings, see online help.
more-1
4
RFiji2 Ref. Guide Rev.bA5 size Chapter 405-29-97 DR, pass 0
Using the Printer Software for Windows 4-9

Saving your settings
To save your custom settings, click Save Settings on the Mainmenu. The Custom Settings dialog box appears:
Type a unique name for your custom settings in the Name box,and click the Save button. Your settings will appear in the listunder the Advanced button on the Main menu.
Note:❑ You cannot use a predefined setting name for your custom
settings.
❑ To delete a custom setting, click Save Settings on the Mainmenu, select the setting in the Custom Settings dialog box andthen click Delete.
❑ You cannot delete the predefined settings.
If you change the Media Type or Ink setting when one of yourcustomized settings is selected in the Advanced settings list onthe Main menu, the setting selected in the list changes toCustom Settings. The customized setting that was previouslyselected is not affected by this change. To return to yourcustomized setting, simply reselect it in the settings list.
custo01
L Fiji2 Ref. Guide Rev.bA5 size Chapter 405-29-97 DR, pass 0
4-10 Using the Printer Software for Windows

Making the Media Type Setting
On the Main menu, select the Media Type setting that matchesthe paper you loaded in the printer. See the following todetermine the Media Type setting (shown in bold) for yourpaper. First find your paper, then click the correspondingMedia Type setting.
Note:If the corresponding Media Type option for your paper is not shownin the Media Type list, change the Print Quality setting in the MoreSettings dialog box, select Automatic as the Mode setting, orchange the predefined setting in the Advanced settings list on theMain menu.
Plain Paper
Plain paperEnvelopes
360 dpi Ink Jet Paper
EPSON 360 dpi Ink Jet Paper (A4) S041059S041025
EPSON 360 dpi Ink Jet Paper (Letter) S041060
Photo Quality Ink Jet Paper
EPSON Photo Quality Ink Jet Paper (A4) S041061S041026
EPSON Photo Quality Ink Jet Paper (Letter) S041062EPSON Photo Quality Ink Jet Paper (Legal) S041067EPSON Photo Quality Ink Jet Card (A6) S041054EPSON Photo Quality Ink Jet Card (5 × 8 in.) S041121EPSON Photo Quality Ink Jet Card (8 × 10 in.) S041122EPSON Photo Quality Self Adhesive Sheet (A4) S041106
4
RFiji2 Ref. Guide Rev.bA5 size Chapter 405-29-97 DR, pass 0
Using the Printer Software for Windows 4-11

Ink Jet Transparencies
EPSON Ink Jet Transparencies (A4) S041063EPSON Ink Jet Transparencies (Letter) S041064
Photo Quality Glossy Paper
EPSON Photo Quality Glossy Paper (A4) S041126EPSON Photo Quality Glossy Paper (Letter) S041124EPSON Photo Paper (4 × 6 in.) S041134
Photo Quality Glossy Film
EPSON Photo Quality Glossy Film (A4) S041071EPSON Photo Quality Glossy Film (Letter) S041072EPSON Photo Quality Glossy Film (A6) S041107
Note:The availability of special media varies by country.
L Fiji2 Ref. Guide Rev.bA5 size Chapter 405-29-97 DR, pass 0
4-12 Using the Printer Software for Windows

Using EPSON Printer Utilities
EPSON printer utilities allow you to check the current printerstatus and do some printer maintenance from your screen. Toaccess the utilities, click the Utility tab in the printer softwarewindow, then click the button for the utility you want to use.The utilities are explained briefly below. For more details, seeonline help.
Note:The letter in parentheses after the utility name indicates the shortcutkey for that utility. Press the Alt key and the letter on the keyboard toopen that utility.
utility
4
RFiji2 Ref. Guide Rev.bA5 size Chapter 405-29-97 DR, pass 0
Using the Printer Software for Windows 4-13

EPSON Status Monitor
The Status Monitor utility helps you to keep track of theprinter, and it alerts you if there are any problems. You can alsocheck how much ink is remaining before printing and whileprinting. When you install the printer software for Windows95, the Status Monitor is automatically copied to your hard disk.
Note:The Status Monitor is only available for Windows 95.
The Status Monitor utility is available only when the printer isconnected directly to the host computer. You cannot use thisutility when printing over a network.
When you send a print job to the printer, the Status Monitorwill appear in the Despooler dialog box. For information on theDespooler dialog box, see “Understanding the EPSON SpoolManager” on page 4-15.
The Status Monitor provides information about the printerstatus as shown by the icons below.
Checking the printer status.
An error has occurred. Your printer cannot print. Checkyour printer.
The printer is ready.
The printer is printing.
The ink level is low or out.
L Fiji2 Ref. Guide Rev.bA5 size Chapter 405-29-97 DR, pass 0
4-14 Using the Printer Software for Windows

Nozzle Check
You can check the print head nozzles for clogging with thisutility. Check the nozzles when you notice a decline in printquality and after cleaning to confirm that the print headnozzles have been cleared. In case the nozzle check indicatesthe print head needs cleaning, you can access the HeadCleaning utility directly from the Nozzle Check utility. SeeChapter 8, “Troubleshooting,” for more information.
Head Cleaning
You can clean the print head with this utility. You may need toclean the head if you notice a decline in print quality. Beforeand after print head cleaning, use the Nozzle Check utility tocheck whether the print head needs to be cleaned (again). Youcan access the Nozzle Check utility directly from the HeadCleaning utility. See Chapter 8, “Troubleshooting,” for moreinformation.
Print Head Alignment
This utility aligns the print head. Use this utility when younotice a misalignment of vertical lines. See Chapter 8,“Troubleshooting,” for more information.
Note:❑ Do not use the Nozzle Check, Head Cleaning, and Print Head
Alignment utilities with printers connected to your computerthrough a network.
❑ Do not use the Nozzle Check, Head Cleaning, and Print HeadAlignment utilities while printing is in progress; otherwise yourprintout may be marred.
4
RFiji2 Ref. Guide Rev.bA5 size Chapter 405-29-97 DR, pass 0
Using the Printer Software for Windows 4-15

Checking Printer Status
When you send a print job to the printer, the EPSON Despoolerand Status Monitor appear in the lower right portion of yourscreen. The Despooler shows the progress of the current printjob and allows you to control the progress of the print job, asdescribed below.
Understanding the EPSON Spool Manager
The EPSON Spool Manager is similar to Windows PrintManager. If it receives two or more print jobs at one time, itputs them in a line (with printers on a network this may becalled a print queue) in the order received. When a print jobreaches the top of the line, the EPSON Despooler sends the jobto the printer.
The Spool Manager starts automatically when you print fromyour application. To access the Spool Manager from Windows95, click the EPSON Spool Manager icon after it appears onthe taskbar. To access the Spool Manager from Windows 3.1,double-click the EPSON Spool Manager icon after it appearsat the bottom of your desktop. For more information, see onlinehelp.
L Fiji2 Ref. Guide Rev.bA5 size Chapter 405-29-97 DR, pass 0
4-16 Using the Printer Software for Windows

Understanding the Despooler
When you send a print job to the printer, the EPSON Despoolerdialog box appears in the lower right portion of your computerscreen. This box shows the progress of the current print job andprovides printer status information.
You can control printing from the Despooler dialog box usingthe stop, pause, and reprint buttons as explained below.
Stop Cancels printing
Pause Pauses printing until you press it again
Reprint Restarts printing from the current page,reprints the whole document, or holdsthe document for printing later
The Status Monitor at the bottom of the Despooler dialog boxonly appears if you are using Windows 95. See page 4-13 formore details.
despol1
4
RFiji2 Ref. Guide Rev.bA5 size Chapter 405-29-97 DR, pass 0
Using the Printer Software for Windows 4-17

Getting Information Through Online Help
Your printer software has an extensive online help feature thatincludes detailed information and instructions about printerdriver settings and the printer utilities. Online help will answermost of your questions about your printer software.
From Windows applications
To access online help from your application, open the Filemenu and choose Print or Print Setup. Then click Printer,Setup, Options, or Properties (you may need to click acombination of these buttons) depending on the software youare using. Click the Help button at the bottom of the Main,Paper, or Utility menu for help related to the items on thatmenu.
If you are running Windows 95, or Windows NT 4.0 you canget specific help related to any item on a menu by right-clickingthe item, then clicking the What’s This? prompt.
From Windows 95
To access online help from Start, click the Start button, point toPrograms and Epson, and then click EPSON Stylus COLOR600 Help. You see the help contents window.
From Windows 3.1
To access online help from Program Manager, open the EPSONprogram group and double-click the EPSON Stylus COLOR600 Help icon. You see the help contents window.
L Fiji2 Ref. Guide Rev.bA5 size Chapter 405-29-97 DR, pass 0
4-18 Using the Printer Software for Windows
Chapter 5Using the Printer Software forMacintosh
Proof Sign-off:Ishizaka _______NorumGrady _______
Introducing the Printer Software Functions . . . . . . . . . . . 5-2
Using the Automatic Setting . . . . . . . . . . . . . . . . . . . . 5-3
Using the Predefined Settings . . . . . . . . . . . . . . . . . . . 5-5
Customizing the Print Settings . . . . . . . . . . . . . . . . . . 5-8Making your settings . . . . . . . . . . . . . . . . . . . . . . 5-8Saving your settings . . . . . . . . . . . . . . . . . . . . . . 5-9Choosing your settings . . . . . . . . . . . . . . . . . . . . . 5-10Modifying visual effects . . . . . . . . . . . . . . . . . . . . 5-10Controlling the printing quality . . . . . . . . . . . . . . . . 5-15
Changing the Paper Size . . . . . . . . . . . . . . . . . . . . . . 5-18
Defining a Custom Paper Size . . . . . . . . . . . . . . . . . . . 5-19
Using EPSON Printer Utilities . . . . . . . . . . . . . . . . . . . 5-20EPSON StatusMonitor . . . . . . . . . . . . . . . . . . . . . 5-21Nozzle Check . . . . . . . . . . . . . . . . . . . . . . . . . . 5-22Head Cleaning . . . . . . . . . . . . . . . . . . . . . . . . . . 5-23Print Head Alignment . . . . . . . . . . . . . . . . . . . . . 5-23
Using the EPSON Monitor2 Utility . . . . . . . . . . . . . . . . 5-24
5
RFiji2 Ref. Guide Rev.bA5 size Chapter 597/05/20 DR, pass 0
Using the Printer Software for Macintosh 5-1

Introducing the Printer Software Functions
The printer software includes a printer driver and printerutilities. The printer driver lets you choose from a wide varietyof settings to get the best results from your printer. The printerutilities help you check the printer and keep it in top condition.
The quickest and easiest way to start printing is to leave theMode option set to Automatic in the Print dialog box. This wayyou only need to check the Media Type and Ink settings, asdescribed on page 5-4.
Basically, there are three levels of settings: the Automaticsetting; the predefined settings, which give you more controlover printer settings; and the custom settings, which you maketo fit your individual needs. To work with predefined andcustom settings, you need to select Advanced as the Modeoption. These settings are described in detail below.
Several printer utilities are provided to help you check thecondition of the printer and perform maintenance procedures.See pages 5-20 through 5-23 for information on the StatusMonitor, Nozzle Check, Head Cleaning, and Print HeadAlignment utilities. For instructions on using the StatusMonitor, see page 5-21, and for instructions on using any of theother utilities, see Chapter 8, “Troubleshooting.”
LFiji2 Ref. Guide Rev.bA5 size Chapter 597/05/20 DR, pass 0
5-2 Using the Printer Software for Macintosh

Using the Automatic Setting
When Automatic is selected as the Mode setting in the Printdialog box, the printer driver takes care of all detailed settingsaccording to the Media Type and Ink settings you make (seepage 5-4 for details on making the Media Type setting). Mostusers will never have to switch from the Automatic to theAdvanced mode. However, if your application program doesnot give you enough control over the printout, you may wantto switch to Advanced mode to experiment with thepredefined settings or make your own custom settings. Seepage 5-6 for information on the predefined settings, and page5-8 for information on making custom settings.
To access the Print dialog box, click Print on the File menu ofyour application. The Print dialog box appears:
Note:If you choose Plain Paper, Photo Quality Ink Jet Paper, PhotoQuality Glossy Paper or Photo Quality Glossy Film as theMedia Type setting while Automatic is selected, a slide bar appears inthe Mode box that lets you choose Quality or Speed. SelectQuality when print quality is more important than speed.
Before printing, be sure to verify the Media Type and Inksettings as described below because they also have an effect onthe other settings. You may also need to check the Page Setupdialog box for other basic settings such as paper size. See page5-18 for information on the Page Setup dialog box.
image7
5
RFiji2 Ref. Guide Rev.bA5 size Chapter 597/05/20 DR, pass 0
Using the Printer Software for Macintosh 5-3

Media Type
Select the Media Type setting that matches the kind of paperyou loaded in the printer. See below to determine which MediaType setting (shown in bold) best matches your paper.
Plain Paper
Plain paperEnvelopes
360 dpi Ink Jet Paper
EPSON 360 dpi Ink Jet Paper (A4) S041059S041025
EPSON 360 dpi Ink Jet Paper (Letter) S041060
Photo Quality Ink Jet Paper
EPSON Photo Quality Ink Jet Paper (A4) S041061S041026
EPSON Photo Quality Ink Jet Paper (Letter) S041062EPSON Photo Quality Ink Jet Paper (Legal) S041067 EPSON Photo Quality Ink Jet Card (A6) S041054EPSON Photo Quality Ink Jet Card (5 × 8 in.) S041121EPSON Photo Quality Ink Jet Card (8 × 10 in.) S041122EPSON Photo Quality Self Adhesive Sheet (A4) S041106
Ink Jet Transparencies
EPSON Ink Jet Transparencies (A4) S041063EPSON Ink Jet Transparencies (Letter) S041064
Photo Quality Glossy Paper
EPSON Photo Quality Glossy Paper (A4) S041126EPSON Photo Quality Glossy Paper (Letter) S041124EPSON Photo Paper (4 × 6 in.) S041134
LFiji2 Ref. Guide Rev.bA5 size Chapter 597/05/20 DR, pass 0
5-4 Using the Printer Software for Macintosh

Photo Quality Glossy Film
EPSON Photo Quality Glossy Film (A4) S041071EPSON Photo Quality Glossy Film (Letter) S041072EPSON Photo Quality Glossy Film (A6) S041107
Note:The availability of special media varies by country.
Ink
If your document includes color, select Color. If you areprinting black text, a draft, or if you want colors to print asvarying shades of gray, choose Black.
Using the Predefined Settings
The predefined settings are provided to help you optimize theprint settings for a particular kind of printout such aspresentation documents or images taken by a video or digitalcamera.
The predefined settings appear in a list located between theMore Settings and Save Settings buttons in the Print dialog box.This list is enabled when you click the Advanced button.
To select a predefined setting, click the Advanced button,then click in the list and select a setting according to the type ofdocument or image you want to print.
When you choose a predefined setting, other settings such asPrint Quality, Halftoning, and Color are set automatically.Changes are shown in the Current Settings display on the rightside of the Print dialog box. Before printing, be sure to verifythe Media Type and Ink settings, as they may be affected by thepredefined setting you select. See the previous section for moreinformation on the Media Type and Ink settings.
5
RFiji2 Ref. Guide Rev.bA5 size Chapter 597/05/20 DR, pass 0
Using the Printer Software for Macintosh 5-5

The printer driver provides the following predefined settings:
Photo
This setting is best for printing scanned photographs. Itincreases the contrast in an image.
Note:Changing the Ink setting after Photo is selected returns the settingslist to Custom Settings, so always make your Ink setting before youselect this option.
Text/Graph
This setting is best for graphics-intensive documents such ascharts and graphs for presentations. It intensifies the colors butlightens the midtones and highlights of an image.
Note:Changing the Ink setting after Text/Graph is selected returns thesettings list to Custom Settings, so always make your Ink settingbefore you select this option.
PhotoEnhance
This setting is best for printing images captured using a video,digital camera, or scanner. EPSON PhotoEnhance featureproduces sharper images and more vivid colors byautomatically adjusting the contrast, saturation, and brightnessof the original image data.
Note:❑ Selecting PhotoEnhance automatically sets the Ink option to
Color. Changing the Ink setting after PhotoEnhance isselected returns the settings list to Custom Settings.
❑ Printing with PhotoEnhance selected may take longer dependingon your computer system and the amount of data contained inyour image.
LFiji2 Ref. Guide Rev.bA5 size Chapter 597/05/20 DR, pass 0
5-6 Using the Printer Software for Macintosh

Economy
This setting provides you with faster printing and saves ink.The printer uses less ink by printing fewer dots per character.Choose this setting for rough drafts of text only.
Note:Changing the Ink setting after Economy is selected returns thesettings list to Custom Settings, so always make your Ink settingbefore you select this option.
ColorSyncThis setting automatically adjusts printout colors to match thecolors on your screen.
Note:Selecting ColorSync automatically sets the Ink option to Color.Changing the Ink setting after ColorSync is selected returns thesettings list to Custom Settings.
Text
This setting is best for printing text-only documents. Itprovides you with faster printing than the Text/Graph settingwith only a slight decrease in printing quality.
Note:Changing the Ink setting after Text is selected returns the setting listto Custom Settings, so always make your Ink setting before youselect this option.
5
RFiji2 Ref. Guide Rev.bA5 size Chapter 597/05/20 DR, pass 0
Using the Printer Software for Macintosh 5-7

Customizing the Print Settings
Many users will never need to manually make their own printsettings. However, if you need more control over the driver, wantto make the most detailed settings available, or just want toexperiment, customize your print settings as described below.
Making your settings
1. Click the Advanced button in the Print dialog box.
2. Click the More Settings button. The More Settings dialog boxappears. The settings in the More Settings dialog box allowyou to modify visual effects and control printing quality.These settings are explained in detail later in this chapter.
Note:The Print Quality, Media Type, and Ink settings affect theavailability of other options, so always make your settings in thisorder: Print Quality, Media Type, Ink, then other settings.
3. After making your settings, click OK. Your settings will beapplied and you will return to the Print dialog box. Toreturn to the Print dialog box without applying yoursettings, click Cancel.
dr-8n
LFiji2 Ref. Guide Rev.bA5 size Chapter 597/05/20 DR, pass 0
5-8 Using the Printer Software for Macintosh

Saving your settings
To save your custom settings as a group, follow these steps:
1. Click Save Settings in the Print dialog box. The CustomSettings dialog box appears.
2. Type a unique name (up to 16 characters) for your customsettings in the Name box.
3. Click Save.
You can save up to 10 groups of settings. You can select yoursaved group of settings from the settings list in the Print dialogbox.
Note:❑ You cannot use a predefined setting name for your custom
settings.
❑ To delete a custom setting, select the setting in the CustomSettings dialog box and click Delete.
❑ You cannot delete the predefined settings.
image3
5
RFiji2 Ref. Guide Rev.bA5 size Chapter 597/05/20 DR, pass 0
Using the Printer Software for Macintosh 5-9

Choosing your settings
To choose your settings, click Advanced in the Print dialogbox, then click in the settings list beside the More Settingsbutton and select your setting.
If you change the Media Type or Ink option when one of yourcustomized settings is selected in the settings list, the selectionshown in the list returns to Custom Settings. The customizedsetting that was previously selected is not affected by thischange. To return to your customized setting, simply reselect itin the list.
Modifying visual effects
If you want to make detailed modifications to the printedappearance of your color and black-and-white documents, youcan use the Color and Halftoning settings in the More Settingsdialog box. You can also invert the entire image using the FlipHorizontal option.
You may need to experiment with different settings to get theoutput you want.
Note:When Color is selected as the Ink setting, all Color settings areavailable. When Black is selected, only Contrast and Brightness areavailable. See page 5-5 for information on the Ink settings.
LFiji2 Ref. Guide Rev.bA5 size Chapter 597/05/20 DR, pass 0
5-10 Using the Printer Software for Macintosh

Color Adjustment
The Color Adjustment settings provide you with a level ofcontrol over printed colors that you can not find in manyapplications.
Mode
There are four color adjustment modes as follows:
Automatic
Analyzes the print data and optimizes color correction for thetype of data sent to the printer.
Photo-realistic
Provides output that closely matches the original data. Use this setting for color photographs.
Vivid
Intensifies the colors and lightens the midtones and highlightsof an image. Use this setting for presentation graphics, suchas charts and graphs.
No Color Adjustment
The printer driver does not enhance the color. Choose thisoption only when making a ColorSync profile for thisprinter. When printing normally, choose one of the othermodes.
5
RFiji2 Ref. Guide Rev.bA5 size Chapter 597/05/20 DR, pass 0
Using the Printer Software for Macintosh 5-11
Slide bars
For the settings below, drag the slide bar to the right or leftwith your mouse or type a value in the box next to the slide barto adjust a setting. The range varies from -25% to +25%.
Brightness
Changes the overall lightness or darkness of an image.
Contrast
Magnifies or minimizes the difference between the bright or dark parts of an image.
Saturation
Modifies the vividness of color. Lower saturation producescolors that are duller than those produced with highersaturation.
Cyan, Magenta, Yellow
Adjusts the amount of each of the three basic colors used forprinting.
PhotoEnhance
Select this option when printing images taken with a videocamera, digital camera, or scanner. EPSON PhotoEnhanceautomatically adjusts the contrast, saturation, and brightness ofthe original image data to produce sharper, more vivid colorprintouts. PhotoEnhance does not affect your original imagedata.
When PhotoEnhance is selected, other settings are dimmed,meaning you cannot change those settings.
LFiji2 Ref. Guide Rev.bA5 size Chapter 597/05/20 DR, pass 0
5-12 Using the Printer Software for Macintosh
Note:❑ PhotoEnhance is only available when Color is selected as the Ink
option.
❑ Printing with PhotoEnhance selected may take longer dependingon your computer system and on the amount of data contained inyour image.
ColorSyncTM
Select ColorSync when matching printed colors with the colorson your screen is important. It automatically adjusts the colorrange to print colors the way they appear on your screen. Thereare two settings, Profile and Rendering Intent. See below fordetails.
To use this feature, make sure you set the system profile foryour monitor. To set your monitor profile, access the ColorSyncSystem Profile utility through the Control Panel and click theSet Profile button. Select your monitor from the list of monitorsthat appears, and then click Select. Close the dialog box.
Note:ColorSync is available only when Color is selected as the Ink option.
Profile
Matches the colors in your output with the colors displayed onyour monitor. This software provides one profile, EPSONStandard, which is custom-designed to work with your printer.When this option is selected, the printer software uses theprofile provided by EPSON.
Some companies may provide other profiles with theirproducts. If installed, these profiles will appear in the Profilelist.
5
RFiji2 Ref. Guide Rev.bA5 size Chapter 597/05/20 DR, pass 0
Using the Printer Software for Macintosh 5-13

Rendering Intent
Transfers the color information using the profile you havechosen from the Profile list.
Perceptual
The best option for reproducing photographs and printoutsthat are not suited to the other options.
Saturation
The best option for reproducing vivid images. Use this settingfor presentation graphics, such as charts and graphics.
Colorimetric
The best option when precise matching of colors is mostimportant, for example, when printing a company logo.Colorimetric attempts to reproduce colors the way the eyedistinguishes them. Keep in mind that Colorimetric, or anyother color matching method, may not always reproducecolors perfectly due to differences in the way scanners,printers, and other devices process color data. SeeAppendix B, “Tips for Color Printing,” for moreinformation.
LFiji2 Ref. Guide Rev.bA5 size Chapter 597/05/20 DR, pass 0
5-14 Using the Printer Software for Macintosh

Halftoning
Use the Halftoning settings to achieve the results describedbelow.
❑ Select No Halftoning when printing text only. Althoughthis setting provides faster printing, it should never beused with color.
❑ Select Error Diffusion to make edges and colors softer whenprinting photographic images. Error diffusion blends everycolored dot in your image with the surrounding coloreddots.
❑ Dithering arranges dots in orderly patterns and is bestsuited for printing charts, graphs, and other images thatrequire precise, solid areas of bright colors. Select CoarseDithering for images with limited detail and shading.Select Fine Dithering for images with significant detail butlimited shading.
Flip Horizontal
This feature flips the image 180° along its vertical axis. Printedimages and text appear backwards.
Controlling the printing quality
Use the following controls in the More Settings dialog box toadjust the quality of the output. Some settings in this dialogbox may be determined by Print Quality and Media Typesettings.
5
RFiji2 Ref. Guide Rev.bA5 size Chapter 597/05/20 DR, pass 0
Using the Printer Software for Macintosh 5-15
Print Quality
The available Print Quality settings are:
SuperFine - 1440 dpi
Select this setting when you want the highest quality output at1440 dpi. With this setting, we recommend the use of EPSONPhoto Quality media. See page 5-4 for a complete list of EPSONspecial media.
Fine - 720 dpi
Select this setting when you want high-quality output at 720dpi. With this setting, we recommend the use of EPSON PhotoQuality media. See page 5-4 for a complete list of EPSONspecial media.
Normal - 360 dpi
Select this setting for most types of documents. Use this settingfor plain paper, EPSON Ink Jet Transparencies, or EPSON 360dpi Ink Jet Paper. See page 5-4 for a complete list of EPSONspecial media.
Economy
Select this option for printing rough drafts of text. This settingspeeds printing and saves ink by printing fewer dots percharacter.
Note:The Print Quality settings limit the availability of Media Typesettings. Before selecting the Media Type, make the Print Qualitysetting. See page 5-4 for details on the Media Type settings.
LFiji2 Ref. Guide Rev.bA5 size Chapter 597/05/20 DR, pass 0
5-16 Using the Printer Software for Macintosh

MicroWeave
MicroWeave allows your printer to generate superior outputbecause graphics data is re-ordered and printed in finerincrements. This technology reduces the possibility of banding,the light horizontal lines that can mar an image.
Note:❑ You can select MicroWeave when printing with black ink, but the
printing time is significantly longer.
❑ MicroWeave is switched off automatically when Economy isselected as the predefined setting in the Print dialog box or as thePrint Quality setting in the More Settings dialog box.
High Speed
This setting activates bidirectional printing, which reduces thetime it takes to print an image. Keep in mind that High Speedshould be switched off for highest quality printing.
Note: If vertical lines printed when High Speed is selected appearmisaligned, you may need to align the print head. For details, see“Aligning the Print Head” on page 8-29.
Finest Detail
If you select Fine - 720 dpi as the Print Quality setting, you canturn on Finest Detail to print text and line art with very sharpedges. Be aware that it may take considerably longer to printusing this feature and it will increase your Macintosh memoryrequirements. Additionally, you may not be able to print somelarger images, and some patterns may not print correctly. Ifyou experience problems printing with Finest Detail on, turn itoff or add more memory.
5
RFiji2 Ref. Guide Rev.bA5 size Chapter 597/05/20 DR, pass 0
Using the Printer Software for Macintosh 5-17
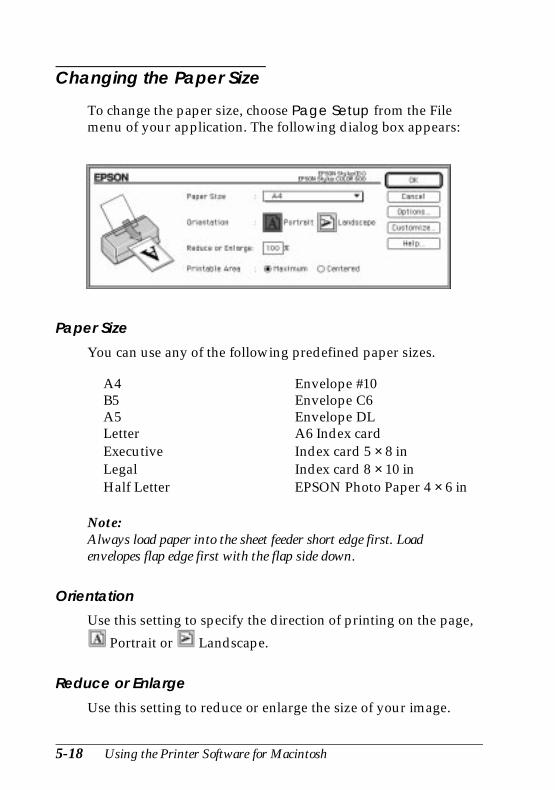
Changing the Paper Size
To change the paper size, choose Page Setup from the Filemenu of your application. The following dialog box appears:
Paper Size
You can use any of the following predefined paper sizes.
A4 Envelope #10B5 Envelope C6A5 Envelope DLLetter A6 Index cardExecutive Index card 5 × 8 inLegal Index card 8 × 10 inHalf Letter EPSON Photo Paper 4 × 6 in
Note:Always load paper into the sheet feeder short edge first. Loadenvelopes flap edge first with the flap side down.
Orientation
Use this setting to specify the direction of printing on the page,
Portrait or Landscape.
Reduce or Enlarge
Use this setting to reduce or enlarge the size of your image.
image4
LFiji2 Ref. Guide Rev.bA5 size Chapter 597/05/20 DR, pass 0
5-18 Using the Printer Software for Macintosh

Printable Area
Select Maximum to make your printout as large as possible onthe paper. Select Centered to position your printout at equaldistances from the edges.
Defining a Custom Paper Size
If your paper size is not included in the paper size list in thePage Setup dialog box, follow the steps below to define acustom paper size.
1. In the Page Setup dialog box, click Customize. The following dialog box appears:
2. To define a new paper size, click New. The dialog boxupdates to allow you to enter a name for the new size.
imate10
image9
5
RFiji2 Ref. Guide Rev.bA5 size Chapter 597/05/20 DR, pass 0
Using the Printer Software for Macintosh 5-19

3. Type the paper size name in the New Paper Size box.
4. Specify the measurement unit as either inches or cm.
5. Type in the width and the height.
6. Click OK. You return to the Page Setup dialog box.
You can define up to eight paper sizes. The paper size namesyou create will appear in the Paper Size menu in the PageSetup dialog box.
To delete a custom paper size, click Customize in the PageSetup dialog box, select its name from the list in the CustomPaper dialog box, and click Delete.
Using EPSON Printer Utilities
EPSON printer utilities allow you to check the current printerstatus and do some printer maintenance from your screen.Click Utility in the Print dialog box to view the Utility dialogbox:
image8
LFiji2 Ref. Guide Rev.bA5 size Chapter 597/05/20 DR, pass 0
5-20 Using the Printer Software for Macintosh
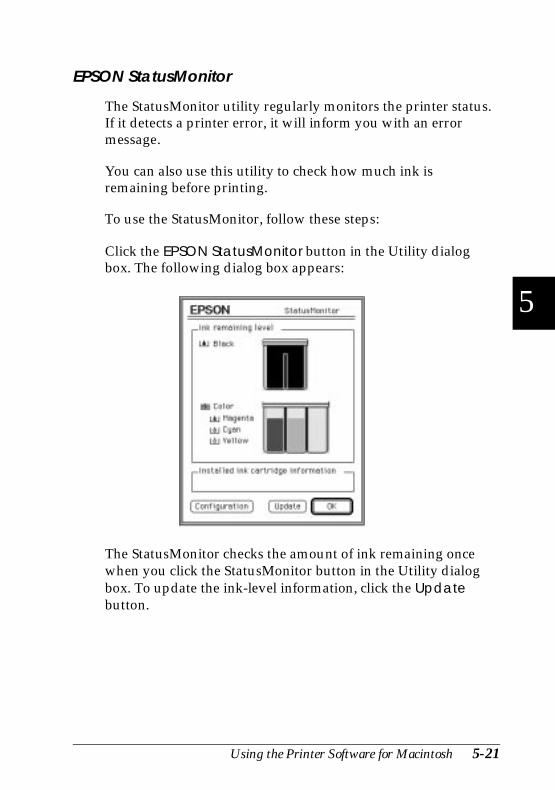
EPSON StatusMonitor
The StatusMonitor utility regularly monitors the printer status.If it detects a printer error, it will inform you with an errormessage.
You can also use this utility to check how much ink isremaining before printing.
To use the StatusMonitor, follow these steps:
Click the EPSON StatusMonitor button in the Utility dialogbox. The following dialog box appears:
The StatusMonitor checks the amount of ink remaining oncewhen you click the StatusMonitor button in the Utility dialogbox. To update the ink-level information, click the Updatebutton.
status01
5
RFiji2 Ref. Guide Rev.bA5 size Chapter 597/05/20 DR, pass 0
Using the Printer Software for Macintosh 5-21

The StatusMonitor provides an error message when a printererror occurs while printing. You can choose how errorinformation will be displayed using the Configuration settingdialog box. Click the Configuration button while theStatusMonitor dialog box is open. The following dialog boxappears:
Choose the method and click OK.
Nozzle Check
Checks whether or not the print head nozzles need to becleaned. Click the Nozzle Check button to print the nozzlecheck pattern. If the print head needs cleaning, you can directlyenter the Head Cleaning utility from this utility. After youclean the print head, you can return to the Nozzle Check utilitydirectly from the Head Cleaning utility.
For detailed information on print head cleaning, see Chapter 8,“Troubleshooting.”
status02
LFiji2 Ref. Guide Rev.bA5 size Chapter 597/05/20 DR, pass 0
5-22 Using the Printer Software for Macintosh

Head Cleaning
Cleans the print head. If print quality declines, use this utilityto ensure the nozzles are delivering ink properly. Before andafter print head cleaning, use the Nozzle Check utility to checkwhether the print head needs to be cleaned (again). You canaccess the Nozzle Check utility directly from the HeadCleaning utility. If the print quality does not improve, repeatprint head cleaning.
For detailed information on print head cleaning, see Chapter 8,“Troubleshooting.”
Note:To avoid wasting ink, clean the print head only if print qualitydeclines.
Print Head Alignment
Aligns the print head so that images print clearly. If you findthat your printed image is fuzzy or the vertical lines in yourprintout are not properly aligned, you may need to use thisutility.
For more details on using this utility, see Chapter 8,“Troubleshooting.”
5
RFiji2 Ref. Guide Rev.bA5 size Chapter 597/05/20 DR, pass 0
Using the Printer Software for Macintosh 5-23

Using the EPSON Monitor2 Utility
After you send a print job to the printer, you can use theEPSON Monitor2 utility to check on what print jobs are queuedfor printing. You can cancel any print job in the queue. Thisutility also shows the status of the job currently being printed.
Before using EPSON Monitor2, you must first turn onbackground printing in the Chooser.
After starting a printing operation, select Epson Monitor2 fromthe Application menu at the right end of the menu bar. Thisopens a dialog box similar to the following:
To cancel a print job, click the name of the job and then clickCancel Printing.
em-24
LFiji2 Ref. Guide Rev.bA5 size Chapter 597/05/20 DR, pass 0
5-24 Using the Printer Software for Macintosh
Chapter 6Printing on Special Paper
Proof Sign-off:Ishizaka _______Nomoto _______Keith _______Grady _______
Loading Special Paper and Other Media . . . . . . . . . . . . . 6-2About special media cleaning sheets . . . . . . . . . . . . . 6-5
Loading Envelopes . . . . . . . . . . . . . . . . . . . . . . . . . 6-6
Loading Transparencies . . . . . . . . . . . . . . . . . . . . . . 6-7
Using EPSON Photo Paper (S041134) . . . . . . . . . . . . . . . 6-8Loading . . . . . . . . . . . . . . . . . . . . . . . . . . . . . . 6-8Removing the perforated margins . . . . . . . . . . . . . . 6-10Storing EPSON Photo Paper . . . . . . . . . . . . . . . . . . 6-10
6
RFiji2 Ref. Guide Rev.bA5 size Chapter 605-20-97 DR, pass 0
Printing on Special Paper 6-1

Loading Special Paper and Other Media
You can use most plain bond paper to achieve good results.However, coated papers and glossy paper/film give you betterresults because they reduce the amount of ink that is absorbed.
EPSON provides special media that are formulated for the inkused in EPSON ink jet printers. EPSON recommends you touse media distributed by EPSON to ensure high-quality results.For a list of EPSON special media, see page 1-6, or “PrintingSupplies” in online help.
When loading special paper distributed by EPSON, read theinstruction sheets packed with your special media first andkeep the following in mind.
❑ Make sure the printable surface of the paper is face upwhen loading media into the sheet feeder. See theinstruction sheets packed with the media to determinewhich side is the printable surface. Some media features cutcorners to help identify the correct loading direction, asshown below.
printable surface
cut corner*
*Some media features cut corners to help identify the correct loading direction
e19n
L Fiji2 Ref. Guide Rev.bA5 size Chapter 605-20-97 DR, pass 0
6-2 Printing on Special Paper

❑ Make sure the paper stack fits under the edge guide taband the arrow mark, both of which are located on theinside surface of the left edge guide. Basic loading capacityfor special media is explained below.
EPSON 360 dpi Ink Jet Paper and PhotoQuality Ink Jet Paper
You can load paper up to thearrow mark. If you load legal-sizeink jet paper, do not load it morethan halfway to the arrow mark.
EPSON Photo QualityInk Jet Cards
You can load up to 30 indexcards. Always place the includedsupport sheet under the cardswhen loading them.
EPSON Photo QualityGlossy Paper
You can load up to 20 sheets.
EPSON Photo QualityGlossy Film
For best results, you should loadglossy film one sheet at a time. Ifyou wish to load multiple sheets ofglossy film, load only up to 30sheets and set the minimum topmargin of the page to 30 mm.Before loading glossy film,always put a support sheet* or asheet of plain paper under theglossy film. Be sure to removeeach printout from the outputtray immediately after printing.Before stacking or storing yourprintout, allow enough time forthe ink to dry throughly andexcept for A6 size glossy filmcover the printed side of everysheet with an enclosed protectivesheet.
6
RFiji2 Ref. Guide Rev.bA5 size Chapter 605-20-97 DR, pass 0
Printing on Special Paper 6-3

EPSON Ink JetTransparencies
You can load up to 10transparencies. Always put asupport sheet* or a sheet of plainpaper under the stack oftransparencies. You also need toreposition the paper support. Seepage 6-8. Be sure to remove eachprintout from the output trayimmediately after printing.Before stacking or storing yourprintout, allow enough time forthe ink to dry throughly andcover the printed side of everysheet with an enclosed protectivesheet.
EPSON Photo QualityAdhesive Sheets
You can load one sheet at a time.
Envelopes You can load up to 10 envelopes.
*If a support sheet is packed with the paper, load it underneath the paper, but do not print on it.
L Fiji2 Ref. Guide Rev.bA5 size Chapter 605-20-97 DR, pass 0
6-4 Printing on Special Paper

❑ If ink smears on your documents when printing on thickspecial media, such as envelopes or index cards, set theadjust lever to the “+” position. To change the setting, openthe printer cover and position the lever as shown below.
Note:Return the adjust lever to the “0” position before printing on media ofnormal thickness. Leaving the lever in the “+“ position may causegaps in the printed image.
About special media cleaning sheets
Cleaning sheets packaged with EPSON special media shouldnot be used with this printer. The cleaning function performedby these sheets is not necessary with this printer, and the sheetscould jam in the printer.
e23
6
RFiji2 Ref. Guide Rev.bA5 size Chapter 605-20-97 DR, pass 0
Printing on Special Paper 6-5

Loading Envelopes
When printing on envelopes, please note the following:
❑ You can load up to 10 envelopes into the sheet feeder.
❑ Load envelopes flap edge first with the flap side down, asshown below.
❑ Do not use envelopes that are curled or folded. Also avoidusing envelopes that are too thin; they may curl duringprinting.
❑ Select Plain Paper as the Media Type setting in the printerdriver. For more details on making printer driver settings,see online help for Windows, or Chapter 6 for Macintosh.
❑ If ink smears on your documents, set the adjust lever to the”+” position. To change the setting, open the printer coverand reposition the lever. See the illustration on page 6-6.
Note:Return the adjust lever to the “0” position, which is the normalposition, after you finish printing on envelopes. Leaving the leverin the “+” position may cause the printed image to have gaps onother media.
H22-E2
L Fiji2 Ref. Guide Rev.bA5 size Chapter 605-20-97 DR, pass 0
6-6 Printing on Special Paper

Loading Transparencies
When printing on transparencies, please note the following:
❑ Before loading transparencies, remove the paper supportand reinstall it into the slots at the back of the printer asshown below.
❑ Always put a support sheet or a sheet of plain paper underthe stack of transparencies.
❑ You can load up to 10 transparencies.
❑ Make sure the printable surface of the paper is face upwhen loading transparencies into the sheet feeder. See theillustration on page 6-4.
❑ Select Ink Jet Transparencies as the Media Type setting inthe printer driver. For more details on making printerdriver settings, see online help for Windows, or Chapter 5for Macintosh.
new-296
RFiji2 Ref. Guide Rev.bA5 size Chapter 605-20-97 DR, pass 0
Printing on Special Paper 6-7
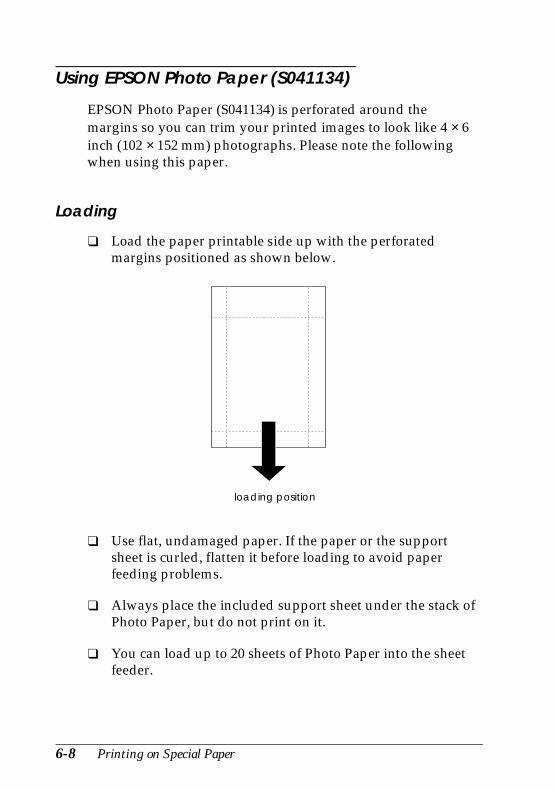
Using EPSON Photo Paper (S041134)
EPSON Photo Paper (S041134) is perforated around themargins so you can trim your printed images to look like 4 × 6inch (102 × 152 mm) photographs. Please note the followingwhen using this paper.
Loading
❑ Load the paper printable side up with the perforatedmargins positioned as shown below.
❑ Use flat, undamaged paper. If the paper or the supportsheet is curled, flatten it before loading to avoid paperfeeding problems.
❑ Always place the included support sheet under the stack ofPhoto Paper, but do not print on it.
❑ You can load up to 20 sheets of Photo Paper into the sheetfeeder.
loading position
c-24a
L Fiji2 Ref. Guide Rev.bA5 size Chapter 605-20-97 DR, pass 0
6-8 Printing on Special Paper
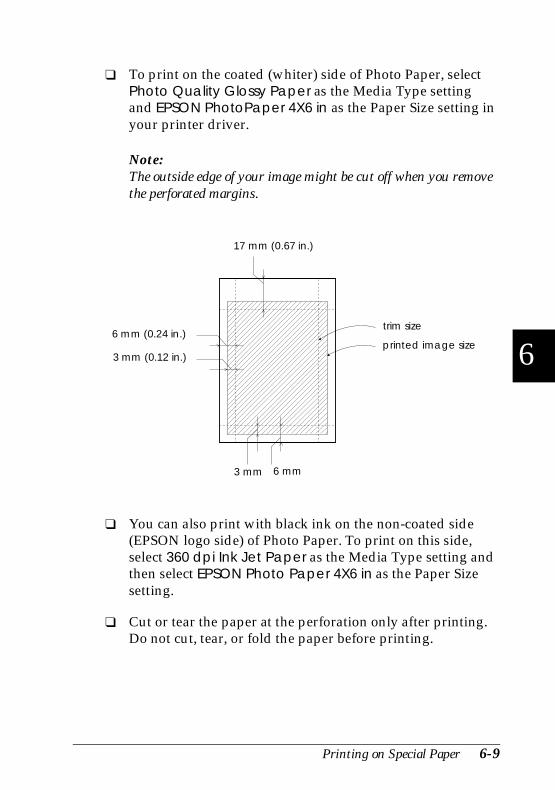
❑ To print on the coated (whiter) side of Photo Paper, selectPhoto Quality Glossy Paper as the Media Type settingand EPSON PhotoPaper 4X6 in as the Paper Size setting inyour printer driver.
Note:The outside edge of your image might be cut off when you removethe perforated margins.
❑ You can also print with black ink on the non-coated side(EPSON logo side) of Photo Paper. To print on this side,select 360 dpi Ink Jet Paper as the Media Type setting andthen select EPSON Photo Paper 4X6 in as the Paper Sizesetting.
❑ Cut or tear the paper at the perforation only after printing.Do not cut, tear, or fold the paper before printing.
trim size
17 mm (0.67 in.)
printed image size6 mm (0.24 in.)
3 mm (0.12 in.)
6 mm3 mm
c-24b6
RFiji2 Ref. Guide Rev.bA5 size Chapter 605-20-97 DR, pass 0
Printing on Special Paper 6-9

Removing the perforated margins
❑ To remove the perforated margins, fold the paper back andforth a few times along the perforations, then carefully tearthe margins off.
❑ You may also remove the margins by cutting along theperforations.
Storing EPSON Photo Paper
❑ Return unused paper to the original package as soon as youfinish printing, and avoid storing it in places exposed tohigh temperature, humidity, or direct sunlight.
c-24c
L Fiji2 Ref. Guide Rev.bA5 size Chapter 605-20-97 DR, pass 0
6-10 Printing on Special Paper

Chapter 7Maintenance and Transportation
Proof Sign-off:Ishizaka _______Nomoto _______Keith _______Grady _______
Replacing an Ink Cartridge . . . . . . . . . . . . . . . . . . . . . 7-2
Cleaning the Printer . . . . . . . . . . . . . . . . . . . . . . . . . 7-8
Transporting the Printer . . . . . . . . . . . . . . . . . . . . . . 7-9
7
Ma
inte
nanc
e
RFiji2 Ref. Guide Rev.bA5 size Chapter 705-20-97 DR, pass 0
Maintenance and Transportation 7-1

Replacing an Ink Cartridge
The printer’s indicator lights will inform you as describedbelow when it is time to obtain a replacement ink cartridge andwhen it is time to replace an empty cartridge.
Note:If you need to replace an ink cartridge when the B and A lights are off,see “Ink Cartridge Problems” on page 8-30.
EPSON recommends the use of genuine EPSON ink cartridges.Other products not manufactured by EPSON may causedamage to your printer not covered by EPSON’s warranties.
When the B ink out light is
❑ flashing obtain a replacement black ink cartridge (S020093).
❑ on replace the empty black ink cartridge.
When the A ink out light is
❑ flashing obtain a replacement color ink cartridge (S020089).
❑ on replace the empty color ink cartridge.
Note:If the ink runs out, you cannot continue printing until you replace iteven if the other ink cartridge still contains ink.
cCaution:❑ Once you remove an ink cartridge, it becomes unusable
and cannot be reinstalled even if ink remains.
❑ Leave the old cartridge installed in the printer until youare ready to replace it with a new one. Attempting to printwithout a cartridge installed can damage the printer.
L Fiji2 Ref. Guide Rev.bA5 size Chapter 705-20-97 DR, pass 0
7-2 Maintenance and Transportation

To replace an ink cartridge, follow these steps.
1. Make sure the printer is on. The P power light should be on, but not flashing. Determine which cartridge needs to be replaced as indicated by the B black and Acolor ink out lights.
Note:If you press the R cleaning button for three seconds when the B and A ink out lights are off, the printer starts cleaning theprint head.
2. Make sure the output tray at the front of the printer islowered; then open the printer cover.
3. Hold down the R cleaning button for three seconds until the print head moves left slightly to the cartridgereplacement position. The P power light flashes when theprint head is in position.
cCaution:Do not move the print head by hand. Always use the Rcleaning button to move it. Otherwise you may damagethe printer.
new5a7
Ma
inte
nanc
e
RFiji2 Ref. Guide Rev.bA5 size Chapter 705-20-97 DR, pass 0
Maintenance and Transportation 7-3

Note:The printer automatically moves the print head back to its home(far right) position after about 60 seconds if you have not startedthe replacement procedure.
4. Lift up the clamp that holds the cartridge you want to replaceas far as it will go. When you do, the cartridge will risepartly out of the cartridge holder. The following illustrationshows color ink replacement. For black ink replacement, liftup only the smaller clamp on the left.
cCaution:Once you open the ink cartridge clamp, the ink cartridgebecomes unusable and cannot be reinstalled even if inkremains.
5. Lift the cartridge out of the printer and dispose of it properly.Do not take the used cartridge apart or try to refill it.
wWarning:If ink gets on your hands, wash them thoroughly with soapand water. If ink gets into your eyes, flush themimmediately with water.
black
color
e27
L Fiji2 Ref. Guide Rev.bA5 size Chapter 705-20-97 DR, pass 0
7-4 Maintenance and Transportation

6. Make sure the replacement ink cartridge is the correct one,color or black. Remove the ink cartridge from its protectivebag. Next, remove only the yellow tape seal from thecartridge as shown below.
cCaution:❑ You must remove the yellow tape seal from the
cartridge. Leaving the tape on when you install thecartridge will permanently damage it.
❑ Do not remove the whole tape seal (especially thewhite portion) from the top of the cartridge. Removeonly the yellow portion.
❑ Do not remove the tape seal from the bottom of thecartridge; otherwise, ink will leak.
black S020093 color S020089
36
7
Ma
inte
nanc
e
RFiji2 Ref. Guide Rev.bA5 size Chapter 705-20-97 DR, pass 0
Maintenance and Transportation 7-5

7. Lower the ink cartridge into the cartridge holder with the label on the cartridge face up and the arrow on thecartridge pointing to the rear of the printer. The larger(color) cartridge goes on the right, the black ink cartridgeon the left.
8. Press the ink cartridge clamp down until it locks in place. The following illustration shows color ink replacement. Forblack ink replacement, press down the smaller clamp on theleft.
cCaution:Once you install the cartridges, do not open their clampsagain until you replace the ink cartridges. Otherwise, thecartridges may become unusable.
!e27-3
27-2
L Fiji2 Ref. Guide Rev.bA5 size Chapter 705-20-97 DR, pass 0
7-6 Maintenance and Transportation

9. Press the R cleaning button then close the printer cover. Theprinter moves the print head and begins charging the inkdelivery system. This process takes about two minutes tocomplete.
When the ink charging process is finished, the printer returnsthe print head to its home position and the P power lightstops flashing.
cCaution: The P power light continues to flash while the printerperforms the ink charging operation. Never turn off theprinter while this light is flashing. Doing so can result inincomplete charging of ink.
Note:Even if you do not press the R cleaning button, the printermoves the print head and begins the ink charging process about60 seconds after you replace the ink cartridge.
7
Ma
inte
nanc
e
RFiji2 Ref. Guide Rev.bA5 size Chapter 705-20-97 DR, pass 0
Maintenance and Transportation 7-7

Cleaning the Printer
To keep your printer operating at its best, you should clean itthoroughly several times a year.
1. Make sure the printer is turned off and all the control panellights are off. Then unplug the power cord.
2. Remove any paper from the sheet feeder.
3. Use a soft brush to carefully clean away all dust and dirt.
4. If the outer case or the inside of the sheet feeder is dirty, cleanit with a soft, clean cloth dampened with mild detergent.Keep the printer cover closed to prevent water from gettinginside.
5. If the inside of the printer accidentally gets soiled with ink,wipe it off with a damp cloth.
wWarning:Be careful not to touch the gears inside the printer.
cCaution:❑ Never use alcohols or thinners to clean the printer; these
chemicals can damage the components as well as the case.
❑ Be careful not to get water on the printer mechanism orelectronic components.
❑ Do not use a hard or abrasive brush.
❑ Do not spray the inside of the printer with lubricants;unsuitable oils can damage the mechanism. Contact yourdealer or a qualified service person if lubrication is needed.
L Fiji2 Ref. Guide Rev.bA5 size Chapter 705-20-97 DR, pass 0
7-8 Maintenance and Transportation

Transporting the Printer
If you need to transport your printer some distance, carefullyrepack it using the original box and packing materials asfollows:
1. Open the printer cover and make sure that the print head iscapped. It is capped when it is in the far right (home)position. If the print head is not capped, turn on the printer;then turn it off again. The print head returns to the homeposition and is capped. Close the printer cover.
cCaution:Leave the ink cartridges installed when you transport theprinter. Removing the cartridges during transport candamage the printer.
2. Unplug the power cord from the electrical outlet; thendisconnect the interface cable from the printer.
3. Remove the paper from the sheet feeder and remove thepaper support.
4. Push in the output extension tray, and then raise the outputtray.
5. Attach the protective materials to the printer.
6. Repack the printer and power cord in the original box.
7. Keep the printer level during transport.
7
Ma
inte
nanc
e
RFiji2 Ref. Guide Rev.bA5 size Chapter 705-20-97 DR, pass 0
Maintenance and Transportation 7-9

L Fiji2 Ref. Guide Rev.bA5 size Chapter 705-20-97 DR, pass 0
7-10 Maintenance and Transportation

Chapter 8Troubleshooting
Proof Sign-off:Ishizaka _______Nomoto _______Keith _______Grady _______
Diagnosing the Problem . . . . . . . . . . . . . . . . . . . . . . 8-2Error indicators . . . . . . . . . . . . . . . . . . . . . . . . . 8-2Status Monitor . . . . . . . . . . . . . . . . . . . . . . . . . . 8-4Printer operation check . . . . . . . . . . . . . . . . . . . . . 8-4
Problems and Solutions . . . . . . . . . . . . . . . . . . . . . . 8-7Power supply . . . . . . . . . . . . . . . . . . . . . . . . . . 8-7Operation . . . . . . . . . . . . . . . . . . . . . . . . . . . . 8-8Paper handling . . . . . . . . . . . . . . . . . . . . . . . . . 8-14Printing quality . . . . . . . . . . . . . . . . . . . . . . . . . 8-17
Increasing the Print Speed . . . . . . . . . . . . . . . . . . . . . 8-24
Cleaning the Print Head . . . . . . . . . . . . . . . . . . . . . . 8-26
Aligning the Print Head . . . . . . . . . . . . . . . . . . . . . . 8-29
Ink Cartridge Problems . . . . . . . . . . . . . . . . . . . . . . . 8-30
Contacting Customer Support . . . . . . . . . . . . . . . . . . . 8-34For United Kingdom and the Republic of Ireland users . . 8-34For Australian users . . . . . . . . . . . . . . . . . . . . . . 8-37For Hong Kong and Singapore users . . . . . . . . . . . . . 8-39For Philippines users . . . . . . . . . . . . . . . . . . . . . . 8-40
8
Tro
uble
shoo
ting
RFiji2 Ref. Guide Rev.bA5 size Chapter 805-29-97 DR, pass 0
Troubleshooting 8-1

Diagnosing the Problem
Troubleshooting printer problems is best handled in two easysteps: first diagnose the problem, then apply likely solutionsuntil the problem is fixed. The information that you need todiagnose the most common problems is provided by theprinter’s control panel lights and by the Status Monitor utility(Windows 95 and Macintosh only). In addition, you candetermine whether a problem lies with the printer itself or withthe computer by performing a printer operation check.
In “Problems and Solutions” later in this chapter you can findcauses and solutions to specific printer problems. Use theinformation presented in this chapter to pinpoint the source ofyour problem, then apply the recommended solutions until theproblem is solved.
Error indicators
You can identify many common printer problems with thelights on the control panel. If your printer stops working andthe lights are on or flashing, use the following table of panellight patterns to diagnose the problem, then follow therecommended corrective measures.
L Fiji2 Ref. Guide Rev.bA5 size Chapter 805-29-97 DR, pass 0
8-2 Troubleshooting

Lights Problem and Solution
Paper Out
n S No paper is loaded inthe printer.
Load paper in the sheet feeder;
then press the E load/eject buttonto turn this light off. The printerresumes printing.
The paper is notloaded correctly.
Remove and reload the paper; then
press the E load/eject button to turnthis light off. The printer resumesprinting.
Paper Jam
f S
o B
o I
Paper has jammed inthe printer.
Take all the paper out of the sheetfeeder, reload the paper, then press
the E load/eject button. If the lightcontinues to flash, turn off the printerand gently pull out any paper thatmay be jammed in the printer. If ittears and pieces remain inside theprinter, open the printer cover andremove the pieces of paper. Turn onthe printer and try again.
Ink Low (black ink cartridge)
f B The black ink cartridgeis nearly empty.
Obtain a replacement black inkcartridge (S020093). See page xx fordetails.
Ink Out (black ink cartridge)
n B The black ink cartridgeis empty.
Replace the black ink cartridge witha new one (S020093). See page xxfor details.
Ink Low (color ink cartridge)
f I The color ink cartridgeis nearly empty.
Obtain a replacement color inkcartridge (S020089). See page xx fordetails.
Ink Out (color ink cartridge)
n I The color ink cartridgeis empty.
Replace the color ink cartridge witha new one (S020089). See page xxfor details.
n = on, o = off, f = flashing
8
Tro
uble
shoo
ting
RFiji2 Ref. Guide Rev.bA5 size Chapter 805-29-97 DR, pass 0
Troubleshooting 8-3
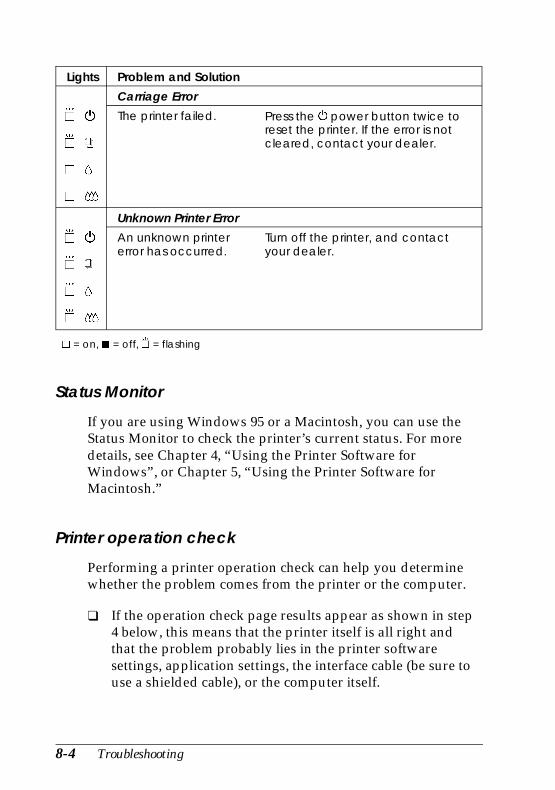
Lights Problem and Solution
Carriage Error
f P
f S
n H
n I
The printer failed. Press the P power button twice toreset the printer. If the error is notcleared, contact your dealer.
Unknown Printer Error
f P
f S
f H
f I
An unknown printererror has occurred.
Turn off the printer, and contactyour dealer.
n = on, o = off, f = flashing
Status Monitor
If you are using Windows 95 or a Macintosh, you can use theStatus Monitor to check the printer’s current status. For moredetails, see Chapter 4, “Using the Printer Software forWindows”, or Chapter 5, “Using the Printer Software forMacintosh.”
Printer operation check
Performing a printer operation check can help you determinewhether the problem comes from the printer or the computer.
❑ If the operation check page results appear as shown in step4 below, this means that the printer itself is all right andthat the problem probably lies in the printer softwaresettings, application settings, the interface cable (be sure touse a shielded cable), or the computer itself.
L Fiji2 Ref. Guide Rev.bA5 size Chapter 805-29-97 DR, pass 0
8-4 Troubleshooting

❑ If the operation check page does not print satisfactorily, forexample, if any segment of the printed lines is missing,there is a problem with the printer. This could be a cloggedink nozzle or a misaligned print head. See “Problems andSolutions” below for possible causes and solutions to theproblem, or go directly to “Cleaning the Print Head” onpage 8-26.
To perform a printer operation check, follow these steps:
1. Make sure both the printer and computer are turned off.
2. Unlock the wire clips on both sides of the interface connector and remove the ground connecter, if necessary.Then disconnect the cable from the printer’s interfaceconnector.
3. Make sure that paper is loaded in the sheet feeder.
cCaution:Use paper at least 182 mm (7.17 inches) wide; forexample, B5 size paper loaded short edge first. Otherwise,the print head will spray ink directly onto the platen,which could mar future printouts.
31a-e
8
Tro
uble
shoo
ting
RFiji2 Ref. Guide Rev.bA5 size Chapter 805-29-97 DR, pass 0
Troubleshooting 8-5

4. Hold down the E load/eject button and press the P powerbutton to turn the printer on. Then release both buttons.
The printer prints an operation check page including theversion of your printer’s ROM, the ink counter code, and anozzle check pattern. Here is a typical printout:
The above sample is in black and white, but the actual test prints in color.
5. Press the P power button to turn off the printer after itfinishes printing the operation check page.
e15
L Fiji2 Ref. Guide Rev.bA5 size Chapter 805-29-97 DR, pass 0
8-6 Troubleshooting

Problems and Solutions
This section divides printer problems into five categories:
Power supply . . . . page 8-7
Operation . . . . . . . page 8-8
Paper handling . . . page 8-14
Printing quality . . . page 8-16
Go to the category for the type of problem you have and lookfor the description that most closely matches the problem. Themost likely causes and solutions are listed first, so try them inthe order that they are written until the problem is solved.
Power supply
The lights come on briefly but then go off and stay off.
Cause What to do
The printer’s voltage ratingmay not match the voltage ofyour electrical outlet.
Check the printer and outlet voltageratings. If the voltages do not match,unplug the printer immediately andcontact your dealer.
w Warning:Do not reconnect the power cord to anelectrical outlet that does not havematching voltage.
8
Tro
uble
shoo
ting
RFiji2 Ref. Guide Rev.bA5 size Chapter 805-29-97 DR, pass 0
Troubleshooting 8-7

The printer does not work and the control panel lights are off.
Cause What to do
The printer is turned off. Press the P power button. The P power light will come on.
The power cord is notproperly plugged into theelectrical outlet.
Turn off the printer, make sure thepower cord is firmly plugged into theelectrical outlet, and turn the printerback on.
The electrical outlet iscontrolled by an outsideswitch or automatic timer.
Use a different outlet.
The electric outlet is out oforder.
Plug another electrical device into theoutlet to determine whether the outletis working. If it is not, use a differentoutlet.
Operation
The P power light is on but nothing prints.
Cause What to do
The interface cable is notplugged in securely.
Confirm that the cable is fastened tothe printer and the computer securely.If the cable is connected correctly, runa printer operation check as describedon page 8-4.
Your interface cable does notmeet both the printer andcomputer specifications.
Use an interface cable that meets bothprinter and computer specifications.See “Interface Specifications” inAppendix C.
L Fiji2 Ref. Guide Rev.bA5 size Chapter 805-29-97 DR, pass 0
8-8 Troubleshooting

Your software is not properlyset up for your printer.
Make sure that your printer isproperly selected in your software.
Install or reinstall the printer softwareas described in Chapter 2.
Nothing prints and the control panel lights are on or flashing.
Cause What to do
Several common printererrors have occured at once.
Use the table in “Error indicators”earlier in this chapter to determinewhat combination of errors may haveoccurred, and apply the recommendedsolutions.
The printer sounds like it is printing, but nothing prints.
Cause What to do
The print head nozzles areclogged.
Clean the print head. See “Cleaningthe Print Head” later in this chapter.If this does not work after four or fivetrials, see below.
One or both of the inkcartridges have been usedlonger than six months orbeyond the date on thepackaging.
Try cleaning the print head. If thatdoes not solve the problem, replacethe ink cartridges as needed. If the Band A ink out lights are off, see page8-30 to replace the ink cartridge.
8
Tro
uble
shoo
ting
RFiji2 Ref. Guide Rev.bA5 size Chapter 805-29-97 DR, pass 0
Troubleshooting 8-9

The printer operation check prints well, but nothing printsfrom within an application program.
Cause What to do
Your printer is not selected inyour software.
Select your printer in the printer setupsection of your software.
The interface cable does notmeet both the printer andcomputer requirements.
Use a printer cable that meets therequirements shown under “SystemRequirements“ on page 1-4.
Your computer is not 100%IBM® AT compatible.
Select Use Print Manager for this portin the Queue Setup window. To accessthis window, click the EPSON SpoolManager4 icon in the EPSON folder(Windows 95) or double-click this iconin the EPSON program group(Windows 3.1), and select Setup fromthe Queue menu.
Your computer system’smemory is too small tohandle the volume of data inyour document.
Try reducing the image resolution ofyour document in your image-editingsoftware.
Install more memory in your computerif you can.
Select lower resolution or less colorsfor your display setting as describedbelow.
For Windows 95, choose a lowerresolution setting as the Color Palettesetting. To access the Color Palette,click Start, point to Settings, andchoose Control Panel. Thendouble-click the Display icon and clickthe Settings tab. For detailedinformation on making this setting, seeyour Windows 95 user’s guide.
L Fiji2 Ref. Guide Rev.bA5 size Chapter 805-29-97 DR, pass 0
8-10 Troubleshooting

For Windows 3.1, double-click theWindows Setup icon on the Mainmenu; then click Options and chooseChange System Settings. Thenchoose a lower resolution setting foryour display from the Display pop-uplist. For detailed information onmaking this setting, see your Windows3.1 user’s guide.
If you have a display-adapter settingutility, use it to set the lowerresolution. For detailed information,see your display board user’s guide.
For Macintosh, choose Control Panelfrom the Apple menu and selectMonitors. Select a lower resolution.For detailed information on makingthis setting, see your Macintosh user’sguide.
The “Sorry, EPSON Stylus COLOR cannot be used” errorappears. (Macintosh only)
Cause What to do
The printer driver has beencorrupted.
Remove and reinstall the driver: Fromthe printer software floppy disk orCD-ROM, click Installer, clickContinue, and select CustomRemove from the pop-up list thatdisplays “Easy Install.” Then selectEPSON Stylus Series Printer Driver,and click Remove. Click Continue, ifnecessary, and click Restart. See page2-20 for instructions on installing theprinter driver.
8
Tro
uble
shoo
ting
RFiji2 Ref. Guide Rev.bA5 size Chapter 805-29-97 DR, pass 0
Troubleshooting 8-11

Color documents print out in black and white.
Cause What to do
Your printer is not selected inyour software.
Select your printer in your software.
Color printing is not selectedin your application or in theprinter driver.
Select color printing in yourapplication and the printer driver. Tryto print again. If the image still comesout in black and white, try printingfrom another program. If this fixes theproblem, contact the manufacturer ofthe software you had trouble with.
Printing starts too high or too low on the page.
Cause What to do
Margins are set incorrectly inyour application.
Check that the margins are setcorrectly in your program. See theprintable area specifications on pageC-6 in Appendix C.
The size of the paper loadedin the printer does not matchthe paper size setting withinyour application program orprinter driver.
Load the correct size of paper, orchange the paper size settings withinyour application program or printerdriver to match the size of paper youare using.
L Fiji2 Ref. Guide Rev.bA5 size Chapter 805-29-97 DR, pass 0
8-12 Troubleshooting

Print speed is not what you expect.
Cause What to do
The image resolution and theamount of color used in thedocument may be too high.
Carefully considering your use ofcolor and resolution can help youoptimize your printing times. Formore details, see “Increasing the PrintSpeed” later in this chapter.
Note:High resolution printing and colorprinting significantly increase the amountof data to be processed. These two factorshave the greatest effect on print speed.
Something on the page is wrong or missing.
Cause What to do
An unknown problem hasoccurred.
Disconnect the interface cable from thecomputer; then try the printeroperation check described earlier inthis chapter.
The printer settings withinyour application areincorrect.
Adjust the printer settings within yourapplication and print again.
The interface cable is notplugged in securely.
Check that the cable is securelyconnected to the printer and thecomputer.
The print head moved to the ink cartridge replacementposition unexpectedly.
Cause What to do
The R cleaning button waspressed while the B or A lightwas flashing or on.
One or both of the ink cartridges islow or out of ink. Replace the inkcartridges as described on page 7-2.
8
Tro
uble
shoo
ting
RFiji2 Ref. Guide Rev.bA5 size Chapter 805-29-97 DR, pass 0
Troubleshooting 8-13

The New Hardware Found screen appears even though theprinter software has already been installed.
Cause What to do
This error may occur whenusing Windows 95.
Click the Do not install a driver(Windows will not prompt youagain) button; then click OK.
Paper handling
Paper does not feed properly from the sheet feeder.
Cause What to do
Too many sheets are loadedin the sheet feeder.
Take the paper stack out of the feeder,remove some sheets, and reload thestack. Before you load paper, check theamount of paper you can load in thesheet feeder. See Chapter 6.
The edge guides are not setcorrectly.
Adjust the guides against the stack ofpaper. See “Loading Paper” in Chapter 3.
Paper is jammed in the paperpath.
Take all the paper out of the sheetfeeder, reload the paper, then press theE load/eject button. If the S paper outlight continues to flash, turn off theprinter and gently pull out any paperthat may be jammed in the printer. If ittears and pieces remain inside theprinter, open the printer cover; thenremove the pieces of paper.
The paper stack does not fitunder the edge guide tabinside the left edge guide.
Reload the paper so that it fits underthe edge guide tab. See “LoadingPaper” in Chapter 3.
The paper is curled or folded. Use flat, undamaged paper.
L Fiji2 Ref. Guide Rev.bA5 size Chapter 805-29-97 DR, pass 0
8-14 Troubleshooting

The paper is old or creased. Use only new, smooth sheets of paper.
The paper’s size is notcompatible with the printer.
Use paper that meets the paperrequirements for this printer. See“Paper” in Appendix C.
The printer loads more than one sheet at a time.
Cause What to do
Too many sheets are loadedin the sheet feeder.
Take the paper stack out of the feeder,remove some sheets, and reload paper.Before you load paper, check theamount of paper you can load in thesheet feeder. See Chapter 6.
The edge guides are not setcorrectly.
Adjust the guides against the stack ofpaper. See “Loading Paper” inChapter 3.
The paper is too thin. Make sure the paper meets the paperrequirements for this printer. See“Paper” in Appendix C.
Ejected paper is wrinkled.
Cause What to do
The paper is damp. Do not store your paper in a damp orhumid environment. Store paper in itsoriginal packaging.
The paper is too thin. Make sure the paper meets the paperrequirements for this printer. See“Paper” in Appendix C.
8
Tro
uble
shoo
ting
RFiji2 Ref. Guide Rev.bA5 size Chapter 805-29-97 DR, pass 0
Troubleshooting 8-15

Paper does not fully eject.
Cause What to do
The paper is too long. Press the E load/eject button to ejectthe paper. Use paper that meets thepaper requirements for this printer.See “Paper” in Appendix C.
Paper feed or paper jam problems occur frequently.
Cause What to do
Sheets of paper are stucktogether.
Fan the stack of paper and align theedges before loading.
The paper is too thin orrough.
Make sure the paper meets the paperrequirements for this printer. See“Paper” in Appendix C.
Too many sheets are loadedin the sheet feeder.
Check the paper package and Chapter 6, “Printing on Special Paper”,for the amount of paper you can loadat one time in the sheet feeder .
The printable side of thepaper is not correctly loaded.
Try turning the stack of paper over inthe sheet feeder. Most packages ofpaper indicate the printable side withan arrow on the end of the package.Make sure the printable side is loadedface up.
L Fiji2 Ref. Guide Rev.bA5 size Chapter 805-29-97 DR, pass 0
8-16 Troubleshooting

Printing quality
The printed image has gaps or faint areas.
Cause What to do
The print head nozzles areclogged.
Clean the print head. See “Cleaningthe Print Head” later in this chapter.
The paper quality has beendegraded due to age.
Use new paper.
The printer driver settingsmay not be correct.
Select Automatic on the printerdriver’s Main menu (Windows) orPrint dialog box (Macintosh), andmake sure the Media Type setting isappropriate for the type of paperloaded in the printer.
The printed image is blurred.
Cause What to do
Your paper is damp. Do not store your paper in a damp orhumid environment. Store the paperin its original packaging.
The printer driver settingsmay not be correct.
Select Automatic on the printerdriver’s Main menu (Windows) orPrint dialog box (Macintosh), andmake sure the Media Type setting isappropriate for the type of paperloaded in the printer.
The printed image is smeared.
Cause What to do
The paper you loaded is toothick.
Open the printer cover and set theadjust lever to the “+” position. SeeChapter 6, “Printing on Special Paper.”
8
Tro
uble
shoo
ting
RFiji2 Ref. Guide Rev.bA5 size Chapter 805-29-97 DR, pass 0
Troubleshooting 8-17

Special paper was loadedwithout the support sheet ora regular sheet of paperunder it. Index cards, glossyfilm, glossy paper, andtransparencies should beloaded with the support sheetor a piece of plain paperunder them.
Load the support sheet or a piece ofplain paper under the special paper.See Chapter 6, “Printing on SpecialPaper,” or the instructions packedwith your paper.
Multiple sheets of EPSONPhoto Quality Glossy Filmare loaded.
Load glossy film one sheet at a timewith the loading support sheet or apiece of plain paper under it.
If you need to load multiple sheets ofglossy film, load only up to 30 sheetswith the loading support sheet or apiece of plain paper under them andset the top margin of the page to 30 mm or more.
Ink has leaked on the platen. Wipe the inside of the printer asshown below with a soft, clean cloth.
w Warning:Be careful not to touch the gears inside theprinter.
ill
L Fiji2 Ref. Guide Rev.bA5 size Chapter 805-29-97 DR, pass 0
8-18 Troubleshooting

The print head nozzles areclogged.
Clean the print head. See “Cleaningthe Print Head” later in this chapter.
White horizontal lines appear in the printed image.
Cause What to do
The print head nozzles areclogged.
Clean the print head. See “Cleaningthe Print Head” later in this chapter.
One of the ink cartridges islow on ink.
Check the control panel to confirmthat the B or A ink out light is flashing,and replace the appropriate inkcartridge.
The MicroWeave option inyour printer driver is notselected.
Turn on MicroWeave in your printerdriver.
The Media Type setting inyour printer driver isincorrect.
Make sure the Media Type settingmatches the type of paper loaded inthe printer.
Vertical printed lines do not align.
Cause What to do
The print head is misaligned. Align the print head with the PrintHead Alignment utility. See “Aligningthe Print Head” later in this chapter.
The printing position ismisaligned.
Make sure the High Speed option inyour printer driver is not selected.
8
Tro
uble
shoo
ting
RFiji2 Ref. Guide Rev.bA5 size Chapter 805-29-97 DR, pass 0
Troubleshooting 8-19

Printing quality is not what you expect.
Cause What to do
The paper loaded is not thepaper selected in yourapplication or the printerdriver.
Make sure you loaded the correctpaper in the printer and that youselected the same media type in yourapplication and/or the printersoftware.
Make sure you are using paper thatmeets the paper requirements for thisprinter. See “Paper” in Appendix C.
You are not printing on thecorrect side of the paper.
Check the paper packaging for thecorrect side for printing; then load theprintable side of the paper face up inthe sheet feeder.
The printer driver settings arenot correct.
Check the printer driver settings tomake sure they are appropriate. Ifthese settings are correct, check yourapplication because some settings areoverridden by application settings.Also, for more information on makingprinter driver settings, see online helpfor Windows, or Chapter 5 forMacintosh.
The High Speed setting isselected in the printer driver.
To obtain higher quality output, makesure High Speed is not selected.
L Fiji2 Ref. Guide Rev.bA5 size Chapter 805-29-97 DR, pass 0
8-20 Troubleshooting

Colors are different than you expect.
Cause What to do
The color print head nozzlesare clogged.
Clean the print head. See “Cleaningthe Print Head” later in this chapter.
Black ink is selected in yourprinter driver.
Set the Ink setting to Color.
The paper is not loadedprintable side up.
Check that the printable side of thepaper is facing up.
The Media Type setting doesnot match the paper loaded.
Change the Media Type setting inyour printer driver to match the typeof media you have loaded.
Load media that matches the MediaType setting you selected in theprinter driver.
The ICM (Windows) orColorSync (Macintosh)setting in your driver is notappropriate for yourdocument.
Select Automatic as the Mode settingin the printer driver.
Your printer and monitor arenot properly calibrated forcolor matching.
See the user’s guides of yourimage-editing software and yourmonitor for information on calibratingyour system for color matching.
Since monitors and printersproduce colors differently,printed colors will not alwaysmatch on-screen colorsperfectly.
See Appendix B , “Tips for ColorPrinting”.
8
Tro
uble
shoo
ting
RFiji2 Ref. Guide Rev.bA5 size Chapter 805-29-97 DR, pass 0
Troubleshooting 8-21

Colors are not very vibrant.
Cause What to do
The image was printed on thewrong side of EPSON Ink JetPaper.
Make sure that you are printing on thecoated side of the paper. If necessary,flip over the paper and try printingagain. If printing has not improved,clean the print heads as described laterin this chapter.
The Media Type setting doesnot match the paper loaded.
Make sure the Media Type setting inyour printer driver matches the type ofmedia you have loaded, or load mediathat matches the Media Type setting.
Color dots are missing in printed characters or graphics. The printed color image has gaps or faint areas.
Cause What to do
The color print head nozzlesare clogged.
Clean the print head. See “Cleaningthe Print Head” later in this chapter.
Black dots are missing in printed characters or graphics. The printed black image is light or faint.
Cause What to do
The black print head nozzlesare clogged.
Clean the print head. See “Cleaningthe Print Head” later in this chapter.
L Fiji2 Ref. Guide Rev.bA5 size Chapter 805-29-97 DR, pass 0
8-22 Troubleshooting

Photographic images look grainy or rough.
Cause What to do
The printing position ismisaligned.
Align the print heads with the PrintHead Alignment utility. See “Aligningthe Print Head” later in this chapter.
The resolution of the originalimage data or the resolutionsetting for the image in yourimage-editing software maybe too low.
Increase the image resolution in yourimage-editing software. Keep in mindthat higher resolution images takelonger to print.
The Status Monitor window does not appear when you areusing Windows 95.
Cause What to do
The Use Print Manager forthis port option is selected inthe Queue Setup window.
Make sure Use Print Manager for thisport is not selected. Click the Startbutton, point to Programs, point toEpson, and click Spool Manager4.Then click Queue and Setup in theEPSON Spool Manager window.
The Enable bi-directionalsupport for this printeroption is not selected in theSpool Settings window.
You must select Enablebi-directional support for this printerin the Spool Settings window to usethe Status Monitor. To access the SpoolSettings window, click the Startbutton, point to Settings, and clickPrinters. Right-click the icon for yourprinter and choose Properties fromthe drop-down menu. Click theDetails tab; then click Spool Settings.Select Enable bi-directional supportfor this printer.
8
Tro
uble
shoo
ting
RFiji2 Ref. Guide Rev.bA5 size Chapter 805-29-97 DR, pass 0
Troubleshooting 8-23

When you clean the print head using the Head Cleaningutility, the output quality does not improve.
Cause What to do
You attempted to clean theprint head while one or bothof the ink cartridges were lowor out of ink.
Check the B and A ink out lights.When one or both of the ink cartridgesare low or out, the Head Cleaningutility has no effect. Replace the inkcartridges as needed. See page 8-2.
Increasing the Print Speed
Just as printing at a high resolution requires more processingtime, printing in color takes longer than printing in blackbecause the volume of data in a color document is muchgreater. For this reason, it is important to be selective in youruse of color if you also require a faster print speed.
Even if your document requires the highest resolution andextensive use of color, for example when printing acamera-ready composite that includes color photographs, itmay still be possible to optimize the print speed by adjustingother printing conditions. Keep in mind that changing someconditions to increase the print speed may also lower printquality.
The following table shows the factors that inversely affect printspeed and print quality (increasing one will decrease the other).
Print qualityPrint speed
LowerFaster
HigherSlower
Printer software settings
Print Quality Economy SuperFine-1440 dpi
High Speed On Off
Halftoning No halftoning Error Diffusion
L Fiji2 Ref. Guide Rev.bA5 size Chapter 805-29-97 DR, pass 0
8-24 Troubleshooting

Print qualityPrint speed
LowerFaster
HigherSlower
Data characteristics
Image size Small Large
Resolution Low High
The table below shows the factors related to print speed only.
Print speed
Faster Slower
Printer software settings
Ink Black Color
Collate* Off On
Page reverse* Off On
Page rotate* Off On
Data characteristics
Variety of colors Grayscale ** Full color
Hardware resources
System speed Fast Slow
HDD free space Large Small
Memory free space Large Small
Software status
Running applications One Many
Virtual memory Not in use In use
*Varies depending on the printer software and application software youare using.
**Grayscale means using black ink only to print varying shades of gray, from pure black to pure white.
8
Tro
uble
shoo
ting
RFiji2 Ref. Guide Rev.bA5 size Chapter 805-29-97 DR, pass 0
Troubleshooting 8-25

Cleaning the Print Head
If you find that the printed image is unexpectedly faint or dotsin the printed image are missing, you may be able to solvethese problems by cleaning the print head, which ensures thatthe nozzles are delivering ink properly.
You can clean the print head from your computer using theHead Cleaning utility in the printer software.
If you are using DOS or you cannot clean the print head withthis utility, you can use the printer’s control panel instead. Formore details, see “Cleaning the Print Head” in Appendix A.
Note:❑ Print head cleaning uses ink. To avoid wasting ink, clean the
print head only if print quality declines.
❑ Use the Nozzle Check utility to confirm that the print head needsto be cleaned.
❑ When the B black or A color ink out light is flashing or on, youcannot clean the print head. Replace the appropriate ink cartridgefirst.
❑ Do not start the Head Cleaning or Nozzle Check utility whileprinting is in progress; otherwise your printout may be marred.
To clean the print head, follow these steps:
For Windows users:
1. Make sure that the printer is on, and the B and A ink outlights are off.
Note:The print head cannot be cleaned if the B or A ink out light isflashing or on. Replace the ink cartridges as needed beforeproceeding.
L Fiji2 Ref. Guide Rev.bA5 size Chapter 805-29-97 DR, pass 0
8-26 Troubleshooting

2. Access the printer driver setting menu as described inChapter 4.
3. Click the Utility tab, then click the Head Cleaning button.
4. Follow the on-screen messages.
The P power light flashes while the printer performs thecleaning cycle. This operation takes about two minutes tocomplete.
cCaution:Never turn off the printer while the P power light isflashing. Doing so may damage the printer.
5. When the P power light stops flashing, click Print nozzlecheck pattern in the Head Cleaning dialog box and usethe pattern to confirm that the head is clean and to reset thecleaning cycle.
Nozzle check pattern:
The above sample is in black and white, but the actual check pattern prints in color.
In the check pattern, if you find that any segments are missingfrom the test lines, you may need to repeat the head cleaningand print the nozzle check pattern again.
If print quality hasn’t improved after repeating this procedurefour or five times, follow the recommendations listed in thischapter. If the print quality still has not improved, contact yourdealer.
8
Tro
uble
shoo
ting
RFiji2 Ref. Guide Rev.bA5 size Chapter 805-29-97 DR, pass 0
Troubleshooting 8-27

For Macintosh users:
1. Make sure that the printer is on, and the B and A ink outlights are off.
Note:The print head cannot be cleaned if the B or A ink out light isflashing or on. Replace the ink cartridges as needed beforeproceeding.
2. Choose Utility from the Print dialog box.
3. Click the Head Cleaning button.
4. Follow the on-screen messages.
The P power light flashes while the printer performs thecleaning cycle. This operation takes about two minutes tocomplete.
cCaution:Never turn off the printer while P power light is flashing.Doing so may damage the printer.
5. When the P power light stops flashing, click theConfirmation button in the Head Cleaning dialog box toprint a nozzle check pattern and to reset the cleaning cycle.Use the check pattern to confirm the head is clean. See page8-27 to see a sample of the nozzle check pattern.
In the check pattern, if you find that any segments are missingfrom the test lines, you may need to repeat the head cleaningand print the nozzle check pattern again. If print quality hasn’timproved after repeating this procedure four or five times, tryother recommendations listed in this chapter. If the printquality still has not improved, contact your dealer.
L Fiji2 Ref. Guide Rev.bA5 size Chapter 805-29-97 DR, pass 0
8-28 Troubleshooting

Aligning the Print Head
If you notice a misalignment of vertical lines, you may be ableto solve these problems from your computer using the PrintHead Alignment utility in the printer software.
If you are using DOS or you cannot align the print head withthis utility, see Appendix A.
Note:Do not start the Print Head Alignment utility while printing is inprogress; otherwise your printout may be marred.
For Windows users:
1. Make sure paper is loaded in the sheet feeder.
cCaution:Use paper at least 210 mm (8.27 inches) wide; forexample, A4 size paper loaded short edge first. Otherwise,the print head will spray ink directly onto the platen,which could mar future printouts.
2. Access the Utility menu as described in Chapter 4.
3. Click the Print Head Alignment button.
4. Follow the messages on your screen to align the print head.
8
Tro
uble
shoo
ting
RFiji2 Ref. Guide Rev.bA5 size Chapter 805-29-97 DR, pass 0
Troubleshooting 8-29

For Macintosh users:
1. Make sure paper is loaded in the sheet feeder.
cCaution:Use paper at least 210 mm (8.27 inches) wide; for example,A4 size paper loaded short edge first. Otherwise, the printhead will spray ink directly onto the platen. This maycause any documents you print afterwards to be smeared.
2. Choose Utility from the Print dialog box.
3. Click the Print Head Alignment button.
4. Follow the messages on your screen to align the print head.
Ink Cartridge Problems
If output quality does not improve even after cleaning andaligning the print head, you may need to replace one or both ofthe ink cartridges.
To replace an ink cartridge while the B and A ink out lights areoff, follow these steps.
If the H or I ink out light is flashing or is on, replace the emptyink cartridge as described in “Replacing an Ink Cartridge” onpage x-xx.
cCaution:❑ Once you remove an ink cartridge it becomes unusable and
cannot be reinstall even if ink remains.
❑ Leave the old cartridge installed in the printer until youare ready to replace it with a new one.
1. Make sure the printer is on. The P power light should be on,but not flashing.
L Fiji2 Ref. Guide Rev.bA5 size Chapter 805-29-97 DR, pass 0
8-30 Troubleshooting

2. Lower the output tray at the front of the printer; then openthe printer cover.
3. Hold down the E load/eject button for three seconds. Theprint head moves to the replacement position. The P powerlight begins flashing.
cCaution:Do not move the print head by hand. Always use the Eload/eject button to move it. Otherwise you may damagethe printer.
Note:The printer automatically moves the print head back to its home(far right) position after 60 seconds if you have not started thereplacement procedure.
4. Lift up the clamp that holds the cartridge you want toreplace. When you do, the cartridge rises partly out of thecartridge holder. For color ink cartridge replacement, liftup the larger clamp on the right. For black ink cartridgereplacement, lift up the smaller clamp on the left.
new6
8
Tro
uble
shoo
ting
RFiji2 Ref. Guide Rev.bA5 size Chapter 805-29-97 DR, pass 0
Troubleshooting 8-31

5. Lift the cartridge out of the printer and dispose of it properly.Do not take the used cartridge apart or try to refill it.
wWarning:If ink gets on your hands, wash them thoroughly with soapand water. If ink gets into your eyes, flush themimmediately with water.
6. Remove the ink cartridge from its protective bag. Next,remove only the yellow tape seal from the cartridge asshown below.
cCaution:❑ You must remove the yellow tape seal from the
cartridge. Leaving the tape on when you install thecartridge will permanently damage it.
❑ Do not remove the tape seal from the bottom of thecartridge; otherwise, ink will leak.
7. Lower the ink cartridge into the cartridge holder with the label on the cartridge face up and the arrow on thecartridge pointing to the rear of the printer.
black S020093 color S020089
36
L Fiji2 Ref. Guide Rev.bA5 size Chapter 805-29-97 DR, pass 0
8-32 Troubleshooting

8. Press the ink cartridge clamp down until it locks in place. The following illustration shows color ink replacement. Forblack ink replacement, press down the smaller clamp onthe left.
cCaution:Once you install the cartridges, do not open their clampsagain until you replace the ink cartridges. Otherwise, thecartridges may become unusable.
9. Press the E load/eject button then close the printer cover. The printer moves the print head and begins charging theink delivery system. This operation takes about twominutes to complete.
When the ink charging process is finished, the printer returns the print head to its home position and the P powerlight stops flashing.
cCaution: The P power light continues to flash while the printerperforms the ink charging operation. Never turn off theprinter while this light is flashing. Doing so can result inincomplete charging of ink.
Even if you do not press the E load/eject button, the printermoves the print head and begins the ink charging processabout 60 seconds after you replace the cartridge.
e27-2
8
Tro
uble
shoo
ting
RFiji2 Ref. Guide Rev.bA5 size Chapter 805-29-97 DR, pass 0
Troubleshooting 8-33

Contacting Customer Support
If your printer is not operating properly and you cannot solveyour problem with the troubleshooting information in thisguide, online help, and EPSON Answers, contact customersupport services for assistance.
We will be able to help you much more quickly if you are ableto give the exact information indicated below.
Serial number of your printer:(The serial number label is on the back of the printer.)
Printer model:
Brand and model of your computer:
Printer software version:(Click About on the printer driver’s Main menu.)
Version of Windows (95, 3.1, etc.) you are using now:
Version of software applications you normally use with your printer:
For United Kingdom and the Republic of Ireland users
If you purchased your printer in the UK or the Republic ofIreland, Epson (UK) Limited provides a range of customerservices and technical support.
Note:For customers in the Republic of Ireland, please use the correct dialingcodes when dialing the UK telephone numbers listed in the followingsections. For example the Enquiry Desk fax number, 01442 227271,should be dialed as 0044 1442 227271 from the Republic of Ireland.
L Fiji2 Ref. Guide Rev.bA5 size Chapter 805-29-97 DR, pass 0
8-34 Troubleshooting

Enquiry Desk
The enquiry desk team can be contacted by calling 0800 220546in the UK or 1 800 409132 from the Republic of Ireland, byfaxing 01442 227271, and via the Internet at [email protected] can provide the following information:
❑ Information and literature on new EPSON products (alsoavailable from Faxon Epson)
❑ Where to purchase genuine EPSON consumables,accessories and options
Customer Support
Our Customer Support team can provide the following services:
❑ Technical information on installing, configuring, andoperating your EPSON products
❑ Arranging for faulty EPSON products to be repaired withinthe warranty period
For information on contacting our Customer Support team,please see the Service and Support Information booklet thatcame with your EPSON product.
If this booklet is not available, details can be found on FaxonEpson faxback service, EPtec Bulletin Board Service or onEPSON’s World Wide Web site. See below for details.
8
Tro
uble
shoo
ting
RFiji2 Ref. Guide Rev.bA5 size Chapter 805-29-97 DR, pass 0
Troubleshooting 8-35

Faxon Epson
Contact Faxon Epson faxback service for:
❑ Literature and specifications on the latest EPSON products
❑ Support information including troubleshooting tips, switchsettings and driver information
To use Faxon Epson, call 01442 227332 using a touch-tonephone. You will be asked to follow a simple routine to registeryour document request, and once you have entered yourtelephone and fax numbers, Faxon Epson will fax a copy of thedocument catalogue to your fax machine.
When you have found the documents that you need in thecatalogue, call Faxon Epson again and enter the document IDnumbers. The documents will be faxed to you automatically.
EPtec - Bulletin Board Service
Call the Epson Bulletin Board Service on 01442 227479 for thelatest drivers and utilities. No membership is required. Makesure that your communications software is set to 8 data bits, 1stop bit, no parity bit, ANSI terminal mode emulation and amodem speed of up to 28.8 Kbps. Downloading protocolssupported include Xmodem, Ymodem and Zmodem. See thedocumentation that came with your communications softwareand modem for more information.
When you first connect to the Bulletin Board Service, you willbe asked for your name, company name, phone number and apassword (which you can invent yourself).
L Fiji2 Ref. Guide Rev.bA5 size Chapter 805-29-97 DR, pass 0
8-36 Troubleshooting

World Wide Web
If you can connect to the Internet and have a Web Browser, you can access EPSON’s World Wide Web site athttp://www.epson.com. Here you will find information on thelatest EPSON products, software drivers, and answers tofrequently asked questions.
For Australian users
EPSON Australia wishes to provide you with a high level ofCustomer Service. As well as this User’s Guide, we provide thefollowing sources for obtaining information:
EPSON FAXBACK
EPSON FAXBACK will fax you the latest specifications andpricing for most EPSON products offered in Australia. There is also technical information including details of the latestsoftware and drivers available. Phone (02) 9903 9075 and thesystem will guide you through a number of choices beforefaxing the information to your fax machine.
EPSON Bulletin Board System
This is where you can download the latest software anddrivers. Visit the BBS to check out the latest versions. If youhave a modem, phone (02) 9417 5090.
Internet URL http://www.epson.com.au
Access the EPSON Australia World Wide Web pages. Worthtaking your modem here for the occasional surf! You can getthe same information as offered on the EPSON FAXBACK andthe EPSON Bulletin Board plus more.
8
Tro
uble
shoo
ting
RFiji2 Ref. Guide Rev.bA5 size Chapter 805-29-97 DR, pass 0
Troubleshooting 8-37

Your Dealer
Don’t forget that your dealer can often help identify andresolve problems. The dealer should always be the first call foradvice on problems. They can often solve problems quickly andeasily as well as give you advice on the next step to take.
EPSON Helpdesk
EPSON Helpdesk is provided as a final backup to make sureour clients have access to advice. Operators on the Helpdeskcan aid you in diagnosing hardware and software problems.They can also advise you on the latest EPSON products andwhere the nearest dealer or service agent is located. Many typesof queries are answered here.
Access to the Helpdesk is at no charge to purchasers of newproducts for the first 12 months of that product’s life. After thatperiod, a different phone number is used and charges aredebited to your telephone account. The current charge rates arespecified when you ring the chargeable support number. Youare asked to signify your acceptance before any charges areincurred.
The Helpdesk numbers are:
first 12 months (02) 9903 9040after 12 months 1 902 263 192fax number (02) 9903 9189
We encourage you to have all the relevant information on handwhen you ring. The more information you prepare, the fasterwe can help solve the problem. This information includes theuser’s guide for your EPSON product, type of computer,operating system, application programs, and any otherinformation you feel is required.
L Fiji2 Ref. Guide Rev.bA5 size Chapter 805-29-97 DR, pass 0
8-38 Troubleshooting

For Hong Kong and Singapore users
Contact the phone or fax number shown below for your area:
Hong Kong
Phone: 2585 4300Fax: 2827 7083
Singapore
Phone: 3377911Fax: 3341185
Internet home page
EPSON Hong Kong has established a local home page in bothChinese and English on the Internet to provide users with thefollowing information:
❑ Product information
❑ Answers to Frequently Asked Questions (FAQs)
❑ Latest versions of EPSON printer drivers
Users can access our World Wide Web home page at:http://www.epson.com.hk.
8
Tro
uble
shoo
ting
RFiji2 Ref. Guide Rev.bA5 size Chapter 805-29-97 DR, pass 0
Troubleshooting 8-39

Electronic bulletin board system
An electronic bulletin board system (BBS) is also available toobtain printer information and the latest versions of printerdrivers. You can log on to the following number for the BBSservice:
BBS: (852) 2827-4244
Technical Support Hotline
You can also contact our technical staff at the followingtelephone and fax numbers:
Phone: (852) 2585-4399Fax: (852) 2827-4383
For Philippines users
To obtain technical support as well as other after sales services,users are welcome to contact the EPSON PhilippinesRepresentative Office at the telephone and fax numbers below:
Phone: (632) 813-6552Fax: (632) 813-6545BBS: (632) 814-0595
L Fiji2 Ref. Guide Rev.bA5 size Chapter 805-29-97 DR, pass 0
8-40 Troubleshooting

Appendix AUsing the Printer with DOS
Proof Sign-off:Ishizaka _______Norum _______Keith _______Grady _______
Installing the Printer Software for DOS Programs . . . . . . . A-2
Using Built-in Fonts and Character Tables . . . . . . . . . . . . A-3Fonts . . . . . . . . . . . . . . . . . . . . . . . . . . . . . . . A-4
Cleaning the Print Head . . . . . . . . . . . . . . . . . . . . . . A-6
Aligning the Print Head . . . . . . . . . . . . . . . . . . . . . . A-7
Using Power-On Functions . . . . . . . . . . . . . . . . . . . . A-8 A
RFiji2 Ref. Guide Rev.bA5 size Appendix A05-20-97 DR, pass 0
Using the Printer with DOS A-1

Installing the Printer Software for DOS Programs
Most DOS software programs include software for EPSON ESC/P 2printers. You need to select the correct printer software to take advantageof your printer’s advanced built-in scalable fonts and graphics handling.
Most DOS programs require you to select from a list of printers to installthe printer software. If your printer is not included in the list, contact yoursoftware manufacturer to obtain updated software.
If your printer software is not available, pick the first printer available inthe list below.
When printing black only:
LQ-870/1170LQ-570 (+)/1070(+)SQ-870/1070LQ-850LQ-500
When printing black and color:
EPSON Stylus PROEPSON Stylus COLOR 500EPSON Stylus COLOR IILQ-860LQ-2550
Note:The drivers for the printers listed above do not provide all EPSON StylusCOLOR 600 features, such as 720-dpi printing, 1440-dpi printing andMicroWeave.
DOS software varies greatly. See the printing section of your softwaremanual for information on accessing the printer driver settings.
L Fiji2 Ref. Guide Rev.bA5 size Appendix A05-20-97 DR, pass 0
A-2 Using the Printer with DOS

Using Built-in Fonts and Character Tables
Your printer has eight built-in fonts and eleven character tables that youcan select using the printer’s default-setting mode as described below.The settings you choose take effect each time you turn on the printer.Available fonts are listed in the next section. For available charactertables, see Appendix C.
Note:Font and character table selections you make with your software override thesettings you make using the default-setting mode. For best results, use yoursoftware to make these settings.
To change the default font or character table, follow these steps:
1. Make sure the printer is turned off and paper is loaded in the sheetfeeder.
Note:Use paper at least A4 (210 mm/8.27 inches) size or wider. Otherwise, theprint heads will spray ink directly onto the platen, which could mar futureprintouts.
2. Hold down the R cleaning button and turn on the printer to enter thedefault-setting mode.
The printer loads a sheet of paper and prints a brief summary andinstructions. It instructs you to select the language that you wantmessages printed in (English, French, German, Italian, or Spanish).
3. Press the R cleaning button until the following lights indicate thelanguage of your choice:
LanguageS B A
English N O O
French O N O
German N N O
Italian O O N
Spanish N O N
N = On, O = Off
A
RFiji2 Ref. Guide Rev.bA5 size Appendix A05-20-97 DR, pass 0
Using the Printer with DOS A-3

4. Press the E load/eject button to print the current default font andcharacter table and the next instructions in the language you selected.The printed instructions list all of the fonts and character tables youcan select and show you how the control panel lights appear for eachselection. Use the instruction sheets to change the settings from thecontrol panel.
5. After making your changes, exit the default-setting mode by turning offthe printer.
Note:❑ You may exit the default-setting mode any time by turning off the printer.
Any changes you have made remain in effect until you change them again.
❑ If you want to check the current default font and character table, enter thedefault-setting mode again and print the current settings. The currentsettings are indicated with arrows.
Fonts
Your printer has eight built-in character fonts including two EPSON fonts:EPSON Roman T and EPSON Sans Serif H. (Roman T is similar to theTimes font; Sans Serif H is similar to Helvetica. )
The table below shows the available fonts.
Fonts Sample
EPSON Courier
EPSON Roman T
EPSON Sans Serif H
EPSON Roman
EPSON Sans Serif
EPSON Prestige
EPSON Script
Draft
L Fiji2 Ref. Guide Rev.bA5 size Appendix A05-20-97 DR, pass 0
A-4 Using the Printer with DOS

Note:❑ Roman T and Sans Serif H fonts are available in proportional spacing only.
❑ Some of the character tables might not be able to print with EPSON Roman T and EPSON Sans Serif H fonts. In these cases, selected charactertables are printed with EPSON Roman.
Scalable fonts The size of the Roman, Sans Serif, Roman T, and Sans Serif H fonts can beselected from 8 to 32 points in 2-point increments through your softwareor by sending an ESC/P 2 command. See the documentation that camewith your software for information on selecting the size of scalable fonts.
EPSONRoman
EPSONRoman T
EPSONSans Serif
EPSONSans Serif H
scalable sample
A
RFiji2 Ref. Guide Rev.bA5 size Appendix A05-20-97 DR, pass 0
Using the Printer with DOS A-5

Cleaning the Print Head
If print quality diminishes, use the printer’s built-in print head cleaningcycle to ensure that the nozzles are delivering ink properly.
To avoid wasting ink, clean the print head only if print quality declines.
1. Make sure that the printer is on and the B and A ink out lights are off.
Note:The print head cannot be cleaned if the B or A ink out light is flashing or on.Replace the ink cartridges as needed before proceeding.
2. Press the R cleaning button for three seconds. The P power lightbegins flashing, and the printer ejects any paper in the paper pathand starts cleaning the print head. This operation takes about twominutes to complete.
cCaution:Never turn off the printer while the P power light is flashing. Doing somay damage the printer.
3. After the P power light stops flashing, print a few lines to confirm thatthe head is clean and to reset the cleaning cycle.
If you entered the print head cleaning mode while the printer wasprinting a document, the printer feeds paper and resumes printingautomatically.
If the print quality does not improve, repeat step 2, then print a few linesto check the output. If print quality hasn’t improved after repeating thisprocedure four or five times, see Chapter 8, “Troubleshooting.” If theprint quality still has not improved after following the recommendationslisted in Chapter 8, contact your dealer.
L Fiji2 Ref. Guide Rev.bA5 size Appendix A05-20-97 DR, pass 0
A-6 Using the Printer with DOS

Aligning the Print Head
When you find that the printed image is fuzzy or the vertical lines in yourprintout are not properly aligned, you may need to align the print headwith the EPSON Print Head Alignment Utility. This utility aligns the printhead to print images clearly. You may need to align the print head whenyou transport the printer or move it to a different environment.
To install this utility on your hard drive, insert the EPSON PrinterSoftware CD-ROM into your CD-ROM drive and then type D:\SETUP atthe DOS prompt. (If your CD-ROM driver has a different drive letter, or ifyou are using the floppy version, substitute it for D:\.) Follow thedirections on the screen. After running the setup program, change to thedrive and directory that contains the utility (or set the path to thedirectory). Then type EPCALIB and press Enter. The following windowappears:
Make sure your printer is selected. Click Next, then follow the directionson the screen.
Note: This utility is designed to be run in DOS with or without a mouse.
calib01
A
RFiji2 Ref. Guide Rev.bA5 size Appendix A05-20-97 DR, pass 0
Using the Printer with DOS A-7

Using Power-On Functions
The functions below (in italics) are available if you hold down thecorresponding control panel buttons while turning on the printer:
Printer operation check = E load/eject button
Prints test pages including a nozzle check pattern, the version of yourprinter’s ROM, and an ink counter code. See page 8-4 for more details.
Default setting = R cleaning button
Enters the default-setting mode. You can change the printer’s default fontand character table. See “Using Built-in Fonts and Character Tables” onpage A-3.
L Fiji2 Ref. Guide Rev.bA5 size Appendix A05-20-97 DR, pass 0
A-8 Using the Printer with DOS

Appendix BTips for Color Printing
Proof Sign-off:Ishizaka _______Nomoto _______Keith _______Grady _______
Basics of Color . . . . . . . . . . . . . . . . . . . . . . . . . . . . B-2
Image Resolution and Image Size . . . . . . . . . . . . . . . . . B-5
Basics of Color Documents . . . . . . . . . . . . . . . . . . . . . B-7
B
RFiji2 Ref.Rev. bA5 size Appendix B05-20-97 DR, pass 0
Tips for Color Printing B-1

Basics of Color
This section describes the basic properties of color, the relationshipsbetween colors, and how to use color to improve the quality of yourprinted documents.
Properties of colorColor is composed of three properties: Hue, Saturation, and Brightness.
Hue The name of the color, such as red, blue, or violet. The circle that represents the relationship between all hues is called the hue circle.
Saturation The vividness of the color. This represents the amount of gray in proportion to the hue.
Brightness The relative lightness or darkness of the color.
The method for representing these properties is called the Munsellrenotation color system. The hue circle and the Munsell renotation colorsystem are useful to understand the properties of color. See also the ColorGuide.
Synchronizing monitor colors and printer colorsYour printer produces images by printing tiny patterns of ink dots onpaper. It uses the colors cyan (C), magenta (M), yellow (Y), and black (K)to create a blending effect that makes you think you are seeing millions ofcolors. This type of color, produced by pigments that absorb some colorsof light and reflect others, is called subtractive.
Note:In theory, pure cyan, magenta, and yellow should produce black, but actually theyproduce a muddy brown and must be combined with black ink to produce a trueblack (K).
Your monitor produces images by illuminating color phosphors on thescreen with an electron gun. (A phosphor is a substance that gives offlight when irradiated.) Each screen point (pixel) has three coloredphosphors: red (R), green (G), and blue (B).
L Fiji2 Ref.Rev. bA5 size Appendix B05-20-97 DR, pass 0
B-2 Tips for Color Printing

Since the printer and monitor produce color images differently, and alsothe available range of color produced by the monitor and printer aredifferent, the image on the screen does not exactly match your printedoutput all of the time. If you want to adjust, or calibrate, the printed colorto more closely match the on-screen color, you may have to experimentwith the printer driver settings.
Additionally, color management software is available from a variety ofsoftware and monitor companies to help you match colors produced byyour monitor and printer. See your image-editing software user’s guidefor information on color matching.
The range of colors that can be displayed:
Note:When printing a scanned image, you may find it more difficult to match colors.Because scanners create the original image data using CMYK, the data format ofyour image will be changed twice.
monitor colors printer colors
4-1, 4-2a
printer
monitor
4-3
B
RFiji2 Ref.Rev. bA5 size Appendix B05-20-97 DR, pass 0
Tips for Color Printing B-3

Process of color printingA printer produces color images by printing tiny patterns of ink dotsusing CMYK colors as mentioned in the previous section. Because mostink jet printers are not able to print different gradations of the threeprimary colors, they must use a halftoning method in order to representmillions of colors or the gradation of colors as follows:
Dithering and error diffusion are the most commonly used halftoningmethods.
DitheringDithering uniformly aligns individual dots of different colored inks tocreate the appearance of neutral colors. This method is suitable forprinting documents that contain large areas of solid color, such as barcharts and graphs.
Error diffusionError diffusion randomly places individual dots of different colors tocreate the appearance of neutral colors. By randomly placing dots, theprinter can achieve excellent colors and subtle color gradation. Thismethod is suited for printing documents that contain finely detailedgraphics or photographic images.
4-4
L Fiji2 Ref.Rev. bA5 size Appendix B05-20-97 DR, pass 0
B-4 Tips for Color Printing

Image Resolution and Image Size
The resolution of your original image affects the quality of your printouts.Generally, the higher the resolution, the better the print quality. However,keep in mind that the higher the resolution, the longer the wait forprocessing and printing a document.
Generally, the printed image size is in inverse proportion to the imageresolution, as shown below. The larger the image size, the lower theimage resolution. Conversely, the smaller the image size, the higher theimage resolution.
Note:Some applications have a function that can correct this relationship.
300 pixel
225 pixel
300 dpi
225 pixel
300 pixel
150 dpi
4-5aa
B
RFiji2 Ref.Rev. bA5 size Appendix B05-20-97 DR, pass 0
Tips for Color Printing B-5

Since increasing the image size means decreasing the image resolution,you must take care that print quality or color tone is not degraded whenworking with images pasted into documents created with wordprocessing software. To avoid print quality and color tone problems,change the size and the resolution of the image in your graphicsapplication before pasting it into your document.
400 pixel
292 pixel
300 dpi
72 pixel
100 pixel
75 dpi
4-5bb
L Fiji2 Ref.Rev. bA5 size Appendix B05-20-97 DR, pass 0
B-6 Tips for Color Printing

Basics of Color Documents
To help you use color to maximize your document’s impact on its readers,determine the who, what, when, where, why, and how of color printing.
Know WHO your readers are and WHAT your purpose isYour documents are intended to communicate information, opinions, orfeelings to one or more people and also to get results. Therefore, first youneed to think about who is going to see your work: customer, co-worker,or other; and what your purpose is: to advise, sell, propose, and so on.
For example:A marketing proposal with generous quantities of bright, fluorescent colors mightfail to impress a conservative accounting firm, yet win over a music videocompany.
Know WHEN to use colorWhile color can enhance any document, you need to decide when colorhelps expand understanding of your message and when it distracts thereader. Sometimes a serious business message is best delivered withoutadditional colors. (Remember that white and black are colors, too.)
For example:A job offer letter to a prospective employee works best in black and white, while alist of safety rules benefits from attention-getting color.
Decide WHERE color will most benefit your documentIf you use color on every page or all over a page, you may lose not onlythe impact of color, but also the clarity and readability of your work.When used consistently and strategically, color breaks up the monotonyof black-and-white text reading.
Note:❑ Avoid placing too many color pictures, tables, or icons on a page.
❑ Size your color images so that they do not overpower text or graphics.
❑ Avoid using too much colored text. It is more difficult to read thanblack-on-white or white-on-black text.
B
RFiji2 Ref.Rev. bA5 size Appendix B05-20-97 DR, pass 0
Tips for Color Printing B-7

Know WHY you are using colorColor adds interest and clarity, and makes documents appear easier tounderstand. Just as you use fonts and graphics to create appeal andcapture attention, color provides an additional visual interpretation of adocument that influences the reader.
For example:An overhead presentation of sales results by territory is far more interesting andmemorable if you show the figures with colored charts and graphs.
Know How to select colors
❑ Use just one hue in the hue circle to makeyour document unified. Modify saturationor brightness to add interest.
❑ Use contrasting hues to make your workmore eye-catching.
❑ Use of complementary colors in documentsis generally not recommended.
❑ Determine a rule for using color throughout the document.
Note:See the Color Guide for the hue circle.
4-64-74-8
L Fiji2 Ref.Rev. bA5 size Appendix B05-20-97 DR, pass 0
B-8 Tips for Color Printing

Appendix CSpecifications
Proof Sign-off:Ishizaka _______Norum _______Keith _______Grady _______
Technical Specifications . . . . . . . . . . . . . . . . . . . . . . C-2Printing . . . . . . . . . . . . . . . . . . . . . . . . . . . . . . C-2Paper . . . . . . . . . . . . . . . . . . . . . . . . . . . . . . . C-4Ink cartridges . . . . . . . . . . . . . . . . . . . . . . . . . . C-7Mechanical . . . . . . . . . . . . . . . . . . . . . . . . . . . . C-8Electrical . . . . . . . . . . . . . . . . . . . . . . . . . . . . . C-8Environmental . . . . . . . . . . . . . . . . . . . . . . . . . . C-9Initialization . . . . . . . . . . . . . . . . . . . . . . . . . . . C-9Default settings . . . . . . . . . . . . . . . . . . . . . . . . . C-10Safety approvals . . . . . . . . . . . . . . . . . . . . . . . . . C-11
Interface Specifications . . . . . . . . . . . . . . . . . . . . . . . C-12Parallel interface . . . . . . . . . . . . . . . . . . . . . . . . . C-12Serial interface . . . . . . . . . . . . . . . . . . . . . . . . . . C-13
ESC/P 2 Control Codes . . . . . . . . . . . . . . . . . . . . . . . C-14
Character Tables . . . . . . . . . . . . . . . . . . . . . . . . . . . C-15International character sets . . . . . . . . . . . . . . . . . . . C-19Characters available with ESC ( ^ command . . . . . . . . C-20
C
RFiji2 Ref. Guide Rev.bA5 size Appendix c05-29-97 DR, pass 0
Specifications C-1

Technical Specifications
Printing
Printing method: On-demand ink jet
Nozzle configuration: Monochrome (black) 64 nozzles (32 × 2 staggered)Color 32 nozzles × 3 (cyan, magenta, yellow)
Printable columns and printing speeds:
Character mode:
Character pitch(characters per inch)
Printingcolumn
Draft speed LQ printingspeed
10 80 400 cps 200 cps
12 96 480 cps 240 cps
15 120 600 cps 300 cps
17 (10 condensed) 137 684 cps 342 cps
20 (12 condensed) 160 800 cps 400 cps
cps stands for characters per second.
Raster graphics mode:
Print quality Printablearea
Available dots
CR speed
180 dpi 8.26 inches 1488 20 ips
360 dpi 8.26 inches 2976 20 ips
720 dpi 8.26 inches 5952 20 ips
ips stands for inches per second.
L Fiji2 Ref. Guide Rev.bA5 size Appendix c05-29-97 DR, pass 0
C-2 Specifications

Resolution: Maximum 1440 dpi × 720 dpi
Print direction: Bidirectional with logic seeking for text andgraphics. (Auto print direction can be set inthe default-setting mode.)
Control code: ESC/P 2 and expanded raster graphics code
Line spacing: 1/6 inch, 1/8 inch, or programmable in1/360-inch increments
Paper feed speed: 66.6 milliseconds per 1/6-inch line
Input buffer: 32KB
Bitmap fonts:
Font 10 cpi 12 cpi 15 cpi Proportional
EPSON Roman N N N N
EPSON Sans Serif N N N N
EPSON Courier N N N —
EPSON Prestige N N N —
EPSON Script N N N —
Select other font/pitch combinations using ESC/P 2 commands.See the Command List later in this appendix.
Scalable fonts:
Font Minimumpoint size
Maximumpoint size
Increments
EPSON Roman 8 32 2
EPSON Sans Serif 8 32 2
EPSON Roman T 8 32 2
EPSON Sans Serif H 8 32 2
Each font has four variations: normal, bold, italic, and bold italic.
Character tables: 1 italic and 10 graphics character tables
Character sets: 14 international character sets and 1 legalcharacter set
C
RFiji2 Ref. Guide Rev.bA5 size Appendix c05-29-97 DR, pass 0
Specifications C-3

Paper
Note:Since the quality of any particular brand or type of paper may be changed by themanufacturer at any time, EPSON cannot attest to the quality of anynon-EPSON brand or type of paper. Always test samples of paper stock beforepurchasing large quantities or printing large jobs.
Single sheets:
Size A4 (210 mm × 297 mm)A5 (148 mm × 210 mm)B5 (182 mm × 257 mm)Letter (216 mm × 279 mm) Legal (216 mm × 356 mm) Half Letter (139.7 mm × 215.9 mm)Executive (184.2 mm × 266.7 mm)
Paper types Plain bond paper, special papersdistributed by EPSON
Thickness 0.08 mm to 0.11 mm (0.003 to 0.004 inch)
Weight 64 g/m2 (17 lb) to 90 g/m2 (24 lb)
Transparencies, glossy film, glossy paper:
Size A4 (210 mm × 297 mm)Letter (216 mm × 279 mm)A6 (105 mm × 148 mm)*
*Glossy film only
Paper types Special papers distributed by EPSON
Self Adhesive sheets:
Size A4 (210 mm × 297 mm)
Paper types Special paper distributed by EPSON
Photo paper
Size 4 × 6" (102 mm × 152 mm)
Paper types Special papers distributed by EPSON
L Fiji2 Ref. Guide Rev.bA5 size Appendix c05-29-97 DR, pass 0
C-4 Specifications

Envelopes:
Size No. 10 (240 mm × 104 mm) DL (220 mm × 110 mm) C6 (114 mm × 162 mm)
Paper types Plain bond paper, air mail
Thickness 0.16 mm to 0.43 mm (0.006 to 0.017 inch)
Weight 45 g/m2 (12 lb) to 75 g/m2 (20 lb)
Index cards:
Size A6 (105 mm × 148 mm)5 × 8 inches (127 mm × 203 mm)10 × 8 inches (254 mm × 203 mm)
Paper types Special papers distributed by EPSON
Thickness 0.23 mm (0.0091 inch)
Weight 188 g/m2
Note: ❑ Poor quality paper may reduce print quality and cause paper jams and other
problems. If you encounter problems, switch to a higher grade of paper.
❑ Do not load curled or folded paper.
❑ Ink jet paper, envelopes, glossy film, glossy paper, and transparencies areonly usable under normal conditions:
Temperature 15 to 25°C (59 to 77°F)Humidity 40 to 60% RH
❑ EPSON Photo Quality Glossy Paper and Photo Quality Self AdhesiveSheets should be stored under the following conditions:
Temperature 15 to 30°C (59 to 86°F)Humidity 20 to 60% RH
C
RFiji2 Ref. Guide Rev.bA5 size Appendix c05-29-97 DR, pass 0
Specifications C-5

Printable area:
Single sheets/index cards
Envelopes
A: The minimum top margin is 3.0 mm (0.12 inch).
When loading multiple sheets of EPSON Photo Quality Film, theminimum top margin is 30 mm (1.2 inches).
B: The minimum left margin is 3.0 mm (0.12 inch).
The minimum right margin for single sheet paper is 3.0 mm (0.12 inch)except for letter and legal size paper. The minimum right margin forletter and legal size paper is 9.0 mm (0.35 inch).
The minimum right margin for envelopes is as follows:7 mm (0.28 inch) for DL envelopes.28 mm (1.10 inches) for No. 10 envelopes.3 mm (0.12 inch) for C6 envelopes.
C: The minimum bottom margin is 14.0 mm (0.54 inch).
Note:Always load paper into the sheet feeder short edge first. However, envelopesshould be loaded long edge first.
A
B-L
B-R
C
a-1
C
B-R
A
B-La-2
L Fiji2 Ref. Guide Rev.bA5 size Appendix c05-29-97 DR, pass 0
C-6 Specifications

Ink cartridges
Black ink cartridge (S020093):
Color Black
Print capacity* 540 pages/A4 (ISO/IEC 10561 LetterPattern at 360 dpi)
Cartridge life 2 years from production date if unopened;6 months if opened at 25°C (77°F)
Temperature Storage: -20 to 40°C (-4 to 104°F)1 month at 40°C (104°F)
Transit: -30 to 60°C (-22 to 140°F)1 month at 40°C (104°F)120 hours at 60°C (140°F)
Freezing:** -16°C (3.2°F)
Dimensions 19.8 mm (W) × 52.7 mm (D) × 38.5 mm (H)
Color ink cartridge (S020089):
Colors Cyan, Magenta, and Yellow
Print capacity* 300 pages (A4, 360 dpi, 5% duty each color)
Cartridge life 2 years from production date if unopened;6 months if opened at 25°C (77°F)
Temperature Storage: -20 to 40°C (-4 to 104°F) 1 month at 40°C (104°F)
Transit: -30 to 60°C (-22 to 140°F) 1 month at 40°C (104°F)120 hours at 60°C (140°F)
Freezing:** -18°C (-0.4°F)
Dimensions 42.9 mm (W) × 52.7 mm (D) × 38.5 mm (H)
* The print capacity may vary depending on how often you use the print head cleaning function.** It thaws and is usable after approximately 3 hours at 25°C (77°F).
cCaution:❑ EPSON recommends the use of genuine EPSON ink cartridges.
Other products not manufactured by EPSON may cause damage toyour printer not covered by EPSON’s warranties.
❑ Do not use an ink cartridge if the date on the package has expired.
C
RFiji2 Ref. Guide Rev.bA5 size Appendix c05-29-97 DR, pass 0
Specifications C-7

Mechanical
Paper feed method: Friction
Paper path: Sheet feeder, rear entry
Sheet feeder capacity: 100 sheets at 64 g/m2 (17 lb) paper
Total print volume: 75,000 pages (A4, Text)
Dimensions: StorageWidth: 429 mm (16.9 inches) Depth: 275 mm (10.8 inches) Height: 168 mm (6.6 inches)
Printing (standard)Width: 429 mm (16.9 inches) Depth: 613 mm (24.1 inches) Height: 309 mm (12.2 inches)
Printing (on transparencies)Width: 429 mm (16.9 inches) Depth: 695 mm (27.4 inches) Height: 196 mm (7.7 inches)
Weight: 5.2 kg (11.5 pounds) without the inkcartridges
Electrical
120V Model 220−240V Model
Input voltage range 103.5 to 132V 198 to 264V
Rated frequency range 50 to 60 Hz
Input frequency range 49.5 to 60.5 Hz
Rated current 0.4A 0.2A
Power consumption Approx. 15W (ISO/IEC 10561 Letter Pattern)
This product is also designed for IT power system with phase to phasevoltage 220-240V.
Note: Check the label on the back of the printer for the voltage of your printer.
L Fiji2 Ref. Guide Rev.bA5 size Appendix c05-29-97 DR, pass 0
C-8 Specifications

Environmental
Temperature: Operation: 10 to 35°C (50 to 95°F)Storage:*1 -20 to 60°C (-4 to 140°F)
1 month at 40°C (104°F) 120 hours at 60°C (140°F)
Humidity: Operation: 20 to 80% RHStorage:*1,*2 5 to 85% RH
*1Stored in shipping container*2Without condensation
Initialization
The printer can be initialized (returned to a fixed set of conditions) inthese ways:
Hardware initialization ∗ The printer is turned on.∗ The printer receives an INIT signal from the parallel interface.
Software initialization ∗ Software sends the ESC @ (initialize the printer) command. The last panel settings are kept.
Hardware initialization
When the printer is turned on, the printer mechanism is initialized and theinput data buffer and print buffer are cleared. Printer settings are returnedto their default values as shown in the table below. However, the printermechanism is not initialized if the printer is turned on within ten secondsafter turning it off. In this case, the printer caps the print head, and ejectsany paper in the paper path.
Software initialization
Clears the print buffer and returns printer settings to the default valuesshown below. However, software initialization does not initialize theprinter mechanism or clear the data buffer.
C
RFiji2 Ref. Guide Rev.bA5 size Appendix c05-29-97 DR, pass 0
Specifications C-9

Default settings
The table below shows the default settings that take effect when theprinter is initialized.
Item Default setting
Top-of-form position Current paper position
Page length Single sheets: 22 inches
Left and right margins Cancelled
Line spacing 1/6-inch line spacing
Character pitch Last font selected using default-settingmode
Vertical tab position Cleared
Horizontal tab positions Every eight characters
Font selection Last font selected using default-settingmode
Special printing effects Cancelled (except condensed andeconomy printing)
User-defined character set Hardware/control panel initialization:clearedSoftware initialization: deselected only
L Fiji2 Ref. Guide Rev.bA5 size Appendix c05-29-97 DR, pass 0
C-10 Specifications

Safety approvals
Safety standards:
U.S. model UL 1950 with D3, CSA C22.2 No.950 withD3
European model EN60950 (VDE and NEMKO)
EMC:
U.S. model FCC part 15 subpart B class BCSA C108.8 class B
European model EN 55022 (CISPR Pub. 22) class B EN 61000-3-2EN 61000-3-3EN 50082-1
IEC801-2IEC801-3IEC801-4
Australian model AS/NZS 3548 class B
C
RFiji2 Ref. Guide Rev.bA5 size Appendix c05-29-97 DR, pass 0
Specifications C-11

Interface Specifications
Your printer is equipped with an 8-bit parallel interface and a serialinterface.
Parallel interface
The built-in parallel interface has the following characteristics:
Foward channelData format: 8-bit parallel, IEEE-1284 compatibility mode
Synchronization: STROBE pulse
Handshake timing: BUSY and ACKNLG signals
Signal level: TTL compatible
Connector: 57-30360 Amphenol connector or equivalent
Reverse channelTransmission mode: IEEE-1284 Nibble mode
Adaptable connector: 57-30360 Amphenol Connector or equivalent
Synchronization: Refer to the IEEE-1284 specification
Handshaking: Refer to the IEEE-1284 specification
Signal level: IEEE-1284 Level 1 device
Data transmission timing: Refer to the IEEE-1284 specification
L Fiji2 Ref. Guide Rev.bA5 size Appendix c05-29-97 DR, pass 0
C-12 Specifications

Serial interface
The printer’s built-in serial interface is based on the RS-423 standard. Thisinterface has the following characteristics:
Standard: Based on RS-423
Synchronization: Synchronous
Bit rate: Approx. 900K bps
Handshaking: X-ON/X-OFF DTR protocol
Word format:
Data bit 8 bits
Parity bit None
Start bit 1 bit
Stop bit 1 bit
Connector: 8-pin mini-circular connector
Recommended cable: Apple System Peripheral-8 cable (Part number M0197)
C
RFiji2 Ref. Guide Rev.bA5 size Appendix c05-29-97 DR, pass 0
Specifications C-13

ESC/P 2 Control Codes
Selecting EPSON ESC/P 2 printer in your software allows you to use themost advanced font and graphics handling available. See the ESC/PReference Manual for details.
General operation:ESC@, ESC U, ESC EM
Paper feeding:CR, FF, LF, ESC 0, ESC 2, ESC 3, ESC +
Page format:ESC ( C, ESC C, ESC C 0, ESC Q, ESC l, ESC ( c, ESC N, ESC O
Print position motion:ESC $, ESC \, ESC ( V, ESC ( v, ESC D, HT, ESC B, ESC J, VT
Font selection:ESC k, ESC x, ESC X, ESC P, ESC M, ESC g, ESC p, ESC 4, ESC 5, ESC E,ESC F, ESC !
Font enhancement:ESC W, DC 4, SO, DC2, SI, ESC w, ESC G, ESC H, ESC T, ESC S, ESC -, ESC ( -, ESC q
Spacing:ESC Space, ESC c, ESC ( U
Character handling:ESC t, ESC ( t, ESC R, ESC %, ESC &, ESC :, ESC 6, ESC 7, ESC ( ^
Bit image: ESC *
Graphics: ESC ( G, ESC ., ESC ( i, ESC ( e, ESC ( \, ESC ( s
Color: ESC r, ESC ( r
Printing mode:ESC ( K
L Fiji2 Ref. Guide Rev.bA5 size Appendix c05-29-97 DR, pass 0
C-14 Specifications

Character Tables
These character tables are selected with the default-setting mode or byusing software commands.
All tables except the italic character table are the same as the PC437 table for hex codes 00 through 7F, so only the PC437 table is showncompletely. The rest of the tables show only the characters for hex codes80 through FF.
PC437 (U.S./Standard Europe)
C
RFiji2 Ref. Guide Rev.bA5 size Appendix c05-29-97 DR, pass 0
Specifications C-15

PC850 (Multilingual) PC860 (Portuguese)
PC861 (Icelandic) PC863 (Canadian-French)
L Fiji2 Ref. Guide Rev.bA5 size Appendix c05-29-97 DR, pass 0
C-16 Specifications

PC865 (Nordic) Abicomp
BRASCll Roman 8
C
RFiji2 Ref. Guide Rev.bA5 size Appendix c05-29-97 DR, pass 0
Specifications C-17

ISO Latin 1
Italic
L Fiji2 Ref. Guide Rev.bA5 size Appendix c05-29-97 DR, pass 0
C-18 Specifications

International character sets
You can select one of the following international character sets with thedefault-setting mode or the ESC R command. For example, when youselect “Italic France,” the characters in the “France” row on the tablebelow are used in the italic character table.
The following eight international character sets can be selected with thedefault-setting mode or with the ESC R command.
The following seven additional sets can be selected only with the ESC Rcommand.
C
RFiji2 Ref. Guide Rev.bA5 size Appendix c05-29-97 DR, pass 0
Specifications C-19

Characters available with ESC ( ^ command
To print the characters in the table below, use the ESC ( ^ command.
L Fiji2 Ref. Guide Rev.bA5 size Appendix c05-29-97 DR, pass 0
C-20 Specifications

Glossary
The following definitions apply specifically to printers.
applicationA software program that helps you carry out a particular task, such as wordprocessing or financial planning.
ASCIIAmerican Standard Code for Information Interchange. A standardized codingsystem for assigning numerical codes to letters and symbols.
bandingThe horizontal lines that sometimes appear when printing graphics. This occurswhen the print head carriage return is misaligned. See also MicroWeave.
bidirectional printingPrinting in which the print heads print in both directions. This increases the speedof printing.
bitA binary digit (0 or 1), which is the smallest unit of information used by a printer orcomputer.
brightness The lightness or darkness of an image.
bufferThe portion of the printer’s memory used to store data before printing it.
byteA unit of information consisting of eight bits.
characters per inch (cpi)A measure of the size of text characters, sometimes referred to as pitch.
character tableA collection of letters, numbers, and symbols that provides you with the charactersused in a particular language.
CMYK Cyan (blue-green), magenta, yellow, and black. These colored inks are used tocreate the subtractive system array of printed colors.
ColorSyncMacintosh software that is designed to help you get WYSIWIG (what you see iswhat you get) color output. This software prints colors as you see them on yourscreen.
cpi (characters per inch)A measure of the size of text characters, sometimes referred to as pitch.
Proof Sign-off:Ishizaka _______Norum _______Grady _______
RFiji2 Ref. GuideRev.bA5 size Glossary05-20-97 DR, pass 0
Glossary 1

defaultA value or setting that takes effect when the equipment is turned on, reset, orinitialized.
default-setting modeA feature that allows you to change fonts or character tables from the printer’scontrol panel if you cannot change them in your software.
ditheringA halftoning method in which dots are arranged in an orderly pattern. Ditheringworks best for printing images with solid colors, such as charts and graphs. See alsoHalftoning.
dot matrixA method of printing in which each letter or symbol is formed by a pattern (matrix)of individual dots.
dpiDots per inch. The dpi measures the resolution. See also resolution.
driver A software program that sends instructions to a computer peripheral to tell it whatto do. For example, your printer driver accepts print data from your wordprocessing application and sends instructions to the printer on how to print thisdata.
economy printingPrinting in which images are printed with fewer dots to save ink.
emulationEmulation means using the control codes of another kind of printer. Most users willnever need to make this setting but some experienced users may find this helpful.
Error DiffusionThis halftoning setting smooths out edges by randomly placing dots of varyingcolors. This has the opposite effect of the Finest Detail setting.
ESC/PAbbreviation for Epson Standard Code for Printers. This system of commands givesyou control of your printer from your computer. It is standard for all EPSONprinters and supported by most application programs for personal computers.
ESC/P 2The enhanced version of the ESC/P printer command language. Commands in thislanguage produce laser-like features, such as scalable fonts and enhanced graphicsprinting.
Finest DetailThis printer driver setting automatically makes your printed images sharper andclearer. This has the opposite effect of the Error Diffusion setting. Be aware that thismay increase the time required for printing.
fontA style of type designated by a family name.
L Fiji2 Ref. GuideRev.bA5 size Glossary05-20-97 DR, pass 0
2 Glossary

grayscale A scale of shades of gray from black to white. Grayscale is used to represent colorswhen printing with black ink only.
halftonesPatterns of black or colored dots used to reproduce an image.
halftoning A method of using dot patterns to represent an image. Halftoning makes it possibleto produce varying shades of gray using only black dots, or a nearly infinite arrayof colors using only a few colors of dots.
high speed printingPrinting in which images are printed in both directions. This provides fasterprinting. This is also called bidirectional printing.
initializationReturns the printer to its defaults (fixed set of conditions). This happens every timeyou turn on the printer or reset the printer.
ink jetA method of printing in which each letter or symbol is formed by preciselyspraying ink onto paper.
interfaceThe connection between the computer and a peripheral such as a printer. Generally,printers have two interfaces, parallel and serial. A parallel interface transmits dataone byte, or eight bits, at a time. A serial interface transmits data one bit at a time.
italicA typestyle in which the characters slant. This sentence is italicized.
loading positionThe position to which the paper is automatically loaded.
IPSInches per second. This scale is used to measure the print head speed.
mediaMaterials upon which data is printed, such as envelopes, plain paper, special paper,and transparency film.
MicroWeave Printing in which images are printed in finer increments to reduce the possibility ofbanding and to produce laser-like images. See also banding.
monochromeThis means printing with only one color of ink, which is generally black ink.
parallel interface See interface.
RFiji2 Ref. GuideRev.bA5 size Glossary05-20-97 DR, pass 0
Glossary 3

power-on functionsThese are special functions, such as a printer operation check, that you can performby holding down a control panel button while turning on the printer.
printable areaThe area of a page on which the printer can print. It is smaller than the physical sizeof the page due to margins.
printer driverA software program that sends commands for using the features of a particularprinter. Often shortened to “driver.” See also driver.
printer operation checkA method for checking the operation of the printer. When you perform a printeroperation check, the printer prints the ROM version, code page, ink counter code,and a nozzle check pattern.
print head alignment modeThis allows you to align the print head if you can’t use the print head alignmentutility. See also print head alignment.
print head alignmentA maintenance procedure you should perform when the black and color inks onyour printout are misaligned or the printout seems fuzzy.
print serverThe print server acts as a post office for all print jobs sent over a network. It receivesthe jobs and then distributes them to the assigned printer. It also holds extra printjobs while the printer is busy. See also print queue.
print queueIf your printer is connected to a network, print jobs that are sent to the printer whileit is busy are stored in a waiting line, or print queue, until they can be printed.
proportional printingPrinting in which the width of the character varies from character to character. Forexample, a capital W receives much more space than a lowercase i. The result looksmore like a typeset book than a typewritten draft.
RAMRandom Access Memory. The portion of the printer’s memory used as a buffer andfor storing user-defined characters. All data stored in RAM is lost when the printeris turned off.
resetTo return a printer to its defaults either by sending a command, an INIT signal, orby turning the printer off and then back on.
resolutionThe number of dots per inch used to represent an image.
L Fiji2 Ref. GuideRev.bA5 size Glossary05-20-97 DR, pass 0
4 Glossary

ROMRead Only Memory. A portion of memory that can only be read and cannot beused for data storage. ROM retains its contents when you turn off the printer.
RGB Red, green, and blue. These colors, in phosphors irradiated by the computermonitor’s electron gun, are used to create the additive array of screen colors.
sans serifA type of font that does not have serifs, or lines crossing the ends of characters toenhance readability. The entries in the index are printed in a sans serif font, but theexplanations are printed in a font with serifs.
scalable fontsFonts that can be enlarged or shrunk. Non-scalable fonts are called bitmap fontsand they can’t change in size.
screen patternThis feature prints shaded areas as they appear on screen, instead of printing themas halftones.
serial interfaceSee interface.
spoolThe process by which the printer driver converts the print data into codes that yourprinter understands. This data is then sent to the printer directly or to the printserver.
spool managerA software program that converts print data into codes that your printerunderstands. See also spool.
status monitorA software program that allows you to check the printer’s status, such as theamount of ink remaining before printing.
subtractive colors Colors produced by pigments that absorb some colors of light and reflect others.See also CMYK.
unidirectional printingPrinting in which the print head prints in one direction only. Unidirectionalprinting is useful for printing graphics because it allows more precise verticalalignment than bidirectional printing.
user-defined charactersCharacters that are defined and stored in the printer by the user. Also calleddownloaded characters.
WYSIWIGWhat-you-see-is-what-you-get. This term is used to describe printout that looksexactly like it appears on screen.
RFiji2 Ref. GuideRev.bA5 size Glossary05-20-97 DR, pass 0
Glossary 5

L Fiji2 Ref. GuideRev.bA5 size Glossary05-20-97 DR, pass 0
6 Glossary

Index
AAdjust lever, 1-2, 6-6–7Advanced setting
Macintosh, 5-2, 5-6, 5-8Windows, 4-2, 4-6, 4-8. See also
online helpAlignment, print head, 8-29–30, A-7.
See also UtilitiesAppleTalk*, 2-25Automatic setting
Macintosh, 5-2–3Windows, 4-2, 4-5
BBrightness, B-2Brightness setting
Macintosh, 5-12Windows. See online help
Buttons, 1-3
E load/eject, 1-3P power, 1-3
R print head cleaning, 1-3,8-3, A-6
CCables. See Interface cablesCartridges. See Ink cartridgesCharacter tables, C-15–20Chooser*, selecting printer with,
2-24–26Cleaning
printer, 7-7print head, 8-26–28, A-6
Cleaning sheets, 6-4
Coarse Dithering settingMacintosh, 5-15Windows. See online helpSee also Halftoning settings
Coated paper, 6-3. See also Specialpaper
Color, tips on using, B-2–8Color Adjustment settings
Macintosh, 5-11–12Windows. See online help
Colorimetric setting*, 5-14Color settings
Macintosh, 5-6, 5-11–14Windows, 4-6. See also online
helpColor slide bars
Macintosh, 5-12Windows. See online help
ColorSync setting*, 5-13Computer requirements, 1-4–5Connecting the printer
to a Macintosh, 2-20to a PC, 2-11
Consumable products, 1-6–7Contrast setting
Macintosh, 5-12Windows. See online help
Control panel, 1-2, A-8Current Settings display
Macintosh, 5-6Windows, 4-6
Customer support, 8-34–39Customizing paper size
Macintosh, 5-19Windows, 3-7. See also online
help
Proof Sign-off:Ishizaka _______Norum _______Grady _______
*Macintosh only✝Windows only
RFiji Ref.Rev.bA5 size Index05-20-97 DR, pass 0
IN-1

Customizing print settingsMacintosh, 5-8–17Windows, 4-8–9
Cyan, Magenta, Yellow settingMacintosh, 5-12Windows. See online help
DDefault settings, C-10Default-setting mode, A-3–5Despooler✝, 4-15–16. See also online
helpDithering, B-4. See also Halftoning
settings DOS programs, A-2Driver. See Printer driverDriver disk creation✝, 2-12, 2-15, 2-18
EEconomy setting
Macintosh, 5-7, 5-16Windows, 4-7. See also online
helpSee also Print Quality settings
Edge guides, 1-2, 3-3–4Envelopes
loading, 6-7printable area, C-6specifications, C-5
EPSON Answers✝, 2-12installing, 2-14, 2-16, 2-19system requirements for, 1-4
EPSON Despooler✝, 4-15–16EPSON Monitor2*, 5-24EPSON special media, 1-7. See also
Special paperEPSON Spool Manager✝, 4-15 EPSON Status Monitor
Macintosh, 5-21Windows, 4-13
EPSON Stylus Printer DriverPackage*, 2-22–24
Error diffusion, B-4 Error Diffusion setting
Macintosh, 5-15Windows. See online help
Error indicators, 8-2–3ESC/P 2 control codes, C-14
FFine-720 dpi setting
Macintosh, 5-16Windows. See online help See also Print Quality settings
Fine Dithering settingMacintosh, 5-15Windows. See online helpSee also Halftoning settings
Finest Detail settingMacintosh, 5-17Windows. See online help
Flip Horizontal*, 5-15Fonts, built-in, A-4–5
GGlossy film, 6-3, 6-5. See also Special
paperGlossy paper, 6-3, 6-5. See also
Special paper
HHalftoning settings
Macintosh, 5-15Windows. See online help
Head. See Print headHead Cleaning utility. See UtilitiesHelp, online, 2-12, 4-17
*Macintosh only✝Windows only
L Fiji Ref.Rev.bA5 size Index05-20-97 DR, pass 0
IN-2

High Speed settingMacintosh, 5-17Windows. See online help
Hue, B-2
IICM setting✝, 4-7. See also online helpImage resolution and size, B-5Index cards, 1-7, 6-3, 6-5
printable area, C-6specifications, C-5See also Special paper
Ink cartridges, 1-6installing, 2-6–10problems with, 8-30–33replacing, 7-2–6specifications, C-7
Ink jet paper, 1-7, 6-5. See also Specialpaper
Ink low, 1-3, 7-2–3, 8-3Ink out, 1-3, 7-2–3, 8-3Ink setting
Macintosh, 5-5Windows. See online help
Installingink cartridges, 2-6–10Macintosh printer software,
2-21–22paper support, 2-3printer software for DOS, A-2Windows printer software,
2-12–19Interface
cables, 1-6parallel, C-12specifications, C-12–13serial, C-13
L
Lights, 1-3B black ink out, 1-3, 7-2–3, 8-3A color ink out, 1-3, 7-2–3, 8-3
S paper out, 1-3, 8-3P power, 1-3, 8-3
Loading paper. See Paper
MMain menu✝, 4-3–4. See also online
helpMaintenance, Chapter 7Matching, color, B-2–4
Macintosh, 5-10–14Windows, 4-7. See also online
helpMedia Type settings
Macintosh, 5-4–5Windows, 4-10–11. See also
online helpMicroWeave setting
Macintosh, 5-17Windows. See online help
More Settings dialog boxMacintosh, 5-8, 5-10, 5-15Windows, 4-8. See also online
help
NNetwork printing✝, 2-16–17No Halftoning setting
Macintosh, 5-15Windows. See online helpSee also Halftoning settings
Normal-360 dpi settingMacintosh, 5-16Windows. See online helpSee also Print Quality settings
*Macintosh only✝Windows only
RFiji Ref.Rev.bA5 size Index05-20-97 DR, pass 0
IN-3

Nozzle Check utilityWindows, 4-14Macintosh, 5-22
OOnline help✝, 2-12, 4-17Options, 1-6 Orientation setting
Macintosh, 5-18Windows. See online help
Output tray, 1-2, 3-2
PPage Setup dialog box*, 3-8–9, 5-18Paper
jam, 1-3, 8-3out, 1-3, 8-3specifications, C-4–6support, 2-3 See also Special paper
Paper, matching with Media Typesetting
Macintosh, 5-4–5Windows, 4-10–11
Paper loading, 3-2–4See also Special Paper
Paper menu✝, 3-6–7, 4-3–4. See alsoonline help
Paper Size settingsMacintosh, 5-18–20Windows, 3-7. See also online
helpPerceptual setting*, 5-14Photo quality paper, 1-7, 6-5. See also
Special paperPhoto setting
Macintosh, 5-6Windows, 4-7. See also online
help
Power Macintosh ExtensionModule*, 2-22, 2-24
Power-on functions, A-8Predefined settings
Macintosh, 5-6–7Windows, 4-6–7. See also online
helpPrint
quality, 8-16–23, 8-26–30speed, 8-24–25
Printable Area settingMacintosh, 5-19Windows. See online help
Printable area specifications, C-6Print dialog box*, 3-9, 5-3Printer
cleaning, 7-7operation check, 8-4–6parts, 1-2stand, 2-4transporting, 7-8unpacking, 2-2
Printer driverDOS, A-2Macintosh, 2-25, 5-2–20. See also
Printer software forMacintosh
Windows, 2-12, 4-2–11. See alsoonline help and Printersoftware for Windows
Printer software for Macintosh accessing, 3-8, 5-3Advanced setting, 5-2, 5-6, 5-8Automatic setting, 5-2–5customized settings, 5-2, 5-8–10installing, 2-21–22predefined settings, 5-2, 5-6–7
*Macintosh only✝Windows only
L Fiji Ref.Rev.bA5 size Index05-20-97 DR, pass 0
IN-4

Printer software for Windowsaccessing, 3-5, 4-2–4Advanced setting, 4-2, 4-6, 4-8.
See also online helpAutomatic setting, 4-2, 4-5customized settings, 4-2, 4-8–9installing, 2-12–19predefined settings, 4-2, 4-6–7See also online help
Printer utilities. See UtilitiesPrint head
alignment, 8-29–30, A-7cleaning, 8-26–28, A-6
Printing, basicsMacintosh, 3-8–9Windows, 3-5–7
Printing problems. SeeTroubleshooting
Print Quality settingsMacintosh, 5-15–16Windows. See online help
Print settingsDOS, A-2–5Macintosh, 5-2–20. See also
Printer software forMacintosh
Windows, 4-2–11. See also onlinehelp and Printer software forWindows
Profile setting*, 5-13
QQuality vs. Speed slide bar
Macintosh, 5-3Windows, 4-5. See also online
help
RReduce or Enlarge setting*, 5-18Rendering Intent setting*, 5-14Replacing an ink cartridge. See Ink
cartridgesResolution
image, B-5–6printing, C-3See also Print Quality settings
SSafety
approvals, C-11instructions, 1–5
Saturation, B-2Saturation setting
Macintosh, 5-12, 5-14Windows. See online help
Scalable fonts, A-5, C-3Self adhesive sheets, 1-7, 6-5Special media, 1-7. See also Special
paperSpecial paper, 1-7, 6-2–3
cleaning sheets, 6-4loading, 6-4–8
Specifications, C-2–11default settings, C-10electrical, C-8environmental, C-9ink cartridges, C-7initialization, C-9interface, C-12–13mechanical, C-8paper, C-4–6printable area, C-6printing, C-2–3safety approvals, C-11
*Macintosh only✝Windows only
RFiji Ref.Rev.bA5 size Index05-20-97 DR, pass 0
IN-5

Spool Manager✝, 4-15Status Monitor
Macintosh, 5-21–22Windows, 4-13
SuperFine-1440 dpi settingMacintosh, 5-16Windows. See online helpSee also Print Quality settings
System requirements, 1-4–5
TText/Graph setting
Macintosh, 5-7Windows, 4-7. See also online
help Transporting the printer, 7-8Transparencies, 1-7, 6-3, 6-5, 6-8Troubleshooting, Chapter 8
ink cartridges, 8-30–33operation, 8-8–13paper handling, 8-14–16power supply, 8-7–8printing quality, 8-16–23printer utilities, 10-23–24
UUnpacking the printer, 2-2User Defined Paper Size dialog box✝.
See online helpUtilities
Driver disk creation✝, 2-12,2-15, 2-18
Macintosh, 5-20–23Windows, 4-12–14
Utility menu✝, 4-3–4, 4-12. See alsoonline help
VVideo/Digital Camera setting
Macintosh, 5-7, 5-12Windows, 4-7. See also online
help
*Macintosh only✝Windows only
L Fiji Ref.Rev.bA5 size Index05-20-97 DR, pass 0
IN-6

EPSON OVERSEAS MARKETING LOCATIONS
EPSON AMERICA, INC.20770 Madrona Ave.
P.O. Box 2842
Torrance, CA 90509-2842
Phone: (800) 922-8911
Fax: (310) 782-5220
EPSON UK LTD.Campus 100, Maylands Avenue,
Hemel Hempstead, Herts,
HP2 7TJ, U.K.
Phone: (+44) 01442 61144
Fax: (+44) 01442 227227
EPSON DEUTSCHLAND GmbHZülpicher Straße 6,
40549 Düsseldorf Germany
Phone: (0211) 56030
Telex: 8584786
EPSON FRANCE S.A.68 bis, rue Marjolin
92300, Levallois-Perret, France
Phone: 33.1.40.87.37.37
Telex: 610657
EPSON AUSTRALIA PTY. LTD.70 GIBBES STREET, CHATSWOOD 2067 NSW.
Phone: 2-9903-9000
Fax: 2-9903-9177
EPSON SINGAPORE PTE. LTD.No. 1 Temasek Avenue #36-00
Millenia Tower, Singapore 039192
Phone: (065) 33 77 911
Fax: (065) 33 41 185
EPSON HONG KONG LTD.Rooms 4706-10, 47/F,
China Resources Bldg.,
26 Harbour Road, Wanchai, Hong Kong
Phone: 2585-4300
Fax: 2827-7083
EPSON TAIWAN TECHNOLOGY &
TRADING LTD.10F, No. 287 Nanking E. Road, Sec. 3,
Taipei, Taiwan, R.O.C.
Phone: (02) 717-7360
Fax: (02) 712-9164
EPSON ITALIA S.p.A.V.le F.lli Casiraghi 427
20099 Sesto S.Giovanni
MI, Italy
Phone: 2-262331
Fax: 2-2440750
EPSON IBERICA S.A.Av. de Roma, 18-26
08290 Cerdanyola del Valles
Barcelona, Spain
Phone: 582. 15.00
Fax: 582. 15.55
SEIKO EPSON CORPORATION
(Hirooka Office)80 Harashinden, Hirooka
Shiojiri-shi, Nagano-ken
399-07 Japan
EPSON PORTUGAL, S.A.R. do Progresso, 471, 1º Perafita
4460 Matosinhos, Portugal
Phone: (02) 996 14 02
Fax: (02) 996 14 11
1996 October
