wheat seed production techniques manual...wheat seed production technique manual 2 2. definition of...
TRANSCRIPT

Wheat Seed Production Techniques
Manual
District Agriculture Development
Office, Sindhupalchwok

Wheat Seed Production Techniques
Manual
District Agriculture Development
Office, Sindhupalchowk

Government of Nepal
Ministry of Agriculture Development
Regional Agriculture Directorate, central development Region
DISTRICT AGRICULTURE DEVELOPMENT OFIICE
Sindhupalchok, Chautara
Acknowledgement
Training Plays important role for the Change in behaviour by improvement of knowledge, skill
and ability of the farmers. To follow up and enhance more technically about the local methods,
techniques, learning and experiences with current climatic requirement and technical needs are
our major responsibility. Good Agricultural practices, traditional knowledge, skill and
experience as well as research output techniques will be very helpful for successful Agriculture
work. Successful Agriculture works refers to increment in the production of cereals, vegetables
and cash crops as well as their marketing for raising the income. Management of the problems
which arises during the farming like; disease pest occurrence, soil, Agro-materials also falls
under the successive Agriculture work.
Regarding to the emerging context for commercialization, raising income and upliftment on
livelihood of farmers by technical enhancement in simple way, we feel very happy by the
preparation of Wheat Seed Production Technique Manual with very useful technical knowledge.
This manual which is prepared under the JICA project on Rehabilitation and Recovery from
Nepal Earthquake (RRNE) not only useful for rural Farmers, but also very useful for every
technician related to Agriculture offices for the training material. It has been hoped that this
manual, especially addressing the wheat seed production techniques will support for the
increment of the productivity, improving in quality wheat seed production.
JICA/RRNE and Good Neighbours Nepal has helped much more for the preparation, correction,
edition, all other related works and funding. I am also glad to assisting the preparation of this
manual directly and indirectly by all persons, DADO technicians and technicians of Agriculture
service centre. I am hoping for this type of manual publication support by all readers and JICA
Nepal in near future containing other precise and important training contents and materials.
March, 2016
………………………
Hikmat Kumar Shrestha
Senior Agriculture Development Officer

Table of Contents
PART I: DEFINITION AND IMPORTANCE OF QUALITY SEED ........................................... 1
1. Background ................................................................................................................................. 1
2. Definition of Seed ....................................................................................................................... 2
3. Features of Quality Seed ............................................................................................................. 2
4. Importance of Good Quality Seed .............................................................................................. 2
PART II: METHOD OF WHEAT SEED PRODUCTION ............................................................ 3
A) Technical Aspects for quality Seed Production ......................................................................... 3
5. Basic Knowledge for Wheat Seed Production ............................................................................ 3
5.1 General schedule for wheat cultivation and technical work ................................................. 3
5.2 Climate and soil condition..................................................................................................... 7
5.3 Marketing plan ...................................................................................................................... 7
5.4 Selection of land .................................................................................................................... 7
5.5 Crop rotation for reducing disease and pest .......................................................................... 8
6. Works before Cultivation of Wheat ............................................................................................ 9
6.1 Selection of variety................................................................................................................ 9
6.2 Conformation of purchased foundation seed ...................................................................... 10
6.3 Germination test of foundation seed ................................................................................... 10
6.4 Treatment of seeds before sowing ....................................................................................... 11
6.5 Land preparation and sowing of wheat ............................................................................... 14
7. Farming Activities during Growth Period ................................................................................ 16
7.1 Weeding and Top dressing .................................................................................................. 16
7.2 Irrigation .............................................................................................................................. 16
7.3 Pressing ............................................................................................................................... 16
7.4 Field inspection ................................................................................................................... 17
8. Major Pest and Diseases in Wheat ............................................................................................ 18
8.1 Major pests in wheat ........................................................................................................... 18
8.2 Major diseases and their control.......................................................................................... 20
9. Harvesting ................................................................................................................................. 21
9.1 Timing of harvest ................................................................................................................ 21

9.2 Method of harvesting .......................................................................................................... 22
9.3 Threshing ............................................................................................................................. 22
10. Post-harvest Processing and Storage ...................................................................................... 22
10.1 Cleaning the seed .............................................................................................................. 22
10.2 Drying................................................................................................................................ 23
10.3 Storing seeds in storage ..................................................................................................... 23
B) Management Aspects for Quality Seed Production ................................................................. 26
11. Necessity of Management by Seed Production Cooperative .................................................. 26
12. Structure and Roles of Seed Production Cooperative ............................................................. 26
13. Major Actions to Be Taken by Seed Production Cooperative ................................................ 28
13.1 Land and variety selection................................................................................................. 28
13.2 Quality control and record keeping ................................................................................... 28
13.3 Collection of produced seeds and storage ......................................................................... 31
13.4 Standard for seed certification........................................................................................... 32
13.5 Packaging .......................................................................................................................... 32
13.6 Warranty tag ...................................................................................................................... 32
13.7 Advertisement and sales .................................................................................................... 34
14. Skilled Human Resource Development under Seed Production Group and Cooperatives for
the Quality Seed Production ......................................................................................................... 34
Compost ........................................................................................................................................ 35
PART 1: Farm Yard Manure (FYM) ............................................................................................ 36
1. Introduction ............................................................................................................................... 36
2. Advantages of Well Decomposed Farm Yard Manure (FYM) ................................................ 36
2.1 Improvement of soil productivity ........................................................................................ 36
2.2 Healthy for plants ................................................................................................................ 37
2.3 Good means of breakdown of organic matter ..................................................................... 37
3. Material Required for Making FYM......................................................................................... 37
4. The Place for Making FYM ...................................................................................................... 37
5. Condition Required for Well Decomposition of FYM ............................................................. 39
6. Collection of Animal Urine and Its Advantages ....................................................................... 40
6.1 Collection of urine ............................................................................................................... 40
6.2 Advantage of collecting urine ............................................................................................. 40
7. Things to Be Considered While Making Farm Yard Manure (FYM) ...................................... 41
PART 2: COMPOST MANURE .................................................................................................. 42
8. Introduction ............................................................................................................................... 42
9. The Advantages of the Compost Manure ................................................................................. 43
10. The Materials Required for Making Compost Manure ........................................................... 43
11. The Place for Making Compost Manure ................................................................................. 43
12. Methods of Preparing Compost Manure ................................................................................. 43
12.1 Methods of preparing compost in pit ................................................................................ 43
12.2 Heap method ..................................................................................................................... 47
13. Identifying the Well Decomposed Compost and FYM .......................................................... 48
References ..................................................................................................................................... 49

Wheat Seed Production Technique Manual 1
PART I: DEFINITION AND IMPORTANCE OF QUALITY SEED
1. Background
Quality seed is very important thing for increasing the production. It is necessary to maintain the
varietal characteristics of seed, and control the seed borne disease for the production of high
quality seed. This manual tries to improve the knowledge on farmers about technical and
management activities during the wheat cultivation, and support for improvement of quality seed
production. The improved technical and management farming activities will be supportive for
quality seed production, and raising livelihood of farmers living in the hilly areas.
Fig. No. 1.1: Wheat plants with mature spikes
Source: JICA Project Team

Wheat Seed Production Technique Manual 2
2. Definition of Seed
“Seed" means a matured ovule having embryonic plant, food substance and protective cover
or seeds or germ which can be used in sowing or planting to produce crop by reproducing in
sexual or asexual mode. (Seed Act, 1988). Seed is a live embryo in dormancy mode with or
without cover, which can grow as a fully developed plant under a favourable environment.
3. Features of Quality Seed
Characteristics of quality seed are as followings:
Seed purity
It should have genetic purity.
It should have physical purity (no mix of other crop seed, weed seed & inert matter).
It should have high germination vigour, germination rate and sprouting capacity.
It should be free from seed born disease and pests.
It should be good seed shape, size and weight for producing good seedlings.
It should be healthy and shining without any spot and weakness on looking.
It should be in equal size and weight, which should have uniformity on germination after
sowing.
It should have standard moisture level (maximum 12%) in wheat seed, which should clink
while biting and shaking by hand.
4. Importance of Good Quality Seed
Quality seed gives more production in comparison to normal seed.
It also leads to increment of production and income of farmers.
Quality production from quality seed can be easily traded in the market.
If high quality seed is produced in the mid-hill region of Nepal, the production of wheat
will be raised in that area.
The variety selected from Nepal has higher adaptability and more resistant than the seed
imported from foreign country.
There are many pocket areas for quality seed production in mid-hill region, which is also
easily accessible to remote farmers.

Wheat Seed Production Technique Manual 3
PART II: METHOD OF WHEAT SEED PRODUCTION
In techniques of quality seed production, there are the following two aspects:
Technical Aspect: where various techniques are adopted for producing quality seeds
Management Aspect: where the individual farmers are managed through cooperatives and
groups, in order to secure sufficient quality of seeds and stable sales of the products.
A) Technical Aspects for quality Seed Production
5. Basic Knowledge for Wheat Seed Production
5.1 General schedule for wheat cultivation and technical work
The general schedule for wheat cultivation and technical work indicated in the following
table.

Wheat Seed Production Technique Manual 4
Table No. 5.1.1: Wheat cropping calendar
Week Stages of plant Activities Farm work
Field inspection Fertilizers application Pests and disease
control
1st
Week
Oct. – 2nd
Week Oct.
Land preparation Initial stage: FYM: 50-60
DOKO (250-300 kg /
Ropani)
Use well fermented FYM
(Farm yard manure)
1st ploughing
Last Week
Oct. Seed treatment by
fungicides: Captan or
Thiram
Apply the following
amount of fertilizer to the
field and plough the land
before sowing.
Urea: 4 kg/ Ropani
DAP: 5 kg/ Ropani
Potash: 2 kg/ Ropani
2nd
ploughing
1st
- 2nd
Week
Nov.
Sowing seed and
pressing soil
250 – 300 seed / square
meter (3.5 kg/ Ropani)
Last Week
Nov. - 1st
Week Dec.
Crown root initiation 1st top dressing: Urea 2
kg / Ropani First Weeding
First irrigation
3rd
Week
Dec. –
Last Week
Dec.
Three tiller formation
stage
First pressing of plants

Wheat Seed Production Technique Manual 5
Week Stages of plant Activities Farm work
Field inspection Fertilizers application Pests and disease
control
1st
Week
Jan. – 3rd
Week Jan.
Tiller development
stage
1st field
inspection:
Uproot and
remove diseased
and off types
plants
White grub
Cut worm
Leaf blight
Yellow rust
Aphids
Second pressing (10 days
after the first pressing)
2nd
Week
Feb. – 4th
Week Feb.
Plant elongation stage 2nd
top dressing: Urea 2
kg / Ropani
Second Weeding
2nd
Week
Mar. - 4th
Week
Mar.
Spike initiation stage Second irrigation
4th
Week
Mar. – 2nd
Week
Apr.
Spike formation
Last Week
Apr. – 2nd
Week
May
Flowering stage 2nd
field
inspection:
Uproot and
remove diseased
and off types
plants
stinking smut(hill bunt)
Loose smut
Leaf blight
Yellow rust
Aphids

Wheat Seed Production Technique Manual 6
Week Stages of plant Activities Farm work
Field inspection Fertilizers application Pests and disease
control
1st
Week
Jun. Grain(seed) ripening 3
rd field
inspection:
Uproot and
remove diseased
and off types
plants
2nd
Week
Jun. -3rd
Week Jun.
Harvesting stage Harvest the crop during dry
and sunny day
Source: JICA Project Team

Wheat Seed Production Technique Manual 7
5.2 Climate and soil condition
(A) Climate
Wheat crop is major crop of hilly region; however, it is cultivated both in hills and
Terai region.
Wheat crop requires cold and dry weather conditions. The optimum temperature for
germination is between 20 ºC and for vegetative growth ranges from 16-22 ºC.
If the weather becomes cool and it dews, the wheat plants grow many shoots and give
more grains.
The wheat plants can be under attack of disease and pests if the weather is very hot
and humid at the time of sowing seeds.
(B) Soil
Wheat can be cultivated in various types of soil.
Fertile loamy black soil and the soil with good water holding capacity is appropriate
for wheat cultivation.
It is better to cultivate wheat in a soil that can hold little more water even in the dry
season.
The soil of the field for wheat cultivation should not be more acidic and alkaline.
5.3 Marketing plan
Before seed production, Cooperative should consider how much seeds that could be
sold in the market, and how much quantity of seed can be stored in their storage. By
considering this, Cooperative should make the plan of selecting the land and
cultivation for seed production.
5.4 Selection of land
Land selection shall be done in coordination with seed production Cooperative. For
Wheat Seed production, clean, plain, and fertile and land with a good drainage facility
should be selected, and consider the following things to select such plot:
Seed production plot should be fertile land with easy facility of irrigation and
drainage. Wheat crop generally does not need irrigation; however irrigation is
necessary at tillering and flowering stage).
Easily accessible for supervision or field inspection.
The land selected for seed production should not be diseased in previous crop time or
it should be less infested with diseases or pests.
It is appropriate to cultivate in a block of land than in small plots of land for seed
production. It is better not to cultivate wheat for seed production for two years if the
loose smut disease appears in the land.

Wheat Seed Production Technique Manual 8
It is necessary to maintain spacing between the plots of wheat grown for seeds and
wheat grown for cereal food or wheat of different variety for seeds as per the certified
standard. To maintain spacing, a small plot between the cultivated plots should be left
empty or barren.
Wheat crop is a self-pollinated crop; hence, there will be less problem of external
pollination. However; the isolation distance should be maintained in order to avoid
transfer of diseases.
Three meters of isolation distance between the different varieties of wheat crop
cultivated for seeds or for different purposes is necessary. Likewise, if any variety of
wheat is infested by loose smut disease, a spacing of 150 meters is necessary between
the plots.
5.5 Crop rotation for reducing disease and pest
For controlling disease and pest, wheat should not be planted in the same plot and
crop rotation should be adopted in every 3 years for seed production.
If farmers cultivate wheat every year, virus and other soil borne diseases will be
increased. Hence, wheat produced from such field could not be used as seed.
The crop rotation can be adopted as given below:
First of all farmers should divide their wheat seed production field into 3 plots.
In the first year, cultivate the wheat in 1st plot and cultivate potato in 2nd
plot, and
if possible cultivate legume or remain fallow in 3rd
plot.
In 2nd year continue the same procedure following same time and season ,but
rotate the crops i.e. wheat will be in 2nd
plot, potato in 3rd
plot and legume will be
in 1st plot
In third year, do same as before by rotating the crop.
This way of every three years, there will be changing the crops in farmers' field,
which will help to eradicate the disease and pest in the seed t production field. The
figure below indicates the crop rotation for 3 different plots for the period of 3
years:
Fig. No. 5.5.1: Concept of crop rotation for Wheat seed
production
Source: JICA Project Team
1st Plot
Wheat
2nd
Plot
Potato
3rd
Plot
Legume

Wheat Seed Production Technique Manual 9
6. Works before Cultivation of Wheat
6.1 Selection of variety
Selection of variety shall be done in coordination with seed production group /
Cooperative, under the support of DADO.
The recent variety, recommendation area, recommendation year, productivity and
maturity days have been mentioned below.
Table No. 6.1.1: Varieties of wheat
S.N. Varieties of
crop
Recommended
year (BS.)
Harvesting
days
Production
capacity
(m/h)
Recommended areas
1 Lerma 52 2017 176 5.0 Mid hill
2 Annapurna 4 2051 161 5.0 Mid and High hill
3 Pasang Lhamu 2054 178 6.7 Mid hill (Such as
Kathmandu valley and
high hill having
similar weather like
that of Jumla)
4 Kanti 2054 174 5.5 Mid and high fertile
land of hilly region
5 WK 1204 2064 179 3.4 Mid hill and high hill
6 Gaura
(BL 3235)
2069 160 4.2 – 5.0 Mid hill and high hill
7 Dhaulagiri
(BL 3503)
2069 156 3.6 – 4.9 Mid and high hill
8 B L 1473 2056 115 4.0 Terai, plain land and
valley with height less
than 1000 m and
medium and high
fertile land
9 Gautam 2061 119 3.4 Plateau/ plain land of
Terai and mid hill
Source: Agriculture Diary, 2073 B.S. Source: Agriculture Diary, 2073

Wheat Seed Production Technique Manual 10
6.2 Conformation of purchased foundation seed
Among received foundation seeds from DADO or other relevant governmental
authorities or other seed companies, the warranty tag of the foundation seed should be
checked whether it is the right variety or not.
6.3 Germination test of foundation seed
Germination of seeds should be tested in order to identify the vigour and germination
rate of seed which is necessary for the healthy and good growth of seedlings, and
obtaining higher yield. If the seed has good germination vigour, higher number of
seeds germination, it can be produced as expectation. The germination rate of seed
can be identified in the following ways:
Dip the seeds in water for 24 hours before the germination test.
Prepare the 2 carton box with plastic film inside it, and then put fine sand or sandy
soil in it.
Remove small stones or pebbles from the sand/sandy soil in each cartoon box.
Plain the surface, and make rows not deeper than an inch in each cartoon box.
Sow 100 seeds in 10 rows (ten seeds for each row) in one carton box, and sow
next 100 seeds similarly in next carton box.
Water to each germination test box every day for making the soil wet.
Start counting seedlings 5 days after sowing, and take record.
The number of sprouts 5 days after sowing gives the vigour rate, and 8 days after
sowing gives the germination rate.
Average germination rate from two test box should be at least 85% for foundation
seed.
Fig. No. 6.3.1: Carton(paper box) ready with
Soil for germination testing of seeds
Fig. No. 6.3.2:Ten lines made in soil with
finger

Wheat Seed Production Technique Manual 11
Fig. No. 6.3.3: Sowing wheat grains in 10
rows
Fig. No. 6.3.4: Wheat grains sowed in rows
Fig. No. 6.3.5:Covering the seeds with soil
Fig. No. 6.3.6: Watering the sown seed
making sprinkler from water bottle
Source: JICA Project Team
6.4 Treatment of seeds before sowing
Due to infection in seeds, wheat crop gets different diseases like: smut, rust, blight
etc. Due to these diseases, there is adverse effect on annual production of wheat.
The infection from such diseases could be minimized or reduced by using only
healthy, and quality seeds chosen through hot water seed treatment and treatment with
fungicide, which is described detail below:
(A) Hot water seed treatment
Initially, soak the seeds in ordinary water for about 4 hours, than dip in hot water 52
ºC for 10 minutes or 55 ºC for 5 minutes. After that, cool and dry the seeds in shade,
and let for fungicide treatment.

Wheat Seed Production Technique Manual 12
(B) Fungicides treatment of seed
It is compulsory to treat the seeds for producing quality and healthy wheat crop.
Mix the wheat seeds before sowing with Bevistin or Benlate2 grams (0.2%) per kg
seeds in an air tight pot and stir it vigorously for 8-10 minutes.
Treating the seeds this way helps in controlling diseases and germs on outer surface of
wheat grain such as blast, loose smut, etc.
Methods of seed treatment have been mentioned in pictures as followings:
Fig. No. 6.4.1: Seeds and Equipment for
treatment
Fig. No. 6.4.2: Putting seeds into treating pot
Fig. No. 6.4.3: Taking out half spoon
fungicides for 1 kg seeds
Fig. No. 6.4.4: Mixing fungicides in 1 kg
seeds in pot

Wheat Seed Production Technique Manual 13
Fig. No. 6.4.5: Tightening lid of pot with
fungicides mixed seeds
Fig. No. 6.4.6: Shaking the pot for well
mixing of fungicides and seeds for 8 – 10
minutes
Fig. No. 6.4.7: Pouring out treated seeds in
clean dish or other pot
Fig. No. 6.4.8: Treated seeds ready for
sowing
Source: JICA Project Team
(C) Precautions during seed treatment
The following things need to be considered while treating the seeds:
Select non-windy place to treat seeds with fungicide so that air will not carry away the
fungicide.
Children, aged people, pregnant women are more vulnerable to poisonous effect of
fungicide hence; they should not be involved in treating the seeds.
Use mask, gloves, and goggles while treating seeds.
Wear the clothes that cover whole body.
Use only proper or prescribed amount of fungicides.
Wash thoroughly with water when fungicide touches your skin directly.

Wheat Seed Production Technique Manual 14
6.5 Land preparation and sowing of wheat
(A) Field sanitation before cultivation
In case residues of earlier crops remain in the field, the larva of the pest and disease of
the previous crops stay alive in soil, and attack the new crops as well. Therefore, the
field should be cleaned after harvest.
(B) Application of FYM (Farm Yard Manure)
Around 50-60 bamboo baskets of well-fermented FYM per Ropani of land should be
applied during the land preparation or first ploughing (if possible 1-2 month earlier of
planting time).
Use of unfermented FYM (farm yard manure) can increase pest such as white grubs,
cut worms and other worms.
In case, heaps of FYM put in the field for long time, the nutrients in the FYM will be
lost and insect may lay eggs in the heaps. So, it should be better spread the manure
and plough the field immediately.
(C) 1stploughing
1-2 month before planting, during Dec-
Jan first ploughing should be done.
Plough the field two times, which will
make the soil loose and make easy for
aeration and root growth. In the first
time, plough the field 5-8 cm deep and
second time 10-15 cm deep ploughing
should be done.
In case, there is big size of soil clods
present in the field after first ploughing,
the breaking of those clods should be
done manually with the help of spade
before those clods become hard.
(D) 2ndPloughing and sowing of wheat
The field should be ploughed second time just before seed sowing in line, and the
application of basal dose of chemical fertilizers should be done. Line sowing has an
advantage over broadcasting as it requires less seed, facilitates easy weed control and
field inspection.
Detail of seed sowing time, amount and method are as follows:
Sowing time:
Generally the time of wheat sowing is during winter or cool season.
The sowing begins from 1st - 2
nd week of November.
Fig. No. 6.5.1: Ploughing the land for
wheat sowing
Source: Crop Development Directorate,
Harihar Bhawan, Lalitpur

Wheat Seed Production Technique Manual 15
Amount of sowing seed:
About 250 – 300 wheat seeds per square meter land should be sown.
About 3.5-4 kg seed is required for a Ropani of land (It may vary as per the variety of
wheat).
Method of sowing seed:
It is better to sow wheat seeds as:
Seed to seed distance: 10 cm.
Line to line distance: 25 cm.
Sow each seeds at 1-1.5 cm depth sowing 2-3 seeds in each spot.
After sowing the seeds, the soil should be slightly pressed in order to compact the
soil. This will help the soil maintain moisture and will enable the seeds to get more
water.
(E) Application of chemical fertilizer
The half dose of Urea, full dose of DAP and full dose of Potash should be applied in
line and sow seeds in same line.
The detail amount, time and time of fertilizer application is mentioned on the table
below:
Table No. 6.5.1: Name of fertilizers, amount and timing of application.
Fertilizers/
Manures
Basic dose
(per Ropani)
Top dressing(kg/ Ropani) Time
1st 2
nd
Compost/FYM 50-60
bamboo
basket
(250-300 kg)
- - Land preparation
(before one month of
sowing)
Urea 4 kg 2 kg 2kg First time: crown root
initiation stage(1 month
after sowing)
Second time: Plant
elongation stage (3
month after sowing)
DAP 5 kg - - 2nd
ploughing time
Potash 2.0 kg - - 2nd
ploughing time
Source: JICA Project Team

Wheat Seed Production Technique Manual 16
7. Farming Activities during Growth Period
7.1 Weeding and Top dressing
1st weeding and top-dressing
Weeding helps to save the unnecessary consumption of micro-nutrients applied
for wheat. First weeding should be done 1 month after sowing (at crown root
initiation stage). At the same time, first top dressing should also be done right
after first weeding.
We should apply 2 kg of urea per Ropani of land on the row near each plant row
as top dressing.
2nd
weeding and top-dressing
Second weeding should be done on plant elongation stage after about three month
of sowing. At the same time, second top dressing should also be done right after
second weeding.
The amount of urea during second top dressing should be applied as same as 1st
top dressing.
7.2 Irrigation
Irrigation means the providence of water in the field for the plants, due to which the
plants get moisture from soil, and we can obtain higher production.
1st irrigation
In case, there is no rain until a month after sowing, we should give the irrigation in the
field after 20-25 days of sowing during the time of crown root initiation stage.
2nd
irrigation
If possible, during the time of spike formation (after about 3 and half month),
irrigation should be given in the field, which help to produce more grains.
7.3 Pressing
Pressing is the process of pressing the
plants in the field by the help of cattle
with putting net on their mouth or by the
help of foot. Pressing helps to increase
the number of tillers of plants, and gives
higher production.
1st Pressing
Pressing is done in the wheat field for
increasing the tiller numbers due to
which the production can be
increased.
Fig. No. 7.3.1: Pressing the wheat
Source: JICA Project Team

Wheat Seed Production Technique Manual 17
First pressing is done after 35-40 days of sowing during tiller formation stage.
2nd
pressing
Second pressing is done in wheat field 10-15 days after first pressing at the time
of tiller development stage.
7.4 Field inspection
Field inspection will help to produce
high quality seed by controlling
disease, pest and maintaining purity.
The field should be removed of
undesirable plants including off-types
of genetic variants of the same variety,
other varieties of wheat, noxious
weeds and infected plants with seed
borne diseases.
This practice is carried out to maintain
the genetic purity of the variety, and to
keep the seed crop free from seed
borne diseases.
The following types of off-types and diseased pest infected plants should be removed
during each field inspection at different stages of plants:
(A) 1st Field inspection
Tiller development stage (50-60 days after of sowing)
Check plant height in the field, and remove plant with un-uniform height (so much
taller and so much dwarf)
Check the plants stalk or tillers thickness and remove, which is thinner and thicker in
appearance from other majority of plants.
Check plant in the field and remove plant having leaves with un-uniform colour.
(B) 2nd Field inspection
Flowering-milking stage (after 4-5 month of sowing)
Check and remove the plants having too early and too late spike formation.
Check and remove the plants having too late and too early flower formation in the
plants among the whole plants in the field.
Check and remove the plants having un-uniform plant height. (remove too short and
too tall plant)
Fig. No. 7.3.1: Technicians together with
farmers inspecting wheat field
Source: JICA Project Team

Wheat Seed Production Technique Manual 18
(C) 3rd Field inspection
Milking stage-maturity stage (5-6month after sowing)
Check the field situation and remove the plants having un-uniform ear size, shape and
different grains setting density.
Check the plants in the field and remove the plants having un-uniform Awn (thin
threads in spike) i.e. too long awn or too short awn.
Check the plants in the field and remove those which are too early matured and too
late matured.
8. Major Pest and Diseases in Wheat
8.1 Major pests in wheat
Pests Symptoms of
damage
Control
Fig. No. 8.1.1: White Grub
Source: Crop Protection
Directorate, Harihar Bhawan,
Lalitpur
It lives in soil
and feed on
roots, and the
plant dies.
Ploughing the field and pick up the
white grub manually,
Do not use unfermented FYM.
Use Hamal Jhol 1.
In case there is the prevalence of
white grub every year, use 2 kg
Meterhizium pesticide for per
Ropani mixing with soil during
second ploughing time.
We also can use Meterhizium
mixing with soil in second weeding
in highly infected field.
Fig. No. 8.1.2: Army worms
Source: Crop Protection
Directorate, Harihar Bhawan,
Lalitpur
The larva of
army worms
randomly feed
on ripe wheat
grain and young
shoot.
They also eat
wheat seeds and
leaves as well.
They eat all
leaves and
make the plant
leafless.
The land should be properly
cleaned and ploughed before
sowing.
The entire residues left of previous
crop should be collected and burnt
or buried.
2 ml of Metacid 50 EC should be
mixed with 1 litre water or make
the solution of 15 litre mixing 30
ml. of Metacid for 1 Ropani of land
and spray in the evening time (army
worms usually hide in soil during
day, hence, pesticide should be
sprayed in the evening time)

Wheat Seed Production Technique Manual 19
Pests Symptoms of
damage
Control
Fig. No. 8.1.3: Wire worms
Source: Crop Protection
Directorate, Harihar Bhawan,
Lalitpur
These worms
damage root
and parts of
plant under soil
and sometime
to the seeds
also.
Adopt crop rotation system
Irrigate the field properly if there is
irrigation facility during period of
cultivation.
Fig. No. 8.1.4: Aphid
Source: Crop Protection
Directorate, Harihar Bhawan,
Lalitpur
These pests
cause more
damage during
the time of
spike formation.
They cause
serious damage
sucking sap
from leaves and
young spikes.
Use Dimethoate pesticide at the rate
of 1 ml. per litre of water, and spray
at the aphid appeared 1 Ropani of
field. (Make the solution of 15 litre
of water mixing with 15 ml of
Dimethoate and spray).
Fig. No. 8.1.5: Cut worms
Source: Crop Protection
Directorate, Harihar Bhawan,
Lalitpur
The larvae of
this pest feed on
stem and leave
in night time.
Spray 1 kg of Dorsban granule per
Ropani near each plant during the
time of vegetative growth stage.
The weeding and field sanitation
should be done for controlling pest
in the field.

Wheat Seed Production Technique Manual 20
8.2 Major diseases and their control
Diseases Symptoms Control/ Management
Fig. No. 8.2.1: Yellow rust
Source: Crop Protection
Directorate, Harihar Bhawan,
Lalitpur
Smaller long-type
yellow dots
appear on upper
side of leaves,
and the dots make
a yellow line on
leaves.
This disease also
appears on
underside of leaf,
husk of grain and
ear part.
The entire wheat
field looks yellow
if there is high
attack of this
disease.
Cultivate the disease
resistant varieties of wheat
such as W. K. 1204, Gautam,
Danphe Munal, Dhaulagiri
etc.
Use only recommended dose
of urea.
Spray the Mancozeb
(fungicide) solution made by
mixing 2.5 gm. in 1 litre
water. (Spray 15-20 litre of
fungicide water solution with
40-50 gm. of Mancozed for 1
Ropani of field.)
Spray Propiconazole solution
at the rate of 0.75 gm. per
litre of water. (Make solution
of 15-20 litre water with 11-
15 gm. chemical for 1
Ropani of field, and spray it).
Fig. No. 8.2.2: Loose smut
Source: Crop Protection
Directorate, Harihar Bhawan,
Lalitpur
The wheat ears
are filled with
black fungal
powder and
sometime wind
carries away the
powders, and
remains nude
spike only.
Before sowing the seeds,
keep the seeds in cold water
for 4 hours, and treat the
seed placing in hot water at
52 degree Celsius for 10
minutes or 50 degree Celsius
for 5 minutes, and shade dry
the seeds for some hours.
Cultivate disease-resistant
variety of wheat such as
Annapurna – 4.
Treat per kg of seeds before
sowing with 2- 3 gram of
fungicide such as Vaitavax –
2000, Bevis tine, Benlet,
Dorosal, etc. (for 1 Ropani,
use 7-10 gm. fungicides for
3.5 kg seed treatment)

Wheat Seed Production Technique Manual 21
Diseases Symptoms Control/ Management
Fig. No. 8.2.3: Bacterial leaf
blight
Source: Crop Protection
Directorate, Harihar Bhawan,
Lalitpur
Initially, small
brown or black
dots appear on
leaves.
Later on these
dots develop into
oval shape.
The central part
of the shape
becomes light
brown with
yellow circle
around them.
Finally, all dots
expand and
become like as
one and the
leaves appeared
as burnt.
Cultivate disease-resistant
variety of wheat such as
Pasang Lhamu, W K 1204,
Aaditya, Gautam, Vijaya,
etc.
Early sowing of seeds
somehow help to minimize
the infection of this disease.
(sowing last of October )
Apply the urea, phosphorus,
and potash as
recommendation amount.
Use the seed only after the
chemical treatment by
Vitavax -200 at the rate of 2-
2.5 gm. per kg of seed (7-9
gm. per 3.5 kg of seeds for 1
Ropani of land)
9. Harvesting
9.1 Timing of harvest
When the stem just below the spikes
turn yellow from green, it is the
signal that the crop is ready for
harvest and it is best to cut and
collect the wheat crop within 7 days
of it. Generally, during the time of
harvesting, moisture in wheat seed is
around30%.
Wheat should be harvested in sunny
day. Seed may germinate or rotten
during storage in case plant become
wet by rainfall.
Fig. No. 9.2.1: Wheat ears ready for harvest
Source: Crop Protection Directorate

Wheat Seed Production Technique Manual 22
9.2 Method of harvesting
The stalk is cut about 5-10 cm above
the ground or with a stalk length of
about 65-75 cm, which is easier for
bundling and threshing.
9.3 Threshing
Beating the cut plants in bundles by manually with stick is also a method of threshing
the seeds, but losses of seeds is high by this method.
Pedal thresher for wheat threshing reduces drudgery. The working capacity of such
threshers is 40-50 kg per hours.
The bundle of wheat can also be threshed beating in slab. This method may damage of
wheat as well as the grain remains in wheat ear.
10. Post-harvest Processing and Storage
10.1 Cleaning the seed
It consists of the separation of undesirable material, such as weeds, straw, chaff, panicle
stems, empty grain and damaged grains, sand, rocks, stone, dust, plastic and even metal
and greases particles from threshed seeds. We clean the seeds for following advantage.
To get the quality seed, we need to clean it properly.
The air fan or wind can be used while cleaning.
Winnowing fans
The seed should be cleaned by using hand operated and power operated winnowing
fans.
After threshing, seed should be cleaned by using these fans.
Generally, such winnowing fans are available at agriculture machinery shops or
agricultural machinery shop in urban areas.
Fig. No. 9.2.2: Wheat harvesting by
farmers
Source: Crop Protection Directorate

Wheat Seed Production Technique Manual 23
10.2 Drying
Generally during the time of harvesting, moisture content of the fresh seeds is higher
(30% around).
Seeds with high moisture contents have a high respiration rate and are susceptible to
attack by micro-organisms, insects and other pests. Therefore, the harvested seeds
with high moisture contents must be dried to make 12% moisture for safe storage or at
least dry until moisture content drops to18% for temporary storage of 2 weeks when
there is not possibility quick drying of seeds.
The main constraint of sun-drying is the dependence on good weather conditions.
Losses in wheat products or seeds is main problem arose by bad drying practice.
Therefore, good drying practice is crucial for minimizing post-harvest losses, since it
directly affects safe storage of seeds.
10.3 Storing seeds in storage
Seed storage refers act of keeping the seeds safe during the storage time until the
seeds are sown or marketed.
Seeds should be very carefully handled and stored without contamination from other
variety and other crop seeds.
The storage also should protect the seeds from pests and rodents which eat or damage
the wheat seeds.
The wheat seed should be stored without mixing with other variety and seed of other
crops.
(A) Moisture management
If the moisture in seed is more than 12 % at the time of storage, the level of both heat and
water increases, and intensify respiration in seeds is also creased. In this condition, the
risk of fungal disease, pest and other disease attack increases and reduce the quality of
seeds. Likewise, seed should be stored in proper moisture. The following measures can be
adopted to manage moisture in seeds:
The seeds should be stored only after drying them in the sun for 4 – 5 times.
The seeds should be cleaned before loading into the store container/sacks.
Table No. 10.3.1: Moisture contents and storage duration
Moisture contents of seeds Storage duration
10-12% For 8-12 months
< 9% For more than 1 year

Wheat Seed Production Technique Manual 24
(B) Storage management
There should be only one door or
opening (not more doors or
windows) in the seed storage to
maintain the temperature and to
protect from the rodents and robbery.
While storing seeds in sack or metal
container, such sacks or containers
should be kept above the floor on a
raised plank and without leaning the
wall.
The storage structure must protect
the wheat seeds from extreme heat or
cold and moisture which causes
microbial and fungal growth; and also from pests and rodents which consume or
damage the wheat seed. So, these points should be considered while storing the wheat
seed.
(C) Pest and rodents control in storage
The store should be cleaned properly before storing the seeds and after the seed are
sold out.
Use fumigants pesticide like Aluminium phosphate or Methyl bromide at the rate of 3
tablets of each 3 gm per ton (1000 kg) of stored seed for fumigation of the storage to
control form the moths, mites and other storage pests.
Fumigation by pesticides in the storage should be done by keeping the fumigants in
the centre of storage and let fumigation inside by closing all doors and windows for at
least 24 hours during storage and before storage period.
The place for storage should be clean and safe from pests and mice.
Use mouse trap in the storage to protect seeds from mice attack.
Inspect the storage regularly to ensure occurrence of pests.
Do not keep door of storage open for a long time for controlling birds, rodents and
insect attack.
For weevil, one Sulphas tablet can be used for 100 kg seeds by wrapping in cotton
cloth and placing it in the centre of the normal sack / metal bin filled with seed.
Fig. No. 10.3.1: Wheat stored in sacks
Source: Crop Development Directorate

Wheat Seed Production Technique Manual 25
(D) Packing material and method
Seed should be packed and stored on sunny day after well drying in sun for 4-5 times.
To store the seeds, the seeds should be properly dried before the monsoon begins and
stored in metal bin, hermetic bag or plastic sack. The bag or sack should be fastened
air tight in order to protect seeds from possible moisture.
Super-grain bag refers to the bag in which insects cannot enter easily and it is air
tight. Even if the insects enter into the bag, the insects and fungus die due to
treatments done for such bag. The following ways can be followed to use super-grain
bags:
Squeeze the air out of the bag after placing the seeds inside the bag.
Keep the bags binding it in two places and fastening properly after the air inside is
squeezed out.
The pests can be controlled without using any chemical pesticides.

Wheat Seed Production Technique Manual 26
B) Management Aspects for Quality Seed Production
11. Necessity of Management by Seed Production Cooperative
Production of seeds for commercial sales needs to be done in a certain scale in order to meet
the demands of the buyers and to be able to provide stable supply. When a part of the
production is affected by diseases or pests, this must be substituted by seeds produced in
other plots; otherwise, the buyers will not be able to rely on the producers for stable supply.
This may be quite difficult for a single farmer to manage; and therefore, it is encouraged that
seed production should be done through seed production cooperatives.
12. Structure and Roles of Seed Production Cooperative
The prime objective of the seed production cooperatives shall be marketing and sales of the
produced seeds, as well as its overall quality control. That’s why, the cooperative should also
function as a liaison body with external organizations such as DADO and Regional Seed
Production Laboratory in order to request for technical support or official seed laboratory
testing. Furthermore, the cooperative can also work on developing the capacity of its member
farmers in order to further enhance the production and quality of seeds.
The major responsibilities of the cooperative in seed production are expected as follows:
To bear the risk and accountability of produced seed and seed production work.
To formulate rules and regulations, approve and implement them for quality seed
production.
To keep records of seed production works, and inform the group / members as per the
need.
To expand seed production selecting possible area for quality seed production.
To supervise the routine works such as use of manure and pesticides, weeding and
irrigation management, harvest time, drying out, cleaning, storing and treatment for seeds
according to the advice from Technical/ District Agriculture Development Office.
To observe crop, hold meetings and exchange information and initiate process to address
the problems.
To promote technical skill and knowledge of seed production.
To coordinate and collaborate with District Agriculture Development Office, District
Cooperative Association, and various other seed production organizations.
To facilitate in laboratory testing, processing, storing, packaging, certification and
marketing of the produced seeds.
To work as a mediator among the District Agriculture Development Office/ Seed trader
and seed production sub-group.
To extend the seed production extending the potential seed production area.
Furthermore, seed production groups shall be formulated by dividing the member farmers by
the location of their farmlands, in order to effectively manage the seed quality. Each group

Wheat Seed Production Technique Manual 27
shall also select one coordinator to link the group members with the cooperative. The major
roles and responsibilities of the group coordinator shall be as follows:
To maintain regular communication, coordination and cooperation with cooperative.
To work as a mediator between farmers and cooperative.
To inspect crops time to time coordinating among inter-groups.
To report problems seen in seed production to the cooperative, and take necessary
initiative for solution.
To treat all members equally.
To inform all members about any information received from the cooperative or any other
bodies or organizations.
To participate or make arrangement for other members to participate in seminars in turn.
To utilize received support or materials for the benefits of all, manage them properly or
get them managed.
To take mutual and consensual decisions, or help to that end.
To get committed for producing quality seeds.
The organizational structure of the suggested Seed Production Cooperative is indicated in
the following figure
Fig. No. 12.1 Structure of suggested seed production cooperative
Source: JICA Project Team
Seed production
group/ Plot 1
Coordinator,
members
Seed production
group/ Plot 2
Coordinator,
members
Seed production
group/ Plot 3
Coordinator,
members
Seed production
group/ Plot 4
Coordinator,
members
Seed production
group/ Plot 5
Coordinator,
members
Seed Production Cooperative
Executive member: Chairman, secretary, treasurer, members
Individual seed production member

Wheat Seed Production Technique Manual 28
13. Major Actions to Be Taken by Seed Production Cooperative
The followings indicate the major actions to be taken by the seed production cooperative.
13.1 Land and variety selection
The variety and amount of seed have to be planed and produced in consultation with
DADO, in consideration of market demand.
Cooperative needs to select appropriate seed variety based on the climatic and
geographical conditions in coordination with the respective District Agriculture
Development Office.
The cooperative shall not change the seed variety every year in the production area to
avoid contamination with other previous variety.
Land plot has to be selected through discussion with member farmers and respective
DADO in consideration of the following points:
If seeds of different variety have to be produced under a single cooperative, the
production area should be divided into separate plots to minimize chances of
getting mixed different seed varieties, while producing quality seeds.
Trustworthy farmers and separate fields with isolation distance should be selected
by coordinating with the concerned farmers to produce quality seed by
cooperative.
Separation of plots for food crop and seed crop can be done on the basis of trail/
roads, water cannel or forest, etc.
In case, seed crop and food crop are to be grown at the same area at the same
period, the crop variety should be same.
13.2 Quality control and record keeping
(A) Record keeping
To ensure the seed quality, it is very important to record the process of seed
production management (field inspection form) of production area, every stage of
crop development, and keep all records of produced seeds including laboratory
certificates.
Also, keep complete records of seed produced by all farmer members after the
harvest.
(B) Preserve seed from mixing and infection
Preserve seed from getting crossed with other variety while harvesting and storing.
Even for cultivating food crop around seed production area, same variety of crop
should be cultivated. However, such crops would be better to cultivate at the
difference of 1 month.

Wheat Seed Production Technique Manual 29
(C) Prediction of disease and pest attack
Predicting the possible attack from disease and pest at the early stage of crops, in
consultation with the District Agriculture Development office or related governmental
offices, the outbreak of disease and pest attack can be easily and effectively controlled
using necessary pesticide at the right time.
(D) Regular inspection of field
It is very important for the farmers, seed production group and cooperative to pay
attention and keep records of genetic quality of crop, condition of weeds, and
infection from disease and pests, etc., during regular field inspection and management
of crop. The frequency and contents of regular inspection are indicated in the
following table.
Table No. 13.2.1
Frequency and contents of field inspection by Cooperative and Group
Responsible
sides for seed
production
Inspection
Time
Inspection Work
Seed
production
Cooperative
At least twice
a month
Inspect of proper spacing, crossing with other
varieties, outbreak of disease and pest, weeds
and height situation etc., and provide necessary
advices to farmers accordingly for controlling
measures, and keeping records of it.
Seed
production
sub-group
At least fourth
a month
Weeds, equal height, outbreak of disease and
pest, and provide necessary advices to farmers
and cooperative accordingly for controlling
measures, and keeping records of it.
Source: JICA Project Team

Wheat Seed Production Technique Manual 30
(E) Coordination with DADO/Regional Seed Production Laboratory or other
related governmental authorities for field inspection
Coordination shall be made with DADO/Regional Seed Production Laboratory or other
related governmental authorities to conduct official field inspections as indicated in the
following:
Table No. 13.2.2
Timing of official field inspection
Source: Seed production and management training booklet, 2069 B.S., www.sqcc.gov.np
The acceptable standards for official field inspection are as follows:
Table No. 13.2.3
Minimum standard of certified seed crop to be checked
During Official Field Inspection
Name of Crop Minimum
Isolation
distance (in
meter)
Maximum
Off-type plants
percentage
Maximum
diseased plant
in percentage
Restricted disease
Wheat 3 0.30 0.50 Loose smut
Source: Seed production and management training booklet, 2069 B.S., www.sqcc.gov.np
Crop name Field inspection Time Activities
First Second
Wheat Time of spike
formation
Grain ripening time
Uproot and Remove:
disease plants
Early or late spike formatted
plant
Plant with different spike,
colour, size, length, grain
numbers etc.

Wheat Seed Production Technique Manual 31
13.3 Collection of produced seeds and storage
(A) Germination test
After harvesting the seeds about 2 to 3 months, conduct germination test as indicated
in “6.3 Germination test”.
The coordinator of each group shall collect samples from individual farmer, and
conduct germination test based on the procedures indicated in “6.3 Germination
test”.
If the result of the germination test is below 85%, the seeds will be returned to the
respective famer. The farmer shall once again clean the seeds and submit it to the
coordinator. This process shall be continued until the germination rate becomes 85%
or above. If the germination rate does not reach 85% after several times of cleaning,
the coordinator shall reject the seeds, and the farmer shall use them for self-
consumption or sales as food-crop.
It should also be noted that germination of seeds is affected by low temperature.
Therefore, when conducting germination test, temperature of the container should be
25-30 ºc.
This process should be conducted with extra care; because if the reliability of the
germination test at this point is low, it will affect the seed quality of the entire lot,
which will lead to lower the income of the whole seed production group.
After confirming that the seeds have germination rate of 85% or above, the
coordinator shall submit the record of final germination tests for each farmer to the
cooperative. The record shall consist of; name of farmer, type and variety of crop,
period of germination test, and germination rate.
(B) Collection of produced seeds and storage
After receiving the final result of the germination tests from the group coordinator, the
cooperative shall collect the seeds from the group.
The certificate provided by regional lab is mandatory before marketing of seeds.
The seeds collected from the individual subgroups shall be managed as one “lot”,
which should not be mixed with seeds from other sub-groups.
The seeds should be mixed together with same lot in clean and open space. But, it
should be ensured that the place is clean before and after mixing the seed to each
other, so that it should be protected to mix with dust and other seeds.
After mixing, the seeds shall be packed in super grain bags or tight metal bins with
one Selphas tablet for 100kg seeds wrapped in cotton cloth in the centre of the bag/bin.
An identical tag indicating the lot number, name of crop, variety of seed, production
year and date of packing shall be placed in a visible location on each bag/bin.

Wheat Seed Production Technique Manual 32
The bags/bins shall be stored as described in “(B) Storage management” of “10.3
Storing seed in storage” with due attention that it will not be mixed with seeds from
other lots.
(C) Coordination for official germination test
The cooperative shall collect samples from each lot, and submit them to DADO or
Regional Seed Production Laboratory for official lab testing.
The standards for certified seeds are as indicated in the following table.
13.4 Standard for seed certification
Table No. 13.4.1
Acceptable and unacceptable standard in seed inspection for certified seed
Crop
name
Min.
Physical
Purity
(%)
Max.
next
mater
(%)
Max.
other
crop
seed(grai
ns per
Kg)
Max.
seeds of
restricted
weeds
(grain per
kg)
Max.
identifiable
other
variety
seeds
(grains per
Kg)
Min.
germin
ation
rate
(%)
Max.
Moisture
percentag
e (%)
Wheat 98 2 20 5 20 85 12
Source: Seed production and management training booklet, 2069 B.S.,
www.sqcc.gov.np
After receiving the results of the official germination test, the result should be
recorded together with the amount of seed collected in each lot. Furthermore, the
following information should be additionally indicated on the bag/bin of seed for each
lot.
Purity Percentage
Germinating percentage
Month of seed testing
13.5 Packaging
After receiving the certificate, seeds should be kept in clean and attractive bags.
According to consumers' choice, seeds can be packed in plastic bags or sacks of
different sizes and sent to the market.
13.6 Warranty tag
In the form received from Agriculture Development Office required details should be
carefully filled up on the basis of laboratory testing certificate.
Name of Crop
Wheat Seed Production Technique Manual 33
Name of variety
Tag number
Lot number
Production Year
Physical Purity Percentage
Moisture percentage
Germinating percentage
Seed weight
Date of seed testing
Name of cooperative
Address of cooperative
Treated chemical name
Validity period of seed laboratory testing results provided by seed testing laboratories
is only up to six months from the time of testing, and retesting is required if
entrepreneurs want to sell that seed after six month duration. (Seed Act, 1988)
Warranty tag should be kept inside plastic, and it should be stitched placing visible in
middle part of the open end of the bag.
While stitching bag together with the form, details of the form should be visible.
Fig. No. 13.6.1 Sample tag
Source: JICA Project Team
Fig. No. 13.6.2 Stitched sample tag in seed
bag
Source: JICA Project Team
Wheat Seed Production Technique Manual 34
13.7 Advertisement and sales
Promotion can be done disseminating information about quality seeds through the
local medias such as local newspapers, Radio, etc. which help in the sale of seeds in
the local market itself.
Marketing for seeds can be done in collaboration with District Agriculture
Development Office and Private companies for selling seeds or signing an agreement
with them.
After Marketing of seeds, the benefit shall be distributed to the individual farmers
after retaining a certain amount for logistic costs for the seed production group /
cooperative. The amount to be retained shall be decided and agreed by the members
prior to the handing over to the seed production group / cooperative.
14. Skilled Human Resource Development under Seed Production Group and
Cooperatives for the Quality Seed Production
In order to further enhance the amount and quality of seeds produced by its members, the
cooperative shall further coordinate with DADO and its Service Centres to receive technical
information and trainings for its core members including the coordinators of each group. The
knowledge gained shall be further disseminated to all members through the coordinators.

Wheat Seed Production Technique Manual 35
Compost
Wheat Seed Production Technique Manual 36
PART 1: Farm Yard Manure (FYM)
1. Introduction
Generally Nepalese farmers have the practice of collecting FYM from their livestock
shed as an organic fertilizer for their crop fields.
Farm Yard Manure is the manure prepared in decomposed from by collecting dung and
urine of farm animals along with wastes feeds, fodder, and the bedding materials. FYM is
the main organic manure used in Nepal.
However, Nepalese farmers have the practice of applying immature (un-decomposed)
FYM in their field. Immature manure FYM can cause the generation of harmful gas
ammonia and wilting, and disturb for well germination of seeds. And, also the immature
(un-decomposed) manure does not improve soil conditioning capacity of increasing water
holding and fertilizer holding ability. Weed seeds can also survive inside manure and as a
result, weeds problems occur in the field.
Well decomposed FYM can solve many crop growth problems in the fields.
2. Advantages of Well Decomposed Farm Yard Manure (FYM)
2.1 Improvement of soil productivity
Application of well decomposed FYM in soil act as a soil conditioner which is
capable of improving moisture holding, fertilizers holding and air passing capacity; as
well as it helps the capacity of drainage to soil in good balance. This type of soil is
very useful for good growth and development of plants.
By the application of well decomposed FYM, some portions of nutrients are available
directly to the plants and remaining nutrients in soil is released to plants for long time.
The materials that soak urine should be used as bedding materials in animal shed
which can help to minimize the loss of urine. Otherwise, we can also make the urine
collecting place separately with plastic or cemented structure, and use urine as
fertilizers.
By using well decomposed FYM in field, fewer amounts of chemical fertilizers are
also enough for crop, which can also save the money.

Wheat Seed Production Technique Manual 37
Table No. 2.1Composition of FYM
Materials Nitrogen
(%)
Phosphorus
(%)
Potash (%)
Paddy straw 0.42 0.20 0.45
Cow dung 0.71 0.70 0.74
Pig faeces 1.35 1.94 1.05
Source: Ministry of Agriculture, Forestry and Fisheries, Japan 2000
2.2 Healthy for plants
Well decomposed FYM is free from weed seeds; plant pathogenic Fungi, bacteria and
parasites.
Around temperatures of 55 °C to 65 °C during decomposition, many microorganisms,
plant pathogenic fungi, bacteria and parasites are destroyed.
2.3 Good means of breakdown of organic matter
FYM is the good means of breakdown of organic matter in simpler form
During decomposition of FYM, high temperature inside is accelerated, which helps to
breakdown of structural molecules of bedding materials (straw, weed, grasses of feed,
etc.) into simpler nutrient form which can be easily uptake by plant after its
application.
3. Material Required for Making FYM
Animal excreta: Dung, Urine
Bedding materials: Straw, saw dust, dry leaves etc.
4. The Place for Making FYM
Place for collecting and making decomposed FYM should be as followings:
The nearer place to animal shed
Elevated and well drained place
Place of easy care and observation
Wheat Seed Production Technique Manual 38
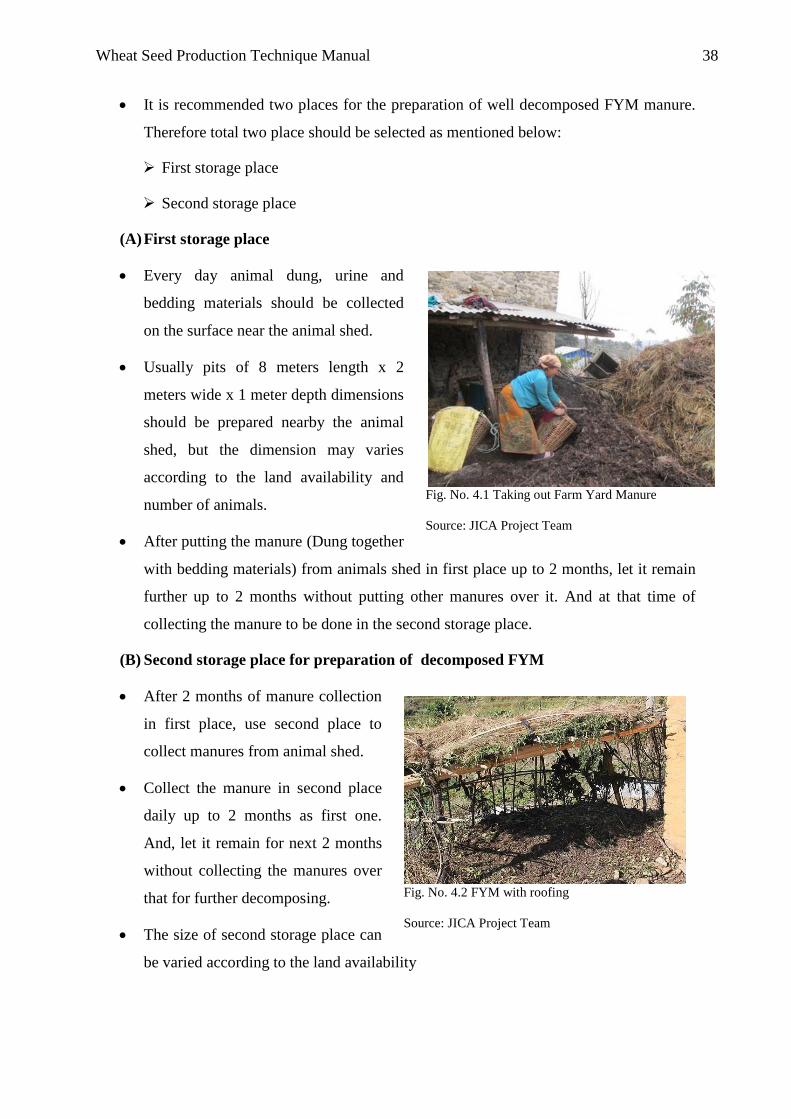
It is recommended two places for the preparation of well decomposed FYM manure.
Therefore total two place should be selected as mentioned below:
First storage place
Second storage place
(A) First storage place
Every day animal dung, urine and
bedding materials should be collected
on the surface near the animal shed.
Usually pits of 8 meters length x 2
meters wide x 1 meter depth dimensions
should be prepared nearby the animal
shed, but the dimension may varies
according to the land availability and
number of animals.
After putting the manure (Dung together
with bedding materials) from animals shed in first place up to 2 months, let it remain
further up to 2 months without putting other manures over it. And at that time of
collecting the manure to be done in the second storage place.
(B) Second storage place for preparation of decomposed FYM
After 2 months of manure collection
in first place, use second place to
collect manures from animal shed.
Collect the manure in second place
daily up to 2 months as first one.
And, let it remain for next 2 months
without collecting the manures over
that for further decomposing.
The size of second storage place can
be varied according to the land availability
Fig. No. 4.1 Taking out Farm Yard Manure
Source: JICA Project Team
Fig. No. 4.2 FYM with roofing
Source: JICA Project Team

Wheat Seed Production Technique Manual 39
If possible, storage place for collecting manure should be walled and roofed with
stone, wood, or hay, which protects manure from direct sunlight and rain. It is
important to protect manure from sunlight and rain to protect micronutrients;
otherwise the micronutrients in the manure will be lost.
(C) Actual Procedure for collecting and using FYM
The fresh dung together with bedding materials should be collected daily from animal
sheds to the first storage place up to 2 months properly, and let it remains for next 2
month by covering it with dry leaves, straw or plastic sheet.
After fulfilling the manure in first storage place, the manures should be collected daily
to the next storage place.
Put the manure in next storage up to 2 months and cover it like as in first place, and
let it remains for next two months.
The manure already becomes fermented in first place up to two months, when we are
collecting dung in second place. So, we can apply the manure from first place to the
field, and the first place will become empty and we can collect the dung again on first
place. This cycle continue on every two month period on first and second places. This
way, we can get well fermented FYM.
5. Condition Required for Well Decomposition of FYM
Well decomposition of manure is required for making good FYM. For making well
decomposed manure, the following things should be considered well during its
preparation:
After piled up the fresh FYM, moisture content of the FYM should be managed 50-
65%. It can be known by squeezing the manure in palm of hand, if it is wet. If
moisture is less, water should be sprayed, and if moisture is high, the manures should
be dried in shadow by removing cover for 1-2 days.
The fresh FYM temperature rises up to 70 degrees Celsius within 2 to 3 weeks (1
week in summer) after deposition, which is not good for well decomposition of FYM.
Therefore, we should be careful for turning over at every 60 ºC for two to three times.
It can be known by putting hand inside the manure and feel hot.

Wheat Seed Production Technique Manual 40
The manure has to be covered with a plastic sheet or straw or dried leaves or mud to
protect rain and direct sunlight.
FYM will be ready to use from first place after 2 months of filling it.
6. Collection of Animal Urine and Its Advantages
6.1 Collection of urine
Urine can also be collected and preserved for separate use or for mixing in manure by
following method:
The floor of cattle shed should be cemented to collect urine.
To collect the urine, cemented tank should be constructed at first; and then urine
could be collected in plastic tank.
By making a pit in a corner of the shed, urine can also be collected
Fig. No. 6.1.1 Cattle urine collection through
pipe from shed
Source: JICA Project Team
Fig. No. 6.1.2 Cattle urine collection through
drain
Source: JICA Project Team
6.2 Advantage of collecting urine
The urine can be collected separately, and used as fertilizer since it has three times
more nitrogen than in dung.
Urine also can be used to control the disease and pests in crops. This can be sprayed
in 5 to 7 days gap by mixing 1 part of urine with 4-5 parts of water.
It also helps to reduce the application of chemical fertilizer and pesticide, which leads
to reducing production cost.

Wheat Seed Production Technique Manual 41
Separate collection of urine will help to sanitize and dry animal shed.
The urine can be used together with water as fertilizer.
7. Things to Be Considered While Making Farm Yard Manure (FYM)
The FYM should not be dried under the sun to decrease its weight, which will cause
the loss of nutrients.
The FYM should not be left on field in small heaps for long time as the nutrients will
be lost.
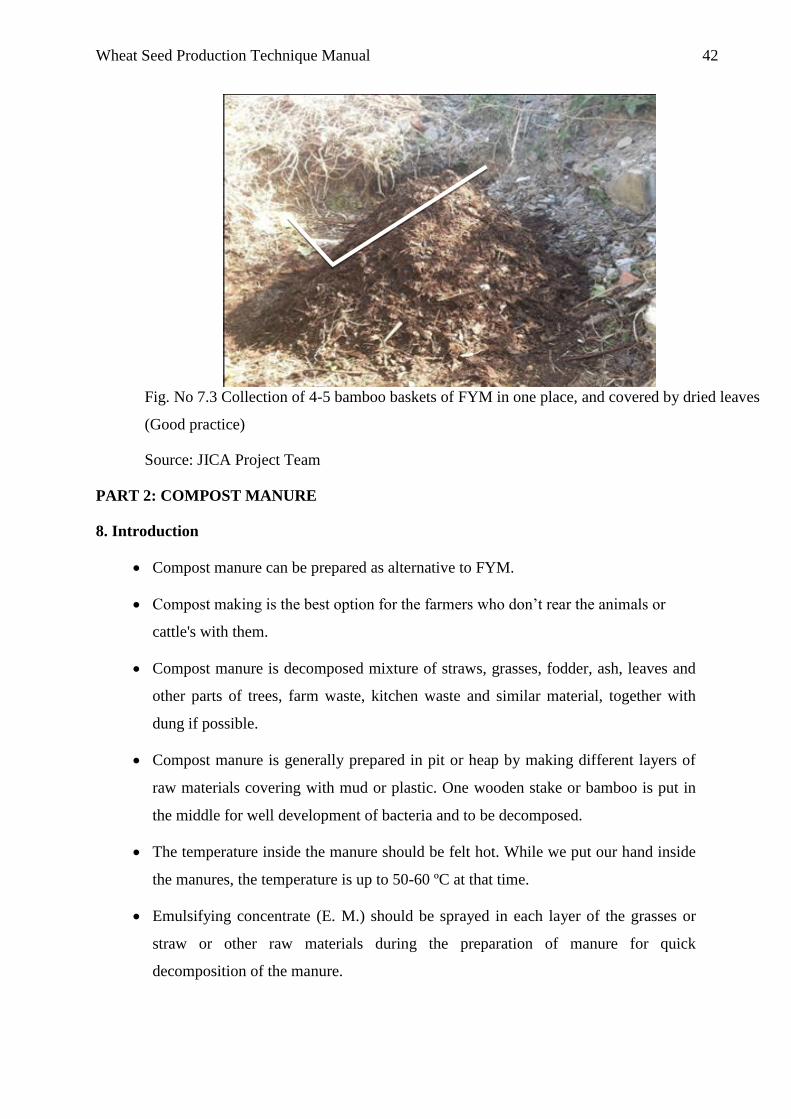
Instead of leaving the FYM in individual heaps, it would be better 4 to 5 bamboo
baskets of manure collection in one heap, and covered with straw, dried leaves,
plastic, etc., which will help to protect the nutrients.
Some photographs of wrong and good practices
Fig. No. 7.1 Manure dried in the sun
(Bad practice)
Source: JICA Project Team
Fig. No. 7.2 Small heap of manure in the field
(Bad practice)
Source: JICA Project Team
Wheat Seed Production Technique Manual 42
Fig. No 7.3 Collection of 4-5 bamboo baskets of FYM in one place, and covered by dried leaves
(Good practice)
Source: JICA Project Team
PART 2: COMPOST MANURE
8. Introduction
Compost manure can be prepared as alternative to FYM.
Compost making is the best option for the farmers who don’t rear the animals or
cattle's with them.
Compost manure is decomposed mixture of straws, grasses, fodder, ash, leaves and
other parts of trees, farm waste, kitchen waste and similar material, together with
dung if possible.
Compost manure is generally prepared in pit or heap by making different layers of
raw materials covering with mud or plastic. One wooden stake or bamboo is put in
the middle for well development of bacteria and to be decomposed.
The temperature inside the manure should be felt hot. While we put our hand inside
the manures, the temperature is up to 50-60 ºC at that time.
Emulsifying concentrate (E. M.) should be sprayed in each layer of the grasses or
straw or other raw materials during the preparation of manure for quick
decomposition of the manure.

Wheat Seed Production Technique Manual 43
9. The Advantages of the Compost Manure
It provides necessary nutrients to the soil for improving its fertility.
Increases the water absorbing capacity of soil.
Improves the physical, chemical and biological quality of soil.
Increase air aeration and water movement in the soil.
Manure can be kept in soil for long time.
Increases the microbial activity in the soil; due to which soil become soft, and
increase fertility status in the soil.
Compost manure can be prepared in own accessible places, so that it will be easy for
carrying manure in the field.
10. The Materials Required for Making Compost Manure
Waste straws and grasses.
Weeds, leaves fallen from trees.
Roots and stems of young plants.
Dung and urine of animals.
Organic kitchen product ( vegetable, food wastes)
Limestone, ash, urea, etc.
11. The Place for Making Compost Manure
The near place from farm.
Elevated and well drained place
Place of easy care and observation.
12. Methods of Preparing Compost Manure
12.1 Methods of preparing compost in pit
(A) Digging pit
It is better to dig a pit on winter season than in summer season due to which the
chance of drying out of material is less.
Wheat Seed Production Technique Manual 44
The length of the pit should be as per need, but depth should not be more than one
meter.
(B) Filling pit
The collected raw materials for making compost manure should be kept arranging
in layers inside the pit.
Wooden stick or a bamboo should be put in the middle of the pit during filling
materials inside the pit.
Spraying water in each layer of compost during its preparation will help for
making good compost manure.
It is better to make each layer up to15-20 cm (1 to 1.5 hand span).
We can also use dried leaves, green fodder, dung, water (2-3 litre of water in each
layer), lime powder (100-200 gm. in each layer), E. M. liquid (Mixture of 1 litre
E.M. and 10-15 litre water, and spray nearly 1 litre in each layer) and forest soil
(2-3 kg. in each layer) between each layer which help to decompose the manure
well.
E.M. liquid, Dung, Urine, lime powder is not mandatory, but it is better to apply
for producing well decomposed FYM.
Lime powder preserves the manure from its acidity and increases the bacterial
activities. Likewise, forest soil increases the bacterial numbers.
The use of dung and urine between the raw materials will increase the quality of
the compost.
The raw materials should be forcefully pressed inside the pit so that it decays
soon.
(C) Using bamboo or wood stake for manure ventilation
During the winter and dry summer, the compost should be prepared by pit method
due to which the moisture can be preserved inside the pit.
In case the temperature inside the compost become so much hot (over than 70 ºC),
bacteria cannot be survived and that will damage the compost, which will give the

Wheat Seed Production Technique Manual 45
less quality of compost. Therefore, to maintain the temperature only up to 60 ºC,
bamboo or wooden stake should be put during the time of compost preparation.
The bamboo or wooden stake should be swing or stirred round by hand in every
week for maintaining the temperature and passing air inside the manure, which
will give well decomposed compost manure after 3-4 month.
(D) Covering by mud or plastic
After filling up the materials the pit should be covered with mud.
Covering the pit with mud stops the spread of bad smell and preserves manure
from rain, direct sun-light and from nutrient loss.
Methods of producing compost by digging pit have been presented as followings:
Fig. No. 12.1.1 Digging a pit for
preparing Compost Manure
Fig. No. 12.1.2 Taking out soil from pit
Fig. No. 12.1.3 Pit ready for putting
compost making materials
Fig. No. 12.1.4 Putting raw materials for
compost making

Wheat Seed Production Technique Manual 46
Fig. No. 12.1.5 Pressing the raw materials
with staking in the middle part to prepare
manure
Fig. No. 12.1.6 Spraying the water for
compost making
Fig. No 12.1.7 Covering with plastic to
decompose the materials for compost
manure
Fig. No. 12.1.8 Observing well
decomposed compost manure
Fig. No. 12.1.9 Observing the condition
of manure while turn-over of compost
Source: JICA Project Team
Fig. No 12.1.10 Farmer applying well
decomposed compost manure in rows

Wheat Seed Production Technique Manual 47
12.2 Heap method
(A) Methods of making compost in heap
Compost manure also can be produced by making heap on earth surface without
digging a pit. The heap method of compost making is done in rainy season due to
which the manure cannot be damaged by excessive moisture.
It is better to make a heap in slightly elevated, and drainage facilitated site.
This method of making compost is better in the area where shortage of labour and
time.
(B) Methods of making heaps on earth surface to produce compost manure
The following methods should be applied for making the compost by heap method:
Put fodder, weeds, grasses, straws, hey and leaves on earth surface in different
layer by making heap.
Make the different layers of straw, leaves, branches, fodders or grasses by putting
dung or lime or soil in between each layer, and spray water together with E.M.
liquid.
The materials in heap should be tightly pressed so that it gets decomposed earlier.
(C) Use of wooden or Bamboo frame for
making compost on heap
Heaps of material can be put inside the
wooden frame or covering around by
wooden stakes or bamboo stakes.
The wooden or bamboo frame can be
made as per desire, but the height should
be 1-1.3 meter height.
Fig. No. 12.2.1 Wooden or bamboo
frame for making compost by heap
method
Source: JICA Project Team

Wheat Seed Production Technique Manual 48
(D) Turn-over in heap method for compost making
Generally, the turn-over of compost should be done when the temperature inside
the compost is 60-65 ºC, which is identified by feeling very hot while we put hand
up to 20 cm inside the compost.
In case the temperature inside the compost become so much hot (over than 70 ºC),
bacteria cannot be survived, and that will damage the compost, which will give
the less quality compost. Therefore turn-over should be done on-time.
Making another frame near the main frame will help to exchange the manure for
controlling the excessive heat inside the compost, and for turnover of compost for
obtaining well decomposed manure.
(E) The timing of turn-over
Compost manure should be turned over when its temperature becomes near 60 ºC,
which can be identified by putting your hand inside, and feels very hot. Thus,
temperature should be checked every week.
13. Identifying the Well Decomposed Compost and FYM
The manure is decayed and appears black.
The used materials loses its original form, and cannot be distinguished
The manure does not stick in hand.
The bad smell of manure is less.

Wheat Seed Production Technique Manual 49
References
Agriculture Information and Communication Centre, 2016. Agriculture Diary.
Gautam, Puri, Sharma, Chalise and Rawal, 2015.Hybrid Wheat Production Technology.
Government of Nepal, Nepal Agricultural Research Council. National Wheat Crop Research
Program. Bhairahawa, Rupandehi.
Khatiwada, Shambhuprasad, 2016. Wheat Seeds Production Technology. Government of
Nepal, Lalitpur.
Nepal, Nepal Agricultural Research Council. Agriculture Plant Division. Khumaltar,