whatsup gold user's guide -
TRANSCRIPT

WhatsUp Gold
User’s Guide
Software Version 4
Ipswitch, Inc.

d as a
forma-
Inc.
ment.
only in
,
ther
perty of
sferred
Ipswitch, Inc. Phone: 781-676-5700
81 Hartwell Ave Fax: 781-676-5710
Lexington, MA 02421-3127 Web: http://www.ipswitch.com
The information in this document is subject to change without notice and should not be construe
commitment by Ipswitch, Inc. While every effort has been made to assure the accuracy of the in
tion contained herein, Ipswitch, Inc. assumes no responsibility for errors or omissions. Ipswitch,
assumes no liability for damages resulting from the use of the information contained in this docu
The software described in this document is furnished under a license and may be used or copied
accordance with the terms of that license.
Copyright © 1995-1999 by Ipswitch, Inc. All rights reserved. IMail, WhatsUp, the WhatsUp logo
WS_FTP, the WS_FTP logos, Ipswitch, and the Ipswitch logo are trademarks of Ipswitch, Inc. O
products or company names are or may be trademarks or registered trademarks and are the pro
their respective companies.
No part of this publication may be reproduced, photocopied, stored on a retrieval system, or tran
without the expressed prior written consent of Ipswitch, Inc.
Printing History
March 1997 First edition.
December 1997 Second edition.
April 1999 Third edition.

. .
. . . . . . . . . xi
.. . . . 1 . . . . 3 .
. . . . 4. . . . 5 . . . 7
. . . . 9
. . . . 9. . . 10. . 1 . . . 12 . . . 12. . . 13 . . 13
. . . 16
. . . . .
. . . . 23
Contents
Preface. . . . . . . . . . . . . . . . . . . . . . . . . . . . . . . . . . . . . . . . . . . . . . . . . . . . . . . . . . . . . . . . . . . . . . . . . . ixWhat This Package Includes . . . . . . . . . . . . . . . . . . . . . . . . . . . . . . . . . . . . . . . . . . . . . . . . . . ixThe Ipswitch Products . . . . . . . . . . . . . . . . . . . . . . . . . . . . . . . . . . . . . . . . . . . . . . . . . . . . . . . . . ixVisit Our Web Site. . . . . . . . . . . . . . . . . . . . . . . . . . . . . . . . . . . . . . . . . . . . . . . . . . . . . . . . . . . . . xPlease Send Us Your Comments . . . . . . . . . . . . . . . . . . . . . . . . . . . . . . . . . . . . . . . . . . . . .xGetting Technical Support . . . . . . . . . . . . . . . . . . . . . . . . . . . . . . . . . . . . . . . . . . . . . . . . . . .. . . . xDownloading Patches and Upgrades . . . . . . . . . . . . . . . . . . . . . . . . . . . . . . . . . . . . . . . . . .
Chapter 1: Introduction . . . . . . . . . . . . . . . . . . . . . . . . . . . . . . . . . . . . . . . . . . . . . . . . . . . . . . . . . . . .1What is WhatsUp Gold? . . . . . . . . . . . . . . . . . . . . . . . . . . . . . . . . . . . . . . . . . . . . . . . . . . . . . . . 1
Mapping the Network . . . . . . . . . . . . . . . . . . . . . . . . . . . . . . . . . . . . . . . . . . . . . . . . . How It Works . . . . . . . . . . . . . . . . . . . . . . . . . . . . . . . . . . . . . . . . . . . . . . . . . . . . . . . .. . 3Receiving Notification . . . . . . . . . . . . . . . . . . . . . . . . . . . . . . . . . . . . . . . . . . . . . . . . .
What’s New in Version 4.0? . . . . . . . . . . . . . . . . . . . . . . . . . . . . . . . . . . . . . . . . . . . . . . . . .. . . 4Standard Features . . . . . . . . . . . . . . . . . . . . . . . . . . . . . . . . . . . . . . . . . . . . . . . . . . . . . . . . . . . . . . 4
Mapping Capabilities . . . . . . . . . . . . . . . . . . . . . . . . . . . . . . . . . . . . . . . . . . . . . . . . . Monitoring Capabilities. . . . . . . . . . . . . . . . . . . . . . . . . . . . . . . . . . . . . . . . . . . . . . . . Notification Capabilities . . . . . . . . . . . . . . . . . . . . . . . . . . . . . . . . . . . . . . . . . . . . . . . .
System Requirements. . . . . . . . . . . . . . . . . . . . . . . . . . . . . . . . . . . . . . . . . . . . . . . . . . . . . .. . . . . 7Upgrading . . . . . . . . . . . . . . . . . . . . . . . . . . . . . . . . . . . . . . . . . . . . . . . . . . . . . . . . . . . . . . . . . . . 8Installation . . . . . . . . . . . . . . . . . . . . . . . . . . . . . . . . . . . . . . . . . . . . . . . . . . . . . . . . . . . . . . . . . . . 9Testing WhatsUp Gold on Your Network . . . . . . . . . . . . . . . . . . . . . . . . . . . . . . . . . . . . . . .
Creating a New Network Map . . . . . . . . . . . . . . . . . . . . . . . . . . . . . . . . . . . . . . . . . . Adding a File Server . . . . . . . . . . . . . . . . . . . . . . . . . . . . . . . . . . . . . . . . . . . . . . . . . . Initiating Monitoring . . . . . . . . . . . . . . . . . . . . . . . . . . . . . . . . . . . . . . . . . . . . . . . . . . . 1
Running WhatsUp Gold as an NT Service . . . . . . . . . . . . . . . . . . . . . . . . . . . . . . . . . . . . . .Setting Up to Run as an NT Service . . . . . . . . . . . . . . . . . . . . . . . . . . . . . . . . . . . . . .Starting and Stopping the NT Service. . . . . . . . . . . . . . . . . . . . . . . . . . . . . . . . . . . . . Upgrading After Installing as an NT Service . . . . . . . . . . . . . . . . . . . . . . . . . . . . . . . .
Chapter 2: Creating Network Maps . . . . . . . . . . . . . . . . . . . . . . . . . . . . . . . . . . . . . . . . . . . . . . . . .15Creating a Network Map . . . . . . . . . . . . . . . . . . . . . . . . . . . . . . . . . . . . . . . . . . . . . . . . . . . .. . . 15Discover and Map Network Devices . . . . . . . . . . . . . . . . . . . . . . . . . . . . . . . . . . . . . . . . . . .Loading a Hosts File . . . . . . . . . . . . . . . . . . . . . . . . . . . . . . . . . . . . . . . . . . . . . . . . . . . . . . . . . . 17Using the Scan Tool . . . . . . . . . . . . . . . . . . . . . . . . . . . . . . . . . . . . . . . . . . . . . . . . . . . . . . . . . . . 18
Results of the Scan . . . . . . . . . . . . . . . . . . . . . . . . . . . . . . . . . . . . . . . . . . . . . . . . . . .20Using the Scan WinNet Tool . . . . . . . . . . . . . . . . . . . . . . . . . . . . . . . . . . . . . . . . . . . . . . . . . . 22Traceroute Mapping . . . . . . . . . . . . . . . . . . . . . . . . . . . . . . . . . . . . . . . . . . . . . . . . . . . . . . . . . . 22Manually Drawing a Map . . . . . . . . . . . . . . . . . . . . . . . . . . . . . . . . . . . . . . . . . . . . . . . . . . . . . 23Tips for Making a Map Easier to Read . . . . . . . . . . . . . . . . . . . . . . . . . . . . . . . . . . . . . . . . .Device Properties . . . . . . . . . . . . . . . . . . . . . . . . . . . . . . . . . . . . . . . . . . . . . . . . . . . . . . . . . . . . . 24
Contents iiiWhatsUp Gold

iv
. . 24 . . 25. . 26 . . 28
. . 33 . . .. . 34 . . 35 . . 37 . . . . 38 . . 39. . . 39
. 42. . 43. . 46 . 48 . 49 . . 51 . . 51. . 52 . . 52 . 54 . . . . 57. . 60
. .
The Polling Method . . . . . . . . . . . . . . . . . . . . . . . . . . . . . . . . . . . . . . . . . . . . . . . . . . .Defining General Properties . . . . . . . . . . . . . . . . . . . . . . . . . . . . . . . . . . . . . . . . . . . .Setting Up Monitoring . . . . . . . . . . . . . . . . . . . . . . . . . . . . . . . . . . . . . . . . . . . . . . . . Using the Right Mouse Menu . . . . . . . . . . . . . . . . . . . . . . . . . . . . . . . . . . . . . . . . . . .
Creating a Subnet . . . . . . . . . . . . . . . . . . . . . . . . . . . . . . . . . . . . . . . . . . . . . . . . . . . . . . . . . . . . 29Setting Map Properties . . . . . . . . . . . . . . . . . . . . . . . . . . . . . . . . . . . . . . . . . . . . . . . . . . . . . . . . 30Setting Map Colors . . . . . . . . . . . . . . . . . . . . . . . . . . . . . . . . . . . . . . . . . . . . . . . . . . . . . . . . . . . 32Editing a Network Map . . . . . . . . . . . . . . . . . . . . . . . . . . . . . . . . . . . . . . . . . . . . . . . . . . . . . . . 33
Getting In and Out of Edit Mode . . . . . . . . . . . . . . . . . . . . . . . . . . . . . . . . . . . . . . . . . Draw Toolbar . . . . . . . . . . . . . . . . . . . . . . . . . . . . . . . . . . . . . . . . . . . . . . . . . . . . . . . . 33Edit Toolbar . . . . . . . . . . . . . . . . . . . . . . . . . . . . . . . . . . . . . . . . . . . . . . . . . . . . . . . . . . 34Keeping Tools Active . . . . . . . . . . . . . . . . . . . . . . . . . . . . . . . . . . . . . . . . . . . . . . . . . Drawing . . . . . . . . . . . . . . . . . . . . . . . . . . . . . . . . . . . . . . . . . . . . . . . . . . . . . . . . . . . .. . 34Creating a Custom Device Type . . . . . . . . . . . . . . . . . . . . . . . . . . . . . . . . . . . . . . . . .Changing Item Properties . . . . . . . . . . . . . . . . . . . . . . . . . . . . . . . . . . . . . . . . . . . . . .Attached Lines . . . . . . . . . . . . . . . . . . . . . . . . . . . . . . . . . . . . . . . . . . . . . . . . . . . . . . . 37Creating Text Captions . . . . . . . . . . . . . . . . . . . . . . . . . . . . . . . . . . . . . . . . . . . . . . . .Arranging the Toolbars . . . . . . . . . . . . . . . . . . . . . . . . . . . . . . . . . . . . . . . . . . . . . . . .
Saving and Naming a Network Map . . . . . . . . . . . . . . . . . . . . . . . . . . . . . . . . . . . . . . . . . .
Chapter 3: Setting Up Notifications . . . . . . . . . . . . . . . . . . . . . . . . . . . . . . . . . . . . . . . . . . . . . . . . . 41Defining Notifications . . . . . . . . . . . . . . . . . . . . . . . . . . . . . . . . . . . . . . . . . . . . . . . . . . . . . . . . 42
Defining System (Sound and WinPopup) Notifications . . . . . . . . . . . . . . . . . . . . . . . .Defining Pager Notifications . . . . . . . . . . . . . . . . . . . . . . . . . . . . . . . . . . . . . . . . . . . . Defining Beeper Notifications . . . . . . . . . . . . . . . . . . . . . . . . . . . . . . . . . . . . . . . . . . . Defining E-mail Notifications . . . . . . . . . . . . . . . . . . . . . . . . . . . . . . . . . . . . . . . . . . .Defining Group Notifications . . . . . . . . . . . . . . . . . . . . . . . . . . . . . . . . . . . . . . . . . . . .Notification Message Variables. . . . . . . . . . . . . . . . . . . . . . . . . . . . . . . . . . . . . . . . . .Testing Beeper, Pager, and E-mail Notifications. . . . . . . . . . . . . . . . . . . . . . . . . . . . .Defining Program Notifications. . . . . . . . . . . . . . . . . . . . . . . . . . . . . . . . . . . . . . . . . . Setting Up a Voice Modem . . . . . . . . . . . . . . . . . . . . . . . . . . . . . . . . . . . . . . . . . . . . .Defining Voice Notifications . . . . . . . . . . . . . . . . . . . . . . . . . . . . . . . . . . . . . . . . . . . .
Assigning Notifications to Devices . . . . . . . . . . . . . . . . . . . . . . . . . . . . . . . . . . . . . . . . . . . .57Using the Alerts Tab . . . . . . . . . . . . . . . . . . . . . . . . . . . . . . . . . . . . . . . . . . . . . . . . . .Assigning a Notification . . . . . . . . . . . . . . . . . . . . . . . . . . . . . . . . . . . . . . . . . . . . . . .
Editing Notifications. . . . . . . . . . . . . . . . . . . . . . . . . . . . . . . . . . . . . . . . . . . . . . . . . . . . . . . . . . 62Assigning Notifications Globally . . . . . . . . . . . . . . . . . . . . . . . . . . . . . . . . . . . . . . . . . . . . . . 63
User’s GuideWhatsUp Gold
. . . 68 . .. . . 70 . . . 72 . . . 74 . . . 75. . . 76
.77 . .. . . 78 . . . 78 . . 78 . . 79 . . 79
. . . 80
.. . . . . . . 83 . . 85 . . 85
. . . . . . 89. . . 90 . . 91 . . . 92. . . 94 . . . 94 . . .. . . 95. . .. . . 96 . . 97
Chapter 4: Monitoring Services . . . . . . . . . . . . . . . . . . . . . . . . . . . . . . . . . . . . . . . . . . . . . . . . . . . . .67Monitoring Standard TCP/IP Services. . . . . . . . . . . . . . . . . . . . . . . . . . . . . . . . . . . . . . . . . .Monitoring Custom Services . . . . . . . . . . . . . . . . . . . . . . . . . . . . . . . . . . . . . . . . . . . . . . . . . . 69
Defining a Custom TCP/IP Service . . . . . . . . . . . . . . . . . . . . . . . . . . . . . . . . . . . . . . Using Rules Expressions. . . . . . . . . . . . . . . . . . . . . . . . . . . . . . . . . . . . . . . . . . . . . . .Rules Expressions Text and Quantifiers Tables . . . . . . . . . . . . . . . . . . . . . . . . . . . . .Testing a Rules Expression . . . . . . . . . . . . . . . . . . . . . . . . . . . . . . . . . . . . . . . . . . . . .
Summary of Requirements for Monitoring Services . . . . . . . . . . . . . . . . . . . . . . . . . . . . . . . Custom Services API . . . . . . . . . . . . . . . . . . . . . . . . . . . . . . . . . . . . . . . . . . . . . . . . . . . . . . . . . . 76
Chapter 5: Using WhatsUp Gold from the Console . . . . . . . . . . . . . . . . . . . . . . . . . . . . . . . . . . . .Opening Network Maps . . . . . . . . . . . . . . . . . . . . . . . . . . . . . . . . . . . . . . . . . . . . . . . . . . . . . . . 77Starting and Stopping Polling . . . . . . . . . . . . . . . . . . . . . . . . . . . . . . . . . . . . . . . . . . . . . . . . . . 77
To Initiate a Single Check. . . . . . . . . . . . . . . . . . . . . . . . . . . . . . . . . . . . . . . . . . . . . . To Stop a Single Check. . . . . . . . . . . . . . . . . . . . . . . . . . . . . . . . . . . . . . . . . . . . . . . .To Initiate Automatic Polling . . . . . . . . . . . . . . . . . . . . . . . . . . . . . . . . . . . . . . . . . . . .To Stop Automatic Polling . . . . . . . . . . . . . . . . . . . . . . . . . . . . . . . . . . . . . . . . . . . . . .
Monitoring the Network Map Display. . . . . . . . . . . . . . . . . . . . . . . . . . . . . . . . . . . . . . . . . . .Alarms . . . . . . . . . . . . . . . . . . . . . . . . . . . . . . . . . . . . . . . . . . . . . . . . . . . . . . . . . . . . . . . . 80Acknowledge Alerts . . . . . . . . . . . . . . . . . . . . . . . . . . . . . . . . . . . . . . . . . . . . . . . . . . Notifications . . . . . . . . . . . . . . . . . . . . . . . . . . . . . . . . . . . . . . . . . . . . . . . . . . . . . . . . . . 80Status Information . . . . . . . . . . . . . . . . . . . . . . . . . . . . . . . . . . . . . . . . . . . . . . . . . . . . 80
Using the Status Window. . . . . . . . . . . . . . . . . . . . . . . . . . . . . . . . . . . . . . . . . . . . . . . . . . . .. . . 82Viewing and Changing Dependencies . . . . . . . . . . . . . . . . . . . . . . . . . . . . . . . . . . . . . . .
Setting “Up” and “Down” Dependencies . . . . . . . . . . . . . . . . . . . . . . . . . . . . . . . . . . .Viewing the Polling Statistics in the Statistics Window . . . . . . . . . . . . . . . . . . . . . . . . . . . . .Debug Log Information . . . . . . . . . . . . . . . . . . . . . . . . . . . . . . . . . . . . . . . . . . . . . . . . . . . . . . . . 87Viewing Active Notifications . . . . . . . . . . . . . . . . . . . . . . . . . . . . . . . . . . . . . . . . . . . . . . . . .. . 88Using the Mini Status View . . . . . . . . . . . . . . . . . . . . . . . . . . . . . . . . . . . . . . . . . . . . . . . . . . . . 88Logging and Reporting Events . . . . . . . . . . . . . . . . . . . . . . . . . . . . . . . . . . . . . . . . . . . . . . .. 89
Types of Events Logged . . . . . . . . . . . . . . . . . . . . . . . . . . . . . . . . . . . . . . . . . . . . . . .Changing How Events Are Logged . . . . . . . . . . . . . . . . . . . . . . . . . . . . . . . . . . . . . . Viewing the Event Log . . . . . . . . . . . . . . . . . . . . . . . . . . . . . . . . . . . . . . . . . . . . . . . .Creating an Event Report . . . . . . . . . . . . . . . . . . . . . . . . . . . . . . . . . . . . . . . . . . . . . .
Using the Command Line Utility to Create Event Reports . . . . . . . . . . . . . . . . . . . . . . . . . . Basic Command Syntax . . . . . . . . . . . . . . . . . . . . . . . . . . . . . . . . . . . . . . . . . . . . . . .Examples . . . . . . . . . . . . . . . . . . . . . . . . . . . . . . . . . . . . . . . . . . . . . . . . . . . . . . . . . . . . . 95Return Codes . . . . . . . . . . . . . . . . . . . . . . . . . . . . . . . . . . . . . . . . . . . . . . . . . . . . . . . . . 95
Logging and Reporting Polling Statistics . . . . . . . . . . . . . . . . . . . . . . . . . . . . . . . . . . . . . . . The Polling Statistics. . . . . . . . . . . . . . . . . . . . . . . . . . . . . . . . . . . . . . . . . . . . . . . . . . 95Changing Statistics Logging . . . . . . . . . . . . . . . . . . . . . . . . . . . . . . . . . . . . . . . . . . . . Viewing the Statistics Log . . . . . . . . . . . . . . . . . . . . . . . . . . . . . . . . . . . . . . . . . . . . . .
Contents vWhatsUp Gold

vi
. . 97. . . 99 . 100. . 101. . . . . 10
07. . 107. 108110 . . 111 . 111. . 114. . 1 . 11. . 119
1 . 121.. 123
. 125 . 125 . 12. 126 .. . 129 . 130 132. . 134. . 1. . . 136. 136 . 137. 137. 139 .
Creating Reports on Polling Statistics . . . . . . . . . . . . . . . . . . . . . . . . . . . . . . . . . . . . .Statistics Report Legend . . . . . . . . . . . . . . . . . . . . . . . . . . . . . . . . . . . . . . . . . . . . . .
Using the Command Line Utility to Create Statistics Reports . . . . . . . . . . . . . . . . . . . . . . . .Basic Command Syntax. . . . . . . . . . . . . . . . . . . . . . . . . . . . . . . . . . . . . . . . . . . . . . . Examples . . . . . . . . . . . . . . . . . . . . . . . . . . . . . . . . . . . . . . . . . . . . . . . . . . . . . . . . . . . 101Return Codes . . . . . . . . . . . . . . . . . . . . . . . . . . . . . . . . . . . . . . . . . . . . . . . . . . . . . . . 101
Sending Recurring Status Reports . . . . . . . . . . . . . . . . . . . . . . . . . . . . . . . . . . . . . . . . . . . .2
Chapter 6: Using WhatsUp Gold from a Web Browser . . . . . . . . . . . . . . . . . . . . . . . . . . . . . . . . 1Setting Up the WhatsUp Gold Web Server . . . . . . . . . . . . . . . . . . . . . . . . . . . . . . . . . . . . .
Customizing Your WhatsUp Gold Web Site . . . . . . . . . . . . . . . . . . . . . . . . . . . . . . . . Making Maps Available for Web Viewing . . . . . . . . . . . . . . . . . . . . . . . . . . . . . . . . . .
Setting Web Server Access. . . . . . . . . . . . . . . . . . . . . . . . . . . . . . . . . . . . . . . . . . . . . . . . . .. 111Default User Accounts for the Web Server . . . . . . . . . . . . . . . . . . . . . . . . . . . . . . . . .Setting Up User Accounts for the Web Server . . . . . . . . . . . . . . . . . . . . . . . . . . . . . .Setting Web Access by IP Address . . . . . . . . . . . . . . . . . . . . . . . . . . . . . . . . . . . . . .
Logging On to the Web Server. . . . . . . . . . . . . . . . . . . . . . . . . . . . . . . . . . . . . . . . . . . . . . . 16WhatsUp Gold Web Display . . . . . . . . . . . . . . . . . . . . . . . . . . . . . . . . . . . . . . . . . . . . . . . . .7WhatsUp Gold Web Functions. . . . . . . . . . . . . . . . . . . . . . . . . . . . . . . . . . . . . . . . . . . . . . .
Chapter 7: Monitoring SNMP Devices. . . . . . . . . . . . . . . . . . . . . . . . . . . . . . . . . . . . . . . . . . . . . . 21SNMP Implementation in WhatsUp Gold . . . . . . . . . . . . . . . . . . . . . . . . . . . . . . . . . . . . . . .SNMP Backgrounder . . . . . . . . . . . . . . . . . . . . . . . . . . . . . . . . . . . . . . . . . . . . . . . . . . . . . . . 122
Management Information Base (MIB). . . . . . . . . . . . . . . . . . . . . . . . . . . . . . . . . . . . . Security . . . . . . . . . . . . . . . . . . . . . . . . . . . . . . . . . . . . . . . . . . . . . . . . . . . . . . . . . . . . . 124SNMP Agent or Manager . . . . . . . . . . . . . . . . . . . . . . . . . . . . . . . . . . . . . . . . . . . . . .SNMP Operations . . . . . . . . . . . . . . . . . . . . . . . . . . . . . . . . . . . . . . . . . . . . . . . . . . . .SNMP Traps . . . . . . . . . . . . . . . . . . . . . . . . . . . . . . . . . . . . . . . . . . . . . . . . . . . . . . . .5
Setting Up the MIB in WhatsUp Gold . . . . . . . . . . . . . . . . . . . . . . . . . . . . . . . . . . . . . . . . . . Viewing SNMP Objects . . . . . . . . . . . . . . . . . . . . . . . . . . . . . . . . . . . . . . . . . . . . . . . . . . . . . 127Graphing SNMP Values . . . . . . . . . . . . . . . . . . . . . . . . . . . . . . . . . . . . . . . . . . . . . . . . . . . . 129
Starting the SNMP Graphing Utility . . . . . . . . . . . . . . . . . . . . . . . . . . . . . . . . . . . . . . .The Graph Window . . . . . . . . . . . . . . . . . . . . . . . . . . . . . . . . . . . . . . . . . . . . . . . . . . .Adding, Editing, and Deleting SNMP Objects . . . . . . . . . . . . . . . . . . . . . . . . . . . . . . .Saving and Opening Graph Files . . . . . . . . . . . . . . . . . . . . . . . . . . . . . . . . . . . . . . . . Graph Options . . . . . . . . . . . . . . . . . . . . . . . . . . . . . . . . . . . . . . . . . . . . . . . . . . . . . . 35
Receiving SNMP Traps . . . . . . . . . . . . . . . . . . . . . . . . . . . . . . . . . . . . . . . . . . . . . . . . . . . . . 136Set Devices to Send Traps to WhatsUp Gold . . . . . . . . . . . . . . . . . . . . . . . . . . . . . . Setting Up the MIB Entries for Traps . . . . . . . . . . . . . . . . . . . . . . . . . . . . . . . . . . . . . Enabling the Trap Handler. . . . . . . . . . . . . . . . . . . . . . . . . . . . . . . . . . . . . . . . . . . . . .Setting Up Notifications for Traps. . . . . . . . . . . . . . . . . . . . . . . . . . . . . . . . . . . . . . . . Viewing Trap Log Entries . . . . . . . . . . . . . . . . . . . . . . . . . . . . . . . . . . . . . . . . . . . . . .
Monitoring SNMP Service . . . . . . . . . . . . . . . . . . . . . . . . . . . . . . . . . . . . . . . . . . . . . . . . . . .139
User’s GuideWhatsUp Gold

. . 142. . 142 . . 142 . ... .
. 147 . .. . . 14. . . 150. . 152. .15. .154 . . 155 . . . .157 . . 159 . . 160.160 . . 161
Chapter 8: Using Network Tools . . . . . . . . . . . . . . . . . . . . . . . . . . . . . . . . . . . . . . . . . . . . . . . . . . .141Using Format, Copy, and Print Functions . . . . . . . . . . . . . . . . . . . . . . . . . . . . . . . . . . . . . . .
Selecting the Results Display Format . . . . . . . . . . . . . . . . . . . . . . . . . . . . . . . . . . . . . Using Cut, Copy and Paste . . . . . . . . . . . . . . . . . . . . . . . . . . . . . . . . . . . . . . . . . . . . .Printing Results . . . . . . . . . . . . . . . . . . . . . . . . . . . . . . . . . . . . . . . . . . . . . . . . . . . . . .142
Display Device Information. . . . . . . . . . . . . . . . . . . . . . . . . . . . . . . . . . . . . . . . . . . . . . . . . . . 143Checking a Web Address . . . . . . . . . . . . . . . . . . . . . . . . . . . . . . . . . . . . . . . . . . . . . . . . . . . . 144Synchronizing Time. . . . . . . . . . . . . . . . . . . . . . . . . . . . . . . . . . . . . . . . . . . . . . . . . . . . . . . . . . 145Verifying Connectivity to an Internet Host . . . . . . . . . . . . . . . . . . . . . . . . . . . . . . . . . . . . . . .
Pinging a Host . . . . . . . . . . . . . . . . . . . . . . . . . . . . . . . . . . . . . . . . . . . . . . . . . . . . . . .148Tracing the Route to an Internet Host . . . . . . . . . . . . . . . . . . . . . . . . . . . . . . . . . . . . . . . . . 9
TraceRoute Search . . . . . . . . . . . . . . . . . . . . . . . . . . . . . . . . . . . . . . . . . . . . . . . . . . Finding Host and Name Server Information on the Internet . . . . . . . . . . . . . . . . . . . . . . . . .
Lookup Query . . . . . . . . . . . . . . . . . . . . . . . . . . . . . . . . . . . . . . . . . . . . . . . . . . . . . . . 2Displaying Information About Internet Users and Organizations . . . . . . . . . . . . . . . . . . . . .
Finger a Host . . . . . . . . . . . . . . . . . . . . . . . . . . . . . . . . . . . . . . . . . . . . . . . . . . . . . . . .. 154Displaying Information About Internet Domain Ownership and Internet Organizations . . . .
Whois Search. . . . . . . . . . . . . . . . . . . . . . . . . . . . . . . . . . . . . . . . . . . . . . . . . . . . . . . .156Searching Directories for Names and Information . . . . . . . . . . . . . . . . . . . . . . . . . . . . . . . .Viewing Quotations from a Quote Server . . . . . . . . . . . . . . . . . . . . . . . . . . . . . . . . . . . . . . .Scanning Your Network. . . . . . . . . . . . . . . . . . . . . . . . . . . . . . . . . . . . . . . . . . . . . . . . . . . . .. . 160Viewing and Graphing SNMP Values . . . . . . . . . . . . . . . . . . . . . . . . . . . . . . . . . . . . . . . . . . Displaying Information About Your Local Network. . . . . . . . . . . . . . . . . . . . . . . . . . . . . . . . Testing Throughput Between Your Computer and a Remote Computer. . . . . . . . . . . . . . . .
Index . . . . . . . . . . . . . . . . . . . . . . . . . . . . . . . . . . . . . . . . . . . . . . . . . . . . . . . . . . . . . . . . . . . . . . . . . .163
Contents viiWhatsUp Gold

viii
User’s GuideWhatsUp Gold
for
files ver ay,
m
Preface
WhatsUp Gold is a graphical network monitoring system designed multi-protocol networks. WhatsUp Gold monitors your critical devices and services and initiates visual and audible alarms whenthere’s a problem. In addition, WhatsUp Gold can notify you remotely by beeper, alphanumeric pager, e-mail, or telephone. WhatsUp Gold runs on Windows 95, Windows 98, or Windows NTon the Intel platforms.
What This Package Includes
WhatsUp Gold includes the following:
• WhatsUp Gold diskettes or CD
• License agreement
• This manual, the WhatsUp Gold User’s Guide
The Ipswitch Products
Other Ipswitch products include:
• WS_FTP Pro FTP Client
WS_FTP Pro provides two powerful Windows interfaces for connecting to remote hosts and transferring files. The “Bonus Utility Pack” that ships with WS_FTP Pro 6.x includes the WS_FTP Find Utility, the WS_FTP Scripting Utility, and the WS_FTP Synchronize Utility.
• WS_FTP Server
WS_FTP Server is a full-featured FTP server for Windows NTsystems. WS_FTP Server lets you create FTP sites that make and folders on your PC available to other users. WS_FTP Seroffers many features not found in most commercial servers todincluding automatic resumption of interrupted transfers.
• IMail Server for Windows NT
IMail Server for Windows NT is an electronic mail server systebased on Internet standards.
Preface
WhatsUp Gold
ix

x
r l
il t.
rks
r
ur nd
. ress:
ch site
IMail Server provides Simple Mail Transfer Protocol (SMTP) fosending and receiving mail over the Internet or over an internaTCP/IP network. It supports any mail client that uses the PostOffice Protocol, Version 3 (POP3) or Internet Message AccessProtocol (IMAP4). Web Messaging lets users access their mafrom any web browser; users do not need to have a mail clien
• WS_Ping ProPack
WS_Ping ProPack is the ultimate network information tool. It provides everything you need to help track down network problems and to get information about users, hosts, and netwoon the Internet or on your intranet. Tools include Info, Time, HTML, Ping, Traceroute, Lookup, Finger, Whois, LDAP, Quote, Scan, SNMP, WinNet, and Throughput. WS_Ping ProPack runs on Windows 95, Windows 98, or Windows NT on the Intel platforms.
Visit Our Web Site
To learn more about Ipswitch products, find evaluation versions, opurchase our products online, visit the Ipswitch web site at: http://www.ipswitch.com. On our technical support pages, you can view oKnowledgeBase of technical information about Ipswitch products akeep up-to-date on product news.
Please Send Us Your Comments
We welcome your feedback on this product and its documentationPlease send your comments and suggestions to the following [email protected].
Getting Technical Support
To get technical support, send e-mail to [email protected]. E-mail technical support is always available; however, a service agreement is required for telephone support beyond the warranty period, and for major upgrades. For more information about IpswitTechnical support and service agreements, go to the Ipswitch webat www.ipswitch.com and click Service and Support.
User’s GuideWhatsUp Gold

our
des.
s at
Downloading Patches and Upgrades
If a software patch is created to fix a bug in the currently shipping version of a product, Ipswitch will make the patch available on ourFTP server (ftp.ipswitch.com) and web sites.
Product upgrades to extend capabilities are also made available onFTP and web sites. A valid service agreement for WhatsUp Gold includes major product upgrades for twelve months.
Check our FTP or web site for current software patches and upgraTo download software from the Ipswitch web site:
1 In your web browser, go to: http://www.ipswitch.com.
2 Click Service and Support, and then click Patches and Upgrades.
3 Read the introductory information about patches and upgradethe top of the page.
4 Under WhatsUp Gold, click the appropriate link.
5 Follow the instructions on your screen.
Preface
WhatsUp Gold
xi

xii
User’s GuideWhatsUp Gold
as
d wn.
eb Up .
by
ted
Chapter 1: Introduction
This chapter describes the basic operation of WhatsUp Gold and lists both standard and new features. In addition, you will find system requirements, upgrading and installation instructions, a quick test procedure, and the procedure for running WhatsUp Goldan NT service.
What is WhatsUp Gold?
WhatsUp Gold is an easy-to-use tool for monitoring TCP/IP, NetBIOS, and IPX networks. WhatsUp Gold initiates both visible anaudible alarms when monitored devices and system services go doWhatsUp Gold can also notify you of problems by digital beeper, alphanumeric pager, e-mail, or voice message. WhatsUp Gold provides a web interface so you can view network status from a wbrowser on any computer on the Internet. You can configure WhatsGold and start monitoring your network without any special training
The following three sections cover the main functions of WhatsUp Gold: mapping, monitoring, and notification.
Mapping the Network
WhatsUp Gold can map your network in several different ways, including an automatic “discover and map” capability that can scanfiles and the Windows network. You can also create a network mapscanning a range of IP addresses, loading a hosts file, scanning aWindows network, or drawing it.
The WhatsUp Gold scan methods:
• Poll devices on the network to which your computer is connec
• Identify any TCP/IP, NetBIOS, or IPX devices
• Create a graphical network map with an icon for each device
Devices can be workstations, servers, hosts, bridges, routers,LAN boxes, hubs, printers, or any custom device you want to
For updated information since this manual was printed, see the Release Notes, whatsupg.txt.
Note
Introduction
WhatsUp Gold
1

2
k. u
re
k
ular es
include. Each device is associated with a specific address.
When you open the network map window, WhatsUp Gold automatically begins monitoring the network.
When a map is open, it is in either Monitor Mode or Edit Mode. Monitor Mode is the mode in which WhatsUp Gold polls the networEdit Mode is the mode in which you make changes to the map; yocan use Edit Mode to refine the network map, add devices, draw connecting lines, and convert icons to a different icon type. For moinformation, see “Manually Drawing a Map” on page 23.
To scan and poll IPX devices, you must have Microsoft NWLinIPX/SPX Compatible Transport installed and running on the system on which WhatsUp Gold is installed. For more information, see “System Requirements” on page 7.
Note
When you place the cursor over a device icon, the status bar at the bottom of the map window shows the device name, address, and a brief status description, including the status of any services being monitored.
The status bar at the bottom of the WhatsUp Gold window displays the polling status and a timer that counts down the time between polls.
Unless you have the expressed permission of the owners of particdevices, do not monitor host systems, workstations, or other devicthat you do not control.
Note
User’s GuideWhatsUp Gold

tsUp le h
the fine
or; the
By that olls
ed to
How It Works
Once you have created or loaded a network map, you can set WhaGold to continuously monitor the network, or you can initiate a sing“poll” of the network. One poll of the network involves checking eacmonitored device in the network map. Each “check” consists of WhatsUp Gold sending a set number of poll-ICMP requests to a device and tracking the responses.
For each monitored device, you can choose from a set of options indevice properties to determine how the device is monitored and dewhat action to take if the device does not respond to a check.
On each TCP/IP device in your network map, you can determine which services are running on that device (such as HTTP, SMTP, POP3, DNS) and you can select those services you want to monitWhatsUp Gold monitors a service by checking the default port that service runs on.
Receiving Notification
In Monitor Mode, colors indicate the status of the various devices. default, devices that respond to polls are displayed in green, thosehave missed one poll are light green, those that have missed two pare yellow, and those that are not accessible (or have not respondfour polls) are red. You can change these colors.
In Monitor Mode, you can display up-to-the-minute status information about a device by double-clicking the device icon to display the device properties, and then clicking the Status tab.
Introduction
WhatsUp Gold
3

4
our
ce
”
g,
In addition, you can define notification actions (such as sending a message to a pager or e-mail account) for a device or a range of devices.
What’s New in Version 4.0?
Version 4 of WhatsUp Gold offers many new capabilities:
• Data reporting and export, including comprehensive Event Reports, Statistics Reports, and “raw data” output to a tab-delimited file
• A “group notification” that allows you to define response teamsby combining multiple notifications into a single named group
• User-defined device types and icons that allow you to create yown application-specific device types
• Enhanced custom services monitoring, including the ability to define custom services globally and monitor them on any devi
• Extensible interface for specifying additional custom services monitoring using Microsoft’s Component Object Model (COM)plug-in technology. See the Note under “Custom Services APIon page 76.
Standard Features
Standard WhatsUp Gold features fall into three categories: mappinmonitoring, and notification.
Mapping Capabilities
The mapping capabilities of WhatsUp Gold include:
• Automatic network scan and mapping
• Multiple protocol support: TCP/IP, Novell NetWare IPX, and Microsoft NetBIOS
• Drawing tools for organizing your network map
• Linked subnet mapping and monitoring
User’s GuideWhatsUp Gold

s, s
the
nd
Monitoring Capabilities
The monitoring capabilities of WhatsUp Gold include:
• Monitoring of a range of devices, including hosts, servers, hubworkstations, bridges, routers, LAN concentrators, and printer
• Scalability from small flat networks to large hierarchical, subnetted networks
• Graphical display in map window of monitored devices and their status
• Multiple views of the network (in addition to the map window)
• Status Window that shows each component, its status, andstatus of any services being monitored
• Statistics Window that shows statistics for a network map alets you sort on column headings
Introduction
WhatsUp Gold
5

6
n k
me,
on
TP,
r
log )
ork e,
• Dependencies Window that shows user-defined up and dowdependencies as well as the polling sequence for a networ
• Ability to save different configurations (“contexts”) of WhatsUpGold windows
• Display and polling of multiple network maps simultaneously
• On-going confirmation of network connections
• Capture and reporting of network statistics such as response titotal number of polls, total lost packets, and response time
• Ability to make the checking of a particular device dependent the status of another device
• Scanning of all IP ports on networked devices, identifying the standard services running on each port (e.g., SMTP, POP3, FTelnet, WWW, or NNTP).
• Notification of SNMP traps, and graphing of real-time SNMP data, such as the packet input and output of a monitored route
• Web access to open network maps and full administration capabilities from any web browser on the network. Users can on to the web server and (depending on assigned permissionscan view map status, device status, or logs. With permissions,they can also configure maps, devices, reports, and users.
• Ability to run WhatsUp Gold as an NT service and use the webinterface to view maps and monitor your network
• Network tools that let you search for and display information about organizations, networks, computers, or people on a netw(Ping, Traceroute, Lookup, Whois, Finger, Whois, LDAP, QuotScan, SNMP, Time, Info, HTML, and Throughput)
• Ability to configure WhatsUp Gold to use your favorite Telnet program
User’s GuideWhatsUp Gold

ot
on the
Notification Capabilities
The notification capabilities of WhatsUp Gold include:
• Initiation of visual and audible alarms when any device does nrespond to polling
• Remote notification by digital beeper, alphanumeric pager, e-mail, or voice message
• Notification via the WinPopup window (on Windows NT systems)
• Notifications that can trigger an executable programs
• The Notifications Window shows all active notifications for the active network map. The notifications are grouped by device.
• Pager support for TAP, SMS-TAP, NTT, and UCP-SMS
System Requirements
WhatsUp Gold requires the following system resources:
• An Intel 386, 486, or Pentium processor
• Windows NT 3.51 or greater (not 3.5), Windows 95, or Windows 98
• A TCP/IP protocol stack. Supported stacks include those fromMicrosoft (Windows 95, 98, and NT)
To scan and poll IPX devices, Microsoft’s NWLink IPX/SPX Compatible Transport must be installed and running on the systemwhich WhatsUp Gold is installed. You can add this transport using Control Panel’s Network applet. (In the Select Network Protocol dialog box, select Microsoft, then select the IPX/SPX-compatible Protocol and follow the online instructions.)
Introduction
WhatsUp Gold
7
8
r
a ve
ld
or
,
Upgrading
If you are upgrading from a previous version of WhatsUp Gold or WhatsUp, you should note the following:
• Back up any network maps (.db for WhatsUp and .wup for WhatsUp Gold). (When you open a .db file in WhatsUp Gold, the file is automatically converted to the .wup format and saved with a .wup extension.)
• Back up your services.ini and hosttypes.ini files. During installation, WhatsUp Gold will ask if you want to overwrite youold services.ini and hosttypes.ini files; answer No.
• Be sure that WhatsUp Gold has completely shut down before doing an upgrade installation. If you exit WhatsUp Gold duringcheck, it may take up to 30 seconds for WhatsUp Gold to remoitself from memory. Until it is removed from memory, WhatsUpGold will appear in the task list if you press Ctrl+Alt+Del.
• If you install WhatsUp Gold as an NT service, you will have tomanually stop the service before upgrading. The WhatsUp Goinstallation program will not attempt to stop the service before updating and will not remove the service if you select to removethe previous installation. In other words, the service has to be installed manually and thus must be removed manually.
Any notifications you have already defined are stored in a file named ipnotify.ini in your Windows or NT directory. This file is shared by other Ipswitch products and is therefore not deletedreplaced when you uninstall or upgrade WhatsUp Gold.
Furthermore, if you ever move WhatsUp Gold to a new systemyou will need to manually copy the ipnotify.ini file to the Windows or NT directory of the new system.
Note
User’s GuideWhatsUp Gold

d
Installation
To install or upgrade WhatsUp Gold:
1 Insert the WhatsUp Gold Disk 1, or CD-ROM, into the appropriate drive.
2 Do one of the following:
• For Windows 95, 98, and NT 4.0, click Start, select Run, and then enter the diskette/CD path followed by install.exe. For example:
a:install.exe
• For Windows NT 3.51, select Run from the File menu, and then enter the diskette/CD path followed by install.exe. For example:
a:install.exe
3 To view a demo of WhatsUp Gold, open the map named world.wup.
Testing WhatsUp Gold on Your Network
The following procedures let you try out WhatsUp Gold. They takeyou through starting a simple network map, adding a file server, anediting the map.
Creating a New Network Map
To create a new network map:
1 Select New from the File menu.
2 Select Create a blank map and click Finish. WhatsUp Gold displays a blank map.
3 Click the Edit Mode button in the main toolbar. WhatsUp Gold displays the Edit Mode toolbars.
4 Click the Add Workstation button in the Edit Toolbar, and then click the map to create an icon for the workstation.
5 Click the Display tool in the Edit Toolbar, and then click the device icon you just created. The device properties appear.
Edit Mode button
Add Workstationbutton
Display tool
Introduction
WhatsUp Gold
9

10
tor
6 On the General tab, enter the information as shown. Set the Display Name to ConsoleTest or whatever name you would like for the WhatsUp Gold console (the system on which WhatsUpGold is installed).
Set the Address to 127.0.0.1 for this device. (This is the local “loopback” network address; it is the address you use to moniyour own system from your system.)
7 Click the Monitor tab and select Monitor This Device.
8 Click the Alerts tab and select Enable alerts and Enable Sound.
9 Click OK .
Adding a File Server
To create an icon for one of your file servers:
1 Click the Add Server tool in the Edit Toolbar, and then click the desired location on the map to create the icon.
2 Click the Display tool in the Edit Toolbar, then click the icon youjust created to view its properties.
Add Server tool
Display tool
User’s GuideWhatsUp Gold

l er ked
3 On the General tab, set the Display Name to Server.
4 Set the Address to the IP address, or set the Host Name text box to the name of a system on your network. (Note: If you use a name, the network stack must be able to resolve it from a locahosts file or by looking it up on a Domain Name Server, a servthat lists host names and their IP addresses. This name is looup whenever the map is loaded.)
5 Click OK .
6 Click the Monitor tab, select the Monitor This Device.
7 Click the Alerts tab and select Enable alerts and Enable Sound, and then click OK .
8 Save the map by selecting Save As from the File menu. Save the map with the name of MyTestMap.
Initiating Monitoring
You are now ready to start monitoring your little network of two items.
1 Click the Edit Mode button to exit Edit Mode and return to Monitor Mode.
2 Click the Check button to poll the network.
Edit Mode button
Check button
Introduction
WhatsUp Gold
11

12
ws
r b are
T un
p
the
e
e ed
Your screen should look something like this.
The status bar indicates that WhatsUp Gold is polling and shothe total count of polls.
Running WhatsUp Gold as an NT Service
WhatsUp Gold can run as a system service on Windows NT 4.0 olater. When running as a service, WhatsUp Gold uses only the wemonitor as its user interface. To use less memory, no map windowsopened on the WhatsUp Gold NT console.
Running WhatsUp Gold as an NT service allows you to log off the Nconsole, thus providing an extra level of security; the service can rcompletely hidden. As with any NT service, you can set WhatsUp Gold to restart whenever Windows NT is rebooted.
Setting Up to Run as an NT Service
We recommend that you create your network maps using WhatsUGold in normal operating mode on the Windows NT console. Onceyour maps are created, select any desired program options (from View menu, select Program Options). These options will be in effect during operation as an NT service.
On the Startup tab in the Program Options, you can specify multiplmaps to load at startup in the Map Names box by specifying the names of the maps, separated by commas. Additional maps can bsubsequently loaded and unloaded using the web interface, providthe maps are in the directory specified in the Directory box. Note that “contexts” are not used when operating WhatsUp Gold as an NT service.
User’s GuideWhatsUp Gold

rs
le,
ld;
the
If you set up any permissions or other web configuration paramete(set on the Web and Web Users tabs) while running WhatsUp Gold in normal operating mode on the NT consoyou may need to reboot the server before switching to NT service mode.
On the Web Users tab, if you select Automatically save changes from web interface, you will be able to change program options fromthe web interface.
Starting and Stopping the NT Service
Your WhatsUp Gold installation includes an executable file namedwugsvc.exe for the purpose of installing, removing, starting, and stopping the WhatsUp Gold NT service.
To install and start WhatsUp Gold as an NT service, enter the following command at the Command Prompt:
wugsvc -install
To remove WhatsUp Gold as an NT service, enter the following command at the Command Prompt:
wugsvc -remove
Note that these two commands don’t install or remove WhatsUp Gothey merely install and remove the NT service capability.
Upgrading After Installing as an NT Service
If you install WhatsUp Gold as an NT service, you will have to manually stop the service before upgrading. The WhatsUp Gold installation program will not attempt to stop the wugsvc service before updating and will not remove the service if you choose to remove previous installation. In other words, the service has to be installedmanually and thus must be removed manually.
Introduction
WhatsUp Gold
13

14
User’s GuideWhatsUp Gold
ur
old
do
,
Chapter 2: Creating Network Maps
With WhatsUp Gold, you can use one of the automatic methods toquickly create a map of your network; then you can start polling yonetwork immediately, using the default properties that WhatsUp Gassigned to the map and the individual network devices.
However, to customize WhatsUp Gold so it polls your network exactly the way that best suits your needs, you’ll probably want to the following steps (covered in this chapter):
1 Create a network map using one or more WhatsUp tools or techniques
2 View and edit the default properties for network devices (hostsservers, etc.)
3 View and edit the default map properties
4 Use Edit Mode to visually organize your network map
Creating a Network Map
The network map is a graphical representation of the devices in a network. The following shows a typical network map.
Network devices can be workstations, hosts, servers, routers, bridges, hubs, LAN boxes, printers, subnetworks (“subnets”), or custom host types.
Creating Network Maps 15WhatsUp Gold

16
ork
to ed in
n
d ry,
WhatsUp Gold provides several methods and tools to create a netwmap and add devices to it:
• Discover and Map - uses the Windows registry, hosts file, andnetwork information to detect ‘network devices
• Hosts file - uses the hosts file on your system
• Scan - locates devices within a range of IP addresses
• Scan WinNet - scans your Windows network for devices
• Traceroute tool - maps routers between your local host and a remote host
• Edit Toolbar - provides tools you can use to add devices to a network map
You can use any combination of WhatsUp Gold methods and toolscreate a network map. Each of these methods and tools is describthe following sections.
Discover and Map Network Devices
The Discover and Map capability creates a map from information oyour computer — or on the network to which your computer is connected — by reading network files and identifying devices listein the files. These files can include a hosts file, the Windows registand Windows network information.
To use the Discover and Map capability:
1 From the File menu, select New to view the New Map dialog box.
User’s GuideWhatsUp Gold

h
ach
2 Select Discover and map network devices, and then click Next. The Discover Devices screen appears.
3 Select the parameters you want to use to create the map.
Import devices from registry. Reads the Windows registry to find host names and IP addresses, and creates an icon for each host.
Import devices from hosts file. Reads a hosts file on the local system and creates an icon for each network device.
Discover devices from Network Neighborhood. If your computer is connected to a Microsoft Windows network, WhatsUp Gold scans the network and creates an icon for eacdevice it finds. (This can take a few minutes, depending on thesize of your network.)
4 Click the Next button. An information screen appears. Click Finish to start the Discover and Map process. WhatsUp Gold loads the network files and creates icons for any network devices it finds.
5 From the File menu, select Save or Save As to save the map.
6 See “Tips for Making a Map Easier to Read” on page 23.
Loading a Hosts File
You can load a hosts file (which lists device names and their associated IP addresses) and WhatsUp Gold creates an icon for edevice listed in the file.
Creating Network Maps 17WhatsUp Gold

18
ed
f IP in the , it
,
1 Select an existing map or create a new map window.
To select an existing map, select Open from the File menu and enter a map file name; the devices in the hosts file will be addto this map.
To create a new map, select New from the File menu. Select Create a blank map, and then click Finish.
2 From the Tools menu, select Import -> Hosts File. The Browse dialog box appears.
3 Locate the hosts file and click OK. WhatsUp Gold reads the hostsfile and creates an icon for each network device it finds.
4 From the File menu, select Save or Save As to save the map.
5 See “Tips for Making a Map Easier to Read” on page 23.
Using the Scan Tool
To automatically detect the network devices within a specified range of IP addresses, you can use the Scan tool. You specify a range oaddresses to be scanned, and WhatsUp Gold polls each address range. If WhatsUp Gold finds an active network device in the rangecreates a workstation icon for the device.
The Scan tool can also identify the network services (such as FTPHTTP, SMTP) on each network device.
To start a Scan:
1 Select an existing map or create a new map window.
To select an existing map, select Open from the File menu and enter the map file name; the devices found by the Scan tool will be added to this map (if you select Map Results as described below).
To create a new map window, select New from the File menu. Select Create a blank map and then click Finish.
2 From the Tools menu, select Import -> Scan IP. The Scan dialog box appears.
User’s GuideWhatsUp Gold

ork
.1
.10.
e
the
ms nd
3 Enter a range of network addresses to scan. Your current netwis used as the default range.
For example, if your network addresses range from 156.21.50through 156.21.50.254, you enter the range shown above.
The scan works consecutively from the last number of the Start Address through the last number in the End Address. For example, if you enter 245.245.1.50 as the Start Address and 245.245.10.60 as the End Address, the Scan only scans from 50to 60 in each of the networks from 245.245.1 through 245.245
4 Set the scanning options.
Map Results. Select this option so that WhatsUp Gold will creatan icon on the map for each device it finds.
Resolve Names. If you select this, WhatsUp Gold resolves the host name for each active IP address and displays the name indialog box; the name is also displayed on the map if Map Results
is selected.
Timeout. Enter the timeout in milliseconds (ms). If a network device does not respond to the Scan within this time, the Scancontinues on to the next IP address. This should be set to 300or greater. For maximum scanning speed, set this to 300 ms auncheck Resolve Names.
Creating Network Maps 19WhatsUp Gold
20
IP
IP es
for
old s,
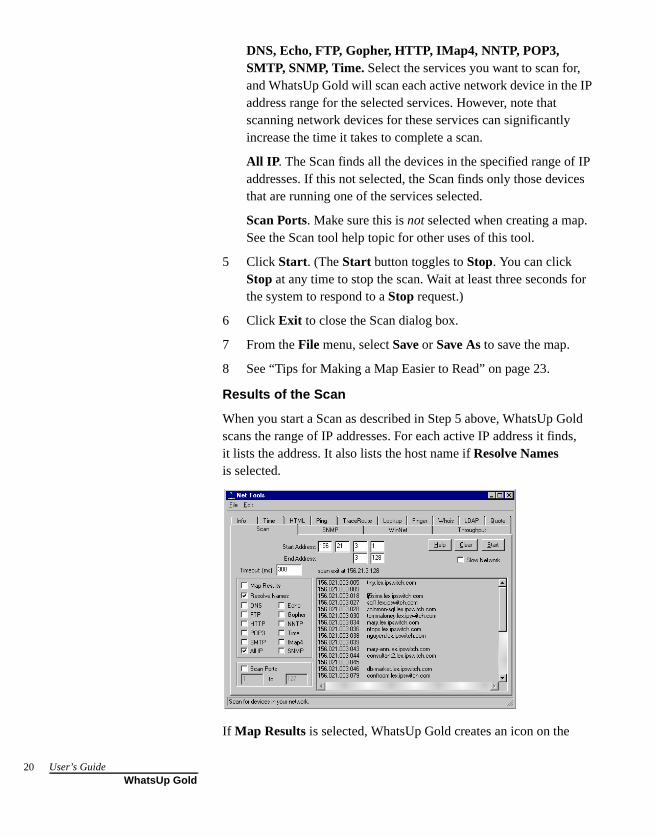
DNS, Echo, FTP, Gopher, HTTP, IMap4, NNTP, POP3, SMTP, SNMP, Time. Select the services you want to scan for, and WhatsUp Gold will scan each active network device in theaddress range for the selected services. However, note that scanning network devices for these services can significantly increase the time it takes to complete a scan.
All IP . The Scan finds all the devices in the specified range of addresses. If this not selected, the Scan finds only those devicthat are running one of the services selected.
Scan Ports. Make sure this is not selected when creating a map.See the Scan tool help topic for other uses of this tool.
5 Click Start. (The Start button toggles to Stop. You can click Stop at any time to stop the scan. Wait at least three seconds the system to respond to a Stop request.)
6 Click Exit to close the Scan dialog box.
7 From the File menu, select Save or Save As to save the map.
8 See “Tips for Making a Map Easier to Read” on page 23.
Results of the Scan
When you start a Scan as described in Step 5 above, WhatsUp Gscans the range of IP addresses. For each active IP address it findit lists the address. It also lists the host name if Resolve Names is selected.
If Map Results is selected, WhatsUp Gold creates an icon on the
User’s GuideWhatsUp Gold

und
active map for each device it finds. On the device properties Services tab, the services found during the Scan are checked.
However, if a device already existed on the active map, services fobecome selected on the Services tab of the device properties.
If you’ve defined a custom device type and select SNMP on the Scan tab, the Scan will recognize the custom device type and icon (if thecorrect entry has been made to the hosttypes.ini file). For more information, see “Creating a Custom Device Type” on page 35.
Devices that have an SNMP service running are flagged with an asterisk.
Services tab for the KentSquare device:
Services tab of device properties after a Scan for SNMP and Echo services:
Services tab of device properties before the Scan:
Creating Network Maps 21WhatsUp Gold

22
nds
e of
t to uter
g
t
Using the Scan WinNet Tool
The Scan WinNet tool creates a map by scanning the Windows
network to which your computer is connected, and finding the other devices on the network. It creates an icon for each device that it fion the network.
To start a Scan WinNet:
1 Select an existing map or create a new map window.
To select an existing map, select Open from the File menu and enter the map file name; the devices found on the Windows network will be added to this map.
To create a new map, select New from the File menu. Select Create a blank map, and then click Finish.
2 From the Tools menu, select Import -> Scan WinNet.
WhatsUp Gold scans your Windows network and creates an icon on the map for each device that it finds. Note that this scan can take a few minutes to complete depending on the sizyour network.
3 From the File menu, select Save or Save As to save the map.
4 See “Tips for Making a Map Easier to Read” on page 23.
Traceroute Mapping
The Traceroute tool lets you map the network devices (usually routers) that comprise the route of an IP packet from your local hosa remote Internet host. WhatsUp Gold displays an icon for each roand shows the connections from router to router.
1 For information on how to use the Traceroute tool, see “Tracinthe Route to an Internet Host” on page 149.
Note
The Scan WinNet will also find NetWare devices, but you will nobe able to monitor these devices.
User’s GuideWhatsUp Gold

d ap,
ps
k
Manually Drawing a Map
You can create network devices manually by using Edit Mode.
1 Select an existing map or create a new map window.
To select an existing map, select Open from the File menu and enter the map file name.
To create a new map, select New from the File menu. Select Create empty map, and then click Finish.
2 In the main toolbar, click the Edit Mode button. The editing toolbars appear.
3 Use the drawing tools to create network devices. For more information, see “Editing a Network Map” on page 33.
4 From the File menu, select Save or Save As to save the map.
5 See “Tips for Making a Map Easier to Read” on page 23.
Tips for Making a Map Easier to Read
If you have a large number of devices in your network and you useDiscover and Map, Scan IP, or Scan WinNet to create a network mthe first version of the map may be a bit difficult to read. Use the tibelow for making your map more readable.
• Select Map Properties from the File menu, and select Clip Names. You can also try the Wrap Names option to see if that makes the device names easier to read.
• Enter or modify the properties of the network devices. For starters, you might want to turn off monitoring for those networdevices that you don’t need to monitor right away. To do this, double-click the device icon to view the device properties; thenclick the Monitor tab and make sure Monitor This Device is turned off.
• Click the Edit Mode button and then drag device icons to new locations. For more information on organizing devices using shapes and lines, see “Editing a Network Map” on page 33.
Edit Mode button
Edit Mode button
Creating Network Maps 23WhatsUp Gold

24
s,
ap, the
IP ou
• To change a device’s icon, double-click it to display its propertieselect the General tab, then select a new Type from the drop-down list.
Device Properties
WhatsUp Gold needs basic information about a device in order tomonitor the device. When you create a map using Discover and MScan IP, or Scan WinNet, WhatsUp Gold automatically determinesdevice’s display name, host name, and IP address. This section describes why and how you might change the default device properties that WhatsUp Gold determines or assigns.
The Polling Method
By default, WhatsUp Gold uses the ICMP polling method for TCP/devices, IPX for IPX devices, and NetBIOS for NetBIOS devices. Ycan change the default polling method at the bottom of the General tab of the device properties.
• ICMP sends packets (echo requests) to a device and tracks the responses.
• TCP/IP is useful for monitoring devices outside of a firewall when the firewall does not pass ICMP packets, but does pass TCP/IP packets. To use the TCP/IP method, at least one TCP/IP service must be monitored on the device (selected on the Services tab of the device properties).
• NetBIOS is the polling method to use for Windows networks.
• IPX is the polling method for Novell NetWare networks.
If the polling method for a device is NetBIOS or IPX, you will not be able to monitor TCP/IP services on this device.
To scan and poll IPX devices, the system on which WhatsUp Gold is installed must have Microsoft NWLink IPX/SPX Compatible Transport installed and running. For more information, see “System Requirements” in Chapter 1.
Note
User’s GuideWhatsUp Gold

es, old
e, it
ill
s
Defining General Properties
On the General tab, you can make any changes to general propertichange the icon type for the device, and set the method WhatsUp Guses to poll the device.
To view or change device properties:
1 Double-click the device to display its properties, and click the
General tab.
2 In the Display Name text box, enter a name using up to eight characters. This is the name displayed on the network map.
3 Host Name (limited to 25 characters).
If the polling method is ICMP or TCP/IP, enter either the host name here or the IP address in Step 4. If you enter a host nammust be a name that can be resolved to an IP address.
If the polling method is NetBIOS or IPX, you must enter a valid NetBIOS or IPX name.
4 In the Address text box, enter a valid IP address.
If the polling method is ICMP or TCP/IP and you entered a Host Name in Step 3, you can leave this blank and WhatsUp Gold wuse the Host Name to look up the IP address.
Check the box next to the Address text box only if you want WhatsUp Gold to look up the IP address each time it checks this device. (This is useful if you use DHCP to assign IP addressedynamically, but note that if you use this feature for a large
Creating Network Maps 25WhatsUp Gold

26
k; he
p-
at is
e a
ait
number of devices, the name lookups put a heavy load on theDNS server.)
If the polling method is NetBIOS or IPX, leave the address blanWhatsUp Gold will display the hardware Ethernet address of tdevice after it completes one poll.
5 In the Type text box, select the desired device type from the drodown list. This selection determines which icon is displayed onthe network map. Note that the subnet icon is a special type thused to link a subnet map to a primary map. For more information, see “Creating a Subnet” on page 29.
6 In the Info Line 1 and Info Line 2 text boxes, enter any additional information about this device. This information can bincluded in notification messages. For example, you can enter“point of contact” for a device or location.
7 Select the method to use for polling this device. For detailed information, see “The Polling Method” on page 24.
8 Click Apply to apply your changes. Click OK to apply the changes and exit the dialog box.
Setting Up Monitoring
You use the Monitor tab to turn monitoring on or off for a device, tospecify how often to check the device, the number of seconds to wfor a response, and any up or down dependencies.
1 In the device properties, click the Monitor tab.
User’s GuideWhatsUp Gold

a
(set t to )
r
lue,
r
his
e this
2 Make sure Monitor This Device is selected.
3 In the Poll Frequency text box, enter a value to determine how often this device should be checked. The Poll Frequency determines if this device is checked on every poll (value = 1),
every second poll (value = 2), every third poll (value = 3), and so on. The default value is every poll (1), but you can use this property to poll a particular device less frequently.
4 In the Timeout text box, enter the number of seconds to wait forresponse from a monitored device.
You can enter a value from 1 to 20 seconds. The default value in the map properties) is 5 seconds. This timeout should be sethe smallest possible value. For a local network, a timeout of 2seconds is usually sufficient. For a long-distance (or slow-pathnetwork, this timeout may need to be as high as 10 seconds.
5 Set the Time Period options to specify when you want to monitothis device. Click the Change button to change the default settingof 7 days a week, 24 hours a day.
Select the Day of Week options: 7 days a week is the default. You can clear the 7 days a week option and then select the specific days of the week that you want to monitor this device.
Select one of the three Time of Day options: 24 hours a day means that monitoring is active all day. Between lets you specify the hours between which the device will be monitored. Not between lets you specify the hours that monitoring will not be active. Because the first value must be less than the second vause the Not between option to enable monitoring between an afternoon time and a morning time.
Click OK to save your changes and exit the dialog box.
6 (Optional) To draw an attached line from this device to anothedevice, select a device from the Connected to item drop-down list. (Attached lines move when you move the device icon.)
WhatsUp Gold draws an attached line between the devices. Tis the primary connection (width of two pixels) if it is the only connection from the device or the most recent connection madfrom that device. In these cases, any other attached lines fromdevice will be secondary connections (width of one pixel).
Creating Network Maps 27WhatsUp Gold

28
the
ect
e ke
ext
e.
ngle .
7 To make this device an “up dependency” for another device (meaning it gets checked only if the other device is up), selectother device from the Check only if up item list.
8 To make this device a “down dependency” for another device (meaning it gets checked only if the other device is down), selthe other device from the Check only if down item list.
9 Click Apply to apply your changes. Click OK to apply the changes and exit the dialog box.
Using the Right Mouse Menu
Select a device and then click the right mouse button to display thdevice pop-up menu. When you’re in Edit Mode, the menu looks lithe image to the left; in Monitor Mode, the menu has fewer commands.
New lets you add devices to the map.
Edit lets you cut, copy, paste, and delete.
Item Properties shows you the device properties.
Net Tools is the same as selecting Net Tools from the Tools menu.
Import is the same as selecting Import from the Tools menu.
Connect calls telnet.exe or whatever program you specify in the Telnet program box on the Progs/SNMP tab of Program Options.
Ping sends an ICMP echo request to the device.
Traceroute shows the network path used to reach a specified TCP/IP address.
Browse. If this device is running a web server on port 80, this command launches a web browser and finds the web site.
Attach to draws an attached line from the selected device to the ndevice you click.
Disconnect disconnects any attached lines from the selected devic
Move to Top. If the selected item is a drawn shape, such as a rectaor circle, this command moves it in front of all other drawn shapes
Move to Bottom. If the selected item is a drawn shape, such as a rectangle or circle, this command moves it behind all other drawn shapes.
User’s GuideWhatsUp Gold
e
ny p,
oes
p):
use e
,
Creating a Subnet
The Subnet feature of WhatsUp Gold allow you to create separatemaps for different segments of your network, yet maintain a connection between the maps. If you already have a “primary” network map, you create a second network map for a particular network segment and then link it to the primary map; this makes thsecond map a “subnet” of the primary map.
WhatsUp Gold can simultaneously monitor the network map and asubnet maps. When a device or service goes down in a subnet mathe subnet icon on the primary map changes color to indicate thatthere’s a problem in the subnet. The subnet icon in the primary network map will have the color of the highest priority alarm that occurs in the subnet map. For example, if a device in the subnet dnot respond to four polls, the subnet icon is red.
To create a subnet map (assuming you already have a primary ma
1 Create a new map and add the devices for the subnet. You canany of the methods for creating a network map described in thprevious section. You can also cut and paste devices from an existing map.
2 Save the new map.
3 Open the primary map or, if it’s already open, make it the active map.
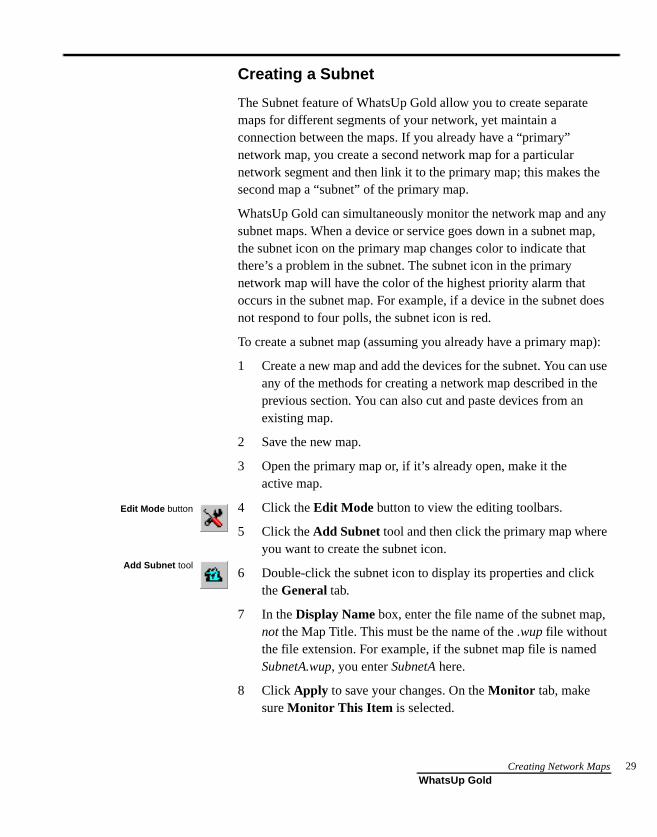
4 Click the Edit Mode button to view the editing toolbars.
5 Click the Add Subnet tool and then click the primary map whereyou want to create the subnet icon.
6 Double-click the subnet icon to display its properties and clickthe General tab.
7 In the Display Name box, enter the file name of the subnet mapnot the Map Title. This must be the name of the .wup file without the file extension. For example, if the subnet map file is namedSubnetA.wup, you enter SubnetA here.
8 Click Apply to save your changes. On the Monitor tab, make sure Monitor This Item is selected.
Edit Mode button
Add Subnet tool
Creating Network Maps 29WhatsUp Gold

30
et
u
art
When you open a network map, WhatsUp Gold can also open any
associated subnet maps and start monitoring them. (From the View menu, select Program Options -> Startup, and then enable the Auto Load Subnets option.)
If a subnet map window is not opened, you can right-click the subnicon and select Load Subnet from the menu to open it.
If a subnet map is opened but is hidden behind other windows, yocan right-click the subnet icon and select View Subnet from the menu to bring the subnet map to the top.
Setting Map Properties
You can set the polling and display properties for each primary network map and subnet map.
Open the map window for the network map, then select Map Properties from the File menu. Or, right-click an empty area of the map to display the right mouse menu and then select Map Properties.
Map Title . This title is used to identify the network map when accessed from a web browser.
Map Poll Frequency. This is the number of seconds between the stof polls. The status bar of each map window displays a timer that counts down from this number to zero before starting each poll.
User’s GuideWhatsUp Gold

poll
to ies
ning
ed
ame it
ap,
Note that this timer continues to count down during polls: if the previous poll is not complete when the timer reaches zero, a new is not started.
Default Timeout. This is the number of seconds to wait for a response from a polled device. This default value is used for new devices that are added to the map.
Auto Resize Map. When this is selected, the map shrinks to fit the display window, if necessary. If the window is larger than required display all of the devices, the map is not resized. (This option applto the map window in Monitor Mode only, it does not affect Edit Mode.)
Clip Names. When this is selected, the Display Names for devices are terminated at the first space or period in the name, thus shortethe display name.
Wrap Names. When this is selected, long display names are wrappat every space or period in the name.
Host Label Font. Specifies the font used for the device’s Display Name. Click the Change button to open the standard Windows font selection dialog box. The “Sample Label” shows the current font selection.
Map width/height in pixels. Specifies the maximum map size and the size of the internal display buffers. These should be set to the ssize as the display screen. The default setting is 800 by 600. In EdMode, these settings appear as a dotted line in the map.
Bitmap Background. Allows you to specify a bitmap to use as a background for a map. This could be a floor plan, a geographical mor any other image you want. You can position the bitmap to completely fill the map background (Stretch), or place it within the map using the TopLeft , Center, or Tile settings. Note that the color
depth of the bitmap must be equal to, or less than, the color depth of the screen.
Creating Network Maps 31WhatsUp Gold

32
et
t
.
ow.
.
a
Setting Map Colors
For each network map, you can set the default colors for the various alerts and for the various parts of the map window (such as the background, attached lines, and other drawn objects). To smap colors:
1 Place the cursor on an empty area of the map and select Map Properties from the right mouse menu.
2 Click the Colors tab.
3 To change the color for an item, select the item name in the lisbox and click the desired color.
Responding. This is the color that indicates that a device is responding to polls. The default is solid bright green.
Lost 1 pkt. The color that indicates that a device has not responded to one poll. The default is solid light green.
Lost 2 pkts. The color that indicates that a device has not responded on two consecutive polls. The default is solid yellow
Lost 3 pkts. The color that indicates that a device has not responded on three consecutive polls. The default is solid yell
Lost 4-7 pkts. The color that indicates that a device has not responded on four to seven polls. The default is solid light red
Lost 8+ pkts. The color that indicates that a device has not responded on eight or more polls or has a network error. The default is solid dark red.
Service down. The color that indicates that a service is down ondevice. The default is solid purple.
Inactive. The color that indicates a device that is not being monitored. The default is solid dark grey.
Background. The color of the map window background. The default is solid light grey.
Text. The color for drawn text. The default is solid black.
Attach lines. The color for attached lines. The default is solid yellow.
User’s GuideWhatsUp Gold

w.
.
Editing a Network Map
You use Edit Mode to move device icons around in the map windoWhen you’re in Edit Mode, you can use tools to:
• Add and delete device icons
• Cut, copy, and paste device icons and drawn objects
• Draw, color, and size graphic shapes to visually organize network elements
Getting In and Out of Edit Mode
To access Edit Mode, make sure the map that you want to edit is active, then click the Edit Mode button in the main toolbar. The editing toolbars appear.
Draw Toolbar
The default color for freehand (unattached) lines is black; you can change this using the color toolbar.
Note
Edit Mode button
WhatsUp Gold stops polling the network when you’re in Edit Mode
Note
Use the Draw Toolbar to add free (unattached) lines, rectangles, filled rectangles, ellipses, filled ellipses, and text blocks to your map.
Creating Network Maps 33WhatsUp Gold

34
lled e. to
r.
Edit Toolbar
To exit Edit Mode and return to Monitor Mode, click the Edit Mode button again. The toolbars disappear.
Keeping Tools Active
When you’re in Edit Mode, you click a tool to use it. By default, thetool stays active for one operation. If you want the tool to remain active until you decide to change it, select Keep Buttons Down from the Options menu.
Drawing
To draw a shape, such as a rectangle, ellipse, filled rectangle, or fiellipse, click the appropriate tool, and then drag to create the shapThe shape uses the active border color, as shown in the illustrationthe left. Filled objects use the active fill color.
To change the border color, click the left mouse button on any coloTo change the fill color, click the right mouse button on any color.
The select tool is the default active tool. When the select tool is active, you can drag any map object to a new location.
When the display tool is active, you can click a device icon to view and modify its properties.
Use the Edit Toolbar to create device icons and to select, move, cut, copy, and paste device icons and drawing objects.
Add workstation
Add server
Add bridge
Add LAN box
Add printer Add custom device. For more infor-mation, see “Creating a Custom Device Type” on page 35.
Add host
Add router
Add hub
Add subnet
Edit Mode button
Border color
Fillcolor
User’s GuideWhatsUp Gold

t,
y
Creating a Custom Device Type
The Edit Toolbar provides tools that let you add a workstation, hosserver, router, bridge, hub, LAN box, subnet, or custom devices toyour network map.
To create a custom device type,
1 Select Device Types from the View menu.
2 Click New.
3 Enter a name for the new device type and click OK .
4 In the Icon Filename text box, enter the name of an icon (.ico) file that:
• Has a depth of 16 colors
• Is exactly 32 pixels tall and 32 pixels wide
• Has a black border surrounded by white
• Has transparent pixels that WhatsUp Gold can use to displastatus colors
5 Select the Type (polling method) of the device. For more information, see “The Polling Method” on page 24.
6 If the Type is TCP/IP, select whatever Services you want to monitor by default when you create a device of this type.
Creating Network Maps 35WhatsUp Gold

36
ice
an
s
o be
ou
7 Click Save to save the new device type.
To use the custom device type on a network map:
1 Click the custom device tool in the Edit Toolbar.
2 Click the map location where you want to add the custom devtype. You see the following dialog box.
3 Choose the custom device type from the drop down list.
4 Click OK .
If you have created a custom device and you intend to use the Sctool (with the Map Results option turned on) to add devices to an existing network map, you will probably want the Scan tool to automatically use the proper custom icon for the device.
To have the Scan tool use the custom icon, the following conditionmust be met:
• The SNMP agent must be enabled on the device(s) you want tmapped as custom devices.
• You must know the correct community name for the device. (Ywill be prompted for this; the default community name is public.)
• The WhatsUp Gold hosttype.ini file must include a section (addedwith a text editor) for the custom host type that specifies:
[device_name_in_brackets]BMPNAME=bitmapnameTYPE=0SCOUNT=0OBJID=sysobjectid
where bitmapname is the name of the .ico file, and sysobjectid is the number for the SNMP object named SysObjectID. (For examples of what these entries should look like, open hosttype.ini in a text editor to view existing entries.)
• SNMP must be selected on the Scan tab when you run the Scan tool.
Custom device tool
User’s GuideWhatsUp Gold
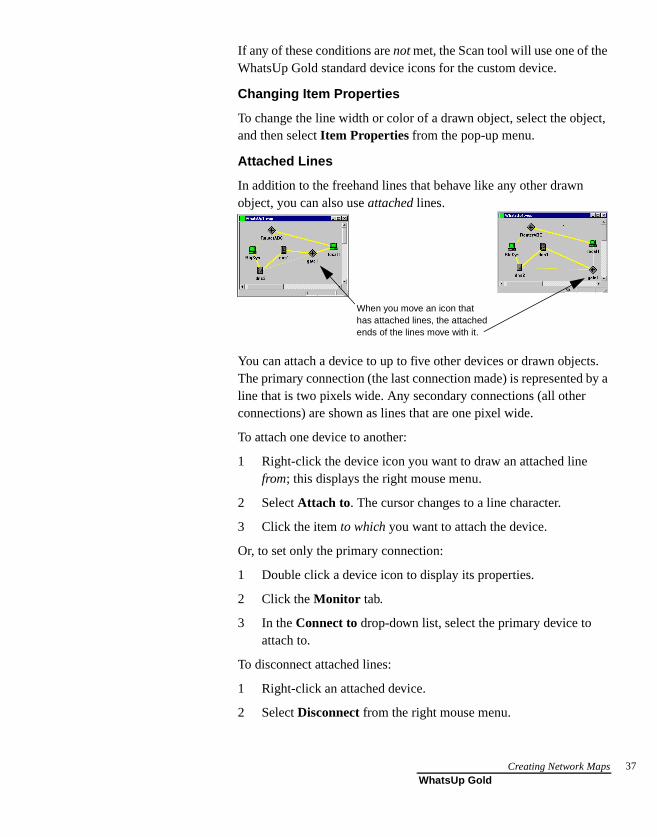
ct,
ts. by a
If any of these conditions are not met, the Scan tool will use one of theWhatsUp Gold standard device icons for the custom device.
Changing Item Properties
To change the line width or color of a drawn object, select the objeand then select Item Properties from the pop-up menu.
Attached Lines
In addition to the freehand lines that behave like any other drawn object, you can also use attached lines.
You can attach a device to up to five other devices or drawn objecThe primary connection (the last connection made) is represented line that is two pixels wide. Any secondary connections (all other connections) are shown as lines that are one pixel wide.
To attach one device to another:
1 Right-click the device icon you want to draw an attached line from; this displays the right mouse menu.
2 Select Attach to. The cursor changes to a line character.
3 Click the item to which you want to attach the device.
Or, to set only the primary connection:
1 Double click a device icon to display its properties.
2 Click the Monitor tab.
3 In the Connect to drop-down list, select the primary device to attach to.
To disconnect attached lines:
1 Right-click an attached device.
2 Select Disconnect from the right mouse menu.
When you move an icon that has attached lines, the attached ends of the lines move with it.
Creating Network Maps 37WhatsUp Gold
38
cts,
ck,
s
he
es in
Or, to disconnect only the primary connection:
1 Double click a device to display its properties.
2 Select the Monitor tab.
3 In the Connect to drop-down list, select None.
Creating Text Captions
You can use text captions to further identify a network map or segments of a map. Text is available in many fonts, sizes, text effeand colors.
In addition, you can specify an opaque background for the text blowhich is also available with a choice of colors. Text blocks can be rotated a full 360 degrees (if you select a TrueType font) to addresspecial text labeling requirements.
To add text to the network map:
1 Select the border color in the Color Toolbar.
2 In the Draw Toolbar, click the Text tool.
3 Place the cursor where you want to locate the text and click. TSample Text and its properties dialog box appear.
4 In the Text box, replace Sample Text with the desired text.
5 Set the color, font, or rotation options as appropriate.
Foreground. Click Change Color to select another color.
Opaque. Select this to set the text against a background color.
Background. If Opaque is selected, the background color is used. You can click Change Color to select another color.
Change Font. Click Change Font to change the font of the text.
Rotation. Enter a number from 0 to 360 to represent the degreto rotate the text. You must be using one of the TrueType fontsorder to rotate text.
6 Click OK .
Text tool
NoteEven after you rotate text, the text retains its original anchor points. To select rotated text, click an original anchor point.
User’s GuideWhatsUp Gold

es he
d
ed
Arranging the Toolbars
In Edit Mode, you can arrange the five WhatsUp Gold toolbars anynumber of ways, on or off a gray toolbar backdrop.
To make a toolbar float in its own window, drag the double gray linat the top of the toolbar to an area off the toolbar backdrop. To move afree-floating toolbar onto the toolbar backdrop, drag its title bar to ttoolbar backdrop; to use the toolbar backdrop if it’s not visible, double-click a toolbar’s title bar.
You can also reshape the Standard Toolbar by grabbing a side andrag to the desired shape.
Saving and Naming a Network Map
If you save a new map by selecting Save from the File menu, the map file is saved with a default name. The first default file name assignby WhatsUp Gold is WhatsUp.wup, and subsequent maps saved thisway are named WhatsUp1.wup, WhatsUp2.wup ... WhatsUpn.wup.
To save a map with your own name, use the Save As command.
Toolbar backdrop
Creating Network Maps 39WhatsUp Gold

40
User’s GuideWhatsUp Gold
s old
ing
ts”
n ee
Chapter 3: Setting Up Notifications
When a device does not respond to polling, or when a service goedown on a device, or when an SNMP trap is received, WhatsUp Gcan notify you in several ways; it can:
• Change the color of the device icon on the map
• Invert the icon’s name
• Sound an alarm
• Activate a beeper
• Send a message to a pager
• Send an e-mail message
• Send a pre-recorded voice message to a telephone or answermachine (if you have a voice modem installed)
• Display a WinPopup on a Windows NT system
• Send a group of notifications
You can also set up a “recurring report” to use a beeper, pager, ore-mail message to send a network status report at a specified timeinterval. For more information, see “Sending Network Status Reporin Chapter 5.
Setting up notifications involves two steps:
1 You first need to define the notifications that you will want to use,such as activating a network administrator’s beeper or sendinge-mail to an individual. This section describes how to do this.
2 Then, you assign a notification to a particular device, selected devices, or all devices.
For information on assigning notifications to a device, see “Assigning Notifications to Devices” on page 57. For informatioassigning notifications for selected devices or for all devices, s“Assigning Notifications Globally” on page 63.
Setting Up Notifications
WhatsUp Gold
41

42
s
oes e in
en er lly
Defining Notifications
You define the different types of notifications using the NotificationEditor. Access the Notifications Editor in one of two ways:
• From the View menu, select Notifications.
• Open the device properties, click the Alerts tab, and select Enable Alerts and Enable Notifications. Then click the Notifications Editor button.
Defining System (Sound and WinPopup) Notifications
System notifications are of two types: sound notifications and WinPopups. A sound notification sounds an alarm when a device gdown or comes back up. WinPopup notifications display a messagthe WinPopup window on particular Windows NT systems.
Select View -> Notifications and click the System tab.
Any notifications you define are stored in a file named ipnotify.ini in your Windows or NT directory. This file is shared by other Ipswitch products and is therefore not deleted or replaced whyou uninstall or upgrade WhatsUp Gold. Furthermore, if you evmove WhatsUp Gold to a new system, you will need to manuacopy the ipnotify.ini file to the Windows or NT directory of the new system.
Note
User’s GuideWhatsUp Gold

er
w
hen
To define a sound notification:
1 Click New and enter a unique name for the notification.
The new notification name appears in the list box.
2 In the Filename text box, enter the name of the .wav file to be played when this notification is triggered.
Click the Browse button to the right of the file name to select a .wav file.
Click the Invoke Sound Recorder button to the right of the file name to open the specified .wav file in the Sound Recorder. For more information, see the Sound RecordHelp menu.
3 Optionally, select Continuous to play the sound continuously until the Quiet button is clicked.
4 Click Save to save the new notification.
To define a WinPopup notification (on Windows NT systems only):
1 Click New and enter a unique name for the notification. The nenotification name appears in the list box.
2 In the Destination text box, specify the Windows NT hosts or domain that you want to receive this notification.
Note that domains are marked with an asterisk (*).
3 In the Message text box, enter a text message plus any of the variables described in “Notification Message Variables” on page 51. (You can use these to add status information.)
4 Click Save to save the new notification.
Defining Pager Notifications
You can define a pager notification to send a message to a pager wa device does not respond.
WhatsUp Gold supports PageNet and other TAP (Telocator Alphanumeric input Protocol) pager services, as well as SMS-TAPand NTT pager services.
Browse
Invoke Sound Recorder
Quiet button
Setting Up Notifications
WhatsUp Gold
43

44
e bers,
tus
To define a pager notification:
1 In the Notification System dialog box, click the Pager tab.
2 Click New and enter a unique name to identify the pager notification, for example, Page Bob. The new notification name appears in the list box.
3 In the Pager Type section, select the type of pager service thatyou are using.
4 In the Terminal Phone Number box, enter the phone number todial. If required, enter the pager password in the Terminal Password box. You can use parenthesis to delimit the area codand a dash to separate the exchange from the extension numfor example: (617) 555-5555.
5 In the Pager ID box, enter the pager identification number.
6 In the Message String box, enter a text message plus any of thenotification variables described in “Notification Message Variables” on page 51. You can use these variables to add stainformation to the notification.
User’s GuideWhatsUp Gold

7 Click Comm Setup to view the following dialog box.
8 In the Alpha Pager section of the dialog box, enter:
Modem Initialization String (ATEO) . The default string is ATEO. This string should contain the modem commands for “Command Echo Off” (EO).
Baud Rate. Select the speed (measured in bits per second) atwhich the serial port will communicate with the modem.
COM Port . Select the port to which your modem is attached.
8N1. The TAP protocol requires the 7E1 setting for communications, but if your pager uses 8N1, you can select this option.
Protocol. Select the protocol used by your pager service.
When you have entered the information, click OK to save your changes and exit the Communications Setup dialog box.
9 On the Pager tab, click Save to save the new notification.
Beeper section
Pager section
Mail section
Setting Up Notifications
WhatsUp Gold
45

46
o ple:
s
ome
Defining Beeper Notifications
A beeper notification activates a beeper when a device does not respond to polling.
To create a beeper notification:
1 Select View -> Notifications and click the Beeper tab.
2 Click New and enter a unique name to identify the beeper notification, for example, Beep Bob. The new notification name appears in the list box.
3 In the Beeper Number box, enter the phone number to dial. You can use parenthesis to delimit the area code and a dash tseparate the exchange from the extension numbers, for exam(617) 555-5555.
4 In the Dial String box, the default is ATDT%s,,,,%s# . WhatsUp Gold replaces the first %s with the phone number and the second %s with the beeper code. Most modems and beepersupport the use of ‘#’ to terminate the message and ‘* ’ to print out a dash.
If the code is dialed too soon, you can increase the number ofcommas in the dial string; you can decrease the number of commas if the modem waits too long.
5 In the Common to all section, the Up Code specifies the characters sent to the beeper to indicate that the device has c
User’s GuideWhatsUp Gold

e
ode
d
s.
rial
ho
back up after being down (the default value is 0*). The Down Code specifies the code sent to indicate the device is down (thdefault value is 9*). The SNMP Trap Code specifies the code sent to indicate that an SNMP trap has been received for the device. You can use the asterisk (*) character to separate the cfrom a subsequent message.
When sent to the beeper, the Up or Down code will be followeby the Item digital code that indicates which device the notification is for. (The Item digital code is specified in the Add/Edit Notifications dialog box when you assign a beeper notification to a particular device. For more information, see “Assigning Notifications to Devices” on page 57.)
6 Click Comm Setup to view the Communications Setup.
7 Enter the following information in the Digital Beeper section of the dialog box:
Dial String . This is the default dial string for beeper notification
Baud Rate. Select the speed (bits per second) at which the seport will communicate with the modem.
COM Port . Select the port to which your modem is attached.
Modem Init String . The default string is ATEOQOV1X4. This string should include the modem commands for “Command EcOff” (EO), “Result Codes On” (QO), “Verbal Results” (V1), and“Extended Status” (X4).
Beeper section
Pager section
Mail section
Setting Up Notifications
WhatsUp Gold
47

48
a
s:
e
Timeout. The timeout value determines how long the system
waits, after sending the last character, before it hangs up the phone (if a transition is not recognized).
When you have entered the information, click OK to save your changes and exit the Communications Setup dialog box.
8 On the Beeper tab, click Save to save the new notification.
Defining E-mail Notifications
An e-mail notification sends a message to an e-mail address whendevice does not respond.
1 Select View -> Notifications and click the Mail tab.
2 Click New and enter a unique name to identify the e-mail notification, for example, Mail to Netadmin . The new notification name appears in the list box.
3 In the IP Address of SMTP Host box, enter the IP address of your SMTP mail host.
4 In the To box, enter one or more e-mail addresses that are accepted by the SMTP server. Separate each address with a comma. The addresses should not contain brackets, braces, quotes, or parentheses.
5 The From address defines the sender of an e-mail notification a<whatsup@%s>, where %s is converted by WhatsUp Gold to the local host name. In most cases, you will not need to chang
User’s GuideWhatsUp Gold

tus
e
e
s,
this address. If you do change the address, be sure to keep the angle brackets (< >) in place.
6 In the Subject box, enter a text message and/or any of the notification variables described in “Notification Message Variables” on page 51. You can use these variables to add status information to the notification.
7 In the Message String box, enter a text message plus any of thenotification variables described in “Notification Message Variables” on page 51. You can use these variables to add stainformation to the notification.
8 Click Save to save the new notification.
Defining Group Notifications
A group notification includes multiple pager, beeper, e-mail, or voicnotifications. Each group notification can be set up to “Notify All” (send all its member notifications at once) or “Notify First” (send onmember notification at a time until one is successfully sent).
Example A. One group notification might be named SeriousProblem and it might include the following four pager notifications:
• PageTodd 24 hours a day on Monday, Wednesday, or Friday
• PageElena 24 hours a day on Tuesday or Thursday
• PageKenny 24 hours a day on Saturday or Sunday
• PageManager 24hours a day, 7 days a week
Example B. Another group notification might try a series of beeperand e-mail notifications until one is successfully sent. In other wordsuppose you have a group notification named Operations; its members are:
• BeepJed
• EmailJed
• BeepHeidi
• EmailHeidi
• BeepFaith
• EmailFaith
In this case, WhatsUp Gold would try to beep Jed first, but if this beeper message is not sent successfully, it then tries to e-mail Jed.
Setting Up Notifications
WhatsUp Gold
49

50
xt di nd
list
tion
il
If the e-mail to Jed is also not successfully sent, WhatsUp Gold netries to beep Heidi. Now, lets suppose the beeper message to Heiis sent successfully; in this case, WhatsUp Gold will not attempt to seany more notifications in the Operations group.
To define a group notification:
1 Select View -> Notifications and click the Group tab.
2 Click the New button, enter a name for the group, and click OK .
3 Add each member notification to the group by clicking the Add button to view the Add/Edit Notification dialog box shown on page 57. The appearance of this dialog box varies slightly depending on the notification that is selected in the drop-down at the top of the dialog box.
As described in the steps on page 57, select a member notificafrom the drop-down list, set the options for the selected notification including Trigger and Time Period, and then click OK . Repeat for each notification in the group.
4 (Optional) To send the member notifications one at a time untone of them is sent successfully, select ������ ���, and then use the Up and Down buttons to sequence the list of members.
5 Click the Save button.
User’s GuideWhatsUp Gold

ng
Notification Message Variables
In pager and e-mail notification messages, you can use the followivariables to encode information about a device.
%a = IP address or hardware address
%C = Item digital code
%c = System Type
%d = Date (yy.mm.dd)
%h = Host Address/Name
%L = Log file (or %Lnn where nn=last nn lines of the log file) This variable can be used in e-mail messages only.
%N = Notes
%n = Display Name
%S = Status (such as “timed out” or “did not respond”)
%s = Integer status (these are Winsock error codes)
%t = Time (hh:mm:ss)
%u = “UP” or “DOWN”
%v = Down services
%V = Down services with “services” printed
%1 = Info line 1
%2 = Info line 2
Testing Beeper, Pager, and E-mail Notifications
To test a beeper, pager, or e-mail notification, select it in the Notification Editor and click the Test button. WhatsUp Gold runs a test and responds with a Succeeded or Failed message.
Setting Up Notifications
WhatsUp Gold
51

52
wn
d
me ice.
em ld
Defining Program Notifications
A program notification starts an application when a device goes door comes back up.
1 Select View -> Notifications and click the Program tab.
2 Click New, enter a name to identify the program notification, anclick OK . The new notification name appears in the list box.
3 In the Program Filename box, enter the executable name of theapplication you want to start.
4 In the Working Directory box, specify a directory where the working files for the application are stored.
5 In the Command Line Arguments box, enter any of the notification variables described in “Notification Message Variables” on page 51. The default variables are the display na(%n), up or down status (%u), and IP address (%a) of the dev
6 Click Save to save the new notification.
Setting Up a Voice Modem
To use voice notifications, you must install a supported voice modand the Unimodem/V drivers on the system on which WhatsUp Gois installed. WhatsUp Gold has been tested with the US Robotics Sportster Voice 33.6 Faxmodem with Personal Voice Mail and with the Diamond 3500 voice modem.
User’s GuideWhatsUp Gold
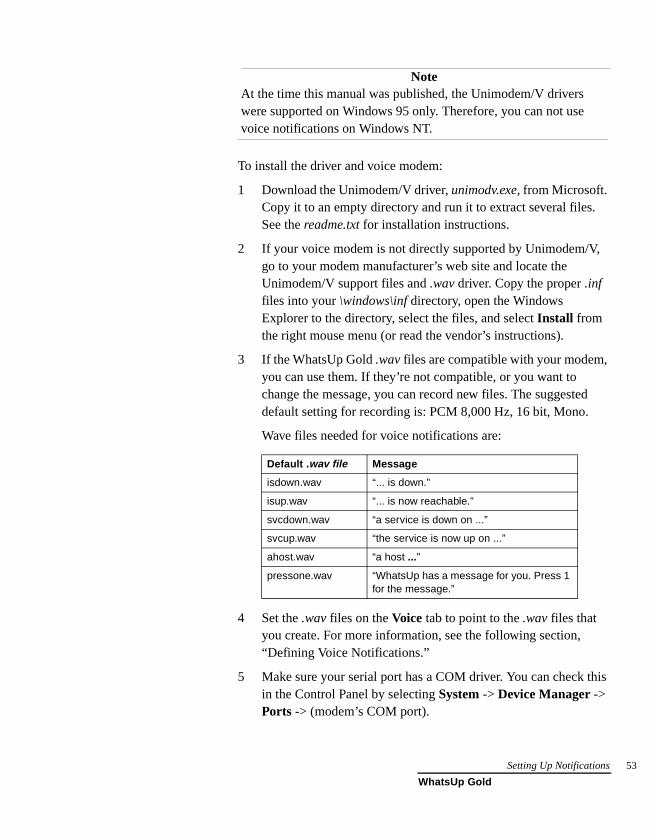
d
his
To install the driver and voice modem:
1 Download the Unimodem/V driver, unimodv.exe, from Microsoft. Copy it to an empty directory and run it to extract several files.See the readme.txt for installation instructions.
2 If your voice modem is not directly supported by Unimodem/V,go to your modem manufacturer’s web site and locate the Unimodem/V support files and .wav driver. Copy the proper .inf files into your \windows\inf directory, open the Windows Explorer to the directory, select the files, and select Install from the right mouse menu (or read the vendor’s instructions).
3 If the WhatsUp Gold .wav files are compatible with your modem,you can use them. If they’re not compatible, or you want to change the message, you can record new files. The suggestedefault setting for recording is: PCM 8,000 Hz, 16 bit, Mono.
Wave files needed for voice notifications are:
4 Set the .wav files on the Voice tab to point to the .wav files that you create. For more information, see the following section, “Defining Voice Notifications.”
5 Make sure your serial port has a COM driver. You can check tin the Control Panel by selecting System -> Device Manager -> Ports -> (modem’s COM port).
Default .wav file Message
isdown.wav “... is down.”
isup.wav “... is now reachable.”
svcdown.wav “a service is down on ...”
svcup.wav “the service is now up on ...”
ahost.wav “a host ...”
pressone.wav “WhatsUp has a message for you. Press 1 for the message.”
At the time this manual was published, the Unimodem/V drivers were supported on Windows 95 only. Therefore, you can not use voice notifications on Windows NT.
Note
Setting Up Notifications
WhatsUp Gold
53

54
es
l
p or
le,
nd
If you do not have all of the above installed (voice modem, Unimodem/V drivers, and a COM driver), you will not see the Voice tab in the Notifications Editor dialog box.
Defining Voice Notifications
You can define voice notifications to send a voice message to a telephone or answering machine when a device goes down or comback up. You can use the default .wav files included with WhatsUp Gold to send a message, or you can record your own .wav files.
When a voice notification is triggered, WhatsUp calls the specifiedtelephone number and plays the initial message. The default initiamessage (pressone.wav) is “WhatsUp has a message for you. Press one for the message.” When you press 1 on the phone, one of the udown messages will play, such as “A host is down.”
If you want to include the device name in the message (for examp“Gyro is down”), you can record a .wav file of a particular device name and enter the .wav file name in the Add Notifications dialog boxwhen you add the voice notification to that device. For more information, see “Assigning Notifications to Devices” on page 57.
1 Select View -> Notifications and click the Voice tab.
The Voice tab is displayed only if the system has a voice modem athe Unimodem/V driver installed.
Note
User’s GuideWhatsUp Gold

ple:
at lt
e
d
l
he
t this
If you do not have a voice modem, Unimodem/V drivers, and aCOM driver installed, you will not see the Voice tab in the Notifications Editor dialog box.
2 Click New and enter a unique name to identify the voice notification, for example, “Phone Fred.” The new notification name appears in the list box.
3 In the Phone number box, enter the phone number to dial. You can use parentheses to delimit the area code and a dash to separate the exchange from the extension numbers, for exam(617) 555-xxxx.
4 In the Repeat Msg box, enter or select the sound (.wav) file that will be played as the initial voice message to tell the recipient ththey have received a message from WhatsUp Gold. The defaumessage (pressone.wav) is “WhatsUp has a message for you. Press 1 for the message.” When the recipient presses 1 on thphone, one of the status messages will be played.
Click Browse to select a .wav file. Click the Invoke Sound Recorder button to open the .wav file in the Sound Recorder. You can play the sound file or edit it to create a different sound. For more information on Sound Recorder, see the SounRecorder Help.
5 In the Count text box, enter the number of times to play the initiamessage (specified in the Repeat Msg box) before timing out (if the message is not acknowledged).
6 In the Button text box, enter the number on the telephone that trecipient presses to get the status message.
The default message (specified in the Repeat Msg box) tells the recipient to press 1 to receive the status message. You can senumber to 99 to make it accept any number pressed on the telephone.
7 Optionally, enter or select the sound (.wav) file that will be played
Browse
Invoke Sound Recorder
If voice mail or an answering machine answers the phone, thevoice notification will not get beyond the initial .wav file specified in the Repeat Msg box.
Note
Setting Up Notifications
WhatsUp Gold
55

56
are:
nt ect
for any of the status messages. The default status messages
Click the Browse button to select a .wav file. Click the Invoke Sound Recorder button to open the .wav file in the Sound Recorder. You can play the sound file or edit it to create a differesound. For information on recording and editing sound files, selan item from the Sound Recorder’s Help menu.
8 Click Save to save the new notification.
Property Default .wav file Message
Item Down isdown.wav “... is down.”
Item Up isup.wav “... is now reachable.”
Svc Down svcdown.wav “a service is down on ...”
Svc Up svcup.wav “the service is now up on ...”
Wave file (in Alerts)
ahost.wav “a host ...”
Browse
Invoke Sound Recorder
User’s GuideWhatsUp Gold

to ed e
s
Assigning Notifications to Devices
WhatsUp can notify you when:
• A device is down
• A service on a device is down
• An SNMP trap has been received for a device
In order to receive a notification for one of these events, you needdefine the notifications you want to use. Then, once you have definthe notifications, you assign them to the appropriate device(s). Thescan be individual devices, selected devices, or all devices in a particular network map.
This section describes how to assign notifications to individual devices. For information about assigning notifications globally (to selected devices or to all devices in a map), see “Assigning Notifications Globally” on page 63.
Using the Alerts Tab
You use the Alerts tab to:
• Enable logging
• Enable a sound alarm
• Assign notifications and/or enable notifications
To use the Alerts tab:
1 Double-click the device to view the device properties, and thenclick the Alerts tab. If alerts are not enabled and no notificationare assigned, the Alerts tab is similar to the following:
Global notifications (assigned to selected or all devices using mapproperties) override notifications assigned to individual devices. Therefore, assign notifications globally before you assign them to individual devices.
Note
Setting Up Notifications
WhatsUp Gold
57

58
in ear
ve
is wed
If notifications have been assigned to the device, they appear the list box. If the assigned notifications are enabled, they appin a black font; but if the notifications were assigned and subsequently disabled, they appear in a gray font. You can haup to 10 notifications for each device.
2 Make sure Enable Alerts is selected.
3 In the Log Activity section, make sure Enable is selected if you want WhatsUp Gold to write entries to the Events Log when thdevice goes down or comes back up. (These entries can be vie
List box
Enabled notifications
Notifications that have been assigned but disabled
User’s GuideWhatsUp Gold

ck
led
on the Log tab of the device properties.) The Threshold value should be less than or equal to the Trigger value for a sound alarm or a notification.
4 (Optional) In the Sound section of the Alerts tab, select Enable Sound to sound an alarm (a specified .wav file) when the device fails.
Trigger. Enter the number of missed polls after which the alarmwill be sounded. The default value is 4.
Continuous. Select this option to sound the alarm until it is manually turned off (by clicking the Quiet button in the main toolbar).
Filename. Enter or select the sound (.wav) file that will be played when the device goes down. WhatsUp Gold provides three .wav files: alarm1.wav, alarm2.wav, alarm3.wav.
Click the Browse button to browse the directories and select a .wav file. Click the Invoke Sound Recorder button to open the .wav file in the Sound Recorder. You can play the sound fileor edit it to create a different sound. For information on using Sound Recorder, see the Sound Recorder Help.
5 (Optional) In the Notifications section of the Alerts tab, select Enable Notifications to activate this section of the Alerts tab.
To delete a notification, select the notification in the list box and cliDelete.
To edit a notification, see “Editing Notifications” on page 62.
To assign a notification to this device, see below.
To play the alarm sounds, you must have a sound card instalon your system.
Note
Quiet button
Browse
Invoke Sound Recorder
Setting Up Notifications
WhatsUp Gold
59

60
es p-
e
p s
e
Assigning a Notification
To assign a notification, you add it to the list box on the Alerts tab (if Enable alerts and Enable Notifications are selected):
1 On the Alerts tab, click the Add button to view the Add/Edit Notifications dialog box. The appearance of this dialog box varislightly depending on the notification that is selected in the drodown list at the top of the dialog box.
2 Select a defined notification, such as Default Beeper or Default Pager, from the drop-down list. All your defined notifications areavailable from this list.
3 Enter a Trigger. After this number of failed checks, WhatsUp Gold sends the notification. We recommend that this number bat least 4.
4 (Optional) Select Auto send UP alert after sending DOWN alert to send the notification when the device(s) comes back uafter a down notification. This option is active for all notificationexcept sounds.
Before you can assign a notification to a device, you must define thnotification. For more information, see “Defining Notifications” on page 42.
Note
User’s GuideWhatsUp Gold
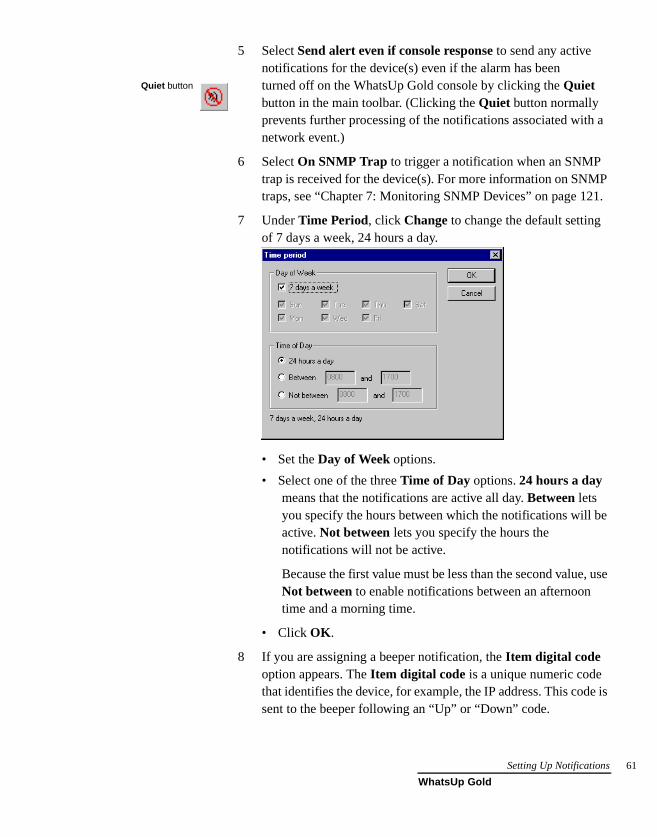
a
P 1.
e
, use
e is
5 Select Send alert even if console response to send any active notifications for the device(s) even if the alarm has been turned off on the WhatsUp Gold console by clicking the Quiet button in the main toolbar. (Clicking the Quiet button normally prevents further processing of the notifications associated withnetwork event.)
6 Select On SNMP Trap to trigger a notification when an SNMP trap is received for the device(s). For more information on SNMtraps, see “Chapter 7: Monitoring SNMP Devices” on page 12
7 Under Time Period, click Change to change the default setting of 7 days a week, 24 hours a day.
• Set the Day of Week options.
• Select one of the three Time of Day options. 24 hours a day means that the notifications are active all day. Between lets you specify the hours between which the notifications will bactive. Not between lets you specify the hours the notifications will not be active.
Because the first value must be less than the second valueNot between to enable notifications between an afternoon time and a morning time.
• Click OK .
8 If you are assigning a beeper notification, the Item digital code option appears. The Item digital code is a unique numeric code that identifies the device, for example, the IP address. This codsent to the beeper following an “Up” or “Down” code.
Quiet button
Setting Up Notifications
WhatsUp Gold
61

62
in
n IP
9 If you are assigning a voice notification, the Wave file text box appears. You can use this box to specify a .wav file that identifies the device that’s down.
To do this, record a .wav file for the device; for example, the recordingcould say “Gyro” for a device named Gyro. When the device goesdown, the voice message will be “Gyro is down.” The default valuethis box is [auto]; this looks for the file display_name.wav (for example, gyro.wav). If the file is not found, it plays the file ahost.wav, which says “a host,” as in “A host is down.”
Editing Notifications
You can edit:
• The way a notification works with a particular device
• The basic definition of a notification
To edit the way the notification works with this device, select the notification on the Alerts tab and click the Edit button to see the Add/Edit dialog box shown on page 60. The steps below the illustration describe each of the values in this dialog box.
To edit the notification definition, you use the Notifications Editor. You can access the Notifications Editor in one of two ways:
• From the View menu, select Notifications.
• If you are on the Alerts tab of device properties, select Enable alerts and Enable Notifications. Then click the Notifications Editor button.
Note that if you are editing notifications from the Alerts tab, you must click Save to apply your changes.
You can use an asterisk (*) character to separate numbers in aaddress. The period character (.) is not allowed in this box.
Note
User’s GuideWhatsUp Gold

all
e
s,
Assigning Notifications Globally
You can assign notifications globally by using the Alerts tab of the map properties. Using this tab, you can assign notifications to all devices in the map, or to just the selected devices.
To assign a notification to selected devices in a network map, or todevices in a map:
1 Open the network map.
2 (Optional) If you want to assign notifications to less than all thdevices on the map, select those devices to which you want toassign the notification.
3 From the File menu, select Map Properties and then click the Alerts tab.
The notifications that appear in the list box in the Notificationssection are the active notifications for the selected device(s).
Notifications assigned globally (on the Alerts tab of map properties) replace notifications assigned to individual devices. Because of thiyou should assign global notifications before you assign notifications for individual devices.
Note
Active notifications appear in this list box
Setting Up Notifications
WhatsUp Gold
63

64
led
4 Make sure Enable Alerts is selected.
5 In the Log Activity section, make sure Enable is selected if you want WhatsUp Gold to write up and down events to the EventLog. The Threshold value should be less than or equal to the Trigger value for a sound alarm or a notification.
6 (Optional) In the Sound section of the Alerts tab, select Enable Sound, and then assign or change the sound alarm.
Trigger. Enter the number of missed polls after which the alarmwill be sounded. The default value is 4.
Continuous. Select this option to sound the alarm until it is manually turned off (by clicking the Quiet button in the main toolbar).
Filename. Enter or select the sound (.wav) file that will be played when the devices go down. WhatsUp Gold provides three .wav files: alarm1.wav, alarm2.wav, alarm3.wav.
Click the Browse button to browse the directories and select a .wav file. Click the Invoke Sound Recorder button to open the .wav file in the Sound Recorder. You can play the sound fileor edit it to create a different sound. For information on using Sound Recorder, see the Sound Recorder Help.
7 In the Notifications section of the Alerts tab, select Enable to activate this section of the Alerts tab.
8 (Optional) To delete a notification, select it and click Delete.
9 (Optional) To edit a notification, see “Editing Notifications” on page 62.
To play the alarm sounds, you must have a sound card instalon your system. Also, do not enable sounds if you plan to runWhatsUp Gold as an NT service.
Note
Quiet button
Browse
Invoke Sound Recorder
When deleting notifications, make sure you have selected Apply to all or Apply to selected before you click the Apply button.
Note
User’s GuideWhatsUp Gold

11 Do one of the following:
• Select Apply to all .
• Select Apply to selected.
12 Click Apply to apply your changes. Click OK to apply your changes and exit the Properties dialog box.
Setting Up Notifications
WhatsUp Gold
65

66
User’s GuideWhatsUp Gold
.
ined
s .
red
r
uld n’s
Chapter 4: Monitoring Services
WhatsUp Gold can monitor services and notify you if they go downIt can monitor:
• Standard TCP/IP services
• Non-standard TCP/IP services such as those that use nonstandard port numbers
• Any other services that can be checked by a custom, user-defmodule using Microsoft’s Component Object Model interface. See the Note under “Custom Services API” on page 76.
When WhatsUp Gold checks a device, it also checks each of the services you have selected to monitor on that device. If a service idown, the device icon on the network map changes color to purple
You can double click a device and select the Status tab to show the status of monitored services; green indicates the service is up, andindicates down.
Using WhatsUp Gold to monitor a service that is logged by anotheapplication may increase the size of that application’s log files by generating entries to those files. In addition, the other application may view the WhatsUp Gold checks as failed connections; this conegatively impact any statistics generated from the other applicatiolog files.
Note
Monitoring Services
WhatsUp Gold
67

68
, an . For
but
or
s
Monitoring Standard TCP/IP Services
Standard TCP/IP services include DNS, FTP, POP3, SMTP, HTTPSNMP, IMAP4, HTTP, Echo, Gopher, Telnet, and Time. You can sca device to see which of these standard services are running on itmore information, see “Scanning Your Network” on page 160.
By default, WhatsUp Gold monitors services using ICMP packets, if you want to monitor a service that is outside a firewall and the firewall does not pass ICMP packets, you need to change the ICMP setting to TCP on the General tab of the device properties.
TCP/IP services can be monitored only on a device that has ICMPTCP selected as the polling method (on the General tab of the device properties). In other words, if you have selected IPX or NetBIOS a
To reduce the load on your network, we recommend you monitor only the most critical services, and not every service on a device.
Note
In order to use the TCP method of monitoring a device, at least one TCP/IP service must be monitored on that device.
Note
User’s GuideWhatsUp Gold

ces
y cts
the polling method for the device, you cannot monitor the TCP/IP services on that device.
You indicate what TCP/IP services you want to monitor on the Services tab of the device properties.
1 Double click a device to view its properties. Click the Monitor tab and select Monitor This Device.
2 Click the Services tab.
3 Select the services you want to monitor.
If you just used the Scan tool on this device, all the active servion the device are selected.
If you haven’t already used the Scan tool, you can click the Scan button on the Services tab to scan the device and determine if anof the standard services are running on it: WhatsUp Gold seleall active services it finds.
4 Click Apply to save changes.
Monitoring Custom Services
You can also monitor “custom” services. Custom services include:
• TCP/IP services that are not listed on the Services tab (such as Radius or IRC)
• TCP/IP services that use a nonstandard port number
Monitoring Services
WhatsUp Gold
69

70
ese
d
e)
y ws
en
n
ou n r
You can define an unlimited number of TCP/IP custom services; thbecome dynamic, sharable objects that can be monitored on any device on any network map.
WhatsUp Gold is shipped with four custom services already definefor you:
• HTTP Content Scan
• Radius Server (Remote Authentication and Dial-In User Servic
• SSL Server
• You can define additional TCP services. For example, you mawant to monitor an IRC (Internet Relay Chat) service, a WindoNT Disk Space Monitor service, a Lotus Notes server, a Microsoft SQL server, or a Microsoft Exchange service.
Defining a Custom TCP/IP Service
The monitoring of a service always involves a protocol handshakeand can also include some additional information exchange betweWhatsUp Gold and the service. You can search the response fromthe service for an exact match of a particular text string, or you cause rules expressions to analyze the response for a more generictext pattern.
For example, if you are looking for any error message, and you knowthat all possible error messages have the word “fail” in common, ycan use a rule expression to look for just the word “fail.” Or, you cacreate a rule expression that looks for any number of possible erromessages. (You can search for “this,” “that,” or “the other.”).
To define a custom TCP/IP service:
1 Select Custom Services from the View menu. You see the
User’s GuideWhatsUp Gold

x
o
is
you ee
Custom Services dialog box.
2 Click the New button.
3 Select TCP/IP Service from the Type drop-down list.
4 In the Name text box, enter a unique name for the service. Thisname will be displayed on the Services tab of the device properties. Click OK to return to the Custom Services dialog boshown above. The name you entered for the new service nowappears in the��� �� ������ list box.
� �� ������ �� ������ ��� ����� ��� � �� ��� ������� � ���� ��
6 In the Port text box, enter the TCP or UDP port that you wish tmonitor. For example, 6667 is the standard port for IRC.
7 In the Timeout Seconds text box, set the timeout for the servicestatus. This is separate from the timeouts used for polling andspecified in seconds.
8 Select the TCP or UDP network type.
9 In the Expect on connect text box, enter a text string or a rule expression that you expect the remote service to send back toon connect. For information on composing a rule expression, s“Using Rules Expressions” on page 72.
10 In the Send command on connect text box, enter the command to send to the service’s port.
The list box shows the custom services that are already defined.
Monitoring Services
WhatsUp Gold
71
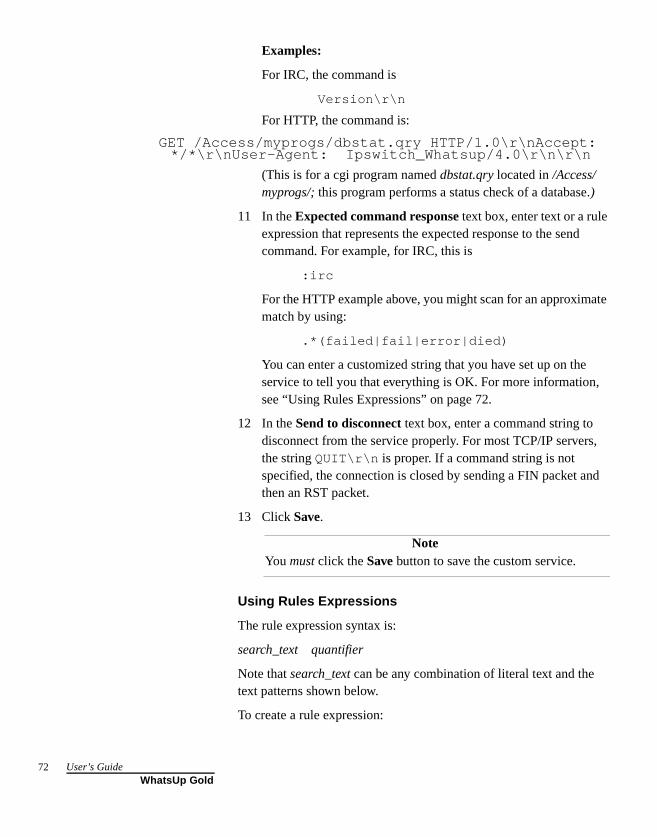
72
ate
,
d
Examples:
For IRC, the command is
Version\r\n
For HTTP, the command is:
GET /Access/myprogs/dbstat.qry HTTP/1.0\r\nAccept: */*\r\nUser-Agent: Ipswitch_Whatsup/4.0\r\n\r\n
(This is for a cgi program named dbstat.qry located in /Access/myprogs/; this program performs a status check of a database.)
11 In the Expected command response text box, enter text or a rule expression that represents the expected response to the sendcommand. For example, for IRC, this is
:irc
For the HTTP example above, you might scan for an approximmatch by using:
.*(failed|fail|error|died)
You can enter a customized string that you have set up on theservice to tell you that everything is OK. For more information,see “Using Rules Expressions” on page 72.
12 In the Send to disconnect text box, enter a command string to disconnect from the service properly. For most TCP/IP serversthe string QUIT\r\n is proper. If a command string is not specified, the connection is closed by sending a FIN packet anthen an RST packet.
13 Click Save.
Using Rules Expressions
The rule expression syntax is:
search_text quantifier
Note that search_text can be any combination of literal text and the text patterns shown below.
To create a rule expression:
You must click the Save button to save the custom service.Note
User’s GuideWhatsUp Gold

e
he
, if
; ge
1 In the Custom Services dialog box shown on page 70, click thBrowse button next to Expect on connect or Expected command response to view the Rules Expression Editor.
2 Select the contains option to look for messages that contain thesearch string; select doesn’t contain to look for messages that donot contain the search string.
3 Select Match Case to search for text that matches the case of tsearch string; to ignore case, make sure Match Case is not selected.
4 Enter the expected text by doing one or more of the following:
• Type the literal text that you want to search for. For exampleyou want to find the word fail, type fail .
• Type the text pattern and quantifiers you want to search forSee “Rules Expressions Text and Quantifiers Tables” on pa74.
• Click Insert Expression or Insert Quantifier to insert a generic form of a text pattern or a quantifier. Then edit the inserted expression. See “Rules Expressions Text and Quantifiers Tables” below.
5 Click OK to save the rule.
Browse button
Monitoring Services
WhatsUp Gold
73
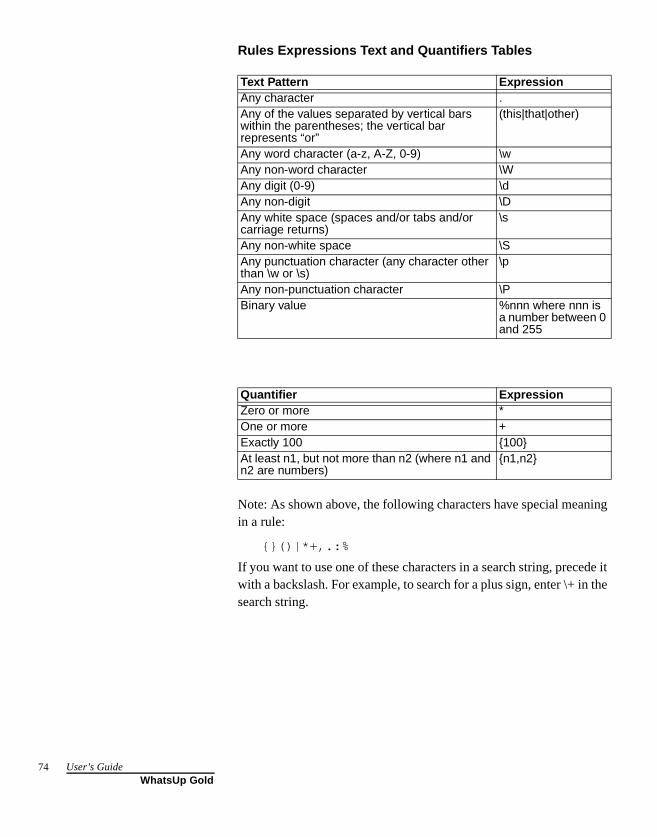
74
ing
de it the
Rules Expressions Text and Quantifiers Tables
Note: As shown above, the following characters have special meanin a rule:
{}()|*+,.:%
If you want to use one of these characters in a search string, precewith a backslash. For example, to search for a plus sign, enter \+ insearch string.
Text Pattern ExpressionAny character .Any of the values separated by vertical bars within the parentheses; the vertical bar represents “or”
(this|that|other)
Any word character (a-z, A-Z, 0-9) \wAny non-word character \WAny digit (0-9) \dAny non-digit \DAny white space (spaces and/or tabs and/or carriage returns)
\s
Any non-white space \SAny punctuation character (any character other than \w or \s)
\p
Any non-punctuation character \PBinary value %nnn where nnn is
a number between 0 and 255
Quantifier ExpressionZero or more *One or more +Exactly 100 {100}At least n1, but not more than n2 (where n1 and n2 are numbers)
{n1,n2}
User’s GuideWhatsUp Gold

t ou
Testing a Rules Expression
To test a rule expression, you use the Rules Expression Editor.
1 If the Rules Expression Editor is not visible, select Custom Services from the View menu. Then, select the rule you want totest. Click the Browse button next to the rule to view the RulesExpression Editor.
2 In the lower text box of the Rules Expression Editor, copy a message that meets your intended search criteria and click Test.
If the rule expression does what you intended it to, Returned TRUE is displayed. If the rule expression doesn’t test true, Returned FALSE is displayed. Edit the rule expression and tesagain. For a long or complex rule expression, we recommend ytest one part of it at a time.
Test results are displayed here.
Browse button
Monitoring Services
WhatsUp Gold
75

76
d or
s
ce ed
s
f nce
Summary of Requirements for Monitoring Services
When you want to send notifications about services (either standarcustom), you need to make the following changes to the device properties:
• Turn on Monitor This Device on the Monitor tab of the device properties
• Use the Alerts tab of the device properties to assign notificationto the device.
Custom Services API
WhatsUp Gold provides a COM (Component Object Model) interfato allow experienced COM program developers to create customizservice checks.
Note
��� �������� ����� ��� ��� ���� ��� �������� ��� �� ��� ���
����� �� ������� � ��� �������� ��� �� � ���� �� ���
�� ���� in the WUG program directory. The information in this file ifor experienced COM program developers to use to extend the monitoring capabilities of WhatsUp Gold. It is beyond the scope othis document and Ipswitch technical support to provide any guidaon writing COM applications.
User’s GuideWhatsUp Gold

ce. is
lling us.
the
tor
p , h ew
for
Chapter 5: Using WhatsUp Gold from the Console
WhatsUp Gold has two interfaces: the console and the web interfaThe WhatsUp Gold console is the system in which WhatsUp Goldinstalled.
This chapter describes how to use the console to start and stop poof the devices in your network map and how to display network statThe next chapter tells you how to use WhatsUp Gold from the webinterface.
Opening Network Maps
In order for WhatsUp Gold to monitor a network, you need to have network map open. You can open previously-defined maps [File --> Open] or create a new network map [File --> New]. For detailed information on creating a network map, see “Chapter 2: Creating Network Maps” on page 15.
You can open multiple map windows and WhatsUp Gold can monithe network maps simultaneously.
For any device that you do not want to poll, you can turn off Monitor This Item on the Monitor tab of the device properties. (The icon forany device that is not being actively monitored is displayed in darkgray by default.)
Starting and Stopping Polling
You can start a single check of the network, in which case WhatsUGold makes a single pass through the devices in the network mappolling each device. You can also initiate automatic polling, in whiccase WhatsUp Gold polls the devices continuously, starting each npass after a specified time interval.
When you open a network map, Whatsup Gold immediately starts automatic polling. WhatsUp Gold can also open any subnet maps;more information, see “Creating a Subnet” on page 29.
Using WhatsUp Gold from the Console
WhatsUp Gold
77

78
t
nd
.
r
op
ce,
3.
To Initiate a Single Check
You can initiate a single check, or polling, of currently active devices by clicking the Poll button on the main window’s toolbar or by selecting Poll from the Tools menu. These two actions are equivalenand result in WhatsUp Gold sending a set number of polls (ICMP echo requests) to the specified IP address for each active device atracking the responses.
If WhatsUp Gold is in automatic polling mode, initiating a single check will interrupt the automatic polling, do an immediate poll of each device in the map, and then restart automatic polling.
To Stop a Single Check
To stop a single check, or polling, of currently active devices, simply click the Stop Poll button on the main toolbar.
To Initiate Automatic Polling
When you open a network map, Whatsup Gold immediately startsautomatic polling on the map and any associated subnet maps.
To change the default settings for automatic polling, choose Map Properties from the File menu. The map properties appear. On the Map tab, set the number of seconds you want between checks (Map Poll Frequency), the number of seconds to wait before time out (Default Timeout), and any other options you may want to change
If polling is stopped, you can restart automatic polling of currently active devices by clicking the Stopwatch button in the main toolbar. WhatsUp Gold checks each device and tracks the responses. Aftewaiting the time set in the Map Poll Frequency, it makes a second polling pass through the devices and continues polling until you stpolling by clicking on the Stopwatch button again or by closing the map window.
WhatsUp Gold polls the devices in the order in which they were created in the network map. To view or change the polling sequenselect Dependencies Window from the Windows menu. For more information, see “Viewing and Changing Dependencies” on page 8
Poll button
Stop Poll button
Stopwatch button
User’s GuideWhatsUp Gold

to
est
ibed
or e
.
ds d
To Stop Automatic Polling
To temporarily stop automatic polling, click the Stopwatch button in the main toolbar. To resume polling, click Stopwatch again.
Monitoring the Network Map Display
By default, the following conventions are used in the map window indicate the status of a device or service:
• Green — the device is “up” (responding to polling)
• Light green — the device has missed at least one polling requ
• Yellow — the device has missed two polling requests
• Red — the device is “down” (It is not accessible or has not responded to four consecutive polling requests)
• Purple — a standard service on the device is down
• Inverted name — an event has been recorded for the device
You can change the default colors in the map properties, as descrin the Map Color Properties topic in Help.
You can quickly display a brief status message by moving the cursover a device icon. In the status bar of the map window, a messagdisplays the device’s host name, IP address, and current status orservice status.
WhatsUp Gold displays a count-down timer on the right side of thestatus bar of the map window. The timer is set to the Map Poll Frequency (File -> Map Properties) and counts down to one between each poll. WhatsUp Gold resets this timer after each poll
If you exit WhatsUp Gold during a poll, it may take up to 30 seconfor WhatsUp Gold to remove itself from memory. Until it is removefrom memory, WhatsUp Gold appears in the Windows task list (when you press Ctrl+Alt+Del).
Note
Using WhatsUp Gold from the Console
WhatsUp Gold
79

80
lt) n ve
. om
Alarms
An alarm sounds when a device fails to respond to four (the defauconsecutive polling requests, provided sound alerts are enabled (othe Alerts tab of device properties). To play the alarm, you must haa sound card installed on your system. You can set the number offailed poll requests that triggers an alarm.
To turn off an alarm, click the Quiet button in the main toolbar, or select Stop Alarm from the Tools menu.
Acknowledge Alerts
To acknowledge alerts, select Acknowledge from the Tools menu. Acknowledge is active only when there are unacknowledged alertsClicking it acknowledges alerts and prevents any pending alerts frbeing sent.
Notifications
Enabled notifications are sent when:
• The device fails to respond to the specified number of polling requests
• A monitored service goes down
• An SNMP trap is received for a device
To view the active notifications for a network map, select Notifications Window from the Windows menu. For more information, see “Viewing Active Notifications” on page 88.
Status Information
To display status information associated with any of the displayeddevices (active or inactive), double click the device to view its properties. Click the Status tab to display current status information.
Quiet button
User’s GuideWhatsUp Gold

to ers d.
tes ock
t
)
e
ap.
The Status tab displays the status of packets sent by WhatsUp Goldpoll this device and a current status message. These status numbare measured from the last time the device’s counters were cleare
Status. Current status of the device. A zero status code indicathe device is up. A numeric status code above 10000 is a Winserror code. The text for the error message is also displayed.
Count. Total number of times this device was polled.
RTT. Round Trip Time (RTT) is the time (in milliseconds) that itook the last packet sent to arrive at the device and return.
The Status tab shows the following three items for the Device (ICMPStatus and Service Status:
Down Count. Count of how many polls have passed since the device or service last responded.
Total. Total count of how many polls occurred where the devicor service did not respond since the counter was last cleared,WhatsUp Gold started, or since the device was added to the m
Last Response Time. Time of day (in hours:minutes:seconds) of the last response.
Using WhatsUp Gold from the Console
WhatsUp Gold
81

82
s of
if f it
f
-e.
”
the
The services graph at the bottom of the dialog box shows the statuany services being monitored on the device (as specified on the Services tab). These are TCP/IP services and cannot be monitoredNetBIOS or IPX is the selected polling method. A service is green iis up, red if it is down, or white if it is not selected for monitoring.
You can also display the following status information from within adevice’s properties:
• Click the History tab to display a graph of the round trip times othe device over the last 30 polls. Red vertical bars indicate thedevice was not responding.
• Click the Up-Time tab to display a pie chart that shows the percentage of successful polls for the total poll count for the devic
• Click the Log tab to display any service or device “up” or “downevents for this device. On the Alerts tab, you can enable logging for the device (select Enable in the Log Activity section) and you can set the Threshold number of missed polls, after which an entry is made in the Event Log.
Using the Status Window
The Status Window shows a list of all the devices in the currently active map and displays the status using the same colors used onnetwork map. The Status Window also shows the status of any services that are being monitored on a device.
From the Windows menu, select Status Window. The Status Window appears.
User’s GuideWhatsUp Gold

You many need to expand the Status Window in order to read the service status information.
In the main toolbar, click the Poll button to start a single check of each device. Click the Stopwatch button to start automatic polling of each device.
You can double click a device in this window to display the device properties.
Viewing and Changing Dependencies
By default, WhatsUp Gold polls devices in the order that they wereadded to the map. In the Dependencies Window, you can view andchange the polling sequence and a device's dependency on otherdevices.
From the Windows menu, select Dependencies Window.
Poll button
Using WhatsUp Gold from the Console
WhatsUp Gold
83

84
ee
tem
t, it
s:
r.
The Dependencies Window shows the network as a hierarchical trshowing the polling sequence and user-defined up and down dependencies. The value in the parenthesis after the name is an iidentifier to resolve ambiguous device names.
Poll Sequence and Up Dependencies. Devices are listed in the orderthey are polled. If a device is “up dependent” on the device above iis indented. You can drag a device within the branch to change thepolling order of the device.
To change the polling sequence, do one of the following:
• In the Poll Sequence and Up Dependencies list, drag a device to a different location in the Poll Sequence list.
• Right-click a device and use the popup menu.
• Select a device and use the Arrange menu.
The following commands appear on the popup and Arrange menu
Move to Start of Poll. Make the device the first device to be polled.
Move to Earlier in Poll. Move the device up one position in the orde
Move to End of Poll. Make the device the last device to be polled.
Move to Later in Poll. Move the device down one position in the polling order.
User’s GuideWhatsUp Gold

n” ans
just
e
Setting “ Up” and “ Down ” Dependencies
You can set any of the devices in the map to have an “up” or “dowdependency on another device in the map. An “up dependency” methat the device is checked only if another specified device is up. A“down dependency” means that the device gets checked only if theother device is down.
Dependencies are shown in the Up Dependencies and Down Dependencies lists by their location. If a device is dependent on another device, it is indented below the other device.
To set an up or down dependency:
1 In the Up Dependencies or Down Dependencies list, move the device that you want to have a dependency so that it appears below the device it will depend on.
2 Right-click the device that you want to have the dependency.
3 Select Depend on Prior Item from the right-mouse menu.
Viewing the Polling Statistics in the Statistics Window
WhatsUp Gold provides easy access to the polling statistics for thactive map. From the Windows menu, select Statistics Window to view the accumulated statistics for each device in the active network map.
The polling statistics are retained when you close or open networkmaps. Each map has an associated .wui file. Polling statistics are logged in the map_name.wui file.
Using WhatsUp Gold from the Console
WhatsUp Gold
85
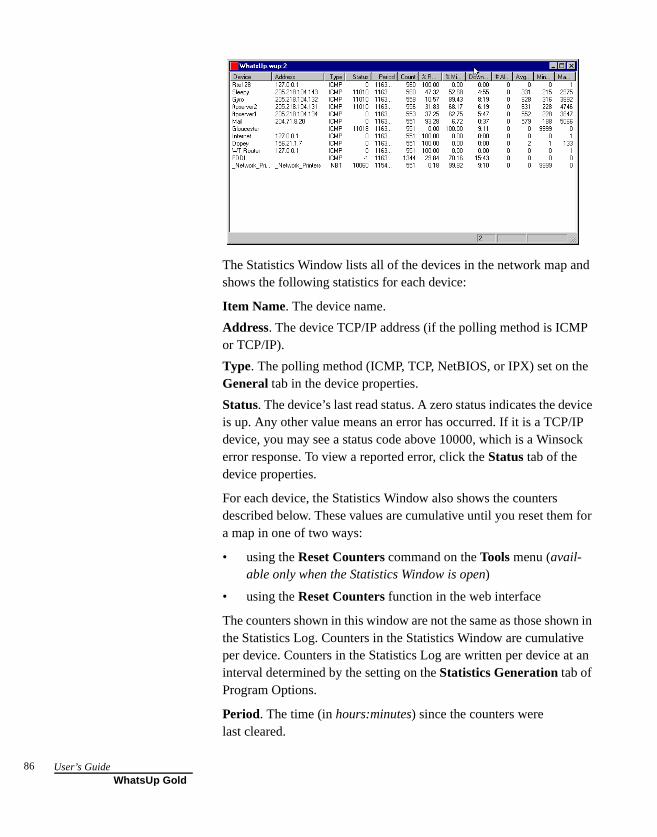
86
nd
P
e
vice IP ck
for
n in e an
The Statistics Window lists all of the devices in the network map ashows the following statistics for each device:
Item Name. The device name.
Address. The device TCP/IP address (if the polling method is ICMor TCP/IP).
Type. The polling method (ICMP, TCP, NetBIOS, or IPX) set on thGeneral tab in the device properties.
Status. The device’s last read status. A zero status indicates the deis up. Any other value means an error has occurred. If it is a TCP/device, you may see a status code above 10000, which is a Winsoerror response. To view a reported error, click the Status tab of the device properties.
For each device, the Statistics Window also shows the counters described below. These values are cumulative until you reset thema map in one of two ways:
• using the Reset Counters command on the Tools menu (avail-able only when the Statistics Window is open)
• using the Reset Counters function in the web interface
The counters shown in this window are not the same as those showthe Statistics Log. Counters in the Statistics Window are cumulativper device. Counters in the Statistics Log are written per device atinterval determined by the setting on the Statistics Generation tab of Program Options.
Period. The time (in hours:minutes) since the counters were last cleared.
User’s GuideWhatsUp Gold

nt
the .
en
y
Count. The number of times the device has been polled since last cleared.
% Responded. Of the total number of polls to the device, the percethat responded.
% Missed. Of the total number of polls to the device, the percent that failed.
Down Time. The total down time (in hours:minutes) for this device. This is calculated by multiplying the number of missed polls by theMap Poll Frequency. For example, if the device misses 7 polls, andpoll frequency is once per minute, the down time will be 7 minutes
# Alerts. The number of alerts that have occurred for the device.
Avg RTT. Average round trip time (RTT) of the last polls sent.
Min RTT . Minimum RTT of polls sent to the device.
Max RTT. Maximum RTT of polls sent to the device.
Down Count. Current count of lost polls, if the device is down.
Total Down Count. Total count of lost polls since the map was loaded.
Service Down Count. Current count of lost service polls, if a serviceis down.
Total Service Down Count. Total count of lost service polls since themap was loaded.
You can click any of the column headings to toggle the sort betweascending and descending.
Debug Log Information
All actions, such as poll requests and service checks performed b
WhatsUp Gold, are recorded in the Debug Log. The Debug Log is areal-time log that displays WhatsUp Gold events as they occur.
Using WhatsUp Gold from the Console
WhatsUp Gold
87

88
rk
ly
Viewing Active Notifications
You can view the notifications that are enabled for the active netwomap by using the Notifications Window. From the View menu, select Notifications Window.
The notifications are grouped by device. You can click on any of the column headings to toggle the sort between ascending and descending order.
Using the Mini Status View
The Mini Status view provides a small profile window that you canuse to monitor network status in place of the map window and theother windows. The Mini Status view lists all devices in the currentactive maps and displays status using the same colors used in themap window.
From the View menu, select Mini Status. The WhatsUp Gold main window is closed and the Mini Status view appears.
User’s GuideWhatsUp Gold

i
or vice
rmat
n
s:
er-k e.
Each map is listed in a separate column. Any services being monitored on a device are shown.
Click the Mini Status view to silence an alarm. Double-click the MinStatus view to expand back to the map window.
Logging and Reporting Events
WhatsUp Gold logs events in the Event Log (whatsupg.log) and lets you create reports based on the event data.
WhatsUp Gold logs both application-level events (such as openingclosing a map) and device-specific events, such as a device or serdown. After WhatsUp Gold logs sufficient event data, you can generate reports on the data or save the data to a tab-delimited fothat can be imported to another application.
The following sections describe the types of events logged, how you can modify event logging, and how you can generate reports othe events.
Types of Events Logged
WhatsUp Gold records events in the log (whatsupg.log) as they occur. WhatsUp Gold logs the following types of events for any open map
• Device changes — logs an up or down alert for a device or a svice, and missed polls for a device. When a device comes bacup, logs the total number of missed polls and the total down tim
Using WhatsUp Gold from the Console
WhatsUp Gold
89

90
bled
the
mpt
e
re e:
ice
or
e a
t is
To log these events for a device, make sure that logging is enaon the Alerts tab of the device properties.
• Map changes — includes map open and close and changes tomap configuration.
• Access table lockout events — occurs when a web access atteis denied, for example, due to settings on the Web Access tab of Program Options. The log entry also shows the IP address of thhost that attempted to log on to the web server.
• SNMP traps — logs SNMP trap server start or stop and any SNMP traps received for a device.
• Notifications — all notifications that get sent are logged.
• Acknowledged Alerts — logs an event when you select Tools -> Acknowledge (to clears all alerts) on the console.
• NT Service events — any up or down events resulting from checking an NT Service.
Changing How Events Are Logged
The application-level events (such as opening or closing a map) alogged automatically. For device-specific events, you can determin
• whether the up or down events for a device are logged
• the number of polls missed (Threshold) before a service or devdown event is recorded
To change how events are logged for a single device:
1 Double-click the device to display its properties.
2 Select the Alerts tab.
3 In the Log Activity section, make the changes you want.
If you do not want to log up and down events or missed polls fthis device, make sure Enable is not checked.
If you want to change the number of missed polls that generatlog entry, change the value in the Threshold box. The default value is 1, which means that when a device misses one poll, ilogged as an event.
4 Click Apply to save your changes.
User’s GuideWhatsUp Gold

e e.
et
Note that the Trigger value (on the device Alerts tab) determines thnumber of missed polls that will trigger a “down” event for the devicA log entry is also made for each “down” event. If the Threshold value is not equal to the Trigger value, you will see alerts in the log with no corresponding “up” or “down” events. This will also distort any Event reports created from the data.
To change how events are logged for all devices or multiple selected devices:
1 Right-click on the map, and then select Map Properties.
2 Click the Alerts tab.
3 In the Log Activity section, make the changes you want.
If you do not want to log events for this device, make sure Enable is turned off. If you want to change the number of missed pollsthat generate a log entry, change the value in the Threshold box. The default value is 1.
4 Select Apply to all or Apply to selected.
Viewing the Event Log
The Event Log provides a history of the events that occur for any network maps that are open. For a description of the events that glogged, see “Types of Events Logged” on page 89.
To view the event information, select Event Log from the View menu. The following screen shows an example:
Using WhatsUp Gold from the Console
WhatsUp Gold
91

92
he of on
g a
ata. ts
see
The Event Log shows the following information: the date and time tevent occurred, the host name and address of the device, the typeevent (such as the device going down or coming up), and the reasfor the failure, such as “timed out,” or “not responding.”
The Event Log holds the event data for all of your WhatsUp Gold maps. It holds data starting with the date you first started monitorinmap, or since you last cleared the log by clicking Clear in the Event Log or by clearing the log from the web interface.
Creating an Event Report
After WhatsUp Gold has been monitoring a map long enough to generate event data, you can create reports based on the event dFor a description of the events that get logged, see “Types of EvenLogged” on page 89. If you want to change how events get logged,“Changing How Events Are Logged” on page 90.
To create an Event Report:
1 From the Reports menu, select Event Report. The Create Event Report dialog box appears.
2 Select the Date Range for the report.
When you select an option, the Start Date and End Date are shown.
The default includes all days since you started monitoring the map, or since the event data was last cleared by clicking Clear in the Event Log or by clearing the log from the web interface.
Select Custom if you want to enter a Start Date and End Date for the report. Enter dates in the format yyyymmdd, for example: 19990308.
3 Select the Report Type.
User’s GuideWhatsUp Gold

ch ort er.
e
ut
ta
e
ta.
Summary. Reports total service and device down time for eachdevice and sorts by device name in Ascending or Descendingorder. You can also sort by Worst First order, which means thedevice with the most down time is shown first.
Detail. Reports all up and down events for each device. For eadevice down event, the elapsed down time is reported. The repsorts devices by device name in Ascending or Descending ordYou can also sort by Worst First order, which means the devicwith the most down time is shown first.
In addition, the Detail report shows the following events: map configuration changes, acknowledge alerts events, NT servicerestarts, and access table lockouts. For more information abothese events, see “Types of Events Logged” on page 89.
Raw Data. Exports the data from the Event Log to a standard format file that can be imported to another application. The dais sorted by date and time in ascending order.
4 Select the Map Name of the map for which you want a report.
5 Click OK to generate the report.
WhatsUp Gold generates the specified report and displays it inthe Report Window. From the Report Window, you can save thdata to a file, print it, or copy data to another application.
If you get the message “insufficient data,” it’s possible that youhave not monitored the map long enough to generate event da
Using WhatsUp Gold from the Console
WhatsUp Gold
93

94
is
Using the Command Line Utility to Create Event Reports
Wugrpt.exe is a WhatsUp Gold utility used to generate reports fromthe WhatsUp Gold Event Log (whatsupg.log) data.
You can invoke wugrpt from the Windows Command Prompt (MS-DOS prompt). You must invoke wugrpt with the -mmapname argument. All other arguments are optional. By default, the report displayed in the MS-DOS window.
Basic Command Syntax
wugrpt -mmapname [-syyyymmdd] [-eyyyymmdd] [-llogfile] [-osortmode] [-rreport] [-tmaptitle]
Argument Explanation
-mmapname You must use the -m argument to specify the name of the WhatsUp Gold map to use for the report. All other arguments are optional.
-syyyymmdd Use -s to specify the start date for the report. The default is the oldest date in the log.
-eyyyymmdd Use -e to specify the end date for the report. The default is the most recent date in the log.
-llogfile Use -l to specify an alternate log file. The default is whatsupg.log.
-osortmode Use -o to specify one of the sort modes: Ascend sorts by device name in ascending order (this is the default value); Descend sorts by device name in descending order; Score sorts by the device’s “score,” which is determined by the sum of polls missed. Score sorts from highest to lowest value.
-rreport Use -r to specify one of the report types: Detail generates a report by device for all events for the selected map in the specified period. Summary generates a report by device for any down or up events in the selected map in the specified period. Export generates a tab delimited file of the raw data.
-tmaptitle Use -t to specify the title to use at the top of the report. The default title is the map name.
-? Use -? to see a summary of argument options.
User’s GuideWhatsUp Gold

d
rmat
rom
cs
ce
tics
e
Examples
The following examples create Event Reports for the Boston1 map:
wugrpt -mWhatsUp1
Generates a detail report for all days in the log (uses defaults).
wugrpt -mWhatsUp1 -s19990301 -e19990131
Generates a detail report for one month of log data.
Return Codes
Wugrpt returns 1 if it performed at least one of the requested operations; it returns 0 if it failed.
Logging and Reporting Polling Statistics
WhatsUp Gold lets you log and report on polling statistics to provide a picture of how your network is performing over a selectetime interval.
WhatsUp Gold can log polling statistics for each device in an openmap. After WhatsUp Gold logs sufficient polling data, you can generate reports on the data or save the data to a tab-delimited fothat can be imported to another application.
The following sections describe the polling statistics, how you can change statistics logging, and how you can generate reports fthe statistics.
The Polling Statistics
WhatsUp Gold writes values for the polling statistics to the StatistiLog (wugstats.log). By default, the statistics data is saved to the logevery hour, but you can change this interval.
WhatsUp Gold can log the following polling statistics for each deviin an open map:
Average RTT. The average Round Trip Time (RTT) for polls to the device. This average is taken over the interval you specify for statisgeneration (View->Program Options->Statistics Generation). The default value is one hour.
Maximum RTT . The highest RTT recorded for the device during thstatistics interval (default is one hour).
Using WhatsUp Gold from the Console
WhatsUp Gold
95
96
s
e as
are
h e
54
Minimum RTT . The lowest RTT recorded during the statistics interval (default is one hour).
Percentage of missed polls. The average percentage of missed pollduring the statistics interval (default is one hour).
Note that the counters shown in the Statistics Log are not the samthose shown in the Statistics Window. Counters in the Statistics Window are cumulative per device. Counters in the Statistics Log written per device at an interval determined by the setting on the Statistics Generation tab of Program Options.
Changing Statistics Logging
You can set how often you want the Statistics log to accumulate polling statistics. By default, the statistics are saved to the log (wugstats.log) every hour — WhatsUp Gold writes the value for eacstatistic to the log, and then sets the value back to zero. Values arrecorded for each open map.
To set how often to update the Statistics log:
1 From the View menu, select Program Options and click the Statistics Generation tab.
2 Change the value for hours. You can set this value from 0 to 2hours. To turn off statistics logging, set the value to zero.
3 Optionally, click Update Now to write current statistics to the logand reset the counters for each statistic.
4 Optionally, click Clear to set the counters for the statistics to zero.
User’s GuideWhatsUp Gold

:
e f
ld g a
ics
pen.
e
Viewing the Statistics Log
To view the Statistics Log, select Statistics Log from the View menu. The Log Viewer appears. The following screen shows an example
The Statistics Log shows the following information: the date and timthe statistics were recorded, map name, host name, average RTT,maximum RTT, minimum RTT, percent missed. For a description othese statistics, see “The Polling Statistics” on page 95.
The Statistics Log holds the polling data for all of your WhatsUp Gomaps. It holds data starting with the date you first started monitorinmap, or since you lasted cleared the log by clicking Clear in the Statistics Log or by clearing the log from the web interface.
If you use the default time interval of one hour for generating statist(on the Statistics Generation tab of Program Options), you will see entries for each device recorded one hour apart, while the map is o
Creating Reports on Polling Statistics
After WhatsUp Gold has monitored a map long enough to generatstatistics data, you can create reports based on the statistics.
To create a statistics report:
1 From the Reports menu, select Statistics Report. The Create Statistics Report dialog box appears.
Using WhatsUp Gold from the Console
WhatsUp Gold
97

98
.
ice cs f 99.
he
n ata
2 Select the Date Range for the report.
When you select an option, the Start Date and End Date are shown.
The default includes all days since you started monitoring the map, or since the statistics were last cleared by clicking Clear in the Statistics Log or by clearing the log from the web interface
Select Custom if you want to enter a Start Date and End Date for the report. Enter dates in the format yyyymmdd, for example: 19990308.
3 Select the Report Type.
Detail. Report polling statistics for each device and sort by devname in Ascending or Descending order. The reported statistiare calculated from data in the Statistics Log. For definitions othe reported statistics, see “Statistics Report Legend” on page
Raw Data. Save the data from the Statistics Log to a tab-delimited format that can be imported by another application. Tdata is sorted by device polling order.
4 Select the Map Name of the map for which you want a report.
5 Click OK to generate the report.
WhatsUp Gold generates the specified report and displays it ithe report window. From the report window, you can save the dto a file, print it, or copy data to another application.
User’s GuideWhatsUp Gold

s r
e
s,
If you get the message “insufficient data,” it’s possible that youhave not monitored the map long enough to generate polling statistics.
As mentioned above, you can create a raw data file of the StatisticReport. The tab-delimited raw data file can be imported by anotheapplication, for example by a spreadsheet application.
Statistics Report Legend
The values in the statistics report are calculated from the data in thStatistics Log (wugstats.log). When you create a statistics report, WhatsUp Gold calculates the average of n daily observations (Sample) for the statistics for each device in the selected map. Thuin the Statistics report, you will see an entry for each device in themap with average daily values for the following:
Using WhatsUp Gold from the Console
WhatsUp Gold
99

100
n
is
Average RTT. The arithmetic mean of n samples of Round Trip Time (RTT).
Average Maximum RTT. The arithmetic mean of n samples of Maximum RTT.
Average Standard Deviation. The standard deviation from the Average RTT of the Average Maximum RTT in n samples.
Average Minimum RTT. The arithmetic mean of n samples of Minimum RTT.
Average Percentage of Missed Polls. The arithmetic mean of n samples of the percentage of missed polls.
Sample. Number (n) of data samples used to calculate the above data. If you use the default for statistics generation (one hour), theif the map was monitored for all 24 hours of the day, you will have24 samples.
Using the Command Line Utility to Create Statistics Reports
Wugstat.exe is a WhatsUp Gold utility used to generate reports fromWhatsUp Gold Statistics Log (wugstats.log) data.
You can invoke wugstat from the Windows Command Prompt (MS-DOS prompt). You must invoke wugstat with the -mmapname argument. All other arguments are optional. By default, the report displayed in the MS-DOS window.
User’s GuideWhatsUp Gold

Basic Command Syntax
wugstat -mmapname [-syyyymmdd] [-eyyyymmdd] [-llogfile] [-osortmode] [-rreport] [-tmaptitle]
Examples
The following examples create statistics reports for the Boston1 map:
wugstat -mWhatsUp1
Generates a detail report for all days in the log (uses defaults).
wugstat -mWhatsUp1 -s19990301 -e19990131
Generates a detail report for one month of log data.
Return Codes
Wugstat returns 1 if it performed at least one of the requested operations; it returns 0 if it failed.
Argument Explanation
-mmapname You must use the -m argument to specify the name of the WhatsUp Gold map to use for the report.
-syyyymmdd Use -s to specify the start date for the report. The default is the oldest date in the log.
-eyyyymmdd Use -e to specify the end date for the report. The default is the most recent date in the log.
-llogfile Use -l to specify an alternate log file. The default is wugstats.log.
-osortmode Use -o to specify one of the sort modes: Ascend sorts by device name in ascending order (this is the default value); Descend sorts by device name in descending order.
-rreport Use -r to specify one of the report types: Detail generates a detailed report that lists AvgRTT, MaxRTT, MinRTT, and % Missed Polls by device; Export generates a tab delimited file of the raw data.
-tmaptitle Use -t to specify the title to use at the top of the report. The default title is the map name.
-? Use -? to see a summary of argument options.
Using WhatsUp Gold from the Console
WhatsUp Gold
101

102
eper, ot of
you
Sending Recurring Status Reports
WhatsUp Gold can send a recurring network status report as a bepager, or e-mail message. The Recurring Report provides snapshyour network status and can include:
• the count and names of devices that are up
• the count and names of devices that are down
• names of devices that have a service down
• the most recent lines from the Event Log
You can set options to send the report at a specified interval. This report lets you receive up-to-date status reports at a remote site, socan be assured the network is running smoothly, or so you can bequickly apprised of any problems. The following example shows aRecurring Report sent via e-mail:
To set up a Recurring Report:
1 From the Reports menu, select Recurring Reports. The Recurring Reports dialog box appears.
2 Select Enable Reports.
User’s GuideWhatsUp Gold

.
he
rt. 4
3 Click Add. The Add/Edit WhatsUp Reports dialog box appears
4 Select a notification from the drop-down list.
For example, if you defined a notification that sends e-mail to tnetwork administrator, you can select that notification from thedrop-down list. For information on defining a notification, see “Chapter 3: Setting Up Notifications” on page 41.
5 Enter how often (in minutes) you want to send the report.
6 Select the Time Period when you would like to receive the repoClick Change to change the default setting of 7 days a week, 2hours a day.
Using WhatsUp Gold from the Console
WhatsUp Gold
103
104
t.
e the
x.
.
:
r
ee er ird
Select the Day of Week options: 7 days a week is the default. You can turn off the 7 days a week option and then select the specificdays of the week that you want to receive reports.
Select one of the three Time of Day options. 24 hours a day means that the reports will be sent all day. Between lets you specify the hours between which the reports are sent. Not between lets you specify the hours during which reports will not be sen
Because the first value must be less than the second value, usNot between option to send reports between an afternoon time and a morning time.
To receive a report at a specific time every day, enter the time in first box and the time plus one minute in the second boFor example, enter 0600 and 0601 in the boxes for the Not between option.
7 Check any other options you want to use. You can use the following options for pager and e-mail notifications, but not forbeeper notifications.
Include UP count. Report the number of up devices.
Include UP names. Report the names of the up devices.
Include DOWN count. Report the number of down devices.
Include DOWN names. Report the names of the down devices
For mail notifications, you can also specify the following option
Include last lines of log file. Check the box and enter the numbeof lines from the end of the Event Log (the most recently recorded lines) that you want to include in the report.
For beeper notifications, you must use the following option to send a report message:
Message format. You can begin the message with 99 (or any numeric character) to identify to the beeper user that this is a message from WhatsUp Gold. The message must contain thr%u characters, which denote the following: the first %u = numbof up devices, the second %u = number of down devices, the th%u = number of up devices that have services down.
User’s GuideWhatsUp Gold

an ) to r
No other message variables (% characters) are allowed. You cuse an asterisk (*), which prints on most beepers as a dash (-separate characters in the message. An example of the beepemessage is: 99*%u*%u*%u*
8 Click OK to save the new notification and close the Add/Edit WhatsUp Reports dialog box.
The new notification appears in the list on the Reports tab.
9 In the Recurring Reports dialog box, click OK to save the changes and close the dialog box.
Using WhatsUp Gold from the Console
WhatsUp Gold
105

106
User’s GuideWhatsUp Gold
er
of
this
Chapter 6: Using WhatsUp Gold from a Web Browser
This chapter describes how to set up the WhatsUp Gold web servand use a web browser to access mapping, monitoring, and notification functions from a remote computer.
Setting Up the WhatsUp Gold Web Server
WhatsUp Gold provides a web server that lets you view the statusyour network and change WhatsUp Gold settings from any web browser. You can enable/disable the web server and set access toserver through the web properties. If you run WhatsUp Gold as a Windows NT service (see chapter 1), the web browser will be yourprimary interface.
To set up the web server:
1 From the View menu, select Program Options, and click the Web tab to display the setup properties.
2 Make sure the Enable Web Server option is checked.
3 If you want web users to be able to change WhatsUp Gold settings from the web interface, make sure Enable Web Configuration is checked.
Using WhatsUp Gold from a Web Browser
WhatsUp Gold
107

108
eb
or
to
r her
g
ge
ely.
p
You can set access for each web user account (see “Setting WAccess” in this chapter). If Enable Web Configuration is not checked, the web users cannot change any WhatsUp Gold settings; they can use only the view functions.
4 Enter or change any of the setup information.
Main Title . The title displayed on the main web page (“Top View”) for the WhatsUp Gold web site. You can enter any text fthe title.
Refresh Frequency. The number of seconds between updates the WhatsUp Gold display on the web site. You can set the refresh rate in the range from 10 to 99999 seconds.
TCP Port. The default is port 80, which is the standard TCP/IPport for a web (HTTP) server. If you already have a web serverunning on this system, set the port number in this box to anotport number (for example, 8000).
You can add information to the main page (“Top View”) by usinthe Main Page Prefix and Main Page Suffix options. You can also use the WhatsUp Gold web server to serve your own webpages. See “Customizing Your WhatsUp Gold Web Site” on pa108.
5 Click OK to apply changes. The changes take effect immediat
Customizing Your WhatsUp Gold Web Site
You can customize your WhatsUp Gold web site as follows:
• Add your own web pages to the site.
• Display information at the top or bottom of the main page (“ToView”), which appears after a successful logon.
To do either of these customizations:
1 From the View menu, select Program Options. The Options dialog box appears.
2 Select the Web tab to display the setup properties.
3 Use the following options to add information to the web site.
User’s GuideWhatsUp Gold

les
so
nd b :
te
of
t,
m
t,
,
HTML Files Directory. If you want the WhatsUp Gold web server to serve your own web pages, you can add any HTML fito this directory. The default is the \Web subdirectory of the directory in which you installed WhatsUp Gold. If you use a different directory, you need to specify the full path to the directory in this text box. Subdirectories to this directory are alsupported.
To open a web page, in your browser’s address field, enter thehost name of the system on which WhatsUp Gold is installed, athe file name for the web page. For example, assuming the weserver is running on the default HTTP port 80, you might enter
http://gyro.ipswitch.com/whatsup/webdir/page1.htm.
Note that you should avoid placing a file named default.htm in this directory because WhatsUp Gold uses that name to activathe web server.
Main Page Prefix. Enter a message to be displayed at the top the main web page (“Top View”). You can enter up to 100 characters of plain text and/or HTML code in this edit box. TheHTML begin and end tags (<HTML> and </HTML>) are automatically added to any HTML code you enter.
Right-click in this edit box to access the standard Windows cucopy, paste, and delete functions.
Main Page Suffix. Enter a message to be displayed at the bottoof the main web page (“Top View”). You can enter up to 100 characters of plain text and/or HTML code in this edit box. TheHTML begin and end tags (<HTML> and </HTML>) are automatically added to any HTML code you enter.
Right-click in this edit box to access the standard Windows cucopy, paste, and delete functions.
The Help files for the web interface (*.htm) are installed in the\Web directory. If you change the default HTML Files Directoryyou should move the Help files into the new directory.
Note
Using WhatsUp Gold from a Web Browser
WhatsUp Gold
109

110
nd
ap
ed
4 Click OK to apply your changes. The changes take effect immediately.
The following example shows the main web page with prefix asuffix information displayed:
Making Maps Available for Web Viewing
Any network maps that are open in WhatsUp Gold can be viewed from a web browser. In addition, web users with Configure program permission can load any maps in the map directory on the systemwhere WhatsUp Gold is installed. There are two ways to set the mdirectory:
• From the WhatsUp Gold console, select Program Options from the View menu, click the Startup tab to display the Startup options. In the Directory box, enter the full path for the directorythat contains the network maps.
Within the Main Page Prefix or Suffix, you can create a link toother web pages, such as a page that lists phone contacts fornetwork operations. These additional web pages must be storin the HTML Files Directory.
Note
Main Title
Main Page Prefix
Main Page Suffix
User’s GuideWhatsUp Gold

.
can
at
nted
b
ey
a on b the
old
• From a web browser, log on to the WhatsUp Gold web server.The web site main page (“Top View”) appears. Select Settings to display the program settings. In the Startup Map Directory box, enter the path for the directory that contains the network maps
You must restart WhatsUp Gold for the change to take effect.
Setting Web Server Access
There are two ways that you can set access to the web server. Youuse either one or both together.
• Require a user ID and password to view page on the WhatsUpGold web site. This includes setting the pages and functions ththe user can access.
• Specify an IP address or set of IP addresses that are either graaccess to the web site or are denied access.
Default User Accounts for the Web Server
WhatsUp Gold provides two default user IDs for accessing the weserver:
• The user ID admin with password admin has full access to WhatsUp Gold pages and functions, with the exception that thcannot set up or change web user accounts.
• The user ID guest with no password has access to all WhatsUpGold pages but cannot change any WhatsUp Gold settings. If user enters any user ID with no password, they will be logged to the guest account. If you do not want users to access the weserver in this way, then you should disable the permissions for guest account.
Setting Up User Accounts for the Web Server
You can add up to 20 user accounts for web access to WhatsUp Gand you can assign different levels of access to each user.
Using WhatsUp Gold from a Web Browser
WhatsUp Gold
111

112
d
can
at
1 From the View menu, select Program Options and click the Web Users tab to display the user access properties.
2 Select the Enable passwords option (make sure it is checked).
If this option is not selected, web users can log on without specifying a password.
3 Click an empty slot in the list of users, then enter a user ID anpassword for the new account.
The first slot is always the default guest account, which does not require a password. You cannot remove this account, but you change the permissions assigned to the account.
4 Select the WhatsUp Gold web pages and the web functions thyou want the user to have.
Access main page. The user can view a list of active maps withItems Up, Items Down, and Services Down reported for each map. When this option is not checked, you cannot provide theuser the Configure program, Configure reports, or Configure users functions.
For more information about the WhatsUp Gold views and functions available from the web server, see “WhatsUp Gold Web Display” on page 117.
Note
User’s GuideWhatsUp Gold

not
p
ess
.
d
last
Access map pages. The user can click a map title (in the main page or “Top View”) to view the network map in a table format.The user can also view a summary of polling statistics and services for the map. When this option is not selected, you cangive the user access to the device pages or logs, or to the Configure maps or Configure hosts functions.
Access host pages. The user can click a device name (in the mapage) to view a detailed summary of activity for that device. When this option is not selected, you cannot give the user accto the Configure hosts function.
Access log. The user can view the log of WhatsUp Gold events
Acknowledge alerts. Lets the user acknowledge a change and stop further alerts for the device(s).
Configure programs. Lets the user change program settings, create a new map, load and unload maps, and create, edit, anassign notifications.
Configure maps. Lets the user change map settings, reset counters for all devices, and add and remove devices.
Configure hosts. Lets the user change host settings; reset counters for individual devices; configure service monitoring; and add, edit, and remove alerts.
Configure reports. Lets the user add, edit, and delete report notifications.
Configure users. Lets the user add, edit, and delete web user accounts.
Access tools. Lets the user access and use the Ping and Traceroute tools.
5 If you want changes made from the web interface (by any webusers) to be saved in the WhatsUp Gold application, select Automatically save changes from web interface. If this option is not selected, any changes made from the web interface will only for the duration of the web session.
6 Click Apply to save your changes.
Using WhatsUp Gold from a Web Browser
WhatsUp Gold
113

114
ss to
be
When a user opens the WhatsUp Gold web pages, they will be prompted to enter the logon user ID and password before they canview the pages.
Setting Web Access by IP Address
You can specify a list of IP addresses to be granted or denied accethe WhatsUp Gold web pages.
To deny access to a specific computer or group of computers:
1 From the View menu, select Program Options and click the Web Access tab to display the access properties.
2 Select Granted Access.
3 Click Add. The Deny Access On dialog box appears.
4 In the IP Address box, enter the IP address of the computer todenied access to the WhatsUp Gold site.
You can disable access to the configuration functions for all WhatsUp Gold web users, thus overriding the settings for each individual user. To do this, from the View menu, select Program Options, click the Startup tab, and then turn off the Enable Web Configuration option.
Note
User’s GuideWhatsUp Gold

ied ask
e
ied ask
n
To deny access to a group of computers, select the Group of Computers option. In the IP Address and Subnet Mask boxes, enter the IP address and subnet mask for the group to be denaccess. For example, if you enter 156.21.50.0 and a subnet mof 255.255.255.0, all IP addresses in the range 156.21.50.1 through 156.21.1.254 will be denied access.
5 Click OK to add the IP address(es) to the list. Access will be granted to all computers except those listed.
6 On the Web Access tab, click Apply to save the changes.
To grant access to a specific computer or group of computers:
1 On the Web Access tab, select Denied Access.
2 Click Add. The Grant Access On dialog box appears.
3 In the IP Address box, enter the IP address of the computer to bgranted access to the WhatsUp Gold site.
To grant access to a group of computers, select the Group of Computers option. In the IP Address and Subnet Mask boxes, enter the IP address and subnet mask for the group to be denaccess. For example, if you enter 156.21.50.0 and a subnet mof 255.255.255.0, all IP addresses in the range 156.21.50.1 through 156.21.50.254 will be granted access.
4 Click OK to add the IP address(es) to the list. Access will be denied to all computers except those listed.
5 On the Web Access tab, click Apply to save the changes.
If the Enable passwords option (on the Web Users tab) is selected, when a user logs on from a valid IP address, they are prompted toenter the logon user ID and password before they can view the specified pages.
To edit a web access address, select the IP address in the list, theclick Edit to display properties, and then enter any changes.
To remove an address from either list, select the address and clickRemove.
Using WhatsUp Gold from a Web Browser
WhatsUp Gold
115
116
en the sists d,
old
eb
r
the
b
or
Logging On to the Web Server
The web server is assigned a web address that can be used to opWhatsUp Gold web page from any browser. This web address conof the host name of the system on which WhatsUp Gold is installeand the web server port number. The default port number is 80.
To log on to the web server:
1 Open any browser on your network and enter your WhatsUp Gweb address in the Address (or URL:) box. For example, if your WhatsUp Gold system is named monitor1.ipswitch.com, then the web address will be: http://monitor1.ipswitch.com:80
After connecting, the logon dialog box appears.
2 Enter the user ID and password for your WhatsUp Gold web account. You may not have to enter a password, depending onhow your WhatsUp Gold administrator set up access to the wserver. (See Enable passwords on the Web Users tab.)
The main page (“Top View”) for the WhatsUp Gold web serverappears. You can use the views and functions provided to youweb user account.
If your attempt to connect to the web server is denied, make sure following have been done:
• Your WhatsUp Gold administrator has set up access to the weserver for you.
• The Enable Web Server option in View -> Program Options -> Web is selected.
• Your computer’s IP address is allowed access on the Web Access tab (View -> Program Options -> Web Access).
You can save your WhatsUp Gold web address as a “favorite”“bookmark” site in your browser.
Note
User’s GuideWhatsUp Gold
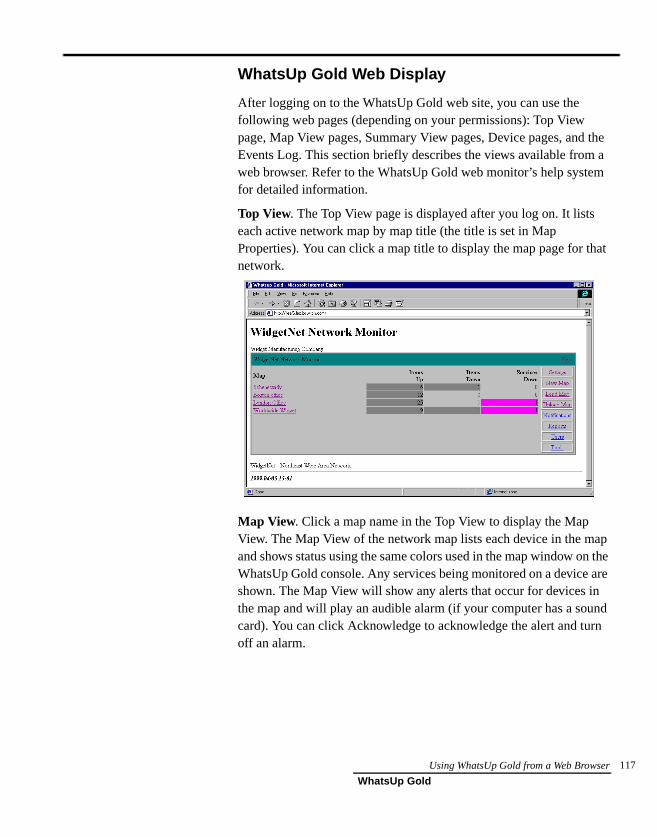
the a m
hat
ap n the are nd
rn
WhatsUp Gold Web Display
After logging on to the WhatsUp Gold web site, you can use the following web pages (depending on your permissions): Top View page, Map View pages, Summary View pages, Device pages, andEvents Log. This section briefly describes the views available fromweb browser. Refer to the WhatsUp Gold web monitor’s help systefor detailed information.
Top View. The Top View page is displayed after you log on. It lists each active network map by map title (the title is set in Map Properties). You can click a map title to display the map page for tnetwork.
Map View. Click a map name in the Top View to display the Map View. The Map View of the network map lists each device in the mand shows status using the same colors used in the map window oWhatsUp Gold console. Any services being monitored on a deviceshown. The Map View will show any alerts that occur for devices inthe map and will play an audible alarm (if your computer has a soucard). You can click Acknowledge to acknowledge the alert and tuoff an alarm.
Using WhatsUp Gold from a Web Browser
WhatsUp Gold
117
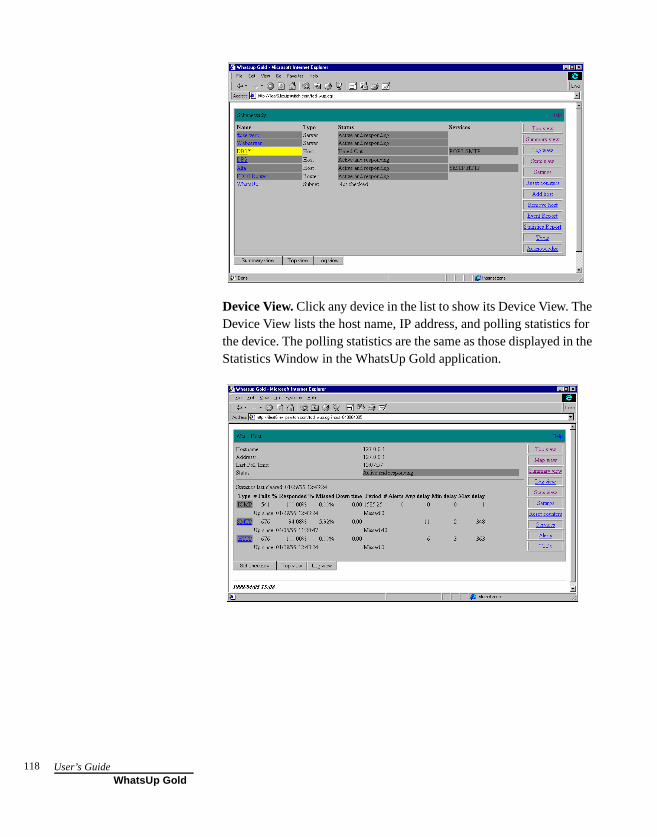
118
e for n the
Device View. Click any device in the list to show its Device View. ThDevice View lists the host name, IP address, and polling statistics the device. The polling statistics are the same as those displayed iStatistics Window in the WhatsUp Gold application.
User’s GuideWhatsUp Gold

for
le lp
up on
Summary View. The Summary View lists all devices in the selectednetwork map and shows the polling statistics for each device.
Log View. You can click the Log View button to view the Event Log page. The Event Log page shows all events that have been loggedthe devices in a network map.
WhatsUp Gold Web Functions
This section briefly describes the WhatsUp Gold functions availabfrom a web browser. Refer to the WhatsUp Gold web monitor’s hesystem for detailed information.
The functions available to each user are determined by the permissions granted to the user account. For information on settingweb accounts, see “Setting Up User Accounts for the Web Server”page 111.
Configure program. Configure the startup settings for WhatsUp Gold and the display settings for the WhatsUp Gold web pages.
Configure maps. Change settings for a selected map, such as maptitle, poll timer, and timeout.
Configure devices. Change the settings for a device, such as the display name, host name, IP address, polling frequency, polling schedule, and up and down dependencies.
Using WhatsUp Gold from a Web Browser
WhatsUp Gold
119

120
Up ,
er
p
ion
to
Configure reports. Configure the recurring network status report. This report provides a snapshot of your network’s status (including and Down devices and down services) and can be sent via e-mailpager, or beeper notification.
Configure users. Add, remove, and change WhatsUp Gold web usaccounts.
Acknowledge alerts. Acknowledge a reported change (alert) and stoany further alerts for the change.
Access tools. Use the Ping, Trace, Lookup, and Scan tools. These tools operate from the system on which the WhatsUp Gold applicatis installed. For example, when you do a “trace” from the web interface, you are tracing the route from the WhatsUp Gold systema remote system.
User’s GuideWhatsUp Gold

s to old an
to
)
ns
P e
MP
ect
Chapter 7: Monitoring SNMP Devices
The Simple Network Management Protocol (SNMP) is an Internetstandard that allows management data on different network devicebe read and monitored by an application. You can use WhatsUp Gto view and monitor SNMP objects on any device that implementsSNMP agent.
This chapter describes how WhatsUp Gold implements SNMP, howview and monitor SNMP values for a networked device, and how WhatsUp Gold can receive unsolicited messages (known as trapsfrom an SNMP device.
SNMP Implementation in WhatsUp Gold
This section provides an overview of the SNMP monitoring functioavailable in WhatsUp Gold. It assumes you are familiar with the SNMP standard and Management Information Base (MIB) for SNMobjects. For background information on SNMP and the MIB, see th“SNMP Backgrounder” section in this chapter.
WhatsUp Gold provides limited monitoring of devices that supportSNMP. WhatsUp Gold supports the current Internet standards: SNVersion 1 and MIB II. You can make custom extensions to MIB II toadd enterprise specific SNMP objects.
WhatsUp Gold does not let you change the value of an SNMP objon a device and does not provide SNMP manager functions.
You can use WhatsUp Gold to do the following types of SNMP monitoring:
• View SNMP information on a device.
You can use the SNMP tool (Net Tools->SNMP from the View menu) to view SNMP information for a device.
• Graph selected SNMP values.
You can graph the values for an SNMP object by starting the SNMP Graphing Utility either from within the SNMP tool or by selecting the utility from the Start menu (Start -> Programs -> WhatsUp Gold -> SNMP Graphing Utility ).
Monitoring SNMP Devices
WhatsUp Gold
121

122
n
s if
ties.
od tion or tocol
e ’s d IP
B).
• Receive traps from SNMP devices.
A trap is sent when the status of a device changes. Traps are unsolicited messages, such as a router indicating one of its interfaces went down or a printer indicating it is out of paper.
WhatsUp Gold records traps in the device’s Log tab and in the Event log. You can also set WhatsUp Gold to send a notificatio(via pager, beeper, e-mail, or voice) when a trap is received.
When a trap is recorded for a device, that device’s label will beinverted (as happens with any change in status). You can thencheck the Log tab in the device properties for the trap information.
• Monitor whether SNMP is running on a device.
You can select SNMP on the device properties Services tab and monitor it just as you can monitor any TCP service. This checkSNMP is running on the device; no SNMP management is involved.
The following sections describe how to use each of these capabili
SNMP Backgrounder
The Simple Network Management Protocol (SNMP) defines a methby which a remote user can view or change management informafor a networked device (a host, gateway, server, etc.). A monitoringmanagement application on the remote user’s system uses the proto communicate with an SNMP agent on the device to access the management data.
The SNMP agent on each device can provide information about thdevice’s network configuration and operations, such as the devicenetwork interfaces, routing tables, IP packets sent and received, anpackets lost. This information, called SNMP objects, is stored in astandard format defined in the Management Information Base (MIThe MIB defines the SNMP objects that can be managed and the format for each object.
User’s GuideWhatsUp Gold

y om ess P, IB,
ent
r a
s
r t
The SNMP protocol, together with the MIB, provide a standard wato view and change network management information on devices frdifferent vendors. Any application that implements SNMP can accMIB data on a specified device. For a detailed description of SNMsee Request for Comments (RFC) 1157. For a description of the Msee RFC 1213.
Management Information Base (MIB)
The MIB contains the essential objects that make up the “manageminformation” for the device. The Internet TCP/IP MIB, commonly referred to as MIB-II, defines the network objects to be managed foTCP/IP network and provides a standard format for each object.
This section provides a brief description of the MIB. For a detaileddescription of the MIB, see RFC 1213.
The MIB is defined as an “object tree” divided into logically relatedgroups of objects. For example, MIB-II contains the following groupof objects:
• system — contains general information about the device, for example: sysDescr (description), sysContact (person responsible), and sysName (device name).
WhatsUp Gold
MIB
MIB
agent
MIB
agent
MIB
agent
MIB
agent
SNMP SNMPSNMP SNMP
NoteThe Internet Engineering Task Force (IETF) publishes Requests foComments (RFCs) for all Internet standards. Each RFC provides adetailed description of the particular standard. View RFCs online ahttp://info.internet.isi.edu/in-notes/rfc/.
Monitoring SNMP Devices
WhatsUp Gold
123

124
ch cr s), t
),
e
cr
an ne
t
f a
. ice
IP
• interfaces — contains information about network interfaces, suas Ethernet adapters, or point-to-point links; for example: ifDes(name), ifOperStatus (status), ifPhysAddress (physical addresifInOctets, and ifOutOctets (number of octets received and senby the interface).
• ip — contains information about the processing of IP packets,such as routing table information: ipRouteDest (the destinationand ipRouteNextHop (the next hop of the route entry).
• Other groups provide information about the operation of a specific protocol, for example, tcp, udp, icmp, snmp, and egp.
• The enterprises group contains vendor specific objects that arextensions to the MIB.
The MIB provides an extensible design to which both public and private objects can be added.
Each object in the MIB has a numeric object identifier and a text name. For example, the system group contains an object named sysDescr, which provides a description of the device. The sysDesobject has the following object identifier:
iso org dod internet mgmt mib system sysDescr
1 3 6 1 2 1 1 1
This object identifier would be 1.3.6.1.2.1.1.1 to which is appendedinstance sub-identifier of 0. That is, 1.3.6.1.2.1.1.1.0 identifies the oand only instance of sysDescr.
You will find all of the MIB-II objects (for TCP/IP networks) under the MIB node of tree (so all these objects will have an identifier thastarts with 1.3.6.1.2.1).
Security
Limited security is provided for access to a device’s data by use ocommunity profile. The network administrator can assign a community name within the SNMP agent, or manager, on a deviceThe network management application can access data on the devonly if it knows the community name.
Most SNMP agent software (on the device) also let you specify theaddresses for which the agent will accept requests.
User’s GuideWhatsUp Gold

on
ubs,
P
ests
the
P
SNMP Agent or Manager
SNMP agent or manager software must be installed and enabled any devices for which you want to receive SNMP information. Windows 95 and Windows NT provide an SNMP agent. Network systems manufacturers provide an SNMP agent for their routers, hand other network boxes.
SNMP Operations
An SNMP application can read values for the SNMP objects (for monitoring of devices) and some applications can also change thevariables (to provide remote management of devices). Basic SNMoperations include:
• Get — gets a specified SNMP object for a device
• Get next — gets the next object in a table or list
• Set — sets the value of an SNMP object on a device
• Trap — sends a message about an event (that occurs on the device) to the management application
The SNMP agent software on a device listens on port 161 for requfrom an SNMP application. The SNMP agent and application communicate using UDP. Trap messages, which are unsolicited messages from a device, are sent on port 162.
If an SNMP application makes a request for information about a device but an SNMP agent is not enabled on the device, the UDP packets are discarded.
SNMP Traps
The SNMP standard provides a limited number of unsolicited messages (called traps) that are sent from a device to an SNMP application. These messages can be sent by the SNMP agent on device to notify an SNMP application of a change in status.
There are six standard traps which you can receive from any SNMagent and there can also be enterprise specific traps for a device, which are defined by the device vendor.
Monitoring SNMP Devices
WhatsUp Gold
125

126
in
to
Traps are numbered as follows:
Setting Up the MIB in WhatsUp Gold
WhatsUp Gold can set up the MIB entries in your local system’s Windows registry. These entries include the SNMP objects definedthe MIB-II standard, including the standard traps. Setting up the entries allows the SNMP tool to convert SNMP object identifiers inobject names and names into object identifiers.
To set up the MIB entries:
1 From the View menu, select Program Options and click the Progs/SNMP tab.
2 Check the Add registry entries option, and then click Apply.
WhatsUp Gold reads the entries from the mib.txt file (located in the directory where you installed WhatsUp Gold) and adds them to thefollowing registry keys:
HKEY_LOCAL_MACHINE\Software\Ipswitch\WhatsUp\SNMP\ObjID
Trap # Trap type Description
0 Cold start The device is rebooting itself and may change its configuration or the SNMP agent’s configuration.
1 Warm start The device is rebooting itself but neither the device’s nor the SNMP agent’s configuration will change.
2 Link down One of the communication links for the device is down.
3 Link up One of the communication links for the device is back up.
4 Authorization failure
The device has received a protocol message that is not properly authenticated.
5 EGP neighbor loss
An EGP neighbor for which the device is an EGP peer is down and the peer relationship no longer exists.
6 Enterprise specific traps
The SNMP specification lets vendors define enterprise specific traps, for example a trap that occurs on a particular vendor’s router. Enterprise specific traps should be added to the MIB on the device and on the management application.
User’s GuideWhatsUp Gold

)
as
WhatsUp Gold uses the ObjID entries to decode text names to numeric object identifiers for the network objects.
HKEY_LOCAL_MACHINE\Software\Ipswitch\WhatsUp\SNMP\Obj
WhatsUp Gold uses the Obj entries to convert numeric object identifiers to text names in returned messages.
You can add your own information (for enterprise specific MIB dataunder those keys by editing mib.txt and using the Add registry entries option as described above. (You need to run this procedureeach time you update the mib.txt file.) The mib.txt file is an ASCII file that can be edited with any text editor. The format is one line per object, with the object’s name followed by a comma, and then the MIB number. For example:
����������� � � � � � � �
����������� � � � � � � �
������������ � � � � � � �
sysName,1.3.6.1.2.1.1.5
Viewing SNMP Objects
The SNMP tool lets you view information on a remote device that han SNMP agent. To view SNMP information:
1 From the Tools menu, select Net Tools, and click the SNMP tab to display the SNMP options.
2. Click to display
3. Select an object,
The window displays
then click Start .
the object’s value.
MIB tree.
1. Enter the devicename or address.
Monitoring SNMP Devices
WhatsUp Gold
127
128
e
he t
e of
it le
the
in
an
ce
lts P
2 In the Address box, enter the host name or IP address of the device for which you want to view SNMP objects, or select onfrom the drop-down list.
3 If necessary, change the string in the Community box. The default string is “public”
SNMP (Version 1) as a protocol does not support security. Security is implemented within the SNMP manager itself (on tdevice) by specifying the IP addresses from which it will acceprequests. However, simple security can be implemented by usthe community string.
The default string (public) will work for most SNMP hosts unlessthe administrator has specifically removed public and replacedwith a string of his/her own. If you know a device is manageabvia SNMP and public doesn’t work, you will have to talk to theowner of that device to get a community name that will work.
4 In the What box, enter an SNMP object name or identifier to retrieve, or browse the MIB tree and select an object. Clicking button next to the What box displays a tree view of the SNMP object entries in the Windows registry (the MIB). When you select an object in the tree view, the object identifier is enteredthe What box.
Each SNMP object has a name and numeric identifier. For example, in the “system” group, the network object named SysDescr with object identifier 1.3.6.1.2.1.1.1 contains a description of the device.
An object can have one or more instances, depending on the configuration of the monitored device. For example, a device chave two network adapters, in which case there will be two instances of the ifPhysAddress object, which has object identifier1.3.6.1.2.1.2.2.1.6. In this case, you need to specify an instannumber at the end of the object identifier (such as 1.3.6.1.2.1.2.2.1.6.1). If you do not specify an instance, it defauto zero. For more information on SNMP objects, see the “SNMBackgrounder” section of this chapter.
You use the What box in combination with the radio buttons (Get, Get Next, Get All Subitems, Monitor) to display values for a network object or objects.
User’s GuideWhatsUp Gold

in
you
d
.
ty aph and
Get. If you know the object name or identifier, you can enter it the What box and use the Get option. For example, on a Windows NT system, a Get request for ifPhysAddress.2 returns the network adapter address. If it is a wrong name or number, will not get any information back. If there is more than one instance of the object, you need to enter the specific instance.
Get Next. Use Get Next to get the next object instance from a table or list within the SNMP agent on the device. You can determine the values to use in the What box by what is returned using Get Next. You should use this option with most of the items that are in the MIB.
Entering *sysInfo in the What box returns most of the “system” identification objects.
Get All Subitems. This option returns any subitems of the nameitem.
Monitor . Starts the SNMP Graphing Utility and graphs the network object specified in the What box.
5 Optionally, change the Delay setting (the default is 1000 milliseconds). This value tells the SNMP tool how long to wait for a response to an SNMP request before reporting a timeout
6 Click Start to retrieve the object you entered in the What box.
Any information found for the object is shown in the results window.
Graphing SNMP Values
Some of the SNMP objects are best monitored by displaying their changing values in a graph. WhatsUp Gold’s SNMP Graphing Utililets you select one or more SNMP objects and show a real-time grof their values. You can also save a particular graph setup to a filelater open the file and resume graphing the SNMP objects.
Starting the SNMP Graphing Utility
To start the SNMP Graphing Utility, do one of the following:
• From the Start menu, select Programs -> WhatsUp Gold -> WhatsUp Gold SNMP Graphing Utility.
Monitoring SNMP Devices
WhatsUp Gold
129

130
dit-
e
• From the SNMP tool (Tools -> Net Tools -> SNMP), enter an SNMP object identifier in the What box, then select the Monitor option, and then click Start.
The WhatsUp Gold Graphing Utility appears and begins real-time graphing of the selected SNMP object. (When you select the utilityfrom the Start menu, the utility starts the default graph file, GRAPH.wgg. This graph contains one graph object, “timer,” that shows the time elapsed between SNMP values reported, which isdetermined by the Interval specified in the graph options (select E>Graph properties).)
By default, the SNMP Graphing Utility graphs the change betweeneach reported value of the SNMP object. You can set the utility to graph only the reported values for an object (by selecting Absolute values in Edit -> Item Properties).
Up to 20 SNMP objects can be active on the graph. You can set thcolor and line width to distinguish each graphed object.
The Graph Window
The main window of the SNMP Graphing Utility shows a line graphfor each SNMP object added to the graph and shows the followinginformation (set by selecting Edit -> Graph Properties):
Vertical maximum
Vertical labels
Value bar
Legend
User’s GuideWhatsUp Gold

cal n
s ical
ed
r
d
Vertical scale. This is the vertical scale of values on the graph. TheVertical Maximum is used to determine the vertical scale. The VertiLabels show values in the vertical scale. You can turn the labels oand off in the Graph Options.
Grid lines. You can display vertical or horizontal lines to mark valueon the graph. You can turn these lines on and off by using the Vertgrid and Horizontal grid options.
Legend. The Legend, displayed at the bottom of the window, lists each SNMP object that is on the current graph. The device’s IP address is shown first, followed by the object identifier for the graphobject, for example:
156.21.50.5 1.3.6.1.2.1.2.2.1.16.1
You can select an item in the Legend and display values in the Value Bar. You can double click an item to display its Graph Item Properties. If more than two items are graphed, a vertical scroll bawill appear in the legend.
Value bar. The Value Bar appears immediately below the graph anshows the following information for the currently selected graph object (the item highlighted in the Legend):
The following sections describe how to graph SNMP objects and change graphing options.
Color box The color assigned to the line graph for the SNMP object.
Scale The value used to scale the graph. This can be changed in the Graph Item Properties.
Last The last reported value for the SNMP object.
Avg The average of the reported values for the SNMP object (since the graph was started).
Min The minimum value reported for the SNMP object since the graph was started.
Max The maximum value reported for the SNMP object since the graph was started.
Monitoring SNMP Devices
WhatsUp Gold
131

132
e
ith
Adding, Editing, and Deleting SNMP Objects
To add an SNMP object to the graph:
1 From the Edit menu, select Add Item to Graph. The Graph Item Properties appear.
2 In the Host box, enter the host name or IP address of the devicfor which you want to graph SNMP objects, or select one fromthe drop-down list.
3 If necessary, change the string in the Community Name box. The default string is: “public”
The default (public) will work for most SNMP hosts unless the administrator has specifically removed public and replaced it wa string of their own. If you know a device is manageable via SNMP and public doesn’t work, you will have to talk to the owner of that device to get a community name that will work.
4 Use the Item and Instance boxes along with the MIB tree to select the SNMP object that you want to graph.
If you know the object identifier for the SNMP object, you can enter it in the Item box. Use the Instance box to enter the instance of the selected SNMP object.
Use the MIB tree if you want to browse the available SNMP objects. When you select an object in the MIB tree, its object identifier is displayed in the Item and Instance boxes.
User’s GuideWhatsUp Gold

as if
ct t
r h.
e if
ted
5 Set any of the following options:
Absolute values. When checked (or turned on), graphs the reported values of an SNMP object rather than graphing the change between the last reported value and the current value(which is the default method). When graphing a counter, suchifOutOctets, the reported values will continuously increase, soyou check Absolute values, the graph will continue to “stair-step” up the scale.
AutoScale. When checked, the graph scale for the SNMP objeis determined by the graphing utility. This is a relative scale thais calculated to make the graph fit into the vertical scale. If youturn off this option, the Scale option becomes active and you canenter a value to scale the graph.
Scale. When AutoScale is turned off (not checked), you can entea fixed value in this text box to determine the scale of the grapYou may want to try different values in this box until you find ascale that is useful.
Bytes to bits. When checked, multiplies the value reported for thSNMP object by 8 to approximate the count in bits. This optioncan be used with SNMP objects that are counters, for exampleyou want to know the baud rate while monitoring a T1 router port, you want (ifOutOctets * 8) to give you a value close to thereal baud rate.
Reset values. When checked, clears the values for the selectedSNMP object when you exit the dialog box. You can clear the values for all SNMP objects on the graph by selecting Clear from the Edit menu.
Line width. Sets the width of the line that represents the selecSNMP object. Select a width from the drop-down list.
Color. Sets the color of the line that represents the selected
SNMP object. Select a color from the drop-down list.
6 Click OK to add the SNMP object to the graph.
Monitoring SNMP Devices
WhatsUp Gold
133
134
fy.
lect
ems raph
To edit a graph item’s properties:
1 To select the item to edit, do one of the following:
• In the graph legend, double click the item you want to modi
• In the graph legend, click the item you want to modify, and then select Item Properties from the Edit menu.
The Edit Item Properties dialog box appears.
2 Make any changes to the properties and click OK to save them and exit the dialog box.
To delete an item from the graph:
In the graph legend, click the item you want to delete, and then seDelete Graph Item from the Edit menu.
Saving and Opening Graph Files
You can save a graph to a file and it will save the selected graph itand options. Data values are not saved. You can later reopen the gfile and resume real-time graphing of the saved SNMP items. WhatsUp Gold SNMP graph files use the extension .wgg.
To save a graph:
1 From the File menu, select Save Graph. The Save As dialog box appears.
2 In the File name box, enter a file name with a .wgg extension.
3 Click Save to save the graph objects.
To open a saved graph:
1 From the File menu, select Open Graph. The Open dialog box appears.
2 Select a graph file name (with a .wgg extension) and click Open.
User’s GuideWhatsUp Gold

ing
the ct
e em.
e
n
s o
Graph Options
You can change the look and operation of the graph window by usthe SNMP graph options. To set graph options:
1 From the Edit menu, select Graph Properties to view the Graph Options dialog box.
2 Set any of the options:
Legend. When checked, the Legend appears at the bottom of graph window. The Legend displays each graphed SNMP objeand its associated device.
Value Bar. When checked, the Value Bar is displayed below thgraph. The Value Bar shows statistics for the selected graph it
Vertical Grid . When checked, displays vertical lines on the graph to mark intervals on the vertical scale.
Horizontal Grid . When checked, displays horizontal lines on thgraph to mark intervals on the horizontal scale.
Vertical Labels. When checked, shows labels to mark values othe vertical scale.
Vertical Maximum . The number entered in this box determinethe maximum value on the graph’s vertical scale and is used tdetermine the interval values on the grid.
Interval (seconds). Sets the time between recording values on the graph.
Monitoring SNMP Devices
WhatsUp Gold
135

136
it. A cited own
e’s the
(via e.
on, If in
the
Receiving SNMP Traps
WhatsUp Gold has an internal SNMP trap handler, which when enabled, listens for and accepts SNMP traps that are addressed totrap is sent when the status of a device changes. Traps are unsolimessages, such as a router indicating one of its interfaces went dor a printer indicating it is out of paper.
When a trap arrives from a device, WhatsUp Gold inverts the deviclabel to show a status change and records the trap information in device’s Log tab and in the Event Log.
You can also set up WhatsUp Gold to send a notification messagepager, beeper, e-mail, or voice) when a trap is received for a devic
To receive traps in WhatsUp Gold, you need to do the following:
1 On the devices that will be monitored, set the SNMP agent tosend traps to WhatsUp Gold.
2 Set up the MIB entries for traps
3 Enable the SNMP Trap Handler
4 Set up any notifications for traps
The following sections describe how to do each of these steps.
Set Devices to Send Traps to WhatsUp Gold
Trap manager addresses must be set in the SNMP agent on eachphysical SNMP device. This cannot be done from WhatsUp Gold.
Setting Up the MIB Entries for Traps
There are six standard traps that are identified in the MIB. In additivendors can define enterprise specific traps for their own devices.you will use any enterprise specific traps, you need to enter them the MIB.
WhatsUp Gold converts the numeric identifiers in traps to text according to the entries in the Windows registry key:
HKEY_LOCAL_MACHINE\Software\Ipswitch\WhatsUp\SNMP\Trap
The six standard SNMP traps are added to this list when you add MIB entries to the registry. If you need to add other traps, you canenter them under the above registry key.
User’s GuideWhatsUp Gold

P
ps
Enabling the Trap Handler
To enable WhatsUp Gold’s SNMP trap handler:
1 From the View menu, select Program Options. The options dialog box appears.
2 Click the Progs/SNMP tab to display the SNMP options.
3 Check the Enable SNMP Trap Handler option, and then click Apply.
Setting Up Notifications for Traps
You can set up WhatsUp Gold to send a notification when an SNMtrap is received for a device. You can specify that the notification issent when any trap message is received or when a specified trap number(s) is received. For background information about SNMP traand trap numbers, see “SNMP Traps” on page 125.
To set up a notification for a trap message:
1 Double click the device to display its properties.
2 Click the Alerts tab to display alerts properties.
3 Select Enable Alerts (make sure it is checked).
4 In the Notifications section, click Add. The Add/Edit Notifications dialog box appears.
Monitoring SNMP Devices
WhatsUp Gold
137
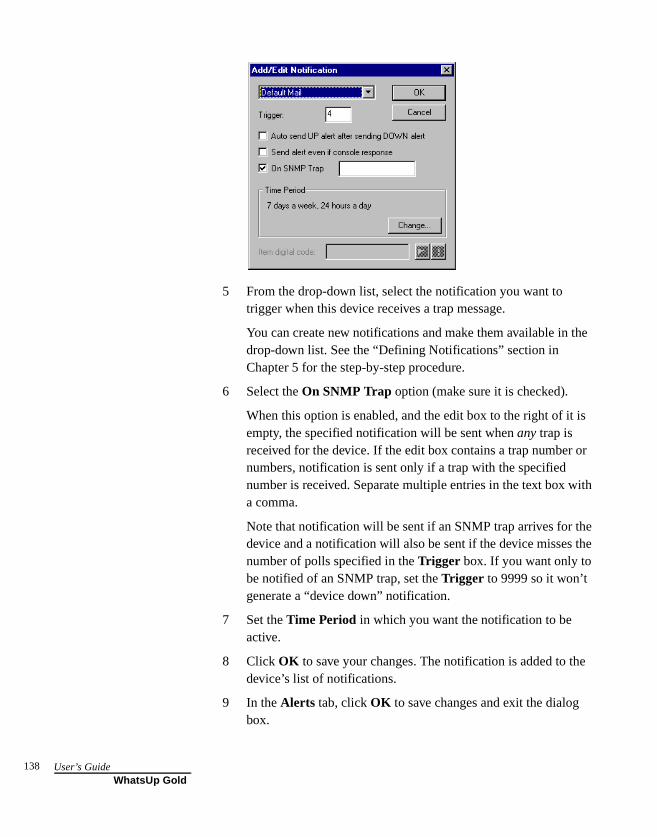
138
he
is
or
ith
e the
e
5 From the drop-down list, select the notification you want to trigger when this device receives a trap message.
You can create new notifications and make them available in tdrop-down list. See the “Defining Notifications” section in Chapter 5 for the step-by-step procedure.
6 Select the On SNMP Trap option (make sure it is checked).
When this option is enabled, and the edit box to the right of it empty, the specified notification will be sent when any trap is received for the device. If the edit box contains a trap number numbers, notification is sent only if a trap with the specified number is received. Separate multiple entries in the text box wa comma.
Note that notification will be sent if an SNMP trap arrives for thdevice and a notification will also be sent if the device misses number of polls specified in the Trigger box. If you want only to be notified of an SNMP trap, set the Trigger to 9999 so it won’t generate a “device down” notification.
7 Set the Time Period in which you want the notification to be active.
8 Click OK to save your changes. The notification is added to thdevice’s list of notifications.
9 In the Alerts tab, click OK to save changes and exit the dialog box.
User’s GuideWhatsUp Gold

) is
nd
f
is
When a trap message (or the specified trap message numberreceived for the device, the notification will be sent.
Viewing Trap Log Entries
To view trap information for a device, select the device properties aclick the Log tab. To view trap information for all devices, you can select Event Log from the View menu. Traps are logged regardless owhether you have enabled log events for the device.
Traps are also logged to the SNMP.log file in the WhatsUp Gold main directory.
Monitoring SNMP Service
To monitor whether SNMP is running on a device:
1 Double click the device to display its properties.
2 Click the Services tab to display services properties.
3 Check the SNMP service. Use the default (public) in the Community box unless your system administrator has set a different community.
4 Click Apply to apply your changes. Click OK to apply the changes and exit the dialog box.
If SNMP service is being monitored on a device, an asterisk (*)displayed next to the device icon in the map.
Monitoring SNMP Devices
WhatsUp Gold
139

140
User’s GuideWhatsUp Gold
for , or old
n
-
p. t-
-
a-
n
Chapter 8: Using Network Tools
WhatsUp Gold includes a versatile set of tools that let you search and display information about organizations, networks, computerspeople on a network. Accessed from the Tools menu, WhatsUp Gnetwork tools include:
• Info — Display a summary of device information.
• Time — Synchronize your computer’s clock with a remote timeserver.
• HTML — Query a web address.
• Ping — Verify connectivity to a host.
• TraceRoute — Trace and view the route to an Internet host.
• Lookup — Query Internet domain name servers for informatioabout hosts and name servers.
• Finger — Display information about users on a host.
• Whois — Display information from the network information center about Internet domain ownership and Internet groups.
• LDAP — Search directories for names and information.
• Quote — View quotations from a quote server.
• Scan — Scan a range of IP addresses to create a network maFor information on using this tool, see “Chapter 2: Creating Nework Maps” on page 15.
• SNMP — View and graph Simple Network Management Protocol values for a device. For information on using this tool, see “Chapter 7: Monitoring SNMP Devices” on page 121.
• WinNet — View Windows Network domains, hosts, and worksttions.
• Throughput — Test data throughput on the connection betweeyour computer and a remote computer.
Using Network Tools
WhatsUp Gold
141

142
ned
wo
e
n all ell as
nds
o
l’s
Using Format, Copy, and Print Functions
This section describes how to select the format of the results returby any of the tools, and how to copy or print the results.
Selecting the Results Display Format
You can display the results reported by any of the tools in either of tformats: click Report View to display the formatted results with labels; click List View to display results in a list format. Note that thbutton toggles between Report View and List View modes.
Using Cut, Copy and Paste
You can use the standard Windows cut, copy, and paste functions ithe tools and you can cut, copy, and paste between the tools as wbetween a tool and any Windows application.
In general, to cut, copy, or paste data in a text box or in a display window, you can click the right mouse button to display the pop-upmenu. You can also select the Copy, Paste, and Select All commafrom the Edit menu.
When displaying results in the Report View, the right-mouse popupmenu is not available. In Report View, you can click a single item tselect it, then select Copy from the Edit menu. To copy all data in Report View, you must first select Select All from the Edit menu, and then you can use Copy from the Edit menu.
Printing Results
You can print the results displayed by any of the tools. Within a tootab, display the results of a query, and then select Print from the File menu. The Windows print setup dialog box appears.
In the Info tool, you can select and copy text only when displaying results in the List View.
Note
User’s GuideWhatsUp Gold

st t
e
y.
Display Device Information
The Info tool displays a summary of information about a network hoor device, including the official host name, IP address, and contacinformation (from the Whois database). An Info request on a host name also polls (pings) the host to verify connectivity.
The Info tool provides a quick way to get host information – it runsLookup and Whois queries on the specified host and also pings thhost to check its availability.
To send an Info query:
1 From the Tools menu, select Net Tools and select the Info tab to display the Info options.
2 In the Hostname box, enter the name of a host you want to quer
This must be a fully qualified host name (for example: whitehouse.gov)
3 Click the Start button.
The results of the query appear in the window.
During the query, the Start button toggles to Stop. You can click Stop at any time to stop the query. Click Clear to erase the results from thedisplay window.
Using Network Tools
WhatsUp Gold
143

144
r
s)
ed
Checking a Web Address
The HTML tool’s primary purpose is to help developers debug theiweb sites. The HTML tool sends a get request to a specified web address (URL) and returns full header information (including cookieand also returns the page data (raw or formatted HTML code).
To query a web address:
1 From the Tools menu, select Net Tools and select the HTML tab to display the HTML options.
2 In the URL (Uniform Resource Locator) box, enter the web address of the web page you want to query.
This must be a specific web site file (for example: http://host name/page)
3 Select the format for displaying the page data: Select Raw to display page data with embedded HTML code. Select Formattto display the page data with carriage returns inserted.
4 Click the Start button.
The results of the query appear in the window.
During the query, the Start button toggles to Stop. You can click Stop at any time to stop the query. Click Clear to erase the results from thedisplay window.
User’s GuideWhatsUp Gold

he
n
s-er
r:
he s
T.
Synchronizing Time
The Time tool lets you synchronize your local system’s clock with tclock of a remote time server. Remote time servers provide a constantly updated time of day reading (in hours, minutes, and seconds) and the date (year, month, day). The Time tool provides predefined entries for some publicly available time servers. You caalso query your own or other time servers.
Using the Time tool, you can also:
• Synchronize your local clock on demand
• Interrogate multiple time of day servers simultaneously and diplay the difference (in seconds) between the remote time servand the local system time.
• Adjust the displayed time of a remote time server by setting anoffset (plus or minus hours) from GMT.
• Sort the display (for multiple time servers) by column (Server Name, Time, Difference, Offset, and Error Code).
To synchronize your local system’s clock with a remote time serve
1 From the Tools menu, select Net Tools and select the Time tab todisplay Time options.
2 In the Time Server box, type the host name or IP Address (for example, xfiles-jr.esa.lanl.gov, navobs1.wustl.edu, wwwvb.isi.edu) of the remote time server you want to query. Tdrop-down list shows the previous host names or IP addresseyou have queried.
3 Click the Synch Clock to Remote Time option (make sure it is checked). Your local system’s date and clock time is always displayed above the results area.
4 Optionally, use the Offset box to adjust the displayed time of a remote time server by an offset (plus or minus hours) from GM
5 Click the Start button.
Using Network Tools
WhatsUp Gold
145

146
rver
g:
u de,
he
A connection is established with the remote time server and the sename and current time are reported in the display window. The reported time is constantly updated until you do one of the followin
• Click Clear to clear the display.
• Select the time server in the display, and then select Remove from the right-mouse menu.
The display window also shows the time difference between your local system’s clock and the time server’s clock, any time offset yospecified, and any error codes reported. (If Time reports an error cotry another time server from the list.)
During the query, the Start button toggles to Stop. You can click Stop at any time to stop the query. Click Clear to erase the results from thedisplay window.
To sort values in a column in ascending order, click the column heading. To reverse the sort order, click again.
To interrogate multiple time servers:
Enter or select the time server’s host name or IP address in the Time Server box and then click Start. Each time server you select is displayed on a separate line.
To update the time reported by the server now:
Right-click the time server in the Server Name column to display tpop-up menu, and then select Update Time from Server.
User’s GuideWhatsUp Gold

e
e
he
e
ty the
to d
To synchronize the local clock with the time server now:
Right-click the time server in the Server Name column to display thpop-up menu, and then select Sync Clock To Remote Time.
To suspend polls to a time server:
Right-click the time server in the Server Name column to display thpop-up menu, and then select Stop Monitoring This Item . To restart monitoring, right-click on the server and select Start Monitoring This Item.
To suspend polls to all time servers:
Right-click any time server in the Server Name column to display tpop-up menu, and then select Stop Monitoring All Items . To restart monitoring, right-click on any server and select Start Monitoring All Items.
To remove a time server from the list of servers:
Right-click the time server in the Server Name column to display thpop-up menu, and then select Remove.
To change the offset (to account for time zone differences):
1 Click the time server in the Server Name column or select a server from the Time Server drop-down list.
2 In the Offset drop-down list, select the desired offset.
3 Click Start.
Verifying Connectivity to an Internet Host
The Ping tool is a network diagnostic tool used to verify connectivito a particular system on your network. Ping sends an ICMP “echorequest” in the form of a data packet to a remote host and displaysresults for each “echo reply”. This exchange is referred to as “pinging.” The Ping command also displays the time for a responsearrive in milliseconds (this will vary depending on network load) andebugging information about the network interface. You can have multiple instances of the Ping tool active simultaneously.
Using Network Tools
WhatsUp Gold
147
148
f
d.
g.
ply.
Pinging a Host
To Ping a host:
1 From the Tools menu, select Net Tools and select the Ping tab todisplay ping options.
2 In the Hostname or IP Address box, type a host name or IP Address (for example, internic.net).
3 Select the protocol to use for pinging depending on the type ohost selected. Use ICMP for TCP/IP hosts, IPX for Novell NetWare hosts, or NetBEUI for Windows network hosts.
4 Set any of the options you want to use:
Count. The number of data packets sent by the ping comman
Delay (sec). Number of seconds to wait between sending a pin
Size. The length in bytes of each packet sent by the ping command.
Timeout (ms). The ping will fail if the host does not respond after this number of milliseconds.
5 Click the Start button.
The Ping tool sends an echo request and waits for the echo reIf the Ping was successful, summary lines are displayed in thePing tab, indicating the result of the Ping.
To ping an IPX device, Microsoft’s NWLink IPX/SPX Compatible Transport must be installed and running on the WhatsUp Gold system. For more information, see “System Requirements” on page 7.
Note
User’s GuideWhatsUp Gold
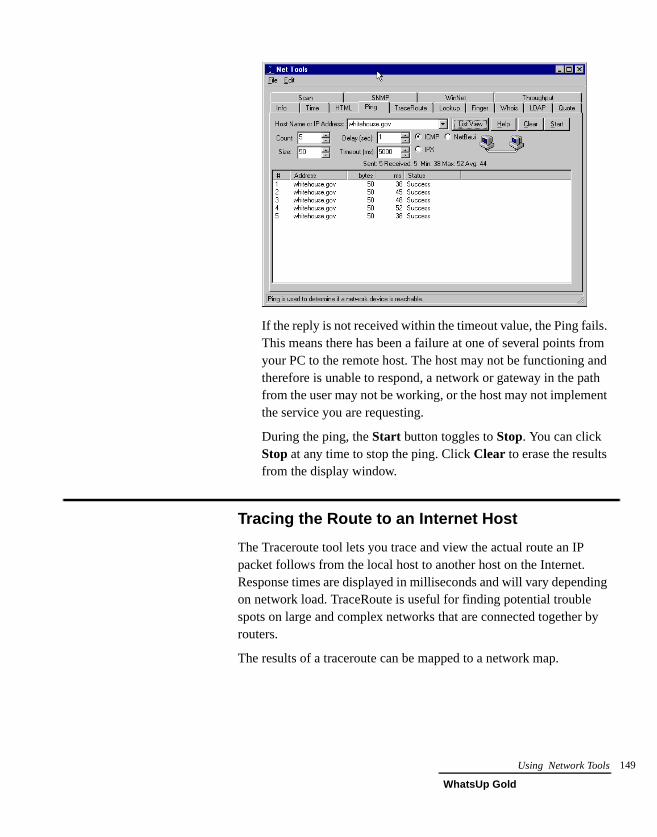
s. om nd th nt
ing
by
If the reply is not received within the timeout value, the Ping failThis means there has been a failure at one of several points fryour PC to the remote host. The host may not be functioning atherefore is unable to respond, a network or gateway in the pafrom the user may not be working, or the host may not implemethe service you are requesting.
During the ping, the Start button toggles to Stop. You can click Stop at any time to stop the ping. Click Clear to erase the results from the display window.
Tracing the Route to an Internet Host
The Traceroute tool lets you trace and view the actual route an IP packet follows from the local host to another host on the Internet. Response times are displayed in milliseconds and will vary dependon network load. TraceRoute is useful for finding potential trouble spots on large and complex networks that are connected togetherrouters.
The results of a traceroute can be mapped to a network map.
Using Network Tools
WhatsUp Gold
149

150
ne
ter
e e IP
s
e Up
lts
TraceRoute Search
To initiate a traceroute search, do the following:
1 From the Tools menu, select Net Tools and select the TraceRoute tab to display the traceroute options.
2 In the Host Name or IP Address text box, enter a host name or IP address for the remote host — this is the host to which youwant to trace the route.
The drop-down list shows the previous host names or IP addresses for which you’ve done a traceroute.
3 Set any of the options you want to use.
Maximum Hopcount. The maximum number of hops to trace
before ending the traceroute. When an IP packet passes from ohost to another, it is referred to as one hop.
Resolve Addresses. When enabled, the host names of each roualong the route will be displayed along with the IP addresses. When disabled, only the IP addresses are shown. Showing thhost names will add time to the traceroute as it requires that thaddresses be resolved.
Map Results. When this option is enabled, when you launch atrace to a host, WhatsUp Gold draws a map of the route, displaying an icon for each router and showing the connectionfrom router to router until it reaches the host.
Set Dependencies. This option is used with the Map Results option. When enabled, it will set each router found by the traceroute as an “up” dependency on the previous router in throute. This means that when polling, if a router is down, WhatsGold will not poll routers further along the route to a host.
4 Click the Start button.
The results of the TraceRoute search are displayed in the resuarea.
User’s GuideWhatsUp Gold
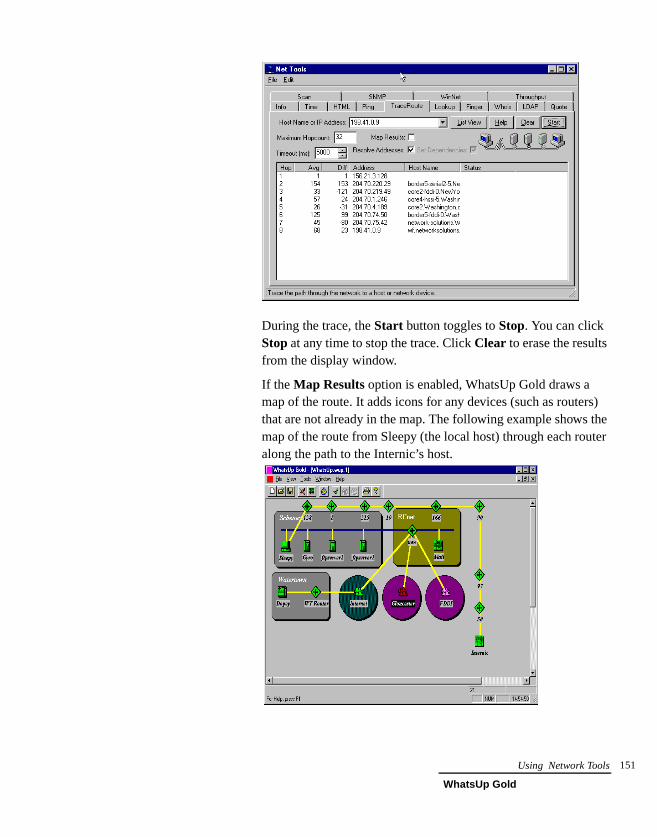
s) the ter
During the trace, the Start button toggles to Stop. You can click Stop at any time to stop the trace. Click Clear to erase the results from the display window.
If the Map Results option is enabled, WhatsUp Gold draws a map of the route. It adds icons for any devices (such as routerthat are not already in the map. The following example shows map of the route from Sleepy (the local host) through each roualong the path to the Internic’s host.
Using Network Tools
WhatsUp Gold
151

152
:
s
d
up.
you
Finding Host and Name Server Information on the Internet
The Lookup tool lets you query Internet domain name servers for information about hosts and name servers. You can use Lookup to
• Find the IP address from a name or a name from an IP addres
• List just the name and Internet address of a host or domain
• Query the name server for information about various hosts andomains
• List hosts in a domain
Lookup Query
To initiate a Lookup query:
1 From the Tools menu, select Net Tools and select the Lookup tabto display lookup options.
2 In the Name or IP Address text box, enter a host name or IP address of the device or domain name server you want to look
3 Set any of the options you want to use.
DNS Server. Enter the IP address of the domain name server want to query or select [stack] from the drop-down list to use thenetwork stack in your operating system.
Note:
When you select the [stack] option, Lookup uses the WinSock stack's lookup routines. If you specify a server, Lookup creates and interprets its own DNS packets and does not use the WinSock stack routines.
User’s GuideWhatsUp Gold

s
e
s a
Query Type. Select a type from the drop-down list. The query
types are:
The Verbose option is useful only when you specify a DNS server. When enabled, you can see the information that comeback from the DNS server.
4 Click the Start button.
The information returned by the lookup query is displayed in th
results area.
Type Returns the following information:
A The host’s Internet address
ALL All information
CNAME The canonical or primary name for the owner
HINFO The CPU type and operating system type of the host
MX The host that acts as the mail exchanger
NS The name server for the named zone
PTR The host name, if the query is an Internet address; otherwise, a pointer to other data
SOA The domain’s “start of authority” information
If you use the network stack, you can only do name-to-addreslookups (A) or address-to-name lookups (PTR). If you specifyDNS server, you can use all of the query types.
Note
Using Network Tools
WhatsUp Gold
153

154
ent for
nt
During the query, the Start button toggles to Stop. You can click Stop at any time to stop the query. Click Clear to erase the resultsfrom the display window.
Displaying Information About Internet Users and Organizations
The Finger tool lets you identify and display information about all users on a network host. This information includes a display of currusers on the host (their user IDs and user names). Also displayedeach user are the home directory, login time, idle times, office location, last time they received mail, and last time they read mail.
A Finger request will also display any information contained in thefile .plan or the file .project in the user’s home directory. These files are often used as a simple way to distribute information.
If the specified host does not have a Finger server, the Finger cliedisplays the message: Connection not made
Finger a Host
To initiate a Finger query, do the following:
1 From the Tools menu, select Net Tools, and select the Finger tabto display Finger options.
User’s GuideWhatsUp Gold

of
nd est
2 In the Finger String text box, enter a host name or IP address.
The drop-down list shows the previous host names or IP addresses for which you sent a Finger request.
3 Click the Start button.
The Finger client contacts the host’s Finger server. The resultsthe query appear in the window.
During the query, the Start button toggles to Stop. You can click Stop at any time to stop the query. Click Clear to erase the results from the display window.
Displaying Information About Internet Domain Ownership and Internet Organizations
The Whois tool, like Finger, is an Internet directory service. Whoisprovides information about who owns an Internet host or domain awho you can contact regarding that host or domain. A Whois requdisplays a contact name, mailing address, telephone number, andnetwork mailbox for all users and organizations who are registeredwith the Network Information Center (NIC) database.
Using Network Tools
WhatsUp Gold
155

156
re.
of
Whois Search
To initiate a Whois search, do the following:
1 From the Tools menu, select Net Tools, and select the Whois tab to display the Whois options.
2 In the Search String text box, enter a search string.
If you know the name or handle of an organization, enter it he
3 In the WAIS Host text box, enter a host name or user name.
4 Click the Start button.
The Whois client contacts that host’s Whois server. The resultsthe query appear in the window.
During the query, the Start button toggles to Stop. You can click Stop at any time to stop the query. Click Clear to erase the resultsfrom the display window.
The current host server for the Network Information Center (NIC) is rs.internic.net. You can send a Whois query to this host to display information on using services that the NIC provides.
Note
User’s GuideWhatsUp Gold

et
t
er
nt , er
cond
Searching Directories for Names and Information
Lightweight Directory Access Protocol (LDAP) is an Internet standard for accessing directory information stored on a server. It permits an LDAP-enabled client to search for and view informationstored in an LDAP directory on another computer. LDAP is a subsof the x.500 directory access protocol.
The LDAP tool lets you view information on a remote computer thahas an LDAP server. Most LDAP servers will let you view e-mail addresses and users’ full names, and many servers will provide information such as the user’s organization name, division or department name, and postal address. In addition, any LDAP servcan contain its own customized set of attributes or data.
To view LDAP information:
1 From the Tools menu, select Net Tools, and select the LDAP tab to display the LDAP options.
2 Define a query for LDAP information.
Use the three text entry boxes at the top of the LDAP dialog tospecify a query for LDAP information.
In the first text box, enter the LDAP attribute that you want to display, or select an attribute from the drop-down list. If you wato display all the entries for the selected attribute (for exampleyou want to display all mail addresses), you can ignore the othtwo text boxes.
If you want to further narrow your search to display specific entries, you can use the second and third text boxes. In the setext box, you can select one of the following:
contains the text (in the third box) is part of the
entry
is the text is the exact name of the entry
is like the text is a near match for the entry
(not supported by all LDAP servers)
Using Network Tools
WhatsUp Gold
157

158
e)
as
nt
of
n
Then, in the last text box, you can enter criteria (such as a namto display only those entries that meet the search criteria. Forexample, if you want to search an LDAP directory for information about a company named Acme, you could enter itfollows:
3 In the LDAP Host box, enter the name of the host that you wato query.
This must be a fully qualified host name (for example, mail.acme.com). From the drop-down list, you can select somethe more widely-used LDAP directories, such as ldap.whowhere.com, ldap.bigfoot.com, ldap.four11.com, and ldap.infospace.com. Your previous LDAP entries are also showin the drop-down list.
4 Click the Start button.
Any LDAP information that meets the specified search criteriais displayed.
User’s GuideWhatsUp Gold

he
During the query, the Start button toggles to Stop. You can click Stop at any time to stop the query. Click Clear to erase the results from the display window.
Viewing Quotations from a Quote Server
The Quote client lets you view information on a remote host that supports a Quote server. Quote servers often display a “quote of tday.” For example, if you connect to the Ipswitch quote server, youmay see a quote like the following:
“It was as true as taxes is. And nothing’s truer than them.”
Charles Dickens (1812-1870)
To view Quotes:
1 From the Tools menu, select Net Tools, and select the Quote tab to display the Quote options.
This must be a fully qualified host name (for example: quotes.ipswitch.com).
2 In the Quote server box, enter the name of a host that containsthe quote server.
3 Click the Start button.
The results of the query appear in the window.
During the query, the Start button toggles to Stop. You can click Stop at any time to stop the query. Click Clear to erase the results from the display window.
If there are too many responses to your query, most LDAP servers will not return anything. You’ll need to further define your search criteria.
Note
Using Network Tools
WhatsUp Gold
159

160
ap of :
MP
of ). ws t or for me t
t
Scanning Your Network
The Scan tool lets you scan a range of IP addresses to create a mthe devices in your network. For more information, see “Chapter 2Creating Network Maps” on page 15.
Viewing and Graphing SNMP Values
The SNMP tool lets you view and graph Simple Network Management Protocol values for a device. The device must be SNenabled. For information on using this tool, see “Chapter 7: Monitoring SNMP Devices” on page 121.
Displaying Information About YourLocal Network
The WinNet tool scans your local network and displays the namesWindows network resources (domains, hosts, or shared resourcesNote that resources on the Windows network use NetBEUI (WindoNetBIOS) names which may or may not correspond to Internet hosdomain names. You can use the drop-down list to select the itemswhich you want to scan. In addition, you can enter the NetBEUI naof a Windows resource on your network and view information abouthat resource.
1 From the Tools menu, select Net Tools, and select the WinNet tab.
2 In the Network Items text box, select the type of network itemsthat you want to display from the drop-down list. You can selecfrom the following item types:
networks — show all networks (groups of domains)
domains — show all domains (groups of servers)
servers — show all servers
shares — show all shared devices, such as printers
all — show all the above types of items
3 Click the Start button.
User’s GuideWhatsUp Gold
e
a
e
y
this
the es
WhatsUp Gold scans your local network and displays the namand address of the specified items.
During the scan, the Start button toggles to Stop. You can click Stop at any time to stop the scan. Click Clear to erase the results from the display window.
Testing Throughput Between Your Computer and a Remote Computer
Throughput is a diagnostic tool that lets you test the data speed onconnection with a remote host. It sends a specified number of IP packets to a specified remote computer and calculates the averagkilobytes per second sent over the communications link.
To test throughput on a connection:
1 From the Tools menu, select Net Tools and select the Throughput tab.
2 In the Hostname or IP Address box, type a host name or IP Address (for example, internic.net).
3 Set any of the options you want to use:
Packet Count. The number of data packets sent by the ping command.
Timeout (ms). The ping will fail if the host does not respond after this number of milliseconds.
Delay (ms). Number of milliseconds to wait between sending aping.
Max Size. The maximum length in bytes of each packet sent bthe ping command.
TCP. TCP checks are through the echo port, which must be running on the remote system. Throughput is more accurate if option is not used.
4 Click the Start button.
For each data packet sent, Throughput shows the number of packets sent and the number received by the remote host, andtime it took to receive a response (in milliseconds). The kilobytper second (which is the throughput) on the connection is
Using Network Tools
WhatsUp Gold
161

162
calculated. Reported speed will vary depending on the systemyou are checking and the size of data packets.During the test, the Start button toggles to Stop. You can click Stop at any time to stop the test. Click Clear to erase the results from the display window.
User’s GuideWhatsUp Gold

Numerics127.0.0.1 10
Aacknowledging alerts
from console 80, 90, 93from web interface 120
add-ins 76alarm colors 32, 79alarms 80
sounding 42sounds 59, 64turning off 80, 90, 93turning off sound 61, 64
alertsacknowledging from
console 80, 90, 93acknowleging from web
interface 120attached lines
disconnecting 37drawing 37
Bbackground image for maps 31baud rate
beeper 47pager 45
beeper notifications 46binary value
searching for 74bitmaps
map background 31bridges See devices.
Ccgi program 72checking
definition 3colors
device status 32, 79map 32setting 32
COM extensibility 76COM interface 76COM Port 47Comm Setup
beeper 47pager 45
command linecreating Events Reports
with 94creating Statistics Reports
with 100community name 36context 12
Ddb files 8Debug Log 87deleting notifications 64dependencies 26, 85
setting 28Dependencies Window 6, 83devices 2
addresses 2alerts 57custom 35general properties of 25global notifications 63IPX 2monitoring 26monitoring services on 68names 23, 25status 80types 2
DHCP 25dial string 47disconnecting attached lines 37Discover and Map 16, 24Disk Space Monitor service 70display name 25, 51DNS See Domain Name
Server.Domain Name Server 11, 20,
26
drawingshapes and lines 33text 38
EEcho 20Edit Mode 33
creating a map 23definition 2
e-mail notifications 48error codes (Winsock) 51, 81,
86Ethernet 26Event Log 58, 64, 91
changing 90creating report from 92enabling/disabling 64entering up/down events
58exporting data from 93referencing in notifications
51referencing in recurring
reports 104types of events 89viewing 91
Event Report 94Exchange service 70exporting data 93, 98extensibility 76
Ffeatures
new 4standard 4
FTP 20
Gglobal notifications 63Gopher 20group notifications 49
Index
WhatsUp Gold
163

16
.
Hhost name 25hosts See devices.hosts file
importing devices from 17specifying 18
hosttype.ini 36HTTP 20HTTP Content Scan 70
IICMP echo requests 78ICMP packets 24ICMP requests 3icon
custom device 35, 36IMail Server for Windows NT
ixIMap4 20importing devices 17installation 9
upgrades 8insufficient data 99integer status 51Internet Relay Chat 71IP addresses 20, 25
scanning a range of 19separating numbers in 62
IP packet 149ipnotify.ini file 8, 42Ipswitch
products ixtechnical support xweb site x
IPX 24, 25IPX devices 24
polling 24scanning 24
IRC 71IRC service
monitoring 69Item digital code 47, 51, 61
LLANbox See devices.lines
attached See attached lines
free (unattached) 33List Window 85Log tab 59logs See Debug Log, Event
Log, Statistics Log.loopback network address 10
Mmaps 2, 4
alarms 80bitmap backgrounds 31colors 32creating 15
drawing 23Scan tool 18Scan WinNet tool 22Traceroute 22
creating subnet maps 29monitoring 79naming 39poll frequency 30properties 30saving 39titles 30
members (of group notifications) 50
MIB II 121Microsoft Exchange service 70Microsoft NWLink IPX/SPX
Compatible Transport 7Microsoft SQL server 70Mini Status view 88modems 47
drivers 52initialization string 45setting up 52
Monitor Modedefinition 2
monitoring 5Disk Space Monitor 70enabling/disabling 77establishing the active
maps 77HTTP Content Scan 70IRC 69Microsoft Exhange 70network maps 79network type 24polling frequency 27Radius service 69setting up 26SQL service 70SSL service 70using a web browser 107using Dependencies
Window 83using map window 79using Mini Status view 88using Notifications
Window 88using Statistics Window
85using Status Window 82
NNetBIOS 24, 25NetWare IPX 24network devices See devices.network elements See devicesnetwork maps See maps.Network Neighborhood
discovering devices from 17
network status report 102network type 24NNTP 20notifications 3, 7
adding to list box 60assigning globally 63assigning to devices 57beeper 46
User’s Guide4WhatsUp Gold

defining 42editing 62e-mail 48global 63group 49how WhatsUp Gold stores
8, 42message variables in 51moving to another system
8, 42overriding 63pager 43program 52properties 57receiving 80setting globally 63sharing among Ipswitch
applications 8, 42sound 43system 42upgrading 8, 42viewing active 80voice 54WinPopup 43
Notifications Window 88Novell IPX See IPX.Novell NetWare networks 24NT service (WhatsUp Gold as)
12, 64starting and stopping 13
NWLink IPX/SPX Compatible Transport 24
Ppager notifications 43patch
software xiphone number
beeper 46modem 55pager 44voice notification 55
plug-ins 76
pollingautomatic 78definition 3dependencies 26frequency 27, 30ICMP requests 3methods 24setting dependencies 85single check 78single poll 78starting and stopping 77statistics 85, 95stopping a single check 78stopping automatic 79time of day 27timeout 26, 27
POP3 20primary connection 38primary map 29printers See devices.progam notifications 52programs
starting 52properties
devices 25display name 25drawn objects 37host name 25IP address 25maps 30
protocols supported 24
QQuiet button 61, 64
RRadius service 69recording wav files 53, 62recurring report 102registry See Windows registry.Remote Authentication and
Dial-In User Service 70reports
event 92recurring 102statistics 95using command line to
create 94, 100rotating
text captions 38round trip time 81routers See devices.RTT See round trip time.rules expressions
search text 73text patterns 74
SScan IP tool See Scan tool.Scan tool 18
custom icons 36Scan WinNet tool 22scanning the Windows network
22service agreements xservices 3
how they are monitored 3monitoring 68properties 68status 82
Simple Network Management Protocol See SNMP.
SMTP 20mail host 48
SNMP 20agent 36backgrounder 122concepts 122manager 121MIB II 121overview 121trap 57, 61, 80
software patches xisound notification 42sounds
quieting alarm 59, 64, 80
Index
WhatsUp Gold
165

16
recording 53, 62turning off alarm 59, 64,
80SQL server 70SSL server 70statistics See polling statistics.Statistics Log 95
changing 96exporting data from 98viewing 97
Statistics Reports 95Statistics Window 5, 85status
device 80message 79network element 80report 102services 82viewing 82
Status Window 5, 82subnet maps 29
loading 30viewing 30
SysObjectID 36system notifications 42system requirements 7systems See devices.
TTAP protocol 45TCP/IP networks 24TCP/IP protocol stack 7TCP/IP services 3technical support xtesting
installation 9notifications 51
text captionscreating 38
threshold 59, 64time period 27, 61Time server 20timeout
beeper 48polling 27, 31Scan tool 19
tipsmaking a map easier to
read 23toolbars
arranging 39Traceroute tool 149trigger 59, 60, 64turning off sound alarms 61, 64
UUDP 71Unimodem V 52upgrading xi, 8
keeping old notifications 8, 42
user accounts 111
Vvoice modem
setting up 52voice notifications 54
adding 62Voice tab 54
WWeb pages
customizing 108functions 119HTML Files Directory
109Main Page Prefix 109Main Page Suffix 109main page title 108refresh frequency 108TCP Port 108Top View title 108views 117
Web serveraccess by IP address 111,
114
customizing 108functions 119logging on 116making maps available
110setting up 107user accounts 111views 117
windowsDependencies Window 6Mini Status See Mini
Status view.Notifications Window 88Statistics Window 5Status Window 5
Windows registryimporting devices from 17
WinNet scanning tool 22WinPopup notifications 42Winsock error codes 51Winsock errors 81, 86WS_FTP Find Utility ixWS_FTP Pro (FTP Client) ixWS_FTP Scripting Utility ixWS_FTP Server ixWS_FTP Synchronize Utility
ixWS_Ping ProPack x
Zzero status code 81
User’s Guide6WhatsUp Gold