welcome to the rain garden online tutorial. by … · rain gardens can come in many different...
TRANSCRIPT

Welcome to the rain garden online tutorial. By completing this session, you will have learned about installing a rain garden and be eligible to apply to the rain garden rebate program.
Please note that this tutorial takes approximately 60 minutes to complete.
The rain garden rebate program for homeowners is funded by the City of Thunder Bay, and the rain garden rebate program for the commercial and institutional sector is funded by the Ontario Ministry of Environment and Climate Change.
1

In this tutorial, we’ll review…
-Educational resource materials required for this program. Once you’ve completed this online tutorial, this resource kit will be available to you for pickup from our office.
-What a rain garden is, how it works and the benefits of planting one
-Eligibility requirements and timelines for the rebate program
-How to install a rain garden
-Finally, we’ll look at rain gardens installed by homeowners who have participated in the rain garden rebate program. We hope that these will add inspiration to your own project.
-This tutorial is followed by a short quiz. Once you have completed the quiz, a copy of your results will be sent to EcoSuperior. There is no minimum score required to apply to the rebate program.
2

Installing a rain garden is relatively easy, but a few basic principles must be followed in order to ensure your rain garden is a success. Rain gardens should function well, be easily maintained, and look attractive.
As part of our rain garden education programming, EcoSuperior offers these excellent documents for reference: Rain Gardens: A how-to manual for homeowners, courtesy of the Wisconsin Department of Natural Resources, and a guide to Rain Garden Plant Zones, from the Indiana Lake Michigan Coastal Program.
3
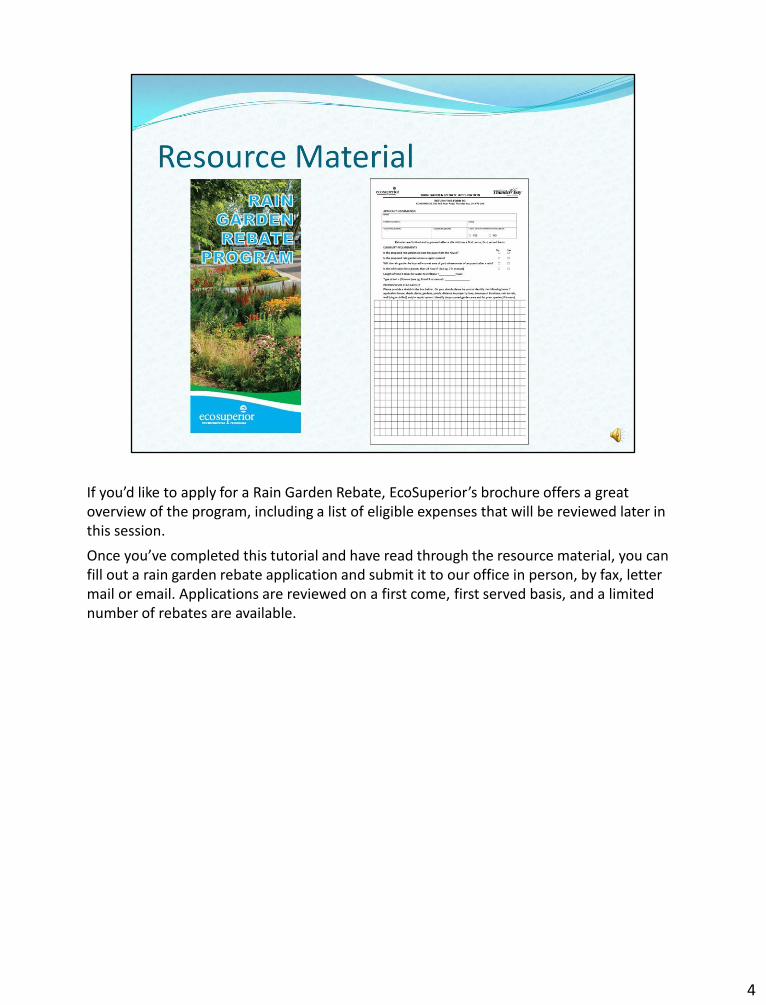
If you’d like to apply for a Rain Garden Rebate, EcoSuperior’s brochure offers a great overview of the program, including a list of eligible expenses that will be reviewed later in this session.
Once you’ve completed this tutorial and have read through the resource material, you can fill out a rain garden rebate application and submit it to our office in person, by fax, letter mail or email. Applications are reviewed on a first come, first served basis, and a limited number of rebates are available.
4

What is a rain garden? Let’s go over a few key elements that make rain gardens attractive, functional features for a residential yard.
5
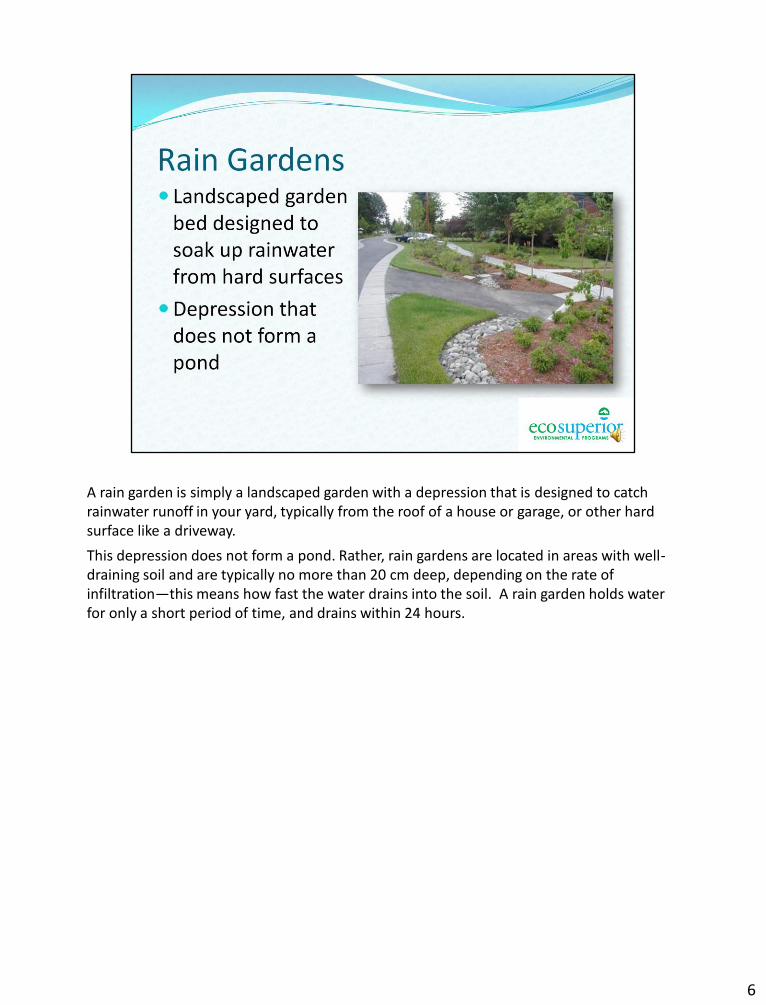
A rain garden is simply a landscaped garden with a depression that is designed to catch rainwater runoff in your yard, typically from the roof of a house or garage, or other hard surface like a driveway.
This depression does not form a pond. Rather, rain gardens are located in areas with well-draining soil and are typically no more than 20 cm deep, depending on the rate of infiltration—this means how fast the water drains into the soil. A rain garden holds water for only a short period of time, and drains within 24 hours.
6
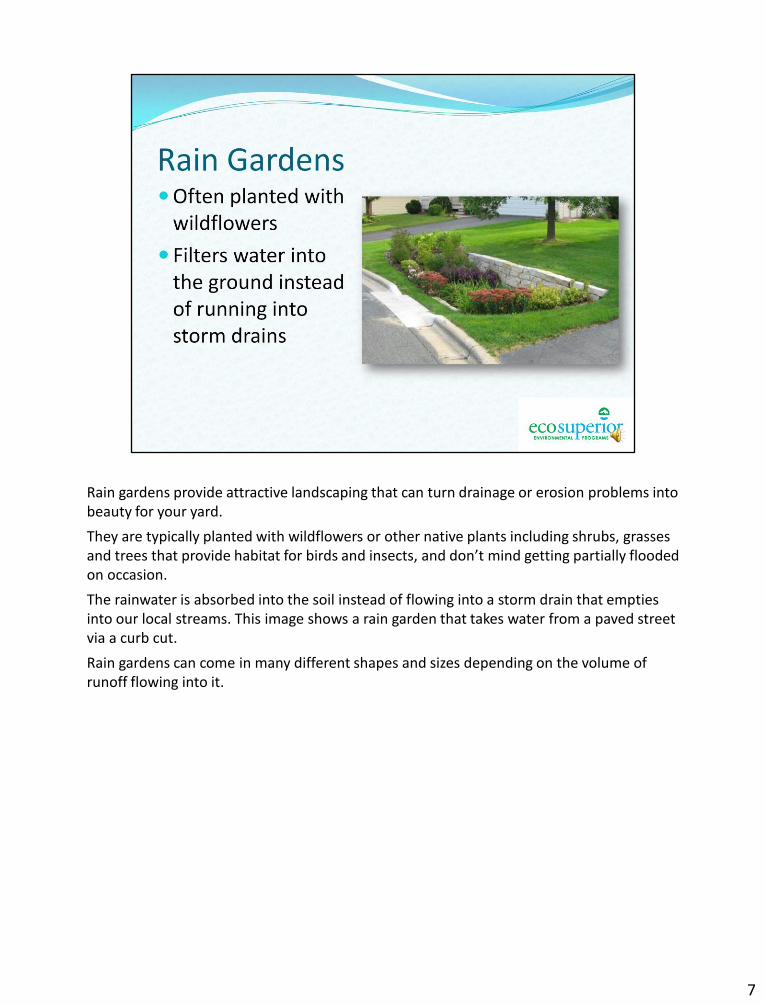
Rain gardens provide attractive landscaping that can turn drainage or erosion problems into beauty for your yard.
They are typically planted with wildflowers or other native plants including shrubs, grasses and trees that provide habitat for birds and insects, and don’t mind getting partially flooded on occasion.
The rainwater is absorbed into the soil instead of flowing into a storm drain that empties into our local streams. This image shows a rain garden that takes water from a paved street via a curb cut.
Rain gardens can come in many different shapes and sizes depending on the volume of runoff flowing into it.
7

Why plant a rain garden? In this section, we’ll review how the urban landscape has changed the course of rainfall; how it impacts our waterways, and how rain gardens can offer solutions.
8

This is an illustration of our city’s waterfront prior to high density urban development.
150 years ago, there was no pavement or asphalt for roadway and parking construction, and there were still large green spaces with trees, shrubs and vegetation to soak up rainwater and melting snow into the ground.
In the natural environment, rainwater moves through the landscape very slowly. Rain is captured on the leaves and branches of vegetation, where it evaporates or trickles down the trunk to the ground. Leaf litter and natural mulch on the ground soak up rainwater. Deep plant roots loosen the soil and help water soak into the ground. The water that soaks into the ground moves slowly through the subsurface to feed creeks and streams and recharge our groundwater aquifers.
9

Compare that scene to today. Cities and urban areas are expanding with the construction of new homes, buildings and parking lots—all connected by paved roadways and more impermeable surfaces. Contrary to the natural environment, water in the form of rainfall or snowmelt in an urban area has a much different journey.
Urban development can change the flow of water in a given area to varying degrees, and cause a host of problems downhill or downstream.
Where natural vegetation and soil structure once allowed the gradual absorption of rain and snowmelt, paved streets and buildings speed up the delivery of both water and pollutants to our waterways.
When rain falls on top of a hard surface like a rooftop, it drains down a downspout, splashes out onto a driveway, flows out into the street, and drops down into the storm sewer. That entire trip might only take a few minutes.
Image: www.islandhighwayproject.wordpress.com
10
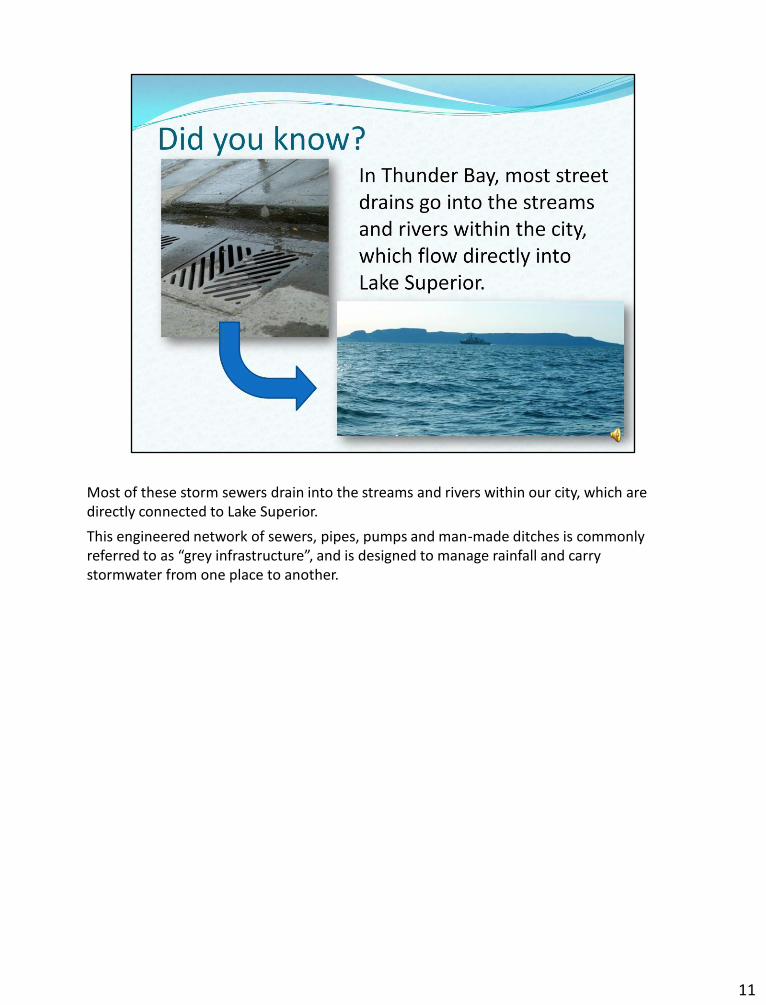
Most of these storm sewers drain into the streams and rivers within our city, which are directly connected to Lake Superior.
This engineered network of sewers, pipes, pumps and man-made ditches is commonly referred to as “grey infrastructure”, and is designed to manage rainfall and carry stormwater from one place to another.
11

However, it’s not just stormwater that enters our local waterbodies.
Along the way, runoff picks up pollutants from commercial, industrial and residential activities and carries it into nearby waterways.
These pollutants commonly include toxic chemicals from motor oil and fuel, heavy metals like lead, silver, copper and chromium that abrade from vehicles, and petrochemicals found in asphalt sealants and coatings.
12
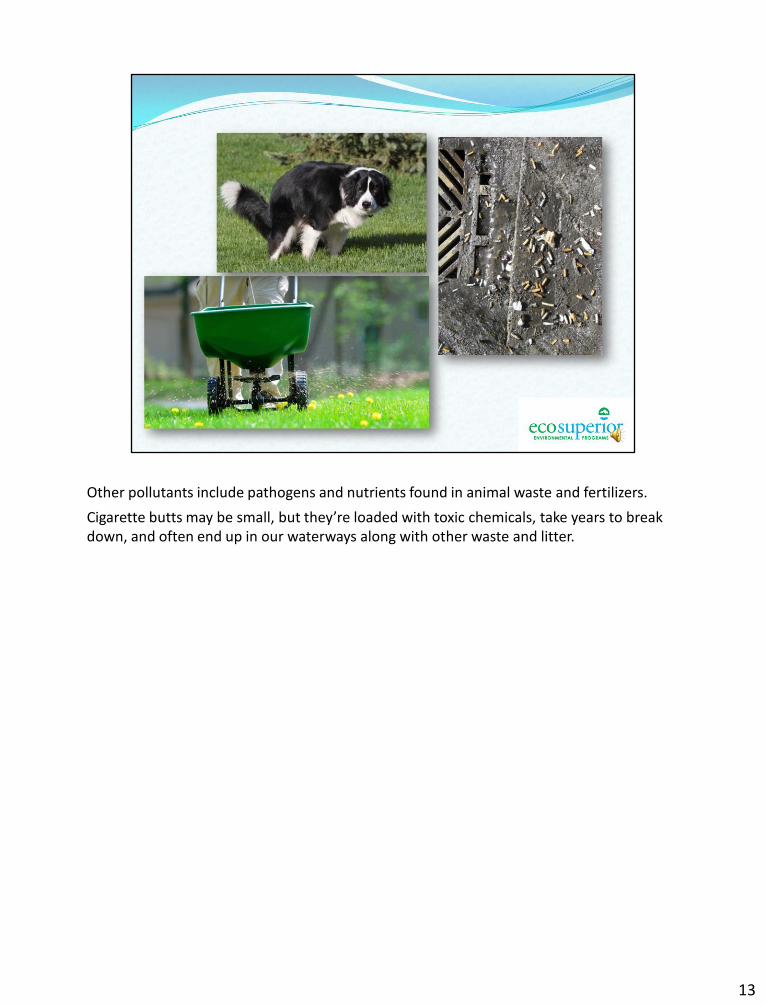
Other pollutants include pathogens and nutrients found in animal waste and fertilizers.
Cigarette butts may be small, but they’re loaded with toxic chemicals, take years to break down, and often end up in our waterways along with other waste and litter.
13
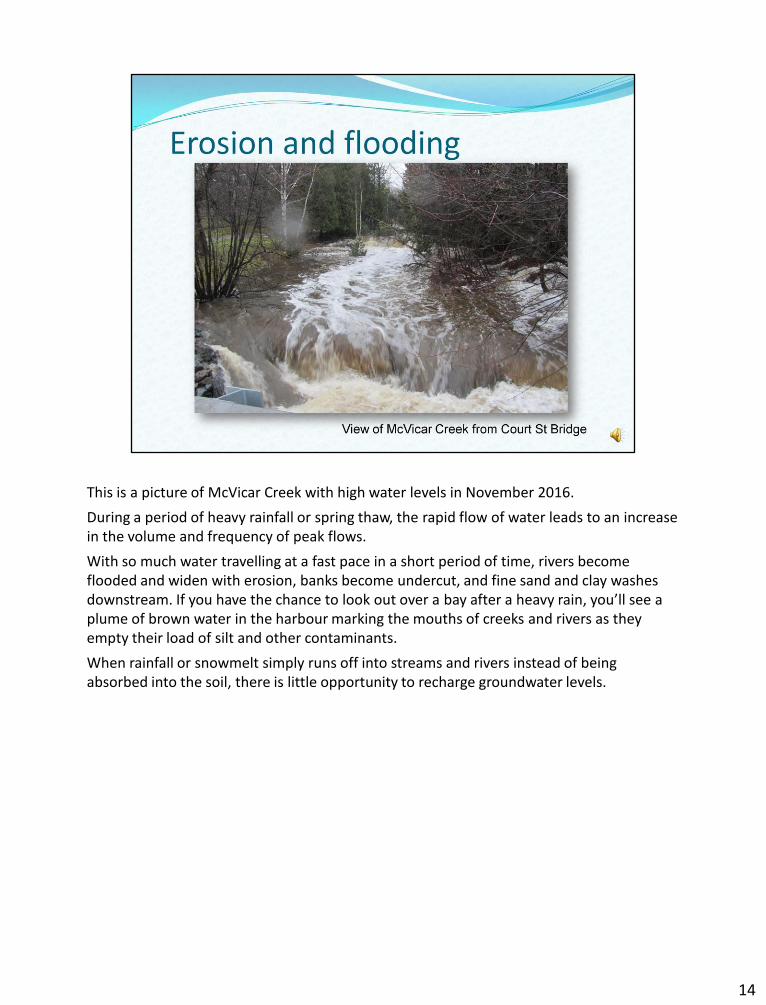
This is a picture of McVicar Creek with high water levels in November 2016.
During a period of heavy rainfall or spring thaw, the rapid flow of water leads to an increase in the volume and frequency of peak flows.
With so much water travelling at a fast pace in a short period of time, rivers become flooded and widen with erosion, banks become undercut, and fine sand and clay washes downstream. If you have the chance to look out over a bay after a heavy rain, you’ll see a plume of brown water in the harbour marking the mouths of creeks and rivers as they empty their load of silt and other contaminants.
When rainfall or snowmelt simply runs off into streams and rivers instead of being absorbed into the soil, there is little opportunity to recharge groundwater levels.
14

The goal of planting a residential rain garden is to absorb runoff in your yard instead of sending it into the storm drain.
In this picture, water is being diverted from storm drains into a rain garden planted with deep-rooted grasses and perennial wildflowers that assist with infiltration.
Image credit: ci.wilmington.nc.us
15

There are many benefits of managing rain at its source. Rain gardens replenish groundwater; help protect neighbourhoods from flooding and drainage problems; keep streams clean by improving water quality; and provide homes and food for birds, bees, butterflies and other insects.
By installing a rain garden on your property, you can do your part to manage stormwater in your yard and reduce the amount of water flowing into municipal storm sewers, our local waterways, and eventually Lake Superior.
16

If you’re interested in the Rain Garden Rebate problem, there are certain requirements to meet in order to qualify. Before you apply, please ensure the following applies to you:
17
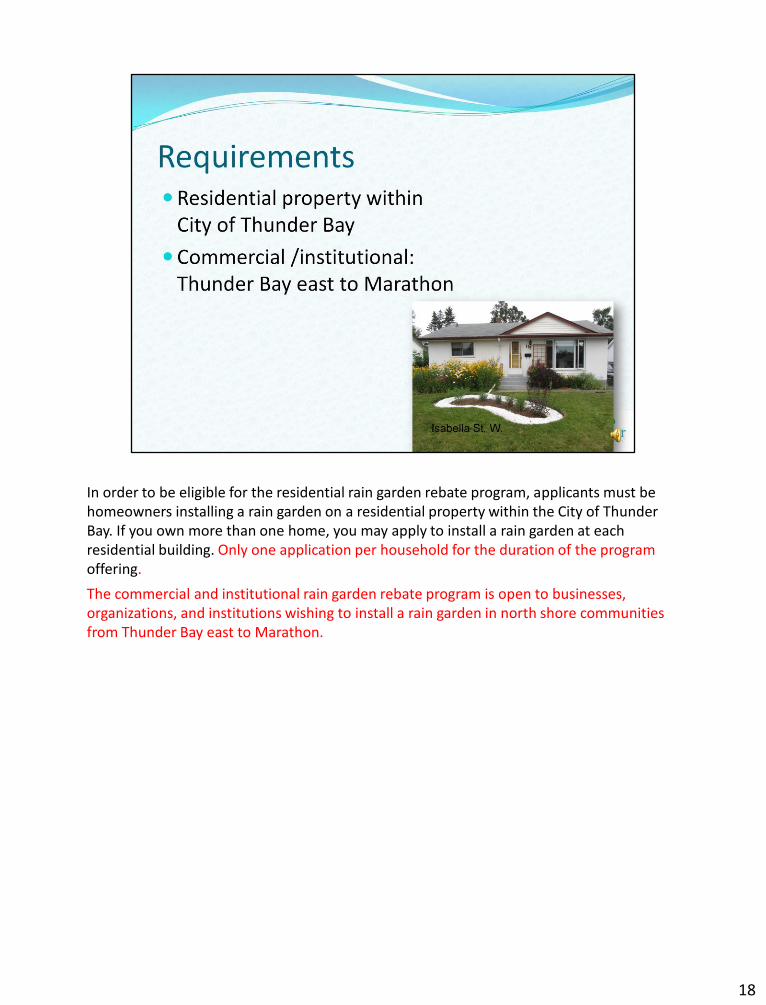
In order to be eligible for the residential rain garden rebate program, applicants must be homeowners installing a rain garden on a residential property within the City of Thunder Bay. If you own more than one home, you may apply to install a rain garden at each residential building. Only one application per household for the duration of the program offering.
The commercial and institutional rain garden rebate program is open to businesses, organizations, and institutions wishing to install a rain garden in north shore communities from Thunder Bay east to Marathon.
18

Planting a rain garden isn’t very difficult, but there are some basic principles to follow to ensure that your rain garden functions well and looks attractive.
This includes location. A rain garden must capture water no less than three meters away from the foundation of a home or nearby building. It must be located in an area where water will infiltrate or drain in less than 24 hours. If you have a wet area of your yard and wish to install a rain garden in that location, water must not pond in that spot for more than 24 hours.
Ponding water typically indicates an area with poor drainage, and standing water can breed mosquitoes and flood existing plants. Rain gardens should not be situated above a septic system.
19

In order to qualify for the Rain Garden Rebate Program, applicants must first attend a rain garden workshop hosted by EcoSuperior, or complete this online tutorial.
There are a limited number of rebates available, so please carefully consider the work and effort of installing a rain garden before you apply. If you choose to apply but withdraw your application later in the season, you have taken a rebate that could have otherwise been used by someone else, and may not be able to be recycled.
If you wish to apply, complete and submit an application no sooner than one week after your tutorial completion date, or the date of the workshop you attended.
The application includes drawing a site plan of your proposed rain garden, conducting an infiltration test and taking a few measurements to make calculations. Qualified applicants will receive a site visit, followed by approval. Applications are received on a first come, first served basis.
20
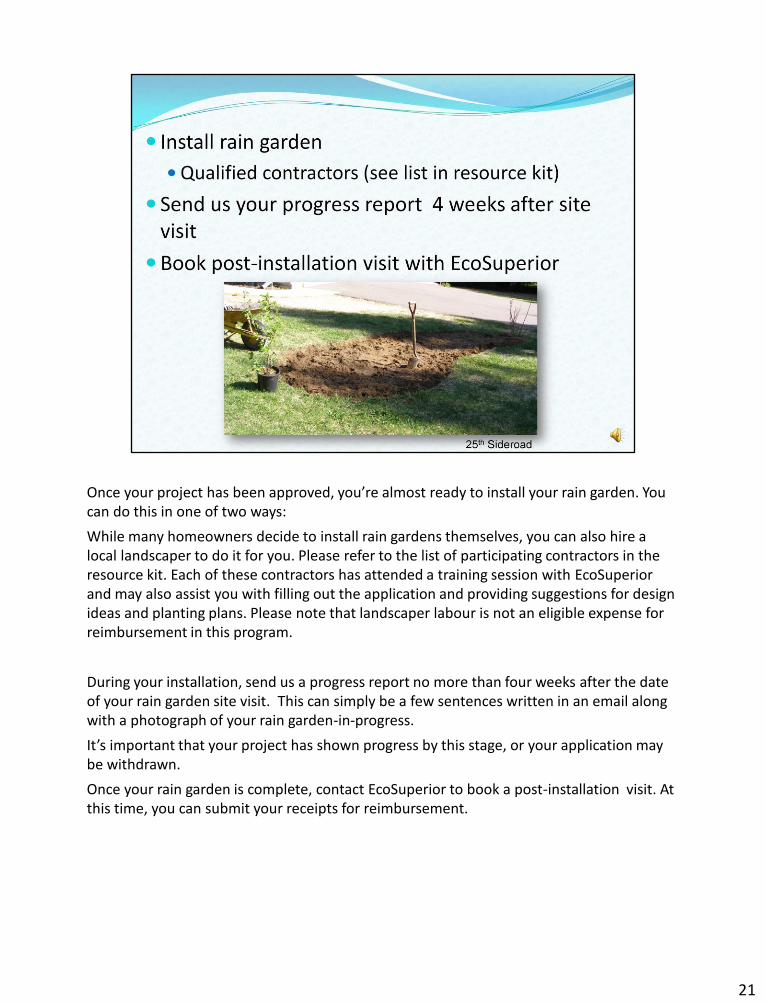
Once your project has been approved, you’re almost ready to install your rain garden. You can do this in one of two ways:
While many homeowners decide to install rain gardens themselves, you can also hire a local landscaper to do it for you. Please refer to the list of participating contractors in the resource kit. Each of these contractors has attended a training session with EcoSuperior and may also assist you with filling out the application and providing suggestions for design ideas and planting plans. Please note that landscaper labour is not an eligible expense for reimbursement in this program.
During your installation, send us a progress report no more than four weeks after the date of your rain garden site visit. This can simply be a few sentences written in an email along with a photograph of your rain garden-in-progress.
It’s important that your project has shown progress by this stage, or your application may be withdrawn.
Once your rain garden is complete, contact EcoSuperior to book a post-installation visit. At this time, you can submit your receipts for reimbursement.
21

This is an image of the rain garden rebate application, page 1.
The first section indicates the field for basic applicant information.
The second section asks questions about the eligibility of your rain garden location. Is it located at least 3 meters away from the house or other foundations? How long does the water take to drain during an infiltration test? And more.
The third section is for your diagram. Provide a sketch in the box and identify the following items if applicable: the house or building, sheds, decks, gardens, ponds, distance to property lines, downspout locations, the rain garden area, and a list of proposed plant species if they are known.
22
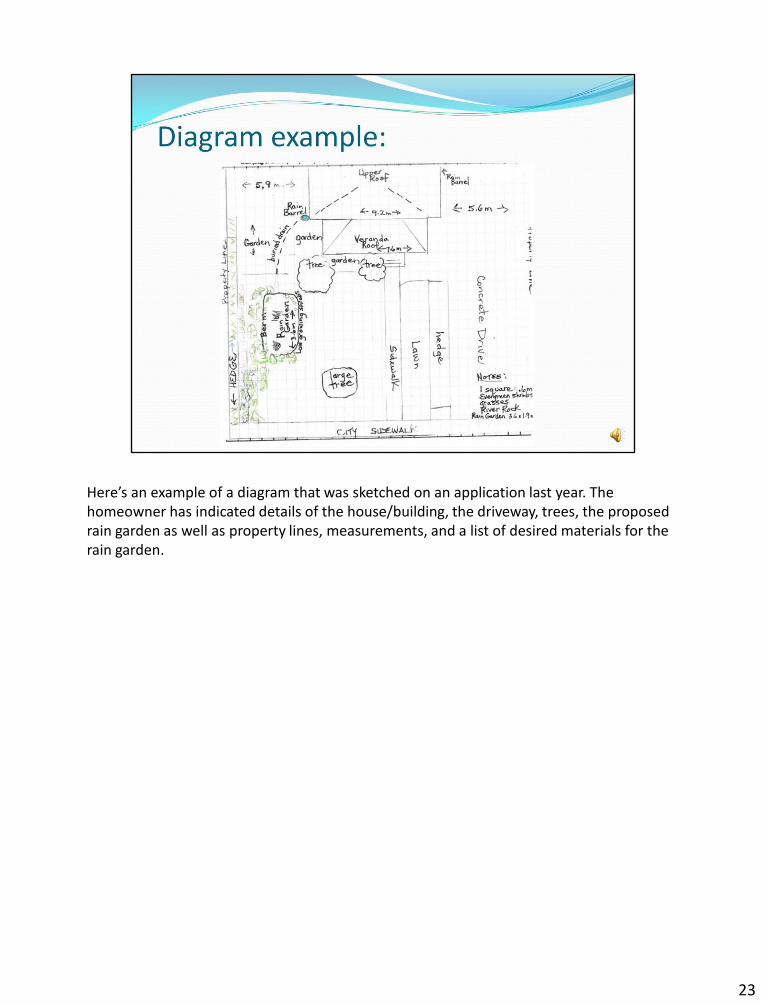
Here’s an example of a diagram that was sketched on an application last year. The homeowner has indicated details of the house/building, the driveway, trees, the proposed rain garden as well as property lines, measurements, and a list of desired materials for the rain garden.
23

The other side of the application involves a little bit of math in order to calculate the length and slope of the rain garden, and the drainage area—this refers to the area of hard surface draining into your rain garden. These will be reviewed in more detail a little later in the tutorial.
Knowing these figures will allow you to calculate the minimum required size of your rain garden in order to capture the runoff from your drainage area.
Refer to pages 7 through 9 in Rain Gardens: A How to Manual for Homeowners as indicated on the application. If you need further assistance, EcoSuperior staff can help you fill this out during a site visit.
24
The rain garden rebate offers up to $500 toward materials expenses and supplies. This includes:
-Plants, at least 50% wildflowers and native species. Native species are beneficial for a number of reasons: They’re well-adapted to our climate and local environment; they provide excellent habitat for birds, bees and insects; and they develop deep root systems that absorb water and break up soil.
-A great source for these plants is EcoSuperior’s wildflower and native plant sale, which takes place on the last Saturday of May. This fundraiser sells grasses, flowers and other perennials suitable for all rain garden plant zones. This year’s sale takes place on Saturday, May 27, 2017.
-As the season progresses, we recognize that native plant varieties can be increasingly difficult to find at local nurseries. We encourage you to do your best to source native plants, but we understand that it is not always possible.
-Other eligible expenses include:
-Trees and shrubs
-Soil amendments including sand, compost, low-clay topsoil
-Gravel, rock, river stones, and stepping stones
-Edging and mulch
-Rain barrels, downspout extensions, weeping tile, stabilizing mats and burlap
25
Ineligible expenses for the Rain Garden Rebate Program currently include:
-landscaper labour (for example, hiring someone to install your rain garden)
-permeable pavers
-tools or hardware
-decorative ornaments
26

Here we’ll cover the basic principles of installing a rain garden.
27

Consider your overall yard layout when thinking about the placement of your rain garden: how can it be integrated into existing and future landscaping? Also, pay attention to views from inside the house as well as those throughout the landscape.
Remember, rain gardens must be located at least 3 meters away from the home or building foundations, and not directly over a septic system.
When water collects in a rain garden and infiltrates into the soil, it doesn’t go straight down. Instead, it spreads out in the shape of a mushroom. So it’s important that rain garden basins are a safe distance away from basements and other infrastructure that could result in leaks or flooding.
Ideally, rain gardens are gravity-fed and situated on a gentle slope away from your home that catches downspout water.
28
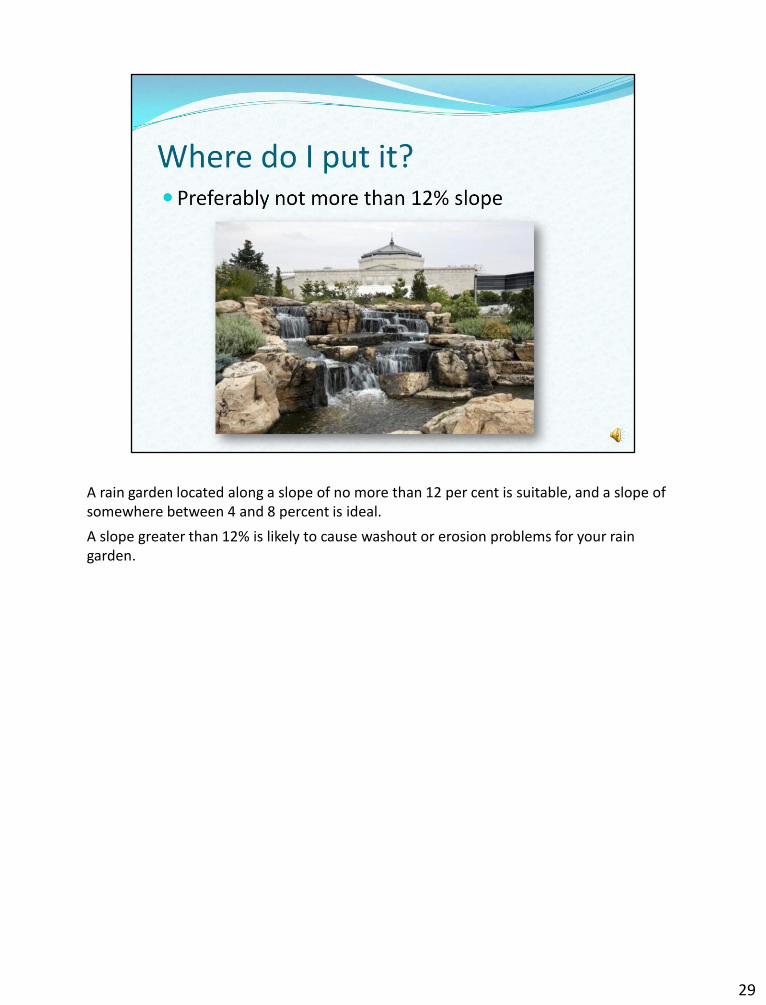
A rain garden located along a slope of no more than 12 per cent is suitable, and a slope of somewhere between 4 and 8 percent is ideal.
A slope greater than 12% is likely to cause washout or erosion problems for your rain garden.
29
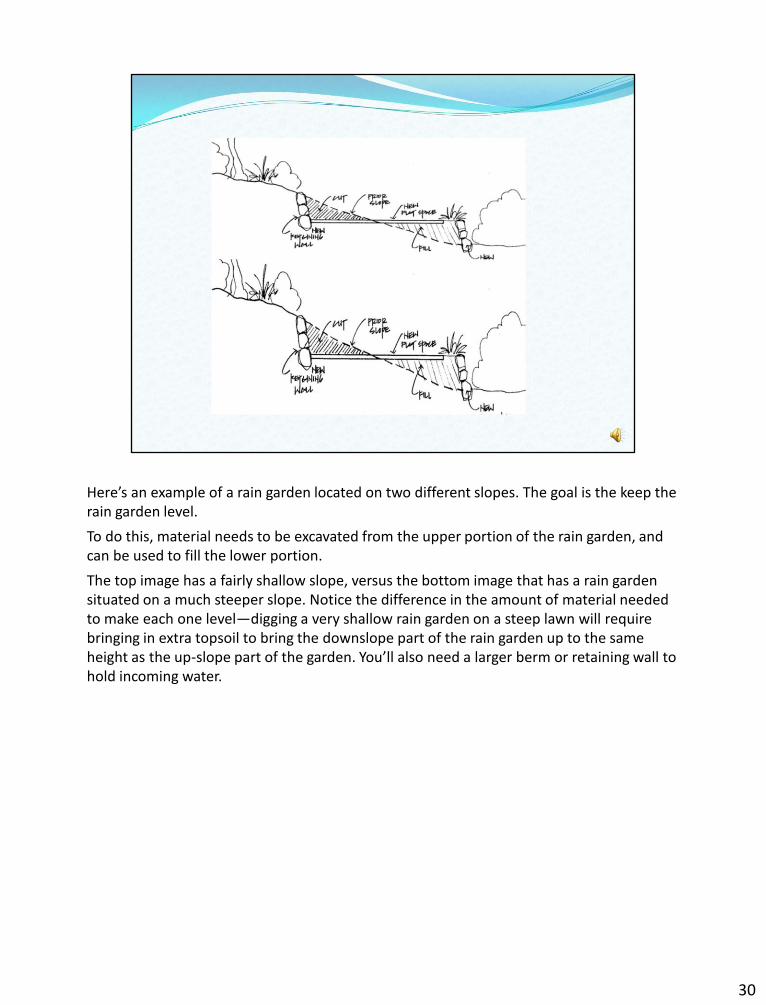
Here’s an example of a rain garden located on two different slopes. The goal is the keep the rain garden level.
To do this, material needs to be excavated from the upper portion of the rain garden, and can be used to fill the lower portion.
The top image has a fairly shallow slope, versus the bottom image that has a rain garden situated on a much steeper slope. Notice the difference in the amount of material needed to make each one level—digging a very shallow rain garden on a steep lawn will require bringing in extra topsoil to bring the downslope part of the rain garden up to the same height as the up-slope part of the garden. You’ll also need a larger berm or retaining wall to hold incoming water.
30

You can find the slope of your lawn using following these steps. Refer to page 7 in Rain Gardens: A How-to Manual for Homeowners:
-Pound one stake in at the uphill end of your rain garden site and pound the other stake in at the downhill end. The stakes should be at least 5 meters apart.
-Tie a string to the bottom of the uphill stake and run the string to the downhill stake.
-Using a string level or carpenter’s level, make the string horizontal and tie the string to the downhill stake at that height.
-Measure the distance (in meters) between the two stakes.
-Now measure the height (in meters) between the ground and the downhill stake string. This is also called the elevation change.
-Divide the height by the distance between the two stakes, and multiply the result by 100. You have now calculated the lawn’s percent slope.
31
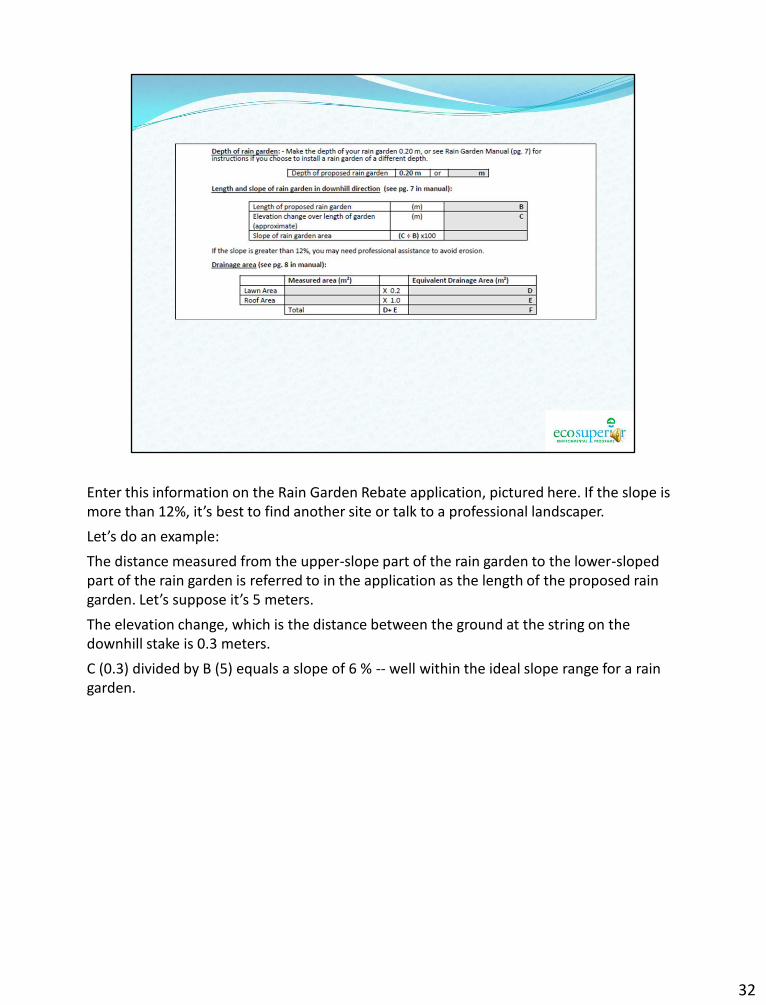
Enter this information on the Rain Garden Rebate application, pictured here. If the slope is more than 12%, it’s best to find another site or talk to a professional landscaper.
Let’s do an example:
The distance measured from the upper-slope part of the rain garden to the lower-sloped part of the rain garden is referred to in the application as the length of the proposed rain garden. Let’s suppose it’s 5 meters.
The elevation change, which is the distance between the ground at the string on the downhill stake is 0.3 meters.
C (0.3) divided by B (5) equals a slope of 6 % -- well within the ideal slope range for a rain garden.
32
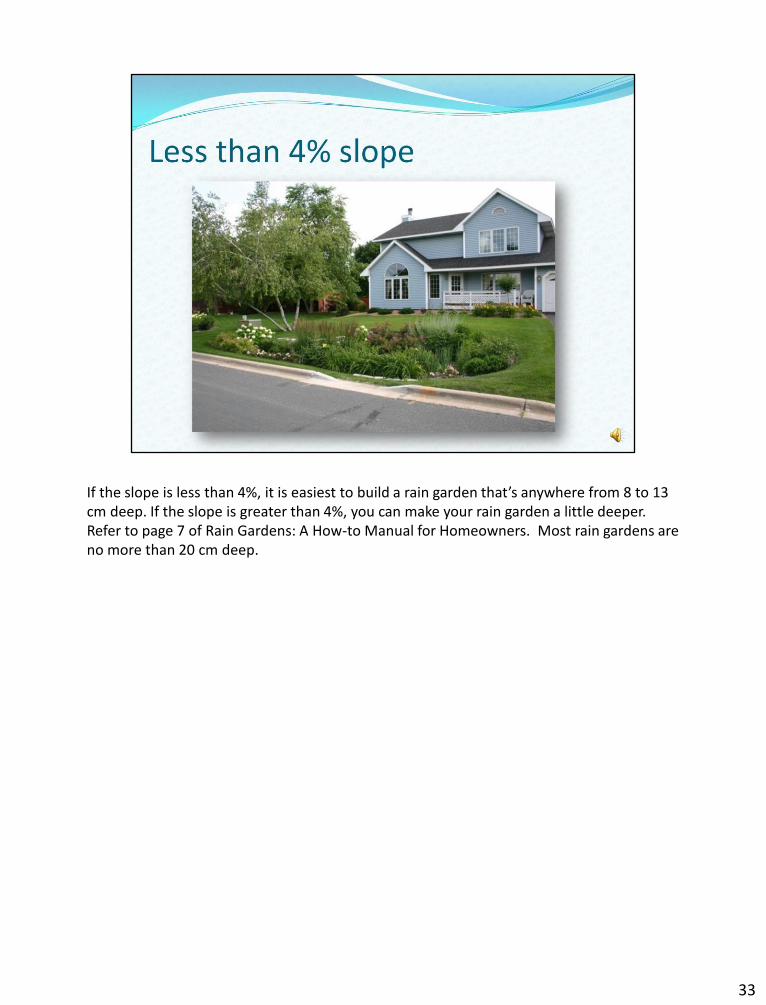
If the slope is less than 4%, it is easiest to build a rain garden that’s anywhere from 8 to 13 cm deep. If the slope is greater than 4%, you can make your rain garden a little deeper. Refer to page 7 of Rain Gardens: A How-to Manual for Homeowners. Most rain gardens are no more than 20 cm deep.
33
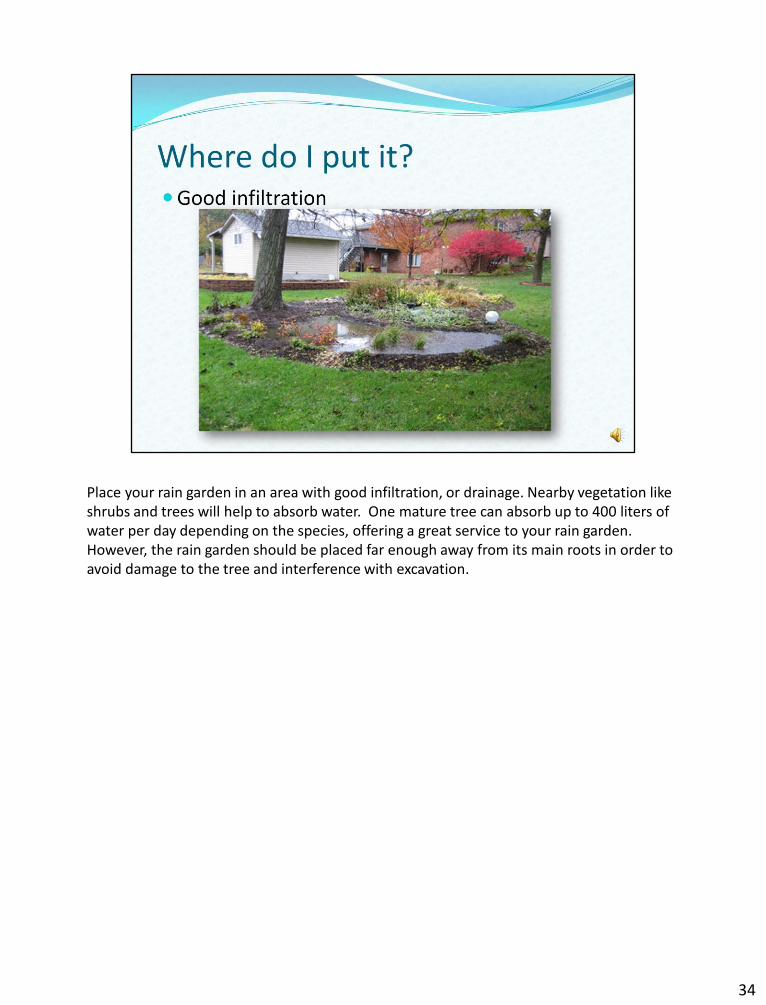
Place your rain garden in an area with good infiltration, or drainage. Nearby vegetation like shrubs and trees will help to absorb water. One mature tree can absorb up to 400 liters of water per day depending on the species, offering a great service to your rain garden. However, the rain garden should be placed far enough away from its main roots in order to avoid damage to the tree and interference with excavation.
34

The rate of infiltration, or how quickly water drains into the soil, varies with the soil type. Soil with a gritty and coarse consistency is sandy soil, and has the fastest rate of infiltration.
Soil that is smooth but not sticky when wet is silty soil. Drainage is still fairly good.
If your soil is very sticky and clumpy when wet, you probably have clay-based soil. Since this type of soil takes longer to infiltrate water, rain gardens in clay-like soil must be bigger than rain gardens in sandy or silty soil.
35
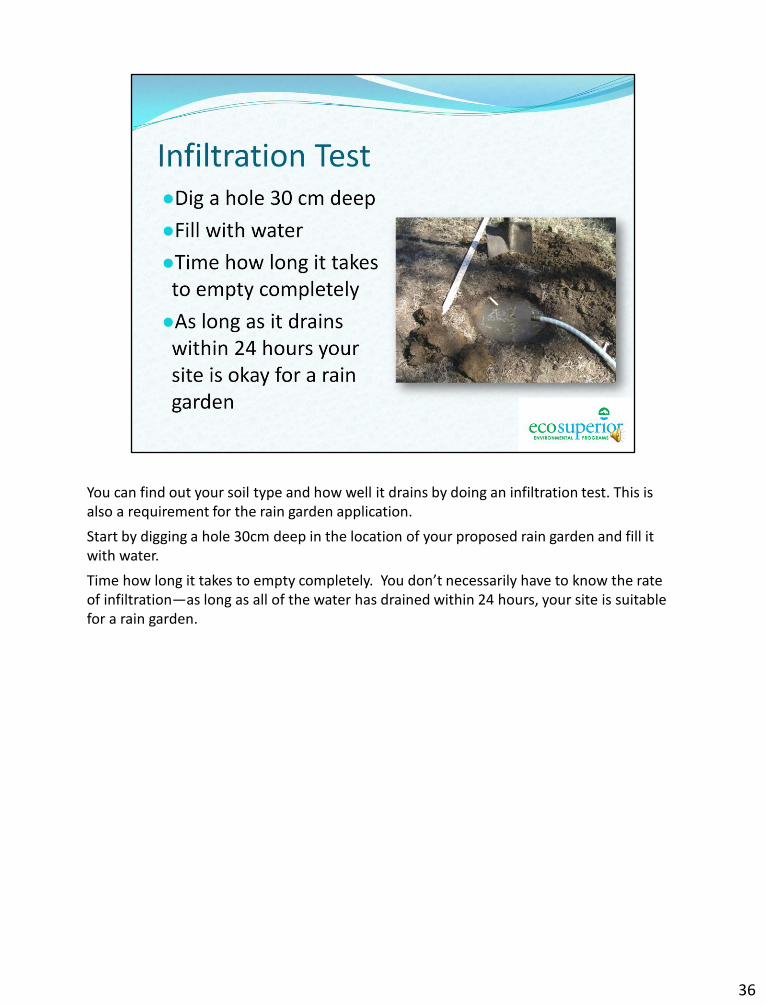
You can find out your soil type and how well it drains by doing an infiltration test. This is also a requirement for the rain garden application.
Start by digging a hole 30cm deep in the location of your proposed rain garden and fill it with water.
Time how long it takes to empty completely. You don’t necessarily have to know the rate of infiltration—as long as all of the water has drained within 24 hours, your site is suitable for a rain garden.
36

You can place your rain garden in an area that receives full sun, a mix of sun and shade, or shade entirely. The soil type will do most of the work of infiltrating water as it works with plants suitable to those conditions.
37

Rain gardens in locations with full sun should be planted with species that thrive in those conditions. Rain gardens in shady spots should be planted with shade-loving varieties. Refer to page 18-22 of the rain garden manual for sample designs and plant lists.
38
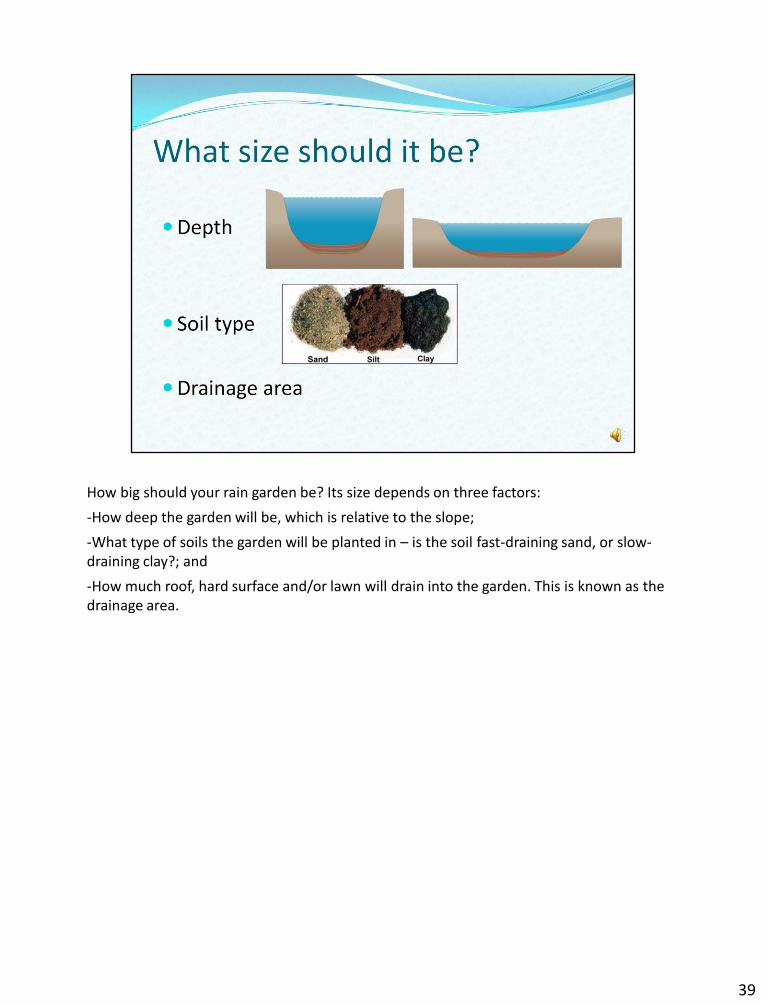
How big should your rain garden be? Its size depends on three factors:
-How deep the garden will be, which is relative to the slope;
-What type of soils the garden will be planted in – is the soil fast-draining sand, or slow-draining clay?; and
-How much roof, hard surface and/or lawn will drain into the garden. This is known as the drainage area.
39
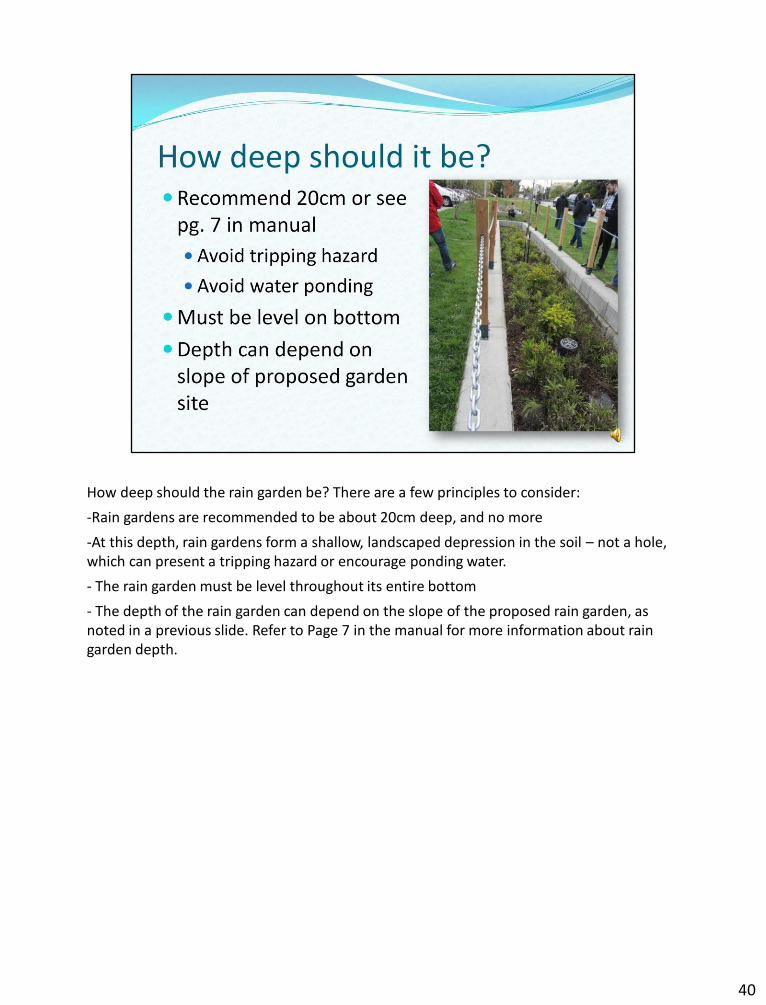
How deep should the rain garden be? There are a few principles to consider:
-Rain gardens are recommended to be about 20cm deep, and no more
-At this depth, rain gardens form a shallow, landscaped depression in the soil – not a hole, which can present a tripping hazard or encourage ponding water.
- The rain garden must be level throughout its entire bottom
- The depth of the rain garden can depend on the slope of the proposed rain garden, as noted in a previous slide. Refer to Page 7 in the manual for more information about rain garden depth.
40
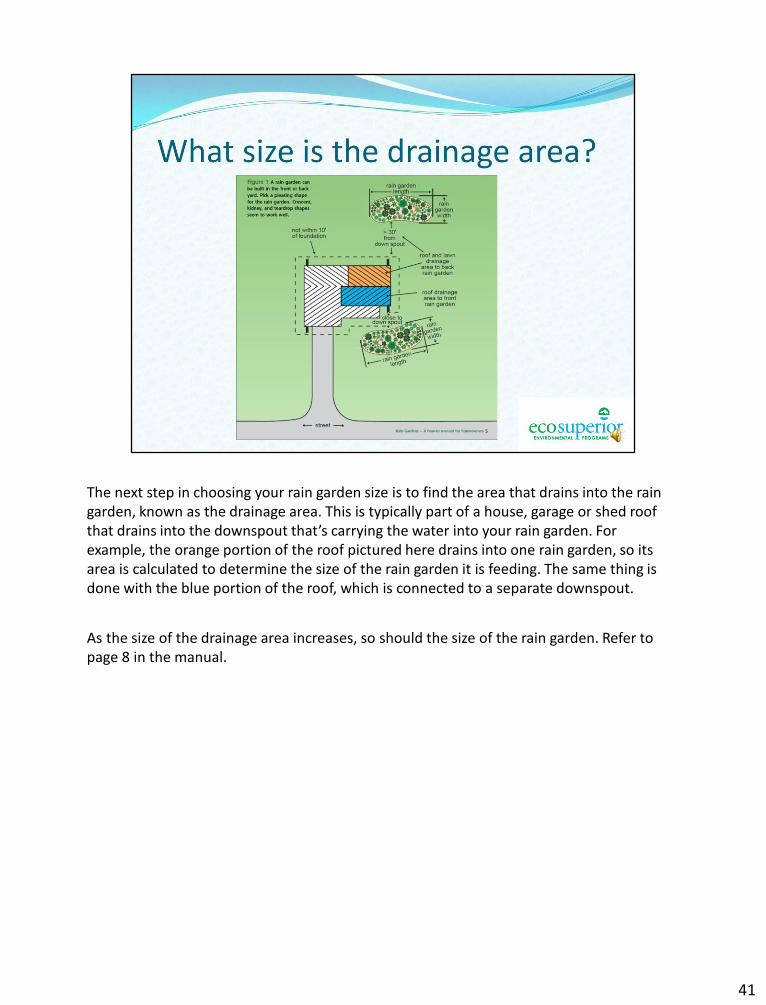
The next step in choosing your rain garden size is to find the area that drains into the rain garden, known as the drainage area. This is typically part of a house, garage or shed roof that drains into the downspout that’s carrying the water into your rain garden. For example, the orange portion of the roof pictured here drains into one rain garden, so its area is calculated to determine the size of the rain garden it is feeding. The same thing is done with the blue portion of the roof, which is connected to a separate downspout.
As the size of the drainage area increases, so should the size of the rain garden. Refer to page 8 in the manual.
41
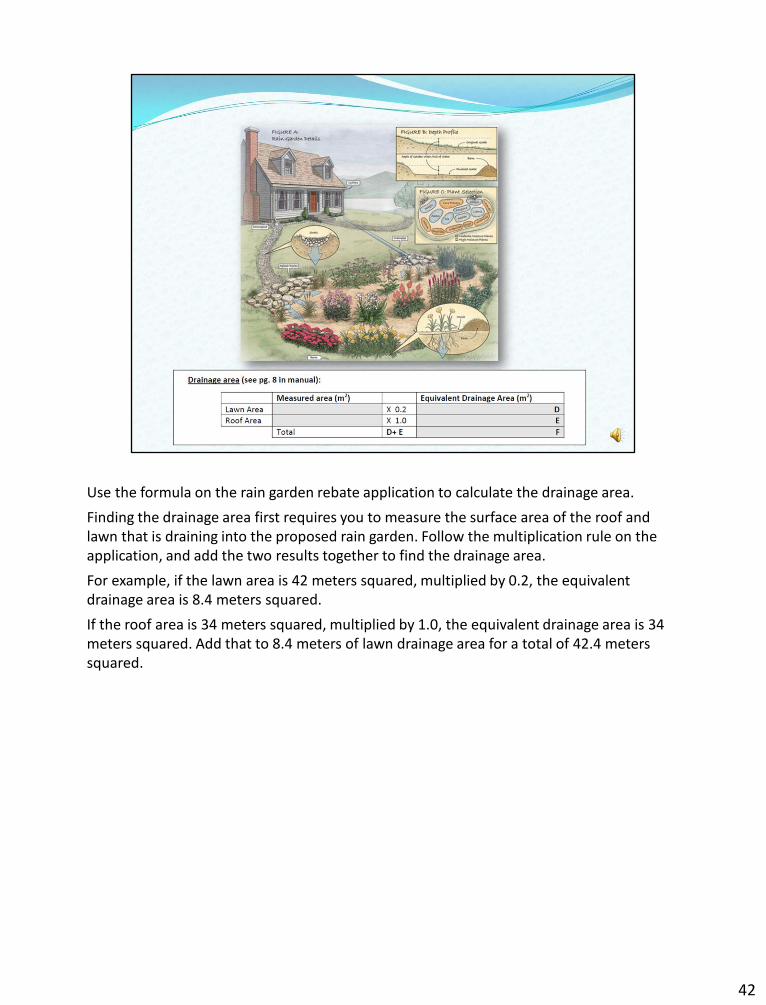
Use the formula on the rain garden rebate application to calculate the drainage area.
Finding the drainage area first requires you to measure the surface area of the roof and lawn that is draining into the proposed rain garden. Follow the multiplication rule on the application, and add the two results together to find the drainage area.
For example, if the lawn area is 42 meters squared, multiplied by 0.2, the equivalent drainage area is 8.4 meters squared.
If the roof area is 34 meters squared, multiplied by 1.0, the equivalent drainage area is 34 meters squared. Add that to 8.4 meters of lawn drainage area for a total of 42.4 meters squared.
42
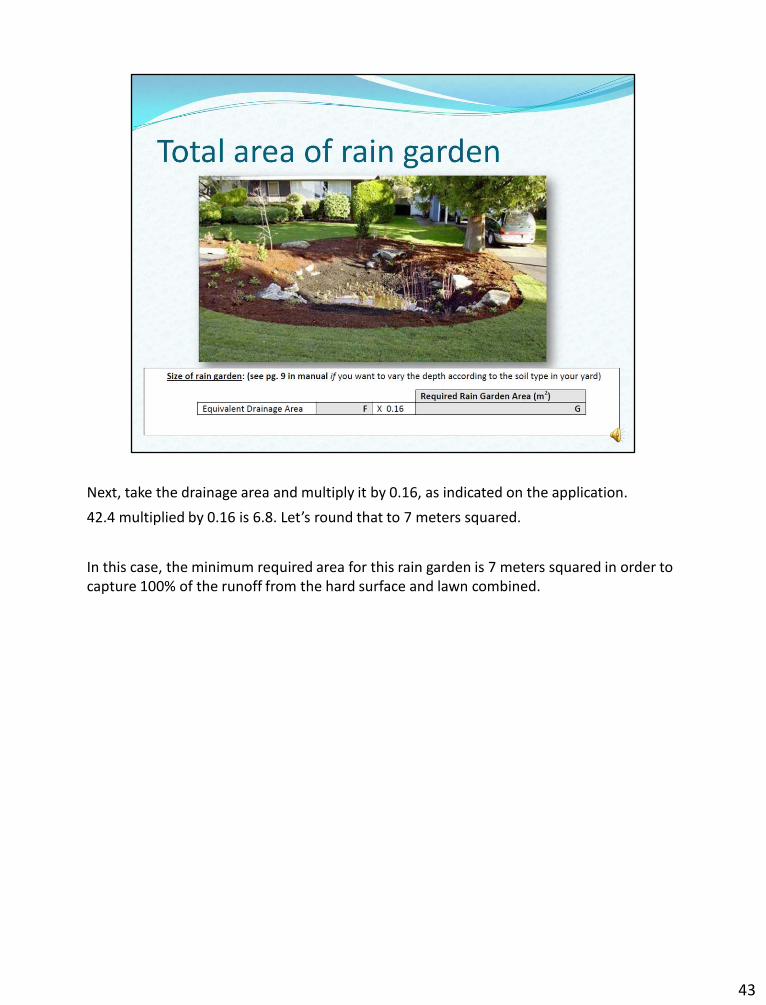
Next, take the drainage area and multiply it by 0.16, as indicated on the application.
42.4 multiplied by 0.16 is 6.8. Let’s round that to 7 meters squared.
In this case, the minimum required area for this rain garden is 7 meters squared in order to capture 100% of the runoff from the hard surface and lawn combined.
43

Then, calculate the rain garden dimensions using the information you’ve entered in previous steps of the application.
Divide the required rain garden area (7) by the rain garden length (5). The width of the rain garden is 1.4 meters. The suggested depth of the rain garden is 0.2 m, as previously indicated in the application.
You can use these dimensions as a guide to shaping your rain garden. Crescent, kidney and teardrop shapes seem to work well.
44

You can refer to pages 7 through 9 of the rain garden manual to fill out this section of the application. If you need assistance, EcoSuperior staff will be happy to make these calculations during the rain garden site visit.
45
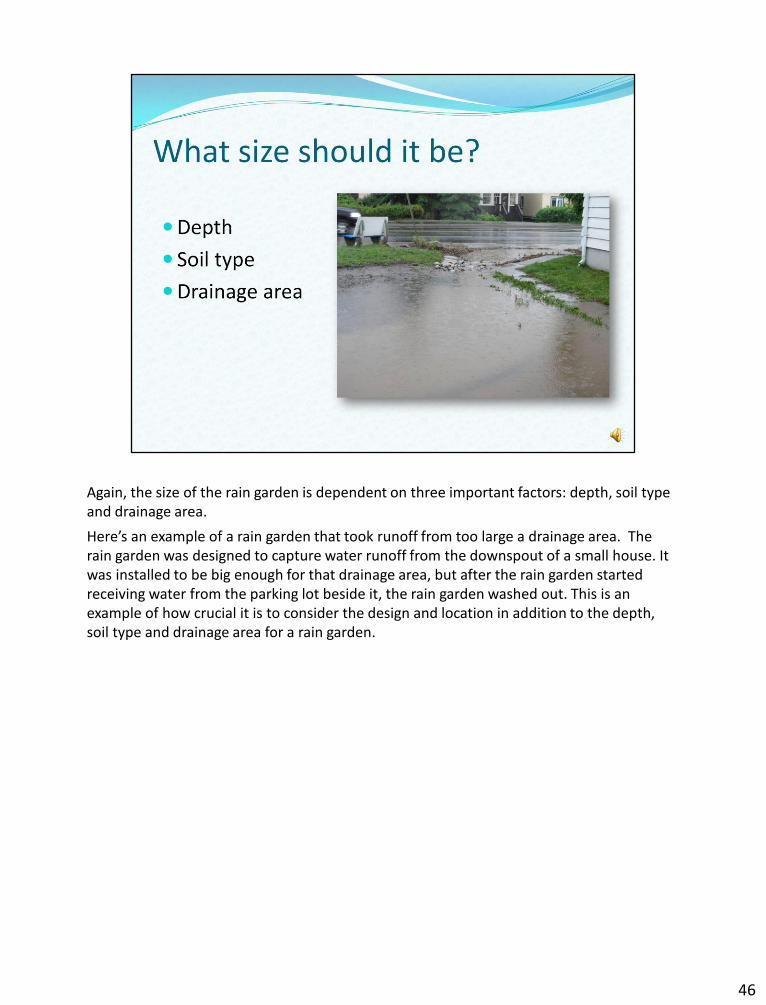
Again, the size of the rain garden is dependent on three important factors: depth, soil type and drainage area.
Here’s an example of a rain garden that took runoff from too large a drainage area. The rain garden was designed to capture water runoff from the downspout of a small house. It was installed to be big enough for that drainage area, but after the rain garden started receiving water from the parking lot beside it, the rain garden washed out. This is an example of how crucial it is to consider the design and location in addition to the depth, soil type and drainage area for a rain garden.
46
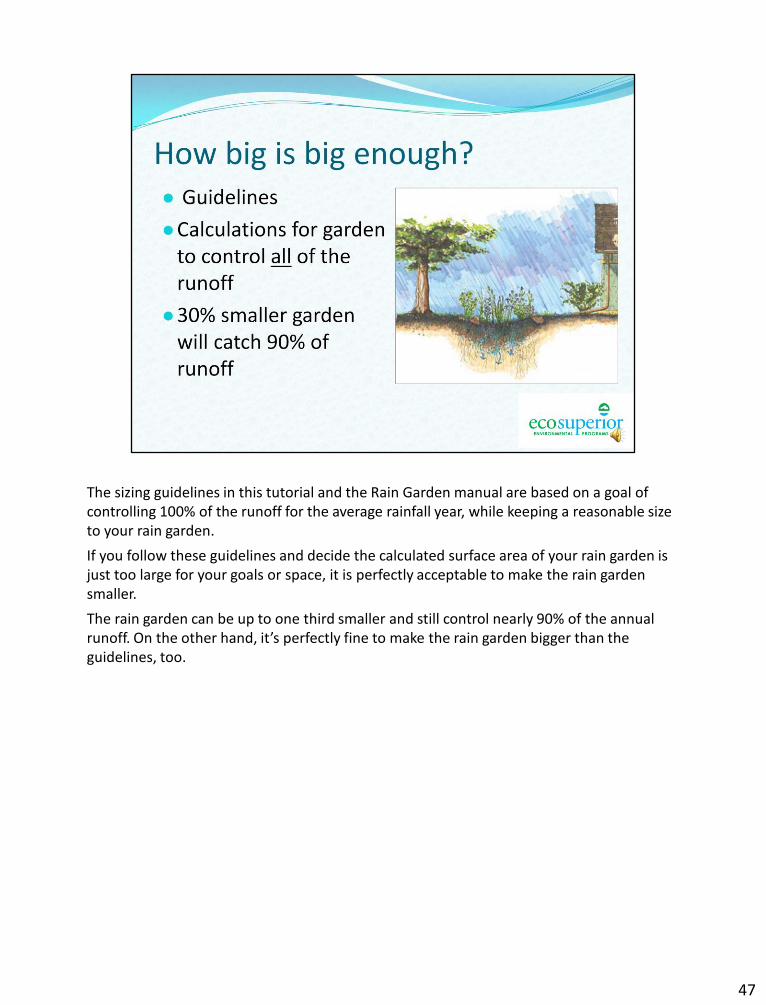
The sizing guidelines in this tutorial and the Rain Garden manual are based on a goal of controlling 100% of the runoff for the average rainfall year, while keeping a reasonable size to your rain garden.
If you follow these guidelines and decide the calculated surface area of your rain garden is just too large for your goals or space, it is perfectly acceptable to make the rain garden smaller.
The rain garden can be up to one third smaller and still control nearly 90% of the annual runoff. On the other hand, it’s perfectly fine to make the rain garden bigger than the guidelines, too.
47
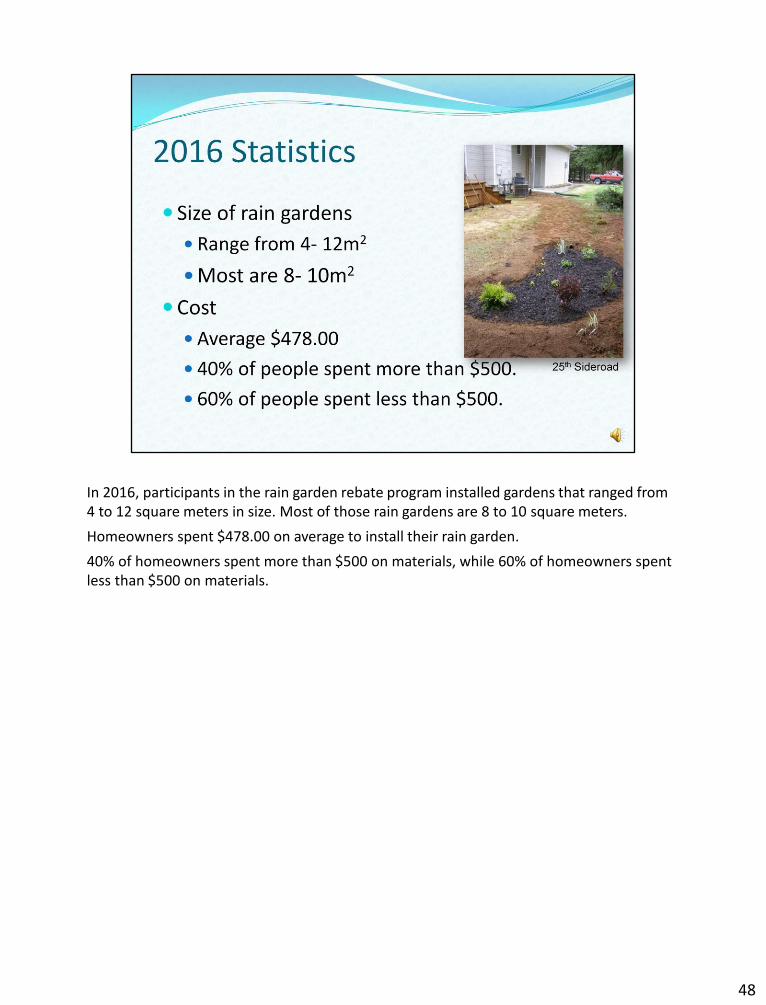
In 2016, participants in the rain garden rebate program installed gardens that ranged from 4 to 12 square meters in size. Most of those rain gardens are 8 to 10 square meters.
Homeowners spent $478.00 on average to install their rain garden.
40% of homeowners spent more than $500 on materials, while 60% of homeowners spent less than $500 on materials.
48
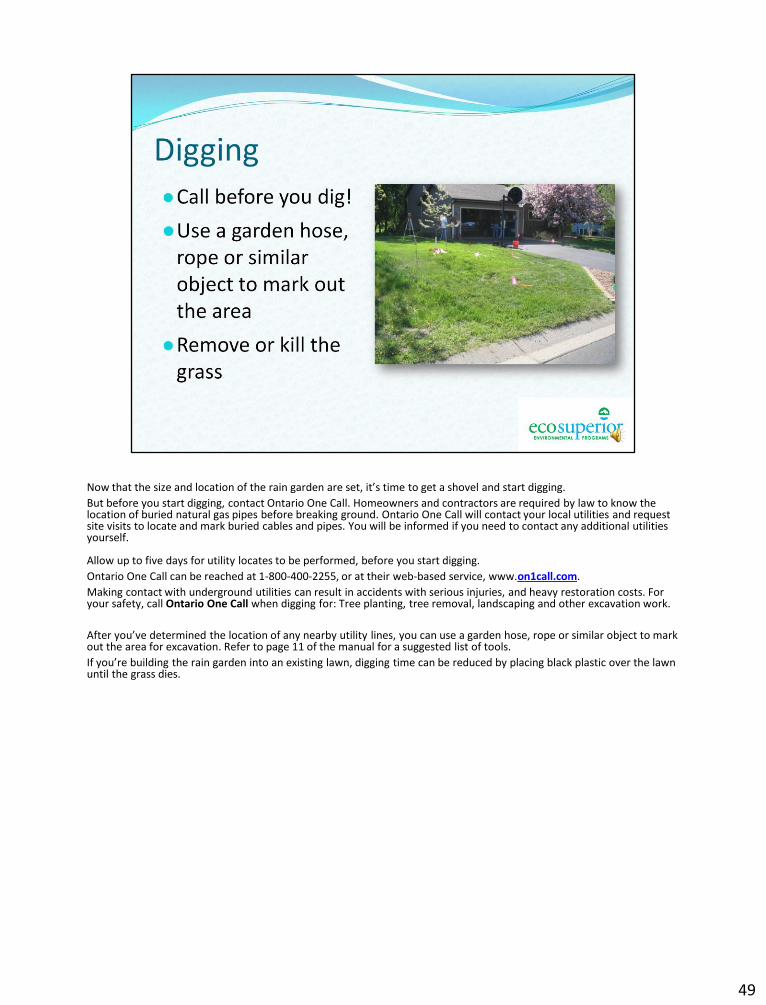
Now that the size and location of the rain garden are set, it’s time to get a shovel and start digging.
But before you start digging, contact Ontario One Call. Homeowners and contractors are required by law to know the location of buried natural gas pipes before breaking ground. Ontario One Call will contact your local utilities and request site visits to locate and mark buried cables and pipes. You will be informed if you need to contact any additional utilities yourself. Allow up to five days for utility locates to be performed, before you start digging.
Ontario One Call can be reached at 1-800-400-2255, or at their web-based service, www.on1call.com.
Making contact with underground utilities can result in accidents with serious injuries, and heavy restoration costs. For your safety, call Ontario One Call when digging for: Tree planting, tree removal, landscaping and other excavation work.
After you’ve determined the location of any nearby utility lines, you can use a garden hose, rope or similar object to mark out the area for excavation. Refer to page 11 of the manual for a suggested list of tools.
If you’re building the rain garden into an existing lawn, digging time can be reduced by placing black plastic over the lawn until the grass dies.
49
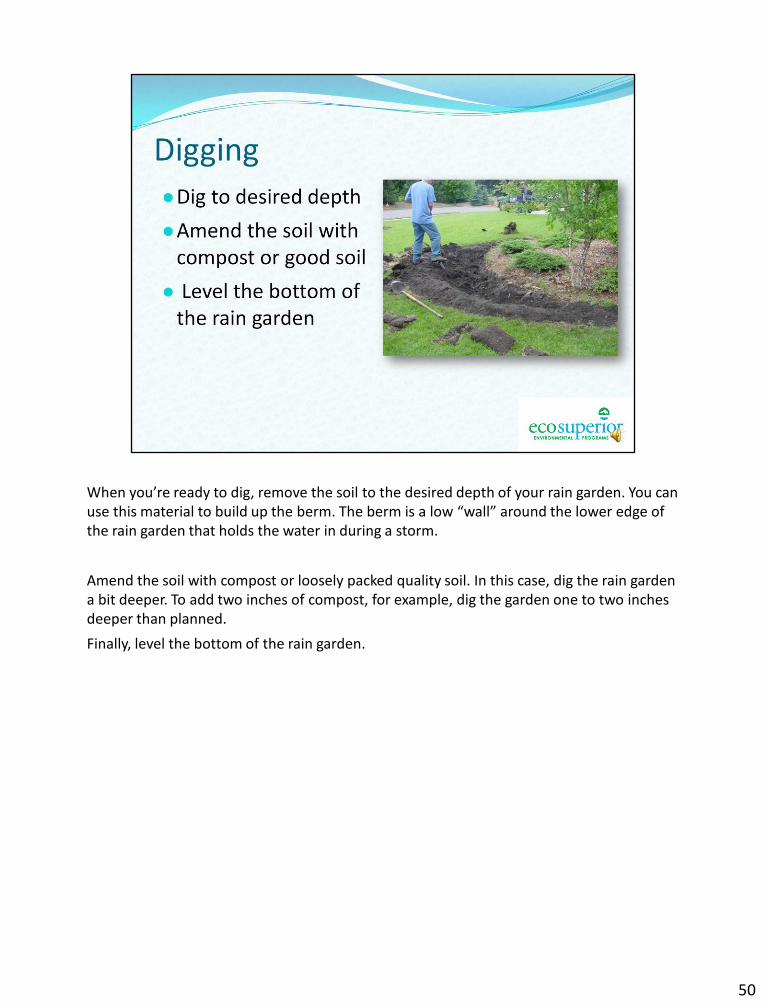
When you’re ready to dig, remove the soil to the desired depth of your rain garden. You can use this material to build up the berm. The berm is a low “wall” around the lower edge of the rain garden that holds the water in during a storm.
Amend the soil with compost or loosely packed quality soil. In this case, dig the rain garden a bit deeper. To add two inches of compost, for example, dig the garden one to two inches deeper than planned.
Finally, level the bottom of the rain garden.
50
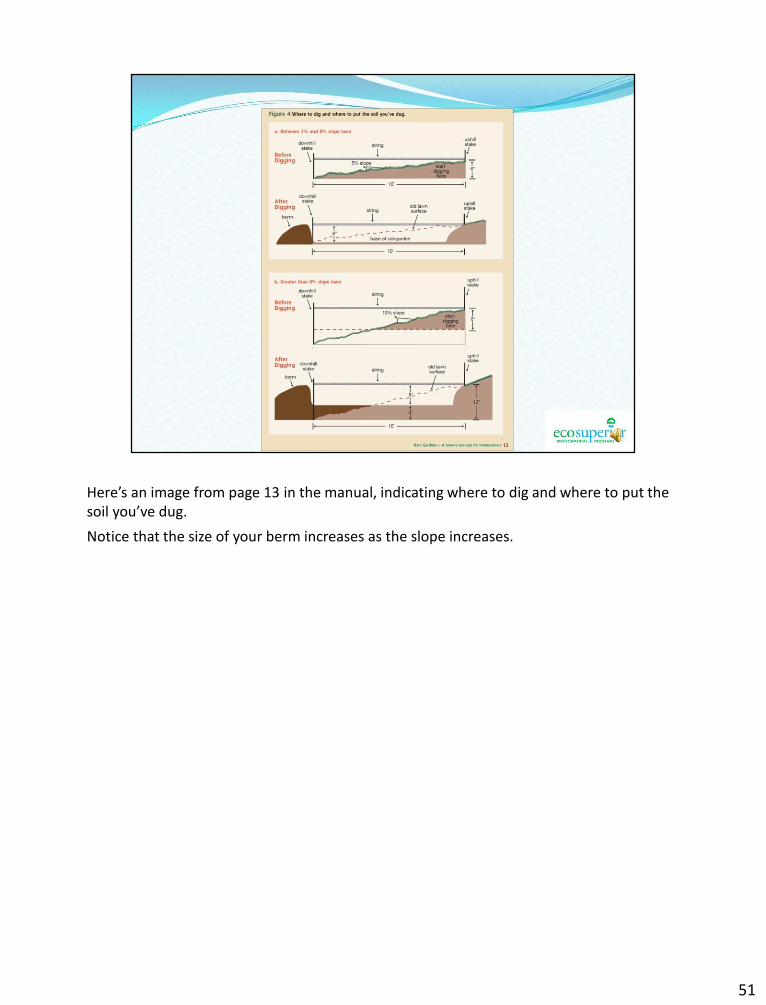
Here’s an image from page 13 in the manual, indicating where to dig and where to put the soil you’ve dug.
Notice that the size of your berm increases as the slope increases.
51
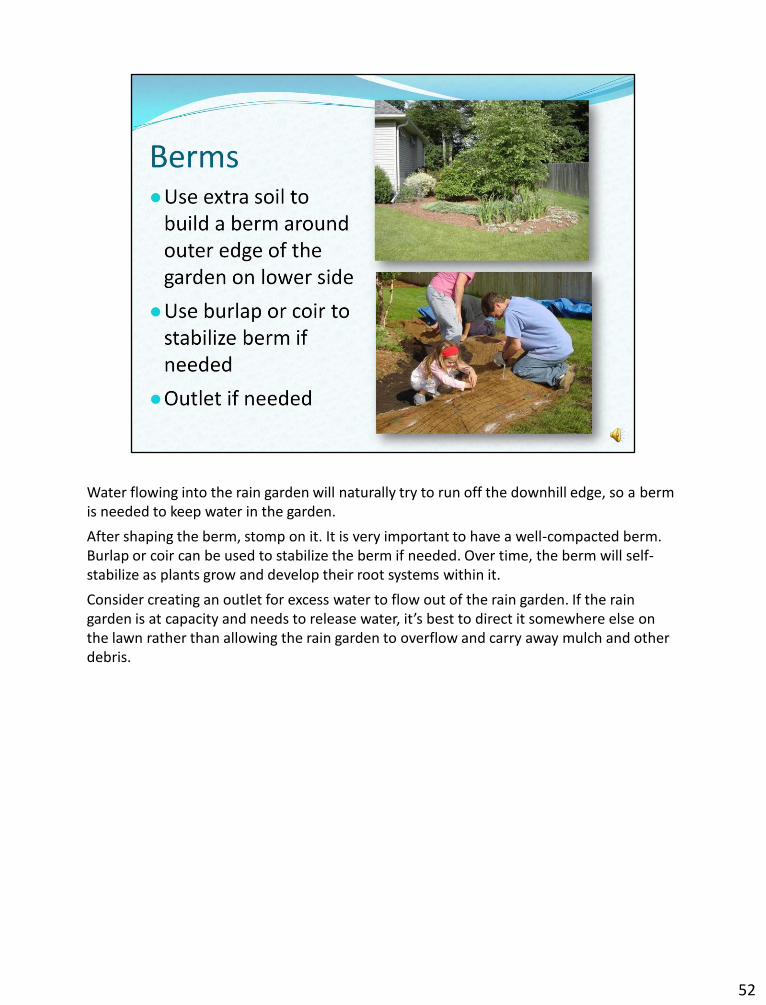
Water flowing into the rain garden will naturally try to run off the downhill edge, so a berm is needed to keep water in the garden.
After shaping the berm, stomp on it. It is very important to have a well-compacted berm. Burlap or coir can be used to stabilize the berm if needed. Over time, the berm will self-stabilize as plants grow and develop their root systems within it.
Consider creating an outlet for excess water to flow out of the rain garden. If the rain garden is at capacity and needs to release water, it’s best to direct it somewhere else on the lawn rather than allowing the rain garden to overflow and carry away mulch and other debris.
52
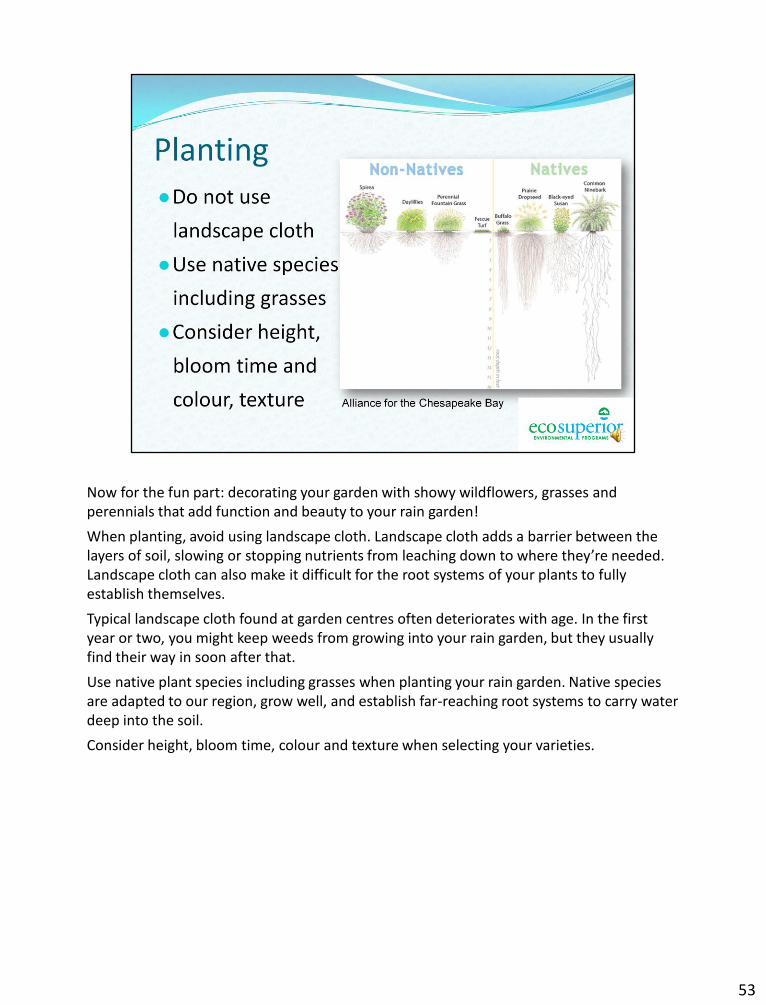
Now for the fun part: decorating your garden with showy wildflowers, grasses and perennials that add function and beauty to your rain garden!
When planting, avoid using landscape cloth. Landscape cloth adds a barrier between the layers of soil, slowing or stopping nutrients from leaching down to where they’re needed. Landscape cloth can also make it difficult for the root systems of your plants to fully establish themselves.
Typical landscape cloth found at garden centres often deteriorates with age. In the first year or two, you might keep weeds from growing into your rain garden, but they usually find their way in soon after that.
Use native plant species including grasses when planting your rain garden. Native species are adapted to our region, grow well, and establish far-reaching root systems to carry water deep into the soil.
Consider height, bloom time, colour and texture when selecting your varieties.
53

Plant in repeating groupings to give bold colours and definition to your rain garden, and water immediately.
Cover your rain garden, including the berm, with a thick layer of mulch. Continue adding mulch to your rain garden from year to year.
You can add stones, ornamental
54
fences, pathways and other features to define your rain garden.
54
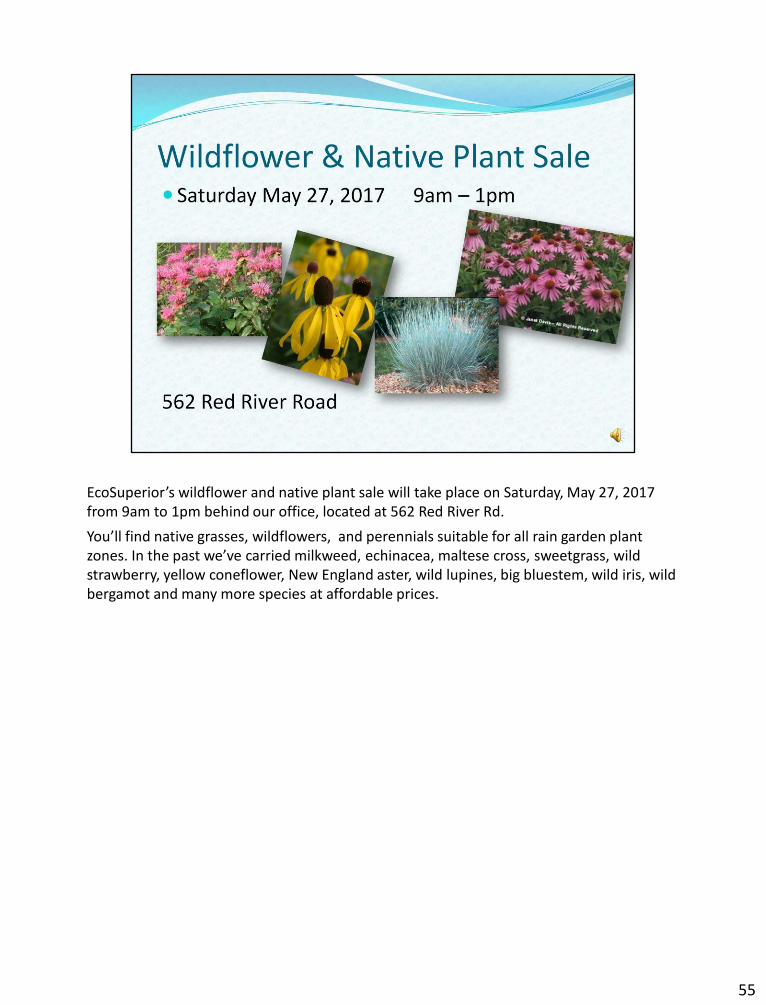
EcoSuperior’s wildflower and native plant sale will take place on Saturday, May 27, 2017 from 9am to 1pm behind our office, located at 562 Red River Rd.
You’ll find native grasses, wildflowers, and perennials suitable for all rain garden plant zones. In the past we’ve carried milkweed, echinacea, maltese cross, sweetgrass, wild strawberry, yellow coneflower, New England aster, wild lupines, big bluestem, wild iris, wild bergamot and many more species at affordable prices.
55
Let’s take a look at some examples of local rain gardens, and what homeowners have done to manage stormwater on their residential property.
As long as the basic principles are followed to ensure a well-functioning garden, you can experiment with different shapes, features, textures and sizes of your rain garden.
56
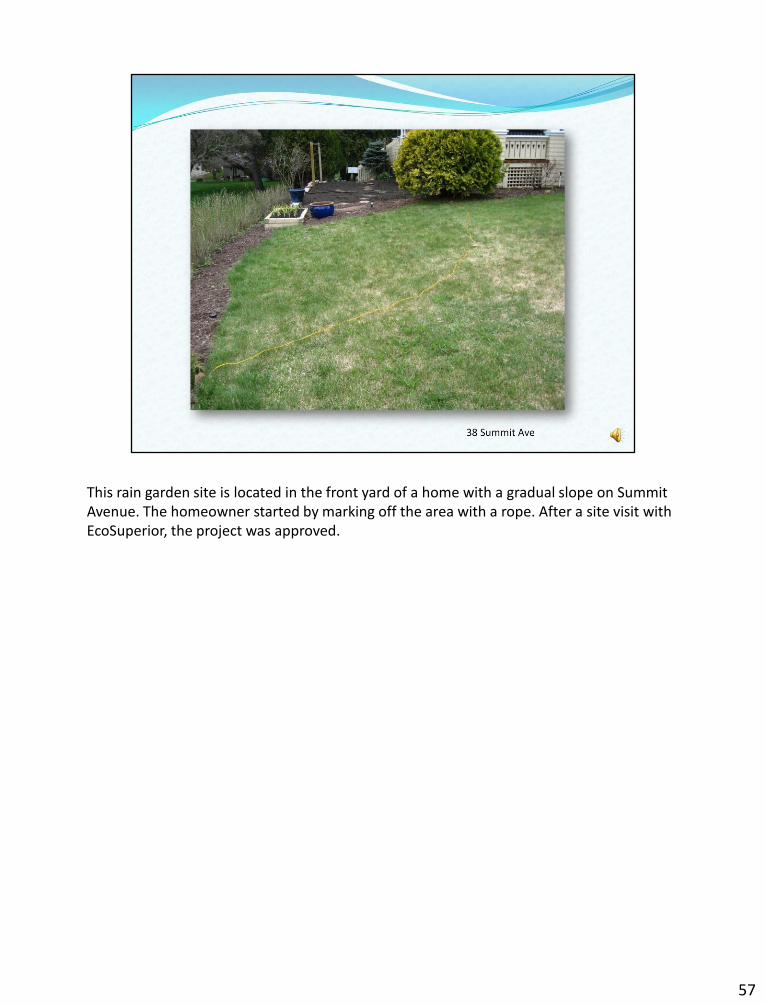
This rain garden site is located in the front yard of a home with a gradual slope on Summit Avenue. The homeowner started by marking off the area with a rope. After a site visit with EcoSuperior, the project was approved.
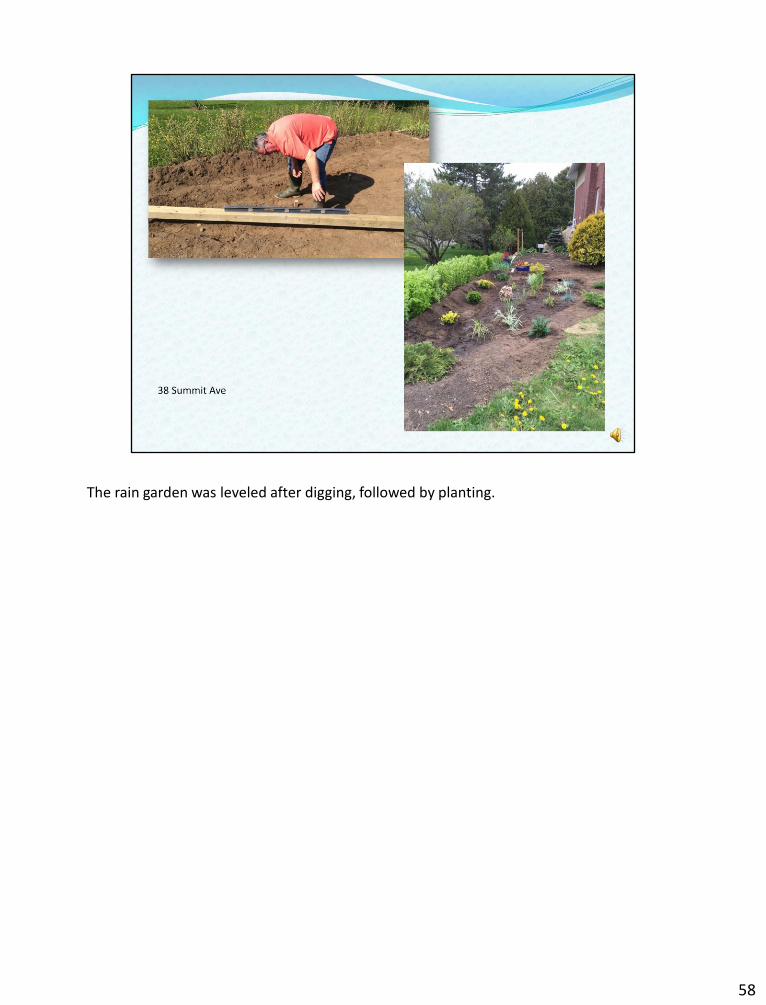
57
The rain garden was leveled after digging, followed by planting.
58
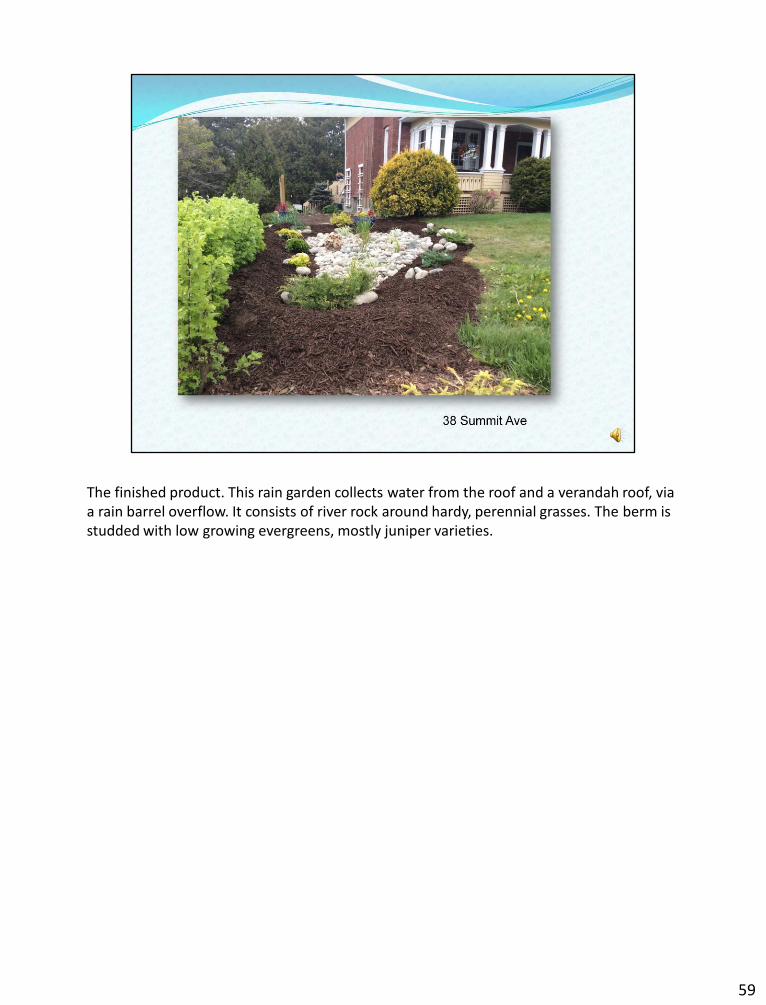
The finished product. This rain garden collects water from the roof and a verandah roof, via a rain barrel overflow. It consists of river rock around hardy, perennial grasses. The berm is studded with low growing evergreens, mostly juniper varieties.
59
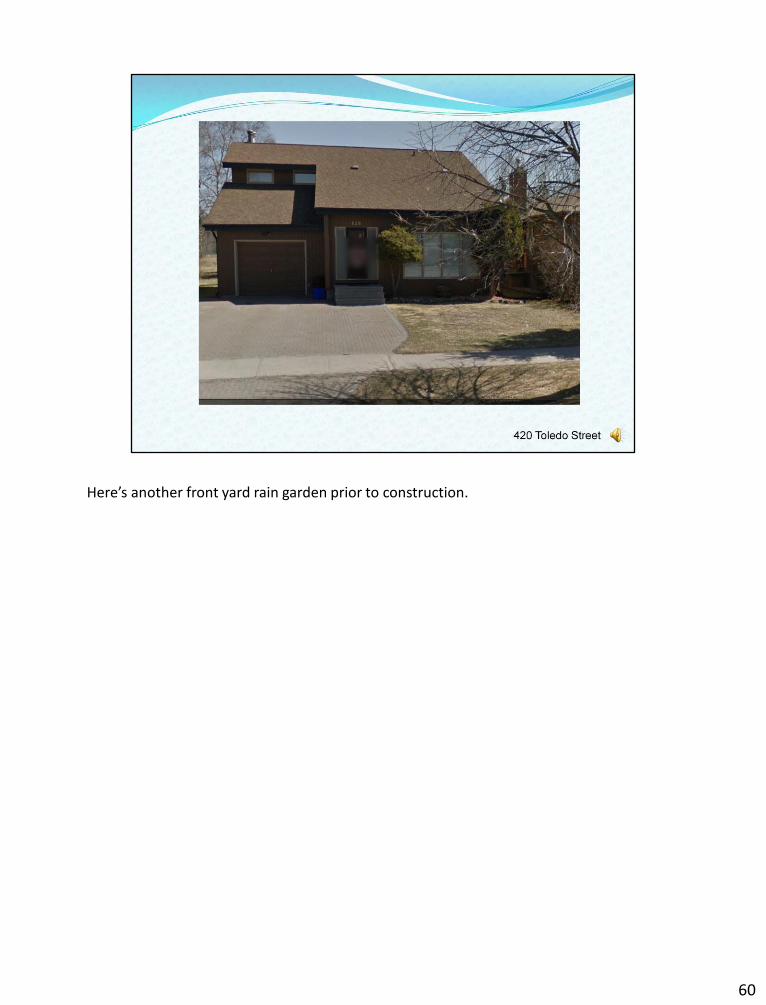
Here’s another front yard rain garden prior to construction.
60
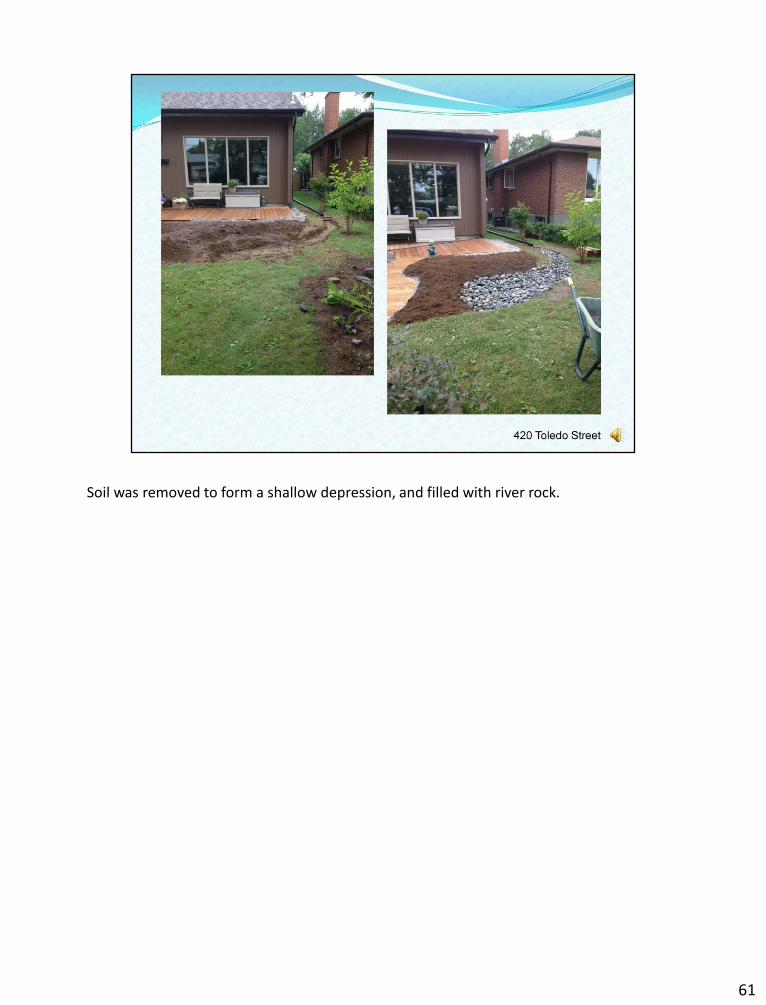
Soil was removed to form a shallow depression, and filled with river rock.
61

Finally, tall, showy flowers and low-growing cover plants were added to complete this rain garden on Toledo St.
62
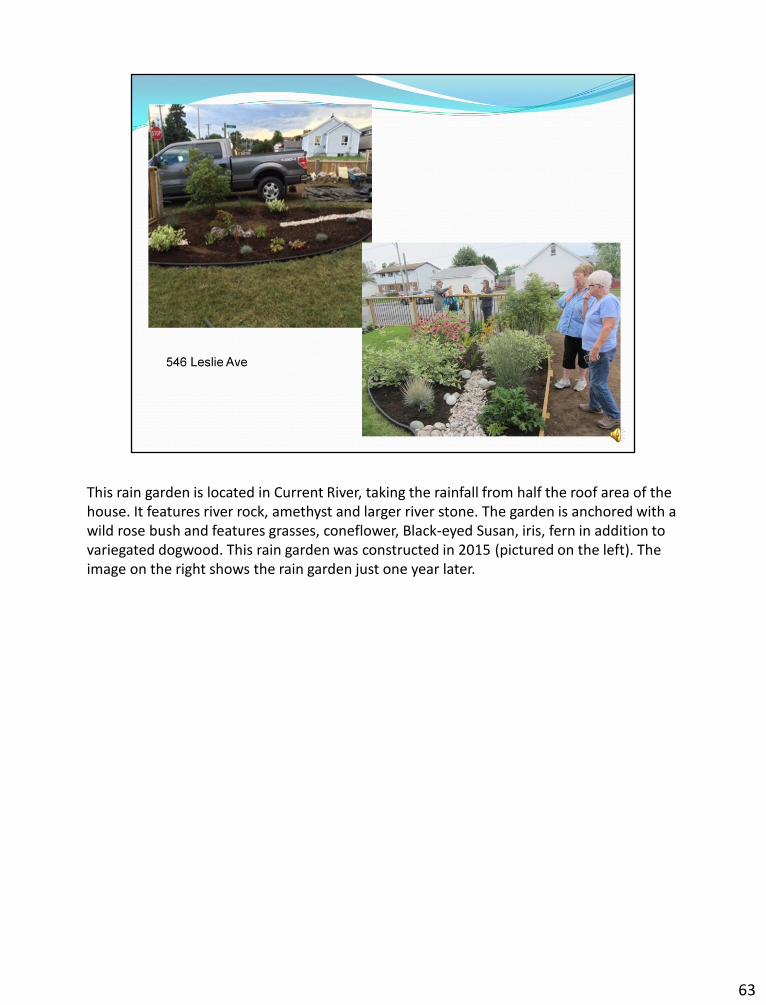
This rain garden is located in Current River, taking the rainfall from half the roof area of the house. It features river rock, amethyst and larger river stone. The garden is anchored with a wild rose bush and features grasses, coneflower, Black-eyed Susan, iris, fern in addition to variegated dogwood. This rain garden was constructed in 2015 (pictured on the left). The image on the right shows the rain garden just one year later.
63
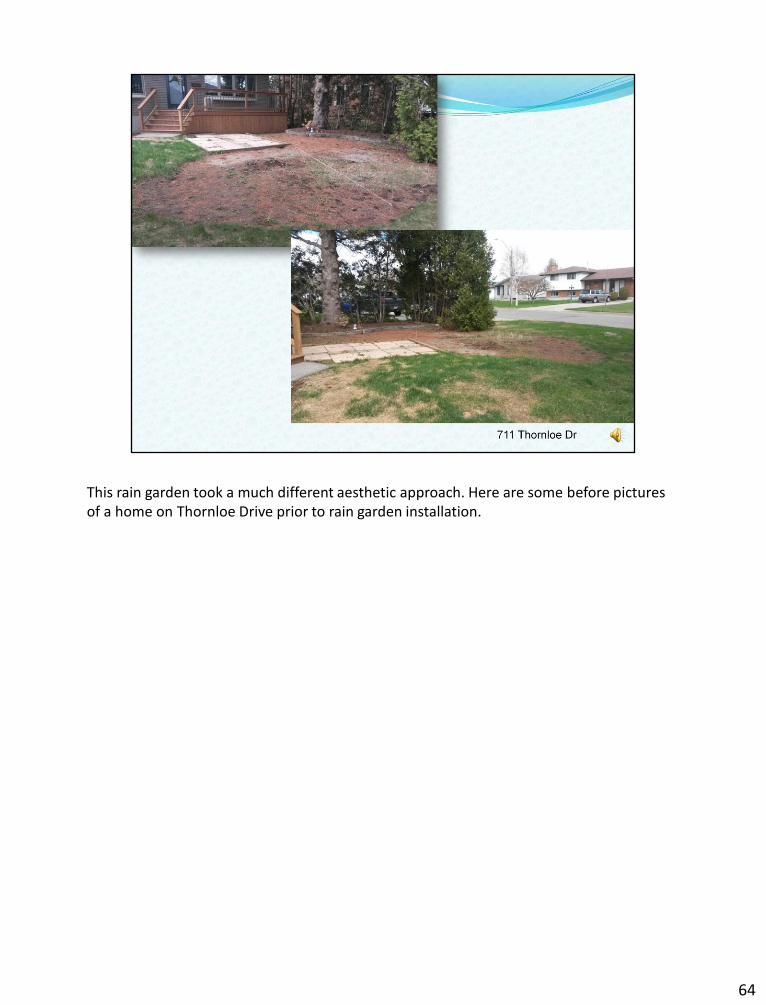
This rain garden took a much different aesthetic approach. Here are some before pictures of a home on Thornloe Drive prior to rain garden installation.
64
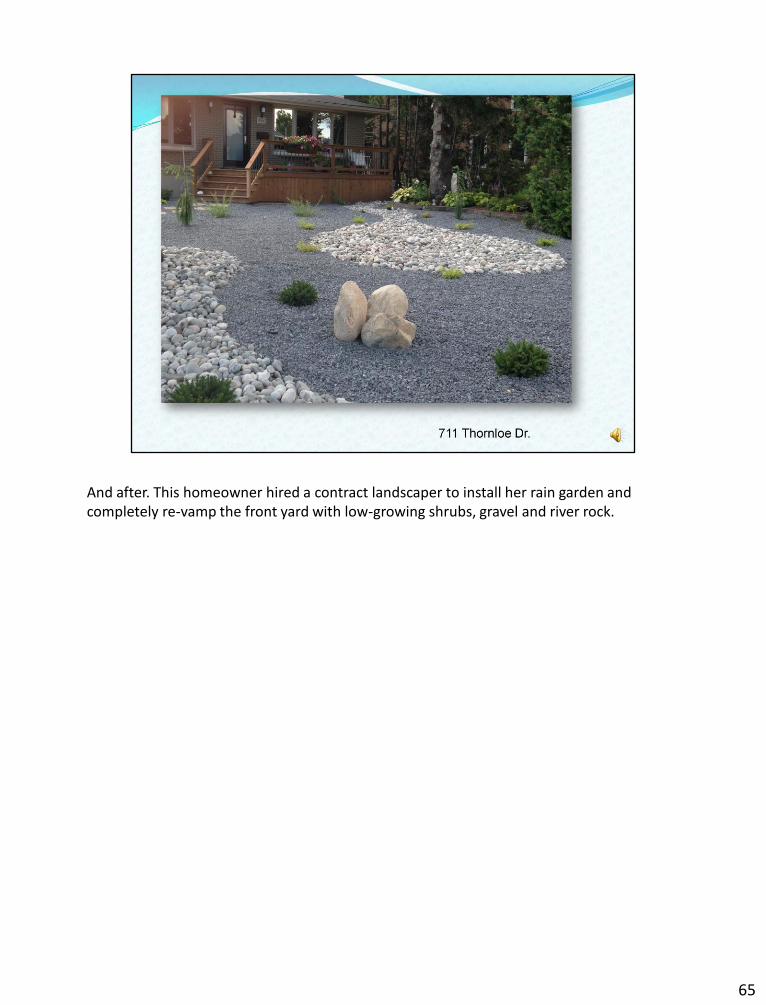
And after. This homeowner hired a contract landscaper to install her rain garden and completely re-vamp the front yard with low-growing shrubs, gravel and river rock.
65
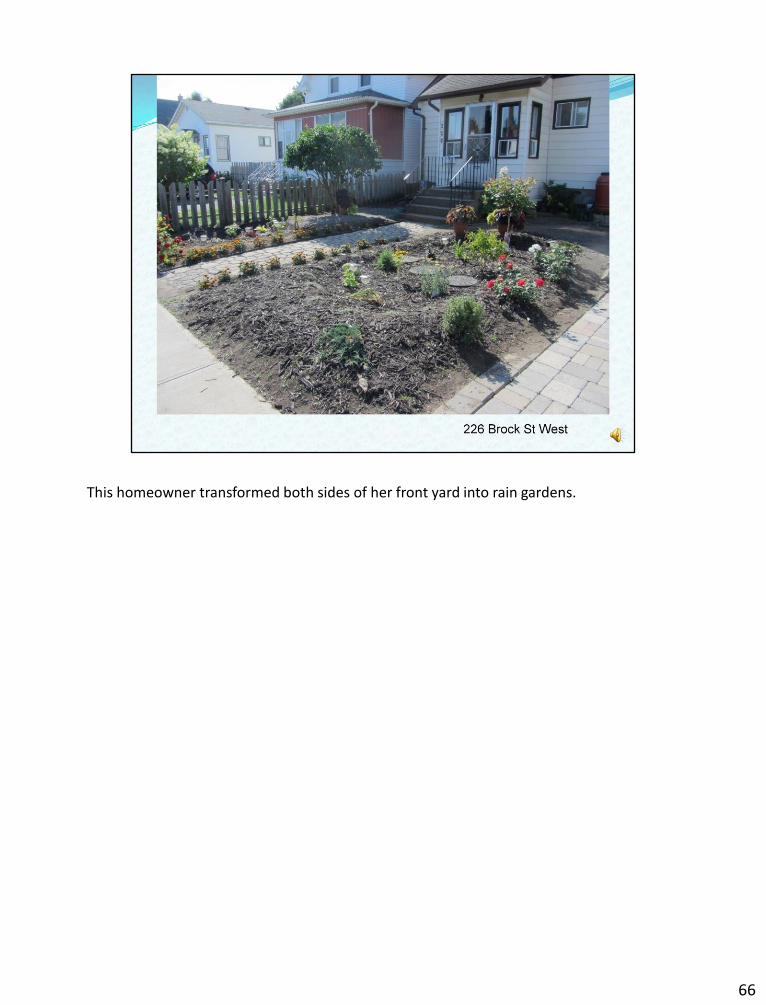
This homeowner transformed both sides of her front yard into rain gardens.
66
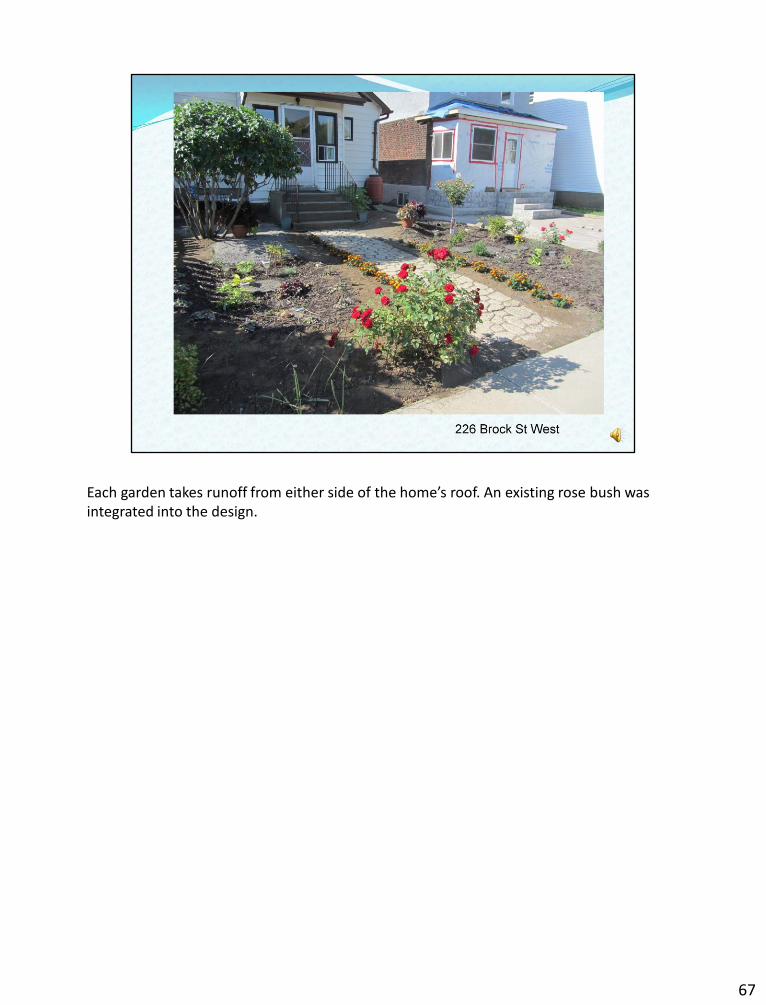
Each garden takes runoff from either side of the home’s roof. An existing rose bush was integrated into the design.
67
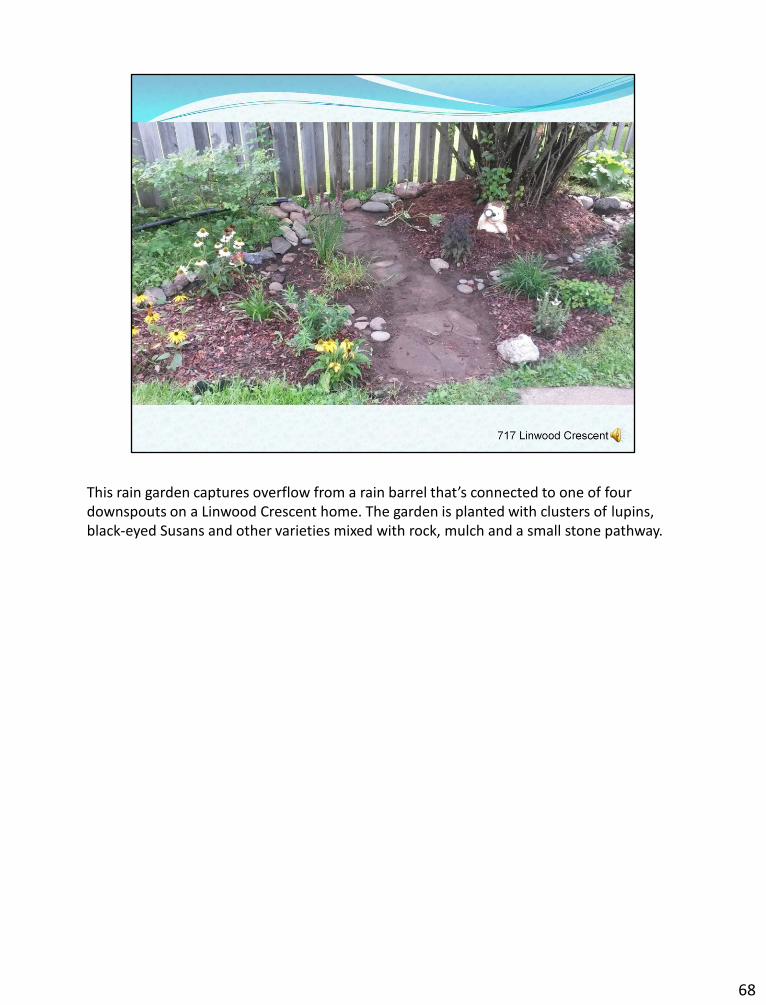
This rain garden captures overflow from a rain barrel that’s connected to one of four downspouts on a Linwood Crescent home. The garden is planted with clusters of lupins, black-eyed Susans and other varieties mixed with rock, mulch and a small stone pathway.
68

This home on Cougar Crescent includes a mix of features integrated into the overall design of the back yard. The rain garden has a unique drainage system that includes several run off hoses from two rain barrels.
69
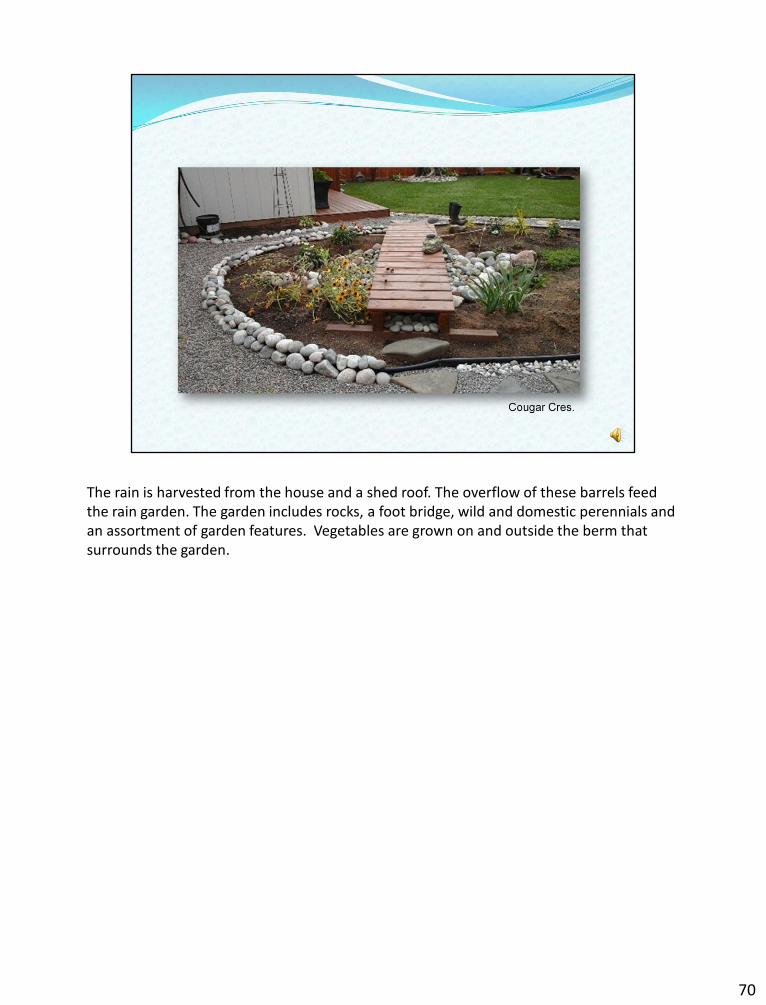
The rain is harvested from the house and a shed roof. The overflow of these barrels feed the rain garden. The garden includes rocks, a foot bridge, wild and domestic perennials and an assortment of garden features. Vegetables are grown on and outside the berm that surrounds the garden.
70
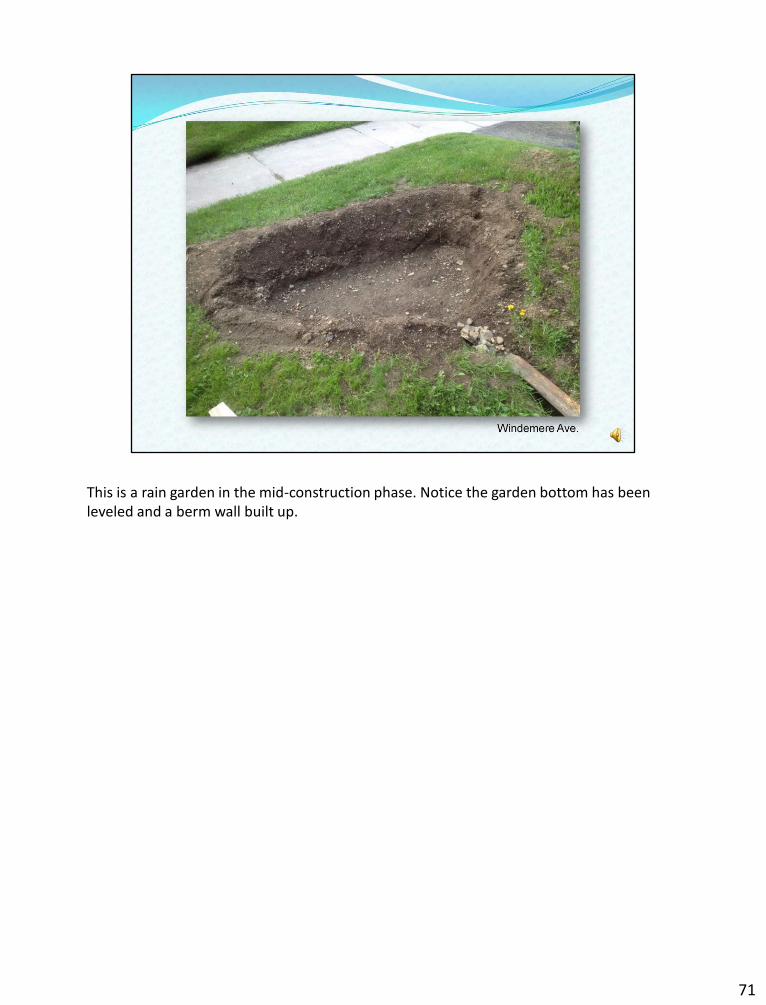
This is a rain garden in the mid-construction phase. Notice the garden bottom has been leveled and a berm wall built up.
71
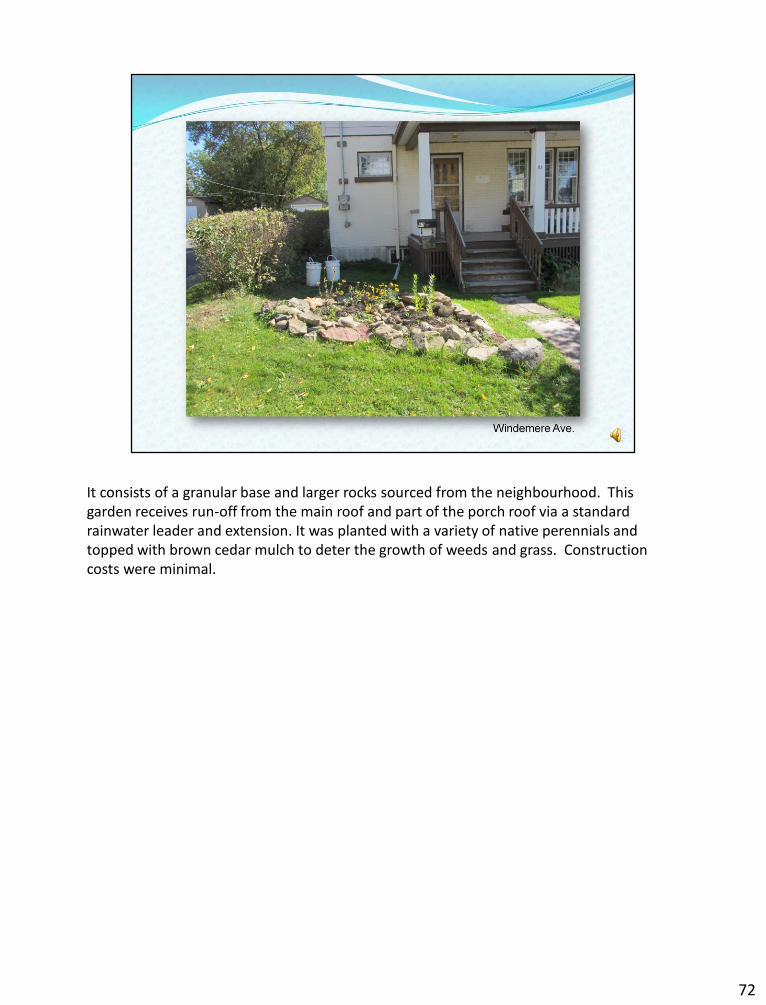
It consists of a granular base and larger rocks sourced from the neighbourhood. This garden receives run-off from the main roof and part of the porch roof via a standard rainwater leader and extension. It was planted with a variety of native perennials and topped with brown cedar mulch to deter the growth of weeds and grass. Construction costs were minimal.
72

This rain garden on Manion Place is pictured in the fall, planted with tall grasses and river rock under an existing birch tree.
73

The homeowner is using a rain chain, a decorative alternative to a downspout, to convey water from the roof into the rain garden.
74
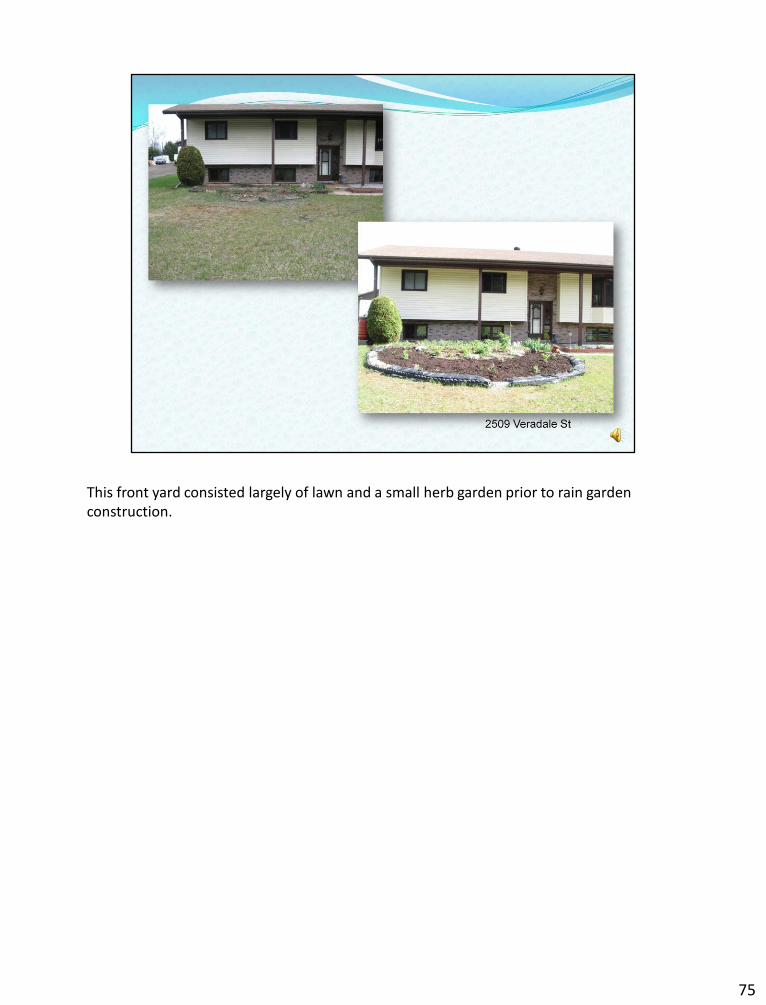
This front yard consisted largely of lawn and a small herb garden prior to rain garden construction.
75
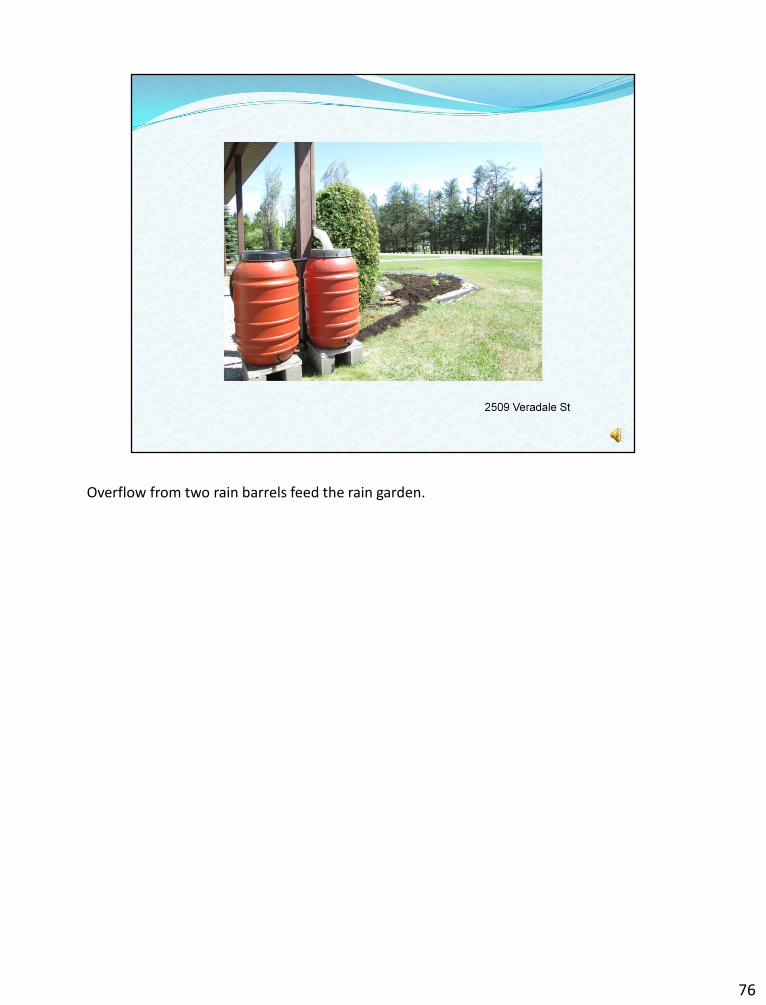
Overflow from two rain barrels feed the rain garden.
76
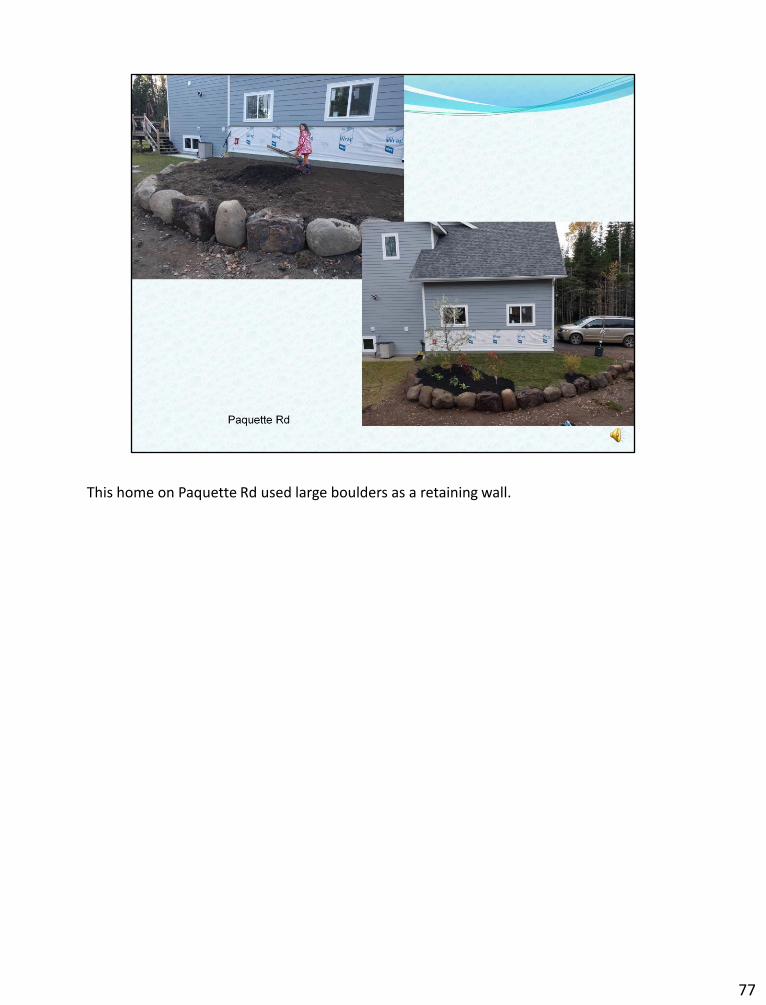
This home on Paquette Rd used large boulders as a retaining wall.
77
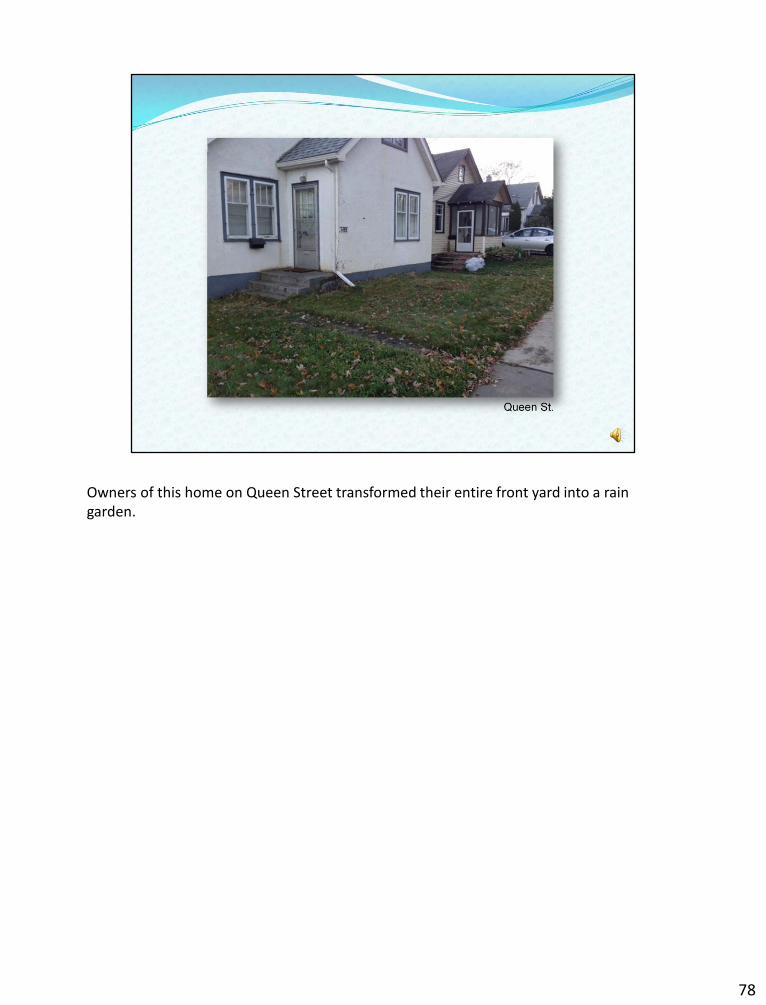
Owners of this home on Queen Street transformed their entire front yard into a rain garden.
78

The river rocks mark a gradual slope starting from the end of the downspout extension to the basin of the rain garden, running parallel to the sidewalk.
79
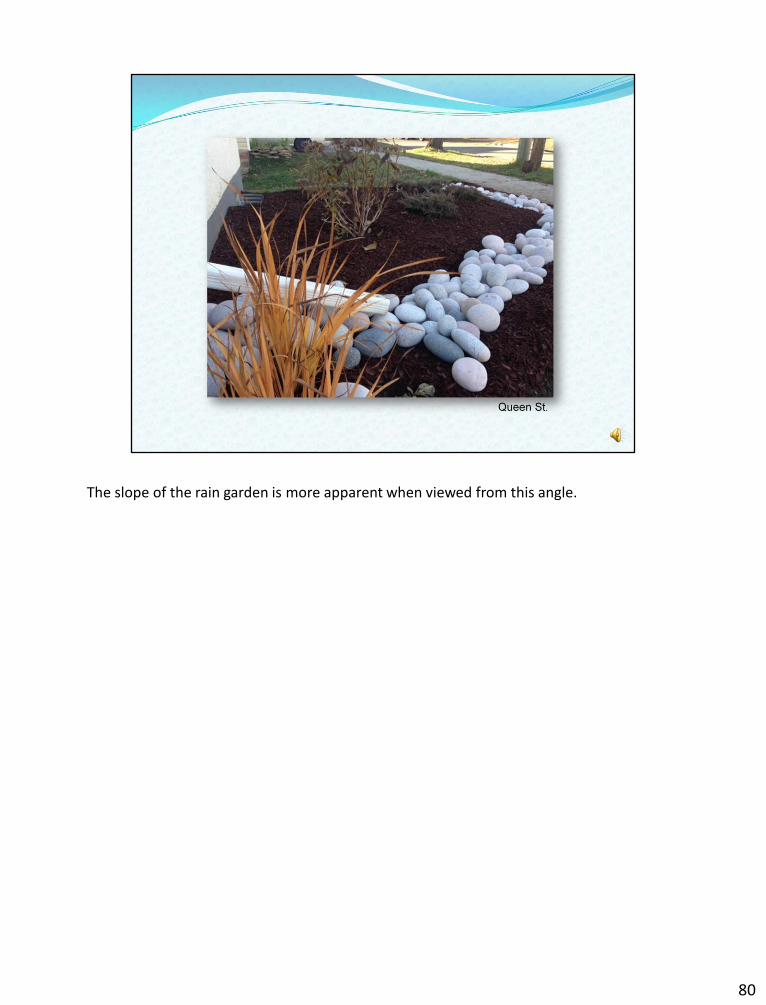
The slope of the rain garden is more apparent when viewed from this angle.
80

This rain garden uses exposed piping to convey water along a swale lined with river rock and gravel.
81

There are three rain gardens on this property on 25th Side Road.
82

Each garden was excavated with the excess soil used as a surrounding berm.
83
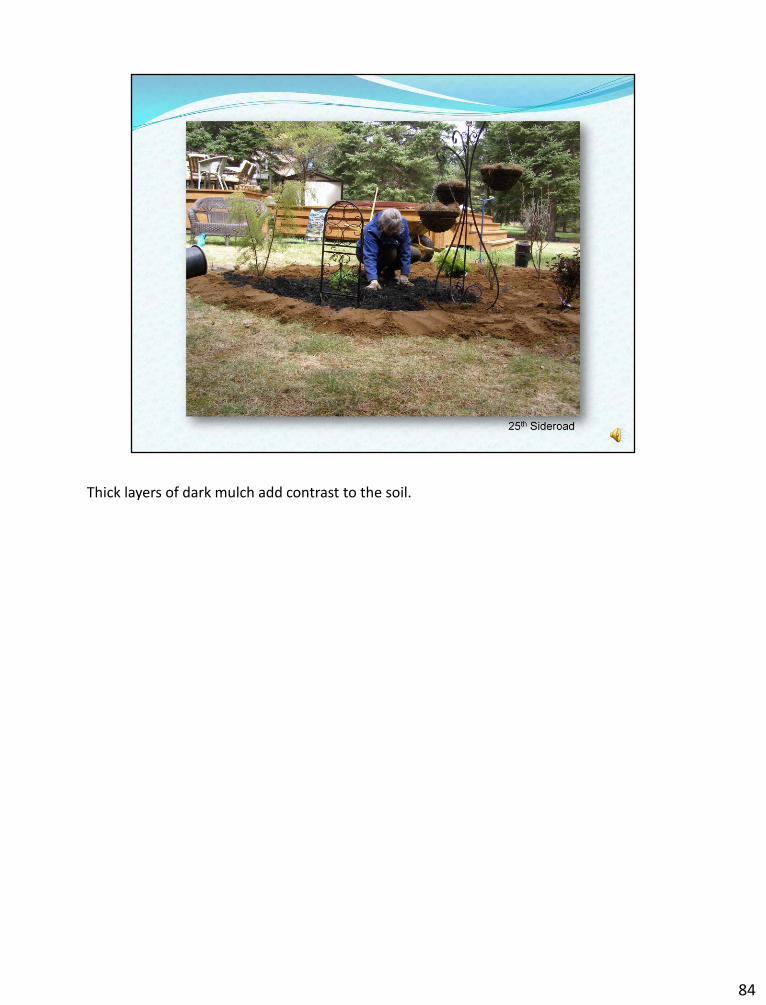
Thick layers of dark mulch add contrast to the soil.
84

A grassed swale directs garage roof drainage to the front garden, and buried hose collects rain barrel overflow to the rear gardens, like the one pictured here.
85

The piping system is buried just beneath the layer of grass.
86
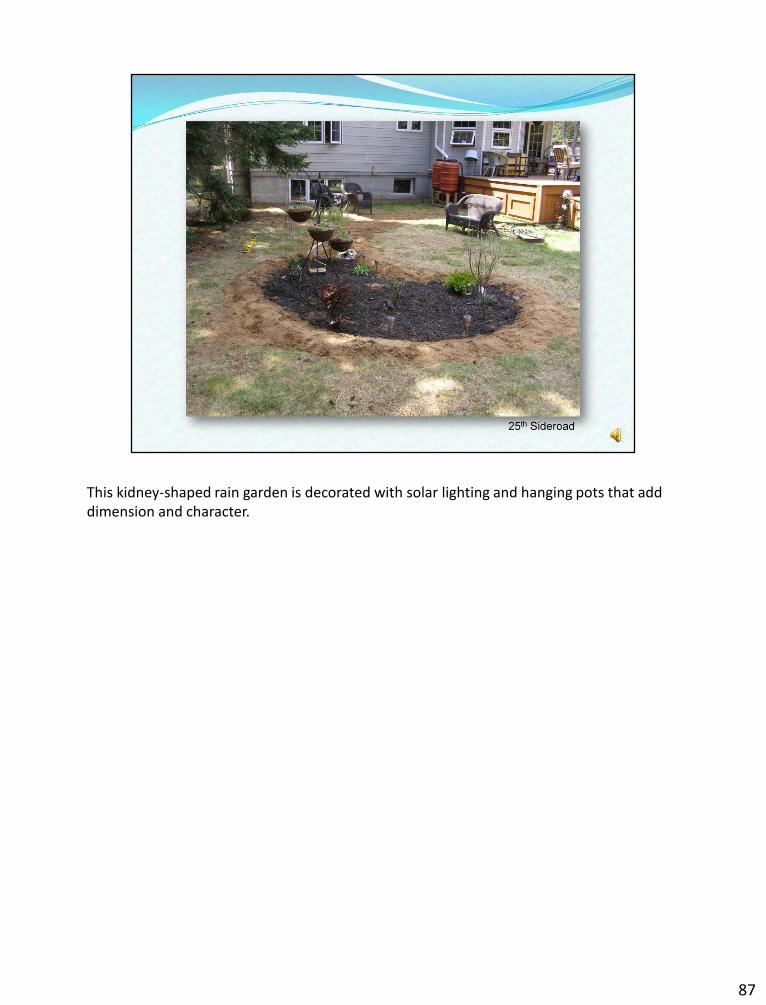
This kidney-shaped rain garden is decorated with solar lighting and hanging pots that add dimension and character.
87

Thank you for completing the rain garden rebate online tutorial. We hope that the examples of local rain gardens have added some inspiration to your own project.
This tutorial is followed by a short quiz. After completing the quiz, you may pick up a rain garden resource kit at our office, located at 562 Red River Rd. Operating hours are Monday-Friday, 8:30 AM TO 4:30 PM. If you have any questions or require further information, please call 624-2140.
88