welcome to keystone the open stack identity service_v1.0.0-20141208-1212
TRANSCRIPT

Outline
• 사전 준비
• OpenStack Keystone 설치
• 데이타베이스 설치
• 스키마 및 테이블 생성
• keystone.conf 설정
• DB 연동 및 keystone 재실행
2

사전 준비
• 유틸리티 설치– sudo apt-get install vim
– sudo apt-get install chkconfig
– sudo apt-get install curl
3

OpenStack Keystone 설치
• Ubuntu 패키지로 설치– sudo apt-get install keystone python-keystone python-
keystoneclient python-mysqldb python-dateutil
• 기본 설정파일 경로: /etc/keystone
– default_catalog.templates: 서비스 URL 템플릿 (identity, compute, volume, 등등)
– keystone.conf: keystone 기본 설정
– logging.conf: 로깅 시스템 설정. 로그 클래스 및 패턴 등등
– policy.json: …
• keystone 실행 확인
4
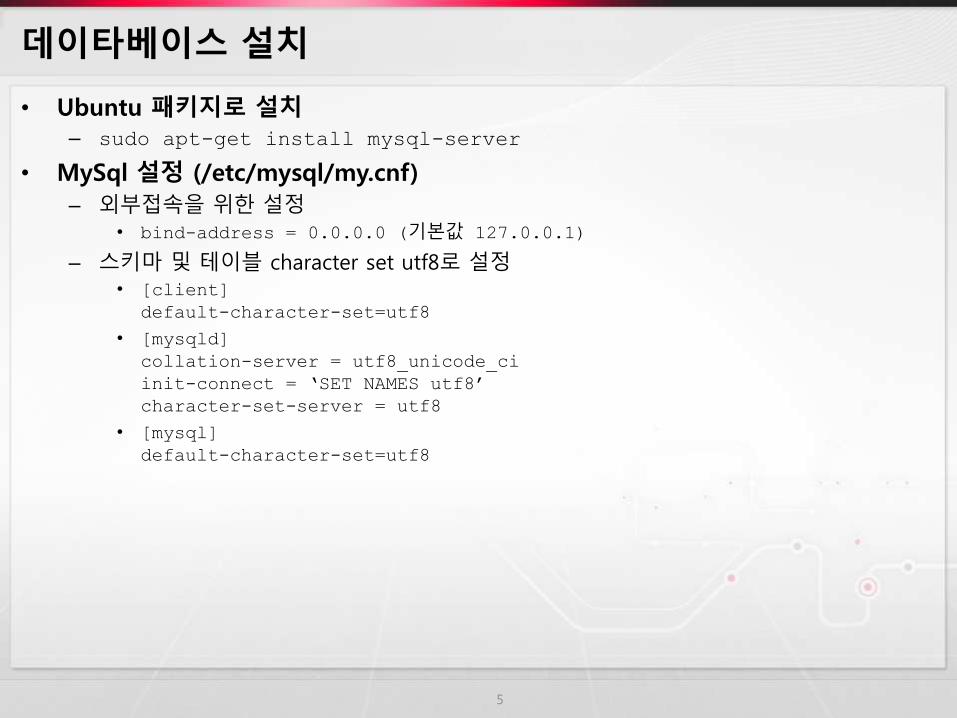
데이타베이스 설치
• Ubuntu 패키지로 설치– sudo apt-get install mysql-server
• MySql 설정 (/etc/mysql/my.cnf)
– 외부접속을 위한 설정• bind-address = 0.0.0.0 (기본값 127.0.0.1)
– 스키마 및 테이블 character set utf8로 설정• [client]
default-character-set=utf8
• [mysqld]
collation-server = utf8_unicode_ci
init-connect = ‘SET NAMES utf8’
character-set-server = utf8
• [mysql]
default-character-set=utf8
5
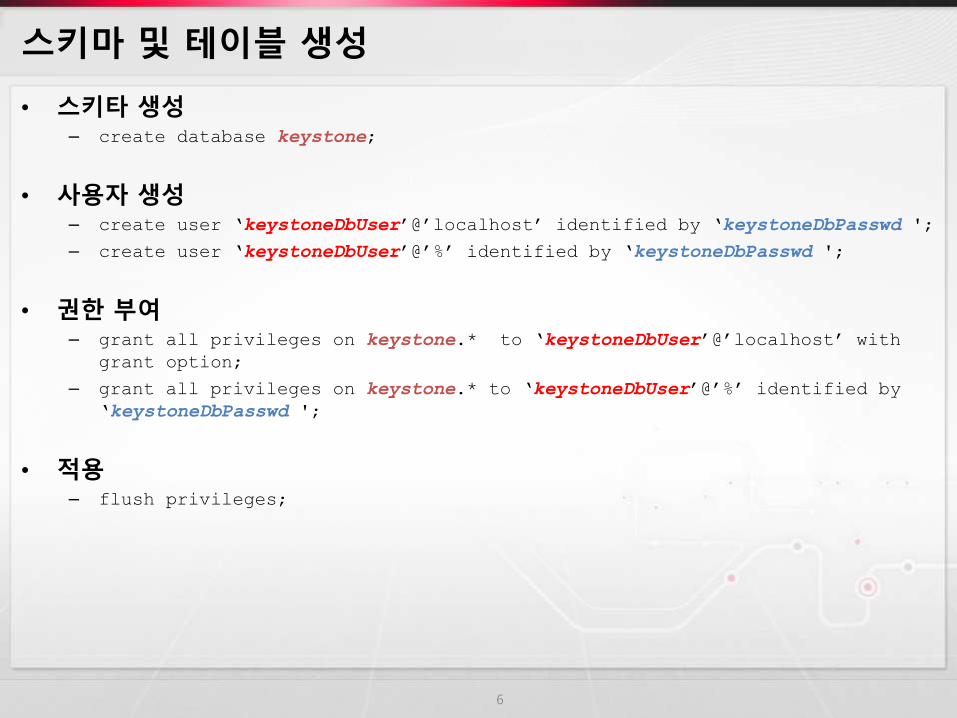
스키마 및 테이블 생성
• 스키타 생성– create database keystone;
• 사용자 생성– create user ‘keystoneDbUser’@’localhost’ identified by ‘keystoneDbPasswd ';
– create user ‘keystoneDbUser’@’%’ identified by ‘keystoneDbPasswd ';
• 권한 부여– grant all privileges on keystone.* to ‘keystoneDbUser’@’localhost’ with
grant option;
– grant all privileges on keystone.* to ‘keystoneDbUser’@’%’ identified by
‘keystoneDbPasswd ';
• 적용– flush privileges;
6

keystone.conf 설정
• /etc/keystone/keystone.conf
– keystone 서비스 bind-address 설정
• bind_host = 0.0.0.0 로 설정
– sql-connection 설정
• mysql://{keystoneDbUser}:{keystoneDbPasswd}@{mysql_host_ip}/{keystone}
– 예: mysql://keystoneuser:[email protected]/keyston
7
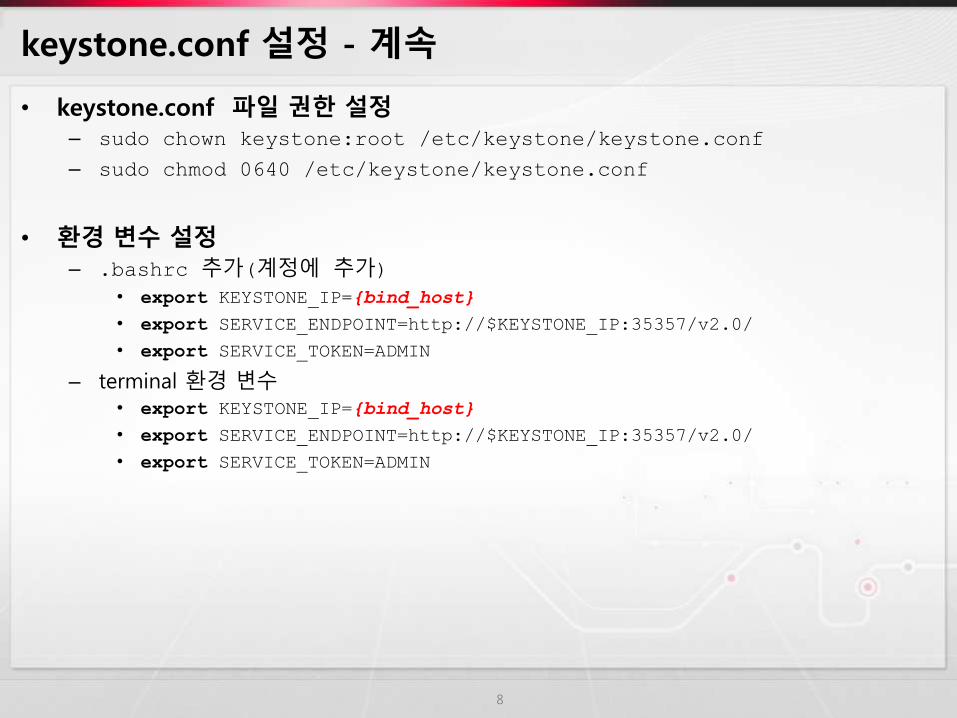
keystone.conf 설정 - 계속
• keystone.conf 파일 권한 설정– sudo chown keystone:root /etc/keystone/keystone.conf
– sudo chmod 0640 /etc/keystone/keystone.conf
• 환경 변수 설정– .bashrc 추가(계정에 추가)
• export KEYSTONE_IP={bind_host}
• export SERVICE_ENDPOINT=http://$KEYSTONE_IP:35357/v2.0/
• export SERVICE_TOKEN=ADMIN
– terminal 환경 변수• export KEYSTONE_IP={bind_host}
• export SERVICE_ENDPOINT=http://$KEYSTONE_IP:35357/v2.0/
• export SERVICE_TOKEN=ADMIN
8
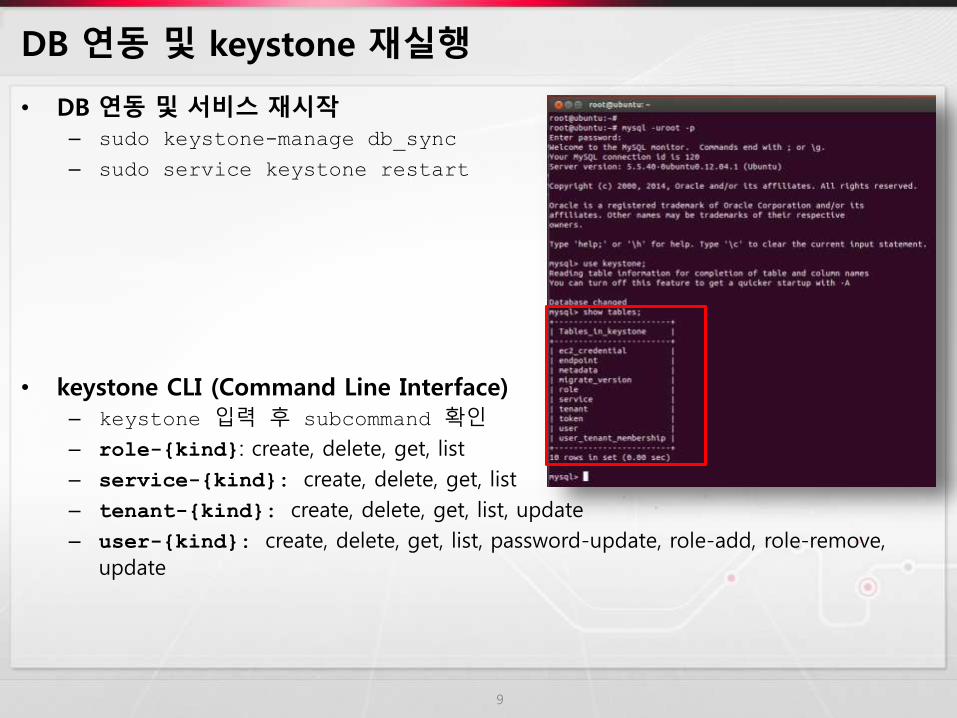
DB 연동 및 keystone 재실행
• DB 연동 및 서비스 재시작– sudo keystone-manage db_sync
– sudo service keystone restart
• keystone CLI (Command Line Interface)– keystone 입력 후 subcommand 확인
– role-{kind}: create, delete, get, list
– service-{kind}: create, delete, get, list
– tenant-{kind}: create, delete, get, list, update
– user-{kind}: create, delete, get, list, password-update, role-add, role-remove,
update
9

데이터 생성 - service
• identity 서비스 생성
10
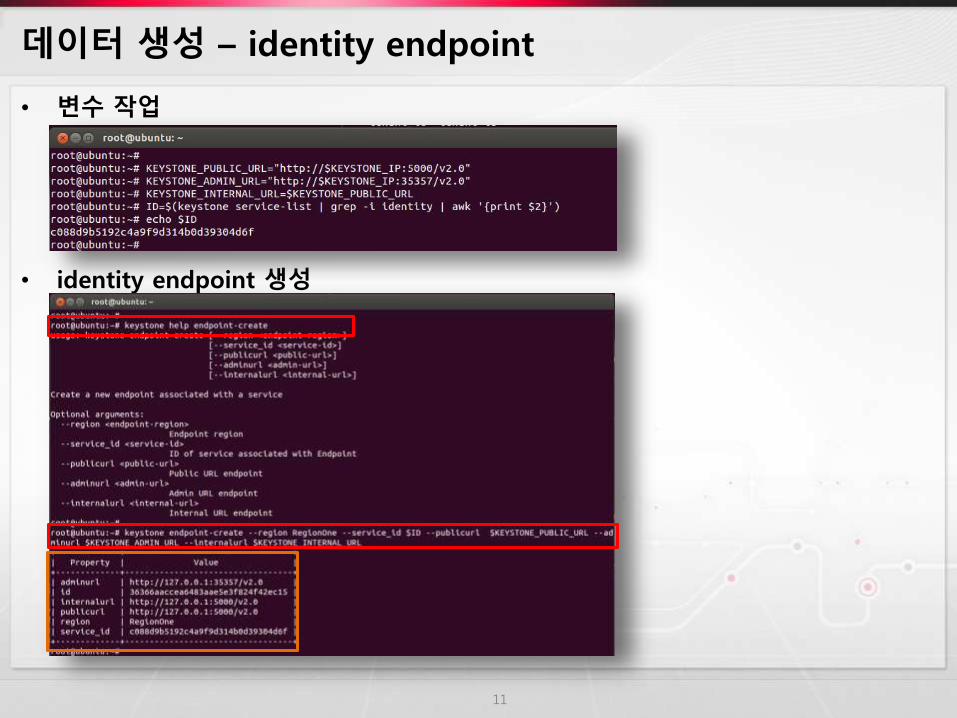
데이터 생성 – identity endpoint
• 변수 작업
• identity endpoint 생성
11
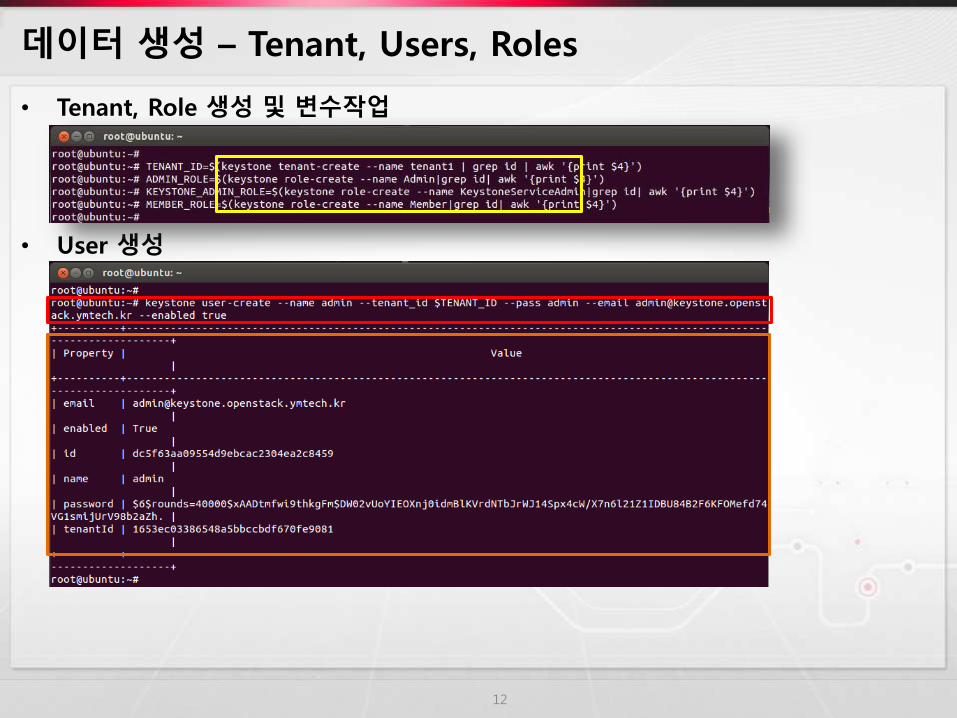
데이터 생성 – Tenant, Users, Roles
• Tenant, Role 생성 및 변수작업
• User 생성
12
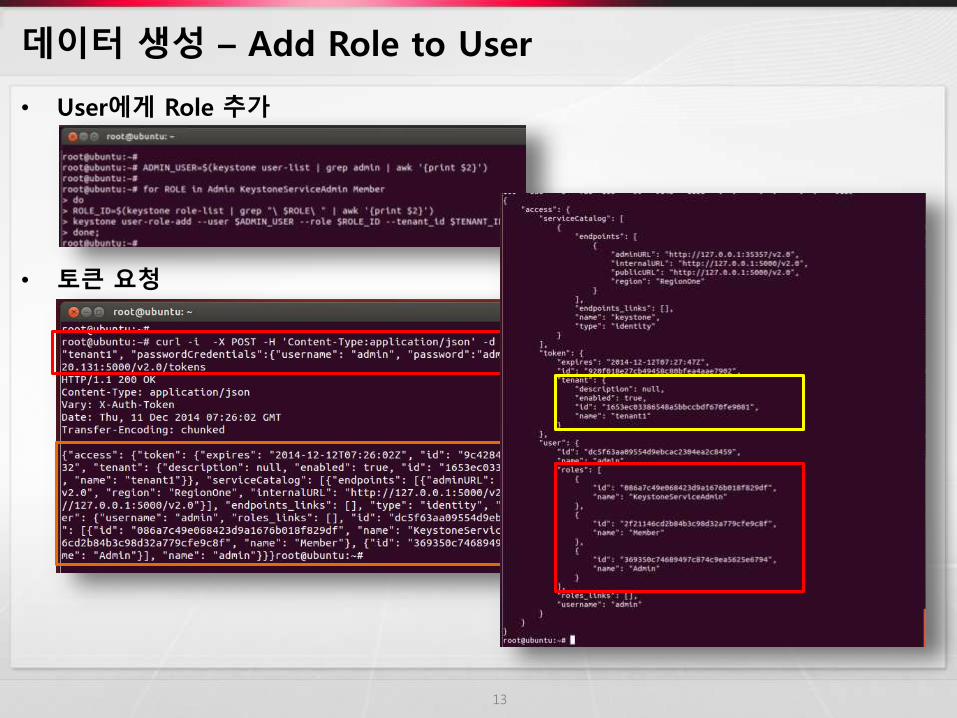
데이터 생성 – Add Role to User
• User에게 Role 추가
• 토큰 요청
13
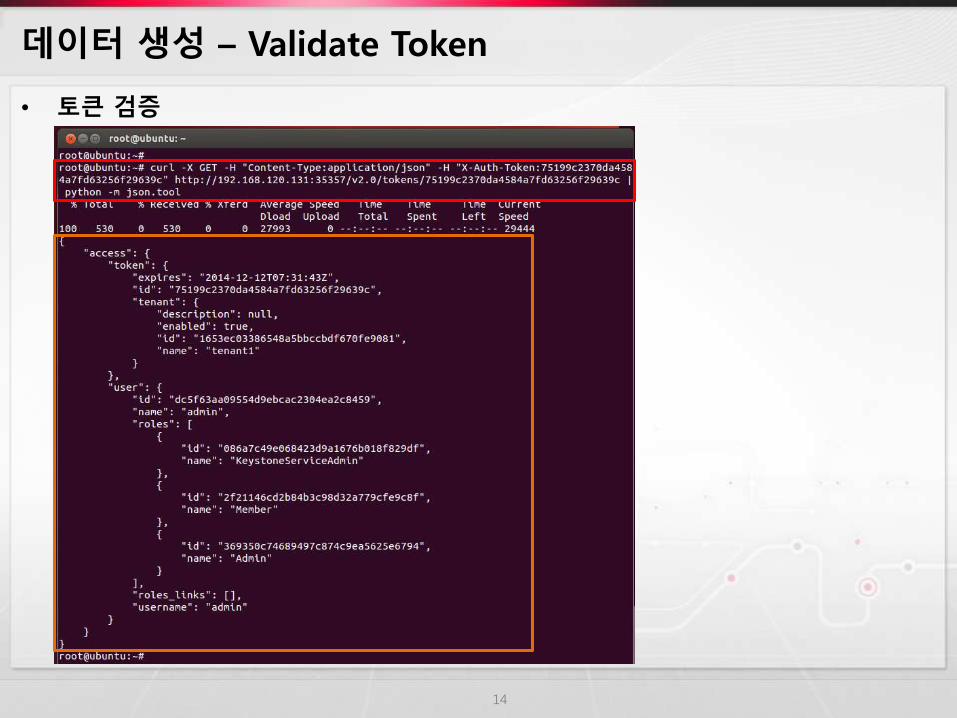
데이터 생성 – Validate Token
• 토큰 검증
14

keystone CLI
Tenant, User, Role 생성
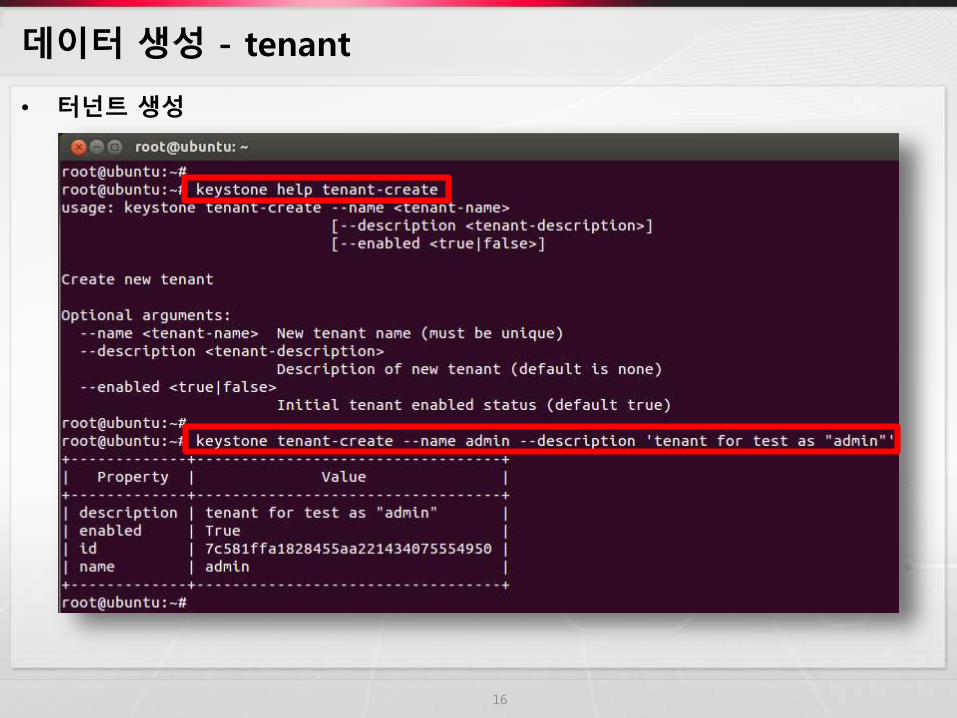
데이터 생성 - tenant
• 터넌트 생성
16
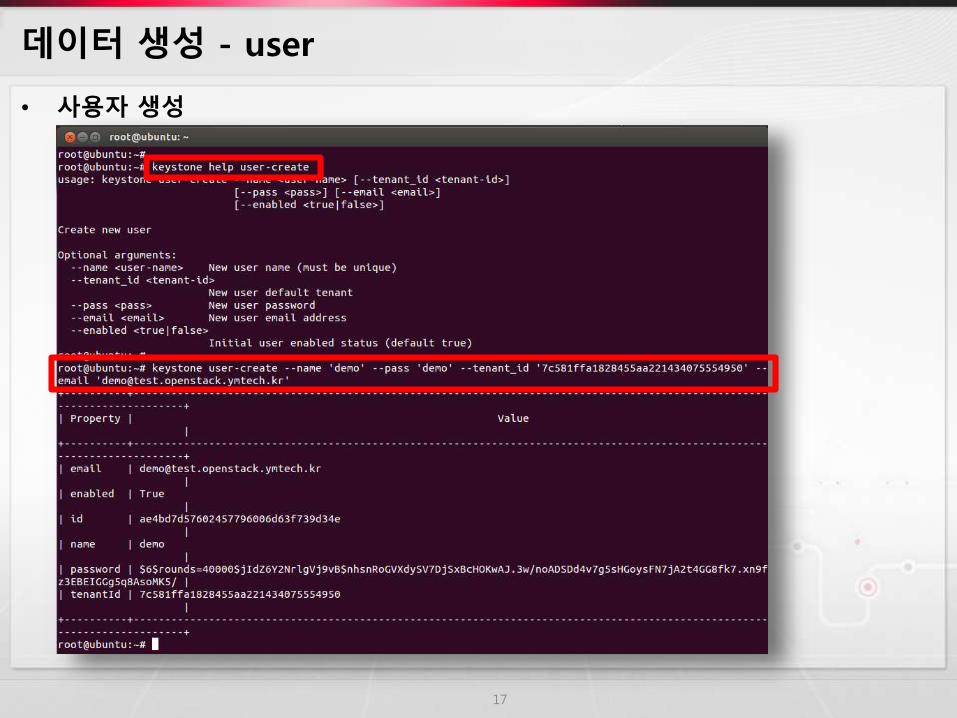
데이터 생성 - user
• 사용자 생성
17
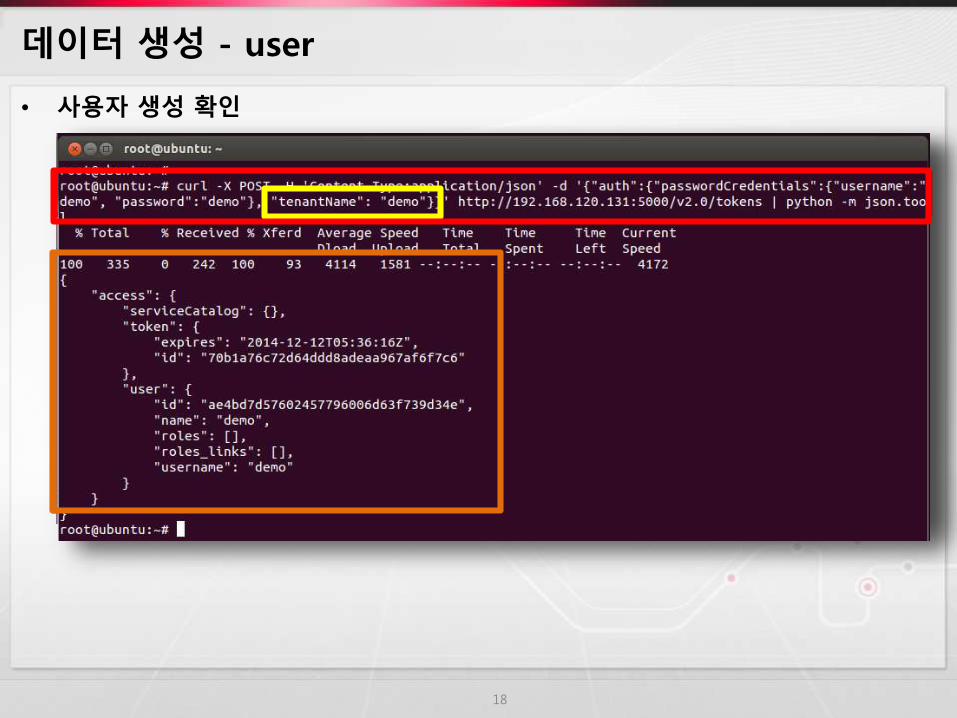
데이터 생성 - user
• 사용자 생성 확인
18

데이터 생성 - role
• Role 생성
19
참조
• OpenStack keystone 개발자 사이트
– http://docs.openstack.org/developer/keystone/
• CONFIGURE KEYSTONE IN UBUNTU 12.04
– http://vivekraghuwanshi.wordpress.com/configure-keystone-in-ubuntu-12-04/
• (Tutorial) What is Keystone and how to install Keystone in Openstack?
– http://blog.flux7.com/blogs/openstack/tutorial-what-is-keystone-and-how-to-install-keystone-in-openstack
• OpenStack Identity API
– http://developer.openstack.org/api-ref-identity-v2.html
•
20