webui user's guide - help.hcltechsw.com · webui screens and data elements, see the bigfix...
TRANSCRIPT

BigFixWebUI User's Guide

Special notice
Before using this information and the product it supports, read the information in Notices
(on page 123).

Edition notice
This edition applies to version 9.5 of BigFix and to all subsequent releases and
modifications until otherwise indicated in new editions.

Contents
Chapter 1. Welcome.......................................................................................................... 1
Chapter 2. Meet the WebUI............................................................................................... 2
Overview Page....................................................................................................................... 2
Navigation Bar....................................................................................................................... 3
List Views...............................................................................................................................4
Document Views....................................................................................................................5
Filters and Search Tools....................................................................................................... 6
Text Search............................................................................................................................ 7
List Controls...........................................................................................................................8
Select All................................................................................................................................ 9
Permissions and Their Effects............................................................................................. 9
WebUI Workflow and Deploy Sequence............................................................................ 10
Chapter 3. Get Started with Devices................................................................................11
The Device List.................................................................................................................... 11
Device Documents.............................................................................................................. 12
Send a File........................................................................................................................... 14
Send Messages to Devices................................................................................................ 18
Chapter 4. Get Started with Patches............................................................................... 21
The Patch List..................................................................................................................... 21
Patch Documents................................................................................................................23
Chapter 5. Get Started with Patch Policy........................................................................ 25
Patch Policy Overview.........................................................................................................25
The Patch Policy List.......................................................................................................... 27

Contents | v
Create a Patch Policy..........................................................................................................28
Patch Policy Documents.....................................................................................................37
Monitoring Deployed Policies.............................................................................................41
Patch Policy Operations:Task Reference...........................................................................42
Chapter 6. Get Started with Software..............................................................................48
The Software Package List................................................................................................ 48
Software Documents...........................................................................................................49
Software Catalog Operations............................................................................................. 50
Add a Software Package............................................................................................ 51
Edit a Software Package.............................................................................................55
Delete a Software Package.........................................................................................56
Chapter 7. Get Started with Custom Content...................................................................58
The Custom Content List....................................................................................................58
Custom Content Documents.............................................................................................. 59
Creating Custom Content................................................................................................... 59
Editing Custom Content......................................................................................................63
Chapter 8. BigFix Query.................................................................................................. 68
Running a sample query..................................................................................................... 73
Building a query...................................................................................................................77
Managing parameters in queries....................................................................................... 80
Chapter 9. Take Action: The Deploy Sequence................................................................ 83
Deploy Sequence Summary................................................................................................83
Deploy Procedure................................................................................................................ 84
Configuration Options................................................................................................. 87
Chapter 10. Get Started with Deployments......................................................................90

Contents | vi
The Deployment List........................................................................................................... 90
Deployment Documents......................................................................................................91
Monitoring Deployments: State, Status, and Result......................................................... 92
Device Results..............................................................................................................92
Deployment Status...................................................................................................... 94
Deployment State.........................................................................................................95
Evaluating Deployments With Multiple Actions.........................................................95
Stop A Deployment............................................................................................................. 96
Chapter 11. The Content App..........................................................................................98
Chapter 12. Glossary.....................................................................................................107
Chapter 13. Support...................................................................................................... 122
Notices.......................................................................................................................................123
Index..........................................................................................................................

Chapter 1. Welcome
Welcome to BigFix WebUI. The WebUI delivers a powerful set of functions for BigFix
operators. It simplifies BigFix workflow, speeds access to data, and improves flexibility,
visibility, and performance.
No prior BigFix experience is needed to learn and use the WebUI. A browser, the WebUI URL,
and a BigFix user name and password are all that is required. Supported browsers include
Internet Explorer (10,11, Edge), and the latest versions of Safari, Firefox, and Chrome.
Administrators and operators familiar with the BigFix console will find a useful introduction
to the WebUI in this guide. For information about installing and administering the WebUI,
see the BigFix WebUI Administration Guide.
To open the WebUI use the URL provided by your administrator and enter your BigFix
user name and password. Single Sign On users will bypass the BigFix login screen and
authenticate through their service provider. Following a successful login the BigFix Overview
displays.
Note: The look of the BigFix interface is changing. We are in the process of updating the
graphics in this guide to reflect the new colors and theme. Thank you for your patience as
we complete this work.

Chapter 2. Meet the WebUI
Take a quick tour of the WebUI screens, controls, and workflow. A detailed description of
each of the main WebUI screens, including the Deploy Sequence and its options, begins in
Get Started with Devices (on page 11). For an introduction to BigFix terms and concepts,
see the Glossary (on page 107).
Overview Page
The WebUI Overview provides a summary of your environment. Its interactive charts and
rich set of links make it easy to move quickly to areas that require immediate attention.
Refresh the screen to see the latest data. The Overview is the WebUI's default landing page.
Display it from any WebUI screen by clicking the home icon on the WebUI navigation bar, or
on the BigFix logo.
Operator permissions and site and role assignments govern which page and data elements
display on WebUI pages. For example, an operator who does not have access to the
Software Distribution component will not see the Add Software button on the Overview. For
more information, see Permissions and Their Effects (on page 9).

BigFix WebUI User's Guide | 2 - Meet the WebUI | 3
The Executive Overview dashboard provides information of particular interest to IT
Officers, Security Officers, and Analysts. To display it click the Overview button beneath the
navigation bar and select Executive Dashboard. Use the Overview button to move between
dashboards. For more information about the Executive Dashboard and its tiles, see the
WebUI Administration Guide.
WebUI sessions close automatically after a period of inactivity. If your session expires, you
will be returned to the page that you were on the next time you log in.
Note: When a tile on a dashboard takes over 10 seconds to load, load time details
appear on the tile. Click Close to clear the message. Factors that can influence response
times include changes to hardware, to the number of endpoints, and the amount of data you
have access to.
Navigation Bar
Use the navigation bar to access the Overview and Device, Content, and Deployment
screens.

BigFix WebUI User's Guide | 2 - Meet the WebUI | 4
Links throughout the WebUI provide shortcuts between views.
List Views
List views show your BigFix environment in directory form: a flexible, searchable index
of devices, deployments, and content. Click the title on a card to open the corresponding
document. (To preview a title too long for its card, hover over it with the mouse.) To take
an action, for example, to deploy a patch or target a device, highlight its card and click the
Deploy button. For more information, see Take Action: The Deploy Sequence (on page
83).

BigFix WebUI User's Guide | 2 - Meet the WebUI | 5
Document Views
The WebUI’s document views present detailed information about a particular device,
deployment, or piece of content. Use document navigation links to drill down into the data
on associated views. The diagram shows a patch document.
Key details are summarized in the right side panel; the Deploy button appears on all device
and content documents.

BigFix WebUI User's Guide | 2 - Meet the WebUI | 6
Filters and Search Tools
Use the WebUI filters to reduce a long list to a short list of specific items. For example, filter
the Software list by Operating System to see software for OS X computers. Combine filters,
for example, to find expired deployments issued by a specific operator at particular time.
The list of active filter groups are displayed across the top of the list.

BigFix WebUI User's Guide | 2 - Meet the WebUI | 7
The filter panel appears in a closed state on some screens.
Text Search

BigFix WebUI User's Guide | 2 - Meet the WebUI | 8
Use a text search to find items based on words or characters they contain. For example,
search the Device list for “2” to find every device with the character “2” in its name.
Use a multiple word search to find any items that contain those terms. For example, results
for a search for “MS13-035 Vista” would include the patch “MS13-035 MSHTML Security
Vulnerability Vista”. Searches are not case-sensitive. For example, a patch list search for the
word “advisory” returns patches with either “advisory” or “Advisory” in their name.
Wildcard searches, and searches for text within the body of a document, are not currently
supported.
List Controls
Sort a list, adjust the number and appearance of list items, and move between pages with
the list view controls.

BigFix WebUI User's Guide | 2 - Meet the WebUI | 9
Select All
The Select All check box selects or clears every item on a page.
Permissions and Their Effects
The elements that are shown on a WebUI screen reflect the permission levels of the user,
and the device, site, and group assignments set for them by the BigFix administrator. For

BigFix WebUI User's Guide | 2 - Meet the WebUI | 10
example, an operator responsible for patching Windows machines might not see Linux
patches in their patch list or Linux machines in their device list. An operator who deploys
software but does no patching might not see the Patch content or Custom content options
in the Content submenu. For more information about permissions and their influence on
WebUI screens and data elements, see the BigFix WebUI Administrators Guide.
WebUI Workflow and Deploy Sequence
To deploy means to dispatch content to one or more endpoints for execution. You can
start a deployment two ways: by selecting content and targeting one or more devices, or
by selecting devices and targeting the content that you want to deploy. Start a deployment
from any device or content screen, or from the Overview page.
Here is an overview of the process. For details, see Take Action: The Deploy Sequence (on
page 83).
1. Select devices or content for deployment.
2. Select content or device targets.
3. Configure any deployment options.
4. Review selections and deploy.

Chapter 3. Get Started with Devices
Use the Device screens to see a list of all devices (as determined by permission levels), find
specific devices, access device documents, and select devices for deployment.
The Device List
• Operator permission settings, device, and site assignments govern list contents.
• See a list of devices eligible for software in your catalog using the Relevant Devices
with applicable software filter.
• BigFix Lock – A machine with a BigFix lock on it does not run BigFix actions until it is
unlocked.
• See a list of devices used by a specific person with the Most Recent User filter. If a
device has one user account, the device holder is listed. If a device has multiple user
accounts the the last person to log on is listed.
BigFix WebUI User's Guide | 3 - Get Started with Devices | 12
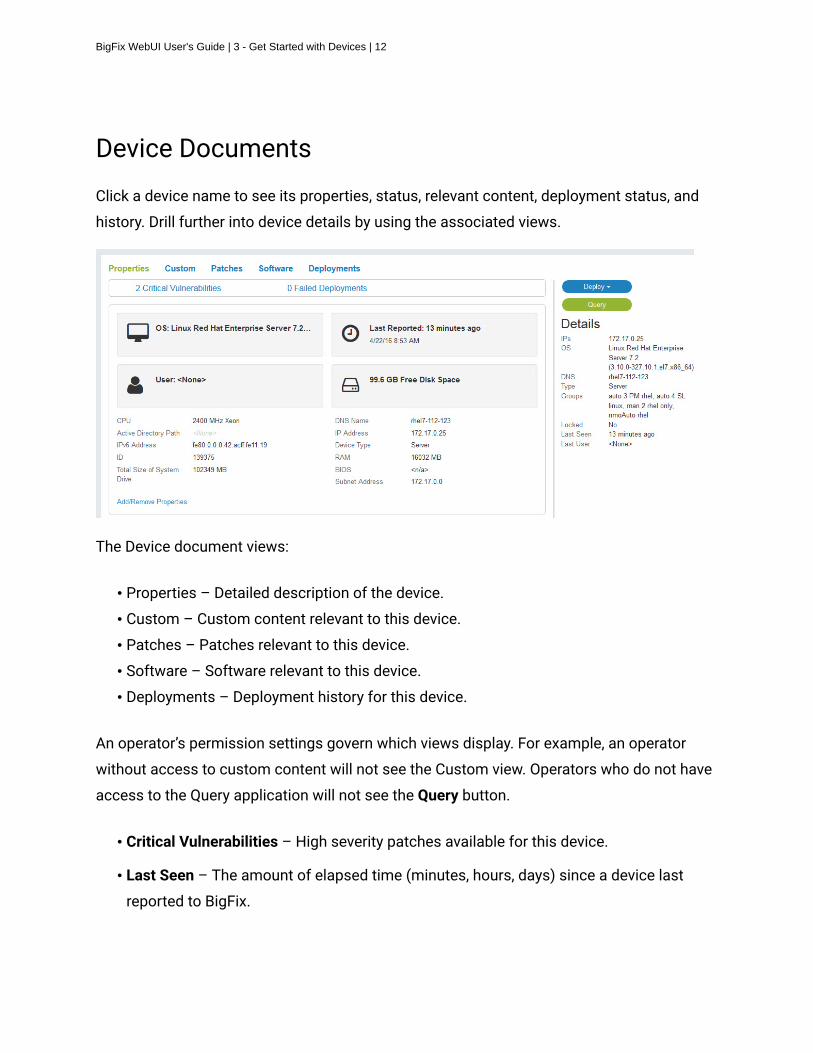
Device Documents
Click a device name to see its properties, status, relevant content, deployment status, and
history. Drill further into device details by using the associated views.
The Device document views:
• Properties – Detailed description of the device.
• Custom – Custom content relevant to this device.
• Patches – Patches relevant to this device.
• Software – Software relevant to this device.
• Deployments – Deployment history for this device.
An operator’s permission settings govern which views display. For example, an operator
without access to custom content will not see the Custom view. Operators who do not have
access to the Query application will not see the Query button.
• Critical Vulnerabilities – High severity patches available for this device.
• Last Seen – The amount of elapsed time (minutes, hours, days) since a device last
reported to BigFix.

BigFix WebUI User's Guide | 3 - Get Started with Devices | 13
• Add/Remove Properties – Display the list of available properties and select the ones
that you want to appear in the device properties view.
• Add Property Group – Customize the Device Properties view by adding or removing
sets of property data from the page.
• Filter Deployment by Status – On the Deployments view, filter the list using Status.

BigFix WebUI User's Guide | 3 - Get Started with Devices | 14
Send a FileYou can upload, list, delete your files and send a file to multiple devices from your file
system.
• The operator must have the following permissions:
◦ Can Create Actions
◦ Custom Content
• SWD must be running and the operator must have access to it.
This section explains you on how to upload a file, send a file to target devices, and delete a
file from the list.
Upload files
To upload a new file into the server:
1. From the Devices page, click More and select Send file.
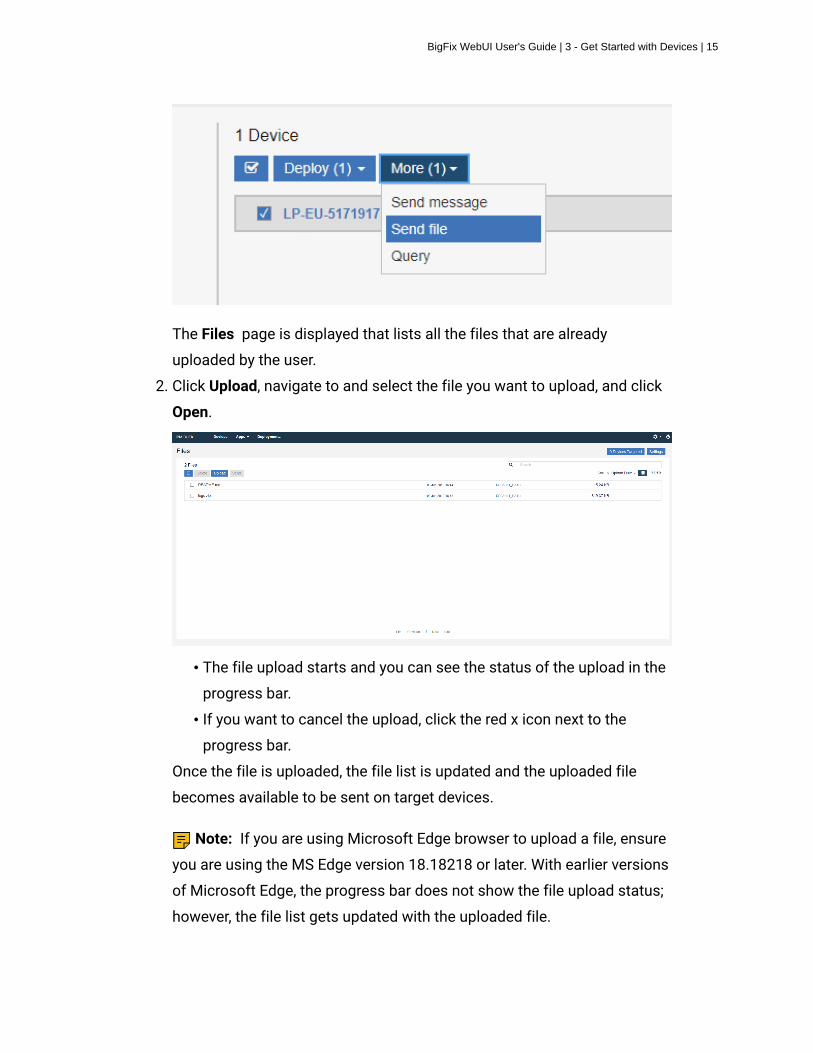
BigFix WebUI User's Guide | 3 - Get Started with Devices | 15
The Files page is displayed that lists all the files that are already
uploaded by the user.
2. Click Upload, navigate to and select the file you want to upload, and click
Open.
• The file upload starts and you can see the status of the upload in the
progress bar.
• If you want to cancel the upload, click the red x icon next to the
progress bar.
Once the file is uploaded, the file list is updated and the uploaded file
becomes available to be sent on target devices.
Note: If you are using Microsoft Edge browser to upload a file, ensure
you are using the MS Edge version 18.18218 or later. With earlier versions
of Microsoft Edge, the progress bar does not show the file upload status;
however, the file list gets updated with the uploaded file.

BigFix WebUI User's Guide | 3 - Get Started with Devices | 16
When the file is uploaded, it is saved in the default path. To change the
default path:
a. Click the link DEFAULT_PATH against the file for which you want to
change the default path.
b. In the Destination file path window:
i. Enter the desired path
ii. Select the option Overwrite if the file already exists on target if
necessary.
c. Click Ok.
The specified path is set as the destination path.
Send a file
You can select a file and send it to one or more selected devices.
Prerequisites: The user permission required to send a file are Create Action
and Custom Create
To send a file to one or more destination devices:
1. In the Devices page, from the list of devices, select one or more
destination devices to which you want to send a file.
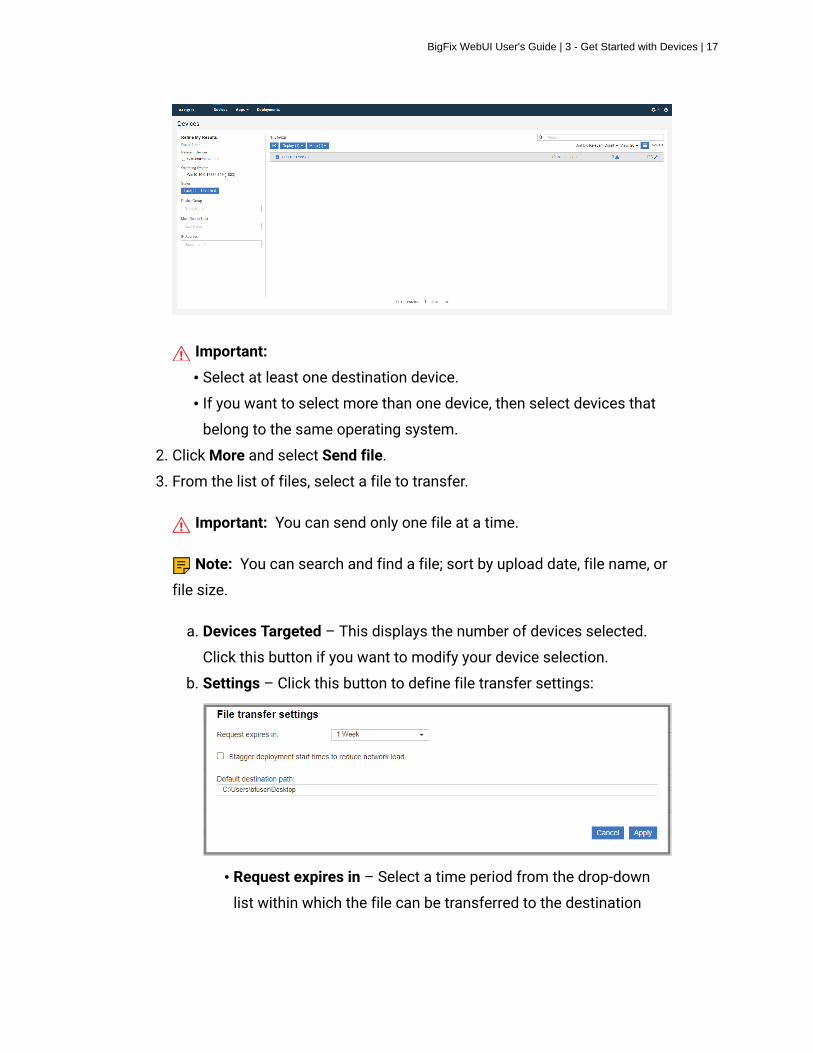
BigFix WebUI User's Guide | 3 - Get Started with Devices | 17
Important:
• Select at least one destination device.
• If you want to select more than one device, then select devices that
belong to the same operating system.
2. Click More and select Send file.
3. From the list of files, select a file to transfer.
Important: You can send only one file at a time.
Note: You can search and find a file; sort by upload date, file name, or
file size.
a. Devices Targeted – This displays the number of devices selected.
Click this button if you want to modify your device selection.
b. Settings – Click this button to define file transfer settings:
• Request expires in – Select a time period from the drop-down
list within which the file can be transferred to the destination

BigFix WebUI User's Guide | 3 - Get Started with Devices | 18
devices. After this time period, the file transfer request expires
and the file cannot be transferred.
• Stagger deployment start times to reduce network load – Select
this option if you want to reduce network load.
• Default destination path – Specify the default destination path
where you want to transfer the file in all selected devices.
4. Click Send.
After successful transfer, the file becomes available in the destination devices
at the default path set.
Note: If the target device is not installed with SSA 3.1.0, then the file
cannot be transferred and the status of the file transfer becomes not relevant.
Delete
To delete files from the server, from the list of files, select one or more files
and click Delete.
Note: When a file is removed, only the reference of the file is removed.
Send Messages to DevicesUsing Send Messages feature, you can send a short message notification to multiple
selected devices. You can determine if the message is read by the end user and also
configure to automatically delete messages from the target devices after a specified
number of days.
• The operator must have the following permissions:
◦ Can Create Actions
◦ Custom Content
• SWD must be running and the operator must have access to it.
• Target devices must have SSA 3.1.0 or later installed with Messages tab setting
enabled.

BigFix WebUI User's Guide | 3 - Get Started with Devices | 19
This section explains you about how to send message notifications to selected target
devices.
1. Open the Devices tab.
2. In the Devices page, from the list of devices, select one or more devices to which you
want to send the message.
3. Click More and select Send message from the drop-down.
4. In the Send message window, enter your subject and message in the relevant sections.
Note:
• You can enter up to 240 characters including the title.
• You can format your content using the formatting options in the toolbar.
• You can copy/paste HTML code into the editor and/or save your message as
HTML code.
5. Click Send.
• When the message is sent, a success message is displayed and the relevant
action is created for the message sent. If the target device is not installed with SSA

BigFix WebUI User's Guide | 3 - Get Started with Devices | 20
3.1.0 or later, then the message cannot be delivered and the status of this action
becomes not relevant.
• When the user reads the message, the status of the action becomes completed.
With this, the operator can determine if the message is read by the end user.
• To automatically delete messages from the target device user's SSA Message tab
after a specified number of days, message expiration days can be set through the
WebUI Server setting _WebUIAppEnv_NOTIFICATION_EXPIRATION_DAYS.

Chapter 4. Get Started with Patches
Use the Patch screens to list patches, find specific patches, and view detailed patch
information including known issues, vulnerable devices, and deployments.
The Patch List
• Operator permission settings, device, and site assignments govern list contents.
• Search bar to search patches by name and CVE IDs.
• See patches for the most critical threats or a specific threat level using the Severity
filters. Patch Severity is assigned by the patch vendor (for example, Microsoft), not
BigFix.
◦ Critical
◦ Important

BigFix WebUI User's Guide | 4 - Get Started with Patches | 22
◦ Moderate
◦ Low
◦ Unknown - patch has no vendor-assigned rating.
• See patches required by many devices by entering a value in the Vulnerable Devices
field.
• See the latest patches using the Release Date field. Specify a date range to see
patches that were issued during a specific time period.
• See patches associated with a specific task using the Category filters:
◦ Security – Apply a software change to address a vulnerability.
◦ Service Pack – Apply patches to installed software. A collection of updates, fixes,
or enhancements delivered in a single installable package. Typically used to
update existing files, but can also be used to fix bugs, close security holes, or add
new features.
◦ Audit – Type of BigFix patch that is used to detect conditions that cannot be
remediated and require the attention of an administrator.
◦ Enhancement – Apply a change that provides new features.
◦ Bug Fix – Apply a change that fixes one or more bugs.
◦ Configuration – Apply a change that addresses a configuration issue.
• Show Hidden Patches – Control the display of audit, corrupt, and superseded patches
in the patch list.
• Supported Patch Sites - Only patches from these sites appear in the WebUI; future
releases will include more patch sites.
◦ Windows
◦ Red Hat Linux
◦ Mac OS X
◦ CentOS
◦ Windows Applications (Adobe Acrobat, Adobe Flash Player, Adobe Reader, Adobe
Shockwave, Google Chrome, ImgBurn, Mozilla Firefox, Notepad++, Nullsoft, Oracle,
Real Networks, Skype, Winamp, Winzip)
◦ Debian
BigFix WebUI User's Guide | 4 - Get Started with Patches | 23
◦ Oracle Linux
◦ SUSE
◦ Ubuntu
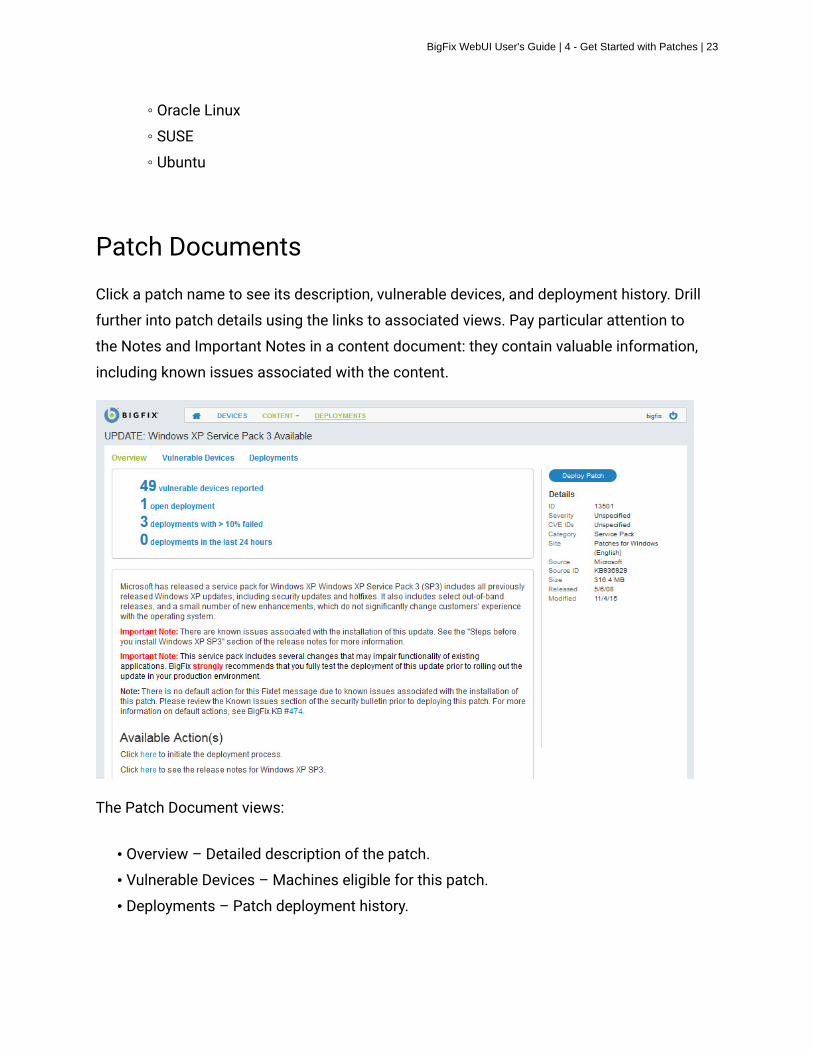
Patch Documents
Click a patch name to see its description, vulnerable devices, and deployment history. Drill
further into patch details using the links to associated views. Pay particular attention to
the Notes and Important Notes in a content document: they contain valuable information,
including known issues associated with the content.
The Patch Document views:
• Overview – Detailed description of the patch.
• Vulnerable Devices – Machines eligible for this patch.
• Deployments – Patch deployment history.

BigFix WebUI User's Guide | 4 - Get Started with Patches | 24
The material in the Available Actions section is pulled directly from the BigFix database, so
options and formatting can vary. A link to the vendor’s release notes is often included. For
example, "Click here to see the release notes for Windows XP SP3."

Chapter 5. Get Started with Patch Policy
Use the Patch Policy application to establish continuous patching across your enterprise.
A patch policy is a set of criteria that defines a patch list; that is, a collection of Fixlets that
meet the patching criteria of a specific set of endpoints. Create patching schedules for
different groups of machines and assign different deployment behaviors to each. Set patch
timing, frequency and duration, pre-caching and retry behavior. Stagger start times, bypass
errors, and notify device owners when a restart is pending.
Implement a patching strategy that meets your organization’s patching cycles and security
guidelines. Use patch policies to establish and maintain a process of continuous security
and compliance for your organization. Patch Policies currently supports Windows and Red
Hat Enterprise Linux (RHEL) patching.
Requirements
• BigFix Platform version 9.5.5, or above.
• BigFix WebUI installed and running.
• Subscriptions to all applicable BigFix patch sites.
Patch Policies supports the Windows and Red Hat Enterprise Linux (RHEL) patch sites.
From the BigFix Console, enable any patch sites that are relevant to your deployment, and
subscribe all computers to those sites.
Patch Policy Overview
Creating a patch policy is straight forward.
1. Enter a name for the policy, and select the types of patches it should include. For
example, create a policy that includes important service packs for operating system
updates.

BigFix WebUI User's Guide | 5 - Get Started with Patch Policy | 26
2. Create a roll out schedule for the policy, including deployment timing, frequency, and
behavior.
3. Select policy targets: the devices to be patched.
4. Activate the policy.
The process is described in detail in Create a Patch Policy (on page 28).
To open the application select Patch Policy from the WebUI Apps menu.
Keeping Policies Current
The Patch Policy app notifies you when new patches that meet policy criteria become
available. The delta icon next to a policy name on the Policy List tells you patch content
has been added or changed. Refresh a policy to include the new material. Refresh policies
manually, or use the Auto-refresh option to keep policies up-to-date.
Exclusions
You can exclude patches from a policy that otherwise meet its inclusion criteria. For
example, manually exclude a patch you know causes problems in a custom application. Or
set a dynamic exclusion to automatically exclude Microsoft Office updates from a policy
that updates Windows. Once set exclusions remain in effect until you remove them. Patch
policies never include patches used for auditing, corrupt patches, or patches without a
default action.
Use the WebUI Deployment views to monitor policy-based patching results. See [link]: Get
Started with Deployments, for more information.
Permissions and Patch Policy
BigFix Master Operators (MOs) have full access to all Patch Policy functions. MOs can
create, edit, delete, activate, and suspend polices, manage patch rollouts and schedules,
and refresh policies when new patches are released. Non Master Operators (NMOs) can
add, edit or delete a policy and they can add targets to an existing schedule, and remove
targets from a schedule if they have relevant permissions.

BigFix WebUI User's Guide | 5 - Get Started with Patch Policy | 27
The Patch Policy List
Important: Non-Master operators need relevant permissions to perform different
actions in the Patch Policies app. For more information on permissions, see The WebUI
Permissions Service.
Policies are listed alphabetically. Use the Sort, Search, View, and filter controls to find
policies quickly. Click a policy name to open its document. Click the Add Policy button to
create a new policy.
Out of Date Policies
The Delta icon indicates that new patches that meet the patch inclusion criteria have
become available since the policy was created or updated. Policies can also fall out of date
when their patches have been modified or replaced.
Refresh a policy to include the new content. Active out of date policies continue to run,
though they are not particularly effective. For example, say you create a new policy that runs
daily at 3pm. On the first day it runs, patches are deployed to its designated targets. On the

BigFix WebUI User's Guide | 5 - Get Started with Patch Policy | 28
second day new patches become available and the policy falls out of date. On the third and
subsequent days the policy runs but does nothing, since the patches it knows about have
already been deployed. As soon as you refresh the policy it will deploy the new patches.
Patches that have been superseded by the new content are no longer be deployed.
Use the Show/Hide Details control to toggle between the Detail and List views.
• Patches: number of patches in the policy.
• Devices: number of targeted computers and computer groups.
• OS: Operating system of patches in the policy.
• Patch Type: OS update, Application update, or 3rd Party application update.
• Policy Status: Active or Suspended.
• Patch Updates: number of Fixlets changed since date and time of creation, or last
refresh.
• Next Refresh: date of next scheduled Auto-refresh, if enabled.
• Site: associated site with a patch policy.
Policy Status: Active or Suspended
Patch policies have two states: Active or Suspended. Suspend an Active policy to refresh it,
add a new schedule, or make other changes. You do not have to suspend a policy to add or
remove targets. New policies remain suspended until you active them.
Create a Patch Policy
BigFix WebUI User's Guide | 5 - Get Started with Patch Policy | 29
Steps for creating a patch policy: selecting patches to include, setting deployment options,
and designating targets, are provided in detail below. To open the application, select Patch
Policy from the WebUI App menu. For a summary of Patch Policy tasks, see Patch Policy
Operations (on page 42).
1. On the Policy list page, click Add Policy.
Note: A non-master operator needs Create/Edit Policy and Delete Policy
permissions to add, edit or delete policy. For more information on permissions, see The
WebUI Permissions Service. Non-Master operators cannot edit definition of the policy
stored in the Master Action Site despite having the permission to Create/Edit Policy.
Currently, non-master operators are not allowed to access the Master Action Site and
they can access only their custom site.
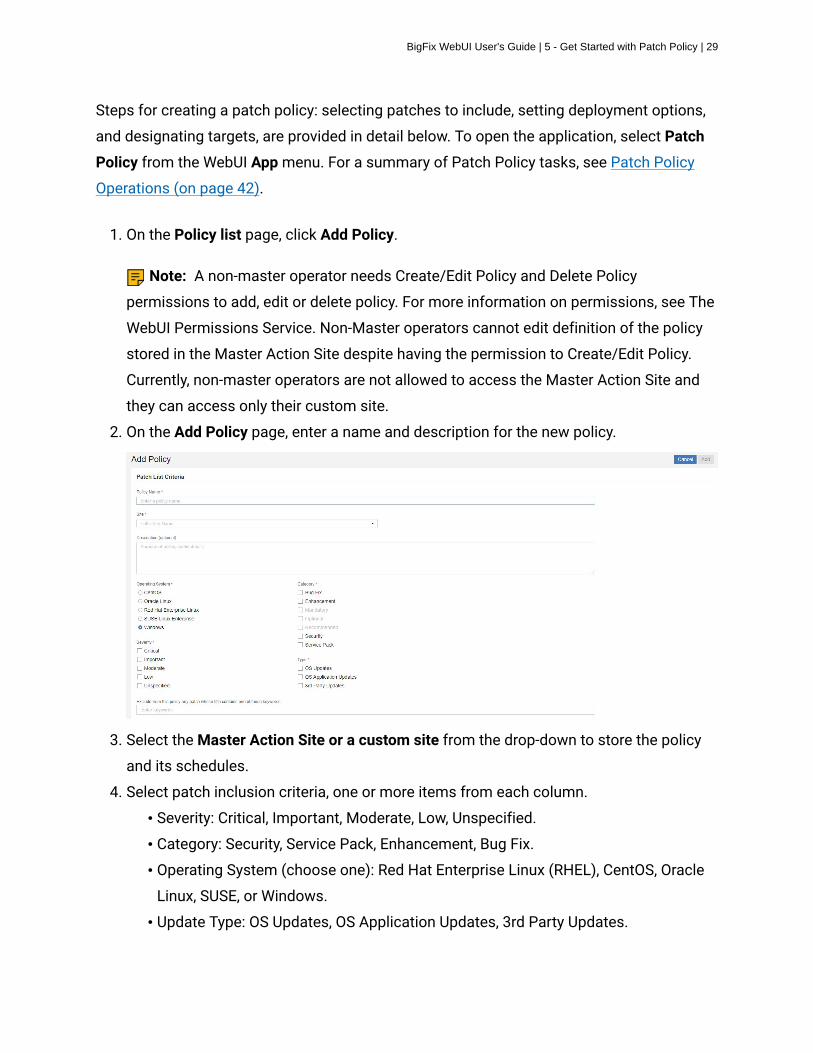
2. On the Add Policy page, enter a name and description for the new policy.
3. Select the Master Action Site or a custom site from the drop-down to store the policy
and its schedules.
4. Select patch inclusion criteria, one or more items from each column.
• Severity: Critical, Important, Moderate, Low, Unspecified.
• Category: Security, Service Pack, Enhancement, Bug Fix.
• Operating System (choose one): Red Hat Enterprise Linux (RHEL), CentOS, Oracle
Linux, SUSE, or Windows.
• Update Type: OS Updates, OS Application Updates, 3rd Party Updates.

BigFix WebUI User's Guide | 5 - Get Started with Patch Policy | 30
Refine your operating system selections as required.
• RHEL versions:
• CentOS versions:
• Oracle Linux versions:

BigFix WebUI User's Guide | 5 - Get Started with Patch Policy | 31
• SUSE versions:
• Windows versions:

BigFix WebUI User's Guide | 5 - Get Started with Patch Policy | 32
5. Specify any patch exclusions. Type a keyword or phrase from the patch title in the
Exclude field, and press Enter to add more. The Exclusion field is not case-sensitive so
capitalization can be ignored.
Use an exclusion to prevent patches that would otherwise meet policy criteria from
being included. For example, exclude all Microsoft Office patches from a policy that
updates Windows with a dynamic exclusion. Or exclude a patch that causes problems
in a custom application with a manual inclusion. Dynamic exclusions are set here or
on the Edit Policy page. Set manual exclusions on the Patches list, once the policy has
been created.
Exclusions remain in place until canceled. To remove an exclusion clear its keywords
from the Edit Policy screen or the Exclude box from the Patches list. Non-Master
Operators can view exclusions, but cannot add to or modify them.
6. Specify Auto-refresh behavior. Use the optional Auto-refresh feature to automatically
include new patch content in your policy. To control update timing and frequency, set a
refresh interval. Auto-refresh is disabled by default.

BigFix WebUI User's Guide | 5 - Get Started with Patch Policy | 33
• Frequency (daily, weekly, monthly), on a specific day (of week/month) at (hour).
• Day After: use the optional Day After controls to schedule Auto-refresh updates
relative to a monthly event, such as patch Tuesday. The second Tuesday of the
month often falls in the second week—but not always. (For example, in August
of 2018, Patch Tuesday fell on the 14th.) Use the Day After options to coordinate
refreshes with events whose dates change month to month.
• Time Zone: defaults to time zone of logged in user. The default time zone is the
one the operator is in.
7. Click Add to save policy settings and display the policy document.
The Schedules and Patches tabs appear at the upper left, beneath the policy name. A
policy summary appears on the right. Once established, policy schedules will display on
the left. The Edit Policy and Delete Policy controls appear at the lower right.

BigFix WebUI User's Guide | 5 - Get Started with Patch Policy | 34
8. Click the Add Schedule button to set policy deployment timing, behavior, and targets. A
policy can have multiple schedules, each with its own deployment options and targets.
A policy without a schedule does not deploy.
Scheduling adds predictability to patching and can help minimize errors. It also ensures
that your environment meets company security policies in time for compliance audits.
Some vendors follow a regular patch release schedule, which can tailor your policy
schedule to meet. You may want to roll out a policy in a test environment prior to
deploying to production. Consider defining separate patch rollouts for Test, QA, and
production stages, each with their own timing and duration.
Note: Non-Master operators need Create/Edit Schedule and Delete Schedule
permissions to add or edit or delete a schedule. For more information on permissions,
see The WebUI Permissions Service. Non-Master operators also need write access to
the site where the policy is stored to add or edit or delete a schedule.
9. Enter a name for the schedule and set the deployment interval.
a. This event repeats (daily, weekly, monthly), on (day of week/month).
b. Day after - Use the optional Day after controls to schedule patching relative to a
monthly event, such as Patch Tuesday. The second Tuesday of the month often
falls in the second week—but not always. (For example, in August of 2018, Patch
Tuesday fell on the 14th.) Use the Day after options to coordinate patching with
events whose dates change month to month.
c. At (Start time).
d. Time Zone. Use Client time to initiate a process relative to its time zone, for
example, to initiate patching in the overnight maintenance window where each

BigFix WebUI User's Guide | 5 - Get Started with Patch Policy | 35
endpoint resides. Use UTC time when you want all endpoints to act simultaneously
across all time zones.
• Client Time - the local time on each endpoint; the time on the device where the
BigFix Agent is installed.
• Universal Time - Coordinated Universal Time (UTC) is the global standard used
to regulate clocks and time worldwide.
e. Patching Duration (minutes, hours, or days, up to 30 days). The amount of time the
policy will attempt to install patches on a target device that is not responding.
f. Maintenance Window - Maintenance Window allows you to run patch policies
during maintenance activities. You can use this dashboard to schedule
maintenance activities run by BigFix. For detailed information, click the
Maintenance Window icon and view the Maintenance Window dashboard.
10. Set deployment and post-deployment behavior.
• Pre-caching: To download required files before patching starts, set the in minutes,
hours, or days up to 5 days.
• Stagger patching start time, for example, to reduce network load. Set an unlimited
number of minutes or hours.
• Bypass patch errors and continue patching. Patch policies are Multiple Action
Groups (MAGs). MAGs run sequentially and stop on the first action that fails. Use
the Bypass patch errors option to ignore failures and proceed to the next action.
Use this option when the actions in a MAG do not depend on the actions that
precede them. For more information about policies and Multiple Action Group
(MAG) processing, see Monitoring Deployed Policies (on page 41).
• Retry up to n times (unlimited). If a patch fails to install on a device, for example,
due to lack of space on the hard drive, set a retry value and the wait period
between attempts.
◦ Wait n (minutes, hours, up to 30 days) between attempts to install.
◦ Wait until device has rebooted to install.
• Force a Restart - Force a restart on completion. Notify device owners when a
restart is required and provide options for restarting at a convenient time. (1, 7, 15
days). Use the default message or type in your own.
11. Click OK to save the schedule and return to the policy document.

BigFix WebUI User's Guide | 5 - Get Started with Patch Policy | 36
12. The new schedule appears at the top of the list. Click Add Targets.
Note: Non-master operators need Add/Remove Your Own Targets permission to
add or remove the self created targets. Non-master operators need Remove Other
Operator's Targets permission to delete the targets that are created by other operators.
Non-Master operators can target only the permitted number of devices and cannot
exceed the limit. In case of violation, WebUI app will display an error message and the
non-master operators cannot proceed further. For more information on permissions,

BigFix WebUI User's Guide | 5 - Get Started with Patch Policy | 37
see The WebUI Permissions Service. Non-master operators need read access to the
site where the policy is stored to add/remove the targets.
13. Select devices or computer groups from the Target By Device or Target By Group tabs.
Note that you cannot target both devices and groups in a single schedule. A schedule
without targets does not deploy. Use the Sort, Search, View, and filter controls to find
targets quickly. Click anywhere in a card to select or deselect it. Click a device or group
name to open its document. Use your browser’s Back button to return to the Patch
Policy app.
14. Click OK to save targets and return to the Policy document.
15. To set a manual exclusion, click the Patches tab.
a. Check the Exclude box next to patches you want to exclude. The Exclude button
tallies your selections.
b. Click the Exclude button.
16. When you are ready, click Activate to activate the policy and commence patching.
Activating a policy activates each of its schedules. Suspend an active policy at any time
to halt patch deployment.
To monitor policy-based patching activity, use the WebUI’s Deployment views (on page
90)
Patch Policy Documents
Use the Patch Policy Document to view and manage policy settings. Policy information
appears on the right.
• Status – Active or Suspended.
• Updates – Number of patch updates available.
• Policy ID – unique identifier for this policy.
• Severity, Category, OS, Type – inclusion criteria.
• Site - name of the site where the policy is stored.
• Next Refresh (Active policies) – Time of next Auto-refresh, if enabled.
• Modified – time policy was last changed.

BigFix WebUI User's Guide | 5 - Get Started with Patch Policy | 38
• Created by: operator name.
Schedules TabThe Schedules tab displays a list of policy schedules in order of creation. Click a schedule
name to display it's Summary page.
• Name – Schedule name.
• Repeat – Deployment interval.
• Targets – Number of targeted devices or computer groups. Click the link to display the
target list. The Add Targets control appears when a schedule has no targets; click the
link to add them.
• Next Deployment: The time the schedule's Multiple Action Groups will be issued to the
BigFix root server. It is subsequently adjusted to accommodate endpoints in all time
zones, ensuring the policy executes at the correct time in each location.
Click the Suspend button to refresh or edit an Active policy. Some Schedules tab controls
are inactive until the policy is Suspended.
Schedules Tab controls:
• Add Schedule
• Activate/Suspend
• Refresh Now
• Edit Policy

BigFix WebUI User's Guide | 5 - Get Started with Patch Policy | 39
• Delete Policy
Note: Non-master operators need Activate/Suspend Policy permission to activate or
suspend the policy and they need Refresh Policy permission to refresh the policy. For more
information on permissions, see The WebUI Permissions Service. Non-master operators
also need write access to the site where the policy is stored to activate/suspend or refresh
the policy.
Schedule Summary PageClick a schedule to display the Schedule summary and its controls. To make changes to a
schedule you must suspend its policy. This is not required when adding or removing targets.
• Pre-cache Downloads – The time when policy patches are pre-cached.
• Stagger Start Time – Amount of time to stagger patching time to reduce network load.
• Bypass errors – Ignore Multiple Action Group (MAG) failures and proceed to the next
action. For more information about patch policies and MAG processing, see Monitoring
Deployed Policies (on page 41).
• Retry on Failure – number of times to retry if a patch fails to install, and the retry
interval.
• Force Restart – Force a restart on completion, and the interval to wait before restarting.

BigFix WebUI User's Guide | 5 - Get Started with Patch Policy | 40
Schedule Summary controls:
• Edit Targets
• Edit Schedule
• Remove Schedule
Patches TabDisplays patches for the selected policy. Patches used for auditing, corrupt patches, and
patches with no default action are not included in patch policies. Superseded patches are
flagged but not deployed; they will be removed from the patches list once the policy has
been refreshed.
To exclude individual patches from the policy check the Exclude box to the left of the title. A
device that has been targeted using a computer group (either a manual or dynamic group),
cannot be individually excluded.
Filters:
• Included – displays included patches.
• Excluded – displays excluded patches, including both dynamic and manual exclusions.
• New – displays patches that will be added to the policy once it is refreshed.
• Applicable Patches – lists patches associated with the devices the logged in user
has permission to operate on. For example, suppose a Non-Master Operator (NMO) is
authorized to patch Windows machines, but not Linux machines. When viewing a policy
that includes both Windows and Linux patches:

BigFix WebUI User's Guide | 5 - Get Started with Patch Policy | 41
◦ When the Applicable patches box is checked the NMO will see only Windows
patches.
◦ When the Applicable box is clear the NMO will see both Windows and Linux
patches.
◦ Master Operators, with unlimited permissions, will see the same patches whether
the Applicable Patches filter is selected or not.
Patches Tab controls:
• Activate/Suspend
• Refresh Policy
• Edit Policy
• Delete Policy
Note: Buttons in the policy document appears only when the respective permissions are
granted to the non-master operators.
Monitoring Deployed Policies
Monitoring Results
Use the WebUI’s Deployment (on page 90) views to monitor policy-based patching
activity.
Working with Multiple Action Groups
A policy is a package of Fixlets and schedules. At the time indicated by the schedule,
all patches meeting policy criteria are collected to create a BigFix Multiple Action Group
(MAG). If a patch is not relevant on a particular device, no individual action will be taken.
A single policy may contain hundreds of patches, and its MAG may contain hundreds of
components. To improve performance, when the number of patches in a policy exceeds 200
it is divided into Multiple Action Groups.
Default behavior of a Multiple Action Group (MAG)

BigFix WebUI User's Guide | 5 - Get Started with Patch Policy | 42
• Staggers deployment start time over the course of an hour to reduce network load.
• Retries three times with a one hour interval on each try.
• Uses default action.
• Expires in 2 days (48 hours).
• The targeting method depends on the target type, whether it is: a) a static endpoint, b) a
manual computer group, or c) an automatic computer group.
Patch Policy Operations:Task Reference
The Patch Policy operations are summarized below. If you suspend an Active policy in order
to make changes, re-activate it when you are done to resume patching.
Add a Policy (on page 43)
Activate a Policy (on page 43)
Suspend a Policy (on page 43)
Refresh a Policy (on page 43)
Edit a Policy (on page 44)
Add a Schedule to a Policy (on page 44)
Edit a Policy Schedule (on page 44)
Add Targets to a Schedule (on page 45)
Remove Targets from a Schedule (on page 45)
Delete a Policy Schedule (on page 45)
Exclude Individual Patches from a Policy (Manual Exclusions) (on page 45)
Exclude Patch Types from a Policy (Dynamic Exclusions) (on page 46)
Enable Auto-refresh (on page 46)
Adjust Auto-refresh Schedule (on page 46)
Disable Auto-refresh (on page 46)

BigFix WebUI User's Guide | 5 - Get Started with Patch Policy | 43
Add a Policy
1. On the Policy List, click Add Policy.
2. Enter a policy name and description.
3. Select policy inclusion criteria: Severity, Category, OS, and Type.
4. Add dynamic exclusions and set Auto-refresh options, as required. Click Add.
5. On the policy document, click Add Schedule.
6. Enter a schedule name. Select options for deployment frequency, and behavior. Click
OK.
7. On the policy document, click the Add Targets link for the new schedule.
8. Select patching targets from the Target By Device or Target By Group tab. Click OK.
9. On the policy document, click Activate.
Activate a Policy
1. From the Policy List, open the policy document.
2. Click the Activate button
Suspend a Policy
1. From the Policy List, open the policy document.
2. Click the Suspend button.
Refresh a Policy
1. From the Policy List, open the policy document.
2. If the policy is active, click the Suspend button.
3. Click the Refresh Now button.
BigFix WebUI User's Guide | 5 - Get Started with Patch Policy | 44
Edit a Policy
1. From the Policy List, open the policy document.
2. If the policy is active, click the Suspend button.
3. Click the Edit Policy link.
4. Make required changes, and Save.
Delete a Policy
1. From the Policy List, open the policy document.
2. If the policy is active, click the Suspend button.
3. Click the Delete Policy link.
Add a Schedule to a Policy
1. From the Policy List, open the policy document.
2. If the policy is active, click the Suspend button.
3. Click Add Schedule.
4. Enter a schedule name, and set scheduling and execution options. Click OK.
5. Click the schedule's Add Targets link.
6. On the Target By Device or Target By Group tab, select devices or groups to add. Click
OK.
Edit a Policy Schedule
1. From the Policy List, open the policy document.
2. If the policy is active, click the Suspend button.
3. Click the schedule name.
4. Click Edit Schedule.
5. Make changes and click OK

BigFix WebUI User's Guide | 5 - Get Started with Patch Policy | 45
Add Targets to a Schedule
1. From the Policy List, open the policy document.
2. Click the schedule's Targets link.
3. On the Target By Device or Target By Group tab, select devices or groups to add. Click
OK.
Remove Targets from a Schedule
1. From the Policy List, open the policy document.
2. Click the schedule's Targets link.
3. On the Target By Device or Target By Group tab, select devices or groups to remove.
Click OK.
Delete a Policy Schedule
1. From the Policy List, open the policy document.
2. If the policy is active, click the Suspend button.
3. Remove all target devices or groups.
a. Click the schedule's Targets link.
b. On the Target By Device or Target By Group tab, click Deselect All. Click OK.
4. On the Schedules tab, click the schedule name.
5. Click Remove Schedule. Click OK.
Exclude Individual Patches from a Policy (Manual Exclusions)
1. From the Policy List, open the policy document.
2. If the policy is active, click the Suspend button.
3. Click the Patches tab.
4. Check the Exclude box next to the patches you want to exclude.
5. Click the Exclude button.

BigFix WebUI User's Guide | 5 - Get Started with Patch Policy | 46
Exclude Patch Types from a Policy (Dynamic Exclusions)
1. From the Policy List, open the policy document.
2. If the policy is active, click the Suspend button.
3. Click Edit Policy.
4. Type a keyword or phrase in the Exclude field and press Enter; repeat as required.
Exclusions keywords are not case-sensitive.
5. Click Save.
Enable Auto-refresh
1. From the Policy List, open the policy document.
2. If the policy is active, click the Suspend button.
3. Click Edit Policy.
4. Click Auto-refresh Enable, and set refresh timing and frequency.
5. Click Save.
Adjust Auto-refresh Schedule
1. From the Policy List, open the policy document.
2. If the policy is active, click the Suspend button.
3. Click Edit Policy.
4. Adjust Auto-refresh timing and frequency.
5. Click Save.
Disable Auto-refresh
1. From the Policy List, open the policy document.
2. If the policy is active, click the Suspend button.
3. Click Edit Policy.
4. Click Auto-refresh Disable.

BigFix WebUI User's Guide | 5 - Get Started with Patch Policy | 47
5. Click Save.

Chapter 6. Get Started with Software
Use the Software-related screens to list software packages, find specific software, and view
detailed package information. A BigFix software package is the collection of Fixlets used
to install software on a device. The package includes the installation files, the Fixlets that
install them, and information about the package itself.
Use the Software app screens to add, edit, and remove packages from your organization’s
software catalog. Use the multiple task feature to create packages with more than one
action. For example, create a single package that can both install and uninstall a piece of
software, or install it multiple ways, using different options.
The Software Package List
• List contents reflect the operator’s device and site assignments, and whether a
particular package was shared, or marked private by the owner.

BigFix WebUI User's Guide | 6 - Get Started with Software | 49
• Add Software to your catalog with the Add Software link. The link does not display if
the operator does not have permission to add software.
Use the Export and Import functions to transfer software packages from one BES server to
another. These tools are useful if you are running multiple BigFix deployments, or want to
make a backup.
• Export - Click to export software packages on the BES server as a zip file. The browser
will prompt you to specify a directory. Multiple packages selected for export are placed
in a single zip file.
• Import - Click to import packages created with the Export function. Operators who do
not have permission to import packages do not see this button.
Note: Importing software packages that include text-based files may sometimes fail.
The import process can change the file’s SHA value and when the SHA validation check
fails, the import fails. This is a known BigFix Platform bug.
Software Documents
Click a software package name to see its description, applicable devices, and deployment
history. Drill further into package details using the links provided in the sidebar, and
associated views. The Software Document views:
• Overview – Detailed description of software package.
• Applicable Devices – Machines eligible for this software.
• Deployments – Software deployment history.

BigFix WebUI User's Guide | 6 - Get Started with Software | 50
• Click Deploy Software to deploy the package.
• Edit or remove a software package from your catalog using the Edit Software link.
• Export the package using the Export Software link.
• Click a deployment task link to edit it. To learn more about task editing see, Editing
Custom Content (on page 63).
Software Catalog Operations
BigFix WebUI User's Guide | 6 - Get Started with Software | 51
This section shows how to add software to your catalog, edit software packages, and
delete packages from the catalog. Note that the permissions used for adding software
to the catalog and the permissions used for editing and deleting software are calculated
differently.
A single BigFix console setting determines whether or not an operator has permission to
add software. Permission to edit and remove software from the catalog is also affected by
who owns the software package, whether it was created using the BigFix console or the
WebUI, and whether a package created in the WebUI was later modified using the console. If
you run into permission issues attempting to edit a software package, talk with your BigFix
administrator.
Add a Software Package
To simplify package creation and editing, installation and uninstallation commands are
generated automatically for supported file types. Feel free to edit these defaults, or type
your own. For unsupported file types, enter the commands you want to use.
• Supported installation file types: .appv, .appx, .bat, dmg, .exe, .msi, .msp, .msu, .pkg
(Mac and Solaris), .rpm.
• Supported uninstallation file types: .appv, .msi, .rpm.
Add a Software Package
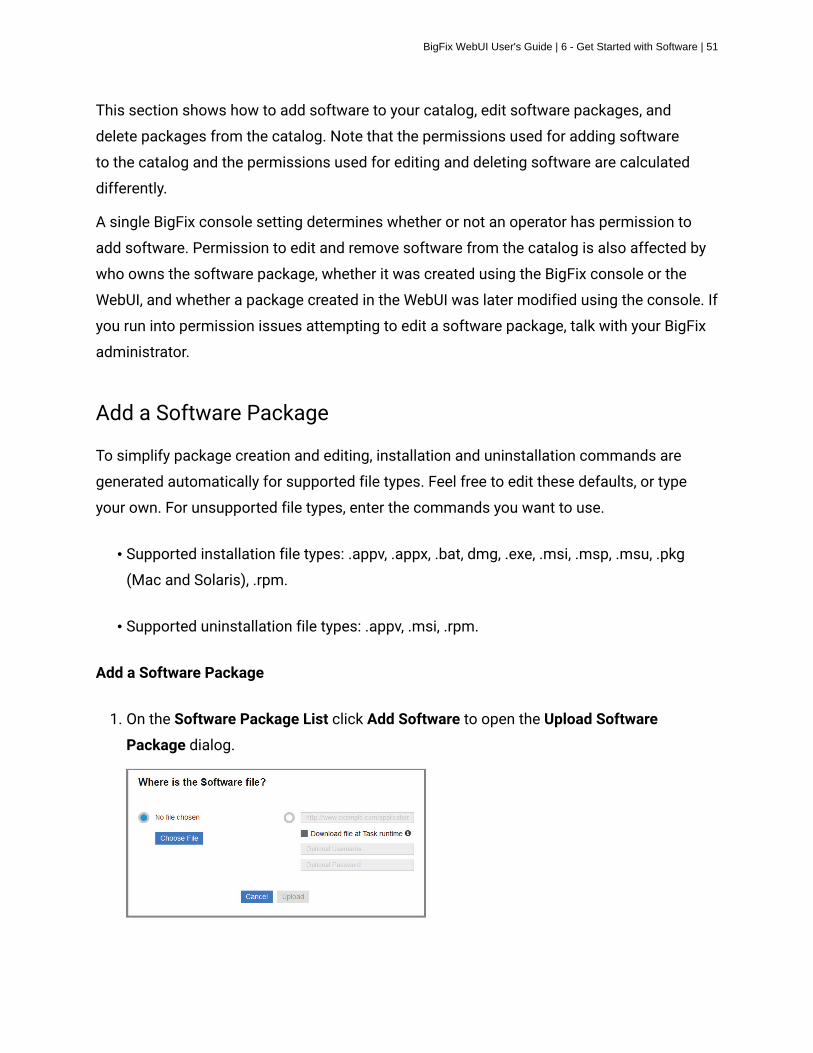
1. On the Software Package List click Add Software to open the Upload Software
Package dialog.

BigFix WebUI User's Guide | 6 - Get Started with Software | 52
2. Choose a local file or enter a URL to download a package. Upload the file to place it on
the BigFix server, where it will remain until the package is deleted. Check the Download
file at Task runtime box to have the file cached when the package is deployed, a useful
alternative if you do not want to permanently store the file.
3. Click Upload.
4. Complete the catalog record. Verify, enter, or select:
• Software Name
• Version number
• Publisher
• Package Icon - To replace the default icon for the package click Change icon, and
upload a .ico or .png file.
• Operating System - Linux, OS X, Solaris, Windows, or Other.
• Category - Type of software. Select one or more existing categories or type a new
category name to create one.
• Description - Describe the package and any instructions that will aid others
responsible for deploying it.
• Configuration - The configuration in this context includes two operations: Install
and Uninstall (optional).

BigFix WebUI User's Guide | 6 - Get Started with Software | 53
• To add the configurations:
◦ Click + Add the configuration. From the Site list. select the BigFix site where
the Fixlet is stored.
◦ To remove the configuration, select the configuration tab you want to
remove and click Delete. The Delete button will be hidden if there is only one
configuration tab.
• On Windows systems, you can run the commands as a System User, Current User,
or as a Local User. Commands that are run by BigFix Clients default to System
User (On OS X, UNIX, and Linux computers, the software is installed as root). In
some cases, you might want to install by using the credentials and local context
of the Current User or a Local User. For details on how to set various parameters
associated with Local User, see Running deployment commands as a Local User
(on page 53).
• Select from the list of installation parameters provided, or click Use Command Line
to edit the installation command. Use the Command Line Preview to verify that it is
correct and complete.
5. Click Save to add the package.
Running deployment commands as a Local User
This section explains the various parameters you can configure when you run a command
as a local user that is different than the logged-in user.

BigFix WebUI User's Guide | 6 - Get Started with Software | 54
• Username: Name of a user who is different than the user that is currently logged in, in
either of the following formats:
1. user@domain. Example: "[email protected]"
2. domain\user. Example: "TEM\myname"
• Password mode: Defines the mode of authentication. The following options are
available:
1. Required: The application prompts you to enter a password, and the value you
enter is passed on to the agent as a Secure Parameter.
2. Impersonate: The agent searches for a session running for the user specified in
Username and runs the command in the session of that user.
3. System: The command is run as the local system account. For this option to
work, the user specified in Username must be logged in to the system when the
command is run.
• Interactive: Select the checkbox. The command opens the user interface of the user
specified in Username and runs in that user’s session.
• Target user: Optional. This option becomes active when you select Interactive. The
command opens the user interface in the session of the user you specify in this field

BigFix WebUI User's Guide | 6 - Get Started with Software | 55
and runs in that session. The command runs with the primary user privileges, but the
target user must be logged in to the system for the command to work.
• Completion: specifies whether the command must wait for the process to end.
1. None: The command does not wait for the process to end. The user must be
logged in to the system before the command starts running. The SWD_Download
folder is retained if this option is selected. Deploy the SWD_Download folder
cleanup fixlet to clean up the client computer, after the process ends.
2. Process: The command waits for the process to end. This option does not require
the specified user to be logged in to the system.
3. Job: The command waits for the process to end. This option expects the process
to do its own job control management and does not require the specified user to
be logged in to the system.
Edit a Software Package
To simplify package creation and editing, installation and uninstallation commands are
generated automatically for supported file types. Feel free to edit these defaults, or type
your own. For unsupported file types, enter the commands you want to use.
• Supported installation file types: .appv, .appx, .bat, dmg, .exe, .msi, .msp, .msu, .pkg
(Mac and Solaris), .rpm.
• Supported uninstallation file types: .appv, .msi, .rpm.
Edit a Software Package
1. Open the software package document that you want to update.
2. Click the Edit Software link in the right side panel.
3. Make any wanted changes to the package data or deployment options. For more
information about each field and its options, see Add Software Package (on page
51).
4. Click Save.

BigFix WebUI User's Guide | 6 - Get Started with Software | 56
Note: Packages edited in the SWD Dashboard such that the package no longer contains
a file or Fixlet, cannot be edited in the WebUI.
Delete a Software Package
1. Open the Software Package document you want to delete.
2. Click the Edit Software link, located in the right side panel.

BigFix WebUI User's Guide | 6 - Get Started with Software | 57
3. Click Delete in the lower left corner of the dialog, and confirm at the prompt.

Chapter 7. Get Started with Custom Content
Use the Custom Content pages to view custom content, edit tasks, and view related
information, including applicable devices and deployments.
The Custom Content List
Use the filters to see specific types of content. Click on a title to open a content document.
Common categories often include installation, configuration, software distribution, security
updates, and uninstallation. The site filters display content stored in a particular site.

BigFix WebUI User's Guide | 7 - Get Started with Custom Content | 59
Custom Content DocumentsClick a custom content name to see its description, list of applicable devices, and
deployment history. Use the links to see details provided in the associated views.
The Custom Content views:
• Overview - detailed description of custom content.
• Applicable Devices - machines eligible for this content.
• Deployments - list of deployments for this piece of content.
If a piece of custom content involves multiple actions, as for a baseline, for example, the
names of its components are listed in the Overview. For information about the differences
between Single tasks and Baselines, see the Glossary (on page 107).
Creating Custom ContentUse the Custom Content Wizard screen to create custom content.

BigFix WebUI User's Guide | 7 - Get Started with Custom Content | 60
The WebUI application allows operators with the appropriate permissions to create new
Fixlet content within the WebUI. The operator can create custom content by filling the
required fields in the custom content creation wizard. The below listed fields in the custom
content creation wizard are mandatory to create custom content:
• Name: Enter a desired name for the custom content.
• Relevance: Enter the required relevance.
• Action: Enter the action script.
Note: Though all the fields are not mandatory, it is recommended to enter the details in
non-mandatory fields.
Creating Custom Content
• To get to the custom content creation page in the global navigation, click Apps > select
Custom from the drop-down, and then click Create Custom Content button.
• On the Create Custom Content Wizard screen, enter the name, add the task description,
relevance, and actionscript accordingly.
Add Task Descriptions

BigFix WebUI User's Guide | 7 - Get Started with Custom Content | 61
Add task descriptions using the Rich Text Format (RTF) or HTML editors;
the Use HTML Editor/Use Rich Text Editor link toggles between them.
The two editors are not kept in sync. In other words, changes made in one
will not be replicated when you switch to the other. Click Save to save the
contents of the active editor; any changes made in the other editor will be
lost.
To protect against cross-site scripting attacks, text entered in the Rich
Text editor is checked before it is saved. For example, style and script
tags will be removed, and URLs and class/ID values might be modified or
removed. Content that is created in the console is rendered accurately in
the HTML editor, but might not be rendered accurately by the Rich Text
editor.
Add Task Relevance
Click the boxed + and – controls to insert or remove a clause. An asterisk
next to a tab name indicates that a change was made on that tab.
Changes made on this page to Relevance created in the BigFix console
using the Conditional Relevance option will subsequently appear in the
console as Relevance clauses.
BigFix WebUI User's Guide | 7 - Get Started with Custom Content | 62
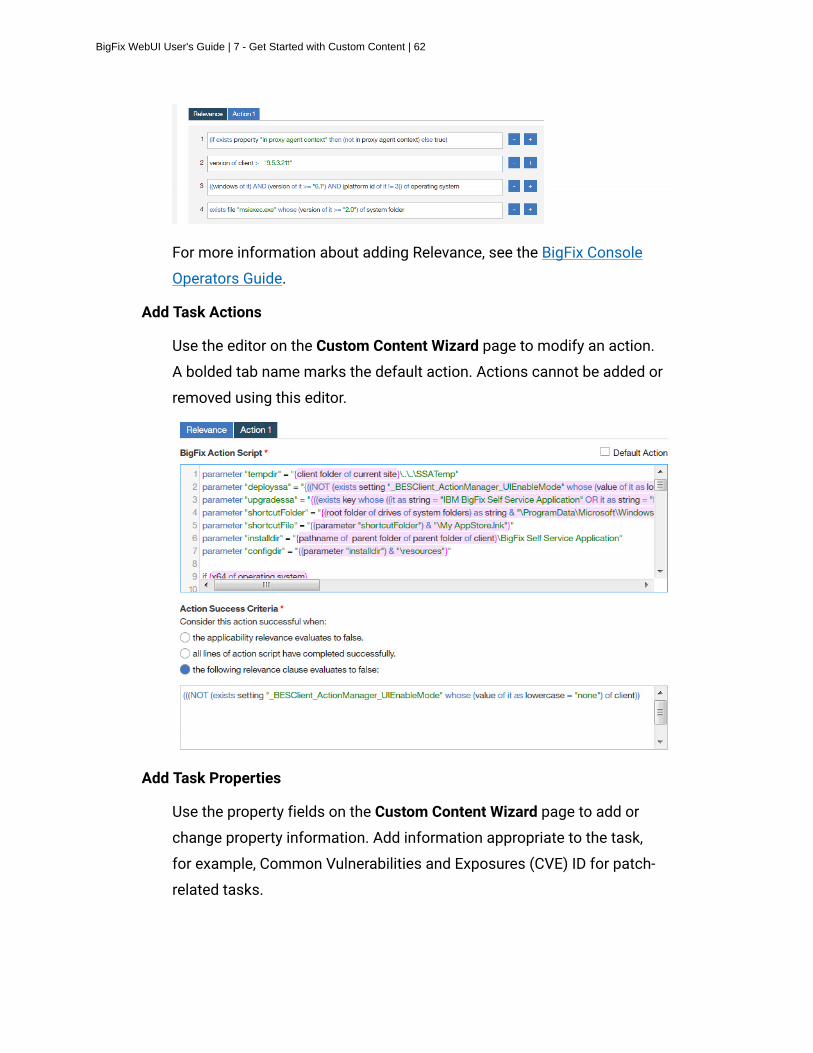
For more information about adding Relevance, see the BigFix Console
Operators Guide.
Add Task Actions
Use the editor on the Custom Content Wizard page to modify an action.
A bolded tab name marks the default action. Actions cannot be added or
removed using this editor.
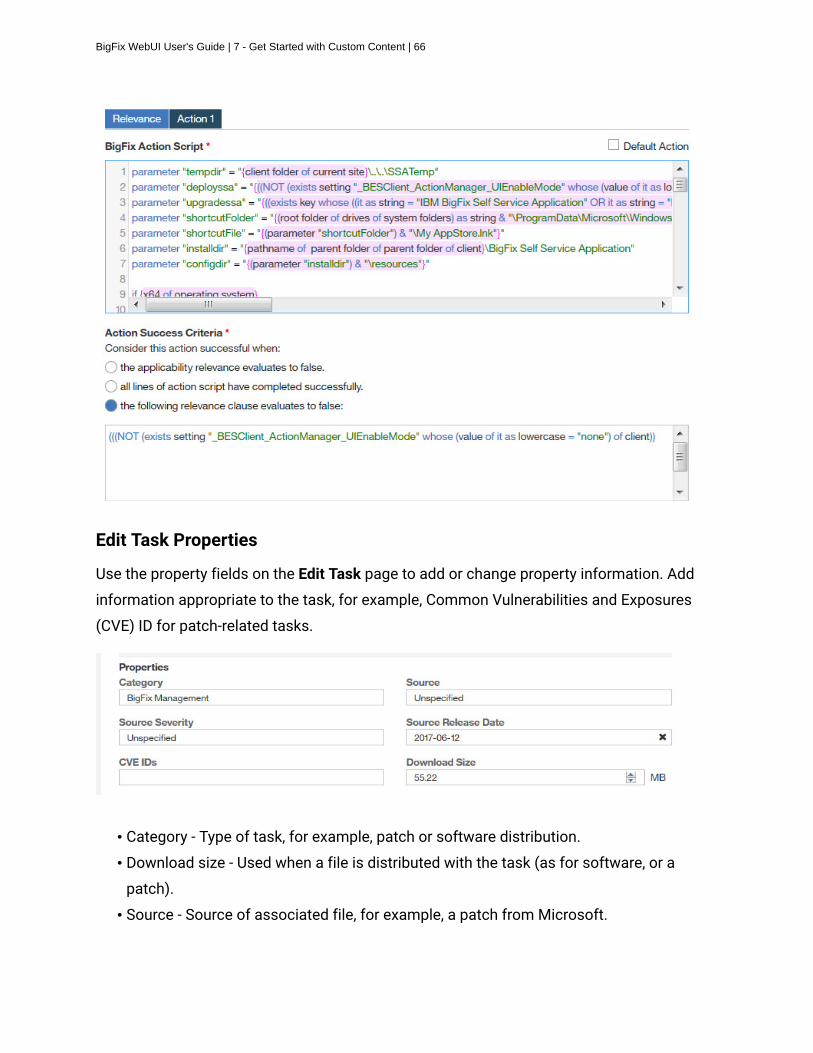
Add Task Properties
Use the property fields on the Custom Content Wizard page to add or
change property information. Add information appropriate to the task,
for example, Common Vulnerabilities and Exposures (CVE) ID for patch-
related tasks.

BigFix WebUI User's Guide | 7 - Get Started with Custom Content | 63
◦ Category - Type of task, for example, patch or software distribution.
◦ Download size - Used when a file is distributed with the task (as for
software, or a patch).
◦ Source - Source of associated file, for example, a patch from
Microsoft.
◦ Source Release Date - Date a piece of software or patch was
released.
◦ Source Severity - Describes the level of risk associated with the
problem fixed by a patch.
◦ CVE IDs - The CVE ID system number of a patch.
◦ Site – Custom content is saved to the selected site.
Important: Non-Master Operators can only save to their operator
site and to the custom content sites that they have write permission.
Important: Master Operators can only save to custom site and
the master action site.
Editing Custom Content
Use the Edit Task screen to edit custom content:
• Add or change an icon.

BigFix WebUI User's Guide | 7 - Get Started with Custom Content | 64
• Edit Relevance - add and remove Relevance clauses.
• Edit Action Script - add or change an action and success criteria.
• Delete a task.
The link to the Edit Task page appears on custom content and software package
documents when an operator has permission to edit tasks. The Edit Task page does not
currently provide the full editing capabilities of the BigFix console. For example, it cannot
be used to add actions, change script type, or include action setting locks. Use the BigFix
console to edit baselines. Tasks that are created in the Profile Management application
must be edited by using the Profile Management application.
Edit Task Descriptions
Edit task descriptions using the Rich Text Format (RTF) or HTML editors; the Use HTML
Editor/Use Rich Text Editor link toggles between them. The two editors are not kept in sync.
In other words, changes made in one will not be replicated when you switch to the other.
Click Save to save the contents of the active editor; any changes made in the other editor
will be lost.
To protect against cross-site scripting attacks, text entered in the Rich Text editor is
checked before it is saved. For example, style and script tags will be removed, and URLs
and class/ID values might be modified or removed. Content that is created in the console

BigFix WebUI User's Guide | 7 - Get Started with Custom Content | 65
is rendered accurately in the HTML editor, but might not be rendered accurately by the Rich
Text editor.
Edit Task Relevance
Use the editor on the Edit Task page to edit Relevance. Click the boxed + and – controls to
insert or remove a clause. An asterisk next to a tab name indicates that a change was made
on that tab. Changes made on this page to Relevance created in the BigFix console using
the Conditional Relevance option will subsequently appear in the console as Relevance
clauses.
For more information about editing Relevance, see the BigFix Console Operators Guide.
Edit Task Actions
Use the editor on the Edit Task page to modify an action. A bolded tab name marks the
default action. Actions cannot be added or removed using this editor.
BigFix WebUI User's Guide | 7 - Get Started with Custom Content | 66
Edit Task Properties
Use the property fields on the Edit Task page to add or change property information. Add
information appropriate to the task, for example, Common Vulnerabilities and Exposures
(CVE) ID for patch-related tasks.
• Category - Type of task, for example, patch or software distribution.
• Download size - Used when a file is distributed with the task (as for software, or a
patch).
• Source - Source of associated file, for example, a patch from Microsoft.

BigFix WebUI User's Guide | 7 - Get Started with Custom Content | 67
• Source Release Date - Date a piece of software or patch was released.
• Source Severity - Describes the level of risk associated with the problem fixed by a
patch.
• CVE IDs - The CVE ID system number of a patch.

Chapter 8. BigFix Query
Use the BigFix Query feature to retrieve data from endpoints through a dedicated query
channel, where the memory available on each Relay minimizes the impact to normal BigFix
processing.
You can use BigFix Query to:
• Query individual computers, manual computer groups and dynamic computer groups
• Test Relevance expressions as you develop the content
• Export query results to a comma-separated value (.csv) file
• Create a library of custom queries and keep the collections private or share them with
others
Users and roles
The Master Operator creates custom sites to host queries, and assigns access to BigFix
Query Operators and Content Creators. This allows Content Creators to save queries on the
custom site, group queries in to categories, and make them available to operators.
Content Creator
As a Content Creator, you can use BigFix Query to do the following tasks:
• Filter queries by selecting or unselecting system and local queries
• Load, hide, delete, or reload sample queries into your operator site
• Customize queries and build your own queries
• Save queries on a new site or with a new name and make them available
to the operators to access it
• Select and filter target devices to run the query
• Switch to operator view to enter values for the parameters used in the
Relevance expression of a query
• View the results of the query and save them to a .csv file
• Open a device document from query results to investigate or apply a fix
The following graphic shows the main Query editor page for a Content Creator:

BigFix WebUI User's Guide | 8 - BigFix Query | 69
Operator
As an Operator, you can use BigFix Query to do the following tasks:
• View the queries that a Content Creator shared with you
• Filter, search, or select a query
• View query descriptions
• Filter and select target devices
• Run a query
• Enter values for the parameters used in the Relevance expression of a
query
• View query results and save them to a .csv file, if you have the required
permission
• Open a device document from query results to investigate or apply a fix
Operators cannot create or delete queries and cannot view Relevance
expressions.
The following graphic shows the main Query editor page for an Operator:

BigFix WebUI User's Guide | 8 - BigFix Query | 70
For details on the editor and how to use custom queries, see Building a query
(on page 77).
For information about the different types of users that can use BigFix Query,
see Permissions for BigFix Query.
About AccordionsThe sections in BigFix Query page is organized with accordions to provide a better visibility
of the tasks to retrieve data from endpoints.
• Query edit - create/edit query: This section allows you to view, edit, and create a query;
search and filter queries
• Select device: This section allows you to select your target/endpoints
• Run: This section allows you to run the selected query on the selected target and fetch
results
About Search
You can search for queries by using basic Search and Advanced Search features.
To perform a basic search, enter a search string and click Search. This lists the queries that
contain the specified string in the query title.

BigFix WebUI User's Guide | 8 - BigFix Query | 71
Note: The application displays entries from your previous searches if they match the
current search string. If the number of entries in the search history is more than four, click
More to view additional search results.
To perform an advanced search and find a string in Relevance expressions along with the
query titles:
1. Enter the search string, and click Advanced Search.
2. Select the categories from the list to refine the search.
Note: All categories are selected by default. To refine your search, clear check
boxes against unwanted categories.
3. Click Save to save your selection for future searches.
This lists the queries that contain the specified string in the query titles and/or in the
Relevance expressions.
About Filters
Filter the queries based on creation type.
Select the System check box to view only the sample queries loaded from the database.
Select the Local check box to view only the custom queries.
Note:
• To view both sample and custom queries, select both System and Local check boxes.
• If you clear both System and Local check boxes, the query app displays both sample
and custom queries.
About Categories
With Categories, Content Creators can group queries according to their needs. Content
Creators can create, populate, and delete categories, while Operators can only show or hide
categories. To add the sample queries to individual categories, click Load Sample Queries.
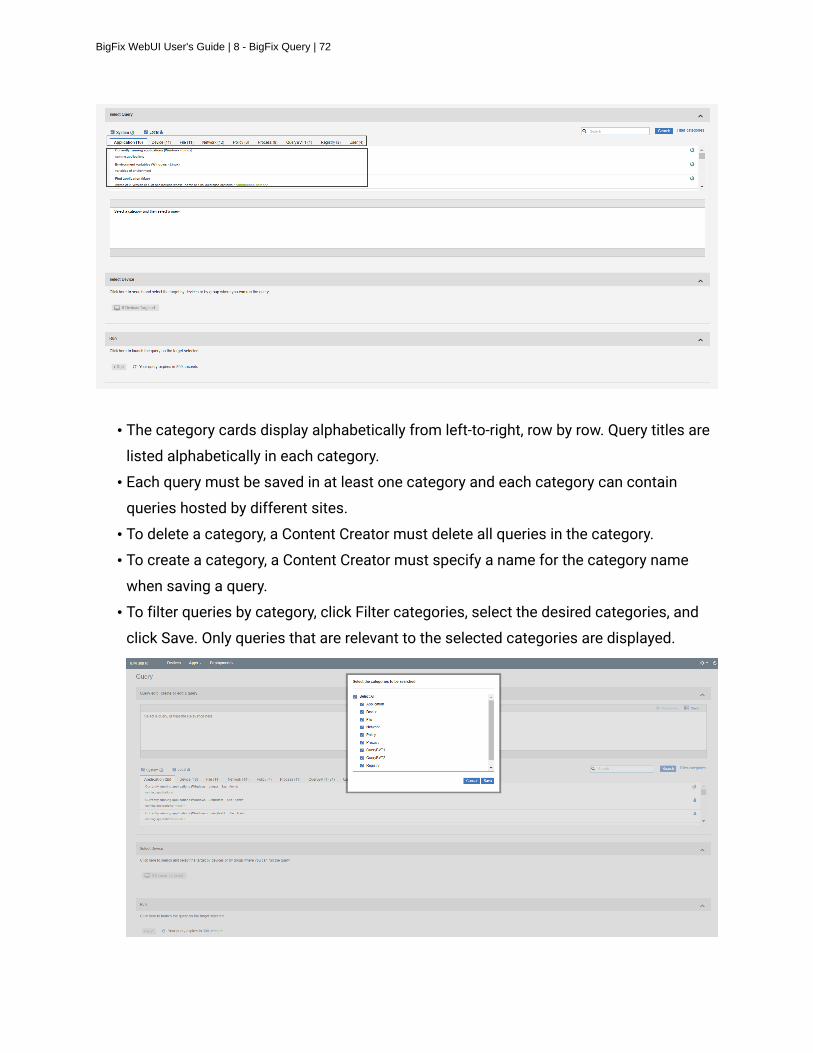
BigFix WebUI User's Guide | 8 - BigFix Query | 72
• The category cards display alphabetically from left-to-right, row by row. Query titles are
listed alphabetically in each category.
• Each query must be saved in at least one category and each category can contain
queries hosted by different sites.
• To delete a category, a Content Creator must delete all queries in the category.
• To create a category, a Content Creator must specify a name for the category name
when saving a query.
• To filter queries by category, click Filter categories, select the desired categories, and
click Save. Only queries that are relevant to the selected categories are displayed.

BigFix WebUI User's Guide | 8 - BigFix Query | 73
About queries and sites
Each query is uniquely identified by the combination of its title and the name of the site
that is hosting the query. If you change either of these two values, a copy of the query is
automatically created. If you create a copy of a query in a different site, you must apply
subsequent updates to each copy individually.
You can save queries only to sites to which you have access as assigned by a Master
Operator. These sites can be either of the following:
• Custom sites created by a Master Operator to share it with Operators.
• Operator sites, if the Content Creator is a Non-Master Operator.
Note: Preexisting queries are not automatically imported into the current BigFix Query
release. However, they are still available as dashboard variables. You can access them using
the REST API dashboard variable resource, as documented on the following page https://
developer.bigfix.com/rest-api/api/dashboardvariable.html.
To learn more about BigFix Query, visit the following links:
• Getting client information by using BigFix Query
• BigFix Query requirements
• BigFix Query restrictions
• Who can use BigFix Query
• How to run BigFix Query from the WebUI
• How BigFix manages BigFix Query requests
Running a sample querySystem queries are sample queries that are marked with the BigFix icon. As Content
Creators, you can load, hide, delete, and reload sample queries in operator sites.
BigFix provides sample queries under the categories Applications, Files, Devices, Networks,
Processes, Registry, Policies, and Users.

BigFix WebUI User's Guide | 8 - BigFix Query | 74
Note: If multiple content creators save a copy of query with the same name and
category in different sites, the application creates multiple instances of the query.
To run a sample query, do the following steps:
1. Click on a category tab.
2. From the listed queries, select a query to display it in the editor.
3. If the query has parameters, enter the parameter values or accept the default values, if
provided. You must use the Operator View to specify parameter values at run time. For
more information, see Managing parameters in queries (on page 80).
4. Click Devices Targeted to open the target list. To select the list of targets to display,
click either Target By Device or Target By Group.

BigFix WebUI User's Guide | 8 - BigFix Query | 75
5. Specify the target where you want to run the query. You can select individual devices,
manual computer groups or dynamic computer groups. The targets are listed as per
the permissions of the user. Master Operators see all devices and groups. Non-Master
Operators might see a subset of the complete list. Use the sort, search, and filtering
functions to quickly locate targets. For a detailed description, see Meet the WebUI (on
page 2).
• To find a specific device or group, enter its name in the Search field.
• Sort a list of devices by device name or the time last seen. Sort a list of groups by
group name, or member count.
• Use filters to locate devices with specific properties. Click the funnel icon to open
and close the filter panel.
When the device or group selection is complete click OK to return to the editor. The
Devices Targeted button displays the total number of devices selected.
Note: When pairing queries and targets, keep in mind that queries that are concise
and limited in scope run most efficiently. Broad queries return larger data sets and use
more resources.
6. To run the query, click Run. If you want to cancel the query, you can do it while the
results are loading.
7. Review your results. Devices report in real time, and new arrivals are appended to the
list as clients report in.

BigFix WebUI User's Guide | 8 - BigFix Query | 76
• To switch to full screen mode and see more results, click the Expand icon . Click
the icon again, or press the Escape key, to exit from full screen mode.
• The icons in the lower right corner of the list show the row totals, and the number
of devices that reported so far.
• To save the results to a file in comma-separated values (.csv) format, click the
Download button. For easy identification of the file, consider including the date and
some descriptive information in the file name.
• To open a device's document, click the device name.
• From the device document, click More and select Queryto return to the query editor
with that device targeted for a query.
• From the query editor, click Device Targeted to view the device list.

BigFix WebUI User's Guide | 8 - BigFix Query | 77
Building a queryWorking with local/custom queries. The queries created by Content Creators are local/
custom queries and are marked with the operator icon. Content Creators can create, load,
run, hide, delete, and reload local queries in their operator sites.
Creating or editing a queryA Content Creator can create a new query in the following ways:
• Enter the Relevance expression in the Query editor and save it
• Create a copy of an existing query and edit as needed
To create or edit a query:
1. In the query editor, ensure you are in Admin View.

BigFix WebUI User's Guide | 8 - BigFix Query | 78
2. Enter the Relevance expression in the editor.
a. To edit an existing query, select the desired query under a category. This displays
the Relevance expression in the editor which you can edit. You can also click Clear
Query to enter your Relevance expression.
3. Add parameters to the Relevance expression, if required. For details about parameters,
see Managing parameters in queries (on page 80)
4. Click Save.
a. Enter a descriptive title for the query
b. Select a site that you are allowed to access and host the query on.

BigFix WebUI User's Guide | 8 - BigFix Query | 79
c. Specify at least one category for the query. If you enter a new name in the
Categories field, a new category is created.
d. Click Save.
Note:
• It is recommended to be familiar with the Relevance language to build queries. To learn
more about the Relevance language, see BigFix Developer.
• Writing Relevance expression in the query editor is similar to writing Fixlets in the BigFix
Console using the Relevance language. Concise queries that are limited in scope run
most efficiently. Broad, general queries that return large data sets consume more
resources. Problems associated with poorly performing Relevance in the Console can
also occur in the Query editor.
Create copy of an existing query
A query is uniquely identified by its title and the site on which it is saved. To create a copy of
a query, change either the title or the site of the query.
Note: If multiple content creators save a copy of a query with the same name and
category in different sites, Master Operators might see multiple instances of the same query
under a category.
To see who last edited a query, hover the cursor over the operator icon of the query.
Deleting a queryTo delete a query, select the query and click the Delete Query icon against it.
Note:
• Operators cannot delete queries.
• Master operators/Content Creators can delete the custom queries only and not the
system queries.

BigFix WebUI User's Guide | 8 - BigFix Query | 80
Using Client Context
As a content creator, you can enable the Evaluation by Agent flag to save a specific query
and use the client context. Enabling the Evaluation by Agent flag and running a query helps
you to retrieve accurate data from the client.
By default, the Queries are evaluated by Client Debugger. You can change it by using the
_WebUIAppEnv_USE_CLIENT_CONTEXT client setting . If this setting is set to 1, the Evaluation
by Agent flag is enabled. The value for each query can be overwritten only by the content
creator. You can save the individual query by enabling the Evaluation by Agent flag, which
allows an operator to use the client context.
Note: Evaluation by Agent flag is available only in BigFix Platform version 9.5.13 and
later.
Managing parameters in queriesAs a Content Creator, you can add parameters to a query to customize it at run time.
Operators are prompted to assign values to the parameters when they run the query, but
they cannot see the Relevance expression.
• To add a parameter, do the following steps:
1. In the query editor, ensure you are in Admin view for the + Parameter button to be
enabled.
2. In the Relevance expression, place the cursor at the point where you want to add
the parameter and click + Parameter.
3. Enter Parameter ID, Parameter Label, and Default Value and click Save.
The parameter is added to the Relevance expression.
Parameters with a default value are displayed in green, and parameters without a
default value are displayed in blue.

BigFix WebUI User's Guide | 8 - BigFix Query | 81
• To reuse a parameter, do the following steps:
1. Click + Parameter and enter the Parameter ID that you want to reuse; the
Parameter Label and Default Value fields are populated automatically.
2. To insert that parameter into the Relevance expression, click Save .
• To see the definition of a parameter, click on the parameter in the query editor.
• To delete a parameter from a query, select the parameter in the query editor, and press
the Backspace or Delete key.
• To assign a value to a parameter (that does not have a default value) at run time as a
Content Creator, click Operator View.
The following graphic shows how a Content Creator sees a query with parameters in the
Admin View:
To review what Operators see when they select the query, click Operator View.

BigFix WebUI User's Guide | 8 - BigFix Query | 82
To return to the query editor, click Admin View.

Chapter 9. Take Action: The Deploy Sequence
To deploy means to dispatch content to one or more endpoints for execution, for example,
to update a patch, install software, or restart a machine. Collectively, the screens that are
used to create deployments are collectively called the Deploy Sequence. The workflow is
straightforward; you might find it similar to making a purchase online.
Deploy Sequence Summary
In summary:
1. Select devices or content for deployment.
2. Select content or device targets.
3. Configure deployment options.
4. Review and deploy.
Prompts, status information, and selection tallies are shown in the side panel. At the top
of the page the status bar reflects your location in the deploy sequence. Embedded help
(question mark icon) is available for some options.
• Target Limits. An administrator can limit the amount of content that can be deployed at
one time, and the number of devices you can deploy to or query at the same time. If you
exceed it, a message displays until you reduce your selections to within the acceptable

BigFix WebUI User's Guide | 9 - Take Action: The Deploy Sequence | 84
range. The message includes the target limit, for example, “You have exceeded the
maximum of 3 devices per deployment.”
• Not all content can be deployed. If non-deployable content (such as an audit action) is
selected, you will be prompted to remove it from the deployment.
• No Default Action – If content without a default action is selected, you will be prompted
to choose one.
• Action Parameters Required – If content that requires a parameter is selected, you will
be prompted to supply one.
Deploy Procedure
1. Select devices or content for deployment; click Deploy.
• Use the List views, filter, and search tools to find the records you want.
• Review the content documents to ensure that you understand their effects.
2. Select content or device targets, respectively; click Next.
• Use the lists, filters, and search tools, and review device and content documents as
needed.
• Alternatively, you can deploy an action directly from the Software Document as
described in Software Documents (on page 49).
3. If the "Require decision" or "Non-deployable" prompts display, one or more actions
require input.
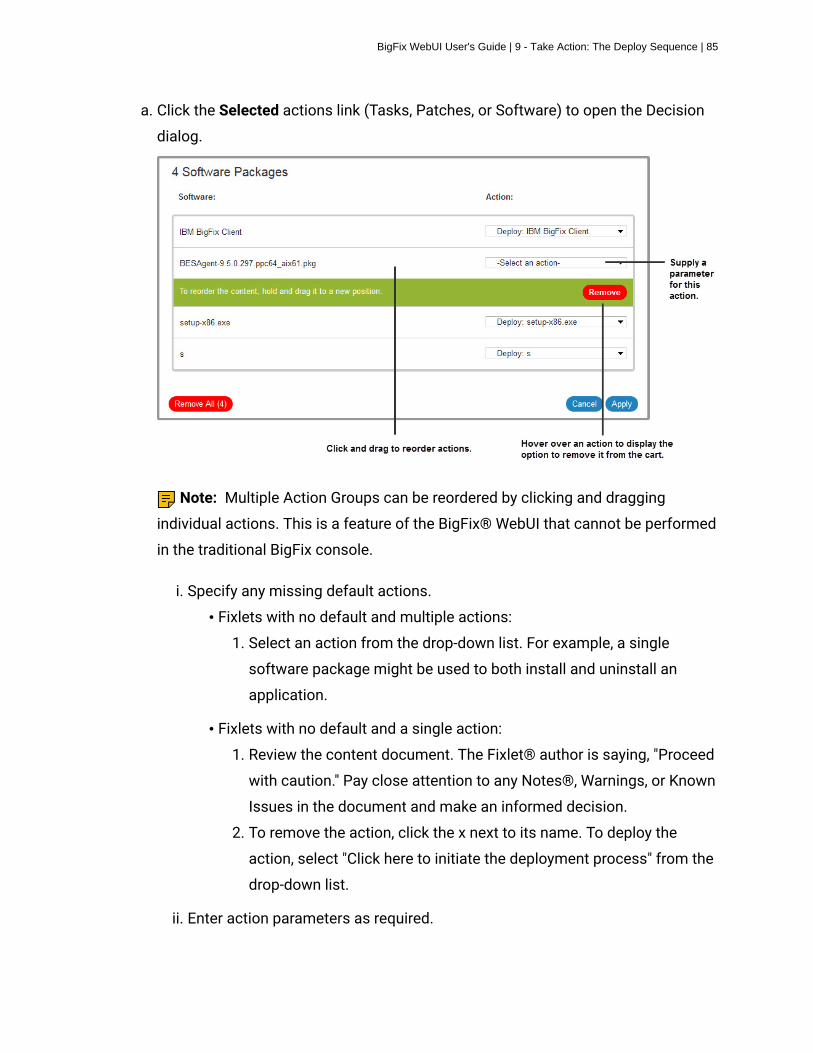
BigFix WebUI User's Guide | 9 - Take Action: The Deploy Sequence | 85
a. Click the Selected actions link (Tasks, Patches, or Software) to open the Decision
dialog.
Note: Multiple Action Groups can be reordered by clicking and dragging
individual actions. This is a feature of the BigFix® WebUI that cannot be performed
in the traditional BigFix console.
i. Specify any missing default actions.
• Fixlets with no default and multiple actions:
1. Select an action from the drop-down list. For example, a single
software package might be used to both install and uninstall an
application.
• Fixlets with no default and a single action:
1. Review the content document. The Fixlet® author is saying, "Proceed
with caution." Pay close attention to any Notes®, Warnings, or Known
Issues in the document and make an informed decision.
2. To remove the action, click the x next to its name. To deploy the
action, select "Click here to initiate the deployment process" from the
drop-down list.
ii. Enter action parameters as required.
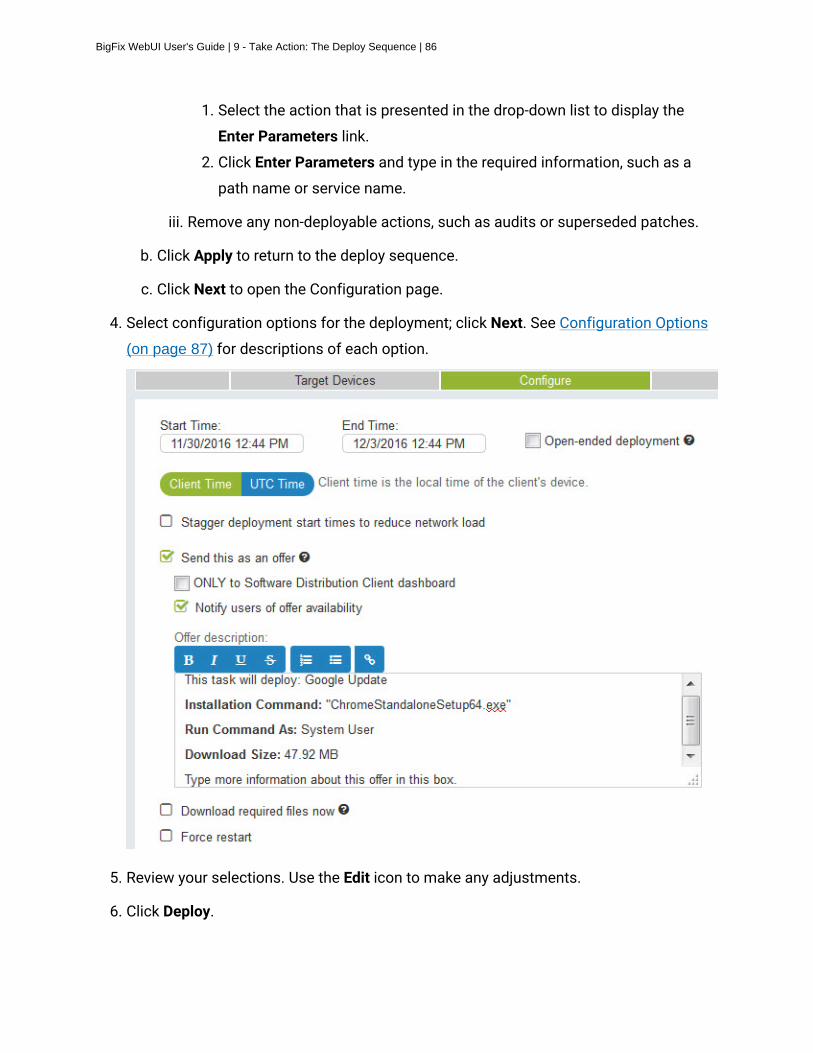
BigFix WebUI User's Guide | 9 - Take Action: The Deploy Sequence | 86
1. Select the action that is presented in the drop-down list to display the
Enter Parameters link.
2. Click Enter Parameters and type in the required information, such as a
path name or service name.
iii. Remove any non-deployable actions, such as audits or superseded patches.
b. Click Apply to return to the deploy sequence.
c. Click Next to open the Configuration page.
4. Select configuration options for the deployment; click Next. See Configuration Options
(on page 87) for descriptions of each option.
5. Review your selections. Use the Edit icon to make any adjustments.
6. Click Deploy.

BigFix WebUI User's Guide | 9 - Take Action: The Deploy Sequence | 87
7. Monitor deployment results with the Deployment views.
Configuration Options
The deployment options are listed below. Some options may not be available on your
system, depending on how your BigFix administrator has configured it.
Set Start and End Time
Schedule a deployment to start at a specific time, for example, to reduce
network load and device-holder inconvenience. When scheduling across time
zones you can schedule actions to start in the past, relative to your own time
zone.
Open-ended deployment
An open-ended deployment has no end date. It runs continuously and checks
whether endpoints comply. For more information, see the Glossary (on page
107).
Client time or UTC time
Further refine when a deployment runs. Client Time is the local time on a
BigFix client's device. Coordinated Universal Time is the primary standard for
regulating clocks and time worldwide.
Stagger deployment times to reduce network load
Enter an interval in hours and minutes.
Send this as an offer
Allow device owners to accept or decline an action, and to control when
it runs. For example, whether or not to install an application, or to run an
installation at night rather than during the day.
Note: Do not send an offer as an open-ended deployment. Open-ended
offers can cause problems for device owners, such as an optional piece of
software they cannot permanently remove.

BigFix WebUI User's Guide | 9 - Take Action: The Deploy Sequence | 88
Offer options:
• ONLY to the Software Distribution Client dashboard - Display software
offers on the Client UI’s Software Distribution Client Dashboard when it
is enabled on the device, and the Self-Service Application is not enabled.
When the Self-Service Application is enabled, all offers display there.
• Notify users of offer availability - Include a notification on the endpoint
that a new offer is available.
• Offer Description - Defaults to the Fixlet description, which can be
amended or changed. If the offer contains multiple actions the name of
each component is included.
Download required files now
Pre-cache deployment-related files, transferring them from a vendor's server to
a BigFix server before deployment. Save time when working with large files or
a tight maintenance window by completing this part of the job first.
Send a Notification
Trigger an email alert when a deployment fails or completes. Enter one or
more recipients in the To: field, separating multiple addresses with a comma.
• Send on Failure - enter a threshold value (1 - 250,000) to receive an email
if the deployment fails on the specified number of devices.
• Send on Completion - check the box to receive an email when the
deployment completes on all targets. Note: this notification option is not
available when targeting computer groups.
Force restart
Force a restart on an endpoint following a deployment, and offer the device
holder a chance to restart the device themselves at convenient time. Set the
restart to occur:
• Immediately (following completion of the deployment)

BigFix WebUI User's Guide | 9 - Take Action: The Deploy Sequence | 89
• 1 day later
• 7 days later
• 15 days later
Send a default message or enter your own. For example, “Your system
administrator requests that you restart your computer, please save your work
and restart. Your device will restart automatically in 7 days.”
Run all member actions of action group regardless of errors
Multiple Action Groups only. Actions in a multiple action group run
sequentially and stop on the first action that fails. Check this box to instruct
the MAG to ignore a failure and proceed to the next action. Use this option
when the actions in a MAG do not depend on the actions that precede them.

Chapter 10. Get Started with Deployments
Use the Deployment views to monitor and verify completion of BigFix deployments.
The Deployment List
The colored bars on the Deployment list summarize the status of each deployment. Use the
filters to find specific deployments by type.
WebUI deployment screens list every deployment. In this they are different from the other
WebUI screens, where permission settings can limit the number of items displayed. While
operators can see all deployments, permissions continue to govern the actions they can
take. For example, an operator who cannot access the WebUI patch screens would see all
patch deployments, but would not be able to stop one that was running.

BigFix WebUI User's Guide | 10 - Get Started with Deployments | 91
The WebUI displays all actions initiated from The WebUI, the BigFix console, and external
sites, including BES Support. For this reason, the Deployment list’s Application Type filter
is labeled, "Patch Software Other", rather than "Patch Software Custom." In this situation
Custom includes any external site, not just Custom sites.
Deployment Documents
Click a deployment name to see its deployment status, behavior (set at configuration), and
targeting information. Drill further into deployment details using the links to associated
views.
The Deployment Document views:
• Overview – detailed description of this deployment: status, behavior, targeting, and
more.
• Device Results – target status – the state of the deployment on each endpoint.
• Component Results – for content with multiple actions: the deployment status of each
component on targeted devices, expressed as a percentage of success.

BigFix WebUI User's Guide | 10 - Get Started with Deployments | 92
Monitoring Deployments: State, Status, and Result
Interpret deployment results correctly by understanding the difference between Device
Results, Deployment Status, and Deployment State.
Device Results
Device Results describe the state of a deployment on a particular endpoint. There are many
different BigFix Device Result codes. The most common ones seen in the WebUI include:
• Fixed, or Completed – The deployment succeeded (on this device).
• Failed – The deployment failed (on this device).
• Pending Restart – Eventual success is implied.
• Not Relevant – The action is not relevant to this device.
• Running
• Evaluating
• Pending Download
Software deployments might have an associated log file. This log can be viewed in the
Device Results screen. The presence of a viewable log file is denoted by an icon. Note that
log files are only available for software deployments.

BigFix WebUI User's Guide | 10 - Get Started with Deployments | 93
Click the log icon to display the associated log data. The entire log can be downloaded by
clicking the log file name.
Note: Log files can only be viewed for software deployments. In addition, to view log
files in the BigFix WebUI, the current user must be subscribed to the Software Distribution

BigFix WebUI User's Guide | 10 - Get Started with Deployments | 94
Site in the traditional BigFix Console, and Analysis 11 of the Software Distribution Site must
be activated.
Deployment Status
Deployment Status is formulated using Device Results.
• For deployments with single actions, Deployment Status is the cumulative deployment
status of each targeted device, expressed as a percentage of success.
• For deployments with multiple actions, Deployment Status is the cumulative
deployment status of each component on each targeted device, expressed as a
percentage of success.
• Green – Fixed (patches), or Completed (software, custom content).
• Dark gray – Other. The category can include Pending Restart, Running, Evaluating,
• Pending Download, and more.
• Light gray – Not yet reported, or not relevant.
• Red – Failed.
• No Status Bar – No relevant devices.

BigFix WebUI User's Guide | 10 - Get Started with Deployments | 95
Deployment State
Deployment State describes the eligibility of a deployment to run on endpoints. It is not
involved in calculating Deployment Status. Deployment State has three values:
• Open – The deployment is eligible to be run by endpoints.
• Expired – The deployment is no longer eligible to run because the end time has passed
for all possible endpoints in all time zones. The default expiration time for an action is 2
days.
• Stopped – The deployment is no longer eligible to run because an operator or
administrator stopped it.
In summary: Device Result is the result of a particular deployment on a specific device.
Deployment State describes the eligibility of a deployment to run. Deployment Status
provides the cumulative results of a deployment on targeted endpoints.
Evaluating Deployments With Multiple Actions
To obtain an accurate picture of the state of a deployment with multiple actions, such
as those involving a group or baseline, check the status of its individual components. In
other words, if a deployment group’s status is less than 100%, check to see which of its
components has not yet completed.

BigFix WebUI User's Guide | 10 - Get Started with Deployments | 96
1. Open the Deployments list.
2. Use the Deployment Type filter to display a list of Group deployments.
3. Select the Deployment that you want and open its document.
4. Click Component Results.
Stop A Deployment
Not every deployment completes successfully the first time. Use the Stop Deployment
button on any Deployment list or document view to terminate a deployment, if needed.
Reasons to stop a deployment include:
• Starting to see failures on many devices.
• Starting to get blue screens on the targeted devices.
• You have updated a baseline (or Fixlet) and need to stop the old one.
Use the Deployment views and the custom tools provided by your BigFix administrator
to diagnose and fix deployment problems. Work with them to learn more about why

BigFix WebUI User's Guide | 10 - Get Started with Deployments | 97
deployments fail and effective methods for resolving issues when they arise. Reasons a
deployment can fail include:
• A computer is offline.
• A computer is being rebuilt or reimaged.
• A computer has insufficient disk space.
• A computer is not communicating with the BigFix update server.
• The BigFix agent is not running on the computer.
• The computer is missing some dependent software.
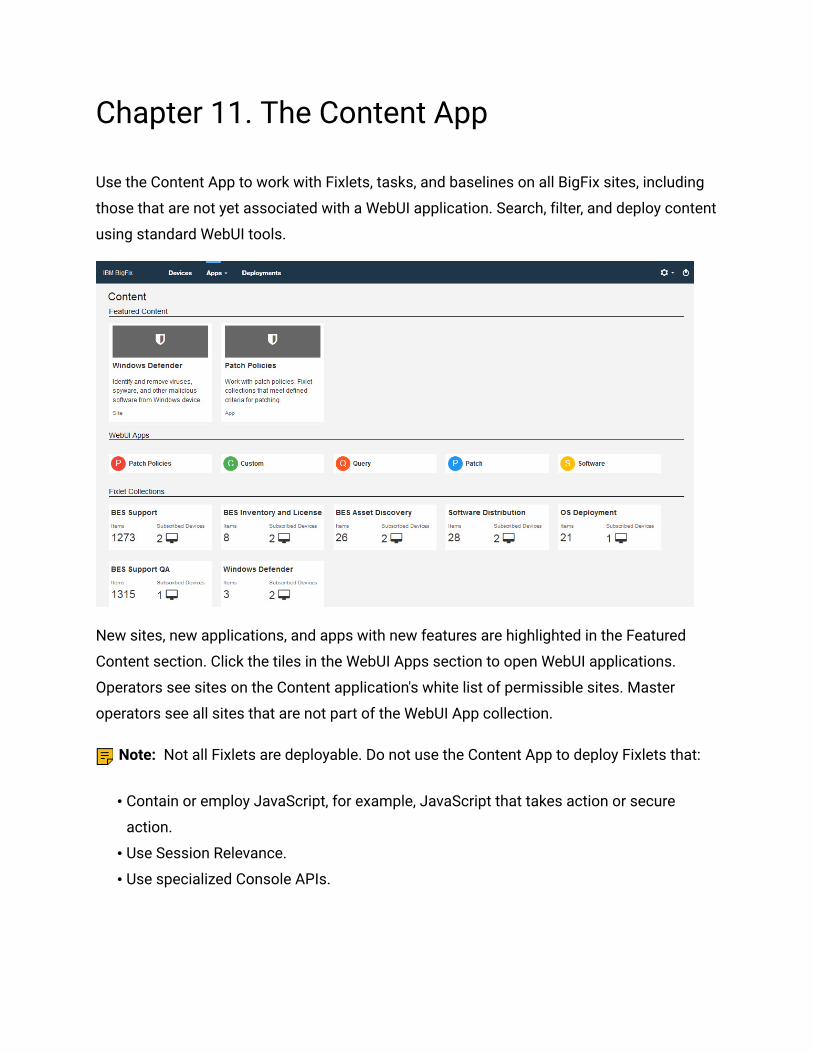
Chapter 11. The Content App
Use the Content App to work with Fixlets, tasks, and baselines on all BigFix sites, including
those that are not yet associated with a WebUI application. Search, filter, and deploy content
using standard WebUI tools.
New sites, new applications, and apps with new features are highlighted in the Featured
Content section. Click the tiles in the WebUI Apps section to open WebUI applications.
Operators see sites on the Content application's white list of permissible sites. Master
operators see all sites that are not part of the WebUI App collection.
Note: Not all Fixlets are deployable. Do not use the Content App to deploy Fixlets that:
• Contain or employ JavaScript, for example, JavaScript that takes action or secure
action.
• Use Session Relevance.
• Use specialized Console APIs.

BigFix WebUI User's Guide | 11 - The Content App | 99
The Fixlets will not run, and you will receive no errors or any other indication that something
is wrong until devices start reporting back that there is a problem. If you are not sure
whether a Fixlet is deployable or not, run it from the BigFix Console to avoid unpredictable
behavior.
Operator Access
The below list associates the activities that an operator can perform with the
type of operator.
• Non-master operators cannot access BES support in the WebUI
application as it is intended only for the Master Operators.
• Master operators can view all the external sites, except for the two below
listed sites in Table 1.
• Non-master operator can only access the external sites that they have
visibility. See the accessible Whitelist sites listed in Table 2.
Table 1. List of external sites that cannot be accessed by the Master
operator
Site ID Site Name
8361 OS Deployment and Bare Metal
Imaging
8363 OS Deployment and Bare Metal
Imaging Beta
Table 2. List of whitelist sites that can be accessed by the Non-master
operator
Site ID Site Name
12249 Advanced Patching
3107 BES Asset Discovery
3073 BigFix Client Compliance (IPSec
Framework)
3043 BigFix Client Compliance
Configuration
9287 BigFix Labs

BigFix WebUI User's Guide | 11 - The Content App | 100
Site ID Site Name
8253 BitLocker Management (Labs)
11316 CIS Checklist for AIX 5.3 and 6.1
11316 CIS Checklist for AIX 5.3 and 6.1
11522 CIS Checklist for AIX 7.1 - RG03
12070 CIS Checklist for Apache HTTP
Server 2.2 on Linux
12391 CIS Checklist for CentOS Linux 6
12410 CIS Checklist for CentOS Linux 7
11535 CIS Checklist for DB2 on Linux
11536 CIS Checklist for DB2 on Windows
15106 CIS Checklist for Internet Explorer
10
12337 CIS Checklist for Internet Explorer
11
12339 CIS Checklist for Mac OS X 10.10
12354 CIS Checklist for Mac OS X 10.11
12425 CIS Checklist for Mac OS X 10.12
11313 CIS Checklist for Mac OS X 10.6
12389 CIS Checklist for Mac OS X 10.8
11566 CIS Checklist for MS IIS 7
12509 CIS Checklist for MS IIS 8
11568 CIS Checklist for MS SQL Server
2005
11570 CIS Checklist for MS SQL Server
2008 R2
11574 CIS Checklist for MS SQL Server
2012 DB Engine
11539 CIS Checklist for Oracle Database
11-11g R2 on Linux

BigFix WebUI User's Guide | 11 - The Content App | 101
Site ID Site Name
11540 CIS Checklist for Oracle Database
11-11g R2 on Windows
11537 CIS Checklist for Oracle Database
9i-10g on Linux
11538 CIS Checklist for Oracle Database
9i-10g on Windows
12373 CIS Checklist for Oracle Linux 6
12364 CIS Checklist for Oracle Linux 7
11318 CIS Checklist for RHEL 5
11366 CIS Checklist for RHEL 6
12181 CIS Checklist for RHEL 7
12187 CIS Checklist for SLES 10
12518 CIS Checklist for SLES 11
11317 CIS Checklist for Solaris 10
11526 CIS Checklist for Solaris 11 - RG03
12465 CIS Checklist for SUSE 12
12453 CIS Checklist for Ubuntu 12.04 LTS
Server
12439 CIS Checklist for Ubuntu 14.04 LTS
Server
12429 CIS Checklist for Ubuntu 16.04 LTS
Server
12288 CIS Checklist for Windows 10
11356 CIS Checklist for Windows 2003 DC
11358 CIS Checklist for Windows 2003 MS
13083 CIS Checklist for Windows 2008 DC
- RG03
13085 CIS Checklist for Windows 2008 MS
- RG03
13075 CIS Checklist for Windows 2008 R2
DC

BigFix WebUI User's Guide | 11 - The Content App | 102
Site ID Site Name
13077 CIS Checklist for Windows 2008 R2
MS
12064 CIS Checklist for Windows 2012 DC
12066 CIS Checklist for Windows 2012 MS
12057 CIS Checklist for Windows 2012 R2
DC
12061 CIS Checklist for Windows 2012 R2
MS
12469 CIS Checklist for Windows 2016 DC
12471 CIS Checklist for Windows 2016 MS
11491 CIS Checklist for Windows 7
12093 CIS Checklist for Windows 8
15107 CIS Checklist for Windows 8.1
11360 CIS Checklist for Windows XP
9342 Client Manager Builder
8151 Client Manager for Application
Virtualization
75 Client Manager for Endpoint
Protection
9318 Client Manager for TPMfOSD
11035 DISA STIG Checklist for AIX 5.1
11036 DISA STIG Checklist for AIX 5.2
11434 DISA STIG Checklist for AIX 53 -
RG03
11436 DISA STIG Checklist for AIX 61 -
RG03
11354 DISA STIG Checklist for AIX 7.1
11040 DISA STIG Checklist for HPUX 11.11
11460 DISA STIG Checklist for HPUX 11.23
- RG03
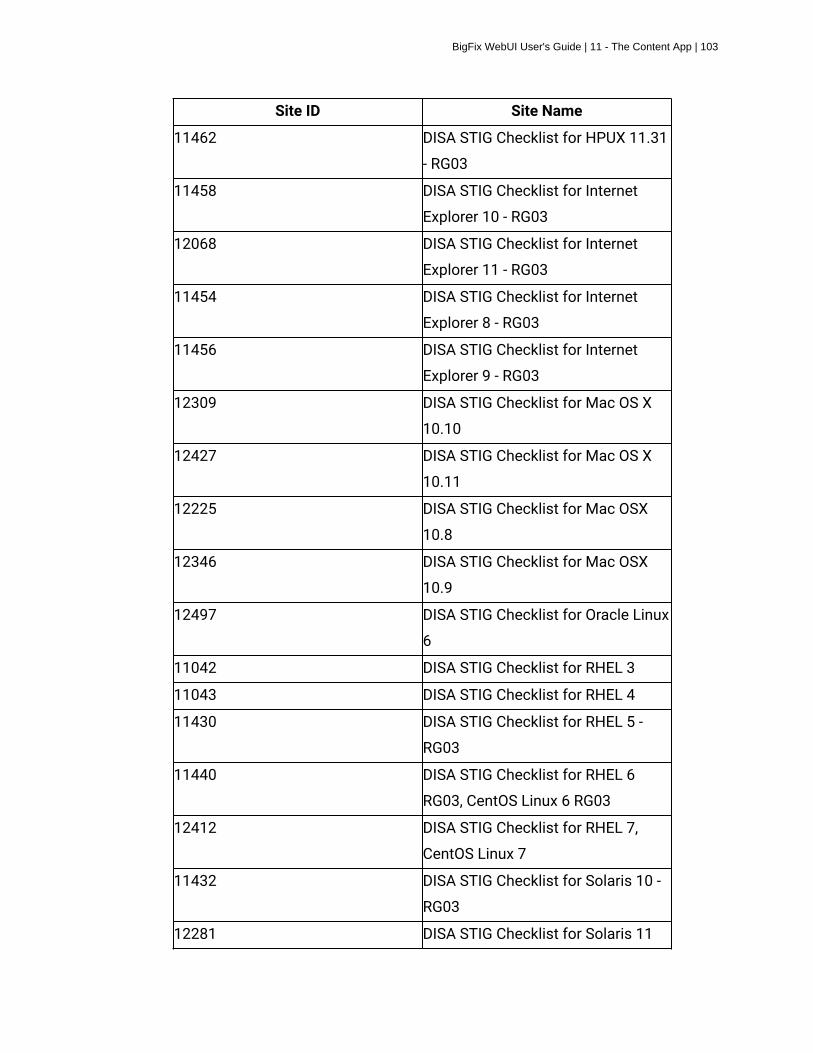
BigFix WebUI User's Guide | 11 - The Content App | 103
Site ID Site Name
11462 DISA STIG Checklist for HPUX 11.31
- RG03
11458 DISA STIG Checklist for Internet
Explorer 10 - RG03
12068 DISA STIG Checklist for Internet
Explorer 11 - RG03
11454 DISA STIG Checklist for Internet
Explorer 8 - RG03
11456 DISA STIG Checklist for Internet
Explorer 9 - RG03
12309 DISA STIG Checklist for Mac OS X
10.10
12427 DISA STIG Checklist for Mac OS X
10.11
12225 DISA STIG Checklist for Mac OSX
10.8
12346 DISA STIG Checklist for Mac OSX
10.9
12497 DISA STIG Checklist for Oracle Linux
6
11042 DISA STIG Checklist for RHEL 3
11043 DISA STIG Checklist for RHEL 4
11430 DISA STIG Checklist for RHEL 5 -
RG03
11440 DISA STIG Checklist for RHEL 6
RG03, CentOS Linux 6 RG03
12412 DISA STIG Checklist for RHEL 7,
CentOS Linux 7
11432 DISA STIG Checklist for Solaris 10 -
RG03
12281 DISA STIG Checklist for Solaris 11
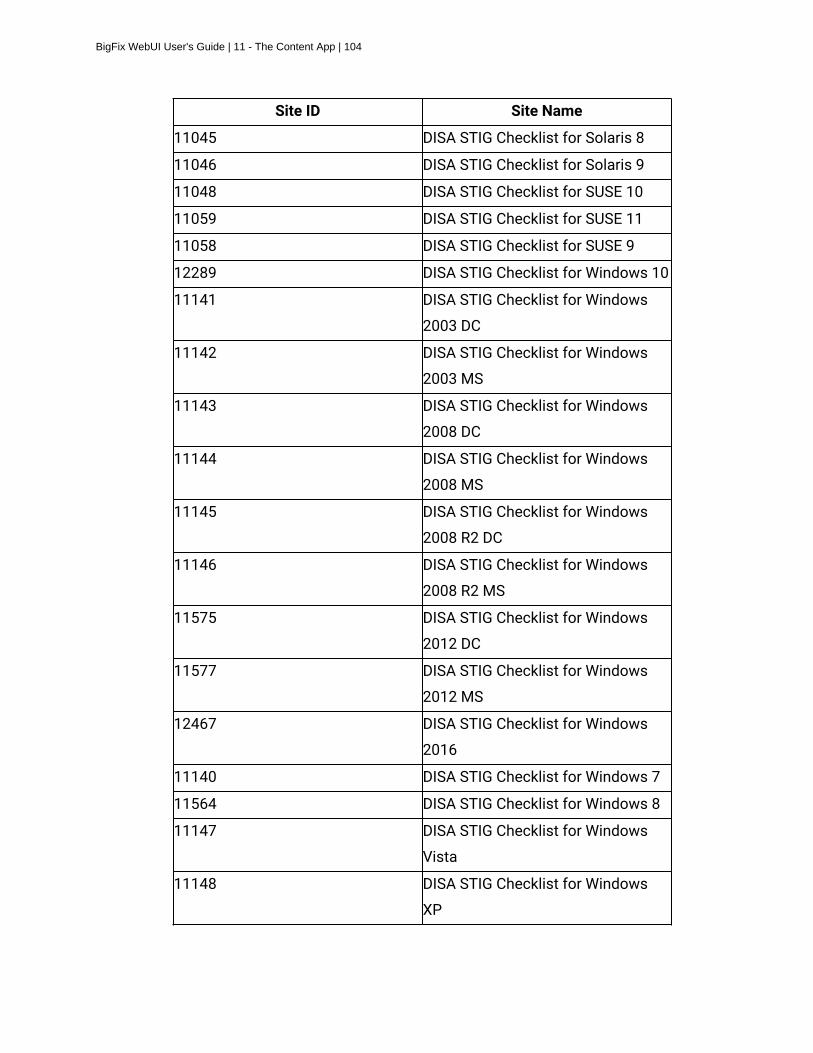
BigFix WebUI User's Guide | 11 - The Content App | 104
Site ID Site Name
11045 DISA STIG Checklist for Solaris 8
11046 DISA STIG Checklist for Solaris 9
11048 DISA STIG Checklist for SUSE 10
11059 DISA STIG Checklist for SUSE 11
11058 DISA STIG Checklist for SUSE 9
12289 DISA STIG Checklist for Windows 10
11141 DISA STIG Checklist for Windows
2003 DC
11142 DISA STIG Checklist for Windows
2003 MS
11143 DISA STIG Checklist for Windows
2008 DC
11144 DISA STIG Checklist for Windows
2008 MS
11145 DISA STIG Checklist for Windows
2008 R2 DC
11146 DISA STIG Checklist for Windows
2008 R2 MS
11575 DISA STIG Checklist for Windows
2012 DC
11577 DISA STIG Checklist for Windows
2012 MS
12467 DISA STIG Checklist for Windows
2016
11140 DISA STIG Checklist for Windows 7
11564 DISA STIG Checklist for Windows 8
11147 DISA STIG Checklist for Windows
Vista
11148 DISA STIG Checklist for Windows
XP

BigFix WebUI User's Guide | 11 - The Content App | 105
Site ID Site Name
11120 FDCC Checklist for Internet Explorer
7
11123 FDCC Checklist for Windows Vista
11124 FDCC Checklist for Windows Vista
Firewall
11121 FDCC Checklist for Windows XP
11122 FDCC Checklist for Windows XP
Firewall
13013 IBM License Reporting (ILMT) v9
8506 MaaS360 Mobile Device
Management
12380 Managed Vulnerabilities
8150 Patching Support
8102 Power Management
15105 QRadar Vulnerabilties
8110 Remote Control
6113 SCM Reporting
9188 Software Distribution
8032 Tivoli Endpoint Manager for
Software Usage Analysis v1.3
9072 Trend Common Firewall
9095 Trend Core Protection Module for
Mac
8232 Updates for Mac Applications
5095 Updates for Windows Applications
11119 USGCB Checklist for Internet
Explorer 7
11113 USGCB Checklist for Internet
Explorer 8
12106 USGCB Checklist for RHEL 5

BigFix WebUI User's Guide | 11 - The Content App | 106
Site ID Site Name
11110 USGCB Checklist for Windows 7
11112 USGCB Checklist for Windows 7
Energy
11111 USGCB Checklist for Windows 7
Firewall
11116 USGCB Checklist for Windows Vista
11114 USGCB Checklist for Windows Vista
Energy
11115 USGCB Checklist for Windows Vista
Firewall
11118 USGCB Checklist for Windows XP
11117 USGCB Checklist for Windows XP
Firewall
8346 Virtual Endpoint Manager
5040 Vulnerabilities to Windows Systems
9112 Windows 7 Migration
9173 Windows Point of Sale

Chapter 12. Glossary
This glossary provides terms and definitions for the [product name] software and products.
The following cross-references are used in this glossary:
• See refers you from a nonpreferred term to the preferred term or from an abbreviation
to the spelled-out form.
• See also refers you to a related or contrasting term.
For other terms and definitions, see the HCL Terminology website (opens in new window).
A (on page 107) B (on page 108) C (on page 109) D (on page 111) E (on page
113) F (on page 113) G (on page 113) L (on page 114) M (on page 114) N (on
page 115) O (on page 115) P (on page 116) R (on page 116) S (on page 117) T
(on page 119) U (on page 120) V (on page 120) W (on page 120)
Aaction
1. See Fixlet (on page 113).
2. A set of Action Script commands that perform an operation or
administrative task, such as installing a patch or rebooting a device.
Action Script
Language used to perform an action on an endpoint.
agent
See BigFix agent (on page 108).
ambiguous software

BigFix WebUI User's Guide | 12 - Glossary | 108
Software that has an executable that looks like another executable, or that
exists in more than one place in a catalog (Microsoft Word as a standalone
product or bundled with Microsoft Office).
audit patch
A patch used to detect conditions that cannot be remediated and require the
attention of an administrator. Audit patches contain no actions and cannot be
deployed.
automatic computer group
A computer group for which membership is determined at run time by
comparing the properties of a given device against the criteria set for group
membership. The set of devices in an automatic group is dynamic, meaning it
can and does change. See also computer group (on page 109).
Bbaseline
A collection of actions that are deployed together. A baseline is typically used
to simplify a deployment or to control the order in which a set of actions are
applied. See also deployment group (on page 111).
BigFix agent
The BigFix code on an endpoint that enables management and monitoring by
BigFix.
BigFix client
See BigFix agent (on page 108).
BigFix console
The primary BigFix administrative interface. The console provides a full set of
capabilities to BigFix administrators.

BigFix WebUI User's Guide | 12 - Glossary | 109
Cclient
A software program or computer that requests services from a server. See
also server (on page 118).
client time
The local time on a BigFix client's device.
Common Vulnerabilities and Exposures Identification Number (CVE ID)
A number that identifies a specific entry in the National Vulnerability
Database. A vendor's patch document often includes the CVE ID, when it is
available. See also National Vulnerability Database (on page 115).
Common Vulnerabilities and Exposures system (CVE)
A reference of publicly known network vulnerabilities which is part of the
National Vulnerabilities Database (NVD), maintained by the US National
Institute of Standards and Technology (NIST).
component
An individual action within a deployment that has more than one action. See
also deployment group (on page 111).
computer group
A group of related computers. An administrator can create computer groups
to organize systems into meaningful categories, and to facilitate deployment
of content to multiple computers. See also automatic computer group (on
page 108), manual computer group (on page 114).
console
See BigFix console (on page 108).
content

BigFix WebUI User's Guide | 12 - Glossary | 110
Digitally-signed files containing data, rules, queries, criteria, and other
instructions, packaged for deployment across a network. BigFix agents use
the detection criteria (Relevance statements) and action instructions (Action
Script statements) in content to detect vulnerabilities and enforce network
policies.
content relevance
A determination of whether a patch or piece of software is eligible for
deployment to one or more devices. See also device relevance (on page
112).
Coordinated Universal Time (UTC)
The international standard of time that is kept by atomic clocks around the
world.
corrupt patch
A patch that flags an operator when corrections made by an earlier patch have
been changed or compromised. This can occur when an earlier service pack
or application overwrites later files, resulting in patched files that are no longer
current. The corrupt patch flags the situation and can be used to re-apply the
later patch.
custom content
BigFix code created by a customer for use on their own network, for example,
a custom patch or baseline.
CVE
See Common Vulnerabilities and Exposures system (on page 109).
CVE ID
See Common Vulnerabilities and Exposures Identification Number (on page
109).

BigFix WebUI User's Guide | 12 - Glossary | 111
Ddata stream
A string of information that serves as a source of package data.
default action
The action designated to execute when a Fixlet is deployed. When no default
action is defined, the operator is prompted to choose between several actions
or to make an informed decision about a single action.
definitive package
A string of data that serves as the primary method for identifying the presence
of software on a computer.
deploy
To dispatch content to one or more endpoints for execution to accomplish an
operation or task, for example, to install software or update a patch.
deployment
Information about content dispatched to one or more endpoints, a specific
instance of dispatched content.
deployment group
The collection of actions created when an operator selects more than one
action for a deployment, or a baseline is deployed. See also baseline (on page
108), component (on page 109), deployment window (on page 112),
multiple action group (on page 115).
deployment state
The eligibility of a deployment to run on endpoints; includes any parameters
set by the operator, such as 'Start at 1AM, end at 3AM.'
deployment status

BigFix WebUI User's Guide | 12 - Glossary | 112
Cumulative results of all targeted devices, expressed as a percentage of
deployment success.
deployment type
An indication of whether a deployment involved one action or multiple actions.
deployment window
The period during which a deployment's actions are eligible for execution. For
example, if a Fixlet has a deployment window of 3 days and an eligible device
that has been offline reports in to BigFix within the 3-day window, it gets the
Fixlet. If the device comes back online after the 3-day window expires, it does
not get the Fixlet. See also deployment group (on page 111).
device
An endpoint, for example, a laptop, desktop, server, or virtual machine
managed by BigFix; an endpoint running the BigFix Agent.
device holder
The person using a BigFix-managed computer.
device property
Information about a device collected by BigFix, including details about its
hardware, operating system, network status, settings, and BigFix client.
Custom properties can also be assigned to a device.
device relevance
A determination of whether a piece of BigFix content applies to applies to a
device, for example, where a patch should be applied, software installed, or a
baseline run. See also content relevance (on page 110).
device result
The state of a deployment, including the end result, on a particular endpoint.
Disaster Server Architecture (DSA)
An architecture that links multiple servers to provide full redundancy in case of
failure.

BigFix WebUI User's Guide | 12 - Glossary | 113
DSA
See Disaster Server Architecture (on page 112).
dynamically targeted
Pertaining to using a computer group to target a deployment.
Eendpoint
A networked device running the BigFix agent.
Ffilter
To reduce a list of items to those that share specific attributes.
Fixlet
A piece of BigFix content containing Relevance and Action Script statements
bundled together to perform an operation or task. Fixlets are the basic building
blocks of BigFix content. A Fixlet provides instructions to the BigFix agent to
perform a network management or reporting action.
Ggroup deployment
A type of deployment where multiple actions were deployed to one or more
devices.

BigFix WebUI User's Guide | 12 - Glossary | 114
Llocked
An endpoint state that prevents the majority of BigFix actions from running
until the device is unlocked.
MMAG
See multiple action group (on page 115).
management rights
The limitation of console operators to a specified group of computers. Only a
site administrator or a master operator can assign management rights.
manual computer group
A computer group for which membership is determined through selection by
an operator. The set of devices in a manual group is static, meaning they do
not change. See also computer group (on page 109).
master operator
A console operator with administrative rights. A master operator can do
almost everything a site administrator can do, with the exception of creating
new operators.
masthead
A collection of files that contain the parameters of the HCL BigFix process,
including URLs to Fixlet content. The HCL BigFix agent brings content into the
enterprise based on subscribed mastheads.
mirror server

BigFix WebUI User's Guide | 12 - Glossary | 115
A BigFix server required if the enterprise does not allow direct web access but
instead uses a proxy server that requires password-level authentication.
multiple action group (MAG)
A BigFix object that is created when multiple actions are deployed together, as
in a baseline. A MAG contains multiple Fixlets or Tasks. See also deployment
group (on page 111).
NNational Vulnerability Database (NVD)
A catalog of publicly-known information security vulnerabilities and exposures
maintained by the National Institute of Standards and Technology (NIST). See
also Common Vulnerabilities and Exposures Identification Number (on page
109).
NVD
See National Vulnerability Database (on page 115).
Ooffer
A deployment option that allows a device holder to accept or decline a BigFix
action and to exercise some control over when it runs. For example, whether
or not to install a software application, and whether to run the installation at
night or during the day.
open-ended deployment
A deployment with no end or expiration date; one that runs continuously,
checking whether or not the computers on a network comply.
operator

BigFix WebUI User's Guide | 12 - Glossary | 116
A person who uses the BigFix WebUI, or portions of the BigFix console.
Ppatch
A piece of code added to vendor software in order to fix a problem, as an
immediate solution that is provided to users between two releases.
patch category
A description of a patch's type and general area of operation, for example, a
bug fix or a service pack.
patch severity
The level of risk imposed by a network threat or vulnerability and, by extension,
the importance of applying its patch.
Rrelay
A client that is running special server software. Relays spare the server and
the network by minimizing direct server-client downloads and by compressing
upstream data.
Relevance
BigFix query language used to determine the applicability of a piece of content
to a given endpoint. Relevance asks yes or no questions and evaluates the
results. The result of a Relevance query determines whether an action can or
should be applied. Relevance is paired with Action Script in Fixlets.

BigFix WebUI User's Guide | 12 - Glossary | 117
SSCAP
See Security Content Automation Protocol (on page 117).
SCAP check
A specific configuration check within a Security Content Automation Protocol
(SCAP) checklist. Checks are written in XCCDF and are required to include
SCAP enumerations and mappings per the SCAP template.
SCAP checklist
A configuration checklist that is written in a machine readable language
(XCCDF). Security Content Automation Protocol (SCAP) checklists have been
submitted to and accepted by the NIST National Checklist Program. They also
conform to a SCAP template to ensure compatibility with SCAP products and
services.
SCAP content
A repository that consists of security checklist data represented in automated
XML formats, vulnerability and product name related enumerations, and
mappings between the enumerations.
SCAP enumeration
A list of all known security related software flaws (CVEs), known software
configuration issues (CCEs), and standard vendor and product names (CPEs).
SCAP mapping
The interrelationship of enumerations that provides standards-based impact
measurements for software flaws and configuration issues.
Security Content Automation Protocol (SCAP)

BigFix WebUI User's Guide | 12 - Glossary | 118
A set of standards that is used to automate, measure, and manage
vulnerability and compliance by the National Institute of Standards and
Technology (NIST).
server
A software program or a computer that provides services to other software
programs or other computers. See also client (on page 109).
signing password
A password that is used by a console operator to sign an action for
deployment.
single deployment
A type of deployment where a single action was deployed to one or more
devices.
site
A collection of BigFix content. A site organizes similar content together.
site administrator
The person in charge of installing BigFix, authorizing and creating new console
operators.
software package
A collection of Fixlets that install a software product on a device. Software
packages are uploaded to BigFix by an operator for distribution. A BigFix
software package includes the installation files, Fixlets to install the files, and
information about the package (metadata).
SQL Server
A full-scale database engine from Microsoft that can be acquired and installed
into the BigFix system to satisfy more than the basic reporting and data
storage needs.
standard deployment

BigFix WebUI User's Guide | 12 - Glossary | 119
A deployment of BigFix that applies to workgroups and to enterprises with
a single administrative domain. It is intended for a setting in which all Client
computers have direct access to a single internal server.
statistically targeted
Pertaining to the method used to target a deployment to a device or piece of
content. Statically targeted devices are selected manually by an operator.
superseded patch
A type of patch that notifies an operator when an earlier version of a patch has
been replaced by a later version. This occurs when a later patch updates the
same files as an earlier one. Superseded patches flag vulnerabilities that can
be remediated by a later patch. A superseded patch cannot be deployed.
system power state
A definition of the overall power consumption of a system. BigFix Power
Management tracks four main power states Active, Idle, Standby or
Hibernation, and Power Off.
Ttarget
To match content with devices in a deployment, either by selecting the content
for deployment, or selecting the devices to receive content.
targeting
The method used to specify the endpoints in a deployment.
task
A type of Fixlet designed for re-use, for example, to perform an ongoing
maintenance task.

BigFix WebUI User's Guide | 12 - Glossary | 120
UUTC
See Coordinated Universal Time (on page 110).
Vvirtual private network (VPN)
An extension of a company intranet over the existing framework of either a
public or private network. A VPN ensures that the data that is sent between
the two endpoints of its connection remains secure.
VPN
See virtual private network (on page 120).
vulnerability
A security exposure in an operating system, system software, or application
software component.
WWake-from-Standby
A mode that allows an application to turn a computer on from standby mode
during predefined times, without the need for Wake on LAN.
Wake on LAN
A technology that enables a user to remotely turn on systems for off-hours
maintenance. A result of the Intel-HCL Advanced Manageability Alliance
and part of the Wired for Management Baseline Specification, users of this
technology can remotely turn on a server and control it across the network,

BigFix WebUI User's Guide | 12 - Glossary | 121
thus saving time on automated software installations, upgrades, disk backups,
and virus scans.
WAN
See wide area network (on page 121).
wide area network (WAN)
A network that provides communication services among devices in a
geographic area larger than that served by a local area network (LAN) or a
metropolitan area network (MAN).

Chapter 13. Support
For more information about this product, see the following resources:
• Knowledge Center
• BigFix Support Center
• BigFix Support Portal
• BigFix Developer
• IBM BigFix Wiki
• HCL BigFix Forum

Notices
This information was developed for products and services offered in the US.
HCL may not offer the products, services, or features discussed in this document in other
countries. Consult your local HCL representative for information on the products and
services currently available in your area. Any reference to an HCL product, program, or
service is not intended to state or imply that only that HCL product, program, or service may
be used. Any functionally equivalent product, program, or service that does not infringe any
HCL intellectual property right may be used instead. However, it is the user's responsibility
to evaluate and verify the operation of any non-HCL product, program, or service.
HCL may have patents or pending patent applications covering subject matter described
in this document. The furnishing of this document does not grant you any license to these
patents. You can send license inquiries, in writing, to:
HCL
330 Potrero Ave.
Sunnyvale, CA 94085
USA
Attention: Office of the General Counsel
For license inquiries regarding double-byte character set (DBCS) information, contact the
HCL Intellectual Property Department in your country or send inquiries, in writing, to:
HCL
330 Potrero Ave.
Sunnyvale, CA 94085
USA
Attention: Office of the General Counsel
HCL TECHNOLOGIES LTD. PROVIDES THIS PUBLICATION "AS IS" WITHOUT WARRANTY
OF ANY KIND, EITHER EXPRESS OR IMPLIED, INCLUDING, BUT NOT LIMITED TO, THE
IMPLIED WARRANTIES OF NON-INFRINGEMENT, MERCHANTABILITY OR FITNESS FOR A
PARTICULAR PURPOSE. Some jurisdictions do not allow disclaimer of express or implied
warranties in certain transactions, therefore, this statement may not apply to you.

This information could include technical inaccuracies or typographical errors. Changes
are periodically made to the information herein; these changes will be incorporated in new
editions of the publication. HCL may make improvements and/or changes in the product(s)
and/or the program(s) described in this publication at any time without notice.
Any references in this information to non-HCL websites are provided for convenience only
and do not in any manner serve as an endorsement of those websites. The materials at
those websites are not part of the materials for this HCL product and use of those websites
is at your own risk.
HCL may use or distribute any of the information you provide in any way it believes
appropriate without incurring any obligation to you.
Licensees of this program who wish to have information about it for the purpose of
enabling: (i) the exchange of information between independently created programs and
other programs (including this one) and (ii) the mutual use of the information which has
been exchanged, should contact:
HCL
330 Potrero Ave.
Sunnyvale, CA 94085
USA
Attention: Office of the General Counsel
Such information may be available, subject to appropriate terms and conditions, including in
some cases, payment of a fee.
The licensed program described in this document and all licensed material available for
it are provided by HCL under terms of the HCL Customer Agreement, HCL International
Program License Agreement or any equivalent agreement between us.
The performance data discussed herein is presented as derived under specific operating
conditions. Actual results may vary.
Information concerning non-HCL products was obtained from the suppliers of those
products, their published announcements or other publicly available sources. HCL has not
tested those products and cannot confirm the accuracy of performance, compatibility or

any other claims related to non-HCL products. Questions on the capabilities of non-HCL
products should be addressed to the suppliers of those products.
Statements regarding HCL's future direction or intent are subject to change or withdrawal
without notice, and represent goals and objectives only.
This information contains examples of data and reports used in daily business operations.
To illustrate them as completely as possible, the examples include the names of individuals,
companies, brands, and products. All of these names are fictitious and any similarity to
actual people or business enterprises is entirely coincidental.
COPYRIGHT LICENSE:
This information contains sample application programs in source language, which illustrate
programming techniques on various operating platforms. You may copy, modify, and
distribute these sample programs in any form without payment to HCL, for the purposes
of developing, using, marketing or distributing application programs conforming to the
application programming interface for the operating platform for which the sample
programs are written. These examples have not been thoroughly tested under all conditions.
HCL, therefore, cannot guarantee or imply reliability, serviceability, or function of these
programs. The sample programs are provided "AS IS," without warranty of any kind. HCL
shall not be liable for any damages arising out of your use of the sample programs.
Each copy or any portion of these sample programs or any derivative work must include a
copyright notice as follows:
© (your company name) (year).
Portions of this code are derived from HCL Ltd. Sample Programs.
TrademarksHCL Technologies Ltd. and HCL Technologies Ltd. logo, and hcl.com are trademarks or
registered trademarks of HCL Technologies Ltd., registered in many jurisdictions worldwide.
Adobe, the Adobe logo, PostScript, and the PostScript logo are either registered trademarks
or trademarks of Adobe Systems Incorporated in the United States, and/or other countries.

Java and all Java-based trademarks and logos are trademarks or registered trademarks of
Oracle and/or its affiliates.
Microsoft, Windows, Windows NT, and the Windows logo are trademarks of Microsoft
Corporation in the United States, other countries, or both.
Linux is a registered trademark of Linus Torvalds in the United States, other countries, or
both.
UNIX is a registered trademark of The Open Group in the United States and other countries.
Other product and service names might be trademarks of HCL or other companies.
Terms and conditions for product documentationPermissions for the use of these publications are granted subject to the following terms and
conditions.
Applicability
These terms and conditions are in addition to any terms of use for the HCL website.
Personal use
You may reproduce these publications for your personal, noncommercial use provided that
all proprietary notices are preserved. You may not distribute, display or make derivative work
of these publications, or any portion thereof, without the express consent of HCL.
Commercial use
You may reproduce, distribute and display these publications solely within your enterprise
provided that all proprietary notices are preserved. You may not make derivative works of
these publications, or reproduce, distribute or display these publications or any portion
thereof outside your enterprise, without the express consent of HCL.

Rights
Except as expressly granted in this permission, no other permissions, licenses or rights are
granted, either express or implied, to the publications or any information, data, software or
other intellectual property contained therein.
HCL reserves the right to withdraw the permissions granted herein whenever, in its
discretion, the use of the publications is detrimental to its interest or, as determined by HCL,
the above instructions are not being properly followed.
You may not download, export or re-export this information except in full compliance with
all applicable laws and regulations, including all United States export laws and regulations.
HCL MAKES NO GUARANTEE ABOUT THE CONTENT OF THESE PUBLICATIONS. THE
PUBLICATIONS ARE PROVIDED "AS-IS" AND WITHOUT WARRANTY OF ANY KIND, EITHER
EXPRESSED OR IMPLIED, INCLUDING BUT NOT LIMITED TO IMPLIED WARRANTIES OF
MERCHANTABILITY, NON-INFRINGEMENT, AND FITNESS FOR A PARTICULAR PURPOSE.