webfocus 8 authentication methods · . • openidauthenabled – our implementation currently has...
TRANSCRIPT
WebFOCUS 8 Authentication Methods By Ben Naphtali One of the distinguishing factors of WebFOCUS 8 as a Business Intelligence platform is its ability to integrate and scale from small departmental configurations to enterprise-wide installations. As you will see, there are various product configuration options that can be used to authenticate users. In this article I’ll describe the various authentication mechanisms that can be used to give you a sense of what can be accomplished with our solution. Of course, there are always customized options that can be used by creating Custom Servlet Filters that allow single sign-on (SSO) functionality. Authentication Types In general, WebFOCUS provides three main types of user authentication – internal, external and pre-authentication. Which you should use depends on a number of factors, such as desired functionality, whether the central IT staff will be involved, security implementation and software infrastructure. No single option is correct or better than another option. A choice needs to be made, given the existing security architecture and desired implementation. Internal This is the default configuration. Using the WebFOCUS Sign In page, or a customized Sign In page, user credentials are verified with the credentials stored within our WebFOCUS repository. Users are added to WebFOCUS Managed Reporting within Security Center, or RESTful Web services. User passwords are stored using a SHA-2 iterative salted hash. The benefit of using this approach is that it is the default configuration and the least complex. In addition, it can provide Account Policies if configured. External Using the WebFOCUS Sign In page, or a customized Sign In page, user credentials are verified with the WebFOCUS Reporting Server, and one of its security providers. The Security providers on the server could be Active Directory, LDAP, Custom RDBMS Authentication, Custom Web Services Authentication, operating system security or Internal/PTH security. Users can be added to WebFOCUS Managed Reporting with Security Center, or RESTful Web services. If the Reporting Server is used as the group provider for WebFOCUS, users can be AUTOADDed as well. Although this configuration is slightly more complex, the benefit of using this approach is that it offers more options to verify user credentials. Typically, this is used when moving away from

departmentally deployed systems, where the users are stored in some other external repository from LDAP to Relational Database Management systems. Using the server to authenticate users, or setting up one of these providers, is the next step to using the Reporting Server as the Group provider for the WebFOCUS client for authorization there as well. Pre-authentication Using any form of pre-authentication, we defer authentication to a third-party security provider, and do not require users to use a Sign In page for WebFOCUS. Users are added to WebFOCUS Managed Reporting using Security Center, or RESTful Web services. If the Reporting Server is used as the Group provider for WebFOCUS, users can be AUTOADDed as well. The following is a list of the pre-authentication methods we currently support within the product. The implementation of any one of these options would likely be based on the environment in which WebFOCUS will be installed and implemented in.
• j2eepreauth – This uses Internet Information Server (IIS) to authenticate the users, typically passing REMOTE_USER to the application server. This is a very common implementation because Microsoft IIS is widely used.
• preauth – Uses a third-party security product that sets a trusted, non-
spoofable/injectable HTPP headervariable, or REMOTE_USER. Products include CA SiteMinder, IBM WebSeal, Oracle Access Manager and others. This is also a widely adopted implementation of the product for enterprise clients, which typically implement some third-party identity management system.
• casAuthEnabled – Uses Central Authentication Services to authenticate users. If
you’ve never heard of Central Authentication Services, you can read all about it here: http://www.jasig.org/cas.
• openIDAuthEnabled – Our implementation currently has default configuration
options for Gmail or Yahoo and allows WebFOCUS to be integrated with an environment that uses these options to authenticate users.
• spnegoAuthEnabled – Also known as Kerberos, which is another single sign-on
solution implemented within our security framework, it is able to pass the Kerberos Ticket from the WebFOCUS client all the way through to the WebFOCUS Reporting Server, as well as DBMSs that support Kerberos, such as SQL Server.
Stay tuned for additional functionality in this area. SAML is a SSO that we have not yet been able to support natively, but we plan to – as well as customized SSO integration with other third-party products.

Scheduling a Procedure 'As Is' in WebFOCUS 8 By Gerry Snyder Did you know you do not have to specify a format when you schedule a procedure in WebFOCUS 8? One of the powerful features of WebFOCUS is the ability to produce reports in many different formats. ReportCaster allows a user to take a procedure that produces a report in one format, such as PDF, and override it so that the report is delivered in another format, such as Excel 2007. You do this when you create a schedule by picking the format that you want from the list of formats available in WebFOCUS. The list of formats defaults to HTML. Great. But wait, what if I designed my report to produce a PDF and when I schedule it, I still want a PDF? Do I have to pick PDF when I create the schedule? That’s not so great. So in WebFOCUS 8 (starting in Release 8.0.04), we redesigned the scheduling tools to simplify the process. Screen 1 shows the Task tab of the scheduling tool in Release 7. Notice that you select a format from the dropdown list and that the list of formats defaults to HTML. So, unless you change the format in the scheduling tool, the report that is distributed when the schedule executes will be in HTML format.
Screen 1

Now look at the Task workspace in the Release 8 scheduling tool. The dropdown list of formats is there but it is disabled. You select a format only if you want to specify a particular format in the schedule. Otherwise, when the schedule executes, the report will be produced in the format that is coded in the procedure.
Screen 2 If you want to specify a particular format in the schedule, you check the box labeled “Override the Format Specified in the Procedure.” This enables the drop-down list of formats and allows a format to be selected from the list. So… If the “Override” box is unchecked, the report will be distributed in the format specified in the procedure. If no format is specified in the procedure, the report will be distributed in HTML. If the “Override” box is checked, the report will be distributed in the format selected from the dropdown list in the scheduling user interface. The default format in this list is HTML. This is a good usability enhancement because in many cases a report has been designed for a particular format, such as a PDF with an image, or a compound report in an Excel format, and a user need not know the exact format the report contains in order to schedule the report. Compare the “Save Report As” fields in the image from Release 7 and the image from Release 8 in which the “Override” checkbox is unselected. Notice that in Release 7 an extension is assigned to the “Save As” value. In the Release 8 image, there is no extension assigned to the

“Save Report As” value. This is because the format in which the report will be distributed is unknown when a format is not specified in the schedule. At schedule execution time, when the report is returned from the Reporting Server, the Reporting Server notes the content type of the report and the Distribution Server assigns the appropriate extension to the distributed file. A user can modify the “Save Report As” value and add an extension, but there is generally no need to do this. For example, a compound report scheduled with the DHTML format can return either an HTML file or an MHT file, depending upon the report content. The Distribution Server will correctly assign the extension .htm or .mht depending upon the output. There are a few instances in which the user should manually assign an extension to the “Save Report As” value when creating a schedule.
1. When the procedure is a chart and the output format is PNG, SVG, JPEG or GIF, the image rendered is always in PNG format unless the extension is specified. So if one of the other three formats is needed, you can either add the appropriate extension to the “Save Report As” value or uncheck the “Override” check box and pick the format from the dropdown list.
2. When the procedure generates a report in Excel 2007 Template format and references a Macro-Enabled Template or Workbook, and when EXL07 Template format is selected or returned by the Reporting Server, ReportCaster assigns the extension .xlsx to the report. However, if the procedure specified a Macro-Enabled Template or Workbook, the report extension must be .xlxm for the report to be opened. Since ReportCaster does not know whether the template or workbook mentioned in the procedure is macro-enabled, it is up to the user to add the appropriate extension to the output when this format is used.
Certain scheduling options are only appropriate with specific formats. For example, only formats DOC, WP, PS and PDF can be distributed to a printer. Typically, unless one of these formats is specified in the schedule, the printer distribution method cannot be used when creating a schedule. However, when a format is not specified in the schedule, the printer distribution method can be used since the report being distributed may be in one of the appropriate formats. If the report returned from the Reporting Server is not DOC, WP, PS, or PDF and the distribution method is printer, then the schedule will fail with an appropriate message in the schedule log. Similarly, only the formats DOC, WP, HTML and DHTML – that is .htm – can be distributed inline by email. If a format is not specified in the schedule, then inline may be selected in the schedule. But if the report returned from the Reporting Server is not in text or HTML format, the report will be distributed as an attachment. There is a known issue with this feature when the schedule procedure contains the compound report syntax SET COMPOUND=OPEN/CLOSE or ON TABLE PCHOLD FORMAT format
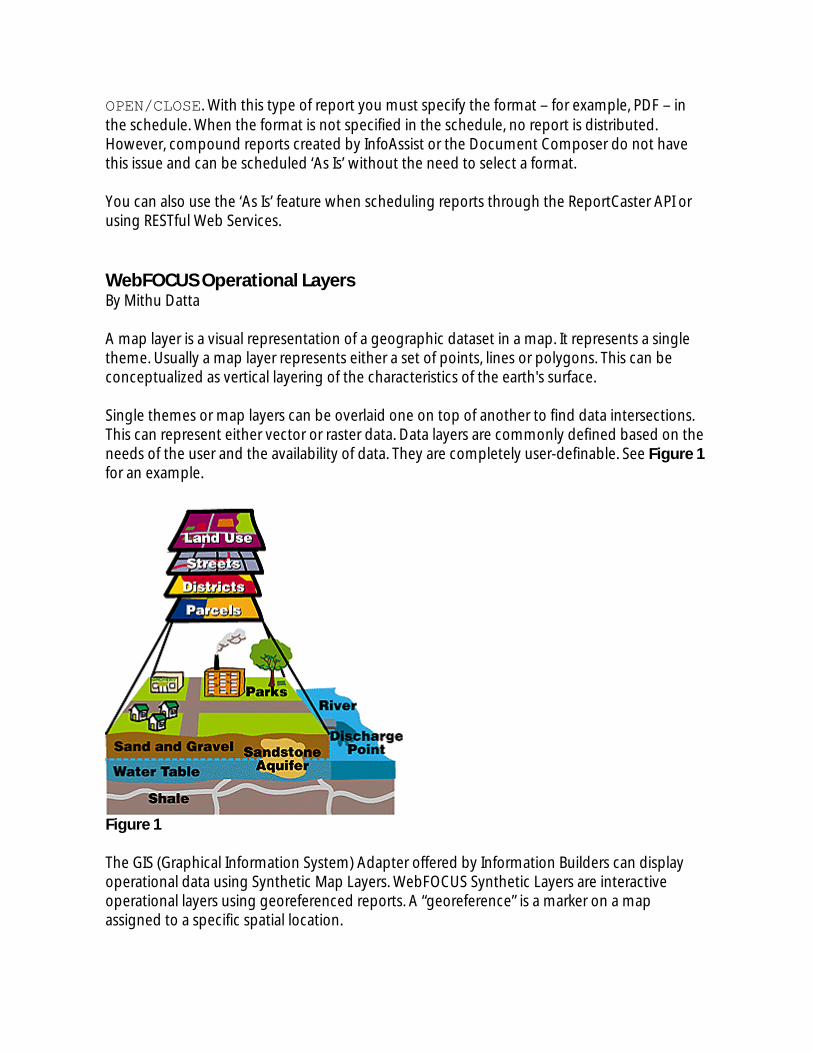
OPEN/CLOSE. With this type of report you must specify the format – for example, PDF – in the schedule. When the format is not specified in the schedule, no report is distributed. However, compound reports created by InfoAssist or the Document Composer do not have this issue and can be scheduled ‘As Is’ without the need to select a format. You can also use the ‘As Is’ feature when scheduling reports through the ReportCaster API or using RESTful Web Services. WebFOCUS Operational Layers By Mithu Datta A map layer is a visual representation of a geographic dataset in a map. It represents a single theme. Usually a map layer represents either a set of points, lines or polygons. This can be conceptualized as vertical layering of the characteristics of the earth's surface. Single themes or map layers can be overlaid one on top of another to find data intersections. This can represent either vector or raster data. Data layers are commonly defined based on the needs of the user and the availability of data. They are completely user-definable. See Figure 1 for an example.
Figure 1 The GIS (Graphical Information System) Adapter offered by Information Builders can display operational data using Synthetic Map Layers. WebFOCUS Synthetic Layers are interactive operational layers using georeferenced reports. A “georeference” is a marker on a map assigned to a specific spatial location.

Operational layers are the map layers that end users view and refer to for day-to-day tasks. According to ESRI (Environmental Systems Research Institute), operational map layers also have the following characteristics:
• They are usually independent map services served on top of base map layers. • Operational layers can be one or many. Multiple operational layers reduce the
performance at which these layers are drawn. • Operational layers are usually very responsive. They should draw quickly and efficiently.
They should be easy to use and understand. WebFOCUS Synthetic Layers offer a very robust way to display operational layers. These layers are drawn using location information from latitude and longitude values. Latitude and longitude values can be in a geographical coordinate system (decimal degrees) or in any projected coordinate system. As in any other operational layers, these layers can represent point, line or polygon objects. A WebFOCUS report used to draw a Synthetic Layer typically has at least three fields:
• Unique identifier • Latitude (arbitrary name) • Longitude (arbitrary name)
Figure 2 shows an example of a report for point locations.
Figure 2 In the example on Figure 2, INCIDENTID is the unique identifier, GEOLATITUDE is the latitude, and GEOLONGITUDE is longitude.

To add a Synthetic Layer to your application, first you need to create a report from your master data with the key information that was previously mentioned. You also need to know the coordinate system the location data is in for; e.g., Geographic, State Plane, etc. To configure the adapter, add the Synthetic Layer to you ESRI Configuration file using the ESRI Configuration Utility. You can launch this from the Business Intelligent Portal, WebFOCUS App Studio or Developer Studio. Let’s go over the steps required: 1. Create a new Synthetic MapService (Screen 1).
Screen 1 2. Add MapService Layers (Screen 2).

Screen 2
3. Add a New Synthetic Layer by clicking on the “New” button, which looks like this:

4. In the New Synthetic Layer Dialog, select a .fex to draw (Screen 3). Enter a name for Layer.
Screen 3

5. After the name of the layer is entered, click “Next” (Screen 4). Select the Procedure using the browse button. Enter the Name of the Report Field to select for Unique Identifier. Enter the X_coordinate field (Longitude) and Y_coordinate field (Latitude). Click Finish to end the process of creating a new Synthetic Layer.
Screen 4

6. Once you have defined the Synthetic Layer, you have to define the Coordinate System the layer is in. A coordinate system is the location of a point or other geographical entity on a planar or spherical surface. There are two kinds of coordinate systems – geographic and projected. A geographical coordinate system is a three-dimensional reference system. A projected coordinate system is a two-dimensional planar surface. It should be a four-digit Well-Known ID (WKID). For a list of values, please visit ESRI’s reference page (Screen 5).
Screen 5

7. Define a symbol to draw the point locations (Screen 6). We are going to use a Marker symbol. For line objects, use a Line Symbol and for polygons use Fill Symbol.
Screen 6 For further guidance on using the ESRI Configuration Utility, please go to Tech Support Site here. Favorite Features That Too Few People Know About EDITOR’S NOTE: After a long, illustrious career at Information Builders, sadly, Noreen Redden is retiring. Her contribution to the company and this newsletter has been huge – too large, really, to try to describe in words. All we can say is thank you. By Noreen Redden After more than 30 years with Information Builders, I thought I’d write about my favorite new product features over that time. However, I quickly realized that a) what was new to me is probably not new to other people, and b) it would take too long to list everything. To me,

WEBFOCUS is new because when I started FOCUS was mostly running on VM and was starting to be available on MVS. Hey, that was before we even contemplated the World Wide Web. With that in mind, I decided to concentrate on four features that I like a lot and are not very well known, even though they have been in the product for a while. The first is MORE. Every time I mention it, I keep thinking about the line from “Oliver Twist,” “Please sir, I want some more.” Also called “universal concatenation,” it allows us to combine data from different files, and even from different structures, into one report. For the full documentation, check out this link: http://documentation.informationbuilders.com/masterindex/html/wstest/wf761crlang/source/topic150.htm For applications, of course, MORE is invaluable. Suppose you made changes to your application and added or subtracted fields, then maybe changed the underlying data source. Or perhaps there are different tables for different user groups, which now must be combined for one report. Because there is a standard reporting pass against each piece, and then a merge of the data, you can use JOINs and DEFINEs to also note where the data actually resides. So, for instance, EMPDATA is a single segment with possible JOINs to JOBLIST to determine job names, etc.; EMPLOYEE is the older file, with a join embedded within the master to JOBFILE (but based on a historical rather than current job code). FIELDNAMES are different, but I want a single report, sorted by the source of the data, showing the following: Source: EMPDATA EMPLOYEE ID ‘NW’ | EDIT(PIN,’9999-99-9999’ ‘CN’ | EDIT(EID,’999-999-999’) Job JOBCLASS CURRENT JOBCODE Desc JOBDESC(in JOBLIST) JOB_DESC (in JOBFILE) So, to get the output I need, some JOINs, and some DEFINEs to make the fieldnames and formats the same: DEFINE FILE EMPDATA SRCE/A20 = 'US SUBSIDIARY'; EMP_ID/A14= 'NW ' | EDIT(PIN,'999-99-9999'); END DEFINE FILE EMPLOYEE SRCE/A20 = 'CANADIAN SUBSIDIARY'; EMP_ID/A14 = 'CN ' | EDIT(EID,'999-999-999'); JOBDESC/A40 = JOB_DESC; END TABLE FILE EMPDATA PRINT EMP_ID AS 'Employee' BY SRCE NOPRINT

BY JOBDESC AS 'Job,Description' ON SRC SUBHEAD "Data for <SRCE" MORE FILE EMPLOYEE WHERE JOBDESC NE ' ' END Here is the partial result: Job Description Employee ----------- -------- Data for CANADIAN SUBSIDIARY ASSIST.MANAGER CN 123-764-317 DEPARTMENT MANAGER CN 119-329-144 CN 818-692-173 FILE QUALITY CN 112-847-612 MANAGER CN 818-692-173 PRODUCTION CLERK CN 119-265-415 PROGRAMMER CN 117-593-129 CN 219-984-371 CN 451-123-478 CN 451-123-478 PROGRAMMER ANALYST CN 117-593-129 PROGRAMMER TRAINEE CN 119-265-415 CN 543-729-165 SECRETARY CN 071-382-660 CN 071-382-660 SECRETARY CN 543-729-165 SUPERVISOR/PRODUCTION CN 123-764-317 SYSTEMS ANALYST CN 126-724-188 CN 326-179-357 Data for US SUBSIDIARY ADMINISTRATOR NW 000-00-0170 ASSISTANT MANAGER NW 000-00-0390 ASST VICE PRESIDENT NW 000-00-0300 CORPORATE CONSULTANT NW 000-00-0120 JUNIOR MARKETING EXECUTIVE NW 000-00-0010 NW 000-00-0020 NW 000-00-0220 Now, once you’ve specified the full request, including any styling before the first MORE, the only thing allowed for subsequent files is a WHERE test – and that brings up the subject of WHERE, the next favorite feature I want to discuss. Screening on one indexed field is efficient, but as we build larger and larger files, with more complex interactions between the data elements required, an index on a combination of multiple fields may be many times more efficient. Check out the multi-dimensional index here:

http://documentation.informationbuilders.com/masterindex/html/html_wf_7703/wf77ddlang/source/topic76.htm. To find a subset of data for marketing, you may want to select the data based on gender, income level, state, ZIP code, marital status, number of children, education level or some combination of these factors. With massive amounts of data, trying to find married women living in New Jersey who are college graduates is a fairly straightforward WHERE test, WHERE GENDER EQ ‘F’ AND STATE EQ ‘NJ’ AND ED_LEVEL EQ ‘COLLEGE GRAD’ AND MARITAL EQ ‘M’, but chugging through millions of instances is costly. The multi-dimensional index conceptually keeps first an index on GENDER | INCOME | STATE | ZIP | MARITAL | CHILD | INCOME | ED_LEVEL Then, INCOME | STATE | ZIP |MARITAL | CHILD | INCOME |ED_LEVEL | GENDER … and all the rest of the combinations and permutations. Is it large, you betcha. But is it fast? Absolutely, and even the creation through REBUILD is very quick. Plus, the files also could have been partitioned based on date, or prospect vs. customer. So now we have multiple files indexed on multiple fields, and because of the structure, you can have any number of criteria, and the search will choose which index, and which of the variations to use. It is identified in the ACCESS file, with a target to specific information in the database, to print the address for a direct mail because an extremely quick process even over multiple files, and multiple criteria. So, TABLE FILE HUGE PRINT LASTNAME FIRSTNAME ADDRESS WHERE GENDER EQ ‘F’ AND STATE EQ ‘NJ’ AND ED_LEVEL EQ ‘COLLEGE GRAD’ AND MARITAL EQ ‘M’ AND CUSTOMER EQ ‘N’ END You can have as many MDIs as you want for a file, and FOCUS will choose the best one, based on the number of elements that are part of the select. It’s terrific and fast. While we are talking about WHERE tests, consider FILTER FILE. With a “toggle” switch set up by the FILTER command, you can establish a common set of screening conditions that apply each time you retrieve data from a data source while still being able to dynamically turn them on and off. Consider an environment where your users are in an ad hoc environment and creating their reports through InfoAssist.

For instance, when I worked in Customer Support, I produced several monthly reports to show statistics and the name of the support representative that reported to me with the highest customer satisfaction, most resolved calls, and so on. So each month, those reports showed the prior month’s data for the group CORE. At the end of the year, when annual reviews were due, I ran the same reports, but this time, for the entire prior year. Another manager liked my reports, but of course, his group code was different. Enter FILTER FILE, another of my favorite features. (For documentation, see http://documentation.informationbuilders.com/masterindex/html/html_wf_7703/wf77crlang/source/topic51.htm.) Here’s the setup of the filters -DEFAULT &GRP=CORE -DEFAULT &SCOPE=MONTHLY; -* DETERMINE THE BEGINNING AND END OF LAST MONTH -SET &TDY = DATECVT(&YYMD,'I8YYMD','YYMD'); -SET &TDX = DATEMOV(&TDY,'BOM'); -SET &TDE = &TDX + (-1); -SET &TDB = DATEMOV(&TDE,'BOM'); -SET &STM = DATECVT(&TDB,'YYMD','A8YYMD'); -SET &ENDM = DATECVT(&TDE,'YYMD','A8YYMD'); -SET &YEAR = &DATEYY - 1; -* ESTABLISH THE FILTERS FILTER FILE INFORESP NAME=MYGROUP, WHERE GROUP EQ '&GRP'; NAME=MNTHTEST WHERE PROCESS_DT FROM '&STM' TO '&ENDM'; NAME=YEARTEST WHERE PROCESS_DT FROM '&YEAR|0101' TO '&YEAR|1231'; NAME=STATTST WHERE STATUS EQ 'RES' OR 'CLOS' END -* ACTIVATE NEEDED FILTERS SET FILTER = MYGROUP STATTST IN INFORESP ON SET FILTER = MNTHTEST YEARTEST IN INFORESP OFF -RUN -IF &SCOPE EQ 'MONTHLY' GOTO MTH; SET FILTER = YEARTEST IN INFORESP ON -RUN -GOTO RUNRQST -MTH SET FILTER = MNTHTEST IN INFORESP ON -RUN -RUNRQST -* RUN THE PROCEDURES IN THE APPLICATION EX GENSTATS EX CUSTSAT EX QUERPT -EXIT

None of the procedures had screening tests embedded within the procedure, but every report request would have filters on group, date and status. If I needed a different report without these filters on the file, all I would have to do is to either SET FILTER = * IN INFORESP OFF or SET FILTER = YEARTEST MNTHTEST STATTST IN INFORESP OFF Finally, I want to mention one last feature that might be useful to you. Say you have a structure established with multiple tables, joins, and a lot of reports that utilize that structure. The developer went to a lot of trouble to make sure that this structure did what was needed. However, it was decided that the users should only be accessing data as of the beginning of the month, and should not be going against live data. So, you are charged with creating an extract at the end of every month for those users. You obviously want the same column names so that your production reports continue to run, but you also need the same structure. Maybe it is also going to a different server; perhaps it will be easier to keep that new structure in a XFOC database. Check out another of my favorite features, Structured Hold Files (I really don’t like the name of this feature; I think it should be called “move and copy data and structure.”) Here’s the documentation: http://documentation.informationbuilders.com/masterindex/html/wstest/wf761crlang/source/topic106.htm The idea? Print everything from your file, but instead of HOLD, set up EXTRACT. You can extract to an ALPHA, BINARY or FOCUS FILE. If you extract to an alpha or binary, it creates a RECTYPE file. Now, move that file to another platform (I recommend alpha because you can then FTP, and EBCDIC will be changed to ASCII). Then, you can TABLE FILE the extract file, and either EXTRACT again to a FOCUS file, or use the RECTYPES and do multiple HOLD FORMAT MYSQL, so that each table can be created, but the HOLD structure can be used to create the JOINs in the new environment. How to do it: Create a TABLE request (you can even use PRINT * and ignore the message about it, only using the first path). Then, ON TABLE SET EXTRACT {ON|*|OFF} ON TABLE HOLD [AS name] FORMAT {ALPHA/BINARY/FOCUS| Because I do really love the CAR file (where else can you get a Jaguar for less than $9,000?) TABLE FILE CAR PRINT COUNTRY CAR MODEL SEG.BODYTYPE

ON TABLE SET EXTRACT ON ON TABLE HOLD FORMAT ALPHA END Creates a data file and a master that looks like this: FILENAME=HOLD , SUFFIX=FIX , $ SEGMENT=ORIGIN, SEGTYPE=S0, $ FIELDNAME=RECTYPE, ALIAS=R, USAGE=A3, ACTUAL=A3, $ FIELDNAME=COUNTRY, ALIAS=COUNTRY, USAGE=A10, ACTUAL=A10, $ SEGMENT=COMP, SEGTYPE=S0, PARENT=ORIGIN, $ FIELDNAME=RECTYPE, ALIAS=1, USAGE=A3, ACTUAL=A3, $ FIELDNAME=CAR, ALIAS=CARS, USAGE=A16, ACTUAL=A16, $ SEGMENT=CARREC, SEGTYPE=S0, PARENT=COMP, $ FIELDNAME=RECTYPE, ALIAS=2, USAGE=A3, ACTUAL=A3, $ FIELDNAME=MODEL, ALIAS=MODEL, USAGE=A24, ACTUAL=A24, $ SEGMENT=BODY, SEGTYPE=S0, PARENT=CARREC, $ FIELDNAME=RECTYPE, ALIAS=3, USAGE=A3, ACTUAL=A3, $ FIELDNAME=BODYTYPE, ALIAS=TYPE, USAGE=A12, ACTUAL=A12, $ FIELDNAME=SEATS, ALIAS=SEAT, USAGE=I3, ACTUAL=A03, MISSING=ON, $ FIELDNAME=DEALER_COST, ALIAS=DCOST, USAGE=D7, ACTUAL=A07, $ FIELDNAME=RETAIL_COST, ALIAS=RCOST, USAGE=D7, ACTUAL=A07, $ FIELDNAME=SALES, ALIAS=UNITS, USAGE=I6, ACTUAL=A06, $ So, I could TABLE FIE HOLD PRINT COUNTRY and get only five countries, unlike a regular HOLD file with only one segment, each of which contains COUNTRY, CAR, MODEL, BODYTYPE, SEATS, DEALER_COST and RETAIL_COST. Now, to reconstruct the FOCUS structure, I could TABLE FILE HOLD PRINT COUNTRY CAR MODEL SEG.BODYTYPE ON TABLE SET EXTRACT ON ON TABLE HOLD AS NEWCAR FORMAT FOCUS END It’s been a great 30 years, full of adventure and learning and growing, and meeting the nicest and smartest people, our customers. WebFOCUS App Studio Now Available By David Glick After three years in development, the new desktop product WebFOCUS App Studio is available to all our customers. The desktop product has undergone a major interface and framework upgrade from the original FOCUS for Windows product.

WebFOCUS App Studio makes use of the common design paradigm that appears in current Windows products: the ribbon, panels, and development canvases. With this major paradigm shift, the product name “App Studio” was selected to emphasize the experience of working within a single tool to develop WebFOCUS Applications. (See Screen 1).
Screen 1 WebFOCUS App Studio has several new features to provide functionality that our customers and field have requested over the years:
• Autosize objects based on screen size. Objects on the page will automatically resize based on the available screen size. Create one page and it will resize automatically for desktop, tablet and smartphone.
• Mobile design. Generate a mobile design for an HTML page that is automatically geared for a phone display.
• jQuery Integration. HTML pages now make use of the common functionality found in the ever popular jQuery JavaScript libraries.
• Smart Context for Report Creation. Fields are added to reports with the knowledge of how they are defined; dimensions are added as sort down fields, and measures are added as aggregate fields automatically.
• Wizards. Guided dialogs provide users with preliminary steps in the creation of their content – selection of the data source, StyleSheet selection, etc.

WebFOCUS App studio delivers a modern user interface so our customers can develop sophisticated InfoApps. As they start leveraging the product, users of Developer Studio should see a huge improvement in the workflow and design. Dynamic Objects on Maintain Forms By Mark Derwin The Maintain language gives you the ability to dynamically change the look of your form. Using WINFORM SET commands you can change most of the properties of the objects on your form, as well as the form itself. The good thing about WINFORM SET is that the changes it makes to the form stay even when the form is refreshed. The changes remain until the form is closed. The bad thing about the command is that it requires a server call and the form needs to be refreshed. The alternative to this command is to use JavaScript. JavaScript commands work at the browser level, which means no trip to the server needs to take place. Naturally, JavaScript commands use considerably fewer resources. They also give us additional abilities that are not available with WINFORM SET. But JavaScript does have a major shortcoming: When the form refreshes, the changes go away. And that means we need to program for that. The first technique I will show is for the checkbox object. If you want to make a checkbox invisible, you could issue the following: Winform Set Formname.CheckBoxname.Visible to 0 Where Formname is the name of your form and CheckBoxname is the name of your checkbox. However, what if you want to do this with JavaScript? To make an object invisible with JavaScript, issue the following: document.getElementById("CheckBox1").style.visibility='hidden'; When you do this, the following happens:

Using Javascript, in order to make both the checkbox and the checkbox text invisible, you have to issue these commands: document.getElementById("CheckBox1").style.visibility='hidden'; document.getElementById("IWC_CheckBox1").style.visibility='hidden'; Now, when you click on the “Hide” button, both objects disappear. To make them appear again, issue the following in the “Show button: document.getElementById("CheckBox1").style.visibility='visible'; document.getElementById("IWC_CheckBox1").style.visibility='visible'; Make sure you replace CheckBox1 with the name of your object. The next technique has to do with the calendar object. We have been able to have a pop-up calendar appear next to date fields for many releases. In Release 7.7, we made this even easier by just having to turn on the Calendar property for your form and for the editbox. However, there may be times when you do not want to dynamically display the calendar icon next to the form.
Use the following JavaScript code to make the calendar icon invisible: document.getElementsByTagName('a')['Date1_Edit']. style.display = 'none'; Use the following code to make the icon visible: document.getElementsByTagName('a')['Date1_Edit']. style.display = '';

My example references the field Date1_Edit. Make sure you replace that field name with the name of the editbox that has the calendar icon associated with it. In conclusion, JavaScript commands make it easy to manipulate objects and their properties on a Maintain Winform. They can even be used to extend the ability of some Maintain commands. WebFOCUS Skybox: Cloud be Nimble, Cloud be Quick! By Larry Eiss As cloud computing has matured, one fundamental benefit has been evident: Implementing, deploying, and managing systems in the cloud cuts time to value significantly. A big part of the reason is that typically it takes a long time to acquire and provision hardware in house. In an effort to ensure reliability and security, larger organizations have implemented strict controls on their networks. Consequently, the process to implement a new system in house can take months, and if funding needs to be sought, it can easily extend beyond a year. This is often just as true for sandbox environments and development systems as for production environments that will host mission-critical applications. Changes in technology often bring improvements that can have a significant impact on revenue and profit if they can be leveraged early. Unfortunately, we have seen lengthy business processes curtail our customers’ plans to leverage valuable new features in our solutions, and even stifle an organization’s ability to make necessary technology upgrades. To address this pain point, Information Builders has created a new cloud-hosted sandbox environment for testing functionality, analyzing migration strategies, prototyping, and developing applications. WebFOCUS Skybox provides a preconfigured environment containing the most recent production version of WebFOCUS to help users become familiar with new features and functionality. It also can be used to test applications without impacting critical business systems. All the standard features of WebFOCUS are turned on and available for use in Skybox, so developers can hit the ground running. In addition to the standard feature set, WebFOCUS Skybox includes Hyperstage and Data Migrator. Hyperstage is a high-performance columnar database that provides exceptional compression for storage of very large datasets while providing exceptionally rapid access for analysis. Data Migrator, coupled with WebFOCUS Change Management, makes all the work developers do in WebFOCUS Skybox easy to move in-house or to a hosted production environment, so no work is lost.

While managed hosting providers typically require a two-year agreement, WebFOCUS Skybox permits commitments as short as 60 days, enabling businesses to deploy BI projects more efficiently and cost-effectively. In addition, the entire environment is managed by Information Builders, allowing users to focus solely on administering their WebFOCUS environment and developing or maintaining their BI applications—not on the IT infrastructure itself. Additional benefits of Skybox include the following:
• Companies can accelerate time to market for BI projects by leveraging Skybox to test existing runtime environments and applications, without the need to create and manage a new development infrastructure. Businesses can convert short-term testing to longer-term managed hosting in the cloud or move the environment in house.
• WebFOCUS Skybox is designed to assist IT or business-unit staff in demonstrating the
latest functionality of WebFOCUS, including upgrades, to internal stakeholders without impacting ongoing business operations.
• WebFOCUS Skybox runs on the 64-bit Standard Edition of Microsoft Windows Server,
minimizing the need to acclimate to an unfamiliar operating system. As business executives face pressure to achieve greater results without increasing IT department budgets, a managed cloud environment with the complete WebFOCUS platform is an ideal way to provide the flexibility they need in their BI deployments. WebFOCUS Skybox is a useful managed service offering that brings businesses the most innovative, highest-performing BI solution available in a cost-effective, agile and fully supported cloud environment. Upload Data Made Easier By Dimitris Poulos The Upload Data facility, introduced with early WebFOCUS 7.6x releases, allows developers and basic users to easily make their external data accessible by WebFOCUS. The facility provides a simple mechanism for users to import their data from Excel or text files to WebFOCUS Reporting Server applications that they are authorized to access, and then use this data in their WebFOCUS applications. The process does not require a Reporting Server or WebFOCUS administrator to be involved, nor does it require a special configuration on the Reporting Server. Basically, after a few point-and-click operations, users end up loading their data and start designing reports with tools such as InfoAssist and Report Painter.

The Upload Data facility went through incremental enhancements during the 7.6x and 7.7x releases to expand the way user data could be used. Enhancements included allowing data to be used in joins and adding support for additional data types. In WebFOCUS 8, the Upload Data facility was totally redesigned to provide further enhancements (Screen 1).
Screen 1 Enhancements available with Release 8 are as follows:
• Upload Data now uses server technologies to upload data and create the corresponding synonyms. This allows us to create standard synonyms throughout the WebFOCUS product line and support all of the data types currently available with WebFOCUS.
• Files supported with upload are as follows:
o Excel workbooks: xls, xlsx . Excel files that have multiple worksheets and data ranges defined also are supported and, in these cases, multiple synonyms get created (Screen 2).
Screen 2
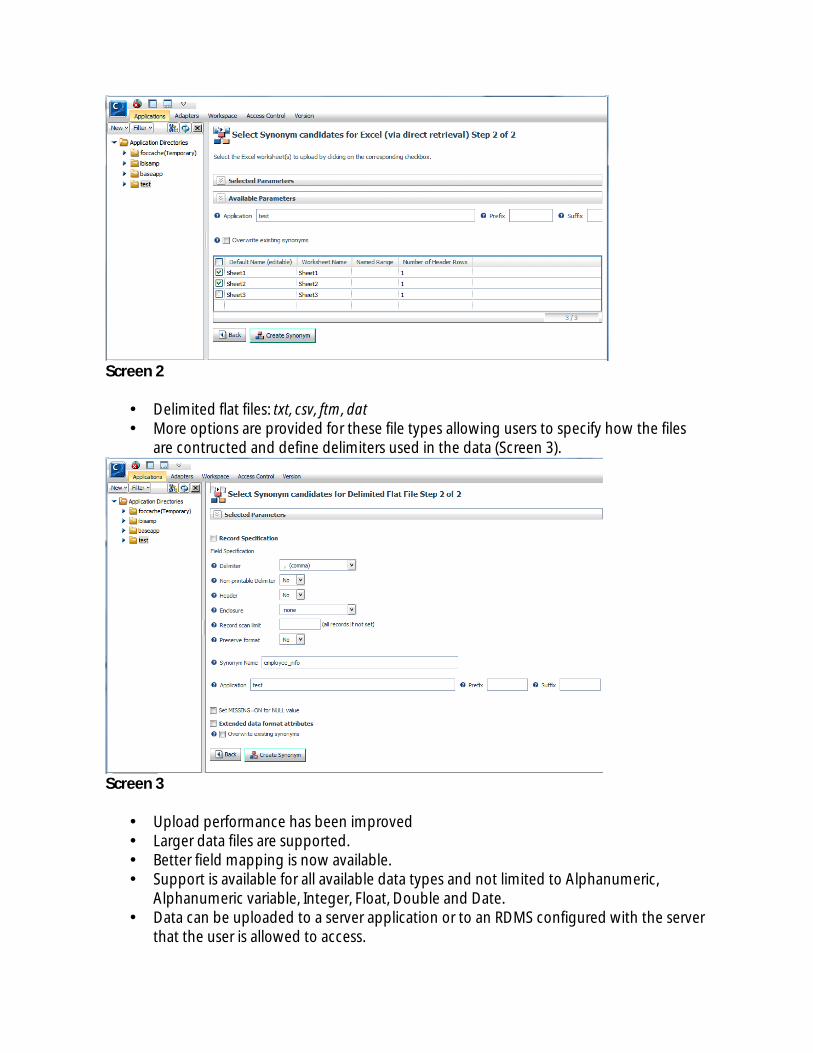
• Delimited flat files: txt, csv, ftm, dat • More options are provided for these file types allowing users to specify how the files
are contructed and define delimiters used in the data (Screen 3).
Screen 3
• Upload performance has been improved • Larger data files are supported. • Better field mapping is now available. • Support is available for all available data types and not limited to Alphanumeric,
Alphanumeric variable, Integer, Float, Double and Date. • Data can be uploaded to a server application or to an RDMS configured with the server
that the user is allowed to access.
• The Reporting Servers supported with Release 8 provide additional privileges to control user permissions. For example, it’s possible to control whether users can view and edit the synonyms created, allow import to an RDBS, and control the applications used to upload files.
• A new interface for editing synonyms created through the upload process is now available. It allows users to easily set up field attributes and provides error handling.
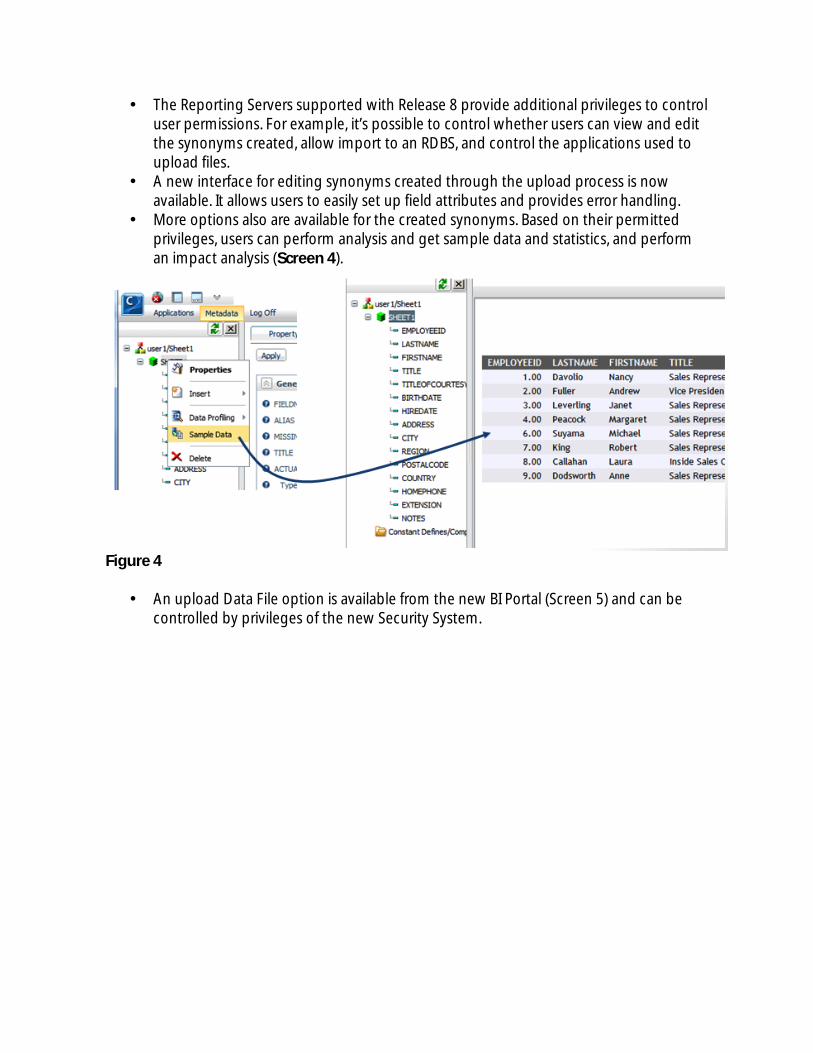
• More options also are available for the created synonyms. Based on their permitted privileges, users can perform analysis and get sample data and statistics, and perform an impact analysis (Screen 4).
Figure 4
• An upload Data File option is available from the new BI Portal (Screen 5) and can be controlled by privileges of the new Security System.

Screen 5
• Upload is also available from Developer Studio and from the Reporting Server Web Console.