webadvisor - register for classes · section name and title of the course to view a detailed course...
TRANSCRIPT

1
WEBADVISOR - REGISTER FOR CLASSES
Register, Add, or Drop classes from the WebAdvisor
If you have questions about the web registration process, or if you are not able to
web register and need more information, please email Enrollment Services through
your MCC email account at [email protected].
1. Go to the MCC website www.middlesexcc.edu . Click on “MY MCC”
2. Select “Web Advisor”

2
3. Log into “WebAdvisor”
4. Click on the “Students” icon.
3
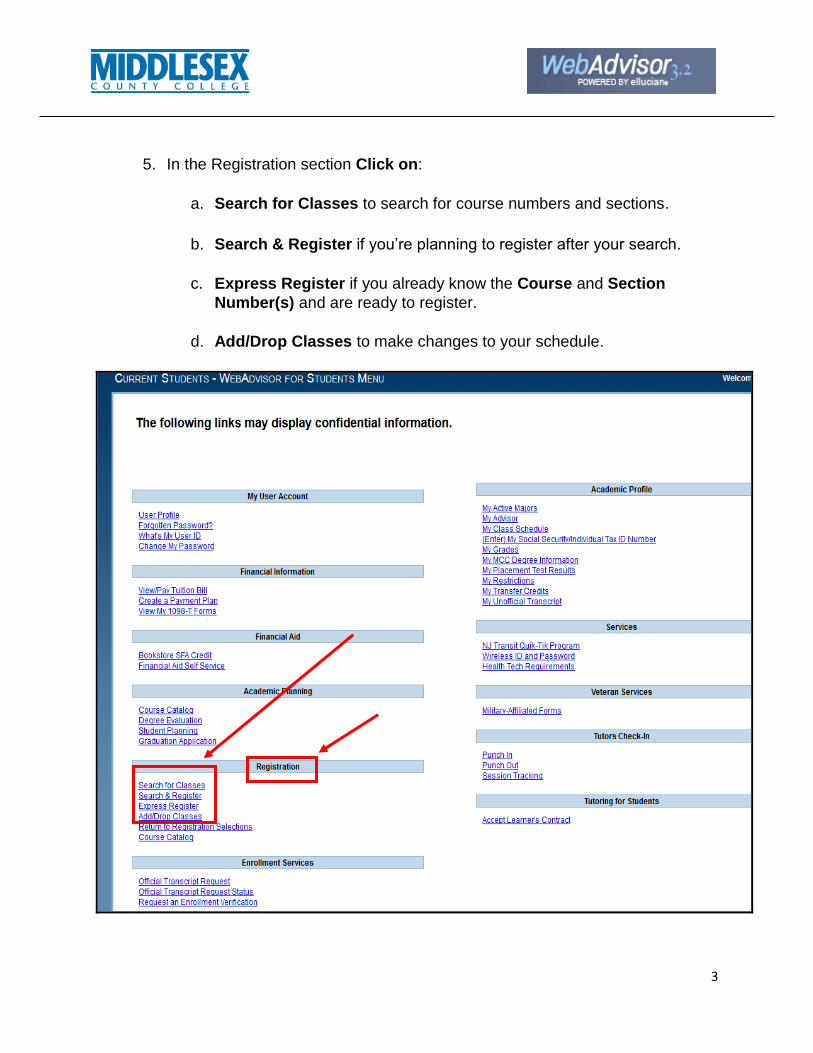
5. In the Registration section Click on:
a. Search for Classes to search for course numbers and sections.
b. Search & Register if you’re planning to register after your search.
c. Express Register if you already know the Course and Section
Number(s) and are ready to register.
d. Add/Drop Classes to make changes to your schedule.

4
Search for Classes
6. To Search for Classes, you must enter the Term and at least one other field
to begin your search.
Save time by searching for Open Courses Only. Click on the View Open
Courses button. Narrow your search further by start date, location, course
type, subject, meeting time, or meeting day.
“Hints” next to each search field provide instruction for that field, as well as
live links to detailed information on a variety of subjects, such as MCC
Bookstore; Term Information; MCC Locations; Online course
information; General Education, or Honors courses.

5
7. Refine your search for classes by choosing a Subject, or by Subject and
Course Number. Example: English 121. To narrow your search even further,
enter additional information, such as Courses Meeting After or Courses
Ending Before, specific meeting days, Course Title, or Instructor’s Last
Name.
After refining your search, click Submit to view a list of course sections
that meet your criteria.
If an error message appears that reads “No classes meeting the
search criteria have been found”, it may mean 1) no course fitting your
criteria is being offered, or 2) you may have entered the information
incorrectly. Try searching by just the term and subject.

6
8. After you click Submit, a list of course sections will appear. Click on the blue
Section Name and Title of the course to view a detailed course description.
Review the Meeting Information column to view the days and times the
course section meets (note that M= Monday; T- Tuesday; W= Wednesday;
TH=Thursday; F=Friday; S= Saturday; SU= Sunday).
Be sure to read any information printed in the Comments column. For
example, this is where you’ll find out if the course meets at the Perth
Amboy or New Brunswick campus; if the course requires co-enrollment
with another course; if the course is an Internet section, etc.
If you are using Search for Classes, be sure to write down the course
number and the two-digit section number when you find a course you wish
to take (Example: 03, PA, T1, etc.). You will need this information in order
to register for the course.

7
Registration Disclaimer
9. Before Registering, Adding, or Dropping classes through WebAdvisor, all
students are required to verify that they have read and understood College
policy regarding registering, adding, and withdrawing from classes. After
reading the information, click the check box at the bottom of the page if you
wish to proceed with your transaction. Choose “Click Here” if you do not wish
to proceed:
To Search & Register, Express Register, or Add/Drop Classes, you
must return to the Students menu and select the appropriate link in the
Registration section.
8
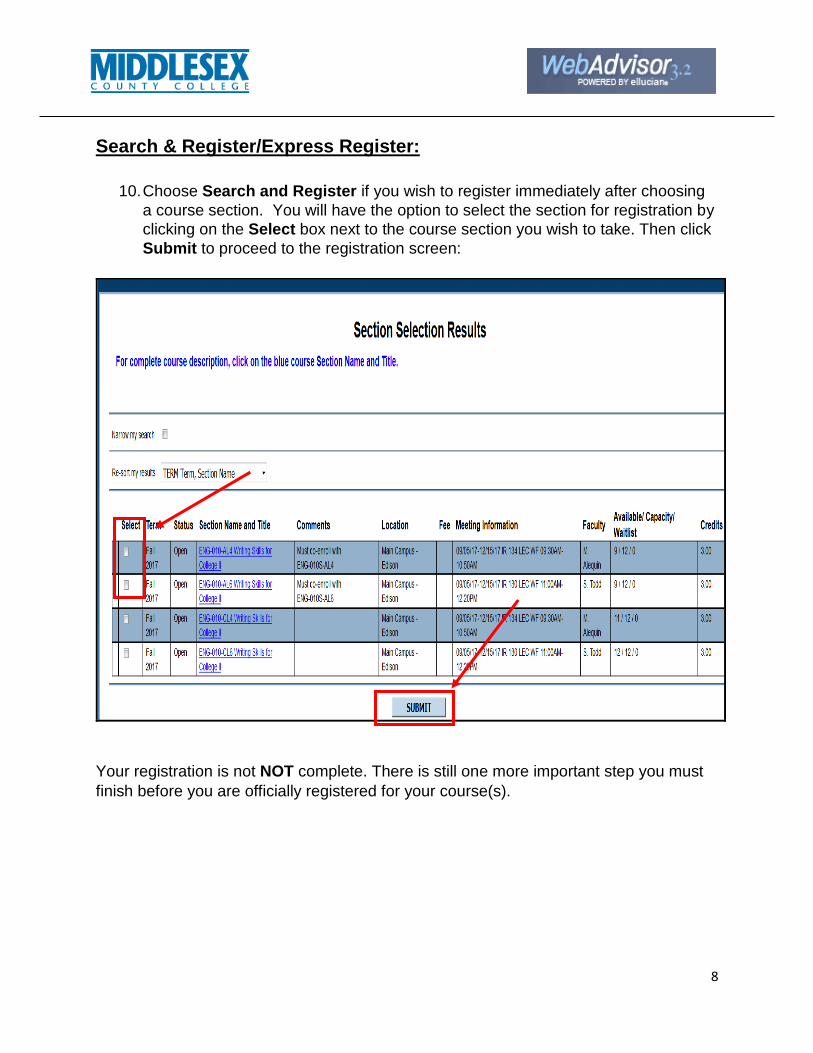
Search & Register/Express Register:
10. Choose Search and Register if you wish to register immediately after choosing
a course section. You will have the option to select the section for registration by
clicking on the Select box next to the course section you wish to take. Then click
Submit to proceed to the registration screen:
Your registration is not NOT complete. There is still one more important step you must
finish before you are officially registered for your course(s).

9
11. Choose Express Register if you know the course number and section
number.
Choose the subject (example: English) from the drop down menu by
clicking on the arrow to the right of the Subject field.
Enter the course the course number (example: 121) in the Course
Number field
Enter the section number (example: 04) in the Section Number field.
Choose the Term (example: 14/FA Fall 2014) from the drop down menu
by clicking on the arrow to the right of the Term field.

10
12. When you have finished entering your proposed class selections, read the
Registration Disclaimer and then click Submit to move to the next screen
where you can finalize your choices.
Your registration is not NOT complete. There is still one more important step you must
finish before you are officially registered for your course(s).

11
Completing Registration
13. Whether you are using Search and Register or Express Register, you will
have the opportunity to review your course selections before you register for
them. Choose what Action you wish to take for the course(s) you’ve selected.
Choose Register if you plan to register for the course.
Choose Remove from List if you want to remove the section from
your list.
IMPORTANT: If you are interrupted and need to log out of
WebAdvisor at this point, you can always return to your list of courses
by choosing Return to Registration Selections from the WebAdvisor
Registration menu on the left.

12
Click SUBMIT at the bottom of the page to finalize your registration.
IMPORTANT
Your registration is not complete until you click SUBMIT and receive confirmation that your
request was accepted.

13
14. If your registration was successful, you will see a list of all your current
registered courses with the statement: “Registered for this section” in the
Status column next to the course.
An email confirmation of your attempted transaction will be sent to your Outlook email account. Check to make sure you receive an email. Read the email carefully for instructions on how to verify that your transaction was processed.
15. If your registration was unsuccessful, you will receive an error message
at the top of the page explaining the reason your attempt to register,
add, or drop failed. The statement “UNSUCCESSFUL Registration” will
appear in the Status column next to the course.

14
Adding/Dropping Classes
15. You may add or drop sections from your schedule. If you wish to add a
course, choose Search & Register or Express Register. Then choose
“Register” from the drop down menu in the “Action” column.
If you wish to drop a course, choose Drop Classes from the Registration
menu.
To drop a course, click the Check Box in the Drop column next to the
course you want to drop. Click Submit at the bottom of the page to
complete the transaction.
Note that you can add and drop courses at the same time, in the same
transaction.
If your drop has been successful, you will see the message “Dropped
from this section” in the Status column next to the course.
Check your MCC email account. You should receive an email with instructions explaining how to verify your web transaction was successful. Remember, if you do not receive an email, then your web transaction request was not processed.

15
Registration Statement
16. Always print a copy of your “Student Statement” to confirm your
schedule/invoice. Click on View/Pay Tuition Bill in the Financial
Information section.
Choose the appropriate Term.
Select View Statement

16
17. Your Account Activity will show:
Your class schedule, including meeting days, times, buildings and rooms
Your total tuition and fees due
If you have questions about the web registration process, or if you are not able to web
register and need more information, please email Enrollment Services through your
MCC email account at [email protected].