web services with websphere studio: deploy and publish · web services with websphere studio:...
TRANSCRIPT

Web services with WebSphere Studio:Deploy and publish
Presented by WebSphere Developer Domain
www7b.software.ibm.com/wsdd/
Table of ContentsIf you're viewing this document online, you can click any of the topics below to link directly to that section.
1. Introduction.............................................................. 22. Work Order Management ............................................. 43. Deploying the EAR on Application Server ......................... 64. Publishing the Web service to a UDDI registry.................... 105. Discovering and testing the service ................................. 196. Summary ................................................................ 22
Web services with WebSphere Studio: Deploy and publish Page 1 of 23

Section 1. Introduction
Should I take this tutorial
This is the second in a two-part series on developing and deploying Web services.
You should take this tutorial if you want to learn how to develop, deploy, and publishWeb services using WebSphere Application Server and the Application Developerconfiguration of WebSphere Studio. You don't need to be experienced with Webservices or technologies such as the Simple Object Access Protocol (SOAP), the WebServices Description Language (WSDL), or the Universal Description, Discovery andIntegration (UDDI) standard, but any such previous background is helpful. This part ofthe tutorial can be useful even if you have not read "Building Web Services withWebSphere Studio, Part 1: Build and test" -- but it is strongly recommended that youdo, as this second part starts off with a deployment of the Enterprise ApplicationArchive (EAR) file that was built in Part 1.
You will find the tutorial easier to follow if you download and install WebSphereApplication Server and the Application Developer configuration of WebSphere Studio.See Tools and resources on page 2 for the download sites. You can also download theWebSphere UDDI Registry and publish your Web service onto a private registryinstead of the public registry used in this tutorial. However, this is not a prerequisite,and you can follow the tutorial even if you do not have a working copy of the tools atyour disposal.
What is this tutorial about?
This tutorial will teach you:
• How to deploy a Web service and its implementation code on a WebSphereApplication Server
• How to use Application Developer and the UDDI Explorer tool to publish your Webservice onto a UDDI registry
• How to discover services published on the registry from client applications
The tutorial is based on a real business scenario involving the work managementapplication that was introduced in Part 1. The Web service allows clients to create newwork orders for a company's workforce. These work orders are managed by the workmanager object. In order to make this second part of the tutorial self-sufficient, a briefrecap of the scenario is provided.
Tools and resources
www7b.software.ibm.com/wsdd/ Presented by WebSphere Developer Domain
Page 2 of 23 Web services with WebSphere Studio: Deploy and publish

The following tools are necessary if you plan to run the examples in this tutorial:
• WebSphere Studio Application Developer trial edition. (313MB)
• WebSphere Application Server Advanced Developer Edition version 4.0. (146MB)
About the author
Ron Ben-Natan is chief technology officer at ViryaNet Inc., a software provider ofwireless workforce management and field service solutions. Prior to that he worked forcompanies such as Intel, AT&T Bell Laboratories, Merrill Lynch and as a consultant atJ.P. Morgan. He has a Ph.D. in Computer Science in the field of distributed computingand has been architecting and developing distributed applications for over 15 years.His hobby is writing about how technology is used to solve real problems, and he hasauthored and co-authored numerous books, including CORBA: A Guide to CommonObject Request Broker Architecture, CORBA on the Web, and The SanFranciscoDeveloper's Guide all published by McGraw-Hill; IBM WebSphere Starter Kit and IBMWebSphere: The Complete Reference both published by Osborne/McGraw-Hill; andIntegrating Service Level Agreements published by John Wiley & Sons. He is also theauthor of numerous articles and tutorials. He can be reached [email protected].
Presented by WebSphere Developer Domain www7b.software.ibm.com/wsdd/
Web services with WebSphere Studio: Deploy and publish Page 3 of 23

Section 2. Work Order Management
Work order management scenario: Recap from Part1
This section briefly recaps the business scenario used in this tutorial. If you have justcompleted reading Part 1 or remember the scenario, go ahead and skip directly to thesection titled Deploying the EAR on Application Server on page 6 .
Recall from Part 1 that InstallCo is in the business of doing TV satellite dishinstallations. InstallCo does not get the customer order directly. Instead, InstallCo iscontracted by the dish companies and retailers, who sell the service to consumers andbook the appointment. These companies then forward the information to InstallCo,which creates a work order in the work management system.
The greatest difficulty in getting a new retailer to work with InstallCo is the way in whichnew orders are transferred from the retailer to InstallCo. Most retailers capture newcustomers in their own systems -- each system being different from the other. Becauseit is not feasible to perform complex integration into so many systems, InstallCo choseto build a Web service that could be used to initiate installation work in their workmanagement system.
The createWorkOrder service: Recap from Part 1
The createWorkOrder Web service receives the required work order information andreturns the order number. The service is the front end to InstallCo's work managementsystem and it is exposed over the Web for all retailers and dish companies to use.When a retailer or dish provider sets an appointment with a customer, the orderinformation is sent to the Web service using SOAP, which calls the method that createsthe order within the work management system.
Packaging work order creation as a Web service, available over the public Internet andtherefore accessible to all, makes for a very low cost of ownership. Packaging thisfunction as a Web service has one other important effect: It makes InstallCo easy tofind as a service provider and the createWorkOrder function easy to interface with,even if you have never used it before.
InstallCo wants to use the Web services framework to self-publish thecreateWorkOrder service on a public UDDI registry. This means that a retailer, whodoes not know InstallCo, can search through such a registry of dish installationcompanies, discover InstallCo, and then quickly and easily build an interface to themusing the createWorkOrder service.
The retailer then uses the WSDL file to learn how to invoke the service. A proxy isgenerated based on the WSDL; this proxy is used to invoke the createWorkOrderservice. The invocation is done using SOAP.
www7b.software.ibm.com/wsdd/ Presented by WebSphere Developer Domain
Page 4 of 23 Web services with WebSphere Studio: Deploy and publish

All this is possible because of the technologies forming Web services -- UDDI, WSDL,and SOAP. For a brief recap on these technologies, please refer back to Part 1 of thistutorial.
Presented by WebSphere Developer Domain www7b.software.ibm.com/wsdd/
Web services with WebSphere Studio: Deploy and publish Page 5 of 23

Section 3. Deploying the EAR on Application Server
Starting the administrator's console
Start by deploying the EAR that you created in Part 1 onto a WebSphere ApplicationServer.
You use the WebSphere administrator console to deploy your application and Webservice. Make sure the Application Server is running. If it is not running, start up boththe HTTP server and the WebSphere Application Server.
Open the administrator's console by opening http://localhost:9090/admin inyour browser. Enter your user ID and click Submit.
Installing the enterprise application - Specifying theEAR
Using the navigator pane on the left, go to WebSphere Administrative Domain=>Nodes => <your host name>=> Enterprise Applications. Click EnterpriseApplications. The right pane now displays the Enterprise Applications list.
Click Install. This brings up the Application Installation Wizard. Enter the path to theEAR file you created in Part 1 (or browse to find it). Because you are deploying an EARfile, you do not need to specify anything else -- all of the application properties areembedded within the EAR. The wizard should be similar to the figure shown below.Click Next.
www7b.software.ibm.com/wsdd/ Presented by WebSphere Developer Domain
Page 6 of 23 Web services with WebSphere Studio: Deploy and publish

Completing the installation of the enterpriseapplication
Because the EAR includes a Web module, you need to specify which virtual host itshould be deployed onto. The next window in the Application Installation Wizard allowsyou to specify the virtual host. Keep the default_host value and click Next.
In the next window, confirm that all the application details are correct and click Finish.The application will be installed (this may take some time, so be patient).
When you now click on Enterprise Applications in the navigator pane, you should seeyour new enterprise application as shown below:
Presented by WebSphere Developer Domain www7b.software.ibm.com/wsdd/
Web services with WebSphere Studio: Deploy and publish Page 7 of 23
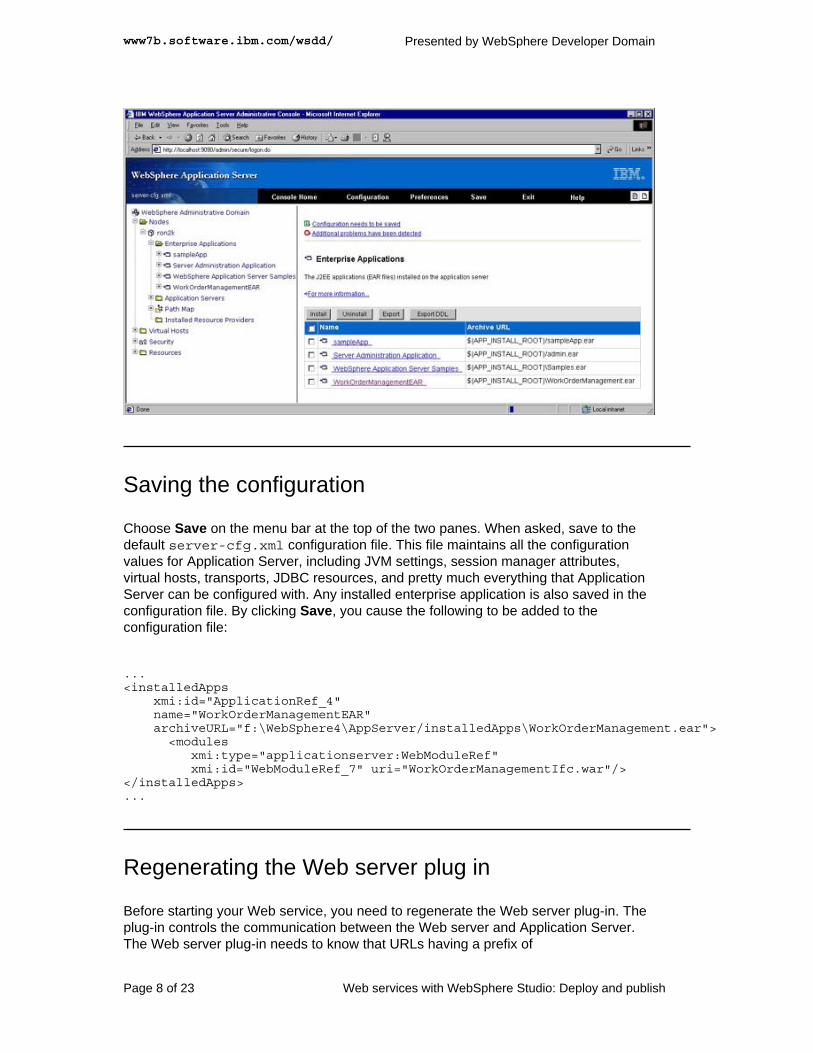
Saving the configuration
Choose Save on the menu bar at the top of the two panes. When asked, save to thedefault server-cfg.xml configuration file. This file maintains all the configurationvalues for Application Server, including JVM settings, session manager attributes,virtual hosts, transports, JDBC resources, and pretty much everything that ApplicationServer can be configured with. Any installed enterprise application is also saved in theconfiguration file. By clicking Save, you cause the following to be added to theconfiguration file:
...<installedApps
xmi:id="ApplicationRef_4"name="WorkOrderManagementEAR"archiveURL="f:\WebSphere4\AppServer/installedApps\WorkOrderManagement.ear">
<modulesxmi:type="applicationserver:WebModuleRef"xmi:id="WebModuleRef_7" uri="WorkOrderManagementIfc.war"/>
</installedApps>...
Regenerating the Web server plug in
Before starting your Web service, you need to regenerate the Web server plug-in. Theplug-in controls the communication between the Web server and Application Server.The Web server plug-in needs to know that URLs having a prefix of
www7b.software.ibm.com/wsdd/ Presented by WebSphere Developer Domain
Page 8 of 23 Web services with WebSphere Studio: Deploy and publish
WorkOrderManagementIfc must be forwarded to the WebSphere ApplicationServer. This plug-in accesses the service by using a URL of the form:http://<hostname>/WorkOrderManagementIfc/servlet/rpcrouter.
Using the navigator pane, select WebSphere Administrative Domain=> VirtualHosts and click default_host. In the right pane, click Web Server Plug-InConfiguration (close to the end of the page).
This brings up the Web Server Plug-In Configuration page. Click Generate. Thischanges the plugin-cfg.xml file in the WebSphere config directory. The changemade is highlighted below; the Web server knows now that all URLs with theWorkOrderManagementIfc prefix need to be forwarded to Application Server:
...<UriGroup Name="default_host_URIs">
<Uri Name="/servlet/snoop/*"/><Uri Name="/servlet/snoop"/><Uri Name="/servlet/snoop2/*"/><Uri Name="/servlet/snoop2"/><Uri Name="/servlet/hello"/><Uri Name="/ErrorReporter"/><Uri Name="*.jsp"/><Uri Name="/j_security_check"/><Uri Name="/servlet/*"/><Uri Name="/webapp/examples"/><Uri Name="/WebSphereSamples"/><Uri Name="/WebSphereSamples/SingleSamples"/><Uri Name="/theme"/><Uri Name="/WorkOrderManagementIfc"/>
</UriGroup>
Finally, you need to restart both the Web server and the Application Server for thechanges to take effect.
Testing your deployment
In order to test your deployment, openhttp://localhost/WorkOrderManagementIfc/sample/WorkOrderManager/TestClient.jspin your browser. Select createNewWorkOrder in the left pane and use the top-rightpane to create a few orders. You should see the lower-right pane show incrementingorder numbers.
Presented by WebSphere Developer Domain www7b.software.ibm.com/wsdd/
Web services with WebSphere Studio: Deploy and publish Page 9 of 23

Section 4. Publishing the Web service to a UDDI registry
Note on the InstallCo example
In this section you'll publish your business and service to a public registry. You mayhave to modify the business name from InstallCo (as it is stated in all examples belowand as it was already tested with the public registry) to installcoXXXX (fill in theXXXX with something you feel is unique), or even with a completely different businessname.
UDDI registries
UDDI registries allow you to publish businesses and services. Once Web services arepublished to a UDDI registry, they can be discovered and used by potential customers.Because UDDI is one of the underlying standards of Web services, you are assuredthat a large potential user base has access to your Web services.
The publishing procedure itself and the UDDI APIs implemented by UDDI registries areaccessible as Web services (using SOAP). This means that the registry is easilyaccessible over the Web. While writing the SOAP messages for invoking APIs is nothard, you can also use the UDDI Explorer in Application Developer to easily publishyour Web services.
Public and private registries
A private UDDI registry is one that you can set up and manage yourself. It is usuallyused to set up a UDDI-based discovery scheme within a company or organization. Youcan download the IBM WebSphere UDDI Registry (see Resources on page 22 ). ThisUDDI registry runs on a WebSphere Application Server, version 4 (both AdvancedEdition and Advanced Developer Edition).
Yet publishing your Web service onto a private registry makes it visible only to thosewho have access to that registry. Another alternative is to publish your Web service ona public UDDI registry, which is the focus of the next part of the tutorial.
For more information on private registries, see Resources on page 22 .
Registering as a user on the IBM UDDI BusinessTest Registry
www7b.software.ibm.com/wsdd/ Presented by WebSphere Developer Domain
Page 10 of 23 Web services with WebSphere Studio: Deploy and publish

The IBM UDDI Business Test Registry is a public UDDI registry that can be used toregister businesses and services to the public. It is most commonly used to test thepattern of publishing and discovering Web services.
Before you can publish your Web services to this registry you will need to set up a useraccount. To open an account, go to the IBM UDDI Business Test Registry site. ClickGet an IBM user ID and password, then click Register. Fill in the registration pageshown below; the most important values to remember are the ID and password. Makesure you have the spelling of your e-mail account correct because you will need toreceive an activation key.
In the next screen you need to accept the license terms for using the UDDI registries.Once you have completed the registration, the activation key will be e-mailed to you.Enter this key on the activation page shown below and click Activate.
Presented by WebSphere Developer Domain www7b.software.ibm.com/wsdd/
Web services with WebSphere Studio: Deploy and publish Page 11 of 23

Setting up your servers
You will be using three servers in this tutorial: the WebSphere Application Server,where you have installed your Web service; the UDDI Business Test Registry, whereyou will publish your service; and the WebSphere test environment within ApplicationDeveloper. You will use Application Developer for using the UDDI Explorer to do theactual publishing into the UDDI registry, and for building a test client (discovering theservice and building the proxy).
Because you will be running two instances of Application Server (one for the workorder creation service and one within Application Developer), you need to modify theserver ports on one of the two instances; two servers cannot use the exact same ports.Leaving the Application Server installation as is, change the ports in your WebSpheretest environment within Application Developer. Open the Server Perspective withinApplication Developer and navigate to the Server Configuration pane in the lower lefthand corner. Open the Server Configurations folder and double-click the WebSphereAdministrative Domain icon. Click on the Ports tab in the top right pane. Change all thevalues in the Advanced ports section apart from the Object level trace port. As anexample, the following screen shows all ports being incremented by 100 (the actualnumber is not important, so long as it does not conflict with other servers):
www7b.software.ibm.com/wsdd/ Presented by WebSphere Developer Domain
Page 12 of 23 Web services with WebSphere Studio: Deploy and publish

Now that the WebSphere test environment within Application Developer runs on yourmachine, you can start the UDDI Explorer Web application.
Opening the UDDI Explorer
To open the UDDI Explorer choose File=> Export from the menu bar. In the ExportWizard, select UDDI and click Next:
Presented by WebSphere Developer Domain www7b.software.ibm.com/wsdd/
Web services with WebSphere Studio: Deploy and publish Page 13 of 23

Click Finish to launch the UDDI Explorer.
Publishing the business
You need to publish your business -- InstallCo -- before you can publish your Webservice on the UDDI registry. In the UDDI Navigator pane (left pane), click IBM TestRegistry. In the toolbar of the Actions pane (top right pane), click the Publish BusinessEntity icon:
First you need to login using the ID and password you used in the registration. ClickGo. After login, you can publish your business. Enter installco as the name and adescription of what the company does:
www7b.software.ibm.com/wsdd/ Presented by WebSphere Developer Domain
Page 14 of 23 Web services with WebSphere Studio: Deploy and publish

You can also add identifiers such as phone numbers, fax numbers, contact names etc.Click Add to add an identifier and fill in the fields. You should also add the categoriesthat this business belongs to (similar to the Yellow Pages categorization scheme). Youcan add multiple categories because your business may belong to more than onebusiness category. When you are done, click Go to submit the form.
More on classification
Each category that your business belongs to is classified based on one of threeclassification schemes:
1. United Nations Standard Products and Service Classification (UNSPSC)
2. North American Industrial Classification System (NAICS)
3. Geographic Classification (e.g., which state the business functions in) (GEO)
You can add any number of categories and provide categories in any combination ofclassification schemes. You need to select the classification scheme and the
Presented by WebSphere Developer Domain www7b.software.ibm.com/wsdd/
Web services with WebSphere Studio: Deploy and publish Page 15 of 23

classification category for each category. As an example, add the UNSPSC categoryfor Other domestic household appliances using the classification browser:
Publishing the service
Once InstallCo is published as a company, you can go ahead and publish the serviceitself. In the UDDI Navigator pane select Find Business Entities. Enter installcoas the Business Name and click Go. Use the UDDI Navigator pane to select IBM TestRegistry=> query results=> installco. On the Actions toolbar in the top right paneselect the Publish Business Service icon:
Enter the URL pointing to your WSDL file. This is the most important part in thepublishing process, since the WSDL file service implementation file defines the service
www7b.software.ibm.com/wsdd/ Presented by WebSphere Developer Domain
Page 16 of 23 Web services with WebSphere Studio: Deploy and publish
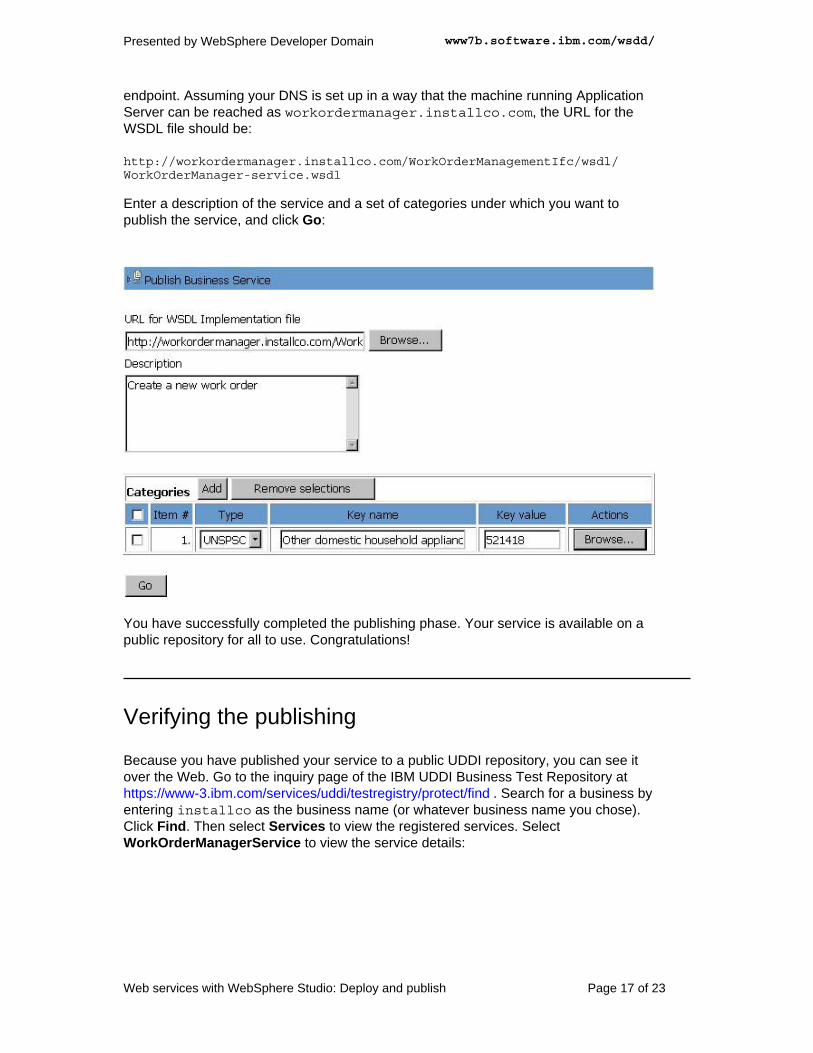
endpoint. Assuming your DNS is set up in a way that the machine running ApplicationServer can be reached as workordermanager.installco.com, the URL for theWSDL file should be:
http://workordermanager.installco.com/WorkOrderManagementIfc/wsdl/WorkOrderManager-service.wsdl
Enter a description of the service and a set of categories under which you want topublish the service, and click Go:
You have successfully completed the publishing phase. Your service is available on apublic repository for all to use. Congratulations!
Verifying the publishing
Because you have published your service to a public UDDI repository, you can see itover the Web. Go to the inquiry page of the IBM UDDI Business Test Repository athttps://www-3.ibm.com/services/uddi/testregistry/protect/find . Search for a business byentering installco as the business name (or whatever business name you chose).Click Find. Then select Services to view the registered services. SelectWorkOrderManagerService to view the service details:
Presented by WebSphere Developer Domain www7b.software.ibm.com/wsdd/
Web services with WebSphere Studio: Deploy and publish Page 17 of 23

www7b.software.ibm.com/wsdd/ Presented by WebSphere Developer Domain
Page 18 of 23 Web services with WebSphere Studio: Deploy and publish

Section 5. Discovering and testing the service
Discovering the Web service and importing theWSDL
Now that you know the service is published on the public registry, let's look at how aretailer would discover and use the service.
Create a new project called UseWorkOrderService in Application Developer. Youwill use this project to create a simple test client. Select File=> Import to bring up theImport Wizard. Select UDDI and click Next. Click Finish to bring up the UDDI Explorer(this time in import mode).
In the UDDI Navigator pane, select Find Business Services. Enter installco in thetop right pane and click Go. Expand the query results entry in the UDDI Navigator paneand select installco. Expand the installco icon and click Find Business Services.Click Go in the top right pane to search for all services. Click onWorkOrderManagerService in the UDDI Navigator pane to bring up the servicedefinition in the top right pane. Expand WorkOrderManagerService and click FindService Interfaces. Click Go. Expand the query results and click on the ServiceInterface icon. The UDDI Navigator should look as follows:
Click the Import icon on the Actions toolbar:
You now have to specify which project to import the Web service to. Select the Webproject you have created (use WorkOrderService) and click Go. This imports theWSDL file to your project.
Presented by WebSphere Developer Domain www7b.software.ibm.com/wsdd/
Web services with WebSphere Studio: Deploy and publish Page 19 of 23

You are ready to create the proxy and the sample test application.
Creating the proxy and sample application
To create the proxy and sample test application use Application Developer's WebServices Wizard in a procedure similar to the one you followed in Part 1.
Select File=> New=> Other from the menu bar. Select Web Services from the leftpane, and Web Service client from the right pane (note that this is different from theselection you made in Part 1, since this time you are creating a client from a WSDLfile). Select the Use WorkOrderService project, select the Overwrite files withoutwarning checkbox and click Next. Make sure the WSDL binding document is selectedand click Next. Click Next again. Select the Launch the test client checkbox and clickNext. Finally, select the Generate a sample checkbox and the Launch the samplecheckbox and click Finish.
This will generate the proxy and the test application, and launch the application withinApplication Developer for you to use as shown below. Note that the server actuallyproviding the functionality is your local Application Server instance. The test application(with the set of sample JSP) is running within Application Developer but the actualtransactions are being performed on the Application Server instance.
www7b.software.ibm.com/wsdd/ Presented by WebSphere Developer Domain
Page 20 of 23 Web services with WebSphere Studio: Deploy and publish

You are done! You have successfully performed the tasks that a real-life InstallCo aswell as a typical retailer would have been required to perform.
Presented by WebSphere Developer Domain www7b.software.ibm.com/wsdd/
Web services with WebSphere Studio: Deploy and publish Page 21 of 23

Section 6. Summary
Summary
In this tutorial, you used the Web service developed in Part 1. You installed the EAR,containing the Web service and the implementation code, onto a runtime instance ofthe WebSphere Application Server. You then used the UDDI Explorer withinApplication Developer to publish your Web service onto a public UDDI registry -- theIBM UDDI Business Test Registry. Finally, you created a new project within ApplicationDeveloper and used the UDDI Explorer to discover the service, generated a proxy tothe published service (installed on Application Server), and ran the test sample.
You have now completed the entire Web service cycle, from both an implementer's aswell as a consumer's point of view. As an implementer, you exposed a businessfunction as a Web service, developed, tested and packaged it, installed it onApplication Server, and published it on a UDDI registry. As a consumer of a Webservice, you discovered a service from a UDDI registry, generated the proxy based onthe WSDL file, and ran a simple test client that uses the Web service.
Resources
• Read the first part of this tutorial, "Building Web Services with WebSphere Studio,Part 1: Build and test".
• WebSphere Studio Application Developer trial edition. (313MB)
• WebSphere Application Server Advanced Developer Edition version 4.0. (146MB)
• Download a copy of version 1.1 of the WebSphere UDDI Registry
• Register your services on a public registry at the IBM UDDI Business Test Registry.
• Check out these developerWorks tutorials:• "Registering and publishing your Web service" (developerWorks, June 2001). This
tutorial describes UDDI and the IBM UDDI4J toolkit allowing you to access UDDIregistries from SOAP clients.
• "Implementing Web services with the WSTK 3.0.1" (developerWorks, January2002). This tutorial shows you how to use the set of technologies packaged withinthe Web Services Toolkit to implement Web services.
• For information on the role of private UDDI nodes in Web services, see "The role ofprivate UDDI nodes in Web services, Part 1: Six species of UDDI" (developerWorks,May 2001).
• Take a look at these articles on the WebSphere Developer Domain:• "Web Services Development and Deployment with IBM Tools and Technologies -
Part 1"
• "Web Services Programming with WebSphere Studio Application Developer --Part 1: Web Services Discovery and Evaluation"
• Check out the Web services resources on the WebSphere Developer Domain.
• The Xerces project at Apache.org provides XML parsers for a variety of languages
www7b.software.ibm.com/wsdd/ Presented by WebSphere Developer Domain
Page 22 of 23 Web services with WebSphere Studio: Deploy and publish
such as Java, C++, and Perl. Also take a look at the Java 2 libraries.
• The SOAP resource center contains articles, examples, FAQs, mailing lists,specifications, tutorials, and other material pertaining to SOAP programming.
• The OASIS WSDL resource page contains many useful links related to WSDL,including the WSDL specification version 1.1.
• The OASIS UDDI resource page contains many useful links related toUDDI,including the UDDI technical specification and various UDDI repositories.
• Download the Web Services Toolkit for dynamic e-business, a software developmentkit that includes a run-time environment, a demo, and examples to aid in designingand executing Web service applications.
• Test-drive Web services with these Web Services demos.
Feedback
Colophon
This tutorial was written entirely in XML, using the developerWorks Toot-O-Matic tutorialgenerator. The open source Toot-O-Matic tool is an XSLT stylesheet and several XSLTextension functions that convert an XML file into a number of HTML pages, a zip file, JPEGheading graphics, and two PDF files. Our ability to generate multiple text and binary formatsfrom a single source file illustrates the power and flexibility of XML. (It also saves ourproduction team a great deal of time and effort.)
You can get the source code for the Toot-O-Matic atwww6.software.ibm.com/dl/devworks/dw-tootomatic-p. The tutorial Building tutorials with theToot-O-Matic demonstrates how to use the Toot-O-Matic to create your own tutorials.developerWorks also hosts a forum devoted to the Toot-O-Matic; it's available atwww-105.ibm.com/developerworks/xml_df.nsf/AllViewTemplate?OpenForm&RestrictToCategory=11.We'd love to know what you think about the tool.
Presented by WebSphere Developer Domain www7b.software.ibm.com/wsdd/
Web services with WebSphere Studio: Deploy and publish Page 23 of 23