web enablement installation and configuration guide · pdf filethis software and related...
TRANSCRIPT
JD Edwards World Web Enablement Installation and Configuration Guide Version A9.1/A9.2 Revised – December 9, 2010

Copyright Notice Copyright © 2009, Oracle. All rights reserved. Trademark Notice Oracle is a registered trademark of Oracle Corporation and/or its affiliates. Other names may be trademarks of their respective owners. License Restrictions Warranty/Consequential Damages Disclaimer This software and related documentation are provided under a license agreement containing restrictions on use and disclosure and are protected by intellectual property laws. Except as expressly permitted in your license agreement or allowed by law, you may not use, copy, reproduce, translate, broadcast, modify, license, transmit, distribute, exhibit, perform, publish or display any part, in any form, or by any means. Reverse engineering, disassembly, or decompilation of this software, unless required by law for interoperability, is prohibited. Subject to patent protection under one or more of the following U.S. patents: 5,781,908; 5,828,376; 5,950,010; 5,960,204; 5,987,497; 5,995,972; 5,987,497; and 6,223,345. Other patents pending. Warranty Disclaimer The information contained herein is subject to change without notice and is not warranted to be error-free. If you find any errors, please report them to us in writing. Restricted Rights Notice If this software or related documentation is delivered to the U.S. Government or anyone licensing it on behalf of the U.S. Government, the following notice is applicable: U.S. GOVERNMENT RIGHTS Programs, software, databases, and related documentation and technical data delivered to U.S. Government customers are "commercial computer software" or "commercial technical data" pursuant to the applicable Federal Acquisition Regulation and agency-specific supplemental regulations. As such, the use, duplication, disclosure, modification, and adaptation shall be subject to the restrictions and license terms set forth in the applicable Government contract, and, to the extent applicable by the terms of the Government contract, the additional rights set forth in FAR 52.227-19, Commercial Computer Software License (December 2007). Oracle USA, Inc., 500 Oracle Parkway, Redwood City, CA 94065. Hazardous Applications Notice This software is developed for general use in a variety of information management applications. It is not developed or intended for use in any inherently dangerous applications, including applications which may create a risk of personal injury. If you use this software in dangerous applications, then you shall be responsible to take all appropriate fail-safe, backup, redundancy and other measures to ensure the safe use of this software. Oracle Corporation and its affiliates disclaim any liability for any damages caused by use of this software in dangerous applications. Third Party Content, Products, and Services Disclaimer This software and documentation may provide access to or information on content, products and services from third parties. Oracle Corporation and its affiliates are not responsible for and expressly disclaim all warranties of any kind with respect to third party content, products and services. Oracle Corporation and its affiliates will not be responsible for any loss, costs, or damages incurred due to your access to or use of third party content, products or services. Contains GNU libgmp library; Copyright 1991 Free Software Foundation, Inc. This library is free software which can be modified and redistributed under the terms of the GNU Library General Public License. Includes Adobe PDF Library, Copyright 1993-2001 Adobe Systems, Inc. and DL Interface, Copyright 1999-2008 Datalogics Inc. All rights reserved. Adobe is a trademark of Adobe Systems Incorporated. Portions of this program contain information proprietary to Microsoft Corporation. Copyright 1985-1999 Microsoft Corporation. Portions of this program contain information proprietary to Tenberry Software, Inc. Copyright 1992-1995 Tenberry Software, Inc. Portions of this program contain information proprietary to Premia Corporation. Copyright 1993 Premia Corporation. This product includes code licensed from RSA Data Security. All rights reserved. This product includes software developed by the OpenSSL Project for use in the OpenSSL Toolkit (http://www.openssl.org/). This product includes cryptographic software written by Eric Young ([email protected]). This product includes software written by Tim Hudson ([email protected]). All rights reserved. This product includes the Sentry Spelling-Checker Engine, Copyright 1993 Wintertree Software Inc. All rights reserved. Open Source Disclosure Oracle takes no responsibility for its use or distribution of any open source or shareware software or documentation and disclaims any and all liability or damages resulting from use of said software or documentation. The following open source software may be used in Oracle's JD Edwards World products and the following disclaimers are provided. This product includes software developed by the Apache Software Foundation (http://www.apache.org/). Copyright (c) 1999-2000 The Apache Software Foundation. All rights reserved. THIS SOFTWARE IS PROVIDED "AS IS" AND ANY EXPRESSED OR IMPLIED WARRANTIES, INCLUDING, BUT NOT LIMITED TO, THE IMPLIED WARRANTIES OF MERCHANTABILITY AND FITNESS FOR A PARTICULAR PURPOSE ARE DISCLAIMED. IN NO EVENT SHALL THE APACHE SOFTWARE FOUNDATION OR ITS CONTRIBUTORS BE LIABLE FOR ANY DIRECT, INDIRECT, INCIDENTAL, SPECIAL, EXEMPLARY, OR CONSEQUENTIAL DAMAGES (INCLUDING, BUT NOT LIMITED TO, PROCUREMENT OF SUBSTITUTE GOODS OR SERVICES; LOSS OF USE, DATA, OR PROFITS; OR BUSINESS INTERRUPTION) HOWEVER CAUSED AND ON ANY THEORY OF LIABILITY, WHETHER IN CONTRACT, STRICT LIABILITY, OR TORT (INCLUDING NEGLIGENCE OR OTHERWISE) ARISING IN ANY WAY OUT OF THE USE OF THIS SOFTWARE, EVEN IF ADVISED OF THE POSSIBILITY OF SUCH DAMAGE.
Web Enablement Installation and Configuration Guide (Revised - December 9, 2010) i
Contents Overview ................................................................................................ 1
Preinstallation Conditions ..................................................................... 2
Install or Upgrade the Seagull License and Message Server................. 3 Step 1 - Install or Upgrade the Seagull License and Message Server ........................... 3 Step 2 - Obtain Authorization Codes ................................................................................ 4 Step 3 - Enter Authorization Codes................................................................................... 4
Deployment Option 1 - Install the J Walk Server on iSeries................. 6 Step 1 – Install the Seagull J Walk Server ......................................................................... 6 Step 2 – Install the JD Edwards World Components for iSeries.................................. 11 Step 3 – Upload the Seagull J Walk Server and JDE Components to the iSeries....... 15 Step 4 – Verify the Seagull J Walk Server on iSeries ..................................................... 16 Step 5 – Verify Seagull License and Message Server on iSeries .................................. 16 Step 6 – Verify the HTTP server on iSeries..................................................................... 16 Step 7 – Connect the Client Browser ............................................................................... 17
Deployment Option 2 - Install the J Walk Server on Windows .......... 18 Step 1 – Install the Seagull J Walk Server ....................................................................... 18 Step 2 – Install the JD Edwards World Components for Windows ............................ 23 Step 3 – Verify the Seagull J Walk Server on Windows................................................ 27 Step 4 – Verify Seagull License and Message Server on iSeries .................................. 27 Step 5 – Connect the Client Browser ............................................................................... 27
Deployment Option 3 - Install the J Walk Client on Windows .......... 28 Step 1 – Install the Seagull J Walk Client ........................................................................ 28 Step 2 – Install the JD Edwards World Components for Windows ............................ 34
Set up Delivery of Reports Using E-mail............................................. 38 Step 1 - Verify User ID is set up on the iSeries............................................................... 38 Step 2 - Set up E-mail Messages from the iSeries .......................................................... 38 Step 3 - Set up the “From” Address for E-mail Messages ............................................ 38 Step 4 – Finish Set up......................................................................................................... 39
Appendices
Appendix A - Troubleshooting ............................................................ 43

Contents
L03 Errors ........................................................................................................................... 43 J01 and J03 Errors .............................................................................................................. 43 425 NOT ABLE TO OPEN DATA CONNECTION ...................................................... 43 Window 2000 Server Timeout Issue ............................................................................... 43 Wrong Images Displayed................................................................................................. 43
Appendix B - Alternate Language Special Install Instructions ........... 45
Appendix C – Package Files ................................................................. 46 Controlling the Order in which .JWR Files are Accessed ............................................ 46 Adding or Replacing Custom Images ............................................................................ 47
Appendix D – WRKSPLF Printing ....................................................... 48
Appendix E – Attachment Link Access ................................................ 50
Appendix F – Calculator Access ........................................................... 53
Appendix G – Double byte................................................................... 54 For Windows Server Install.............................................................................................. 54 For iSeries Server Install ................................................................................................... 54
Appendix H – Customized Signon....................................................... 55
Appendix I – Registration Wizard........................................................ 59
Appendix J – Activating Sign off Button on Menu Panels .................. 63
Appendix K – UPK Content Sensitive Help......................................... 64
Appendix L – Restriction of Creation of Virtual Devices .................... 65
Appendix M – E-mail Separator Character........................................... 66
Appendix N – E-mail Special Instructions ........................................... 67
Appendix O – Session Resume............................................................. 68
Appendix P – Parameterized URL ........................................................ 69 Web Enablement................................................................................................................ 69 HostedWorldServlet ......................................................................................................... 70 World Application Parameters........................................................................................ 71 External System ................................................................................................................. 73
Appendix Q – Function Keys Case Sensitive ....................................... 75
Appendix R – Action Code Icon Display ............................................. 76
ii JD Edwards World

Contents
Appendix S – Logo Push Button .......................................................... 77
Appendix T – Text File Entry Table ..................................................... 78
Web Enablement Installation and Configuration Guide (Revised - December 9, 2010) iii


Web Enablement Installation and Configuration Guide (Revised - December 9, 2010) 1
Overview
JD Edwards World Web Enablement web-based user interface is a statement of Oracle's continued commitment to the JD Edwards World product family. Web Enablement allows you to extend the advantages realized within your enterprise to anywhere in the world, at any time, through a simple Internet browser.
This guide explains installation and configuration options and steps for JD Edwards World Web Enablement and the Windows Client. This includes the LegaSuite GUI product from Seagull Software, formerly named J Walk. To match the version of the product JD Edwards World is using, the name J Walk is referenced throughout this guide.
To use JD Edwards World Web Enablement, you must first decide whether you want to run the Seagull J Walk Server on the iSeries (Deployment Option 1), Windows/NT server (Deployment Option 2), or install the J Walk Client (Deployment Option 3). All options are explained in this guide.
This installation process includes the install for Employee, Customer, and Supplier Self-Service. To complete the setup process for any Self-Service applications, refer to the A9.1/A9.2 Self-Service Install and Configuration Guide included in the A92 Web download from edelivery.oracle.com or from Patches and Updates at My Oracle Support.

Preinstallation Conditions
Preinstallation Conditions
Before you install JD Edwards World Web Enablement, be sure you meet the following conditions:
You uninstall any previous J Walk Server for iSeries V5Rx installations from your workstation using the Add or Remove Programs from the Control Panel
If you have any Seagull products previously installed on your server or PC, ensure you have a copy or backup of your folders SEAJWK and JWALK located in the root directory. This new JD Edwards World Web Enablement install replaces your current settings files with new versions of the configuration file (JWALK.INI) and html files
The Web Enablement Java Client requires a running HTTP server
Note: Refer to the JD Edwards World Minimum Technical Requirements Guide specific to your release level available on My Oracle Support for hardware and software, which must be installed prior to this installation.
2 JD Edwards World

Install or Upgrade the Seagull License and Message Server
Install or Upgrade the Seagull License and Message Server
Ensure you complete the following procedures included in this section. Install the Seagull License and Message Server (LMS) for all deployment options. If the LMS is already installed, upgrade it to the current version.
Before you Begin
Ensure the Seagull License and Message Server (LMS) is not running by typing the following on the command line:
SEALMS/ENDLMSTCP
If you are upgrading an existing LMS, backup the SEALMS library
Note: If you are using the LMS for products other than JD Edwards World software, it may be necessary to obtain new license codes from third-party vendors.
If you are upgrading an existing LMS currently at version 4.32 or higher (with the exception of version 4.33), your existing JD Edwards World Authorization Codes will continue to be valid; therefore, you can skip the following sections:
Obtain Authorization Codes
Enter Authorization Codes
If you are upgrading an existing LMS that is currently at a version lower than 4.32, contact My Oracle Support, JD Edwards World Technical to obtain new Authorization Codes
Ensure you have a TCP/IP connection to the iSeries on which you are installing the server, as well as QSECOFR authority
Step 1 - Install or Upgrade the Seagull License and Message Server 1. From a PC, double-click the file named SETUP.EXE from the JD Edwards World
J Walk Web Enablement download or CD.
2. From the Web Enablement options menu choose License Server.
3. Type the TCP/IP Address or iSeries Name in the TCP/IP Address field and type the QSECOFR password in the Password field. Click OK.
The system automatically uploads and starts the Seagull License and Message Server.
Web Enablement Installation and Configuration Guide (Revised - December 9, 2010) 3

Install or Upgrade the Seagull License and Message Server
Note: To start the Seagull License and Message Server manually, type the following on the iSeries command line:
SEALMS/STRLMSTCP
Note: To end the Seagull License and Message Server manually, type the following on the iSeries command line:
SEALMS/ENDLMSTCP
Note: If you receive the following error message during installation:
425 NOT ABLE TO OPEN DATA CONNECTION
Refer to Appendix A - Troubleshooting for instructions on how to resolve this issue. Ensure to rerun the License and Message Server Installation after resolving this issue.
Step 2 - Obtain Authorization Codes Prior to requesting authorization codes, run the License Report (LISTLIC).
1. From the iSeries command line type:
SEALMS/REPORTLIC
Press Enter.
WRKSPLF
Press Enter.
Save the LISTLIC spooled file to be attached to your Service Request, e.g. Notepad or PDF.
2. Open a Service Request (SR) with My Oracle Support, JD Edwards World Technical under JD Edwards World GUI.
Attach the LISTLIC report to the Service Request (SR) or provide the following information found in the LISTLIC report.
iSeries serial number
Logical Partition Number (LPAR)
3. You receive your authorization codes within 48 hours.
Step 3 - Enter Authorization Codes 1. Connect to the iSeries using the J Walk connection through a browser.
2. Signon to the iSeries as QSECOFR.
4 JD Edwards World

Install or Upgrade the Seagull License and Message Server
3. From the iSeries command line type, enter:
SEALMS/WRKSEALIC
4. Select Change Option on the Client Package Type.
5. Enter the Authorization Code.
Note: You are now ready to access your iSeries applications through the Web using Seagull J Walk.
Web Enablement Installation and Configuration Guide (Revised - December 9, 2010) 5

Deployment Option 1 - Install the J Walk Server on iSeries
Deployment Option 1 - Install the J Walk Server on iSeries
Step 1 – Install the Seagull J Walk Server 1. From a PC, unzip the file A92WEB.ZIP file into a temporary folder.
2. From the temporary folder, double-click the file named SETUP.EXE. SETUP.EXE starts the Options Menu where you can launch the following installations.
3. From the Setup screen, Installations Options menu, select the J Walk Servers link.
4. From the Setup screen, J Walk Servers menu, select the Seagull iSeries Server link. The setup program launches.
6 JD Edwards World

Deployment Option 1 - Install the J Walk Server on iSeries
5. From the Welcome screen, click Next.
6. From the Software License Agreement screen, accept the license agreement and then click Next.
Web Enablement Installation and Configuration Guide (Revised - December 9, 2010) 7

Deployment Option 1 - Install the J Walk Server on iSeries
7. Complete the Customer Information screen. Click Next.
8. Complete the iSeries settings Address and Web server settings Domain on the Configuration screen. The system displays the default values for the Port numbers. Click Next.
8 JD Edwards World

Deployment Option 1 - Install the J Walk Server on iSeries
9. From the Setup Type screen, choose the Custom option. Click Next.
10. From the Destination Folder screen, click Next.
11. From the Custom Setup screen, deselect the HTML Client for Java option and click Next.
Web Enablement Installation and Configuration Guide (Revised - December 9, 2010) 9

Deployment Option 1 - Install the J Walk Server on iSeries
12. From the Java client installation screen, click Next.
13. From the ActiveX client installation screen, click Next.
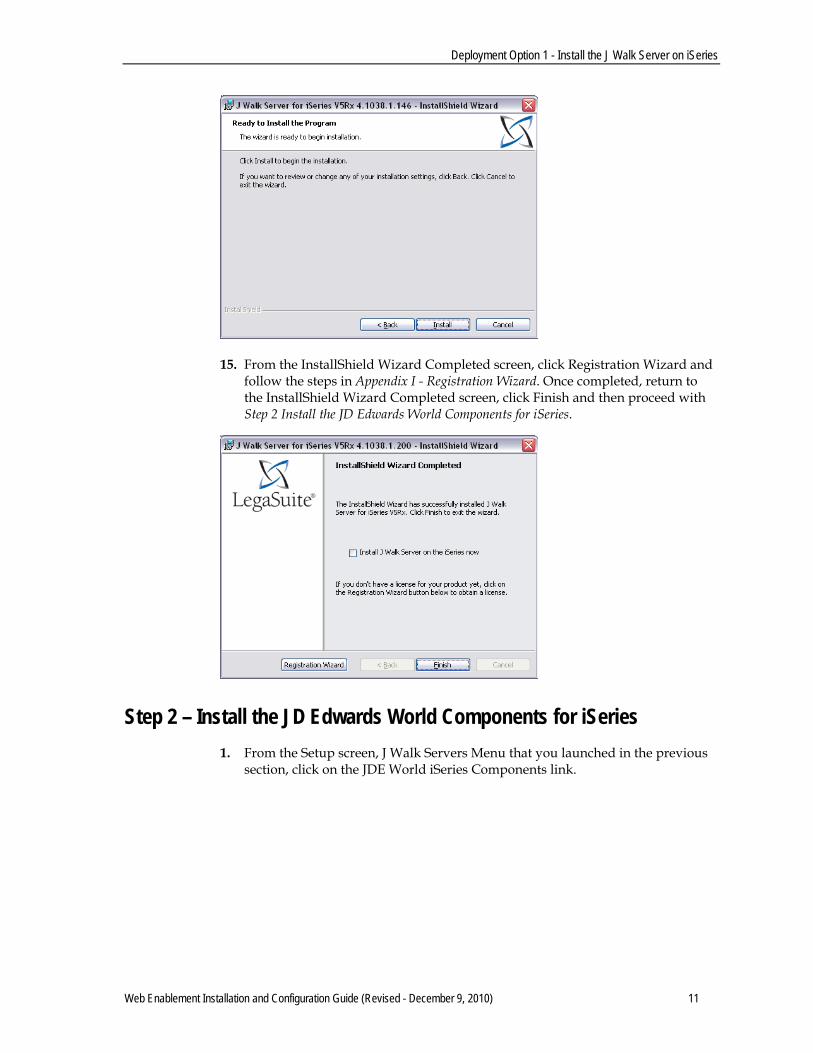
14. From the Ready to Install the Program screen, click Install.
10 JD Edwards World
Deployment Option 1 - Install the J Walk Server on iSeries
15. From the InstallShield Wizard Completed screen, click Registration Wizard and follow the steps in Appendix I - Registration Wizard. Once completed, return to the InstallShield Wizard Completed screen, click Finish and then proceed with Step 2 Install the JD Edwards World Components for iSeries.
Step 2 – Install the JD Edwards World Components for iSeries 1. From the Setup screen, J Walk Servers Menu that you launched in the previous
section, click on the JDE World iSeries Components link.
Web Enablement Installation and Configuration Guide (Revised - December 9, 2010) 11

Deployment Option 1 - Install the J Walk Server on iSeries
2. From the Oracle Universal Installer (OUI) Welcome screen, click Next.
3. Enter a folder Name for the installation, for example A92WEB and any OraHome directory and then click Next. Oracle recommends that you retain the OraHome name in some form for your path directory.
Using the OraHome name is an Oracle convention that facilitates consistent directory names among Oracle product installations.
12 JD Edwards World

Deployment Option 1 - Install the J Walk Server on iSeries
4. Accept the default destination directory and then click Next.
5. From the Summary screen, click Install.
Web Enablement Installation and Configuration Guide (Revised - December 9, 2010) 13

Deployment Option 1 - Install the J Walk Server on iSeries
6. From the End of Installation screen, click Exit.
7. From the Exit screen, click Yes.
14 JD Edwards World

Deployment Option 1 - Install the J Walk Server on iSeries
Step 3 – Upload the Seagull J Walk Server and JDE Components to the iSeries
The first part of the iSeries installation is complete. Now you need to upload the Seagull J Walk Server and the JDE Components to your iSeries using the Seagull FTP Wizard.
1. To start the FTP upload to the iSeries, run the following program from the Windows Start Menu:
Start Menu->Programs->LegaSuite->J Walk Server for iSeries V5Rx->4. 1xxx.x.xxx ->Install J Walk Server on iSeries
2. From the FTP Connection settings screen, ensure you have QSECOFR authority to start the iSeries install. Click OK.
Note: Depending on your network connections, the install can take longer than 20 minutes to FTP all the objects to the iSeries.
3. From the J Walk Server for iSeries 400 installation screen, click OK to complete the installation.
Note: If you experience difficulty transferring the objects, contact My Oracle Support, JD Edwards World Technical for assistance.
Note: If you receive the following error message during installation:
425 NOT ABLE TO OPEN DATA CONNECTION
Refer to Appendix A - Troubleshooting for instructions on how to resolve this issue.
Web Enablement Installation and Configuration Guide (Revised - December 9, 2010) 15
Deployment Option 1 - Install the J Walk Server on iSeries
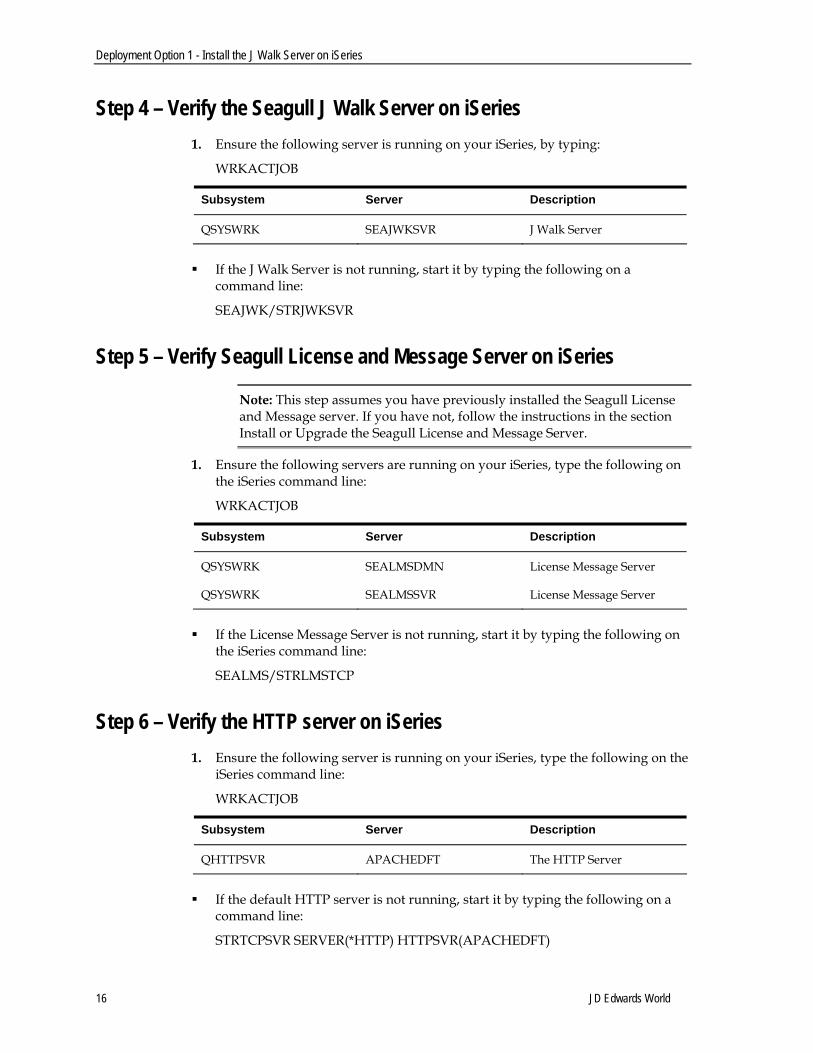
Step 4 – Verify the Seagull J Walk Server on iSeries 1. Ensure the following server is running on your iSeries, by typing:
WRKACTJOB
Subsystem Server Description
QSYSWRK SEAJWKSVR J Walk Server
If the J Walk Server is not running, start it by typing the following on a
command line:
SEAJWK/STRJWKSVR
Step 5 – Verify Seagull License and Message Server on iSeries
Note: This step assumes you have previously installed the Seagull License and Message server. If you have not, follow the instructions in the section Install or Upgrade the Seagull License and Message Server.
1. Ensure the following servers are running on your iSeries, type the following on the iSeries command line:
WRKACTJOB
Subsystem Server Description
QSYSWRK SEALMSDMN License Message Server
QSYSWRK SEALMSSVR License Message Server
If the License Message Server is not running, start it by typing the following on
the iSeries command line:
SEALMS/STRLMSTCP
Step 6 – Verify the HTTP server on iSeries 1. Ensure the following server is running on your iSeries, type the following on the
iSeries command line:
WRKACTJOB
Subsystem Server Description
QHTTPSVR APACHEDFT The HTTP Server
If the default HTTP server is not running, start it by typing the following on a
command line:
STRTCPSVR SERVER(*HTTP) HTTPSVR(APACHEDFT)
16 JD Edwards World

Deployment Option 1 - Install the J Walk Server on iSeries
Step 7 – Connect the Client Browser 1. Use a web browser to launch Web Enablement.
2. Type the following URL in the web browser and press Enter.
http://your_iSeries/jwalk/JWALK.HTML
Note: Ensure you replace the text your_iSeries with the name used for your iSeries, as specified during the install.
Web Enablement Installation and Configuration Guide (Revised - December 9, 2010) 17

Deployment Option 2 - Install the J Walk Server on Windows
Deployment Option 2 - Install the J Walk Server on Windows
Step 1 – Install the Seagull J Walk Server 1. From a PC, unzip the file A92WEB.ZIP file into a temporary folder.
2. From the temporary folder, double-click the file named SETUP.EXE. SETUP.EXE starts the Options Menu where you can launch the following installations.
3. From the Setup screen, Installations Options menu, select the J Walk Servers link.
4. From the Setup screen, J Walk Servers menu, select the Seagull Windows Server link.
18 JD Edwards World
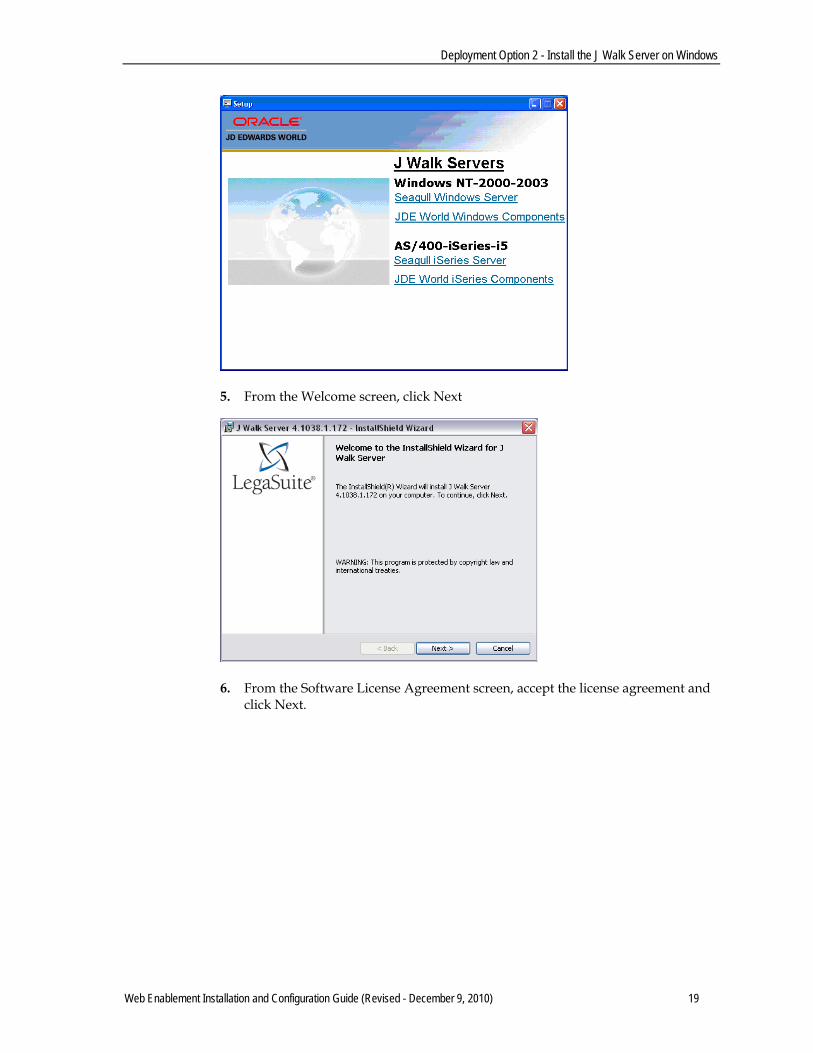
Deployment Option 2 - Install the J Walk Server on Windows
5. From the Welcome screen, click Next
6. From the Software License Agreement screen, accept the license agreement and click Next.
Web Enablement Installation and Configuration Guide (Revised - December 9, 2010) 19

Deployment Option 2 - Install the J Walk Server on Windows
7. From the Customer Information screen, complete the information.
8. Complete the iSeries settings Address and Web server settings Domain on the Configuration screen. The system displays the default values for the Port numbers. Click Next.
20 JD Edwards World

Deployment Option 2 - Install the J Walk Server on Windows
9. From the Setup Type screen, choose Custom.
10. From the Destination Folder screen, ensure the Install J Walk Server to: path is:
C:\Program Files\SEAGULL\J Walk Server\4.1xxx.x.xxx\
And the path to start Menu Folder is:
LegaSuite\J Walk Server\4.1xxx.x.xxx
11. Configure your selections to match the ones on the following graphic. Click next.
Web Enablement Installation and Configuration Guide (Revised - December 9, 2010) 21

Deployment Option 2 - Install the J Walk Server on Windows
12. From the Java Client Installation screen, ensure the path points to your web server folder.
13. From the Ready to Install the Program screen, click Install.
22 JD Edwards World
Deployment Option 2 - Install the J Walk Server on Windows
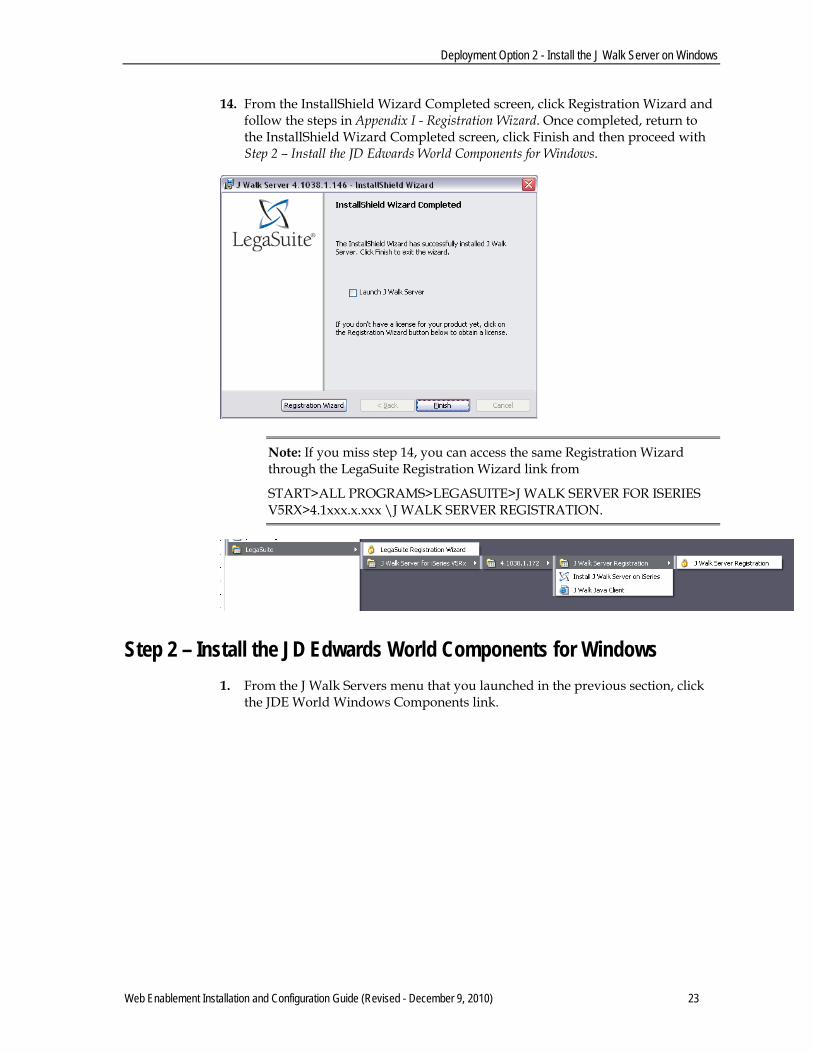
14. From the InstallShield Wizard Completed screen, click Registration Wizard and follow the steps in Appendix I - Registration Wizard. Once completed, return to the InstallShield Wizard Completed screen, click Finish and then proceed with Step 2 – Install the JD Edwards World Components for Windows.
Note: If you miss step 14, you can access the same Registration Wizard through the LegaSuite Registration Wizard link from
START>ALL PROGRAMS>LEGASUITE>J WALK SERVER FOR ISERIES V5RX>4.1xxx.x.xxx \J WALK SERVER REGISTRATION.
Step 2 – Install the JD Edwards World Components for Windows 1. From the J Walk Servers menu that you launched in the previous section, click
the JDE World Windows Components link.
Web Enablement Installation and Configuration Guide (Revised - December 9, 2010) 23

Deployment Option 2 - Install the J Walk Server on Windows
2. From the Oracle Universal Installer (OUI): Welcome screen, click Next.
3. Enter a folder Name for the installation, for example A92WEB and any OraHome directory and then click Next. Oracle recommends that you retain the OraHome name in some form for your path directory.
Using the OraHome name is an Oracle convention that facilitates consistent directory names among Oracle product installations.
24 JD Edwards World

Deployment Option 2 - Install the J Walk Server on Windows
4. Enter your IIS web server Directory and then click Next.
5. From the Summary screen, click Next.
Web Enablement Installation and Configuration Guide (Revised - December 9, 2010) 25

Deployment Option 2 - Install the J Walk Server on Windows
6. From the End of Installation screen, click Exit.
7. From the Exit screen, click Yes.
26 JD Edwards World

Deployment Option 2 - Install the J Walk Server on Windows
Step 3 – Verify the Seagull J Walk Server on Windows 1. From the Windows server, when the J Walk Server is running, the following
icon must display on your icon tray at the bottom right-hand corner of your screen:
If the icon above does not display, start the J Walk Sever:
Start\Programs\LegaSuite\J Walk Server\4.1xxx.x.xxx\Start A9.1 Web Enablement Employee Server.
Step 4 – Verify Seagull License and Message Server on iSeries
Note: This step assumes you have previously installed the Seagull License and Message server. If you have not, follow the instructions in the section Install or Upgrade the Seagull License and Message Server.
Ensure the following servers are running on your iSeries, by typing on the iSeries command line:
WRKACTJOB
Subsystem Server Description
QSYSWRK SEALMSDMN License Message Server
QSYSWRK SEALMSSVR License Message Server
If the License Message Server is not running, start it by typing the following on the iSeries command line:
SEALMS/STRLMSTCP
Step 5 – Connect the Client Browser 1. Start the J Walk Server before you connect a web browser to the Java
application.
2. Type the following URL in the web browser and press Enter.
http://your_Windows_server/JWALK.HTML
Note: Ensure you replace the text your_Windows_server with the name used for your Windows server, as specified during the install.
Web Enablement Installation and Configuration Guide (Revised - December 9, 2010) 27

Deployment Option 3 - Install the J Walk Client on Windows
Deployment Option 3 - Install the J Walk Client on Windows
This is a client install provided for both single and double-byte installs.
Step 1 – Install the Seagull J Walk Client 1. From a PC, unzip the file A92WEB.ZIP file into a temporary folder.
2. From the temporary folder, double-click the file named SETUP.EXE. SETUP.EXE starts the Options Menu where you can launch the following installations.
3. From the Setup screen, Installations Options menu, select the J Walk Servers link.
4. From the Setup screen, J Walk Servers menu, select the Seagull Windows Server link.
28 JD Edwards World

Deployment Option 3 - Install the J Walk Client on Windows
5. From the Welcome screen, click Next.
6. From the Software License Agreement screen, accept the license agreement and click Next.
Web Enablement Installation and Configuration Guide (Revised - December 9, 2010) 29

Deployment Option 3 - Install the J Walk Client on Windows
7. Complete the information on the Customer Information screen. Click Next.
8. Complete the iSeries settings Address and Web server settings Domain on the Configuration screen. The system displays the default values for the Port numbers. Click Next.
30 JD Edwards World

Deployment Option 3 - Install the J Walk Client on Windows
9. From the Setup Type screen, choose Custom. Click Next.
10. From the Destination Folder screen, ensure the Install J Walk Server to: path is:
C:\Program Files\SEAGULL\J Walk Server\4.1xxx.x.xxx\
And the path to start Menu Folder is:
LegaSuite\J Walk Server\4.1xxx.x.xxx
Click Next.
Web Enablement Installation and Configuration Guide (Revised - December 9, 2010) 31

Deployment Option 3 - Install the J Walk Client on Windows
11. Configure your selections to match the ones on the following screen. Click Next.
12. From the Java Client Installation screen, ensure the path points to your web server folder. Click Next.
32 JD Edwards World

Deployment Option 3 - Install the J Walk Client on Windows
13. Click Install from the Ready to Install the Program screen.
14. From the InstallShield Wizard Completed screen, click Registration Wizard and follow the steps in Appendix I - Registration Wizard. Once completed, return to the InstallShield Wizard Completed screen, click Finish and then proceed with Step 2 – Install the JD Edwards World Components for Windows.
Note: If you miss step 14, you can access the same Registration Wizard through the LegaSuite Registration Wizard link from
START>ALL PROGRAMS>LEGASUITE>J WALK SERVER FOR ISERIES V5RX>4.1xxx.x.xxx \J WALK SERVER REGISTRATION.
Web Enablement Installation and Configuration Guide (Revised - December 9, 2010) 33
Deployment Option 3 - Install the J Walk Client on Windows
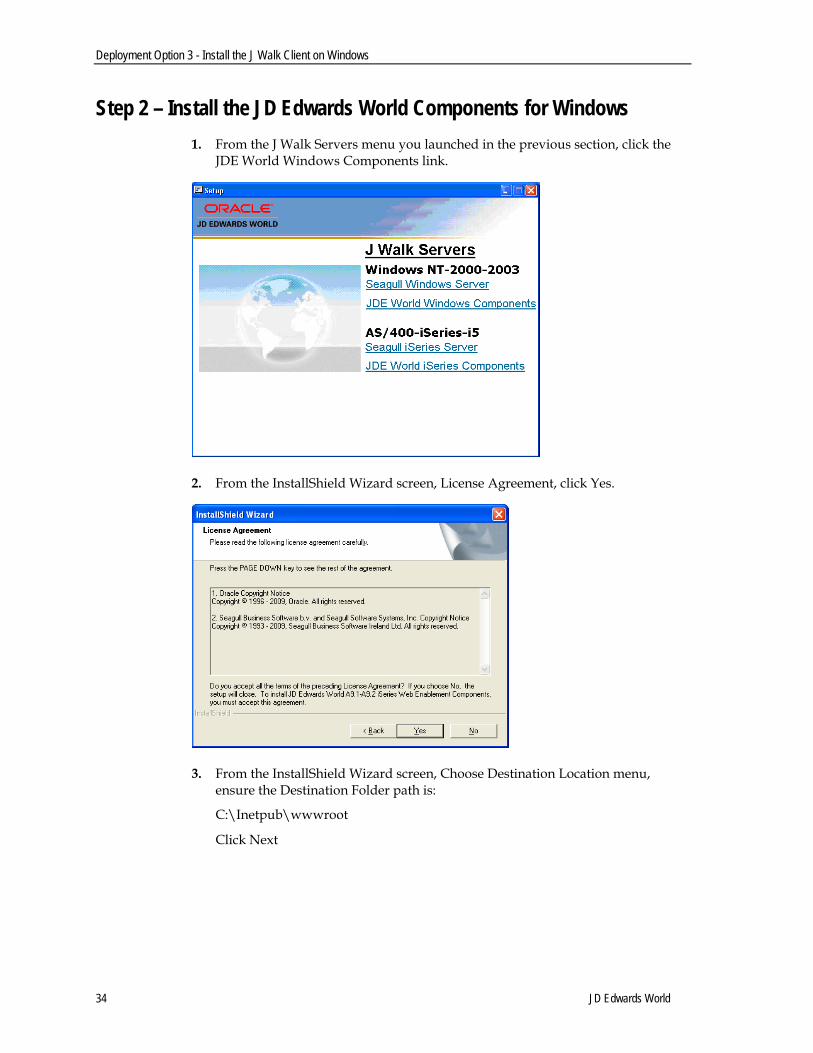
Step 2 – Install the JD Edwards World Components for Windows 1. From the J Walk Servers menu you launched in the previous section, click the
JDE World Windows Components link.
2. From the InstallShield Wizard screen, License Agreement, click Yes.
3. From the InstallShield Wizard screen, Choose Destination Location menu, ensure the Destination Folder path is:
C:\Inetpub\wwwroot
Click Next
34 JD Edwards World

Deployment Option 3 - Install the J Walk Client on Windows
4. From the InstallShield Wizard screen, InstallShield Wizard Complete, click Finish.
5. Once the process finishes, Exit the Install Shield process.
6. Explore the PC and open the Folder that contains the Seagull executables. The default location is:
C:\Program Files\SEAGULL\J Walk Server\4.1xxx.x.xxx\
7. Find the JW9C.EXE (program type application) and right-click to display options.
Select Send To, and then select Desktop create shortcut.
Web Enablement Installation and Configuration Guide (Revised - December 9, 2010) 35

Deployment Option 3 - Install the J Walk Client on Windows
8. A new icon is created on the Desktop; right-click the new icon to access the Properties.
36 JD Edwards World

Deployment Option 3 - Install the J Walk Client on Windows
9. Enter a space and the text /eA91App in the Target input field after the last character on the line. Click OK to save your changes.
10. Double-click the new icon to access the A91 Web Enablement client installation.
Note: To upgrade the A92 Web Enablement Client for Windows, contact My Oracle Support, JD Edwards World Technical prior to altering the current configuration.
Web Enablement Installation and Configuration Guide (Revised - December 9, 2010) 37
Set up Delivery of Reports Using E-mail
Set up Delivery of Reports Using E-mail
A set up is required to ensure the successful delivery of reports through e-mail. Appropriate iSeries authority is required to set up e-mail availability.
Step 1 - Verify User ID is set up on the iSeries 1. From the iSeries command line, type the following command:
WRKDIRE USER (Web Enablement User ID)
Where Web Enablement User ID is the User ID of the user you wish to set up on iSeries e-mail.
2. Press Enter.
If the following error message displays:
User not enrolled in system distribution directory.
Proceed to Step 2 - Set up E-mail Messages from the iSeries.
If no error message displays, then proceed to Step 3 - Set up the “From” Address for E-mail Messages.
Step 2 - Set up E-mail Messages from the iSeries 1. Create authority for the Web Enablement User ID on the iSeries. From the
iSeries command line, type the following commands:
ADDDIRE USRID(E-mail User ID My_iSeries) USRD('User Name') USER(User ID)
Where My_iSeries is the iSeries machine name and E-Mail User ID is the new E-mail directory User ID and User ID is the Web Enablement User ID.
2. Execute the following two statements, once, on the iSeries:
ADDDIRE USRID(INTERNET GATEWAY) USRD('Allow OS/400 to send INTERNET Mail') SYSNAME(INTERNET) MSFSRVLVL(*USRIDX) PREFADR(NETUSRID *IBM ATCONTXT)
CHGDSTA SMTPRTE(INTERNET GATEWAY)
Step 3 - Set up the “From” Address for E-mail Messages The following steps set up the “From” address for e-mail messages sent from Web Enablement. Ensure the “From” address is set to a valid address that gets through the firewall issues when sending e-mail message to outbound source.
38 JD Edwards World
Set up Delivery of Reports Using E-mail
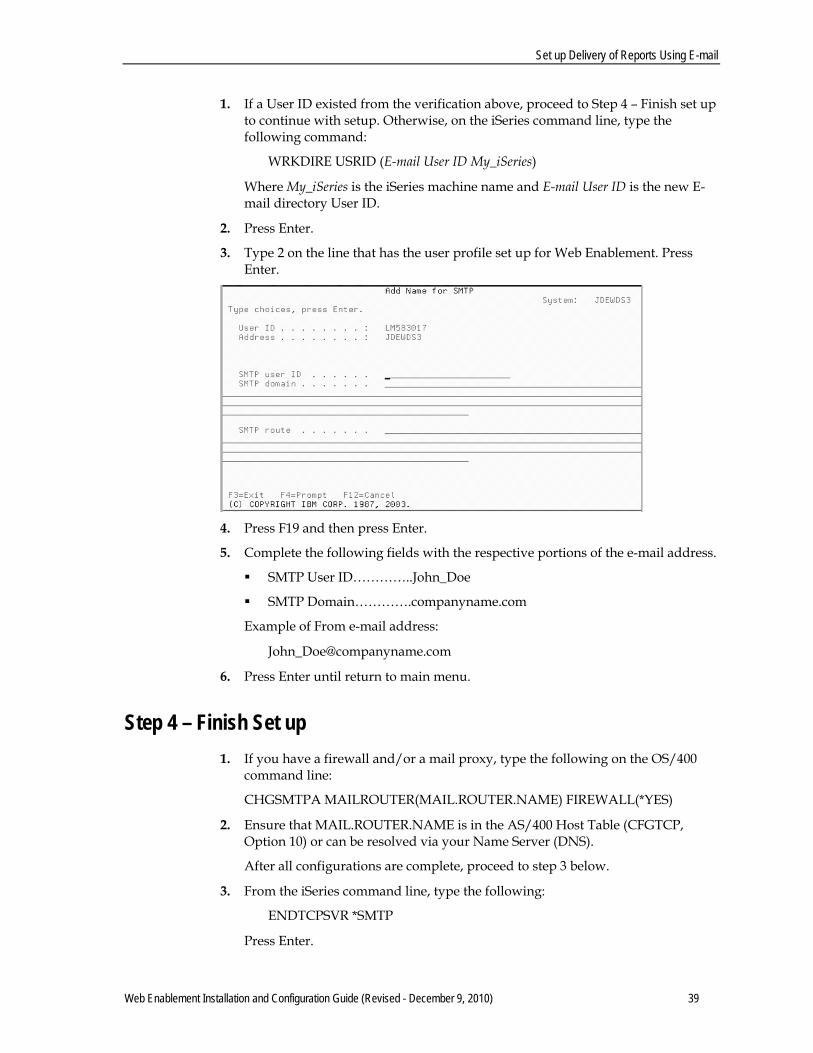
1. If a User ID existed from the verification above, proceed to Step 4 – Finish set up to continue with setup. Otherwise, on the iSeries command line, type the following command:
WRKDIRE USRID (E-mail User ID My_iSeries)
Where My_iSeries is the iSeries machine name and E-mail User ID is the new E-mail directory User ID.
2. Press Enter.
3. Type 2 on the line that has the user profile set up for Web Enablement. Press Enter.
4. Press F19 and then press Enter.
5. Complete the following fields with the respective portions of the e-mail address.
SMTP User ID…………..John_Doe
SMTP Domain………….companyname.com
Example of From e-mail address:
6. Press Enter until return to main menu.
Step 4 – Finish Set up 1. If you have a firewall and/or a mail proxy, type the following on the OS/400
command line:
CHGSMTPA MAILROUTER(MAIL.ROUTER.NAME) FIREWALL(*YES)
2. Ensure that MAIL.ROUTER.NAME is in the AS/400 Host Table (CFGTCP, Option 10) or can be resolved via your Name Server (DNS).
After all configurations are complete, proceed to step 3 below.
3. From the iSeries command line, type the following:
ENDTCPSVR *SMTP
Press Enter.
Web Enablement Installation and Configuration Guide (Revised - December 9, 2010) 39

Set up Delivery of Reports Using E-mail
4. From the iSeries command line, type the following:
ENDMSF
Press Enter.
5. On the iSeries command line, type the following:
STRTCPSVR *SMTP
Press Enter.
6. On the iSeries command line, type the following:
STRMSF
Press Enter.
7. On the iSeries command line, type the following:
WRKACTJOB SBS(QSYSWRK)
Press Enter.
8. Verify the following results:
3 jobs named QMSF running
A job named QTSMTPBRCL running
A job named QTSMTPBRSR running
A job named QTSMTPCLNT running
A job named QTSMTPSRVR running
Note: If e-mail does not work after following the above instructions above, you can do some preliminary troubleshooting by looking at the job logs for QMSF and for QTSMTPBRSR, QTSMTPBRCL, QTSMTPCLNT, and QTSMTPSRVR. If any of these jobs is not running, check the job logs.
Most error messages found in those logs have a workable recovery procedure or lead to a PTF.
9. Create a folder on the iSeries. Type in the following command on the iSeries:
CRTFLR FLR(My_Folder) TEXT(‘Folder_Description’)
Where My_Folder is the iSeries IFS Folder Name and Folder_Description is the description of the folder.
To return to the User Options menu, press Enter.
10. To grant authority for your folder, type the following on a command line on the iSeries:
WRKFLR My_Folder
Option 14 for authority. Change Public to *ALL.
11. Verify the appropriate text file entry is set accordingly on the WV9100.JWM and DYNBLD9100.JWM.
Use a text editor tool such as MS Notepad or MS WordPad to open the WV9100.JWM and DYNBLD9100.JWM files.
40 JD Edwards World

Set up Delivery of Reports Using E-mail
The following are example paths for location of WV9100.JWM and DYNBLD9100.JWM.
For iSeries-i5 Installation:
Your iSeries-i5 root folder/JWALK/ JWALKAPP/A9100APP/
For Windows NT-2000-2003 Server and J Walk Client for Windows Installations:
C:\Inetpub\wwwroot\ JWALKAPP\A9100APP\
WV9100.JWM and DYNBLD9100.JWM Text File Entry Updates:
SNDDSTFLR set to name of My_Folder
Web Enablement Installation and Configuration Guide (Revised - December 9, 2010) 41

Set up Delivery of Reports Using E-mail
Appendices
42 JD Edwards World

Appendix A - Troubleshooting
Appendix A - Troubleshooting
L03 Errors Solution – Start the License and Message Server on the iSeries.
From a command line, type SEALMS/STRLMSTCP to start the LMS. If you have not installed LMS then refer to the Installing the License and Message Server section in this guide.
If this does not fix the issue, refer to My Oracle Support.
J01 and J03 Errors To troubleshoot most errors, refer to My Oracle Support.
425 NOT ABLE TO OPEN DATA CONNECTION If you receive the error above during installation, open the file INSTFTP.txt and add a semicolon ‘;’ in front of the following two lines. The following example displays the lines with the semicolon added:
; LIT=RCMD DLTF FILE(QTEMP/QREXSRC)
; LIT=RCMD DLTF FILE(QTEMP/JWKTEMP)
Window 2000 Server Timeout Issue The session is timing out when the screen is inactive over a short period of time.
Solution – Change the timeout settings by going to Start | Control Panel | Administration | Internet Service Manager and then from the Internet Information Services screen right-click Default Web Site for properties.
To select properties:
From the Default Web Site Properties screen, select the Home Directory tab and then select Configuration.
From the Application Configuration screen, select the App Options tab where the Session timeout value can be adjusted.
Wrong Images Displayed If the system displays wrong images, such as old PeopleSoft images instead of Oracle images, you need to delete cached files from Microsoft Internet Explorer.
To delete cached files:
Web Enablement Installation and Configuration Guide (Revised - December 9, 2010) 43

Appendix A - Troubleshooting
Open a new session of Internet Explorer.
Click Tools from the menu bar.
Select Internet Options…
Click Delete Files… on the General Tab.
Click OK.
44 JD Edwards World

Appendix B - Alternate Language Special Install Instructions
Appendix B - Alternate Language Special Install Instructions
Several J Walk components, such as button text and hover help text, can be translated to other languages. The translation does not require that you have the J Walk Developer. The WV9100.JWM and DYNBLD9100.JWM text files have different language translations.
The following are example paths for location of WV9100.JWM and DYNBLD9100.JWM:
For iSeries-i5 Installation:
Your iSeries-i5 root folder/JWALK/ JWALKAPP/A9100APP/Translation Text Files
For Windows NT-2000-2003 Server and J Walk Client for Windows Installations, copy to the following folder:
C:\Inetpub\wwwroot\ JWALKAPP\A9100APP\Translation Text Files
To reference the WV9100.JWM and DYNBLD9100.JWM text files, you need to set up a new instance of the J Walk Server and then copy the text files WV9100_ccc.JWM and DYNBLD9100_ccc.JWM to the new J Walk Server instance located with the JWR and JWX files.
The ccc is the three-character name for the respective language. Delete the existing WV9100.JWM and DYNBLD9100.JWM files and rename the _ccc files without the _ccc.
In addition, based on the language you want to display, you may need to change the CCSID parameter for that group in the JWALK.INI file and, you may need to edit the value of a parameter in JWALK.HTML file. Contact the My Oracle Support, JD Edwards World Technical for more information.
Users who need the translated text, must sign in using a URL, which points to this instance of the J Walk Server.
Web Enablement Installation and Configuration Guide (Revised - December 9, 2010) 45

Appendix C – Package Files
Appendix C – Package Files
The following is a list of package files to be installed on either a Windows NT Server or the iSeries:
.JWR
Compiled panel file (or package file) that contains all the GUI panels that display at runtime.
.JWM
External text file that contains text references that are referenced from compiled application panels.
.JWC
Control file used to handle .JWR sequencing and automatically update .JWR files based on date stamp.
Graphics files (.JPG, .GIF)
Graphics used in GUI panels or referenced individually.
.INI
Configuration settings such as host session address, router, emulator, automatic signon, dynamic transformation. They are edited when you run the Configuration Assistant and referenced using the / parameter in the Target field of the Client shortcut properties.
Controlling the Order in which .JWR Files are Accessed If you have created your own custom .JWR panel files, you can use a control file (.JWC) to control the order in which these files are accessed.
If you deploy more than one .JWR panel file, they are accessed in reverse-alphabetical order. For example, if you have three files (apples.JWR, bananas.JWR, and oranges.JWR) in your A91APP directory, Self-Service applications accesses oranges first, then bananas, then apples. If you want to have more control over the order in which these files are accessed:
Use a control file (.JWC) to manage your compiled panel files. Use the Runtime= parameter to specify runtime package files that must be accessed at runtime to display GUI panels instead of host screens. For example:
Runtime=APPLES.JWR
Runtime=ORANGES.JWR
Runtime=BANANAS.JWR
In this example, the APPLES.JWR is searched first for the panel that matches the current host screen. If a matching panel is found, it is displayed. If not, the next file, ORANGES.JWR, is searched and so forth.
46 JD Edwards World

Appendix C – Package Files
Adding or Replacing Custom Images If you have any custom images to add or replace, copy the images to the following folder. For the BKGRD2.jpg and BKGRD3.jpg images, the size is 784 by 550 pixels.
For iSeries-i5 Installation prior to uploading, copy your custom images into the following path on the installation PC:
C:\Program Files\SEAGULL\J Walk Server for iSeries V5Rx\4.1xxx.x.xxx\bin\jwalk\JWALKAPP\A9100App\Images
For iSeries-i5 Installation after uploading, copy your custom images into the following path on the iSeries-i5:
/Your iSeries-i5 root folder/JWALK/JWALKAPP/A9100App/Images
For Windows NT-2000-2003 Server and J Walk Client on Windows Installations, copy to the following folder:
C:\Inetpub\wwwroot\JWALKAPP\A9100App\Images
Web Enablement Installation and Configuration Guide (Revised - December 9, 2010) 47
Appendix D – WRKSPLF Printing
Appendix D – WRKSPLF Printing
The ability to print a WRKSPLF entry was added to JD Edwards World Web Enablement. To have this process work correctly when you click print icon on the WRKSPLF or WRKSBMJOB panels, some setup is required.
To print WRKSPLF entries, the administrator installing the JD Edwards World Web Enablement needs to verify that the appropriate text file entry is set accordingly on the WV9100.JWM and DYNBLD9100.JWM files.
Use a text editor tool such as MS Notepad or MS WordPad to open the WV9100.JWM and DYNBLD9100.JWM files.
The following are example paths for location of WV9100.JWM and DYNBLD9100.JWM:
For iSeries-i5 Installation:
Your iSeries-i5 root folder/JWALK/ JWALKAPP/A9100APP/
For Windows NT-2000-2003 Server and J Walk Client for Windows Installations:
C:\Inetpub\wwwroot\ JWALKAPP\A9100APP\
WV9100.JWM and DYNBLD9100.JWM Text File Entry Updates:
MASTSSURL set to the appropriate path for the type of install:
If NT Java Client, http://<PC server name>
If Native Java Client install, http://iSeries machine name
If J Walk Client on Windows install, http://<PC Server name>
ERMURL set to the appropriate path for the type of install for ERM Self-Service:
If NT Java Client, http://<PC server name>
If Native Java Client install, http://iSeries machine name
If J Walk Client on Windows install, http://<PC Server name>
INSTALL and ERMPRTURL default is WAS for a Native Java Client. If NT Java Client, this value must be changed to NT. If J Walk Client on Windows, this value must be changed to WIN.
Note: When you attach a WRKSPLF (work spool file) to an electronic message (e-mail), there are size limitations for the WRKSPLF.
The system uses the iSeries e-mail messaging process to include the WRKSPLF as an attachment to the e-mail.
When the WRKSPLF is converted to a .TXT file, there is a size limitation. The iSeries e-mail messaging works for reports less than 30 pages.
In addition, if the WRKSPLF report to be printed is more than 132 characters wide, the user needs to change the Scaling before printing to print at less than 100% and to
48 JD Edwards World

Appendix D – WRKSPLF Printing
print as a landscape display. This applies to the NT Java Client, J Walk Client for Windows, and Native Java Client WRKSPLF print.
Web Enablement Installation and Configuration Guide (Revised - December 9, 2010) 49

Appendix E – Attachment Link Access
Appendix E – Attachment Link Access
JD Edwards World added the ability to access URL addresses, documents, and an Email to Web Enablement. You have two different ways to access these Attachment Links.
You use the Header Links at the top of each main panel.
You use a right-click within an input capable field that is 20 characters or more in length.
You need to change the setup to have this work correctly when you click on a Header Link or right-click within an input capable field on a panel.
To access this required setup process, the administrator installing the JD Edwards World Web Enablement needs to verify that the appropriate text file entries are set accordingly on the WV9100.JWM and DYNBLD9100.JWM files.
Use a text editor tool such as MS Notepad or MS WordPad to open the WV9100.JWM and DYNBLD9100.JWM files.
The following are example paths for location of WV9100.JWM and DYNBLD9100.JWM:
For iSeries-i5 Installation:
Your iSeries-i5 root folder/JWALK/ JWALKAPP/A9100APP/
For Windows NT-2000-2003 Server and J Walk Client for Windows Installations,
C:\Inetpub\wwwroot\ JWALKAPP\A9100APP\
WV9100.JWM and DYNBLD9100.JWM Text File Entry Updates:
DYNBLDURL and ERMSSURL set to the appropriate path for the type of install:
If NT Java Client, http://<PC server name>/Docs/
If Native Java Client install, http://iSeries machine name/Docs/
If J Walk Client for Windows, http://<PC servername>/Docs/
SAMPLE.PDF
Note: The document, SAMPLE.PDF, must be included in the Docs folder within your install.
For the first Header Link button:
OTHTEXT1 set to the text displayed (e.g. URL)
OTHPATH1 set to the path of the URL, Document, or Email (e.g. www.oracle.com)
OTHTYP1 set to the attachment type of URL, Document, or E-mail (e.g. URL), available choices are:
URL for a URL address
50 JD Edwards World

Appendix E – Attachment Link Access
EML for an E-mail
DOC for a file with an extension of .doc
To use the following three attachment types, the files to be accessed have to be added to the Docs folder on the J Walk Server. In addition, using any one of these three attachment types requires the OTHPATHx to contain only the file name (e.g. SAMPLE.PDF).
EXC for a file with an extension of .xls
PDF for a file with an extension of .pdf
EXE for a file with an extension of .exe
Copy any one of these files into the following folder:
For iSeries-i5 Installation:
www/<HTTP server>, such as apachedft/htdocs/Docs/
For Windows NT-2000-2003 Server and J Walk Client for Windows Installations:
C:\Inetpub\wwwroot\Docs\
However, a file with extension .xls, .pdf, or .exe can also be accessed using a URL or DOC attachment type and does not have to be added to the Docs folder on the J Walk Server. This allows access to a file on a PC that does not contain a J Walk Server.
For the URL file type, the OTHPATHx path is:
http://<Computer Name or IP Address of PC>/<folder path to file>/<File name>
For the Doc file type, the path is:
file://<Computer Name or IP Address of PC>/<folder path to file>/<File name>
Or
http://<Computer Name or IP Address of PC>/<folder path to file>/<File name>
Note: For file extensions of .doc, .xls, .pdf, or .exe where these files are not within the J Walk Server Docs folder, verify shared permission is set up for file accessibility.
For the second Header Link button:
OTHTEXT2 set to the text displayed (e.g. Document)
OTHPATH2 set to the path of the URL, Document, or Email (e.g. SAMPLE.PDF)
OTHTYP2 set to the attachment type of URL, Document, or E-mail (e.g. PDF); see available choices under OTHTYP1 above.
For the third Header Link button:
OTHTEXT3 set to the text displayed (e.g. Email)
Web Enablement Installation and Configuration Guide (Revised - December 9, 2010) 51

Appendix E – Attachment Link Access
OTHPATH3 set to the path of the URL, Document, or Email (e.g. [email protected]&subject=Test of EMALSEP&body=insert body of text here, where & is the e-mail parameter character for the respective e-mail client)
OTHTYP3 set to the attachment type of URL, Document, or E-mail (e.g. EML); see available choices under OTHTYP1 above.
For the fourth Header Link button:
OTHTEXT4 set to the text displayed (e.g. World Resources)
OTHPATH4 set to the path of the URL, Document, or Email (e.g. https://metalink3.oracle.com/od/faces/index.jspx)
OTHTYP4 set to the attachment type of URL, Document, or E-mail (e.g. URL); see available choices under OTHTYP1 above.
For the fifth Header Link button:
OTHTEXT5 set to the text displayed (e.g. Support)
OTHPATH5 set to the path of the URL, Document, or Email (e.g. http://support.oracle.com)
OTHTYP5 set to the attachment type of URL, Document, or E-mail (e.g. URL); see available choices under OTHTYP1 above.
For the Text display for the right-click drop down:
OTHTEXT7 set to the text displayed for URL or Email access (e.g. URL Open/Email)
OTHTEXT8 set to the text displayed for Document access (e.g. Document).
52 JD Edwards World

Appendix F – Calculator Access
Appendix F – Calculator Access
To use the calculator within JD Edwards World Web Enablement, CALC.EXE must be retrieved from any PC and be placed within the Deployment area of the J Walk Server or Client. The executable file, CALC.EXE, is retrieved from any PC in either C:\WINNT\system32 or C:\WINDOWS\system32 or wherever your Windows Operating System files are. Copy this file into the following folder.
For iSeries-i5 Installation:
www/<HTTP server>, such as apachedft/htdocs/Docs/
For Windows NT-2000-2003 Server and J Walk Client for Windows Installations:
C:\Inetpub\wwwroot\Docs\
To access the calculator, the administrator installing the JD Edwards World Web Enablement needs to verify that the appropriate text file entry is set accordingly on the WV9100.JWM and DYNBLD9100.JWM files.
Use a text editor tool such as MS Notepad or MS WordPad to open the WV9100.JWM and DYNBLD9100.JWM files.
Example paths for location of WV9100.JWM and DYNBLD9100.JWM are:
For iSeries-i5 Installation:
Your iSeries-i5 root folder/JWALK/ JWALKAPP/A9100APP/
For Windows NT-2000-2003 Server and J Walk Client for Windows Installations:
C:\Inetpub\wwwroot\ JWALKAPP\A9100APP\
WV9100.JWM and DYNBLD9100.JWM Text File Entry Updates:
CALCEXEPTH set to the appropriate path for the type of install:
If NT Java Client, http://<PC server name>/Docs/
If Native Java Client install, http://iSeries machine name/Docs/
If J Walk Client for Windows, http://<PC servername>/Docs/
OTHPATH6 set to name of file to open (e.g. calc.exe)
OTHTEXT6 set to text that displays when right click on an input capable field (e.g. Calculator)
OTHTYP6 set to type of file to open (e.g. EXE)
Users can access an input capable field on a panel display, right-click and choose Calculator from the drop-down menu.
Web Enablement Installation and Configuration Guide (Revised - December 9, 2010) 53

Appendix G – Double byte
Appendix G – Double byte
For Windows Server Install 1. Stop J Walk server if it is running. Use a text editor tool such as MS Notepad or
MS WordPad to open the JWALK.INI file, located in the following folder:
C:\Program Files\SEAGULL\J Walk Server\4.1xxx.xxxx
2. In [A91APP] section, change the value of CCSID parameter from 500 to the appropriate values (i.e. 930 for Japanese, 933 for Korean, 927 for Traditional Chinese, or 926 for Simplified Chinese). Apply same change to the self-service sections if you use self-service applications.
3. Use a text editor tool, such as MS Notepad or MS WordPad to open JWALK.HTML file, located in the following folder:
C:\Inetpub\wwwroot
4. Change the value of the parameter for ‘FontUsage’ from 2 to 0. Example of the value of the parameter after your change:
“theApplet.addParameter('FontUsage', '0')”
For iSeries Server Install 1. Stop J Walk server if it is running. Open JWALK.INI file located in the following
IFS directory path:
\root\seajwk
2. In [A91APP] section, change the value of CCSID parameter from 500 to the appropriate values (i.e. 930 for Japanese, 933 for Korean, 927 for Traditional Chinese, or 926 for Simplified Chinese). Apply the same changes to the self-service sections if you use self-service applications.
3. Use a text editor tool, such as MS Notepad or MS WordPad, to open JWALK.HTML file, located in the following directory path:
Your_webserver_root/jwalk/ (/www/apachedft/htdocs/JWALK if you use Apache web server)
4. Change the value of the parameter for ‘FontUsage’ from 2 to 0. Example of the value of the parameter after your change:
“theApplet.addParameter('FontUsage', '0')”
54 JD Edwards World

Appendix H – Customized Signon
Appendix H – Customized Signon
If you have a customized Signon screen and want to use it with the A9.2 Web Enablement, you need to set some text file entries and add one entry to the Signon screen DDS so that the J Walk product can:
Uniquely identify this client customized Signon screen
Display this panel correctly
Allow the user to continue to navigate through Web Enablement
Have background image on panel SIGNONCS display correctly, contact My Oracle Support, JD Edwards World Technical for assistance
The change is to display three periods on Line 1 of the screen, starting in Column 2. In the following DDS example, line 49 displays the three periods on Line 01, Column 02:
The following is an example of a Signon screen with the … added in the upper left corner, row 1, columns 2, 3, and 4:
Web Enablement Installation and Configuration Guide (Revised - December 9, 2010) 55

Appendix H – Customized Signon
Several text file entries can be set to display the fields on the Customized Signon panel.
To set up the display of Signon fields, the administrator installing the JD Edwards World Web Enablement needs to verify that the appropriate text file entry is set accordingly on the WV9100.JWM file.
Use a text editor tool such as MS Notepad or MS WordPad to open the WV9100.JWM file.
Example paths for location of WV9100.JWM:
For iSeries-i5 Installation:
Your iSeries-i5 root folder/JWALK/ JWALKAPP/A9100APP/
For Windows NT-2000-2003 Server and J Walk Client for Windows Installations:
C:\Inetpub\wwwroot\ JWALKAPP\A9100APP\
WV9100.JWM Text File Entry Updates:
CUSTUSRTRW set to the row of the text field description for User (e.g. 06)
CUSTUSRTCL set to the column of the text field description for User (e.g. 17)
CUSTUSRTL set to the length of the text field description for User (e.g. 33)
CUSTUSRRW set to the row of the input capable field for User (e.g. 06)
CUSTUSRCL set to the column of the input capable field for User (e.g. 53)
CUSTUSRIL set to the length of the input capable field for User (e.g. 10)
CUSTPSWTRW set to the row of the text field description for Password (e.g. 07)
CUSTPSWTCL set to the column of the text field description for Password (e.g. 17)
CUSTPSWTL set to the length of the text field description for Password (e.g. 33)
CUSTPSWRW set to the row of the input capable field for Password (e.g. 07)
CUSTPSWCL set to the column of the input capable field for Password (e.g. 53)
CUSTPSWIL set to the length of the input capable field for Password (e.g. 10)
The following list of text file entries is optional:
CUSTALT1TR set to the row of the text field description for Program/procedure (e.g. 08)
CUSTALT1TC set to the column of the text field description for Program/procedure (e.g. 17)
CUSTALT1TL set to the length of the text field description for Program/procedure (e.g. 33)
CUSTALT1R set to the row of the input capable field for Program/procedure (e.g. 08)
CUSTALT1C set to the column of the input capable field for Program/procedure (e.g. 53)
56 JD Edwards World

Appendix H – Customized Signon
CUSTALT1IL set to the length of the input capable field for Program/procedure (e.g. 10)
CUSTALT2TR set to the row of the text field description for Menu (e.g. 09)
CUSTALT2TC set to the column of the text field description for Menu (e.g. 17)
CUSTALT2TL set to the length of the text field description for Menu (e.g. 33)
CUSTALT2R set to the row of the input capable field for Menu (e.g. 09)
CUSTALT2C set to the column of the input capable field for Menu (e.g. 53)
CUSTALT2IL set to the length of the input capable field for Menu (e.g. 10)
CUSTALT3TR set to the row of the text field description for Current library (e.g. 10)
CUSTALT3TC set to the column of the text field description for Current library (e.g. 17)
CUSTALT3TL set to the length of the text field description for Current library (e.g. 33)
CUSTALT3R set to the row of the input capable field for Current library (e.g. 10)
CUSTALT3C set to the column of the input capable field for Current library (e.g. 53)
CUSTALT3IL set to the length of the input capable field for Current library (e.g. 10)
CUSTSYS1TR set to the row of the text field description for System (e.g. 02)
CUSTSYS1TC set to the column of the text field description for System (e.g. 48)
CUSTSYS1TL set to the length of the text field description for System (e.g. 20)
CUSTSYS1R set to the row of the output field for System (e.g. 02)
CUSTSYS1C set to the column of the output field for System (e.g. 70)
CUSTSYS1IL set to the length of the output field for System (e.g. 08)
CUSTSYS2TR set to the row of the text field description for Subsystem (e.g. 03)
CUSTSYS2TC set to the column of the text field description for Subsystem (e.g. 48)
CUSTSYS2TL set to the length of the text field description for Subsystem (e.g. 20)
CUSTSYS2R set to the row of the output field for Subsystem (e.g. 03)
CUSTSYS2C set to the column of the output field for Subsystem (e.g. 70)
CUSTSYS2IL set to the length of the output field for Subsystem (e.g. 10)
CUSTSYS3TR set to the row of the text field description for Display (e.g. 04)
CUSTSYS3TC set to the column of the text field description for Display (e.g. 48)
CUSTSYS3TL set to the length of the text field description for Display (e.g. 20)
CUSTSYS3R set to the row of the output field for Display (e.g. 04)
Web Enablement Installation and Configuration Guide (Revised - December 9, 2010) 57

Appendix H – Customized Signon
CUSTSYS3C set to the column of the output field for Display (e.g. 70)
CUSTSYS3IL set to the length of the output field for Display (e.g. 10)
58 JD Edwards World

Appendix I – Registration Wizard
Appendix I – Registration Wizard
1. From the Welcome to SEAGULL Registration Wizard screen, click Next.
2. From the Select installation machine screen, select Host machine (iSeries, zSeries, Solaris, HP-UX, AIX, and Linux). Click Next.
3. From the Host system serial number screen, enter your host system serial number and select your LPAR number from the drop down option. Click Next.
Note: You can identify your serial number and partition (LPAR) from the License Report (LISTLIC). From an iSeries command line type:
SEALMS/REPORTLIC
Press Enter.
WRKSPLF
Press Enter.
Web Enablement Installation and Configuration Guide (Revised - December 9, 2010) 59

Appendix I – Registration Wizard
4. From the Registration information screen, complete your information and enter the Installation key C276BE1D52014B5BEBEE. Click Next
5. From the Activation Request submit screen, select Via Web (requires direct Internet connection). Click Next.
60 JD Edwards World

Appendix I – Registration Wizard
6. From the Submit by Web screen, click Next.
Note: The registration key SEAGULL.SAF is stored in the following folder:
C:\Documents and Settings\All Users\Application Data\SEAGULL\Registration Wizard\
7. From the Successfully downloaded Activation File screen, click Next.
8. From the Success screen, click Finish.
Web Enablement Installation and Configuration Guide (Revised - December 9, 2010) 61

Appendix I – Registration Wizard
9. Copy the file SEAGULL.SAF from the following folder:
C:\Documents and Settings\All Users\Application Data\SEAGULL\Registration Wizard\
To the following folder:
C:\Program Files\SEAGULL\J Walk Server for iSeries V5Rx\4.1xxx.x.xxx\bin\seajwk
62 JD Edwards World

Appendix J – Activating Sign off Button on Menu Panels
Appendix J – Activating Sign off Button on Menu Panels
To have the Sign off push button display on a Menu panel, the administrator installing the JD Edwards World Web Enablement needs to verify that the appropriate text file entry is set accordingly on the WV9100.JWM and DYNBLD9100.JWM files.
Use a text editor tool such as MS Notepad or MS WordPad to open the WV9100.JWM and DYNBLD9100.JWM files.
Example paths for location of WV9100.JWM and DYNBLD9100.JWM:
For iSeries-i5 Installation:
Your iSeries-i5 root folder/JWALK/ JWALKAPP/A9100APP/
For Windows NT-2000-2003 Server and J Walk Client for Windows Installations:
C:\Inetpub\wwwroot\ JWALKAPP\A9100APP\
WV9100.JWM and DYNBLD9100.JWM Text File Entry Updates:
MENUCPYR1 set to the exact character text on row 23, columns 46-51 of the menu screen.
If the content of MENUCPYR1 contains the same text as listed on row 23,
columns 46-51 of the menu screen, the Sign off push button displays only on a Menu panel and functions as a "90" (e.g. Sign Off) and the standard menu
panel push button displays and functions as F12..
Note: A partial match between row 23, columns 46-51 of the menu screen and the value in MENUCPYR1 is considered a match. Verify the value in MENUCPYR1 differs completely.
If the content of MENUCPYR1 differs from what is listed on row 23, columns 46-51
of the menu screen, the Sign off push button does not display and the standard
application panel push button displays and functions as F3.
Web Enablement Installation and Configuration Guide (Revised - December 9, 2010) 63

Appendix K – UPK Content Sensitive Help
Appendix K – UPK Content Sensitive Help
Note: Refer to the JD Edwards World Web Enablement Help Menu Integration document, which is available after installing the UPK (User Productivity Kit) Help Menu Integration patch. This document contains set up instructions using Web Enablement.
64 JD Edwards World

Appendix L – Restriction of Creation of Virtual Devices
Appendix L – Restriction of Creation of Virtual Devices
If your system restricts the creation of virtual devices, you can activate the following two settings within the JWALK.INI to create named virtual devices within the Web Enablement client.
Use a text editor tool such as MS Notepad or MS WordPad to open the JWALK.INI file, located in the following folder:
If Native Java Client install, /Your iSeries-i5 root folder/SEAJWK/
If NT Java Client or J Walk Client on Windows, C:\Program Files\SEAGULL\J Walk Server\4.1xxx.x.xxx
To activate creation of Virtual Devices for Web Enablement, remove the semicolon in front of the two JWALK.INI settings:
DeviceNameSequence=001
DeviceName=A92WEB, can change the A92WEB to any other six character value
Web Enablement Installation and Configuration Guide (Revised - December 9, 2010) 65

Appendix M – E-mail Separator Character
Appendix M – E-mail Separator Character
A text file entry has been set up to allow correct creation of e-mail parameter information. The administrator installing the JD Edwards World Web Enablement needs to verify that the appropriate text file entry is set accordingly on the WV9100.JWM and DYNBLD9100.JWM files.
Use a text editor tool such as MS Notepad or MS WordPad to open the WV9100.JWM and DYNBLD9100.JWM files.
Example paths for location of WV9100.JWM and DYNBLD9100.JWM are:
For iSeries-i5 Installation:
Your iSeries-i5 root folder/JWALK/ JWALKAPP/A9100APP/
For Windows NT-2000-2003 Server and J Walk Client for Windows Installations:
C:\Inetpub\wwwroot\ JWALKAPP\A9100APP\
WV9100.JWM and DYNBLD9100.JWM Text File Entry Updates:
EMALSEP set to the separator character for the respective email client server. Default value is & for Microsoft Outlook.
66 JD Edwards World

Appendix N – E-mail Special Instructions
Appendix N – E-mail Special Instructions
A text file entry has been set up to add the parameter CCSID (65535) to the CRTPF command within the scripted process to e-mail a spooled file (WRKSPLF). Adding the CCSID (65535) parameter states that no language conversion should occur. The default value is N, which does not add this parameter.
The administrator installing the JD Edwards World Web Enablement needs to verify that the appropriate text file entry is set accordingly on the WV9100.JWM file.
Use a text editor tool such as MS Notepad or MS WordPad to open the WV9100.JWM file.
Example paths for location of WV9100.JWM and DYNBLD9100.JWM:
For iSeries-i5 Installation:
Your iSeries-i5 root folder/JWALK/ JWALKAPP/A9100APP/
For Windows NT-2000-2003 Server and J Walk Client for Windows Installations:
C:\Inetpub\wwwroot\ JWALKAPP\A9100APP\
WV9100.JWM Text File Entry Updates:
Change CRTPFCHG value to Y to add the parameter CCSID(65535)
In addition, text file entries can be set to fill in the To address, Subject or the Body of the e-mail when you click the Email Header link at the top of main panels. However, if the text file entry for OTHPATH3 has a value other than blank, then the following text file entries are not used:
Change EMAILTO to the value for the To e-mail address
Change EMAILSUB to the value for the Subject in an e-mail
Change EMAILBODY to the value for the Body in an e-mail
Web Enablement Installation and Configuration Guide (Revised - December 9, 2010) 67

Appendix O – Session Resume
Appendix O – Session Resume
You can set up Session Resume on a J Walk Server. When you use Session Resume, the system allows users only one session at time, but does not require users to signon more than once as long as that session is active.
Use a text editor tool such as MS Notepad or MS WordPad to open the JWALK.INI file, located in the following folder:
If Native Java Client install, /Your iSeries-i5 root folder/SEAJWK/
If NT Java Client or J Walk Client on Windows, C:\Program Files\SEAGULL\J Walk Server\4.1xxx.x.xxx
Add the following two lines to the J Walk Server group in the JWALK.INI file:
SessionResume=1
ClientAliveCheckTime=N, where a new session is initiated after N minutes
Add a line to the JWALK.HTML file.
Use a text editor took, such as MS Notepad or MS WordPad, to open JWALK.HTML, located in the following directory path:
Your_webserver_root/jwalk/ (/www/apachedft/htdocs/JWALK if you use Apache web server)
Use the following example to assist you updating the JWALK.HTML file. The text that appears in red must be added to the file:
Example: JWALK.HTML file
68 JD Edwards World

Appendix P – Parameterized URL
Appendix P – Parameterized URL
Note: Parameterized URL processing is only available when using JD Edwards World A9.2 or above.
Parameterized URL is the functional process that allows external systems to launch a native JD Edwards World application through the use of a simple URL. The functionality provides an external system a near seamless user interface integration with most JD Edwards World applications.
The Parameterized URL process simulates an interactive web user interface with JD Edwards World applications (similar to the way modern applications communicate through the use of a URL) using the LegaSuite GUI (formerly J Walk) Web Enablement product.
An interactive request initiates a Web Enablement session within JD Edwards World and then allows users to interact with the results and/or proceed to other JD Edwards World applications.
There are two options to access JD Edwards World Parameterized URL:
Option one does not use Session Resume, the system requires users to signon every time when a Web Enablement session is initiated(each time a parameterized URL is executed)
Option two utilizes Session Resume. Session Resume parks a session when the browser window is closed, then when JD Edwards World is accessed again, the system reuses the current active session and returns the user to the previous panel. A timer is set to keep the current Web Enablement session active. A parameterized URL call can reuse an active session, so the user does not have to sign in each time a call to JD Edwards World is issued
Four different application group processes have to be set up for Parameterized URL to function properly:
Web Enablement
HostedWorldServlet
World Application Parameters
External System
Note: For the Parameterized URL process to function correctly, J98INITA is a requirement for the Initial program to call value for a user profile whether this user has access to a single environment or multiple environments.
Web Enablement There is an update to the JWALK.INI file for both option types.
Web Enablement Installation and Configuration Guide (Revised - December 9, 2010) 69

Appendix P – Parameterized URL
Use a text editor tool such as MS Notepad or MS WordPad to open the JWALK.INI file, located in the following folder:
If Native Java Client install, /Your iSeries-i5 root folder/SEAJWK/
If NT Java Client or J Walk Client on Windows, C:\Program Files\SEAGULL\J Walk Server\4.1xxx.x.xxx
Add the following two lines to the J Walk Server group in the JWALK.INI file within the SEAJWK folder:
DeviceName=JWALK
DeviceNameSequence=00000
Note: To use Parameterized URL, the Device Name has to begin with JWALK.
The Session Resume second option requires additional updates to the Web Enablement set up. See instructions in Appendix O – Session Resume.
HostedWorldServlet 1. Download the most current Web Enablement software update and extract the
archive, which creates the folder in the download directory.
2. Access the following download directory folder:
A91_A92_JWalk_CD_SUx_v1038_1_xxx\Parameterized URL
Deploy the jdeworld.war file to the Application Server.
Note: See MTRs for Application Server requirements for Parameterized URL.
3. Stop and restart this Application Server. Next, the system creates the folder jdeworld in this Application Server area.
4. Access the following path in this Application Server area:
applications/jdeworld/jdeworld/WEB-INF/classes/config/
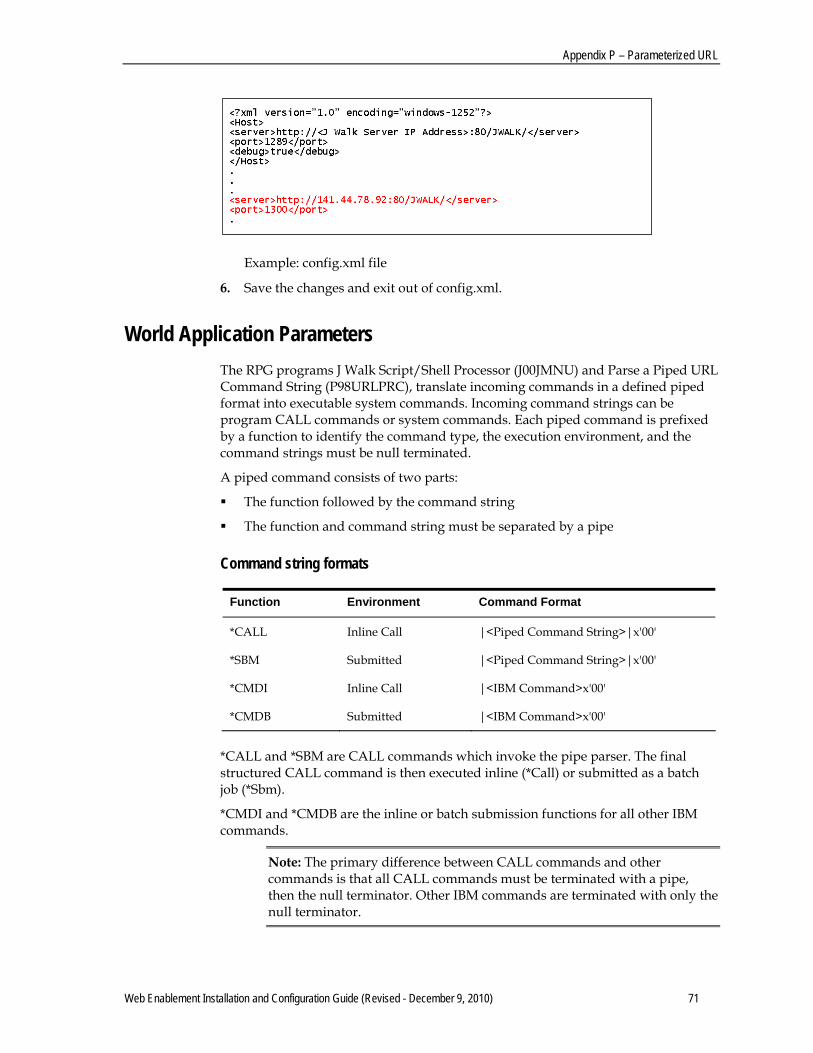
5. Edit the config.xml file.
Update the server path and point to the J Walk server IP Address and keep the :80 indicating the Default port used for the HTTP Server for J Walk. However, if the HTTP Server port is not 80, then it needs to be changed to the correct port. Also, update the J Walk Server port value within <port>1289</port> if it is different than port 1289.
Use the following example to assist you updating the config.xml file. The text that appears in red must be added to the file:
70 JD Edwards World
Appendix P – Parameterized URL
Example: config.xml file
6. Save the changes and exit out of config.xml.
World Application Parameters The RPG programs J Walk Script/Shell Processor (J00JMNU) and Parse a Piped URL Command String (P98URLPRC), translate incoming commands in a defined piped format into executable system commands. Incoming command strings can be program CALL commands or system commands. Each piped command is prefixed by a function to identify the command type, the execution environment, and the command strings must be null terminated.
A piped command consists of two parts:
The function followed by the command string
The function and command string must be separated by a pipe
Command string formats
Function Environment Command Format
*CALL Inline Call |<Piped Command String>|x'00'
*SBM Submitted |<Piped Command String>|x'00'
*CMDI Inline Call |<IBM Command>x'00'
*CMDB Submitted |<IBM Command>x'00'
*CALL and *SBM are CALL commands which invoke the pipe parser. The final structured CALL command is then executed inline (*Call) or submitted as a batch job (*Sbm).
*CMDI and *CMDB are the inline or batch submission functions for all other IBM commands.
Note: The primary difference between CALL commands and other commands is that all CALL commands must be terminated with a pipe, then the null terminator. Other IBM commands are terminated with only the null terminator.
Web Enablement Installation and Configuration Guide (Revised - December 9, 2010) 71
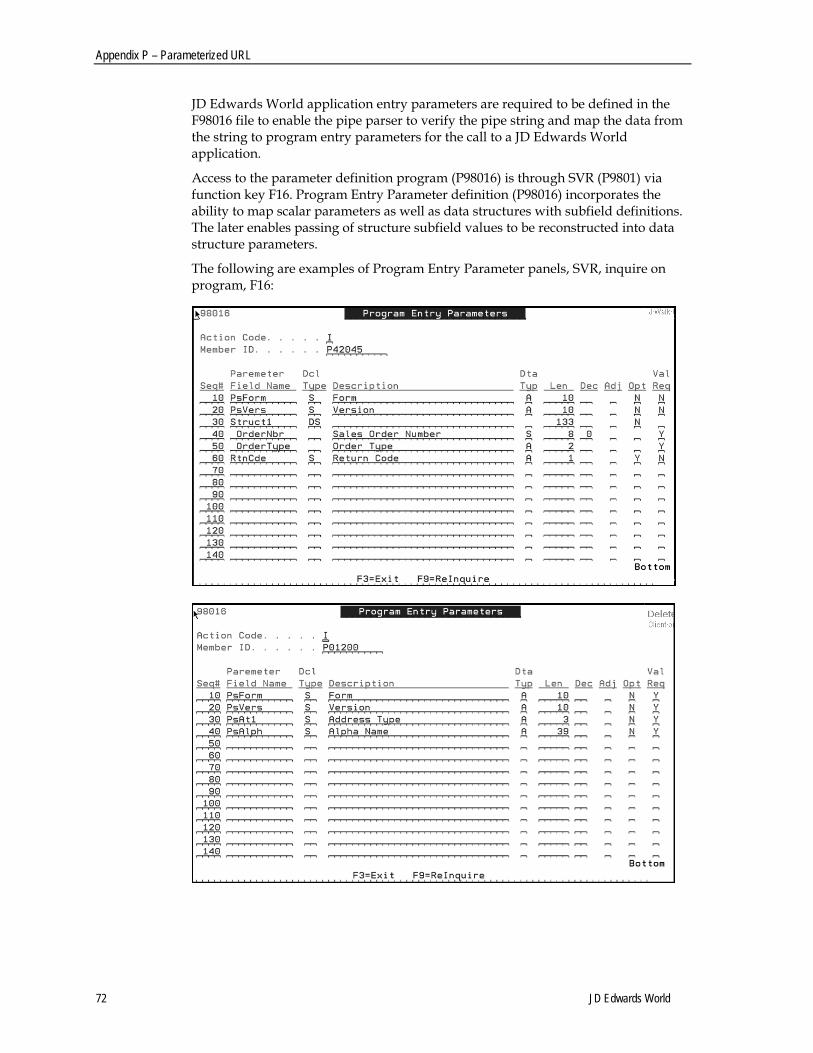
Appendix P – Parameterized URL
JD Edwards World application entry parameters are required to be defined in the F98016 file to enable the pipe parser to verify the pipe string and map the data from the string to program entry parameters for the call to a JD Edwards World application.
Access to the parameter definition program (P98016) is through SVR (P9801) via function key F16. Program Entry Parameter definition (P98016) incorporates the ability to map scalar parameters as well as data structures with subfield definitions. The later enables passing of structure subfield values to be reconstructed into data structure parameters.
The following are examples of Program Entry Parameter panels, SVR, inquire on program, F16:
72 JD Edwards World

Appendix P – Parameterized URL
In JD Edwards World, access Library List Revisions, 5/G944, and update the value for Menu/Pgm with J00JMNU for all production environment library lists.
Update the following two JD Edwards World System i System values:
QAUTOVRT, Autoconfigure virtual devices
QDEVRCYACN, Device I/O error action
To view the System values on a System i command line, type the following:
DSPSYSVAL SYSVAL(QAUTOVRT) and then press Enter
DSPSYSVAL SYSVAL(QDEVRCYACN) and then press Enter
Note: QAUTOVRT is a required update and QDEVRCYACN is a recommended update.
To update these System values, on a command line, type the following:
CHGSYSVAL SYSVAL(QAUTOVRT) VALUE(9999) and then press Enter
CHGSYSVAL SYSVAL(QDEVRCYACN) VALUE(*ENDJOBNOLIST) and then press Enter
External System The following are two set up examples to access application programs in JD Edwards World Web Enablement using a Web Link.
To setup a Web Link for Customer Integration:
Specify the URL of the Customer Name Search application using this format:
http://[Server]:[port]/jdeworld/hostedworldservlet?&@PID=[N]|P01200&@DataStructure=|P01200|[Version]|%20|[Name]
[Server]:[port] is the JD Edwards World System i and port for the System i WebSphere Application server or another Application server and port
Web Enablement Installation and Configuration Guide (Revised - December 9, 2010) 73

Appendix P – Parameterized URL
[N] is the Call Switch
The Call Switch values are:
N = call Parameterized URL application when DataStructure values have changed
Y = always call Parameterized URL application
[Version] is the DREAM Writer Version of P01200 to execute
[Name] is the customer alpha name for the Address Book record.
To setup a Web Link for World to CRM On Demand Sales Order Integration:
Specify the URL of the View Sales Quote / Order program using this format:
http://[Server]:[port]/jdeworld/hostedworldservlet?&@PID=[Y]|P42180&@DataStructure=|P42180|[Version]|[External System Name][ID]|[Name]
[Server]:[port] is the JD Edwards World System i and port for the System i WebSphere Application server or another Application server and port
[Y] is the Call Switch
The Call Switch values are:
N = call Parameterized URL application when DataStructure values have changed
Y = always call Parameterized URL application
[Version] is the DREAM Writer Version of P42180 to execute
[External System Name] is the name of the External System Instance
The External System Name:
Value retrieved from the User Defined Code Table, system 98S and Code ES.
[ID] is the External System Key
[Name] is the description, assigned in an External System, for an integration transaction.
74 JD Edwards World
Appendix Q – Function Keys Case Sensitive
Appendix Q – Function Keys Case Sensitive
The first three function keys displayed in the left-side navigation bar are retrieved from Text File entries. Hence, the administrator must verify if the display of the Function key text on F24, within the JD Edwards World environment, is not a mixed case, and then the following text file entries must be updated.
The administrator installing the JD Edwards World Web Enablement needs to verify that the appropriate text file entries are set accordingly on the WV9100.JWM and DYNBLD9100.JWM files.
Use a text editor tool such as MS Notepad or MS WordPad to open the WV9100.JWM and DYNBLD9100.JWM files.
Example paths for location of WV9100.JWM and DYNBLD9100.JWM:
For iSeries-i5 Installation:
Your iSeries-i5 root folder/JWALK/ JWALKAPP/A9100APP/
For Windows NT-2000-2003 Server and J Walk Client for Windows Installations:
C:\Inetpub\wwwroot\ JWALKAPP\A9100APP\
WV9100.JWM and DYNBLD9100.JWM Text File Entry Updates:
DETAIL
DETAILS
DISPERR
EXITPROG
FIELDSH
FLDSH
MOREFUN
MOREFUNF24
Web Enablement Installation and Configuration Guide (Revised - December 9, 2010) 75

Appendix R – Action Code Icon Display
Appendix R – Action Code Icon Display
To display the Action Code icons correctly on an application panel with an Action Code field, you need to set several text file entries to the various text descriptions for the Action Code field. The value of the text file entry is case sensitive.
The administrator installing the JD Edwards World Web Enablement needs to verify that the appropriate text file entries are set accordingly on the WV9100.JWM and DYNBLD9100.JWM files.
Use a text editor tool such as MS Notepad or MS WordPad to open the WV9100.JWM and DYNBLD9100.JWM files.
Example paths for location of WV9100.JWM and DYNBLD9100.JWM:
For iSeries-i5 Installation:
Your iSeries-i5 root folder/JWALK/ JWALKAPP/A9100APP/
For Windows NT-2000-2003 Server and J Walk Client for Windows Installations:
C:\Inetpub\wwwroot\ JWALKAPP\A9100APP\
WV9100.JWM and DYNBLD9100.JWM Text File Entry Updates:
ACTIONTEXT set to the first variation of the text description for Action Code field (e.g. Action Code)
ACTIONTXT2 set to the second variation of the text description for Action Code field (e.g. Action code)
ACTIONTXT3 set to the third variation of the text description for Action Code field (e.g. Action Type)
ACTIONTXT4 set to the fourth variation of the text description for Action Code field (e.g. Action)
ACTIONTXT5 set to the fifth variation of the text description for Action Code field (e.g. Action)
ACTIONTXT6 set to the sixth variation of the text description for Action Code field (e.g. Action)
ACTIONTXT7 set to the seventh variation of the text description for Action Code field (e.g. ACTION CODE)
ACTIONTXT8 set to the eighth variation of the text description for Action Code field (e.g. ACTION TYPE)
ACTIONTXT9 set to the ninth variation of the text description for Action Code field (e.g. ACTION)
If you need more than one language for the variations above, JD Edward World recommends to set up another J Walk Server instance for each language needed. For more information, see Appendix B –Alternate Language Special Install Instructions.
76 JD Edwards World

Appendix S – Logo Push Button
Appendix S – Logo Push Button
On each Main panel, you can see a push button over the Oracle logo. The administrator installing the JD Edwards World Web Enablement can set up the push button access for a URL address, document, or an e-mail. The administrator must verify that the appropriate text file entries are set accordingly on the WV9100.JWM and DYNBLD9100.JWM files.
Use a text editor tool such as MS Notepad or MS WordPad to open the WV9100.JWM and DYNBLD9100.JWM files.
Example of paths for location of WV9100.JWM and DYNBLD9100.JWM:
For iSeries-i5 Installation:
Your iSeries-i5 root folder/JWALK/ JWALKAPP/A9100APP/
For Windows NT-2000-2003 Server and J Walk Client for Windows Installations:
C:\Inetpub\wwwroot\ JWALKAPP\A9100APP\
WV9100.JWM and DYNBLD9100.JWM Text File Entry Updates:
ORACLECOM set to the path of the URL, Document, or Email (e.g. www.oracle.com)
ORACLEURLT set to the type of URL, Document, or E-mail (e.g. URL), see available choices under OTHTYP1 within Appendix E – Attachment Link Access.
Web Enablement Installation and Configuration Guide (Revised - December 9, 2010) 77

Appendix T – Text File Entry Table
Appendix T – Text File Entry Table
The following table displays all the text file entries that need to be updated. The table lists the file where the text file entry resides (WV9100.JWM or DYNBLD9100.JWM), a description of what the text file entry does and the value of the entry. The value of the text file entry is case sensitive.
Text File Entry Table
Entry Name File Description Value
MASTSSURL WV9100.JWM and DYNBLD9100.JWM
WRKSPLF Printing
http://<iSeries machine name> for Native Java Client
http://<PC server name> for NT Java Client and J Walk Client on Windows
ERMURL WV9100.JWM and DYNBLD9100.JWM
WRKSPLF Printing
See values for MASTSSURL
INSTALL WV9100.JWM and DYNBLD9100.JWM
WRKSPLF Printing
Default is WAS for Native Java Client
NT for NT Java Client
WIN for J Walk Client on Windows
ERMPRTURL WV9100.JWM and DYNBLD9100.JWM
WRKSPLF Printing
See values for INSTALL
DYNBLDURL WV9100.JWM and DYNBLD9100.JWM
Attachment Link Access
http://<iSeries machine name>/Docs/ for Native Java Client
http://<PC servername>/Docs/ for NT Java Client and J Walk Client for Windows
Note: SAMPLE.PDF must be included in the Docs folder within the respective install.
ERMSSURL WV9100.JWM and DYNBLD9100.JWM
Attachment Link Access
See values for DYNBLDURL
OTHTEXT1 WV9100.JWM and DYNBLD9100.JWM
Attachment Link Access
Default is URL
OTHPATH1 WV9100.JWM and DYNBLD9100.JWM
Attachment Link Access
Default is www.oracle.com
78 JD Edwards World

Appendix T – Text File Entry Table
Entry Name File Description Value
OTHTYP1 WV9100.JWM and DYNBLD9100.JWM
Attachment Link Access
Default is URL
Available choices are:
URL for a URL address
EML for an E-mail
DOC for a file with extension .doc
EXC for a file with extension .xls
PDF for a file with extension .pdf
EXE for a file with extension .exe
OTHTEXT2 WV9100.JWM and DYNBLD9100.JWM
Attachment Link Access
Default is Document
OTHPATH2 WV9100.JWM and DYNBLD9100.JWM
Attachment Link Access
Default is SAMPLE.pdf
OTHTYP2 WV9100.JWM and DYNBLD9100.JWM
Attachment Link Access
Default is PDF See available choices for OTHTYP1
OTHTEXT3 WV9100.JWM and DYNBLD9100.JWM
Attachment Link Access
Default is Email
OTHPATH3 WV9100.JWM and DYNBLD9100.JWM
Attachment Link Access
Default is World.Web.Enable [email protected]
OTHTYP3 WV9100.JWM and DYNBLD9100.JWM
Attachment Link Access
Default is EML See available choices for OTHTYP1
OTHTEXT4 WV9100.JWM and DYNBLD9100.JWM
Attachment Link Access
Default is World Resources
OTHPATH4 WV9100.JWM and DYNBLD9100.JWM
Attachment Link Access
Default is https://metalink3.ora cle.com/od/faces/ind ex.jspx
OTHTYP4 WV9100.JWM and DYNBLD9100.JWM
Attachment Link Access
Default is URL See available choices for OTHTYP1
OTHTEXT5 WV9100.JWM and DYNBLD9100.JWM
Attachment Link Access
Default is Support
OTHPATH5 WV9100.JWM and DYNBLD9100.JWM
Attachment Link Access
Default is http://supp ort.oracle.com
Web Enablement Installation and Configuration Guide (Revised - December 9, 2010) 79

Appendix T – Text File Entry Table
Entry Name File Description Value
OTHTYP5 WV9100.JWM and DYNBLD9100.JWM
Attachment Link Access
Default is URL See available choices for OTHTYP1
OTHTEXT7 WV9100.JWM and DYNBLD9100.JWM
Attachment Link Access
Default is URL Open/Email
OTHTEXT8 WV9100.JWM and DYNBLD9100.JWM
Attachment Link Access
Default is Document
CALCEXEPTH WV9100.JWM and DYNBLD9100.JWM
Calculator Access See values for DYNBLDURL
OTHTEXT6 WV9100.JWM and DYNBLD9100.JWM
Calculator Access Default is Calculator
OTHPATH6 WV9100.JWM and DYNBLD9100.JWM
Calculator Access Default is calc.exe
OTHTYP6 WV9100.JWM and DYNBLD9100.JWM
Calculator Access Default is EXE
ORACLECOM WV9100.JWM and DYNBLD9100.JWM
Oracle Logo Attachment Link Access
Default is http://www.oracle.com
ORACLEURLT WV9100.JWM and DYNBLD9100.JWM
Oracle Logo Attachment Link Access
Default is URL See available choices for OTHTYP1
CUSTUSRTRW WV9100.JWM Customized Signon
Row of text field description for User Default is 06
CUSTUSRTCL WV9100.JWM Customized Signon
Column of text field description for User Default is 17
CUSTUSRTL WV9100.JWM Customized Signon
Length of text field description for User Default is 33
CUSTUSRRW WV9100.JWM Customized Signon
Row of input capable field for User Default is 06
CUSTUSRCL WV9100.JWM Customized Signon
Column of input capable field for User Default is 53
CUSTUSRIL WV9100.JWM Customized Signon
Length of input capable field for User Default is 10
CUSTPSWTRW WV9100.JWM Customized Signon
Row of text field description for Password Default is 07
80 JD Edwards World
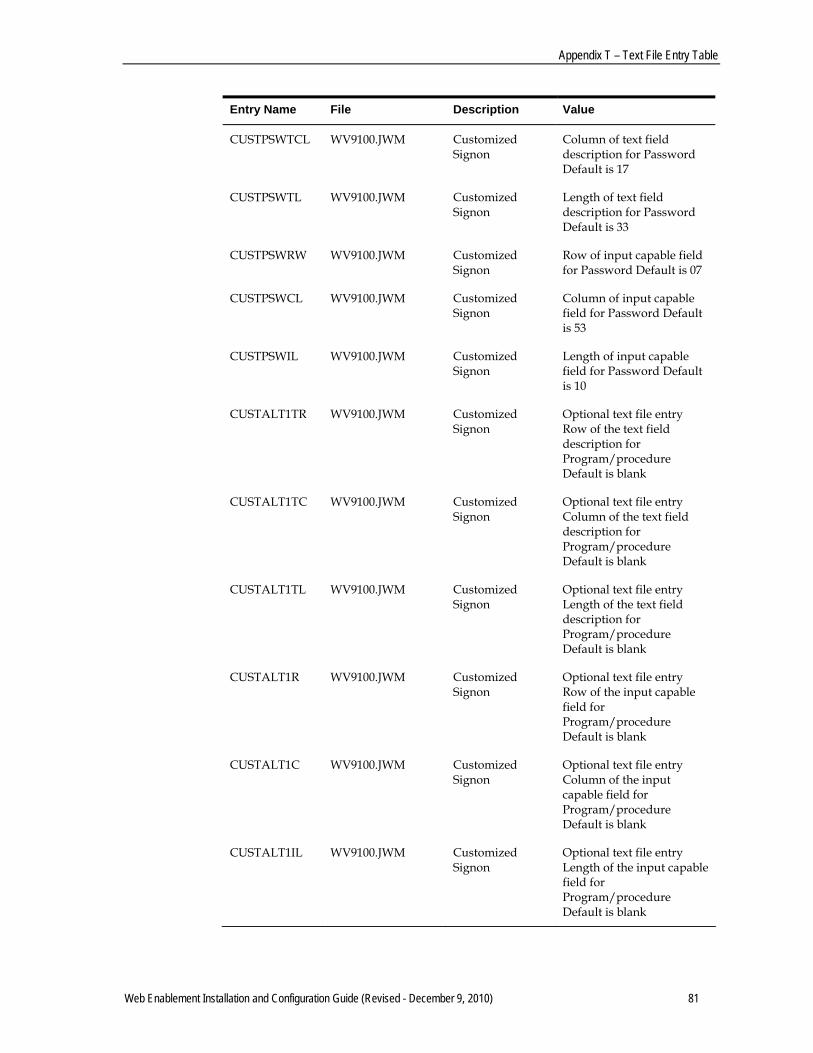
Appendix T – Text File Entry Table
Entry Name File Description Value
CUSTPSWTCL WV9100.JWM Customized Signon
Column of text field description for Password Default is 17
CUSTPSWTL WV9100.JWM Customized Signon
Length of text field description for Password Default is 33
CUSTPSWRW WV9100.JWM Customized Signon
Row of input capable field for Password Default is 07
CUSTPSWCL WV9100.JWM Customized Signon
Column of input capable field for Password Default is 53
CUSTPSWIL WV9100.JWM Customized Signon
Length of input capable field for Password Default is 10
CUSTALT1TR WV9100.JWM Customized Signon
Optional text file entry Row of the text field description for Program/procedure Default is blank
CUSTALT1TC WV9100.JWM Customized Signon
Optional text file entry Column of the text field description for Program/procedure Default is blank
CUSTALT1TL WV9100.JWM Customized Signon
Optional text file entry Length of the text field description for Program/procedure Default is blank
CUSTALT1R WV9100.JWM Customized Signon
Optional text file entry Row of the input capable field for Program/procedure Default is blank
CUSTALT1C WV9100.JWM Customized Signon
Optional text file entry Column of the input capable field for Program/procedure Default is blank
CUSTALT1IL WV9100.JWM Customized Signon
Optional text file entry Length of the input capable field for Program/procedure Default is blank
Web Enablement Installation and Configuration Guide (Revised - December 9, 2010) 81

Appendix T – Text File Entry Table
Entry Name File Description Value
CUSTALT2TR WV9100.JWM Customized Signon
Optional text file entry Row of the text field description for Menu Default is blank
CUSTALT2TC WV9100.JWM Customized Signon
Optional text file entry Column of the text field description for Menu Default is blank
CUSTALT2TL WV9100.JWM Customized Signon
Optional text file entry Length of the text field description for Menu Default is blank
CUSTALT2R WV9100.JWM Customized Signon
Optional text file entry Row of the input capable field for Menu Default is blank
CUSTALT2C WV9100.JWM Customized Signon
Optional text file entry Column of the input capable field for Menu Default is blank
CUSTALT12IL WV9100.JWM Customized Signon
Optional text file entry Length of the input capable field for Menu Default is blank
CUSTALT3TR WV9100.JWM Customized Signon
Optional text file entry Row of the text field description for Current library Default is blank
CUSTALT3TC WV9100.JWM Customized Signon
Optional text file entry Column of the text field description for Current library Default is blank
CUSTALT3TL WV9100.JWM Customized Signon
Optional text file entry Length of the text field description for Current library Default is blank
CUSTALT3R WV9100.JWM Customized Signon
Optional text file entry Row of the input capable field for Current library Default is blank
CUSTALT3C WV9100.JWM Customized Signon
Optional text file entry Column of the input capable field for Current library Default is blank
82 JD Edwards World

Appendix T – Text File Entry Table
Entry Name File Description Value
CUSTALT13IL WV9100.JWM Customized Signon
Optional text file entry Length of the input capable field for Current library Default is blank
CUSTSYS1TR WV9100.JWM Customized Signon
Optional text file entry Row of the text field description for System Default is blank
CUSTSYS1TC WV9100.JWM Customized Signon
Optional text file entry Column of the text field description for System Default is blank
CUSTSYS1TL WV9100.JWM Customized Signon
Optional text file entry Length of the text field description for System Default is blank
CUSTSYS1R WV9100.JWM Customized Signon
Optional text file entry Row of the output field for System Default is blank
CUSTSYS1C WV9100.JWM Customized Signon
Optional text file entry Column of the output field for System Default is blank
CUSTSYS1IL WV9100.JWM Customized Signon
Optional text file entry Length of the output field for System Default is blank
CUSTSYS2TR WV9100.JWM Customized Signon
Optional text file entry Row of the text field description for Subsystem Default is blank
CUSTSYS2TC WV9100.JWM Customized Signon
Optional text file entry Column of the text field description for Subsystem Default is blank
CUSTSYS2TL WV9100.JWM Customized Signon
Optional text file entry Length of the text field description for Subsystem Default is blank
CUSTSYS2R WV9100.JWM Customized Signon
Optional text file entry Row of the output field for Subsystem Default is blank
CUSTSYS2C WV9100.JWM Customized Signon
Optional text file entry Column of the output field for Subsystem Default is blank
Web Enablement Installation and Configuration Guide (Revised - December 9, 2010) 83
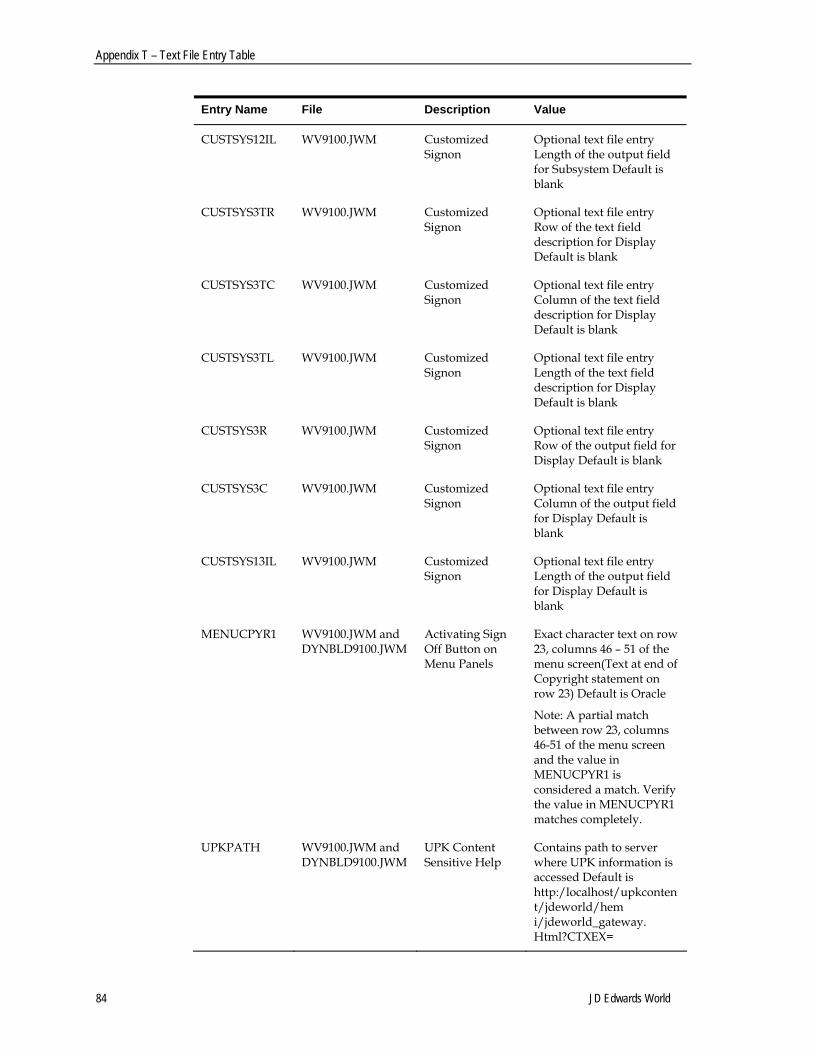
Appendix T – Text File Entry Table
Entry Name File Description Value
CUSTSYS12IL WV9100.JWM Customized Signon
Optional text file entry Length of the output field for Subsystem Default is blank
CUSTSYS3TR WV9100.JWM Customized Signon
Optional text file entry Row of the text field description for Display Default is blank
CUSTSYS3TC WV9100.JWM Customized Signon
Optional text file entry Column of the text field description for Display Default is blank
CUSTSYS3TL WV9100.JWM Customized Signon
Optional text file entry Length of the text field description for Display Default is blank
CUSTSYS3R WV9100.JWM Customized Signon
Optional text file entry Row of the output field for Display Default is blank
CUSTSYS3C WV9100.JWM Customized Signon
Optional text file entry Column of the output field for Display Default is blank
CUSTSYS13IL WV9100.JWM Customized Signon
Optional text file entry Length of the output field for Display Default is blank
MENUCPYR1 WV9100.JWM and DYNBLD9100.JWM
Activating Sign Off Button on Menu Panels
Exact character text on row 23, columns 46 – 51 of the menu screen(Text at end of Copyright statement on row 23) Default is Oracle
Note: A partial match between row 23, columns 46-51 of the menu screen and the value in MENUCPYR1 is considered a match. Verify the value in MENUCPYR1 matches completely.
UPKPATH WV9100.JWM and DYNBLD9100.JWM
UPK Content Sensitive Help
Contains path to server where UPK information is accessed Default is http:/localhost/upkcontent/jdeworld/hem i/jdeworld_gateway. Html?CTXEX=
84 JD Edwards World

Appendix T – Text File Entry Table
Entry Name File Description Value
UPKVIEWH WV9100.JWM and DYNBLD9100.JWM
UPK Content Sensitive Help
Default is N If N, then UPK will not display in Help Drop Down left click choices. If Y, then left click on Help Drop Down and choose UPK.
UPKVIEWI WV9100.JWM and DYNBLD9100.JWM
UPK Content Sensitive Help
Default is N If N, then UPK icon will not display in upper right hand corner. If Y, then UPK icon will display in upper right hand corner.
EMALSEP WV9100.JWM and DYNBLD9100.JWM
E-mail Separator Character
Set to the separator character for the respective email client server. Default is & for Microsoft Outlook
CRTPFCHG WV9100.JWM E-mail Special Instructions
Default is N If Y, will add parameter CCSID(65535) to the CRTPF command within the scripted process to e-mail a spooled file(WRKSPLF).
EMAILTO WV9100.JWM E-mail Special Instructions
Value for the recipient’s e-mail address(‘To’) Default is blank
Note: EMAILTO, EMAILSUB, and EMAILBODY will only be used if text file entry OTHPATH3 is blank
EMAILSUB WV9100.JWM E-mail Special Instructions
Value for the Subject in an e-mail Default is Insert Subject text here
EMAILBODY WV9100.JWM E-mail Special Instructions
Value for the body of in an e-mail Default is Insert body of text here
DETAIL WV9100.JWM and DYNBLD9100.JWM
Function Keys Case Sensitive
Text value for a Function key in the Navigation Bar Default is Detail
DETAILS WV9100.JWM and DYNBLD9100.JWM
Function Keys Case Sensitive
Text value for a Function key in the Navigation Bar Default is Details
DISPERR WV9100.JWM and DYNBLD9100.JWM
Function Keys Case Sensitive
Text value for a Function key in the Navigation Bar Default is Display Error Message
Web Enablement Installation and Configuration Guide (Revised - December 9, 2010) 85

Appendix T – Text File Entry Table
Entry Name File Description Value
EXITPROG WV9100.JWM and DYNBLD9100.JWM
Function Keys Case Sensitive
Text value for a Function key in the Navigation Bar Default is Exit Program
FIELDSH WV9100.JWM and DYNBLD9100.JWM
Function Keys Case Sensitive
Text value for a Function key in the Navigation Bar Default is Field Sensitive Help
FLDSH WV9100.JWM and DYNBLD9100.JWM
Function Keys Case Sensitive
Text value for a Function key in the Navigation Bar Default is Field Sensitive Help
MOREFUN WV9100.JWM and DYNBLD9100.JWM
Function Keys Case Sensitive
Text value for a Function key in the Navigation Bar Default is Display Functions
MOREFUNF24 WV9100.JWM and DYNBLD9100.JWM
Function Keys Case Sensitive
Text value for a Function key in the Navigation Bar Default is Display Functions – F24
ACTIONTEXT WV9100.JWM and DYNBLD9100.JWM
Action Code Icon Display
First variation for text description for Action Code field Default is Action Code
ACTIONTXT2 WV9100.JWM and DYNBLD9100.JWM
Action Code Icon Display
Second variation for text description for Action Code field Default is Action code
ACTIONTXT3 WV9100.JWM and DYNBLD9100.JWM
Action Code Icon Display
Third variation for text description for Action Code field Default is Action Type
ACTIONTXT4 WV9100.JWM and DYNBLD9100.JWM
Action Code Icon Display
Fourth variation for text description for Action Code field Default is Action.
ACTIONTXT5 WV9100.JWM and DYNBLD9100.JWM
Action Code Icon Display
Fifth variation for text description for Action Code field Default is Action.
ACTIONTXT6 WV9100.JWM and DYNBLD9100.JWM
Action Code Icon Display
Sixth variation for text description for Action Code field Default is Action:
86 JD Edwards World

Appendix T – Text File Entry Table
Entry Name File Description Value
ACTIONTXT7 WV9100.JWM and DYNBLD9100.JWM
Action Code Icon Display
Seventh variation for text description for Action Code field Default is ACTION CODE
ACTIONTXT8 WV9100.JWM and DYNBLD9100.JWM
Action Code Icon Display
Eighth variation for text description for Action Code field Default is ACTION TYPE
ACTIONTXT9 WV9100.JWM and DYNBLD9100.JWM
Action Code Icon Display
Ninth variation for text description for Action Code field Default is ACTION
Web Enablement Installation and Configuration Guide (Revised - December 9, 2010) 87