weave installation instructions - walker...
TRANSCRIPT

www.walkerzanger.com
These instructions are provided as a general guideline for the installation of Weave. An experienced,professional tile installer, who has read and understands these instructions, should perform the work. Some installations require a more detailed specification. For additional installation recommendations, please contact the Walker Zanger showroom where the tile was purchased.
The owner or owner’s representative is responsible for determining the acceptability of the product prior to installation. Weave is a handmade, artistic product; variation in color, shade, tone and size is normal. In many cases, there will be folds, wrinkles and bubbles in the glass. These surface characteristics are inherent to the cast glass manufacturing process and should be expected. Upon delivery open and inspect each box of tile. Verify sheet-to-sheet color consistency by first comparing each sheet, from the backside, to one another. Next, compare the face of the sheets by laying them adjacent to one another and comparing the visible portion (edge) of the mosaic tiles. No adjustments will be made after installation.
Material Inspection
Weave Installation Instructions

Substrate PreparationIn general, there are four types of acceptable substrates for Weave: • Concrete - Cured a minimum of 28 days, may require additional surface preparation • Cement Mortar - Two-coat cement mortar bed reinforced with 2.5lb galvanized metal lath and cured a minimum of 7 days • Cement Backer Board (CBU) - Durrock, Fiberock, Hardibacker, PermaBase, Wonderboard • Drywall - Dry locations onlyThe tile installation’s substructure, location and substrate type (i.e. CBU or concrete) will influence the details of how the substrate should be prepared. The following substrate preparation methods are detailed in the Tile Council of North America’s “2015 TCNA Handbook for Ceramic, Glass, and Stone Tile Installation” and are organized by alphanumeric designation (i.e. P602-15). Use the following chart to identify which TCNA method
is appropriate for your installation and refer to the TCNA Handbook for details.
The TCNA handbook is available for purchase at www.tcnatile.com.
WALLSINTERIOR EXTERIOR
Wood Studs
Metal Studs
Solid Backing(Masonry)
W243-15
W243-15
N/A
W231-15
W241-15
W221-15
W231-15
W241-15
W201-15
W244E-15
W244E-15
N/A
N/A
N/A
N/A
W244C-15W244F-15
W244C-15W244F-15
N/A
Backer Board Mortar Drywall* Backer Board Mortar Drywall
SPECIALTY
Bathtub Walls**
Shower Receptor**Floors/Walls
Steam ShowerWalls
(opaque tile only)
Swimming Pools
Countertops
B412-15
B415-15
SR614-15
N/A
C513-15
B411-15
B414-15
SR613-15
P602-15
C511-15
Backer Board Mortar * Drywall should be primed and allowed to fully dry prior to tile installation. ** Wood or Metal Studs‡ Use only Cementitious Backer Unit (CBU) or Fiber Cement Board
2
Substrate RequirementsSolid blocking for the anchoring of fixtures, such as shower doors and towel bars, must be installed prior to installing the tile substrate. • A vapor barrier membrane (asphalt laminated paper, 4 mil polyethylene, etc.) is required behind CBU and mortar beds in wet or exterior applications. • Installing translucent glass tile over anti-fracture/waterproof membranes or non-absorptive substrates (i.e. coated glass mat gypsum, coated foam backerboards, etc.) is not recommended. • Cement mortar beds must be cured a minimum of 7 days prior to tile installation. • Treat CBU joints with mesh-tape and thin-set per the CBU manufacturer’s recommendations and allow to cure 48 hours prior to tile installation.
Substrate Build-Up (installing Weave next to thicker tile materials)When installing Weave adjacent to thicker materials, with the intention of the two tiles finishing in the same plane (flush), the substrate must first be brought up to a level such that the glass tile can be installed with the recommended amount of thin-set. This should be accomplished in one of three ways depending on the amount of variation between the uninstalled glass tile and the installed surrounding material.Caution: Installing glass tile over fresh excessively built-up thin-set mortars may result in tile cracking due to mortar shrinkage.
Unacceptable Substrates• Single-float mortar bed walls (cement mortar beds, which do not employ cured scratch coats)• Cement mortar beds reinforced with metal lath less than 2.5 lb per square yard (i.e. chicken wire)• Wood Products such as plywood, luan, MDF, pressboard and composites
‡

For Variation between ¼” - ¼”
Step 1 Apply a build-up layer of a recom-mended thin-set, screed to the desired substrate depth and cure for a minimum of 48 hours.
Step 2 After the build-up layer of thin-set has cured for a minimum of 48 hours, install and grout the tile per the Weave Installation Instructions.
For Variation between ¼” - ¾”
Step 1 Using a recommended thin-set, install a piece of ¼” or ½” cement board. Use a notch trowel size and cement board thickness that will render the desired substrate depth. Cure a minimum of 24 hours.
Step 2 After the installed cement board layer has cured for a minimum of 24 hours, install and grout the tile per the Weave Installation Instructions.
Step 1 Apply a thin layer (bond-coat) of a recommended thin-set.
Step 2 While the bond-coat is still tacky, apply a cement mortar bed (4:1 sand & cement mixture per ANSI A108.1B). Screed the cement mortar bed to the desired substrate depth and cure a minimum of 7 days.
Step 3 To eliminate voids and visual inconsistencAfter the cement mortar bed has cured a minimum of 7 days, install and grout the tile per the Weave Installation Instructions.
For Variation between ¾” - 1½”
3
Thin-SetThe use of specific white thin-sets are recommended for the installation of Weave (see list below), however,these products vary in their degree of whiteness and color consistency. Due to the translucent nature of many glass tiles, the color of the thin-set will affect the installed tile’s appearance. Some of the thin-sets listed below are specifically manufactured for use with translucent glass tile and are marketed as “bright-white” and controlledfor bag-to-bag color consistency. Confirm the thin-set color is acceptable prior to installation. For projects that require multiple units of thin-set, either use a color controlled thin-set or dry-batch (pre-mix) the units of thin-set powder to avoid bag-to-bag color variation. All submerged applications (pools & water features) must be cureda minimum of 21 days prior to submersion or heavy water exposure, unless otherwise noted by the thin-set and
grout manufacturer.
When mixing thin-set or grout: 1. Measure liquid and powder per the manufacturer’s recommendations, 2. Machine mix at a maximum of 300 rpm, 3. Allow the thin-set or grout to slake (sit) 10-15 minutes, 4. Re-mix (repeat step 2) and do not add more liquid or powder.
Acceptable Thin-Sets • BOSTIK: Glass-Mate mixed with 425 Admixture* • CUSTOM BUILDING PRODUCTS: Premium Glass Tile Thin-Set Mortar* † • LATICRETE: Glass Tile Adhesive* • MAPEI: Adesilex P10 Bright White Thin-Set Mortar mixed With Keraply Mortar Additive* † • TEC SPECIALTY PRODUCTS: Super Flex Premium Performance Universal Latex-Modified Thin-Set Mortar * Bright White. † Color controlled for bag-to-bag consistency
Unacceptable Adhesives • Organic Adhesives (Mastic) - due to low bond strengths and yellowing • Epoxy - due to low flexibility and degradation when exposed to UV light
GroutGrout Weave with a urethane-based grout or a cement-based, sanded grout (will not scratch the tile)meeting ANSI A118.6 or A118.7, such as: • BOSTIK: Ceramic Tile Grout • BOSTIK: Dimension RapidCure (not recommended when Weave is installed in pools or shower floors) • BOSTIK: Trucolor RapidCure (not recommended when Weave is installed in pools or shower floors) • CUSTOM BUILDING PRODUCTS: Polyblend Sanded Tile Grout • CUSTOM BUILDING PRODUCTS: Prism SureColor Grout • LATICRETE: 1500 Sanded Grout • LATICRETE: PermaColor or PermaColor Select Grout • MAPEI: Keracolor S • MAPEI: Ultracolor Plus • TEC: AccuColor Premium Sanded Tile Grout • TEC: Power Grout
Installation Materials
4

5
Anti-Fracture/Waterproofing Membranes There are a wide variety of anti-fracture and waterproofing membranes available for use in tile installations. Each membrane product will vary in type, application and performance; consult the membrane manufacturer for specific recommendations and limitations. Some common membrane materials are: • BOSTIK: GoldPlus • CUSTOM BUILDING PRODUCTS: RedGard • LATICRETE: Hydro Ban • MIRACOTE: MiraFlex Membrane C • MAPEI: Mapelastic AquaDefense • TEC SPECIALTY PRODUCTS: HydraFlexWarning: The use of topical anti-fracture/waterproof membranes directly behind the tile bond coat (thin-set) is not recommended when installing translucent glass tile.
Movement JointsMovement joints are essential for the success of most tile installations. Follow recommendations on Movement Joints EJ171-15 in the “2015 TCNA Handbook for Ceramic, Glass and Stone Tile Installation”. Movement joint requirements will vary based on substrata, climate and size of installation. An architect or design professional should be consulted when specifying the exact number and location of each movement joint. Not all sealants are recommended for submerged or heavy water use; consult sealant manufacturer for use recommendations.
Step 1 Cover the saw tray with a piece of ¼" cement board. This will provide a continu-ous surface that supports the sheet during cutting and prevents mosaic pieces from falling into the tray’s cutting channel.
Step 2 Adjust the blade height so the blade cuts through ù of the cement board thickness.
Step 3 Cut another piece of ¼" cement board to a square size that is larger than a sheet of mosaics. Apply a strip of self-adhesive, com-pressible, foam weather-strip to one edge of the cement board.
CuttingWeave can be cut to meet jobsite dimensions with the use of a high-quality wet tile saw equipped with acontinuous, smooth-rim, diamond glass tile blade such as: • Alpha Professional Tools - Vetro • Husqvarna - Superlok Glass+ • MK Diamond - MK 215GL or MK 215GL-XL • Rodia - Glass Tile Blade • Saw Master - Cheetah Series Glass Blade (Fine) • World Diamond Source - Glass Tile BladeNOTES: • To maintain cut quality, periodically dress the diamond blade with a dressing stone. • To smooth cut tile edges, use a #120 lapidary stone (tile rub stone), PVA polishing pads or 220 silicon carbide sandpaper. • Always use safety/personal protection equipment when cutting or drilling glass tile.
To facilitate wet cutting, paper-faced mosaics must be removed from the paper and cut individually or the mount-ing paper must be protected from saw overspray. The following photos document a process, which can be used to facilitate wet cutting while minimizing water contact with the mounting paper.

Step 4 With the saw turned off, place the mosaic sheet, paper side up, on the cement board covered saw tray and align the cut.
Step 5 Place the second piece of cement board on top of the mosaic sheet. Cover the portion of sheet that is to be installed (keeper) with the weather-strip side down and against the blade. The board will protect the mounting paper from saw over-spray.
Step 6 Place downward pressure on the top layer of cement board, turn the saw on and slowly proceed with cutting. The downward pressure should be suffcient to compress the weather-strip, preventing water from fowing under the board, and stabilize the mosaic tiles during cutting.
Step 7 Once cutting is complete, turn the saw off, carefully remove the top layer of cement board and quickly towel dry the mounting paper.
Step 8 Towel dry the back of the tile and install the sheet as normal.
DrillingWeave can be drilled using a wet core diamond bit, designed for drilling dense materials (i.e. glass or granite) and a water swivel (central water feed). Solid blocking for the anchoring of fixtures, such as shower doors and towel bars, must be installed prior to installing the tile substrate. The diameter of all drilled holes must be large enough to allow the fastener to pass through the tile and substrate without making contact. Detailed information regarding drilling is available in the Installation section of our website www.walkerzanger.com.
Glass mosaic tiles may also be removed from the sheet and wet cut individually or cut by hand using glass mosaic nippers.
Step 1 Attach the water swivel (central water feed) and wet core diamond bit to the drill. Connect the water swivel to a water source and adjust the water flow to a slow trickle. Constant, slow water flow will reducing chipping by cool-ing and lubricating the drill bit.
Step 2 Using a template to stabilize the drill bit, begin slowly drilling with light pressure.
Step 3 Gradually increase drilling speed and maintain steady pressure until the desired depth is achieved.
NOTES: • The above process should keep the mount-
ing paper relatively dry during cutting. However, if a sheet becomes saturated, quickly lay it on a flat surface and allow it to completely dry before handling.
• For best results, towel dry the weather-strip between cuts.
• Replace the weather-strip when it no longer recovers its original shape after compression.
6

Step 1 To initiate the bond coat, use the flat side of a trowel and firmly apply thin-set to the substrate.
Step 2 To establish the proper depth of the setting bed, use a 1/4”x1/4” square notch trowel to apply additional thin-set and comb full notches in one direction.
Step 3 Use the flat side of the trowel to flatten the notches and achieve a smooth, consistent thin-set setting bed
Step 4 Apply mosaic sheets to the thin-set setting bed, paper side towards you, with light, even pressure. Periodically, check thin-set for skin-ning (slight drying). If skinning occurs, remove thin-set and reapply.
Step 5 To achieve the flattest possible sur-face, lightly tap the sheets with a wooden beat-ing block and a finish hammer. To unify sheet transitions, tap from one sheet to the next.
Step 7 Peel the paper from the tile starting at the corner. Removing the paper while the setting material is still fresh allows for individual tile adjustment and re-inspection of color consistency.
Step 8 Straighten individual mosaic tiles prior to final set with the goal of creating a consistent overall field of mosaics. To eliminate the sheet pattern, pay particular attention to the transitions between sheets.
Step 9 To eliminate voids and visual inconsistencies, push in any translucent glass pieces that have not achieved sufficient thin-set contact.
Step 10 After a full 24 hours (some installa-tions may require extended cure times) use water and a nylon scrub-brush to remove residual glue from the tile. Clean rinse and towel dry.
Step 11Apply grout with a rubber grout float, forcing grout into joints until full.
Step 12 Allow grout to set-up (firm) and smooth finish with a damp sponge. After approxi-mately 2 hours remove grout haze with a lightly damp sponge. For final removal of grout haze, polish with a clean, soft cloth.
NOTE: Grout application and cleaning process will vary based on the type and brand of grout. Refer to grout manufacturer’s instructions for details.
Step 6 After 15-30 minutes, (floors can be removed sooner) lightly wet the paper. Keep the paper wet by wiping with a damp sponge several times over a 5-10 minute period. After the paper has absorbed the water, the glue will release.
7
Installation

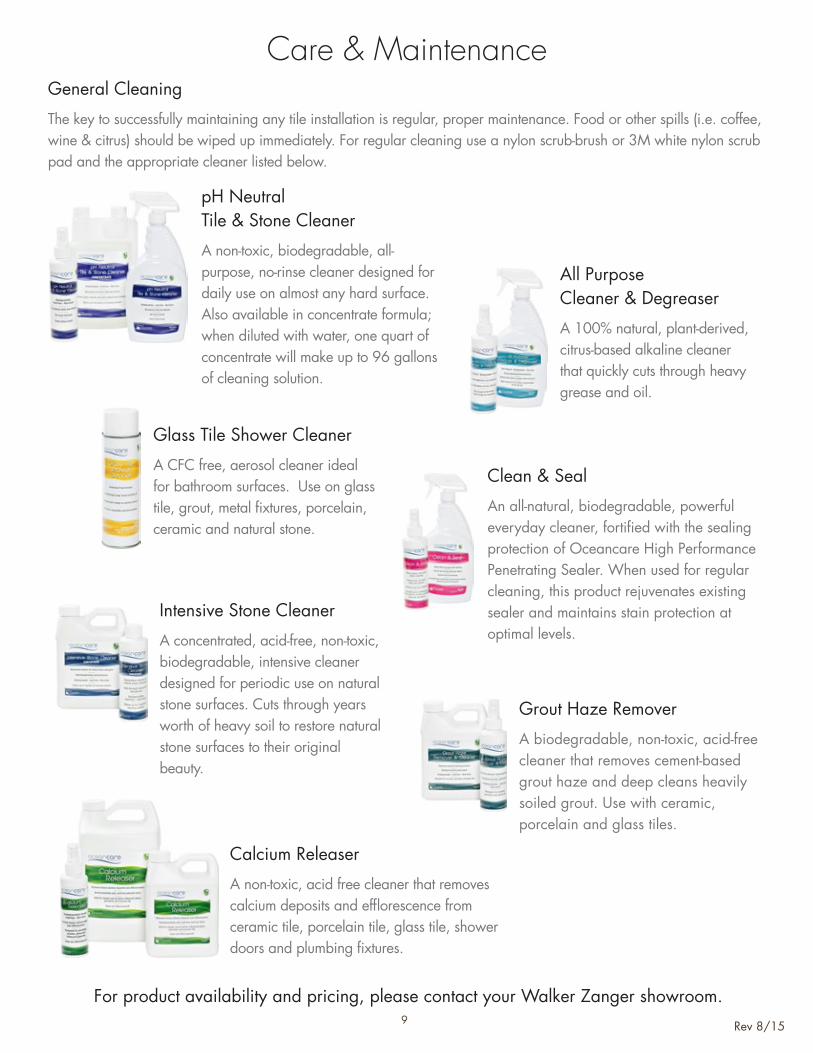
Oceancare, an innovative line of sealing and maintenance products for tile and natural stone. Developed usingcutting-edge chemical technology, Oceancare products are highly effective, easy to use and environmentally friendly.
Sealing
High Performance Enhancing Sealer Hybrid Carrier Technology®
A low VOC, all-in-one color enhancer and penetrating sealer for both interior and ex-terior applications. Intensifies and enriches the color of natural stone, grout, concrete and other porous masonry materials. Forms a barrier that is resistant to water and oil and provides superior stain protection.
High Performance Penetrating Sealer Hybrid Carrier Technology®
Penetrates and protects grout, natural stone and other porous masonry materials. Forms an invisible, no-sheen barrier that is resistant to water and oil and provides superior stain protection. Low residue, easy to use formula. May be applied to dry, damp, cured or uncured grout or natural stone (seriously...immediately after grouting!).
Clean & Seal
O C E A N C A R E P R O D U C T R E C O M M E N D A T I O N S - U S A G E L O C A T I O NWALLS FLOORS COUNTERTOPSTub
SurroundShower
Door Backsplash Cooktop Appliances Pool/Spa FountainPlumbingFixturesInterior Bathroom KitchenExterior ShowerInterior
pH Neutral Tile & Stone Cleaner
Clean & Seal
Glass Tile Shower Cleaner
All Purpose Cleaner & Degreaser
Grout Haze Remover
Intensive Stone Cleaner
Grout Haze Remover
Intensive Stone Cleaner
Calcium Releaser
Exterior Shower
O C E A N C A R E P R O D U C T R E C O M M E N D A T I O N S - S O I L T Y P EGeneralCleaning Soiled Grout Heavily Soiled
Stone Soap Scum Grease & Oil Pool WaterlineGrime
Hard WaterDeposits Efflorescence Cement
Grout HazeCalciumBuild-Up
pH Neutral Tile & Stone Cleaner
Glass Tile Shower Cleaner
All Purpose Cleaner & Degreaser
Calcium Releaser
For product availability and pricing, please contact your Walker Zanger showroom.
Care & Maintenance
8
General Cleaning
The key to successfully maintaining any tile installation is regular, proper maintenance. Food or other spills (i.e. coffee, wine & citrus) should be wiped up immediately. For regular cleaning use a nylon scrub-brush or 3M white nylon scrub pad and the appropriate cleaner listed below.
All PurposeCleaner & Degreaser
A 100% natural, plant-derived, citrus-based alkaline cleaner that quickly cuts through heavy grease and oil.
Grout Haze Remover
A biodegradable, non-toxic, acid-free cleaner that removes cement-based grout haze and deep cleans heavily soiled grout. Use with ceramic,porcelain and glass tiles.
pH Neutral Tile & Stone Cleaner
A non-toxic, biodegradable, all-purpose, no-rinse cleaner designed for daily use on almost any hard surface. Also available in concentrate formula; when diluted with water, one quart of concentrate will make up to 96 gallons of cleaning solution.
Calcium Releaser
A non-toxic, acid free cleaner that removes calcium deposits and efflorescence from ceramic tile, porcelain tile, glass tile, shower doors and plumbing fixtures.
Intensive Stone Cleaner
A concentrated, acid-free, non-toxic, biodegradable, intensive cleaner designed for periodic use on natural stone surfaces. Cuts through years worth of heavy soil to restore natural stone surfaces to their original beauty.
Clean & Seal
An all-natural, biodegradable, powerful everyday cleaner, fortified with the sealing protection of Oceancare High Performance Penetrating Sealer. When used for regular cleaning, this product rejuvenates existing sealer and maintains stain protection at optimal levels.
Glass Tile Shower Cleaner
A CFC free, aerosol cleaner ideal for bathroom surfaces. Use on glass tile, grout, metal fixtures, porcelain, ceramic and natural stone.
Care & Maintenance
For product availability and pricing, please contact your Walker Zanger showroom.9 Rev 8/15