weather forecaster - holman industries · ws5019 weather forecaster.indd 2 25/07/13 10:24 am. ......
TRANSCRIPT

WS5019INSTRUCTION MANUAL
WeatherForecaster
WS5019 Weather Forecaster.indd 1 25/07/13 10:24 AM

Table of Contents Technical Data
Technical Data.........................p1-p3Glossary...................................p4-p5Initial Operation............................p6ProgrammingManual Time Setup..................p7-p8Daily Alarm Setup.........................p9Snooze / 12-24Hr / ºC-ºF..............p10Max/Min Indoor/Outdoor Temp..p11
Weather Forecast................................p12Moon Phase Display...........................p13Living Space Humidity & Battery...... p14Wireless Connection & Tips..............p15Country / City Code Table...........p16-p21Warranty / QR Code................Back Page
WS5019 Weather Forecaster.indd 2 25/07/13 10:24 AM
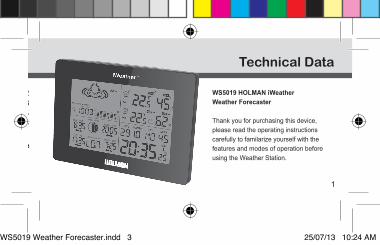
Table of Contents Technical Data
1
WS5019 HOLMAN iWeather Weather Forecaster
Thank you for purchasing this device,please read the operating instructionscarefully to familarize yourself with thefeatures and modes of operation beforeusing the Weather Station.
Weather Forecast................................p12Moon Phase Display...........................p13Living Space Humidity & Battery...... p14Wireless Connection & Tips..............p15Country / City Code Table...........p16-p21Warranty / QR Code................Back Page
WS5019 Weather Forecaster.indd 3 25/07/13 10:24 AM

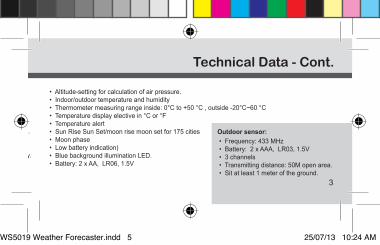
• Altitude-setting for calculation of air pressure. • Indoor/outdoor temperature and humidity • Thermometer measuring range inside: 0°C to +50 °C , outside -20°C~60 °C • Temperature display elective in °C or °F • Temperature alert • Sun Rise Sun Set/moon rise moon set for 175 cities • Moon phase • Low battery indication) • Blue background illumination LED. • Battery: 2 x AA, LR06, 1.5V
Technical Data - Cont.
2
Technical Data - Cont.
Technical Details: Indoor Unit • Six keys: MODE, +, - , HISTORY,CHANNEL,SNOOZE/LIGHT. • Time display in 12/24 format • Continuous perpetual calendar up to 2099 • Display of Date, Month and Day of week • Day of week display available in 7 languages, i.e. German, English, Italian, French, Dutch Spanish,Danish. • Weeks Display • Dual alarm with snooze function (alarm will activate every five minutes) • 5 weather forecasts: sunny, partly sunny, cloudy, rainy, stormy, weather symbol can be selected manually. • Barometer and bar and data for 12 hours history of air pressure.
WS5019 Weather Forecaster.indd 4 25/07/13 10:24 AM
• Altitude-setting for calculation of air pressure. • Indoor/outdoor temperature and humidity • Thermometer measuring range inside: 0°C to +50 °C , outside -20°C~60 °C • Temperature display elective in °C or °F • Temperature alert • Sun Rise Sun Set/moon rise moon set for 175 cities • Moon phase • Low battery indication) • Blue background illumination LED. • Battery: 2 x AA, LR06, 1.5V
Technical Data - Cont.
3
Technical Data - Cont.
Technical Details: Indoor Unit • Six keys: MODE, +, - , HISTORY,CHANNEL,SNOOZE/LIGHT. • Time display in 12/24 format • Continuous perpetual calendar up to 2099 • Display of Date, Month and Day of week • Day of week display available in 7 languages, i.e. German, English, Italian, French, Dutch Spanish,Danish. • Weeks Display • Dual alarm with snooze function (alarm will activate every five minutes) • 5 weather forecasts: sunny, partly sunny, cloudy, rainy, stormy, weather symbol can be selected manually. • Barometer and bar and data for 12 hours history of air pressure.
Outdoor sensor: • Frequency: 433 MHz • Battery: 2 x AAA, LR03, 1.5V • 3 channels • Transmitting distance: 50M open area. • Sit at least 1 meter of the ground.
WS5019 Weather Forecaster.indd 5 25/07/13 10:24 AM
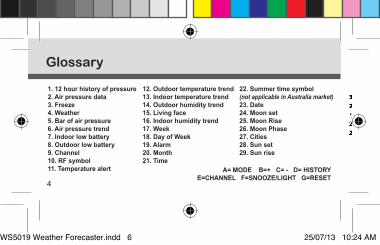
1. 12 hour history of pressure2. Air pressure data 3. Freeze 4. Weather5. Bar of air pressure 6. Air pressure trend7. Indoor low battery8. Outdoor low battery9. Channel10. RF symbol 11. Temperature alert
12. Outdoor temperature trend 13. Indoor temperature trend 14. Outdoor humidity trend15. Living face 16. Indoor humidity trend17. Week18. Day of Week 19. Alarm20. Month21. Time
22. Summer time symbol (not applicable in Australia market)23. Date24. Moon set25. Moon Rise26. Moon Phase27. Cities28. Sun set29. Sun rise
Glossary
4
A= MODE B=+ C= - D= HISTORYE=CHANNEL F=SNOOZE/LIGHT G=RESET
WS5019 Weather Forecaster.indd 6 25/07/13 10:24 AM

22. Summer time symbol (not applicable in Australia market)23. Date24. Moon set25. Moon Rise26. Moon Phase27. Cities28. Sun set29. Sun rise
Glossary
5
A= MODE B=+ C= - D= HISTORYE=CHANNEL F=SNOOZE/LIGHT G=RESET
WS5019 Weather Forecaster.indd 7 25/07/13 10:24 AM
6
Initial Operation - Outdoor Sensor & Indoor Sensor Programming - Manual Time Setup
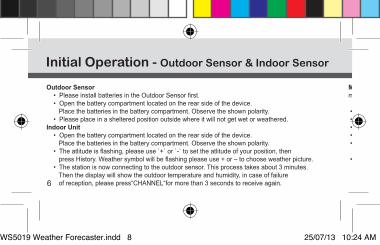
Outdoor Sensor • Please install batteries in the Outdoor Sensor first. • Open the battery compartment located on the rear side of the device. Place the batteries in the battery compartment. Observe the shown polarity. • Please place in a sheltered position outside where it will not get wet or weathered.Indoor Unit • Open the battery compartment located on the rear side of the device. Place the batteries in the battery compartment. Observe the shown polarity. • The atlitude is flashing, please use `+` or `-` to set the atlitude of your position, then press History. Weather symbol will be flashing please use + or – to choose weather picture. • The station is now connecting to the outdoor sensor. This process takes about 3 minutes. Then the display will show the outdoor temperature and humidity, in case of failure of reception, please press“CHANNEL“for more than 3 seconds to receive again.
Manual time set-up (most important to quit the reception of radio controlled signal by holding the minus button for 3 seconds in case it starts to flash before setup.)
• Press and hold “MODE“ for 3 seconds. • The display for the year is flashing. Use “+ “ and “-“ to select the year. Press “MODE “ to confirm. • The display for the month is flashing. Use “+ “ and “-“ to select the month. Press “MODE “ to confirm. • The display for the date is flashing. Use “+ “ and “-“ to select the date. Press “MODE “ to confirm. • The display for the time zone is flashing. Use “+ “ or “- “ to select the time zone. Press “MODE “ to confirm. • The language selection for the display of the weekdays is flashing. Use “+ “ or “- “ to select the language. Press “MODE “ to confirm.
WS5019 Weather Forecaster.indd 8 25/07/13 10:24 AM

7
Initial Operation - Outdoor Sensor & Indoor Sensor Programming - Manual Time Setup
Outdoor Sensor • Please install batteries in the Outdoor Sensor first. • Open the battery compartment located on the rear side of the device. Place the batteries in the battery compartment. Observe the shown polarity. • Please place in a sheltered position outside where it will not get wet or weathered.Indoor Unit • Open the battery compartment located on the rear side of the device. Place the batteries in the battery compartment. Observe the shown polarity. • The atlitude is flashing, please use `+` or `-` to set the atlitude of your position, then press History. Weather symbol will be flashing please use + or – to choose weather picture. • The station is now connecting to the outdoor sensor. This process takes about 3 minutes. Then the display will show the outdoor temperature and humidity, in case of failure of reception, please press“CHANNEL“for more than 3 seconds to receive again.
Manual time set-up (most important to quit the reception of radio controlled signal by holding the minus button for 3 seconds in case it starts to flash before setup.)
• Press and hold “MODE“ for 3 seconds. • The display for the year is flashing. Use “+ “ and “-“ to select the year. Press “MODE “ to confirm. • The display for the month is flashing. Use “+ “ and “-“ to select the month. Press “MODE “ to confirm. • The display for the date is flashing. Use “+ “ and “-“ to select the date. Press “MODE “ to confirm. • The display for the time zone is flashing. Use “+ “ or “- “ to select the time zone. Press “MODE “ to confirm. • The language selection for the display of the weekdays is flashing. Use “+ “ or “- “ to select the language. Press “MODE “ to confirm.
WS5019 Weather Forecaster.indd 9 25/07/13 10:24 AM
8
Programming - Manual Time Setup - Cont. Programming - Daily Alarm Setup
• The 12/24 hour is flashing Use “+ “ or “- “ to select. Press “MODE “ to confirm. • The display for the hour is flashing. Use “+ “ or “- “ to select the hour. Press “MODE “ to confirm. • The display for the minutes is flashing. Use “+ “ or “- “ to select the minutes. Press “MODE “ to confirm. • The country/city is flashing. Use “+ “ or “- “ to select the city of sunrise/sunset moonrise/moonset. Press “MODE “ to confirm.
Information: • The clock automatically changes from set-up mode to time display mode if no keys are pressed for 20 seconds.
• Press “MODE” to switch from time display to A1 display. • Press and hold the key “MODE” for 3 seconds, the flashing alarm time is shown. • The hour display of the alarm time will flash. Use “+“ or “-“ to select hour. Press “MODE “ to confirm. • Then follow with the minutes. Use “+“ or “-“ to select the minutes. Press “MODE “ to confirm. • Then press “MODE” to switch from A1 display to A2 display. (The setting is the same as for A1) • A1 is for Monday to Friday and A2 is for Saturday and Sunday. Daily alarm on/off • When showing A1 alarm time, press “+“ to activate the alarm 1 with alarm symbol showing. • Press “+” again to cancel the alarm. • When showing A2 alarm time, press “+“ to activate the alarm 2 with alarm symbol showing. • Press “+” again cancel the alarm . Information: • The clock automatically changes from set-up mode to time mode if no keys are pressed for 20 seconds. • Press any key to turn off alarm when beeping. (The alarm sounds for 2 minutes if no key is pressed to stop it)
WS5019 Weather Forecaster.indd 10 25/07/13 10:24 AM
9
Programming - Manual Time Setup - Cont. Programming - Daily Alarm Setup
• The 12/24 hour is flashing Use “+ “ or “- “ to select. Press “MODE “ to confirm. • The display for the hour is flashing. Use “+ “ or “- “ to select the hour. Press “MODE “ to confirm. • The display for the minutes is flashing. Use “+ “ or “- “ to select the minutes. Press “MODE “ to confirm. • The country/city is flashing. Use “+ “ or “- “ to select the city of sunrise/sunset moonrise/moonset. Press “MODE “ to confirm.
Information: • The clock automatically changes from set-up mode to time display mode if no keys are pressed for 20 seconds.
• Press “MODE” to switch from time display to A1 display. • Press and hold the key “MODE” for 3 seconds, the flashing alarm time is shown. • The hour display of the alarm time will flash. Use “+“ or “-“ to select hour. Press “MODE “ to confirm. • Then follow with the minutes. Use “+“ or “-“ to select the minutes. Press “MODE “ to confirm. • Then press “MODE” to switch from A1 display to A2 display. (The setting is the same as for A1) • A1 is for Monday to Friday and A2 is for Saturday and Sunday. Daily alarm on/off • When showing A1 alarm time, press “+“ to activate the alarm 1 with alarm symbol showing. • Press “+” again to cancel the alarm. • When showing A2 alarm time, press “+“ to activate the alarm 2 with alarm symbol showing. • Press “+” again cancel the alarm . Information: • The clock automatically changes from set-up mode to time mode if no keys are pressed for 20 seconds. • Press any key to turn off alarm when beeping. (The alarm sounds for 2 minutes if no key is pressed to stop it)
WS5019 Weather Forecaster.indd 11 25/07/13 10:24 AM

10
Programming - Snooze / 12-24Hr / ºC-ºF Programming - Max/Min Indoor/Outdoor Temp
Snooze function - To activate the snooze function, follow the steps below • Press the key “SNOOZE/LIGHT“, while the alarm sounds, to activate the snooze function. • If the snooze function is activated, snooze symbol is flashing. • The alarm will repeat after 5 minutes. • The snooze function can be stopped by pressing any key.
12/24 hours modeThe time display can be in 12 hour (AM/PM) or 24 hour mode.
°C/°F temperature displayThe temperature display can be in °C or °F. Press the key “-“ to switch between the mode.
Press + for displaying of indoor/outdoor max/min. of temperature and humidity Temperature alert set up. • Press “CHANNEL” to select the channel (ch1,ch2,ch3) if more than one outdoor sensor are within reach. • Press and hold the key - , in the area of outdoor, select ON/OFF when flashing. • Press “MODE”, the upper limit temperature is flashing, use + or – to set the maximum alert temperature. • Press ”MODE” , the lower limit temperature is flashing, use + or – to set the minimum alert temperature. • When the alert is activated, the alert symbol will be shown.
Temperature alert on/offPress and hold the “–” key to set the temperature alert on or off. • Alert on: Temperature alert symbol shown in display. • Alert off: Temperature alert symbol goes out.
WS5019 Weather Forecaster.indd 12 25/07/13 10:24 AM
11
Programming - Snooze / 12-24Hr / ºC-ºF Programming - Max/Min Indoor/Outdoor Temp
Snooze function - To activate the snooze function, follow the steps below • Press the key “SNOOZE/LIGHT“, while the alarm sounds, to activate the snooze function. • If the snooze function is activated, snooze symbol is flashing. • The alarm will repeat after 5 minutes. • The snooze function can be stopped by pressing any key.
12/24 hours modeThe time display can be in 12 hour (AM/PM) or 24 hour mode.
°C/°F temperature displayThe temperature display can be in °C or °F. Press the key “-“ to switch between the mode.
Press + for displaying of indoor/outdoor max/min. of temperature and humidity Temperature alert set up. • Press “CHANNEL” to select the channel (ch1,ch2,ch3) if more than one outdoor sensor are within reach. • Press and hold the key - , in the area of outdoor, select ON/OFF when flashing. • Press “MODE”, the upper limit temperature is flashing, use + or – to set the maximum alert temperature. • Press ”MODE” , the lower limit temperature is flashing, use + or – to set the minimum alert temperature. • When the alert is activated, the alert symbol will be shown.
Temperature alert on/offPress and hold the “–” key to set the temperature alert on or off. • Alert on: Temperature alert symbol shown in display. • Alert off: Temperature alert symbol goes out.
WS5019 Weather Forecaster.indd 13 25/07/13 10:24 AM

12
Weather Forecasts
5 Weather Forecasts
Sunny Slightly sunny Cloudy Rainy Stormy
Note: As the weather is forecasted by temperature, humidity only, the displaywill have a discrepancy with the actual weather occasionally.
Illumination
Press the key “SNOOZE/LIGHT“ to activate the display illumination for 5 seconds.
Moon Phase Display
WS5019 Weather Forecaster.indd 14 25/07/13 10:24 AM

13
Weather Forecasts
5 Weather Forecasts
Sunny Slightly sunny Cloudy Rainy Stormy
Note: As the weather is forecasted by temperature, humidity only, the displaywill have a discrepancy with the actual weather occasionally.
Illumination
Press the key “SNOOZE/LIGHT“ to activate the display illumination for 5 seconds.
The weather station usessaved data to show
the moon phase.
Please refer to the chartfor information on
Moon Phasepositions.
Moon Phase Display
WS5019 Weather Forecaster.indd 15 25/07/13 10:24 AM

The weather station uses saved data to determine the humidity in the living space and shows the respective symbols:
Low Battery Condition DisplayThe weather station displays the low battery condition symbol to warn you that the weather station or the outdoor sensor need to have the batteries exchanged. It is a good idea to exchange both when the symbol appears.
Dry below 40% Comfortable 40% - 70% (Temperature Display: 20 - 28°C) Humid 70% - 90%
Dry Comfortable Humid
14
Living Space Humidity & Battery Wireless Connection & Tips
Wireless connection to the Outdoor Sensor • Press the key “CHANNEL” to select a channel. You can read the data of up to 3 sensors at one weather station. • Press and hold the key “CHANNEL” for 3 seconds to search for outdoor sensors.TipsWhen placing both the inside and outside units remember they are subject to interference. Try to: • Install both the units as close as possible to each other. • Try and avoid outside interference by not placing them near computers, TV’s or TV antenna’s etc. • Also remember concrete walls and floors can interupt transmissions. Try and avoid as much as possible. • If the connection is successful initially and then fails occassionally, try to reduce the distance. • If the connection fails and then is regained, as sometimes when it reconnects the information is not correct, it is a good idea to take batteries out and do a manual reset .
WS5019 Weather Forecaster.indd 16 25/07/13 10:24 AM

The weather station uses saved data to determine the humidity in the living space and shows the respective symbols:
Low Battery Condition DisplayThe weather station displays the low battery condition symbol to warn you that the weather station or the outdoor sensor need to have the batteries exchanged. It is a good idea to exchange both when the symbol appears.
Dry Comfortable Humid
15
Living Space Humidity & Battery Wireless Connection & Tips
Wireless connection to the Outdoor Sensor • Press the key “CHANNEL” to select a channel. You can read the data of up to 3 sensors at one weather station. • Press and hold the key “CHANNEL” for 3 seconds to search for outdoor sensors.TipsWhen placing both the inside and outside units remember they are subject to interference. Try to: • Install both the units as close as possible to each other. • Try and avoid outside interference by not placing them near computers, TV’s or TV antenna’s etc. • Also remember concrete walls and floors can interupt transmissions. Try and avoid as much as possible. • If the connection is successful initially and then fails occassionally, try to reduce the distance. • If the connection fails and then is regained, as sometimes when it reconnects the information is not correct, it is a good idea to take batteries out and do a manual reset .
WS5019 Weather Forecaster.indd 17 25/07/13 10:24 AM
16
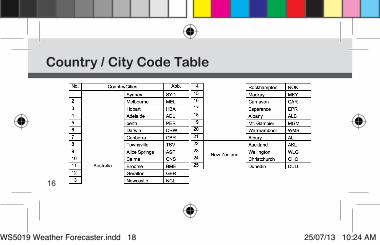
Country / City Code Table Country / City Code Table
WS5019 Weather Forecaster.indd 18 25/07/13 10:24 AM
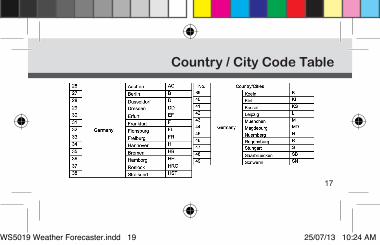
17
Country / City Code Table Country / City Code Table
WS5019 Weather Forecaster.indd 19 25/07/13 10:24 AM

Country / City Code Table Country / City Code Table
18
WS5019 Weather Forecaster.indd 20 25/07/13 10:24 AM

Country / City Code Table Country / City Code Table
19
WS5019 Weather Forecaster.indd 21 25/07/13 10:24 AM
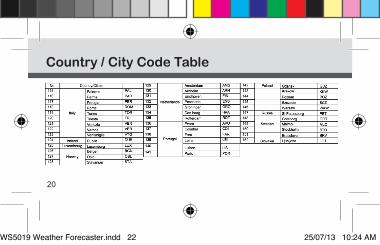
Country / City Code Table Country / City Code Table
20
WS5019 Weather Forecaster.indd 22 25/07/13 10:24 AM

Country / City Code Table Country / City Code Table
21
WS5019 Weather Forecaster.indd 23 25/07/13 10:24 AM

Warranty
Warranty: We will honour all statutory guarantees that this productis of acceptable quality. (including that it is fit for purpose)
HOLMAN Industries: 47 Walters Drive,Osborne Park, WA 6017.Ph: +61 8 9204 1011 www.holmanindustries.com.au
Scan the QR Code above to see more information on this product and the full iWeather product range.
WS5019 Weather Forecaster.indd 24 25/07/13 10:24 AM