wea’s tutor portal · tutor portal - help guide for tutors created by tburrell page 1 of 67 26th...
TRANSCRIPT

Tutor Portal - Help Guide for Tutors
Created by tburrell Page 1 of 67 26th
November 2013
WEA’s Tutor Portal
Help Guide for Tutors
November 2013
Tutor Portal - Help Guide for Tutors
Created by tburrell Page 2 of 67 26th
November 2013
Contents
Signing In to the Tutor Portal ..................................................................................... 4
Home screen / page (after sign-in) ............................................................................ 5
Alerts ........................................................................................................................... 5
Reminders (overdue paperwork) ........................................................................... 6
Notices / News Items ................................................................................................... 7
Received with thanks .................................................................................................. 7
Due soon ..................................................................................................................... 8
My Activities .............................................................................................................. 9
Activities this year .................................................................................................. 9
Possible “Status” values for an activity .................................................................. 10
Reordering rows and resizing columns in an activity table .................................... 10
Viewing an activity’s details ................................................................................... 11
Actions for activities ............................................................................................... 11
Activities in previous years ........................................................................................ 13
Course documents .................................................................................................... 14
Course Information Sheets .............................................................................. 14
Tutor Report Form ........................................................................................... 22
Recently viewed ........................................................................................................ 26
Search All .................................................................................................................. 27
My Contracts ................................................................................................................. 29
My Claims ..................................................................................................................... 38
My Details ............................................................................................................... 44
Personal Details ........................................................................................................ 44
Updating fields that require approval ..................................................................... 45
Updating fields that don’t require approval ............................................................ 46
Contact Details .......................................................................................................... 48
Security Details ......................................................................................................... 50
Training ................................................................................................................... 53
Qualifications ............................................................................................................. 53
Making changes to your existing teaching qualifications ....................................... 54
Making changes to your existing subject qualifications .......................................... 54

Tutor Portal - Help Guide for Tutors
Created by tburrell Page 3 of 67 26th
November 2013
Adding to your teaching qualifications ................................................................... 55
Adding to your subject qualifications ...................................................................... 56
WEA Training ............................................................................................................ 57
External Training / CPD ............................................................................................. 57
Editing existing external training events / CPD experiences .................................. 58
Adding a new external training event / CPD experience ........................................ 59
Messages ..................................................................................................................... 60
Inbox ......................................................................................................................... 60
Resorting messages .............................................................................................. 60
Marking messages as having been read ............................................................... 61
Moving through the table of messages .................................................................. 61
Searching for Internal Messages ..................................................................... 61
Signing Out of the Tutor Portal ..................................................................................... 63
Getting Help in the Tutor Portal .................................................................................... 63
APPENDIX A – FLOWCHART FOR CREATING CISs ................................................. 64
APPENDIX B – FLOWCHART FOR CREATING TRFs ................................................ 65
APPENDIX C – FREQUENTLY ASKED QUESTIONS ................................................. 66

Tutor Portal - Help Guide for Tutors
Created by tburrell Page 4 of 67 26th
November 2013
Signing In to the Tutor Portal
To sign in to the Tutor Portal enter its URL address https://tutorportal.wea.org.uk in your
browser (please include the “s” after “http” as this is a secure site), then click the “Sign
in” button at the top right of the screen:
Enter your email address and password then click the “Sign in” button:
If you believe you should have access to
the Tutor Portal but currently don’t, send an email to [email protected]
requesting access and including your details.
If you’ve forgotten your password, click the “Forgot your password?” link under the
“Sign in” button and follow the instructions given.
Note: A password for the Tutor Portal should be at least 8 characters long and include:
a capital letter,
a number, and
a non-alphanumeric character (such as an exclamation mark ! or hash symbol #).
Note: The checkbox next to the “Sign
in” button is very important: Make sure
it is not ticked if you are using a public
computer that other people also use (eg
in a library or Internet café) otherwise
somebody else using the same
computer will be able to sign in with
your credentials and have access to
your personal and course information.
(Also, make sure you sign out properly
after using the Tutor Portal).

Tutor Portal - Help Guide for Tutors
Created by tburrell Page 5 of 67 26th
November 2013
Home screen / page (after sign-in)
After signing in, the button bar menu under the WEA logo fills with extra options for
finding what you need in the system and the “Home” screen of the Tutor Portal
displays.
The “Home” screen is divided into 4 sections: “Reminders”, “Notices / News Items”,
“Received with thanks”, “Due soon”:
Each of these sections displays useful information and reminders about activities /
courses you are about to teach / are teaching / have just finished teaching.
Anything that appears in the sections of your “Home” screen is also notified to you by
SMS text alert to your mobile phone (if you have provided the WEA with your number)
or by email (if you have provided the WEA with your email address). If you have
provided us with a mobile number AND an email address you will receive a notification
to your mobile phone only. Your regional office also receives a copy of these
notifications.
Alerts
Additionally, the Tutor Portal will send you alerts by SMS text message or email for the
following:
Course Information Sheet (CIS) you need to complete online in the Tutor Portal
for a course you have indicated you are willing to teach (your organiser gets a
copy of this notification too),
Contract sent by your regional office for a course you have indicated you are
willing to teach, which you need to confirm acceptance of,
Course pack sent by your regional office for a course you are about to start
teaching,

Tutor Portal - Help Guide for Tutors
Created by tburrell Page 6 of 67 26th
November 2013
Incomplete enrolment forms being returned to you by your regional office for
full completion and sending back
Tutor Report Form you need to complete for a course soon to end.
Reminders (overdue paperwork)
The “Reminders” section of the “Home” screen after sign-in is updated daily at 2pm
and displays information about the following types of paperwork you have not yet
sent to your regional office:
acceptance of contracts (before a course is due to start),
overdue enrolment forms (after week 2 of a course, or asap for late
enrollers),
interim register tear-off (pink) slips (after week 2 of a course),
final registers (immediately after a course finishes),
tutor report forms (TRFs) (immediately after a course finishes).
If a scroll bar appears down the right hand side of the “Reminders” section it means
there are more reminders than can fit into the section and you need to scroll down to
see the remainder.
If you have a query, we would recommend that you wait until after 2pm to give
course administrators in your regional office time to enter information onto the
system about paperwork received that morning. This could change the status of your
course / contract / claim / CIS / TRF and mean that you no longer need to contact
them.
Once you’ve read a reminder, click the checkbox at the start of its row. The Tutor
Portal will then remove it from the “Reminders” section when you move to another
screen of the portal or click the Refresh icon of your web browser:
Tutor Portal - Help Guide for Tutors
Created by tburrell Page 7 of 67 26th
November 2013
Your regional office will chase up any outstanding paperwork not yet received from
you within 14 days of either your course start date or end date, depending on what
paperwork is missing.
Note:
As the Tutor Portal is further developed, in the future you will be able to:
click the “contact your organiser” text of a reminder to automatically link to
the Tutor Portal’s internal messaging system and send the organiser a
message about the paperwork for that particular course,
click the activity reference number of a course / activity to automatically link to
it.
Notices / News Items
Occasionally, the WEA may wish to send a broadcast message announcing
important information for tutors, such as when the WEA will be closed for Christmas,
when Online Enrolments will start, important news on the WEA’s website etc. These
will appear in the “Notices / News Items” section of the “Home” screen.
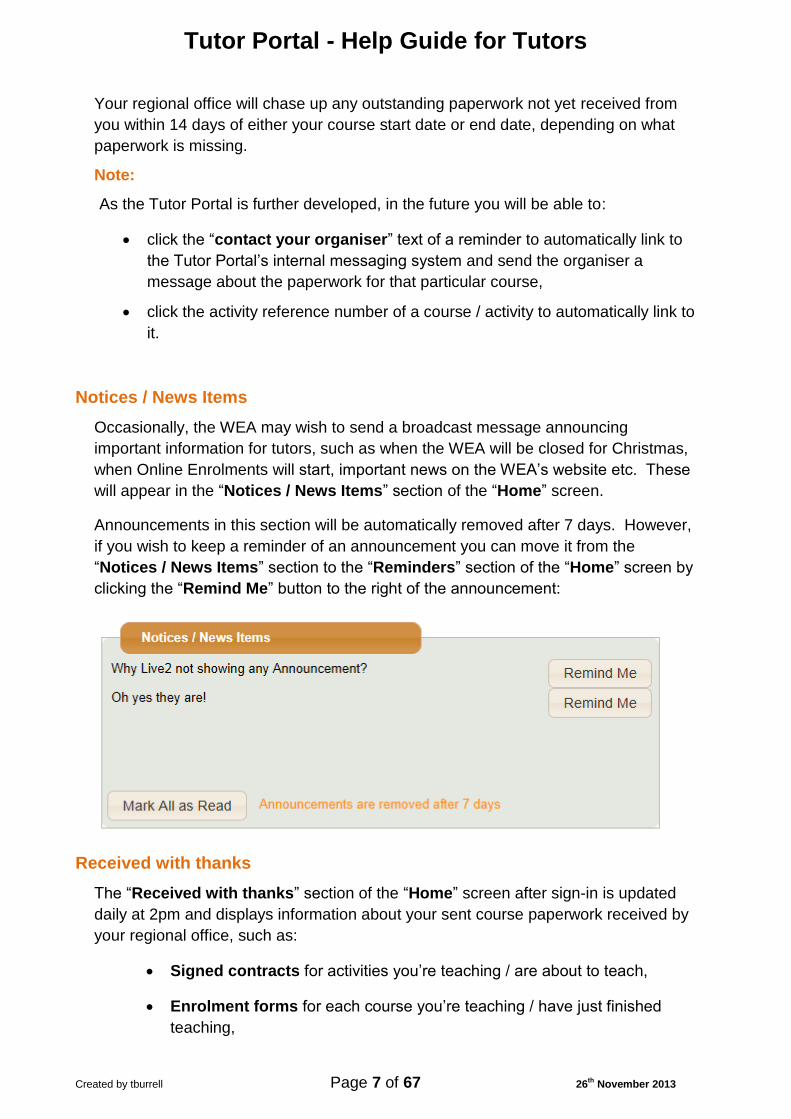
Announcements in this section will be automatically removed after 7 days. However,
if you wish to keep a reminder of an announcement you can move it from the
“Notices / News Items” section to the “Reminders” section of the “Home” screen by
clicking the “Remind Me” button to the right of the announcement:
Received with thanks
The “Received with thanks” section of the “Home” screen after sign-in is updated
daily at 2pm and displays information about your sent course paperwork received by
your regional office, such as:
Signed contracts for activities you’re teaching / are about to teach,
Enrolment forms for each course you’re teaching / have just finished
teaching,

Tutor Portal - Help Guide for Tutors
Created by tburrell Page 8 of 67 26th
November 2013
Interim register tear-off (pink) slips for courses you’re in the process of
teaching,
Final registers for courses you’ve recently finished teaching,
Tutor Report Forms for courses you’ve recently finished teaching.
The notifications will stop displaying in this section after you’ve indicated you’ve read
them by ticking the checkbox for each, and thereafter be viewable in the “Messages”
section of the Tutor Portal:
Due soon
The “Due soon” section of the “Home” screen after sign-in gives you advance notice
about the following paperwork that is due for sending in to your regional office:
enrolment forms and interim register tear-off (pink) slip (should be sent
immediately after your 2nd session),
final register and end of course paperwork (Individual Learning Plans
(ILPs), “Tell Us About It” forms, Tutor Report Form (TRF) etc) (3 days before
your course is scheduled to end).

Tutor Portal - Help Guide for Tutors
Created by tburrell Page 9 of 67 26th
November 2013
My Activities
You can view information about the courses, tasters and short activities you are
teaching / have taught for the WEA by clicking “My Activities” on the button bar below
the WEA logo after sign-in then clicking one of the links on the “My Activities” menu.
The links are categorised under 4 headings:
“Activities This Year” / “Activities In Previous Years” / “Course Documents” /
“Recently Viewed”:
Activities this year
The links under the “Activities This Year” heading relate to the “Status” possibilities of
activities for the current academic year (for the WEA this starts on 1st August) and are:
Note: You can also find details of “Cancelled” activities, or all activities for all years, via the “Search All” link at the bottom of the “My Activities” menu on the button bar across the top of the screen.

Tutor Portal - Help Guide for Tutors
Created by tburrell Page 10 of 67 26th
November 2013
“All” / “Proposal” / “Approved” / “In Progress” / “Completed”.
You can click a status link on the “My Activities” menu to see a table of your activities
currently of that status in the system, or click “All” to see a table of all your activities for
the current academic year:
Possible “Status” values for an activity
An explanation of each possible “Status” for an activity displays under a table of
activities:
“Proposal”: Your organiser is currently preparing the course details.
“Approved”: your regional office has processed the course details and your
course paperwork will be with you soon.
“In progress”: the course has started and we have received your week 2
paperwork.
“Completed”: the course has finished and we have received your final
paperwork.
“Cancelled”: the course has been cancelled.
Reordering rows and resizing columns in an activity table
The rows in a table of activities can be reordered by clicking the column header text
of the column by which you wish to reorder the activities, for example you can
reorder from A-Z (or Z-A) for text columns (such as “Ref”, “Name”, “Status”) or from
earliest to latest (or latest to earliest) for date columns (such as “Start Date”, “End
Date”).

Tutor Portal - Help Guide for Tutors
Created by tburrell Page 11 of 67 26th
November 2013
To resize a column, hover your mouse over the dividing line that separates 2
columns then click and drag the line to the left (to make narrower) or to the right (to
make broader).
Viewing an activity’s details
To view an activity’s details, click its “View” link in the right hand “Action” column of
the activity table (which appears after clicking a link under the “Activities This Year”
heading of the “My Activities” menu). A pop-up box similar to the following appears
(you cannot edit the details of an activity):
Actions for activities
Hovering over or clicking the “You can now perform the following actions” link
under the activity’s details displays a sticky pop-up menu with options to create or
view any of the following documents related to that activity:

Tutor Portal - Help Guide for Tutors
Created by tburrell Page 12 of 67 26th
November 2013
The “Actions” menu options are:
“1. Course Information Sheet” When your course organiser / learning manager
adds a new activity / course to the WEA’s management information system and ticks
a box to say a CIS is required for it, “(Required)” will display at the end of this menu
option. Once the end date of the course arrives and / or you have submitted a CIS,
“(Required)” will not display. For step by step help on creating CISs see the
“Course Documents” section below.
“2. Tutor Report Form” After the end date of a course has arrived, you are required
to fill out and submit a “Tutor Report Form” for the course. “(Required)” will display
at the end of this menu option to remind you that this course has ended and you
have not yet submitted the TRF. Once you’ve submitted the TRF “(Required)” will
not display. For step by step help on creating TRFs see the “Course Documents”
section below.
“3. Contracts” You can view the contract(s) created for you for a course you are
teaching / activity you are undertaking . The number in brackets at the end of this
menu option tells you how many contracts have been set up for you for the course /
activity. For information on viewing “Contracts” see the “My Contracts” section
below.
“4. Claims” You can view the claim(s) created for you for a course you are teaching
/ activity you are undertaking. The number in brackets at the end of this menu option
tells you how many claims have been raised against the course / activity (either
automatically via monthly Autopay or upon submission of a claim by you for the
Note: You will also receive:
an alert message 3 days before the scheduled end date of your course
reminding you that you need to send the TRF to your regional office or
complete it online in the Portal, and
a reminder 14 days after your course’s scheduled end date if your regional office hasn’t yet received your TRF or you haven’t yet completed it online.

Tutor Portal - Help Guide for Tutors
Created by tburrell Page 13 of 67 26th
November 2013
course / activity). For information on viewing “Claims” see the “My Claims” section
below.
You can close the “Actions” sticky pop-up menu by clicking the “X” at its top right
corner.
You can close the “Activity Details” box by clicking the “X” at its top right corner.
Activities in previous years
Activities for the 4 years prior to the current year are available for viewing by clicking
one of the year links under the “Activities in previous years” heading of the “My
Activities” menu. A table of activities similar to the one mentioned above, but for the
clicked year only, appears.
Tutor Portal - Help Guide for Tutors
Created by tburrell Page 14 of 67 26th
November 2013
Course documents
At the time of writing this guide there are 2 types of document you are able to create in
the Tutor Portal:
“Course Information Sheet” (CIS)
“Tutor Report Form” (TRF)
The CIS goes through an approval process in the system during which your Tutor
Organiser / Learning Manager views what you’ve submitted and either approves or
rejects it. The TRF goes through a review and commenting process and you can view
the comments added by your Course Organiser / Learning Manager. See Appendix A
for a flowchart of the CIS workflow process and Appendix B for the TRF process.
You don’t have to finish either of these documents in one go when creating them in the
system. You can save what you’ve done so far (by clicking the “Save” button) then
return to them later to finish off and submit them (by clicking the “Submit” button).
Course Information Sheets
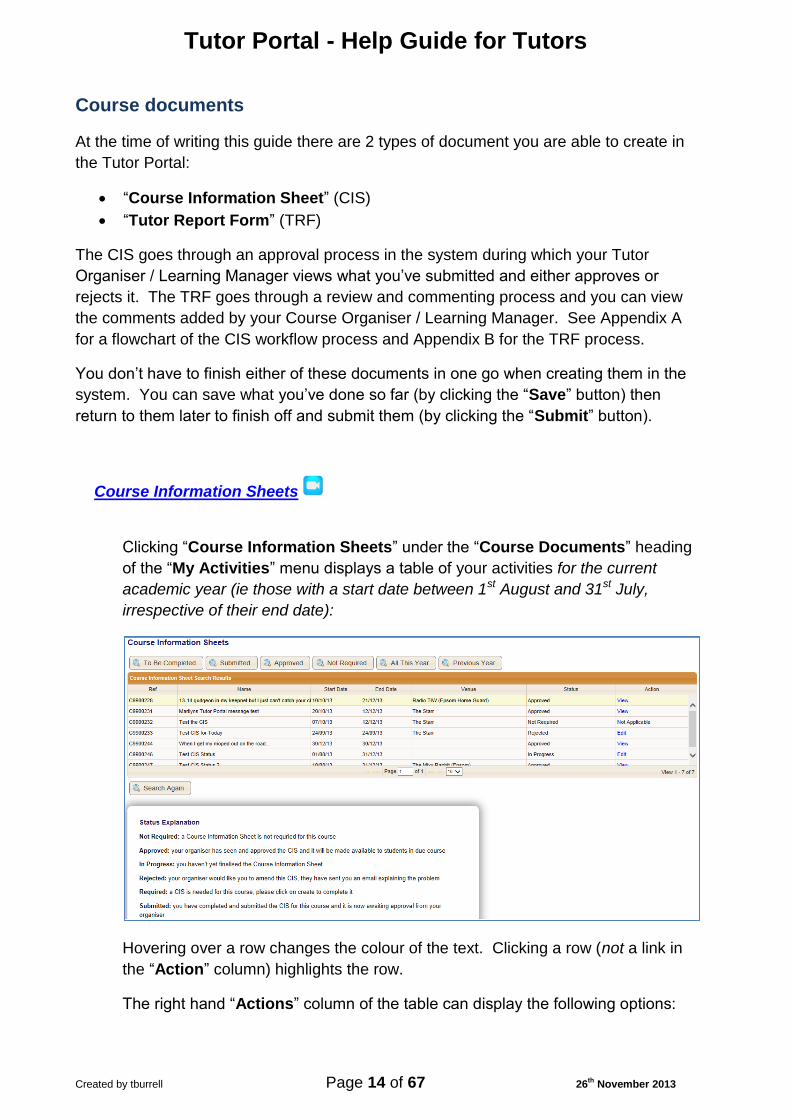
Clicking “Course Information Sheets” under the “Course Documents” heading
of the “My Activities” menu displays a table of your activities for the current
academic year (ie those with a start date between 1st August and 31st July,
irrespective of their end date):
Hovering over a row changes the colour of the text. Clicking a row (not a link in
the “Action” column) highlights the row.
The right hand “Actions” column of the table can display the following options:

Tutor Portal - Help Guide for Tutors
Created by tburrell Page 15 of 67 26th
November 2013
“Create” - Clicking a “Create” link in the “Action” column enables you to
create and submit for approval a CIS for that activity (full step by step help
is below).
“View” - Clicking a “View” link in the “Action” column enables you to view
the CIS you’ve already created for that activity.
“Edit” – clicking an “Edit” link in the “Action” column enables you to edit
an activity’s CIS if its status is “In Progress” (ie you’ve started to create
the CIS but not yet completed and submitted it) or “Rejected” (ie your
learning manager / course organiser has reviewed your submitted CIS
and wants you to edit it).
“Not Applicable” - If an activity displays in the table and no CIS is needed
for it, “Not Applicable” shows in the “Action” column for that activity.
Status possibilities of CISs are: “Not required” / “Required” / “In Progress” /
“Submitted” / “Approved” / “Rejected”. There’s an explanation box under the
table for each:
“Not required”: a CIS is not required for this course,
“Required”: a CIS is needed for this course; please click on “Create” to
complete it,
“In Progress”: you haven’t yet finalised the CIS (ie you’ve started it and
saved it in the Tutor Portal, but not yet submitted it for approval by your
organiser / learning manager),
“Submitted”: you have completed and submitted the CIS for this
course and it is now awaiting approval from your organiser,
“Approved”: your organiser has seen and approved the CIS and it will
be made available to (potential) students in due course (ie in the course
search facility of the WEA’s website and in the paper-based course pack
you receive from regional office).
“Rejected”: your organiser would like you to amend this CIS; they have
sent you an email explaining the problem.
Note: The “10” listbox under the table of activities enables you to set the number
of rows to show in the table on screen at the same time (choices are 10, 20, 30).
You can also move forwards and backwards by the default 10 rows at a time by
typing a number in the “Page” box under the table.
The contents of the table can be filtered by clicking buttons above the table (“To
be completed” / “Submitted” / “Approved” / “Not required” / “Previous
year”).
Clicking “To be completed” displays 3 different statuses: “Required”
CISs in the table (those you have yet to start), “In Progress” CISs (those
you have partially completed and saved but not yet submitted for
Tutor Portal - Help Guide for Tutors
Created by tburrell Page 16 of 67 26th
November 2013
approval) and “Rejected” CISs (those your organiser / learning manager
has rejected, which you need to edit and resubmit).
Clicking “Submitted” displays “Submitted” CISs in the table (those you
have submitted for approval by your organiser / learning manager).
Clicking “Approved” displays “Approved” CISs in the table (those
approved by your organiser / learning manager).
Clicking “Not required” displays activities in the table for which CISs are
not required for this year.
Clicking “Previous Year” displays your CISs submitted in the academic
year before the actual current year.
Clicking “All This Year” redisplays all CISs for the current academic year
again (if you’ve filtered the table using one of the other buttons).
Note:
A “Next year” button will also start displaying above the table, once the WEA
starts requesting this information (around March time).
Searching for CISs using the Search facility
There may be times when the buttons provided above the CIS table don’t enable
you to find what you’re looking for, for example a CIS from 2 or 3 years ago, or
you want to quickly find a CIS based on the title of the course it relates to.
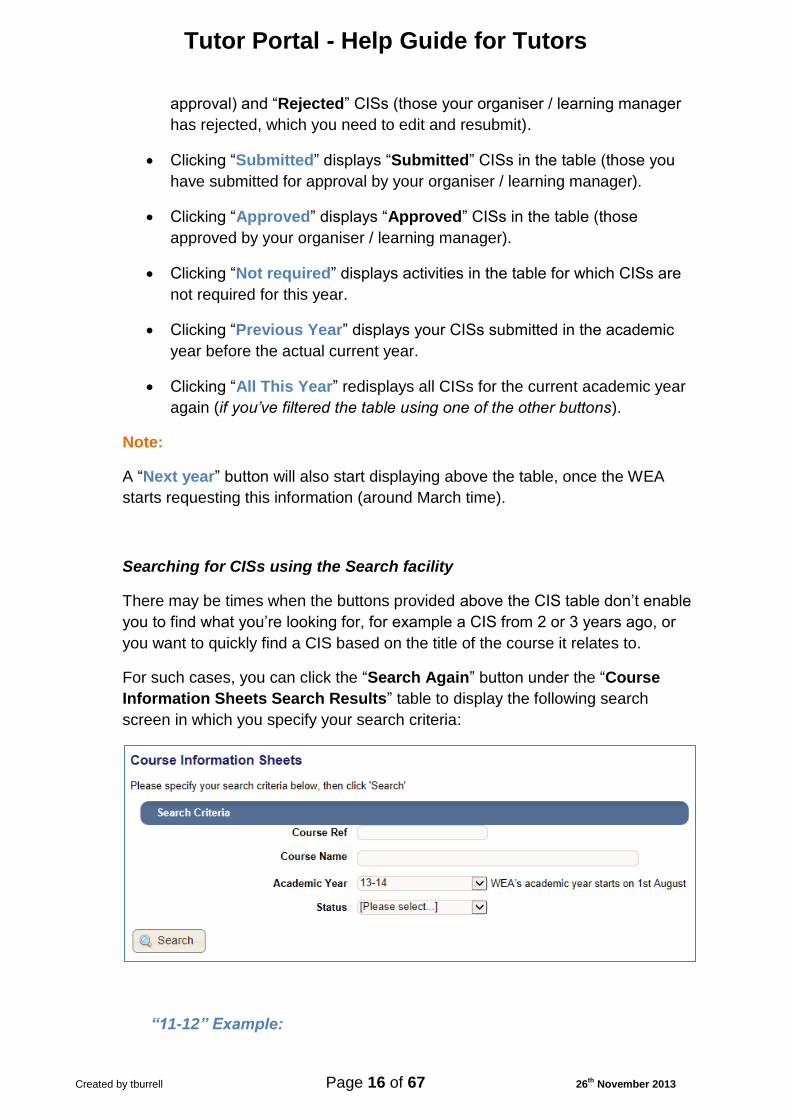
For such cases, you can click the “Search Again” button under the “Course
Information Sheets Search Results” table to display the following search
screen in which you specify your search criteria:
“11-12” Example:

Tutor Portal - Help Guide for Tutors
Created by tburrell Page 17 of 67 26th
November 2013
As an example, to find all activities for which a CIS was required for the 11-
12 academic year you would choose “11-12” from the “Academic Year” field
of the search screen, leave the “Status” field at its default of “[Please
select]” then click the “Search” button.
How to create and submit a Course Information Sheet (CIS):
1. Click the “Create” link in the “Action” column of a table of activities for which a CIS is
required (or click “1. Course Information Sheet” on the sticky pop-up menu of an activity being viewed).
2. On the form that appears, the information about the activity is listed (but is not editable) at the top:
Under this information there is a series of expandable / collapsible sections containing the following fields which you need to fill out in order to create the CIS for this activity. If a red asterisk appears next to the text of the section headings this indicates that the field is required and currently is blank:
“Essential Materials”,
“Course Aims”,
“Course Description” (this is pulled through from the information entered by your course organiser / learning manager into a system related to the Tutor Portal),
Prior Knowledge / Entry Requirements,
Course Content / Topics,
“Teaching, Learning and Assessment” (select checkboxes),
Feedback on Progress,
“Learning Outcomes”,
“Reading and Information Sources”,
Suggestions for Further Study or Use of Knowledge / Skills Gained.
3. Initially only the “Essential Materials” section is expanded, however you can click the “Expand All” button to expand all sections and quickly click into each field to fill out the details in each. (The “Expand All” button changes to a “Collapse All” button so you can quickly scroll up and down again). Alternatively, you can click each section’s header text individually to expand one at a time:

Tutor Portal - Help Guide for Tutors
Created by tburrell Page 18 of 67 26th
November 2013
4. Under the expandable / collapsible sections of fields is a series of action buttons, each of which is explained in the table below. In particular, you may wish to use the “Copy” button to copy information from a previous CIS into your new one:
Button Description
“Save” If you need to save what you’ve entered on the CIS form so far, so that you can return to it later then finish and submit it, click the “Save” button. This will change the status of the CIS to “In Progress” so you can easily find partially completed CISs in the table of activities later. Tip: It’s a good idea to get into the habit of periodically clicking the “Save” button as you’re creating your CIS (so you don’t lose what you’ve done so far, in case the server goes down or you lose web access unexpectedly).
“Submit” Once you’ve filled in the fields on the CIS form, click the “Submit” button to save and submit it for approval by your organiser. This will change the status of the CIS to “Submitted” (and once your organiser has read the CIS its status will be changed to either “Approved” or “Rejected”. If rejected, your organiser will give a reason using the portal’s in-system messaging facility and you will receive an email with this information, for example they may advise you that they will discuss this with you face to face or by phone. You will also see rejection information on the CIS form itself when you view it). Note: A rejected CIS will not show on the “Home” screen after sign-in, under any of the categories, eg “Reminders” or “Due soon”.
“Copy” Clicking the “Copy” button enables you to copy the CIS information from one of your previously submitted CISs to the one you are currently creating.

Tutor Portal - Help Guide for Tutors
Created by tburrell Page 19 of 67 26th
November 2013
1. After clicking “Copy”, specify your search criteria for finding the CIS you wish to copy from. You can search based on “Activity Ref”, “Activity Name”, “Academic Year” and “Status”:
2. Click the “Search” button to see a table of results based on your entered search criteria.
3. Click the “Select” link at the end of the row for the CIS you wish to copy:
4. The information from the selected CIS will automatically be entered into your current, blank CIS You should then edit the copied text to make it appropriate for the new cohort of students in the new activity / course. Your course organiser / learning manager is able to see if a newly submitted CIS matches exactly a previously submitted CIS.
Tip: When copying from a previous CIS into a new one, make sure you click the “Copy” button before adding information into any fields, otherwise current information will be overwritten by the copied information!
“Print” You can click the “Print” button to print a copy of your completed CIS form for your own records / course file.
5. Click into the large white text box of the first expanded section and type (or edit if
you’ve copied from a previous CIS) information appropriate for that field:

Tutor Portal - Help Guide for Tutors
Created by tburrell Page 20 of 67 26th
November 2013
The icons along the top of each editable section enable formatting of typed, copied or pasted text. Hover your mouse over each icon to see a tooltip appear that tells you what it is, for example you may wish to make selected words bold by clicking the B icon.
Note: If you are using Microsoft’s Internet Explorer 10 browser (the one in use on the WEA’s computers at the time of writing this guide), you may experience strange behaviour from some of these editing icons if you are working in “Compatibility” mode.
6. When ready to move on to the next field, click that section to expand it, click into the text box and type your information for that field. Repeat until you get to the bottom of the CIS form. The “Teaching, Learning and Assessment” field differs from the others – click the “Select” button and tick the checkboxes of the methods you propose to use on your course then click “OK”:
.
7. Once you’ve entered all your information in all the sections’ fields, click the “Submit”
button at the bottom of the CIS form to save and submit your CIS to your organiser for approval. Its status will be set to “Submitted” until your organiser / learning manager either approves or rejects it.

Tutor Portal - Help Guide for Tutors
Created by tburrell Page 21 of 67 26th
November 2013
8. If you want a hard copy of your completed CIS, click the “Print” button. The form will appear on screen, ready for you to save it as a PDF document onto your computer and / or print it (Note: you must have the latest version of the free “Adobe Reader” programme installed on your computer):
To save or print the form, hover over it so the following PDF Actions Bar appears along the bottom (assuming you have the latest version of the free Adobe Reader programme
installed on your computer), , then do either of the following:
Click the “Save” (floppy disk) icon (the first one on the left of the bar), accept the default name “ReportExport.pdf” for the file or change it to a name that makes sense for your CIS form, then click the “Save” button.
Click the “Print” (printer) icon (the second one on the left of the bar), choose any required printing options offered by the default printer associated with your computer, then click the “Print” button.

Tutor Portal - Help Guide for Tutors
Created by tburrell Page 22 of 67 26th
November 2013
Tutor Report Form
At the end of every course you teach you are required to submit a “Tutor Report
Form” (TRF) to let your organiser and the WEA know how your course went. You
can now do this electronically in the Tutor Portal.
Clicking “Tutor Report Form” under the “Course Documents” section of the “My
Activities” menu displays a table of activities for which a TRF may or may not be
required for the current academic year:
If a TRF isn’t required for a particular activity, the “Status” column of the table
displays “Not Required”. If a TRF is required for an activity, its “Status” displays
one of the following values as it makes its way through the work process:
“Required” – if you are fully using the Tutor Portal, you have not yet started
to create the TRF in it,
“In Progress” – you have started to create the TRF in the Tutor Portal, have
saved it but have not yet submitted it for review and commenting on by your
organiser / learning manager,
“Submitted” – you have created the TRF in the Tutor Portal and submitted it
for review and commenting on by your organiser / learning manager,
“Completed” – your submitted TRF has been reviewed and commented on
by your organiser / learning manager. You will receive an email with a link to
view the comments.
“Not Required” – a TRF is not required for the particular activity.
“Not yet due” – a TRF is required for a future course with an end date still
some way off.
Note: To display all TRFs for all years, click the "Search Again" button below the
table, choose "[Please Select]" for the academic year then click the "Search" button.
How to create and submit a Tutor Report Form (TRF): There are several ways to create a TRF for an activity in the Tutor Portal, depending

Tutor Portal - Help Guide for Tutors
Created by tburrell Page 23 of 67 26th
November 2013
on where you are in the system (see below for 2 ways). Way 1:
1. After signing in, click “My Activities” then “Tutor Report Form” on the button bar menu to see a table of your activities for the current academic year for which TRFs may or may not be needed.
2. Click the “Create” link in the table’s right hand “Action” column (for an activity for which a TRF needs to be created).
3. Fill out the TRF form. The top section shows the activity’s details which you can’t edit. The bottom section shows a collapsed series of expandable sections containing fields you need to complete. You can click the “Expand All” button to quickly expand all sections in one go, then click into each of the fields to complete them.
The first section “Completion and Achievement” contains 5 fields:
“Number completing” / “Numbers of students achieving their learning outcomes – Yes” / “Numbers of students achieving their learning outcomes – No” / “Number expected to achieve accreditation (if applicable)” / “Reasons for non-achievement”:
The second section “Student feedback” contains a series of number fields for aggregation of your students’ answers to the end-of-course feedback forms they completed where they rate things as one of 4 possible categories (“Excellent”, “Good”, “Satisfactory”, “Disappointing”):
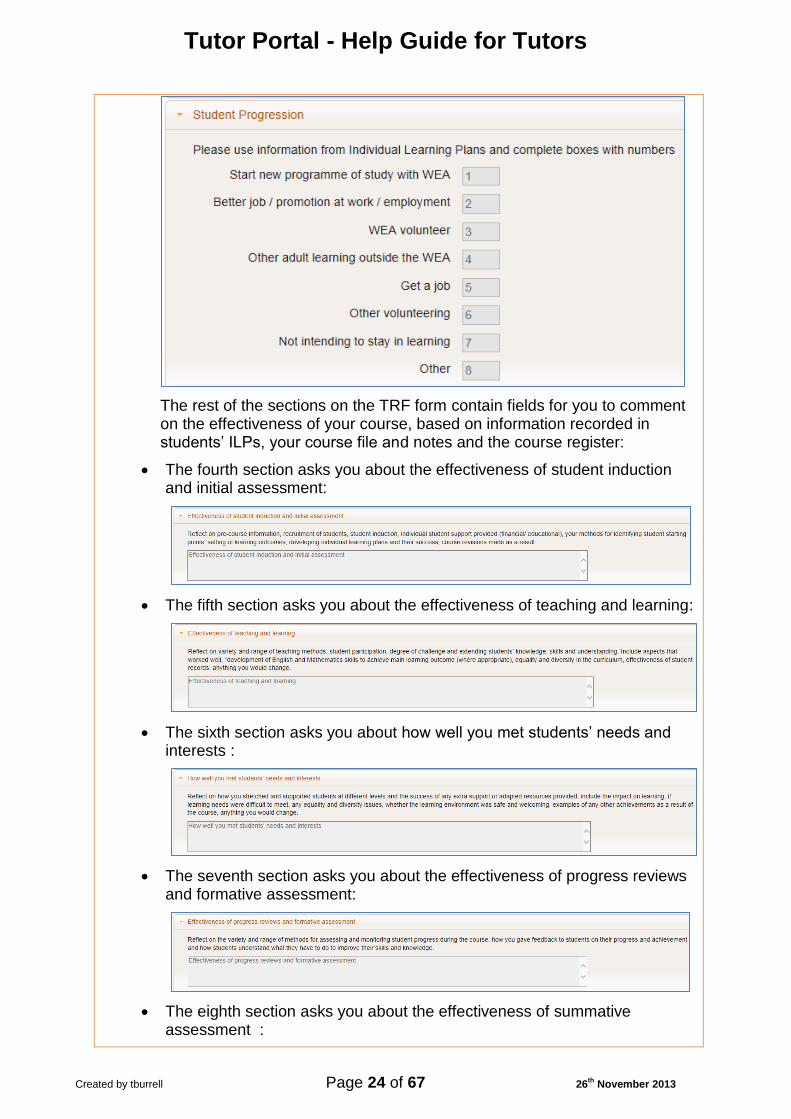
The third section “Student progression” contains number fields for aggregation of your students’ answers to the question on their ILPs asking what they will go on to do after your course:
Tutor Portal - Help Guide for Tutors
Created by tburrell Page 24 of 67 26th
November 2013
The rest of the sections on the TRF form contain fields for you to comment on the effectiveness of your course, based on information recorded in students’ ILPs, your course file and notes and the course register:
The fourth section asks you about the effectiveness of student induction and initial assessment:
The fifth section asks you about the effectiveness of teaching and learning:
The sixth section asks you about how well you met students’ needs and interests :
The seventh section asks you about the effectiveness of progress reviews and formative assessment:
The eighth section asks you about the effectiveness of summative assessment :

Tutor Portal - Help Guide for Tutors
Created by tburrell Page 25 of 67 26th
November 2013
The ninth section asks you about how well you guided and supported students to progress:
The tenth section asks you about any other issues to help improve the students’ experience :
The eleventh section asks you about how well you feel you were supported by the WEA to provide a good course:
The final section “Learning Manager or Organiser comments / action points” contains fields that only your organiser / learning manager can complete (in an online system connected to the Tutor Portal):
Once your organiser has entered their comments you will receive an email with a link to view them in the Tutor Portal.
4. Click the “Submit” button under the fields at the bottom of the TRF form to save and submit it for review and commenting on by your organiser / learning manager. The status of the TRF will automatically be changed to “Submitted” (and once your organiser has reviewed and commented on it, its status will be changed to “Completed”).
Notes re buttons on the TRF form:
“Save”: As the TRF is a large form, it is good practice to get into the habit of periodically clicking the “Save” button at the top or bottom of the form so

Tutor Portal - Help Guide for Tutors
Created by tburrell Page 26 of 67 26th
November 2013
that what you’ve completed so far is saved in case the server goes down, you lose your web access or you don’t have time to complete the form in one sitting. The status of the TRF will become “In Progress” after you click the “Save” button. This will help you to find a partially completed TRF in the system later.
“Submit”: When you’re ready to submit your TRF to your course organiser / learning manager, you can click the “Submit” button. This will automatically save the form and notify your organiser by email that it is ready for review and commenting on.
“Print”: If you wish to print a hard copy on paper of the TRF for your own records, you can click the “Print” button (make sure you’ve clicked the “Save” button first) to see a PDF version of the TRF on your screen. Note: You must have the latest version of the free “Adobe Reader” programme installed on your computer to view and print the PDF.
Way 2:
1. In an activity being viewed, click or hover over the “You can now perform the following actions” link at the bottom.
2. Click “2. Tutor Report Form (Required)” on the sticky pop-up menu that appears.
3. Fill out the TRF form (see Way 1 above, from step 3 onwards).
Recently viewed
Under the “Recently viewed” section of the “My Activities” menu you can click a link
to open one of the last 4 activities you’ve recently viewed in the system. The “Activity
Details” screen appears, with non-editable information about the activity and a link at
the bottom to perform certain actions:

Tutor Portal - Help Guide for Tutors
Created by tburrell Page 27 of 67 26th
November 2013
Actions
Hovering over or clicking the “Perform the following actions” link at the bottom of
the activity being viewed opens a sticky pop-up menu of information you can view
and / or submit about the activity (you can close the menu by clicking the “X” button
at its top right corner). See the previous section “Actions for activities” for further
information.
Search All
The “Search All” option on the “My Activities” menu displays a series of search criteria
fields:
You can filter your search of activities based on the following options:
“Activity Ref”: If you know the activity reference number of the activity whose
details you wish to view, type it into the “Activity Ref” field.
Note: You can use the wildcard character “*” (asterisk) to represent one or more
characters. For example if you tutor for more than one WEA region you could
search for all activities in only one of the regions by filtering your search based
on its 2 character code at the start of the activity reference number, eg “C36*”
would find only those activities for the region whose code is “36”.
“Activity Name”: If you wish to view the details of a particular activity, type its
name, or part of its name, into the “Activity Name” field. You can use the
wildcard character “*” (asterisk) to represent one or more characters.
“Academic Year”: If you leave this listbox at the default “[Please Select]” then
all years will be searched through, otherwise choose an academic year option
from the listbox.
“Status”: The “Status” listbox contains the options: “Approved”, “Cancelled”,
“Completed”, “In Progress”, “Proposal”. If you leave this listbox at the default
“[Please Select]” then all statuses will be searched through.

Tutor Portal - Help Guide for Tutors
Created by tburrell Page 28 of 67 26th
November 2013
Once you’ve entered your text and / or selected your choices in the search criteria
fields, click the “Search” button at the bottom. A table of activities matching your
search criteria will appear:
To view the details of one of the found activities, click the “View” link in the right hand
column of that activity’s row.
If you wish to perform another search, click the “Search Again” button under the table.

Tutor Portal - Help Guide for Tutors
Created by tburrell Page 29 of 67 26th
November 2013
My Contracts
The “My Contracts” button displays a menu of links under the headings “This Year”,
“Previous Years” and “Recently Viewed”:
This year
The links under the “This Year” heading relate to the possible statuses for a
contract: “All” / “Offered” / “Contracted” / “Completed” / “Cancelled”.
Click “All” to see a table of all contracts for the current year only. (To see all
contracts for all years, use the “Search Again” button below the table):
A key below the table explains what each possible “Status” for a contract means:
“Provisional”: Your organiser will shortly be asking the regional office to
process your contract information,
“Proposed”: Your contract is currently being prepared by regional office,
“Offered”: The regional office has sent / emailed your contract to you,
“Contracted”: Your signed contract / email confirmation has been
received by the regional office,
Note: If you wish to view your “Provisional” or “Proposed” contracts you
can use the “Search All” option at the bottom of the “My Contracts” menu.

Tutor Portal - Help Guide for Tutors
Created by tburrell Page 30 of 67 26th
November 2013
“Completed”: All payments have been made against your contract,
“Cancelled”: The contract was cancelled.
The contracts in the table can be reordered alphabetically (from A to Z or Z to A for
text type columns, eg “Activity / Training”, “Type”, “Status”) or numerically (from
lowest to highest or highest to lowest for number type columns, eg “Start Date”,
“End Date” and “Total”) by clicking the column header text of the column you wish
to use for reordering purposes. You can also resize the columns of the table.
To view a contract click the “View” link in the right hand “Action” column. A
movable and resizable pop-up box appears on screen with a link at the bottom to
perform actions concerning the contract:
Actions
Click or hover over the “You can now perform the following actions” link at
the bottom of the contract’s details to see a sticky menu of options:

Tutor Portal - Help Guide for Tutors
Created by tburrell Page 31 of 67 26th
November 2013
The first possible action when viewing a contract’s details is to view the claims
raised against the contract.
Clicking the “1. Claims” link closes the “Contract Details” pop-up box and
displays a table of claims made against the just viewed contract:
If there are no claims for the contract just viewed, the "Search My Claims” table
will be empty and “No claims found” will appear at the bottom right of the table.
If claims are found for the contract just viewed, they will display row by row in the
“Search My Claims” table. To view a claim’s details, click its “View” link in the
right hand “Action” column.
The second possible action when viewing a contract’s details is to raise a query
or request a change concerning it.
Clicking the “2. Raise query or request change” link dims the contract’s
details and displays a “Contract Query” section in the “Contract Details” pop-
up box in which you can enter text to send via the Tutor Portal’s internal
Note:
To return to the just viewed contract’s details after clicking
the link on its “Actions” sticky menu to view its claims, click
on “My Contracts” on the button bar across the top of the
screen, then click the topmost contract under the “Recently
Viewed” heading.

Tutor Portal - Help Guide for Tutors
Created by tburrell Page 32 of 67 26th
November 2013
messaging system. After typing your text, click the “Send” button below the
query’s text box:
The query / requested change will be picked up by your regional office and
replied to within 3 working days according to your region’s procedures.
Note: Your regional office will not use the Tutor Portal’s in-built messaging
facility to send you an SMS text or email concerning contract queries.
A confirmation message appears on screen after clicking “Send”. Click “OK” to
close it and return to the “Contract Details” pop-up box:
To close the “Contract Details” box click the “X” at its top right corner.
Note:
You can close the “Contract Query” box by clicking the “X” at its top right corner. If
you can’t see the “X” by default, you need to widen the “Contract Details” pop-up

Tutor Portal - Help Guide for Tutors
Created by tburrell Page 33 of 67 26th
November 2013
box (inside which the “Contract Query” box is showing) by dragging its right hand
edge across to the right on your screen.

Tutor Portal - Help Guide for Tutors
Created by tburrell Page 34 of 67 26th
November 2013
Previous years
Under the “Previous Years” heading of the “My Contracts” menu you can see
links for the 4 years previous to the actual current one. Clicking a year opens a
table of contracts for that year on screen. (Note: To see a table of all your
contracts for all years, you can click the “Search Again” button below the table and
specify “[please select]” as the value for the “Year” field).
“2012” Example:
Clicking “2012” under the “Previous Years” heading would display your
contracts for activities in the academic year 2012-13 (ie those contracts with a
start date between 01/08/12 and 31/7/13), similar to the following:
Recently viewed
Under the “Recently Viewed” heading of the “My Contracts” menu you can see
the contract numbers for up to the last 4 contracts you’ve viewed in the Tutor Portal
(however if you don’t sign out of the Tutor Portal properly, the “Recently Viewed”
list will show the last 4 viewed of your most recent properly signed out session):

Tutor Portal - Help Guide for Tutors
Created by tburrell Page 35 of 67 26th
November 2013
Click a recently viewed contract’s number to open its details on screen (not in a
pop-up box). You can see information such as:
Reference number of contract
Name of course the contract relates to
Type of contract (course, development etc),
Status of contract (provisional, proposed, offered, contracted, completed,
cancelled),
Date contract was received by your regional office,
Start and end dates for the contract,
Holiday preference (end of course, ad hoc, monthly)
Whether the contract is an Autopay one (where you are automatically paid
monthly without the need to submit a claim form),
The number of hours you are contracted for,
Rate of pay for the contract,
The amount the contract is for,
The amount already paid to you (claims paid total),
The amount still to be paid to you (balance outstanding),
As mentioned in the previous section, you can hover over or click the “perform the
following actions” link below the contract’s details to see the sticky pop-up menu
of options (for seeing the claims for the contract or sending a query / change
request).

Tutor Portal - Help Guide for Tutors
Created by tburrell Page 36 of 67 26th
November 2013
Search All
Clicking the “Search All” link at the bottom of the “My Contracts” menu displays a
number of “Search Criteria” options on screen:
You can search for a particular contract based on:
“Contract Ref” (type its reference number in the field)
“Status” (choose one from the listbox: )
“Activity Ref” (type any activity reference number in the field)
“Activity Name” (type any activity name in the field)
“Activity Type” (choose one from the listbox: )
“Contracts Starting between” (type a from date in the field or click the box (or
the Calendar icon to the right of the box) and click a starting date) “and” (type a

Tutor Portal - Help Guide for Tutors
Created by tburrell Page 37 of 67 26th
November 2013
to date in the field or click the box (or the Calendar icon to the right of the box)
and click an ending date: ).
Note: You can go backwards and forwards a month at a time in a Calendar by
clicking the Back arrow to the left of the Calendar’s month and year, or the
Forward arrow to the right of the Calendar’s month and year. To return to the
current month and year simply click the date box in the list of “Search Criteria”
again.
“Academic Year” (choose one from the listbox)
Note: To quickly delete any text entered in one of the “Search Criteria” fields, click the
“X” that appears at the right hand side of the field when you click into it:
Click the “Search” button under the criteria options once you’ve entered / selected your
required criteria. Anything found in the system that matches your search criteria will be
displayed:
To view the details of a found contract, click the “View” link in the right hand “Actions”
column of the contract’s row.
To perform another search, click the “Search Again” button under the table of search
results.
Tutor Portal - Help Guide for Tutors
Created by tburrell Page 38 of 67 26th
November 2013
My Claims
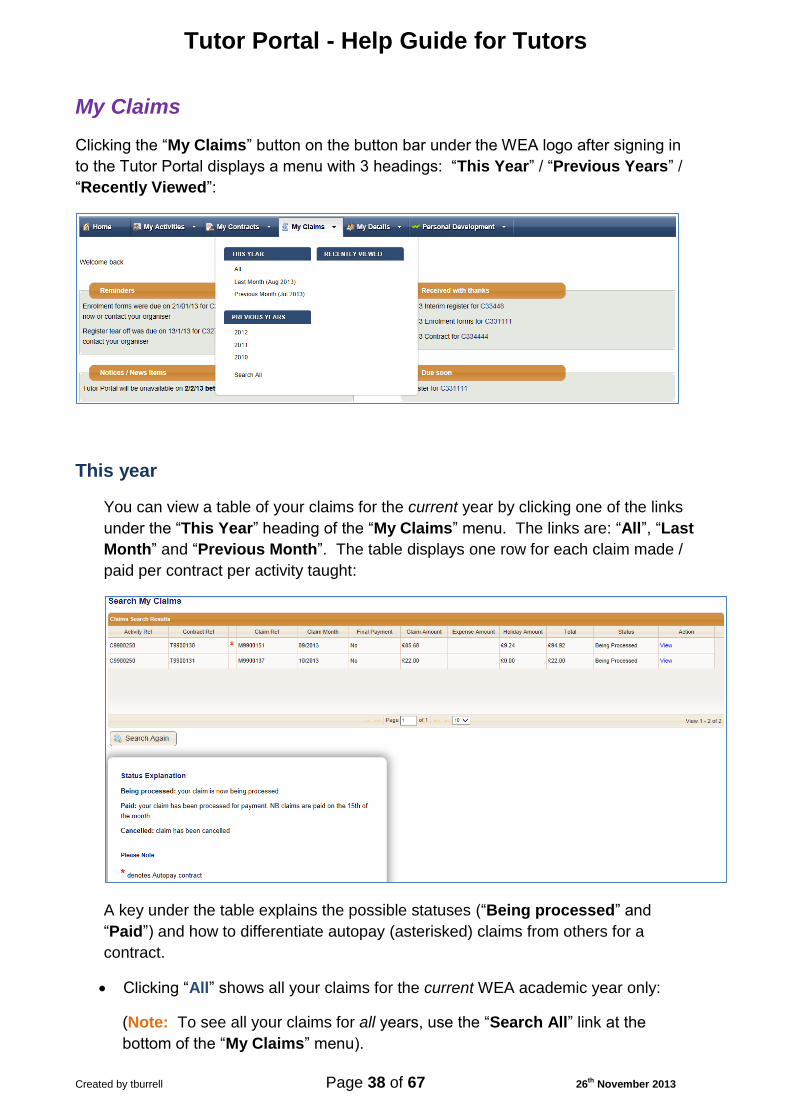
Clicking the “My Claims” button on the button bar under the WEA logo after signing in
to the Tutor Portal displays a menu with 3 headings: “This Year” / “Previous Years” /
“Recently Viewed”:
This year
You can view a table of your claims for the current year by clicking one of the links
under the “This Year” heading of the “My Claims” menu. The links are: “All”, “Last
Month” and “Previous Month”. The table displays one row for each claim made /
paid per contract per activity taught:
A key under the table explains the possible statuses (“Being processed” and
“Paid”) and how to differentiate autopay (asterisked) claims from others for a
contract.
Clicking “All” shows all your claims for the current WEA academic year only:
(Note: To see all your claims for all years, use the “Search All” link at the
bottom of the “My Claims” menu).
Tutor Portal - Help Guide for Tutors
Created by tburrell Page 39 of 67 26th
November 2013
Clicking “Last Month” shows any autopay claims, and timesheeted claims
manually submitted, which have a claim end date in the month before the actual
current month, for example if the current month is September then last month
relates to any claims with a claim end date of between 1st and 31st August.
Clicking “Previous Month” shows any claims, autopay and timesheeted, which
have a claim end date in the month before last month.
Table headings can be clicked to reorder rows alphabetically from A-Z or Z-A (for
text type columns, eg “Activity Ref” or “Status”) or from earliest to latest or latest to
earliest (for number type columns, eg “Claim Month”).
The “Status” of a claim can be any of the following:
“Being Processed” = claim has been entered on the system and is now
being processed.
“Paid” = claim has been processed for payment and will be paid on the
15th of the month.
“Cancelled” = claim has been cancelled so won’t be processed. (Note:
A claim might be cancelled if it was duplicated or entered in error).
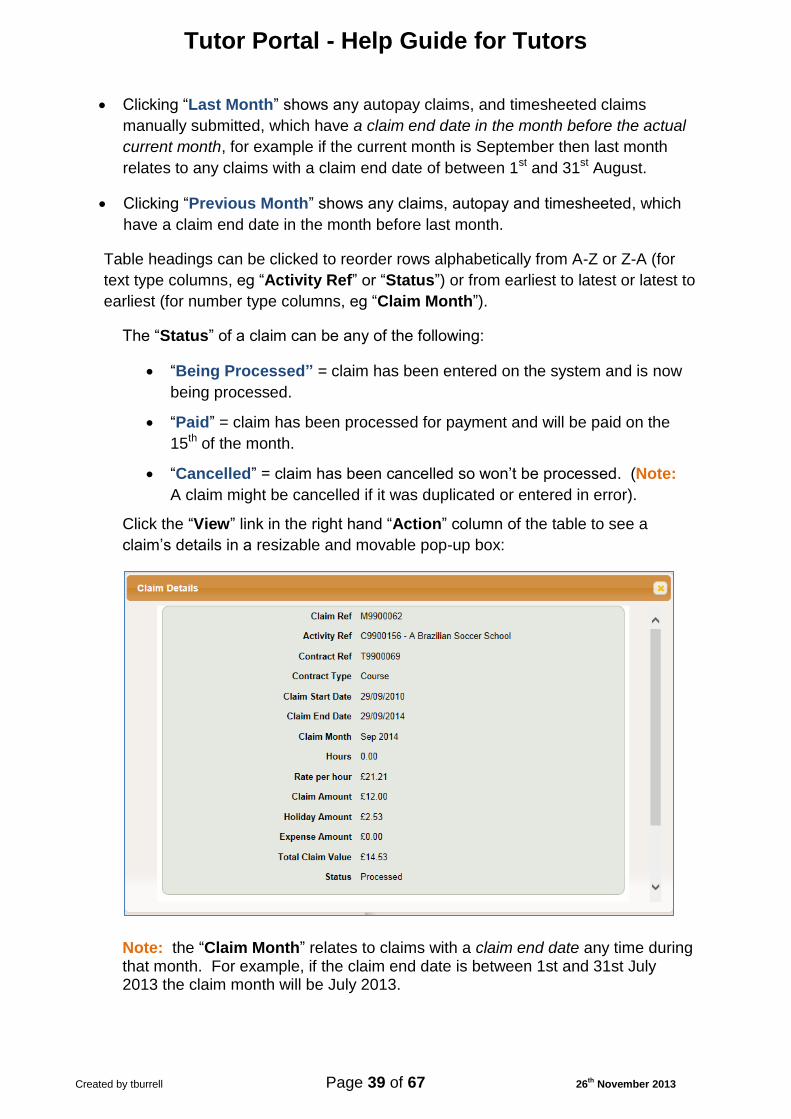
Click the “View” link in the right hand “Action” column of the table to see a
claim’s details in a resizable and movable pop-up box:
Note: the “Claim Month” relates to claims with a claim end date any time during that month. For example, if the claim end date is between 1st and 31st July 2013 the claim month will be July 2013.

Tutor Portal - Help Guide for Tutors
Created by tburrell Page 40 of 67 26th
November 2013
Actions
The “Actions” sticky pop-up menu displays when you hover over or click the
“You can now perform the following actions” link at the bottom of the “Claim
Details” pop-up box:
The “Actions” menu contains the following options:
“1. Go to Contract”
Displays details of the contract to which the currently viewed claim relates,
plus a link to display a pop-up menu of further actions for the contract (ie “1.
Claims” and “2. Raise query or request change”).
“2. Go to Activity”
Displays details of the activity to which the currently viewed claim relates,
plus a link to display a pop-up menu of further actions for the activity (ie “1.
Course Information Sheet”, “2. Tutor Report Form”, “3. Contracts”, “4.
Claims” and “5. Send message to students on this course”).
“3. Raise query about this claim”
Dims the claim’s details and brings up a “Claim Query” box for entering text
to send to your regional office (simply type your text in the box then click the
“Send” button):

Tutor Portal - Help Guide for Tutors
Created by tburrell Page 41 of 67 26th
November 2013
Note:
As the Tutor Portal is further developed, you will in future be able to choose
the type of claim query you wish to make (“Expense query”, “Claim query”,
“Prior Approval” or “Other”).
After clicking “Send” you will see a confirmation message; click “OK” to close
it and see your claim details again.
Previous years
You can see links for the 4 years before the actual current one under the “Previous
years” heading of the “My Claims” menu. Clicking a link displays a table of claims
made and automatically paid during that academic year.

Tutor Portal - Help Guide for Tutors
Created by tburrell Page 42 of 67 26th
November 2013
Recently viewed
You can see links to the 4 most recently viewed claims under the “Recently viewed”
heading of the “My Claims” menu.
Note:
If you haven’t signed out properly from the system, the links will be for the 4 claims
viewed before your last properly signed out session when using the Tutor Portal.
Search All
To see all your claims for all years, click the “Search All” link at the bottom of the “My
Claims” menu on the button bar across the top of the screen, specify “[Please select]”
for the academic year and “All months” for the claim month then click “Search”. A
table displays showing your claims for the current year, previous years and next year:
The “Results Key” under the table tells you how to differentiate autopay (asterisked)
claims from those that you timesheet and submit manually.
Click “View” in the right hand “Action” column of the “Search Results” table to see the
details of a claim.
Click the “Search Again” button under the table of results to search for claims based on
selected criteria:

Tutor Portal - Help Guide for Tutors
Created by tburrell Page 43 of 67 26th
November 2013
Claims fields that can be used to search for specific claims include: “Activity Ref”,
“Activity Name”, “Contract Ref”, “Claim Ref”, “Claim Month”, “Academic Year”,
“Final Payment”, “Status” and “Autopay”. Once you’ve made your choices and / or
entered your text in the relevant fields, click the “Search” button to see a table of claims
that match your search criteria.

Tutor Portal - Help Guide for Tutors
Created by tburrell Page 44 of 67 26th
November 2013
My Details
Clicking “My Details” on the button bar displays a menu containing links to view your
“Personal Details”, “Contact Details” and “Security Details”:
Personal Details
Your personal details are comprised of current information provided by you previously
and held by the WEA. Apart from the “Employment Start” date, the fields on the
“Personal Details” form are of 2 types, those that must go through a request and
approval procedure and those that can be changed by you straight away:

Tutor Portal - Help Guide for Tutors
Created by tburrell Page 45 of 67 26th
November 2013
Updating fields that require approval
Those fields that are included in the request and approval process are:
“Forename”, “Middle Name”, “Surname”, “Date of Birth” and “NI Number”.
1. If you need to request that the WEA make changes to the data in these fields, click the
“Request Change” button next to the field containing the empty or wrong data, fill out
the form that appears then click “Send”.
Example of request to change “Middle Name” data:
Example of request to change “Date of Birth” data:
Example of request to change “NI Number” data:
Note: If you enter an invalid NI Number, a message appears on screen asking you
to enter a valid one:

Tutor Portal - Help Guide for Tutors
Created by tburrell Page 46 of 67 26th
November 2013
Click “OK” to close the message, edit the NI Number in the field and click “Send”
again.
2. After clicking “Send”, a confirmation message appears informing you that an email will
shortly be sent:
The email is sent to your regional office who will respond according to their processes
and procedures.
3. Click “OK” to close the email request message and see your personal details again.
Updating fields that don’t require approval
1. For those fields of your personal details which do not require approval, you can update
them by clicking the “Update” button at the bottom of the “Edit your Personal Details”
screen. This makes the following greyed out listbox fields editable:
“Gender”: Click the box and choose “Male” or “Female” from the list that
appears:

Tutor Portal - Help Guide for Tutors
Created by tburrell Page 47 of 67 26th
November 2013
“Ethnicity”: Choose an option from the list:
Note: If you don’t wish to classify your ethnicity you can choose “Not
provided” in the list. However, we would encourage you to provide this
information as it helps with our equality and diversity reporting obligations to
ensure that everyone is treated equally. If you specify “[Please select]” as
your choice, when you save your changes you will see an error message
informing you that you must complete the field:
Click “OK” to close the message box, click the “Update” button to make the
field editable again, and choose your answer.
“Physical Disability”: Choose an option from the list, either “No”, “no
answer” or “Yes”:
If you leave the option as “[Please select]”, when you save your changes
you will see an error message informing you that you must complete the
field:

Tutor Portal - Help Guide for Tutors
Created by tburrell Page 48 of 67 26th
November 2013
Click the “OK” button to close the message, click the “Update” button to
make the field editable again, and choose your answer.
“Learning Disability”: As per “Physical Disability” above.
2. When you’ve made your choices, click the “Save” button at the bottom of your personal
details.
Note: The “Employment Start” field is the only one on the “Personal Details” form
that isn’t editable. You can click the “Important Information” button next to the field for
an explanation of what your employment dates with the WEA mean:
Contact Details
You can make changes to the information the WEA holds about your address,
telephone number and mobile number. To do so, click “My Details” on the button bar
across the top of the screen, then click “Contact Details” on the menu that appears. A
form with current information provided previously by you displays:

Tutor Portal - Help Guide for Tutors
Created by tburrell Page 49 of 67 26th
November 2013
1. Click the “Update” button below the currently held details. This enables use of
the “Find Address” button and makes the fields in the “Contact Details” form
editable.
2. Click into the field you wish to change. To quickly delete the text in a field, click
the “X” that appears at the right hand side of the field when you click into it, then
type your new information.
3. To check the postcode entered, click the “Find Address” button.
a. If your postcode isn’t found a message will appear on screen informing
you that no matches have been found:
Click the “Close” button and enter a valid postcode.
b. If your postcode is found, select the correct address from the matches
found then click the “Select” button under the list of matching addresses:
Tutor Portal - Help Guide for Tutors
Created by tburrell Page 50 of 67 26th
November 2013
The new address will be entered into your “Address” and “Town” fields on
your “Contact Details” form.
4. To save your changes, click the “Save” button at the bottom of the form.
Note: Clicking “Important Information” displays a text box with information about
SMS alerts and emails that are used for notifying you about Tutor Portal related activity.
If you haven’t provided the WEA with your mobile phone number, you will receive
notifications by email instead.
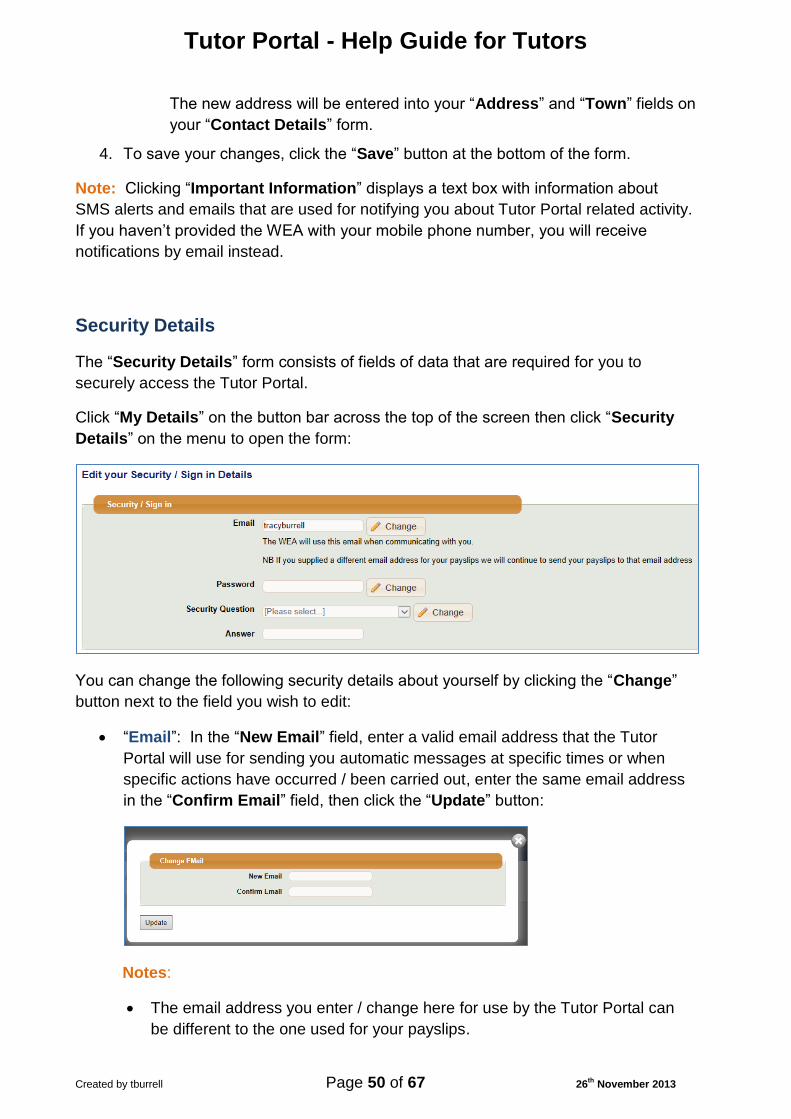
Security Details
The “Security Details” form consists of fields of data that are required for you to
securely access the Tutor Portal.
Click “My Details” on the button bar across the top of the screen then click “Security
Details” on the menu to open the form:
You can change the following security details about yourself by clicking the “Change”
button next to the field you wish to edit:
“Email”: In the “New Email” field, enter a valid email address that the Tutor
Portal will use for sending you automatic messages at specific times or when
specific actions have occurred / been carried out, enter the same email address
in the “Confirm Email” field, then click the “Update” button:
Notes:
The email address you enter / change here for use by the Tutor Portal can
be different to the one used for your payslips.

Tutor Portal - Help Guide for Tutors
Created by tburrell Page 51 of 67 26th
November 2013
When you change your email address, the system notifies your regional
office.
“Password”: In the “Old Password” field, enter your current password for
accessing the Tutor Portal (it will be encrypted on screen as a series of dots), in
the “New Password” field, enter what you wish your new password to be (it must
be of the required length and containing the required types of characters (see the
“Signing in to the Tutor Portal” section at the beginning of this guide for further
information) and will be encrypted on screen as a series of dots), enter your new
password again in the “Confirm Password” field (it will be encrypted on screen
as a series of dots), then click the “Save” button:
“Security Question” and “Answer”:
You can change the security question that the system will ask you if you forget
your password and use the link on the sign-in screen to request a new one.
1. Click the “Change” button to the right of the “Security Question” field. The
“Change Security Question” form appears:
Note: If you mistype your new password in the “Confirm Password”
field, a message appears:
Retype your new password in both the “New Password” and “Confirm
Password” fields then click “Save” again.

Tutor Portal - Help Guide for Tutors
Created by tburrell Page 52 of 67 26th
November 2013
2. Choose an option from the “New Security Question” listbox:
What was your 1st pet’s name? or
What was your mother’s maiden name?
3. In the “Security Answer” field, type the answer you will provide when asked
the chosen question.
4. Click the “Save” button to save your changes and return to the “Security
Details” screen.

Tutor Portal - Help Guide for Tutors
Created by tburrell Page 53 of 67 26th
November 2013
Training
The “Training” menu contains options for viewing details held about your teaching
qualifications and training / CPD events you have attended. You can also notify the
WEA of any updates to your knowledge and skills so that these are reflected in the
system. The 3 options on the menu are:
“Qualifications”
“WEA Training”
“External Training / CPD”
Qualifications
Click the “Qualifications” link on the “Training” menu to see 2 tables of
information the WEA currently holds about you:
“Teaching qualifications”
“Subject qualifications”
If you spot any errors or omissions you can make changes to the information.

Tutor Portal - Help Guide for Tutors
Created by tburrell Page 54 of 67 26th
November 2013
Making changes to your existing teaching qualifications
1. Click the pencil icon at the end of the row for the teaching qualification that
contains missing or incorrect information.
2. Make your required changes to the details then click the “Save” button:
Making changes to your existing subject qualifications
1. Click the pencil icon at the end of the row for the subject qualification that
contains missing or incorrect information.
2. Make your required changes to the details then click the “Save” button:
Notes:
Any changes you make will be followed up within 3 days by your
regional office, who will ask you to provide proof of certification, for
example, if you change the “Status” of your teaching qualification from
“Working Towards” to “Achieved (unverified)”. Once your regional
office has seen your certificate, and photocopied it for their records, they
will change the “Status” of your qualification to “Achieved (verified)”.
You will not see a notification on your “Home” screen regarding the need to bring your certificate into your regional office.

Tutor Portal - Help Guide for Tutors
Created by tburrell Page 55 of 67 26th
November 2013
Adding to your teaching qualifications
As you gain more qualifications over time you can add them to those already held
on the system.
Note: Any additions will be notified to your regional office who will follow up within
3 days and ask you to provide proof.
1. Click the “Add Teaching Qualification” button at the bottom left of the
“Teaching qualifications” table.
2. Fill out the “Staff Teaching Qualification Entry” dialog box with the
following information:
a. “Teaching Qualification” (choose from the listbox)
b. “Year Awarded” (type the year you were awarded the qualification)
c. “Financial Support” (click the box to checkmark it if relevant)
d. “Status” (choose an option from the listbox)

Tutor Portal - Help Guide for Tutors
Created by tburrell Page 56 of 67 26th
November 2013
Adding to your subject qualifications
1. Click the “Add Subject Qualification” button at the bottom left of the
“Subject Qualifications” table.
2. Fill out the “Staff Subject Qualification Entry” dialog box with the
following information:
a. “Subject Qualification” (choose from the listbox)
b. “Subject” (choose from the listbox)
c. “Year” (type the year you gained the subject qualification or
experience)
d. “Experience in School” (click the box to checkmark it if relevant)
e. “Experience in FE” (click the box to checkmark it if relevant)
f. “Experience in ACL” (click the box to checkmark it if relevant)
g. “Experience in Training Provider” (click the box to checkmark it if
relevant)
h. “Experience in University” (click the box to checkmark it if relevant)
i. “Experience Other” (type relevant information into the text box)
j. “Years Experience” (choose an option from the listbox for the
number of years you’ve been experienced or qualified in the subject)
k. “Status” is greyed out (this will change once your regional office has
verified the information).

Tutor Portal - Help Guide for Tutors
Created by tburrell Page 57 of 67 26th
November 2013
WEA Training
You can review details of WEA training events you have been invited to. To do
this, click “Training” on the button bar across the top of the screen, then click
“WEA Training” on the menu that appears. A table of all WEA training you have
been invited to appears. You can change what displays in the table by clicking
one of the following buttons above it:
“This Year”,
“Last Year”,
“All Years”.
If you wish to view further details about any of the events listed, click the event’s
title in the “Event” column. A “Training Event” pop-up box appears:
To close the “Training Event” pop-up box, click the “X” at its top right corner.
External Training / CPD
You can review information held by the WEA about any of your external training
events or CPD events / experiences. (Note: This is separate to any WEA training
events you have attended).

Tutor Portal - Help Guide for Tutors
Created by tburrell Page 58 of 67 26th
November 2013
To do this, click “Training” on the button bar across the top of the screen, then
click “External Training / CPD” on the menu that appears. A table of all external
training events / CPD experiences you have notified us about appears:
You can edit the information currently held and add a new event / experience.
Editing existing external training events / CPD experiences
1. In a table of external training / CPD events, click the pencil icon at the end
of the row for the external training event / CPD experience you wish to
amend. An editable form appears, similar to the following:
2. Click into the field(s) you wish to change then make your changes.
Note:
The “Supported by WEA?” checkbox should be clicked if the WEA
supported you financially to attend the event.

Tutor Portal - Help Guide for Tutors
Created by tburrell Page 59 of 67 26th
November 2013
3. To save all your changes, click the “Save” button at the bottom left of the
form. (If you change your mind and don’t wish to make any changes you
can click the “Cancel” button at the bottom left of the form).
Adding a new external training event / CPD experience
1. Click the “Add new experience” button at the bottom left of the table of
events / experiences.
2. Fill out the fields on the form that appears:
3. Click the “Save” button under the fields. (If you change your mind and no
longer wish to add this training event / experience, you can click the “Cancel”
button).
4. Your new external training event / experience will appear in the table:

Tutor Portal - Help Guide for Tutors
Created by tburrell Page 60 of 67 26th
November 2013
Messages
The messages area of the Tutor Portal enables you to read any messages sent to you
for information or action either by the system automatically or by your course organiser.
You can view a list of “All” messages or only “Unread” ones by clicking the appropriate
link on the “Messages” menu:
Inbox
The “Inbox” heading on the “Messages” menu contains 2 links: “All” and “Unread”.
Clicking “All” displays a table of all internal communications sent to you, similar to the
following:
The sorts of messages you can review include things such as when enrolments sent by
you for a course you are / were teaching were received at your regional office, when a
CIS you submitted was approved by your course organiser, when a TRF you submitted
has been reviewed and completed by your course organiser / learning manager etc.
The categories of messages include “Received”, “Reminder” and “Due Soon”.
Resorting messages
You can resort the rows of the table by clicking the column header of the one you want
to resort the entries by, for example clicking the “Date Read” column header text once
will resort the rows to show the oldest entries at the top of the table and clicking the
header text again will resort the rows to show the most recent entries at the top.
Tutor Portal - Help Guide for Tutors
Created by tburrell Page 61 of 67 26th
November 2013
Marking messages as having been read
Once you’ve read a communication you can mark it as having been read by clicking the
tickbox in the righthand “Read” column. This automatically adds the current date to the
“Date Read” column and changes the colour of the row to differentiate read items from
unread ones.
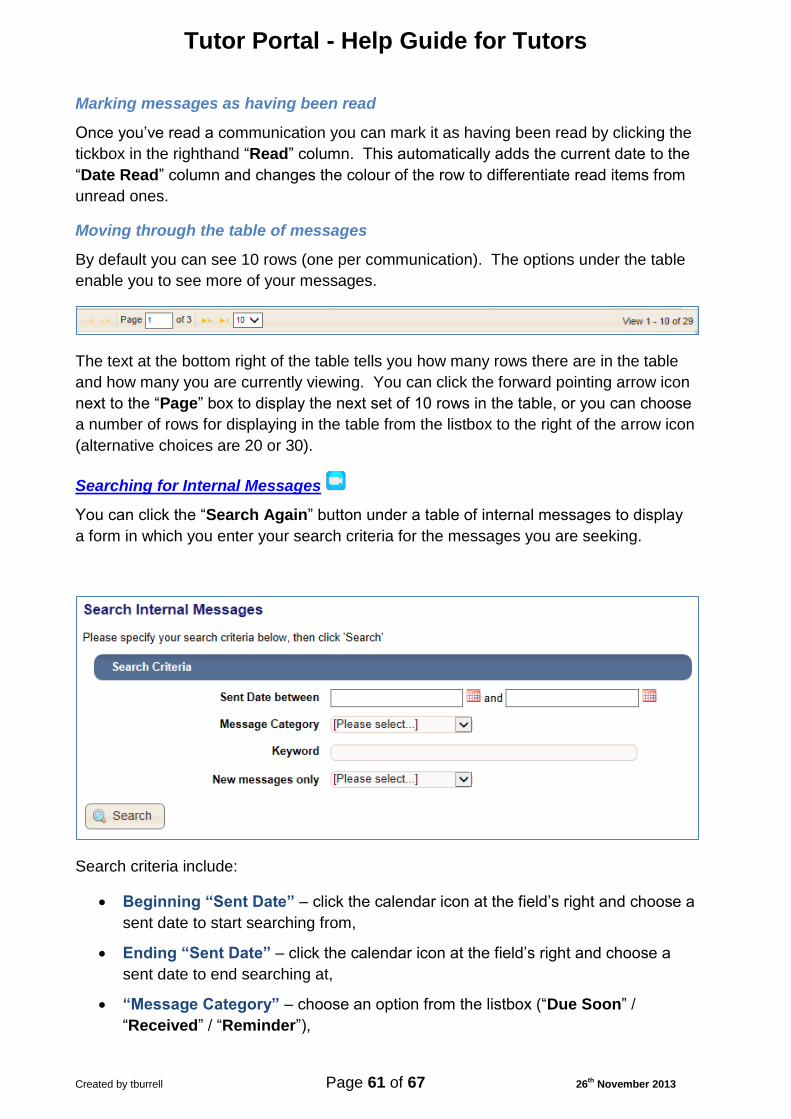
Moving through the table of messages
By default you can see 10 rows (one per communication). The options under the table
enable you to see more of your messages.
The text at the bottom right of the table tells you how many rows there are in the table
and how many you are currently viewing. You can click the forward pointing arrow icon
next to the “Page” box to display the next set of 10 rows in the table, or you can choose
a number of rows for displaying in the table from the listbox to the right of the arrow icon
(alternative choices are 20 or 30).
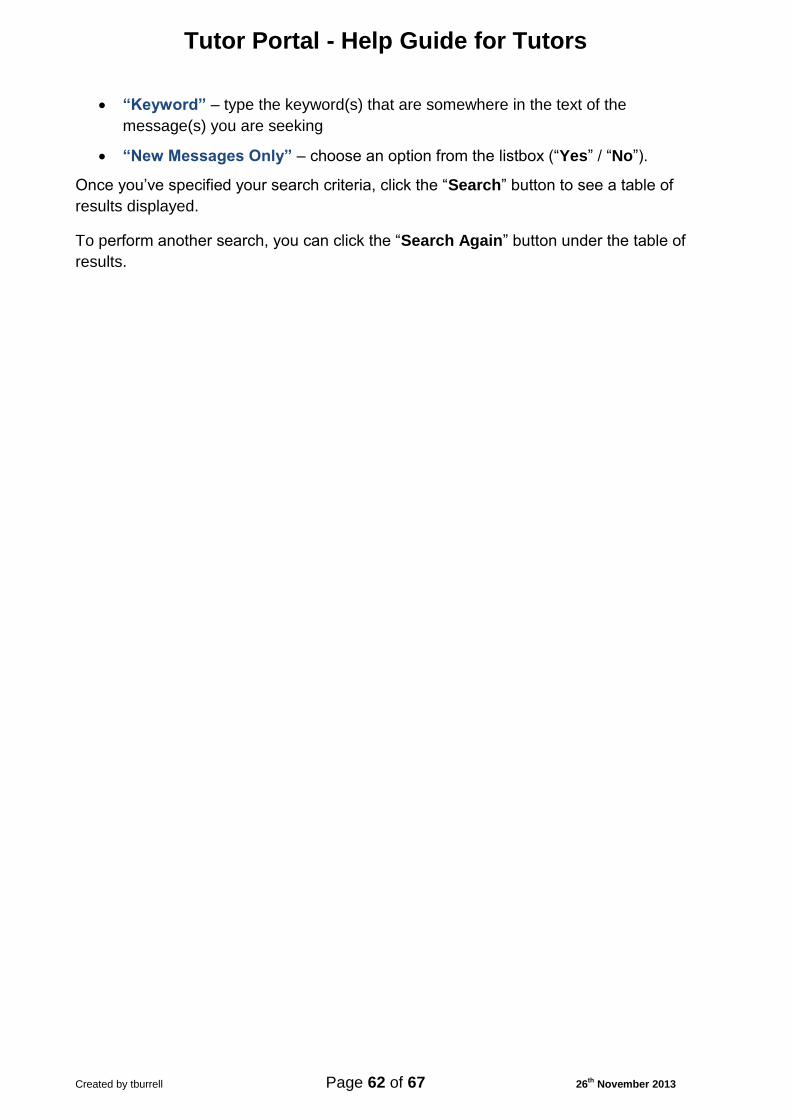
Searching for Internal Messages
You can click the “Search Again” button under a table of internal messages to display
a form in which you enter your search criteria for the messages you are seeking.
Search criteria include:
Beginning “Sent Date” – click the calendar icon at the field’s right and choose a
sent date to start searching from,
Ending “Sent Date” – click the calendar icon at the field’s right and choose a
sent date to end searching at,
“Message Category” – choose an option from the listbox (“Due Soon” /
“Received” / “Reminder”),
Tutor Portal - Help Guide for Tutors
Created by tburrell Page 62 of 67 26th
November 2013
“Keyword” – type the keyword(s) that are somewhere in the text of the
message(s) you are seeking
“New Messages Only” – choose an option from the listbox (“Yes” / “No”).
Once you’ve specified your search criteria, click the “Search” button to see a table of
results displayed.
To perform another search, you can click the “Search Again” button under the table of
results.

Tutor Portal - Help Guide for Tutors
Created by tburrell Page 63 of 67 26th
November 2013
Signing Out of the Tutor Portal
When you’ve finished using the Tutor Portal it is very important that you sign out
correctly for the following reasons:
If you are using a shared public access computer, for example in a library or
internet café, anyone using the computer after you could pass themselves off as
you if you are still signed into the Tutor Portal.
Your sign in credentials are also linked to the WEA’s Intranet.
The “Recently Viewed” sections of the various
in the Tutor Portal will only be accurate if you sign out properly.
To sign out of the Tutor Portal, click the “Click here to sign out” link at the top right of
the Tutor Portal screen:
After signing out you will be taken back to the initial “Sign In” screen.
Getting Help in the Tutor Portal
At the top of each screen you can see a “Help” button. Click this to see a menu of help
for each of the areas in the Tutor Portal.
You can read text based help or view screencast videos, or both, depending on your
preference and where you are in the system when you click “Help”.

Tutor Portal - Help Guide for Tutors
Created by tburrell Page 64 of 67 26th
November 2013
APPENDIX A – FLOWCHART FOR CREATING CISs
Organiser starts APFFollowing details of APF need to be
completed: Course Title Start & Target End Date No sessions & hrs /session Venue Tutor Activity type should be teaching, short
activity or taster
Tutor notfied that CIS required
Tutor completes CIS and submit it
Organiser notified that tutor has submited CIS
Organiser reviews CIS
CIS needs amending CIS okay
Organiser amends CIS
Organiser marks CIS as approved. CIS available on weaMIS under My CIS and
thefollowing info copied to APF
Description Learning outcomes Entry Requirements
Organisers rejects CIS and enters
reason why
Tutor informed of problem with CIS
Tutor amends CIS & resubmits
Organiser notified that CIS has been
resubmitted

Tutor Portal - Help Guide for Tutors
Created by tburrell Page 65 of 67 26th
November 2013
APPENDIX B – FLOWCHART FOR CREATING TRFs
Tutor Report becomes due when the course reaches the target end date. It will be required for the following activity types: Teaching Short activity Tasters
Tutor reminded to complete TRF
Tutor completes and submit TRF
Organiser notified that TRF has been submitted
Organiser reviews TRF, enters comments and mark
as completed
Tutor notified that organiser has added comments
TRF is saved on weaMIS and available in My Tutor
Reports
Tutor Portal - Help Guide for Tutors
Created by tburrell Page 66 of 67 26th
November 2013
APPENDIX C – FREQUENTLY ASKED QUESTIONS
Q. What is the Tutor Portal? A. It’s an online facility which will provide you with 24 hours access to information which will help support you with the course administration process. Q. What will I be able to see on the Portal? A. You will have access to many things in the Portal including your courses, contracts and claims. You will also be able to see the details we hold for you and information on events you have been invited to with us. Q. Is my information secure? A. Yes, log in is via a Secure Certificate i.e. SSL and you should see a little padlock near the address bar of your browser to indicate that the site is secure and the URL should start with “https”. Q. At what point will I get my log in to the Tutor Portal? A. The Tutor Portal is being phased in over the next year. Once you have received the training your Region will arrange for the log in details to be sent to you. Q. I have a Mac PC can I still use the Portal? A. Yes. The Portal has been tested using IE, Firefox, Chrome and Safari. Q. Can I use the TP on a tablet? A. Yes, it’s been tested on an iPad and an Android tablet Q. Can I use the Tutor Portal on a smart phone? A. You may be able to see the Tutor Portal on a smart phone but we have not developed any Apps at this stage. Q. I want to use the Portal but I do not have access to a computer and / or the internet, what can I do? A. Many libraries now offer access to computers and the internet and there are also a large number of internet cafes around the country. If you have a computer but no internet access you may be able to use hotspot locations which are becoming increasingly popular. Contact your Region for advice. Q. I have got very limited experience using computers but I would really like to use the Portal, what should I do? A. You might want to consider taking a general computer course, contact your Regional Office who can advise you on the best way to get training. Q Is the Portal now the only way that I can communicate with the WEA? A. The Portal will provide you with a lot of information and you can access it out of office hours. But if it doesn’t provide the information you need you can still contact the Regional Office or your organisers in the normal way. Q. I am having problems signing into the Tutor Portal what should I do? A. If you have already been given your sign in details or the problem is technical, email [email protected]. If you have not yet received your sign in details contact your Regional Office.

Tutor Portal - Help Guide for Tutors
Created by tburrell Page 67 of 67 26th
November 2013
Q. The information on the Portal seems to be incorrect, what should I do? A. Contact your Regional Office who should be able to help you. Q. What if I have a problem out of office hours? A. There are a range of reference materials and guidance available including video clips which might help with some problems. If you are still having problems you can email your Regional Office who will endeavour to get back to you the next working day. If it’s urgent, phone the regional office during office hours. (NB. emails are not monitored during out of office hours.)