wax paper resist - stampin' pad
TRANSCRIPT

Belinda Tubby Stampin’ Up! Demonstrator
[email protected] www.Stampinpad.com
All Images copyright Stampin' Up! © 1990-2005
Wax Paper Resist
Use wax paper to make an interesting background for
your cards
Supplies
Wax Paper
Glossy Card Stock
Iron
Ink
Brayer
Scratch paper
Cut two pieces of glossy
cardstock
Tear off a piece of wax
paper large enough to
cover your background
pieces

Belinda Tubby Stampin’ Up! Demonstrator
[email protected] www.Stampinpad.com
All Images copyright Stampin' Up! © 1990-2005
Begin by crumpling the
wax paper into a small ball
several times
Unfold and smooth the wax
paper
Lay the first piece of card
stock glossy side up and
place the wax paper over it
Place the second piece of
card stock glossy side
down on top of the wax
paper
Belinda Tubby Stampin’ Up! Demonstrator
[email protected] www.Stampinpad.com
All Images copyright Stampin' Up! © 1990-2005
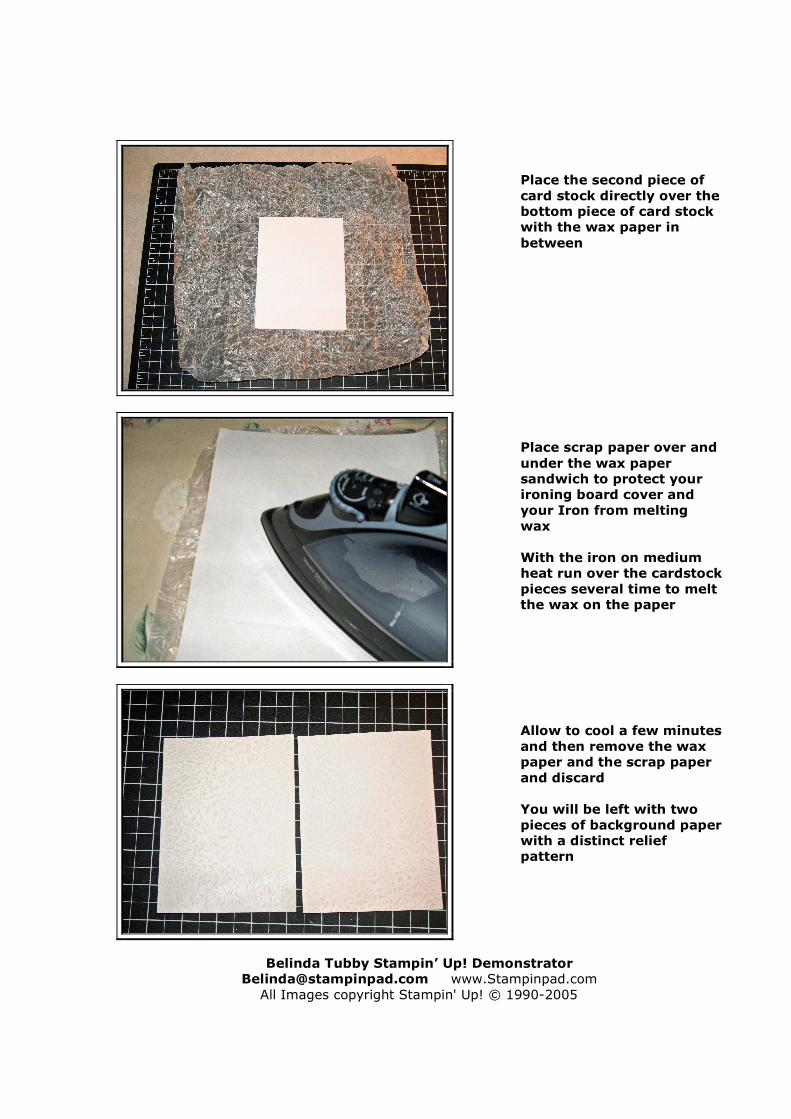
Place the second piece of
card stock directly over the
bottom piece of card stock
with the wax paper in
between
Place scrap paper over and
under the wax paper
sandwich to protect your
ironing board cover and
your Iron from melting
wax
With the iron on medium
heat run over the cardstock
pieces several time to melt
the wax on the paper
Allow to cool a few minutes
and then remove the wax
paper and the scrap paper
and discard
You will be left with two
pieces of background paper
with a distinct relief
pattern

Belinda Tubby Stampin’ Up! Demonstrator
[email protected] www.Stampinpad.com
All Images copyright Stampin' Up! © 1990-2005
Load your brayer with ink
and brayer over the card
stock
Continue adding ink with
the brayer until you have
achieved the desired result
You will be left with a great
piece of background paper

Belinda Tubby Stampin’ Up! Demonstrator
[email protected] www.Stampinpad.com
All Images copyright Stampin' Up! © 1990-2005
Use a piece of tissue to
wipe away the wax residue
and any excess ink
Your pattern will become
even more distinct as the
white shows through
Use your background piece
to create a finished card!!

Belinda Tubby Stampin’ Up! Demonstrator
[email protected] www.Stampinpad.com
All Images copyright Stampin' Up! © 1990-2005