waves q-clone eq sampling system · once the test-signal returns from the device, it is analyzed...
TRANSCRIPT
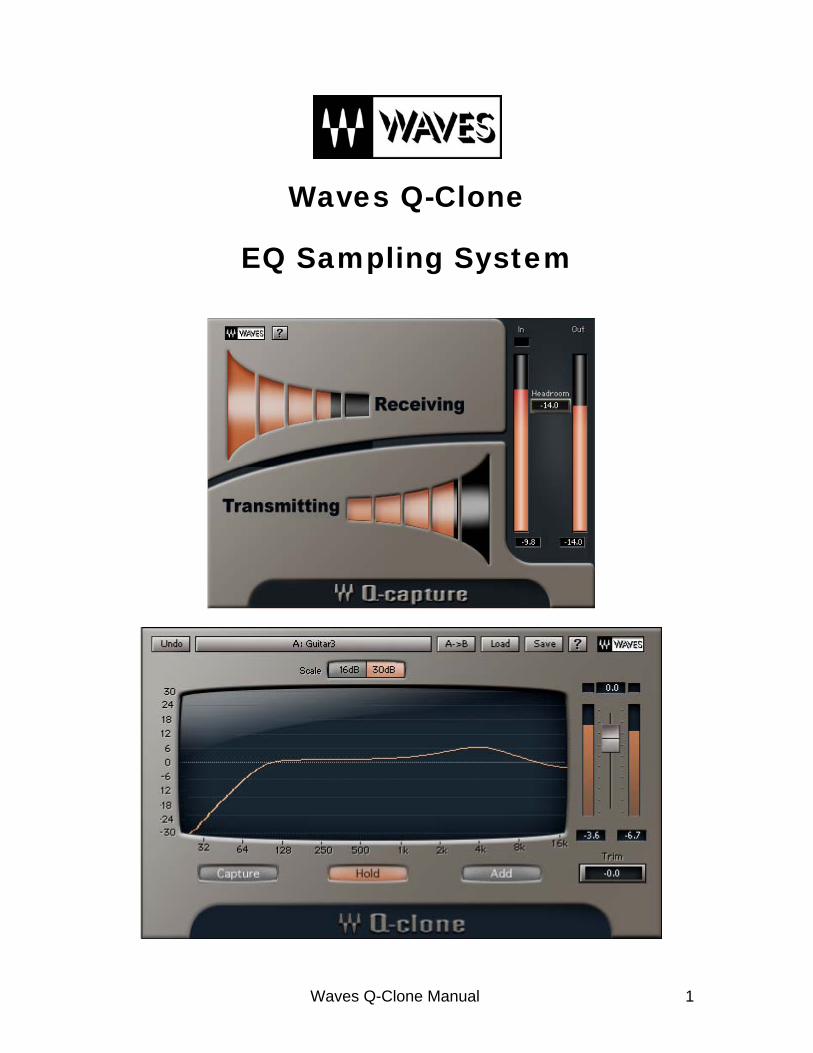
Waves Q-Clone
EQ Sampling System
Waves Q-Clone Manual 1
Introduction You own a great sounding hardware EQ. It sounds great. It feels good. You know just how to “tweak” the knobs to get the sound that you are looking for. But perhaps you can’t afford to buy 97 more hardware EQs for every one of the 98 tracks in your current mix! Even if you could, wouldn’t it be like a dream come true if you could digitally save the various settings of your hardware EQs on all of the different tracks of your mix? Now you can. With the Q-Clone you can “clone” your favorite hardware EQ and use it on an unlimited number of tracks, “tweak” the EQ in real time using the familiar hardware EQ knobs, create a library of the cloned presets, and then change them at any given time. BASIC CONCEPT The Waves Q-clone is an EQ-device cloning system. It captures the EQ curve of a single mono analog EQ and uses it to process any given track. This process can be repeated on several tracks, cloning different EQ-settings from the same device to each track. The Q-Clone also comes with a great library of sampled EQ curves from classic, acclaimed and vintage hardware equalizers. The presets can be used without having your own hardware EQ to sample. The Q-Clone can be opened on any given track. After a simple procedure is followed, the Q-Clone will create the image of the EQ hardware device that is connected to your DAW. THE Q-CLONE PRODUCT The Q-Clone clones the linear part of any system that it is connected to. It will not replicate distortions, noise, or other non-linear properties. However, it will perfectly replicate the sound of the filters and their phase responses. The Q-Capture is a mono-only component so it will capture only mono devices. However, you can open a stereo Q-Clone component on a stereo track and it will apply the same EQ settings to both channels. This will be a perfectly matched stereo clone of the analog device. The system is comprised of 2 plug-in components: The Q-Clone and the Q-Capture. This manual will go into more depth on the Q-Clone and the Q-Capture in “The Plug-ins components” section.
Waves Q-Clone Manual 2
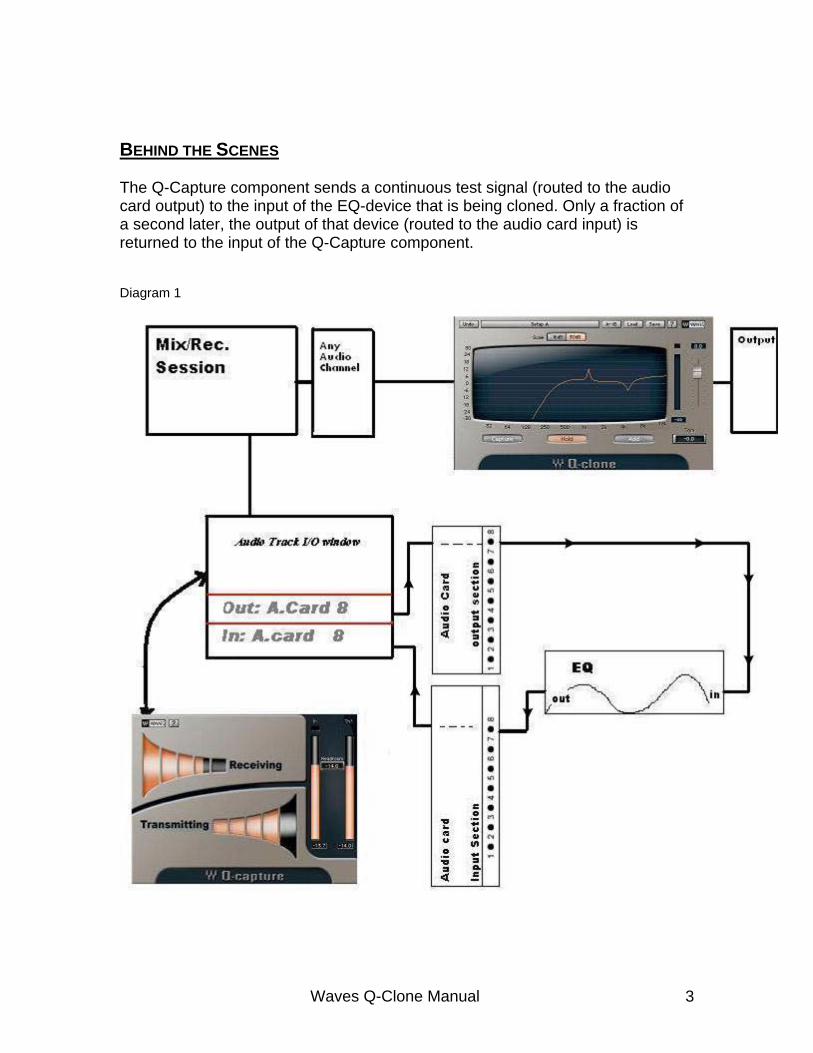
BEHIND THE SCENES The Q-Capture component sends a continuous test signal (routed to the audio card output) to the input of the EQ-device that is being cloned. Only a fraction of a second later, the output of that device (routed to the audio card input) is returned to the input of the Q-Capture component.
Waves Q-Clone Manual 3
Diagram 1
Once the test-signal returns from the device, it is analyzed and loaded into the Q-Clone component as an impulse-response. This happens several times per second so that the EQ-settings of the device are well tracked by the cloned EQ. As long as the Q-Clone is in ‘Capture’ mode, it keeps on tracking the EQ-settings of the device. When the Q-Clone enters 'Hold' mode (accomplished by clicking the Hold button) the very last settings are frozen. All EQ settings are stored within sessions and can be stored as presets. The presets can be shared across different sessions or different tracks within the same session. WHICH EQ HARDWARE DEVICES ARE SUPPORTED TO WORK WITH THE Q-CLONE?
1. Any “working condition” EQ device with analog/digital I/O. 2. Any analog channels strip with EQ section built in. 3. Not a combination of EQ with compressor or any other non linear
processor.
The plug-in components
Waves Q-Clone Manual 4
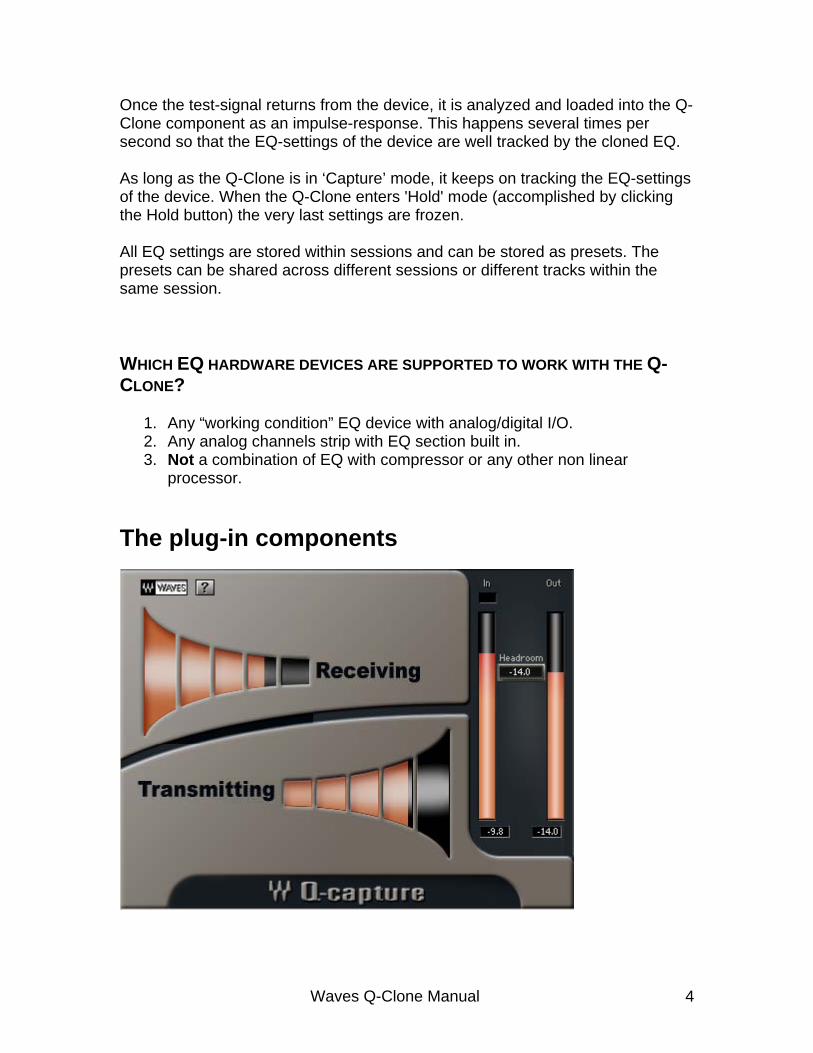
Q-Capture Component The Q-capture sends a test signal from its output that is intended to be fed back into its own input through the EQ-device. It should be opened on a live I/O. This can be a Mono Auxiliary track or an Audio Track, depending on your Audio host. Only a single instance of Q-Capture can work at a time.
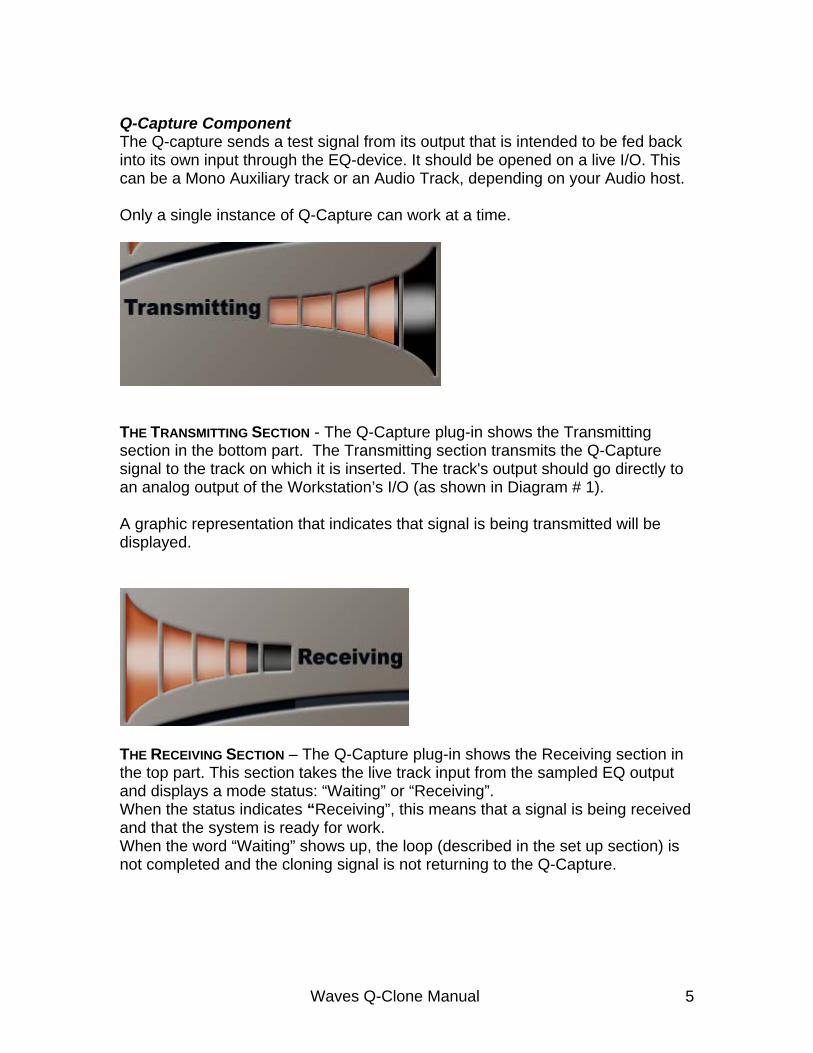
THE TRANSMITTING SECTION - The Q-Capture plug-in shows the Transmitting section in the bottom part. The Transmitting section transmits the Q-Capture signal to the track on which it is inserted. The track's output should go directly to an analog output of the Workstation’s I/O (as shown in Diagram # 1). A graphic representation that indicates that signal is being transmitted will be displayed.
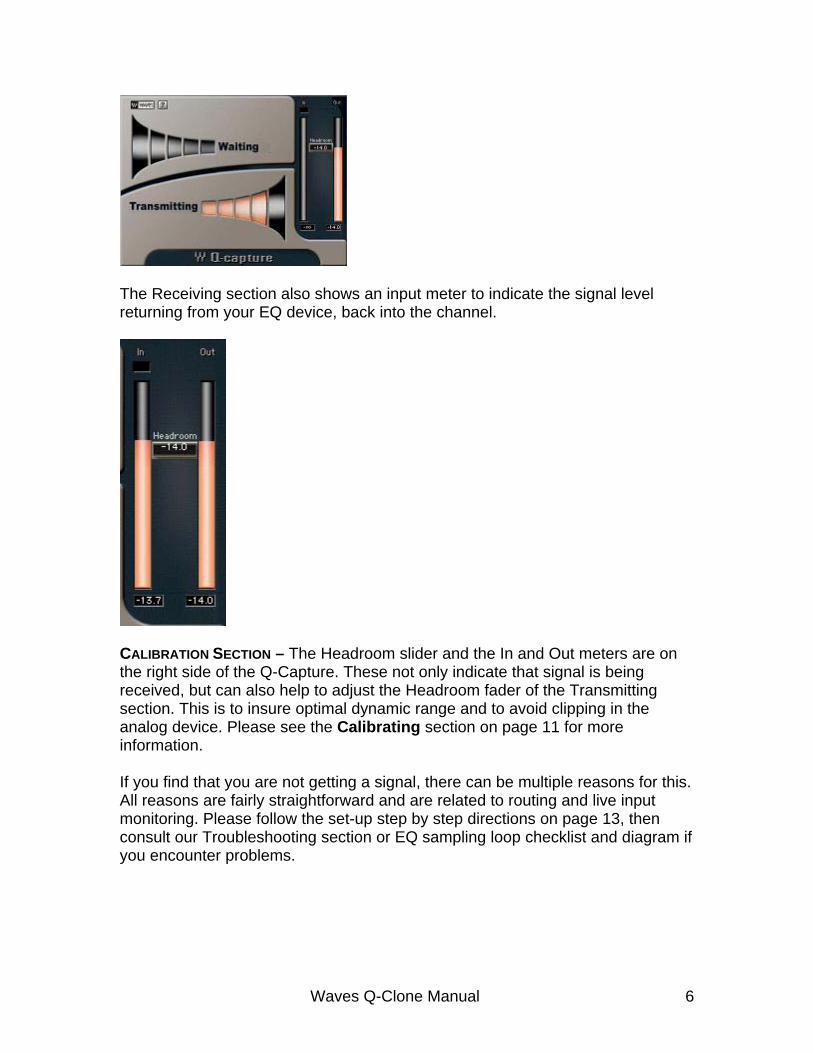
THE RECEIVING SECTION – The Q-Capture plug-in shows the Receiving section in the top part. This section takes the live track input from the sampled EQ output and displays a mode status: “Waiting” or “Receiving”. When the status indicates “Receiving”, this means that a signal is being received and that the system is ready for work. When the word “Waiting” shows up, the loop (described in the set up section) is not completed and the cloning signal is not returning to the Q-Capture.
Waves Q-Clone Manual 5
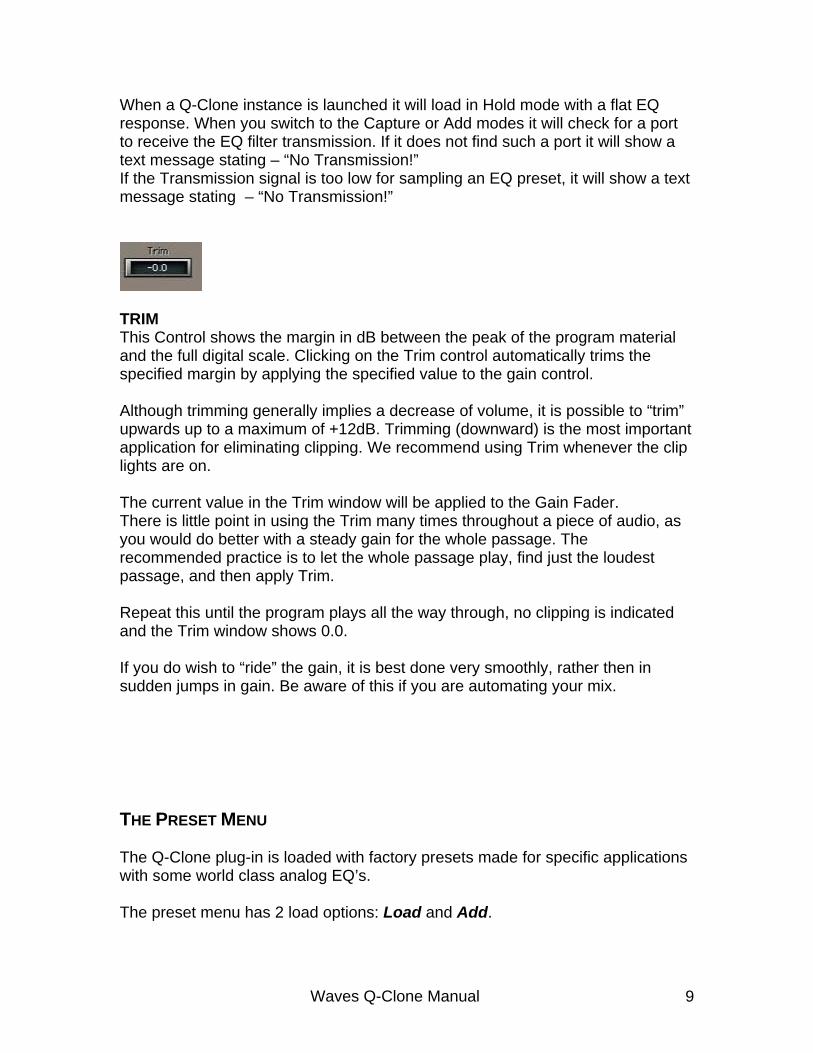
The Receiving section also shows an input meter to indicate the signal level returning from your EQ device, back into the channel.
CALIBRATION SECTION – The Headroom slider and the In and Out meters are on the right side of the Q-Capture. These not only indicate that signal is being received, but can also help to adjust the Headroom fader of the Transmitting section. This is to insure optimal dynamic range and to avoid clipping in the analog device. Please see the Calibrating section on page 11 for more information. If you find that you are not getting a signal, there can be multiple reasons for this. All reasons are fairly straightforward and are related to routing and live input monitoring. Please follow the set-up step by step directions on page 13, then consult our Troubleshooting section or EQ sampling loop checklist and diagram if you encounter problems.
Waves Q-Clone Manual 6

Q-Clone Component The Q-Clone plug-in has 2 main controls - Gain and Mode. It also has a Scale control for the frequency response graph. The Mode control shows: Capture, Hold and Add.
CAPTURE – Capture sets the plug-in to adapt its filter purely to the settings in the cloned EQ device. This mode can only work when the Q-Capture component is active. When hidden, the plug-in will automatically assume Hold mode. At any time you can open the GUI (Graphic User Interface) of the instance that you wish to set.
HOLD – In Hold mode the plug-in is processing with the filter currently sampled. Thus it is not receiving further changes until it is changed to the Capture or Add settings.
ADD – Add allows the plug-in to receive updates on top of the currently cloned EQ. If you want to make a change to the current setting then you can put the plug-in into this mode. The settings you make with your EQ will be cloned and added to the current filter. This is exactly like adding another instance of the Q-
Waves Q-Clone Manual 7

Clone, except that the overall EQ will be shown in a single graph and the CPU usage will be that of only a single instance. Please note that to switch from Capture to Add Mode, or vice-versa, you must first go through Hold mode.
FREQUENCY RESPONSE GRAPH The larger part of the Q-Clone GUI shows a frequency response graph. It has a logarithmic frequency scale in the horizontal showing 25 Hz to 16 kHz and Gain in the vertical axis showing +/- 16dB or +/- 30dB.
GRAPH SCALE CONTROL – The Graph Scale Control allows you to choose either +/-16 gain or +/-30dB gain as the scale of measurement for vertical axis of the Q-Clone component.
GAIN FADER - The Gain control is a continuous fader going from -48dB to +12dB. The default setting is 0dB. To the right of the EQ graph display there is output metering.
Waves Q-Clone Manual 8
When a Q-Clone instance is launched it will load in Hold mode with a flat EQ response. When you switch to the Capture or Add modes it will check for a port to receive the EQ filter transmission. If it does not find such a port it will show a text message stating – “No Transmission!” If the Transmission signal is too low for sampling an EQ preset, it will show a text message stating – “No Transmission!”
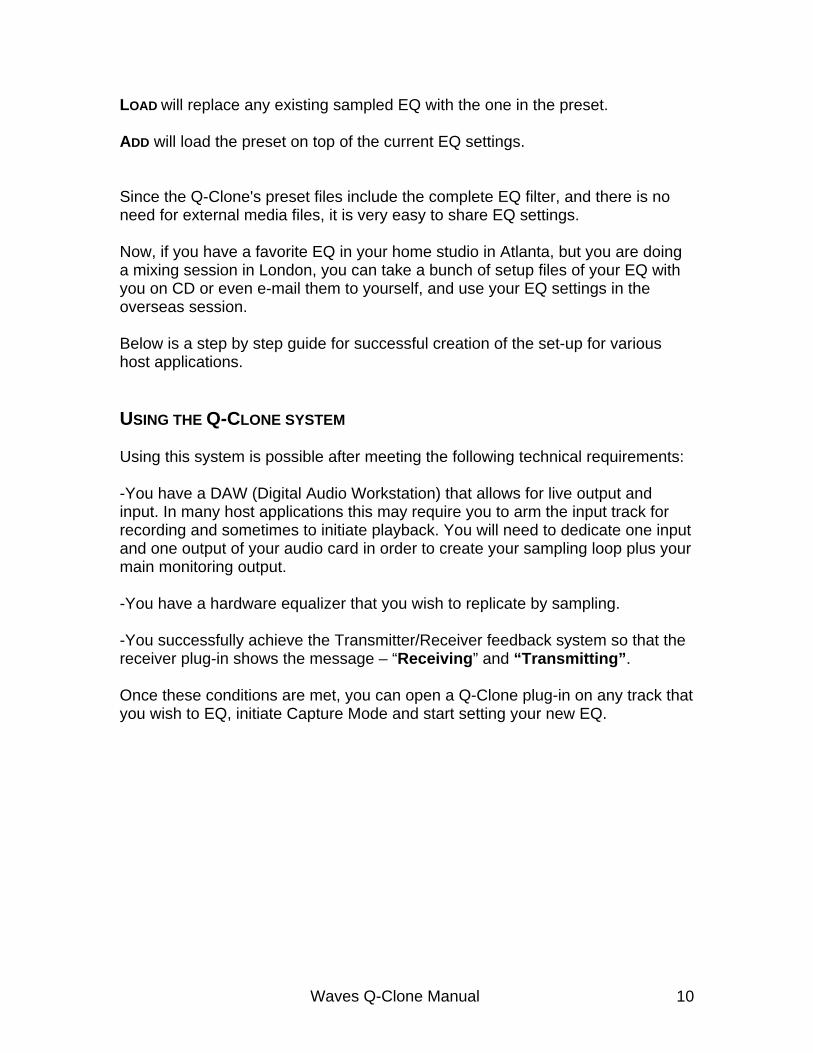
TRIM This Control shows the margin in dB between the peak of the program material and the full digital scale. Clicking on the Trim control automatically trims the specified margin by applying the specified value to the gain control. Although trimming generally implies a decrease of volume, it is possible to “trim” upwards up to a maximum of +12dB. Trimming (downward) is the most important application for eliminating clipping. We recommend using Trim whenever the clip lights are on. The current value in the Trim window will be applied to the Gain Fader. There is little point in using the Trim many times throughout a piece of audio, as you would do better with a steady gain for the whole passage. The recommended practice is to let the whole passage play, find just the loudest passage, and then apply Trim. Repeat this until the program plays all the way through, no clipping is indicated and the Trim window shows 0.0. If you do wish to “ride” the gain, it is best done very smoothly, rather then in sudden jumps in gain. Be aware of this if you are automating your mix. THE PRESET MENU The Q-Clone plug-in is loaded with factory presets made for specific applications with some world class analog EQ’s. The preset menu has 2 load options: Load and Add.
Waves Q-Clone Manual 9
LOAD will replace any existing sampled EQ with the one in the preset. ADD will load the preset on top of the current EQ settings. Since the Q-Clone's preset files include the complete EQ filter, and there is no need for external media files, it is very easy to share EQ settings. Now, if you have a favorite EQ in your home studio in Atlanta, but you are doing a mixing session in London, you can take a bunch of setup files of your EQ with you on CD or even e-mail them to yourself, and use your EQ settings in the overseas session. Below is a step by step guide for successful creation of the set-up for various host applications. USING THE Q-CLONE SYSTEM Using this system is possible after meeting the following technical requirements: -You have a DAW (Digital Audio Workstation) that allows for live output and input. In many host applications this may require you to arm the input track for recording and sometimes to initiate playback. You will need to dedicate one input and one output of your audio card in order to create your sampling loop plus your main monitoring output. -You have a hardware equalizer that you wish to replicate by sampling. -You successfully achieve the Transmitter/Receiver feedback system so that the receiver plug-in shows the message – “Receiving” and “Transmitting”. Once these conditions are met, you can open a Q-Clone plug-in on any track that you wish to EQ, initiate Capture Mode and start setting your new EQ.
Waves Q-Clone Manual 10

CALIBRATING: In this section we will learn how to calibrate the Q-Clone with our Hardware EQ in order to achieve the best cloning results. First, we should explain “Headroom”. Every electronic channel, digital or analog, has a maximum signal level that it can pass. Attempting to exceed this typically results in hard clipping, where the waveform is leveled off flat when it reaches the limit. The maximum level is much more difficult to define for analog tape machines than in digital recording. In analog machines, a higher recording level can be obtained by accepting some distortion on signal peaks. This is possible because it is low-order distortion, generating mostly third order harmonics. Hard clipping such as that which occurs in electronic circuitry or digital storage generates lots of high-order harmonics which are far more obtrusive. Hard clipping is not normally detectable if it is very brief (about 1 millisecond) but if sustained it sounds very unpleasant. Both in recording and in live music, the level of signals arriving is not entirely predictable. It is optimal to have some margin of safety between the "usual" operating level and the point where clipping occurs. In calibrating the Q-Clone we want to achieve a nominal output level (Transmitting signal) and input level (Receiving signal) into your EQ hardware. To calibrate the Q-Clone you first need to set up your hardware EQ with the plug-in in your Audio host application (as explained in your host application set-up chapter, below). When the connection is right (and everything is set as explained in the instructions) you should see the word “Receiving” in the top part of the Q-Capture and the word “Transmitting” at the bottom part of it.
or
Waves Q-Clone Manual 11
If the set up is not working properly, you will see the word “Waiting” in one or both parts of the GUI. This can happen when the physical loop between your audio host, audio card and EQ hardware device is not complete. You would also get the "Waiting" message if the I/O on the Audio/AUX channel is not assigned to the correct I/O of your audio card. After opening the Q-Capture you will see that the calibration fader is set to give 14db of headroom by default. This 14db is the amount of headroom (+/-) that most EQ hardware devices allow you to work with. This means that every gain parameter in your EQ device has a gain space from -14db (cut) to +14 db (boost). In EQ devices that have less then 14db of headroom, we recommend calibrating to 14db in order to be on the safe side if the EQ device is not calibrated internally. The Headroom fader will control the output and the input of the Q-Capture signal together. Adjust your Hardware general output gain with the input meter. The goal is to match the levels of the ‘In’ and the ‘Out’ meters. Now open the Q-Clone component and see that the frequency response line in the frequency display is flat on the 0db axis. If the line is not exactly on the 0db line you can still match it to this point by changing the output gain of your EQ hardware device (using the EQ device fader or knob).
Waves Q-Clone Manual 12

Quick Start up and Set up: Here are basic, step by step directions on how to prepare your session to use the Q-Clone and clone your EQ device for various Host Applications: Pro-tools 6.7 LE and TDM:
1. Connect a cable from one of your audio card output ports into the input of the EQ device.
2. Connect a cable from the output of the EQ device to your audio card input port.
3. Set all of the frequencies gain knobs on your EQ device to 0 db and turn any filters off.
4. Open your recording session. 5. Open a new AUX (Auxiliary) track. 6. Assign the output of the new AUX track to be the same number as the
output port that you used in step 1. 7. Assign the input of the new AUX track to be the same number as the input
port that you used in step 2.
Waves Q-Clone Manual 13
8. Open the Q-Capture on this AUX track and make sure that this is the only plug-in that you have on this track’s plug-in list.
9. Calibrate the Q-Capture with your EQ device as instructed in the Calibration section on page 11.
10. Go to your Audio track (where you want to use the cloned set-up of your EQ device) and open the Q-Clone on its insert.
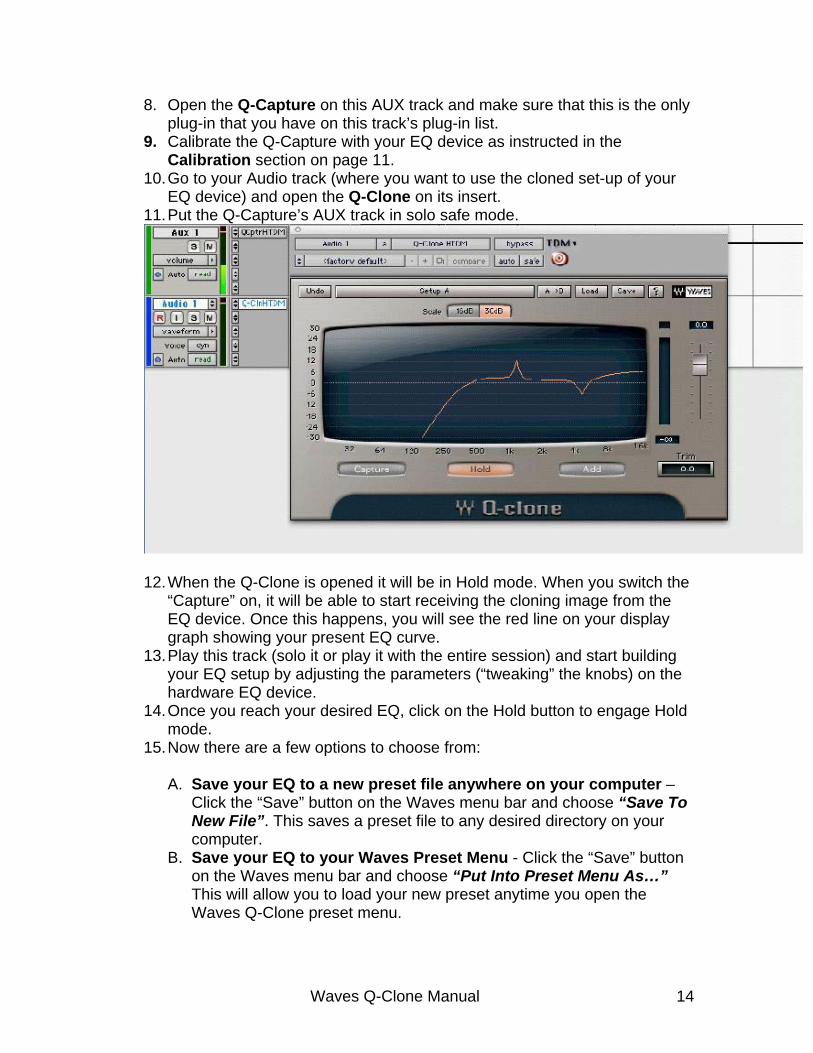
11. Put the Q-Capture’s AUX track in solo safe mode.
12. When the Q-Clone is opened it will be in Hold mode. When you switch the
“Capture” on, it will be able to start receiving the cloning image from the EQ device. Once this happens, you will see the red line on your display graph showing your present EQ curve.
13. Play this track (solo it or play it with the entire session) and start building your EQ setup by adjusting the parameters (“tweaking” the knobs) on the hardware EQ device.
14. Once you reach your desired EQ, click on the Hold button to engage Hold mode.
15. Now there are a few options to choose from:
A. Save your EQ to a new preset file anywhere on your computer – Click the “Save” button on the Waves menu bar and choose “Save To New File”. This saves a preset file to any desired directory on your computer.
B. Save your EQ to your Waves Preset Menu - Click the “Save” button on the Waves menu bar and choose “Put Into Preset Menu As…” This will allow you to load your new preset anytime you open the Waves Q-Clone preset menu.
Waves Q-Clone Manual 14

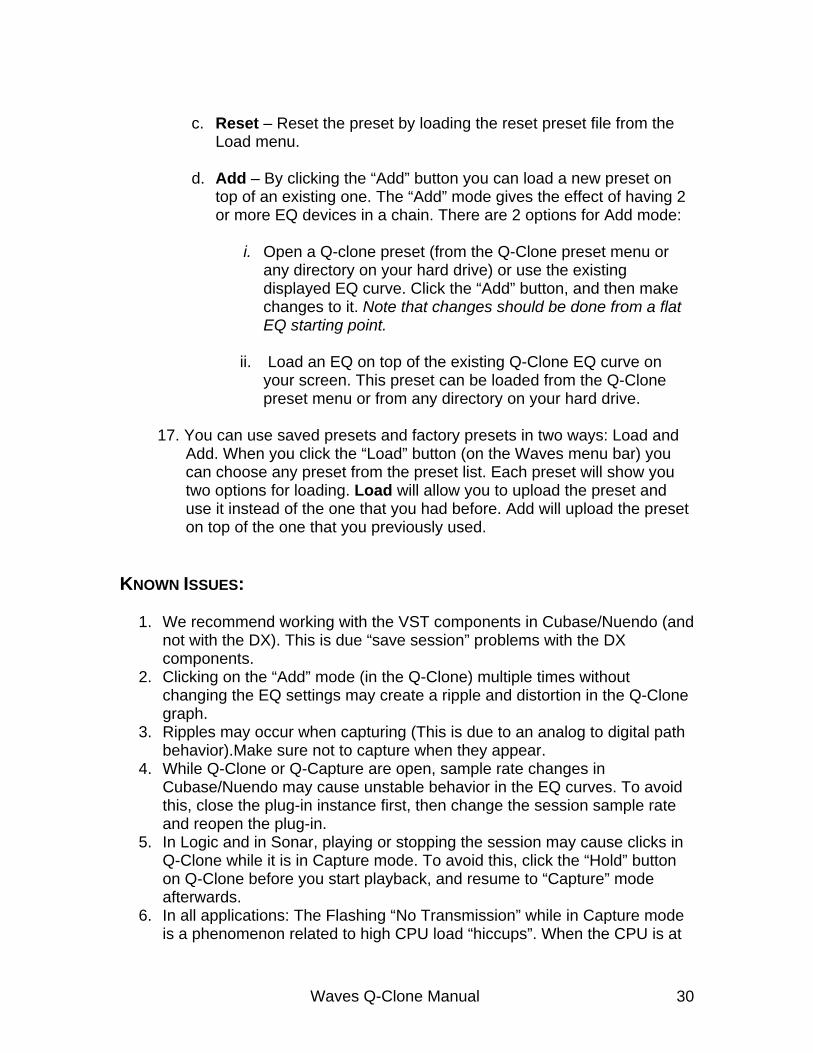
C. Reset – Reset the preset by loading the “reset preset” file from the Load menu.
D. Add on top – By clicking the “Add” button you can load a new preset on top of an existing one. The “Add” mode gives the effect of having 2 or more EQ devices in a chain. There are 2 options for Add mode:
i. Open a Q-clone preset (from the Q-Clone preset menu or any
directory on your hard drive) or use the existing displayed EQ curve. Click the “Add” button, and then make changes to it. Note that changes should be done from a flat EQ starting point.
ii. Load an EQ on top of the existing Q-Clone EQ curve on your
screen. This preset can be loaded from the Q-Clone preset menu or from any directory on your hard drive.
Nuendo/Cubase SX 2.x-3:
1. Connect a cable from one of your audio card output ports into the input of the EQ device.
2. Connect a cable from the output of the EQ device to your audio card input port.
3. Set all of the frequencies gain knobs on your EQ device to 0 db and turn any filters off.
4. Open your Nuendo/Cubase SX recording session. 5. Open a new mono audio track. It will be dedicated to the Q-Capture
component. 6. Open “devices” from the Cubase menu bar and open “Device Setup”.
Choose the “VST Audiobay” and uncheck the “Direct Monitoring” checkbox.
Waves Q-Clone Manual 15

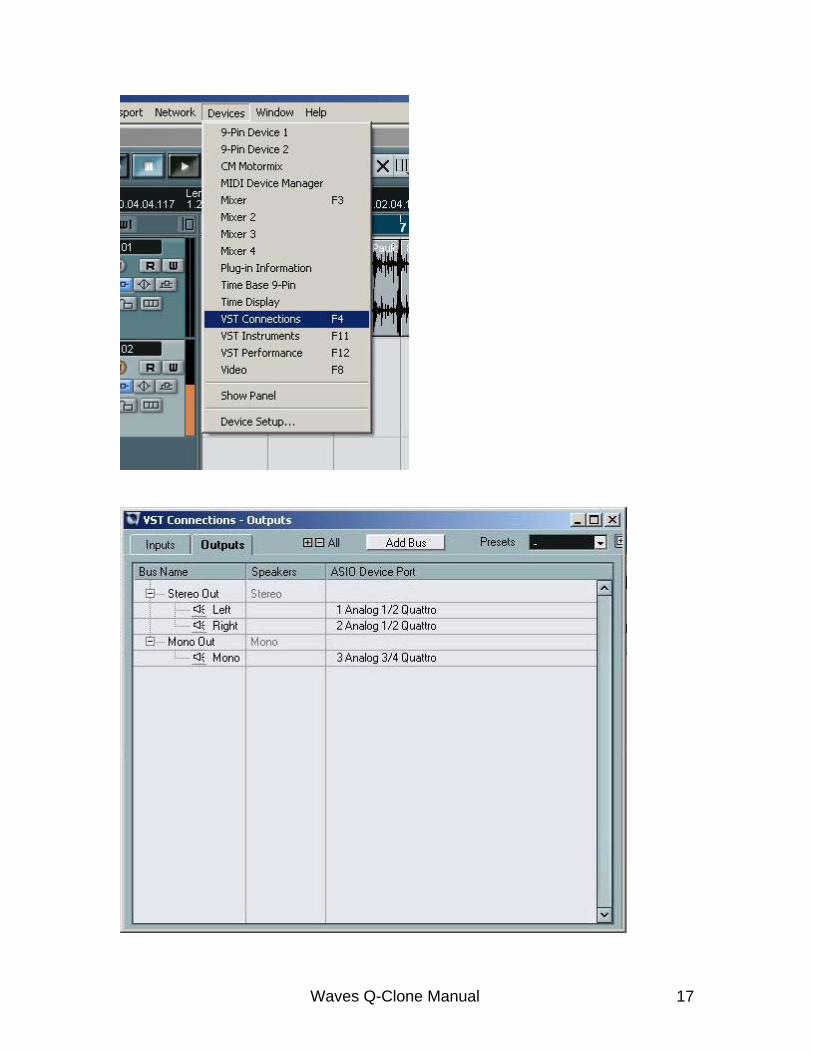
7. Set the I/O of this track to match the insert I/O that you used in steps 1 & 2. The basic I/O setting can be done from the Nuendo/Cubase Menu Bar under Devices>VST Connections (as seen in the following pictures).
Waves Q-Clone Manual 16
Waves Q-Clone Manual 17
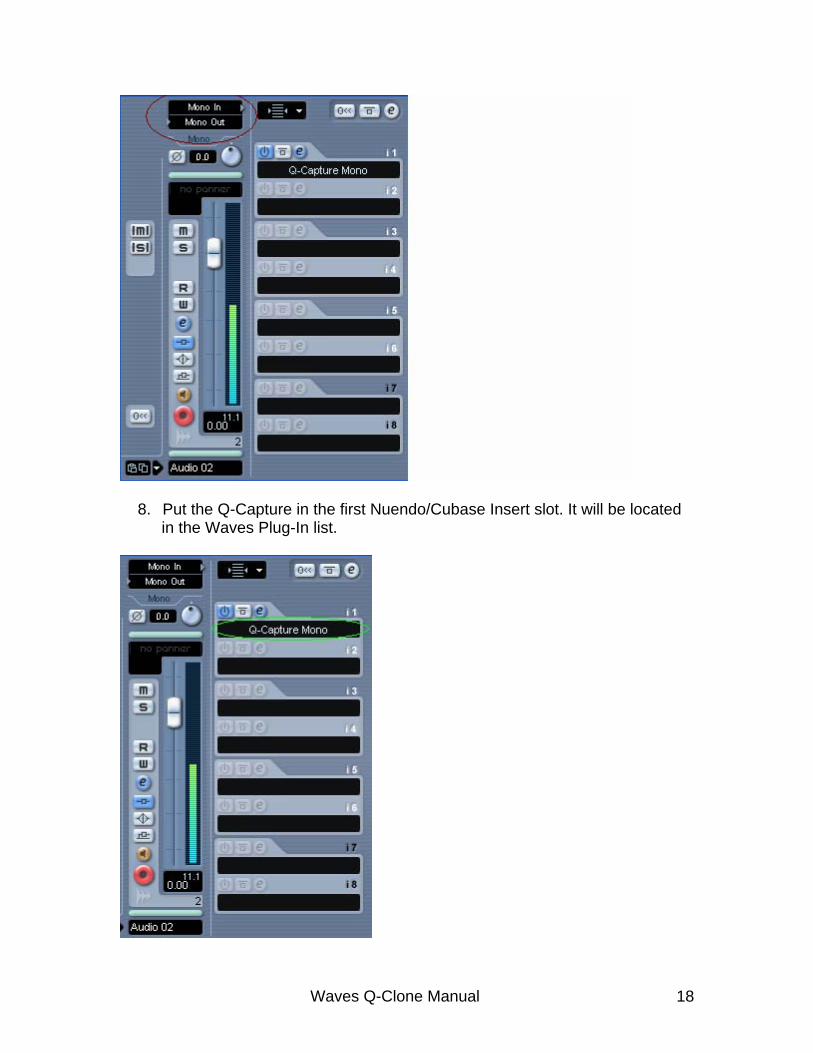
8. Put the Q-Capture in the first Nuendo/Cubase Insert slot. It will be located in the Waves Plug-In list.
Waves Q-Clone Manual 18

9. Arm the monitor (push the monitor button) on this track
10. Calibrate your EQ hardware with the Q-Capture following the directions on
the Calibration chapter on page 11. 11. On the audio track that you want to process, open the Q-Clone in the insert
channel of that track. It will be located in the Waves Plug-In list.
12. Make sure that the I/O on this channel is different than the I/O on the Q-Capture’s channel.
Waves Q-Clone Manual 19

13. When the Q-Clone is opened it will be in “Hold” mode. When you switch the “Capture” on, it will be able to start receiving the cloning image from the EQ device. Once this happens, you will see the red line on your display graph showing your present EQ curve.
14. Play this track (solo it or play it with the entire session) and start building
your EQ setup by adjusting the parameters (“tweaking” the knobs) on the hardware EQ device.
15. Once you reach your desired EQ, click on the Hold button to engage Hold
mode. 16. Now there are a few options to choose from:
A. Save your EQ to a new preset file anywhere on your computer – Click the “Save” button on the Waves menu bar and choose “Save To New File”. This saves a preset file to any desired directory on your computer. B. Save your EQ to your Waves Preset Menu - Click the “Save” button on the Waves menu bar and choose “Put Into Preset Menu As…” This will allow you to load your new preset anytime you open the Waves Q-Clone preset menu. C. Reset – Reset the preset by loading the reset preset file from the Load menu.
Waves Q-Clone Manual 20

D. Add – By clicking the “Add” button you can load a new preset on top of an existing one. The “Add” mode gives the effect of having 2 or more EQ devices in a chain. There are 2 options for Add mode:
i. Open a Q-clone preset (from the Q-Clone preset menu or any
directory on your hard drive) or use the existing displayed EQ curve. Click the “Add” button, and then make changes to it. Note that changes should be done from a flat EQ starting point.
ii. Load an EQ on top of the existing Q-Clone EQ curve on your
screen. This preset can be loaded from the Q-Clone preset menu or from any directory on your hard drive.
17. You can use saved presets and factory presets in two ways: Load and Add. When you click the “Load” button (on the Waves menu bar) you can choose any preset from the preset list. Each preset will show you two options for loading. Load will allow you to upload the preset and use it instead of the one that you had before. Add will upload the preset on top of the one that you previously used.
Sonar 3.x :
1. Connect a cable from one of your audio card output ports into the input of the EQ device.
2. Connect a cable from the output of the EQ device to your audio card input port.
3. Set all of the frequencies gain knobs on your EQ device to 0 db and turn any filters off.
4. Open a new Audio track in your session. 5. Set the I/O of this track to match the insert I/O that you used in steps 1
and 2.
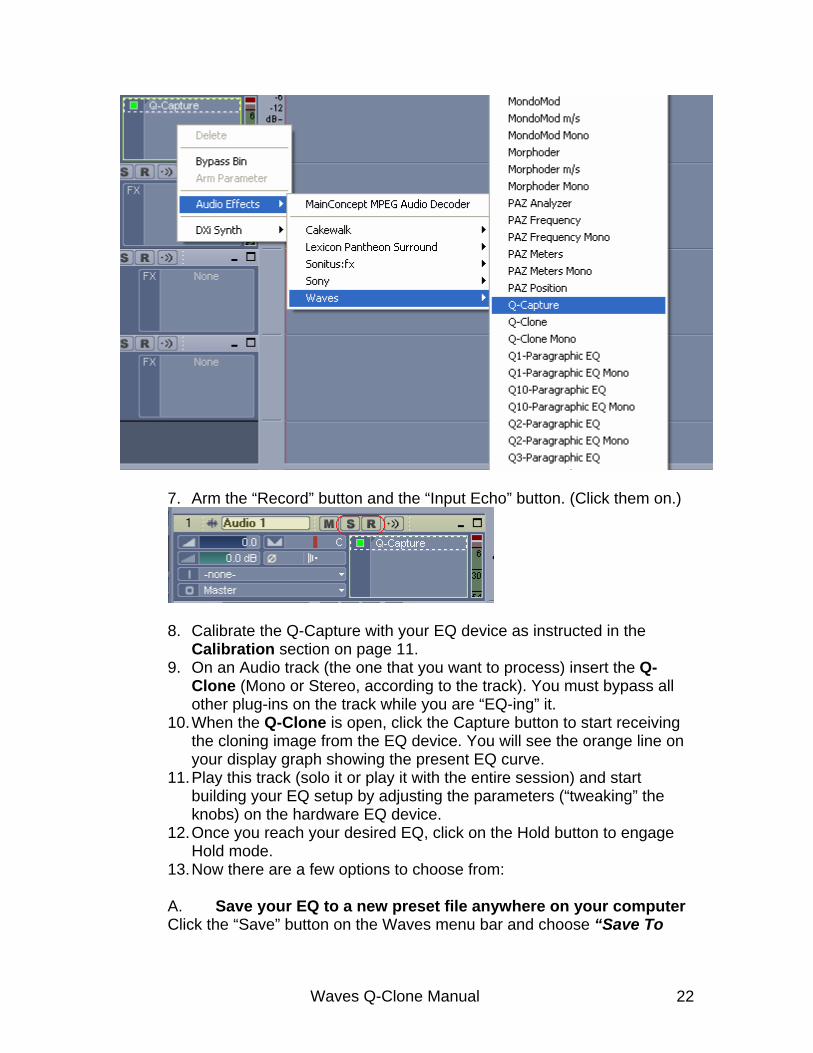
6. In the track’s Audio Effects window, insert the Q-Capture (from the
Waves plug-ins list).
Waves Q-Clone Manual 21
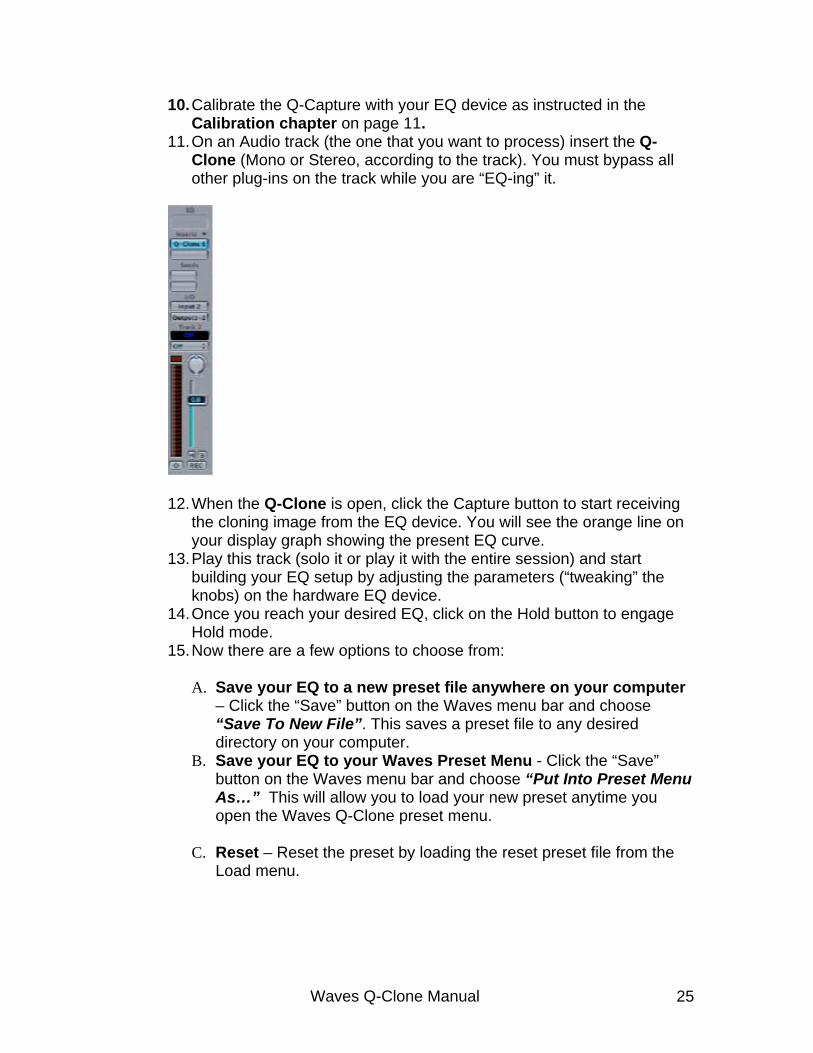
7. Arm the “Record” button and the “Input Echo” button. (Click them on.)
8. Calibrate the Q-Capture with your EQ device as instructed in the
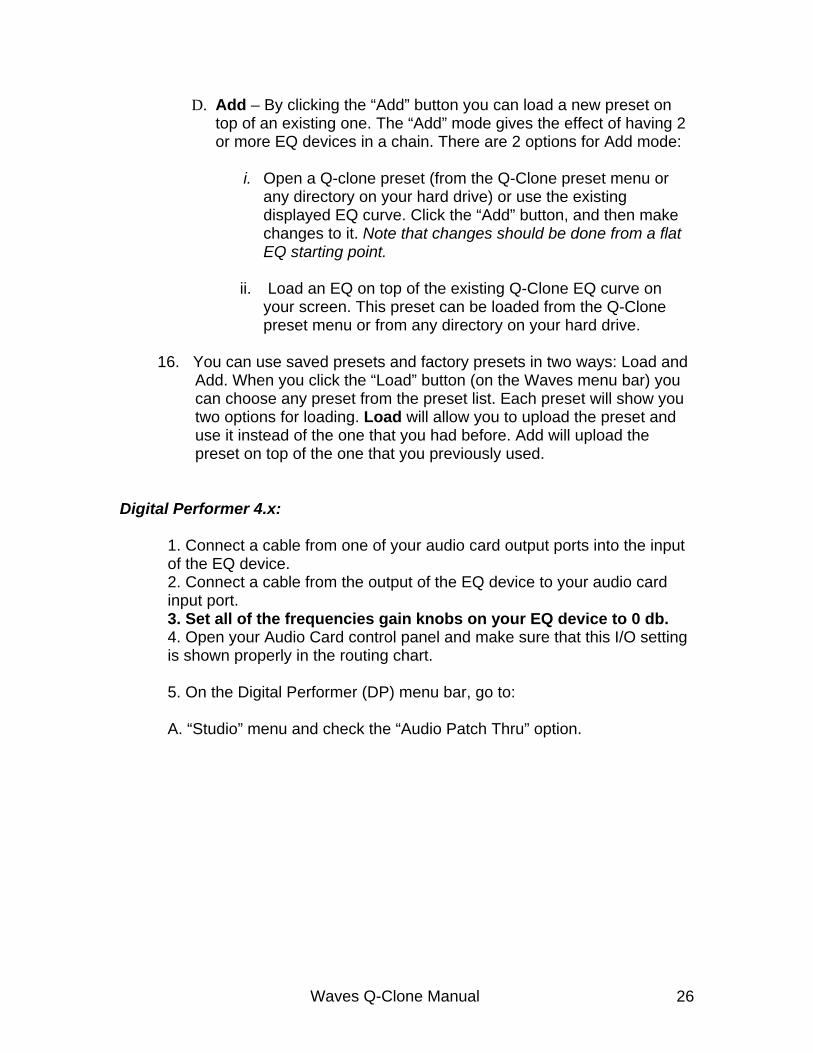
Calibration section on page 11. 9. On an Audio track (the one that you want to process) insert the Q-
Clone (Mono or Stereo, according to the track). You must bypass all other plug-ins on the track while you are “EQ-ing” it.
10. When the Q-Clone is open, click the Capture button to start receiving the cloning image from the EQ device. You will see the orange line on your display graph showing the present EQ curve.
11. Play this track (solo it or play it with the entire session) and start building your EQ setup by adjusting the parameters (“tweaking” the knobs) on the hardware EQ device.
12. Once you reach your desired EQ, click on the Hold button to engage Hold mode.
13. Now there are a few options to choose from: A. Save your EQ to a new preset file anywhere on your computer Click the “Save” button on the Waves menu bar and choose “Save To
Waves Q-Clone Manual 22

New File”. This saves a preset file to any desired directory on your computer.
B. Save your EQ to your Waves Preset Menu - Click the “Save” button on the Waves menu bar and choose “Put Into Preset Menu As…” This will allow you to load your new preset anytime you open the Waves Q-Clone preset menu. C. Reset – Reset the preset by loading the reset preset file from the Load menu.
D. Add – By clicking the “Add” button you can load a new preset on top of an existing one. The “Add” mode gives the effect of having 2 or more EQ devices in a chain. There are 2 options for Add mode:
i. Open a Q-clone preset (from the Q-Clone preset menu or any directory on your hard drive) or use the existing displayed EQ curve. Click the “Add” button, and then make changes to it. Note that changes should be done from a flat EQ starting point.
ii. Load an EQ on top of the existing Q-Clone EQ curve on your screen. This preset can be loaded from the Q-Clone preset menu or from any directory on your hard drive.
14. You can use saved presets and factory presets in two ways: Load and Add. When you click the “Load” button (on the Waves menu bar) you can choose any preset from the preset list. Each preset will show you two options for loading. Load will allow you to upload the preset and use it instead of the one that you had before. Add will upload the preset on top of the one that you previously had used.
Logic Pro 7:
1. Connect a cable from one of your audio card output ports into the input
of the EQ device. 2. Connect a cable from the output of the EQ device to your audio card
input port. 3. Set all of the frequencies gain knobs on your EQ device to 0 db. 4. Open your Audio Card control panel and make sure that this in/out
setting is shown properly in the routing chart. 5. Go to Logic menu bar and open the Audio menu. Choose “Audio
Hardware & Drivers…”. In this dialog box choose the “Drivers” tab and check the “Software Monitoring” check box (If it is not already checked).
Waves Q-Clone Manual 23

6. Open your Logic session and open a new Audio file (which will be
dedicated to the Q-Capture). 7. On this track, assign the input of the channel to the input of your audio
card that receives the hardware output cable (input Y). 8. Also on this track assign the output of the channel to the output of your
audio card that receives the hardware input cable (output X).
9. Click the Rec button of this channel On and hit play and stop to
activate the plug-in. One this is happening you automatically see the signal from the plug in the channel’s meter.
Waves Q-Clone Manual 24
10. Calibrate the Q-Capture with your EQ device as instructed in the Calibration chapter on page 11.
11. On an Audio track (the one that you want to process) insert the Q-Clone (Mono or Stereo, according to the track). You must bypass all other plug-ins on the track while you are “EQ-ing” it.
12. When the Q-Clone is open, click the Capture button to start receiving
the cloning image from the EQ device. You will see the orange line on your display graph showing the present EQ curve.
13. Play this track (solo it or play it with the entire session) and start building your EQ setup by adjusting the parameters (“tweaking” the knobs) on the hardware EQ device.
14. Once you reach your desired EQ, click on the Hold button to engage Hold mode.
15. Now there are a few options to choose from:
A. Save your EQ to a new preset file anywhere on your computer – Click the “Save” button on the Waves menu bar and choose “Save To New File”. This saves a preset file to any desired directory on your computer.
B. Save your EQ to your Waves Preset Menu - Click the “Save” button on the Waves menu bar and choose “Put Into Preset Menu As…” This will allow you to load your new preset anytime you open the Waves Q-Clone preset menu.
C. Reset – Reset the preset by loading the reset preset file from the
Load menu.
Waves Q-Clone Manual 25
D. Add – By clicking the “Add” button you can load a new preset on top of an existing one. The “Add” mode gives the effect of having 2 or more EQ devices in a chain. There are 2 options for Add mode:
i. Open a Q-clone preset (from the Q-Clone preset menu or
any directory on your hard drive) or use the existing displayed EQ curve. Click the “Add” button, and then make changes to it. Note that changes should be done from a flat EQ starting point.
ii. Load an EQ on top of the existing Q-Clone EQ curve on
your screen. This preset can be loaded from the Q-Clone preset menu or from any directory on your hard drive.
16. You can use saved presets and factory presets in two ways: Load and
Add. When you click the “Load” button (on the Waves menu bar) you can choose any preset from the preset list. Each preset will show you two options for loading. Load will allow you to upload the preset and use it instead of the one that you had before. Add will upload the preset on top of the one that you previously used.
Digital Performer 4.x:
1. Connect a cable from one of your audio card output ports into the input of the EQ device. 2. Connect a cable from the output of the EQ device to your audio card input port. 3. Set all of the frequencies gain knobs on your EQ device to 0 db. 4. Open your Audio Card control panel and make sure that this I/O setting is shown properly in the routing chart. 5. On the Digital Performer (DP) menu bar, go to: A. “Studio” menu and check the “Audio Patch Thru” option.
Waves Q-Clone Manual 26
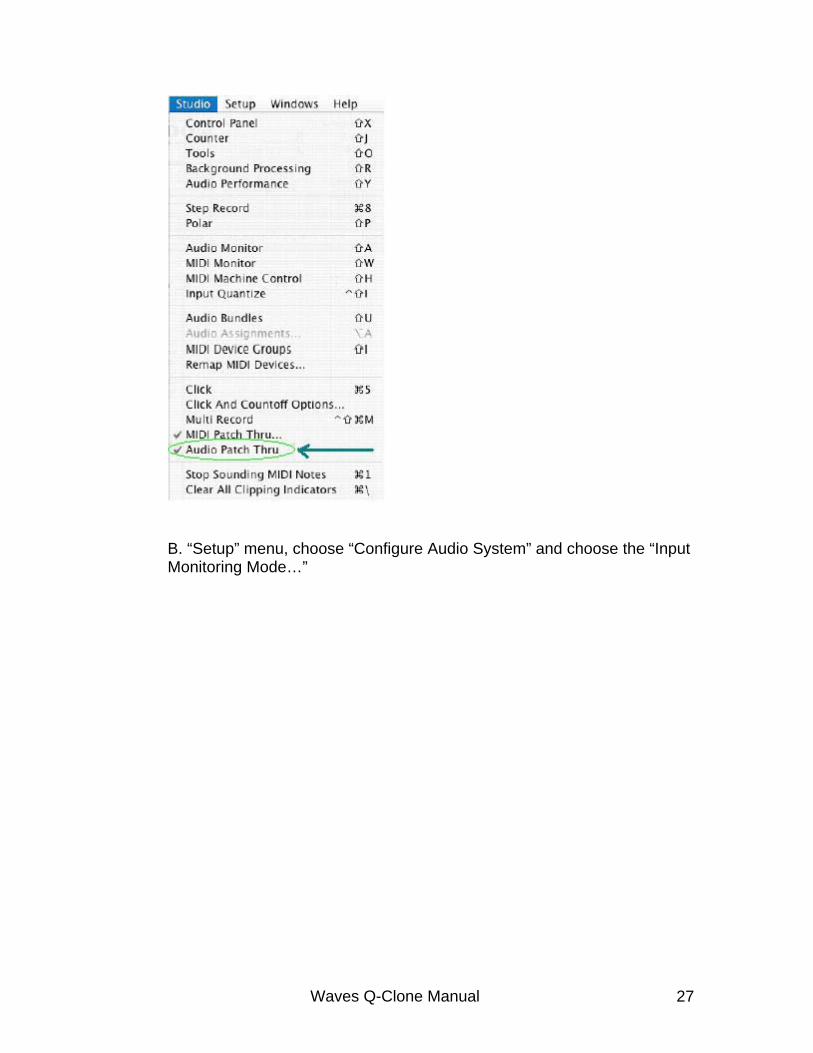
B. “Setup” menu, choose “Configure Audio System” and choose the “Input Monitoring Mode…”
Waves Q-Clone Manual 27

In this dialog box check the “Always” option and click OK.
6. Open your DP session and open a new Audio file (which will be
dedicated to the Q-Capture). 7. On this dedicated track, assign the input of the channel to the audio
card input that is connected to the hardware output cable (input Y). 8. Also on this dedicated track, assign the output of the channel to the
output of your audio card which receives the hardware input cable (output X).
9. Arm the “Rec” button on this channel.
Waves Q-Clone Manual 28

11. Calibrate the Q-Capture with your EQ device as instructed in the
Calibration section on page 11. 12. On an Audio track (the one that you want to process) insert the Q-
Clone (Mono or Stereo, according to the track). You must bypass all other plug-ins on the track while you are “EQ-ing” it.
13. When the Q-Clone is open, click the Capture button to start receiving the cloning image from the EQ device. You will see the orange line on your display graph showing the present EQ curve.
14. Play this track (solo it or play it with the entire session) and start building your EQ setup by adjusting the parameters (“tweaking” the knobs) on the hardware EQ device.
15. Once you reach your desired EQ, click on the Hold button to engage Hold mode.
16. Now there are a few options to choose from: a. Save your EQ to a new preset file anywhere on your computer
Click the “Save” button on the Waves menu bar and choose “Save To New File”. This saves a preset file to any desired directory on your computer.
b. Save your EQ to your Waves Preset Menu - Click the “Save” button on the Waves menu bar and choose “Put Into Preset Menu As…” This will allow you to load your new preset anytime you open the Waves Q-Clone preset menu.
Waves Q-Clone Manual 29
Waves Q-Clone Manual 30
c. Reset – Reset the preset by loading the reset preset file from the
Load menu.
d. Add – By clicking the “Add” button you can load a new preset on top of an existing one. The “Add” mode gives the effect of having 2 or more EQ devices in a chain. There are 2 options for Add mode:
i. Open a Q-clone preset (from the Q-Clone preset menu or
any directory on your hard drive) or use the existing displayed EQ curve. Click the “Add” button, and then make changes to it. Note that changes should be done from a flat EQ starting point.
ii. Load an EQ on top of the existing Q-Clone EQ curve on
your screen. This preset can be loaded from the Q-Clone preset menu or from any directory on your hard drive.
17. You can use saved presets and factory presets in two ways: Load and
Add. When you click the “Load” button (on the Waves menu bar) you can choose any preset from the preset list. Each preset will show you two options for loading. Load will allow you to upload the preset and use it instead of the one that you had before. Add will upload the preset on top of the one that you previously used.
KNOWN ISSUES:
1. We recommend working with the VST components in Cubase/Nuendo (and not with the DX). This is due “save session” problems with the DX components.
2. Clicking on the “Add” mode (in the Q-Clone) multiple times without changing the EQ settings may create a ripple and distortion in the Q-Clone graph.
3. Ripples may occur when capturing (This is due to an analog to digital path behavior).Make sure not to capture when they appear.
4. While Q-Clone or Q-Capture are open, sample rate changes in Cubase/Nuendo may cause unstable behavior in the EQ curves. To avoid this, close the plug-in instance first, then change the session sample rate and reopen the plug-in.
5. In Logic and in Sonar, playing or stopping the session may cause clicks in Q-Clone while it is in Capture mode. To avoid this, click the “Hold” button on Q-Clone before you start playback, and resume to “Capture” mode afterwards.
6. In all applications: The Flashing “No Transmission” while in Capture mode is a phenomenon related to high CPU load “hiccups”. When the CPU is at
Waves Q-Clone Manual 31
maximum capacity, the real time tasks have dropouts which result in flashing “No Transmission” messages.
7. Sonar will have a boost in the returned Capture signal. This can be fixed by applying digital corrective gain before the Q-Capture plug-in.
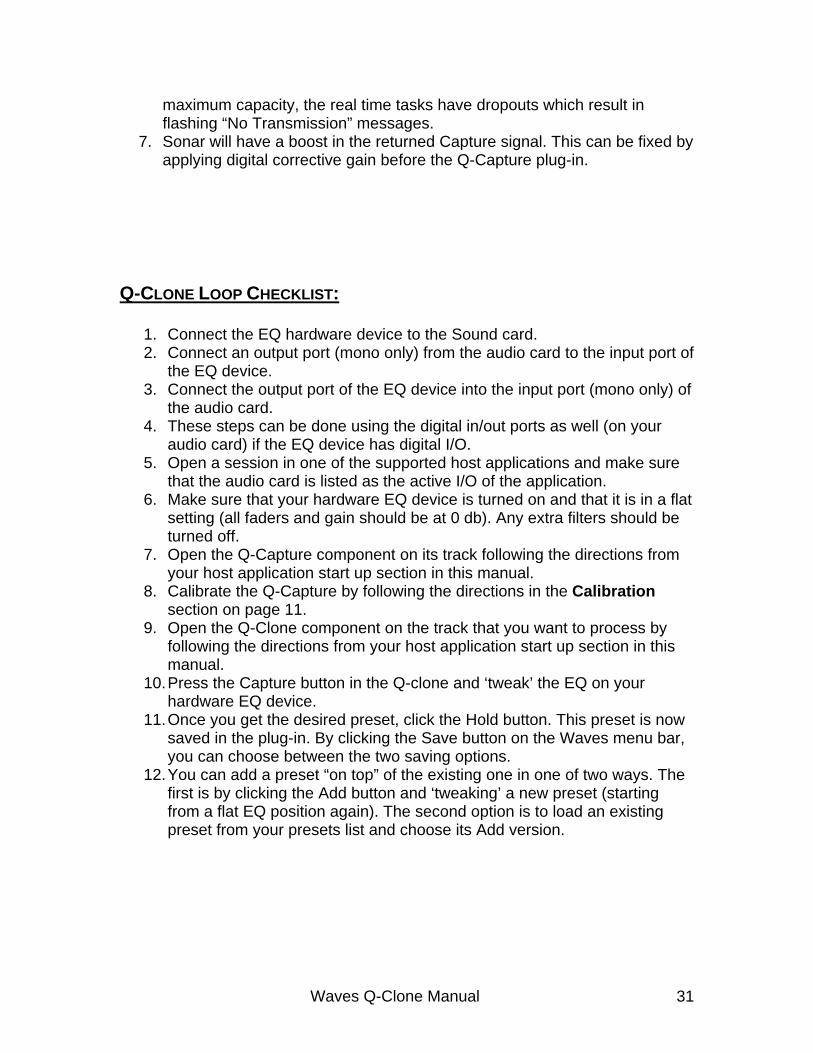
Q-CLONE LOOP CHECKLIST:
1. Connect the EQ hardware device to the Sound card. 2. Connect an output port (mono only) from the audio card to the input port of
the EQ device. 3. Connect the output port of the EQ device into the input port (mono only) of
the audio card. 4. These steps can be done using the digital in/out ports as well (on your
audio card) if the EQ device has digital I/O. 5. Open a session in one of the supported host applications and make sure
that the audio card is listed as the active I/O of the application. 6. Make sure that your hardware EQ device is turned on and that it is in a flat
setting (all faders and gain should be at 0 db). Any extra filters should be turned off.
7. Open the Q-Capture component on its track following the directions from your host application start up section in this manual.
8. Calibrate the Q-Capture by following the directions in the Calibration section on page 11.
9. Open the Q-Clone component on the track that you want to process by following the directions from your host application start up section in this manual.
10. Press the Capture button in the Q-clone and ‘tweak’ the EQ on your hardware EQ device.
11. Once you get the desired preset, click the Hold button. This preset is now saved in the plug-in. By clicking the Save button on the Waves menu bar, you can choose between the two saving options.
12. You can add a preset “on top” of the existing one in one of two ways. The first is by clicking the Add button and ‘tweaking’ a new preset (starting from a flat EQ position again). The second option is to load an existing preset from your presets list and choose its Add version.
Waves Q-Clone Manual 32
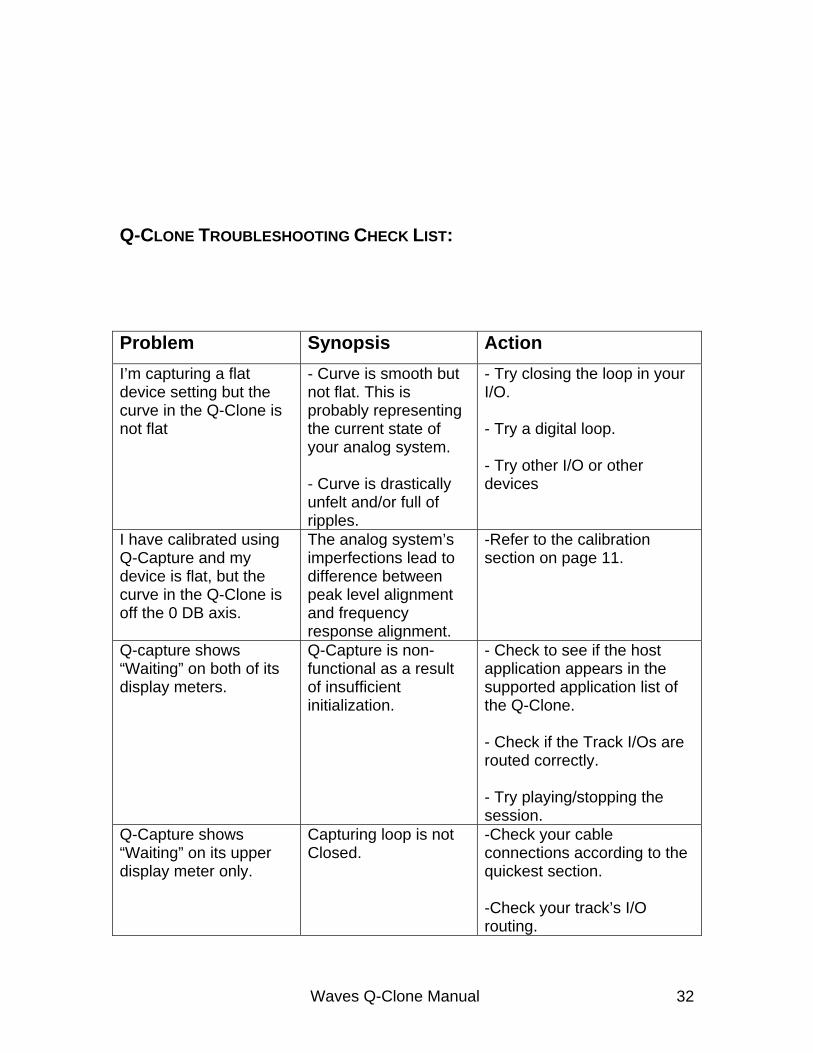
Q-CLONE TROUBLESHOOTING CHECK LIST: Problem Synopsis Action I’m capturing a flat device setting but the curve in the Q-Clone is not flat
- Curve is smooth but not flat. This is probably representing the current state of your analog system.
- Curve is drastically unfelt and/or full of ripples.
- Try closing the loop in your I/O. - Try a digital loop. - Try other I/O or other devices
I have calibrated using Q-Capture and my device is flat, but the curve in the Q-Clone is off the 0 DB axis.
The analog system’s imperfections lead to difference between peak level alignment and frequency response alignment.
-Refer to the calibration section on page 11.
Q-capture shows “Waiting” on both of its display meters.
Q-Capture is non-functional as a result of insufficient initialization.
- Check to see if the host application appears in the supported application list of the Q-Clone. - Check if the Track I/Os are routed correctly. - Try playing/stopping the session.
Q-Capture shows “Waiting” on its upper display meter only.
Capturing loop is not Closed.
-Check your cable connections according to the quickest section. -Check your track’s I/O routing.
Waves Q-Clone Manual 33
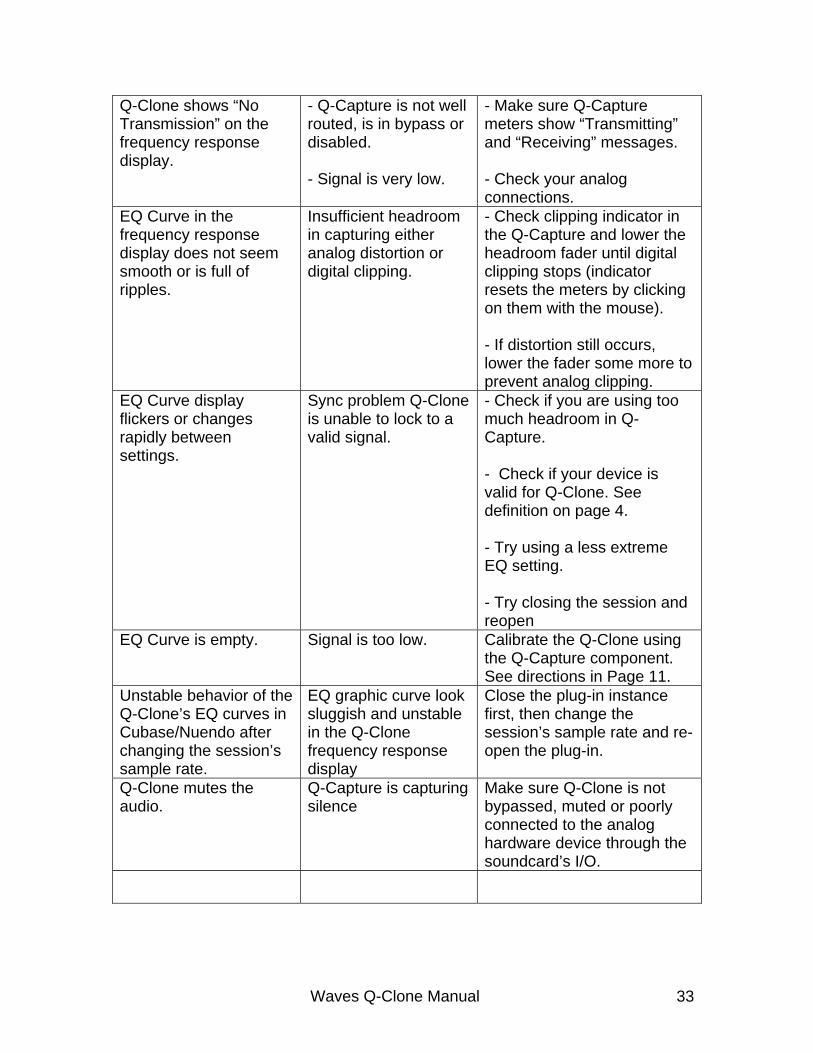
Q-Clone shows “No Transmission” on the frequency response display.
- Q-Capture is not well routed, is in bypass or disabled. - Signal is very low.
- Make sure Q-Capture meters show “Transmitting” and “Receiving” messages. - Check your analog connections.
EQ Curve in the frequency response display does not seem smooth or is full of ripples.
Insufficient headroom in capturing either analog distortion or digital clipping.
- Check clipping indicator in the Q-Capture and lower the headroom fader until digital clipping stops (indicator resets the meters by clicking on them with the mouse). - If distortion still occurs, lower the fader some more to prevent analog clipping.
EQ Curve display flickers or changes rapidly between settings.
Sync problem Q-Clone is unable to lock to a valid signal.
- Check if you are using too much headroom in Q-Capture. - Check if your device is valid for Q-Clone. See definition on page 4. - Try using a less extreme EQ setting. - Try closing the session and reopen
EQ Curve is empty. Signal is too low. Calibrate the Q-Clone using the Q-Capture component. See directions in Page 11.
Unstable behavior of the Q-Clone’s EQ curves in Cubase/Nuendo after changing the session’s sample rate.
EQ graphic curve look sluggish and unstable in the Q-Clone frequency response display
Close the plug-in instance first, then change the session’s sample rate and re-open the plug-in.
Q-Clone mutes the audio.
Q-Capture is capturing silence
Make sure Q-Clone is not bypassed, muted or poorly connected to the analog hardware device through the soundcard’s I/O.

Waves Q-Clone Manual 34