wavelink's te client for ios user guide · the te client for ios is optimized for ios devices,...
TRANSCRIPT

Wavelink's TE Client for iOS
User Guide
Version 1.0.01
Revised 6/4/2014

Copyright © 2014 LANDESK Software, Inc. and its affiliates. All rights reserved.
LANDESK and its logos are registered trademarks or trademarks of LANDESK Software, Inc. and its affiliates in the United States and/or other countries. Other brands and names may be claimed as the property of others.
Website: http:\\www.wavelink.com
LANDESK does not warrant that this document is error free and retains the right to make changes to this document or related product specifications and descriptions at any time without notice. LANDESK does not assume any obligation to update the information contained herein. This document is provided “AS IS” and without any guaranty, warranty, or license, express or implied, including but not limited to: fitness for a particular purpose, merchantability, non infringement of intellectual property, or other rights of any third party. Any LANDESK products referenced in this document are not intended for use in medical, life saving, or life sustaining applications. Third parties may have intellectual property rights relevant to this document and the technologies discussed herein.
2

Chapter 1: Installing and LicensingThe Terminal Emulation (TE) Client is an application installed on a mobile device or tablet that connects to IBM 5250/3270, VT100/220, and XTERM hosts. The Client uses the Telnet or SSH protocols to connect to the remote host and emulates the terminal.
The TE Client uses host profiles to configure the host information. Emulation parameters define how the Client acts during the emulation session, such as the beep volume or what to do if the scanned data is larger than the entry field. The TE Client for iOS does not have the same options as TE Clients for Windows operating systems.
The TE Client for iOS is optimized for iOS devices, and includes the capability to configure the Client from the device. Client menus and keyboards have been tailored for iOS. The Client screen zooms, pans, and reorients based on device orientation. This manual introduces the options and tasks available with a TE Client for iOS.
The TE Client is licensed either manually for each device, or by using a Wavelink license server. Contact Wavelink Customer Support to obtain licenses.
The Client can also be configured to connect to a host through a Wavelink ConnectPro proxy server. ConnectPro is an optional component of Terminal Emulation that handles session persistence. ConnectPro acts as a proxy between the mobile device and the emulation host. If the device loses connectivity or goes to sleep, the ConnectPro server maintains the session until the device reconnects. ConnectPro is free with Terminal Emulation but is installed separately. For information on installing and using ConnectPro, see the ConnectPro User Guide on the Wavelink Web site.
This section has instructions for installing and licensing the TE Client:
• Installing the TE Client on iOS
• Licensing the TE Client
3

1
Installing the TE Client on iOS
The Terminal Emulation Client for iOS is available for iOS version 6.1 or newer. It is supported on the following devices:
• iPad, 3rd & 4th generation
• iPad Mini
• iPhone 4, 4S, 5
• iPod, Touch 4th & 5th generation
Before you install the TE Client for iOS, you must rebuild the IPA file using a distribution profile and certificate associated with an Apple developer account. If you want to distribute the TE Client to more than 100 devices, you must have an iOS Developer Enterprise account.
The instructions below include information about creating a distribution certificate, app ID, and provisioning profile using the Apple Developer website, and then how to use the script provided by Wavelink to rebuild the IPA.
NOTE: The tasks for creating the distribution certificate, app ID, and provisioning profile only need to be done once. After these tasks are complete, newer versions of the TE Client IPA files can be signed using the same certificate, ID, and profile.
You must build the IPA file on a computer running OS X. Your account on the machine must have administrative rights, and you must have Xcode installed, including the Command Line Tools. If you are replacing the icons for the app, the icons should be stored on the same computer, and should be 114 x 114 pixels and 57 x 57 pixels in PNG format.
• Rebuilding the IPA File with an iOS Developer Enterprise Account (recommended)
• Rebuilding the IPA File with an iOS Developer Account
Rebuilding the IPA File with an iOS Developer Enterprise Account
To create a distribution certificate:
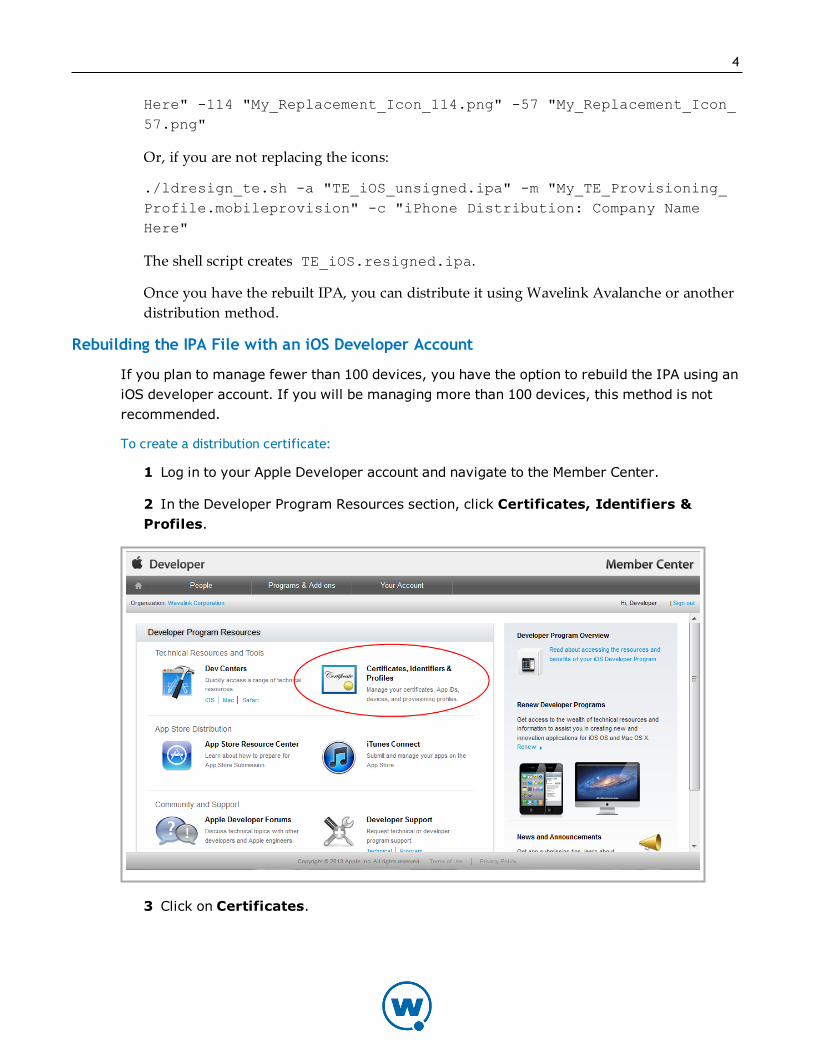
1 Log in to your Apple Developer account and navigate to the Member Center.
2 In the Developer Program Resources section, click Certificates, Identifiers & Profiles.

2
3 Click on Certificates.
4 Create a new distribution certificate by clicking on the [+] button.
5 Select the In-House and Ad Hoc type.
3
6 Follow the onscreen instructions for creating and uploading a CSR.
7 Generate the distribution certificate and download it.
8 Open the Keychain Access application on the computer.
9 Import the distribution certificate by clicking File > Import Items and selecting the certificate. The name of the file should be ios_distribution.cer. When the certificate has been imported, it shows up in Keychain Access as "iPhone Distribution: [Company Name]".
To create a new App ID:
1 From the Member Center, create a new App ID.
2 Create a description that helps you identify the app. For the type of ID:
• If you choose Explicit App ID, use com.landesk.te
• If you choose a Wildcard App ID, use com.landesk.*
To create a new provisioning profile:
1 From the Member Center, click Certificates, Identifiers & Profiles.
2 Click on Provisioning Profiles.
3 Select In House as the profile type.
4 Select the App ID that you created.
5 Choose the distribution certificate you created and generate the provisioning profile, then download it.
To create the signed IPA file:
1 Open a terminal window and navigate to the location of the TE_iOS_unsigned.ipa file.
2 (Optional) If you are replacing the icons for the app, ensure they are saved locally.
3 Run the shell script ldresign_te.sh with the following command:
./ldresign_te.sh -a <path to unsigned IPA> -m <path to provisioning profile> -c <name of the certificate> -114 <path to 114x114 icon> -57 <path to 57x57 icon>
For example:
./ldresign_te.sh -a "TE_iOS_unsigned.ipa" -m "My_TE_Provisioning_Profile.mobileprovision" -c "iPhone Distribution: Company Name
4
Here" -114 "My_Replacement_Icon_114.png" -57 "My_Replacement_Icon_57.png"
Or, if you are not replacing the icons:
./ldresign_te.sh -a "TE_iOS_unsigned.ipa" -m "My_TE_Provisioning_Profile.mobileprovision" -c "iPhone Distribution: Company Name Here"
The shell script creates TE_iOS.resigned.ipa.
Once you have the rebuilt IPA, you can distribute it using Wavelink Avalanche or another distribution method.
Rebuilding the IPA File with an iOS Developer Account
If you plan to manage fewer than 100 devices, you have the option to rebuild the IPA using an iOS developer account. If you will be managing more than 100 devices, this method is not recommended.
To create a distribution certificate:
1 Log in to your Apple Developer account and navigate to the Member Center.
2 In the Developer Program Resources section, click Certificates, Identifiers & Profiles.
3 Click on Certificates.

5
4 Create a new distribution certificate by clicking on the [+] button.
5 Select the App Store and Ad Hoc type.
6 Follow the onscreen instructions for creating and uploading a CSR.
7 Generate the distribution certificate and download it.
8 Open the Keychain Access application on the computer.
9 Import the distribution certificate by clicking File > Import Items and selecting the certificate. The name of the file should be ios_distribution.cer. When the certificate has been imported, it shows up in Keychain Access as "iPhone Distribution: [Company Name]".
To create a new App ID:
1 From the Member Center, create a new App ID.

6
2 Create a description that helps you identify the app. For the type of ID:
• If you choose Explicit App ID, use com.landesk.te
• If you choose a Wildcard App ID, use com.landesk.*
To create a new provisioning profile:
1 From the Member Center, click Certificates, Identifiers & Profiles.
2 Click on Provisioning Profiles.
3 Select Ad Hoc as the profile type.
4 Select the App ID that you created, then select the devices that can use the app. If no devices appear in the list, you must add them to the account. You are limited to 100 devices for a developer account.
5 Choose the distribution certificate you created and generate the provisioning profile, then download it.

7
To create the signed IPA file:
1 Open a terminal window and navigate to the location of the TE_iOS_unsigned.ipa file.
2 (Optional) If you are replacing the icons for the app, ensure they are saved locally.
3 Run the shell script ldresign_te.sh with the following command:
./ldresign_te.sh -a <path to unsigned IPA> -m <path to provisioning profile> -c <name of the certificate> -114 <path to 114x114 icon> -57 <path to 57x57 icon>
For example:
./ldresign_te.sh -a "TE_iOS_unsigned.ipa" -m "My_TE_Provisioning_Profile.mobileprovision" -c "iPhone Distribution: Company Name Here" -114 "My_Replacement_Icon_114.png" -57 "My_Replacement_Icon_57.png"
Or, if you are not replacing the icons:
./ldresign_te.sh -a "TE_iOS_unsigned.ipa" -m "My_TE_Provisioning_Profile.mobileprovision" -c "iPhone Distribution: Company Name Here"
The shell script creates TE_iOS.resigned.ipa.
Once you have the rebuilt IPA, you can distribute it to the devices that are specified in the provisioning profile.
Licensing the TE Client
The TE Client requires a license for full functionality. Emulation licenses may be specific to an emulation type (for example, a license can be issued for VT emulation or IBM emulation).
There are two types of TE Client licenses: platform licenses and maintenance licenses.
• Platform licenses. A platform (or base) license authorizes you to use a version of the TE Client and any builds associated with that version. For example, if you purchased a 1.0 TE Client license, then you are entitled to use 1.00-xx builds. If you want to upgrade beyond a version 1.0 TE Client, then you must either buy a new platform license or purchase a maintenance license. Platform licenses do not expire, but they do not allow you to upgrade to a newer version of the TE Client.
• Maintenance licenses. A maintenance license allows you to upgrade your TE Client when new major versions of the TE Client become available. For example, a maintenance license would allow you to upgrade from TE Client 1.x to TE Client 2.x. You must have a base license for each maintenance license in use.

8
Maintenance licenses are valid only through a specific date. After the expiration date, if you upgrade the TE Client, it will revert to operating in demo mode.
You can use the Client without a license, but you will be limited to the demo mode without full functionality. When you attempt to initiate a terminal emulation session, the TE Client will begin broadcasting in an attempt to locate a license server. At that point, you are prompted to either enter a license or to initiate the session in demo mode. While in demo mode, you may initiate terminal emulation sessions with hosts. However, each terminal emulation session that you initiate will automatically disconnect after one hour.
There are two ways to license the TE Client:
• Manual licensing. Use the TE Client interface on the mobile device to manually input licensing information.
• License Server. Use a License Server to automatically provide TE Client licenses to the mobile devices on your network.
NOTE: To obtain Terminal Emulation licenses, please contact Wavelink customer service.
This section provides the following information:
• Manually Licensing the TE Client
• Using the License Server to License the TE Client
Manually Licensing the TE Client
You may key in your authorization information manually through the TE Client interface on the mobile device. When you manually assign licenses, each device is associated with a unique User Number. For example, to license 50 devices, Wavelink would issue a license with a user limit of 50. Each of the 50 devices would have a different User Number, from 1 to 50.
When you manually configure the licensing information, you must have the following information:
Platform The emulation type.
Licensee Name The name of the person or company for which the Client is licensed.
Serial Number The serial number for the license.
Expiration Date The expiration date of the license in the format of MMDDYYYY.

9
Authorization Code
The authorization code for the license.
User Number A number unique to the device. It can be any number between 1 and the maximum number of users for which the license provides.
User Limit The maximum number of users for the license.
To manually license a TE Client:
1 On the device, launch the TE Client.
2 Press and hold on the main screen until the menu appears. Tap More > Authorization.
3 Tap Add New License.
4 Provide the license information in the text boxes.
5 Tap Done.
Using the License Server to License the TE Client
The client license server is a Wavelink application that is responsible for supplying licenses to mobile devices that are using the TE Client.
NOTE: The client license server should not be confused with the Avalanche license server. They are separate Wavelink applications.
For information about installing and configuring the client license server, see the Terminal Emulation License Server Reference Guide on the Wavelink Web site.
When you use the device to attempt to initiate an emulation session with a host, an unlicensed Client automatically attempts to obtain a license from a license server.
To use the license server to obtain a license:
1 When you attempt to connect to a host using the TE Client, it broadcasts a request for a license on the local IP network. Or, if you have configured the license server address, the Client sends a request to the specified license server.
2 License servers with an available license respond by offering a license.
3 The TE Client accepts the first license that it receives and sends a reply to the license server.

Chapter 2: Using the TE Client 10
Chapter 2: Using the TE ClientOnce the TE Client has been installed, the Terminal Emulation app will appear in the list of installed apps. To launch the Client, tap the Terminal Emulation icon. The TE Client works with either the device's camera or a sled with a built-in camera. When you scan data, it appears in the currently selected field.
• To connect to a host, tap the main screen. You will be able to select the host profile from the list that appears. If you leave a session inactive for more than three minutes, the TE Client will automatically reconnect to the session when you activate the device. The session will resume from the last screen you were using, without loss of data.
• To access the main menu, press and hold on the main screen.
• To disconnect an emulation session, press and hold on the main screen. When the menu appears, tap Disconnect.
• To exit the Client, disconnect any current sessions and then press and hold on the main screen. When the menu appears, tap Exit.
• To use a camera scanner, tap the Scan button on the keyboard. When you have scanned the barcode, the camera interface closes and the emulation screen reappears.
• To delete a host profile, navigate to the Host Profiles screen and tap Delete. Then tap on the red circle next to the name of the profile you want to delete. Then tap the Delete that appears on the line of the profile you want to delete.

Chapter 3: Configuring the TE Client 11
Chapter 3: Configuring the TE ClientYou can configure the TE Client either through Wavelink Avalanche or through the installed Client on the device. You do not need to have Avalanche licenses in order to use Avalanche to configure the TE Client.
For details about the host profile options and emulation parameters available, see the sections below.
• Configuring Host Profiles
• Configuring Emulation Parameters
• Configuring the TE Client using Avalanche
Configuring Host Profiles
A host profile defines the settings that the TE Client should use when it attempts to initiate a connection with a specific host. The host profile may include the emulation type, IP address of the host, IP address of the ConnectPro server, or other settings. You may configure an unlimited number of host profiles from the device or through Wavelink Avalanche.
When a device user attempts to initiate a session with a host, the TE Client displays a list of available host profiles. The user selects the host he wants to connect to, and the TE Client uses the host profile settings to connect to the host.
Depending on the emulation type, there are different options available when configuring a host profile. The following options may be available when you configure a host profile:
Profile Name
Profile name The name of the host profile.
Basic Settings
Type The emulation type that the mobile device uses when connected to the host system.
Address The IP address or host name of the host system to which the mobile device will connect.
When creating a host profile, you may enter a subnet-specific address rather than an IP address or a DNS name, which looks like: 0.X.X.X/X. The specified address is combined with the mobile device IP address to determine the host’s address. The number after the slash determines the number of bits of the subnet-specific address that should be ignored.

Chapter 3: Configuring the TE Client 12
Basic Settings
Examples:
For a mobile device with an IP address of 10.20.30.40:
• When connecting to a subnet-specific address of 0.1.2.3/8, the device will look for a host at 10.1.2.3
• When connecting to a subnet-specific address of 0.0.2.3/16, the device will look for a host at 10.20.2.3
• When connecting to a subnet-specific address of 0.0.0.3/24, the device will look for a host at 10.20.30.3
Subnet-specific addressing is also available for WEB emulation. However, you should use a | character instead of a / character to denote the number of bits.
Examples:
For a mobile device with an IP address of 10.20.30.40:
• When connecting to a subnet-specific address of http://0.1.2.3|8
the device will look for a host at:http://10.1.2.3/
• When connecting to a subnet-specific address of https://0.0.0.3|24:8080/start.asp
the device will look for a host at:https://10.20.30.3:8080/start.asp
Port The TCP port number on which the host system is listening for emulation requests from Clients.
Only use ConnectPro connections
Indicates whether the TE Client should only connect to the host through a ConnectPro or TermProxy server. If you enable this checkbox, you must configure the host information (name, IP address, emulation type, and port).
Use SSL/TLS encryption
Uses SSL/TLS to encrypt the information sent to the host. There is no additional software for SSL/TLS on Smart devices, but the host must be configured for SSL/TLS.

Chapter 3: Configuring the TE Client 13
Basic Settings
When you enable SSL/TLS encryption, you must use a certificate. Tap the Manage Certificates button, then tap Insert Certificate. Tap the name of the certificate in the list and then Accept Certificate.
NOTE: The certificate must be saved as certificates.pem on the device in the root directory of the first listed mounted storage (not part of the root file system). This may be internal storage or an SD card.
Use SSH encryption
Uses SSH to encrypt the information sent to the host. There is no additional software for SSH on the device, but the host must be configured for SSH.
Width of telnet window (columns)
The number of columns to display on the device screen.
Height of telnet window (rows)
The number of rows to display on the device screen.
Display in black and white
Uses white text on a black background for the display.
Special Not currently implemented.
SSH Settings
Tunnel Telnet using SSH Local Port Forwarding
Sets whether or not to use tunneling. If you are using 5250 emulation with SSH, you must use SSH tunneling.
Address The IP address or host name for SSH tunneling.
Port The TCP port number for SSH tunneling.
User Name The username for SSH.
Password The password for SSH.

Chapter 3: Configuring the TE Client 14
ConnectPro Settings
Type The version number of the ConnectPro or TermProxy server.
Address The IP address or host name of the server.
Port The TCP port number on which the proxy server is listening for emulation requests from Clients.
Terminate ConnectPro Session
Indicates when the ConnectPro or TermProxy server should terminate the connection to the host.
Possible Values:
• Never. The proxy server never terminates the session established with the host. The Client is responsible for terminating the session.
• On Network Error. The proxy server terminates the session with the host when a network error occurs, such as a loss of network connectivity.
• On Session Exit. The proxy server terminates the session with the host when the session is terminated by the Client.
• Always. The proxy server will terminate the session with the host on a network error or when the session is terminated.
Client Reconnects if Unexpectedly Disconnected
Specifies if the Client will attempt to reconnect if the session with the proxy server is lost and the Client has not received a disconnect message from the proxy server.
Reconnect string Specifies the reconnect string that the Smart device should use when connecting to the host. (Alternately, you may configure reconnect strings in ConnectPro.)
Use SSL/TLS encryption
Uses SSL/TLS to encrypt the information sent to the host. There is no additional software for SSL/TLS on Smart devices, but the host must be configured for SSL/TLS.
When you enable SSL/TLS encryption, you must use a certificate. Tap the Manage Certificates button, then tap Insert Certificate. Tap the name of the certificate in the list and then Accept Certificate.
NOTE: The certificate must be saved as certificates.pem on the device in the root

Chapter 3: Configuring the TE Client 15
ConnectPro Settings
directory of the first listed mounted storage (not part of the root file system). This may be internal storage or an SD card.
Use SSH Encryption Uses a Wavelink custom encryption method to encrypt the connection to the ConnectPro server. When you use custom encryption, provide an encryption key.
IBM Settings
Workstation ID (5250)-Or-LU or Pool Name (3270)
An ID for mobile devices connecting to an IBM host. The ID may include static characters and the following switches, which are used to capture dynamic data specific to each mobile device:
• %a - %d. Captures specific octets of the IP address of the mobile device. For example, use %a%b%c%d to capture all four IP octets of the address of the mobile device, or use %d to capture only the last octet of the IP address of the mobile device.
• %m - %r. Captures specific octets of the MAC address of the mobile device. For example, use %p%q%r to capture the last three octets of the MAC address of the mobile device.
• %s. Captures the session number.
• %t. Captures the Avalanche terminal ID of the mobile device. (If the mobile device does not have an Avalanche Enabler, then this parameter is not valid.)
A workstation ID can be 1-20 alphanumeric characters plus switches, but IBM hosts usually truncate workstation IDs that are more than 10 characters. The workstation ID should not begin with a numeric character.
VT Settings
Telnet Negotiation String
A Telnet negotiation string for the host connection. A Telnet negotiation string is used to identify a mobile device to a host system and to present a Client with the appropriate emulation options. The host system can then supply information to the mobile device based on Telnet negotiation string (for example, menus or display options). The string can be 1-20 alpha-numeric characters.

Chapter 3: Configuring the TE Client 16
Autologin with IBMHOST
User Name The user name the Client should use when connecting to the host.
Password The password the Client should use when connecting to the host.
Program/Procedure
A program/procedure that should run when the Client connects.
Menu The name of the menu you want displayed when the Client connects.
Current Library
The name of a library the Client should navigate to when it connects.
Autologin with VT
Prompts Responses
Name The user name prompt that the host system uses. Possible Values: 0 - 60 alpha-numeric characters
The response that the mobile device should send to the login prompt. Possible Values: 0 - 30 alpha-numeric characters
Password The password prompt that the host system uses. Possible Values: 0 - 60 alpha-numeric characters
The password that the mobile device should send to the host system at the password prompt. Possible Values: 0 - 30 alpha-numeric characters
Command The command prompt that the host system sends to the TE Client after the login is complete. Possible Values: 0 - 60 alpha-numeric characters
The command that the mobile device should send the host system at the command prompt. Possible Values: 0 - 30 alpha-numeric characters
Autolaunch
AutoLaunch Session
The Client attempts to connect to the specified host each time the Client is launched. Only one host profile on the device should have autolaunch set.
To configure a host profile from the device:
1 From the TE Client, tap Menu > Host Profiles.
2 If the password is required, type the password in the text box and tap OK. (The default password is system.)

Chapter 3: Configuring the TE Client 17
3 Click Add New to create a new host profile, or tap the name of the existing host profile that you want to edit.
NOTE: If the device pulls a host profile payload from Avalanche, you cannot create or remove host profiles from the device, though you can edit the existing profile.
4 Configure the options as desired and tap Save.
5 Press the Back button to return to the main Client screen.
If a host profile has already been deployed to the device through the Host Profile Configuration payload in Avalanche, you will not be able to create new host profiles from the device. To create new payloads in Avalanche, see Configuring the TE Client using Avalanche.
Configuring Emulation Parameters
Emulation parameters define how the TE Client behaves while it is connected to a host. This includes sounds and special key functions, as well as the passwords for configuring the Client.
Depending on the emulation type, there are different options available when configuring emulation parameters. The following options may be available:
5250 and 3270 Options
Enter Key Swapped Uses the Enter key as Send instead of Field Exit. This option does not affect the keys on the TE virtual keyboards.
Enabler Free Cursor
Allows the user to move the cursor into protected areas of the screen after they use the keyboard to toggle Free Cursor mode.
Oversized Scanning
Determines what to do if scanned data is too large for the entry field.
Retry Workstation ID
Allows the TE Client to retry the workstation ID with a letter appended to it.
Use Enter as Reset Uses the Enter key as a Reset key if the terminal is in an error state.
Initial Caps Lock state
Sets the keyboard to open with Caps lock on when enabled.
VT Options
Backspace Key Sends Delete
Sends a delete <7F> instead of a backspace <08> when the backspace key is pressed.

Chapter 3: Configuring the TE Client 18
VT Options
Ignore 8-bit Received Control Codes
Treats 8-bit control codes as extended characters.
New Answer Back Displays a string on the mobile device when it receives an ENQ from the host. It supports the following variables:
• %m - %r representing the six octets of the MAC address.
• %a - %d representing the four octets of the IP address.
• %s representing the session number.
• %t representing the terminal ID (Avalanche only).
For example, if you want the response to an ENQ to be the full MAC address, use:%m%n%o%p%q%r
VT Line Mode Simulates line mode behavior for hosts that do not support it.
Initial Caps Lock State
Sets the keyboard to open with Caps lock on when enabled.
Handle Telxon Sequences
Supports Telxon escape sequences from the host.
Local Echo Specifies whether the terminal uses local echo to reflect what is sent to the host.
Scan Terminator Sets information appended each time scanned data is entered.
Authorization Settings
License Server Address
The address of the License Server.
License Server Port
The port the License Server will be using to provide licenses.
License Server Site ID
The Site ID to use when requesting licenses from the License Server.
Key Macros
Add New Key Macro
Allows you to use a macro to replace a key with another key.

Chapter 3: Configuring the TE Client 19
Network Settings
Use Timing Mark Heartbeat
Sends timing marks to the host to determine if the session is still alive. When set to Yes, the Client detects terminated sessions and automatically re-establishes a connection to prevent data loss.
Log Network Activity
Creates a log of network activity for the session. The log is stored in the first listed mounted storage on the device (not part of the root file system). This may be either internal storage or an SD card.
Log File Max Size (kB)
The maximum size of the session log file. When the log reaches its max file size, the current contents are written to a backup log file and a new log file is started. If a backup log file currently exists, it is overwritten.
Passwords Settings
Advanced Password
Sets the password for configuring host profiles.
Configuration Password
Sets the password for configuring emulation parameters.
Scanner Setting
Auto Send Scans Automatically sends to the host after a barcode is scanned. This option is for 5250 and 3270 emulation only.
Screen Settings
Lock Screen to Portrait
Locks the screen to portrait orientation.
Fixed Screen Mode
Each time a screen is received from the host, the screen is set to display row 1, column 1 in the upper left corner.
Default Font Size Sets the zoom level when connected to the host. When this is set to 0, the Client will calculate an optimum size.
Disable pan and zoom
Disables the ability to pan and zoom when connected to a host.
Disable keyboard minimizing
Disables the option to minimize the keyboard.

Chapter 3: Configuring the TE Client 20
Screen Settings
Keyboard Height (portrait)
Sets the height of the onscreen keyboard as a percentage of the screen when the device is in portrait orientation.
Keyboard Height (landscape)
Sets the height of the onscreen keyboard as a percentage of the screen when the device is in landscape orientation.
Sounds Settings
Key Clicks Produces a click sound each time a key is pressed.
Beep Volume Sets the volume of the beeper.
Incoming Screen Beep
Beeps when a new screen is sent from the host. This option is for 5250 and 3270 emulation only.
Silent Mode Disables all TE Client beeping.
To configure a host profile from the device:
1 From the TE Client, tap and hold on the main screen. When the menu appears, tap Emulation Parameters.
2 If the password is required, type the password in the text box and tap OK. The default password is config.
3 Press the Console button at the top to return to the main Client screen.
Configuring the TE Client using Avalanche
TE can be configured through Avalanche for a more controlled and consistent user experience.
For example, you can use an Avalanche payload to configure host profiles or client settings for Android and iOS devices with the TE application already installed. You can configure multiple host profile payloads for each device, but only one client settings payload.
You can configure TE with Avalanche using any of the following methods:
• Deliver touchless configuration payloads. If your devices are managed in Avalanche, you can use the TE Client Settings, TE Host Profile Configuration, and TE SSL Certificate payloads to deliver changes directly to your devices for hands-free installation. For more information, see Configuring Client from Avalanche Licensed.
• Scan a QR code. If your devices are not managed by Avalanche, you can create configuration payloads and print a QR code for devices to scan and install the changes. For more information, see Configuring Client from Avalanche Unlicensed.

Chapter 3: Configuring the TE Client 21
• Download a configuration file. If your devices are managed by another service like Avalanche, you can create configuration payloads in the Wavelink Configurator Console, download the configuration changes, and deploy the configuration file or a key-value pair to devices through an alternate service. For more information, see Configuring Client for an Alternate MDM.
Configuring Client from Avalanche Licensed
If you have your devices licensed through Avalanche, you can use the TE Client Settings, TE Host Profile Configuration, and TE SSL Certificate payloads to deliver hands-free app configuration to multiple devices at once.
You can configure multiple host profile payloads for each device, but only one client settings payload. These payloads can only be deployed to devices managed in Avalanche.
To configure the TE Client when the device has an Avalanche license:
1 Log in to the Avalanche Console.
2 Navigate to the folder where you want the payload created.
3 From the Profiles tab, click Add Payload in the Available Payloads panel.
4 The Payload dialog box appears. Select the iOS and Android option, and then the type of TE payload you want to create.
5 Configure the options as desired and click Save.
6 From the Profiles tab, click Add Profile in the Available Profiles panel.
7 The New Profile dialog box appears. Click Application Configuration.
8 Create a name for the profile, then select the payload or payloads you want to associate with the profile. Save your changes.
9 Select the checkbox next to the name of the profile and click Apply in the Available Profiles panel.
10 Deploy your changes. The next time the device checks in, the payload is automatically downloaded. When the TE Client is launched, the new settings are applied and the host profiles are available.
To download the payload immediately to a device:
1 On the device, launch the TE Client.
2 If the TE Client prompts you to configure the device, tap Use Enrollment Rule. Otherwise, perform a long tap from the main screen, and then tap Client Configuration > Use Enrollment Rule.

Chapter 3: Configuring the TE Client 22
3 On the Enrollment Configuration screen, enter your Server URL and Enrollment ID. To scan the Server URL, use a QR code printed from any Avalanche folder.
4 Tap Go.
• If the device uses iOS 6.0+, the device enrollment page appears. Enter the enrollment details requested and tap Enroll to complete the first-time configuration and apply the payload. Completing this step will enroll an iOS 6 smart device in Avalanche.
• If the device uses iOS 7.0+, the configuration will automatically download and apply. Devices using iOS 7.0+ and higher are not enrolled in Avalanche.
When the TE Client is launched, the new settings are applied and the host profiles are available.
Configuring Client from Avalanche Unlicensed
To configure the TE Client using Avalanche, you do not need to have Avalanche licenses. Through Avalanche, you can use the TE Client Settings, TE Host Profile Configuration, and TE SSL Certificate payloads to create app configurations that devices locate, download, and install through a scanned QR code.
You can configure multiple host profile payloads for each device, but only one client settings payload. For devices not managed by Avalanche, you must print these configuration changes as QR codes for devices to scan.
To configure the TE Client when the device does not have an Avalanche license:
1 Log in to the Avalanche Console.
2 Navigate to the folder where you want the payload created.
NOTE: In the Avalanche navigation tree, there is a Default device folder. If all of your devices are using the same configuration, you may want to use the Default folder. However, if you have devices using different configurations, create a separate folder for each configuration.
3 From the Profiles tab, click Add Payload in the Available Payloads panel.
4 The Payload dialog box appears. Select the iOS and Android option, and then the type of TE payload you want to create.
5 Configure the options as desired and click Save.
6 From the Profiles tab, click Add Profile in the Available Profiles panel.
7 The New Profile dialog box appears. Click Application Configuration.

Chapter 3: Configuring the TE Client 23
8 Create a name for the profile, then select the payload or payloads you want to associate with the profile. Save your changes.
9 Select the checkbox next to the name of the profile and click Apply in the Available Profiles panel.
10 Deploy your changes.
11 In the Navigation Tree, click the View button to view the folder details.
12 On the Folder Details page, click Print QR Code.
13 The QR code for the payloads applied to the folder appears in the browser. Print or email the QR code as needed.
14 On the device, launch the TE Client.
15 If the TE Client prompts you to configure the device, tap Scan QR code to configure and scan the QR code. Otherwise, perform a long tap from the main screen, and then tap Client Configuration > Scan QR code to configure and scan the QR code.
The device connects to the Avalanche server and pulls the configuration information associated with the folder. The device is not enrolled in Avalanche and does not appear in the Avalanche inventory.
Configuring Client for an Alternate MDM
If you manage your devices through a mobile device management service other than Avalanche, you can configure your TE Client settings through the Wavelink Configurator and download the configurations as a file for mass distribution. Using this tool, you can create the configuration in the Configurator Console, export it, and then use your mobile device management service to send a key-value pair to the Client that points to the configuration file.
You can configure multiple host profile payloads for each device, but only one client settings payload to a configuration file.
For the key-value pair on iOS devices, the Key is com.wavelink.configuration.url. The Value is the location for where you are hosting the Configuration.json file, whether it is a web server or network drive location.
Configuring the TE Client with a key-value pair can only be performed on devices with iOS 7.0+.
To configure the TE Client when the device does not have an Avalanche license and is managed by another service:
1 Go to https://configurator.wavelink.com.
Chapter 3: Configuring the TE Client 24
2 Log in to the Wavelink Configurator Console.
3 Navigate to the folder where you want the payload created.
4 From the Profiles tab, click Add Payload in the Available Payloads panel.
5 The Payload dialog box appears. Select the iOS and Android option, and then the type of TE configuration payload you want to create.
6 Configure the options as desired and click Save.
7 From the Profiles tab, click Add Profile in the Available Profiles panel.
8 The Smart Device Profile dialog box appears. Click Application Configuration.
9 Create a name for the profile, then select the Studio payload or payloads you want to associate with the profile. Save your changes.
10 Select the profile you created and click Apply in the Available Profiles panel.
11 Click the profile name.
12 On the Application Configuration Profile page, click Export Config.
Your browser downloads the Configuration.json file. This file can be renamed as needed, though the new file name should always be reflected correctly within the key-value pair.
After the file and key-value pair are deployed to the iOS device from your mobile device manager and the TE Client is launched, it downloads and applies the new settings.

Wavelink Contact Information 25
Wavelink Contact InformationFor product downloads or documentation, go to the Wavelink downloads page:
http://www.wavelink.com/download-software
For information on contacting Wavelink, please go to:
http://www.wavelink.com/Customer-Care-Contact-Customer-Care