wattbox™ ip web interface ip web interface users guide pg. 2 support: 866.838.5052 table of...
TRANSCRIPT

™
IP WEB INTERFACE User’s Guide

WattBox™ IP Web Interface Users Guide
pg. 2
www.snapav.com Support: 866.838.5052
Table of Contents 1. Overview ........................................................................................................................................................................... 3
2. Contacting Technical Support ....................................................................................................................................... 3
3. Using the Web Interface .................................................................................................................................................. 3
3.1. Accessing From an Internal Network ........................................................................................................................................ 3
3.2. Accessing from a Remote Location .......................................................................................................................................... 3
4. Control / Status ................................................................................................................................................................ 4
4.1. Connection Status .................................................................................................................................................................... 4
4.2. Real Time WattBox Status Graphic .......................................................................................................................................... 4
4.3. Status and Control .................................................................................................................................................................... 5
5. Configuration ................................................................................................................................................................... 6
5.1. Outlet Setup.............................................................................................................................................................................. 6
5.2. Website / IP Address ................................................................................................................................................................ 7
5.3. Time Out Settings ..................................................................................................................................................................... 8
6. Schedule ........................................................................................................................................................................... 9
6.1. New Scheduled Event .............................................................................................................................................................. 9
6.2. Schedule ................................................................................................................................................................................ 10
7. Network ...........................................................................................................................................................................11
7.1. IP Address .............................................................................................................................................................................. 11
7.2. DNS Server IP ........................................................................................................................................................................ 11
7.3. Port Number ........................................................................................................................................................................... 12
7.3.1. Configuring Ports for Remote Access ........................................................................................................................................... 12
7.4. Dynamic DNS ......................................................................................................................................................................... 13
7.4.1. Configuring Dynamic DNS for Remote Access.............................................................................................................................. 13
7.5. Apply and Reset ..................................................................................................................................................................... 13
8. Email ...............................................................................................................................................................................14
8.1. Email Settings ......................................................................................................................................................................... 14
8.2. Test Email............................................................................................................................................................................... 14
8.3. Receive Event ........................................................................................................................................................................ 15
8.4. Email Address Book ............................................................................................................................................................... 15
9. Account ..........................................................................................................................................................................16
9.1. Account Settings ..................................................................................................................................................................... 16
10. System Time ...................................................................................................................................................................17
10.1. Date and Time Settings .......................................................................................................................................................... 17
10.2. Daylight Savings Time ............................................................................................................................................................ 17
11. Event Log .......................................................................................................................................................................18
12. About ..............................................................................................................................................................................18
13. System Status ................................................................................................................................................................19
13.1. System Information ................................................................................................................................................................. 19
13.2. Network Status ....................................................................................................................................................................... 19
14. Save / Restore ................................................................................................................................................................19

WattBox™ IP Web Interface Users Guide
pg. 3 © 2012 WattBox™
1. Overview The following document outlines the operation of the WattBox™ Configuration Utility and Web Interface for WattBox™ IP Power Conditioners. Read through the entire document before using the Configuration Utility or Web Interface. Should you have any questions after reading this document, please contact SnapAV: Technical Support.
Note: The WattBox Utility must be run in order to view the IP address and configure the network settings for initial setup. Without the IP address, you will not be able to access the WattBox. Follow the steps outlined in the WB-IP Quick Start Guide located on the CD Rom or download from www.SnapAV.com before proceeding with the information in this document.
2. Contacting Technical Support Phone: (866) 838-5052
Email: [email protected]
3. Using the Web Interface The Web Interface allows access to the WattBox via a browser from the internal network as well as remote access. The latter requires the use of a Dynamic DNS address and port forwarding configuration to allow access from the web.
3.1. Accessing From an Internal Network
From the WattBox Utility Select a WattBox from the device list and click on the Launch Web Browser button or double click the device to launch the browser.
From a Browser Open the web browser and enter the IP address of the WattBox.
Example: http://192.168.1.55:1000
Note: If the default port (80) has not been changed it is not required at the end of the address. Example: http://192.168.1.55
If the WattBox has been given a name as described in section 7.1 IP Address on pg. 11, the name can be entered in place of the WattBox IP address.
Example: http://NetworkWB400:1000
Note: If the default port (80) has not been changed it is not required at the end of the address. Example: http://NetworkWB400
3.2. Accessing from a Remote Location If Dynamic DNS (See Section: 7.4 Dynamic DNS) has been configured, the WattBox can be accessed from a remote location. When accessing remotely, the name for the server is used in place of an IP address.
Open the web browser and enter the DDNS Name of the WattBox, DDNS service provider, and the external port for that has been configured in the router to allow access to the WattBox.
Example: http://JonesWattBox:1000
Note: The WattBox utility cannot be used to launch the browser when accessing remotely.
See Section: 7.3 Port Number and 7.4 Dynamic DNS for details on port forwarding and DDNS addresses.

WattBox™ IP Web Interface Users Guide
pg. 4
www.snapav.com Support: 866.838.5052
4. Control / Status
4.1. Connection Status
Auto Reboot
Status: Displays the current state of Auto Reboot
Enabled: Auto Reboot is Enabled.
Disabled: Auto Reboot is Disabled.
Target Site List of sites/IP addresses configured to ping for Auto Reboot. Last item in the list is the address of the router, this is an automatic setting.
IP Address Lists the IP address of Target Sites (See Section: 5.2 Website / IP Address)
Response Time
Current response time of the Target Site
Timeout Percentage of communication vs. loss of communication time recorded for the site. A 0 (zero) indicates that no communication loss has occurred with the site.
4.2. Real Time WattBox Status Graphic
Internet Green (Solid): All sites/IP Addresses are communicating with the WattBox
Red (Solid): None of the Sites/IP Addresses are communicating with the WattBox.
Auto Reboot: When Illuminated:
Auto Reboot is Enabled, WattBox will perform power cycle for outlets that are ON when communication with the assigned Website/IP Address is lost.
Note: Outlets that are OFF, will not power cycle.
When Not Illuminated:
Auto Reboot is Disabled, no power cycle will occur when communication with the assigned Website/IP Address is lost.
Outlet LEDs (next to outlet):
When Illuminated: Outlet is ON.
When Not Illuminated: Outlet is OFF.

WattBox™ IP Web Interface Users Guide
pg. 5 © 2012 WattBox™
4.3. Status and Control
Item Number and Name of Outlet. If no name has been assigned in Outlet Setup, this will show Outlet followed by the number.
Status Current status of Outlet. On or Off
Control Turns outlet On/Off, the button name will change with the reverse of the current state of the outlet. If outlet is set to Master Switch Disabled (Reset Only), Disabled will be shown and no outlet control can be performed.
Reset Performs a power cycle for the selected outlet. Outlet will turn off and then turn On. No Reset button will appear for outlets that are currently Off.
Note: The power cycle occurs based on the delay times configured in Outlet Setup.
Reset All Performs a power cycle for all outlets on the WattBox.
Note: The power cycle occurs based on the delay times configured in Outlet Setup.

WattBox™ IP Web Interface Users Guide
pg. 6
www.snapav.com Support: 866.838.5052
5. Configuration
5.1. Outlet Setup
WB-200/WB-400
Outlet Name Allows for naming the outlet based on the device connected. Router, Modem, ETC…
Outlet Mode: Normal Enables full outlet control via Web interface, outlet can be turned On/Off or Reset.
Reset Only
Disables full outlet control via Web interface, outlet can be Reset, but not turned On or Off.
Recommended setting for devices that should never be turned off, such as routers and modems to avoid accidental disconnection.
Power On Delay
Sets the turn on time between each outlet when the WattBox is powered ON or an Outlet reset has been performed. Default setting is an additional 1 sec between each outlet starting at 1 for outlet 1.
It is recommended that this is set to at least 5sec for media servers and other devices that require a longer turn on time.
WB-600
Outlet Name Allows for naming the outlet based on the device connected. Router, Modem, ETC…
Outlet Mode: Master Switch Enabled: Enables outlet control via main power button. Outlets will turn On/Off when power button is pressed.
Web interface control remains for turning outlets On/Off or Resetting.
Master Switch Disabled:
Disables outlet control via main power button. Outlets will NOT turn On/Off when power button is pressed.
Web interface control remains for turning outlets On/Off or Resetting.
Master Switch Disabled (Reset Only):
Disables outlet control via main power button. Outlets will NOT turn On/Off when power button is pressed.
Web interface allows for outlet to be reset, but disables the ability to turn outlets On/Off from Web interface.
Power On Delay
Sets the turn on time between each outlet when the WattBox is powered ON or an Outlet reset has been performed. Default setting is an additional 1 sec between each outlet starting at 1 for outlet 1.
It is recommended that this is set to at least 5sec for media servers and other devices that require a longer turn on time.

WattBox™ IP Web Interface Users Guide
pg. 7 © 2012 WattBox™
5.2. Website / IP Address
Website / IP Address
List of Websites / IP Addresses to Ping for Auto Reboot. Last item in the list is the address of the router. This is auto populated by the WattBox software, but can be changed if needed.
Protocol Setting for network communication type. We recommend that UDP is used as it will communicate with both websites and IP address. Only use TCP for troubleshooting or if the connected device requires this setting.
TCP: Will send a request to Websites
UDP: Will send a ping to Websites or IP Address. This is the recommended setting.
Response Current response time of the Target Site
Timeout Percentage of communication vs. loss of communication time recorded for the site. A 0 (zero) indicates that no communication loss has occurred with the site.
Reboot Outlets
Assigns the target site to a particular outlet for Auto Reboot, the number of available outlet changes based on the WattBox model being used. Only outlets that are ON at the time of the lost communication will power cycle.
Checked: Outlet will power cycle when ON if communication to the site is lost.
Unchecked: Outlet will NOT power cycle when ON if communication to the site is lost.
Logic:
And - Outlet will power cycle when ON if communication to ALL checked sites is lost.
Or – Outlet will power cycle when ON if communication to ANY one of the checked sites is lost.

WattBox™ IP Web Interface Users Guide
pg. 8
www.snapav.com Support: 866.838.5052
5.3. Time Out Settings
Timeout Before Reset
(UDP Only)
Sets the timeout interval before an Auto Reboot is performed.
Continuous Timeouts Before Reset
(UDP and TCP)
Sets the number of timeouts after an Auto Reboot is performed.
Ping Delay After Power Cycle
(UDP and TCP)
Sets the amount of time before Auto Reboot resumes pinging once an auto reboot has been performed..
Reboot Attempts Amount of Auto Reboots to attempt when communication with a Website/IP Address is lost. (0 =Infinite Reboots)
Apply Applies changes made to settings for entire screen
Reset Resets all settings to last applied state, this does not perform any changes to the WattBox settings.
WattBox™ IP Web Interface Users Guide
pg. 9 © 2012 WattBox™
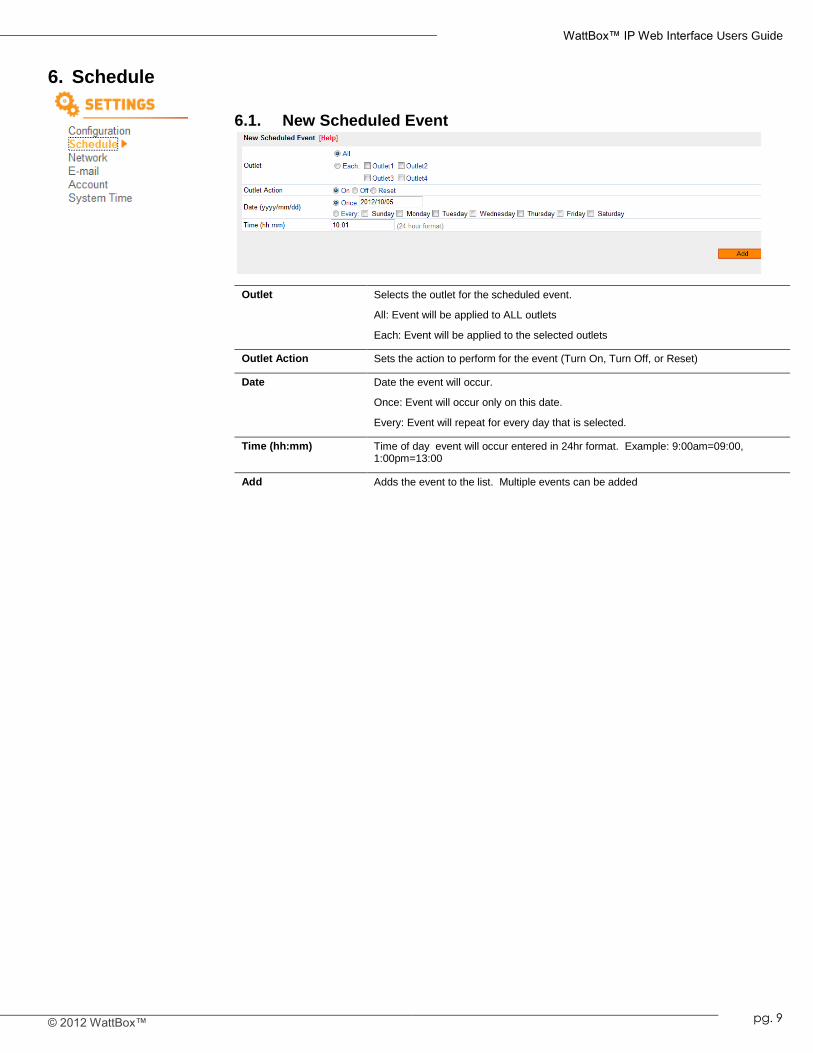
6. Schedule
6.1. New Scheduled Event
Outlet Selects the outlet for the scheduled event.
All: Event will be applied to ALL outlets
Each: Event will be applied to the selected outlets
Outlet Action Sets the action to perform for the event (Turn On, Turn Off, or Reset)
Date Date the event will occur.
Once: Event will occur only on this date.
Every: Event will repeat for every day that is selected.
Time (hh:mm) Time of day event will occur entered in 24hr format. Example: 9:00am=09:00, 1:00pm=13:00
Add Adds the event to the list. Multiple events can be added

WattBox™ IP Web Interface Users Guide
pg. 10
www.snapav.com Support: 866.838.5052
6.2. Schedule
No. Number of the scheduled event
Enabled
The event is enabled and will be performed per the scheduled date and time.
The event has been disabled and will not be performed regardless of the scheduled date and time.
Events are enabled when added and can be disabled by selecting edit and unchecking the Enabled checkbox.
Date Date the event will occur
Time Time of day the event will occur shown in 24hr format. Example: 9:00am=09:00, 1:00pm=13:00
Outlet Outlet that will be controlled for the event.
Action Action that will be performed for the event.
Edit Allows for editing of the event once added. We recommened that the shcedule be saved to a backup configuration before making any changes in order to not lose important settings.
Delete Deletes the event from the schedule. We recommened that the shcedule be saved to a backup configuration before making any changes in order to not lose important settings.

WattBox™ IP Web Interface Users Guide
pg. 11 © 2012 WattBox™
7. Network
7.1. IP Address
Hostname Assigns a name to the WattBox so that it can be easily identified when viewing through the web interface. This name will appear as the browsers tab name when accessing.
This hostname can be used to access the WattBox from an internal network by simply typing the name into the web broswer’s address bar. This is will allow for easier access as an IP address will not need to be remembered.
IP Address IP address assigned to the WattBox. This can be static or dynamic depneding on the setting for Obtain IP Address.
Note: Always use a static IP address.
Subnet Mask Network router’s subnet mask
Default Gateway IP address of the router for the network.
Obtain IP Address*
Using DCHP
Will set an available IP address based on the router’s IP table automatically. The address may change should the router lose power.
Manually Allows for assignment of a static IP address that will not automatically change based on the condition of the router table.
7.2. DNS Server IP
Primary DNS Server IP*
Address of the Primary DNS server. Note this is usually the address of the Default gateway.
Secondary DNS Server IP*
Address of the secondary DNS Server.
Obtain DNS Server*
Manually Allows for assignment of DNS servers to use.
Automatically Will set the DNS servers to match the router and overrides manual settings.

WattBox™ IP Web Interface Users Guide
pg. 12
www.snapav.com Support: 866.838.5052
7.3. Port Number
HTTP Port Number*
Default setting is 80, and is not required in the browser to access the WattBox. When a number other than the default is set, the port number is required at the end of the WattBox address. Example: http://192.168.1.55:90
Note: Port forwarding settings in router must be configured to access the WattBox from outside the network (External Web Access).
7.3.1. Configuring Ports for Remote Access 1. In the routers setup menu, configure port forwarding for the IP address assigning an external port to
forward to the internal port (80). Each router is different, refer to the routers manual for information on how to configure port forwarding.
Note: If the router does not offer separate internal and external port settings, set the WattBox HTTP Port number to the same port assigned in the router.
2. Repeat steps 1 for all WattBox devices on the network.
3. Configure the WattBox for Dynamic DNS as defined in section 7.4 Dynamic DNS on pg. 13.
Note: After a port number is assigned, it must be included at the end of the address in order to access the WattBox from a web browser. See Section: 3 Using the Web Interface for details.

WattBox™ IP Web Interface Users Guide
pg. 13 © 2012 WattBox™
7.4. Dynamic DNS
This setting provides access to the WattBox from outside the network through a web browser. If outside access is not desired we recommend leaving this at the default setting.
Note: To access a WattBox device from the web, port forwarding must be configured within the router. See the section 7.3 Port Number on pg. 12 for more information.
DDNS Provider Service provider for the DDNS. While any preferred DDNS provider can be used, we recommned the use of our free WattBoxDNS.com service be used.
Domain Name Name to identify and access the WattBox from anywhere. To avoid confusion this should be the same name set under Hostname if it is available. Chose a name that will easily identify the WattBox.
*NOTE: These settings require clicking apply to confirm, this will be followed by a system reboot.
7.4.1. Configuring Dynamic DNS for Remote Access
A Dynamic DNS will allow for a named address to be used to access the WattBox even if the IP address changes. There are many free and paid DDNS services available, however we recommend the use of our hosted WattBoxDNS.com as it is maintained by WattBox and will always be free.
Note: Before configuring DDNS, a port must be assigned to the WattBox and port forwarding configured within the router. See section 7.3 Port Number on pg. 12.
1. Select the name of the desired DDNS service.
2. Enter a domain name. Example: JonesWattBox.
Note: If using WattBoxDNS.com as the DDNS service, a username and password is not required. Other services may require a username and password.
3. Click Apply to save the settings.
4. Open the Event Log (See Section: 11 Event Log), and verify that the chosen name is available.
5. If the name is available, a log entry stating: “Registration with DDNS Server ns2.wattboxdns.com completed” will appear in the log. The WattBox can now be accessed remotely.
If the name was NOT available, a log entry stating: “Registration completed. The name is already in use. The new name is 'JoneWattBox100'” will appear in the log. Repeat steps 2-5 using the name provided in the log or continue to enter names until an acceptable one is registered.
After the DDNS is configured the WattBox can now be accessed remotely from any browser by entering the server name that was entered. See Section: 3.2 Accessing from a Remote Location on how to access from a remote location. Only 1 DDNS address is needed for multiple WattBox’s on a single network, individual access requires the address followed by the port.
7.5. Apply and Reset
Apply Applies changes made to settings for the entire screen
Reset Resets all settings to last applied state, this does not perform any changes to the WattBox settings.

WattBox™ IP Web Interface Users Guide
pg. 14
www.snapav.com Support: 866.838.5052
8. Email
8.1. Email Settings
E-Mail Notification
Enable or Disable E-Mail notifications
E-Mail Server Enter the name of the server used for sending emails.
Corporate Exchange Accounts
Contact the network admin for server information
Personal Web Accounts
Enter the smtp server used to send emails.
Example: smtp.gmail.com Note that imap and POP must be turned on within a Gmail account. Refer to the email provider for details on using smtp.
E-Mail Port Default port 25 may be used for most accounts, however if this does not work 587 works for most providers. Refer to the email provider for details on using smtp.
Corporate accounts require contacting the network admin for port information as the ports above may be blocked within the companys firewall.
Sender’s E-Mail Address
This is used for notifacaiton purposes only and does not need to be the email account being used to send emails. We recommend that a name be used that identifies the WattBox sending the emails.
Example: [email protected]
E-Mail Server Requires Authentication
Most web based email providers require this to be set to Yes.
Username Enter the name used to log into the email being used to send emails.
Example: [email protected]
Password Enter the password used to access the email account being used to send emails.
Apply Applies settings in the fields above.
Reset Resets all settings to last applied state, this does not perform any changes to the WattBox settings.
8.2. Test Email Note: This screen will only appear when Email is Enabled.
Send a test Email
Enter an email address to send a test email to and select Send Now. Note that the settings in Email Settings section must be saved before sending a test email.
WattBox™ IP Web Interface Users Guide
pg. 15 © 2012 WattBox™
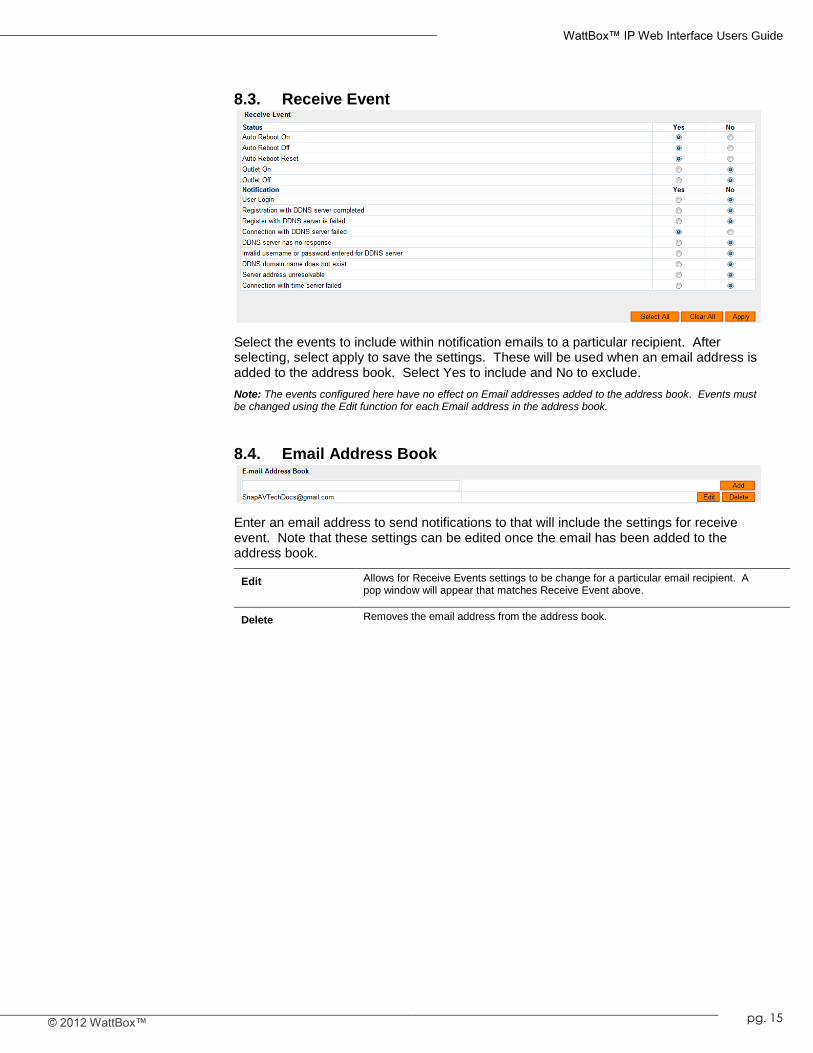
8.3. Receive Event
Select the events to include within notification emails to a particular recipient. After selecting, select apply to save the settings. These will be used when an email address is added to the address book. Select Yes to include and No to exclude.
Note: The events configured here have no effect on Email addresses added to the address book. Events must be changed using the Edit function for each Email address in the address book.
8.4. Email Address Book
Enter an email address to send notifications to that will include the settings for receive event. Note that these settings can be edited once the email has been added to the address book.
Edit Allows for Receive Events settings to be change for a particular email recipient. A pop window will appear that matches Receive Event above.
Delete Removes the email address from the address book.

WattBox™ IP Web Interface Users Guide
pg. 16
www.snapav.com Support: 866.838.5052
9. Account
9.1. Account Settings
Permission Sets the permision level of the account.
Administrator Access to Control and configure all settings for the WattBox
User Access to Control the WattBox outlets, but cannot adjust settings. User accounts will only see the Control page when logged in. This would be used for the customer to turn outlets On or Off.
Login Name of the account used to log into the WattBox.
Password Password for the account
Apply Applies settings in the fields.
Reset Resets all settings to last applied state, this does not perform any changes to the WattBox settings.

WattBox™ IP Web Interface Users Guide
pg. 17 © 2012 WattBox™
10. System Time
10.1. Date and Time Settings
Current Time Current date and time
Time Between Automatic Updates
Sets the time to pull time updates from the time server
Time Server Time information is pulled from the selected server. Default of time.nist.gov works best, however other servers are available should problems setting the system time arise.
Time Zone Time Zone the WattBox is located.
Manual Time Entry
Manual entry of system time.
10.2. Daylight Savings Time
Use Daylight Savings Time
Automatically Daylight time is generated based on the date of the system.
Manually Allows for manual entry of a start and end date to use for Daylight Savings Time
Disabled Daylight Savings will not be used.
WattBox™ IP Web Interface Users Guide
pg. 18
www.snapav.com Support: 866.838.5052
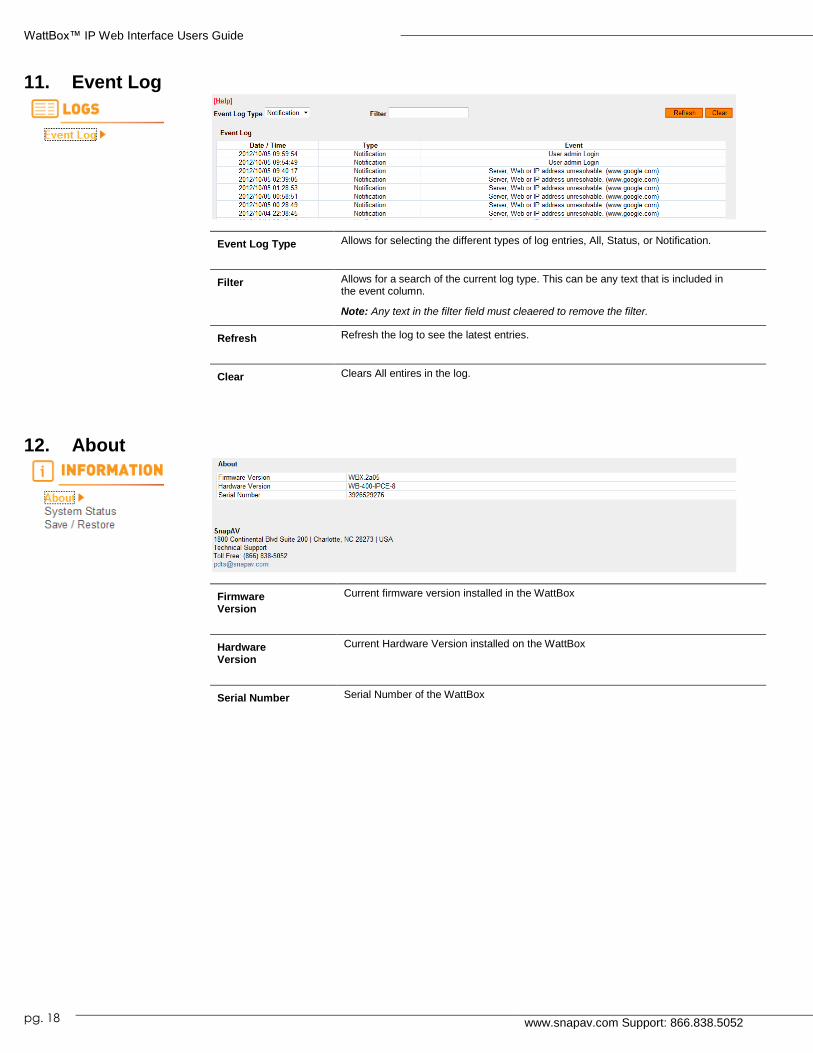
11. Event Log
Event Log Type Allows for selecting the different types of log entries, All, Status, or Notification.
Filter Allows for a search of the current log type. This can be any text that is included in the event column.
Note: Any text in the filter field must cleaered to remove the filter.
Refresh Refresh the log to see the latest entries.
Clear Clears All entires in the log.
12. About
Firmware Version
Current firmware version installed in the WattBox
Hardware Version
Current Hardware Version installed on the WattBox
Serial Number Serial Number of the WattBox
WattBox™ IP Web Interface Users Guide
pg. 19 © 2012 WattBox™
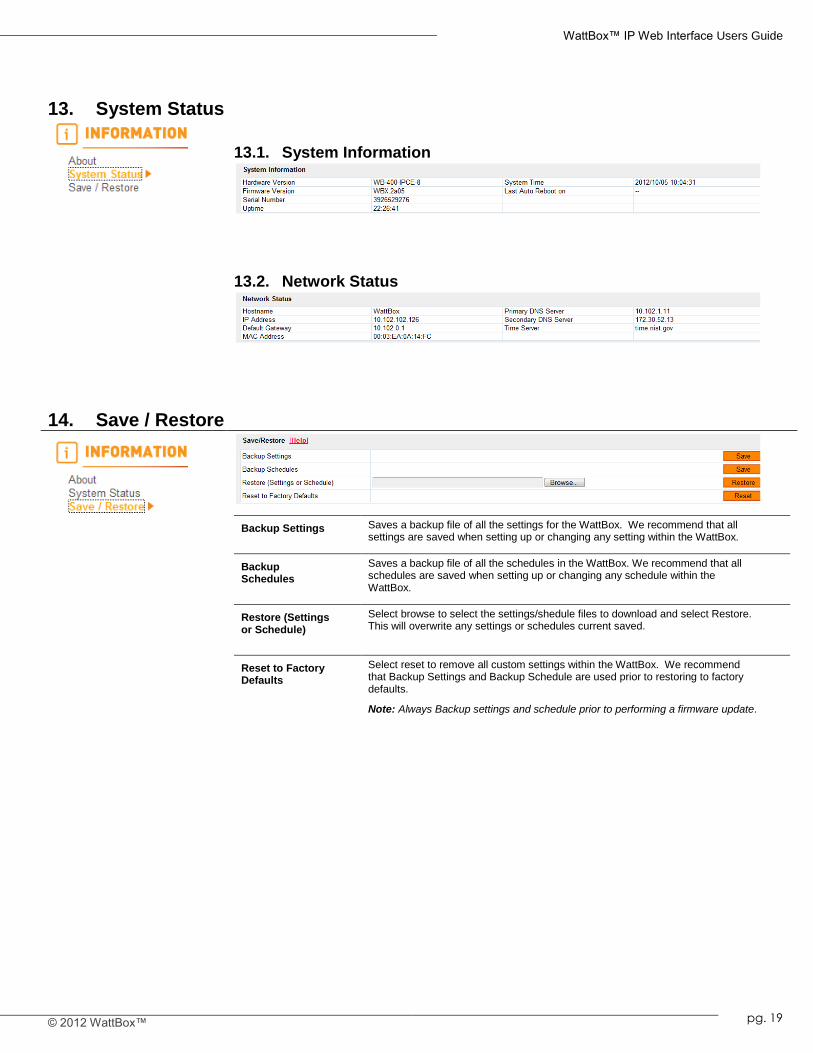
13. System Status
13.1. System Information
13.2. Network Status
14. Save / Restore
Backup Settings Saves a backup file of all the settings for the WattBox. We recommend that all settings are saved when setting up or changing any setting within the WattBox.
Backup Schedules
Saves a backup file of all the schedules in the WattBox. We recommend that all schedules are saved when setting up or changing any schedule within the WattBox.
Restore (Settings or Schedule)
Select browse to select the settings/shedule files to download and select Restore. This will overwrite any settings or schedules current saved.
Reset to Factory Defaults
Select reset to remove all custom settings within the WattBox. We recommend that Backup Settings and Backup Schedule are used prior to restoring to factory defaults.
Note: Always Backup settings and schedule prior to performing a firmware update.

WattBox™ IP Web Interface Users Guide
TM
© 2012 WattBox™
121107-0942