watertechw² d062 sensor instruction manual · watertechw² d062 sensor instruction manual ... the...
TRANSCRIPT

INSTRUCTION MANUAL
WaterTechw² D062 SensorTemperature Measurement

** This page is intentionally left blank **
WaterTechw² D062 Sensor Instruction Manual
Table of Contents1 Foreword........................................................................................................................................................ 5
2 Introduction.................................................................................................................................................... 6
2.1 Manual Conventions.............................................................................................................................. 6
2.2 WaterWatch² Trademark........................................................................................................................ 6
2.3 Scope of Manual.................................................................................................................................... 6
2.4 External Sensors................................................................................................................................... 6
3 Safety Precautions......................................................................................................................................... 7
3.1 General ................................................................................................................................................. 7
3.2 Electrical installation.............................................................................................................................. 7
3.3 Operating............................................................................................................................................... 7
3.4 Service and Maintenance...................................................................................................................... 7
3.5 End of Life Disposal............................................................................................................................... 8
4 Mechanical Installation................................................................................................................................... 9
4.1 Operation Limits..................................................................................................................................... 9
4.1.1 Temperature.................................................................................................................................. 9
4.1.2 Pressure........................................................................................................................................ 9
4.1.3 Material Compatibility.................................................................................................................... 9
4.2 Sensor Components.............................................................................................................................. 9
4.3 Mounting................................................................................................................................................ 9
4.3.1 Mounting Options......................................................................................................................... 10
4.3.2 Mounting Shaft............................................................................................................................. 10
4.3.3 Handrail and Wall Brackets..........................................................................................................10
4.3.4 Customer Supplied Brackets.......................................................................................................11
5 Electrical Installation.................................................................................................................................... 12
5.1 Connection Overview........................................................................................................................... 12
5.2 Electrical Installation............................................................................................................................ 12
5.2.1 7300w² Connections.................................................................................................................... 12
5.2.2 Sensor Interface ModTechw² Connections..................................................................................13
5.2.3 Temperature Sensor Connections...............................................................................................13
5.2.4 Extending ModTechw² Cables.....................................................................................................13
6 Sensor Configuration................................................................................................................................... 14
6.1 Sensor Config...................................................................................................................................... 14
6.2 Sensor Status...................................................................................................................................... 14
6.3 Add Sensor.......................................................................................................................................... 14
6.4 S:0x WTw² Temperature...................................................................................................................... 15
6.4.1 S:0x Info ...................................................................................................................................... 15
6.4.2 S:0x Remove............................................................................................................................... 15
6.4.3 S:0x Modbus Address.................................................................................................................. 15
7 Measurement Configuration......................................................................................................................... 16
7.1 Measurement Config............................................................................................................................ 16
7.1.1 Measurement Status.................................................................................................................... 16
7.1.2 Add Measurement....................................................................................................................... 16
226566IM Issue02 Date 28/03/2014 Page 3 of 26

WaterTechw² D062 Sensor Instruction Manual
7.2 M:0x – Measurement Channel.............................................................................................................17
7.2.1 M:0x Info ..................................................................................................................................... 17
7.2.2 M:0x Title..................................................................................................................................... 17
7.2.3 M:0x Units................................................................................................................................... 17
7.2.4 M:0x Set Zero.............................................................................................................................. 17
7.2.5 M:0x Set Cal................................................................................................................................ 17
7.2.6 M:0x Averaging............................................................................................................................ 17
7.2.7 M:0x Remove............................................................................................................................... 17
7.2.8 M:0x Display Position..................................................................................................................17
8 Calibration ................................................................................................................................................... 18
8.1 Calibration Frequency..........................................................................................................................18
8.2 Equipment required for Calibrations....................................................................................................18
8.3 Calibration Zero .................................................................................................................................. 18
8.4 Calibration Span ................................................................................................................................. 19
9 Maintenance............................................................................................................................................... 21
9.1 General cleaning ................................................................................................................................. 21
9.2 Inspection............................................................................................................................................ 21
9.3 Dismantling the Sensor........................................................................................................................ 21
10 Spares....................................................................................................................................................... 22
10.1.1 Service Parts............................................................................................................................. 22
11 Sensor Faults............................................................................................................................................. 23
11.1 Unstable reading on controller...........................................................................................................23
11.2 Error Codes from 7300w² Monitor......................................................................................................23
11.2.1 Over range/Under range............................................................................................................23
12 Technical Support...................................................................................................................................... 24
12.1 Returning Equipment for Repair........................................................................................................24
13 Technical Specification.............................................................................................................................. 25
13.1 Electrical ........................................................................................................................................... 25
13.2 Measurement - 4-20mA transmitter probe.........................................................................................25
Page 4 of 26 226566IM Issue02 Date 28/03/2014

WaterTechw² D062 Sensor Instruction Manual
1 Foreword
The WaterTechw² family of sensors are the latest version of water quality monitoring sensors offered by Partech. The 'w²' in the product title denotes compatibility with the Waterwatch² range. The sensors are designed for use with the 7300w² Monitor. The term WaterTech is used for any Partech sensor not under thebanner of; turbidity, suspended solids, oxygen, oil on water, or UV measurements.
The WaterTechw² D062 Sensor has been specifically designed to monitor temperature. The result is a robust, accurate, easy to use and stable temperature measurement system. The probes are filled with a special cast resin that protects against moisture. As standard the probes are fitted with 5 m cable, but they can be supplied with other lengths on request. The sensor within the probes consists of a metal cylinder containing the thermistor network. This sensor tip is fitted to a black plastic housing The probes are designedfor use between -5°C and +45°. The accuracy of the measurement is +/- 0.2°C.
The sensor requires very little maintenance, with no special tools or training required. The probe has been factory calibrated so does not require further calibration.
Page 5 of 26 226566IM Issue02 Date 28/03/2014
WaterTechw² D062 Sensor

WaterTechw² D062 Sensor Instruction Manual
2 Introduction
2.1 Manual Conventions
All dimensions stated in this manual are in millimetres unless otherwise stated.
The manual has been written assuming the user has a knowledge of instrumentation and an understanding of the type of measurement being made. Training in the use of the 7300w² Monitor and sensors can be provided, please contact Partech for further information.
Icons have been used throughout this manual to draw your attention to precautions and useful notes.
They are categorised in the following way-
GENERAL NOTES – Specifications and general notes of interest to the user.
GENERAL CAUTION – Used where caution is required to prevent injury, damage, corruption of data, loss of calibration or invalidation of warranty etc.
INSTALLATION NOTES – General installation notes of interest to the installer.
ELECTRICAL CAUTION – Used where there is a danger of electric shock to the installer or end user, or where caution is required to prevent damage to the instrument.
MAINTENANCE NOTES – Used to highlight recommended maintenance procedures and help withfault finding.
ENVIRONMENTAL NOTES – General notes on environmental issues, waste and disposal.
2.2 WaterWatch² Trademark
WaterWatchw² is the family name for the w² range of monitors and sensors. Sensors and instruments designed for specific use with the 7300w² Monitor will be suffixed with the w² trademark.
2.3 Scope of Manual
This manual describes the installation, configuration, testing and operation of the WaterTechw² D062 Sensor. Please refer to 7300w² Monitor manual for standard functions of the 7300w² Monitor.
2.4 External Sensors
External sensors refers to any sensors, expansion modules or instruments connected externally to the 7300w² Monitor.
226566IM Issue02 Date 28/03/2014 Page 6 of 26

WaterTechw² D062 Sensor Instruction Manual
3 Safety Precautions
3.1 General
Read the safety precautions carefully.
Check the delivery of your WaterWatch² sensor for damage. Any damage should be reported to your supplieras soon as possible.
Use care when unpacking the sensor. NEVER use sharp instruments to open the packaging, as this can cause damage to the sensor or cable.
Only use accessories specifically manufactured by Partech for use with this sensor.
Read the operating instructions carefully before installing and operating this sensor.
Keep the cable connections dry and free from contamination during installation.
Keep the sensor away from high voltage cables.
3.2 Electrical installation
Only suitably qualified personnel or a competent person may install, operate or repair this equipment. The installer must ensure all electrical installations comply with local wiring regulations and standards (refer to BS7671 for UK installations).
Please check the sensor has been wired correctly. Incorrect wiring may causes damage to the sensor or monitor.
The WaterWatch² family of sensors are designed exclusively for use with the 7300w² Monitor. DO NOT connect to other monitors.
Sensors may need to be correctly addressed to the monitor before use. Please read the Sensor Configuration section of this manual for full details.
3.3 Operating
Because these sensors have a wide range of applications, users must acquire the appropriate knowledge to use these sensors in their specific application.
Partech are always available to provide advice and assistance in your application. Please contact Partech forfurther information.
These sensors may need to be calibrated before use. Please read the Calibration section of this manual for full details of calibration procedures.
3.4 Service and Maintenance
Before maintenance, this equipment must be isolated or disconnected from HAZARDOUS LIVE voltages before access.
Maintenance instructions for the WaterTechw² sensor should be carried out as specified in this instruction manual. Failure to carry out regular maintenance could invalidate the Warranty.
Services and repairs must be carried out by a Partech engineer. Partech can provide a service contract for your system. Please ask for details.
3.5 End of Life Disposal
Equipment should be recycled according to local regulations.
Any calibration solutions should be disposed of as described in the Manufacture Safety Data Sheet accompanied with the calibration solution.
Partech can provide recycling and disposal of your old Partech equipment, and may also provide the same service for other manufactures equipment when replaced with Partech equipment.
Partech may provide a trade-in for old Partech equipment when upgrading your system. Please contact us for further information.
Page 7 of 26 226566IM Issue02 Date 28/03/2014
WaterTechw² D062 Sensor Instruction Manual
4 Mechanical Installation
Whilst every attempt has been made to ensure that these instructions are correct, common sense and good engineering practice should always be used, as every installation can present a new set of challenges and difficulties. If you are in any doubt please contact Partech or your local distributor for further information.
4.1 Operation Limits
4.1.1 TemperatureThe upper operational temperature limit is restricted to 45°C. At low temperatures the limit of operationis -5°C with the practical limitation being ice formation in the sample. The construction of the sensor is such that freezing should not present a problem.
4.1.2 PressureThe sensor provided is not intended for high-pressure applications and should not be subjected to internal pressures in excess of 1 Bar.
4.1.3 Material CompatibilityCare should also be taken to ensure material compatibility between the media being monitored and the wetted parts of the assembly. The principle wetted parts are black Acetal Co-Polymer, Polypropylene. If you are in any doubt about chemical compatibility please contact Partech.
Regulations governing the use of equipment in contact with potable water exist and these need to be understood by the user of this product. It is Partech's belief that the low surface area in contact with the potable water and the normal installation practise of feeding the sample stream to waste mean thatthis product is suitable for use in potable water treatment processing.
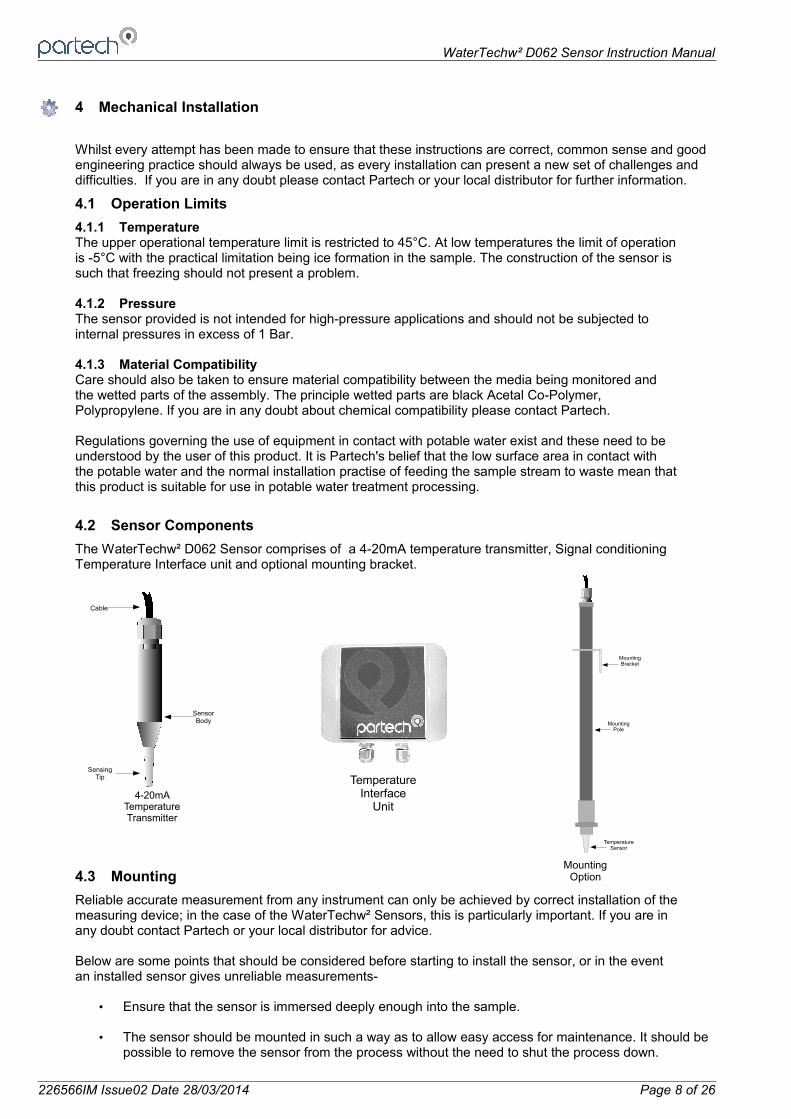
4.2 Sensor Components
The WaterTechw² D062 Sensor comprises of a 4-20mA temperature transmitter, Signal conditioning Temperature Interface unit and optional mounting bracket.
4.3 Mounting
Reliable accurate measurement from any instrument can only be achieved by correct installation of themeasuring device; in the case of the WaterTechw² Sensors, this is particularly important. If you are in any doubt contact Partech or your local distributor for advice.
Below are some points that should be considered before starting to install the sensor, or in the event an installed sensor gives unreliable measurements-
• Ensure that the sensor is immersed deeply enough into the sample.
• The sensor should be mounted in such a way as to allow easy access for maintenance. It should be possible to remove the sensor from the process without the need to shut the process down.
226566IM Issue02 Date 28/03/2014 Page 8 of 26
Cable
SensorBody
SensingTip
4-20mA Temperature Transmitter
TemperatureInterface
Unit
MountingPole
MountingBracket
TemperatureSensor
MountingOption

WaterTechw² D062 Sensor Instruction Manual
• The sensor must be monitoring a sample of the process that is representative of the whole process.
• To allow a single technician to calibrate and maintain the system the sensor should be placed within sight of the 7300w² Monitor. Although cable runs of up to 100 metres are possible operational problems can be caused.
• Where possible, angle the sensor so that it is pointing down stream, this will allow any “ragging” to be removed by the flow past the sensor..
4.3.1 Mounting Options
Partech offer a range of mounting brackets for the installation of the WaterTechw² Sensor, which will allow the user to apply the sensor in a wide variety of locations. Drawings of the brackets are shown in the relevant “Optional Accessories” sections of this manual. When assessing mounting options, attention should be paid to the accessibility of the sensor for calibration and maintenance, stability of the sensor in the flow conditions present on site and to ensuring the sensor is fully submerged atall times.
4.3.2 Mounting Shaft
An optional mounting shaft fittingcan be used to allows the
WaterTechw² Sensors to be fitted to a number of mounting accessories.Partech supply mounting shafts manufactured from 2” nominal bore grey ABS pipe in 0.5, 1.0, 1.5, 2, 2.5 and3.0 metre lengths. Whilst other lengths can be provided as special orders, generally standard lengths will satisfy most requirements. It should be noted that sensors with long mounting shafts are difficult to move safely and can present problems with calibration and maintenance, shaft lengths should be kept to a minimum where possible.4.3.3 Handrail and Wall Brackets
The mounting shafts described above need to be attached to the structure of the tank or flow channel where measurement is required. The mounting shaft sits inside the mounting bracket and is located using locking collars. To remove the mounting shaft, remove the locking thumb screw and lift the shaft from the bracket.
Care should be taken to ensure that the sensor can be reached from the walkway to allow removal for calibration and maintenance.
Page 9 of 26 226566IM Issue02 Date 28/03/2014

WaterTechw² D062 Sensor Instruction Manual
4.3.4 Customer Supplied Brackets
When creating brackets to mount the WaterTechw² Sensor, care should be taken to ensure that the following guidelines are observed:
• The bracket must be strong enough to support the sensor with minimum movement when installed into the sample.
• The sensor should be fitted by clamping around the sensor body or suspended by the cable.
• Consideration should be given to enable simple removal and replacement of the sensor for inspection, calibration and servicing to be carried out.
226566IM Issue02 Date 28/03/2014 Page 10 of 26

WaterTechw² D062 Sensor Instruction Manual
5 Electrical Installation
5.1 Connection Overview
5.2 Electrical Installation
Unscrew the two cover screws on the lower panel of the 7300w² Monitor to reveal the Terminals. Each terminal strip is labelled as illustrated below. (This equipment must be isolated or disconnected from HAZARDOUS LIVE voltages before access). Refer to the 7300w² Monitor user manual for full description of all the terminals within the monitor. The maximum size wire that can be terminated is 2.5mm² CSA. All the connections are via removable Plug/Socket terminals. To disengage the terminal strip, simply pull down to release. 5.2.1 7300w² Connections
A maximum of two sensors can be directly connected to the standard 7300w² Monitor, additional sensors
can be added using the optional expansion boxes available separately.
When routing the sensor interface cables, please ensure the cable is separated from any mains cables. Although the Partech w² sensors have a high resistance to interference, separation of mains and data cablesis good practice and should always be followed where practical.
All sensors in the w² range communicate with the monitor using the ModTechw² Protocol. This protocol has been specifically designed to take advantage of the advanced features and diagnostics designed into the w² range of sensors.
Page 11 of 26 226566IM Issue02 Date 28/03/2014
7300w² MonitorSensor Interface
Sensor
ModTechw² Cable
MainsInput
WaterTechw² D062 Sensor Instruction Manual
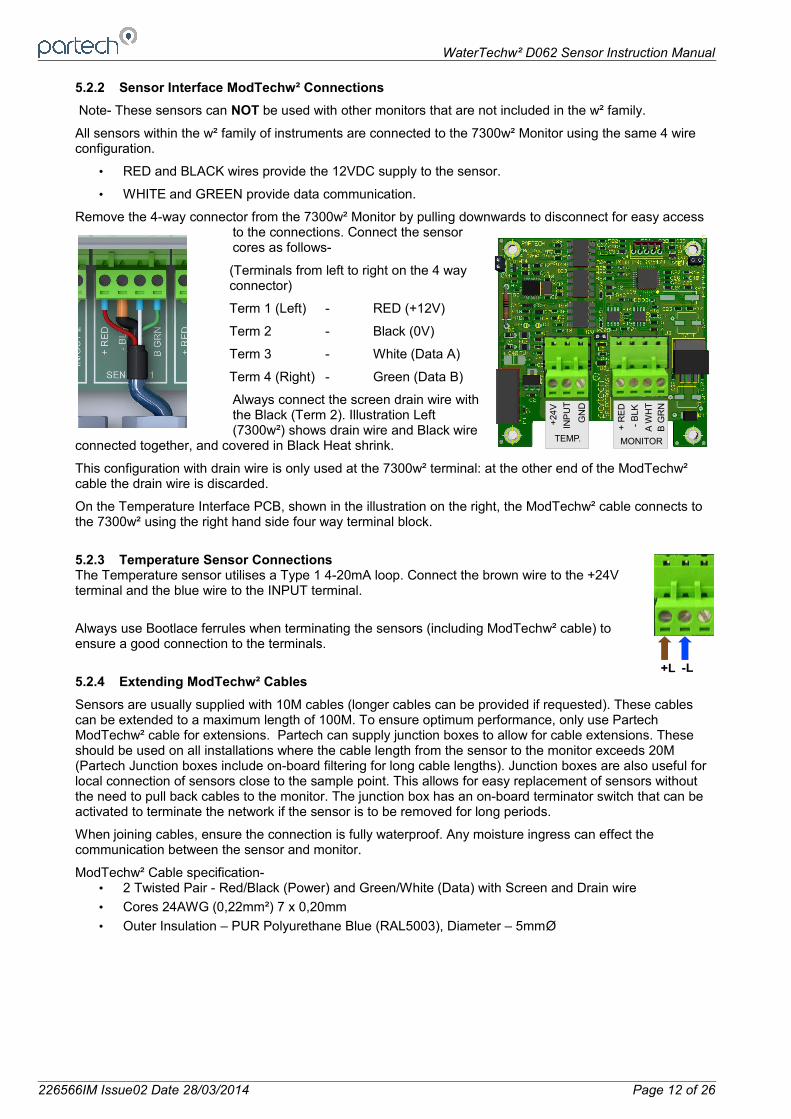
5.2.2 Sensor Interface ModTechw² Connections
Note- These sensors can NOT be used with other monitors that are not included in the w² family.
All sensors within the w² family of instruments are connected to the 7300w² Monitor using the same 4 wire configuration.
• RED and BLACK wires provide the 12VDC supply to the sensor.
• WHITE and GREEN provide data communication.
Remove the 4-way connector from the 7300w² Monitor by pulling downwards to disconnect for easy access to the connections. Connect the sensorcores as follows-
(Terminals from left to right on the 4 way connector)
Term 1 (Left) - RED (+12V)
Term 2 - Black (0V)
Term 3 - White (Data A)
Term 4 (Right) - Green (Data B)
Always connect the screen drain wire withthe Black (Term 2). Illustration Left(7300w²) shows drain wire and Black wire
connected together, and covered in Black Heat shrink.
This configuration with drain wire is only used at the 7300w² terminal: at the other end of the ModTechw² cable the drain wire is discarded.
On the Temperature Interface PCB, shown in the illustration on the right, the ModTechw² cable connects to the 7300w² using the right hand side four way terminal block.
5.2.3 Temperature Sensor ConnectionsThe Temperature sensor utilises a Type 1 4-20mA loop. Connect the brown wire to the +24Vterminal and the blue wire to the INPUT terminal.
Always use Bootlace ferrules when terminating the sensors (including ModTechw² cable) toensure a good connection to the terminals.
5.2.4 Extending ModTechw² Cables
Sensors are usually supplied with 10M cables (longer cables can be provided if requested). These cables can be extended to a maximum length of 100M. To ensure optimum performance, only use Partech ModTechw² cable for extensions. Partech can supply junction boxes to allow for cable extensions. These should be used on all installations where the cable length from the sensor to the monitor exceeds 20M (Partech Junction boxes include on-board filtering for long cable lengths). Junction boxes are also useful for local connection of sensors close to the sample point. This allows for easy replacement of sensors without the need to pull back cables to the monitor. The junction box has an on-board terminator switch that can be activated to terminate the network if the sensor is to be removed for long periods.
When joining cables, ensure the connection is fully waterproof. Any moisture ingress can effect the communication between the sensor and monitor.
ModTechw² Cable specification-• 2 Twisted Pair - Red/Black (Power) and Green/White (Data) with Screen and Drain wire
• Cores 24AWG (0,22mm²) 7 x 0,20mm
• Outer Insulation – PUR Polyurethane Blue (RAL5003), Diameter – 5mmØ
226566IM Issue02 Date 28/03/2014 Page 12 of 26
+ R
ED
- B
LK
A W
HT
B G
RN
MONITOR
+24
V
INP
UT
GN
D
TEMP.
+L -L

WaterTechw² D062 Sensor Instruction Manual
6 Sensor Configuration
Before attempting to configure the sensor, please read the user manualthat came with your monitor. The monitor manual will introduce you tothe basic set-up of the monitor, and will familiarise you with the monitormenu structure and buttons.
The monitor leaves the factory with no sensors pre-installed.
Assuming the monitor has been physically connected to a sensor, the next step is to register and configure the sensor before any measurements can be made. A single sensor may provide one or more measurements. We advise only connecting one sensor at a time. Once the first sensor has been registered, connect the second and register again. Repeat for any additional sensors.
If a second sensor of the same type is to be used the Modbus address of the first device must be changed to avoid a conflict. Care must be taken to ensure that this Modbus address is not in use by another device. Addresses 1-8 are the best choice.
All sensors must be registered to the monitor in this way, even if they are different types.
Please note that live measurements are not available until the SensorConfiguration stage has been completed.
6.1 Sensor Config
From the MAIN MENU screen, select SENSOR CONFIG by pressing ,
and press to accept.
6.2 Sensor Status
This option allows the user to review the current status of the 8 sensor channels, these will all be set todisabled until a sensor is added.
Once a sensor has been installed the display will be updated to indicate the sensor type installed and it's status.
6.3 Add Sensor
1. From the MAIN MENU screen, select SENSOR CONFIG by
pressing and press .
2. The SENSOR MENU should be displayed. Press to
highlight ADD SENSOR, and press .
3. The Monitor will now search all possible addresses (0 to 240)to find any attached sensors. During the search, any sensors found will be displayed momentary before continuing with the search.
4. Once the search is complete, the Monitor will display a list of sensors found. Each sensor will be automatically allocated a sensor number from S:01 to S:08.
5. Repeat the above process to install a second, third or more sensors. A total of 8 sensors are possible (expansion box may be required to add additional sensors).
6. Sensor addition is now complete.
7. If a single or multiple sensors have been found the can be pressed to escape from continuing the search.
Page 13 of 26 226566IM Issue02 Date 28/03/2014
M:01 ºC
22.8TEMPERATURE
Monitor: OK 09:59:45 11/07/13
MAIN MENU
Monitor Config
Expansion Config
Sensor Config
Measurement Config
Alarm Config
Output Config
Information
SENSOR CONFIG
Sensor Status
Add Sensor
<No Sensors Installed>

WaterTechw² D062 Sensor Instruction Manual
6.4 S:0x WTw² Temperature
Once the sensor has been added and registered, the monitor will provide
a list of functions specific to the sensor. Press or to select the
sensor and press . The CONFIG MENU will display a list of sensorfunctions.
6.4.1 S:0x Info This function provides a range of diagnostic information that may be
requested by Partech for fault finding Press the key to access theinformation sub-menu.
Only the first two pages of this sub-menu are shown as they are deemedthe most relevant for initial diagnosis.
The first page of this information menu option shows the sensor type,
Modbus address and the sensor serial number. Press the key toaccess the next page.
The second page displays the installed firmware version numbers and the factory date. Press the key to escape from this sub-menu.
This will return us the the Sensor Config. Menu again.
6.4.2 S:0x RemoveThis allows the sensor to be removed for re-configuration of the monitor orif a sensor has been added in error. If a sensor has been replaced with anew sensors, the old sensor must be removed before the new sensor isinstalled.
You will be prompted with 'Are you sure?' before the sensor is removed.
Press to accept and remove.
6.4.3 S:0x Modbus AddressThis option allows manual adjustment of the ModTechw² address for thesensor, under normal circumstances this should not be changed.
If a second WaterTechw² D062 Sensor is to be added the Modbusaddress must be changed.
226566IM Issue02 Date 28/03/2014 Page 14 of 26
SENSOR CONFIGSensor Status
Add Sensor
S:01 WTw2 Temperature
S:01 CONFIG
S:01 Remove
S:01 Modbus Address
S:01 Info
S:01 CONFIG
S:01 Remove
S:01 Modbus Address
S:01 Info
S:01 CONFIG
S:01 Remove
S:01 Modbus Address
S:01 Info

WaterTechw² D062 Sensor Instruction Manual
7 Measurement Configuration
The monitor leaves the factory without any measurements configured. Measurements can only be added after installing the relevant sensor(s).
Once the sensor has been registered with the monitor and installed, the default measurement will be added automatically, the measurement can be configured by following these steps.
7.1 Measurement Config
From the MAIN MENU screen, select MEASUREMENT CONFIG by
pressing , press . The screen shot to the left shows the defaultconfiguration after the installation of the WaterTechw² D062 sensor on asingle sensor configuration:
M:01 = Temperature (S:01)
7.1.1 Measurement StatusThis option allows the user to review the current status of the 16 measurement channels, these will all be set to disabled until a sensor is added. In the example above the first channel will be occupied.
Once a measurement has been configured the display will be updated to indicate the measurement and it's status.
7.1.2 Add Measurement
The WaterTechw² D062 Sensor is a single measurement sensor, thereforethere should be no need to add measurements, however if themeasurement is removed in error the following procedure will allow themeasurement to be returned.
1. The MEASUREMENT MENU should be displayed. Press to
highlight ADD MEASUREMENT, and press .
2. The temperature measurement will be displayed.
3. Press to select the measurement.
4. The measurement will be allocated a measurement number from M:01 – M:16. A total of 16 measurements may be displayed.
5. Press to return back to the display screen. Your firstmeasurement configured should now be displayed. If two
measurements were configured, press to cycle through thedisplay screens to show 2 measurements, 4 measurements etc.
The Measurement Menu will list all configured measurements in order M:01to M:16 the list will also indicate the sensor number that is delivering thesignal for the measurement.
Page 15 of 26 226566IM Issue02 Date 28/03/2014
MEASUREMENT CONFIGMeasurement StatusAdd Measurement
M:01 Temperature (S:01)
MEASUREMENT CONFIGMeasurement Status
Add Measurement
MEASUREMENT CONFIGMeasurement StatusAdd Measurement
M:01 Temperature (S:01)

WaterTechw² D062 Sensor Instruction Manual
7.2 M:0x – Measurement Setup
Selecting a measurement will reveal a new sub-menu associated with that
measurement. In MEASUREMENT CONFIG press to highlight the
required measurement and press .
7.2.1 M:0x Info This option provides additional information on the measurement, thisinformation will only be required if a problem exists with the instrumentperformance.
7.2.2 M:0x TitleThis allows the title of the measurement to be changed from it's default,the measurement title is used in measurement mode to identify themeasured value. A selection of standard terms are available along with a'User Defined' option that can be adjusted to suit your requirements. Forexample this could be changed to 'Temperature Line 1'. The maximumnumber of characters is 20.
7.2.3 M:0x Set ZeroThis option relates to the calibration of the system and is covered in the section below.
7.2.4 M:0x Set CalThis option relates to the calibration of the system and is covered in the section below.
7.2.5 M:0x AveragingThis allows the user to impose averaging on the measured value, this is used to reduce the speed of reaction to the process changes.
The following values are available for the user to select:
Damping Rate Response Time (Seconds) Typical Use
Instant 0.2s Instrument demonstration and test
Very Fast 1s
Fast 10s Final Effluent monitoring
Medium 30s
Slow 1m
Very Slow 2m
7.2.6 M:0x RemoveThis allows the user to remove a measurement that has been selected in error or to allow re-configuration of the system. Please use this option with care, all user settings will be lost if the measurement is removed in error.
7.2.7 M:0x Display PositionThis option allows the position of the measurement to be moved. For example the Temperature measurement can be changed from M:01 to M:02 so it will appear second on the list in MEASUREMENT CONFIG menu. Any associated alarms and outputs will automatically move with the re0numbered measurements.
226566IM Issue02 Date 28/03/2014 Page 16 of 26
M:01 CONFIG
M:01 Info
M:01 TitleM:01 Set Zero (0.0 °C)
M:01 Averaging
M:01 Remove
M:01 Set Cal (20.0 °C)
M:01 Display Position
MEASUREMENT CONFIGMeasurement StatusAdd Measurement
M:01 Temperature (S:01)

WaterTechw² D062 Sensor Instruction Manual
8 Calibration
The WaterTechw² D062 sensor has been calibrated prior to leaving the factory. It is an inherently stable measurement so even when a new system is installed, calibration should not be required. If calibration is attempted a period of 1/2 hour should be allowed for the WaterTechw² D062 Sensor to stabilise before calibration commences. This is to enable the system to adjust to the “new” ambient temperature conditions. This should not be considered as system warm up time from power up, but to acclimatise to the environment if the sensor has come from a warm store to a cold sample point.
The standard calibration procedure involves a two point calibration – zero and span, the process for calibration is described below. The sensors has a linear response to temperature.
It is recommended that calibration only be attempted in circumstances that have indicated an inaccuracy withthe reading. Without knowledge of the measurement it is possible to decrease the accuracy rather than increase it. This is particularly important when performing the zero point calibration at zero degrees.
If further guidance is required please contact our Technical Support Engineers to discuss your requirements.
8.1 Calibration Frequency
There is no absolute guide to the frequency of calibration. The user must make a judgement based on how critical the measurement is to the process, variability in the sample and standard practice within their organisation.
We recommend that a check is carried out every six months on temperature accuracy. This will then indicate whether a calibration is required.
8.2 Equipment required for Calibrations
This section describes the materials and equipment you will need, and the basic steps required to ensure a successful calibration of the WaterTechw² D062 Sensor.
The following is required:
• Approximately 0.5 Litres standard ice / water mix.
• Approximately 0.5 Litres of water at room temperature.
• An accurate thermometer with at least the ability to measure to 0.1° accuracy.
8.3 Calibration Zero
Zero or Low calibration can be carried out at any value between -5 and 10°C, the process below describes a method of calibration at 0°C.
To calibrate the sensor, place the metal end of the sensor into a beaker of ice / water mixture. This melting ice will be at exactly 0°C. Allow the sensor to equilibrate for at least 5 minutes before attempting the procedure below. It is important to keep the mixture stirred whilst carrying the calibration as the accuracy of the reading depends on thorough mixing.
From the 7300w² Monitor, navigate to the Calibration menu as follows-
• Press to show the “MAIN MENU”.
• Select “MEASUREMENT CONFIG” by pressing and press to accept.
• Select Temperature by pressing and press to accept.
Page 17 of 26 226566IM Issue02 Date 28/03/2014
MEASUREMENT CONFIGMeasurement StatusAdd Measurement
M:01 Temperature (S:01)
WaterTechw² D062 Sensor Instruction Manual
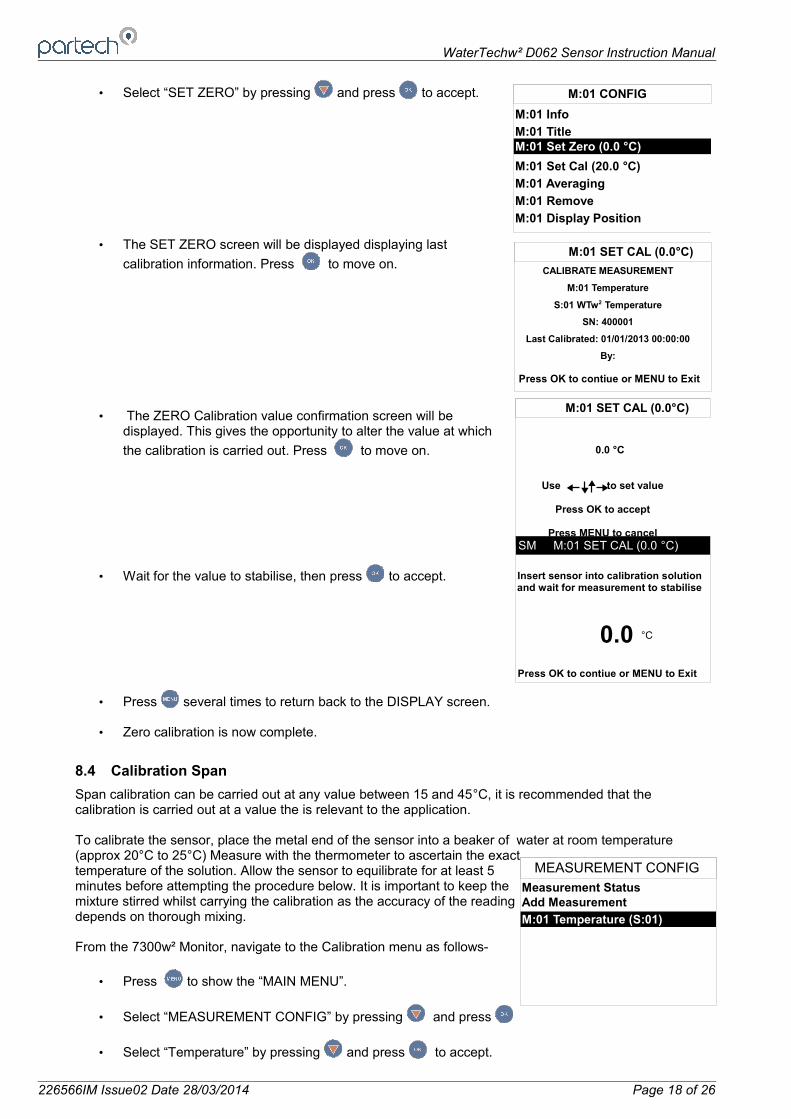
• Select “SET ZERO” by pressing and press to accept.
• The SET ZERO screen will be displayed displaying last
calibration information. Press to move on.
• The ZERO Calibration value confirmation screen will bedisplayed. This gives the opportunity to alter the value at which
the calibration is carried out. Press to move on.
• Wait for the value to stabilise, then press to accept.
• Press several times to return back to the DISPLAY screen.
• Zero calibration is now complete.
8.4 Calibration Span
Span calibration can be carried out at any value between 15 and 45°C, it is recommended that the calibration is carried out at a value the is relevant to the application.
To calibrate the sensor, place the metal end of the sensor into a beaker of water at room temperature (approx 20°C to 25°C) Measure with the thermometer to ascertain the exacttemperature of the solution. Allow the sensor to equilibrate for at least 5minutes before attempting the procedure below. It is important to keep themixture stirred whilst carrying the calibration as the accuracy of the readingdepends on thorough mixing.
From the 7300w² Monitor, navigate to the Calibration menu as follows-
• Press to show the “MAIN MENU”.
• Select “MEASUREMENT CONFIG” by pressing and press
• Select “Temperature” by pressing and press to accept.
226566IM Issue02 Date 28/03/2014 Page 18 of 26
M:01 SET CAL (0.0°C)
CALIBRATE MEASUREMENT
M:01 Temperature
S:01 WTw2 Temperature
SN: 400001
Last Calibrated: 01/01/2013 00:00:00
By:
Press OK to contiue or MENU to Exit
SM M:01 SET CAL (0.0 °C)
Insert sensor into calibration solution and wait for measurement to stabilise
Press OK to contiue or MENU to Exit
0.0 °C
M:01 CONFIG
M:01 Info
M:01 TitleM:01 Set Zero (0.0 °C)
M:01 Averaging
M:01 Remove
M:01 Set Cal (20.0 °C)
M:01 Display Position
M:01 SET CAL (0.0°C)
0.0 °C
Use to set value
Press OK to accept
Press MENU to cancel
MEASUREMENT CONFIGMeasurement StatusAdd Measurement
M:01 Temperature (S:01)

WaterTechw² D062 Sensor Instruction Manual
• Select “SET CAL” by pressing and press to accept.
• The SET CAL screen will be displayed,displaying last calibration
information Press to move on.
• The SET CAL set calibration value screen will be displayed.
• Enter the value for the temperature of the beaker of water. (Default
is 20°C). Press or to move the cursor below the digit to be
changed. Press or to increase or decrease the digit, and
press the to accept the value.
• The SET CAL calibration screen will now be displayed.
• Wait for the value to stabilise, then press to accept.
• Press several times to return back to the DISPLAY screen.
• Calibration span is now complete.
Page 19 of 26 226566IM Issue02 Date 28/03/2014
M:01 CONFIG
M:01 Info
M:01 TitleM:01 Set Zero (0.0 °C)
M:01 Averaging
M:01 Remove
M:01 Set Cal (20.0 °C)
M:01 Display Position
M:01 SET CAL (20.0°C)
CALIBRATE MEASUREMENT
M:01 Temperature
S:01 WTw2 Temperature
SN: 400001
Last Calibrated: 01/01/2013 00:00:00
By:
Press OK to contiue or MENU to Exit
M:01 SET CAL (20.0°C)
20.0 °C
Use to set value
Press OK to accept
Press MENU to cancel
SM M:01 SET CAL (20.0 °C)
Insert sensor into calibration solution and wait for measurement to stabilise
Press OK to contiue or MENU to Exit
20.4 °C

WaterTechw² D062 Sensor Instruction Manual
9 Maintenance
9.1 General cleaning
Monthly, or as required, check the measurement cell for fouling. The sensor is easily accessed, by removing from the measurement point to view sensor end. Check the body for debris or biological fouling and clean as required.
9.2 Inspection
Make a routine check of any cable connections or terminations.
9.3 Dismantling the Sensor
The sensor is fully encapsulated and has no removable or serviceable parts.
226566IM Issue02 Date 28/03/2014 Page 20 of 26
WaterTechw² D062 Sensor Instruction Manual
10 Sensor Faults
10.1 Unstable reading on controller
The following can cause an unstable display value:
• Bad connection in the sensor cable - check all connections are secured.
10.2 Error Codes from 7300w² Monitor
Please refer to the 7300w² Monitor manual for further information.
10.2.1 Over range/Under rangeThis indicates that the measured value is outside the normal operating limits of the sensor. This could be caused by a sensor fault but can also indicate a genuine over or under range condition.
The following action is recommended:
1. Remove sensor from measurement point
2. Place the sensor in a water sample at significantly different temperature
At each stage observe the behaviour of the displayed value. If the error message clears then it is possible that the problem was caused by fa genuine over or under range condition.
If the problem persists please contact Partech or your local representative for further guidance.
Page 21 of 26 226566IM Issue02 Date 28/03/2014
WaterTechw² D062 Sensor Instruction Manual
11 Technical Support
Technical Support is available by phone, fax, or email, the details of which are shown below.
• Phone: +44 (0) 1726 879800
• Fax: +44 (0) 1726 879801
• Email: [email protected]
• Website: www.partech.co.uk
To enable us to provide quick and accurate technical support please have the following information ready when you contact us:
• Serial Number or original purchase details.
• Sensor Type, and Serial Number.
• Application details.
• Description of fault.
• Digital photos can also be useful to determine correct installation and suitability to the application.
11.1 Returning Equipment for Repair
If equipment needs to be returned to Partech for repair or service the following address should be used:SERVICE DEPARTMENT
PARTECH (ELECTRONICS) LTD
CHARLESTOWN
ST AUSTELL
CORNWALL
PL25 3NN
UNITED KINGDOM
Please include the following information with the returned equipment. Also ensure that sensor is clean and adequately protected for transportation (Advice on packing can be provided by our service department).
• Contact name and phone number of person authorising the repair
• Site details including application sample point
• Return address for equipment
• Description of fault or service required
• Any special safety precautions because of nature of application
226566IM Issue02 Date 28/03/2014 Page 22 of 26
WaterTechw² D062 Sensor Instruction Manual
12 Technical Specification
12.1 Electrical
Supply.............................................12VDC from 7300w² Monitor to interface box
Sensor Interface Communication....ModTechw² Protocol (Specifically developed for WaterWatch² range)
12.2 Measurement - 4-20mA transmitter probe
Construction......................Sensor tip 9mm dia. x 32 mm. Body 21.5 mm dia. Total length with cable gland 138 mm.
Material..............................Stainless steel tip and black acetyl body.
Cable length......................Standard cable 10 m 2-wire 0.75 mm² PUR. Other lengths available on request.
Operating temperature......Standard range: -5°C to +45°C.
Calibration.........................Factory calibrated
4mA...................................-5°C
20mA.................................+45°C
Accuracy...........................+/- 0.2°C.
Sensor warm-up time.......1 millisecond.
Reading update min........ 500 millisecond.
Sensor supply..................14 volt (50 ohm loop resistance) to 32 VDC (950 ohm loop resistance) from Interface box.
Page 23 of 26 226566IM Issue02 Date 28/03/2014

WaterTechw² D062 Sensor Instruction Manual
226566IM Issue02 Date 28/03/2014 Page 24 of 26

WaterTechw² D062 Sensor Instruction Manual
226566IM Issue02 Date 28/03/2014 Page 25 of 26
