water source installation instructions …g).pdfadd-on dpm26a pump module kit ... (packed with unit...
TRANSCRIPT

INSTALLATIONINSTRUCTIONS
WATER SOURCEHEAT PUMP
MODELS: WPV48DWPV60D
BARD MANUFACTURING COMPANYBryan, Ohio 43506
Since 1914...Moving ahead, just as planned.
Manual: 2100-250GSupersedes: 2100-250FFile: Volume I, Tab 8Date: 09-25-01
Copyright 2001
Earth Loop FluidTemperatures 25° - 110°
Ground Water Temperatures 45° - 75°
MIS-658

CONTENTS
Application and LocationGeneral ................................................................... 2Shipping Damage ................................................... 2Application .............................................................. 2Location .................................................................. 2Ductwork ................................................................. 2Filter ........................................................................ 3Condensate Drain ................................................... 3Piping Access to the Unit ........................................ 3
WiringMain Power ............................................................. 4Thermostat Low Voltage Wiring ............................. 4
AccessoriesAdd-on DPM26A Pump Module Kit ........................ 6General ................................................................... 6Installation .............................................................. 6
Closed Loop (Earth Coupled Ground Loop Applications)
Circulation System Design ..................................... 7Heat Pump Connections Without Pump Kit ............ 9Piping Connections ................................................. 9System Start Up Procedure .................................. 12
Open Loop (Well System Application)Water Connections ............................................... 13Well Pump Sizing ................................................. 14System Start Up Procedure .................................. 14Water Corrosion ................................................... 15Remedies of Water Problems ............................... 16Lake and Pond Installations ................................. 17
Sequence of OperationCooling With or Without Duct Heaters ................. 19Single Stage Heat Without Duct Heaters ............. 19Two Stage Heat With Duct Heaters ...................... 19Emergency Heat ................................................... 19
Pressure Tables ................................................. 25
Quick Reference Trouble-Shooting Chart ....... 26
Thermostat Diagrams........................................ 27
Wiring Diagrams ...........................................28-30
Ground Source Heat Pump Performance Report ................................31-32
FiguresFigure 1 Filter Removal ....................................... 3Figure 2 Piping Access to the Unit ...................... 3Figure 3 Optional Terminal Board Cover ............. 4Figure 4 Duct Heater ........................................... 5Figure 5 Connection of Water Lines ................... 6Figure 6 Components for Circulating System ..... 7Figure 7 .............................................................. 9Figure 8 .............................................................. 9Figure 9 .............................................................. 9Figure 10 Pump Module Hookup ........................ 10Figure 11 ............................................................ 10Figure 12 Pump Module Hookup Performance ... 11Figure 13 Pressure and Temperature Sensing
Adapter and Components ................... 11Figure 14 Water Connection Components .......... 14Figure 15 Cleaning Water Coil ............................ 16Figure 16 Water Well System ............................. 18Figure 17 Functional Components ...................... 20Figure 18 Control Location .................................. 20Figure 19 Water Source Heat Pump -
Cooling Cycle ...................................... 21Figure 20 Water Source Heat Pump -
Heating Cycle ..................................... 22
TablesTable 1 Specifications ...................................... 1Table 2 Water Coil Pressure Drop .................... 1Table 3 Indoor Blower Performance ................. 1Table 4 Accessory Items - Duct Heaters .......... 5Table 5 Constant Low Valves ......................... 13Table 6A and 6B Capacity & Efficiency Ratings............. 23Table 7 Capacity Multiplier Factors ................ 24Table 8 Correction Factors ............................. 24Table 9 Flow Rates for Various Fluids ............ 24Table 10 Pressure Table – Cooling .................. 25Table 10A Pressure Table – Heating .................. 25

Manual 2100-250Page 1
�
TABLE 1SPECIFICATIONS
LEDOM D84VPW D06VPW
)HP/V/ZH06(gnitaRlacirtcelE 1-802/032 1-802/032
egnaRegatloVgnitarepO 791-352 791-352
yticapmAtiucriCmuminiM 5.43 0.63
eziSeriWdleiF+ 8# 8#
.rkB.tkCro.xaMesuFyaleD++ 05 06
802/032spmAtinUlatoT 0.72/7.32 8.82/9.52
ROSSERPMOC
stloV 802/032 802/032
802/032spmAdaoLdetaR 3.22/0.91 1.42/2.12
tnerruCnoitceleS.tkChcnarB 7.32 0.52
802/032spmArotoRkcoL 921/921 841/841
ROTAROPAVEdnaROTOMREWOLB
dpS/PH-rotoMrewolB dps-32/1 dps-32/1
spmA-rotoMrewolB 7.4 7.4
/swoR/.tF.qSaerAecaFhcnIrePsniF 31/3/6.4 31/3/6.4
.SBLTHGIEWGNIPPIHS 073 573
TABLE 3INDOOR BLOWER PERFORMANCE
(CFM – DRY COIL WITH FILTER)
� For wet coil CFM multiply by .96ESP = External Static Pressure (inches of water)
ledoM
D06VPW,D84VPW
lanoitpOtuohtiWdellatsnI54WC
lanoitpOhtiWdellatsnI54WC
CWniPSEdeepSrotoM deepSrotoM
hgiH muideM woL hgiH muideM
00. 047,1 056,1 035,1 047,1 006,1
01. 596,1 706,1 015,1 596,1 055,1
02. 056,1 075,1 084,1 056,1 025,1
03. 206,1 235,1 344,1 526,1 005,1
04. 055,1 094,1 004,1 005,1 064,1
05. 094,1 534,1 843,1 044,1 083,1
06. 024,1 563,1 092,1 093,1 013,1
TABLE 2WATER COIL PRESSURE DROP
ledoM D06VPW,D84VPW
MPG GISP dHtF
4 --- ---
5 --- ---
6 56.1 28.3
7 53.2 34.5
8 01.3 61.7
9 68.3 29.8
01 56.4 57.01
11 05.5 17.21
21 04.6 97.41
31 54.7 22.71
41 06.8 88.91
51 09.9 98.22

Manual 2100-250Page 2
APPLICATION AND LOCATION
GENERAL
Units are shipped completely assembled and internally wired, requiring only duct connections, thermostatwiring, 230-208 volt AC power wiring, and water piping. The equipment covered in this manual is to beinstalled by trained, experienced service and installation technicians. Any heat pump is more critical of properrefrigerant charge and an adequate duct system than a cooling only air conditioning unit.
These instructions and any instructions packaged with any separate equipment required to make up the entireheat pump system should be carefully read before beginning the installation. Note particularly any tags and/orlabels attached to the equipment.
While these instructions are intended as a general recommended guide, they do not in any way supersede anynational and/or local codes. Authorities having jurisdiction should be consulted before the installation is made.
SHIPPING DAMAGE
Upon receipt of the equipment, the carton should be checked for external signs of shipping damage. Ifdamage is found, the receiving party must contact the last carrier immediately, preferably in writing, requestinginspection by the carrier's agent.
APPLICATION
Capacity of the unit for a proposed installation should be based on heat loss calculations made in accordancewith methods of the Air Conditioning Contractors of America, formerly National Warm Air Heating and AirConditioning Association. The air duct system should be sized and installed in accordance with Standards ofthe National Fire Protection Association for the Installation of Air Conditioning and Ventilating Systems of Otherthan Residence Type NFPA No. 90A, and Residence Type Warm Air Heating and Air Conditioning Systems,NFPA No. 90B.
LOCATION
The unit may be installed in a basement, closet or utility room provided adequate service access is insured.Ideally, three sides of the unit should have a minimum access clearance of two feet but the unit can beadequately serviced if two or only one side has a minimum two feet of clearance. The unit should be locatedin the conditioned space to prevent freezing of the water lines.
Clearance to combustible materials is 0 inches for the heat pump. If an optional duct heater is installed, followthe instructions packed with the duct heater for specifications regarding clearance to combustible material.
Before setting the unit, consider ease of piping, drain and electrical connections for the unit. Also, for unitswhich will be used with a field installed heat recovery unit, consider the proximity of the unit to the water heateror storage tank. Place the unit on a solid base, preferably concrete, to minimize undesirable noise andvibration. DO NOT elevate the base pan on rubber or cork vibration eliminator pads as this will permit the unitbase to act like a drum, transmitting objectionable noise.
DUCT WORK
If the unit is to be installed in a closet or utility room which does not have a floor drain, a secondary drain panunder the entire unit is highly recommended.
DO NOT install the unit in such a way that a direct path exists between any return grille and the unit. Rather,insure that the air entering the return grille will make at least one turn before entering the unit air coil. This willreduce possible objectionable compressor and air noise from entering the occupied space.
Design the duct work according to methods given by the Air Conditioning Contractors of America. When ductruns through unconditioned spaces, it should be insulated with vapor barrier. It is recommended that flexibleconnections be used to connect the duct work to the unit in order to keep the noise transmission to aminimum.

Manual 2100-250Page 3
FILTER
This unit must not be operated without a filter. It comes equipped with a disposable filter which should bechecked often and replaced if dirty. Insufficient air flow due to undersized duct systems or dirty filters canresult in nuisance tripping of the high or low pressure control. Refer to Table 1 for correct air flow and staticpressure requirements. See Figure 1.
FIGURE 1FILTER REMOVAL
wpv0.tif
CONDENSATE DRAIN
Determine where the drain line will run. This drain line contains cold water and must be insulated to avoiddroplets of water from condensing on the pipe and dropping on finished floors or the ceiling under the unit. Atrap MUST BE installed in the drain line and the trap filled with water prior to start up. The use of plugged teesin place of elbows to facilitate cleaning is highly recommended.
Drain lines must be installed according to local plumbing codes. It is not recommended that any condensatedrain line be connected to a sewer main. The drain line enters the unit through the water access panel, seeFigure 2, and connects to the FPT coupling under the condensate drain pan.
PIPING ACCESS TO THE UNIT
Water piping to and from the unit enters the unit casing through the water access panel. Piping connectionsare made directly to the heat exchanger coil and are 3/4" or 1" FPT. The access panel can be installed on thefront of the unit (as received) or on the right side of the unit. It is highly recommended that the piping from thewater coil to the outside of the casing be installed while the unit is completely accessible and before it is finallyset in position. Two 1 3/4" inch plastic bushings are provided (packed with unit installation instructions) toprotect piping from sheet metal edges of access panel. See Figure 2.
FIGURE 2PIPING ACCESS TO UNIT
Install 1.750 snap busing(2 supplied, packed withinstallation instructions)into opening prior toinstallation piping. MIS-381
Remove desired knockoutfor piping unit

Manual 2100-250Page 4
MIS-380
WIRING
All electrical connections are made through the top of the unit. High voltage connections are made with wirenuts to the factory-provided pigtail leads in the junction box. Low voltage connections are made to the terminalstrip mounted on the top of the unit. Refer to the wiring diagram for connecting the terminals.
MAIN POWER
Refer to the unit serial plate for wire sizing information and correct protection size. Each unit is marked with a"Minimum Circuit Ampacity." This means that field wiring connections must be sized to carry that amount ofcurrent. Each unit and/or wiring diagram is also marked "Use Copper Conductors Only," meaning the leadsprovided are not suitable for aluminum wiring. Refer to the National Electric Code for complete current-carrying capacity data on the various grades of wiring material.
The unit rating plate lists "Maximum Overcurrent Protective Device" that is to be used with the equipment.This device may be a time delay fuse or HACR type circuit breaker. The correct size overcurrent protectivedevice must be used to provide for proper circuit protection and to avoid nuisance trips due to the momentaryhigh starting current of the compressor motor.
THERMOSTAT LOW VOLTAGE WIRING
A 24 volt terminal strip is mounted on top of the unit with an optional terminal board cover included with the unitinstallation instructions. See Figure 3. Two types of thermostats are available: 1) Single stage heat, singlestage cool to operate the heat pump alone without backup duct style electric heaters. This thermostat isequipped with a signal light to indicate when the unit is "locked out" because of the low temperature or highpressure control. Refer to the wiring diagram 4091-810 for correct connection of the terminals. 2) Two stageheat, single cool to operate the heat pump or duct heaters on heating or the heat pump on cooling. Thisthermostat is also equipped with a signal light to indicate when the unit is "locked out" because of operation ofthe low temperature or high pressure control. In addition, a second signal light tells when the unit has beenplaced in Emergency Heat. Refer to the wiring diagram 4091-811, and to the wiring diagram packed with theduct heater for correct connection of the low voltage terminals.
FIGURE 3OPTIONAL TERMINAL BOARD COVER
Right SideLeft Side
Terminal BoardTerminal board cover packedwith installation instructions)
Remove screws from terminalboard. Place cover in position,and reinstall screws to securecover to board

Manual 2100-250Page 5
FIGURE 4DUCT HEATER
The following is a verbal description of the proper procedure for connecting the low voltage hookups for theduct heater. (Refer to wiring diagram 4091-811).
1. Black wire from duct heater to C on the 24 volt terminal block.
2. Green wire from duct heater to green wire from thermostat. These wires must be wire nutted and isolatedfrom the terminal block. Failure to do so will result in improper heater operation.
3. Connect green with tracer from heater to the G terminal on the 24 volt terminal block.
4. Connect the white wire from the heater to W2 on 24 volt terminal block.A. For the 15 and 20 KW duct heaters, connect the white and white with black tracer wires to W2.
TABLE 4ACCESSORY ITEMS – DUCT HEATER
(SEE FIGURE 4)
.oNtraP HP stloV WKmuminiMyticapmA
eziSeriW �mumixaM
esuF
snoisnemiD
UC LA A B C D E F
080-4068 1 042 0.5 72 01# 8# 03 8 01 4 7 7 21
180-4068 1 042 8.9 25 6# 4# 55 8 01 4 7 7 61
280-4068 � 1 042 7.41 87 4# 1# 08 51 81 5 11 9 81
380-4068 � 1 042 2.91 001 2# 0# 001 51 81 5 11 9 81
� Use wire suitable for at least 75° C.� Fused units (over 48 amperes).NOTE: All duct heaters are supplied with backup protection and internal fusing as required by NEC.
wpv2.tif

Manual 2100-250Page 6
ACCESSORIES
ADD-ON DPM26A PUMP MODULE KITNOTE: This section applies only if a DPM26A Pump Module is added. Refer to DPM26A instructions for complete
installation details.
GENERALThis high efficiency water source heat pump series was designed with a refrigerant to water heat exchanger commonlyknow as a desuperheater coil factory-installed for ease in installing optional DPMA pump module kit. The addition ofthis optional kit allows for heat recovery for hot water heating when connected to a home water heater. The amount ofannual hot water supplied and thus additional energy cost savings will depend on the amount of hot water usage and thenumber of hours the heat pump operates. This pump kit is suitable for potable water.
INSTALLATION1. Follow all local, state, and national codes applicable to the installation of the pump module kit.
2. Follow the installation instructions received with the DPM26A pump module kit.
3. Connect the water lines between the unit, pump module kit, and the water heater.
WATER TOWATERHEATER
SERVICESHUT-OFFVALVES
WATER TO UNITWATER FROMWATER HEATER
SERVICESHUT-OFFVALVE
WATER FROM PUMP KITMIS-1613
DPM26A
WPV MODEL
FIGURE 5CONNECTION OF WATER LINES

Manual 2100-250Page 7
CLOSED LOOP(Earth Coupled Ground Loop Applications)
NOTE: Low temperature thermostat must be reset from factory setting to 15º for closedloop applications.
This unit is designed to work on earth coupled ground loop systems, however, these systems operate atentering water (without antifreeze) temperature well below the temperature normally experienced in water wellsystem.
For information on earth coupled loop design, piping connections to heat pump and installation refer to manual2100-099, "Earth Coupled Loop System Design Manual," available from your distributor.
THE CIRCULATION SYSTEM DESIGN
Equipment room piping design is based on years of experience with earth coupled heat pump systems. Thedesign eliminates most causes of system failure.
Surprisingly, the heat pump itself is rarely the cause. Most problems occur because designers and installersforget that a closed loop earth coupled heat pump system is NOT like a household plumbing system.
Most household water systems have more than enough water pressure either from the well pump or themunicipal water system to overcome the pressure or head loss in 1/2 inch or 3/4 inch household plumbing. Aclosed loop earth coupled heat pump system, however, is separated from the pressure of the householdsupply and relies on a small, low wattage pump to circulate the water and antifreeze solution through the earthcoupling, heat pump and equipment room components.
The small circulator keeps the operating costs of the system to a minimum. However, the performance of thecirculator MUST be closely matched with the pressure or head loss of the entire system in order to provide therequired flow through the heat pump. Insufficient flow through the heat exchanger is one of the most commoncauses of system failure. Proper system piping design and circulator selection will eliminate this problem.
Bard supplies a worksheet to simplify head loss calculations and circulator selection. Refer to "CirculatingPump Worksheet" section in manual 2100-099.
Two general methods are used to pipe the water circuit in the equipment room. The first and easiest to use isto install a pump module. This module comes complete with connecting hose and heat pump adaptersavailable from Bard. A second method is to "site build" the piping at the installation.
To move the transfer fluid (water or antifreeze and water solution) through the earth loop system and the watersource heat pump, some type of circulation system is required. Design of circulation system must includeprovisions for the following. See Figure 6.
1. Selection of a circulation pump or pumps for total system.
2. Providing air bleed off before start-up running.
3. Providing for flow monitoring.
4. Positive pressure control and limiting.
5. Antifreeze charging capability.
NOTE: The expansion and contraction of earth loop piping may cause a 50 to 60 psig water pressure chargein system between summer to winter.

Manual 2100-250Page 8
The components for a circulation system are as follows: Refer to Figure 6.
1. Circulating pump systems are engineered for each individual system to provide the correct water flowand overcome the friction loss of the system piping. Isolation flanges or ball valves are used to insulatepump from system piping. You need to be able to remove the pump from piping without losing thetransfer fluid for repairs if ever required.
Determining pressure drop and selecting a circulation pump or pumps. It is very important inselecting the circulating pump that a very accurate pressure drop calculation be made because finalpressure drop at the selected pump must pump against will to determine the actual flow rate (GPM)that is delivered to the water source heat pump, the pumping cost and efficiency of the entire system.
2. Ball valve and flange
3. Barb X MIP brass adapter
4. Brass test plugs--in order to start up and troubleshoot a closed loop system properly, water in and waterout temperatures at the heat pump must be monitored. A test plug is installed on one leg of eachconnection line. A probe thermostat can be temporarily inserted, the temperature monitored and thethermometer removed. Use one thermometer to monitor these temperatures. Using two differentthermometers to measure the temperature differential can introduce large measurement errors. Theyare also used to measure pressure drop to determine coil flow rate.
5. Bard X insert brass adapter
6. Two boiler drains are located on both sides of the circulator for final filling, air purging and antifreezeaddition.
The top drain should be the highest point in the equipment room piping. This will help purge air out of thesystem during final filling at start up.
7. PE or PB pipe to fit transition
8. One inch reinforced flexible hose
9. 90º street ell (brass)
10. Flow meter (Bard part No. 8603-017)--or equivalent side to monitor water flow is recommended.
FIGURE 6COMPONENTS FOR CIRCULATION SYSTEM
RETURN AIR
wpv4.tif

Manual 2100-250Page 9
HEAT PUMP CONNECTIONS WITHOUT PUMP KIT
The units have various female connections inside on water coil. To keep losses small, all piping andcomponents in the heat pump should be one inch copper or plastic. The transition to one inch pipe should bemade at the exterior of the heat pump if 3/4 inch piping is used in small heat pump models.
Be sure to use a backup wrench when installing the adapters to the heat pump.
PIPING CONNECTIONS
Up to 12 feet of reinforced flexible hose is used. Cut hoses to the desired lengths and install with as fewbends as possible. Close bends increase pipe head loss so any bends should be as wide as possible. Usethe clamps to secure hoses in position.
wpv7.tif
wpv6.tif
wpv5.tif
FIGURE 7
FIGURE 8
FIGURE 9

Manual 2100-250Page 10
FIGURE 11
FIGURE 10PUMP MODULE HOOKUP
GPM-1 WITHOUT CABINET SHOWN
GROUND LOOPWATER IN
GROUND LOOPWATER OUT
HEAT PUMPWATER OUT
COMPRESSOR
WATER OUT(PRESSURE -TEMPERATURETEST PLUG)
WATER IN(PRESSURE -TEMPERATURETEST PLUG)
PIPING ACCESS PANEL (MAY BEINSTALLED AS SHOWN OR ONLEFT OR RIGHT SIDE OF UNIT. INSTALL 1.750 SNAP BUSHING
wpv8.tif
MIS-1219
TEST PLUG CAP
PETE'S TEST PLUG
SELF SEALING
BARB X INSERTBRASS ADAPTER
1" & 3/4" MPT
WATER COIL CONNECTIONAT HEAT PUMPTHERMOMETER
DIAL FACE PRESSURE GAUGEWITH GAUGE ADAPTOR
Manual 2100-250Page 11
HE
AD
(F
EE
T)
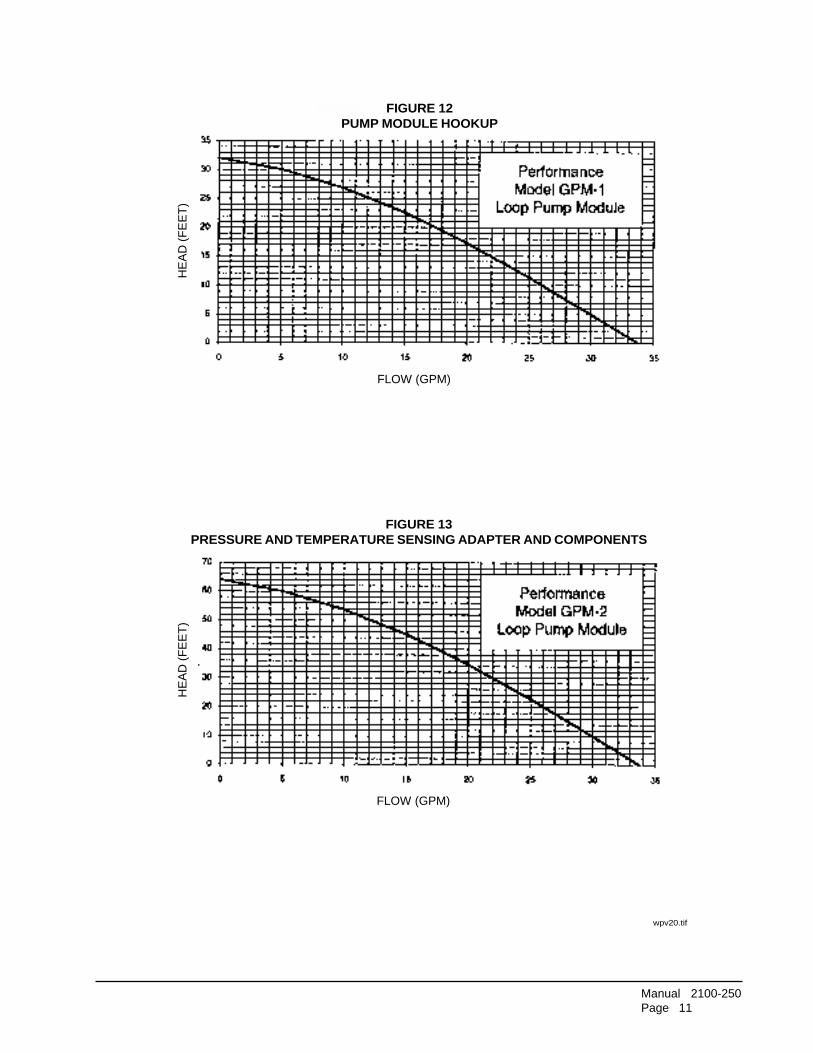
FIGURE 12PUMP MODULE HOOKUP
FLOW (GPM)
HE
AD
(F
EE
T)
FIGURE 13PRESSURE AND TEMPERATURE SENSING ADAPTER AND COMPONENTS
FLOW (GPM)
wpv20.tif

Manual 2100-250Page 12
SYSTEM START UP PROCEDURE
1. Be sure main power to the unit is OFF at disconnect.
2. Set thermostat system switch to OFF, fan switch to AUTO.
3. Move main power disconnect to ON. Except as required for safety while servicing, DO NOTOPEN THE UNIT DISCONNECT SWITCH.
4. Check system air flow for obstructions.
A. Move thermostat fan switch to ON. Blower runs.B. Be sure all registers and grilles are open.
C. Move thermostat fan switch to AUTO. Blower should stop.
5. Flush, fill and pressurize the closed loop system as outlined in manual 2100-099.
6. Fully open the manual inlet and outlet valves. Start the loop pump module circulator(s) and check forproper operation. If circulator(s) are not operating, turn off power and diagnose the problem.
7. Check fluid flow using a direct reading flow meter or a single water pressure gauge, measure thepressure drop at the pressure-temperature plugs across the water coil. Compare the measurementwith flow versus pressure drop table to determine the actual flow rate. If the flow rate is too low,recheck the selection of the loop pump module model for sufficient capacity. If the module selection iscorrect, there is probably trapped air or a restriction in the piping circuit.
8. Start the unit in cooling mode. By moving the thermostat switch to cool, fan should be set for AUTO.
9. Check the system refrigerant pressures against the cooling refrigerant pressure table in the installationmanual for rated water flow and entering water temperatures. If the refrigerant pressures do notmatch, check for air flow problem then refrigeration system problem.
10. Switch the unit to the heating mode. By moving the thermostat switch to heat, fan should be set forAUTO.
11. Check the refrigerant system pressures against the heating refrigerant pressure table in installationmanual. Once again, if they do not match, check for air flow problems and then refrigeration systemproblems.
NOTE: If a charge problem is determined (high or low):
A. Check for possible refrigerant leaks.
B. Recover all remaining refrigerant from unit and repair leak.
C. Evacuate unit down to 29 inches of vacuum.
D. Recharge the unit with refrigerant by weight. This is the only way to insure a proper charge.

Manual 2100-250Page 13
OPEN LOOP (Well System Applications)
NOTE: Low temperature thermostat factory set to 25º for open loop applications.
It is very important that an adequate supply of clean, noncorrosive water at the proper pressure be providedbefore the installation is made. Insufficient water, in the heating mode for example, will cause the lowtemperature control to trip, shutting down the heat pump. In assessing the capacity of the water system, it isadvisable that the complete water system be evaluated to prevent possible lack of water or water pressure atvarious household fixtures whenever the heat pump turns on. All plumbing to and from the unit is to beinstalled in accordance with local plumbing codes. The use of plastic pipe, where permissible, isrecommended to prevent electrolytic corrosion of the water pipe. Because of the relatively cold temperaturesencountered with well water, it is strongly recommended that the water lines connecting the unit be insulated toprevent water droplets from condensing on the pipe surface.
Refer to piping, Figure 14. Slow closing Solenoid Valve (6) with a 24V coil provides on/off control of the waterflow to the unit. Refer to the wiring diagram for correct hookup of the valve solenoid coil.
Constant Flow Valve (7) provides correct flow of water to the unit regardless of variations in water pressure.Observe the water flow direction indicated by the arrow on the side of the valve body. Following is a tableshowing which valve is to be installed with which heat pump.
Strainer (5) installed upstream of constant flow valve (7) to collect foreign material which would clog the flowvalve orifice.
Figure 14 shows the use of shut-off valves (9) and (11), on the in and out water lines to permit isolation of theunit from the plumbing system should future service work require this. Globe valves should not be used asshut-off valves because of the excessive pressure drop inherent in the valve design. Instead use gate or ballvalves as shut-offs so as to minimize pressure drop.
Drain cocks (8) and (10) and tees have been included to permit acid cleaning the refrigerant-to-water coilshould such cleaning be required. See WATER CORROSION.
Drain cock (12) provides access to the system to check water flow through the constant flow valve to insureadequate water flow through the unit. A water meter 1-10 GPM (8603-013) is used to check the water flowrate.
.oNtraPelbaliavA.niMGISPerusserP
etaRwolFMPG
700-3068 )1(51 6
800-3068 )1(51 8
010-3068 )1(51 4
110-3068 )1(51 5
(1) The pressure drop through the constant flow valve will varydepending on the available pressure ahead of the valve.Unless a minimum of 15 PSIG is available immediatelyahead of the valve, no water will flow.
TABLE 5CONSTANT FLOW VALVES

Manual 2100-250Page 14
WELL PUMP SIZING
Strictly speaking, sizing the well pump is the responsibility of the well drilling contractor. It is important,however, that the HVAC contractor be familiar with the factors that determine what size pump will be required.Rule of thumb estimates will invariably lead to under or oversized well pumps. Undersizing the pump will resultin inadequate water to the whole plumbing system but with especially bad results to the heat pump--NO HEAT/NO COOL calls will result. Oversized pumps will short cycle and could cause premature pump motor or switchfailures.
The well pump must be capable of supplying enough water and at an adequate pressure to meet competingdemands of water fixtures. The well pump must be sized in such a way that three requirements are met:
1. Adequate flow rate in GPM
2. Adequate pressure at the fixture.
3. Able to meet the above from the depth of the well-feet of lift.
The pressure requirements put on the pump are directly affected by the diameter of pipe being used, as wellas, by the water flow rate through the pipe. The worksheet included in manual 2100-078 should guaranteethat the well pump has enough capacity. It should also ensure that the piping is not undersized which wouldcreate too much pressure due to friction loss. High pressure losses due to undersized pipe will reduceefficiency and require larger pumps and could also create water noise problems.
SYSTEM START UP PROCEDURE
1. Be sure main power to the unit is OFF at disconnect.
2. Set thermostat system switch to OFF, fan switch to AUTO.
3. Move main power disconnect to ON. Except as required for safety while servicing -- DO NOT OPENTHE UNIT DISCONNECT SWITCH.
FIGURE 14WATER CONNECTION COMPONENTS
10
11
5
8
9
6
7
12
WATER IN
WATER OUTMIS-1624

Manual 2100-250Page 15
4. Check system air flow for obstructions.A. Move thermostat fan switch to ON. Blower runs.
B. Be sure all registers and grilles are open.
C. Move thermostat fan switch to AUTO. Blower should stop.
5. Fully open the manual inlet and outlet valves.
6. Check water flow.
A. Connect a water flow meter to the drain cock between the constant flow valve and the solenoidvalve. Run a hose from the flow meter to a drain or sink. Open the drain cock.
B. Check the water flow rate through constant flow valve to be sure it is the same as the unit is ratedfor. (Example 4 GPM for a WPV30).
C. When water flow is okay, close drain cock and remove the water flow meter. The unit is now readyto start.
7. Start the unit in cooling mode. By moving the thermostat switch to cool, fan should be set forAUTO.
A. Check to see the solenoid valve opened.
8. Check the system refrigerant pressures against the cooling refrigerant pressure table in the installationmanual for rated water flow and entering water temperatures. If the refrigerant pressures do not match,check for air flow problem then refrigeration system problem.
9. Switch the unit to the heat mode. By moving the thermostat switch to heat, fan should be set for AUTO.A. Check to see the solenoid valve opened again.
10. Check the refrigerant system pressures against the heating refrigerant pressure table in installationmanual. Once again, if they do not match, check for air flow problems and then refrigeration systemproblems.
NOTE: If a charge problem is determined (high or low):
A. Check for possible refrigerant loss.B. Discharge all remaining refrigerant from unit.
C. Evacuate unit down to 29 inches of vacuum.
D. Recharge the unit with refrigerant by weight. This is the only way to insure a proper charge.
WATER CORROSION
Two concerns will immediately come to light when considering a water source heat pump, whether for groundwater or for a closed loop application: Will there be enough water? And, how will the water quality affect thesystem?
Water quantity is an important consideration and one which is easily determined. The well driller must performa pump down test on the well according to methods described by the National Well Water Association. Thistest, if performed correctly, will provide information on the rate of flow and on the capacity of the well. It isimportant to consider the overall capacity of the well when thinking about a water source heat pump becausethe heat pump may be required to run for extended periods of time.
The second concern, about water quality, is equally important. Generally speaking, if the water is not offensivefor drinking purposes, it should pose no problem for the heat pump. The well driller or local water softeningcompany can perform tests which will determine the chemical properties of the well water.
Water quality problems will show up in the heat pump in one or more of the following ways:
1. Decrease in water flow through the unit.
2. Decreased heat transfer of the water coil (entering to leaving water temperature difference is less).

Manual 2100-250Page 16
There are four main water quality problems associated with ground water. These are:
1. Biological Growth. This is the growth of microscopic organisms in the water and will show up as a slimydeposit through out the water system. Shock treatment of the well is usually required and this is bestleft up to the well driller. The treatment consists of injecting chlorine into the well casing and flushingthe system until all growth is removed.
2. Suspended Particles in the Water. Filtering will usually remove most suspended particles (fine sand,small gravel) from the water. The problem with suspended particles in the water is that it will erodemetal parts, pumps, heat transfer coils, etc. So long as the filter is cleaned and periodicallymaintained, suspended particles should pose no serious problem. Consult with your well driller.
3. Corrosion of Metal. Corrosion of metal parts results from either highly corrosive water (acid water,generally not the case with ground water) or galvanic reaction between dissimilar metals in thepresence of water. By using plastic plumbing or dielectric unions galvanic reaction is eliminated. Theuse of corrosion resistant materials (such as the Cupro Nickel coil) through the water system will reducecorrosion problems significantly.
4. Scale Formation. Of all the water problems, the formation of scale by ground water is by far the mostcommon. Usually this scale is due to the formation of calcium carbonate by magnesium carbonate orcalcium sulfate may also be present. Carbon dioxide gas (CO2), the carbonate of calcium andmagnesium carbonate, is very soluble in water. It will remain dissolved in the water until some outsidefactor upsets the balance. This outside influence may be a large change in water temperature orpressure. When this happens, enough carbon dioxide gas combines with dissolved calcium ormagnesium in the water and falls out of solution until a new balance is reached. The change intemperature that this heat pump produces is usually not high enough to cause the dissolved gas to fallout of solution. Likewise, if pressure drops are kept to a reasonable level, no precipitation of carbondioxide should occur.
REMEDIES OF WATER PROBLEMS
Water Treatment. Water treatment can usually be economically justified for closed loop systems. However,because of the large amounts of water involved with a ground water heat pump, water treatment is generallytoo expensive.
Acid Cleaning the Water Coil or Heat Pump Recovery Unit. If scaling of the coil is strongly suspected, the coilcan be cleaned up with a solution of Phosphoric Acid (food grade acid). Follow the manufacturer's directionsfor mixing, use, etc. Refer to the "Cleaning Water Coil," Figure 15. The acid solution can be introduced intothe heat pump coil through the hose bib (part 8 of Figure 15). Be sure the isolation valves (parts 9 and 11 ofFigure 15) are closed to prevent contamination of the rest of the system by the coil. The acid should bepumped from a bucket into the hose bib (part 8 of Figure 15) and returned to the bucket through the otherhose bib (part 10 of Figure 15). Follow the manufacturer's directions for the product used as to how long thesolution is to be circulated, but it is usually circulated for a period of several hours.
FIGURE 15CLEANING WATER COIL
wpv13.tif

Manual 2100-250Page 17
LAKE AND POND INSTALLATIONS
Lakes and ponds can provide a low cost source of water for heating and cooling with a ground water heatpump. Direct usage of the water without some filtration is not recommended as algae and turbid water canfoul the water to freon heat exchanger. Instead, there have been very good results using a dry well dug next tothe water line or edge. Normal procedure in installing a dry well is to backhoe a 15 to 20 foot hole adjacent tothe body of water (set backhoe as close to the water's edge as possible). Once excavated, a perforatedplastic casing should be installed with gravel backfill placed around the casing. The gravel bed should provideadequate filtration of the water to allow good performance of the ground water heat pump. Refer to Figure 16.
The following is a list of recommendations to following when installing this type of system:
A. A lake or pond should be at least 1 acre (40,000 square feet) in surface area for each 50,000 BTUs ofground water heat pump capacity or have 2 times the cubic feet size of the dwelling that you are tryingto heat (includes basement if heated).
B. The average water depth should be at least 5 feet and there should be an area where the water depthis at least 12 to 15 feet deep.
C. If possible, use a submersible pump suspended in the dry well casing. Jet pumps and other types ofsuction pumps normally consume more electrical energy than similarly sized submersible pumps. Pipethe unit the same as a water well system.
D. Size the pump to provide necessary GPM for the ground water heat pump. A 12 GPM or greater waterflow rate is required on all modes when used on this type system.
E. A pressure tank should be installed in dwelling to be heated adjacent to the ground water heat pump.A pressure switch should be installed at the tank for pump control.
F. All plumbing should be carefully sized to compensate for friction losses, etc., particularly if the pond orlake is over 200 feet from the dwelling to be heated or cooled.
G. Keep all water lines below low water level and below the frost line.
H. Most installers use 4 inch field tile (rigid plastic or corrugated) for water return to the lake or pond.
I. The drain line discharge should be located at least 100 feet from the dry well location.
J. The drain line should be installed with a slope of 2 inches per 10 feet of run to provide completedrainage of the line when the ground water heat pump is not operating. This gradient should also helpprevent freezing of the discharge where the pipe terminates above the frost line.
K. Locate the discharge high enough above high water level so the water will not back up and freezeinside the drain pipe.
L. Where the local conditions prevent the use of a gravity drainage system to a lake or pond, you caninstead run standard plastic piping out into the pond below the frost and low water level.
For complete information on water well systems and lake and pond applications, refer to Manual 2100-078available from your distributor.
WARNINGThin ice may result in the vicinity of the discharge line.

Manual 2100-250
Page 18
FIGURE 16WATER WELL SYSTEM
WATER SUPPLYLINE
ELECTRICAL LINE
12' to 15"
LAKEor
POND
GRAVEL FILL
WATER LEVEL
15' TO 20' DEEP
DROP PIPE
PERFORATEDPLASTIC CASING
SUBMERSIBLEPUMP
TO PRESSURETANK
WELL CAP
PITLESS ADAPTER
MIS-1607

Manual 2100-250Page 19
1. COOLING WITH OR WITHOUT DUCT HEATERS
Whenever the system lever is moved to COOL, thermostat system switch completes a circuit R to O,energizing the reversing valve solenoid. On a call for cooling, the cooling bulb completes a circuit fromR to G, energizing the blower relay coil. The blower relay contacts complete a 230 volt circuit to theblower motor and the blower operates. R to Y circuit is completed at the same time as the fan circuitand current flows from Y to terminal 4 at the lockout relay. Terminal 4 of the lockout relay provides twopaths for current flow.
A. Through the lockout relay coil which offers the resistance of the lockout relay coil.
B. Through the normally closed contacts of the lockout relay to terminal 5 of the lockout relay and thenthrough the high and low pressure switches to the compressor contactor coil.
If the high pressure and low temperature switches remain closed (refrigerant pressure and temperatureremains normal), the path of least resistance is through these safety controls to the compressorcontactor coil. The contacts of the compressor contactor complete a 230 volt circuit to the compressorand the compressor runs. If discharge pressure reaches the set point of the high pressure control, thenormally closed contacts of the high pressure control open and current no longer flows to thecompressor contact coil--the coil drops out. Current now can take the path of least resistance throughthe lockout relay coil, energizing the lockout relay coil and opening terminals 4 and 5 of the lockoutrelay. The lockout relay will remain energized as long as a circuit is completed between R and Y at thethermostat. In the meantime, since the compressor is operating, refrigerant pressure will equalize andthe high pressure switch will automatically reset. However, the circuit to the compressor contact will notbe complete until the lockout relay is de-energized by moving the thermostat system switch to OFF,breaking the circuit from R to Y dropping out the lockout relay coil and permitting terminals 4 and 5 tomake. When the high pressure switch closes, a circuit is complete to L at the thermostat, energizingthe signal light to indicate a malfunction. When the system switch is moved from OFF to COOL, thecycle is repeated.
2. SINGLE STAGE HEAT WITHOUT DUCT HEATERS
Compressor circuit R to Y including lockout relay and pressure controls is the same as cooling. Blowercircuit R to G is the same as cooling. With system switch set to HEAT, no circuit is completed betweenR and O and reversing valve solenoid is not energized.
3. TWO STAGE HEAT WITH DUCT HEATERS
First stage heat is the same as single heating without duct heater. When the second stage thermostatbulb makes, a circuit is completed from C to W2, energizing the duct heater heat contactor, through theheating element and manual reset limit. C to W2 also simultaneously energizes the 24 volt coil on theinterlock relay, closing the contacts, which in turn energize the low voltage coil on the blower relay toclose the high voltage contacts and power the blower motor. The elements and blower remain energizedas long as C to W2 are made.
4. EMERGENCY HEAT
When the system switch is moved to EMER, the compressor circuit R to Y is disconnected. Control ofthe electric heaters is from C to W2 and W3 through the thermostat second stage heating bulb. Bloweroperation is controlled by the second stage heating bulb. Operation is the same as above, "Two StageHeat with Duct Heaters."
SEQUENCE OF OPERATION

Manual 2100-250Page 20
FIGURE 18
FIGURE 17
MIS-096
wpv13.tif

Manual 2100-250Page 21
FIGURE 19WATER SOURCE HEAT PUMP
COOLING CYCLE
MIS-1229

Manual 2100-250Page 22
FIGURE 20WATER SOURCE HEAT PUMP
HEATING CYCLE
MIS-1228

Manual 2100-250Page 23
MODEL WPV60D
1,570 CFM11 GPM
yrD/bluBbluBteW yticapaCgnilooC
FseergeDlioCretaWgniretnEerutarepmeTdiulF
03 � 04 � 05 06 07 08 09 001 011
26/57
gnilooClatoTgnilooCelbisneS
noitcejeRfotaeHlatoTREE �
777,85279,44115,5616.91
170,75957,24232,5640.81
663,55645,04459,4674.61
066,35233,83576,4609.41
459,15911,63693,4633.31
842,05609,33811,4667.11
245,84396,13938,3602.01
638,64084,92165,3636.8
031,54762,72282,3660.7
76/08
gnilooClatoTgnilooCelbisneS
noitcejeRfotaeHlatoTREE �
925,26263,64296,9632.02
417,06180,44693,9616.81
009,85008,14001,9600.71
580,75815,93308,8683.51
072,55732,73705,8667.31
554,35539,43112,8641.21
046,15476,23419,7625.01
528,94293,03816,7609.8
110,84111,82223,7682.7
27/58
gnilooClatoTgnilooCelbisneS
noitcejeRfotaeHlatoTREE �
837,36287,04471,3719.02
492,16343,93259,1712.91
058,85509,73037,0715.71
504,65664,63705,9618.51
169,35720,53582,8611.41
615,15885,33360,7614.21
270,94941,23148,5617.01
726,64017,03816,4610.9
381,44172,92693,3603.7
bluByrD yticapaCgnitaeH
FseergeDlioCretaWgniretnEerutarepmeTdiulF
52 � 03 � 04 � 05 06 07 08 09
07gnitaeHlatoT
noitprosbAfotaeHlatoTPOC �
005,23615,1297.2
000,53339,3209.2
000,04667,8221.3
000,54006,3353.3
000,05334,8375.3
000,55662,3497.3
000,06001,8410.4
000,56339,2512.4
TABLE 6B
MODEL WPV48D
1,550 CFM9 GPM
yrD/bluBbluBteW yticapaCgnilooC
FseergeDlioCretaWgniretnEerutarepmeTdiulF
03 � 04 � 05 06 07 08 09 001 011
26/57
gnilooClatoTgnilooCelbisneS
noitcejeRfotaeHlatoTREE �
764,45576,73035,2679.81
873,28643,63684,1634.71
092,05710,53244,0698.51
102,84786,33793,9543.41
211,64853,23353,8508.21
320,44920,13803,7562.11
439,14996,92462,6517.9
548,93073,82912,5571.8
657,73140,72571,4536.6
76/08
gnilooClatoTgnilooCelbisneS
noitcejeRfotaeHlatoTREE �
449,75048,83225,6685.91
227,55074,73114,5699.71
005,35001,63003,4604.61
772,15927,43881,3608.41
550,94953,33770,2612.31
338,64889,13669,0626.11
116,44816,03558,9520.01
883,24842,92447,8534.8
661,04778,72336,7548.6
27/58
gnilooClatoTgnilooCelbisneS
noitcejeRfotaeHlatoTREE �
837,36287,04471,3719.02
492,16343,93259,1712.91
058,85509,73037,0715.71
504,65664,63705,9618.51
169,35720,53582,8611.41
615,15885,33360,7614,21
270,94941,23148,5617.01
726,64017,03816,4610.9
381,44172,92693,3603.7
bluByrD yticapaCgnitaeH
FseergeDlioCretaWgniretnEerutarepmeTdiulF
52 � 03 � 04 � 05 06 07 08 09
07gnitaeHlatoT
noitprosbAfotaeHlatoTPOC �
005,23615,1267.2
000,53339,3209,2
000,04667,8221.3
000,54006,3353.3
000,05334,8375.3
000,55662,3497.3
000,06001,8110.4
000,56339,25332.4
TABLE 6A
CAPACITY AND EFFICIENCY APPLICATION RATINGSBASED ON 15% SODIUM CHLORIDE
TABLES 6A - 6B

Manual 2100-250Page 24
TABLE 7CAPACITY MULTIPLIER FACTORS
wolFriAdetaRfo% 01- detaR 01
hutBlatoT 579.0 00.1 20.1
hutBelbisneS 059.0 00.1 50.1
TABLE 8CORRECTION FACTORS FOR PERFORMANCE
AT OTHER WATER FLOWS
wolFdetaRMPG-sulP
gnitaeH gnilooC
hutB sttaW hutB sttaW
2 00.1 89 10.1 00.1
4 10.1 79 30.1 10.1
6 20.1 69 50.1 20.1
8 20.1 59 60.1 20.1
TABLE 9FLOW RATES FOR VARIOUS FLUIDS
sdiulFsuoiraVrofsetaRwolF* D84VPW D06VPW
retawhserfMPGderiuqeretarwolF 6 8
edirolhcmuidos%51MPGderiuqeretarwolF 9 11
4SG%52MPGderiuqeretarwolF 9 11

Manual 2100-250
Page 25
TABLES 10 & 10APRESSURE TABLES
Low side pressure ± 2 PSIGHigh side pressure ± 5 PSIG
Tables are based upon rated CFM (airflow) across the evaporator coil and rated fluid flow rate through the water coil. If there is any doubt as tocorrect operation charge being in the system, the charge should be removed, system evacuated and recharged to serial plate specification.
Fluid Temperature Entering Water Coil °FCOOLING
ledoM riAmooRerutarepmeT erusserP °03 °53 °04 °54 °05 °55 °06 °56 °07 °57 °08 °58 °09 °59 °001 °501 °011
D84VPW
BD°57BW°26
ediSwoLediShgiH
86111
76121
76231
66241
66351
56361
56471
56481
46591
46502
36512
36522
36532
26642
26652
16762
16772
BD°08BW°76
ediSwoLediShgiH
37411
27521
27631
17641
17751
07761
07871
07981
96002
96112
86122
86232
86342
76452
76462
66572
66682
BD°58BW°27
ediSwoLediShgiH
97811
87921
87041
77151
77261
67371
67481
57591
57602
47712
37922
37042
37052
27262
27372
17482
17592
D06VPW
BD°57BW°26
ediSwoLediShgiH
9509
06101
16211
26321
36431
46541
56651
66761
76871
86981
96002
07112
17222
27332
37442
57552
67662
BD°08BW°76
ediSwoLediShgiH
3629
46401
56511
66621
86831
96941
07061
17171
27381
37491
47502
57712
67822
87932
97052
08262
18372
BD°58BW°27
ediSwoLediShgiH
8669
96701
07911
17131
37241
47451
57661
67771
77981
97102
08212
18422
28632
38842
58952
68172
78382
ledoM riAmooRerutarepmeT erusserP 52 ° °03 °53 °04 4 °5 °05 °55 °06 °56 °07 °57 °08
D84VPW BD°07ediSwoLeciShgiH
82481
23981
63591
04002
34602
74212
15712
45322
75822
16432
56932
96542
D06VPW BD°07ediSwoLeciShgiH
13412
53912
93522
34032
74632
25242
65742
06352
46852
86462
27962
77572
HEATINGFluid Temperature Entering Water Coil °F

Manual 2100-250
Page 26
Heat Gen.
Pow
er F
ailu
re
Blo
wn
Fus
e or
Trip
ped
Bre
aker
Fau
lty W
iring
Loos
e T
erm
inal
s
Low
Vol
tage
Def
ectiv
e C
onta
cts
in C
onta
ctor
Com
pres
sor
Ove
rload
Pot
entia
l Rel
ay
Run
Cap
acito
r
Sta
rt C
apac
itor
Fau
lty W
iring
Loos
e T
erm
inal
s
Con
trol
Tra
nsfo
rmer
Low
Vol
tage
The
rmos
tat
Con
tact
or C
oil
Pre
ssur
e C
ontr
ols
(Hig
h or
Low
)
Indo
or B
low
er R
elay
Dis
char
ge L
ine
Hitt
ing
Insi
de o
f She
ll
Bea
rings
Def
ectiv
e
Sei
zed
Val
ve D
efec
tive
Mot
or W
ingi
ngs
Def
ectiv
e
Ref
riger
ant C
harg
e Lo
w
Ref
riger
ant O
verc
harg
e
Hig
h H
ead
Pre
ssur
e
Low
Hea
d P
ress
ure
Hig
h S
uctio
n P
ress
ure
Low
Suc
tion
Pre
ssur
e
Non
-Con
dens
able
s
Une
qual
ized
Pre
ssur
es
Sol
enoi
d V
alve
Stu
ck C
lose
d (H
tg)
Sol
enoi
d V
alve
Stu
ck C
lose
d (C
lg)
Sol
enoi
d V
alve
Stu
ck O
pen
(Htg
or
Clg
)
Leak
ing
Def
ectiv
e V
alve
or
Coi
l
Plu
gged
or
Res
tric
ted
Met
erin
g D
evic
e (H
tg)
Sca
led
or P
lugg
ed C
oil (
Htg
)
Sca
led
or P
lugg
ed C
oil (
CLg
)
Wat
er V
olum
e Lo
w (
Htg
)
Wat
er V
olum
e Lo
w (
Clg
)
Low
Wat
er T
empe
ratu
re (
Htg
)
Plu
gged
or
Res
tric
ted
Met
erin
g D
evic
e (C
lg)
Fin
s D
irty
or P
lugg
ed
Mot
or W
indi
ng D
efec
tive
Air
Vol
ume
Low
Air
Filt
ers
Dirt
y
Und
ersi
zed
or R
estr
icte
d D
uctw
ork
Aux
illar
y H
eat U
pstr
eam
of C
oil
Compressor Will Not Run No Power at Contactor
� � � � � � � � � � � � �
Compressor Will Not Run Power at Contactor
� � � � � � � � � � �
Compressor "Hums" But Will Not Start
� � � � � � � � � � �
Compressor Cycles on Overload � � � � � � � � � � � � � � � � � � � � � � � � � �
Thermostat Check Light Lite-Lockout Relay
�
Compressor Off on High Pressure Control � � � � � � � � � � � � � � �
Compressor Off on Low Pressure Control � � � � � � � � �
Compressor Noisy � � �
Head Pressure Too High � � � � � � � � � � � � � �
Head Pressure Too Low � � � � � � � �
Suction Pressure Too High � � � �
Suction Pressure Too Low � � � � � � � � � � � � �
I.D. Blower Will Not Start � � � � � � � � � �
I.D. Coil Frosting or Icing � � � � � � � �
High Compressor Amps � � � � � � � � � � � � � � � � � � �
Excessive Water Usage � � �
Compressor Runs Continuously – No Cooling
� � � � � � � � � � �
Liquid Refrigerant Flooding Back To Compressor
� � � � � � �
Compressor Runs Continuously – No Heating
� � � � � � � � �
Reversing Valve Does Not Shift � � � � �
Liquid Refrigerant Flooding Back To Compressor
� � � � � � � �
Aux. Heat on I.D. Blower Off � � � � � � �
Excessive Operation Costs � � � � � � � � � � � � � � �
Ice in Water Coil � � � � � � �
Water Coil
WATER COIL SECTION
Line Voltage Control Circuit Compressor Refrigerant System
Hea
ting
Cyc
le
AUX.
Coo
ling
Cyc
le
Hea
ting
or C
oolin
g C
ycle
s
Indoor Blower Motor and Coil
INDOOR SECTIONPOWER SUPPLYWater
SolenoidRev. Valve
QUICK REFERENCE TROUBLE SHOOTING CHART FOR WATER TO AIR HEAT PUMP
�
�
DENOTES COMMON CAUSE
DENOTES OCCASIONAL CAUSE

Manual 2100-250Page 27
THERMOSTAT DIAGRAMS

Manual 2100-250Page 28

Manual 2100-250Page 29

Manual 2100-250Page 30

Manual 2100-250Page 31
GROUND SOURCE HEAT PUMP PERFORMANCE REPORT
This performance check report should be filled out by installer and retained with unit.
DATE: TAKEN BY: 1. OUTDOOR UNIT:
Mfgr. Model No. S/N INDOOR UNIT (Split System):
Mfgr. Model No. S/N
2. Person Reporting
3. Company Reporting
4. Installed By Date Installed
5. User’s (Owner’s) Name
Address
6. Unit Location
WATER SYSTEM INFORMATION
7. Open Loop System (Water Well) Closed Loop System
A. If Open Loop where is water discharged?
8. The following questions are for Closed Loop Systems only
A. Closed loop system designed by:
B. Type of antifreeze used % Solution
C. System type: Series Parallel
D. Pipe Material Nominal Size
E. Pipe Installed:
1. Horizontal Total length of pipe ft.
No. pipes in trench Depth bottom pipe ft.
2. Vertical Total length of bore hole ft.

Manual 2100-250Page 32
THE FOLLOWING INFORMATION IS NEEDED TO CHECK PERFORMANCE OF UNIT
FLUID SIDE DATA Cooling Heating 9. Entering fluid temperature F
10. Leaving fluid temperature F 11. Entering fluid pressure PSIG 12. Leaving fluid pressure PSIG 13. Pressure drop through coil PSIG 14. Gallons per minute through the water coil GPM 15. Liquid or discharge line pressure PSIG 16. Suction line pressure PSIG 17. Voltage at compressor (unit running) V 18. Amperage draw at line side of contactor A 19. Amperage at compressor common terminal A 20. * Suction line temperature 6” from compressor F 21. * Superheat at compressor F 22. * Liquid line temperature at metering device F 23. * Coil Subcooling F INDOOR SIDE DATA Cooling Heating 24. Dry bulb temperature at air entering indoor coil F 25. Wet bulb temperature of air entering indoor coil F 26. Dry bulb temperature of air leaving indoor coil F 27. Wet bulb temperature of air leaving indoor coil F 28. Indoor fan motor operation voltage (split system only) V 29. Indoor fan motor operating amperage A 30. * Static pressure drop across indoor coil (split system only) WC 31. * Supply air static pressure (packaged unit) WC 32. * Return air static pressure (packaged unit) WC
33. Other information about installation
* Items that are optional.
2100250 perf rpt.doc 2100250 perf. rpt.doc