water proofing-residential buildings
TRANSCRIPT

8/11/2019 Water Proofing-Residential Buildings
http://slidepdf.com/reader/full/water-proofing-residential-buildings 1/26
WATERPROOFING OF BUILDINGSWaterproof or water-resistant describes objects unaffected by water or resisting water passage, or
which are covered with a material that resists or does not allow water passage. Such items may
be used in wet environments or under water. Waterproofing describes making an object
waterproof or water-resistant.
Waterproofing is a method by which an item is made resistant to damage by water.
Waterproofing is the formation of an impervious barrier which is designed to prevent water
entering or escaping from various sections of building structures. Internal areasthat are
waterproofed include bathrooms , shower recesses , laundries and toilets . Whilst an External
area waterproofed extends to roofs , planter boxes , podiums , balconies ,retaining
walls and swimming pools .
Waterproofing is the combination of materials or systems that prevent water intrusion into
structural elements of the buildings or its finished spaces. Basic waterproofing and envelope
design incorporates 3 steps to ensure a watertight and environmentally soundinterior :
1. Understanding water sources likely to be encountered
2. Designing systems to prevent leakage from these sources. 3. Finalizing the design by properly detailing each individual envelope component into adjacent
components.
CAUSES OF LEAKAGE
For leakage to occur, 3 conditions must be present
Water in any of its forms must be present.
Water must be moved along by some type of force, including wind, gravity for above-grade
envelope components and hydrostatic pressure or capillary action for below-grade components.
Finally and the most important, there must be a breach (hole, brak, or some type of opening) in
the envelope to facilitate the entry of water into the protected spaces
Available water is moved into the interior of a structure by numerous forces that include:
Natural gravity
Surface tension
Wind/Air currents
Capillary action
Hydrostatic pressure
The first 3 typically are encountered on above-grade portions of the envelope, whereas the last 2
are recognized at grade or below-grade areas of buildings or structures

8/11/2019 Water Proofing-Residential Buildings
http://slidepdf.com/reader/full/water-proofing-residential-buildings 2/26
WATERPROOFING IN CONSTRUCTION
In construction, a building or structure is waterproofed with the use of membranes to protect
contents underneath or within as well as protecting structural integrity. The waterproofing of the
building envelope in construction specifications is under '07 - Thermal and Moisture' protectionand includes roofing material as well aswaterproofing materials.
A building or structure needs waterproofing as concrete itself will not be watertight on its own. The
conventional system of waterproofing involves 'membranes'. This relies on the application of one
or more layers of membrane (available in various materials: e.g., bitumen, silicate, PVC, HDPE, etc.) that
act as a barrier between the water and the building structure, preventing the passage of water. However,
the membrane system relies on exacting application, presenting difficulties. Problems with application or
adherence to the substrate can lead to leakage.
Over the past two decades, the construction industry has had technological advances in waterproofing
materials, including integral waterproofing systems as well as more advanced membrane materials.
Integral systems work within the matrix of a concrete structure, giving the concrete itself a waterproof
quality. There are two main types of integral waterproofing systems: the hydrophilic and the hydrophobic
systems. A hydrophilic system typically uses a crystallization technology that replaces the water in the
concrete with insoluble crystals. Various brands available in the MARKET claim similar properties, but
not all can react with a wide range of cement hydration by-products, and thus require caution.
Hydrophobic systems use fatty acids to block pores within the concrete, preventing water passage.
New membrane materials include
Hydrotech’s Monolithic Membrane 6125 (MM6125) and
Re-New’s Turbo Seal.
These new materials seek to overcome shortcomings in older methods like PVC and HDPE. Generally,
new technology in waterproof membranes relies on polymer based materials that are extremely adhesive
to create a seamless barrier around the outside of a structure.
If we bifurcate a structure in to different categories with respect to waterproofing perhaps we can
classify the structure in to following: -
1. Waterproofing of foundations
2. Waterproofing of basements
3. Waterproofing of bathrooms and toilets,
4. Waterproofing of terraces
Waterproofing of the above mentioned areas needs a detailed site investigation in case of
old construction but in new construction if the proper methodology and proper materials are used
the structure can be made waterproof for period of five years extended to twenty years depending
on the materials used for waterproofing. In this project, we will try to understand different
techniques used to waterproof foundations and basements only but before that we will try to

8/11/2019 Water Proofing-Residential Buildings
http://slidepdf.com/reader/full/water-proofing-residential-buildings 3/26
understand what are the methods used in waterproofing any part of structure with the help of an
flowchart.

8/11/2019 Water Proofing-Residential Buildings
http://slidepdf.com/reader/full/water-proofing-residential-buildings 4/26
DAMPNESS AND ITS EFFECTS
A wet cellar can dramatically reduce the value of your home. Studies show that most people won't even
consider buying a home with water leakage. Selling a home with water leaks can easily result in as much
as a 25% reduction in the sale price.Even if you rarely have problems with dampness or flooding, it's best to solve the problem completely
before doing any remodeling work. Permanent solutions can take time to implement. A good place to start
is to talk to an independent home inspector who specializes in waterproofing problems.
Proper insulation is critical to creating a comfortable, dry basement. Besides keeping out the cold,
basement insulation prevents condensation. The ground stays cool year round. It in turn keeps basement
walls cool. When the warmer air in the room comes in contact with all those cool walls, it has to give up
some of its moisture in the form of condensation. In fact, condensation is the primary source of the
moisture that causes mold and mildew problems in basements. Effective insulation separates the warm
air of the room from the cool walls, thereby preventing the moisture problems that stem from
condensation. (see below the top-10 most common insulation mistakes in basements)
1. DEFECTS CAUSED BY DAMPNESS:-
The various defects caused by dampness in buildings may be summarized as under:
1. It causes efflorescence which may ultimately result in disintegration of bricks, stone,
tiles, etc.
2. It may result in softening and crumbling of plaster.
3. It may cause bleaching and flaking of paint with the information of colored patches.
4. It may result in warping, buckling and rotting of timber.
5. It may lead to corrosion of metal
6. It may deteriorate electrical fittings. 7. It promotes growth of termites.
8. It breeds mosquitoes and creates unhealthy living conditions for the occupants.
2. CAUSES OF DAMPNESS
Absorption of moisture by the building materials is one of the chief cause of dampness. On
account of granular nature of materials, moisture finds an easy access through the voids and this
aided by capillary action assists the moisture to travel in different directions. Thus, either on
account of faulty design of structure or bad workmanship or by use of defective materials,
moisture may find its way to interior of the building either through the foundation and plinth,
walls, chhajjas, floors or the roof.
3. SOURCES OF DAMPNESS
The important sources of dampness may be summarized as below:-

8/11/2019 Water Proofing-Residential Buildings
http://slidepdf.com/reader/full/water-proofing-residential-buildings 5/26
1. Dampness rising through the foundation walling. Moisture from wet ground may rise
well above ground level on account of capillary action.
2. Splashing rain water which rebounds after hitting the wall surface may also cause
dampness.
3. Penetration of rain-water through unprotected tops of walls, parapets, compound walls
etc. may cause dampness. 4. In case of slope roofs rain-water may percolates through defective roof covering. In
addition, faulty eaves course and eaves or valley gutter may allow the rain-water to descend
through the top of supporting wall and cause dampness.
5. On condensation, the moisture present in the atmosphere gets deposited on the
components of the building which may cause dampness.
6. In case of flats roofs, inadequate roof slopes, improper rain-water pipe connections and
defective junction between roof slab and parapet wall may prove to be the sources of dampness.
Dampness caused due to leakages in wet areas of a building which include kitchen, bathroom,
water closet etc. The leakages could be on account of use of sub-standard plumbing fittings andfixtures as well as faulty execution of work and bad work-man ship.
4. SURFACE TREATMENT
The moisture finds its way through the pores of materials used in finishing. In order to check the
entry of the moisture into the pores, they must be filled up. Surface treatment consists in filling
up the pores of the surface subjected to dampness. The use of water repellent metallic soaps such
as calcium and aluminum oleates and stearates is much effective in protecting the building
against the ravages of heavy rain. Bituminous solution, cement coating, transparent coating, paints and varnishes fall under this category. In addition to other surface treatments given to
walls, the commonly used is lime cement plaster. The wall plaster with cement, lime and sand
mixed in proportion of 1:1:6 are found to serve the purpose of preventing dampness in wall due
to rain effectively.
5. MATERIAL USED FOR WATER PROOFING
An effective damp proofing material should have the following properties:
1. It should be impervious. 2. It should be strong and durable be capable of withstanding both dead as well as live
loads without damage.
3. It should be dimensionally stable.
4. It should be free from deliquescent salts like sulphates, chlorides and nitrates.
The material commonly used to check dampness can be divided into the following four
categories:

8/11/2019 Water Proofing-Residential Buildings
http://slidepdf.com/reader/full/water-proofing-residential-buildings 6/26
1. Flexible material:- material like bitumen felts ( which may be Hessian – base or
fibre/glass fibre-based) , plastic sheeting ( polythene sheet) etc.
2. Semi-rigid material: - Material like mastic asphalt or combination of material or layers.
3. Rigid material:- Material like first class bricks, stones, slates, cement concrete etc.
4. Grout consisting of cement slurry and acrylic based chemicals/polymers.
6. SIGNS THAT YOU HAVE WATERPROOFING PROBLEMS IN YOUR BASEMENT
Mold and Mildew
Fungus that grows in damp and dark areas, and cause discoloration, or musty odors.
Moldy Odors
This is the result of the decay process from mold, and dry rot.
Peeling Paint
Peeling paint is a sign that you have moisture problems and waterproofing issues.
Damp Spots on Walls
Water has absorbed through your walls.White Substance on Basement Walls
This is a chemical breakdown of the bonding agent that holds your walls together. This white substance is
a sign of possible structural deterioration.
Cracked Walls
Should be inspected to determine the exact cause.
Rust on Appliances or Furniture
Like furnaces. Rust is caused by a wet environment and is the sign of waterproofing issues.
Dry Rot
Black fungus grows mostly on walls or wooden surfaces, causing wood to decay.
Basement Waterproofing
Water may enter a basement through various means including through joints, walls, or floors.
Various basement waterproofing systems address these problems. There are many systems
available of varying cost, effectiveness, and installation invasiveness.
We shall now discuss few methods of waterproofing basements.
7. WATER PROOFING TREATMENT BY USING GROUT CONSISTING OF CEMENT
MORTAR ADMIXED WITH ACRYLIC BASED CHEMICALS ALONG WITH ROUGH
STONE SLABS:-
This treatment is presently being commonly adopted for ensuring water tightness of basement in
damp soil or at site where sub soil water table is high. The treatment consists in enclosing the
entire basement with in a water proof box constructed by use of rough stone slabs and cement
mortar admixed with acrylic based chemical.

8/11/2019 Water Proofing-Residential Buildings
http://slidepdf.com/reader/full/water-proofing-residential-buildings 7/26
The steps are as followed:-
Step 1:- The excavation of the ground for the basement is carried out in such a way that a
working space of at least 750 mm is available around the periphery of the external walls of the
proposed basement. The excavated area is kept dry by continuous pumping using well-point
equipment or by adopting any other suitable method. Over the dry leveled ground a 75 to 100
mm thick layer of lean concrete 1:3:6 is laid to serve as mud mat or leveling course for the raft
slab. This layer of lean concrete should project by 150 mm beyond the external wall. Over the
layer of lean concrete a layer of 15 to 20 mm thick rough quarry-finished stone slabs is laid over
20 mm thick cement mortar (1:4) admixed with acrylic based chemical. The stone slabs are laid
side by side leaving a gap of about 15 to 20 mm between them. The joints thus left are raked
open and ground with cement slurry admixed with acrylic based chemical. A 20 mm thick layer
of cement mortar (1:4) admixed with acrylic based compound is laid over the stone slabs stone
chips 12 mm & down are embedded at random in this layer of mortar.
The total maximum thickness of the above water proofing layer should be around 6 60
mm. This layer should cover the entire area of lean concrete i.e. it should be extended 150 mm
beyond the external face of raft slab/walls.
Step 2:- The R.C.C. raft slab suitably designed to with stand the highest applicable water
pressure during monsoon is laid over the water proofing layer in step 1. The R.C.C. walls of the
basement are constructed monolithically with the R.C.C. raft. After the curing of the R.C.C. wall
is over, the water proofing treatment is continued unbroken on the external sides of the walls, soas to form an external box of the water proofing level.
Step 3:- To continue the treatment along the vertical plane, a groove about 30 to 40 mm deep is
made in top mortar layer or bottom layer of the water proofing treatment [laid in step (1) ]at a
clear distance of about 18 mm from the external face of the wall all along the periphery of the
basement. Rough quarry-finished stone slabs 15 mm to 20 mm in thickness are fixed vertically in
the above groove.

8/11/2019 Water Proofing-Residential Buildings
http://slidepdf.com/reader/full/water-proofing-residential-buildings 8/26
The stone slabs are fixed side by side without leaving any gap between the edges.
Maximum of two to three horizontal layers of stone are laid at a time one over the other
vertically up. A coat of very rough cement plaster (1:4) is applied to the external face of the
rough stones. After the layer is set, the gap between the wall and stone layer is filled with a grout
made up of cement slurry admixed with acrylic based chemical, which on gellation forms an
impermeable layer, monolithic with the external face of the wall. A final coat of 15 mm cement mortar plaster (1:4) is applied over the rough external
cement plaster and finished smoothly. This treatment to external face of walls is continued up to
300 mm above ground level. The acrylic based chemical is normally added @ 1 % i.e. 1 kg of
chemical to be mixed with 100kg of cement.

8/11/2019 Water Proofing-Residential Buildings
http://slidepdf.com/reader/full/water-proofing-residential-buildings 9/26
8. WATERPROOFING USING FLEXIBLE PVC WATERBARS
Description: - Waterbars are flexible PVC water stops to seal construction and expansion joints
in concrete structures.
Uses: - Waterbars are used in concrete for the sealing of construction and expansion joints. It is
installed in a specified position, allowing concrete to be poured around it. The material takes up
it’s function as a joint sealant once the concrete has hardened and a joint has been formed.
Depending on the type of Waterbar, it can be used for construction or expansion joints.
Advantages: -
Multi-rib sections provide a tortuous path and impenetrable water check.
Easy to fix using tie-clips (See below photo)
Easy on-site welding.
High strength PVC material.
Specifications: - Waterbars comply with: U.S. Corporation of Engineers Specification. CRD-
C572-74. Requirements of BS2571 and BS2782.
Application: -
SURFACE WATERBARS: Installed into the face of the concrete structure. The waterbar is
typically fixed on the water side of the concrete wall or floor, by attaching it temporarily to the
formwork using fixing wire. The protruding ribs become cast into the concrete to provide an
excellent watertight seal as well as securely anchoring the waterbar to the structure.
INTERNAL WATERBARS: The waterbar is fitted into split formwork or shuttering for
casting centrally into the concrete. Use fixing wire or tie-clips to attach waterbar to internal
reinforcement.
WELDING: Waterbars are made from thermoplastic PVC and cantherefore be welded. The
ends are heated with on-site welding equipment until the PVC becomes plastic and is then
immediately pressed together. Waterbars allow easy on-site welding, including the prefabrication
of cross, T, L and corner pieces.
8/11/2019 Water Proofing-Residential Buildings
http://slidepdf.com/reader/full/water-proofing-residential-buildings 10/26
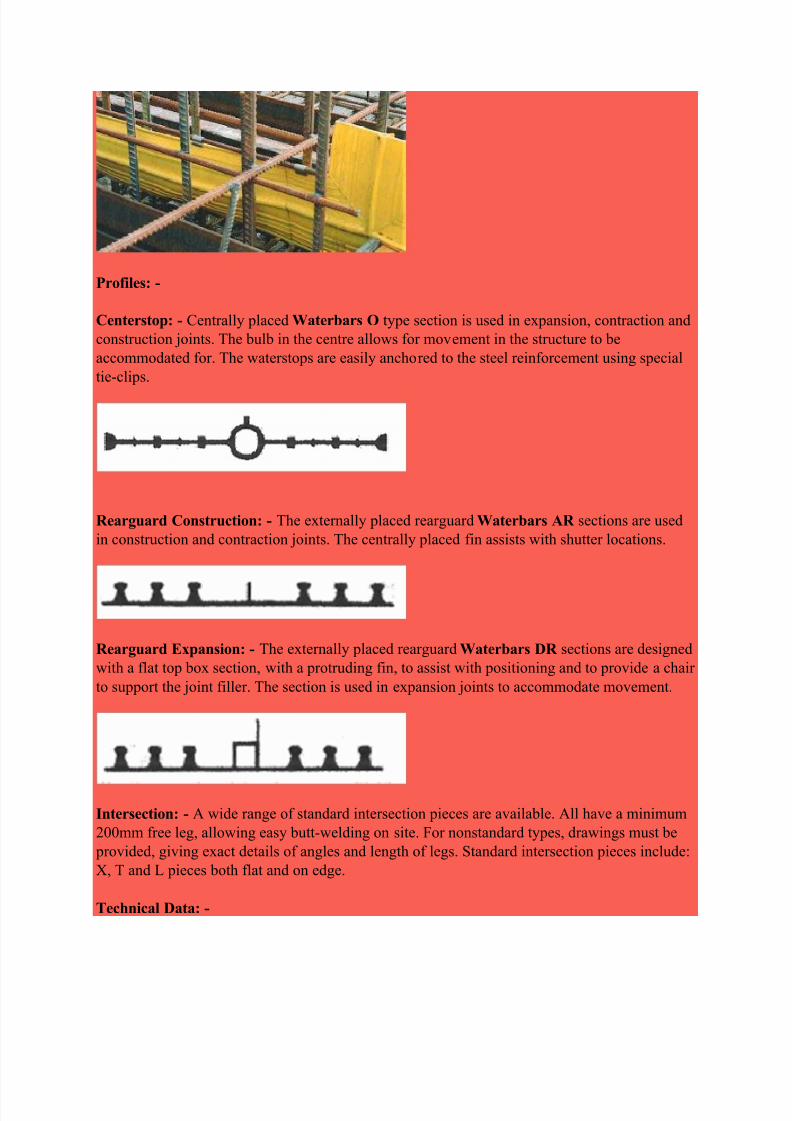
Profiles: -
Centerstop: - Centrally placed Waterbars O type section is used in expansion, contraction and
construction joints. The bulb in the centre allows for movement in the structure to be
accommodated for. The waterstops are easily anchored to the steel reinforcement using special
tie-clips.
Rearguard Construction: - The externally placed rearguard Waterbars AR sections are used
in construction and contraction joints. The centrally placed fin assists with shutter locations.
Rearguard Expansion: - The externally placed rearguard Waterbars DR sections are designed
with a flat top box section, with a protruding fin, to assist with positioning and to provide a chair
to support the joint filler. The section is used in expansion joints to accommodate movement.
Intersection: - A wide range of standard intersection pieces are available. All have a minimum
200mm free leg, allowing easy butt-welding on site. For nonstandard types, drawings must be
provided, giving exact details of angles and length of legs. Standard intersection pieces include:
X, T and L pieces both flat and on edge.
Technical Data: -

8/11/2019 Water Proofing-Residential Buildings
http://slidepdf.com/reader/full/water-proofing-residential-buildings 11/26
Basis : Polyvinyl Chloride
Colour : Yellow
Density : 1.3kg/litre
Service Temperature : -35°C to 55°C
Hydrostatic Head : Up to 60 metres
Joint Movement : Up to 10 mm (expansion joint profiles only)
Tensile Strength (ASTM-D412-75) : longitudinal > 13 N/mm² transverse
> 12.5² N/mm2
Elongation at Break (ASTM-D412-75) : longitudinal > 310% transverse >
260%
Alkali Resistance (CRD-C572-65) : Passed
Important: - Good placement practice must be followed to ensure that concrete is well placed
and compacted around the Waterbar during installation. In the case of factory made junctions,
where angles are not 90°C, drawing must be provided giving exact joint details. Other profiletypes and widths are available upon request (depending on volume).

8/11/2019 Water Proofing-Residential Buildings
http://slidepdf.com/reader/full/water-proofing-residential-buildings 12/26
9. WATERPROOFING USING LIQUID APPLIED CEMENTITIOUS MEMBRANE
Description: - Liquid Applied Cementitious Membrane is the materials which are available in two
components and sometimes three components depending on the manufacturer. The two components
consist of Liquid and Powder. The Liquid is a mixture of polymers and water, these polymers acts as
strength providing material when mixed with Powder which is generally a cement based material. Is a
high performance two component flexible acrylic polymers modified cement based waterproof coating for
concrete and masonry surfaces. The system consists of a powder and a liquid, is grey in colour and
easily applied by brush.
Features and Benefits: -
Provides excellent impermeable coating
Heavy duty waterproof coating
Good adhesion with cementitious surfaces
Applied for Positive & negative sides of waterproofing
Easily Brush applied
Flexible enough to take care of minor cracks in concrete & plaster
Durable & economical
Non-flammable
Application tools easily washed in water
Available in pre-packed, ready-to-use containers
Method of Application: -
The RCC walls and the base slab of basement must be cured for 28 days minimum before
applying liquid applied cementitious membrane. The condition of walls and base slab must be
assessed carefully for any irregularities and cavities. All the cold joints must be inspected for its
water tightness. If required, inject cement slurry admixed with expansive grouts should beinjected into the cold joints.
Prepare the surface carefully to receive the first coat of the material. All the loose particles and
debris must be removed with the help of wire brush. The grouting holes must be finished to level
and ensure that they are properly sealed with suitable material.
The entire area must be thoroughly wetted with water to a state where it is saturated. But extra
care must be taken to see that there is no stagnant or standing water. Any such water must be
mopped off. As such, the concrete substrate to receive the treatment must be in a Saturated
Surface Dry Condition.
Mix both the parts i.e. Liquid and Powder with a slow speed (100 - 150 RPM) forced action
mixer for big quantity of 15 kg, to achieve an even consistency. All the powder lumps formed during mixed must be hand crushed completely. PLEASE DO
NOT ADD WATER during mixing. For large application areas, take up a quantity that can be
mixed and applied in 20 - 30 minutes.
ALWAYS ADD the POWDER component into the LIQUID and NOT the LIQUID into the
powder.

8/11/2019 Water Proofing-Residential Buildings
http://slidepdf.com/reader/full/water-proofing-residential-buildings 13/26
Over the properly pre-wetted surface, apply first coat at a thickness of 500-600 microns and
allow it dry for 5-6 hours. Apply the 2 coats at the same thickness. The total applied thickness
should be of minimum 1.5 mm in three coats.
Allow each coat to dry sufficiently before applying next coat.
Allow Dr. Fixit Pidifin 2K film to air cure for atleast 72 hours.
Precautions and Limitations: -
Must be protected from foot traffic & other physical abuse
Do not pond with water immediately after the 2nd coat. Allow it air to cure for atleast 72 hours
Pre-wetting of the substrate is essential before coating
Film thickness of 1 to 1.2 mm must be achieved in 2 coats. For a critical areas 1.5 mm thick film
is recommended to be achieved in 3 coats
Must be applied on totally cured surface
Do not undertake application in hot sun (above 300C) and below 100C
Do not dilute product with water at site.

8/11/2019 Water Proofing-Residential Buildings
http://slidepdf.com/reader/full/water-proofing-residential-buildings 14/26
10. WATERPROOFING OF BASEMENTS USING TORCH – ON MEMBRANES
These membranes are perhaps the best for waterproofing of terraces having large spans, also
when the concept of terrace garden or roof swimming pools is used. It is entirely a bituminous
product and requires a primer and the membrane for application on to the surface. The membraneis slightly melted with the heat which is shown in the pictures and thus the best waterproofing
can be achieved for atleast 25 years. The finished membrane is over coated with a paint of
aluminum to give heat proofing.
Primer application: -
Apply solvent-based bitumen primer on cleaned & leveled surface @ 3-5 sq.mtr/ltr. The priming
will enhance the adhesion of the membrane to the substrate. Allow the primer coat to dry. The drying will
generally depend on the ambient temperature.
Membrane Application
Starting from one end, unroll the TORCHSHIELD roll once the priming coat is dried. Align
the TORCHSHIELD roll correctly & re-roll it half in alignment before torching. Avoid shifting of themembrane while torching Use gas burner to heat substrate & underside to softening points. When the
embossing disappears, roll forward & press firmly against substrate. Ensure sufficient bleed on side &
end over laps. Once the half of the roll is torched properly to the substrate, unroll the balance roll and
repeat the process. An overlap of 100-mm shall be maintained for all the continuing sides. Heating shall
be done on both the membranes to be overlapped and pressed firmly with the help of round shape trowel.
The care shall be taken to leave no gap at any point in the overlapped area. If noticed, reheating shall be
done to seal it. The Torchshield must be laid over the entire PCC area with a minimum of 150 mm over
hang from the size of raft on all sides.
Protection
The Torchshield membranes shall be protected against damage by laying sand cement mortar in
1:4 ratio at 15 to 20 mm thickness. Cure the surface for 7 days before starting the work for laying RCC
raft or column footings.
Method of Application
The entire external surface of the wall shall be prepared properly and made ready to receive the
waterproofing treatment. All the honeycomb areas, undulations, cracks shall be filled with polymer
modified mortar. For which Dr. Fixit Polymer Mortar PX shall be used as per the standard material
specification.
Primer Application
Bitumen based primer shall be applied as explained above over the entire surface and
shall be allowed to dry.
Membrane Application Torchshield shall be applied as per the standard installation practices as explained above
over the dried primer. Before the application of Torchshield begins over the wall, a corner
rounding / angle fillet shall be made at the junction of PCC and Raft to avoid the right angle
bend of membrane.
The application of membrane shall begin from the edge of PCC with a sufficient lap of 100 mm
minimum with the bottom membrane (over PCC) and to be taken over raft thickness and then
over the wall. An overlapping of 100 mm must be ensured with the subsequent membrane with

8/11/2019 Water Proofing-Residential Buildings
http://slidepdf.com/reader/full/water-proofing-residential-buildings 15/26
all sides. The fixing shall be done from the PCC level moving horizontally first and then
vertically. All the lap joints and termination shall be done as per standard specifications as
explained earlier.
Clean & remove dust, dirt,
loose particles and unsound
substrate
Apply primer coat with
solvent based bitumen primer
Unroll the TORCHSHIELD
roll
Align the Torchshield Roll
Use gas burner to heat
substrate & underside to
softening points
Keep overlap margin for
minimum 100 mm
Heat both the overlaps & use
round tipped trowel to seal
overlap
Seal the edges well
and protect with a
Polysulphide sealant
Torchshield applied all over
the terrace
Protection
The back filling can start simultaneously as one move upward. Before back filling begins,
the membrane shall be protected either with plaster or with a protection board.
For plaster, sand shall be sprinkled over the membranes as soon as it is fixed after torching. The
plastering shall be done in 1:3 sand cement mortar at 15 mm thickness. Thermocol in 20 mm
thickness can be used as a protection board. The cold bitumen (mastic) can be used for fixing the
Thermocol over the Torchshield. Once the Thermocol is fixed, back filling can start in layers.This will allow people to work comfortably as it will create the platform to work as one move
upwards.

8/11/2019 Water Proofing-Residential Buildings
http://slidepdf.com/reader/full/water-proofing-residential-buildings 16/26
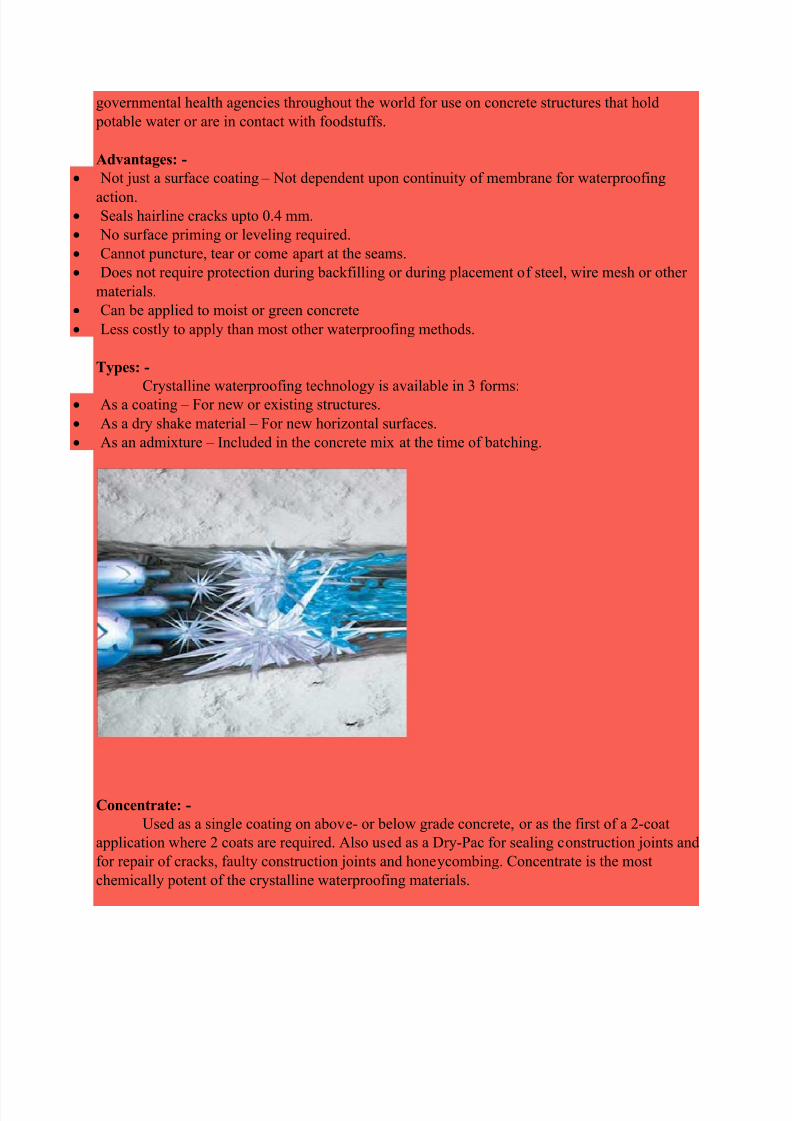
11. WATERPROOFING USING CRYSTALLIZATION
Crystallization is the (natural or artificial) process of formation of
solid crystalsprecipitating from a uniform solution or melt, or more rarely deposited directly
from agas. Crystallization is also a chemical solid-liquid separation technique, in which masstransfer of a solute from the liquid solution to a pure solid crystalline phase occurs.
Process: -
The crystallization process consists of two major events, nucleation and crystal
growth.Nucleation is the step where the solute molecules dispersed in the solvent start to gather into
clusters, on the nanometer scale (elevating solute concentration in a small region), that becomes stable
under the current operating conditions. These stable clusters constitute the nuclei. However when the
clusters are not stable, they redissolve. Therefore, the clusters need to reach a critical size in order to
become stable nuclei. Such critical size is dictated by the operating conditions
(temperature, supersaturation, etc.). It is at the stage of nucleation that the atoms arrange in a defined
and periodic manner that defines the crystal structure — note that "crystal structure" is a special term that
refers to the relative arrangement of the atoms, not the macroscopic properties of the crystal (size and
shape), although those are a result of the internal crystal structure.
The crystal growth is the subsequent growth of the nuclei that succeed in achieving the critical
cluster size. Nucleation and growth continue to occur simultaneously while the supersaturation
exists. Supersaturation is the driving force of the crystallization, hence the rate of nucleation and
growth is driven by the existing supersaturation in the solution. Depending upon the conditions,
either nucleation or growth may be predominant over the other, and as a result, crystals withdifferent sizes and shapes are obtained (control of crystal size and shape constitutes one of the
main challenges in industrial manufacturing, such as for pharmaceuticals). Once the
supersaturation is exhausted, the solid-liquid system reaches equilibrium and the crystallization
is complete, unless the operating conditions are modified from equilibrium so as to supersaturate
the solution again.

8/11/2019 Water Proofing-Residential Buildings
http://slidepdf.com/reader/full/water-proofing-residential-buildings 17/26
Many compounds have the ability to crystallize with different crystal structures, a phenomenon
called polymorphism. Each polymorph is in fact a different thermodynamic solid state and
crystal polymorphs of the same compound exhibit different physical properties, such as
dissolution rate, shape (angles between facets and facet growth rates), melting point, etc. For this
reason, polymorphism is of major importance in industrial manufacture of crystalline products.
Description: -
It is a unique chemical treatment for the waterproofing and protection of concrete that is
suitable for the following applications:
Foundation walls
Basement walls
Manholes
Parking decks
Reservoirs
Sewage and water treatment tanks
Tunnels Underground vaults
It can be used on either poured-in-place concrete or concrete block and can be applied to either
the interior or exterior surface with equal results.
Characteristics: -
It waterproofs underground structures from the inside against hydrostatic pressure. By the
process of diffusion and the materials have an affinity with water, the crystalline formation
migrates throughout the pores and capillary tracts of concrete even against strong hydrostatic
pressure. When mixed with water and applied as a cementitious coating, the active chemicalscause a catalytic reaction which generates a nonsoluble crystalline formation of dendritic fibers
within the pores and capillary tracts of concrete. Thus, the concrete itself becomes permanently
sealed against the penetration of water or liquids from any direction.
It protects concrete and reinforcing steel. This treatment is highly resistant to most aggressive
substances, pH 3 - 11 constant contact and pH 2 - 12 periodic contact. By preventing the
intrusion of chemicals, salt water, sewage and other harmful materials, It protects concrete and
reinforcing steel from deterioration and oxidation. The concrete is also protected against spalling,
efflorescence, popouts and other damages caused by weathering, bleeding of the salts and
internal expansion and contraction during the freeze/thaw cycle.
Crystallization permits concrete to breathe. The crystalline formation has fixed-size air spaces so
small that water cannot pass through. It does allow the passage of air and vapor; thus the
concrete is able to breathe and become thoroughly dry, preventing moisture vapor buildup. These
products are nontoxic. They have been approved by NSF International (National Sanitation
Foundation), U.S. Environmental Protection Agency, Agriculture Canada and many other
8/11/2019 Water Proofing-Residential Buildings
http://slidepdf.com/reader/full/water-proofing-residential-buildings 18/26
governmental health agencies throughout the world for use on concrete structures that hold
potable water or are in contact with foodstuffs.
Advantages: -
Not just a surface coating – Not dependent upon continuity of membrane for waterproofing
action. Seals hairline cracks upto 0.4 mm.
No surface priming or leveling required.
Cannot puncture, tear or come apart at the seams.
Does not require protection during backfilling or during placement of steel, wire mesh or other
materials.
Can be applied to moist or green concrete
Less costly to apply than most other waterproofing methods.
Types: -
Crystalline waterproofing technology is available in 3 forms: As a coating – For new or existing structures.
As a dry shake material – For new horizontal surfaces.
As an admixture – Included in the concrete mix at the time of batching.
Concentrate: -
Used as a single coating on above- or below grade concrete, or as the first of a 2-coat
application where 2 coats are required. Also used as a Dry-Pac for sealing construction joints and
for repair of cracks, faulty construction joints and honeycombing. Concentrate is the most
chemically potent of the crystalline waterproofing materials.

8/11/2019 Water Proofing-Residential Buildings
http://slidepdf.com/reader/full/water-proofing-residential-buildings 19/26
Modified: -
Used as a second coat to reinforce Concentrate where 2-coats are required and as a single
coat for exterior damp proofing.
Concentrate DS1 and DS2: -
Dry shake formulations designed for application on fresh horizontal concrete prior tofinishing operations.
Admix: -
Used as an integral waterproofing admixture which is included in the concrete mix at the
time of batching.
Patch’n Plug: -
Fast-setting, nonshrink, high bond strength hydraulic cement compound for concrete
repairs. Stops flowing water in seconds. Patch’n Plug seals cracks and tie holes. It is also used
for the general repair or patching of concrete. Patch’n Plug can be used in conjunction withAdmix to increase the compressive strength and bond strength of existing concrete.
Acrylic Admix: -
An acrylic polymer formulation specifically designed for use as an admix to fortify
Portland cement mixes. Acrylic Admix increases hardness, durability, bonding capability and
chemical resistance.
Gamma-Cure: -
Can be used as an alternative to water curing for certain applications.
Installation
Surface Preparation: -
Concrete surfaces to be treated must be clean and free of laitance, dirt, films, paint, coatings or
other foreign matter.
Surfaces must also have an open capillary system so as to provide tooth and suction for
treatment. If surfaces are too smooth, the concrete should be acid etched, lightly sandblasted or
water blasted.
Structural defects such as cracks, faulty construction joints and honeycombing should be routed
out to sound concrete and repaired.
Horizontal surfaces should have a rough wood float or broom finish. On fresh horizontal
concrete Concentrate DS1 or DS2 powder can be power troweled into the surface while it is still
in plastic state.
Wetting Concrete: -
Prior to the application, concrete surfaces must be thoroughly wetted with clean
water to control surface suction, aid the proper curing of the treatment and ensure the growth of

8/11/2019 Water Proofing-Residential Buildings
http://slidepdf.com/reader/full/water-proofing-residential-buildings 20/26
the crystalline formation deep within the pores of the concrete. Excess surface water should be
removed before the application.
Methods: -
To mix the product for slurry coat application, the Xypex powder is mixed with
clean water to a creamy consistency in the following proportions by volume:
Mixing for Brush Application: -
Mix 5 parts powder to 2 parts of water (0.8 kg/m2).
Mix 3 parts powder to 1 part of water (1.0 kg/m2).
Mixing for Spray Application: -
Mix 5 parts powder to 3 parts water (0.8 kg/m2). The mix may vary with equipment type.
Mixing for Dry – Pac: -
Mix 6 parts Concentrate powder with 1 part clean water by volume. Do not mix too wet, otherwise, mix may crack and spall at it dries.
Application: -
The treatment should be applied with a semi-stiff br istle brush, a janitor’s broom for large
horizontal applications, or with specialized spray equipment. The treatment must be uniformly
applied under the conditions and quantities specified. One coat should have a thickness of 1/16"
(1.6 mm). When a second coat is required, it should be applied after the first coat has reached an
initial set but is still green (less than 48 hours). Light pre-watering between coats may be
required due to drying. The treatment cannot be applied in rain or during freezing conditions.
Spray Application of Crystalline

8/11/2019 Water Proofing-Residential Buildings
http://slidepdf.com/reader/full/water-proofing-residential-buildings 21/26
Brush Application of Crystalline
Curing: - A misty for spray of water must be used for curing the treatment.
Curing must begin as soon as the coating has hardened sufficiently so that it is not damaged by a
fine spray.
Under most conditions, it is sufficient to spray the material treated surfaces 3 times a day for 2 –
3 days.
In hot, dry weather, spraying may be required more frequently.
During the curing period, the treatment must be protected from rainfall, frost and puddling of
water.

8/11/2019 Water Proofing-Residential Buildings
http://slidepdf.com/reader/full/water-proofing-residential-buildings 22/26
WATERPROOFING MATERIALS
1. PIDIPROOF LW (Specifications conforms to IS-2645) - Its an Integral liquid waterproofing
compound for plaster and concrete.
Features / Benefits
Being a liquid, dispersible in concrete/mortar mixes. Makes concrete/mortar more cohesive
Increases durability, by increase in impermeability.
Economical in application
Does not affect the setting time and strength.
Reduces shrinkage cracks in plaster and concrete
Shelf life : 1 year
Typical applications
For waterproofing of concrete and sand-cement mortar used in basements, roof slabs and
screeds, water retaining structures, external plastering,
Technical information
Base : Fatty acid
Total solid content : 13+0.5%
pH : High alkali
Dosage/Coverage
200 ml per 50 kg bag of cement. Just add gauging water that is to be mixed with
mortar/concrete.
2. TONIC (Cement additive)
Features / Benefits
Delays corrosion by minimising chloride penetration
Increases workability for easy placement.
Increases strength and durability, by reducing water cement ratio.
Produces waterproof concrete/mortar by blocking capillaries/pores in the concrete
Shelf life : 1 year

8/11/2019 Water Proofing-Residential Buildings
http://slidepdf.com/reader/full/water-proofing-residential-buildings 23/26
Typical applications
Dr. Fixit TONIC shall be added to all types of concrete and mortar to achieve water proof
and durable concrete/mortar e.g. RCC column, beam, slab, water retaining structures, external
plastering, screeds, water tanks, sumps and drains, etc.
Technical information
Base : Polymer modified Fatty acid Total solid content : 13.50+0.5%
Specific gravity: 1.05+0.02
pH : High alkali
Dosage/Coverage
200 ml per 50 kg bag of cement. Just add to gauging water that is to be mixed with
mortar/concrete.
3. PIDIFIN 2K(Certification by CFTRI, Mysore, for Portable water contact) – It is brush applied
waterproofing coating for balconies, small terraces, wet areas & ledges
Features / Benefits
Provides excellent impermeable coating.
Good adhesion with cementaitious surfaces
Applied for positive & negative sides of waterproofing
Flexible enough to take care of minor cracks in concrete & plaster.
Durable and economical
Available in pre-packed, ready-to-use containers.
Shelf life : 6 months
Typical applications

8/11/2019 Water Proofing-Residential Buildings
http://slidepdf.com/reader/full/water-proofing-residential-buildings 24/26
Bathrooms and wet areas
Small terraces upto 1000 sq.ft.
Internal walls for prevention from seepage due to rain lash
Small water tanks interior surfaces (upto 30,000 ltrs. capacity)
Technical information
Appearance : Grey powder + white liquid
Mix ratio (Powder:Liquid) = 2:1(by weight)
1.5:1(by volume)
Pot life at 30 degree Celsius : Approx. 30 mins.
Application temp : Between 10-30 degree Celsius
Dosage/Coverage
6-7 sq.ft./kg for 2 coats for total minimum thickness of 1 mm approximately. For
protection against physical damage, a mortar screed of 15-25 mm thickness may be provided.

8/11/2019 Water Proofing-Residential Buildings
http://slidepdf.com/reader/full/water-proofing-residential-buildings 25/26
4. PIDICRETE URP(SBR Latex for waterproofing and repairs)
Features / Benefits
White liquid, easily brush applied.
Useful as waterproofing coat.
Useful as a bonding agent between old and new concrete surfaces. Excellent as a cement modifier.
Repair mortar modified with Dr.FIXIT Pidicrete URP suitable for repairing of RCC beams,
columns, slabs and other RCC members
Shelf life : 1 year
Typical applications
Waterproofing of terraces, toilets, edge, masonary walls, sloping RCC roofs etc.
Repairs to RCC members
Waterproofing mortars/concretes.
As an additive in plasters at 5-6% by weight of cement content
Technical information
Total active solid content: 34+2%
pH : 8-9
Pot life : 30-45 minutes, when mixed with cement at 30 degree celsius
Dosage/Coverage
20-22 sq.ft./kg for 2 coats(URP + cement in proportion 1:1.5)
5. SUPER LATEX (SBR Latex for waterproofing and repairs)

8/11/2019 Water Proofing-Residential Buildings
http://slidepdf.com/reader/full/water-proofing-residential-buildings 26/26
Features / Benefits
Excellent coverage 70-80 sq.ft./kg in 2 coats, hence economical
Less material wastage: material does not fall back/rebound, when used as bonding agent.
High bond strength.
Prevents leakage and dampness.
Enhances strength of a repair mortar & provides durability.
Shelf life : 1 year
Typical applications
As a bond coat : Plaster to plaster, Concrete to concrete, for plaster over brick masonry.
As waterproof repair plaster.
Crack repair : Plaster cracks more than 5mm in gaps developed between masonry and RCC
members
As coating for prevention of corrosion in rebars.
Efflorescence(salt petre/damp surfaces)
Technical information
Type : Styrene butadiene rubber polymer liquid Colour : white
Storage condition : free from frost
Active solid content : 44+1%
Dosage/Coverage
Mix (S.Latex:Water:Cement) = 1:4:7, 70-80 sq.ft./kg for 2 coats as a waterproof coating.