water fountain fuente (item no. … fountain fuente ... instructions for use / safety instructions ....
TRANSCRIPT

Water fountain FUENTE (item no. 65214/65222/65223/65224)
Instructions for use / safety instructions

2
Safety instructions
Included in delivery
Water fountain 65222
Water fountain 65223
Water fountain 65224
Water fountain 65214
Assembly and fi lling
Water fountain 65222 and 65223
Water fountain 65224
Water fountain 65214
Use
Cleaning and care
Disposal
Technical dataTechnical dataT
Content
3
5
5
6
7
8
9
9
10
10
12
13
14
14

Intended use
The water fountain is intended for decorative purposes.
ATTENTION: The water fountains 65223, 65224 and 65214 are de-signed for indoor use in dry rooms and are not suitable for operation outdoors or in rooms exposed to moisture (bathroom).
The water fountain 65222 is desig-ned for indoor and outdoor use.
Hazards to children
Position the water fountain out of the reach of children and keep child-ren away from it, ...
... as children are not aware of the hazards caused by the incorrect use of electric appliances.
... as it contains small parts that could be swallowed (e.g. stones).
Make sure that children and animals do not drink out of the water foun-tain and never mix the water with toxic substances or additives (e.g. scented oils), that may accidentally be consumed by children or animals.
Electrical hazards
Only connect the indoor water foun-tain to a properly installed mains socket outlet matching the voltage stated in the technical data for the indoor water fountain. Ensure that no one is able to trip over the connection lead and route or secure it in such a way that no one can get
entangled in it.
Electric appliances that come into contact with water may cause the risk of electric shock. Using the water fountain may result in the occasional unavoidable splash of water. Therefore, the fountain must never be placed on electric appli-ances. Position it in such a way that water spillage cannot come into contact with electric appliances if the fountain is accidentally knocked or overturned.
Before connecting the indoor water fountain to the mains power supply, it must be completely assembled and filled with water.
The socket outlet must be easily ac-cessible, so that the fountain can be unplugged quickly whenever neces-sary. When unplugging, always pull the plug, not the power cord.
Unplug the fountain before cleaning it and if malfunctions occur.
Only connect the fountain to the mains adapter provided.
Do not use any other mains adap-ter.
Do not use the indoor water foun-tain if the pump or power cords show any visible signs of damage. Do not make any modifications to the unit. The pump power cord cannot and must not be replaced. Any repairs to the appliance or the power cord must only be carried out by a qualified person or repair shop - improper repairs may expose the user to considerable hazards.
Safety instructions
3

During thunderstorms, appliances connected to the mains supply may suffer damage. Consequently always disconnect the mains power plug from the wall socket outlet during thunderstorms.
Keep the power cord away from sources of heat and sharp edges to avoid damage.
Caution - damage to the appliance
The pump cannot be decalcified. Use only distilled or demineralised water to operate the water foun-tain. To prevent damage to the fountain or pump, never add other substances (essential oils, chlorine water, acids, products containing soap/bases etc.). The water tempe-rature must be between + 5° C (41 F) and + 35° C (95 F)
Fill the fountain with distilled or demineralised water up to the level marker. Check the water level regu-larly. There must always be enough water in the fountain base so that the pump is fully under water. Using the fountain with insufficient amount of water can damage the pump.
Do not fill the fountain with sand or other objects that could block the pump‘s intake ports.
Do not use chemicals for cleaning.
Position the water fountain on a surface that is not sensitive to mois-ture, as occasional water splashes cannot be avoided.
Protect the fountain from direct sunlight.
4
Safety instructions

5
Included in delivery of water fountain 65222
porcelain top part
pump
base
connecting plug
socket
net adaptor
basin

porcelain top part
pump
base
connecting plug
socket
net adaptor
basin
6
Included in delivery of water fountain 65223

stainless steel stainless steel top parttop part
pump
basin
net adaptoradaptor
decoration pebblespebbles
connecting plugconnecting plug
socket
Included in delivery of water fountain 65224
7

frontal stainless steel covering
pump
basin
wall plugwall plug
net adaptor
socket
connecting plugplug
spacerspacer
allen key
screws
Included in delivery of water fountain 65214
8
Assembly and fi lling
9
Assembly and fi lling of the water fountain
Take all parts out of the packaging and remove all packaging material. Keep the original packaging in a safe place for future transportation / storage.
WARNING: Before connecting the water fountain to the mains power supply it must be fully assembled and filled with water.
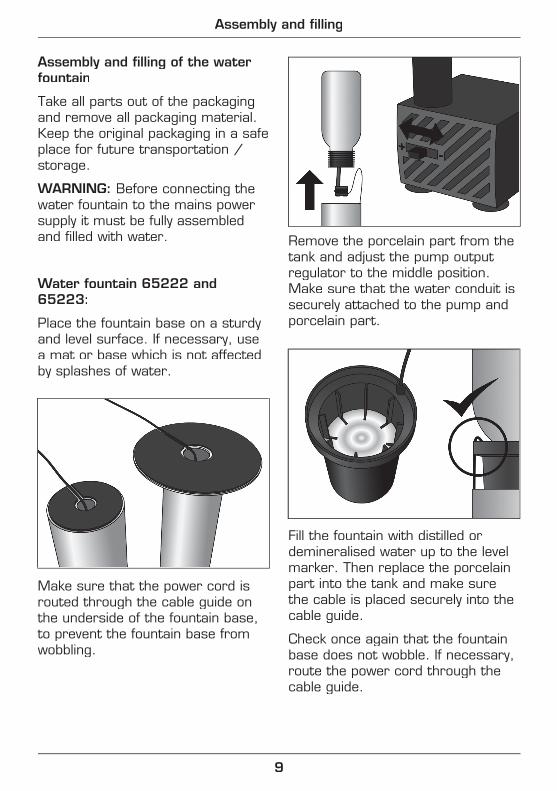
Water fountain 65222 and 65223:
Place the fountain base on a sturdy and level surface. If necessary, use a mat or base which is not affected by splashes of water.
Make sure that the power cord is routed through the cable guide on the underside of the fountain base, to prevent the fountain base from wobbling.
Remove the porcelain part from the tank and adjust the pump output regulator to the middle position. Make sure that the water conduit is securely attached to the pump and porcelain part.
Fill the fountain with distilled or demineralised water up to the level marker. Then replace the porcelain part into the tank and make sure the cable is placed securely into the cable guide.
Check once again that the fountain base does not wobble. If necessary, route the power cord through the cable guide.
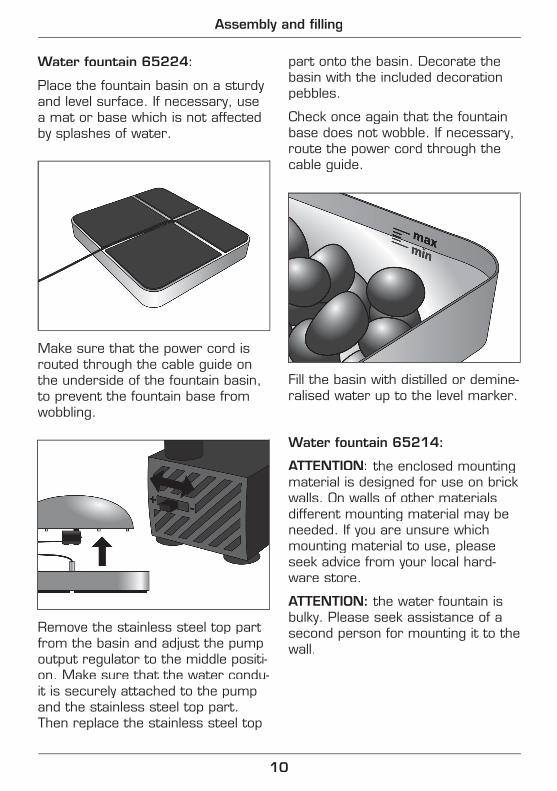
Water fountain 65224:
Place the fountain basin on a sturdy and level surface. If necessary, use a mat or base which is not affected by splashes of water.
Make sure that the power cord is routed through the cable guide on the underside of the fountain basin, to prevent the fountain base from wobbling.
Remove the stainless steel top part from the basin and adjust the pump output regulator to the middle positi-on. Make sure that the water condu-it is securely attached to the pump and the stainless steel top part. Then replace the stainless steel top
part onto the basin. Decorate the basin with the included decoration pebbles.
Check once again that the fountain base does not wobble. If necessary, route the power cord through the cable guide.
Fill the basin with distilled or demine-ralised water up to the level marker.
Water fountain 65214:
ATTENTION: the enclosed mounting material is designed for use on brick walls. On walls of other materials different mounting material may be needed. If you are unsure which mounting material to use, please seek advice from your local hard-ware store.
ATTENTION: the water fountain is bulky. Please seek assistance of a second person for mounting it to the wall.
10
Assembly and fi lling

Mark 2 drilling holes on the wall. The distance between these holes must be 400 mm / 15.748 inch. Drill the holes into the wall and fit the wall plugs into these holes.
The screws with spacers must be screwed into the wall plugs, leaving a distance to the wall of 2 mm / 0.08 inch.
Remove the frontal stainless steel covering from the fountain body. Mount the body to the wall and
adjust it using a water-level. Then tighten the screws.
Fill the fountain tank with distilled or demineralised water up to the level marker.
Adjust the pump output regulator to the middle position and make sure the water conduit is secure-ly attached to the stainless steel covering.
Replace the covering into the body. Make sure that the pump stands solid on the bottom of the tank.
11
Assembly and fi lling

IMPORTANT: Before using the wa-ter fountain make sure to degrease those parts of the product to come into contact with water. Use a spon-ge and a solution of lukewarm water and a ph-neutral cleaning liquid. Grease and staining may derogate the equal flow of the water.
The water fountain is outfitted with 2 different power adaptors. Please select the one applicable in your country. Connect the conntecting plug into the socket of the power supply cable. On the water fountain 65222 the plug must be secured by tightening the screw nut to the adaptor.
Use of the item
To operate the water fountain plug the adaptor into a main power outlet.
To increase or decrease the pump output the regulator can be adjus-ted. To do so please turn the water fountain off by pulling the plug out of the power outlet.
To increase output move the regula-tor towards the “+” position.
To decrease output move the regu-lator towards the “-“ position
12
Assembly and fi lling / Use of the item

Align the fountains 65222, 65223 and, 65214 by adjusting the porce-lain top part or body for an equal flow of the water.
Cleaning and care
The water fountain must be cleaned regularly:
Disassemble the pump as illustra-ted.
Rinse the magnetic rotor in luke-warm water. Remove any deposits with a soft sponge.
Clean all other parts with clear water and a toothbrush or similar implement.
Now re-assemble the pump.
If necessary, wipe the fountain base and decorative pieces with a sponge and a solution of lukewarm water and ph-neutral cleaning liquid. Then rinse with clear water again.
Should you not use the water foun-tain for a longer period, please clean it as above, let it dry completely and repack it, if possible into the origi-nal packaging to protect it against potential damages.
13
Use of the item / cleaning and care
magnetic rotor

Disposal
Should you wish to dispose of this product, please do so in accor-dance with the latest local regulations. Details are available from your local authorities.
Dispose of the packaging in the proper manner.
Technical data
65222 65223 65224 65214
Power supply 230 V-50 Hz
Mains adapter 12 V - 200 mA 12 V - 1670 mA
Pump output 2W 12W
Protection type, adapter IP44 IP20
Protection type, pump IPX8
Water temperature range + 5° C (41 F) to + 35° C (95 F)
Filling capacity app. 0,5 l app. 1,8 l app. 2,5 l
Ambient conditions 10 - 70% air humidity
Dimensions (H x W x D) 76,5 x 24,0 x
24,0 cm
25,0 x 12,0 x 12,0 cm
8,4 x 32,5 x
28,3 cm
50,0 x 50,0 x 6,0 cm
Protection class II: The mains adapter is doubleinsulated.
Protection class III: The pump with switch is operated by SELV (Se-curity Electric Low Voltage) of 12 V-50 Hz.
In the course of product improvements we reserve the right to make techni-cal and design modifications to the appliance.
14
Disposal / technical data

15

Scheffer-Klute GmbHSKS Design
PO Box 1701D-59844 Sundern
www.blomus.com