warranty - bg defense · if your bolt fails to unlock, you may try to free it by grasping the...
TRANSCRIPT

TYPE-A SIPR/16 CARBINE RIFLE
OPERATOR’S MANUALTYPE-A RIFLE CO. - SIRP/16 - 5.56 NATO
PLEASE READ ALL INSTRUCTIONS AND WARNINGS IN THIS MANUAL BEFORE
USING THIS FIREARM
USE PREMIUM FACTORY AMMUNITION ONLY (SPE-CIALLY NO STEEL-CASED AMMO). FAILURE TO USE THE CORRECT AMMUNITION MAY CAUSE OPERA-TION FAILURES, DAMAGE, INJURY, OR PROPERTY
DAMAGE.
MANUFACTURED BY:
RIF
LE
CO
MP
AN
Y
3148 PLAINFIELD NE SUITE 273GRAND RAPIDS, MI 49525
WarrantyTYPE-A Rifle Co. LLC will replace all items that are
considered unserviceable under general use. Warranty does not apply to any issues or failures that came about from improper maintenance, improper storage, improper
handling, improper repair, abuse or any alterations/modifications, other than those performed by:
TYPE-A Rifle Co. LLC.
Repair to damage(s) beyond these terms is not the responsibility of TYPE-A Rife Co. LLC, and will be at their
discretion.
MANUFACTURED BY:
RIF
LE
CO
MP
AN
Y
3148 PLAINFIELD NE SUITE 273GRAND RAPIDS, MI 49525
SPR( )
SPR( )

SIPR/16 GEN1 5.56NATOOPERATOR’S MANUAL
TYPE-A, SIPR/16, 5.56NATO
WARNING!PLEASE READ THESE INSTRUCTIONS AND ALL
OF THE WARNINGS CAREFULLY!
PLEASE MAKE SURE YOU COMPLETELY COMPREHEND ALL OF THE CONTENTS OF THIS DOCUMENT BEFORE YOU OPERATE THIS FIREARM. FAILURE TO DO SO MAY/COULD RESULT IN LIFE THREATENING INJURY OR DEATH TO YOU
OR OTHERS AROUND YOU.
MANUFACTURED BY:
RIF
LE
CO
MP
AN
Y
3148 PLAINFIELD NE SUITE 273GRAND RAPIDS, MI 49525 WWW.TYPEARIFLES.COM
PAGE 1
BEWARE OF DANGEROUS PROCEDURES
Be sure the cam pin is actually installed in the bolt group. If it is not, your rifle will still fire and will explode upon firing, causing serious injury. If you are unsure of what the cam pin is please see disassembly instructions (ARTICLE 4, Page 7).If your rifle stops firing with a live round in the chamber of a hot barrel (misfire), remove the round quickly. However, if you cannot remove it within 5 seconds, remove magazine and wait 15 minutes with the rifle pointing in a safe direction. This way you won’t get hurt by a possible round cooking-off (firing by itself). Regardless, keep your face away from the ejection port while clearing a hot chamber.Only use authorized factory ammo that is manufactured to U.S. or NATO specifications.If your bolt fails to unlock, you may try to free it by grasping the charging handle, and banging the buttstock on the ground (keeping yourself and others clear of the muzzle).If there’s water in the barrel, do not fire the rifle because it could explode.If a noticeable difference in sound or recoil is experienced, STOP firing. Either condition could indicate an incomplete powder burn and/or a bullet stuck in the bore.
THE FUNDAMENTAL RULES FOR SAFE GUN HANDLING ARE:
1. Always keep the gun pointed in a safe direction. Always assume the gun is loaded. Do not point the muzzle at anything you do not intend to shoot.2. Always keep your finger(s) off the trigger until you are absolutely ready to shoot.3. Always keep the gun unloaded until you are ready to use it.4. Always know your target, what is beyond it, and your surroundings. 5. Know your proper gun safety.6. Always inspect your gun to make sure it is safe to operate. 7. Use only correct (and factory premium) ammo for your gun.8. Always wear eye & ear protection before operating your gun.9. Never be under the influence of Alcohol, Drugs, Prescriptions, or any over-the- counter type medication while operating the firearm. 10. Store your firearms so that they are not accessible to unauthorized persons. 11. Be aware that certain type of firearms and many shooting activities require additional safety, training, and precautions.
Warning!
Firearms have been determined to be dangerous and potentially lethal weapons subject to restrictions. Possession of this or any firearm indicates your acceptance of responsibil-ity to comply with the law and prevent consequences of danger which can result from improper handling of the firearm.
Table of Contents
ARTICLE 1: SIPR/16 Overview Page 4ARTICLE 2: Specifications Page 5ARTICLE 3: Clearing of Rifle Page 6ARTICLE 4: Disassembly of Rifle Page 7ARTICLE 5: Cleaning of Rifle Page 8ARTICLE 6: Bolt Carrier Group Inspection Page 9ARTICLE 7: Routine Lubrication Page 10ARTICLE 8: Reassembly Page 11ARTICLE 9: Function Check Page 12ARTICLE 10: Loading Page 13ARTICLE 11: Firing Page 14ARTICLE 12: Unloading Page 15ARTICLE 13: Immediate Action Drills Page 16ARTICLE 15: Operating in Adverse Conditions Page 17
PLEASE MAKE SURE TO READ ALL INSTRUCTIONS AND WARNINGS WHILE
READING THIS MANUAL. PLEASE DO SO BEFORE USING THIS FIREARM.
PAGE 3
WARNING
PLEASE BE SURE TO READ THESE INSTRUCTIONS AND ALL OF THE WARNINGS AND
WARRENTY LABELS CAREFULLY!MAKE SURE YOU COMPLETELY COMPRE-
HEND ALL THE CONTENTS OF THIS BOOKLET BEFORE YOU USE THIS FIREARM. FAILURE TO DO
SO MAY RESULT IN SERIOUS INJURY OR EVEN DEATH TO YOU AND OTHERS AROUND YOU!
PAGE 2
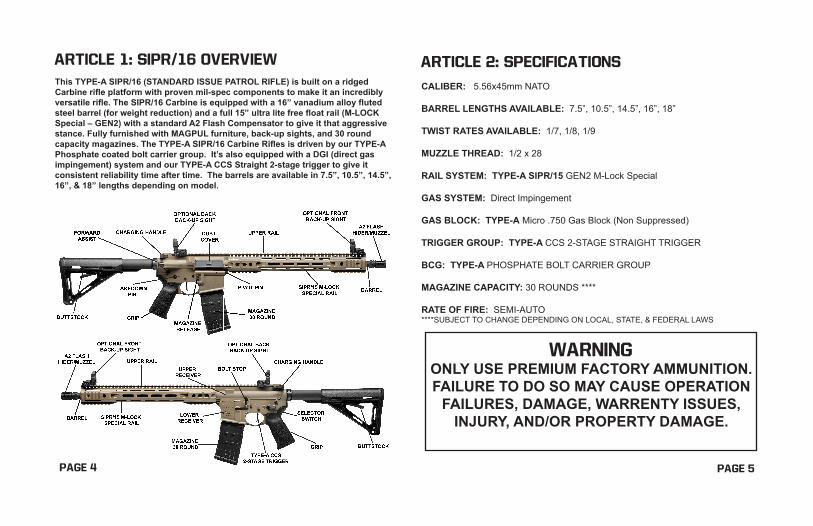
ARTICLE 2: SPECIFICATIONS
CALIBER: 5.56x45mm NATO
BARREL LENGTHS AVAILABLE: 7.5”, 10.5”, 14.5”, 16”, 18”
TWIST RATES AVAILABLE: 1/7, 1/8, 1/9
MUZZLE THREAD: 1/2 x 28
RAIL SYSTEM: TYPE-A SIPR/15 GEN2 M-Lock Special
GAS SYSTEM: Direct Impingement
GAS BLOCK: TYPE-A Micro .750 Gas Block (Non Suppressed)
TRIGGER GROUP: TYPE-A CCS 2-STAGE STRAIGHT TRIGGER
BCG: TYPE-A PHOSPHATE BOLT CARRIER GROUP
MAGAZINE CAPACITY: 30 ROUNDS **** RATE OF FIRE: SEMI-AUTO****SUBJECT TO CHANGE DEPENDING ON LOCAL, STATE, & FEDERAL LAWS
WARNINGONLY USE PREMIUM FACTORY AMMUNITION. FAILURE TO DO SO MAY CAUSE OPERATION
FAILURES, DAMAGE, WARRENTY ISSUES, INJURY, AND/OR PROPERTY DAMAGE.
PAGE 5
ARTICLE 1: SIPR/16 OVERVIEW
This TYPE-A SIPR/16 (STANDARD ISSUE PATROL RIFLE) is built on a ridged Carbine rifle platform with proven mil-spec components to make it an incredibly versatile rifle. The SIPR/16 Carbine is equipped with a 16” vanadium alloy fluted steel barrel (for weight reduction) and a full 15” ultra lite free float rail (M-LOCK Special – GEN2) with a standard A2 Flash Compensator to give it that aggressive stance. Fully furnished with MAGPUL furniture, back-up sights, and 30 round capacity magazines. The TYPE-A SIPR/16 Carbine Rifles is driven by our TYPE-A Phosphate coated bolt carrier group. It’s also equipped with a DGI (direct gas impingement) system and our TYPE-A CCS Straight 2-stage trigger to give it consistent reliability time after time. The barrels are available in 7.5”, 10.5”, 14.5”, 16”, & 18” lengths depending on model.
PAGE 4

ARTICLE 4: DISASSEMBLY OF RIFLE
Clear your rifle (as per Section 3)
1. Push takedown pin & Pivot pin3. Separate upper and lower receivers.4. Pull back on the charging handle, remove the bolt carrier group and charging handle from the receiver.5. Remove firing pin & retaining pin.6. Pull bolt assembly into locked position7. Remove bolt cam pin from bolt.8. Drop/Remove firing pin out the rear of the bolt carrier. 9. Remove bolt assembly from the carrier.10. Remove the extractor pin.11. Then remove the extractor and spring.12. Press the buffer, push down and hold buffer retainer pin down.13. While holding the buffer retaining pin down, remove the buffer and buffer spring.
PAGE 7
ARTICLE 3: CLEARING RIFLE
1. Point rifle in a SAFE DIRECTION! Place selector switch on “SAFE”. If rifle is not cocked, the safety selector lever cannot be pointed towards the “SAFE” position.2. If magazine is present in the mag well, press the catch button and remove the magazine from magwell.3. Next, lock bolt open, pull charging handle rearward. Press bottom of bolt catch and allow bolt to move forward until it engages bolt catch. Return charging handle to its forward position.4. Inspect receiver & chamber to ensure the area is clear of ammo.5. Once clear, allow bolt to go forward by pressing upper portion of bolt catch.
PAGE 6

ARTICLE 5: CLEANING OF RIFLE
Clear your rifle (as per Section 3)
Even though this rifle was built for harsh environments and can easily function reliably for thousands of rounds between cleaning, its still “best practice” to keep you rifle clean and well oiled. We recommend that you clean your TYPE-A SIPR/16 Carbine Rifle after every live-fire session for optimal accuracy and performance.
A clean chamber is critical (due to our tight tolerance) for optimum consistency and reliability. We recommend that you use a chamber bush and CLP (Cleaner, Lubricant, & Protectant) is used to break-down the carbon build up and any foreign material, followed by a clean pass with a lint free patch after every live-fire session. With the rifle disassembled, thoroughly clean and inspect all component to insure everything is properly in order. Once you have inspected every component be sure to lubricate all moving parts with a light mist of CLP.
PAGE 8
ARTICLE 6: BOLT CARRIER GROUP INSPECTION
INSPECT BEFORE LUBRICATING:DO NOT Interchange bolts or components between rifles.
FIRING PIN:Replace if any components look bent, cracked or blunted.
FIRING PIN RETAINING PIN:Replace if any components look bent, worn, and/or show signs of stress cracks.
BOLT:Replace if there are signs of stress fracture cracks, specifically in the cam pin hold area. Bolts that contain pits extending into the firing pin hole need to be replaced.
EXTRACTOR:Inspect for chipped or broken edges in the area that engages the bullet case. Replace if there is any signs of chips and/or broken edges.
PAGE 9

ARTICLE 7: ROUTINE LUBRICATION
Bolt:Lightly lubricate w/CLP all bolt and bolt carrier compo-nents.
Upper receiver:Lightly lubricate the inside of upper receiver bore, chamber and outer surfaces w/CLP.
Lower Receiver:Lightly lubricate the inside of the lower receiver, trigger group, magwell, buffer, and buffer spring w/CLP.
ARTICLE 8: REASSEMBLY
1. Insert buffer spring & buffer until captured by the buffer retaining pin. (You will need to press the retainer pin down prior to sliding the buffer spring & buffer into the buffer tube.)2. Insert extractor & spring into bolt. If the spring comes loose, put the large end of the spring in the extractor and seat it. 3. Then push the extractor pin back into the bolt.4. Stagger the gas ring gaps to stop gas loss.5. Slide the bolt back into the front of the carrier.6. Then replace the bolt cam pin with the hole facing towards you so the ring pin can drop straight through. 7. Pull bolt out. 8. Replace firing pin into carrier. Please make sure it passes through the cam pin hole.9. Then replace firing pin retaining pin, insert charging handle back into the upper receiver.10. Slide complete bolt carrier group into upper receiver until fully seated.11. Then mate the upper and lower receiver together ensuring to properly line the pivot pin holes.12. Push in front pivot pin 13. Push in rear takedown pin
PAGE 11PAGE 10

PAGE 12
ARTICLE 9: FUNCTION CHECK
BE SURE TO REMOVE MAGAZINE & CLEAR CHAMBER OF RIFLE
SAFEPull charging handle to rear and release quickly.Place Selector on SAFE.Pull trigger, hammer should not fall.
SEMIPull charging handle to rear and release quickly.Place selector on SEMI.Pull trigger, hammer should fall.
Pull charging handle to rear and release quickly.
Pull trigger and hold to rear, hammer should fall.
Continue to hold trigger to the rear. Pull charging handle to rear and release quickly.
Release trigger and pull again. Hammer should fall.
ARTICLE 10: LOADING
MAKE SURE RIFLE SELECTOR SWITCH IS ON “SAFE” MODE.
Insert loaded magazine upward into magwell until maga-zine catch engages and holds magazine. Ensure magazine is properly seated by tapping base upward to seated cor-rectly.
1. If bolt is locked open, depress upper portion of bolt catch which will allow the bolt to slid forward.2. Inspect to ensure the bolt is fully forward, seated, and locked.
OR
1. Pull charging handle fully rearward and release quickly allowing it to snap forward.2. Inspect to ensure bolt is fully forward, seated, and locked.
PLEASE NOTE: If firearm is not to be immediately fired, close ejection port cover to protect from contaminates. Only use Mil-Spec 5.56 NATO Magazines.
PAGE 13

ARTICLE 11: FIRING
1. Load and make sure the selector switch is on “SAFE” mode. Grab the TYPE-A SIPR/16 by the pistol grip with one hand and handguard with the other hand. Make sure to keep your trigger finger outside the trigger guard and away from the trigger itself. Place the butt stock firmly into your shoulder while positioning the head of the stock to get an line-of-sight on your intended target. 2. With your thumb, rotate the selector switch to “SEMI” mode (when ready to fire).3. With the rifle aimed at the intended target and/or safe area, place your index finger on the trigger while gently squeezing until the rifle fires. After firing another cartridge will automatically load into the chamber after firing, until the mag is fully empty. After firing, always return the selector switch on “SAFE” mode. 4. If you have fired all the ammo in the magazine, the bolt will automatically lock into the rear position by the bolt catch.
PAGE 14
ARTICLE 12: UNLOADING
1. Make sure the rifle selector switch is in the “SAFE” mode position.2. Press magazine release button & the magazine will drop from magwell.3. Then pull the charging handle fully rearward and eject the chambered cartridge.4. Inspect the chamber, to ensure chamber is empty of any remaining ammo.5. Remove any remaining live ammunition from the magazine by sliding them forward by hand, one by one, until magazine is empty.
PAGE 15

PAGE 16 PAGE 17
ARTICLE 13: IMMEDIATE ACTION DRILLS
WARNING!
IF YOUR FIREARM STOPS WORKING PROPERLY, OR IS SHOWING SIGNS OF MALFUNCTIONING MAKE SURE TO STOP FIRING,
MAKE SURE THE RIFLE IS IN SAFE DIRECTION, UNLOAD, AND/OR CONTACT TYPE-A RIFLE CO. LLC IMMEDIATELY.
If your rifle is firing/operating properly, yet a cartridge fails to fire, preform the following steps immediately:
1. Make sure the magazine is properly seated. Inspect by slapping upward on the bottom plate of the magazine.2. Pull charging handle all the way back and release quickly.3. Properly observe ejection of ammo cartridge. Inspect chamber for any obstructions. If cartridge or case is ejected or chamber is clear....Release the charging handle to feed a new round into the chamber...Release quickly. NOTE: Do not ride the charging charging handle forward.4. FIRE
If the rifle will not fire, inspect action for other troubles and/or contact a TYPE-A Rifle Co. LLC as soon as possible.
ARTICLE 14: OPERATING IN ADVERSE CONDITIONS
Operating Rifle in Snow/Freezing Environments:
1. Always attempt to keep the weapon dry.2. Unload and hand function the weapon every 30-40 minutes to help prevent freezing of functioning parts.3. Do not lay a warm weapon directly into the snow and/ or ice.4. When moving a cold rifle into a warm place, take moisture into condensation (possible corrosion). If possible, leave your firearm in a safe/protected cold area outside (unloaded). Once the unloaded firearm is brought into a warm place, it should be disassembled and cleaned several times as it reaches room temperature (if this is not preformed, corrosion could occur). You will also want to inspect the inside of your magazine, along with the ammo to ensure that is free of moisture/condensation. Moisture could cause freezing and malfunctions.

PAGE 18
ARTICLE 14: OPERATING IN ADVERSE CONDITIONS
Operating Rifle in Hot, Dry Climate:
1. Always use CLP to clean, lubricate, and protect your rifle.2. Hot/dry climates are typically areas that could contain blowing of sand and find dust particles. Deserts are typically hot during the day and freezing during the nights. Since these environments are taxing on your firearms and equipment, extra consideration should be taken to protect your investment. Your functionality of your rifle will depend on your consistent routine of cleaning & lubricating your firearm. 3. Remember that dust and sand will make its way into your rifle and magazines. This can and will cause malfunctions. Ensure the inside areas and functional parts of the rifle are clean on a regular basis after firing. 4. Corrosion is less likely to form on metal parts in dry climate so lubrication should be applied to the internal working surfaces and parts. Again, use normal amounts of CLP for lube.5. Unload and dry ammunition and inside of magazine after ever use. Do not lubricate ammo and/or magazine.
PAGE 19
ARTICLE 14: OPERATING IN ADVERSE CONDITIONS
Operating Rifle in Hot, Wet Climate:
1. Always use CLP to clean, lubricate, and protect your rifle.2. Clean and lubricate your rifle frequently. Always inspect hidden areas of the bolt and carrier group assembly, upper receiver, chamber/barrel extension, lower receiver and receiver extension assembly (buffer tube) for corrosion. Also pay attention to the spring- Ioaded detents on the firearm. 3. To prevent corrosion, remove fingerprints with a dry lint free rag. Then use CLP to lubricate surface lightly. 4. Always unload & check the inside of magazine often for corrosion and moisture build up. If moisture is present on ammo wipe dry before using again.