**warning read first** wiring or 12 volt wiring, we ... secure the front section loosely to the...
TRANSCRIPT

**WARNINGREADFIRST**
Ifyouarenotfamiliarwithserieswiringor12voltwiring,westronglysuggestyouhaveaprofessionalfinishthewiring.IncorrectpolarityorimproperwiringmaycausedamagetoyourmachineoryourFrogheadconsole.Wearenotresponsibleforanydamagescausedduetofaultywiring.Damagetoyourconsolecausedbyfaultywiringwillvoidthe
consoleswarranty.
**WARNINGREADFIRST**
GenericPlateInstallationGuideTools&EquipmentNeeded
• WireStrippers

• WireCrimpers• RazorKnife• SocketsetorWrenchset• Allenwrenches(T-handleorBundle)
IncludedHardware&Equipment
• MountingPlate• 4x)CushionedP-Clampstosizeofrollcage• 4x)¾”x¼-20CapBolts• 4x)½”x¼-20CapBolts• 8x)5/8”Fenderwashers• 4x)Flangenuts
Contents:Step1:RemoveRoof
Step2:MountingHardwareInstallation
Step3:ConsoleInstallation
Step4:PowerWireDirections
Step5:BatteryWiringInstructions
SupportContactInformation
STEP1:RemoveRoof
Theeasiestmethodofinstallingtheplateandconsolesystemistofirstremoveyourroof.Alternateinstructionswillbegivenifyoudonotwishtoremoveyour
rooforcannot.Thealternatemethodisabitmoredifficult.
Step2:MountingHardwareInstallation
PlacetheP-Clampsoverthefrontandrearcrossbarsoftherollcage.YouwantthePfacingoutsidethevehicle.

Next,securethefrontsectionlooselytotheplateusingtheP-Clamps,¾”x¼-20bolts,5/8”fenderwashers,andflangenuts.Forthebestpossiblemounting,mounttheplatetothebacksideoftheP-clamp,(whichwillbethetopofthe
clamp),using¾”bolts,washers,andflangenuts.Tomakeiteasytotightenfromthebottom,makesureyourcapheadsareonthe
“bottom”andyourflangenutisonthe“top”.“Bottom”and“Top”arepositionsbasedontheplateonceitisinitspropermountingposition.Makesuretheelongatedslotsareatthefrontofthebikeforproperinstallation.Ifinstallingwiththeroofoff,lifttheplateupandovertherearbarandfittherearP-Clamps.
Ifinstallingwitharoof,skiptonextstepbeforemountingtherearsection.

Step3:ConsoleInstallation
Havesomeonehelpyouholdtheconsoleinposition.Insertincludedboltsthroughincludedwashers.Insertboltsthroughmountingplateslotsandintothethreadedinsertsintheconsole.Tightenthescrewsenoughsothatyoucanstillslidetheconsoleupanddownonthebracket.

Afterconsoleisheldupbythebolts,pushtheconsoleuptofittightagainstthefrontoftheplateslots.Ifyouhaveanyobstructionsthatwillnotallowforthisyoucanadjusttheconsoleontheslotstoplaceitwhereyouwant.Securetheconsoleinpositionbytighteningtheboltsuntiltheconsolewillnolongerslideonthe
bracket.
Lifttheplateupandpushitasfarforwardaspossible.Ifitistootightandyouarenotabletogettheplateovertherearrollbars,loosenthefrontP-Clampsuntilyoucangetitover.Onceover,installtheP-Clampsthesameasyoudidforthe
front.OnceinpositionlooselyfinishcenteringtheconsolewhereyouneeditandthentightendowntheP-ClampboltsusinganAllenwrenchandwrench.


Step4:PowerWireDirections
Findtheshortest,safest,unobstructedroutetothebatteryfromtheconsole.Useziptiestosecureittightlytothecage.

Ifpossiblerunthewirethroughthegapbetweenthebodyandthecage.
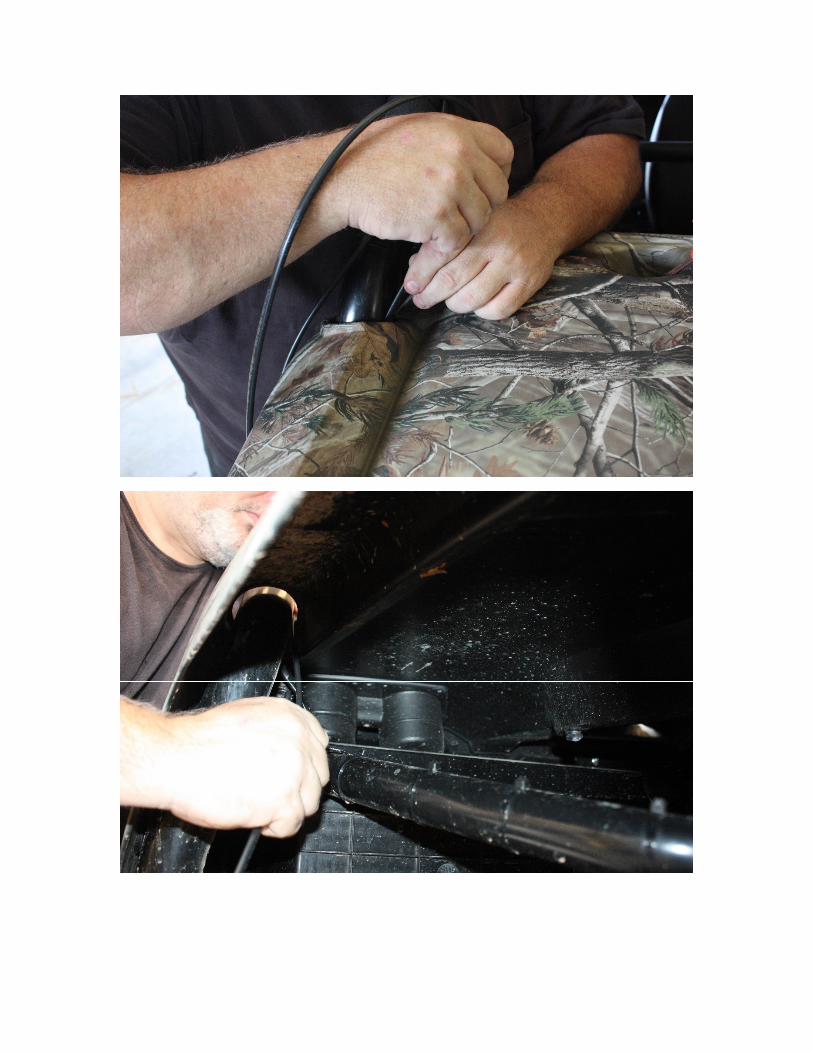

Ifavailablerunthepowerwirethroughexistingwiregapsintothebatterycompartment.
Afterpullingallextrawirethroughthegapextendthewiretothegroundandcutoffanyexcessyoumayhave.
Step5:BatteryWiringInstructions
**WARNING**
Ifyouarenotfamiliarwithserieswiringor12voltwiring,westronglysuggestyouhaveaprofessionalfinishthewiring.Incorrectpolarityorimproperwiring

maycausedamagetoyourmachineoryourFrogheadconsole.Wearenotresponsibleforanydamagescausedduetofaultywiring.Damagetoyourconsolecausedbyfaultywiringwillvoidtheconsoleswarranty.
**WARNING**
Stripexteriorpowerwirecovertoaccesstheredandblackwireinside.
CutFuseholderwireabouthalfwayandstripbothendsabout½”(onehalfinch).

Attachoneoftheringterminals(included)tooneendofthefuseholderandthe
buttconnector(included)totheotherendofthefuseholder.

Stripbothblackandredwireabout½”(onehalfinch).Attachthesecondringterminal(included)totheblackpowerwire.Attachothersideofbuttconnector
fromthefuseholdertotheredpowerwire.
Removenutsfrombatteryterminals.Placeringterminalsonthebatteryterminals
oneatatime,refasteningthebatteryterminalnutsasyougo.
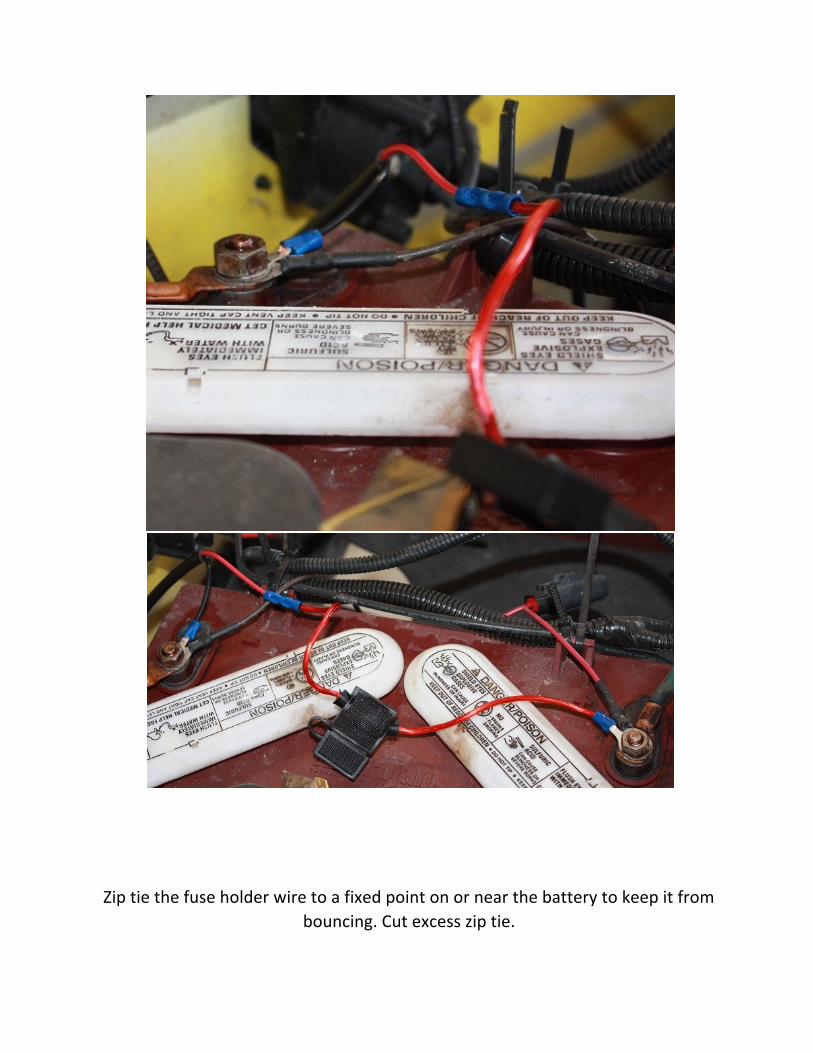
Ziptiethefuseholderwiretoafixedpointonornearthebatterytokeepitfrombouncing.Cutexcessziptie.

Insert15AFuseintofuseholder.Fitisgenerallytightsoabitofresistanceistobe
expected.

SupportContactInformation
Phone:(844)376-4432
Email:[email protected]
Website:www.frogheadindustries.com
SnailMail:4055OldDowlenRd
Beaumont,TX77706