warewolf user guide 1: introduction and basic concepts · warewolf user guide 1: introduction and...
TRANSCRIPT

Warewolf User Guide 1: Introduction and Basic Concepts
Course Outline
An Introduction to Warewolf Preparation for the Course Welcome to Warewolf Studio Create your first Microservice Exercise 1 Using the Explorer The Toolbox Working with Variables Running a Microservice Embedded Microservices Exercise 2 Debugging Final note on Debugging

1 | P a g e
Warewolf User Guide 1 – Version 1.2
An Introduction to Warewolf
Business application developers have long since struggled to keep up with the ever-changing demands of today’s business landscape. Armies of developers learn and adapt to new frameworks, methodologies, and architectures in the hope that they might finally find the agility, efficiency, and power needed to take their applications to the forefront of their industries. However, as complexity increases and microservices emerge as a mainstay of modern programming, the platforms for integrating these systems remain stagnant. Microservices were sold to us as “the next big thing” but we were never told how we could implement them easily. As a result, 21st century developers are, in effect, still building programs the same way Fortran programmers worked in the 1950s: typing code line by line over hundreds of hours. As the clouds of the past clear and the light of a full moon shines bright, the Warewolf finally emerges. Born out of the need for a visual, flow-based method for managing and manipulating today’s most complex applications, Warewolf represents the next step in the evolution of service-oriented architecture. With Warewolf, developers can drag, drop, and design visual representations of microservices and their flow, and then actually use them by calling Warewolf over HTTP/S. Microservice assembly and connection is no longer a matter of endless hours spent programming. With Warewolf, you simply lay out and design your microservices using the drag and drop interface of Warewolf Studio. Then, supply the proper variables and credentials, add any number of connectors where necessary, and call Warewolf. That’s all there is. You just created and used a microservice. Now, save that service for use later in your program and drag it back out when it’s needed again. With Warewolf, microservices are no longer lines of code that must be written, but elements of software design to be pulled onto a canvas and dropped into place. They can live in your library, in the cloud, or on any other connected Warewolf anywhere in the world. Have you ever wished that your workflow design program could just do the programming for you? We did. And that is exactly why we created Warewolf. So go ahead - do a year’s worth of programming in three months. Complete a day’s task in an hour. Assemble a team of two or three where eleven or twelve independent experts were once needed. To work with a Warewolf server, we built a program called Warewolf Studio. This is where the magic happens, so during this introduction, we spend most of our time exploring Warewolf Studio.
Preparation for the course

2 | P a g e
Warewolf User Guide 1 – Version 1.2
This course has been designed to be a hands-on training experience. We’ll guide you systematically
through exercises designed to enhance your understanding of how Warewolf works.
You will need the following to complete the course:
1. A laptop or PC (see system requirements below) with the latest version of Warewolf installed.
2. Access to a SQL Server 2008 database for the database exercises. If you are doing this course in
a classroom environment, we recommend being on a network, ideally with Internet access.
Course candidates can either work individually, or they can pair, sharing a computer.
3. Some of the content of the course is based around the Microsoft AdventureWorks 2008
database, so there needs to be at least one server in the classroom environment running SQL
Server 2008 or SQL server lite.
4. A notebook and pen to take notes.
You can download and install Adventureworks for your SQL server version from this site:
http://msftdbprodsamples.codeplex.com/
You can download the free Microsoft SQL Server 2008 Express edition from the following URL: http://www.microsoft.com/en-us/download/details.aspx?id=30438 If you are running on a LAN that is controlled by a network administrator, please confirm that your
workstations can access the SQL server.
Ideally, you should also have access to the following URL for one of the exercises:
https://www.google.com/
Let’s get started!

3 | P a g e
Warewolf User Guide 1 – Version 1.2
Welcome to Warewolf Studio
(Figure 1)
When you first open Warewolf Studio, you will see a screen that looks like Figure 1. The first thing you
may notice is that central to Warewolf Studio is a flow-based designer, numbered [4] in Figure 1.
By default, the Hello World microservice is opened in the designer.
The flow-based designer is a design surface that has a Start node, and follows a path until it reaches the
last item in a flow, where it stops. If you look at the connector leading off the Start node, you will see a
small arrow indicator at the end of the connector. The arrow indicator denotes the direction of the flow.
The designer (as well as the Explorer [2] and the Toolbox [3]) work using a drag and drop interface. You
select items on the design surface [4] and move them as you see fit. When you move items, the
connector lines automatically adjust themselves. Try it now for yourself.
Apart from the green Start node, everything else on the design surface is a tool or connector that has
been dragged onto the design surface from the Toolbox, or as a Resource from the Explorer, and
connected into the flow using the connecting arrows.
4 | P a g e
Warewolf User Guide 1 – Version 1.2
Create your first Microservice
Let’s dive right in and build your first microservice.
(Figure 2)
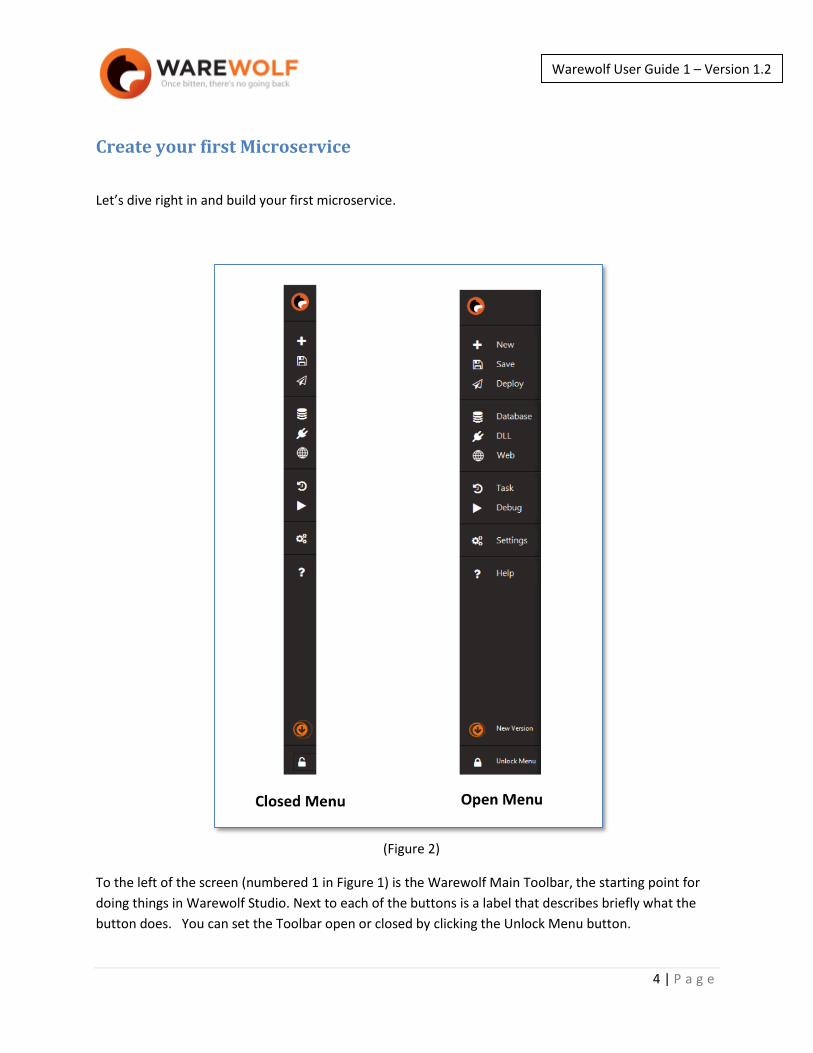
To the left of the screen (numbered 1 in Figure 1) is the Warewolf Main Toolbar, the starting point for
doing things in Warewolf Studio. Next to each of the buttons is a label that describes briefly what the
button does. You can set the Toolbar open or closed by clicking the Unlock Menu button.

5 | P a g e
Warewolf User Guide 1 – Version 1.2
Warewolf Studio also makes extensive use of hints. You can hover over almost anything in Warewolf
Studio and get a descriptive hint on what the item is.
Exercise 1
If you hover over the top button labeled New, the New Service hint appears. Click this button to create a
new microservice.
(Figure 3)
A new design surface has appeared, containing only the Start node, as illustrated in Figure 3.
If you look at the tab for the design surface on the Tab Bar, in the center of the screen, you will see that
Warewolf has automatically called this tab “Unsaved 1.” Just below the Tab Bar, in orange, you can see
an underlined URL. When you create or rename a microservice, Warewolf automatically creates a URL
for the microservice.
You can navigate between the different tabs by clicking on them, enabling you to work with multiple
workflows at once.

6 | P a g e
Warewolf User Guide 1 – Version 1.2
Click on the URL. You may get a "Did you know?" message with a helpful hint. Click OK.
Your default web browser automatically navigates to the URL. If you look at the URL in your browser
address bar, you can see that it is the same as the URL in Warewolf. Currently, the web browser window
is empty; this is because your microservice doesn’t do anything yet.
At this point, Warewolf has created the service for you. You can execute this service regardless of
whether the Studio is running or not.
So let’s make it do something. First, let’s go back into Warewolf.
In this exercise, we are going to build a dice roll microservice. It will roll an imaginary dice and return a
random number between one and six.
To get started, save the microservice and name it DiceRoll. The second button on the left in the Menu
bar (see Figure 2) is the Save button. Click it, and the Save Dialog box appears.
(Figure 4)
Name yours DiceRoll, as in Figure 4, and click the Save button. Warewolf will save your microservice as
DiceRoll. You have now saved your first microservice.
7 | P a g e
Warewolf User Guide 1 – Version 1.2
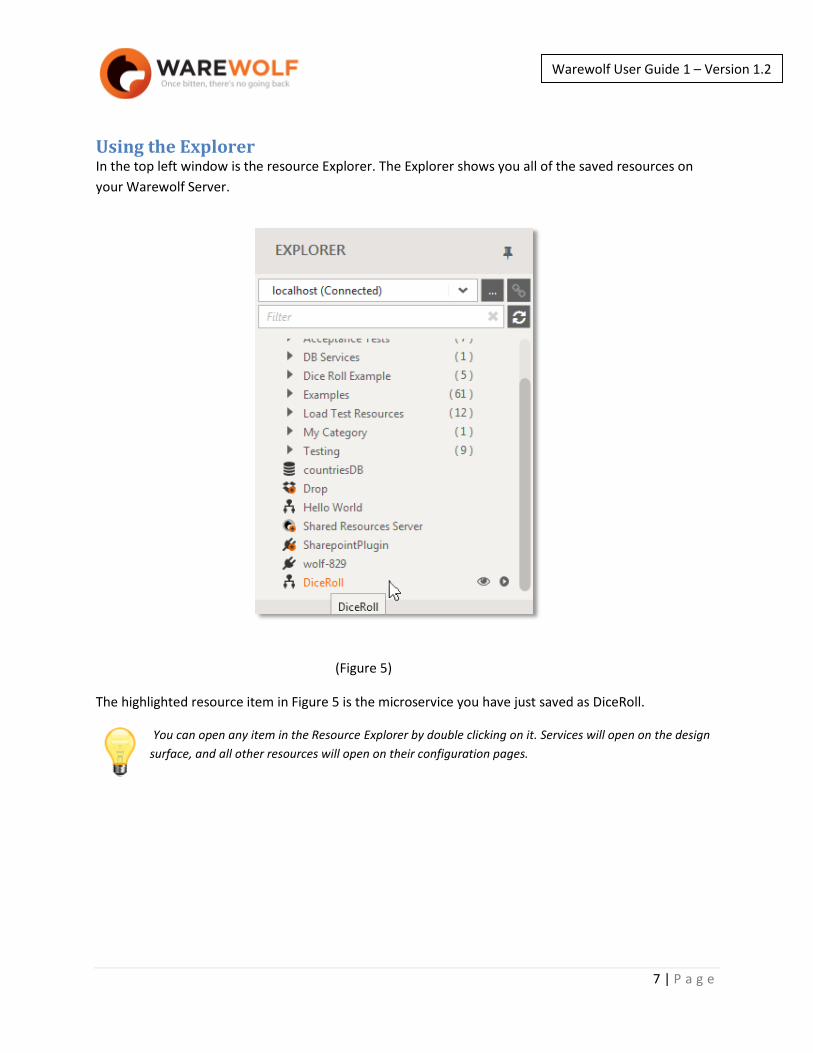
Using the Explorer In the top left window is the resource Explorer. The Explorer shows you all of the saved resources on
your Warewolf Server.
(Figure 5)
The highlighted resource item in Figure 5 is the microservice you have just saved as DiceRoll.
You can open any item in the Resource Explorer by double clicking on it. Services will open on the design
surface, and all other resources will open on their configuration pages.

8 | P a g e
Warewolf User Guide 1 – Version 1.2
Let’s try this now.
On the tab bar above the designer, hover over the DiceRoll tab, and an orange x will appear on the right
side of the tab. Click the x to close the microservice tab. If changes have been made on the design
surface, Warewolf will ask you whether you want to save your changes or not. In this case, you haven’t
made any changes, so the tab will close without prompting you.
There are two ways to open a resource using the Explorer. The first is to double click on the resource in the
Explorer. The other way is to right click on the Resource you want to open, and use the context menu
shown in Figure 6 to open the Resource.
(Figure 6)
You may need to scroll down to find DiceRoll. Open the DiceRoll microservice.
Look back to the URL at the top of the designer, and you’ll see that it changed from Unsaved 1.json to
DiceRoll.json.

9 | P a g e
Warewolf User Guide 1 – Version 1.2
The Toolbox
Collapsed view and expanded view:
(Figure 7)
In the bottom left pane is the Toolbox. The Toolbox contains over 50 pre-built logic tools and connectors
that speed up software development. They take care of the ‘heavy lifting’ so you can focus on what the
software needs to do, not on the details of how it’s done.
The tools in the Toolbox are grouped into the logical groups shown in Figure 7. For the sake of this
example, we are going to use a Utility tool called Random, which can be found under the Utility tab, as
shown in Figure 8.
To drill down to the tool you want quickly, you can either go directly to the tool in the Toolbox, or type the tool
name in the filter box at the top of the Toolbox window. To view all the tools and their functions go to the
knowledge base article on Tools and Connectors.

10 | P a g e
Warewolf User Guide 1 – Version 1.2
(Figure 8)
To get the Random tool into the workflow, drag it from the Toolbox onto the Start node on the design
surface, as illustrated in Figure 9.
(Figure 9)
When you get near the Start node, the connector arrow will appear at the bottom of it. When it does,
you can drop the tool, and Warewolf will create the connector automatically.

11 | P a g e
Warewolf User Guide 1 – Version 1.2
When you hover over a tool, you’ll see at least four connector nodes. You can create a connector between two tools manually, by hovering over one of the connector nodes and dragging one into existence between two connector nodes on two different tools. The logic will flow from the tool you start on to the tool you end on.
Try this now. Select the connector between the Start node and the Random tool. The connector will be highlighted in Orange, as shown in Figure 10.
(Figure 10)
Click on the top part of the Random tool then press the Delete button on your keyboard to delete the
connector. Now re-create the connector using the steps described above.
The Random tool can generate four types of random strings and numbers; it defaults to generating
random numbers. To generate a random number, we need to specify a range.
Since our goal is to roll a dice, we want a random number in the range between 1 and 6, so enter 1 in
the From textbox, and 6 in the To textbox.
12 | P a g e
Warewolf User Guide 1 – Version 1.2
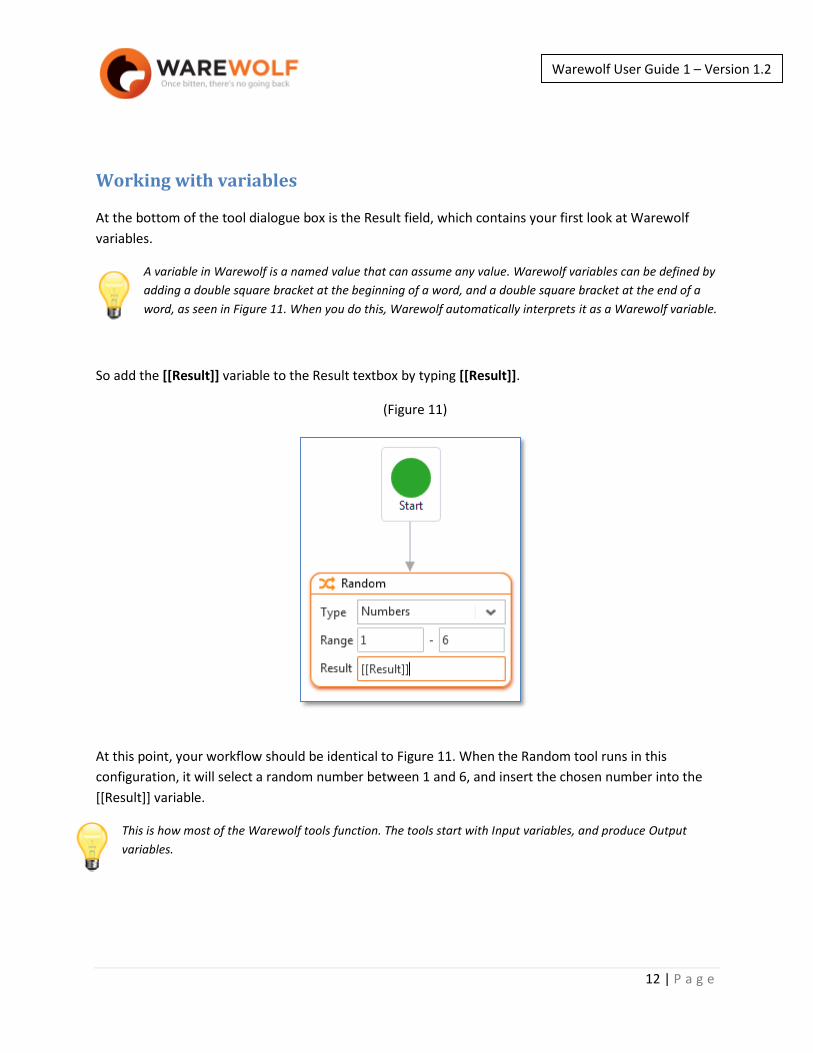
Working with variables At the bottom of the tool dialogue box is the Result field, which contains your first look at Warewolf
variables.
A variable in Warewolf is a named value that can assume any value. Warewolf variables can be defined by
adding a double square bracket at the beginning of a word, and a double square bracket at the end of a
word, as seen in Figure 11. When you do this, Warewolf automatically interprets it as a Warewolf variable.
So add the [[Result]] variable to the Result textbox by typing [[Result]].
(Figure 11)
At this point, your workflow should be identical to Figure 11. When the Random tool runs in this
configuration, it will select a random number between 1 and 6, and insert the chosen number into the
[[Result]] variable.
This is how most of the Warewolf tools function. The tools start with Input variables, and produce Output
variables.

13 | P a g e
Warewolf User Guide 1 – Version 1.2
The top right pane in Warewolf contains the Variable list (Number 5 in Figure 1 above). If you look at
the variable list, you will see that it now contains a variable called Result. Warewolf automatically
created the Result variable when we added it to the Result field in the Random tool.
(Figure 12)
We didn’t have to call it Result; in fact, we could have used a more descriptive name, like [[DiceRoll]],
which would make it a lot easier to identify when you work with larger workflows.
Automatic variable creation is a huge time-saving feature that is built into Warewolf. Later on, we will look
at how to take full advantage of this feature.
Warewolf can use variables in three ways: internally, as Input variables or as Output variables. By default,
all variables can be used by the workflow while it is running, so all variables are internal variables. For more
information on Variables have a look at Warewolf Syntax.
Input variables are variables that need to be provided to the service when it starts, and are used
to configure the state of the workflow. For example, if you need to look up clients in a workflow,
you could make [[AccountNumber]] an input variable, so you can locate any specific client
record.
14 | P a g e
Warewolf User Guide 1 – Version 1.2
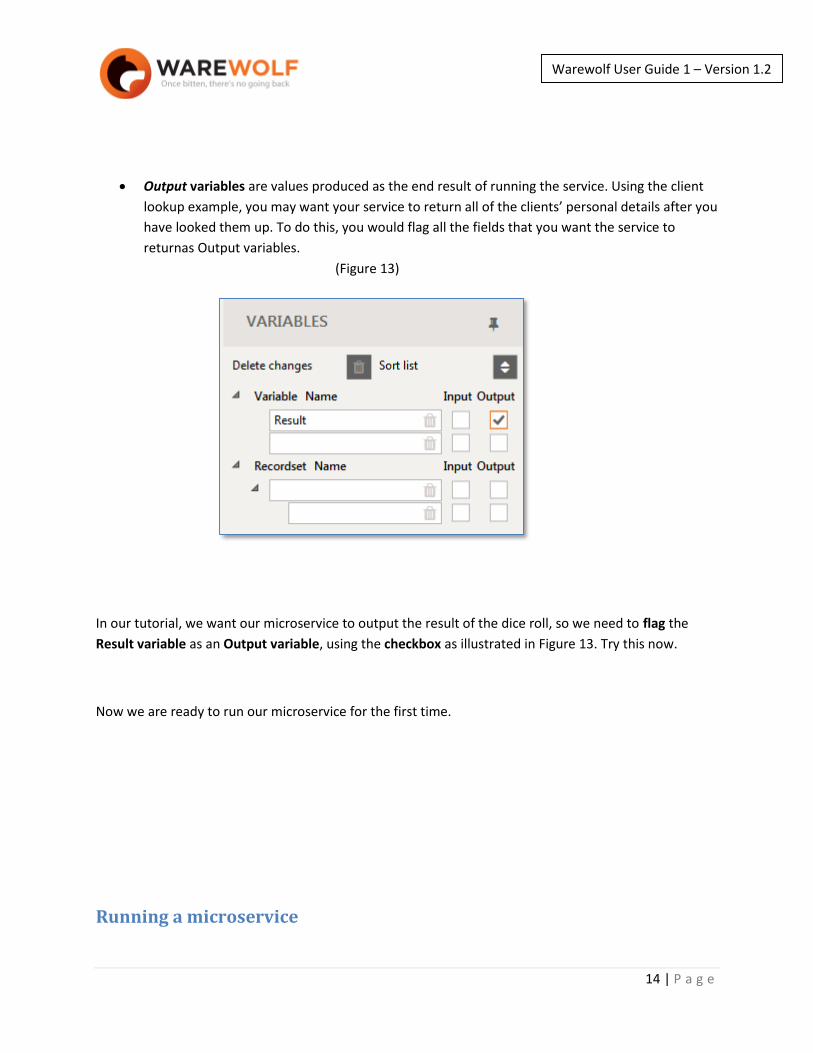
Output variables are values produced as the end result of running the service. Using the client
lookup example, you may want your service to return all of the clients’ personal details after you
have looked them up. To do this, you would flag all the fields that you want the service to
returnas Output variables.
(Figure 13)
In our tutorial, we want our microservice to output the result of the dice roll, so we need to flag the
Result variable as an Output variable, using the checkbox as illustrated in Figure 13. Try this now.
Now we are ready to run our microservice for the first time.
Running a microservice

15 | P a g e
Warewolf User Guide 1 – Version 1.2
On the Main Toolbar, click the Debug Button.
The Debug dialog box will appear.
(Figure 14)
The Debug dialog box has two buttons at the bottom of the window that can run the workflow. To start
with, let’s view the output in browser mode. You can either click the View In Browser button, or press
F7. Your browser will start, and your workflow will run.

16 | P a g e
Warewolf User Guide 1 – Version 1.2
In your browser, you will get XML output that looks something like this:
(Figure 15)
By default, Warewolf outputs an XML dataset called DataList. Inside Datalist, you can see our output
variable: Result. In this case, <Result> is returning a dice roll value of 3.
If you refresh your browser, you can see that the value of <Result> changes randomly, and returns a
number between 1 and 6. Try it a few times.
Well done! You have just successfully built your first microservice using Warewolf.
Warewolf has one more output trick up its sleeve. If you look at the URL in the browser address bar, you
can see that the microservice being called is named DiceRoll.xml. (Figure 16) If you change the .xml to
.json, the Warewolf microservice will return JSON data instead of XML, without any extra work on your
part. Try this now for yourself.
(Figure 16)
17 | P a g e
Warewolf User Guide 1 – Version 1.2
Embedded Microservices
In Exercise 1, we built the Dice Roll microservice. In Exercise 2, we are going to take this a step further,
and build a microservice that rolls two dice and returns the sum of the two.
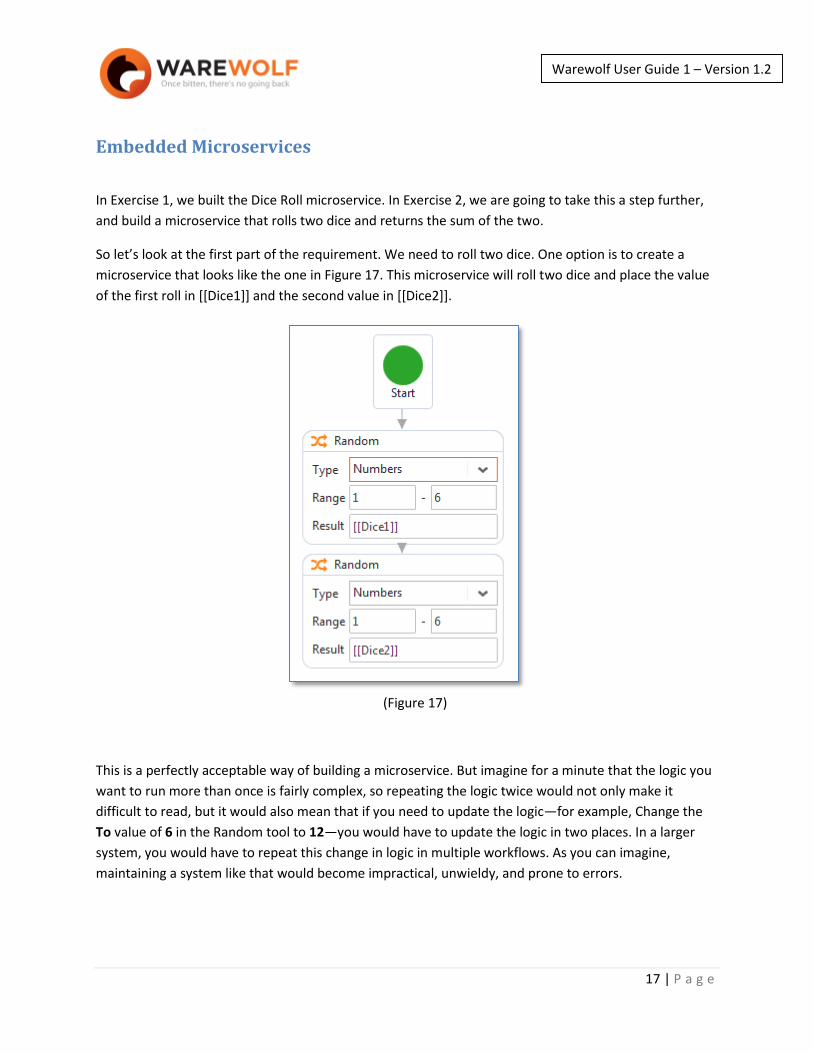
So let’s look at the first part of the requirement. We need to roll two dice. One option is to create a
microservice that looks like the one in Figure 17. This microservice will roll two dice and place the value
of the first roll in [[Dice1]] and the second value in [[Dice2]].
(Figure 17)
This is a perfectly acceptable way of building a microservice. But imagine for a minute that the logic you
want to run more than once is fairly complex, so repeating the logic twice would not only make it
difficult to read, but it would also mean that if you need to update the logic—for example, Change the
To value of 6 in the Random tool to 12—you would have to update the logic in two places. In a larger
system, you would have to repeat this change in logic in multiple workflows. As you can imagine,
maintaining a system like that would become impractical, unwieldy, and prone to errors.

18 | P a g e
Warewolf User Guide 1 – Version 1.2
Components
A component is a unit of composition with contractually specified interfaces and explicit context
dependencies only. A software component can be deployed independently and is subject to composition by
third parties.
To solve this problem, Warewolf allows you to reuse microservices as components. In Warewolf, we can
re-use the DiceRoll microservice that we just built as a component.
(Figure 18)

19 | P a g e
Warewolf User Guide 1 – Version 1.2
Exercise 2
First, create a new microservice, and save it as DoubleDiceRoll.
Next, we are going to re-use your original Diceroll microservice as a component. As mentioned a little
earlier, you can drag resources from the Explorer onto your design surface, just as you drag tools onto
the design surface. As shown in Figure 19.
(Figure 19)

20 | P a g e
Warewolf User Guide 1 – Version 1.2
When you drop a resource onto the design surface from the Explorer, it will open in Large view. Most tools
and resources have both a Large view and Small view, as illustrated in Figure 20. The Large view of a tool or
resource shows all of the available configuration options.
(Figure 20)
In Warewolf, we typically expand to Large view to edit the parameters, and minimize back to small view
when we have completed our editing.
To switch between large view and small view, double-click the tool or resources icon bar located at the
top, as highlighted in Figure 20.
Figure 20 also shows the DiceRoll microservice embedded in the DoubleDiceRoll microservice as a
component.
If you look at the large-view Result field in Figure 20, it contains the variable called [[Result]] that you
originally assigned in the Random tool in the DiceRoll microservice. Warewolf automatically assigns the
variable names that you originally assigned.
If we look at the Variables list in Figure 21, you can see that when you dragged the DiceRoll microservice
into DoubleDiceRoll, Warewolf automatically created a variable called [[Result]] in DoubleDiceRoll too.

21 | P a g e
Warewolf User Guide 1 – Version 1.2
(Figure 21)
We want to roll two die. In order to do this, we are going to re-use the DiceRoll microservice as a
component. Drag on a second DiceRoll microservice, and connect it below the first one in the workflow,
as illustrated in Figure 22.
(Figure 22)
22 | P a g e
Warewolf User Guide 1 – Version 1.2
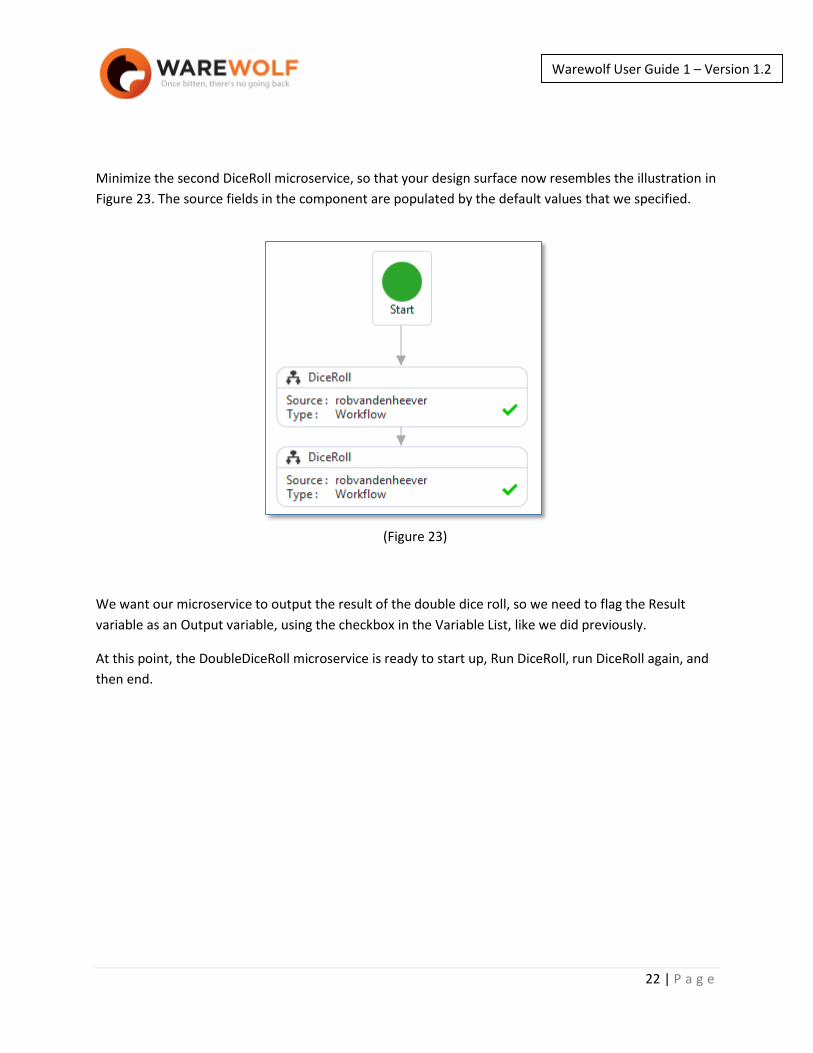
Minimize the second DiceRoll microservice, so that your design surface now resembles the illustration in
Figure 23. The source fields in the component are populated by the default values that we specified.
(Figure 23)
We want our microservice to output the result of the double dice roll, so we need to flag the Result
variable as an Output variable, using the checkbox in the Variable List, like we did previously.
At this point, the DoubleDiceRoll microservice is ready to start up, Run DiceRoll, run DiceRoll again, and
then end.

23 | P a g e
Warewolf User Guide 1 – Version 1.2
Debugging Warewolf has a very good debugging system built into it. Using the debugger, you can examine how a
workflow runs in detail.
The Output window is located in the bottom right corner of Warewolf (highlighted as number 6 in Figure
1). To see the debug output for DoubleDiceRoll, click on the Debug Button on the Toolbar. The Debug
dialog window displays in the middle of the screen. Click the Debug (F6) button on the dialog window to
run the microservice in Debug mode.
(Figure 24)
You will be using the debugging tool in Warewolf a lot. Instead of using the Toolbox Debug button, you can also use shortcut keys: F6 runs the debugger, and F7 views the microservice output in your browser. For a full list of shortcut keys please go to the knowledge base article on Warewolf Studio Shortcut Keys.
Well done! You have just created your first debug output from a Warewolf microservice.

24 | P a g e
Warewolf User Guide 1 – Version 1.2
Let’s have a look at what the debug Output looks like for DoubleDiceRoll.
(Figure 25)
The debug output window is located below the variable list to the right of your design surface. The
debug output displays detailed output for each step in the workflow. Figure 25 illustrates how each step
in the debug output has several values.
Service: We can see that the DiceRoll service is being run here, even though we are actually working in the DoubleDiceRoll service.
Server: We haven’t touched on this yet, but in the same way you embedded two DiceRoll microservices into DoubleDiceRoll, you can also embed microservices from remote Warewolf servers. This means that your microservice can actually run and receive output from a Warewolf server located anywhere on earth, simply by dragging and dropping the remote microservice into your workflow—which puts amazing development power in your hands!
Type: Service is a connector or workflow. Each type of tool or resource that can be dropped onto the design surface has a Type.
End Time: The time, to the millisecond, when the step stopped executing.
Duration: This step executed for 00.00.00.138 of a second. Warewolf is very fast.
Inputs: This microservice doesn’t have any input values, so the Input Value does not appear.
Outputs: [[Result]]=1. The dice roll returned the value of 1.
The first step in the debug output is always the Start Node of the workflow (See Fig 26). The debug
window also indicates the sequence that the steps ran in. The last step in the debug output is the End
Node. The Duration value of the End Node indicates how long the whole microservice took to run.
25 | P a g e
Warewolf User Guide 1 – Version 1.2
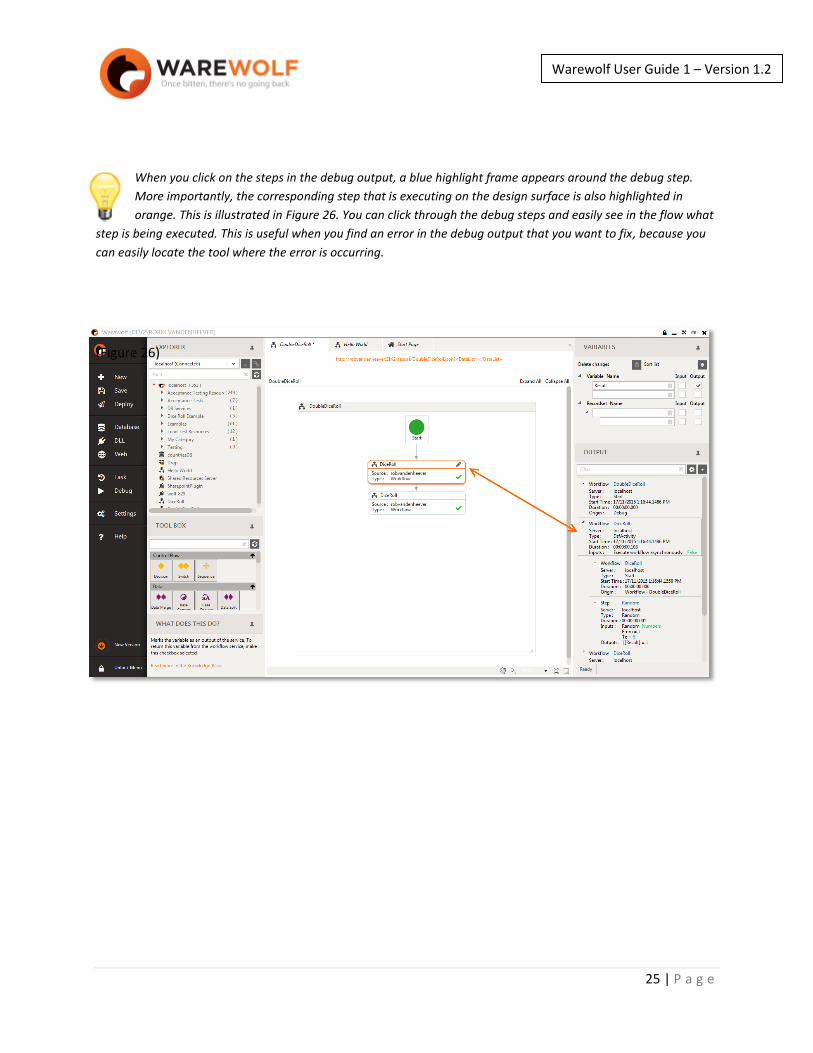
When you click on the steps in the debug output, a blue highlight frame appears around the debug step.
More importantly, the corresponding step that is executing on the design surface is also highlighted in
orange. This is illustrated in Figure 26. You can click through the debug steps and easily see in the flow what
step is being executed. This is useful when you find an error in the debug output that you want to fix, because you
can easily locate the tool where the error is occurring.
(Figure 26)

26 | P a g e
Warewolf User Guide 1 – Version 1.2
Let’s look at the actual output for this debug session.
(Figure 27)
If you remember our original requirement, we wanted two values, one for each dice roll. If we look at
Step 4, where the first DiceRoll is assigned a value, we can see that [[Result]]=1. If we look at Step 6,
where the second DiceRoll is assigned a value, we can see that [[Result]]=1.

27 | P a g e
Warewolf User Guide 1 – Version 1.2
This is a problem. Why? Well, Step 6 is actually overwriting the value of [[Result]] that was assigned in
Step 4.
We are still using the same variable for both DiceRoll steps!
OK! Let’s fix this error in our logic!
Expand the first DiceRoll service on the design surface. The Result variable in the embedded
microservice is assigned to an internal variable called [[Result]]. The same issue applies to both of the
embedded DiceRoll microservices. What we need to do is assign unique internal variable names to both.
(Figure 28)

28 | P a g e
Warewolf User Guide 1 – Version 1.2
Change the mapped variable name to [[Dice1]] for the first DiceRoll, and for the second DiceRoll, change
the mapped variable name to [[Dice2]], as below.
(Figure 29)
Figure 30 shows that Warewolf has automatically created the two new variables. Notice the small trash
icon next to [[Result]].
The trash icon displays because the [[Result]] variable is no longer being used in the workflow (Remember,
we overwrote the instances of it with [[Dice1]] and [[Dice2]]). To remove it, simply click the trash icon. If you
have multiple unused variables that you want to delete all at once, you can click the Trash icon at the top of
the Variable list (circled in Figure 30).
(Figure 30)

29 | P a g e
Warewolf User Guide 1 – Version 1.2
We want to output the two Dice variables, so flag both Dice variables as output variables, as in Figure
31.
(Figure 31)
If we run the microservice in debug mode again, we get the
output in Figure 32.
Looking at Step 6, you can see that the microservice now has
the two output variables for [[Dice1]] and [[Dice2]] assigned.
You can also see [[Dice1]] being assigned in Step 2, and
[[Dice2]] being assigned in Step 5.
Our debug window has helped us to easily locate and fix the
bug in our workflow.
(Figure 32)

30 | P a g e
Warewolf User Guide 1 – Version 1.2
The next output we want to include in our microservice is the total of the two dice values. To do this,
drag an Assign tool on to your design surface and add it to the end of your workflow. (See Figure
33)Find the Assign tool in the Data category, or search for it by name in the Filter of the Tool Box.
(Figure 33)

31 | P a g e
Warewolf User Guide 1 – Version 1.2
Open the tool in large view. In the left-hand column, add a new variable called [[DiceTotal]]. On the right
side of the Assign tool, in the New Value column, add the two dice variables together by typing the
following: = [[Dice1]] + [[Dice2]]
As soon as you type the “=” sign, the ”𝑓𝑥”symbol appears. This means you have entered formula mode.
Warewolf has a powerful formula system built into variable assignment that is functionally and syntactically
equivalent to Microsoft Excel. This functionality adds powerful mathematical capabilities to Warewolf.
Next, Flag [[DiceTotal]] as an Output variable, as illustrated in Figure 34.
(Figure 34)
When we run the microservice in debug mode now, the last two debug steps will look similar to the
output in Figure 35.
(Figure 35)

32 | P a g e
Warewolf User Guide 1 – Version 1.2
If we look at the Assign Inputs in Figure 35, we see how Warewolf interprets our logic and produces a
new Output Variable.
The last debug step now shows three Output Variables, including [[DiceTotal]], which is the sum of
[[Dice1]] and [[Dice2]].
If we run the Debug output in Browser mode (F7), you can see how Warewolf structures the XML output
for multiple output variables. Refresh your browser to execute the microservice again for different
random results.
(Figure 36)
Congratulations! You have rolled two virtual dice and displayed their total, without writing a line of
code.

33 | P a g e
Warewolf User Guide 1 – Version 1.2
Final note on Debugging
The Debug window can also accept values for your Input variables for testing. In the example below, you
can see that we have added a variable called [[PlayerCount]] in the variable list, which is flagged as an
Input variable.
(Figure 37)
34 | P a g e
Warewolf User Guide 1 – Version 1.2
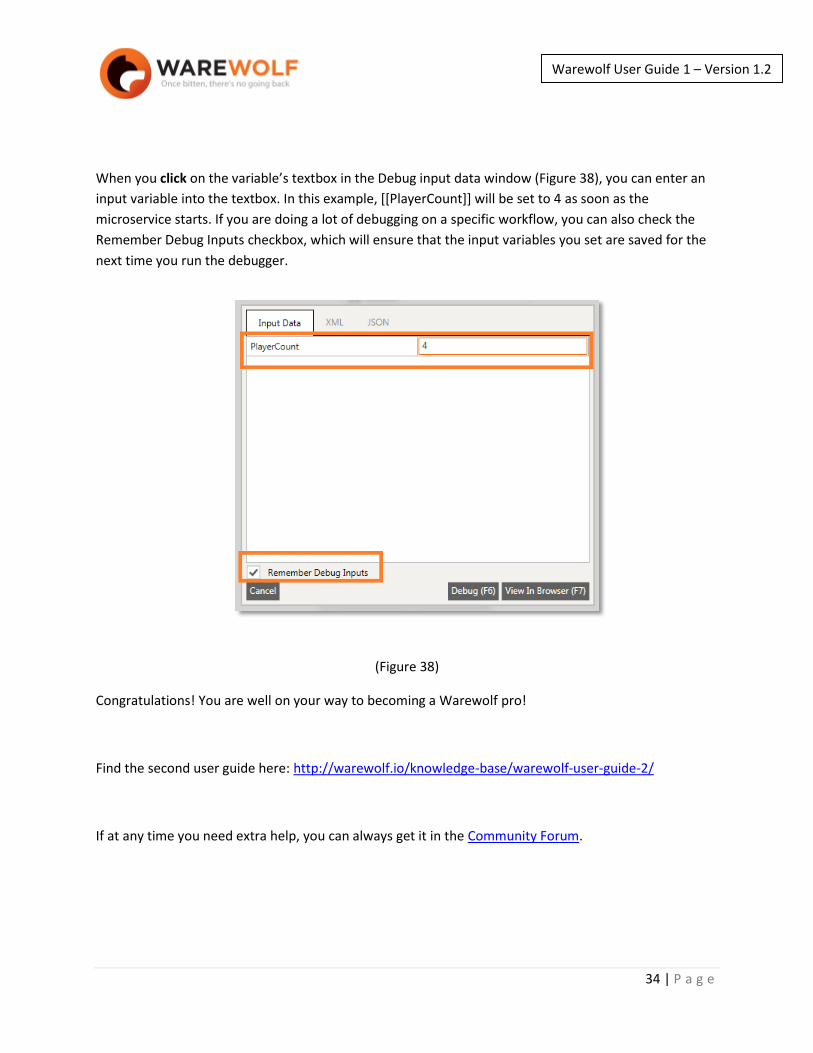
When you click on the variable’s textbox in the Debug input data window (Figure 38), you can enter an
input variable into the textbox. In this example, [[PlayerCount]] will be set to 4 as soon as the
microservice starts. If you are doing a lot of debugging on a specific workflow, you can also check the
Remember Debug Inputs checkbox, which will ensure that the input variables you set are saved for the
next time you run the debugger.
(Figure 38)
Congratulations! You are well on your way to becoming a Warewolf pro!
Find the second user guide here: http://warewolf.io/knowledge-base/warewolf-user-guide-2/
If at any time you need extra help, you can always get it in the Community Forum.