vst host
TRANSCRIPT

VSTHostA program to run VST-compatible PlugIns
Version 1.52
Copyright © 2002-2011 by Hermann Seib
Download Information
The latest version of VSTHost can be found at http://www.hermannseib.com/english/vsthost.htm (or http://www.hermannseib.com/vsthost.htm for the German-speaking minority).
Betas of the upcoming next version can be downloaded from http://www.hermannseib.com/programs/beta – if you got a problem with the current release version, you can always look whether it's already fixed before contacting me about it.
Contact Information
The author can be reached per email at [email protected]
Translations
The French localization has been done by Patrice Vigier of Vigier Guitars (www.vigierguitars.com).
Skins
Vera Kinter aka Artvera (www.artvera-music.com) has created some beautiful skins for VSTHost which can be downloaded from VSTHost’s web site.
Tests
A lot of intensive tests (and bug detections) have been done by Christian Boileau and friends from the French community “Fans des Shadows”.
All above contributions have been done voluntarily and unpaid – and I can imagine the effort that’s gone into them.Thank you very much for this!
Copyright Information
VSTHost © Hermann Seib, 2002-2011. All rights reserved.
VST and ASIO are trademarks of Steinberg Media Technologies GmbH.
All other product names and any trademarks mentioned are used for identification purposes only and are copyrights of their respective holders.
2

Table of ContentsIntroduction............................................................................................................................................7
What is VST?.....................................................................................................................................7What is ASIO?....................................................................................................................................7More Information on VST, ASIO and PlugIns...................................................................................7What is VSTHost?..............................................................................................................................8
Evolution........................................................................................................................................8What does it cost?...............................................................................................................................8
Installation..............................................................................................................................................9Requirements......................................................................................................................................9
Attention Upgraders!......................................................................................................................9Configuration....................................................................................................................................10
Audio Configuration.....................................................................................................................10ASIO Control Panel......................................................................................................................12ASIO Channel Selection...............................................................................................................12MIDI Configuration......................................................................................................................13
MIDI Input Devices..................................................................................................................13MIDI Output Devices...............................................................................................................14MIDI Thru................................................................................................................................15Remote Control Port.................................................................................................................16
Joystick Configuration..................................................................................................................17Joystick n XYZ.........................................................................................................................18Joystick n RUV.........................................................................................................................19Joystick n POV.........................................................................................................................19Joystick n Buttons m-n.............................................................................................................20MIDI Output Devices...............................................................................................................21
Other Configuration Tasks............................................................................................................21Operation..............................................................................................................................................22
Command line parameters................................................................................................................22Syntax...........................................................................................................................................22
Multiprocessor provisions................................................................................................................23Technical explanation...................................................................................................................24
Thread Start Points...................................................................................................................24Main Window...................................................................................................................................26Menu Entries....................................................................................................................................26
File Menu.....................................................................................................................................26Use Bank…..............................................................................................................................27Load Performance.....................................................................................................................28Save Performance.....................................................................................................................28Save Performance As................................................................................................................29Next Performance.....................................................................................................................29Previous Performance...............................................................................................................29Reload Performance..................................................................................................................29Autosave Performance..............................................................................................................29Autosave PlugIn Banks.............................................................................................................29Export Performance..................................................................................................................30Import Performance..................................................................................................................30Set Data Path............................................................................................................................30New PlugIn...............................................................................................................................31
Bridging..............................................................................................................................33Shell PlugIns.......................................................................................................................33
PlugIn Auto-Connect................................................................................................................34Set PlugIn Path.........................................................................................................................34Rescan PlugIns.........................................................................................................................34
3
Fast Rescan PlugIns..................................................................................................................34Rescan on Start.........................................................................................................................34Use PlugIn File Names.............................................................................................................35PlugIns......................................................................................................................................35Exit...........................................................................................................................................35
PlugIn Menu.................................................................................................................................36Window....................................................................................................................................36
Configure............................................................................................................................36MIDI Parameters.................................................................................................................37MIDI -> Parameter..............................................................................................................43Parameter -> MIDI..............................................................................................................46
Permanent.................................................................................................................................49Load Bank................................................................................................................................49Save Bank.................................................................................................................................49Save Bank As............................................................................................................................49Autosave Bank..........................................................................................................................49Reload Bank.............................................................................................................................49Bypass......................................................................................................................................49Mute.........................................................................................................................................50Chain After...............................................................................................................................50Unchain....................................................................................................................................52Export XML.............................................................................................................................52Close.........................................................................................................................................54Program Name..........................................................................................................................54Load Program...........................................................................................................................55Save Program As......................................................................................................................55Next Program............................................................................................................................55Previous Program......................................................................................................................55Export Programs.......................................................................................................................55Programs mm-nn......................................................................................................................55
Engine Menu................................................................................................................................55Run...........................................................................................................................................56Restart.......................................................................................................................................56Configure..................................................................................................................................56
Input Assign........................................................................................................................56Output Assign......................................................................................................................57Priorities..............................................................................................................................57Speed...................................................................................................................................58OSC.....................................................................................................................................58
Audio Thru...............................................................................................................................59BPM.........................................................................................................................................60Load BPM................................................................................................................................60Recorder...................................................................................................................................60Add to Input..............................................................................................................................61Autorepeat................................................................................................................................61Autorepeat Winding..................................................................................................................61Player Sync...............................................................................................................................61Player File.................................................................................................................................61Configure Recorder..................................................................................................................62MIDI Player..............................................................................................................................63Autorepeat................................................................................................................................63Player File.................................................................................................................................63Configure MIDI Player.............................................................................................................64Use Engine’s BPM...................................................................................................................64Set Engine’s BPM.....................................................................................................................64Player Sync...............................................................................................................................64
4

Midi Panic................................................................................................................................64Send SysEx File........................................................................................................................64
Devices Menu...............................................................................................................................64View Menu...................................................................................................................................65
Auto Edit..................................................................................................................................65Linear Knobs............................................................................................................................65Toolbar.....................................................................................................................................65Recorder Bar.............................................................................................................................67Keyboard Bar............................................................................................................................67Configure Keyboard Bar...........................................................................................................68
Octave Indicators.................................................................................................................68Key Labels..........................................................................................................................68Monophonic Keyboard........................................................................................................68Channel...............................................................................................................................68Velocity...............................................................................................................................68Send Aftertouch...................................................................................................................69Send Channel Pressure........................................................................................................69Layout.................................................................................................................................69
Capture Keyboard.....................................................................................................................70MIDI Player Bar.......................................................................................................................70Status Bar..................................................................................................................................71Status Bar Level Meter.............................................................................................................71Peak Value Level Meters..........................................................................................................71Minimize to System Tray..........................................................................................................71Skin...........................................................................................................................................71
Window Menu..............................................................................................................................71Master.......................................................................................................................................72SysEx........................................................................................................................................72
Help Menu....................................................................................................................................74About VSTHost........................................................................................................................74
Appendix A: Things you should never need.........................................................................................75Additional .ini File Sections.............................................................................................................75
.ini File Layout.............................................................................................................................75[Settings]......................................................................................................................................75
BankSaveVersion=2.................................................................................................................75BgTickmult=3...........................................................................................................................75Bridge32=<app start directory + AppName + “Bridge32.exe”>...............................................76Bridge64=<app start directory + AppName + “Bridge64.exe”>...............................................76Bridge32Trace=<app start directory + AppName + “Bridge32.exe”>......................................76Bridge64Trace=<app start directory + AppName + “Bridge64.exe”>......................................76IdleMSecs=50...........................................................................................................................76KillVSTKeys=1........................................................................................................................76LevelMSecs=500......................................................................................................................76NoteOffVel=0x40.....................................................................................................................76NumProcessors=physical # processors.....................................................................................76OptRunningStatus=1.................................................................................................................76PercMSecs=750........................................................................................................................77PluginsPerBridge=1000............................................................................................................77SysExBufSize=256...................................................................................................................77SysExBufWait=60....................................................................................................................77TraceBase=0x60000000...........................................................................................................77TraceMask=0x7FFFFFFF.........................................................................................................77TranslateNoteOff=1..................................................................................................................78UserExit=..................................................................................................................................78VUFadeMSecs=1700................................................................................................................78VUMaxMSecs=1000................................................................................................................78
5

WSetMin=4194304...................................................................................................................79WSetMax=41943040................................................................................................................79
[ASIOignore]................................................................................................................................79[DSoundignore]............................................................................................................................79[MMEignore]................................................................................................................................79[MIDIignore]................................................................................................................................79[ASIOForcePreferred]..................................................................................................................79
Appendix B: OSC Implementation.......................................................................................................80What is OSC?...................................................................................................................................80VSTHost Address Space...................................................................................................................80
/engine..........................................................................................................................................80/engine/bpm [bpm].......................................................................................................................81/engine/channels...........................................................................................................................81/engine/channels/in [inputs]..........................................................................................................81/engine/channels/out [outputs]......................................................................................................81/engine/run [on]............................................................................................................................81/plugin...........................................................................................................................................81/plugin/n........................................................................................................................................81/plugin/n/path................................................................................................................................81/plugin/n/displayname...................................................................................................................81/plugin/n/numparameters..............................................................................................................81/plugin/n/numprograms.................................................................................................................81/plugin/n/parameter.......................................................................................................................82/plugin/n/parameter/p [value]........................................................................................................82/plugin/n/parameter/p/name..........................................................................................................82/plugin/n/parameter/p/label...........................................................................................................82/plugin/n/parameter/p/display ......................................................................................................82/plugin/n/program [current]..........................................................................................................82/plugin/n/program/p......................................................................................................................82/plugin/n/program/p/name............................................................................................................82
6

Introduction
What is VST?“Okay, what are VST PlugIns?”, I hear some of you say… well, let’s do a little history research. If you already know what it means, just skip to the next section.
The term VST was coined by Steinberg some years ago as an abbreviation for „Virtual Studio Technology“. It is an interface definition that allows communication between a VST Host (originally, of course, Steinberg’s Cubase sequencer, but many more programs have adopted the interface by now) and virtual effects and instruments. These effects and instruments are implemented as separate units and can be “plugged into” the VST Host wherever they’re needed, thus they are commonly called “PlugIns”. The VST Host sends audio data streams to the PlugIns in a special format and adds their output to its own audio processing.
Since V2 of the VST definition, there are two kinds of VST PlugIns: effects and instruments. The distinction is that effects process an incoming audio stream, while instruments create their own – they are triggered by MIDI events, just like an external synthesizer would be.
With V3 of the VST definition, Steinberg created a completely new interface which is completely incompatible to V1 and V2. Since V1.46, VSTHost can load VST3 PlugIns – there are a few, but since they're so radically different internally, PlugIn writers have been very reluctant to adopt it so far – but it doesn't yet fully explore the VST3 capabilities. There's a bit of a chicken-and-egg problem here; I can only add features if I got PlugIns to test them with. Fine, but – there are no freeware VST3 PlugIns available, only some commercial ones, which are primarily targeted at the Cubase / Nuendo environments. I can't afford to buy them just for this purpose, so I'm a bit stuck...
Then, there's yet another PlugIn type: VST modules. The “VST Module Architecture” describes a kind of sidestep between VST 2 and VST 3 – these PlugIns are architecturally related to VST 3, but offer only MIDI capabilities. I don't think that there are many of these. Since V1.46, VSTHost supports a relatively big subset of the VST Module Architecture capabilities, but I've got the same problem here as with VST 3 – no test material, no further development...
Steinberg’s SDKs provide a VST implementation for quite some operating systems; VSTHost, however, only works on Windows.
VSTHost can use the old-fashioned Windows Multimedia Extensions (MME) interface to exchange audio data with the sound card, or it can use an ASIO driver, if available.
What is ASIO?“Okay, but what is ASIO?”, I hear some of you say… probably the ones who didn’t know “VST” … well, let’s do a little history research again. If you already know what it means, just skip to the next section.
The term ASIO, again, was coined by Steinberg some years ago as an abbreviation for “Audio Streaming Input Output”. It defines a rather fast communication method between the audio hardware and an audio-processing program, such as a VST Host. An ASIO driver, if available, normally performs better than a MME driver, since it has considerably less overhead, allows multi-channel communication and so on.
More Information on VST, ASIO and PlugInsThe SDKs for Steinberg’s VST and ASIO Software Development Kits can be found on the Internet. When I last checked, they could be found at http://www.steinberg.net/en/company/developer.html .
7
An exhaustive, searchable list of PlugIn descriptions can be found at http://www.kvraudio.com .
What is VSTHost?VSTHost is a program to run VST PlugIns. In contrast to the big programs (Cubase, Nuendo, Logic come to mind), it is not a full-fledged giant sequencer package that needs many seconds just to come up to a point where it can say “Hello”. It’s relatively small, and hopefully will stay so, and it only runs PlugIns. No sequencing (well, it can play back simple audio and MIDI files), no elaborate recording facilities (although it does have a simple multitrack tape recorder built in). To make up for that, you can define very complex PlugIn setups and switch between them easily.
EvolutionThe main goal for VSTHost, in the beginning, was simply to provide a little test bed for VST PlugIn development, and to understand how VST works “under the hood”. By now, this goal has been reached; VSTHost can load nearly every PlugIn (it even occurs in the “list of compatible hosts” for quite some PlugIns, which I find rather flattering). If you want to perform some in-depth debugging, the full source code for a reduced version of VSTHost is available for download on my web site (see page 2 for details).
VSTHost is still evolving, however; the goal for now is to turn it into a valuable tool for performing artists in a live environment. Sort of a “super-synthesizer”, if you want.
What does it cost?Aaaah, this is the point where money comes into play; I was never good at that … basically, it’s free. The download version is not restricted in any way, doesn’t even show a nag screen. Why encourage pirates to tinker with it?
In theory, it’s “donationware”, which means that you can download and use it; if you find it useful, it would be nice to register by sending a little bit of money to my PayPal account. There’s a “Donate” button on VSTHost’s web site for that. If that doesn’t work, sending to my PayPal account using [email protected] as receiver does the trick. I don’t insist on it, but it would be nice if you honored the countless hours I’ve invested into making this thing usable by donating a bit to the further development of VSTHost.
8
InstallationVSTHost is too simple (or too intelligently written? You decide ) to need an elaborate installation procedure. Simply copy the contents of the .zip file into a directory that suits you, eventually create a link to it in your start menu or on the desktop, and that’s it.
In theory, this would make it possible to use VSTHost as “stickware” (i.e., software directly running from an USB stick); however, since it relies heavily on outside resources (audio cards, PlugIns, …), this can only be reached by restricting yourself to a very basic setup.
RequirementsTo run VSTHost, you need at least the following:
• a contemporary computer with a Pentium II (or better) or Athlon processor with least 500MHz; the more, the better (actually, it does even work with an AMD K6-II at 300MHz, but only with very simple PlugIns, so this is not really recommendable);
• a fair amount of RAM; while 128MB should be sufficient for a minimalistic setup, 256MB are much better; for larger setups, 512MB or more are recommended; the sky is the limit
• a sound card; while VSTHost works even with the measliest AC97 on-board chips, a modern card that can handle 24bit audio is recommended;
• Windows operating system; Windows 98, ME, NT4, 2000, and XP are supported.To my knowledge, it also runs in an up-to-date WINE environment on a x86-based Linux, but I never tried that; while it may work, it is definitely not a supported configuration. Vista and Windows 7… good question… VSTHost should work on them, but this is definitely no supported configuration, either.
If your sound card came without an ASIO driver (obviously created with game players in mind instead of musicians), you might try to use Michael Tippach’s ASIO4ALL driver, which can be found at, surprise, surprise, http://www.asio4all.com – it can work wonders compared to the MME drivers that are normally provided with the sound cards.
That’s it – there isn’t more to it. Unless you used an earlier VSTHost version; in this case…
Attention Upgraders!Starting with V1.43, VSTHost doesn’t store its settings in the registry any more. Instead, it uses a “Data” directory for storing information, such as performance banks, recordings, global initialization files and the like. If you just downloaded and installed VSTHost for the first time, that’s no problem – the distribution comes with a populated “Data” sub-directory, and VSTHost defaults to using the path where it is installed, with an appended “\Data”, so everything just starts up nicely.
For long-term users, the situation isn’t so simple, since their settings are already stored in the registry.In previous versions, VSTHost contained startup code that automatically corrected such things, but in the meantime this means quite some code that isn’t normally needed, so I decided to move it into a separate program. Starting with V1.43, the VSTHost package includes a little helper program called vsthostregclean. Simply double-click on this in the Explorer, and it should transfer all your registry settings into the corresponding files (and clean up the registry while doing so).
If you’re upgrading from a version >= V1.43, you should still execute vsthostregclean, as it also corrects settings that are different from previous versions.
The Slave mode settings are a completely different subset in the registry, so if you previously used VSTHost in Slave mode, you’ll have to append the command line parameter /slave to vsthostregclean. The easiest way to do this, from my point of view, is to open a command prompt, CD to the VSTHost installation directory, and issue the command, like
9

C:\Program Files\VSTHost>vsthostregclean /slave
Mouse junkies can right-click on vsthostregclean.exe, select “Create Link” (or whatever that’s called in your local version of Windows) to create a link, then modify the link’s properties to include the /slave parameter on the invoked program’s command line, save the new properties, and then double-click on the link (and remove the link again, since this is a one-time operation).
If you’re also using the Open Source variant of VSTHost, vsthostregclean has the unfortunate side effect of removing all the settings for this one, too; for such an environment, you can pass the additional parameter /keep to vsthostregclean so that it doesn’t remove the Settings and Load sub-keys from the registry.
Then, there’s one more possible parameter – this deals with the fact that in previous versions VSTHost used its own file name (normally “VSTHost”) as its start point in the registry. If you renamed VSTHost (or created a hardlink for it), the key in the registry isn’t VSTHost, either. For such situations, you can append the parameter /app=appname so that vsthostregclean uses appname instead of “VSTHost” for its operation.
That’s it – there isn’t any more to it. Simply start VSTHost for the next task:
ConfigurationWhen you start VSTHost for the first time, it comes up with a minimal configuration. A “deaf, dumb, and blind kid”, as The Who would have called it. You’ll see a window like this (the exact look, of course, is determined by your Windows setup):
Figure 1: Initial VSTHost window
Hmmm. Well. OK. So what does that mean…? Let’s start with the obvious first task:
Audio ConfigurationWhen VSTHost comes up the first time, it doesn’t know anything about the computer’s configuration. Being rather conservative in its views, it doesn’t preload any specific driver. In Windows systems, there’s something called the Wave Mapper device. The user can predefine an audio device as the default device – the thing that is used whenever Windows needs to issue a “Ping!” or “Bleep!” or “Whoop!” to indicate certain conditions. VSTHost preloads this standard device as its Audio output device, and that with a very large buffer size. This, however, is probably the worst possible solution – but one that’s practically guaranteed to work.
To set up a better configuration, we have to enter the Wave Device Settings dialog by choosing its menu entry:
10

Figure 2: Wave Device Settings menu entry
… which opens the following dialog:
Figure 3: Wave Device Selection Dialog
Here, the wave devices used by VSTHost can be defined. The combo boxes contain the possible devices. As you can see, the Wave Mapper is preselected (and loaded), with a large buffer size. At 44.1kHz, which VSTHost uses with MME devices, this means that it processes audio at a rate of 10 buffers per second. This buffer size should work even on the slowest computers, but it doesn’t allow real-time operation. So, we’d better redefine that setup to the best possible for the computer at hand.
The devices listed in the combo boxes all have a prefix, either MME: for Windows Multimedia Extensions drivers, or DSound: for DirectSound drivers (DirectSound5 at the moment – doesn’t work well in Vista or 7. Be warned.), or ASIO: for ASIO drivers.
The Input port combo box shows all available input devices. This box will never contain ASIO drivers; since ASIO drivers combine the operation of input and output drivers, they are only listed in the Output Port combo box. Whenever an ASIO driver is selected in the Output Port box, the Input Port box is grayed out to reflect the fact that ASIO doesn’t need a separate Input port.
The Output Port combo box shows all available output devices. If it should be empty, your computer doesn’t have (or doesn’t think it has; Windows 98 sometimes works in mysterious ways ) any sound card. In this case, VSTHost can still be used to load and debug PlugIns, but you won’t hear anything, which makes it a kind of useless intellectual exercise for most of us.
You should select the best possible combination for your computer; with Windows NT, there’s not much choice, since there are not many ASIO drivers for NT floating around (read that as: zero). ASIO4ALL doesn’t work, since NT4 doesn’t follow the WDM driver model, so your choice will probably be rather limited. In general, you should always take the drivers that are closest to the hardware; in audio processing applications, speed really counts, and avoidable overhead is bad. If an ASIO driver is available for your sound card, take it; it will provide the best performance in most cases… with a notable exception: if you have Cubase or Nuendo installed, they installed an ASIO emulation driver called “ASIO Multimedia Driver”, which adds a layer above the Windows MME driver. Avoid this ASIO driver whenever possible (it always is, since VSTHost can handle the MME driver itself), it gives a horrible performance.
The Sample Rate combo box allows to select between various available sample rates, if the configured output driver allows them; VSTHost tries its best to determine what the driver can do and what not, but this doesn’t always work out – some drivers happily report that they can playback at 192kHz, although they can’t even do 88.2kHz. Also, most ASIO drivers rely on the ASIO Control Panel to determine the sample rate. In these cases, the combo box will hold exactly one possible value.
11

The Buffer Size combo box lets you select between some buffer sizes; these are carefully selected for their property that their multiples exactly fit into one second at 44.1kHz. Now, that may be nice, but… first of all, 44.1kHz isn’t mandatory for ASIO drivers, and some of these mandate other buffer sizes. Therefore, apart from the predefined values, you can enter any (reasonable) buffer size you want into this combo box.Here’s how a sample configuration looks like (this PC uses a Terratec DMX 6fire 24/96 card):
Figure 4: Setup for Terratec DMX 6fire 24/96
Experiment with the buffer size; if it is too large, you’ll hear noticeable delays between the triggering of a note and its actual appearance at the speakers. If it is too small, the overhead introduced by the frequent buffer handling might become too much for your poor little computer; in that case, it starts to skip processing some buffers since it doesn’t have enough time for it. This results in an occasionally audible crackling noise. In this case, increase the buffer size until it goes away.
Note: if you're switching from an MME or DirectSound driver to ASIO4All, take care. The ASIO4All driver might try to open the device you just closed, and there are some drivers that don't like this – they need a little time to pass before re-opening them works. So, in this case, it's better to select “* No Wave *” for Input and Output Port, close the dialog, reopen it, and then select ASIO4All as output driver. This should work with all audio drivers, even if they're poorly written.
Once you have configured an ASIO driver, the following two menu entries can be used:
ASIO Control PanelHere, you can call up the selected ASIO Driver’s configuration panel. This varies greatly between the various drivers and is not part of VSTHost. The VSTHost audio engine is stopped while the ASIO Control Panel is open.
ASIO Channel SelectionNormally, VSTHost operates with as many channels as the Wave device drivers permit. If you only need specific channels, however, you can use this to select a subset of the available stereo pairs to use.
Selecting the menu entry brings up the following dialog:
Figure 5: ASIO Channel Selection Dialog
12
Checking the “Load all input / output paths” boxes sets the normal behavior of using all possible channels. If unchecked, you can select any possible combination (deselecting all restores the default). This can save quite a lot of precious CPU cycles.
OK, we’ve set up our Wave devices… so now what?
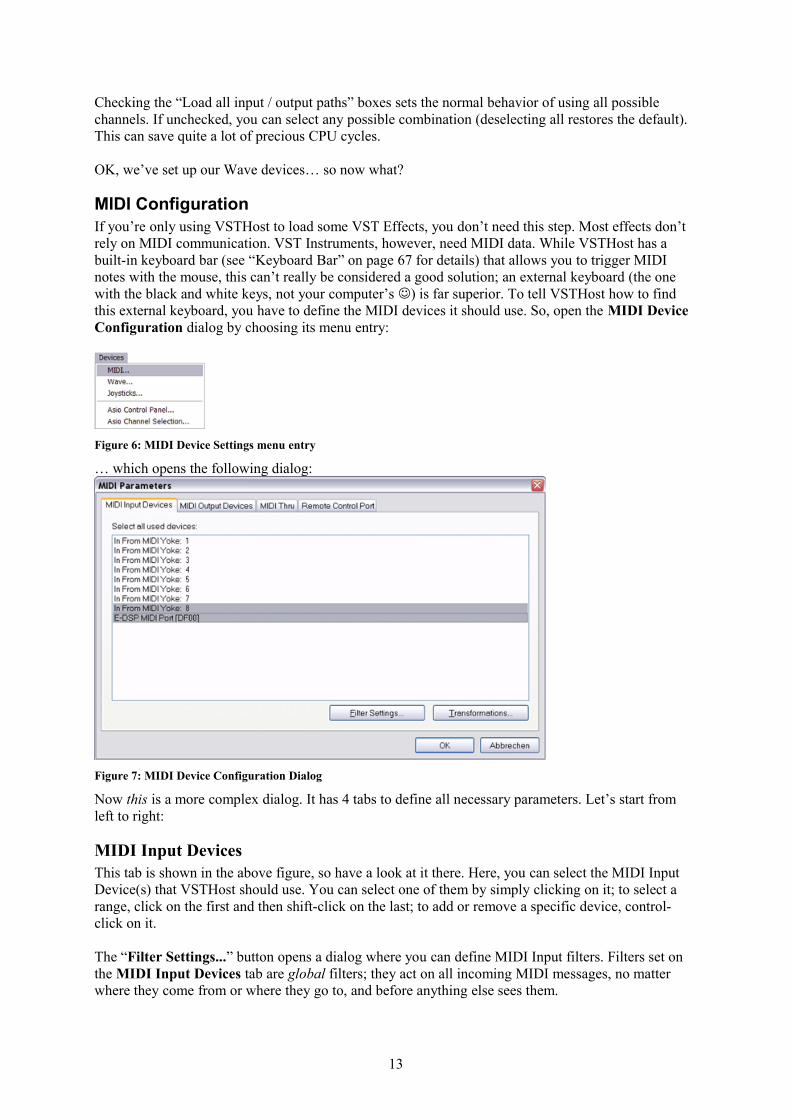
MIDI ConfigurationIf you’re only using VSTHost to load some VST Effects, you don’t need this step. Most effects don’t rely on MIDI communication. VST Instruments, however, need MIDI data. While VSTHost has a built-in keyboard bar (see “Keyboard Bar” on page 67 for details) that allows you to trigger MIDI notes with the mouse, this can’t really be considered a good solution; an external keyboard (the one with the black and white keys, not your computer’s ) is far superior. To tell VSTHost how to find this external keyboard, you have to define the MIDI devices it should use. So, open the MIDI Device Configuration dialog by choosing its menu entry:
Figure 6: MIDI Device Settings menu entry
… which opens the following dialog:
Figure 7: MIDI Device Configuration Dialog
Now this is a more complex dialog. It has 4 tabs to define all necessary parameters. Let’s start from left to right:
MIDI Input DevicesThis tab is shown in the above figure, so have a look at it there. Here, you can select the MIDI Input Device(s) that VSTHost should use. You can select one of them by simply clicking on it; to select a range, click on the first and then shift-click on the last; to add or remove a specific device, control-click on it.
The “Filter Settings...” button opens a dialog where you can define MIDI Input filters. Filters set on the MIDI Input Devices tab are global filters; they act on all incoming MIDI messages, no matter where they come from or where they go to, and before anything else sees them.
13

The “Transformations...” button opens a dialog where you can define MIDI Input transformations. Transformations set on the MIDI Input Devices tab are global filters; they act on all incoming MIDI messages, no matter where they come from or where they go to, and before anything else sees them, unless they have been filtered. See “Filter Settings and Transformations” on page 38 for details.
MIDI Output Devices
Figure 8: MIDI Output Device selection
Here, you can select the MIDI Output Device(s) that VSTHost should use. You can select one of them by simply clicking on it; to select a range, click on the first and then shift-click on the last; to add or remove a specific device, control-click on it.
The “Filter Settings...” button opens a dialog where you can define MIDI Output filters. Filters set on the MIDI Output Devices tab are global filters; they act on all MIDI messages coming from VSTHost itself, no matter where they come from.
The “Transformations...” button opens a dialog where you can define MIDI Output transformations. Transformations set on the MIDI Output Devices tab are global filters; they act on all MIDI messages coming from VSTHost itself, no matter where they come from, unless they have been filtered. See “Filter Settings and Transformations” on page 38 for details.
14

MIDI Thru
Figure 9: MIDI Thru Definitions
Here, you can define VSTHost’s “Soft MIDI Thru” behavior. Since PC sound cards normally don’t have a MIDI Thru connector, the software has to provide it. Since VSTHost can load multiple MIDI input and output devices, a general MIDI Thru setting would be inappropriate; it might even lead to MIDI feedback loops. Therefore, you can separately define the MIDI Output devices for each MIDI Input device that it forwards incoming MIDI messages to. You can select one of them by simply clicking on it; to select a range, click on the first and then shift-click on the last; to add or remove a specific selection, control-click on it.
Note: while you can define as many combinations as you like, VSTHost doesn’t remember them all (spoilsport that it is). When you close the dialog, it loads all configured devices and their MIDI Thru settings. All MIDI Thru settings for devices that are not loaded (either because they haven’t been selected or because they could not be loaded for some reason) are lost.
The “Filter Settings...” button opens a dialog where you can define MIDI Thru filters. Filters set on the MIDI Thru tab are global filters; they act on all MIDI messages that are passed thru from MIDI In before they are sent to the target device(s).
The “Transformations...” button opens a dialog where you can define MIDI Thru transformations. Transformations set on the MIDI Thru tab are global filters; they act on all MIDI messages that are passed thru from MIDI In before they are sent to the target device(s), unless they have been filtered. See “Filter Settings and Transformations” on page 38 for details.
15

Remote Control Port
Figure 10: Remote Control Port/Channel Definition
Here, you can define VSTHost’s Remote Control. In addition to passing MIDI messages to the loaded PlugIns, VSTHost can be remotely controlled by MIDI messages, too. Here, you can define a MIDI Input Port (mental note to self: finally decide on “port” or “device” nomenclature!) that controls VSTHost. It has to be one of the devices selected on the MIDI Input Devices tab, otherwise VSTHost simply ignores the settings when you close the dialog. The default setting of “---“ means that there’s no Remote Control port.
Below the port, you can configure the action for each of VSTHost’s settings that is remote-controllable; this, I have to admit, is a rather complicated list. This list is of the same type as the one used in the MIDI -> Parameter Mapping window (see “MIDI -> Parameter” on page 43 for details on editing it); the difference is that the From and To settings on the Parameter side represent the full range for the parameter (given below) expressed as a floating-point value in range 0.0 .. 1.0. Unless you’re really sure what you’re doing, it is probably a good idea to leave these settings alone.
Currently, the following VSTHost parameters can be remotely controlled:
Parameter Type Range CommentPerformance Numeric 0-127 Selects one of the 128 possible performances in the
current bank (see “Load Performance” on page 28 for details).
Bank Numeric 0-16383 Selects one of the 16384 possible banks (see “UseBank…” on page 27 for details).
Full RewindRewindPlay BackwardsStopRecordPlayPauseForwardFull Forward
Switch 0-1 These parameters correspond to the transport buttons in the built-in Wave Player and Recorder (see “Recorder” on page 60 for details). Any incoming value maps to a value below 0.5 is ignored; those that do map to 0.5 and above (e.g., incoming value 127 for a 7-bit MIDI CC) trigger the corresponding action.
MIDI StopMIDI PlayMIDI Pause
Switch 0-1 These parameters correspond to the transport buttons in the built-in MIDI Player (see “MIDIPlayer” on page 63 for details). Any incoming value maps to a value below 0.5 is ignored; those that do map to 0.5 and above (e.g., incoming value
16

127 for a 7-bit MIDI CC) trigger the corresponding action.
BPM Numeric 1-280 Can be used to set the VST engine’s BPM value.Here’s a little trick if you use a 14bit absolute controller and want to use its full range (i.e., if it’s a knob or slider): set the To value on the Parameter side to 0.018 – this compresses the input range (0..16383) into the target range (1..280) rather nicely.
Master Output Numeric -60..+10dB Can be used to set the VST engine's master output level.
Master Input Numeric -60..+10dB Can be used to set the VST engine's master input level.
Next Performance
Switch 0-1 Selects the next performance in the current bank. Any incoming value maps to a value below 0.5 is ignored; those that do map to 0.5 and above (e.g., incoming value 127 for a 7-bit MIDI CC) trigger the action.
Previous Performance
Switch 0-1 Selects the previous performance in the current bank. Any incoming value maps to a value below 0.5 is ignored; those that do map to 0.5 and above (e.g., incoming value 127 for a 7-bit MIDI CC) trigger the action.
All MIDI messages that are translated into Remote Control operations are swallowed by VSTHost; all others are passed to the VST host engine’s MIDI processing so that the currently loaded PlugIns can use them.
Joystick ConfigurationThis, obviously, can only be done if at least one joystick or game pad is installed in your system. If you have, you can use the joystick(s, up to 2 can be used) to generate MIDI messages for the loaded PlugIns and/or MIDI Out ports. The joystick handling defaults to no processing at all; so, if you want to use your joystick(s) in VSTHost, open the Joystick Configuration dialog by selecting its menu entry:
Figure 11: Joystick Configuration menu entry
17

This opens the following dialog:
Figure 12: Joystick Configuration dialog
This is one of the many tabbed dialogs in VSTHost; here, a number of tabs appear for each attached joystick. It depends on the joystick capabilities which ones really appear.
Note: VSTHost only loads the joystick properties once when it starts; Joysticks that are attached or detached while the program is running are not considered in this dialog.
Joystick n XYZThe above tab allows the definition of a joystick’s X, Y, and Z axes. These axes normally send analog data (well, not really… they’re quantized to 0-65535) to allow a wide range of possible positions. Only the axes that are available are displayed. Each of the combo boxes contains the same entries:
Figure 13: Target MIDI message (partial)
Here, you can select the type of message that is generated. Nearly all of them are MIDI messages that are routed to PlugIns and/or MIDI Output ports, with one notable exception: the Velocity Wheel is part of the MIDI Keyboard Bar (see “Keyboard Bar” on page 67 for details).
Once you select a message type, fields defining additional properties appear:
Figure 14: Axis / Controller Properties
The check boxes have the following meaning:Zero at center This is mainly interesting for self-centering joystick axes. If this check box is
selected, the stick’s center position is interpreted as the zero position, and moving the stick in one of the both possible directions increases the value up to the maximum position. If it is not selected, the leftmost (or topmost, for the Y axis) position of the stick is interpreted as the zero position, and the rightmost (or bottommost, for the Y axis) position is the maximum position.
Logarithmic Here, you can define whether the stick’s output is interpreted as a linear or logarithmic value. “Logarithmic” means that moving the stick in the lower
18
value area means much finer changes in the MIDI output value than in the higher value area. This can be useful if your joystick is of the “nervous” kind; VSTHost uses a relatively generous “center” area, which is interpreted as 0, if Zero at center is checked. Some joysticks, however, generate values outside that area, or the values jump around even if you don’t touch the thing. In this case, it can be very useful to check Logarithmic, since this means that variations near the center area have much less effect. It can also be interesting for Pitch Wheels, for example, to add a bit of dynamics.
Reverse This setting reverses the highest and lowest position. This is mainly useful for the Y axis, where the joystick specification defines that the topmost position has the lowest value, and the bottommost position has the highest value – which is precisely the opposite of what you’d expect for a pitch wheel, for example .
14-Bit Depending on which controller is selected (000-031, (N)RPN, you can also define whether the stick sends 7-bit or 14-bit MIDI messages.
The little knob on the right can be used to determine the MIDI channel (numbered 0..15 here) used.
If you select 101: RPN MSB, the following combo box appears:
Figure 15: RPN Parameter selection
Here, you can define which of the defined Registered Parameter Numbers is used.
If you select 99: NRPN MSB, an additional knob appears:
Figure 16: NRPN Parameter selection
Here, you can select the Non-Registered Parameter Number (0-16383).
Joystick n RUVThis tab allows the definition of a joystick’s R(udder), U, and V axes. Only the axes that are available are displayed. The possibilities are identical to those on the Joystick n XYZ tab, so I won’t repeat them here.
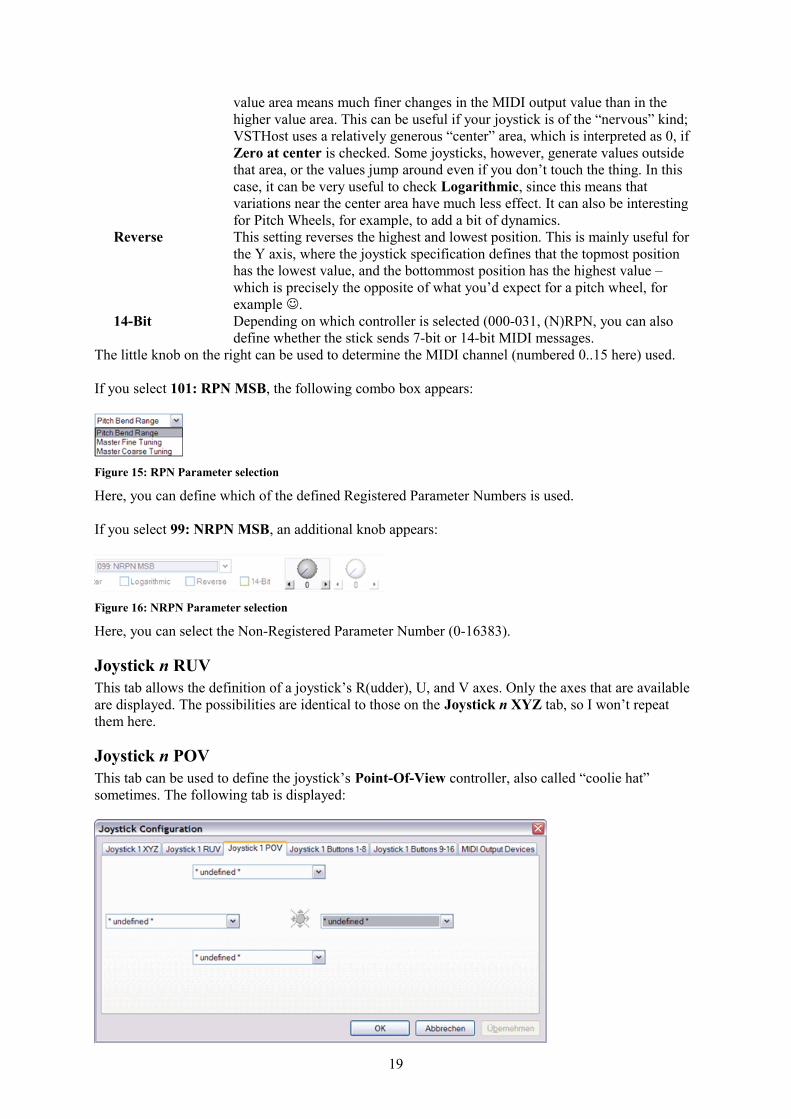
Joystick n POVThis tab can be used to define the joystick’s Point-Of-View controller, also called “coolie hat” sometimes. The following tab is displayed:
19
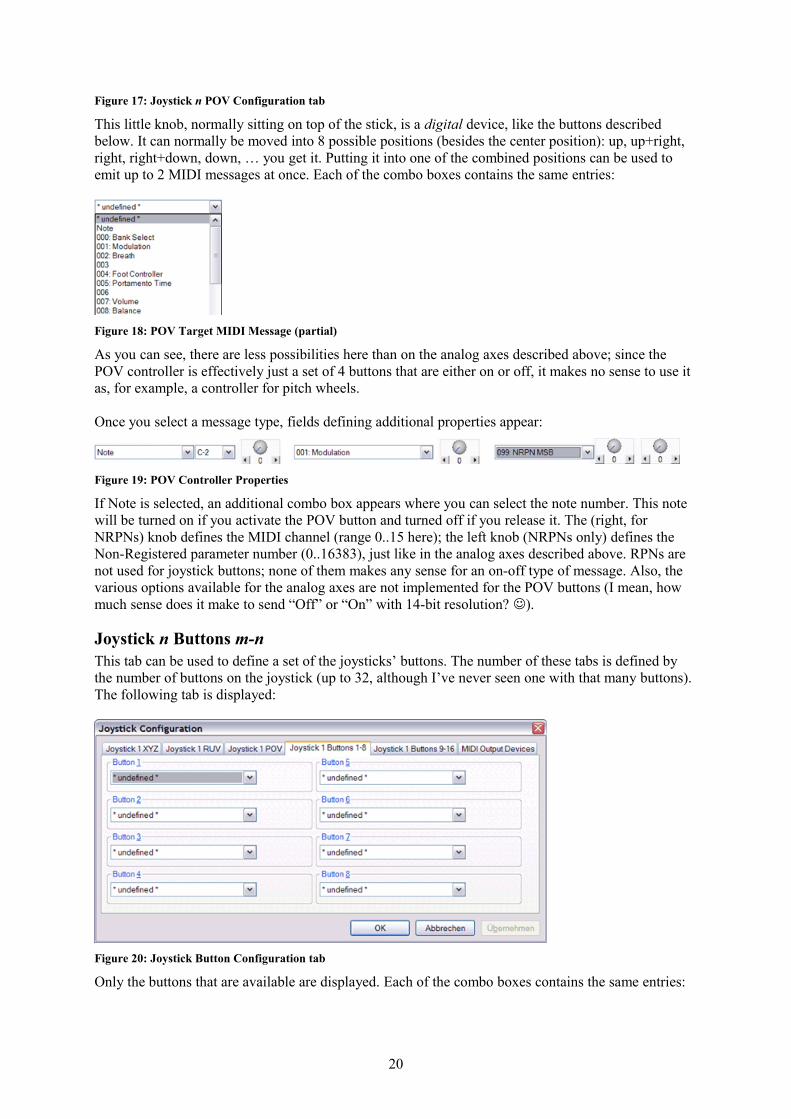
Figure 17: Joystick n POV Configuration tab
This little knob, normally sitting on top of the stick, is a digital device, like the buttons described below. It can normally be moved into 8 possible positions (besides the center position): up, up+right, right, right+down, down, … you get it. Putting it into one of the combined positions can be used to emit up to 2 MIDI messages at once. Each of the combo boxes contains the same entries:
Figure 18: POV Target MIDI Message (partial)
As you can see, there are less possibilities here than on the analog axes described above; since the POV controller is effectively just a set of 4 buttons that are either on or off, it makes no sense to use it as, for example, a controller for pitch wheels.
Once you select a message type, fields defining additional properties appear:
Figure 19: POV Controller Properties
If Note is selected, an additional combo box appears where you can select the note number. This note will be turned on if you activate the POV button and turned off if you release it. The (right, for NRPNs) knob defines the MIDI channel (range 0..15 here); the left knob (NRPNs only) defines the Non-Registered parameter number (0..16383), just like in the analog axes described above. RPNs are not used for joystick buttons; none of them makes any sense for an on-off type of message. Also, the various options available for the analog axes are not implemented for the POV buttons (I mean, how much sense does it make to send “Off” or “On” with 14-bit resolution? ).
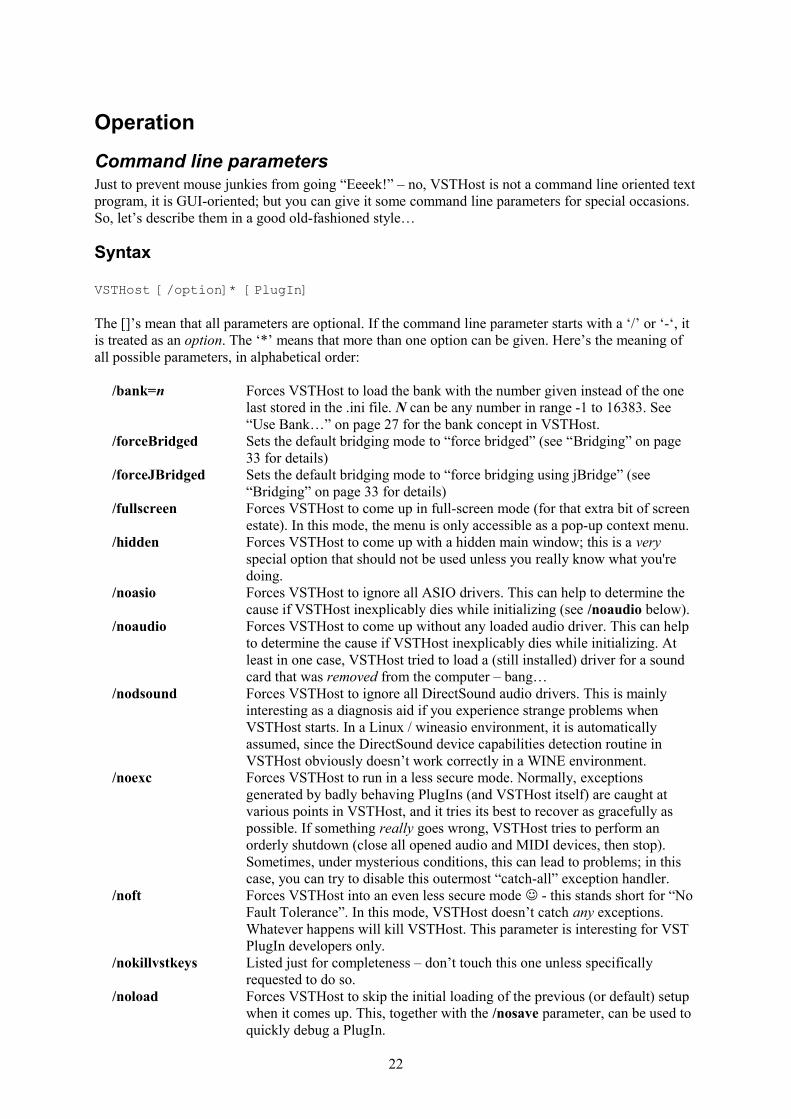
Joystick n Buttons m-nThis tab can be used to define a set of the joysticks’ buttons. The number of these tabs is defined by the number of buttons on the joystick (up to 32, although I’ve never seen one with that many buttons). The following tab is displayed:
Figure 20: Joystick Button Configuration tab
Only the buttons that are available are displayed. Each of the combo boxes contains the same entries:
20

Figure 21: Button Target MIDI Message (partial)
As you can see, there are less possibilities here than on the analog axes described above; since a joystick button can only be either on or off, it makes no sense to use it as, for example, a controller for pitch wheels.
Once you select a message type, fields defining additional properties appear:
Figure 22: Button Controller Properties
If Note is selected, an additional combo box appears where you can select the note number. This note will be turned on if you activate the button and turned off if you release it. The (right, for NRPNs) knob defines the MIDI channel (range 0..15 here); the left knob (NRPNs only) defines the Non-Registered parameter number (0..16383), just like in the analog axes described above. RPNs are not used for joystick buttons; none of them makes any sense for an on-off type of message. Also, the various options available for the analog axes are not implemented for buttons (I mean, how much sense does it make to send “Off” or “On” with 14-bit resolution? ).
MIDI Output DevicesHere, you can define the MIDI Output device(s) that the joysticks send their data to. The following tab is displayed:
Figure 23: MIDI Output Devices tab
This tab is always available. Normally, the joysticks don’t send MIDI data to the MIDI Output ports; if you want to, you can configure it here. The list box displays all loaded MIDI Output devices. You can select one of them by simply clicking on it; to select a range, click on the first and then shift-click on the last; to add or remove a specific device, control-click on it.
Other Configuration TasksWhile there are quite some other things that can be configured in VSTHost, they are not installation-related, so they’ll be described later, when it is appropriate.
21
Operation
Command line parametersJust to prevent mouse junkies from going “Eeeek!” – no, VSTHost is not a command line oriented text program, it is GUI-oriented; but you can give it some command line parameters for special occasions. So, let’s describe them in a good old-fashioned style…
Syntax
VSTHost [/option]* [PlugIn]
The []’s mean that all parameters are optional. If the command line parameter starts with a ‘/’ or ‘-‘, it is treated as an option. The ‘*’ means that more than one option can be given. Here’s the meaning of all possible parameters, in alphabetical order:
/bank=n Forces VSTHost to load the bank with the number given instead of the one last stored in the .ini file. N can be any number in range -1 to 16383. See “Use Bank…” on page 27 for the bank concept in VSTHost.
/forceBridged Sets the default bridging mode to “force bridged” (see “Bridging” on page 33 for details)
/forceJBridged Sets the default bridging mode to “force bridging using jBridge” (see “Bridging” on page 33 for details)
/fullscreen Forces VSTHost to come up in full-screen mode (for that extra bit of screen estate). In this mode, the menu is only accessible as a pop-up context menu.
/hidden Forces VSTHost to come up with a hidden main window; this is a very special option that should not be used unless you really know what you're doing.
/noasio Forces VSTHost to ignore all ASIO drivers. This can help to determine the cause if VSTHost inexplicably dies while initializing (see /noaudio below).
/noaudio Forces VSTHost to come up without any loaded audio driver. This can help to determine the cause if VSTHost inexplicably dies while initializing. At least in one case, VSTHost tried to load a (still installed) driver for a sound card that was removed from the computer – bang…
/nodsound Forces VSTHost to ignore all DirectSound audio drivers. This is mainly interesting as a diagnosis aid if you experience strange problems when VSTHost starts. In a Linux / wineasio environment, it is automatically assumed, since the DirectSound device capabilities detection routine in VSTHost obviously doesn’t work correctly in a WINE environment.
/noexc Forces VSTHost to run in a less secure mode. Normally, exceptions generated by badly behaving PlugIns (and VSTHost itself) are caught at various points in VSTHost, and it tries its best to recover as gracefully as possible. If something really goes wrong, VSTHost tries to perform an orderly shutdown (close all opened audio and MIDI devices, then stop). Sometimes, under mysterious conditions, this can lead to problems; in this case, you can try to disable this outermost “catch-all” exception handler.
/noft Forces VSTHost into an even less secure mode - this stands short for “No Fault Tolerance”. In this mode, VSTHost doesn’t catch any exceptions. Whatever happens will kill VSTHost. This parameter is interesting for VST PlugIn developers only.
/nokillvstkeys Listed just for completeness – don’t touch this one unless specifically requested to do so.
/noload Forces VSTHost to skip the initial loading of the previous (or default) setup when it comes up. This, together with the /nosave parameter, can be used to quickly debug a PlugIn.
22

/nolocal Forces VSTHost to come up with the internal English language. Since V1.44, VSTHost can use so-called “satellite DLLs” – DLLs with localized resources in other languages. vsthostDEU.dll and vsthostFRA.dll are included, and automatically loaded on systems where the primary UI language is set to German or French.By the way - if somebody would volunteer to translate VSTHost's texts into another language, please don't hesitate to contact me!
/nomidi Forces VSTHost to come up without any loaded MIDI driver. Same reason as for /noaudio.
/nomme Forces VSTHost to ignore MME audio drivers. See /noaudio above./nosave Forces VSTHost to skip the saving of the complete current setup upon
program termination. Normally used together with the /noload parameter in a debugging situation.
/noskin Forces VSTHost to come up without a skin (see “Skin” on page 71 for details).
/nosse Forces VSTHost to ignore the processor's SSE capabilities (if available) and only use the x87-compatible FPU.Since SSE speeds up operations considerably, this option should be used with care. In most cases, its only effect is to slow VSTHost down a bit.
/nosse2 Forces VSTHost to ignore the processor's SSE2 capabilities; setting /nosse automatically includes /nosse2.Unless you're using the double-precision version of VSTHost, SSE2 is not used very much inside VSTHost – but where it's used, it is normally faster than the FPU. On some Core Duo variants, however, SSE2 can be slightly slower than the normal FPU usage, so setting this option might help to squeeze out a tiny little bit more processing power (in the range of 0.1% for a setup with many PlugIns).
/numProcessors=n In a multiprocessor environment, VSTHost normally uses as many cores and processors as possible. Using this option, you can force VSTHost to operate in single-processor mode, like versions before V1.43 did, by specifying /numProcessors=1You can enter any value here; values below 1 are ignored, values greater than 32 are interpreted as 32. Please keep in mind that it makes absolutely no sense to specify a higher number of processors than you have inside the PC; it won’t make your computer go faster .
/perf=n Forces VSTHost to load the performance with the number given instead of the one last stored in the .ini file or 0, depending on the setting of “ReloadPerformance” (see page 29). N can be any number in range 0 to 128. /perf itself can be overridden by specifying /noload.
/runBridged Sets the default bridging mode to “run bridged” (see “Bridging” on page 33 for details)
/slave[:nn] Forces VSTHost into Slave mode; the Slave mode and how to use it is not part of this document.
/userexit=name Forces VSTHost to load a User Exit DLL. Currently only one User Exit DLL has been created for the Lionstracs Mediastation (see www.lionstracs.com for details) to allow a better integration into this environment.
plugin The complete path name of a PlugIn to load. This is normally used in a debugging environment, but also if you drag a PlugIn onto VSTHost’s icon.
Multiprocessor provisionsIn versions before V1.43, VSTHost didn’t care much about the capabilities of the machine it runs on. There are, as I freely admit, no processor-specific optimizations, which may make it a little bit slower than commercial packages, but it also means that it simply works on practically every machine that
23

can load at least Windows 98 (Windows 95 doesn’t require a floating-point coprocessor, which VSTHost absolutely needs). In case of a multiprocessor machine, however, this lack of interest for its environment is a bit out of place, since it would mean that VSTHost only uses one processor. Since the rise of the Core Duo and Athlon64 X2, this isn’t a good idea any more; a steadily increasing number of machines have multiprocessor cores, and it’s not really fine if VSTHost uses only one half (or less, in case of a quad core machine) of the available processing power.
Since V1.43, VSTHost can use as many processors as there are in the machine (up to 32, which is a hard-coded 32-bit Windows limit; the x64 version can use 64 cores). If there’s only one processor, the overhead is minimal (2 additional “if” statements in the audio processing thread). If there are more, it’s considerable, but it pays off in the end.
Technical explanationIf you just want to make music, damnit!, you can safely ignore these paragraphs, although they might help you to get the maximum performance from VSTHost if a certain configuration simply doesn’t work the way you thought it should.
VSTHost starts as many processing threads as there are processors available. While processing audio, it determines how many possible thread start points are possible, and then triggers as many threads as possible and necessary to go to work on them. Each thread finds the same set of thread start points; the first thread going to work on a start point blocks this path for the other threads, which go on searching for thread start points to process. This continues until all threads come to the conclusion that there are no more thread start points to process.
Thread Start PointsWhat is a “thread start point”? Hmm… well, VSTHost can only parallelize audio processing of independent PlugIns. If a PlugIn’s input is dependent on another PlugIn’s output, they have to be processed sequentially. Consider a simple setup:
Here, nothing can be run in parallel. Everything has to be done in a strict order. VSTHost doesn’t even bother to trigger a thread running on a second processor, as there is only one thread start point – PlugIn A. Now, let’s assume that PlugIn A is a VSTi, and you want to run its output through a delay effect:
Everything still has to be done in a strict order, PlugIn a remains the only thread start point. In such a configuration, there’s absolutely no performance gain from a multiprocessor machine.
A slightly more complex setup would be this:
Here, VSTHost can run the two PlugIns in parallel; it just to wait with the final audio output until both PlugIns contributed their outputs. PlugIn A and PlugIn B are thread start points.
Let’s progress to an even more complex example:
PlugIn AAudio In Audio Out
PlugIn AAudio In PlugIn B Audio Out
PlugIn AAudio In Audio Out
PlugIn B
24

Here, VSTHost could, in theory, run all three PlugIns in parallel; it just has to wait with the final audio output until all three PlugIns have contributed their outputs. PlugIn A, B, and C are thread start points. There’s no problem… but wait – let’s assume that there are only 2 processors available. What happens now? In this case, VSTHost sends 2 threads to work, one on each processor. The first one that “sees” PlugIn A starts to work on it and marks it as “started”. The second one sees that PlugIn A is already being worked on, looks for another start point, and finds PlugIn B, so it starts to work on this one. After some microseconds, both threads come back for more work as PlugIns A and B are finished; the first one processes PlugIn C, the second one stops.
And now for a really complex example:
Here, we see 4 thread start points: PlugIns A, B, C, and D. Assuming our 2 processors again, the behavior becomes rather indeterminable now. One thread will presumably go to work on PlugIn A, the other one will go to work on PlugIn B. Each of them will contribute the respective PlugIn’s output to PlugIn E’s input. The thread that determines that PlugIn E has enough input now will continue processing E, the other one will continue with the next thread start point, which is PlugIn C. Now, each of the 2 threads contributes to PlugIn F’s input; the one that determines that PlugIn F has enough input will process PlugIn F, while the other one begins work on PlugIn D. In this setup, processing should be rather evenly spread over the two processors – unless one of the PlugIns A, B, C, or E takes much longer than the others. In this case, the other thread will finish its work after going through all the other start points and finding that there’s nothing more to do after the first PlugIn, since PlugIns E and/or F need more input; VSTHost has to wait until the first thread completes the whole sequence. This situation leads to an uneven work distribution, but there’s nothing that VSTHost can do about it.
In other words, even if there are two or more processors, VSTHost can not guarantee that they are fully used; depending on the configuration, it might happen that the performance gain is negligible. Some PlugIns contribute to the uncertainty in their own way by being multiprocessor-aware, so they try to spread their processing over multiple processors themselves.
OK, technical stuff finished, let’s continue and finally start working with VSTHost…
PlugIn AAudio In Audio Out
PlugIn B
PlugIn C
PlugIn AAudio In
Audio Out
PlugIn B
PlugIn C
PlugIn EPlugIn F
PlugIn D
25

Main WindowNow that we’ve finally started and parametrized VSTHost, let’s return to our initial picture:
Figure 24: VSTHost Initial (again)
Since V1.46, VSTHost always shows two pseudo-PlugIns: {In} and {Out}. These “PlugIns” are used to make it easier to graphically show the audio flow, and they have the additional benefit that you can set up Remote Control operations for them – you can, for example, define a MIDI controller to silence Audio In or Out separately. The buttons and connectors on the windows for these PlugIns are described later (see “New PlugIn” on page 31 or “PlugIn Menu” on page 36 for details).
Voilà – VSTHost works.
Menu Entries
Figure 25: VSTHost's unimpressive Main Menu
Practically all of VSTHost’s operations can be controlled from the menu, so let’s examine that in detail.
File Menu
Figure 26: File Menu
26

Here, you can load and save VSTHost setups (called “performances”, organized into “banks”) and load new PlugIns into the current performance. Plus, of course, terminate VSTHost .
Use Bank…This menu opens a dialog to let you select one of the possible VSTHost Performance Banks:
Figure 27: Bank Selection Dialog
There are two types of banks in VSTHost; the Internal Bank, which is stored in the file “#Internal.vsthost” in VSTHost’s data directory (see “Set Data Path” on page 30), and up to 16384 different file banks. The internal bank is used by default, as no file bank has yet been allocated. Only the file banks can be selected by remote operation.
To select one of the banks, simply double-click it, or select it and press OK. If the bank file has already been configured, the dialog is closed and the new bank is used from now on; if, however, the bank file is not configured (or the file name has been removed with the Clear button), a file selection dialog is opened where you can select a file to be used to store VSTHost’s performances to. The default value should normally be OK, but you can override it, if you want to. You can enter the name of a non-existing file here; if it doesn’t exist, VSTHost allocates it.
A Bank file contains a set of up to 129 VSTHost performances (see “Load Performance” below). By default, VSTHost stores its performances in the internal bank; since 129 configurations might be too few for some people, you can change to file mode, which gives you up to 16385 banks of up to 129 performances each. That should be enough, I think .
Note: selecting another bank does not change the currently loaded performance in any way; if you want to select a program from the new bank, you have to load another performance, too. This behavior can be used to copy performances from one bank to another; simply load the performance, then switch to the target bank, and save the performance (you can use “Save Performance As…” to save it to a new name and/or position, if you want to).
27

Load PerformanceThis menu entry opens the following dialog:
Figure 28: Load VSTHost Performance Dialog
Here, you can select one of the 129 possible performances in the current bank (see “Use Bank…” above).
This operation can also be performed by sending a Program Change MIDI message to the Remote Control Channel, with one exception: performance 000 is a special program; this cannot be selected by remote operation. Unless Reload Performance is checked on the File menu, VSTHost loads this performance as its initial setup. This way, you can define a nice default environment.
A performance’s initial name is “** Init **” – not very inventive, I have to admit – and can be changed if you save it with Save As… (described below).
The Up and Down buttons can be used to reposition the selected performance in the current bank. Note: this action takes place immediately; it can not be undone by pressing the Cancel button.
Save PerformanceSelecting this menu entry saves the current performance. If Autosave Performance (see below on that) is turned on, and if the /nosave parameter is not given, VSTHost always saves the current performance when it exits. When another performance is loaded, the current performance is saved in any case before loading the new one.
28

Save Performance AsThis menu entry opens the following dialog:
Figure 29: Save VSTHost Performance As... Dialog
Here, you can save the current configuration to a(nother) performance. After having selected the new position in the list box, you can give the performance a descriptive name. Pressing OK saves the performance to the new position and automatically uses it as the new current performance.
The Up and Down buttons can be used to reposition the selected performance in the current bank. Note: this action takes place immediately; it can not be undone by pressing the Cancel button.
Next PerformanceThis menu entry loads the performance with the next higher number.
Previous PerformanceThis menu entry selects the performance with the next lower number.
Reload PerformanceThis menu entry can be toggled; if it is checked, VSTHost reloads the last used performance when it is started the next time (unless the /noload parameter is given, of course). If it is unchecked, VSTHost always loads the default performance (number 000) when it starts.
Autosave PerformanceThis menu entry can be toggled; if it is checked, VSTHost saves the current performance whenever another performance is loaded, or if VSTHost is terminated.
Autosave PlugIn BanksStarting with V1.43, VSTHost can automatically save the current settings of all PlugIns of a performance. In previous versions, you had to do it on your own – if you loaded a PlugIn, and changed any sound parameters, you had to save the PlugIn’s bank. VSTHost just remembered the currently loaded bank’s name with the performance. This is still the default, but, unless you’re working in an environment with very little free space on your hard disk, you might consider turning this Autosave mode on. It adds a lot of comfort.
29

In order for this to work, VSTHost allocates a sub-directory for each bank (see “Use Bank…” on page 27) in its Data directory and stores the banks for each performance there.
Export PerformanceLoading and saving performances works nice as long as only one VSTHost instance on one machine is concerned, but it has one big problem: sharing performances between machines and/or users is quite difficult, since VSTHost uses a very simple scheme to store performances inside the bank. “Simple” for VSTHost, but not so simple to share, since it uses a (potentially large) number of files plus a set of entries in the performance bank file, which would have to be assembled by hand – and reinserted on the target machine by hand, too, including tedious file renaming if the performance is to be stored under another number.
Since V1.49, VSTHost contains an Export/Import Performance feature which eases things quite a lot. A complete performance can be exported into one file, which can be easily shared.
This menu entry opens a standard file dialog where you can select the file name of a “VSTHost Performance File” (with the unmistakable extension .vsthostperf) to store the currently loaded performance to. After having pressed OK, the complete performance and the current banks of all loaded PlugIns are stored into this file; that means that it can become quite large.
This performance file can then be easily sent to others, or stored in a performance library.
Import PerformanceThis menu entry opens a standard file dialog where you can select the file name of a “VSTHost Performance File” (with extension .vsthostperf) to be loaded into the current performance (see “ExportPerformance” above on the topic of performance exports).
VSTHost does not include the PlugIns themselves in the exported performance, only their location on the machine where the performance is exported. If the PlugIn is not at the same location on the target machine, VSTHost tries its best to find PlugIns of the same name in the configured PlugIn path and then shows the following dialog, which contains the original path and the found alternatives:
where you can select the corresponding PlugIn. If there's no PlugIn of the same name available, you can use the “Path...” button to select one from another location – but it should better be the same PlugIn, otherwise the bank stored in the performance won't work with it. Pressing Cancel instead removes the PlugIn from the imported performance.
Note: in contrast to loading a performance (see “Load Performance” on page 28 for details), the imported performance does not replace the previously loaded one; it is added to the current setup instead. This allows to use the exported performances as “building blocks” that contain a complete set of preconfigured PlugIns for a specific task.
Set Data PathThis menu entry can be used to set a new Data path for VSTHost. The default value is VSTHost’s location, with an appended \Data.
Before V1.43, VSTHost stored nearly all settings in the Windows registry; over time, this amounted to a very complicated setup with hundreds of sub-keys, which isn’t really easy to work with. VSTHost is using an initialization-file-based operation now. This makes it easier to change settings outside VSTHost (one click opens the correct file, no cunning navigation through Regedit’s nested structures needed), and eases the path to a preconfigured setup – instead of an installer program, just copy the necessary files together with the application.
VSTHost uses a layered approach; when it starts up, it reads the data path from an initialization file that resides in the same directory as the VSTHost executable, and has the same name, but with the
30

extension .ini (please note the careful wording – you might have renamed the thing from VSTHost.exe to blabla.exe, for example; in this case, it would be blabla.ini). This initialization file, allocated when you start up VSTHost for the first time, is very simple; here’s an example:
[Settings]DataPath=C:\Program Files\VSTHost\Data
Figure 30: VSTHost.ini
The interesting thing about this setting is that it allows a multi-user setup, because you can put environment variable names into the data path. Here’s an example that should work in all Windows NT variants (NT / 2000 / XP / Vista / 7):
[Settings]DataPath=%APPDATA%\VSTHost
Figure 31: Multi-user VSTHost.ini
Once VSTHost has read the data path from this initialization file, it switches to another initialization file that resides in the given data path, and has the same name as VSTHost’s executable, but with the extension .ini (see above regarding the careful wording ). This is VSTHost’s main initialization file, where all the settings are kept. Other files that are read from there are PlugIns.ini (containing information about all PlugIns that VSTHost knows; see “Set PlugIn Path” on page 34 for details), effCanDos.ini, and hostCanDos.ini (these files, which come with the VSTHost package, contain a header that details what they are good for).
The default setup assumes that all data that VSTHost uses are put into the same directory; with this menu item, you can define another data path for them.
Attention: if you decide to change the data path to another directory, and want to put some or all of the already existing data there, you have to copy the data files from the old to the new directory yourself – and you have to change the absolute paths that might be stored inside VSTHost.ini, and/or the *.vsthost bank files. VSTHost doesn’t do that for you (unless the configuration has been saved with one of the latest VSTHost versions and contain “%BankPath%” instead of an absolute path).
New PlugInNow it gets interesting… if this menu entry is selected, VSTHost opens a file selection dialog box that allows locating a PlugIn that you want to add to the current performance. Since VSTHost is a simple little program, it doesn’t perform lengthy “Where are the PlugIns?” scans upon program start to present a nice, preformed list of available PlugIns (unless you specifically tell it to; see “Rescan onStart” on page 34 for details); it simply allows you to select the file containing the PlugIn. In Windows, PlugIns are normally simple DLLs, i.e., their names end with “.dll”.
If a “big player” (Cubase, Nuendo, etc.) has already been installed on your computer, it has set up a directory where VST PlugIns are installed; normally, the path to this directory is stored in the registry under HKEY_LOCAL_MACHINE\Software\VST in the value VSTPluginsPath. If VSTHost finds this value, it starts the file selection dialog there; if not, it uses the current directory.
In any case, once a PlugIn has been selected and loaded, VSTHost remembers the directory where it took it from as its new start point.
Once you have loaded a PlugIn, VSTHost presents it in a little window on its main client area, like this (the example uses ASynth, a very good freeware VST instrument):
Figure 32: Example for a loaded PlugIn's Main window
31

There are some buttons on that window. All of them are just alternatives to entries of the PlugIn menu (see “PlugIn Menu” on page 36 for details) and the main toolbar (see “Toolbar” on page 65 for details). If you move the mouse over a button and leave it there, a little pop-up text will be displayed that tells what the respective button can be used for. On the right side, there’s a little level meter that displays the PlugIn’s current output level. The Main window can be dragged around on the screen with the mouse to any location you like. Since the links between PlugIns are displayed there, too, this can be used to arrange the PlugIn windows in a way that shows the relations between them, like this:
Figure 33: VSTHost Main Window with some PlugIns loaded
Since V1.44, there are some funny little dots to the left and to the right of the PlugIn main windows; these are “connectors” which allow to define links between the PlugIns as a convenient alternative to the “Chain After…” menu item (see page 50 for this one). On the left side, there’s an Audio Input connector and a MIDI input connector; on the right side, there’s an Audio Output connector and a MIDI Output connector. Only connectors that make sense for this PlugIn are shown; if, for example, a PlugIn as no audio input channels, the Audio In connector is omitted.
You can click on one of the connectors with the left mouse button, upon which the connector changes its color; now, without releasing the mouse button, move to the corresponding connector of another PlugIn that you want to create a link to. If you reach a connector that can be used, it changes its color, too; now you can release the mouse button to create a link.
Double-clicking on a line between two connectors opens the “Chain After…” window of the target PlugIn so that you can change the link type, level, and so on.
To delete a link, simply select a connection; you can do this either by clicking on a connector and then dragging the mouse onto an existing line, upon which the line changes its color, or by clicking directly on the line between the two connectors. As soon as the line changes its color, you can delete the connection by clicking with the right mouse button – without releasing the left mouse button first. This may sound complicated at first, but if you try it, it’s rather intuitive (as “intuitive” as this whole computer stuff can get ).
Another notable thing about the PlugIn main window is the background image; this one is different for Instrument and Effect PlugIns. If you don’t like it, you can provide another one – VSTHost looks for a .BMP or .PNG file that comes with the PlugIn. If, for example, your PlugIn is a DLL located at
32

“C:\Program Files\VstPlugins\Again.dll”, and there is a file called “C:\Program Files\VstPlugins\Again.bmp” (which really holds a bitmap ), VSTHost will use the this bitmap as the background for the PlugIn main window.
BridgingUp to V1.47, VSTHost was a pure 32-bit program (code, not audio format this time ). This means that it could only load 32-bit PlugIns; if you're running it on a 64-bit system (Windows Vista / Windows 7), and already have assembled a nice collection of 64-bit PlugIns (still very much future music while I'm writing this), VSTHost couldn't load these. Steinberg provides a separate bridge program in their Cubase / Nuendo products for this; VSTHost didn't.
Since V1.48, VSTHost contains its own set of bridging programs (VSTHostBridge32.exe and VSTHostBridge64.exe) which allows the 32-bit version of VSTHost to load 64-bit PlugIns – and the other way round. VSTHost's bridge program allows all PlugIn kinds supported by VSTHost to be bridged: VST 1/2/3 and VST Module Architecture. There's no need for an installation procedure; just place the two programs into the same directory where VSTHost.exe resides, and they are found automatically.
If VSTHost and the PlugIn have a different “bitness” (i.e., one is a 32-bit module, the other one a 64-bit), bridging takes place automatically; if you want to force bridging for a PlugIn that has the same “bitness”, you have to add the entry runBridged=1 (run all PlugIns in one concentrated bridge program) or forceBridged=1 (run each PlugIn in its own dedicated bridge program) to the PlugIn's section in effCanDos.ini (look into VSTHost's data directory for that). effCanDos.ini contains a descriptive header that describes which values can be set for each PlugIn, and how. It's a simple text file, so any text editor can be used to modify it.
Alternatively, you can use the command line parameters /runBridged, /forceBridged, or /forceJBridged to set the default values VSTHost uses when loading PlugIns (see “Command lineparameters” on page 22 for details).
Attention: there are some limits to what bridging can do. A bridged PlugIn that tries to modify a window in the host by sub-classing it (a very bad practice anyway), for example, is doomed to an instant death, since the host windows are not in the same process. I've tried to make VSTHost's bridge as universally usable as possible, but it can't catch every possible misbehavior.
This bridging code is still quite new; I can't guarantee that it works satisfactorily under all conditions. If VSTHost's bridge programs doesn't work for a specific PlugIn, there's another possibility:
JBridgeSince V1.47, VSTHost supports JBridge, which can also be used to “bridge” the gap between the 32-bit and the 64-bit world. You can find JBridge at http://jstuff.wordpress.com/jbridge/. Just installing it is sufficient – you don't need to do anything else, as far as VSTHost is concerned. If you want to use JBridge for a specific PlugIn, you have to add the entry forceJBridged=1 to the PlugIn's section in effCanDos.ini (look into VSTHost's data directory for that). effCanDos.ini contains a descriptive header that describes which values can be set for each PlugIn, and how. It's a simple text file, so any text editor can be used to modify it. JBridge only supports VST1/2 PlugIns, however.
Shell PlugInsThere are some special PlugIns called “Shell PlugIns”; these are special in that they are no effect or VSTi by themselves, but they provide a “shell” for a set of secondary PlugIns. The Waves bundles (see www.waves.com for these) are a prominent – and perhaps the only – example for this special kind of PlugIn. If VSTHost encounters one of these, it doesn’t immediately load the PlugIn, but presents a dialog that allows you to select one of the secondary PlugIns, like this:
33
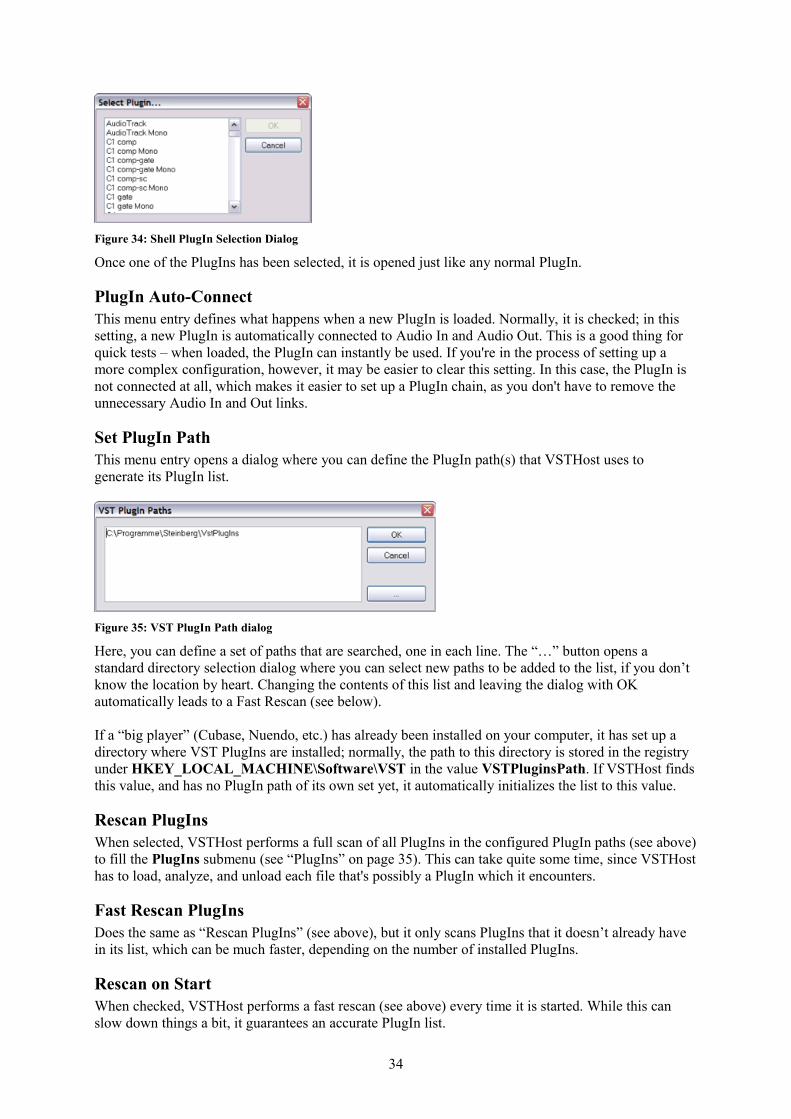
Figure 34: Shell PlugIn Selection Dialog
Once one of the PlugIns has been selected, it is opened just like any normal PlugIn.
PlugIn Auto-ConnectThis menu entry defines what happens when a new PlugIn is loaded. Normally, it is checked; in this setting, a new PlugIn is automatically connected to Audio In and Audio Out. This is a good thing for quick tests – when loaded, the PlugIn can instantly be used. If you're in the process of setting up a more complex configuration, however, it may be easier to clear this setting. In this case, the PlugIn is not connected at all, which makes it easier to set up a PlugIn chain, as you don't have to remove the unnecessary Audio In and Out links.
Set PlugIn PathThis menu entry opens a dialog where you can define the PlugIn path(s) that VSTHost uses to generate its PlugIn list.
Figure 35: VST PlugIn Path dialog
Here, you can define a set of paths that are searched, one in each line. The “…” button opens a standard directory selection dialog where you can select new paths to be added to the list, if you don’t know the location by heart. Changing the contents of this list and leaving the dialog with OK automatically leads to a Fast Rescan (see below).
If a “big player” (Cubase, Nuendo, etc.) has already been installed on your computer, it has set up a directory where VST PlugIns are installed; normally, the path to this directory is stored in the registry under HKEY_LOCAL_MACHINE\Software\VST in the value VSTPluginsPath. If VSTHost finds this value, and has no PlugIn path of its own set yet, it automatically initializes the list to this value.
Rescan PlugInsWhen selected, VSTHost performs a full scan of all PlugIns in the configured PlugIn paths (see above) to fill the PlugIns submenu (see “PlugIns” on page 35). This can take quite some time, since VSTHost has to load, analyze, and unload each file that's possibly a PlugIn which it encounters.
Fast Rescan PlugInsDoes the same as “Rescan PlugIns” (see above), but it only scans PlugIns that it doesn’t already have in its list, which can be much faster, depending on the number of installed PlugIns.
Rescan on StartWhen checked, VSTHost performs a fast rescan (see above) every time it is started. While this can slow down things a bit, it guarantees an accurate PlugIn list.
34
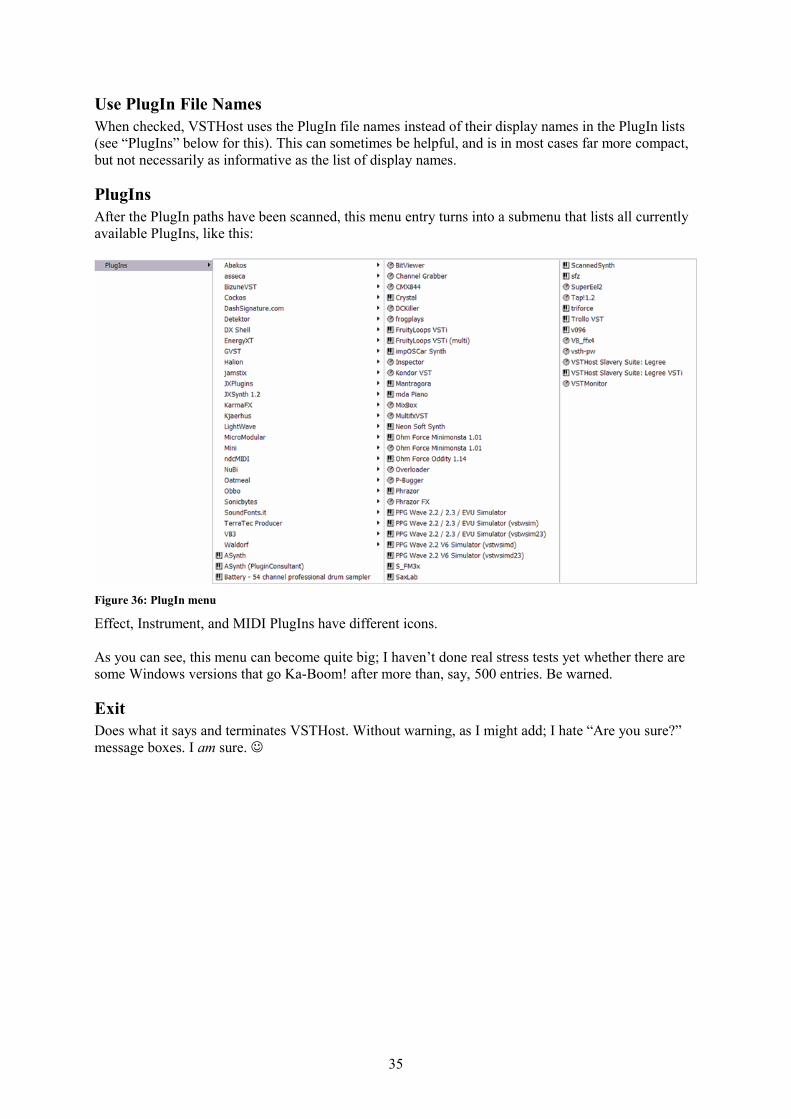
Use PlugIn File NamesWhen checked, VSTHost uses the PlugIn file names instead of their display names in the PlugIn lists (see “PlugIns” below for this). This can sometimes be helpful, and is in most cases far more compact, but not necessarily as informative as the list of display names.
PlugInsAfter the PlugIn paths have been scanned, this menu entry turns into a submenu that lists all currently available PlugIns, like this:
Figure 36: PlugIn menu
Effect, Instrument, and MIDI PlugIns have different icons.
As you can see, this menu can become quite big; I haven’t done real stress tests yet whether there are some Windows versions that go Ka-Boom! after more than, say, 500 entries. Be warned.
ExitDoes what it says and terminates VSTHost. Without warning, as I might add; I hate “Are you sure?” message boxes. I am sure.
35
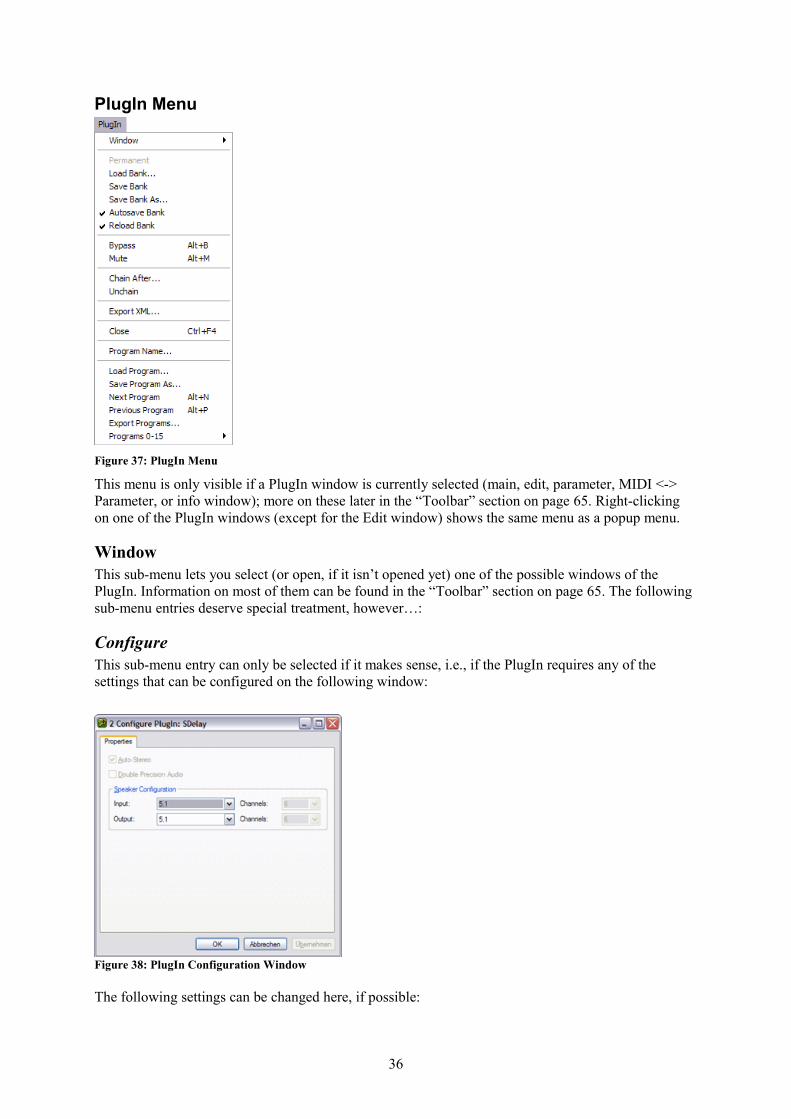
PlugIn Menu
Figure 37: PlugIn Menu
This menu is only visible if a PlugIn window is currently selected (main, edit, parameter, MIDI <-> Parameter, or info window); more on these later in the “Toolbar” section on page 65. Right-clicking on one of the PlugIn windows (except for the Edit window) shows the same menu as a popup menu.
WindowThis sub-menu lets you select (or open, if it isn’t opened yet) one of the possible windows of the PlugIn. Information on most of them can be found in the “Toolbar” section on page 65. The following sub-menu entries deserve special treatment, however…:
ConfigureThis sub-menu entry can only be selected if it makes sense, i.e., if the PlugIn requires any of the settings that can be configured on the following window:
Figure 38: PlugIn Configuration Window
The following settings can be changed here, if possible:
36
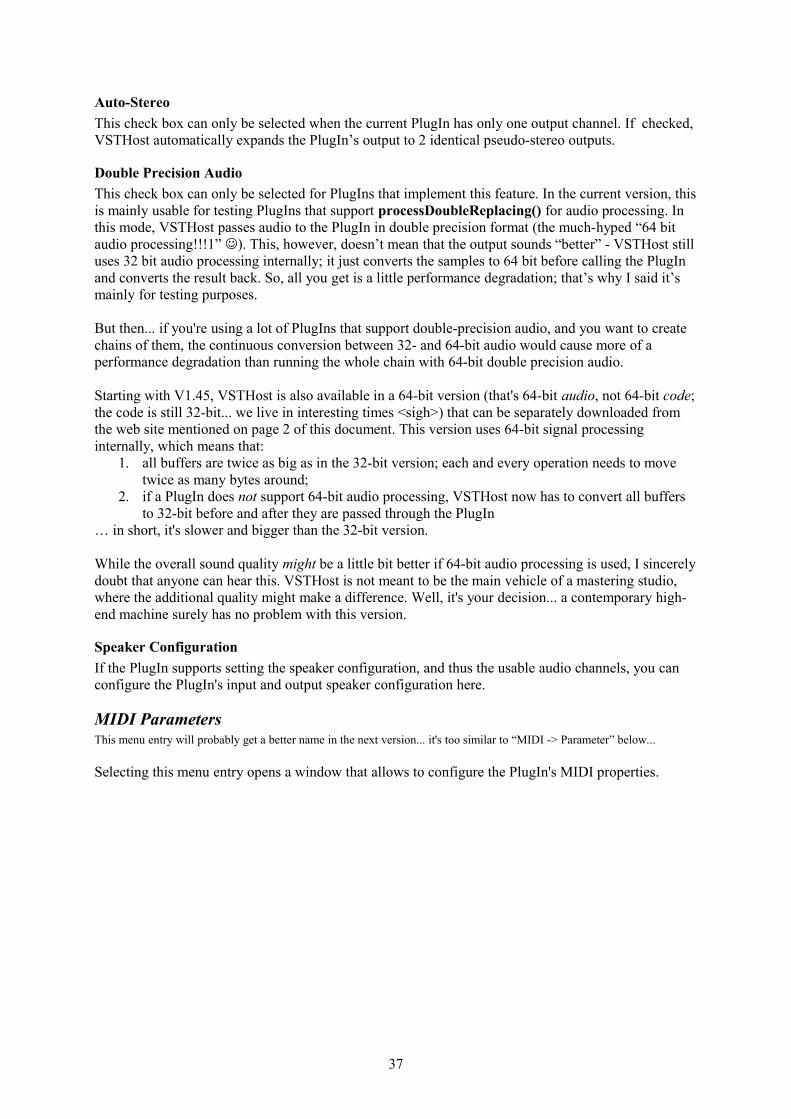
Auto-StereoThis check box can only be selected when the current PlugIn has only one output channel. If checked, VSTHost automatically expands the PlugIn’s output to 2 identical pseudo-stereo outputs.
Double Precision AudioThis check box can only be selected for PlugIns that implement this feature. In the current version, this is mainly usable for testing PlugIns that support processDoubleReplacing() for audio processing. In this mode, VSTHost passes audio to the PlugIn in double precision format (the much-hyped “64 bit audio processing!!!1” ). This, however, doesn’t mean that the output sounds “better” - VSTHost still uses 32 bit audio processing internally; it just converts the samples to 64 bit before calling the PlugIn and converts the result back. So, all you get is a little performance degradation; that’s why I said it’s mainly for testing purposes.
But then... if you're using a lot of PlugIns that support double-precision audio, and you want to create chains of them, the continuous conversion between 32- and 64-bit audio would cause more of a performance degradation than running the whole chain with 64-bit double precision audio.
Starting with V1.45, VSTHost is also available in a 64-bit version (that's 64-bit audio, not 64-bit code; the code is still 32-bit... we live in interesting times <sigh>) that can be separately downloaded from the web site mentioned on page 2 of this document. This version uses 64-bit signal processing internally, which means that:
1. all buffers are twice as big as in the 32-bit version; each and every operation needs to move twice as many bytes around;
2. if a PlugIn does not support 64-bit audio processing, VSTHost now has to convert all buffers to 32-bit before and after they are passed through the PlugIn
… in short, it's slower and bigger than the 32-bit version.
While the overall sound quality might be a little bit better if 64-bit audio processing is used, I sincerely doubt that anyone can hear this. VSTHost is not meant to be the main vehicle of a mastering studio, where the additional quality might make a difference. Well, it's your decision... a contemporary high-end machine surely has no problem with this version.
Speaker ConfigurationIf the PlugIn supports setting the speaker configuration, and thus the usable audio channels, you can configure the PlugIn's input and output speaker configuration here.
MIDI ParametersThis menu entry will probably get a better name in the next version... it's too similar to “MIDI -> Parameter” below...
Selecting this menu entry opens a window that allows to configure the PlugIn's MIDI properties.
37

MIDI Input Devices
Figure 39: PlugIn MIDI Parameters Window, Input Devices Tab
On the MIDI Input Devices tab, you can define the MIDI Input Devices used by this PlugIn; the default is to react on messages from all loaded devices. The Keyboard Bar and the MIDI Player are treated like MIDI Input devices here. You can select one of them by simply clicking on it; to select a range, click on the first and then shift-click on the last; to add or remove a specific device, control-click on it.
Filter Settings and TransformationsThe “Filter Settings...” and “Transformations...” buttons open a secondary dialog (both open the same dialog, they just start it on a different tab):
Filter Settings
Figure 40: Filter Settings and Transformations, Filter Settings Tab
38

Here, you can select MIDI Messages that are filtered; i.e., they are removed from the MIDI stream that is sent to this specific PlugIn. Common usages include:
• Disallowing messages from specific MIDI channels; this can be used to separately control up to 16 PlugIns from a single MIDI Input Device
• Preventing Program Change messages to change the PlugIn’s program• Inhibiting certain controllers• Preventing SysEx messages to reach the PlugIn
If you want to filter only some Note On/Off messages, you can define them by pressing the “...” Button on the right of the “Note On” check box, which opens the following sub-dialog:
Figure 41: Filter Notes Dialog
Here, any combination of Note On/Off messages can be filtered.
If you want to filter only some Control Change messages, you can define them by pressing the “...” Button on the right of the “Control Change” check box, which opens the following sub-dialog:
Figure 42: Filter Controllers Dialog
Here, any combination of Continuous Controller messages can be filtered.
39

Special Filter
Figure 43: Filter Settings and Transformations, Special Filter Tab
On this tab, you can define special MIDI filters that aren't possible with the “normal” filter page (see above). It uses the same logic as the “MIDI -> Parameter” window (see page 43 for details); the fields are described there.
While this window allows to set up very flexible filters that can filter MIDI messages in really extreme ways, there's a downside – setting up filters this way is quite a bit slower than with the “normal” filtering mechanism, so it is better to use that for simple filtering purposes.
Of course, this becomes less important if your computer is fast enough. Hey, it's just MIDI we're talking about here – 3000 bytes per second... unless it comes from a MIDI-over-IP or virtual MIDI cable, of course.
Transformations
Figure 44: Filter Settings and Transformations, Transformations Tab
40

Here, you can define MIDI transformations. The following transformations can be done:
Velocity Curve
This transformation is only valid for Note On messages. The predefined curves that can be loaded deal with various standard situations, such as adapting an external MIDI Master Keyboard's velocity curve to your personal preferences. You can, however, set up completely weird velocity transformations with this.
Each curve is defined through a set of nodes. Each of these nodes is shown as a little rectangle on the curve. There are two types of nodes: linear and spline nodes. A linear node is just that – it creates a straight line between itself and the adjacent nodes. A spline node, in contrast, creates a curved line between itself and the adjacent nodes. The two node types are shown in different colors – grey for linear nodes and cyan for spline nodes.
You can insert a node by double-clicking somewhere in the area. The type of the node can be toggled by left-clicking on it, and then right-clicking it, too, without releasing the left mouse button first. That may sound complicated, but it's relatively easy to do it. Unless you're a switched Mac user who has a handicapped one-button mouse, hee hee.... ahem.
Clicking on a node shows its current position. You can drag the selected node around freely in the range set by its left and right neighbors.
A node can be deleted by left-clicking on it and pressing the Del key on on keyboard.
Note: the velocity transformation can also be used to turn notes off – it allows to change the velocity to 0, which is interpreted as a Note Off message. This is intentionally possible, and if you drag a node to the lowest possible position, “Off” is shown to make it clear.
Channel
This transformation is valid for all “normal” MIDI messages that carry channel information. Using it, you can change the message's MIDI channel to a fixed value.
Transposition
This transposition is valid for all messages that have a note information – Note On, Note Off, and Polyphonic Aftertouch. Messages of this kind can be transposed up to 4 octaves in both directions.
Now let's carry on with the other tabs on the “MIDI Parameters” window we started to describe on page 37...
41

MIDI Output Devices
Figure 45: PlugIn MIDI Parameters Window, Output Devices Tab
On the MIDI Output Devices tab, you can define the MIDI Output devices that this PlugIn sends MIDI messages to. Normally, it sends to all loaded MIDI Output Devices. You can select one of them by simply clicking on it; to select a range, click on the first and then shift-click on the last; to add or remove a specific device, control-click on it.
The “Filter Settings...” and “Transformations...” buttons open a secondary dialog (both open the same dialog, they just start it on a different tab). See “Filter Settings and Transformations” on page 38 for details.
Note: in earlier versions, MIDI routing between PlugIns was set up on this tab; this is now done with MIDI links (see “Chain After” on page 50 for details).
Remote Control Port
Figure 46: PlugIn MIDI Parameters Window, Remote Control Port Tab
42
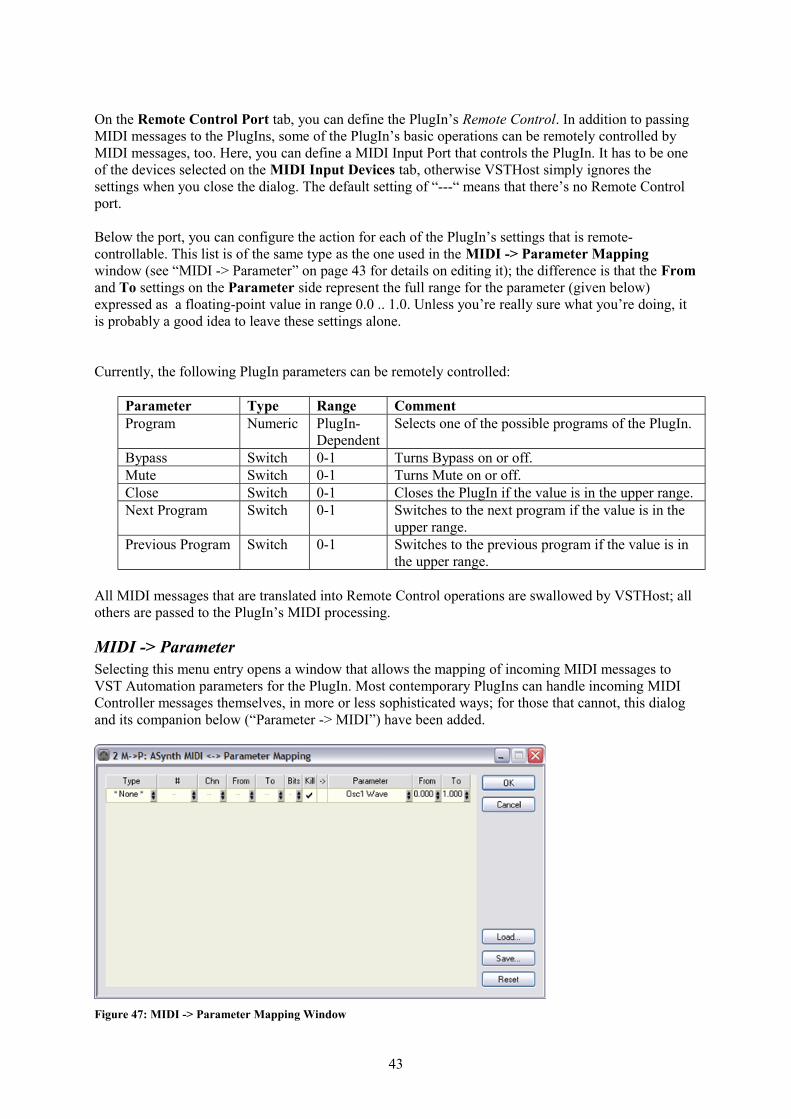
On the Remote Control Port tab, you can define the PlugIn’s Remote Control. In addition to passing MIDI messages to the PlugIns, some of the PlugIn’s basic operations can be remotely controlled by MIDI messages, too. Here, you can define a MIDI Input Port that controls the PlugIn. It has to be one of the devices selected on the MIDI Input Devices tab, otherwise VSTHost simply ignores the settings when you close the dialog. The default setting of “---“ means that there’s no Remote Control port.
Below the port, you can configure the action for each of the PlugIn’s settings that is remote-controllable. This list is of the same type as the one used in the MIDI -> Parameter Mapping window (see “MIDI -> Parameter” on page 43 for details on editing it); the difference is that the From and To settings on the Parameter side represent the full range for the parameter (given below) expressed as a floating-point value in range 0.0 .. 1.0. Unless you’re really sure what you’re doing, it is probably a good idea to leave these settings alone.
Currently, the following PlugIn parameters can be remotely controlled:
Parameter Type Range CommentProgram Numeric PlugIn-
DependentSelects one of the possible programs of the PlugIn.
Bypass Switch 0-1 Turns Bypass on or off.Mute Switch 0-1 Turns Mute on or off.Close Switch 0-1 Closes the PlugIn if the value is in the upper range.Next Program Switch 0-1 Switches to the next program if the value is in the
upper range.Previous Program Switch 0-1 Switches to the previous program if the value is in
the upper range.
All MIDI messages that are translated into Remote Control operations are swallowed by VSTHost; all others are passed to the PlugIn’s MIDI processing.
MIDI -> ParameterSelecting this menu entry opens a window that allows the mapping of incoming MIDI messages to VST Automation parameters for the PlugIn. Most contemporary PlugIns can handle incoming MIDI Controller messages themselves, in more or less sophisticated ways; for those that cannot, this dialog and its companion below (“Parameter -> MIDI”) have been added.
Figure 47: MIDI -> Parameter Mapping Window
43

This is one of the more complex windows in VSTHost, since there are quite a lot of possibilities.
Nearly all of the fields here are spin controls; i.e., they got a spin button on their right side that allows scrolling through the possible values by clicking in on the upper/lower half. Dragging the mouse up or down allows to change the speed at which the selection changes. Wherever possible, clicking the item with the right mouse button offers a context menu with all possible settings. Some of the fields can be edited directly by double-clicking them.
As soon as you change the value of the last line’s MIDI Type from *None* to anything else, a new *None* line is added to the list. This allows the definition of as many lines as you like. All lines containing a type of *Learn* or *None* are discarded when the window is closed with OK.
The window has two parts; the left part defines the incoming MIDI message(s), the right part defines which parameter is to be modified by them, and how. The two parts are discussed below.
There are some additional buttons on the window. Reset simply resets the list. Load… can be used to load a new mapping from a file, whereas Save… can be used to save the current mapping to a file.Attention: VSTHost does not check the PlugIn type when loading a mapping from a file; since only the Parameter number is saved, mappings created for a completely different PlugIn will be happily loaded, but may result in undesirable mappings, since each PlugIn has its own idea about which parameter is at which position.
Incoming MIDI MessageThis side defines the incoming MIDI message to be mapped to a parameter. It consists of the following fields:
Type This field defines the type of the MIDI message(s) processed for this line. Aiming to be as versatile as possible, there are quite a lot of choices here:*Learn* If this type is selected, VSTHost uses the next
incoming MIDI message to define the type of the MIDI message.
*None* This is the default value; lines of this type are ignored by MIDI processing.
Bank React on an incoming CC#0 (and eventually CC#32) message. This can be either a 7-bit or 14-bit message.
Program React on an incoming Program Change message.CC React on an incoming Continuous Controller
message. If the controller number is below 32, this can be either a 7-bit or 14-bit controller.
RPN React on an incoming RPN message bundle. Both Increment/Decrement and Data Entry are processed.
NRPN React on an incoming NRPN message bundle. Both Increment/Decrement and Data Entry are processed.
Pitch React on an incoming Pitch Wheel messageNote On Key React on an incoming Note On message’s key. # in
this case defines the velocity.Note On Velocity React on an incoming Note On message’s velocity. #
in this case defines the key.Note Off Key React on an incoming Note Off message’s key. # in
this case defines the velocity.Note Off Velocity React on an incoming Note Off message’s velocity. #
in this case defines the key.Poly Aftertouch Key React on an incoming Polyphonic Aftertouch
message’s key. Not many attached keyboards will be able to deliver this. # in this case defines the pressure.
Channel Pressure React on an incoming Channel Pressure message.Clock This, actually, isn’t a MIDI message; VSTHost can
44

determine the clock speed from a set of incoming MIDI Clock (F8) realtime messages, and use this as an input value for all kinds of MIDI <-> parameter operations. The From and To fields are set to VSTHost’s minimum and maximum clock speeds in this case.
Start, Continue, Stop These correspond to the MIDI Realtime messages of the same name. Since they can only send exactly one value (1), they aren’t really usable for MIDI <-> Parameter conversions, unless setting the parameter triggers an action, but they can be very useful for Remote Control (see “Remote Control Port” on page 16).
Then, there are the “CC Relative” types; these are not part of the official MIDI specification, but have been added by some companies to augment their product’s capabilities. They were implemented to use the new features provided by rotary encoders, something that simply wasn’t available when the MIDI standard was created. Using these encoders, you can pass relative controller changes to the program. This is a very nifty feature – you can send “increment the value a little” or “decrement the value a little more” messages from an external controller. Unfortunately, there’s no standard for this kind of message, so just about each major player did it in his own way… that’s why the modern controllers that can send Relative CC (for example, Behringer BCR-2000/BCF-2000, Doepfer Pocket Dial) normally provide more than one way to send them. Since I happen to own a Behringer BCR-2000, the types below correspond to the BCR-2000’s “Relative 1”, “Relative 2”, and “Relative 3” modes in their order.CC Relative 2C Relative changes are sent as 2’s-complement
numbers. In 7-bit mode, bit 6 is the sign bit, and in 14-bit mode, bit 13 is the sign bit. This is the mode used by Steinberg products, for example.
CC Relative Bin Relative changes are sent as binary values, with an offset (64 in 7-bit mode and 2048 in 14-bit mode).
CC Relative SB Relative changes are sent with a dedicated sign bit; in 7-bit mode, bit 6 is the sign bit, and in 14-bit mode, bit 13 is the sign bit. If set, the number is negative. This is the mode used by Apple/eMagic Logic, for example.
# For some types, an additional number can be given; for example, for CC messages, this is the controller number, while it is the note number for Note On/Off and Polyphonic Aftertouch messages. *All* can be used to react on the full range indiscriminately.
Chn Can be used to set the MIDI channel. *All* can be used to react on the full range indiscriminately.
FromTo
These define the MIDI value range. For 7-bit types, this is normally 0..127 (except for the relative CC types, where it is 0..64), whereas it is 0..16383 for 14-bit types (except for the relative CC types, where it is 0..8192). This can be used to further narrow the range of incoming messages; you can, for example, decide to only process Note On messages with a velocity between 64 and 127.If the range is reversed (i.e., To is lower than From), the values between To and From are excluded from processing; i.e., defining the range as 127..64 would only process incoming values of 0..63.
Bits For some types, you can define whether they are treated as 7-bit or 14-bit entitiesKill This flag defines whether the MIDI message is “killed”, i.e., removed from the
MIDI events list. This defaults to yes; normally, if you transform a MIDI message into a parameter, you won’t need to pass the MIDI message to the PlugIn any
45

more. If you want to pass the MIDI message anyway, a simple mouse click on the “Killing field” allows this.
Translation to...This field, which has the header text “->”, can be used to define a complex set of changes – it can be used to create a conjunction. If you click into this field, a “+” sign appears, and the outgoing parameter change fields (see below) disappear. In this mode, the incoming MIDI message is parsed, but is not used to change a parameter; VSTHost merely remembers whether the last message of the given type and channel would match the other criteria.
This result is then ANDed with the next line. Only if both lines' criteria are met, the incoming MIDI message is translated into a parameter.
Note: you can set up as many ANDed lines as you like, but they have to be followed by a line which finally determines which parameter is to be changed. If this final line is missing, all ANDed lines are discarded when the setup is saved.
Outgoing Parameter ChangeThis side defines which of the PlugIn’s parameters is to be modified by the incoming MIDI message. It consists of the following fields:
Parameter Here, you can select one of the PlugIn’s VST Parameters.If *Learn* is selected, VSTHost uses the parameter from the Automation value change that comes in; this allows you to select *Learn*, then switch to the PlugIn’s Editor window, twiddle the desired knob there, and (provided this is an automatable parameter) instantly have the corresponding parameter selected.
FromTo
Here, you can select the value range that is sent to the PlugIn. To do so, the incoming MIDI message’s value range is converted into a possible range of 0.000…1.000, which is then expanded into the value range given here.If the range is reversed (i.e., To is lower than From), the output values are reversed, too; i.e., by specifying a range of 1.000..0.000 here, an incoming value of 0.1 would result in a parameter value of 0.9 sent to the PlugIn.
Parameter -> MIDISelecting this menu entry opens a window that allows the mapping of incoming VST Automation parameter changes to outgoing MIDI messages for the PlugIn. Most contemporary PlugIns can handle incoming and outgoing MIDI Controller messages in more or less sophisticated ways; for those that cannot, this dialog and its companion above (“MIDI -> Parameter”) have been added.
Figure 48: Parameter -> MIDI Mapping Window
46

See “MIDI -> Parameter” above for a general description of the editing possibilities on this window.
The window has two parts; the left part defines the incoming VST Parameter change, the right part defines which set of MIDI messages is to be generated by them, and how. The two parts are discussed below.
There are some additional buttons on the window. Reset simply resets the list. Load… can be used to load a new mapping from a file, whereas Save… can be used to save the current mapping to a file.Attention: VSTHost does not check the PlugIn type when loading a mapping from a file; since only the Parameter number is saved, mappings created for a completely different PlugIn will be happily loaded, but may result in undesired mappings, since each PlugIn has its own idea about which parameter is at which position.
Incoming Parameter ChangeThis side defines which of the PlugIn’s parameters should generate a (set of) MIDI message(s). It consists of the following fields:
Parameter Here, you can select one of the PlugIn’s VST Parameters.If *Learn* is selected, VSTHost uses the parameter from the Automation value change that comes in; this allows you to select *Learn*, then switch to the PlugIn’s Editor window, twiddle the desired knob there, and (provided this is an automatable parameter) instantly have the corresponding parameter selected.
FromTo
Here, you can select the value range that’s accepted from the PlugIn. The defined maximal value range for VST parameters is 0.000…1.000.If the range is reversed (i.e., To is lower than From), the values between To and From are excluded from the generation; i.e., defining the range as 1.000..0.500 would only process incoming values between 0.000 and 0.49°.
Translation to..This field, which has the header text “->”, can be used to define a complex set of changes – it can be used to create a conjunction. If you click into this field, a “+” sign appears, and the outgoing MIDI message fields (see below) disappear. In this mode, the incoming parameter change is parsed, but is not used to create a MIDI message; VSTHost merely remembers whether the last change of the given parameter would be in the given range.
This result is then ANDed with the next line. Only if both lines' criteria are met, the incoming parameter change creates a MIDI message.
Note: you can set up as many ANDed lines as you like, but they have to be followed by a line which finally determines which MIDI message is to be generated. If this final line is missing, all ANDed lines are discarded when the setup is saved.
Outgoing MIDI MessageThis side defines the (set of) MIDI Message(s) generated by the parameter change. These messages are then treated just like original MIDI messages originating from the PlugIn – they can be sent to all configured MIDI Outputs, or to another PlugIn (where they could even be modified to VST Parameter changes again, allowing rather bizarre inter-PlugIn modulations). It consists of the following fields:
Type This field defines the type of the MIDI messages. Aiming to become as versatile as possible, there are quite a lot of choices here:*Learn* If this type is selected, VSTHost uses the next
incoming MIDI message to define the type of the MIDI message (this is a bit of a hack; an incoming MIDI message is used to define the type of an outgoing MIDI message… oh well, it works…).
*None* This is the default value; lines of this type are ignored by MIDI processing.
47

Bank Creates an outgoing CC#0 (and eventually CC#32) message. This can be either a 7-bit or 14-bit message.
Program Creates an outgoing Program Change message.CC Creates an outgoing CC message. This can be either a
7-bit or 14-bit message.RPN Creates an outgoing RPN message bundle.NRPN Creates an outgoing NRPN message bundle.Pitch Creates an outgoing Pitch Wheel messageNote On Key Creates an outgoing Note On message’s key. The
velocity is defined by #.Note On Velocity Creates an outgoing Note On message’s velocity. The
key is defined by #.Note Off Key Creates an outgoing Note Off message’s key. The
release velocity is defined by #.Note Off Velocity Creates an outgoing Note Off message’s velocity. The
key is defined by #.Poly Aftertouch Key Creates an outgoing Polyphonic Aftertouch message’s
key. Not many attached keyboards will be able to deliver this. The aftertouch pressure is defined by #.
Polyphonic Aftertouch
Creates an outgoing Polyphonic Aftertouch message. Not many attached keyboards will be able to deliver this. The key is defined by #.
Channel Pressure Creates an outgoing Channel Pressure message.Clock This doesn’t really make much sense – although a
specially crafted PlugIn might put it to use. The parameter value, whatever it is, triggers a single MIDI Clock (F8) realtime message.
Start, Continue, Stop These also don’t make much sense in a normal environment. The parameter value, whatever it is, triggers a single MIDI Start, Continue, or Stop realtime message.
Then, there are the “CC Relative” types; these are not part of the official MIDI specification, but have been added by some companies to augment their product’s capabilities in a makeshift, non-standardized way. They were implemented to use the new features provided by rotary encoders, something that simply wasn’t available when the MIDI standard was created. Using these encoders, you can pass relative controller changes to the program. This is a very nifty feature – you can send “increment the value a little” or “decrement value a little more” messages from an external controller. Unfortunately, there’s no standard for this kind of message, so just about each major player did it in his own way… that’s why the modern controllers that can send Relative CC (for example, Behringer BCR-2000/BCF-2000, Doepfer Pocket Dial) normally provide more than one way to send them. Since I happen to own a Behringer BCR-2000, the types below correspond to the BCR-2000’s “Relative 1”, “Relative 2”, and “Relative 3” modes.CC Relative 2C Relative changes are sent as 2’s-complement
numbers. This is the mode used by Steinberg products, for example.
CC Relative Bin Relative changes are sent as binary values, with an offset (64 in 7-bit mode and 2048 in 14-bit mode).
CC Relative SB Relative changes are sent with a dedicated sign bit; in 7-bit mode, bit 6 is the sign bit, and in 14-bit mode, bit 13 is the sign bit. If set, the number is negative. This is the mode used by Apple/eMagic Logic, for example.
# For some types, an additional number can be given; for example, for CC
48

messages, this is the controller number, while it is the note number for Note On/Off Velocity and Polyphonic Aftertouch messages.
Chn Can be used to set the MIDI channel.FromTo
These define the MIDI value range. For 7-bit types, this is normally 0..127 (except for the relative CC types, where it is 0..64), whereas it is 0..16383 for 14-bit types (except for the relative CC types, where it is 0..8192). This can be used to further narrow the range of incoming messages; you can, for example, decide to only process Note On messages with a velocity between 64 and 127.If the range is reversed (i.e., To is lower than From), the values between To and From are reversed, too.
Bits For some types, you can define whether they are treated as 7-bit or 14-bit entities
PermanentThis menu entry is reserved for future use. Just ignore it
Load BankSelecting this menu entry opens a dialog where you can load a program bank (normally a file with extension “.fxb”) into the current PlugIn. Once you specify one and save the performance, VSTHost loads this bank into the PlugIn automatically whenever the performance containing the PlugIn is loaded. If the PlugIn banks are saved automatically (see “Autosave PlugIn Banks” on page 29 for details), VSTHost treats this as an import; as soon as the performance is saved, the loaded bank is saved into VSTHost’s data directory for the current bank, and this copy is used from then on.
Save BankSelecting this menu entry saves the current PlugIn’s program bank into the file. If there is no current program bank defined for the PlugIn (i.e., no Load Bank operation has been done before), it acts like Save Bank As.
Save Bank AsSelecting this menu entry opens a dialog where you can select a new file name (normally a file with extension “.fxb”) to save the current PlugIn’s program bank into.
Autosave BankThis menu entry defines whether the PlugIn's program bank is automatically saved with the performance. Initially, it is checked; however, there may be circumstances where you don't want this to happen. In this case, turn it off.
Reload BankThis menu entry is nearly synonymous to “Autosave Bank“ above, but it covers the other way – if it is checked, the PlugIn's program bank is automatically loaded when the PlugIn is part of a performance that's just being loaded. Initially, it is checked; however, there may be circumstances where you don't want this to happen. In this case, turn it off.
BypassSelecting this menu entry toggles the Bypass mode for the effect on and off. In contrast to Mute (see below), bypassing an effect doesn’t turn off the whole chain, since all effects that are chained after the bypassed one still receive its input.
Note: bypassing an effect does not turn it off; it still receives input, and it still generates output (which is silently discarded), since it has to deliver the correct output as soon as Bypass is turned off again. So, no performance gain here .
49

In V1.44, this behavior has been refined a bit; if the PlugIn reports that it can be bypassed (i.e., if canDo(“bypass”) returns 1), VSTHost calls the PlugIn’s setBypass() method to let it define whether bypassing turns processing off completely or whether the PlugIn does a “soft bypass” on its own.
MuteAh yes, a very important menu entry. Selecting this (un)mutes the current effect. In contrast to Bypass (see above), this completely mutes the effect’s output; this means that all effects that are chained to the muted one receive only silence as input.
Note: muting an effect does not turn it off; it still receives input, and it still generates output (which is silently discarded), since it has to deliver the correct output as soon as Mute is turned off again. So, no performance gain here .In V1.44, this behavior has been refined a bit; if the PlugIn reports that it can be bypassed (i.e., if canDo(“bypass”) returns 1), VSTHost calls the PlugIn’s setBypass() method to let it define whether bypassing turns processing off completely or whether the PlugIn does a “soft bypass” on its own.
Chain AfterSelecting this menu entry allows to define PlugIn Chains; a chain, in VSTHost, is a sequence of PlugIns that are linked together.
The {In} pseudo-PlugIn provides audio input from VSTHost to a PlugIn (unless it has no inputs), then the PlugIn's output is passed on to the next element(s) in the chain, and so on, until the {Out} pseudo-PlugIn has been reached; this PlugIn’s output generates the real VSTHost audio output.
Note: versions earlier than V1.46 used a rather complicated setup with Send and Insert links; this is not necessary any more, since there are dedicated audio input and output PlugIns.
You can set up complicated setups this way. Each PlugIn can be linked to a multitude of other PlugIns.
Selecting the Chain After menu entry opens the following dialog:
Figure 49: Chain PlugIn After Dialog
This dialog lists all PlugIns that the current PlugIn can be “chained after”, or “linked to”. It does not include PlugIns that include the current PlugIn in their predecessor chains, because that would lead to recursive setups – and this would kill VSTHost.
There are some buttons available for each entry:
- this button is used to link the current PlugIn’s Audio channels after the selected one. Selected PlugIns look like this:
The button has changed to , and the line is shown in a different color. This button is only available if the PlugIn can deliver audio output.
50
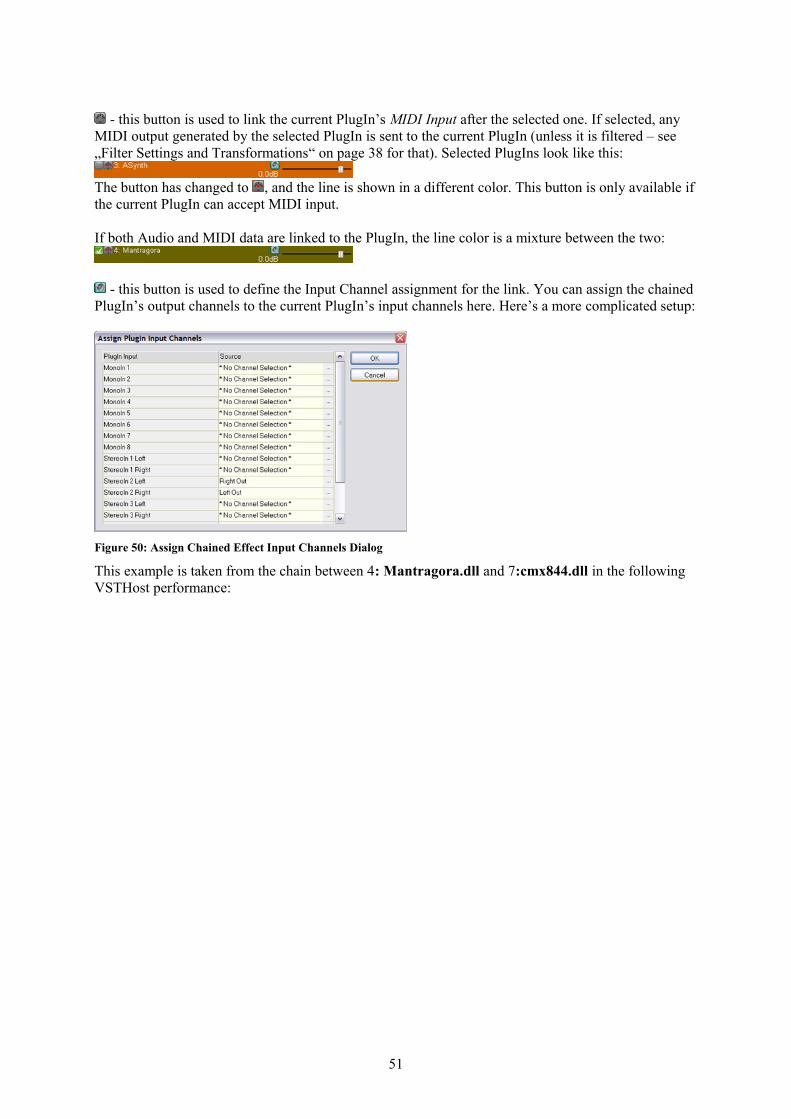
- this button is used to link the current PlugIn’s MIDI Input after the selected one. If selected, any MIDI output generated by the selected PlugIn is sent to the current PlugIn (unless it is filtered – see „Filter Settings and Transformations“ on page 38 for that). Selected PlugIns look like this:
The button has changed to , and the line is shown in a different color. This button is only available if the current PlugIn can accept MIDI input.
If both Audio and MIDI data are linked to the PlugIn, the line color is a mixture between the two:
- this button is used to define the Input Channel assignment for the link. You can assign the chained PlugIn’s output channels to the current PlugIn’s input channels here. Here’s a more complicated setup:
Figure 50: Assign Chained Effect Input Channels Dialog
This example is taken from the chain between 4: Mantragora.dll and 7:cmx844.dll in the following VSTHost performance:
51

Figure 51: complicated setup with multichannel mixer
Then, there’s a little slider that allows to define the level passed through this link; if, for example, you want to chain a Reverb PlugIn after an Instrument PlugIn, you would define the link as a Send Link and reduce the level in this link to, say, -10dB. In this way, both the original instrument and the reverb are heard, but the reverb contributes much less to the overall audio output.
Note: if you already linked some PlugIns, you can activate the “Chain After” dialog of the target PlugIn by double-clicking on a link line on the main window.
UnchainThis is a bit tricky… the Chain After dialog can be used to set up the PlugIn(s) that a PlugIn is linked to. Deselecting the link on that dialog removes it, breaking the chain if there’s any other PlugIn linked to the current one.
Selecting the Unchain menu item, however, removes all links to and from the current PlugIn – but it leaves the rest of the chain intact and “glues” predecessors and successors together. That is, all predecessors and successors remain linked, just the current PlugIn is entirely removed from the chain.
Note: the effect can be quite dramatic... if you unchain PlugIn 7: CMX844 from the performance shown above, 20 new links suddenly appear! So, please use this with caution.
Export XMLStarting with the VST SDK 2.4, Steinberg added a new feature to the VST specification – an XML definition to refine the parameter definitions of a PlugIn. Normally, the parameters are displayed as a rather non-descriptive bunch of short strings and attached values (see “Toolbar” on page 65 for details). To quote the VST SDK: “The VST Parameters Structure XML definition provides an easy way to structure parameters of existing VST Plug-Ins hierarchically, without having to recompile the Plug-In binary.” Well, in case of VSTHost, this doesn’t really apply yet (the hierarchical definitions are ignored), but at least it can be used to give the parameters more descriptive names, add tags to
52
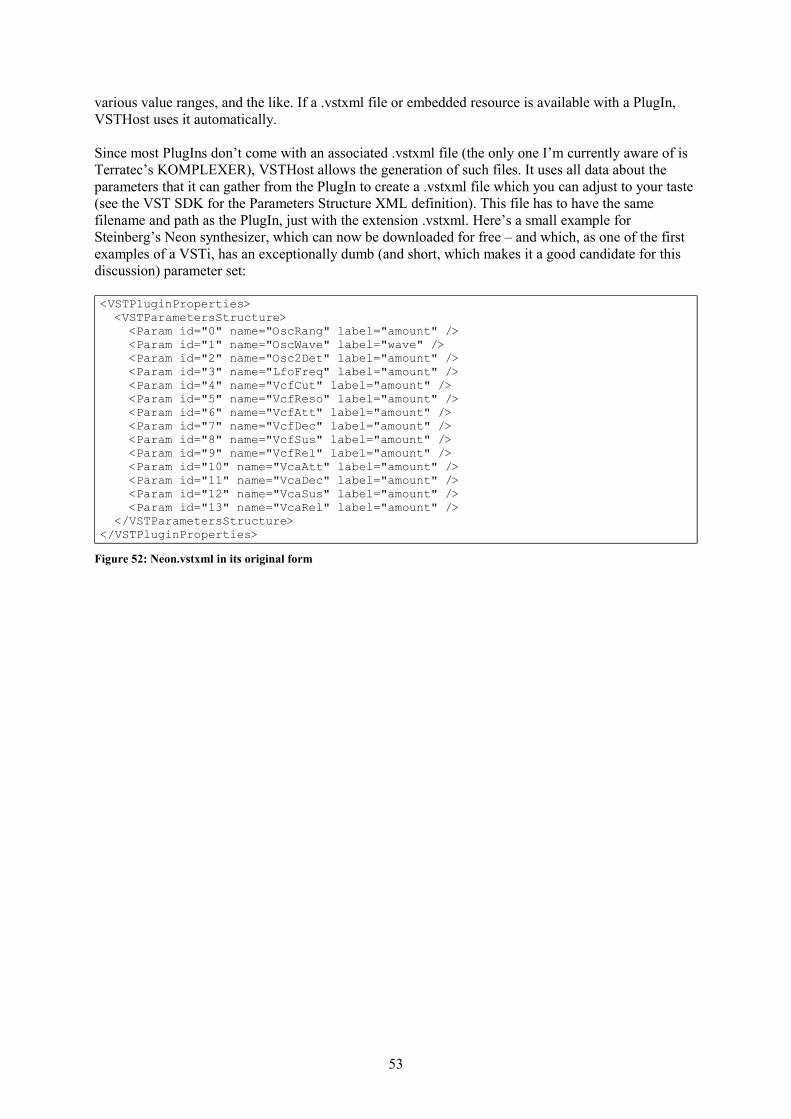
various value ranges, and the like. If a .vstxml file or embedded resource is available with a PlugIn, VSTHost uses it automatically.
Since most PlugIns don’t come with an associated .vstxml file (the only one I’m currently aware of is Terratec’s KOMPLEXER), VSTHost allows the generation of such files. It uses all data about the parameters that it can gather from the PlugIn to create a .vstxml file which you can adjust to your taste (see the VST SDK for the Parameters Structure XML definition). This file has to have the same filename and path as the PlugIn, just with the extension .vstxml. Here’s a small example for Steinberg’s Neon synthesizer, which can now be downloaded for free – and which, as one of the first examples of a VSTi, has an exceptionally dumb (and short, which makes it a good candidate for this discussion) parameter set:
<VSTPluginProperties> <VSTParametersStructure> <Param id="0" name="OscRang" label="amount" /> <Param id="1" name="OscWave" label="wave" /> <Param id="2" name="Osc2Det" label="amount" /> <Param id="3" name="LfoFreq" label="amount" /> <Param id="4" name="VcfCut" label="amount" /> <Param id="5" name="VcfReso" label="amount" /> <Param id="6" name="VcfAtt" label="amount" /> <Param id="7" name="VcfDec" label="amount" /> <Param id="8" name="VcfSus" label="amount" /> <Param id="9" name="VcfRel" label="amount" /> <Param id="10" name="VcaAtt" label="amount" /> <Param id="11" name="VcaDec" label="amount" /> <Param id="12" name="VcaSus" label="amount" /> <Param id="13" name="VcaRel" label="amount" /> </VSTParametersStructure></VSTPluginProperties>
Figure 52: Neon.vstxml in its original form
53
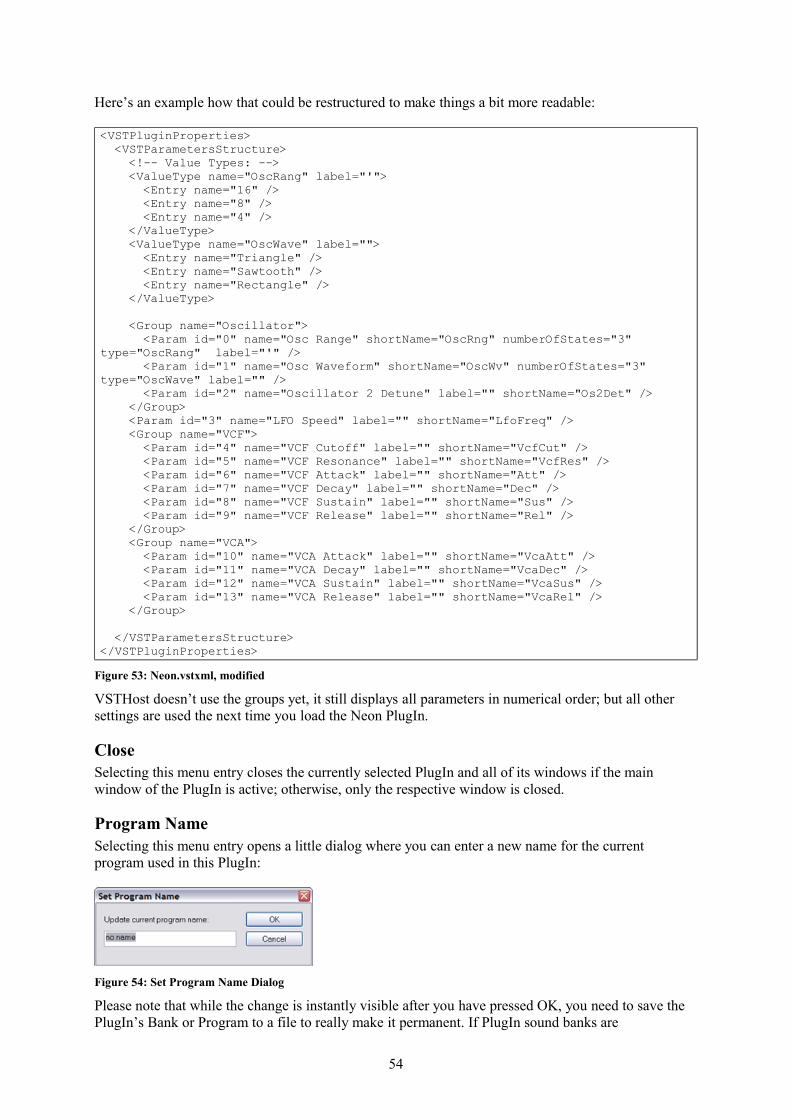
Here’s an example how that could be restructured to make things a bit more readable:
<VSTPluginProperties> <VSTParametersStructure> <!-- Value Types: --> <ValueType name="OscRang" label="'"> <Entry name="16" /> <Entry name="8" /> <Entry name="4" /> </ValueType> <ValueType name="OscWave" label=""> <Entry name="Triangle" /> <Entry name="Sawtooth" /> <Entry name="Rectangle" /> </ValueType>
<Group name="Oscillator"> <Param id="0" name="Osc Range" shortName="OscRng" numberOfStates="3" type="OscRang" label="'" /> <Param id="1" name="Osc Waveform" shortName="OscWv" numberOfStates="3" type="OscWave" label="" /> <Param id="2" name="Oscillator 2 Detune" label="" shortName="Os2Det" /> </Group> <Param id="3" name="LFO Speed" label="" shortName="LfoFreq" /> <Group name="VCF"> <Param id="4" name="VCF Cutoff" label="" shortName="VcfCut" /> <Param id="5" name="VCF Resonance" label="" shortName="VcfRes" /> <Param id="6" name="VCF Attack" label="" shortName="Att" /> <Param id="7" name="VCF Decay" label="" shortName="Dec" /> <Param id="8" name="VCF Sustain" label="" shortName="Sus" /> <Param id="9" name="VCF Release" label="" shortName="Rel" /> </Group> <Group name="VCA"> <Param id="10" name="VCA Attack" label="" shortName="VcaAtt" /> <Param id="11" name="VCA Decay" label="" shortName="VcaDec" /> <Param id="12" name="VCA Sustain" label="" shortName="VcaSus" /> <Param id="13" name="VCA Release" label="" shortName="VcaRel" /> </Group>
</VSTParametersStructure></VSTPluginProperties>
Figure 53: Neon.vstxml, modified
VSTHost doesn’t use the groups yet, it still displays all parameters in numerical order; but all other settings are used the next time you load the Neon PlugIn.
CloseSelecting this menu entry closes the currently selected PlugIn and all of its windows if the main window of the PlugIn is active; otherwise, only the respective window is closed.
Program NameSelecting this menu entry opens a little dialog where you can enter a new name for the current program used in this PlugIn:
Figure 54: Set Program Name Dialog
Please note that while the change is instantly visible after you have pressed OK, you need to save the PlugIn’s Bank or Program to a file to really make it permanent. If PlugIn sound banks are
54

automatically saved (see “Autosave PlugIn Banks” on page 29 for details), this is taken care of when the performance is saved.
Load ProgramSelecting this menu entry opens a dialog where you can load a program (normally a file with extension “.fxp”) into the current PlugIn.
Save Program AsSelecting this menu entry opens a dialog where you can save the current program of the current PlugIn into a file (normally a file with extension “.fxp”)
Next ProgramSelecting this menu item changes the PlugIn’s current program to the next program in the list.
Previous ProgramSelecting this menu item changes the PlugIn’s current program to the previous program in the list.
Export ProgramsSelecting this menu item opens a dialog where you can select a folder; VSTHost then saves all programs of the PlugIn into this folder. Each program is saved under an automatically generated name of the form PlugInName_ProgramNumber.ProgramName.fxp – looks rather complicated when written in this form, but if you look at an example, like “ASynth_001.PWBass.fxp”, it becomes fairly obvious.
Programs mm-nnA PlugIn can define how many programs it supports. Some have no program, some have one, some have 10, others have 128… and so on. Since a single list of potentially thousands of programs would be rather awkward to use, VSTHost splits it into manageable parts and displays a list of submenus for these. Selecting one of the items on the submenu loads the selected program into the PlugIn.
The above three menu items change the current program for a PlugIn; VSTHost remembers this program number, together with an eventually loaded Program Bank. VSTHost loads this program into the PlugIn automatically whenever the VSTHost performance containing the PlugIn is loaded.
Note: VSTHost does not automatically save the PlugIn’s program bank. If the PlugIn relies on a specific setup that’s stored in a bank file, please remember to save that before you save the performance. Since V1.43, this can be changed (see “Autosave PlugIn Banks” on page 29).
Engine MenuThis menu contains entries that control the overall operation of the VST Audio Engine.
Figure 55: Engine Menu
55

RunSelecting this menu entry toggles the engine’s run mode. When VSTHost is started the first time, the engine is turned on; selecting this menu entry, or clicking on the corresponding toolbar button, turns it off.
This menu entry is primarily used for debugging purposes; sometimes, if you just want to debug various display aspects of a PlugIn, it’s not necessary to keep the full audio engine running in the background, consuming tons of precious CPU cycles.
RestartStops and restarts the audio engine. Mainly useful if something goes wrong (buffer size too small, for example, leading to synchronization errors between VSTHost and the ASIO driver).
If Player Sync is not checked (see “Player Sync” on page 61 for details), this can be used to reset the current position.
ConfigureThis is one of the many tabbed dialogs in VSTHost. It has the following tabs:
Input AssignSelecting this tab opens the following dialog:
Figure 56: Engine Configuration, Assign Input Channels Tab
Just as a PlugIn can have its inputs reassigned (see “Chain After” on page 50), so can VSTHost’s Audio Engine.
You can define the number of audio input channels that VSTHost's engine uses internally; the default setting of -1 means “use as many channels as provided by the current audio input device”. If you want a consistent setup for multiple audio devices, like “the internal engine uses 2 input channels, no matter what the audio interface provides”, you can set it up here.
On the left side, the channels used by VSTHost’s VST audio engine are listed; on the right side, you can select one of the channels provided by the loaded Wave Input device. Click on the “…” on the right side of the Source column to select from the available channels.
This allows a reassignment, or removal of certain unwanted channels. See the above figure – the DMX 6fire 24/96 ASIO driver presents the CD In Left and Right channels in positions 1 and 2; I prefer to
56

have the Line Inputs there so that loaded Effect PlugIns automatically use these if their input assignment is not specifically set.
Output AssignSelecting this tab shows the following, already familiar, dialog:
Figure 57: Engine Configuration, Assign Output Channels Tab
This works just like Input Assign above, but in the other direction. Here, you can assign an output channel provided by the Wave Output device to each of the VSTHost audio engine’s internal channels.
You can define the number of output audio channels that VSTHost's engine uses internally; the default setting of -1 means “use as many channels as provided by the current audio output device”. If you want a consistent setup for multiple audio devices, like “the internal engine uses 2 output channels, no matter what the audio interface provides”, you can set it up here.
PrioritiesSelecting this tab shows the following dialog:
Figure 58: Engine Configuration, Priorities Tab
57

Normally, this can be left untouched; VSTHost automatically sets the priority to “very high” before loading an ASIO driver and then reverts to the configured setting. This leads to a reasonable behavior in most cases. If the default settings don’t work satisfactorily with your specific configuration, you can play with VSTHost’s settings until you find a solution that works. Be careful, however – setting the process priority to Realtime and the thread priority to Time Critical can lead to situations where VSTHost consumes all of the computer’s CPU time and doesn’t let anyone else work – the computer freezes. Especially dangerous on slower machines. You’ve been warned – “Don’t press this button!”
Speed
Figure 59: Speed Tab
If you don’t have the main toolbar (see “Toolbar” on page 65 for details) activated, you can define VSTHost’s current BPM rate using this tab. With this, you can define the speed that VSTHost reports to the loaded PlugIns. The Load from performance check box duplicates the function of the “LoadBPM” menu entry (see below).
OSC
58

Figure 60: OSC Tab
OSC is an acronym for “Open Sound Control”; this is a transport protocol specification that allows to control many aspects of VSTHost over a network connection. The OSC specification can be retrieved from http://opensoundcontrol.org. VSTHost currently offers a rather limited implementation; for details, see “Appendix B: OSCImplementation” on page 80.
On this tab, you can configure the network connection VSTHost uses for the OSC service.
VSTHost implements the following network protocols, so that it should interface with the widest variety of OSC controllers (Jazzmutant Lemur, iPad, …), which you can select from the Transport combo box:
UDP The most commonly used protocol, where OSC messages are transmitted as UDP packets
TCP OSC 1.0-compatible TCP transport, where the packets are transmitted with a leading 4-byte length information in binary form.
TCP Slip OSC 1.1/2.0-compatible TCP transport which uses SLIP frames to delimit the packets, which is a more robust form
Since OSC only defines the protocol of the packets traveling around, without limiting the underlying transport mechanism, you have to find out which transport method suits your controller best.
Port defines the UDP/TCP port to use. A commonly used value, 7701, is used as default value, but you can use anything you like (… if you know what you're doing! ☺).
Note: activating one of the network transports will most likely trigger the Windows firewall, if you are using any post-Windows 2000 operating system; you'll be asked whether you really want to allow VSTHost to access the network. This is normal, since VSTHost installs a network service in this case that allows other computers to access it – so you'd better allow it, or other PCs and/or OSC-compatible controllers won't be able to access VSTHost.
Audio ThruThis menu entry can be toggled to define whether VSTHost directly passes its Audio input to the output. If checked, the audio input is not only sent through eventually loaded PlugIns, but also directly
59
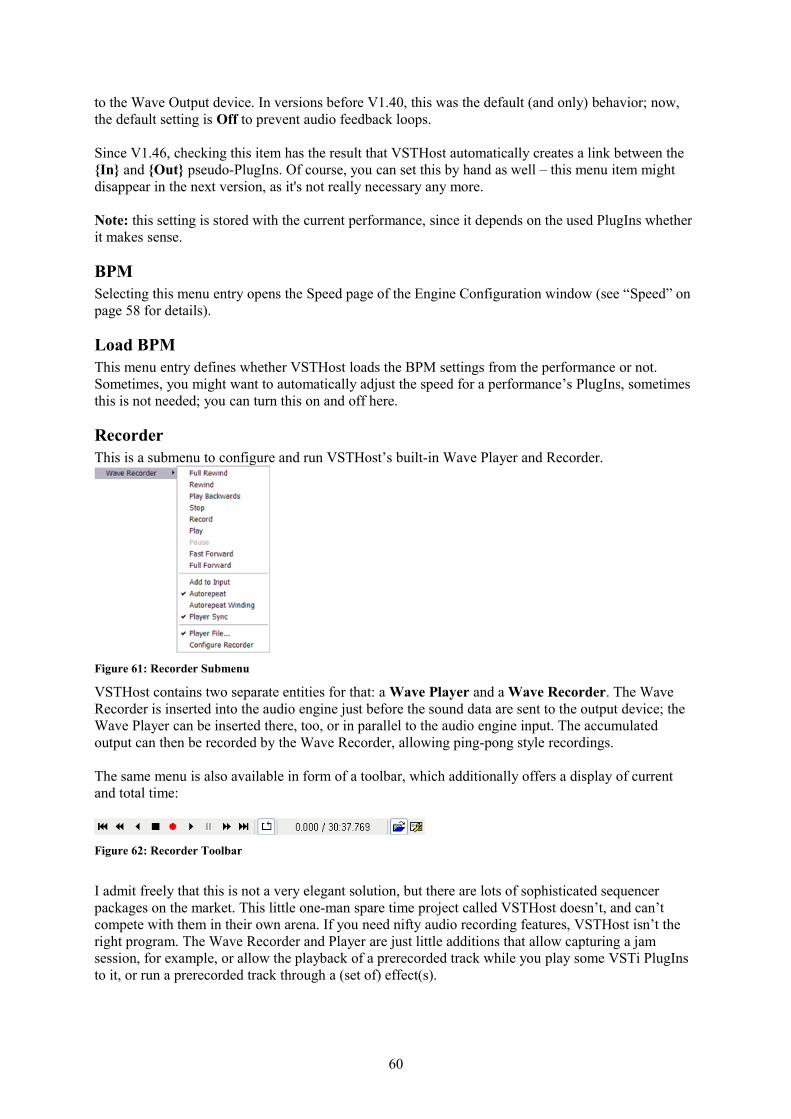
to the Wave Output device. In versions before V1.40, this was the default (and only) behavior; now, the default setting is Off to prevent audio feedback loops.
Since V1.46, checking this item has the result that VSTHost automatically creates a link between the {In} and {Out} pseudo-PlugIns. Of course, you can set this by hand as well – this menu item might disappear in the next version, as it's not really necessary any more.
Note: this setting is stored with the current performance, since it depends on the used PlugIns whether it makes sense.
BPMSelecting this menu entry opens the Speed page of the Engine Configuration window (see “Speed” on page 58 for details).
Load BPMThis menu entry defines whether VSTHost loads the BPM settings from the performance or not. Sometimes, you might want to automatically adjust the speed for a performance’s PlugIns, sometimes this is not needed; you can turn this on and off here.
RecorderThis is a submenu to configure and run VSTHost’s built-in Wave Player and Recorder.
Figure 61: Recorder Submenu
VSTHost contains two separate entities for that: a Wave Player and a Wave Recorder. The Wave Recorder is inserted into the audio engine just before the sound data are sent to the output device; the Wave Player can be inserted there, too, or in parallel to the audio engine input. The accumulated output can then be recorded by the Wave Recorder, allowing ping-pong style recordings.
The same menu is also available in form of a toolbar, which additionally offers a display of current and total time:
Figure 62: Recorder Toolbar
I admit freely that this is not a very elegant solution, but there are lots of sophisticated sequencer packages on the market. This little one-man spare time project called VSTHost doesn’t, and can’t compete with them in their own arena. If you need nifty audio recording features, VSTHost isn’t the right program. The Wave Recorder and Player are just little additions that allow capturing a jam session, for example, or allow the playback of a prerecorded track while you play some VSTi PlugIns to it, or run a prerecorded track through a (set of) effect(s).
60

The Wave Player mimics a tape recorder, just like the ones you all might know since early childhood, with some little add-ons – you can, for example, play the loaded file backwards, and you can record and playback at the same time.
Whenever the Stop button or menu entry is clicked while recording, VSTHost allows you to determine whether and under which name the recording should be saved.
Some of the menu items, however, do require a little explanation:
Add to InputThis menu entry can be used to toggle the Wave Player’s position. If it is checked, a played audio file is played in parallel to the audio engine’s input so that you can run it through (chains of) loaded effects. If it is unchecked, a played audio file is played in parallel to the accumulated output of all loaded PlugIns.
AutorepeatThis menu entry can be used to toggle between normal playback mode, in which the Player stops when it reaches the end of the input file, and auto-repeat mode, where it automatically restarts playback.
Autorepeat WindingThis menu entry can be used to toggle between normal winding mode, in which the Player stops when it reaches the end of the input file, and auto-repeat mode, where it automatically restarts winding.
Player SyncThis menu entry can be used to change the semantics of the Wave Player a bit.
If unchecked, the player is treated as a separate sound generation device, and VSTHost uses a free-running transport information sent to the PlugIns (i.e., it always reports “playback is running”, and the current position is incremented).
If checked, however, the Wave Player acts as a simple transport control for the VST engine. If you load a PlugIn that has sequencing capabilities (Phrazor comes to mind, or Jamstix), this can be used to control the Start/Stop/Position information sent to the PlugIn. This functionality also works if no file is loaded into the Wave Player; in this case, it just “plays” silence until Stop is pressed, and Full Forward cannot be selected (there’s no defined end position).
This is not a very elaborate transport control yet (you can’t, for example, set loop positions), but sufficient for basic transport control purposes.
Player FileHere, you can define the file that the Wave Player uses. Most of the transport menu entries / toolbar buttons will be grayed out until a valid Wave file has been loaded. Before V1.43, this was a global setting; now, it is stored with the current performance.
Normally, VSTHost loads only .wav files; you can, however, teach it to load .mp3 files as well. VSTHost can use the mpg123 package for this. You can find it at http://www.mpg123.org.
Since there might be “interesting” licensing problems with the MPEG consortium (not with the libmpg123 creator, as this is licensed under the LGPL, so I could embed it without problems) if VSTHost simply included this package, I've decided against doing it. You have to download and install it yourself – this way, there should be no licensing problems.
Here's how to get it, if you haven't installed it already:
61

1. You have to download a version from http://www.mpg123.org - on their download page, there's this nice little paragraph:Win32 and Win64 binaries
You Windows folks are lucky since version 1.6.0: Patrick joined the team as a Windows developer and is providing binaries regulary, see download/win32/! Also, JonY chipped in with builds for 64bit Windows, to be found in download/win64/. The latter files are signed with JonY's GPG key. He likes to play with freshest toolsets, p.ex. 1.12.4 binaries are built with gcc 4.6 and link time optimization. So, go to the Win32 or Win64 download directory now, depending on the version of VSTHost that you're using. There's a whole range of files of different versions there; when I wrote this paragraph, I used http://www.mpg123.org/download/win32/mpg123-1.13.0-x86.zip and http://www.mpg123.org/download/win64/mpg123-1.13.0-x86-64.zip. At the time you read this, there might be a better version available; as long as the .zip contains a file called "libmpg123-0.dll", you should be able to use the latest&greatest version.
2. Once you decided on and downloaded a file, all you need to do is to unzip the file libmpg123-0.dll contained in the archive to a position that VSTHost finds in the library search path. I put it into the Windows system directory, but that's not really necessary; the easiest place, if you don't need libmpg123-0.dll in any other product, is the directory where you installed VSTHost.Of course, you can unzip the complete package and enjoy the nice little MP3 player application it contains, but... well, you already got the Windows Media Player, and/or WinAMP, and/or... still, you can. If you want to look at the license, or add the DLL to your own programs, you find everything you need in the package.
3. Once you installed the libmpg123 package so that VSTHost can find it, and restarted VSTHost if it was running, it should be able to load .mp3 files, too; the dialog should show come up with the file type “Audio Files (*.wav; *.mp3)” now.
Configure RecorderSelecting this menu item brings up the following dialog:
Figure 63: Wave Recorder Configuration Dialog
Here, you can define the format of files that are recorded by VSTHost. The default setting is rather conservative – 2 channels, 16 bit integer. This format has the big advantage that the generated files are comparatively small and can be read by virtually every wave file editor package in existence. It isn’t the best format, however…
Most modern sound cards for musicians can do much better. They can deliver accurate sampling and playback of 24 bit audio streams, on potentially dozens of channels – far more than VSTHost’s CD-compatible default format permits.
The Channels setting should not exceed the available number of output channels in the VSTHost audio engine – while you can set it to up to 32 channels, most of them would simply contain silence. A rather costly silence, since each little sample of silence occupies at least a byte on your hard disk, more likely two, or even four bytes.
The Bits setting is a bit misleading. You can set the number of bits per sample, but internally VSTHost treats them the following way:
• 8 generates 8-bit unsigned samples; like in the old SoundBlaster 1 days
62
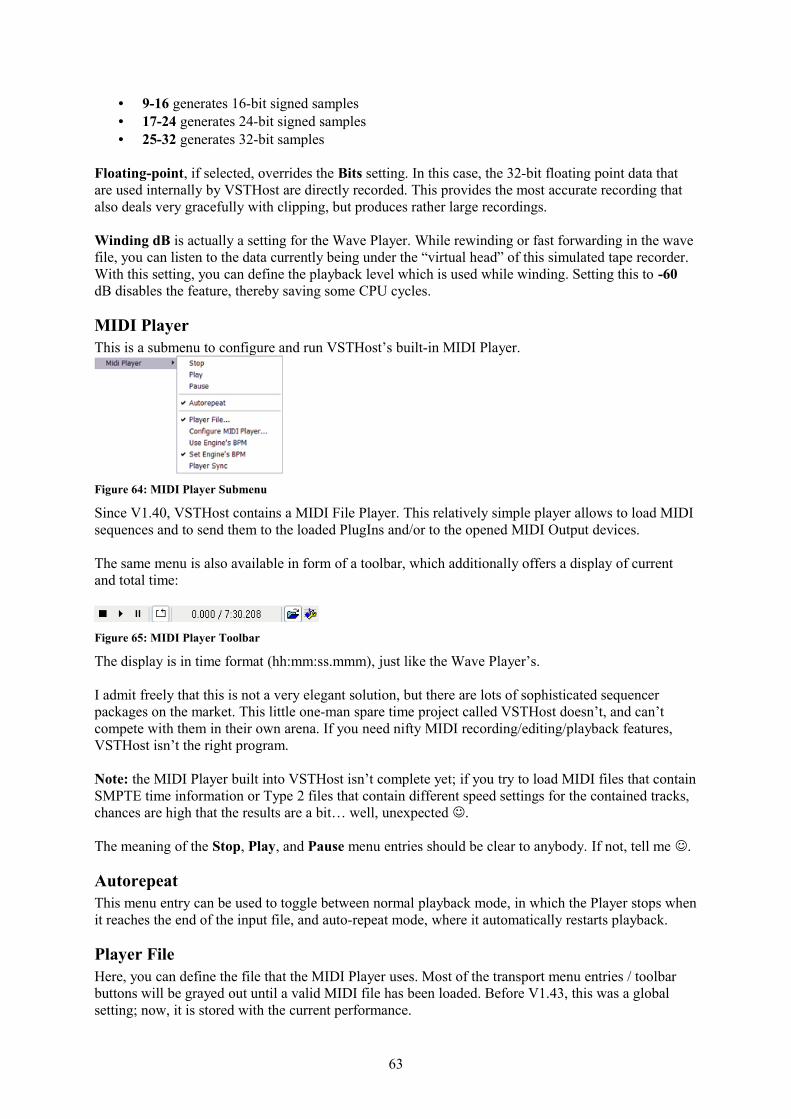
• 9-16 generates 16-bit signed samples• 17-24 generates 24-bit signed samples• 25-32 generates 32-bit samples
Floating-point, if selected, overrides the Bits setting. In this case, the 32-bit floating point data that are used internally by VSTHost are directly recorded. This provides the most accurate recording that also deals very gracefully with clipping, but produces rather large recordings.
Winding dB is actually a setting for the Wave Player. While rewinding or fast forwarding in the wave file, you can listen to the data currently being under the “virtual head” of this simulated tape recorder. With this setting, you can define the playback level which is used while winding. Setting this to -60 dB disables the feature, thereby saving some CPU cycles.
MIDI PlayerThis is a submenu to configure and run VSTHost’s built-in MIDI Player.
Figure 64: MIDI Player Submenu
Since V1.40, VSTHost contains a MIDI File Player. This relatively simple player allows to load MIDI sequences and to send them to the loaded PlugIns and/or to the opened MIDI Output devices.
The same menu is also available in form of a toolbar, which additionally offers a display of current and total time:
Figure 65: MIDI Player Toolbar
The display is in time format (hh:mm:ss.mmm), just like the Wave Player’s.
I admit freely that this is not a very elegant solution, but there are lots of sophisticated sequencer packages on the market. This little one-man spare time project called VSTHost doesn’t, and can’t compete with them in their own arena. If you need nifty MIDI recording/editing/playback features, VSTHost isn’t the right program.
Note: the MIDI Player built into VSTHost isn’t complete yet; if you try to load MIDI files that contain SMPTE time information or Type 2 files that contain different speed settings for the contained tracks, chances are high that the results are a bit… well, unexpected .
The meaning of the Stop, Play, and Pause menu entries should be clear to anybody. If not, tell me .
AutorepeatThis menu entry can be used to toggle between normal playback mode, in which the Player stops when it reaches the end of the input file, and auto-repeat mode, where it automatically restarts playback.
Player FileHere, you can define the file that the MIDI Player uses. Most of the transport menu entries / toolbar buttons will be grayed out until a valid MIDI file has been loaded. Before V1.43, this was a global setting; now, it is stored with the current performance.
63

Configure MIDI PlayerSelecting this menu item brings up the following dialog:
Figure 66: MIDI Player Configuration Dialog
Here, you can define various settings. Use Engine’s BPM and Set Engine’s BPM correspond to the menu entries described below. Send MIDI data to: defines the MIDI devices that the MIDI Player sends to; by default, MIDI data are only passed to interested PlugIns. You can select one of them by simply clicking on it; to select a range, click on the first and then shift-click on the last; to add or remove a specific device, control-click on it.
Use Engine’s BPMIf this menu item is checked, VSTHost overrides the BPM settings in the MIDI files with its own that you can define on the main toolbar (see the corresponding field in the toolbar discussion on page 67 for details).
Set Engine’s BPMIf this menu item is checked, VSTHost adapts its BPM settings to the ones that are used in the MIDI file. This can be important for PlugIns that, for example, adjust LFO or delay settings to the used BPM rate.
Player SyncThis menu entry defines whether the MIDI Player is treated as a separate entity or controlled with the Wave Player’s transport control buttons. Since the MIDI Player in its current incarnation is a bit restricted (you can’t, for example. move to a specific position), checking this menu item modifies the transport controls of the Wave Player, too – you can’t select things any more that aren’t possible for MIDI playback.
Midi PanicThis menu entry is only there for emergencies. When you need it, you need it badly . When selected, VSTHost tries its best to reset all loaded VSTi PlugIns, MIDI-capable effect PlugIns, and all MIDI devices attached to the configured MIDI Output ports to a known state. It turns off all notes on all channels, resets all controllers and pitch wheel information.
Send SysEx FileThis menu entry can be used to send a SysEx file (.syx format – the simplest possible format, just a bunch of SysEx messages) to all MIDI devices that have been configured on the SysEx window (see “SysEx” on page 72 for details).
Devices MenuAll entries of this menu have already been discussed in the Configuration section (see “Configuration” on page 10 for details).
64
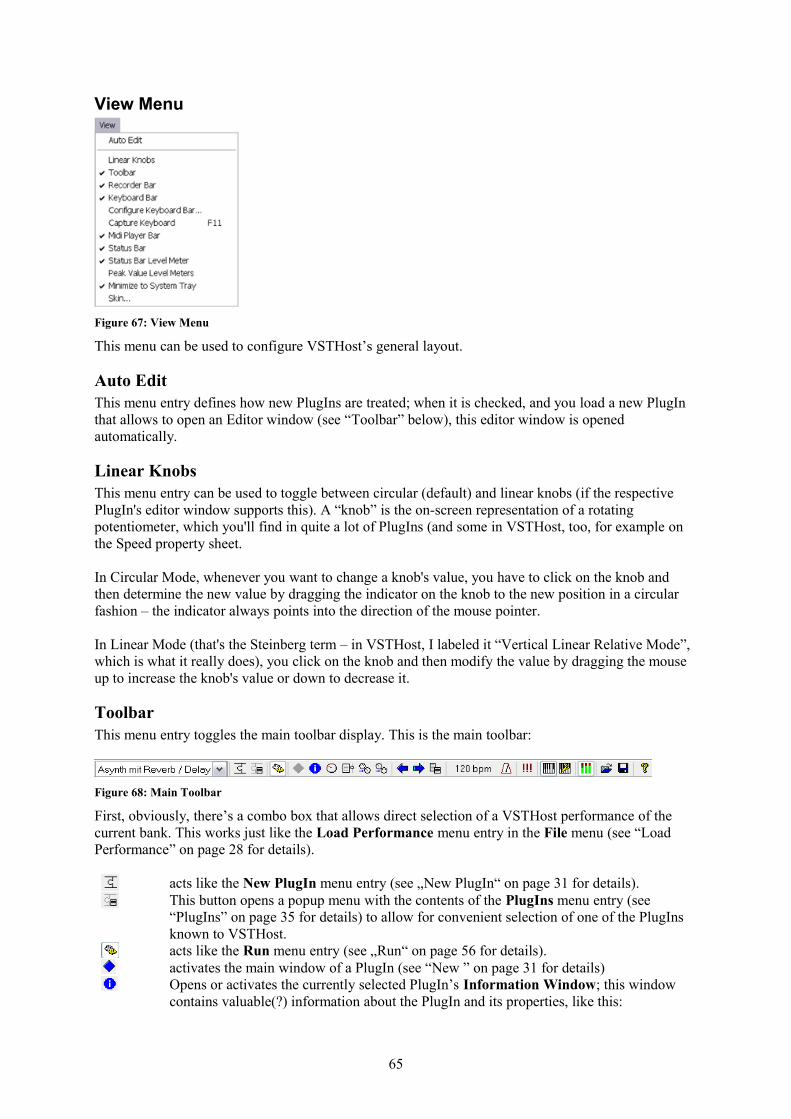
View Menu
Figure 67: View Menu
This menu can be used to configure VSTHost’s general layout.
Auto EditThis menu entry defines how new PlugIns are treated; when it is checked, and you load a new PlugIn that allows to open an Editor window (see “Toolbar” below), this editor window is opened automatically.
Linear KnobsThis menu entry can be used to toggle between circular (default) and linear knobs (if the respective PlugIn's editor window supports this). A “knob” is the on-screen representation of a rotating potentiometer, which you'll find in quite a lot of PlugIns (and some in VSTHost, too, for example on the Speed property sheet.
In Circular Mode, whenever you want to change a knob's value, you have to click on the knob and then determine the new value by dragging the indicator on the knob to the new position in a circular fashion – the indicator always points into the direction of the mouse pointer.
In Linear Mode (that's the Steinberg term – in VSTHost, I labeled it “Vertical Linear Relative Mode”, which is what it really does), you click on the knob and then modify the value by dragging the mouse up to increase the knob's value or down to decrease it.
ToolbarThis menu entry toggles the main toolbar display. This is the main toolbar:
Figure 68: Main Toolbar
First, obviously, there’s a combo box that allows direct selection of a VSTHost performance of the current bank. This works just like the Load Performance menu entry in the File menu (see “LoadPerformance” on page 28 for details).
acts like the New PlugIn menu entry (see „New PlugIn“ on page 31 for details).This button opens a popup menu with the contents of the PlugIns menu entry (see “PlugIns” on page 35 for details) to allow for convenient selection of one of the PlugIns known to VSTHost.acts like the Run menu entry (see „Run“ on page 56 for details).activates the main window of a PlugIn (see “New ” on page 31 for details)Opens or activates the currently selected PlugIn’s Information Window; this window contains valuable(?) information about the PlugIn and its properties, like this:
65

Figure 69: PlugIn Information Window
Opens or activates the currently selected PlugIn’s Editor Window; this window is provided by the PlugIn for configuration purposes. Since it’s provided by the PlugIn, the layout of this window can vary. Greatly. And since the window behavior is controlled by the PlugIn, this can vary greatly, too… anyway, here’s an example:
Figure 70: Example PlugIn Editor Window
Opens or activates the currently selected PlugIn’s Parameter Window; since not all PlugIns provide an Editor window, this can be the only possibility to set the PlugIn’s parameters. Some PlugIns can only be configured on the Parameter window; others refuse that completely and only accept input from the Editor window. Anyway, you can open both in VSTHost. Here’s an example:
Figure 71: Example PlugIn Parameter Window
The displayed parameters and their values, of course, vary from PlugIn to PlugIn; while the layout is done by VSTHost, the parameters, their value range and display are provided by the PlugIn. If the PlugIn has more than 100 parameters, the window contains a menu at the top that allows to select a parameter range to be displayed.
VSTHost remembers the opened windows and their positions for each PlugIn in the performance.Opens the PlugIn’s MIDI->Parameter Mapping window (see “MIDI -> Parameter” on page 43 for details).
66

Opens the PlugIn’s Parameter->MIDI Mapping window (see “Parameter -> MIDI” on page 46 for details).These buttons correspond to the Previous Program and Next Program menu entries (see “Next Program” and “Previous Program” on page 55 for details).This button opens a popup menu for the current PlugIn that allows selection of a specific program. It corresponds to the Program mm-nn menu entries in the PlugIn menu, but is displayed over the active PlugIn’s currently selected window.This field shows the currently defined speed. The default used by VSTHost is 120 BPM. This value is reported to all loaded PlugIns. Clicking on the speed allows you to directly enter a new BPM value, or modify the current using the mouse wheel.This button, in case you didn’t find that out by yourself, resembles a metronome. It opens the Speed Setup dialog (see “BPM” on page 60 for details).This button corresponds to the Midi Panic menu entry (see “Midi Panic” on page 64 for details).This button shows or hides VSTHost’s Keyboard Bar. See “Keyboard Bar” below for details.This button is used to configure the Keyboard Bar. See “Configure Keyboard Bar” on page 68 for details.This button opens the Master window. See “Master” on page 72 for details.This button is used to load a program bank into the currently selected PlugIn. See “LoadBank” on page 49 for details.This button is used to save the current program bank of the currently selected PlugIn to disk. See “Save Bank” on page 49 for details.The most important button of them all. See “About VSTHost” on page 74 for details.
Recorder BarSelecting this menu item hides or shows the Recorder toolbar display. The Recorder toolbar has already been discussed (see “Recorder” on page 60 for details).
Keyboard BarSelecting this menu item hides or shows the Keyboard bar. The Keyboard bar, when opened for the first time, looks like this:
Figure 72: Keyboard Bar
It comes up with a Pitch Wheel, a Mod Wheel, and a keyboard with 61 keys, covering the bottom area of VSTHost’s main window. This bar can be configured to a very high degree (see “ConfigureKeyboard Bar” below for details), and you can grab it with the mouse and fix it on top of the window area or on the bottom (default), or anywhere else on the screen if you want to. VSTHost remembers the position.
The Keyboard bar can be used as a “poor man’s MIDI keyboard”; you can enter MIDI messages by mouse or (computer) keyboard with it. You can configure for each PlugIn whether it reacts on messages from the Keyboard Bar (see “MIDI Input Devices” on page 38 for details).
The following keys on the PC keyboard can be used to trigger MIDI Notes, if the Keyboard Bar is active (i.e., activated by clicking on it with the mouse):
Figure 73: PC keyboard keys used for MIDI Note generation
67

In addition, the following keys can be used:
Left shift, Right shift transposes the PC keyboard's range two octaves down/upIns, Del increment/decrement pitch wheel dataHome, End increment/decrement modulation wheelPgUp, PgDn increment/decrement key velocityLeft, Right decrement/increment upper keyboard octaveDown, Up decrement/increment lower keyboard octave
Configure Keyboard BarSelecting this menu entry opens the following dialog:
Figure 74: Keyboard Bar Configuration Dialog, Keyboard Tab
Huh. Yet another of these tabbed configuration dialogs. Isn’t it depressing to see how many options there are in such a simple program?
Anyway, this is the Keyboard tab where you can define the general layout of the Keyboard Bar.
Octave IndicatorsIf this item is checked, the Keyboard Bar shows 2 octave indicators below the keyboard. These are two (normally gray) bars that indicate the keys that can be played on your PC’s keyboard. You can drag these bars around with the mouse to change the octaves used by the upper and lower key range on your PC keyboard (see “Keyboard Bar” above for the usable keys).
Key LabelsGimmick for people who don’t use keyboards very often. You can display the note names on the keys.
Monophonic KeyboardThis check box can be used to switch between polyphonic and monophonic keyboard mode.
In monophonic keyboard mode, every pressed key terminates the previous note. The radio buttons govern what happens when the current note is released, and there are still other notes held:
Lowest the lowest currently pressed key determines the current noteHighest the highest currently pressed key determines the current noteLast the last note pressed before the terminated note determines the current noteNone still pressed keys are ignored
ChannelThis knob defines the MIDI channel used for MIDI messages generated by the Keyboard Bar.
Velocity
68

This knob defines the velocity used if you trigger notes with the PC keyboard, which cannot send velocity information (unfortunately… I’d love a keyboard where the attack can be used to define whether a character is printed bold in a word processor, or where the pressure defines the auto-repeat rate, or… ). The velocity can be redefined by adding a Velocity Wheel to the keyboard, or by the PgUp/PgDn keys.
Send AftertouchThis check box can be used to activate the sending of (Polyphonic) Key Aftertouch MIDI messages if you slide the mouse up and down a key while keeping one of the mouse buttons pressed. Note that not all PlugIns will be able to react on Key Aftertouch, since devices that offer it are relatively rare.
Send Channel PressureThis check box can be used to activate the sending of Channel Pressure MIDI messages if you slide the mouse up and down a key while keeping one of the mouse buttons pressed.
LayoutHere, you can define how many keys starting at which key are displayed on the Keyboard Bar. If the predefined values in the combo boxes don’t suit your needs, you can enter any reasonable value you like.
Figure 75: Keyboard Bar Configuration Dialog, Wheels Tab
On this tab, the wheels shown by the Keyboard Bar can be configured. There are three types of wheels:
Pitch Wheel Can be used to send Pitch Wheel MIDI messages. Auto-centers when the wheel is released.
Modulation Wheel Can be used to send a configured Continuous Controller MIDI message. By default, this is set to send Mod Wheel data (CC#1), but it can set to any other CC# you like (or need).
Velocity Wheel Can be used to increase or decrease the velocity for MIDI messages generated with the PC keyboard.
You can set quite a lot of options for these wheels; have fun experimenting!
69
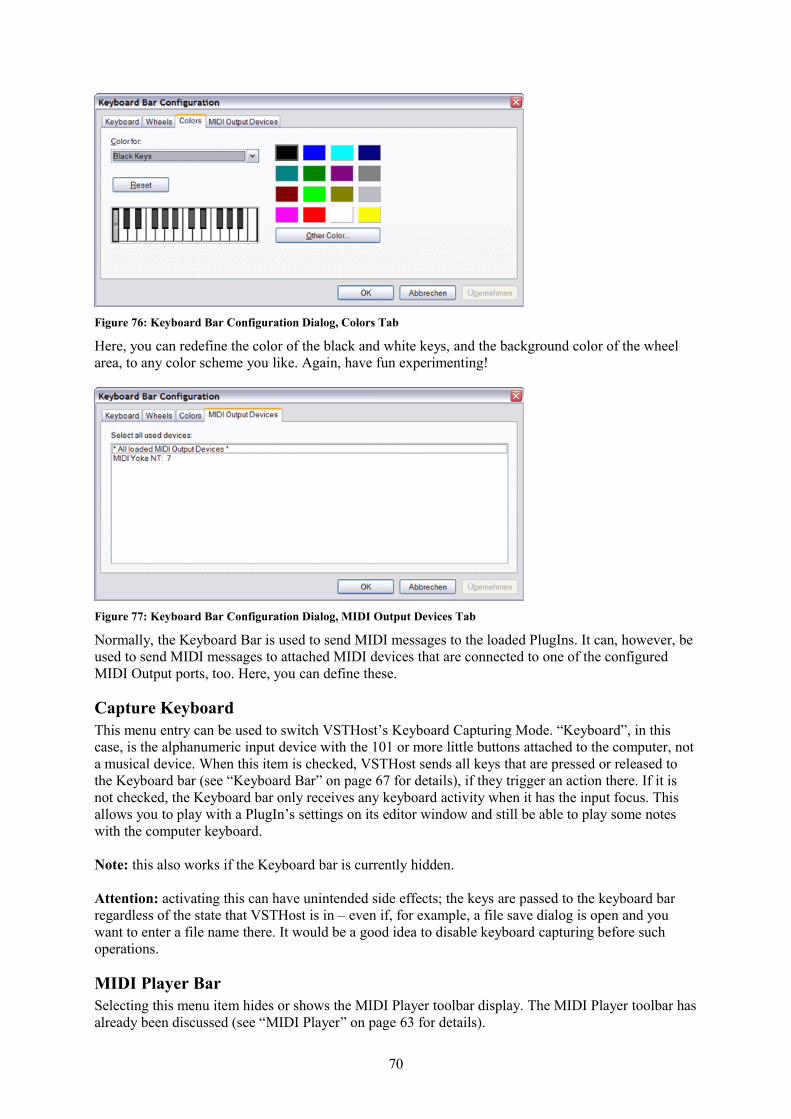
Figure 76: Keyboard Bar Configuration Dialog, Colors Tab
Here, you can redefine the color of the black and white keys, and the background color of the wheel area, to any color scheme you like. Again, have fun experimenting!
Figure 77: Keyboard Bar Configuration Dialog, MIDI Output Devices Tab
Normally, the Keyboard Bar is used to send MIDI messages to the loaded PlugIns. It can, however, be used to send MIDI messages to attached MIDI devices that are connected to one of the configured MIDI Output ports, too. Here, you can define these.
Capture KeyboardThis menu entry can be used to switch VSTHost’s Keyboard Capturing Mode. “Keyboard”, in this case, is the alphanumeric input device with the 101 or more little buttons attached to the computer, not a musical device. When this item is checked, VSTHost sends all keys that are pressed or released to the Keyboard bar (see “Keyboard Bar” on page 67 for details), if they trigger an action there. If it is not checked, the Keyboard bar only receives any keyboard activity when it has the input focus. This allows you to play with a PlugIn’s settings on its editor window and still be able to play some notes with the computer keyboard.
Note: this also works if the Keyboard bar is currently hidden.
Attention: activating this can have unintended side effects; the keys are passed to the keyboard bar regardless of the state that VSTHost is in – even if, for example, a file save dialog is open and you want to enter a file name there. It would be a good idea to disable keyboard capturing before such operations.
MIDI Player BarSelecting this menu item hides or shows the MIDI Player toolbar display. The MIDI Player toolbar has already been discussed (see “MIDI Player” on page 63 for details).
70

Status BarThis menu entry can be used to toggle the Status Bar on the bottom of VSTHost’s main window on or off.
Status Bar Level MeterThe status bar can be used to show a little level meter, if you don’t use the Master window for that (see “Master” below). Since this can be a bit irritating, it can be turned on or off with this menu entry.
Peak Value Level MetersThis setting configures how the level meters on status bar, the Master window, and the main windows of the loaded effects work. If this setting is not checked, they display the level in RMS format. This is the default since V1.38, since it uses less CPU cycles. When checked, the peak level (i.e., the level of the loudest sample in the buffers running through the engine) is displayed.
Minimize to System TrayNormally, when the VSTHost main window is minimized, it appears in the task bar, just like a normal application. If this menu item is checked, however, it is minimized into the system tray of the task bar, leaving only a little icon visible. Double-clicking this icon restores the VSTHost main window; right-clicking it brings up a popup menu, which contains the normal VSTHost menu entries, plus a “Restore” item, which does the same as double-clicking the icon.
This feature just saves some space on the task bar; I've been asked for it, and had the code at hand, so I added it... decide for yourself whether it makes sense.
SkinSince V1.44, the GUI of VSTHost can be radically changed. This has been called “skinning” in the IT world for quite some time now, so I’ve adopted the (slightly rubbish IMO) term. Here, you can select a “Skin file” (which is just a special .INI file) which holds all entries that define the current “look” of VSTHost. Included in VSTHost.zip, you should find a sample skin definition in the subdirectory Data\DefaultSkin. The Skin.ini in this directory contains a complete description of all parameters that can be modified.
After having selected a new skin for VSTHost, you have to close the application to put it into effect; while new windows opened in VSTHost will already show the new skin, pre-existing windows and the background won’t.
Vera Kinter has created some skins (see http://www.artvera-music.com for some more fine examples of her creativity); these can be found on VSTHost’s web site (see page 2 for this).
Window Menu
Figure 78: Window Menu
The contents of this menu vary with the number of loaded PlugIns and their various opened windows. The first two menu entries, however, are always there:
71
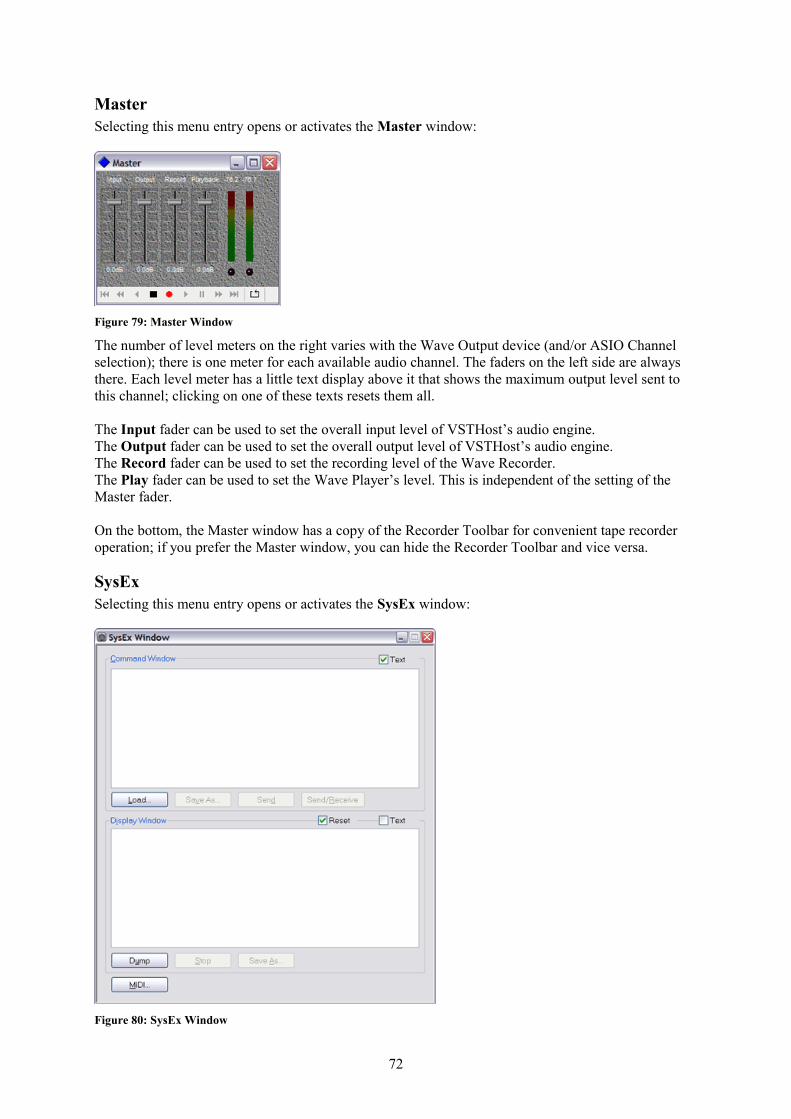
MasterSelecting this menu entry opens or activates the Master window:
Figure 79: Master Window
The number of level meters on the right varies with the Wave Output device (and/or ASIO Channel selection); there is one meter for each available audio channel. The faders on the left side are always there. Each level meter has a little text display above it that shows the maximum output level sent to this channel; clicking on one of these texts resets them all.
The Input fader can be used to set the overall input level of VSTHost’s audio engine.The Output fader can be used to set the overall output level of VSTHost’s audio engine.The Record fader can be used to set the recording level of the Wave Recorder.The Play fader can be used to set the Wave Player’s level. This is independent of the setting of the Master fader.
On the bottom, the Master window has a copy of the Recorder Toolbar for convenient tape recorder operation; if you prefer the Master window, you can hide the Recorder Toolbar and vice versa.
SysExSelecting this menu entry opens or activates the SysEx window:
Figure 80: SysEx Window
72

Here, you can load and/or save SysEx files in .syx format. This is a very simple file format, also used by Midi-OX, for example; it’s just a set of SysEx messages without any protocol overhead.
There are two important windows here: the Command Window and the Display Window. Both accept and display data in hexadecimal format, and, if the Text box is checked, in text format, too. You can use the Tab and Backtab keys to switch between the two areas, if necessary.
The Command Window contains SysEx messages (and other interspersed MIDI messages – VSTHost is agnostic when it comes to sending messages from this window ) to be sent to the configured MIDI devices. Pressing the Load button opens a file selection window where you can select a file to be loaded (surprise, surprise…). The contents of this file are taken 1:1; VSTHost doesn’t check the contents, neither when loading it, nor when sending the data. You can use this to send out complete garbage; be warned.
As soon as data have been entered or loaded from a file, the other buttons are activated. Save As... well, I’ll let you find out what it does . Send sends out the contents of the Command Window, but doesn’t check for any responses from the MIDI devices; Send/Receive sends them, too, but also turns on reception of SysEx messages into the Display Window.
The Display Window contains messages received from the MIDI devices. Only SysEx messages are processed; this works the same way as in Midi-OX (the whole SysEx window is modeled after the Midi-OX SysEx window, just differing in details), and Jamie and Jerry know their stuff pretty well, so I used the same logic.
Reception of MIDI data into the Display Window can be started in two ways. The first way, using the Send/Receive button, has already been discussed above. The second way would be to press the Dump button. This is useful if a MIDI device can only send manual dumps, triggered on the device itself. In both cases, VSTHost starts to write incoming SysEx messages into the Display Window. If the Reset box is checked, the previous contents of the window are cleared when reception starts; if not, they are kept and new messages are simply appended.
As soon as reception starts, the Stop button is activated and a text field appears that informs you how many bytes of SysEx data have currently been received into the Display Window. Pressing the Stop button terminates SysEx reception – VSTHost doesn’t know or care about the incoming MIDI messages’ format, since this is completely generic, so it can’t determine from the incoming data when the transmission has been completed. I could, of course, add a timeout, following the logic: “If nothing happened for 10 seconds, it looks like the transmission is over”, but that’s a bit unreliable; the whole procedure needs manual operation, so having to press the Stop button is OK in my opinion.
Save As... does the same as on the Command Window, just for the Display Window’s contents.
Pressing the MIDI… button opens a dialog where you can select the MIDI devices that VSTHost sends to and receives SysEx from; this is also used for files sent directly using the Send SysEx File menu command (see “Send SysEx File” on page 64 for details).
73

Help Menu
Figure 81: Help Menu in its entire glory
This menu is not extremely helpful at all; as this is a spare time project, I haven’t found the time yet to create a help file (don’t ask how long it took to write this manual!), so it contains only one entry:
About VSTHostSelecting this menu entry opens the most important dialog of the whole program, the thing you’ve all been waiting for:
Figure 82: the equally glorious About dialog
… and with this extremely important information I’ll end this document.
Have fun using VSTHost!
Hermann SeibVienna, September 20th, 2011
74

Appendix A: Things you should never needBut if you do... you might need them dearly.
VSTHost got quite some features “under the hood” that are only useful in rare situations. Consequently, there's no directly accessible user interface for them. They'll be detailed in this appendix.
Additional .ini File SectionsVSTHost checks for additional .ini file entries in quite some situations. Some of the files checked are self-documenting – see the files Data\effCanDos.ini and Data\hostCanDos.ini, which come with the VSTHost package. These contain a header that details what you can accomplish with them.
The main initialization file, Data\vsthost.ini (or however it's really called – see “Set Data Path” on page 30 for the reason behind this cautious wording ) is created dynamically, however, and not all sections that can be used are allocated in advance – in most installations, they are absolutely unnecessary. You can easily enter them by hand; the Notepad editor that comes with Windows is absolutely sufficient.
.ini File LayoutA section in the .ini file, in case you're new to this, is always started with a header that contains the name of the section in square brackets, like [Settings], for example. Sections are unique – there must not be more than one section with the same name in the .ini file. If VSTHost encounters this in a file changed by hand, the sections are merged into one. Leading and trailing blanks in the section name are ignored, and it's treated case-insensitive.
Each section contains a set of entries, each one on a single line, and in the form entry=value. Leading and trailing blanks in the entry are ignored, and it's treated case-insensitive. Entries are unique, too – if VSTHost encounters this in a file changed by hand, only the first entry is used.
Here, now, are the sections and entries that VSTHost understands, but which are not automatically added to the main initialization file, together with their default values:
[Settings]Note: this section is always there, so you should search it in the main initialization file (see “Set DataPath” on page 30 for details) and add your entries there, instead of adding a new section.
BankSaveVersion=2The VST SDK 2.4 defined an extended bank save format with a version number of 2; since V1.49, VSTHost uses this format to save .fxb files. By setting BankSaveVersion=1, you can use the old format.
BgTickmult=3If VSTHost determines that it's running in the background (i.e., it's not the foreground window), it reduces the screen updates a bit. This is mainly “thanks” to the WINE environment, which allows VSTHost to be run on x86-based Linux systems; in this environment, frequent redraws in background windows seriously ruin the overall system performance, so VSTHost does what it can to circumvent the problem. Setting this value to 1 causes it to redraw as fast in the background as in the foreground; any higher value multiplies the interval between the idle calls (see IdleMSecs below) by the given amount when running in the background, so given the default values, VSTHost will only update the screen about 6 times per second. No need to burn precious CPU cycles for something that isn't seen anyway, since another window is currently on top...
75

Bridge32=<app start directory + AppName + “Bridge32.exe”>Bridge64=<app start directory + AppName + “Bridge64.exe”>These two settings can be used to define the names of the bridge programs used by VSTHost (see “Bridging” on page 33 for details). In the default value, AppName is normally “VSTHost”, but if you rename it to anything else, this would be the name prepended to “BridgeXX.exe” - and VSTHost wouldn't find the bridge programs any more, unless you rename these, too. Either rename them appropriately, or define their names (plus eventually additional parameters) here.
Bridge32Trace=<app start directory + AppName + “Bridge32.exe”>Bridge64Trace=<app start directory + AppName + “Bridge64.exe”>Same as above, but for the tracing version of VSTHost – this allows you to keep the normal and tracing versions of VSTHost in the same directory, by renaming the tracing bridge programs. The easier way would be to keep the tracing version in a separate directory and just set its initial VSTHost.ini's data path to the same data directory as the normal version's (see “Set Data Path” on page 30 for details).
IdleMSecs=50This setting defines the interval between 2 successive calls to the PlugIns' idle() functions, which are used to update the PlugIns' editor windows. This defaults to 50ms, i.e., 20 times per second. Good enough for me, but some people like faster updates. On modern machines, going down to 20 (i.e., 50 updates per second) should be no real problem – but keep in mind that it will increase the processor load.
KillVSTKeys=1Better leave this at its default setting. It can seriously disturb PlugIns that are not prepared for it. That said... normally, VSTHost translates incoming keys into their VST counterpart when possible, and then removes the key from the normal processing loop. When set to 0, the key is passed on as a Windows message, too. Can be overridden by the /nokillvst command line parameter (see page 22 for more details on this).
LevelMSecs=500This setting defines the interval between 2 successive displays of the current output level in the status bar (if that's activated – see “Status Bar Level Meter” on page 71 for details).
NoteOffVel=0x40When generating Note Off MIDI messages, VSTHost uses this value as the velocity. Nearly all PlugIns and external devices ignore this velocity information anyway.
NumProcessors=physical # processorsThis setting can be used to override the number of processors used by VSTHost. Normally, all available cores and processors are used, but you can set a different maximum here. This setting can be overridden with the /numProcessors command line parameter (see page 22 for more details on this setting).
OptRunningStatus=1When set to anything other than 0, VSTHost tries to optimize outgoing MIDI messages for Running Status usage – i.e., Note Off messages are translated to Note On messages with a velocity of 0 if appropriate, so that intelligently written MIDI drivers (hee hee...) can optimize the MIDI output stream a bit.
76

PercMSecs=750This setting defines the interval between 2 successive displays of the CPU percentage used by VSTHost.
PluginsPerBridge=1000This setting can be used to configure how many PlugIns VSTHost loads into one instance of the bridge program (see “Bridging” on page 33 for details) before starting a new instance. The default setting essentially means “keep it down to one bridge program”.
Lowering this setting to 1 would force each PlugIn into a separate bridge program – which would mean maximum overhead, but each PlugIn would have the maximum of available memory... but there's the /forceBridged command line parameter and the corresponding entry in effCanDos.ini for that (see page 22 for more details on this) which allow a finer control, so changing this setting is not really recommended.
SysExBufSize=256SysExBufWait=60These two settings are used to configure the SysEx window settings (see “SysEx” on page 72 for details). When sending out the contents of the SysEx window, VSTHost splits the SysEx messages into chunks of the maximum size given in SysExBufSize; after each buffer, it waits SysExBufWait milliseconds before sending the next one.
These settings can become vital for Windows XP users; the Windows 2000/XP standard MIDI driver (which is used by a lot of [especially cheap] USB MIDI devices) is severely buggy and doesn't play nice when confronted with partial SysEx messages. This can result in faulty messages being sent out to the device. If you got such a setup and have to transmit SysEx messages that are longer than the default value of 256, setting SysExBufSize=65530 can cure the problem.
TraceBase=0x60000000TraceMask=0x7FFFFFFFThese two settings are only interesting for the tracing version of VSTHost; the normal version simply ignores them. Together, they determine what VSTHost traces, and how. Normally, you won't need this, but if you're trying to correct a problem with my help, I might request a trace file from you, and in this case, the settings might become interesting.
The tracing version of VSTHost contains a lot of texts that can be written to the trace file while the program is running, thereby creating a rather precise “trace” of the program functionality. The trace output can be expanded or reduced by setting up these settings.
Each trace output falls into a specific category, which takes up one bit in a 32-bit word. When writing the traces, VSTHost first adds the settings in TraceBase to this word, and then remove sthose bits from the word that are not set in TraceMask. VSTHost only outputs traces that come out with at least one bit between position 0 (i.e., lowest bit) and 27 set in the result; the uppermost 4 bits are used to determine the trace output format.
Here are the bits currently defined for VSTHost:Bit number Setting
0 “Anything else” - i.e., anything that doesn't fall in one of the below categories.
1 Organizational details
2 ASIO-related traces
77

Bit number Setting3 MME-related traces
4 DirectSound-related traces
5 MIDI-related traces
6 Audio processing related traces
7 VST related traces
8 High-resolution timer related traces
9 Slave-processing related (see separate “Slave Mode” document)
10 Window painting system related traces
11 Joystick-related traces
28 Add the process ID to the trace file name
29 Prepend the thread ID to the trace file entry
30 Prepend timestamp to the trace file entry
31 Flush trace file after writing this entryNormally, the traces are buffered; i.e., they are only written to disk when a fair amount of text has been collected. This ensures that the tracing process doesn't slow down the system too much. VSTHost uses this flag on some of the “hairier” traces when it might be possible that the next activities kill the program; if it is set permanently, it gives a highly accurate trace, since VSTHost can't die without the latest traces having been written out to disk, but it also means permanent disk activity which slows down everything.
TranslateNoteOff=1This setting can be used to define whether VSTHost translates incoming Note On MIDI messages with a velocity of 0 into Note Off messages before passing them to the loaded PlugIns. Normally, this is done, and I'd leave it at that... but you can change it here by setting the value to 0.
UserExit=This setting can be used to force VSTHost to load a specific User Exit DLL. Currently only one User Exit DLL has been created for the Lionstracs Mediastation (see www.lionstracs.com for details) to allow a better integration into this environment. This setting can be overridden by the /userexit command line parameter (see page 22 for more details on this).
VUFadeMSecs=1700This setting defines the time in milliseconds that the VU meters in VSTHost take to “fade” from maximum to zero. Always displaying an accurate value would give a very jumpy display – and you might miss some short peaks, so VSTHost – like practically any other audio-processing program, and like hardware mixing consoles – lets the meter rise very quickly if a higher value is to be displayed, but lets it fall rather slowly. Shorter values give a more precise, but also much more “nervous” display.
VUMaxMSecs=1000This setting defines the time in milliseconds that the VU meters in VSTHost remember the current maximum value.
78

WSetMin=4194304WSetMax=41943040These two can be used to change the working set size used by VSTHost. These two are mainly included because I like to have an “adjusting screw” for every possible setting. Normally, best left alone; if you really want to know what this is about, google for SetProcessWorkingSetSize.
[ASIOignore][DSoundignore][MMEignore][MIDIignore]These sections are normally not there; they are only necessary when a specific audio or MIDI driver ruins your “experience”, as they say nowadays...
VSTHost is a bit peculiar in one respect: it always checks all available audio and MIDI drivers when it starts up and tries to determine their capabilities. Sometimes, it comes across a driver that's still installed in your system – but the corresponding hardware device has long been abandoned... and this can cause some of these drivers to crash. In such a case, you can force VSTHost to ignore the driver by adding an entry for it to the matching section. Let's say that you got an ASIO driver for a “Meetoo 895 ASIO” device and this crashes VSTHost. In this case, adding the section[ASIOignore]Meetoo 895 ASIO=1to VSTHost's main initialization file should prevent it from being seen by VSTHost.
Now, the trick of course is to find out which driver kills VSTHost, and its name... for this, you can use the tracing version of VSTHost (see VSTHost's web site for this – address is given at the start of this document). VSTHost should trace the names of the drivers it's trying to load, and this should lead you to the killer and name it, too.
… and while you're at it, you might want to remove the killer from your system in the same session which would make adding the section irrelevant … but you can't always easily do that, that's why VSTHost can be customized to ignore the bugger.
[ASIOForcePreferred]This section is normally not there; it's checked to cure a very peculiar problem with some ASIO drivers.
Normally, ASIO drivers tell the host something like “minimal buffer size 16, maximal buffer size 1024, preferred buffer size 256” - i.e., they let the host choose which buffer size it wants to use, within certain constraints. Some drivers, however, tell that they can use a wide range of buffer sizes – but refuse to work if anything but the preferred buffer size is set.
Let's say that you got an ASIO driver for a ZOOM G7 device (that's what the option was added for) and this doesn't work if you define an “unwanted” buffer size. In this case, adding the section[ASIOForcePreferred]ZOOM G Series ASIO=1to VSTHost's main initialization file should prevent it from being set to anything but its preferred buffer size by VSTHost.
79
Appendix B: OSC ImplementationThis appendix details VSTHost's OSC implementation.
What is OSC?Open Sound Control (OSC) is a general protocol for encapsulating and organizing control among multi-layered systems for musical applications and is gaining increasing attention; especially new input devices like the iPad or the JazzMutant Lemur make it increasingly interesting. OSC is developed at The Center for New Music and Audio Technology (CNMAT) at UC Berkeley by Matt Wright and others.
OSC defines the layout of messages that can be sent between OSC-conforming applications. These messages have a simple syntax – they define an address and optional parameters. The address is given in the form of an hierarchical string, delimited by forward slashes ('/'). For details regarding the protocol, please visit http://opensoundcontrol.org.
Unfortunately, OSC is a very loosely specified protocol – only the bare necessities, like “how must a message look to be OSC-conforming”, are defined, but not a bit above that. The greatest problem is that there's no request/response mechanism is defined, so it's up to the OSC-conforming applications to define their own... which quite some have already done.
VSTHost has built-in support for the following OSC parameter types:Type Contenti 32-bit big-endian two's complement integerf 32-bit big-endian IEE 754 floating point numbers,S OSC string (see OSC documentation on this)b OSC blob (see OSC documentation on this)T,F,N,I True / False / Nil / Impulset OSC timetag in NTP formath 64-bit big-endian two's complement integerd 64-bit big-endian IEE 754 floating point numberc 32-bit big-endian characterr RGBA valuem 4-byte MIDI message (port ID, status byte, data 1, data 2)
although only some are used at the moment. VSTHost tries its best to convert incoming parameters into the format required internally.
VSTHost uses a slightly reduced version of the system introduced by Open Sound World (see http://osw.sourceforge.net for details), which looked like a good compromise between complexity and capabilities to me.
VSTHost acts as a passive server - it doesn't actively send OSC messages around, but receives queries and sends responses to these back to the caller. Each query is followed by one or more responses.
VSTHost Address SpaceIf you're not sure what an address space is in OSC, please visit http://opensoundcontrol.org – it's all explained there, and I don't feel the pressing need to copy the original text into VSTHost's documentation.
/engineThe /engine container holds all settings of the VSTHost engine. At the moment, there aren't many, but this will surely change.
80

Returns: the number of available entries in the /engine container.
/engine/bpm [bpm]The /engine/bpm address returns the currently configured BPM rate. A new BPM rate can be passed (either as an integer or floating-point value).Returns: the currently set BPM rate.
/engine/channelsThe /engine/channels container holds the engine's I/O configuration.Returns: the number of available entries in the /engine/channels container.
/engine/channels/in [inputs]The /engine/channels/in method returns the number of engine input channels. A new number of inputs can be passed as an integer value.Returns: the currently configured number of engine inputs.
/engine/channels/out [outputs]The /engine/channels/out method returns the number of engine output channels. A new number of outputs can be passed as an integer value.Returns: the currently configured number of engine outputs.
/engine/run [on]The /engine/run method returns whether the engine is running. A new state can be passed as an integer or boolean value.Returns: the current state in boolean form (T/F).
/pluginThe /plugin container allows access to all currently loaded PlugIns, labeled 0..(n-1). PlugIns 0 and 1 are always available; these are the Input and Output pseudo-PlugIns.Returns: the number of currently loaded PlugIns (at least 2).
/plugin/nThe /plugin/n container (where n is a number between 0 and the number of currently loaded PlugIns – 1) allows access to a PlugIn's settings.Returns: the PlugIn's DLL path
/plugin/n/pathThe /plugin/n/path method returns the PlugIn's DLL path, if it has one (the {In} and {Out} pseudo-PlugIns don't have one).Returns: the PlugIn's DLL path
/plugin/n/displaynameThe /plugin/n/displayname method returns the PlugIn's display name (i.e., the displayed name).Returns: the PlugIn's displayed name
/plugin/n/numparametersThe /plugin/n/numparameters method returns – guess – the number of parameters in this PlugIn.
/plugin/n/numprogramsThe /plugin/n/numprograms method returns the number of programs in this PlugIn.
81

/plugin/n/parameter/plugin/n/parameter is the container for the PlugIn's parameters; labeled 0..(numparameters-1).Returns: the number of parameters in this PlugIn.
/plugin/n/parameter/p [value]/plugin/n/parameter/p is a method as well as a container; as a method, it returns the parameter's current value as a floating-point value. A new value can be optionally passed in, also in floating-point format. p contains the parameter number in the range 0 to (number of parameters – 1).Returns: the (current or new) value of the parameter
/plugin/n/parameter/p/nameThe /plugin/n/parameter/p/name method returns the name of the parameter.
/plugin/n/parameter/p/labelThe /plugin/n/parameter/p/label method returns the label of the parameter.
/plugin/n/parameter/p/display The /plugin/n/parameter/p/display method returns the display value of the parameter.
/plugin/n/program [current]/plugin/n/program is a container for the PlugIn's programs, labeled 0..(numPrograms-1), as well as a method; the new current program can be passed in as a parameter.Returns: the current or new program number
/plugin/n/program/pThe /plugin/n/program/p container holds a program's settings; p is the number of the program in the range (0..numPrograms-1).Returns: Name of the program
/plugin/n/program/p/nameThe /plugin/n/program/p/name method returns the name of program p.
82