volume 1: sybase adaptive server™ enterprise ...dis.unal.edu.co/~icasta/man_sybase/svrtsg1.pdfsql...
TRANSCRIPT

Volume 1: Sybase® Adaptive Server™Enterprise Troubleshooting and ErrorMessages Guide

Document ID: 39996-01-1192-01Last Revised: January 1999Copyright © 1989-1999 by Sybase, Inc. All rights reserved.
This publication pertains to Sybase database management software and to any subsequent release until otherwiseindicated in new editions or technical notes. Information in this document is subject to change without notice. Thesoftware described herein is furnished under a license agreement, and it may be used or copied only in accordancewith the terms of that agreement.
To order additional documents, U.S. and Canadian customers should call Customer Fulfillment at (800) 685-8225,fax (617) 229-9845.
Customers in other countries with a U.S. license agreement may contact Customer Fulfillment via the above faxnumber. All other international customers should contact their Sybase subsidiary or local distributor. Upgradesare provided only at regularly scheduled software release dates. No part of this publication may be reproduced,transmitted, or translated in any form or by any means, electronic, mechanical, manual, optical, or otherwise, withoutthe prior written permission of Sybase, Inc.
Sybase, the Sybase logo, PowerBuilder, Powersoft, Replication Server, S-Designor, SQL Advantage, SQL Debug,SQL SMART, Transact-SQL, VisualWriter are registered trademarks of Sybase, Inc. Adaptable WindowingEnvironment, Adaptive Server, Adaptive Server Enterprise, Adaptive Server Enterprise Monitor, AnswerBase,Application Manager, AppModeler, Backup Server, Client-Library, Client Services, CodeBank, Connection Manager,DataArchitect, Database Analyzer, DataExpress, Data Pipeline, DataWindow, DB-Library, Designor, DevelopersWorkbench, Dimensions Anywhere, Dimensions Enterprise, Dimensions Server, DirectCONNECT, Easy SQR,Embedded SQL, EMS, Enterprise CONNECT, Enterprise Manager, Enterprise SQL Server Manager, Enterprise WorkArchitecture, Enterprise Work Designer, Enterprise Work Modeler, EWA, Gateway Manager, GeoPoint, InfoMaker,InformationCONNECT, InternetBuilder, iScript, KnowledgeBase, MainframeCONNECT, Maintenance Express, MAP,MetaWorks, MethodSet, Movedb, MySupport, Navigation Server Manager, Net-Gateway, NetImpact, Net-Library,ObjectCONNECT, ObjectCycle, OmniCONNECT, OmniSQL Access Module, OmniSQL Server, OmniSQL Toolkit,Open Client, Open ClientCONNECT, Open Client/Server, Open Client/Server Interfaces, Open Gateway, OpenServer, Open ServerCONNECT, Open Solutions, Optima++, PB-Gen, PC DB-Net, PC Net Library, PowerBuilt,PowerBuilt with PowerBuilder, PowerScript, PowerSocket, Powersoft Portfolio, PowerWare Desktop, PowerWareEnterprise, ProcessAnalyst, Replication Agent, Replication Driver, Replication Server Manager, Resource Manager,RW-Library, SAFE, SDF, Secure SQL Server, Security Guardian, SKILS, smart.partners, smart.parts, smart.script, SQLAnywhere, SQL Central, SQL Code Checker, SQL Edit, SQL Edit/TPU, SQL Remote, SQL Server, SQL Server/CFT,SQL Server/DBM, SQL Server Manager, SQL Server SNMP SubAgent, SQL Station, SQL Toolset, StarDesignor,Sybase Client/Server Interfaces, Sybase Development Framework, Sybase Dimensions, Sybase Gateways, SybaseIQ, Sybase MPP, Sybase SQL Desktop, Sybase SQL Lifecycle, Sybase SQL Workgroup, Sybase User Workbench,SybaseWare, SyBooks, System 10, System 11, SystemTools, Visual Components, VisualSpeller, Warehouse WORKS,Watcom, Watcom SQL, Watcom SQL Server, web.sql, WebSights, WebViewer, WorkGroup SQL Server, XA-Library,XA-Server, and XP Server are trademarks of Sybase, Inc. 1/99
Unicode and the Unicode Logo are registered trademarks of Unicode, Inc.
All other company and product names used herein may be trademarks or registered trademarks of their respectivecompanies.
Use, duplication, or disclosure by the government is subject to the restrictions set forth in subparagraph (c)(1)(ii) ofDFARS 52.227-7013 for the DOD and as set forth in FAR 52.227-19(a)-(d) for civilian agencies.
Sybase, Inc., 6475 Christie Avenue, Emeryville, CA 94608.
Table of Contents
About This Book . . . . . . . . . . . . . . . . . . . . . . . . . . . . . . . . . . . . . . . . . . . . . . . . . . . . . . . . . . . . . . . . . . . . . . . 9
Audience . . . . . . . . . . . . . . . . . . . . . . . . . . . . . . . . . . . . . . . . . . . . . . . . . . . . . . . . . . . . . . . . . . . 9
What This Guide Contains. . . . . . . . . . . . . . . . . . . . . . . . . . . . . . . . . . . . . . . . . . . . . . . . . . . . . 9
Related Documents . . . . . . . . . . . . . . . . . . . . . . . . . . . . . . . . . . . . . . . . . . . . . . . . . . . . . . . . . 10
Changes to This Book . . . . . . . . . . . . . . . . . . . . . . . . . . . . . . . . . . . . . . . . . . . . . . . . . . . . . . . 11
Your Comments About this Book . . . . . . . . . . . . . . . . . . . . . . . . . . . . . . . . . . . . . . . . . . . . . . 12
Style Conventions . . . . . . . . . . . . . . . . . . . . . . . . . . . . . . . . . . . . . . . . . . . . . . . . . . . . . . . . . . 13Style Conventions in Text. . . . . . . . . . . . . . . . . . . . . . . . . . . . . . . . . . . . . . . . . . . . . . 13SQL Syntax Conventions . . . . . . . . . . . . . . . . . . . . . . . . . . . . . . . . . . . . . . . . . . . . . . 13
Electronic Information Sources . . . . . . . . . . . . . . . . . . . . . . . . . . . . . . . . . . . . . . . . . . . . . . . 14
If You Need Help . . . . . . . . . . . . . . . . . . . . . . . . . . . . . . . . . . . . . . . . . . . . . . . . . . . . . . . . . . . . 15
Chapter 1: System Database Recovery . . . . . . . . . . . . . . . . . . . . . . . . . . . . . . . . . . . . . . . . . . . . . . 17
Ensuring Recoverability . . . . . . . . . . . . . . . . . . . . . . . . . . . . . . . . . . . . . . . . . . . . . . . . . . . . . 17
Finding the Appropriate Recovery Scenario . . . . . . . . . . . . . . . . . . . . . . . . . . . . . . . . . . . . . 19
master Database Is Corrupt and Adaptive Server Does Not Start . . . . . . . . . . . . . . . . . . . 20Valid Dump of the master Database Exists . . . . . . . . . . . . . . . . . . . . . . . . . . . . . . 20Valid Dump of the master Database Does Not Exist . . . . . . . . . . . . . . . . . . . . . 21
master Database Is Corrupt and Adaptive Server Starts . . . . . . . . . . . . . . . . . . . . . . . . . . . 22Valid Dump of the master Database Exists . . . . . . . . . . . . . . . . . . . . . . . . . . . . . . 22Valid Dump of the master Database Does Not Exist . . . . . . . . . . . . . . . . . . . . . 22
Master Device Is Lost and Valid Dump Exists . . . . . . . . . . . . . . . . . . . . . . . . . . . . . . . . . . . . 23Valid Dump with Default Sort Order . . . . . . . . . . . . . . . . . . . . . . . . . . . . . . . . . . . 23Valid Dump with Non-Default Sort Order . . . . . . . . . . . . . . . . . . . . . . . . . . . . . . 24
Master Device Is Lost and Valid Dump Does Not Exist . . . . . . . . . . . . . . . . . . . . . . . . . . . . 25
The model Database Is Lost or Corrupted. . . . . . . . . . . . . . . . . . . . . . . . . . . . . . . . . . . . . . . 26
Non-Master Device Containing Pieces of tempdb Is Lost . . . . . . . . . . . . . . . . . . . . . . . . . . 26
Master Device Is Going Bad . . . . . . . . . . . . . . . . . . . . . . . . . . . . . . . . . . . . . . . . . . . . . . . . . . 28
Adaptive Server Does Not Start After Altering Configuration . . . . . . . . . . . . . . . . . . . . . . . 29
Manually Rebuilding Adaptive Server with bcp and buildmaster . . . . . . . . . . . . . . . . . . . . 29
3

Table of Contents
Checklist . . . . . . . . . . . . . . . . . . . . . . . . . . . . . . . . . . . . . . . . . . . . . . . . . . . . . . . . . . . . . 30Considerations. . . . . . . . . . . . . . . . . . . . . . . . . . . . . . . . . . . . . . . . . . . . . . . . . . . . . . . . 30Steps for Rebuilding Adaptive Server . . . . . . . . . . . . . . . . . . . . . . . . . . . . . . . . . . 30
Copy the System Tables to Files . . . . . . . . . . . . . . . . . . . . . . . . . . . . . . . . . . . . 31Get Configuration Information and Shut Down the Server. . . . . . . . . . . 32Perform buildmaster Commands and Edit the run_server File. . . . . . . . . 32Bring Up the Server in Single User Mode . . . . . . . . . . . . . . . . . . . . . . . . . . . 33Copy the Files into the System Tables. . . . . . . . . . . . . . . . . . . . . . . . . . . . . . . 33Shut Down/Bring Up Adaptive Server in Single-User Mode . . . . . . . . 34Run the Install Scripts for master and model . . . . . . . . . . . . . . . . . . . . . . . . . 35Shut Down/Bring Up the Server in Multi-User Mode . . . . . . . . . . . . . . . 35Verify the Results and Test Applications . . . . . . . . . . . . . . . . . . . . . . . . . . . . 35
If You Cannot Use bcp or a Dump . . . . . . . . . . . . . . . . . . . . . . . . . . . . . . . . . . . . . . 36
Chapter 2: Encyclopedia of Tasks . . . . . . . . . . . . . . . . . . . . . . . . . . . . . . . . . . . . . . . . . . . . . . . . . . . . 37
Disaster Recovery Tasks . . . . . . . . . . . . . . . . . . . . . . . . . . . . . . . . . . . . . . . . . . . . . . . . . . . . . 37How to Build a New Master Device . . . . . . . . . . . . . . . . . . . . . . . . . . . . . . . . . . . . 37How to Rebuild master Database and Leave Master Device Intact. . . . . . . . 38How to Start Adaptive Server in Single-User Mode . . . . . . . . . . . . . . . . . . . . . 39
Returning Adaptive Server to Multiuser Mode. . . . . . . . . . . . . . . . . . . . . . 41How to Run the installmaster and installmodel Scripts. . . . . . . . . . . . . . . . . . . . . 41How to Load the master Database from Backup . . . . . . . . . . . . . . . . . . . . . . . . . 42How to Restore System Table Information in master Database . . . . . . . . . . . 43
Restoring Device and Database Information in the System Catalog . . 43Reestablishing Adaptive Server Logins . . . . . . . . . . . . . . . . . . . . . . . . . . . . . 44
How to Alter the number of devices Parameter Manually . . . . . . . . . . . . . . . . . 45How to Alter tempdb . . . . . . . . . . . . . . . . . . . . . . . . . . . . . . . . . . . . . . . . . . . . . . . . . . 45How to Alter the model Database. . . . . . . . . . . . . . . . . . . . . . . . . . . . . . . . . . . . . . . 45How to Add a Sybase Dump Device . . . . . . . . . . . . . . . . . . . . . . . . . . . . . . . . . . . 46How to Reset Adaptive Server to Its Default Configuration . . . . . . . . . . . . . 46How to Set A Default Backup Server Manually in Adaptive Server . . . . . . 47
Avoiding Disaster through Good DBA Practices . . . . . . . . . . . . . . . . . . . . . . . . . . . . . . . . . 48
Online Recovery and Recovery Fault Isolation . . . . . . . . . . . . . . . . . . . . . . . . . . . . . . . . . . . 52Background. . . . . . . . . . . . . . . . . . . . . . . . . . . . . . . . . . . . . . . . . . . . . . . . . . . . . . . . . . . 53Online Recovery Concepts and Pre-11.5 Recovery . . . . . . . . . . . . . . . . . . . . . . 53
Recovery from Backups. . . . . . . . . . . . . . . . . . . . . . . . . . . . . . . . . . . . . . . . . . . . 54Suiciding the Log. . . . . . . . . . . . . . . . . . . . . . . . . . . . . . . . . . . . . . . . . . . . . . . . . . 54
Recovery With RFI . . . . . . . . . . . . . . . . . . . . . . . . . . . . . . . . . . . . . . . . . . . . . . . . . . . . 54Using RFI . . . . . . . . . . . . . . . . . . . . . . . . . . . . . . . . . . . . . . . . . . . . . . . . . . . . . . . . . 55
What To Do When Online Recovery Fails. . . . . . . . . . . . . . . . . . . . . . . . . . . . . . . 56
4

Table of Contents
Restoring from Backups . . . . . . . . . . . . . . . . . . . . . . . . . . . . . . . . . . . . . . . . . . . 57Partial online recovery using RFI . . . . . . . . . . . . . . . . . . . . . . . . . . . . . . . . . . . 57Suiciding the Log. . . . . . . . . . . . . . . . . . . . . . . . . . . . . . . . . . . . . . . . . . . . . . . . . . 59
RFI Example . . . . . . . . . . . . . . . . . . . . . . . . . . . . . . . . . . . . . . . . . . . . . . . . . . . . . . . . . . 60
How to Manually Change Sort Order or Default Character Set . . . . . . . . . . . . . . . . . . . . . . 61Manual Process . . . . . . . . . . . . . . . . . . . . . . . . . . . . . . . . . . . . . . . . . . . . . . . . . . . . . . . 62How to Load a Sort Order or Additional Character Set. . . . . . . . . . . . . . . . . . 65How to Change the Sort Order. . . . . . . . . . . . . . . . . . . . . . . . . . . . . . . . . . . . . . . . . 65How to Change the Default Character Set . . . . . . . . . . . . . . . . . . . . . . . . . . . . . . 65How to Find a Sort Order File Name . . . . . . . . . . . . . . . . . . . . . . . . . . . . . . . . . . . 66
Method 1: If You Know the Sort Order Description. . . . . . . . . . . . . . . . . . 66Method 2: If You Know the Sort Order ID . . . . . . . . . . . . . . . . . . . . . . . . . . 67
How to Find a Sort Order ID. . . . . . . . . . . . . . . . . . . . . . . . . . . . . . . . . . . . . . . . . . . 67How to Find a Character Set ID . . . . . . . . . . . . . . . . . . . . . . . . . . . . . . . . . . . . . . . . 68How to View Your Existing Sort Order and Character Sets . . . . . . . . . . . . . . 68
Useful dbcc Commands . . . . . . . . . . . . . . . . . . . . . . . . . . . . . . . . . . . . . . . . . . . . . . . . . . . . . 69Standard dbcc Commands . . . . . . . . . . . . . . . . . . . . . . . . . . . . . . . . . . . . . . . . . . . . . 69Other dbcc Commands . . . . . . . . . . . . . . . . . . . . . . . . . . . . . . . . . . . . . . . . . . . . . . . . 70
Command: dbcc page . . . . . . . . . . . . . . . . . . . . . . . . . . . . . . . . . . . . . . . . . . . . . . 70Command: dbcc pglinkage . . . . . . . . . . . . . . . . . . . . . . . . . . . . . . . . . . . . . . . . . . 71Command: dbcc log . . . . . . . . . . . . . . . . . . . . . . . . . . . . . . . . . . . . . . . . . . . . . . . . 71Command: dbcc traceflags . . . . . . . . . . . . . . . . . . . . . . . . . . . . . . . . . . . . . . . . . . 72Command: dbcc traceon . . . . . . . . . . . . . . . . . . . . . . . . . . . . . . . . . . . . . . . . . . . . 72Command: dbcc traceoff . . . . . . . . . . . . . . . . . . . . . . . . . . . . . . . . . . . . . . . . . . . . 72Command: dbcc memusage . . . . . . . . . . . . . . . . . . . . . . . . . . . . . . . . . . . . . . . . . 72
How to Analyze dbcc checkstorage Faults . . . . . . . . . . . . . . . . . . . . . . . . . . . . . . . . . . . . . . 73Fault Analysis . . . . . . . . . . . . . . . . . . . . . . . . . . . . . . . . . . . . . . . . . . . . . . . . . . . . . . . . 73dbcc checkstorage startup and drop table . . . . . . . . . . . . . . . . . . . . . . . . . . . . . . . . . 76Faults Due to sp_placeobject . . . . . . . . . . . . . . . . . . . . . . . . . . . . . . . . . . . . . . . . . . . . 76
Other Useful Tasks . . . . . . . . . . . . . . . . . . . . . . . . . . . . . . . . . . . . . . . . . . . . . . . . . . . . . . . . . . 77How to Fix a Corrupted Index on System Tables . . . . . . . . . . . . . . . . . . . . . . . . 77
Read These Warnings First . . . . . . . . . . . . . . . . . . . . . . . . . . . . . . . . . . . . . . . . . 77Repairing the System Table Index . . . . . . . . . . . . . . . . . . . . . . . . . . . . . . . . . . 77Workaround for sysobjects Nonclustered Indexes . . . . . . . . . . . . . . . . . . . . 79
How to Rescue Data from a Corrupted Table . . . . . . . . . . . . . . . . . . . . . . . . . . . 80Back Up Data to a New Table . . . . . . . . . . . . . . . . . . . . . . . . . . . . . . . . . . . . . . 80Back Up Data to an Operating System File . . . . . . . . . . . . . . . . . . . . . . . . . . 81
How to Start Adaptive Server with Trace Flags . . . . . . . . . . . . . . . . . . . . . . . . . 82
5

Table of Contents
Modifying the runserver File to Include Trace Flags for UNIX . . . . . . . . 82Modifying the runserver File to Include Trace Flags for DigitalOpenVMS. . . . . . . . . . . . . . . . . . . . . . . . . . . . . . . . . . . . . . . . . . . . . . . . . . . . . . . . . 83Using the Load Command With Trace Flags in Novell NetWare. . . . . . 84Using Trace Flags in OS/2 . . . . . . . . . . . . . . . . . . . . . . . . . . . . . . . . . . . . . . . . . 84Using Server Configuration to Include Trace Flags in Windows NT . . 85
How to Reload a Suspect User Database . . . . . . . . . . . . . . . . . . . . . . . . . . . . . . . 85How to Drop a Database When drop database Fails . . . . . . . . . . . . . . . . . . . . . . 86How to Fix and Prevent Allocation Errors . . . . . . . . . . . . . . . . . . . . . . . . . . . . . . 87
Understanding Allocation Errors . . . . . . . . . . . . . . . . . . . . . . . . . . . . . . . . . . . 87Fixing Allocation Errors . . . . . . . . . . . . . . . . . . . . . . . . . . . . . . . . . . . . . . . . . . . 88Fixing Allocation Errors when Object ID and Index ID are Known . . . 89Detecting Allocation Errors as Early as Possible . . . . . . . . . . . . . . . . . . . . . 91Syntax for dbcc checkalloc with the fix Option. . . . . . . . . . . . . . . . . . . . . . . . 94
How to Find an Object Name from a Page Number . . . . . . . . . . . . . . . . . . . . . 95How to Interpret sp_who Output . . . . . . . . . . . . . . . . . . . . . . . . . . . . . . . . . . . . . . . 97Device Administration Issues. . . . . . . . . . . . . . . . . . . . . . . . . . . . . . . . . . . . . . . . . . 98How to Choose Between Raw Partitions and UNIX Files . . . . . . . . . . . . . . . . 98
Correct Use of Raw Partitions . . . . . . . . . . . . . . . . . . . . . . . . . . . . . . . . . . . . . . 99Getting Information About Your Partition . . . . . . . . . . . . . . . . . . . . . . . . 101Other Situations to Avoid . . . . . . . . . . . . . . . . . . . . . . . . . . . . . . . . . . . . . . . . 102
How to Move a Sybase Device or Database With Disk Mirroring . . . . . . 102How to Gather Information About Read/Write Errors . . . . . . . . . . . . . . . . 103
Before You Create and Execute sp_diskblock . . . . . . . . . . . . . . . . . . . . . . . 103How to Mark a Database “suspect'”. . . . . . . . . . . . . . . . . . . . . . . . . . . . . . . . . . 105
Before You Create and Execute sp_marksuspect . . . . . . . . . . . . . . . . . . . . 105After You Execute sp_marksuspect . . . . . . . . . . . . . . . . . . . . . . . . . . . . . . . . 106
How to Reset a Database's “suspect” Status . . . . . . . . . . . . . . . . . . . . . . . . . . 107Before You Create and Execute sp_resetstatus. . . . . . . . . . . . . . . . . . . . . . 107After You Execute sp_resetstatus . . . . . . . . . . . . . . . . . . . . . . . . . . . . . . . . . . 108Alternative Method of Resetting a Database's “suspect” Status . . . . 110
How to Find a Device's Virtual Device Number . . . . . . . . . . . . . . . . . . . . . . 110Before You Create and Execute sp_vdevno . . . . . . . . . . . . . . . . . . . . . . . . . 111
How to Detect and Clear Long-Running Transactions. . . . . . . . . . . . . . . . . 111Causes of Long-Running Transactions . . . . . . . . . . . . . . . . . . . . . . . . . . . . 111Detecting Long-Running Transactions . . . . . . . . . . . . . . . . . . . . . . . . . . . . 112Clearing Long-Running Transactions . . . . . . . . . . . . . . . . . . . . . . . . . . . . . 112
How to Reduce the Size of tempdb. . . . . . . . . . . . . . . . . . . . . . . . . . . . . . . . . . . . 113Reset tempdb to Default Size. . . . . . . . . . . . . . . . . . . . . . . . . . . . . . . . . . . . . . 113Verify and Alter tempdb on Desired Devices . . . . . . . . . . . . . . . . . . . . . . . 115
How to Remap All Objects in a Database . . . . . . . . . . . . . . . . . . . . . . . . . . . . . 116
6
Table of Contents
The Remapping Script . . . . . . . . . . . . . . . . . . . . . . . . . . . . . . . . . . . . . . . . . . . 117How to Prepare for Analyzing an Optimizer Problem. . . . . . . . . . . . . . . . . 118
Steps to Take Before Analysis . . . . . . . . . . . . . . . . . . . . . . . . . . . . . . . . . . . . 119Terminology . . . . . . . . . . . . . . . . . . . . . . . . . . . . . . . . . . . . . . . . . . . . . . . . . . . . 119How to Gather the Information . . . . . . . . . . . . . . . . . . . . . . . . . . . . . . . . . . 119Understanding the Information You Have Gathered . . . . . . . . . . . . . . 121
How to Determine Which Physical Devices a Database is On. . . . . . . . . . 126How to Identify and Fix a Corrupted Table . . . . . . . . . . . . . . . . . . . . . . . . . . . 126How to Monitor the Error Log . . . . . . . . . . . . . . . . . . . . . . . . . . . . . . . . . . . . . . . 127Checking the Operating System Error Log. . . . . . . . . . . . . . . . . . . . . . . . . . . . 131
Location of the Operating System Error Log . . . . . . . . . . . . . . . . . . . . . . 131Types of Problems to Check . . . . . . . . . . . . . . . . . . . . . . . . . . . . . . . . . . . . . . 132
Index. . . . . . . . . . . . . . . . . . . . . . . . . . . . . . . . . . . . . . . . . . . . . . . . . . . . . . . . . . . . . . . . . . . . . . . . . . . . . . . . . 133
7

Table of Contents
8

About This Book
The Sybase Adaptive Server Enterprise Troubleshooting and Error MessagesGuide describes troubleshooting procedures for problems that Sybase®
users may encounter when using Sybase Adaptive Server Enterprise™.The problems addressed here are those which the Sybase Technical Supportstaff hear about most often. The guide is applicable to Versions 11.0.xthrough 11.9.2, and its purpose is:
• To provide enough information about certain error conditions so thatyou can resolve problems without help from Technical Support.
• To provide lists of information that you can gather before callingTechnical Support, which will help resolve your problem more quickly.
• To provide you with a greater understanding of Sybase products.
♦Note Adaptive Server Enterprise is referred to as Adaptive Server in theremainder of this book.
AudienceThis guide is intended for the following:
• Sybase System and Database Administrators
• Sybase Technical Support contacts
• Developers of applications using Sybase software
This guide assumes that you are thoroughly familiar with the Sybaseproducts. If you are unfamiliar with any of the procedures described inthis guide, call Sybase Technical Support for assistance.
What This Guide ContainsThe Troubleshooting and Error Messages Guide is a three-volume set. Thisfirst volume contains guidelines for system database recovery and othertroubleshooting procedures. The second volume contains detailed errormessage descriptions. The third volume includes the text of all ComponentIntegration Services, Backup Server, and Adaptive Server error messages.
The chapters are as follows:
9

About This Book
• Chapter 1 includes step-by-step procedures for recovering from variousdisaster situations involving Sybase system databases. Read thischapter before disasters occur so that recovery will be easier.
• Chapter 2describes a variety of useful tasks, including those requiredfor recovery from disaster situations.
• Chapter 3 contains detailed information about common SybaseAdaptive Server error messages, including the text of each message,potential causes of the error, and what you can do to recover from theerror. The messages are listed in numerical order. Some error messagetypes fall into more than one number sequence. For example, dbccerrors are in the 25xx range and are also in the 79xx range. Since theerror message writeups are presented in numerical order, there ismore than one section titled “dbcc Errors.” Only the most commonlyoccurring error messages are documented in this chapter.
You can create a complete listing of the Adaptive Server error messagesfor your installation by typing the following:
1> use master2> go
1> select * from sysmessages2> go
• Additional chapters contain reference information about SybaseAdaptive Server, Backup Server, and Component Integration Services(CIS) error messages, including the text of each message and a brieftroubleshooting tip with instructions on what to do first when youencounter the error. All numbered error messages are documentedin these chapters.
Related DocumentsThe Sybase Adaptive Server Enterprise Troubleshooting and Error MessagesGuide refers you to other Sybase manuals for additional information aboutcommands and concepts mentioned in the writeups as well as informationyou need to make decisions about your Adaptive Server. The followingdocuments are referred to frequently:
• Adaptive Server Enterprise Reference Manual – this manual containsdetailed information on Adaptive Server commands and system storedprocedures.
10

Changes to This Book
• Adaptive Server Enterprise System Administration Guide – this guideprovides detailed information about administering servers anddatabases.
• Adaptive Server Enterprise Performance and Tuning Guide – this guideprovides detailed information on Adaptive Server performance andtuning.
• Adaptive Server Enterprise Transact-SQL User's Guide – this guidedescribes Transact-SQL®, the Sybase-enhanced version of the relationaldatabase language.
Changes to This BookThe following changes have been made to the Sybase Adaptive ServerEnterprise Troubleshooting and Error Messages Guide:
• The following topics have been added to the Encyclopedia of Tasks:
– Online Recovery & Recovery Fault Isolation
– Useful dbcc Commands
– How to Monitor the Error Log
– Checking the Operating System Error Log
• New detailed writeups have been added for the following errormessages:
– Sequencer Error: 247
– Query Processor Errors: 309, 539, 547
– Access Method Errors: 691, 692, 693, 694, 695, 696, 697
– Memory Manager Error: 709
– Open Database Manager Errors: 941, 950
– Page Manager Error: 1131
– Create Utilities Errors: 1732, 1739, 1740, 2753
– dbcc Errors: 2582, 7928, 7989
– Procedure Manager Error: 2806
– dump and load Errors: 3216, 3230, 4222
11

About This Book
– Recovery Error: 3401
– alter table Errors: 4964, 4981
– Text Manager Error: 7114
– Distributed Database Network Errors: 7207, 7234, 7235
– RPC Error: 8009
– CIS Error: 11202
– reorg Utility Error: 11903
– Suspect Granularity Errors: 12716, 12717
– Kernel Error: memory usage in procedure headers
• Detailed writeups of the following error messages have been modified(in some cases the writeup may be unchanged, but the message textitself changed in 11.9.2):
– Access Method Error: 629
– Buffer Manager Error: 834
– Descriptor Manager Error: 8201
• All error message listings have been updated, including the messagetext and troubleshooting guidelines. This includes all Adaptive Server,Backup Server, and Component Integration Services errors.
• Updated instructions are provided on how to access the SybaseCustomer Service and Support World Wide Web page for the latestsupport information and services.
Your Comments About this BookIn order to continue to improve the Sybase Adaptive Server EnterpriseTroubleshooting and Error Messages Guide, we need your feedback. Sendyour comments about the guide to the email address [email protected].
Comments might include:
• Corrections
• Requests for specific additions
• Material you would like to submit
12

Style Conventions
• Comments about which sections are particularly helpful
• Comments about which sections are not clear
• Any other input you might have
♦Note The [email protected] email address is for comments about thetroubleshooting guide. It is not for reporting problems or asking technicalquestions. To report a problem or ask a technical question, contact SybaseTechnical Support.
Style ConventionsWherever possible, the Sybase Adaptive Server Enterprise Troubleshooting andError Messages Guide uses the style conventions of the Sybase productmanuals. This section contains a brief summary of those conventions.
Style Conventions in TextCommands and script names appear in bold type; for example:
To change the isql command terminator...
Object names appear in italics; for example:
Use the installmodel script to complete the installation of the model database.
SQL Syntax ConventionsThe conventions for syntax statements in this manual are as follows:
Key Definition
command Command names, command option names, utilitynames, utility flags, and other keywords are in bold.
variable Variables, or words that stand for valuesthat you fill in, are in italics.
{} Curly braces indicate that you choose atleast one of the enclosed options. Do notinclude braces in your option.
[] Brackets mean choosing one or more of theenclosed options is optional. Do not includebrackets in your option.
() Parentheses are to be typed as part of the command.
13
About This Book
Key Definition
| The vertical bar means you may select onlyone of the options shown.
, The comma means you may choose as many of theoptions shown as you like, separating your choiceswith commas to be typed as part of the command.
SQL syntax statements (displaying the syntax and options for a command)are printed as follows:
sp_dropdevice [device_name]
Examples showing the use of Transact-SQL commands are printed asfollows:
1> select * from publishers2> go
Examples of output from the computer are printed as follows:
pub_id pub_name city state------ ------------------— ----------- -----0736 New Age Books Boston MA0877 Binnet & Hardley Washington DC1389 AlgodataInfosystems Berkeley CA
(3 rows affected)
Electronic Information SourcesFor the most up-to-date information on troubleshooting and technical tips,refer to Sybase's electronic services:
• Technical Library, Sybase's CD-ROM knowledge base.
• The Customer Service and Support (CS&S) World Wide Web page.To access the CS&S page:
a. Go to the Sybase Support home page:
http://support.sybase.com
b. Click on Support.
To view or download support information, you need a Web browsersuch as Netscape Navigator™ that supports SSL (Secure Sockets Layer).If you are behind a firewall, your proxy server must also support SSL.
14
If You Need Help
Alternatively, you may use Sybase's customized support site,
http://mysupport.sybase.com
If You Need HelpHelp with your Sybase software is available in the form of documentationand Sybase Technical Support. If you have any questions about theprocedures contained in this guide, ask the designated person at your siteto contact Sybase Technical Support.
For a checklist that helps you collect information when contacting TechnicalSupport, refer to “Reporting Errors” in “Error Message Writeups”.
15

About This Book
16
Chapter 1
System Database Recovery
This chapter provides step-by-step procedures for recovering from variousdisaster situations involving Sybase system databases or the entire masterdevice.
WARNING! Storing the system databases sybsystemprocs, sybsecurity, and sybsyntax,and user databases on the master device is not recommended, as thisgreatly complicates disaster recovery.
Ensuring RecoverabilityThe best time to prepare for a disaster is before it happens.
Review the procedures in this chapter before an actual disaster occurs,such as a power failure, hard disk crash, or other severe problem thatcould cause the loss of your master device, your master database, or othervital system resource. Here are some hints for making these proceduresthe most effective:
• Create and keep backups of complete, detailed scripts to re-createyour system exactly as it existed before the disaster and to performrecovery as efficiently as possible. In particular, your scripts shouldcontain the following information:
– Copies of key system tables in the master database, particularlysysdatabases, sysdevices, sysusages, sysconfigures, syscharsets andsyslogins. You can make copies of these tables by using bcp withthe –c option.
– Records of disk init, disk reinit, create database, alter database, sp_addsegment,and sp_extendsegment commands.
– Records of all changes made to syslogins and sysloginroles. You maywant to keep an ongoing script of all the sp_addlogin and sp_droplogincommands.
17

Chapter 1 System Database Recovery
– Records of creations and modifications of system and userdatabases, particularly for structural changes, and particularlyfor master.
– SQL records. Even if you are adding only a single disk device or acouple of logins, it is good system administration practice to save allthis information in scripts and hard copy.
• Take steps to prevent other users logging into Adaptive Server whileyou are working with the master database or device. To do this alwaysstart Adaptive Server using the -m option. You can also temporarily usea different interfaces file or entry with a different port number andname, so that other users will not find the server you are working on.
• Back up (using dump database) the master database frequently to helpsimplify solving problems with the master database. Back it up after anychanges to system tables, especially sysusages, sysdatabases, sysdevices,syslogins, and sysloginroles.
• Truncate the master database log frequently.
• Keep statistics on how much time and space are required for dumpsand loads.
• Avoid keeping user databases on the master device, as it complicatesrecovery scenarios.
• Always issue a dump database command after the following:
– bcp (fast version)
– create index
– select into
– dump transaction with no_log
– dump transaction with truncate_only
• Where appropriate, automate the use of operating system thresholdprocedures and scripts that run backups.
• Verify that your interfaces file is correct.
• Catalog and label your backup media carefully.
• Try to run dbcc commands at the time you make dumps to ensure thatthe dump is not corrupted.
18

Finding the Appropriate Recovery Scenario
As of System 11, different versions of the configuration file are maintainedon disk in $SYBASE directory for reference.
Refer to “Developing a Backup and Recovery Plan” in the SystemAdministration Guide to learn more about the procedures described in thischapter so that you are ready for an emergency.
Finding the Appropriate Recovery ScenarioUse the following table to determine where to look in this chapter forinformation on your system database recovery problem.
If And And Then see
The master database iscorrupt
Adaptive Serverdoes not start
A valid dump of themaster database exists
“Valid Dump of themaster Database Exists”
The master database iscorrupt
Adaptive Serverdoes not start
A valid dump ofthe master databasedoes not exist
“Valid Dump of the masterDatabase Does Not Exist”
The master database iscorrupt
Adaptive Serverstarts
A valid dump of themaster database exists
“Valid Dump of themaster Database Exists”
The master database iscorrupt
Adaptive Serverstarts
A valid dump ofthe master databasedoes not exist
“Manually RebuildingAdaptive Server with bcpand buildmaster”
The master device iscompletely lost
A valid dump of themaster databaseexists
“Master Device Is Lostand Valid Dump Exists”
The master device iscompletely lost
A valid dump ofthe master databasedoes not exist
“Master Device Is Lostand Valid Dump DoesNot Exist”
The model database islost or corrupted
“The model Database IsLost or Corrupted”
You have lost a device,other than the masterdevice, that containedpieces of tempdb
“Non-Master DeviceContaining Pieces oftempdb Is Lost”
The master device isgoing bad
“Master Device IsGoing Bad”
Adaptive Server does notstart after you have madeconfiguration changes
“Adaptive Server DoesNot Start After AlteringConfiguration”
Most of these problems (with the exception of “You have lost a device,other than the master device, that contained pieces of tempdb”) can be
19
Chapter 1 System Database Recovery
addressed with the procedure for “Manually Rebuilding Adaptive Serverwith bcp and buildmaster”.
master Database Is Corrupt and Adaptive Server Does Not StartThis section is divided into two sub-sections: one applies if you have avalid dump of the master database and the other applies if you do not.
Valid Dump of the master Database Exists♦Note These procedures assume that the rest of the master device and the
sybsystemprocs database are intact.
If your master device has a non-default sort order, go to “Valid Dump withNon-Default Sort Order”.
1. Rebuild the master database without initializing the master device.Refer to “How to Rebuild master Database and Leave Master DeviceIntact” in “Encyclopedia of Tasks”.
2. Start Adaptive Server in single-user mode. Refer to “How to StartAdaptive Server in Single-User Mode” in “Encyclopedia of Tasks”.
3. Ensure that the Adaptive Server has the correct name for the BackupServer in the sysservers table. Refer to “How to Set A Default BackupServer Manually in Adaptive Server” in “Encyclopedia of Tasks” forinstructions.
4. Load the master database from backup using the load database commandto specify the physical device or file name to reference. For example:
1> load database master from " device_name "2> go
Adaptive Server automatically shuts down after the load is complete.
5. With Adaptive Server still down, manually reestablish the number ofdevices configuration parameter if necessary. Refer to “How to Alter thenumber of devices Parameter Manually” in “Encyclopedia of Tasks”.
6. Start Adaptive Server in single-user mode.
20
master Database Is Corrupt and Adaptive Server Does Not Start
7. Restore system catalog information for the master database if changeswere made to it since the last dump. Refer to “How to Restore SystemTable Information in master Database” in “Encyclopedia of Tasks”.
8. Dump the master database.
9. Shut down Adaptive Server.
10. Start Adaptive Server in multiuser mode. Refer to “Returning AdaptiveServer to Multiuser Mode” in “Encyclopedia of Tasks”.
Valid Dump of the master Database Does Not Exist♦Note These procedures assume that the rest of the master device is intact.
1. Rebuild the master database without initializing the master device.Refer to “How to Rebuild master Database and Leave Master DeviceIntact” in “Encyclopedia of Tasks”.
2. With Adaptive Server still down, manually reestablish the number ofdevices configuration parameter if necessary. Refer to “How to Alter thenumber of devices Parameter Manually” in “Encyclopedia of Tasks”.
3. Start Adaptive Server in single-user mode. Refer to “How to StartAdaptive Server in Single-User Mode” in “Encyclopedia of Tasks”.
4. Restore the system tables information contained in the master database.This information describes all Sybase devices and user databases. Ifyou have bcp files of the system tables, refer to “Manually RebuildingAdaptive Server with bcp and buildmaster”; otherwise refer to“Restoring Device and Database Information in the System Catalog” in“Encyclopedia of Tasks”.
5. Use sp_addserver to add a SYB_BACKUP entry to the sysservers table:
1> sp_addserver "SYB_BACKUP" null,2> <correct backup server name >3> go
6. Dump the master database.
7. Shut down Adaptive Server.
8. Start Adaptive Server in multiuser mode. Refer to “Returning AdaptiveServer to Multiuser Mode” in “Encyclopedia of Tasks”.
21
Chapter 1 System Database Recovery
master Database Is Corrupt and Adaptive Server StartsThis section is divided into two sub-sections: one in which you have avalid dump of the master database and one in which you do not.
Valid Dump of the master Database ExistsPerform these steps to recover a master database that is corrupt but usableby Adaptive Server. For example, some tables in the master database arecorrupt but Adaptive Server can start, and the System Administrator canto a certain extent use the master database.
♦Note This procedure assumes that the rest of the master device is intact.
1. Start Adaptive Server in single-user mode. Refer to “How to StartAdaptive Server in Single-User Mode” in “Encyclopedia of Tasks”.
2. Load the master database from backup. Refer to “How to Load themaster Database from Backup” in “Encyclopedia of Tasks”.
Adaptive Server will automatically shut down after the load iscomplete.
3. Start Adaptive Server in single-user mode. Refer to “How to StartAdaptive Server in Single-User Mode” in “Encyclopedia of Tasks”.
4. Restore system catalog information of master database if changes weremade to it since the last dump. Refer to “How to Restore System TableInformation in master Database” in “Encyclopedia of Tasks”.
5. Start Adaptive Server in multiuser mode. Refer to “Returning AdaptiveServer to Multiuser Mode” in “Encyclopedia of Tasks”.
Valid Dump of the master Database Does Not ExistIf you do not have a valid dump of the master database, you have lost yourmaster database. To resolve this problem, follow the procedure describedunder “Manually Rebuilding Adaptive Server with bcp and buildmaster”.
22

Master Device Is Lost and Valid Dump Exists
Master Device Is Lost and Valid Dump Exists
Valid Dump with Default Sort OrderUse this procedure only if your Adaptive Server was installed with yourplatform's default sort order. If you have installed a non-default sort order,refer to “Valid Dump with Non-Default Sort Order”.
1. Rebuild the lost master device. Refer to “How to Build a New MasterDevice” in “Encyclopedia of Tasks” for instructions.
2. Start Adaptive Server in single-user mode. Refer to “How to StartAdaptive Server in Single-User Mode” in “Encyclopedia of Tasks”.
3. Ensure that the Adaptive Server has the correct name for the BackupServer in the sysservers table. Refer to “How to Set A Default BackupServer Manually in Adaptive Server” in “Encyclopedia of Tasks” forinstructions.
4. Run installmaster or alter master for 2MB if master was originally 5MB.
5. Load the master database from backup using the load database commandto specify the physical device or file name to reference. For example:
1> load database master from device_name2> go
Adaptive Server will shut itself down after the load is complete.
6. With Adaptive Server still down, manually reestablish the number ofdevices configuration parameter if necessary. Refer to “How to Alter thenumber of devices Parameter Manually” in “Encyclopedia of Tasks”.
7. Start Adaptive Server.
8. Restore system catalog information for the master database if changeswere made to it since the last dump. Refer to “How to Restore SystemTable Information in master Database” in “Encyclopedia of Tasks”.
9. Load or rebuild the model database if necessary. Refer to “How to Alterthe model Database” in “Encyclopedia of Tasks”.
10. Drop, re-create, and load any user databases located fully or partiallyon the master device.
23

Chapter 1 System Database Recovery
WARNING! Storing system databases sybsystemprocs, sybsecurity, and sybsyntax,and user databases on the master device is not recommended, as thisgreatly complicates disaster recovery.
Valid Dump with Non-Default Sort Order1. Comment out the entry for the Adaptive Server in the interfaces file.
2. Rename the RUN_SERVER file for the Adaptive Server toRUN_SERVER.old. Rename your configuration file, adding “.old” tothe name.
3. Run sybinit. Choose the option to install a new Adaptive Server. Installthe Adaptive Server using the original master device, the originalAdaptive Server name, and the sort order and character set to reflectthat on the dump. This creates a new entry in the interfaces file as wellas a new RUN_SERVER file to replace the one you renamed in step 2.
4. Start Adaptive Server in single-user mode. Refer to “How to StartAdaptive Server in Single-User Mode” in “Encyclopedia of Tasks”.
5. Ensure that the Adaptive Server has the correct name for the BackupServer in the sysservers table. Refer to “How to Set A Default BackupServer Manually in Adaptive Server” in “Encyclopedia of Tasks” forinstructions.
♦Note The master database must look exactly as it did and occupy exactly thesame location on the master device as it did before the database was lost.
6. Load the master database from backup using the load database commandto specify the physical device or file name to reference. For example:
1> load database master from device_name2> go
Adaptive Server shuts itself down after the load is complete.
7. With Adaptive Server still down, manually reestablish the number ofdevices configuration parameter if necessary. Refer to “How to Alter thenumber of devices Parameter Manually” in “Encyclopedia of Tasks”.
8. Start Adaptive Server. Change the name of the start-up file with the“.old” suffix created in step 2 back to the original name and startAdaptive Server with that file.
24
Master Device Is Lost and Valid Dump Does Not Exist
9. Restore system catalog information for the master database if changeswere made to it since the last dump. Refer to “How to Restore SystemTable Information in master Database” in “Encyclopedia of Tasks”.
10. Load or rebuild the model database if necessary. Refer to “How to Alterthe model Database” in “Encyclopedia of Tasks”.
11. Drop, re-create, and load any user databases located fully or partiallyon the master device.
Master Device Is Lost and Valid Dump Does Not Exist1. Build a new master device. Refer to “How to Build a New Master
Device” in “Encyclopedia of Tasks”.
2. With Adaptive Server still down, manually reestablish the number ofdevices configuration parameter if necessary. Refer to “How to Alter thenumber of devices Parameter Manually” in “Encyclopedia of Tasks”.
3. Start Adaptive Server in single-user mode. Refer to “How to StartAdaptive Server in Single-User Mode” in “Encyclopedia of Tasks”.
4. Restore system catalog information for the master database. Refer to“How to Restore System Table Information in master Database” in“Encyclopedia of Tasks” or “Manually Rebuilding Adaptive Serverwith bcp and buildmaster”
5. Alter the tempdb database if necessary. Refer to “How to Alter tempdb”in “Encyclopedia of Tasks”.
6. Check Adaptive Server to verify that the system database sybsystemprocsis still intact. If it is not, rebuild sybsystemprocs by running disk init toinitialize a device for the database and then creating sybsystemprocson the new device.
7. Execute the installmaster and the installmodel scripts. Refer to “How to Runthe installmaster and installmodel Scripts” in “Encyclopedia of Tasks”.
8. Use sp_addserver to add a SYB_BACKUP entry to the sysservers table:
1> sp_addserver "SYB_BACUKP" null,2> <correct backup server name >3> go
9. Dump the master database.
10. Drop, re-create, and load any user databases located fully or partiallyon the master device.
25

Chapter 1 System Database Recovery
WARNING! Storing system databases sybsystemprocs, sybsecurity, and sybsyntaxand user databases on the master device is not recommended, as thisgreatly complicates disaster recovery.
11. Use the latest version of the configuration file to restore theconfiguration parameters.
12. Shut down Adaptive Server.
13. Start Adaptive Server in multiuser mode with the old configurationfile. Refer to “Returning Adaptive Server to Multiuser Mode” in“Encyclopedia of Tasks”.
The model Database Is Lost or CorruptedIf you can use the model database with the use model command, and if youhave a valid dump of the database, then you can load the model databasefrom backup.
If you cannot use the model database or do not have a dump of the modeldatabase, follow these steps:
1. Shut down Adaptive Server.
2. Run the following command:
% buildmaster -x -d master_device_name
3. Restart Adaptive Server.
4. Reload any user-specific structures or data in model, such as tables,stored procedures, users and permissions.
Non-Master Device Containing Pieces of tempdb Is LostFollow this procedure if a device containing pieces of tempdb, other thanthe master device, has been lost:
1. Start Adaptive Server in single-user mode. Refer to “How to StartAdaptive Server in Single-User Mode” in “Encyclopedia of Tasks”.
2. Print out the sysusages table for tempdb using the following command:
1> select * from sysusages where dbid=22> go
26
Non-Master Device Containing Pieces of tempdb Is Lost
3. Delete all but the first entry in sysusages for tempdb (dbid=2). Make surethat the segmap column for the first entry is 7. If the model database hasbeen increased beyond its default size, do not reduce the size of tempdbso that it is smaller than model. If the size of model is larger than thedefault 2MB, call Sybase Technical Support.
WARNING! disk refit or disk reinit will fail on any master database on which thisprocedure is used.
For example:
1> begin transaction2> delete master..sysusages3> where dbid=2 and lstart != 04> go
1> update master..sysusages set segmap = 72> where dbid = 23> go
1> select * from master..sysusages where dbid=22> go
4. If the above select command produced the following output:
dbid segmap lstart size
2 7 0 1024
continue to step 5. If it did not, roll back the transaction and contactSybase Technical Support.
5. Commit the transaction and shut down Adaptive Server using thefollowing commands:
1> commit transaction2> go
1> shutdown2> go
6. Start Adaptive Server in multiuser mode. Refer to “Returning AdaptiveServer to Multiuser Mode” in “Encyclopedia of Tasks”.
7. Disallow updates to system catalogs:
1> sp_configure "allow updates", 02> go
27

Chapter 1 System Database Recovery
8. Drop (sp_dropdevice) and reinitialize (disk init) the lost device. If userdatabases are on the same device with tempdb, you may have to dropthose databases also, before dropping and reinitializing the lost device.
9. Use the alter database command to restore tempdb to the desired size.
10. Dump the master database.
Master Device Is Going BadIf your master device is working fine but you are starting to notice othersymptoms that could lead to major problems, use the procedure in thissection to prevent those major problems.
Here are some examples of other symptoms that could lead to problemswith your master device:
• Your operating system log reports I/O disk errors.
• Databases other than master are starting to exhibit problems.
• There is a problem with tempdb or model.
Perform the following procedure if your master device is going bad:
1. Ensure the consistency of the master database by running dbcc checkallocand dbcc checkdb.
2. Ensure the consistency of any user databases located fully or partiallyon the master device by running dbcc checkalloc and dbcc checkdb.
3. Dump any user databases located fully or partially on the master device.Save the contents of sysusages, sysdevices, sysdatabases, and syslogins.
4. If the consistency checks on the master database do not produce errors,and changes have been made since the last backup, dump the masterdatabase.
5. Perform steps 1 and 2 for the model database if it has been changed sincethe original installation.
6. Have your hardware checked and repaired. If the device is replaced,follow the steps listed in “Master Device Is Lost and Valid DumpExists” in “System Database Recovery”.
28

Adaptive Server Does Not Start After Altering Configuration
Adaptive Server Does Not Start After Altering ConfigurationWhen Adaptive Server starts, it reads the configuration parameterscontained in the configuration file for your Adaptive Server.
The values of these variables are used at start-up time to determine howmuch memory to allocate for various resources needed by Adaptive Server.If there are insufficient resources available to satisfy all the requests,Adaptive Server will not start. This situation most often occurs when oneor more erroneously high values are set with the sp_configure command.
Refer to “How to Reset Adaptive Server to Its Default Configuration” in“Encyclopedia of Tasks” for information about resetting configurationparameters.
Manually Rebuilding Adaptive Server with bcp and buildmasterManually rebuilding Adaptive Server with bcp and buildmaster enables youto create a new master device/configuration block and preserve systemtables.
Some of the most common uses for a manual rebuild are when:
• The master device has no more available space. You can migrate thesystem table information to a new, larger master device while retainingall current data on the original devices.
• Restoring the master device resulted in 605 errors due to an incorrectsysusages table. You can use trace flags, along with the bcp and buildmastersteps, to get the information needed for a rebuild.
• No backup of the master database exists. The old master database isaccessible, although it is not runnable. You can migrate the systeminformation to a new master database.
You can also use the rebuild steps below for immediate recovery when:
• Severe data corruption necessitates a speedy recovery. You can run thebcp and buildmaster commands, instead of using the sybinit utility, runningthe disk reinit/refit commands, or creating/loading from backups.
• You need to perform a recovery from an inadvertent configurationchange, such as memory set too high.
• Major corruption problems on, or loss of, the master device requirescreating a new server. In this case, you must use bcp on your systemtables immediately.
29

Chapter 1 System Database Recovery
♦Note Ensure that your backup procedures include bcp commands for all relevanttables, including the six system tables listed under “Steps for RebuildingAdaptive Server”. You can then more easily restore the master database ifnecessary.
ChecklistYou can use the following checklist when you manually rebuild AdaptiveServer with bcp and buildmaster. Details on each step follow.
1. Copy the system tables to files (bcp...out with the -c option).
2. Get configuration information and shut down the server.
3. Run the buildmaster command to create the new master device.
4. Bring up the server in single user mode.
5. Delete sysconfigures, and then copy the files into the system tables(bcp...in), including sysconfigures.
6. Reconfigure, shut down with nowait and then restart the server.
7. Run the install scripts for master and model.
8. Shut down/bring up the server in multi-user mode.
9. Test the results.
ConsiderationsBefore performing Adaptive Server recovery, carefully evaluate the issuesspecific to your system, and then choose the best approach.
You may also find it helpful to review appropriate recovery and rebuildinformation in earlier sections of this chapter.
Steps for Rebuilding Adaptive ServerLet us say that your master device is full and is producing 1105 errors(system segment is full). As a last resort, you have run the dump transactioncommand with the truncate_only or no_log option, which did not free anydatabase space. You cannot even run alter database to add rows to thesysusages system table, because the system segment is full. This section
30
Manually Rebuilding Adaptive Server with bcp and buildmaster
details how to manually rebuild Adaptive Server in this common situation,focusing on these six system tables:
• sysdevices represents the available physical devices.
• sysdatabases represents the databases known to Adaptive Server.
• sysusages plots how individual databases use the device fragments,such as for data and transaction logging.
• syslogins holds the login information about users allowed to workin the server.
• sysconfigures contains the user-settable configuration parameters.
• syscharsets contains the character sets and sort orders defined forAdaptive Server use.
Your Adaptive Server configuration may include other system tables ofcritical importance. If so, be sure to include them when recreating theoriginal environment. For example:
• sysservers holds the names of other remote servers.
• sysremotelogins contains the login information for the remote hosts.
• sysloginroles may be necessary for sites in doing extensivegroup/security work.
The following procedures rely on the bcp command. If bcp is unavailable,see “If You Cannot Use bcp or a Dump”.
Copy the System Tables to Files
Copy the system tables to data files as follows:
1. Execute the bcp...out command for each of the six main tables. At aSybase bin directory prompt, enter:
bcp master..sysdevices out /directory.spec/devs -Usa -P -cbcp master..sysdatabases out /directory.spec/dbs -Usa -P -cbcp master..sysusages out /directory.spec/usages -Usa -P -cbcp master..syslogins out /directory.spec/logins -Usa -P -cbcp master..sysconfigures out /directory.spec/configures -Usa -P -cbcp master..syscharsets out /directory.spec/charsets -Usa -P -c
2. If your site needs other system tables, such as sysservers, andsysremotelogins, run bcp...out for them now as well. The syntax is:
bcp master..< table_name > out /directory.spec/< filename > -Usa -P -c
Where:
31

Chapter 1 System Database Recovery
– table_name is the name of the table, for example sysservers.
– filename is the name you want to give the bcp file, for example srvrs.
For details on using the bcp command, see the Adaptive Server utilitiesmanual for your platform.
♦Note You cannot use bcp and buildmaster to recover user databases on the masterdevice. You must manually drop and reload these user databases frombackups.
Get Configuration Information and Shut Down the Server
Print current configuration values to an output file, and then shut downthe Adaptive Server as follows:
1. At a Sybase bin directory prompt:
isql -Usa -P -S< server > << EOF > /directory.spec/sp_configure.out
For details on isql parameters, see the Adaptive Server utilities manualfor your platform.
2. At the isql prompt, enter:
sp_configuregoshutdowngoEOF
Perform buildmaster Commands and Edit the run_server File
Consider these guidelines before running buildmaster:
• Preserve the original. When doing a full buildmaster rebuild to createa new master device, preserve the original device in case you needinformation from it. First do all the work on a new device (a filesystemis adequate for this.) Once the server is running, you can either repeatthe same work on the original master device or copy the new devicewith an operating system utility, such as dd (Unix).
• Keep tempdb on master. If you previously moved tempdb off the masterdevice, sysusages for master will be nonstandard if the master databasewas altered after moving tempdb.
32

Manually Rebuilding Adaptive Server with bcp and buildmaster
Maintaining tempdb on the master device ensures a standard masterdevice layout that you can restore conveniently if the device is lost. It isrecommended that you take this opportunity to move tempdb back tothe master device.
To create a new master device:
1. Create a new master device/configuration block. At the Sybase bindirectory prompt, enter:
buildmaster -d< path_to_new_master_device >-s< new_master_device_size >
where the <new_master_device_size> is the size of the new master devicein 2K pages.
♦Note To find where the current master device path is set, look in the “run_server”file under the Sybase install directory. The default name is RUN_SYBASE;if the server name is not SYBASE, the filename is RUN_servername.
2. Copy the “run_server” file under the Sybase install directory, and thenedit the copy as follows:
– Change the -d<path_to_old_master_device> to reflect the<path_to_new_master_device> that you created in step 1.
– Change the comment, # Size of Master Device:<old_master_device_size>”, to reflect the <new_master_device_size>.
Bring Up the Server in Single User Mode
1. Copy the “run_server” file and name it with a “m_” prefix to indicatesingle user mode; for example, m_RUN_servername.
2. Edit the m_RUN_servername file to add the single-user mode flag (-m onUnix) in the dataserver command.
3. At a Sybase install directory prompt, enter:
startserver -f m_RUN_servername
For details refer to “How to Start Adaptive Server in Single-User Mode” in“Encyclopedia of Tasks”.
Copy the Files into the System Tables
1. Log into the Adaptive Server that contains the new master device.No password is needed.
33

Chapter 1 System Database Recovery
2. Delete the sysconfigures table. You will replace the rows in step 4.
3. Remove the rows in the sysusages output file /directory.spec/usages fordbid 1 (master), 2 (tempdb), and 3 (model). dbid is the leftmost value ineach row.
This step prevents incorrect sysusages errors. Otherwise, databases tryto use uninitialized space from rows in the output file that are not inthe new sysusages table.
4. Copy the files back into the system tables by entering the followingcommands at a Sybase bin directory prompt:
bcp master..sysdevices in /directory.spec/devs -Usa -P -b 1 -cbcp master..sysdatabases in /directory.spec/dbs -Usa -P -b 1 -cbcp master..sysusages in /directory.spec/usages -Usa -P -b 1 -cbcp master..syslogins in /directory.spec/logins -Usa -P -b 1 -cbcp master..sysconfigures in /directory.spec/configures -Usa -P -b 1 -cbcp master..syscharsets in /directory.spec/charsets -Usa -P -b 1 -c
The -b 1 parameter allows processing to continue when bcp encountersduplicate records, such as the SA login created during the initialbuildmaster process.
♦Note Remember to run bcp...in for any other tables that you included in the step“Copy the System Tables to Files”.
5. Look at your error log prior to failure for the default sort order andcharacter set ID. Then invoke isql and enter:
1> update sysconfigures set value = <new-sort-id>2> where comment like “%default sort%”3> go1> update sysconfigures set value = <new-charset>2> where comment like “%default character%”3> go
6. Run checkpoint on the master database. Invoke isql and enter:
1> checkpoint2> go
Shut Down/Bring Up Adaptive Server in Single-User Mode
1. At a Sybase bin directory prompt, invoke isql:
isql -Usa -P << EOF
34

Manually Rebuilding Adaptive Server with bcp and buildmaster
2. Shut down the server. Use the with nowait option to avoid misleadingerror messages. At the isql prompt, enter:
shutdown with nowaitgoEOF
3. Start the server in single user mode. Refer to “How to Start AdaptiveServer in Single-User Mode” in “Encyclopedia of Tasks”.
4. If the sort order is changing, the server rebuilds some indexes and shutsdown again. In this case, simply repeat step 3.
Run the Install Scripts for master and model
At this point, Adaptive Server has recovered all of the user databasesand sybsystemprocs. Assuming that both master and sybsystemprocs areavailable to the server, run the install scripts to install system proceduresand grant permissions for using Adaptive Server. Run the install scriptsfrom a Sybase bin directory prompt. For example, for Unix platforms enter:
isql -Usa -P < $SYBASE/scripts/installmaster
isql -Usa -P < $SYBASE/scripts/installmodel
Shut Down/Bring Up the Server in Multi-User Mode
From the Sybase install directory prompt, enter:
startserver -f RUN_< server >
Verify the Results and Test Applications
Recommendations for verifying and recording the manual rebuild results:
• Perform dbcc commands on all databases.
• Dump the master database.
• Make and store hard copies of system tables, especially:
– sysdevices
– sysdatabases
– sysusages
– syslogins
– sysconfigures
– syscharsets
35

Chapter 1 System Database Recovery
• Test applications to ensure that they work as expected.
If You Cannot Use bcp or a DumpIf you cannot use bcp or a dump to restore master database information,refer to the information on using disk reinit and disk refit in “How to RestoreSystem Table Information in master Database” in “Encyclopedia of Tasks”.
Also note, if you do not have disk reinit scripts, you can get deviceinformation from these sources:
• Error log, which provides the physical and logical device names andvdevno
• Operating system, which provides the size
36
Chapter 2
Encyclopedia of Tasks
This chapter provides step-by-step procedures for tasks needed to recoverfrom various disaster situations involving Sybase system databases orthe entire master device, as well as for other tasks not strictly related todisaster recovery.
♦Note Although this chapter provides examples for a range of platforms,availability of SQL Server/Adaptive Server Enterprise varies. ASE 11.5.xamd 11.9.x are not ported to Stratus, OpenVMS, Novell Netware, and OS/2.
Disaster Recovery TasksThis section steps you through tasks necessary for recovery from variousdisaster situations involving Sybase system databases or the entire masterdevice.
How to Build a New Master DeviceTo build a new master device, execute buildmaster, specifying the locationand size of the master device. buildmaster should always be run by theoperating system user who owns the Adaptive Server devices. Rememberthat buildmaster takes the size in 2K blocks (4K for Stratus). For example,if you want a 14MB master device, set the size parameter to 7168 2Kblocks (3584 for Stratus).
WARNING! Never execute buildmaster while Adaptive Server is running!
To build a new 14MB master device, use a command similar to one inthe following table:
37

Chapter 2 Encyclopedia of Tasks
Operating System Command
UNIX buildmaster -ddevice_name -s7168
Stratus VOS buildmaster.pm -ddevice_name -s3584
Digital OpenVMS buildmaster/disk=device_name/size=7168
Novell NetWare load bldmastr -ddevice_name -s7168
OS/2, Windows NT bldmastr -ddevice_name -s7168
If the master database has been altered, alter it again using exactly thesame commands. The master database must be re-created both logicallyand physically to look exactly the way it did at the time of the last dump.This includes any alterations to tempdb or model.
buildmaster initializes the specified device as the Sybase master deviceand creates the master, model, and tempdb databases on this device. Anyinformation existing on the device will be overwritten.
Refer to buildmaster in the Adaptive Server utility programs manual foradditional information.
♦Note Be sure to execute buildmaster from the correct Adaptive Server version.Refer to “How to Determine Your Adaptive Server Version” in “ErrorMessage Writeups” for instructions.
How to Rebuild master Database and Leave MasterDevice IntactTo rebuild the master database only and leave the master device intact, runbuildmaster with the -m option (on UNIX, Stratus, or Novell NetWare) or the/master option (on Digital OpenVMS). Be sure to specify the correct size ofthe master device, not the master database.
The commands in the following table build a new master database withoutchanging the configuration block or initializing the master device. Thesecommands also set sort order and character set values to their defaults.
Operating System Command
UNIX buildmaster -ddevice_name -sdevice_size -m
SCO UNIX buildmaster -d/dev/rid001d -s5120 -m
Stratus VOS buildmaster.pm -ddevice_name -m
38

Disaster Recovery Tasks
Operating System Command
Digital OpenVMS buildmaster /disk=device_name /master /size=device_size
Novell NetWare load bldmastr -ddevice_name -sdevice_size -m
OS/2, Windows NT bldmastr -ddevice_name -sdevice_size -m
WARNING! Never run the buildmaster utility while Adaptive Server is running.
Refer to the Adaptive Server utility programs manual and to “RebuildingOnly the master Database” in the System Administration Guide for additionalinformation.
How to Start Adaptive Server in Single-User ModeTo start Adaptive Server in single-user mode, issue the followingcommand:
% startserver -m -f runserver_filename
If this fails, do the following instead:
Edit a copy of the runserver file for the Adaptive Server and add the -moption (on UNIX) or the /masterrecover option (on Digital OpenVMS) tothe end of the dataserver line. On Novell NetWare, OS/2, and WindowsNT, no runserver file is used. Instead, specify the -m flag on the file servercommand line, as shown on the startup command table below.
The following examples show the runserver file edited to start an AdaptiveServer named TEST in single-user mode:
On UNIX
#!/bin/sh## Adaptive Server Information:# name: TEST# master device: /work/master.dat# master device size: 10752# errorlog: /usr/u/sybase/install/errorlog# interfaces:/usr/u/sybase/interfaces#/usr/u/sybase/bin/dataserver-d/work/master.dat-sTEST -e/usr/u/sybase/install/errorlog
39

Chapter 2 Encyclopedia of Tasks
-i/usr/u/sybase/interfaces-c/usr/u/sybase/TEST.cfg -m
On Digital OpenVMS
You do not need to edit the runserver file. Start Adaptive Server withthe following command:
$ startserver /server= server_name /masterrecover
♦Note Create a separate runserver file for each Adaptive Server to start insingle-user mode. Refer to “How to Start Adaptive Server with TraceFlags” for information about using runserver files.
Start Adaptive Server with the following command:
Operating System Command
UNIX startserver -frunserver_filename -m
Stratus VOS startserver -frunserver_filename -m
Digital OpenVMS startserver/server=server_name /masterrecover
Novell NetWare load sqlsrvr -ddevice_name -m
OS/2 sqlsrvr -ddevice_name -m
Windows NT See directions below.
Once Adaptive Server is running and recovery is complete on all databases,review the error log and verify that no errors occurred. If you havesuccessfully started Adaptive Server in single-user mode, a message likethe following should appear in the error log:
00:95/12/29 13:09:53.14 server *** WARNING ******************00:95/12/29 13:09:53.17 server Adaptive Server booted single user mode -updates allowed to system catalogs
On Windows NT
Follow these steps to start Adaptive Server in single-user mode onWindows NT:
1. Log into Windows NT using an account with Windows NTadministrator privileges.
2. Double-click the Server Config icon in the Sybase for Windows NTprogram group.
40

Disaster Recovery Tasks
3. Select the Adaptive Server icon.
4. Select Configure Adaptive Server.
5. Select the name of the Adaptive Server to configure, and chooseContinue.
6. Enter “sa” for login name. (No password is required.)
7. If the Adaptive Server is not running, Server Config asks you to start itnow; choose Yes.
8. Select the Command Line Option or the Command Line Parametersbutton.
Server Config displays the Command Line Parameters dialog box.
9. Edit the text in the Command Line Parameters dialog box to includethe start-up parameter m.
10. Click OK.
11. Choose Save at the Adaptive Server's configuration dialog box.
12. Exit Server Config.
Returning Adaptive Server to Multiuser Mode
To start Adaptive Server in multiuser mode, use the original runserverfile without the -m option.
On Novell, restart Adaptive Server without the -m flag.
On Digital OpenVMS, restart Adaptive Server without the /masterrecoveroption.
How to Run the installmaster and installmodel ScriptsTo execute the installmaster and installmodel scripts, located in the$SYBASE/scripts directory, type the command for your platform.
Operating System Command
UNIX isql -Usa -Psa_password -Sserver_name< installmaster
isql -Usa -Psa_password -Sserver_name< installmodel
41
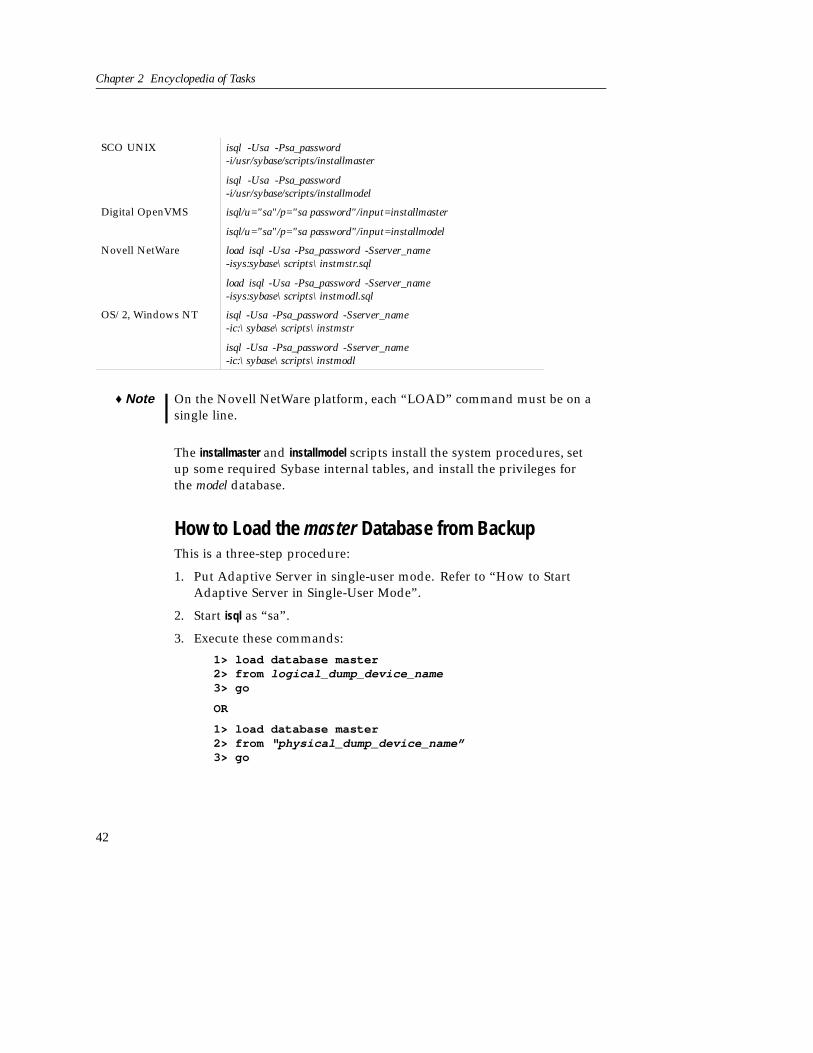
Chapter 2 Encyclopedia of Tasks
SCO UNIX isql -Usa -Psa_password-i/usr/sybase/scripts/installmaster
isql -Usa -Psa_password-i/usr/sybase/scripts/installmodel
Digital OpenVMS isql/u="sa"/p="sa password"/input=installmaster
isql/u="sa"/p="sa password"/input=installmodel
Novell NetWare load isql -Usa -Psa_password -Sserver_name-isys:sybase\scripts\instmstr.sql
load isql -Usa -Psa_password -Sserver_name-isys:sybase\scripts\instmodl.sql
OS/2, Windows NT isql -Usa -Psa_password -Sserver_name-ic:\sybase\scripts\instmstr
isql -Usa -Psa_password -Sserver_name-ic:\sybase\scripts\instmodl
♦Note On the Novell NetWare platform, each “LOAD” command must be on asingle line.
The installmaster and installmodel scripts install the system procedures, setup some required Sybase internal tables, and install the privileges forthe model database.
How to Load the master Database from BackupThis is a three-step procedure:
1. Put Adaptive Server in single-user mode. Refer to “How to StartAdaptive Server in Single-User Mode”.
2. Start isql as “sa”.
3. Execute these commands:
1> load database master2> from logical_dump_device_name3> go
OR
1> load database master2> from “physical_dump_device_name”3> go
42

Disaster Recovery Tasks
Alternatively, if the database was dumped to a remote site, refer to “loaddatabase” in the Adaptive Server Enterprise Reference Manual for informationabout loading the master database.
Once the master database is loaded successfully, Adaptive Serverautomatically shuts itself down and the isql session exits with the followingmessage:
DB-Library: Unexpected EOF from SQL Server.
How to Restore System Table Information in masterDatabaseThis section is divided into two parts. The first part describes how toreestablish device and database information in the system catalog, and thesecond part describes how to reestablish Adaptive Server logins.
Restoring Device and Database Information in the System Catalog
If a create database, alter database, or disk init command has been issued sincethe last database dump of master, or if no valid dump of master exists, andno valid bcp files of system tables exist, refer to “Backing Up and Restoringthe System Databases” in the System Administration Guide for informationon the use of the disk reinit and disk refit commands. These commands restorethe system tables information contained in the master database, whichdescribes all Sybase devices and user databases.
If you kept the disk init scripts originally used to initialize the databasedevices, you can use them to formulate the disk reinit commands, since diskreinit uses the same parameters. If these scripts are not available, examinethe contents of sysdevices before a disaster and build the necessary disk reinitcommand scripts for use when needed. This information is also availablefrom the server error log and the operating system.
Execute disk reinit on the device on which sybsystemprocs is located if it ison a device other than master. To retrieve the correct parameters for diskreinit, check the values you saved from sysdevices. If this information is notavailable, check the most recent error log.
♦Note The device on which sybsystemprocs resides will not be included in your diskinit script, as sybinit creates that device during installation. Therefore, recordthe values in sysdevices for the device on which sybsystemprocs resides, evenif you plan to use your disk init scripts.
43

Chapter 2 Encyclopedia of Tasks
After all the disk reinit commands complete, compare the current contentsof sysdevices with a copy of the sysdevices table that was made before themaster device was lost. Since the disk refit command is based on the contentsof that table, it is crucial that the table accurately reflect all devices.
After the disk refit command is complete, manually compare the contents ofthe current sysdatabases and sysusages with copies of those same tables thatwere made prior to the loss of the master device.
Keep up-to-date copies of these tables on hand, using bcp with the -coption, to ensure the quickest recovery after a disaster. If sysdatabases andsysusages do not match your hard-copy records, contact Sybase TechnicalSupport for assistance.
Reestablishing Adaptive Server Logins
If you have added Adaptive Server logins since the last database dump ofmaster, or if no valid dump of master exists, restore the syslogins table.
How you restore the table depends on what information you have on hand:
• If you saved the scripts with all sp_addlogin and sp_droplogin statementsmade in the correct order, run those scripts.
• If you do not have the scripts, but have a copy of syslogins saved,reconstruct the sp_addlogin and sp_droplogin commands and thecorresponding suids.
• If neither the scripts nor the copy of syslogins is available, follow thesesteps:
a. Query all of the user databases to determine the name and the suid ofeach user. The sp_addlogin system procedure assigns an suid to eachlogin in numerical order, and this suid is mapped to the sysuserstable in each user database.
b. Once all names and suids are known, execute sp_addlogin for eachuser, in the appropriate order, so that newly generated logins havethe same suid as the users in the user databases. You might have toenter dummy accounts for users whose logins have been droppedin order to keep current users' suid values in the correct sequence.Drop these dummy accounts when you are done.
44

Disaster Recovery Tasks
How to Alter the number of devices Parameter ManuallyThis step is necessary only if you are using a virtual device number (vdevno)that is greater than the default value for the number of devices configurationparameter (in this case, some of your devices will be inaccessible until youperform this step). The default value for number of devices is 10 on mostplatforms.
♦Note Perform this task only if the configuration file prior to an Adaptive Servercrash is lost. If the configuration file is available, use that file to start upAdaptive Server or use the number of devices from the last configuration file.
To aid in the recovery process, determine whether this step will be neededbefore an actual disaster. Do this by examining the device_number columnin the sp_helpdevice output.
If Adaptive Server is not up and running, check the start-up section of themost recent error log, which contains the device number.
If a virtual device number greater than the default is being used, increasethe number of devices parameter in the configuration file before you startAdaptive Server. For example, if the highest vdevno in use is 30 and thedefault is 10, edit the configuration file to set the number of devices parameterto 31.
How to Alter tempdbIf tempdb has been enlarged and these changes are not reflected in yourcurrent master database, alter tempdb again to ensure that there is enoughspace to process your normal work load. Refer to the Adaptive ServerSystem Administration Guide for more information.
To help prevent errors from occurring during disaster recovery, record thecommands you used originally to alter tempdb.
How to Alter the model DatabaseBecause the model database is created at the same time as the masterdatabase, no action is needed to build it. If you have made any changes tomodel, however, you must reapply them.
45
Chapter 2 Encyclopedia of Tasks
If you need to alter the size of the model database, alter the size of the tempdbdatabase so that it is at least as big as model. If you attempt to start AdaptiveServer, and model is bigger than tempdb, Adaptive Server will not start.
How to Add a Sybase Dump DeviceThis capability was required prior to Version 10, and is still available, butit is now more common to dump to a physical device. You can specify adevice by simply naming it, using syntax like the following:
1> load database master from “ <physical device name> ”
If you must use dump devices, refer to sp_addumpdevice in the AdaptiveServer Enterprise Reference Manual for information. Record the exact syntaxof the original sp_addumpdevice command for each Adaptive Server. Thishelps prevent errors from occurring during disaster recovery.
How to Reset Adaptive Server to Its Default ConfigurationWhenever you make a change to your configuration values usingsp_configure, Adaptive Server saves the old configuration file underthe name servername.sequential_number. This means that your defaultconfiguration should exist in one of these files.
If you successfully locate the desired configuration file, do the following:
1. Name the current servername.cfg file to servername.cfg.old.
2. Rename the file you located to servername.cfg.
3. Restart Adaptive Server.
If you are unable to locate the desired configuration file, do the following:
1. Rename the servername.cfg file in your Sybase home directory toservername.cfg.old.
2. Start Adaptive Server without specifying a configuration file name.
Adaptive Server will use the default configuration and create a newconfiguration file if there is no servername.cfg file available at start-up time.
46

Disaster Recovery Tasks
How to Set A Default Backup Server Manually inAdaptive ServerThis procedure is needed to allow the Adaptive Server that is beingrecovered to access its Backup Server. If this step is not performed whenneeded, then Adaptive Server will not be able to process any dump or loadcommands.
As a Sybase System Administrator (“sa_role”), execute the followingcommands in an isql session on the Adaptive Server that is being recovered:
1> use master2> go
1> select srvname, srvnetname from sysservers2> where srvname = "SYB_BACKUP"3> go
There are three possible outcomes to this query. The following tablematches each outcome to the steps you should take in that circumstance:
Outcome Action
Adaptive Server returnsa single row and thesrvnetname column containsthe correct reference forthe Backup Server
No further action is needed
Adaptive Server returns asingle row but the srvnetnamecolumn does not containthe correct reference
Issue the following commands:
1> update sysservers2> set srvnetname = “ backup_server_name ”3> where srvname = “SYB_BACKUP”4> go
where backup_server_name is the name of the BackupServer as it appears in the interfaces file.
Adaptive Server returns0 rows
Issue the following command:
1> sp_addserver SYB_BACKUP, null,2> backup_server_name3> go
where backup_server_name is the name of the BackupServer as it appears in the interfaces file.
47

Chapter 2 Encyclopedia of Tasks
Avoiding Disaster through Good DBA PracticesThis section provides a number of recommendations for keeping yourAdaptive Server installation working at peak effectiveness. By maintainingthese good practices, you can maximize server uptime, correct problemsproactively, and be as prepared as possible to handle emergencies.
1. Keep Up-to-Date Backups
Maintaining current backups of your data is vital for any recoveryplan. Keep multiple generations of backups, and keep some offsite asan extra precaution.
Make regular database dumps of:
– the master database. To insure that your backup of master is alwayscurrent, back up master after each maintenance command thataffects disks, storage, databases, or segments - for example, aftercreating or deleting databases, initializing new devices, and creatingor modifying segments.
– the model database
– the sybsystemprocs database
– user databases.
2. Maintain copies of System Tables and DDL
Keep the latest offline copies of the following tables:
– sysusages
– syslogins
– sysloginroles
– sysdatabases
– sysdevices
– syscharsets
– sysconfigures
– sysservers
– sysremotelogins
– sysresourcelimits (11.5 and later)
48

Avoiding Disaster through Good DBA Practices
– systimeranges (11.5 and later)
Use the bcp utility to copy out these tables. In addition, maintain ahardcopy by printing the output of the following queries:
select * from sysusages order by vstartselect * from sysusages order by dbid, lstartselect * from sysloginsselect * from sysloginrolesselect * from sysdatabasesselect * from sysdevicesselect * from syscharsetsselect * from sysconfiguresselect * from sysserversselect * from sysremoteloginsselect * from sysresourcelimits (11.5 and later)select * from systimeranges (11.5 and later)
Also maintain:
– copies of your configuration file.
– the first two blocks (2 pages) of the master device.
– a copy of the config block. You can generate this using SybaseCentral or Power Designer. On Unix platforms, you can obtain acopy of the config block with this command:
dd if=master_device of=$SYBASE/config_block.bak bs=1024 count=8
– all Data Definition Language (DDL) scripts you use to create userobjects, specially stored procedures if you elect to use sp_hidetext(11.5 and later).
♦Note Implement all changes to schema in the same way that the installmasterscript is implemented.
3. Verify Database Consistency
Run dbcc checks on a regular basis to monitor the health of yourdatabases. Database-wide checks are available with dbcc checkdb, dbcccheckalloc, and dbcc checkstorage (11.5 and higher). dbcc checkcatalog is alsoa useful tool. For a brief overview of dbcc commands, see “Useful dbccCommands”. Detailed information appears in the System AdministrationGuide.
Since dbcc checks can be resource intensive, consider adopting astrategy to take advantage of object level dbcc's. On a given day run
49

Chapter 2 Encyclopedia of Tasks
a certain number of checktable and tablealloc commands for a portion ofthe database. On subsequent days, run different tables. Over a periodof days you can accomplish a complete check of your databases forintegrity. For example if your database has 200 tables in addition to thesystem tables, run dbcc's on the system tables on night one, run dbcc's oneach of the first 50 of the user tables on night two, the next 50 the nextnight and so on, until at the end of five nights you have checked everytable in the database. On the sixth night you can begin the cycle again.
♦Note Running table-level dbcc's misses the GAM page checks.
Alternative strategies include:
– loading the database to another server, and running the dbcc's onthat server;
– dbcc checkstorage (11.5 and higher).
Building dbcc checks into your regular backup/maintenance schedulecan ensure that you have consistent, accurate backups available atall times.
4. Implement Mirroring
Mirroring, either at the Adaptive Server level or at the operating systemlevel, can provide nonstop recovery in the event of media failure.
The factors you need to consider, and instructions on implementingAdaptive Server mirroring, are detailed in the section titled "MirroringDatabase Devices" in the System Administration Guide.
5. Perform Ongoing Maintenance
As part of a routine program of server maintenance, you should:
– Monitor the Adaptive Server error log for errors. Note that usersmay not report errors of severity 17 or 18 if their work is notinterrupted.
Set up a routine that browses the error log, searching for errors. See“How to Monitor the Adaptive Server Error Log” for an example.For information on the error log format and severity levels, seethe System Administration Guide.
50

Avoiding Disaster through Good DBA Practices
♦Note NT users can also monitor server messages by means of the WindowsNT Event Log. For details, refer to What's New in Sybase Adaptive ServerEnterprise Release 11.5.
Prune the error log regularly as it grows constantly since AdaptiveServer appends informational messages to the log during startup.A full error log with no space to write to may cause the server tofreeze. Remember to shut down the server first, and make a copy ofthe log before pruning.
An example of log pruning on Unix follows:
% cp errorlog errorlog. date% cp /dev/null errorlog
where date is the current date.
– Monitor the operating system log to keep an eye on the health of thehardware and the server environment. Many Adaptive Server errorscan be due to underlying hardware problems, and can thereforeindicate hardware problems.
Refer to “Checking the Operating System Error Log” for informationon how to locate your log and how to check it.
– Monitor space usage with system procedures such as sp_helpsegment,sp_spaceused, and sp_helpdb. By running sp_spaceused regularly, forexample, you can determine if a database is running out of space fornew objects.
Alternatively, you can set up thresholds to monitor free space ondatabase segments.
See "Getting Information About Database Storage" and “CreatingThreshold Procedures” in the System Administration Guide for details.
– On Versions prior to 11.9.2, update index statistics. Distributionpages hold statistics on the distribution of index key values. As atable grows and changes, these statistics become old, and the servermay start to choose the wrong index strategy for queries. You canaddress this condition by running update statistics periodically.
Version 11.9.2 and later do not utilize distribution pages; instead,they use a different mechanism for maintaining statistics. Refer toNew Functionality in Adaptive Server Enterprise 11.9.2 for details.
6. Avoid Risky Practices
51
Chapter 2 Encyclopedia of Tasks
– Avoid moving tempdb off the master device. When AdaptiveServer is installed, tempdb resides on the master device. Althoughit is possible to move tempdb off the master device later for spaceconsiderations, this is not advisable. Once tempdb is moved offthe master device, it is difficult and time-consuming to recoverif a problem occurs on the master device or the device to whichtempdb is moved.
– Never put anything other than master, model and tempdb on themaster device. Storing user databases on the master device maymake it difficult to recover the system databases or user databases ifeither become damaged.
7. Recovery Tips, Or What to do When Things Go Wrong
– Choose the correct recovery method. Your choice of methods will bedictated by the type of failure you encounter. For example, loss of adevice will require restoring from backups.
Network/machine failure usually has little impact on the server butcould corrupt data in some situations, and recovery may fail.
– If mirroring is enabled at your site, disable the mirror beforeloading a dump, thus preserving a copy of what you had beforein case dumps are bad.
– Never run buildmaster on the original master device. It may containinformation you need later. Instead, do a buildmaster on a differentdevice, and when your environment is completely restored, you canmove back to your original master device.
8. Additional Tips
After an operating system upgrade, check permissions on your sybasedevices.
Online Recovery and Recovery Fault IsolationVersion 11.5 of Sybase Adaptive Server Enterprise introduced RecoveryFault Isolation (RFI) to enhance the granularity of recovery. This discussionsurveys various recovery options and focuses on the difference betweentraditional online recovery and RFI. We use examples to show how RFI canbe used to enhance the recovery scenarios and how it can help to avoidextensive downtime due to recovery problems.
52

Online Recovery and Recovery Fault Isolation
BackgroundRecovery can mean several things:• Online recovery is the process by which the database is brought into a
consistent state after the server is restarted.
• Recovery from backups means restoring a corrupt database by loadinga database dump, then applying transaction log dumps to the databaseto bring it back to a consistent state.
• Finally, although Adaptive Server does not offer this functionality,recovery can also refer to recovering specific objects from a dump orother offline storage and restoring only that object rather than thedatabase as a whole. While this technique is outside the scope of thecurrent discussion, it may be useful in some of the recovery processesoutlined below.
Online Recovery Concepts and Pre-11.5 RecoveryOnline recovery brings the database to a consistent state after you restartthe server.
During routine Adaptive Server operation, all changes to the databaseare written first to the log, then to the data pages on disk. Log pagesare written to disk when the transaction completes, that is, when thetransaction commits. However, because all changed pages are writtento disk whenever a checkpoint occurs, for for other reasons prior tocommit, changes can be written to the log or data pages as part of anas-yet-incomplete transaction. If the server fails after an uncommittedtransaction is written to the log but before the transaction completes,online recovery reads the log and ensures that no uncommitted changesare reflected in the database. Likewise, online recovery ensures that anychanges recorded in the log for committed transactions that have not yetbeen flushed to disk are updated on the data pages and written to disk.
Prior to version 11.5, online recovery was an all-or-nothing proposition.If recovery failed due to some corruption, there was no way to partiallyrecover the database and leave the corrupt portion offline. The preferableoption was to restore the database from backups. However, if backupswere not available or time constraints made it difficult to go through theextensive procedures necessary to restore through backups, customersoften used an undocumented and risky procedure, referred to as "suicidingthe log", to skip recovery and get the database back on line.
53

Chapter 2 Encyclopedia of Tasks
Recovery from Backups
The traditional recovery option, when online recovery fails, is to restore thedatabase from dumps, and incrementally apply transaction logs to bringthe restored database back to the most current possible state. This is thebest solution for restoring to an absolutely consistent state after corruption.It often brings the database to a state of consistency to within seconds ofthe point of original failure.
However, the drawback with this traditional approach is that the recoverygranularity is at the level of the transaction dump. If a transaction causingcorruption is dumped, the traditional method means loading a databasedump and applying transaction log dumps up to, but not including, thetransaction dump containing the offending transaction. This can result inhours of lost transactions.
Suiciding the Log
While suiciding the log can usually bring the server back online, it alsofrequently results in both physical and logical corruption in the database,because it bypasses the normal process of rolling back incompletetransactions in the log (and rolling forward completed transactions) thattakes place during online recovery. Frequently, the resulting corruption isnot encountered until a later time, and the connection with the earlier logsuicide is not always recognized.
WARNING! Log suicide is highly risky, and is not recommended except in extremecases.
Recovery With RFIVersion 11.5 implements Recovery Fault Isolation (RFI), a new onlinerecovery feature that provides a level of granularity in recovery by meansof partial recovery. RFI can isolate corruption, encountered duringrecovery, to the corrupt pages. This enables you to restore databaseintegrity by isolating and repairing corruption on a page by page (and,consequently, on an object by object) basis without having to restore theentire database and transaction logs from backups.
54

Online Recovery and Recovery Fault Isolation
♦Note While RFI can only define granularity at the page or database level,corruption is typically corrected at the object level with, for example, anentire index being recreated or an entire table being replaced.
Using RFI
♦Note RFI allows partial recovery only on non-system objects. If it encounterscorruption on system tables, recovery fails for the entire database.
RFI allows the database administrator (DBA) to select the granularity ofrecovery for each user database. The choices are:• Mark the whole database suspect on any recovery failure. This is the
default behavior and it is how recovery worked in previous versions.
• Set the number of pages that can be offlined during recovery and stillallow the database to be opened. The DBA can decide whether thepartially recovered database is to be open for updates or for reads only.
Finally, the DBA can set the database to be marked suspect on any recoveryfailure, then change the setting to recover all but the corrupt pages. In thismode users cannot access the database, enabling the DBA to determine theappropriate course of action and proceed accordingly.
There is a significant difference between RFI's page-level and database-levelgranularity. Database granularity mandates that all transactions in thedatabase should either be completed and rolled forward, or rolled backand all changes backed out. In either case the database is in a logicallyconsistent state at the end of recovery. In short, recovery is all or nothing.Any interruption in recovery that makes this impossible causes recoveryto fail entirely, and the only sure way to guarantee a consistent state is torestore from backups. This can be problematical, depending on how manybackups are available, their validity, and how recent they are.
Page level granularity, on the other hand, allows the server to offlinecorrupt pages in a transaction while onlining other pages. Since recoveryhas not been able to complete and verify the transactions, this will leavesome of the transactions only partially available and all other transactionscompletely recovered as usual. There is no way to determine whethertransactions that involved offlined pages are complete except by manualexamination.
If, for example, a transaction changes rows on three pages and the changeson two pages are written to disk before the server stops, recovery would
55

Chapter 2 Encyclopedia of Tasks
normally assure that the third page also was written to disk. If, however,recovery marks as suspect the page to which the third update is to bemade, there is no way to determine whether the transaction is complete orincomplete; that is, whether all three pages are updated or only the firsttwo. A transaction in this state is deemed to be partially available, as thechanges to the first two pages are available while the change to the thirdpage is unavailable, and it is not known whether it was changed.
At another level, consider a case where a page from a specific table ismarked offline. Subsequent work is dependent on this page but only atan implicit level, meaning that it is assumed that business rules will behandled without explicitly coding referential checks. If the code were toexplicitly check for the offline data, an error would be raised; but if thisis not done and the work proceeds with only an implicit dependence onthe offline pages (which cannot be restored to a consistent state), it mayresult in logical inconsistencies in the database. This is yet another reasonwe recommend that all dependencies between data be explicity coded viadeclared referential constraints, triggers or existence checks.
It is important to understand that while it is possible to bring corruptpages online, doing so without first repairing the pages will result inlogical and data inconsistency. When restoring a database by repairingoffline pages (or by restoring objects to which the offlined pages belonged),therefore, the DBA must explicitly determine the degree to which logicalconsistency of the database may be suspect according to business rulesand coding practices. Of course, restoring the database from a databasebackup and incremental transaction backups assures both the logical andphysical integrity of the database through the last successful load of atransaction dump.
It is also important to run dbcc tablealloc or dbcc indexalloc with the fix optionon any objects with suspect pages because the allocation information forthese objects is also suspect.
What To Do When Online Recovery FailsThe options for recovering from a failure in online recovery, in order frommost desirable to least, are:• Restoring from Backups
• Partial online recovery using RFI
56

Online Recovery and Recovery Fault Isolation
• Suiciding the Log
Restoring from Backups
Prior to Version 11.5, this was the only option if recovery failed, thedatabase could not be repaired, and suicide of the log was not desirable.It is still the preferred option for recovering the database after failureduring online recovery if a) the entire database is marked suspect due tothresholds being exceeded, or b) system table(s) are corrupt. It is also thepreferred method whenever the absolute need for physical and logicalconsistency overrides all other concerns.
♦Note It is highly recommended that you run dbcc checks prior to and following adump, to ensure that the backup is valid. Refer to Backup and Recovery inthe System Administration Guide for details.
Partial online recovery using RFI
Implementing RFI gives the DBA many more choices in the event of failureduring online recovery. Before opting for log suicide, consider theseadvantages of RFI over log suicide:1. Isolated pages are known and can be examined. You can thus make
an informed decision on whether to repair the faults or restore frombackups.
– If the isolated pages belong to an index, the corruption can often befixed by dropping and recreating the index.
– If the isolated page are data pages, the data can sometimes berecovered via other means. You can also leave the pages safelyoffline; transactions that explicitly depend on their presence will failuntil they are made available.
– Pages referenced in recovery that are marked suspect, but aresubsequently deallocated further along in the recovery process, areassumed to have been properly written for the earlier transactionand are taken off the suspect list, thus making the corruption forthat page "self-healing".
2. You can set thresholds to determine at what level page faults areunacceptable, and at which the whole database should remainunrecovered.
57

Chapter 2 Encyclopedia of Tasks
3. You can make the database available to users while conducting repairs.The database can be configured to allow updates or to allow read-onlyaccess.
4. Faults on system table pages cause recovery to fail for the entiredatabase.
5. You can implement a limited form of suicide recovery by disregardingall or some of the suspect pages and onlining them even if they arecorrupt. The suicide is limited in the sense that only transactionsassociated with those pages are suspect. Recovery rolls forward (orback) other transactions in the log properly.
Implementing Recovery with RFIIn Version 11.5 and higher, the default granularity of recovery remainsat the database level. Take the following steps to implement page levelgranularity:1. Check or implement page granularity on desired databases using the
sp_setsuspect_granularity stored procedure:
sp_setsuspect_granularity [dbname [,{"database" | "page"} [, "read_only"]]]
If you set the granularity to page level, you have the option to set thedatabase to read_only mode when recovery detects suspect pages. Bydefault, all available pages are accessible for both reads and writes.
♦Note Wherever possible, use the read_only mode. If a query attempts to access anoffline page, the server raises error messages 12716 and 12717 regardlessof whether the database is read_only. For more information on these errorssee the chapter titled “Error Message Writeups.”
2. Set the threshold for escalating page level granularity to databasegranularity using the sp_setsuspect_threshold stored procedure:
sp_setsuspect_threshold [dbname [,threshold ]]
Once the number of offlined pages reaches this threshold value,recovery marks the entire database suspect. The default thresholdvalue is 20 pages. It is unlikely that setting it much higher will be ofmuch use since 20 corrupt pages is very likely to indicate corruptionat a level than cannot be effectively repaired.
58
Online Recovery and Recovery Fault Isolation
3. Bring the suspect pages or database on line. You can print a list of pagesor databases that are suspect after recovery using the sp_listsuspect_dband sp_listsuspect_page stored procedures:
sp_listsuspect_dbsp_listsuspect_page [dbname]
You can bring these pages or database online using the sp_forceonline_dbor sp_forceonline_page stored procedures:
sp_forceonline_db dbname{"sa_on" | "sa_off"
| "all_users"}
sp_forceonline_pagedbname, pagenumber
{"sa_on" | "sa_off" | "all_users"}
sa_on and sa_off toggle the database or page online and offline, andallow access to the database or page only to those with the sa_role set on.This permits the DBA to examine and repair the suspect database orpages without other users being able to access them.
WARNING! The all_users option is irreversible and makes the database or pageavailable to all users. If no repairs have been made, this may result insome level of logical inconsistency.
Suiciding the Log
The new RFI feature in 11.5 eliminates most of the need for suiciding thelog. The two most common reasons for suiciding the log in the past were:1. No backups are available or the backups are too old.
2. Insufficient time to restore.
There should never, of course, be a situation where backups are unavailableor are too old. Unfortunately that is too often the case, either because thedumps are bad or due to poor planning. In such situations, suiciding thelog may be the only recourse. Aside from those situations however, youshould never consider suiciding a viable option.
59

Chapter 2 Encyclopedia of Tasks
♦Note DBA's should test all backup and restore procedures before relying onthem. If you attempt to load a dump on the original database and itcompletes only partially, you will have eliminated the possibility of usingthat database again and may even have eliminated the final chance torecover data by suiciding the log.
RFI ExampleHere is an example of recovery using RFI's page level features:
During recovery of a database, five pages were marked suspect. The DBAexamined the pages and determined that three of them are index pageson a single allpages—locked (APL) table, and that the other two markedsuspect are data pages belonging to different tables. The database has beenmarked as read_only and while users can query the database, no changescan currently take place.
First the DBA onlines the pages with the sa_on option. The DBA thenimmediately dumps the transaction log to ensure the ability to recoverto this point should something else go wrong. Recovery would involveloading a database dump and all subsequent transaction dumps.
Before RFI, a dump of a suspect database was not possible. With RFI, theDBA can make a dump of the slightly corrupt database in case it is neededlater. Often a recent dump with a few problems is preferable to an olderdump with no problems. This is purely a safety measure as the DBA hopesto be able to repair the database, which is currently partly unrecovered.
Next the DBA runs dbcc indexalloc on the index containing the three offlinepages. indexalloc reveals errors, and it is decided that the best thing todo is to rebuild the index. If the index was a nonclustered index, or adata-only-locked (DOL) clustered (placement) index, it could simply bedropped and recreated. However, this is an APL clustered index and anytime the clustered index is suspect, the table is suspect as well. The DBAruns dbcc checktable to examine the integrity of the data pages. dbcc checktablealways checks the data page linkage before checking the index structures.(Keep in mind that a DOL table's data and non-leaf index pages do nothave maintained sibling links that can be followed by dbcc pglinkage type ofchecks.) By looking at the output of dbcc checktable, the DBA determinesthat the data page linkage is intact. This means that it is safe to drop theclustered index.
60

How to Manually Change Sort Order or Default Character Set
♦Note If the data page linkage also showed corruption, the DBA would have toresort to backups or find another way to restore the table (an offline bcpcopy, for example).
Looking at the data pages for the other two objects, it is found that the firstobject is a static reference table, and an offline copy of this table's dataexists. The DBA decides to truncate the table and bcp in a new copy. Forthe second object, an APL clustered table, the data page linkage is foundto be broken, but the clustered index is still intact. With this informationthe DBA is able to locate all of the rows, bcp them out, truncate the tableand bcp them back in.
Once all of these tasks are complete, the question of possible incompletelogical changes to the tables due to incomplete transactions still remains.The only way to test for data integrity is to use user-written queriesand reports that expose inconsistencies. After doing this, the DBA candetermine if those inconsistencies can be tolerated, or repaired, or ifbackups are the best option.
The final step is to detect and fix any allocation inconsistencies that mayexist due to recovery having only partially completed. The DBA can rundbcc checkalloc to check the entire database, or dbcc tablealloc and dbcc indexalloccan be run on the suspect objects.
From this example it is clear that Recovery Fault Isolation makes manymore choices available to the DBA. With database-only granularity, theDBA has no way to examine the extent of the corruption and make adecision as to what the best solution to the failed recovery might be.
How to Manually Change Sort Order or Default Character SetFollow these instructions to change the sort order or default character setfor your Adaptive Server if errors occurred when you tried to use sybinitto do this.
This writeup includes the following sections:
• “Manual Process”
• “How to Load a Sort Order or Additional Character Set”
• “How to Change the Sort Order”
• “How to Change the Default Character Set”
• “How to Find a Sort Order File Name”
61

Chapter 2 Encyclopedia of Tasks
• “How to Find a Sort Order ID”
• “How to Find a Character Set ID”
• “How to View Your Existing Sort Order and Character Sets”
Before deciding to use the manual process:
1. Read “Changing the Default Character Set, Sort Order, or MessageLanguage” in the System Administration Guide for information about theconsequences of changing the sort order and default character set.
2. Look at your Adaptive Server error log and in $SYBASE/init/logs (forsybinit) to determine why sybinit (or sybconfig) failed to change the sortorder or default character set.
3. If you find errors in the error log, correct them. See below for commoncauses of failure.
4. Try again to use sybinit (or sybconfig) to change the sort order or defaultcharacter set. If it still fails, go to “Manual Process”.
Some common causes of the failure to change the sort order or defaultcharacter set using sybinit (or sybconfig) include:
• You are changing to a case-insensitive sort order and duplicates wouldexist in a system table (because “A” is now equal to “a”, and so on).You should be able to determine which table(s) has this problem frominformation in the error log. Modify the data so that duplicates willnot exist under a case-insensitive sort order.
• There is insufficient system segment space to re-create system indexes.Use sp_extendsegment to increase the system segment space for userdatabases or use alter database to increase the size of the system segmentfor the master database. Refer to “Extending the Scope of Segments”and “A Segment Tutorial” in the System Administration Guide for details.
• There is insufficient log space. Refer to “Using the Special dumptransaction Options” in the System Administration Guide for what todo in this case.
• A problem exists in sybinit (or sybconfig).
Manual ProcessThe manual process to change the sort order is:
62
How to Manually Change Sort Order or Default Character Set
1. Do the following steps first:
– Make sure the environment variable (or logical name) LANG isnot defined.
– Set the environment variable (or logical name) SYBASE.
– Login to Adaptive Server and make sure the default database foruser “sa” is master:
1> select dbname, name from master..syslogins where name = "sa"2> go
dbname name----------- ------------------master sa
– Make the users aware that Adaptive Server will be going down.
2. If you do not already know the file name for the sort order you want toload, go to “How to Find a Sort Order File Name”.
3. Load the sort order or additional character set you want into syscharsets.Refer to “How to Load a Sort Order or Additional Character Set” forinstructions.
4. Determine the value for sort order ID if you plan to change the sortorder. Refer to “How to Find a Sort Order ID” for instructions.
5. Determine the value for character set ID if you plan to change thedefault character set. Refer to “How to Find a Character Set ID” forinstructions.
6. If you planned to change the default character set, do it now. Refer to“How to Change the Default Character Set” for instructions.
7. If you planned to change the sort order, do it now. Refer to “How toChange the Sort Order” for instructions.
8. Before proceeding, make sure no one is actively using Adaptive Server.
9. Shut down Adaptive Server.
10. Restart Adaptive Server. If you changed the sort order, Adaptive Serverwill make a number of changes at this time. Refer to “Recovery AfterReconfiguration” in the System Administration Guide for details aboutwhat Adaptive Server does during this database recovery. Look at theAdaptive Server error log to make sure no problems have occurred.
11. When Adaptive Server has finished the changes related to the changedsort order, it automatically shuts down.
63
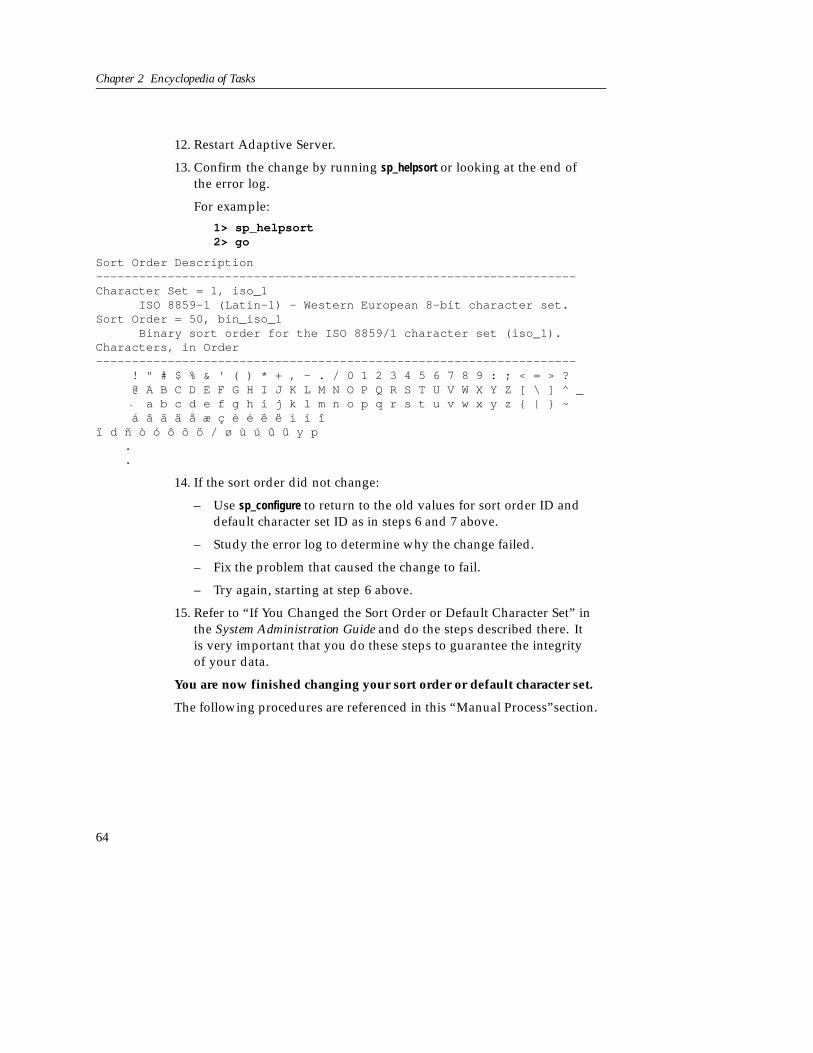
Chapter 2 Encyclopedia of Tasks
12. Restart Adaptive Server.
13. Confirm the change by running sp_helpsort or looking at the end ofthe error log.
For example:
1> sp_helpsort2> go
Sort Order Description-------------------------------------------------------------------Character Set = 1, iso_1
ISO 8859-1 (Latin-1) - Western European 8-bit character set.Sort Order = 50, bin_iso_1
Binary sort order for the ISO 8859/1 character set (iso_1).Characters, in Order-------------------------------------------------------------------
! " # $ % & ' ( ) * + , - . / 0 1 2 3 4 5 6 7 8 9 : ; < = > ?@ A B C D E F G H I J K L M N O P Q R S T U V W X Y Z [ \ ] ^ _
a` b c d e f g h i j k l m n o p q r s t u v w x y z { | } ~á â ã ä å æ ç è é ê ë ì í î
ï d ñ ò ó ô õ ö / ø ù ú û ü y p..
14. If the sort order did not change:
– Use sp_configure to return to the old values for sort order ID anddefault character set ID as in steps 6 and 7 above.
– Study the error log to determine why the change failed.
– Fix the problem that caused the change to fail.
– Try again, starting at step 6 above.
15. Refer to “If You Changed the Sort Order or Default Character Set” inthe System Administration Guide and do the steps described there. Itis very important that you do these steps to guarantee the integrityof your data.
You are now finished changing your sort order or default character set.
The following procedures are referenced in this “Manual Process”section.
64

How to Manually Change Sort Order or Default Character Set
How to Load a Sort Order or Additional Character SetUse one of the following commands to load a sort order or an additionalcharacter set into syscharsets:
Operating System Command
UNIX $SYBASE/bin/charset -P sa_pwd -S server_namesort_filechar_set
Digital OpenVMS charset /pass="sa_pwd" -/server="server_name" sort_file -/local=sybase_system:[sybase.charsets.char_set]
Novell NetWare load $SYBASE/bin/charset -Psa_pwd -Sserver_namesort_filechar_set
OS/2, Windows NT $SYBASE/bin/charset -Psa_pwd -Sserver_namesort_filechar_set
where:
• sa_pwd is the “sa” password
• server_name is the name of the Adaptive Server
• sort_file is the appropriate sort order name from the charsets directory;to load a character set, use “charset.loc” for the value for sort_file
• char_set is the name of the character set you are loading
For example, to load the case-insensitive sort order for character set iso_1on UNIX, the command is:
% $SYBASE/bin/charset -P sa_pwd -S server_name nocase.srt iso_1
For example, to load the cp850 character set on OpenVMS, the command is:
$ charset /pass="sa_pwd" -/server="server_name" charset.loc -/local=sybase_system:[sybase.charsets.cp850]
How to Change the Sort OrderUse the following command to change the sort order:
1> sp_configure "default sortorder id", sort_order_ID2> go
How to Change the Default Character SetUse the following command to change the default character set:
65

Chapter 2 Encyclopedia of Tasks
1> sp_configure "default character set id", charset_ID2> go
How to Find a Sort Order File NameThe charset command which allows you to load a sort order into syscharsetsrequires the specification of a sort order file name. In addition, you need toknow the sort order file name to determine the sort order ID. This sectiondescribes two different methods for determining sort order file names.
Method 1: If You Know the Sort Order Description
Use this method if you know the sort order description.
• Go to the appropriate character set directory and display the sybinit (orsybconfig) menu options for that character set's sort order files. Forexample:
UNIX:
% cd $SYBASE/charsets/ char_set_dir% grep menuname *.srt
OpenVMS:
$ set default -sybase_system:[sybase.charsets. char_set_dir ]$ search *.srt menuname
For example, for character set iso_1 on UNIX:
% cd $SYBASE/charsets/iso_1% grep menuname *.srt
binary.srt:menuname = "Binary ordering, for the ISO 8859/1or Latin-1 character set (iso_1)."
dictionary.srt:menuname = "General purpose dictionary ordering."espdict.srt:menuname = "Spanish dictionary ordering."
espnoac.srt:menuname = "Spanish case and accent insensitivedictionary order."
espnocs.srt:menuname = "Spanish case insensitive dictionary order."
noaccents.srt:menuname = "Dictionary order, case insensitive,accent insensitive."
nocase.srt:menuname = "Dictionary order, case insensitive."
66

How to Manually Change Sort Order or Default Character Set
nocasepref.srt:menuname = "Dictionary order,case insensitive with preference."
• Identify the appropriate file name based on the menu description.
Method 2: If You Know the Sort Order ID
Use this method if you know the sort order ID.
• Go to the appropriate character set directory. For example:
UNIX:
% cd $SYBASE/charsets/ char_set_dir
OpenVMS:
$ set default -sybase_system:[sybase.charsets. char_set_dir ]
• Using the sort order ID, determine the file name:
UNIX:
% grep sort_order_id *.srt | grep ID
For example, to find sort order 52 on UNIX:
% cd $SYBASE/charsets/iso_1% grep 52 *.srt | grep ID
nocase.srt:id = 0x34 ; Unique ID # (52) for the sort order
OpenVMS:
$ search *.srt sort_order_id ,ID /match=and
For example, to find sort order 52 on OpenVMS:
$ set default sybase_system:[sybase.charsets.iso_1]$ search *.srt 52,ID /match=and
******************************SYBASE1150_SYSTEM:[SYBASE.CHARSETS.ISO_1]NOCASE.SRT;1id = 0x34 ; Unique ID # (52) for the sort order
For both of these examples, the file name for sort order ID 52 is nocase.srt.
How to Find a Sort Order IDTo find a sort order ID, search the sort order file for “ID”.
67

Chapter 2 Encyclopedia of Tasks
For example, use the following command if you want the sort order IDfor “Dictionary order, case insensitive” for character set iso_1 (the sortorder file name is nocase.srt):
UNIX:
% cd $SYBASE/charsets/iso_1% grep ID nocase.srt
id = 0x34 ; Unique ID # (52) for the sort order
OpenVMS:
$ set default sybase_system:[sybase.charsets.iso_1]$ search nocase.srt ID
******************************SYBASE1150_SYSTEM:[SYBASE.CHARSETS.ISO_1]NOCASE.SRT;1id = 0x34 ; Unique ID # (52) for the sort order
How to Find a Character Set IDTo find a character set ID, search the character set data file for “id”.
For example, on a UNIX machine use the following command if you wantthe character set ID for character set iso_1:
% cd $SYBASE/charsets/iso_1% grep id charset.loc
id = 0x01
How to View Your Existing Sort Order and Character SetsEnter the following command to view the character sets and sort ordersthat are currently available in your Adaptive Server:
1> select id, csid, name, description from master..syscharsets2> go
In the output:
• When csid = 0, the value of id represents the character set ID
• When csid = the character set ID (something other than 0), the valueof id represents the sort order ID
For example:
68
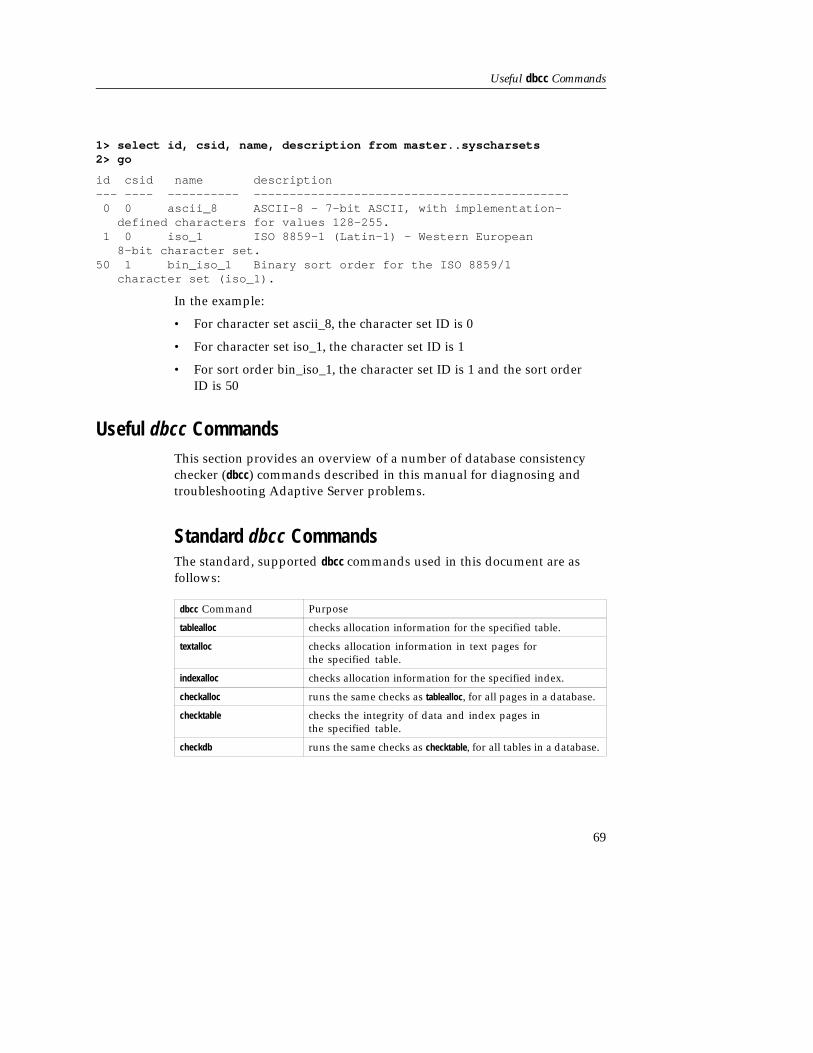
Useful dbcc Commands
1> select id, csid, name, description from master..syscharsets2> go
id csid name description--- ---- ---------- --------------------------------------------
0 0 ascii_8 ASCII-8 - 7-bit ASCII, with implementation-defined characters for values 128-255.
1 0 iso_1 ISO 8859-1 (Latin-1) - Western European8-bit character set.
50 1 bin_iso_1 Binary sort order for the ISO 8859/1character set (iso_1).
In the example:
• For character set ascii_8, the character set ID is 0
• For character set iso_1, the character set ID is 1
• For sort order bin_iso_1, the character set ID is 1 and the sort orderID is 50
Useful dbcc CommandsThis section provides an overview of a number of database consistencychecker (dbcc) commands described in this manual for diagnosing andtroubleshooting Adaptive Server problems.
Standard dbcc CommandsThe standard, supported dbcc commands used in this document are asfollows:
dbcc Command Purpose
tablealloc checks allocation information for the specified table.
textalloc checks allocation information in text pages forthe specified table.
indexalloc checks allocation information for the specified index.
checkalloc runs the same checks as tablealloc, for all pages in a database.
checktable checks the integrity of data and index pages inthe specified table.
checkdb runs the same checks as checktable, for all tables in a database.
69
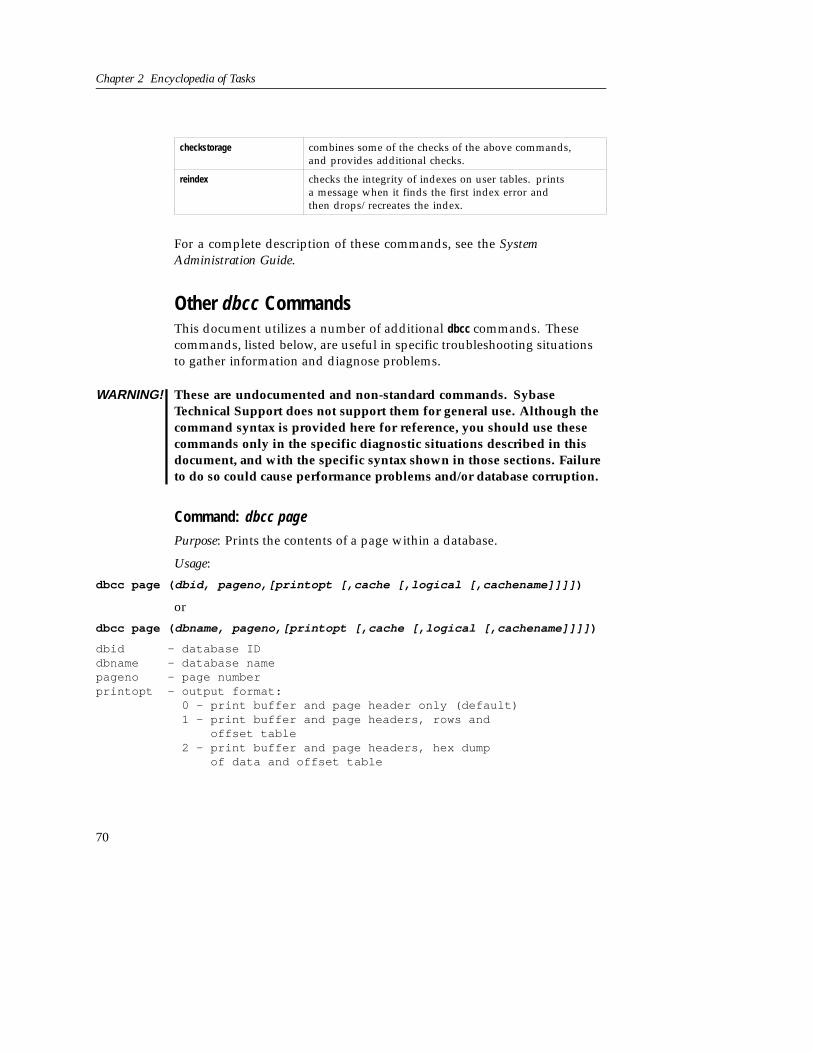
Chapter 2 Encyclopedia of Tasks
checkstorage combines some of the checks of the above commands,and provides additional checks.
reindex checks the integrity of indexes on user tables. printsa message when it finds the first index error andthen drops/recreates the index.
For a complete description of these commands, see the SystemAdministration Guide.
Other dbcc CommandsThis document utilizes a number of additional dbcc commands. Thesecommands, listed below, are useful in specific troubleshooting situationsto gather information and diagnose problems.
WARNING! These are undocumented and non-standard commands. SybaseTechnical Support does not support them for general use. Although thecommand syntax is provided here for reference, you should use thesecommands only in the specific diagnostic situations described in thisdocument, and with the specific syntax shown in those sections. Failureto do so could cause performance problems and/or database corruption.
Command: dbcc page
Purpose: Prints the contents of a page within a database.
Usage:
dbcc page ( dbid, pageno,[printopt [,cache [,logical [,cachename]]]] )
or
dbcc page ( dbname, pageno,[printopt [,cache [,logical [,cachename]]]] )
dbid - database IDdbname - database namepageno - page numberprintopt - output format:
0 - print buffer and page header only (default)1 - print buffer and page headers, rows and
offset table2 - print buffer and page headers, hex dump
of data and offset table
70

Useful dbcc Commands
cache - where to get the page:0 - read page from disk1 - read page from cache if present, otherwise
read from disk (default)logical - the page type
0 - pageno is a virtual page1 - pageno is a logical page (default)
cachename - the cache name-1 - all caches
Command: dbcc pglinkage
Purpose: checks the linkage of a page chain.
Usage:
dbcc pglinkage ( dbid, start_pg_num, number_pages,printopt, search_for, search_order )
dbid - database IDstart_pg_num - page number at which
to start checkingnumber_pages - the number of pages to check:
0 - check all pagesprintopt - denotes which pages to display:
0 - display only the number ofpages checked
1 - display the last 16 pages checked2 - display all the page numbers checked
search_for - stop checks when this page numberis reached
search_order - direction of search:0 - follow previous page pointers1 - follow next page pointers
Command: dbcc log
Purpose: displays transaction log records.
Usage:
dbcc log ( dbid, objid, pageno, rowno, nrecs, type, printopt )
dbid - database IDobjid - can be < 0, zero, or > 0. Meaning of this
option depends on the values of 'pageno'and/or 'rowno'. For example, if objid >0 and'pageno' and 'rowno' = 0, all records forthat object are displayed.
pageno - page number (or 0)
71
Chapter 2 Encyclopedia of Tasks
rowno - row number (or 0)nrecs - number of records and log scan directiontype - the type of log record to displayprintopt - denotes display options
0 - display header and data1 - display header only.
Command: dbcc traceflags
(available with 11.0.3 and later)
Purpose: Shows what traceflags, if any, are currently active in the server.
Usage:
dbcc traceflags
Command: dbcc traceon
Purpose: activates the specified trace flag.
Usage:
dbcc traceon ( trace_flag )
Command: dbcc traceoff
Purpose: de-activates the specified trace flag.
Usage:
dbcc traceoff ( trace_flag )
Command: dbcc memusage
Purpose: Shows memory allocation for server structures and objects, forexample the size and number of stored procedures.
Usage:
dbcc memusage
WARNING! Running dbcc memusage on a multi-engine server can cause the otherrunning processes to timeslice.
72
How to Analyze dbcc checkstorage Faults
How to Analyze dbcc checkstorage Faultsdbcc checkstorage reports any faults it finds during database checks.checkstorage performs a number of checks not performed by the pre-11.5dbcc commands, as well as a subset of checks of the other commands.
Fault AnalysisThe following table lists by type code the common faults that dbcccheckstorage reports, and shows the techniques you can use to furtherevaluate these faults. The most common approach is to use object level dbcccommands, such as dbcc checktable, to understand and further investigatecheckstorage faults. Where the Action/Follow-up column lists multipleoptions, these appear in the order of most preferable option first. Wherethe Action/Follow-up column lists an error number, see the writeup forthe error in “Error Message Writeups” for details.
Table 2–1: checkstorage fault analysis
checkstorageType Code
Fault Description Action/Follow-up
100000 Disk read failed Check Sybase device
100001 Page ID errors such as page numberout of range
Similar to 2523 Error
100002 pfreeoff field on header page has aninvalid value
Similar to 2505 Error
100003 1. Allocation page in wrong location orlocation of an allocation page containssomething else
2. Object ID reference error
dbcc checktable
dbcc tablealloc
dbcc checkalloc
Similar to 2529 Error
dbcc checktable
dbcc tablealloc
dbcc checkalloc
Similar to 1133, 2522, 2540 Errors
100006 Object allocation error dbcc tablealloc
Similar to 2522, 2525 Errors
100008 Incorrect page status bit in page header dbcc checktable
Similar to 7948 Error
73
Chapter 2 Encyclopedia of Tasks
checkstorageType Code
Fault Description Action/Follow-up
100009 Column/row size error, or other rowformat error
dbcc checktable
Similar to 2506, 2507, 2508 Errors
100010 Row location error dbcc checktable
Similar to 2509 Error
100014 Page referenced by more than one object Similar to 2502 Error
100015 Page referenced more than once for an object Similar to 2502 Error
100016 Page allocated but not linked dbcc checktable
Similar to 2540 Error
100017 Fault encountered on Object AllocationMap (OAM) page linkage
Similar to 2502 Error
100018 Allocation is not recorded in the ObjectAllocation Map (OAM)
dbcc tablealloc
dbcc indexalloc
dbcc checkalloc
Similar to 7939 Error
100021 Fault encountered on last page of object chain dbcc checktable
Similar to 2575, 9924 Errors
100022 Fault encountered on first page of object chain dbcc checktable
Similar to 2577, 2578 Errors
100023 Object Allocation Map (OAM) count error dbcc tablealloc
dbcc indexalloc
dbcc checkalloc
Similar to 7940, 7949 Errors
100024 Object Allocation Map (OAM) count error dbcc tablealloc
dbcc indexalloc
dbcc checkalloc
Similar to 7940, 7949 Errors
100026 Serial allocation rule violation Similar to 7989 Error
100027 Text chain has bad root page number Similar to 2523 Error
100028 A page of the object was found in alocation other than where allocationsare currently allowed
dbcc tablealloc
dbcc indexalloc
dbcc checkalloc
Similar to 2558 Error
74

How to Analyze dbcc checkstorage Faults
checkstorageType Code
Fault Description Action/Follow-up
100029 Control page: pprevpg or pnextpg non-zero Similar to 2577 Error
100029 Data/text page: next page valuenon-zero on last page
dbcc checktable
Similar to 2575 Error
100029 Data/text page: previous page valuenon-zero on first page
dbcc checktable
Similar to 2578 Error
100031 Link check: referenced page is not allocated,or is allocated to a different object
dbcc tablealloc
dbcc checkalloc
Similar to 2521, 2522 Errors
100032 Link check: pprevpg or pnextpg is inconsistentwith page reference
Similar to 2503 Error
The following checkstorage faults do not correspond to any existing dbccerrors:
Table 2–2: checkstorage faults that do not map to dbcc errors
checkstorage TypeCode
Fault Description
100004 Pages with a timestamp in the future.
100005 Pages from the wrong database.
100007 Extent ID - pages allocated to a non-existent object. checkallocwith the fix option can correct this error.
100011 Text pointer - a corrupt text/image value for a table row/column.Look for other faults to determine the nature of the problem.
100012 Page status bits for the page show page type is differentfrom the page chain being examined.
100019 Extra Object Allocation Map (OAM) Entry.
Similar to 7940, 7949 Errors. checkalloc or tablealloc withthe fix option can correct this error.
100025 Row count or rows per page error in Object AllocationMap (OAM). checktable corrects this error.
75

Chapter 2 Encyclopedia of Tasks
checkstorage TypeCode
Fault Description
100029 1) index page only flag incorrectly set on a data page. Creating aclustered index or bulk copying data out and back in can correctthis error. 2) poffset does not match the contents of the page. 3)plastrowoff is not the offset of the last row on an index page. 4)Out of range values in OAM page header fields.
Many 100029 faults can be corrected by bulk copyingdata out and back in.
100030 Page formatting requirements for pages other than data and index.Checks depend on page type. OAM page: entries are for allocationpages and total of used+unused is less than 255. Control page: firstor last page is invalid for database; the affinity table is corrupt.Text page: timestamps on the first page are invalid or inconsistent.Allocation page: extent on allocation page is not correctly allocatedand is not free for allocation (similar to 2525 error).
dbcc checkstorage startup and drop tabledbcc checkstorage can fail during its initialization phase if another sessionconcurrently performs a drop table. This is not a serious problem. If it occurs,simply run dbcc checkstorage again.
♦Note The problem may only occur during checkstorage startup. Once startup iscomplete and checkstorage processing is underway, drop table commandscan be issued once again.
Faults Due to sp_placeobjectIf you use sp_placeobject, checkstorage generates a 100028 soft fault for theobject. This may also be followed by a 100025 fault, but this does not meanthat the OAM row count is wrong. It merely indicates that checkstoragecould not collect an accurate row count because of the use of sp_placeobject.
When 100028 and 100025 faults occur in pairs, therefore, you do not needto be concerned about the 100025 fault. The 100028 (and corresponding100025) fault can be removed by using bcp to unload and reload the table.
76
Other Useful Tasks
Other Useful TasksThis section steps you through tasks that are useful for resolving problemsyou may encounter that are not strictly related to disaster recovery.
How to Fix a Corrupted Index on System TablesIf the index on one of your system tables has been corrupted, you can usethe sp_fixindex stored procedure to repair the index.
WARNING! Do not run sp_fixindex on the clustered index of the sysobjects orsysindexes tables or on user tables. Read the following section for theseand other important warnings.
Read These Warnings First
• Do not run sp_fixindex on the clustered index of the sysobjects or sysindexestables. If you do, sp_fixindex will return this error message:
The index with id 1 on sysobjects cannot be recreated.
• Do not run sp_fixindex on user tables.
♦Note You can run sp_fixindex on a nonclustered index on sysobjects, but you willencounter a known problem. For a workaround, refer to “Workaround forsysobjects Nonclustered Indexes”.
• Sybase would like to pursue the source of any persistent indexcorruption that is not hardware related. This debugging processrequires that you do two things:
– Leave your system catalogs untouched. Sybase must dial in to yourdatabase and examine the corruption prior to any modificationsto the system catalogs.
– Preserve your transaction logs. Sybase must examine yourtransaction logs to find the source of modifications to the pagesinvolved.
Repairing the System Table Index
Repairing a corrupted system table index is a multi-step process; runningsp_fixindex is one of those steps.
77
Chapter 2 Encyclopedia of Tasks
To perform the repair:
1. Get the object name, object ID, and index ID of the corrupted index. Ifyou only have a page number, refer to “How to Find an Object Namefrom a Page Number”.
2. If the corrupted index is on a system table in the master database, putAdaptive Server in single-user mode. Refer to “How to Start AdaptiveServer in Single-User Mode” for details.
3. If the corrupted index is on a system table in a user database, put thedatabase in single-user mode and reconfigure to allow updates tosystem tables:
1> use master2> go
1> sp_dboption database_name , "single user", true2> go
1> sp_configure "allow updates", 12> go
4. Issue the sp_fixindex command:
1> use database_name2> go
1> checkpoint2> go
1> sp_fixindex database_name , object_name , index_ID2> go
♦Note To run sp_fixindex, you must possess “sa_role” permissions.
5. Run dbcc checktable to verify that the corrupted index is now fixed.
6. Disallow updates to system tables:
1> use master2> go1> sp_configure "allow updates", 02> go
7. Turn off single-user mode:
1> sp_dboption database_name , "single user", false2> go
78

Other Useful Tasks
1> use database_name2> go
1> checkpoint2> go
Workaround for sysobjects Nonclustered Indexes
Running sp_fixindex to repair a nonclustered index on sysobjects requiresseveral additional steps.
1. Perform steps 1–3, as described above.
2. Issue the following Transact-SQL query:
1> use database_name2> go
1> checkpoint2> go
1> select sysstat from sysobjects2> where id = 13> go
3. Save the original sysstat value.
4. Change the sysstat column to the value required by sp_fixindex:
1> update sysobjects2> set sysstat = sysstat | 40963> where id = 14> go
5. Run sp_fixindex:
1> sp_fixindex database_name , sysobjects, 22> go
6. Restore the original sysstat value:
1> update sysobjects2> set sysstat = sysstat_ORIGINAL3> where id = object_ID4> go
7. Run dbcc checktable to verify that the corrupted index is now fixed.
8. Disallow updates to system tables:
1> sp_configure "allow updates", 02> go
9. Turn off single-user mode:
79

Chapter 2 Encyclopedia of Tasks
1> sp_dboption database_name , "single user", false2> go
1> use database_name2> go
1> checkpoint2> go
How to Rescue Data from a Corrupted TableThis section describes the steps needed to copy data from a corrupted tableinto a new table or file. Note that you will probably be able to copy onlysome of your data.
Back Up Data to a New Table
Copy the data from the corrupted table into a new table by creating adummy table, and copying the old data into the dummy table.
You can create the new table in any database (except model) where enoughspace is available. Follow these steps:
1. Check the table size that you want to copy, as follows:
1> sp_spaceused table_name2> go
2. Check the amount of available space in the database in which you planto create the new table:
1> use database_name2> go
1> sp_spaceused2> go
The easiest way to copy the table into a new one is to select all thedata from your corrupted table into a temporary table. This way, youcan skip step 3.
If space is too limited to create your table in any database, you mayback up the data to an operating system file. Refer to “Back Up Data toan Operating System File”.
3. Enable the select into/bulkcopy option on the database where you want tocreate the new table. You do not need to enable the select into/bulkcopy
80

Other Useful Tasks
option on tempdb, as tempdb already has this option enabled. For moreinformation about enabling the select into/bulkcopy option on a database,refer to Error 268 in “Error Message Writeups”.
After you have run a select into command or used non-logged bulkcopy tomove data into a database, you cannot perform a transaction log dumpto a device. Therefore, once you have made unlogged changes to yourdatabase, issue a dump database command.
Setting the select into/bulkcopy option to “on” still allows you to use dumptransaction database_name with truncate_only.
WARNING! Be careful about running select into across databases if you have columnnames that exist in both databases, as this may cause problems.
4. Copy the old table into the new table:
1> select * into database_name..new_table2> from old_table3> go
Or, if you select all the data into a temporary table:
1> select * into tempdb..new_table from old_table2> go
5. Drop the original table.
6. Use sp_rename to give the new table the old name.
7. Recreate all views, triggers, stored procedures, constraints, defaults,and so on that referenced the table.
An alternative approach is to bulk copy data out of the old table into a fileand bulk copy back into the new table.
Back Up Data to an Operating System File
To back up data into an operating system file, perform the following steps:
1. Use bcp to copy the data from the table into a file. For informationabout bcp, refer to bcp in the Adaptive Server utility programs manualfor your platform.
2. Drop and re-create the table.
3. Use bcp to copy the file into the re-created table.
81

Chapter 2 Encyclopedia of Tasks
4. Recreate all views, triggers, stored procedures, constraints, defaults,and so on that referenced the table.
♦Note If there are space constraints, and the table needs a clustered index,consider creating the index before adding the data to the table, then runupdate statistics after the data is added.
How to Start Adaptive Server with Trace FlagsFollow the instructions in this section to start Adaptive Server with a traceflag. If you have a UNIX or Digital OpenVMS system, you can modify therunserver file to start Adaptive Server with a trace flag. OS/2 and NovellNetWare systems use the command line to start Adaptive Server with atrace flag. Windows NT uses a command-line option set with the ServerConfig program.
Look for the section below that matches your operating system.
WARNING! Start Adaptive Server with a trace flag only when instructedto do so in this manual or as directed by Sybase TechnicalSupport or an SWR letter. Using these flags at any othertime may create serious problems.
Do not attempt a normal shutdown afterusing trace flags 3607 or 3608. Always use shutdown with nowait inthese cases.
Modifying the runserver File to Include Trace Flags for UNIX
1. Make a copy of the runserver file. A common naming convention forthis new file is RUN_SERVERNAME_TRACEFLAG. For example, ifyou wanted to start an Adaptive Server named PRODUCTION withtrace flag 3605, you could copy your existing runserver file into a filenamed RUN_PRODUCTION_3605.
2. Edit the new runserver file to include the desired trace flag.
The sample modified runserver file below includes the 3605 trace flagfor an Adaptive Server named PRODUCTION (substitute the correctvalues for your installation, including the correct trace flag number):
82

Other Useful Tasks
#!/bin/sh## Adaptive ServerInformation:# name: PRODUCTION# master device: /work/master.dat# master device size: 10752# errorlog: /usr/u/sybase/install/errorlog# interfaces: /usr/u/sybase/interfaces#
/usr/u/sybase/bin/dataserver -d/work/master.dat \-sPRODUCTION -e/usr/u/sybase/install/errorlog \-i/usr/u/sybase/interfaces\-c/usr/u/sybase/PRODUCTION.cfg -T3605
The last element of the last line activates the trace flag, which is flag3605 in this example.
3. Use the startserver command to start Adaptive Server with the modifiedrunserver file:
% startserver -fRUN_PRODUCTION_3605
♦Note The startserver command must be on one line.
4. After you have completed corrections, restart Adaptive Server withyour normal runserver file.
Modifying the runserver File to Include Trace Flags for Digital OpenVMS
1. Make a backup copy of your runserver file, and then edit the copyof the file to include the desired trace flag. The sample modifiedrunserver file below includes trace flag 3605 for an Adaptive Servernamed PRODUCTION:
!dcl!! Adaptive Server Information:! name: PRODUCTION! master device: SYBASE_SYSTEM:[DEVICES]PRODUCTION_MASTER.DAT! master device size: 10240! errorlog: SYBASE_SYSTEM:[SYBASE.INSTALL]PRODUCTION.ERR! interfaces: SYBASE_SYSTEM:[SYBASE]!$ define sybase_system SYBASE1150_SYSTEM:$ define sybase sybase_system:[sybase]
83

Chapter 2 Encyclopedia of Tasks
$ define syb_devcreate sybase_system:[sybase.bin]devcreate.exe$ define dslisten "PRODUCTION"$ server :== $SYBASE_SYSTEM:[SYBASE.bin]dataserver.exe$ server -/DEVICE=(SYBASE_SYSTEM:[DEVICES]PRODUCTION_MASTER.DAT) -/ERRORFILE=SYBASE_SYSTEM:[SYBASE.INSTALL]PRODUCTION.ERR -/INTERFACES=SYBASE_SYSTEM:[SYBASE] -/TRACE=3605
To set more than one trace flag, modify the last line, as in the followingexample:
$ server -/DEVICE=(SYBASE_SYSTEM:[DEVICES]PRODUCTION_MASTER.DAT) -/ERRORFILE=SYBASE_SYSTEM:[SYBASE.INSTALL]PRODUCTION.ERR -/INTERFACES=SYBASE_SYSTEM:[SYBASE] -/TRACE=(3605,3608)
2. Use the startserver command to start Adaptive Server with the modifiedrunserver file:
$ startserver /server=production
3. Change the name of the modified runserver file to store it as a backupshould you need to run Adaptive Server with this trace flag again.Then restore the backup copy of the original runserver file you made instep 1 to its original name.
4. After you have completed corrections, restart Adaptive Server withyour normal runserver file.
WARNING! Do not attempt a normal shutdown after using trace flags 3607 or 3608.Always use shutdown with nowait in these cases.
Using the Load Command With Trace Flags in Novell NetWare
To start Adaptive Server with a special trace flag, add the trace flag to theload command on the console command line. For example:
:load SQLSRVR -d DEVICE_NAME-T trace_flag_number
Using Trace Flags in OS/2
To start Adaptive Server with trace flags in OS/2, use a command similarto the following:
84

Other Useful Tasks
sqlserver /d device_name /T trace_flag_number
Substitute your site's master device physical device name and the trace flagnumber you want to use.
Using Server Configuration to Include Trace Flags in Windows NT
Follow these steps to start Adaptive Server with trace flags in Windows NT:
1. Log into Windows NT using an account with Windows NTadministrator privileges.
2. Double-click the Server Config icon in the Sybase for Windows NTprogram group.
3. Select the Adaptive Server icon.
4. Select Configure Adaptive Server.
5. Select the name of the Adaptive Server to configure, and chooseContinue.
6. Enter “sa” for login name. (No password is required.)
7. If the Adaptive Server is not running, Server Config asks you to start itnow; choose Yes.
8. Select the Command Line Option or the Command Line Parametersbutton.
Server Config displays the Command Line Parameters dialog box.
9. Edit the text in the Command Line Parameters dialog box to include thetrace flag parameter -T, followed by the trace flag you want.
10. Click OK.
11. Choose Save at the Adaptive Server's configuration dialog box.
12. Exit Server Config.
How to Reload a Suspect User DatabaseIf all other methods of restoring a user database marked “suspect” havefailed, perform the steps in this section to reload the suspect databasefrom a known, clean backup.
Reload the suspect user database from backup by following the stepsin “Recovering a Database: Step-by-Step Instructions” in the SystemAdministration Guide. It is very important to follow that procedure to
85
Chapter 2 Encyclopedia of Tasks
ensure that the segment sizes and locations are created in the proper order,or your database will not reload properly.
If you cannot drop the database using the normal procedure, use the dbccdbrepair command. Refer to “How to Drop a Database When drop databaseFails”.
For more information about reloading databases, refer to Error 2558 in “ErrorMessage Writeups”.
How to Drop a Database When drop database FailsFollow the steps in this section to drop a database when drop database fails.Do not use these steps unless directed to do so by this book, or unless thereis no critical data in the database.
1. Log in as the “sa”.
2. Check to make sure the database has been marked “suspect.” Thefollowing query produces a list of all databases which are markedsuspect:
1> select name from master..sysdatabases2> where status & 320 = 3203> go
3. If the database is marked “suspect”, go to step 4. If it is not marked“suspect”, mark it in one of the following ways:
a. Execute the sp_marksuspect stored procedure discussed under “Howto Mark a Database “suspect'””, and restart Adaptive Server toinitialize the change.
b. Use the procedure below:
1> sp_configure "allow updates", 12> go
1> use master2> go
1> begin transaction2> update sysdatabases set status = 3203> where name = database_name4> go
Verify that only one row was affected and commit the transaction:
86
Other Useful Tasks
1> commit transaction2> go
Reset the allow updates option of sp_configure:
1> sp_configure "allow updates", 02> go
4. Shut down Adaptive Server with nowait:
1> shutdown with nowait2> go
Restart the server to initialize the change.
5. Remove the database:
1> dbcc dbrepair( database_name ,dropdb)2> go
dbcc dbrepair sometimes displays an error message even though itsuccessfully drops the database. If an error message occurs, verify thatthe database is gone by executing the use database_name command. Thiscommand should fail with a 911 error, since you dropped the database.If you find any other error, contact Sybase Technical Support.
How to Fix and Prevent Allocation ErrorsThis section describes allocation errors, how to fix them, and how toprevent them from reoccurring. Errors 2521, 2540, 2546, 7939, 7940, and7949 are covered.
Understanding Allocation Errors
The dbcc checkalloc, dbcc tablealloc, and dbcc indexalloc commands check theconsistency of the allocation structures in a database. If an inconsistencybetween information in the page chain of an object and information inthe allocation structures of that object is detected, an error is displayed.Additionally, if dbcc checkalloc is run while the database is not in single-usermode, errors that do not really exist (spurious errors) may be reported.Spurious errors may be reported when changes in the database occur whiledbcc checkalloc is running.
Allocation errors 2521, 2540, 2546, 7939, 7940, and 7949 have differentlevels of severity, but they should all be corrected.
87
Chapter 2 Encyclopedia of Tasks
Fixing Allocation Errors
If only one table is affected, then use this command:
1> dbcc tablealloc( tablename )2> go
Otherwise, follow these steps to correct any allocation error that hasoccurred, including errors 2521, 2540, 2546, and 7940:
1. Set the database that encountered the error in single-user mode. If theerror was on the master database, set it to single-user mode by shuttingdown and restarting Adaptive Server in single-user mode. Refer to“How to Start Adaptive Server in Single-User Mode” for instructions. Ifthe database is a user database, use this procedure:
1> sp_dboption database_name , single, true2> go
1> use database_name2> go
1> checkpoint2> go
♦Note dbcc checkalloc with the fix option fails with Error 2595 if the database isnot set in single-user mode. If you cannot run Adaptive Server with thedatabase in single-user mode, refer to “Error Message Writeups”for theparticular error you are trying to correct, or call Sybase Technical Support.
2. Run dbcc checkalloc with the fix option to correct the error:
1> use master2> go
1> dbcc checkalloc( database_name , fix)2> go
3. Reset the database from single-user mode. To reset the master database,shut down and restart Adaptive Server without the special single-usermode procedure. To reset a user database, use the following procedure:
1> sp_dboption database_name , single, false2> go
1> use database_name2> go
88

Other Useful Tasks
1> checkpoint2> go
♦Note For large databases, you may want to execute the commands in steps 1–3from a script file, which allows you to save the results for future reference.
4. Examine the dbcc checkalloc output. If there are any errors, refer to “ErrorMessage Writeups” or contact Sybase Technical Support.
Fixing Allocation Errors when Object ID and Index ID are Known
Follow these steps when the allocation errors affect a single table and theObject ID and Index ID are known, including errors 7939 and 7949:
Identify Table: User or System TableLook at the value for the object ID in the error message. If it is 100 orgreater, the object is a user table and you should continue with “Action forUser Tables”. If it is below 100, the object is a system table and requires adifferent procedure described in the section “Action for System Tables”.
Action for User TablesIf the object ID from the error message is 100 or greater, follow these stepsto correct the error:
1. Check the value of the index ID in the error message to determinewhether it is a table (value is 0) or an index (value is greater than 0).
2. Run dbcc tablealloc or dbcc indexalloc, depending on whether the objectis a table or an index as determined in step 1. Before you run eithercommand, keep these facts in mind:
– dbcc tablealloc corrects this problem on a table or an index, but if theproblem is on an index, you can avoid affecting the entire table byusing dbcc indexalloc. If the table is large or heavily used, if may bemost practical to use dbcc indexalloc.
– These commands can correct the error only when run in the full oroptimized mode, and with the nofix option not specified, the defaultfor user tables.
Use the command appropriate for your situation:
89

Chapter 2 Encyclopedia of Tasks
For Tables (index ID = 0) For Indexes (0 < index ID < 255)
1> dbcc tablealloc (object_ID)
2> go
1> dbcc_indexalloc (object_id,2> index_id)
3> go
Refer to “dbcc” in the Adaptive Server Enterprise Reference Manual and”Checking database Consistency” in the System Administration Guide forinformation about dbcc tablealloc and dbcc indexalloc.
Action for System TablesIf the object ID is less than 100, follow these steps to correct the error:
1. Put the affected database in single-user mode:
– If the database is master, use the procedure in “How to StartAdaptive Server in Single-User Mode”, and then go to step 2.
– If the database is not master, use the sp_dboption stored procedure toput the affected database in single-user mode:
1> use master2> go
1> sp_dboption database_name , single, true2> go
1> use database_name2> go
1> checkpoint2> go
2. Check the value of the index ID in the error message to determinewhether it is a table (value is 0) or an index (value is greater than 0).
3. Run dbcc tablealloc or dbcc indexalloc, depending on whether the objectnamed in the error message is a table or an index. Then execute theappropriate command, using the object ID from the error message.Before you run the appropriate command, keep these facts in mind:
– dbcc tablealloc corrects either a table or an index, but if the problem ison an index, you can avoid affecting the entire table by using dbccindexalloc. If you need to minimize the amount of time the table isunavailable, it may be most practical to use dbcc indexalloc.
90
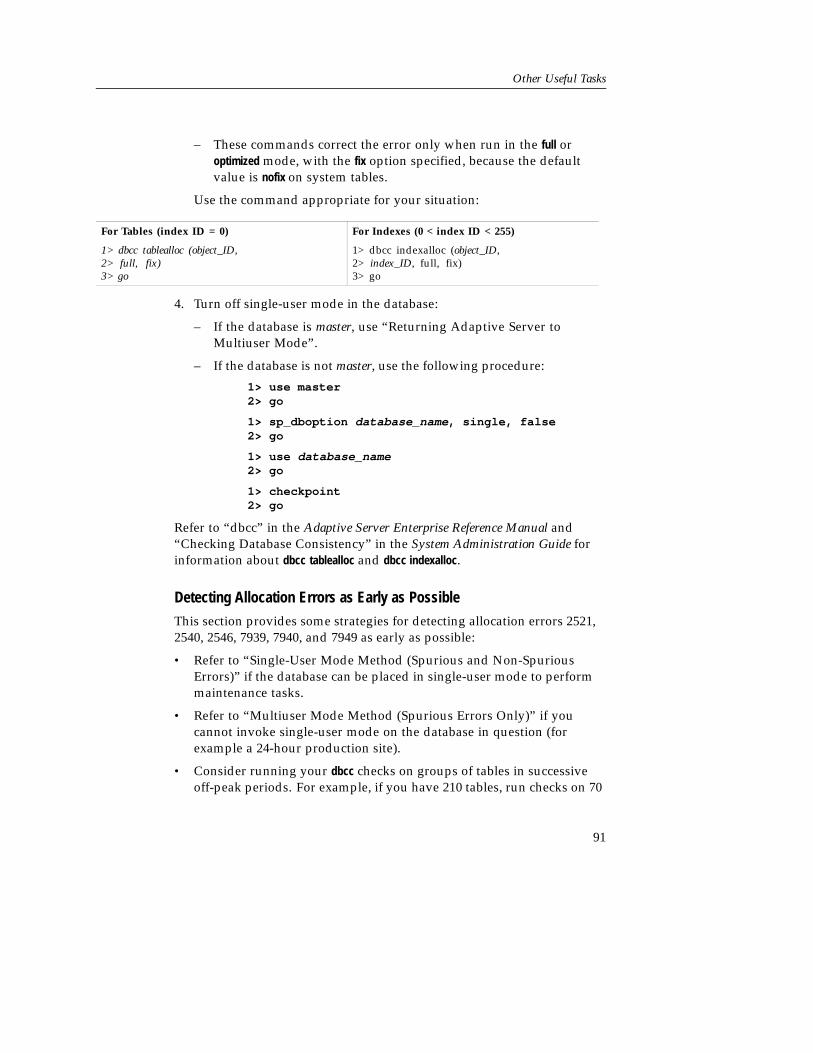
Other Useful Tasks
– These commands correct the error only when run in the full oroptimized mode, with the fix option specified, because the defaultvalue is nofix on system tables.
Use the command appropriate for your situation:
For Tables (index ID = 0) For Indexes (0 < index ID < 255)
1> dbcc tablealloc (object_ID,2> full, fix)3> go
1> dbcc indexalloc (object_ID,2> index_ID, full, fix)3> go
4. Turn off single-user mode in the database:
– If the database is master, use “Returning Adaptive Server toMultiuser Mode”.
– If the database is not master, use the following procedure:
1> use master2> go
1> sp_dboption database_name , single, false2> go
1> use database_name2> go
1> checkpoint2> go
Refer to “dbcc” in the Adaptive Server Enterprise Reference Manual and“Checking Database Consistency” in the System Administration Guide forinformation about dbcc tablealloc and dbcc indexalloc.
Detecting Allocation Errors as Early as Possible
This section provides some strategies for detecting allocation errors 2521,2540, 2546, 7939, 7940, and 7949 as early as possible:
• Refer to “Single-User Mode Method (Spurious and Non-SpuriousErrors)” if the database can be placed in single-user mode to performmaintenance tasks.
• Refer to “Multiuser Mode Method (Spurious Errors Only)” if youcannot invoke single-user mode on the database in question (forexample a 24-hour production site).
• Consider running your dbcc checks on groups of tables in successiveoff-peak periods. For example, if you have 210 tables, run checks on 70
91

Chapter 2 Encyclopedia of Tasks
tables nightly until you cycle through all the tables. If you adopt thisapproach, placing the database in single-user mode is only necessarywhen running dbcc tablealloc on system tables. The same approach canbe taken for dbcc checktable but there is no need to place the database insingle-user mode.
Without single-user mode, you cannot prevent non-spurious errormessages from occurring.
Single-User Mode Method (Spurious and Non-Spurious Errors)If you can run dbcc checkalloc in single-user mode, replace each occurrenceof dbcc checkalloc in scripts and procedures with dbcc checkalloc with the fixoption, as follows:
1> use master2> go
1> sp_dboption database_name , single, true2> go
1> use database_name2> go
1> checkpoint2> go
1> use master2> go
1> dbcc checkalloc( database_name , fix)2> go
1> sp_dboption database_name , single, false2> go
1> use database_name2> go
1> checkpoint2> go
♦Note Use dbcc checkalloc with the fix option while in a database other than theone that is being repaired.
Before you implement this strategy, consider these facts:
• dbcc checkalloc with the fix option must be run in single-user mode.
92
Other Useful Tasks
• Because dbcc checkalloc with the fix option may report other errors,Sybase recommends that you save the output from the dbcc checkalloccommand and examine it.
• dbcc checkalloc with the fix option is the same program as dbcc checkalloc,except that dbcc checkalloc with the fix option requires single-user modeand fixes errors instead of just reporting them. dbcc checkalloc with the fixoption is not slower than dbcc checkalloc.
• Because the master database is usually updated less frequently,allocation errors occur much less often. Therefore, you may not needto use this strategy on master. If you do use it on master, refer to“How to Start Adaptive Server in Single-User Mode” of this guide forinstructions on how to activate single-user mode (it cannot be invokedvia sp_dboption on master).
• You do not ever need to run dbcc checkalloc after dbcc checkalloc with the fixoption to ensure that the errors were corrected.
• Although no actual users are logged on, you may not be able to enablesingle-user mode if there are processes still active.
If you have databases on which you cannot run allocation checks insingle-user mode, use the following procedure to eliminate the spuriousallocation errors that can occur when dbcc checkalloc is run in multiusermode.
Multiuser Mode Method (Spurious Errors Only)If your site does not allow single-user operation (such as a 24-hourproduction Adaptive Server), you cannot completely prevent spuriousallocation errors, but you can prevent spurious errors on the transactionlog—where most occur. Use both of the strategies described in this sectionto stop occurrences of spurious allocation errors.
Strategy 1
Do not run dbcc check commands when performing operations like createindex, truncate table, or bcp; or when doing large numbers of inserts into thedatabase.
Strategy 2
Before you implement this strategy, consider these facts:
• This strategy is unnecessary if you can run the database in single-usermode. If you can run the database in single-user mode, use the strategy
93

Chapter 2 Encyclopedia of Tasks
described in “Single-User Mode Method (Spurious and Non-SpuriousErrors)”.
• Because the master database is usually updated less frequently thanuser databases, allocation errors occur much less frequently. Therefore,this strategy may be unnecessary on master.
For this strategy, replace each occurrence of dbcc checkalloc in scripts andprocedures with the following:
1> dbcc traceon (2512)2> go
1> dbcc checkalloc ( database_name )2> go
1> dbcc traceoff (2512)2> go
1> use database_name2> go
1> dbcc tablealloc (syslogs)2> go
This procedure prevents dbcc checkalloc from examining the syslogs table,where most spurious errors originate (dbcc tablealloc checks syslogs instead).If you get genuine allocation errors, refer to “Error Message Writeups”for instructions.
Syntax for dbcc checkalloc with the fix Option
This section explains only dbcc checkalloc with the fix option. Refer to “dbcc”in the Adaptive Server Reference Manual for information about dbcc and itsother keywords and options.
Function
dbcc checkalloc with the fix option detects and fixes allocation errors indatabases.
Syntax
dbcc checkalloc( database_name , fix)
Example
1> sp_dboption database_name , single, true2> go
94
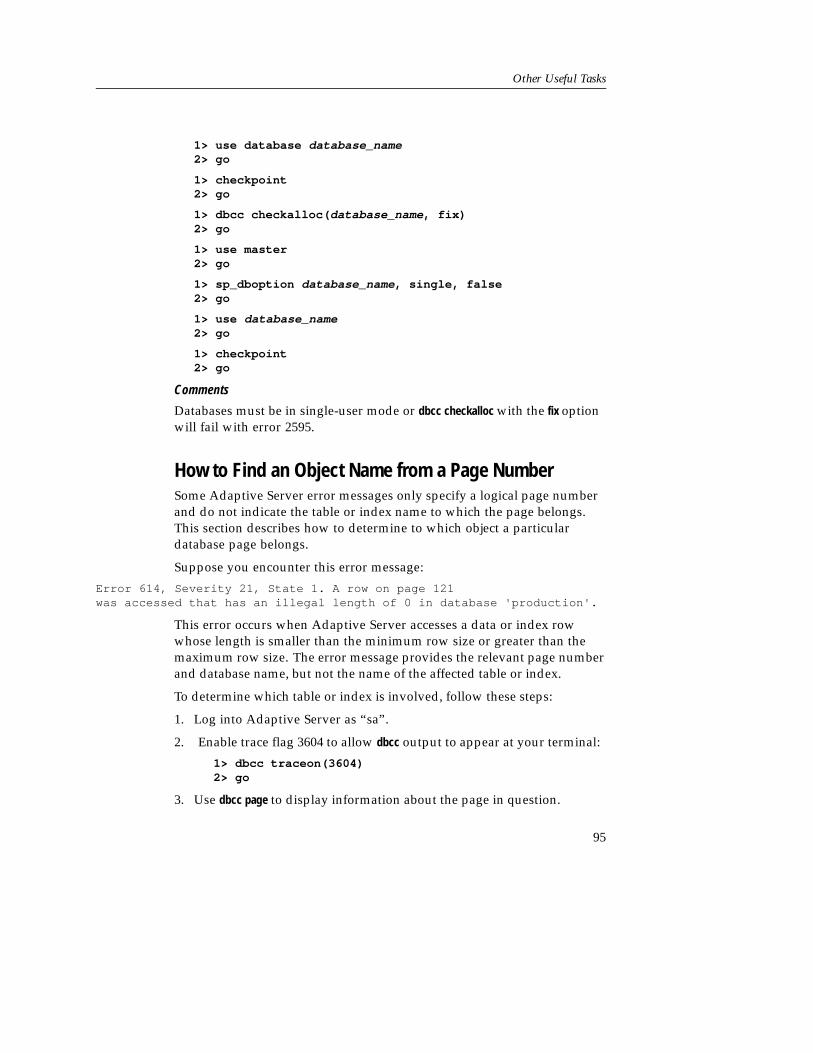
Other Useful Tasks
1> use database database_name2> go
1> checkpoint2> go
1> dbcc checkalloc( database_name , fix)2> go
1> use master2> go
1> sp_dboption database_name , single, false2> go
1> use database_name2> go
1> checkpoint2> go
Comments
Databases must be in single-user mode or dbcc checkalloc with the fix optionwill fail with error 2595.
How to Find an Object Name from a Page NumberSome Adaptive Server error messages only specify a logical page numberand do not indicate the table or index name to which the page belongs.This section describes how to determine to which object a particulardatabase page belongs.
Suppose you encounter this error message:
Error 614, Severity 21, State 1. A row on page 121was accessed that has an illegal length of 0 in database 'production'.
This error occurs when Adaptive Server accesses a data or index rowwhose length is smaller than the minimum row size or greater than themaximum row size. The error message provides the relevant page numberand database name, but not the name of the affected table or index.
To determine which table or index is involved, follow these steps:
1. Log into Adaptive Server as “sa”.
2. Enable trace flag 3604 to allow dbcc output to appear at your terminal:
1> dbcc traceon(3604)2> go
3. Use dbcc page to display information about the page in question.
95

Chapter 2 Encyclopedia of Tasks
Here is the syntax:
dbcc page ( database_name , page_number )
♦Note The dbcc page command is not a supported feature and Sybase TechnicalSupport cannot answer any questions regarding any values other thanobject ID and index ID.
To find information about page 121 (the index or table page indicatedin the error message) in the salaries database, execute the followingcommand:
1> dbcc page (salaries, 121)2> go
Page found in cache default data cache.BUFFER:Buffer header for buffer 0x13d6800page=0x13d7000 bdnew=0x0 bdold=0x0 bhash=0x0 bmass_next=0x0bmass_prev=0x0 bvirtpg=0 bdbid=0 bkeep=0
bmass_stat=0x0800 bbuf_stat=0x0000 bpageno=121bxls_pin = 0x00000000 bxls_next = 0x00000000bbxls_flushseq 0 bxls_pinseq 0
PAGE HEADER:Page header for page 0x13d7000pageno=121 nextpg=122 prevpg=120 objid=7 timestamp=0001 0000043fnextrno=1 level=10 indid=0 freeoff=1 minlen=1page status bits: 0x8000,0x8,
DBCC execution completed. If DBCC printed error messages, contacta user with System Administrator (SA) role.
WARNING! Be sure to provide the correct page number.
4. Translate the object ID (objid) into a table name. For example:
1> use production2> go1> select object_name(7)2> go
96

Other Useful Tasks
--------------bad_table
5. Translate the index ID (indid) into an index name, if applicable:
1> use database_name2> go
1> select name2> from sysindexes3> where id = objid4> and indid = indid5> go
Refer to the table below to determine the type of object to which thepage belongs. The object type corresponds to its index ID value onthe page:
Index ID Meaning
0 Actual table data
1 Clustered index
2-250 Nonclustered indexes
255 Text/image page
Index ID 3, for example, corresponds to a nonclustered index. If theindex ID is 0, the page does not belong to an index.
6. Disable trace flag 3604:
1> dbcc traceoff(3604)2> go
How to Interpret sp_who Outputcmd Column Contains the Entry “Maintenance Token”
Adaptive Server generates sp_who output by reading values fromsysprocesses, which is a “fake” table built by the server. The command listedin the cmd column is from the cmd column of the sysprocesses table.
“Maintenance Token” in the cmd column of sysprocesses indicates thatthe status value of the process is zero. This means that the process isinitializing or in a transient state. A process completing initialization orrunning recovery may display the command string “Maintenance Token”.
The presence of “Maintenance Token” does not indicate a problem.
loginame Value Changes During Stored Procedure Execution
97
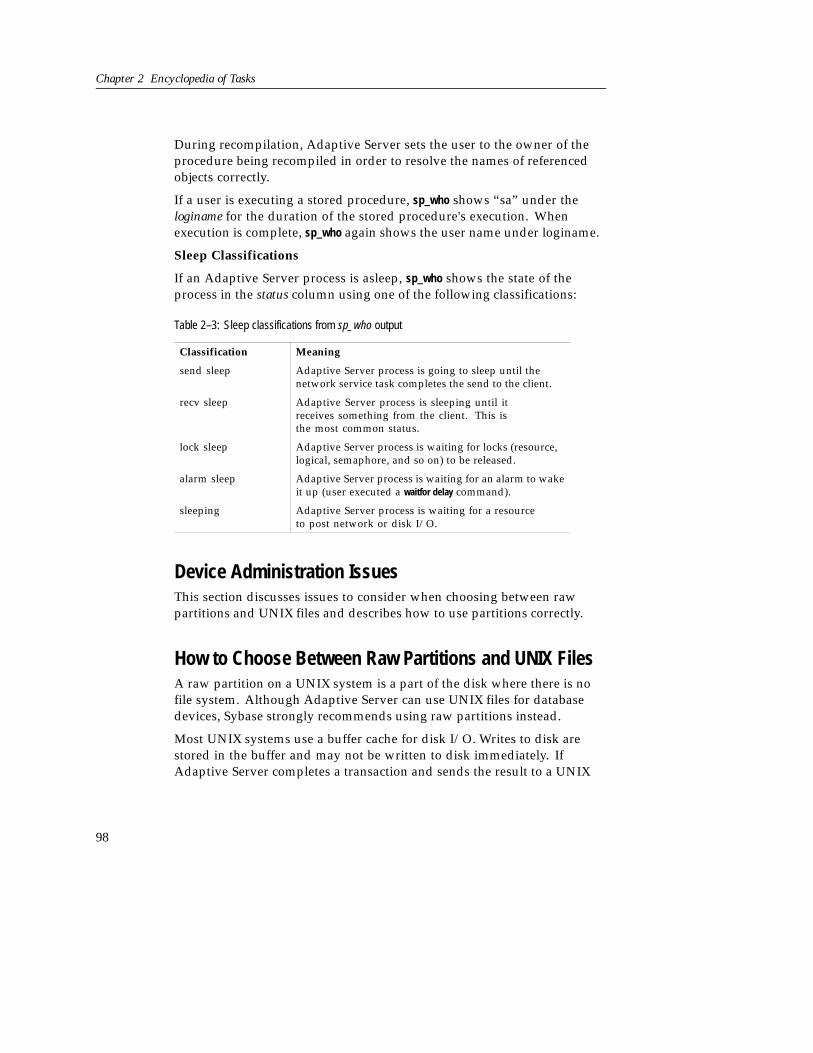
Chapter 2 Encyclopedia of Tasks
During recompilation, Adaptive Server sets the user to the owner of theprocedure being recompiled in order to resolve the names of referencedobjects correctly.
If a user is executing a stored procedure, sp_who shows “sa” under theloginame for the duration of the stored procedure's execution. Whenexecution is complete, sp_who again shows the user name under loginame.
Sleep Classifications
If an Adaptive Server process is asleep, sp_who shows the state of theprocess in the status column using one of the following classifications:
Table 2–3: Sleep classifications from sp_who output
Classification Meaning
send sleep Adaptive Server process is going to sleep until thenetwork service task completes the send to the client.
recv sleep Adaptive Server process is sleeping until itreceives something from the client. This isthe most common status.
lock sleep Adaptive Server process is waiting for locks (resource,logical, semaphore, and so on) to be released.
alarm sleep Adaptive Server process is waiting for an alarm to wakeit up (user executed a waitfor delay command).
sleeping Adaptive Server process is waiting for a resourceto post network or disk I/O.
Device Administration IssuesThis section discusses issues to consider when choosing between rawpartitions and UNIX files and describes how to use partitions correctly.
How to Choose Between Raw Partitions and UNIX FilesA raw partition on a UNIX system is a part of the disk where there is nofile system. Although Adaptive Server can use UNIX files for databasedevices, Sybase strongly recommends using raw partitions instead.
Most UNIX systems use a buffer cache for disk I/O. Writes to disk arestored in the buffer and may not be written to disk immediately. IfAdaptive Server completes a transaction and sends the result to a UNIX
98

Other Useful Tasks
file, the transaction is considered complete even though the UNIX buffercache may not have been written to disk. If the system crashes before thisbuffer cache is written, you lose data. In this situation, Adaptive Serverhas no way of knowing that the write to disk eventually failed, and thetransaction is not rolled back. In addition, some UNIX operating systemsdo partial writes. In that case, if the system crashes, the Sybase devicewill be corrupted.
Using raw partitions for Sybase devices allows Adaptive Server to processits own I/O requests, without having to go through the UNIX bufferingscheme. In this way, Adaptive Server knows exactly what portions of atransaction completed or failed in the event of a system crash. If Sybasedevices use UNIX files, corruption could occur.
Refer to the Adaptive Server installation and configuration guides or youroperating system documentation for more information.
Correct Use of Raw Partitions
If you choose to use raw partitions, examine your operating system's useof partitions carefully. Otherwise, you may overwrite valuable data. Inparticular, avoid the following situations:
• Partition is already in use.
• Partition overlaps with another partition.
• Operating system is using partition for swap space.
• A file system is mounted on the partition
• Character or block devices for each disk partition (one or the othershould be used, not both).
The following sections describe these situations in detail.
Partition Is Already In UseAsk your UNIX system administrator what the partition was originallyconfigured for and make sure that it was not designated to serve for anyother purpose except for the use of your Adaptive Server. If your partitionis used for any other purpose, most of the information it stores mightbe corrupted or destroyed.
99

Chapter 2 Encyclopedia of Tasks
Partition Overlaps with Another PartitionVerify that the partition you intend to use does not share cylinders withanother partition. In particular, watch for the following scenarios:
• On some UNIX systems (for example, SunOS BSD), partition c is, byconvention, defined to be the whole disk, so it is expected that partitionc will overlap all the other partitions.
If you are using partition c for your database device, do not useany other partitions on that drive, or check with your UNIX SystemAdministrator to make sure that partition c is not defined as beingthe whole disk.
• On other UNIX systems (AT&T SVR4), partition s6 is defined to bethe whole disk.
Operating System Is Using Partition for Swap SpaceRefer to your operating system administration guide for steps to determinewhether a partition is being used for swap space.
For example, on AT&T SVR4 and HP, determine whether your partition isincluded in the output that is generated, using the following commands:
On AT&T SVR4:
% /etc/swap -l
On HP-UX:
% /etc/swapinfoor
% /usr/sam/bin/swapinfo
These commands report information on swap partitions only if the entriesare found in the file system table.
If the output of these commands includes the device name associated withyour database partition, then the device is being used for swap space. Askyour operating system administrator which partition you may use for yourdatabase. For more information on how to choose raw partitions, refer tothe Adaptive Server installation and configuration guides.
100
Other Useful Tasks
A File System Is Mounted on the PartitionDetermine whether your partition is included in the output generated bythe following command(s):
% df
% /etc/mount
If the output from these commands includes the device name associatedwith your database partition, ask your operating system administrator tounmount the file system from the partition or to help you choose anotherdisk partition. Note that using the partition as a raw database partitionwill destroy all file system information that was there.
Getting Information About Your Partition
There are several ways to determine how a raw partition is being used:
• Interview your operating system administrator.
• Examine your file system table.
• Examine the partition map.
Examine the File System TableThe file system table name varies by platform. Check your operatingsystem manual for the correct name.
♦Note Good commenting in the file system table helps prevent most diskpartition errors.
Examine the Partition MapEach partition includes a partition map, which is usually in the first sectorof the first cylinder.
The partition includes the partition map, which is usually in the first sectorof the first cylinder. Refer to your operating system administration guidefor steps to determine at what cylinder a partition starts.
♦Note If you are running the Logical Volume Manager (LVM) on an AIXoperating system, verify that the first AIX cylinder of your raw partitionis free (except for the master device) and is available for the use of theLVM configuration. In order to do this, make sure that vstart = 2 (one AIXcylinder = 2 Sybase pages) for all user-defined disks.
101
Chapter 2 Encyclopedia of Tasks
Refer to your operating system documentation for more informationabout disk partition administration. The Adaptive Server installation andconfiguration guide contains additional information about choosing a rawpartition for your database device.
Other Situations to Avoid
Do not let multiple Adaptive Server devices or mirrors usethe same partition. Make a list of all partitions used by allAdaptive Servers on the machine and look for duplicates. The$SYBASE/install/RUN_SERVERNAME (or equivalent) file contains themaster device name. Use the stored procedure sp_helpdevice in eachAdaptive Server to find all the database devices and mirrors in use bythat Adaptive Server.
Having two or more Adaptive Servers on the same machine with twoor more Sybase System Administrators increases the likelihood of thisproblem. Any process logged in as “sybase” can write to that partitionsince the user “sybase” owns it. To minimize the risk, keep a log of all thepartitions in use by UNIX and by Adaptive Server. Establish proceduresfor updating the log when any configuration changes are made.
As an extra security check, make sure that the permissions for the deviceare read and write only by the “sybase” user. Then, if another userattempts to write anything to that partition, no damage will occur.
How to Move a Sybase Device or Database With DiskMirroringAlthough the primary purpose of disk mirroring is to expedite recovery, itcan also be used to move a Sybase device.
The commands in this example move devices from disk1 and disk2 to disk3and disk4:
1> disk mirror name = "disk1",2> mirror = "/usr/u/sybase/disk3"3> go
1> disk mirror name = "disk2",2> mirror = "/usr/u/sybase/disk4"3> go
102
Other Useful Tasks
1> disk unmirror name = "disk1",2> side = primary, mode = remove3> go
1> disk unmirror name = "disk2",2> side = primary, mode = remove3> go
To move a database to new devices using this procedure, move all thedevices on which the database resides.
WARNING! This procedure will partially or fully move any other databases thatreside on the target devices.
For more information on disk mirroring, refer to “Mirroring DatabaseDevices” in the System Administration Guide.
How to Gather Information About Read/Write ErrorsThe commands to create a procedure called sp_diskblock, which translatesa Sybase virtual disk and block number into the corresponding Sybasedevice, database, and logical page number, are shown below. Usesp_diskblock to gather information about read or write errors that AdaptiveServer might encounter. Refer to Read/Write Error for more information.
sp_diskblock collects information from the system tables of theAdaptive Server on which it is executed; therefore, you must execute it onthe Adaptive Server that has the read/write error.
WARNING! The sp_diskblock stored procedure is provided for your information—it isnot supported at this time.
Before You Create and Execute sp_diskblock
Before creating and executing sp_diskblock, note the following:
• Create sp_diskblock in the sybsystemprocs database.
• If you change the name of the procedure, make sure the new procedurename begins with “sp_”.
• Review the Transact-SQL User's Guide explanation of how to createand execute stored procedures.
103

Chapter 2 Encyclopedia of Tasks
Syntax
sp_diskblock virtual_disk , block_number
Sample
1> sp_diskblock 4, 8712> go
Virtual disk 4, block 871 corresponds to:Logical page 1895 in the "production" database(dbid=4) on device "main".
Stored Procedure Code
CREATE PROC sp_diskblock @disk int, @block int ASDECLARE @low int,
@dname varchar(30),@msg varchar(90),@lpage int,@dbid int,@segmap int
SELECT @low = low, @dname = nameFROM master.dbo.sysdevices WHERE low/16777216 = @disk
and cntrltype = 0IF ( @low IS NULL )
BEGINSELECT @msg = 'Virtual
device ' + CONVERT(varchar, @disk)+ ' does not exist on this server.'
PRINT @msgRETURN (1)
ENDELSE
BEGINSELECT @lpage = lstart
+ @block + @low - vstart,@dbid = dbid, @segmap = segmap
FROM master.dbo.sysusages WHERE(@block + @low)>= vstartAND (@block + @low) <= (vstart + size)
IF ( @dbid IS NULL )BEGIN
SELECT @msg = 'Block ' + CONVERT(varchar, @block)+' on disk "' + @dname+ '" is currently not in use for any database.'
PRINT @msgRETURN (1)
END
104

Other Useful Tasks
ELSEBEGIN
SELECT @msg = "Virtual disk" + convert(varchar,@disk)+ ", block " + convert(varchar,@block)+ " corresponds to:"
PRINT @msgSELECT @msg ='Logical page ' + convert(varchar,@lpage)
+ ' in the "' + DB_NAME(@dbid)+ '" database (dbid=' + convert(varchar(3),@dbid)+ ') on device "' + @dname + '".'
PRINT @msgEND
ENDRETURN (0)
How to Mark a Database “suspect'”The commands to create a procedure called sp_marksuspect, which turns onthe suspect status bit on the specified database, are described in the storedprocedure code below.
Use sp_marksuspect to prepare a damaged database that is to be droppedwith dbcc dbrepair.
WARNING! The sp_marksuspect stored procedure is provided for your information—itis not supported at this time.
Before You Create and Execute sp_marksuspect
Before creating and executing sp_marksuspect, note the following:
• Create sp_marksuspect in the master database.
• Since this procedure modifies the system catalog, you must enableupdates to the catalog before executing the procedure. Use theprocedure below to enable updates:
1> use master2> go
1> sp_configure "allow updates", 12> go
• If you change the name of the procedure, make sure the new procedurename begins with “sp_”.
105

Chapter 2 Encyclopedia of Tasks
• Review the Transact-SQL User's Guide explanation of how to createand execute stored procedures.
After You Execute sp_marksuspect
Once the procedure is created successfully, updates to the system catalogshould be immediately disabled as follows:
1> sp_configure "allow updates", 02> go
Syntax
sp_marksuspect database_name
Example
1> sp_marksuspect PRODUCTION2> go
Database 'PRODUCTION' has been marked suspect!
WARNING: This database should now be droppedvia dbcc dbrepair!
Stored Procedure Code
CREATE PROC sp_marksuspect @dbname varchar(30) ASDECLARE @msg varchar(80)IF @@trancount > 0
BEGINPRINT "Can't run sp_marksuspect from within a transaction."RETURN (1)
ENDIF suser_id() != 1
BEGINSELECT @msg = "You must be the System Administrator (SA)SELECT @msg = @msg + "to execute this procedure."PRINT @msgRETURN (1)
ENDIF (SELECT COUNT(*)
FROM master..sysdatabasesWHERE name = @dbname) != 1
BEGINSELECT @msg = "Database '" + @dbname + "' does not exist!"PRINT @msgRETURN (1)
END
106

Other Useful Tasks
IF (SELECT COUNT(*)FROM master..sysdatabases
WHERE name = @dbname and status & 320 = 320) = 1BEGIN
SELECT @msg = "Database '" + @dbname + "' "SELECT @msg = @msg + "is already marked suspect."PRINT @msgRETURN (1)
ENDBEGIN TRAN
update master..sysdatabases set status = status|320WHERE name = @dbname
IF @@error != 0 or @@rowcount != 1ROLLBACK TRAN
ELSEBEGIN
COMMIT TRANSELECT @msg = "Database '" + @dbname + "' has been marked suspect!"PRINT @msgPRINT " "SELECT @msg = "NOTE: You may now drop this database"SELECT @msg = @msg + "via dbcc dbrepair (dbname, dropdb)."PRINT @msgPRINT " "
END
How to Reset a Database's “suspect” StatusThe commands to create a procedure called sp_resetstatus, which turns offthe “suspect” flag on a database while leaving all other database optionsintact, are shown below. This is the safest method. An alternative approachusing Transact-SQL commands is also presented.
Reset a database's “suspect” status only when instructed in this manual orby Sybase Technical Support. Otherwise, you may damage your database.
WARNING! The sp_resetstatus stored procedure is provided for your information—it isnot supported at this time.
Before You Create and Execute sp_resetstatus
Before creating and executing sp_resetstatus, note the following:
• Create sp_resetstatus in the master database.
• You must have sa_role to execute this procedure.
107
Chapter 2 Encyclopedia of Tasks
• Since this procedure modifies the system catalog, you must enableupdates to the catalog before executing the procedure. Use theprocedure below to enable updates:
1> use master2> go
1> sp_configure "allow updates", 12> go
• If you change the name of the procedure, make sure the new procedurename begins with “sp_”.
• Review the Transact-SQL User's Guide explanation of how to createand execute stored procedures.
After You Execute sp_resetstatus
After successfully executing this procedure, you must do two things:
1. Immediately shut down Adaptive Server.
2. Restart Adaptive Server and immediately disable updates to the systemcatalog as follows:
1> sp_configure "allow updates", 02> go
Syntax
sp_resetstatus database_name
Example
1> sp_resetstatus PRODUCTION2> go
Database 'PRODUCTION' status reset!
WARNING: You must reboot Adaptive Server prior toaccessing this database!
Stored Procedure Code
CREATE PROC sp_resetstatus @dbname varchar(30) ASDECLARE @msg varchar(80)IF @@trancount > 0
BEGINPRINT "Can't run sp_resetstatus from within a transaction."RETURN (1)
END
108
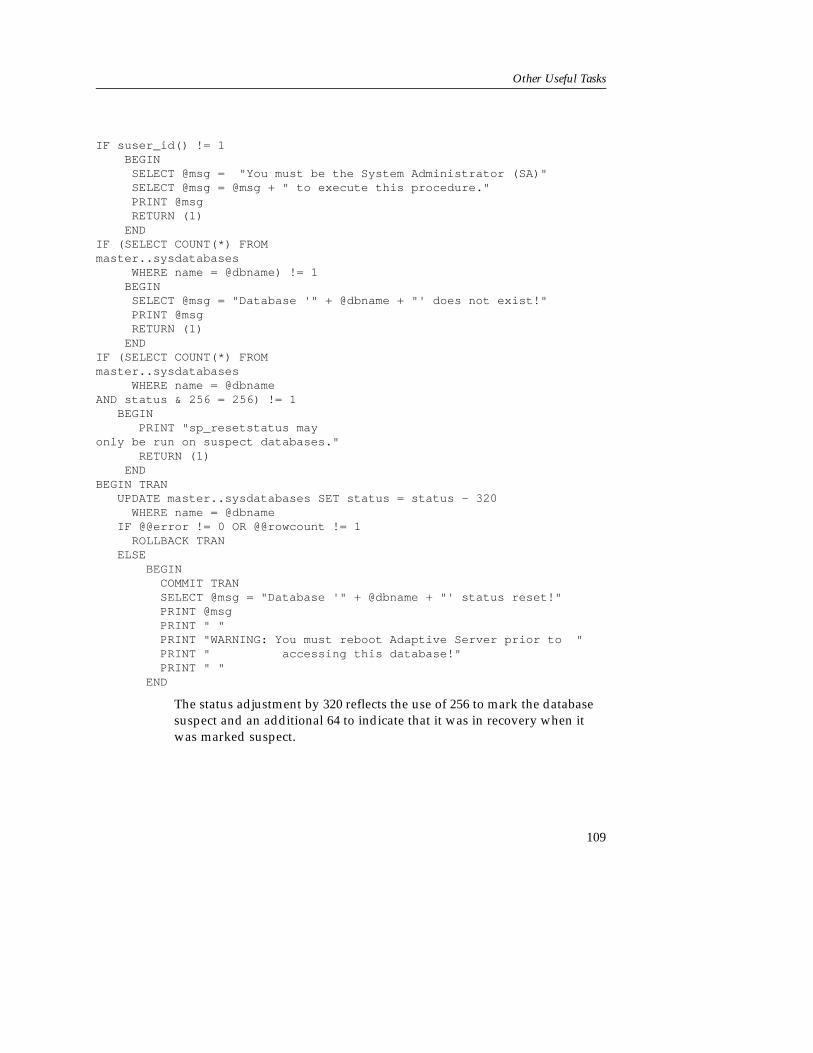
Other Useful Tasks
IF suser_id() != 1BEGIN
SELECT @msg = "You must be the System Administrator (SA)"SELECT @msg = @msg + " to execute this procedure."PRINT @msgRETURN (1)
ENDIF (SELECT COUNT(*) FROMmaster..sysdatabases
WHERE name = @dbname) != 1BEGIN
SELECT @msg = "Database '" + @dbname + "' does not exist!"PRINT @msgRETURN (1)
ENDIF (SELECT COUNT(*) FROMmaster..sysdatabases
WHERE name = @dbnameAND status & 256 = 256) != 1
BEGINPRINT "sp_resetstatus may
only be run on suspect databases."RETURN (1)
ENDBEGIN TRAN
UPDATE master..sysdatabases SET status = status - 320WHERE name = @dbname
IF @@error != 0 OR @@rowcount != 1ROLLBACK TRAN
ELSEBEGIN
COMMIT TRANSELECT @msg = "Database '" + @dbname + "' status reset!"PRINT @msgPRINT " "PRINT "WARNING: You must reboot Adaptive Server prior to "PRINT " accessing this database!"PRINT " "
END
The status adjustment by 320 reflects the use of 256 to mark the databasesuspect and an additional 64 to indicate that it was in recovery when itwas marked suspect.
109
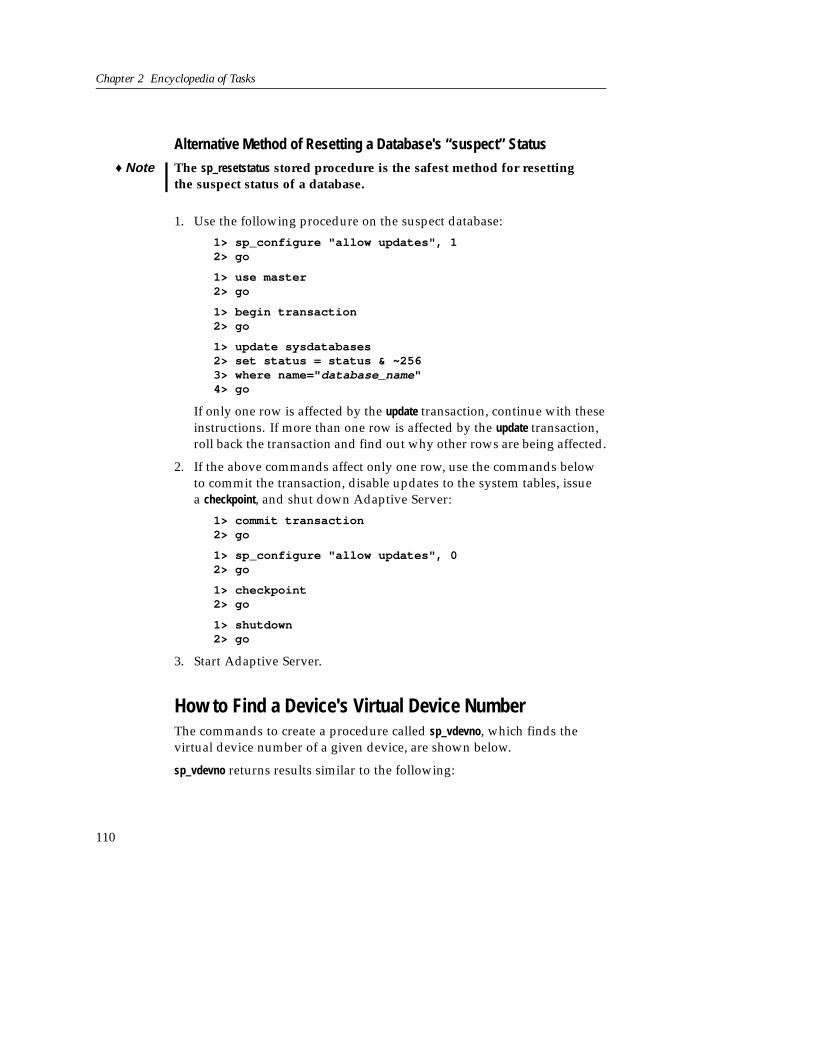
Chapter 2 Encyclopedia of Tasks
Alternative Method of Resetting a Database's “suspect” Status
♦Note The sp_resetstatus stored procedure is the safest method for resettingthe suspect status of a database.
1. Use the following procedure on the suspect database:
1> sp_configure "allow updates", 12> go
1> use master2> go
1> begin transaction2> go
1> update sysdatabases2> set status = status & ~2563> where name=" database_name "4> go
If only one row is affected by the update transaction, continue with theseinstructions. If more than one row is affected by the update transaction,roll back the transaction and find out why other rows are being affected.
2. If the above commands affect only one row, use the commands belowto commit the transaction, disable updates to the system tables, issuea checkpoint, and shut down Adaptive Server:
1> commit transaction2> go
1> sp_configure "allow updates", 02> go
1> checkpoint2> go
1> shutdown2> go
3. Start Adaptive Server.
How to Find a Device's Virtual Device NumberThe commands to create a procedure called sp_vdevno, which finds thevirtual device number of a given device, are shown below.
sp_vdevno returns results similar to the following:
110

Other Useful Tasks
1> sp_vdevno2> go
vdevno name status---------- ---–------- ------
0 master 24 user_disk4 3
WARNING! The sp_vdevno stored procedure is provided for your information—it isnot supported at this time.
The sp_helpdevice stored procedure reports similar information.
Before You Create and Execute sp_vdevno
Before creating and executing sp_vdevno, note the following:
• Create sp_vdevno in the master database.
• If you change the name of the procedure, make sure the new procedurename begins with “sp_”.
• Review the Transact-SQL User's Guide explanation of how to createand execute stored procedures.
Stored Procedure Code
CREATE PROC sp_vdevno ASSELECT vdevno = low/power(2,24), name, status from master..sysdeviceswhere cntrltype = 0
How to Detect and Clear Long-Running TransactionsA single, long-running transaction can prevent the log from beingtruncated. This occurs because Adaptive Server only dumps the inactiveportion of a transaction log. It is important to detect the presence of thesetransactions and act accordingly. Otherwise, the transaction log eventuallyfills up, even if dump transaction commands are executed.
Causes of Long-Running Transactions
Some of the causes for a long-running transaction include:
• An incorrectly written update, insert, or delete statement that runs formany hours. Commands that create cartesian products or include userinput are common mistakes in coding.
111

Chapter 2 Encyclopedia of Tasks
• An application error that starts a transaction but never completes it.
Detecting Long-Running Transactions
The syslogshold table in the master database contains information abouteach database's oldest active transaction (if any) and Replication Servertruncation point (if any) for the transaction log. This table is builtdynamically when you query it.
Check syslogshold for old transactions for the database for which the erroroccurred:
1> use master2> go
1> select * from syslogshold2> where dbid = database_ID3> go
Determine whether the oldest active transaction can be terminated; it mayhave been left inactive intentionally. Continue this procedure until thereare no other old transactions that can be terminated.
For more information about the syslogshold table, refer to “Backing Up andRestoring User Databases” in the System Administration Guide.
Clearing Long-Running Transactions
You can clear a long-running transaction in one of two ways:
1. Using the Transact-SQL kill command.
2. Restarting Adaptive Server.
If the long-running transaction is due to a runaway query, and the processwith the open transaction has been identified, use the kill command to stopthe process. This clears the transaction and allows the log to be truncated.If the kill command cannot stop the process, restart Adaptive Server toresolve the problem.
Restarting Adaptive Server causes the database to go through normalrecovery, so any outstanding transactions are either committed or rolledback.
If this type of problem occurs frequently, Sybase Technical Support may beable to identify which process is involved.
112
Other Useful Tasks
How to Reduce the Size of tempdbThe tempdb (temporary) database provides storage for temporary tablesand other temporary working storage needs. If you have a corrupted diskthat contains portions of tempdb, you should first reduce tempdb to itsdefault size and then extend it onto any new device.
This section describes how to reduce tempdb to its default size (2MB ofdata and log on the master device).
Reset tempdb to Default Size
Before proceeding, start Adaptive Server in single-user mode to preventanother user from altering the database while you are manually updatingsysusages. Refer to “How to Start Adaptive Server in Single-User Mode” forinstructions on doing this.
1. Log into Adaptive Server as the System Administrator:
% isql -Usa -S server_name -P password
2. Dump the master database in case something goes wrong and youneed to restore from the backup:
1> dump database master2> to " dump_device "3> go
where dump_device is the name of the target dump device.
3. Save the following key system tables to data files with the bcp..outcommand, to aid in master database recovery if necessary:
– master..sysusages
– master..sysdevices
– master..sysdatabases
– master..syslogins
– master..sysconfigures
– master..syscharsets
The syntax for saving the tables to files appears in “Copy the SystemTables to Files” in “System Database Recovery”.
113

Chapter 2 Encyclopedia of Tasks
WARNING! This procedure should be used only on tempdb. It works because tempdbis rebuilt each time the system is shut down and restarted. Using thisprocedure on any other database will result in database corruption.
4. Reconfigure Adaptive Server to allow changes to the system catalog:
1> use master2> go
1> sp_configure "allow updates", 12> go
5. Display the current rows belonging to tempdb from sysusages, and notethe number of rows affected:
1> begin transaction2> go
1> select * from sysusages2> where dbid = db_id('tempdb')3> go
The db_id function returns the database ID number. In this case, thedatabase ID for tempdb is returned.
6. Set the first 2MB of tempdb back to data and log in case they wereseparated:
1> update sysusages2> set segmap = 7 where dbid = db_id('tempdb')3> and lstart = 04> go
7. Delete all other rows belonging to tempdb from sysusages.The numberof rows affected should be one less than the number of rows affectedby the previous select command.
1> delete sysusages where dbid = db_id('tempdb')2> and lstart != 03> go
WARNING! Each time Adaptive Server is shut down and restarted, the modeldatabase is copied to tempdb. Therefore, if the model database has beenincreased beyond its default size, do not reduce the size of tempdb sothat it is smaller than model.
8. Verify that tempdb has one entry that looks like this:
114

Other Useful Tasks
1> select * from sysusages2> where dbid = db_id('tempdb')
dbid segmap lstart size vstart--— ------ ----— ---- ------2 7 0 1024 2564
9. If the information is correct, go to step 10 to commit the transaction.
If you see a problem, back out of your changes by entering thefollowing commands:
1> rollback transaction2> go
Do not continue with the procedure. Review the steps you performedto determine the cause of the problem.
10. Complete the transaction:
1> commit transaction2> go
11. Reconfigure Adaptive Server to disallow changes to the system catalog(the normal state for Adaptive Server):
1> sp_configure "allow updates", 02> go
12. Immediately issue a checkpoint and shut down Adaptive Server:
WARNING! You must shut down Adaptive Server before altering the size of tempdbagain. If you continue to run without shutting down and restarting, youwill receive serious errors on tempdb.
1> checkpoint2> go
1> shutdown2> go
13. Restart Adaptive Server.
Verify and Alter tempdb on Desired Devices
Verify that tempdb has been correctly reset, and alter the database asrequired to include any additional devices:
1. Log into Adaptive Server as the System Administrator:
115
Chapter 2 Encyclopedia of Tasks
% isql -Usa -S server_name -P password
2. Verify that tempdb has one 2MB fragment for data and log on themaster device:
1> sp_helpdb tempdb2> go
3. Alter tempdb as required to extend the database onto the desireddevices. For example:
1> alter database tempdb2> on device_name = device_size3> go
♦Note device_size is specified in megabytes.
4. Back up the master database again, in case you need to restore fromthis point:
1> dump database master to " dump_device "2> go
where dump_device is the name of the target dump device.
You can use sp_logdevice to place the transaction log on another device. Thefirst 2MB of tempdb must remain on the master device, but future log spaceallocations will be made on the device specified by sp_logdevice.
How to Remap All Objects in a Database♦Note This section is relevant if you are upgrading from SQL Server 4.2 or SQL
Server 4.9.x to SQL Server 11.0.x, or from SQL Server 4.9.2 to AdaptiveServer 11.5.
If the query remapping phase fails while you are upgrading your AdaptiveServer, the query trees for your stored procedures are out of date and youhave to remap them. You know the remapping phase has failed if thefollowing message is written to the upgrade log created by sybinit:
Terminating remapping of query trees due toerror_number errors in database database_name .
You encounter Error 2835 if you try to run a stored procedure whose querytree is out of date.
116

Other Useful Tasks
This section explains how to remap all objects in a database. These objectsinclude stored procedures, triggers, rules, defaults, and views.
If you want to remap a single object use the sp_remap command, asdocumented in “sp_remap” in the Adaptive Server Reference Manual.
Remapping is a two-step procedure:
1. Run remap_all_script, which is listed below, in a Transact-SQL sessionand save the output in a file, remapall.out, by issuing this command atyour operating system prompt:
% isql -Usa -P < remap_all_script > remapall.out
The file remapall.out contains all objects that need to be remapped.
2. Run this command at your operating system prompt:
% isql -Usa -P < remapall.out
The Remapping Script
/** This is remap_all_script.***
*/
set nocount ongo/*
* Fill in your database name for database_name throughout this script*/
use database_namegoprint 'use database_name 'print 'go'goprint 'dump transaction database_name
with truncate_only'print 'go'go
declare prep_remp_csr cursor forselect convert(varchar(30), id) from sysobjectswhere type = 'V' or type = 'P' or type = 'R'
117

Chapter 2 Encyclopedia of Tasks
or type = 'D' or type = 'TR'godeclare @pid varchar(30)declare @cnt intselect @cnt = 0open prep_remp_csrfetch prep_remp_csr into @pidwhile(@@sqlstatus = 0)
beginprint "dbcc remap ( %1!, database_name ,1)" , @pidprint "go"if (@cnt < 3)
beginselect @cnt = @cnt + 1
endelse
beginselect @cnt = 0print "dump transaction
database_name with truncate_only"print "go"
endfetch prep_remp_csr into @pid
end
close prep_remp_csrdeallocate cursor prep_remp_csrgo
How to Prepare for Analyzing an Optimizer ProblemThis section describes the information you should gather before youanalyze or call Technical Support for help in analyzing an Adaptive Serveroptimizer problem. It is divided into these sections:
• Steps to Take Before Analysis
• Terminology
• How to gather the information
• Understanding the information you have gathered
Have this information on hand if you decide to seek help from TechnicalSupport.
118

Other Useful Tasks
WARNING! Query performance is a complex area of Sybase technology. Do not usethe procedure in this section unless you have attended ProfessionalServices' Performance and Tuning class and have found a specific querythat requires Technical Support analysis.
Steps to Take Before Analysis
Take the following steps first:
1. Run update statistics to see if performance improves.
2. If the problem appeared following an upgrade, drop and recreate theprocedure to see if performance improves.
3. For a new query, verify there are no parameter search argument(SARG) mismatches.
4. Proceed with analysis if these steps do not help.
One or more of the following may indicate that your problem is related tothe optimizer:
• A new query is not using the expected indexes
• Forcing an index or join order (using forceplan) improves performance
• You experience drastic performance differences between releases
Terminology
The following terms are used in this section:
• query – any Adaptive statement, such as a batch query, the Adaptivecontent of a stored procedure or trigger, or the Adaptive that is used inthe creation of a view (view definition).
• SARG – the search argument that qualifies the search required to runthe query. Here is an example:
select * from table where col=1
• join clause – the clause that joins tables. Here is an example:
select * from tableA, tableB where tableA.col = tableB.col
How to Gather the Information
Gathering information for solving an optimizer problem is a multi-stepprocedure, involving three distinct Transact-SQL sessions. You will save
119
Chapter 2 Encyclopedia of Tasks
each session's output to a file. You can then examine the informationin these files, or make the files available to the Technical Supportrepresentative assisting you.
Steps for Gathering the InformationHere are the steps for gathering the information:
1. Save the text of the Transact-SQL query that provoked the optimizerproblem to a file called query_text.
2. Create an input file, input_file1, that contains the followingTransact-SQL:
1> use database_name2> go
1> update statistics table_name2> go
1> sp_help table_name2> go
In the update statistics portion of this Transact-SQL code, database_nameis the name of the database containing table_name, the relevant table.Using the table name will update statistics for all indexes on the table.
If there is more than one table involved in the optimizer problem, runthe input_file1 script once and name each file according to its table name.
3. Run input_file1 through isql, saving the results of the commands ininput_file1 to output_file1:
% isql -Usa -P < input_file1 > output_file1
Set output_file1 aside.
4. Create a second input file, input_file2, that contains the followingTransact-SQL:
1> use database_name2> go
1> set showplan on2> go
1> set statistics io on2> go
1> set statistics time on2> go
120
Other Useful Tasks
1> dbcc traceon(3604)2> go
1> dbcc traceon(302)2> go
1> dbcc traceon(310)2> go
... contents of query_text
♦Note You must have “sa_role” to run dbcc traceon(302) and dbcc traceon(310).
At the end of input_file2, include the contents of query_text, the file youcreated in step 1, which includes the Transact-SQL code that provokedthe optimizer problem.
5. Run input_file2 through isql, saving the results of the commands ininput_file2 to output_file2:
% isql -Usa -P < input_file2 > output_file2
Set output_file2 aside.
The Files the Steps Have CreatedYou should now have the following text files:
File name Contains
query_text The text of the Transact-SQL query, storedprocedure, trigger, or view definition thatprovoked your optimizer problem.
output_file1 The results of running sp_help on the table(s)implicated in the optimizer problem.
output_file2 The results of running set showplan on, set statisticsio on, set statistics time on, dbcc traceon (302), dbcctraceon (310), and the Transact-SQL query thatprovoked the optimizer problem.
Understanding the Information You Have Gathered
You have taken a number of steps to get information about your optimizerproblem. Here is an explanation of each of these steps:
121

Chapter 2 Encyclopedia of Tasks
update statisticsThe update statistics command updates all statistics on the distributionpage for all indexes. Running update statistics for each table, rather thanfor individual indexes, ensures that all statistics for all indexes on thetable(s) are current.
It is advisable to run update statistics as part of your regular databasemaintenance. Although running update statistics may be time-consuming, itis critical for an accurate analysis of your query. Without accurate statisticson the distribution page the optimizer will never have an accurate pictureof the index; it may overlook a useful index in favor of a less efficient one.
The rule of thumb is to run update statistics whenever approximately5 to 10 percent of the data in a table has changed, via insert, update, or deletecommands.
WARNING! Do not interrupt update statistics. If Adaptive Server failure occurs, rerunafter the server is restarted.
sp_helpsp_help provides more accurate information about a table than the scriptyou used to create the table and its indexes. In the event that indexes havebeen added or changed or that columns have been added via alter table,sp_help will show the present state of the table(s) involved.
set showplan onThe set showplan on command shows which query plan the optimizer haschosen for your query. Use set showplan on before running any query orprocedure you will be analyzing. In some cases you may need to issue theset noexec on command to save time when you are running a very longquery. However, if noexec is set, no set statistics output will be returned. Thiscan make analysis very difficult, if not impossible.
Refer to the chapter on query plans in the Performance and Tuning Guide formore information on interpreting showplan results.
There are several important pieces of information to look for when readingshowplan output:
• Index utilization
Was an index used? Which one? Was a table scan done?
122

Other Useful Tasks
• The order of tables in a join, also known as join order
Knowing the order that the optimizer chose for joins is critical to youranalysis. Tables are listed in the showplan output in the order in whichthey are joined.
set statistics io onSince any analysis of a performance problem will require knowledge ofthe number and types of I/Os performed for the query, the set statistics ioon command is critical. The set statistics io on command provides you withthe following information:
• Physical reads
This is the number of times Adaptive Server reads a page from disk.The first time a query is run, the number of physical reads will generallybe high. This happens because the required pages are not usually incache. Subsequent runs of the query can access the pages in cache, andphysical reads are minimized, if not avoided. If the number of physicalreads remains high during subsequent executions of a query, you willneed to take a close look at how the query executes.
In some instances, the size of the data cache may also be a problem. If itis too small, pages have to be read from disk more often.
If you recently upgraded to Adaptive Server version 11.0 and arenoticing significant performance degradation, determine whether thedata cache has shrunk in size. If it has, increase it back to its pre-11.0size.
• Logical reads
Logical reads are a combination of physical reads and “cachehits”—reads from pages in cache. If your statistics show a number oflogical reads and no physical reads, it means that all required pagesare in cache, which is the ideal situation. To determine the number ofcache hits, subtract the number of physical reads from the number oflogical reads.
• Scan count
This is the number of times the table was read (either via a table scan oran index) in order to find rows to satisfy the query or join. In nearlyall simple single table queries, the scan count will be 1. When an ORclause is present there will be one scan count for each OR in the query.In the case of a join, the scan count can be crucial.
123
Chapter 2 Encyclopedia of Tasks
If a bad join order has been chosen by the optimizer, you are likely tosee a very high number of scan counts on a large table, causing a veryhigh number of logical reads. However, a high scan count on a smalltable is preferable to a moderate scan count on a large table. Althoughthe scan count of the small table is high the logical reads are low. A1000-scan count for a 1-page table is better than a 100-scan count ofa 1000-page table.
The following example demonstrates how join order and scan countaffect the number of reads:
Table A has 1 page and 10 rows that qualify for the join. Table B has1000 pages and 10 rows that qualify for the join.
If Table B is the outer table of the join Adaptive Server will only needto read through it once in order to find all qualifying rows. The singlescan totals 1000 reads. Adaptive Server then reads Table A for eachqualifying row found in B. The single page in A is scanned 10 times,equaling 10 reads, with a total of 1010 reads for the query. If A werethe outer table Adaptive Server would have to read B once for each ofthe ten qualifying rows on A: 1000 pages multiplied by 10 scans equals10,000 reads.
This example assumes that there is no useful index available.
• Total writes for this command
This is the total number of writes Adaptive Server did for the query.This count includes inserts, updates and deletes on user tables,temporary tables and work tables. Even queries that do not includedata manipulation statements may require writes to work tables ortemporary tables, which are counted here.
set statistics time onset statistics time on provides the following information:
• Adaptive Server elapsed time
This is the total accumulated elapsed time that is recorded for the queryor command. This can seem long if, for example, a query was blockedby a lock, network traffic or other resource contention. The time thequery must wait for the blockage to clear is added to the elapsed time.
• Adaptive Server CPU time
124
Other Useful Tasks
This is the amount of time for which the query had exclusive use of theCPU. It reflects the time taken to parse, compile, and execute the query.Functions add to the CPU time. For example, a convert statement willincrease the CPU time slightly. Also, compute-intensive queries andqueries that perform a large amount of I/O take more CPU time.
The output of set statistics time on may be useful, but it is not usually asignificant factor in most optimizer analyses.
dbcc traceon (3604)This trace flag sends the output of dbcc traceon (302) and dbcc traceon (310) tothe screen.
dbcc traceon (302)This trace flag returns the optimizer's cost estimates for each SARG andjoin clause in the query. Trace flag 302 is documented in greater detail inthe chapter on advanced optimizing techniques in the Performance andTuning Guide.
Here is the information to watch for in dbcc traceon (302) output:
• All SARGs and join clauses in the query should be shown in theoptimizer's cost estimates. If not, determine why.
• Check that row and page counts are accurate.
If you think that the row counts are off, run select count(*) from the tablein question. If page counts appear to be off, run dbcc tablealloc to get thecount of used pages, including index pages.
• The optimizer reads row/page counts from the Object AllocationMap (OAM) page. To ensure that the OAM page is updated, run dbcctablealloc on the table and rerun the query that provoked the optimizerproblem. Making sure the counts are right is particularly importantin very large databases (VLDBs).
dbcc traceon (310)dbcc traceon (310) gives the optimizer cost estimates for all permutations of ajoin or joins. Examine the dbcc traceon (310) output to determine whetherthe query is “connected.” If so, it indicates that the join will not result in acartesian product. The statement “query is connected” will appear beforethe optimizer has performed cost estimates on all possible indexes, asindicated in the output of dbcc traceon (302) .
125

Chapter 2 Encyclopedia of Tasks
How to Determine Which Physical Devices a Databaseis OnUse the following steps to find the physical devices on which a databaseresides:
1. Find the dbid of the database in sysdatabases.
2. For that dbid, select from sysusages to list all of the device fragmentsbelonging to that database.
3. Using sysdevices, determine which device has a low through high virtualpage range that includes the vstarts from step 2. The device fragmentwhose vstart you used is on that device.
How to Identify and Fix a Corrupted Table♦Note This task should only be used to correct specific errors as directed in
Chapter 3
1. Use the procedure in “How to Find an Object Name from a PageNumber” to identify which table and/or index correspond to the pagenumber in the error message text.
2. If the object with the error is not a system table (a system table's objectID is less than 100), continue with step 3.
If the object with the error is a system table and the index ID is not0, refer to “How to Fix a Corrupted Index on System Tables” forinstructions on how to repair the system table index.
If the index ID is 0, contact Sybase Technical Support. They may be ableto help you repair the corruption but it may be necessary to restorefrom clean backups.
3. For user tables, if the index ID is 0 or 255, continue with step 4.
If the index ID is not 0 or 255, first run dbcc checktable to verify that thedata is good. Next, translate the index ID into an index name:
1> use database_name2> go
1> select name from sysindexes2> where id = object_ID and indid = index_ID3> go
126
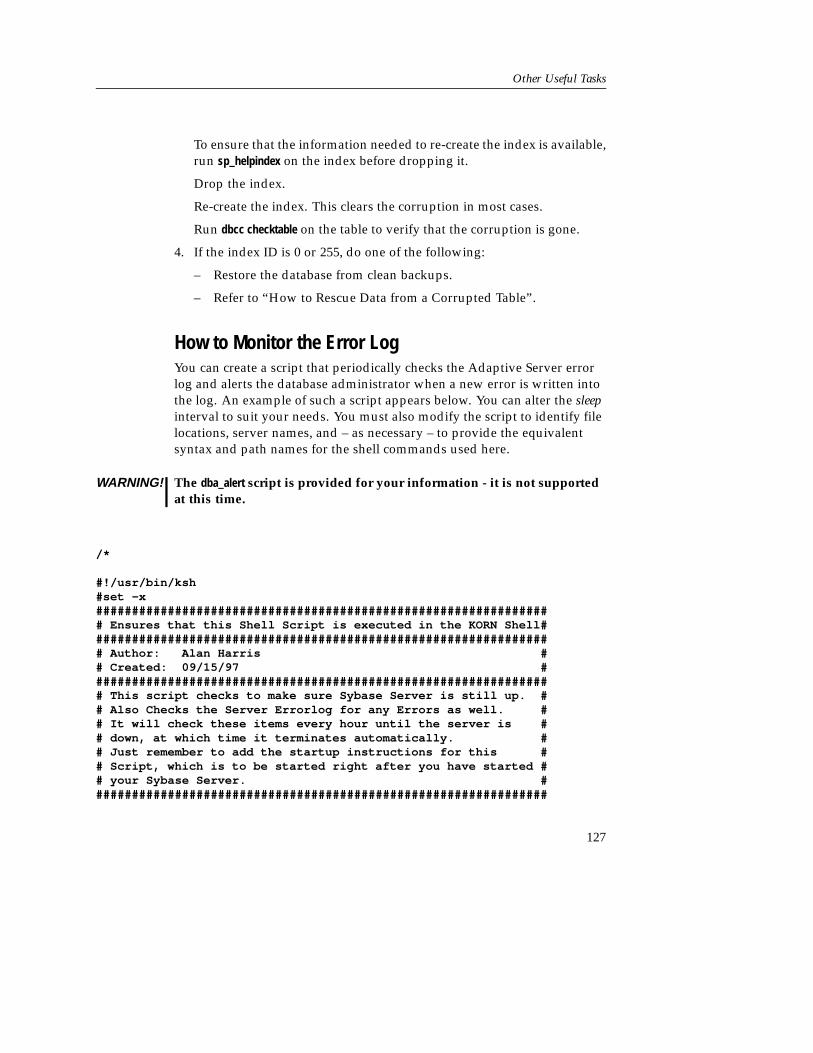
Other Useful Tasks
To ensure that the information needed to re-create the index is available,run sp_helpindex on the index before dropping it.
Drop the index.
Re-create the index. This clears the corruption in most cases.
Run dbcc checktable on the table to verify that the corruption is gone.
4. If the index ID is 0 or 255, do one of the following:
– Restore the database from clean backups.
– Refer to “How to Rescue Data from a Corrupted Table”.
How to Monitor the Error LogYou can create a script that periodically checks the Adaptive Server errorlog and alerts the database administrator when a new error is written intothe log. An example of such a script appears below. You can alter the sleepinterval to suit your needs. You must also modify the script to identify filelocations, server names, and – as necessary – to provide the equivalentsyntax and path names for the shell commands used here.
WARNING! The dba_alert script is provided for your information - it is not supportedat this time.
/*
#!/usr/bin/ksh#set -x################################################################ Ensures that this Shell Script is executed in the KORN Shell################################################################# Author: Alan Harris ## Created: 09/15/97 ################################################################# This script checks to make sure Sybase Server is still up. ## Also Checks the Server Errorlog for any Errors as well. ## It will check these items every hour until the server is ## down, at which time it terminates automatically. ## Just remember to add the startup instructions for this ## Script, which is to be started right after you have started ## your Sybase Server. ################################################################
127

Chapter 2 Encyclopedia of Tasks
# Notes on what to change so this script will work for you... ##-------------------------------------------------------------## Check location of Errorlog and where you want the work ## and .msg files to be created. ## Change all "plsql1" & "PLSQL1" to be your Sybase Server ## Name so that you can make a copy of this script for ## each of you Sybase Servers. ## Enter E-mail Addresses where noted below inside << >> ## ################################################################
ERRORLOG=/usr/u/sybase/install/errorlogDIFF_ERRORLOG=/usr/u/sybase/logs/errorlog.plsql1.diffPRIOR_ERRORLOG=/usr/u/sybase/logs/errorlog.plsql1.priorTAIL_ERRORLOG=/usr/u/sybase/logs/errorlog.plsql1.tailINTERNET_ID=<<Your E-mail Address>>INTERNET_ID_BKUP=<<Your Backup's E-mail Address>>INTERNET_OPS_STAFF=<<Your Operations Staff E-mail Address>>LOGS=/usr/u/sybase/logsMSG=/usr/u/sybase/logsMSG_ERRORLOG=/usr/u/sybase/logs/errorlog_error_mail_plsql1.msgMSG_SERVER=/usr/u/sybase/logs/server_down_mail_plsql1.msgMSG_SERVER_OPS=/usr/u/sybase/logs/server_down_OPS_mail_plsql1.msgDSQUERY=PLSQL1SYBASE=/usr/u/sybasePATH=/usr/bin:/etc:/usr/sbin:/usr/ucb:$SYBASE/bin:
$SYBASE/install:/usr/bin/X11:/sbin:.export SYBASE PATH ERRORLOG DIFF_ERRORLOG PRIOR_ERRORLOG LOGS MSGexport MSG_ERRORLOG MSG_SERVER DSQUERY
cd ${LOGS}
################################################################ While loop to do the following until Server is down! ## Checking to make sure Server is still up and Running ## Checking Server Errorlog for any Errors as well. ## Including a 60 min. sleep ################################################################
while [ 1 ]do
################################################################ Removing any previous error plsql1.msg files... ################################################################
128

Other Useful Tasks
if [ -e ${MSG_ERRORLOG} ]then
rm ${MSG_ERRORLOG}fi
if [ -e ${MSG_SERVER} ]then
rm ${MSG_SERVER}fi
if [ -e ${MSG_SERVER_OPS} ]then
rm ${MSG_SERVER_OPS}fi
################################################################ Checking SQL Server Errorlog for Errors ################################################################
################################################################ If 1st time the shell executes then search entire errorlog ## otherwise search the file containing the difference than ## the last time the errorlog was searched. ################################################################
if [ ! -e "${PRIOR_ERRORLOG}" ]then
ERRORLOG_ERROR_YN= g` rep -E "Error:|infected|WARNING:|severity|encountered"${ERRORLOG} | grep -vE "1608,|21,"
t`
ail -n 50 ${ERRORLOG}> ${PRIOR_ERRORLOG}
if [ ! -z "${ERRORLOG_ERROR_YN}"]then
print "Subject: ErrorMessages were found in ${DSQUERY}
errorlog, Check Immediately! \n " > ${MSG_ERRORLOG}print "Error Messages were found in ${ERRORLOG}, \n \n
Check immediately! \n ." >> ${MSG_ERRORLOG}grep -E "Error|infected|WARNING:|severity|encountered "
${ERRORLOG} >> ${MSG_ERRORLOG}print "\nCheck Immediately!." >> ${MSG_ERRORLOG}sendmail ${INTERNET_ID} < ${MSG_ERRORLOG}sendmail ${INTERNET_ID_BKUP} < ${MSG_ERRORLOG}sendmail SYBASE < ${MSG_ERRORLOG}
fi
129
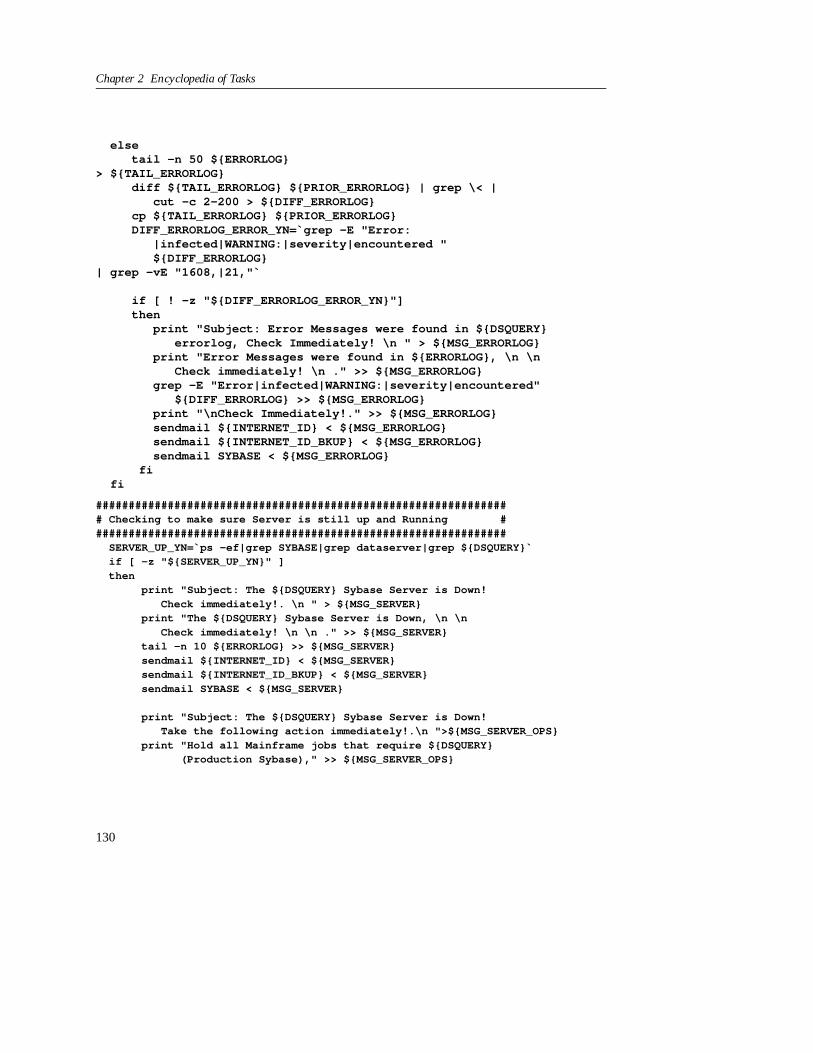
Chapter 2 Encyclopedia of Tasks
elsetail -n 50 ${ERRORLOG}
> ${TAIL_ERRORLOG}diff ${TAIL_ERRORLOG} ${PRIOR_ERRORLOG} | grep \< |
cut -c 2-200 > ${DIFF_ERRORLOG}cp ${TAIL_ERRORLOG} ${PRIOR_ERRORLOG}DIFF_ERRORLOG_ERROR_YN= g` rep -E "Error:
|infected|WARNING:|severity|encountered "${DIFF_ERRORLOG}
| grep -vE "1608,|21,"
i
`
f [ ! -z "${DIFF_ERRORLOG_ERROR_YN}"]then
print "Subject: Error Messages were found in ${DSQUERY}errorlog, Check Immediately! \n " > ${MSG_ERRORLOG}
print "Error Messages were found in ${ERRORLOG}, \n \nCheck immediately! \n ." >> ${MSG_ERRORLOG}
grep -E "Error|infected|WARNING:|severity|encountered"${DIFF_ERRORLOG} >> ${MSG_ERRORLOG}
print "\nCheck Immediately!." >> ${MSG_ERRORLOG}sendmail ${INTERNET_ID} < ${MSG_ERRORLOG}sendmail ${INTERNET_ID_BKUP} < ${MSG_ERRORLOG}sendmail SYBASE < ${MSG_ERRORLOG}
fifi
################################################################ Checking to make sure Server is still up and Running ################################################################
SERVER_UP_YN= p` s -ef|grep SYBASE|grep dataserver|grep ${DSQUERY}i
`f [ -z "${SERVER_UP_YN}" ]
thenprint "Subject: The ${DSQUERY} Sybase Server is Down!
Check immediately!. \n " > ${MSG_SERVER}print "The ${DSQUERY} Sybase Server is Down, \n \n
Check immediately! \n \n ." >> ${MSG_SERVER}tail -n 10 ${ERRORLOG} >> ${MSG_SERVER}sendmail ${INTERNET_ID} < ${MSG_SERVER}sendmail ${INTERNET_ID_BKUP} < ${MSG_SERVER}sendmail SYBASE < ${MSG_SERVER}
print "Subject: The ${DSQUERY} Sybase Server is Down!Take the following action immediately!.\n ">${MSG_SERVER_OPS}
print "Hold all Mainframe jobs that require ${DSQUERY}(Production Sybase)," >> ${MSG_SERVER_OPS}
130

Other Useful Tasks
print "until further notice. \n" >> ${MSG_SERVER_OPS}print "Refer to the Document, \"JCL and Procs Using OUTBOUND
- Group Systems Team\". " >> ${MSG_SERVER_OPS}print "This Document can be found in the OPS Procedures
Manual." >> ${MSG_SERVER_OPS}print "Hold ALL Jobs that have Sybase in the \
"Destination From/To\" column." >> ${MSG_SERVER_OPS}sendmail ${INTERNET_OPS_STAFF} < ${MSG_SERVER_OPS}sendmail SYBASE < ${MSG_SERVER_OPS}break
fisleep 3600
done
Checking the Operating System Error LogSome Adaptive Server errors, such as the 605 error, can result fromhardware failure or other problems in the Adaptive Server environment.You will probably need to examine your Operating System (OS) error logto thoroughly investigate these errors.
Location of the Operating System Error Log
The following table shows the location of the error log for your operatingsystem, and the system command, if any, that you can use to examinethe log.
♦Note For other platforms, consult your operating system documentation to findthe location of the log file. Note that not all hardware-related problems willresult in an error being written to one of the errorlog locations listed below.Check your diagnostic toolkit for additional utilities.
Table 2–4: Operating System Error Logs
Platform Log Location Notes
Digital UNIX /var/adm/messages
HP-UX /var/adm/syslog/syslog.log View directly or use thedmesg command
131
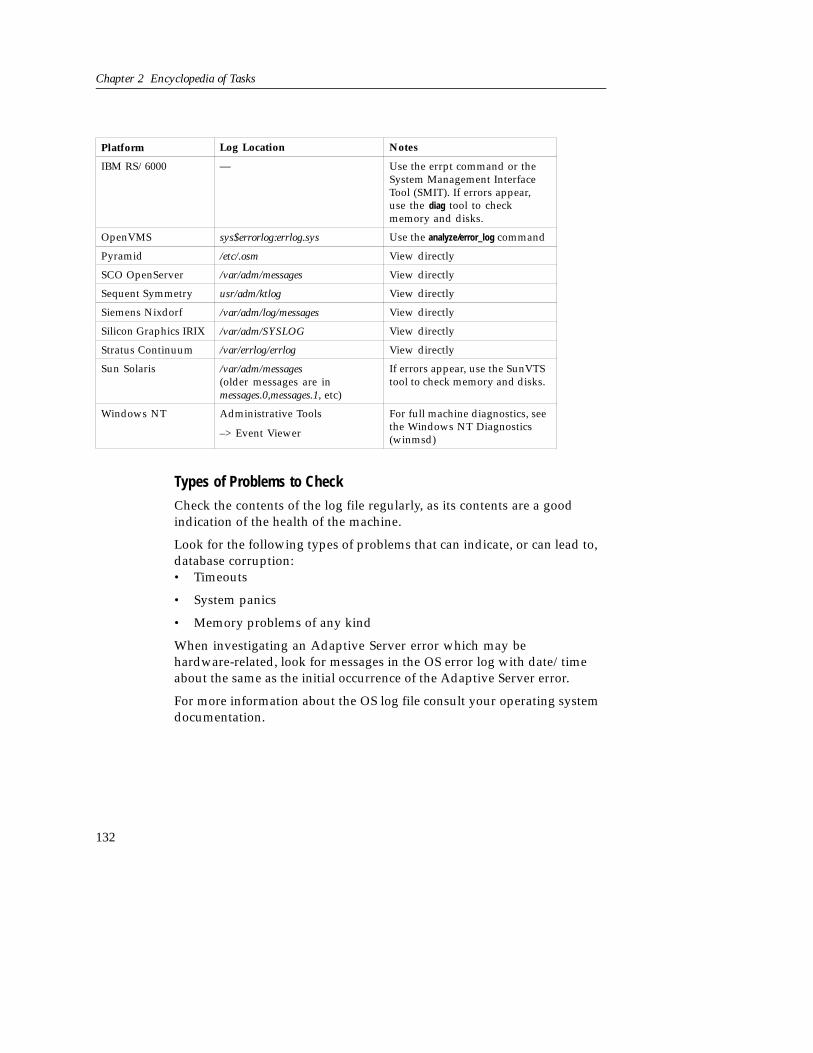
Chapter 2 Encyclopedia of Tasks
Platform Log Location Notes
IBM RS/6000 — Use the errpt command or theSystem Management InterfaceTool (SMIT). If errors appear,use the diag tool to checkmemory and disks.
OpenVMS sys$errorlog:errlog.sys Use the analyze/error_log command
Pyramid /etc/.osm View directly
SCO OpenServer /var/adm/messages View directly
Sequent Symmetry usr/adm/ktlog View directly
Siemens Nixdorf /var/adm/log/messages View directly
Silicon Graphics IRIX /var/adm/SYSLOG View directly
Stratus Continuum /var/errlog/errlog View directly
Sun Solaris /var/adm/messages(older messages are inmessages.0,messages.1, etc)
If errors appear, use the SunVTStool to check memory and disks.
Windows NT Administrative Tools
–> Event Viewer
For full machine diagnostics, seethe Windows NT Diagnostics(winmsd)
Types of Problems to Check
Check the contents of the log file regularly, as its contents are a goodindication of the health of the machine.
Look for the following types of problems that can indicate, or can lead to,database corruption:• Timeouts
• System panics
• Memory problems of any kind
When investigating an Adaptive Server error which may behardware-related, look for messages in the OS error log with date/timeabout the same as the initial occurrence of the Adaptive Server error.
For more information about the OS log file consult your operating systemdocumentation.
132

Index
911 error 87
AAdaptive Server
does not start 20–21, 29rebuilding manually 29–36resetting to default configuration 46returning to multi-user mode 41starting in single-user mode 39–41starting with trace flags 82
Allocation errorsand single-user mode 92–93detecting early 91–94explanation of 87fixing with the fix option 88–89
BBackup Server
accessing after recovery 47setting default manually in Adaptive
Server 47buildmaster 37
rebuilding Adaptive Server 29–36
Ccharacter set
how to find 68how to view existing 68–69
Comments 12–13Corrupted
index, how to fix 77–80table, rescuing data from 80–82
Corrupted indexon system tables, repairing 77–80
DDatabase
dropping when drop databasefails 86–87
matching to physical devices 126page, matching to object 95suspect, how to reload 85–86
dbccprinting output to screen 95
dbcc checkallocand single-user mode 87
dbcc checkalloc with fix optionsyntax 94–95
dbcc checkstorageanalyzing faults 73and other dbcc errors 73faults due to sp_placeobject 76
dbcc page 95default character set
changing manually 61–69Device
finding virtual device number 110lost, with pieces of tempdb 26–28moving using disk
mirroring 102–103Disaster recovery 17disk refit 43disk reinit 43drop database
failure procedure 86–87
EError 911 87Error log
monitoring 127Operating System 131script for checking 127
133

Index
HHelp 15
IIndex
corrupted, how to fix 77–80corruption 77–80finding name from object ID and index
ID 97finding name from page
number 95–97Information sources 14–15installmaster
executing 41–42installmodel
executing 41–42
LLog
suicide 54, 59Logical page number
in Adaptive Server error messages 95Logins
reestablishing 44Long-running transactions
causes of 111–112detecting and clearing 111–112
MMail address
[email protected] 12Maintenance Token 97master database
corrupt 20–21, 22loading from backup 42–43putting in single-user mode 39–41rebuilding 38–39restoring system catalogs 43–44returning to multi-user mode 41
Master devicebuilding new 37–38going bad 28restoring lost device 23–25restoring with valid dump 23–25restoring without valid dump 25–26
Mirroringusing to move a Sybase
device 102–103model database
altering 45–46installing 41–42lost or corrupted 26rebuilding 45–46
Multiuser modereturning Adaptive Server to 41
NNovell
starting Adaptive Server with traceflags 84
number of devices parameteraltering manually 45
OObject
finding name from pagenumber 95–97
object_name function 96Online Recovery 53
and Recovery Fault Isolation 54Optimizer problems
getting help with 118–125preparing for analysis of 118–125
OS/2starting Adaptive Server with trace
flags in 84–85
PPreparing for database recovery 17–19
134
Index
RRaw partitions
correct use of 99–101getting information about 101–102
Recoverypreparing for database 17–19
Recovery Fault Isolation 54advantages 57example 60implementing 58
Remapping all objects in adatabase 116–118
Restoring master device 23–25with valid dump 23–25without valid dump 25–26
Restoring system cataloginformation 43–44
Runserversample file 39
runserver filemodifying for Digital
OpenVMS 83–84modifying for UNIX 82
Sset showplan on 122–123set statistics io on 123–124set statistics time on 124–125Single-user mode
starting Adaptive Server in 39–41sort order
changing manually 61–69how to view existing 68–69
sp_addlogin 44sp_configure
devices parameter, alteringmanually 45
sp_extendsegment 62sp_help 122
sp_whooutput 97–98
Style conventions 14Suspect database
how to reload 85–86Suspect status
marking a database with 105–107resetting a database's 107–110
SYB_BACKUPmanually setting 47
SYBASE dump deviceadding 46
Syntaxdbcc checkalloc with fix option 94–95style conventions 13–14
System catalogsrestoring information in 43–44
TTable
corrupted, how to fix 126–127corrupted, rescuing data from 80–82finding name from page
number 95–97tempdb
altering 45device lost 26–28rebuilding 45reducing the size of 113–116
Trace flag302 125310 1253604 95
Trace flagshow to start Adaptive Server
with 82–85using in Novell 84using in NT 85using in OS/2 84–85
135
Index
Transact-SQLsyntax conventions 13–14
Transactions, long-runningcauses of 111–112detecting and clearing 111–112
[email protected] mail address 12
Uupdate statistics 122
Vvdevno 45Virtual device number 45
WWindows NT
starting Adaptive Server with traceflags in 85
136