vocal harmony & real-time pitch correction for ……vocal harmony & real-time pitch...
TRANSCRIPT
Owner’sManual
Vocal Harmony & Real-TimePitch Correction for Guitarists
Professional audio equipment
WARNING FOR YOUR PROTECTIONREAD THE FOLLOWING:
KEEP THESE INSTRUCTIONS
HEED ALL WARNINGS
FOLLOW ALL INSTRUCTIONS
THE APPARATUS SHALL NOT BE EXPOSED TO DRIPPING OR SPLASHING LIQUID AND NO OBJECT FILLED WITH LIQUID, SUCH AS VASES, SHALL BE PLACED ON THE APPARATUS
CLEAN ONLY WITH A DRY CLOTH.
DO NOT BLOCK ANY OF THE VENTILATION OPENINGS. INSTALL IN ACCORDANCE WITH THE MANUFACTURER’S INSTRUCTIONS.
DO NOT INSTALL NEAR ANY HEAT SOURCES SUCH AS RADIATORS, HEAT REGISTERS, STOVES, OR OTHER APPARATUS (INCLUDING AMPLIFIERS) THAT PRODUCE HEAT.
ONLY USE ATTACHMENTS/ACCESSORIES SPECIFIED BY THE MANUFACTURER.
UNPLUG THIS APPARATUS DURING LIGHTNING STORMS OR WHEN UNUSED FOR LONG PERIODS OF TIME.
Do not defeat the safety purpose of the polarized or grounding-type plug. A polarized plug has two blades with one wider than the other. A grounding type plug has two blades and a third grounding prong. The wide blade or third prong are provided for your safety. If the provided plug does not fit your outlet, consult an electrician for replacement of the obsolete outlet.
Protect the power cord from being walked on or pinched particularly at plugs, convenience receptacles, and the point where they exit from the apparatus.
Refer all servicing to to qualified service personnel. Servicing is required when the apparatus has been damaged in any way, such as power-supply cord or plug is damaged, liquid has been spilled or objects have fallen into the apparatus, the apparatus has been exposed to rain or moisture, does not operate normally, or has been dropped.
MAINS DISCONNECT: The plug shall remain readily operable. For rack-mount or installation where plug is not accessible, an all-pole mains switch with a contact separation of at least 3 mm in each pole shall be incorporated into the electrical installation of the rack or building.
If connected to 240V supply, a suitable CSA/UL certified power cord shall be used for this supply.
ELECTROMAGNETICCOMPATIBILITY
This device complies with part 15 of the FCC Rules and the Product Specifications noted on the Declaration of Conformity. Operation is subject to the following two conditions:
• this device may not cause harmful interference, and
• this device must accept any interference received, including interference that may cause undesired operation.
Operation of this unit within significant electromagnetic fields should be avoided.
• use only shielded interconnecting cables.
The symbols shown above are internationally accepted symbols that warn of potential hazards with electrical products. The lightning flash with arrowpoint in an equilateral triangle means that there are dangerous voltages present within the unit. The exclamation point in an equilateral triangle indicates that it is necessary for the user to refer to the owner’s manual.
These symbols warn that there are no user serviceable parts inside the unit. Do not open the unit. Do not attempt to service the unit yourself. Refer all servicing to qualified personnel. Opening the chassis for any reason will void the manufacturer’s warranty. Do not get the unit wet. If liquid is spilled on the unit, shut it off immediately and take it to a dealer for service. Disconnect the unit during storms to prevent damage.

If you want to dispose this product, do not mix it with general household waste. There is a separate collection system for used electronic products in accordance with legislation that requires proper treatment, recovery and recycling.
Private household in the 25 member states of the EU, in Switzerland and Norway may return their used electronic products free of charge to designated collection facilities or to a retailer (if you purchase a similar new one).
For Countries not mentioned above, please contact your local authorities for a correct method of disposal.
By doing so you will ensure that your disposed product undergoes the necessary treatment, recovery and recycling and thus prevent potential negative effects on the environment and human health.
DECLARATION OF CONFORMITY
Manufacturer’s Name: Harman Music GroupManufacturer’s Address: 8760 S. Sandy Parkway Sandy, Utah 84070, USA
declares that the product:Product name: Vocalist® Live 5 Product option: all (requires Class II power adapter that conforms to the requirements of EN60065, EN60742, or equivalent.)
conforms to the following Product Specifications:
Safety: IEC 60065 -01+Amd 1 EMC: EN 55022:2006 EN 55024:1998 FCC Part 15
Supplementary Information:
The product herewith complies with the requirements of the: Low Voltage Directive 2006/95/EC EMC Directive 2004/108/EC RoHS Directive 2002/95/EC WEEE Directive 2002/96/EC With regard to Directive 2005/32/EC and EC Regulation 1275/2008 of 17 December 2008, this product is designed, produced, and classified as Professional Audio Equipment and thus is exempt from this Directive. With regard to Directive 2005/32/EC and EC Regulation 278/2009 of 6 April 2009, this regulation applies to Class A (single output) external power supplies. The external power supply used with this product is a multi-output power supply and thus is exempt from this Directive. Roger Johnsen Vice-President of Engineering 8760 S. Sandy Parkway Sandy, Utah 84070, USA Date: September 22, 2010
European Contact: Your local DigiTech/Vocalist Sales and Service Office or Harman Music Group 8760 South Sandy Parkway Sandy, Utah 84070 USA Ph: (801) 568-8800 Fax: (801) 568-7583
WarrantyWe at DigiTech® are very proud of our products and back up each one we sell with the following warranty:
1. Please register online at digitech.com within ten days of purchase to validate this warranty. This war-ranty is valid only in the United States.
2. DigiTech warrants this product, when purchased new from an authorized U.S. DigiTech dealer and used solely within the U.S., to be free from defects in materials and workmanship under normal use and service. This warranty is valid to the original purchaser only and is non-transferable.
3. DigiTech liability under this warranty is limited to repairing or replacing defective materials that show evidence of defect, provided the product is returned to DigiTech WITH RETURN AUTHORIZATION, where all parts and labor will be covered up to a period of 1 year. A Return Authorization number may be obtained by contacting DigiTech. The company shall not be liable for any consequential damage as a result of the product’s use in any circuit or assembly.
4. Proof-of-purchase is considered to be the responsibility of the consumer. A copy of the original pur-chase receipt must be provided for any warranty service.
5. DigiTech reserves the right to make changes in design, or make additions to, or improvements upon this product without incurring any obligation to install the same on products previously manufactured.
6. The consumer forfeits the benefits of this warranty if the product’s main assembly is opened and tampered with by anyone other than a certified DigiTech technician or, if the product is used with AC voltages outside of the range suggested by the manufacturer.
7. The foregoing is in lieu of all other warranties, expressed or implied, and DigiTech neither assumes nor authorizes any person to assume any obligation or liability in connection with the sale of this product. In no event shall DigiTech or its dealers be liable for special or consequential damages or from any delay in the performance of this warranty due to causes beyond their control.
NOTE: The information contained in this manual is subject to change at any time without notification. Some information contained in this manual may also be inaccurate due to undocumented changes in the product since this version of the manual was completed. The information contained in this version of the owner’s manual supersedes all previous versions.
Technical Support & Service If you require technical support, contact DigiTech Technical Support. Be prepared to accurately describe the problem. Know the serial number of your device – this is printed on a sticker attached to the chassis. If you have not already taken the time to register your product, please do so now at digitech.com.
Before you return a product to the factory for service, we recommend you refer to this manual. Make sure you have correctly followed installation steps and operating procedures. For further technical assistance or service, please contact our Technical Support Department at (801) 566-8800 or visit digitech.com. If you need to return a product to the factory for service, you MUST first contact Technical Support to obtain a Return Authorization Number.
NO RETURNED PRODUCTS WILL BE ACCEPTED AT THE FACTORY WITHOUT A RETURN AUTHORIZATION NUMBER.
Please refer to the Warranty information, which extends to the first end-user. After expiration of the warranty, a reasonable charge will be made for parts, labor, and packing if you choose to use the factory service facility. In all cases, you are responsible for transportation charges to the factory. If the product is still under warranty, DigiTech will pay the return shipping.
Use the original packing material if it is available. Mark the package with the name of the shipper and with these words in red: DELICATE INSTRUMENT, FRAGILE! Insure the package properly. Ship prepaid, not collect. Do not ship parcel post.
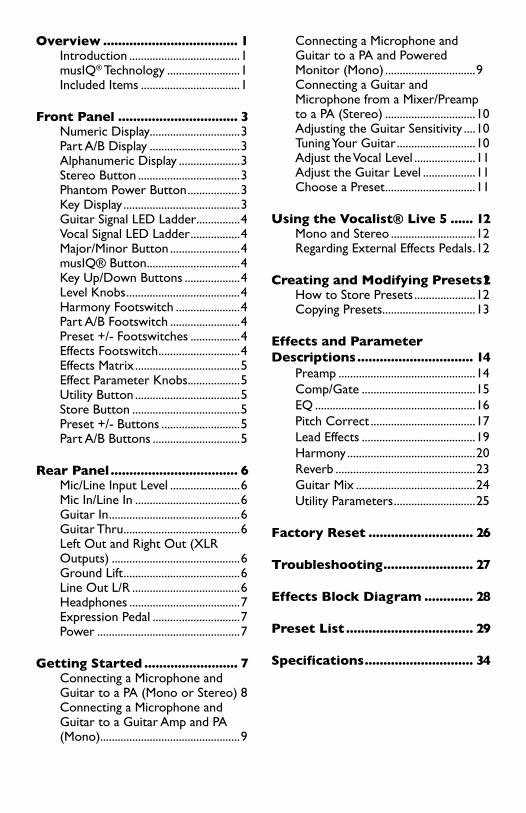
Overview .................................... 1Introduction ......................................1musIQ® Technology .........................1Included Items ..................................1
Front Panel ................................ 3Numeric Display...............................3Part A/B Display ...............................3Alphanumeric Display .....................3Stereo Button ...................................3Phantom Power Button ..................3Key Display ........................................3Guitar Signal LED Ladder ...............4Vocal Signal LED Ladder .................4Major/Minor Button ........................4musIQ® Button ................................4Key Up/Down Buttons ...................4Level Knobs .......................................4Harmony Footswitch ......................4Part A/B Footswitch ........................4Preset +/- Footswitches .................4Effects Footswitch ............................4Effects Matrix ....................................5Effect Parameter Knobs..................5Utility Button ....................................5Store Button .....................................5Preset +/- Buttons ...........................5Part A/B Buttons ..............................5
Rear Panel .................................. 6Mic/Line Input Level ........................6Mic In/Line In ....................................6Guitar In .............................................6Guitar Thru ........................................6Left Out and Right Out (XLR Outputs) ............................................6Ground Lift ........................................6Line Out L/R .....................................6Headphones ......................................7Expression Pedal ..............................7Power .................................................7
Getting Started ......................... 7Connecting a Microphone and Guitar to a PA (Mono or Stereo) 8Connecting a Microphone and Guitar to a Guitar Amp and PA (Mono)................................................9
Connecting a Microphone and Guitar to a PA and Powered Monitor (Mono) ...............................9Connecting a Guitar and Microphone from a Mixer/Preamp to a PA (Stereo) ...............................10Adjusting the Guitar Sensitivity ....10Tuning Your Guitar ...........................10Adjust the Vocal Level .....................11Adjust the Guitar Level ..................11Choose a Preset ...............................11
Using the Vocalist® Live 5 ...... 12Mono and Stereo .............................12Regarding External Effects Pedals .12
Creating and Modifying Presets 12How to Store Presets .....................12Copying Presets................................13
Effects and Parameter Descriptions ............................... 14
Preamp ...............................................14Comp/Gate .......................................15EQ .......................................................16Pitch Correct ....................................17Lead Effects .......................................19Harmony ............................................20Reverb ................................................23Guitar Mix .........................................24Utility Parameters ............................25
Factory Reset ............................ 26
Troubleshooting ........................ 27
Effects Block Diagram ............. 28
Preset List .................................. 29
Specifications ............................. 34

1
Overview
IntroductionCongratulations on your purchase of the Vocalist® Live 5. The Vocalist Live 5 is a breakthrough processor that automatically generates live multi-part vocal harmony by analyzing guitar chord progressions. Armed with patent pending musIQ® Harmony Technology (which includes both musIQ note detection and musIQ harmony generation), the Vocalist Live 5 gives you accurate vocal harmonies even with complicated songs because only Vocalist Live tracks guitar chords, along with your voice.
musIQ® TechnologymusIQ is a revolutionary technology that eliminates the need to program key and scale information to generate Harmony Voices. In real time musIQ technology analyzes the Lead Voice as well as the notes and chords played on a guitar and automatically generates accurate and musically correct vocal harmonies that both complement the Lead Voice and fit the music being played. With musIQ technology, you can focus on your singing and playing performance and eliminate song programming.
Vocalist® Live 5 Main Features• musIQ harmony technology• Up to four voices of automatic harmony with selectable voicing or a manually
selected key and scale/mode• Selection of lead voice effects (Preamp, Reverb, Echo/Delay, Compressor, EQ,
modulation and pitch effects)• Next-generation vocal pitch detection, pitch shifting, and humanization
processing.• Built-in guitar tuner• Built-in microphone preamp• Stereo XLR balanced and 1/4” unbalanced line outputs• 50 factory presets (each with a Part A and Part B) and 50 user (editable)
presets (each with a Part A and Part B)• Expression pedal input for real-time control of most performance parameters• XLR ground lift function• 1/4” Headphone output• +48V phantom power• 24-bit/44.1kHz audio quality
Included ItemsBefore you get started, please make sure that the following items have been included:
• The Vocalist Live 5• PS0913B Power Supply• This owner’s manual• Warranty Card
2
The utmost care was taken while your Vocalist® Live 5 was being manufactured. Everything should be included and in perfect working order. If anything is missing, contact the factory at once. Please help us become acquainted with you and your needs by completing your warranty card or registering online at www.vocalistpro.com. It is your safeguard should a problem arise with your Vocalist Live 5.
Important safety tip: Always turn on amplifiers AFTER all other connections are made to the Vocalist Live 5 and AFTER the Vocalist Live 5 is powered on.
3
Front Panel1 2 3 4 5 6 7 8
9
10
11
12
13141516
17
18
1920
21
22
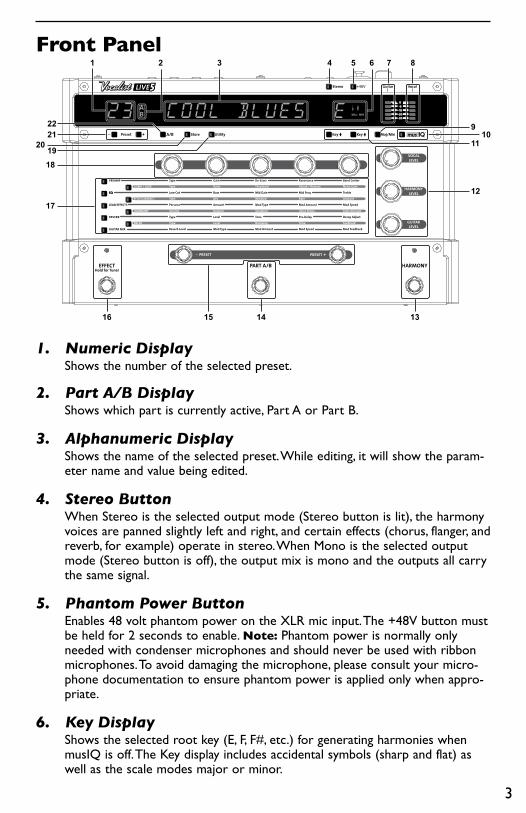
1. Numeric Display Shows the number of the selected preset.
2. Part A/B DisplayShows which part is currently active, Part A or Part B.
3. Alphanumeric DisplayShows the name of the selected preset. While editing, it will show the param-eter name and value being edited.
4. Stereo ButtonWhen Stereo is the selected output mode (Stereo button is lit), the harmony voices are panned slightly left and right, and certain effects (chorus, flanger, and reverb, for example) operate in stereo. When Mono is the selected output mode (Stereo button is off), the output mix is mono and the outputs all carry the same signal.
5. Phantom Power ButtonEnables 48 volt phantom power on the XLR mic input. The +48V button must be held for 2 seconds to enable. Note: Phantom power is normally only needed with condenser microphones and should never be used with ribbon microphones. To avoid damaging the microphone, please consult your micro-phone documentation to ensure phantom power is applied only when appro-priate.
6. Key DisplayShows the selected root key (E, F, F#, etc.) for generating harmonies when musIQ is off. The Key display includes accidental symbols (sharp and flat) as well as the scale modes major or minor.
4
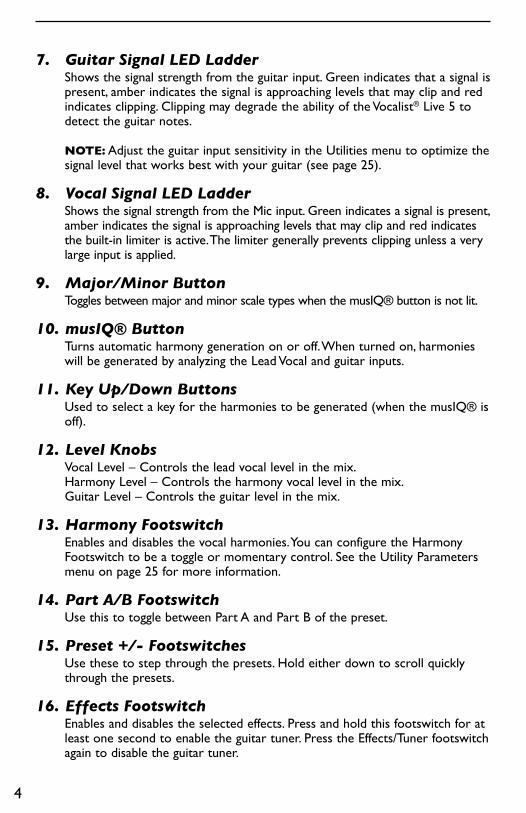
7. Guitar Signal LED LadderShows the signal strength from the guitar input. Green indicates that a signal is present, amber indicates the signal is approaching levels that may clip and red indicates clipping. Clipping may degrade the ability of the Vocalist® Live 5 to detect the guitar notes. NOTE: Adjust the guitar input sensitivity in the Utilities menu to optimize the signal level that works best with your guitar (see page 25).
8. Vocal Signal LED LadderShows the signal strength from the Mic input. Green indicates a signal is present, amber indicates the signal is approaching levels that may clip and red indicates the built-in limiter is active. The limiter generally prevents clipping unless a very large input is applied.
9. Major/Minor ButtonToggles between major and minor scale types when the musIQ® button is not lit.
10. musIQ® ButtonTurns automatic harmony generation on or off. When turned on, harmonies will be generated by analyzing the Lead Vocal and guitar inputs.
11. Key Up/Down ButtonsUsed to select a key for the harmonies to be generated (when the musIQ® is off).
12. Level KnobsVocal Level – Controls the lead vocal level in the mix.Harmony Level – Controls the harmony vocal level in the mix.Guitar Level – Controls the guitar level in the mix.
13. Harmony FootswitchEnables and disables the vocal harmonies. You can configure the Harmony Footswitch to be a toggle or momentary control. See the Utility Parameters menu on page 25 for more information.
14. Part A/B FootswitchUse this to toggle between Part A and Part B of the preset.
15. Preset +/- FootswitchesUse these to step through the presets. Hold either down to scroll quickly through the presets.
16. Effects FootswitchEnables and disables the selected effects. Press and hold this footswitch for at least one second to enable the guitar tuner. Press the Effects/Tuner footswitch again to disable the guitar tuner.
5
17. Effects MatrixThe Effects Matrix provides information regarding the current preset and parameter edit functions. The buttons running down the left side of the Matrix provide a visual indication of which effects are in use for the selected preset. While editing a preset, the flashing button LED indicates that the Effect row is selected for editing. Use the five Parameter knobs above the Effects Matrix columns to edit the parameters for the selected effect row. For more infor-mation about the Effects matrix, see page 14.
18. Effect Parameter KnobsUse these to adjust parameters for the selected row in the Effects matrix.
19. Utility ButtonPress to access the Utility Parameter menu. For more information on the Utility menu, see page 25.
20. Store ButtonPress to save changes you make to a preset. For more information on storing presets, see page 12.
21. Preset +/- ButtonsUse these to step through the presets. Hold either down to scroll quickly through the presets.
22. Part A/B ButtonUse this to toggle between Part A and Part B of the preset.
6
Rear Panel
Input Gain
Mic/Line In
9VAC1.3A
musIQ is a registered
trademark of 3dB ResearchLeft Out Right Out
Guitar Thru LeftLine Out
RightLine Out
StereoHeadphone
ExpressionPedalGuitar In Ground
Lift
On Off
1 2 3 4 5 6 7 8 9 10
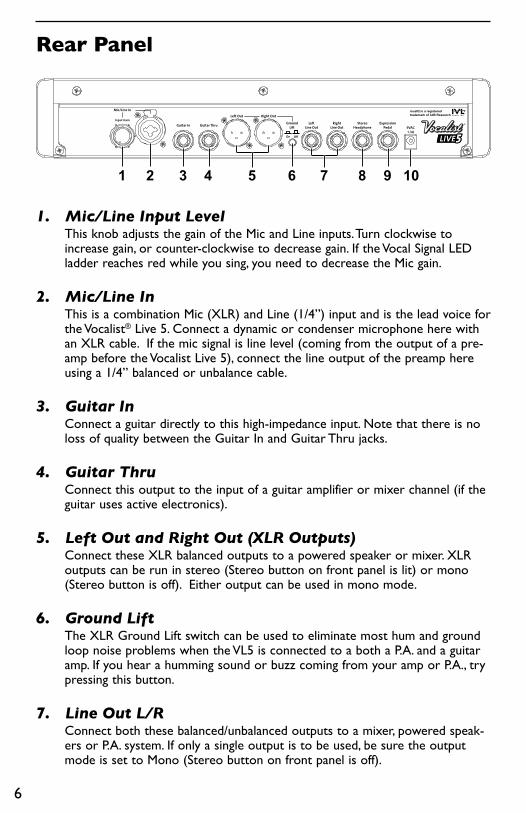
1. Mic/Line Input Level This knob adjusts the gain of the Mic and Line inputs. Turn clockwise to increase gain, or counter-clockwise to decrease gain. If the Vocal Signal LED ladder reaches red while you sing, you need to decrease the Mic gain.
2. Mic/Line InThis is a combination Mic (XLR) and Line (1/4”) input and is the lead voice for the Vocalist® Live 5. Connect a dynamic or condenser microphone here with an XLR cable. If the mic signal is line level (coming from the output of a pre-amp before the Vocalist Live 5), connect the line output of the preamp here using a 1/4” balanced or unbalance cable.
3. Guitar InConnect a guitar directly to this high-impedance input. Note that there is no loss of quality between the Guitar In and Guitar Thru jacks.
4. Guitar ThruConnect this output to the input of a guitar amplifier or mixer channel (if the guitar uses active electronics).
5. Left Out and Right Out (XLR Outputs)Connect these XLR balanced outputs to a powered speaker or mixer. XLR outputs can be run in stereo (Stereo button on front panel is lit) or mono (Stereo button is off). Either output can be used in mono mode.
6. Ground LiftThe XLR Ground Lift switch can be used to eliminate most hum and ground loop noise problems when the VL5 is connected to a both a P.A. and a guitar amp. If you hear a humming sound or buzz coming from your amp or P.A., try pressing this button.
7. Line Out L/RConnect both these balanced/unbalanced outputs to a mixer, powered speak-ers or P.A. system. If only a single output is to be used, be sure the output mode is set to Mono (Stereo button on front panel is off).
7
8. HeadphonesUse this jack to hear the Line Out L/R mix through headphones.
9. Expression PedalThe Vocalist® Live 5 can use either a standard passive guitar volume pedal or a resistance-based expression pedal. If using a standard guitar volume pedal, it should use a 250 kOhms or higher pot. If using an expression pedal, it must offer a TRS connection and offer a minimum resistance of 10kOhms.
See the Utility Parameters menu on page 25 for information on expression controllable parameters.
10. PowerConnect only the PS0913B power supply to this jack.
8
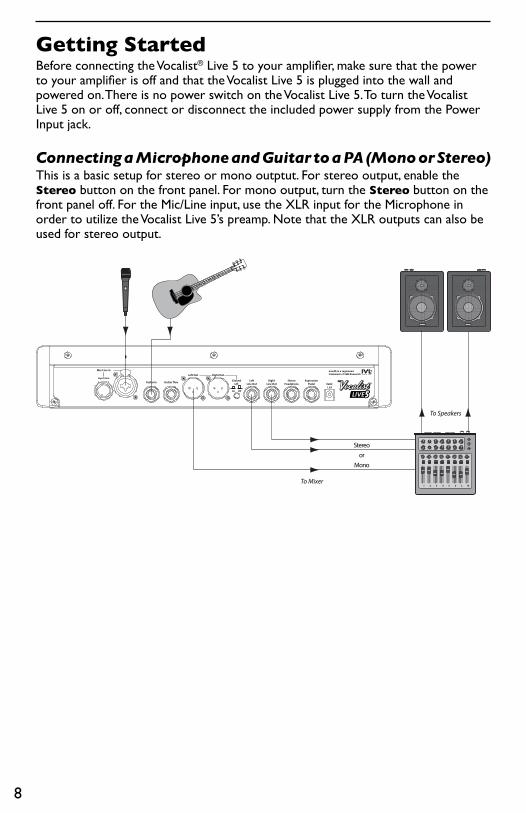
Getting StartedBefore connecting the Vocalist® Live 5 to your amplifier, make sure that the power to your amplifier is off and that the Vocalist Live 5 is plugged into the wall and powered on. There is no power switch on the Vocalist Live 5. To turn the Vocalist Live 5 on or off, connect or disconnect the included power supply from the Power Input jack.
Connecting a Microphone and Guitar to a PA (Mono or Stereo)This is a basic setup for stereo or mono outptut. For stereo output, enable the Stereo button on the front panel. For mono output, turn the Stereo button on the front panel off. For the Mic/Line input, use the XLR input for the Microphone in order to utilize the Vocalist Live 5’s preamp. Note that the XLR outputs can also be used for stereo output.
Input Gain
Mic/Line In
9VAC1.3A
musIQ is a registered
trademark of 3dB ResearchLeft Out Right Out
Guitar Thru LeftLine Out
RightLine Out
StereoHeadphone
ExpressionPedalGuitar In Ground
Lift
On Off
Stereoor
Mono
To Speakers
1 2 3 4 5 6 L R
To Mixer
9
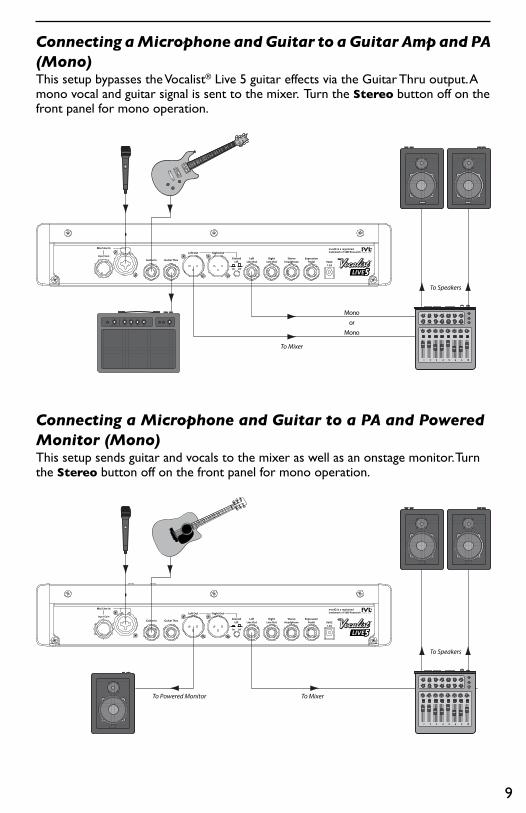
Connecting a Microphone and Guitar to a Guitar Amp and PA (Mono)This setup bypasses the Vocalist® Live 5 guitar effects via the Guitar Thru output. A mono vocal and guitar signal is sent to the mixer. Turn the Stereo button off on the front panel for mono operation.
Input Gain
Mic/Line In
9VAC1.3A
musIQ is a registered
trademark of 3dB ResearchLeft Out Right Out
Guitar Thru LeftLine Out
RightLine Out
StereoHeadphone
ExpressionPedalGuitar In Ground
Lift
On Off
To Mixer
To Speakers
1 2 3 4 5 6 L R
Monoor
Mono
Connecting a Microphone and Guitar to a PA and Powered Monitor (Mono)This setup sends guitar and vocals to the mixer as well as an onstage monitor. Turn the Stereo button off on the front panel for mono operation.
Input Gain
Mic/Line In
9VAC1.3A
musIQ is a registered
trademark of 3dB ResearchLeft Out Right Out
Guitar Thru LeftLine Out
RightLine Out
StereoHeadphone
ExpressionPedalGuitar In Ground
Lift
On Off
To Speakers
1 2 3 4 5 6 L R
To MixerTo Powered Monitor
10
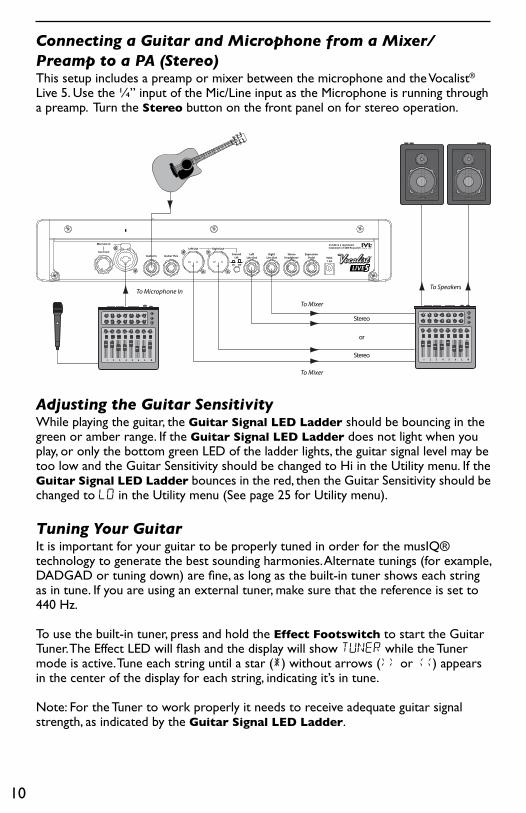
Connecting a Guitar and Microphone from a Mixer/Preamp to a PA (Stereo)This setup includes a preamp or mixer between the microphone and the Vocalist® Live 5. Use the ¼” input of the Mic/Line input as the Microphone is running through a preamp. Turn the Stereo button on the front panel on for stereo operation.
Input Gain
Mic/Line In
9VAC1.3A
musIQ is a registered
trademark of 3dB ResearchLeft Out Right Out
Guitar Thru LeftLine Out
RightLine Out
StereoHeadphone
ExpressionPedalGuitar In Ground
Lift
On Off
Stereo
To SpeakersTo Microphone In
1 2 3 4 5 6 L R
To Mixer
To Mixer
1 2 3 4 5 6 L R
or
Stereo
Adjusting the Guitar SensitivityWhile playing the guitar, the Guitar Signal LED Ladder should be bouncing in the green or amber range. If the Guitar Signal LED Ladder does not light when you play, or only the bottom green LED of the ladder lights, the guitar signal level may be too low and the Guitar Sensitivity should be changed to Hi in the Utility menu. If the Guitar Signal LED Ladder bounces in the red, then the Guitar Sensitivity should be changed to Lo in the Utility menu (See page 25 for Utility menu).
Tuning Your GuitarIt is important for your guitar to be properly tuned in order for the musIQ® technology to generate the best sounding harmonies. Alternate tunings (for example, DADGAD or tuning down) are fine, as long as the built-in tuner shows each string as in tune. If you are using an external tuner, make sure that the reference is set to 440 Hz.
To use the built-in tuner, press and hold the Effect Footswitch to start the Guitar Tuner. The Effect LED will flash and the display will show TUNER while the Tuner mode is active. Tune each string until a star (*) without arrows (>> or <<) appears in the center of the display for each string, indicating it’s in tune.
Note: For the Tuner to work properly it needs to receive adequate guitar signal strength, as indicated by the Guitar Signal LED Ladder.
11
Adjust the Vocal LevelUsing the Input Gain knob on the rear of the unit adjust the level so the Vocal Level LED Ladder bounces around amber when you sing loudly and bounces in the green when you sing quietly. Avoid having the Vocal Level LED Ladder bouncing in the red.
Adjust the Guitar LevelIdeally the Guitar Signal LED Ladder should be in the green or amber range while playing. Most electric and acoustic/electric guitars send their signal at a level appropriate for the Vocalist Live 5. If you have a volume control on your guitar (for example, an acoustic guitar with a pre-amp built in), you should adjust the volume so that the Guitar Signal LED Ladder is in the green or amber range most of the time while playing.
Once the guitar level is set with your guitar’s volume control, you can adjust how much guitar is heard in the mix with the Guitar Level knob.
Choose a PresetUsing the Preset +/- footswitches and buttons you can cycle through the different presets (for a full preset list see page 29). Some presets to try:
• 03 CSN - Contains a three part harmony: your lead vocal, a 3rd and 5th above to create a triad.
• 05 Gold PC – Studio quality vocal enhancement and pitch correction with a simple 3rd above harmony.
• 06 4 UNISONS – Uses four harmony voices in unison to create a fat thick-ening effect.
• 09 ACCAPELLA C - Features 5th down, 3rd down and 3rd up harmonies in the key of C without the need for a guide instrument.
• 10 OTTOTUNE1 - Uses the Chromatic Pitch Correction to get that chart topping sound best suited for Pop and R & B.
Cycle through different presets to get an idea of the range of effects contained in the Vocalist® Live 5.
12
Using the Vocalist® Live 5Each preset has two parts, an A part and a B part that can be toggled with the A/B footswitch or button. This can be helpful for subtle changes within a song. For example, you could have different harmony settings for the Verse and Chorus of a song. Each preset has a name, number, part, as well as a set of harmonies and/or other effects assigned to it.
• You can cycle through all the different presets by pressing the Preset +/- foot-switches or buttons
• Toggle between the A and B parts of each preset by using the Part A/B foot-switch or button.
• You can turn a preset’s harmonies on or off with the Harmony footswitch. • You can turn a preset’s effects on or off with the Effects footswitch.
Mono and StereoYou can output the lead vocal and harmonies in either mono or stereo. To use a mono signal, enable the Stereo button on the front panel, and connect the Line Out Left/Right or Left/Right Out XLR output to your P.A.
To use a stereo signal, enable the Stereo button on the front panel and connect both XLR outputs or Line outputs to your P.A.
Regarding External Effects PedalsDo not hook up any other effects pedals to your guitar prior to plugging it into the Vocalist® Live 5, as this could affect vocal harmony generation. The only thing between your guitar and the Vocalist Live 5 should be the guitar cable. Use the Guitar Thru to connect your effects and stomp boxes.
Creating and Modifying PresetsIn addition to creating vocal harmonies, the Vocalist Live 5 also offers a wide variety of effects you can apply to your voice. You can quickly change the harmonies and effects by changing the presets. Use the Effects Matrix and Parameter Knobs to edit effects and harmonies. To start, press an effect button to the left of the matrix, the button LED will blink indicating that you are in Edit Mode. Then use the parameter knobs to adjust the current value for each parameter. While editing a parameter the Alphanumeric Display will show its name and the Numeric Display will show its current value. Once you are finished editing, press the effect button again to exit edit mode. Effects and parameter descriptions are described later in this manual.
How to Store PresetsNote: The Vocalist Live 5 has two parts to each preset, an A part and a B part. Each part of the preset is edited separately, but they are stored together.
1. Select a preset with the Preset +/- footswitches or buttons. 2. Press the Store button. The Alphanumeric Display briefly reads Store to,
then the currently selected preset name and number appear.3. Use the first parameter knob to choose which preset you would like to save to
13
4. Change the Preset Name (if desired). To change the preset name:• Turn the second Parameter knob to select a letter in the Alphanumeric
display (or use the Key Up/Down buttons). The selected letter will flash.• Turn the third Parameter Knob to change the selected letter.
5. Press the Store button again to save your settings (or press any button other than Store to cancel).
Note: There are two kinds of presets: User and Factory. You can change User presets (numbers 1A/B-50A/B), but you can’t change Factory presets (numbers 51A/B-00A/B). When the Vocalist® Live 5 ships from the factory, the User and Factory presets are identical.
Warning: Do not disconnect the power from the Vocalist Live 5 when storing a preset (when the Alphanumeric display reads Storing...). Doing so may erase your user presets. In the event that this happens, perform a Factory Reset, described on page 26.
Copying PresetsThe Vocalist Live 5 allows you to copy the A part to both A and B parts and vice versa. This can be helpful when making massive changes to a preset and you want it copied to both parts.
To copy the A or B part to both parts:
1. Follow Steps 1-4 for storing a preset above.2. Press the A/B footswitch or button (Display shows STOR A AB,
STOR B AB, depending on which part was selected when you pressed Store). Press the A/B Footswitch again to select STOR AB AB.
3. STOR A AB will store Part A settings to both Part A and B.4. STOR B AB will store Part B settings to both Part A and B.5. STOR AB AB will store Parts A and B to Parts A and B.6. Press the Store button again to copy the preset to both parts (or press any
button other than Store to cancel).
14
Effects and Parameter Descriptions
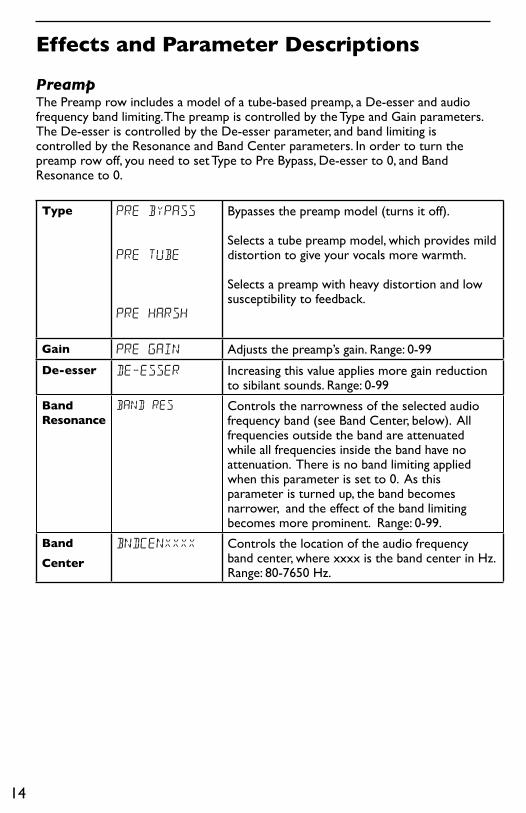
PreampThe Preamp row includes a model of a tube-based preamp, a De-esser and audio frequency band limiting. The preamp is controlled by the Type and Gain parameters. The De-esser is controlled by the De-esser parameter, and band limiting is controlled by the Resonance and Band Center parameters. In order to turn the preamp row off, you need to set Type to Pre Bypass, De-esser to 0, and Band Resonance to 0.
Type PRE BYPASS
PRE TUBE
PRE HARSH
Bypasses the preamp model (turns it off).
Selects a tube preamp model, which provides mild distortion to give your vocals more warmth.
Selects a preamp with heavy distortion and low susceptibility to feedback.
Gain PRE GAIN Adjusts the preamp’s gain. Range: 0-99
De-esser DE-ESSER Increasing this value applies more gain reduction to sibilant sounds. Range: 0-99
Band Resonance
BAND RES Controls the narrowness of the selected audio frequency band (see Band Center, below). All frequencies outside the band are attenuated while all frequencies inside the band have no attenuation. There is no band limiting applied when this parameter is set to 0. As this parameter is turned up, the band becomes narrower, and the effect of the band limiting becomes more prominent. Range: 0-99.
Band
Center
BNDCENxxxx Controls the location of the audio frequency band center, where xxxx is the band center in Hz. Range: 80-7650 Hz.
15
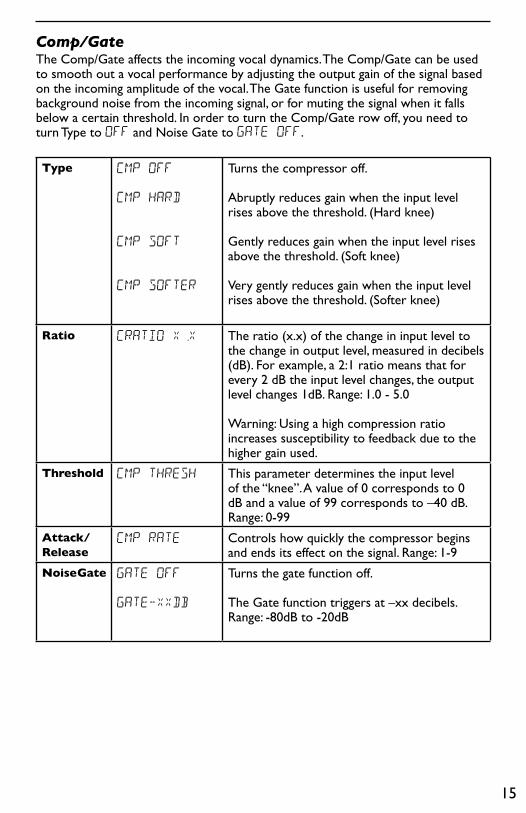
Comp/GateThe Comp/Gate affects the incoming vocal dynamics. The Comp/Gate can be used to smooth out a vocal performance by adjusting the output gain of the signal based on the incoming amplitude of the vocal. The Gate function is useful for removing background noise from the incoming signal, or for muting the signal when it falls below a certain threshold. In order to turn the Comp/Gate row off, you need to turn Type to OFF and Noise Gate to GATE OFF.
Type cmp off
cmp hard
cmp soft
cmp softer
Turns the compressor off.
Abruptly reduces gain when the input level rises above the threshold. (Hard knee)
Gently reduces gain when the input level rises above the threshold. (Soft knee)
Very gently reduces gain when the input level rises above the threshold. (Softer knee)
Ratio Cratio x.x The ratio (x.x) of the change in input level to the change in output level, measured in decibels (dB). For example, a 2:1 ratio means that for every 2 dB the input level changes, the output level changes 1dB. Range: 1.0 - 5.0
Warning: Using a high compression ratio increases susceptibility to feedback due to the higher gain used.
Threshold Cmp thresh This parameter determines the input level of the “knee”. A value of 0 corresponds to 0 dB and a value of 99 corresponds to –40 dB. Range: 0-99
Attack/Release
Cmp rate Controls how quickly the compressor begins and ends its effect on the signal. Range: 1-9
Noise Gate Gate off
Gate-xxDb
Turns the gate function off.
The Gate function triggers at –xx decibels.Range: -80dB to -20dB
16
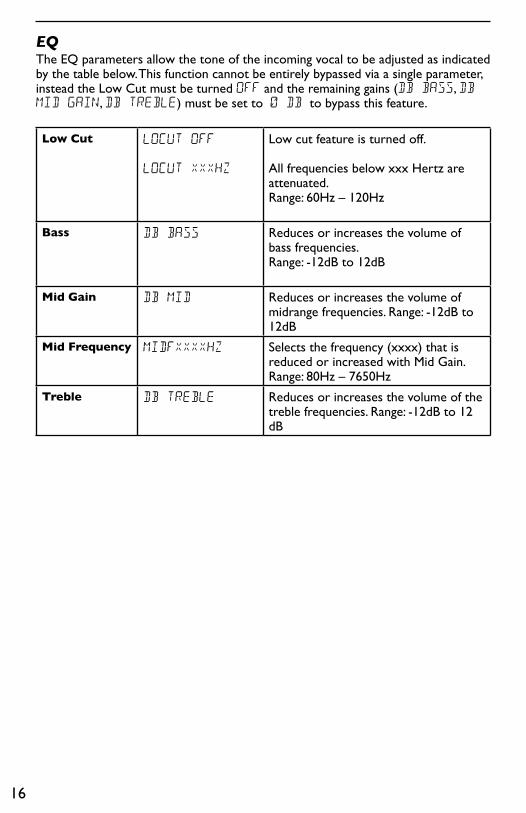
EQThe EQ parameters allow the tone of the incoming vocal to be adjusted as indicated by the table below. This function cannot be entirely bypassed via a single parameter, instead the Low Cut must be turned OFF and the remaining gains (dB Bass, dB Mid Gain, dB Treble) must be set to 0 dB to bypass this feature.
Low Cut Locut off
Locut xxxhz
Low cut feature is turned off.
All frequencies below xxx Hertz are attenuated. Range: 60Hz – 120Hz
Bass Db bass Reduces or increases the volume of bass frequencies. Range: -12dB to 12dB
Mid Gain Db mid Reduces or increases the volume of midrange frequencies. Range: -12dB to 12dB
Mid Frequency Midfxxxxhz Selects the frequency (xxxx) that is reduced or increased with Mid Gain. Range: 80Hz – 7650Hz
Treble Db treble Reduces or increases the volume of the treble frequencies. Range: -12dB to 12 dB
17
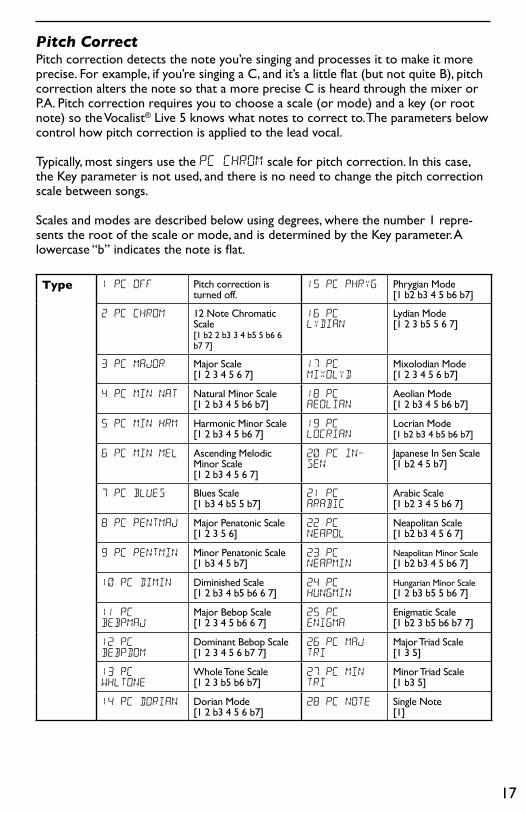
Pitch CorrectPitch correction detects the note you’re singing and processes it to make it more precise. For example, if you’re singing a C, and it’s a little flat (but not quite B), pitch correction alters the note so that a more precise C is heard through the mixer or P.A. Pitch correction requires you to choose a scale (or mode) and a key (or root note) so the Vocalist® Live 5 knows what notes to correct to. The parameters below control how pitch correction is applied to the lead vocal.
Typically, most singers use the PC CHROM scale for pitch correction. In this case, the Key parameter is not used, and there is no need to change the pitch correction scale between songs.
Scales and modes are described below using degrees, where the number 1 repre-sents the root of the scale or mode, and is determined by the Key parameter. A lowercase “b” indicates the note is flat.
Type 1 PC off Pitch correction is turned off.
15 pc phryg Phrygian Mode [1 b2 b3 4 5 b6 b7]
2 pc chrom 12 Note Chromatic Scale[1 b2 2 b3 3 4 b5 5 b6 6 b7 7]
16 pc
lydian
Lydian Mode [1 2 3 b5 5 6 7]
3 pc major Major Scale [1 2 3 4 5 6 7]
17 pc
mixolyd
Mixolodian Mode [1 2 3 4 5 6 b7]
4 pc min nat Natural Minor Scale [1 2 b3 4 5 b6 b7]
18 pc
aeolian
Aeolian Mode [1 2 b3 4 5 b6 b7]
5 pc min hrm Harmonic Minor Scale [1 2 b3 4 5 b6 7]
19 pc
locrian
Locrian Mode [1 b2 b3 4 b5 b6 b7]
6 pC min mel Ascending Melodic Minor Scale [1 2 b3 4 5 6 7]
20 pc in-
sen
Japanese In Sen Scale [1 b2 4 5 b7]
7 pc blues Blues Scale [1 b3 4 b5 5 b7]
21 pc
arabic
Arabic Scale [1 b2 3 4 5 b6 7]
8 pc pentmaj Major Penatonic Scale [1 2 3 5 6]
22 pc
neapol
Neapolitan Scale [1 b2 b3 4 5 6 7]
9 pc pentmin Minor Penatonic Scale [1 b3 4 5 b7]
23 pc
neapmin
Neapolitan Minor Scale [1 b2 b3 4 5 b6 7]
10 pc dimin Diminished Scale [1 2 b3 4 b5 b6 6 7]
24 PC
hungmin
Hungarian Minor Scale [1 2 b3 b5 5 b6 7]
11 pc
bebpmaj
Major Bebop Scale [1 2 3 4 5 b6 6 7]
25 pc
enigma
Enigmatic Scale [1 b2 3 b5 b6 b7 7]
12 pc
bebpdom
Dominant Bebop Scale [1 2 3 4 5 6 b7 7]
26 pc maj
tri
Major Triad Scale [1 3 5]
13 pc
whltone
Whole Tone Scale [1 2 3 b5 b6 b7]
27 pc min
tri
Minor Triad Scale [1 b3 5]
14 pc dorian Dorian Mode [1 2 b3 4 5 6 b7]
28 pc note Single Note [1]
18
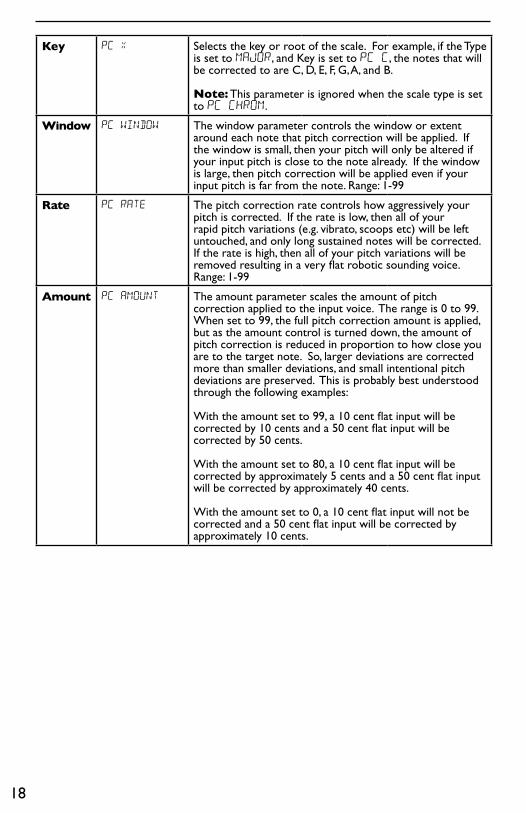
Key pc x Selects the key or root of the scale. For example, if the Type is set to MAJOR, and Key is set to PC C, the notes that will be corrected to are C, D, E, F, G, A, and B.
Note: This parameter is ignored when the scale type is set to PC CHROM.
Window PC Window The window parameter controls the window or extent around each note that pitch correction will be applied. If the window is small, then your pitch will only be altered if your input pitch is close to the note already. If the window is large, then pitch correction will be applied even if your input pitch is far from the note. Range: 1-99
Rate PC rate The pitch correction rate controls how aggressively your pitch is corrected. If the rate is low, then all of your rapid pitch variations (e.g. vibrato, scoops etc) will be left untouched, and only long sustained notes will be corrected. If the rate is high, then all of your pitch variations will be removed resulting in a very flat robotic sounding voice. Range: 1-99
Amount Pc amount The amount parameter scales the amount of pitch correction applied to the input voice. The range is 0 to 99. When set to 99, the full pitch correction amount is applied, but as the amount control is turned down, the amount of pitch correction is reduced in proportion to how close you are to the target note. So, larger deviations are corrected more than smaller deviations, and small intentional pitch deviations are preserved. This is probably best understood through the following examples:
With the amount set to 99, a 10 cent flat input will be corrected by 10 cents and a 50 cent flat input will be corrected by 50 cents.
With the amount set to 80, a 10 cent flat input will be corrected by approximately 5 cents and a 50 cent flat input will be corrected by approximately 40 cents.
With the amount set to 0, a 10 cent flat input will not be corrected and a 50 cent flat input will be corrected by approximately 10 cents.
19
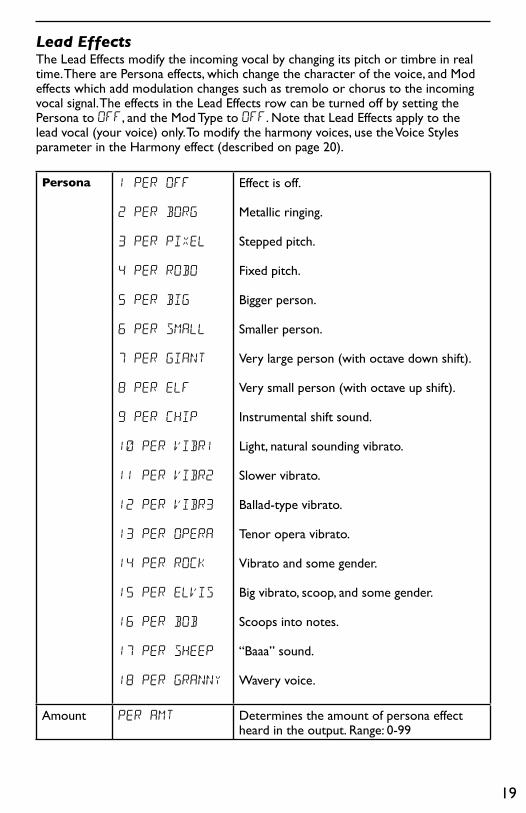
Lead EffectsThe Lead Effects modify the incoming vocal by changing its pitch or timbre in real time. There are Persona effects, which change the character of the voice, and Mod effects which add modulation changes such as tremolo or chorus to the incoming vocal signal. The effects in the Lead Effects row can be turned off by setting the Persona to OFF, and the Mod Type to OFF. Note that Lead Effects apply to the lead vocal (your voice) only. To modify the harmony voices, use the Voice Styles parameter in the Harmony effect (described on page 20).
Persona 1 PER OFF
2 PER BORG
3 PER PIXEL
4 PER ROBO
5 PER BIG
6 PER SMALL
7 PER GIANT
8 PER ELF
9 PER CHIP
10 PER VIBR1
11 PER VIBR2
12 PER VIBR3
13 PER opera
14 PER rock
15 PER elvis
16 PER bob
17 PER SHEEP
18 PER GRANNY
Effect is off.
Metallic ringing.
Stepped pitch.
Fixed pitch.
Bigger person.
Smaller person.
Very large person (with octave down shift).
Very small person (with octave up shift).
Instrumental shift sound.
Light, natural sounding vibrato.
Slower vibrato.
Ballad-type vibrato.
Tenor opera vibrato.
Vibrato and some gender.
Big vibrato, scoop, and some gender.
Scoops into notes.
“Baaa” sound.
Wavery voice.
Amount Per amt Determines the amount of persona effect heard in the output. Range: 0-99
20
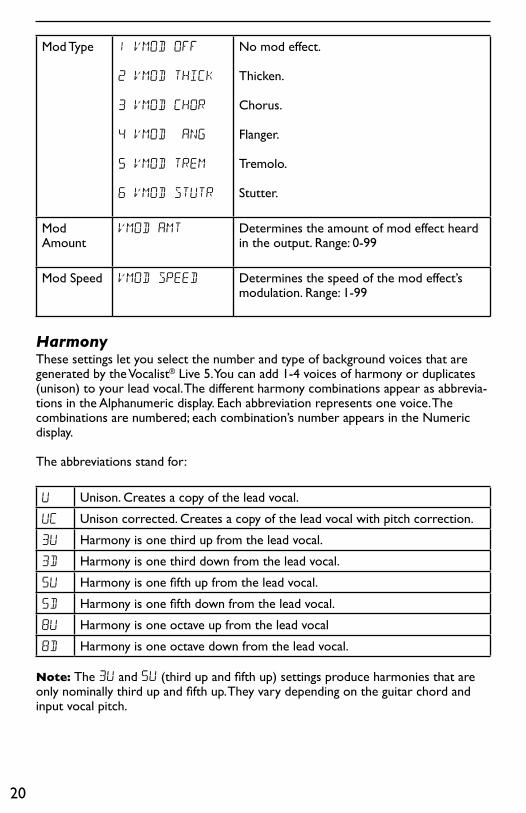
Mod Type 1 VMOD off
2 Vmod thick
3 Vmod chor
4 Vmod flang
5 Vmod trem
6 Vmod stutr
No mod effect.
Thicken.
Chorus.
Flanger.
Tremolo.
Stutter.
Mod Amount
Vmod amt Determines the amount of mod effect heard in the output. Range: 0-99
Mod Speed Vmod speed Determines the speed of the mod effect’s modulation. Range: 1-99
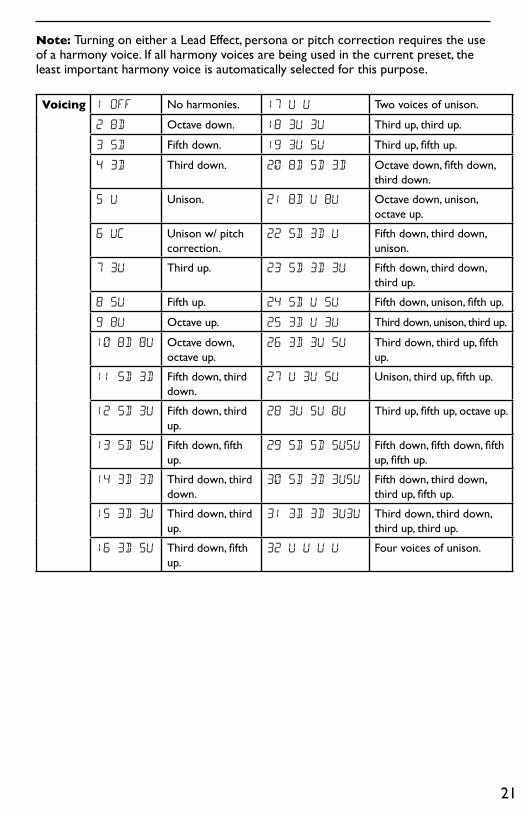
HarmonyThese settings let you select the number and type of background voices that are generated by the Vocalist® Live 5. You can add 1-4 voices of harmony or duplicates (unison) to your lead vocal. The different harmony combinations appear as abbrevia-tions in the Alphanumeric display. Each abbreviation represents one voice. The combinations are numbered; each combination’s number appears in the Numeric display.
The abbreviations stand for:
U Unison. Creates a copy of the lead vocal.
Uc Unison corrected. Creates a copy of the lead vocal with pitch correction.
3u Harmony is one third up from the lead vocal.
3d Harmony is one third down from the lead vocal.
5u Harmony is one fifth up from the lead vocal.
5d Harmony is one fifth down from the lead vocal.
8u Harmony is one octave up from the lead vocal
8d Harmony is one octave down from the lead vocal.
Note: The 3U and 5U (third up and fifth up) settings produce harmonies that are only nominally third up and fifth up. They vary depending on the guitar chord and input vocal pitch.
21
Note: Turning on either a Lead Effect, persona or pitch correction requires the use of a harmony voice. If all harmony voices are being used in the current preset, the least important harmony voice is automatically selected for this purpose.
Voicing 1 Off No harmonies. 17 U u Two voices of unison.
2 8D Octave down. 18 3u 3u Third up, third up.
3 5d Fifth down. 19 3u 5u Third up, fifth up.
4 3d Third down. 20 8d 5d 3d Octave down, fifth down, third down.
5 U Unison. 21 8d u 8u Octave down, unison, octave up.
6 Uc Unison w/ pitch correction.
22 5d 3d u Fifth down, third down, unison.
7 3u Third up. 23 5d 3d 3u Fifth down, third down, third up.
8 5u Fifth up. 24 5d u 5u Fifth down, unison, fifth up.
9 8u Octave up. 25 3d u 3u Third down, unison, third up.
10 8d 8u Octave down, octave up.
26 3d 3u 5u Third down, third up, fifth up.
11 5d 3d Fifth down, third down.
27 U 3u 5u Unison, third up, fifth up.
12 5d 3u Fifth down, third up.
28 3u 5u 8u Third up, fifth up, octave up.
13 5d 5u Fifth down, fifth up.
29 5d 5d 5u5u Fifth down, fifth down, fifth up, fifth up.
14 3d 3d Third down, third down.
30 5d 3d 3u5u Fifth down, third down, third up, fifth up.
15 3d 3u Third down, third up.
31 3d 3d 3u3u Third down, third down, third up, third up.
16 3d 5u Third down, fifth up.
32 U u u u Four voices of unison.
22
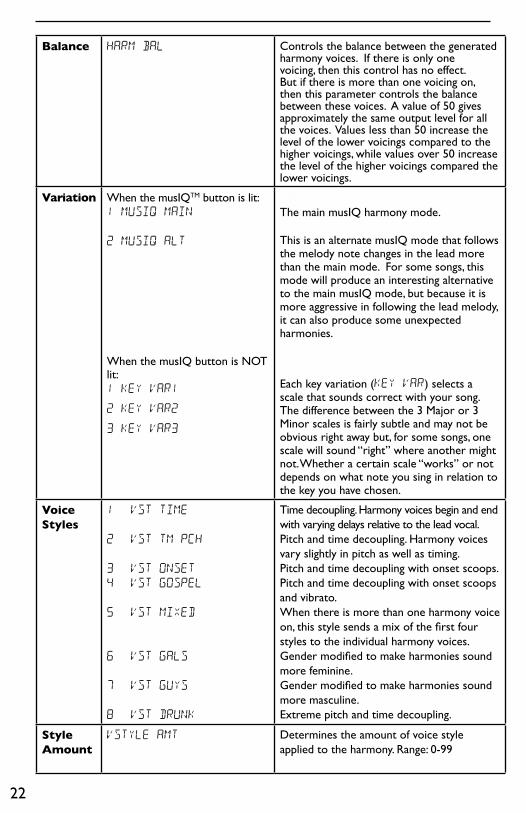
Balance harm bal Controls the balance between the generated harmony voices. If there is only one voicing, then this control has no effect. But if there is more than one voicing on, then this parameter controls the balance between these voices. A value of 50 gives approximately the same output level for all the voices. Values less than 50 increase the level of the lower voicings compared to the higher voicings, while values over 50 increase the level of the higher voicings compared the lower voicings.
Variation When the musIQTM button is lit:1 musiq main
2 musiq alt
When the musIQ button is NOT lit:1 key var1
2 key var2
3 key var3
utton is lit:The main musIQ harmony mode.
This is an alternate musIQ mode that follows the melody note changes in the lead more than the main mode. For some songs, this mode will produce an interesting alternative to the main musIQ mode, but because it is more aggressive in following the lead melody, it can also produce some unexpected harmonies.
Each key variation (KEY VAR) selects a scale that sounds correct with your song. The difference between the 3 Major or 3 Minor scales is fairly subtle and may not be obvious right away but, for some songs, one scale will sound “right” where another might not. Whether a certain scale “works” or not depends on what note you sing in relation to the key you have chosen.
Voice Styles
1 vst time
2 vst tm pch
3 vst onset
4 vst gospel
5 vst mixed
6 vst gals
7 vst guys
8 vst drunk
Time decoupling. Harmony voices begin and end with varying delays relative to the lead vocal.Pitch and time decoupling. Harmony voices vary slightly in pitch as well as timing.Pitch and time decoupling with onset scoops.Pitch and time decoupling with onset scoops and vibrato.When there is more than one harmony voice on, this style sends a mix of the first four styles to the individual harmony voices.Gender modified to make harmonies sound more feminine.Gender modified to make harmonies sound more masculine.Extreme pitch and time decoupling.
Style Amount
vstyle amt Determines the amount of voice style applied to the harmony. Range: 0-99
23
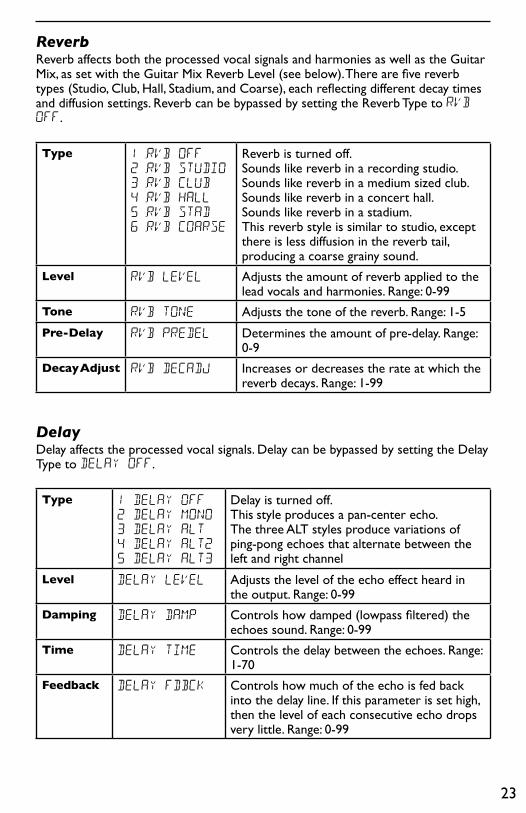
ReverbReverb affects both the processed vocal signals and harmonies as well as the Guitar Mix, as set with the Guitar Mix Reverb Level (see below). There are five reverb types (Studio, Club, Hall, Stadium, and Coarse), each reflecting different decay times and diffusion settings. Reverb can be bypassed by setting the Reverb Type to RVB OFF.
Type 1.RVB OFF
2.rvb studio
3.rvb club
4.rvb hall
5.rvb stad
6.rvb coarse
Reverb is turned off. Sounds like reverb in a recording studio. Sounds like reverb in a medium sized club. Sounds like reverb in a concert hall. Sounds like reverb in a stadium. This reverb style is similar to studio, except there is less diffusion in the reverb tail, producing a coarse grainy sound.
Level Rvb level Adjusts the amount of reverb applied to the lead vocals and harmonies. Range: 0-99
Tone Rvb tone Adjusts the tone of the reverb. Range: 1-5
Pre-Delay Rvb predel Determines the amount of pre-delay. Range: 0-9
Decay Adjust Rvb decadj Increases or decreases the rate at which the reverb decays. Range: 1-99
DelayDelay affects the processed vocal signals. Delay can be bypassed by setting the Delay Type to delay OFF.
Type 1 DELAY off
2 DELAY mono
3 DELAY alt
4 DELAY alt2
5 DELAY alt3
Delay is turned off. This style produces a pan-center echo. The three ALT styles produce variations of ping-pong echoes that alternate between the left and right channel
Level Delay level Adjusts the level of the echo effect heard in the output. Range: 0-99
Damping Delay damp Controls how damped (lowpass filtered) the echoes sound. Range: 0-99
Time Delay time Controls the delay between the echoes. Range: 1-70
Feedback Delay fdbck Controls how much of the echo is fed back into the delay line. If this parameter is set high, then the level of each consecutive echo drops very little. Range: 0-99
24
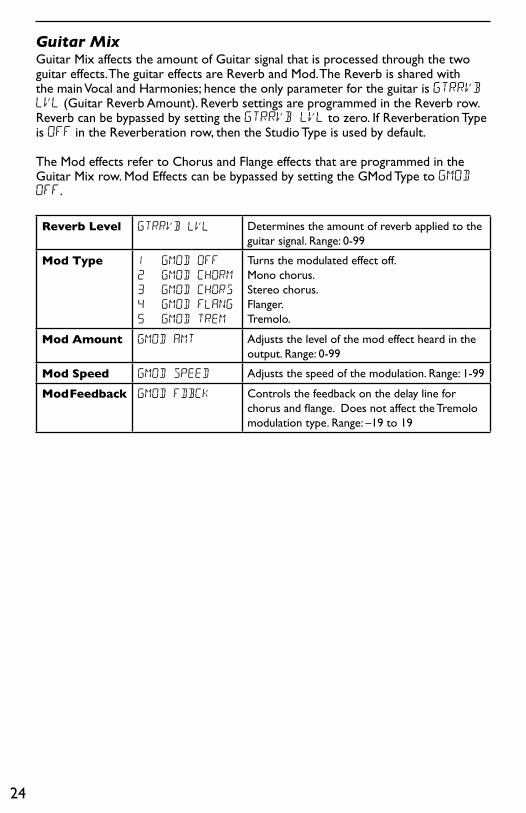
Guitar MixGuitar Mix affects the amount of Guitar signal that is processed through the two guitar effects. The guitar effects are Reverb and Mod. The Reverb is shared with the main Vocal and Harmonies; hence the only parameter for the guitar is GtrRvb lvl (Guitar Reverb Amount). Reverb settings are programmed in the Reverb row. Reverb can be bypassed by setting the GtrRvb lvl to zero. If Reverberation Type is OFF in the Reverberation row, then the Studio Type is used by default.
The Mod effects refer to Chorus and Flange effects that are programmed in the Guitar Mix row. Mod Effects can be bypassed by setting the GMod Type to Gmod OFF.
Reverb Level gtrrvb lvl Determines the amount of reverb applied to the guitar signal. Range: 0-99
Mod Type 1 gmod off
2 gmod chorm
3 gmod chors
4 gmod FLang
5 GMOD Trem
Turns the modulated effect off.Mono chorus.Stereo chorus.Flanger.Tremolo.
Mod Amount Gmod amt Adjusts the level of the mod effect heard in the output. Range: 0-99
Mod Speed gmod speed Adjusts the speed of the modulation. Range: 1-99
Mod Feedback Gmod fdbck Controls the feedback on the delay line for chorus and flange. Does not affect the Tremolo modulation type. Range: –19 to 19
25
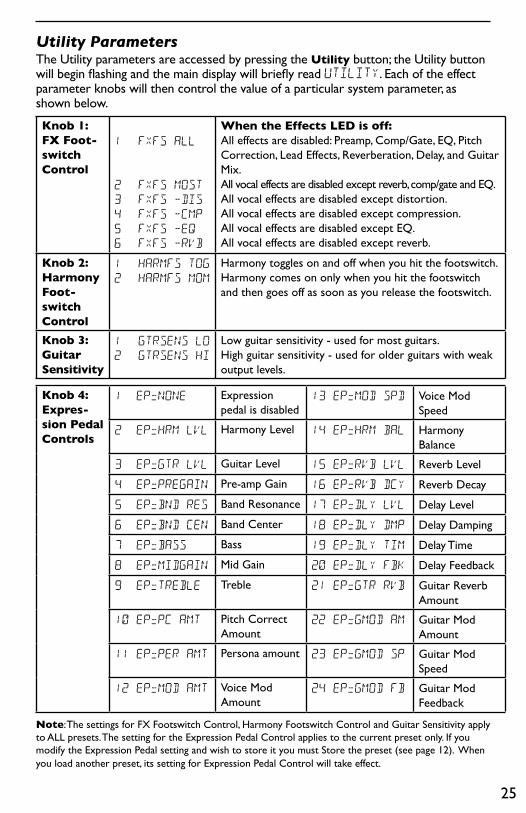
Utility ParametersThe Utility parameters are accessed by pressing the Utility button; the Utility button will begin flashing and the main display will briefly read UTILity. Each of the effect parameter knobs will then control the value of a particular system parameter, as shown below.
Knob 1: FX Foot-switch Control
1 FXFS all
2 FXFS most
3 FXFS -DIS
4 FXFS -CMP
5 FXFS -EQ
6 FXFS -RVB
When the Effects LED is off:All effects are disabled: Preamp, Comp/Gate, EQ, Pitch Correction, Lead Effects, Reverberation, Delay, and Guitar Mix.All vocal effects are disabled except reverb, comp/gate and EQ.All vocal effects are disabled except distortion.All vocal effects are disabled except compression.All vocal effects are disabled except EQ.All vocal effects are disabled except reverb.
Knob 2:Harmony Foot-switch Control
1 HARMFS TOG
2 HARMFS MOM
Harmony toggles on and off when you hit the footswitch.Harmony comes on only when you hit the footswitch and then goes off as soon as you release the footswitch.
Knob 3: Guitar Sensitivity
1 GTRSENS LO 2 GTRSENS HI
Low guitar sensitivity - used for most guitars.High guitar sensitivity - used for older guitars with weak output levels.
Knob 4:Expres-sion Pedal Controls
1 EP=NONE Expression pedal is disabled
13 EP=MOD SPD Voice Mod Speed
2 EP=HRM LVL Harmony Level 14 EP=HRM BAL Harmony Balance
3 EP=GTR LVL Guitar Level 15 EP=RVB lvl Reverb Level
4 EP=PREGAIN Pre-amp Gain 16 EP=RVB DCY Reverb Decay
5 EP=BND RES Band Resonance 17 EP=dly lvl Delay Level
6 EP=BND CEN Band Center 18 EP=dly DMP Delay Damping
7 EP=BASS Bass 19 EP=dly tim Delay Time
8 EP=MIDGAIN Mid Gain 20 EP=dly fbk Delay Feedback
9 EP=TREBLE Treble 21 EP=GTR RVB Guitar Reverb Amount
10 EP=PC AMT Pitch Correct Amount
22 EP=GMOD AM Guitar Mod Amount
11 EP=PER AMT Persona amount 23 EP=GMOD SP Guitar Mod Speed
12 EP=MOD AMT Voice Mod Amount
24 EP=GMOD FB Guitar Mod Feedback
Note: The settings for FX Footswitch Control, Harmony Footswitch Control and Guitar Sensitivity apply to ALL presets. The setting for the Expression Pedal Control applies to the current preset only. If you modify the Expression Pedal setting and wish to store it you must Store the preset (see page 12). When you load another preset, its setting for Expression Pedal Control will take effect.
26
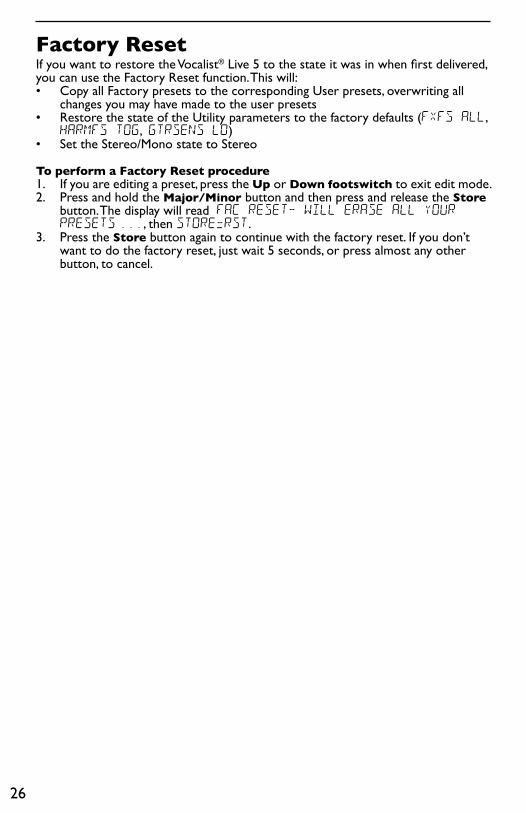
Factory ResetIf you want to restore the Vocalist® Live 5 to the state it was in when first delivered, you can use the Factory Reset function. This will:• Copy all Factory presets to the corresponding User presets, overwriting all
changes you may have made to the user presets • Restore the state of the Utility parameters to the factory defaults (FXFS ALL,
HARMFS TOG, GTRSENS LO) • Set the Stereo/Mono state to Stereo To perform a Factory Reset procedure1. If you are editing a preset, press the Up or Down footswitch to exit edit mode.2. Press and hold the Major/Minor button and then press and release the Store
button. The display will read FAC RESET- WILL ERASE ALL YOUR PRESETS... , then STORE=RST.
3. Press the Store button again to continue with the factory reset. If you don’t want to do the factory reset, just wait 5 seconds, or press almost any other button, to cancel.
27
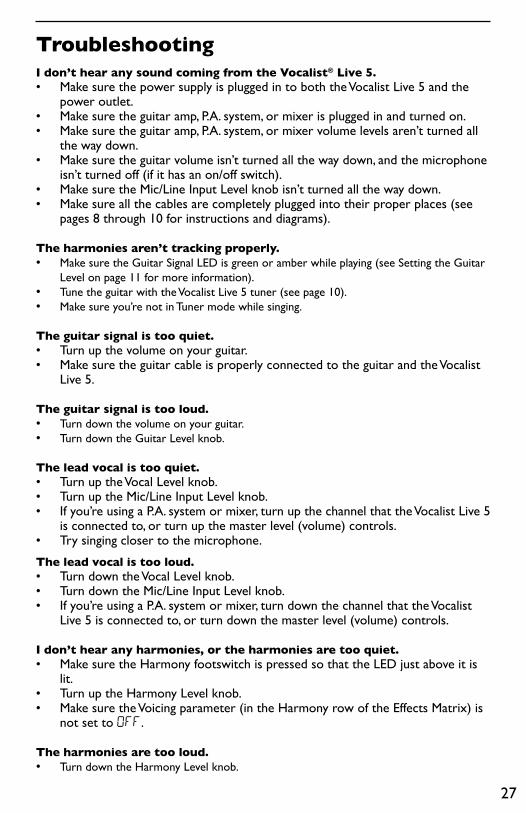
TroubleshootingI don’t hear any sound coming from the Vocalist® Live 5.• Make sure the power supply is plugged in to both the Vocalist Live 5 and the
power outlet.• Make sure the guitar amp, P.A. system, or mixer is plugged in and turned on.• Make sure the guitar amp, P.A. system, or mixer volume levels aren’t turned all
the way down.• Make sure the guitar volume isn’t turned all the way down, and the microphone
isn’t turned off (if it has an on/off switch).• Make sure the Mic/Line Input Level knob isn’t turned all the way down.• Make sure all the cables are completely plugged into their proper places (see
pages 8 through 10 for instructions and diagrams).
The harmonies aren’t tracking properly.• Make sure the Guitar Signal LED is green or amber while playing (see Setting the Guitar
Level on page 11 for more information).• Tune the guitar with the Vocalist Live 5 tuner (see page 10).• Make sure you’re not in Tuner mode while singing.
The guitar signal is too quiet.• Turn up the volume on your guitar.• Make sure the guitar cable is properly connected to the guitar and the Vocalist
Live 5.
The guitar signal is too loud.• Turn down the volume on your guitar.• Turn down the Guitar Level knob.
The lead vocal is too quiet.• Turn up the Vocal Level knob.• Turn up the Mic/Line Input Level knob.• If you’re using a P.A. system or mixer, turn up the channel that the Vocalist Live 5
is connected to, or turn up the master level (volume) controls.• Try singing closer to the microphone.
The lead vocal is too loud.• Turn down the Vocal Level knob.• Turn down the Mic/Line Input Level knob.• If you’re using a P.A. system or mixer, turn down the channel that the Vocalist
Live 5 is connected to, or turn down the master level (volume) controls.
I don’t hear any harmonies, or the harmonies are too quiet.• Make sure the Harmony footswitch is pressed so that the LED just above it is
lit.• Turn up the Harmony Level knob.• Make sure the Voicing parameter (in the Harmony row of the Effects Matrix) is
not set to OFF.
The harmonies are too loud.• Turn down the Harmony Level knob.
28
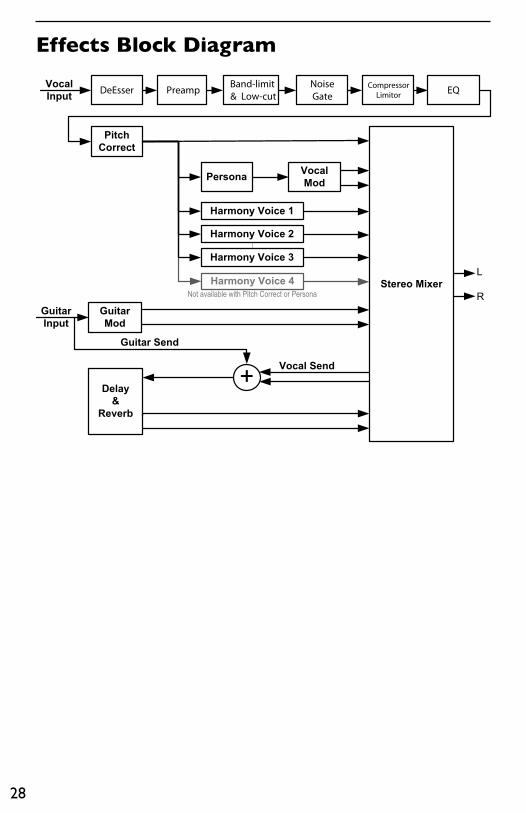
Effects Block Diagram
Delay
&
Reverb
Preamp NoiseGate
Band-limit& Low-cut
Vocal Send
Vocal
InputDeEsser
Stereo Mixer
Pitch
Correct
Harmony Voice 3
Harmony Voice 4L
RGuitar
Mod
Guitar
Input
Harmony Voice 2
Harmony Voice 1
PersonaVocal
Mod
CompressorLimitor EQ
Not available with Pitch Correct or Persona
Guitar Send
29
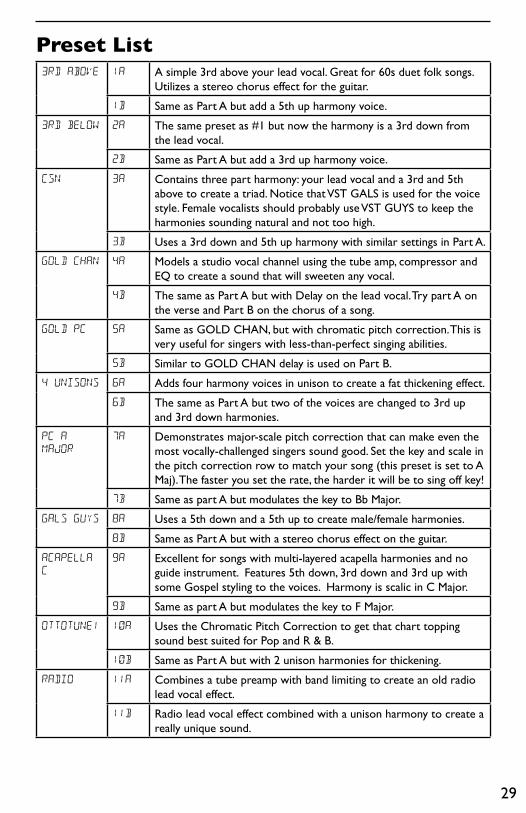
Preset List3RD ABOVE 1A A simple 3rd above your lead vocal. Great for 60s duet folk songs.
Utilizes a stereo chorus effect for the guitar.
1B Same as Part A but add a 5th up harmony voice.
3RD BELOW 2A The same preset as #1 but now the harmony is a 3rd down from the lead vocal.
2B Same as Part A but add a 3rd up harmony voice.
CSN 3A Contains three part harmony: your lead vocal and a 3rd and 5th above to create a triad. Notice that VST GALS is used for the voice style. Female vocalists should probably use VST GUYS to keep the harmonies sounding natural and not too high.
3B Uses a 3rd down and 5th up harmony with similar settings in Part A.
GOLD CHAN 4A Models a studio vocal channel using the tube amp, compressor and EQ to create a sound that will sweeten any vocal.
4B The same as Part A but with Delay on the lead vocal. Try part A on the verse and Part B on the chorus of a song.
GOLD PC 5A Same as GOLD CHAN, but with chromatic pitch correction. This is very useful for singers with less-than-perfect singing abilities.
5B Similar to GOLD CHAN delay is used on Part B.
4 UNISONS 6A Adds four harmony voices in unison to create a fat thickening effect.
6B The same as Part A but two of the voices are changed to 3rd up and 3rd down harmonies.
PC A
MAJOR
7A Demonstrates major-scale pitch correction that can make even the most vocally-challenged singers sound good. Set the key and scale in the pitch correction row to match your song (this preset is set to A Maj). The faster you set the rate, the harder it will be to sing off key!
7B Same as part A but modulates the key to Bb Major.
GALS GUYS 8A Uses a 5th down and a 5th up to create male/female harmonies.
8B Same as Part A but with a stereo chorus effect on the guitar.
ACAPELLA
C
9A Excellent for songs with multi-layered acapella harmonies and no guide instrument. Features 5th down, 3rd down and 3rd up with some Gospel styling to the voices. Harmony is scalic in C Major.
9B Same as part A but modulates the key to F Major.
OTTOTUNE1 10A Uses the Chromatic Pitch Correction to get that chart topping sound best suited for Pop and R & B.
10B Same as Part A but with 2 unison harmonies for thickening.
RADIO 11A Combines a tube preamp with band limiting to create an old radio lead vocal effect.
11B Radio lead vocal effect combined with a unison harmony to create a really unique sound.
30
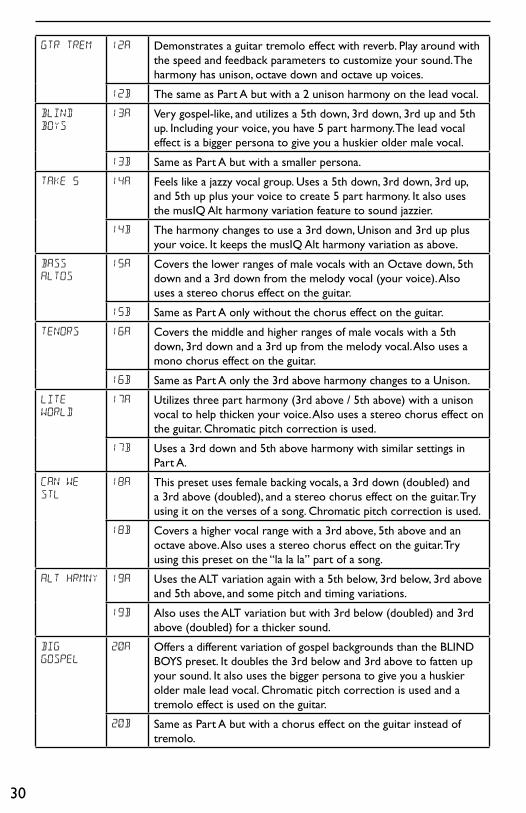
GTR TREM 12A Demonstrates a guitar tremolo effect with reverb. Play around with the speed and feedback parameters to customize your sound. The harmony has unison, octave down and octave up voices.
12B The same as Part A but with a 2 unison harmony on the lead vocal.
BLIND
BOYS
13A Very gospel-like, and utilizes a 5th down, 3rd down, 3rd up and 5th up. Including your voice, you have 5 part harmony. The lead vocal ef fect is a bigger persona to give you a huskier older male vocal.
13B Same as Part A but with a smaller persona.
TAKE 5 14A Feels like a jazzy vocal group. Uses a 5th down, 3rd down, 3rd up, and 5th up plus your voice to create 5 part harmony. It also uses the musIQ Alt harmony variation feature to sound jazzier.
14B The harmony changes to use a 3rd down, Unison and 3rd up plus your voice. It keeps the musIQ Alt harmony variation as above.
BASS
ALTOS
15A Covers the lower ranges of male vocals with an Octave down, 5th down and a 3rd down from the melody vocal (your voice). Also uses a stereo chorus effect on the guitar.
15B Same as Part A only without the chorus effect on the guitar.
TENORS 16A Covers the middle and higher ranges of male vocals with a 5th down, 3rd down and a 3rd up from the melody vocal. Also uses a mono chorus effect on the guitar.
16B Same as Part A only the 3rd above harmony changes to a Unison.
LITE
WORLD
17A Utilizes three part harmony (3rd above / 5th above) with a unison vocal to help thicken your voice. Also uses a stereo chorus effect on the guitar. Chromatic pitch correction is used.
17B Uses a 3rd down and 5th above harmony with similar settings in Part A.
CAN WE
STL
18A This preset uses female backing vocals, a 3rd down (doubled) and a 3rd above (doubled), and a stereo chorus effect on the guitar. Try using it on the verses of a song. Chromatic pitch correction is used.
18B Covers a higher vocal range with a 3rd above, 5th above and an oc tave above. Also uses a stereo chorus effect on the guitar. Try using this preset on the “la la la” part of a song.
ALT HRMNY 19A Uses the ALT variation again with a 5th below, 3rd below, 3rd above and 5th above, and some pitch and timing variations.
19B Also uses the ALT variation but with 3rd below (doubled) and 3rd above (doubled) for a thicker sound.
BIG
GOSPEL
20A Offers a different variation of gospel backgrounds than the BLIND BOYS preset. It doubles the 3rd below and 3rd above to fatten up your sound. It also uses the bigger persona to give you a huskier older male lead vocal. Chromatic pitch correction is used and a tremolo effect is used on the guitar.
20B Same as Part A but with a chorus effect on the guitar instead of tremolo.
31
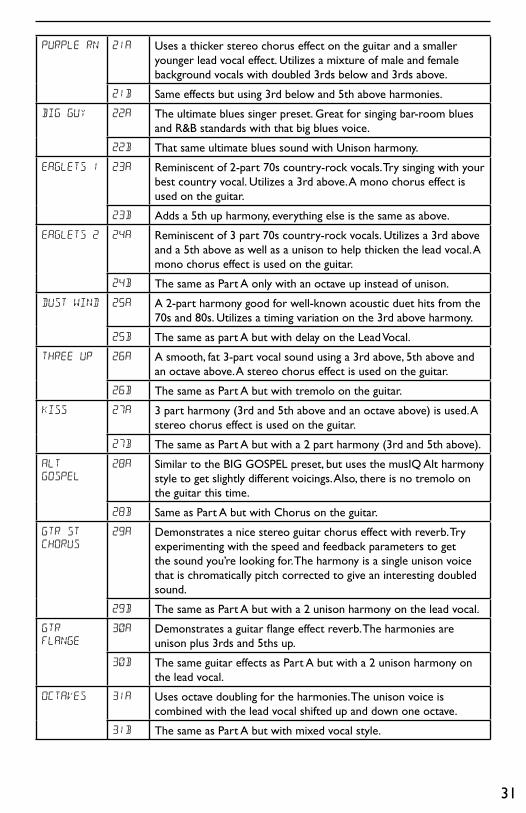
PURPLE RN 21A Uses a thicker stereo chorus effect on the guitar and a smaller younger lead vocal effect. Utilizes a mixture of male and female back ground vocals with doubled 3rds below and 3rds above.
21B Same effects but using 3rd below and 5th above harmonies.
BIG GUY 22A The ultimate blues singer preset. Great for singing bar-room blues and R&B standards with that big blues voice.
22B That same ultimate blues sound with Unison harmony.
EAGLETS 1 23A Reminiscent of 2-part 70s country-rock vocals. Try singing with your best country vocal. Utilizes a 3rd above. A mono chorus effect is used on the guitar.
23B Adds a 5th up harmony, everything else is the same as above.
EAGLETS 2 24A Reminiscent of 3 part 70s country-rock vocals. Utilizes a 3rd above and a 5th above as well as a unison to help thicken the lead vocal. A mono chorus effect is used on the guitar.
24B The same as Part A only with an octave up instead of unison.
DUST WIND 25A A 2-part harmony good for well-known acoustic duet hits from the 70s and 80s. Utilizes a timing variation on the 3rd above harmony.
25B The same as part A but with delay on the Lead Vocal.
THREE UP 26A A smooth, fat 3-part vocal sound using a 3rd above, 5th above and an octave above. A stereo chorus effect is used on the guitar.
26B The same as Part A but with tremolo on the guitar.
KISS 27A 3 part harmony (3rd and 5th above and an octave above) is used. A stereo chorus effect is used on the guitar.
27B The same as Part A but with a 2 part harmony (3rd and 5th above).
ALT
GOSPEL
28A Similar to the BIG GOSPEL preset, but uses the musIQ Alt har mony style to get slightly different voicings. Also, there is no tremolo on the guitar this time.
28B Same as Part A but with Chorus on the guitar.
GTR ST
CHORUS
29A Demonstrates a nice stereo guitar chorus effect with reverb. Try experimenting with the speed and feedback parameters to get the sound you’re looking for. The harmony is a single unison voice that is chromatically pitch corrected to give an interesting doubled sound.
29B The same as Part A but with a 2 unison harmony on the lead vocal.
GTR
FLANGE
30A Demonstrates a guitar flange effect reverb. The harmonies are unison plus 3rds and 5ths up.
30B The same guitar effects as Part A but with a 2 unison harmony on the lead vocal.
OCTAVES 31A Uses octave doubling for the harmonies. The unison voice is com bined with the lead vocal shifted up and down one octave.
31B The same as Part A but with mixed vocal style.
32
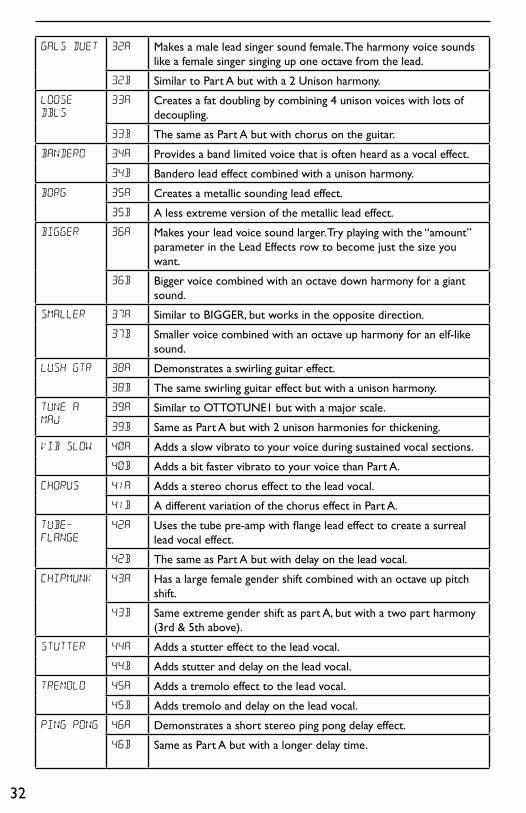
GALS DUET 32A Makes a male lead singer sound female. The harmony voice sounds like a female singer singing up one octave from the lead.
32B Similar to Part A but with a 2 Unison harmony.
LOOSE
DBLS
33A Creates a fat doubling by combining 4 unison voices with lots of decoupling.
33B The same as Part A but with chorus on the guitar.
BANDERO 34A Provides a band limited voice that is often heard as a vocal effect.
34B Bandero lead effect combined with a unison harmony.
BORG 35A Creates a metallic sounding lead effect.
35B A less extreme version of the metallic lead effect.
BIGGER 36A Makes your lead voice sound larger. Try playing with the “amount” parameter in the Lead Effects row to become just the size you want.
36B Bigger voice combined with an octave down harmony for a giant sound.
SMALLER 37A Similar to BIGGER, but works in the opposite direction.
37B Smaller voice combined with an octave up harmony for an elf-like sound.
LUSH GTR 38A Demonstrates a swirling guitar effect.
38B The same swirling guitar effect but with a unison harmony.
TUNE A
MAJ
39A Similar to OTTOTUNE1 but with a major scale.
39B Same as Part A but with 2 unison harmonies for thickening.
VIB SLOW 40A Adds a slow vibrato to your voice during sustained vocal sections.
40B Adds a bit faster vibrato to your voice than Part A.
CHORUS 41A Adds a stereo chorus effect to the lead vocal.
41B A different variation of the chorus effect in Part A.
TUBE-
FLANGE
42A Uses the tube pre-amp with flange lead effect to create a surreal lead vocal effect.
42B The same as Part A but with delay on the lead vocal.
CHIPMUNK 43A Has a large female gender shift combined with an octave up pitch shift.
43B Same extreme gender shift as part A, but with a two part harmony (3rd & 5th above).
STUTTER 44A Adds a stutter effect to the lead vocal.
44B Adds stutter and delay on the lead vocal.
TREMOLO 45A Adds a tremolo effect to the lead vocal.
45B Adds tremolo and delay on the lead vocal.
PING PONG 46A Demonstrates a short stereo ping pong delay effect.
46B Same as Part A but with a longer delay time.
33
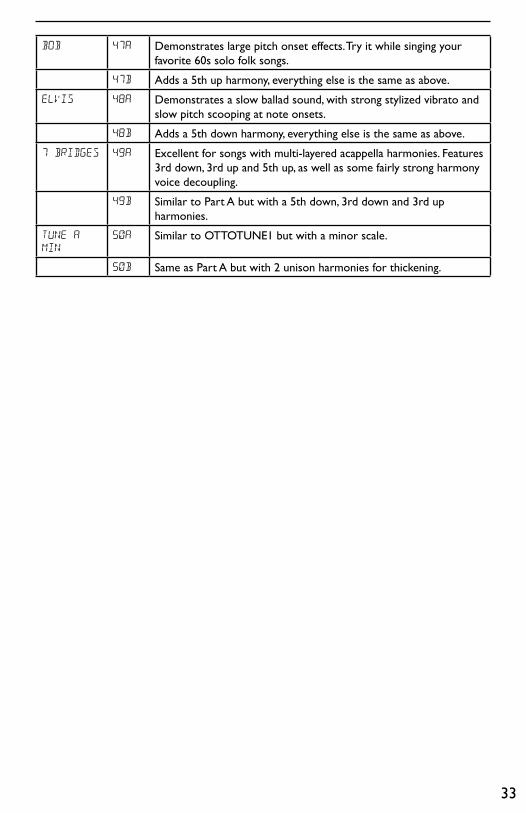
BOB 47A Demonstrates large pitch onset effects. Try it while singing your favorite 60s solo folk songs.
47B Adds a 5th up harmony, everything else is the same as above.
ELVIS 48A Demonstrates a slow ballad sound, with strong stylized vibrato and slow pitch scooping at note onsets.
48B Adds a 5th down harmony, everything else is the same as above.
7 BRIDGES 49A Excellent for songs with multi-layered acappella harmonies. Features 3rd down, 3rd up and 5th up, as well as some fairly strong harmony voice decoupling.
49B Similar to Part A but with a 5th down, 3rd down and 3rd up harmonies.
TUNE A
Min
50A Similar to OTTOTUNE1 but with a minor scale.
50B Same as Part A but with 2 unison harmonies for thickening.
34
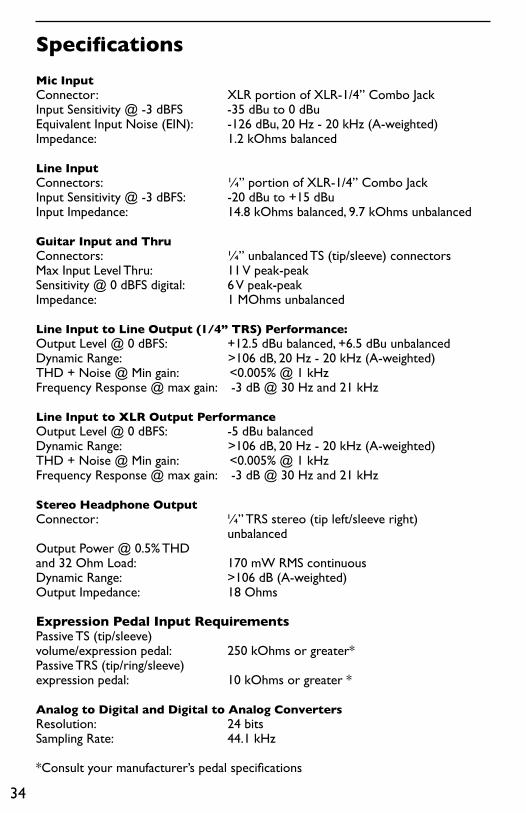
Specifications
Mic InputConnector: XLR portion of XLR-1/4” Combo JackInput Sensitivity @ -3 dBFS -35 dBu to 0 dBuEquivalent Input Noise (EIN): -126 dBu, 20 Hz - 20 kHz (A-weighted) Impedance: 1.2 kOhms balanced
Line Input Connectors: ¼” portion of XLR-1/4” Combo Jack Input Sensitivity @ -3 dBFS: -20 dBu to +15 dBuInput Impedance: 14.8 kOhms balanced, 9.7 kOhms unbalanced
Guitar Input and ThruConnectors: ¼” unbalanced TS (tip/sleeve) connectorsMax Input Level Thru: 11 V peak-peakSensitivity @ 0 dBFS digital: 6 V peak-peakImpedance: 1 MOhms unbalanced
Line Input to Line Output (1/4” TRS) Performance:Output Level @ 0 dBFS: +12.5 dBu balanced, +6.5 dBu unbalancedDynamic Range: >106 dB, 20 Hz - 20 kHz (A-weighted) THD + Noise @ Min gain: <0.005% @ 1 kHz Frequency Response @ max gain: -3 dB @ 30 Hz and 21 kHz
Line Input to XLR Output PerformanceOutput Level @ 0 dBFS: -5 dBu balancedDynamic Range: >106 dB, 20 Hz - 20 kHz (A-weighted) THD + Noise @ Min gain: <0.005% @ 1 kHz Frequency Response @ max gain: -3 dB @ 30 Hz and 21 kHz
Stereo Headphone OutputConnector: ¼” TRS stereo (tip left/sleeve right) unbalanced Output Power @ 0.5% THD and 32 Ohm Load: 170 mW RMS continuousDynamic Range: >106 dB (A-weighted)Output Impedance: 18 Ohms
Expression Pedal Input RequirementsPassive TS (tip/sleeve) volume/expression pedal: 250 kOhms or greater*Passive TRS (tip/ring/sleeve) expression pedal: 10 kOhms or greater *
Analog to Digital and Digital to Analog ConvertersResolution: 24 bitsSampling Rate: 44.1 kHz
*Consult your manufacturer’s pedal specifications
35
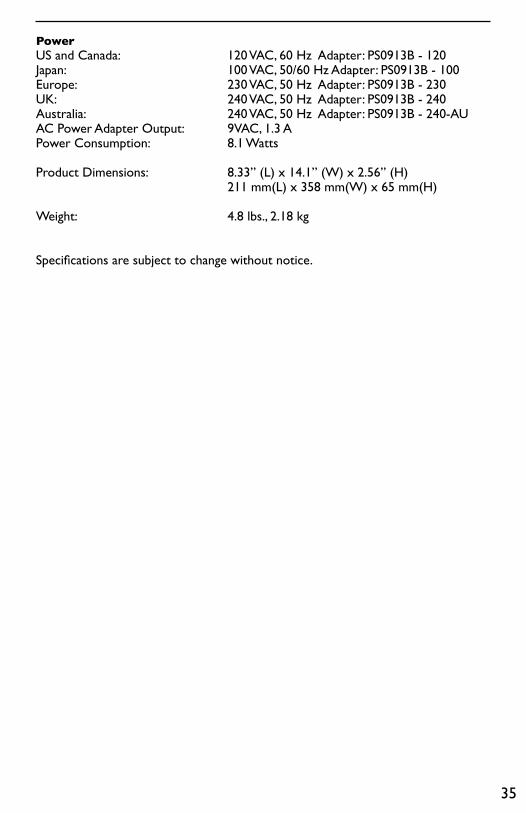
PowerUS and Canada: 120 VAC, 60 Hz Adapter: PS0913B - 120Japan: 100 VAC, 50/60 Hz Adapter: PS0913B - 100Europe: 230 VAC, 50 Hz Adapter: PS0913B - 230UK: 240 VAC, 50 Hz Adapter: PS0913B - 240Australia: 240 VAC, 50 Hz Adapter: PS0913B - 240-AUAC Power Adapter Output: 9VAC, 1.3 APower Consumption: 8.1 Watts
Product Dimensions: 8.33” (L) x 14.1” (W) x 2.56” (H) 211 mm(L) x 358 mm(W) x 65 mm(H)
Weight: 4.8 lbs., 2.18 kg
Specifications are subject to change without notice.


10653 S. River Front Parkway, Suite 300South Jordan, UT 84095, USA
Sandy, Utah 84070PH (801) 566-8800 FAX (801) 566-7005
Vocalist® Live 5 Owner’s Manual 18-0776V-B
© 2016 Harman, all rights reserved.
Vocalist is a registered trademark of Harman, Inc.
musIQ® is a registered trademark of 3dB Research Ltd.
Printed in China