visualworks: database developers guide - cincom smalltalk
TRANSCRIPT

Cincom Smalltalk™
Database ApplicationDeveloper's Guide
P46-0128-07
S I M P L I F I C A T I O N T H R O U G H I N N O V A T I O N ®
InstallGuide Cover 0107 1/17/07 10:19 AM Page 1
© 1995–2009 Cincom Systems, Inc.
All rights reserved.
This product contains copyrighted third-party software.
Part Number: P46-0128-07
Software Release 7.7
This document is subject to change without notice.
RESTRICTED RIGHTS LEGEND:
Use, duplication, or disclosure by the Government is subject to restrictions as set forth in subparagraph (c)(1)(ii) of the Rights in Technical Data and Computer Software clause at DFARS 252.227-7013.
Trademark acknowledgments:
CINCOM, CINCOM SYSTEMS, the Cincom logo and Cincom Smalltalk logo are registered trademarks of Cincom Systems, Inc. ParcPlace and VisualWorks are trademarks of Cincom Systems, Inc., its subsidiaries, or successors and are registered in the United States and other countries. ObjectLens, ObjectSupport, Cincom Smalltalk, Database Connect, DLL & C Connect, COM Connect, and StORE are trademarks of Cincom Systems, Inc., its subsidiaries, or successors. ENVY is a registered trademark of Object Technology International, Inc. All other products or services mentioned herein are trademarks of their respective companies. Specifications subject to change without notice.
The following copyright notices apply to software that accompanies this documentation:
VisualWorks is furnished under a license and may not be used, copied, disclosed, and/or distributed except in accordance with the terms of said license. No class names, hierarchies, or protocols may be copied for implementation in other systems.This manual set and online system documentation © 1995–2009 by Cincom Systems, Inc. All rights reserved. No part of it may be copied, photocopied, reproduced, translated, or reduced to any electronic medium or machine-readable form without prior written consent from Cincom.
Cincom Systems, Inc.
55 Merchant Street
Cincinnati, Ohio 45246
Phone: (513) 612-2300
Fax: (513) 612-2000
World Wide Web: http://www.cincom.com
About This Book
The VisualWorks® Database Connect provides support for accessing relational databases from within a VisualWorks application. A variety of industry-standard database servers are supported, including Oracle, Sybase, ODBC, and PostgreSQL. This guide describes the general database access features for VisualWorks and the particular implementations for specific vendors.
AudienceThis guide presumes that you are familiar with relational database systems (RDBMS) and the SQL query language.
Some chapters in this book also presuppose a general knowledge of object-oriented concepts, Smalltalk, and the VisualWorks environment.
For an overview of Smalltalk, the VisualWorks development environment and its application architecture, see the VisualWorks Application Developer’s Guide.
OverviewThe VisualWorks Database framework is divided into two parts:
• External Database Interface (EXDI)
• Object Lens
The EXDI provides a basic, lower-level API for database access, connection and session control, SQL operations and simple object mapping. To the EXDI, the Object Lens adds more elaborate object-relational mapping features, including tools for building Smalltalk classes from tables in an existing database.
Database Application Developer’s Guide iii
About This Book
If your application requires an API for basic database access, then you may only need to use the EXDI. If, however, you require more elaborate object-relational mapping, or you wish to use GUI tools to model tables in an existing database, then you also need to use the Lens.
Accordingly, this guide begins with a discussion of the EXDI, and then continues with a presentation of the Object Lens.
If you intend to primarily use the EXDI, we suggest beginning your review of this guide with Configuring Database Support and EXDI Database Interface. Specific discussions of Oracle, Sybase, and ODBC APIs follow.
For developers who wish to focus on the Object Lens and its tools, we suggest briefly skimming the discussion of the EXDI, and then focusing on Developing a Database Application and Building a Data Model.
Conventions
We have followed a variety of conventions, which are standard in the VisualWorks documentation.
Typographic ConventionsThe following fonts are used to indicate special terms:
Example Description
template Indicates new terms where they are defined, emphasized words, book titles, and words as words.
cover.doc Indicates filenames, pathnames, commands, and other constructs to be entered outside VisualWorks (for example, at a command line).
filename.xwd Indicates a variable element for which you must substitute a value.
windowSpec Indicates Smalltalk constructs; it also indicates any other information that you enter through the VisualWorks graphical user interface.
Edit menu Indicates VisualWorks user-interface labels for menu names, dialog-box fields, and buttons; it also indicates emphasis in Smalltalk code samples.
iv VisualWorks

Conventions
Special SymbolsThis book uses the following symbols to designate certain items or relationships:
Mouse Buttons and MenusVisualWorks supports a one-, two-, or three-button mouse common on various platforms. Smalltalk traditionally expects a three-button mouse, where the buttons are denoted by the logical names <Select>, <Operate>, and <Window>:
These buttons correspond to the following mouse buttons or combinations:
Examples Description
File > New Indicates the name of an item (New) on a menu (File).
<Return> key
<Select> button
<Operate> menu
Indicates the name of a keyboard key or mouse button; it also indicates the pop-up menu that is displayed by pressing the mouse button of the same name.
<Control>-<g> Indicates two keys that must be pressed simultaneously.
<Escape> <c> Indicates two keys that must be pressed sequentially.
Integer>>asCharacter Indicates an instance method defined in a class.
Float class>>pi Indicates a class method defined in a class.
<Select> button Select (or choose) a window location or a menu item, position the text cursor, or highlight text.
<Operate> button Bring up a menu of operations that are appropriate for the current view or selection. The menu that is displayed is referred to as the <Operate> menu.
<Window> button Bring up the menu of actions that can be performed on any VisualWorks window (except dialogs), such as move and close. The menu that is displayed is referred to as the <Window> menu.
3-Button 2-Button 1-Button
<Select> Left button Left button Button
Database Application Developer’s Guide v
About This Book
Note: This is a different arrangement from how VisualWorks used the middle and right buttons prior to 5i.2.If you want the old arrangement, toggle the Swap Middle and Right Button checkbox on the UI Feel page of the Settings Tool.
Getting HelpThere are many sources of technical help available to users of VisualWorks. Cincom technical support options are available to users who have purchased a commercial license. Public support options are available to both commercial and non-commercial license holders.
Commercial LicenseesIf, after reading the documentation, you find that you need additional help, you can contact Cincom Technical Support. Cincom provides all customers with help on product installation. For other problems there are several service plans available. For more information, send email to [email protected].
Before Contacting Technical SupportWhen you need to contact a technical support representative, please be prepared to provide the following information:
• The version id, which indicates the version of the product you are using. Choose Help > About VisualWorks in the VisualWorks main window. The version number can be found in the resulting dialog under Version Id:.
• Any modifications (patch files) distributed by Cincom that you have imported into the standard image. Choose Help > About VisualWorks in the VisualWorks main window. All installed patches can be found in the resulting dialog under Patches:.
• The complete error message and stack trace, if an error notifier is the symptom of the problem. To do so, select copy stack in the error notifier window (or in the stack view of the spawned Debugger). Then paste the text into a file that you can send to technical support.
<Operate> Right button Right button <Option>+<Select>
<Window> Middle button <Ctrl> + <Select> <Command>+<Select>
3-Button 2-Button 1-Button
vi VisualWorks
Getting Help
Contacting Technical Support Cincom Technical Support provides assistance by:
Electronic MailTo get technical assistance on VisualWorks products, send email to [email protected].
WebIn addition to product and company information, technical support information is available on the Cincom website:
http://supportweb.cincom.comTelephone
Within North America, you can call Cincom Technical Support at (800) 727-3525. Operating hours are Monday through Friday from 8:30 a.m. to 5:00 p.m., Eastern time.
Outside North America, you must contact the local authorized reseller of Cincom products to find out the telephone numbers and hours for technical support.
Non-Commercial LicenseesVisualWorks Non-Commercial is provided “as is,” without any technical support from Cincom. There are, however, on-line sources of help available on VisualWorks and its add-on components. Be assured, you are not alone. Many of these resources are valuable to commercial licensees as well.
The University of Illinois at Urbana-Champaign very kindly provides several resources on VisualWorks and Smalltalk:
• A mailing list for users of VisualWorks Non-Commercial, which serves a growing community of VisualWorks Non-Commercial users. To subscribe or unsubscribe, send a message to:
with the SUBJECT of "subscribe" or "unsubscribe". You can then address emails to [email protected].
• A Wiki (a user-editable web site) for discussing any and all things VisualWorks related at:
http://www.cincomsmalltalk.com/CincomSmalltalkWiki
The Usenet Smalltalk news group, comp.lang.smalltalk, carries on active discussions about Smalltalk and VisualWorks, and is a good source for advice.
Database Application Developer’s Guide vii

About This Book
Additional Sources of InformationThis is but one manual in the VisualWorks library. The Cincom Smalltalk publications website:
http://www.cincomsmalltalk.com/documentation/
is a resource for the most up to date versions of VisualWorks manuals and additional information pertaining to Cincom Smalltalk.
Online HelpVisualWorks includes an online help system.
To display the online documentation browser, open the Help pull-down menu from the VisualWorks main menu bar and select one of the help options.
News GroupsThe Smalltalk community is actively present on the internet, and willing to offer helpful advice. A common meeting place is the comp.lang.smalltalk news group. Discussion of VisualWorks and solutions to programming issues are common.
VisualWorks WikiA wiki server for VisualWorks is running and can be accessed at:
http://brain.cs.uiuc.edu:8080/VisualWorks.1This is becoming an active place for exchanges of information about VisualWorks. You can ask questions and, in most cases, get a reply in a couple of days.
Commercial PublicationsSmalltalk in general, and VisualWorks in particular, is supported by a large library of documents published by major publishing houses. Check your favorite technical bookstore or online book seller.
viii VisualWorks
Contents
Chapter 1 Configuring Database Support 1-1
Loading Database Support ......................................................................................1-1Preparing a Database Connection ...........................................................................1-2
Environment Strings ....................................................................................1-2Oracle Library Access on UNIX Platforms ..................................................1-2Setting the Database Login Defaults ...........................................................1-3Setting the Object Lens Login Defaults .......................................................1-3Testing the Database Connection ...............................................................1-4Troubleshooting Oracle Access ...................................................................1-5
Installing Examples and Data ...................................................................................1-6Loading the EXDI Workbook .......................................................................1-6Setting Up the Example Lens Application ...................................................1-7
Chapter 2 EXDI Database Interface 2-1
EXDI Framework ......................................................................................................2-1Data Interchange ......................................................................................................2-2Using Database Connections ...................................................................................2-3
Securing Passwords ....................................................................................2-4Getting the Details Right .............................................................................2-4Setting a Default Environment .....................................................................2-5Default Connections ....................................................................................2-5External Authentication ...............................................................................2-6On the Importance of Disconnecting ...........................................................2-6
Using Sessions ........................................................................................................2-7Variables in Queries ....................................................................................2-8Named Input Binding ...................................................................................2-9
Binding NULL .................................................................................2-9Getting Answers .....................................................................................................2-10
Handling Multiple Answer Sets ..................................................................2-12Sending an Answer Message ....................................................................2-12
Waiting for the Server ...................................................................2-13Did the Query Succeed? ..............................................................2-13
Database Application Developer’s Guide xi

How Many Rows were Affected? ................................................. 2-13Describing the Answer Set .......................................................... 2-13Buffers and Adaptors ................................................................... 2-14Processing an Answer Stream ..................................................... 2-14
Using Cursors and Scrollable Cursors ...................................................... 2-15Using an Output Template ........................................................................ 2-18
Skipping Slots in an Output Template .......................................... 2-18Using Column Names to Bind for Output ..................................... 2-19Reusing the Output Template ...................................................... 2-20
Setting a Block Factor to Improve Performance ........................................ 2-20Cancelling an Answer Set ......................................................................... 2-20Disconnecting the Session ....................................................................... 2-21
Controlling Transactions ........................................................................................ 2-21Coordinated Transactions ......................................................................... 2-21
Releasing Resources ............................................................................................ 2-22Tracing the Flow of Execution ................................................................................ 2-22
Directing Trace Output .............................................................................. 2-23Setting the Trace Level ............................................................................. 2-23Disabling Tracing ...................................................................................... 2-23Adding Your Own Trace Information ......................................................... 2-24
Error Handling ....................................................................................................... 2-24Exceptions and Error Information ............................................................. 2-25Exception Handling ................................................................................... 2-25Choosing an Exception to Handle ............................................................ 2-26Exceptions and Stored Procedures .......................................................... 2-27
OEM Encoding ...................................................................................................... 2-27Image Save and Restart Considerations ............................................................... 2-28
Reconnecting When an Image is Restarted ............................................. 2-29
Chapter 3 Using the Database Connect for Oracle 3-1
Database Connect for Oracle Classes .................................................................... 3-1OracleConnection .................................................................................................... 3-2
Class Protocols ........................................................................................... 3-2environment mapping .................................................................... 3-2
Instance Protocols ...................................................................................... 3-3accessing ....................................................................................... 3-3transactions ................................................................................... 3-3
OracleSession ......................................................................................................... 3-3Instance Protocols ...................................................................................... 3-4
accessing ....................................................................................... 3-4data processing ............................................................................. 3-4prefetch .......................................................................................... 3-5
xii VisualWorks

testing .............................................................................................3-5OracleColumnDescription ........................................................................................3-6
Instance Protocols .......................................................................................3-6accessing .......................................................................................3-6
OracleError ...............................................................................................................3-6Instance Protocols .......................................................................................3-6
accessing .......................................................................................3-6Data Conversion and Binding ...................................................................................3-7
Binding NULL and Backward Compatibility .................................................3-8Binding Numbers and Conversion ...............................................................3-8Array Binding ...............................................................................................3-9
Using PL/SQL ........................................................................................................3-11Preparing a PL/SQL Query .......................................................................3-11Executing a PL/SQL Query .......................................................................3-12Binding PL/SQL Variables .........................................................................3-12Variable Type and Size ..............................................................................3-13Retrieving PL/SQL Variables .....................................................................3-14
Oracle Threaded API .............................................................................................3-14Configuring the Threaded API ...................................................................3-15Using OracleThreadedConnection ............................................................3-15Connection Pooling ...................................................................................3-15Using THAPI with the Object Lens ............................................................3-17
Calling Oracle Stored Procedures ..........................................................................3-19Statement Caching .................................................................................................3-21CLOB/BLOB support ..............................................................................................3-22
Adjustable Buffering for LOBs ...................................................................3-25
Chapter 4 Using the ODBC Connect 4-1
ODBC EXDI Classes ................................................................................................4-1ODBCConnection .....................................................................................................4-2
Transactions ................................................................................................4-2Instance Protocols .......................................................................................4-3
accessing .......................................................................................4-3ODBCSession ..........................................................................................................4-3
Instance Protocols .......................................................................................4-4catalog functions ............................................................................4-4data processing ..............................................................................4-6testing .............................................................................................4-6
ODBCColumnDescription ........................................................................................4-6ODBCError ...............................................................................................................4-7ODBCDataSource ....................................................................................................4-7
Instance Protocols .......................................................................................4-7
Database Application Developer’s Guide xiii

accessing ....................................................................................... 4-7Data Conversion and Binding .................................................................................. 4-8
Restrictions on Binding ............................................................................... 4-9Unicode Support ...................................................................................................... 4-9
Storing and Retrieving Unicode ................................................................ 4-10Using Stored Procedures ...................................................................................... 4-11
Preparing a Stored Procedure Query ....................................................... 4-12Executing a Query .................................................................................... 4-12Binding Variables for Stored Procedures .................................................. 4-12Retrieving Stored Procedure Variables ..................................................... 4-14
Large Objects ........................................................................................................ 4-14Support for Large Objects ........................................................................ 4-14Binding for Input ........................................................................................ 4-15Binding for Output ..................................................................................... 4-15Restrictions on Retrieving Large Objects ................................................. 4-16
Support for Multiple Active Result Sets (MARS) .................................................... 4-16
Chapter 5 Using the DB2 Connect 5-1
DB2 EXDI Classes .................................................................................................. 5-2DB2Connection ....................................................................................................... 5-2
Instance Protocols ...................................................................................... 5-3blob functions ................................................................................. 5-3datalink functions ........................................................................... 5-3
DB2Session ............................................................................................................. 5-3Transactions ................................................................................................ 5-3Executing Queries ...................................................................................... 5-4Instance Protocols ...................................................................................... 5-4
accessing ....................................................................................... 5-4data processing ............................................................................. 5-5catalog functions ............................................................................ 5-6
Data Conversion and Binding .................................................................................. 5-7Restrictions on Binding ............................................................................... 5-8
Using Stored Procedures ........................................................................................ 5-9Examples .................................................................................................. 5-10
Large Objects ........................................................................................................ 5-12Binding for Input ........................................................................................ 5-12Fetch Multiple LOBs in One Execution ..................................................... 5-14Using Locators .......................................................................................... 5-15
Large Object File References ................................................................................ 5-15Instance Protocols .................................................................................... 5-16
instance creation .......................................................................... 5-16public protocol .............................................................................. 5-16
xiv VisualWorks

file creation options ......................................................................5-16Using LOB File References .......................................................................5-16
Using Data Links ....................................................................................................5-17Instance Protocols .....................................................................................5-17
accessing .....................................................................................5-17Threaded API .........................................................................................................5-18
Using the Threaded API ............................................................................5-19Known Limitations ..................................................................................................5-19
Chapter 6 Using the Database Connect for Sybase CTLib 6-1
CTLib EXDI Classes ................................................................................................6-1CTLibConnection .....................................................................................................6-2
Class Protocols ...........................................................................................6-2environment mapping .....................................................................6-2
Instance Protocols .......................................................................................6-3accessing ......................................................................................6-3control ............................................................................................6-4
CTLibSession ...........................................................................................................6-4Instance Protocols .......................................................................................6-4
accessing .......................................................................................6-4data processing .............................................................................6-5
Using Cursors and Scrollable Cursors ........................................................6-5CTLibColumnDescription .........................................................................................6-6
Instance Protocols .......................................................................................6-6accessing ......................................................................................6-6
CTLibError ................................................................................................................6-6Instance Protocols .......................................................................................6-6
accessing ......................................................................................6-6Data Conversion and Binding ...................................................................................6-8Exception Handling ..................................................................................................6-8Calling Sybase Stored Procedures ..........................................................................6-9Sybase Threaded API ............................................................................................6-10
Limitations .................................................................................................6-11Using CTLibThreadedConnection .............................................................6-11Example ....................................................................................................6-11
Chapter 7 Developing a Database Application 7-1
Overview ..................................................................................................................7-1VisualWorks Application Structure ...........................................................................7-2Components of a Database Application ...................................................................7-3
Entity Classes .............................................................................................7-4Database Application Class ........................................................................7-5
Database Application Developer’s Guide xv

Main Window ................................................................................ 7-6Data Model .................................................................................... 7-6Lens Session ................................................................................. 7-7
Data Form Classes ..................................................................................... 7-7Data Form Canvases ..................................................................... 7-8Queries .......................................................................................... 7-9
VisualWorks Database Tools ................................................................................. 7-10Data Modeler ............................................................................................ 7-10Mapping Tool ............................................................................................ 7-10Database Tables Viewer ........................................................................... 7-10Query Editor ............................................................................................. 7-10Menu Query Editor ................................................................................... 7-11Ad Hoc SQL Tool ...................................................................................... 7-11Canvas Composer .................................................................................... 7-11Tool Extensions ........................................................................................ 7-11
To the Palette ............................................................................... 7-11To the Canvas Tool ...................................................................... 7-11
Lens Name Space Control .................................................................................... 7-12Name Space Options ................................................................................ 7-12
Chapter 8 Building a Data Model 8-1
An Example Data Model .......................................................................................... 8-1Create a New Data Model ....................................................................................... 8-3Defining Database Entities ...................................................................................... 8-4
Define Entities from an Existing Table ........................................................ 8-4Create Entities for a New Table .................................................................. 8-7
Creating Relations Between Entities ..................................................................... 8-11Create Relations Automatically ................................................................. 8-11Create Relations Manually ........................................................................ 8-13
Check and Save the Data Model .......................................................................... 8-13
Chapter 9 Creating a Data Form 9-1
Generating a Data Form .......................................................................................... 9-1Connecting a Data Form to an Application .............................................................. 9-6Testing an Application .............................................................................................. 9-7Replacing Input Fields with Other Widgets .............................................................. 9-7
Embedding a Data Form ........................................................................... 9-10Editing a Query ......................................................................................... 9-11Removing the Fetch Button ...................................................................... 9-12
Creating a Custom Data Form Template ............................................................... 9-12Specifying an Aspect Path ..................................................................................... 9-13
xvi VisualWorks

Chapter 10 Lens Programmatic API 10-1
Connecting to a Database ......................................................................................10-1Using a Lens Session Connection from an Application .............................10-1Getting an Unconnected Session from a Data Model ...............................10-2
Performing a Query ................................................................................................10-3Sending a Query to a Lens Session ..........................................................10-4Limiting the Number of Rows Fetched ......................................................10-4Processing on Individual Rows from a Lens Session ................................10-5
Beginning and Ending Transactions .......................................................................10-6Adding Objects to the Database ............................................................................10-7Removing an Object from the Database ................................................................10-8Updating Objects in a Database ..........................................................................10-10
Posting Changes for Multiple Objects .....................................................10-11Generating Sequence Numbers ...........................................................................10-11
Using Database Generated Sequence Numbers ....................................10-11Generating Sequence Numbers in Lens .................................................10-12
Reusing an Interface with a Different DBMS ........................................................10-14Basing a Data Form or Query on Multiple Tables .................................................10-15
Using Object Navigation ..........................................................................10-15Using a Database Join ............................................................................10-15
Responding to Transaction Events .......................................................................10-16Accepting Edits Automatically at Commit Time ....................................................10-17
Verifying Before Committing ....................................................................10-18Disconnecting and Reconnecting .........................................................................10-18Maintaining Collections ........................................................................................10-19
Creating a Child Set Via Foreign-Key References ..................................10-19Maintaining a Collection With a Query ....................................................10-20
Chapter 11 Writing Queries 11-1
Editing a Query ......................................................................................................11-1Query Syntax .........................................................................................................11-2
“From” Clause ...........................................................................................11-3“Select” Clause ..........................................................................................11-3
Example 1 ....................................................................................11-4Example 2 ....................................................................................11-4Example 3 ....................................................................................11-4Example 4 ....................................................................................11-4Example 5 ....................................................................................11-5
“Where” Clause .........................................................................................11-5Example 1 ....................................................................................11-5Example 2 ....................................................................................11-5Example 3 ....................................................................................11-5
Database Application Developer’s Guide xvii

Example 4 .................................................................................... 11-5Example 5 .................................................................................... 11-6Example 6 .................................................................................... 11-6Example 7 .................................................................................... 11-6Example 8 .................................................................................... 11-6
“Order By” Clause ..................................................................................... 11-7“Group By” Clause .................................................................................... 11-7
Alternate SQL ........................................................................................................ 11-7Editing Generated SQL ............................................................................. 11-7Programmatically Modifying SQL ............................................................. 11-8Constants in the Object Lens .................................................................... 11-9
xviii VisualWorks

1
Configuring Database SupportVisualWorks Database support is provided in several parcels. This chapter describes how to get the support properly installed in the development image, how to load example code, and how to resolve some common configuration issues.
VisualWorks provides EXDI support for Oracle, Sybase, ODBC, MySQL, and DB2. A PostgresSQL EXDI is available as a contributed component, though it is not supported by Cincom. The Object Lens may be used only with Oracle, Sybase, and DB2.
Loading Database SupportBasic database support is contained in four parcels provided with the standard VisualWorks release:
• Database.pcl
• Lens-Runtime.pcl (runtime functionality)
• Lens-Dev.pcl (full development functionality)
• LDM-Framework.pcl (used by the Store toolset)
Database-specific extensions (e.g. Oracle, PostgreSQL) are provided as options during installation of VisualWorks. When installing by hand, copy the parcels containing support for your database to either the /parcels or /database subdirectory of the VisualWorks installation.
To load the database support parcels into your image, open the Parcel Manager (select System > Parcel Manager in the Launcher window), select the suggested Database extensions, and load the EXDI and/or Lens parcels by double-clicking on the desired items in the upper-right-hand list of the Parcel Manager.
Database Application Developer’s Guide 1-1

Configuring Database Support
Preparing a Database ConnectionIn general, setting up your database software to work with VisualWorks should be straightforward. This section addresses a few setup issues that can occur, and explains how to test your database connection.
Environment StringsThe Database Connect requires that you enter a database environment string. This can be any string that identifies the database, according to conventions for the specific database and platform.
Throughout this document we will assume your database is configured such that an environment string in the following format is recognized:
<host_name>_<dbSID>For example:
ocelot_ORCLwould identify an Oracle database named ORCL on the system named ocelot, as defined in the TNSNAMES.ORA configuration file.
If you do not know the environment string for your database, consult your database administrator or the database administration documentation.
Oracle Library Access on UNIX PlatformsStarting with VisualWorks 3.0, all database libraries are dynamically bound to the object engine, using shared libraries.
To access these libraries, it is essential that the UNIX environment variable LD_LIBRARY_PATH contains the path containing these libraries. For example, enter this line in your script file:
• for Solaris: setenv LD_LIBRARY_PATH
• for HPUX: SHLIB_PATH
For details on setting the environment variable correctly, see Troubleshooting Oracle Access.
1-2 VisualWorks

Preparing a Database Connection
Setting the Database Login DefaultsYou can create database profiles with login and environment settings as part of your VisualWorks image, which are available to all VisualWorks tools and to the applications that you build. These profiles are available in all database connection dialog boxes.
You can also create profiles from within any database connection dialog (by editing the properties and then clicking on Save... to define the profile’s name).
To set your database login information:
1 In the VisualWorks Launcher window, choose System > Settings.
2 In the Settings tool, select the Database - Profiles page by clicking on its tab (listed under Tools).
3 On the profiles Settings page, click Add... to create a new profile.
4 Enter a Name for the database profile, the Interface to use (e.g., OracleConnection), the Environment (e.g. ocelot_ORCL), User Name, and Password.
5 When finished, click OK.
6 Return to the Launcher window and save your VisualWorks image by choosing File > Save Image As....
Any database profiles you have created are now a part of the VisualWorks image, available to all database applications.
You can also export these profiles as an XML-format file, which can be used to import your profiles into other images. To save all profiles in a single XML file, select Database - Profiles in the tree of settings, and then choose Save Page... from the <Operate> menu.
Setting the Object Lens Login DefaultsTo use the Object Lens functionality, you need to set up a distinct Lens profile. Skip this discussion if you only wish to use the EXDI layer of the database connect.
The Object Lens requires a username and password for the Lens tools (a developer login that has rights to create tables), and a separate individual username for executing Lens applications.
To set the Lens connection profile:
1 In the VisualWorks Launcher window, choose System > Settings.
Database Application Developer’s Guide 1-3

Configuring Database Support
2 In the Settings tool, select the Database - Lens page by clicking on its tab (listed under Tools).
3 Enter the Developer name, password, and environment that you use to log in to your database. These are the defaults used by the Database Development Tools.
4 Enter the default User name and Password for individuals using your application to access databases. These are the defaults for user applications, which appear in database access dialog boxes.
5 When finished, click OK.
6 Return to the Launcher window and save your VisualWorks image by choosing File > Save Image As....
Testing the Database ConnectionWith the database support parcels loaded, follow these steps to test your database connection:
1 In the VisualWorks Launcher window, choose Tools > Database > Ad Hoc SQL to open the Ad Hoc SQL tool.
2 In the Ad Hoc SQL tool, click on the Connect button.
3 In the login dialog, select the desired connection profile, and click Connect (you can also create a new connection profile from this dialog; for details, see Setting the Database Login Defaults).
If the connection is successful, the Connect button in the Ad Hoc SQL tool is disabled and the Disconnect button is enabled.
If the connection is not successful, verify that:
• The VisualWorks Database Connect product (e.g., Oracle, Sybase, etc.) for your database management system has been installed on your system and is available from your image.
1-4 VisualWorks

Preparing a Database Connection
• Your database vendor’s client and server software and networking have been installed and configured properly.
4 Click Disconnect and close the Ad Hoc SQL tool.
Troubleshooting Oracle AccessSometimes it is difficult to properly configure Oracle client libraries, because Oracle tends to change their file structure from release to release. Also, you can install several different versions of the Oracle client library on a single machine. This means that proper configuration requires that the developer have a more detailed understanding of the installation on a given platform.
The VisualWorks Oracle Connect relies solely upon the environment variable to find the right library files to load. The folder which contains OCI.DLL must be included in the environment variable (e.g., PATH on Windows) so that VisualWorks can find the right OCI.DLL to load.
On machines that have multiple Oracle clients installed, the folder containing the desired OCI.DLL should appear first (meaning before other Oracle clients' folders) in the list of environment variables. Oracle provides a tool called Home Selector that can help you to select the desired version, or you can do it manually.
To set the path manually under Windows, modify the environment variable so that the folder containing the OCI.DLL you want to use appears the first in the environment string (including the full path).
1 For example, under Windows XP, open the System control panel and select the Advanced tab.
2 On the Advanced tab, click the Environment Variables button.
3 In the Environment Variables dialog, select Path from the list of System variables, and click Edit.
4 In the editing dialog, enter the appropriate value. Note that this input field may contain a very long string of text. It is probably best to just keyboard arrow keys to position and edit this.
5 If you have Oracle clients 8.1.7, 9.2 and 10 installed on your machine and you want to use Oracle 9.2, you can modify the environment string to make the folder conaining OCI.DLL in 9.2 installation appear before the folders for other Oracle clients.
6 Click OK to close the Environment Variables editor.
Database Application Developer’s Guide 1-5
Configuring Database Support
Installing Examples and DataThe VisualWorks Database Connect includes a Workbook of code examples for exploring the EXDI, and a sample Lens application and data. Both examples are provided as code parcels which can be loaded into your development image.
The EXDI Workbook provides an interactive programmatic interface to the EXDI. Using predefined code samples or your own additions, this tool provides a simple way to learn about the connection and session objects.
An example Lens application is referred to in this guide, and is available for your inspection. It includes a simple GUI, and sample data which can be installed into your database.
Loading the EXDI WorkbookThe EXDI Workbook is a simple Workspace application that includes a mechanism for connecting and disconnecting from a database, and example code fragments you can use to exercise the EXDI.
To install and open the EXDI Workbook:
1 Load the Database-Examples parcel.
In the Launcher, select System > Load Parcels Named..., and enter Database-Examples.
2 Ensure the required database support parcels have been loaded (located in the database directory).
E.g. for Sybase database systems, load CTLibEXDI. For Oracle databases, load OracleEXDI, and for other vendors, choose the appropriate EXDI parcel.
3 In the Launcher window, select Database > Database Examples Workbook from the Tools menu.
When prompted for a database, either select a connection profile (for details, see Setting the Database Login Defaults), or enter connection parameters and click Connect.
Once the connection has been established, the Workbook window opens.
4 The Workbook includes two workspace variables: connection and session, corresponding to the objects representing the current
1-6 VisualWorks

Installing Examples and Data
database connection. You can now interactively evaluate simple code fragments to manipulate these objects.
For example, to query the status of the database connection, highlight the code fragment:
connection isConnectedThen, select Inspect It from the <Operate> menu. An inspector opens on the result of sending isConnected (it should be True).
5 When you are finished with the Workbook, you can close the connection by evaluating connection disconnect, or by selecting Disconnect from the Database menu.
The Workbook includes code to manipulate the connection object, to CREATE and DROP a table, to INSERT data and SELECT rows. You can edit the code samples or use any of the behavior of the connection and session objects.
Setting Up the Example Lens ApplicationThis Lens example is a simple library application for tracking books, the people who borrow them, and the book-loan transactions.
The sample application and several database examples mentioned in this guide assume the existence of sample database tables. You must load these into a database before using the application. The tables are:
• BookExample
• BorrowerExample
• BookloanExample
• AdminExample (for Sybase only)
To install and set up the sample application:
1 Load the Lens-Examples parcel.
In the Launcher window, select System > Load Parcels Named..., and enter Lens-Examples.
2 Ensure the required database support parcels have been loaded (located in the database directory).
E.g. for Sybase database systems, load CTLibEXDI. For Oracle databases, load OracleEXDI, and for other vendors, choose the appropriate EXDI parcel.
Database Application Developer’s Guide 1-7

Configuring Database Support
3 To set up your login and environment information, open the Settings Manager (System > Settings), and on the Database - Lens page, enter appropriate values for Developer name, password, environment, and Apply these changes.
4 In a workspace evaluate:
Examples.Database1Example addSampleData.When the action completes successfully, VisualWorks displays a notifier saying the sample tables and data were installed. Click OK to dismiss the message.
Database1Example is now ready for use.
You should now be able to use the example to add and remove books.
To run the example application, execute the following code in a Workspace:
Examples.Database1Example open.When prompted, confirm or enter your database login information, including the kind of database, your user name and password, and the environment string, and click OK.
To remove the example tables and data from your image, evaluate:
Examples.Database1Example removeSampleData.
1-8 VisualWorks

2
EXDI Database InterfaceThe VisualWorks Database Connect is based upon an API for low-level access known as the External Database Interface (EXDI). For many applications, the EXDI is sufficient for interacting with a database. Applications that require more sophisticated object-relational mapping may use the Object Lens, which is described in subsequent chapters.
The EXDI package provides a set of protocols supported by several superclasses, but does not provide direct support for any particular database. Database Connect extensions are provided for connectivity to specific databases, such as Oracle and Sybase. These extensions to the EXDI are described in the following chapters.
This chapter provides an overview of the EXDI framework, explains the general rules for data interchange between Smalltalk and a relational database, how to connect, disconnect, create sessions, make queries, get results and handle errors. It also describes how you can trace the flow of a transaction.
The examples in this chapter assume that you have installed and configured a VisualWorks database connection according to the instructions provided in Configuring Database Support and that the necessary database vendor software has been installed and correctly configured.
EXDI FrameworkInteracting with a relational database involves the following activities:
• Establishing a connection to the database server
• Preparing and executing SQL queries
Database Application Developer’s Guide 2-1

EXDI Database Interface
• Obtaining the results of the queries
• Disconnecting from the server
The External Database Interface consists of a set of classes that provide a uniform access protocol for performing these activities, as well as the other activities necessary for building robust database applications. The classes that make up the External Database Interface are found in the Database package. Each of these classes is listed in the tables below with a more detailed explanation to follow later in this chapter.
Core External Database Interface Classes
In addition to these three core classes, the following classes provide useful functionality.
External Database Interface Support Classes
Data InterchangeBefore going further, it is important to understand how relational data is transferred to and from the Smalltalk environment. Data in the relational database environment is stored in tables, which consist of
Database Interface Class Description
ExternalDatabaseConnection Provides the protocol for establishing a connection to a relational database server, and for controlling the transaction state of the connection.
ExternalDatabaseSession Provides the protocol for executing SQL queries, and for obtaining their results.
ExternalDatabaseAnswerStream Provides the stream protocol for reading the data that might result from a query.
Database Interface Class Description
ExternalDatabaseColumnDescription Holds the descriptions of the columns of data retrieved by queries
ExternalDatabaseError Bundles the error information that may result if something goes awry.
ExternalDatabaseFrameworkExternalDatabaseBufferExternalDatabaseTransaction
Provide behind-the-scenes support for the activities above, and are not accessed directly.
2-2 VisualWorks
Using Database Connections
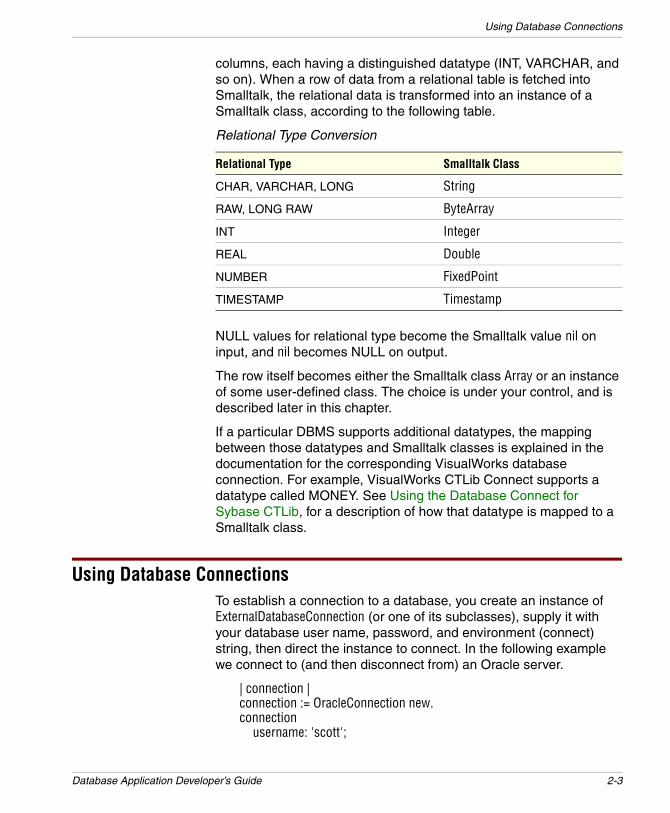
columns, each having a distinguished datatype (INT, VARCHAR, and so on). When a row of data from a relational table is fetched into Smalltalk, the relational data is transformed into an instance of a Smalltalk class, according to the following table.
Relational Type Conversion
NULL values for relational type become the Smalltalk value nil on input, and nil becomes NULL on output.
The row itself becomes either the Smalltalk class Array or an instance of some user-defined class. The choice is under your control, and is described later in this chapter.
If a particular DBMS supports additional datatypes, the mapping between those datatypes and Smalltalk classes is explained in the documentation for the corresponding VisualWorks database connection. For example, VisualWorks CTLib Connect supports a datatype called MONEY. See Using the Database Connect for Sybase CTLib, for a description of how that datatype is mapped to a Smalltalk class.
Using Database ConnectionsTo establish a connection to a database, you create an instance of ExternalDatabaseConnection (or one of its subclasses), supply it with your database user name, password, and environment (connect) string, then direct the instance to connect. In the following example we connect to (and then disconnect from) an Oracle server.
| connection |connection := OracleConnection new.connection
username: 'scott';
Relational Type Smalltalk Class
CHAR, VARCHAR, LONG String
RAW, LONG RAW ByteArray
INT Integer
REAL Double
NUMBER FixedPoint
TIMESTAMP Timestamp
Database Application Developer’s Guide 2-3

EXDI Database Interface
password: 'tiger';environment: 'ocelot_ORCL'.
connection connect.connection disconnect.
The environment string format follows the conventions described in the discussion of Environment Strings.
Securing PasswordsIn the connection example above, references to the username, password, and environment string are stored in instance variables of the connection object, and will be stored in the image when it is saved. For security reasons, you may wish to avoid having a password stored in the image. A variant of the connect message allows you to specify a password without having the session retain a reference to it. The example below assumes that the class that contains the code fragment responds to the message askUserForPassword. The string it answers is used to make the connection.
connectionusername: 'scott';environment: 'ocelot_ORCL'.
connection connect: self askUserForPassword.
Getting the Details RightEnvironment strings (also called connect strings by some vendors) can be tricky things to remember. As a convenience, class ExternalDatabaseConnection keeps a registry of environment strings, allowing them to be referenced by logical keys. This enables applications to provide users with a menu of logical environment names, instead of the less mnemonic environment strings.
ExternalDatabaseConnection supplies the following class-side messages for manipulating the registry:
addLogical: aKey environment: anEnvironmentString
Add a new entry in the Dictionary, associating aKey as the logical name for the environment and anEnvironmentString as the value to use when connecting.
removeLogical: aKey
Remove an entry from the logical environment map.
2-4 VisualWorks
Using Database Connections
mapLogical: aKey
Answer the string to use for the environment in making a connection.
environments
Return the Dictionary of all mappings from logical names to SQL-environment strings.
For example, executing the following example establishes a logical environment named 'test'.
OracleConnection addLogical: 'test' environment: ‘ocelot_ORCL’.
Thereafter, applications that specify 'test' as their environment will actually get the longer Oracle connect string. Actually, any string that an application provides as an environment is first checked against the logical environment registry. If no match is found, the application’s string is used unchanged.
Setting a Default EnvironmentExternalDatabaseConnection also remembers a default key, enabling applications to connect without specifying an environment. The default key is set by sending ExternalDatabaseConnection the message defaultEnvironment:, passing the default environment string as the argument. The message defaultEnvironment answers with the current default environment, which may be nil.
The following code sets 'test' to be the default logical environment, enabling applications to connect without specifying an environment.
ExternalDatabaseConnection defaultEnvironment: 'test'
Default ConnectionsIn addition to hiding the details of the environment, ExternalDatabaseConnection has the notion of a default connection, enabling some applications to be coded without direct references to the type of database to which they will be connected. As an abstract class, ExternalDatabaseConnection does not create an instance of itself.
Database Application Developer’s Guide 2-5
EXDI Database Interface
Instead, it forwards the new message to the subclass whose name it has remembered as the default. For example, to register OracleConnection as the default class to use, execute:
ExternalDatabaseConnection defaultConnection: #OracleConnection.
This feature, along with the environment registry explained above, enables the connection example to be rewritten as:
| connection |connection := ExternalDatabaseConnection new.connection
username: 'scott';password: 'tiger'.
connection connect.connection disconnect.
The default is set initially by the ExternalDatabaseInstallation application when the first database connection is installed.
External AuthenticationSome databases (e.g. Oracle) allow so-called “external authentication” in which the host OS authenticates the database connection, instead of using a username and password provided via the EXDI.
The VisualWorks EXDI performs external authentication, when both username and password are empty strings. When one or both are provided, users can still choose external authentication, by using the authenticationMode: method.
On the Importance of DisconnectingEstablishing a connection to a database reserves resources on both the client, VisualWorks, and the host, database server, side. To ensure that resources are released in a timely fashion, it is important to disconnect connections as soon as they are no longer needed, as shown in the examples above.
VisualWorks provides a finalization-based mechanism for cleaning up after a connection if it is “dropped” without first being disconnecting. Since finalization is triggered by garbage collection, the eventual cleanup could take place long after the connection has been dropped. If your application or application environment is resource-sensitive, we recommend proactively disconnecting the connections.
2-6 VisualWorks
Using Sessions
Using SessionsHaving established a connection to a database server, you can then ask the connection for a query session, which reserves the “right” to execute queries using the connection.
A session is a concrete subclass of ExternalDatabaseSession, and is obtained from a connected connection by sending the message getSession. The connection answers with a session. If the connection is to a Sybase server (i.e., is a CTLibConnection), the session will be a CTLibSession.
You can ask a session to prepare and execute SQL queries by sending the messages prepare:, execute, and answer, in that order. Depending on the DBMS, prepare: will either send the query to the server or defer the send until the query is actually executed. This is important to note, because errors can be detected (and signals raised) at either prepare: or execute time.
To examine the results of the query execution, send an answer message to the session. This is important to do even when the query does not return an answer set (e.g., an INSERT or UPDATE query). If an error occurred during query execution, it is reported via answer. More on answer, and how it is used to retrieve data, later in this chapter.
We can extend the connection example shown previously to execute a simple query. Note the use of two single quotes around the name. These are needed to embed a single-quote within a Smalltalk String.
| connection session |(connection := ExternalDatabaseConnection new)
username: 'jones';password: 'secret';connect.
(session := connection getSession)prepare: 'INSERT INTO phonelist VALUES( ''Smith'', ''x1234'' )';execute;answer.
connection disconnect.
Database Application Developer’s Guide 2-7

EXDI Database Interface
Variables in QueriesRepetitive inserts would be very inefficient if each insert required that a query be prepared and executed. This overhead can by side-stepped by preparing a single query, with query variables as placeholders. This prepared query can then be repeatedly executed with new values supplied for the placeholders.
Query variables (also called parameters) are placeholders for values in a query. Some databases (e.g., Oracle) produce an execution plan when a query is prepared. Preparing the plan can be expensive. Using variables and binding values to them before each execution can eliminate the overhead of preparing the query for subsequent executions, which can be a substantial performance improvement for some repetitive applications.
To execute a query containing one or more query variables, the session must first be given an input template object, which will be used to satisfy the variables in the query. The method by which values are obtained from the input template depends on the form of the query variable. If the input variable is a question mark, then the input template must either have indexed variables or instance variables. The first template variable will be used to satisfy the value for the first query variable, the second template variable will be used to satisfy the second query variable, and so on. Consider the example:
session prepare: 'INSERT INTO phonelist (name, phone) VALUES(?, ?)'.#( ( 'Curly' 'x47' ) ( 'Moe' 'x29') ( 'Larry' 'x83' ) )
do:[:phoneListEntry |session
bindInput: phoneListEntry;execute;answer].
Here the input template is an Array with two elements. The first element, the name, will be bound to the first query variable, and the second element, the phone number, will be bound to the second.
A closely related form for query variables is a colon followed immediately by a number. Again, the input template must contain indexed or instance variables, and the number refers to the position of the variable. The query above could be rewritten to use this form of query variable as follows:
session prepare: 'INSET INTO phonelist (name, phone) VALUES(:1, :2)'.
2-8 VisualWorks
Using Sessions
Named Input BindingThe third form that a query variable can take is a colon followed by a name. This form of binding is intended for use with objects which have named accessor methods. For example, let’s assume that we have a PhoneListEntry object that we want to persist in the database, which is defined as the following class:
Smalltalk.Database defineClass: #PhoneListEntrysuperclass: #{Core.Object}indexedType: #noneprivate: falseinstanceVariableNames: 'name phone'classInstanceVariableNames: ''imports: ''category: 'Database-Examples'
Further, let’s say that PhoneListEntry includes the following accessor methods:
name Using named input binding, we can write a query like this:
sessionprepare: 'INSERT INTO phonelist (name, phone) VALUES (:name, :phone)'.newPhone := PhoneListEntry name: ‘Joe’ phone: ‘00’.session bindInput: newPhone.
The name in a query variable represents a message to send to the input template. The input template is expected to answer a value, which will then be bound for the variable.
This form of binding is very powerful, but should be used with care. If the input template does not respond to the message selector formed from the bind variable name, a Message Not Understood notifier will result. Also, there are many messages that all objects respond to that would have unexpected effects if used as bind variables, such as halt.
Binding NULLTo bind a NULL value to a variable, use the “value” nil. This works in general, but causes problems in a particular scenario with Oracle. The query:
SELECT name, phone FROM phonelist WHERE name = ?will not work as expected if the variable's value is nil. Oracle requires that such queries be written as:
SELECT name, phone FROM phonelist WHERE name IS NULL
Database Application Developer’s Guide 2-9

EXDI Database Interface
Getting AnswersOnce a database server has executed a query, it can be queried to determine whether the query executed successfully. If all went well, the server is also ready with an answer set, which is accessed by way of an answer stream. Verifying that the query executed successfully and obtaining an answer stream are both accomplished by sending a session the message answer.
In responding to the answer message, the session first verifies that the query has finished executing. If the database server has not yet responded, the session will wait. If the server has completed execution and has reported errors, the session will raise an exception. See the discussion of Error Handling for information on the exceptions that might be raised, and details on how to handle them.
If no error occurred, answer will respond in one of three ways. If the query is not one that results in an answer set (that is, an INSERT or UPDATE query), answer will respond with the symbol #noAnswerStream. If the query resulted in an answer set (that is, a SELECT query), answer will return an instance of ExternalDatabaseAnswerStream, which is used to access the data in the answer set, and is explained below.
The third possible response to answer is the symbol #noMoreAnswers. When a database supports multiple SQL statements in one query, or stored procedures that can execute multiple queries, you can send answer repeatedly to get the results of each query. It will respond with either #noAnswerStream or an answer stream for each, and will eventually respond with the symbol #noMoreAnswers to signify that the set of answers has been exhausted.
The following (complete) code sample illustrates the use of #noAnswerStream and #noMoreAnswers:
| connection aSession |connection := CTLibConnection new.connection
username: 'myUsername';password: 'myPassword';environment: 'SybaseEnv'.
connection connect.aSession := connection getSession.aSession
prepare: 'CREATE TABLE phonelist (name varchar(50), phonechar(20))';
2-10 VisualWorks

Getting Answers
execute;answer;answer.
aSessionprepare: 'INSERT INTO phonelist VALUES(:1, :2)'.#( ( 'Curly' 'x47' ) ( 'Moe' 'x29') ( 'Larry' 'x83' ) ) do:
[:phoneListEntry |aSession
bindInput: phoneListEntry;execute;answer;answer].
aSessionprepare: 'CREATE PROCEDURE get_some_phonenumbers
as SELECT * FROM phonelist WHERE phone = ''x47''SELECT * FROM phonelist WHERE phone = ''x83'' '.
aSessionexecute;answer;answer.
aSessionprepare: 'EXEC get_some_phonenumbers';bindOutput: PhoneListEntry new;execute.
numbers := OrderedCollection new.[ | answer |
[ (answer := session answer) == #noMoreAnswers]whileFalse:
[answer == #noAnswerStreamifFalse:
[numbers := numbers , (answer upToEnd)]]]on: connection class externalDatabaseErrorSignaldo: [:ex | Dialog warn: ex parameter first dbmsErrorString].
aSession prepare: 'DROP PROCEDURE get_some_phonenumbers'.aSession
execute;answer;answer.
aSession prepare: 'DROP TABLE phonelist'.aSession
execute;answer;answer.
numbers inspect.connection disconnect.
Database Application Developer’s Guide 2-11

EXDI Database Interface
Handling Multiple Answer SetsIf your application is intended to be portable and support ad hoc queries, we recommend that you send answer repeatedly until you receive #noMoreAnswers. This enables your code to work with servers (e.g., Sybase) which can return multiple answer sets.
The following code fragment retrieves the answer sets that might result from executing a Sybase stored procedure:
sessionprepare: 'exec get_all_phonenumbers';bindOutput: PhoneEntry new;execute.
numbers := OrderedCollection new.connection class externalDatabaseErrorSignal
handle: [:ex | Dialog warn: ex parameter first dbmsErrorString]do:[ | answer |
[ (answer := session answer) == #noMoreAnswers]whileFalse: [ answer == #noAnswerStreamifFalse: [numbers := numbers , (answer upToEnd) ] ] ].
For more information on managing Sybase stored procedures, refer to Using the Database Connect for Sybase CTLib.
Sending an Answer MessageWhen you send answer to a session, a number of things happen in the background as the session prepares the resources needed to process an answer set. Most of these steps are out of the direct view of the application. However, an understanding of them may help when you are debugging database applications.
To answer a query, the session performs the following steps:
1 Waits for the server to complete execution.
2 Verifies that the query executed without error.
3 Determines whether an answer set is available.
4 If the query returns an answer set, then the session performs the following additional steps:
5 Obtains a description of the answer set.
6 Allocates buffers to hold rows from the answer set.
7 Prepares adaptors to help translate relational data to Smalltalk objects.
2-12 VisualWorks
Getting Answers
Waiting for the ServerSome database servers, such as Sybase, support asynchronous query execution, giving control back to the application after the server has begun executing the query. To determine whether the server has completed execution, a session sends itself the message isReady, which returns a Boolean indicating that the server is ready with an answer, until isReady returns true. If the target DBMS does not support asynchronous execution (for example, Oracle), isReady will always return true.
Queries to Oracle databases block the OE for the duration of the query execution, unless run on an Oracle threaded connection. Refer to Oracle Threaded API for more information.
Did the Query Succeed?The session next verifies that the query executed without error. Errors that the server reports are bundled into instances of ExternalDatabaseError (or a Connection-specific subclass). A collection of these errors is then passed as a parameter to an exception. See Error Handling for more details.
How Many Rows were Affected?Some queries, such as UPDATE or DELETE, do not return answer sets. To determine how many rows the query affected, send the message rowCount to the session, which will respond with an integer representing the number of rows affected by the query. Because database engines consider a query to have executed successfully even if no rows where matched by a WHERE clause, testing the row count is an easy way to determine whether an UPDATE or DELETE query had the desired effect.
Database-specific restrictions on the availability of this information are documented in the release notes for your Database Connect product.
Describing the Answer SetIf the query has executed without error, the session determines whether the query will return an answer set.
If the session returns an answer set, the session will obtain from the server a description of the columns in the set. Sending the message columnDescriptions to the session (after sending answer) will return an Array of instances of ExternalDatabaseColumnDescription (or a connection-specific subclass), which describes the columns in the answer set.
Database Application Developer’s Guide 2-13

EXDI Database Interface
A column description includes: the name, length, type (expressed as a Smalltalk class), precision, scale, and nullability of a column. A column description will respond to the following accessing protocol messages:
name "Answer the name of the column"type "Answer the Smalltalk type that will hold data
from the column"length "Answer the length of the column"scale "Answer the scale of the column, if known"precision "Answer the precision of the column, if known"nullable "Answer the nullability of the column, if known"
Connection-specific subclasses may make additional information available. Note that the names returned for calculated columns may be different depending on the target DBMS.
For example, the query:
SELECT COUNT(*) FROM phonelistdetermines the number of rows in the phone list table. Oracle names the resulting column "COUNT(*)", while Sybase does not provide a name.
Buffers and AdaptorsFinally, the session uses the column descriptions to allocate buffers to hold rows of data from the server, and adaptors to help create Smalltalk objects from the columns of relational data that will be fetched from the server into the buffers. This step is invisible to user applications, but can be the source of several errors. For example, if insufficient memory is available to allocate buffers, an unableToBind exception will be raised. An invalidDescriptorCount exception will be raised if the output template doesn’t match the column descriptions.
Care must be exercised when using EXDI methods such as bindVariable:value: or bindVariable:value:type:size:, which require buffers of adequate size to handle all possible return values for a given column.
Processing an Answer StreamAfter the session has completed the steps above, and assuming that the query results in an answer set, the session creates an ExternalDatabaseAnswerStream and returns it to the application. ExternalDatabaseAnswerStream is a subclass of Stream, and is used to access the answer set. There are a few restrictions. Answer streams are not positionable, they cannot be flushed, and they cannot be written.
2-14 VisualWorks
Getting Answers
Answer streams are created by the session; your application should not attempt to create one for itself.
Answer streams respond to the messages atEnd, for testing whether all rows of data from an answer set have been fetched, and next for fetching the next row. Attempting to read past the end of the answer stream results in an endOfStreamSignal.
In our example, all rows of the phone list could be fetched as follows:
numbers := OrderedCollection new.answer := session answer.[answer atEnd] whileFalse:
[ | row |row := answer next.numbers add: row].
Sending upToEnd causes the answer stream to fetch the remaining rows of the answer set and return them in an OrderedCollection. Using upToEnd, the example above can be simplified as:
answer := session answer.numbers := answer upToEnd.
While this works well for small answer sets, it can exhaust available memory for large answer sets.
Unless the session has been told otherwise, data retrieved through the answer set comes packaged as instances of the class Array.
Using Cursors and Scrollable CursorsThe VisualWorks EXDIs for Oracle, Sybase, and DB2 provide support for cursors and scrollable cursors. A cursor represents a movable position in the result set. When using a cursor, the results of a query are held in a set of rows which may be fetched either in sequence or via random access.
A cursor is used for sequential access, while a scrollable cursor is used for random access. The scrollable cursor can fetch results moving either forward or backward from a given position, and the specified result may be indicated either via an absolute or relative row offset.
When using cursors, the rows in the result set are numbered starting with one. With a scrollable cursor, you can fetch the same rows several times, you can fetch a specific row, or a specific row relative to the current position.
Database Application Developer’s Guide 2-15

EXDI Database Interface
The cursor API is implemented in class ExternalDatabaseAnswerStream. The following public methods are available in the accessing protocol:
moveTo: anInteger
Answer the row at cursor position anInteger, where anInteger must be a positive integer.
skip: anInteger
Answer the row at current cursor position + anInteger, where anInteger can be either a positive or a negative value.
next
Answer the next row from the answer stream.
previous
Answer the previous row from the answer stream.
Additionally, in class ExternalDatabaseSession, two methods are provided for querying the state of a cursor:
scrollable
Answer a Boolean indicating whether the cursor is scrollable or not.
scrollable: aBoolean
Set whether the cursor is scrollable or not.
Note that certain vendors may have specific requirements or restrictions on the use of cursors. For example, Sybase requires that the connection object be initialized with a special call before using cursors (see Using Cursors and Scrollable Cursors for details). Forward-only cursors can be used to delete and update rows, but the block factor must be set to 1. If blockFactor: is used with a value greater than 1, the cursor position can get out of sync.
The following two code examples illustrate the use of cursors and scrollable cursors. First, to create a sample data set, use the following:
aConnection connect.aSession := aConnection getSession.aSession prepare: 'CREATE TABLE TestScroll (id INT, A VARCHAR(20) )'.aSession execute.aSession answer.
2-16 VisualWorks

Getting Answers
[aSession := aConnection getSession.aSession prepare: 'INSERT INTO TestScroll(id, A) VALUES ( ?, ?)'.array := Array new: 100.1 to: array size
do: [:i|aSession bindInput: (Array with: i with: i printString).aSession execute.aSession answer]]
ensure:[aSession disconnect.aConnection disconnect].
The cursor API may be used as follows:
aConnection connect.[aSession := aConnection getSession.aSession scrollable: true.aSession prepare: 'SELECT * FROM TestScroll'.aSession execute.answer := aSession answer.Transcript show: 'Using >>moveTo:'; cr.1 to: 100 do:
[:i |rec := answer moveTo: i.Transcript show: 'pos = ', i printString , ', Data = ' , rec printString;
cr].Transcript show: 'Using >>previous'; cr.1 to: 99 do:
[:i |Transcript show: 'pos = ', i printString , ', Data = ' , rec printString;
cr].rec := answer previous].
Transcript show: 'Using >>skip:'; cr.1 to: 95 by: 5 do:
[:i |Transcript show: 'pos = ', i printString , ', Data = ' , rec printString;
cr].rec := answer skip: 5].
Transcript show: 'Using >>moveTo:'; cr.1 to: 100 by: 5 do:
[:i |rec := answer moveTo: i.Transcript show: 'pos = ', i printString , ', Data = ' , rec printString;
cr].] ensure:
[aSession disconnect.aConnection disconnect].
Database Application Developer’s Guide 2-17
EXDI Database Interface
Using an Output TemplateHaving rows of a table (or columns from a more complex query) arrive packaged as instances of the class Array might suffice for some applications. For more complex applications, it is preferable to have the data appear as instances of some user-defined class. In our example, we would want rows of data fetched from the phonelist table to appear as instances of class PhoneListEntry.
To achieve this, ExternalDatabaseSession supports an output template mechanism. If an output template is supplied to the session, it will be used instead of the class Array when creating objects to represent rows of data in the answer set. In our example, this would look like:
sessionprepare: 'SELECT name, phone FROM phonelist';bindOutput: PhoneListEntry new;execute.
answer := session answer.Rows of data from the table will now appear (by sending answer next) as instances of PhoneListEntry.
Columns of data from a row of the answer set are loaded into the output template's variables by position. Column 1 loads into the first variable, column 2 loads into the second variable, and so on. The output template can have either instance variables or indexed variables. When both are present, the indexed variables are used.
Skipping Slots in an Output TemplateTo skip a variable in the bind template, place an instance of the class Object in it. There must be exactly as many non-Object variables in the output template as there are columns in the answer set. For example, consider the scenario of having the additional instance variable unused in an instance of PhoneListEntry. If this instance variable is not fetched from the database, you could add the method
newForSelect "Create a new instance of the receiver, and initialize it to be fetched from the database."^super new initializeForSelect
to the instance creation protocol on the class side of PhoneList-Entry, and
initializeForSelect "Initialize an instance of the receiver to be fetched from thedatabase."unused := Object new.
2-18 VisualWorks

Getting Answers
to the initialize-release protocol on the instance side. This enables us to safely rework the example above by writing
bindOutput: PhoneListEntry newForSelect;to specify the output template.
Using Column Names to Bind for OutputAs with input binding, a name-based alternative is provided for output binding. Sending a session the message bindOutputNamed:, with the output template as an argument, causes the session to create a set of mutator messages to send to the output template to store values fetched from the database. These mutator messages are formed by appending colons to the column names. Our phone list example could use named output binding if the class PhoneListEntry provided the following instance-side accessing methods:
name: aName "Set the phone entry’s name"name := aName phoneNumber: aPhoneNumber. "Set the phone entry’s phone number"phone := aPhoneNumber
The same caveats apply to named output binding as apply to named input binding. If the output template does not answer the message, a Message Not Understood notifier will result. Be sure that the needed method names do not override methods that are necessary for the functioning of the object.
If you are connecting to an Oracle database, be aware that Oracle answers column names in uppercase letters. In this situation you should write methods with uppercase names. If you connect to both Oracle and other databases, create methods with both uppercase and lowercase names.
Another approach is to use a “column alias” to explicitly label the column in the SQL query. Enclose the column alias in quotation marks immediately following the column name in the query. For example,
sess prepare: 'select id "id", str "str" from foo'.forces Oracle to use the the lowercase “id” and “str” as the column labels. These lowercase labels will be used by VisualWorks to construct the mutator methods, id: and str:.
Database Application Developer’s Guide 2-19

EXDI Database Interface
Reusing the Output TemplateBy default, a new copy of the output template is used for each row of data fetched. If your application processes the answer set one row at a time, the overhead of creating a copy can be eliminated by arranging to reuse the original output template. Sending allocateForEachRow: false to the session tells it to reuse the template. Output template reuse is temporarily disabled when sending upToEnd to the answer stream.
Setting a Block Factor to Improve PerformanceSome database managers allow client control over the number of rows that will be physically transferred from the server to the client in one logical fetch. Setting this blocking factor appropriately can greatly improve the performance of many applications by trading buffer space for time (network traffic).
If our phone list database resided on an Oracle server, the performance of the example might be greatly improved by sending the message blockFactor: to the session, as follows:
sessionprepare: 'SELECT name, phone FROM phonelist';bindOutput: PhoneListEntry new;blockFactor: 100;execute.
Since the phone list entries are small, asking for 100 rows at a time is not unreasonable.
Note that the block factor does not affect the number of objects that will be returned when you send the message next to the answer stream. Objects are read from the stream one at a time.
If a database connection does not support user control over blocking factors (as with Sybase), the value passed to blockFactor: is ignored, and the value remains set at 1. Additional restrictions on the use of blockFactor:, if any, are listed in the release notes for your Database Connect product.
Cancelling an Answer SetIf your application finishes with an answer stream before reaching the end of the stream (perhaps you only care about the first few rows of data), it is good practice to send the message cancel to the session. This tells the database server to release any resources that it has
2-20 VisualWorks

Controlling Transactions
allocated for the answer set. The answer set will be automatically canceled the next time you prepare a query, or when the session is disconnected, but a proactive approach is often preferable.
Disconnecting the SessionEstablishing a session reserves resources on the client side, and often on the server side. When you're done with a session, sending the message disconnect to the session disconnects it and releases any resources that it held. The connection is not affected. A disconnected session will be automatically reconnected the next time a query is prepared. If you expect your application to experience long delays between queries, you might consider disconnecting sessions where possible.
Sessions will automatically disconnect when their connection is disconnected. Sessions are also protected by a finalization executor, and will be disconnected, eventually, after all references to them are dropped.
Controlling TransactionsBy default, every SQL statement that you prepare and execute is done within a separate database transaction. To execute several SQL statements within a single transaction, send begin to the connection before executing the statements, followed by commit after the statements have executed. To cancel a transaction, send rollback to the connection.
The connection keeps track of the transaction state. If an application bypasses the connection by preparing and executing SQL statements like COMMIT WORK or END TRANSACTION, the connection will lose track of the transaction state. As a rule, stored procedures should not change the transaction state, because the caller will be unaware of the change. This might lead to later problems.
Coordinated TransactionsSeveral connections can participate in a single transaction by appointing one connection as the coordinator. Before the connections are connected (that is, sent connect or connect:), send the coordinating connection the message transactionCoordinatorFor: once for each participating connection, passing the connection as the argument.
Database Application Developer’s Guide 2-21

EXDI Database Interface
After the coordination has been established, sending begin to the coordinator begins the coordinated transaction. Sending commit or rollback to the coordinator causes the message to be broadcast to all dependent connections.
If the database system supports two-phase commit, the coordination assures the atomic behavior of the distributed transaction. If the database does not support two-phase commit, a serial broadcast is used.
Participants in a coordinated transaction must be supported by a single-database connection. It is not possible, for example, to mix Oracle and Sybase connections in a coordinated transaction.
Releasing ResourcesIf your application has relatively long delays between uses of the database, you may want to release external resources during those delays. To do so, send a pause message to any active connections. This causes the connections to disconnect their sessions, if any, and then disconnect themselves. Any pending transaction is rolled back. Both the connections and their sessions remain intact, and can be reconnected.
To revive a paused connection, send it resume. The connection will then attempt to re-establish its connection to the database. If the password was not stored in the connection, as discussed in Securing Passwords, the proceedable exception requiredPasswordSignal will be raised.
Sessions belonging to resumed connections will reconnect themselves when they are prepared again.
Sending pause or resume to ExternalDatabaseConnection has the same effect as sending pause or resume to all active connections.
Tracing the Flow of ExecutionA tracing facility is built into the VisualWorks database framework, and is used by database connections to log calls to the database vendors’ interfaces. Enabling this facility can be quite useful if your application’s use of the database malfunctions.
2-22 VisualWorks
Tracing the Flow of Execution
A trace entry consists of a time stamp, the name of the method that requested the trace, and an optional information string. Database connections use this string to record the parameters passed to the database vendor’s interface routines, and the status or error codes that the interfaces return. This information can be invaluable when tracking down database problems.
Directing Trace OutputTo direct tracing information to the System Transcript window, execute the following expression in a workspace (or as part of your application):
ExternalDatabaseConnection traceCollector: TranscriptTo direct tracing into a file, execute the following:
ExternalDatabaseConnection traceCollector: 'trace.log' asFilename writeStream
Setting the Trace LevelThe framework supports the following of levels of tracing. The default trace level is zero.
Trace Levels
The trace level is set by executing:
ExternalDatabaseConnection traceLevel: anInteger
Disabling TracingSetting the trace level to 0 disables tracing.
Trace Level Description
0 Disables tracing.
1 Limits the trace to information about connection and query execution.
2 Adds additional information about parameter binding and buffer setup.
3 Traces every call to the database.
Database Application Developer’s Guide 2-23

EXDI Database Interface
Adding Your Own Trace InformationTo intermix application trace information into the trace stream, place statements like
ExternalDatabaseConnection trace: aStringOrNilin your application. An argument of nil is equivalent to an empty string; only a time stamp and the name of the sending method will be placed in the trace stream.
You can avoid hard-coding the literal name ExternalDatabaseConnection by asking a connection for its class, and sending the trace message to that object, as in:
connection class trace: ('Made it this far ' , count printString , ' times').See the tracing protocol on the class side of ExternalDatabaseConnection for additional information.
Error HandlingError handling in the VisualWorks database framework is based on Exception subclasses and exception handlers. This is a change from the previous exception handling framework, which was based on signals. The interface is such that no changes should be necessary to old code to switch to the new framework.
For practical purposes, the set of errors that a database application might encounter can be divided into two groups.
The first group are state errors, and these normally occur when an application omits a required step or tries to perform an operation out of order. For example, an application might attempt to answer a query before executing it. If the application is coded correctly, these kind of errors generally do not arise.
The second group are execution errors, and they occur when an application performs a step in the correct order but for some reason the step fails.
When either type of error is encountered, an exception is signaled and any available error information is passed as a parameter of the exception. The application is responsible for providing exception handlers and recovery logic.
2-24 VisualWorks

Error Handling
Exceptions and Error InformationThe database framework provides a family of exceptions, most of which are subclasses of the common parent ExternalDatabaseException.
If an exception is the result of a database error, the connection code that raises the exception first collects the available database error information into instances of ExternalDatabaseError, and then passes the information as a parameter of the signal. If the signal results from a state error, the signal is sent without additional information.
An instance of ExternalDatabaseError, or a connection-specific subclass, stores a database-specific error code, and, when available, includes the string that describes the error. The error code is retrieved by sending a database error the message dbmsErrorCode, and to get the string the message dbmsErrorString is sent. See the ExternalDatabaseError accessing protocol for additional information.
VisualWorks defines the following basic exceptions:
externalDatabaseErrorSignal
The most general external database error signal. This signal and its descendents are not proceedable.
invalidTableNameSignal
A table named in a query does not match a table in the database.
missingBindVariableSignal
A binding was not provided for a query variable.
unableToCloseCursorSignal
Cannot close the table of query results created by the open statement, ending access by the application program.
unableToOpenCursorSignal
Cannot open the table of query results for access by the application program.
Exception HandlingThe example below shows one way to provide an exception handler. The handler is for the general-purpose database exception externalDatabaseErrorSignal. If this exception, or one of its children, is signaled from the statements in the do: block, the handle: block is evaluated. In this example, the handle: block extracts the error string
Database Application Developer’s Guide 2-25

EXDI Database Interface
from the first database error in the collection that was passed as a parameter to the exception handler, and uses this string in a warning dialog.
[sessionprepare: 'SELECT name, phone FROM fonelist';execute.answer := session answer]
on: connection class externalDatabaseErrorSignaldo: [:ex |
"If the query fails, display the error string in an OK dialog" Dialog warn: ex parameter first dbmsErrorString].
In this example, the error is caused by the invalid table name in the query. If the connection in this example is to an Oracle database, the database error in the collection passed to the handler (that is, the database error accessed by ex parameter first) will be an instance of OracleError, and will hold as its dbmsErrorCode the number 942, and as its dbmsErrorString the string 'ORA_00942: table or view does not exist'.
Choosing an Exception to HandleWith the wealth of exceptions that might be signaled, which ones should an application provide handlers for? The answer, as with many of life’s difficult questions, is “it depends.” For many applications, it only matters if a query “works.” In this case, providing a handler for externalDatabaseErrorSignal is usually sufficient. Other applications might be more sensitive to specific types of errors, and will want to provide more specific handlers.
Unfortunately, the use of exception-specific handlers is complicated by the fact that the errors that the low-level database interface reports may at first appear to be unrelated to the operation being performed. For example, the connection to a remote database server can be interrupted at any time, but the exception signaled will depend on the database activity that the application was performing at the time the problem was detected.
The recommended strategy is to provide a handler for as general a signal as you feel comfortable with (for example, externalDatabaseErrorSignal), and invest effort, if necessary, in examining and responding to the database-specific errors that will be passed to the handler. We recommend against providing a completely general handler (for example, for Object errorSignal), especially during development, as this will make nondatabase problems more difficult to isolate.
2-26 VisualWorks

OEM Encoding
Exceptions and Stored ProceduresAs a general rule, if your application makes use of stored procedures, you should use exception handlers there as well. These allow a graceful return to Smalltalk, which can then attempt to handle the exception. For example, you might add a boolean success flag as the last statement in the procedure, and if the return value is nil or false (anything but true), assume that an exception was raised and that the results are invalid.
OEM EncodingThe Oracle, ODBC, MySQL, and CTLib EXDIs include support for OEM code pages. These are most often used under MS-DOS-like operating systems. Examples include: 437 - The original IBM PC code page; 737 - Greek; and 775 - Estonian, Lithuanian and Latvian.
Disabled by default, OEM encoding must be explicitly enabled via the connection object.
For example, to use OEM encoding with an Oracle database:
| conn sess |conn := OracleConnection new.conn username: 'username'; password: 'password'; environment: 'env'.conn connect."Drop the test table."sess := conn getSession. sess prepare: 'drop table test_umlauts'; execute; answer."Create a test table."sess prepare: 'create table test_umlauts (cid number, cname varchar2(50))'; execute; answer. "Turn on OEM encoding."conn turnOnOEMEncoding. "Insert test data using OEM encoding."sess prepare: 'insert into test_umlauts values(10, ''ä, ö, and ü'')'; execute; answer.
Database Application Developer’s Guide 2-27

EXDI Database Interface
"Turn off OEM encoding."conn turnOffOEMEncoding. "Insert test data using normal encoding based upon NLS_LANG."sess prepare: 'insert into test_umlauts values(11, ''ä, ö, and ü'')'; execute; answer. "Turn on OEM encoding."conn turnOnOEMEncoding. "Retrieve the test data, record with cid=10 will be displayed correctly."sess prepare: 'select * from test_umlauts' ; execute.ans := sess answer.ans upToEnd. "Turn off OEM encoding."conn turnOffOEMEncoding. "Retrieve the test data, record with cid=11 will be displayed correctly."sess prepare: 'select * from test_umlauts' ; execute.ans := sess answer.ans upToEnd.
Image Save and Restart ConsiderationsWhen an image containing active database connections is exited, the connections are first paused, and any partially completed transactions are terminated via rollback.
To arrange for your application to perform some set of steps before the transaction is terminated, your application model must first register as a dependent of the class ExternalDatabaseConnection. For example:
anExternalDatabaseConnection addDependent: self.The application model then creates an update: (or update:with:) method, and tests for the update: argument #aboutToQuit. For example:
update: anAspectSymbol with: aValueanAspectSymbol == #aboutToQuit
ifTrue:[ "perform desired action." ].
2-28 VisualWorks
Image Save and Restart Considerations
Reconnecting When an Image is RestartedWhen an image is restarted, all references to external resources are initialized, as if a pause message had been sent to the class ExternalDatabaseConnection. To arrange for your application to take further action, take the steps described above, testing for the update: argument #returnFromSnapshot.
Your application can reconnect its connections by sending them connect (or connect: with a password). This re-establishes the connection to the database server (subject to the constraints discussed in Releasing Resources). Any sessions will need to be re-prepared by sending the sessions prepare: with the query to prepare, though your application might as easily drop the old sessions and get new ones.
Database Application Developer’s Guide 2-29

EXDI Database Interface
2-30 VisualWorks

3
Using the Database Connect for OracleThis chapter describes the VisualWorks Database Connect for Oracle External Database Interface (EXDI) features and implementation, which includes the following:
• Database Connect for Oracle Classes
• Data Conversion and Binding
• Using PL/SQL
• Oracle Threaded API
• Calling Oracle Stored Procedures
• CLOB/BLOB support
Database Connect for Oracle ClassesThe EXDI defines application-visible services and is composed of abstract classes. Database Connect for Oracle is a set of concrete classes that implement EXDI services by making calls to the Oracle Call Interfaces (OCI) library. VisualWorks also extends services available to the application to provide features unique to the Oracle database system.
The EXDI organizes its services into classes for connections, sessions, and answer streams. In addition, classes for column descriptions and errors provide specific information that the application may use. The public EXDI classes are:
• ExternalDatabaseConnection
• ExternalDatabaseSession
Database Application Developer’s Guide 3-1
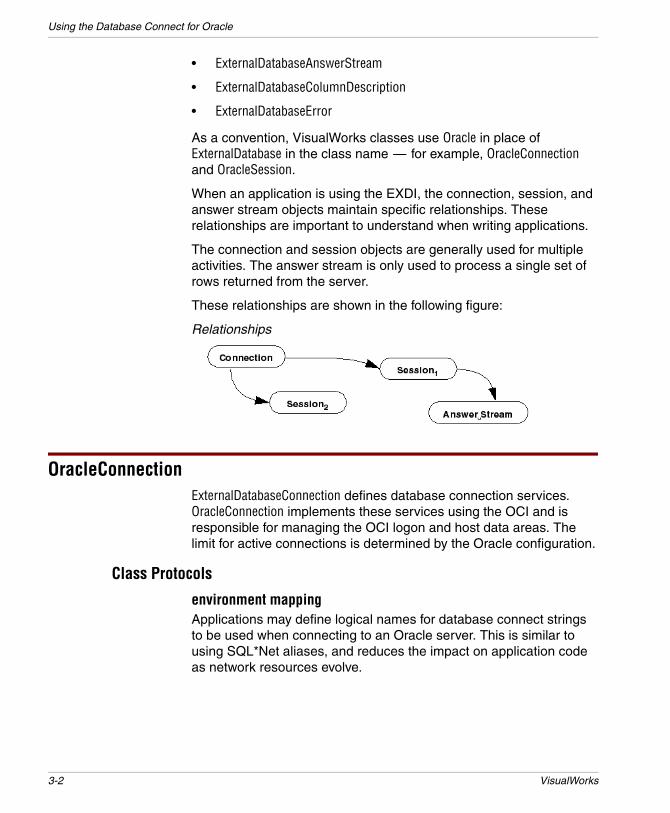
Using the Database Connect for Oracle
• ExternalDatabaseAnswerStream
• ExternalDatabaseColumnDescription
• ExternalDatabaseError
As a convention, VisualWorks classes use Oracle in place of ExternalDatabase in the class name — for example, OracleConnection and OracleSession.
When an application is using the EXDI, the connection, session, and answer stream objects maintain specific relationships. These relationships are important to understand when writing applications.
The connection and session objects are generally used for multiple activities. The answer stream is only used to process a single set of rows returned from the server.
These relationships are shown in the following figure:
Relationships
OracleConnectionExternalDatabaseConnection defines database connection services. OracleConnection implements these services using the OCI and is responsible for managing the OCI logon and host data areas. The limit for active connections is determined by the Oracle configuration.
Class Protocols
environment mappingApplications may define logical names for database connect strings to be used when connecting to an Oracle server. This is similar to using SQL*Net aliases, and reduces the impact on application code as network resources evolve.
3-2 VisualWorks

OracleSession
The following adds a new entry in the logical environment map for the database connect that associates a logical name with a database connect string.
addLogical:environment:Once this association is defined, the environment for an Oracle connection may be specified using the logical name. For example:
OracleConnection addLogical: 'devel' environment: 'ocelot_t'.where 'ocelot_t' is a SQL*Net alias defined in TNSNAMES.ORA. (See SQL*Net Easy Configuration Tool or consult the Oracle documentation.)
Instance Protocols
accessingThe environment method specifies the connect string which identifies which Oracle server to connect to. The Oracle SQL*Net documentation details how to construct a valid connect string.
The following requests the use of TCP/IP to talk to a database on the ocelot node.
ocelot_tApplication developers are strongly encouraged to define and use logical environment names. Thus, only system administrators need to know the actual connect strings.
transactionsOracle does not support two-phase commit coordination spanning multiple connections. As a result, coordinated Oracle connections are simulated using a broadcast commit. Applications that use coordinated connections are responsible for their own recovery after a failure that leaves partially committed transactions.
OracleSessionExternalDatabaseSession defines execution of prepared SQL statements. OracleSession implements these services using the OCI and is responsible for managing the OCI cursor. The limit for active sessions per connection is determined by the Oracle configuration limit on cursors.
Database Application Developer’s Guide 3-3
Using the Database Connect for Oracle
Instance Protocols
accessingThe accessing protocol methods are:
blockFactor
Answers the current number of rows that are buffered in an answer stream associated with this session.
blockFactor: aNumber
Sets the number of rows to buffer internally using the array interface. This exchanges memory for reduced overhead in fetching data, but is otherwise transparent.
maxLongBytes
Answers the number of bytes to allocate for receiving LONG or LONG RAW data.
maxLongBytes: aNumber
Sets the maximum number of bytes to fetch for a LONG or LONG RAW column. The default is 32767 bytes. The maximum setting is limited by available memory. A large setting may use considerable memory, especially when using large values for blockFactor.
data processingThe data processing protocol methods are:
cancel
The processing initiated by sending the execute message to the session cannot be interrupted. However, applications may use cancel to inform the Oracle server that the application has no further interest in results from the current query.
rowCount
Answers an Integer representing the number of rows inserted, updated, deleted, or the cumulative number of rows fetched by the previous query. Note that setting a #blockFactor: greater than one will affect the granularity of the cumulative count, because rows will be fetched in blocks.
3-4 VisualWorks

OracleSession
preparePLSQL: bindVariable: bindVariable:value: bindVariable:value:type:size
These methods are described in Using PL/SQL.
prefetchThe prefecth protocol methods are:
setPrefetchRows: anInteger
With OCI 8 and later, it is possible to improve the speed of a query by specifying a number of rows to prefetch.
For example:
aConnection := OracleConnection new.aConnection
username:'scott'; password: 'tiger'; environment: 'myDB'.aConnection connect.aSession := aConnection getSession.aSession
blockFactor: 2;prepare: 'SELECT * FROM EMP WHERE SAL > ?';bindInput: (Array with: 100);setPrefetchRows: 2; execute.
aSession answer upToEnddo: [:each | Transcript show: each printString; cr].
aSession disconnect.aConnection disconnect.The best choice for the number of rows to prefetch depends on numerous factors such as network speed and the amount of client-side memory available. You should try different values to find the optimal setting for a specific application.
testingThe testing protocol methods are:
isReady
The OCI does not provide a mechanism to determine if the execution has been completed and the results are ready. Therefore, isReady will always return true and then the application will wait until the results are ready when sending the answer message.
Database Application Developer’s Guide 3-5

Using the Database Connect for Oracle
OracleColumnDescriptionExternalDatabaseColumnDescription defines information used to describe columns of tables or as a result of executing a SELECT statement. The OracleColumnDescription class adds information specific to Oracle.
Instance Protocols
accessingAs with all variables defined for column descriptions, these may be nil if the values are not defined in the context in which the column description was created.
The oracleInternalType method answers an Integer representing the Oracle internal type code for the column.
OracleErrorExternalDatabaseError defines information used in reporting errors to the application. The OracleError class adds information specific to Oracle. A collection containing instances of OracleError will be provided as the parameter to exceptions raised by the database connection in response to conditions reported by Oracle.
Instance Protocols
accessingThe accessing protocol methods are:
dbmsErrorCode
Answers the error code (a SmallInteger) from OCI.
dbmsErrorString
Answers a String describing the error code.
osErrorCode
Answers the operating system code value (a SmallInteger) corresponding to an error received.
osErrorString
Always answers nil. The OCI does not provide this information.
3-6 VisualWorks

Data Conversion and Binding
Data Conversion and BindingWhen receiving data from the database, all data returned by the OCI is converted into instances of Smalltalk classes. These conversions are summarized in the following table. Although abstract classes are used to simplify the table, the object holding the data is always an instance of a concrete class.
Conversion of Oracle datatypes to Smalltalk classes
When binding values for query variables, only instances of ByteArray, Date, Time, Timestamp, Integer, Double, Float, FixedPoint, String, or Text (or their subclasses) may be used in the input bind object.
For additional details on the conversion of types when binding numbers, see Binding Numbers and Conversion.
When binding PL/SQL Values, the Oracle type TABLE OF is mapped to Array.
When rebinding variables prior to re-executing a query, the Oracle type of the variable must not change. That is, if the variable was first bound with a numeric value, rebinding with a string value will cause an error. Binding first with an Integer and then rebinding with a FixedPoint value does not present a problem, since both are treated as NUMBERs. Binding first when nil is an implicit first binding with a String variable.
To bind a NULL value, use nil, which is treated as a NULL value of type VARCHAR.
Oracle Datatype Smalltalk class
NUMBER FixedPoint, Float, Double, Integer
CHAR, VARCHAR, VARCHAR2, LONG String
ROWID, CLOB String
RAW, LONG RAW, BLOB ByteArray
DATE, TIMESTAMP Timestamp
Database Application Developer’s Guide 3-7

Using the Database Connect for Oracle
Note that the EXDI allows binding a nil first to a variable, then a value, or vice versa, but Oracle places a restriction on the binding of NULL in queries. Conditional tests for a NULL value must be written as:
SELECT name FROM employee WHERE id IS NULLBinding a nil (NULL) value to a query variable will not match fields containing NULL values.
Binding NULL and Backward CompatibilityWhen using Oracle servers version 8.1.7 and lower, the following caveat applies: when binding a nil as the first bind value, you must use a different binding method since older Oracle servers don't allow switching datatypes. For example, with servers running Oracle 9 and higher, the following code may be used:
session bindVariable: #v1 value: nil.For compatibility with Oracle 8.1.7 and lower, use the following expanded form of the binding method:
session bindVariable: #v1 value: nil type: #Integer32 size: 0.
Binding Numbers and ConversionWhen a NUMBER is retrieved from the server, it is converted into a Smalltalk type according to the following rules:
• If a precision has been specified in the schema, the value will be converted to either a Double or a Float, depending on the precision specified in the schema.
• If no precision was specified and the value will fit into 32-bit integer, it will be converted to an Integer (or SmallInteger, if the value fits into 29 bits).
• Otherwise, the value will be converted to a FixedPoint.
To achieve optimal performance, we recommend that the same type of Smalltalk numbers (e.g., SmallInteger) be bound to the same query variable. However, in cases where different Smalltalk numbers (e.g., Integer and Double) have to be bound to the same query variable, VisualWorks can process it appropriately, but performance may be slightly impaired since buffer reallocation might be necessary.
The following example illustrates binding numbers:
| connection session typedData arraySize | connection := OracleConnection new. connection
3-8 VisualWorks

Data Conversion and Binding
environment: 'env'; username: 'name'; connect: 'pwd'.
session := connection getSession.session prepare: 'CREATE TABLE testnumber (Col1 NUMBER(20,4))'.session execute.session answer.session prepare: 'INSERT INTO testnumber values (?)'."Binding same kind of numbers."typedData := #(0 123 456 789 921).arraySize := typedData size.1 to: arraySize do:
[:i |session bindInput: (Array with: (typedData at: i)).session execute.session answer].
"Binding different kinds of numbers."typedData := #(0 16r100000000 12.4 12.5d 12.6s).arraySize := typedData size.1 to: arraySize do:
[:i |session bindInput: (Array with: (typedData at: i)).session execute.session answer].
session prepare: 'SELECT * FROM testnumber'.session execute.session answer upToEnd inspect.session prepare: 'DROP TABLE testnumber'. session execute.session answer.session disconnect .connection disconnect.
Array BindingWhen binding arrays of values, the size of the array must match the size specified by the INSERT statement. Arrays may be bound either by position or by name. To illustrate binding by name, we can used class BindTest, an example contained in the Database-Examples parcel.
For example, to bind an Array by position:
| aConnection aSession |aConnection := OracleConnection new.aConnection username: 'name';
password: 'pwd';environment: 'env'.
aConnection connect.
Database Application Developer’s Guide 3-9

Using the Database Connect for Oracle
aConnection begin.aSession := aConnection getSession.aSession prepare: 'CREATE TABLE testtb (cid number, cname
varchar2(50))'.aSession execute.aSession answer.aSession prepare: 'INSERT INTO testtb (cid, cname) values (?, ?)'. aSession bindInput: #( (301 302 303) ('test301' 'test302' 'test303') ). aSession execute.aSession answer.aConnection commit.
To bind values by name:
| aConnection aSession bindItem |aConnection := OracleConnection new.aConnection username: 'name';
password: 'passw';environment: 'env'.
aConnection connect.aConnection begin.aSession := aConnection getSession.aSession prepare: 'insert into testtb values (:cid, :cname)'. bindItem := BindTest
cid: #(39 40 41) cname: #('try39' 'try40' 'try41').
aSession bindInput: bindItem. aSession execute.aSession answer.aSession prepare: 'SELECT * FROM testtb'. aSession execute.aSession answer upToEnd inspect.aSession prepare: 'DROP TABLE testtb'. aSession execute.aSession answer.aConnection commit.
When multiple host variables are used in array binding, the sizes of the binding arrays for different host variables are not required to be the same, but the size of the longest array is used as the execution iteration.While the sizes of the arrays used with bindInput: are not absolutely required to be the same, for performance reasons it is recommended that your application binds arrays of the same size when using the same prepared SQL statement.
3-10 VisualWorks

Using PL/SQL
Using PL/SQLTo provide access to PL/SQL, and stored procedures in particular, OracleSession provides methods under the data processing protocol. These methods, which are explained in greater detail below, are:
preparePLSQL:
Prepare a query, in the form of an anonymous PL/SQL block. The prepare block must be run before a bind block, as per Oracle specifications.
bindVariable:value:
Set a binding for the PL/SQL variable named by the first argument (a Symbol). The value must be an instance of a class compatible with the legal types listed in Data Conversion and Binding, or can be an Array containing such values.
bindVariable:value:type:size:
Set a binding for a PL/SQL variable, using a specific type and field size. The value must be as described above. The type may be one of the following symbols: #String, #ByteArray, #Char, #Timestamp, #Float, #Double, #Integer32, #Integer, #FixedPoint, #MLSLABEL. The symbol #Char gives Oracle blank-padded comparison semantics. The symbol #Integer32 gives a 32-bit integer encoding. The symbol #MLSLABEL is for use with Trusted Oracle.
bindVariable:
Answers the current value (or Array of values) bound to the PL/SQL variable named by the argument (a Symbol).
For details about PL/SQL, see Oracle’s PL/SQL User’s Guide and Reference.
Preparing a PL/SQL QueryTo prepare a PL/SQL query, send an OracleSession the message #preparePLSQL:, passing the query as a String argument:
session := connection getSession.session preparePLSQL: 'BEGIN package.proc(:arg) END;'.
Database Application Developer’s Guide 3-11
Using the Database Connect for Oracle
The PL/SQL query must be in the form of an anonymous PL/SQL block. That is, it must be bracketed by a BEGIN/END pair, and the END must be followed by a semicolon.
The query can span multiple lines. Line breaks in the query are converted to white space before the query is prepared, unless the line break is within a quoted string.
Bind variables in the query may be either named, as in the code fragment above, or positional. See Binding PL/SQL Variables for details on query variable binding.
Executing a PL/SQL QueryOnce values have been bound for query variables, a prepared PL/SQL query is executed just like a standard SQL query. Sending execute to the OracleSession begins execution, and sending answer retrieves the result of the query.
Unlike SQL SELECT statements, PL/SQL queries do not return answer sets, so answer will either respond with #noAnswerStream, if the query executed without error, or by raising an exception if an error was encountered. Any exception is accompanied by a Collection of instances of OracleError.
Binding PL/SQL VariablesIn addition to preparing the query, the message preparePLSQL: directs the session to use PL/SQL-style binding, which is distinct from the style of binding described in the VisualWorks Application .
Values bound to PL/SQL queries can be either scalar values or arrays of scalar values. The values must be drawn from the set of types described under Data Conversion and Binding.
To bind a value (or Array of values) to a variable, send an OracleSession the message bindVariable:value: with the name and value as arguments. If the query uses named variables, the name must be a Symbol. If the query uses positional binding, the name must be the SmallInteger that corresponds to the variable’s position.
For example, the following code fragment invokes a stored procedure that expects a DATE, a TABLE OF VARCHAR, and a NUMBER as arguments.
sessionpreparePLSQL: 'BEGIN pkg.addstuff(:arg1, :arg2, :arg3) END;';bindVariable: #arg1 value: Timestamp now;
3-12 VisualWorks
Using PL/SQL
bindVariable: #arg2 value: #( 'One' 'Two' 'Three' nil );bindVariable: #arg3 value: 4;execute;answer.
NULL values are represented by nil.
To retrieve the return values from functions, you must bind a place-holder of the correct type, as shown below:
sessionbindVariable: 1 value: 0; "place holder for a NUMBER return value"bindValue: 2 value: argValue;preparePLSQL: 'BEGIN :1 := pkg.somefunction(:2) END;';execute;answer.
"retrieve the function return value"returnValue := session bindVariable: #SymbolicParameterName.
The use of #bindVariable: to access return values is explained below.
Variable Type and SizeBinding values requires knowledge of the value’s type and size. When using bindVariable:value:, the type and size are inferred. To appreciate what this means, it helps to fully understand bindVariable:value:type:size:.
When a value is bound using bindVariable:value:type:size:, the type must be one of #String, #ByteArray, #Char, #Timestamp, #Float, #Double, #Integer32, #Integer, #FixedPoint, or #MLSLABEL. For compatibility with older VisualWorks applications, the type may also be a class name, and may be one of String, ByteArray, Integer, Double, Float, or Timestamp.
The value must be a single value or an Array. If it is an Array, all elements must be compatible with the specified type.
If the size is nil, a default size will be calculated based on the type and value. If the type is #String or #ByteArray, the default size is large enough to hold the value (or the longest value in the array). If the type is #String or #ByteArray and the length is such that a LONG buffer is required, one will be allocated and the size will be rounded up to the next larger multiple of 4. For types of fixed length, the size is ignored. For #MLSLABEL, the size defaults to 255 bytes.If size is not nil, it is the application developer’s responsibility to create objects that are big enough to hold the returned values in the arguments for bindVariable:value: and bindVariable:value:type:size:.
Database Application Developer’s Guide 3-13

Using the Database Connect for Oracle
Because no explicit type and size information are available when using bindVariable:value:, type is inferred using the value. If the value is an Array, VisualWorks will try to find the most appropriate buffer type to allocate based upon the values in the Array, if such a buffer type can't be found, an InconsistentDataTypesInArrayBinding exception will be thrown. The value used to infer the type must be an instance of (or subclass of) ByteArray, Date, Double, FixedPoint, Float, Integer, SmallInteger, String, Text, Time, or Timestamp. Given the value and inferred type, the size is inferred as described previously.
The following two code fragments are equivalent:
session bindVariable: #notes value: 'Hello, World!'.session bindVariable: #notes value: 'Hello, World!' type: #String size: 12.
When a parameter of Oracle type INTEGER is required, bind the value by specifying a type of Integer and a size of nil (to accept the default size), as in:
session bindVariable: #count value: 3 type: #Integer size: nil.If you know that the integer values will always fit into a 32-bit buffer, you can use #Integer32.
Retrieving PL/SQL VariablesAfter a query has executed, values for function results and OUT (or IN OUT) parameters can be retrieved by sending the session the message bindVariable: with the name (or integer position) of the variable as an argument. bindVariable: will answer with either a single value or an Array of values, depending on whether the value is a scalar or a TABLE.
Oracle Threaded APIVisualWorks supports a Threaded API (THAPI) for non-blocking (asynchronous) calls to the Oracle database server.
The regular, non-threaded OracleConnection “blocks” the virtual machine while it communicates with the Oracle server. When a query is sent from VisualWorks, it is actually passed to the Oracle client library. This library contains executable code which in turn sends the query on to the Oracle server, and then waits for an answer.
This design is problematic in that the virtual machine is blocked as long as it has passed control into the client library. Since the virtual machine itself is a single process (an OS-level, or so-called
3-14 VisualWorks
Oracle Threaded API
heavyweight process), 100% of computing resources are lost while the entire process waits on the call to the library, which in turn waits for results from the server.
With OracleThreadedConnection, the virtual machine provides a native thread to call the client library. During the call, the thread waits on the Oracle server, while the virtual machine performs its other tasks. When the client library call is completed, the thread returns, waiting for some other assignment. At this point, the retrieved data is in memory and ready for the EXDI session which initiated the query.
Note that there are thread-aware methods at both the EXDI and the Lens level. Since the level of complexity is generally increased when using a thread, care must be exercised when using THAPI.
Configuring the Threaded APIUse of THAPI requires that the library paths be set on UNIX platforms:
Solaris: The LD_LIBRARY_PATH environment variable must be set to point to where the client libraries reside.
HP-UX: The SHLIB_PATH environment variable must be set to point to where the client libraries reside.
Using OracleThreadedConnectionFor Ad Hoc SQL queries, simply select the OracleThreaded connection type from the Database Connect pull down menu. To use Oracle with THAPI at the EXDI level, modify your existing EXDI code as follows:
1 Replace references to OracleConnection with references to OracleThreadedConnection.
2 Replace references to OracleSession with references to OracleThreadedSession.
Connection PoolingThe Oracle EXDI provides support for connection pooling. This feature is beneficial only in multi-threaded mode, and works with the Oracle THAPI, described previously.
Support for connection pooling is included in the OracleThapiEXDI package, though to use this functionality you need Oracle 9.0 or later client libraries.
Database Application Developer’s Guide 3-15

Using the Database Connect for Oracle
The following example illustrates the use of connection pooling in a multithreaded environment:
pool := OracleConnectionPool new.pool username: 'username';
password: 'password';environment: 'env'.
pool create.aBlock := [:tableName || conn sess ansStrm |
conn := pool getConnection.conn username: 'scott'; password: 'tiger'.conn connect.sess := conn getSession.sess prepare: 'select * from ', tableName.sess execute.ansStrm := sess answer.ansStrm upToEnd.sess disconnect. conn disconnect].
b1 := aBlock newProcessWithArguments: #('emp').b2 := aBlock newProcessWithArguments: #('bonus').b3 := aBlock newProcessWithArguments: #('dept').b1 priority: 30.b2 priority: 30.b3 priority: 30.b1 resume.b2 resume.b3 resume." Wait until all of the work is done before the connection pool is destroyed."(Delay forSeconds: 30) wait.pool destroy.
In this example, three processes are created, their priorities are assigned level 30, and then they are all started, roughly simultaneously.
A Delay is used to wait while the work is done, before the pool object is destroyed. Alternatively, a mutex and semaphore may be employed to avoid using the Delay. For an illustration, see: OracleConnectionPool class>>example1.
By default, the minimum number of connections in the connection pool is 1, while the maximum number is 5, and the next increment for connections to be opened is 1.
3-16 VisualWorks
Oracle Threaded API
To change these defaults, use the following code:
pool := OracleConnectionPool new.pool connMin: 2; "minimum number of connections is 2."
connIncr: 2; "the next increment for connections to be opened is 2."connMax: 10. "maximum number is 10."
pool username: 'username';password: 'password';environment: 'env'.
pool create.
Using THAPI with the Object LensTo use Oracle with THAPI in a Lens session, edit the Lens DataModel properties, and set the SQL Dialect to OracleThreaded. Use this setting for any new Lens DataModel classes too.
The Lens is not thread-safe throughout. As a rule, allow one instance of OracleConnection per forked process with the EXDI. For Lens, allow one instance of LensSession per forked process.
The following example uses a single BlockClosure to retrieve data from three different tables. Multiple sessions are used, each with a single connection. When run, three identical processes are created, each ready to manipulate a different table.
sem := Semaphore forMutualExclusion.aBlock := [:tableName || conn sess ansStrm | conn := OracleThreadedConnection new. connusername: 'name';
password: 'passw';environment: 'env'.
conn connect. sess := conn getSession. sess prepare: 'select * from ', tableName. sess execute. ansStrm := sess answer. (ansStrm == #noMoreAnswers) ifFalse: [ [ansStrm atEnd] whileFalse: [ |row| row := ansStrm next. sem critical: [Transcript show: tableName,': '. Transcript show: row printString; cr]]]. conn disconnect]. b1 := aBlock newProcessWithArguments: #('foo'). b2 := aBlock newProcessWithArguments: #('test1'). b3 := aBlock newProcessWithArguments: #('table3'). b1 priority: 30.
Database Application Developer’s Guide 3-17

Using the Database Connect for Oracle
b2 priority: 30. b3 priority: 30. b1 resume. b2 resume. b3 resume.
In this code example, note that the threaded connection EXDI class (OracleThreadedConnection) is used, as well as a mutualExclusion semaphore for writing to the Transcript. The semaphore prevents a “forked UI processes” disaster from occurring, since the Transcript needs to be protected from multi-threaded message overlaps. The three processes are created, their priorities are all assigned level 30, and then they are all started, roughly simultaneously.
Note that this example presupposes that three tables foo, test1, and table3, already exist. Any existing non-empty tables may be used by substituting their names.
The next example demonstrates the use of multiple sessions on a single connection:
sem := Semaphore forMutualExclusion.conn := OracleThreadedConnection new.conn username: 'name';
password: 'passw';environment: 'env'.
conn connect.aBlock := [:tableName || sess ansStrm |
sess := conn getSession.sess prepare: 'select * from ', tableName.sess execute.ansStrm := sess answer.(ansStrm == #noMoreAnswers) ifFalse: [
[ansStrm atEnd] whileFalse: [ |row|row := ansStrm next.sem critical:[Transcript show: tableName,': '.Transcript show: row printString; cr]]]].
b1 := aBlock newProcessWithArguments: #('foo').b2 := aBlock newProcessWithArguments: #('test1').b3 := aBlock newProcessWithArguments: #('table3').b1 attachToThread.b2 attachToThread.b3 attachToThread.b1 priority: 30.b2 priority: 30.b3 priority: 30.b1 resume.
3-18 VisualWorks

Calling Oracle Stored Procedures
b2 resume.b3 resume.b1 detachFromThread.b2 detachFromThread.b3 detachFromThread.
Again, note class OracleThreadedConnection is used, as well as a mutualExclusion semaphore for writing to the Transcript. Three processes are created, their priorities are all assigned level 30, and then they are all started, roughly simultaneously.
The effect of sending #detachFromThread is to release the native thread from its attachment to the BlockClosure.
Calling Oracle Stored ProceduresThe EXDI enables you to call Oracle stored procedures. Doing so, you may need to assign calling parameters, and you can retrieve return parameters. Oracle stored procedures can be quite intricate and error prone. While VisualWorks fully supports invoking stored procedures, it includes no specific facilities for trouble-shooting or debugging errors resulting from them. When creating stored procedures, use a tool such as SQL*Plus, which provides error checking feedback.
After establishing the connection, the query is set up in the argument of a preparePLSQL: message. To avoid errors, the query is defined to accept an array size argument (ArraySize). This integer value is passed as the first argument when the procedure is invoked, and tells the procedure how many records to return. Set this value large enough to return the entire table.
The other arguments are assigned to bind variables corresponding to variables in the stored procedure. Once set up, the procedure is executed by sending the execute and answer messages to the session.
The arrays returned by an Oracle stored procedure should be filled entirely on return, otherwise an error occurs. For this reason, the second loop in the procedure pads any unfilled array elements with blanks.
The example retrieves arrays from the PL/SQL stored procedure.
"Call the stored procedure from VisualWorks"| aConnection aSession idNo arr2 arr3 arr1 |ExternalDatabaseConnection
defaultConnection: #OracleConnection.
Database Application Developer’s Guide 3-19

Using the Database Connect for Oracle
ExternalDatabaseConnection traceCollector: Transcript.ExternalDatabaseConnection traceLevel: 5.aConnection := ExternalDatabaseConnection new.aConnection username: 'name';
password: 'pw';environment: 'env'.
aSession := aConnection connect getSession.idNo := 1.arr1 := Array new: 10 withAll: 0.arr2 := Array new: 10 withAll: (String new: 20).arr3 := Array new: 10 withAll: (String new: 20).
aSession preparePLSQL: 'BEGIN multi_pkg.multi_col_select (10, :id, :col1, :col2, :col3); END;'.
aSession bindVariable: #id value: idNo.aSession bindVariable: #col1 value: arr1.aSession bindVariable: #col2 value: arr2.aSession bindVariable: #col3 value: arr3.aSession execute; answer. (aSession bindVariable: #col1) inspect.(aSession bindVariable: #col2) inspect.(aSession bindVariable: #col3) inspect.aConnection disconnect.
The example above assumes the existence of a table and stored procedure, which can be created using these SQL statements:
/* Create the table here */CREATE TABLE employee (id INT, ssn VARCHAR(20),
fullname VARCHAR(20));/* Add some data to the table, add as many rows as desired */INSERT INTO employee (id, ssn, fullname)
VALUES (1, '000-00-0001', 'John Jones');/* Create the package here */ CREATE PACKAGE multi_pkg AS
TYPE IdTableType IS TABLE OF employee.id%TYPE INDEX BY BINARY_INTEGER;
TYPE SsnTableType IS TABLE OF employee.ssn%TYPE INDEX BY BINARY_INTEGER;
TYPE FullnameTableType IS TABLE OFemployee.fullname%TYPE INDEX BY BINARY_INTEGER;
PROCEDURE multi_col_select( ArraySize INT,
IDValue INT,IdCol OUT IdTableType,SsnCol OUT SsnTableType, FullnameCol OUT FullnameTableType);
END multi_pkg;/* Create the package body here */
3-20 VisualWorks
Statement Caching
CREATE OR REPLACE PACKAGE BODY multi_pkg ASPROCEDURE multi_col_select
( ArraySize INT, IDValue INT,IdCol OUT IdTableType,SsnCol OUT SsnTableType,FullnameCol OUT FullnameTableType)
ASi INT;CURSOR col_sel ISSELECT id, ssn, fullname FROM employee
WHERE id = IDValue;BEGIN
i := 1;OPEN col_sel;LOOP
EXIT WHEN i > ArraySize;FETCH col_sel INTO IdCol(i), SsnCol(i), FullNameCol(i);EXIT WHEN col_sel%NOTFOUND;i := i + 1;
END LOOP;/* Pad the remainder of the arrays with blanks */LOOP
EXIT WHEN i > ArraySize;IdCol(i) := -1;SsnCol(i) := '';FullNameCol(i) := '';i := i + 1;
END LOOP;CLOSE col_sel;
END multi_col_select;END multi_pkg;
Statement CachingThe OracleEXDI supports statement caching. This feature is useful for improved performance when you execute the same SQL statement multiple times. When statement caching is enabled, an existing prepared statement handle will be reused.
By default, statement caching is disabled. This feature was added in Oracle 9.0.0 and later. The VisualWorks EXDI for Oracle is compatible with both pre-9.0.0 versions and later.
Database Application Developer’s Guide 3-21

Using the Database Connect for Oracle
To enable and use statement caching:
| conn sess |conn := OracleConnection new.“Check to see whether statement caching is supported by the installed Oracle client.”conn supportStatementCaching
ifFalse: [self error: 'Does not support caching.'].“Enable statement caching.”conn useStatementCaching: true.conn environment: 'oracleDB';
username: 'username';connect: 'password'.
“Set the size of the statement cache.conn setStatementCacheSize: 30.sess := conn getSession. 1 to: 20 do: [:i|
sess prepare: 'INSERT INTO testtb VALUES( ?, ''test'' )'.sess bindInput: (Array with: i).sess execute.ansStrm := sess answer].
CLOB/BLOB supportLarge Objects (LOBs) demand huge amounts of storage space and efficient mechanisms to access them. Video, images, voice-recordings, graphics, intelligent documents, and database snapshots are all stored as LOBs. Most DBMS have some type of support for LOBs.
LOB (Large Object) support is provided by the Oracle EXDI. Both CLOB (Character LOB) and BLOB (Binary LOB) data is supported.
LOB columns are not differentiated from LONGs and others when doing binding. Accordingly, any limitations of different Oracle versions on binding LOBs apply.
When retrieving LOBs, you can choose whether to get values or LOB proxies. The default size when getting values is 4000 bytes (you can change this by sending defaultDisplayLobSize: to an instance of OracleSession).
Getting proxies returns a LOB proxy, which contains the LOB locator and necessary methods to do LOB writes and reads. Using LOB proxies is the recommended way to deal with large LOBs.
3-22 VisualWorks

CLOB/BLOB support
The following sample demonstrates binding:
| aConnection aSession clob blob clobLength blobLength |aConnection := OracleConnection new.aConnection username: 'name';
password: 'passw';environment: 'env'.
aConnection connect.aSession := aConnection getSession.aSession prepare: 'CREATE TABLE TestLob (A CLOB, B BLOB, C INTEGER)'.aSession execute.aSession answer.aConnection begin.aSession prepare: 'INSERT INTO TestLob (a, b, c) VALUES (?, ?, ?)'.clobLength := 1048576. "1M"blobLength := 1048576. "1M"clob := String new: clobLength withAll: $a.blob := ByteArray new: blobLength withAll: 1.aSession bindInput: (Array with: clob with: blob with: 1).aSession execute.aSession answer.aConnection commit.
The following sample demonstrates LOB writing:
| aConnection aSession clobProxy blobProxy clob blob clobLengthblobLength ansStrm res |
aConnection := OracleConnection new.aConnection username: 'name';
password: 'passw';environment: 'env'.
aConnection connect.aConnection begin.aSession := aConnection getSession.aSession prepare: 'SELECT a, b FROM TestLob WHERE c = 1
FOR UPDATE'.aSession answerLobAsProxy.aSession execute.ansStrm := aSession answer.res := ansStrm upToEnd.clobLength := 1048576.blobLength := 1048576.clob := String new: clobLength withAll: $e.blob := ByteArray new: blobLength withAll: 0.clobProxy := (res at: 1) at: 1.clobProxy writeFrom: 1 with: clob asByteArray.blobProxy := (res at: 1) at: 2.
Database Application Developer’s Guide 3-23

Using the Database Connect for Oracle
blobProxy writeFrom: 1 with: blob.aConnection commit.
The following sample extends the above examples specifically for Oracle 8 users, showing how to avoid restrictions against multiple LONGs on a single INSERT, insert empty LOBs, and update values later:
"CREATE TABLE TestLob (A CLOB, B BLOB, C INTEGER)"| aConnection aSession |aConnection := OracleConnection new.aConnection username: 'name';
password: 'passw';environment: 'env'.
aConnection connect.aConnection begin.aSession := aConnection getSession.aSession prepare: 'INSERT INTO TestLob (a, b, c)
VALUES ( EMPTY_CLOB(), EMPTY_BLOB(), ?)'.aSession bindInput: (Array with: 1).aSession execute.aSession answer.aConnection commit.
The following example shows how to retrieve a LOB value:
| aConnection aSession clob blob ansStrm clobLength blobLength clobValue blobValue |aConnection := OracleConnection new.aConnection username: 'name';
password: 'passw';environment: 'env'.
aConnection connect.aSession := aConnection getSession.aSession answerLobAsProxy.aSession prepare: 'SELECT * FROM TestLob WHERE c=1'.aSession execute.ansStrm := aSession answer upToEnd.clob := (ansStrm at: 1) at: 1.clobLength := clob getLobLength.clobValue := clob readAll.blob := (ansStrm at: 1) at: 2.blobLength := blob getLobLength.blobValue := blob readAll.
3-24 VisualWorks

CLOB/BLOB support
Note that the method OracleLobProxy>>readAll returns an object whose is the smaller of the actual LOB size and the value of defaultDisplayLobSize. If you want to get the complete LOB values, you can set defaultDisplayLobSize to be bigger than all of the LOB sizes by using method OracleSession>>defaultDisplayLobSize:.
Adjustable Buffering for LOBsWhen reading/writing LOBs, the size of the buffer can be set from an instance of OracleSession. You can adjust the buffer size based upon the lengths of LOB you are handling.
For example:
| conn sess |conn := OracleConnection new.conn username: 'userid';
password: 'pwd';environment: 'OracleDB'.
conn connect.conn begin.sess := conn getSession."Better set this, otherwise the returned LOBs will have the default size: 4000 bytes."sess defaultDisplayLobSize: 1130729."Use the default lobBufferSize 32768."sess answerLobAsValue.sess prepare: 'select * from testlob'.sess execute.ansStrm := sess answer upToEnd."Increase the buffer size, it will improve performance for Large LOBs."sess lobBufferSize: 524288. sess prepare: 'select * from testlob'.sess execute.ansStrm := sess answer upToEnd.sess disconnect. conn rollback.
Database Application Developer’s Guide 3-25

Using the Database Connect for Oracle
3-26 VisualWorks

4
Using the ODBC ConnectThis chapter describes the ODBC Connect features including:
• ODBC EXDI Classes
• Data Conversion and Binding
• Unicode Support
• Using Stored Procedures
• Large Objects
ODBC EXDI ClassesThe EXDI defines application-visible services and is composed of abstract classes. ODBC Connect extends the EXDI by providing a layer of concrete ODBC classes. The ODBC Connect classes implement ODBC services by making private library calls to an ODBC Driver Manager Call Level Interface (CLI).
The public ODBC classes are:
• ODBCConnection
• ODBCTransaction
• ODBCSession
• ODBCColumnDescription
• ODBCError
• ODBCDataSource
• ODBCDataType
Database Application Developer’s Guide 4-1
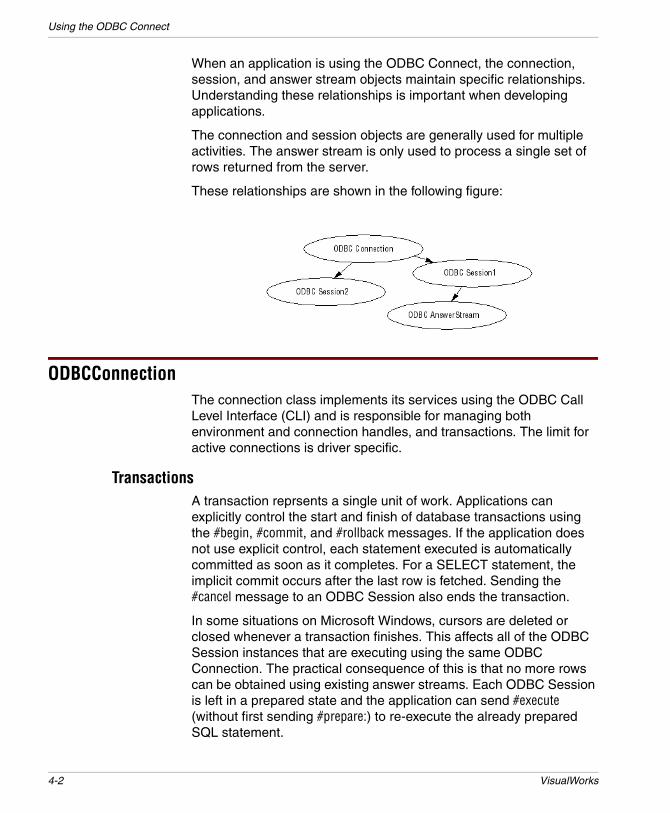
Using the ODBC Connect
When an application is using the ODBC Connect, the connection, session, and answer stream objects maintain specific relationships. Understanding these relationships is important when developing applications.
The connection and session objects are generally used for multiple activities. The answer stream is only used to process a single set of rows returned from the server.
These relationships are shown in the following figure:
ODBCConnectionThe connection class implements its services using the ODBC Call Level Interface (CLI) and is responsible for managing both environment and connection handles, and transactions. The limit for active connections is driver specific.
TransactionsA transaction reprsents a single unit of work. Applications can explicitly control the start and finish of database transactions using the #begin, #commit, and #rollback messages. If the application does not use explicit control, each statement executed is automatically committed as soon as it completes. For a SELECT statement, the implicit commit occurs after the last row is fetched. Sending the #cancel message to an ODBC Session also ends the transaction.
In some situations on Microsoft Windows, cursors are deleted or closed whenever a transaction finishes. This affects all of the ODBC Session instances that are executing using the same ODBC Connection. The practical consequence of this is that no more rows can be obtained using existing answer streams. Each ODBC Session is left in a prepared state and the application can send #execute (without first sending #prepare:) to re-execute the already prepared SQL statement.
4-2 VisualWorks
ODBCSession
ODBC does not support two-phase commit coordination spanning multiple connections. As a result, coordinated ODBC connections are simulated using a broadcast commit. Applications that use coordinated connections are responsible for their own recovery after a failure that leaves partially committed transactions.
Instance Protocols
accessingThe accessing protocol methods are:
environment: aString
Generally, the environment specifies a server name as a String, but the ODBC EXDI also allows the use of a DSN (Data Source Name).
On Windows, System and User DSNs are stored in the registry.
In VisualWorks, if a complete connect string is provided as environment, there is no need to create a client DSN, no need to provide user name and password either.
For example:
connection := Database.ODBCConnection new.connection environment: 'DRIVER={SQLServer};Database=dbname;UID=username;PWD=password;SERVER=servername;'.connection connect.
For additional details, see the discussion of ODBCDataSource.
ODBCSessionThe session class manages the preparing, binding, and executing SQL statements using the ODBC CLI. It is responsible for managing the state-ment handles, bind buffers, cursors, and catalog function results. The limit for active (connected, prepared, or executing) sessions per connection is ODBC driver specific.
In general, once a connection is established, a session object is created and used to perform transactions, as follows:
| connection session result answer |connection := Database.ODBCConnection new.connection
username: 'myUsername'; password: 'myPassword';environment: 'myDSN'.
Database Application Developer’s Guide 4-3

Using the ODBC Connect
connection connect.session := connection getSession.session
prepare: 'CREATE TABLE testtable (cid int, cname varchar(50))';execute;answer;answer.
session prepare: 'INSERT INTO testtable VALUES(:1, :2)'.#( (1 'Curly' ) (2 'Moe') (3 'Larry') ) do:
[ :item |session
bindInput: item;execute;answer;answer].
sessionprepare: 'SELECT * FROM testtable';execute.
answer := session answer.result := OrderedCollection new add: answer upToEnd.session answer.session prepare: 'DROP TABLE testtable';
execute;answer;answer.
result inspect.connection disconnect.
Instance Protocols
catalog functionsSending any of the messages in this category is equivalent to preparing and executing a query using the receiver. After the message completes, the table information is obtained as an answer stream in the normal way (e.g., by sending the message answer and then fetching the rows from the answer stream). Each row is an Array with one element for each column.
Each message in this category calls a correspondingly named ODBC function (if supported on the current platform), the arguments are directly passed to the function and take their defini-tions from the function definition. For additional details on the arguments or specific elements in the answer set, refer to the ODBC documentation.
The catalog functions are:
4-4 VisualWorks

ODBCSession
getSQLColumns:tableOwner:tableName:columnName:
Calls the ODBC function SQLColumns to obtain a list of names of tables stored in the current data source.
The columns of the answer set are defined as: TABLE_QUALIFIER, TABLE_OWNER, TABLE_NAME, COLUMN_NAME, DATA_TYPE, TYPE_NAME, PRECISION, LENGTH, SCALE, RADIX, NULLABLE, and REMARKS.
getSQLSpecialColumns:tableQualifier:tableOwner:tableName:scope: nullable:
Calls the ODBC function SQLSpecialCol-umns to obtain information about the columns that uniquely identify a row and the columns that are automatically updated in the table.
The columns of the answer set are as: SCOPE, COLUMN_NAME, DATA_TYPE, PRECISION, LENGTH, SCALE, and PSEUDO_COLUMN.
The arguments for tableQualifier:, tableOwner:, and tableName: are directly passed to the function and take their definitions from the function definition. The argument for getSQLSpecialColumns: must be either #SQL_BEST_ROWID or #SQL_ROWVER. The argument for scope: must be one of #SQL_SCOPE_CURROW, #SQL_SCOPE_TRANSACTION, or #SQL_SCOPE_SESSION. The argument for nullable: must be either #SQL_NO_NULLS or #SQL_NULLABLE.
getSQLStatistics:tableOwner:tableName:unique:accuracy:
Calls the ODBC function SQLStatistics to obtain a list of statistics about a single table and the indexes associated with the table.
The columns of the answer set are defined as: TABLE_QUALIFIER, TABLE_OWNER, TABLE_NAME, NON_UNIQUE, INDEX_QUALIFIER, INDEX_NAME, and TYPE.
The arguments for getSQLStatistics:, tableOwner:, and tableName: are directly passed to the function and take their definitions from the function definition. The argument for unique: must be either #SQL_INDEX_UNIQUE or #SQL_INDEX_ALL. The argument for accuracy: must be either #SQL_ENSURE or #SQL_QUICK.
Database Application Developer’s Guide 4-5

Using the ODBC Connect
getSQLTables:tableOwner:tableName:tableType:
Calls the ODBC function SQLTables to obtain a list of names of tables stored in the current data source. The columns of the answer set are defined as: TABLE_QUALIFIER, TABLE_OWNER, TABLE_NAME, TABLE_TYPE, and REMARKS.
data processingThe data processing protocol methods are:
cancel
The processing initiated by sending the execute message to the session cannot be interrupted. However, applications may use cancel to inform ODBC that the application has no further interest in results from the current query.
executeDirect: aString
Execute the prepared SQL statement without a prior external prepare step. Note that your application must bind values before sending this message, wherever binding is needed.
rowCount
Answers an Integer representing the number of rows inserted, updated, or deleted by the previous query.
testingThe ODBC CLI does not provide a mechanism for asynchronous query execution. Therefore, isReady will always answer true.
ODBCColumnDescriptionThe ODBCColumnDescription class defines information used to describe columns of tables or as a result of executing a SELECT statement.
fSqlType
Answers an Integer representing the ODBC CLI internal type code for the column. If the value is not known, a nil will be answered. Refer to the MS-SQLServer ODBC CLI Programmer’s Manual for a list of the values which may return.
4-6 VisualWorks

ODBCError
ODBCErrorThe ODBCError class defines information used in reporting errors to the application. The error class adds information specific to ODBCConnect. A collection containing instances of ODBCError will be provided as the parameter to exceptions raised by ODBCConnect in response to conditions reported by the ODBC CLI.
dbmsErrorCode
Answers the error code field (a SmallInteger) returned by the server. If the error condition was generated by the ODBC CLI, the value will be -99999. Refer to ODBC documentation for more information about reported errors.
dbmsErrorString
Answers a String describing the error code.
sqlState
Answers a 5 character string which is the SQLSTATE of the error being reported.
osErrorCode
Always answers nil. The ODBC CLI does not provide this information.
osErrorString
Always answers nil. The ODBC CLI does not provide this information.
ODBCDataSourceThe ODBCDataSource class defines information used in representing Data Source Names (DSN) within VisualWorks. Instances of this class each represent a single DSN and store the DSN name and description strings. Sending dataSources to an ODBCConnection instance returns a list of ODBCDataSource instances. The list contains all DSNs registered with the client.
Instance Protocols
accessingThe accessing protocol methods are:
Database Application Developer’s Guide 4-7

Using the ODBC Connect
name
Answers the string that represents the name of the receiver.
description
Answers the string that represents the receivers description string.
Data Conversion and BindingWhen receiving data from the database, all data returned by the ODBC CLI is converted into instances of Smalltalk classes. These conversions are summarized in the following table. Although abstract class names may be used to simplify the table, the object holding the data is always an instance of a concrete class. The ODBC type names used in the following table are representa-tive of the ODBC SQL type mapping.
Conversion of ODBC datatypes to Smalltalk classes
When binding values for query variables, only instances of ByteArray, Date, Time, Timestamp, Integer, Double, Float, Fixed-Point, String, Boolean, and Streams on String or ByteArray may be used as the input bind object.
ODBC Datatype Smalltalk class
INTEGER, SMALLINT, TINYINT Integer
BIT Boolean
DOUBLE PRECISION, FLOAT Double
REAL, SMALLFLOAT Float
DECIMAL, NUMERIC, MONEY FixedPoint
CHAR, VARCHAR, NVARCHAR String
BINARY, VARBINARY ByteArray
LONG VARCHAR ReadWriteStream on: String
LONG VARBINARY ReadWriteStream on: ByteArray
TIME Time
DATE Date
TIMESTAMP Timestamp
4-8 VisualWorks

Unicode Support
To bind a NULL value, use nil, which is treated as a NULL value of type VARCHAR.
Restrictions on BindingWhen rebinding variables prior to re-executing a query, the ODBC type and maximum length of the variable must not change. That is, if the variable was first bound with an Integer value, rebinding with a String value will cause an error. String and ByteArray bind input values may grow or shrink as long as they still fit into the space originally allocated for the buffer. To increase the chance that the buffer will be suitable for larger values, the allocated size should be twice size of the original value or greater. If the initial bind value for a variable is nil, the bind value is considered to be a String with external size of one.
ODBC Connect places restrictions on the binding of NULL in queries. Conditional tests for a NULL value must be performed.
Unicode SupportThe VisualWorks ODBC Connect provides support for Unicode. Your entire database can be set to use Unicode columns, or particluar columns can hold Unicode. For String data, though, you should generally not attempt to mix regular String columns with those in Unicode.
Unicode data may be stored in columns of type NCHAR, NVARCHAR and NTEXT on SQL Server, or UNICHAR and UNIVARCHAR on Sybase (other vendors may use different names).
In order to use UTF-8, the national character set for the database must be specified as UTF-8 on the database server. You may need to use the DBA tools to change this setting. The exact encoding used also varies depending upon the database vendor. For example, SQL Server represents Unicode columns using UCS-2 encoding (UTF-16), while on Oracle, it can be either UTF-16 or UTF-8.
We recommend that you always try to use the latest ODBC drivers from the database vendor, since earlier versions sometimes have difficulties dealing with Unicode. For example, the ODBC driver for Oracle 9.2 does not provide functional Unicode support, while the Oracle 10 version does.
Also, note that some data conversion behavior is vendor-specifc.
Database Application Developer’s Guide 4-9
Using the ODBC Connect
Storing and Retrieving UnicodeTo make use of Unicode, your application needs to explicitly tell the database session that you are binding a Unicode string. When retrieving a Unicode value from the database, the EXDI automatically detects any Unicode columns and sets the correct encoding.
In practice, the changes to your application code for Unicode support are fairly minimal. First, you need to specify the desired encoding (the default is #’UCS-2’). This can be done at the connection or session level. Next, you need to tell the session object to use Unicode. When inserting a String object, the EXDI will handle its conversion into Unicode.
Note that if the session specifies Unicode, all strings are converted to their Unicode representation before being inserted into columns. For non-Unicode columns, ODBC translates the Unicode values back into the expected encoding.
On retrieval, “National” column types furnish their strings in Unicode, and their data converted to a VisualWorks String, based on the encoding format specified by the session. It is best to ensure that the encoding used to INSERT matches the encoding used to SELECT. Also, it is important that the current Locale object can represent the retrieved string, i.e., that it can embrace all the characters retrieved.
To specify Unicode in a database session, use the following code:
aSession unicodeEncoding: #'UCS-2'.aSession unicode: true.aSession prepare: 'INSERT ...
Since the default encoding is #’UCS-2’, you may omit the use of unicodeEncoding:. This method may be used to specify UTF-8.
Again, you should not attempt to mix regular string columns with those in Unicode. After evaluating aSession unicode: true, all binding strings are considered Unicode and encoded accordingly.
To retrieve Unicode data from the database, no special code is required in your application. Unicode columns are detected automatically and encoded appropriately.
The following example demonstrates how to store and retrieve Unicode values from a database:
| aConnection aSession answer result |aConnection := ODBCConnection new.aConnection
4-10 VisualWorks

Using Stored Procedures
username: 'username';password: 'password';environment: 'connectionString'.
aConnection connect. aSession := aConnection getSession.aSession prepare: 'CREATE table test_unicode(id int, nc nchar(100), nvcnvarchar(200), nt ntext)'.aSession execute.answer := aSession answer.aSession := aConnection getSession.aSession unicode: true.aSession prepare: 'INSERT into test_unicode values (1, ?, ?, ?)'.aSession bindInput: # ('String1' 'String2' 'String3').aSession execute.answer := aSession answer.aSession := aConnection getSession.aSession prepare: 'SELECT * from test_unicode'.aSession execute.answer := aSession answer.result := answer upToEnd.result inspect.aSession := aConnection getSession.aSession prepare: 'DROP table test_unicode'.aSession execute.answer := aSession answer.
Using Stored ProceduresTo provide access to stored procedures, ODBCSession provides methods under the data processing protocol. These methods, which are explained in more detail below, are:
preparePROC: aString
Prepare a query which calls a stored procedure. A stored procedure can return multiple row sets and have input, output and return parameters.
bindVariableAt:
Answer the value of a stored procedure variable at the specified position.
Database Application Developer’s Guide 4-11
Using the ODBC Connect
bindVariable:at:
Bind a value to a (one-relative) parameter position in the query. Reuse an existing buffer only if it is big enough. E.g., an existing buffer can be too small if it holds a #String, but the new value is a #LargeString.
Preparing a Stored Procedure QueryTo prepare a query using a stored procedure, send an ODBCSession the message #preparePROC:, passing the query as a String argument:
session := connection getSession.session preparePROC: '{ ? = call myProc(?, ?)}'.
Bind variables in the query are positional. See Binding Variables for Stored Procedures for details on query variable binding.
Executing a QueryOnce values have been bound for query variables, a prepared query is executed just like a standard SQL query. Sending execute to the ODBCSession begins execution, and sending answer retrieves the result of the query.
Note that when using stored procedures, the return codes and output parameters are sent in the last packet from the server and are not available before the result sets are exhausted.
Alternatively, you may use #executeDirect:, as follows:
connection connect.session := connection getSession.session executeDirect: ' sp_databases'.answer := session answer.result := answer upToEnd.answer := session answer.connection disconnect.result inspect.
Binding Variables for Stored ProceduresIn addition to preparing the query, the message preparePROC: directs the session to use stored procedure binding, which is distinct from the style of binding described in the VisualWorks Application Developer’s Guide.
Values bound to stored procedure queries can be either scalar values or arrays of scalar values. The values must be drawn from the set of types described under Data Conversion and Binding.
4-12 VisualWorks
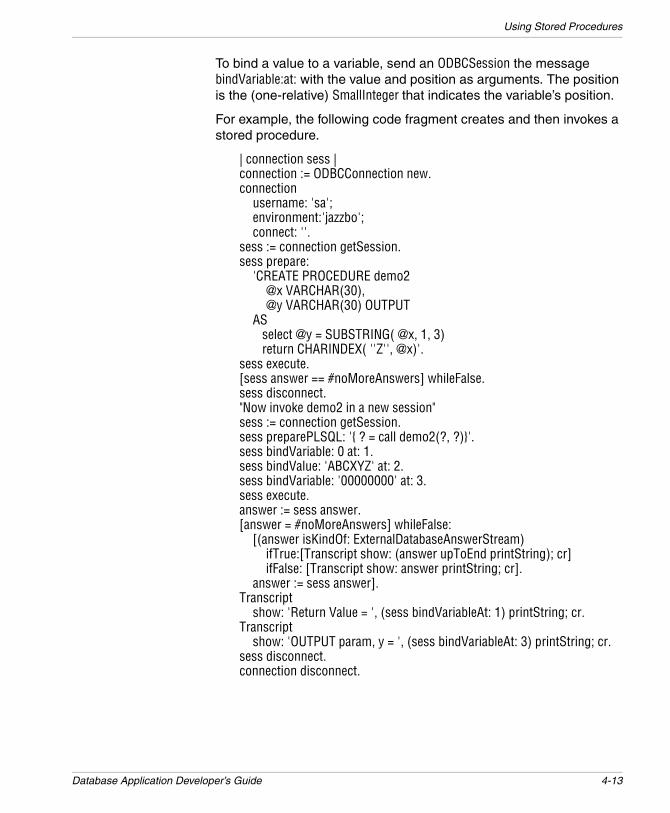
Using Stored Procedures
To bind a value to a variable, send an ODBCSession the message bindVariable:at: with the value and position as arguments. The position is the (one-relative) SmallInteger that indicates the variable’s position.
For example, the following code fragment creates and then invokes a stored procedure.
| connection sess |connection := ODBCConnection new.connection
username: 'sa';environment:'jazzbo';connect: ''.
sess := connection getSession.sess prepare:
'CREATE PROCEDURE demo2@x VARCHAR(30),@y VARCHAR(30) OUTPUT
AS select @y = SUBSTRING( @x, 1, 3) return CHARINDEX( ''Z'', @x)'.
sess execute.[sess answer == #noMoreAnswers] whileFalse.sess disconnect."Now invoke demo2 in a new session"sess := connection getSession.sess preparePLSQL: '{ ? = call demo2(?, ?)}'.sess bindVariable: 0 at: 1.sess bindValue: 'ABCXYZ' at: 2.sess bindVariable: '00000000' at: 3.sess execute.answer := sess answer.[answer = #noMoreAnswers] whileFalse:
[(answer isKindOf: ExternalDatabaseAnswerStream)ifTrue:[Transcript show: (answer upToEnd printString); cr]ifFalse: [Transcript show: answer printString; cr].
answer := sess answer].Transcript
show: 'Return Value = ', (sess bindVariableAt: 1) printString; cr.Transcript
show: 'OUTPUT param, y = ', (sess bindVariableAt: 3) printString; cr.sess disconnect.connection disconnect.
Database Application Developer’s Guide 4-13
Using the ODBC Connect
When the fragment shown above is evaluated, the following should appear in the Transcript:
#noAnswerStreamReturn Value = 6OUTPUT param, y = 'ABC'--- end Transcript ---
The use of #bindVariableAt: to access return values is explained below.
Retrieving Stored Procedure VariablesAfter a query has executed, values for function results and OUT (or IN OUT) parameters can be retrieved by sending the session the message bindVariableAt: with the integer position of the variable as an argument. bindVariableAt: will answer with either a single value or an Array of values, depending on whether the value is a scalar or a TABLE.
Large ObjectsLarge Objects (LOBS) demand huge amounts of storage space and efficient mechanisms to access them. Video, images, voice-recordings, graphics, intelligent documents, and database snapshots are all stored as LOBs. Most DBMS have some type of support for LOBs.
Support for Large ObjectsODBC CLI defines two datatypes to support large objects: LONG_VARBINARY and LONG_VARCHAR. ODBC Connect maps these types as ReadWriteStream on a Smalltalk ByteArray and a ReadWriteStream on a String.Databases such as MS-SQLServer do not store LONG_VARCHAR (TEXT) or LONG_VARBINARY (IMAGE) values in the rows of which they are a part. Instead a pointer to a separate chain of pages for TEXT/IMAGE data is stored in the row. They are allocated in whole disk pages; therefore, short items will effectively waste space. See the MS-SQLServer Online Dynamic Server Administrator’s Guide or MS ODBC 3.0 SDK for information about how to allocate lob space.
4-14 VisualWorks
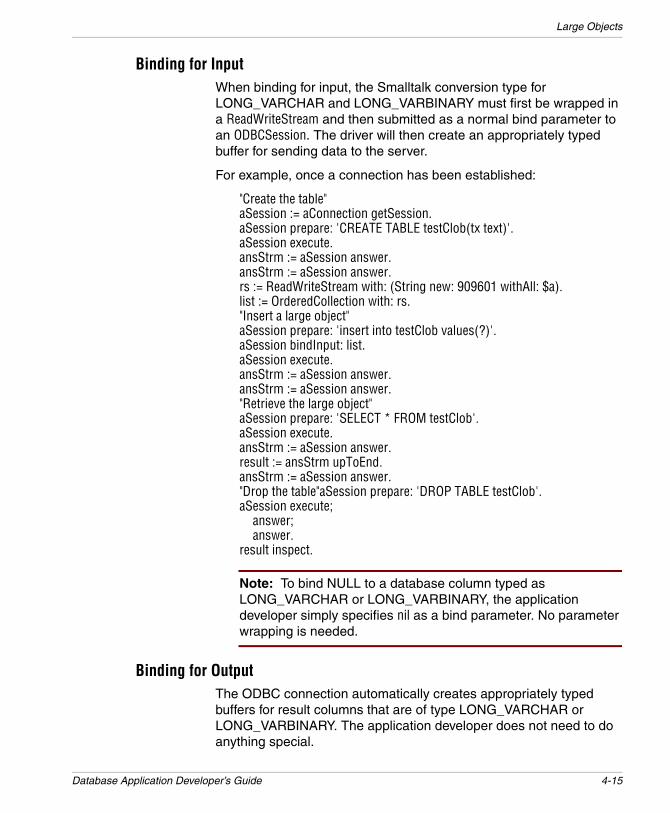
Large Objects
Binding for InputWhen binding for input, the Smalltalk conversion type for LONG_VARCHAR and LONG_VARBINARY must first be wrapped in a ReadWriteStream and then submitted as a normal bind parameter to an ODBCSession. The driver will then create an appropriately typed buffer for sending data to the server.
For example, once a connection has been established:
"Create the table"aSession := aConnection getSession.aSession prepare: 'CREATE TABLE testClob(tx text)'.aSession execute.ansStrm := aSession answer.ansStrm := aSession answer.rs := ReadWriteStream with: (String new: 909601 withAll: $a). list := OrderedCollection with: rs."Insert a large object"aSession prepare: 'insert into testClob values(?)'.aSession bindInput: list.aSession execute.ansStrm := aSession answer.ansStrm := aSession answer."Retrieve the large object"aSession prepare: 'SELECT * FROM testClob'.aSession execute.ansStrm := aSession answer.result := ansStrm upToEnd.ansStrm := aSession answer."Drop the table"aSession prepare: 'DROP TABLE testClob'.aSession execute;
answer;answer.
result inspect.
Note: To bind NULL to a database column typed as LONG_VARCHAR or LONG_VARBINARY, the application developer simply specifies nil as a bind parameter. No parameter wrapping is needed.
Binding for OutputThe ODBC connection automatically creates appropriately typed buffers for result columns that are of type LONG_VARCHAR or LONG_VARBINARY. The application developer does not need to do anything special.
Database Application Developer’s Guide 4-15
Using the ODBC Connect
Restrictions on Retrieving Large ObjectsODBC Connect will attempt to read all available data from long result columns up to ODBCSession>>defaultMaxLongData. The read size for long data is controllable through ODBCSession>>defaultMaxLongData: maxReadBytes.
Note: The maximum read size for long data is platform-specific.
Support for Multiple Active Result Sets (MARS)When using older SQL Server ODBC drivers, sharing a connection among multiple sessions has long been an issue. Attempting to do this causes problems for multi-thread applications.
The native SQL client provided with SQL Server 2005 provides a way to get around it: MARS (Multiple Active Result Sets).
MARS is available for use if you set a connection attribute SQL_COPT_SS_MARS_ENABLED to be SQL_MARS_ENABLED_YES. Note that attribute must be set before connecting to a data source.
With a multi-threaded (multi-session) application that shares the same connection, the EXDI supports MARS through interleaving. With multiple connections and a single session on each connection, MARS is supported via parallel execution.
4-16 VisualWorks

5
Using the DB2 ConnectThe DB2/UDB Connect provides access to IBM UDB databases version 6.x or later, on MS-Windows and Linux platforms. It includes EXDI layer support, including a threaded API, as well as support for the Object Lens and Store, the VisualWorks scource code management system.
This database connect makes direct calls to the CLI library, it supports block fetching, the use of arrays to input multiple parameter values (block insert/update), multiple answer sets, LOB locators and file references. Stored procedures are supported, with all types of parameters, including answering result sets.
The DB2 connect is available under the ParcPlace Public License, and has been tested on Windows NT 4.0 (SP6), Windows 2000 (SP2), and DB2 UDB v6.1 for Linux (SP1) on Red Hat Linux 6.1.
For a more general discussion of the VisualWorks EXDI framework, see EXDI Database Interface.
This chapter describes the DB2 Connect features including:
• DB2 EXDI Classes
• Data Conversion and Binding
• Using Stored Procedures
• Large Objects
• Using Data Links
• Threaded API
Database Application Developer’s Guide 5-1

Using the DB2 Connect
DB2 EXDI ClassesThe EXDI defines application-visible services and is composed of abstract classes. The DB2 connect extends the EXDI by providing a layer of concrete DB2 classes. The DB2 connect classes implement services by making private library calls to the DB2 Call Level Interface (CLI).
The public DB2 classes are:
• DB2Connection
• DB2Session
• DB2LOBLocator
• DB2DataLink
When an application is using the DB2 connect, the connection, session, and answer stream objects maintain specific relationships. Understanding these relationships is important when developing applications.
The connection and session objects are generally used for multiple activities. The answer stream is only used to process a single set of rows returned from the server.
These relationships are shown in the following figure:
DB2ConnectionThe connection class implements its services using the Call Level Interface (CLI) and is responsible for managing both environment and connection handles, and transactions. The limit for active connections is driver specific.
For a more detailed discussion of the database connection class, see Using Database Connections.
5-2 VisualWorks

DB2Session
Instance Protocols
blob functionsThe BLOB functions protocol methods are:
getLOBLength: aLocator
Retrieve the length of a LOB value associated with aLocator.
getLOBPosition: aLocator search: aStringOrLocator from: aPosition
Retrieve the position of aStringOrLocator in a LOB value associated with aLocator.
getLOBSubString: aLocator from: aPosition length: aLength asLocator: aBoolean
Retrieve the substring of a LOB value associated with aLocator.
See the discussion of DB2LOBLocator and DB2LOBFileReference, below, for additional LOB functionality.
datalink functionsThe datalink functions protocol methods are:
getDLAttribute: attributeName for: aDataLink
Answer the value of an attributeName associated with aDataLink.
See the discussion Using Data Links, for additional DATALINK functionality.
DB2SessionThe session class manages the preparation, binding, and execution of SQL statements using the DB2 CLI. It is responsible for managing the state-ment handles, bind buffers, cursors, and catalog function results. The limit for active (connected, prepared, or executing) sessions per connection is driver specific.
TransactionsA transaction reprsents a single unit of work. Applications can explicitly control the start and finish of database transactions using the #begin, #commit, and #rollback messages. If the application does not use explicit control, each statement executed is automatically
Database Application Developer’s Guide 5-3

Using the DB2 Connect
committed as soon as it completes. For a SELECT statement, the implicit commit occurs after the last row is fetched. Sending the #cancel message to a DB2 session also ends the transaction.
DB2 does not support two-phase commit coordination spanning multiple connections. Applications that use coordinated connections are responsible for their own recovery after a failure that leaves partially committed transactions. This limitation may be removed in the future.
Executing QueriesYou ask a session object to prepare and execute SQL queries by sending the messages prepare:, execute, and answer, in that order.
To examine the results of the query execution, send an answer message to the session. This is important to do even when the query does not return an answer set (e.g., an INSERT or UPDATE query). If an error occurred during query execution, it is reported to the application at answer time.
For an extended discussion of queries, see Using Sessions.
Instance Protocols
accessingThe accessing protocol methods are:
blockFactor
Answer the current number of rows that are buffered in an answer stream associated with this session.
blockFactor: aNumber
Set the number of rows that are buffered internally.
5-4 VisualWorks

DB2Session
Caution: The DB2 UDB version 7.1 FP1 client contains a bug in the retrieval of blocked fetch LOB locators and LOB values. Don‘t set blockFactor: to be greater than 1 for queries with LOB fields. To avoid these problems, you can use a version 7.1 DB2 server with version 6.1 client libraries. Version 7.1 FP2 resolves the problem with blockFactor, but introduces another issue: calls to SQLMoreResults() with a parameterized query and an array of input parameter values cause a crash. However, stored procedure calls are OK. Fixpak 3 (also known as DB2/UDB 7.2) resolves these issues.
data processingThe data processing protocol methods are:
rowCount
Answers an Integer representing the number of rows inserted, updated, deleted, or the cumulative number of rows fetched by the previous query.
cursorName
Answer the cursor name associated with receiver.
answerLOBAsLocators answerLOBAsValues answerLOBAsFileRef:
Set the session to answer LOB values be answered: as locators, values, or as file references.
bindInputArrayByColumns: anArray
Bind the parameter array with an array of values in the corresponding position.
For example, this code fragment inserts three rows into a table:
sessionprepare: ’insert into table2 values(?, ?)’;bindInputArrayByColumns:
#( #(101 102 103)#(’Red’ ’red’ ’roses’));
execute;answer.
bindInputArray: anArray
Bind the parameter array with an array of values.
Database Application Developer’s Guide 5-5

Using the DB2 Connect
For example, the following code fragment inserts 3 rows into a table:
sessionprepare: ’insert into table2 values(?, ?)’;bindInputArray:
#( #(110 ’Velvet’ )#(111 ’Green’ )#(112 ’Brick’));
execute;answer.
Or, with domain objects:
entries := Arraywith: (MyObject id: 110 name: ’Velvet’)with: (MyObject id: 111 name: ’Green’)with: (MyObject id: 113 name: ’Brick’).
sessionprepare: ’insert into table2 values(?, ?)’;bindInputArray: entries;execute;answer.
catalog functionsSending any of the messages in this category is equivalent to preparing and executing a query using the receiver. After the message completes, the table information is obtained as an answer stream in the normal way (e.g., by sending the message answer and then fetching the rows from the answer stream). Each row is an Array with one element for each column.
Each message in this category calls a correspondingly named CLI function, the arguments are directly passed to the function and take their defini-tions from the function definition. For additional details on the arguments or specific elements in the answer set, refer to the DB2 reference documentation.
The catalog functions are:
getSQLPrimaryKeys: tableQualifier tableOwner: tableOwner tableName: tableName
Calls the DB2 function SQLPrimaryKeys() to obtain a list of column names that comprise the primary key for a table.
5-6 VisualWorks

Data Conversion and Binding
The columns of the answer set are defined in the DB2 documentation as: TABLE_CAT, TABLE_SCHEM, TABLE_NAME, COLUMN_NAME, ORDINAL_POSITION, PK_NAME.
getSQLForeignKeys: tableQualifier tableOwner: tableOwner tableName: tableName fkQualifier: fkTableQualifier fkOwner: fkTableOwner fkTableName: fkTableName
Calls the DB2 function SQLForeignKeys() to obtain information about foreign keys for the specified table.
The columns of the answer set are defined in the DB2 documentation as: PKTABLE_CAT, PKTABLE_SCHEM, PKTABLE_NAME, PKCOLUMN_NAME, FKTABLE_CAT, FKTABLE_SCHEM, FKTABLE_NAME, FKCOLUMN_NAME, ORDINAL_POSITION, UPDATE_RULE, DELETE_RULE, FK_NAME, PK_NAME, DEFERRABILITY.
Data Conversion and BindingWhen receiving data from the database, all data returned by the CLI is converted into instances of Smalltalk classes. These conversions are summarized in the following table. Although abstract class names may be used to simplify the table, the object holding the data is always an instance of a concrete class. The DB2 type names used in the following table are representa-tive of the DB2 SQL type mapping.
Conversion of DB2 datatypes to Smalltalk classes
DB2 Datatype Smalltalk class
INTEGER, SMALLINT Integer
BITINTEGER Boolean
DOUBLE, FLOAT Double
REAL Float
DECIMAL FixedPoint
CHAR, VARCHAR, LONG VARCHAR String
VARCHAR FOR BIT DATA ByteArray
BLOB ByteArray, ReadWriteStream on: ByteArray, DB2BLOBLocator, DB2LOBFileReference
Database Application Developer’s Guide 5-7

Using the DB2 Connect
When binding values for query variables, only instances of ByteArray, Date, Time, Timestamp, Integer, Double, Float, Fixed-Point, String, Boolean, DB2DataLink, DB2LOBLocator, DB2LOBFileReference and Streams on String or ByteArray may be used as the input bind object.
To bind a NULL value, use nil, which is treated as a NULL value of type VARCHAR.
When a BLOB or CLOB is retrieved from the server, it is converted into a Smalltalk type according to the following rules:
• By default, or if you send answerLOBAsValues to the session object, the BLOB/CLOB is returned as a String or ByteArray.
• If you send answerLOBAsLocators to the session object, it is returned as an instance of DB2LOBLocator or one of its subclasses,
• If you send answerLOBAsFileRef: with an instance of DB2LOBFileReference to the session object, the LOB value will be saved to file (see the description of class DB2LOBFileReference, above), and the result is the symbol #FileRef.
Restrictions on BindingCompared with the ODBC EXDI, the restrictions on binding are more relaxed. When re-binding variables prior to re-executing a query, the DB2 type and maximum length of the variable can change. For example, if the variable was first bound with an Integer value, rebinding with a String value is acceptable. Instances of String and ByteArray bound as input values may grow or shrink as long as they still fit into the column field.
The general limitations of DB2 with respect to datatypes remain.
CLOB String, ReadWriteStream on: String, DB2CLOBLocator, DB2LOBFileReference
TIME Time
DATE Date
TIMESTAMP Timestamp
DATALINK DB2DataLink
DB2 Datatype Smalltalk class
5-8 VisualWorks

Using Stored Procedures
The ability to re-bind input values may be illustrated using the following code example:
sessionprepare: ’create table testRebind (testField varchar(50))’;execute; answer.
sessionprepare: ’insert into testRebind values(?)’;bindInput: #(’String’);execute; answer;bindInput: #(123);execute; answer;bindInput: (Array with: Time now);execute; answer.
Using Stored ProceduresThe DB2 EXDI supports positional binding of variables, but when calling stored procedures, it uses the variable name to bind values.
To provide access to stored procedures, class DB2Session provides the following methods:
prepareCall: aString
Prepare a query using a CALL statement.
bindVariable: aSymbol
Answer the current value bound to the named parameter (a Symbol).
bindVariable: aSymbol value: aValue
Set the value of a named parameter.
bindVariable: aSymbol value: aValue kind: aSymbol
Set the value of a named parameter with parameter type (kind): #in, #out, #inout.
deferCursorClosing
Set cursor to defer cursor close while all result sets are being retrieved.
immediateCursorClosing
Set default cursor closing behavior.
Database Application Developer’s Guide 5-9
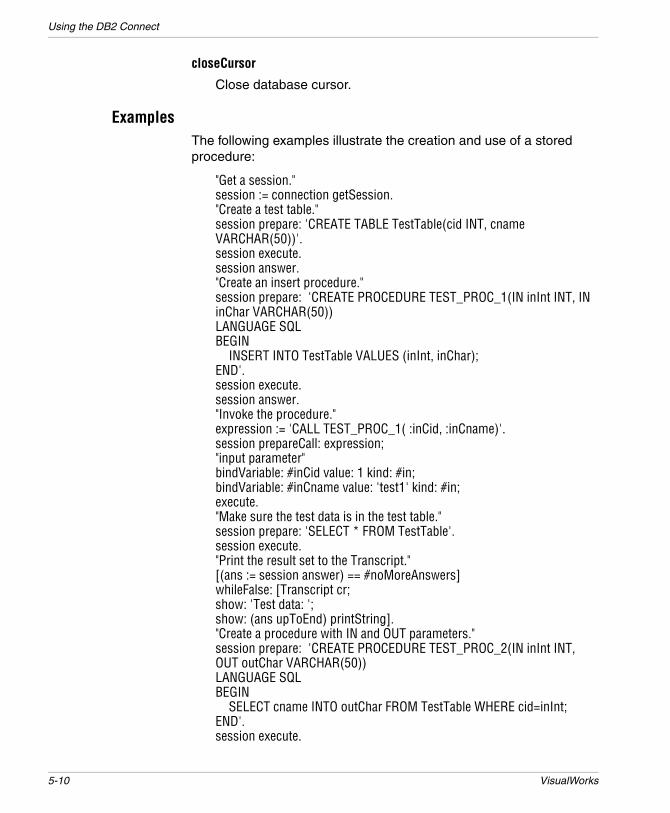
Using the DB2 Connect
closeCursor
Close database cursor.
ExamplesThe following examples illustrate the creation and use of a stored procedure:
"Get a session."session := connection getSession."Create a test table."session prepare: 'CREATE TABLE TestTable(cid INT, cname VARCHAR(50))'.session execute.session answer."Create an insert procedure."session prepare: 'CREATE PROCEDURE TEST_PROC_1(IN inInt INT, IN inChar VARCHAR(50))LANGUAGE SQLBEGIN
INSERT INTO TestTable VALUES (inInt, inChar);END'.session execute.session answer."Invoke the procedure."expression := 'CALL TEST_PROC_1( :inCid, :inCname)'.session prepareCall: expression;"input parameter"bindVariable: #inCid value: 1 kind: #in;bindVariable: #inCname value: 'test1' kind: #in;execute."Make sure the test data is in the test table."session prepare: 'SELECT * FROM TestTable'.session execute."Print the result set to the Transcript."[(ans := session answer) == #noMoreAnswers]whileFalse: [Transcript cr;show: 'Test data: ';show: (ans upToEnd) printString]."Create a procedure with IN and OUT parameters."session prepare: 'CREATE PROCEDURE TEST_PROC_2(IN inInt INT, OUT outChar VARCHAR(50))LANGUAGE SQLBEGIN
SELECT cname INTO outChar FROM TestTable WHERE cid=inInt;END'.session execute.
5-10 VisualWorks

Using Stored Procedures
session answer."Invoke the procedure."expression := 'CALL TEST_PROC_2( :inCid, :outCname)'.session prepareCall: expression;"input parameter"bindVariable: #inCid value: 1 kind: #in;"output parameter"bindVariable: #outCname value: 'test1' kind: #out;execute."Print the result set to the Transcript."[(ans := session answer) == #noMoreAnswers]whileFalse: [Transcript cr;show: 'Output parameter: ';show: (session bindVariable: #outCname) printString]."Create a procedure with INOUT parameters."session prepare: 'CREATE PROCEDURE TEST_PROC_3(INOUT inoutValue INT)LANGUAGE SQLBEGIN DECLARE v_cid INT DEFAULT 0;
SELECT cid INTO v_cid FROM TestTable WHERE cid=inoutValue;SET inoutValue = v_cid + 100;
END'.session execute.session answer."Invoke the procedure."expression := 'CALL TEST_PROC_3( :inoutCid )'.session prepareCall: expression;"input/output parameter"bindVariable: #inoutCid value: 1 kind: #inout;execute."Print the result set to the Transcript."[(ans := session answer) == #noMoreAnswers]whileFalse: [Transcript cr;show: 'Output parameter: ';show: (session bindVariable: #inoutCid) printString]."Disconnect the session and the connection."session disconnect.connection disconnect.
The following example illustrates the use of a stored procedure:
expression := 'CALL TWO_RESULT_SETS( :inSalary, :outRc)'.session := connection getSession.session
prepareCall: expression;"defer cursor closing for procedures, answering multiple answer sets"deferCursorClosing;
Database Application Developer’s Guide 5-11

Using the DB2 Connect
blockFactor: 30;"input parameter"bindVariable: #inSalary value: 14000.0d kind: #in;"output parameter"bindVariable: #outRc value: 0 kind: #out;execute.
"Check errors"(error := session bindVariable: #outRc) == 0
ifTrue: [Transcript cr;show: expression, ' completed successfully']
ifFalse: [Transcript cr;show: expression, ' failed with SQLCODE = ', error printString].
"Get result -- multiple answer sets"[(a := session answer) == #noMoreAnswers]
whileFalse: [Transcript cr;show: ’Result set: ’;show: (a upToEnd) printString].
Large ObjectsLarge Objects (LOBs) demand huge amounts of storage space and efficient mechanisms to access them. Video, images, voice-recordings, graphics, intelligent documents, and database snapshots are all stored as LOBs. Most DBMS have some type of support for LOBs.
Binding for InputWhen binding for input, the Smalltalk conversion type for CLOB and BLOB objects must first be wrapped in a ReadWriteStream and then submitted as a normal bind parameter to a DB2Session. The database connect will then create an appropriately-typed buffer for sending data to the server. Also, LOB locators returned from the query can be used as parameters.
The following sample illustrates LOB binding:
| connection session clob blob clobLength blobLength |connection := DB2Connection new environment: 'env';
username: 'username';password: 'pwd';connect.
session := connection getSession.session prepare: 'CREATE TABLE TestLob (a CLOB(32k), b BLOB(32k), cINT)'.session execute.session answer.
5-12 VisualWorks

Large Objects
connection begin.session := connection getSession.session prepare: 'INSERT INTO TestLob (a, b, c) VALUES ( ?, ?, ?)'.clobLength := 30720. "30k"blobLength := 30720. "30k"clob := String new: clobLength withAll: $a.blob := ByteArray new: blobLength withAll: 1.session
bindInput:(Array with: clob readStream with: blob readStream with: 1).
session execute.session answer.connection commit.
The following example shows how to retrieve LOB values:
connection begin. "Retrieve 4000 bytes of data."session := connection getSession.session answerLOBAsValues.session prepare: 'select * from TestLob'.session execute.ans := session answer.res := ans upToEnd.clob := (res at: 1) at: 1.clob size. blob := (res at: 1) at: 2.blob size. "Retrieve the values of the whole LOBs."session1 := connection getSession.session1 maxLongData: 32000.session1 answerLOBAsValues.session1 prepare: 'select * from TestLob'.session1 execute.ans := session1 answer.res := ans upToEnd.clob := (res at: 1) at: 1.clob size. blob := (res at: 1) at: 2.blob size. connection rollback.
Database Application Developer’s Guide 5-13

Using the DB2 Connect
Fetch Multiple LOBs in One ExecutionTo retrieve several LOB files at once, assume that we have a folder called Test, which contains text file called File-1.txt and a binary file called MyApp.exe, to be saved using LOBs.
In the example code shown below, these two files are inserted into the LOB columns of a DB2 table, and then retrieved to the same folder using different file names.
aSession := aConnection getSession. "Create a test table."aSession prepare: 'CREATE TABLE TestLOBFileRef (a CLOB(32k), b BLOB(1M), c INT)'.aSession execute.aSession answer. "Inserting the files into the test table."aConnection begin.aSession prepare:'INSERT INTO TestLOBFileRef (a, b, c) VALUES (?, ?, ?)'.clobFileRef := DB2LOBFileReference forCLOB: 'C:\Test\File-1.txt'.blobFileRef := DB2LOBFileReference forBLOB: 'C:\Test\MyApp.exe'.aSession bindInput: (Array with: clobFileRef with: blobFileRef with: 1).aSession execute.aSession answer.aConnection commit. "Retrieve the LOB files to the same folder using different file names."aConnection begin.clobFileRef := (DB2LOBFileReference for: 'C:\Test\File-1-Output.txt') overwriteFile.blobFileRef := (DB2LOBFileReference for: 'C:\Test\MyApp-Output.exe') overwriteFile.aSession := aConnection getSession.answer := aSession prepare: 'select a, b from TestLOBFileRef where c=1';answerLOBAsFileRef: (Array with: clobFileRef with: blobFileRef);execute;answer.answer upToEnd.aConnection rollback.
By comparing the files, you will find that the retrieved files are identical to the ones we inserted.
5-14 VisualWorks

Large Object File References
Using LocatorsUse a LOB locator when your application needs to select or manipulate a large object, but does not wish to transfer the entire object from the database server to VisualWorks.
LOB locators are represented using instances of class DB2LOBLocator. A DB2LOBLocator object is a compact token that may be used to reference a large object stored in the database. When running a query, the DB2 connect does not place the referenced large object in the result set, but merely updates the LOB locator object.
If desired, your application can also request the entire large object associated with the locator token.
In fact, a LOB locator is not a value stored in a database column. It is a reference that is valid only for the duration of a single transaction. It is the application developer’s responsibility to ensure that a locator object is not used beyond the duration of a transaction.
The following code sample illustrates the use of a LOB locator:
connection begin.answerStream := querySession
prepare: 'select blobField from table';answerLOBAsLocators; "answer locators instead values"execute;answer.
insertSessionprepare: ’insert into table2 values(?)’.
answerStream upToEnddo: [:row |
insertSession bindInput: (row first);execute;answer].
connection commit.For additional example code illustrating the use of LOB locators, see the tests in the DB2EXDITest parcel, located in the extra subdirectory.
Large Object File ReferencesInstances of class DB2LOBFileReference represent DB2 LOB file references.
For some examples of use, see the tests in the DB2EXDITest parcel, located in the extra subdirectory.
Database Application Developer’s Guide 5-15

Using the DB2 Connect
Instance Protocols
instance creationThe instance creation methods are:
for: aFilenameforBLOB: aFilenameforCLOB: aFilename
Answer a new instance for the specified filename.
public protocolThe public protocol methods include:
appendToFile overwriteFile createFile
File write operations are as stated.
file creation optionsThe file creation options protocol methods include:
compute: aBlock
Specify a one-argument block, whose argument is the old file name, and whose result is a new file name.
Using LOB File ReferencesThe following examples demonstrate the insertion and retrieval of a LOB file reference. In these examples, local files are used. These should be located in the VisualWorks home directory (e.g., /image).
To insert the contents of a file:
| aConnection aSession lobFileRef file fStream |aConnection := DB2Connection new environment: 'env';
username: 'username';password: 'pwd';connect.
aSession := aConnection getSession.aSession prepare: 'CREATE TABLE TestLOBFileRef (a CLOB(32k), c INT)'.aSession execute.aSession answer.aConnection begin.aSession prepare: 'INSERT INTO TestLOBFileRef (a, c) VALUES ( ?, ?)'.file := 'LOBFileReference.test' asFilename.fStream := file writeStream.fStream
nextPutAll: Collection comment;close.
5-16 VisualWorks

Using Data Links
lobFileRef := DB2LOBFileReference forCLOB: file asString.aSession bindInput: (Array with: lobFileRef with: 1).aSession execute.aSession answer.aConnection commit.
To retrieve a LOB file reference:
aConnection begin.fileRef := (DB2LOBFileReference for: 'testLobFileRefOutputFile.test')overwriteFile. aSession := aConnection getSession.answer := session prepare: 'select a from TestLOBFileRef where c=1';
answerLOBAsFileRef: fileRef;execute;answer.
answer upToEnd.aConnection rollback.
Using Data LinksDB2 supports the DATALINK SQL datatype, which is used to reference an object stored external to the database. This datatype can be used like any other, to define table columns.
Instances of class DB2DataLink represent a DATALINK objects.
Instance Protocols
accessingThe accessing protocol methods include:
scheme
Answer the scheme of a DATALINK containing an URL.
For example, in a DATALINK containing:
http://www.myCompany.com/docs/gizmo.pdfThe method scheme will return:
http
server
Answer the server name of a DATALINK containing an URL.
For example, in a DATALINK containing:
http://www.myCompany.com/docs/gizmo.pdf
Database Application Developer’s Guide 5-17
Using the DB2 Connect
The method server will return:
www.myCompany.com
comment
Answer a string that contains the comment for this DATALINK.
path
Answer the path and file name of a DATALINK containing an URL, including a file access token, if allowed.
pathOnly
Answer only the path and file name of a DATALINK containing an URL. A file access token is never included.
For example, in a DATALINK containing:
http://www.myCompany.com/docs/gizmo.pdfThe method server will return:
/docs/gizmo.pdf
complete
Answer the data location attribute of a DATALINK containing an URL.
For more information on the use of DATALINKs, refer to the DB2 reference documentation.
Threaded APIVisualWorks supports a Threaded API (THAPI) for DB2. This enables your application to make calls to the database without blocking the object engine (i.e., asynchronous calls).
While DB2 provides a thread-safe interface through the CLI, note that its internal implementation involves a connection-specific semaphore. Thus, at any moment only one thread can invoke a CLI function that takes an environment handle as input, and all other functions using the same connection will be serialized. Internally, then, the CLI will block any other threads using the same connection. One exception is #cancel, which will interrupt a statement that is currently running on another thread.
To provide multi-threaded behavior, each thread must be mapped to a single connection.
5-18 VisualWorks

Known Limitations
Using the Threaded APITo use DB2 with THAPI at the EXDI level, modify your existing EXDI code as follows:
1 Replace references to DB2Connection with references to DB2ThreadedConnection.
2 Replace references to OracleSession with references to DB2ThreadedSession.
For example code illustrating the use of the threaded API, see the tests in the DB2EXDITest parcel, located in the extra subdirectory.
Known LimitationsThe following are known limitations in the DB2 database connect, specifically in its support for the Object Lens:
Known issues:
• Automatic creation and modification of database tables from the Lens is currently not supported. You must first create all the tables in your database and then use the Data Modeler to map these tables to Smalltalk classes.
• Automatic altering of tables from the Lens is currently not supported.
• Mapping of CLOB and BLOB objects is limited only to LOB locators.
Database Application Developer’s Guide 5-19

Using the DB2 Connect
5-20 VisualWorks

6
Using the Database Connect for Sybase CTLibThis chapter describes the Database Connect for Sybase CTLib External Database Interface (EXDI) features and implementation, which includes the following:
• CTLib EXDI Classes
• Data Conversion and Binding
• Calling Sybase Stored Procedures
• Sybase Threaded API
CTLib EXDI ClassesThe EXDI defines application-visible services and is composed of abstract classes. The Database Connect for Sybase CTLib is a set of concrete classes that implement EXDI services by making calls to the Sybase CTLib. Database Connect for Sybase CTLib also extends services available to the application to provide features unique to the Sybase database system.
The EXDI organizes its services into classes for connections, sessions, and answer streams. In addition, classes for column descriptions and errors provide specific information that the application may use. The public EXDI classes are:
• ExternalDatabaseConnection
• ExternalDatabaseSession
• ExternalDatabaseAnswerStream
Database Application Developer’s Guide 6-1

Using the Database Connect for Sybase CTLib
• ExternalDatabaseColumnDescription
• ExternalDatabaseError
As a convention, Database Connect for Sybase CTLib classes use CTLib in place of ExternalDatabase in the class name — for example, CTLibConnection and CTLibSession.
When an application is using the EXDI, the connection, session, and answer stream objects maintain specific relationships. These relationships are important to understand when writing applications.
The connection and session objects are generally used for multiple activities. The answer stream is only used to process a single set of rows returned from the server.
These relationships are shown in the following figure.
Relationships
CTLibConnectionExternalDatabaseConnection defines database connection services. -CTLibConnection implements these services using the CTLib and is responsible for managing the CS_CONNECTION control block. The limit for active connections is determined by the system and the database resources.
Class Protocols
environment mappingApplications may define logical names for Sybase CTLib server names to be used when connecting. This reduces the impact on application code as network resources evolve.
6-2 VisualWorks

CTLibConnection
addLogical:environment:
Adds a new entry in the logical environment map for the Database Connect for Sybase CTLib that associates a logical name with a connect string. Once this association is defined, the environment for a CTLibConnection may be specified using the logical name.
For example:
CTLibConnection addLogical: 'devel' environment: 'DSQUERY'.
Instance Protocols
accessing The following public methods are included in the accessing protocol:
environment: aString
When using the Database Connect for Sybase CTLib, the environment specifies a server name, which must be a name defined in the interfaces file.
On Windows, the [SQLSERVER] section of the win.ini file defines the available servers. In addition to the entries in the win.ini file, servers accessible via named pipes may be referenced via the server’s node name.
Application developers are strongly encouraged to define and use logical environment names (see addLogical:environment: above). Thus, only system administrators need to know the actual server names.
appName
Answers the value for application name set by the application. Answers nil if never set.
appName: aString
Specifies the value for application name set by the application. While the application name is entirely optional, if provided, it is passed to the CTLib ct_con_props function before the connection is sent the connect message.
hostName
Answers the value for host name set by the application (or nil if never set).
Database Application Developer’s Guide 6-3
Using the Database Connect for Sybase CTLib
hostName: aString
Specifies the value for host name set by the application. While the host name is entirely optional, if provided, it is passed to the CTLib ct_con_props function before the connection is sent the connect message.
controlThe following public methods are included in the control protocol:
setInterfaceFile: aString
Specify the name and location of an interface file to be used when connections are established. An argument of nil instructs CTLib to use its default interfaces file.
setLoginTimeout: aNumber
Sets the login timeout to the number of seconds given by the argument. Setting the timeout to zero disables timeout. CTLib’s default timeout is 60 seconds.
CTLibSessionExternalDatabaseSession defines execution of prepared SQL statements and stored procedures. CTLibSession implements these services using the CTLib. CTLibSession is where the majority of the features unique to the Sybase product become available to the application developer.
A new CTLibSession corresponds to the allocation of a new CS_COMMAND structure. There can be more than one session per connection, but since the server does not accept a second command when there are results pending from the previous command, the same limitations would apply to the sessions. For example, it is not possible to fetch data in two sessions simultaneously within the same connection.
CTLibSession provides support for the output of COMPUTE rows and returns parameters from stored procedures in the same way as regular rows.
Instance Protocols
accessingThe following public methods are included in the accessing protocol:
6-4 VisualWorks

CTLibSession
returnStatus
Answers the return status from the stored procedure just executed. If the last result obtained from the CTLib was not from a stored procedure, answers nil.
textLimit
Answer the current value for the text limit.
textLimit: aNumber
Set both the CS_TEXTLIMIT property and CS_TEXTSIZE option of the CTLib and server. The value must be greater than 0. The default size is 32768.
blockFactor
Answers the current number of rows that will be buffered in an answer stream associated with this session.
blockFactor: aNumber
Sets the number of rows to buffer internally using the array interface. This exchanges memory for reduced overhead in fetching data, but is otherwise transparent.
data processing The following public methods are included in the data processing protocol:
cancel
The processing initiated by sending the execute message to the session may be interrupted by sending cancel. However, the server may not stop processing immediately. After cancel completes, the session may prepare: and execute a new command batch. (See also SybaseAnswerStream>>close).
rowCount
Answers the number of rows affected by the most recently executed query.
Using Cursors and Scrollable CursorsThe VisualWorks EXDI for CTLib supports the use of cursors and scrollable cursors. Note that only Sybase CTLib verion 15 and later support scrollable cursors. Also, with Sybase only, your application must initialize the connection object before using a cursor, because
Database Application Developer’s Guide 6-5
Using the Database Connect for Sybase CTLib
the Sybase sever needs explicit version information in order to prepare the client library. To initialize Sybase for use of cursors, evaluate:
aConnection setBehaviorToVersion15This must be sent before #connect in your application code.
Additionally, if you only want to use forward-only cursors, set the instance variable useCursor in the session to be true. E.g.:
aSession useCursor: true.Scrollable cursors in Sybase are read-only. To use scrollable cursors, set the instance variable scrollable in the session to be true. E.g.:
aSession scrollable: true.The requirements described in this section only apply to the Sybase implementation of cursors. For a general discussion of cursors, see: Using Cursors and Scrollable Cursors.
CTLibColumnDescriptionExternalDatabaseColumnDescription defines information used to describe columns of tables or as a result of executing a SELECT statement. The CTLibColumnDescription class adds information specific to Sybase.
Instance Protocols
accessing As with all variables defined for column descriptions, these may be nil if the values are not defined in the context in which the column description was created.
CTLibErrorExternalDatabaseError defines information used in reporting errors to the application. The CTLibError class adds information specific to Sybase. A collection containing instances of CTLibError will be provided as the parameter to exceptions raised by Database Connect for Sybase CTLib in response to conditions reported by Sybase.
Instance Protocols
accessing The following public methods are included in the accessing protocol:
6-6 VisualWorks

CTLibError
dbmsErrorCode
Answers the code value assigned to an error received from the ct_callback callback function.
dbmsErrorString
Answers the string describing an error received from the ct_callback callback function.
line
Answers the nesting level of the command batch or stored procedure that generated the message received from the ct_callback callback function.
msgno
Answers the code value assigned to a message received from the ct_callback callback function.
msgstate
Answers the message state assigned to a message received from the ct_callback callback function. This number may be of help to Sybase Technical Support.
msgtext
Answers the string describing a message received from the ct_callback callback function.
osErrorCode
Answers the operating system code value corresponding to an error received from the ct_callback callback function.
osErrorString
Answers the string describing the operating system error received from the ct_callback callback function.
procname
Answers the name of the stored procedure that generated the message received from the ct_callback callback function.
severity
Answers the severity level of an error or message received from the ct_callback callback functions.
Database Application Developer’s Guide 6-7

Using the Database Connect for Sybase CTLib
srvname
Answers the name of the server that generated the message received from the ct_callback callback function.
Data Conversion and BindingWhen receiving data from the database, all data returned by the CTLib is converted into instances of Smalltalk classes. These conversions are summarized in the table below. Abstract classes are used to simplify the table, and the object holding the data is always an instance of a concrete class.
Conversion of Sybase datatypes to Smalltalk classes
CTLib does not directly support input parameter binding. It is still possible to use the bindInput: feature on CtLibSession. However, the input parameters are expanded inline in a copy of the query text before the query is submitted to CTLib (via the ct_command function).
Query variables can be specified using any of the notations supported by the EXDI (i.e., ?, :name, or :position).
To bind a NULL value, use nil.
Exception HandlingDatabase Connect for Sybase CTLib adds the following exception to the set defined in the EXDI.
Sybase Datatype Smalltalk class
INT, SMALLINT, TINYINT Integer
REAL Float
FLOAT Double
MONEY, SMALLMONEY FixedPoint
CHAR, VARCHAR, TEXT String
BINARY, VARBINARY, IMAGE ByteArray
BIT Boolean
DATETIME, SMALLDATETIME Timestamp
DECIMAL, NUMERIC FixedPoint
6-8 VisualWorks

Calling Sybase Stored Procedures
unableToOpenInterfaceFileSignal
The file named by the argument to setInterfaceFile: could not be opened.
Calling Sybase Stored ProceduresYou can call a Sybase (CTLib) stored procedure. Doing so, you may need to assign calling parameters, and you can retrieve return parameters. Sybase stored procedures can be quite intricate and error prone. While VisualWorks fully supports invoking stored procedures, it includes no specific facilities for trouble-shooting or debugging errors resulting from them.
Stored procedures can have more than one statement, and so they can return more than one answer stream. To avoid losing data, you need to call answer until you get the #noMoreAnswers symbol as the result. For example, a non-select query may generate a #noAnswerStream, but be followed by a select statement which will have an answer stream. If you stop too early you will lose data.
To illustrate, a stored procedure may first be defined by evaluating the following expression:
| connection mySession |connection := CTLibConnection new.connection username: 'name';
environment: 'env';password: 'password';connect.
"create a stored procedure"mySession := connection prepare:'create procedure ck_2 @custName VARCHAR(20), @y int, @outVar intoutputasselect @outVar = @y * @yselect @custNameselect * from BorrowerExample where name = @custName'.mySession execute.[mySession answer == #noMoreAnswers] whileFalse.
Next, we can invoke this stored procedure using the following expression:
| connection session answer aList |connection := CTLibConnection new.connection
username: 'psmith';
Database Application Developer’s Guide 6-9

Using the Database Connect for Sybase CTLib
environment: 'OCELOT100';password: 'psmithpsmith';connect.
session := connection prepare: 'declare @tmp int exec ck_2 :1, :2, @outVar = @tmp output'. session bindInput: #('Susan Chinn' 10).session bindOutput: nil.session execute.aList := OrderedCollection new. [(answer := session answer) == #noMoreAnswers]
whileFalse:[answer == #noAnswerStream
ifFalse:[answer do: [:each | aList addLast: each]]].
session notNil ifTrue: [session disconnect].connection notNil ifTrue: [connection disconnect].Transcript show: aList printString; cr.
A stored procedure may have both input fields and output fields. The output variable must be declared as a temporary variable, and declared as output when you call the stored procedure.
In this example, when we invoke the stored procedure, the return parameter is declared by 'declare @tmp int', and then assigned to @outVar, which is the name of the output variable in the stored procedure itself. The temporary variable tmp can be any name.
The prepare: message argument also specifies the name of the stored procedure (ck_2 in the example) and the input variables, which may be declared and assigned or bound by an object. Here, the input variables are bound using positional binding, and specified via the bindInput: message.
Finally, we send answer to the session until the result #noMoreAnswers is returned.
Sybase Threaded APIVisualWorks supports a Threaded API (THAPI) for CTLib. This enables your application to make calls to the Sybase database without blocking the object engine.
The issues surrounding the use of blocking vs. non-blocking APIs may be found in the discussion of the Oracle Threaded API.
6-10 VisualWorks

Sybase Threaded API
LimitationsCurrently, the Sybase threaded client library allows multiple sessions per connection, but only one session may run on a connection at any time.
If your application needs multiple sessions, you must either use Semaphores to control the order of running the sessions, or multiple connections (this is illustrated in the second code sample, below). If your application needs to have multiple result sets open at one time, you must maintain multiple connections, one per active session.
Developers seeking to write portable applications should be aware that this limitation does not exist for Oracle libraries, and that code written for an Oracle server that uses multiple concurrent sessions might not be portable for use with Sybase clients.
Using CTLibThreadedConnectionFor Ad Hoc SQL queries, simply select the SYBASE-CTLib Threaded connection type from the Database Connect pull down menu.
To use Sybase with THAPI at EXDI level, replace your existing EXDI code as follows:
1 Replace references to CTLibConnection with references to CTLibThreadedConnection.
2 Replace references to CTLibSession with references to CTLibThreadedSession.
ExampleThe examples below illustrate the use of CTLibThreadedConnection. The first example uses the same BlockClosure to retrieve data from from three different tables. There are multiple sessions, each with a single connection.
Note that a mutualExclusion semaphore is used for writing to the Transcript. This prevents a “forked UI processes” conflict, since the Transcript needs to be protected from multi-threaded message overlaps.
When run, three identical processes are created, each ready to work with a different table. The priorities are all assigned to level 30, and then they are all started, roughly simultaneously.
Database Application Developer’s Guide 6-11

Using the Database Connect for Sybase CTLib
This example assumes that the three tables systypes, sysusers, and sysroles, already exist. Any existing non-empty tables may be used by substituting their names.
| aBlock b1 b2 b3 sem |sem := Semaphore forMutualExclusion.aBlock := [:tableName :id |
| conn sess ansStrm |conn := CTLibThreadedConnection new.conn
username: 'user';password: 'password';environment: 'env'.
conn connect.sess := conn getSession.sess prepare: 'select * from ', tableName.sess execute.ansStrm := sess answer.[ansStrm == #noMoreAnswers] whileFalse:
[(ansStrm == #noAnswerStream) ifFalse: [[ansStrm atEnd]
whileFalse: [| row |row := ansStrm next.sem critical:
[Transcript show: tableName, id, ': '. Transcript show: row printString; cr]].
ansStrm := sess answer]].conn disconnect].
b1 := aBlock newProcessWithArguments: #('systypes' 'Connection 1').b2 := aBlock newProcessWithArguments: #('sysusers' 'Connection 2').b3 := aBlock newProcessWithArguments: #('sysroles' 'Connection 3').b1 priority: 30.b2 priority: 30.b3 priority: 30.b1 resume.b2 resume.b3 resume.
The second example illustrates the use of one connection with multiple sessions, using an access Semaphore to control the order of running each session:
| connection accessSemaphore sem bBlock b1 b2 b3 |connection := CTLibThreadedConnection new.connection
username: 'user';password: 'password';
6-12 VisualWorks
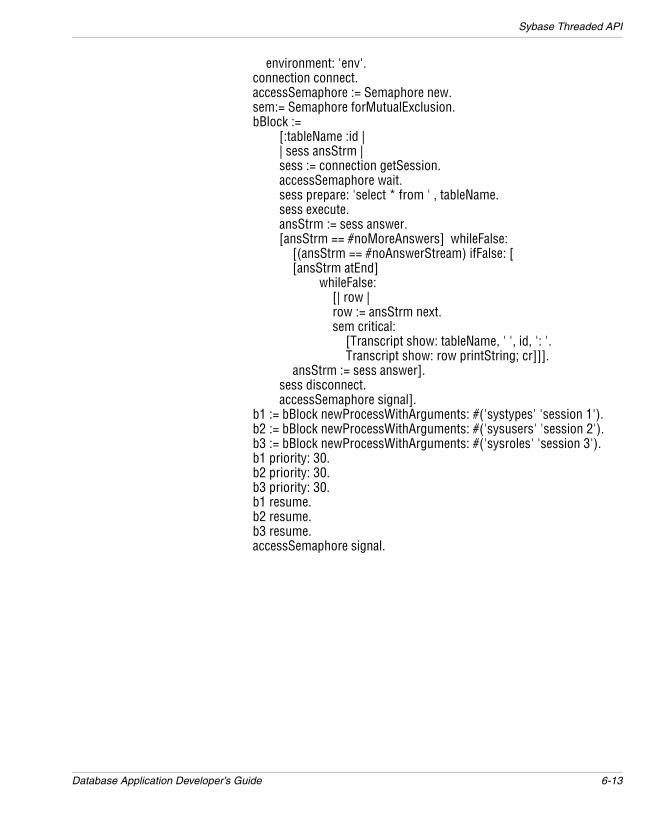
Sybase Threaded API
environment: 'env'.connection connect.accessSemaphore := Semaphore new.sem:= Semaphore forMutualExclusion.bBlock :=
[:tableName :id | | sess ansStrm |sess := connection getSession.accessSemaphore wait.sess prepare: 'select * from ' , tableName.sess execute.ansStrm := sess answer.[ansStrm == #noMoreAnswers] whileFalse:
[(ansStrm == #noAnswerStream) ifFalse: [[ansStrm atEnd]
whileFalse: [| row |row := ansStrm next.sem critical:
[Transcript show: tableName, ' ', id, ': '. Transcript show: row printString; cr]]].ansStrm := sess answer].
sess disconnect.accessSemaphore signal].
b1 := bBlock newProcessWithArguments: #('systypes' 'session 1').b2 := bBlock newProcessWithArguments: #('sysusers' 'session 2').b3 := bBlock newProcessWithArguments: #('sysroles' 'session 3').b1 priority: 30.b2 priority: 30.b3 priority: 30.b1 resume.b2 resume.b3 resume.accessSemaphore signal.
Database Application Developer’s Guide 6-13

Using the Database Connect for Sybase CTLib
6-14 VisualWorks
7
Developing a Database ApplicationThis chapter discusses the architecture of a VisualWorks database application, its components, and gives an overview of the various tools available for building application components and database modelling:
• VisualWorks Application Structure
• Components of a Database Application
• VisualWorks Database Tools
• Lens Name Space Control
OverviewThe VisualWorks database application framework provides support for external access to a variety of common RDBMS. The framework consists of these four elements:
• External database interface classes (EXDI)
• Database-specific (e.g., Oracle and Sybase) connection extensions to the EXDI, providing concrete classes
• Lens runtime interface
• Lens data forms and tools
The EXDI provides the lowest level of database access support in VisualWorks, giving you the most direct and detailed control of a database session. It enables execution of SQL statements in database sessions, binding of parameters, and the like.
Database Application Developer’s Guide 7-1

Developing a Database Application
For a more general discussion of the VisualWorks EXDI framework, see EXDI Database Interface.
The following sections of this chapter introduce the organization and structure of a VisualWorks database application.
The Lens provides higher-level facilities that simplify the task of database access. The Lens Data Modeler provides a mechanism for mapping table rows and columns to Smalltalk objects, as well as tools for creating and managing the mappings. It provides a runtime environment for handling object persistence in an object-oriented fashion, largely hiding the relational SQL activity underneath.
For a step-by-step guide to the use of the Lens Data Modeler, see Building a Data Model.
The Lens runtime environment supports object containers, object identity, database proxies, and a sophisticated query capability. The Lens also provides UI designer features that simplify the task of creating a user interface to your database-accessing application.
VisualWorks Application StructureA VisualWorks application generally consists of the user interface (UI) and the information model. The UI handles input and output, usually in a graphical manner employing windows and widgets. The information model handles data storage and processing, and is generally divided into one or more domain models and application models.
Domain models represent the state and behavior of objects in the application’s domain, the aspect of a business that the application is designed to automate.
Application models provide a layer of information and services between the user interface and domain models. In effect, the application model controls or coordinates the interaction between the UI and the domain model.
VisualWorks database applications have this same structure, except that at least one of its domain models represents the information in the database, external to VisualWorks.
In a database application, domain models represent the data, but they do not know how to access the database itself. A separate layer handles the details of database access. Separating the domain model from the particular database clarifies the application by
7-2 VisualWorks

Components of a Database Application
distinguishing how the data is used from the way it is stored. Also, since the data handling is generalized, the same data model can be retargeted to different databases by simply changing the database access layer.
Applications typically access the database using mechanisms provided by the Object Lens. The Object Lens is a set of classes and tools that simplify database access and help the developer map tables in the relational database to objects in the Smalltalk domain model.
Components of a Database ApplicationA database application that you create with VisualWorks consists of:
• Many entity classes, which serve as domain models for the application. An entity class instance models a row of the database table, with instance variables modeling the columns.
Database Application Developer’s Guide 7-3

Developing a Database Application
• A single database application class, which serves as the database application for the application.
• One or more data form classes, which serve as general-purpose application models.
Entity ClassesAn entity class is the Smalltalk representation of a database table. Each instance of an entity class represents a row in the corresponding database table. Columns in a database table are represented by instance variables in the corresponding entity class.
For example, a database may represent a customer as having a customer number, a name, and a category, maybe indicating the amount of business they do. Each row of the table would be represented by an instance of class Customer, which has three instance variables: custNumber, custName, and custCategory.
Entity classes only need to contain instance variables for those columns that are of interest to the application that you are building; columns that are not of interest do not need to be represented. Entity classes may also have instance variables that do not map to columns in a database table.
Foreign key references are expressed as direct object references. That is, the instance variables of one entity are defined to be of a “type” that is another entity. For example, a foreign key reference from
7-4 VisualWorks
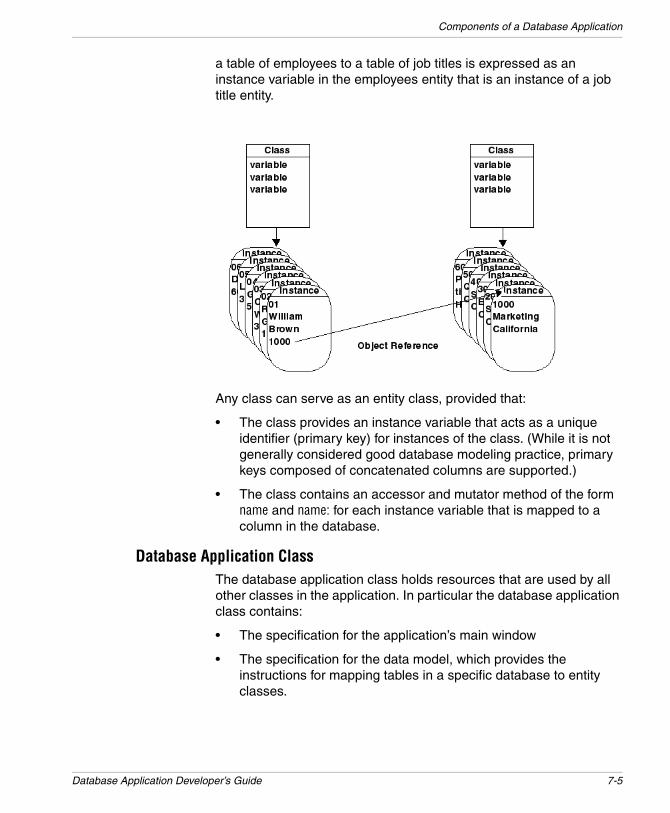
Components of a Database Application
a table of employees to a table of job titles is expressed as an instance variable in the employees entity that is an instance of a job title entity.
Any class can serve as an entity class, provided that:
• The class provides an instance variable that acts as a unique identifier (primary key) for instances of the class. (While it is not generally considered good database modeling practice, primary keys composed of concatenated columns are supported.)
• The class contains an accessor and mutator method of the form name and name: for each instance variable that is mapped to a column in the database.
Database Application ClassThe database application class holds resources that are used by all other classes in the application. In particular the database application class contains:
• The specification for the application’s main window
• The specification for the data model, which provides the instructions for mapping tables in a specific database to entity classes.
Database Application Developer’s Guide 7-5

Developing a Database Application
• A lens session, which provides the connection to the database and uses the data model to manage consistency between the information in the database and the application.
A database application class is a subclass of LensMainApplication which is a subclass of ApplicationModel. You can create a database application class when you install a data model, just as you do for an Application Model when installing a canvas.
You may also choose Tools > Database > New Database Application ... to create it by hand.
Main Window The main window (sometimes called the Application Launcher) is the root window of the application. The main window begins the chain of interaction between windows and dialog boxes of the application.
When you create a database application class, VisualWorks creates an initial window specification called windowSpec. This window specification contains basic controls for managing database connections and transactions. Using simple menu picks under the Database menu, you can login and logout from a database, and commit or rollback transactions.
You can enhance this window by adding actions that control your application or open other windows.
Data ModelThe data model is the heart of a database application. An application’s data model defines the mapping between the object model and the database schema. The data model specifies which entity classes are included in the application and how those entity classes are mapped to database tables. It also specifies the relationships between classes and thus tables. Relationships may be 1:1 or 1:MANY. MANY:MANY relationships may be modeled as two1:MANY relationships with an intersection table and object in between.
7-6 VisualWorks
Components of a Database Application
The data model is not merely a graphical or logical representation of the mapping between database tables and entity classes; it completely specifies that mapping. Queries to the database are based on information stored in the data model. Furthermore, the lens session uses the data model at runtime to determine how to map the information in database tables into Smalltalk objects. For this reason, if a database schema changes, any data models built from that schema must be updated.
A database application uses one data model. In the simplest case, that data model is stored as a method called dataModelSpec in the database application class that uses it. A database application class, however, does not need to contain the data model that it uses. You can set the dataModelDesignator of a database application class to use a data model that is in another class. For example, you may choose to place all of your data models in a single database application class and reference those data models from other database application classes.
Lens SessionAt runtime, the mapping between rows of database tables and Smalltalk objects is done by the lens session. The lens session is created in the context of the application’s data model. It uses the properties in the data model to determine which database management system to use and how to map tables from that system to Smalltalk objects. In this way, the lens session acts as a layer or buffer between the relational database and the objects. The objects themselves are not dependent on the database. This makes it easy to port a database application to different databases.
The lens session for a database application class is stored in the session variable of the class.
Data Form ClassesData forms are the basic building blocks of database applications. Data forms present information from the database to application users and enable that information to be edited. Data forms are specialized application models that support viewing and manipulating rows of a database table through the lens session.
A data form class contains:
• One or more window specifications (canvases)
• One or more query specifications
Database Application Developer’s Guide 7-7

Developing a Database Application
• Smalltalk methods to suit the particular set of utilities in a particular data model. These methods customize the inherited implementation to suit a particular application.
Data form classes focus on displaying and manipulating the instances of a single entity class. They are not, however, limited to a single entity. Data forms also can manipulate “rows” that are made up of instances of more than one entity. For example, they can show the results of a join across database tables.
Data forms are subclasses of LensDataManager, which is a subclass of ApplicationModel.
Data Form CanvasesData form canvases display information from the database. Data form canvases usually have controls that allow application users to navigate through the rows in a table and to create, view, update, and delete rows.
Data form canvases are similar to other canvases in that they are stored as window specification methods and can be edited using VisualWorks’ painting tools. Data form canvases differ from other canvases in that the widgets on them must include special validation and notification methods that ensure proper interaction with the lens session and with other data forms.
When you create a data form class, VisualWorks generates an initial canvas for it. The canvas is based on the template data form that you specify. Templates supplied with VisualWorks provide widgets with the validation and notification methods required. They also provide controls that enable the application user to:
• Execute a query associated with the data form
• Navigate through a set of objects (rows)
• Create and delete objects and edit the different variables
You can modify the initial canvas to suit your application’s needs. You can also create your own templates. For details see Creating a Custom Data Form Template.
A data form may contain one or more canvases, all of which are intended to display objects of the data form’s associated entity class. These canvases can display different attributes of the entity or display them in different ways.
7-8 VisualWorks
Components of a Database Application
Data form canvases can be linked together or combined to created entire application interfaces:
• A linked data form is one which is displayed in a separate window when the application user clicks on a button in another data form. The linked data form widget is a special-purpose action button with additional properties that describe how the data form is to behave.
• An embedded data form is one which is displayed embedded inside another data form. An embedded data form widget is a special-purpose subcanvas with additional properties.
Linked and embedded data forms are arranged in a parent/child hierarchy, with the application’s main window being the topmost node. During operation, various events are communicated through this hierarchy. The events that are communicated include window closing, logging in and out of the database, and committing and rolling back transactions. This allows for easy development of master/detail drilldown applications as well as more complex applications.
QueriesA query specifies the rows of a table that will be loaded for viewing and editing in the data form. The query also specifies the order in which the rows will be presented within an application data set.
Queries exist in the context of a specific data model. Thus, data forms exist in the context of a specific data model. If the data model on which a data form is based is changed, then the data form may also need to be changed. In particular, the data form will need to be changed if the instance variables that it manipulates are changed.
When you create a data form class, VisualWorks generates a default query for it. The default query is stored as a method called ownQuery and retrieves all of the rows from the table that is mapped to the data form’s entity or entities. It retrieves only the columns for which instance variables are mapped in the data model. If the data form manipulates more than one entity, the query uses the relationship between those entities when retrieving information from the database.
Queries can be combined to narrow down the data set to the desired granularity. For example, the contents of the embedded and linked data forms are typically determined by combining the ownQuery of the embedded or linked data form with a restricting query that is defined
Database Application Developer’s Guide 7-9

Developing a Database Application
in the parent data form. Putting the restricting query in the parent makes the child data form more reusable. Different parents can use the child data form in different ways, with different restricting queries.
VisualWorks Database ToolsVisualWorks includes both tools and tool extensions to help you create applications that access relational databases. The database tools are introduced briefly here, and their use is explained in more detail as they are used in the following chapters.
Data ModelerThe Data Modeler is the central tool for creating and editing data models. Using the Data Modeler, you define the entity classes and their instance variables, and set data model properties.
The Data Modeler provides access to other database tools.
Mapping ToolThe Mapping Tool enables you to define the associations between the entity classes and database tables, and between instance variables and columns. From the Mapping Tool you can also create or alter tables in the database. (You cannot remove tables using the Mapping Tool. To remove a table you would use the Ad Hoc SQL Tool and issue a DROP TABLE SQL command.)
Database Tables ViewerThe Database Tables window displays a list of the tables in the database and their columns. This tool enables you to select tables in the database, and automatically model the tables and their relations in the data model.
Query EditorThe Query Editor is a form-based dialog that helps you create and edit the queries that retrieve information from the database. A Query Assistant module provides further assistance in selecting query elements.
7-10 VisualWorks
VisualWorks Database Tools
Menu Query EditorThe Menu Query Editor enables you to edit the queries used to retrieve information from the database and use that information to define the choices on a menu.
Ad Hoc SQL ToolThe Ad Hoc SQL tool enables you to write SQL statements and send them directly to the database. This tool is accessed from the VisualWorks main window, and is useful for testing queries and performing certain database operations from VisualWorks.
Canvas ComposerThe Canvas Composer sets properties that specify how the initial canvases for data forms are generated.
Tool Extensions VisualWorks’ painting tools contain several features that are specifically designed for database applications.
To the PaletteThe Palette includes two widgets for connecting data forms together as part of a larger application:
• Linked Data Form is a special action button that, when users click it, displays another data form in a separate window.
• Embedded Data Form is a special subcanvas that displays another data form in the current window.
To the Canvas ToolThe Canvas Tool includes several commands that are especially useful when creating database applications:
• Tools > Reusable Data Form Components displays a window with widgets that are predefined for use in data forms, including buttons for navigating and editing data. These widgets can be copied into your data forms.
• Special > Define Menu as Query displays the Menu Query Editor, which enables you to define queries that retrieve information from the database and use that information as choices on a menu. The Define Menu as Query command is available when you have a menu button selected on the canvas.
Database Application Developer’s Guide 7-11

Developing a Database Application
• Special > Create Child Data Form creates another data form to be the child of the selected linked or embedded data form widget and displays the child’s canvas so that you can edit it.
• Special > Paint Child Data Form displays the canvas for the data form that is attached to the selected linked or embedded data form widget.
• Special > Browse Child Data Form displays a class browser with the Smalltalk code for the data form that is attached to the selected linked or embedded data form widget.
Lens Name Space ControlWith the release of VisualWorks 5i, the addition of name spaces provides new flexibility and with it complexity to Lens modeling tasks.
When new classes are being created or existing classes selected, the system must know both the simple name (e.g., Customer) and name space (e.g., Lens) of the class. This class could then be referred to by its fully qualified name Lens.Customer.
To make using the Lens as simple as possible, the Name Space Control Tool was created. You can open the tool using LensNamespaceControl open or by menu option in Data Modeling Tool. Two lists are presented, Selected and Available, with arrows to move items back and forth between the lists.
The selected list will always contain at least the Smalltalk and Lens name spaces. What is in this list will control the behavior of all all Lens tools where a menu pick of name spaces is required. The choices are controlled and, for user convenience, the menu always defaults to the last user selection. Two selection memories are supported; one for modeling activity and another separate memory for application creation.
Name Space Options
Note: Compatibility with versions prior to 5i is supported (i.e., an old Data Model can be loaded); however, once saved, it will be in a new form which cannot then be used in previous versions.
1 You can do all your modeling in the Smalltalk name space.
2 You can model and develop in the Smalltalk and/or Lens name space.
7-12 VisualWorks

Lens Name Space Control
3 You can add your own name spaces. To use a new name space:
• It must be defined with imports to Smalltalk.*, Database.*, and Lens.*.
• The Lens Name Space Control must be used to move the new name space to the Selected List.
Database Application Developer’s Guide 7-13

Developing a Database Application
7-14 VisualWorks

8
Building a Data ModelThe data model is the heart of a database application. A data model stores information about the associations between database tables and VisualWorks classes. A database application has one data model, but may represent data from several tables.
Initially, you create a new, empty data model, and then you populate it with entity classes. There are two primary ways of creating entities for the data model. You can:
• Generate the entities from existing tables in the database.
• Create new entities and then generate tables from them.
The VisualWorks Object Lens provides a suite of tools that simplify the process of building a data model. In this chapter, we’ll introduce the three most useful tools: the Database Tables browser, the Data Modeler tool, and the Mapping tool.
An Example Data ModelA Lens data model uses Smalltalk classes as entities, where each entity class represents either a database table or the class (type) of an element in a table row (the values in a column). Entity class names should follow the Smalltalk convention of beginning with an upper-case letter.
Each instance variable in an entity class represents a table column, and each should be named following the Smalltalk convention of beginning with a lower-case letter.
Database Application Developer’s Guide 8-1

Building a Data Model
The discussion of the Lens tools in this chapter shows how to create a simple data model that is expressed using three classes: Customer, Employee, and Job.
For reference purposes, the example data model is included with the VisualWorks distribution in the form of a parcel named Lens-Example2. You may load this parcel and browse the completed classes, but do not load it if you intend to create the example entity classes from scratch.
In this data model, class Customer is defined as follows:
Smalltalk defineClass: #Customersuperclass: #{Core.Object}indexedType: #noneprivate: falseinstanceVariableNames: 'customerId zipCode areaCode phoneNumber
creditLimit comments salespersonId'imports: ''category: 'Lens-Examples'
The VisualWorks Lens provides a way to associate SQL datatypes with the instance variables in an entity class. In this example data model, the instance variables of class Customer are typed as follows:
Class Employee is defined as follows:
Smalltalk defineClass: #Employeesuperclass: #{Core.Object}indexedType: #noneprivate: falseinstanceVariableNames: 'employeeId lastName firstName middleInitial
hireDate salary commission jobIdmanagerId'
Name Type
customerId SerialNumber
zipCode String
areaCode String
phoneNumber String
creditLimit FixedPoint
comments String
salespersonId Employee
8-2 VisualWorks

Create a New Data Model
imports: ''category: 'Lens-Examples'
These types are associated with the instance variables of Employee:
Finally, class Job is defined as:
Smalltalk defineClass: #Jobsuperclass: #{Core.Object}indexedType: #noneprivate: falseinstanceVariableNames: 'jobId function'imports: ''category: 'Lens-Examples'
These types are associated with the instance variables of Job:
Create a New Data ModelBefore you define the mapping between a database table and the domain model, you must create the empty data model. This is true whether you are creating a data model from an existing table, or will create the table from the data model.
Name Type
employeeId SerialNumber
lastName String
firstName String
middleInitial String
hireDate Date
salary FixedPoint
commission String
jobId Job
managerId Employee
Name Type
jobId SerialNumber
function String
Database Application Developer’s Guide 8-3
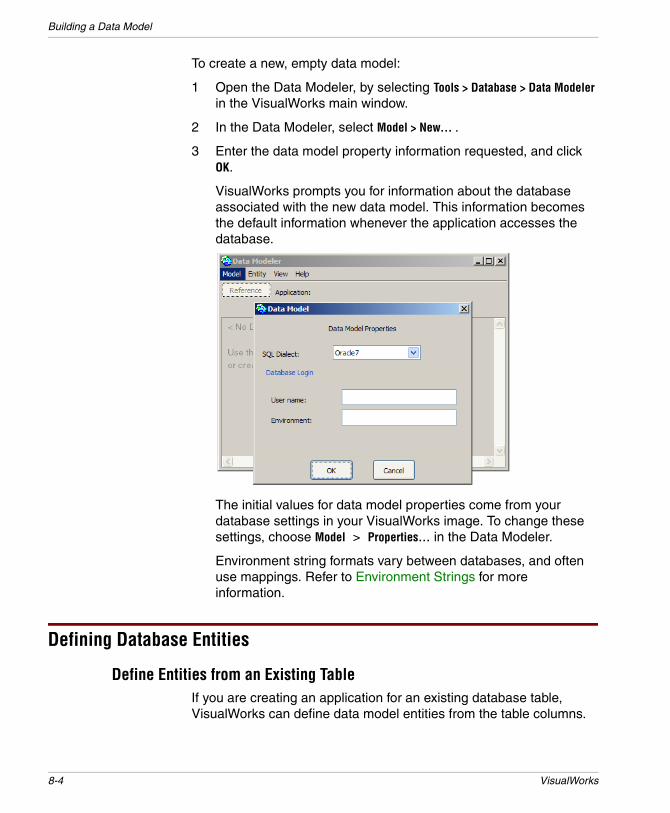
Building a Data Model
To create a new, empty data model:
1 Open the Data Modeler, by selecting Tools > Database > Data Modeler in the VisualWorks main window.
2 In the Data Modeler, select Model > New... .
3 Enter the data model property information requested, and click OK.
VisualWorks prompts you for information about the database associated with the new data model. This information becomes the default information whenever the application accesses the database.
The initial values for data model properties come from your database settings in your VisualWorks image. To change these settings, choose Model > Properties... in the Data Modeler.
Environment string formats vary between databases, and often use mappings. Refer to Environment Strings for more information.
Defining Database Entities
Define Entities from an Existing TableIf you are creating an application for an existing database table, VisualWorks can define data model entities from the table columns.
8-4 VisualWorks

Defining Database Entities
1 Open the Database Tables browser by choosing View > Database Tables in the Data Modeler.
If prompted, log in to the database.
2 Enter the name of the table to use, or a pattern for matching, and click Fetch.
Depending on your configuration, VisualWorks may prompt you to establish a database connection.
The Database Tables browser lists all matching database tables.
3 Select the table you want to model, and click Create.
VisualWorks prompts you to select the name space from a list (initially Smalltalk and Lens) in which the named class will exist. You can add your own name space to contain your entity classes. The rule is that the name space must import both Smalltalk.* and Lens.*. (See Lens Name Space Control for more details.)
4 Select the class category in which to create the entities. Enter a category name and click OK.
Depending on how your database is set up, VisualWorks may prompt you for the primary key for the selected table. If so, specify a field.
Database Application Developer’s Guide 8-5

Building a Data Model
VisualWorks creates an new entity class with instance variables for the data model and updates the Data Modeler to graphically show that entity.
The graphic is initially collapsed. Click on the arrow next to the class name to expand the graph, or choose Entity > Show References.
Instance variables are named to correspond to the columns in the database table, using Smalltalk naming conventions.
To view the mappings explicitly, select the entity and choose View > Mappings. The mappings are shown, together with additional information, in the Mapping tool.
Select an instance variable to view the details (Type) of that variable and the column to which it corresponds (shown in the upper part of the Mapping Tool).
Variables preceded by an equal sign (=) compose the primary key in the database. Note that the primary key cannot be nil, so Not Nil and Not Null are selected for the variable and column.
8-6 VisualWorks
Defining Database Entities
5 To add entity classes to the data model for additional tables, repeat steps 3 and 4, above.
6 When you are finished creating entity classes, install the data model specification, by selecting Model > Install in the Data Modeler tool.
Create Entities for a New TableIf you are creating an application for which there is no existing table, you can define your entity classes first and allow VisualWorks to create the table for you. Before you start, ensure that you have adequate database rights to modify an existing table, or create a new one.
To illustrate, we shall use the Lens Data Modeler and Mapping tools to define class Customer from the example data model (for details, see An Example Data Model).
To define this entity class and use it to create a table:
1 Open the Data Modeler, and select Model > New... to create a new data model.
As necessary, specify the user name, password, and environment, and click OK.
2 To create a new entity class, choose Entity > Add..., enter a class name (e.g. Customer), select a name space, and click OK.
The new class appears in the Data Modeler, and the Lens may open a Mapping tool automatically.
3 To open the Mapping tool yourself, select the class Customer as it appears in the Data Modeler tool and choose View > Mappings.
Use the Mapping tool to define instance variables in the entity class Customer. Each instance variable represents a table column.
4 To define an entity instance variable, select the table entity class containing it (e.g., Customer), choose Variable > Add..., enter an instance variable name (e.g., customerId), and click OK.
This adds an instance variable to the table entity class. Note that entity instance variable names should follow the Smalltalk convention of beginning with a lower-case letter.
Database Application Developer’s Guide 8-7

Building a Data Model
In this example, the instance variable customerId is used to hold a primary key, and is thus referred to as a key variable.Each Lens entity class must have one key variable.
Use the drop-down menu to select the variable’s Type. For the purposes of this example, select SerialNumber as the type, and click Not Nil.
5 Repeat the previous step to create all the instance variables you will need.
For the example class Customer, add the following instance variables (these in addition to customerId, already defined in the previous step):
The example data model uses the variable salespersonId to refer to an Employee, but this class has not yet been defined in the VisualWorks image. Thus, as a placeholder, you must define it as an Integer. Later, we shall change this to an Employee.
Note: As a rule, when defining variables that reference other classes that have not yet been defined in the development image, you should use the Integer type.
6 As noted above, the variable customerId is intended for use as the table’s primary key. To indicate this in the data model, use the cursor to select the customerId inst var, and choose Select Single Column Key from the Entity menu.
Name Type
zipCode String
areaCode String
phoneNumber String
creditLimit FixedPoint
comments String
salespersonId Integer
8-8 VisualWorks

Defining Database Entities
The Mapping tool now displays the customerId variable with an = sign preceding its name, to indicate that this single column is the table's primary key. When finished, click OK.
Alternately, you may specify a primary key using the Key Editor. Select Entity > Edit Key... to open the Key Editor dialog, and then use the arrow buttons to select at least one variable as a key.
The Key Editor enables you to create a primary key that is composed of several columns strung together. If you choose to do this, each variable should be a String type so that all can be appended together without error. When appended, they must form a unique value, suitable for use as a primary key.To control complexity, we discourage composite primary keys, and recommend using a single instance variable as the key.
7 To create the table definition, select the entity class in the Mapping tool (e.g., Customer), then select Entity > Specify Table.
The Mapping tool creates a default table and column mapping based on the entity classes and variables. The column definitions
Database Application Developer’s Guide 8-9

Building a Data Model
appear in the right side of the Mapping tool window. At this point, any VARCHAR fields can be modified to establish their proper length.
To rename a column, choose Variable > Rename Column.
To rename the table, choose Table > Rename.... Also set the column type, if necessary.
8 Now, create the table in the database by choosing Check With Database from the Table menu of the Mapping tool.
The Mapping tool compares the data model with the database and, because the table doesn’t exist, prompts you to confirm that you want to create it. Confirm creation. The tool then creates the table and reports that the specification and the database match.
9 To continue building the example data model, repeat steps 2 through 8 for class Employee. For details on the instance variables and their assigned types, see An Example Data Model.
10 Repeat steps 2 through 8 for class Job.
11 Once all three entity classes have been defined, they should appear in the Data Modeler tool. If not, select View > Update.
The foreign key references won't appear yet because we initially defined their columns using Integer types as placeholders. To specify that these are actually references to other entities (not just integers), we must change the types.
8-10 VisualWorks

Creating Relations Between Entities
12 To specify the correct foreign key for an entity class (e.g., Customer), select it in the Data Modeler and choose Mappings from the View menu.
13 Select the variable that should be a foreign key, and change its type from Integer to the desired entity class.
For example, in in class Customer, select the salespersonId variable and change its type to Employee.
14 To propagate this change to the database, select Check With Database from the Table menu of the Mapping tool.
15 Repeat steps 12 through 14 for the jobId and managerId variables in class Employee. The former should be type Job and the latter type Employee.
16 To make all the links visible, select Infer All Foreign Key References from the Model menu, in the Data Modeler tool.
Creating Relations Between EntitiesWhen you first create entity classes in the Data Modeler, there are no relationships defined between the classes. The tables in the relational database, however, are related, by foreign key references to each other.
In most situations, when you create entity classes from database tables, the Data Modeler can read foreign key information from the database and set up foreign key references for you. In some cases, however, it cannot, and the foreign keys must be created explicitly.
Create Relations AutomaticallyTo read foreign key references from the database:
1 In the Data Modeler, choose Model > Infer All Foreign Key References.
Database Application Developer’s Guide 8-11

Building a Data Model
For each foreign key reference between the entities, the Data Modeler displays a confirming dialog box:
The dialog provides alternative namings for the foreign key variable, and you can edit a name to your own specification. In general, you will probably accept the indicated option. You may also Skip the reference, and so not define the foreign key.
2 Select or enter the foreign key name, and click Accept Reference to accept the relationship.
3 Repeat step 2 for each foreign key reference.
4 To view the relations graphically, expand the entities in the data model:
8-12 VisualWorks

Check and Save the Data Model
Create Relations ManuallyIf the Data Modeler cannot read foreign key information, or if you have other reasons for wanting to specify the relations yourself, you can define the foreign keys in the data model manually.
1 In the Data Modeler, select an entity, then select View > Mappings.
2 Select a instance variable to be the foreign key and select the type for the key.
For foreign key references, the type should match the name of the entity class to which the variable refers. For instance, the managerId variable may refer to the Employee entity class, and so is assigned Employee as its type.
3 In the Data Modeler, update the display by choosing View > Update.
Expand the entity to graphically represent the relations.
4 Repeat step 2 to set up each foreign key reference.
Check and Save the Data Model When you make any change to the data model, you must make sure that it still corresponds to the database and then save it.
1 In the Data Modeler, choose Model > Check With Database.
If the Data Modeler reports any discrepancies, you are presented with dialogs to select how to reconcile the differences, by updating either the data model or the database table. If you do not, when your application attempts to connect to the database for the first time, an error will occur.
2 Install the data model specification by choosing Model > Install.
VisualWorks prompts you for the name of the database application class and for a name for the data model specification. Provide the requested information and click OK.
For a new data model specification, you are also prompted for the name space, which can be any name space, and the superclass, which must be LensMainApplication.
VisualWorks updates the Data Modeler display to show the application class and specification name.
3 Close the Data Modeler.
Database Application Developer’s Guide 8-13

Building a Data Model
8-14 VisualWorks

9
Creating a Data FormData Forms are UI elements generated by the Lens toolset. A Data Form provides a simple way to create a basic database application, with a form as the user interface. You may use the data form as generated, or enhance it with additional widgets and design features.
Even if you create your own GUI without using a generated data form, generating the form initially sets up elements for the Object Lens database interface that you can access from your application.
This chapter explores the following topics:
• Generating a Data Form
• Connecting a Data Form to an Application
• Testing an Application
• Replacing Input Fields with Other Widgets
• Creating a Custom Data Form Template
• Specifying an Aspect Path
Generating a Data FormThe first step in building any data form is to generate an initial framework for the data form using the VisualWorks toolset. To generate a data form, you create a new data form class, including the base query, and specify the initial window specification (or canvas) for the data form.
1 In the VisualWorks Launcher window, choose Tools > Database > New Data Form....
Database Application Developer’s Guide 9-1
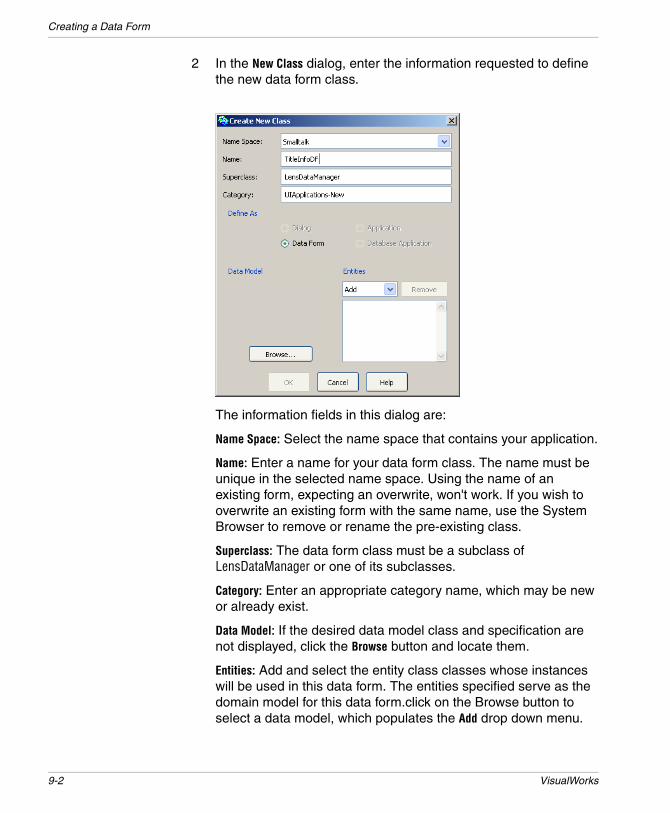
Creating a Data Form
2 In the New Class dialog, enter the information requested to define the new data form class.
The information fields in this dialog are:
Name Space: Select the name space that contains your application.
Name: Enter a name for your data form class. The name must be unique in the selected name space. Using the name of an existing form, expecting an overwrite, won't work. If you wish to overwrite an existing form with the same name, use the System Browser to remove or rename the pre-existing class.
Superclass: The data form class must be a subclass of LensDataManager or one of its subclasses.
Category: Enter an appropriate category name, which may be new or already exist.
Data Model: If the desired data model class and specification are not displayed, click the Browse button and locate them.
Entities: Add and select the entity class classes whose instances will be used in this data form. The entities specified serve as the domain model for this data form.click on the Browse button to select a data model, which populates the Add drop down menu.
9-2 VisualWorks
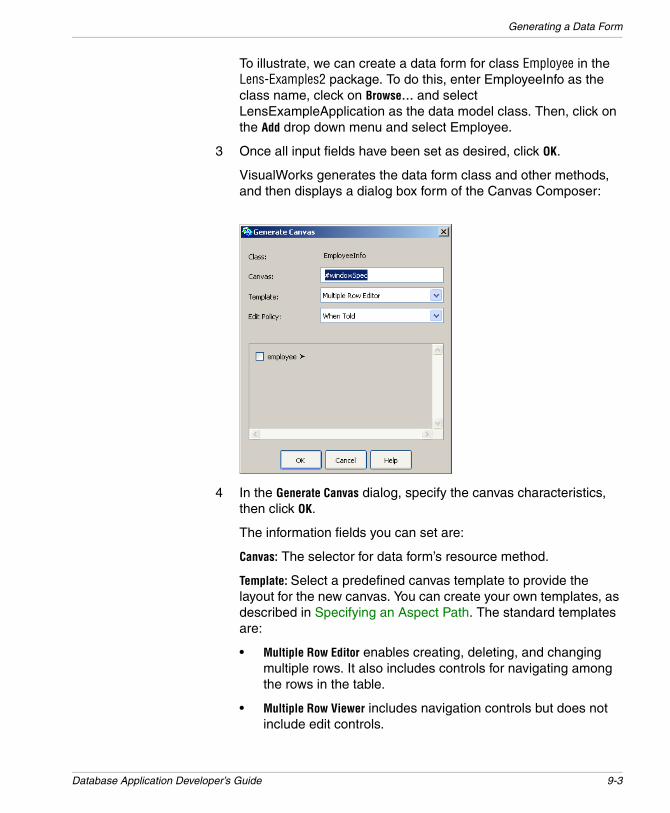
Generating a Data Form
To illustrate, we can create a data form for class Employee in the Lens-Examples2 package. To do this, enter EmployeeInfo as the class name, cleck on Browse... and select LensExampleApplication as the data model class. Then, click on the Add drop down menu and select Employee.
3 Once all input fields have been set as desired, click OK.
VisualWorks generates the data form class and other methods, and then displays a dialog box form of the Canvas Composer:
4 In the Generate Canvas dialog, specify the canvas characteristics, then click OK.
The information fields you can set are:
Canvas: The selector for data form’s resource method.
Template: Select a predefined canvas template to provide the layout for the new canvas. You can create your own templates, as described in Specifying an Aspect Path. The standard templates are:
• Multiple Row Editor enables creating, deleting, and changing multiple rows. It also includes controls for navigating among the rows in the table.
• Multiple Row Viewer includes navigation controls but does not include edit controls.
Database Application Developer’s Guide 9-3

Creating a Data Form
• Row Editor includes controls for creating, deleting, and changing a single row. It does not include controls for navigating among the rows in the table.
• Row Viewer includes only a control for retrieving information from the database; it does not include edit or navigation controls.
• Tabular Editor generates a data form with a dataset widget which enables users to view and edit a set of rows. It includes controls for creating, deleting, and changing rows. Navigation is done through the dataset.
• Tabular Viewer generates a data form with a dataset widget which enables users to view a set of rows from a database table. The tabular viewer does not allow editing. Navigation is done through the dataset.
Edit Policy determines when application users can edit information in the data form.
• If Touched allows editing at all times.
• When Told allows editing only after users formally begin editing by clicking an Edit button or similar operation.
• Never makes the data form unavailable for editing.
The graph at the bottom of the dialog box enables you to select the instance variables to be added to the data form.
For the purposes of this example, select the check box next to employee and click OK.
When you have competed this dialog and clicked OK, VisualWorks displays the generated canvas for the new data form.
9-4 VisualWorks

Generating a Data Form
5 (Optional) Edit and install the data form canvas.
The generated canvas has already been installed as a resource method in the class that represents the data form (in this example, class EmployeeInfo), and the supporting Smalltalk code has been generated. You may, however, edit the canvas further using the standard VisualWorks canvas painting features. If you do so, install the canvas again to save your changes.If you want to browse your newly created classes, they are likely to be found in the package (none) in the browser, since they haven't been formally assigned to any particular package yet.
6 Test the data form
To see your data form work, click the Open button in the Canvas Tool, or select Open from the Edit menu. VisualWorks launches the application.
A Temporary Launcher stands in for a database application class, and provides login, commit, rollback, and logout database controls. It also provides a lens session, which manages interactions between the form and the database.
To retrieve database data, click the Fetch button.
Depending on the template you used, you can now browse and edit the data.If you are using a data form with a tabular view, note that selecting a column (a DataSet widget) is accomplished by
Database Application Developer’s Guide 9-5

Creating a Data Form
holding the <ALT> key while pressing the <Select> button on the mouse. For details on working with DataSets, see the GUI Developer’s Guide.
If you make changes, you can save them in the running application by clicking Accept. The lens session keeps track of the changes and enter them into the database when the transaction is committed. You can save your change to the database (and end the transaction) by clicking Commit.
When you are done testing the data form, select Database > Exit in the launcher. You may also want to close the canvas and painting tools.
Connecting a Data Form to an ApplicationOnce your data form is built, you must connect it to your application. To connect data forms to main application windows or to other data forms, VisualWorks provides two special widgets:
• A linked data form widget is a special-purpose action button that when clicked displays another data form in a separate window.
• An embedded data form widget is a special-purpose subcanvas that displays another data form in the same window as a parent data form.
The linked and embedded data form widgets support properties to set up methods in the parent data form that control the child data form.
1 Open your application main window spec in the canvas.
You can use the VisualWorks Resource Finder to select your application and its main canvas spec (usually windowSpec), and click Edit. The canvas opens on the application main window.
2 Add linked or embedded data form widget to your canvas, and open the Properties Tool on the widget.
3 On the Basic page of the Properties Tool:
• In the Class field, enter the class name of the data form to open when the user clicks this data form button.
• In the Label field, enter the button label.
4 Click Generate Properties.
9-6 VisualWorks

Testing an Application
VisualWorks fills in the rest of the basic properties based on information in the data form.
5 Apply the changes.
6 Click Define... to generate instance variables and accessor methods for the data form widget.
A dialog prompts you to verify that you want to define the widget’s model. Click OK.
7 Install the canvas to save your changes.
Testing an ApplicationTo test your application, click the Open button in the Canvas Tool. Your application starts and displays its new main window, with the data form button you just defined.
Click the button to open the data form. Verify that the data form still works correctly. When you are satisfied that your application works correctly, return to the main application window and choose Database > Exit.
Replacing Input Fields with Other WidgetsThe standard data forms use input fields. In some cases, other VisualWorks widgets, such as menu buttons, are more useful.
To replace an input field with another widget:
1 Open the data form specification in the canvas.
Database Application Developer’s Guide 9-7
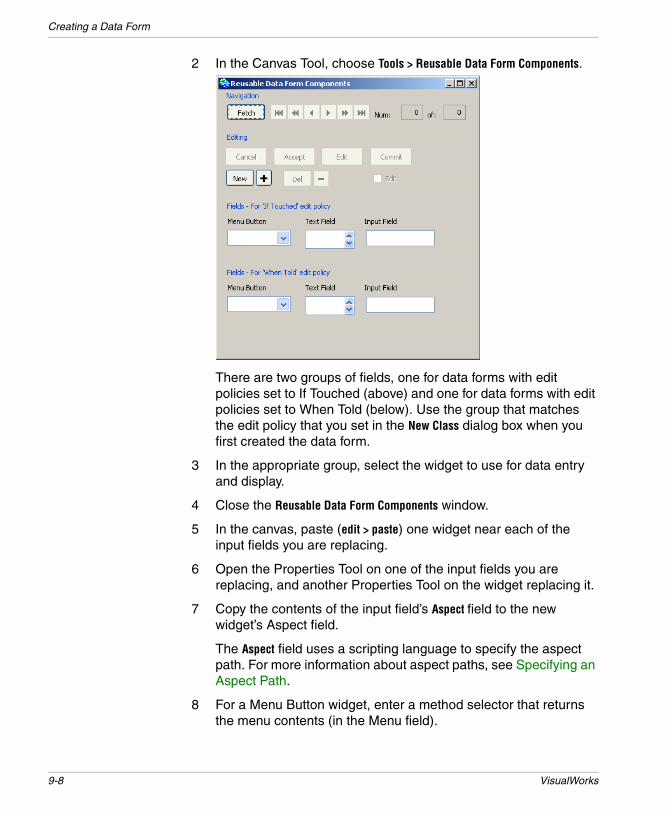
Creating a Data Form
2 In the Canvas Tool, choose Tools > Reusable Data Form Components.
There are two groups of fields, one for data forms with edit policies set to If Touched (above) and one for data forms with edit policies set to When Told (below). Use the group that matches the edit policy that you set in the New Class dialog box when you first created the data form.
3 In the appropriate group, select the widget to use for data entry and display.
4 Close the Reusable Data Form Components window.
5 In the canvas, paste (edit > paste) one widget near each of the input fields you are replacing.
6 Open the Properties Tool on one of the input fields you are replacing, and another Properties Tool on the widget replacing it.
7 Copy the contents of the input field’s Aspect field to the new widget’s Aspect field.
The Aspect field uses a scripting language to specify the aspect path. For more information about aspect paths, see Specifying an Aspect Path.
8 For a Menu Button widget, enter a method selector that returns the menu contents (in the Menu field).
9-8 VisualWorks
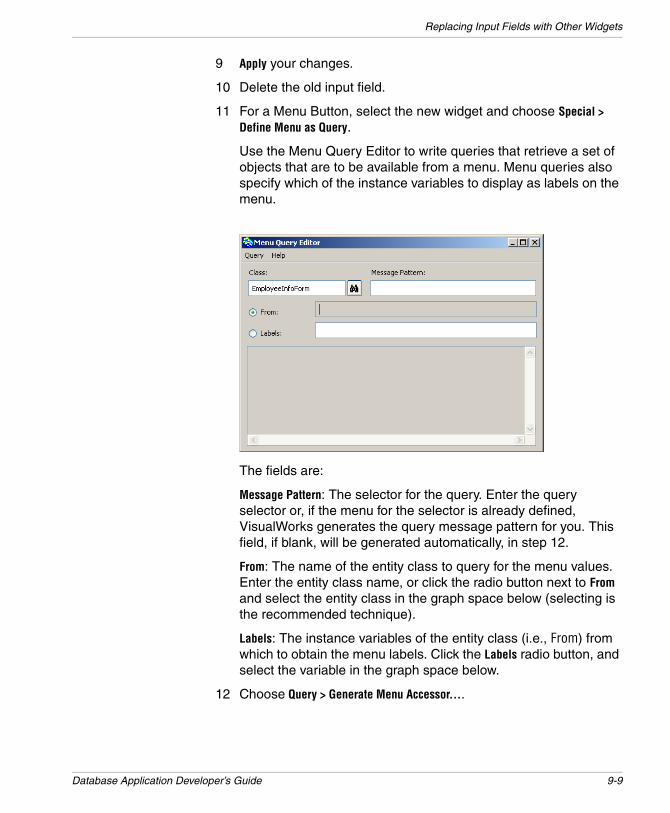
Replacing Input Fields with Other Widgets
9 Apply your changes.
10 Delete the old input field.
11 For a Menu Button, select the new widget and choose Special > Define Menu as Query.
Use the Menu Query Editor to write queries that retrieve a set of objects that are to be available from a menu. Menu queries also specify which of the instance variables to display as labels on the menu.
The fields are:
Message Pattern: The selector for the query. Enter the query selector or, if the menu for the selector is already defined, VisualWorks generates the query message pattern for you. This field, if blank, will be generated automatically, in step 12.
From: The name of the entity class to query for the menu values. Enter the entity class name, or click the radio button next to From and select the entity class in the graph space below (selecting is the recommended technique).
Labels: The instance variables of the entity class (i.e., From) from which to obtain the menu labels. Click the Labels radio button, and select the variable in the graph space below.
12 Choose Query > Generate Menu Accessor....
Database Application Developer’s Guide 9-9

Creating a Data Form
When prompted to confirm the accessor name, verify that it matches the name you entered for the Menu property of the menu button, and click OK.
To summarize, the entity type provided by the widget will be that of the entity class selected in the From field. Basically, the entity class you select via From provides the key, and the item specified via Labels is a descriptive text element of that entity. In the entity's database table, typical columns might be ID and DESCRIPTION.
VisualWorks generates an accessor method that returns the menu for the button. It also generates a message pattern to be used for the menu’s query method and inserts it in the Message Pattern field of the Menu Query Editor.the menu only works correctly after the first data fetch, at which point selecting a menu item switches the data form into edit mode and the button can show the selected item.
13 Choose Query > Install....
When prompted to confirm that you want to install the query, click OK. Close the Menu Query Editor and return to the canvas for EmpInfoDF.
14 Install... the canvas to save your changes.
Embedding a Data FormIn some situations it is preferable to include the data form in another window rather than to open a new window. To embed a data form:
1 Open the window specification in the canvas, and arrange widgets to make room for the data form.
2 Add an Embedded Data Form widget to the canvas and resize it.
3 In the Properties tool, specify the data form Class, and click Generate Properties.
Based on the properties of the data form you specify, VisualWorks supplies the rest of the basic properties.
4 Apply your changes and install the canvas.
5 Click Define... to generate the widget’s model. Click OK to confirm generating the methods.
6 If there is a circular foreign key reference in a table, VisualWorks prompts you to choose how to define the restricting query for the
9-10 VisualWorks

Replacing Input Fields with Other Widgets
embedded form. Select an option and click OK, or click Cancel to create an alternative query.
If you click Cancel, VisualWorks creates a query that does not restrict the query of the child data form. You can edit the query using the query editor.
Editing a QueryIf the generated queries provided by VisualWorks are not suitable, you can edit them using the Query Editor.
1 In the Resource Finder, select your data form definition and the query to edit, and click Edit.
Initially the Where clause does not specify any rows, so the query returns the full table with no restriction. The Where clause must begin with the variable in the child data form that matches the parent data form.
2 Expand the graph and select a variable to add it to the Where clause.
You can type the clause directly into the Where field, but because the query syntax is neither Smalltalk code nor an SQL statement, it’s generally best to use the tools in the Query Editor and Query Assistant to create queries.
3 Click the Query Assistant button, and select an operator to insert into the Where clause.
Database Application Developer’s Guide 9-11

Creating a Data Form
4 In the graph, find and select the target variable in the parent data form, to add it to the query.
The Where clause must end with the variable in the parent data form to be checked against the child data form.
For more information about the Query Editor, see Writing Queries.
5 Choose Query > Install.... VisualWorks displays a dialog box confirming that you want to install the query as empListViewerDFQuery.
6 Click OK.
Removing the Fetch ButtonBecause we are going to use this as part of another data form, we don’t need the Fetch button. To remove it, select it using the mouse and press <Delete>.
Creating a Custom Data Form TemplateWhile the predefined set of templates suffices for many common applications, custom templates enable you to control the appearance and extend or restrict the behavior of default data forms.
Template canvases can be stored in either the LensDataManager class or a subclass. For any particular subclass of LensDataManager, the Canvas Composer lists all templates that are available from that subclass and its superclasses.
The actions protocol of LensDataManager supports a variety of common data-form activities, such as advancing to the next row of data and accepting edits. By creating a custom subclass of LensDataManager, you can add to this set of generic actions. Your custom templates can then include action buttons for invoking these new actions. Then, when creating a new data form, you can name your custom class as the superclass rather than LensDataManager.
To create a custom template:
1 Create a canvas that contains the desired input fields, action buttons, menu buttons, and so on.
2 For each data widget (usually input fields or dataset columns), set the Aspect property to #row * | trigger.
9-12 VisualWorks

Specifying an Aspect Path
The #row keyword indicates that the value of the field is to be derived from the current row of data. The asterisk is a wildcard that is replaced by the appropriate variable accessor in the generated form. The vertical bar indicates that the edited version of the value is to be buffered until it is explicitly accepted. trigger is the name of a variable that holds a value model used by the accept method to cause the model’s value to be replaced with the buffered value.
3 For each label widget, set the Label property to an asterisk when you want the table and column name to appear as the default label.
4 For each widget of any type, include an asterisk in the ID property to cause the table name and column name to be placed there in the generated ID.
For example, an input field’s ID in a template is typically #*Field, which causes each generated ID to be assembled from the table name, column name, and the word Field.
5 To repeat a group of widgets throughout the available space in the form (as in the existing multipleRowEditorTemplate), group the widgets using the arrange > group command.
The resulting composite must have an ID property of #cellContents. The spacing between groups of widgets is controlled by a region widget that is placed behind the grouped widgets. This region must have an ID property of #cellBounds.
6 Install the completed canvas on the LensDataManager class, or a subclass, with the canvas name ending with “Template”.
The portion of the canvas name that precedes the word Template is broken into separate words and used to identify the template in the Canvas Composer’s Template menu.
Specifying an Aspect PathWhen VisualWorks generates a data form, it automatically fills in the Aspect property for each widget in the data form with an aspect path. Each aspect path identifies a column within the row object being displayed in the data form.
Database Application Developer’s Guide 9-13

Creating a Data Form
The aspect path also causes the interface builder to create an appropriate aspect adaptor, to connect the widget to its part of the row. The path may also cause the builder to create an input buffer behind the widgets, by combining the aspect adaptor with a BufferedValueHolder.
The generated aspect paths are usually sufficient. You only need to enter an aspect path if you are adding a widget that was not generated as part of the initial canvas or if you are changing the information displayed by a widget.
To specify an aspect path:
1 The first symbol in an aspect path is called the head, which is the name of the accessor method that returns the value model holding the domain object being adapted. The builder uses this value model as the subject channel. For widgets on data forms, the head is usually #row, which corresponds to a method that returns a value model that contains a row object.
2 For widgets on data forms, follow the head with an at sign (@) and the name of an entity in the data form’s row. For example, #row @ empinfo specifies the empinfo entity in the row. Usually this name is the same as the name of the kind of entity used for that part of the row, but it is just an tag. The @ construct must appear in aspect paths for data forms even if the row of the data form has only a single component.
3 The remaining elements (up to but not including a vertical bar, if one exists) are the path. For the path, enter a series of aspects, each of which identifies the accessor and mutator messages to be used for retrieving and storing information at that step in the path. For example, #customer name would cause the #name message to be sent to the value of the customer model when the widget needs a value to display. If the widget were used to change the value, the message #name: would be sent to the value of the customer model, along with the new name.
4 If you include a number in an aspect path, the messages #at: and #at:put: are used, and the number that was in the path is used as the index argument. For example, a path of #descriptors 2 causes the second element of the value of the descriptors model to be adapted. The value of descriptors might be, for example, an Array. Using a numeric element in an aspect path of course assumes that the value of the model is stable in the sense that
9-14 VisualWorks

Specifying an Aspect Path
the targeted information is always at a constant offset into the collection.
A path may be arbitrarily long, with each aspect being used to access or edit the result of the preceding step.
5 The final aspect in the path determines the kind of aspect adaptor created by the builder:
• If the aspect is a symbol, an instance of AspectAdaptor is created.
• If the aspect is a number, an instance of IndexedAdaptor is created.
6 To store the edited information being displayed in a buffer until an explicit action inserts the information into the domain model, add a vertical bar and an additional name after the path.
The final name is the message to be sent to the application model to retrieve the value model to be used as the trigger channel controlling the BufferedValueHolder that will be created by the builder. Automatically generated data forms all use a single trigger channel named #trigger.
Database Application Developer’s Guide 9-15

Creating a Data Form
9-16 VisualWorks

10
Lens Programmatic APIThe Lens API enables you to use Lens facilities to access a database independently of data forms. These techniques make use of the session object that is available from the Object Lens.
Connecting to a DatabaseConnecting to a database using the Lens involves establishing a session, initializing it with a username and password, and then asking the session to connect to the database.
A generated database application automatically prompts for the username and password and then connects a lens session, the first time database access is required by the application.
When you want to provide a custom dialog for getting the login parameters, or to avoid presenting a dialog altogether, redefine the #databaseLogin method that is inherited from LensApplicationModel.
Using a Lens Session Connection from an ApplicationSometimes the user interface for a generated database application is not needed, but the automatic connection facilities are still useful. For example, an application may need to perform one of the queries defined for the generated application, but doesn’t need the entire interface. In this situation, you can use the application’s default session-connecting mechanism without having to open the application.
1 Get or create an instance of the application.
2 To get a lens session from the application, send a session message to the application instance.
Database Application Developer’s Guide 10-1
Lens Programmatic API
The application prompts for the username and password, as usual, and returns a connected lens session.
3 When you are finished using the lens session, you can disconnect it by sending a #disconnect message to the session. Do not disconnect if you obtained the session from a running application, since that would disconnect the application as well.
| app session query rows | "Create the application and get a connected session." app := Database1Example new. session := app session. session isNil ifTrue: [^nil]. "Use the session to perform a query." query := app bookLoanMgr overdueBooksQuery. query session: session. rows := query values. "Disconnect the session, if appropriate." session disconnect. ^rows
Getting an Unconnected Session from a Data ModelYou can obtain an unconnected lens session from a data model. This is useful, for example, if you need to initialize the session’s username and password someway other than with the default mechanism, and then connect it.
If you do not set the username and password explicitly, a connection will be attempted using the defaults from the data model. Only after the defaults fail will the user be prompted for a username and password. This causes a delay while the default connection is attempted. To prevent the delay, detect the need for the username and password in the application.
1 Get the default data model, by sending a dataModel message to the application class.
To get a different data model, send dataModelAt: with the data model specification’s name as the argument.
2 Send getSession to the data model to get an unconnected lens session.
3 Set the lens session’s username and password to the desired values.
4 Connect the lens session to the database, by sending a connect message or to the session.
10-2 VisualWorks
Performing a Query
If the password is not stored with the session, send connect: with the password string instead.
If the username or password is not recognized, the user will be prompted for new login information.
5 When you are finished with the lens session, disconnect it if appropriate.
| dataModel session query rows usr pwd | "Get the data model and an unconnected session." dataModel := Database1Example dataModel. session := dataModel getSession. session isNil ifTrue: [^nil]. "Set the username and password." usr := Dialog request: 'Enter username'. pwd := Dialog request: 'Enter password'. session username: usr. session password: pwd. "Connect to the database and test for success." session connect. session isDisconnected ifTrue: [^nil]. "Here, we use the session to perform a query." query := BookLoanMgrExample new overdueBooksQuery. query session: session. rows := query values. "Disconnect the session." session disconnect. ^rows
Performing a QueryA base query (called ownQuery) is designed implicitly for a data form when the data form is created. This query is performed when rows are fetched into the data form. In many applications, creating a data form is the only technique required for designing and performing a query.
Frequently, a custom query or special control is required, as described in the following sections.
Database Application Developer’s Guide 10-3

Lens Programmatic API
Sending a Query to a Lens SessionWhen a data form is not needed, when a non-generated interface is being used, or when a customized query is needed, a query can be explicitly created and stored using the Query Editor. In the example, which involves selected columns from two tables, the row objects are arrays containing the selected values.
1 Create an instance of the application that supplies the data model.
2 Send a session message to the application to get a lens session.
3 Get the query by creating an instance of the child data form (bookLoanMgr) in which the query was installed and sending it the query message (overdueBooksQuery).
4 Give the lens session to the query (via session:).
5 Perform the query (via values), getting a collection of arrays (in this case) or other row objects.
6 Disconnect the lens session, if appropriate.
| app session query rows | "Create the application and get its session." app := Database1Example new. session := app session. "Get the query and give the session to it." query := app bookLoanMgr overdueBooksQuery. query session: session. "Get a collection of row objects from the query." rows := query values. "Disconnect the session, if appropriate." session disconnect. ^rows
Limiting the Number of Rows FetchedBy default, SQL queries fetch all rows satisfying the query. If the query returns a larger number of rows, you may need to restrict the number of rows fetched. There are several options.
For applications using the Lens, you can check the Fetch On Demand option for the query in the Query Editor. This causes rows to be fetched six at a time. The next six rows are fetched only when accessed.
10-4 VisualWorks

Performing a Query
You can also create a Create(*) query, that returns the number of rows that would be fetched by the query. If the number is too big, your application can prompt the user whether to fetch all the rows or to refine the query.
To fetch and examine rows one at a time, use an answer stream, as described in the next section, Processing on Individual Rows from a Lens Session.
Another approach is write the query with the proper qualifications. Since this is not supported by the Query Editor, you have to create the query manually. Refer to Alternate SQL for more information.
Processing on Individual Rows from a Lens SessionThe values message retrieves all rows satisfying the query, creating an entity instance for each row. For some purposes, it is better to process records in sequence, using a data stream. To do this, send an answer message to the session instead. You can then cycle through the rows by sending a next message to the stream.
The example shows how to access each row of data separately, and how to process the returned rows when the query does not provide full objects. The example is a method within the Database1Example application, so it uses the lens session that is already available from the application, which is assumed to be open.
1 Send an answer message to a query to get a QueryStream.
2 Create a loop to process the stream, incrementing through the stream by sending a next message to the stream.
The next row object (in this case, an array of selected column values) is returned.
3 After all desired rows have been processed, close the answer stream by sending a close message to it.
reportOverdueBooks"Create and display a report of all overdue books.This method demonstrates how to execute a queryand process the returned rows one by one."| query answerStream report nextRow name address title
datedue penaltyPerDay daysOverdue fine fineString |"Initialize the report stream."report := '' writeStream.report nextPutAll: 'Overdue books as of ', Date today printString.report cr; cr."Get the query."
Database Application Developer’s Guide 10-5

Lens Programmatic API
query := self overdueBooksQuery."Give the query the current session."query session: self session. "Execute the query and get the answer stream."answerStream := query answer. "Process each row of the answer stream."[answerStream atEnd] whileFalse: [
nextRow := answerStream next. "Unload the row array into temporary variables."name := nextRow at: 1.address := nextRow at: 2.title := nextRow at: 3.datedue := nextRow at: 4."Compute the overdue penalty based on the due date."penaltyPerDay := 0.10s.daysOverdue := Date today subtractDate: datedue asDate.fine := daysOverdue * penaltyPerDay."Format the penalty amount as US dollars."fineString := PrintConverter
print: fineformattedBy: '$###.##'."Add an item to the report stream."
report nextPutAll: title; cr;tab; nextPutAll: name; cr;tab; nextPutAll: address; cr;tab; print: daysOverdue; nextPutAll: ' days overdue, ';nextPutAll: fineString; nextPutAll: ' penalty'; cr; cr].
"Close the answer stream."answerStream close."Display the report."report close.Dialog warn: report contents
for: Dialog defaultParentWindow.
Beginning and Ending TransactionsWhen you are using an interface that was generated by VisualWorks’ database tools, database operations are accumulated in a single transaction until the Commit command is used. When you add, remove, or update objects programmatically, each such operation is a separate transaction by default. However, that policy is subject to change, so it’s a good idea to begin and end transactions explicitly.
The most important reason for beginning and ending transactions explicitly is when one database operation must be reversed if a related operation fails. In that situation, both operations must occur
10-6 VisualWorks

Adding Objects to the Database
inside the same transaction. After all of the operations in a transaction have succeeded, the database changes are finalized by sending a commit message to the lens session. If any of the operations fails, the entire transaction can be reversed by sending rollback to the session.
• To begin a transaction, send begin to the lens session.
• To end a transaction by making its effects permanent in the database, send commit to the lens session.
• To end a transaction by removing its effects from the database, send rollback to the lens session.
Adding Objects to the DatabaseFor most applications, a data form can be used to add rows to a table. When a direct, programmatic means of adding a row is needed, the lens session can be asked to add an object.
To add an object, send an add: message to the lens session. The argument is the object to be added. It’s wise to perform this step inside an error-trapping block (handle:do:).
The object that is added can be any type of object that exists in the data model of the application that provides the lens session. The data model is consulted to identify the table in which the object belongs.
Objects that are held by reference variables in the object are also added, called a “cascading add.” When a referenced object holds the original object, the cascade is interrupted, so circular references are broken automatically.
Applications that access a lens session directly in this way can intercept database errors that obstruct the transaction. In the example, the most general of database signals is used, to catch any type of database-related error. The ExternalDatabaseConnection class also provides several specialized signals.
In a similar way, a collection of objects can be added by sending addAll: to the lens session instead of add:, with the collection as the argument.
| app session newBook |app := Database1Example new.session := app session.
Database Application Developer’s Guide 10-7
Lens Programmatic API
session isNil ifTrue: [^nil]."Create the object to be added."newBook := Bookexample new.newBook
bookid: '2-3456-789-0';title: 'Moby Dick';author: 'Herman Melville'.
"Begin a transaction."session begin."Add the object and detect any database error."ExternalDatabaseConnection externalDatabaseErrorSignal
handle: [ :ex | session rollback.^Dialog warn: '
The book could not be added.This usually happens because thebook was added previously.'
for: Dialog defaultParentWindow.]do: [
session add: newBook.session commit].
session disconnect.
Removing an Object from the DatabaseFor most applications, a data form can be used to remove rows from a table. When a direct, programmatic means of removing a row is needed, a lens session can be asked to remove an object, as shown in the basic steps. The object that is removed can be any type of object that exists in the data model of the application that provides the lens session—the data model will be consulted to identify the table in which the object is to be found.
To remove an object, send a remove:ifAbsent: message to a connected lens session. The first argument is the object to be removed, which must be obtained from the database (creating an object with the same primary key values is not sufficient). The second argument is a zero-argument block that contains the actions to be performed when the object is not found. It's wise to perform this step inside an error-trapping block (handle:do:).
Applications that access a lens session directly in this way can intercept database errors that obstruct the transaction. In the example, the most general of database signals is used, to catch any type of database-related error. The ExternalDatabaseConnection class
10-8 VisualWorks

Removing an Object from the Database
also provides several specialized signals. The most common error, caused when the object is not in the table, can be handled via the block that is the second argument of the remove:ifAbsent: message. Often, this block is left empty, indicating that no special action is needed when the object is not found.
When the object to be removed is referenced by another object that has not yet been removed from the database, the removal fails. The rowIsReferencedErrorSignal supplied by the ExternalDatabaseConnection class can be used to detect that condition and react appropriately.
| app session query rows book |app := Database1Example new.session := app session.session isNil ifTrue: [^nil]."Fetch a sample object to be removed."query := app bookMgr ownQuery.query session: session.rows := query values.rows isEmpty ifTrue: [^Dialog
warn: 'There are no books.Please use a Database1Exampleto add one, then try removing again.'
for: Dialog defaultParentWindow].book := rows first."Remove the object and detect any database error."session begin.ExternalDatabaseConnection externalDatabaseErrorSignal
handle: [ :ex | session rollback.^Dialog warn: '
The book could not be removed.This usually happens because thetable could not be accessed.']
do: [session
remove: bookifAbsent: [Dialog warn: 'The book does not exist.'].
session commit].session disconnect.
Database Application Developer’s Guide 10-9
Lens Programmatic API
Updating Objects in a DatabaseWhen an object in a database is modified, it is marked as being dirty. Updating the corresponding row in the database is known as posting the changes. In a generated interface, changes are posted to the database when the Accept button is clicked and are made permanent when the Commit command is used.
To update a row programmatically, modify the entity and send a postUpdates message to it. It’s wise to perform this step inside an error-trapping block (handle:do:).
Updating the primary key of a row in a database is equivalent to removing and then re-adding the row, so references from other objects in the database can disrupt the update. See the preceding sections relating to adding and removing objects from the database for further discussion of this point.
| app session book |app := Database1Example new.session := app session.session isNil ifTrue: [^nil]."Create the object to be added."book := Bookexample new.book
bookid: '4-5678-901-2';title: 'Grapes of Wrath';author: 'John Steinbeck'.
"Add the object, to ensure it exists for the update stage."session begin.ExternalDatabaseConnection externalDatabaseErrorSignal
handle: [ :ex | session rollback.^Dialog
warn: 'The book could not be added,and not because it already exists.This usually happens because thetable could not be accessed.'
for: Dialog defaultParentWindow]do: [
"If the row already exists, ignore the error."LensSession objectNotUniquelyIdentifiedSignal
handle: [ :ex | ex return]do: [
session add: book.
10-10 VisualWorks

Generating Sequence Numbers
session commit]]."Modify the object (not the key field)."book title: 'East of Eden'."Update the object and detect any database error."session begin.ExternalDatabaseConnection externalDatabaseErrorSignal
handle: [ :ex | session rollback.^Dialog warn: '
The book could not be updated.This usually happens because thetable could not be accessed.']
do: [book postUpdates.session commit].
session disconnect.
Posting Changes for Multiple ObjectsWhen a lens session is committed, or when a query is executed, changes are posted for any dirtied object that is held by that session. Thus, sending commit to a session is a way of posting changes for more than one object at a time and avoids having to send postUpdates to each individual object.
In the previous example, instead of sending postUpdates to the dirtied object, just send a commit message to the lens session.
Generating Sequence NumbersA database application frequently relies on sequential numbers, for customer account numbers, product serial numbers, and other situations requiring a unique identifier.
Some databases provide a sequence-number service and will automatically supply the next number in the sequence on demand. Others do not, but you can generate sequence numbers in a lens session.
Using Database Generated Sequence NumbersOracle provides a service for generating sequence numbers. To use this feature in your application:
Database Application Developer’s Guide 10-11

Lens Programmatic API
1 In the Data Modeler’s Mapping Tool, assign a datatype of SerialNumber to the variable for the sequence number. Ensure the associated column in the table is numeric.
2 Choose Table > Check with Database to verify consistency and to notify the database manager that sequence numbers need to be generated for the column.
3 In any data form that displays the serial number, set the field or column to Read Only, on the Details page of the Properties Tool.
4 (Optional) In the data manager class for any data form that creates the serial number, create a private method named endCreating.
This method must invoke the inherited endCreating method, then get the dataset widget and refresh the cell containing the serial number.
endCreating"In addition to the inherited actions, refreshthe cell in the DatasetView that contains thenewly generated (but not yet displayed) serial number."| datasetView rowNum colNum |"Be sure to invoke the inherited implementation first."super endCreating."Get the dataset widget."datasetView := (self builder componentAt: #rows) widget."Get the row and column of the new serial number.In this case, the serial number is the second column,because the first column is used for the row marker."colNum := 2.rowNum := self rows selectionIndex."Refresh the cell in the widget."datasetView invalidateCellIndex: colNum @ rowNum."Give the newly created borrower to the parent window."self parent borrower: self row value.
If you omit this step, the new serial number is not displayed until the data form is refreshed or the row is refetched. To refresh all of the displayed information displayed, send the message self refreshDisplay. To refetch the currently selected row and update the display, send the message self refreshRow.
Generating Sequence Numbers in LensSybase databases do not have a service for generating sequence numbers. To generate a sequence in a Lens session:
10-12 VisualWorks
Generating Sequence Numbers
1 Create a table that includes a column for the sequence number.
The same table can include multiple sequences if, as in the example, each row in the table is keyed on the name of the table for which the sequence number is intended.
2 Use the Query Editor to generate a query for finding the admin object for the desired table.
By using the table name as a parameter in the query, the same query can be used to look up the sequence number for any table.
3 In the database application class, redefine the databaseLogin method, which initializes the lens session.
This method should invoke the inherited implementation. Then it gets the lens session, and installs the sequence number by sending a serialNumberGeneratorBlock: message to the session. The block takes one argument, an array containing the database application class name (a symbol), the variable name (string), the qualified table name (string) and the column name (string). The block is responsible for reading the sequence number from the admin table, incrementing the value in the table, and returning the original value.
Ideally, to prevent locking the admin table longer than necessary, a second lens session or even a separate data model would be used to manage the admin table. In the example, for simplicity, we update the admin table in the main lens session.
databaseLogin"In addition to the inherited action, equip thesession with a block for generating serial numbersfor the library card identifier.""Be sure to invoke the inherited method first."super databaseLogin."Test to make sure the session was initialized successfully."session isNil ifTrue: [^session]."Set the session's block for generating serial numbers."session
serialNumberGeneratorBlock: [ :argsArray || table adminQuery nextNum answerStream admin |"Get the tablename -- other args are not needed here."table := argsArray at: 3."Get the query for finding the appropriate admin object."adminQuery := self adminForTable: table."Perform the query and get the answer stream, if any."adminQuery session: session.
Database Application Developer’s Guide 10-13

Lens Programmatic API
answerStream := adminQuery answer.answerStream atEnd
"Get the next number, then increment the table's copy."ifFalse: [admin := answerStream next.answerStream close.nextNum := admin nextnumber.admin nextnumber: nextNum + 1.admin postUpdates]"If no rows were returned, advise the user."ifTrue: [nextNum := 0.Dialog warn: '
A sequence number for thisborrower's library card could not be generated.The Adminexample table needs a row withtablename = ' , table
for: Dialog defaultParentWindow]."The block returns the number to be assigned."nextNum].
^session
Reusing an Interface with a Different DBMSAfter you have generated an application for use with one database manager (such as Oracle7), you can reuse the same interface with a different database manager (such as Oracle6 or Sybase).
1 Create similar data models and underlying tables for each of the target database managers.
2 In the database application class, redefine the inherited dataModelAt: aDesignator method.
Begin by invoking the inherited implementation. The method must return a two-element array containing the name of the class on which the desired data model is stored and the name of the desired data model’s specification method.
The example prompts the user to choose the database when the application is started, which determines which data model specification to use. A similar approach could be used to choose the database silently, based on an environment variable or similar setting.
10-14 VisualWorks

Basing a Data Form or Query on Multiple Tables
The interface need not be modified, except where you have customized it to rely on DBMS-specific features such as sequence-number generation.
dataModelAt: aDesignator"Give the user a choice between Oracle7 or Sybase."
| selector dsg |selector := Dialog
choose: 'Which database?'labels: (Array with: 'Oracle7' with: 'Sybase')values: #(#dataModelSpec #sybaseDMSpec)default: #dataModelSpec.
dsg := Arraywith: #Database1Examplewith: selector.
^super dataModelAt: dsg
Basing a Data Form or Query on Multiple TablesThere are two ways to assemble data from multiple tables for a data form or a query: by navigating objects within the data model, and using a database join.
Using object navigation, when creating a data form or a query, you add only one entity, relying on its data-model connections to the other tables. In the second approach, you add each entity separately and arrange for the join to occur in the database by setting the where clause of the query.
In general, the object-navigation approach is preferable when the set of referenced objects is much smaller than the number of rows that will be retrieved; otherwise, the database-join approach is more economical.
Using Object NavigationIn the Canvas Composer (for a data form) or the Query Editor (for a query), add only the entity that has the other entities in its variables. In the example of employees and departments, add only the employees entity.
Using a Database Join1 In the Canvas Composer or Query Editor, add each entity
separately. In the example of employees and workstations, add both the employees entity and the workstations entity.
Database Application Developer’s Guide 10-15
Lens Programmatic API
2 Use the Default Join supplied by the Query Assistant to create a Where clause that joins the entities via the references in the data model.
Responding to Transaction EventsSometimes an application needs to intervene before a database transaction is begun, committed, or rolled back. The lens session provides for such intervention, by sending an update:with:from: message to its dependents before and after each type of transaction event.
The first argument to the update:with:from message is one of the following:
#preBeginThe application can redefine update:with:from: to test for one or more of those symbols and respond appropriately.
An application that is a subclass of LensMainApplication automatically enrolls itself as a dependent of its lens session. Applications based on other classes will need to create this dependency explicitly.
There is an additional event mechanism that is used to inform the data forms within an application of certain important events, including logging in to or out of the database, closing one of the application’s windows, and committing or rolling back a transaction. These events are distributed by sending messages directly to the application and its data forms according to the parent-child hierarchy of the application, rather than by distributing update notifications to dependents. These events include:
#requestForCommit#requestForRollback#localRequestForWindowClose#requestForLogout#noticeOfLogin#noticeOfCommit#noticeOfRollback#noticeOfLogout#noticeOfWindowClose#confirmationOfLogin#confirmationOfCommit#confirmationOfRollback#confirmationOfLogout
10-16 VisualWorks
Accepting Edits Automatically at Commit Time
For the request events, each recipient is expected to return either true or false. The aggregate value of the broadcast request will be true if all of the recipients return true, and false otherwise. The event for window close is named localRequestForWindowClose because ApplicationStandardSystemControllers already send the message requestForWindowClose to their models. The notice events are sent before the fact of the actual event; the confirmation events are sent afterwards. Except for the window close events, which are limited to the application and/or data forms inside the window being closed, the events are distributed to all nodes of the hierarchy, including the application itself.
These events already play important roles in the functioning of LensMainApplication and LensDataManager, so subclasses of these classes should be careful about overriding the definitions of these methods. Unless you intend to completely replace the current event service, be sure that your method sends the event message to super.
Accepting Edits Automatically at Commit TimeIn a generated application, when a persistent object has been added, removed, or changed by your lens session, other users of the database are prevented from changing that data. This is known as locking the data. However, during the period while a persistent object is still being edited (before the edits are accepted), you can choose to lock the data or not. This locking policy (Lock on Accept or Lock on Edit) is set when you create the database application class and can be overridden for an embedded or linked data form using the Connection properties.
To maintain data integrity, a Lock on Edit policy is preferred because it keeps one user from undoing another user’s changes unknowingly. However, when it is more important to minimize the chances of a user locking the data during a protracted edit (or while going out to lunch), a Lock on Accept policy is preferable. This choice is complicated by the fact that some database managers lock not only the affected rows in the database, but entire pages of unaffected neighboring data. When that is the case, a Lock on Accept policy is even more attractive.
A lock can only be released when the enclosing transaction is ended, either via commit or rollback. There is no way to selectively unlock an object once it has been locked.
An object can be explicitly locked by sending a lock message to it.
Database Application Developer’s Guide 10-17

Lens Programmatic API
If some of the edits have not yet been accepted when the ObjectLens is committed, the user is warned via a dialog that offers the choice of discarding the edits or cancelling the commit. This prevents long-lived locks from occurring accidentally as a result of the user neglecting to accept one or more edits. This also helps to guarantee that related changes are made at the same time. Your application can intervene to automatically accept any unaccepted edits at commit time.
Verifying Before CommittingA generated data form can redefine the noticeOfCommit method to prompt the user for permission to accept the edits. A noticeOfCommit message is sent to each data form by a generated application before the Commit command is executed, for just this purpose.
1 In the class on which you installed the data form that is to accept-on-commit, create a noticeOfCommit method.
2 In the method, test whether an edit is in progress by sending an isEditing message to the data form (self).
3 (Optional) If an edit is in progress, prompt the user for permission to accept the edits.
4 If permission is granted, accept the edits by sending accept to the data form (self).
noticeOfCommit"This message is sent when the session's transactionis about to be committed. Here, we use it as an opportunityto prompt the user for permission to accept any pendingedits so they will be included in the commit."| confirmed |self isEditing
ifTrue: [confirmed := Dialog
confirm: 'Book-loan edits are in progress -- OK to Accept?'
initialAnswer: true.confirmed ifTrue: [self accept]].
Disconnecting and ReconnectingWhen a VisualWorks image is saved, every lens session must end any active transactions. The lens session gives its dependent application an opportunity to make the decision whether to commit or
10-18 VisualWorks
Maintaining Collections
rollback the transaction. It does so by sending an update:with:from: message to its dependents (by default, the database application is the only dependent), with #terminateTransaction as the first argument.
An application that is not a subclass of LensMainApplication should arrange to receive the update:with:from: message by making itself a dependent of the lens session, by sending addDependent:.
When a VisualWorks image is restarted, an update:with:from: message with #install as its first argument is sent to dependents of the session. The application typically resumes the lens session (via resume or resume:, depending on whether the password is stored in the session).
Maintaining CollectionsIn many situations, a one-to-many relationship exists, such as one customer having many orders. It is often convenient to store the customer’s orders as a collection held by the customer object. There are two ways to accomplish this.
Creating a Child Set Via Foreign-Key ReferencesThe first method relies on a preliminary implementation of lens automation that takes advantage of foreign-key references in the database. These foreign-key references are reflected as a collection automatically.
The customer-orders example arranges for the lens to maintain a collection of orders in an unmapped instance variable of the customer, using what is called a child set. If the customer key of an order object is changed, the order is removed from the old customer’s child set of orders and added to the new customer’s child set automatically.
It is important to note that because the collection of orders is a simple IdentitySet, sending messages to it directly to add or remove items has no effect on the lens or the state of your data. Also, while the collection does not map to a single row in the database, it is a persistent object and can be converted to a proxy by the ObjectLens, as when a transaction is rolled back. For that reason, your application should be careful when making direct references to the child set, because an active ObjectLens session is needed to refetch its contents.
Database Application Developer’s Guide 10-19

Lens Programmatic API
1 Evaluate the following in a workspace to add a check box to the Mapping Tool for specifying that the selected variable is to hold a collection:
LensEditor enableChildSetsIf any of your data models use this feature, be sure to file evaluate this expression in any image in which you will be working with those data models.
2 In the Data Modeler, select the entity that represents an element in the collection (e.g., the Order entity, as noted above).
3 In the Mapping Tool, set the type of the foreign-key variable (customer) to be the containing entity (Customer).
4 In the Data Modeler, select the containing entity (Customer).
5 In the Mapping Tool, add a variable for holding the collection (orders) and set its type to the contained entity (Order).
6 Turn on the Collection check box for the orders variable.
Maintaining a Collection With a QueryThe second method uses a query to fetch the customer’s orders. This approach places more responsibility on the application, because additions and removals are not made automatically. This approach has the advantage of flexibility. For example, the query could be constructed such that only orders after a given date are collected from the database, and the orders could be sorted by the query.
1 Use the Query Editor to create a query that retrieves the contained objects (orders). The query can use parameters for customizing it dynamically. Store the query on the containing class (Customer).
2 In the containing class (Customer), create an accessing method for the collection (orders). This method is responsible for performing the query and, if desired, storing the result in an instance variable as a cache.
orders"If the cache is empty, retrieve the collection from the database."orders isNil
ifTrue: [orders := self ordersQuery session: self session) values].
^orders
10-20 VisualWorks

11
Writing QueriesQueries for use by the Object Lens are created and edited using the Query Editor. The editor simplifies the task of writing queries by presenting the syntactical elements in a dialog.
Editing a QueryTo open the Query Editor, choose View > Query Editor in the Data Modeler.
You edit a query by selecting options and completing fields, as described in Query Syntax.
Database Application Developer’s Guide 11-1

Writing Queries
As an additional help in completing the fields, the Query Editor includes the Query Assistant. To open the assistant, click the Query Assistant button.
The Query Assistant’s buttons and menu items are activated and deactivated according to which field is currently selected in the Query Editor. Only legitimate entries for that field are enabled. When you select an item, it is inserted at the current cursor position in the editor.
While the assistant only shows legitimate entries for a field, you are still responsible for selecting items to form a legitimate query. The assistant does not guarantee a correct query.
Query SyntaxThe Query Editor enables you to specify the query in terms of the following parts:
• From specifies the objects from which the result set is taken. This is usually one entity, but it may be more.
• Select specifies the results expected from the query: full objects, single columns, or combinations of them.
• Where specifies which objects (rows in the database) are selected.
11-2 VisualWorks
Query Syntax
• Order By specifies the ordering criteria by which the results are sorted.
• Group By specifies the way the results are grouped for computing functions, provided Select contains aggregate functions.
• Distinct specifies whether or not the result should contain duplicate results.
• Lock Result specifies whether or not the objects fetched by the query should be locked. Locking is performed by using the underlying database mechanisms.
• Unique specifies that only one row is expected to return.
• Fetch On Demand instructs the resulting collection to lazily fetch accessed rows from the database.
The following sections provide detailed explanations for the From, Select, Where, Order By, and Group By fields of the Query Editor.
“From” ClauseThe From field is not directly editable. To add entities, select from the list that appears in the lower right-hand side of the editor. This list appears only when the radio button on the left side of the From field is selected. To remove entities, click the eraser button in the upper right-hand side of the Query Editor. Clicking the eraser button removes all entities.
An entity can appear in the list more than once. In this case, they will be numbered consecutively. This is useful when performing queries that join a table with itself.
A data form’s ownQuery and any restricting queries have the From field disabled. VisualWorks database application framework requires the queries to remain consistent with the definitions of the data forms. This consistency is enforced by the Query Editor.
“Select” ClauseThe result from a query is a collection of objects. Each object in the collection may be one of three types:
• A mapped object
• A value from an instance variable of a mapped object, or a result of applied functions
• An array containing elements from the above two types
Database Application Developer’s Guide 11-3

Writing Queries
If the Full Objects field is checked, then the result collection is formed from objects that are instances of the entities found in the From expression. If only one entity is found in the From field, then the result is a collection of objects from that entity. If more than one entity is found, then the result will be a collection of arrays. Each array contains mapped objects of the given entities in the same order as the entities are found in the From field.
If Full Objects is not checked, then an expression can be entered. The examples included in this section describe the expressions that can be used.
Example 1The result from the following Select value is a collection of objects from the Tm2order entity:
Select: tm2order
Example 2The result from the following Select value is a collection of arrays. Each array is composed of two objects: Tm2order and Tm2customer. Note that it is up to the Where clause to determine how the pairs are constructed. In this example, if an empty Where clause was used the result would be all the possible pairs between the tm2orders and tm2customers (the cartesian product), which is probably not the desired result.
Select: tm2order, tm2customer
Example 3The result of the following Select value is a collection of arrays. Each array is composed of three values: two strings and a number. The strings are the first and last name of a customer, while the number is the total from an order. Again, the Where clause is responsible for making sure that the total corresponds to an order. The order belongs to the customer that appears in the same array in the result collection.
Select: tm2customer first, tm2customer last, tm2order total
Example 4The result of the following Select value is a collection of the order totals to the power of 2.
Select: tm2order total power: 2
11-4 VisualWorks

Query Syntax
Example 5The result of the following Select value is a collection with the sum of the group order totals. The grouping is determined by the Group By expression.
Select: tm2order total Sum
“Where” ClauseWhere is the most important of the expressions in the Query Editor. Expressions must be valid Smalltalk syntax expressions that result in true, false, or a Boolean expression involving mapped entities.
The expressions are evaluated in the context of the class and method where they are installed. Therefore, instance variables of the class can be used as well as parameters to the method itself. To specify parameters to the method, edit the Message Pattern field to include them.
Example 1The following example has the same effect as leaving the Where clause empty. All the objects specified by the From and Select clauses will be returned.
Where: true
Example 2The following example results in an empty collection.
Where: false
Example 3In the following example, the result is all the orders whose total is larger than 100.
Where: tm2order total > 100
Example 4For this example, a message pattern is used as follows:
ordersHigherThan: limit. The result includes all the orders with a total higher than the given limit. If the limit is nil, then all the orders are returned.
Where: limit isNil ifTrue: [true]ifFalse: [tm2order total > limit]
Database Application Developer’s Guide 11-5
Writing Queries
Example 5In the following example, customerTemplate is an instance variable of the class where the query is installed and is used as a template. The query returns all the objects that match the template. A template for an entity is a non-persistent instance of the corresponding class. This object will be compared, field by field, with the objects in the database. Only those matching the fields will be retrieved. To indicate fields that are not interesting for the comparison, the value in the template should be: Object new. Numeric, Timestamp, and similar fields are compared using exact matching. String fields may contain wildcards.
Where: tm2customer isLike: customerTemplateFor example, the following template extracts all the customers whose name start with ‘A’:
| dontCare |dontCare := Object new.customerTemplate := Tm2customer new.customerTemplate first: dontCare;
id: dontCare;address: dontCare;"etc"last: 'A*'.
Example 6If you wanted to extract all of the customers that live in a certain area code, use the following:
customerTemplate zip: 94086.
Example 7Assuming From: tm2order tm2customer, the following expression fetches all the pairs of tm2order and tm2customer where the order belongs to the customer.
Where: tm2order customer = tm2customer
Example 8In the following expression, assume myCustomer is an instance variable of the class where the query is installed. When the query is performed, the value of myCustomer must be an instance of tm2customer that is mapped to the database. The query will return all the orders for a given customer.
Where: tm2order customer = myCustomer
11-6 VisualWorks

Alternate SQL
“Order By” ClauseOrder By is built in a similar way as the Answer part is. More than one sorting criterion can be used.
Order By: tm2order customer cid, tm2order total descendingThe above example results in a collection sorted by the customer id. Each customer will be ordered by the descending value of totals.
“Group By” ClauseGroup By is built similarly to the Order By expressions.
Alternate SQLIn some situations it is necessary to override the SQL code that is generated by the ObjectLens. These situations include performance tuning and complex queries.
You can explicitly provide the SQL for a lens query to execute, by either editing the method defining the query operation or by setting the query object's alternateSQL property programmatically.
Editing Generated SQL1 Define a query that selects the desired table columns and install
it.
The lens mechanism will map the answer set returned by the alternate SQL statement to the same number and type of columns as the lens query is constructed to expect.
For example, if an Order entity contains four variables corresponding to four columns in the database, and the Order entity is selected in the lens query for mapping to full objects, then the alternate SQL statement must also return four columns of the same type and in the same sequence.
2 Manually edit the lens query method.
Editing should be delayed until the final phase of application delivery, because it will be overwritten any time it is edited and installed using the query editor.
Database Application Developer’s Guide 11-7
Writing Queries
Programmatically Modifying SQLProgrammatic modification must occur after an instance of the lens query is created but before its execution by methods such as performQuery or performQueryWithParent. This applies to cases where bindVariables are to be replaced with constants before the SQL string is sent to the database server.
The custom SQL code must comply with the following conventions when mapping objects defined in the data modeler:
• It must return column values for all variables mapped in the data modeler for this entity or table.
• The columns must be returned in the order these variables appear in the data model. Any variation from this order will generate severe errors.
One way of avoiding errors in this process is to enable database tracing and copy the generated column names from the transcript to the method editor. To enable tracing, send the message toggleTracing to the ExternalDatabaseConnection class.
Custom SQL code may be either a valid SQL SELECT statement or the name of a Sybase (CTLib) stored SQL procedure. Oracle stored procedures are not supported by the ObjectLens, but may be invoked using the Oracle EXDI.
Following is an example of an ownQuery that has been edited manually. The alternateSQL: statement defines the alternate SQL code. This line must be inserted exactly as shown, with custom code defined in the string.
ownQuery"This method was generated by UIDefiner. Any edits madehere will be lost if the class is regenerated anew.""QueryEditor new openOnClass: self andSelector: #ownQuery"<resource: #query>| _qo |_qo := LensQuery new._qo description: 'ownQuery'._qo arrayContainerNames: #((#order #Order) )._qo mode: #own._qo alternateSQL: 'Select Order.Number, Order.Amount,
Order.Date, Order.Product from Order where Order.Amount > 1000'.
^_qo
11-8 VisualWorks

Alternate SQL
The next example shows how a lens query can be changed programmatically when it is being created. It provides two methods for dataform classes:
• buildSQL, which is used to generate the SQL string
• an altered version of the above ownQuery, which now uses buildSQL while generating the query operation.
Notice how the contents of the aspect likeVar, which is assumed to have been entered into the user interface and is of type string, is put into another string with the help of the printString message.
buildSQL"Generate the desired SQL string based on values insome of the variables."^'Select table.column1, table.column2, table.column3from user.table where table.column1 like ' ,self likeVar value printString ownQuery"This method was generated by UIDefiner. Any edits madehere will be lost if the class is regenerated anew.""QueryEditor new openOnClass: self andSelector: #ownQuery"
<resource: #query>| _qo |_qo := LensQuery new._qo description: 'ownQuery'._qo arrayContainerNames: #((#order #Order) )._qo mode: #own._qo alternateSQL: self buildSQL.
^_qo
Constants in the Object LensQueries in the ObjectLens always assume bind variables when they encounter constants. This architecture allows for the reuse of queries once they have been prepared for execution.
Unfortunately, queries prepared this way do not take advantage of the Oracle optimizer, and there may be significant differences in terms of the code path that Oracle servers execute. For this reason, you may want to generate SQL strings that contain constants.
Performance gains per query execution may be on the order of several minutes for larger databases.
Database Application Developer’s Guide 11-9

Writing Queries
11-10 VisualWorks
Index
Aaction buttons, removing 9-12Ad Hoc SQL tool 1-4, 7-11adding
objects to database 10-7Adminexample 1-7answer set 2-10
cancelling 2-20describing 2-13handling multiple 2-12using an output template 2-18
answer stream 2-14application models 7-2ApplicationModel 7-6, 7-8aspect paths 9-8, 9-14
Bbase query (of data forms) 10-3begin transaction 10-7Bookexample 1-7Bookloanexample 1-7Borrowerexample 1-7Browse Child Data Form (Canvas Tool
command) 7-12buffers and adaptors 2-14
CCanvas Composer tool 7-11, 9-3Canvas Tool 9-5, 9-7, 9-8
commandsBrowse Child Data Form 7-12Create Child Data Form 7-12Define Menu as Query 7-11Paint Child Data Form 7-12Reusable Data Form Components
7-11canvases 7-7, 9-3
predefinedtabular viewer 9-4
cellBounds 9-13cellContents 9-13changing
data models 8-13child data forms 7-9class
mapping to relational datatype 2-3close (message) 10-5collections 10-19commit (message) 10-11commit transaction 10-7confirmationOfCommit 10-16confirmationOfLogin 10-16confirmationOfLogout 10-16confirmationOfRollback 10-16connect string 2-4connecting
data forms to applications 9-6to a database 10-1
connection coordinator 2-21Create Child Data Form (Canvas Tool
command) 7-12creating
canvases 9-3
Ddata
for database example 1-7from multiple tables 10-15storage and processing 7-2
Data Form, defined 9-1data forms
base query 10-3canvases 7-8classes 7-4, 7-7connecting to applications 9-6embedded 7-9linked 7-9parents and children 7-9using data from multiple tables 10-15widgets for 9-6
data integrity 10-17Data Modeler tool 7-10, 8-5, 8-11, 8-13data models 7-6
changing 8-13choosing at runtime 10-14installing 8-13saving 8-13
databaseaccessing 2-1connecting to 2-2, 2-3
Database Application Developer’s Guide Index-1

controlling transactions 2-21–2-22default connection 2-5disconnecting from 2-6interaction with Smalltalk 2-2mapping datatype to Smalltalk class 2-3reconnecting a restarted image 2-29relational datatypes 2-3saving connected image 2-28types of errors 2-24
database application classes 7-4database applications 7-2
data form connections 9-6reusing with a different DBMS 10-14starting 9-7
database extensions to VisualWorks 7-11database joins 7-8, 10-15database login defaults, setting 1-3database profiles, setting 1-3Database Tables tool 7-10database transactions 10-6
responding to 10-16database
See also transactiondatabases
adding objects 10-7connecting to 10-1locking 10-17removing objects 10-8sequential numbers 10-11
dataModelDesignator 7-7, 10-14dataModelSpec 7-7DataSet widgets, using 9-5defaults, setting database login 1-3Define Menu as Query (Canvas Tool
command) 7-11direct object references 7-4dirty objects 10-10domain models 7-2DSN (Data Source Name), using 4-3
EEmbedded Data Form (Palette action button)
7-11embedded data form widget 7-9, 9-6, 9-10embedded data forms 7-9endCreating 10-12entity classes 7-3environment string 2-4environment, setting default 2-5error handling, database signals for 10-7events in database transactions 10-16exception
handling 2-24–2-26execution
error 2-24tracing the flow 2-22
External Database Interfaceclasses, defined 2-2
ExternalDatabaseAnswerStream 10-5ExternalDatabaseFramework 10-7
Fforeign key references 7-4, 8-11
Ggenerating sequential numbers 10-11
Hhandle:do: 10-7
II/O 7-2image
restarting and reconnecting to database 2-29
saving when connected to database 2-28
information models 7-2inserting rows in database 10-7install aspect 10-19installing data models 8-13instance variables 7-4integrity of data 10-17interfaces, reusing with different DBMS
10-14isEditing 10-18
Jjoined query or data form 10-15joins 7-8
Kkey references, foreign 7-4
Llens sessions 7-6, 7-7
disconnecting from and reconnecting to 10-18
LensDataManager 7-8LensMainApplication 7-6Linked Data Form (Palette action button)
7-11linked data form widget 7-9, 9-6localRequestForWindowClose 10-16Lock on Accept 10-17Lock on Edit 10-17
Index-2 VisualWorks
lock, database 10-17login defaults, database 1-3
Mmain windows 7-6Mapping Tool 7-10Menu Query Editor tool 7-11models
application 7-2domain 7-2
Nname (accessor method) 7-5name: (mutator method) 7-5named input binding 2-9next (message) 10-5noticeOfCommit 10-16, 10-18noticeOfLogin 10-16noticeOfLogout 10-16noticeOfRollback 10-16noticeOfWindowClose 10-16numbers, sequential 10-11
Oobject references, direct 7-4ObjectLens 7-3output template 2-18
defined 2-18reusing 2-20skipping a variable 2-18
overdueBooksQuery 10-4ownQuery method 7-9
PPaint Child Data Form (Canvas Tool
commands) 7-12parameter 2-8
binding NULL 2-9binding to a name 2-9defined 2-8
parent data forms 7-9password, database 10-1password, securing 2-4paths, in aspect properties 9-14performance tuning 2-20performing a query 10-3placeholder. See parameterpreBegin 10-16
Qqueries 7-9
performing 10-3restricting 7-9
queryallocating adaptors 2-14allocating buffers 2-14asynchronous execution 2-13cancelling answer set 2-20checking execution status 2-13describing an answer set 2-13executing 2-8getting an answer 2-10, 2-12handling multiple answer sets 2-12parameters 2-8processing an answer stream 2-14raising an exception 2-10testing row count 2-13using an output template 2-18viewing results 2-7
Query Editor tool 7-10, 10-4query variable. See parameter
Rremoving
action buttons 9-12objects from database 10-8
requestForCommit 10-16requestForLogout 10-16requestForRollback 10-16Resource Finder tool 9-11resource, releasing 2-22resources 7-5restricting queries 7-9resume 10-19Reusable Data Form Components (Canvas
Tool command) 7-11reusing your interfaces 10-14rollback transaction 10-7root windows 7-6
Ssample data for database example 1-7saving data models 8-13sequential numbers, generating 10-11Serial number datatype 10-12session
defined 2-7disconnecting 2-21, 2-22reconnecting 2-22
session (variable) 7-7session
See also querysetting database login defaults 1-3signals for database errors 10-7specifications
Database Application Developer’s Guide Index-3
data model 7-5main window 7-5query 7-7window 7-7
SQLAd Hoc SQL tool 1-4, 7-11executing 2-2, 2-7, 2-21stored procedures 6-9
startingdatabase applications 9-7
state error 2-24
Ttabular viewer (template) 9-4templates 7-8Temporary Launcher 9-5terminateTransaction 10-19TNSNAMES.ORA 1-2tools 7-10
Ad Hoc SQL 1-4, 7-11Canvas Composer 7-11, 9-3Canvas Tool 9-5, 9-7, 9-8Data Modeler 7-10, 8-5, 8-11, 8-13Database Tables 7-10Mapping Tool 7-10Menu Query Editor 7-11Query Editor 7-10, 10-4Resource Finder 9-11
tracing 2-22adding information 2-24defined 2-22disabling 2-23setting trace level 2-23specifying output location 2-23
tracing protocol 2-24transaction
controlling 2-21–2-22coordinated 2-21
transaction events 10-16transactions, database 10-6tutorial application
setting upsetting database login defaults 1-3
testing 9-7
Uupdate:with:from: 10-16user interfaces 7-2user-interface objects 7-2username, database 10-1
Vvalues 10-4
variables, instance 7-4
Wwidgets
embedded data form 9-6, 9-10linked data form 9-6
window specificationsinitial 7-6
windowsmain 7-6root 7-6
windowSpec 7-6
Index-4 VisualWorks