visual builder and process automation lab - github pages
TRANSCRIPT

Lab 5 : BYOL [HOL2752] Lab 5 : BYOL [HOL2752]
Introduction
Three Ways to work with Process
Process Setup
Step 1: Create a Process AliasStep 2 : Start the process from a Visual Builder ActionStep 3: Show Tasks and task actions
Introduction In this lab we will be connecting products to an order process that uses Oracle Process Cloud Service. Itis necessary to use an instance of Visual Builder that is shipped within Oracle Integration Cloud for thislab. Additionally, this lab uses a prebuilt Process and Integration with which Visual Builder interacts.Creating the Process and Integration from scratch is beyond the scope of this lab.
Three Ways to work with Process
There are three primary ways to interact with Oracle Process from within Visual Builder.
1. Process Service APIs
Process Service APIs are available as REST and can be called directly from within Visual Builder.You may setup service connections and use Service Data Providers and/or call APIs from withincustom Javascript to popluate Array Data Providers. When a Process alias is created withinVisual Builder some doc of the most commonly used APIs along with code samples is provided
2. Visual Builder Process actions and objects
Visual Builder includes a set of actions and objects for easier access to Process. Severalcommon actions are presented as actions to be added into UI workflow.

3. Process UI Components
Process incudes a set of UI components that can be used to add more information about youractive processes and instance.
Process Setup
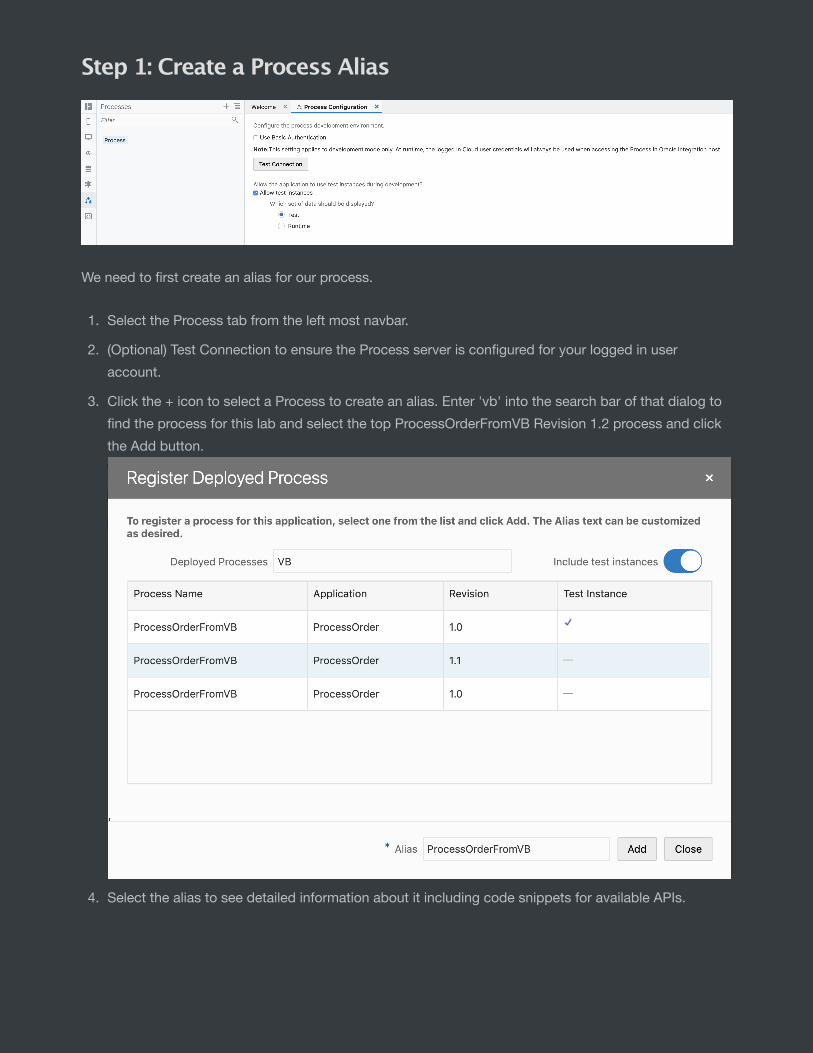
Step 1: Create a Process Alias
We need to first create an alias for our process.
1. Select the Process tab from the left most navbar.
2. (Optional) Test Connection to ensure the Process server is configured for your logged in useraccount.
3. Click the + icon to select a Process to create an alias. Enter 'vb' into the search bar of that dialog tofind the process for this lab and select the top ProcessOrderFromVB Revision 1.2 process and clickthe Add button.
4. Select the alias to see detailed information about it including code snippets for available APIs.

5. Select Static for the Runtime Process
Step 2 : Start the process from a Visual Builder Action
Now, we'll create a user interface action from which to kick off a process. On the Product page of themobile application, we'll add a button to take an order.

1. Open the product-start page and go to the General tab of the object inspector.
2. Click on the Right Side '+' button and selecton Button
3. Click on the recently added '+' button on the Products page and change the icon to a cart within theIcon Gallery

4. Select the Cart icon on the Product page and move to the Events tab in the object inspector andclick the New Event button and select 'Quick Start: 'click'

5. Now, you will be in the Action Chain editor. Scroll down the Actions palette to the Process actions.
6. Drag the Start Process action to the + sign after Start in the action chain editor
7. Click Select Process in the Action Chain object inspector and select Recieve Message from the Alias.

8. Notice the process is expecting an Input Parameter called productNumber.

9. This was designed within Process Cloud as an input argument.
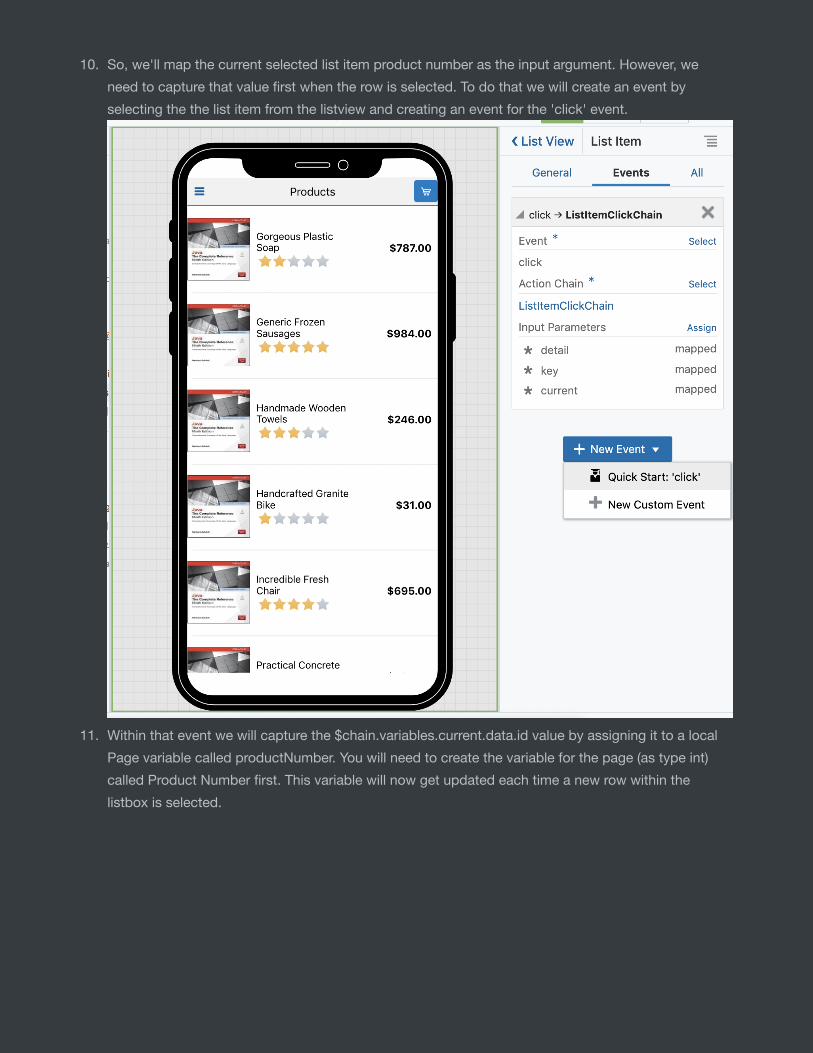
10. So, we'll map the current selected list item product number as the input argument. However, weneed to capture that value first when the row is selected. To do that we will create an event byselecting the the list item from the listview and creating an event for the 'click' event.
11. Within that event we will capture the $chain.variables.current.data.id value by assigning it to a localPage variable called productNumber. You will need to create the variable for the page (as type int)called Product Number first. This variable will now get updated each time a new row within thelistbox is selected.

12. Now that we have that variable assigned, we can map it to our input argument.

13. Run the app and click the cart icon to kick off the process. You can verify that the process wasproperly started within the Process Cloud by looking at your open tasks.
Step 3: Show Tasks and task actions
1. We can also view the tasks within Visual Builder using a Table component. Go to your web app andadd a new page under the Reports flow called reports-process-tasks.

2. On that page, drag a Table component and in the Object Inspector go to the Quick Start tab and AddData. Select the 'task' service call under the Process Objects. Select some fields to display such asid, label, and priority. Click Finish.

3. Back in the designer, select Add Task Actions and select the defaults by hitting Finish.4. Now, set the designer to Live mode and select a row from the table. Then select the action combox,
you should see "Accept/Reject" displayed. You may complete the action at this point.
