virtual vehicles - pearsoncmg.com
TRANSCRIPT

Chapter 3
Virtual Vehicles
You love your car, right? But itwould be cooler with racingstripes and your lucky numberon its side. NASCAR, here youcome. Or, why not create yourown outrageous chopper? Aquick snap of a motorcycleand a couple of mouse clicksshould do the job.
The projects in this chapterfeature makeovers for a fewforms of ground-based trans-portation. Some people lovetheir vehicle, and others toler-ate it as a necessary pain theymust endure, but we alldepend on transport in oneway or another.
Maybe we can have fun withsome of the vehicles we inter-act with every day.
Project 1:Picturesque 18-Wheelers
Project 3:Outrageous Choppers
Project 2:Virtual Race Cars
Project 4:Toy Cars?
04_0672328607_ch03.qxd 1/24/06 11:35 AM Page 49

We were near an underpass and theweather was a little dismal when this large18-wheeler went roaring past us. Mybrother and I both saw the truck, wentsilent for a moment, stared at each other,and then both said,“Did you see that?”Whatwe were referring to was the painting onthe side of the trailer; it was an amazingdesert scene in bold reds and orangesfeaturing a larger-than-life Yosemite Sam. Itell you, it was a sight.
As I sit in traffic, I often wish that moretractor-trailers were done up with artwork ofsome kind. I mean, wouldn’t it be awesome tosee a truck with a giant Mona Lisa painted onits side? Much better than some of the boringpanels seen on many of the trucks thatcurrently inhabit the highways and byways.
I think it’s time to digitally alter a truck to seehow it can have an effect on its surroundings.Follow along to see how much fun this canbe and how easy it can be to “paint”a truck.
Two files are needed for this project. First,you need a shot of a large truck, then youneed to open another image to be paintedonto the truck’s side. I’ll use the panoramicimage that you can create in one of theprojects in Chapter 8,“Messin’ with MotherNature.”This image will work well becauseof the shape of the truck’s side. As you cansee in Figure 3.1, the truck’s side is a longrectangle. If you haven’t created thepanoramic image yet, you can grab a copyof the completed project from the website.
Project 1: Picturesque 18-Wheelers
Many summers ago I was traveling across the country with myyoungest brother.We were heading off to some rock concert. It wasquite a show.The traveling was great fun, as well, and it was a greatchance for my baby brother and me to get to know each otherbetter without all the trappings of daily life.There was one momenton the highway neither of us will forget. No, not the time the horsecarriage almost ran us over—that’s another story altogether.
Figure 3.1 A large truck just begging for some digitalairbrushing.
04_0672328607_ch03.qxd 1/24/06 11:35 AM Page 50
1. With both files open, activate theimage you want to paint onto thetruck’s side by clicking its title bar.
2. Choose Selections, Select All to selectthe entire image.
3. Select Edit, Copy or Edit, Copy Mergedif the image has extra layers so thatyou’ll get the entire image.
4. Activate the image with the truck byclicking its title bar. If your image ishidden behind a number of others, youcan also activate it by selectingWindow, filename, where filename isthe name of the image you want tohave activated.
5. Select Edit, Paste As New Layer to pastethe second image’s contents into anew layer in the truck image.
Places Everyone, PlacesYou may notice when you paste the newlayer in that it’s way too large, or even waytoo small. In any event it will need to beresized and moved into place.
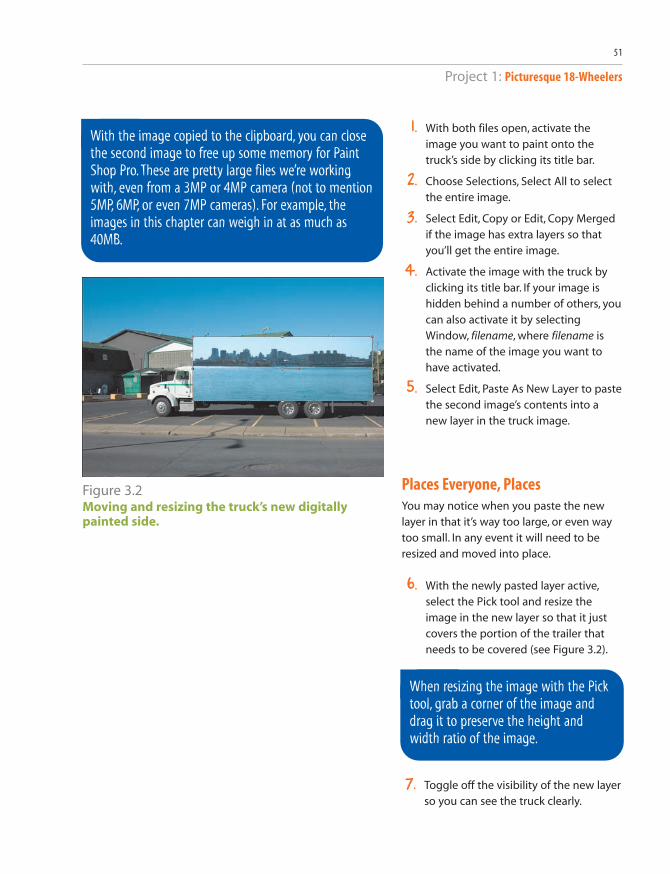
6. With the newly pasted layer active,select the Pick tool and resize theimage in the new layer so that it justcovers the portion of the trailer thatneeds to be covered (see Figure 3.2).
Project 1: Picturesque 18-Wheelers
51
With the image copied to the clipboard, you can closethe second image to free up some memory for PaintShop Pro.These are pretty large files we’re workingwith, even from a 3MP or 4MP camera (not to mention5MP, 6MP, or even 7MP cameras). For example, theimages in this chapter can weigh in at as much as40MB.
Figure 3.2 Moving and resizing the truck’s new digitallypainted side.
When resizing the image with the Picktool, grab a corner of the image anddrag it to preserve the height andwidth ratio of the image.
7. Toggle off the visibility of the new layerso you can see the truck clearly.
04_0672328607_ch03.qxd 1/24/06 11:35 AM Page 51

Creating a Mask to Add the DigitalArtwork to the TruckWe could, of course, move the pasted imagearound and get it exactly into place, erasingsome of it as necessary. A better method,though, is to use a mask with the new layerto allow only enough of the image to showthrough to cover that part of the trailer. Thismethod is also pretty cool in that you caneasily reopen the file and simply paste inanother image. With the mask there, it willbe just that easy to change artwork on theside of the truck.
8. Select the Freehand Selection tool; setthe Selection type to Point; and use theFreehand Selection tool to draw aselection around the truck’s side,zooming in as necessary to see whereyou’re selecting (see Figure 3.3)
9. With the selection made, activate thelayer with the image that will bepainted onto the truck’s side by click-ing its layer in the Layers palette.
10. Right-click the layer in the Layerspalette and select New Mask Layer,Show Selection. Doing so allows theimage to show through the mask andbe painted on the truck’s side. It masksoff only those areas that are outsidethe side of the truck. Pretty cool stuff.
Creating a Mask to Help with FinalTouchesAt this point, you can clean up any areas ofthe mask that might need a little help. Forexample, I’ll clean up the area where thetruck’s side has a rounded corner.
Chapter 3 Virtual Vehicles
52
Figure 3.3 Creating a selection of the truck’s side with theFreehand Selection tool.
You’ll note in Figure 3.3 that I have ignored the smallcurve in the upper-left corner of the truck’s side.Thiscan easily be dealt with later. For now, it’s more impor-tant to get a decent selection around the area of thetruck’s side.
04_0672328607_ch03.qxd 1/24/06 11:35 AM Page 52

11. If necessary, activate the mask layerand use the Paint Brush tool witheither white or black as the paintingcolor. Painting with black masks out anarea, and painting with white lets theimage show through. In Figure 3.4, I’musing a black brush to restore therounded area of the truck side’s frame.
Adding the Final TouchesWhen you’re satisfied with the mask, it’stime for the crowning touch. That is a smallchange to the blending mode to help bringout any details in the original truck’s side.Note that this setting works for the (mostly)white truck and the color photo I’m using.Your mileage might vary if you’re using twocompletely different images.
12. Activate the Group layer that holds thephoto layer and the mask layer.
13. Change the Blending mode to Multiply.You can see my final digital photo inFigure 3.5.
That’s much better. I think we shouldstart a “beautify that truck” movement.At least there would be somethingnicer to look at while we’re stuck intraffic.
Project 1: Picturesque 18-Wheelers
53
Figure 3.4 Fixing the mask.
Figure 3.5 The beautified truck ready to make deliveries instyle.
04_0672328607_ch03.qxd 1/24/06 11:35 AM Page 53

1. Open the file that contains the car youwant to modify (the file on the websitefor this project is called GraySedan.tif). I’m using the shot of a four-door, dark gray sedan that you can seein Figure 3.6.
This is exciting. I’m starting to feel alittle like Jesse James on MonsterGarage. Let’s light those (digital)cutting torches and get down to it.
Building Some New WheelsTo help with the illusion, I used theSelection tool with the Selection mode setto Circle to grab a copy of the wheels fromthe truck that was featured in the lastproject (see Figure 3.7).
Actually, it’s not the whole wheel that Iwant—I really only want the mags. I thinkthey look more like racing wheels than thestock ones that came with the sedan.
You can grab the wheel off any vehicle,really. We’ll be deforming it into place in anyevent. Here’s how:
2. With the wheel file (White Truck.tif)open and active, select View, Rulers toturn on the rulers.
3. Select View, Guides to turn on theguides. Click and drag down from thetop ruler to create a horizontal guide.
Project 2: Virtual Race Cars
I’m a big race fan. Other than the Grand Prix, though, there isn’tmuch racing in my neighborhood. I wish there were some NASCAR-type racing around. Most people will never get a chance to drive oneof those stock car beasts, but at least they seem more approachablethan those airplane-like Formula 1 race cars. I bet that with a littletime, effort, and imagination, I could turn my four-door family sedaninto a pretty good imitation of a stock car.
Figure 3.6 A future stock car…feel the power!
Figure 3.7 I thought the stock car needed beefier wheels.
04_0672328607_ch03.qxd 1/24/06 11:35 AM Page 54

Put the guide as close to the center ofthe wheel as you can.
Repeat this process, but drag from theruler at the left to make a verticalguide. Position it near the center, aswell (see Figure 3.8).
Grabbing a Mag WheelNow that the guides have been created,they can help you make a selection.
4. Choose the Selection tool and set theSelection type to Circle. Using thecenter of the guides as a starting point,click and drag to make a circular selec-tion. Depending on the image youused and how you placed your guides,it might take several tries to get theright selection. Don’t move the guides,though; just remember where youstarted your click and drag and thenrefine your starting point until you geta good selection around the hub of thewheel (see Figure 3.9).
5. With the selection made, select Edit,Copy to copy the wheel to theWindows clipboard. Then activate theRacing Car image and select Edit, PasteAs New Layer to paste the new wheelinto the existing image.
Project 2: Virtual Race Cars
55
Figure 3.8 Creating a pair of guides to help create a circularselection.
Figure 3.9 A pretty good circular selection made with thehelp of the guides.
You will probably have to resize thewheel, and you’ll almost certainly needto push, bend, and squeeze it intoplace. All this can be done with the Picktool.
04_0672328607_ch03.qxd 1/24/06 11:35 AM Page 55

6. Use the Pick tool with the Ctrl key tochange the perspective of the pastedwheel by dragging a corner of thebounding box (see Figure 3.10).
Use the underlying wheel to help withthe placement and shape of the newwheel. They are both really justsquished circles, after all.
7. When you’re satisfied with the shapeand placement of the new wheel,duplicate the wheel layer and drag thecopy into place over the other visiblewheel. You might have to resize thecopy, but if the wheels are straight,you’ll probably not have to do anyfurther shaping. You can see bothwheels in place in Figure 3.11.
It’s Time to Add a Racing NumberThings are moving along nicely, but it’s timeto add a racing number. I want the numberto stand out a little, so I’ll put it on a circularbackground. Here’s how to do so:
8. Select the Ellipse tool and select a filland a stroke color. I chose a brightyellow.
9. Use the Pick tool to deform the Ellipseshape you created. It should basicallyresemble the wheels you added, atleast in shape.
Chapter 3 Virtual Vehicles
56
To help you place and shape the wheel,you might want to turn down theopacity of the layer the wheel is on.
Figure 3.10 Deforming the new wheel into place with the Picktool.
Figure 3.11 The beefier wheels in place on the sedan.
04_0672328607_ch03.qxd 1/24/06 11:35 AM Page 56

10. Use the Text tool to add a number. Iused a somewhat fancy serif font witha 6-pixel stroke in red and a bright bluebackground. Hey, this is racing, right? I used Caslon 224 Medium at a size of72 points. Note that if you’re followingalong with the file from the websiteand you don’t have the Caslon font,Paint Shop Pro X substitutes the fontfor Arial.
11. Use the Pick tool to bend the numberinto place within the circle (see Figure 3.12).
12. Change the Blending mode of both thenumber layer and the circle layer toOverlay. This makes the new shapesblend into the existing picture ratherthan looking like they were simplystuck there (see Figure 3.13).
Project 2: Virtual Race Cars
57
Figure 3.12 Adding a racing number.
Figure 3.13 A blending mode change helps add to the realism.
If you’re brave enough, you can further add to therealism by bending, twisting, or pushing the racingnumber with the Warp Brush, located near thebottom of the toolbar.You might find it hidingbehind the Mesh tool, or vice versa.The Mesh tool isworthy of experimentation toward this end, as well.Before you give either a try, though, I recommenddoing so on a duplicate layer. If you make manychanges as you bend and push the shapes, you’llhave to back out of each, one at a time by pressingCtrl+Z. It’s better just to trash the duplicate layer,make another copy, and try again.The figure showsmy efforts with the Warp tool set to 270 pixels, 0Hardness, 100% Strength, and the Mode set to Push.
04_0672328607_ch03.qxd 1/24/06 11:35 AM Page 57

All It Needs Is a Racing StripeThe final touch for this project, at least as faras we’ll go for now, is to add a couple ofracing stripes. The stripes will be added asvector shapes that can be poked andprodded until they bend into the desiredshape. I like to keep each shape on its ownlayer because I find it less messy that waywhen I need to make any changes.
13. Select the Rectangle tool and then setthe fill and stroke colors. I chose thesame blue I used for the interior of theracing number. Draw a rectangle nearthe hood of the car. The shape and sizedon’t matter too much because we’llhave to bend the shape into, er, shape.
14. Right-click the shape and selectConvert to Paths. This enables you touse the Pen tool to shape the rectan-gle. (see Figure 3.14).
15. Right-click the lower-left corner of therectangular shape and select NodeType, Curve After. Drag the newlycreated handle to curve the left side ofthe rectangular shape. The object hereis to try to keep to the lines of the car.
Repeat this process for the lower-rightcorner, but select Node Type, CurveBefore.You can see the result of drag-ging the new handle on the right sideof the racing stripe shape in Figure 3.15.
16. Set the blending mode of the layerthat has the racing stripe to Overlay.This enables the luminance (in otherwords the lighting, or highlights andshadows, if you will) from the layerwith the car to show through.
Chapter 3 Virtual Vehicles
58
Figure 3.14 Shaping the racing stripe.
Figure 3.15 Molding the racing stripe to the car’s shape.
04_0672328607_ch03.qxd 1/24/06 11:35 AM Page 58

17. Duplicate the shape layer and, usingthe Pick tool, drag the new shape intoplace so you now have two racingstripes on the hood of the car (seeFigure 3.16).
18. Using the same process you used tocreate the stripes on the hood, createtwo more on the roof of the car.At this point—after saving the file soyou don’t lose all your hard work—youmight want to rename the layers. I havea comfort point in the number of layersI see in the Layers palette, and thisproject is falling out of that zone. If youever come back to a project like this,you’ll appreciate the fact that yourenamed the layers. I named the layersLeft Hood Stripe, Right Hood Stripe,Left Wheel, Right Wheel, and so on. Thetime you spend doing this now will beinstantly paid back if you ever revisitthis project.
My final racing family sedan is shownin Figure 3.17. Honey, can I go to the store for something? Come on,we must need bread, milk,something…anything?
Project 2: Virtual Race Cars
59
Figure 3.16 Two racing stripes added to the car’s hood.
Figure 3.17 The average family stock car.
04_0672328607_ch03.qxd 1/24/06 11:35 AM Page 59

Chapter 3 Virtual Vehicles
60
If you’d like you can take this project further, hereare some ideas to get you started:
• Add some stickers from fictitious companiesand sponsors; these can be created fromscratch using shapes and type.
• Change the color of the car.
• Increase the size of the wheels.
• Add a hood scoop or a rear airfoil.
• Do some background-ectomy and place thecar in a more realistic atmosphere. Are thereany tracks near you, or maybe a stretch ofhighway that would make a better backdrop?
This figure, for example, shows how the car mightlook in a bright blue rather than the originalgunmetal gray.The effect was created by applyingColor Balance (select Adjust, Color Balance) to acopy of the car on a separate layer.
Whatever you do, have some fun with it.
04_0672328607_ch03.qxd 1/24/06 11:35 AM Page 60

What I’d like to do with this particularproject is honor some of those crazychopped motorcycles and theirbuilders/creators with one of my ownmaking. Of course, this won’t be a realchopper, and probably couldn’t be built inreal life, but isn’t that part of the fun of adigital darkroom? You bet it is!
We’ll actually be creating a monster dragbike from one of the racing bikes manyriders seem so fond of. I know these bikesare fast, but let’s see if we can add somespeed-enhancing improvements.
To get started, open a file that contains ashot of a motorcycle. You can download theone I’m using from the companion website,or you can use your own. If you want towork with a shot of your own, make surethat when you shoot it, you get down alittle so the bike is as centered as possible.
You can see the photo I’ll be working within Figure 3.18.
Boy, you can tell that thing’s fast just bylooking at it. Let’s see if we can turn it into abit of a dragster, though.
To add to the “monster-ism” aspect of thisproject, I’ll borrow the wheels from thetruck photo of the first project in thischapter.
Project 3: Outrageous Choppers
There seems to be a large interest in choppers recently. In fact, inter-est seems to be stronger than it was in the 1960s and 1970s.Thereare even a number of television shows based on the people whocreate some of these amazing machines. Even if you don’t ride, youhave to appreciate the beauty of some of the machines thesepeople build.
Figure 3.18 A digital snapshot of a motorcycle.
04_0672328607_ch03.qxd 1/24/06 11:35 AM Page 61

1. With both photos open, activate thetruck photo and use the Selection tool;then with the Selection Type set toCircle, select one of the back wheels ofthe truck. You can draw guides throughthe wheel’s center as we did in theprevious project when we selected themag from one of the truck wheels.
2. With the wheel selected, select Edit,Copy Merged (if it has lots of layers,you want to make sure you actually getthe wheel).
You can close the truck file, because itis no longer needed for this project.
3. Activate the motorcycle image by click-ing its title bar. Then select Edit, PasteAs New Layer to paste the truck wheelinto the motorcycle image.
4. Using the Pick tool, resize and placethe wheel (see Figure 3.19).
5. As you can see from Figure 3.20, I’veleft the wheel, let’s not say ludicrouslylarge, but…okay, let’s say it—I’ve leftthe wheel rather large. Of course, that’spart of the point of this outrageouschop job, isn’t it?
Using a Mask to Blend the Wheel InI’d like some of the motorcycle to showthrough around the new wheel. We couldsimply erase parts of the wheel, but if wedid that it would cause problems if wedecided to move the wheel even a little bit.
Instead of erasing the wheel, we’ll use thepower of a mask to hide parts of the wheelso the underlying motorcycle photo canshow through. The concept is pretty simple:Where the mask is white the wheel will bevisible, and where the mask is black the
Chapter 3 Virtual Vehicles
62
TIPIf you plan to do more projects like the ones in thisbook, you might want to consider creating a folderwhere you can keep bits and pieces of images to bereused in other projects. For example, the truck wheelfrom the first project in this chapter makes an appear-ance in both the second (Virtual Race Cars) and third(this one) projects. Eventually, you’ll find that you havequite a collection of odds and ends that can be usedfor many different projects.
Figure 3.19 Adding a large truck wheel and tire to the rear endof the motorcycle.
04_0672328607_ch03.qxd 1/24/06 11:35 AM Page 62
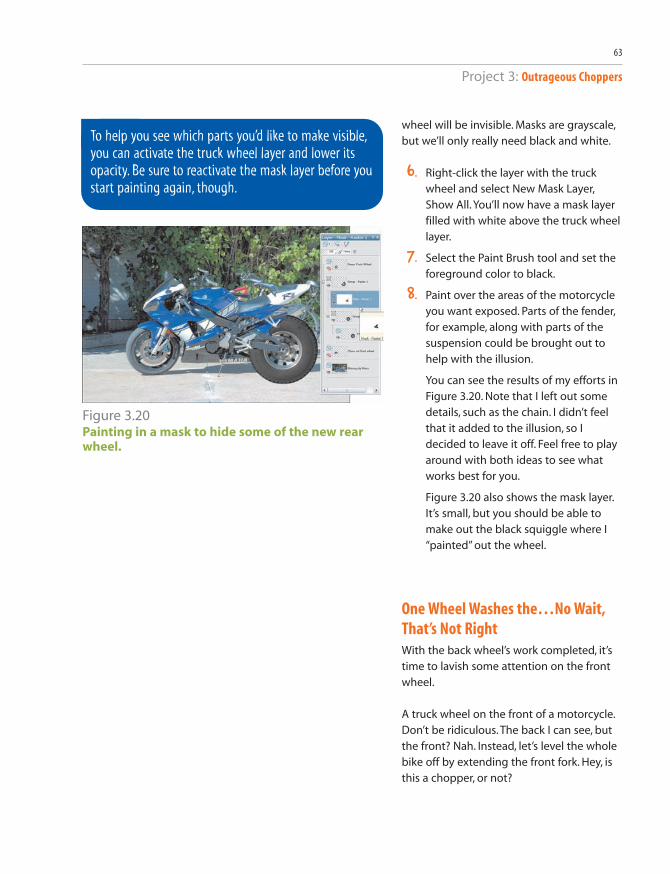
wheel will be invisible. Masks are grayscale,but we’ll only really need black and white.
6. Right-click the layer with the truckwheel and select New Mask Layer,Show All. You’ll now have a mask layerfilled with white above the truck wheellayer.
7. Select the Paint Brush tool and set theforeground color to black.
8. Paint over the areas of the motorcycleyou want exposed. Parts of the fender,for example, along with parts of thesuspension could be brought out tohelp with the illusion.
You can see the results of my efforts inFigure 3.20. Note that I left out somedetails, such as the chain. I didn’t feelthat it added to the illusion, so Idecided to leave it off. Feel free to playaround with both ideas to see whatworks best for you.
Figure 3.20 also shows the mask layer.It’s small, but you should be able tomake out the black squiggle where I“painted” out the wheel.
One Wheel Washes the…No Wait,That’s Not RightWith the back wheel’s work completed, it’stime to lavish some attention on the frontwheel.
A truck wheel on the front of a motorcycle.Don’t be ridiculous. The back I can see, butthe front? Nah. Instead, let’s level the wholebike off by extending the front fork. Hey, isthis a chopper, or not?
Project 3: Outrageous Choppers
63
To help you see which parts you’d like to make visible,you can activate the truck wheel layer and lower itsopacity. Be sure to reactivate the mask layer before youstart painting again, though.
Figure 3.20 Painting in a mask to hide some of the new rearwheel.
04_0672328607_ch03.qxd 1/24/06 11:35 AM Page 63

9. Make the motorcycle layer active byclicking its layer in the Layers palette.Then use your favorite selectiontools/methods to select the frontwheel and fork of the motorcycle. Ifyou need a bit of a refresher onmaking selections, take a look atAppendix B,“Paint Shop Pro X in aNutshell,” before proceeding.
10. With the front wheel selected, selectEdit, Copy. Then select Edit, Paste AsNew Layer to paste the copy of thefront wheel to its own layer. Use thePick tool to move the wheel into posi-tion (see Figure 3.21).
Chapter 3 Virtual Vehicles
64
Of course, we’ll only level the bike off. Tilting it upwould take quite a bit more work. If you feel comfort-able enough with the work being done in these proj-ects, you can give it a try. All you need to do is selectthe entire bike and copy it to a new layer.When youhave it there, use the Pick tool to tilt the bike to thedesired angle.With that done, follow along with therest of the work being done on the front end but makethe fork extension long enough to join the bike withthe front wheel.
Figure 3.21 Move the copy of the front wheel into place.
You can see in Figure 3.21 that I’vemoved the copied wheel down andforward a little. I basically want it linedup horizontally with the new backwheel and lined up in such a way as tomake the front forks one straight line.
Out with the OldWith a copy of the front wheel tucked safelyaway on its own layer, it’s time to hide theold one. The best way to do so is to use theClone Brush tool to copy parts of the side-walk, trees, and so on over the front wheel.To make it easy to step back, though, youcan paint with the Clone Brush to a newlayer. See Appendix B if you need toimprove your cloning skills.
11. Select the Clone Brush tool. I set thesize of the brush so that it was about asbig as the curb in the background, and Ichose Use All Layers and Aligned mode.
12. Make the new front wheel layer invisi-ble by clicking its visibility icon in theLayers palette. You don’t want to clonethe new wheel over anything else inthe image.
04_0672328607_ch03.qxd 1/24/06 11:35 AM Page 64

13. Activate the layer with the motorcyclephoto. Then click the small arrow in theicon in the upper-left corner of theLayers palette and select New RasterLayer. I named it Cloned out FrontWheel.
14. Use the Clone Brush to clone areas ofthe sidewalk and background over theexisting front wheel (see Figure 3.22).When you’re finished, make the layerwith the new front wheel active againto see how it turned out.
15. Use the Clone Brush tool to copy asection of the front fork so it connectsthe existing front fork with the part ofit that came along with the frontwheel. Use the Eraser tool to clean upthe pasted new front wheel, if neces-sary. You can see my version in Figure 3.23.
Fixing the ShadowAll that’s left is to fix the shadow. You’ll needyour best cloning skills for this task. Weneed to extend the shadow so the new rearwheel and extended front wheel have ashadow that matches their new positions.
We’ll also need to get creative. The backwheel won’t be bad—it just needs to beenlarged along the bottom. To be a goodfake, though, the front wheel and forkshadow doesn’t need to be enlarged, butshifted or tilted. I think a selection copiedand pasted to a new layer before the appli-cation of the Clone Brush might work best.
Project 3: Outrageous Choppers
65
Figure 3.22 Clone out the existing front wheel.
Figure 3.23The monster bike just needs a bigger shadow togo with its new attitude.
04_0672328607_ch03.qxd 1/24/06 11:35 AM Page 65

16. Activate the Motorcycle layer by click-ing its layer in the Layers palette. Thenmake a selection around the existingshadow about two-thirds of the wayfrom the front wheel to the motor-cycle’s stand.
17. Select Edit, Copy; then select Edit, PasteAs New Layer. Select the Pick tool anduse it to rotate the copy of the shadowinto place, moving it as necessary (seeFigure 3.24).
18. Use the Clone Brush tool to fix the areawhere the copied shadow meets theoriginal. Be sure you do your cloning toa new layer and that you set the optionto Use All Layers.
You can clone the back wheel’s shadowto the same layer. Remember that youcan always press Ctrl+Z to undo andtry again.
Chapter 3 Virtual Vehicles
66
You can use the Selection tool with a RectangleSelection Type or an Ellipse Selection Type. If you’rebrave, you might even give the Freehand tool a try. Justbe sure you leave a little bit of the non-shadow areawithin your selection. It’ll help to blend it later.
Figure 3.24 Fixing the shadow of the front wheel.
Figure 3.25The final “monster” bike.
This image is a good example of howchanging the brush size and hardnesscan make a big difference. I used asmaller brush for the front than I didfor the back wheel and, after I initiallystarted cloning, I realized that myshadow didn’t quite match. So, I resetthe Hardness from 75 to 50.That madea big difference.
You can see my final image in Figure 3.25.
04_0672328607_ch03.qxd 1/24/06 11:35 AM Page 66

I had originally intended for this project todemonstrate how to take a toy car andmake it barely fit into the driveway. A photoof a toy Hummer RC or Bigfoot-type of toypickup truck would have done nicely.However, I was sitting in traffic recentlywhen I spotted one of those new Smartcars. It was then that the idea struck me. Irealized I could take a photo of a small,super-economical car and make it appeareven smaller—say, the size of a child’s toy.As it happens, a neighbor has one of thosenew cars, so I grabbed a couple snaps of itwhile walking the pup (you really have toappreciate digital photography for thataspect of immediacy alone). The followingproject demonstrates what I did with thatphoto and one other. It just goes to showthat simple can be good—simple being arelative term, of course. A bizarre sense ofhumor probably doesn’t hurt either.
I agonized for a while thinking about howbest to portray the car. Finally, I decided thatthe contents of the image would be mosthelpful in making the decision.
Take a look at Figure 3.26 to see what I mean.Figure 3.26 shows the photo of the car postbackground-ectomy, meaning I’ve alreadyremoved the stuff from around the car.
Notice the raggedness of the bottoms ofthe wheels. That’s where the grass waswhen the car was parked.
Project 4: Toy Cars?
I think I’ll end this chapter with something a little lighter. Read onto see what I have in mind.
The photo of the car doesn’t have to be exactly likemy photo (see Figure 3.26), but you’ll want to payattention to the angle you’re shooting at so you canfind or create something appropriate with which tomerge it. Also, pay attention to how the light hits thecar in your photo; this will have an effect on whatother photographs you can place the car with in termsof keeping the result believable. For example, the lighton the car in Figure 3.26 is quite strong on the back ofthe car, but the side of the car is in shadow.This obser-vation will help you create a better illusion.
Figure 3.26 The car sans background.
04_0672328607_ch03.qxd 1/24/06 11:35 AM Page 67

Given the raggedness around the bottomsof the wheels and the fact that the car wasoriginally parked on (or near) grass, Idecided that I could place the car in thegrass next to my boxer puppy.
The lighting is often one of the hardestthings to match up—along with the color,which is, after all dependent on the light.The fact that the shot of the dog was fromabout the same angle, taken at around thesame time of day, and with about the sameweather should mean that the two imageswill work well together. Also, both imagewere shot from about their relative centers.That will help with the illusion.
Figure 3.27 is the shot of the boxer puppy.
1. Open a couple of images, the firstbeing the shot of the auto you want touse and the second being the imageyou want to place it against. I’vealready removed the background fromthe image of the car. For several exam-ples of how this can be accomplished,check out Appendix B.
2. With the background of the carremoved and the car image madeactive by clicking its title bar, chooseSelections, Select All. Then select Edit,Copy. If you like, you can close theimage of the car to free up somememory for Paint Shop Pro.
3. Activate the second image—in thiscase it’s the photo of the boxer—andselect Edit, Paste As New Layer. Thisplaces the image of the car into theimage of the puppy (see Figure 3.28).
Chapter 3 Virtual Vehicles
68
Figure 3.27 Sugrrr the boxer.
Figure 3.28 Putting the car and the puppy together.
04_0672328607_ch03.qxd 1/24/06 11:35 AM Page 68

4. Select the Pick tool and use it to resizethe car by clicking and dragging one ofthe corners of the bounding box. Movethe resized car into position (see Figure 3.29).
Doing a Little YardworkThere is one more small detail that helpswith the illusion, though. If you look closelyat the photo of the dog, you’ll see thatthere’s a pretty small field of depth. Noticethat I’ve placed the car, which is in focus,within that narrow band of grass that’s infocus in the photo of the dog.
If necessary, resize the car so that it fitswithin that bit of the grass.
The lighting and the color look good, butthe car still looks like it was pasted into thephoto of the dog, which of course it was. Tohelp with that final problem, the CloneBrush can be used to clone some of thegrass in front of car along the car’s bottom.
5. With the car layer active, create a newraster layer to clone the grass to it byclicking the New Raster Layer Icon inthe Layers palette.
6. Select the Clone Brush and use it tocopy some of the grass from the layerwith the image of the puppy. Makesure the Use All Layers option is on soyou can clone the grass to the newlayer from the underlying layer.
Project 4: Toy Cars?
69
Figure 3.29 Resize and position the car in the grass.
This is one of those times when you’ll want to zoom inridiculously close.You also should select a small brushsize and play with hardness settings until you can getthe cloned grass to look right.After you’ve cloned some of the grass, you can clean itup with the Eraser tool.You can also copy and pastefrom the cloned layer into another layer to thickenyour cloned grass.In fact, I used several layers to hold bits of the lawn.This made it fairly east to reposition the different bitsso I could get the realistic look I was after.
04_0672328607_ch03.qxd 1/24/06 11:35 AM Page 69

Finishing UpAfter finishing up the grass implants, Ithought the car still looked a little too real. Ifigured that a little softening might be justwhat the doctor ordered.
7. Make the car layer active by clicking itslayer in the Layers palette. Then selectAdjust, Blur, Gaussian Blur. I set theRadius to 2.00 because that settingseemed to give me the best result.That’s it. You can see my final toy car inFigure 3.30.
Wrapping UpThis was a fun chapter for me because I lovebikes, cars, and trucks. I hope you enjoyed itas well and that it inspires you to grab yourcamera and head out for a photo-gatheringadventure.
Don’t be narrow-minded when thinkingabout forms of transportation for projectslike the ones in this chapter. You could workwith bicycles, planes, trains—baby strollersmight even be fun to work with.
If you are not inspired by thoughts of travel,maybe you’d like to think about some petphotos. The next chapter has a couple ofprojects that use some fun photos of ourfurry friends, so get going.
Chapter 3 Virtual Vehicles
70
Figure 3.30 Great, my front lawn is starting to look like a circustent.
04_0672328607_ch03.qxd 1/24/06 11:35 AM Page 70