virtual san with photon controller setup guide - vmware · virtual san with photon controller setup...
TRANSCRIPT
Virtual SAN with Photon ControllerSetup Guide
Version 1.2
This document supports the version of each product listed andsupports all subsequent versions until the document isreplaced by a new edition. To check for more recent editions ofthis document, see http://www.vmware.com/support/pubs.
EN-002523-01
Virtual SAN with Photon Controller Setup Guide
2 VMware, Inc.
You can find the most up-to-date technical documentation on the VMware Web site at:
http://www.vmware.com/support/
The VMware Web site also provides the latest product updates.
If you have comments about this documentation, submit your feedback to:
Copyright © 2017 VMware, Inc. All rights reserved. Copyright and trademark information.
VMware, Inc.3401 Hillview Ave.Palo Alto, CA 94304www.vmware.com
Contents
About VMware Virtual SAN with Photon Controller 5
1 Updated Information 7
2 Introduction to Virtual SAN with Photon Controller 9
3 Cluster Requirements 13
4 Deploy Virtual SAN on a Photon Controller Cluster 17
Configure the Network 17Deploy the Virtual SAN Management Service 18Configure a Hybrid Virtual SAN Cluster 20Configure an All-Flash Virtual SAN Cluster 22
5 Managing the Virtual SAN Cluster 27
Displaying Information About the Virtual SAN Cluster 27Managing Hosts in the Virtual SAN Cluster 28Managing Storage Devices in the Virtual SAN Cluster 29
6 Security Reference 31
Index 33
VMware, Inc. 3

Virtual SAN with Photon Controller Setup Guide
4 VMware, Inc.

About VMware Virtual SAN with PhotonController
VMware Virtual SAN with Photon Controller Setup Guide describes how to install and configure VMwareVirtual SAN on a Photon Controller cluster. This guide explains the requirements of the Photon Controllercluster, how to set up Virtual SAN on the cluster, and how to manage the cluster.
Intended AudienceThis information is for software developers and virtualization administrators who are familiar withvirtualization technology and data center storage concepts.
VMware, Inc. 5

Virtual SAN with Photon Controller Setup Guide
6 VMware, Inc.
Updated Information 1Virtual SAN with Photon Controller Setup Guide is updated with each release of the product or when necessary.
This table provides the update history of Virtual SAN with Photon Controller Setup Guide.
Revision Description
EN-002523-01 n Updated architecture diagram.n Updated the high-level tasks used to deploy a Photon Controller cluster.n Added step to verify cluster configuration on ESXI hosts.n Additional minor revisions.
EN-002523-00 Initial release.
VMware, Inc. 7

Virtual SAN with Photon Controller Setup Guide
8 VMware, Inc.

Introduction to Virtual SAN withPhoton Controller 2
VMware Virtual SAN™ is a distributed software layer within the ESXi hypervisor. It aggregates local ordirect-attached capacity devices to create a single storage pool shared across all hosts in the Virtual SANcluster. Virtual SAN can support the data storage needs for applications running on a Photon™ Platform.
Photon PlatformVMware Photon Platform is a distributed, high-scale container runtime and management platform thatsupports cloud-native applications. This platform is for large-scale deployments of application containers.You can use Photon Platform to implement a highly available, resilient infrastructure, to support a highdegree of change and high-scale operations. The technical advantages of ESXi enable Photon Platform tointegrate with Virtual SAN.
Photon Platform provides Kubernetes as a Service for deployment, maintenance, and scaling of applications.Kubernetes is an open-source platform for automating deployment, scaling, and operations of applicationcontainers across clusters of hosts, providing a container-centric infrastructure. You can use Kubernetes tomanage containerized applications across your cloud hosts.
Photon Platform consists of a control plane called the VMware Photon Controller and a lightweightcomputing host. Each physical host in a Photon Controller cluster contains an ESXI host, and the PhotonController is used to manage ESXi hosts.
Photon ControllerVMware Photon Controller is an open-source host controller that you can use to manage hardware,containers, VMs, and host clusters. It provides a distributed, high-scale control plane optimized for cloud-native applications, which include containers and developer frameworks, such as Pivotal Cloud Foundry(PCF).
Photon Controller combines ESXi with an innovative control plane to deliver highly scalable infrastructureas a service. It is designed to handle hundreds to thousands of hosts, and many thousands of tenant VMs.
Virtual SANVirtual SAN can provide a common image datastore for a Photon Controller cluster. Virtual SAN isimplemented directly in the ESXi hypervisor.
Virtual SAN uses a software-defined approach that creates shared storage for virtual machines and cloudnative applications. It virtualizes the local physical storage resources of ESXi hosts and turns them into poolsof storage. You can divide and assign these pools to VMs and applications according to their quality ofservice requirements.
For more information about Virtual SAN, see Administering VMware Virtual SAN version 6.2.
VMware, Inc. 9
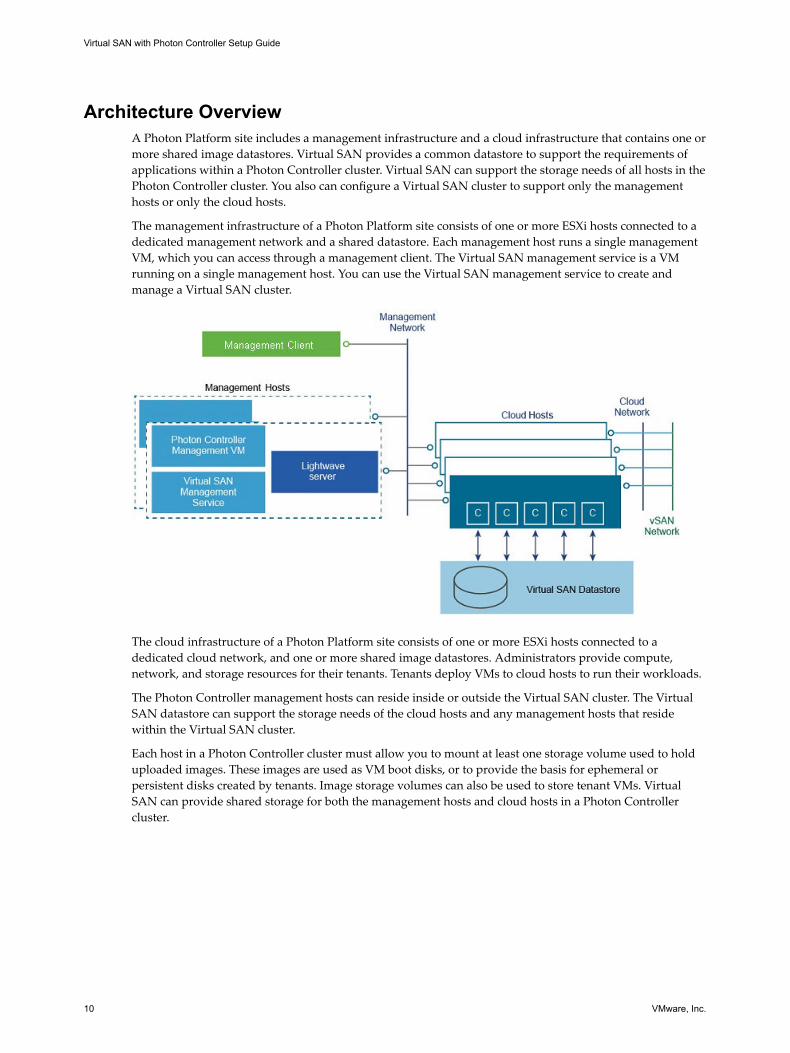
Architecture OverviewA Photon Platform site includes a management infrastructure and a cloud infrastructure that contains one ormore shared image datastores. Virtual SAN provides a common datastore to support the requirements ofapplications within a Photon Controller cluster. Virtual SAN can support the storage needs of all hosts in thePhoton Controller cluster. You also can configure a Virtual SAN cluster to support only the managementhosts or only the cloud hosts.
The management infrastructure of a Photon Platform site consists of one or more ESXi hosts connected to adedicated management network and a shared datastore. Each management host runs a single managementVM, which you can access through a management client. The Virtual SAN management service is a VMrunning on a single management host. You can use the Virtual SAN management service to create andmanage a Virtual SAN cluster.
The cloud infrastructure of a Photon Platform site consists of one or more ESXi hosts connected to adedicated cloud network, and one or more shared image datastores. Administrators provide compute,network, and storage resources for their tenants. Tenants deploy VMs to cloud hosts to run their workloads.
The Photon Controller management hosts can reside inside or outside the Virtual SAN cluster. The VirtualSAN datastore can support the storage needs of the cloud hosts and any management hosts that residewithin the Virtual SAN cluster.
Each host in a Photon Controller cluster must allow you to mount at least one storage volume used to holduploaded images. These images are used as VM boot disks, or to provide the basis for ephemeral orpersistent disks created by tenants. Image storage volumes can also be used to store tenant VMs. VirtualSAN can provide shared storage for both the management hosts and cloud hosts in a Photon Controllercluster.
Virtual SAN with Photon Controller Setup Guide
10 VMware, Inc.

Virtual SAN Management for Photon PlatformYou can use the Virtual SAN management service to configure and manage Virtual SAN without vCenterServer®. You can deploy the Virtual SAN management service on an ESXi host. Then you can use RVCcommands or the Virtual SAN SDK to configure and manage the Virtual SAN cluster.
Virtual SAN SDK The Virtual SAN SDK for Java includes documentation, libraries, and codeexamples that developers can use to build solutions integrated into VirtualSAN. You can use the APIs to automate all aspects of installation,configuration, monitoring, and troubleshooting of Virtual SAN. All VirtualSAN management APIs are supported in a Photon Controller environment.
Ruby vSphere Console The Ruby vSphere Console (RVC) is an interactive command-line consoleuser interface, based on RbVmomi Ruby interface to the vSphere API. You canuse RVC commands to create a Virtual SAN cluster, and to manage andtroubleshoot the cluster. Most of the Virtual SAN RVC managementcommands are supported in a Photon Controller environment. RVC isincluded with the Virtual SAN management service. For more informationabout RVC, see VMware Ruby vSphere Console Command Reference for VirtualSAN.
To use RVC, you run the ssh command to access the IP address of the VirtualSAN management service and log in as a privileged user. No additionalconfiguration is required to begin.
Lightwave Lightwave™ provides identity, authentication, and authorization functionsfor Photon Platform. The Lightwave server resides in a VM on amanagement host.
Chapter 2 Introduction to Virtual SAN with Photon Controller
VMware, Inc. 11

Virtual SAN with Photon Controller Setup Guide
12 VMware, Inc.
Cluster Requirements 3The Photon Controller cluster must meet the requirements for enabling Virtual SAN.
n All capacity devices, drivers, and firmware versions in your Virtual SAN configuration must be certifiedand listed in the Virtual SAN section of the VMware Compatibility Guide.
n A Virtual SAN cluster must contain a minimum of three hosts that contribute capacity to the cluster.
n A host that resides in a Virtual SAN cluster cannot participate in other clusters.
Hardware RequirementsThe ESXi hosts in your Photon Controller cluster must meet the Virtual SAN hardware requirements.
All capacity devices, drivers, and firmware versions in your Virtual SAN configuration must be certified andlisted in the Virtual SAN section of the VMware Compatibility Guide.
Table 3‑1. Storage Device Requirements for Virtual SAN Hosts
Storage Component Requirements
Cache n You must have one SAS or SATA solid state disk (SSD) or PCIeflash device.
n Before the Number of failures to toleratecalculation, the flashcache must be at least 10% of the anticipated consumed capacity,without the protection copies.
n vSphere Flash Read Cache must not use any of the flash devicesreserved for Virtual SAN cache.
n Cache flash devices must not be formatted with VMFS oranother file system.
Virtual machine data storage n For hybrid group configuration, at least one SAS, NL-SAS, orSATA magnetic disk must be available.
n For all-flash disk group configuration, at least one SAS or SATASSD or PCIe flash device must be available.
Storage controllers You must have one SAS or SATA host bus adapter (HBA), or a RAIDcontroller that is in passthrough mode or RAID 0 mode.
VMware, Inc. 13
Booting RequirementsThe memory requirements for Virtual SAN depend on the number of disk groups and devices that aremanaged by the ESXi hypervisor.
Memory Each host must contain a minimum of 32 GB of memory to accommodate themaximum number of disk groups and capacity devices per disk group.
Flash Boot Devices Booting a Virtual SAN host from a USB device or SD card requires a bootdevice of at least 4 GB.
If the memory of the ESXi host is greater than 512 GB, you must boot the hostfrom a SATADOM or disk device. Booting a Virtual SAN host from aSATADOM device requires a single-level cell (SLC) device. The boot devicemust be at least 16 GB.
Booting an ESXi 6.0 host from a USB device or SD card results in the systemwriting Virtual SAN trace logs to RAM disk. These logs are automaticallyoffloaded to persistent media during a shutdown or system crash (PANIC).This method is the only way to support the handling of Virtual SAN traceswhen booting an ESXi host from a USB device or SD card. If a power failureoccurs, Virtual SAN trace logs are not preserved.
Booting an ESXi 6.0 host from a SATADOM device results in the systemwriting Virtual SAN trace logs directly to the SATADOM device. TheSATADOM device must meet the specifications in this guide.
Software RequirementsThe components in your environment must meet the software version requirements for using Virtual SAN.
The ESXi hosts that participate in Virtual SAN clusters must be running ESXi 6.5.0a.
Networking RequirementsThe network infrastructure and the networking configuration on the ESXi hosts must meet the minimumnetworking requirements for Virtual SAN.
Table 3‑2. Networking Requirements for Virtual SAN
Networking Component Requirement
Host bandwidth Each host must have minimum bandwidth dedicated to Virtual SAN.n Dedicated 1 Gbps for hybrid configurationsn Dedicated or shared 10 Gbps for all-flash configurations
Connection between hosts Each host in the Virtual SAN cluster, regardless of whether itcontributes capacity, must have a VMkernel network adapter forVirtual SAN traffic.
Host network All hosts in your Virtual SAN cluster must be connected to a VirtualSAN Layer 2 or Layer 3 network.
Multicast Multicast must be enabled on the physical switches and routers thathandle Virtual SAN traffic along the Layer 2 path and (optionally) theLayer 3 path.
IPv4 and IPv6 support The Virtual SAN network can support IPv4 or IPv6 addresses.
Virtual SAN with Photon Controller Setup Guide
14 VMware, Inc.
License RequirementsUsing Virtual SAN in production environments requires a valid license for Virtual SAN.
Before installing and configuring a Virtual SAN with Photon Controller cluster, review the End User LicenseAgreement. You must accept the license agreement before you can deploy the software OVA.
Chapter 3 Cluster Requirements
VMware, Inc. 15

Virtual SAN with Photon Controller Setup Guide
16 VMware, Inc.
Deploy Virtual SAN on a PhotonController Cluster 4
You can deploy the Virtual SAN management service on any management host, and create a Virtual SANcluster in a Photon Platform environment.
You can configure a Photon Controller cluster before or after you deploy the Virtual SAN managementservice. You can deploy the Virtual SAN management service on a management host that resides inside oroutside the cluster. For more information about Photon Controller installation and configuration, see thePhoton Controller documentation.
These tasks are typically used to deploy a Photon Controller cluster with Virtual SAN:
1 Configure a network to support Virtual SAN.
2 Download the Photon Controller installation appliance.
3 Deploy the Photon Controller Management VM, Lightwave server, on Virtual SAN on managementESXi hosts.
4 Deploy the Photon Controller agent on cloud ESXi hosts.
5 Create the Virtual SAN cluster and datastore.
This guide describes the tasks required to deploy the Virtual SAN management service and configure aVirtual SAN cluster in a Photon Platform environment.
This chapter includes the following topics:
n “Configure the Network,” on page 17
n “Deploy the Virtual SAN Management Service,” on page 18
n “Configure a Hybrid Virtual SAN Cluster,” on page 20
n “Configure an All-Flash Virtual SAN Cluster,” on page 22
Configure the NetworkConfigure a network to support Virtual SAN traffic on the Photon Controller cluster. Use ESXCLIcommands to set the network parameters.
Connect to each ESXi host and configure a port group. Add an IP interface to support Virtual SAN. All hostsparticipating in Virtual SAN must be connected to a single Layer 2 network and multicast must be enabled.
Prerequisites
Verify that the host cluster meets the networking requirements listed in this guide.
VMware, Inc. 17
Procedure
1 Add a port group on the virtual switch to support Virtual SAN traffic.
esxcli network vswitch standard portgroup add -p VSAN_portgroup -v vSwitch0
2 Set the VLAN ID for the VSAN_portgroup. A dedicated VLAN carries multicast Virtual SAN trafficamong participating hosts.
esxcli network vswitch standard portgroup set --vlan-id 0-4095
3 Add an interface to support Virtual SAN traffic.
esxcli network ip interface add -p VSAN_portgroup -i vmk1
4 (Optional) Enable DHCP on the interface.
esxcli network ip interface ipv4 set -t dhcp -i vmk1
5 Tag the interface for Virtual SAN traffic.
esxcli network ip interface tag add -t VSAN -i vmk1
For more information about network requirements for Virtual SAN, refer to Administering VMwareVirtual SAN version 6.2.
Deploy the Virtual SAN Management ServiceYou can deploy the Virtual SAN management service when you deploy a Photon Controller managementVM.
Use the OVF Tool to install the Photon Controller Installer VM on a management host. Deploy Lightwave,Photon Controller management VM, and the Virtual SAN management service on a management host.Deploy the Photon Controller Agent on cloud hosts in the Photon Controller cluster.
Prerequisites
n Obtain the OVF file that contains the Photon Controller Installer VM.
n Obtain the OVA file that contains the Virtual SAN management service.
Procedure
1 Log in to a host that contains the OVF Tool.
2 At the command-line prompt, deploy the Photon Controller Installer VM.
ovftool --acceptAllEulas --noSSLVerify --skipManifestCheck --X:injectOvfEnv
--overwrite --powerOffTarget --powerOn --diskMode=thin --net:"NAT"="<network name>"
--datastore="<datastore name>" --name="Photon Controller Installer" --
prop:enable_syslog="true"
--prop:admin_password=<administrator password> <path to OVF>/installer-ova.ova
vi://root:<host password>@<host IP>
For example:
ovftool --acceptAllEulas --noSSLVerify --skipManifestCheck --X:injectOvfEnv
--overwrite --powerOffTarget --powerOn --diskMode=thin --net:"NAT"="VM Network"
--datastore="datastore1" --name="Photon Controller Installer" --prop:enable_syslog="true"
--prop:admin_password=vmware /Applications/photon/installer-ova.ova
vi://root:[email protected]
3 Log in to the Photon Controller Installer VM and edit the following file: deployment.yml
n In the Compute > Hypervisors section, add the ESXi hosts in your cluster.
n In the lightwave > controllers section, add or delete controllers to match your environment.
Virtual SAN with Photon Controller Setup Guide
18 VMware, Inc.
n In the photon > cloud section, add the cloud host IDs.
n In the photon > controllers section, add or modify the Photon Controller VMs.
4 Prepare the Virtual SAN management service OVA.
a Create the following target directory in the Photon Controller Installer VM.
/var/opt/vmware/photon/controller/appliances/vsan.ova-dir
b Extract the files from the Virtual SAN OVA into the target directory.
For example:
tar -xvf vsan.ova -C /var/opt/vmware/photon/controller/appliances/vsan.ova-dir/
c Create a deployment backup file.
For example:
cd /var/opt/vmware/photon/controller/appliances/vsan.ova-dir
cp vsan.ovf vsan.ova.bak
d Verify that the files that compose the Virtual SAN management service are present in the targetdirectory.
For example:
ls /var/opt/vmware/photon/controller/appliances/vsan.ova-dir
vsan-disk1.vmdk
vsan.cert
vsan.mf
vsan.ovf
vsan.ovf.bak
5 From the Photon Controller Installer VM, run the following command to deploy Lightwave, PhotonController Management VM, and the Virtual SAN management service. This command also installs thePhoton Controller Agent on the cloud hosts.
root@lw-photon [ /opt/vmware/bin ]# /opt/vmware/photon/controller/bin/photon-setup platform
install -config deployment-hybrid.yml
The Virtual SAN management service is running on the management host. You can issue RVC commands tocreate and manage a Virtual SAN cluster.
You can access the Virtual SAN management API or RVC at rvc "<user>@<domain>"@<management vm>:8006.
For example:
vcsa-03:~ # rvc "[email protected]"@vsan-mgmt-srvr.mydomain.com:8006
Install the "ffi" gem for better tab completion.
WARNING: Nokogiri was built against LibXML version 2.7.6, but has dynamically loaded 2.9.2
The authenticity of host 'vsan-mgmt-srvr.rainpole.com' can't be established.
Public key fingerprint is 8551ba8526ffa1450a1df00c276c1f0e46f3dc5661a1de3983b666cdbc8c2d5d.
Are you sure you want to continue connecting (y/n)? y
Warning: Permanently added 'vsan-mgmt-srvr.mydomain.com' (vim) to the list of known hosts
password:************
0 /
1 vsan-mgmt-srvr.mydomain.com/
Chapter 4 Deploy Virtual SAN on a Photon Controller Cluster
VMware, Inc. 19
Configure a Hybrid Virtual SAN ClusterYou can create and configure a hybrid Virtual SAN cluster on the Photon Controller cluster by using RVCcommands. In hybrid clusters, flash devices are used for the cache layer and magnetic disks are used for thecapacity layer.
The Virtual SAN management service is a VM running on a management host. Use RVC commands tocreate and configure a hybrid Virtual SAN cluster.
Procedure
1 Connect the Ruby vSphere Console (RVC) to the Virtual SAN management service.
Access the RVC as follows: rvc "<user>@<domain>"@<management vm>:8006.
For example:
vcsa-03:~ # rvc "[email protected]"@vsan-mgmt-srvr.mydomain.com:8006
Install the "ffi" gem for better tab completion.
WARNING: Nokogiri was built against LibXML version 2.7.6, but has dynamically loaded 2.9.2
The authenticity of host 'vsan-mgmt-srvr.rainpole.com' can't be established.
Public key fingerprint is 8551ba8526ffa1450a1df00c276c1f0e46f3dc5661a1de3983b666cdbc8c2d5d.
Are you sure you want to continue connecting (y/n)? y
Warning: Permanently added 'vsan-mgmt-srvr.rainpole.com' (vim) to the list of known hosts
password:************
0 /
1 vsan-mgmt-srvr.mydomain.com/
2 Navigate to the computers directory. The cluster configuration files are in this directory.
> cd /10.110.120.130/Global/computers/
3 To create the Virtual SAN cluster, run the RVC command, cluster.create <cluster_name>.
/10.110.120.130/Global/computers> cluster.create demo
This step creates an empty Virtual SAN cluster that contains no hosts.
4 In the computers directory, verify that the Virtual SAN cluster exists. Note the cluster name and thecluster ID number.
/10.110.120.130/Global/computers> ls
0 demo (cluster): cpu 0 GHz, memory 0 GB
5 Add hosts to the cluster. To add one or more hosts, run the RVC command,cluster.add_host <cluster_name> <host_IP> <host_IP> –u <username> –p <password>.
/10.110.120.130/Global/computers>
cluster.add_host 0 10.160.100.10 10.160.100.11 10.160.100.12 -u root -p password
......Done
......Done
......Done
Virtual SAN with Photon Controller Setup Guide
20 VMware, Inc.
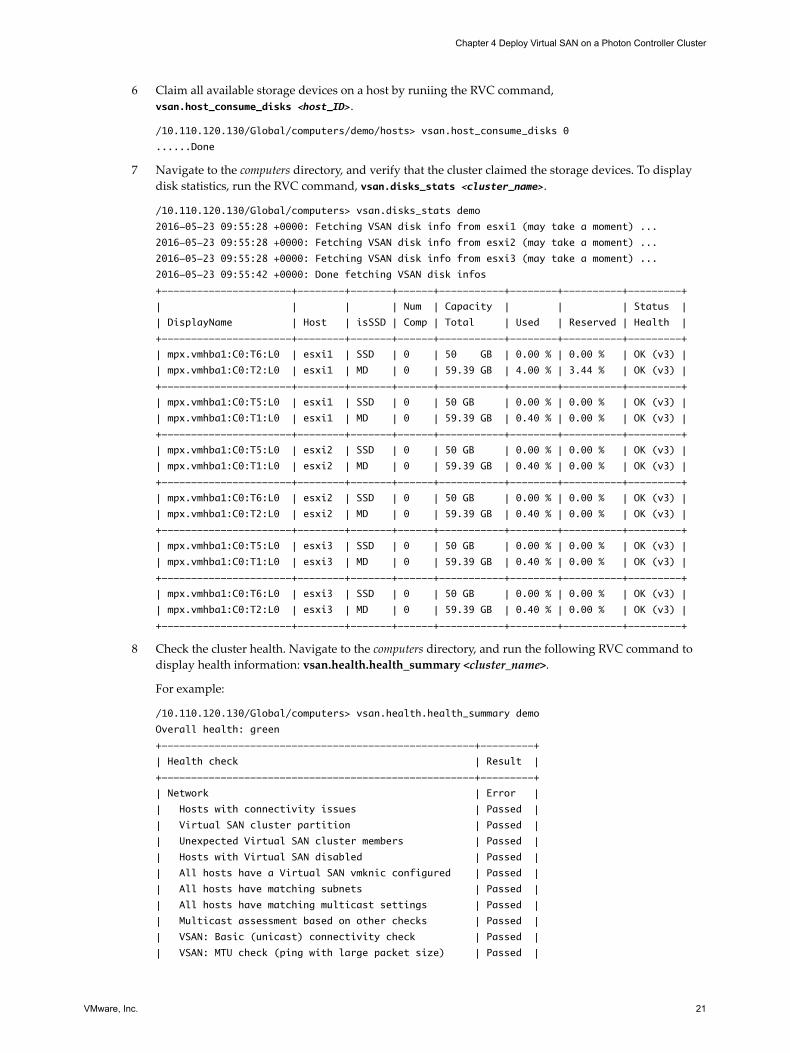
6 Claim all available storage devices on a host by runiing the RVC command,vsan.host_consume_disks <host_ID>.
/10.110.120.130/Global/computers/demo/hosts> vsan.host_consume_disks 0
......Done
7 Navigate to the computers directory, and verify that the cluster claimed the storage devices. To displaydisk statistics, run the RVC command, vsan.disks_stats <cluster_name>.
/10.110.120.130/Global/computers> vsan.disks_stats demo
2016-05-23 09:55:28 +0000: Fetching VSAN disk info from esxi1 (may take a moment) ...
2016-05-23 09:55:28 +0000: Fetching VSAN disk info from esxi2 (may take a moment) ...
2016-05-23 09:55:28 +0000: Fetching VSAN disk info from esxi3 (may take a moment) ...
2016-05-23 09:55:42 +0000: Done fetching VSAN disk infos
+----------------------+--------+-------+------+-----------+--------+----------+---------+
| | | | Num | Capacity | | | Status |
| DisplayName | Host | isSSD | Comp | Total | Used | Reserved | Health |
+----------------------+--------+-------+------+-----------+--------+----------+---------+
| mpx.vmhba1:C0:T6:L0 | esxi1 | SSD | 0 | 50 GB | 0.00 % | 0.00 % | OK (v3) |
| mpx.vmhba1:C0:T2:L0 | esxi1 | MD | 0 | 59.39 GB | 4.00 % | 3.44 % | OK (v3) |
+----------------------+--------+-------+------+-----------+--------+----------+---------+
| mpx.vmhba1:C0:T5:L0 | esxi1 | SSD | 0 | 50 GB | 0.00 % | 0.00 % | OK (v3) |
| mpx.vmhba1:C0:T1:L0 | esxi1 | MD | 0 | 59.39 GB | 0.40 % | 0.00 % | OK (v3) |
+----------------------+--------+-------+------+-----------+--------+----------+---------+
| mpx.vmhba1:C0:T5:L0 | esxi2 | SSD | 0 | 50 GB | 0.00 % | 0.00 % | OK (v3) |
| mpx.vmhba1:C0:T1:L0 | esxi2 | MD | 0 | 59.39 GB | 0.40 % | 0.00 % | OK (v3) |
+----------------------+--------+-------+------+-----------+--------+----------+---------+
| mpx.vmhba1:C0:T6:L0 | esxi2 | SSD | 0 | 50 GB | 0.00 % | 0.00 % | OK (v3) |
| mpx.vmhba1:C0:T2:L0 | esxi2 | MD | 0 | 59.39 GB | 0.40 % | 0.00 % | OK (v3) |
+----------------------+--------+-------+------+-----------+--------+----------+---------+
| mpx.vmhba1:C0:T5:L0 | esxi3 | SSD | 0 | 50 GB | 0.00 % | 0.00 % | OK (v3) |
| mpx.vmhba1:C0:T1:L0 | esxi3 | MD | 0 | 59.39 GB | 0.40 % | 0.00 % | OK (v3) |
+----------------------+--------+-------+------+-----------+--------+----------+---------+
| mpx.vmhba1:C0:T6:L0 | esxi3 | SSD | 0 | 50 GB | 0.00 % | 0.00 % | OK (v3) |
| mpx.vmhba1:C0:T2:L0 | esxi3 | MD | 0 | 59.39 GB | 0.40 % | 0.00 % | OK (v3) |
+----------------------+--------+-------+------+-----------+--------+----------+---------+
8 Check the cluster health. Navigate to the computers directory, and run the following RVC command todisplay health information: vsan.health.health_summary <cluster_name>.
For example:
/10.110.120.130/Global/computers> vsan.health.health_summary demo
Overall health: green
+-----------------------------------------------------+---------+
| Health check | Result |
+-----------------------------------------------------+---------+
| Network | Error |
| Hosts with connectivity issues | Passed |
| Virtual SAN cluster partition | Passed |
| Unexpected Virtual SAN cluster members | Passed |
| Hosts with Virtual SAN disabled | Passed |
| All hosts have a Virtual SAN vmknic configured | Passed |
| All hosts have matching subnets | Passed |
| All hosts have matching multicast settings | Passed |
| Multicast assessment based on other checks | Passed |
| VSAN: Basic (unicast) connectivity check | Passed |
| VSAN: MTU check (ping with large packet size) | Passed |
Chapter 4 Deploy Virtual SAN on a Photon Controller Cluster
VMware, Inc. 21
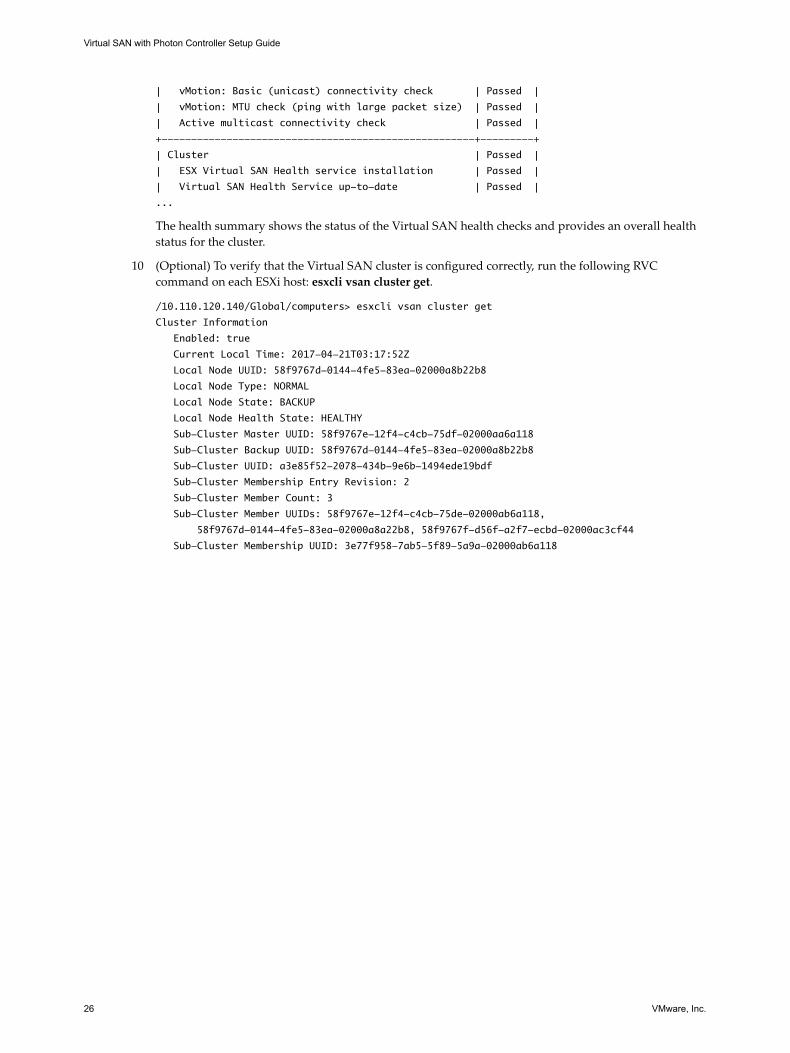
| vMotion: Basic (unicast) connectivity check | Passed |
| vMotion: MTU check (ping with large packet size) | Passed |
| Active multicast connectivity check | Passed |
+-----------------------------------------------------+---------+
| Cluster | Passed |
| ESX Virtual SAN Health service installation | Passed |
| Virtual SAN Health Service up-to-date | Passed |
...
The health summary shows the status of the Virtual SAN health checks and provides an overall healthstatus for the cluster.
9 (Optional) To verify that the Virtual SAN cluster is configured correctly, run the following RVCcommand on each ESXi host: esxcli vsan cluster get.
For example:
/10.110.120.130/Global/computers> esxcli vsan cluster get
Cluster Information
Enabled: true
Current Local Time: 2017-04-21T03:17:52Z
Local Node UUID: 58f9767d-0144-4fe5-83ea-02000a8b22b8
Local Node Type: NORMAL
Local Node State: BACKUP
Local Node Health State: HEALTHY
Sub-Cluster Master UUID: 58f9767e-12f4-c4cb-75df-02000aa6a118
Sub-Cluster Backup UUID: 58f9767d-0144-4fe5-83ea-02000a8b22b8
Sub-Cluster UUID: a3e85f52-2078-434b-9e6b-1494ede19bdf
Sub-Cluster Membership Entry Revision: 2
Sub-Cluster Member Count: 3
Sub-Cluster Member UUIDs: 58f9767e-12f4-c4cb-75de-02000ab6a118,
58f9767d-0144-4fe5-83ea-02000a8a22b8, 58f9767f-d56f-a2f7-ecbd-02000ac3cf44
Sub-Cluster Membership UUID: 3e77f958-7ab5-5f89-5a9a-02000ab6a118
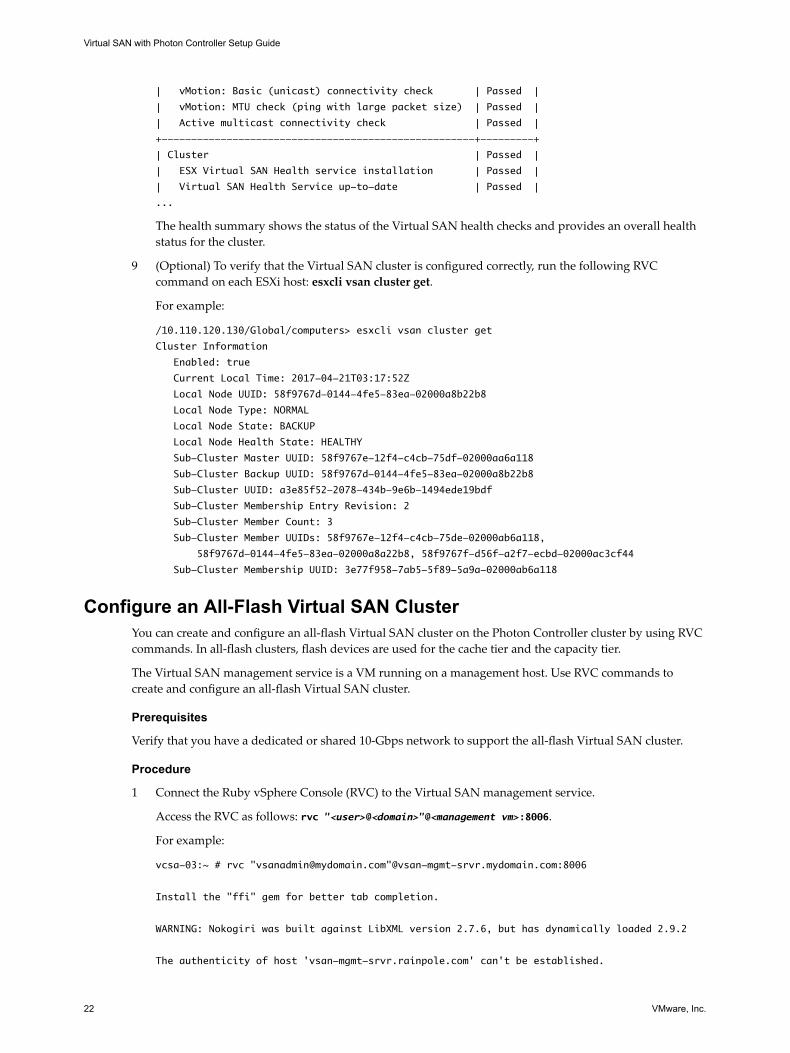
Configure an All-Flash Virtual SAN ClusterYou can create and configure an all-flash Virtual SAN cluster on the Photon Controller cluster by using RVCcommands. In all-flash clusters, flash devices are used for the cache tier and the capacity tier.
The Virtual SAN management service is a VM running on a management host. Use RVC commands tocreate and configure an all-flash Virtual SAN cluster.
Prerequisites
Verify that you have a dedicated or shared 10-Gbps network to support the all-flash Virtual SAN cluster.
Procedure
1 Connect the Ruby vSphere Console (RVC) to the Virtual SAN management service.
Access the RVC as follows: rvc "<user>@<domain>"@<management vm>:8006.
For example:
vcsa-03:~ # rvc "[email protected]"@vsan-mgmt-srvr.mydomain.com:8006
Install the "ffi" gem for better tab completion.
WARNING: Nokogiri was built against LibXML version 2.7.6, but has dynamically loaded 2.9.2
The authenticity of host 'vsan-mgmt-srvr.rainpole.com' can't be established.
Virtual SAN with Photon Controller Setup Guide
22 VMware, Inc.
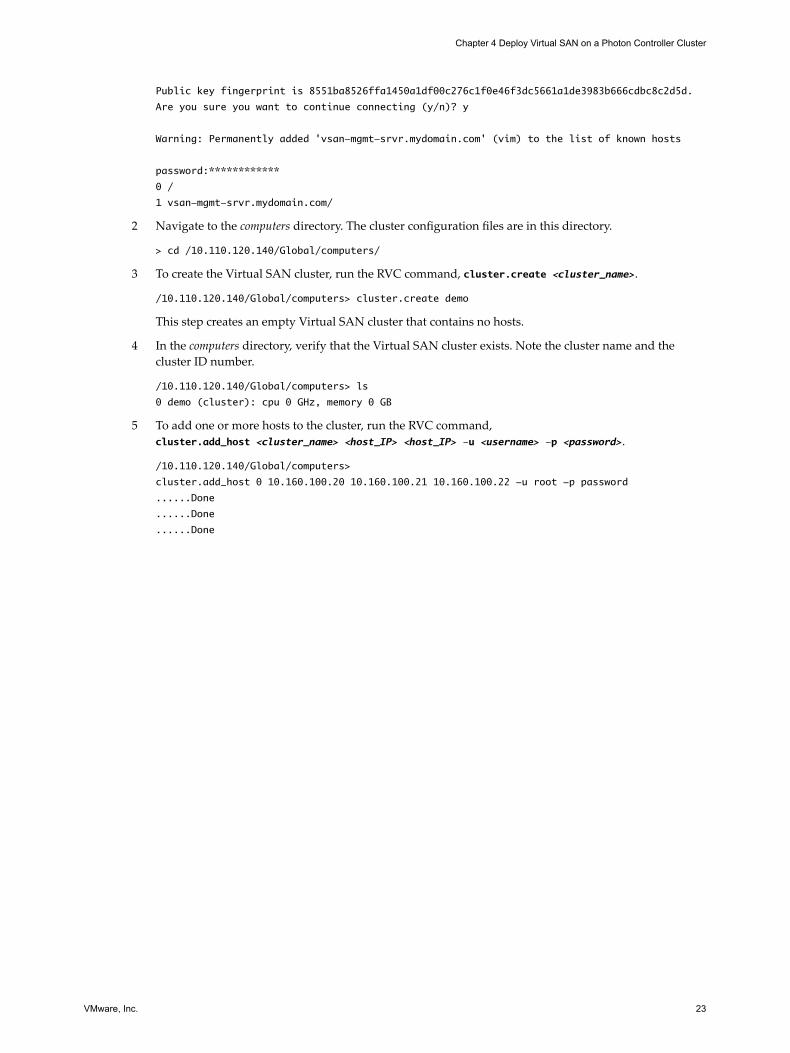
Public key fingerprint is 8551ba8526ffa1450a1df00c276c1f0e46f3dc5661a1de3983b666cdbc8c2d5d.
Are you sure you want to continue connecting (y/n)? y
Warning: Permanently added 'vsan-mgmt-srvr.mydomain.com' (vim) to the list of known hosts
password:************
0 /
1 vsan-mgmt-srvr.mydomain.com/
2 Navigate to the computers directory. The cluster configuration files are in this directory.
> cd /10.110.120.140/Global/computers/
3 To create the Virtual SAN cluster, run the RVC command, cluster.create <cluster_name>.
/10.110.120.140/Global/computers> cluster.create demo
This step creates an empty Virtual SAN cluster that contains no hosts.
4 In the computers directory, verify that the Virtual SAN cluster exists. Note the cluster name and thecluster ID number.
/10.110.120.140/Global/computers> ls
0 demo (cluster): cpu 0 GHz, memory 0 GB
5 To add one or more hosts to the cluster, run the RVC command,cluster.add_host <cluster_name> <host_IP> <host_IP> –u <username> –p <password>.
/10.110.120.140/Global/computers>
cluster.add_host 0 10.160.100.20 10.160.100.21 10.160.100.22 -u root -p password
......Done
......Done
......Done
Chapter 4 Deploy Virtual SAN on a Photon Controller Cluster
VMware, Inc. 23

6 Mark the disks for use in the Virtual SAN cluster.
a Navigate to the hosts directory and list the hosts. Note the unique ID assigned to each host.
/10.110.120.140/Global/computers> cd 1/hosts/
/10.110.170.117/Global/computers/demo/hosts> ls
0 esxi5 (host): cpu 2*1*2.80 GHz, memory 34.00 GB
1 esxi6 (host): cpu 2*1*2.80 GHz, memory 34.00 GB
2 esxi7 (host): cpu 2*1*2.80 GHz, memory 34.00 GB
b To display information about the storage devices attached to each host, run the RVC command,vsan.disks_info <host_ID>.
/10.110.120.140/Global/computers/demo/hosts> vsan.disks_info 0
/10.110.120.140/Global/computers/demo/hosts> vsan.disks_info ./esxi1
2016-05-23 09:43:39 +0000: Gathering disk information for host esxi1
2016-05-23 09:43:44 +0000: Done gathering disk information
Disks on host esxi5:
+---------------------------+-------+-------+---------------------------------------+
| DisplayName | isSSD | Size | State |
+---------------------------+-------+-------+---------------------------------------+
| Local VMware Disk | SSD | 50 GB | eligible |
| (mpx.vmhba1:C0:T2:L0) | | | |
| VMware Virtual Disk | | | Checksum Enabled: false |
+---------------------------+-------+-------+---------------------------------------+
| Local VMware Disk | SSD | 50 GB | eligible |
| (mpx.vmhba1:C0:T1:L0) | | | |
| VMware Virtual Disk | | | Checksum Enabled: false |
+---------------------------+-------+-------+---------------------------------------+
| Local VMware Disk | MD | 20 GB | ineligible (Existing partitions found |
| (mpx.vmhba1:C0:T0:L0) | | | on disk ‘mpx.vmhba1:C0:T0:L0’.) |
| | | | |
| VMware Virtual Disk | | | Partition table: |
| | | | 2: 4.00 GB, type = vfat |
| | | | 5: 0.24 GB, type = vfat |
| | | | 6: 0.24 GB, type = vfat |
| | | | 7: 0.11 GB, type = coredump |
| | | | 8: 0.28 GB, type = vfat |
| | | | 9: 2.50 GB, type = coredump |
| | | | |
| | | | Checksum Enabled: false |
+---------------------------+-------+-------+---------------------------------------+
| Local VMware Disk | SSD | 50 GB | eligible |
| (mpx.vmhba1:C0:T3:L0) | | | |
| VMware Virtual Disk | | | |
| | | | Checksum Enabled: false |
+---------------------------+-------+-------+---------------------------------------+
c On each host, run the following RVC command to mark a storage device for use as cache orcapacity: vsan.host_claim_disks_differently <host_ID> –d <device_ID> –c <device_type>.
/10.110.120.140/Global/computers/demo/hosts> vsan.host_claim_disks_differently 0
-d mpx.vmhba1:C0:T1:L0 -c capacity_flash
2016-05-11 07:22:30 +0000: Gathering disk information for host esxi5
2016-05-11 07:22:38 +0000: Done gathering disk information
Disks on host esxi5:
Claiming Local VMware Disk (mpx.vmhba1:C0:T1:L0) as capacity_flash ...
Virtual SAN with Photon Controller Setup Guide
24 VMware, Inc.
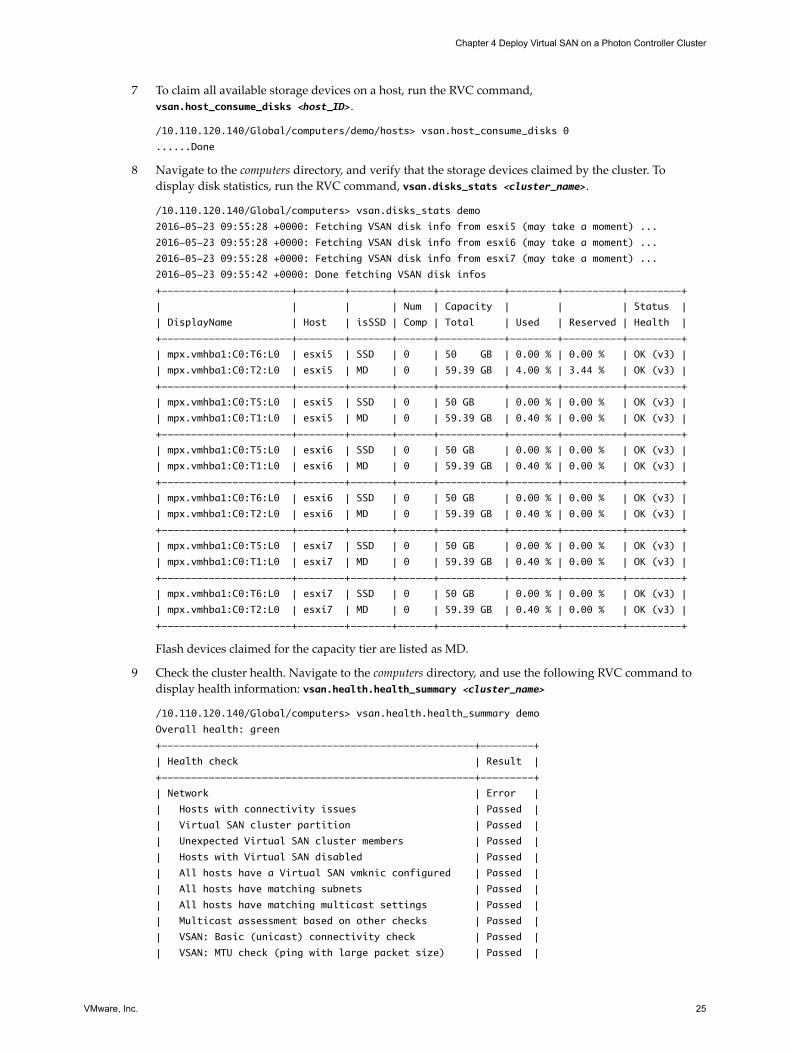
7 To claim all available storage devices on a host, run the RVC command,vsan.host_consume_disks <host_ID>.
/10.110.120.140/Global/computers/demo/hosts> vsan.host_consume_disks 0
......Done
8 Navigate to the computers directory, and verify that the storage devices claimed by the cluster. Todisplay disk statistics, run the RVC command, vsan.disks_stats <cluster_name>.
/10.110.120.140/Global/computers> vsan.disks_stats demo
2016-05-23 09:55:28 +0000: Fetching VSAN disk info from esxi5 (may take a moment) ...
2016-05-23 09:55:28 +0000: Fetching VSAN disk info from esxi6 (may take a moment) ...
2016-05-23 09:55:28 +0000: Fetching VSAN disk info from esxi7 (may take a moment) ...
2016-05-23 09:55:42 +0000: Done fetching VSAN disk infos
+----------------------+--------+-------+------+-----------+--------+----------+---------+
| | | | Num | Capacity | | | Status |
| DisplayName | Host | isSSD | Comp | Total | Used | Reserved | Health |
+----------------------+--------+-------+------+-----------+--------+----------+---------+
| mpx.vmhba1:C0:T6:L0 | esxi5 | SSD | 0 | 50 GB | 0.00 % | 0.00 % | OK (v3) |
| mpx.vmhba1:C0:T2:L0 | esxi5 | MD | 0 | 59.39 GB | 4.00 % | 3.44 % | OK (v3) |
+----------------------+--------+-------+------+-----------+--------+----------+---------+
| mpx.vmhba1:C0:T5:L0 | esxi5 | SSD | 0 | 50 GB | 0.00 % | 0.00 % | OK (v3) |
| mpx.vmhba1:C0:T1:L0 | esxi5 | MD | 0 | 59.39 GB | 0.40 % | 0.00 % | OK (v3) |
+----------------------+--------+-------+------+-----------+--------+----------+---------+
| mpx.vmhba1:C0:T5:L0 | esxi6 | SSD | 0 | 50 GB | 0.00 % | 0.00 % | OK (v3) |
| mpx.vmhba1:C0:T1:L0 | esxi6 | MD | 0 | 59.39 GB | 0.40 % | 0.00 % | OK (v3) |
+----------------------+--------+-------+------+-----------+--------+----------+---------+
| mpx.vmhba1:C0:T6:L0 | esxi6 | SSD | 0 | 50 GB | 0.00 % | 0.00 % | OK (v3) |
| mpx.vmhba1:C0:T2:L0 | esxi6 | MD | 0 | 59.39 GB | 0.40 % | 0.00 % | OK (v3) |
+----------------------+--------+-------+------+-----------+--------+----------+---------+
| mpx.vmhba1:C0:T5:L0 | esxi7 | SSD | 0 | 50 GB | 0.00 % | 0.00 % | OK (v3) |
| mpx.vmhba1:C0:T1:L0 | esxi7 | MD | 0 | 59.39 GB | 0.40 % | 0.00 % | OK (v3) |
+----------------------+--------+-------+------+-----------+--------+----------+---------+
| mpx.vmhba1:C0:T6:L0 | esxi7 | SSD | 0 | 50 GB | 0.00 % | 0.00 % | OK (v3) |
| mpx.vmhba1:C0:T2:L0 | esxi7 | MD | 0 | 59.39 GB | 0.40 % | 0.00 % | OK (v3) |
+----------------------+--------+-------+------+-----------+--------+----------+---------+
Flash devices claimed for the capacity tier are listed as MD.
9 Check the cluster health. Navigate to the computers directory, and use the following RVC command todisplay health information: vsan.health.health_summary <cluster_name>
/10.110.120.140/Global/computers> vsan.health.health_summary demo
Overall health: green
+-----------------------------------------------------+---------+
| Health check | Result |
+-----------------------------------------------------+---------+
| Network | Error |
| Hosts with connectivity issues | Passed |
| Virtual SAN cluster partition | Passed |
| Unexpected Virtual SAN cluster members | Passed |
| Hosts with Virtual SAN disabled | Passed |
| All hosts have a Virtual SAN vmknic configured | Passed |
| All hosts have matching subnets | Passed |
| All hosts have matching multicast settings | Passed |
| Multicast assessment based on other checks | Passed |
| VSAN: Basic (unicast) connectivity check | Passed |
| VSAN: MTU check (ping with large packet size) | Passed |
Chapter 4 Deploy Virtual SAN on a Photon Controller Cluster
VMware, Inc. 25
| vMotion: Basic (unicast) connectivity check | Passed |
| vMotion: MTU check (ping with large packet size) | Passed |
| Active multicast connectivity check | Passed |
+-----------------------------------------------------+---------+
| Cluster | Passed |
| ESX Virtual SAN Health service installation | Passed |
| Virtual SAN Health Service up-to-date | Passed |
...
The health summary shows the status of the Virtual SAN health checks and provides an overall healthstatus for the cluster.
10 (Optional) To verify that the Virtual SAN cluster is configured correctly, run the following RVCcommand on each ESXi host: esxcli vsan cluster get.
/10.110.120.140/Global/computers> esxcli vsan cluster get
Cluster Information
Enabled: true
Current Local Time: 2017-04-21T03:17:52Z
Local Node UUID: 58f9767d-0144-4fe5-83ea-02000a8b22b8
Local Node Type: NORMAL
Local Node State: BACKUP
Local Node Health State: HEALTHY
Sub-Cluster Master UUID: 58f9767e-12f4-c4cb-75df-02000aa6a118
Sub-Cluster Backup UUID: 58f9767d-0144-4fe5-83ea-02000a8b22b8
Sub-Cluster UUID: a3e85f52-2078-434b-9e6b-1494ede19bdf
Sub-Cluster Membership Entry Revision: 2
Sub-Cluster Member Count: 3
Sub-Cluster Member UUIDs: 58f9767e-12f4-c4cb-75de-02000ab6a118,
58f9767d-0144-4fe5-83ea-02000a8a22b8, 58f9767f-d56f-a2f7-ecbd-02000ac3cf44
Sub-Cluster Membership UUID: 3e77f958-7ab5-5f89-5a9a-02000ab6a118
Virtual SAN with Photon Controller Setup Guide
26 VMware, Inc.

Managing the Virtual SAN Cluster 5You can perform common management tasks on the Virtual SAN cluster, such as creating and deleting theVirtual SAN cluster.
This information helps you manage a Virtual SAN with Photon Controller. For more information aboutusing RVC commands to manage a Virtual SAN cluster, see the VMware Ruby vSphere Console CommandReference for Virtual SAN documentation.
Create and Delete a Virtual SAN ClusterWhen you first create a Virtual SAN cluster, the cluster is empty with no host or storage devices.
To create a Virtual SAN cluster, run the RVC command, cluster.create <cluster_name>.
For example:
cluster.create demo
To delete a Virtual SAN cluster, run the RVC command, cluster.delete <cluster_name>.
For example:
cluster.delete demo
This chapter includes the following topics:
n “Displaying Information About the Virtual SAN Cluster,” on page 27
n “Managing Hosts in the Virtual SAN Cluster,” on page 28
n “Managing Storage Devices in the Virtual SAN Cluster,” on page 29
Displaying Information About the Virtual SAN ClusterUse RVC commands to display information about the performance and health of your Virtual SAN cluster.
Display Cluster SummaryYou can display summary and health information about your Virtual SAN cluster.
To display summary information, run the RVC command, vsan.cluster_info <cluster_ID>.
Display Cluster Health
To display health information, run the RVC command, vsan.health.health_summary <cluster_ID>.
VMware, Inc. 27
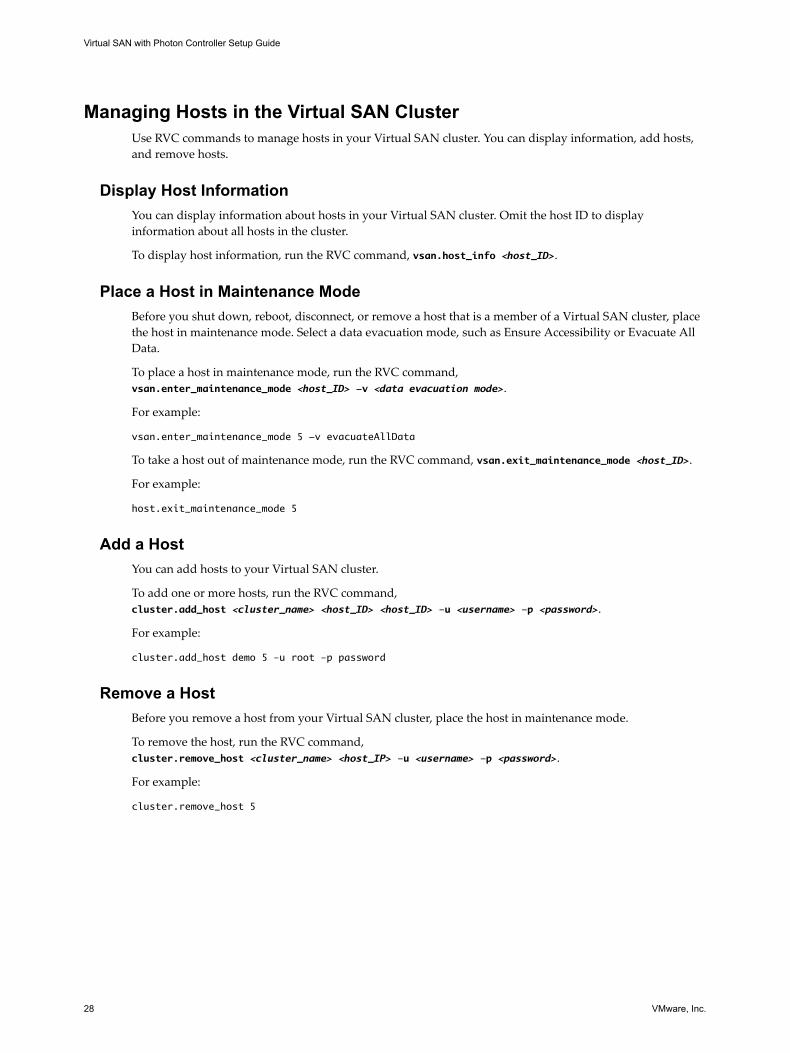
Managing Hosts in the Virtual SAN ClusterUse RVC commands to manage hosts in your Virtual SAN cluster. You can display information, add hosts,and remove hosts.
Display Host InformationYou can display information about hosts in your Virtual SAN cluster. Omit the host ID to displayinformation about all hosts in the cluster.
To display host information, run the RVC command, vsan.host_info <host_ID>.
Place a Host in Maintenance ModeBefore you shut down, reboot, disconnect, or remove a host that is a member of a Virtual SAN cluster, placethe host in maintenance mode. Select a data evacuation mode, such as Ensure Accessibility or Evacuate AllData.
To place a host in maintenance mode, run the RVC command,vsan.enter_maintenance_mode <host_ID> -v <data evacuation mode>.
For example:
vsan.enter_maintenance_mode 5 -v evacuateAllData
To take a host out of maintenance mode, run the RVC command, vsan.exit_maintenance_mode <host_ID>.
For example:
host.exit_maintenance_mode 5
Add a HostYou can add hosts to your Virtual SAN cluster.
To add one or more hosts, run the RVC command,cluster.add_host <cluster_name> <host_ID> <host_ID> –u <username> –p <password>.
For example:
cluster.add_host demo 5 –u root –p password
Remove a HostBefore you remove a host from your Virtual SAN cluster, place the host in maintenance mode.
To remove the host, run the RVC command,cluster.remove_host <cluster_name> <host_IP> –u <username> –p <password>.
For example:
cluster.remove_host 5
Virtual SAN with Photon Controller Setup Guide
28 VMware, Inc.
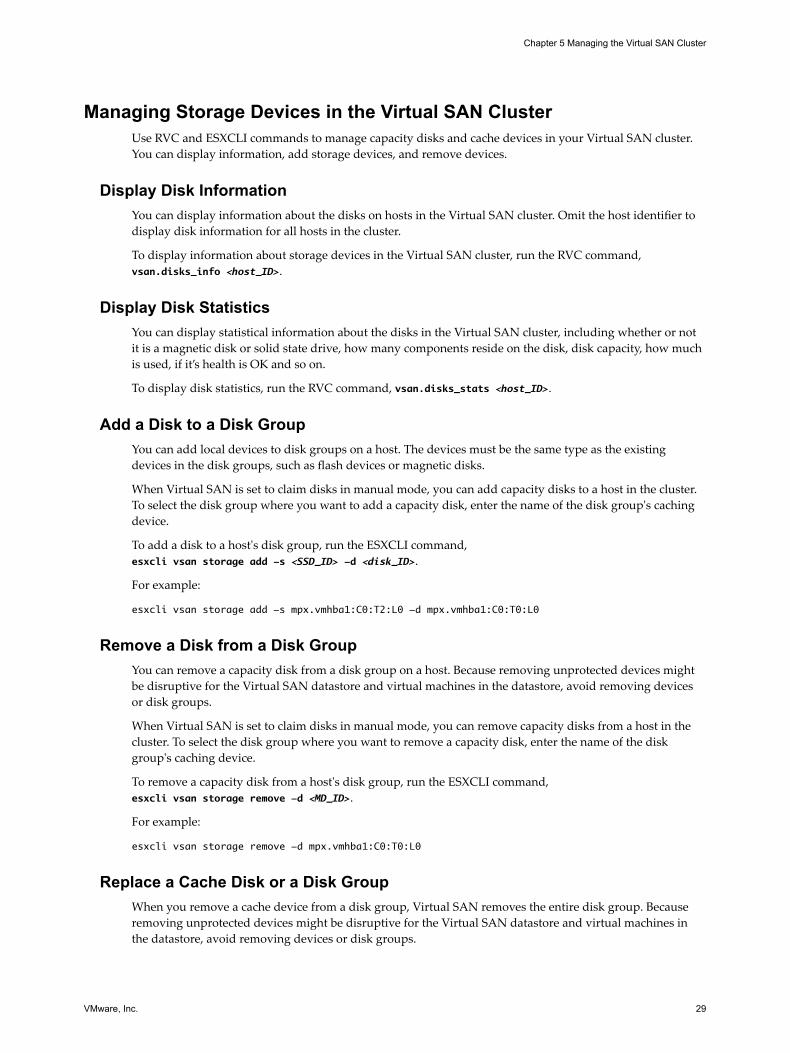
Managing Storage Devices in the Virtual SAN ClusterUse RVC and ESXCLI commands to manage capacity disks and cache devices in your Virtual SAN cluster.You can display information, add storage devices, and remove devices.
Display Disk InformationYou can display information about the disks on hosts in the Virtual SAN cluster. Omit the host identifier todisplay disk information for all hosts in the cluster.
To display information about storage devices in the Virtual SAN cluster, run the RVC command,vsan.disks_info <host_ID>.
Display Disk StatisticsYou can display statistical information about the disks in the Virtual SAN cluster, including whether or notit is a magnetic disk or solid state drive, how many components reside on the disk, disk capacity, how muchis used, if it’s health is OK and so on.
To display disk statistics, run the RVC command, vsan.disks_stats <host_ID>.
Add a Disk to a Disk GroupYou can add local devices to disk groups on a host. The devices must be the same type as the existingdevices in the disk groups, such as flash devices or magnetic disks.
When Virtual SAN is set to claim disks in manual mode, you can add capacity disks to a host in the cluster.To select the disk group where you want to add a capacity disk, enter the name of the disk group's cachingdevice.
To add a disk to a host's disk group, run the ESXCLI command,esxcli vsan storage add -s <SSD_ID> -d <disk_ID>.
For example:
esxcli vsan storage add -s mpx.vmhba1:C0:T2:L0 -d mpx.vmhba1:C0:T0:L0
Remove a Disk from a Disk GroupYou can remove a capacity disk from a disk group on a host. Because removing unprotected devices mightbe disruptive for the Virtual SAN datastore and virtual machines in the datastore, avoid removing devicesor disk groups.
When Virtual SAN is set to claim disks in manual mode, you can remove capacity disks from a host in thecluster. To select the disk group where you want to remove a capacity disk, enter the name of the diskgroup's caching device.
To remove a capacity disk from a host's disk group, run the ESXCLI command,esxcli vsan storage remove -d <MD_ID>.
For example:
esxcli vsan storage remove -d mpx.vmhba1:C0:T0:L0
Replace a Cache Disk or a Disk GroupWhen you remove a cache device from a disk group, Virtual SAN removes the entire disk group. Becauseremoving unprotected devices might be disruptive for the Virtual SAN datastore and virtual machines inthe datastore, avoid removing devices or disk groups.
Chapter 5 Managing the Virtual SAN Cluster
VMware, Inc. 29

Enter the name of the disk group's cache device to remove the disk group. To replace a cache device, removethe cache device and then add the cache and it's associated capacity device.
To remove a cache device, run the ESXCLI command, esxcli vsan storage remove -s <SSD_ID>. To add thedisk group, run the ESXCLI command esxcli vsan storage add -s <SSD_ID> -d <MD_ID>
For example:
esxcli vsan storage add -s naa.55cd2e404b9cfe4b -d naa.5000c50057ae7d3b
Virtual SAN with Photon Controller Setup Guide
30 VMware, Inc.
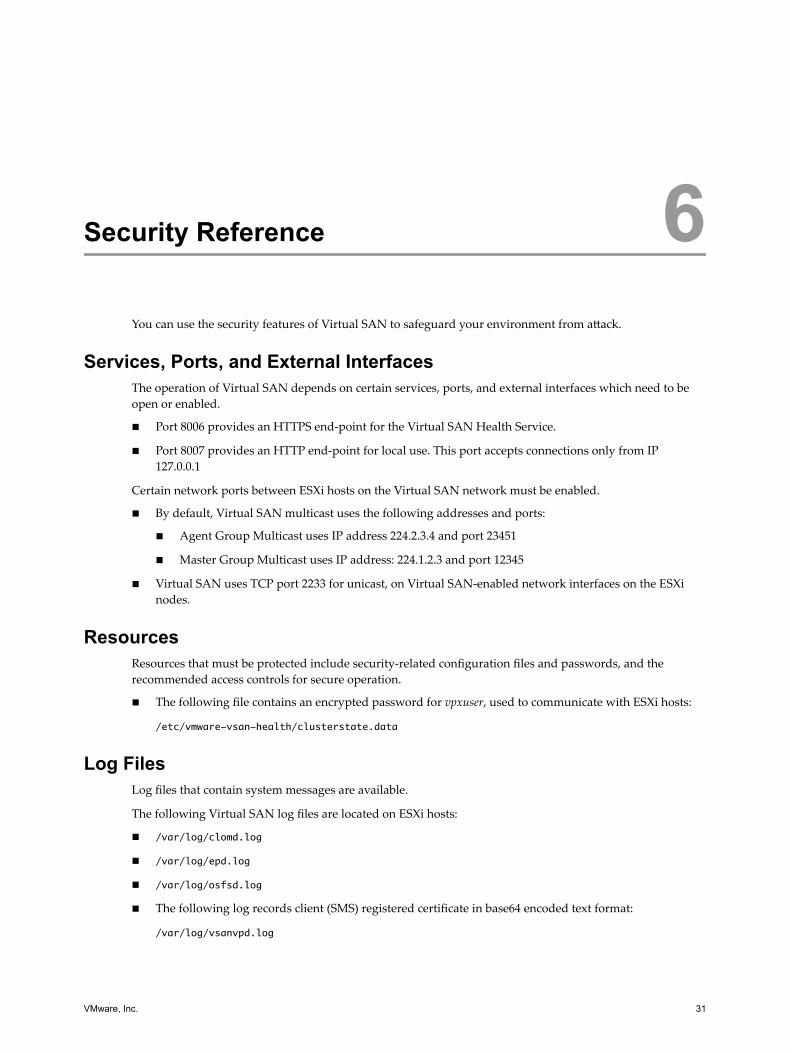
Security Reference 6You can use the security features of Virtual SAN to safeguard your environment from attack.
Services, Ports, and External InterfacesThe operation of Virtual SAN depends on certain services, ports, and external interfaces which need to beopen or enabled.
n Port 8006 provides an HTTPS end-point for the Virtual SAN Health Service.
n Port 8007 provides an HTTP end-point for local use. This port accepts connections only from IP127.0.0.1
Certain network ports between ESXi hosts on the Virtual SAN network must be enabled.
n By default, Virtual SAN multicast uses the following addresses and ports:
n Agent Group Multicast uses IP address 224.2.3.4 and port 23451
n Master Group Multicast uses IP address: 224.1.2.3 and port 12345
n Virtual SAN uses TCP port 2233 for unicast, on Virtual SAN-enabled network interfaces on the ESXinodes.
ResourcesResources that must be protected include security-related configuration files and passwords, and therecommended access controls for secure operation.
n The following file contains an encrypted password for vpxuser, used to communicate with ESXi hosts:
/etc/vmware-vsan-health/clusterstate.data
Log FilesLog files that contain system messages are available.
The following Virtual SAN log files are located on ESXi hosts:
n /var/log/clomd.log
n /var/log/epd.log
n /var/log/osfsd.log
n The following log records client (SMS) registered certificate in base64 encoded text format:
/var/log/vsanvpd.log
VMware, Inc. 31
The vsanvpd.log also contains messages about successful or failed client requests. For example:
2014-09-10T01:00:21Z vsanSoapServer: run:141:Failed to accept client 10.114.174.101
[30]: SSL_ERROR_SSLerror:14094416:SSL routines:SSL3_READ_BYTES:sslv3 alert certificate unknown
2014-09-10T01:00:22Z vsanSoapServer: run:133:Serve accepted client 10.112.185.33
2014-09-10T01:00:22Z vsanSoapServer: verify_cert_with_store:811:Cannot verify cert with CA
store /etc/vmware/ssl/castore.pem: self signed certificate (18)
General operational information and security logs are located in the Virtual SAN Management Server:
/var/log/vmware/vsan-health/vmware-vsan-health-service.log
Additional InformationVirtual SAN does not create any additional accounts during installation and bootstrap.
Privileges assigned to vsan-health user only allow it to manage the life-cycle (start, stop, restart, status) of theVirtual SAN Health Service.
Virtual SAN with Photon Controller is released and distributed as part of Photon Controller. The securityupdate and patch process is the same as for Photon Controller.
Virtual SAN with Photon Controller Setup Guide
32 VMware, Inc.

Index
Aabout Virtual SAN with Photon Controller 5add disk 29add host 28all-flash cluster 22
Ccloud hosts 9cluster health 27cluster requirements 13cluster summary 27configure networking 17configure hybrid Virtual SAN cluster 20create cluster 27
DDeploying Virtual SAN on Photon Controller
cluster 17
Fflash boot devices 13
Hhardware requirements 13
Iinstalling Virtual SAN management service 18intended audience 5introduction 9
Llicense requirements 13
Mmanage cluster 27management hosts 9memory requirements 13
Nnetworking requirements 13
PPhoton Controller 9Photon Platform 9
Rremove cluster 27remove disk 29remove host 28RVC 9
SSDK 9security features 31software requirements 13storage controllers 13
Uupdated information 7
VVirtual SAN management service 9VM boot disks 9VMware Compatibility Guide 13
VMware, Inc. 33

Virtual SAN with Photon Controller Setup Guide
34 VMware, Inc.