vinyl 2017 flooring recipes - tarkett · 2019-06-30 · of the adhesive manufacturer and flooring...
TRANSCRIPT

2017 FLOORING RECIPESLUXURYVINYLTILES

Glue-down 04
Click 36
Loose-lay 46
Installation tips 56
From your initial idea to the final result, you may
have a number of questions about the installation
of a flooring project.
To help you explore and install some of the
decorative layouts we’ve created, we’ve developed
a step-by-step installation guide that we hope
you’ll find helpful.
Would you like to be flooring unbeatable ?

glue-down

Room type:Square 49 m2 Size: 7m x 7m
STEP-BY-STEP INSTALLATION
RANDOM CHECKERBOARD
COLLECTION: iD INSPIRATION 55-70Metal Frame Rose 24207 078 - 50 x 50 cm - nb. of boxes: 5
Metal Frame Platinum 24207 079 - 50 x 50 cm - nb. of boxes: 5
Metal Frame Aluminium 24207 080 - 50 x 50 cm - nb. of boxes: 5
Note: Tarkett may recommend a selection of manufacturer adhesive, we do not however guarantee the products listed (list available at: professionals.tarkett.com/content/list-recommended-adhesives). Tarkett would not accept any liability for any of these products failing to perform in conjunction with any of their products. It is the responsibility of the adhesive manufacturer and flooring contractor to ensure the product being used is appropriate to use and applied in accordance with the manufacturer recommendations.
NEW
1. Define axes of the room■ Measure the size of the room (A, B and C) when the room is square enough to define the axes and centre point
■ The line “ d ” goes through the middle of B and C
■ The central point “ o ” is found where line “ d ” crosses the midpoint of A
3. Start gluing■ Since your layout is planned, you can now define the area for gluing- Start from the shifted axes “ Y’ ” and “ Z ” - Spread adhesive on an adapted area of the installation and after maximum 5 minutes of drying time, lay down the tiles. - When a complete tile cannot be installed, use the scribing method- Use a cork press to ensure bonding■ Follow this method and install planks backward until you reach the door “ ”
2. Define the layout■ Create the layout with a plank covering the line “ Z ” and “ Y’ ” as reference and starting from the point “ o’ ” [“ Y’ ” is shifted about half a plank length.]
■ Check that width of of plank closest to the wall is aesthetically big enough. If not, shift the installation to have a satisfying result “ ”
7
B
C
A
d
o
o
o’
Z
1
10
2
11
3
12
678 45 9
Z
Y’
Y’

Room type:Rectangular 112 m2 Size: 8m x 14m
STEP-BY-STEP INSTALLATION
GRADIENCE
COLLECTION: iD INSPIRATION 55-70Twine Light Grey: 24206 038 - 25 x 50 cm - nb. of boxes: 8
Twine Medium Grey: 24206 039 - 25 x 50 cm - nb. of boxes: 5
Twine Dark Gre: 24206 040 - 25 x 50 cm - nb. of boxes: 5
Twine Blue Grey: 24206 041 - 25 x 50 cm - nb. of boxes: 5
Twine Turquoise: 24206 042 - 25 x 50 cm - nb. of boxes: 5
Twine Denim: 24206 043 - 25 x 50 cm - nb. of boxes: 5
Twine Indigo: 24206 044 - 25 x 50 cm - nb. of boxes: 8
Note: Tarkett may recommend a selection of manufacturer adhesive, we do not however guarantee the products listed (list available at: professionals.tarkett.com/content/list-recommended-adhesives). Tarkett would not accept any liability for any of these products failing to perform in conjunction with any of their products. It is the responsibility of the adhesive manufacturer and flooring contractor to ensure the product being used is appropriate to use and applied in accordance with the manufacturer recommendations.
NEWB
C
A
d
o o
d
XX
X
X
d
XX
X
X
xx
x
x
o
y
Y’
o
1. Define axes of the room■ Measure the size of the room (A, B and C) when the room is rectangle enough to define the axes and centre point
■ The line “ d ” goes through the middle of B and C
■ The central point “ o ” is found where line “ d ” crosses the midpoint of A
2. Define diagonal axes■ Create the diagonals by using a compass with a circle from the central point creating the 4 junctions “ X ” with axes
3. Define diagonal axes■ Draw a circle from the central point: - create the 4 junctions “ x ” with axes - draw 4 circles from those junctions
■ The diagonals cross all the intersections of the circles
4. Define the layout■ From the diagonals, start installation of the first tile
■ Create the layout with a plank covering the line “ y ” as reference and starting from the point “ o ”
■ Check that width of of plank closest to the wall is aesthetically big enough. If not, shift the installation to have a satisfying result “ ”
5. Start gluing■ Since your layout is planned, you can now define the area for gluing: - Start from the shifted axes “ Y’ ”- When a complete tile cannot be installed, use the scribing method- Spread adhesive on a part of the installation and after maximum 5 minutes of drying time, lay down the tiles- Use a cork press to ensure bonding
■ Follow this method and install planks backward until you reach the door “ ”
Note: install the border last and scribe it to join perfectly the tiles
Note: in this installation, remember to take into account the black border when you check dimensions of planks close to the walls. Tip: cut tiles in diagonal to prepare the borders.
18
910
111213
14
152
3
45
67
9

Room type:Square 49 m2 Size: 7m x 7m
STEP-BY-STEP INSTALLATION
SQUARED PALLETTE
Note: Tarkett may recommend a selection of manufacturer adhesive, we do not however guarantee the products listed (list available at: professionals.tarkett.com/content/list-recommended-adhesives). Tarkett would not accept any liability for any of these products failing to perform in conjunction with any of their products. It is the responsibility of the adhesive manufacturer and flooring contractor to ensure the product being used is appropriate to use and applied in accordance with the manufacturer recommendations.
COLLECTION: iD INSPIRATION 55-70Antik Oak Beige 24201 001 - 20 x 122 cm - nb. of boxes: 2
Terrazzo Green 24207 130 - 50 x 50 cm - nb. of boxes: 3
Terrazzo Anthracite 24207 131 - 50 x 50 cm - nb. of boxes: 3
NEW
1. Define axes of the room■ Measure the size of the room (A, B and C) when the room is square enough to define the axes and centre point
■ The line “ d ” goes through the middle of B and C
■ The central point “ o ” is found where line “ d ” crosses the midpoint of A
3. Start gluing■ Since your layout is planned, you can now define the area for gluing- Start from the shifted axes “ Y’ ” and “ Z ” - Spread adhesive on an adapted area of the installation and after maximum 5 minutes of drying time, lay down the tiles. - When a complete tile cannot be installed, use the scribing method- Use a cork press to ensure bonding■ Follow this method and install planks backward until you reach the door “ ”
2. Define the layout■ Create the layout with a plank covering the line “ Z ” and “ Y’ ” as reference and starting from the point “ o’ ” [“ Y’ ” is shifted about half a plank length.]
■ Check that width of plank closest to the wall is aesthetically big enough. If not, shift the installation to have a satisfying result “ ”
11
B
C
A
d
o
o
o’
Z
1
12369
811 2710 4 5
Z
Y’
Y’
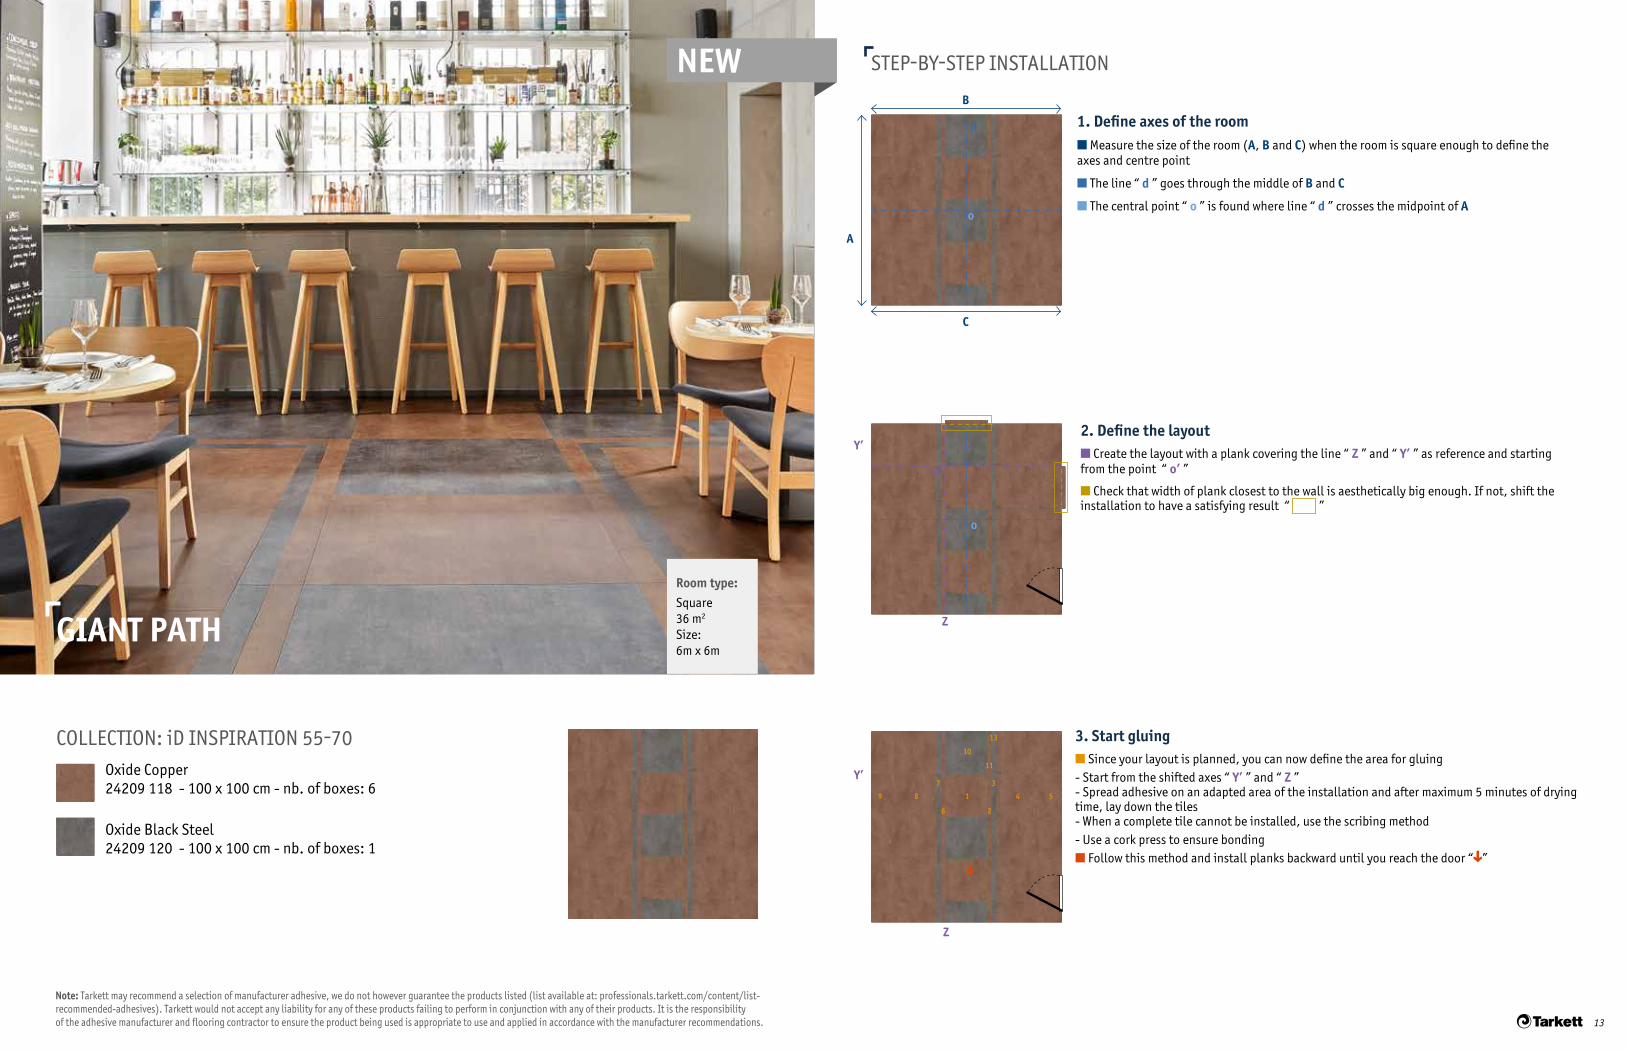
Room type:Square 36 m2 Size: 6m x 6m
STEP-BY-STEP INSTALLATION
GIANT PATH
Note: Tarkett may recommend a selection of manufacturer adhesive, we do not however guarantee the products listed (list available at: professionals.tarkett.com/content/list-recommended-adhesives). Tarkett would not accept any liability for any of these products failing to perform in conjunction with any of their products. It is the responsibility of the adhesive manufacturer and flooring contractor to ensure the product being used is appropriate to use and applied in accordance with the manufacturer recommendations.
COLLECTION: iD INSPIRATION 55-70Oxide Copper 24209 118 - 100 x 100 cm - nb. of boxes: 6
Oxide Black Steel 24209 120 - 100 x 100 cm - nb. of boxes: 1
NEW
1. Define axes of the room■ Measure the size of the room (A, B and C) when the room is square enough to define the axes and centre point
■ The line “ d ” goes through the middle of B and C
■ The central point “ o ” is found where line “ d ” crosses the midpoint of A
3. Start gluing■ Since your layout is planned, you can now define the area for gluing- Start from the shifted axes “ Y’ ” and “ Z ” - Spread adhesive on an adapted area of the installation and after maximum 5 minutes of drying time, lay down the tiles - When a complete tile cannot be installed, use the scribing method- Use a cork press to ensure bonding■ Follow this method and install planks backward until you reach the door “ ”
2. Define the layout■ Create the layout with a plank covering the line “ Z ” and “ Y’ ” as reference and starting from the point “ o’ ”
■ Check that width of plank closest to the wall is aesthetically big enough. If not, shift the installation to have a satisfying result “ ”
13
B
C
A
d
o
o
o’
Z
1
10
48 59
2
11
6
3
13
7
Z
Y’
Y’

Room type:Square 64 m2 Size: 8m x 8m
STEP-BY-STEP INSTALLATION
VINTAGE HERRINGBONE
Note: Tarkett may recommend a selection of manufacturer adhesive, we do not however guarantee the products listed (list available at: professionals.tarkett.com/content/list-recommended-adhesives). Tarkett would not accept any liability for any of these products failing to perform in conjunction with any of their products. It is the responsibility of the adhesive manufacturer and flooring contractor to ensure the product being used is appropriate to use and applied in accordance with the manufacturer recommendations.
COLLECTION: iD INSPIRATION 55-70Contemporary Oak Grey 24200 109 - 12,5 x 122 cm - nb. of boxes: 2 24201 109 - 20 x 122 cm - nb. of boxes: 2 24202 109 - 25 x 122 cm - nb. of boxes: 2Contemporary Oak Grege 24200 110 - 12,5 x 122 cm - nb. of boxes: 2 24201 110 - 20 x 122 cm - nb. of boxes: 2 24202 110 - 25 x 122 cm - nb. of boxes: 2Contemporary Oak Brown 24200 112 - 12,5 x 122 cm - nb. of boxes: 2 24201 112 - 20 x 122 cm - nb. of boxes: 2 24202 112 - 25 x 122 cm - nb. of boxes: 2
NEWB
C
A
d
o
1. Define axes of the room■ Measure the size of the room (A, B and C) when the room is square enough to define the axes and centre point
■ The line “ d ” goes through the middle of B and C
■ The central point “ o ” is found where line “ d ” crosses the midpoint of A
2. Define diagonal axes■ Create the diagonals by using a compass with a circle from the central point creating the 4 junctions “ X ” with axes
3. Define diagonal axes■ Drawing a circle from the central point: - create the 4 junctions “ x ” with axes - draw 4 circles from those junctions
■ The diagonals cross all the intersections of the circles
4. Define the layout■ Create the layout with a plank covering the line “ y ” as reference and starting from the point “ o ”
■ Check that width of plank closest to the wall is aesthetically big enough. If not, shift the installation to have a satisfying result “ ”
■ Define shifted axe “ Y’ ” 3 or 4 lines away from the wall to start installation
5. Start gluing■ Since your layout is planned, you can now define the area for gluing: - Shift the starting line to plank the closest to the wall on the opposite side of the door - Spread adhesive on a part of the installation and after maximum 5 minutes of drying time, lay down the planks (Use the example of the planks “ 1 “ to “ 6 “ that are to be installed in that order) - Use a cork press to ensure bonding - Install only full planks
■ Follow this method and install planks backward until you reach the door “ ”
Last steps to complete your projectAs Tarkett recommends specific acrylic adhesive with wet bonding, it will be easier to do the gluing/laying process plank after plank. Planks that have to be trimmed should be the last ones to be installed. Trimming of edges is done by scribing. Use a heavy roller on the whole surface, in both directions to ensure bonding.
d
XX
X
X
d
o
XX
X
X
15
o
y
Y’
13
9 10
78 4256
xx
x
x
o

Room type:Rectangular 12 m2 Size: 2m x 6m
STEP-BY-STEP INSTALLATION
WOOD GALLERY
COLLECTION: iD INSPIRATION 55-70Wenge Grege 24205 012 - 16.66 x 100 cm - nb.of boxes: 4
1. Define axes of the room■ Measure the size of the room (A, B and C) when the room is rectangle enough to define the axes and centre point
■ The line “ d ” goes through the middle of B and C
■ The central point “ o ” is found where line “ d ” crosses the midpoint of A
2. Define the layout■ Create the layout with a plank covering the line “ y ” as reference and starting from the point “ o ”
■ Check that width of plank closest to the wall is aesthetically big enough. If not, shift the installation to have a satisfying result “ ”
■ Define shifted axis “ Y’ ” 3 or 4 plank widths away from the wall to start installation
Note: Keep in mind that width of feature strips needs to be taken into account for the layout definition.
3. Start gluing■ Since your layout is planned, you can now define the area for gluing- Start from the shifted axis “ Y’ ”- Spread adhesive on a part of the installation and after maximum 5 minutes of drying time, lay down the planks (Use the example of the group of planks “ 1 “ to “12 “ that are to be installed in that order)- Use a cork press to ensure bonding - Install only full planks
■ Follow this method and install planks backward until you reach the door “ ”
Tip: install the last rows (up and down) last to walk on LVT where adhesive is already dry.
Last steps to complete your projectAs Tarkett recommends specific acrylic adhesive with wet bonding, it will be easier to do the gluing/laying process plank after plank. Planks that have to be trimmed should be the last ones to be installed. Trimming of edges is done by scribing. Use a heavy roller on the whole surface, in both directions to ensure bonding.
Note: Tarkett may recommend a selection of manufacturer adhesive, we do not however guarantee the products listed (list available at: professionals.tarkett.com/content/list-recommended-adhesives). Tarkett would not accept any liability for any of these products failing to perform in conjunction with any of their products. It is the responsibility of the adhesive manufacturer and flooring contractor to ensure the product being used is appropriate to use and applied in accordance with the manufacturer recommendations.
TIMELESS
17
B
C
A
d
o
y
Y’
o
Y’
1 2 3
10
4 5
12
6 7 89
11

Room type:Rectangular 120 m2 Size: 10m x 12m
STEP-BY-STEP INSTALLATION
OLD TOWNHOUSE
COLLECTION: iD INSPIRATION 55-70Brushed Pine Natural 24201 015 - 20 x 122 cm - nb. of boxes: 35
Dark Grey Feature Strip 1421 009 - 1 linear meter long - 50 units of 1 lm/box: 50 lm
1. Define axes of the room■ Measure the size of the room (A, B and C) when the room is rectangle enough to define the axes and centre point
■ The line “ d ” goes through the middle of B and C
■ The central point “ o ” is found where line “ d ” crosses the midpoint of A
2. Define the layout■ Create the layout with a plank covering the line “ y ” as reference and starting from the point “ o ”
■ Check that width of plank closest to the wall is aesthetically big enough. If not, shift the installation to have a satisfying result “ ”
■ Define shifted axis “ Y’ ” 3 or 4 plank widths away from the wall to start installation
Note: Keep in mind that width of feature strips needs to be taken into account for the layout definition.
3. Start gluing■ Since your layout is planned, you can now define the area for gluing- Start from the shifted axis “ Y’ ”- Spread adhesive on a part of the installation and after maximum 5 minutes of drying time, lay down the planks (Use the example of the planks “ 1 “ to “ 10 “ that are to be installed in that order)- Use a cork press to ensure bonding - Between each line of planks, add a line of Dark Grey feature strip - Install only full planks
■ Follow this method and install planks backward until you reach the door “ ”
Tip: install the last rows (up and down) last to walk on LVT where adhesive is already dry.
Last steps to complete your projectAs Tarkett recommends specific acrylic adhesive with wet bonding, it will be easier to do the gluing/laying process plank after plank. Planks that have to be trimmed should the last ones to be installed. Trimming of edges is done by scribing. Use a heavy roller on the whole surface, in both directions to ensure bonding.
Note: Tarkett may recommend a selection of manufacturer adhesive, we do not however guarantee the products listed (list available at: professionals.tarkett.com/content/list-recommended-adhesives). Tarkett would not accept any liability for any of these products failing to perform in conjunction with any of their products. It is the responsibility of the adhesive manufacturer and flooring contractor to ensure the product being used is appropriate to use and applied in accordance with the manufacturer recommendations.
TIMELESS
19
B
C
A
d
o
y
Y’
o
Y’ 12
8
3
10
4567
9

Room type:Rectangular 24 m2 Size: 3m x 8m
STEP-BY-STEP INSTALLATION
SIMPLE STEP
COLLECTION: iD INSPIRATION 55-70English Oak Light 24201 026 - 20 x 122 cm - nb. of boxes: 5
English Oak Beige 24201 024 - 20 x 122 cm - nb. of boxes: 2
1. Define axes of the room■ Measure the size of the room (A, B and C) when the room is rectangle enough to define the axes and centre point
■ The line “ d ” goes through the middle of B and C
■ The central point “ o ” is found where line “ d ” crosses the midpoint of A
2. Define the layout■ Create the layout with a plank covering the axe “ Y’’ ” as reference and centered on the point “ o ”
■ Check that width of plank closest to the wall is aesthetically big enough. If not, shift the installation to have a satisfying result “ ”
■ Define shifted axes “ Y’ ”and “ Y’’ ” 3 or 4 plank widths away from the wall to start installation
3. Start gluing■ Since your layout is planned, you can now define the area for gluing- Start from the shifted axes “ Y’ ”and “ Y’’ ”- Spread adhesive on a part of the installation and after maximum 5 minutes of drying time, lay down the planks (Use the example of the planks “ 1 “ to “ 10 “ that are to be installed in that order)- Use a cork press to ensure bonding - Install only full planks
■ Follow this method and install planks backward until you reach the door “ ”
Last steps to complete your projectAs Tarkett recommends specific acrylic adhesive with wet bonding, it will be easier to do the gluing/laying process plank after plank. Planks that have to be trimmed should the last ones to be installed. Trimming of edges is done by scribing. Use a heavy roller on the whole surface, in both directions to ensure bonding.
Note: Tarkett may recommend a selection of manufacturer adhesive, we do not however guarantee the products listed (list available at: professionals.tarkett.com/content/list-recommended-adhesives). Tarkett would not accept any liability for any of these products failing to perform in conjunction with any of their products. It is the responsibility of the adhesive manufacturer and flooring contractor to ensure the product being used is appropriate to use and applied in accordance with the manufacturer recommendations.
TIMELESS
21
B
C
A
d
o
Y’
Y’
Y’’
Y’’
o
1
6
7
8
9
10
4
5
2
3

Room type:Square 36 m2 Size: 6m x 6m
STEP-BY-STEP INSTALLATION
MILANO
COLLECTION: iD INSPIRATION 55-70Antic Oak Grey 24203 004 - 25 x 150 cm - nb. of boxes: 12
Feature Strip Dark Grey 1421 009 - 50 units of 1 lm/box : 50 lm
Feature Strip Red 1421 010 - 50 units of 1 lm/box : 50 lm
1. Define axes of the room■ Measure the size of the room (A, B and C) when the room is square enough to define the axes and centre point
■ The line “ d ” goes through the middle of B and C
■ The central point “ o ” is found where line “ d ” crosses the midpoint of A
2. Define the layout■ Create the layout with a plank covering the line “ y ” as reference and starting from the point “ o ”
■ Check that width of plank closest to the wall is aesthetically big enough. If not, shift the installation to have a satisfying result “ ”
■ Define shifted axis “ Y’ ” 3 or 4 plank widths away from the wall to start installation
Note: Keep in mind that width of feature strips needs to be taken into account for the layout definition.
3. Start gluing■ Since your layout is planned, you can now define the area for gluing- Start from the shifted axis “ Y’ ”- Spread adhesive on a part of the installation and after maximum 5 minutes of drying time, lay down the planks (Use the example of the planks “ 1 “ to “ 10 “ that are to be installed in that order)- Use a cork press to ensure bonding - Between each line of planks, add a line of Dark Grey feature strip followed by a line of Red feature strip - Install only full planks■ Follow this method and install planks backward until you reach the door “ ”
Tip: install the last rows (up and down) last to walk on LVT where adhesive is already dry.
Last steps to complete your projectAs Tarkett recommends specific acrylic adhesive with wet bonding, it will be easier to do the gluing/laying process plank after plank. Planks that have to be trimmed should be the last ones to be installed. Trimming of edges is done by scribing. Use a heavy roller on the whole surface, in both directions to ensure bonding.
Note: Tarkett may recommend a selection of manufacturer adhesive, we do not however guarantee the products listed (list available at: professionals.tarkett.com/content/list-recommended-adhesives). Tarkett would not accept any liability for any of these products failing to perform in conjunction with any of their products. It is the responsibility of the adhesive manufacturer and flooring contractor to ensure the product being used is appropriate to use and applied in accordance with the manufacturer recommendations.
TIMELESS
23
B
C
A
d
o
y
Y’
o
Y’
16
9
27
4
10
38
5

Room type:Rectangular 56 m2 Size: 7m x 8m
B
C
A
d
o o
d
XX
X
X
d
XX
X
X
xx
x
x
o
y
o
17
13
28
14
39
15
41016
51117
61218
STEP-BY-STEP INSTALLATION
1. Define axes of the room■ Measure the size of the room (A, B and C) when the room is rectangle enough to define the axes and centre point
■ The line “ d ” goes through the middle of B and C
■ The central point “ o ” is found where line “ d ” crosses the midpoint of A
2. Define diagonal axes■ Create the diagonals by using a compass with a circle from the central point creating the 4 junctions “ X ” with axes
3. Define diagonal axes■ Drawing a circle from the central point: - create the 4 junctions “ x ” with axes - draw 4 circles from those junctions
■ The diagonals cross all intersections of the circles
4. Define the layout■ From the diagonals, start installation of the first plank
■ Create the layout with a plank covering the line “ y ” as reference and starting from the point “ o ”
■ Check that width of plank closest to the wall is aesthetically big enough. If not, shift the installation to have a satisfying result “ ”
5. Start gluing■ Since your layout is planned, you can now define the area for gluing: - Shift the starting line to the last full plank, close to the wall on the opposite side of the door - Spread adhesive where the first planks will be laid and after maximum 5 minutes of drying time, lay down the planks (Use the example of the planks “ 1 “ to “ 18 “ that are to be installed in that order)- Use a cork press to ensure bonding - Install only full planks
■ Follow this method and install planks backward until you reach the door “ ”
Last steps to complete your projectAs Tarkett recommends specific acrylic adhesive with wet bonding, it will be easier to do the gluing/laying process plank after plank. Planks that have to be trimmed should be the last ones to be installed. Trimming of edges is done by scribing. Use a heavy roller on the whole surface, in both directions to ensure bonding.
HYBRID HERRINGBONE
COLLECTION: iD INSPIRATION 55-70 Rustic Oak Dark Grey 24201 122 - 20 x 122 cm - nb. of boxes: 6
Rustic Oak Medium Grey 24201 123 - 20 x 122 cm - nb. of boxes: 6
Rustic Oak Light Grey 24201 124 - 20 x 122 cm - nb. of boxes: 6
Note: Tarkett may recommend a selection of manufacturer adhesive, we do not however guarantee the products listed (list available at: professionals.tarkett.com/content/list-recommended-adhesives). Tarkett would not accept any liability for any of these products failing to perform in conjunction with any of their products. It is the responsibility of the adhesive manufacturer and flooring contractor to ensure the product being used is appropriate to use and applied in accordance with the manufacturer recommendations.
TIMELESS
25
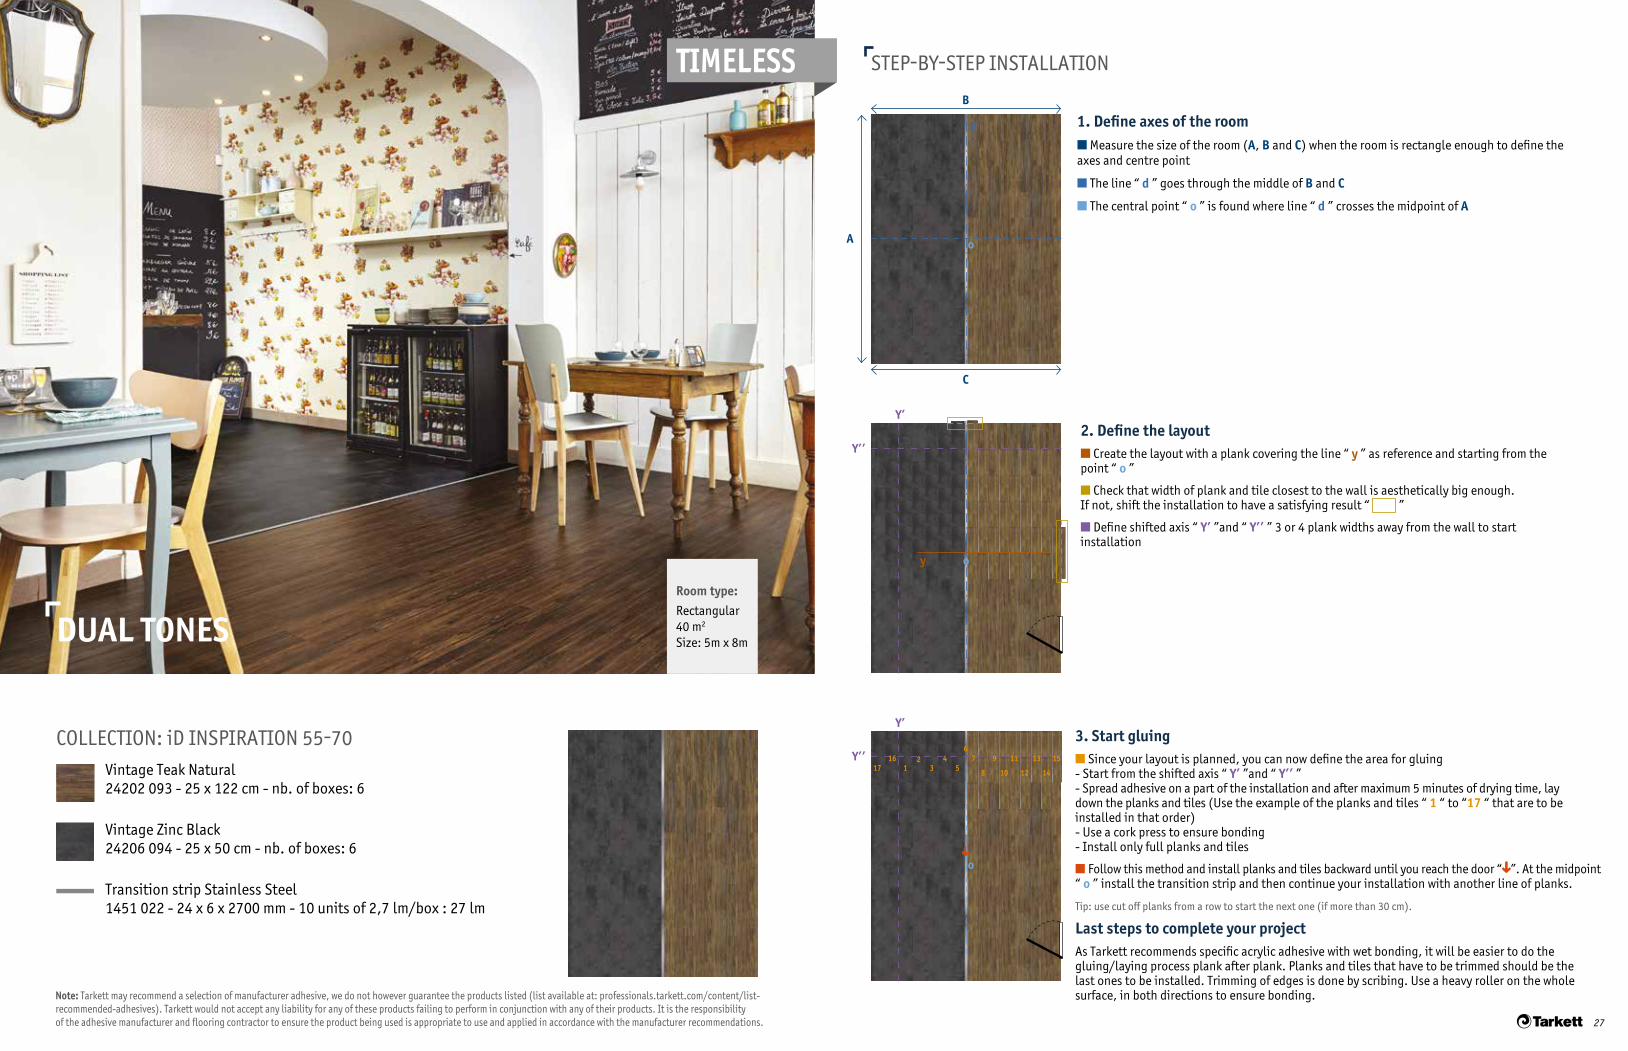
Room type:Rectangular 40 m2 Size: 5m x 8m
STEP-BY-STEP INSTALLATION
DUAL TONES
COLLECTION: iD INSPIRATION 55-70Vintage Teak Natural 24202 093 - 25 x 122 cm - nb. of boxes: 6
Vintage Zinc Black 24206 094 - 25 x 50 cm - nb. of boxes: 6
Transition strip Stainless Steel 1451 022 - 24 x 6 x 2700 mm - 10 units of 2,7 lm/box : 27 lm
1. Define axes of the room■ Measure the size of the room (A, B and C) when the room is rectangle enough to define the axes and centre point
■ The line “ d ” goes through the middle of B and C
■ The central point “ o ” is found where line “ d ” crosses the midpoint of A
2. Define the layout■ Create the layout with a plank covering the line “ y ” as reference and starting from the point “ o ”
■ Check that width of plank and tile closest to the wall is aesthetically big enough. If not, shift the installation to have a satisfying result “ ”
■ Define shifted axis “ Y’ ”and “ Y’’ ” 3 or 4 plank widths away from the wall to start installation
3. Start gluing■ Since your layout is planned, you can now define the area for gluing- Start from the shifted axis “ Y’ ”and “ Y’’ ”- Spread adhesive on a part of the installation and after maximum 5 minutes of drying time, lay down the planks and tiles (Use the example of the planks and tiles “ 1 “ to “17 “ that are to be installed in that order)- Use a cork press to ensure bonding - Install only full planks and tiles
■ Follow this method and install planks and tiles backward until you reach the door “ ”. At the midpoint “ o ” install the transition strip and then continue your installation with another line of planks.
Tip: use cut off planks from a row to start the next one (if more than 30 cm).
Last steps to complete your projectAs Tarkett recommends specific acrylic adhesive with wet bonding, it will be easier to do the gluing/laying process plank after plank. Planks and tiles that have to be trimmed should be the last ones to be installed. Trimming of edges is done by scribing. Use a heavy roller on the whole surface, in both directions to ensure bonding.Note: Tarkett may recommend a selection of manufacturer adhesive, we do not however guarantee the products listed (list available at: professionals.tarkett.com/content/list-
recommended-adhesives). Tarkett would not accept any liability for any of these products failing to perform in conjunction with any of their products. It is the responsibility of the adhesive manufacturer and flooring contractor to ensure the product being used is appropriate to use and applied in accordance with the manufacturer recommendations.
TIMELESS
27
B
C
A
d
o
y
Y’
Y’
Y’’
Y’’
o
1172
316
57 9 11 13 154
6
8 10 12 14
o

STEP-BY-STEP INSTALLATION
VINTAGE WEAVE
COLLECTION: iD INSPIRATION 55-70Wenge Natural 24205 010 - 16.66 x 100 cm - nb. of boxes: 7
Rustic Slate Beige 24207 070 - 50 x 50 cm - nb. of boxes: 3
Room type:Square 36 m2 Size: 6m x 6m
1. Define axes of the room■ Measure the size of the room (A, B and C) when the room is square enough to define the axes and centre point
■ The line “ d ” goes through the middle of B and C
■ The central point “ o ” is found where line “ d ” crosses the midpoint of A
2. Define the layout■ Create the layout with a tile covering the plank “ y ” as reference and centered on the point “ o ”
■ Check that width of plank closest to the wall is aesthetically big enough. If not, shift the installation to have a satisfying result “ ”
■ Define shifted axis “ Y’ ”and “ Y’’ ” 3 or 4 plank widths away from the wall to start installation
3. Start gluing■ Since your layout is planned, you can now define the area for gluing- Start from the shifted axis “ Y’ ”and “ Y’’ ”- Spread adhesive on a part of the installation and after maximum 5 minutes of drying time, lay down the planks and tiles (Use the example of the planks and tiles “ 1 “ to “ 9 “ that are to be installed in that order)- Use a cork press to ensure bonding - Install only full planks and tiles
■ Follow this method and install planks and tiles backward until you reach the door “ ”
Tip: use cut off planks from a row to start the next one (if more than 30 cm).
Last steps to complete your projectAs Tarkett recommends specific acrylic adhesive with wet bonding, it will be easier to do the gluing/laying process plank after plank. Planks and tiles that have to be trimmed should be the last ones to be installed. Trimming of edges is done by scribing. Use a heavy roller on the whole surface, in both directions to ensure bonding.
Note: Tarkett may recommend a selection of manufacturer adhesive, we do not however guarantee the products listed (list available at: professionals.tarkett.com/content/list-recommended-adhesives). Tarkett would not accept any liability for any of these products failing to perform in conjunction with any of their products. It is the responsibility of the adhesive manufacturer and flooring contractor to ensure the product being used is appropriate to use and applied in accordance with the manufacturer recommendations.
TIMELESS
29
B
C
A
d
o
y
Y’
Y’
Y’’
Y’’
o
1
5
9
2
6
3
7
4
8

Room type:Rectangular 14 m2 Size: 2m x 7m
STEP-BY-STEP INSTALLATION
1. Define axes of the room■ Measure the size of the room (A, B and C) when the room is rectangle enough to define the axes and centre point
■ The line “ d ” goes through the middle of B and C
■ The central point “ o ” is found where line “ d ” crosses the midpoint of A
2. Define diagonal axes■ Create the diagonals by using a compass with a circle from the central point creating the 4 junctions “ X ” with axes
3. Define diagonal axes■ Drawing a circle from the central point: - create the 4 junctions “ x ” with axes - draw 4 circles from those junctions
■ The diagonals cross all intersections of the circles
4. Define the layout■ From the diagonals, start installation of the first tile
■ Create the layout with a tile covering the line “ y ” as reference and starting from the point “ o ”
■ Check that width of plank closest to the wall is aesthetically big enough. If not, shift the installation to have a satisfying result “ ”
5. Start gluing■ Since your layout is planned, you can now define the area for gluing- Start from the shifted axis “ Y’ ”- Spread adhesive on a part of the installation and after maximum 5 minutes of drying time, lay down the tiles (Use the example of the tiles “ 1 “ to “ 10 “ that are to be installed in that order)- Use a cork press to ensure bonding - Install only full tiles
■ Follow this method and install tiles backward until you reach the door “ ”Note: install the border last and scribe it to join perfectly the tiles.
Last steps to complete your projectAs Tarkett recommends specific acrylic adhesive with wet bonding, it will be easier to do the gluing/laying process, tile after tile. Tiles that have to be trimmed should be the last ones to be installed. Trimming of edges is done by scribing. Use a heavy roller on the whole surface, in both directions to ensure bonding.
Note: in this installation, remember to take into account the black border when checking dimensions of tiles close to the walls.Tip: cut tiles in diagonal to prepare borders.
HARLEQUIN
COLLECTION: iD INSPIRATION 55-70Twine Indigo 24207 044 - 50 x 50 cm - nb. of boxes: 3
Twine Light Grey 24207 038 - 50 x 50 cm - nb. of box: 2
Note: Tarkett may recommend a selection of manufacturer adhesive, we do not however guarantee the products listed (list available at: professionals.tarkett.com/content/list-recommended-adhesives). Tarkett would not accept any liability for any of these products failing to perform in conjunction with any of their products. It is the responsibility of the adhesive manufacturer and flooring contractor to ensure the product being used is appropriate to use and applied in accordance with the manufacturer recommendations.
TIMELESS
31
B
C
A
d
o o
d
XX
X
X
d
XX
X
X
xx
x
x
o
y
Y’
o
1 5
8
2
9
10
3
6
4
7

Room type:Rectangular 48 m2 Size: 6m x 8m
STEP-BY-STEP INSTALLATION
ART DECO
COLLECTION: iD INSPIRATION 55-70Vintage Zinc Black 24206 094 - 25 x 50 cm - nb. of boxes: 5
Vintage Zinc Rust 24206 095 - 25 x 50 cm - nb. of boxes: 5
Vintage Zinc Silver 24206 096 - 25 x 50 cm - nb. of boxes: 5
1. Define axes of the room■ Measure the size of the room (A, B and C) when the room is rectangle enough to define the axes and centre point
■ The line “ d ” goes through the middle of B and C
■ The central point “ o ” is found where line “ d ” crosses the midpoint of A
2. Define the layout■ Create the layout with a tile covering the line “ y ” as reference and starting from the point “ o ”
■ Check that width of plank closest to the wall is aesthetically big enough. If not, shift the installation to have a satisfying result “ ”
■ Define shifted axis “ Y’ ” axe “ Y’’ ” 3 or 4 tile widths away from the wall to start installation
3. Start gluing■ Since your layout is planned, you can now define the area for gluing- Start from the shifted axis “ Y’ ”and “ Y’’ ”- Spread adhesive on a part of the installation and after maximum 5 minutes of drying time, lay down the tiles (Use the example of the tiles “ 1 “ to “ 13 “ that are to be installed in that order)- Use a cork press to ensure bonding - Install only full tiles
■ Follow this method and install tiles backward until you reach the door “ ”
Last steps to complete your projectAs Tarkett recommends specific acrylic adhesive with wet bonding, it will be easier to do the gluing/laying process, tile after tile. Tiles that have to be trimmed should be the last ones to be installed. Trimming of edges is done by scribing. Use a heavy roller on the whole surface, in both directions to ensure bonding.
Note: Tarkett may recommend a selection of manufacturer adhesive, we do not however guarantee the products listed (list available at: professionals.tarkett.com/content/list-recommended-adhesives). Tarkett would not accept any liability for any of these products failing to perform in conjunction with any of their products. It is the responsibility of the adhesive manufacturer and flooring contractor to ensure the product being used is appropriate to use and applied in accordance with the manufacturer recommendations.
TIMELESS
33
B
C
A
d
o
y
Y’
Y’
Y’’
Y’’
o
1
2
3
10
4
13
5
12
6
7
8
9
11

Room type:Square 64 m2 Size: 8m x 8m
STEP-BY-STEP INSTALLATION
MACRO CHECKERBOARD
COLLECTION: iD INSPIRATION 55-70Tissé Beige 24207 082 - 50 x 50 cm - nb. of boxes: 9
Tissé Black 24207 083 - 50 x 50 cm - nb. of boxes: 9
1. Define axes of the room■ Measure the size of the room (A, B and C) when the room is square enough to define the axes and centre point
■ The line “ d ” goes through the middle of B and C
■ The central point “ o ” is found where line “ d ” crosses the midpoint of A
2. Define the layout■ Create the layout with a tile covering the line “ y ” as reference and starting from the point “ o ”
■ Check that width of plank closest to the wall is aesthetically big enough. If not, shift the installation to have a satisfying result “ ”
Note: in this installation, remember to take into account the border when checking dimensions of tiles close to the walls.
3. Start gluing■ Since your layout is planned, you can now define the area for gluing- Start from the shifted axis “ Y’ ” and “ Y’’ ”- Spread adhesive on a part of the installation and after maximum 5 minutes of drying time, lay down the tiles (Use the example of the group of tiles “ 1 “ to “ 12 “ that are to be installed in that order)- Use a cork press to ensure bonding - Install only full tiles
■ Follow this method and install tiles backward until you reach the door “ ”
Note: install the border last and scribe it to join perfectly the tiles.
Last steps to complete your projectAs Tarkett recommends specific acrylic adhesive with wet bonding, it will be easier to do the gluing/laying process, tile after tile. Tile that have to be trimmed should be the last ones to be installed. Trimming of edges is done by scribing. Use a heavy roller on the whole surface, in both directions to ensure bonding.
Note: Tarkett may recommend a selection of manufacturer adhesive, we do not however guarantee the products listed (list available at: professionals.tarkett.com/content/list-recommended-adhesives). Tarkett would not accept any liability for any of these products failing to perform in conjunction with any of their products. It is the responsibility of the adhesive manufacturer and flooring contractor to ensure the product being used is appropriate to use and applied in accordance with the manufacturer recommendations.
TIMELESS
35
B
C
A
d
o
y o
Y’
Y’’
1 2 3
10
4
5
12
6 7 8
9 11

click
37
Note: Expension gaps must be covered by skirtings. For more details, see installation instructions. Threshold needs to be installed at the entrance door (list available at: professionals.tarkett.com/content/list-recommended-adhesives).
STEP-BY-STEP INSTALLATION
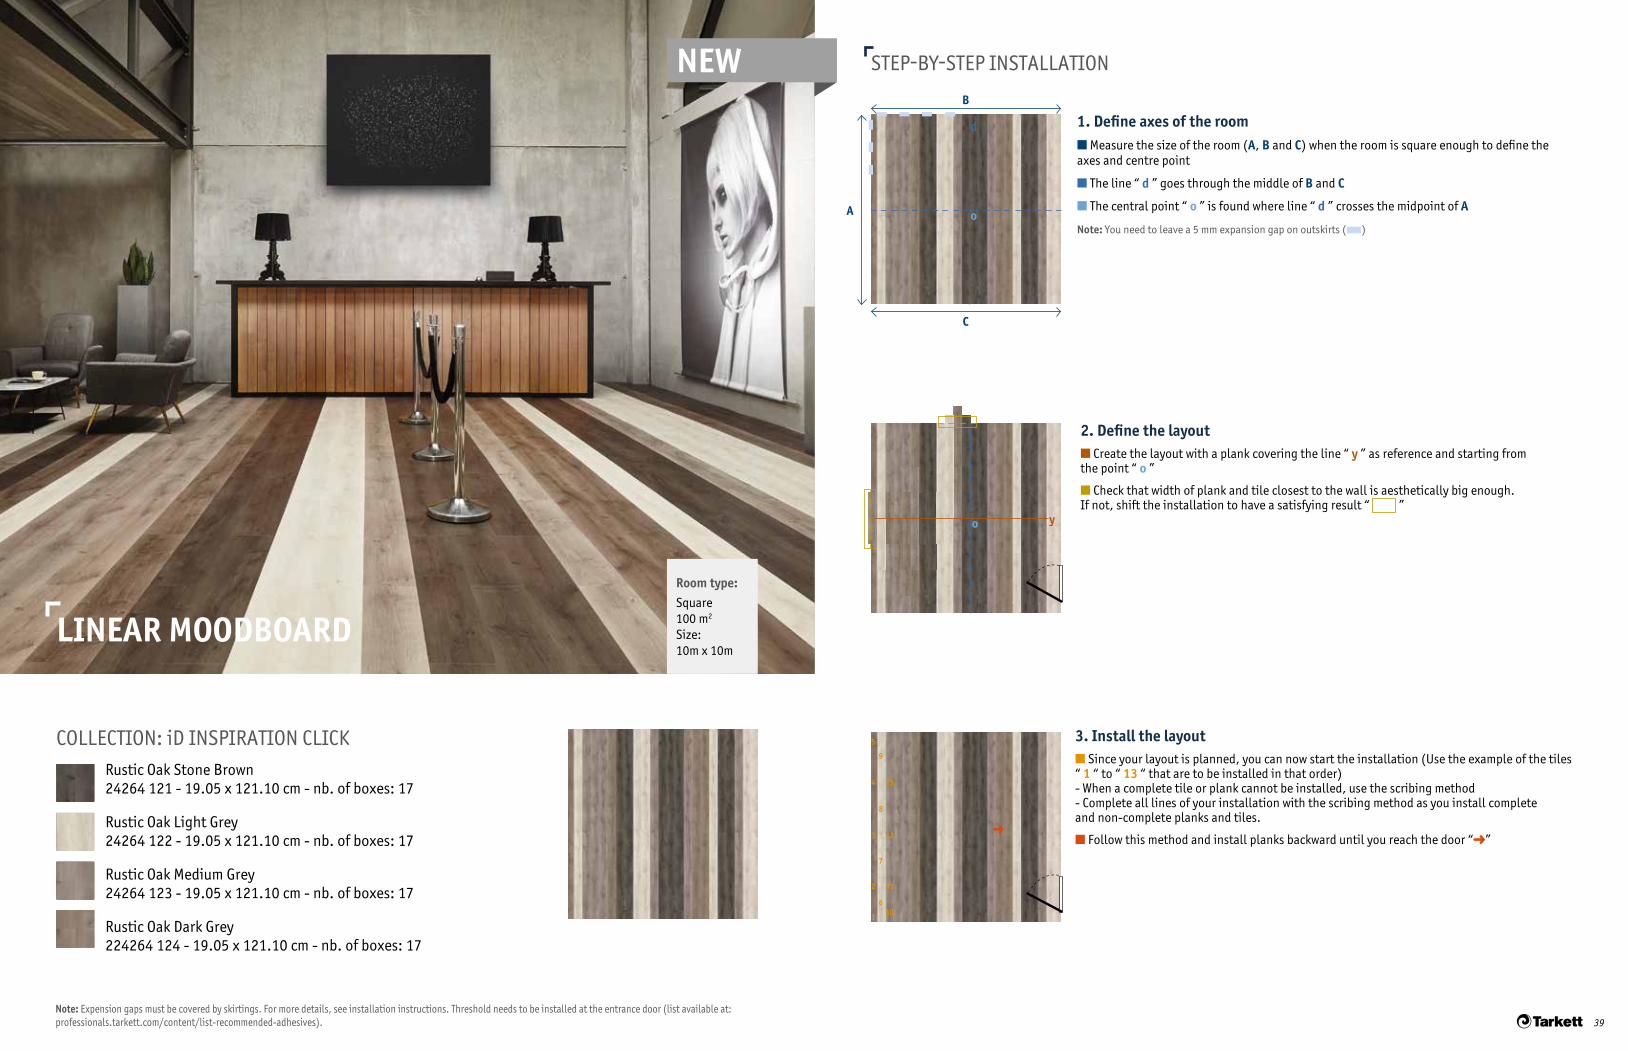
LINEAR MOODBOARD
COLLECTION: iD INSPIRATION CLICKRustic Oak Stone Brown 24264 121 - 19.05 x 121.10 cm - nb. of boxes: 17
Rustic Oak Light Grey 24264 122 - 19.05 x 121.10 cm - nb. of boxes: 17
Rustic Oak Medium Grey 24264 123 - 19.05 x 121.10 cm - nb. of boxes: 17
Rustic Oak Dark Grey 224264 124 - 19.05 x 121.10 cm - nb. of boxes: 17
Room type:Square 100 m2 Size: 10m x 10m
NEW
1. Define axes of the room■ Measure the size of the room (A, B and C) when the room is square enough to define the axes and centre point
■ The line “ d ” goes through the middle of B and C
■ The central point “ o ” is found where line “ d ” crosses the midpoint of A
Note: You need to leave a 5 mm expansion gap on outskirts (■)
2. Define the layout■ Create the layout with a plank covering the line “ y ” as reference and starting from the point “ o ”
■ Check that width of plank and tile closest to the wall is aesthetically big enough. If not, shift the installation to have a satisfying result “ ”
3. Install the layout■ Since your layout is planned, you can now start the installation (Use the example of the tiles “ 1 “ to “ 13 “ that are to be installed in that order)- When a complete tile or plank cannot be installed, use the scribing method - Complete all lines of your installation with the scribing method as you install complete and non-complete planks and tiles.
■ Follow this method and install planks backward until you reach the door “ ”
39
B
C
A
d
o
yo
1 10
2 11
3 12
4 13
5
6
7
8
9

DUAL TONES
COLLECTION: iD ESSENTIAL CLICKDelicate Oak Natural 24722 002 - 18.2 x 122 cm - nb. of boxes: 9
Rust Metal Brown 24723 001 - 31 x 60.3 cm - nb. of boxes: 10
Room type:Square 30 m2 Size: 6m x 5m
STEP-BY-STEP INSTALLATION
1. Define axes of the room■ Measure the size of the room (A, B and C) when the room is square enough to define the axes and centre point
■ The line “ d ” goes through the middle of B and C
■ The central point “ o ” is found where line “ d ” crosses the midpoint of A
Note: You need to leave a 5 mm expansion gap on outskirts (■)
2. Define the layout■ Create the layout with a plank covering the line “ y ” as reference and starting from the point “ o ”
■ Check that width of plank and tile closest to the wall is aesthetically big enough. If not, shift the installation to have a satisfying result “ ”
3. Install the layout■ Since your layout is planned, you can now start the installation (Use the example of the tiles “ 1 “ to “ 17 “ that are to be installed in that order)- When a complete tile or plank cannot be installed, use the scribing method - Complete all lines of your installation with the scribing method as you install complete and non-complete planks and tiles.
■ Follow this method and install planks backward until you reach the door “ ”
Note: Expension gaps must be covered by skirtings. For more details, see installation instructions. Threshold needs to be installed at the entrance door (list available at: professionals.tarkett.com/content/list-recommended-adhesives).
TIMELESS
41
B
C
A
d
o
y o
1 16
2 17
3
4
5
6
7
8
9
10
11
12
13
14
15

STEP-BY-STEP INSTALLATION
FRENCH MARINIERE
COLLECTION: iD ESSENTIAL CLICKLimewashed Oak Beige 24722 000 - 18.3 x 122 cm - nb. of boxes: 7
Delicate Oak Natural 24722 002 - 18.3 x 122 cm - nb. of boxes: 7
Room type:Square 25 m2 Size: 5m x 5m
1. Define axes of the room■ Measure the size of the room (A, B and C) when the room is square enough to define the axes and centre point
■ The line “ d ” goes through the middle of B and C
■ The central point “ o ” is found where line “ d ” crosses the midpoint of A
Note: You need to leave a 5 mm expansion gap on outskirts (■)
2. Define the layout■ Create the layout with a plank covering the line “ y ” as reference and starting from the point “ o ”
■ Check that width of plank and tile closest to the wall is aesthetically big enough. If not, shift the installation to have a satisfying result “ ”
3. Install the layout■ Since your layout is planned, you can now start the installation (Use the example of the planks “ 1 “ to “ 12 “ that are to be installed in that order)- When a complete plank cannot be installed, use the scribing method - Complete all lines of your installation with the scribing method as you install complete and non-complete planks.
■ Follow this method and install planks backward until you reach the door “ ”
Note: Expension gaps must be covered by skirtings. For more details, see installation instructions. Threshold needs to be installed at the entrance door (list available at: professionals.tarkett.com/content/list-recommended-adhesives).
TIMELESS
43
B
C
A
d
o
y o
1
105 6 7 8 9
2
11
3
12
4

Room type:Rectangular 48 m2 Size: 6m x 8m
STEP-BY-STEP INSTALLATION
COLLECTION: iD INSPIRATION CLICKPatina Ash Beige 24264 106 - 25 x 100 cm - nb. of boxes: 7
Patina Ash Grey 24264 108 - 25 x 100 cm cm - nb. of boxes: 7
1. Define axes of the room■ Measure the size of the room (A, B and C) when the room is rectangle enough to define the axes and centre point
■ The line “ d ” goes through the middle of B and C
■ The central point “ o ” is found where line “ d ” crosses the midpoint of A
2. Define the layout■ Create the layout with a plank covering the line “ y ” as reference and starting from the point “ o ”
■ Check that width of the plank closest to the wall is aesthetically big enough. If not, shift the installation to have a satisfying result “ ”
■ Define shifted axis “ Y’ ” 3 or 4 plank widths away from the wall to start installation
3. Install the layout■ Since your layout is planned, you can now start the installation (Use the example of the planks “ 1 “ to “ 10 “ that are to be installed in that order)- When a complete plank cannot be installed, use the scribing method- Complete all lines of your installation with the scribing method as you install completeand non-complete planks.■ Follow this method and install planks backward until you reach the door “ ”
Note: Tarkett may recommend a selection of manufacturer adhesive, we do not however guarantee the products listed (list available at: professionals.tarkett.com/content/list-recommended-adhesives). Tarkett would not accept any liability for any of these products failing to perform in conjunction with any of their products. It is the responsibility of the adhesive manufacturer and flooring contractor to ensure the product being used is appropriate to use and applied in accordance with the manufacturer recommendations.
TWO STEP
TIMELESS
45
B
C
A
d
o
y
Y’
o
Y’
1
5
6 10
7
8
9
2
3
4
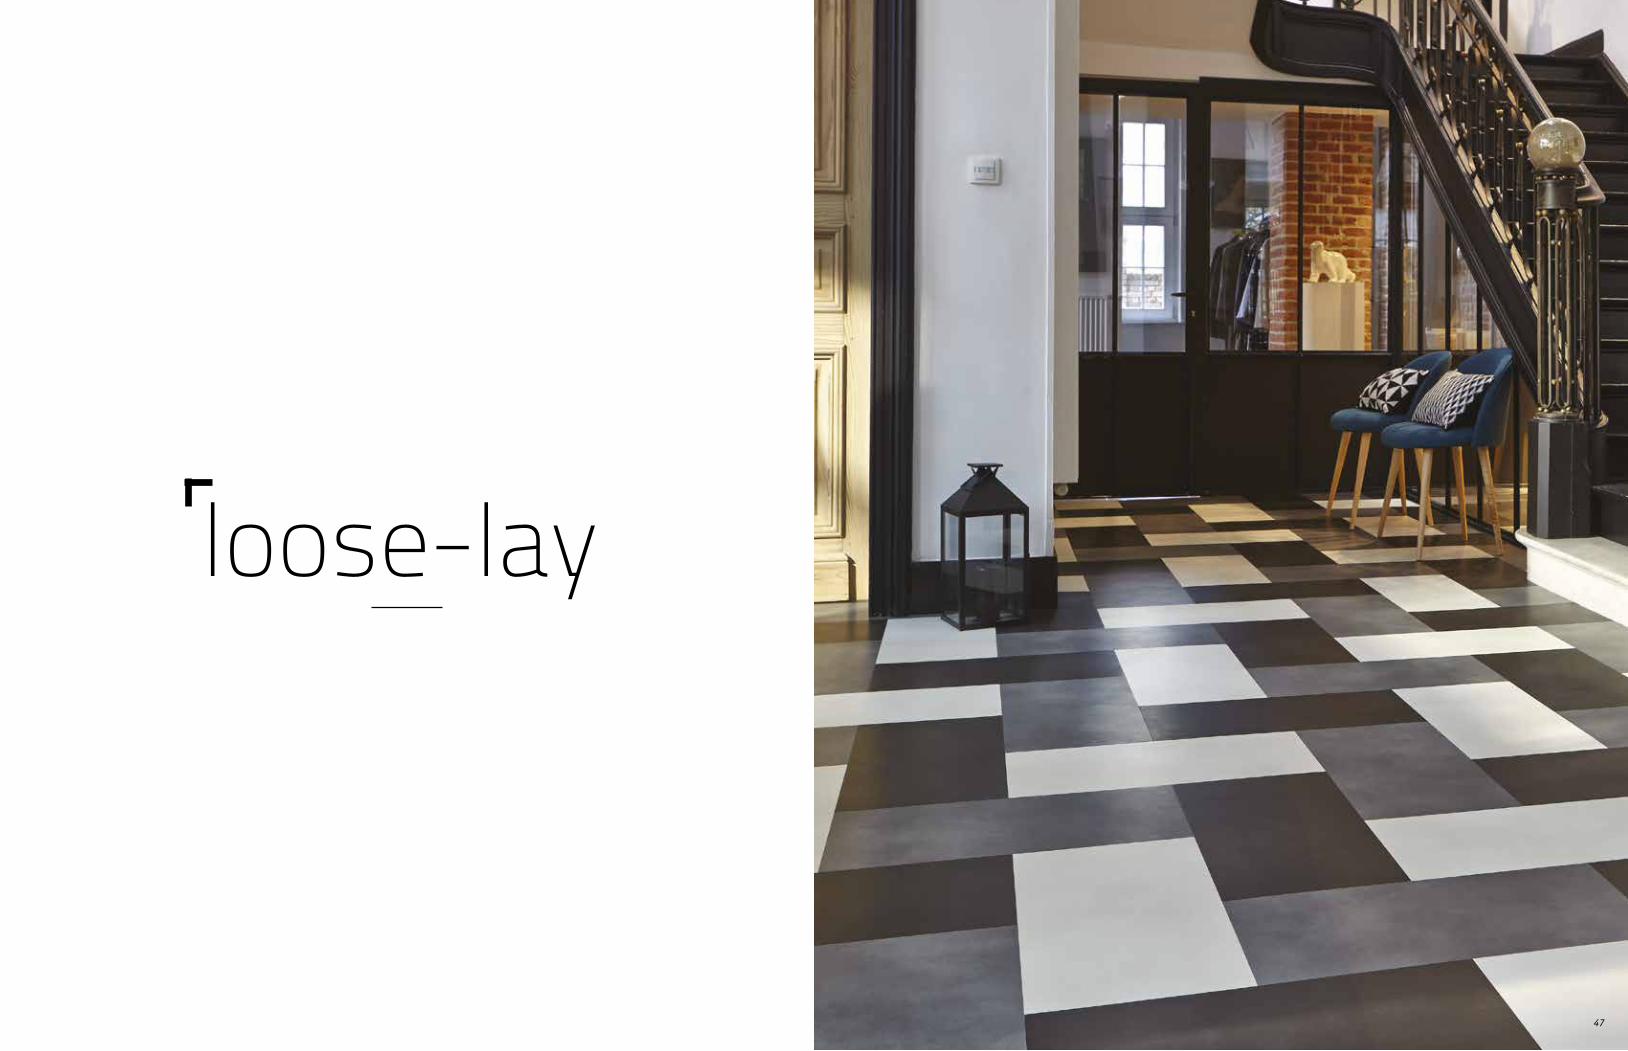
loose-lay
47

STEP-BY-STEP INSTALLATION
MIXED PATHRoom type:Rectangular 48 m2 Size: 6m x 8m
COLLECTION: iD INSPIRATION LOOSE-LAYBeton White 24641 000 - 30.5 x 61 cm - nb. of boxes: 7
Beton Grey 24641 002 - 30.5 x 61 cm - nb. of boxes: 7
Beton Black 24641 001 - 30.5 x 61 cm - nb. of boxes: 7
1. Define axes of the room■ Measure the size of the room (A, B and C) when the room is rectangle enough to define the axes and centre point
■ The line “ d ” goes through the middle of B and C
■ The central point “ o ” is found where line “ d ” crosses the midpoint of A
2. Define the layout■ Create the layout with a tile covering the line “ y ” as reference and starting from the point “ o ”
■ Check that width of the plank closest to the wall is aesthetically big enough. If not, shift the installation to have a satisfying result “ ”
■ Installation will start far from the entrance door. Define the starting axes “ Y ” and “ Y’ ” for the placement of the first cuts
3. Start the installation■ As the room is over 16m2 but less than 64m2, Tarkett recommends spreading Tackifier adhesive on the outskirts (10 cm large area) ■ - Begin from the starting axes (“ Y ” and “ Y’ ”) - As soon as the first cuts are placed (first row), continue the installation from the opposite wall to the entrance door and from one side to the other (Use the example of the tiles “ 1 “ to “ 16“ that are to be installed in that order) - On the side wall, when a complete tile cannot be installed, use the scribing method to finish the installation of the tile before moving to another tile - Use a cork press to ensure bonding
Tip: before applying the tackifier, fix the last full tile with a double sided tape adhesive in order to prepare all the cut tiles and draw their position on the floor with a pencil.
Note: Tarkett may recommend a selection of manufacturer adhesive, we do not however guarantee the products listed (list available at: professionals.tarkett.com/content/list-recommended-adhesives). Tarkett would not accept any liability for any of these products failing to perform in conjunction with any of their products. It is the responsibility of the adhesive manufacturer and flooring contractor to ensure the product being used is appropriate to use and applied in accordance with the manufacturer recommendations.
TIMELESS
49
B
C
A
d
o
y
Y’
Y’
Y
Y
o
1 23
8910
1112
1314
15 164 5
67

Room type:Rectangular 50 m2 Size: 5m x 10m
STEP-BY-STEP INSTALLATION
HYBRID HERRINGBONE
COLLECTION: iD INSPIRATION LOOSE-LAYLimed Oak Beige 24640 000 - 22.9 x 121.9 cm - nb. of boxes: 7
Limed Oak Grey 24640 001 - 22.9 x 121.9 cm - nb. of boxes: 7
Limed Oak Brown 24640 002 - 22.9 x 121.9 cm - nb. of boxes: 7
B
C
A
d
o
1. Define axes of the room■ Measure the size of the room (A, B and C) when the room is rectangle enough to define the axes and centre point
■ The line “ d ” goes through the middle of B and C
■ The central point “ o ” is found where line “ d ” crosses the midpoint of A
2. Define diagonal axes■ Create the diagonals by using a compass with a circle from the central point creating the 4 junctions “ X ” with axes
3. Define diagonal axes■ Drawing a circle from the central point: - create the 4 junctions “ x ” with axes - draw 4 circles from those junctions
■ The diagonals cross all intersections of the circles
4. Define the layout■ From the diagonals, start installation of the first plank
■ Create the layout with a plank covering the line “ y ” as reference and starting from the point “ o ”
■ Check that width of the plank closest to the wall is aesthetically big enough. If not, shift the installation to have a satisfying result “ ”
■ Installation will start far from the entrance door. Define the starting axes “ Y ” and “ Y’ ” for the placement of the first cuts
5. Start the installation■ As the room is over 16m2 but less than 64m2, Tarkett recommends spreading Tackifier adhesive on the outskirts (10 cm large area) ■ - Begin from starting axes (“ Y ” and “ Y’ ”) - As soon as the first cuts are placed (first row), continue the installation from the opposite wall to the entrance door and from one side to the other (Use the example of the planks “ 1 “ to “ 16 “ that are to be installed in that order) - On the side wall, when a complete plank cannot be installed, use the scribing method to finish the installation of the plank before moving to another plank - Use a cork press to ensure bonding
Tip: before applying the tackifier, fix the last full plank with a double sided tape adhesive in order to prepare all the cut planks and draw their position on the floor with a pencil.
Note: Tarkett may recommend a selection of manufacturer adhesive, we do not however guarantee the products listed (list available at: professionals.tarkett.com/content/list-recommended-adhesives). Tarkett would not accept any liability for any of these products failing to perform in conjunction with any of their products. It is the responsibility of the adhesive manufacturer and flooring contractor to ensure the product being used is appropriate to use and applied in accordance with the manufacturer recommendations.
TIMELESS
51
o
y
Y Y’
15
9152 6
10163 711
48121314
d
o XX
X
X
d
XX
X
X
xx
x
x
o
Y Y’
STEP-BY-STEP INSTALLATION
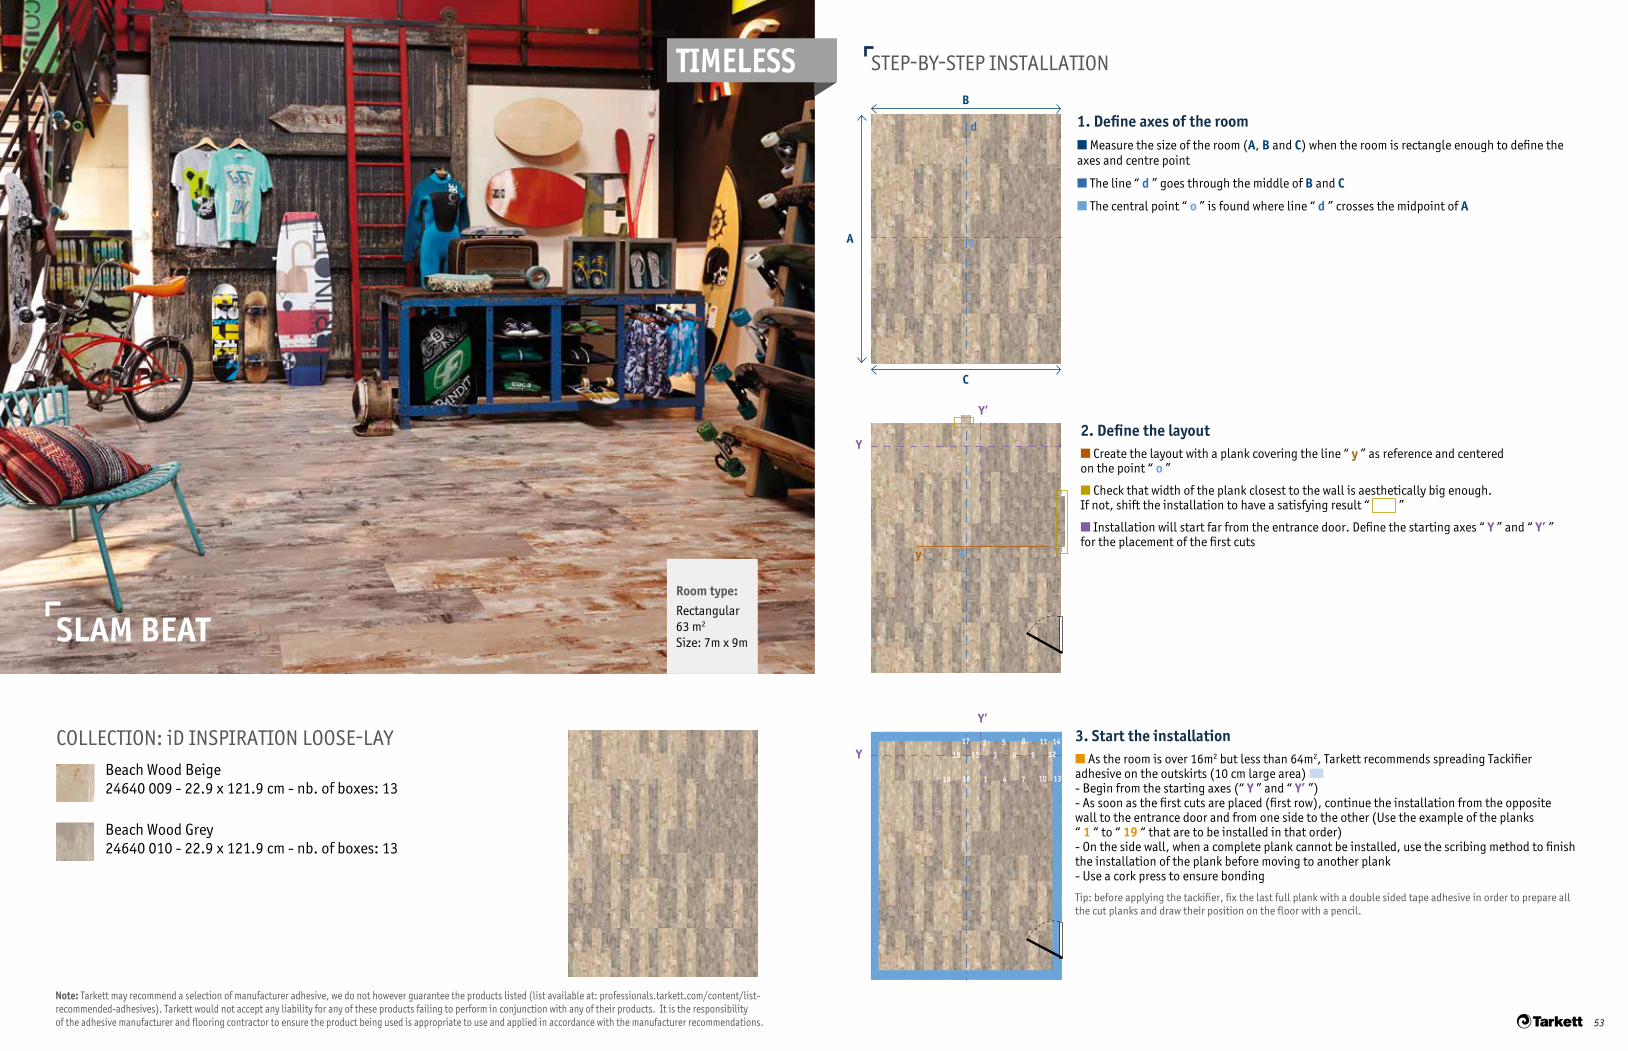
SLAM BEAT
COLLECTION: iD INSPIRATION LOOSE-LAYBeach Wood Beige 24640 009 - 22.9 x 121.9 cm - nb. of boxes: 13
Beach Wood Grey 24640 010 - 22.9 x 121.9 cm - nb. of boxes: 13
Room type:Rectangular 63 m2 Size: 7m x 9m
1. Define axes of the room■ Measure the size of the room (A, B and C) when the room is rectangle enough to define the axes and centre point
■ The line “ d ” goes through the middle of B and C
■ The central point “ o ” is found where line “ d ” crosses the midpoint of A
2. Define the layout■ Create the layout with a plank covering the line “ y ” as reference and centered on the point “ o ”
■ Check that width of the plank closest to the wall is aesthetically big enough. If not, shift the installation to have a satisfying result “ ”
■ Installation will start far from the entrance door. Define the starting axes “ Y ” and “ Y’ ” for the placement of the first cuts
3. Start the installation■ As the room is over 16m2 but less than 64m2, Tarkett recommends spreading Tackifier adhesive on the outskirts (10 cm large area) ■ - Begin from the starting axes (“ Y ” and “ Y’ ”) - As soon as the first cuts are placed (first row), continue the installation from the opposite wall to the entrance door and from one side to the other (Use the example of the planks “ 1 “ to “ 19 “ that are to be installed in that order) - On the side wall, when a complete plank cannot be installed, use the scribing method to finish the installation of the plank before moving to another plank - Use a cork press to ensure bonding
Tip: before applying the tackifier, fix the last full plank with a double sided tape adhesive in order to prepare all the cut planks and draw their position on the floor with a pencil.
Note: Tarkett may recommend a selection of manufacturer adhesive, we do not however guarantee the products listed (list available at: professionals.tarkett.com/content/list-recommended-adhesives). Tarkett would not accept any liability for any of these products failing to perform in conjunction with any of their products. It is the responsibility of the adhesive manufacturer and flooring contractor to ensure the product being used is appropriate to use and applied in accordance with the manufacturer recommendations.
TIMELESS
53
B
C
A
d
o
y
Y’
Y’
Y
Y
o
1
23
5
4
96
8
10
11
12
13
14
15
16
17
18
19 7
STEP-BY-STEP INSTALLATION
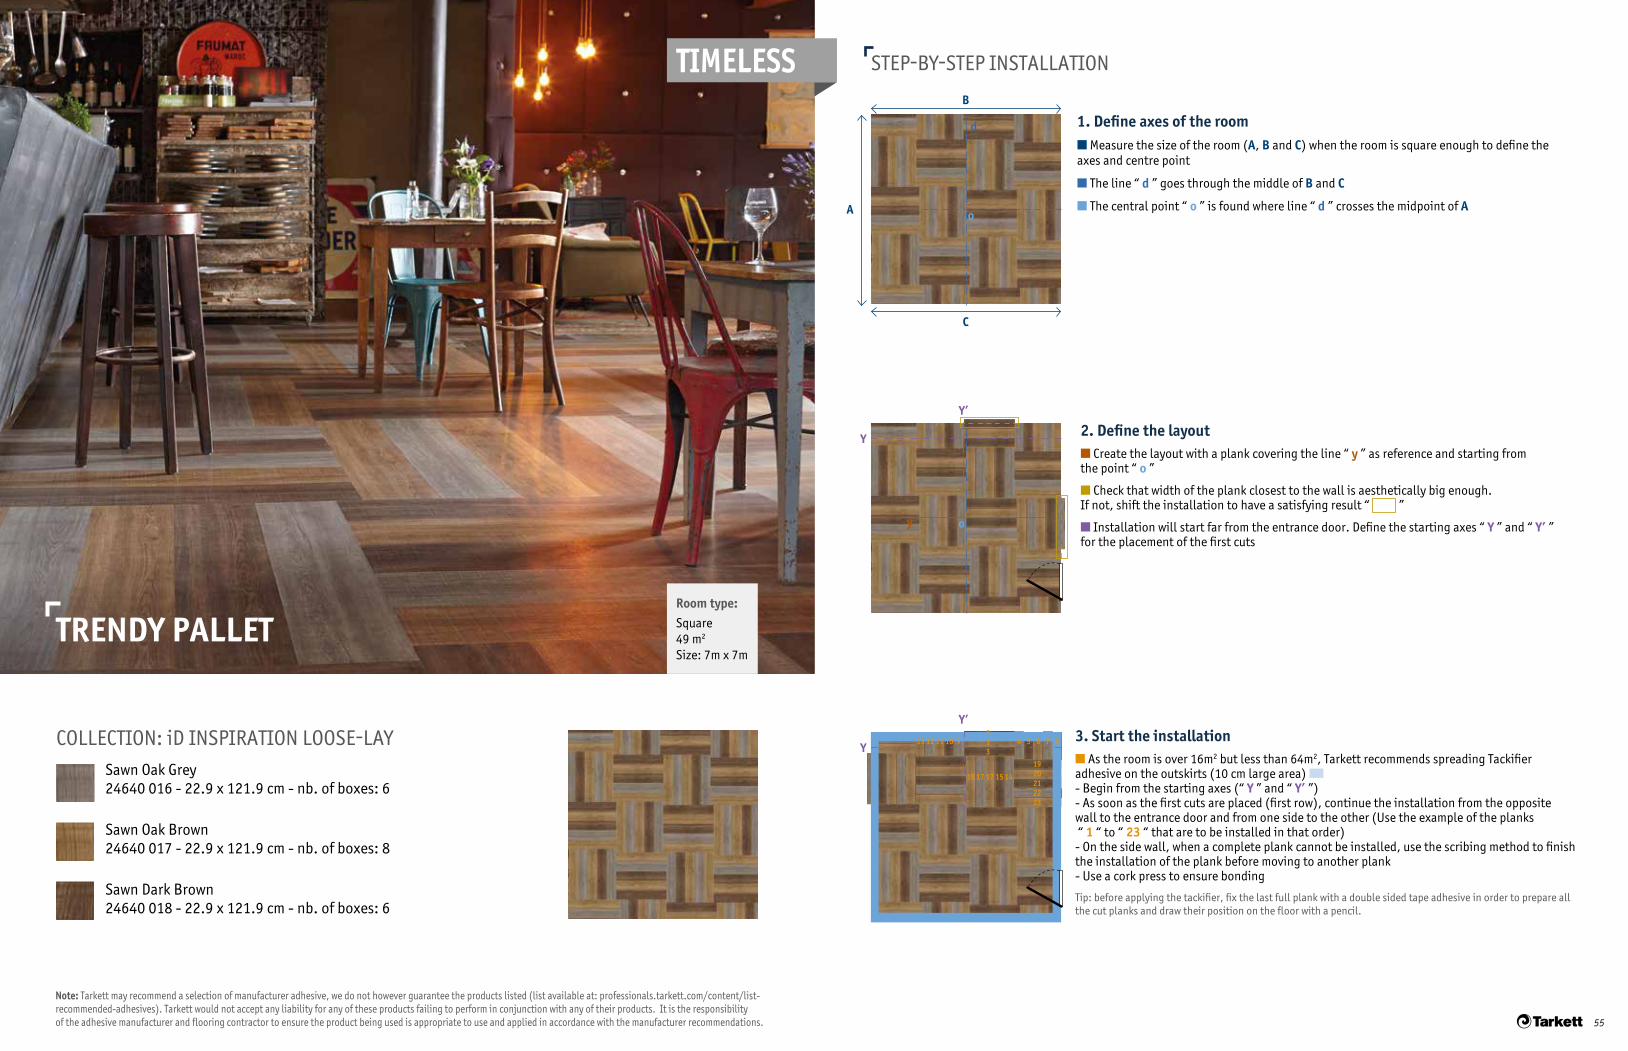
TRENDY PALLET
COLLECTION: iD INSPIRATION LOOSE-LAYSawn Oak Grey 24640 016 - 22.9 x 121.9 cm - nb. of boxes: 6
Sawn Oak Brown 24640 017 - 22.9 x 121.9 cm - nb. of boxes: 8
Sawn Dark Brown 24640 018 - 22.9 x 121.9 cm - nb. of boxes: 6
Room type:Square 49 m2 Size: 7m x 7m
1. Define axes of the room■ Measure the size of the room (A, B and C) when the room is square enough to define the axes and centre point
■ The line “ d ” goes through the middle of B and C
■ The central point “ o ” is found where line “ d ” crosses the midpoint of A
2. Define the layout■ Create the layout with a plank covering the line “ y ” as reference and starting from the point “ o ”
■ Check that width of the plank closest to the wall is aesthetically big enough. If not, shift the installation to have a satisfying result “ ”
■ Installation will start far from the entrance door. Define the starting axes “ Y ” and “ Y’ ” for the placement of the first cuts
3. Start the installation■ As the room is over 16m2 but less than 64m2, Tarkett recommends spreading Tackifier adhesive on the outskirts (10 cm large area) ■ - Begin from the starting axes (“ Y ” and “ Y’ ”) - As soon as the first cuts are placed (first row), continue the installation from the opposite wall to the entrance door and from one side to the other (Use the example of the planks “ 1 “ to “ 23 “ that are to be installed in that order) - On the side wall, when a complete plank cannot be installed, use the scribing method to finish the installation of the plank before moving to another plank - Use a cork press to ensure bonding
Tip: before applying the tackifier, fix the last full plank with a double sided tape adhesive in order to prepare all the cut planks and draw their position on the floor with a pencil.
Note: Tarkett may recommend a selection of manufacturer adhesive, we do not however guarantee the products listed (list available at: professionals.tarkett.com/content/list-recommended-adhesives). Tarkett would not accept any liability for any of these products failing to perform in conjunction with any of their products. It is the responsibility of the adhesive manufacturer and flooring contractor to ensure the product being used is appropriate to use and applied in accordance with the manufacturer recommendations.
TIMELESS
55
B
C
A
d
o
y
Y’
Y’
Y
Y
o
1
20
413
18
512
17
611
17
710
15
89
14
2
193
21
2322

installation tips
57

INSTALLATION TIPS GLUE-DOWN
IMPORTANT!■ Make sure all specifications and instructions are followed carefully.■ Contact your Tarkett representative if you are unsure about any part of the installation.■ This information is subject to change due to continuous improvement.■ Use the same shade number for each continuous surface.■ Store the boxes in small neat piles (max. 5 boxes high).■ Let the flooring acclimatise at least 24h before laying at room temperature (minimum 15°C).■ The subfloor must be flat, level, clean, without marks (no felt pen, marker, etc.), sound, dry, solid, hard, smooth and not exposed
to moisture. Absorbency must be checked and adjusted to have moderately absorbent subfloor.■ Use only adhesives recommended by Tarkett and developed for LVT installation. Always follow the adhesive manufacturer’s
instructions and recommendations.■ For specific areas with sunlight exposure (winter garden…), select an adapted adhesive recommended by manufacturers.■ The work must be completed with an inspection: ensure that the newly laid floor is free from adhesive residues.
SUBFLOORThe subfloor must be level, flat, clean, free from marks (no felt pen, marker of any type, ballpoint pens, paint, etc., that could cause discoloration due to migration) sound, dry, solid, hard, smooth (the absorbency must be checked) and not exposed to moisture.
The preparation/dryness of the subfloor and installation procedures should all be in accordance with the current relevant standard within the country of use. The dryness of a solid subfloor should be below the maximum moisture level permitted when tested in accordance with that standard.
E.g. in the UK, the relative humidity of concrete surfaces must be below 75%, and less than 2% with the CCM method.
In North America, ASTM F-170 recommends a water-to-cement ratio of 0.40 to 0.45.
Before selecting a smoothing compound, check what type of traffic the floorcovering will be subjected to once installed. Latex smoothing compounds are not suitable for areas that will receive heavy traffic, especially heavy, narrow wheeled traffic (see EN 12529, Castors and wheels). Check levelling compound compatibility, and follow the instructions of the levelling compound manufacturer.
Note: exclusion of liability (adhesives, levelling compounds, etc.) Although Tarkett may list a selection of adhesive, levelling compound and surface damp-proof membrane manufacturers and types, we do not guarantee the products listed. The list of products and manufacturers is not guaranteed complete or current.
Tarkett will accept no liability for any of these products failing to perform in conjunction with any of its products. It is the responsibility of the adhesive, levelling compound and surface damp-proof membrane manufacturer and flooring contractor to ensure the products being used are appropriate for use and applied in accordance with the manufacturers’ recommendations.
CONDITIONS REQUIRED FOR INSTALLATIONIt is important to store the planks (or tiles) for at least 24 hours before installation at a minimum room temperature of 15°C /see each country regulations. This temperature should be maintained throughout the installation.
The minimum temperature of the subfloor should be 10-12°C and room temperature 15°C. See each country regulations.
The recommended relative humidity inside the room should be 35-65%. See each country regulations.
Planks (or tiles) should be stored flat in their packages, in small neat piles (max. 5 boxes high).
UNDERFLOOR HEATINGIt is imperative that underfloor heating system have been previously commissioned and found to be functioning correctly before installation of the floorcovering.
Ensure that the underfloor heating system is switched-off 48 hours before installation of the floorcovering begins, and remains off for at least 48 hours after installation is completed. While the underfloor heating system is off, an alternative heating source should be provided, if required, to ensure that the installation area is kept at a constant temperature of 18-27°C.
Gradually increase the temperature over a number of days by only a few degrees per day until the desired room temperature is reached.
The temperature should never exceed the floorcovering industry’s agreed maximum of 27°C on the underside of the floorcovering (the adhesive line).
LAYING DIRECTIONBefore starting to install tiles/planks, determine the layout you want to achieve, taking into account the shape of the room and the design to be laid.
Important! Before laying the first rows of tiles, check that: - the cut tiles closest to the walls are more than 10 cm wide; - at doorways and corners, the cut tiles are not less than half a whole tile.
■ Tiles
Tiles are marked on the reverse with arrows. Tiles should be laid in a checkerboard pattern.
Installation should start from the center of the room and finish on the sides (walls).
■ Planks
Stagger each row of planks to ensure that the end joints do not coincide with the previous row installed.
For wood patterns, avoid installing planks with the same design next to each other.
GLUING1
Glue with an acrylic adhesive emulsion recommended by Tarkett. Apply about 250 g/m2 using the recommended trowel (A1 according TKB norm). Always follow the adhesive manufacturer’s instructions and respect adhesive drying and working time.
In case of particular conditions, ie. significant temperature variation (veranda, winter garden…) or heavy traffic, bi-component adhesive could be required. Place the tiles or planks tight edge to edge.
After selected area installation, press manually the tiles or planks using a piece of board with a rounded edge. After manual pressing, use a heavy roller in both directions to ensure final bonding.1 For more details on gluing, please refer to the adhesives sheet available in each product box.
AFTER INSTALLATIONIMPORTANT! Wait 48 to 72 hours before allowing any foot traffic or moving in furniture.
■ Protection of installation
If building work is carried out after installation, the floor should always be protected by covering it with hardboard or plywood sheeting. Masking tape must not be stuck directly to the floor. Never subject a newly installed floorcovering to heavy wheeled traffic at an early stage, as this will force adhesive from beneath the floorcovering.
■ Initial site clean
An initial site clean is always recommended before the new floorcovering is commissioned.
Residual adhesive should be removed with methylated spirits and a clean cloth.
Lightly soiled floors: vacuum, sweep or damp mop the area to remove loose dirt and building dust. A combined machine is very effective for large areas (combined scrubber/dryer with cylindrical brushes for safety flooring).
59
INSTALLATION TIPS CLICK
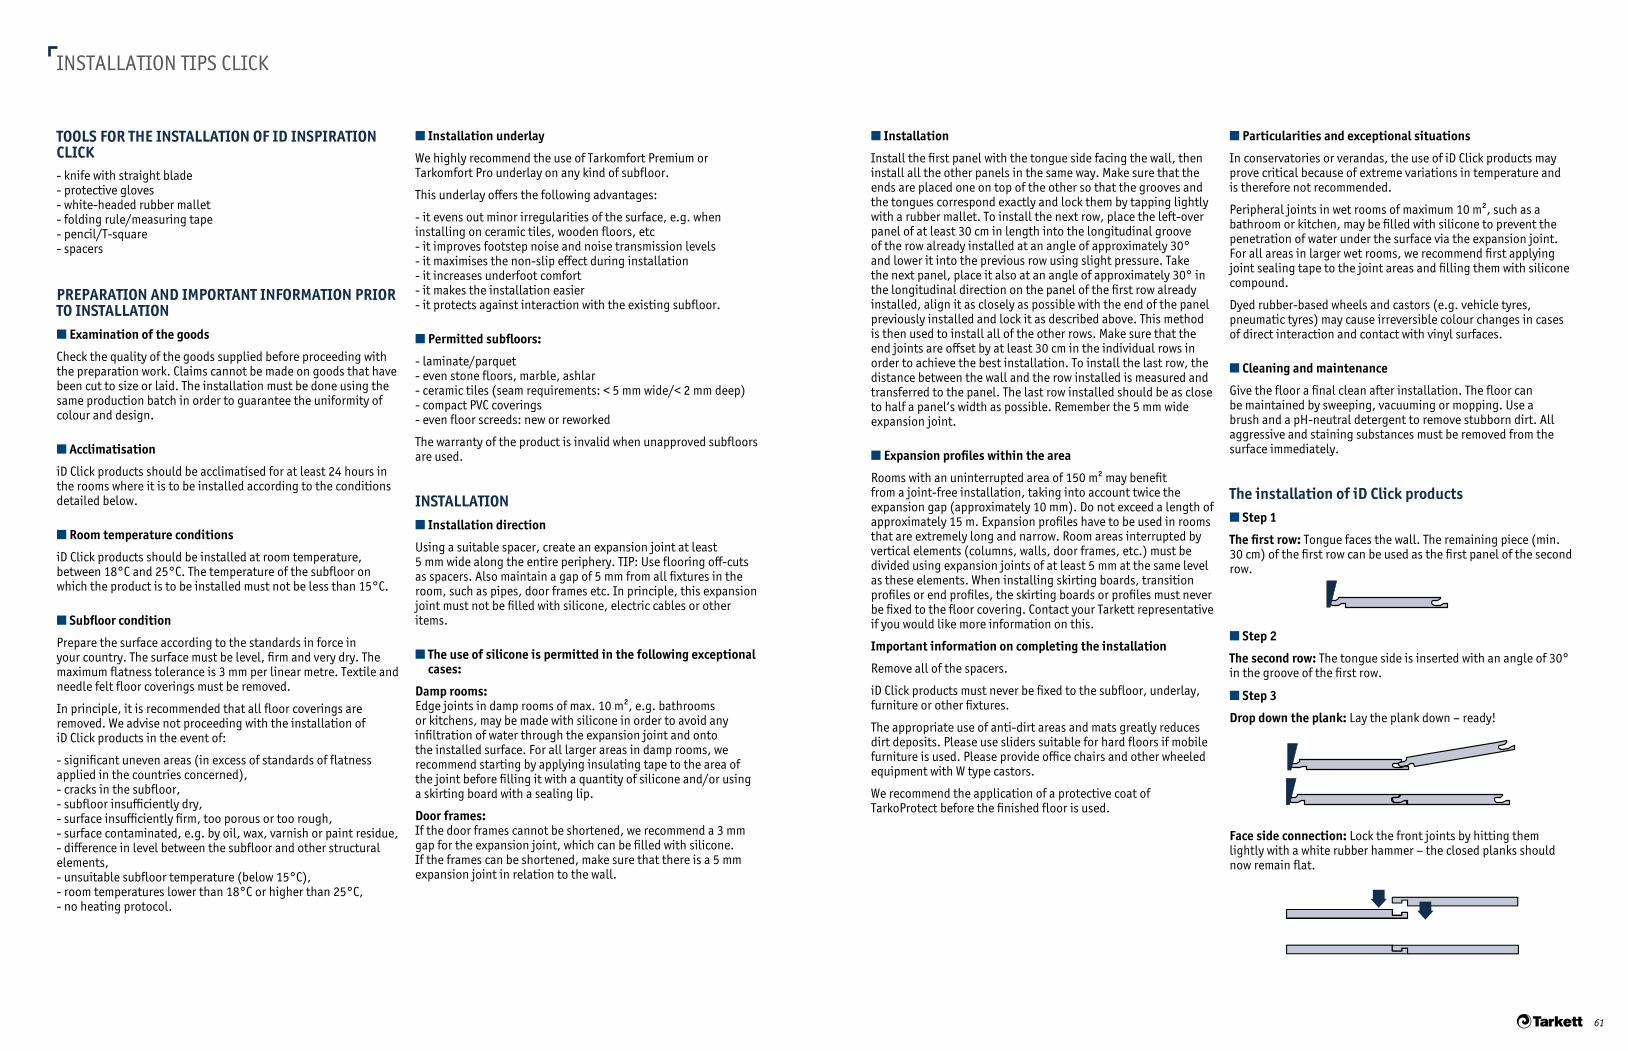
TOOLS FOR THE INSTALLATION OF ID INSPIRATION CLICK- knife with straight blade - protective gloves - white-headed rubber mallet - folding rule/measuring tape - pencil/T-square - spacers
PREPARATION AND IMPORTANT INFORMATION PRIOR TO INSTALLATION■ Examination of the goods
Check the quality of the goods supplied before proceeding with the preparation work. Claims cannot be made on goods that have been cut to size or laid. The installation must be done using the same production batch in order to guarantee the uniformity of colour and design.
■ Acclimatisation
iD Click products should be acclimatised for at least 24 hours in the rooms where it is to be installed according to the conditions detailed below.
■ Room temperature conditions
iD Click products should be installed at room temperature, between 18°C and 25°C. The temperature of the subfloor on which the product is to be installed must not be less than 15°C.
■ Subfloor condition
Prepare the surface according to the standards in force in your country. The surface must be level, firm and very dry. The maximum flatness tolerance is 3 mm per linear metre. Textile and needle felt floor coverings must be removed.
In principle, it is recommended that all floor coverings are removed. We advise not proceeding with the installation of iD Click products in the event of:
- significant uneven areas (in excess of standards of flatness applied in the countries concerned), - cracks in the subfloor, - subfloor insufficiently dry, - surface insufficiently firm, too porous or too rough, - surface contaminated, e.g. by oil, wax, varnish or paint residue, - difference in level between the subfloor and other structural elements, - unsuitable subfloor temperature (below 15°C), - room temperatures lower than 18°C or higher than 25°C, - no heating protocol.
■ Installation underlay
We highly recommend the use of Tarkomfort Premium or Tarkomfort Pro underlay on any kind of subfloor.
This underlay offers the following advantages:
- it evens out minor irregularities of the surface, e.g. when installing on ceramic tiles, wooden floors, etc - it improves footstep noise and noise transmission levels - it maximises the non-slip effect during installation - it increases underfoot comfort - it makes the installation easier - it protects against interaction with the existing subfloor.
■ Permitted subfloors:
- laminate/parquet - even stone floors, marble, ashlar - ceramic tiles (seam requirements: < 5 mm wide/< 2 mm deep) - compact PVC coverings - even floor screeds: new or reworked
The warranty of the product is invalid when unapproved subfloors are used.
INSTALLATION■ Installation direction
Using a suitable spacer, create an expansion joint at least 5 mm wide along the entire periphery. TIP: Use flooring off-cuts as spacers. Also maintain a gap of 5 mm from all fixtures in the room, such as pipes, door frames etc. In principle, this expansion joint must not be filled with silicone, electric cables or other items.
■ The use of silicone is permitted in the following exceptional cases:
Damp rooms: Edge joints in damp rooms of max. 10 m², e.g. bathrooms or kitchens, may be made with silicone in order to avoid any infiltration of water through the expansion joint and onto the installed surface. For all larger areas in damp rooms, we recommend starting by applying insulating tape to the area of the joint before filling it with a quantity of silicone and/or using a skirting board with a sealing lip.
Door frames: If the door frames cannot be shortened, we recommend a 3 mm gap for the expansion joint, which can be filled with silicone. If the frames can be shortened, make sure that there is a 5 mm expansion joint in relation to the wall.
■ Installation
Install the first panel with the tongue side facing the wall, then install all the other panels in the same way. Make sure that the ends are placed one on top of the other so that the grooves and the tongues correspond exactly and lock them by tapping lightly with a rubber mallet. To install the next row, place the left-over panel of at least 30 cm in length into the longitudinal groove of the row already installed at an angle of approximately 30° and lower it into the previous row using slight pressure. Take the next panel, place it also at an angle of approximately 30° in the longitudinal direction on the panel of the first row already installed, align it as closely as possible with the end of the panel previously installed and lock it as described above. This method is then used to install all of the other rows. Make sure that the end joints are offset by at least 30 cm in the individual rows in order to achieve the best installation. To install the last row, the distance between the wall and the row installed is measured and transferred to the panel. The last row installed should be as close to half a panel‘s width as possible. Remember the 5 mm wide expansion joint.
■ Expansion profiles within the area
Rooms with an uninterrupted area of 150 m² may benefit from a joint-free installation, taking into account twice the expansion gap (approximately 10 mm). Do not exceed a length of approximately 15 m. Expansion profiles have to be used in rooms that are extremely long and narrow. Room areas interrupted by vertical elements (columns, walls, door frames, etc.) must be divided using expansion joints of at least 5 mm at the same level as these elements. When installing skirting boards, transition profiles or end profiles, the skirting boards or profiles must never be fixed to the floor covering. Contact your Tarkett representative if you would like more information on this.
Important information on completing the installation
Remove all of the spacers.
iD Click products must never be fixed to the subfloor, underlay, furniture or other fixtures.
The appropriate use of anti-dirt areas and mats greatly reduces dirt deposits. Please use sliders suitable for hard floors if mobile furniture is used. Please provide office chairs and other wheeled equipment with W type castors.
We recommend the application of a protective coat of TarkoProtect before the finished floor is used.
■ Particularities and exceptional situations
In conservatories or verandas, the use of iD Click products may prove critical because of extreme variations in temperature and is therefore not recommended.
Peripheral joints in wet rooms of maximum 10 m², such as a bathroom or kitchen, may be filled with silicone to prevent the penetration of water under the surface via the expansion joint. For all areas in larger wet rooms, we recommend first applying joint sealing tape to the joint areas and filling them with silicone compound.
Dyed rubber-based wheels and castors (e.g. vehicle tyres, pneumatic tyres) may cause irreversible colour changes in cases of direct interaction and contact with vinyl surfaces.
■ Cleaning and maintenance
Give the floor a final clean after installation. The floor can be maintained by sweeping, vacuuming or mopping. Use a brush and a pH-neutral detergent to remove stubborn dirt. All aggressive and staining substances must be removed from the surface immediately.
The installation of iD Click products■ Step 1
The first row: Tongue faces the wall. The remaining piece (min. 30 cm) of the first row can be used as the first panel of the second row.
■ Step 2
The second row: The tongue side is inserted with an angle of 30° in the groove of the first row.
■ Step 3
Drop down the plank: Lay the plank down – ready!
Face side connection: Lock the front joints by hitting them lightly with a white rubber hammer – the closed planks should now remain flat.
61
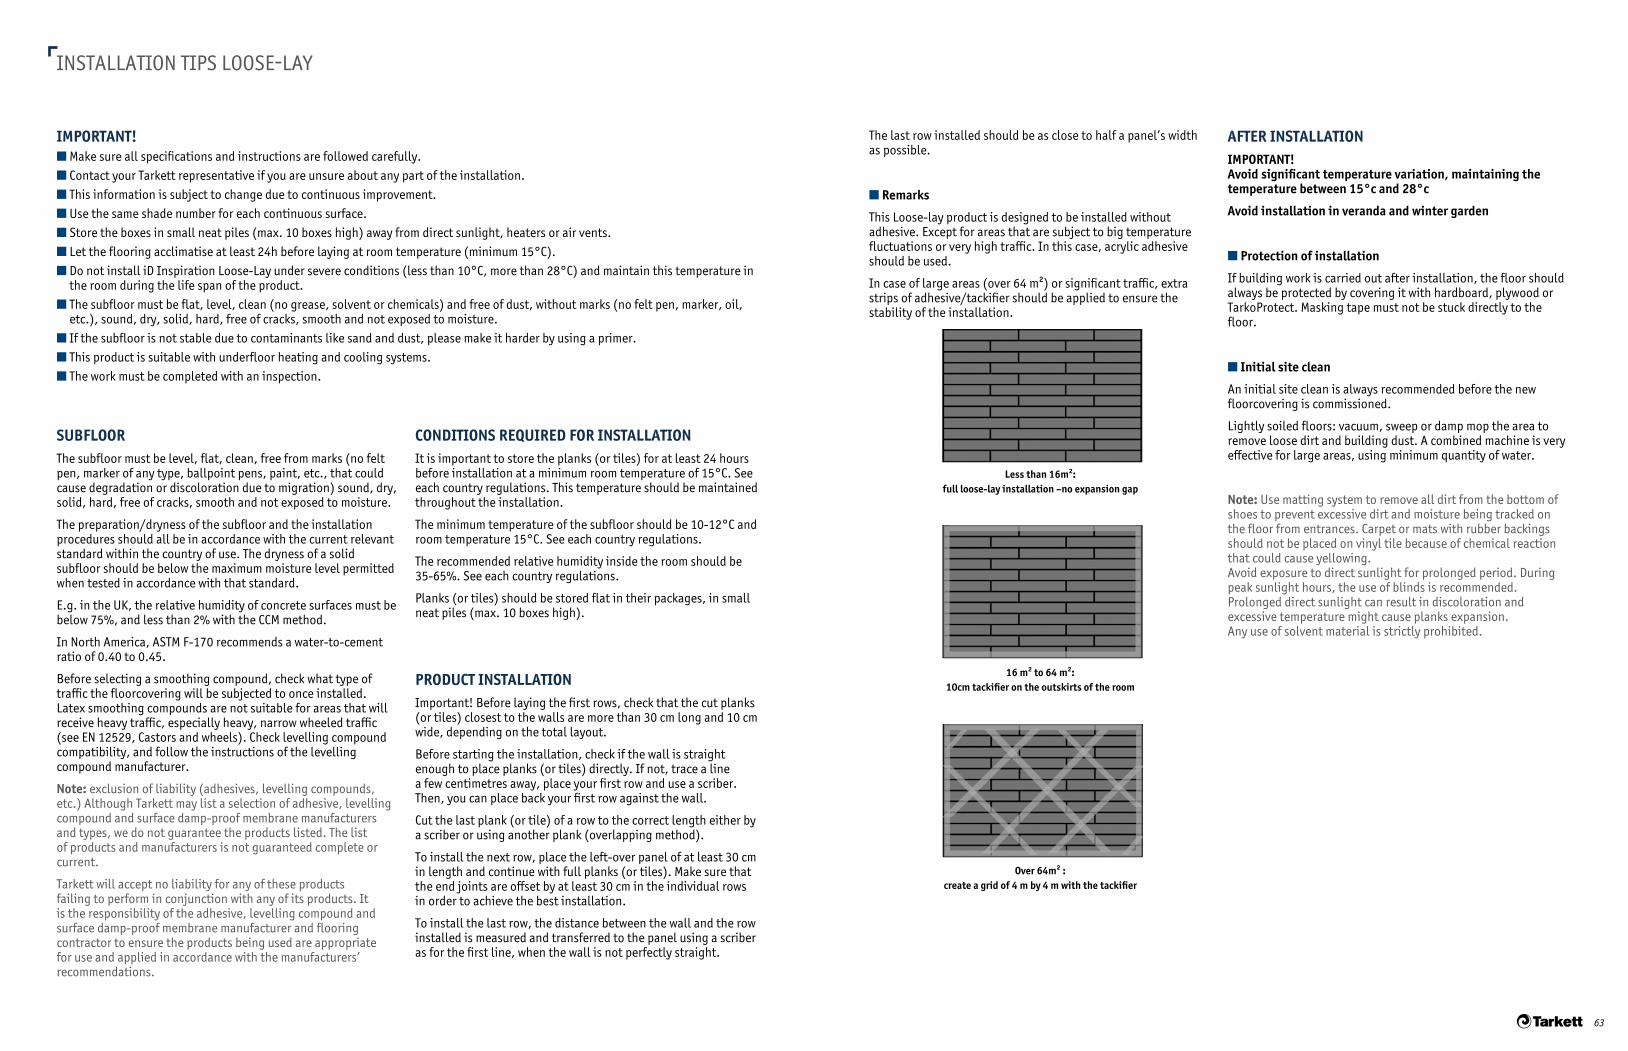
INSTALLATION TIPS LOOSE-LAY
IMPORTANT!■ Make sure all specifications and instructions are followed carefully.■ Contact your Tarkett representative if you are unsure about any part of the installation.■ This information is subject to change due to continuous improvement.■ Use the same shade number for each continuous surface.■ Store the boxes in small neat piles (max. 10 boxes high) away from direct sunlight, heaters or air vents.■ Let the flooring acclimatise at least 24h before laying at room temperature (minimum 15°C).■ Do not install iD Inspiration Loose-Lay under severe conditions (less than 10°C, more than 28°C) and maintain this temperature in
the room during the life span of the product.■ The subfloor must be flat, level, clean (no grease, solvent or chemicals) and free of dust, without marks (no felt pen, marker, oil,
etc.), sound, dry, solid, hard, free of cracks, smooth and not exposed to moisture.■ If the subfloor is not stable due to contaminants like sand and dust, please make it harder by using a primer.■ This product is suitable with underfloor heating and cooling systems.■ The work must be completed with an inspection.
SUBFLOORThe subfloor must be level, flat, clean, free from marks (no felt pen, marker of any type, ballpoint pens, paint, etc., that could cause degradation or discoloration due to migration) sound, dry, solid, hard, free of cracks, smooth and not exposed to moisture.
The preparation/dryness of the subfloor and the installation procedures should all be in accordance with the current relevant standard within the country of use. The dryness of a solid subfloor should be below the maximum moisture level permitted when tested in accordance with that standard.
E.g. in the UK, the relative humidity of concrete surfaces must be below 75%, and less than 2% with the CCM method.
In North America, ASTM F-170 recommends a water-to-cement ratio of 0.40 to 0.45.
Before selecting a smoothing compound, check what type of traffic the floorcovering will be subjected to once installed. Latex smoothing compounds are not suitable for areas that will receive heavy traffic, especially heavy, narrow wheeled traffic (see EN 12529, Castors and wheels). Check levelling compound compatibility, and follow the instructions of the levelling compound manufacturer.
Note: exclusion of liability (adhesives, levelling compounds, etc.) Although Tarkett may list a selection of adhesive, levelling compound and surface damp-proof membrane manufacturers and types, we do not guarantee the products listed. The list of products and manufacturers is not guaranteed complete or current.
Tarkett will accept no liability for any of these products failing to perform in conjunction with any of its products. It is the responsibility of the adhesive, levelling compound and surface damp-proof membrane manufacturer and flooring contractor to ensure the products being used are appropriate for use and applied in accordance with the manufacturers’ recommendations.
CONDITIONS REQUIRED FOR INSTALLATIONIt is important to store the planks (or tiles) for at least 24 hours before installation at a minimum room temperature of 15°C. See each country regulations. This temperature should be maintained throughout the installation.
The minimum temperature of the subfloor should be 10-12°C and room temperature 15°C. See each country regulations.
The recommended relative humidity inside the room should be 35-65%. See each country regulations.
Planks (or tiles) should be stored flat in their packages, in small neat piles (max. 10 boxes high).
PRODUCT INSTALLATIONImportant! Before laying the first rows, check that the cut planks (or tiles) closest to the walls are more than 30 cm long and 10 cm wide, depending on the total layout.
Before starting the installation, check if the wall is straight enough to place planks (or tiles) directly. If not, trace a line a few centimetres away, place your first row and use a scriber. Then, you can place back your first row against the wall.
Cut the last plank (or tile) of a row to the correct length either by a scriber or using another plank (overlapping method).
To install the next row, place the left-over panel of at least 30 cm in length and continue with full planks (or tiles). Make sure that the end joints are offset by at least 30 cm in the individual rows in order to achieve the best installation.
To install the last row, the distance between the wall and the row installed is measured and transferred to the panel using a scriber as for the first line, when the wall is not perfectly straight.
The last row installed should be as close to half a panel’s width as possible.
■ Remarks
This Loose-lay product is designed to be installed without adhesive. Except for areas that are subject to big temperature fluctuations or very high traffic. In this case, acrylic adhesive should be used.
In case of large areas (over 64 m²) or significant traffic, extra strips of adhesive/tackifier should be applied to ensure the stability of the installation.
Less than 16m²: full loose-lay installation –no expansion gap
16 m² to 64 m²: 10cm tackifier on the outskirts of the room
Over 64m² : create a grid of 4 m by 4 m with the tackifier
AFTER INSTALLATIONIMPORTANT! Avoid significant temperature variation, maintaining the temperature between 15°c and 28°c
Avoid installation in veranda and winter garden
■ Protection of installation
If building work is carried out after installation, the floor should always be protected by covering it with hardboard, plywood or TarkoProtect. Masking tape must not be stuck directly to the floor.
■ Initial site clean
An initial site clean is always recommended before the new floorcovering is commissioned.
Lightly soiled floors: vacuum, sweep or damp mop the area to remove loose dirt and building dust. A combined machine is very effective for large areas, using minimum quantity of water.
Note: Use matting system to remove all dirt from the bottom of shoes to prevent excessive dirt and moisture being tracked on the floor from entrances. Carpet or mats with rubber backings should not be placed on vinyl tile because of chemical reaction that could cause yellowing. Avoid exposure to direct sunlight for prolonged period. During peak sunlight hours, the use of blinds is recommended. Prolonged direct sunlight can result in discoloration and excessive temperature might cause planks expansion. Any use of solvent material is strictly prohibited.
63
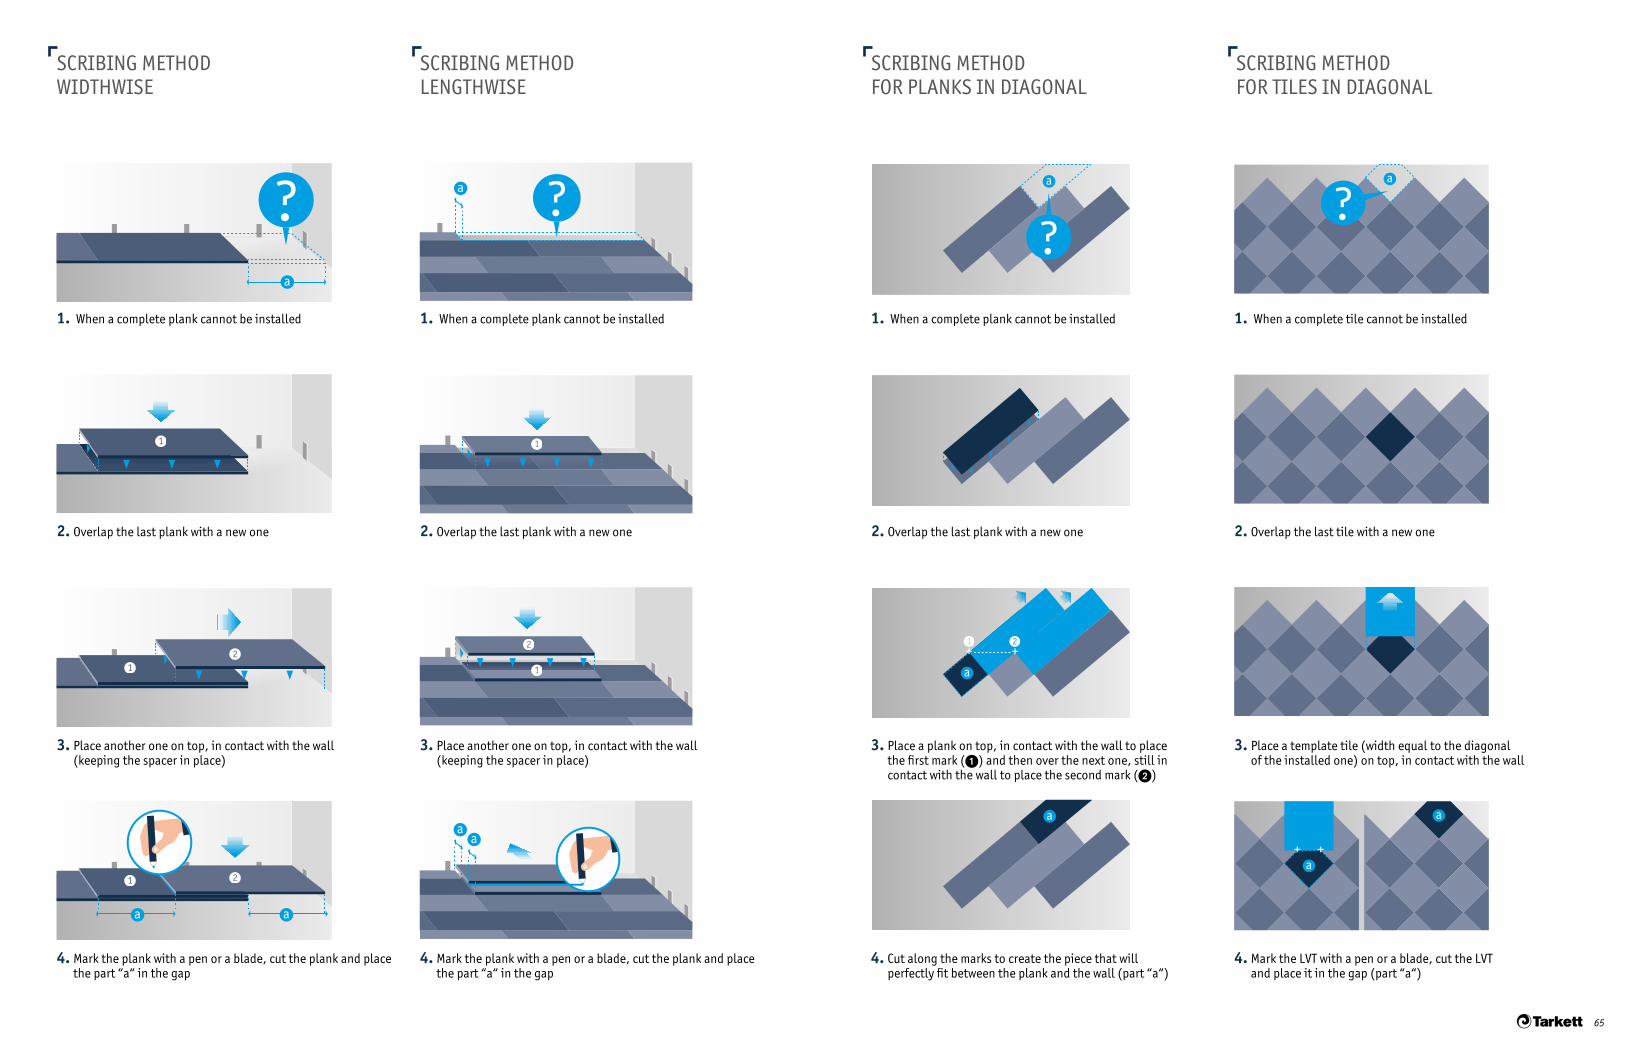
SCRIBING METHOD WIDTHWISE
SCRIBING METHOD FOR PLANKS IN DIAGONAL
SCRIBING METHOD FOR TILES IN DIAGONAL
SCRIBING METHOD LENGTHWISE
1. When a complete plank cannot be installed 1. When a complete plank cannot be installed1. When a complete plank cannot be installed 1. When a complete tile cannot be installed
2. Overlap the last plank with a new one 2. Overlap the last plank with a new one2. Overlap the last plank with a new one 2. Overlap the last tile with a new one
3. Place another one on top, in contact with the wall (keeping the spacer in place)
3. Place a template tile (width equal to the diagonal of the installed one) on top, in contact with the wall
3. Place another one on top, in contact with the wall (keeping the spacer in place)
3. Place a plank on top, in contact with the wall to place the first mark () and then over the next one, still in contact with the wall to place the second mark ()
4. Mark the plank with a pen or a blade, cut the plank and place the part “a“ in the gap
4. Mark the LVT with a pen or a blade, cut the LVT and place it in the gap (part “a“)
4. Mark the plank with a pen or a blade, cut the plank and place the part “a“ in the gap
4. Cut along the marks to create the piece that will perfectly fit between the plank and the wall (part “a“)
?
a a
a
a ?
aa
a
a
+ +
a
?
a
?
b
b
+ +a
a
a
?
b
b
+ +a
a
a
?
b
b
+ +a
a
a
?
b
b
+ +a
a
a
a
+ +
a
?
a
a
+ +
a
?
a
a
+ +
a
?
a ?
aa
a ?
aa
a ?
aa
?
a a
a
?
a a
a
?
a a
a
65

2017■ WESTERN EUROPE: Austria: Tarkett Holding GmbH, Niederlassung Wien – Tel. +43 1 47 88 062 ■ Belgium: Tarkett France Belux – Tel. +32 16 35 98 80 ■ Denmark: Tarkett A/S – Tel. +45 43 90 60 11
■ Finland: Tarkett Oy – Tel. +358 9 4257 9000 ■ France: Tarkett SAS – Tel. +33 1 41 20 42 49 ■ Germany: Tarkett Holding GmbH, Bereich Objekt – Tel. +49 62 33 810 ■ Greece: Tarkett Monoprosopi Ltd – Tel. +30 210 6745 340 ■ Italy: Tarkett S.p.A. – Tel. +39 0744 7551 ■ Luxembourg: Tarkett GDL SA – Tel. +352 949 211 8804 ■ Netherlands: Tarkett Holding GmbH, Vestiging Nederland – Tel. +31 76 57 80 760 ■ Norway: Tarkett AS – Tel. +47 32 20 92 00 ■ Portugal: Tarkett SA – Tel. +351 21 427 64 20 ■ Spain: Tarkett Floors S.L – Tel. +34 91 358 00 35 ■ Sweden: Tarkett Sverige AB – Tel. +46 771 25 19 00 ■ Switzerland: Tarkett Holding GmbH, Bereich Objekt Schweiz – Tel. +41 043 233 79 24 ■ Turkey: Tarkett Aspen - Tel. +90 212 213 65 80 ■ United Kingdom: Tarkett Ltd – Tel. +44 (0) 1622 854 040 ■ EASTERN EUROPE: Baltic Countries: Tarkett Baltics: Tel. +370 37 262 220 ■ Czech Republic: Tarkett France SAS, org. slozka - Tel. +420-271 001 602 ■ Hungary: Tarkett France SAS - Tel. +36 1 437 8150 ■ Poland: Tarkett Polska Sp. z o. o. – Tel. +48 22 639 31 68 ■ Russian Federation: ZAO Tarkett RUS - Tel. +7 495 775 3737 ■ Slovakia: Tarkett France SAS, org.zlozka - Tel. +421 248 291 317 ■ South East Europe: Tarkett SEE – Tel. +381 21 7557 649 (44) 569 12 21 ■ Ukraine: Tarkett UA – Tel: +38 (0) 44 569 12 21 ■ ASIA AND OCEANIA: Australia: Tarkett Australia Pty Ltd – Tel. +61 2 88 53 12 00 ■ China: Tarkett Floor Covering (Shanghai) Co. Ltd. – Tel. +86 (21) 60 95 68 38 ext 841 ■ North East Asia: Tarkett Hong Kong Limited – Tel. +852 2511 8716 ■ India: Tarkett France (India Branch) - Tel. +91 11 4352 4073 ■ South East Asia: Tarkett Flooring Singapore Pte. Ltd. – Tel. +65 6346 1585 ■ AFRICA: Tarkett International: Tel. +33 1 41 20 41 01 ■ MIDDLE EAST: Tarkett Middle East: Tel. +961 1 51 3363/4 ■ Israël: Tarkett International: Tel. +33 1 41 20 41 01 ■ NORTH AMERICA: USA: Tarkett Inc. – Tel. +1 713 869 5811 / Johnsonite – Tel. + 1 440 543 8916 ■ Canada: Tarkett Inc. – Tel. +1 450 293 173 ■ LATIN AMERICA: Brazil: Tarkett - Tel. 55 12 3954 7108 ■ Argentina - Chile - Uruguay: Tarkett Latam Mercosur - Tel. 54 11 47 08 07 72 / 54 9 11 44 46 88 82 ■ Colombia - Panama - Bolivia - Ecuador - Paraguay - Peru - Trinidad and Tobago: Tarkett - Tel. 55 11 9 8410 9310 ■ Mexico /Central America: Tarkett Latam Mexico - Tel. 52 735 392-394
flooristhenewplayground.tarkett.com