hypershop.zendesk.com · web viewmac os 10.x and above physical descriptions no. name description 1...
TRANSCRIPT

iStick User Manual
Revision 1.3

Table of contents
1. Introduction2. Box Contents3. System Requirements4. Physical Descriptions5. iStick App Installation6. Using iStick App
6.1 iStick App Description6.2 Navigating Around The App6.3 “Edit” Function6.4 Create New Folder6.5 Copy/Move Files6.6 Formatting iStick6.7 Opening A File6.8 Music Playback6.9 Video Playback6.10 Photo Library6.11 Contacts Backup6.12 About
1. Introduction

iStick is a USB flash drive with an integrated Apple Lightning connector that not only works with
Mac/PC computers but also with iOS devices (iPhone, iPad, iPod touch) as well. iStick allows
users to:
Easily transfer files between Mac/PC computers and iOS devices (iPhone, iPad, iPod
touch)
Perform file management (Copy, Paste, Delete etc.) on Mac/PC, iOS devices and iStick
Browse and open documents, photos, music and video files stored on iStick and iOS device
with aid of a free companion iOS app
Backup and restore iOS contact list
Use iStick as an ordinary USB flash drive on Mac and PC
2. Box Contents
iStick
Quick Reference Guide
3. System Requirements
iOS device: iPhone 5/5s/6/6 Plus, iPad mini, iPad mini with Retina display, iPad (4 th
generation), iPad Air, iPod touch (5th generation) and later models
iOS: iOS 6.x/7.x/8.x and above
PC: Windows XP/7/8 and above
Linux 2.6.x and above
Mac OS 10.x and above
4. Physical Descriptions

No. Name Description
1 Apple Lightning Connector Connector to iOS devices
2 Standard USB Connector Connector to Mac/PC
3 Sliding SwitchSlide to chose between Apple Lightning and USB
connector
4 LED Operating status indicator
5. iStick App Installation (as shown on an iPhone 5s running iOS8)
There are four ways to install the iStick App as described below.
Note:App installation requires an Apple ID and Internet connection to perform. If you do not have an
Apple ID, please refer to the following links to apply for an Apple ID:
English: http://support.apple.com/kb/HT5622
Chinese: http://support.apple.com/kb/HT5622?viewlocale=zh_CN&locale=en_US
Method 1: Automatic Installation
Connect the iStick to the iOS device, a “App Not Installed” dialog box will pop up.
Select the “App Store” option to be brought to the App Store to find and download the iStick
app.
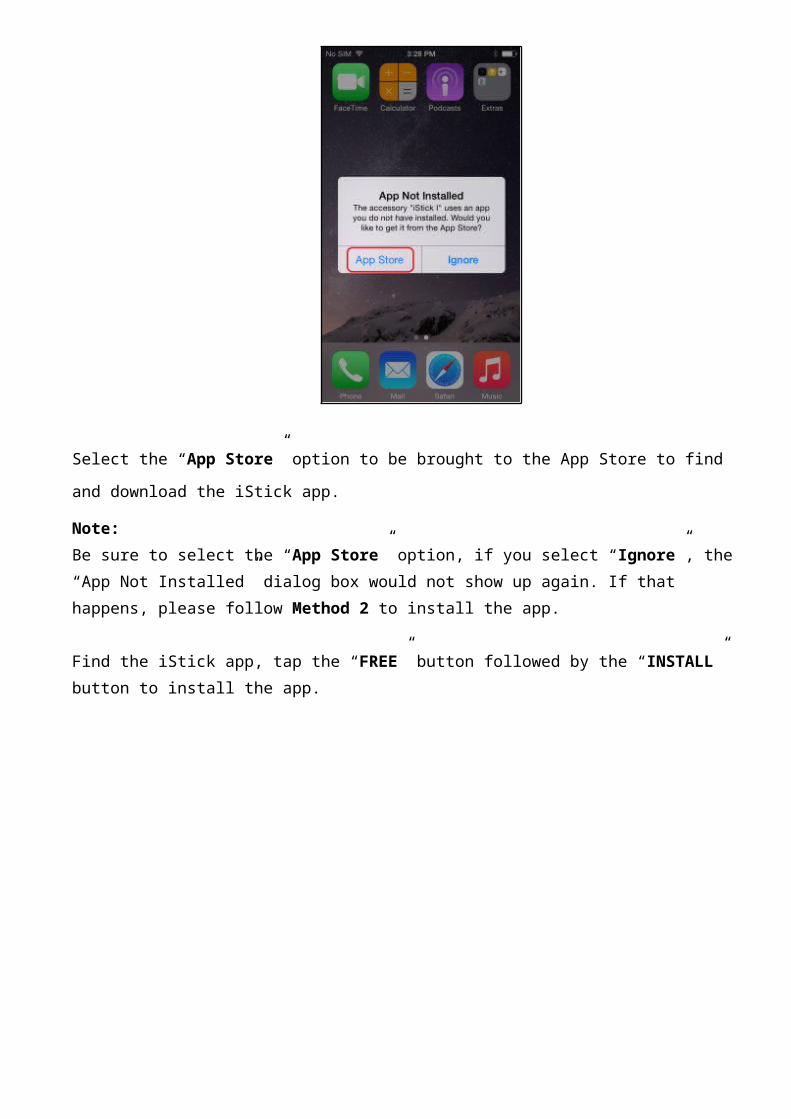
Note: Be sure to select the “App Store” option, if you select “Ignore”, the “App Not Installed” dialog
box would not show up again. If that happens, please follow Method 2 to install the app.
Find the iStick app, tap the “FREE” button followed by the “INSTALL” button to install the app.
Enter your Apple ID and password to download the app.

After installation is completed, tap the "OPEN" button or tap on the iStick app icon on the home screen to start the app.
Method 2: Find App for Accessory in Settings
If you select the “Ignore” option in the “App Not Installed” dialog box in Method 1, you can use
the following method to find and download the iStick app.
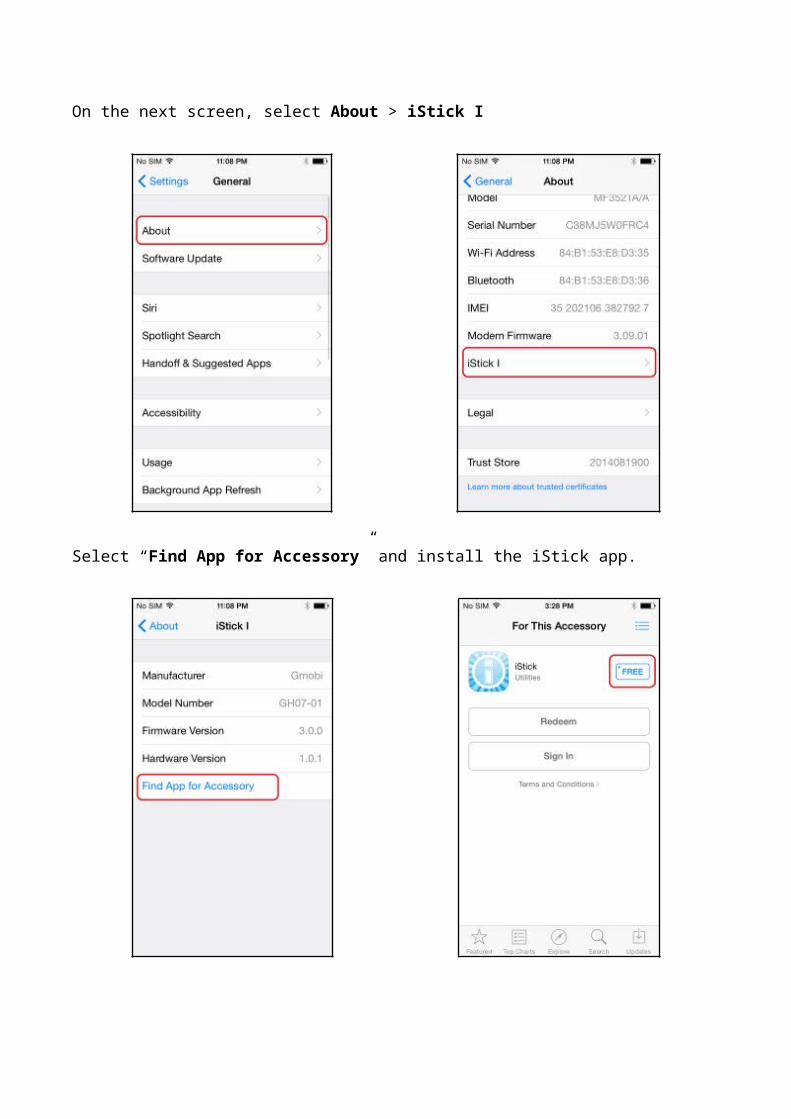
Go to Settings > General

On the next screen, select About > iStick I
Select “Find App for Accessory” and install the iStick app.
Method 3: Find iStick app on the App store
Open “App Store”
Search for "iStick"
Find and install the iStick app

Method 4: Install iStick app via computer iTunes
Connect iOS device to the computer and open iTunes.
Select “iTunes Store”

Search for “iStick”
Select “iStick” app

Select FREE > DOWNLOAD
Enter Apple ID and password

Wait for app to download
Once the app is downloaded, select “Install”

Click "Apply" button to install the app onto the iOS device
Wait for app to install

After app installation is completed, the iStick app will appear on the iOS device home screen.
6. Using iStick App

With the iStick app installed, connecting the iStick hardware to the iOS device will automatically
trigger a dialog box requesting permission for the iStick app to communicate with the iStick.
Select “Allow” or just tap the iStick app icon to start the app.
6.1 iStick App Description
No. Name Description

1
iPhone (if iStick is connected to an
iPhone)
iPad (if iStick is connected to an
iPad)
Browse local files stored within the iStick app on the iPhone/iPad
2 iStick Browse files stored on iStick
3 Contacts Contacts Backup & Restore
4 Photo Library Select photos to backup to iStick
5 About Support information
6.2 Navigating Around The App
From the app main menu, tap on the “iPhone” or “iPad” icon to browse the local files currently stored in the iStick app on the iPhone/iPad
Description of functions
“Return”: Return to the previous page (e.g. app main menu)The main area displays a list of files/folders which you can Edit or create a new folder“Edit”: Select this to delete/copy/move files and folders“+”: Select to create a new folder
6.3 “Edit” Function

“Select All”: Selects all files and folders“Deselect All”: Unselects all files and folders“Cancel”: Cancel operationTools at the bottom of the page: Delete, Copy, Move, Email
6.4 Create New Folder
Tap on “+” to create a new folder. Enter a name for the new folder and tap “Enter”
6.5 Copy/Move files
Open any folder (e.g. Photos) and select “Edit”

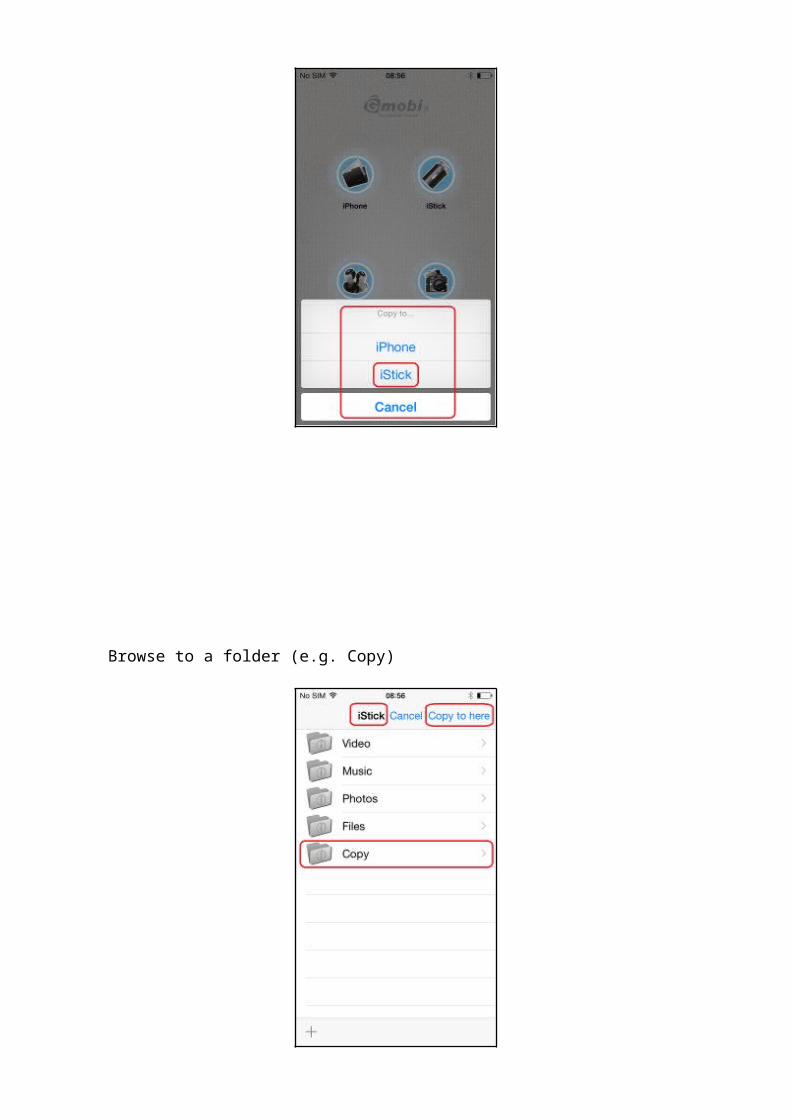
Select the files and choose the “Copy” or “Move” icon from the bottom toolbar and select the destination (e.g. iPhone, iStick or Camera Roll)
Select the destination folder (e.g. Copy) and select “Copy to here”

The copy progress will be displayed. Once copy is complete, you can open the destination folder to verify that the files have been copied over.
Note :You can follow the above steps to perform Delete, Move and Email function by choosing the appropriate icon at the bottom toolbar.
6.6 Formatting iStick
To format and erase all contents on the iStick, select the format icon at the lower right corner as shown and select “Continue” in the pop-up “Warning” dialog box.

The formatting progress is shown at the top of the screen.
Note: Do not remove the iStick while it is formatting. Otherwise it may become unrecognizable to connected devices and you will have to reformat the iStick again with a computer.
6.7 Opening a file
Click on iStick icon in the app main menu to browse files and folders on the iStick. Tap on a folder (e.g. Files) to enter that folder. Tap on any file to open it.

Tap on the upper left corner to go back to folder view.
6.8 Music Playback
Tap to enter the “Music” folder and tap on any music file to start music playback.

Music Player Interface
6.9 Video Playback
Tap to enter the “Video” folder and tap on any video file to start playback.
No. Icon Description
1 Loop Play song in a loop
2 Shuffle Shuffle song playback
3 Progress Bar
Indicates the playback progress of the song. Drag
to start playback at any point of the song.
4 Volume Control Adjust playback volume
5 Previous Track Play previous song
6 Play / Pause Play / Pause
7 Next Track Play next song

Video playback
Video Player Interface

No. Icon Description
1 Done Exit video player
2 Progress BarIndicates the playback progress of the video. Drag to start playback at
any point of the video.3 Volume Control Adjust playback volume
4 Previous Track Play previous video
5 Play / Pause Play / Pause
6 Next Track Play next video
6.10 Photo Library
This feature allows you to access the iOS device photo library, from which you can select photos to copy from the iOS device to the iStick.

Photo Library Description“Back”:Return to previous page“Select All”: Select all the Photos/Videos files“Done”: Done with selection“All”: List both Photo and Video files“Photo”: List only Photo files“Video”: List only Video files
Listing Photo files only

Listing Video files only
Select the files you want to copy and tap “Done”

Select the destination (e.g. iStick)
Browse to a folder (e.g. Copy)

Tap “Copy to here”
The copying progress will be shown.

Files will appear in the destination folder after copying is done.
6.11 Contacts Backup

You can use the iStick and the iStick app to backup and restore your iOS contacts. First you need to ensure that the iStick app has access to your contacts. Go to Settings > Privacy > Contacts > Enable iStick app
A “Warning” dialog box will pop up If there are no iOS contacts available
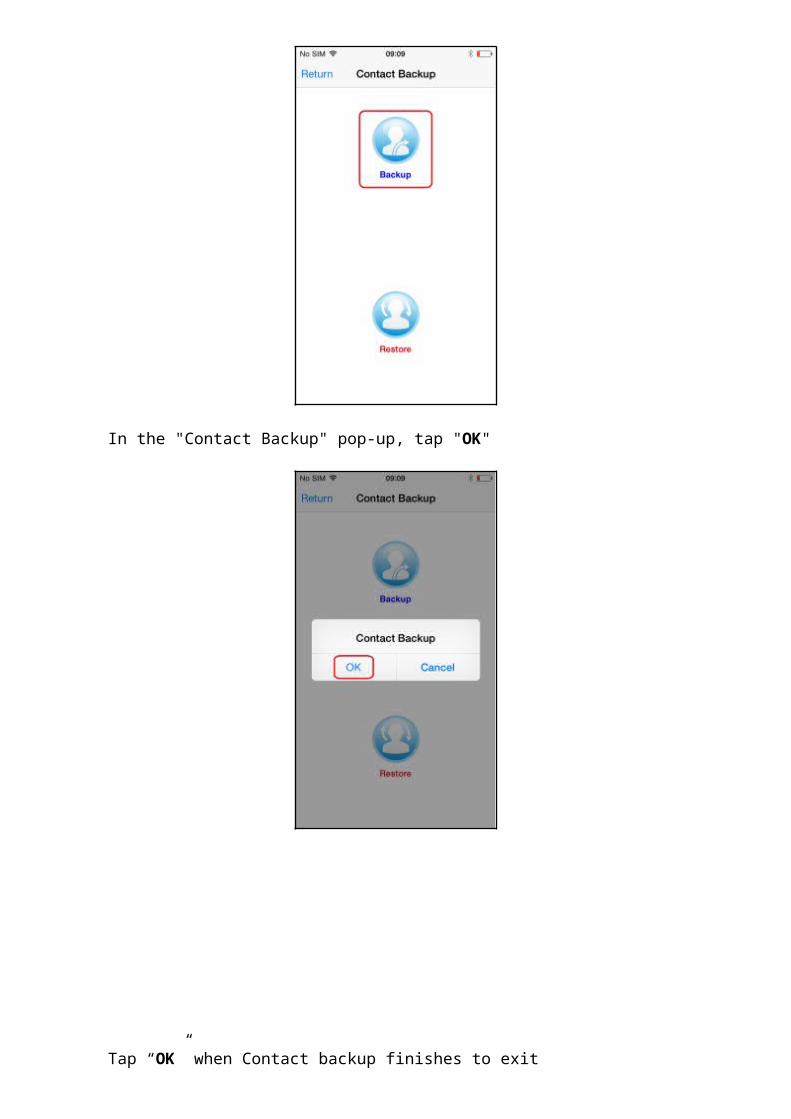
Tap on "Contacts" icon and tap "Backup" to perform contacts backup
In the "Contact Backup" pop-up, tap "OK"
Tap “OK” when Contact backup finishes to exit

Contacts will be backed up in the iStick “Contacts Backup” folder as a .ab backup file.
To restore contacts, tap “Restore” in the “Contact Backup” section

Tap “OK” in the pop-up dialog box
Tap "OK" to confirm the “Contacts Restore”

In the “Contacts Backup” folder, select the .ab address book file that you want to restore from.
Tap “OK” to exit “Contact Restore” and you can verify that the contacts are indeed restored to the iOS contacts directory.
6.12 About
“Done”: Return to the main menu“iStick v2.8.6”: Current iStick app version“Operating Instructions”: iStick app user manual“Support”: Online help information“Report Bug”: Email bugs/feedback about the app