video production: filming a story - amazon s3 · video production: filming a story ... ggregory 02...
TRANSCRIPT

4Video Production: Filming a Story
Joanna Duchesne, with additional writing by Liz Miller, Sukanya Pillay and Yvette Cheesman
This chapter invites you to start fi lming with your camera as soon as you can—the more you practice, the easier it will become.
You will learn about technical aspects of your camera and equipment, different types of shots, and tips on how to fi lm stable, well-composed, and compelling images. The chapter will steer you towards preparing your own video project, and show you how to fi lm sequences and interviews, develop characters, and build a story. There are also exercises designed to help you try out what you have learned. Don’t wait until you are confi dent—your skills will develop as you work.
In some cases we talk about the grammar of fi lm and video, and conventions that are used, for example, in framing shots. Think of these as a writer would grammar—in general you should abide by them, but once you know them, you will also be able to break the rules effectively.
To produce social advocacy video, you must play many roles. As you prepare to shoot, you must think accurately and objectively like a human rights monitor, technically like a camera and sound technician, sequentially like an editor, as well as like an advocacy-driven storyteller. However, you don’t need to do all these jobs—remember that most fi lms are made with a team, and are not completely individual efforts. When you are fi lming, if possible have people to help you with logistics, sound, and camera (and translation if necessary), and consider hiring an editor to bring a fresh eye to the project.
THE TOOLS
Your basic kitYour basic kit should consist of a video camera, tapes, batteries, a battery charger, headphones and relevant leads to power your camera.
122
Gregory 02 chap03 122Gregory 02 chap03 122 22/7/05 11:14:3222/7/05 11:14:32

Video Production 123
Try to include an external microphone and a tripod for steady fi lming. RCA/S-Video or fi rewire cables are also useful to playback what you have fi lmed on a television, camera, or computer.
You may want to invest in separate lighting but this is expensive and can be hired if necessary. Most cameras function well even in relatively low light, so you will fi nd that you rarely need specialized lighting gear.
Suggested additional equipment
• Camera case with desiccant to keep camera dry• Waterproof jacket (if using camera in humid or wet situations)
or “Pelican Case” (a hard case that protects the camera from knocks and water)
• Batteries (choose their duration based on your projected access to mains electricity)
• Tripod (either a photo-video tripod or a video tripod with a fl uid head)
• Microphone(s) (see the discussion on microphones below, pp. 140–2)
• Headphones • Windscreen for microphone (reduces or eliminates wind
noise)• Reflector Board (for more information on this see below,
p. 134)• Extended warranty• Insurance
What are the formats of video camera? Video cameras or “camcorders” come in all shapes and sizes. They are categorized by the type of tape they use, and by the standard on which they operate (PAL or NTSC). Most cameras are now digital, though some older cameras are an analog format.
There are two different video standards: NTSC or PAL. In general NTSC is used in the Americas and a few African and Asian countries, while PAL is used elsewhere. Brazil uses a PAL variant known as PAL-M. SECAM is an older standard that has generally been replaced by PAL. You will want to buy a camera that will be convenient for use where you plan to live or work, and one with which you will be able to easily share footage or screen footage to collaborators. You can take an NTSC camera and fi lm in a PAL standard location but
Gregory 02 chap03 123Gregory 02 chap03 123 22/7/05 11:14:3222/7/05 11:14:32

124 Video for Change
you will fi nd that it is harder to playback the images or share them with people using the PAL standard unless you are using a specialized playback machine and television that can play both standards. Some fi lmmakers choose to shoot in PAL even in NTSC countries as the quality of the image is generally better.
If you are buying a camera we strongly advise you to buy a digital format like MiniDV.
Higher-quality digital and analog formats
• MiniDV cameras: In the last few years, digital cameras have become more and more popular. They provide higher-resolution images than older formats. MiniDV tapes are small and record in a digital format.
• DVD cameras: These cameras use DVD technology with the capability of recording onto a disc or memory card. This new format is still not in widespread use.
• DVCAM cameras: These cameras provide better quality and steadier images than a MiniDV. This format is used more and more by broadcasters. MiniDV tapes can usually be used in this lightweight camera.
• HD cameras and 24P cameras: New cameras that shoot in formats suited for high-defi nition television, and a format that is closer to analog fi lm in shutter speed, and thus better suited for transfer to fi lm. Both are high-quality formats, increasingly being used by documentary fi lmmakers.
• BetaCam SP or DigiBeta: BetaCam cameras are generally used by broadcasters, and provide a superior image quality. However, they tend to be very heavy, cumbersome, and expensive. Digital BetaCam or ‘DigiBeta’ is a high quality broadcast and editing format.
The tape formats most commonly used by broadcasters are DVCAM, BetaCam SP, and DigiBeta.
Older analog formats
• VHS: These cameras use the same tapes as a VHS machine. They are large and heavy to operate and the images fi lmed are not as good quality as more modern formats.
Gregory 02 chap03 124Gregory 02 chap03 124 22/7/05 11:14:3222/7/05 11:14:32

Video Production 125
• VHS-C: These are more compact video cameras than VHS but the image quality is similar. S-VHS and S-VHS-C cameras also exist. They provide superior images and sound to the VHS and VHS-C.
• Hi8: The Hi8 camera uses 8 mm tapes, smaller in size, but superior in quality to VHS.
Batteries and power for your camera
All cameras can be powered via a mains connection or using a detachable battery. Camcorders have a built-in signal in the viewfi nder, which will tell you if the battery is running low. If you use an LCD screen or an external mike without its own battery, you will use more power. Always make sure your battery is fully charged when preparing to fi lm, and take an extra charged battery, and if possible, adapters that will enable you to charge your camera batteries from an automobile or other 12-volt power source.
Most batteries are now lithium/ion batteries. They do not need to be completely discharged before recharging.
Looking after your camera and tapes Protecting your camera
Cameras do not operate well in harsh climates. Be very careful with the sun or any other heat source. If you are fi lming outside in the sun, keep the camera in the shade after fi lming. To ensure the best performance in hot, humid conditions try to keep a desiccant, like a sachet of silica gel, and replace it every 2–3 months. This will help to take a little moisture out of your equipment. A good alternative natural desiccant is dry, uncooked rice in a porous bag.
Cameras do not like sand or dust so try to keep your camera clean at all times. If you are fi lming in windy or sandy conditions, you can protect the camera with a cover. Take special care of the lens by cleaning it regularly with a clean cloth, and always pack your camera carefully in a clean, dry bag.
If it is raining ensure your camera is well-covered, and dried in a container with desiccant following use, as water can damage the electrical elements and rust casings and mechanisms. Watch out also for water on the lens, which will affect image quality. When fi lming in the rain, one or two drops of water on the lens might look innocent but they can ruin the image and make editing diffi cult.
Gregory 02 chap03 125Gregory 02 chap03 125 22/7/05 11:14:3222/7/05 11:14:32

126 Video for Change
You can permanently damage your camera lens if you fi lm towards the sun or another strong light. The iris on your camera opens or closes automatically to let in the correct amount of light to record a good picture. If you expose your lens to sudden strong light, the iris may not be able to adapt quickly enough. If you need to fi lm something with a strong light source, adapt your exposure manually to close the iris, or consider using a fi lter on the lens. This fi lter can also help protect the lens from dust.
Protecting videotapes
Like your camera, videotapes are very sensitive and must be protected from excessive heat, humidity, dust, smoke, dirt, and moisture. Always carry a tape in its case, away from direct sunlight. Store your tapes in a vertical position, like books on a shelf, and don’t run the risk of recording accidentally over a tape—once you have fi nished fi lming always move the red tab on the top of your tape from “record” to “save.” Keep tapes away from magnetic fi elds, and don’t leave tapes lying on top of or close to a television, computer or video.
Labeling, logging, and transcribing your tapes
Always remember to label your videotapes, noting subject matter, interviewee names, length and date of what has been recorded. If you are in a location where it would be dangerous to reveal what you are recording, put something innocuous on the label and remember what you have fi lmed for labeling later. Tapes with no labels at all are often lost and can get recorded over, so, unless the situation is extreme, try to put some kind of information on the label, if only the date. If you are going into a dangerous setting pre-label your tapes before shooting—e.g. with a sequential set of numbers. Producing a log or shotlist and transcribing interviews of each tape can help you to remember where important images are, and decide how to tell your story. For a sample shotlist and transcript, see Appendix VI.
Remember:
• Protect your camera and videotapes from extreme temperatures• Move the red tab to “save”• Label well before or immediately after shooting
Gregory 02 chap03 126Gregory 02 chap03 126 22/7/05 11:14:3222/7/05 11:14:32

Video Production 127
Time-codes and the date/time facility Your digital camera automatically writes continuous invisible time-code (running from 00:00:00:00, hours/minutes/seconds/frames) onto the tape as you are recording. This is important for when you want to choose your shots and edit your story together. You can shotlist your material, identifying where your material is on each tape by time code, and the editing machine will easily be able to fi nd shots according to their time-code (e.g. a shot begins at 00:03:03:00 and ends 00:03:15:00).
Watch out for time-code breaks
Digital cameras often cause problems at the editing stage because of what are known as “time-code breaks.” Breaks can happen if the camera is turned off or the tape is removed from the camera and then replaced. In this case the time-code will revert to 00:00:00:00 at the point when you have stopped recording, leaving you without an easy way to log your material.
To make sure you have no time-code breaks while fi lming many cameras have “end” or “edit search” functions. The end search will wind the tape to the end of what you have last recorded. The edit search facility will allow you to choose from wherever you are on your tape, to go to the closest point from where you can fi lm again. Beware, though, because with both these facilities you will lose a few seconds of your previous shot.
You can avoid time-code breaks during your actual fi lming by prerecording the time-code of a whole tape with the lens cap on. The camera will fi lm only black but it will generate an unbroken time-code from the start of the tape to the end. When you put it in your camera again for fi lming, the camera will recognize the time-code and will use this existing continuous time-code.
It is also a good idea not to go back over your footage while you are fi lming—wait till the tape is fi nished, and you will run no risks of breaking the time-code.
The date and time facility
Accurate date and time information are critical if the video is needed as evidence of when an incident took place. For further information on this, see Chapter 6.
Nearly all camcorders can permanently record the date and time as you record. On most digital cameras, the date and time is recorded
Gregory 02 chap03 127Gregory 02 chap03 127 22/7/05 11:14:3222/7/05 11:14:32

128 Video for Change
as digital information onto the tape without being superimposed on the picture. Because the date and time are often important, make sure that they are set correctly via the camera’s menu.
THE TECHNIQUES
All videos are made up of shots, sequences, and scenes. In this section we look primarily at developing a solid grasp of the key shot types, and developing elementary sequences. One way to think about how shots, sequences, and scenes fi t together is to imagine them paralleling the structure of a book, as demonstrated in Table 4.1.
Table 4.1 Shots, sequences, and scenes
Shot Sentence! !A series makes a… A series makes a…
Sequence Paragraph! !A series makes a… A series makes a…
Scene Chapter! !A series makes a… A series makes a…
Video Book
Composing and framing your shots Framing is the way in which a scene, person, or object is placed within the image you record. Viewers are familiar with certain conventions, and it is important to realize what effect different shots have on a viewer. If you fi lm a close-up of somebody’s face, you pull the viewer into their thoughts, emotions, or words; if you fi lm the same person from a distance, you help the viewer understand the person’s context.
Remember that none of these are hard-and-fast rules that you must stick to—once you understand how they are used, then you have the fl exibility to know when it will be effective to break them.
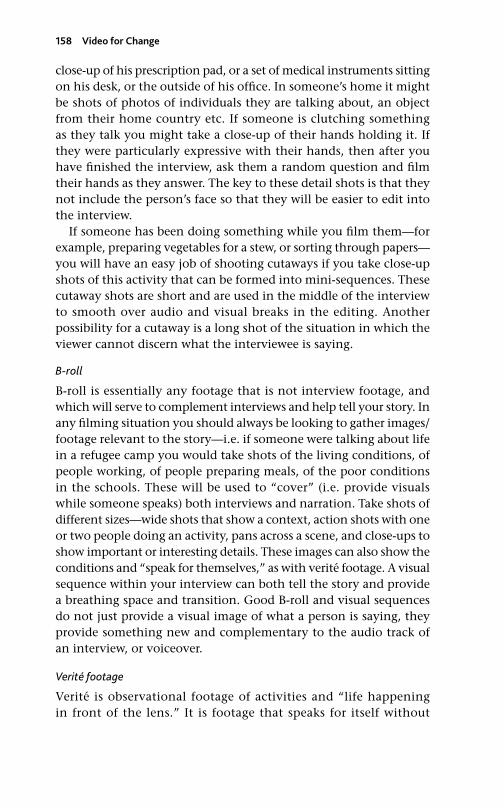
You have many options to choose from but the following are the main types of shot size to be aware of (see Figure 4.1):
Gregory 02 chap03 128Gregory 02 chap03 128 22/7/05 11:14:3222/7/05 11:14:32

Video Production 129
• Extreme Long Shots (abbreviated to ELS, also called Wide Shots, WS): These shots are often used as an “establishing shot”; they orient the viewer not just to one location, but also to an overall atmosphere, context, and situation. Whenever the scene changes think about reorienting your viewers with a new establishing shot.
• Long Shot (LS): This shot shows a person from head to toe. Be careful with headroom: too much space above a person’s head will look strange, as will too much space at the person’s feet.
• Mid-shot (MS): This shot shows a person from just below waist level to just above
the top of their head. This shot is often used in interviews. • Close-up (CU): This shot shows a person from mid chest to just above the top
of their head, and is ideal for important or emotional parts of interviews. You can go closer but if you are subtitling your interview, leave enough space under the person’s chin to allow for text on the screen. It is better to lose the top of someone’s head in a frame than their chin, especially if they are talking.
• Extreme Close-up (ECU): This shot shows detail. An extreme close-up shot in an interview
might just show a person’s eyes or mouth.
Figure 4.1 Different shot sizes (Taw Nay Htoo)
Gregory 02 chap03 129Gregory 02 chap03 129 22/7/05 11:14:3222/7/05 11:14:32

130 Video for Change
Rule of thirds
A good guideline for composing your shots is the rule of thirds. This means that you should imagine your frame (the image your camera takes) divided into thirds, with actions and objects placed at the intersections of the vertical and horizontal thirds. This is far more interesting to the eye. Don’t place people you are fi lming in the middle of the frame simply because they are important. It’s far better to have the horizon either two-thirds from the top of the frame or two-thirds from the bottom. And if you are fi lming someone standing in front of a wider scene it’s good to have him or her standing slightly to the left or to the right of the frame. This permits the person to speak into the empty part of the frame—it gives them “nose-room.”
Getting a good-quality image Focus
Creating the sharpest image possible is critical. Almost every camcorder is fi tted with an auto focus facility. In most situations this will ensure that what you are fi lming is sharply in focus—very useful if there is little or no movement in your shot.
When to use manual focus
If you are fi lming with multiple or moving objects in the frame, or with objects both in the foreground and background, the camcorder may be confused as to what it is meant to be focusing on and will repeatedly give you blurred images while it tries to rest on a subject. Switch to manual focus on these occasions, manually adjusting the focus to keep the key subject(s) in focus.
In low light, the camera’s auto focus will often “hunt around” to locate something to focus on because it needs a reasonable level of light in order to fi nd the lines and edges that it uses to choose a focal point. In such situations, manual focus is your only option.
Zooming and focusing
The more you are zoomed in, the smaller the range of objects that will be in focus. This is called depth of fi eld. For example, if you are fi lming a wide shot of a crowd you will fi nd that almost everyone in the crowd is in focus. But if you zoom in to a close-up shot of one person in the crowd, the focus on people in the foregrounds and backgrounds is soft. If you want to avoid this, set up your shot by zooming in fi rst on the person you want. Focus on them, put your
Gregory 02 chap03 130Gregory 02 chap03 130 22/7/05 11:14:3422/7/05 11:14:34
Video Production 131
camera in manual focus mode, then pull back for your wide shot. When you zoom in to get your shot, the focus will remain where you want it.
Wide shots are almost always in focus
The depth of fi eld you have to work with when you are on a wide shot is considerable (especially when the light is good). If you are in a situation in which there is a lot of motion and things are changing quickly, try to stay on a wide shot and get the variety of shots you need by changing your location. Many an important shot has been missed or ruined because the cameraperson was wasting time trying to get focus when they should have been getting the shot.
Exposure
All camcorders are equipped with an automated exposure system. Like your eye, the iris of the camcorder will close down or open up to let in the correct amount of light. The camcorder will automatically open up the iris or increase the aperture to take in more light, or close it down to limit the brightness. In very low light, it will “boost the gain” to give you a grainier, but still usable picture.
You can override these functions by switching to the manual iris or adjusting the gain manually, but you will have to continually adjust the iris of the camcorder yourself. When you are just starting to learn how to fi lm it’s best to leave your controls on automatic—it’s easy to forget that you changed the settings when you have many other things to deal with. Remember also that the brightness of the LCD screen has nothing to do with the exposure settings.
White balance
Different sources of light produce light of different “color temperatures.” Artifi cial lighting, such as indoor light bulbs, produces an orange tinge. Daylight is bluer in color. The human brain adjusts to these variations better than a camera can. What looks perfectly fi ne to your eye might look orange or blue to the camera.
Remember:
• Auto focus is best where movement is limited and the light is good• Manual focus is best with multiple moving subjects and low light• Wide shots are almost always in focus
Gregory 02 chap03 131Gregory 02 chap03 131 22/7/05 11:14:3422/7/05 11:14:34

132 Video for Change
Most camcorders have an automatic “white balance” facility, which will register and adjust the color temperature of the prevailing light source. In most situations you can use this. Some camcorders also have pre-set white balance positions to cope with different types of lighting. If your camcorder is like this, remember to reset these positions if the lighting conditions change. You can also set the white balance manually for any location by zooming in on a piece of white paper or other white object so that it fi lls the screen; and then pressing the manual white balance button. Setting the white balance manually is a good idea for interviews and in situations where there is mixed indoor and outdoor lighting, but generally it’s safe to stick with the automatic white balance.
Lights and lighting
Lighting is used to illuminate a subject and to create a mood, or to shape and defi ne your subject. Hard directional light—sunlight or fl ashlight—will illuminate with precision but may also create harsh shadows. Soft diffused light—e.g. on a foggy day—causes a wider and softer illumination and is ideal for portraits. You will often have to work with natural light. It is also less expensive and less obtrusive.
There are a number of common terms used in describing light sources—natural or artifi cial.
• The “key light” is your main source of light. It is off to the side from your camera, angled towards your subject shining light directly onto them. If you have the room, keep the key light between 9 and 15 feet from a subject, and the subject several feet from the background. The key light source will be slightly above your subject and angled down for the most fl attering effect.
• The “fi ll light” is used to illuminate the shadows created by the key, and usually is on the opposite side of the camera to the key light, so that it lights the opposite side of the person you are fi lming.
Remember:
• Artifi cial light gives an orange tinge; outdoor light gives a blue tinge • Reset the white balance if you use the fi xed or manual settings
Gregory 02 chap03 132Gregory 02 chap03 132 22/7/05 11:14:3422/7/05 11:14:34

Video Production 133
• The “backlight” is a defi ning light source—it is often used to create a rim of light to separate the subject from the background, or a person’s head from the background, especially if the background is black and so is your subject’s hair. It is placed directly behind and above the subject being fi lmed, and shines onto the back of their head and onto their shoulders.
Outdoor/natural light
The sun is your primary “key light” when you are working outside. Pointing your camcorder directly at a light source, especially the sun, can damage it. In general you want to keep your back to the sun or your primary light source. At the same time you don’t want to position your subject so that they are squinting while looking at you or the camera.
If you position your subject in front of a strong light source the contrast may be too extreme. Especially when shooting with consumer cameras the camera may adjust the exposure to the light level in the background instead of on your subject, creating a silhouette around them. Where possible, daylight is not only adequate but also makes the picture look more “natural.” An overcast day can be good for shooting, as the clouds diffuse the intensity of sunlight. However, if the sun is moving in and out of small clouds you may end up with uneven lighting.
Figure 4.2 Three-point lighting set-up
KEY
KEY
KEYCamera
Gregory 02 chap03 133Gregory 02 chap03 133 22/7/05 11:14:3422/7/05 11:14:34

134 Video for Change
Low and limited light
While many camcorders can record well with low levels of light, the image they produce is often of poorer quality. The camera accommodates by adding “gain” which translates to more light but a lower quality image. To let more light into your camera you can open the iris/exposure and you can also reduce the shutter speed to 1/30 or 1/60 (in NTSC) or 1/25 or 1/50 (in PAL) if you are using MiniDV.
A useful technique when you have limited light is to refl ect light sources by pointing the light at the wall or ceiling and letting it bounce onto your subject, or working with the refl ection of a primary source of light. One simple technique is to line a piece of cardboard with tin foil and refl ect the light from the sun onto your subject. You can also use any piece of white paper or cloth, or an inexpensive refl ector board. Black tends to absorb color while white tends to refl ect color.
The best way to understand lighting is to begin to look at objects and people around you and to try to identify the light sources and refl ections. Is it soft or hard, primary or secondary, natural or artifi cial, refl ected or direct?
Holding your camera and keeping it stable One of the best features of camcorders is that they are so portable and lightweight, but this can cause problems when trying to fi lm steady shots. The smoothest shots will be made using a tripod or monopod,
“Lighting can be used to great effect,” says lighting cameraman Steen Eriksen, who has fi lmed in most of the world’s trouble spots.
I recently fi lmed some interviews with some relatives of the “disappeared” in Iraq. I used a black background and shone three small lights onto different parts of the frame, so that the interviewee’s face was illuminated. The effect was quite arresting and helped to convey the haunting pain of the subject matter. The use of three lights helped to diminish any potential shadows on the subject’s face.
Tips:
• In low light, pictures will be of poorer quality • Backlit pictures appear silhouetted • Softer light is better for portraits
Gregory 02 chap03 134Gregory 02 chap03 134 22/7/05 11:14:3422/7/05 11:14:34

Video Production 135
but remember that it is only a tool to stabilize the camera. Where possible use a tripod to enable you to fi lm stable, fi xed shots and movements. A monopod (a single-legged tripod that is planted on the ground for stability) will also allow you to shoot stable images even if you are frequently on the move, and stopping only for a single shot or sequence.
If you don’t have a monopod or a tripod, or choose to fi lm hand-held, some simple techniques help make your camera stable.
Grip
First, get your grip right: hold the camcorder fi rmly with the grip strap tightened over your right hand and use your left hand to steady the camcorder. Depending on your camera you are using, the best place for your left hand is usually under the lens, near to the other controls you may need to use, like the manual focus. Don’t put your hand over the auto-focus sensor on the front of the camera.
Stability
Whenever you can, brace yourself fi rmly against something solid like a rock, a tree or a parked vehicle. If you are standing, support your elbows tucked-in against your chest to keep your hands stable. This may feel uncomfortable but it will soon be second nature. Keep your footing secure and your feet slightly apart. If you are fi lming with the LCD screen, use your chest to steady the camera. If you are kneeling down, use your raised knee to support your arm and camcorder. To film low angle shots lie down full-length with your elbows on the ground for support. You should also consider purchasing a shoulder-supported strap that will help add stability to shots.
Your fi rst shots Keep the image still as much as possible and hold it
When you are learning to fi lm, take plenty of “still life” with your video camera, especially close-ups of faces and details, and stable still
Remember:
• Avoid camera shake • Grip your camcorder fi rmly • Support your elbows
Gregory 02 chap03 135Gregory 02 chap03 135 22/7/05 11:14:3422/7/05 11:14:34

136 Video for Change
shots. These shots should be held for 15 seconds even if this feels like an eternity at the time.
For every camera movement you shoot, be sure to shoot at least fi ve still shots that are stable and held for at least 10–15 seconds. In a still shot, your subject may be moving, but your camera is still or making minor movements to accommodate them.
Moving your camera: Pans, tilts, and zooms Basic camera movements
There are some basic camera movements, which imitate the way we move our head and eyes. “Panning” shots are where the camera moves from one side to another, and “tilting” shots are where the camera moves upwards or downwards. “Zooms” are used to close in on a subject or pull out to show the wider context of an image. These movements are ideal when you cannot include the whole of the subject in one static shot, such as a crowd of people or a tall statue. They are also used for covering action sequences, and for showing connections between different things.
Panning and tilting
Try to hold the shot for 10–15 seconds before you pan or tilt your camera sideways or vertically. This helps the viewer establish what he or she is supposed to be looking at before the move begins. Slowly pivot the camera around, upwards or downwards, keeping at a constant speed. If you move too fast or do not hold the shot at the start and fi nish, the image may be blurred. When you stop, hold the shot for 10–15 seconds again. This may seem like a long time, but you will end up using the static shot at least as often as the move itself. By getting the three shots—the initial still shot, the pan, and then the fi nal shot—you offer yourself and your editor choices later in the production process.
A good guideline in terms of speed for both pans and tilts is to allow approximately fi ve seconds for an object to pass from one side of the screen to the other. Try not to move too far. A natural arc of
Remember:
• Hold shots for 10–15 seconds• Get still shots before and after camera movements• For every shot in which you move the camera, shoot fi ve still shots
Gregory 02 chap03 136Gregory 02 chap03 136 22/7/05 11:14:3422/7/05 11:14:34

Video Production 137
about 90° is the most you can usually use without disorienting your viewer. Smaller is usually better. If you can’t reveal everything you want in a pan or tilt of 45°, you should consider repositioning yourself so you can. A good way to ensure a smooth pan is to have your body (your feet) pointed towards the end point of the pan, and then fl ex around to the start point. This way you can “uncoil” your body into the pan and create a smoother, more stable pan.
Avoid “hose-piping”
Remember, however, that it is very easy to overuse these types of camera movements and end up making your audience seasick from watching too many of these shots in succession. Above all, avoid “hose-piping,” which means continually panning and tilting across a subject in an effort to cover it all (“hose-piping” describes how a gardener or fi reman would spray a hose of water across a bed of plants or a fi re). It’s much better to break the subject up into more than one shot.
Zooming
Zooms are achieved by manually adjusting the lens or by using a motorized zoom rocker button. The zoom creates the visual effect of moving closer to or away from your subject (sometimes called a pull-out). Hold your shot for at least 10–15 seconds before and after you zoom to give your audience time to register the scene, and to give yourself shot options in the editing room. Often, as with other camera moves, you will fi nd that the static shot is the one you need. Make sure you have it. Remember that close-up shots taken from a camera position that is far away from the subject will amplify any slight camera shake. If you want to fi lm a subject close-up, move nearer to it (this is called “zooming with your feet”) if you can, and zoom in to create a closer shot.
If your camera has a “digital zoom” function, it is best to switch it off. This setting actually uses the camera’s built-in software to “blow up” the image, but downgrades image quality, often making your shot unusable.
Remember:
• Do not overuse pans, tilts, and zooms• Avoid “hose-piping” over a subject
Gregory 02 chap03 137Gregory 02 chap03 137 22/7/05 11:14:3422/7/05 11:14:34

138 Video for Change
To zoom or not to zoom
Too many zoom shots in succession are also very diffi cult to watch. Usually the zoom is used to emphasize an intimate or emotional moment, or to highlight an important detail in a wider shot. With the zoom-in you can dictate where your audience’s attention should be focused. With the zoom-out you can initially pick out a detail in a scene, perhaps a person’s face, or disclose information that is not evident at the start of the shot. As with other camera moves, smaller is usually better. A small zoom-in for emphasis or a small pull-out for context might help your story where a larger in-camera movement would not.
Moving with your camera Walking
Keep your legs bent at the knees and your body lowered all the time. This will help you avoid the rise and fall of normal walking. Create a slow motion, gliding feeling. Put each foot down softly and close to the ground. Do the same if you walking backwards. Have someone walking with you to clear the way.
Rob Brouwer is a human rights documentary fi lmmaker who now works for Amnesty International. He spent over a decade working as a cameraman throughout Latin America.
I originally trained as a photographer, so when I started fi lming, it took me a while to really understand how to use camera movements wisely. I remember fi lming at a funeral procession for victims of death squads in Guatemala. Afterwards, I went to see the material being edited together. I watched as the editor used my pan of the procession, using the hold at the beginning with a voiceover to explain what was happening. He also used a static shot of an old woman crying with a voice explaining how many people had died. He said he might have used the zoom that I done because it was really effective but he needed more time for it to hold at the end. This really taught me why a static shot is needed before and after every movement.
Remember:
• Zoom in for detail, pull out for context • Move nearer to subjects for close-ups • Get static shots at the end of every movement• Be careful with the digital zoom
Gregory 02 chap03 138Gregory 02 chap03 138 22/7/05 11:14:3522/7/05 11:14:35
Video Production 139
Crabbing and tracking
“Crabbing” is walking sideways. Lift your feet in a slow-motion glide with your knees bent, crossing your leg behind or in front of you, letting one foot rest fi rmly before moving the other. “Tracking” is when a vehicle, offi ce chair or even a wheelchair is used to get smooth moving shots. If you are sitting in something, use the armrest or your knees to steady the camera.
Moving with people you are fi lming If people are walking in your shot and you are following them as they move, try to make sure that you leave enough space in your frame for them to “walk into.” If they are walking from right to left, you should keep them more to the right of the frame so that they have space on the left to walk into. Without that space they will look as if they are pushing the picture along themselves. Too much headroom will look strange. Instead tilt down slightly and you will get a far more natural shot when there is only a small amount of space between the top of their head and the top of the frame. At the end of the shot let the person exit the frame.
Direction and continuity Aim to collect images that when edited together will create a logical and credible continuity of events or a sense of direction that the audience will be able to understand. For example, if you are fi lming
Remember:
• Keep your knees bent • Move slowly, in a gliding manner • Use wheeled vehicles for tracking
Waldemar de Vries has fi lmed human rights stories all over Africa.
I once fi lmed a nun who went back to visit her church that had been destroyed by rebels in Guinea. I followed her walking into the church, keeping her face in the frame to the right, and moved the camera upwards as she looked up at the light shining through the bullet holes in the roof in the left of the frame. When I played back the material later, the footage really conveyed the destruction and the effect that it had on the nun.
Gregory 02 chap03 139Gregory 02 chap03 139 22/7/05 11:14:3522/7/05 11:14:35

140 Video for Change
people walking from one place to another, you should make sure that they are always traveling in the same direction. If you don’t, it will seem to your audience that they are fi rst walking in one direction and then another. If you do decide to switch the direction from which you are observing an action make sure to use a wide shot to reorientate your viewers.
The same is true if you are fi lming two people talking to each other. One person will have the left side of the face favored in the shot; the other person should have the right side of their face favored. This will mean that they appear to be facing each other while they are talking. If, for example, you fi lm both people favoring the left side of their faces, it will seem as though they are both facing the same direction. This will give the illusion that they are not talking to each other but to someone out of frame on the left.
The importance of soundRemember, sound is at least half your story. In an interview, where the success of your footage depends on the clarity of what the person is saying, sound is more than half the story. It is the story.
Even if you have shot excellent visual footage it can be useless without good sound. Always use your headphones, so you can hear precisely what the camera is recording. Our hearing fi lters out noises that a microphone will pick up (e.g. air-conditioning or electrical hum). Without headphones you will not be aware of these noises until you are logging your footage or in the edit room. Without headphones you will also not know if your sound recording is distorting loud sounds. If you have poor sound, there is little you can do to salvage your footage.
Be aware of any sound that will interfere with interviews or general fi lming. You may want to have someone assist you in recording sound, especially if you are using an external mike.
Wherever your location, consider how you can “account” for uncontrollable sounds by incorporating them into the story you are telling—e.g. fi lming the goats that are bleating in the pen outside a home—and also make sure to record some “wild sound” or “room tone.” This is 30 seconds to one minute of the “sound” of a location that can be used to cover sound editing.
Your camera’s microphone
The built-in microphone on most cameras is omni-directional, which means it will pick up sound from all around, favoring the loudest.
Gregory 02 chap03 140Gregory 02 chap03 140 22/7/05 11:14:3522/7/05 11:14:35
Video Production 141
This may be suffi cient for a street demonstration or other general activity. If you have no additional microphone and you are fi lming an interview, move your camera as close to the interviewee as possible. The built-in microphone is highly sensitive to surrounding sound, so you want to be in as quiet a place as possible—away from the crowd or multiple noise sources.
External microphones
If you are working with a camera, you will usually have an external mike input that will automatically override the built-in microphone. Some cameras require you to manually set which mike you want to use, so be sure you know how to do this. If you have a manual for your camera, refer to it. If not, a few minutes spent switching from one mike to another while you listen with the headphones should be enough to sort it out.
Hand-held microphones
Hand-held microphones can be very useful because they enable you to get the sound source very close to a person while giving you some freedom to move your camera. These microphones are often especially tuned to the frequencies of the human voice and have what is called a “cardioid” (heart-shaped) pattern that favors sounds that are close to the microphone. These can be very useful when interviewing people or speaking to the camera in a crowd.
Directional or “shotgun” microphones
If you have a directional microphone, it will pick up sound in the direction you point it, so you can pinpoint exactly what source of sound you would like. This kind of mike is useful if you need to be fl exible or, for example, have to record a number of people speaking in a crowd.
Clip-on microphones
When recording interviews, try to use a clip-on or lavaliere mike. These are very small microphones that you can attach to your interviewee’s clothing, near to their neck. Although they are usually omni-directional, these mikes will pick up what your interviewee says in this position. Make sure there are no obstructing objects such as hair or jewelry, or slick fabrics, which could interfere with the recording.
Gregory 02 chap03 141Gregory 02 chap03 141 22/7/05 11:14:3522/7/05 11:14:35

142 Video for Change
Wireless microphones
In recent years, a number of relatively inexpensive high-quality wireless microphones have become available. These battery-powered microphones/transmitters, which have a matching receiver that attaches to the camera, are very useful because they allow you to pick up sound without the need for a cable or lead, and allow the camera to operate freely separate from the sound recording. When worn by a person you are following, a wireless will pick up their voice and the voices of people around them even though the camera is dozens of feet away. A wireless can also be placed in the middle of a room, or on a conference table. As with any microphone, the closer it is to the sound source the better.
There are certain situations where a wireless mike is the best or only option for getting the sound you need—e.g. if you are fi lming people who are moving, or where you are trying to be discreet about the fi lming. Be careful, however, to monitor the batteries, as they will need to be changed often. Distance, electronic interference, and physical objects can degrade or interrupt the signal. It is crucial to monitor the sound the camera is getting from a wireless.
Remember that some cameras can also use a combination of microphones simultaneously—for example, a shotgun mike and a wireless mike.
Wind noise
There are a few ways to minimize the sound of the wind when it buffets your microphone. Stand with your back to the wind to shield the microphone or stand next to a natural windbreak such as a wall. External microphones can be equipped with wind-gags to help reduce wind noise. Some video cameras will have a button called “wind noise,” which minimizes the sound of the wind on your video recording. If there is no such button, and your external
Remember:
• Learn the characteristics of your mike• Omni-directional microphones favor loudest sounds • Point uni-directional mikes directly at sound source, and use them when the
sound source is rapidly changing • Clip-on mikes are best for interviews • Combine different mikes for maximum fl exibility and coverage
Gregory 02 chap03 142Gregory 02 chap03 142 22/7/05 11:14:3522/7/05 11:14:35

Video Production 143
mike protrudes from the camera, try placing a thin sock using a rubber band over the built-in microphone. It may look odd, but it will dramatically decrease the sound of the wind.
Acoustics
If you are fi lming indoors, always be aware of the acoustics of the room or how the sound bounces from the walls. Places like tiled bathrooms tend to refl ect sound and will echo very badly. Rooms with sound-absorbent materials in them such as carpets, curtains, or soft furnishings are far better. Watch out for other sources of sound that will interfere—music playing, vacuuming, or the whir of air-conditioning. Always turn down these noise sources if you can, and if there is a really loud noise (such as a car-horn right outside or an airplane taking off) rerecord, as your audio will otherwise be unusable.
Exercise 4.1: What catches the eye?If you are working in a group, this is a simple exercise to demonstrate that the idea behind fi lming is simple. It’s all about giving people
Common mistakes with sound
• Don’t forget to wear headphones when recording an interview. Good interviews have been ruined because no one was paying attention to the sound levels, and didn’t hear sounds like a person vacuuming in the background or air-conditioning.
• When using a uni-directional mike, always make sure that the microphone is pointed towards the person you want to hear. Some interviewers can be so concentrated on the interview itself that they wave the microphone around or in the wrong direction. If the person recording is not wearing headphones, or watching the sound levels, this may not be noticed.
• External microphones can be useless if you don’t turn them on! As they override the built-in microphone, people have recorded interviews with no sound at all.
• Check your microphone battery. If possible, carry an extra battery.
Remember:
• Consider acoustics • Be aware of background sounds • Always monitor your audio
Gregory 02 chap03 143Gregory 02 chap03 143 22/7/05 11:14:3522/7/05 11:14:35

144 Video for Change
the images they need to satisfy their curiosity, and to understand a situation. All you need is a pen.
Start tapping on the table with a pen. After a few seconds, ask people what their attention was drawn to fi rst, then what they looked at next, and then what? It is very likely that they will say:
• The pen (they looked for the focus of the action)—What?• The person doing it, and up at their face (they looked for the
reason)—Who?• Other people in the room, or around to see if there was a reason
and to understand the situation—Where?
This readily translates into a close-up, a medium shot and a long shot. With a few other shots—a medium shot taken from the side, and perhaps an over-the-shoulder shot (where the camera is behind the person looking over their shoulder at what they are doing), you have enough to put together a sequence with confi dence.
If you like, try fi lming these shots with your camera and playing them back on a television or monitor, so people can see how the shots relate to what they described.
Exercise 4.2: Practice with your cameraIn this exercise you will learn how to shoot a short, repetitive activity, making sure you get all the shots you need to edit a short sequence, as well as give a sense of the story. For this exercise you need: your camera, a tripod, a microphone.
Your objective is to fi lm a person doing an activity related to your video’s theme, and fi lm this person and their environment. Choose the person you want to fi lm carefully, as in Exercise 4.5 you will conduct an interview with them. You want to convey:
• Where am I?• Who is the person?• What are they doing?• How do they feel about this work or what is their motivation
for doing it? Can I understand why they are doing it?
It may be best if the person you are fi lming is carrying out a repetitive action, as this will allow you to fi lm it from multiple angles and shot-sizes. Each shot should last 15 seconds and if you pan, tilt,
Gregory 02 chap03 144Gregory 02 chap03 144 22/7/05 11:14:3522/7/05 11:14:35

Video Production 145
or zoom, use only one move per shot and start and fi nish with a still shot held for 10–15 seconds.
There are multiple aims to this exercise. You need to make sure you have all the shots you need to ensure you can edit together a sequence (this is called “coverage”), and you also want to have a sequence that does more than this—that tells a story. For this, you need shots that convey context, and shots that convey the action and telling details.
Take your camera and shoot the following shots:
1. Establish the context: Exterior extreme long shot of the building where person is, or the place where they are working, or an exterior extreme long shot with a tilt or pan. Try a pan from the street or sky to the building/location.
• Rehearse the shot before you record so that the shots with which you begin and end are well composed
• Don’t forget to hold the shot for 15 seconds at the end of every camera move
Or try an Exterior/Interior—Long shot—looking through a door or a window to an interior space. If you are working outdoors, move in closer for the LS.
2. Get the action: Medium shots of the person doing something—sitting at desk, washing dishes, cooking, selling items, writing, watching television etc. Search for a variety of angles, and try to capture different stages of a process.
3. Get the emotion: Close-ups of the person’s expression to convey how they feel about what they are doing. Remember that the story often comes through most powerfully in the expression on someone’s face.
4. Get the telling detail: Close-ups of details of what the person is working with or engaged with—you might ask to get “into the shoes of that person” so that the object is shot from their perspective (e.g. in a kitchen, this could be the dishes they are washing—so ask them to move to the side and shoot the dirty dishes in a pile. Alternatively you could fi lm over their shoulder, etc.).
5. Re-establish the context: Medium shot of the person still doing the same activity and fi nishing the task. Follow it with a long shot of the person fi nishing the task, and if possible walking out of the frame.
Gregory 02 chap03 145Gregory 02 chap03 145 22/7/05 11:14:3522/7/05 11:14:35

146 Video for Change
Review your footage: Congratulations! You have shot your fi rst scene. What you might have discovered is that there is often some “directing” in documentary footage and on occasion you might set up or adjust a situation slightly. When you have fi nished shooting, take a look at the footage. Try to fi nd someone who has experience with video to work with you to review the material.
Look out for:
Technical
• What is the composition of the frames? Consider the rule of thirds, headroom, and nose-room.
• Did you remember the 15 seconds rule about holding moving shots at the beginning and end, and for sticking with still shots?
• Are shots stable? Do you notice how instability is magnifi ed with a zoomed-in shot?
• Are there any distracting elements in the frame?• Do the foreground and the background work together or not?
For example, does a potted plant in the background look like it is growing out of a person’s hair?
• Is the horizon line straight?• Where is the light source in the frame—is the light even
throughout the shot?• Did you control the filmmaking environment where you
could? If there were noises disrupting the shots (dogs barking, repetitive alarms) did you either fi nd a way to fi lm away from them, stop them (ask to switch off the television or radio) or did you incorporate them into the story by fi lming them or making them into cutaways?
Conceptual
• Do you see both the context of the scene and the details?• Try turning down the sound—is it still clear what the person
is doing?
Exercise 4.3: Listening for sound In this exercise you learn how a microphone picks up sound in a different way from your natural hearing. You will need your camera and any mikes that you plan on using.
Gregory 02 chap03 146Gregory 02 chap03 146 22/7/05 11:14:3522/7/05 11:14:35

Video Production 147
It’s very important to attune your ears and eyes to possible sounds that may enhance or interfere with your fi lming. Wherever you are, stop and listen to the sounds around you. Try to pick out individual sounds. It is also important to learn how your different microphones will pick up different sounds based on their recording characteristics.
First, listen for the sounds in the room you are in now. What sounds do you think will be picked up by your camera microphone? Try it out using your camera and headphones. Do you hear unexpected sounds?
Now imagine… What sounds might be picked up by your microphone in the following situations?
• A second-fl oor offi ce in the center of the capital city of your country?
• A house in a rural community in your country?• A refugee camp at midday?
Sample answers might include:
• A second-fl oor offi ce in the center of the capital city of your country: The electrical hum of air-conditioning, a photocopier, or neon lights; someone typing at a computer; phones ringing; traffi c noises; workmen in the area.
• A house in a rural community: Television or radio playing; animal noises; milling or pounding of grain; insect sounds, like crickets; sounds of villagers or children playing outside; someone sweeping or cleaning the house.
• A refugee camp at midday: The sound of washing at a water pump; a child crying; people chopping vegetables; a pot bubbling; crackling wood in a fi re; the sound of a vehicle arriving at the camp.
Now, go with your camera and headphones to a potential location for your video.
First, use your eyes and ears and consider what sounds your microphone is likely to pick up.
Second, listen through your headphones and identify the sounds that your camera’s microphone or external microphone is picking up. Try listening with different mikes—if you have an external directional
Gregory 02 chap03 147Gregory 02 chap03 147 22/7/05 11:14:3522/7/05 11:14:35

148 Video for Change
mike, try it out. Think about how you could minimize unwanted noises either by:
• Selecting an appropriate microphone• Changing the location of your shoot• Acting to eliminate or minimize the noise• Finding a way to incorporate it into your shooting plan
Exercise 4.4: Movement exercise In this exercise you try acting as a live “dolly,” meaning that you move with the camera while following someone. Then you try the same exercise, but you set up a shot on a tripod and the movement originates within the frame—while the camera moves, you do not change position to physically follow the person. Your objective is to use movement to liven up your fi lming, but not to distract the viewer from the content. You will need a camera and a tripod.
Have the person enter a new space and select a new activity. First try walking with them. Remember not to get too close. Try walking behind them, beside them, in front of them. Ask them to walk slowly or have someone with you to guide you if you are walking backward. Try to keep them in the same place in your frame and move at the same speed as them.
Reviewing your footage:
• Do you feel as if you are too close to the subject? Does it look like you are chasing them rather than accompanying them? Do they walk out of frame when you don’t intend them to?
• Is the image stable? If not, review the section on “crabbing.”• If you are fi lming someone, do they remain in the same place
within the frame as you and do you move together?
Note: When you shoot from the side or behind, you can insert a voiceover at a later moment as long as you don’t see them talking.
Now try this sequence again but without moving your body. Put the camera on a tripod and have the person walk through the frame several times in different places, and with different shot sizes. Pan, tilt, or zoom to accommodate them as they cross your frame and exit it. Always allow them to exit the frame, as this will make it easier for you to cut shots together when you come to edit.
Gregory 02 chap03 148Gregory 02 chap03 148 22/7/05 11:14:3622/7/05 11:14:36

Video Production 149
FILMING THE STORY
Keep your audience interested The most important job of any storyteller is to keep the audience interested, and avoid disorienting them in terms of time, space, point of view, or in the narrative thread. No matter how compelling we think an issue or story is, it is our job to present that story in a way that engages the audience’s intellect, their emotions, their senses of humor and justice, while not oversimplifying the issue or irresponsibly representing people or situations.
To keep them engaged, the audience should know where they are, what they are seeing, and who is involved. They should know whom they are listening to and what the story is. The most basic building block you have that will keep your audience oriented is the sequence—a series of shots that show the context and details of an action, person, situation, or location, presented in a way that makes sense to your audience. Your complete story is a series of different sequences, often structured with a beginning, middle and end.
Filming a sequence Always keep in mind the story you want to tell, how you plan to establish it, and how you will introduce an issue or character. Be aware of developing the issue or the character, what has happened to them, and how you can illustrate this.
For example, if your story is to follow a forensic team sifting through evidence of a mass grave, think about beginning with an establishing shot of the area, then an introductory shot of the team and a close-up on the member of the team you will follow. Show him fi lling out a form, picking bones out of the soil, and trying to identify a corpse. Be sure to shoot close-up and wide shots and each step of the process.
For example, if you shoot a close-up of the bone being carefully removed from the soil, follow it with the bone being cleared of excess dirt, then the bone being placed into a plastic bag and, fi nally, being labeled. Sequencing your shot, and varying your angles makes the images more compelling, contextual, and realistic. You could then fi lm an interview with the forensic scientist, asking him about what he was doing during this process, or what this evidence points to. In the editing process you could choose whether to include the sound of his voice over the images of him carrying out his work. You can tell a very different story from fi lming the same event from different
Gregory 02 chap03 149Gregory 02 chap03 149 22/7/05 11:14:3622/7/05 11:14:36

150 Video for Change
perspectives or from what you decide to favor and what you choose to ignore.
It’s always important to be thorough when fi lming people doing something. Take, for example, offi cials registering refugees at the entrance of the camp. You will want to fi lm a variety of shots to explain the scene.
First of all, you will need an establishing shot to set the scene followed by a close-up of a sign showing the name of the camp. You may then decide to fi lm a long shot of a refugee waiting in line. Next, you might fi lm a mid-shot of an offi cial sitting down and writing down the name of a refugee. You might then go behind the offi cial and fi lm the refugee being registered, looking at the offi cial, then a close-up of the refugee’s expression.
You might then come around to stand on the same side of the refugee and shoot a close-up of the offi cial writing. You may then think that a long shot of the two together will help to tell the story. Try to capture the interaction from the points of view of the people involved. For a good sequence you want to capture the registration experience from the points of view of both the refugee and the offi cial.
Remember, you don’t always have to shoot “in sequence” if activities are repeated, or if it will be easier to fi lm one aspect of a scene at one time.
Filming to edit It is at the editing stage, otherwise known as “postproduction” that your story will come together, so thinking about what an editor needs is vital.
When you are shooting you may think you are repeating the shot too many times, but remember, an editor needs many shots to choose from. Use a variety of shots, including wide, long, mid-shots, and close-ups, as well as different angles.
The other key thing to remember is that effective editing and fi lmmaking is about compression of time and space. In any fi lm we do not see every moment of an action, just the key moments that will keep us orientated. Events that take place over 20 minutes in real time, can be shown in 20 seconds in a video, and we will accept the compression. When shooting to edit you are looking to provide your editor with all the components he or she needs to compress a sequence without jarring an audience.
Gregory 02 chap03 150Gregory 02 chap03 150 22/7/05 11:14:3622/7/05 11:14:36

Video Production 151
How shots fi t together
Editing is effective when a variety of shots are put together without appearing strange or jarring to the eye. How these shots fi t together depends on the content and composition of each shot. An editor always needs to contrast images, putting shots together that are not too similar or too different so that there is not a jarring “jump-cut.” For example, a close-up of a person’s face will not go well with a close-up of another person’s face but it will look good with a mid-shot of the person sitting in a chair. An overview establishing shot of a refugee camp will go well with a more detailed shot of someone cooking, or collecting water.
The following tips are important to remember:
Follow the 15-second rule
Always fi lm a stable shot for 10–15 seconds before you start any movement with your camera. Even if you are just shooting a stationary subject, you should always let 10–15 seconds roll. This gives the editor enough material to choose and insert a shot into a sequence.
“Bracket” your shots
“Bracketing” means shooting a subject repeatedly to get the best shot. Shooting the same subject, try to shoot wide, medium, and close focal lengths. You might want to try to zoom out, then zoom in; or pan left and pan right. Bracketing is good for experimenting with light, movement, and distance from the subject.
Shoot “bridge” shots and think sequentially
Thinking sequentially does not mean that you have to shoot in a sequential order, but rather that chronological elements should all be on the tape for the editor to rearrange into a logical sequence, demonstrating cause and effect.
For example, if you are fi lming a dead body being carried into a building for examination, your camera needs to follow it. Think about what has to happen to put the body into the house. These shots help the editor to edit a “sequence” and to compress a complex action into a series of shots. The links or “bridges” move your story forward in time.
Be aware of dramatic changes in the weather
If it starts to rain, and most of your shots are in the sunshine, it could be hard to edit them into a sequence. If the weather changes and time
Gregory 02 chap03 151Gregory 02 chap03 151 22/7/05 11:14:3622/7/05 11:14:36

152 Video for Change
permits, “re-establish” your scene (with a wide establishing shot) in the new weather conditions. That way, the editor won’t have to put one shot with rain into a sequence with fi ve other sunny shots.
Filming characters A dramatic and powerful way to tell your story is through one character, or a series of characters who represent an abstract story idea: for example, health care of refugees, election fraud, the “disappeared.”
If you interview someone, you should always strive to go beyond the interview with your camera. Often the difference between an expert interview and a genuine character with whom people can empathize is the context you provide through additional sequences around that person. Character-driven stories depend on good action sequences showing the person doing things, and interacting with their environment. They give a character depth because we see that character in many different situations.
The method for developing character is straightforward: once you fi nd captivating characters, stick with them. Follow them through the day, interview them, shoot their reactions to situations, shoot personal belongings, and other details of their personality.
If they go between places, fi lm their journeys. If they cry, if they speak, if they interact with others, shoot it all. By doing this, you create character; someone who is not one-dimensional and whose individual story can ultimately tell the big story. With video, many “little pictures” can create one overall big picture. That big picture is what you want your viewers to remember, long after they have fi nished watching.
Remember, a character need not be a person. A character can be a physical place or event as well: a polluted lake, a deserted village, a refugee camp, or a political demonstration. These things may not be human but they still have “personality.” That personality or ambience is what you should look for.
Characters and continuity
Think about what your characters are wearing because when you edit together a sequence, seeing them in different clothing may not work well. You could ask them to wear the same or similar clothing if you are fi lming over a period of days, or in the editing stage you may choose to use only the sound of their voice in one particular sequence.
Gregory 02 chap03 152Gregory 02 chap03 152 22/7/05 11:14:3622/7/05 11:14:36

Video Production 153
Case study: A personal experience developing a fi lm around a character Once I was fi lming a human rights lawyer called Alirio Uribe in Colombia. He regularly receives death threats but continues to work to defend others who had been targeted or killed by illegal paramilitaries in the country.
It was important to fi lm Alirio in as many different scenarios as possible to give a sense of how he perseveres with his life despite everything. In the video Alirio fi rst appears in the back seat of a car, giving the voiceover a chance to introduce him. The video then cuts to a wide shot of him getting out of the car, walking into court, and in the courtroom. The viewer fi nds out about the case he is working on.
Driving home, Alirio talks about the death threats he receives. We then see him the next morning having breakfast with his family. His voice over these images explains who these death threats come from and why. The next scene shows him at a market with his wife and heading to a park with his family. His wife talks about the reality of having a husband who works as a human rights lawyer, living under the threat of death, and how this affects their family.
Filming an interview Interviews are often the building blocks for documentary fi lm. Some simple steps can ensure good interviews:
Choose a location
Remember that there are many options for where you do an interview. Traditional news programs often rely on mid-shots of interviewees in offi ces, or neutral surroundings (i.e. backdrops of curtains, potted plants etc.). Think about fi lming people in the location where what they are discussing took place, or in their home, or walking around. Often people are more relaxed when they are doing something rather than in a formal sit-down interview setting. Others will fi nd having photos, or other objects related to their interview, near them will help them talk.
The Dutch fi lmmaker Heddy Honigmann does this very effectively in her fi lm Good Husband, Dear Son, where she interviews the mothers, wives, and daughters of men killed in a village near Sarajevo. A woman holds a photo of her husband, another sits with the tools he used to work with, another stands in the home they built together, and this makes their ability to recall painful memories and the viewer to empathize that much easier.
Gregory 02 chap03 153Gregory 02 chap03 153 22/7/05 11:14:3622/7/05 11:14:36
154 Video for Change
You may not be able to control the location where an interview takes place, but always consider what is comfortable for your interviewee and the best technical environment for your camera. Listen for background sounds; look at the lighting and what is behind and around the interviewee. What story do they tell about your interviewee?
If appropriate and if the situation is not too emotionally sensitive, ask your interviewee to readjust glasses or change a shirt. A sloppy or strange appearance can distract the viewer from what the interviewee is saying or diminish their credibility.
Establish a relationship with your interviewee and ensure they are making an informed decision about appearing on video
In an interview, it is natural for people to feel uncomfortable and it’s very important to be sensitive to their needs. Their experiences may be traumatic, politically sensitive, or they may simply be shy in front of the camera. Be aware of how cultural norms or cross-cultural communication issues (if you and the interviewee are from different cultures) are affecting the situation.
Always try to make your interviewee feel at ease before you start. Many of your interviewees may be reluctant to talk on camera, so it is your job to relax them. Always maintain eye contact and give the person your fullest attention. People often need to warm up, so start with a more general question to get the interview going. Ask each person to say his or her name at the beginning of any recording. This may seem obvious, but there may be confusion later on, especially if you are interviewing many people in a row on one tape.
In Chapter 2 we discuss the issue of informed consent. In interviews or fi lming with victims and survivors it is particularly important to explain the importance of consent.
Observe your interviewee
Look for physical details that reveal someone’s character: callused hands, an awkward and nervous posture, lack of eye contact, animated hand gestures while speaking. These will be useful to bear in mind as you frame your shots, and also to help identify shots that you can fi lm as cutaways to use during the editing process. Remember, unless you have two cameras, you cannot shoot two things at once. You will only be able to shoot some details after an interview or an event is over.
Observe how your interviewee reacts to the camera. If your interviewee gesticulates to emphasize meaning, you may need wider
Gregory 02 chap03 154Gregory 02 chap03 154 22/7/05 11:14:3622/7/05 11:14:36

Video Production 155
shots. People you are fi lming can move around while speaking. Watch for early signs of such movement, so that you can be prepared to widen your shots or move with them once the interview begins.
Frame your interview
Always remember the rule of thirds when fi lming interviews. In close-up shots, keep your interviewee’s eyes a third of the way down from the top of the frame.
Make sure your interviewee has enough talking space. If they are looking over to the left of the frame you should move them further to the right of your viewfi nder, and vice versa.
If you are shooting a series of interviews, do not always shoot your interviewees on the same side of the camera. Instead, shoot some on the left third of your frame, and the other half on the right third. These variations allow for continuity and balance in the fi nal edit of your footage. If you know beforehand that two people will be used to make contrasting points of view, shoot one looking to the left, the other to the right. That way, you can juxtapose them more effectively.
Where should the interviewee look?
Usually you will ask them to look at the interviewer, who is placed just off to the side of the camera, close to the lens, and diagonally across from the interviewee. If you are both fi lming and asking the questions ask the interviewee to look towards this place rather than directly at the camera. For a more confrontational interview you may on occasion want your interviewee to look directly into the camera.
Bracket shots in an interview
Try not to shift angles in the midst of the interviewee’s response to a question. Move your camera for a bracket shot while the questions are being posed or while the interpreter is speaking. Editors appreciate having bracket shots of the same person as it gives them alternatives to edit with. Capturing expressive hand movements or other visual elements also conveys a sense of your interviewee’s character.
Think about your angle
If you shoot a person with too wide an angle, it can diminish them. Wide-angle interviews are good when someone is walking or explaining something that is also being shown on the camera. In interviews, a higher angle will “diminish” a person whereas a low
Gregory 02 chap03 155Gregory 02 chap03 155 22/7/05 11:14:3622/7/05 11:14:36

156 Video for Change
angle will make the person seem more powerful. In most interviews it is preferable to keep the camera at eye level.
Conducting an interview: Avoid “yes” or “no” questions
Remember that you are aiming to get your interviewee to give full and complete answers that you can use to tell your story. The best way to do this is to ask open questions that do not require a yes or no in response. For example, if you ask, “Are the living conditions in the refugee camp bad?” your interviewee may reply: “Yes, they are.” However, if you ask, “Can you describe what the living conditions are like in the refugee camp?” you might get a more useful answer. Open questions like “Tell me about…?” are good for getting more complete answers. Explain to your interviewee how to incorporate your questions into their answers.
For example:Question—How long have you worked at this center?Answer—Five years.This will be hard to edit. Instead you should ask your interviewee
to say:Question—How long have you worked at this center?Answer—I have worked at this centre for over fi ve years.Avoid bias for or against your interviewee. This does not mean
you cannot be sympathetic to someone who has been traumatized or suffered a human rights violation. Being fair means being impartial to the information you are seeking. Be especially careful not to ask leading questions like “Wouldn’t you say that the government is responsible for stopping the supply of food to the refugee camp?” It’s better to ask, “Can you explain who is responsible for stopping the supply of food to the camp?” The fi rst question reveals your bias and can elicit a yes or no. The latter question invites a more detailed answer.
Always keep silent during the interview. Interviewers who continually give encouraging sounds to their interviewee like, “Aha” or “I see” have ruined many answers to questions, and make it harder to edit the material. Be careful not to interrupt and disrupt their fl ow of conversation.
Other shots you will need: Establishing shots
In every interview, as well as recording the actual interview you need to think about situating where the story is, or the context of an interview. Often this will involve shooting an establishing shot
Gregory 02 chap03 156Gregory 02 chap03 156 22/7/05 11:14:3622/7/05 11:14:36

Video Production 157
or sequence. This shows the interviewee in the environment where they are to be interviewed, talking with their interviewer in long shot or otherwise doing something over which an audio narration could later be placed to introduce the interviewee.
Cutaways, reaction shots, B-roll, and veritéCutaways and “B-roll” are the building blocks of editing that are the most overlooked and the most vital to a successful editing process.
Cutaway
A cutaway is a shot that the camera “cuts away” to from an interview or dominant scene, to allow for explanation of the character and the context of their story. These shots also “cover” edits and help to build a sequence. A cutaway is usually a detail of the scene—in the case of an interview it could be the character’s hands, for example, or the face of a person listening. Cutaways are easiest to fi lm in situations where people are engaged in an activity and you can take a close-up shot of a detail, or when they are in an environment with other people or with many other interesting potential shots around them. An interview in a bland room makes the on-location cutaway shots diffi cult.
In an interview context, you may want to keep your camera fi xed on the person throughout. Once the interview is over, you can ask them to remain where they are and continue speaking while you shoot some “cutaway” shots of the person’s immediate surroundings, and of details of their actions. In a doctor’s offi ce you might take a
“When you interview someone who is traumatized, you need to be very aware of what is happening to them,” says Mariana Katzarova, who is a researcher on Russia at Amnesty International. “Especially if the person is recounting an incident or traumatic experience for the fi rst time they may go into fi ne detail and relive the experience in some way. You need to be able to listen and put their needs before the interview that you are recording.”
Remember:
• Think about the sound, lighting and background of an interview• Always try to get an on-camera consent, unless there are security reasons
not to• Observe your interviewee • Avoid yes or no answers and don’t ask leading questions• Keep silent while your interviewee answers
Gregory 02 chap03 157Gregory 02 chap03 157 22/7/05 11:14:3722/7/05 11:14:37
158 Video for Change
close-up of his prescription pad, or a set of medical instruments sitting on his desk, or the outside of his offi ce. In someone’s home it might be shots of photos of individuals they are talking about, an object from their home country etc. If someone is clutching something as they talk you might take a close-up of their hands holding it. If they were particularly expressive with their hands, then after you have fi nished the interview, ask them a random question and fi lm their hands as they answer. The key to these detail shots is that they not include the person’s face so that they will be easier to edit into the interview.
If someone has been doing something while you fi lm them—for example, preparing vegetables for a stew, or sorting through papers—you will have an easy job of shooting cutaways if you take close-up shots of this activity that can be formed into mini-sequences. These cutaway shots are short and are used in the middle of the interview to smooth over audio and visual breaks in the editing. Another possibility for a cutaway is a long shot of the situation in which the viewer cannot discern what the interviewee is saying.
B-roll
B-roll is essentially any footage that is not interview footage, and which will serve to complement interviews and help tell your story. In any fi lming situation you should always be looking to gather images/footage relevant to the story—i.e. if someone were talking about life in a refugee camp you would take shots of the living conditions, of people working, of people preparing meals, of the poor conditions in the schools. These will be used to “cover” (i.e. provide visuals while someone speaks) both interviews and narration. Take shots of different sizes—wide shots that show a context, action shots with one or two people doing an activity, pans across a scene, and close-ups to show important or interesting details. These images can also show the conditions and “speak for themselves,” as with verité footage. A visual sequence within your interview can both tell the story and provide a breathing space and transition. Good B-roll and visual sequences do not just provide a visual image of what a person is saying, they provide something new and complementary to the audio track of an interview, or voiceover.
Verité footage
Verité is observational footage of activities and “life happening in front of the lens.” It is footage that speaks for itself without
Gregory 02 chap03 158Gregory 02 chap03 158 22/7/05 11:14:3722/7/05 11:14:37

Video Production 159
necessarily requiring explanatory voiceover or narration. An example of verité would be footage of police offi cers beating protesters at a demonstration, or a scene in which we follow someone walking to a village water-pump far from their home.
Weaving general images and verité scenes of reality skillfully throughout a story gives it shape, pace, and tempo. Without them, a story seems fl at and fi lled with the “talking heads” of one interview after another.
For every action there is a reaction
Reaction shots are compelling because they put a situation, a person, an event, in greater context with its surroundings. When shooting an interview in a public space, be ready to fi lm the reactions of crowds or individuals to what is being said. This is especially important at political rallies or demonstrations. In more intimate situations, if someone is relaying an important story, shoot onlookers responding with looks of interest, concern, tears, or happiness. Reaction is often full of emotion—it always conveys to your audience that what they are listening to is interesting. (If it isn’t—and that’s your point—nothing could convey that better than cutaways of people looking bored.) Remember that you don’t always need to shoot your reaction shots during the main action or interview—they can be shot before or afterwards if people continue to behave in a similar way.
Allow the story to unfold
The moment you put a video camera in your hand, be mindful of the immediacy that your role demands. The interview can turn sour, it can start to rain, or the most compelling part of any story can begin only when you turn your back on it. The interviewee may talk about a particular incident, which you may decide would be more important to the story than other fi lming you have planned. Always watch out for what you can fi lm to illustrate the story, even when the camera is turned off.
Filming events that happen only once
When fi lming a one-off event, you need to think as you would when fi lming an activity, but you will need to think, act, and react quickly to what you are seeing through the lens of your camera. Practicing fi lming a live event is also a great way to improve your camera skills. Sometimes you want to experience that event through
Gregory 02 chap03 159Gregory 02 chap03 159 22/7/05 11:14:3722/7/05 11:14:37

160 Video for Change
one person’s experience, other times you want the footage to remain more “observational.”
If it is critical to ensure there are effective images of the events that are occurring then it will be best to fi lm stable wide shots. Make sure you have the footage to establish who, what, why, where, and when. Prepare in advance for the most critical moment by shooting other B-roll and establishing footage that will help explain the key events, and that can be gathered separately, as well as by interviewing people, both before and after events, and asking them to explain what is going on. Ask simple questions like “What is happening here?” Or perhaps you want an impression after the event—how did the meeting, the event, go?
For example, if YOU are fi lming at a demonstration and a fi ght breaks out between a police offi cer and a protester, keep the camera rolling. Most importantly get wide shots that show the whole scene, and give an overview of the situation, and include clear indicators of where you are. Try to keep your camera stable, to ensure that you can edit this material later if necessary.
Filming a conversation, an encounter, or a meeting A challenging situation is fi lming a spontaneous conversation between two or more people or a mass meeting with just one camera.
Here, as with when you fi lm any one-off activity, you need to use stable wide shots to ensure you establish a setting, and that you have the best chance of catching any key moment.
For a conversation you should get in as close as possible to include the people talking in a wide shot. As you get comfortable with the rhythm of a conversation you might want to start fi lming just one person. When the conversation shifts to another person you can pan across, or zoom out for a wide shot. Don’t worry about always getting the fi rst words of a new speaker—in editing, the shot will often linger on the person who has just fi nished speaking or who is listening, and you can cover the lack of an image with a cutaway. Useful cutaways in this setting include reaction shots of other people
Remember:
• Cutaways and B-roll are vital • Reaction shots help to convey interest and emotion
Gregory 02 chap03 160Gregory 02 chap03 160 22/7/05 11:14:3722/7/05 11:14:37

Video Production 161
listening—remember these, and other contextualizing or B-roll shots, don’t necessarily need to be gathered at the same time as the main action.
In a meeting, acoustics will often work against you. Unless you can record your sound directly from the public address system (if the speaker is using a mike) you will need to be close to the speaker, and with a directional mike that is focused on the speaker, not the ambient noise in a room. If you can’t get close enough to record good sound, consider focusing on getting good wide shots of the whole setting including the speaker and audience, as well as audience reaction shots, and then getting good interviews in the immediate aftermath. As with any other live event, a good question to ask people is—“What just happened?”—and then leave them with a silence they fi ll with an answer.
Filming discreetlyEvery camcorder has a small red light that comes on every time you press the record button: you can disguise it by sticking masking tape over the light or by holding the camera so that your hands obscure it. Many cameras also give you the option of disabling this light.
To fi lm discreetly, make sure the camera is on auto focus and fully zoomed out and then hold it unobtrusively as if just carrying it by your side. If you are trying to fi lm a person, you may need to tilt the lens up slightly to avoid fi lming just their torso and to include their head in the shot. It is usually prudent to remove such tapes from the camera as soon as possible after you have the shots you need.
There are ethical, legal, and safety considerations to consider when carrying out fi lming without permission or when the person or people you are fi lming are unaware. Ensure you have thought these through thoroughly before you do undercover or covert fi lming. For more information, see Chapter 2.
Draft a shooting planIn Chapter 3 we talked about drafting a shooting plan as a step in preproduction. Now that you have more familiarity with the different kinds of shots and how sequences are constructed you can also prepare a shooting plan for your video.
You should draft your shooting plan based on the following:
• Which people do I need to fi lm? Am I interviewing them or following their activities?
Gregory 02 chap03 161Gregory 02 chap03 161 22/7/05 11:14:3722/7/05 11:14:37

162 Video for Change
• What interview/dialogue, establishing shot, B-roll, verité, and cutaways will I fi lm with each person? What additional material related to that person will I need to gather before or after fi lming with them? What contextualizing footage for my story and the people featured do I need to fi lm?
• Can I break this down further into specifi c shots and sequences?• Is there additional sound that needs to be recorded on-site or
secured elsewhere?
For example, if you were going to be interviewing a mother who lost three sons during a brutal dictatorship, and a human rights organization that has been working to uncover mass graves and document names of the “disappeared,” you might want to fi lm the following:
• Establishing shots of the country would help to introduce and tell the story of its recent history. For example, overviews of street scenes, former military headquarters, evidence of the chaos of transition or the continuing presence of military forces, e.g. checkpoints or soldiers on the street. If there is any evidence of the former regime, you might want to fi lm this.
• The mother’s home may be a good place to fi lm an interview, with cutaways (short shots) of her looking at photos of her sons, and close-ups of the photos and of her face looking at them. Cutaways of the house and other poignant objects would also be effective.
• Provided there are no security concerns, the human rights organization’s offi ce could be a good place for an interview, including an establishing shot of the offi ce and close-ups of fi les and photos of the “disappeared” and B-roll of the organization at work.
• You might visit a mass grave, or even conduct an interview with someone from the human rights organization at the site as they conduct their work. You need to ensure that this is possible, that evidence at the site is left undamaged, and that no specifi c, identifi able remains are in shot.
Exercise 4.5: Film an interview With this exercise you will pull together what you have learned so far about fi lming interviews, as well as shooting establishing
Gregory 02 chap03 162Gregory 02 chap03 162 22/7/05 11:14:3722/7/05 11:14:37

Video Production 163
shots, cutaways, and B-roll. Set-up an interview with the person you observed conducting an activity before. Try to do it in the location where they were doing the activity, and perhaps while they are still doing it. Bring along a volunteer to help you ask questions and to assist in sound recording. Your objective is to shoot a 3- to 5-minute interview, including cut-away shots, and B-roll to cover the interview and linked narration.
Stage 1: Establishing shot or sequence
Choose your location and possible interview activity using the guidelines in this chapter.
Start with an establishing shot. Typically this is a wide shot at the beginning of a scene designed to inform viewers of a change in location and to orient them to the general mood and relative placement of subjects in the scene. This shot is also often used for the visuals when a narrator is “introducing” the subject of an interview.
You can choose the following options for your establishing shot (or sequence):
• Action shot of individual in context• A pan from the street to your subject (interviewee) in the middle
of an activity• A wide-angle shot of the environment that slowly zooms in to
your subject in the middle of an activity• Shoot an extreme close-up of an action, and zoom or cut to
reveal a wider picture• A sequence showing the person conducting an activity
Stage 2: Shoot the interview
• Frame your subject, thinking about composition and lighting. Ensure there is neither too much backlight nor too much glare in the interviewee’s eyes. Find your medium shot and close-up, bearing in mind how much the interviewee moves or gesticulates while talking.
• Start your interview—aim to get 3 to 5 minutes of material. Be creative. If the person is doing an activity talk to them about what they are doing.
• Remember to ask open-ended questions that do not require a “yes” or “no” answer. Remember that the interviewee’s answers
Gregory 02 chap03 163Gregory 02 chap03 163 22/7/05 11:14:3722/7/05 11:14:37
164 Video for Change
should be self-contained, as you will probably not use the interviewer’s questions in the fi nal video.
• Five to eight questions should be suffi cient.
Stage 3: Shoot cutaway shots and B-roll
• Shoot cutaway shots paying attention to the person’s surround-ings, their body language and gesticulation and to the details of any activity they have been performing as you talked.
• Shoot B-roll and verité sequences that can complement the interviewee’s answers. If they discuss a place, person or event, see if it is possible to fi lm this. Look at what you have from your initial exercise and then decide what additional material you will need. Go and shoot this.
Reviewing your footage:
• Is the frame stable, and does the interviewee remain in frame?
• Did you use medium shots and close-ups? Are close-ups used in more emotional or personal moments? Is the transition between the shot sizes done during an interviewer’s question so that it can be easily edited-out, or smoothly and unobtrusively during the interviewee’s answer?
• Are questions non-biased, open-ended? Are the interview responses self-contained?
• Are the cutaways interesting in themselves, or purely functional?• Does the B-roll you have complement and supplement the
interview, or does it just “show” what the person is saying?• Did you shoot additional material to fi ll the gaps from your
initial fi lming? Is it a good fi t?
Exercise 4.6: Filming an activityWith the same person, think of something that they do every day. You must communicate this visually, and will not be able to use them speaking or voiceover to explain it. See if you show this activity in 10 shots. Draw 10 shots you want to fi lm—this is called your storyboard. Review your storyboard. Does this show the story you would like to tell?
Example: Imagine that your friend works in a crowded offi ce, trying to sort through thousands of fi les on people who have gone
Gregory 02 chap03 164Gregory 02 chap03 164 22/7/05 11:14:3722/7/05 11:14:37

Video Production 165
missing or who have been “disappeared” under a repressive regime. Every day people come to their offi ce, carrying photos, trying to locate a relative. Members of the organization will sit with them, making a fi le on the missing person’s name and attaching their photo. Think of a sequence that will show the activity of the human rights organization. Draw 10 shots you want to fi lm. This is your storyboard. Review this. Does it show the story you would like to tell?
To give you an example, Figure 4.3 shows how this storyboard might look visually.
Example of a 10-shot storyboard in the human rights offi ce:
1. LS: Human rights researcher sits at desk working and looks up 2. MS: Person at other side of the desk is standing and sits down, and zoom
to CU of shaking hands 3. LS: Researcher pushes seat back, stands up and walks over to a film
cabinet 4. CU: Researcher’s hands looking at different fi les and selecting a folder that
says REPORT 5. MS: Person across from the desk is shown talking about something
intense 6. MS: Human rights worker listens carefully and takes notes 7. CU: A section on the form 8. LS of both in the frame discussing section together 9. Over the shoulder MS of the human rights worker as the person gets up
to leave and shakes hands10. CU as the human rights worker closes the fi le
Think of an activity that you want to fi lm. Try drawing another storyboard and then fi lm based on what you have drawn.
Exercise 4.7: Capturing a sense of place Note: A tripod or monopod is recommended for this exercise.
Your goal is to convey the feeling of a place and the community of people who live, work, and pass through there, to someone who has never been there. Go to the location and observe it at the beginning, middle, and end of the day, as well as other key moments (e.g. if there was a marketplace, the hour when it opens, or the time when the local college fi nishes classes and all the students go home). On each visit, stay for at least half an hour and fi lm what happens.
Gregory 02 chap03 165Gregory 02 chap03 165 22/7/05 11:14:3722/7/05 11:14:37

166 Video for Change
• Make sure you get a range of shots and angles. What is the mood of the place? What activities are going on in the place? Who enters and leaves?
• Extreme long shots can be very important in helping to establish a place or connect scenes that take place over a period of time.
• You may fi nd it helpful also to pick out a person whose activities are connected to the place, and follow them for part of your fi lming.
Sequences conveying the feeling of a place are often used at the beginning of a fi lm, to connect scenes, or as a closing sequence.
Gregory 02 chap03 166Gregory 02 chap03 166 22/7/05 11:14:3822/7/05 11:14:38
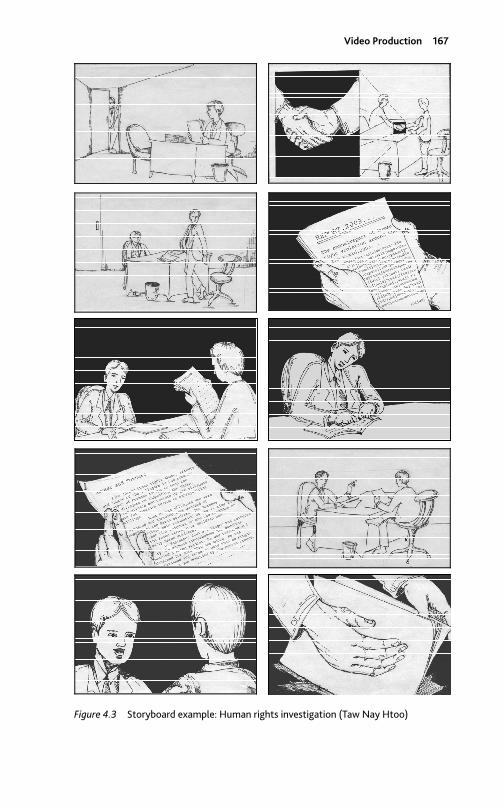
Video Production 167
Figure 4.3 Storyboard example: Human rights investigation (Taw Nay Htoo)
Gregory 02 chap03 167Gregory 02 chap03 167 22/7/05 11:14:3822/7/05 11:14:38