v.i.a. modeling guide for revit families. basics v.i.a. panels utilize the curtain wall tools of...
TRANSCRIPT

V.I.A.Modeling Guide
For Revit Families

basics
• V.I.A. Panels utilize The Curtain Wall tools of Revit
• The panels are defined as Curtain Panel Families
• Intention of the families is to create layouts at once with nested
families instead of arranging frames, junctions and skins individually.
• Only a small set of rules (sizes, constraints) are integrated
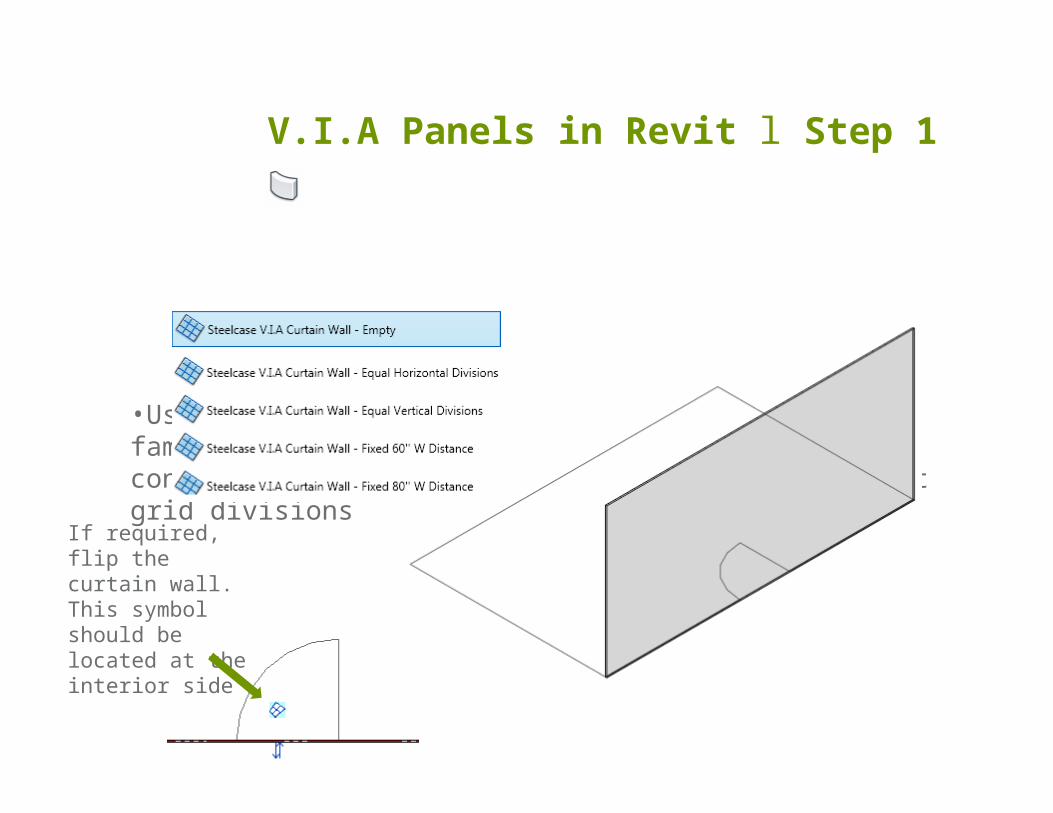
V.I.A Panels in Revit l Step 1
•Use the Wall tool and add a Curtain Wall familiy. Note that the V.I.A. overview project contains additional curtain wall types with preset grid divisions
If required, flip the curtain wall. This symbol should be located at the interior side .

V.I.A Panels in Revit l Step 2
•Use the Curtain Grid tool and add horizontal and vertical grid lines to the curtain wall.
For Utility Panels defined as curtain panels, create a grid distance of 4.06.

V.I.A Panels in Revit l Step 3
•TAB-click and change a System Panel to a V.I.A. panel type in the Type Selector.

V.I.A Panels in Revit l Step 4
•Use the SPACE key to change the orientation of the door•Set the properties in the Properties dialog
Doors can be displayed open or closed for 3D and elevation views. 2 hardwire types are available

V.I.A Panels in Revit l Step 5
•Solid panels can have different skin arrangements for the interior and exterior side
Check „Ceiling Track“ for top panelsCheck „Floor Track“ for bottom panelsUncheck both properties for intermediate panels
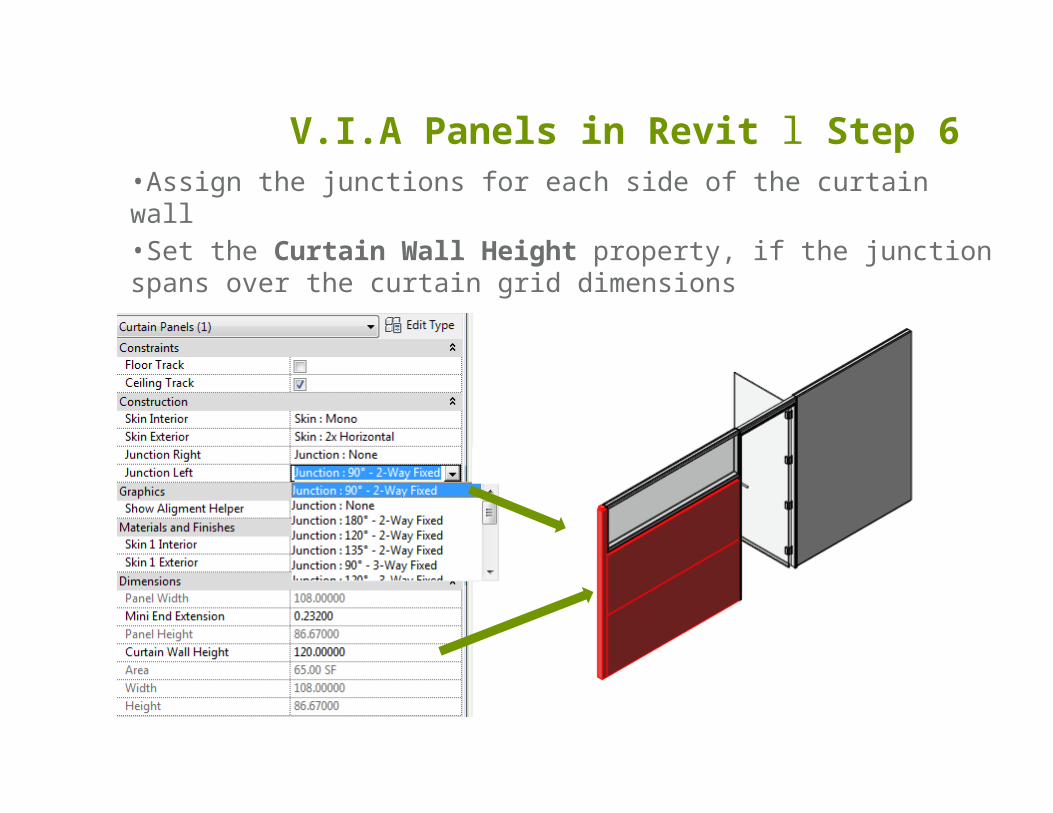
V.I.A Panels in Revit l Step 6
•Assign the junctions for each side of the curtain wall•Set the Curtain Wall Height property, if the junction spans over the curtain grid dimensions

V.I.A Panels in Revit l Step 7
•Alternatively, you can use the Furniture Systems family „Steelcase V.I.A. - Junctions – Junction.rfa“ to place the junctions individually.

•Continue the next run with a curtain wall•Use the Align Tool to connect the curtain wall in plan view to the existing wall. Use the Alignment Helper Lines to align.•You can switch of the Alignment Helper in The Properties for indiviual panels or under Object Styles/Furniture category
V.I.A Panels in Revit l Step 8
Alignment Helper Lines
Before After

V.I.A Panels in Revit l Step 9
•Continue to define the skins as described in step 5•Note the Mini End Extension property for Small, Medium and Large Mini-Ends

V.I.A families overview
Solid Panel
Individual skin divisions for interior and exterior
Individual skin divisions for interior and exteriorSolid Panel w Junctions
Integrated junctions and ends

V.I.A families overview
Glass PanelGlass can be set for both sides
Segmented Glass Panel
3 horizontal divisions
Utility PanelNeed a fixed grid distance of 4.06‘‘W.
Junction To place junctions individually.

V.I.A families overview
Eno Projector Shroud
Eno Markerboard
Fixed dimensions:
Projector Position (for 96‘‘Width):
Fixed dimensions
Fixed dimensions:
Materialfor screen
Single Monitor Shroud
Double Monitor Shroud Fixed dimensions:

V.I.A families overview
Slatwall PanelFixed Height dimensions:
Solid Panel w Single Monitor
Solid Panel w Double Monitor
interior exterior Variable Monitor Position:
Fixed Monitor dimensions:
:
Fixed Monitor dimensions:
interior exterior