version 1 - tallygenicom.nl · liability for difficulties arising from unknown or unforeseen...
TRANSCRIPT

TGNet AdminUser’s Guide
version 1.2

2 TGNet Admin User’s Guide
This User’s Guide is published by TallyGenicom for use with the software described herein. Translations,reprinting or copying by any means of this User’s Guide, complete or in part, in any different formrequires our explicit approval. TallyGenicom reserves the right to revise this User’s Guide without notice,for any reason. Liability for difficulties arising from unknown or unforeseen technical limitations isdisclaimed.
Visit our webpage:
http://www.tallygenicom.com
TGNet Admin User’s Guide© October 2004All rights reserved
TallyGenicom6020 South 190th StreetKent, Washington 98032

User’s Guide 3
Contents Preface............................................................................................................ 5
Chapter 1: Installing and Getting Started ....................................................... 7
Installing ......................................................................................................................................... 7Set Privileges and Passwords ..........................................................................................................8Configuration ............................................................................................................................... 10Start Printer Discovery .................................................................................................................. 13
Chapter 2: Features ...................................................................................... 15
The Toolbar Icons ........................................................................................................................ 15De-Select Printer ........................................................................................................................... 16Delete Printer ................................................................................................................................ 16The Menu Bar .............................................................................................................................. 16Printer Menu ................................................................................................................................. 16Add Printer .................................................................................................................................... 16Groups ........................................................................................................................................... 17Cache............................................................................................................................................. 19Exit ................................................................................................................................................. 19Discovery Menu ............................................................................................................................ 20Start ............................................................................................................................................... 20Configuration ............................................................................................................................... 21Tools Menu ................................................................................................................................... 22Printer Configuration .................................................................................................................. 22Network Interface Configuration................................................................................................ 24Virtual Control Panel .................................................................................................................... 25
Figure 1: Control Panel for Tally T6200 series printers ........................................................ 25Figure 2: Control Panel for TallyGenicom 6300 series printers .......................................... 25Figure 3: Control Panel for Genicom 5100 printer .............................................................. 25
Smart Update ................................................................................................................................ 26Update Printer Firmware ............................................................................................................. 27Options Menu ...............................................................................................................................28Preferences ....................................................................................................................................28
Figure 4: No Alerts To View ................................................................................................... 32Figure 5: Alerts Detected........................................................................................................ 32Figure 6: Lower panel printer details showing “Paper Out”. ...............................................33
Security .......................................................................................................................................... 34Help Menu .................................................................................................................................... 36Help ............................................................................................................................................... 36About ............................................................................................................................................. 36Non-Menu Features...................................................................................................................... 37 Refresh Printers In Cache ....................................................................................................... 37 Right Mouse Click on Printer ................................................................................................. 37

4 TGNet Admin User’s Guide
Table of Contents
Chapter 3: Using TGNet Admin ................................................................... 39
Monitoring Printers...................................................................................................................... 39Sorting the Display ....................................................................................................................... 40
Figure 7: Ascending Consumables Sort ................................................................................ 40Controlling the Printers ............................................................................................................... 42
Figure 8: Printer is in Off-line state. ...................................................................................... 42Figure 9: Printer is placed in On-line state. ........................................................................... 42
Changing Printer Configurations .............................................................................................. 43Updating Printer Firmware ......................................................................................................... 44Security .......................................................................................................................................... 44
Appendix ....................................................................................................... 45
Supported Printers ........................................................................................................................ 45Status ............................................................................................................................................. 46Well-Known Printers ..................................................................................................................... 46Generic Printers ............................................................................................................................ 47

Preface: 5
Preface
The TallyGenicom TGNet Admin program gives a network administrator, or aTallyGenicom printer user, the ability to remotely manage printers over a net-work.
TGNet Admin capabilities (dependent on specific printer) include:
• discovery of printers on networks,
• monitoring of printer status/information,
• grouping of printers for display based on user-defined groups,
• virtual control panels of TallyGenicom printers,
• editing the configuration of single or multiple TallyGenicom printers,
• updating printer firmware individually and in groups,
• updating printers’ network interface configuration.
The following hardware and software is recommended or required to run TGNetAdmin:
• PC with 300 megahertz or higher processor clock speed is recommended; 233MHz required minimum. An Intel Pentium Celeron family, AMD K6/AthlonDuron family, or compatible processor is recommended.
• Operating System: Windows XP/2000/NT4/Server 2003/Me/98SE/98
• Memory: 256 megabytes (MB) of RAM or higher recommended; 128 MBminimum supported; (may limit performance and some features)
• Disk space: 150 megabytes (MB) of available hard disk space
• Super VGA (800 x 600) or higher resolution video adapter and monitor;1024 x 768 for optimal viewing.
• CD-ROM or DVD drive
• Keyboard and Microsoft Mouse or compatible pointing device
• Local Area Network Connection with TCP/IP protocol installed

6 TGNet Admin User’s Guide
BlankPage

Chapter 1: Installing TGNet Admin & Getting Started 7
Installing and Getting Started
Chapter 1
InstallingInsert the CD in the CD drive. When the welcome window appears, click on “IAccept”. Click on “Install TGNet Admin”. This will bring up the installationwizard. After selecting where on your PC the TGNet Admin program and support-ing files will be installed, a Java Virtual Machine window will appear:
Click “Yes”. When the install is finished, launch TGNet Admin and after a shortwait, its main window will open, displaying empty upper and lower panels.

8 TGNet Admin User’s Guide
Set Privileges and PasswordsCertain features of TGNet Admin require Supervisor or Administrator privilege.To log-in, you may click on the “Enable/Disable TGNet Admin Security Toolbaricon.
Selecting any of the privilege protected features, before log-in, will cause thefollowing warning to appear.
Click OK to bring up the Log-in window:
TGNet Admin provides three privilege levels: User, Supervisor and Administrator.By default, TGNet Admin installs with the User level enabled. The default Supervi-sor password is super, and the default Administrator password is adm. For anyinstallation of TGNet Admin that is not for an Administrator, it is recommendedto immediately change the Administrator password and the Supervisor password.
See chapter 2 Options => Security => TGNet Admin Security for an explanation ofthe privilege levels within TGNet Admin, and changing the passwords.
Privileges and Passwords

Chapter 1: Installing TGNet Admin & Getting Started 9
Selecting “Keep me signed in on this computer” will maintain the privilege levelthat has been enabled when TGNet Admin is closed and subsequently relaunched,without the need to re-enter a password. If this option is unchecked, TGNetAdmin reverts to the User privilege level when closed..
Select “Enable Administrator Privilege” and enter the password in the box thenclick OK.
Instead of clicking on theToolbar Icon for “Enable/Disable TGNet Admin Security”,you can also reach this windowby clicking on the “Options”menu at the top of the window,selecting “Security,” and thenclicking on “TGNet AdminPasswords.”
Privileges and Passwords

10 TGNet Admin User’s Guide
ConfigurationOnce you have logged in as Administrator, click on the “Discov-ery” menu and then on “Configuration”. This brings up the IPAddress Range window:
Configuration
Here is where the network administrator may specify a list of IP addresses, whichTGNet Admin will use to discover printers on the network. Initially the list isempty. Click on “Add” to enter a range of IP addresses.
A range of inclusive IP addresses (the “Start” and “Stop” columns contain differ-ent values) or a single IP address (the “Start” and “Stop” columns contain thesame value) may be entered.

Chapter 1: Installing TGNet Admin & Getting Started 11
In the “Add IP Address Range” window, one enters a single IP Address Range.Use the tab key to move from field to field. Enter the subnet mask and click OK.
Continue to click “Add” to create additional IP address ranges.
When finished Adding addresses, the window will look something like this:
Configuration
The fourth column now has boxes indicating whether a particular printer orrange of printers is enabled for Discovery. This state can be toggled by clicking inthe box. Only printers that are “Enabled” will be Discovered. This allows theadministrator to list all the network printers here, but selectively Discover print-ers. Note: the “current” changes to this list are not saved until the OK button isclicked.

12 TGNet Admin User’s Guide
To edit an address entry, select the desired row and then click the “Edit” button.Doing so brings up a similar window as seen when “Add”ing IP addresses. Tabthrough the fields and change where desired.
To remove an address entry, select the desired row and then click the “Remove”button. This might become necessary if a printer is no longer part of the network,or if a range of addresses are no longer valid.
Once this window has been populated with the IP addresses of the printers inyour network, the information is stored and will still be there when TGNet Adminis closed and relaunched.
Click OK when you’re through here.
You are now ready to let TGNet Admin search the network for printers by begin-ning the Discovery => Start.
Configuration

Chapter 1: Installing TGNet Admin & Getting Started 13
Start Printer Discovery
After the Network Administrator has configured TGNet Admin with the IP ad-dresses of the network printers, the next step is to have TGNet Admin query thoseIP addresses and obtain a list of printers to be managed, (only printers will belisted, not other devices whose IP addresses might happen to lie within thespecified ranges). This is called “Printer Discovery” and it is accessed threedifferent ways: (1) from the “Discovery” menu click “Start”; or (2) type “Alt-d” andclick on “Start”; or (3) click on the “Start Printer Discovery” icon:
Once “Start Printer Discovery” has been launched, this progress box will appear.If a large number of IP addresses have been configured for Discovery, then pleasebe patient while TGNet Admin discovers printers in the list.
When Discovery is complete, a list of Discovered printers will appear in the upperpanel, each with its IP Address, Device Model name, Status, Consumables status,DNS Name, and Serial Number.
TGNet Admin “knows” about certain TallyGenicom printers and displays anappropriate icon for these printers. For printers which TGNet Admin does not“know” about, but which have some portion of the Printer MIB, a “generic” iconwill be displayed.
Printer Discovery

14 TGNet Admin User’s Guide
If the list of printers is greater than can fit in the window, a scroll bar will appearon the right side of the upper panel. The boundary bar between the upper andlower panels, as well as the outer window boundaries, can be moved using typicalclick and drag technique.
Clicking on one of the printers will select it. Details of the selected printer willappear in the lower panel.
Printer Details
From the list of “cached” printers, you may configure individual printers, uploadconfigurations to printers, monitor various printers, and tell TGNet Admin to letyou know whenever any of the printers generate an alert. Chapter 2 goes throughall of the functions of TGNet Admin.

Chapter 2: Features 15
Chapter 2
Clear Cache
Start Printer Discovery
Refresh Printers In CacheThere is no Menu Bar command for this
Filter View of Printers
Enable/Disable TGNet Admin Security
Logout of Current Security Level
No Alerts To View
Passing the tip of the cursor over all but the last of the icons will cause a text boxto pop up giving the function of the button. This text is repeated at the bottom ofthe TGNet Admin window.
Add Printer To Cache
Delete Printer From Cache
Virtual Control Panel
Launch Custom ApplicationThere is no Menu Bar command for this
Alerts Detected - click to viewThere is no Menu Bar command for this
TGNet Admin Help Topics
Go To TallyGenicom WebsiteThere is no Menu Bar command for this
Features
This chapter describes the individual features of the TGNet Admin SoftwareProduct. There are usually two ways to initiate different features of TGNetAdmin: click on an icon, or use the Menu Bar which consists of Printer, Discovery,Tools, Options and Help menus.
The Toolbar Icons

16 TGNet Admin User’s Guide
Printer MenuAdd Printer
This menu item adds a single printer to the Cache. You mayuse either an IP address or the Domain Name of a printer.These are obtained from your Network Administrator.
The Menu Bar
Delete PrinterThis menu item deletes a single printer from the Cache. Oneof the printers shown in the upper panel must first be selectedin order to delete it. If you have not highlighted a printer, awarning message will appear.
Once you have selected a printer by highlighting the printerrow you wish to delete, a window will appear in which you willbe given a chance to change your mind and cancel. If youchoose OK, the printer will be deleted from the Cache.
De-Select PrinterTGNet Admin periodically refreshes the information displayedin the lower panel for a highlighted printer. To ease the loadthis imposes on the network, you may wish to De-Select theprinter. Once clicked, the information in the lower panel willdisappear.
Printer Menu ⇒ Add / Delete / De-Select Printer
A Toolbar Icon is available for this function, .
A Toolbar Icon is available for this function, .

Chapter 2: Features 17
GroupsManage Groups
This dialog box enables you to set up different groups ofprinters. There is an obvious advantage to group printersby their firmware, drivers, or other characteristics. Youmay create (Add) new groups, Rename or Delete groups.After creating groups, you may view the printers in any ofthe groups.
Initially, all Discovered printers are placed in the Ungrouped Devices group underRoot Group. When Ungrouped Devices is selected, printers will be listed in the lowerright panel. The Root Groups and the Ungrouped Devices groups cannot be deleted.
To Add a new group, you must firstselect the Root Group. If the new groupis to be a subset of an existing groupselect the desired group, and then Add.Type a descriptive name for the newgroup into the text box and then clickjust outside the text box or press theEnter key. Select printers from the“Available Printers to Group” list, whichshows all Discovered printers whetheralready in some other group or not,and click on the arrows pointing to theright to move them into the “Member ofSelected Group” list. As groups arecreated and printers are put into them,they are removed from the UngroupedDevices group.
Printer Menu ⇒ Groups
The next time Ungrouped Devices is selected, the printers which have been placed insome other group will not be shown in the “Available Printers to Group” list,(unlike what happens when any other group is selected), and the printers whichhave not yet been placed in any group will still be shown in the “Member ofSelected Group” list.

18 TGNet Admin User’s Guide
View/Filter PrintersOnce you have your groups created, you may change theupper panel view by clicking on the View/Filter Printers.A window will open showing the groups that have beencreated. Select the group to be viewed from the windowand click on “Apply View Filter”.
There is a Toolbar Icon for this function, .
Printer Menu ⇒ Groups
Now, only the printers in the selected group will appearin the upper panel of the main TGNet Admin window.All Discovered printers are still in the Cache, however,and TGNet Admin continues to poll them. Also, func-tions under the Tools menu, such as Printer Configura-tion, act on all applicable Discovered printers, not justthe ones in the displayed group.

Chapter 2: Features 19
CacheClear Cache
The Printer Cache is a persistent file maintained byTGNet Admin, transparent to the user, and is the placein which the information retrieved from the discoveredprinters is stored. Individual printers may be added ordeleted from the Cache. The Clear Cache menu selec-tion will clear all the Discovered printers from theCache. Once the Cache is cleared, it cannot be recov-ered. To ensure this option wasn’t selected by mistake,a dialog box will appear and let you cancel. Discovery,(requires Administrator privilege), or Add Printer may
be used to re-populate the Cache.
There is a Toolbar Icon for this function, .
Export Printer Cache
Printer Menu ⇒ Cache
The information held in the Cache may be exported asa comma separated values (.csv) format file, to facili-tate report creation. All the Discovered printers in theCache at the time of export will be included.
ExitWhen TGNet Admin is Exited, the Cache is preserved. Thereis an option in System tab of Preferences, where the Supervi-sor or Administrator may turn this feature off. If the “Keep mesigned in on this computer” option is selected during the Log-in process, TGNet Admin will preserve that privilege levelduring Exit. The Group View/Filter selected view will not bepreserved on Exit.

20 TGNet Admin User’s Guide
Discovery MenuStart
Selecting Discovery Start launches a printer Discovery pro-cess, based on the list of enabled IP Address ranges createdin Discovery => Configuration (see next page).
A Toolbar Icon is available to launch a Discovery, .
Administrator access is required toinitiate this function due to the potentiallarge volume of network traffic, depend-ing on the number of IP addressesselected.
A progress window lets you track howfar along the Discovery process is.
When finished, all Discovered printerswill be listed in the Cache.
If printers are not found, but shouldhave been, you may need to makeadjustments to the Discovery Timeoutand Retry parameters found in theDiscovery tab of Preferences.
Discovery Menu ⇒ Start

Chapter 2: Features 21
ConfigurationThis menu item provides you with a means of creating a list ofIP Addresses for TGNet Admin to use in the Discovery process.You may create as many ranges of IP Addresses as desired. Arange can consist of a single IP Address or many IP Addresses.You also have the ability to enable or disable certain IP Ad-dress ranges as desired.
Discovery Menu ⇒ Configuration
To Remove an existing IP range, first select the range row and then click theREMOVE button. This choice removes the IP Range from the list, and thoseprinters in this range will no longer be included in a Discovery. To limit discoverywithout removing a range, click the Enabled box, removing the check. By default,an IP Address range is Enabled when it is Added.
Changes made to the list of IP Address Ranges have no bearing on the Cache,except that the current list, for any given Discovery process, determines which IPaddresses are searched for printers, and thus adding “new” printers to the Cache.Changes to this list can only Add printers to the Cache, and only after Discovery.This list never removes printers from the Cache.
In either case, a similar dialog box appears inwhich you may add or edit an IP addressrange.
To add an IP address range, click the ADD button. ToEdit an existing IP range, select the range row andthen click the EDIT button.

22 TGNet Admin User’s Guide
Tools MenuMenu selections in the Tools menu are designed to take advantage of featuresspecifically built into certain Tally, TallyGenicom, and Genicom printers. Refer tothe Appendix for a list of supported printers.
In the Tools menu, a grayed-out menu item means that a printer must first beselected before opening the menu, or that the selected printer is not supported.
Printer ConfigurationAn eligible printer fromthe upper panel must firstbe selected to activate thisoption. The two optionsdetermine the source of theprinter configuration; allother actions afterwardsare the same. That is, usersmay open an existing file,or get a configuration froma selected printer.
Load from FileThis option opens an existing printer configuration file on your PC or from aconnected network. An eligible printer must already be selected. Click on Loadfrom File and a Browse window will open allowing you to find an appropriatefile. Click Open and the chosen file will be opened in the Printer Configurationeditor. A window will open displaying the retrieved configuration data. If theselected file is not a printer configuration formatted file, a warning window willopen.
Load From PrinterThis option retrieves the printer configuration from the currently selectedprinter. Click on “Load From Printer” and a progress window will indicate the
progress of retrieving theconfiguration data.
Once the configuration datahas been obtained by TGNetAdmin, whether from a savedfile or a printer, the PrinterConfiguration Editor will beopened, where you canmodify any or all ten of theconfiguration settings (includ-ing renaming them).
Tools Menu ⇒ Printer Configuration

Chapter 2: Features 23
Restore Defaults abandons changes made during the editing session; Save to Fileopens a browse dialog box for saving to a new file or to overwrite an old one.
Refer to the Printer Operator Manual for a detailed explanation of PrinterConfiguration.
Clicking Submit brings up adialog box containing a listof printers, taken from theCache, that TGNet Adminhas determined are candi-dates for receiving theconfiguration data.
By default, all candidateprinters are selected, asindicated by the check boxeson the left. Click to select/de-select desired printers.
Once SEND has been clicked, the operation may not be halted. A progresswindow will be displayed for each printer as the configuration data is being sent.You should read the log file, printer_config_log.txt (found in the root folder ofTGNet Admin, e.g., C:\Program Files\TallyGenicom\TGNet Admin\ ) to confirmthe updating of each selected printer.
Tools Menu ⇒ Printer Configuration

24 TGNet Admin User’s Guide
If the IP address is changed here, the printer will be displayed with a status of
Unavailable. You should delete the printer from the Cache, , then Add the
printer with the new IP address, . Alternatively, after deletion, put the new
IP address in Discovery Configuration, and go through Discover, .
Network Interface ConfigurationLoad From Network
This menu item supportsnetwork configuration forTGNet PSIO, TGNet IIF-4,and EasyCom XpressPSIO interfaces. Foreligible printers, you mayview and edit a portion ofthe Network InterfaceConfiguration settings fora selected printer.
Select an eligible printer (“Load From Network” will be grayed out if the printeris not eligible), then click on Load From Network. If the Network Interfacepassword has been changed from the default, a dialog box will come up askingfor the NIC password. This will have been set by the Network Administrator.Once the password is accepted, the Network Configuration Editor window willopen.
The Network Configura-tion Editor displays thenetwork parameters thatare available for changing.Once the changes havebeen made, click “Save andReset Network Interface”to send any changes madeto the printer. To abandonany changes made, click“Close”.
The full range of networkconfiguration parametersmay be found by rightclicking on the desiredprinter and launching aWeb Browser.
Tools Menu ⇒ Network Interface Configuration

Chapter 2: Features 25
Virtual Control PanelThis menu selection gives you “virtual” access toan eligible printer’s Control Panel, as if you werestanding in front of the printer and pushingbuttons on the actual control panel of theprinter. Refer to the Appendix for supportedprinters.
There is a Toolbar Icon for this function, .
Figure 2: Control Panelfor TallyGenicom 6300
series printers
Figure 1: Control Panel for Tally T6200 series printers
Tools Menu ⇒ Virtual Control Panel
Figure 3: Control Panel for Genicom 5100 printer
26 TGNet Admin User’s Guide
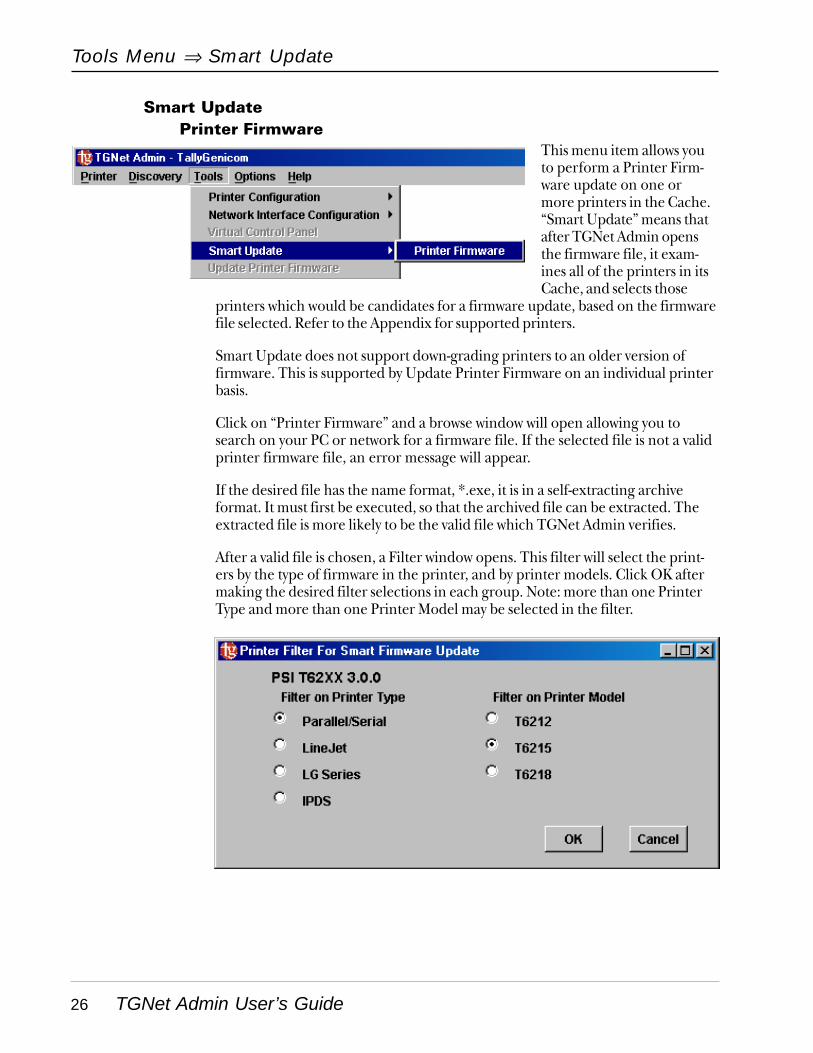
Smart UpdatePrinter Firmware
This menu item allows youto perform a Printer Firm-ware update on one ormore printers in the Cache.“Smart Update” means thatafter TGNet Admin opensthe firmware file, it exam-ines all of the printers in itsCache, and selects those
printers which would be candidates for a firmware update, based on the firmwarefile selected. Refer to the Appendix for supported printers.
Smart Update does not support down-grading printers to an older version offirmware. This is supported by Update Printer Firmware on an individual printerbasis.
Click on “Printer Firmware” and a browse window will open allowing you tosearch on your PC or network for a firmware file. If the selected file is not a validprinter firmware file, an error message will appear.
If the desired file has the name format, *.exe, it is in a self-extracting archiveformat. It must first be executed, so that the archived file can be extracted. Theextracted file is more likely to be the valid file which TGNet Admin verifies.
After a valid file is chosen, a Filter window opens. This filter will select the print-ers by the type of firmware in the printer, and by printer models. Click OK aftermaking the desired filter selections in each group. Note: more than one PrinterType and more than one Printer Model may be selected in the filter.
Tools Menu ⇒ Smart Update

Chapter 2: Features 27
Update Printer FirmwareThis menu item updates the firmware of asingle printer. Refer to the Appendix forsupported printers. First select the targetprinter, then click Update Printer Firmware. Abrowse window will open allowing you to findthe desired firmware file. The Printer FirmwareUpdate begins immediately when a valid file isselected. There is no filtering on the UpdatePrinter Firmware menu option.
Use this menu option only when you are sure that the firmware file you are downloading is valid forthe printer selected.
After clicking OK, a dialog box opens containinga list of cached printers, that TGNet Admin hasdetermined are candidates for updating. Bydefault, all candidate printers are selected, asindicated by the check boxes on the left. Click toselect/de-select the desired printers. When ready,click Send. To cancel out, click Close.
Tools Menu ⇒ Update Printer Firmware
When the update has finished, the followingmessage will appear. You may right click on theprinter and choose to “Refresh Printer”. After“Refresh”ing, confirm that the updated firm-ware version number appears in the lowerpanel.
Once the firmware has been successfully sent to a printer, a dialog box will open,identifying the successful printer by IP address. The OK button must be clickedbefore TGNet Admin will move on to the next printer in the list. This will berepeated until all printers in the list have been updated.

28 TGNet Admin User’s Guide
Options MenuThe Preferences pertain to the functioning of various features of TGNet Admin.
Custom Application LocationTGNet Admin provides the capability to launch another application from withinTGNet Admin. The Custom Application Location is where this is configured. Fillin an absolute path name for the application, e.g., Print Guide, in the text box:
C:\Program Files\TallyGenicom\PrintGuide\PGuide.exe
If you don’t know the path name, click on “Browse” to browse to the application.
Save Cache To FileBy default, the TGNet Admin Cache is saved to a file, and when TGNet Admin issubsequently launched, the cached printers are displayed. If you wish to turn thisfeature off, it may be done here by clicking to uncheck the “Save Cache To File”box. The next time TGNet Admin is launched, the Cache will be empty and noprinters will be displayed.
Options Menu ⇒ Preferences
PreferencesThe Preferences window contains the following Tabs:System, Discovery, Printer Polling, Fast Polling, Logging,and Alerts. After setting options on any or all of the tabs,click OK. When any changes are made to Preferences, theapplication must be restarted before the changes takeeffect.
System

Chapter 2: Features 29
DiscoveryThe Discovery options enable you to modify the way TGNet Admin Discovers theprinter(s) on the network.
Add Printer affects the timing foradding a single printer.
Discovery affects the timing for theDiscovery process.
SNMP affects timing for other SNMPactivity in TGNet Admin.
These settings may need to beadjusted for TGNet Admin’s perfor-mance in your particular networkenvironment.
Printer PollingPrinters in the Cache can be periodically polled to update the Status column inthe upper display panel.
You may choose to leave this featureon the default setting Refresh Rate of30 seconds.
In cases where there are a largenumber of printers in the Cache, youmay Disable this feature, as it wouldhave limited value.
You may select a Custom RefreshRate based on the number of print-ers in the Cache. The smaller theRefresh Rate, the more networktraffic TGNet Admin will generate.
Options Menu ⇒ Preferences

30 TGNet Admin User’s Guide
Options Menu ⇒ Preferences
Fast PollingThis feature is currently not supported.

Chapter 2: Features 31
LoggingTGNet Admin can create three kinds of logs, saved as text files. You may enable ordisable each one individually here.
TGNet Admin LoggingGeneral information, warnings, and errors are saved in a log called tgnetadm.txt(found in the root folder of TGNet Admin, e.g.,C:\Program Files\TallyGenicom\TGNet Admin\ ).This file may be useful for tracking problems with TGNet Admin. By default,TGNet Admin Logging is turned off, as it has a direct effect on the performanceof the application.
Discovery LoggingThe log is called discovery_log.txt and is created each time a Printer Discovery isperformed, found in the root folder of TGNet Admin, e.g.,C:\Program Files\TallyGenicom\TGNet Admin\By default, Discovery Logging is enabled and is only active when a Discovery is inprogress. It may be useful in tracking down Discovery issues.
Printer Configuration LoggingBy default, Printer Configuration Logging is enabled and is only active when aPrinter Configuration update is being done. When an update is completed, usersneed to check printer_config_log.txt (found in the root folder of TGNet Admin,e.g., C:\Program Files\TallyGenicom\TGNet Admin\ ), to confirm the updating ofeach selected printer.
Options Menu ⇒ Preferences

32 TGNet Admin User’s Guide
Options Menu ⇒ Preferences
AlertsPrinters listed in the Cache, which have the ability to send SNMP traps and areconfigured to do so, can trigger an alert in TGNet Admin. For example, if aprinter runs out of paper, the printer can send an SNMP trap to TGNet Admin.Refer to the Printer Operator Manual for setup instructions. By default, thisfeature is disabled.
If Alerts are Enabled, the Toolbar Alerts Icon will change from “No Alerts ToView” to “Alerts Detected” when a printer in the Cache sends an alert.
Each alert is only sent once, so TGNet Admin must be running at the time thetrap is sent. The Alerts Detected icon indicates that there are one or more alertsto be viewed.
The workstation to which printers are set up to send traps must have a fixed IPaddress.
Figure 4: No Alerts To View Figure 5: Alerts Detected

Chapter 2: Features 33
The printer showing in Figure 6 hasrun out of paper and an alert has beenreceived by TGNet Admin. TheToolbar Icon has changed from “NoAlerts To View” to “Alerts Detected -click to view”. Clicking on the iconbrings up the Detected Alerts window.
If this printer is selected, the informa-tion in the lower panel also shows thatit is out of paper. This information isshown whether or not Alerts areenabled.
Note: this window will not show a newalert if it comes in while this window isopen. The suggested usage for thecurrent implementation of Alerts is touse the IP Address of the printer whichsent the trap, select this printer in theupper panel and see the error state ofthe printer.
Figure 6: Lower panel printer details showing “Paper Out”.
Options Menu ⇒ Preferences

34 TGNet Admin User’s Guide
Options Menu ⇒ Security
SecurityTGNet Admin Security
A simple password-basedsecurity system has beenimplemented in TGNetAdmin. There are three levelsof security: Administrator,Supervisor, and User. TheAdministrator and Supervisorlevels require a password.
TGNet Admin is shipped with the default passwords of super for Supervisor Privi-lege, and adm for Administrator Privilege. It is recommended that these passwordsbe changed when TGNet Admin is installed.
Features requiring Administrator Privilege:• Launching a Discovery• Inputting IP Address Range list used in Discovery• Updating Printer Firmware• Smart Printer Firmware Update• Network Interface Configuration
Features requiring Administrator or Supervisor Privilege:• Setting Preferences• Printer Configuration operations
All other functions are accessible to all users.
This is the log-in screen whichappears when selecting anyfeature requiring a password, ifyou have not previously loggedin.
“No Action - Keep CurrentSecurity Settings” has the sameeffect as clicking the “Cancel”button.
“Keep me signed in on thiscomputer” checkbox will maintain the privilege log-in level at the point TGNetAdmin is exited. The next time TGNet Admin is launched, you will automaticallybe logged in at the previous log-in privilege level. If this option is unchecked,TGNet Admin will revert to the lowest level, User Privilege, when it is relaunchedafter being shut down.
Selecting “Enable User Privilege” then OK, is how a Supervisor or Administratorcan log out from this dialog box.
A Toolbar Icon is available for the Enable TGNet Admin Security feature, .

Chapter 2: Features 35
TGNet Admin PasswordsThis is where the Administratorand Supervisor passwords arechanged. It is recommendedthat these passwords be changedwhen TGNet Admin is installed.
The application is shipped with the default passwords of super for SupervisorPrivilege, and adm for Administrator Privilege.
LogoutLogging out sets all securityprivileges to the lowest level,User Privilege.
“Logout of Current Security Level” Toolbar Icon: .
Options Menu ⇒ Security
In order to set both Supervisor and Administrator passwords, you will enter one,click OK, and come into the menu again to set the other one.

36 TGNet Admin User’s Guide
Help MenuHelp
Clicking on this option opens up an HTML docu-ment listing all of the functions of TGNet Admin. Itcan be printed to a local printer or any printer onthe network.
Help Toolbar Icon, .
AboutClicking on this option brings up the “about”window showing the version number of the soft-ware.
It is not necessary to enter the TallyGenicom website’s URL into your browser.Clicking on the TallyGenicom icon to the right of the Toolbar Icons will automati-cally launch the default browser and open up the main page of the website.
Help Menu ⇒ Help

Chapter 2: Features 37
Non-Menu FeaturesRight Mouse Click on Printer
The following options become available by right clicking on a printer displayed inthe upper panel:
Refresh PrinterUpdates the cached information on the selected printer only.Selective updating can only be done by right clicking.
Delete PrinterDeletes the selected printer from the Cache.
Launch Web BrowserOpens up the Web Panel for the selected printer. This functioncan only be accessed with a right click. This is dependent on theprinter supporting it.
Toggle Printer StateSupported by Tally T6200 series and TallyGenicom 6300 series printers.
Launch Virtual Control PanelSupported by Tally T6200 series, TallyGenicom 6300 series, and Genicom 5100printers.
Reset DeviceSupported by Tally T6200 series and TallyGenicom 6300 series printers.
Refresh Printers In Cache
There is a Toolbar Icon with no corresponding Menu Bar command, ,
which refreshes the information on all of the printers in the Cache. If there are alot of printers listed in the Cache, this process might take a bit a time, so bepatient.
Non-Menu Features

38 TGNet Admin User’s Guide
BlankPage

Chapter 3: Monitoring and Managing Printers 39
Chapter 3Using TGNet Admin
Monitoring PrintersThe upper panel in TGNet Admin provides the following information columns:IP Address, Device Model, Status, Consumables, DNS Name, and Serial Number.
Each column can be used to sort the display by clicking on the column title.
IP AddressThe IP Address column displays an icon plus the IP Address. For printers that are“well-known” to TGNet Admin, an icon resembling the printer will be displayed.Otherwise the generic icon will be shown.
Device ModelThe Device Model column displays the Model Name for “well-known” printersand Printer for any other generic printer.
StatusThe Status column attempts to display the current status of each printer. See theAppendix for a list of status display messages.
ConsumablesThe Consumables column attempts to display the current level of ribbon life, inthe case of TallyGenicom line printers. Printers which have no means of sensingconsumable life will most likely have a display of 0%.
DNS NameThe DNS Name column will either display an IP Address or the DNS name of theprinter, if there is a DNS server which knows about the printer.
Serial NumberThe Serial Number column displays the serial number of the printer, if thisfeature is supported by the printer. The printer must be “well-known”.TallyGenicom line printers support this feature.

40 TGNet Admin User’s Guide
You might click on the Consumables column for an ascending sort so that thoseprinters closest to needing attention to the ribbon would be listed first.
Figure 7 shows the results of an ascending sort on the Consumables column, witha printer that needs a new ribbon listed first.
Figure 7: Ascending Consumables Sort
Sorting The Display
Sorting the DisplayClick on any of the column titles to sort the display, based on what is dis-played in the selected column. The direction of the sort is indicated by asmall triangle which will either point upwards for an ascending sort ordownwards for a descending sort. No triangle means there is no sorting.The unsorted printers are presented in the order they were added to theCache.

Chapter 3: Monitoring and Managing Printers 41
Clicking on a printer shown in the upper panel, brings up a display in the lowerpanel with additional information.
For the selected printer, T6215, in addition to the printer informationthat is provided in the upper panel, the lower panel shows its serialnumber, asset number, MAC address, that it is in an on-line state withConfiguration #1 active, the name of the printer, how much memory ithas, where it is located, and which versions of the printer software andthe network software are running.
In general, the specific amount of detail provided to TGNet Admin isdependent upon the printer. “Well-known” printers will typically havemore information that TGNet Admin is able to display. Generic printersare those which are not “well-known” to TGNet Admin, but supportsome portion of the SNMP Printer MIB.
Selecting A Printer

42 TGNet Admin User’s Guide
Controlling the PrintersFor those printers supporting Virtual Control Panel, you may control a printerwithout being physically near it. A print job may have been sent to a T6215, forexample, but it seems to be stuck in the queue. TGNet Admin shows that thestatus of that printer is off-line and so its Virtual Control Panel is brought up andthe printer is placed on-line, permitting the printing of the job.
Figure 8: Printer is in Off-line state.
Figure 9: Printer is placed in On-line state.
Controlling A Printer

Chapter 3: Monitoring and Managing Printers 43
Changing Printer ConfigurationsOne of the powerful features of TGNet Admin is the ability to update the PrinterConfigurations of more than one printer at a time. A printer’s Printer Configura-tion needs to be revised every time, for example, that a previously establishedform is changed, or when a new kind of form is added. For Tally T6200 seriesprinters and TallyGenicom 6300 series printers with firmware version 3.0c orhigher, any of the 10 Printer Configurations may be edited and updated throughTGNet Admin. Multiple printers may have their Printer Configurations updated atonce.
The Editor window opens with Config 1 displayed. Systematically edit each of theparameters that need to be changed, for any or all of the 10 Configurations. Clickon “Save to File” to create a Master Configuration file. Once it has been testedand verified, then it can be applied to any or all other similar printers, as detailedin Tools => Printer Configuration => Load from File.
When the Submit procedure is executed, the log file, printer_config_log.txtshould be checked to verify the success/failure of updating each of the targetprinters, (found in the root folder of TGNet Admin).
Editing Printer Configurations
A common way to go about this is to select one of the printers needing its PrinterConfigurations to be updated, and from the Tools menu, select Printer Configura-tion then Load From Printer. This will open up the Printer Configuration Editor.
The above display shows the default Configuration of a TallyGenicom 6312printer with the default Configuration names. Each of the 10 available Configura-tions can be given more meaningful names, reflecting their application.

44 TGNet Admin User’s Guide
Updating Printer FirmwareTGNet Admin provides two printer firmware update methods for networked TallyT6200 series printers and TallyGenicom 6300 series printers. The Tally T6200series printers must have the 8 megabyte controller in order to support either ofthese methods. You may update their firmware with version 3.0c or greater, anddo so to more than one printer at a time using the Smart Update option in theTools menu. The process of how to do this is explained in Chapter 2, Tools =>Smart Update => Printer Firmware.
It is recommended that printer firmware be kept up-to-date, unless older versionsare needed for the sake of legacy applications. The firmware version of eachprinter is shown in TGNet Admin’s lower panel when a printer is selected.
Should it be required that older firmware be reloaded, the Update PrinterFirmware menu selection is the way to do it. See Chapter 2, Tools => UpdatePrinter Firmware. Only a single printer at a time may be updated.
SecurityIn cases where restricted access is needed, the Administrator and Supervisorpasswords should be changed from the defaults, at the time TGNet Admin isinstalled.
When Administrator or Supervisor privilege is invoked on a workstation whererestricted access is required, the Administrator or Supervisor must either Logoutvia the Logout Tool Bar Icon, , via the Security => Logout menu, or closethe application.
Printer Firmware

Appendix: 45
Appendix
Supported PrintersMenu selections in the Tools Menu of TGNet Admin are designed to take advan-tage of features specifically built into certain Tally, TallyGenicom, and Genicomprinters with the following firmware versions:
Printer Configuration Smart Firmware Update Firmware Update Virtual Control Panel *NIC Config
T6212 3.0c+ 3.0c+ 2.2d+ 3.0c+ S80 412.654
T6215 3.0c+ 3.0c+ 2.2d+ 3.0c+ S80 412.654
T6218 3.0c+ 3.0c+ 2.2d+ 3.0c+ S80 412.654
6306 all all all all S80 412.654
6312 all all all all S80 412.654
5100 N/A N/A N/A 44A116012 S80 416.640
NIC firmware for the Tally and TallyGenicom printers Printer Configuration,Smart Firmware Update, Firmware Update, Virtual Control Panel, and NICConfiguration must be version 412.654 or greater. For Genicom 5100 printers theNIC firmware must be EasyCom Xpress PSIO 10/100 version 416.640.
Tally and TallyGenicom printers which support traps will need a NIC firmwareversion of 412.654 or greater.
*Network Interface firmware version

46 TGNet Admin User’s Guide
StatusThe upper panel of TGNet Admin provides a Status column, which attempts todisplay the Status of printers contained in the Cache. Status indications are colorcoded in three colors to indicate the readiness of a printer’s availability forprinting.
Green indicates that the printer is Online and ready to print.
Orange indicates that the printer is not reporting a conditionwhich would prevent it from printing, other than possiblybeing Offline.
Red indicates that, either the printer is in an indeterminatestate or that it has a condition which prevents it fromprinting.
In any case, clicking on the printer in question may reveal further information inthe lower panel of TGNet Admin, about the readiness of the printer.
Well-Known PrintersPrinters which have been referred to as “well-known” in this User’s Guide, typi-cally have more meaningful Status information than those which are classified asGeneric.
Unavailable is displayed when the printer has become unreachable onthe network.
T6200/6300 Series PrintersIdle Online, waiting for print jobsPrinting Online, busy with a print jobOffline Offline either due to operator action or a fault conditionRibbon Low Printer ribbon is getting low on inkPaper Out Printer cannot print due to a paper out conditionRibbon Out Printer ribbon has reached end of lifePlaten Open Printer cannot print because the platen is openPaper Motion Fault Printer cannot print due to a paper jamService Required Printer cannot print, service is required
5100 Series PrintersIdle Online, waiting for a print jobPrinting Online, busy with a print jobOffline Offline, but the status is otherwise indeterminate
Printer Status

Appendix: 47
Generic PrintersThere is no guarantee that Generic printers support any of the 3 SNMP Objectswhich TGNet Admin looks at to determine a printer’s Status. In any case, TGNetAdmin makes a best effort to retrieve the information contained inhrDeviceStatus, hrPrinterStatus and hrPrinterDetectedErrorState. What is dis-played is based on the definition of these three objects, as defined in RFC 1514.Below is a recap of the pertinent information in the RFC. Please refer to RFC 1514for a more detailed description.
hrDeviceStatusunknownrunningwarningtestingdown
hrPrinterStatusotherunknownidleprintingwarmup
hrPrinterDetectedErrorStatelowPapernoPaperlowTonernoTonerdoorOpenjammedofflineserviceRequested
Unknown is displayed when none of the above are returned
Printer Status

4500 Daly Drive, Suite 100 T 703.833.8700Chantilly, VA 20151 F 703.222.7629
www.tallygenicom.com