veritasstoragefoundation and high availability solutions
TRANSCRIPT

Veritas Storage Foundation™and High AvailabilitySolutions VirtualizationGuide
Solaris
6.0.1
July 2012

Veritas Storage Foundation and High AvailabilitySolutions Virtualization Guide
The software described in this book is furnished under a license agreement andmay be usedonly in accordance with the terms of the agreement.
Product version: 6.0.1
Document version: 6.0.1 Rev 0
Legal NoticeCopyright © 2012 Symantec Corporation. All rights reserved.
Symantec, the Symantec logo, Veritas, Veritas Storage Foundation, CommandCentral,NetBackup, Enterprise Vault, and LiveUpdate are trademarks or registered trademarks ofSymantec corporation or its affiliates in the U.S. and other countries. Other names may betrademarks of their respective owners.
The product described in this document is distributed under licenses restricting its use,copying, distribution, and decompilation/reverse engineering. No part of this documentmay be reproduced in any form by any means without prior written authorization ofSymantec Corporation and its licensors, if any.
THEDOCUMENTATIONISPROVIDED"ASIS"ANDALLEXPRESSORIMPLIEDCONDITIONS,REPRESENTATIONS AND WARRANTIES, INCLUDING ANY IMPLIED WARRANTY OFMERCHANTABILITY, FITNESS FOR A PARTICULAR PURPOSE OR NON-INFRINGEMENT,ARE DISCLAIMED, EXCEPT TO THE EXTENT THAT SUCH DISCLAIMERS ARE HELD TOBELEGALLYINVALID.SYMANTECCORPORATIONSHALLNOTBELIABLEFORINCIDENTALOR CONSEQUENTIAL DAMAGES IN CONNECTION WITH THE FURNISHING,PERFORMANCE, OR USE OF THIS DOCUMENTATION. THE INFORMATION CONTAINEDIN THIS DOCUMENTATION IS SUBJECT TO CHANGE WITHOUT NOTICE.
The Licensed Software andDocumentation are deemed to be commercial computer softwareas defined in FAR12.212 and subject to restricted rights as defined in FARSection 52.227-19"Commercial Computer Software - Restricted Rights" and DFARS 227.7202, "Rights inCommercial Computer Software or Commercial Computer Software Documentation", asapplicable, and any successor regulations. Any use, modification, reproduction release,performance, display or disclosure of the Licensed Software andDocumentation by theU.S.Government shall be solely in accordance with the terms of this Agreement.

Symantec Corporation350 Ellis StreetMountain View, CA 94043
http://www.symantec.com

Technical SupportSymantec Technical Support maintains support centers globally. TechnicalSupport’s primary role is to respond to specific queries about product featuresand functionality. TheTechnical Support group also creates content for our onlineKnowledge Base. The Technical Support group works collaboratively with theother functional areas within Symantec to answer your questions in a timelyfashion. For example, theTechnical Support groupworkswithProductEngineeringand Symantec Security Response to provide alerting services and virus definitionupdates.
Symantec’s support offerings include the following:
■ A range of support options that give you the flexibility to select the rightamount of service for any size organization
■ Telephone and/or Web-based support that provides rapid response andup-to-the-minute information
■ Upgrade assurance that delivers software upgrades
■ Global support purchased on a regional business hours or 24 hours a day, 7days a week basis
■ Premium service offerings that include Account Management Services
For information about Symantec’s support offerings, you can visit our Web siteat the following URL:
www.symantec.com/business/support/index.jsp
All support services will be delivered in accordance with your support agreementand the then-current enterprise technical support policy.
Contacting Technical SupportCustomers with a current support agreement may access Technical Supportinformation at the following URL:
www.symantec.com/business/support/contact_techsupp_static.jsp
Before contacting Technical Support, make sure you have satisfied the systemrequirements that are listed in your product documentation. Also, you should beat the computer onwhich theproblemoccurred, in case it is necessary to replicatethe problem.
When you contact Technical Support, please have the following informationavailable:
■ Product release level

■ Hardware information
■ Available memory, disk space, and NIC information
■ Operating system
■ Version and patch level
■ Network topology
■ Router, gateway, and IP address information
■ Problem description:
■ Error messages and log files
■ Troubleshooting that was performed before contacting Symantec
■ Recent software configuration changes and network changes
Licensing and registrationIf yourSymantecproduct requires registrationor a licensekey, access our technicalsupport Web page at the following URL:
www.symantec.com/business/support/
Customer serviceCustomer service information is available at the following URL:
www.symantec.com/business/support/
Customer Service is available to assist with non-technical questions, such as thefollowing types of issues:
■ Questions regarding product licensing or serialization
■ Product registration updates, such as address or name changes
■ General product information (features, language availability, local dealers)
■ Latest information about product updates and upgrades
■ Information about upgrade assurance and support contracts
■ Information about the Symantec Buying Programs
■ Advice about Symantec's technical support options
■ Nontechnical presales questions
■ Issues that are related to CD-ROMs or manuals

Support agreement resourcesIf youwant to contact Symantec regarding an existing support agreement, pleasecontact the support agreement administration team for your region as follows:
[email protected] and Japan
[email protected], Middle-East, and Africa
[email protected] America and Latin America
DocumentationYour feedback on product documentation is important to us. Send suggestionsfor improvements and reports on errors or omissions. Include the title anddocument version (located on the second page), and chapter and section titles ofthe text on which you are reporting. Send feedback to:
For information regarding the latest HOWTO articles, documentation updates,or to ask a question regarding product documentation, visit the Storage andClustering Documentation forum on Symantec Connect.
https://www-secure.symantec.com/connect/storage-management/forums/storage-and-clustering-documentation
About Symantec ConnectSymantec Connect is the peer-to-peer technical community site for Symantec’senterprise customers. Participants can connect and share informationwith otherproduct users, including creating forum posts, articles, videos, downloads, blogsand suggesting ideas, as well as interact with Symantec product teams andTechnical Support. Content is rated by the community, and members receivereward points for their contributions.
http://www.symantec.com/connect/storage-management

Technical Support . . . . . . . . . . . . . . . . . . . . . . . . . . . . . . . . . . . . . . . . . . . . . . . . . . . . . . . . . . . . . . . . . . . . . . . . . . . . . . . . . . . . . . . . . . . . . . . 4
Chapter 1 Overview of Veritas Storage Foundation and HighAvailability Virtualization Solutions . . . . . . . . . . . . . . . . . . . . . . . . . . 15
Overview .... . . . . . . . . . . . . . . . . . . . . . . . . . . . . . . . . . . . . . . . . . . . . . . . . . . . . . . . . . . . . . . . . . . . . . . . . . . . . . . . . 15Reference documentation .... . . . . . . . . . . . . . . . . . . . . . . . . . . . . . . . . . . . . . . . . . . . . . . . . . . . . 16
AboutVeritasStorageFoundationandHighAvailabilityVirtualizationSolutions .... . . . . . . . . . . . . . . . . . . . . . . . . . . . . . . . . . . . . . . . . . . . . . . . . . . . . . . . . . . . . . . . . . . . . . . . . . 17
Chapter 2 Storage Foundation and High Availability Solutionssupport for Solaris Zones . . . . . . . . . . . . . . . . . . . . . . . . . . . . . . . . . . . . . . . . . . . . 19
About Solaris Zones .... . . . . . . . . . . . . . . . . . . . . . . . . . . . . . . . . . . . . . . . . . . . . . . . . . . . . . . . . . . . . . . . . . . 20About VCS support for zones .... . . . . . . . . . . . . . . . . . . . . . . . . . . . . . . . . . . . . . . . . . . . . . . . . . . . . . . 20
Overview of how VCS works with zones .... . . . . . . . . . . . . . . . . . . . . . . . . . . . . . . . . . . 20About the ContainerInfo service group attribute ... . . . . . . . . . . . . . . . . . . . . . . . 21About the ContainerOpts resource type attribute ... . . . . . . . . . . . . . . . . . . . . . . 21Zone-aware resources ... . . . . . . . . . . . . . . . . . . . . . . . . . . . . . . . . . . . . . . . . . . . . . . . . . . . . . . . . . . 22About the Mount agent ... . . . . . . . . . . . . . . . . . . . . . . . . . . . . . . . . . . . . . . . . . . . . . . . . . . . . . . . . 23About networking agents ... . . . . . . . . . . . . . . . . . . . . . . . . . . . . . . . . . . . . . . . . . . . . . . . . . . . . . . 26About the Zone agent ... . . . . . . . . . . . . . . . . . . . . . . . . . . . . . . . . . . . . . . . . . . . . . . . . . . . . . . . . . . . 26About configuring failovers among physical and virtual
servers ... . . . . . . . . . . . . . . . . . . . . . . . . . . . . . . . . . . . . . . . . . . . . . . . . . . . . . . . . . . . . . . . . . . . . . . . . 27Configuring VCS in zones .... . . . . . . . . . . . . . . . . . . . . . . . . . . . . . . . . . . . . . . . . . . . . . . . . . . . . . . . . . . 27
Prerequisites for configuring VCS in zones .... . . . . . . . . . . . . . . . . . . . . . . . . . . . . . 27Deciding on the zone root location .... . . . . . . . . . . . . . . . . . . . . . . . . . . . . . . . . . . . . . . . . 29Creating a zone with root on local disk ... . . . . . . . . . . . . . . . . . . . . . . . . . . . . . . . . . . . . 29Creating a zone with root on shared storage .... . . . . . . . . . . . . . . . . . . . . . . . . . . . . 30Performing the initial internal zone configuration .... . . . . . . . . . . . . . . . . . . . 32About installing applications in a zone .... . . . . . . . . . . . . . . . . . . . . . . . . . . . . . . . . . . . 32Configuring the service group for the application .... . . . . . . . . . . . . . . . . . . . . . 32Configuring a zone resource in a failover service group with the
hazonesetup utility ... . . . . . . . . . . . . . . . . . . . . . . . . . . . . . . . . . . . . . . . . . . . . . . . . . . . . . . . 35Configuring zone resource in a parallel service group with the
hazonesetup utility ... . . . . . . . . . . . . . . . . . . . . . . . . . . . . . . . . . . . . . . . . . . . . . . . . . . . . . . . 38
Contents

Configuring multiple zone resources using same VCS user forpassword less communication .... . . . . . . . . . . . . . . . . . . . . . . . . . . . . . . . . . . . . . . . . 40
Modifying the service group configuration .... . . . . . . . . . . . . . . . . . . . . . . . . . . . . . 41Verifying the zone configuration .... . . . . . . . . . . . . . . . . . . . . . . . . . . . . . . . . . . . . . . . . . . 42Performing maintenance tasks ... . . . . . . . . . . . . . . . . . . . . . . . . . . . . . . . . . . . . . . . . . . . . . . 42Troubleshooting zones .... . . . . . . . . . . . . . . . . . . . . . . . . . . . . . . . . . . . . . . . . . . . . . . . . . . . . . . . . 43Configuring for physical to virtual and virtual to physical
failovers—a typical setup .... . . . . . . . . . . . . . . . . . . . . . . . . . . . . . . . . . . . . . . . . . . . . . . . 43VCS limitations with Solaris zones ... . . . . . . . . . . . . . . . . . . . . . . . . . . . . . . . . . . . . . . . . . 44
Adding VxFS file systems to a non-global zone .... . . . . . . . . . . . . . . . . . . . . . . . . . . . . . . 45Direct mount of VxFS file systems from global zone .... . . . . . . . . . . . . . . . . . . . . . . . 45
Mounting a VxFS file system in a non-global zone .... . . . . . . . . . . . . . . . . . . . . 46Adding a direct mount to a zone's configuration .... . . . . . . . . . . . . . . . . . . . . . . 47Creating VxFS file systems inside non-global zones ... . . . . . . . . . . . . . . . . . . . 47
Veritas Storage Foundation Cluster File System mounts ... . . . . . . . . . . . . . . . . . . . 49Concurrent I/O access in non-global zones ... . . . . . . . . . . . . . . . . . . . . . . . . . . . . . . . . . . . . . 50Veritas extension for Oracle Disk Manager ... . . . . . . . . . . . . . . . . . . . . . . . . . . . . . . . . . . . . 51Exporting VxVM volumes to a non-global zone .... . . . . . . . . . . . . . . . . . . . . . . . . . . . . . . 53
VxVM devices in Oracle Solaris global zones ... . . . . . . . . . . . . . . . . . . . . . . . . . . . . 54Removing a VxVM volume from a non-global zone .... . . . . . . . . . . . . . . . . . . . 54
About SF Oracle RAC support for Oracle RAC in a zoneenvironment .... . . . . . . . . . . . . . . . . . . . . . . . . . . . . . . . . . . . . . . . . . . . . . . . . . . . . . . . . . . . . . . . . . . . . . 55Supported configuration .... . . . . . . . . . . . . . . . . . . . . . . . . . . . . . . . . . . . . . . . . . . . . . . . . . . . . . 56Known issues with supporting SF Oracle RAC in a zone
environment .... . . . . . . . . . . . . . . . . . . . . . . . . . . . . . . . . . . . . . . . . . . . . . . . . . . . . . . . . . . . . . . . 57Setting up an SF Oracle RAC cluster with Oracle RAC on non-global
zones ... . . . . . . . . . . . . . . . . . . . . . . . . . . . . . . . . . . . . . . . . . . . . . . . . . . . . . . . . . . . . . . . . . . . . . . . . . . . . . . . . 60Preparing to install non-global zones ... . . . . . . . . . . . . . . . . . . . . . . . . . . . . . . . . . . . . . . 61Installing non-global zones ... . . . . . . . . . . . . . . . . . . . . . . . . . . . . . . . . . . . . . . . . . . . . . . . . . . . 66Creating SF Oracle RAC configuration files inside non-global
zones ... . . . . . . . . . . . . . . . . . . . . . . . . . . . . . . . . . . . . . . . . . . . . . . . . . . . . . . . . . . . . . . . . . . . . . . . . . . 67EnablingOracle DiskManager file access fromnon-global zones
with Veritas File System .... . . . . . . . . . . . . . . . . . . . . . . . . . . . . . . . . . . . . . . . . . . . . . . . . 67Configuring high availability for non-global zones ... . . . . . . . . . . . . . . . . . . . . 68Configuring the cluster name for clustering non-global
zones ... . . . . . . . . . . . . . . . . . . . . . . . . . . . . . . . . . . . . . . . . . . . . . . . . . . . . . . . . . . . . . . . . . . . . . . . . . . 69Installing Oracle RAC inside the non-global zones ... . . . . . . . . . . . . . . . . . . . . . 70Linking the ODM library .... . . . . . . . . . . . . . . . . . . . . . . . . . . . . . . . . . . . . . . . . . . . . . . . . . . . . . . 70Creating the Oracle database ... . . . . . . . . . . . . . . . . . . . . . . . . . . . . . . . . . . . . . . . . . . . . . . . . . 70Configuring non-global zones under VCS .... . . . . . . . . . . . . . . . . . . . . . . . . . . . . . . . . 71Sample VCS configuration with non-global zones ... . . . . . . . . . . . . . . . . . . . . . . 72
Configuring Solaris non-global zones for disaster recovery .... . . . . . . . . . . . . . . 92
Contents8

Software limitations of Storage Foundation support of non-globalzones ... . . . . . . . . . . . . . . . . . . . . . . . . . . . . . . . . . . . . . . . . . . . . . . . . . . . . . . . . . . . . . . . . . . . . . . . . . . . . . . . . 94Administration commands are not supported in non-global
zone .... . . . . . . . . . . . . . . . . . . . . . . . . . . . . . . . . . . . . . . . . . . . . . . . . . . . . . . . . . . . . . . . . . . . . . . . . . . 94VxFS file system is not supported as the root of a non-global
zone .... . . . . . . . . . . . . . . . . . . . . . . . . . . . . . . . . . . . . . . . . . . . . . . . . . . . . . . . . . . . . . . . . . . . . . . . . . . 95QIO and CQIO are not supported .... . . . . . . . . . . . . . . . . . . . . . . . . . . . . . . . . . . . . . . . . . . . 95Package installation in non-global zones ... . . . . . . . . . . . . . . . . . . . . . . . . . . . . . . . . . 95Package removal with non-global zone configurations .... . . . . . . . . . . . . . 95Root volume cannot be added to non-global zones ... . . . . . . . . . . . . . . . . . . . . . 95Some Veritas Volume Manager operations can cause volume
device names to go out of sync .... . . . . . . . . . . . . . . . . . . . . . . . . . . . . . . . . . . . . . . . . 95
Chapter 3 Storage Foundation and High Availability Solutionssupport for Solaris Projects . . . . . . . . . . . . . . . . . . . . . . . . . . . . . . . . . . . . . . . . 97
About Solaris Projects ... . . . . . . . . . . . . . . . . . . . . . . . . . . . . . . . . . . . . . . . . . . . . . . . . . . . . . . . . . . . . . . . . 97About VCS support for Solaris projects ... . . . . . . . . . . . . . . . . . . . . . . . . . . . . . . . . . . . . . . . . . . 98
Overview of how VCS works with Solaris projects ... . . . . . . . . . . . . . . . . . . . . . . 98About the ContainerInfo service group attribute ... . . . . . . . . . . . . . . . . . . . . . . . 98About the ContainerOpts resource type attribute ... . . . . . . . . . . . . . . . . . . . . . . 99Project-aware resources ... . . . . . . . . . . . . . . . . . . . . . . . . . . . . . . . . . . . . . . . . . . . . . . . . . . . . . . 100About the Project agent ... . . . . . . . . . . . . . . . . . . . . . . . . . . . . . . . . . . . . . . . . . . . . . . . . . . . . . . 100
Configuring VCS in Solaris projects ... . . . . . . . . . . . . . . . . . . . . . . . . . . . . . . . . . . . . . . . . . . . . 100Prerequisites for configuring VCS in projects ... . . . . . . . . . . . . . . . . . . . . . . . . . 100
Chapter 4 Storage Foundation and High Availability Solutionssupport for Branded Zones . . . . . . . . . . . . . . . . . . . . . . . . . . . . . . . . . . . . . . . . 103
About branded zones .... . . . . . . . . . . . . . . . . . . . . . . . . . . . . . . . . . . . . . . . . . . . . . . . . . . . . . . . . . . . . . . 103System requirements ... . . . . . . . . . . . . . . . . . . . . . . . . . . . . . . . . . . . . . . . . . . . . . . . . . . . . . . . . . . . . . . . 104Veritas Storage Foundation support for branded zone .... . . . . . . . . . . . . . . . . . . . 104About migrating VCS clusters on Solaris 10 systems .... . . . . . . . . . . . . . . . . . . . . . 104Preparing to migrate a VCS cluster ... . . . . . . . . . . . . . . . . . . . . . . . . . . . . . . . . . . . . . . . . . . . . . 105Configuring VCS/SF in a branded zone environment .... . . . . . . . . . . . . . . . . . . . . . 106
Chapter 5 Storage Foundation and High Availability Solutionssupport for Oracle VM Server for SPARC . . . . . . . . . . . . . . . . 111
Terminology for Oracle VM Server for SPARC .... . . . . . . . . . . . . . . . . . . . . . . . . . . . . . 112Oracle VM Server for SPARC deployment models ... . . . . . . . . . . . . . . . . . . . . . . . . . . 113
Split Storage Foundation stack .... . . . . . . . . . . . . . . . . . . . . . . . . . . . . . . . . . . . . . . . . . . . 114Guest-based Storage Foundation stack .... . . . . . . . . . . . . . . . . . . . . . . . . . . . . . . . . . 114
9Contents

Benefits of deploying Storage FoundationHighAvailability solutionsin Oracle VM server for SPARC .... . . . . . . . . . . . . . . . . . . . . . . . . . . . . . . . . . . . . . . . . . . . 114Standardization of tools ... . . . . . . . . . . . . . . . . . . . . . . . . . . . . . . . . . . . . . . . . . . . . . . . . . . . . . 114Array migration .... . . . . . . . . . . . . . . . . . . . . . . . . . . . . . . . . . . . . . . . . . . . . . . . . . . . . . . . . . . . . . . . 114Moving storage between physical and virtual environments ... . . . . . . 115Boot Image Management ... . . . . . . . . . . . . . . . . . . . . . . . . . . . . . . . . . . . . . . . . . . . . . . . . . . . . 115
Features ... . . . . . . . . . . . . . . . . . . . . . . . . . . . . . . . . . . . . . . . . . . . . . . . . . . . . . . . . . . . . . . . . . . . . . . . . . . . . . . . . 115Storage Foundation features ... . . . . . . . . . . . . . . . . . . . . . . . . . . . . . . . . . . . . . . . . . . . . . . . . 115Oracle VM Server for SPARC features ... . . . . . . . . . . . . . . . . . . . . . . . . . . . . . . . . . . . 118
Split Storage Foundation stack model ... . . . . . . . . . . . . . . . . . . . . . . . . . . . . . . . . . . . . . . . . . 119How Storage Foundation and High Availability Solutions works
in the Oracle VM Server for SPARC .... . . . . . . . . . . . . . . . . . . . . . . . . . . . . . . . . 119Veritas Storage Foundation features restrictions ... . . . . . . . . . . . . . . . . . . . . . 120
Guest-based Storage Foundation stack model ... . . . . . . . . . . . . . . . . . . . . . . . . . . . . . . . 122How Storage Foundation and High Availability Solutions works
in the guest domains .... . . . . . . . . . . . . . . . . . . . . . . . . . . . . . . . . . . . . . . . . . . . . . . . . . . . 122About Veritas Storage Foundation Cluster File System in an
Oracle VM Server for SPARC environment .... . . . . . . . . . . . . . . . . . . . . . . 123Supported configurations with SFCFS and multiple I/O
Domains .... . . . . . . . . . . . . . . . . . . . . . . . . . . . . . . . . . . . . . . . . . . . . . . . . . . . . . . . . . . . . . . . . . . . 124Veritas Storage Foundation features restrictions ... . . . . . . . . . . . . . . . . . . . . . 127
System requirements ... . . . . . . . . . . . . . . . . . . . . . . . . . . . . . . . . . . . . . . . . . . . . . . . . . . . . . . . . . . . . . . . 128Hardware requirements ... . . . . . . . . . . . . . . . . . . . . . . . . . . . . . . . . . . . . . . . . . . . . . . . . . . . . . . 128
Veritas product release notes ... . . . . . . . . . . . . . . . . . . . . . . . . . . . . . . . . . . . . . . . . . . . . . . . . . . . . . 129Veritas Storage Foundation and High Availability ... . . . . . . . . . . . . . . . . . . . 129Veritas Storage Foundation Cluster File System .... . . . . . . . . . . . . . . . . . . . . . 129
Product licensing .... . . . . . . . . . . . . . . . . . . . . . . . . . . . . . . . . . . . . . . . . . . . . . . . . . . . . . . . . . . . . . . . . . . . 129Installing Storage Foundation in a Oracle VM Server for SPARC
environment .... . . . . . . . . . . . . . . . . . . . . . . . . . . . . . . . . . . . . . . . . . . . . . . . . . . . . . . . . . . . . . . . . . . . 129Installing and configuring Oracle VM Server for SPARC and
domains .... . . . . . . . . . . . . . . . . . . . . . . . . . . . . . . . . . . . . . . . . . . . . . . . . . . . . . . . . . . . . . . . . . . . . 130Installing Storage Foundation in the control domain or
guest ... . . . . . . . . . . . . . . . . . . . . . . . . . . . . . . . . . . . . . . . . . . . . . . . . . . . . . . . . . . . . . . . . . . . . . . . . . 130Installing Veritas File System in the guest domain .... . . . . . . . . . . . . . . . . . . 131Enabling DMP in the control and alternate I/O domains .... . . . . . . . . . . 131Verifying the configuration .... . . . . . . . . . . . . . . . . . . . . . . . . . . . . . . . . . . . . . . . . . . . . . . . . 135
Exporting a Veritas volume to a guest domain from the controldomain .... . . . . . . . . . . . . . . . . . . . . . . . . . . . . . . . . . . . . . . . . . . . . . . . . . . . . . . . . . . . . . . . . . . . . . . . . . . . 136
Provisioning storage for a guest domain .... . . . . . . . . . . . . . . . . . . . . . . . . . . . . . . . . . . . . . 137Provisioning Veritas VolumeManager volumes as data disks for
guest domains .... . . . . . . . . . . . . . . . . . . . . . . . . . . . . . . . . . . . . . . . . . . . . . . . . . . . . . . . . . . . 137Provisioning Veritas VolumeManager volumes as boot disks for
guest domains .... . . . . . . . . . . . . . . . . . . . . . . . . . . . . . . . . . . . . . . . . . . . . . . . . . . . . . . . . . . . 139
Contents10

UsingVeritasVolumeManager snapshots for cloning logical domainboot disks ... . . . . . . . . . . . . . . . . . . . . . . . . . . . . . . . . . . . . . . . . . . . . . . . . . . . . . . . . . . . . . . . . . . . . . . . . 141
Configuring Oracle VM Server for SPARC guest domains for disasterrecovery .... . . . . . . . . . . . . . . . . . . . . . . . . . . . . . . . . . . . . . . . . . . . . . . . . . . . . . . . . . . . . . . . . . . . . . . . . . 146
Software limitations .... . . . . . . . . . . . . . . . . . . . . . . . . . . . . . . . . . . . . . . . . . . . . . . . . . . . . . . . . . . . . . . . 149Memory Corruption in the guest domain during SCSI
commands .... . . . . . . . . . . . . . . . . . . . . . . . . . . . . . . . . . . . . . . . . . . . . . . . . . . . . . . . . . . . . . . . . 149Exporting the raw volume device node fails ... . . . . . . . . . . . . . . . . . . . . . . . . . . . . 149Resizing a Veritas Volume Manager volume (exported as a slice
or full disk) does not dynamically reflect the new size of thevolume in the guest ... . . . . . . . . . . . . . . . . . . . . . . . . . . . . . . . . . . . . . . . . . . . . . . . . . . . . . . 150
Known issues ... . . . . . . . . . . . . . . . . . . . . . . . . . . . . . . . . . . . . . . . . . . . . . . . . . . . . . . . . . . . . . . . . . . . . . . . . . . 150Guest-based known issues ... . . . . . . . . . . . . . . . . . . . . . . . . . . . . . . . . . . . . . . . . . . . . . . . . . . . 150Split Storage Foundation stack known issues ... . . . . . . . . . . . . . . . . . . . . . . . . . . 152
Chapter 6 Veritas Cluster Server support for using CVM withmultiple nodes in a Oracle VM Server for SPARCenvironment . . . . . . . . . . . . . . . . . . . . . . . . . . . . . . . . . . . . . . . . . . . . . . . . . . . . . . . . . . . . . . . . . 153
Clustering using Cluster Volume Manager ... . . . . . . . . . . . . . . . . . . . . . . . . . . . . . . . . . . . . 153Installing Storage Foundation on multiple nodes in a Logical
Domain .... . . . . . . . . . . . . . . . . . . . . . . . . . . . . . . . . . . . . . . . . . . . . . . . . . . . . . . . . . . . . . . . . . . . . . . . . . . 154Reconfiguring the clustering agents for Cluster Volume
Manager ... . . . . . . . . . . . . . . . . . . . . . . . . . . . . . . . . . . . . . . . . . . . . . . . . . . . . . . . . . . . . . . . . . . . . 154Cluster Volume Manager in the control domain for providing high
availability ... . . . . . . . . . . . . . . . . . . . . . . . . . . . . . . . . . . . . . . . . . . . . . . . . . . . . . . . . . . . . . . . . . . . . . . . 156
Chapter 7 Veritas Cluster Server: Configuring Oracle VMServer for SPARC for high availability . . . . . . . . . . . . . . . . . . . . . 159
About Veritas Cluster Server in a Oracle VM Server for SPARCenvironment .... . . . . . . . . . . . . . . . . . . . . . . . . . . . . . . . . . . . . . . . . . . . . . . . . . . . . . . . . . . . . . . . . . . . 159Dynamic reconfiguration of memory and CPU of a guest
domain .... . . . . . . . . . . . . . . . . . . . . . . . . . . . . . . . . . . . . . . . . . . . . . . . . . . . . . . . . . . . . . . . . . . . . . 160Veritas Cluster Server requirements ... . . . . . . . . . . . . . . . . . . . . . . . . . . . . . . . . . . . . . 161Veritas Cluster Server limitations .... . . . . . . . . . . . . . . . . . . . . . . . . . . . . . . . . . . . . . . . . 161Veritas Cluster Server known issues ... . . . . . . . . . . . . . . . . . . . . . . . . . . . . . . . . . . . . . 161
About Veritas Cluster Server configuration models in an Oracle VMServer for SPARC environment .... . . . . . . . . . . . . . . . . . . . . . . . . . . . . . . . . . . . . . . . . . . . 162Veritas Cluster Server setup to fail over a logical domain on a
failure of logical domain .... . . . . . . . . . . . . . . . . . . . . . . . . . . . . . . . . . . . . . . . . . . . . . . 163
11Contents
Veritas Cluster Server setup to fail over a logical domain on afailure of Application running inside the logical domain orlogical domain itself ... . . . . . . . . . . . . . . . . . . . . . . . . . . . . . . . . . . . . . . . . . . . . . . . . . . . . . 168
Veritas Cluster Server setup to fail over an Application runninginside logical domain on a failure of Application .... . . . . . . . . . . . . . . 175
Oracle VM Server for SPARC guest domain migration in VCSenvironment .... . . . . . . . . . . . . . . . . . . . . . . . . . . . . . . . . . . . . . . . . . . . . . . . . . . . . . . . . . . . . . . . . . . . 176Overview of a warm migration .... . . . . . . . . . . . . . . . . . . . . . . . . . . . . . . . . . . . . . . . . . . . . 177Overview of a live migration .... . . . . . . . . . . . . . . . . . . . . . . . . . . . . . . . . . . . . . . . . . . . . . . . 178Prerequisites before you perform domain migration .... . . . . . . . . . . . . . . . 179Supported deployment models for Oracle VM Server for SPARC
domain migration with VCS .... . . . . . . . . . . . . . . . . . . . . . . . . . . . . . . . . . . . . . . . . . . 180Migrating Oracle VM guest when VCS is installed in the control
domain that manages the guest domain .... . . . . . . . . . . . . . . . . . . . . . . . . . . 180Migrating Oracle VM guest when VCS is installed in the control
domain and single-node VCS is installed inside the guestdomain to monitor applications inside the guestdomain .... . . . . . . . . . . . . . . . . . . . . . . . . . . . . . . . . . . . . . . . . . . . . . . . . . . . . . . . . . . . . . . . . . . . . . 181
Migrating Oracle VM guest when VCS cluster is installed in theguest domains tomanage applications forOracleVMServerfor SPARC version 2.1 and above .... . . . . . . . . . . . . . . . . . . . . . . . . . . . . . . . . . . . 183
Migrating Oracle VM guest when VCS cluster is installed in theguest domains tomanage applications forOracleVMServerfor SPARC version 2.0 ... . . . . . . . . . . . . . . . . . . . . . . . . . . . . . . . . . . . . . . . . . . . . . . . . . . 183
About configuring Veritas Cluster Server for Oracle VM Server forSPARC with multiple I/O domains .... . . . . . . . . . . . . . . . . . . . . . . . . . . . . . . . . . . . . . . . 185About Alternate I/O domain .... . . . . . . . . . . . . . . . . . . . . . . . . . . . . . . . . . . . . . . . . . . . . . . . 186Setting up the Alternate I/O domain .... . . . . . . . . . . . . . . . . . . . . . . . . . . . . . . . . . . . . 186Configuring VCS to manage a Logical Domain with multiple I/O
domains .... . . . . . . . . . . . . . . . . . . . . . . . . . . . . . . . . . . . . . . . . . . . . . . . . . . . . . . . . . . . . . . . . . . . . 187Configuring VCS to manage a Logical Domain using services from
multiple I/O domains .... . . . . . . . . . . . . . . . . . . . . . . . . . . . . . . . . . . . . . . . . . . . . . . . . . . . . . . . . 187A typical setup for a Logical Domain with multiple I/O
services ... . . . . . . . . . . . . . . . . . . . . . . . . . . . . . . . . . . . . . . . . . . . . . . . . . . . . . . . . . . . . . . . . . . . . . 188Identify supported storage and network services ... . . . . . . . . . . . . . . . . . . . . . 189Determine the number of nodes to form VCS cluster ... . . . . . . . . . . . . . . . . 190Install and configureVCS inside the control domain andalternate
I/O domain .... . . . . . . . . . . . . . . . . . . . . . . . . . . . . . . . . . . . . . . . . . . . . . . . . . . . . . . . . . . . . . . . . 190Configuring storage services ... . . . . . . . . . . . . . . . . . . . . . . . . . . . . . . . . . . . . . . . . . . . . . . . 190Configure storage service groups .... . . . . . . . . . . . . . . . . . . . . . . . . . . . . . . . . . . . . . . . . . 193Configure network service groups .... . . . . . . . . . . . . . . . . . . . . . . . . . . . . . . . . . . . . . . . 195Configure a service group to monitor services from multiple I/O
domains .... . . . . . . . . . . . . . . . . . . . . . . . . . . . . . . . . . . . . . . . . . . . . . . . . . . . . . . . . . . . . . . . . . . . 198
Contents12

Configure the AlternateIO resource ... . . . . . . . . . . . . . . . . . . . . . . . . . . . . . . . . . . . . . . 199Configure the service group for a Logical Domain .... . . . . . . . . . . . . . . . . . . . 201Failover scenarios ... . . . . . . . . . . . . . . . . . . . . . . . . . . . . . . . . . . . . . . . . . . . . . . . . . . . . . . . . . . . . . . 203Recommendationswhile configuringVCS andOracle VMServer
for SPARC with multiple I/O domains .... . . . . . . . . . . . . . . . . . . . . . . . . . . . . . 203Sample VCS configuration for AlternateIO resource configured
as a fail over type .... . . . . . . . . . . . . . . . . . . . . . . . . . . . . . . . . . . . . . . . . . . . . . . . . . . . . . . . 204
Chapter 8 Symantec ApplicationHA: Configuring Oracle VMServer for SPARC for high availability . . . . . . . . . . . . . . . . . . . . . 209
About Symantec ApplicationHA .... . . . . . . . . . . . . . . . . . . . . . . . . . . . . . . . . . . . . . . . . . . . . . . . . 209Why Symantec ApplicationHA .... . . . . . . . . . . . . . . . . . . . . . . . . . . . . . . . . . . . . . . . . . . . . . . . . . 210LDom configurations with Symantec ApplicationHA .... . . . . . . . . . . . . . . . . . . . . . 211Symantec ApplicationHA in the guest domains (LDoms) ... . . . . . . . . . . . . . . . . . 211VCS in the control domain and SymantecApplicationHA in the guest
domain (LDom) .... . . . . . . . . . . . . . . . . . . . . . . . . . . . . . . . . . . . . . . . . . . . . . . . . . . . . . . . . . . . . . . . . 212Installing and configuring ApplicationHA for application
availability ... . . . . . . . . . . . . . . . . . . . . . . . . . . . . . . . . . . . . . . . . . . . . . . . . . . . . . . . . . . . . . . . . . . . . . . . 214Additional documentation .... . . . . . . . . . . . . . . . . . . . . . . . . . . . . . . . . . . . . . . . . . . . . . . . . . . . . . . . . 214
Oracle Solaris documentation .... . . . . . . . . . . . . . . . . . . . . . . . . . . . . . . . . . . . . . . . . . . . . . 214Symantec documentation .... . . . . . . . . . . . . . . . . . . . . . . . . . . . . . . . . . . . . . . . . . . . . . . . . . . 214
13Contents

Contents14

Overview of Veritas StorageFoundation and HighAvailability VirtualizationSolutions
This chapter includes the following topics:
■ Overview
■ About Veritas Storage Foundation and High Availability VirtualizationSolutions
OverviewThis document provides information about Veritas Storage Foundation andHighAvailability Virtualization Solutions. Review this entire document before youinstallVeritasStorageFoundationandHighAvailabilityproducts in zones, brandedzones, projects, and logical domains.
This book provides many high-level examples and information. As such, youshould be a skilled user ofVeritas products andknowledgeable concerningOracle'svirtualization technologies.
Each chapter in this guide presents information on using a particular Oraclevirtualization technology with Veritas products. These chapters follow:
■ Storage Foundation andHigh Availability Solutions support for Solaris Zones
■ StorageFoundation andHighAvailability Solutions support for Solaris Projects
1Chapter

■ Storage Foundation andHighAvailability Solutions support for BrandedZones
■ Storage Foundation and High Availability Solutions support for Oracle VMServer for SPARC
■ Using multiple nodes in an Oracle VM Server for SPARCn environment
■ Configuring logical domains for high availability
Reference documentationThe following documentation provides information on installing, configuring,and using Veritas Cluster Server:
■ Veritas Cluster Server Release Notes
■ Veritas Cluster Server Installation Guide
■ Veritas Cluster Server Bundled Agents Reference Guide
■ Veritas Cluster Server Agent for DB2 Installation and Configuration Guide
■ Veritas Cluster Server Agent for Oracle Installation and Configuration Guide
■ Veritas Cluster Server Agent for Sybase Installation and Configuration Guide
The following documentation provides information on installing, configuring,and using Veritas Storage Foundation products:
■ Veritas Storage Foundation Release Notes
■ Veritas Storage Foundation and High Availability Installation Guide
■ Veritas Storage Foundation Administrator's Guide
The following documentation provides information on installing, configuring,and using Veritas Storage Foundation for Oracle RAC:
■ Veritas Storage Foundation for Oracle RAC Release Notes
■ VeritasStorageFoundation forOracleRACInstallationandConfigurationGuide
■ Veritas Storage Foundation for Oracle RAC Administrator's Guide
The following documentation provides information on installing, configuring,and using Veritas Storage Foundation Cluster File System:
■ Veritas Storage Foundation Cluster File System Release Notes
■ Veritas Storage Foundation Cluster File System Installation Guide
■ Veritas Storage Foundation Cluster File System Administrator's Guide
Overview of Veritas Storage Foundation and High Availability Virtualization SolutionsOverview
16

Note:Veritas Storage Foundation for Oracle RAC andVeritas Storage FoundationCluster File System does not support branded zones.
For Oracle VM Server for SPARC (formerly Solaris Logical Domains), BrandedZone, Projects, and Zone installation and configuration information, refer to theOracle site: www.oracle.com.
Oracle provides regular updates and patches for Oracle VM Server for SPARC,Branded Zones, and Zone features. Contact Oracle for details.
About Veritas Storage Foundation and HighAvailability Virtualization Solutions
Veritas StorageFoundationandHighAvailabilityVirtualizationSolutions includessupport for non-global and Branded zones, Projects, and Oracle VM Server forSPARC.
Solaris Zones, also known as non-global zones is an operating system-levelvirtualization technology,whichprovides ameansof virtualizingoperating systemservices to create an isolated environment for running applications. Non-globalzones function as completely isolated virtual servers with a single operatingsystem instance.
Branded zones are an extension of the Solaris Zone infrastructure. A Brandedzone is a non-native zone that allows individual zones to emulate an operatingsystem environment other than the native environment of the global operatingsystem.
OracleVMServer forSPARC is avirtualization technology that enables the creationof independent virtualmachine environments on the samephysical system.OracleVM Server for SPARC provides a virtualized computing environment abstractedfrom all physical devices, which allows you to consolidate and centrally manageyour workloads on a system. The logical domains can be specified roles such as acontrol domain, service domain, I/O domain , and guest domain. Each domain isa full virtual machine where the operating systems can be started, stopped, andrebooted independently.
The Solaris operating system provides a facility called projects to identifyworkloads. The project serves as an administrative tag,which you canuse to groupuseful and related work. You can for example create one project for a salesapplication and another project for a marketing application. By placing allprocesses related to the sales application in the sales project and the processesfor the marketing application in the marketing project, you can separate andcontrol the workloads in a way that makes sense to the business.
17Overview of Veritas Storage Foundation and High Availability Virtualization SolutionsAbout Veritas Storage Foundation and High Availability Virtualization Solutions

Overview of Veritas Storage Foundation and High Availability Virtualization SolutionsAbout Veritas Storage Foundation and High Availability Virtualization Solutions
18

Storage Foundation andHigh Availability Solutionssupport for Solaris Zones
This chapter includes the following topics:
■ About Solaris Zones
■ About VCS support for zones
■ Configuring VCS in zones
■ Adding VxFS file systems to a non-global zone
■ Direct mount of VxFS file systems from global zone
■ Veritas Storage Foundation Cluster File System mounts
■ Concurrent I/O access in non-global zones
■ Veritas extension for Oracle Disk Manager
■ Exporting VxVM volumes to a non-global zone
■ About SF Oracle RAC support for Oracle RAC in a zone environment
■ Setting up an SF Oracle RAC cluster with Oracle RAC on non-global zones
■ Configuring Solaris non-global zones for disaster recovery
■ Software limitations of Storage Foundation support of non-global zones
2Chapter

About Solaris ZonesSolaris Zones is a software partitioning technology, which provides a means ofvirtualizing operating system services to create an isolated environment forrunning applications. This isolation prevents processes that are running in onezone from monitoring or affecting processes running in other zones.
You can configure non-global zones with a shared-IP address or an exclusive-IPaddress. The shared-IP zone shares a network interface with global-zone and theexclusive-IP zone does not share network interface with global-zone.
See the Oracle Solaris Administration: Oracle Solaris Zones, Oracle Solaris 10Zones, and Resource Management Solaris operating environment document.
Oracle provides regular updates and patches for the Oracle Solaris Zones feature.Contact Oracle for more information.
About VCS support for zonesVCS provides application management and high availability to applicationsrunning in zones.
The Zone agent is IMF-aware and uses the asynchronous monitoring framework(AMF) kernel driver for IMF notification. For more information about theIntelligent Monitoring Framework (IMF) and intelligent resource monitoring,refer to the Veritas Cluster Server Administrator's Guide. For more informationabout how to perform intelligent resource monitoring for the Zone agent, see theVeritas Cluster Server Bundled Agents Reference Guide.
Overview of how VCS works with zonesYou can use VCS to perform the following:
■ Start, stop, monitor, and fail over a non-global zone.
■ Start, stop, monitor, and fail over an application that runs in a zone.
How VCS models containersVCS and the necessary agents run in the global zone. For the applications thatrun in a zone, the agents can run some of their functions (entry points) inside thezone. If any resource faults, VCS fails over the service group with the zone toanother node.
You can configure VCS to use Symantec Product Authentication Service to runin a secure environment. Communication from non-global zones to global zonesis secure in this environment.
Storage Foundation and High Availability Solutions support for Solaris ZonesAbout Solaris Zones
20
Installing and configuring zones in VCS environmentsInstall and configure the zone. Create the service group with the standardapplication resource types (application, storage, networking) and the Zoneresource. VCS manages the zone as a resource. You then configure the servicegroup’s ContainerInfo attribute.
Configuring the ContainerInfo attributeThe service group attribute ContainerInfo specifies information about the zone.When you have configured and enabled the ContainerInfo attribute, you haveenabled the zone-aware resources in that service group to work in the zoneenvironment.
VCS defines the zone information at the level of the service group so that you donot have to define it for each resource. You may specify a per-system value forthe ContainerInfo attribute.
About the ContainerInfo service group attributeThe ContainerInfo attribute has the Name key, Type key, and Enabled key. TheName key defines the name of the container. The Type key lets you select the typeof container that you plan to use. The Enabled key enables the Zone-awareresources within the service group. The ContainerInfo attribute specifies if youcan use the service group with the container.
Assign the following values to the ContainerInfo attribute:
■ NameThe name of the container.
■ TypeThe type of container. You can set this to Zone.
■ EnabledSpecify the value as 0, if you want to disable the container. Specify the valueas 1, if you want to enable the container. Specify the value as 2, to enablephysical to virtual and virtual to physical failovers. When the value is 2, theZone resource mimics a non-existent entity.
You can set a per-system value for this attribute.
About the ContainerOpts resource type attributeThe ContainerOpts resource attribute is pre-set for Zone-aware resource types.It determines the following:
■ Whether the zone-aware resource can run in the zone.
21Storage Foundation and High Availability Solutions support for Solaris ZonesAbout VCS support for zones

■ Whether the container information that is defined in the service group’sContainerInfo attribute is passed to the resource.
These values are only effective when you configure the ContainerInfo servicegroup attribute.
Attribute's keys follow:
The ContainerOpts resource type attribute's definitions for Zone-aware typescontain the following values:
■ RunInContainer (RIC)When the value of theRunInContainer key is 1, the agent function (entry point)for that resource runs inside of the local container.When the value of theRunInContainer key is 0, the agent function (entry point)for that resource runs outside the local container (in the global environment).A limitation for the RunInContainer value is that only script agent functions(entry points) can run inside a container.
■ PassCInfo (PCI)When the value of the PassCInfo key is 1, the agent function (entry point)receives the container information that is defined in the service group’sContainerInfo attribute. An example use of this value is to pass the name ofthe container to the agent.
Zone-aware resourcesTable 2-1 1ists the ContainerOpts attributes default values for resource types.Zone-aware resources have predefined values for the ContainerOpts attribute.
Note:Symantec recommends that youdonotmodify thevalueof theContainerOptsattribute, with the exception of the Mount agent.
See “About the Mount agent” on page 23.
See “About networking agents” on page 26.
Table 2-1 ContainerOpts attribute default values for applications and resourcetypes
PassCInfoRunInContainerResource type
01Apache
01Application
01ASMInst
Storage Foundation and High Availability Solutions support for Solaris ZonesAbout VCS support for zones
22

Table 2-1 ContainerOpts attribute default values for applications and resourcetypes (continued)
PassCInfoRunInContainerResource type
01ASMDG
01Db2udb
10NIC
10IP
10IPMultiNIC
10IPMultiNICB
01Process
10Zone
01Oracle
01Netlsnr
01Sybase
01SybaseBk
01ProcessOnOnly
10Project
About the Mount agentYou may need to modify the ContainerOpts values for the Mount resource incertain situations.
In certain situationswhere the block device is not exported to zone, you canmakethe file systemavailable inside local zone.Mount the block device on the directorythat has a path that includes the zone root from global zone, for example:
BlockDevice = /dev/vx/dsk/dg/vol1
MountPoint = /zones/zone-test/root/mntpt
Where /zones/zone-test is the zone root of the local zone.
23Storage Foundation and High Availability Solutions support for Solaris ZonesAbout VCS support for zones

Mount agent supports the following configuration for mount points
1 Direct mount of file system with mount point as full path seen from globalzone. Typical mount resource configuration for this type of mount is shownbelow:
group mntgrp (
SystemList = { Sys1 = 0, Sys1 = 1 }
)
Mount mnt-direct (
MountPoint = "/zones/zone-test/root/mnt"
BlockDevice = "/dev/vx/dsk/dg/vol"
FSType = vxfs
FsckOpt = "-y"
)
2 Loop-back file systemmount inside non-global zone for file systemmountedin global zone. Typical mount resource configuration for this type of mountis shown below:
group mntgrp (
SystemList = { Sys1 = 0, Sys1 = 1 }
)
Mount mnt-lofs (
MountPoint = "/zones/zone-test/root/mnt-zone"
BlockDevice = "/mnt"
FSType = lofs
FsckOpt = "-n"
)
Storage Foundation and High Availability Solutions support for Solaris ZonesAbout VCS support for zones
24

3 Directmount ofNFS based file system inside non-global zone. Typicalmountresource configuration for this type of mount is shown below:
group mntgrp (
SystemList = { Sys1 = 0, Sys1 = 1 }
ContainerInfo = { Name = zone-test, Type = Zone, Enabled = 1 }
)
Mount mntnfs (
MountPoint = "/mnt"
BlockDevice = "system:/shared-dir"
FSType = nfs
FsckOpt = "-n"
ContainerOpts = { RunInContainer = 1, PassCInfo = 0 }
)
Bringing a Mount resource online in the zoneThe Mount resource is brought online in the global zone by default(RunInContainer = 0). If you want to bring a mount resource online inside thenon-global zone, perform the following:
■ Export the block device to the zone through zone configuration. Ensure thatthe raw volume is used appropriately to prevent the possibility of datacorruption.
■ Modify the ContainerInfo attribute for the service group and set values for theName, Type, and Enabled keys.
# hagrp -modify service_group ContainerInfo Name zone_name\
Type Zone Enabled 1
■ Override the ContainerOpts attribute at the resource level.
■ Set the value of the RunInContainer key to 1, for example:
# hares -override Mountres ContainerOpts
# hares -modify Mountres ContainerOpts \
RunInContainer 1 PassCInfo 0
For information on overriding resource type static attributes, refer to theVeritasCluster Server Administrator's Guide.
25Storage Foundation and High Availability Solutions support for Solaris ZonesAbout VCS support for zones
Setting the attribute values for a Mount resource for NFSmountsFor NFS mounts, you must mount in the non-global zone.
■ Modify the ContainerInfo attribute for the service group and set values forName, Type and Enabled keys.
■ Override the ContainerOpts attribute at the resource level.
■ Set the value of the RunInContainer key to 1.Set theRIC value to 1.Whenyou set RIC=1, specify the value of theMountPointattribute relative to the zone root, for example:
BlockDevice = abc:/fs1
MountPoint = /mnt1
The file system is mounted on /zone_root/mnt1.
About networking agentsEnable the attribute ExclusiveIPZone for resources of type IP andNICwhen theseresources are configured to manage the IP and the NIC inside an exclusive-IPzone. This attribute is disabled by default. The IP agent and theNIC agent assumesthe native zone (shared-IP) by default.
VCS brings resources online in the global zone by default.
If you want to bring these resources online inside the exclusive-IP zone, performthe following tasks:
■ Make sure that the resource is in a service group that has valid ContainerInfoattribute value configured.
■ Set the value of the ExclusiveIPZone attribute to 1.
Note:The exclusive-IP zone supports the IP andNIC networking agents. Formoreinformation about these agents, see the Veritas Cluster Server Bundled AgentsReference Guide.
About the Zone agentThe Zone agent monitors zones, brings them online, and takes them offline. Formore information about the agent, see the Veritas Cluster Server Bundled AgentsReference Guide.
Use hazonesetup utility to create user account with group administrativeprivileges. TheDeleteVCSZoneUser attribute of zone resource controls removing
Storage Foundation and High Availability Solutions support for Solaris ZonesAbout VCS support for zones
26

the user account when the zone resource is taken offline. For more information,see the Veritas Cluster Server Bundled Agents Reference Guide.
About configuring failovers among physical and virtual serversYou can configure VCS to fail over from a physical system to a virtual system andvice versa. A physical to virtual failover gives an N + N architecture in an N + 1environment. For example, several physical servers with applications can failover to containers on another physical server.
See “Configuring for physical to virtual and virtual to physical failovers—a typicalsetup” on page 43.
Configuring VCS in zonesConfiguring VCS in zones involves the following tasks:
Review the prerequisites.
See “Prerequisites for configuring VCS in zones” on page 27.
First
Decide on the location of the zone root, which is either on local storageor shared storage.
See “Deciding on the zone root location” on page 29.
Second
Install the application in the zone.
See “About installing applications in a zone” on page 32.
Third
Create the application service group and configure its resources.
See “Configuring the service group for the application” on page 32.
Fourth
Prerequisites for configuring VCS in zonesReview the following prerequisites for configuring VCS in zones:
■ For Oracle Solaris 10, VCS supports UFS, ZFS, and VxFS mounts for the zoneroot.
■ For Oracle Solaris 11, VCS supports only ZFS for zone root.
Method for file system access inside non-global zoneFile system mounts must meet one of the following two conditions:
■ Use a loopback file system. All mounts that the application uses must be partof the zone configuration and must be configured in the service group. For
27Storage Foundation and High Availability Solutions support for Solaris ZonesConfiguring VCS in zones

example, you can create a zone, z-ora, and define the file system containingthe application’s data to have the mount point as /oradata. When you createthe zone, you can define a path in the global zone. An example is/export/home/oradata, which the mount directory in the non-global zonemaps to. The MountPoint attribute of the Mount resource for the applicationis set to /export/home/oradata. Confirm that /export/home/oradatamapsto /oradata with the zonecfg -z zone_name info command. You can alsolook into the zone configuration /etc/zones/zone_name.xml file. The Zoneresource depends on the Mount resource.
■ Use adirectmount file system.All file systemmountpoints that the applicationuses that run in a zone must be set relative to the zone’s root. For example, ifthe Oracle application uses /oradata, and you create the zone with thezonepath as /z_ora, then the mount must be /z_ora/root/oradata. TheMountPoint attribute of the Mount resource must be set to this path. TheMount resource depends on the Zone resource.
Note: The Mount agent does not support mounting VxFS file systems directlyinside non-global zones.
Using custom agents in zonesIf you use custom agents, review the following information for their use in zones:
■ If you use custom agents to monitor the applications that run in zones, makesure that the agents use script-based entry points. VCS does not supportrunning C++ entry points inside a zone.
■ If you want the custom agent to monitor an application in the zone, for thecustom agent type, set the following values for the ContainerOpts attribute:RunInContainer = 1 and the PassCInfo = 0.
■ If you don't want the custom agent to monitor an application in the zone, forthe customagent type, set the following values for theContainerOpts attribute:RunInContainer = 0 and the PassCInfo = 0.
■ Two main use cases exist where you might want to use a RunInContainer = 0and PassCInfo = 1, descriptions of these follow.
■ The first is the Zone agent's use of these values. The Zone agent's entrypoints cannot run inside of thenon-global zone but the agent itselfmanagesthe zone. RunInContainer requires a value of 0 because the agentmust runin the global zone. PassCInfo has a value of 1 because the Zone agentrequires the name of the container from the ContainerInfo service groupattribute.
Storage Foundation and High Availability Solutions support for Solaris ZonesConfiguring VCS in zones
28
■ The second case is how the IP agent uses RunInContainer and PassCInfo.The IP agent's entry pointsmust run outside of thenon-global zone becausea shared-IP zone may cause the networking stack to not completely run inthe non-global zone. You cannot perform an ifconfig command and thenplumb the IP from inside of a non-global zone.When you run the ifconfigcommand in the global zone with the zone option - it plumbs the IP andmakes it available to the zone that you specify. The need for the container'sname comes from the use of this command, even though it cannot run inthe container. This is applicable to all networking agents.
Deciding on the zone root locationEach zone has its own section of the file system hierarchy in the zone rootdirectory. Processes that run in the zone can access files only within the zoneroot.
You can set the zone root in the following two ways:
■ Zone root on local storageIn this configuration, you must configure and install a zone on each node inthe cluster.
■ Zone root on shared storageIn this configuration, configure and install a zone in shared storage from onesystem and duplicate the configuration on each node in the cluster.Setting the zone root on shared storage means you need to install thenon-global zone on shared storage from one system only. The zone root canfail over to the other systems. To do this, the system software, including thepatches, must be identical on each system during the existence of the zone.
Creating a zone with root on local diskCreate a zone root on the local disk on each node in the cluster. The file systemfor application data is on a shared device and is either the loopback type or thedirect mount type. For a direct mount file system, run the mount command fromthe global zone with the mount point specified as the complete path that startswith the zone root. For a loopback file system, add it into the zone's configurationbefore you boot the zone.
29Storage Foundation and High Availability Solutions support for Solaris ZonesConfiguring VCS in zones
To create a zone root on local disks on each node in the cluster
1 Configure the zone with the zonecfg command.
zonecfg -z newzone
zonecfg:newzone> create
2 Set the zonepath parameter to specify a location for the zone root.
zonecfg:newzone> set zonepath=/export/home/newzone
3 If your application data resides on a loopback mount file system, create theloopback file system in the zone.
4 Exit the zonecfg configuration.
zonecfg> exit
5 Create the zone root directory.
mkdir zonepath
6 Set permissions for the zone root directory.
chmod 700 zonepath
7 Install the non-global zone.
zoneadm -z newzone install
8 Repeat step 1 to step 7 on each system in the service group’s SystemList.
9 If the application data is on a loopback file system, mount the file systemcontaining the application’s data on shared storage.
10 Boot the zone.
zoneadm -z newzone boot
11 If the application data is on a directmount file system,mount the file systemfrom the global zone with the complete path that starts with the zone root.
Creating a zone with root on shared storageCreate a zone with root which points to the shared disk's location on each nodein the cluster. The file system for application data is on a shared device and iseither the loopback type or the direct mount type. For a direct mount file system,
Storage Foundation and High Availability Solutions support for Solaris ZonesConfiguring VCS in zones
30
run the mount command from the global zone with the mount point specified asthe complete path that starts with the zone root. For a loopback file system, addit into the zone's configuration before you boot the zone.
To create a zone root on shared disks on each node in the cluster
1 Create a file system on shared storage for the zone root. The file system thatis to contain the zone root may be in the same disk group as the file systemthat contains the application data.
2 Configure the zone with the zonecfg command.
zonecfg -z newzone
zonecfg:newzone> create
3 Set the zonepath parameter to specify a location for the zone root.
zonecfg:newzone> set zonepath=/export/home/newzone
4 If your application data resides on a loopback mount file system, create theloopback file system in the zone.
5 Exit the zonecfg configuration.
zonecfg> exit
6 Create the zone root directory.
mkdir zonepath
7 Set permissions for the zone root directory.
chmod 700 zonepath
8 Repeat step 2 to step 7 on each system in the service group’s SystemList.
9 Mount the file system that contains the shared storage on one of the systemsthat share the storage to the directory specified in zonepath.
10 Run the following command to install the zone on the systemwhere the zonepath is mounted.
zoneadm -z newzone install
11 If the application data is on a loopback file system, mount the file systemcontaining the application’s data on shared storage.
31Storage Foundation and High Availability Solutions support for Solaris ZonesConfiguring VCS in zones

12 Boot the zone.
zoneadm -z newzone boot
13 If the application data is on a directmount file system,mount the file systemfrom the global zone with the complete path that starts with the zone root.
Performing the initial internal zone configurationWhen a zone is booted for the first time after installation, the zone is in anunconfigured state. The zone does not have an internal configuration for namingservices. Its locale and timezonehavenot been set, andvarious other configurationtasks have not been performed. You need to perform the initial internal zoneconfiguration after zone installation.
You can perform the internal zone configuration in the following ways:
■ sysidcfg tool
■ Zone console login
For more details refer to Oracle documentation about "Performing the InitialInternal Zone Configuration" section in theOracle Solaris Administration: OracleSolaris Zones, Oracle Solaris 10 Zones, and Resource Management guide.
About installing applications in a zonePerform the following tasks to install the application in a zone:
■ If you have created zones locally on each node in the cluster, install theapplication identically in all zones on all nodes. If you are installing anapplication that is supported by a Veritas High Availability agent, see theinstallation and configuration guide for the agent.
■ Install the agent packages on the global zone and the currently existing zones.Installs the agents in future zones when they are installed.
■ You must define all the mount points that the application uses that areconfigured in the zone in the service group's configuration.
Configuring the service group for the applicationYou need to configure the application service group and the required resourcedependencies. The following diagrams illustrates different examples of resourcedependencies. In one case the zone root is set up on local storage. In the other,zone root is set up on shared storage.
Storage Foundation and High Availability Solutions support for Solaris ZonesConfiguring VCS in zones
32

Resource dependency diagrams: zone root on local disksThe following resource dependency diagrams show zone configurations on localdisks configured for loopback and direct mounted file systems.
Figure 2-1 depicts the dependency diagram when the zone root is set up on localstorage with the loopback file system for the application. You can replace theMount resource with the CFSMount resource and the DiskGroup resource withthe CVMVolDg resource in the following diagram. In this configuration, decide ifyou want the service group to be a parallel service group. If so, you may need tolocalize certain attributes for resources in the service group. For example, youhave to change the IP resource's Address attribute for each node.
Figure 2-1 Zone root on local disks with loopback file system
DiskGroup
Mount
Zone
NIC
IP
Application
Application
Figure 2-2 depicts the dependency diagram when the zone root is set up on localstorage with a direct mount file system for the application. You can replace theMount resource with the CFSMount resource and the DiskGroup resource withthe CVMVolDg resource in the following diagram. In this configuration, decide ifyou want the service group to be a parallel service group. If so, you may need tolocalize certain attributes for resources in the service group. For example, youhave to change the IP resource's Address attribute for each node.
33Storage Foundation and High Availability Solutions support for Solaris ZonesConfiguring VCS in zones

Figure 2-2 Zone root on local disks with direct mount file system
Mount
Zone
NIC
IP
Application
DiskGroupManagesmounting andumounting theApplication filesystem
Resource dependency diagrams: zone root on shared disksThe following resource dependency diagrams showzone configurations on shareddisks configured for loopback and direct mounted file systems.
Figure 2-3 depicts the dependency diagram when a zone root is set up on sharedstorage with the loopback file system. You can replace the Mount resource withtheCFSMount resource and theDiskGroup resourcewith theCVMVolDg resourcein the following diagram for application. In this configuration, decide if you wantthe service group to be a parallel service group. If so, you may need to localizecertain attributes for resources in the service group. For example, you have tochange the IP resource's Address attribute for each node.
Figure 2-3 Zone root on shared storage with loopback file system
DiskGroup
Mount
Zone
NIC
IP
Application
DiskGroup/Zpool
Mount
Zoneroot
Applicationfile system
Figure 2-4 depicts the dependency diagram when a zone root is set up on sharedstorage with the direct mount file system for the application. You can replace theMount resource with the CFSMount resource and the DiskGroup resource withthe CVMVolDg resource in the following diagram for application. In thisconfiguration, decide if you want the service group to be a parallel service group.
Storage Foundation and High Availability Solutions support for Solaris ZonesConfiguring VCS in zones
34
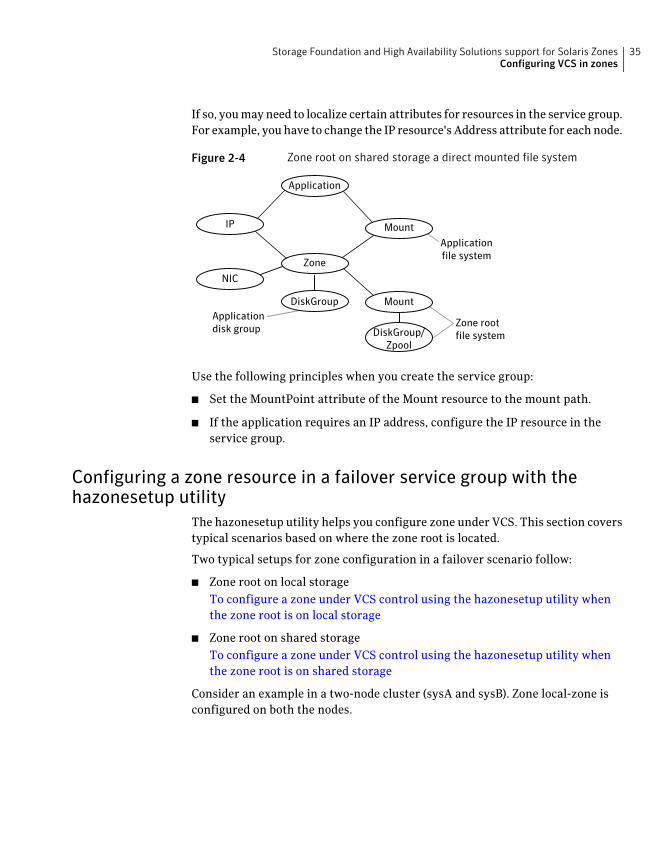
If so, youmayneed to localize certain attributes for resources in the service group.For example, youhave to change the IP resource's Address attribute for eachnode.
Figure 2-4 Zone root on shared storage a direct mounted file system
Mount
Zone
NIC
IP
Application
DiskGroup Mount
DiskGroup/Zpool
Applicationfile system
Applicationdisk group Zone root
file system
Use the following principles when you create the service group:
■ Set the MountPoint attribute of the Mount resource to the mount path.
■ If the application requires an IP address, configure the IP resource in theservice group.
Configuring a zone resource in a failover service group with thehazonesetup utility
The hazonesetup utility helps you configure zone under VCS. This section coverstypical scenarios based on where the zone root is located.
Two typical setups for zone configuration in a failover scenario follow:
■ Zone root on local storageTo configure a zone under VCS control using the hazonesetup utility whenthe zone root is on local storage
■ Zone root on shared storageTo configure a zone under VCS control using the hazonesetup utility whenthe zone root is on shared storage
Consider an example in a two-node cluster (sysA and sysB). Zone local-zone isconfigured on both the nodes.
35Storage Foundation and High Availability Solutions support for Solaris ZonesConfiguring VCS in zones
To configure a zone under VCS control using the hazonesetup utility when the zoneroot is on local storage
1 Boot the local zone on first node outside VCS.
sysA# zoneadm -z local-zone boot
2 Make sure that you can reach the global zone from local zone.
# zlogin local-zone
# ping sysA
3 Runhazonesetupwith correct arguments on the first node. This adds failoverzone service group and zone resource in VCS configuration.
sysA# hazonesetup -g zone_grp -r zone_res -z local-zone\
-p password -a -s sysA,sysB
Note: If you want to use a particular user for password-less communicationuse -u option of the hazonesetup command. If -u option is not specified adefault user is used for password-less communication.
4 Switch the zone service group to next node in the cluster.
sysA# hagrp -switch zone_grp -sys sysB
5 Run the hazonesetup utility with correct arguments on the node. Thehazonesetup utlity detects that the zone service group and zone resource arealreadypresent inVCSconfigurationandupdate the configurationaccordinglyfor password-less communication.
sysB# hazonesetup -g zone_grp -r zone_res -z local-zone\
-p password -a -s sysA,sysB
6 Repeat step 4 and step 5 for all the remaining nodes in the cluster.
Storage Foundation and High Availability Solutions support for Solaris ZonesConfiguring VCS in zones
36

To configure a zone under VCS control using the hazonesetup utility when the zoneroot is on shared storage
1 Configure a failover service groupwith required storage resources (DiskGroup,Volume, Mount, etc.) to mount the zone root on the node. Set the requireddependency between storage resources (DiskGroup->Volume->Mount).
sysA# hagrp -add zone_grp
sysA# hares -add zone_dg DiskGroup zone_grp
sysA# hares -add zone_vol Volume zone_grp
sysA# hares -add zone_mnt Mount zone_grp
sysA# hares -link zone_mnt zone_vol
sysA# hares -link zone_vol zone_dg
2 Bring the service group online on first node. This mounts the zone root onfirst node.
sysA# hagrp -online zone_grp -sys sysA
3 Boot the local zone on first node outside VCS.
sysA# zoneadm -z local-zone boot
4 Run hazonesetup with correct arguments on the first node. Use the servicegroup configured in step 1. This adds the zone resource toVCS configuration.
sysB# hazonesetup -g zone_grp -r zone_res -z local-zone \
-p password -a -s sysA,sysB
Note: If you want to use a particular user for password-less communicationuse -u option of the hazonesetup command. If -u option is not specified adefault user is used for password-less communication.
5 Set the proper dependency between the Zone resource and other storageresources. The Zone resource should depend on storage resource(Mount->Zone).
sysA# hares -link zone_res zone_mnt
6 Switch the service group to next node in the cluster.
sysA# hagrp -switch zone_grp -sys sysB
37Storage Foundation and High Availability Solutions support for Solaris ZonesConfiguring VCS in zones
7 Run the hazonesetup utility with correct arguments on the node. Thehazonesetup utility detects that the service group and the zone resource arealreadypresent inVCSconfigurationandupdate the configurationaccordinglyfor password-less communication.
sysB# hazonesetup -g zone_grp -r zone_res -z local-zone\
-p password -a -s sysA,sysB
8 Repeat step 6 and step 7 for all the remaining nodes in the cluster
Configuring zone resource in a parallel service group with thehazonesetup utility
The hazonesetuputility helps you configure a zoneunderVCS. This section coverstypical scenarios based on the location of the zone root.
In the case of a zone resource in parallel service group, the zone root can be onlocal or shared storage that the node owns.
Consider an example in a two-node cluster (sysA and sysB). Zone local-zone1 isconfigured on sysA and local-zone2 is configured on sysB.
Storage Foundation and High Availability Solutions support for Solaris ZonesConfiguring VCS in zones
38

To configure a zone under VCS control using hazonesetup utility when the zoneroot is on local storage
1 Boot the local zone on all the nodes outside VCS.
sysA# zoneadm -z local-zone1 boot
sysB# zoneadm -z local-zone2 boot
2 Run the hazonesetup utility with correct arguments on all the nodessuccessively.
sysA# hazonesetup -g zone_grp -r zone_res -z local-zone1\
-p password -a -l -s sysA,sysB
sysB# hazonesetup -g zone_grp -r zone_res -z local-zone2\
-p password -a -l -s sysA,sysB
Note: If you want to use a particular user for password-less communicationuse -u option of the hazonesetup command. If -u option is not specified adefault user is used for password-less communication.
3 Running hazonesetup on first node adds parallel zone service group and zoneresource in VCS configuration. Running hazonesetup on other nodes detectthat the zone service group and zone resource are already present in VCSconfiguration and update the configuration accordingly for password-lesscommunication.
Note: Run the hazonesetup utility on all the nodes in the cluster that have a zonerunning on that node. This is required as hazonesetup runs the halogin commandinside the local zone that enables password-less communication between localzone and global zone.
You can use the same user for multiple zones across systems. Specify the sameuser name using the -u option while running hazonesetup utility for differentzones on different systems. When you do not specify a user name while runninghazonesetup utility, the utility creates a user with the default user namez_resname_hostname for a non-secure cluster and z_resname_clustername for asecure cluster.
39Storage Foundation and High Availability Solutions support for Solaris ZonesConfiguring VCS in zones
Configuring multiple zone resources using same VCS user for passwordless communication
The hazonesetup utility helps you configure multiple zones under VCS, whichare using same VCS user for password less communication between non-globalzone and global zone.
Consider an example in a two-node cluster (sysA and sysB). Zones local-zone1 andlocal-zone2 are configured on both the nodes.
To configure zones under VCS control in failovermode using the hazonesetup utilitywhen the zone root is on local storage
1 Boot the local zones on first node outside VCS.
sysA# zoneadm -z local-zone1 boot
sysA# zoneadm -z local-zone2 boot
2 Run the hazonesetup utility with the correct arguments on the first node.This adds failover zone service group, zone resource in VCS configuration,configures same VCS user (zone_user) to be used for password lesscommunication between non-global zone, and global zone.
sysA# hazonesetup -g zone1_grp -r zone1_res -z local-zone1\
-u zone_user -p password -a -s sysA,sysB
sysA# hazonesetup -g zone2_grp -r zone2_res -z local-zone2\
-u zone_user -p password -a -s sysA,sysB
3 Switch the zone service group to next node in the cluster.
sysA# hagrp -switch zone_grp -sys sysB
4 Run the hazonesetup utility with correct arguments on the node. Thehazonesetup utility detects that the zone service group, zone resource arealready present in VCS configuration, and update the configurationaccordingly for password-less communication.
sysB# hazonesetup -g zone1_grp -r zone1_res -z local-zone1\
-u zone_user -p password -a -s sysA,sysB
sysB# hazonesetup -g zone2_grp -r zone2_res -z local-zone2\
-u zone_user -p password -a -s sysA,sysB
5 Repeat step 3 and step 4 for all the remaining nodes in the cluster.
Storage Foundation and High Availability Solutions support for Solaris ZonesConfiguring VCS in zones
40
Modifying the service group configurationPerform the following procedure to modify a service group’s configuration.
To modify the configuration to manage a zone
1 Run the hazonesetup script to set up the zone configuration.
# hazonesetup [-t] -g sg_name -r res_name -z zone_name\
[-u user_name] -p password [-a] [-l] -s systems
Where the values are:
Updates the password for the VCS zone user.-t
Name of the zone service group to be created in VCS configuration.-g sg_name
Name of the zone resource to be created in VCS configuration.-r res_name
Name of the zone that is configured on the system.-z zone_name
Nameof theVCSuser used for password less communicationbetweenthe local zone and the global zone. If no username is specified thedefault username is used.
-u user_name
Password for the VCS user used for password less communication.
If Symantec Authentication Service is enabled, the password shouldbe at least six characters long.
-p password
Populate AutoStartList for the group.-a
Configure a parallel service group. If you do not specify the -l option,a failover service group is created by default.
-l
A comma separated list of systems where the zone service groupneed to be configured, for example: sys1,sys2,sys3.
-s systems
If the application service group does not exist, the script creates a servicegroup.
The script adds a resource of type Zone to the application service group. Thescript logs in to the zone and runs the halogin command. It also creates auser account with group administrative privileges to enable password lesscommunication between global zone and local zone for VCS.
2 Modify the resource dependencies to reflect your zone configuration. See theresource dependency diagrams for more information.
See “Configuring the service group for the application” on page 32.
3 Save the service group configuration and bring the service group online.
41Storage Foundation and High Availability Solutions support for Solaris ZonesConfiguring VCS in zones

Verifying the zone configurationRun the hazoneverify command to verify the zone configuration.
The command verifies the following requirements:
■ The systems hosting the service group have the required operating system torun zones.
■ The service group does not have more than one resource of type Zone.
■ The dependencies of the Zone resource are correct.
To verify the zone configuration
1 If you use custom agents make sure the resource type is added to theAPP_TYPES or SYS_TYPES environment variable.
See “Using custom agents in zones” on page 28.
2 Run the hazoneverify command to verify the zone configuration.
# hazoneverify servicegroup_name
Performing maintenance tasksPerform the following maintenance tasks as necessary:
■ Make sure that the zone configuration files are consistent on all the nodes atall times. The file is located at /etc/zones/zone_name.xml.
■ When you add a patch or upgrade the operating system on one node, makesure to upgrade the software on all nodes.
■ Make sure that the application configuration is identical on all nodes. If youupdate the application configuration on one node, apply the same updates toall nodes.
To update password of VCS user used for password less communication
1 Run the hazonesetup utility with correct arguments on the nodewhere Zoneresource is online.
sysA# hazonesetup -t -g zone_grp -r zone_res -z local-zone\
-u zoneuser -p new_password -a -s sysA,sysB
2 Switch the zone service group to next node in the cluster.
sysA# hagrp -switch zone_grp -sys sysB
Storage Foundation and High Availability Solutions support for Solaris ZonesConfiguring VCS in zones
42

3 Run the hazonesetup utility with correct arguments on the node.
sysB# hazonesetup -t -g zone_grp -r zone_res -z local-zone\
-u zoneuser -p new_password -a -s sysA,sysB
4 Repeat step 2 through step 3 for all the remaining nodes in the cluster.
Troubleshooting zonesUse following information to troubleshoot VCS and zones:
■ VCS HA commands do not work.
Recommended actions:
■ Verify the VCS packages are installed.
■ Run the halogin command from the zone.
Formore information on the halogin command, refer to theVeritasClusterServer Administrator's Guide.
■ Verify your VCS credentials. Make sure the password is not changed.
■ Verify the VxSS certificate is not expired.
■ Resource does not come online in the zone.
Recommended actions:
■ Verify VCS and the agent packages are installed correctly.
■ Verify the application is installed in the zone.
■ Verify the configuration definition of the agent.
Configuring for physical to virtual and virtual to physical failovers—atypical setup
In this configuration, youhave twophysical nodes. Onenode runs Solariswithoutzones configured (sysA) and another node runs Solaris with zones configured(sysB).
43Storage Foundation and High Availability Solutions support for Solaris ZonesConfiguring VCS in zones

Figure 2-5 An application service group that can fail over into a zone and back
Solaris Solaris
While the Zoneresource is
needed, it doesnot manage a
real entity
The Applicationresource residesin the non-global zone
Application
sysA
Mount
DiskGroup
Zone
Application
sysB
Mount
DiskGroup
Zone
In the main.cf configuration file, define the container name, type of container,and whether it is enabled or not in the service group definition.
ContainerInfo@sysA = {Name = Z1, Type = Zone, Enabled = 2}
ContainerInfo@sysB = {Name = Z1, Type = Zone, Enabled = 1}
On sysA, set the value of Enabled to 2 to ignore zones so that the application runson the physical system.When the service group fails over to sysB, the applicationruns inside the zone after the failover because Enabled is set to 1 on sysB. Theapplication can likewise fail over to sysA from sysB.
When ContainerInfo::Enabled is set to 2, the Zone agent reports resource statebased on state of the corresponding group.
IMF monitoring must be disabled on the node where ContainerInfo::Enable is setto 2 (sysA in this example).
◆ To disable IMF monitoring, set the Mode key of IMF attribute to 0:
# hares -override zone_res IMF
# hares -local zone_res IMF
# hares -modify zone_res IMF Mode 0 MonitorFreq 5 \
RegisterRetryLimit 3 -sys sysA
VCS limitations with Solaris zones■ Currently VCS does not support mounting of VxFS file system directly inside
non-global zone with Mount resource.
■ CFS is not supported as Zone root file system.
Storage Foundation and High Availability Solutions support for Solaris ZonesConfiguring VCS in zones
44

Adding VxFS file systems to a non-global zoneVxFS file systems that were previously created in the global zone can be madeavailable in the non-global zone using a loopback file system mount. Thisfunctionality is especially useful when the sole purpose ofmaking the file systemavailable in the non-global zone is to share access of this file system with one ormore non-global zones. For example, if a configuration file is available in aparticular file system and this configuration file is required by the non-globalzone, then the file systemcan be sharedwith the non-global zone using a loopbackfile system mount.
The following commands share access of file system /mnt1 as a loopback filesystem mount with an existing non-global zone newzone:
# zonecfg -z newzone
zonecfg:newzone> add fs
zonecfg:newzone:fs> set dir=/mnt1
zonecfg:newzone:fs> set special=/mnt1
zonecfg:newzone:fs> set type=lofs
zonecfg:newzone:fs> end
zonecfg:newzone> verify
zonecfg:newzone> commit
zonecfg:newzone> exit
The value of dir is a directory in the non-global zone. The value of special is adirectory in the global zone to be mounted in the non-global zone.
Caution: Sharing file systems with non-global zones through a loopback filesystem mount makes the file system available for simultaneous access from allthe non-global zones. This method should be used only when you want sharedread-only access to the file system.
Direct mount of VxFS file systems from global zoneExclusive access of a VxFS file system can be delegated to a non-global zone bydirectmounting the file system in the non-global zone.Using directmounts limitsthe visibility of and access to the file system to only the non-global zone that hasdirect mounted this file system.
See “Mounting a VxFS file system in a non-global zone” on page 46.
See “Adding a direct mount to a zone's configuration” on page 47.
See “Creating VxFS file systems inside non-global zones” on page 47.
45Storage Foundation and High Availability Solutions support for Solaris ZonesAdding VxFS file systems to a non-global zone

Mounting a VxFS file system in a non-global zoneTo direct mount a VxFS file system in a non-global zone, the directory to mountmust be in the non-global zone and the mount must take place from the globalzone. The following procedure mounts the directory dirmnt in the non-globalzone newzone with a mount path of /zonedir/newzone/root/dirmnt.
Note:VxFS entries in the global zone /etc/vfstab file for non-global zone directmounts are not supported, as the non-global zone may not yet be booted at thetime of /etc/vfstab execution.
Once a file systemhas beendelegated to anon-global zone through adirectmount,the mount point will be visible in the global zone through the mount command,but not through the df command.
To direct mount a VxFS file system in a non-global zone
1 Log in to the zone and make the mount point:
global# zlogin newzone
newzone# mkdir dirmnt
newzone# exit
2 Mount the file system from the global zone:
■ Non-cluster file system:
global# mount -F vxfs /dev/vx/dsk/dg/vol1 /zonedir/zone1\
/root/dirmnt
■ Cluster file system:
global# mount -F vxfs -o cluster /dev/vx/dsk/dg/vol1 \
/zonedir/zone1/root/dirmnt
3 Log in to the non-global zone and ensure that the file system is mounted:
global# zlogin newzone
newzone# df | grep dirmnt
/dirmnt (/dirmnt):142911566 blocks 17863944 files
Storage Foundation and High Availability Solutions support for Solaris ZonesDirect mount of VxFS file systems from global zone
46
Adding a direct mount to a zone's configurationAnon-global zone can also be configured to have a VxFS file system directmountautomatically when the zone boots using zonecfg. The fsck command is run,before the file system is mounted. If the fsck command fails, the zone fails toboot.
To add a direct mount to a zone's configuration
1 Check the status and halt the zone:
global# zoneadm list -cv
ID NAME STATUS PATH BRAND IP
0 global running / solaris shared
1 myzone running /zone/myzone solaris shared
global# zoneadm -z myzone halt
2 Boot the zone:
global# zoneadm -z myzone boot
3 Log in to the non-global zone and enable vxfsldlic service:
myzone# svcadm enable vxfsldlic
4 Ensure that the file system is mounted:
myzone# df | grep dirmnt
/dirmnt (/dirmnt):142911566 blocks 17863944 files
Creating VxFS file systems inside non-global zonesYou can create a VxFS file system inside of a non-global zone.
47Storage Foundation and High Availability Solutions support for Solaris ZonesDirect mount of VxFS file systems from global zone

To create the VxFS file system inside of a non-global zone
1 Check the zone status and halt the zone:
global# zoneadm list -cv
ID NAME STATUS PATH BRAND IP
0 global running / solaris shared
1 myzone running /zone/myzone solaris shared
global# zoneadm -z myzone halt
2 Add devices to the zone's configuration:
global# zonecfg -z myzone
zonecfg:myzone> add device
zonecfg:myzone:device> set match=/dev/vxportal
zonecfg:myzone:device> end
zonecfg:myzone> add device
zonecfg:myzone:device> set match=/dev/fdd
zonecfg:myzone:device> end
zonecfg:myzone> add device
zonecfg:myzone:device> set match=/dev/vx/rdsk/dg_name/vol_name
zonecfg:myzone:device> end
zonecfg:myzone> add device
zonecfg:myzone:device> set match=/dev/vx/dsk/dg_name/vol_name
zonecfg:myzone:device> end
zonecfg:myzone> add fs
zonecfg:myzone:fs> set dir=/etc/vx/licenses/lic
zonecfg:myzone:fs> set special=/etc/vx/licenses/lic
zonecfg:myzone:fs> set type=lofs
zonecfg:myzone:fs> end
zonecfg:myzone> verify
zonecfg:myzone> commit
zonecfg:myzone> exit
3 On Solaris 11, youmust set fs-allowed=vxfs,odm to the zone's configuration:
global# zonecfg -z myzone
zonecfg:myzone> set fs-allowed=vxfs,odm
zonecfg:myzone> commit
zonecfg:myzone> exit
If you want to use ufs, nfs and zfs inside the zone, setfs-allowed=vxfs,odm,nfs,ufs,zfs.
Storage Foundation and High Availability Solutions support for Solaris ZonesDirect mount of VxFS file systems from global zone
48

4 Boot the zone:
global# zoneadm -z myzone boot
5 Login to the non-global zone and create the file system inside the non-globalzone:
global# zlogin myzone
myzone# mkfs -F vxfs /dev/vx/rdsk/dg_name/vol_name
6 Create a mount point inside the non-global zone and mount it:
myzone# mkdir /mnt1
myzone# mount -F vxfs /dev/vx/dsk/dg_name/vol_name /mnt1
Mounting aVxFS file systemas a cluster file system from the non-global zoneis not supported.
Veritas Storage Foundation Cluster File Systemmounts
Veritas Storage Foundation Cluster File System (SFCFS) provides support for thesame file system to bemade available frommultiple nodes that have been groupedtogether as a cluster. VxFS supports the sharing or delegation of cluster-mountedfile systems in the non-global zone.
Note: Creating a non-global zone root on CFS is not supported. However, anon-global zone can be created on VxFS for Solaris 10 systems.
See “Direct mount of VxFS file systems from global zone” on page 45.
Note: CFS is not supported as Zone root file system.
The requirements to support SFCFS in non-global zones parallels that of SFCFSsupport in global zones. Some key points are as follows:
■ Both lofs anddirectmount are supported; Symantec recommendsdirectmount.
■ The device must be visible and shared on all nodes.
■ The zone configuration must be the same on all nodes. The zone name can bedifferent.
49Storage Foundation and High Availability Solutions support for Solaris ZonesVeritas Storage Foundation Cluster File System mounts

Mounting a VxFS file system as a cluster file system from the non-global zone isnot supported.
Support for SFCFS in a non-global zone is available in Veritas File System 5.0Maintenance Pack 1 and later.
To direct mount a VxFS file system as a cluster file system in a non-global zone
1 Log in to the zone and make the mount point:
global# zlogin newzone
newzone# mkdir dirmnt
newzone# exit
2 Mount the file system from the global zone.
Cluster File System:
global# mount -F vxfs -o cluster /dev/vx/dsk/dg/vol1 \
/zonedir/zone1/root/dirmnt
Note: It is not possible to make SFCFS cluster between different non-globalzones of the same node.
Note:CFS file systemshouldnot be used as a part of non-global zone configuration.It should be used through VCS as a part of main.cf configuration or it should bemounted manually from global zone. If using LOFS to mount the CFS filesystemwithin the non global zone, then do not use any CFS file system related optionsin the zone configuration since the CFS file systemwill already bemounted in theglobal zone.
Concurrent I/O access in non-global zonesConcurrent I/O allows multiple processes to read from or write to the same filewithout blocking other read(2) or write(2) calls. POSIX semantics requires readand write calls to be serialized on a file with other read and write calls.Concurrent I/O is generally used by applications that require high performancefor accessing data and do not perform overlapping writes to the same file.
Veritas Storage Foundation supports concurrent I/O for applications running inthe non-global zones as well. This implies that a process in a non-global zone canaccess the file concurrentlywith other processes in the global or non-global zone.
Storage Foundation and High Availability Solutions support for Solaris ZonesConcurrent I/O access in non-global zones
50

The application or running threads are responsible for coordinating the writeactivities to the same file when using Concurrent I/O.
An applicationmust perform the following activities to enable the concurrent I/Oadvisory on a file:
fd=open(filename, oflag)
ioctl(fd, VX_SETCACHE, VX_CONCURRENT)
write(fd, buff, numofbytes)
Veritas extension for Oracle Disk ManagerThe Veritas extension for Oracle DiskManager (ODM) is specifically designed forOracle9i or later to enhance filemanagement anddisk I/O throughput. The featuresof Oracle Disk Manager are best suited for databases that reside in a Veritas FileSystem. Oracle Disk Manager allows Oracle9i or later users to improve databasethroughput for I/O intensive workloads with special I/O optimization.
The Veritas extension for Oracle Disk Manager is supported in non-global zones.To run Oracle 11g Release 2 on a non-global zone and use Oracle Disk Manager,the Oracle software version must be 11.2.0.3.
Care must be taken when installing and removing packages when working withthe VRTSodm package, for more information refer to the following:
■ See “Package installation in non-global zones” on page 95.
■ See “Package removal with non-global zone configurations ” on page 95.
The followingprocedure enablesOracleDiskManager file access fromnon-globalzones with Veritas File System.
51Storage Foundation and High Availability Solutions support for Solaris ZonesVeritas extension for Oracle Disk Manager

To enable Oracle Disk Manager file access from non-global zones with Veritas FileSystem
1 Make global zone licenses visible to the non-global zone by exporting the/etc/vx/licenses/lic directory to the non-global zone as a lofs:
global# zonecfg -z myzone
zonecfg:myzone> add fs
zonecfg:myzone:fs> set dir=/etc/vx/licenses/lic
zonecfg:myzone:fs> set special=/etc/vx/licenses/lic
zonecfg:myzone:fs> set type=lofs
zonecfg:myzone:fs> end
zonecfg:myzone> commit
2 Halt the zone:
global# zoneadm -z myzone halt
3 On Solaris 10, you must boot the zone:
global# zoneadm -z myzone boot
4 On Solaris 10, create the /dev/odm directory inside the non-global zone fromglobal zone using complete path of non-global zone.
global# mkdir -p /zones/myzone/dev/odm
5 On Solaris 11, you must make global zone /dev/odm visible to the non-globalzone by exporting the /dev/odm directory to the non-global zone:
global# zonecfg -z myzone
zonecfg: myzone
zonecfg:myzone> add device
zonecfg:myzone:device> set match=/dev/odm
zonecfg:myzone:device> end
zonecfg:myzone:device> commit
Storage Foundation and High Availability Solutions support for Solaris ZonesVeritas extension for Oracle Disk Manager
52

6 On Solaris 11, you must boot the zone:
global# zoneadm -z myzone boot
7 To display the output from the df command:
# df | grep dirmnt
/dirmnt (/dev/vx/dsk/ngsf45/vol1):62761756 blocks 7845216 files
Exporting VxVM volumes to a non-global zoneAvolumedevicenode canbe exported for use innon-global zoneusing the zonecfgcommand. The following procedure makes a volume vol1 available in thenon-global zone myzone.
Caution: Exporting raw volumes to non-global zones has implicit security risks.It is possible for the zone administrator to create malformed file systems thatcould later panic the system when a mount is attempted. Directly writing to rawvolumes, exported to non-global zones, and using utilities such as dd can lead todata corruption in certain scenarios.
To export VxVM volumes to a non-global zone
1 Create a volume vol1 in the global zone:
global# ls -l /dev/vx/rdsk/rootdg/vol1
crw------- 1 root root 301, 102000 Jun 3
12:54 /dev/vx/rdsk/rootdg/vol1crw------- 1 root sys 301, 10200
0 Jun 3 12:54 /devices/pseudo/vxio@0:rootdg,vol1,102000,raw
2 Add the volume device vol1 to the non-global zone myzone:
global# zonecfg -z myzone
zonecfg:myzone> add device
zonecfg:myzone:device> set match=/dev/vx/rdsk/mydg/vol1
zonecfg:myzone:device> end
zonecfg:myzone> commit
53Storage Foundation and High Availability Solutions support for Solaris ZonesExporting VxVM volumes to a non-global zone

3 Ensure that the devices will be seen in the non-global zone:
global# zoneadm -z myzone halt
global# zoneadm -z myzone boot
4 Verify that /myzone/dev/vx contains the raw volume node and that thenon-global zone can perform I/O to the raw volume node.
The exported device can now be used for performing I/O or for creating filesystems.
VxVM devices in Oracle Solaris global zonesOn the Oracle Solaris operating environment, there are two physical nodescorresponding to each volume node entry, /devices and /dev, respectively, withthe same major and minor number. The physical nodes appear as follows:
/devices raw volume node : /devices/pseudo/vxio@0:
dgname,volname,minor_number,raw
/devices block volume node : /devices/pseudo/vxio@0:
dgname,volname,minor_number,blk
/dev raw volume node : /dev/vx/rdsk/dgname/volumename
/dev block volume node : /dev/vx/dsk/dgname/volumename
The following example provides sample values in /devices:
ls -l /devices/pseudo/vxio*vol1*
brw------- 1 root sys 302, 66000 Mar 25
17:21 /devices/pseudo/vxio@0:mydg,vol1,66000,blk
crw------- 1 root sys 302, 66000 Mar 25
17:21 /devices/pseudo/vxio@0:mydg,vol1,66000,raw
The following example provides sample values in /dev:
ls -l /dev/vx/*dsk/mydg/vol1
brw------- 1 root root 302, 66000 Mar 25 17:21 /dev/vx/dsk/mydg/vol1
crw------- 1 root root 302, 66000 Mar 25 17:21 /dev/vx/rdsk/mydg/vol1
Removing a VxVM volume from a non-global zoneThe following procedure removes a VxVM volume from a non-global zone.
Storage Foundation and High Availability Solutions support for Solaris ZonesExporting VxVM volumes to a non-global zone
54

To remove a VxVM volume from a non-global zone
◆ Remove the volume device vol1 from the non-global zone myzone:
global# zonecfg -z myzone
zonecfg:myzone> remove device match=/dev/vx/rdsk/rootdg/vol1
zonecfg:myzone> end
zonecfg:myzone> commit
About SFOracle RAC support for Oracle RAC in a zoneenvironment
This release supports the installation and configuration of two non-global zonesin each global zone. The SF Oracle RAC cluster must comprise non-global zonesfrom different global zones.
Note: SF Oracle RAC does not support a cluster formed of non-global zones fromthe same global zone.
SF Oracle RAC and the necessary agents run in the global zone. Oracle RAC runsin the non-global zone. Youmust configure non-global zoneswith an exclusive-IPzone. The exclusive-IP zonedoesnot share thenetwork interfacewith global-zone.
Using SF Oracle RAC, you can start, stop, and monitor a non-global zone andprovide high availability to Oracle RAC instances inside the non-global zone.
Figure 2-6 illustrates the SF Oracle RAC configuration in a zone environment.
55Storage Foundation and High Availability Solutions support for Solaris ZonesAbout SF Oracle RAC support for Oracle RAC in a zone environment

Figure 2-6 SF Oracle RAC with Oracle RAC in a zone environment
Shared storage
SF Oracle RAC inglobal zone sys1
SF Oracle RAC inglobal zone sys2
Oracle RAC - Cluster A
Oracle RAC - Cluster B
sys1_zone1
Oracle Clusterwareand database
sys2_zone1
Oracle Clusterwareand database
sys1_zone2
Oracle Clusterwareand database
sys2_zone2
Oracle Clusterwareand database
Supported configurationThe configuration supported by SF Oracle RAC for a zone environment is asfollows:
Solaris SPARC systemsArchitecture
11.2.0.3Oracle RAC version
Refer to Veritas Storage Foundation for Oracle RAC ReleaseNotes for the supported OS versions.
Operating system version
Exclusive IP zone
Note: For exclusive IP zone, you need a minimum of threenetwork interfaces for each non-global zone, one as publiclink and two as private links.
Zone IP address type
Storage Foundation and High Availability Solutions support for Solaris ZonesAbout SF Oracle RAC support for Oracle RAC in a zone environment
56
Note: All private interfaces inside a non-global zone must be configured underLLT as private interfaces. If you plan to have only one non-global zone clusteracross global zones, it is recommended that the private interfaces configured fora non-global zone be exactly the same in name and total number as those whichhave beenused for LLT configuration in the global zone.However, if you configurea subset of LLT interfaces as private interfaces in non-global zones, OracleClusterware will take cluster reconfiguration decisions in the event of networkpartition.
Known issues with supporting SF Oracle RAC in a zone environmentThis section describes the known issues in supporting SF Oracle RAC in a zoneenvironment.
Issue with VCS agentsIf thehost nameof thenon-global zone is different fromthenameof thenon-globalzone, you may observe unexpected behavior with the VCS agents configured forthe non-global zone.
Workaround: Ensure that the host name of the non-global zone is the same asthe name of the non-global zone.
Stopping non-global zones configured with direct-mount filesystems from outside VCS causes the corresponding zoneresource to fault or go offlineStopping non-global zones, which are configured with direct-mount file systems,fromoutsideVCS causes the corresponding zone resource to fault or to go offline.The status of the zone shows down and the corresponding zone resource faults orgoes offline. As a result, VCS cannot bring the zone resource online.
Workaround:
1. Log into the global zone as the root user.
2. Unmount the CFS mount points that were in use by the zone and are stillmounted:
# umount -o mntunlock=VCS /mount_point
3. Stop the zone:
# zoneadm -z zone_name halt
This changes the status of the non-global zone to installed or configured.
57Storage Foundation and High Availability Solutions support for Solaris ZonesAbout SF Oracle RAC support for Oracle RAC in a zone environment

Error message displayed for PrivNIC resource if zone is notrunningIf the PrivNIC resource is configured for a zone in a non-global zone environmentand the respective zone is not running, the following error message is displayedin the VCS engine log file /var/VRTSvcs/log/engine_*.log:
VCS ERROR V-16-20035-0 (sys1)
PrivNIC:ora_priv:monitor:Zone [zone1] not running.
Warning messages displayed when VCS restartsWhen you restart VCS, the following warning message is displayed before themulti-user services inside a zone are started:
VCS WARNING V-16-10001-14056 (sys1)
Zone:vcszoneres:monitor:Zone is running without specified
milestone [multi-user-server] nline - returning offline.
You may safely ignore the message.
The installer log of non-global zone containswarningmessagesThe installer log of non-global zone contains warning messages related to theVRTS packages.
Workaround:
Before installing the new non-global zone, you must set the parent directory ofzonepath to be 755. The parent directory of the zone can be derived from thecomplete zonepath by running the dirname command on the complete zonepathincluding the zonename.
Issue with CFS mountsAttempts to mount the CFS mounts on a global zone, after they are unmountedusing theharesorumount command, failwith the following error if theCFSmountson the global zone are mounted on a non-global zone as an lofs file system:
VCS WARNING V-16-20011-5508 (sys1)
CFSMount:ocrvote_mnt:online:Mount Error :
UX:vxfs mount: ERROR: V-3-21264:
/dev/vx/dsk/ocrvotedg/ocrvotevol is already mounted,
/ocrvote is busy,allowable number
of mount points exceeded
Workaround:
Storage Foundation and High Availability Solutions support for Solaris ZonesAbout SF Oracle RAC support for Oracle RAC in a zone environment
58

Perform the following steps to resolve the issue:
1. Log into the global zone as the root user.
2. View the CFS and lofs mounts that are unmounted on the global zone:
# cat /etc/mnttab |grep mount_point
For example:
# cat /etc/mnttab |grep ocrvote/ocrvote \
/zonevol/sys1_zone1/root/ocrvote lofs \
dev=53859d8 12971587943
3. Unmount the CFS and lofs mounts:
# umount /zonevol/sys1_zone1/root/mount_point
4. Check if there are any active CFS and lofs mounts:
# cat /etc/mnttab |grep mount_point
5. Mount the CFS and lofs mounts in one of the following ways on the globalzone.
Using hares command:
# hares -online res_name -sys sys_name
Manually:
# mount -F vxfs -o cluster /dev/vx/dsk/\
dg_name/vol_name /mount_point
6. Verify if the CFS mounts are mounted successfully:
# cat /etc/mnttab |grep mount_point
For example:
# cat /etc/mnttab |grep ocrvote/dev/vx/dsk/ocrvotedg/ocrvotevol \
/ocrvote vxfsrw,suid,delaylog,largefiles,qio,cluster,\
ioerror=mdisable,crw,dev=53859d8 1297159501
59Storage Foundation and High Availability Solutions support for Solaris ZonesAbout SF Oracle RAC support for Oracle RAC in a zone environment

Setting up an SF Oracle RAC cluster with Oracle RACon non-global zones
Setting up anSFOracle RAC clusterwithOracle RAConnon-global zones involvesthe following steps:
1. Prepare to install non-global zones.
See “Preparing to install non-global zones” on page 61.
2. Install non-global zones.
See “Installing non-global zones” on page 66.
3. Create SF Oracle RAC configuration files inside non-global zones.
See “Creating SF Oracle RAC configuration files inside non-global zones”on page 67.
4. Enable Oracle Disk Manager file access from non-global zones with VeritasFile System.
See “Enabling Oracle Disk Manager file access from non-global zones withVeritas File System” on page 67.
5. Configure high availability for non-global zones.
See “Configuring high availability for non-global zones” on page 68.
6. Configure the cluster name for clustering non-global zones.
See “Configuring the clustername for clusteringnon-global zones”onpage69.
7. Install Oracle RAC in non-global zones.
See “Installing Oracle RAC inside the non-global zones” on page 70.
8. Link the ODM library.
See “Linking the ODM library” on page 70.
9. Create the Oracle database.
See “Creating the Oracle database” on page 70.
10. Configure the non-global zones under VCS.
See “Configuring non-global zones under VCS” on page 71.
Storage Foundation and High Availability Solutions support for Solaris ZonesSetting up an SF Oracle RAC cluster with Oracle RAC on non-global zones
60

Preparing to install non-global zones
Note: Ensure that the host name of the non-global zone is the same as the nameof the non-global zone. If this convention is violated, youmay observe unexpectedbehavior with the VCS agents configured for the non-global zone.
Perform the following preparatory tasks:
1. Create non-global zones.
For instructions, see the System Administration Guide: Solaris Containers -Resource Management and Solaris Zones document.
2. After creating non-global zones, set the zone path.
For example:
# zonecfg -z sys1_zone1
zonecfg:sys1_zone1> set zonepath=/zone/sys1_zone1
zonecfg:sys1_zone1> commit
where sys1_zone1 is the nameof the non-global zone and /zone/sys1_zone1is the zone path.
3. Update the file system configuration for non-global zones by adding thefollowing SF Oracle RAC directories as loop-back mounts:
/opt (For accessing SF Oracle RAC binaries)
/usr/local/bin ( For Oracle utilities)
/etc/vx/licenses/lic (For SF Oracle RAC licenses)
For example:
sys1#zonecfg:sys1_zone1> add fs
sys1#zonecfg:sys1_zone1:fs>set dir=/opt
sys1#zonecfg:sys1_zone1:fs>set special=/opt
sys1#zonecfg:sys1_zone1:fs>set type=lofs
sys1#zonecfg:sys1_zone1:fs>end
sys1#zonecfg:sys1_zone1> add device
sys1#zonecfg:sys1_zone1:fs>set match=/dev/vxportal
sys1#zonecfg:sys1_zone1:fs>end
sys1#zonecfg:sys1_zone1> add device
sys1#zonecfg:sys1_zone1:fs>set match=/dev/fdd
sys1#zonecfg:sys1_zone1:fs>end
sys1#zonecfg:sys1_zone1> add device
sys1#zonecfg:sys1_zone1:fs>set match=/dev/odm
61Storage Foundation and High Availability Solutions support for Solaris ZonesSetting up an SF Oracle RAC cluster with Oracle RAC on non-global zones

sys1#zonecfg:sys1_zone1:fs>end
sys1#zonecfg:sys1_zone1>commit
4. Configure non-global zones to use network interfaces from global zones.
See “Configuring non-global zones to use network interfaces from globalzones” on page 62.
5. Plan the storage for Oracle Cluster Registry, voting disk, and data files.
See “Planning the storage for Oracle Cluster Registry, voting disk, and datafiles” on page 63.
6. Configure non-global zones to use devices from global zones.
See “Configuring non-global zones to use devices from global zones”on page 65.
7. Revise the default set of privileges for non-global zones.
See “Revising the default set of privileges for non-global zones” on page 66.
Configuring non-global zones to use network interfaces fromglobal zonesConfigure the non-global zone to use the network interfaces from the global zone.This is done by adding the required network interfaces to the non-global zones.The interfaces aremade available to the zone after the zone is installed andbooted.
Note: If you have installed two non-global zones in each global zone, ensure thatyou do not use the same interface on both non-global zones.
To configure non-global zones to use network interfaces from global zones
1 Log into each global zone as the root user.
2 Configure the non-global zone:
# zonecfg -z sys1_zone1
Storage Foundation and High Availability Solutions support for Solaris ZonesSetting up an SF Oracle RAC cluster with Oracle RAC on non-global zones
62

3 Create an exclusive IP zone:
# set ip-type=exclusive
4 Add the network interfaces to the non-global zone from the global zone.
The following is a sample configuration:
# zonecfg:sys1_zone1>add net
# zonecfg:sys1_zone1:net>set physical=bge1
# zonecfg:sys1_zone1:net>end
# zonecfg:sys1_zone1:>commit
Planning the storage for Oracle Cluster Registry, voting disk,and data filesThere are two ways to make global zone file system visible to non-global zones:
■ Loop back mount through zone configuration
■ Direct mount under non-global zones root directory
Table 2-2 describes the mount types.
63Storage Foundation and High Availability Solutions support for Solaris ZonesSetting up an SF Oracle RAC cluster with Oracle RAC on non-global zones

Table 2-2 Mount types
DescriptionMount types
A loopback file system allows mounting of directories from the globalzone to a non-global zone in read-write mode. Any changes made to thedirectories in the non-global zone reflect on the global zone. Similarly,changesmade to thedirectories in the global zone reflect on thenon-globalzone.
Mount the following directories as loopback mounts:
■ /ocrvote ( For OCR and voting disk files)
■ /oradata ( For data files)
Oracle RAC directories must be mounted separately as needed. See theOracle documentation for instructions.
Note: If you want to use the database mounts from the global zone asloopback mounts in non-global zones, add them as loopback mounts.
The following configuration steps illustrate a loopback-mountedfile-system configuration for /ocrvote:
sys1#zonecfg:sys1_zone1> add fssys1#zonecfg:sys1_zone1:fs>set dir=/ocrvotesys1#zonecfg:sys1_zone1:fs>set special=/ocrvotesys1#zonecfg:sys1_zone1:fs>set type=lofssys1#zonecfg:sys1_zone1:fs>endsys1#zonecfg:sys1_zone1>commit
Loop backmountthrough zoneconfiguration
Performing a direct mount of storage under the non-global zones rootdirectory makes it available to non-global zones without adding thosedirectories in the zone configuration.
You can direct-mount directories such as /ocrvote, /oradata anddatabase data mounts.
For example:
# mount -F vxfs -o cluster /dev/vx/dsk/ocrvotedg/ocrvotevol \/zone/sys1_zone1/root/ocrvote
Direct mountundernon-globalzones rootdirectory
Set theCVMVolDg resource attribute CVMDeactivateOnOffline to 1 for the shareddisk groups that are created for data files.
For example:
Storage Foundation and High Availability Solutions support for Solaris ZonesSetting up an SF Oracle RAC cluster with Oracle RAC on non-global zones
64

# haconf -makerw
# hares -modify ocrvote_voldg CVMDeactivateOnOffline 1
# haconf -dump -makero
Configuring non-global zones to use devices fromglobal zonesOn Solaris 10, add the following devices from the global zone to the non-globalzone:
■ /dev/llt
■ /dev/vcsmm
■ /dev/lmx
■ /dev/vxportal
■ /dev/fdd
■ /dev/gab/*
■ /dev/nic_name
wherenic_name is thenameof thenetwork interface, for example,/dev/bge1.
Ensure that you include all thepublic andprivatenetwork interfaces configuredfor each non-global zone.
On Solaris 11, add the following devices from the global zone to the non-globalzone:
■ /dev/llt
■ /dev/odm
■ /dev/vcsmm
■ /dev/lmx
■ /dev/vxportal
■ /dev/fdd
■ /dev/gab/*
■ /dev/nic_name
wherenic_name is thenameof thenetwork interface, for example,/dev/bge1.
Ensure that you include all thepublic andprivatenetwork interfaces configuredfor each non-global zone.
For example, the steps to add the device /dev/llt are as follows:
sys1# zonecfg:sys1_zone1>add device
sys1# zonecfg:sys1_zone1:device>set match=/dev/llt
65Storage Foundation and High Availability Solutions support for Solaris ZonesSetting up an SF Oracle RAC cluster with Oracle RAC on non-global zones

sys1# zonecfg:sys1_zone1:device>end
sys1# zonecfg:sys1_zone1:>commit
Revising the default set of privileges for non-global zonesConfigure the following setting for Oracle Grid Infrastructure
sys1# zonecfg -z sys1_zone1 set limitpriv="default, \
proc_priocntl,proc_clock_highres,sys_time"
For more information, see the Oracle Metalink document: 420265.1
Installing non-global zones
Note: Before installing a non-global zone, set the parent directory of zonepath tobe 755. Otherwise, some of the VRTS and operating system packages will not bepropagated inside the new non-global zone.
sys1# dirname zone_path
sys1# chmod 755 zone_path
To install non-global zones
1 Log into each global zone as the root user.
2 Run the zoneadm command with the install option:
# zoneadm -z sys1_zone1 install
Preparing to install zone <sys1_zone1>.
Creating list of files to copy from the global zone.
Copying <2443> files to the zone.
Initializing zone product registry.
Determining zone package initialization order.
Preparing to initialize <1192> packages on the zone.
Initialized <1192> packages on zone.
Zone <sys1_zone1> is initialized.
Installation of <12> packages was skipped.
The file </zone/sys1_zone1/root/var/sadm/system/logs/install_log>
contains a log of the zone installation.
3 Boot the zone:
# zoneadm -z zone_name boot
Storage Foundation and High Availability Solutions support for Solaris ZonesSetting up an SF Oracle RAC cluster with Oracle RAC on non-global zones
66

4 Update the /etc/hosts file of the global and non-global zones. Both the filesmust contain the IP address and host name information of the global andnon-global zones.
5 Configure the non-global zone to run in multi-user mode.
After the non-global zone boots up, log in to the non-global zone console andconfigure all the required services. The following services aremandatory forSF Oracle RAC to function:
multi-user
multi-user-server
vxfsldlic
Use the following command to log in to the non-global zone console:
# zlogin -C sys1_zone1
To configure the required services, see the System Administration Guide:Solaris Containers - Resource Management and Solaris Zones document.
Creating SF Oracle RAC configuration files inside non-global zonesCreate the /etc/llthosts file inside the non-global zones.
In the following example, 0 and 1 are the node IDs for the non-global zones. Thenode IDs must be the same as that present in the corresponding global zone file.
A sample /etc/llthosts file for non-global zones is as follows:
# cat /etc/llthosts
0 sys1_zone1
1 sys2_zone1
A sample /etc/llthosts file for global zones is as follows:
# cat /etc/llthosts
0 sys1
1 sys2
Enabling Oracle Disk Manager file access from non-global zones withVeritas File System
Perform the following steps to enable access from non-global zones.
67Storage Foundation and High Availability Solutions support for Solaris ZonesSetting up an SF Oracle RAC cluster with Oracle RAC on non-global zones
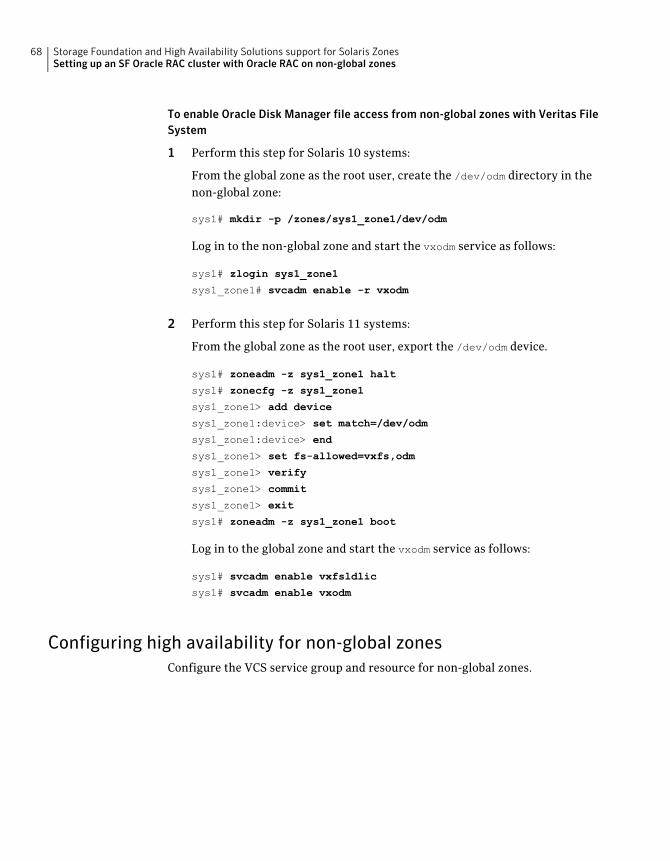
To enable Oracle Disk Manager file access from non-global zones with Veritas FileSystem
1 Perform this step for Solaris 10 systems:
From the global zone as the root user, create the /dev/odm directory in thenon-global zone:
sys1# mkdir -p /zones/sys1_zone1/dev/odm
Log in to the non-global zone and start the vxodm service as follows:
sys1# zlogin sys1_zone1
sys1_zone1# svcadm enable -r vxodm
2 Perform this step for Solaris 11 systems:
From the global zone as the root user, export the /dev/odm device.
sys1# zoneadm -z sys1_zone1 halt
sys1# zonecfg -z sys1_zone1
sys1_zone1> add device
sys1_zone1:device> set match=/dev/odm
sys1_zone1:device> end
sys1_zone1> set fs-allowed=vxfs,odm
sys1_zone1> verify
sys1_zone1> commit
sys1_zone1> exit
sys1# zoneadm -z sys1_zone1 boot
Log in to the global zone and start the vxodm service as follows:
sys1# svcadm enable vxfsldlic
sys1# svcadm enable vxodm
Configuring high availability for non-global zonesConfigure the VCS service group and resource for non-global zones.
Storage Foundation and High Availability Solutions support for Solaris ZonesSetting up an SF Oracle RAC cluster with Oracle RAC on non-global zones
68

To configure high availability for non-global zones
◆ Log into each global zone and set up the zone configuration:
# hazonesetup [-t] -g group_name -r zoneres_name -z zone_name \
[-u] user_name -p password [-a] [-l] -s systems
where group_name is the name of the application service group.
zoneres_name is the name of the resource configured to monitor the zone.
zone_name is the name of the non-global zone.
user_name is the nameof theVCSuser used for passwordless communicationbetween the non-global zone and the global zone. The default username isused if no user name is specified.
password is the password assigned to the VCS or security (Symantec ProductAuthentication Service) user created by the command.
-a indicates that the AutoStartList attribute for the group is populated.
-l indicates that a parallel service group is configured. If you do not specifythe option, a failover service group is created by default.
systems is a comma separated list of systems on which the service group willbe configured. Use this option only when you create the service group.
For example:
# hazonesetup -g vcszone -r vcszoneres -z sys1_zone1 -p password \
-a -l sys1,sys2
If the application service group does not exist, the script creates a servicegroup with a resource of type Zone. The script adds a resource of type Zoneto the application service group. It also creates a user account with groupadministrative privileges to enable inter-zone communication.
Configuring the cluster name for clustering non-global zonesCreate the /etc/cluster_name file in non-global zones and provide a uniquecluster name. Use this unique cluster name when you are prompted to providethe name of the cluster during Oracle Clusterware installation.
Note:This is a critical file thatmust be created for supportingmultiple non-globalzones on a global zone. Issuesmay be observed if the cluster name is not providedwhile configuring a non-global zone.
However, make sure that you do not create the file in global zones.
69Storage Foundation and High Availability Solutions support for Solaris ZonesSetting up an SF Oracle RAC cluster with Oracle RAC on non-global zones

Installing Oracle RAC inside the non-global zonesInstall Oracle Clusterware and the Oracle database on non-global zones.
For instructions, see the Oracle documentation.
Note: Do not create the database at this stage.
Linking the ODM libraryPerform the steps in the procedure on each node if the Oracle libraries are onlocal storage. If the Oracle libraries are installed on shared storage, copy thelibraries on one node only. Use the mount command to check that the file systemcontaining the Oracle libraries are mounted.
To link the ODM library
1 Log in as the Oracle user.
2 Change to the $ORACLE_HOME/lib directory:
sys1_zone1$ cd $ORACLE_HOME/lib
3 Back up Oracle's ODM library.
For Oracle RAC 11g:
sys1_zone1$ mv libodm11.so libodm11.so.`date +%m_%d_%y-%H_%M_%S`
4 Link the Veritas ODM library with Oracle's libodm library:
For Oracle RAC 11g:
sys1_zone1$ ln -s /usr/lib/sparcv9/libodm.so libodm11.so
5 Confirm that the correct ODM library is used:
sys1_zone1$ ldd $ORACLE_HOME/bin/oracle | grep odm
Note: If the library is not linked correctly, no output is displayed.
Creating the Oracle databaseCreate the Oracle RAC database in the non-global zone. For information, see theOracle RAC documentation.
Storage Foundation and High Availability Solutions support for Solaris ZonesSetting up an SF Oracle RAC cluster with Oracle RAC on non-global zones
70

Configuring non-global zones under VCSConfigure the non-global zones to be managed by VCS.
To configure the non-global zones under VCS
1 Stop VCS:
# hastop -all force
2 Update the existing configuration file on one of the nodes.
Refer to the following sample configuration file to update theOracle main.cffile.
See “Sample VCS configuration with non-global zones” on page 72.
3 Start VCS on the same node:
# hastart
4 Start VCS on the remaining nodes:
# hastart
5 Disable Oracle Clusterware from starting automatically on all non-globalzones:
# clus_home/bin/crsctl disable crs
where clus_home is the full path to the$CRS_HOMEor$GRID_HOMEdirectorydepending on the Oracle RAC version.
6 For administrator-manageddatabases that are configuredunderVCS control,change the management policy for the database from automatic to manualto prevent the Oracle database from starting automatically:
# $ORACLE_HOME/bin/srvctl modify database -d db_name -y manual
7 Set the attribute Critical to 1 for the cssd resource and the oracle resource:
# haconf -makerw
# hares -modify resource_name Critical 1
# haconf -dump -makero
If you have two or more zones running on a system, set the attribute to 1 foreach cssd and Oracle resource.
71Storage Foundation and High Availability Solutions support for Solaris ZonesSetting up an SF Oracle RAC cluster with Oracle RAC on non-global zones
Sample VCS configuration with non-global zonesThis section illustrates sample VCS configurations for non-global zones.
■ Multiple databases with loopback data mountsSee “Multiple databases with loopback data mounts” on page 72.
■ Multiple databases with direct data mountsSee “Multiple databases with direct data mounts” on page 78.
■ Multiple databases with loopback and direct data mountsSee “Multiple databases on multiple non-global zones” on page 83.
Multiple databases with loopback data mountsFigure 2-7 illustrates the sample configuration for multiple databases withloopback data mounts.
Storage Foundation and High Availability Solutions support for Solaris ZonesSetting up an SF Oracle RAC cluster with Oracle RAC on non-global zones
72
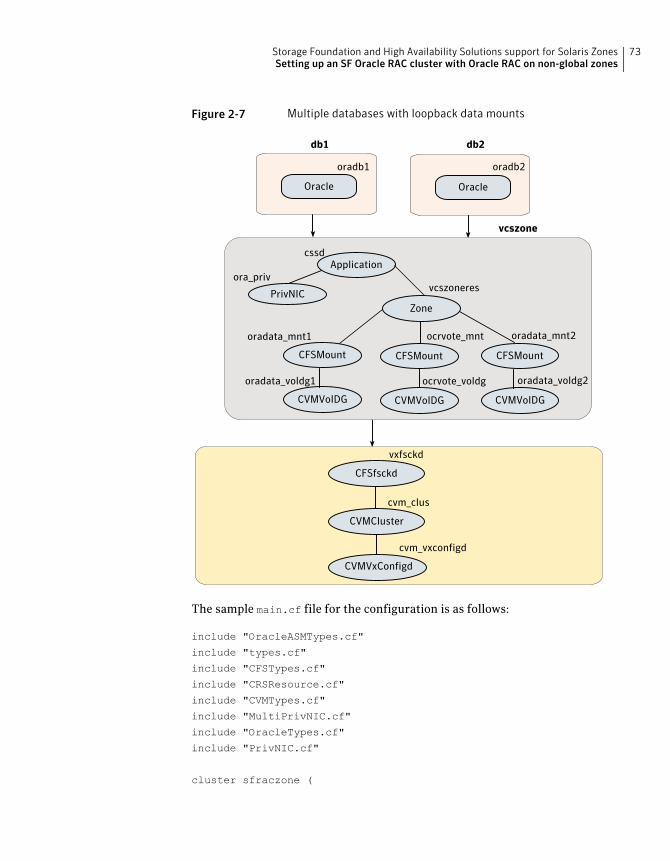
Figure 2-7 Multiple databases with loopback data mounts
PrivNIC
Applicationcssd
ora_priv
CVMVoIDG
ocrvote_voldg
CFSMount
ocrvote_mnt
vcszone
CVMCluster
CFSfsckd
vxfsckd
cvm_clus
cvm_vxconfigd
CVMVxConfigd
Zone
Oracle
db1
Oracle
db2
vcszoneres
oradb1 oradb2
CVMVoIDG
CFSMount
CVMVoIDG
CFSMount
oradata_mnt1
oradata_voldg1
oradata_mnt2
oradata_voldg2
The sample main.cf file for the configuration is as follows:
include "OracleASMTypes.cf"
include "types.cf"
include "CFSTypes.cf"
include "CRSResource.cf"
include "CVMTypes.cf"
include "MultiPrivNIC.cf"
include "OracleTypes.cf"
include "PrivNIC.cf"
cluster sfraczone (
73Storage Foundation and High Availability Solutions support for Solaris ZonesSetting up an SF Oracle RAC cluster with Oracle RAC on non-global zones
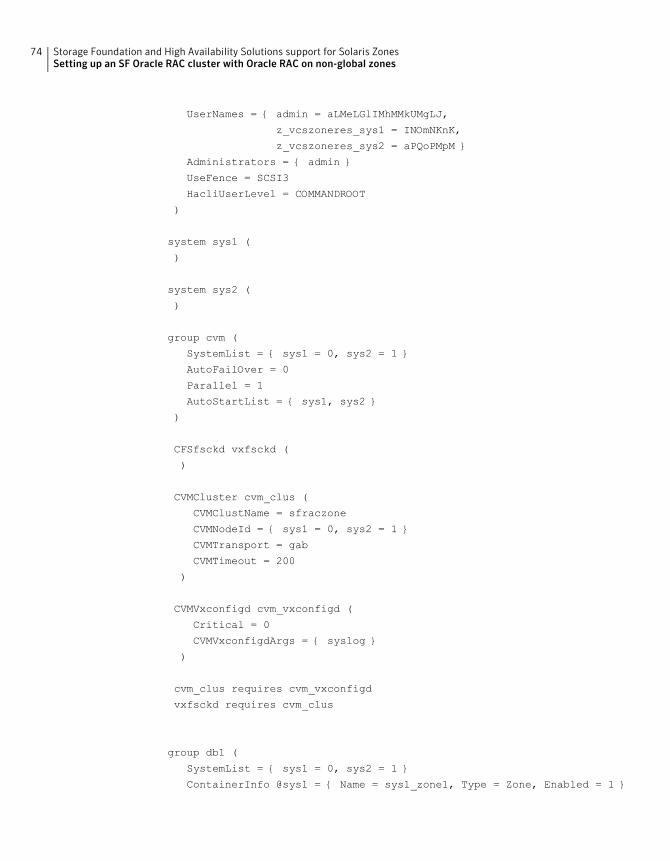
UserNames = { admin = aLMeLGlIMhMMkUMgLJ,
z_vcszoneres_sys1 = INOmNKnK,
z_vcszoneres_sys2 = aPQoPMpM }
Administrators = { admin }
UseFence = SCSI3
HacliUserLevel = COMMANDROOT
)
system sys1 (
)
system sys2 (
)
group cvm (
SystemList = { sys1 = 0, sys2 = 1 }
AutoFailOver = 0
Parallel = 1
AutoStartList = { sys1, sys2 }
)
CFSfsckd vxfsckd (
)
CVMCluster cvm_clus (
CVMClustName = sfraczone
CVMNodeId = { sys1 = 0, sys2 = 1 }
CVMTransport = gab
CVMTimeout = 200
)
CVMVxconfigd cvm_vxconfigd (
Critical = 0
CVMVxconfigdArgs = { syslog }
)
cvm_clus requires cvm_vxconfigd
vxfsckd requires cvm_clus
group db1 (
SystemList = { sys1 = 0, sys2 = 1 }
ContainerInfo @sys1 = { Name = sys1_zone1, Type = Zone, Enabled = 1 }
Storage Foundation and High Availability Solutions support for Solaris ZonesSetting up an SF Oracle RAC cluster with Oracle RAC on non-global zones
74

ContainerInfo @sys2 = { Name = sys2_zone1, Type = Zone, Enabled = 1 }
Parallel = 1
AutoStartList = { sys1, sys2}
Administrators = { z_vcszoneres_sys1, z_vcszoneres_sys2 }
)
Oracle oradb1 (
Critical = 1
Sid @sys1 = db11
Sid @sys2 = db12
Owner = oracle
Home = "/oracle/11g/dbhome"
StartUpOpt = SRVCTLSTART
ShutDownOpt = SRVCTLSTOP
)
requires group vcszone online local firm
group db2 (
SystemList = { sys1 = 0, sys2 = 1 }
ContainerInfo @sys1 = { Name = sys1_zone1, Type = Zone, Enabled = 1 }
ContainerInfo @sys2 = { Name = sys2_zone1, Type = Zone, Enabled = 1 }
Parallel = 1
AutoStartList = { sys1, sys2}
Administrators = { z_vcszoneres_sys1, z_vcszoneres_sys2 }
)
Oracle oradb2 (
Critical = 1
Sid @sys1 = db21
Sid @sys2 = db22
Owner = oracle
Home = "/oracle/11g/dbhome"
StartUpOpt = SRVCTLSTART
ShutDownOpt = SRVCTLSTOP
)
requires group vcszone online local firm
group vcszone (
SystemList = { sys1 = 0, sys2 = 1 }
ContainerInfo @sys1 = { Name = sys1_zone1, Type = Zone, Enabled = 1 }
ContainerInfo @sys2 = { Name = sys2_zone1, Type = Zone, Enabled = 1 }
Parallel = 1
75Storage Foundation and High Availability Solutions support for Solaris ZonesSetting up an SF Oracle RAC cluster with Oracle RAC on non-global zones

AutoStartList = { sys1, sys2 }
Administrators = { z_vcszoneres_sys1, z_vcszoneres_sys2 }
)
Application cssd (
Critical = 1
StartProgram = "/opt/VRTSvcs/rac/bin/cssd-online"
StopProgram = "/opt/VRTSvcs/rac/bin/cssd-offline"
CleanProgram = "/opt/VRTSvcs/rac/bin/cssd-clean"
MonitorProgram = "/opt/VRTSvcs/rac/bin/cssd-monitor"
)
CFSMount ocrvote_mnt (
Critical = 0
MountPoint @sys1 = "/ocrvote"
MountPoint @sys2 = "/ocrvote"
BlockDevice = "/dev/vx/dsk/ocrvotedg/ocrvotevol"
MountOpt = "mincache=direct"
)
CVMVolDg ocrvote_voldg (
Critical = 0
CVMDiskGroup = ocrvotedg
CVMVolume = { ocrvotevol }
CVMActivation = sw
CVMDeactivateOnOffline = 1
)
CFSMount oradata_mnt1 (
Critical = 0
MountPoint @sys1 = "/db1"
MountPoint @sys2 = "/db1"
BlockDevice = "/dev/vx/dsk/db1dg/db1vol"
)
CVMVolDg oradata_voldg1 (
Critical = 0
CVMDiskGroup = db1dg
CVMVolume = { db1vol }
CVMActivation = sw
CVMDeactivateOnOffline = 1
Storage Foundation and High Availability Solutions support for Solaris ZonesSetting up an SF Oracle RAC cluster with Oracle RAC on non-global zones
76

)
CFSMount oradata_mnt2 (
Critical = 0
MountPoint @sys1 = "/db2"
MountPoint @sys2 = "/db2"
BlockDevice = "/dev/vx/dsk/db2dg/db2vol"
)
CVMVolDg oradata_voldg2 (
Critical = 0
CVMDiskGroup = db2dg
CVMVolume = { db2vol }
CVMActivation = sw
CVMDeactivateOnOffline = 1
)
PrivNIC ora_priv (
Critical = 0
Device @sys1 = { bge2 = 0, bge3 = 1 }
Device @sys2 = { bge2 = 0, bge3 = 1 }
Address @sys1 = "192.168.1.12"
Address @sys2 = "192.168.1.13"
NetMask = "255.255.255.0"
)
Zone vcszoneres (
)
requires group cvm online local firm
cssd requires ora_priv
cssd requires vcszoneres
ocrvote_mnt requires ocrvote_voldg
oradata_mnt1 requires oradata_voldg1
oradata_mnt2 requires oradata_voldg2
vcszoneres requires ocrvote_mnt
vcszoneres requires oradata_mnt1
vcszoneres requires oradata_mnt2
77Storage Foundation and High Availability Solutions support for Solaris ZonesSetting up an SF Oracle RAC cluster with Oracle RAC on non-global zones

Multiple databases with direct data mountsFigure 2-8 illustrates a sample configuration for multiple databases with directdata mounts.
Figure 2-8 Multiple databases with direct data mounts
PrivNIC
Applicationcssd
ora_priv
Zone
ocrvote_voldg
CVMVoIDG
ocrvote_mnt
vcszone
cvm
CVMCluster
CFSfsckd
vxfsckd
cvm_clus
cvm_vxconfigd
CVMVxConfigd
CFSMount
db1 db2
Oracle
CFSMount
CVMVoIDg
oradata_mnt1
Oracle
CFSMount
CVMVoIDg
oradata_mnt2
vcszoneres
oradb2oradb1
oradata_voldg1 oradata_voldg2
The sample main.cf file is as follows:
Storage Foundation and High Availability Solutions support for Solaris ZonesSetting up an SF Oracle RAC cluster with Oracle RAC on non-global zones
78

include "OracleASMTypes.cf"
include "types.cf"
include "CFSTypes.cf"
include "CRSResource.cf"
include "CVMTypes.cf"
include "MultiPrivNIC.cf"
include "OracleTypes.cf"
include "PrivNIC.cf"
cluster sfraczone (
UserNames = { admin = aLMeLGlIMhMMkUMgLJ,
z_vcszoneres_sys1 = INOmNKnK,
z_vcszoneres_sys2 = aPQoPMpM }
Administrators = { admin }
UseFence = SCSI3
HacliUserLevel = COMMANDROOT
)
system sys1 (
)
system sys2 (
)
group cvm (
SystemList = { sys1 = 0, sys2 = 1 }
AutoFailOver = 0
Parallel = 1
AutoStartList = { sys1, sys2 }
)
CFSfsckd vxfsckd (
)
CVMCluster cvm_clus (
CVMClustName = sfraczone
CVMNodeId = { sys1 = 0, sys2 = 1 }
CVMTransport = gab
CVMTimeout = 200
)
CVMVxconfigd cvm_vxconfigd (
Critical = 0
79Storage Foundation and High Availability Solutions support for Solaris ZonesSetting up an SF Oracle RAC cluster with Oracle RAC on non-global zones

CVMVxconfigdArgs = { syslog }
)
cvm_clus requires cvm_vxconfigd
vxfsckd requires cvm_clus
group db1 (
SystemList = { sys1 = 0, sys2 = 1 }
ContainerInfo @sys1 = { Name = sys1_zone1, Type = Zone, Enabled = 1 }
ContainerInfo @sys2 = { Name = sys2_zone1, Type = Zone, Enabled = 1 }
Parallel = 1
AutoStartList = { sys1, sys2 }
Administrators = { z_vcszoneres_sys1, z_vcszoneres_sys2 }
)
CFSMount oradata_mnt1 (
Critical = 0
MountPoint @sys1 = "/zones/sys1_zone1/root/db1"
MountPoint @sys2 = "/zones/sys2_zone1/root/db1"
BlockDevice = "/dev/vx/dsk/db1dg/db1vol"
)
CVMVolDg oradata_voldg1 (
Critical = 0
CVMDiskGroup = db1dg
CVMVolume = { db1vol }
CVMActivation = sw
CVMDeactivateOnOffline = 1
)
Oracle oradb1 (
Critical = 1
Sid @sys1 = db11
Sid @sys2 = db12
Owner = oracle
Home = "/oracle/11g/dbhome"
StartUpOpt = SRVCTLSTART
ShutDownOpt = SRVCTLSTOP
)
requires group vcszone online local firm
oradata_mnt1 requires oradata_voldg1
Storage Foundation and High Availability Solutions support for Solaris ZonesSetting up an SF Oracle RAC cluster with Oracle RAC on non-global zones
80

oradb1 requires oradata_mnt1
group db2 (
SystemList = { sys1 = 0, sys2 = 1 }
ContainerInfo @sys1 = { Name = sys1_zone1, Type = Zone, Enabled = 1 }
ContainerInfo @sys2 = { Name = sys2_zone1, Type = Zone, Enabled = 1 }
Parallel = 1
AutoStartList = { sys1, sys2 }
Administrators = { z_vcszoneres_sys1, z_vcszoneres_sys2 }
)
CFSMount oradata_mnt2 (
Critical = 0
MountPoint @sys1 = "/zones/sys1_zone1/root/db2"
MountPoint @sys2 = "/zones/sys2_zone1/root/db2"
BlockDevice = "/dev/vx/dsk/db2dg/db2vol"
)
CVMVolDg oradata_voldg2 (
Critical = 0
CVMDiskGroup = db2dg
CVMVolume = { db2vol }
CVMActivation = sw
CVMDeactivateOnOffline = 1
)
Oracle oradb2 (
Critical = 1
Sid @sys1 = db21
Sid @sys2 = db22
Owner = oracle
Home = "/oracle/11g/dbhome"
StartUpOpt = SRVCTLSTART
ShutDownOpt = SRVCTLSTOP
)
requires group vcszone online local firm
oradata_mnt2 requires oradata_voldg2
oradb2 requires oradata_mnt2
group vcszone (
SystemList = { sys1 = 0, sys2 = 1 }
ContainerInfo @sys1 = { Name = sys1_zone1, Type = Zone, Enabled = 1 }
81Storage Foundation and High Availability Solutions support for Solaris ZonesSetting up an SF Oracle RAC cluster with Oracle RAC on non-global zones

ContainerInfo @sys2 = { Name = sys2_zone1, Type = Zone, Enabled = 1 }
Parallel = 1
AutoStartList = { sys1, sys2 }
Administrators = { z_vcszoneres_sys1, z_vcszoneres_sys2 }
)
Application cssd (
Critical = 1
StartProgram = "/opt/VRTSvcs/rac/bin/cssd-online"
StopProgram = "/opt/VRTSvcs/rac/bin/cssd-offline"
CleanProgram = "/opt/VRTSvcs/rac/bin/cssd-clean"
MonitorProgram = "/opt/VRTSvcs/rac/bin/cssd-monitor"
)
CFSMount ocrvote_mnt (
Critical = 0
MountPoint @sys1 = "/zones/sys1_zone1/root/ocrvote"
MountPoint @sys2 = "/zones/sys2_zone1/root/ocrvote"
BlockDevice = "/dev/vx/dsk/ocrvotedg/ocrvotevol"
MountOpt = "mincache=direct"
)
CVMVolDg ocrvote_voldg (
Critical = 0
CVMDiskGroup = ocrvotedg
CVMVolume = { ocrvotevol }
CVMActivation = sw
CVMDeactivateOnOffline = 1
)
PrivNIC ora_priv (
Critical = 0
Device @sys1 = { bge0 = 0, bge1 = 1 }
Device @sys2 = { bge0 = 0, bge1 = 1 }
Address @sys1 = "192.168.1.7"
Address @sys2 = "192.168.1.8"
NetMask = "255.255.255.0"
)
Zone vcszoneres (
)
requires group cvm online local firm
Storage Foundation and High Availability Solutions support for Solaris ZonesSetting up an SF Oracle RAC cluster with Oracle RAC on non-global zones
82
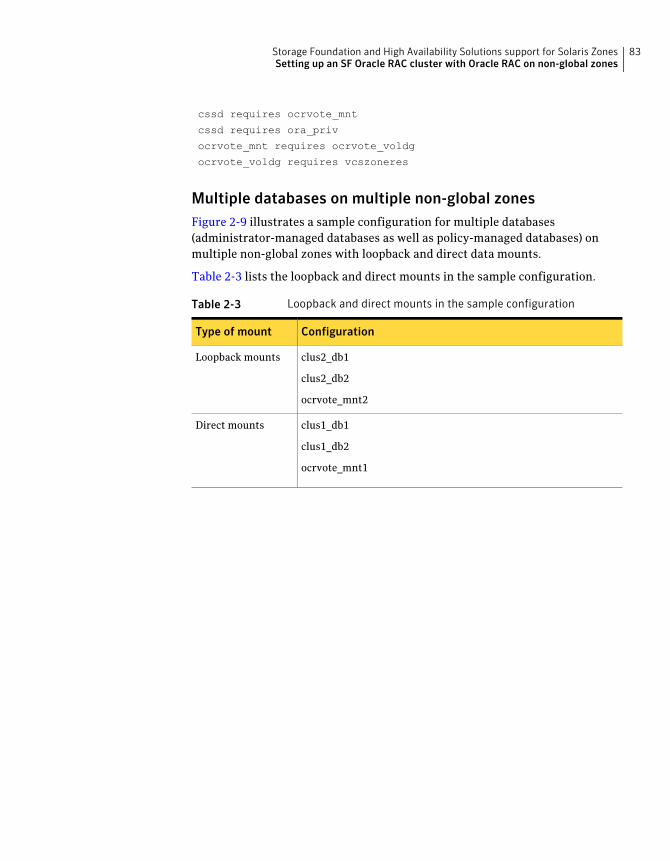
cssd requires ocrvote_mnt
cssd requires ora_priv
ocrvote_mnt requires ocrvote_voldg
ocrvote_voldg requires vcszoneres
Multiple databases on multiple non-global zonesFigure 2-9 illustrates a sample configuration for multiple databases(administrator-managed databases as well as policy-managed databases) onmultiple non-global zones with loopback and direct data mounts.
Table 2-3 lists the loopback and direct mounts in the sample configuration.
Table 2-3 Loopback and direct mounts in the sample configuration
ConfigurationType of mount
clus2_db1
clus2_db2
ocrvote_mnt2
Loopback mounts
clus1_db1
clus1_db2
ocrvote_mnt1
Direct mounts
83Storage Foundation and High Availability Solutions support for Solaris ZonesSetting up an SF Oracle RAC cluster with Oracle RAC on non-global zones

Figure 2-9 Multiple databases on multiple non-global zones
PrivNIC
Application
cssd2
ora_priv2
CVMVoIDG
ocrvote_voldg2
CFSMount
ocrvote_mnt2
vcszone2
cvm
CVMCluster
CFSfsckd
vxfsckd
cvm_clus
cvm_vxconfigd
CVMVxConfigd
Zone
Oracle
clus2_db1
Oracle
clus2_db2
vcszoneres2
clus2_oradb1 clus2_oradb2
CVMVoIDG
CFSMount
CVMVoIDG
CFSMount
oradata_mnt3
oradata_voldg3
oradata_mnt4
oradata_voldg4
PrivNIC
Application
cssd1
ora_priv1
Zone
ocrvote_voldg1
CVMVoIDG
ocrvote_mnt1
vcszone1
CFSMount
clus1_db1 clus1_db2
Oracle
CFSMount
CVMVoIDg
oradata_mnt1
Oracle
CFSMount
CVMVoIDg
oradata_mnt2
vcszoneres1
clus1_oradb2clus1_oradb1
oradata_voldg1 oradata_voldg2
Zone Cluster A Zone Cluster B
The sample main.cf file is as follows:
include "OracleASMTypes.cf"
include "types.cf"
include "CFSTypes.cf"
Storage Foundation and High Availability Solutions support for Solaris ZonesSetting up an SF Oracle RAC cluster with Oracle RAC on non-global zones
84

include "CRSResource.cf"
include "CVMTypes.cf"
include "MultiPrivNIC.cf"
include "OracleTypes.cf"
include "PrivNIC.cf"
cluster sfraczone (
UserNames = { admin = aLMeLGlIMhMMkUMgLJ,
z_vcszoneres1_sys1 = aPQoPMpM,
z_vcszoneres1_sys2 = fIJhIFiF,
z_vcszoneres2_sys1 = HIJhIFiF,
z_vcszoneres2_sys2 = dqrPqnQn }
Administrators = { admin }
UseFence = SCSI3
HacliUserLevel = COMMANDROOT
)
system sys1 (
)
system sys2 (
)
group cvm (
SystemList = { sys1 = 0, sys2 = 1 }
AutoFailOver = 0
Parallel = 1
AutoStartList = { sys1, sys2}
)
CFSfsckd vxfsckd (
)
CVMCluster cvm_clus (
CVMClustName = sfraczone
CVMNodeId = { sys1 = 0, sys2 = 1 }
CVMTransport = gab
CVMTimeout = 200
)
CVMVxconfigd cvm_vxconfigd (
Critical = 0
85Storage Foundation and High Availability Solutions support for Solaris ZonesSetting up an SF Oracle RAC cluster with Oracle RAC on non-global zones

CVMVxconfigdArgs = { syslog }
)
cvm_clus requires cvm_vxconfigd
vxfsckd requires cvm_clus
group clus1_db1_grp (
SystemList = { sys1 = 0, sys2 = 1 }
ContainerInfo @sys1 = { Name = sys1_zone1, Type = Zone, Enabled = 1 }
ContainerInfo @sys2 = { Name = sys2_zone1, Type = Zone, Enabled = 1 }
Parallel = 1
AutoStartList = { sys1, sys2}
Administrators = { z_vcszoneres1_sys1, z_vcszoneres1_sys2}
)
CFSMount oradata_mnt1 (
Critical = 0
MountPoint @sys1 = "/zones/sys1_zone1/root/db1"
MountPoint @sys2 = "/zones/sys2_zone1/root/db1"
BlockDevice = "/dev/vx/dsk/clus1_db1dg/clus1_db1vol"
)
CVMVolDg oradata_voldg1 (
Critical = 0
CVMDiskGroup = clus1_db1dg
CVMVolume = { clus1_db1vol }
CVMActivation = sw
CVMDeactivateOnOffline = 1
)
Oracle clus1_oradb1 (
Critical = 1
Sid @sys1 = clus1_db11
Sid @sys2 = clus1_db12
Owner = oracle
Home = "/oracle/11g/dbhome"
StartUpOpt = SRVCTLSTART
ShutDownOpt = SRVCTLSTOP
)
requires group vcszone1 online local firm
oradata_mnt1 requires oradata_voldg1
Storage Foundation and High Availability Solutions support for Solaris ZonesSetting up an SF Oracle RAC cluster with Oracle RAC on non-global zones
86

clus1_oradb1 requires oradata_mnt1
group clus1_db2_grp (
SystemList = { sys1 = 0, sys2 = 1 }
ContainerInfo @sys1 = { Name = sys1_zone1, Type = Zone, Enabled = 1 }
ContainerInfo @sys2 = { Name = sys2_zone1, Type = Zone, Enabled = 1 }
Parallel = 1
AutoStartList = { sys1, sys2}
Administrators = { z_vcszoneres1_sys1, z_vcszoneres1_sys2}
)
CFSMount oradata_mnt2 (
Critical = 0
MountPoint @sys1 = "/zones/sys1_zone1/root/db2"
MountPoint @sys2 = "/zones/sys2_zone1/root/db2"
BlockDevice = "/dev/vx/dsk/clus1_db2dg/clus1_db2vol"
)
CVMVolDg oradata_voldg2 (
Critical = 0
CVMDiskGroup = clus1_db2dg
CVMVolume = { clus1_db2vol }
CVMActivation = sw
CVMDeactivateOnOffline = 1
)
Oracle clus1_oradb2 (
Critical = 1
Sid @sys1 = clus1_db21
Sid @sys2 = clus1_db22
Owner = o racle
Home = "/oracle/11g/dbhome"
StartUpOpt = SRVCTLSTART
ShutDownOpt = SRVCTLSTOP
)
requires group vcszone1 online local firm
oradata_mnt2 requires oradata_voldg2
clus1_oradb2 requires oradata_mnt2
group vcszone1 (
SystemList = { sys1 = 0, sys2 = 1 }
87Storage Foundation and High Availability Solutions support for Solaris ZonesSetting up an SF Oracle RAC cluster with Oracle RAC on non-global zones

ContainerInfo @sys1 = { Name = sys1_zone1, Type = Zone,
Enabled = 1 }
ContainerInfo @sys2 = { Name = sys2_zone1, Type = Zone,
Enabled = 1 }
Parallel = 1
AutoStartList = { sys1, sys2}
Administrators = { z_vcszoneres1_sys1, z_vcszoneres1_sys2}
)
Application cssd1 (
Critical = 1
StartProgram = "/opt/VRTSvcs/rac/bin/cssd-online"
StopProgram = "/opt/VRTSvcs/rac/bin/cssd-offline"
CleanProgram = "/opt/VRTSvcs/rac/bin/cssd-clean"
MonitorProgram = "/opt/VRTSvcs/rac/bin/cssd-monitor"
)
CFSMount ocrvote_mnt1 (
Critical = 0
MountPoint @sys1 = "/zones/sys1_zone1/root/ocrvote"
MountPoint @sys2 = "/zones/sys2_zone1/root/ocrvote"
BlockDevice = "/dev/vx/dsk/ocrvotedg1/ocrvotevol1"
MountOpt = "mincache=direct"
)
CVMVolDg ocrvote_voldg1 (
Critical = 0
CVMDiskGroup = ocrvotedg1
CVMVolume = { ocrvotevol1 }
CVMActivation = sw
CVMDeactivateOnOffline = 1
)
PrivNIC ora_priv1 (
Critical = 0
Device @sys1 = { bge0 = 0, bge1 = 1 }
Device @sys2 = { bge0 = 0, bge1 = 1 }
Address @sys1 = "192.168.1.7"
Address @sys2 = "192.168.1.8"
NetMask = "255.255.255.0"
)
Zone vcszoneres1 (
Storage Foundation and High Availability Solutions support for Solaris ZonesSetting up an SF Oracle RAC cluster with Oracle RAC on non-global zones
88

)
requires group cvm online local firm
cssd1 requires ocrvote_mnt1
cssd1 requires ora_priv1
ocrvote_mnt1 requires ocrvote_voldg1
ocrvote_voldg1 requires vcszoneres1
group clus2_db1_grp (
SystemList = { sys1 = 0, sys2 = 1 }
ContainerInfo @sys1 = { Name = sys1_zone2, Type = Zone,
Enabled = 1 }
ContainerInfo @sys2 = { Name = sys2_zone2, Type = Zone,
Enabled = 1 }
Parallel = 1
AutoStartList = { sys1, sys2 }
Administrators = { z_vcszoneres2_sys1, z_vcszoneres2_sys2}
)
Oracle clus2_oradb1 (
Critical = 1
Sid @sys1 = clus2_db11
Sid @sys2 = clus2_db12
Owner = oracle
Home = "/oracle/11g/dbhome"
StartUpOpt = SRVCTLSTART
ShutDownOpt = SRVCTLSTOP
)
requires group vcszone2 online local firm
group clus2_db2_grp (
SystemList = { sys1 = 0, sys2 = 1 }
ContainerInfo @sys1 = { Name = sys1_zone2, Type = Zone,
Enabled = 1 }
ContainerInfo @sys2 = { Name = sys2_zone2, Type = Zone,
Enabled = 1 }
Parallel = 1
AutoStartList = { sys1, sys2 }
Administrators = { z_vcszoneres2_sys1, z_vcszoneres2_sys2}
)
89Storage Foundation and High Availability Solutions support for Solaris ZonesSetting up an SF Oracle RAC cluster with Oracle RAC on non-global zones
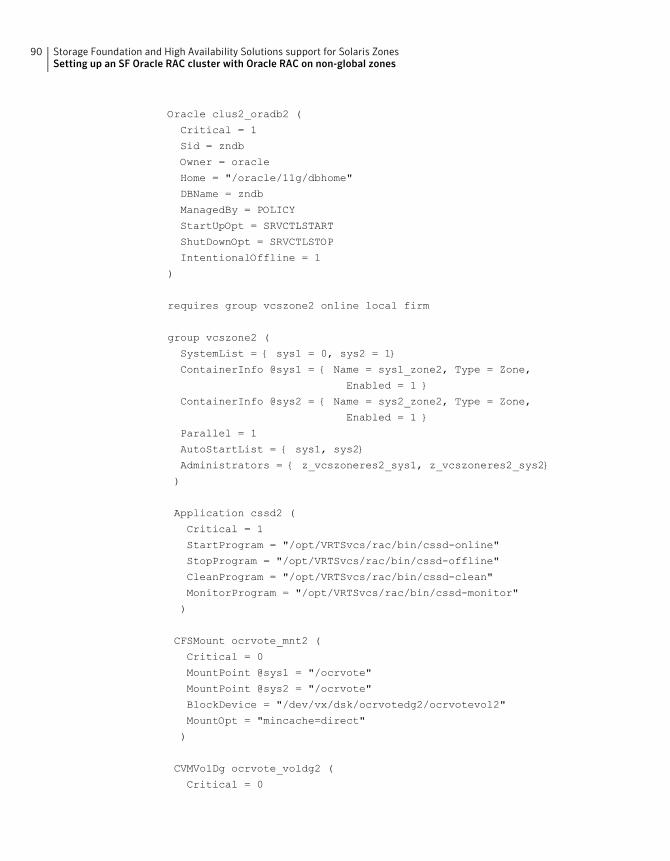
Oracle clus2_oradb2 (
Critical = 1
Sid = zndb
Owner = oracle
Home = "/oracle/11g/dbhome"
DBName = zndb
ManagedBy = POLICY
StartUpOpt = SRVCTLSTART
ShutDownOpt = SRVCTLSTOP
IntentionalOffline = 1
)
requires group vcszone2 online local firm
group vcszone2 (
SystemList = { sys1 = 0, sys2 = 1}
ContainerInfo @sys1 = { Name = sys1_zone2, Type = Zone,
Enabled = 1 }
ContainerInfo @sys2 = { Name = sys2_zone2, Type = Zone,
Enabled = 1 }
Parallel = 1
AutoStartList = { sys1, sys2}
Administrators = { z_vcszoneres2_sys1, z_vcszoneres2_sys2}
)
Application cssd2 (
Critical = 1
StartProgram = "/opt/VRTSvcs/rac/bin/cssd-online"
StopProgram = "/opt/VRTSvcs/rac/bin/cssd-offline"
CleanProgram = "/opt/VRTSvcs/rac/bin/cssd-clean"
MonitorProgram = "/opt/VRTSvcs/rac/bin/cssd-monitor"
)
CFSMount ocrvote_mnt2 (
Critical = 0
MountPoint @sys1 = "/ocrvote"
MountPoint @sys2 = "/ocrvote"
BlockDevice = "/dev/vx/dsk/ocrvotedg2/ocrvotevol2"
MountOpt = "mincache=direct"
)
CVMVolDg ocrvote_voldg2 (
Critical = 0
Storage Foundation and High Availability Solutions support for Solaris ZonesSetting up an SF Oracle RAC cluster with Oracle RAC on non-global zones
90
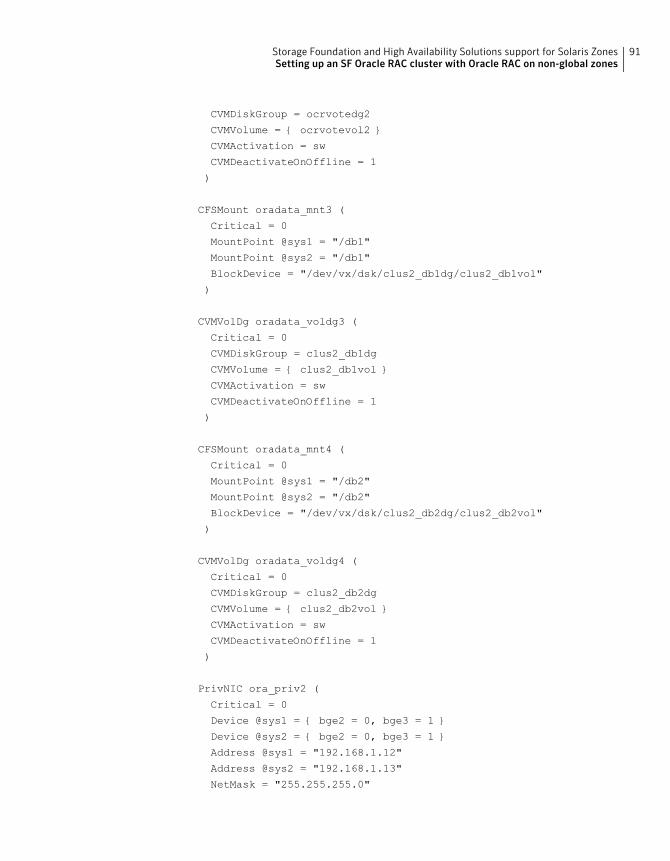
CVMDiskGroup = ocrvotedg2
CVMVolume = { ocrvotevol2 }
CVMActivation = sw
CVMDeactivateOnOffline = 1
)
CFSMount oradata_mnt3 (
Critical = 0
MountPoint @sys1 = "/db1"
MountPoint @sys2 = "/db1"
BlockDevice = "/dev/vx/dsk/clus2_db1dg/clus2_db1vol"
)
CVMVolDg oradata_voldg3 (
Critical = 0
CVMDiskGroup = clus2_db1dg
CVMVolume = { clus2_db1vol }
CVMActivation = sw
CVMDeactivateOnOffline = 1
)
CFSMount oradata_mnt4 (
Critical = 0
MountPoint @sys1 = "/db2"
MountPoint @sys2 = "/db2"
BlockDevice = "/dev/vx/dsk/clus2_db2dg/clus2_db2vol"
)
CVMVolDg oradata_voldg4 (
Critical = 0
CVMDiskGroup = clus2_db2dg
CVMVolume = { clus2_db2vol }
CVMActivation = sw
CVMDeactivateOnOffline = 1
)
PrivNIC ora_priv2 (
Critical = 0
Device @sys1 = { bge2 = 0, bge3 = 1 }
Device @sys2 = { bge2 = 0, bge3 = 1 }
Address @sys1 = "192.168.1.12"
Address @sys2 = "192.168.1.13"
NetMask = "255.255.255.0"
91Storage Foundation and High Availability Solutions support for Solaris ZonesSetting up an SF Oracle RAC cluster with Oracle RAC on non-global zones

)
Zone vcszoneres2 (
)
requires group cvm online local firm
cssd2 requires ora_priv2
cssd2 requires vcszoneres2
ocrvote_mnt2 requires ocrvote_voldg2
vcszoneres2 requires ocrvote_mnt2
vcszoneres2 requires oradata_mnt3
vcszoneres2 requires oradata_mnt4
oradata_mnt3 requires oradata_voldg3
oradata_mnt4 requires oradata_voldg4
Configuring Solaris non-global zones for disasterrecovery
Solaris Zones can be configured for disaster recovery by replicating the zone rootusing replication methods like Hitachi TrueCopy, EMC SRDF, Veritas VolumeReplicator, and so on. The network configuration for the Zone in the primary sitemaynot be effective in the secondary site if the two sites are in different IP subnets.Hence, you need to make these additional configuration changes to the Zoneresource.
To configure the non-global zone for disaster recovery, configure VCS on boththe sites in the global zones with GCO option.
Refer to the Veritas Cluster Server Administrator’s Guide for more informationabout global clusters, their configuration, and their use.
To set up the non-global zone for disaster recovery
1 On the primary site, create the non-global Zone and configure its networkparameters.
■ Create the non-global zone on the primary site using the zonecfgcommand.
■ Add the network adapters to the non-global zone’s configuration if thezone is configured as an exclusive IP zone. Assign an IP address to thenetwork adapter along with the Netmask and Gateway.
Storage Foundation and High Availability Solutions support for Solaris ZonesConfiguring Solaris non-global zones for disaster recovery
92
■ After the zone boots, set up the other network-related information suchas theHostName, DNS Servers, DNSDomain, andDNS Search Path in theappropriate files (/etc/hostname, /etc/resolve.conf).
2 On the primary site, shut down the zone.
3 Use replication-specific commands to failover the replication to the secondarysite from primary site.
4 Repeat step 1 on the secondary site.
5 Perform step 6, step 7, step 8, and step 9 on the primary cluster and secondaryclusters.
6 Create aVCS service groupwith aVCSZone resource for the non-global zone.
Configure the DROpts association attribute on the Zone resource with thefollowing keys and site-specific values for each: HostName, DNSServers,DNSSearchPath, and DNSDomain. If the non-global zone is an exclusive IPzone in this site, configure the following keys in the DROpts associationattribute on the Zone resource: Device (network adapter name), IPAddress,Netmask, and Gateway.
7 Add the appropriate Mount resources and DiskGroup resources for the FileSystemandDiskGroup onwhich the non-global zone’s zoneroot resides. Adda resource dependency from the Zone resource to the Mount resource andanother dependency from the Mount resource to the Diskgroup resource.
8 Add one of the following VCS replication resources to the service group formanaging the replication.
■ A hardware replication agentExamples of these agents include SRDF for EMC SRDF, HTC for HitachiTrueCopy, MirrorView for EMC MirrorView, etc. Refer to the appropriateVCS replication agent guide for configuring the replication resource.
■ The VVRPrimary agent
ForVVR-based replication, add theRVGPrimary resource to the service group.
Refer to the following manuals for more information:
■ For information about configuringVVR-related resources, see theVeritasStorage Foundation and High Availability Solutions ReplicationAdministrator's Guide.
■ For information about the VVR-related agents, see the Veritas ClusterServer Bundled Agents Reference Guide.
9 Add a dependency from the DiskGroup resource to the replication resource.
93Storage Foundation and High Availability Solutions support for Solaris ZonesConfiguring Solaris non-global zones for disaster recovery

Figure 2-10 Sample resource dependency diagram for hardware replicationbased non-global zones
Zone
DiskGroup
Mount
SRDF
Figure 2-11 Sample resource dependency diagram for VVR replication-basednon-global zones
Zone
RVGPrimary
Mount
When the resource is online in a site, the replication resource makes sure of thefollowing:
■ The underlying replicated devices are in primary mode, and the underlyingstorage and eventually the zone root goes into read-write mode.
■ The remote devices are in secondary mode.
Thus, when the Zone resource goes online the resource modifies the appropriatefiles inside the non-global zone to apply the disaster recovery-related parametersto the non-global zone.
Software limitations of Storage Foundation supportof non-global zones
This section describes the software limitations of Storage Foundation support ofnon-global zones in this release.
Administration commands are not supported in non-global zoneAll administrative tasks, such as resizing a volume, adding a volume to a volumeset, and file system reorganization, are supported only in the global zone.
Storage Foundation and High Availability Solutions support for Solaris ZonesSoftware limitations of Storage Foundation support of non-global zones
94

Consequently, administrative commands, such as fsadm, fsvoladm, and vxassist,and administrative ioctls are not supported in the non-global zone by both VxFSand VxVM.
VxFS file system is not supported as the root of a non-global zoneFor Solaris 11, the root of a non-global zone cannot currently be on a VxFS filesystem.
QIO and CQIO are not supportedQuick I/O and Cached Quick I/O are not supported by VxFS in non-global zones.
Package installation in non-global zonesOn Solaris 10 or 11, the packages are not propagated to the non-global zonesautomaticallywhenever the package is installed in the global zone. Refer to InstallGuide of the product for instructions to install packages inside the non-globalzone.
Package removal with non-global zone configurationsIf non-global zones arepart of the systemconfiguration and theVRTSodmpackageis installed, ensure that /dev/odm is unmounted in each non-global zone prior toVRTSodm package removal or product uninstallation. This ensures there are nonon-global zone odm module references that might prevent the global zone fromunloading the odm module.
You can unmount /dev/odm in the non-global zonewith the following commands:
global# zlogin myzone
myzone# svcadm disable vxodm
Root volume cannot be added to non-global zonesThe root volume cannot be added to non-global zones.
Some Veritas Volume Manager operations can cause volume devicenames to go out of sync
If a volume is exported to a non-global zone, some Veritas Volume Manageroperations can cause the global and non-global volume device names to go out ofsync, which can create data corruption. This is because the Solaris operating
95Storage Foundation and High Availability Solutions support for Solaris ZonesSoftware limitations of Storage Foundation support of non-global zones

environment zone support is not aware of the devfsadm(1M) command, and thusthe zone configuration is not updated with any changes to the /dev or /devicesnamespaces.
The following operations can cause device names to go out of sync:
■ Removing a volume
■ Importing a disk group
■ Deporting a disk group
■ Renaming a disk group or volume
■ Reminoring a disk group
■ Restarting vxconfigd or resetting the kernel
To prevent device names from to going out of sync, if a volume is exported to anon-global zone and an operation that can cause device names to go out of syncoccurs on that volume, remove the volume from the zone configuration using thezonecfg command and reboot the zone using the zoneadm command.
See the zonecfg(1M) and zoneadm(1M) manual pages.
Note: This issue applies to any Solaris device for which the /dev or /devicesdevice node is changed and has been configured in the non-global zone before thechange.
Storage Foundation and High Availability Solutions support for Solaris ZonesSoftware limitations of Storage Foundation support of non-global zones
96

Storage Foundation andHigh Availability Solutionssupport for Solaris Projects
This chapter includes the following topics:
■ About Solaris Projects
■ About VCS support for Solaris projects
■ Configuring VCS in Solaris projects
About Solaris ProjectsThe Solaris operating system provides the projects facility to identify workloads.The project serves as an administrative tag that you use to group related work ina useful manner. You can create one project for a sales application and anotherproject for a marketing application. By placing all processes related to the salesapplication in the sales project and the processes for the marketing applicationin the marketing project, you can separate and control the workloads in a waythat makes sense to the business.
A user that is a member of more than one project can run processes in multipleprojects at the same time. This multiple project approach makes it possible forusers to participate in several workloads simultaneously. All processes that aprocess starts inherits the project of the parent process. As a result, switching toa new project in a startup script runs all child processes in the new project.
For more information, refer to the Solaris operating environment documentSystem Administration Guide: Solaris Containers--Resource Management andSolaris Zones .
3Chapter
About VCS support for Solaris projectsVCS provides application management and high availability to applications thatrun in Solaris projects.
Overview of how VCS works with Solaris projectsYou can use VCS to perform the following:
■ Start, stop, monitor, and fail over a Solaris project.
■ Start, stop, monitor, and fail over an application that runs inside a Solarisproject.
How VCS models containersVCS and necessary agents run in the global zone. For the applications that run ina Solaris project, the agents can run online entry point inside the project. If anyresource faults, VCS fails over the service group.
Installing and configuring projects in a VCS environmentInstall and configure the project. Create the service group with the standardapplication resource types (application, storage, networking) and the Projectresource. VCS manages the project as a resource. You then configure the servicegroup’s ContainerInfo attribute.
Configuring the ContainerInfo attributeThe service group attribute ContainerInfo specifies information about the Solarisproject. When you have configured and enabled the ContainerInfo attribute, youhave enabled the project-aware resources in that service group to work in theproject environment. VCSdefines theproject information at the level of the servicegroup so that you do not have to define it for each resource. You need to specifya per-system value for the ContainerInfo attribute.
About the ContainerInfo service group attributeThe ContainerInfo attribute has the Name key, Type key, and Enabled key. TheName key defines the name of the container. The Type key lets you select the typeof container that you plan to use. The Enabled key enables the Project-awareresources within the service group. The ContainerInfo attribute specifies if youcan use the service group with the container.
Assign the following values to the ContainerInfo attribute:
Storage Foundation and High Availability Solutions support for Solaris ProjectsAbout VCS support for Solaris projects
98

■ NameThe name of the container.
■ TypeThe type of container. You can set this to Project.
■ EnabledSpecify the value as 0, if you want to disable the container. Specify the valueas 1, if you want to enable the container. Specify the value as 2, to enablephysical to virtual and virtual to physical failovers. When the value is 2, theProject resource mimics a non-existent entity.
You can set a per-system value for this attribute.
About the ContainerOpts resource type attributeThe ContainerOpts resource attribute is pre-set for project-aware resource types.It determines the following:
■ Whether the project-aware resource can run in the project.
■ Whether the container information that is defined in the service group’sContainerInfo attribute is passed to the resource.
These values are only effective when you configure the ContainerInfo servicegroup attribute.
attribute's keys follow:
The ContainerOpts resource type attribute's definitions for project-aware typescontain the following values:
■ RunInContainerWhen the value of the RunInContianer key is 1, only online agent function(entry point) for that resource runs inside of the project.When the value of theRunInContainer key is 0, the agent function (entry point)for that resource runs outside the local container (in the global environment).A limitation for the RunInContainer value is that only script agent functions(entry points) can run inside a container.
■ PassCInfoWhen the value of the PassCInfo key is 1, the agent function receives thecontainer information that is defined in the service group’s ContainerInfoattribute. An example use of this value is to pass the name of the container tothe agent.
99Storage Foundation and High Availability Solutions support for Solaris ProjectsAbout VCS support for Solaris projects

Project-aware resourcesAtpresent Process, Application andOracle resources are project aware. If a servicegroup, which is configured for Solaris Project contains resources other thanProcess, Application, or Oracle, Symantec recommends you set RunInContainerto 0.
About the Project agentThe Project agent monitors Solaris Project, brings them online, and takes themoffline.
For more information about the agent, see the Veritas Cluster Server BundledAgents Reference Guide.
Configuring VCS in Solaris projectsConfiguring VCS in projects involves the following tasks:
Review the prerequisites.
See “Prerequisites for configuring VCS in projects” on page 100.
First
Decide on the location of the project root, which is either on localstorage or shared storage.
Second
Install the application in the project.Third
Create the application service group and configure its resources.Fourth
Prerequisites for configuring VCS in projectsReview the following prerequisites for configuring VCS in projects: VCS supportonly Process, Application and Oracle agent.
Using custom agents in projectsIf youuse customagents, review the following information for their use inprojects:
■ If you use custom agents tomonitor the applications that run in project, makesure that the agents use script-based entry points. VCS does not supportrunning C++ entry points inside a project.
Storage Foundation and High Availability Solutions support for Solaris ProjectsConfiguring VCS in Solaris projects
100

■ If you want the custom agent to monitor an application in the project, for thecustom agent type, set the following values for the ContainerOpts attribute:RunInContainer = 1 and the PassCInfo = 0.
■ If you don't want the custom agent to monitor an application in the project,for the custom agent type, set the following values for the ContainerOptsattribute: RunInContainer = 0 and the PassCInfo= 0.
For an example, refer to theVeritasClusterServerBundledAgentsReferenceGuide.
101Storage Foundation and High Availability Solutions support for Solaris ProjectsConfiguring VCS in Solaris projects

Storage Foundation and High Availability Solutions support for Solaris ProjectsConfiguring VCS in Solaris projects
102

Storage Foundation andHigh Availability Solutionssupport for Branded Zones
This chapter includes the following topics:
■ About branded zones
■ System requirements
■ Veritas Storage Foundation support for branded zone
■ About migrating VCS clusters on Solaris 10 systems
■ Preparing to migrate a VCS cluster
■ Configuring VCS/SF in a branded zone environment
About branded zonesBranded zones (BrandZ) is a framework that extends the Solaris Zonesinfrastructure to create branded zones. Branded zone is a non-native zone thatallows you to emulate an operating system environment other than the nativeoperating system. Each operating system is plugged into the BrandZ frameworkwith a brand associated to the operating system.
See the Oracle documentation for more information on branded zones.
4Chapter
System requirementsSee the Veritas Storage Foundation and High Availability Release Notes for thesystem requirements.
Veritas Storage Foundation support for branded zoneSF provides support for the following in a branded zone environment:
■ VxVM volume devices
■ VxFS file systems using loopback file system mount or direct mount
You can export aVxVMvolumeor aVxFS file system to a branded zone and accessthe volume or the file system in the branded zone. The procedure to export thevolumes or the file systems are the same as that for the non-global zones.
Refer to the Veritas VolumeManager Administrator's Guide or the Veritas FileSystem Administrator's Guide for more details.
About migrating VCS clusters on Solaris 10 systemsYou can migrate VCS clusters that run on Solaris 10 systems to solaris10 brandzones on Solaris 11 systems. For example, with BrandZ you can emulate a Solaris10 operating system as Solaris 10 container in the Solaris 11 branded zone. ThisSolaris 10 non-global zone acts as a complete runtime environment for Solaris10 applications on Solaris 11 systems. You can directlymigrate an existing Solaris10 system into a Solaris 10 container.
Figure 4-1 illustrates theworkflow tomigrate a VCS cluster on Solaris 10 systemsto branded zones on Solaris 11 systems.
Storage Foundation and High Availability Solutions support for Branded ZonesSystem requirements
104
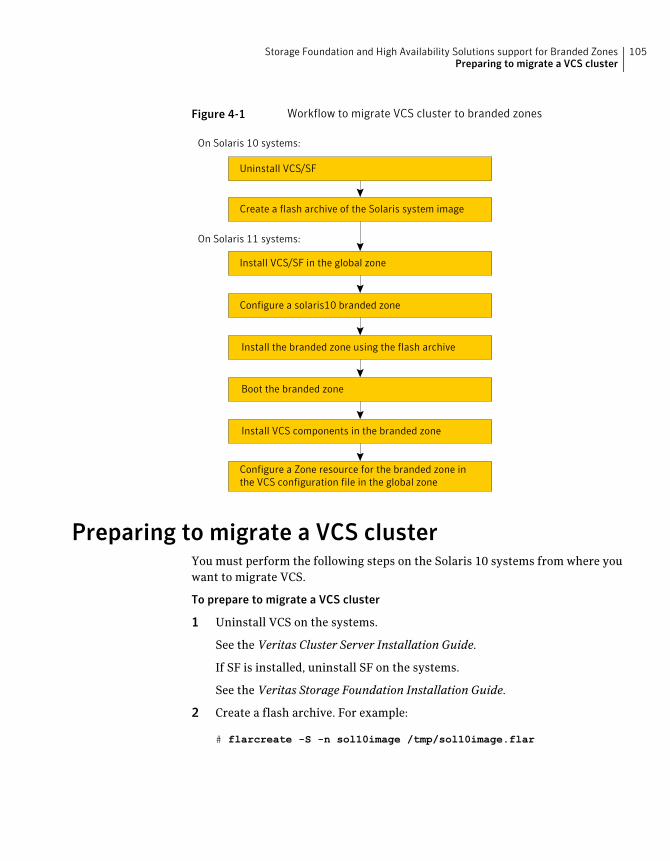
Figure 4-1 Workflow to migrate VCS cluster to branded zones
Create a flash archive of the Solaris system image
Configure a solaris10 branded zone
Install the branded zone using the flash archive
Install VCS/SF in the global zone
Configure a Zone resource for the branded zone inthe VCS configuration file in the global zone
On Solaris 10 systems:
Uninstall VCS/SF
On Solaris 11 systems:
Boot the branded zone
Install VCS components in the branded zone
Preparing to migrate a VCS clusterYou must perform the following steps on the Solaris 10 systems from where youwant to migrate VCS.
To prepare to migrate a VCS cluster
1 Uninstall VCS on the systems.
See the Veritas Cluster Server Installation Guide.
If SF is installed, uninstall SF on the systems.
See the Veritas Storage Foundation Installation Guide.
2 Create a flash archive. For example:
# flarcreate -S -n sol10image /tmp/sol10image.flar
105Storage Foundation and High Availability Solutions support for Branded ZonesPreparing to migrate a VCS cluster

Configuring VCS/SF in a branded zone environmentYou must perform the following steps on the Solaris 11 systems.
To configure VCS/SF in a branded zone environment
1 Install VCS, SF, or SFHA as required in the global zone.
See the Veritas Cluster Server Installation Guide.
See the Veritas Storage Foundation and High Availability Installation Guide.
2 Configure a solaris10 brand zone. For example, this step configures a solaris10zone.
■ Run the following command in the global zone as the global administrator:
# zonecfg -z sol10-zone
sol10-zone: No such zone configured
Use 'create' to begin configuring a new zone.
■ Create the solaris10 brand zone using the SYSsolaris10 template.
zonecfg:sol10-zone> create -t SYSsolaris10
■ Set the zone path. For example:
zonecfg:sol10-zone> set zonepath=/zones/sol10-zone
Note that zone root for the branded zone can either be on the local storageor the shared storage (VxFS or UFS).
■ Add a virtual network interface.
zonecfg:sol10-zone> add net
zonecfg:sol10-zone:net> set physical=net1
zonecfg:sol10-zone:net> set address=192.168.1.20
zonecfg:sol10-zone:net> end
■ Verify the zone configuration for the zone and exit the zonecfg commandprompt.
zonecfg:sol10-zone> verify
zonecfg:sol10-zone> exit
The zone configuration is committed.
3 Verify the zone information for the solaris10 zone you configured.
# zonecfg -z sol10-zone info
Storage Foundation and High Availability Solutions support for Branded ZonesConfiguring VCS/SF in a branded zone environment
106

Review the output to make sure the configuration is correct.
4 Install the solaris10 zone that you created using the flash archive you createdpreviously.
See “Preparing to migrate a VCS cluster” on page 105.
# zoneadm -z sol10-zone install -p -a /tmp/sol10image.flar
After the zone installation is complete, run the following command to listthe installed zones and to verify the status of the zones.
# zoneadm list -iv
5 Boot the solaris10 brand zone.
# /usr/lib/brand/solaris10/p2v sol10-zone
# zoneadm -z sol10-zone boot
After the zone booting is complete, run the following command to verify thestatus of the zones.
# zoneadm list -v
6 Install VCS in the branded zone:
■ Install only the following VCS 6.0.1 packages and patches:
■ VRTSperl
■ VRTSat
■ VRTSvcs
■ VRTSvcsag
7 If you configured Oracle to run in the branded zone, then install the VCSagent for Oracle packages (VRTSvcsea) and the patch in the branded zone.
See theVeritas Cluster ServerAgent forOracle Installation andConfigurationGuide for installation instructions.
8 For ODM support, install the following additional packages and patches inthe branded zone:
■ Install the following 6.0 packages and patches:
■ VRTSvlic
■ VRTSvxfs
■ VRTSodm
107Storage Foundation and High Availability Solutions support for Branded ZonesConfiguring VCS/SF in a branded zone environment

9 If using ODM support, relink Oracle ODM library in Solaris 10 brand zones:
■ Log into Oracle instance.
■ Relink Oracle ODM library.If you are running Oracle 10gR2:
$ rm $ORACLE_HOME/lib/libodm10.so
$ ln -s /opt/VRTSodm/lib/sparcv9/libodm.so \
$ORACLE_HOME/lib/libodm10.so
If you are running Oracle 11gR1:
$ rm $ORACLE_HOME/lib/libodm11.so
$ ln -s /opt/VRTSodm/lib/sparcv9/libodm.so \
$ORACLE_HOME/lib/libodm11.so
■ To enable odm inside branded zone, enable odm in global zone using smfscripts as described as below:
global# svcadm enable vxfsldlic
global# svcadm enable vxodm
To use ODM inside branded zone, export /dev/odm, /dev/fdd,/dev/vxportal devices and /etc/vx/licenses/lic directory.
global# zoneadm -z myzone halt
global# zonecfg -z myzone
zonecfg:myzone> add device
zonecfg:myzone:device> set match=/dev/vxportal
zonecfg:myzone:device> end
zonecfg:myzone> add device
zonecfg:myzone:device> set match=/dev/fdd
zonecfg:myzone:device> end
zonecfg:myzone> add device
zonecfg:myzone:device> set match=/dev/odm
zonecfg:myzone:device> end
zonecfg:myzone> add device
zonecfg:myzone:device> set match=/dev/vx/rdsk/dg_name/vol_name
zonecfg:myzone:device> end
zonecfg:myzone> add device
zonecfg:myzone:device> set match=/dev/vx/dsk/dg_name/vol_name
zonecfg:myzone:device> end
zonecfg:myzone> add fs
zonecfg:myzone:fs> set dir=/etc/vx/licenses/lic
Storage Foundation and High Availability Solutions support for Branded ZonesConfiguring VCS/SF in a branded zone environment
108

zonecfg:myzone:fs> set special=/etc/vx/licenses/lic
zonecfg:myzone:fs> set type=lofs
zonecfg:myzone:fs> end
zonecfg:myzone> set fs-allowed=vxfs,odm
zonecfg:myzone> verify
zonecfg:myzone> commit
zonecfg:myzone> exit
global# zoneadm -z myzone boot
10 Configure the resources in the VCS configuration file in the global zone. Forexample:
group g1 (
SystemList = { vcs_sol1 = 0, vcs_sol2 = 1 }
ContainterInfo@vcs_sol1 {Name = sol10-zone, Type = Zone,
Enabled = 1 }
ContainterInfo@vcs_sol2 {Name = sol10-zone, Type = Zone,
Enabled = 1 }
AutoStartList = { vcs_sol1 }
Administrators = { "z_z1@vcs_lzs@vcs_sol2.symantecexample.com" }
)
Process p1 (
PathName = "/bin/ksh"
Arguments = "/var/tmp/cont_yoyo"
)
Zone z1 (
)
p1 requires z1
See the Veritas Cluster Server Bundled Agents Reference Guide for VCS Zoneagent details.
109Storage Foundation and High Availability Solutions support for Branded ZonesConfiguring VCS/SF in a branded zone environment

Storage Foundation and High Availability Solutions support for Branded ZonesConfiguring VCS/SF in a branded zone environment
110

Storage Foundation andHigh Availability Solutionssupport for Oracle VMServer for SPARC
This chapter includes the following topics:
■ Terminology for Oracle VM Server for SPARC
■ Oracle VM Server for SPARC deployment models
■ Benefits of deploying Storage FoundationHighAvailability solutions inOracleVM server for SPARC
■ Features
■ Split Storage Foundation stack model
■ Guest-based Storage Foundation stack model
■ System requirements
■ Veritas product release notes
■ Product licensing
■ Installing Storage Foundation in a Oracle VM Server for SPARC environment
■ Exporting a Veritas volume to a guest domain from the control domain
■ Provisioning storage for a guest domain
5Chapter

■ Using Veritas Volume Manager snapshots for cloning logical domain bootdisks
■ Configuring Oracle VMServer for SPARC guest domains for disaster recovery
■ Software limitations
■ Known issues
Terminology for Oracle VM Server for SPARCThe following terminology is used in configuring the Veritas software in OracleVM Server for SPARC.
Table 5-1 Lists the terminology for Oracle VM Server for SPARC
DefinitionTerm
Logical domain or virtual machine with itsown operating system, resources, andidentity within the same physical host.
Logical domain
A firmware layer that provides a set ofhardware-specific support functions to theoperating systems running inside logicaldomains through a stable interface, knownas the sun4v architecture. The hypervisor isinterposed between the operating systemand the hardware layer.
Hypervisor
Software that communicates with theHypervisor and logical domains to sequencechanges, such as the addition and removalof resources or creation of a logical domain.
The Logical Domains Manager provides anadministrative interface and keeps track ofthe mapping between the physical andvirtual devices in a system.
Logical Domains Manager
The primary domain which provides aconfiguration platform to the system for thesetup and teardown of logical domains.
Executes LogicalDomainsManager softwareto govern logical domain creation andassignment of physical resources.
Control domain
Storage Foundation and High Availability Solutions support for Oracle VM Server for SPARCTerminology for Oracle VM Server for SPARC
112
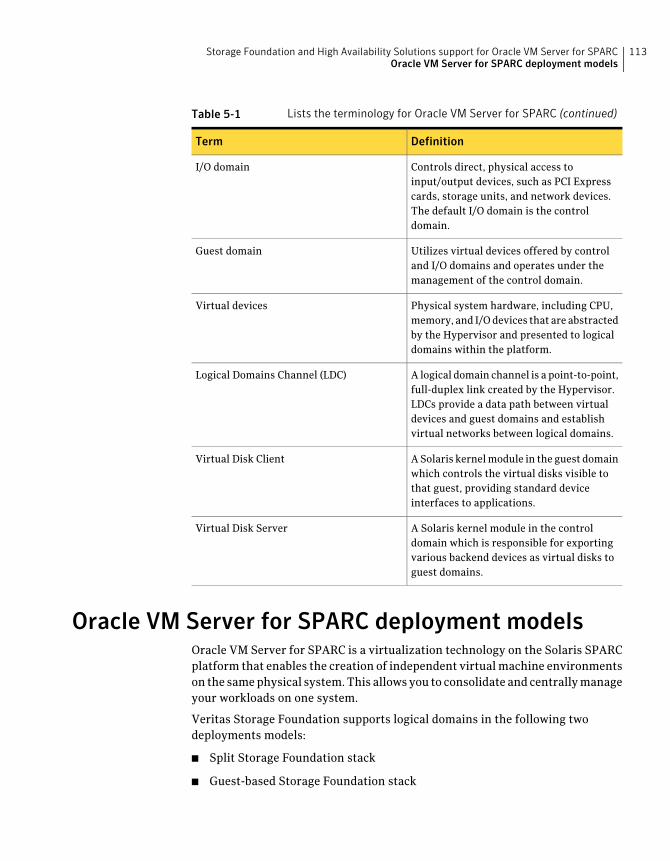
Table 5-1 Lists the terminology for Oracle VM Server for SPARC (continued)
DefinitionTerm
Controls direct, physical access toinput/output devices, such as PCI Expresscards, storage units, and network devices.The default I/O domain is the controldomain.
I/O domain
Utilizes virtual devices offered by controland I/O domains and operates under themanagement of the control domain.
Guest domain
Physical system hardware, including CPU,memory, and I/Odevices that are abstractedby the Hypervisor and presented to logicaldomains within the platform.
Virtual devices
A logical domain channel is a point-to-point,full-duplex link created by the Hypervisor.LDCs provide a data path between virtualdevices and guest domains and establishvirtual networks between logical domains.
Logical Domains Channel (LDC)
ASolaris kernelmodule in the guest domainwhich controls the virtual disks visible tothat guest, providing standard deviceinterfaces to applications.
Virtual Disk Client
A Solaris kernel module in the controldomain which is responsible for exportingvarious backend devices as virtual disks toguest domains.
Virtual Disk Server
Oracle VM Server for SPARC deployment modelsOracle VM Server for SPARC is a virtualization technology on the Solaris SPARCplatform that enables the creation of independent virtualmachine environmentson the samephysical system.This allows you to consolidate and centrallymanageyour workloads on one system.
Veritas Storage Foundation supports logical domains in the following twodeployments models:
■ Split Storage Foundation stack
■ Guest-based Storage Foundation stack
113Storage Foundation and High Availability Solutions support for Oracle VM Server for SPARCOracle VM Server for SPARC deployment models

Veritas Storage Foundation Cluster File System (SFCFS) is supported only inthe guest-based Storage Foundation stack.
See “About Veritas Cluster Server configuration models in an Oracle VM Serverfor SPARC environment” on page 162.
Split Storage Foundation stackThe support for this model was introduced in 5.0 MP1 release and this modelcontinues to be supported in this release.
See “Split Storage Foundation stack model” on page 119.
Guest-based Storage Foundation stackThe support for this model was introduced in 5.0 MP3 release.
See “Known issues” on page 150.
Note: The SFCFS stack can be installed across multiple I/O domains within oracross physical servers.
See “Veritas Cluster Server limitations” on page 161.
Benefits of deploying Storage Foundation HighAvailability solutions in Oracle VM server for SPARC
There are several benefits to a Oracle VM Server for SPARC environment.
Standardization of toolsIndependent ofhowanoperating system ishosted, consistent storagemanagementtools save an administrator time and reduce the complexity of the environment.
StorageFoundation in the control domainprovides the samecommand set, storagenamespace, and environment as in a non-virtual environment.
Array migrationData migration for Storage Foundation can be executed in a central location,migrating all storage fromanarrayutilized byStorage Foundationmanagedhosts.
This powerful, centralized data migration functionality is available with StorageFoundation Manager 1.1 and later.
Storage Foundation and High Availability Solutions support for Oracle VM Server for SPARCBenefits of deploying Storage Foundation High Availability solutions in Oracle VM server for SPARC
114

Moving storage between physical and virtual environmentsStorage Foundation can make painful migrations of data from physical to virtualenvironments easier and safer to execute.
With Storage Foundation, there is no need to copy any data from source todestination, but rather the administrator reassigns the same storage or a copy ofthe storage for a test migration, to the virtual environment.
Boot Image ManagementUsing Storage Foundation in this environment the user can utilize features suchas instant snapshots to contain boot images and manage them from a centrallocation in the control domain.
FeaturesThis section describes some of the features in Oracle VM Server for SPARC usingthe products in the Veritas Storage Foundation and High Availability Solutions.
Storage Foundation featuresThe following features apply for Storage Foundation.
The vxloadm utility enables access to a file system containedin a VxVM volume from the Control DomainThe vxloadm utility lets you access a file system contained inside a VxVM volumefrom outside the guest domain, that is from the Control Domain. This is done bymapping all the partitions contained within that volume using the vxlo driver.The partitions can then be mounted if they contain valid file systems.
To use this vxloadm utility
1 Check if the driver is loaded in memory:
# modinfo| grep vxlo
226 7b3ec000 3870 306 1 vxlo (Veritas Loopback Driver 0.1)
2 Run the vxloadm utility:
# /etc/vx/bin/vxloadm
115Storage Foundation and High Availability Solutions support for Oracle VM Server for SPARCFeatures
3 You can now use the utility.
See “Examples of using the vxloadm utility” on page 116.
4 Symantec recommends once you are doneusing the vxloadmutility to unloadthe vxlo driver:
# rem_drv vxlo
# modinfo| grep vxlo
226 7b3ec000 3870 306 1 vxlo (Veritas Loopback Driver 0.1)
# modunload -i 226
where 226 is the module ID from the modinfo | grep vxlo command.
Examples of using the vxloadm utility
Use the vxloadm addall command to create device(s) mapping the variouspartition(s) contained in a VxVM volume. For example:
# /etc/vx/bin/vxloadm addall vol1 /dev/vx/dsk/testdg/vol1
This creates a device node entry for every slice or partition contained within thevolume in the /dev/vxlo/dsk/ and /dev/vxlo/rdsk/ directories.
# ls -l /dev/vxlo/dsk/
lrwxrwxrwx 1 root root 46 Sep 25 14:04 vol1s0
-> ../../../devices/pseudo/vxlo@0:vol1s0,1,blk
lrwxrwxrwx 1 root root 46 Sep 25 14:04 vol1s3
-> ../../../devices/pseudo/vxlo@0:vol1s3,2,blk
# ls -l /dev/vxlo/rdsk/
lrwxrwxrwx 1 root root 46 Sep 25 14:04 vol1s0
-> ../../../devices/pseudo/vxlo@0:vol1s0,1,raw
lrwxrwxrwx 1 root root 46 Sep 25 14:04 vol1s3
-> ../../../devices/pseudo/vxlo@0:vol1s3,2,raw
Use the vxloadm get command to display the list of all currently mappedpartition(s) created using the vxloadm utility. For example:
# /etc/vx/bin/vxloadm get
VxVM INFO V-5-1-0 NAME FILENAME
MOUNT OFFSET C/H/S
VxVM INFO V-5-1-15260 vol1s0 /dev/vx/dsk/testdg/vol1
6180 6787/1/618
VxVM INFO V-5-1-15260 vol1s3 /dev/vx/dsk/testdg/vol1
4326000 50902/1/618
Storage Foundation and High Availability Solutions support for Oracle VM Server for SPARCFeatures
116
Use theappropriate file systemcommands to access the file system(s). For example:
# fstyp /dev/vxlo/rdsk/vol1s0
ufs
# mount -F ufs /dev/vxlo/dsk/vol1s0 /mnt
Use the vxloadm delete to remove the partition mappings of a volume. Forexample:
# /etc/vx/bin/vxloadm delete vol1s0
# /etc/vx/bin/vxloadm delete vol1s3
Note: This vxloadm utility should only be used on volumes that are currently notin use or held open by a guest domain.
The vxformat utility automatically relabels the virtual diskbacked by a VxVM volume in the guest domainThe vxformatutility provides the user the ability to automatically relabel a virtualdisk backed by a VxVM volume. This utility is meant to be executed from insidethe guest domain only.
The vxformat utility is particularly useful when a VxVM volume with existingpartitions is grown in size and you need to access the new size from the guestdomain.
Requirements for relabeling to succeed
■ The relabel succeeds only- if it can find a new cylinder size that is alignedwiththe start and size of each of the existing partitions.In case the vxformat command cannot find such cylinder size, it displays thefollowing descriptive message and then exits:
Cannot re-label device /dev/rdsk/c0t1d2s2 since we failed to
find new cylinder size that's aligned with all the existing partitions
■ The relabel succeeds only - if the available blocks is greater than the last sectorof each and every non-s2 partition.Otherwise, thevxformat command displays the following message and thenexits:
Cannot re-label device /dev/rdsk/c0d2s2 since the last sector of a
non-s2 partition is greater than the available blocks
117Storage Foundation and High Availability Solutions support for Oracle VM Server for SPARCFeatures

Example of using the vxformat utility
Use the vxformat command to relabel the virtual disk. For example:
# /etc/vx/bin/vxformat c0d1s2
rawpath: /dev/rdsk/c0d1s2
Old disk capacity: 2097000 blocks
New disk capacity: 4194000 blocks
Device /dev/rdsk/c0d1s2 has been successfully re-labeled.
Please use prtvtoc(1) to obtain the latest partition table information
If the underlying device size has not changed, the vxformat command displaysthe following message without changing the label. For example:
# /etc/vx/bin/vxformat c0d1s2
Old disk capacity: 2343678 blocks
New disk capacity: 2343678 blocks
size of device /dev/rdsk/c0d2s2 is unchanged
Oracle VM Server for SPARC featuresSFHA solutions support the following features for Oracle VM server for SPARC.
Guest domain migrationThe guest domain migration feature is supported for cold, warm, and livemigrations by Storage Foundation with both deployment models:
■ Split Storage Foundation stack
■ Guest-based Storage Foundation stack
Virtual I/O dynamic reconfigurationThevirtual I/Odynamic reconfiguration feature is supportedwithbothdeploymentmodels:
■ Split Storage Foundation stack
■ Guest-based Storage Foundation stack
Storage Foundation and High Availability Solutions support for Oracle VM Server for SPARCFeatures
118

Note: For resizing a volume exported as a single slice: The new size should bevisible dynamically in the guest immediately.
For resizing a volume exported as a full disk: Even though the new size is visibledynamically in the guest, the new space allocated in the volume cannot be utilizedunless the label in the vdisk has been adjusted to reflect the new sectors. Thisadjustment of the label needs to be done carefully.
Split Storage Foundation stack modelFigure 5-1 illustrates the split Storage Foundation stack model with Oracle VMServer for SPARC logical domains.
Figure 5-1 Split Storage Foundation stack model with logical domains
Guest Domain Control domain
Storage
(I/O Control Point)(Virtual Machine)
Virtual Disk Server
Volume
VxVM/CVM
DMP
Virtual Disk Client
VxFSUFS
Hypervisor
Server
Domain Channel
How Storage Foundation and High Availability Solutions works in theOracle VM Server for SPARC
Veritas Storage Foundation and High Availability Solutions supports Oracle VMServer for SPARC logical domains in both single-node, multiple-node, andmultiple-node high availability configurations.
119Storage Foundation and High Availability Solutions support for Oracle VM Server for SPARCSplit Storage Foundation stack model

Figure 5-1 illustrates the recommended placement of Storage Foundation stackcomponent products in this model.
Following indicates the recommended placement of Storage Foundation stackcomponent products:
■ For a single node configuration, Veritas Volume Manager (VxVM) includingDMP is placed in the control domain, and Veritas File System (VxFS) is placedin the guest domain.
■ For clustered nodes, Cluster Volume Manager (CVM) is placed in the controldomain, and VxFS is placed in the guest domain.See “Clustering using Cluster Volume Manager” on page 153.See “Installing Storage Foundation on multiple nodes in a Logical Domain”on page 154.See “Cluster Volume Manager in the control domain for providing highavailability” on page 156.
■ For clustered nodes in a highly available environment, install Veritas ClusterServer (VCS) in the control domain.See “About Veritas Cluster Server in a Oracle VM Server for SPARCenvironment” on page 159.See “AboutVeritas Cluster Server configurationmodels in anOracleVMServerfor SPARC environment” on page 162.See “ConfiguringVeritas Cluster Server to fail over an application on a failure”on page 176.
■ VxFS drivers in the guest domain cannot currently interact with the VxVMdrivers in the control domain. This renders some features, which require directVxVM-VxFS coordination, unusable in such a configuration.See “Veritas Storage Foundation features restrictions” on page 120.
Note: VxFS can also be placed in the control domain, but there will be nocoordination between the two VxFS instances in the guest and the controldomain.
Veritas Storage Foundation features restrictionsThe following Veritas Storage Foundation software features are restricted in thesplit Storage Foundation stack model:
■ Smartmove and Thin Reclamation — These features require co-ordinationbetween VxVM and VxFS and hence are not supported in this model.
Storage Foundation and High Availability Solutions support for Oracle VM Server for SPARCSplit Storage Foundation stack model
120

■ VxVM volume snapshots — Due to the inability of VxFS in the guest domainto coordinate with VxVM in the control domain, taking a data consistentsnapshot of a VxVM volume containing a VxFS file system requires shuttingdown the application and unmounting the file system before taking thesnapshot.
■ Resizing VxVM volumes and any type of file system on top of the volumewithvxresize — Resizing any type of file system on the guest whose underlyingdevice is backed by a VxVM volume in the control domain, requires resizingthe VxVM volume and the file system in the guest individually.If you are growing a VxFS file system in the guest whose underlying device isbacked by a VxVMvolume requires you to first grow the volume in the controldomain using the vxassist command, and then the file system in the guestdomain using the fsadm command.
Shrinking a VxFS file system, on the other hand, requires you to first shrinkthe file system in the guest domain using the fsadm command, and then thevolume in the control domain using the vxassist command. Using thevxassist command requires you to use the -f option of the command, as inthe following example.
# vxassist -g [diskgroup] -f shrinkto volume length
Caution:Do not shrink the underlying volume beyond the size of the VxFS filesystem in the guest as this can lead to data loss.
■ Exporting a volume set to a guest domain is not supported.
■ Veritas Volume Replicator is not supported in the Split Storage Foundationstack model.
■ Multi-volume filesets/DST
■ File-level Smartsync
■ The following VxFS tunables are not set to their default values based on theunderlying volume layout, due to VxFS being in the guest domain and VxVMbeing installed in the control domain:
■ read_pref_io
■ write_pref_io
■ read_nstream
■ write_nstream
121Storage Foundation and High Availability Solutions support for Oracle VM Server for SPARCSplit Storage Foundation stack model

If desired, you can set the values of these tunables based on the underlyingvolume layout in the /etc/vx/tunefstab file.
See theVeritasStorageFoundationAdministrator'sGuide formore informationabout tuning I/O.
■ StorageFoundationCluster File System isnot recommended in this deploymentmodel.
Guest-based Storage Foundation stack modelFigure 5-2 Guest-based Storage Foundation stack model
Guest Domain Control domain
Storage
(I/O Control Point)(Virtual Machine)
Virtual Disk Server
VxVM/CVM
DMP
Virtual Disk Client
VxFS
Virtual Disk(Path A)
Hypervisor
Server
Domain Channel
Virtual Disk(Path B)
Path B
Path A
Figure 5-2 illustrates the guest-based Storage Foundation stackmodel with guestlogical domains.
How Storage Foundation and High Availability Solutions works in theguest domains
The entire Storage Foundation stack is co-located within the guest in thisdeployment model.
Storage Foundation and High Availability Solutions support for Oracle VM Server for SPARCGuest-based Storage Foundation stack model
122

Symantec recommends that you export all paths to a diskwhich is being exportedto a guest and letVeritasDMPdo themulti-pathing of the disk in the guest domain.
Note: Only full SCSI disks can be used under Veritas Volume Manager (VxVM)andDMP in thismodel.Non-SCSI devices (volume, file, slice, etc) arenot supported.
Veritas Storage Foundation and High Availability Solutions and Veritas StorageFoundation Cluster File System supports running in the guest domains in bothsingle-node, multiple-node, and multiple-node high availability configurations.
■ For a singlenode configuration,VxVM(includingDMP) andVxFSare co-locatedin the guest domain.
■ For clustered nodes, CVM can also be used inside the guest domain. As withregular physical nodes, formingaCVMcluster of logical domainguests requiresshared storage visibility across the guests that are part of the cluster.See the Veritas Storage Foundation Cluster File System High AvailabilityAdministrator’s Guide for CVM information.See the Veritas Storage Foundation Installation Guide for installation andconfiguration information.
■ For clustered nodes in a highly available environment, install Veritas ClusterServer (VCS) in the guest domains.See the Veritas Cluster Server documentation for more information.
Veritas Volume Replicator (VVR) is supported in the guest-based StorageFoundation stack model in the following configurations:
■ A guest domain on one host acting as the VVR primary, and another guest onanother host acting as the VVR secondary.
■ Two guest domains on the same physical host, but you must export separateLUNs or disks to the data volumes andStorageReplicator Logs of the two guestdomains.
In this model, the boot disk of the guest can be a VxVM volume. For more detailson this support:
See “Provisioning Veritas Volume Manager volumes as boot disks for guestdomains” on page 139.
About Veritas Storage Foundation Cluster File System in an Oracle VMServer for SPARC environment
Veritas Storage Foundation Cluster File System (SFCFS) allows clustered serversto mount and use a file system simultaneously as if all applications using the filesystem were running on the same server for a Oracle VM Server for SPARC.
123Storage Foundation and High Availability Solutions support for Oracle VM Server for SPARCGuest-based Storage Foundation stack model

Veritas Storage Foundation Cluster File System limitationsDepending on the configuration model, the following limitations apply to usingSFCFS in an Oracle VM Server for SPARC environment.
Limitations for SFCFS configuration in the guest domain:
■ There is no support for replicating a shared disk group using VVR, when oneor more guest domains share the disk group.
■ If you want to configure I/O fencing in guest domain, then do not exportphysical devices to more than one guest domain on the same physical node.Otherwise, I/O fencing fences off the devicewhenever one of the guest domaindies. This situation causes the other guest domains also to lose access to thedevice.
Symantec recommendsyou todisable I/O fencing if youexported the samephysicaldevice to multiple guest domains.
Supported configurations with SFCFS and multiple I/O Domains
Figure 5-3 SFCFS cluster across two guest domains
Guest Domain 1
Cluster
VSW = Virtual Switch
VDS 0 VSW 1Private
VSW 0Public
Public Network
Server (T5240)
Guest Domain 2
VDS 0 VSW 0Public
VSW 1Private
SFCFS
Physical AdaptersPhysical Adapters
VDS = Virtual Disk ServiceSFCFS = Storage Foundation
Cluster File System
IPMP = IP MultipathHB = LLT Heartbeat LinksRaw disk paths
Node 1
IPMP
DMP
HB
Node 2
IPMP
DMP
HB
I/O Domain I/O Domain
Storage
Storage Foundation and High Availability Solutions support for Oracle VM Server for SPARCGuest-based Storage Foundation stack model
124

Figure 5-3 illustrates that each guest domain gets network and disk storageredundancy from the two I/O domains.
Figure 5-4 SFCFS cluster across two guest domains
Server 2Server 1
Guest Domain 1 SFCFSCluster
Guest Domain 2Node 1 Node 2
VSW 1Private
VSW 0Public
PhysicalAdapter
PhysicalAdapter
PhysicalAdapter
PublicNetwork
Storage
IPMP HBDMP
IPMP HBDMP
VDS0VDS0VSW 1Private
VSW 0Public
PhysicalAdapter
I/O DomainPrimary
I/O DomainAlternate
VDS0VSW 1Private
VSW 0Public
I/O DomainAlternate
VSW 1Private
VSW 0Public VDS0
I/O DomainPrimary
Interconnect
VSW = Virtual SwitchVDS = Virtual Disk ServiceSFCFS = Storage Foundation
Cluster File System
IPMP = IP MultipathHB = LLT Heartbeat LinksRaw disk paths
Figure 5-4 illustrates that each guest domain gets network and disk storageredundancy from the two I/O domains on that physical server. The guest clusterspans across two physical servers.
125Storage Foundation and High Availability Solutions support for Oracle VM Server for SPARCGuest-based Storage Foundation stack model

Figure 5-5 SFCFS cluster across four guest domains
Server 2Server 1
Guest Domain 1 SFCFSCluster
Guest Domain 4
Node 1 Node 4
PhysicalAdapter
PhysicalAdapter
PhysicalAdapter
PublicNetwork
Storage
IPMP HBDMP
IPMP HBDMP
PhysicalAdapter
Interconnect
Guest Domain 2
Node 2IPMP HB
DMP
Guest Domain 3Node 3
IPMP HBDMP
VDS0VSW 1Private
VSW 0Public VDS0
VSW 1Private
VSW 0Public
I/O DomainAlternate
I/O DomainPrimary
VSW 1Private
VSW 0Public VDS0
I/O DomainAlternate
VSW 1Private
VSW 0Public VDS0
I/O DomainPrimary
VSW = Virtual SwitchIPMP = IP MultipathHB = LLT Heartbeat Links VDS = Virtual Disk ServiceRaw disk paths SFCFS = Storage Foundation
Cluster File System
Figure 5-5 illustrates that each guest domain gets network and disk storageredundancy from two I/Odomains on that physical server. The guest cluster spansacross two physical servers.
Storage Foundation and High Availability Solutions support for Oracle VM Server for SPARCGuest-based Storage Foundation stack model
126

Figure 5-6 SFCFS cluster across four guest domains
Guest Domain 1 Guest Domain 4
Node 1 Node 4
PhysicalAdapter
PublicNetworkStorage
IPMP HBDMP
IPMP HBDMP
Interconnect
Guest Domain 2
Node 2IPMP HB
DMP
Guest Domain 3Node 3
IPMP HBDMP
VDS0VSW 1Private
VSW 0Public VDS0
VSW 1Private
VSW 0Public
I/O Domain 2I/O Domain 1
VSW 1Private
VSW 0Public VDS0
I/O Domain 4
VSW 1Private
VSW 0Public VDS0
I/O Domain 3
VSW = Virtual SwitchIPMP = IP MultipathHB = LLT Heartbeat Links VDS = Virtual Disk Service
Raw disk paths SFCFS = Storage FoundationCluster File System
Server (T5440)SFCFS Cluster
PhysicalAdapter Physical
AdapterPhysicalAdapter
Figure 5-6 illustrates each guest gets its disk storage redundancy from two out ofthe four I/O domains. Each guest gets its network redundancy from all the fourI/O domains.
Veritas Storage Foundation features restrictionsThe following Veritas Storage Foundation software features are restricted in theOracle VM Server for SPARC guest domain environment.
Veritas Volume Replicator bunker replicationVeritas Volume Replicator (VVR) currently does not support configuring a guestdomain as a bunker node in the bunker replication mode. This restriction may beremoved in a later release.
127Storage Foundation and High Availability Solutions support for Oracle VM Server for SPARCGuest-based Storage Foundation stack model
Mirroring across controllers using vxassist the mirror=ctlroptionCurrently, all virtual disks in the guest are under the same virtual controller c0.When vxassist tries to look for a second controller to place themirror on, it failsand therefore the command fails.
All disks fall under the c0 controller, even if they are exported using differentphysical paths in the backend and coming from different HBAs.
DMP SCSI bypassThe virtual disk client (VDC) driver controls all virtual disks in the guest domainand not the SCSI driver.
Therefore, it is not possible to construct a SCSI packet and send the packet downthrough DMP. Setting the tunable dmp_fast_recovery to on has no effect.
Event Source Daemon (vxesd) fabric monitoring capabilitiesOne of the features of the vxesd daemon is to register with the HBA API to listento fabric events. Even though the HBA API is loaded in the guest, since there iscurrently no concept of a directly connected HBA in the guest, this API is not ofany use. Therefore, this capability of vxesd is not available.
Physical WWN for a pathIt is not possible to create a SubPath FailoverGroup (SFG)without PhysicalWWN.Physical World Wide IDs cannot be obtained from inside the guest because theyare fetched by DMP using the HBA API which is currently not functional insidethe guest.
System requirementsSee the Veritas Cluster Server Release Notes for the system requirements.
Hardware requirementsVisit theOracleWeb site for information about the supported hardware forOracleVM Server for SPARC
Storage Foundation and High Availability Solutions support for Oracle VM Server for SPARCSystem requirements
128

Veritas product release notesRead the relevant Veritas product release notes before installing any version ofVeritas Storage Foundation and High Availability or Veritas Storage FoundationCluster File System.
Veritas Storage Foundation and High AvailabilityRelease notes for Veritas Storage Foundation are located under thedocs/storage_foundation directory and the Veritas Cluster Server are locatedunder the docs/cluster_serverdirectory of theVeritas Storage Foundation disc.
■ Veritas Storage Foundation Release Notes
■ Veritas Cluster Server Release Notes
Veritas Storage Foundation Cluster File SystemRelease notes for Veritas Storage Foundation Cluster File System are locatedunder the docs/sf_cluster_file_system_ha directory of the Veritas StorageFoundation disc.
■ Veritas Storage Foundation Cluster File System.
Product licensingCustomers running Veritas Storage Foundation or Veritas Storage FoundationCluster File System in a Oracle VM Server for SPARC environment are entitled touse an unlimited number of logical domains on each licensed server or CPU.
Installing Storage Foundation in a Oracle VM Serverfor SPARC environment
This section describes how to install Storage Foundation in several Oracle VMServer for SPARC environments.
To install the Split Storage Foundation stack model environment, you mustcomplete the following sections in order:
■ See “Installing and configuring Oracle VM Server for SPARC and domains”on page 130.
■ See “InstallingStorageFoundation in the control domainor guest”onpage130.
■ See “Installing Veritas File System in the guest domain” on page 131.
129Storage Foundation and High Availability Solutions support for Oracle VM Server for SPARCVeritas product release notes

■ See “Verifying the configuration” on page 135.
To install the Guest based Storage Foundation stack model environment, whichincludes Veritas Storage Foundation Cluster File System, you must complete thefollowing sections in order:
■ See “Installing and configuring Oracle VM Server for SPARC and domains”on page 130.
■ See “InstallingStorageFoundation in the control domainor guest”onpage130.
■ See “Verifying the configuration” on page 135.
To install and configure Veritas Cluster Server in a Oracle VM Server for SPARCenvironment, see the following sections:
■
■ See “ConfiguringVeritas Cluster Server to fail over an application on a failure”on page 176.
Installing and configuring Oracle VM Server for SPARC and domainsRefer to theOracle documentation for instructions about installing andconfiguringthe Oracle VM Server for SPARC software and configuring the control and guestdomains.
Installing Storage Foundation in the control domain or guestThis section describes how to install Storage Foundation in the control domainor guest domain.
Installing the split Storage Foundation stack modelIf you are installing the split Storage Foundation stack model, the entire stackmust be in the control domain and VxFS must be in the guest domain.
Use the procedures in the Veritas installation documentation and Release Notesto install Storage Foundation in the control domain.
To install the split Storage Foundation stack model
◆ Install the product.
See the Veritas Storage Foundation Installation Guide for Solaris.
See the Veritas Storage Foundation Release Notes for Solaris.
Storage Foundation and High Availability Solutions support for Oracle VM Server for SPARCInstalling Storage Foundation in a Oracle VM Server for SPARC environment
130

Installing the guest-based Storage Foundation stack modelIf you are installing the guest-basedStorage Foundation stackmodel environment,the entire stack must be in the guest domain.
Use the procedures in the SF or SFCFS Installation Guide and Release Notes, asappropriate, to install SF or SFCFS in a guest domain.
To install the guest-based Storage Foundation stack model
◆ Install the product.
See the Veritas Storage Foundation Installation Guide for Solaris for SF.
See the Veritas Storage Foundation Release Notes for Solaris for SF.
See the Veritas Storage Foundation Cluster File System Installation Guide forSolaris for SFCFS.
See theVeritasStorageFoundationClusterFileSystemReleaseNotes forSolarisfor SFCFS.
Installing Veritas File System in the guest domainThis section describes how to install VxFS in the guest domain.
To install Veritas File System in the guest domain
◆ If the guest OS is Oracle Solaris 11, refer to the Installation Guide for theproduct to install VxFS inside the guest domain.
If the guest OS is Oracle Solaris 10:
■ Copy theVxFS packages from the /pkgs directory on the disc to a locationin the guest domain where you have write permissions.
■ Install the packages:
# pkgadd -d VRTSvlic.pkg
# pkgadd -d VRTSvxfs.pkg
# pkgadd -d VRTSfssdk.pkg
■ Reboot the guest domain.
Enabling DMP in the control and alternate I/O domainsThis section describes how to enableDynamicMulti-Pathing (DMP) in the controland alternate I/O domains.
131Storage Foundation and High Availability Solutions support for Oracle VM Server for SPARCInstalling Storage Foundation in a Oracle VM Server for SPARC environment

Figure 5-7 DMP model
Storage
Guest Domain 1
VxFS
vxio
DMP
Domain Channel
Control Domain
DMP
Alternate Domain
DMP
Guest Domain 2
VxFS
vxio
DMP
Guest Domain 3
VxFS
vxio
DMP
Guest Domain 4
VxFS
vxio
DMP
To enable DMP in the control and alternate I/O domains
1 Install VRTSvxvm and VRTSaslapm packages on both the control andalternate I/O domains.
2 Turn on the enclosure-based naming default setting in both the control andalternate domains.
# vxddladm set namingscheme=ebn
Storage Foundation and High Availability Solutions support for Oracle VM Server for SPARCInstalling Storage Foundation in a Oracle VM Server for SPARC environment
132

3 Create the VDS devices on DMP metanodes that can be provisioned to theguest domains.
For example:
# ldm add-vdsdev /dev/vx/dmp/xyz vol0015-001-p1@primary-vds0
# ldm add-vdsdev /dev/vx/dmp/xyz vol0015-001-p2@alternate-vds0
4 While provisioning, export the DMP metanodes from both the control andalternate I/O domain. This allows DMP in the guest domain to see two accesspaths, one through the control domain and the other through the alternatedomain to the storage.
# ldm add-vdsdev /dev/vx/dmp/xyz vol0015-001-p1@primary-vds0
# ldm add-vdsdev /dev/vx/dmp/xyz vol0015-001-p2@alternate-vds0
# ldm add-vdisk timeout=30 vdsk0015-001-p1 \
vol0015-001-p1@primary-vds0 hsxd0015
# ldm add-vdisk timeout=30 vdsk0015-001-p2 \
vol0015-001-p2@alternate-vds0 hsxd0015
DMP in the guest domain can take care of the control and alternate I/Odomainfailures.
See “Enabling DMP path failover in the guest domain” on page 133.
Enabling DMP path failover in the guest domainInOracleVMServer configurations theVDCdriver timeout is set to zero by defaultwhich signifies infinity. This can cause the failed I/O not to return to the guestdomain, if either the control or alternate I/O domain crashes unexpectedly. As aresult the guest domain cannot get back the failed I/Os and cannot route themthrough the alternate domain. If this issue occurs or to avoid this issue, you mustset the VDC driver timeout.
There are two ways to set the VDC driver timeout:
See “To change the VDC driver timeoutglobally” on page 134.
This procedure modifies globally all theLUNs that are exported to the current guestdomain. This requires a reboot to all theguest domains.
See “To change the VDC driver timeout foreach LUN” on page 134.
This procedure you manually export everyLUNdirectly to the guest domain and set thetimeout parameter to 30 seconds. No rebootis required.
133Storage Foundation and High Availability Solutions support for Oracle VM Server for SPARCInstalling Storage Foundation in a Oracle VM Server for SPARC environment

To change the VDC driver timeout globally
1 On each guest domain, edit the /etc/system file and add the following lineto set the VDC driver timeout to 30 seconds:
set vdc:vdc_timeout=30
2 Reboot the guest domains.
To change the VDC driver timeout for each LUN
You will need to export any LUN directly to the guest domain and set the timeoutparameter to 30 seconds.
1 Create the primary domain using four internal disks and get all required SANLUNs for the guest domains allocated to the primary domain.
2 Turn on enclosure-based naming in the primary domain.
# vxddladm set namingscheme=ebn
3 Remove half of the system’s I/O from the primary domain:
# ldm remove-io pci_X primary_domain_name
where pci_x is the name of the PCI bus for your system.
where prinary_domain_name is the name of the primary domain.
For example:
# ldm remove-io pci_@400 primary
4 Create the alternate I/O domain on the other four internal disks and add theI/O that was removed from the primary domain:
# ldm add-io pci_X primary_domain_name
where pci_x is the name of the PCI bus for your system.
where primary_domain_name is the name of the primary domain.
For example:
# ldm add-io pci_@400 primary
Storage Foundation and High Availability Solutions support for Oracle VM Server for SPARCInstalling Storage Foundation in a Oracle VM Server for SPARC environment
134
5 Turn on enclosure-based naming in the alternate I/O domain.
# vxddladm set namingscheme=ebn
At this point you have one of the two paths to each SAN LUN in the primarydomain and the other path is in the alternate I/O domain. Both will have thesame name: /dev/vx/dmp/enclousre_based_name.
6 On the primary domain, create the guest domains. In the sample theenclosure-based name of one of the LUNs is xyz and the guest domain ishsxd0015:
# ldm add-vdsdev /dev/vx/dmp/xyz vol0015-001-p1@primary-vds0
# ldm add-vdsdev /dev/vx/dmp/xyz vol0015-001-p2@alternate-vds0
# ldm add-vdisk timeout=30 vdsk0015-001-p1 \
vol0015-001-p1@primary-vds0 hsxd0015
# ldm add-vdisk timeout=30 vdsk0015-001-p2 \
vol0015-001-p2@alternate-vds0 hsxd0015
The same set of four commands for each SAN LUN that gets placed in a guestdomain. Use three SAN LUNs for SAN boot in the guest domain and the restfor application data. Each LUN in the guest domain has one path backupthrough the primary domain and one backup through the alternate domain.That means each LUN only uses one LDC in each domain. Also, since you areusing DMP you still only use 1 LDC in each domain, even if the LUNhasmorethan two paths from the array.
Verifying the configurationVerify the configuration of Oracle VM server for SPARC in the control domainand the guest domain. Refer to the Oracle documentation for details.
Verify the Storage Foundation installation in both the control domain and theguest domain.Refer to the following guides for more information:
■ See the Veritas Storage Foundation Installation Guide for Solaris.
■ See the Veritas Storage Foundation Release Notes for Solaris.
■ See theVeritas Storage FoundationandHighAvailability InstallationGuide forSolaris.
■ See the Veritas Storage Foundation and High Availability Release Notes forSolaris.
■ See the Veritas Storage Foundation Cluster File System and High AvailabilityInstallation Guide for Solaris.
135Storage Foundation and High Availability Solutions support for Oracle VM Server for SPARCInstalling Storage Foundation in a Oracle VM Server for SPARC environment

■ See the Veritas Storage Foundation Cluster File System and High AvailabilityRelease Notes for Solaris.
Exporting a Veritas volume to a guest domain fromthe control domain
Use the following procedure to migrate a VxVM disk group from a non-logicaldomain environment to a Oracle VM Server for SPARC environment.
Note: This section applies to only the Split Storage Foundation model.
In the following example control domain is named “primary” and the guest domainis named “logical domain1.” The prompts in each step show in which domain torun the command.
To create virtual disks on top of the Veritas Volume Manager data volumes usingthe ldm command
1 The VxVM diskgroup on the target host is imported in the control domain,after which volumes are visible from inside the control domain.
See theVeritasStorageFoundationAdministrator’sGuide tomovedisk groupsbetween systems.
2 In the control domain (primary), configure a service exporting the VxVMvolume containing a VxFS or UFS filesystem as a slice using theoptions=slice option:
primary# ldm add-vdiskserverdevice options=slice \
/dev/vx/dsk/dg-name/volume_name \
volume_name volume_name@primary-vds0
Caution: A volume by default shows up as a full disk in the guest. The VirtualDisk Client driver writes a VTOC on block 0 of the virtual disk, whichwill endup as a WRITE on block 0 of the VxVM volume. This can potentially causedata corruption, because block 0 of the VxVM volume contains user data.Using options=slice exports a volume as a slice to the guest and does notcause any writes to block 0, therefore preserving user data.
3 Add the exported disk to a guest domain:
primary# ldm add-vdisk vdisk1 volume_name
volume_name@primary-vds0 logical domain1
Storage Foundation and High Availability Solutions support for Oracle VM Server for SPARCExporting a Veritas volume to a guest domain from the control domain
136

4 Start the guest domain, and ensure that the new virtual disk is visible.
primary# ldm bind logical domain1
primary# ldm start logical domain1
5 If the new virtual disk device node entires do not show up in the/dev/[r]dskdirectories, then run the devfsadm command in the guest domain:
logical domain1# devfsadm -C
In this example, the new disk appears as /dev/[r]dsk/c0d1s0.
logical domain1# ls -l /dev/dsk/c0d1s0
lrwxrwxrwx 1 root root 62 Sep 11 13:30 /dev/dsk/c0d1s0 ->
../../devices/virtual-devices@100/channel-devices@200/disk@1:a
6 Mount the file system on the disk to access the application data:
logical domain1# mount -F vxfs /dev/dsk/c0d1s0 /mnt
logical domain1# mount -F ufs /dev/dsk/c0d1s0 /mnt
Provisioning storage for a guest domainUse the following procedure to provision storage for a guest domain. You canprovision both boot disks and data disks.
Note: This section applies to the Split Storage Foundation stack model only.
For the guest-based Storage Foundation model:
See “How Storage Foundation and High Availability Solutions works in the guestdomains” on page 122.
Provisioning Veritas Volume Manager volumes as data disks for guestdomains
The following procedure usesVxVMvolumes as data disks (virtual disks) for guestdomains.
VxFS can be used as the file system on top of the data disks.
137Storage Foundation and High Availability Solutions support for Oracle VM Server for SPARCProvisioning storage for a guest domain

The example control domain is named “primary” and the guest domain is named“logical domain1.” The prompts in each step show in which domain to run thecommand.
To provision Veritas Volume Manager volumes as data disks
1 Create a VxVM disk group (mydatadg in this example) with some disksallocated to it:
primary# vxdg init mydatadg TagmaStore-USP0_29 TagmaStore-USP0_30
2 Create aVxVMvolumeof the desired layout (in this example, creating a simplevolume):
primary# vxassist -g mydatadg make datavol1 500m
3 Configure a service exporting the volume datavol1 as a virtual disk:
primary# ldm add-vdiskserverdevice /dev/vx/dsk/mydatadg/datavol1 \
datadisk1@primary-vds0
4 Add the exported disk to a guest domain.
primary# ldm add-vdisk vdisk1 datadisk1@primary-vds0 logical domain1
5 Start the guest domain, and ensure that the new virtual disk is visible:
primary# ldm bind logical domain1
primary# ldm start logical domain1
6 If the new virtual disk device node entires do not show up in the/dev/[r]dskdirectories, then run the devfsadm command in the guest domain:
logical domain1# devfsadm -C
7 Label the disk using the format command to create a valid label before tryingto access it.
See the format(1M) manual page.
8 Create the file system where c0d1s2 is the disk.
logical domain1# mkfs -F vxfs /dev/rdsk/c0d1s2
Storage Foundation and High Availability Solutions support for Oracle VM Server for SPARCProvisioning storage for a guest domain
138

9 Mount the file system.
logical domain1# mount -F vxfs /dev/dsk/c0d1s2 /mnt
10 Verify that the file system has been created:
logical domain1# df -hl -F vxfs
Filesystem size used avail capacity Mounted on
/dev/dsk/c0d1s2 500M 2.2M 467M 1% /mnt
Provisioning Veritas Volume Manager volumes as boot disks for guestdomains
The following procedure provisions boot disks for a guest domain.
A VxVM volume appears as a full disk by default and can be used as a boot diskfor a guest domain.
The following process gives the outline of how a VxVM volume can be used as aboot disk.
The example control domain and is named “primary” the guest domain is named“logical domain1.” The prompts in each step show in which domain to run thecommand.
To provision Veritas Volume Manager volumes as boot disks for guest domains
1 On the control domain, create a VxVM volume of a size that is recommendedfor Solaris 11 installation. In this example, a 7GB volume is created:
primary# vxassist -g boot_dg make bootdisk-vol 7g
2 Configure a service by exporting the /dev/vx/dsk/boot_dg/bootdisk1-volvolume as a virtual disk:
primary# ldm add-vdiskserverdevice \
/dev/vx/dsk/boot_dg/bootdisk1-vol bootdisk1-vol@primary-vds0
3 Add the exported disk to logical domain1:
primary# ldm add-vdisk vdisk1 bootdisk1-vol@primary-vds0 \
logical domain1
4 Follow Oracle’s recommended steps to install and boot a guest domain, anduse the virtual disk vdisk1 as the boot disk during the net install.
139Storage Foundation and High Availability Solutions support for Oracle VM Server for SPARCProvisioning storage for a guest domain

Note: It is not supported to encapsulate such a boot disk inside the guest usingVxVM or any other 3rd party Volume Management software.
Using VxVM mirrored volumes as boot devices for Ldoms
Figure 5-8 VxVM mirrored volumes as boot devices for Ldoms
LDOM
vdisk
bootdg
boot disk (c0d0)
Control Domain running VxVM
mirrored volume
Disk1 Disk2
For providing high availability and redundancy of the guest boot disks, Symantecrecommends that you use mirrored volumes as the backend storage for the bootdisks.
The following are some advantages of using this configuration:
■ Youneed to export only a single “vdisk” to the guest LDOM, using only a singleLDC channel. This saves on the overall LDC channels being utilized in thecontrol domain.
■ Boot disks are managed in a single central location, possibly even in one diskgroup in the control domain.
■ You can easily take snapshots of the boot image using VxVM snapshot featurein the control domain.
■ With VxVM doing mirroring in the control domain and a single device beingexported to the LDOM, even if the primary boot disk goes bad, the volume stillremains enabled in the control domain and is accessible using the same devicein the LDOM.
Storage Foundation and High Availability Solutions support for Oracle VM Server for SPARCProvisioning storage for a guest domain
140

■ There is no need to carry out the extra step of encapsulating the boot diskinside the guest for mirroring as it is already mirrored in the Control Domain.
Using Veritas VolumeManager snapshots for cloninglogical domain boot disks
The following highlights the steps to clone the boot disk from an existing logicaldomain using VxVM snapshots, and makes use of the third-mirror breakoffsnapshots.
See “Provisioning Veritas Volume Manager volumes as boot disks for guestdomains” on page 139.
Figure 5-9 illustrates an example of using Veritas VolumeManager snapshots forcloning Logical Domain boot disks.
Figure 5-9 Example of using Veritas Volume Manager snapshots for cloningLogical Domain boot disks
vdisk2
Guest: ldom2Guest: ldom1
c0d0s2c0d0s2
vdisk1
Control domain
clone
SNAP-bootdisk1-vol
vdisk1 is createdby exporting alarge volume“bootdisk1-vol”
vdisk2 is created byexporting the
snapshot volume“SNAP-bootdisk1-
vol”
snapshotbootdisk1-vol
Before this procedure, logical domain1 has its boot disk contained in a largevolume, /dev/vx/dsk/boot_dg/bootdisk1-vol.
This procedure involves the following steps:
141Storage Foundation and High Availability Solutions support for Oracle VM Server for SPARCUsing Veritas Volume Manager snapshots for cloning logical domain boot disks

■ Cloning the logical domain configuration to form a new logical domainconfiguration.This step is a Solaris logical domain procedure, and can be achieved using thefollowing commands:
# ldm list-constraints -x
# ldm add-domain -i
Refer to the Oracle documentation for more information about cloning thelogical domain configuration to form a new logical domain configuration.See the Logical Domains Administration Guide.
■ After cloning the configuration, clone the boot disk andprovision it to the newlogical domain.To create a new logical domain with a different configuration than that oflogical domain1, skip this step of cloning the configuration and create thedesired logical domain configuration separately.
Storage Foundation and High Availability Solutions support for Oracle VM Server for SPARCUsing Veritas Volume Manager snapshots for cloning logical domain boot disks
142

To clone the boot disk using Veritas Volume Manager snapshots
1 Create a snapshot of the source volumebootdisk1-vol. To create the snapshot,you can either take some of the existing ACTIVE plexes in the volume, or youcan use the following command to add new snapshot mirrors to the volume:
primary# vxsnap [-b] [-g diskgroup] addmir volume \
[nmirror=N] [alloc=storage_attributes]
By default, the vxsnap addmir command adds one snapshot mirror to avolume unless you use the nmirror attribute to specify a different numberof mirrors. The mirrors remain in the SNAPATT state until they are fullysynchronized. The -b option can be used to perform the synchronization inthe background.Once synchronized, themirrors are placed in theSNAPDONEstate.
For example, the following command adds two mirrors to the volume,bootdisk1-vol, on disks mydg10 and mydg11:
primary# vxsnap -g boot_dg addmir bootdisk1-vol \
nmirror=2 alloc=mydg10,mydg11
If you specify the -b option to the vxsnap addmir command, you can use thevxsnap snapwait command to wait for synchronization of the snapshotplexes to complete, as shown in the following example:
primary# vxsnap -g boot_dg snapwait bootdisk1-vol nmirror=2
143Storage Foundation and High Availability Solutions support for Oracle VM Server for SPARCUsing Veritas Volume Manager snapshots for cloning logical domain boot disks

2 To create a third-mirror break-off snapshot, use the following form of thevxsnap make command.
Caution:Shut down the guest domain before executing the vxsnap commandto take the snapshot.
primary# vxsnap [-g diskgroup] make \
source=volume[/newvol=snapvol] \
{/plex=plex1[,plex2,...]|/nmirror=number]}
Either of the following attributesmaybe specified to create thenewsnapshotvolume, snapvol, by breaking off one or more existing plexes in the originalvolume:
Specifies the plexes in the existing volume that are to be broken off. Thisattribute can only be used with plexes that are in the ACTIVE state.
plex
Specifies how many plexes are to be broken off. This attribute can only beused with plexes that are in the SNAPDONE state. Such plexes could havebeen added to the volume by using the vxsnap addmir command.
nmirror
Snapshots that are created from one or more ACTIVE or SNAPDONE plexesin the volume are already synchronized by definition.
For backup purposes, a snapshot volume with one plex should be sufficient.
For example,
primary# vxsnap -g boot_dg make \
source=bootdisk1-vol/newvol=SNAP-bootdisk1-vol/nmirror=1
Here bootdisk1-volmakes source; SNAP-bootdisk1-vol is the newvolume and1 is the nmirror value.
The block device for the snapshot volume will be/dev/vx/dsk/boot_dg/SNAP-bootdisk1-vol.
3 Configure a service by exportingthe/dev/vx/dsk/boot_dg/SNAP-bootdisk1-volfile as a virtual disk.
primary# ldm add-vdiskserverdevice \
/dev/vx/dsk/boot_dg/SNAP-bootdisk1-vol vdisk2@primary-vds0
Storage Foundation and High Availability Solutions support for Oracle VM Server for SPARCUsing Veritas Volume Manager snapshots for cloning logical domain boot disks
144
4 Add the exported disk to logical domain1 first.
primary# ldm add-vdisk vdisk2 \
SNAP-bootdisk1-vol@primary-vds0 logical domain1
primary# ldm bind logical domain1
primary# ldm start logical domain1
5 Start logical domain1 and boot logical domain1 from its primary boot diskvdisk1.
primary# ldm bind logical domain1
primary# ldm start logical domain1
6 If the new virtual disk device node entires do not show up in the/dev/[r]dskdirectories, then run the devfsadm command in the guest domain:
logical domain1# devfsadm -C
where vdisk2 is the c0d2s# device.
logical domain1# ls /dev/dsk/c0d2s*
/dev/dsk/c0d2s0 /dev/dsk/c0d2s2 /dev/dsk/c0d2s4 /dev/dsk/c0d2s6
/dev/dsk/c0d2s1 /dev/dsk/c0d2s3 /dev/dsk/c0d2s5 /dev/dsk/c0d2s7
7 Mount the root file system of c0d2s0 and modify the /etc/vfstab entriessuch that all c#d#s# entries are changed to c0d0s#. Youmust do this becauselogical domain2 is a new logical domain and the first disk in the operatingsystem device tree is always named as c0d0s#.
8 Stop and unbind logical domain1 from its primary boot disk vdisk1.
primary# ldm stop logical domain1
primary# ldm unbind logical domain1
9 After you change the vfstab file, unmount the file system and unbind vdisk2from logical domain1:
primary# ldm remove-vdisk vdisk2 logical domain1
145Storage Foundation and High Availability Solutions support for Oracle VM Server for SPARCUsing Veritas Volume Manager snapshots for cloning logical domain boot disks

10 Bind vdisk2 to logical domain2 and then start and boot logical domain2.
primary# ldm add-vdisk vdisk2 vdisk2@primary-vds0 logical domain2
primary# ldm bind logical domain2
primary# ldm start logical domain2
After booting logical domain2, appears as logical domain1 on the consolebecause the other host-specific parameters like hostname and IP address arestill that of logical domain1.
logical domain1 console login:
11 To change the parameters bring logical domain2 to single-usermode and runthe sys-unconfig command.
12 Reboot logical domain2.
During the reboot, the operating system prompts you to configure thehost-specific parameters such as hostname and IP address, which you mustenter corresponding to logical domain2.
13 After you have specified all these parameters, logical domain2 bootssuccessfully.
Configuring Oracle VM Server for SPARC guestdomains for disaster recovery
The Oracle VMs can be configured for disaster recovery by replicating the bootdisk using replicationmethods likeHitachi TrueCopy, EMCSRDF, VeritasVolumeReplicator, and so on. Thenetwork configuration for theOracleVM in the primarysite may not be effective in the secondary site if the two sites are in different IPsubnets. You will need to make these additional configuration changes to theLDom resource.
To configure the guest domains for disaster recovery, you need to configure VCSon both the sites in the Control Domains with GCO option.
Refer to the Veritas Cluster Server Administrator’s Guide for more informationabout global clusters.
Storage Foundation and High Availability Solutions support for Oracle VM Server for SPARCConfiguring Oracle VM Server for SPARC guest domains for disaster recovery
146

To set up the guest domain for disaster recovery
1 On the primary site, create the guest domain using ldm commands andconfigure the network-related parameters.
2 On the primary site after you boot the guest domain, copy and install thepackage VRTSvcsnr from the VCS installation media in the guest domain.This package installs the vcs-network-reconfig service in the guest domain.This servicemakes sure that the site-specific network parameters are appliedwhen the guest domain boots.
3 On the primary site, shut down the guest domain.
4 Use replication specific commands to failover the replication to the secondarysite from the primary site.
5 Repeat step 1 on the secondary site.
6 Perform step7, step 8, step 9, and step 10 on both the primary cluster and thesecondary clusters.
7 Create a VCS service group and add a VCS LDom resource for the guestdomain.
Configure the following disaster recovery-related attributes on the LDomresource with site-specific values for each: IPAddress, Netmask, Gateway,DNS (DNS Server).
Set the value of the ConfigureNetwork attribute to 1 to make the changeseffective. The LDom agent does not apply the disaster recovery-relatedattributes to the guest domain if the value of the ConfigureNetwork attributeis 0.
8 Add the appropriate Mount and DiskGroup resources in the service groupfor the file system and the disk group on which the boot image of the guestdomain resides.
Add a resource dependency from the LDom resource to the Mount resourceand another dependency from theMount resource to theDiskgroup resource.
9 Add the appropriate VCS replication resource in the service group. Examplesof hardware replication agents are SRDF for EMC SRDF, HTC for HitachiTrueCopy, MirrorView for EMC MirrorView, etc.
Refer to the appropriate VCS Replication agent guide for configuring thereplication resource.
For VVR-based replication, add the appropriate RVGPrimary resource to theservice group.
Refer to the following manuals for more information:
147Storage Foundation and High Availability Solutions support for Oracle VM Server for SPARCConfiguring Oracle VM Server for SPARC guest domains for disaster recovery

■ For information about configuringVVR-related resources, see theVeritasStorage Foundation and High Availability Solutions ReplicationAdministrator's Guide.
■ For information about the VVR-related agents, see the Veritas ClusterServer Bundled Agents Reference Guide.
10 Add a dependency from the DiskGroup resource to the replication resource.
Figure 5-10 Sample resource dependency diagram for hardware replicationbased guest domains
LDom
DiskGroup
Mount
SRDF
Figure 5-11 Sample resource dependency diagram for VVR replication-basedguest domains
LDom
RVGPrimary
Mount
The replication resource makes sure that when the resource is online in a site,the underlying replicated devices are in primary mode and the remote devicesare in secondarymode. Thus,when the LDomresource goes online, the underlyingstorage will always be in read-write mode. When the LDom resource goes online,it sets the DR related parameters in the EEPROM parameternetwork-boot-arguments for the guest domain before starting the guest domain.When the guest domain boots, the vcs-network-reconfig service starts inside theguest domain. This service reads the EEPROMparameter and applies the disasterrecovery related parameters by modifying the appropriate files inside the guestdomain.
Storage Foundation and High Availability Solutions support for Oracle VM Server for SPARCConfiguring Oracle VM Server for SPARC guest domains for disaster recovery
148
Software limitationsThe following section describes some of the limitations of the Oracle VM serverfor SPARC software and how those software limitations affect the functionalityof the Veritas Storage Foundation products.
Memory Corruption in the guest domain during SCSI commandsWhen running VxVM and DMP the system panics in the guest domain. Thefollowing error messages display on the console:
vxdmp: NOTICE: VxVM vxdmp V-5-3-289 DMP: Memory Overrun!
Caller dmpscsi_sys.c(170) Ptr 0x3000528e580 Size 0x100
vxdmp: NOTICE: VxVM vxdmp V-5-3-289 DMP: Memory Overrun!
Caller dmppgrio.c(824) Ptr 0x3002d7f1a80 Size 0xe8
These error messages are due to a kernel memory corruption occurring in theSolaris kernel driver stacks (virtual disk drivers). This issue occurs when issuingUSCSICMD with the sense request enable (USCSI_RQENABLE) on a virtual diskfrom the guest.
Symantec has an open escalation with Oracle and an associated Oracle (SUN) bugid for this issue:
Oracle (SUN) Escalation number: 1-23915211
Oracle (SUN) bug id: 6705190 (ABS: uscsicmd on vdisk can overflow the sensebuffer)
This Oracle (SUN) bug has been fixed in Sun patch 139562-02.
Exporting the raw volume device node failsFollowing messages can be observed in the /var/adm/messages file:
vds: [ID 998409 kern.info] vd_setup_vd():
/dev/vx/rdsk/testdg/testvol identification failed
vds: [ID 790452 kern.info] vd_setup_vd():
/dev/vx/rdsk/testdg/testvol can not be exported as a virtual disk
(error 5)
vds: [ID 556514 kern.info] vds_add_vd(): Failed to add vdisk ID 21
vds: [ID 970787 kern.info] vds_add_vd(): No vDisk entry found for
vdisk ID 21
Workaround: ExportVxVMvolumesusing their block device nodes instead.Oracleis investigating this issue.
149Storage Foundation and High Availability Solutions support for Oracle VM Server for SPARCSoftware limitations

Oracle (SUN) bug id: 6716365 (disk images on volumes should be exported usingthe ldi interface)
This Oracle (Sun) bug is fixed in Oracle (Sun) patch 139562-02.
Resizing a Veritas Volume Manager volume (exported as a slice or fulldisk) does not dynamically reflect the new size of the volume in theguest
On resizing a VxVM volume exported to a guest, the virtual disk still shows theold size of the volume. The virtual disk drivers do not update the size of thebackend volume after the volume is resized.
Oracle has an RFE for this issue (CR 6699271 Dynamic virtual disk sizemanagement).
Workaround: The guest must be stopped and rebound for the new size to bereflected.
This Oracle (Sun) bug is fixed in Oracle (Sun) patch 139562-02.
Known issuesThe following section describes someof the known issues of theOracleVMServerfor SPARC software and how those known issues affect the functionality of theVeritas Storage Foundation products.
Guest-based known issuesThe following are new known issues in this release of Veritas Storage Foundationand High Availability Solutions Support for Oracle VM Server for SPARC.
Encapsulating a non-scsi disk may failTrying to encapsulate a non-scsi disk which is a slice of a disk or a disk exportedas a slice may fail with the following error:
VxVM vxslicer ERROR V-5-1-599 Disk layout does not support swap shrinking
VxVM vxslicer ERROR V-5-1-5964 Unsupported disk layout.
Encapsulation requires at least 0 sectors of unused space either at the
beginning or end of the disk drive.
This is because while installing the OS on such a disk, it is required to specify theentire size of the backend device as the size of slice "s0", leaving no free space onthe disk.
Storage Foundation and High Availability Solutions support for Oracle VM Server for SPARCKnown issues
150

Boot disk encapsulation requires free space at the end or the beginning of the diskfor it to proceed ahead.
Guest domain node shows only one PGR key instead of twoafter rejecting the other node in the clusterFor configuration information concerning the guest domain node shows only 1PGR key instead of 2 after rejecting the other node in the cluster:
See Figure 5-4 on page 125.
Thiswasobservedwhile performinga series of reboots of theprimaryandalternateI/O domains on both the physical hosts housing the two guests. At some pointone key is reported missing on the coordinator disk.
This issue is under investigation. The vxfen driver can still function as long asthere is 1 PGR key. This is a low severity issue as it will not cause any immediateinterruption. Symantec will update this issue when the root cause is found forthe missing key.
Disk paths intermittently go offline while performing I/O on amirrored volumeThis was observed while testing the SFCFS stack inside a 4-node guest clusterwhere each node gets its network and virtual disk resources from multiple I/Odomains within the same host.
See “Supported configurationswithSFCFSandmultiple I/ODomains”onpage124.
While performing I/O on a mirrored volume inside a guest, it was observed thata vdisk would go offline intermittently even when at least one I/O domain whichprovided a path to that disk was still up and running.
Symantec recommends that you install Solaris 10 Update 7 that contains the fixfor Oracle (Sun) bug id 6742587 (vds can ACK a request twice).
Deadlock between DMP kernel and VDC driver during volumecreationThis was observed by Oracle during their interoperatability testing of 5.0 MP3.The deadlock happens when creating a mirrored VxVM volume, while there isongoing I/O to a UFS file system on another disk which is not under VxVM. Thisissue has been observed typically in a large configuration such as 14 virtual CPUsand around 10Gig of memory configured for the guest domain running VxVM.
Relevant Oracle (Sun) bug id: 6744348
This known issue has been fixed and verified in the 5.0 MP3 RP1 release.
151Storage Foundation and High Availability Solutions support for Oracle VM Server for SPARCKnown issues
For the latest information onupdates, patches, documentation, and known issuesregarding this 5.0 MP3 RP1 release, see the following TechNote on the SymantecTechnical Support website:
For Solaris SPARC:
http://entsupport.symantec.com/docs/281987
For Solaris x64:
http://entsupport.symantec.com/docs/286955
Split Storage Foundation stack known issuesThe following are new known issues in this release of Veritas Storage Foundationand High Availability Solutions Support for Oracle VM Server for SPARC.
Caching of data writes on the backend volume in the servicedomainThis was observed by a customer during their evaluation of Oracle VM Server forSPARC with Storage Foundation. This issue occurs because data written to thevirtual diskmight get cached into the service domain before it is effectivelywrittento the virtual disk backend. This can cause potential data loss if the service domaincrashes while the data is still cached.
Oracle (Sun) bug id is: 6684721 (file backed virtual I/O should be synchronous)
This Oracle (Sun) bug is fixed in Oracle (Sun) patch 139562-02 that has beenobsoleted by 138888-07.
A volume can become inaccessible from the guest in the eventof control domain rebootAll access to such a volume hangs if the primary domain is rebooted. This is dueto the vdisk corresponding to the volume does not come back online after thecontrol domain reboots.
This issue has been identified and fixed under Oracle (Sun) bug id: 6795836(vd_setup_vd() should handle errors from vd_identify_dev() better)
This Oracle (Sun) bug is fixed in Oracle (Sun) patch 141777-01.
Storage Foundation and High Availability Solutions support for Oracle VM Server for SPARCKnown issues
152
Veritas Cluster Serversupport for using CVM withmultiple nodes in a OracleVM Server for SPARCenvironment
This chapter includes the following topics:
■ Clustering using Cluster Volume Manager
■ Installing Storage Foundation on multiple nodes in a Logical Domain
■ Cluster VolumeManager in the control domain for providing high availability
Clustering using Cluster Volume ManagerThe Veritas Volume Manager cluster functionality (CVM) makes logical volumesand raw device applications accessible throughout a cluster.
In the split Storage Foundation model, CVM is placed in the control domain andVxFS is placed in the guest domain. In thismodel, CVMprovides high availabilityand shared storage visibility at the control domain level across multiple physicalnodes in the cluster.
See “ClusterVolumeManager in the control domain forprovidinghighavailability”on page 156.
6Chapter

In the guest-based Storage Foundation stack model, CVM is placed in the guestdomain, providing high availability and shared storage visibility at the guestdomain level across multiple guest domains that act as the nodes in the cluster.
Installing Storage Foundation on multiple nodes in aLogical Domain
To install Storage Foundation on multiple nodes in a Solaris Logical Domainsenvironment, you must complete the following operations, which are the sameas on a single node:
■ See “Installing and configuring Oracle VM Server for SPARC and domains”on page 130.
■ See “InstallingStorageFoundation in the control domainor guest”onpage130.
■ See “Installing Veritas File System in the guest domain” on page 131.
■ See “Verifying the configuration” on page 135.
Reconfiguring the clustering agents for Cluster Volume ManagerThis section applies to only the Split Storage Foundation model.
For a Storage Foundation CVM, the following additional configuration steps arenecessary:
■ See “Removing the vxfsckd resource” on page 154.
■ See “Creating CVMVolDg in a group” on page 155.
Removing the vxfsckd resourceAfter configuring Storage Foundation and CVM, remove the vxfsckd resource.
To remove the vxfsckd resource
1 Make the configuration writeable:
# haconf -makerw
2 Delete the resource:
# hares -delete vxfsckd
3 Make the configuration read-only:
# haconf -dump -makero
Veritas Cluster Server support for using CVM with multiple nodes in a Oracle VM Server for SPARC environmentInstalling Storage Foundation on multiple nodes in a Logical Domain
154

4 Stop the resources:
# hastop -all
5 Restart the resources.
# hastart
Run the hastart command on all nodes in the cluster.
Creating CVMVolDg in a groupThe following procedure creates CVMVolDg in a given group.
To create CVMVolDg
1 Make the configuration writeable:
# haconf -makerw
2 Add the CVMVolDg resource:
# hares -add name_of_resource CVMVolDg name_of_group
3 Add a diskgroup name to the resource:
# hares -modify name_of_resource CVMDiskGroup diskgroup_name
4 Make the attribute local to the system:
# hares -local name_of_resource CVMActivation
5 Add the attribute to the resource.
# hares -modify name_of_resource CVMActivation \
activation_value -sys nodename
Repeated this step on each of the nodes.
6 If you want to monitor volumes, enter the following command:
# # hares -modify name_of_resource CVMVolume -add \
name_of_volume
In a database environment, Symantec recommends you monitor volumes.
155Veritas Cluster Server support for using CVM with multiple nodes in a Oracle VM Server for SPARC environmentInstalling Storage Foundation on multiple nodes in a Logical Domain
7 Modify the resource so that a failure of this resource does not bring down theentire group:
# hares -modify name_of_resource Critical 0
8 Enable the resources:
# hares -modify name_of_resource Enabled 1
9 Make the configuration read-only:
# haconf -dump -makero
10 Verify the configuration:
# hacf -verify
This should put the resource in the main.cf file.
Cluster Volume Manager in the control domain forproviding high availability
The main advantage of clusters is protection against hardware failure. Shouldthe primary node fail or otherwise becomeunavailable, applications can continueto run by transferring their execution to standby nodes in the cluster.
CVM can be deployed in the control domains of multiple physical hosts runningOracle VM Server for SPARC, providing high availability of the control domain.
Figure 6-1 illustrates a CVM configuration.
Veritas Cluster Server support for using CVM with multiple nodes in a Oracle VM Server for SPARC environmentCluster Volume Manager in the control domain for providing high availability
156

Figure 6-1 CVM configuration in an Oracle VM Server for SPARC environment
Shared storage
Host BHost A
vdisk1
guest: ldom2VxFS [/snapfs1]
guest: ldom1VxFS [/fs1]
c0d0s2c0d0s2
vdisk1
Control domain BControl domain A
shared-dg1 shared-dg1
vol1 snap-vol1 vol1 snap-vol1
vdisks are created byexporting the sharedvolume and snapshot
If a control domain encounters ahardware or software failure causing the domainto shut down, all applications running in the guest domains on that host are alsoaffected. These applications can be failed over and restarted inside guests runningon another active node of the cluster.
Caution:As such applications running in the guestsmay resumeor time out basedon the individual application settings. The user must decide if the applicationmust be restarted on another guest on the failed-over control domain. There is apotential data corruption scenario if the underlying shared volumes get accessedfrom both of the guests simultaneously.
Shared volumes and their snapshots can be used as a backing store for guestdomains.
157Veritas Cluster Server support for using CVM with multiple nodes in a Oracle VM Server for SPARC environmentCluster Volume Manager in the control domain for providing high availability
Note: The ability to take online snapshots is currently inhibited because the filesystem in the guest cannot coordinate with the VxVM drivers in the controldomain.
Make sure that the volume whose snapshot is being taken is closed before thesnapshot is taken.
The following example procedure shows how snapshots of shared volumes areadministered in such an environment. In the example, datavol1 is a shared volumebeing used by guest domain logical domain1 and c0d1s2 is the front end for thisvolume visible from logical domain1.
To take a snapshot of datavol1
1 Unmount any VxFS file systems that exist on c0d1s0.
2 Stop and unbind logical domain1:
primary# ldm stop logical domain1
primary# ldm unbind logical domain1
This ensures that all the file systemmetadata is flushed down to the backendvolume, datavol1.
3 Create a snapshot of datavol1.
See theVeritas Storage FoundationAdministrator'sGuide for information oncreating and managing third-mirror break-off snapshots.
4 Once the snapshot operation is complete, rebind and restart logical domain1.
primary# ldm bind logical domain1
primary# ldm start logical domain1
5 Once logical domain1 boots, remount the VxFS file system on c0d1s0.
Veritas Cluster Server support for using CVM with multiple nodes in a Oracle VM Server for SPARC environmentCluster Volume Manager in the control domain for providing high availability
158

Veritas Cluster Server:Configuring Oracle VMServer for SPARC for highavailability
This chapter includes the following topics:
■ About Veritas Cluster Server in a Oracle VM Server for SPARC environment
■ About Veritas Cluster Server configurationmodels in anOracle VMServer forSPARC environment
■ Oracle VM Server for SPARC guest domain migration in VCS environment
■ About configuringVeritas Cluster Server forOracleVMServer for SPARCwithmultiple I/O domains
■ Configuring VCS to manage a Logical Domain using services from multipleI/O domains
About Veritas Cluster Server in a Oracle VM Serverfor SPARC environment
Veritas Cluster Server (VCS) provides high availability (HA) for Oracle VMServerfor SPARC. You can configure VCS tomonitor the Logical Domain, services to theLogical Domain, and the applications that run in logical domain, or to monitoronly the applications that run in the logical domain.
7Chapter

See “About Veritas Cluster Server configuration models in an Oracle VM Serverfor SPARC environment” on page 162.
Table 7-1 lists the failure scenarios and the VCS failover options based on whichyou can plan your VCS configuration in an Oracle VM Server for SPARCenvironment.
Table 7-1 Veritas Cluster Server failover options for logical domain failure
Typical VCS configurationVCS failoverFailure scenario
VCS is installed in the controldomain of each node.
See “Veritas Cluster Serversetup to fail over a logicaldomain on a failure of logicaldomain” on page 163.
VCS fails over the logicaldomain from one node toanother node
Logical domains, theirstorage, or switches fail
VCS is installed in the controldomain of each node, andsingle node VCS is installedon each guest domain.
See “Veritas Cluster Serversetup to fail over a logicaldomain on a failure ofApplication running insidethe logical domain or logicaldomain itself” on page 168.
VCS fails over the logicaldomain from one nodeanother node.
The application starts on thesame logical domainafter thelogical domain failover.
Logical domains, theirstorage, or switches fail
Or
Applications that run inlogical domains fail
VCS is installed in the guestdomain of each node.
See “Veritas Cluster Serversetup to fail over anApplication running insidelogical domain on a failure ofApplication” on page 175.
VCS fails over the applicationfrom one logical domain toanother.
Applications that run inlogical domains fail
Or
logical domain where theapplication is running fails
Dynamic reconfiguration of memory and CPU of a guest domainVCS supports dynamic reconfiguration of memory and CPU assigned to a guestdomain. Modify the values of the Memory and NumCPU attributes of an LDomresource to dynamically reconfigure the memory and CPU of a guest domain.
Veritas Cluster Server: Configuring Oracle VM Server for SPARC for high availabilityAbout Veritas Cluster Server in a Oracle VM Server for SPARC environment
160

Veritas Cluster Server requirementsFor installation requirements:
See “System requirements” on page 128.
For the configuration model where VCS is installed on the control domain:
■ VCS requires shared storage that is visible across all the nodes in the cluster.
■ Configure Logical Domain on each cluster node.
■ The logical domain’s boot device and application data must reside on sharedstorage.
For the configuration model where VCS is installed on the guest domain:
■ VCS requires the application data to reside on the shared storage.
■ Each node can have more than one logical domain.
■ Each logical domain can have its own boot device.
Veritas Cluster Server limitationsDepending on the configuration model, the following limitations apply to VCS inan Oracle VM Server for SPARC environment.
Limitations for VCS configuration in the control domain:
■ Each logical domain configuredunderVCSmust have at least twoVCPUs.Withone VCPU, the control domain always registers 100% CPU utilization for thelogical domain. This is an Oracle VM Server for SPARC software issue.
Limitation for VCS configuration in the guest domain:
■ Do not export a physical device to more than one guest domains on the samephysical node. For example: If you configure I/O fencing in guest domain, andif one of the guest domains dies, then I/O fencing fences off the other guestdomains as well.
Veritas Cluster Server known issuesThe following section describes known issues with VCS in a Oracle VM Server forSPARC environment.
161Veritas Cluster Server: Configuring Oracle VM Server for SPARC for high availabilityAbout Veritas Cluster Server in a Oracle VM Server for SPARC environment

Shutting down the control domainmay cause the guest domainto crash (1631762)
Two Oracle SPARC Enterprise T5240 serverphysical boxes, each with a control domainand a guest domain. The guest domains ineach of the physical boxes form a two nodecluster. The nodes are named node 0 andnode 1 in the following text.
Set up
Gracefully shuttingdown the control domainof node 0 causes the guest domain of node 0to crash.
Symptom
Even though the guest domain can continueto function when the control domain is shutdown, the heartbeats between node 0 andnode 1 are lost as the control domain shutsdown. As a result, the cluster forms twoseparate sub-clusters without thesub-clusters being able to see each others'heartbeats.
I/O fencing resolves the split brain situationand determines that only one sub-clusterwill continue to function while the othersub-cluster should panic. Therefore, thepanic of node 0 is expected behavior.
Analysis
None; this is expected behavior. However,Symantec recommends keeping the controldomain highly available for the properfunction of the SFCFS and SFRAC stack inthe guest domains.
If you have set up a virtual private LLTheartbeats between the two guests (node 0and node1), the guest will not crash.
Resolution:
About Veritas Cluster Server configurationmodels inan Oracle VM Server for SPARC environment
When you configure VCS in an Oracle VM Server for SPARC environment, youneed some specific information about the logical domain, network, and the storagedevices that the logical domain requires to run.
You need to know the following information about your logical domain:
Veritas Cluster Server: Configuring Oracle VM Server for SPARC for high availabilityAbout Veritas Cluster Server configuration models in an Oracle VM Server for SPARC environment
162
■ The logical domain’s name
■ The names of the primary network interfaces for each node
■ The virtual switch that the logical domain uses
■ The name and type of storage that the logical domain uses
VCS configuration depends on whether you want VCS to fail over the logicaldomain or the application on a failure:
■ See “Veritas Cluster Server setup to fail over a logical domain on a failure oflogical domain” on page 163.
■ See “Veritas Cluster Server setup to fail over a logical domain on a failure ofApplication running inside the logical domain or logical domain itself”on page 168.
■ See “Veritas Cluster Server setup to fail over an Application running insidelogical domain on a failure of Application” on page 175.
See “AboutVeritas Cluster Server in aOracleVMServer for SPARC environment”on page 159.
Veritas Cluster Server setup to fail over a logical domain on a failureof logical domain
Figure 7-1 illustrates a typical setup where VCS installed in the control domainprovides high availability to the logical domain and it’s resources.
163Veritas Cluster Server: Configuring Oracle VM Server for SPARC for high availabilityAbout Veritas Cluster Server configuration models in an Oracle VM Server for SPARC environment

Figure 7-1 Typical setup for logical domain high availability with VCS installedin control domains
Physical layer
Virtual layer
Control domain Logical domain
VCS
Control domain Logical domain
VCS
ldom1 ldom1
Node1 Node2
Applicationstorage
Public network
Boot device
VCS private network
ldom1
A typical two-node VCS configuration for logical domain high availability has thefollowing software and hardware infrastructure:
■ Oracle VM Server for SPARC software is installed on each system Node1 andNode2.
■ Shared storage is attached to each system.
■ A logical domain (logical domain1) exists on both the nodeswith a shared bootdevice.
■ Each LDom has an operating system installed.
■ VCS is installed in the control domains of each node.
Veritas Cluster Server: Configuring Oracle VM Server for SPARC for high availabilityAbout Veritas Cluster Server configuration models in an Oracle VM Server for SPARC environment
164

Figure 7-2 Workflow to configure VCS to fail over a logical domain on a failure
Set up the required hardware(systems, network, and storage)
Install Solaris 10/11 and configureLDoms
Install VCS on control domain ofeach server
Create VCS service group for LDom inthe control domain
For VCS to monitor theLDom:
Configuration scenariosFigure 7-3 shows the basic dependencies for an logical domain resource.
Figure 7-3 A logical domain resource depends on storage and networkresources
LDom
Storage Network
165Veritas Cluster Server: Configuring Oracle VM Server for SPARC for high availabilityAbout Veritas Cluster Server configuration models in an Oracle VM Server for SPARC environment

Network configuration
Use the NIC agent tomonitor the primary network interface, whether it is virtualor physical. Use the interface that appears using the ifconfig command.
Recommended network device to monitor.
Figure 7-4 is an example of an logical domain service group. The logical domainresource requires both network (NIC) and storage (Volume and DiskGroup)resources.
See theVeritasClusterServerBundledAgentsReferenceGuide formore informationabout the NIC agent.
Storage configurations
Depending on your storage configuration, use a combination of the Volume,DiskGroup, and Mount agents to monitor storage for logical domains.
Note: Symantec recommends volumes or flat files in volumes that are managedby VxVM for LDom storage for configurations where VCS is in control domain.
Veritas Volume Manager exposed volumes
Veritas Volume Manager (VxVM) exposed volumes is the recommended storagesolution forVCS in a control domain configuration.Use theVolumeandDiskGroupagents to monitor a VxVM volume. VCS with VxVM provides superior protectionfor your highly available applications.
Figure 7-4 shows an logical domain resource that depends on a Volume andDiskGroup resource.
Figure 7-4 The logical domain resource can depend on resources such as NIC,Volume, and DiskGroup depending on the environment
LDomLDom
Volume NIC
DiskGroup
Formore information about theVolumeandDiskGroup agents, refer to theVeritasCluster Server Bundled Agents Reference Guide.
Veritas Cluster Server: Configuring Oracle VM Server for SPARC for high availabilityAbout Veritas Cluster Server configuration models in an Oracle VM Server for SPARC environment
166

Image files
Use the Mount, Volume, and DiskGroup agents to monitor an image file.
Figure 7-5 shows how the LDom resource depends on the resources with imagefile.
Figure 7-5 The LDom resource in conjunction with different storage resources
LDomLDom
Mount NIC
Volume
DiskGroup
See theVeritasClusterServerBundledAgentsReferenceGuide formore informationabout the Mount agent.
Configuring logical domain
You must perform the following steps to configure logical domain.
To configure logical domain
1 Make sure that the network and storage setup meet the VCS requirements.
See “Veritas Cluster Server requirements” on page 161.
2 Make sure that you have installed the required Solaris operating system inthe logical domain.
3 Create logical domain (ldom1) on each systemwith an identical configurationand boot device.
Installing Veritas Cluster Server inside the control domain
You must install VCS in the control domain of each system.
To install Veritas Cluster Server inside the control domain
◆ Install and configure VCS in the control domain of each system.
The process for installing VCS in the control domain is very similar to the regularinstallation of VCS. However, you must specify the host name of the controldomain for the name of the host where you want to install VCS.
167Veritas Cluster Server: Configuring Oracle VM Server for SPARC for high availabilityAbout Veritas Cluster Server configuration models in an Oracle VM Server for SPARC environment
See the Veritas Cluster Server Installation Guide for VCS installation andconfiguration instructions.
Creating the Veritas Cluster Server service groups for logicaldomainsYou can also create and manage service groups using the Veritas OperationsManager (VOM), or through the command line.
See the Veritas Cluster Server Administrator’s Guide for complete informationabout using and managing service groups.
Verifying a logical domain service group failoverVerify the configuration in different situations.
Using hagrp - switch command
Switch the logical domain service group to another node in the cluster to makesure the service group fails over. If all the resources are properly configured, theservice group shuts down on the first node and comes up on the second node.
Other verification scenarios
In all of these verification scenarios, you are stopping ormoving an logical domain,or stopping a resource for that logical domain. VCS should detect the failure, orthe movement, and either failover the effected logical domain or take no action.
The following list presents some quick testing scenarios;
■ From outside of VCS control, stop the logical domain. VCS should fail thelogical domain over to the other node.
■ Boot the logical domain through VCS by entering a hagrp -online command.move the logical domain to another node by shutting it down through VCS onthe nodewhere the logical domain is running. Boot the logical domain outsideofVCS control on the other node- the service group comes online on that node.
Veritas Cluster Server setup to fail over a logical domain on a failureof Application running inside the logical domain or logical domainitself
Figure 7-6 illustrates a typical setup where VCS installed in the control domainprovides high availability to applications that run in the guest domains.
Veritas Cluster Server: Configuring Oracle VM Server for SPARC for high availabilityAbout Veritas Cluster Server configuration models in an Oracle VM Server for SPARC environment
168

Figure 7-6 Typical setup for application high availability with VCS installed incontrol domains
Physical layer
Virtual layer
Control domain Logical domain
VCSApplication
Control domain Logical domain
VCSApplication
ldom1 ldom1
Node1 Node2
Applicationstorage
Public network
Boot device
VCS privatenetwork
VCS(one-node)
VCS(one-node)
ldom1
A typical two-node VCS configuration that fails over the logical domains to keepthe applications that run in themhighly available has the following infrastructure:
■ Oracle VM Server for SPARC software is installed on each system Node1 andNode2.
■ Shared storage is attached to each system.
■ A logical domain (logical domain1) with same configuration details exists onboth the nodes with a shared boot device.
■ Each logical domain has an operating system installed.
■ VCS is installed in the control domains of each node.
■ Each guest domain has single-node VCS installed. VCS kernel components arenot required.
■ VCS service group exists inside the guest domain for the application runninginside the guest domain. VCS in the control domain uses this service group tomanage the applications using RemoteGroup resource.
169Veritas Cluster Server: Configuring Oracle VM Server for SPARC for high availabilityAbout Veritas Cluster Server configuration models in an Oracle VM Server for SPARC environment

■ Service group with RemoteGroup resource exists in the control domain tomonitor the application service group in the guest domain.
■ Service group with LDom resource exists in the control domain.
■ An online global firm dependency exists from RemoteGroup service group tothe LDom service group.
Figure 7-7 A logical domain resource depends on storage and networkresources
LDom
Storage Network
You can configure VCS to keep the logical domains highly available. In additionto monitoring the logical domain, you can also configure VCS to monitor theapplications that run in them.
You need to perform additional steps for VCS in the control domain to manageapplications in the guest domains. After you install VCS in the control domain,youmust create separate service groups for theRemoteGroup resource and logicaldomain resource with online global firm dependency.
Note: If you create theRemoteGroup resource as part of the logical domain servicegroup, then the RemoteGroup resource state remains asUNKNOWN if the logicaldomain is down.VCSdoes not probe the service group and cannot bring the logicaldomain online. The online global firm dependency between the service groupsallows VCS to fail over a faulted child logical domain service group independentof the state of the parent RemoteGroup service group.
Perform the following tasks to configure VCS to fail over a logical domain due toits failure:
■ Review the configuration scenariosSee “Configuration scenarios” on page 165.
■ Configure logical domainsSee “Configuring logical domain” on page 167.
■ Install VCS on control domainSee “Installing Veritas Cluster Server inside the control domain” on page 167.
■ Create VCS service group for the logical domain
Veritas Cluster Server: Configuring Oracle VM Server for SPARC for high availabilityAbout Veritas Cluster Server configuration models in an Oracle VM Server for SPARC environment
170
See “Creating the Veritas Cluster Server service groups for logical domains”on page 168.
Perform the following additional tasks to configure VCS to fail over a logicaldomain on an application failure:
■ Install single-node VCS on guest domainSee “Installing single-node Veritas Cluster Server inside the guest domain”on page 173.
■ Configure VCS in control domain to monitor the application in guest domainSee “ConfiguringVeritas Cluster Server tomonitor the application in the guestdomain” on page 173.
Figure 7-8 depicts theworkflow to configureVCS tomanage the failure of a logicaldomain or the failure of an application that runs in an logical domain.
171Veritas Cluster Server: Configuring Oracle VM Server for SPARC for high availabilityAbout Veritas Cluster Server configuration models in an Oracle VM Server for SPARC environment

Figure 7-8 Workflow to configure VCS to fail over a logical domain on a failure
Set up the required hardware(systems, network, and storage)
Install Solaris 10/11 and configureLDoms
Install VCS on control domain ofeach server
Create Application service group inthe guest domain
Create RemoteGroup service groupfor the Application service group inthe control domain
Install single-node VCS on guestdomain of each server
Create VCS service group for LDom inthe control domain
For VCS to monitor theapplication in guest domain:
For VCS to monitor theLDom:
Create online global firm dependencybetween the LDom and theRemoteGroup service groups
Configuring Veritas Cluster Server for application monitoringYou must perform the following procedures to configure VCS to monitor theapplication in the guest domain:
■ See “Installing single-node Veritas Cluster Server inside the guest domain”on page 173.
■ See “ConfiguringVeritas Cluster Server tomonitor the application in the guestdomain” on page 173.
Veritas Cluster Server: Configuring Oracle VM Server for SPARC for high availabilityAbout Veritas Cluster Server configuration models in an Oracle VM Server for SPARC environment
172

Installing single-node Veritas Cluster Server inside the guest domain
Perform the following steps to install one-nodeVeritas Cluster Server (VCS) insidethe guest domain:
To install and configure one-node Veritas Cluster Server inside the logical domain
1 Install one-node VCS (no kernel components required) in the guest domain.
See the Veritas Cluster Server Installation Guide to perform a single-nodeVCS installation in the logical domains.
2 Start the VCS engine.
Configuring Veritas Cluster Server to monitor the application in the guestdomain
Perform the following steps to configureVeritas Cluster Server (VCS) in the controldomain to monitor the application in the guest domain.
To configure Veritas Cluster Server to monitor the application in the guest domain
1 Configure a VCS service group (asg1) for the application.
The ManualOps attribute of the service group must remain set to true, thedefault value.
2 Add a VCS user (asg1 -admin) with the minimum privilege as the groupoperator of the VCS service group (asg1).
3 Configure a RemoteGroup service group (rsg1) in the control domain tomonitor the VCS service group (asg1) that was configured in 1.
4 Set the value of the following RemoteGroup resource attributes as follows:
■ RestartLimit attribute of the resource or type to 1 or higher
■ OfflineWaitLimit attribute of the resource or type to 1
■ ToleranceLimit attribute of the resource or type to 1
5 Create the dependencies between the groups and resources as shown inFigure 7-9.
173Veritas Cluster Server: Configuring Oracle VM Server for SPARC for high availabilityAbout Veritas Cluster Server configuration models in an Oracle VM Server for SPARC environment

Figure 7-9 Group and resource dependency diagram
RemoteGroup
LDom
Mount
Volume
DiskGroup
NIC
Application
Storage Network
Control domain Logical domain (ldom1)
Application service group (asg1)rsg1monitorsasg1
RemoteGroup service group (rsg1)
LDom service group (lsg1)
online global (firm)
Note: RemoteGroup and Application service groups are required only when youwant to configure VCS to monitor the application in the guest domain.
RemoteGroup resource definition
The resource definition for the RemoteGroup resource is as follows:
RemoteGroup rsg1 (
GroupName = asg1
IpAddress = <IP address of logical domain1>
ControlMode = OnOff
Username = asg1-admin
Password = <asg1-admin's password>
)
See theVeritasClusterServerBundledAgentsReferenceGuide formore informationon the RemoteGroup agent.
Veritas Cluster Server: Configuring Oracle VM Server for SPARC for high availabilityAbout Veritas Cluster Server configuration models in an Oracle VM Server for SPARC environment
174

Veritas Cluster Server setup to fail over an Application running insidelogical domain on a failure of Application
Figure 7-10 illustrates a typical VCS setup to provide high availability forapplications that run in guest domains.
Figure 7-10 Typical setup for applications high availability with Veritas ClusterServer installed in guest domains
Physical layer
Virtual layer
Control domain
VCS
Control domain
VCS
Application
Node1 Node2
Applicationstorage
Public network
Bootdevice
Bootdevice
Logical domain Logical domainldom1 ldom2
Application
VCS privatenetwork
Application
A typical two-node VCS configuration that fails over the applications to keep theapplications that run in logical domains highly available has the followinginfrastructure:
■ Oracle VM Server for SPARC software is installed on each system Node1 andNode2.
■ Shared storage is attached to each system.
■ Logical domains are created onboth thenodes thatmayhave local boot devices.
■ Each LDom has an operating system installed.
■ VCS is installed in the guest domains of each node.
Workflow:
175Veritas Cluster Server: Configuring Oracle VM Server for SPARC for high availabilityAbout Veritas Cluster Server configuration models in an Oracle VM Server for SPARC environment
■ Set up guest domain and install Solaris OS
■ Install VCS on the guest domain
■ Create Application service group in the guest domain
Configuring Veritas Cluster Server to fail over an applicationon a failureYoumust install and configure Veritas Cluster Server (VCS) in the guest domainsof each system to enable VCS to manage applications in the guest domains.
To configure Veritas Cluster Server to manage applications in the guest domains
1 Install and configure VCS in the guest domains of each system.
See the Veritas Cluster Server Installation Guide for installation andconfiguration instructions.
2 Create two virtual NICs using private virtual switches for privateinterconnects.
You can configure virtual switcheswithnophysical network interfaces if youwant the failover across logical domains in the same control domain.
3 Configure VCS service group for the application that you want to monitor.
■ Configure Mount and Disk resources to monitor the storage.
■ Configure NIC resources to monitor the network.
■ Configure application resources using the application-specific agent.
See the Veritas Cluster Server Administrator’s Guide for more details onconfiguring applications and resources in VCS.
See the Veritas Cluster Server Bundled Agents Reference Guide for details onthe storage and networking bundled agents.
Oracle VM Server for SPARC guest domain migrationin VCS environment
VCS supports cold, warm, and live migration, also known as domain migration,for Oracle VM Server for SPARC guest domains.
Domain migration enables you to migrate a guest domain from one host systemto another host system. The system on which the migration is initiated is thesource system. The system to which the domain is migrated is the target system.
Veritas Cluster Server: Configuring Oracle VM Server for SPARC for high availabilityOracle VM Server for SPARC guest domain migration in VCS environment
176

While a migration operation is in progress, the domain that you want to migratetransfers from the source system to the migrated domain on the target system.
The domain migration until Oracle VM Server for SPARC 2.0 release is a warmmigration. Awarmmigration iswhere the domain that youwant tomigrate entersa suspended state before the migration.
The Oracle VM Server for SPARC 2.1 introduces live migration, which providesperformance improvements that enable an active domain to migrate while itcontinues to run.
In addition to live migration, you can migrate bound or inactive domains. Thismigration is a cold migration.
You can use domain migration to perform tasks such as the following:
■ Balancing the load between systems
■ Performing hardware maintenance while a guest domain continues to run
Overview of a warm migrationTheLogicalDomainsManager on the source systemaccepts the request tomigratea domain and establishes a secure network connection with the Logical DomainsManager running on the target system.Once this connectionhas been established,the migration occurs.
The migration operation occurs in the following phases:
After connecting with the Logical Domains Manager running in the targethost, information about the source system and domain are transferred tothe target host. The Logical Domains Manager on the target host uses thisinformation to performa series of checks to determinewhether amigrationis possible. The checks differ depending on the state of the source domain.For example, if the source domain is active the Logical Domains Mangerperforms a different set of checks than if the domain is bound or inactive.
Phase 1
When all checks in Phase 1 have passed, the source and target systemsprepare for the migration. The Logical Domains Manager on the sourcesuspends and the source domain.On the target system, the LogicalDomainsManager creates a domain to receive the source domain.
Phase 2
For an active domain, the next phase is to transfer all the runtime stateinformation for the domain to the target. The Logical Domains Managerretrieves this information from the hypervisor. On the target, the LogicalDomains Manager installs the state information in the hypervisor.
Phase 3
177Veritas Cluster Server: Configuring Oracle VM Server for SPARC for high availabilityOracle VM Server for SPARC guest domain migration in VCS environment
Handoff—after all state information is transferred, the handoff occurswhenthe target domain resumes execution (if the source was active). The LogicalDomainManager on the source destroys the source domain. From this pointon, the target domain is the sole version of the domain running.
Phase 4
Overview of a live migrationTheLogicalDomainsManager on the source systemaccepts the request tomigratea domain and establishes a secure network connection with the Logical DomainsManager that runson the target system.Themigrationoccurs after this connectionhas been established.
The migration operation occurs in the following phases:
After the source system connects with the Logical Domains Manager thatruns in the target system, the Logical Domains Manager transfersinformation about the source system and the domain to be migrated to thetarget system. The Logical Domains Manager uses this information toperform a series of checks to determine whether a migration is possible.TheLogicalDomainsManagerperformsstate-sensitive checkson thedomainthat you plan to migrate. The checks it performs is different for an activedomain than for bound or inactive ones.
Phase 1
When all checks in Phase 1 have passed, the source and target systemsprepare for the migration. On the target system, the Logical DomainsManager creates a domain to receive the domain. If the domain that youplant to migrate is inactive or bound, the migration operation proceeds toPhase 5.
Phase 2
If thedomain that youwant tomigrate is active, its runtime state informationis transferred to the target system. The domain continues to run, and theLogical DomainsManager simultaneously tracks themodifications that theoperating system makes to this domain. The Logical Domains Manager onthe source retrieves this information on the source from the sourcehypervisor and sends the information to the Logical Domains Manager onthe target. The Logical Domains Manager on the target installs thisinformation in the hypervisor for the target.
Phase 3
TheLogicalDomainsManager suspends thedomain that youwant tomigrate.At this time, all of the remaining modified state information is re-copied tothe target system. In this way, there should be little or no perceivableinterruption to the domain. The amount of interruption depends on theworkload.
Phase 4
Veritas Cluster Server: Configuring Oracle VM Server for SPARC for high availabilityOracle VM Server for SPARC guest domain migration in VCS environment
178

A handoff occurs from the Logical Domains Manager on the source systemto the Logical Domains Manager on the target system. The handoff occurswhen themigrated domain resumes execution (if the domain to bemigratedwas active), and the domain on the source system is destroyed. From thispoint forward, the migrated domain is the sole version of the domainrunning.
Phase 5
With Oracle VM Server for SPARC 2.1, the default domain migration attemptedis Live Migration. If the installed version of Oracle VM Server for SPARC is 2.0,the domainmigration defaults to warmmigration. Formore details on supportedconfigurations, read Chapter 9, Migrating Domains in the Oracle® VM Server forSPARC 2.1 Administration Guide.
VCS supports the following three varieties ofOracleVMServer for SPARCdomainmigration:
■ Guest migration from one VCS node to other VCS node in the cluster, forexample:
sys1# ldm migrate logical domain1 sys2
■ Guest migration from a VCS node to a non-VCS node, for example:
sys1# ldm migrate logical domain1 sys3
■ Renaming the logical domain during the migration to the target system, forexample:
sys1# ldm migrate logical domain1 sys2:logical domain2
Prerequisites before you perform domain migrationPerform the following prerequisites before you perform a domain migration:
■ Verify that the value of IntentionalOffline attribute for LDom type is 1. Notethat 1 is the default value.
■ Make sure that the LDom resource for the LDom that you plan to migrate isin an ONLINE or OFFLINE steady state.
■ To rename the logical domain when you migrate it, make sure that theLDomNameattribute for the LDomresource inVCS is localizedwith the targetLDom name for the target node. When you rename it, VCS can continue tomonitor the LDom after migration.
■ Make sure that CfgFile attribute for LDom is configured before migration.
179Veritas Cluster Server: Configuring Oracle VM Server for SPARC for high availabilityOracle VM Server for SPARC guest domain migration in VCS environment

■ Make sure that RemoveLDomConfigForMigration attribute is set beforemigration. If this attribute is set, the LDom Agent removes the LDomconfiguration from the system on which an offline or clean is called. Thisarrangement helps in the scenariowhen a LDom is failed-over to a target nodeand ismigrated back to the source node. In the presence of LDomconfigurationon the source node, migration would not be possible. Refer to the LDomAgentattribute description in the Bundled Agents Reference Guide for Solaris formore information.
Supported deployment models for Oracle VM Server for SPARC domainmigration with VCS
The following are the supported deployment models for Oracle VM Server forSPARC domain migration with VCS:
■ See “Migrating Oracle VM guest when VCS is installed in the control domainthat manages the guest domain” on page 180.
■ See “Migrating Oracle VM guest when VCS is installed in the control domainand single-node VCS is installed inside the guest domain to monitorapplications inside the guest domain” on page 181.
■ See “Migrating Oracle VM guest when VCS cluster is installed in the guestdomains to manage applications for Oracle VM Server for SPARC version 2.1and above” on page 183.
■ See “Migrating Oracle VM guest when VCS cluster is installed in the guestdomains tomanage applications for Oracle VMServer for SPARC version 2.0”on page 183.
Migrating Oracle VM guest when VCS is installed in the control domainthat manages the guest domain
Use the following information to migrate when you have VCS installed in thecontrol domain that manages the guest domain.
To perform a migration of an LDom when VCS is installed in the control domain
◆ Use the ldm command for migration.
ldm migrate [-f] [-n] [-p password_file] source_ldom \
[user@target_host[:target_ldom]
For example:
Sys1# ldm migrate ldom1 Sys2
Veritas Cluster Server: Configuring Oracle VM Server for SPARC for high availabilityOracle VM Server for SPARC guest domain migration in VCS environment
180

Figure 7-11 illustrates a logical domainmigrationwhenVCS is clustered betweencontrol domains.
Figure 7-11 Logical domain migration when VCS is clustered between controldomains
Physical layer
Virtual layer
Control domain
VCS
Control domain Logical domainldom1
Node1 Node2
Applicationstorage
Public network
Bootdevice
VCSprivatenetwork
ldom1
VCS
Migrating Oracle VM guest when VCS is installed in the control domainand single-node VCS is installed inside the guest domain to monitorapplications inside the guest domain
Use the following information to migrate when you have:
■ VCS installed in the control domain
■ The VCS in control domain manages the application in the guest domain, and
■ Single-node VCS installed in the guest domain monitors the application inguest domain.
181Veritas Cluster Server: Configuring Oracle VM Server for SPARC for high availabilityOracle VM Server for SPARC guest domain migration in VCS environment

To perform a migration of the LDom when VCS is installed in the control domainthat manages the applications in the guest domains
◆ Use the ldm command for migration.
ldm migrate [-f] [-n] [-p password_file] source_ldom \
[user@target_host[:target_ldom]
For example:
Sys1# ldm migrate ldom1 Sys2
Figure 7-11 illustrates a logical domainmigrationwhenVCS is clustered betweencontrol domains and single-node VCS in the guest domainmonitors applications.
Figure 7-12 Logical domain migration when VCS is clustered between controldomains and single-node VCS in the guest domain monitorsapplications
Physical layer
Virtual layer
Control domain
VCS
Control domain Logical domainldom1
Node1 Node2
Applicationstorage
Public network
Bootdevice
VCSprivatenetwork
ldom1
VCSApplication
VCS(single-node)
Veritas Cluster Server: Configuring Oracle VM Server for SPARC for high availabilityOracle VM Server for SPARC guest domain migration in VCS environment
182
Migrating Oracle VM guest when VCS cluster is installed in the guestdomains to manage applications for Oracle VM Server for SPARCversion 2.1 and above
Perform one of the following procedures when you want a migration of guestdomain when VCS cluster is configured between guest domains.
To perform amigration of the LDomwhen VCS is installed in the guest domain thatmanages the applications in the guest domains for Oracle VM Server for SPARCversion 2.1 and above
◆ Use the ldm command for migration.
ldm migrate [-f] [-n] [-p password_file] source_ldom \
[user@target_host[:target_ldom]
For example:
Sys1# ldm migrate ldom1 Sys2
Migrating Oracle VM guest when VCS cluster is installed in the guestdomains to manage applications for Oracle VM Server for SPARCversion 2.0
The domain migration is a warm migration.
Note: You do not have to start and stop LLT and GAB. In a warm migration, LLTand GAB restart themselves gracefully.
183Veritas Cluster Server: Configuring Oracle VM Server for SPARC for high availabilityOracle VM Server for SPARC guest domain migration in VCS environment

To performadomainmigration for an LDomwhenVCS is installed in guest domains
1 Stop VCS engine. Use the hastop -local -force command on the systemthat has the logical domain that you plan to migrate. Perform this step sothat GAB does not have to kill the VCS engine process when the migration iscomplete. GAB wants all clients to reconfigure and restart when theconfiguration is not in sync with other members in the cluster.
2 If CVM is configured inside the logical domain, perform this step. Set thevalue of the LLT peerinact parameter to sufficiently high value on all nodesin the cluster. You set the value to very high value so that while the logicaldomain is in migration, the system is not thrown out of the cluster by theother members in the cluster. If the CVM stack is unconfigured, theapplications can stop.
See theVeritasClusterServerAdministrator’sGuide for LLT tunableparameterconfiguration instructions.
3 If fencing is configured in single instance mode inside the logical domain,perform this step. Unconfigure and unload the vxfen module in the logicaldomain. Perform this step so that GAB does not panic the node when thelogical domain migration is complete.
4 Migrate the logical domain from the control domain using the ldm interface.Wait for migration to complete.
ldm migrate [-f] [-n] [-p password_file] source_ldom \
[user@target_host[:target_ldom]
For example:
Sys1# ldm migrate ldom1 Sys2
5 Perform this step if you performed step 3. Load and configure vxfen modulein the logical domain. See the Veritas Cluster Server Administrator’s Guidefor information about I/O fencing and its administration.
6 Perform this step if youperformed step 2. Reset the value of the LLTpeerinactparameter to its original value on all nodes in the cluster.
See theVeritasClusterServerAdministrator’sGuide for LLT tunableparameterconfiguration instructions.
7 Use the hastart command to start VCS engine inside the logical domain.
Figure 7-13 illustrates a logical domainmigrationwhenVCS is clustered betweencontrol domains and single-node VCS in the guest domainmonitors applications.
Veritas Cluster Server: Configuring Oracle VM Server for SPARC for high availabilityOracle VM Server for SPARC guest domain migration in VCS environment
184

Figure 7-13 The logical domain migration when VCS is clustered between guestdomains
Logicaldomainldom2
Physical layer
Virtual layer
Node1 Node2
Public network
VCSprivatenetwork
ldom1
VCS
Application
Applicationstorage
Bootdevice
Bootdevice
Note that thisapplication iscurrentlyinactive.
Controldomain
Controldomain
VCS
Application
Logicaldomainldom1
About configuring Veritas Cluster Server for OracleVM Server for SPARC with multiple I/O domains
With Oracle VM Server for SPARC virtualization technology, you can createmultiple I/O domains (control domain and alternate I/O domain) to provideredundant storage and network services to a guest Logical Domain. A typicalcluster-setup configured to use multiple I/O domains has two physical systems.On each physical system, the control domain and alternate I/O domain provideI/O services from back-end storage and network devices to a Logical Domain.
185Veritas Cluster Server: Configuring Oracle VM Server for SPARC for high availabilityAbout configuring Veritas Cluster Server for Oracle VM Server for SPARC with multiple I/O domains
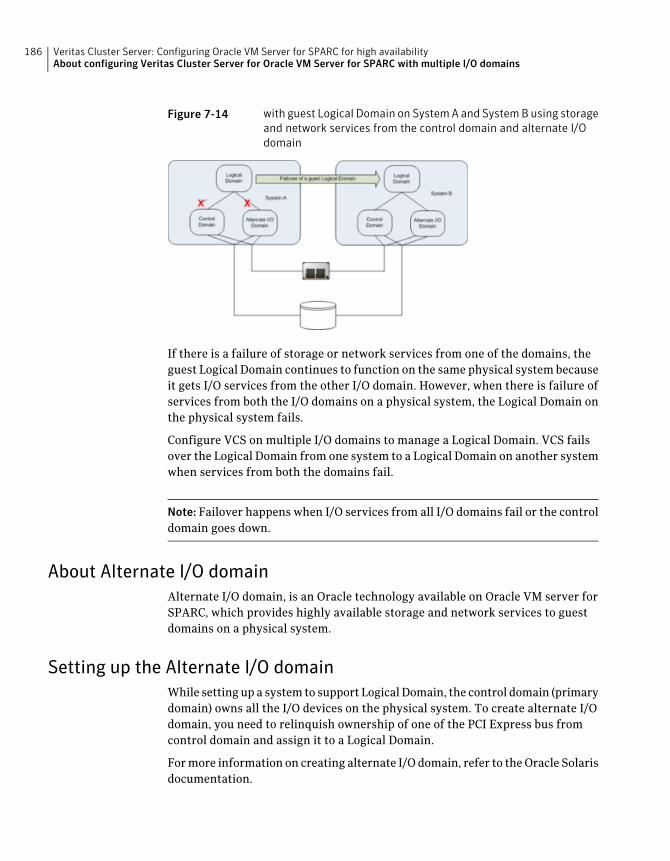
Figure 7-14 with guest Logical Domain on System A and System B using storageand network services from the control domain and alternate I/Odomain
If there is a failure of storage or network services from one of the domains, theguest Logical Domain continues to function on the same physical system becauseit gets I/O services from the other I/O domain. However, when there is failure ofservices from both the I/O domains on a physical system, the Logical Domain onthe physical system fails.
Configure VCS on multiple I/O domains to manage a Logical Domain. VCS failsover the Logical Domain from one system to a Logical Domain on another systemwhen services from both the domains fail.
Note: Failover happens when I/O services from all I/O domains fail or the controldomain goes down.
About Alternate I/O domainAlternate I/O domain, is an Oracle technology available on Oracle VM server forSPARC, which provides highly available storage and network services to guestdomains on a physical system.
Setting up the Alternate I/O domainWhile setting up a system to support Logical Domain, the control domain (primarydomain) owns all the I/O devices on the physical system. To create alternate I/Odomain, you need to relinquish ownership of one of the PCI Express bus fromcontrol domain and assign it to a Logical Domain.
Formore information on creating alternate I/O domain, refer to theOracle Solarisdocumentation.
Veritas Cluster Server: Configuring Oracle VM Server for SPARC for high availabilityAbout configuring Veritas Cluster Server for Oracle VM Server for SPARC with multiple I/O domains
186

Configuring VCS to manage a Logical Domain with multiple I/O domainsProceed to configure VCS. See “Configuring VCS to manage a Logical Domainusing services from multiple I/O domains” on page 187.
Configuring VCS to manage a Logical Domain usingservices from multiple I/O domains
VCSprovides high availability to LogicalDomains using I/O services frommultipleI/Odomains.When I/O services from the control domain and alternate I/Odomainfail, VCS fails over the LDom fromone system to another system. LDomcontinuesto be functional on the same system and does not need a fail over if one of the I/Odomain continues to provide service.
VCSuses service groups and resources tomanage the storage andnetwork servicesthat are provided to a Logical Domain. These service groups aremonitored by theAlternateIO resource. The AlternateIO service group provides the informationabout the state of the storage and network services to the LDom agent. VCS failsover the Logical Domain when services from both the I/O domains fail.
Perform the following tasks to configure VCS to manage a Logical Domain:
■ Identify supported storage and network servicesSee Identify supported storage and network services
■ Determine the number of nodes to form VCS clusterSee Determine the number of nodes to form VCS cluster
■ Install and configure VCS inside the control and alternate I/O domainsSee Install and configure VCS inside the control domain and alternate I/Odomain
■ Configure storage servicesSee Configuring storage services
■ Configure storage service groupsSee Configure storage service groups
■ Configure network service groupsSee Configure network service groups
■ Configure service group to monitor services from multiple I/O domainsSee Configure a service group to monitor services from multiple I/O domains
■ Configure AlternteIO resourceSee Configure the AlternateIO resource
■ Configure Logical Domain service group
187Veritas Cluster Server: Configuring Oracle VM Server for SPARC for high availabilityConfiguring VCS to manage a Logical Domain using services from multiple I/O domains

See Configure the service group for a Logical Domain
Figure 7-15 Workflow to configure VCS on a physical system to manage a LogicalDomain
A typical setup for a Logical Domain with multiple I/O servicesGuest logical domain using I/O services from multiple I/O domains.
Veritas Cluster Server: Configuring Oracle VM Server for SPARC for high availabilityConfiguring VCS to manage a Logical Domain using services from multiple I/O domains
188

Figure 7-16 shows VCS configuration to monitor a logical domain using I/Oservices from multiple I/O domains
System A, System B - T5440 servers
LDom SG - Logical Domain service group
AlternateIO SG - AlternateIO service group
Storage SG - Storage service group
Network SG - Network service group
Identify supported storage and network servicesThe following back-end storage and network services can be exported to LogicalDomains.
189Veritas Cluster Server: Configuring Oracle VM Server for SPARC for high availabilityConfiguring VCS to manage a Logical Domain using services from multiple I/O domains

VCS agents to be usedBack-end deviceI/O services
DiskLUN, shared diskStorage
MountFlat file
Zpoolzpool
CVMVolDGVeritas CVM volume
NICNICNetwork
Determine the number of nodes to form VCS clusterThe total number of nodes that form a VCS cluster depends on the number ofphysical systems times the the control domain and alternate I/O domain on eachphysical system.
For example, if you have two physical systems, each having a control domain andan alternate I/O domain, you need to configure VCS as a four node cluster.
Install and configure VCS inside the control domain and alternate I/Odomain
Install and configure VCS inside the control domain and alternate I/O domain
For more details, refer to the Veritas™ Cluster Server Installation Guide.
Configuring storage servicesDepending upon the storage service, the configuration procedure differs.
■ LUN, Shared Disk, or CVM volumeSee “About virtual disk multipathing for storage services” on page 191.See “Configuring virtual disk multipathing for LUN, Shared Disk, or CVMVolume” on page 191.
■ ZFS volumeSee “Configuring storage services when back-end device is a ZFS volume”on page 192.
■ Flat fileFor more information, refer to the LDom Administrator’s guide.
■ ZpoolFor more information, refer to the LDom Administrator’s guide.
Veritas Cluster Server: Configuring Oracle VM Server for SPARC for high availabilityConfiguring VCS to manage a Logical Domain using services from multiple I/O domains
190

About virtual disk multipathing for storage servicesYou must configure virtual disk multipathing only if the storage back-end deviceis a LUN, Shared Disk, or CVM volume.
Virtual diskmultipathing enables you to configure a virtual disk on a guest LogicalDomain to access its back-end storage bymore than onepath. This feature ensuresthat the virtual disk accessed by the guest logical domain remains accessible aslong as services from one of the I/O domain are available.
For example, if you set up a virtual disk multipathing configuration to access aphysical disk from a shared storage that is connected to more than one servicedomain. So, when the guest domain accesses the virtual disk, the virtual diskdriver goes through one of the service domains to access the back-end storage. Ifthe virtual disk driver cannot connect to the service domain, the virtual diskattempts to reach the back-end storage through a different service domain.
Configuring virtual disk multipathing for LUN, Shared Disk, orCVM VolumeTo enable virtual diskmultipathing, youmust export a virtual disk back-end pathfrom each service domain and add the virtual disks to the same multipathinggroup (mpgroup). The mpgroup is identified by a name and is configured whenyou export the virtual disk back-end.
191Veritas Cluster Server: Configuring Oracle VM Server for SPARC for high availabilityConfiguring VCS to manage a Logical Domain using services from multiple I/O domains

To configure virtual disk multipathing
1 Add the physical disk back-endpath of the disk service to the primary domain.
# ldm add-vdsdev mpgroup=data backend_path1 volume@primary-vds0
wherebackend_path1, is thepath to thevirtual disk back end fromtheprimarydomain.
2 Add thephysical disk back-endpathof the disk service to the alternate domainfor disk added in Step 1.
# ldm add-vdsdev mpgroup=data backend_path2 volume@alternate-vds0
where backend_path2, is the path to the virtual disk back end from thealternate domain.
3 Export the virtual disk to the guest domain.
# ldm add-vdisk disk_name volume@primary-vds0 ldom_name
where disk_name is the name of the virtual storage device and ldom_nameis the name of the Logical Domain.
Note: Do not set the value of the Options attribute to exclusive; excl. If setto exclusive, Logical Domain cannot use the multipathing functionality.
Formore details on configuring virtual diskmultipathing, refer to theOracleVM server for SPARC Administration Guide.
Configuring storage services when back-end device is a ZFSvolumeIf you export ZFS volume as a back-end storage to Logical Domain, you need to
1 Export ZFS volume created in the control domain.
You do not need to configure mpgroup.
2 Export ZFS volume created in the alternate I/O domain.
You do not need to configure mpgroup.
Note: Ensure the ZFS volume size created in both domains matches.
3 Create ZFS root pool mirror inside the Logical Domain from the volumesexported from control domain and alternate I/O domain.
Veritas Cluster Server: Configuring Oracle VM Server for SPARC for high availabilityConfiguring VCS to manage a Logical Domain using services from multiple I/O domains
192

Configure storage service groupsVCS agents manage storage services that are made available to a guest LogicalDomain. Depending on the back-end storage device, use the appropriate VCSagent. For more information on supported VCS agents, see Identify supportedstorage and network services.
Note: You must configure a storage service group on each physical system in thecluster.
Figure 7-17 shows storage service groups in the control domain and alternateI/O domain on a physical system
193Veritas Cluster Server: Configuring Oracle VM Server for SPARC for high availabilityConfiguring VCS to manage a Logical Domain using services from multiple I/O domains

DescriptionConfigurationparameter
You may need to localize VCS resource attributes depending onthe type of back-end storage device.
For example, forDisk resource, if the back-end storage paths fromthe control and alternate I/O domains are different, you need tolocalize the partition attribute.
Disk disk1(Partition @primary = "/dev/rdsk/c3t50060E8000C46C50d2s2"Partition @alternate = "/dev/rdsk/c1t50060E8000C46C50d2s2"
)
Localize resourceattribute value
Service groups thatmanage storage services in the control domainand alternate I/O domainmust be configured as a parallel servicegroup.
Service group type
Modify the SystemList attribute of the service group to addhostnames of the control domain and alternate I/O domainconfigured on the physical system.
Configure theSystemList attribute
If all the resources are of the type Disk, configure a Phantomresource.
The Disk resource is of the type OnOnly and does not contributeto determine the state of the service group. ThePhantomresourceenables VCS to determine the state of parallel service groups thatdo not include OnOff resources.
Formore information on thePhantomagent, refer to theVeritas™Cluster Server Bundled Agents Reference Guide.
Configure Phantomresource
An example of storage service group configuration from main.cf configuration(for a setup that has two physical systems)
Control domain host names – primary1, primary2
Alternate domain host names – alternate1, alternate2
group primary1-strsg (
SystemList = { primary1 = 0, alternate1 = 1 }
AutoStartList = { primary1, alternate1 }
Parallel = 1
)
Veritas Cluster Server: Configuring Oracle VM Server for SPARC for high availabilityConfiguring VCS to manage a Logical Domain using services from multiple I/O domains
194

Disk disk1
(
Partition @primary1 = "/dev/rdsk/c3t50060E8000C46C50d2s2"
Partition @alternate1 = "/dev/rdsk/c1t50060E8000C46C50d2s2"
)
Phantom ph1 (
)
group primary2-strsg (
SystemList = { primary2 = 0, alternate2 = 1 }
AutoStartList = { primary2, alternate2 }
Parallel = 1
)
Disk disk2
(
Partition @primary2 = "/dev/rdsk/c3t50060E8000C46C50d2s2"
Partition @alternate2 = "/dev/rdsk/c1t50060E8000C46C50d2s2"
)
Phantom ph2 (
)
Configure network service groupsVCS agents manage network resources that are made available to a guest LogicalDomain. Depending on the back-end storage device, use appropriate VCS agent.For more information, see Identify supported storage and network services.
Note:Youmust configure a network service group on each physical system in thecluster.
195Veritas Cluster Server: Configuring Oracle VM Server for SPARC for high availabilityConfiguring VCS to manage a Logical Domain using services from multiple I/O domains
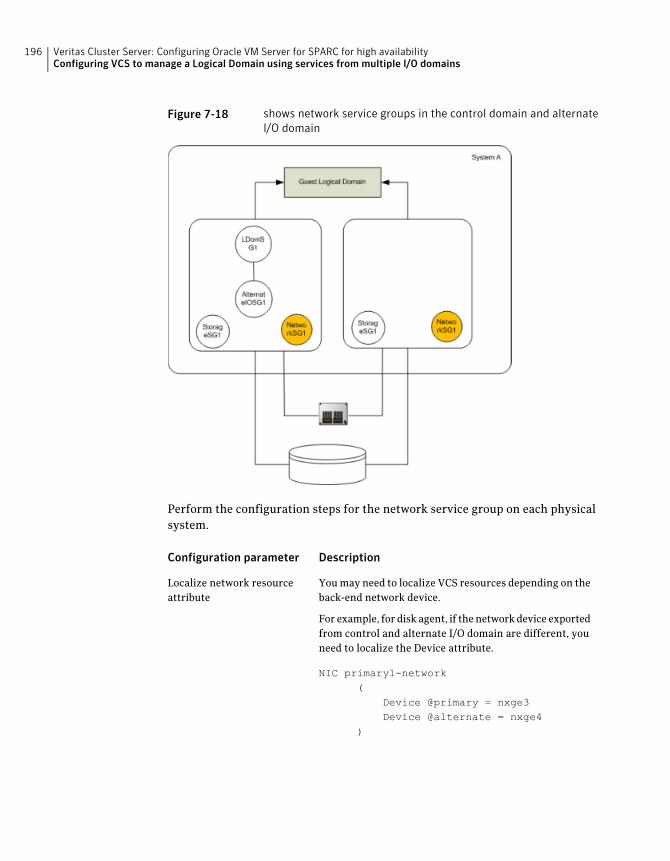
Figure 7-18 shows network service groups in the control domain and alternateI/O domain
Perform the configuration steps for the network service group on each physicalsystem.
DescriptionConfiguration parameter
Youmay need to localize VCS resources depending on theback-end network device.
For example, for disk agent, if the network device exportedfrom control and alternate I/O domain are different, youneed to localize the Device attribute.
NIC primary1-network(
Device @primary = nxge3Device @alternate = nxge4
)
Localize network resourceattribute
Veritas Cluster Server: Configuring Oracle VM Server for SPARC for high availabilityConfiguring VCS to manage a Logical Domain using services from multiple I/O domains
196

DescriptionConfiguration parameter
Service groups thatmanagenetwork services in the controldomain and alternate I/O domain must be configured asa parallel service group.
Service group type
Modify the SystemList attribute in the service group toadd host names of the control domain and alternate I/Odomain configured on the physical system.
Configure the SystemListattribute
If all the resources are of the type NIC, configure aPhantom resource.
The NIC resource is of the type OnOnly and does notcontribute to determine the state of the service group. ThePhantom resource enables VCS to determine the state ofparallel service groups that do not include OnOffresources.
For more information on the Phantom agent, refer to theVeritas™Cluster Server BundledAgentsReferenceGuide.
Configure Phantom resource
Anexample of network service group configuration frommain.cf (for a setup thathas two physical systems)
Control domain host names – primary1, primary2
Alternate domain host names – alternate1, alternate2
group primary1-nwsg (
SystemList = { primary1 = 0, alternate1 = 1 }
AutoStartList = { primary1, alternate1 }
Parallel = 1
)
NIC nicres1 (
Device @primary1 = nxge3
Device @alternate1 = nxge1
)
Phantom ph3 (
)
group primary2-nwsg (
SystemList = { primary2= 0, alternate2 = 1 }
AutoStartList = { primary2, alternate2 }
Parallel = 1
)
197Veritas Cluster Server: Configuring Oracle VM Server for SPARC for high availabilityConfiguring VCS to manage a Logical Domain using services from multiple I/O domains

NIC nicres2(
Device @primary2= nxge3
Device @alternate2 = nxge1
)
Phantom ph4 (
)
Configure a service group to monitor services from multiple I/Odomains
Configure a service group for the AlternateIO resource to monitor storage andnetwork services that are exported from back-end devices to a Logical Domain.
Configuration notes for the service group:
■ Configure the service group as a parallel or a failover service group. See, Typeof service group configuration for the AlternateIO resource.
■ Ifmultiple storage services are exported to a LogicalDomain, you can configureseparate service groups to monitor each of the storage services. For example,you can configure separate service groups to monitor LUN and ZFS volumestorage services.
■ The SystemList attribute of the service group must contain only host namesof the control domains present on each physical system in the cluster.
■ Localize the StorageSGattribute of the service groupwith the list of the storageservice groups configured for each node.
■ Enable preonline trigger for a fail over type service group
# hagrp -modify aiosg TriggerPath bin/AlternateIO
where aiosg is the name of the service group
# hagrp -modify aiosg TriggersEnabled PREONLINE
Type of service group configuration for the AlternateIOresource
ConditionService group type
Veritas Cluster Server: Configuring Oracle VM Server for SPARC for high availabilityConfiguring VCS to manage a Logical Domain using services from multiple I/O domains
198
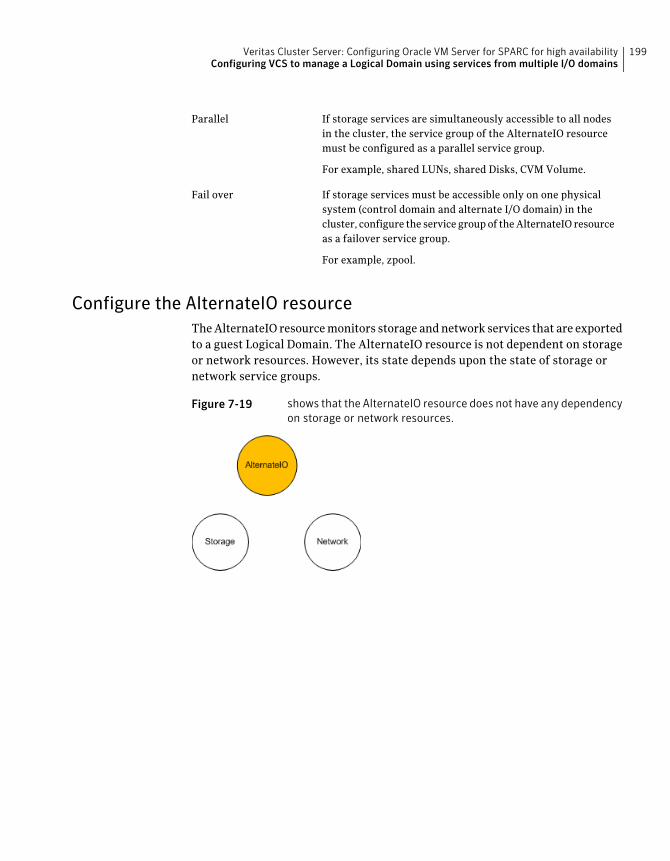
If storage services are simultaneously accessible to all nodesin the cluster, the service group of the AlternateIO resourcemust be configured as a parallel service group.
For example, shared LUNs, shared Disks, CVM Volume.
Parallel
If storage services must be accessible only on one physicalsystem (control domain and alternate I/O domain) in thecluster, configure the service groupof theAlternateIO resourceas a failover service group.
For example, zpool.
Fail over
Configure the AlternateIO resourceTheAlternateIO resourcemonitors storage andnetwork services that are exportedto a guest Logical Domain. The AlternateIO resource is not dependent on storageor network resources. However, its state depends upon the state of storage ornetwork service groups.
Figure 7-19 shows that the AlternateIO resource does not have any dependencyon storage or network resources.
199Veritas Cluster Server: Configuring Oracle VM Server for SPARC for high availabilityConfiguring VCS to manage a Logical Domain using services from multiple I/O domains

DescriptionConfigurationparameter
This attribute is a key value pair. A storage service group is thekey and the value of the key can either be 0 or 1.
Set the value of the key to 1 to bring the service group onlinewhen the AlternateIo resource comes online and to take theservice group offlinewhen theAlternateIo resource goes offline.
Localize the StorageSG attribute of the AlternateIO resourcewith the list of storage service groups that are configured oneach node.
AlternateIO altiores1(StorageSG @primary1 = { primary1-strsg1 = 1 }StorageSG @primary2 = { primary2-strsg1 = 1 })
StorageSG attribute
This attribute is a key value pair. A network service group is thekey and the value of the key can either be 0 or 1.
Set the value of the key to 1 to bring the service group onlinewhen the AlternateIo resource comes online and to take theservice group offlinewhen theAlternateIo resource goes offline.
Localize the NetworkSG attribute of the AlternateIO resourcewith the list of network service groups that are configured oneach node.
AlternateIO altiores1(NetworkSG @primary1 = { primary1-nwsg = 0 }NetworkSG @primary2 = { primary2-nwsg = 0 })
NetworkSG attribute
Veritas Cluster Server: Configuring Oracle VM Server for SPARC for high availabilityConfiguring VCS to manage a Logical Domain using services from multiple I/O domains
200

DescriptionConfigurationparameter
For any of the service groups configured in the StorageSG orNetworkSG attributes, if you set the value to 1, configure thepreonline trigger at the service group level.
Configuring the preonline trigger ensures that service groupslisted in the StorageSG attributes are offline on all systemsexcept onto the system where failover or a manual switch overis initiated.
For information on enabling the preonline trigger, see Configureservice group to monitor services from multiple I/O domains.
Preonline trigger
Sample service group configuration for the AlternateIOresourceAssumption – Storage and network service groups are of the type parallel.
group aiosg (
SystemList = { primary1 = 0, primary2 = 1 }
AutoStartList = { primary1, primary2 }
Parallel = 1
)
AlternateIO aiores1 (
StorageSG @primary1 = { primary1-strsg = 0 }
StorageSG @primary2 = { primary2-strsg = 0 }
NetworkSG @primary1 = { primary1-nwsg = 0 }
NetworkSG @primary2 = { primary2-nwsg = 0 }
)
Configure the service group for a Logical DomainVCS uses the LDom agent to manage a guest logical domain. The Logical Domainresource has an online local hard dependency on the AlternateIO resource.
201Veritas Cluster Server: Configuring Oracle VM Server for SPARC for high availabilityConfiguring VCS to manage a Logical Domain using services from multiple I/O domains

Figure 7-20 shows the dependency of LDom service group on the AlternateIOservice group.
Configuration notes:
■ Configure the service group as a fail over type service group.
■ The SystemList attribute in the LDom service group must contain only hostnames of the control domains from each physical system in the cluster.
■ The LDom service group must have online local hard dependency with theAlternateIO service group.
Sample configuration for LDom service groupThe LDom service group must have online local hard dependency with theAlternateIO service group.
group ldmsg (
SystemList = { primary1 = 0, primary2 = 1 }
AutoStartList = { primary1, primary2 }
)
LDom ldmres (
LDomName = ldg1
)
Veritas Cluster Server: Configuring Oracle VM Server for SPARC for high availabilityConfiguring VCS to manage a Logical Domain using services from multiple I/O domains
202

Failover scenarios
VCS behaviorAlternate I/OdomainControl domainScenario
No fail overOnlineOnlineState of eachstorage servicegroup No fail overOnlineOffline/FAULT
No fail overOffline/FAULTOnline
Fail overOffline/FAULTOffline/FAULT
No fail overOnlineOnlineState of eachnetwork servicegroup No fail overOnlineOffline/FAULT
No fail overOffline/FAULTOnline
Fail overOffline/FAULTOffline/FAULT
No fail overUpUpDomain state
No fail overdownUp
Fail overUpDown
Fail overdownDown
Recommendations while configuring VCS and Oracle VM Server forSPARC with multiple I/O domains
■ Online and offline operations for service groups in the StorageSG attributeTo manually bring online or take offline service groups that are configured inthe StorageSG attribute do not use the AlternateIO resource or its servicegroup.Instead, use service groups configured in the StorageSG attribute.
■ Freeze the service group for the AlternateIO resourceFreeze the AlternateIO service group before you bring online or take offlineservice groups configured in the StorageSG attribute of the AlternateIOresource. If you do not freeze the service group, the behavior of the LogicalDomain is unknown as it is dependent on the AlternateIO service group.
■ Configuring preonline trigger for storage service groupsYou must configure preonline trigger in the following scenario:When the service groups configured in the StorageSG attribute of theAlternateIO resource are of fail over type, and if you accidentally bring storageservice groups online on another physical system in the cluster.
203Veritas Cluster Server: Configuring Oracle VM Server for SPARC for high availabilityConfiguring VCS to manage a Logical Domain using services from multiple I/O domains

It is possible to bring the storage service groups online on another physicalsystem because resources configured to monitor back-end storage servicesare present in different service groups on each physical system. Thus, VCScannot prevent resources coming online on multiple systems. This may causedata corruption.
To configure preonline trigger for each service group listed in the StorageSGattribute, run the following commands:
■ # hagrp -modify stg-sg TriggerPath bin/AlternateIO/StorageSG
where stg-sg is the name of the storage service group
■ # hagrp -modify stg-sg TriggersEnabled PREONLINE
Note: Perform this procedure for storage service groups on each node.
■ Set connection time out period for virtual disksWhen a disk device is not available, I/O services from the guest domain to thevirtual disks are blocked.Symantec recommends to set a connection time out period for each virtualdisk so that applications times out after the set period instead of waitingindefinitely.# ldm add-vdisk timeout=seconds disk_name volume_name@service_name
ldom
Sample VCS configuration for AlternateIO resource configured as afail over type
include "types.cf"
cluster altio-cluster (
UserNames = { admin = XXXXXXXXXXX }
Administrators = { admin }
HacliUserLevel = COMMANDROOT
)
system primary1 (
)
system alternate1 (
)
system primary2 (
)
Veritas Cluster Server: Configuring Oracle VM Server for SPARC for high availabilityConfiguring VCS to manage a Logical Domain using services from multiple I/O domains
204

system alternate2 (
)
group aiosg (
SystemList = { primary1 = 0, primary2 = 1 }
AutoStartList = { primary1 }
TriggerPath = "bin/AlternateIO"
TriggersEnabled @primary1 = { PREONLINE }
TriggersEnabled @primary2 = { PREONLINE }
)
AlternateIO altiores (
StorageSG @primary1 = { primary1-strsg = 1 }
StorageSG @primary2 = { primary2-strsg = 1 }
NetworkSG @primary1 = { primary1-nwsg = 0 }
NetworkSG @primary2 = { primary2-nwsg = 0 }
)
// resource dependency tree
//
// group aiosg
// {
// AlternateIO altiores
// }
group ldomsg (
SystemList = { primary1 = 0, primary2 = 1 }
AutoStartList = { primary1 }
)
LDom ldmguest (
LDomName = ldg1
)
requires group aiosg online local hard
// resource dependency tree
//
205Veritas Cluster Server: Configuring Oracle VM Server for SPARC for high availabilityConfiguring VCS to manage a Logical Domain using services from multiple I/O domains

// group ldomsg
// {
// LDom ldg1
// }
group primary1-strsg (
SystemList = { primary1 = 0, alternate1 = 1 }
AutoStart = 0
Parallel = 1
TriggerPath = "bin/AlternateIO/StorageSG"
TriggersEnabled @primary1 = { PREONLINE }
TriggersEnabled @alternate1 = { PREONLINE }
AutoStartList = { primary1, alternate1 }
)
Zpool zpres1 (
PoolName @primary1= zfsprim
PoolName @alternate1 = zfsmirr
ForceOpt = 0
)
// resource dependency tree
//
// group primary1-strsg
// {
// Zpool zpres1
// }
group primary1-nwsg (
SystemList = { primary1 = 0, alternate1 = 1 }
Parallel = 1
)
Phantom ph1 (
)
NIC nicres1 (
Device @primary1 = nxge3
Veritas Cluster Server: Configuring Oracle VM Server for SPARC for high availabilityConfiguring VCS to manage a Logical Domain using services from multiple I/O domains
206

Device @alternate1 = nxge4
)
// resource dependency tree
//
// group primary1-nwsg
// {
// Phantom ph1
// Proxy nicres1
// }
group primary2-strsg (
SystemList = { primary2 = 0, alternate2 = 1 }
Parallel = 1
TriggerPath = "bin/AlternateIO/StorageSG"
TriggersEnabled @primary2 = { PREONLINE }
TriggersEnabled @alternate2 = { PREONLINE }
)
Zpool zpres2 (
PoolName @ primary2 = zfsprim
PoolName @ alternate2 = zfsmirr
ForceOpt = 0
)
// resource dependency tree
//
// group primary2-strsg
// {
// Zpool zpres2
// }
group primary2-nwsg (
SystemList = { primary2 = 0, alternate2 = 1 }
Parallel = 1
)
207Veritas Cluster Server: Configuring Oracle VM Server for SPARC for high availabilityConfiguring VCS to manage a Logical Domain using services from multiple I/O domains
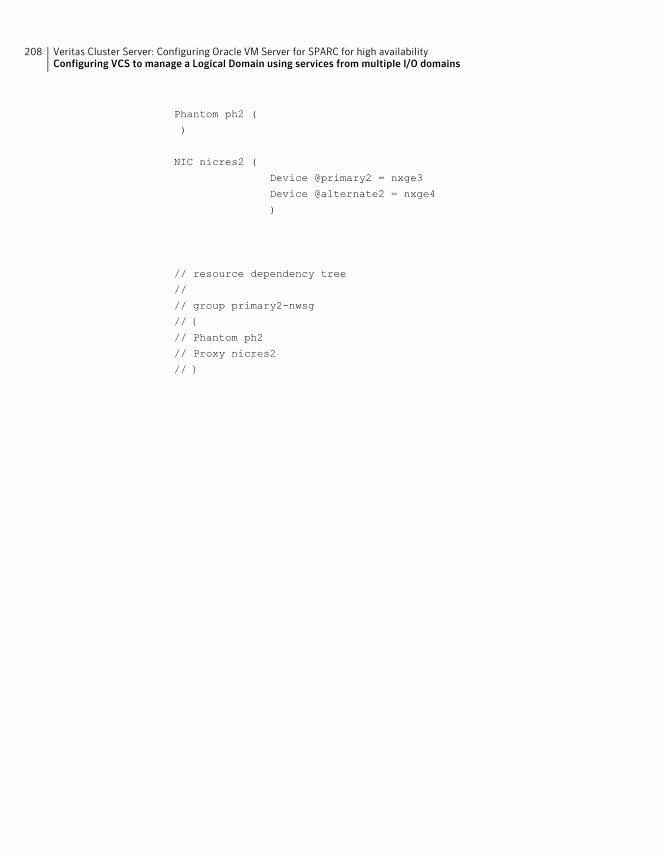
Phantom ph2 (
)
NIC nicres2 (
Device @primary2 = nxge3
Device @alternate2 = nxge4
)
// resource dependency tree
//
// group primary2-nwsg
// {
// Phantom ph2
// Proxy nicres2
// }
Veritas Cluster Server: Configuring Oracle VM Server for SPARC for high availabilityConfiguring VCS to manage a Logical Domain using services from multiple I/O domains
208

Symantec ApplicationHA:Configuring Oracle VMServer for SPARC for highavailability
This chapter includes the following topics:
■ About Symantec ApplicationHA
■ Why Symantec ApplicationHA
■ LDom configurations with Symantec ApplicationHA
■ Symantec ApplicationHA in the guest domains (LDoms)
■ VCS in the control domain and Symantec ApplicationHA in the guest domain(LDom)
■ Installing and configuring ApplicationHA for application availability
■ Additional documentation
About Symantec ApplicationHAOracleVMServer for SPARC is a virtualization andpartitioning solution supportedon Oracle Solaris CoolThreads technology-based servers. Oracle VM Server forSPARC lets you createmultiple virtual systems called logical domains (also calledguest domains), on a single physical host.
8Chapter

SymantecApplicationHAprovidesmonitoring capabilities for applications runninginside logical domains in the Oracle VM Server for SPARC virtualizationenvironment. Symantec ApplicationHA adds a layer of application awareness tothe core high availability (HA) functionality offered by Veritas™ Cluster Server(VCS) in the control domain.
SymantecApplicationHA is basedonVCSanduses similar concepts suchas agents,resources, and service groups. However, it does not include the high availabilitycluster components such as the GroupMembership and Atomic Broadcast (GAB),Low Latency Transport (LLT), Asynchronous Monitoring Framework (AMF), andVeritas Fencing (VxFEN). Symantec ApplicationHA has a lightweight serverfootprint that allows faster installation and configuration.
Before you install the product, read the Symantec ApplicationHA Release Notes.To install the product, follow the instructions in the Symantec ApplicationHAInstallation Guide.
Why Symantec ApplicationHASymantec ApplicationHA provides the following key benefits:
■ Out of the box integration with VCS.
■ Full visibility and control over applications with the ability to start, stop, andmonitor applications running inside guest domains.
■ High availability of the application as well as the guest domain inside whichthe application runs.
■ Graded application fault-management responses such as:
■ Application restart
■ ApplicationHA-initiated, graceful internal reboot (soft reboot) of a guestdomain
■ VCS-initiated, external reboot (hard reboot) of guest domain
■ Failover of the guest domain to another VCS node
■ Standardized way to manage applications using a single interface that isintegrated with the Veritas Operations Manager (VOM) console.
■ Specialized Application Maintenance mode, in which ApplicationHA allowsyou to intentionally take an application out of its purview for maintenance ortroubleshooting.
Symantec ApplicationHA: Configuring Oracle VM Server for SPARC for high availabilityWhy Symantec ApplicationHA
210
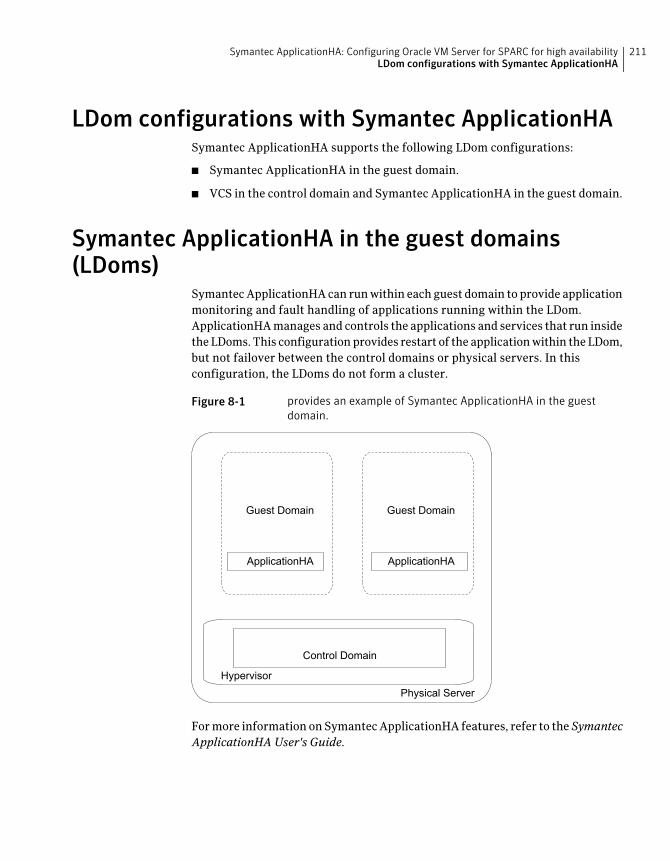
LDom configurations with Symantec ApplicationHASymantec ApplicationHA supports the following LDom configurations:
■ Symantec ApplicationHA in the guest domain.
■ VCS in the control domain and Symantec ApplicationHA in the guest domain.
Symantec ApplicationHA in the guest domains(LDoms)
SymantecApplicationHAcan runwithin each guest domain to provide applicationmonitoring and fault handling of applications running within the LDom.ApplicationHAmanages and controls the applications and services that run insidetheLDoms.This configurationprovides restart of the applicationwithin theLDom,but not failover between the control domains or physical servers. In thisconfiguration, the LDoms do not form a cluster.
Figure 8-1 provides an example of Symantec ApplicationHA in the guestdomain.
Guest Domain
ApplicationHA
Hypervisor
Control Domain
Physical Server
Guest Domain
ApplicationHA
Formore information onSymantecApplicationHA features, refer to the SymantecApplicationHA User's Guide.
211Symantec ApplicationHA: Configuring Oracle VM Server for SPARC for high availabilityLDom configurations with Symantec ApplicationHA

VCS in the control domain and SymantecApplicationHA in the guest domain (LDom)
UsingSymantecApplicationHA in the LDoms in combinationwithVeritas ClusterServer (VCS) bySymantec in the control domainprovides anend-to-endavailabilitysolution for LDoms and their resources.
Symantec ApplicationHA provides the following for Applications in the LDoms:
■ Full visibility and control over applications with the ability to start, stop, andmonitor applications running inside guest domains.
■ Graded application fault-management responses such as:
■ Application restart
■ ApplicationHA-initiated, graceful internal reboot (soft reboot) of a guestdomain
■ Standardized way to manage applications using a single interface that isintegrated with the Veritas Operations Manager (VOM) console.
■ Specialized Application Maintenance mode, in which ApplicationHA allowsyou to intentionally take an application out of its purview for maintenance ortroubleshooting.
VCS provides the following for LDoms:
■ VCS in the host (control domain) enables logical domain availability.
■ VCS-initiated, external reboot (hard reboot) of guest domain
■ Failover of the guest domain to another VCS node.
ApplicationHArunning in the LDomcannotifyVCS running in the control domainto trigger a logical domain (LDom) failover.
The following figure illustrates how Symantec ApplicationHA and VCS aredeployed in a typical Oracle VM Server for SPARC virtualization environment.
Symantec ApplicationHA: Configuring Oracle VM Server for SPARC for high availabilityVCS in the control domain and Symantec ApplicationHA in the guest domain (LDom)
212

Figure 8-2 Symantec ApplicationHA in the guest domain and Veritas ClusterServer in the control domain
Figure 8-3 VCS in the control domain and ApplicationHA in the guest domain
Hypervisor
Control Domain
Physical Server
Guest Domain
ApplicationHA
Guest Domain
ApplicationHA
Hypervisor
Control Domain
Physical Server
Guest Domain
ApplicationHA
Guest Domain
ApplicationHA
VCS VCS
Formore information onSymantecApplicationHA features, refer to the SymantecApplicationHA User's Guide.
213Symantec ApplicationHA: Configuring Oracle VM Server for SPARC for high availabilityVCS in the control domain and Symantec ApplicationHA in the guest domain (LDom)

For more information on Veritas Cluster Server features, refer to the VeritasCluster Server Administrator's Guide.
Installing and configuring ApplicationHA forapplication availability
The following procedure applies for the following LDom configurations:
■ Symantec ApplicationHA in the guest domain.
■ VCS in the control domain and Symantec ApplicationHA in the guest domain.
To set up a logical domain (LDom) environment with Symantec ApplicationHA:
1 Install ApplicationHA.
2 Configure ApplicationHA.
For installation and configuration information, refer to Symantec ApplicationHAInstallation Guide.
Additional documentationThis section provides additional documentation.
Oracle Solaris documentationSee http://www.oracle.com/us/technologies/virtualization/index.html.
Symantec documentationFor Symantec product installation and configuration information:
■ Veritas Dynamic Multi-Pathing Installation Guide
■ Veritas Storage Foundation Installation Guide
■ Veritas Storage Foundation High Availability Installation Guide
■ Veritas Storage Foundation for Cluster Server High Availability InstallationGuide
■ Veritas Cluster Server High Availability Installation Guide
■ Veritas Cluster Server Bundled Agents Reference Guide
■ Symantec ApplicationHA Installation Guide
To locate Symantec product guides:
Symantec ApplicationHA: Configuring Oracle VM Server for SPARC for high availabilityInstalling and configuring ApplicationHA for application availability
214

■ Symantec Operations Readiness Tools (SORT):https://sort.symantec.com/documents
■ Storage Foundation DocCentral Site:http://sfdoccentral.symantec.com/
215Symantec ApplicationHA: Configuring Oracle VM Server for SPARC for high availabilityAdditional documentation

Symantec ApplicationHA: Configuring Oracle VM Server for SPARC for high availabilityAdditional documentation
216