veritas volume manager for patrol vx.x - sentry software · pdf fileinstalling veritas volume...
TRANSCRIPT
Veritas Volume Manager KM forPATROL
USER DOCUMENTATION
Version 2.5.01
September 2015
HIGH AVAILABILITY MONITORING
Contacting BMC Software
You can access the BMC Software Web site at http://www.bmc.com. From this Web site, you canobtain information about the company, its products, corporate offices, special events, and careeropportunities.
United States and Canada
Address BMC Software, Inc.2101 CityWest Blvd. Houston TX77042-2827
Telephone 1 (713) 918 8800 or 1 (800) 841 2031 (Toll Free)
Copyright 2006 BMC Software, Inc. or licensors, as an unpublished work. All rights reserved.
BMC Software, the BMC Software logos, and all other BMC Software product or service names areregistered trademarks or trademarks of BMC Software, Inc.
All other trademarks belong to their respective companies.
BMC Software considers information included in this documentation to be proprietary andconfidential. Your use of this information is subject to the terms and conditions of the applicableEnd User License Agreement for the product and the proprietary and restricted rights noticesincluded in this documentation.
Restricted Rights Legend
U.S. Government Restricted Rights to Computer Software. UNPUBLISHED -- RIGHTS RESERVEDUNDER THE COPYRIGHT LAWS OF THE UNITED STATES. Use, duplication, or disclosure of any dataand computer software by the U.S. Government is subject to restrictions, as applicable, set forthin FAR Section 52.227-14, DFARS 252.227-7013, DFARS 252.227-7014, DFARS 252.227-7015, andDFARS 252.227-7025, as amended from time to time. Contractor/Manufacturer is BMC Software,Inc., 2101 CityWest Blvd., Houston, TX 77042-2827, USA. Any contract notices should be sent to thisaddress.
2
Ver
itas
Vol
ume
Man
age
r K
M f
or
PA
TRO
L V
ersi
on 2
.5.0
1

Customer Support
You can obtain technical support by using the Support page on the BMC Software Web site or bycontacting Customer Support by telephone or e-mail.
Support Web Site
You can obtain technical support from BMC Software 24 hours a day, 7 days a week at http://www.bmc.com/support_home. From this Web site, you can:
Read overviews about support services and programs that BMC Software offers
Find the most current information about BMC Software products
Search a database for problems similar to yours and possible solutions
Order or download product documentation
Report a problem or ask a question
Subscribe to receive e-mail notices when new product versions are released
Find worldwide BMC Software support center locations and contact information, including e-mail addresses, fax numbers, and telephone numbers
You can also access product documents and search the Knowledge Base for help with an issue at http://www.sentrysoftware.com
Support by Telephone or E-mail
In the United States and Canada, if you need technical support and do not have access to theWeb, call 800 537 1813. Outside the United States and Canada, please contact your local supportcenter for assistance. To find telephone and email contact information for the BMC Softwaresupport center that services your location, refer to the Contact Customer Support section of theSupport page on the BMC Software Web site at http://www.bmc.com/support_home.
3
Ver
itas
Vol
ume
Man
age
r K
M f
or
PA
TRO
L V
ersi
on 2
.5.0
1

4
Ver
itas
Vol
ume
Man
age
r K
M f
or
PA
TRO
L V
ersi
on 2
.5.0
1
Table of Contents.....................................................................................................................................................................................12Requirements
.......................................................................................................................................................................................12System Requirements
.......................................................................................................................................................................................12Software Requirements
.......................................................................................................................................................................................14Security Requirements
.......................................................................................................................................................................................18Disk Space Requirements
.....................................................................................................................................................................................19Getting the BMC Software Installation Utility
.....................................................................................................................................................................................19Packages
.....................................................................................................................................................................................20Extracting the Setup Files
.....................................................................................................................................................................................22Installing Veritas Volume Manager KM for PATROL
.....................................................................................................................................................................................35Uninstalling Veritas Volume Manager KM for PATROL
.....................................................................................................................................................................................40Loading / Unloading the KM
.......................................................................................................................................................................................40Loading the KM
......................................................................................................................................................................41Preparing to Load the KM
......................................................................................................................................................................41Loading the KM on PATROL Console
......................................................................................................................................................................41Loading the KM on PATROL Central
......................................................................................................................................................................42Preloading the KM
.......................................................................................................................................................................................42Unloading the KM
......................................................................................................................................................................43Unloading the KM from the PATROL Agent
......................................................................................................................................................................43Unloading the KM from the PATROL Console
......................................................................................................................................................................44Unloading the KM from the PATROL Central Console
.....................................................................................................................................................................................44Performing Post-Installation Operations
.......................................................................................................................................................................................44Configuring the KM User Account
.......................................................................................................................................................................................46Verifying Application Discovery
.......................................................................................................................................................................................46Checking the Instance Limits
.......................................................................................................................................................................................48Checking the Initial Setup of the KM
.......................................................................................................................................................................................48Restarting PATROL Agent and PATROL Console
.....................................................................................................................................................................................49Upgrading the Platform
.....................................................................................................................................................................................51Integrating with BMC Portal
.....................................................................................................................................................................................51Integrating with BMC ProactiveNet Performance Management 8.5.x and 8.6.x
.......................................................................................................................................................................................52Creating and Importing an Adapter for a BMC PATROL KM
.......................................................................................................................................................................................53Updating an Adapter for a BMC PATROL KM
.......................................................................................................................................................................................53Importing and Customizing Thresholds

5
Ver
itas
Vol
ume
Man
age
r K
M f
or
PA
TRO
L V
ersi
on 2
.5.0
1
.......................................................................................................................................................................................54Managing Baselines and Key Performance Indicators
.....................................................................................................................................................................................57Configuring the KM
.......................................................................................................................................................................................57Configuring the Multi-Node Monitoring Mode
.......................................................................................................................................................................................59Filtering Elements to Monitor
.......................................................................................................................................................................................62Configuring the Element Status
.......................................................................................................................................................................................64Configuring the Node Status
.......................................................................................................................................................................................65Configuring the Log Filter
.......................................................................................................................................................................................67Configuring the Log Scan Limit
.......................................................................................................................................................................................68Configuring Logs Alert Acknowledgement
.....................................................................................................................................................................................69Using the KM
.......................................................................................................................................................................................69Acknowledging Alerts
.......................................................................................................................................................................................70Enabling the Debug Mode
.......................................................................................................................................................................................73Generating Reports
.......................................................................................................................................................................................73Refreshing Parameters
.....................................................................................................................................................................................76Classes and Parameters
.......................................................................................................................................................................................77VVM_DAEMON
.......................................................................................................................................................................................79VVM_DAEMON_CONTAINER
.......................................................................................................................................................................................82VVM_DISKDEVICE
.......................................................................................................................................................................................87VVM_DISKDEVICE_CONTAINER
.......................................................................................................................................................................................88VVM_DISKGROUP
.......................................................................................................................................................................................92VVM_DISKGROUP_CONTAINER
.......................................................................................................................................................................................102VVM_DISKPATH
.......................................................................................................................................................................................103VVM_LOG
.......................................................................................................................................................................................107VVM_LOG_CONTAINER
.......................................................................................................................................................................................109VVM_PLEX
.......................................................................................................................................................................................114VVM_RLINK
.......................................................................................................................................................................................116VVM_RVG
.......................................................................................................................................................................................118VVM_RVG_CONTAINER
.......................................................................................................................................................................................120VVM_SERVER
.......................................................................................................................................................................................125VVM_SUBDISK
.......................................................................................................................................................................................129VVM_VOLUME
.......................................................................................................................................................................................134VVM_VOLUME_CONTAINER
.....................................................................................................................................................................................138Where to Find Additional Help
Release Notes for v2.5.01

7
Ver
itas
Vol
ume
Man
age
r K
M f
or
PA
TRO
L V
ersi
on 2
.5.0
1
What's NewVeritas Volume Manager KM for PATROL now supports Windows 2012.
Fixed IssuesVVM-129: The value of the VVMVolumeStateNT parameter was sometimes improperly setto Degraded (=5) instead of Active (=0) on Windows systems; which caused a false alarm tobe triggered by the VVMVolumeStatus parameter.
VVM-136: The value of the VVMRLinkKernelState parameter was sometimes improperly setto Enabled (=1) instead of Connect (= 0) on Windows systems; which caused a false alarm tobe triggered by the VVMRLinkKernelStatus parameter.
VVM-143: The KM did not properly interpret the output of the iostat command used tocollect statistics from deported volumes on Windows. This resulted in a false alarm to betriggered by the VVMLoginStatus parameter.
VVM-153: A false alarm was triggered by the VVMDiskdeviceStatus parameter whenmonitoring a Storage Foundation 5x system running on Windows.
VVM-159: The Microsoft Cluster active node was not properly detected when the KM wasoperating in multi-node monitoring mode.
VVM-174: The Sudo configuration requirements have been updated in the SecurityRequirements chapter of the user documentation.
VVM-180: When SRL Overflow Protection was set to "DCM" or "AutoDCM", the KM did nottrigger an alert when DCM logging was activated. A new state has been added to theVVMRLinkKernelState of the VVM_RLINK application class, DCM Logging (2), which by defaulttriggers an alarm through VVMRLinkKernelStatus.
VVM-188: The status report file of Veritas Volume Manager KM for PATROL is now suffixedwith the Agent port number to avoid overwriting it when multiple virtual Agents are used.
VVM-189: Invalid alarms were triggered on the VCSLoginStatus parameter when the KM wasunable to check the active node.
VVM-190: The main discovery cycle was irregular due to an asynchronous default KMdiscovery interval. It is now reduced to 30 seconds to avoid such irregularity.
VVM-191: On Windows systems, if the PATROL Agent installation path contained spaces,scripts calls and output redirection commands failed.

8
Ver
itas
Vol
ume
Man
age
r K
M f
or
PA
TRO
L V
ersi
on 2
.5.0
1

Overview

10
Ver
itas
Vol
ume
Man
age
r K
M f
or
PA
TRO
L V
ersi
on 2
.5.0
1
Veritas Volume Manager KM for PATROL (or VVM KM) helps you ensure that your Veritas VolumeManager installations run efficiently 24 hours a day.
The KM more especially monitors:
Server: monitors overall health of the Veritas Volume Manager and it is critical daemons.
Disks and Multi Paths: monitors the health of disk devices and dynamic multi-pathing (DMP).
Logs: checks regularly for any errors in the system and event logs and monitors the log spaceutilization.
Logical Volumes: automatically discovers and monitors volumes, plexes and subdisks.
Replication (VVR): monitors status and performance of replicated volume groups (RVGs) andreplication links (RLINKs).
Performance: collects I/O performance statistics at disk, volume, plex & subdisk levels tohelp identify any bottlenecks.
All the information collected is grouped into application classes and displayed in the PATROLConsole. Alarms and warnings inform you when a suspicious behavior is detected; thus allowingyou to quickly and clearly identify peaks, troughs and trends in the performance of your backupresources.
Refer to the Reference Guide for more information about the application classes.

Preparing for Installation

12
Ver
itas
Vol
ume
Man
age
r K
M f
or
PA
TRO
L V
ersi
on 2
.5.0
1
This chapter provides information about the tasks that must be performed before you startinstalling Veritas Volume Manager KM for PATROL. Make sure to carefully read the followingsections requirements:
Review the System, Software, Security and Disk Space Requirements
Get the BMC Software Installation Utility
Download the Installation Packages
Extract the Setup Files
RequirementsSystem RequirementsThe following list shows the operating systems and their versions supported by Veritas VolumeManager KM for PATROL.
Microsoft Windows Server 2003, 2008 and 2012, all versions supported by BMC PATROL Agent3.7 and greater
Linux, all distributions supported by BMC PATROL Agent 3.7 and greater
Sun Solaris 8, 9, 10 and 11 supported by BMC PATROL Agent 3.7 and greater
HP-UX 11, supported by BMC PATROL Agent 3.7 and greater
IBM AIX 5.x and 6.x, supported by BMC PATROL Agent 3.7 and greater
If the operating system is upgraded (or downgraded) at a later date, you will need to reload commandsfor the Veritas Volume Manager KM for PATROL. Refer to Upgrading the Platform.
Software RequirementsSoftware Requirements
The following table contains a list of required software and their versions supported by VeritasVolume Manager KM for PATROL.
Software Version
Veritas Volume Manager™ (included in VeritasStorage Foundation Suites)
4.5, 5.0, 5.1, 6.x
BMC Software PATROL Agent 3.4.20, 3.5.x, 3.6.x, 3.7.x, 3.8.x, 3.9.x, 9.x
BMC Software PATROL Console 3.4.x, 3.5.x, 7.x
BMC Portal 2.3.x, 2.4.x, 2.5.x, 2.6.x, 2.7.x, 2.8.x
BMC ProactiveNet Performance Manager 8.x, 8.5.x, 8.6.x, 9.x
13 Requirements
Ver
itas
Vol
ume
Man
age
r K
M f
or
PA
TRO
L V
ersi
on 2
.5.0
1
BMC TrueSight Operations Management 10
Version 2.5 of Veritas Volume Manager KM for PATROL does not support Veritas Volume Manager versionsbefore 3.2 and PATROL Agent versions before 3.4.
If the operating system is upgraded (or downgraded) at a later date, you will need to reload commandsfor the VVM KM. Refer to Upgrading the Platform.
Changes to Veritas Volume Manager
There are no changes required to the Veritas Volume Manager application in order to use VeritasVolume Manager KM for PATROL.
Changes to BMC PATROL
To improve the performance of the VVM KM, the PATROL Agent tuning variable “/AgentSetup/AgentTuning/pslInstructionMax” should be disabled by setting it to 0 (zero) or increased to atleast 5,000,000.
This applies for all Veritas Volume Manager active servers and media servers where the KM isinstalled. This adjustment will allow the data collectors to execute without incurring an internalscheduling delay.
This PATROL Agent tuning variable can be updated using wpconfig (on Microsoft Windows),xpconfig (on Unix) or PATROL Configuration Manager (PCM). Alternatively, you can use one ofthe following single line PSL command through the PATROL Console OS> prompt to update thistuning variable.
To disable:
%PSL pconfig("REPLACE",
"/AgentSetup/AgentTuning/pslInstructionMax",0);
To set to at least 5,000,000:
%PSL v="/AgentSetup/AgentTuning/pslInstructionMax";
if(get(v)<5000000){pconfig("REPLACE",v,5000000);}
In large Veritas Volume Manager systems, the value of 5,000,000 for the tuning variable“pslInstructionMax” may still be insuf f icient. In such situations, error messages will appear on the PATROLConsole System Output Window (SOW) reporting that some VVM KM data collectors are in an inf inite loop.In this case you can set the tuning variable to zero to disable this functionality.
The KM stores all configuration information in the PATROL Agent configuration database

14Requirements
Ver
itas
Vol
ume
Man
age
r K
M f
or
PA
TRO
L V
ersi
on 2
.5.0
1
(pconfig), under paths /VVM and /Runtime/VVM. PATROL Agent user (default: patrol) should beable to read and write to these pconfig variables at anytime. If Access Control List (ACL) is usedto control which users are authorized to connect to a PATROL Agent, please ensure that themode for PATROL Agent user includes “C” in the PATROL Agent variable “/AgentSetup/accessControlList”. Please refer the PATROL Agent Ref erence Manual for more details
You cannot copy or distribute these KM conf iguration variables between managed nodes, because theymay not have the same value for each managed node. For example, the login user details may not be thesame for all managed nodes. Also some of these variables, like installation paths, are set automaticallyduring the initial discovery
Additional Software Requirements
The following table contains a list of additional software requirements of Veritas VolumeManager KM for PATROL:
Purpose Software Version
When running VVM KM with sudo useraccount on Solaris, HP-UX, AIX or Linuxmanaged nodes
Sudo (superuser do) 1.6.7 or later
When running VVM KM on Linux managednodes
Korn shell binary (/bin/ksh) Any
When running VVM KM on MicrosoftWindows x64 managed nodes
Reg.exe patch KB948698(http://support.microsoft.com/kb/948698)
Any
The Microsoft Windows x64 Reg.exe patch, KB948698 is required to allow access to 64-bit registry keysfrom PATROL Agent. Access the above patch site from the managed node to obtain the correct patchfor that platform.
Security RequirementsBy default, Veritas Volume Manager is installed and run as the root user (on Unix) or asadministrator user (on Microsoft Windows).
Veritas Volume Manager KM for PATROL needs to be run as a user account with administrativeprivileges to read and execute Veritas Volume Manager application programs and file systems.Login details of this user are configured in the KM during the configuration. The password isstored in the PATROL Agent in a DES encrypted format.

15 Requirements
Ver
itas
Vol
ume
Man
age
r K
M f
or
PA
TRO
L V
ersi
on 2
.5.0
1
The encrypted password can be viewed by any user who has access to the PATROL Agent configurationvariables (pconfig). This user could then execute PSL statements using the encrypted password throughthe PATROL Console. This can be prevented by setting up an appropriate Access Control List (ACL) forusers. Please refer to the PATROL Agent Reference Manual for details on how to set up an ACL.
One of the following user accounts can be used for configuring the login details of the KM:
1. root user (Unix) or administrator user (Microsoft Windows)
2. a non-root user, such as patrol, with sudo privileges on Veritas Volume Manager to executeapplication programs and access the file systems (Unix only)
3. a non-root (Unix) or non-administrator (Microsoft Windows) account, such as patrol,configured in Veritas Volume Manager application to administer the Veritas VolumeManager application
Refer to the Veritas Volume Manager System Administrator’s Guide for details on how to set up this type ofaccount.
Access Permissions
The VVM KM user needs “read & execute” permission to executable and library files under thepaths listed below. The Veritas Volume Manager installation path INSTALL_PATH, referenced inthe tables below is normally /opt/VRTSvxvm (on Unix) or C:\Program Files\Veritas\VolumeManager x.x (on Microsoft Windows).
Executable and Library Files accessed by VVM KM User
Unix Microsoft Windows
INSTALL_PATH/bin INSTALL_PATH/lib/usr/sbin/*
INSTALL_PATH\vx*.exe
If the KM is enabled to failover in a clustered environment, the login user needs executepermissions to the following cluster commands:
/opt/VRTSvcs/bin/hagrp (in Veritas Cluster Server)
vxdctl (in Veritas Cluster File System)
/usr/cluster/bin/clrg (in Oracle Solaris Cluster)
C:\Windows\sysnative\cluster (in Microsoft Cluster)
The VVM KM includes some scripts which should be executable by the PATROL Agent user andthe VVM KM user. These scripts are stored under KM_HOME path, normally PATROL_HOME/lib/VVM.

16Requirements
Ver
itas
Vol
ume
Man
age
r K
M f
or
PA
TRO
L V
ersi
on 2
.5.0
1
In addition to these Veritas Volume Manager commands, VVM KM executes other operating systemcommands, such as ps, uname which may not require special privileges.
To list all OS commands used by the VVM KM, execute the following PSL code from the PATROLConsole, using PSL Task menu, after installing and loading the KM.
i=0; sudoers="";
foreach var (grep("^/Runtime/VVM/CommandControls/",pconfig("LIST")))
{
ctl=get(var);
opt=ntharg(grep("Option",ctl),"2-"," =");
nsa=ntharg(grep("NoSudoAttempt",ctl),"2-"," =");
sua=ntharg(grep("SingleUserAttempt",ctl),"2-"," =");
typ=ntharg(grep("CommandType",ctl),"2-"," =");
cmd=nthargf(grep("CommandText",ctl),"2-","=","=");
if((typ == "")||(typ == "OS"))
{
met="";
if(opt == "NoLogin") { met = "(run as patrol user)"; }
elsif(nsa == "YES") { met = "(run as configured user without sudo)"; }
elsif(sua == "YES") { met = "(run as supplied user - used in menu)"; }
else
{
scmd=cmd;
s=index(scmd,"%sudo");
if(s) { scmd=replace(substr(scmd,s,length(scmd)),"%sudo",""); }
sudoers=union(sudoers,ntharg(ntharg(scmd,1,"|"),"1-"," "," "));
}
printf("(%2d) %-30s %-40s: %s\n",i++,ntharg(var,"5","/"),met,cmd);
}
}
printf("\n\nCommands used with sudo:\n%s",sort(sudoers));
The PATROL Agent user (normally patrol) needs “read & execute” permission to following pathsand files:
/var/adm/messages (on Solaris)
/var/adm/syslog/syslog.log (on HP-UX)
/var/log/messages (on Linux and AIX)
If a monitored log file cannot be read by the PATROL Agent user, it will be copied to KM_TEMP pathusing the configured login account, and processed by the PATROL Agent user. On completion the copiedlog file will be removed. This may increase the file system usage under KM_TEMP temporarily duringthis activity.
17 Requirements
Ver
itas
Vol
ume
Man
age
r K
M f
or
PA
TRO
L V
ersi
on 2
.5.0
1
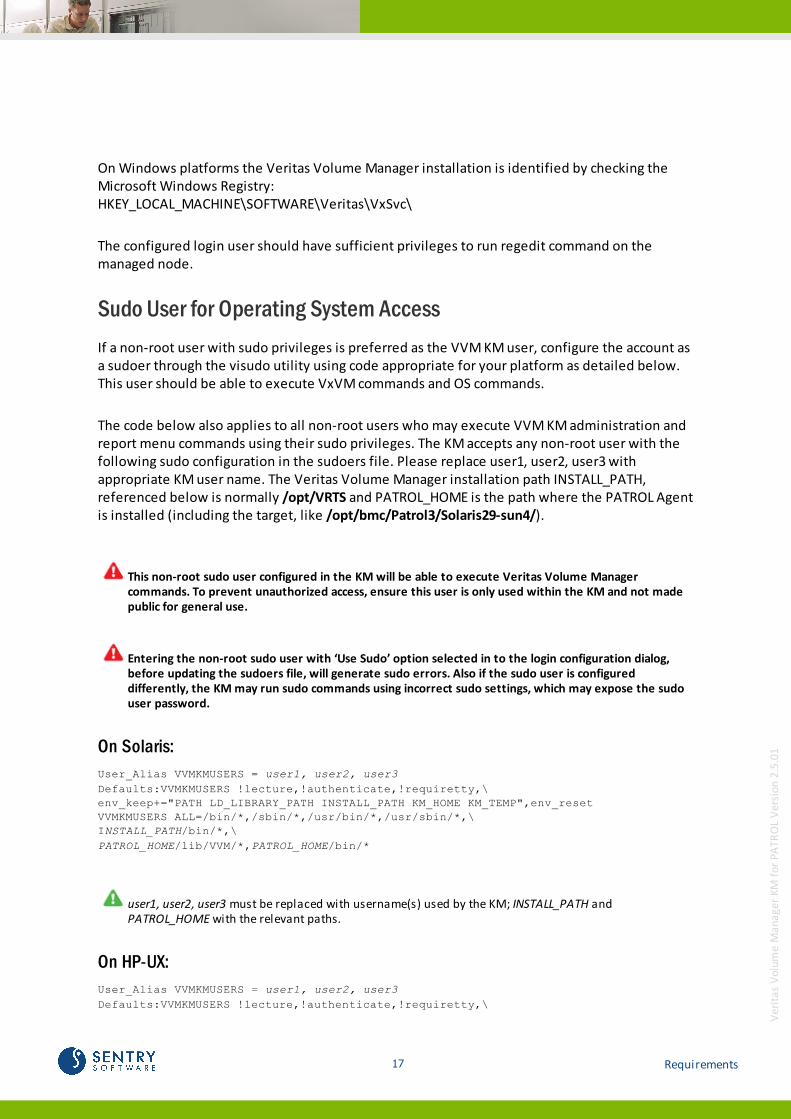
On Windows platforms the Veritas Volume Manager installation is identified by checking theMicrosoft Windows Registry: HKEY_LOCAL_MACHINE\SOFTWARE\Veritas\VxSvc\
The configured login user should have sufficient privileges to run regedit command on themanaged node.
Sudo User for Operating System Access
If a non-root user with sudo privileges is preferred as the VVM KM user, configure the account asa sudoer through the visudo utility using code appropriate for your platform as detailed below.This user should be able to execute VxVM commands and OS commands.
The code below also applies to all non-root users who may execute VVM KM administration andreport menu commands using their sudo privileges. The KM accepts any non-root user with thefollowing sudo configuration in the sudoers file. Please replace user1, user2, user3 withappropriate KM user name. The Veritas Volume Manager installation path INSTALL_PATH,referenced below is normally /opt/VRTS and PATROL_HOME is the path where the PATROL Agentis installed (including the target, like /opt/bmc/Patrol3/Solaris29-sun4/).
This non-root sudo user configured in the KM will be able to execute Veritas Volume Managercommands. To prevent unauthorized access, ensure this user is only used within the KM and not madepublic for general use.
Entering the non-root sudo user with ‘Use Sudo’ option selected in to the login configuration dialog,before updating the sudoers file, will generate sudo errors. Also if the sudo user is configureddifferently, the KM may run sudo commands using incorrect sudo settings, which may expose the sudouser password.
On Solaris:
User_Alias VVMKMUSERS = user1, user2, user3
Defaults:VVMKMUSERS !lecture,!authenticate,!requiretty,\
env_keep+="PATH LD_LIBRARY_PATH INSTALL_PATH KM_HOME KM_TEMP",env_reset
VVMKMUSERS ALL=/bin/*,/sbin/*,/usr/bin/*,/usr/sbin/*,\
INSTALL_PATH/bin/*,\
PATROL_HOME/lib/VVM/*,PATROL_HOME/bin/*
user1, user2, user3 must be replaced with username(s) used by the KM; INSTALL_PATH andPATROL_HOME with the relevant paths.
On HP-UX:
User_Alias VVMKMUSERS = user1, user2, user3
Defaults:VVMKMUSERS !lecture,!authenticate,!requiretty,\
18Requirements
Ver
itas
Vol
ume
Man
age
r K
M f
or
PA
TRO
L V
ersi
on 2
.5.0
1
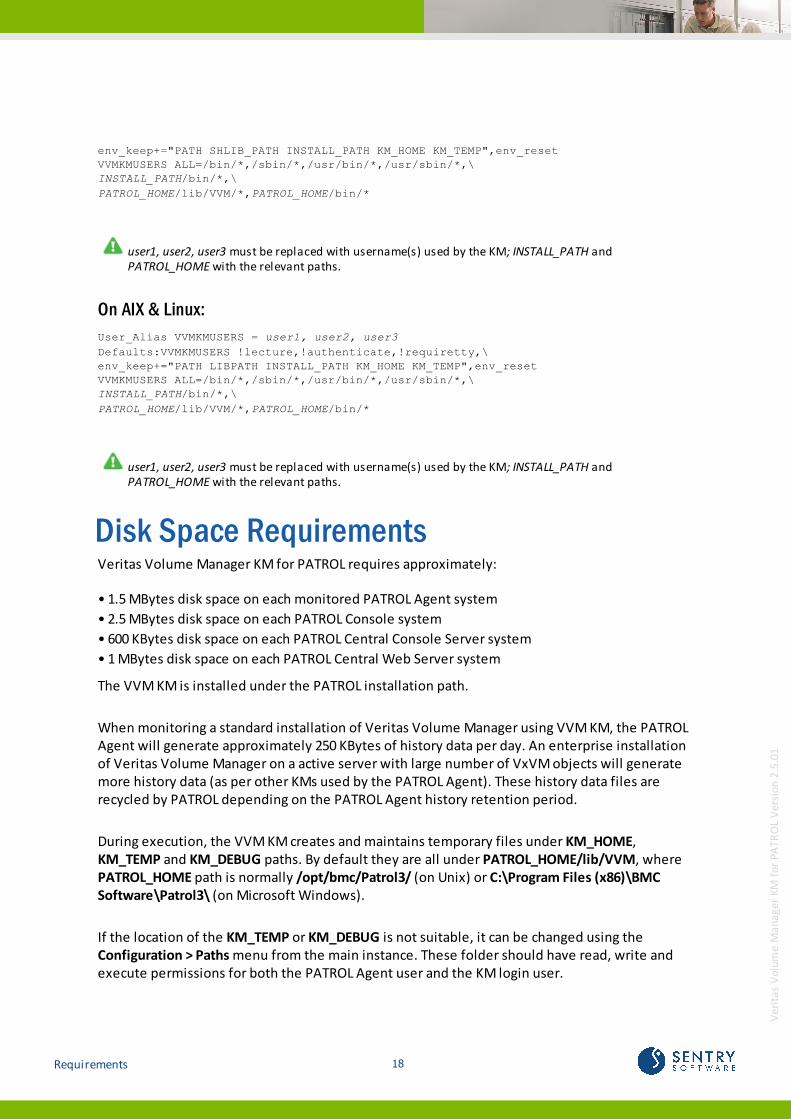
env_keep+="PATH SHLIB_PATH INSTALL_PATH KM_HOME KM_TEMP",env_reset
VVMKMUSERS ALL=/bin/*,/sbin/*,/usr/bin/*,/usr/sbin/*,\
INSTALL_PATH/bin/*,\
PATROL_HOME/lib/VVM/*,PATROL_HOME/bin/*
user1, user2, user3 must be replaced with username(s) used by the KM; INSTALL_PATH andPATROL_HOME with the relevant paths.
On AIX & Linux:
User_Alias VVMKMUSERS = user1, user2, user3
Defaults:VVMKMUSERS !lecture,!authenticate,!requiretty,\
env_keep+="PATH LIBPATH INSTALL_PATH KM_HOME KM_TEMP",env_reset
VVMKMUSERS ALL=/bin/*,/sbin/*,/usr/bin/*,/usr/sbin/*,\
INSTALL_PATH/bin/*,\
PATROL_HOME/lib/VVM/*,PATROL_HOME/bin/*
user1, user2, user3 must be replaced with username(s) used by the KM; INSTALL_PATH andPATROL_HOME with the relevant paths.
Disk Space RequirementsVeritas Volume Manager KM for PATROL requires approximately:
• 1.5 MBytes disk space on each monitored PATROL Agent system
• 2.5 MBytes disk space on each PATROL Console system
• 600 KBytes disk space on each PATROL Central Console Server system
• 1 MBytes disk space on each PATROL Central Web Server system
The VVM KM is installed under the PATROL installation path.
When monitoring a standard installation of Veritas Volume Manager using VVM KM, the PATROLAgent will generate approximately 250 KBytes of history data per day. An enterprise installationof Veritas Volume Manager on a active server with large number of VxVM objects will generatemore history data (as per other KMs used by the PATROL Agent). These history data files arerecycled by PATROL depending on the PATROL Agent history retention period.
During execution, the VVM KM creates and maintains temporary files under KM_HOME,KM_TEMP and KM_DEBUG paths. By default they are all under PATROL_HOME/lib/VVM, wherePATROL_HOME path is normally /opt/bmc/Patrol3/ (on Unix) or C:\Program Files (x86)\BMCSoftware\Patrol3\ (on Microsoft Windows).
If the location of the KM_TEMP or KM_DEBUG is not suitable, it can be changed using theConfiguration > Paths menu from the main instance. These folder should have read, write andexecute permissions for both the PATROL Agent user and the KM login user.

19 Getting the BMC Software Installation Utility
Ver
itas
Vol
ume
Man
age
r K
M f
or
PA
TRO
L V
ersi
on 2
.5.0
1
Getting the BMC Software InstallationUtilityIn order to install Veritas Volume Manager KM for PATROL, you need the latest version of theBMC Software Installation Utility. You can download the latest Installation Utility from the BMCSoftware EPD (electronic product download) from: http://webapps.bmc.com/signon/content/logon.jsp on the BMC Software Website, or from the Veritas Volume Manager KM for PATROLpage on the Sentry Software Website
Choose the appropriate package depending on the platform you plan to install Veritas VolumeManager KM for PATROL on:
For UNIX/Linux systems: ins_ALL_<version>.tar
For Windows systems: ins_WINDOWS_<version>.exe
The packages are valid for all the PATROL components: Agent, Console, Console Server, etc.
Place the Installation Utility package in the same folder as the Veritas Volume Manager KM forPATROL packages.
PackagesThe Veritas Volume Manager KM for PATROL packages are available on the Sentry Software Website.
There are two packages, each of which can be used to install the KM on every PATROLcomponent (Agent, Console, etc.) according to the platform you are using. However, dependingon the package download source, the file names may differ:
Downloading from Sentry Software Web site
vvm_ALL_2500.zip
vvm_ALL_2500.tar
The Veritas Volume Manager KM for PATROL packages are designed for use with the BMC SoftwareInstallation Utility (formerly known as Thorium). They need to be merged with the latest availableversion of the BMC Software Installation Utility. Please see instructions.
20Extracting the Setup Files
Ver
itas
Vol
ume
Man
age
r K
M f
or
PA
TRO
L V
ersi
on 2
.5.0
1
Extracting the Setup FilesLike most Knowledge Modules for PATROL, you need to install Veritas Volume Manager KM forPATROL on the following components of your PATROL architecture:
Every managed system with a PATROL Agent
Every PATROL Console (Classic) that will show Veritas Volume Manager performance-relatedinformation and alerts
The Console Server
PATROL Central – Web Edition

Installing the KM
22
Ver
itas
Vol
ume
Man
age
r K
M f
or
PA
TRO
L V
ersi
on 2
.5.0
1
Introduction
This section describes the installation procedure for Veritas Volume Manager KM for PATROL onany PATROL component (Agents, Consoles, Console Server, etc.). As the setup is based on theBMC Software Installation Utility, this procedure applies to all operating systems supported byVeritas Volume Manager KM for PATROL.
Installing Veritas Volume ManagerKM for PATROLInstalling Veritas Volume Manager KM for PATROL is an automated process managed by a wizard.The wizard goes through the necessary steps to install Veritas Volume Manager KM for PATROLand all files associated with it. You are simply prompt for the product's folder location and theproduct/components to install.
Browse to the bmc_products folder where the files have been extracted (both Veritas VolumeManager KM for PATROL and the Common Installer).
23 Installing Veritas Volume Manager KM for PATROL
Ver
itas
Vol
ume
Man
age
r K
M f
or
PA
TRO
L V
ersi
on 2
.5.0
1
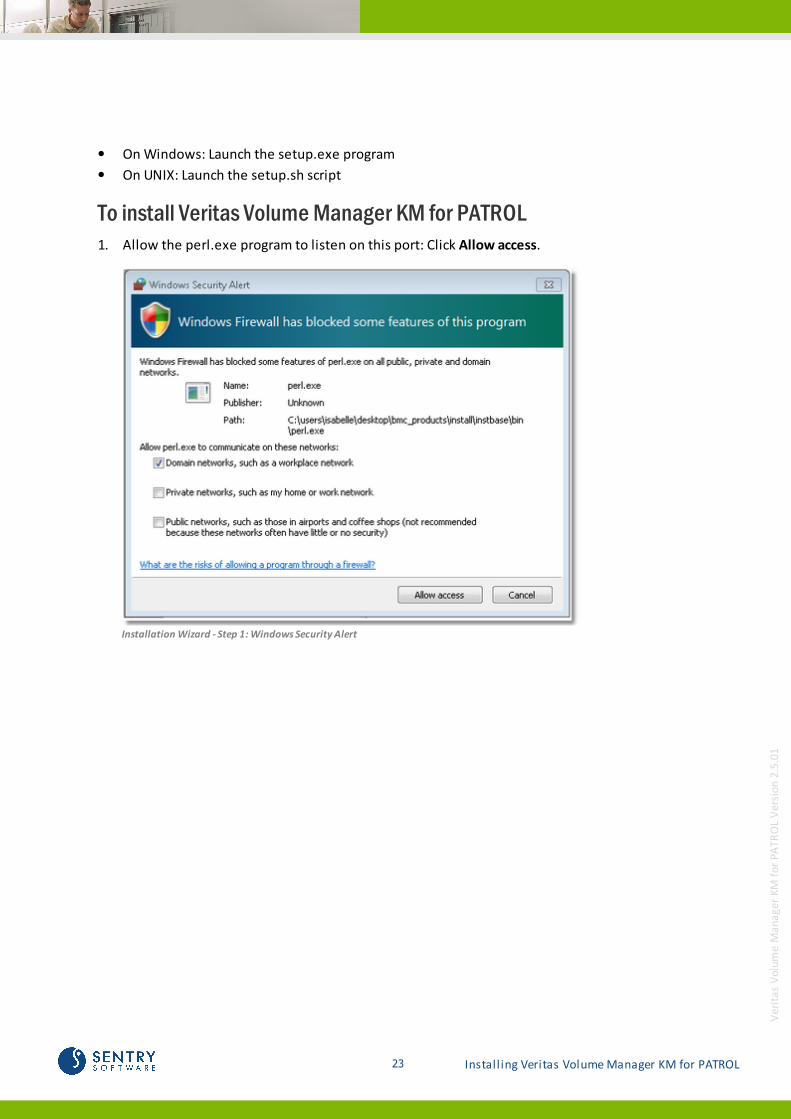
On Windows: Launch the setup.exe program
On UNIX: Launch the setup.sh script
To install Veritas Volume Manager KM for PATROL1. Allow the perl.exe program to listen on this port: Click Allow access.
Installation Wizard - Step 1: Windows Security Alert

24Installing Veritas Volume Manager KM for PATROL
Ver
itas
Vol
ume
Man
age
r K
M f
or
PA
TRO
L V
ersi
on 2
.5.0
1
2. The welcome screen of the installer appears. Click Next to continue.
Installation Wizard - Step 2: Welcome
25 Installing Veritas Volume Manager KM for PATROL
Ver
itas
Vol
ume
Man
age
r K
M f
or
PA
TRO
L V
ersi
on 2
.5.0
1
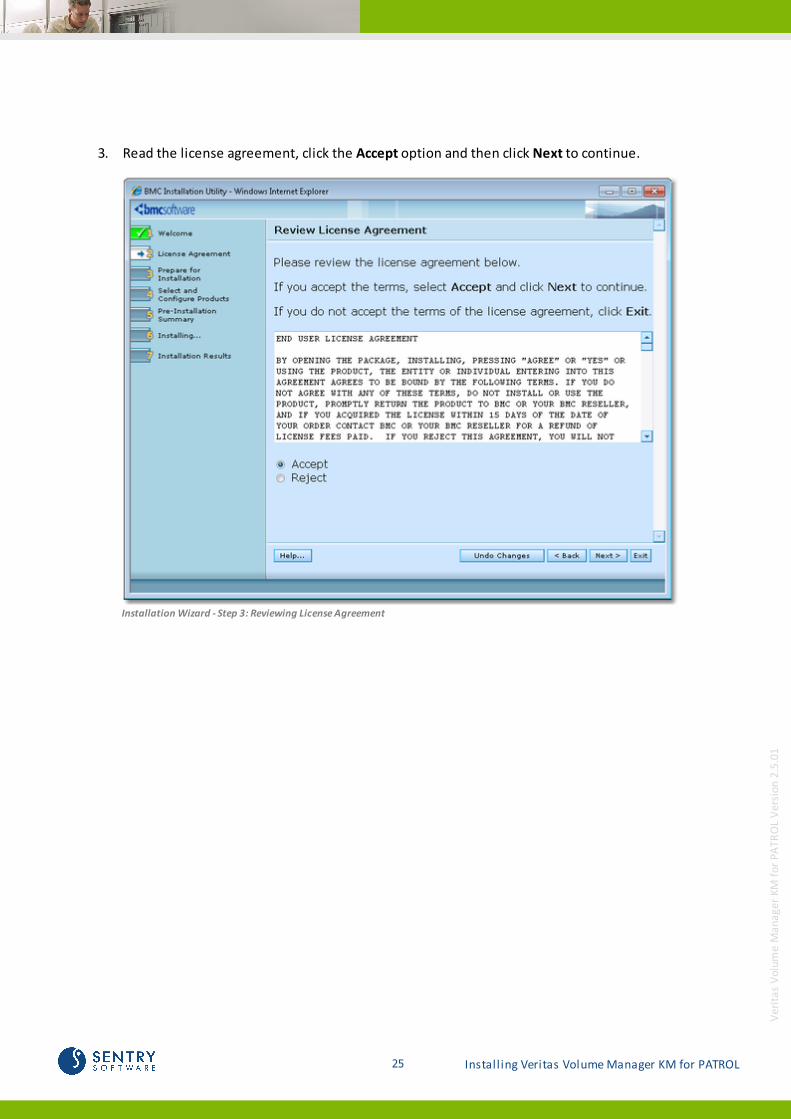
3. Read the license agreement, click the Accept option and then click Next to continue.
Installation Wizard - Step 3: Reviewing License Agreement
26Installing Veritas Volume Manager KM for PATROL
Ver
itas
Vol
ume
Man
age
r K
M f
or
PA
TRO
L V
ersi
on 2
.5.0
1
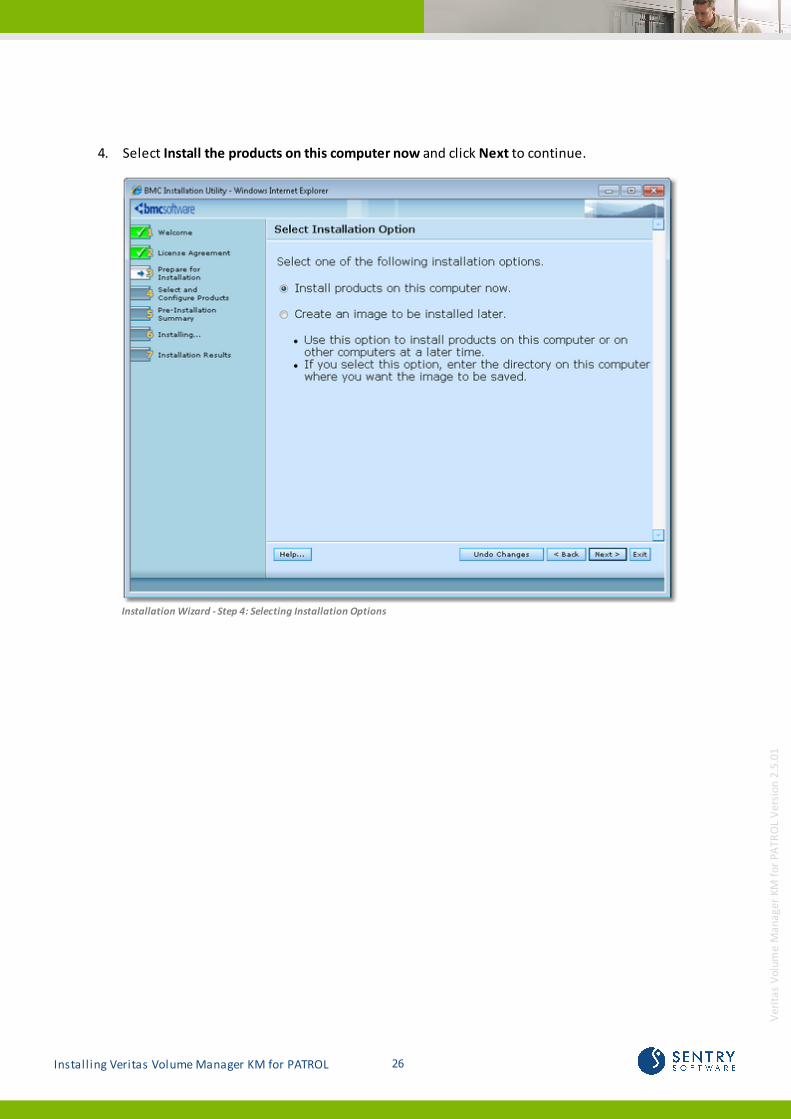
4. Select Install the products on this computer now and click Next to continue.
Installation Wizard - Step 4: Selecting Installation Options
27 Installing Veritas Volume Manager KM for PATROL
Ver
itas
Vol
ume
Man
age
r K
M f
or
PA
TRO
L V
ersi
on 2
.5.0
1
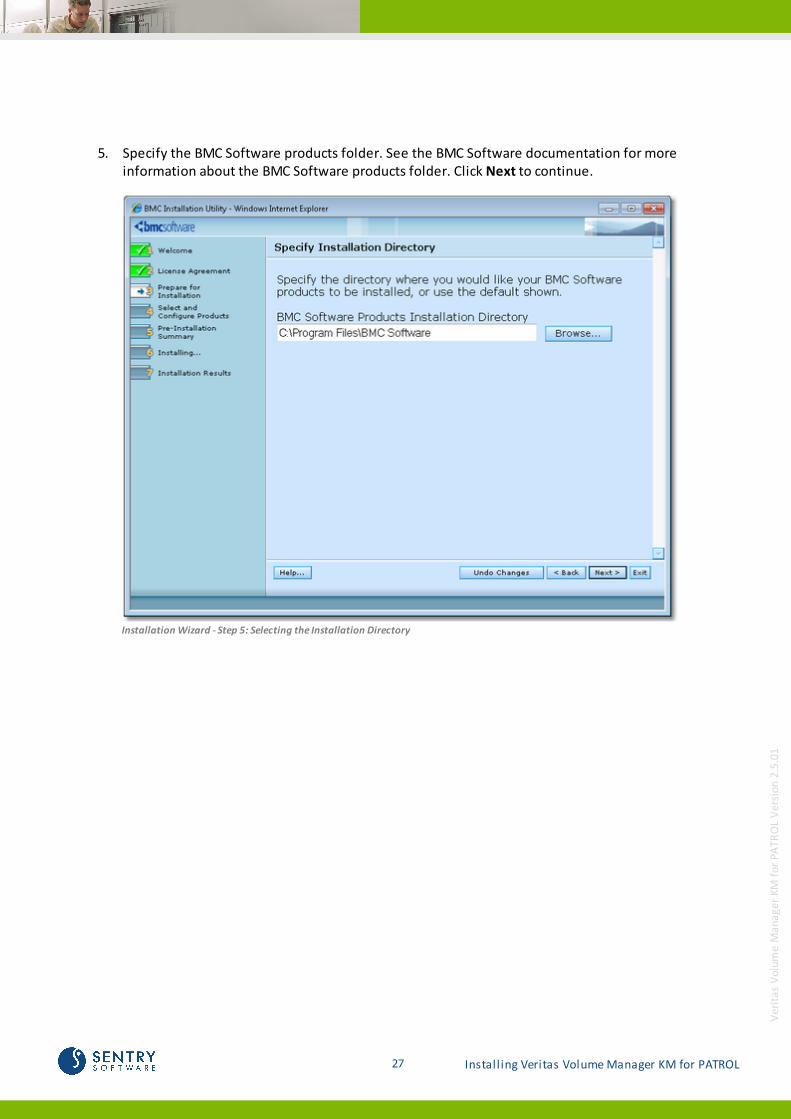
5. Specify the BMC Software products folder. See the BMC Software documentation for moreinformation about the BMC Software products folder. Click Next to continue.
Installation Wizard - Step 5: Selecting the Installation Directory
28Installing Veritas Volume Manager KM for PATROL
Ver
itas
Vol
ume
Man
age
r K
M f
or
PA
TRO
L V
ersi
on 2
.5.0
1
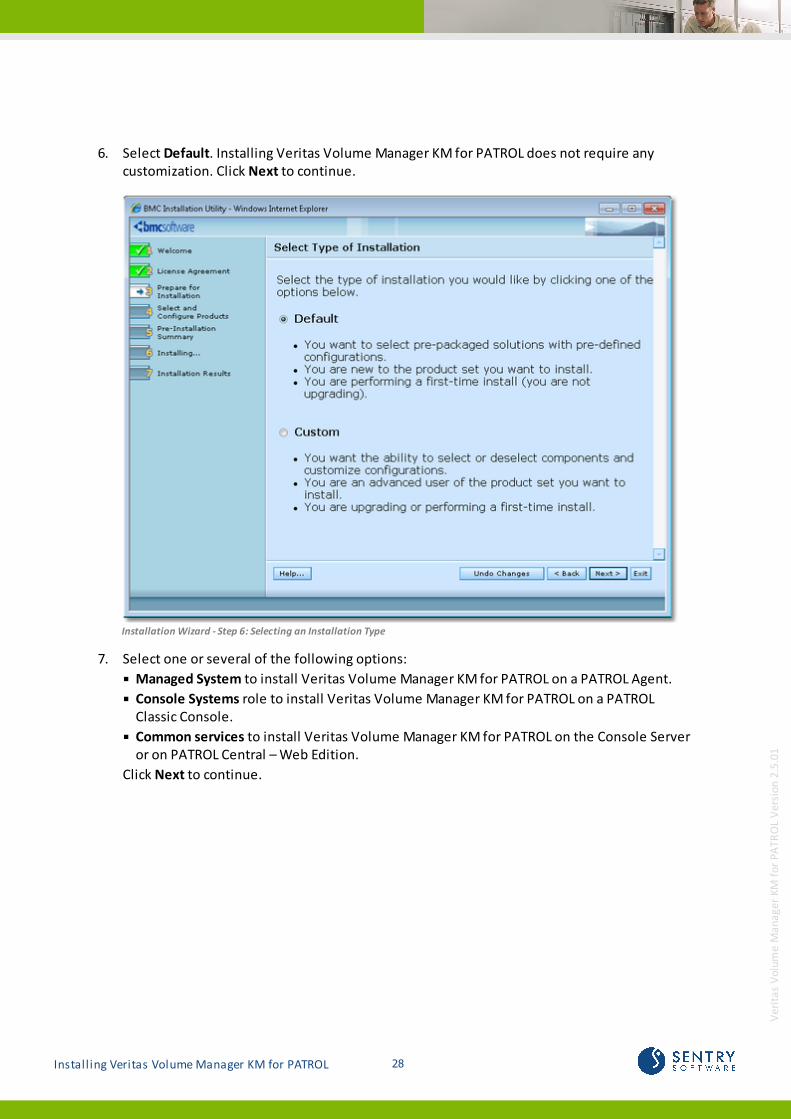
6. Select Default. Installing Veritas Volume Manager KM for PATROL does not require anycustomization. Click Next to continue.
Installation Wizard - Step 6: Selecting an Installation Type
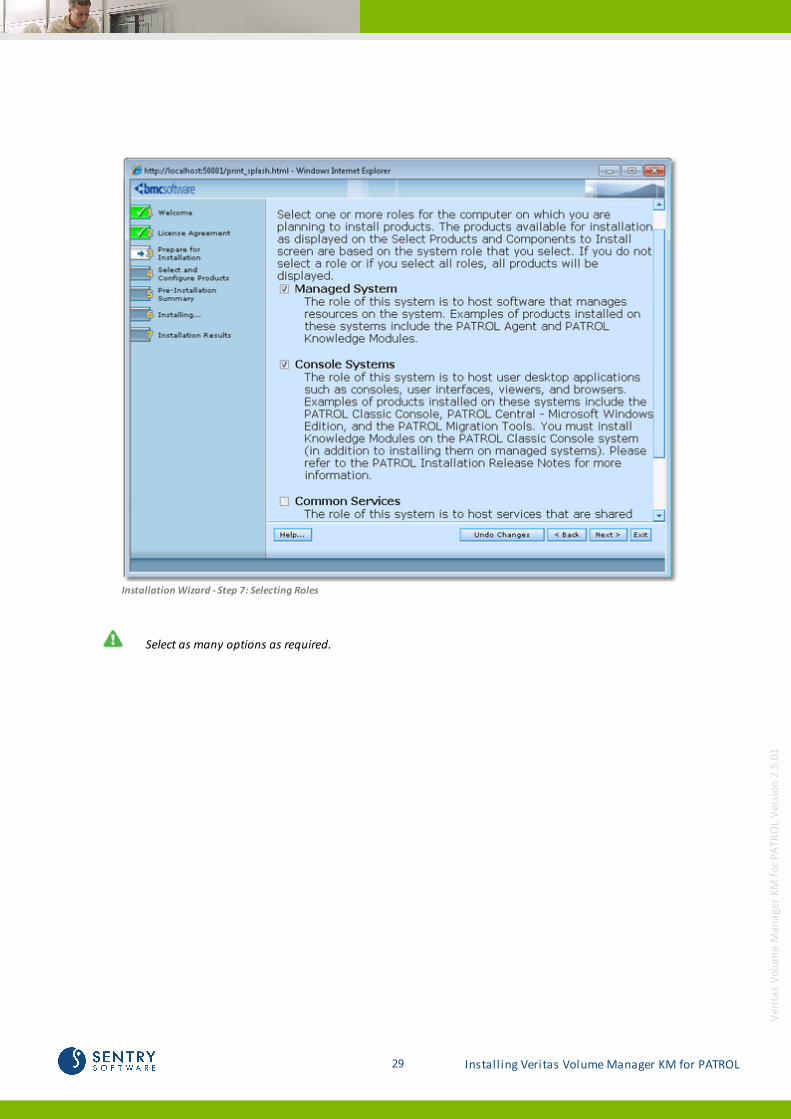
7. Select one or several of the following options:
Managed System to install Veritas Volume Manager KM for PATROL on a PATROL Agent.
Console Systems role to install Veritas Volume Manager KM for PATROL on a PATROLClassic Console.
Common services to install Veritas Volume Manager KM for PATROL on the Console Serveror on PATROL Central – Web Edition.
Click Next to continue.
29 Installing Veritas Volume Manager KM for PATROL
Ver
itas
Vol
ume
Man
age
r K
M f
or
PA
TRO
L V
ersi
on 2
.5.0
1
Installation Wizard - Step 7: Selecting Roles
Select as many options as required.

30Installing Veritas Volume Manager KM for PATROL
Ver
itas
Vol
ume
Man
age
r K
M f
or
PA
TRO
L V
ersi
on 2
.5.0
1
8. Check the Veritas Volume Manager KM for PATROL box to install the KM (it should beselected by default). Click Next to continue.
Installation Wizard - Step 8: Selecting Products and Components

31 Installing Veritas Volume Manager KM for PATROL
Ver
itas
Vol
ume
Man
age
r K
M f
or
PA
TRO
L V
ersi
on 2
.5.0
1
9. Review the installation parameters and click Start Install to launch the installationprocedure.
Installation Wizard - Step 9: Reviewing Installation Options

32Installing Veritas Volume Manager KM for PATROL
Ver
itas
Vol
ume
Man
age
r K
M f
or
PA
TRO
L V
ersi
on 2
.5.0
1
10. The setup program displays the actions performed and indicates the percentage ofcompletion.Once the installation complete, click Next to view the installation results.
Installation Wizard - Step 10: Installation Status

33 Installing Veritas Volume Manager KM for PATROL
Ver
itas
Vol
ume
Man
age
r K
M f
or
PA
TRO
L V
ersi
on 2
.5.0
1
11. The wizard displays the installation results.Click View Log to display a detailed log of the installation procedure. Click Next and thenFinish to exit the setup program.
Installation Wizard - Step 11: Installation Results
12. Click the Finish button to complete and close the installation wizard.

34Installing Veritas Volume Manager KM for PATROL
Ver
itas
Vol
ume
Man
age
r K
M f
or
PA
TRO
L V
ersi
on 2
.5.0
1
Installation Wizard - Step 12: Completing and closing the Installation Wizard
A Help button is available at each step of the procedure. Click to display the installation online help.The Exit button allows you to stop the installation procedure.
35 Installing Veritas Volume Manager KM for PATROL
Ver
itas
Vol
ume
Man
age
r K
M f
or
PA
TRO
L V
ersi
on 2
.5.0
1
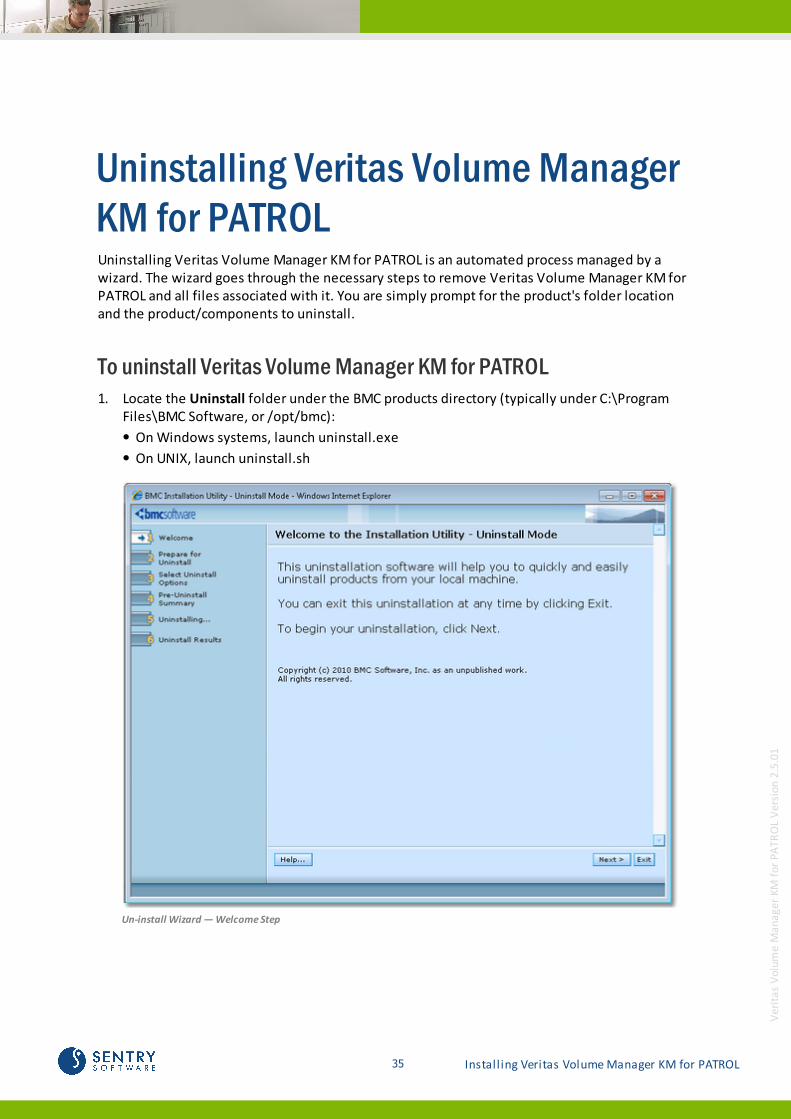
Uninstalling Veritas Volume ManagerKM for PATROLUninstalling Veritas Volume Manager KM for PATROL is an automated process managed by awizard. The wizard goes through the necessary steps to remove Veritas Volume Manager KM forPATROL and all files associated with it. You are simply prompt for the product's folder locationand the product/components to uninstall.
To uninstall Veritas Volume Manager KM for PATROL1. Locate the Uninstall folder under the BMC products directory (typically under C:\Program
Files\BMC Software, or /opt/bmc):
On Windows systems, launch uninstall.exe
On UNIX, launch uninstall.sh
Un-install Wizard — Welcome Step
36Uninstalling Veritas Volume Manager KM forPATROL
Ver
itas
Vol
ume
Man
age
r K
M f
or
PA
TRO
L V
ersi
on 2
.5.0
1
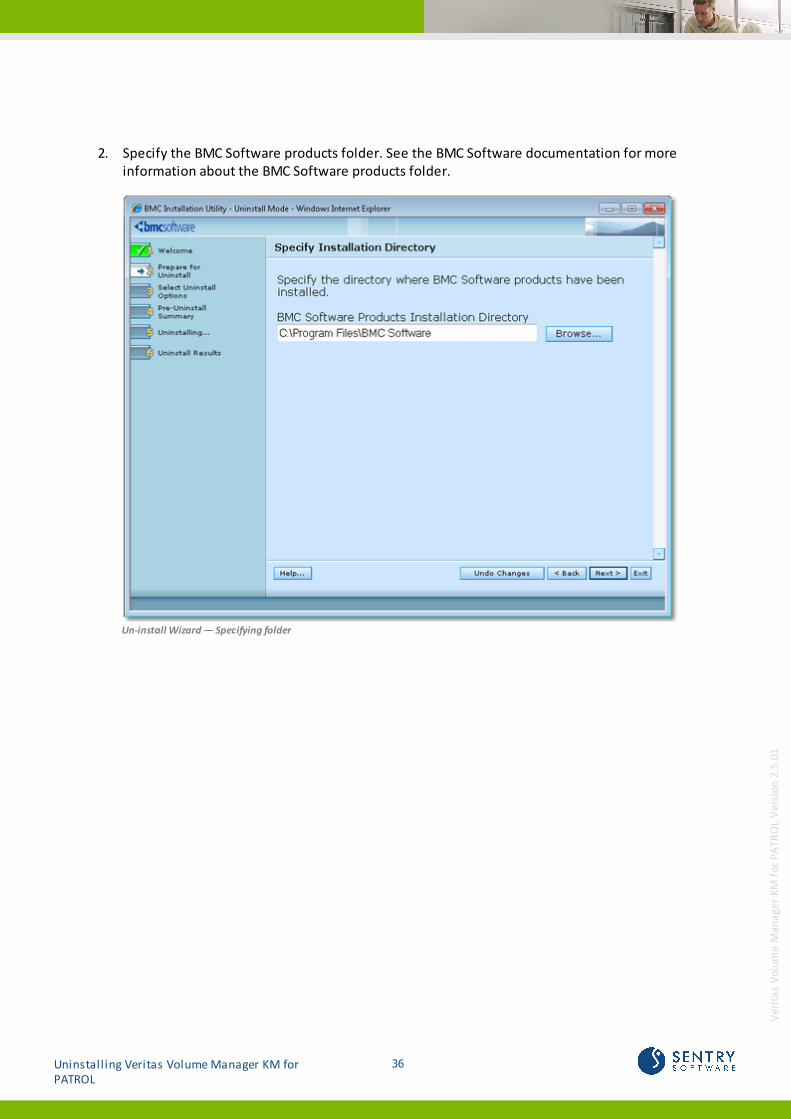
2. Specify the BMC Software products folder. See the BMC Software documentation for moreinformation about the BMC Software products folder.
Un-install Wizard — Specifying folder
37 Uninstalling Veritas Volume Manager KM forPATROL
Ver
itas
Vol
ume
Man
age
r K
M f
or
PA
TRO
L V
ersi
on 2
.5.0
1
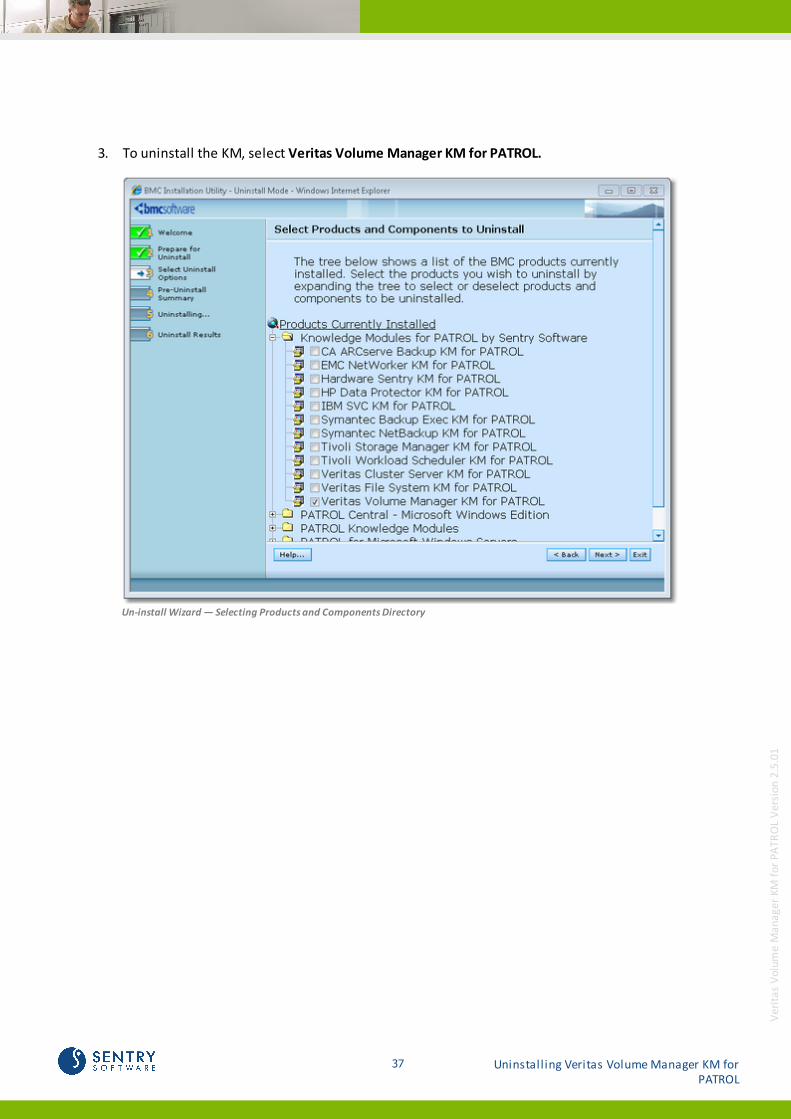
3. To uninstall the KM, select Veritas Volume Manager KM for PATROL.
Un-install Wizard — Selecting Products and Components Directory
38Uninstalling Veritas Volume Manager KM forPATROL
Ver
itas
Vol
ume
Man
age
r K
M f
or
PA
TRO
L V
ersi
on 2
.5.0
1
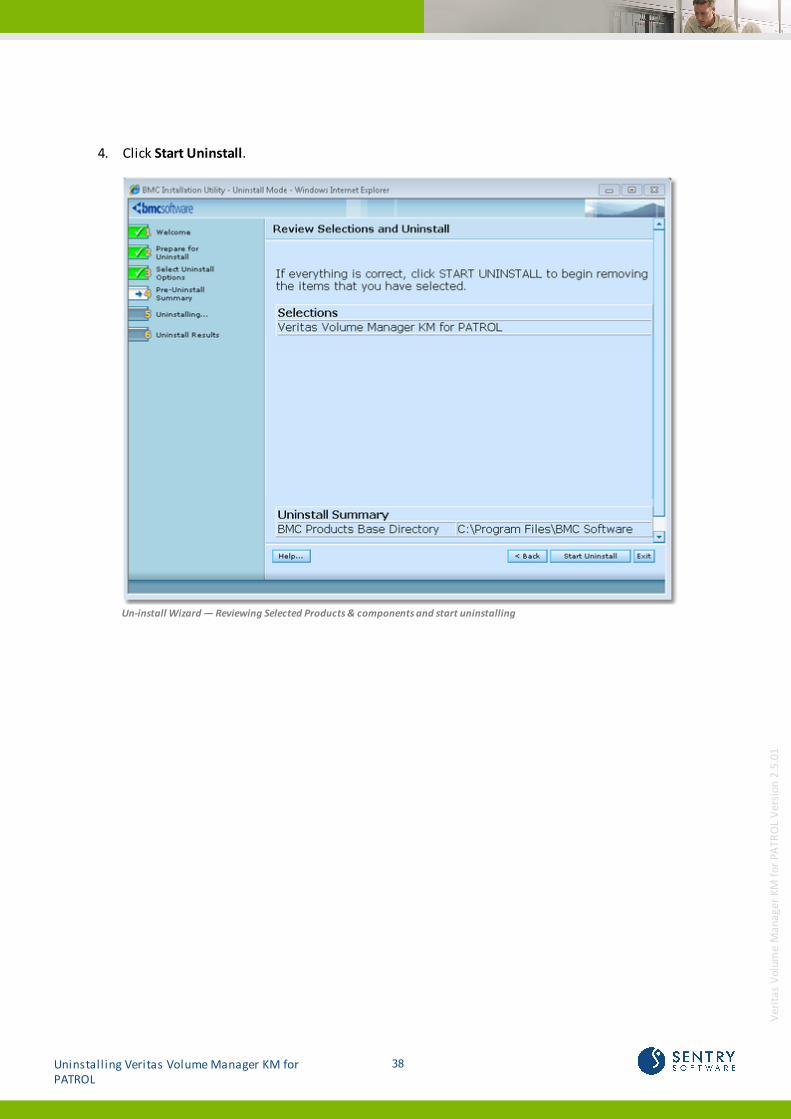
4. Click Start Uninstall.
Un-install Wizard — Reviewing Selected Products & components and start uninstalling
39 Uninstalling Veritas Volume Manager KM forPATROL
Ver
itas
Vol
ume
Man
age
r K
M f
or
PA
TRO
L V
ersi
on 2
.5.0
1
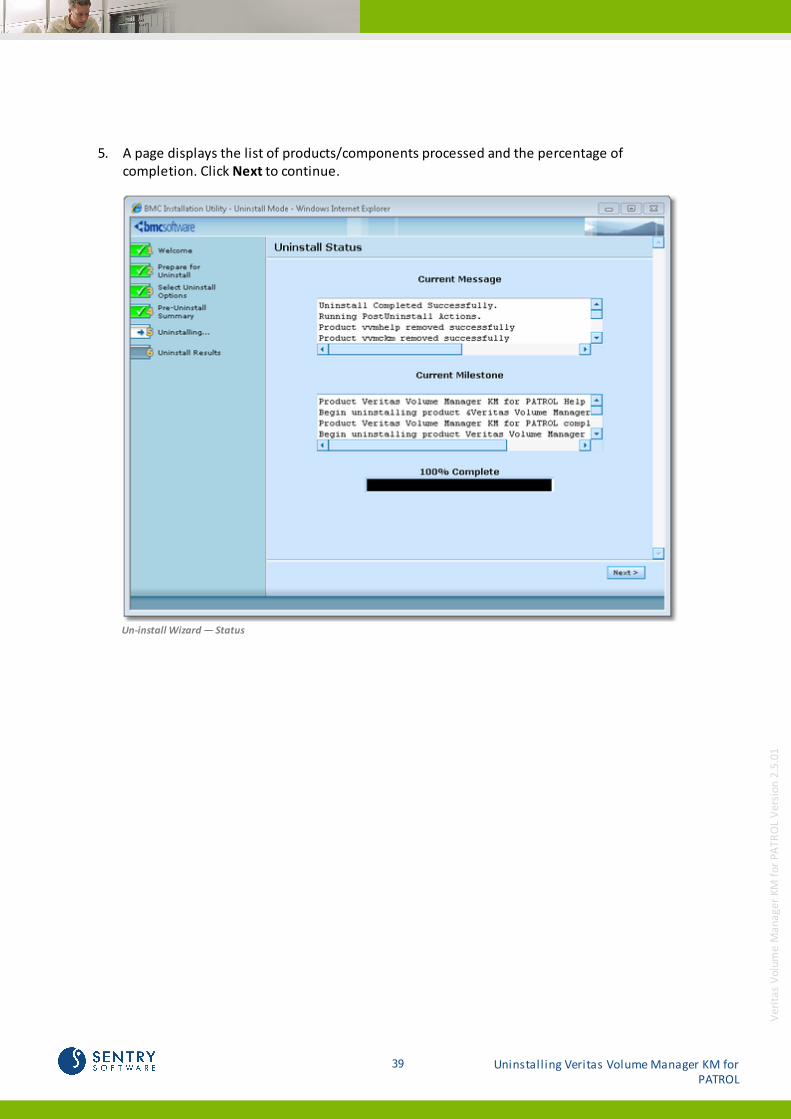
5. A page displays the list of products/components processed and the percentage ofcompletion. Click Next to continue.
Un-install Wizard — Status

40Uninstalling Veritas Volume Manager KM forPATROL
Ver
itas
Vol
ume
Man
age
r K
M f
or
PA
TRO
L V
ersi
on 2
.5.0
1
6. A page displaying SUCCESS indicates that Veritas Volume Manager KM for PATROL is nowuninstalled.
Un-install Wizard — Uninstall Results
Loading / Unloading the KMOnce installed the KM will have to be preloaded on one of the following PATROL consoles:
PATROL Console
PATROL Central
The PATROL Agent can also be configured to automatically preload the KM.
Loading the KMThis section provides instructions to load Veritas Volume Manager KM for PATROL on MicrosoftWindows and Unix platforms.
Before you load the VVM KM, you must install the KM on PATROL Console and PATROL Agentsystems.

41 Loading / Unloading the KM
Ver
itas
Vol
ume
Man
age
r K
M f
or
PA
TRO
L V
ersi
on 2
.5.0
1
Preparing to Load the KM1. Start the PATROL Console and update the connection to all PATROL Agent systems where the
VVM KM is installed.
2. Check the value of the PATROL Agent tuning variable, /AgentSetup/AgentTuning/pslInstructionMax, and if necessary, increase it
Loading the KM on PATROL ConsoleTo load the KM on a PATROL Console:
1. From the PATROL Console menu bar, choose File > Load KM...
2. Select the VVM_LOAD.kml file
3. Click Open or OK.
The VVM KM will be loaded to the PATROL Console, and all connected PATROL Agents will startdiscovering the Veritas Volume Manager environment.
If the automatic discovery successfully finds the Veritas Volume Manager server installation, the VVM_SETUP instance will be instantiated:
This automatic discovery may take up to 5 minutes to instantiate the VVM_SETUP instance. Look for anyerror messages on the PATROL Console System Output Window (SOW) during the initial discovery.
If you want to save the new list of loaded files as the PATROL Console user preference:
1. From the PATROL Console menu bar, choose File > Save Configuration
2. Load the VVM_LOAD.kml file on each PATROL Console.
3. Configure the KM.
Loading the KM on PATROL CentralTo load the KM on PATROL Central:
1. In the Console, right-click the Managed System and select Load Knowledge Modules... TheLoad Knowledge Modules wizard is displayed
2. Click Next
3. Select the managed systems where the VVM KM is to be loaded, and click Next >. The wizardwill display a list of all available .kml files for the managed systems you selected.
4. Select the VVM_LOAD.kml file for each managed system, click Next> and Finish.
The VVM KM will be loaded to the PATROL Central Console Server, and all connected selectedmanaged systems will start discovering the Veritas Volume Manager environment. If theautomatic discovery successfully finds the Veritas Volume Manager installation, the VVM_SETUPinstance will be instantiated.
42Loading / Unloading the KM
Ver
itas
Vol
ume
Man
age
r K
M f
or
PA
TRO
L V
ersi
on 2
.5.0
1
This automatic discovery may take up to 5 minutes to instantiate the VVM_SETUP instance. Look for anyerror messages on the PATROL Central System Output Window (SOW) during the initial discovery.
5. Load the VVM_LOAD.kml file on each PATROL Central Management Profile where VVM KMisto be loaded.
6. Configure the KM.
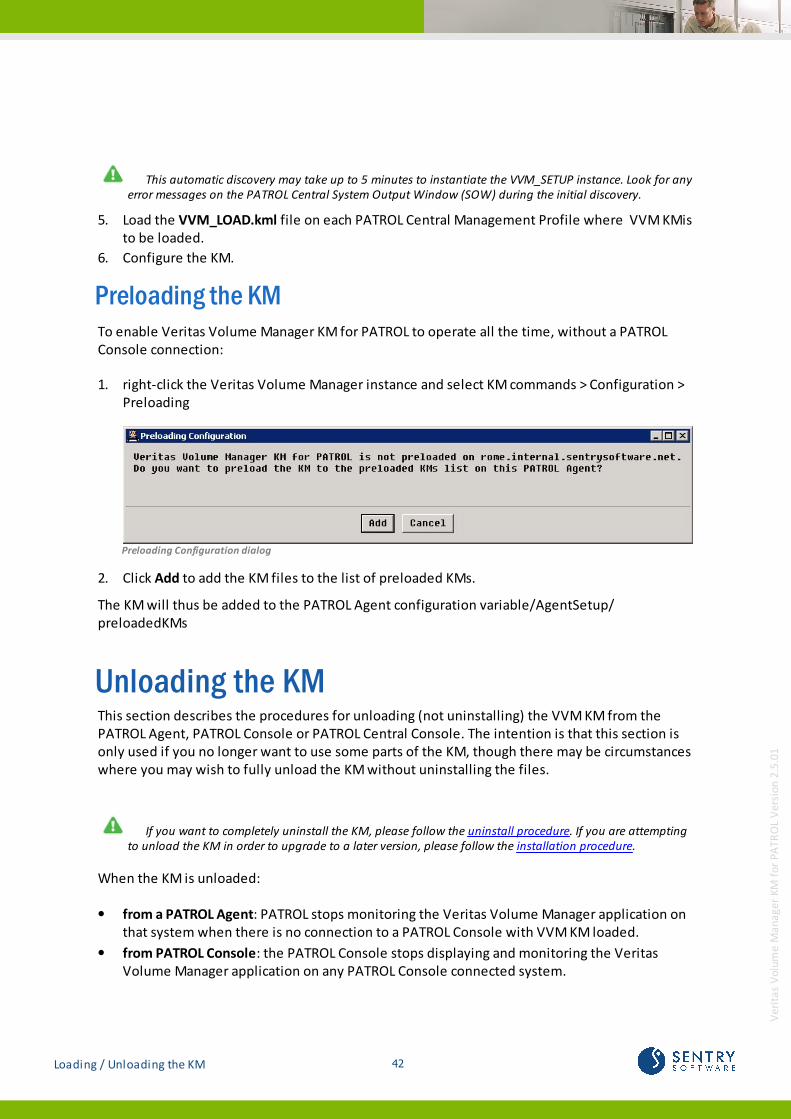
Preloading the KMTo enable Veritas Volume Manager KM for PATROL to operate all the time, without a PATROLConsole connection:
1. right-click the Veritas Volume Manager instance and select KM commands > Configuration >Preloading
Preloading Configuration dialog
2. Click Add to add the KM files to the list of preloaded KMs.
The KM will thus be added to the PATROL Agent configuration variable/AgentSetup/preloadedKMs
Unloading the KMThis section describes the procedures for unloading (not uninstalling) the VVM KM from thePATROL Agent, PATROL Console or PATROL Central Console. The intention is that this section isonly used if you no longer want to use some parts of the KM, though there may be circumstanceswhere you may wish to fully unload the KM without uninstalling the files.
If you want to completely uninstall the KM, please follow the uninstall procedure. If you are attemptingto unload the KM in order to upgrade to a later version, please follow the installation procedure.
When the KM is unloaded:
from a PATROL Agent: PATROL stops monitoring the Veritas Volume Manager application onthat system when there is no connection to a PATROL Console with VVM KM loaded.
from PATROL Console: the PATROL Console stops displaying and monitoring the VeritasVolume Manager application on any PATROL Console connected system.

43 Loading / Unloading the KM
Ver
itas
Vol
ume
Man
age
r K
M f
or
PA
TRO
L V
ersi
on 2
.5.0
1
Unloading the KM from the PATROL AgentTo unload the KM from the PATROL Agent:
1. the Console, right-click the Veritas Volume Manager icon and select KM Commands >Configuration > Preloading
2. Click Remove
3. Restart the PATROL Agent.
4. Repeat these steps on every PATROL Agent system (managed node) where the VVM KM is tobe unloaded.
You can also use the utility wpconf ig (on Microsoft Windows) or xpconf ig to unload the KM. You willthen have to remove VVM_LOAD.kml f rom the PATROL Agent conf iguration variable /AgentSetup/preloadedKMs.
The KM cannot be partially unloaded from the PATROL Agent using the above steps. If you need to unloadsome parts of the KM from the PATROL Agent, refer to the PATROL Agent Reference Manual.
Unloading the KM from the PATROL ConsoleApplication classes are unloaded individually. This allows for a partial unloading of the KM toenable it to run as a reduced installation.
To unload the VVM KM completely or partially:
1. Remove the unwanted application classes that starts with VVM_ in the list of loadedapplication classes as described below:
With the PATROL Console for Unix:
From the PATROL Console main window choose Attributes> Application Classes...
Select a VVM KM application class to be removed and choose Edit>Delete.
Repeat for all classes to be removed.
With the PATROL Console for MS Windows:
From the PATROL Console tree view choose the KM tab and expand the folder ApplicationClasses.
Right-click on a VVM KM application class to be removed and choose Delete.
Repeat for all classes to be removed.
2. Select File>Save Configuration to save the modified list of loaded application classes as thePATROL Console user preference.
3. Repeat these steps on every PATROL Console system where the VVM KM is to be unloaded.

44Loading / Unloading the KM
Ver
itas
Vol
ume
Man
age
r K
M f
or
PA
TRO
L V
ersi
on 2
.5.0
1
Unloading the KM from the PATROL Central ConsoleA KM can be unloaded from particular managed systems or for all systems across the monitoredenvironment. Application classes may be unloaded individually, or by selecting all classes atonce. This allows for a partial unloading of the KM to enable it to run as a reduced installation onsome or all of the managed systems.
To completely or partially unload the VVM KM from some or all of the managed systems:
1. Right click on the PATROL Main Map, and choose Unload Knowledge Modules...
2. Select the managed systems where the VVM KM is to be unloaded, and click Next>.
3. Select the VVM KM application classes to be removed for the appropriate managed systems,click Next> and Finish.
4. Repeat the above steps for each PATROL Central Management Profile where the VVM KM isto be unloaded.
Performing Post-InstallationOperationsIt is recommended to perform post installation checks once the KM is installed and loaded onthe PATROL Console to ensure it properly operates. Post-installation operations include:
Configuring the KM user account
Verifying:
the application discovery
the instance limits
the initial setup
Restarting the PATROL Agent and PATROL Console.
Configuring the KM User AccountA user account with administrative privileges must be configured in BMC PATROL to read andexecute Veritas Volume Manager application programs and file systems. Depending on theoperating systems used, several options will be available.
On Unix platforms, you can use the following user accounts:
a root user
a non-root user, such as patrol, that has sudo privileges on Veritas Volume Manager toexecute application programs and access file systems
a non-root account, such as patrol, configured in Veritas Volume Manager application toadminister the Veritas Volume Manager application.

45 Performing Post-Installation Operations
Ver
itas
Vol
ume
Man
age
r K
M f
or
PA
TRO
L V
ersi
on 2
.5.0
1
On Windows platforms, you can use the following user accounts:
an administrator user
a non-administrator account, such as patrol, configured in Veritas Volume Managerapplication to administer the Veritas Volume Manager application.
To configure the KM User Account:1. In the Console, right-click the Veritas Volume Manager instance > Configuration > Login. The
Login Configuration dialog box is displayed:
Login Configuration dialog
2. To use:
the default PATROL Agent Account, check the Use Agent Default Account box. The logindetails entered in the Username and Password fields will then be ignored.
a different user account, enter the login details in the Username and Password fields
3. If a sudo user account is used:
check the Use Sudo box
click SUDO Binary File to verify the sudo binary file path
4. Click OK.
If the credentials are not valid, the VVMLoginStatus parameter will appear in “suspicious state”after the next data collection.
46Performing Post-Installation Operations
Ver
itas
Vol
ume
Man
age
r K
M f
or
PA
TRO
L V
ersi
on 2
.5.0
1
Verifying Application DiscoveryTo verify the application discovery:
1. Check that the VVM_SETUP instance is actually named Veritas Volume Manager. If not, forcea full discovery by right-clicking the VVM_SETUP instance > KM Commands > Force Discovery
2. Check that the application class instances are actually instantiated. The initial data collectionmay take some time depending on the complexity of your environment (up to one hour). Ifneeded, force a data collection by right-clicking the Veritas Volume Manager instance > KMCommands > Refresh Parameters.
If Veritas Volume Manager server is configured in a clustered environment, you'll have to enableMulti-node Mode monitoring.
Checking the Instance LimitsBy default, Veritas Volume Manager KM for PATROL does not limit the number of instances thatare discovered or monitored for each monitored elements. However, in order to optimizeperformance in large environment, it is possible to disable or limit the monitoring of specificelements:

47 Performing Post-Installation Operations
Ver
itas
Vol
ume
Man
age
r K
M f
or
PA
TRO
L V
ersi
on 2
.5.0
1
To modify the default configuration1. In the Console, right-click the KM main icon > Configuration> Instance Limits
VVM KM Default Instance Limits
2. Enter the number of instances to be displayed in the console for each monitored element
3. To disable the monitoring of a specific application class, enter 0 in the relevant field
4. Click OK.

48Performing Post-Installation Operations
Ver
itas
Vol
ume
Man
age
r K
M f
or
PA
TRO
L V
ersi
on 2
.5.0
1
Checking the Initial Setup of the KMTo check the initial setup of the KM:
1. Check whether the discovered files and directory paths are correct, using the menu Configuration>Paths from the Veritas Volume Manager instance.
2. Check the InfoBoxes and Parameters of all the VVM KM instances and verify that they are setcorrectly.
3. Under each container instance, open all detail parameters (text parameters with names inthe format VVM<Object>Details), and check for error messages.
4. Check the new value of parameter VVMLoginStatus set after completion of all datacollection. If either is not in OK state, open the annotation point to determine the cause ofthe error.
5. After the KM has been running for at least an hour:
Right-click the KM main icon > KM commands > KM Status from the Veritas VolumeManager instance. A report is displayed, detailing information on the managed system.Search the report for warnings or alarms. If errors are found during any of the above steps(including incorrect data in Infoboxes or any warnings or alarms in the KM Status report),determine the cause(s) and take action to resolve these errors. If required, email theTechnical Support and attach the KM Status report.
If needed, click Save As Task to open the report in a task window. You will be able to latersave it as a text file or print it.
If any errors are found during any of the above steps (including any incorrect data in Infoboxes or anywarnings or alarms in the KM Status report), determine the cause(s) and take steps to resolve these errors.You may need to refer to the User Guide, or contact Technical Support, attaching the KM Status report.
To save the KM Status report as a task window, click Save As Task. This task window can then be printedor saved as a text f ile.
Restarting PATROL Agent and PATROL ConsoleRestarting the PATROL Agent and PATROL Console is optional but often a good practice toconfirm that the VVM KM operates correctly after restarting the PATROL Agent and/or PATROLConsole.
In addition, the PATROL Agent restart will force all KM discoveries and data collections to startimmediately.
49 Upgrading the Platform
Ver
itas
Vol
ume
Man
age
r K
M f
or
PA
TRO
L V
ersi
on 2
.5.0
1
Upgrading the PlatformIf you upgrade (or downgrade) your operating system or Veritas Volume Manager, thecommands for the VVM KM need to be reloaded. Use the menu Reload Commands from themain VVM KM container instance (labeled Veritas Volume Manager).

Integrating the KM

51
Ver
itas
Vol
ume
Man
age
r K
M f
or
PA
TRO
L V
ersi
on 2
.5.0
1
Introduction
This section provides detailed information about the integration of Veritas Volume Manager KMfor PATROL with BMC ProactiveNet Performance Management.
Integrating with BMC Portal1. Log on to BMC Portal with appropriate credentials to add infrastructure elements.
2. Click on Configure tab.
3. Under Tasks, select Elements to open the Elements page.
4. Click Add.
5. Select Infrastructure Element, and click Next.
6. Select appropriate RSM, and click Next.
7. Enter the label for the element, select PATROL Integration, and click Next.
8. Select/create a group name, and click Next.
9. Select appropriate method to discover the PATROL Agent hosts, and click Next.
10. Fill the required details for discovering the PATROL Agents, and click Commit.
Integrating with BMC ProactiveNetPerformance Management 8.5.x and8.6.xOverviewTo integrate a BMC PATROL KM into BMC ProactiveNet Performance Management 8.5.x or 8.6.x,you need to create a specific adapter. An adapter for BMC PATROL facilitates pulling ofperformance data from existing BMC PATROL solutions into BMC ProactiveNet. Using anAdapter, you can import BMC PATROL application classes (provided in a Knowledge Module –KM)into BMC ProactiveNet. The Adapter periodically synchronizes the performance data collected bythese application classes into BMC ProactiveNet.

52Integrating with BMC ProactiveNet PerformanceManagement 8.5.x and 8.6.x
Ver
itas
Vol
ume
Man
age
r K
M f
or
PA
TRO
L V
ersi
on 2
.5.0
1
Creating and Importing an Adapter for a BMCPATROL KMCreating an Adapter for a BMC PATROL KM1. Open the BMC ProactiveNet Administration Console. The BMC ProactiveNet Administration Console
is displayed as shown in the following figure:EMC
2. Right-click the Adapters folder and select Import Monitor Type and Add Adapter > BMCPATROL.
3. In the Configuration tab, enter the required information:
In the Instance Name field, enter a name for this instance of the Adapter that will performthe integration of the ‘targeted KM’ into BMC ProactiveNet.
Select the Agent where this instance of the Adapter will be executed
Enter the Integration Service Agent hostname or IP address
Enter the Integration Service Agent Port. The default port is 3182.
Enter the required credential to connect to the Integration Service Agent
4. Click Next to continue
5. Click Next to let the system load the BMC PATROL application classes.
6. Select the application classes to import
Unselecting will delete the application classes that have already been imported during a previousoperation. Application classes ready to be deleted are marked with a red x.
7. Click Next to start the import process. The system displays a summary of the application classimport, click Next to continue.
8. Select the application classes you wish to auto-synchronize with the Integration ServiceAgent.
9. Click Next to continue
10. Set the Filter details if need.
11. Click Next to continue.
12. Set the Auto-sync poll scheduling, if needed.
13. Click Next to continue. The system displays a summary of your settings, click Finish toconfirm. The Adapter has been added to the Adapters folder of the Administration Console.
14. To see the class instances that have been imported by the Adapter, expand the Adaptersfolder, right-click the Adapter and select Details.
We strongly recommend that you create a specific adapter for each KM you need to integrate intoBMC ProactiveNet to enable the update of a single KM independently.
53 Integrating with BMC ProactiveNet PerformanceManagement 8.5.x and 8.6.x
Ver
itas
Vol
ume
Man
age
r K
M f
or
PA
TRO
L V
ersi
on 2
.5.0
1
Updating an Adapter for a BMC PATROL KMUpdating an Adapter1. Delete the Adapter instance
2. Go through the Add an Adapter wizard to actually delete the monitor types that had beencreated based on the previous version of the KM
3. Close
4. Resume the entire Creating an Adapter for a BMC PATROL KM procedure
For complete and detailed information on these procedures, please refer to the BMC ProactiveNetdocumentation available f rom BMC Web site.
Importing and Customizing Thresholds1. Launch the BMC ProactiveNet PW Commands. On Windows 2008, you need to run the PW
Commands as Administrator.
2. Execute the following command line:pw adapter -type patrol -get_thresholds <file name> -pproxy_host <hostname|ipaddress>
-pproxy_port <port_number>] [-pproxy_user <username>] [-pproxy_passwd <password>] -i -v
where
-get_thresholds <file name> = File name with absolute path at which thresholds
will be imported
-pproxy_host <hostname|ipaddress> = Host name or IP Address of Patrol Proxy Server
-pproxy_port <port_number> = Port at which Patrol Proxy Agent communicates with Patrol
Proxy Server
-pproxy_user <username> = User name of Patrol Proxy user
-pproxy_passwd <password> = Password to authenticate Patrol Proxy user
-i = import Instance level thresholds
-v = run in "verbose" mode, producing extra lines of output during extraction and
conversion processes
The command has produced a text file with all the parameter threshold settings.
3. Open the file in a text editor. Check that the global thresholds have been properlyinterpreted.
4. Then go to the # INSTANCE LEVEL THRESHOLDS section of the file.
5. Uncomment all instance level thresholds for the _PATROL__SEN_VVM_ prefixed instances.
Search the file for the 'NOT_IMPLEMENTED' occurrences to detect thresholds that were notproperly converted by the PATROL Adapter.
6. Save the file.
7. Execute the following command:pw threshold loadpatrolthreshold [<thresholdfilename> [-v]]
where:
<thresholdfilename> is a thresholds file name. If no file path is specified
then the default '<Installation Directory>/pw/tmp/' is used
54Integrating with BMC ProactiveNet PerformanceManagement 8.5.x and 8.6.x
Ver
itas
Vol
ume
Man
age
r K
M f
or
PA
TRO
L V
ersi
on 2
.5.0
1
-v enables the Verbose mode
Class-level thresholds can be displayed using the Absolute Global Thresholds panel in the BMCProactiveNet Operator Console, while instance-level thresholds are displayed in the AbsoluteInstance Thresholds panel to indicate thresholds have been successfully imported into BMCProactiveNet.
Managing Baselines and Key PerformanceIndicatorsIn order to facilitate the detection of abnormalities on your monitored environment, BMCProactiveNet calculates baselines per parameter (metrics or attributes) based on valuescollected over a specified period of time to determine a normal operating range. When thecollected values for these parameters are out of range, an alert is triggered.
Some parameters are identified by default as Key Performance Indicators and thereforeautomatically included in the base lining calculation.
Managing baselines
The baseline is the expected normal operating range for a metric or attribute of a monitor.
The baseline is calculated by collecting the values for a monitor’s attributes and metrics over aspecified time period and establishing a low baseline value (consisting of the 10th percentile ofall the values for a given time period) and a high baseline value (consisting of the 90th percentileof all the values for a given time period), taking a weighted average of these values over time. Ahigher weight is given to the latest data being factored into the baseline average. The accuracyof the baseline improves over time.
Requirements for baseline generation
For baselines to be generated for an attribute, that abnormality threshold means that thethreshold exists and is not suppressed. Additionally, if the Key Performance Indicator (KPI) mode is active, only those attributes thathave an active abnormality threshold and are also KPI attributes will have baselines generatedfor them.
Absolute thresholds (with "outside baseline") or signature thresholds do not satisfy these requirements.

55 Integrating with BMC ProactiveNet PerformanceManagement 8.5.x and 8.6.x
Ver
itas
Vol
ume
Man
age
r K
M f
or
PA
TRO
L V
ersi
on 2
.5.0
1
Managing Key Performance Indicators
The KPI attribute of a parameter can be activated or deactivated manually through the BMCProactiveNet Administration Console. In this KM, some parameters or attributes have beendesignated as important indicators of performance (KPIs). We do not recommend that thesedefault settings are modified.
However, advanced users may activate or deactivate KPIs from the BMC ProactiveNetAdministration Console.
To add or remove Key Performance Indicator (KPI) attributes for a monitor type
1. In the Administration Console, from the menu bar, choose Tools > KPI Administration. TheKPI Administration dialog box is displayed.
2. From the Monitor Type list, choose the monitor type for which you want to add or removeKPI attributes. A list of attributes for the selected monitor type is displayed.
3. In the KPI column for the attributes that you want to add or remove as Key PerformanceIndicators:
select the KPI check box to add the corresponding attribute as a KPI
deselect the KPI check box to remove the corresponding attribute from the KPIs for thatmonitor type
For complete and detailed information on this procedure, please refer to the BMC ProactiveNetdocumentation available f rom BMC Web site.
Parameters for which the system by default calculates baselines as well as parametersconsidered as KPIs are respectively identified by the following icons:
Baselining
KPI

Monitoring your Environment
57
Ver
itas
Vol
ume
Man
age
r K
M f
or
PA
TRO
L V
ersi
on 2
.5.0
1
Veritas Volume Manager KM for PATROL monitors and manages Veritas Volume Manager diskgroups, volumes, plexes, subdisks and the raw devices they rely on. It provides metrics on thereliability and performance of the disk arrays controlled.
Configuring the KMThe configuration instructions provided in this section should be followed on all PATROL AgentSystems where Veritas Volume Manager KM for PATROL is installed.
Before configuring the KM, make sure:
the KM is loaded on the PATROL Console
the VVM_SETUP or Veritas Volume Manager instance is displayed in the Console.
Configuring the Multi-Node Monitoring ModeIf the Veritas Volume Manager environment is installed in a cluster using Veritas Cluster Server,Veritas Cluster File System, Oracle Solaris Cluster or Microsoft Cluster, the VVM KM must beinstalled on all the cluster nodes to enable continuous monitoring and avoid single point offailure. To avoid duplicate alerts from multiple nodes, it is recommended to configure thesolution to operate in multi-node monitoring mode.
To configure the multi-node monitoring mode:
58Configuring the KM
Ver
itas
Vol
ume
Man
age
r K
M f
or
PA
TRO
L V
ersi
on 2
.5.0
1
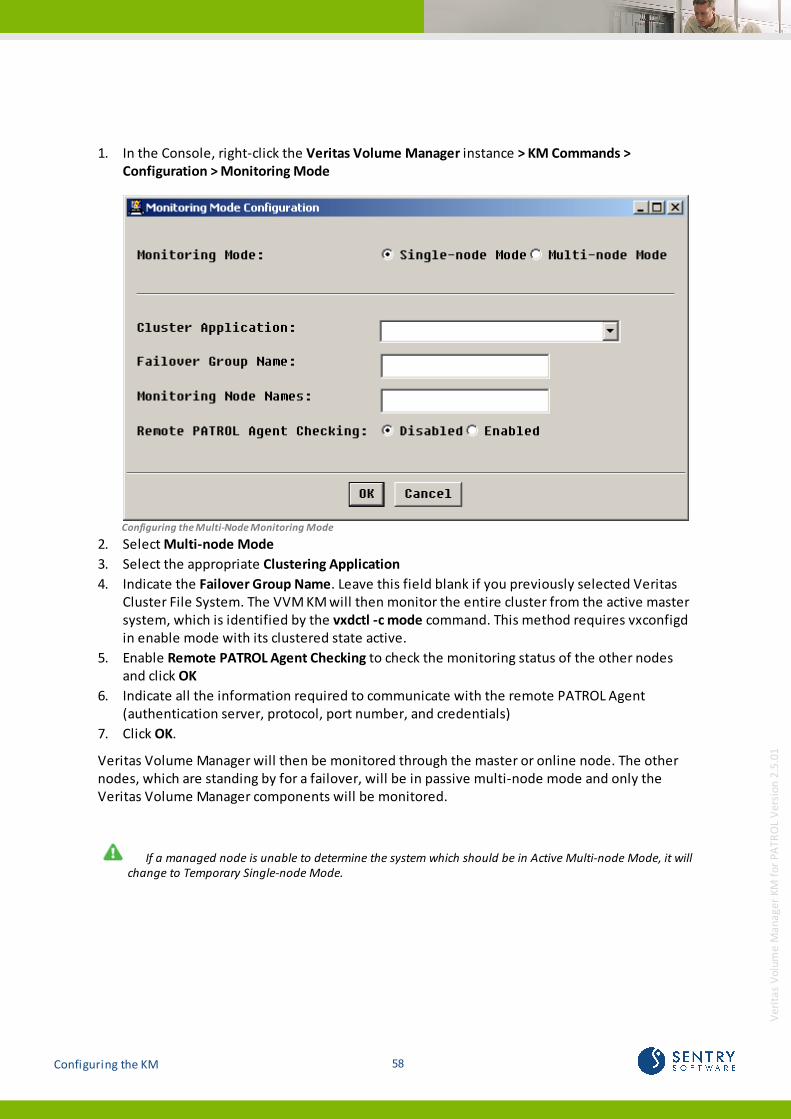
1. In the Console, right-click the Veritas Volume Manager instance > KM Commands >Configuration > Monitoring Mode
Configuring the Multi-Node Monitoring Mode
2. Select Multi-node Mode
3. Select the appropriate Clustering Application
4. Indicate the Failover Group Name. Leave this field blank if you previously selected VeritasCluster File System. The VVM KM will then monitor the entire cluster from the active mastersystem, which is identified by the vxdctl -c mode command. This method requires vxconfigdin enable mode with its clustered state active.
5. Enable Remote PATROL Agent Checking to check the monitoring status of the other nodesand click OK
6. Indicate all the information required to communicate with the remote PATROL Agent(authentication server, protocol, port number, and credentials)
7. Click OK.
Veritas Volume Manager will then be monitored through the master or online node. The othernodes, which are standing by for a failover, will be in passive multi-node mode and only theVeritas Volume Manager components will be monitored.
If a managed node is unable to determine the system which should be in Active Multi-node Mode, it willchange to Temporary Single-node Mode.

59 Configuring the KM
Ver
itas
Vol
ume
Man
age
r K
M f
or
PA
TRO
L V
ersi
on 2
.5.0
1
Filtering Elements to MonitorBy default, the solution monitors all the elements discovered, which may represent animportant workload to the agents and servers. Because the monitoring of some elements maybe irrelevant for various reasons, you can apply filters to indicate which elements will bemonitored or not:
1. In the Console, right-click one of the following instances depending on the elements thatyou wish to monitor:
Daemons > KM Commands > Configuration > Daemons to filter daemons to be monitored
Logs > KM Commands > Configuration > Logs to filter logs to be monitored. Only the VVMengine log file will be monitored on AIX and Microsoft Windows platforms since there isno ASCII format system log file to monitor.
Disk Paths > KM Command > Configuration > Disk Paths to filter disk paths to be monitored
Diskgroups > KM Commands Configuration > Diskgroups to filter diskgroups to bemonitored
Disk Devices > KM Commands > Configuration > Disk Devices to filter disk devices to bemonitored
RLinks > KM Commands > Configuration > Replication Links to filter replication links to bemonitored
RVGs> KM Commands > Configuration > Replicated Volume Groups to filter replicatedvolumes groups to be monitored
Volumes > KM Commands > Configuration > Volumes to filter volumes to be monitored
Plexes > KM Commands Configuration > Plexes to filter plexes to be monitored
Subdisks > KM Commands > Configuration > Subdisks to filter subdisks to be monitored

60Configuring the KM
Ver
itas
Vol
ume
Man
age
r K
M f
or
PA
TRO
L V
ersi
on 2
.5.0
1
Filtering Elements to Monitor
The [ALL] entry ensures that all the elements found during PATROL discovery are instantiatedand monitored. Daemons marked as “enabled” are monitored by default; those marked as“disabled” are instantiated in an OFFLINE state.
2. To enable elements for monitoring:
In the current configuration list, select the elements to enable
Select Enable
Click Update
A log f ilter will have to be conf igured if you enable log f iles for monitoring.
61 Configuring the KM
Ver
itas
Vol
ume
Man
age
r K
M f
or
PA
TRO
L V
ersi
on 2
.5.0
1
3. To disable elements for monitoring:
In the current configuration list, select the elements to disable
Select Disable
Click Update
Disabled instances will be instantiated in an OFFLINE state. Commands will not be executed, thusleaving parameters not set.
4. To delete elements monitoring rules:
In the current configuration list, select the elements to delete
Select Delete
Click Update
5. To add a new element monitoring rule:
(Optional) Check the Regular Expression box if you want to use a regular expression toenable or disable elements monitoring
Type the name of the element to be monitored or the regular expression required
If needed, enter a description
From the Status list, select Enable
Click Update.
To revert to the default monitoring conf iguration, type “[default]” as a new entry and click Update.
6. Resume the procedure for all the application classes for which you wish to apply monitoringfilters.

62Configuring the KM
Ver
itas
Vol
ume
Man
age
r K
M f
or
PA
TRO
L V
ersi
on 2
.5.0
1
Configuring the Element StatusThe status of an element is determined by the State parameter and by the status mapping rule.This mapping rule indicates which states will trigger a warning or an alarm on the Statusparameter. It can be configured as follows:
1. In the Console, right-click one of the instance for which you want to configure status andselect > KM commands > Configuration > Element Status
Deamon Status Configuration Dialog
63 Configuring the KM
Ver
itas
Vol
ume
Man
age
r K
M f
or
PA
TRO
L V
ersi
on 2
.5.0
1
2. In the Warning Filter State Rules list, select the states that will not trigger a warning
3. If needed, apply a time condition to a specific state. For example, if you want to trigger awarning when the Deamon state is Stopped for more than 60 minutes:
From the State list, select 6 (Stopped)
From the Condition list, select >
In the Minutes field, enter 60
4. In the Alarm Filter State Rules list, select the states that will not trigger an alarm
5. If needed, apply a time condition to a specific state. For example, if you want to trigger analarm when the Deamon state is Not Running for more than 120 minutes:
From the State list, select 9 (Not Running)
From the Condition list, select >
In the Minutes field, enter 120
6. Click Update.
To revert to the default status mapping rule for either f ilter, select [default] f rom the list of states andclick Update.
7. Resume the procedure for all the application classes for which you wish to apply monitoringfilters.
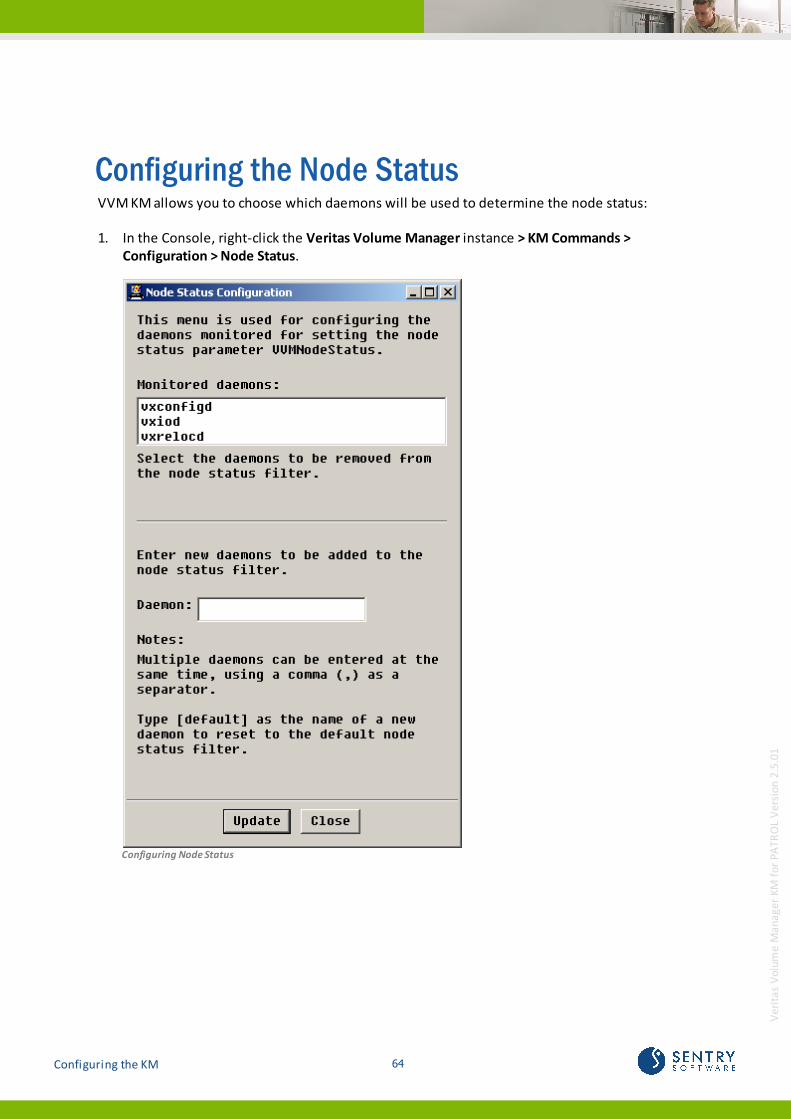
64Configuring the KM
Ver
itas
Vol
ume
Man
age
r K
M f
or
PA
TRO
L V
ersi
on 2
.5.0
1
Configuring the Node StatusVVM KM allows you to choose which daemons will be used to determine the node status:
1. In the Console, right-click the Veritas Volume Manager instance > KM Commands >Configuration > Node Status.
Configuring Node Status

65 Configuring the KM
Ver
itas
Vol
ume
Man
age
r K
M f
or
PA
TRO
L V
ersi
on 2
.5.0
1
2. In the Monitored daemons list, select the daemons that won't be used to determine thenode status
3. In the Daemon field, list the daemons to be used to determine the node status. The Daemonlist must be comma-delimited.
4. To use default settings, type [default] in the Daemon field
5. Click Update.
The VVMNodeStatus parameter will then be set to:
Suspicious if any command run by the VVM KM returns a server error message
Failure if any configured daemon is not running. Several recovery actions will then beinitiated.
To revert to the shipped default list of monitored daemons (as shown above), type “ [default]” as a newdaemon for the list and click Update.
Configuring the Log FilterA log error filter can be configured to specify the regular expressions that will generate awarning or an alarm. Each time the KM will find these expressions in a log file or in VVMLogText,the error message will be written to the VVMLogAlarmText or VVMLogWarningText parameter.By default, the default log filter is configured for the system log file. If you enabled additionallog files for monitoring, you will have to customize the log filter by adding appropriateexpressions for those log files.

66Configuring the KM
Ver
itas
Vol
ume
Man
age
r K
M f
or
PA
TRO
L V
ersi
on 2
.5.0
1
To configure the log error filter:
1. In the Console, right-click the Logs instance > KM Commands > Configuration > Logs Filter
Log Filter Configuration dialog
2. In the Warning Filter Expressions list, select the expressions that will not trigger a warning
3. In the Alarm Filter Expressions list, select the expressions that will not trigger an alarm
4. To add a new regular expression to the warning or alarm filter:
In the Expression field, indicate the regular expression to be included (e.g.: skipping)
Select Include
Regular expressions are case-sensitive.

67 Configuring the KM
Ver
itas
Vol
ume
Man
age
r K
M f
or
PA
TRO
L V
ersi
on 2
.5.0
1
5. To exclude a regular expression from the warning or alarm filter:
In the Expression field, indicate the regular expression to be excluded (e.g.: otlsol01). Youcan also limit the exclusion to a particular expression already listed by using standardwildcard syntax, such as “skipping . otlsol06”.
Select Exclude
6. Click Update.
Configuring the Log Scan LimitThe VVM KM scans log files by reading the new log entries since the last data collection cycle. Bydefault, only 500 KBytes of data is scanned for each log file during each data collection cycle. Thislog scan limit can however be modified to better suit your requirements.
Increasing the Log Scan Limit may impact the performance of the data collector (VVMLogCollector),the KM, and the PATROL Agent.
To customize the log scan limit:
1. In the Console, right-click the Log(s) instance > KM Commands > Configuration Log(s) ScanLimit
68Configuring the KM
Ver
itas
Vol
ume
Man
age
r K
M f
or
PA
TRO
L V
ersi
on 2
.5.0
1
Log Scan Limit Configuration dialog
2. Indicate the amount of data that will be read by the KM during each data collection cycle
3. Click OK.
Configuring Logs Alert AcknowledgementBy default, alerts will automatically be acknowledged unless you modified the settings to allowmanual acknowledgement.
Manual acknowledgement may impact the performance of the application and of the PATROL Agentif the number of alerts waiting to be acknowledged constantly increases.
To change the default behavior:
1. In the Console, right-click the Log(s) instance > KM Commands > Configuration> Log(s) AlertAcknowledgement
2. Indicate whether the warning and alarm messages will be manually or automaticallyacknowledged
3. Click Ok.
69 Configuring the KM
Ver
itas
Vol
ume
Man
age
r K
M f
or
PA
TRO
L V
ersi
on 2
.5.0
1
Using the KMThis section describes all the features available for Veritas Volume Manager KM for PATROL.
Acknowledging AlertsBy default, alerts are acknowledged automatically. If you modified the alert acknowledgementdefault settings, you'll have to manually acknowledge alerts:
1. In the Console, right-click the Log instance > KM Commands > Acknowledgement
2. Select:
Warning to view, select, and individually acknowledge errors in the VVMLogWarningTextparameter
Alarms to view, select, and individually acknowledge errors in the VVMLogAlarmTextparameter
All to acknowledge all alerts (Warnings and Alarms) at once without viewing.
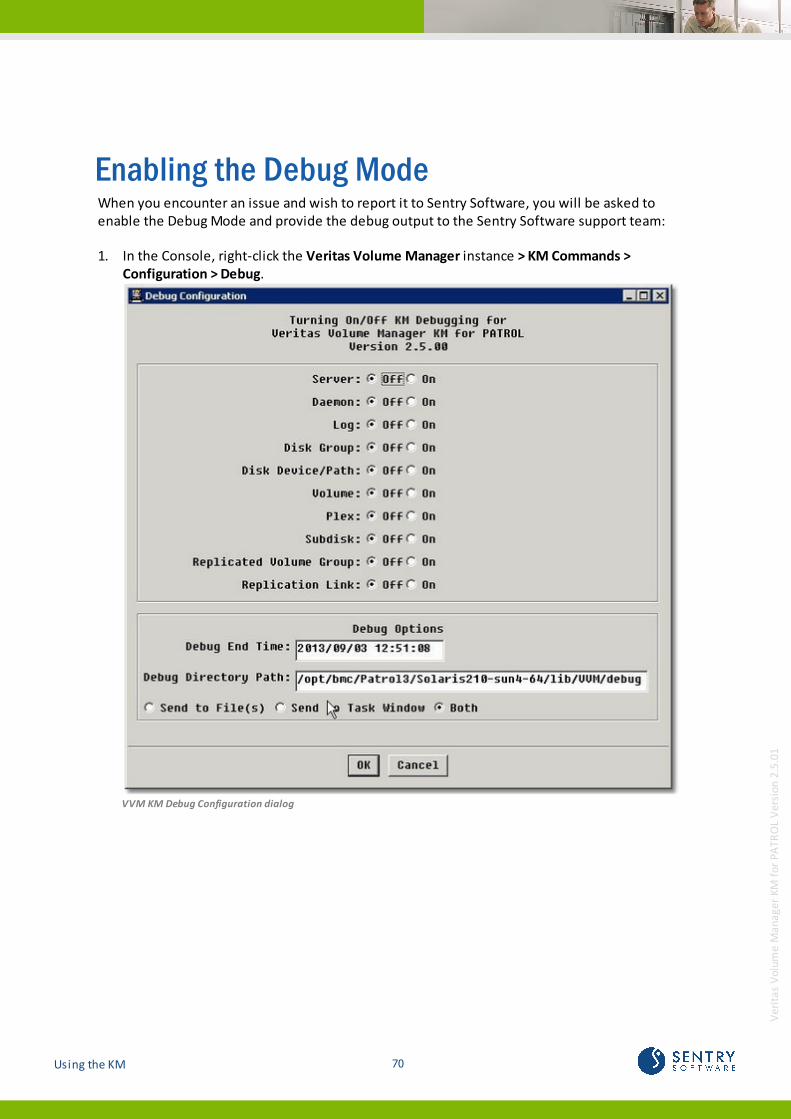
70Using the KM
Ver
itas
Vol
ume
Man
age
r K
M f
or
PA
TRO
L V
ersi
on 2
.5.0
1
Enabling the Debug ModeWhen you encounter an issue and wish to report it to Sentry Software, you will be asked toenable the Debug Mode and provide the debug output to the Sentry Software support team:
1. In the Console, right-click the Veritas Volume Manager instance > KM Commands >Configuration > Debug.
VVM KM Debug Configuration dialog
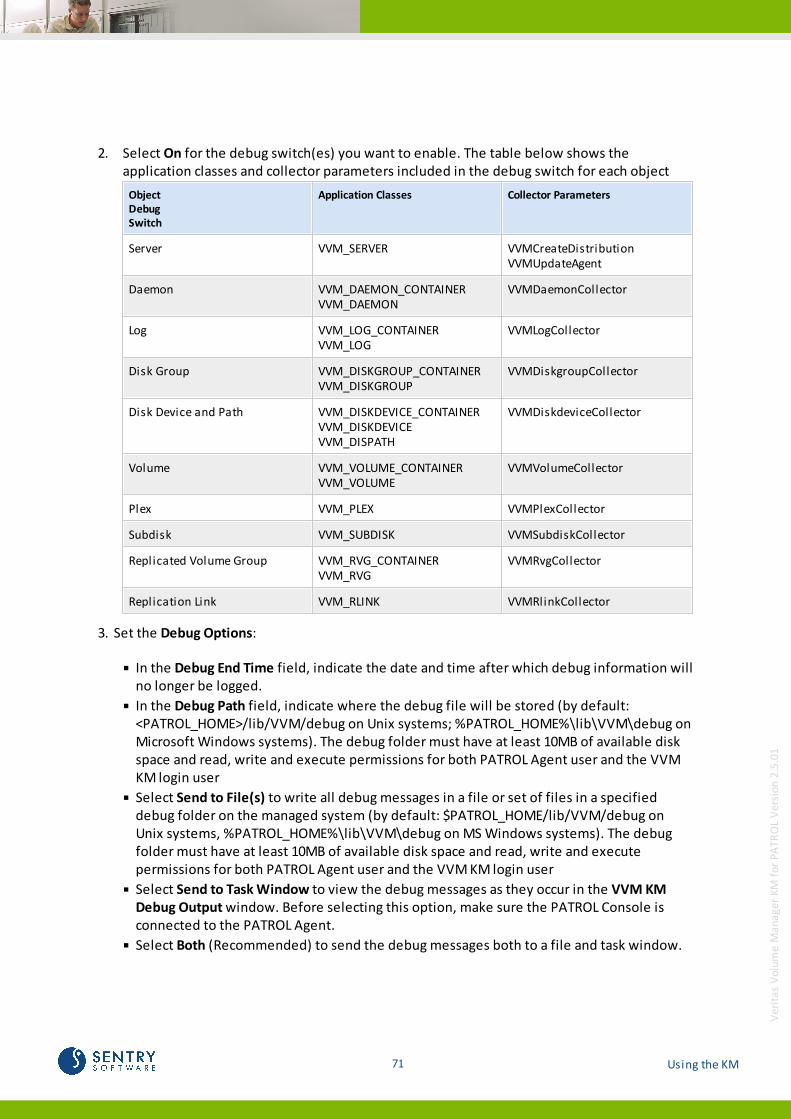
71 Using the KM
Ver
itas
Vol
ume
Man
age
r K
M f
or
PA
TRO
L V
ersi
on 2
.5.0
1
2. Select On for the debug switch(es) you want to enable. The table below shows theapplication classes and collector parameters included in the debug switch for each object
Object Debug Switch
Application Classes Collector Parameters
Server VVM_SERVER VVMCreateDistributionVVMUpdateAgent
Daemon VVM_DAEMON_CONTAINERVVM_DAEMON
VVMDaemonCollector
Log VVM_LOG_CONTAINERVVM_LOG
VVMLogCollector
Disk Group VVM_DISKGROUP_CONTAINERVVM_DISKGROUP
VVMDiskgroupCollector
Disk Device and Path VVM_DISKDEVICE_CONTAINERVVM_DISKDEVICEVVM_DISPATH
VVMDiskdeviceCollector
Volume VVM_VOLUME_CONTAINERVVM_VOLUME
VVMVolumeCollector
Plex VVM_PLEX VVMPlexCollector
Subdisk VVM_SUBDISK VVMSubdiskCollector
Replicated Volume Group VVM_RVG_CONTAINER VVM_RVG
VVMRvgCollector
Replication Link VVM_RLINK VVMRlinkCollector
3. Set the Debug Options:
In the Debug End Time field, indicate the date and time after which debug information willno longer be logged.
In the Debug Path field, indicate where the debug file will be stored (by default:<PATROL_HOME>/lib/VVM/debug on Unix systems; %PATROL_HOME%\lib\VVM\debug onMicrosoft Windows systems). The debug folder must have at least 10MB of available diskspace and read, write and execute permissions for both PATROL Agent user and the VVMKM login user
Select Send to File(s) to write all debug messages in a file or set of files in a specifieddebug folder on the managed system (by default: $PATROL_HOME/lib/VVM/debug onUnix systems, %PATROL_HOME%\lib\VVM\debug on MS Windows systems). The debugfolder must have at least 10MB of available disk space and read, write and executepermissions for both PATROL Agent user and the VVM KM login user
Select Send to Task Window to view the debug messages as they occur in the VVM KMDebug Output window. Before selecting this option, make sure the PATROL Console isconnected to the PATROL Agent.
Select Both (Recommended) to send the debug messages both to a file and task window.

72Using the KM
Ver
itas
Vol
ume
Man
age
r K
M f
or
PA
TRO
L V
ersi
on 2
.5.0
1
4. Click OK first to start the VVM KM debugging
5. Click Yes to reload the KM and capture debug from the initial collection cycle.
Disabling the Debug Mode
The debug switches will be turned off automatically when the debug end time is reached. If youwant to manually stop debugging:
1. Access the VVM KM Debug Configuration dialog
2. Select Off for the debug switch(es) you want to disable
3. Click OK.
Preparing the Debug Files for Sending to Sentry Software
If you chose to only send the output to a task window, you can save the debug output as follows:
Right-click in the VVM KM Debug Output window.
Select Save As and specify a location to save data.
If you chose to send debug information to file(s), you will be asked to prepare the debug files forsending to Sentry Software:
Click Yes to compress the files into:
vvm_km_debug_<date>_<time>.tar.Z in folder $PATROL_HOME/lib/VVM/ on Unix systems
vvm_km_debug_<date>_<time>.zip in folder %PATROL_HOME%\lib\VVM\ on MS Windowssystems
If the compressed f ile (.tar.Z or .zip) is not created successfully, you can create this manually by includingall f iles and sub-directories under $PATROL_HOME/lib/VVM/ (on Unix) or %PATROL_HOME%\lib\VVM\ (onMS Windows).

73 Using the KM
Ver
itas
Vol
ume
Man
age
r K
M f
or
PA
TRO
L V
ersi
on 2
.5.0
1
Generating ReportsFollowing is a list of reports available in the Veritas Volume Manager KM for PATROL.
<Log Instance>=> Reports => Messages List - reports last 100 lines of messages logged in theassociated file instance.
Diskgroups => Reports => Veritas Volume Manager Topology Report - lists all Veritas VolumeManager topology objects
Daemons => Reports => Daemon List Report - lists all Veritas Volume Manager daemonsfound
<Diskgroup Instance> => Reports => Diskgroup Topology Report - lists all Veritas VolumeManager topology objects for a particular diskgroup.
To save the report as a task window click Save As Task. This task window can then be printed or savedas a text f ile.
Refreshing ParametersThis section describes how to manually refresh parameters without waiting for an automaticpolling cycle.
Forcing All Discoveries
To force all discoveries, right-click the Veritas Volume Manager instance and select:
Refresh Process Cache to refresh the PATROL Agent process cache
Force Discovery.
The discovery will then be forced on all the KMs loaded on the PATROL Agent and on all the KMapplications classes.
Forcing All Data Collectors
To force all data collectors, right-click the Veritas Volume Manager instance and select:
Refresh Process Cache to refresh the PATROL Agent process cache
Refresh parameters to force all data collectors at the same time.
The VVM KM data collectors and all the data collectors defined under the application classesloaded on the PATROL Agent will then be refreshed.

74Using the KM
Ver
itas
Vol
ume
Man
age
r K
M f
or
PA
TRO
L V
ersi
on 2
.5.0
1
Forcing Selected Data Collectors
This option is only available from a PATROL Developer Console.
1. Right-click the Veritas Volume Manager instance and select Refresh Process Cache to refreshthe PATROL Agent process cache .
2. Force a data collector to execute immediately as follows
With the PATROL Console for MS Windows
Right-click the Veritas Volume Manager instance and choose Parameters without Icons...
Select the required data collector.
Click Update.
With the PATROL Console for Unix
Right-click the Veritas Volume Manager instance and choose Customize > Parameters...
Select the required data collector.
Click on Options > Update.
With the PATROL Central Operator Console
Right-click the Veritas Volume Manager instance and choose Properties... .
Select the tab Parameter List and tick the required data collector.
Click Update.

Reference Guide
76
Ver
itas
Vol
ume
Man
age
r K
M f
or
PA
TRO
L V
ersi
on 2
.5.0
1
Introduction
This chapter provides statistical information about resources, operating status, andperformances managed by Veritas Volume Manager KM for PATROL. It contains tables describingthe parameters used in the KM, grouped by Application Classes, and provides a brief descriptionof each parameter and its default settings.
Classes and ParametersThis section lists the application classes of Veritas Volume Manager KM for PATROL. It gives youdetails on the icons that represent the class, Infobox, parameters and the menu commandsavailable for each application class. There are 11 main application classes and 56 “container”classes.
VVM_DAEMON
VVM_DAEMON_CONTAINER
VVM_DISKDEVICE
VVM_DISKDEVICE_CONTAINER
VVM_DISKGROUP
VVM_DISKGROUP_CONTAINER
VVM_DISKPATH
VVM_LOG
VVM_LOG_CONTAINER
VVM_PLEX
VVM_RLINK
VVM_RVG
VVM_RVG_CONTAINER
VVM_SERVER
VVM_SUBDISK
VVM_VOLUME
VVM_VOLUME_CONTAINER
Baselines and Key Performance Indicators
Some parameters are identified by default as Key Performance Indicators (KPIs) and thereforeautomatically included in the base lining calculation. To learn more about auto baselining andKPIs, please refer to the Managing Baselines and Key Performance Indicators chapter.
In this guide, parameters flagged as KPIs and included by default in the baseline calculationprocess are respectively identified by the following icons:

77 Classes and Parameters
Ver
itas
Vol
ume
Man
age
r K
M f
or
PA
TRO
L V
ersi
on 2
.5.0
1
Baselining
KPI
VVM_DAEMONIcon
Parameters
Name Description Units Default AlertConditions
BMCProactiveNetAttribute Type
VVMDaemonCPUDuration
Indicates the CPUseconds consumed bythe daemon.
Seconds None Statistics
VVMDaemonCPUUtilization*
Indicates the CPUseconds consumed bythe daemon.
Percentage (%) None Statistics
VVMDaemonMemorySize*
Indicates the core imagesize of the daemon in thevirtual memory.
Kilobytes (KB) None Statistics
VVMDaemonProcessCount
Indicates the number ofthe processes/threads ofthe daemon found.
Processes None Statistics
VVMDaemonState Indicates the state of thedaemon as reported inthe command executedby the data collector.
{0 = Running;1 = Sleeping;2 = Waiting;3 = Queued;4 = Intermediate;5 = Terminated;6 = Stopped/Disabled;7 = Growing;8 = Nonexistent/NotResponding;9 = Not Running;-1 = Unknown}
None Availability
VVMDaemonStatus Monitors the status ofthe daemon. This statusis determined by thedaemon status mappingrule defined in the KMcommand Configuration> Daemon(s) Status.
{0 = OK ;1 = Suspicious ;2 = Failure}
Warning = 1Alarm = 2
Availability

78Classes and Parameters
Ver
itas
Vol
ume
Man
age
r K
M f
or
PA
TRO
L V
ersi
on 2
.5.0
1
Name Description Units Default AlertConditions
BMCProactiveNetAttribute Type
If this status parameterchanges to warning oralarm state, the recoveryaction will trigger anevent and annotate thelast data point.
VVMDaemonSummary
Summarizes the daemoninformation as reportedby commands executedby the data collector.
n/a None n/a
For detailed information about Baselining and KPI, see Managing Baselines and Key Performance Indicators.
* Parameters marked with an asterisk are used by default when visualizing the corresponding monitor instancein BPPM.
InfoBox
Name Description
Name Name of the Veritas Volume Manager daemon.
Description Description of the Veritas Volume Manager daemon.
PID Process ID of the daemon.
PPID Parent process ID of the daemon.
Owner Owner of the daemon.
Status Status of the daemon as reported in the PATROL Agent process cache.
Command Command that started the daemon.
CollectorName
Name of the data collector that sets variables and parameters under this applicationinstance.
Collector LastStart
Date & time when the last data collection cycle started.
Collector LastEnd
Date & time at the completion of the last data collection cycle.
Collector NextStart
Date & time when the next data collection cycle is expected to start.
CollectorStatus
Data collector execution status (Idle or Running).
Menu Commands
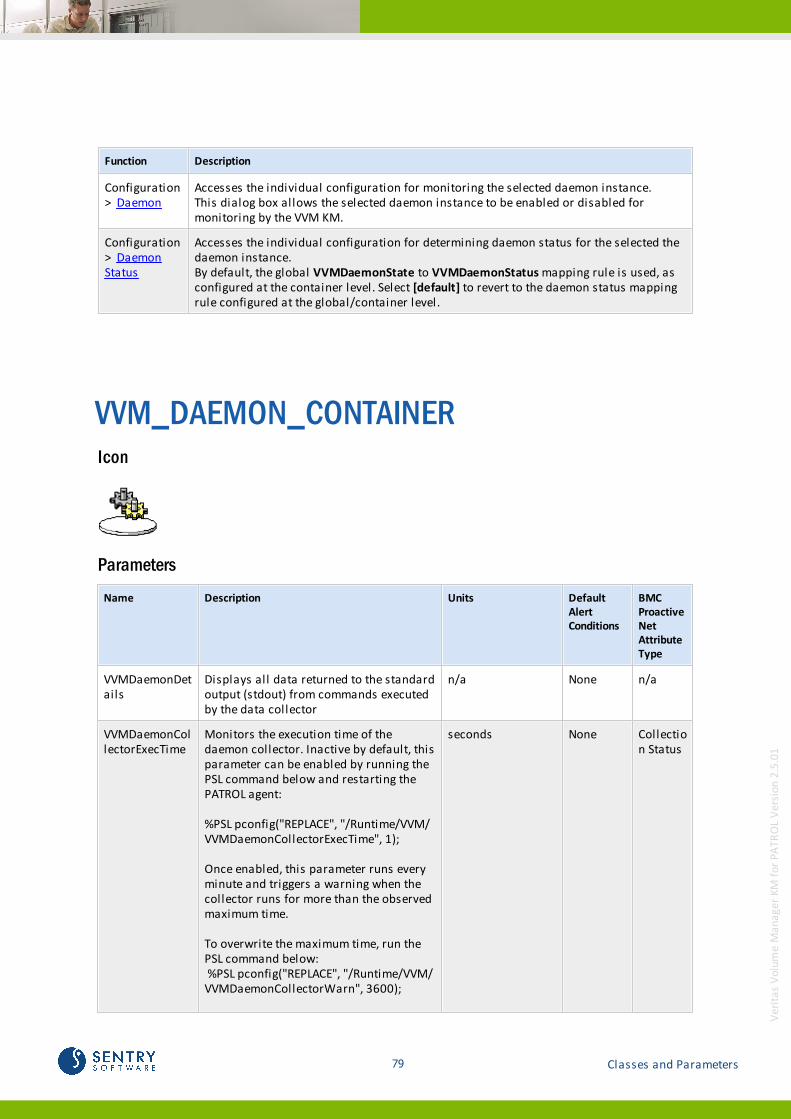
79 Classes and Parameters
Ver
itas
Vol
ume
Man
age
r K
M f
or
PA
TRO
L V
ersi
on 2
.5.0
1
Function Description
Configuration> Daemon
Accesses the individual configuration for monitoring the selected daemon instance.This dialog box allows the selected daemon instance to be enabled or disabled formonitoring by the VVM KM.
Configuration> DaemonStatus
Accesses the individual configuration for determining daemon status for the selected thedaemon instance.By default, the global VVMDaemonState to VVMDaemonStatus mapping rule is used, asconfigured at the container level. Select [default] to revert to the daemon status mappingrule configured at the global/container level.
VVM_DAEMON_CONTAINERIcon
Parameters
Name Description Units DefaultAlertConditions
BMCProactiveNetAttributeType
VVMDaemonDetails
Displays all data returned to the standardoutput (stdout) from commands executedby the data collector
n/a None n/a
VVMDaemonCollectorExecTime
Monitors the execution time of thedaemon collector. Inactive by default, thisparameter can be enabled by running thePSL command below and restarting thePATROL agent:
%PSL pconfig("REPLACE", "/Runtime/VVM/VVMDaemonCollectorExecTime", 1);
Once enabled, this parameter runs everyminute and triggers a warning when thecollector runs for more than the observedmaximum time.
To overwrite the maximum time, run thePSL command below: %PSL pconfig("REPLACE", "/Runtime/VVM/VVMDaemonCollectorWarn", 3600);
seconds None Collection Status
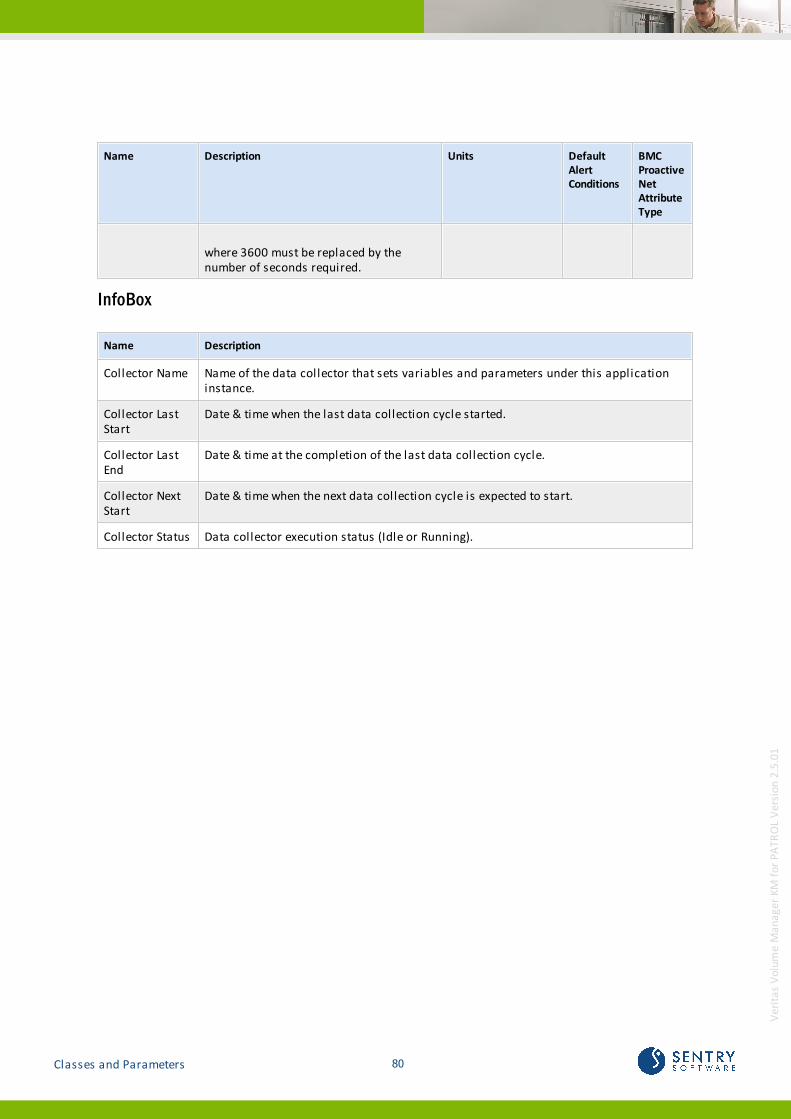
80Classes and Parameters
Ver
itas
Vol
ume
Man
age
r K
M f
or
PA
TRO
L V
ersi
on 2
.5.0
1
Name Description Units DefaultAlertConditions
BMCProactiveNetAttributeType
where 3600 must be replaced by thenumber of seconds required.
InfoBox
Name Description
Collector Name Name of the data collector that sets variables and parameters under this applicationinstance.
Collector LastStart
Date & time when the last data collection cycle started.
Collector LastEnd
Date & time at the completion of the last data collection cycle.
Collector NextStart
Date & time when the next data collection cycle is expected to start.
Collector Status Data collector execution status (Idle or Running).
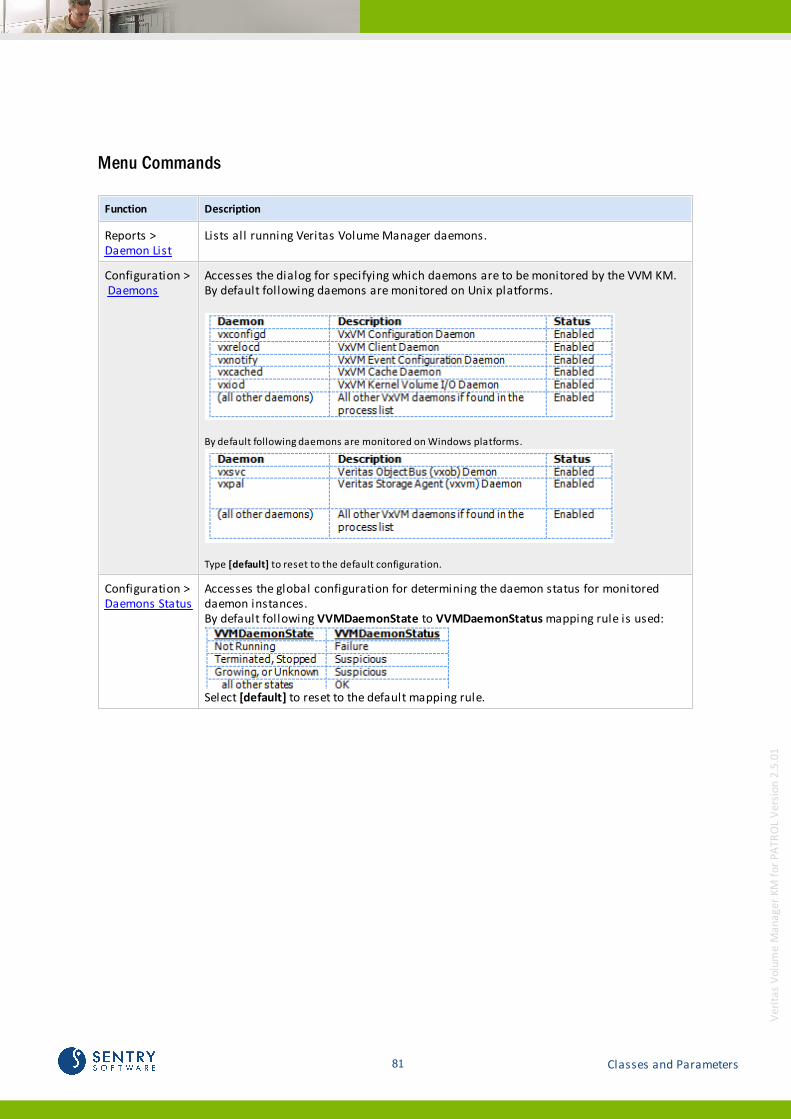
81 Classes and Parameters
Ver
itas
Vol
ume
Man
age
r K
M f
or
PA
TRO
L V
ersi
on 2
.5.0
1
Menu Commands
Function Description
Reports > Daemon List
Lists all running Veritas Volume Manager daemons.
Configuration > Daemons
Accesses the dialog for specifying which daemons are to be monitored by the VVM KM.By default following daemons are monitored on Unix platforms.
By default following daemons are monitored on Windows platforms.
Type [default] to reset to the default configuration.
Configuration > Daemons Status
Accesses the global configuration for determining the daemon status for monitoreddaemon instances.By default following VVMDaemonState to VVMDaemonStatus mapping rule is used:
Select [default] to reset to the default mapping rule.
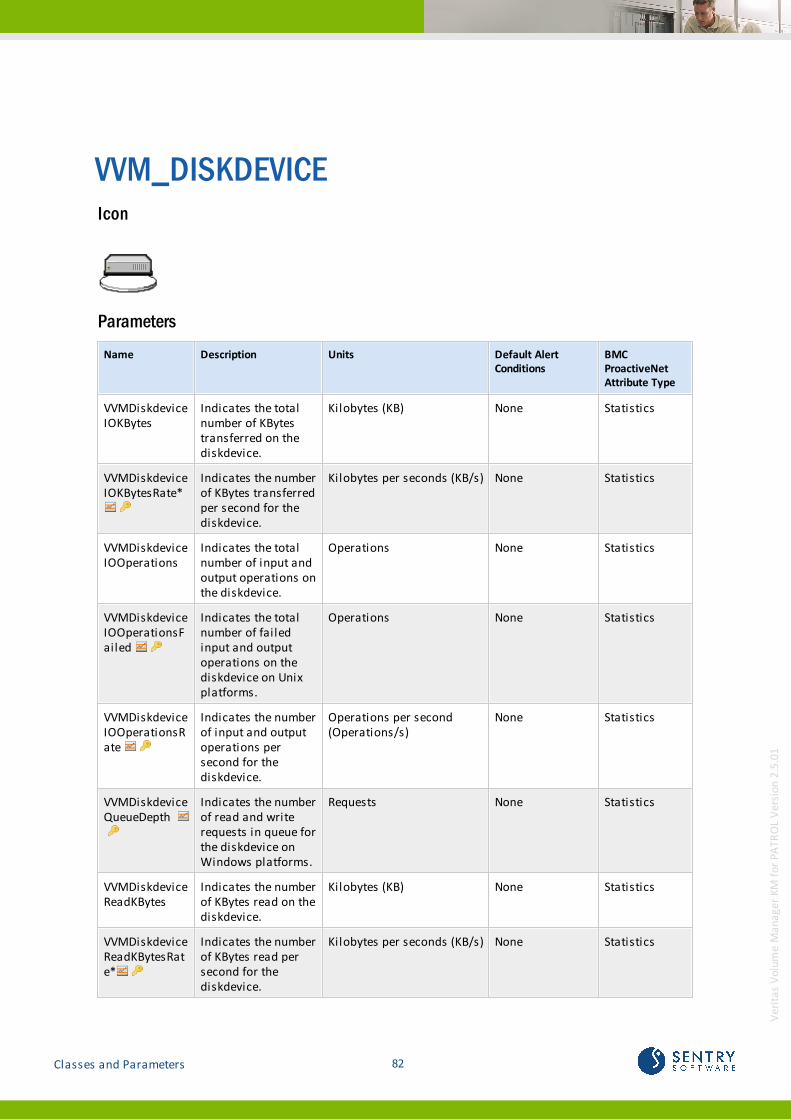
82Classes and Parameters
Ver
itas
Vol
ume
Man
age
r K
M f
or
PA
TRO
L V
ersi
on 2
.5.0
1
VVM_DISKDEVICEIcon
Parameters
Name Description Units Default AlertConditions
BMCProactiveNetAttribute Type
VVMDiskdeviceIOKBytes
Indicates the totalnumber of KBytestransferred on thediskdevice.
Kilobytes (KB) None Statistics
VVMDiskdeviceIOKBytesRate*
Indicates the numberof KBytes transferredper second for thediskdevice.
Kilobytes per seconds (KB/s) None Statistics
VVMDiskdeviceIOOperations
Indicates the totalnumber of input andoutput operations onthe diskdevice.
Operations None Statistics
VVMDiskdeviceIOOperationsFailed
Indicates the totalnumber of failedinput and outputoperations on thediskdevice on Unixplatforms.
Operations None Statistics
VVMDiskdeviceIOOperationsRate
Indicates the numberof input and outputoperations persecond for thediskdevice.
Operations per second(Operations/s)
None Statistics
VVMDiskdeviceQueueDepth
Indicates the numberof read and writerequests in queue forthe diskdevice onWindows platforms.
Requests None Statistics
VVMDiskdeviceReadKBytes
Indicates the numberof KBytes read on thediskdevice.
Kilobytes (KB) None Statistics
VVMDiskdeviceReadKBytesRate*
Indicates the numberof KBytes read persecond for thediskdevice.
Kilobytes per seconds (KB/s) None Statistics
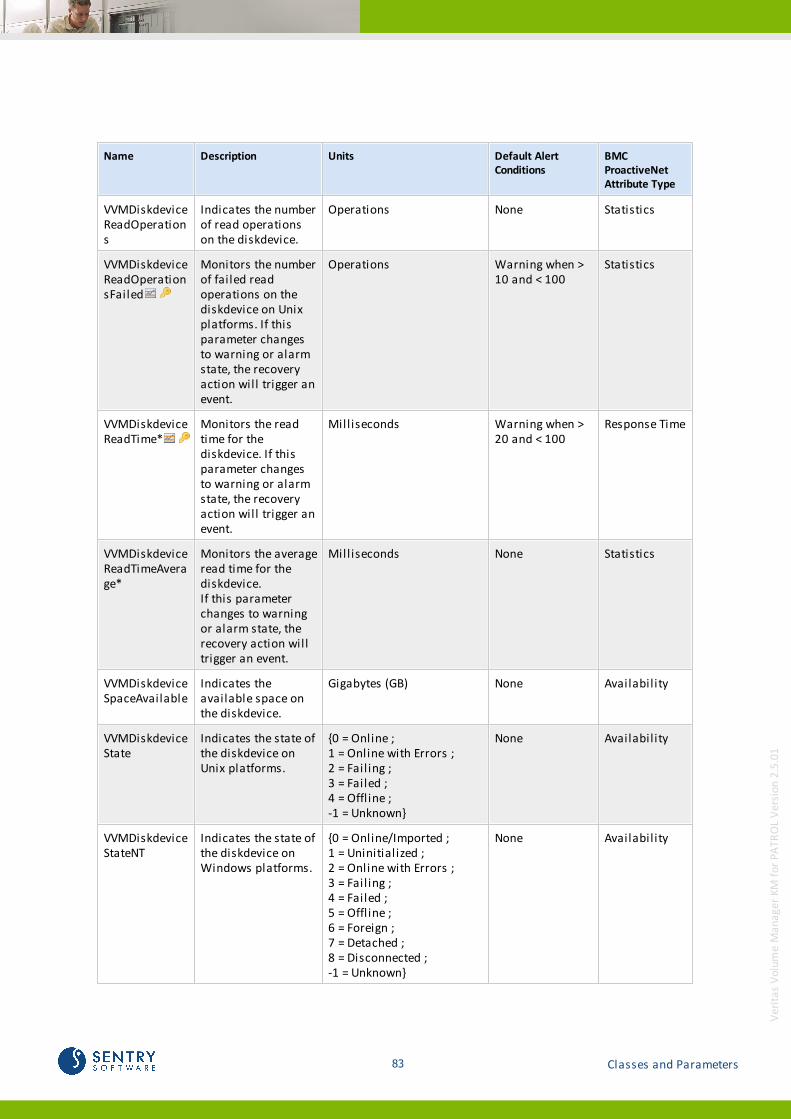
83 Classes and Parameters
Ver
itas
Vol
ume
Man
age
r K
M f
or
PA
TRO
L V
ersi
on 2
.5.0
1
Name Description Units Default AlertConditions
BMCProactiveNetAttribute Type
VVMDiskdeviceReadOperations
Indicates the numberof read operationson the diskdevice.
Operations None Statistics
VVMDiskdeviceReadOperationsFailed
Monitors the numberof failed readoperations on thediskdevice on Unixplatforms. If thisparameter changesto warning or alarmstate, the recoveryaction will trigger anevent.
Operations Warning when >10 and < 100
Statistics
VVMDiskdeviceReadTime*
Monitors the readtime for thediskdevice. If thisparameter changesto warning or alarmstate, the recoveryaction will trigger anevent.
Milliseconds Warning when >20 and < 100
Response Time
VVMDiskdeviceReadTimeAverage*
Monitors the averageread time for thediskdevice.If this parameterchanges to warningor alarm state, therecovery action willtrigger an event.
Milliseconds None Statistics
VVMDiskdeviceSpaceAvailable
Indicates theavailable space onthe diskdevice.
Gigabytes (GB) None Availability
VVMDiskdeviceState
Indicates the state ofthe diskdevice onUnix platforms.
{0 = Online ;1 = Online with Errors ;2 = Failing ;3 = Failed ;4 = Offline ;-1 = Unknown}
None Availability
VVMDiskdeviceStateNT
Indicates the state ofthe diskdevice onWindows platforms.
{0 = Online/Imported ;1 = Uninitialized ;2 = Online with Errors ;3 = Failing ;4 = Failed ;5 = Offline ;6 = Foreign ;7 = Detached ;8 = Disconnected ;-1 = Unknown}
None Availability

84Classes and Parameters
Ver
itas
Vol
ume
Man
age
r K
M f
or
PA
TRO
L V
ersi
on 2
.5.0
1
Name Description Units Default AlertConditions
BMCProactiveNetAttribute Type
VVMDiskdeviceStatus
Monitors the statusof the diskdevice.This status isdetermined by thediskdevice statusmapping rule definedin the KM commandConfiguration >Diskdevice(s) Status.If this statusparameter changesto warning or alarmstate, the recoveryaction will trigger anevent and annotatethe last data point.
{0 = OK ;1 = Suspicious ;2 = Failure}
Warning = 1Alarm = 2
Availability
VVMDiskdeviceSummary
Summarizes thediskdeviceinformation asreported bycommands executedby the data collector.
n/a None n/a
VVMDiskdeviceWriteKBytes
Indicates the numberof KBytes written onthe diskdevice.Note: This parameteris not available fornon-dynamic diskgroups onWindows platforms.
Kilobytes (KB) None Statistics
VVMDiskdeviceWriteKBytesRate*
Indicates the numberof KBytes written persecond for thediskdevice.Note: This parameteris not available fornon-dynamic diskgroups onWindows platforms.
Kilobytes per second (KB/s) None Statistics
VVMDiskdeviceWriteOperations
Indicates the numberof write operationson the diskdevice.Note: This parameteris not available fornon-dynamic diskgroups onWindows platforms.
Operations None Statistics

85 Classes and Parameters
Ver
itas
Vol
ume
Man
age
r K
M f
or
PA
TRO
L V
ersi
on 2
.5.0
1
Name Description Units Default AlertConditions
BMCProactiveNetAttribute Type
VVMDiskdeviceWriteOperationsFailed
Monitors the numberof failed writeoperations on thediskdevice on Unixplatforms. If thisparameter changesto warning or alarmstate, the recoveryaction will trigger anevent.
Operations Warning when >10 and < 100
Statistics
VVMDiskdeviceWriteTime*
Monitors the writetime for thediskdevice. If thisparameter changesto warning or alarmstate, the recoveryaction will trigger anevent.
Milliseconds Warning when >20 and < 100
Response Time
VVMDiskdeviceWriteTimeAverage*
Monitors the averagewrite time for thediskdevice. If thisparameter changesto warning or alarmstate, the recoveryaction will trigger anevent.Note: This parameteris not available fornon-dynamic diskgroups onWindows platforms.
Milliseconds None Statistics
VVMDiskpathEnabled
Monitors the numberof enabled diskpaths with kernelstate ENABLED.
Count Alarm = 1 Availability
VVMDiskpathNonEnabled
Indicates the numberof disk paths that arenot enabled.
Count Warning when > 1 and < 100
Availability
For detailed information about Baselining and KPI, see Managing Baselines and Key Performance Indicators.
* Parameters marked with an asterisk are used by default when visualizing the corresponding monitor instancein BPPM.
InfoBox
Name Description
Diskdevice Name of the Veritas Volume Manager diskdevice.
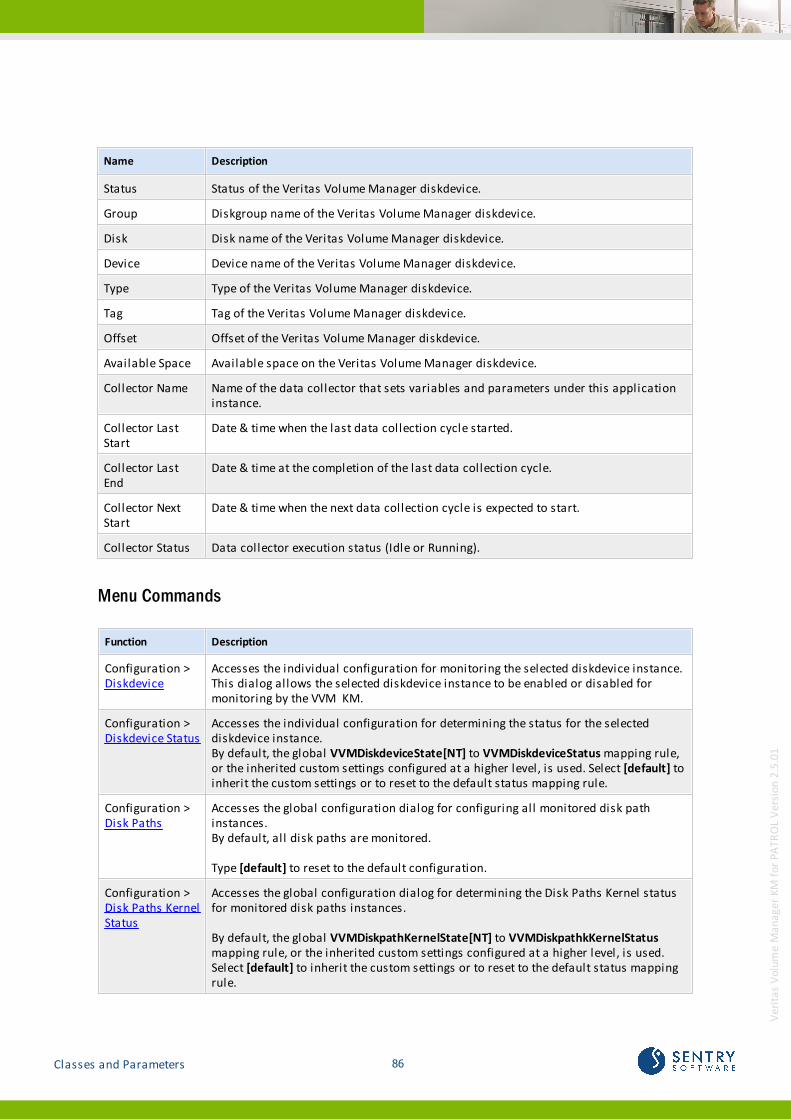
86Classes and Parameters
Ver
itas
Vol
ume
Man
age
r K
M f
or
PA
TRO
L V
ersi
on 2
.5.0
1
Name Description
Status Status of the Veritas Volume Manager diskdevice.
Group Diskgroup name of the Veritas Volume Manager diskdevice.
Disk Disk name of the Veritas Volume Manager diskdevice.
Device Device name of the Veritas Volume Manager diskdevice.
Type Type of the Veritas Volume Manager diskdevice.
Tag Tag of the Veritas Volume Manager diskdevice.
Offset Offset of the Veritas Volume Manager diskdevice.
Available Space Available space on the Veritas Volume Manager diskdevice.
Collector Name Name of the data collector that sets variables and parameters under this applicationinstance.
Collector LastStart
Date & time when the last data collection cycle started.
Collector LastEnd
Date & time at the completion of the last data collection cycle.
Collector NextStart
Date & time when the next data collection cycle is expected to start.
Collector Status Data collector execution status (Idle or Running).
Menu Commands
Function Description
Configuration > Diskdevice
Accesses the individual configuration for monitoring the selected diskdevice instance.This dialog allows the selected diskdevice instance to be enabled or disabled formonitoring by the VVM KM.
Configuration > Diskdevice Status
Accesses the individual configuration for determining the status for the selecteddiskdevice instance.By default, the global VVMDiskdeviceState[NT] to VVMDiskdeviceStatus mapping rule,or the inherited custom settings configured at a higher level, is used. Select [default] toinherit the custom settings or to reset to the default status mapping rule.
Configuration > Disk Paths
Accesses the global configuration dialog for configuring all monitored disk pathinstances.By default, all disk paths are monitored.
Type [default] to reset to the default configuration.
Configuration > Disk Paths KernelStatus
Accesses the global configuration dialog for determining the Disk Paths Kernel statusfor monitored disk paths instances.
By default, the global VVMDiskpathKernelState[NT] to VVMDiskpathkKernelStatusmapping rule, or the inherited custom settings configured at a higher level, is used.Select [default] to inherit the custom settings or to reset to the default status mappingrule.
87 Classes and Parameters
Ver
itas
Vol
ume
Man
age
r K
M f
or
PA
TRO
L V
ersi
on 2
.5.0
1
VVM_DISKDEVICE_CONTAINERIcon
Parameters
None.
InfoBox
Name Description
CollectorName
Name of the data collector that sets variables and parameters under this applicationinstance.
CollectorLast Start
Date & time when the last data collection cycle started.
CollectorLast End
Date & time at the completion of the last data collection cycle.
CollectorNext Start
Date & time when the next data collection cycle is expected to start.
CollectorStatus
Data collector execution status (Idle or Running).
Menu Commands
Function Description
Configuration > Diskdevices
Accesses the dialog for specifying which diskdevices under the selected diskdevicecontainer instance are to be monitored by the VVM KM.By default, all diskdevices are monitored.
Type [default] to reset any custom configurations from current level and below and inheritcustom setting, if any, or revert to default configuration.
Configuration > DiskdevicesStatus
Accesses the configuration dialog for determining the status for monitored diskdeviceinstances under the selected diskdevice container instance.

88Classes and Parameters
Ver
itas
Vol
ume
Man
age
r K
M f
or
PA
TRO
L V
ersi
on 2
.5.0
1
Function Description
By default, the global VVMDiskdeviceState[NT] to VVMDiskdeviceStatus mapping rule, orthe inherited custom settings configured at a higher level, is used. Select [default] to inheritthe custom settings or to reset to the default status mapping rule.
Configuration > DiskPaths
Accesses the global configuration dialog for configuring all monitored disk path instances.By default, all disk paths are monitored.
Type [default] to reset to the default configuration.
Configuration > DiskPaths KernelStatus
Accesses the global configuration dialog for determining the Disk Paths Kernel status formonitored disk paths instances.
By default, the global VVMDiskpathKernelState[NT] to VVMDiskpathkKernelStatus mappingrule, or the inherited custom settings configured at a higher level, is used. Select [default] toinherit the custom settings or to reset to the default status mapping rule.
VVM_DISKGROUPIcon
Parameters
Name Description Units Default AlertConditions
BMCProactiveNetAttribute Type
VVMDiskgroupSpaceAvailable*
Indicates the availablespace for the diskgroup.
Gigabytes (GB) None Availability
VVMDiskgroupState Indicates the state of thediskgroup on Unixplatforms.
{0 = Enabled;1 = Disabled;-1 = Unknown}
None Availability
VVMDiskgroupStateNT
Indicates the state of thediskgroup on Windowsplatforms.
{0 = Imported;1 = Deported;1 = Unknown}
None Availability
VVMDiskgroupStatus Monitors the status of thediskgroup. This status isdetermined by thediskgroup status mappingrule defined in the KMcommand Configuration >Diskgroup(s) Status.
{0 = OK;1 = Suspicious;2 = Failure}
Warning = 1Alarm = 2
Availability
89 Classes and Parameters
Ver
itas
Vol
ume
Man
age
r K
M f
or
PA
TRO
L V
ersi
on 2
.5.0
1
Name Description Units Default AlertConditions
BMCProactiveNetAttribute Type
If this status parameterchanges to warning oralarm state, the recoveryaction will trigger an eventand annotate the last datapoint.
VVMDiskgroupSummary
Summarizes the diskgroupinformation as reported bycommands executed by thedata collector.
n/a None n/a
* Parameters marked with an asterisk are used by default when visualizing the corresponding monitor instancein BPPM.
InfoBox
Name Description
Name Name of the Veritas Volume Manager diskgroup.
Status State of the Veritas Volume Manager diskgroup.
ID ID of the Veritas Volume Manager diskgroup.
Type Type of the Veritas Volume Manager diskgroup.
Collector Name Name of the data collector that sets variables and parameters under this applicationinstance.
Collector LastStart
Date & time when the last data collection cycle started.
Collector LastEnd
Date & time at the completion of the last data collection cycle.
Collector NextStart
Date & time when the next data collection cycle is expected to start.
Collector Status Data collector execution status (Idle or Running).
Menu Commands
Function Description
Reports > DiskgroupTopologyReport
Reports all Veritas Volume Manager topology objects for the selected diskgroup.
Configuration > Diskgroup
Accesses the individual configuration for monitoring the selected diskgroup instance.
90Classes and Parameters
Ver
itas
Vol
ume
Man
age
r K
M f
or
PA
TRO
L V
ersi
on 2
.5.0
1
This dialog allows the selected diskgroup instance to be enabled or disabled formonitoring by the VVM KM.
Configuration > DiskgroupStatus
Accesses the individual configuration for determining diskgroup status for the selecteddiskgroup instance.By default, the global VVMDiskgroupState[NT] to VVMDiskgroupStatus mapping rule, orthe inherited custom settings configured at a higher level, is used. Select [default] toinherit the custom setttings or to reset to the default status mapping rule.
Configuration > Disk Devices
Accesses the dialog for specifying which diskdevices under the selected diskgroupinstance are to be monitored by the VVM KM.By default, all diskdevices are monitored.Type [default] to reset any custom configurations from current level and below andinherit custom setting, if any, or revert to default configuration.Refer to the User Guide for PATROL Knowledge Module for Veritas Volume Manager bySentry Software for more details.
Configuration > Disk DevicesStatus
Accesses the configuration dialog for determining the status for monitored diskdeviceinstances under the selected diskgroup instance.By default, the global VVMDiskdeviceState[NT] to VVMDiskdeviceStatus mapping rule, orthe inherited custom settings configured at a higher level, is used. Select [default] toinherit the custom settings or to reset to the default status mapping rule.
Configuration > Disk Paths
Accesses the global configuration dialog for configuring all monitored disk pathinstances.By default, all disk paths are monitored.
Type [default] to reset to the default configuration.
Configuration > Disk PathsKernel Status
Accesses the global configuration dialog for determining the Disk Paths Kernel statusfor monitored disk paths instances.
By default, the global VVMDiskpathKernelState[NT] to VVMDiskpathkKernelStatusmapping rule, or the inherited custom settings configured at a higher level, is used.Select [default] to inherit the custom settings or to reset to the default status mappingrule.
Configuration > Volumes
Accesses the dialog for specifying which volumes under the selected diskgroup instanceare to be monitored by the VVM KM.By default, all volumes are monitored.Type [default] to reset any custom configurations from current level and below andinherit custom setting, if any, or revert to default configuration.
Configuration > Volumes Status
Accesses the configuration dialog for determining the status for monitored volumeinstances under the selected diskgroup instance.By default, the global VVMVolumeState[NT] to VVMVolumeStatus mapping rule, or theinherited custom settings configured at a higher level, is used. Select [default] to inheritthe custom settings or to reset to the default status mapping rule.
Configuration > Volumes KernelStatus
Accesses the configuration dialog for determining the kernel status for monitoredvolume instances under the selected diskgroup instance.By default, the global VVMVolumeKernelState[NT] to VVMVolumeKernelStatus mappingrule, or the inherited custom settings configured at a higher level, is used. Select [default] to inherit the custom settings or to reset to the default status mapping rule.
Configuration > VolumesLogging Status (Unix only)
Accesses the configuration dialog for determining the logging status for monitoredvolume instances under the selected diskgroup instance.By default, the global VVMVolumeLoggingState to VVMVolumeLoggingStatus mappingrule, or the inherited custom settings configured at a higher level, is used. Select[default] to inherit the custom settings or to reset to the default status mapping rule.
91 Classes and Parameters
Ver
itas
Vol
ume
Man
age
r K
M f
or
PA
TRO
L V
ersi
on 2
.5.0
1
Configuration > Plexes
Accesses the dialog for specifying which plexes under the selected diskgroup instanceare to be monitored by the VVM KM.By default, all plexes are monitored.Type [default] to reset any custom configurations from current level and below andinherit custom setting, if any, or revert to default configuration.
Configuration > Plexes Status
Accesses the configuration dialog for determining the status for monitored plexinstances under the selected diskgroup instance.By default, the global VVMPlexState[NT] to VVMPlexStatus mapping rule, or theinherited custom settings configured at a higher level, is used. Select [default] to inheritthe custom settings or to reset to the default status mapping rule.
Configuration > Plexes KernelStatus
Accesses the configuration dialog for determining the kernel status for monitored plexinstances under the selected diskgroup instance.By default, the global VVMPlexKernelState[NT] to VVMPlexKernelStatus mapping rule,or the inherited custom settings configured at a higher level, is used. Select [default] toinherit the custom settings or to reset to the default status mapping rule.
Configuration > Subdisks
Accesses the dialog for specifying which subdisks under the selected diskgroup instanceare to be monitored by the VVM KM.By default, all subdisks are monitored.Type [default] to reset any custom configurations from current level and below andinherit custom setting, if any, or revert to default configuration.
Configuration > Subdisks KernelStatus
Accesses the configuration dialog for determining the kernel status for monitoredsubdisk instances under the selected diskgroup instance.By default, the global VVMSubdiskKernelState[NT] to VVMSubdiskKernelStatus mappingrule, or the inherited custom settings configured at a higher level, is used. Select[default] to inherit the custom settings or to reset to the default status mapping rule.
Configuration > ReplicatedVolume Groups
Accesses the configuration dialog for specifying which replicated volume groups underthe selected disk group instance are to be monitored by the VVM KM. By default, allreplicated volume groups are monitored. Type [default] to reset any customconfigurations from current level and below and inherit custom setting, if any, or revertto default configuration.
Configuration >ReplicatedVolume GroupsStatus
Accesses the global configuration for determining the replicated volume group statusfor monitored replicated volume group instances.By default, the following VVMRvgStateto VVMRvgStatus mapping rule is used:
Configuration > ReplicatedVolume GroupsKernel Status
Accesses the global configuration for determining the replicated volume group kernelstatus for monitored replicated volume group instances.By default, the following VVMRvgKernelState to VVMRvgKernelStatus mapping rule isused:
Configuration > ReplicationLinks
Accesses the dialog for specifying which replication links under the selected disk groupinstance are to be monitored by the VVM KM. By default, all replication links aremonitored. Type [default] to reset any custom configurations from current level andbelow and inherit custom setting, if any, or revert to default configuration.
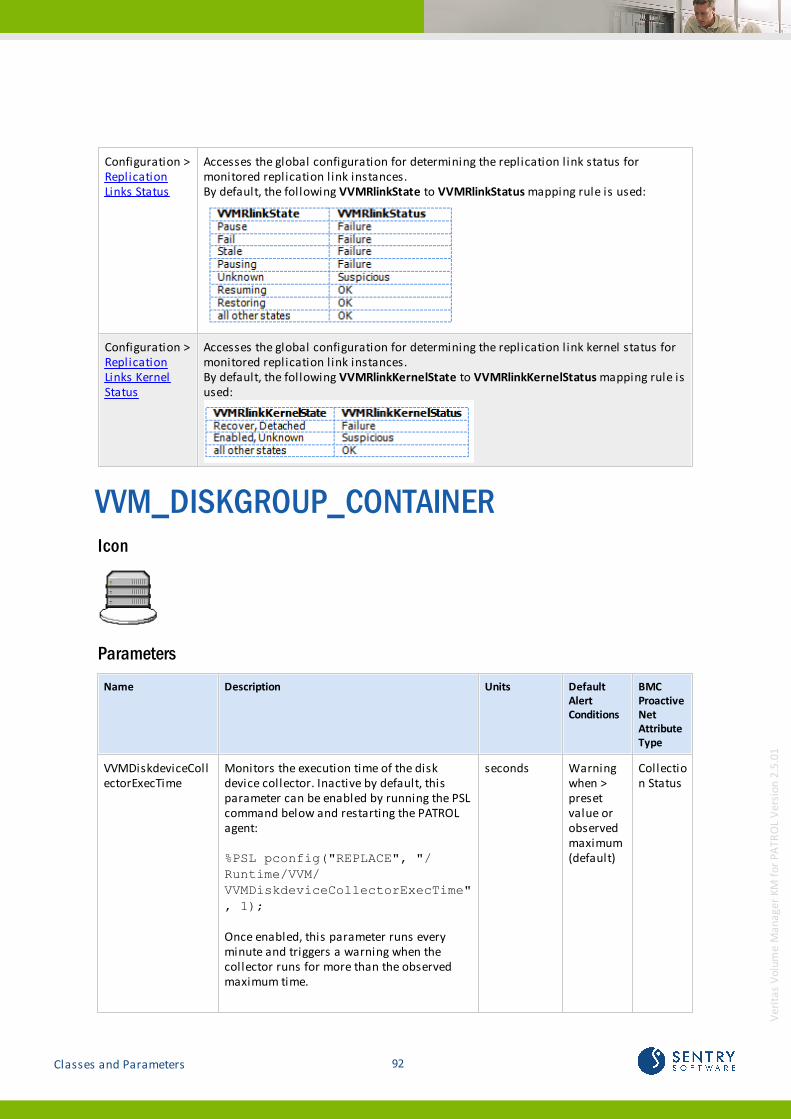
92Classes and Parameters
Ver
itas
Vol
ume
Man
age
r K
M f
or
PA
TRO
L V
ersi
on 2
.5.0
1
Configuration > ReplicationLinks Status
Accesses the global configuration for determining the replication link status formonitored replication link instances.By default, the following VVMRlinkState to VVMRlinkStatus mapping rule is used:
Configuration > ReplicationLinks KernelStatus
Accesses the global configuration for determining the replication link kernel status formonitored replication link instances.By default, the following VVMRlinkKernelState to VVMRlinkKernelStatus mapping rule isused:
VVM_DISKGROUP_CONTAINERIcon
Parameters
Name Description Units DefaultAlertConditions
BMCProactiveNetAttributeType
VVMDiskdeviceCollectorExecTime
Monitors the execution time of the diskdevice collector. Inactive by default, thisparameter can be enabled by running the PSLcommand below and restarting the PATROLagent:
%PSL pconfig("REPLACE", "/Runtime/VVM/VVMDiskdeviceCollectorExecTime", 1);
Once enabled, this parameter runs everyminute and triggers a warning when thecollector runs for more than the observedmaximum time.
seconds Warningwhen >presetvalue orobservedmaximum(default)
Collection Status
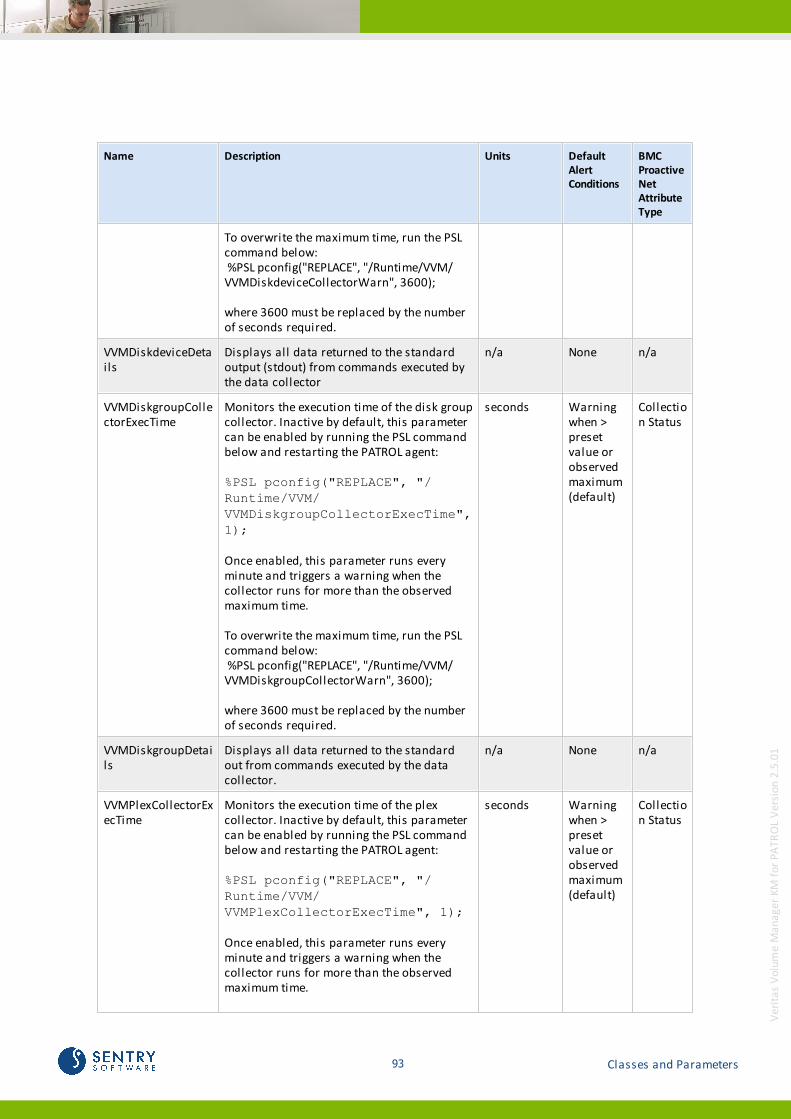
93 Classes and Parameters
Ver
itas
Vol
ume
Man
age
r K
M f
or
PA
TRO
L V
ersi
on 2
.5.0
1
Name Description Units DefaultAlertConditions
BMCProactiveNetAttributeType
To overwrite the maximum time, run the PSLcommand below: %PSL pconfig("REPLACE", "/Runtime/VVM/VVMDiskdeviceCollectorWarn", 3600);
where 3600 must be replaced by the numberof seconds required.
VVMDiskdeviceDetails
Displays all data returned to the standardoutput (stdout) from commands executed bythe data collector
n/a None n/a
VVMDiskgroupCollectorExecTime
Monitors the execution time of the disk groupcollector. Inactive by default, this parametercan be enabled by running the PSL commandbelow and restarting the PATROL agent:
%PSL pconfig("REPLACE", "/Runtime/VVM/VVMDiskgroupCollectorExecTime",1);
Once enabled, this parameter runs everyminute and triggers a warning when thecollector runs for more than the observedmaximum time.
To overwrite the maximum time, run the PSLcommand below: %PSL pconfig("REPLACE", "/Runtime/VVM/VVMDiskgroupCollectorWarn", 3600);
where 3600 must be replaced by the numberof seconds required.
seconds Warningwhen >presetvalue orobservedmaximum(default)
Collection Status
VVMDiskgroupDetails
Displays all data returned to the standardout from commands executed by the datacollector.
n/a None n/a
VVMPlexCollectorExecTime
Monitors the execution time of the plexcollector. Inactive by default, this parametercan be enabled by running the PSL commandbelow and restarting the PATROL agent:
%PSL pconfig("REPLACE", "/Runtime/VVM/VVMPlexCollectorExecTime", 1);
Once enabled, this parameter runs everyminute and triggers a warning when thecollector runs for more than the observedmaximum time.
seconds Warningwhen >presetvalue orobservedmaximum(default)
Collection Status
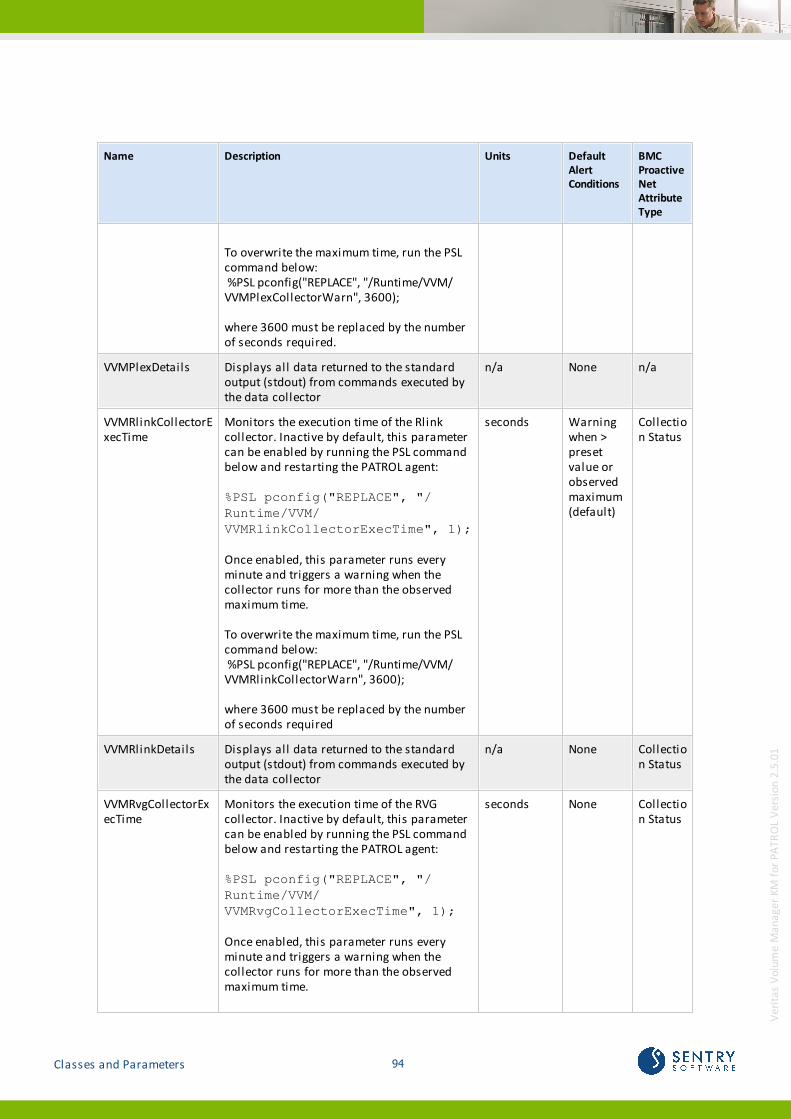
94Classes and Parameters
Ver
itas
Vol
ume
Man
age
r K
M f
or
PA
TRO
L V
ersi
on 2
.5.0
1
Name Description Units DefaultAlertConditions
BMCProactiveNetAttributeType
To overwrite the maximum time, run the PSLcommand below: %PSL pconfig("REPLACE", "/Runtime/VVM/VVMPlexCollectorWarn", 3600);
where 3600 must be replaced by the numberof seconds required.
VVMPlexDetails Displays all data returned to the standardoutput (stdout) from commands executed bythe data collector
n/a None n/a
VVMRlinkCollectorExecTime
Monitors the execution time of the Rlinkcollector. Inactive by default, this parametercan be enabled by running the PSL commandbelow and restarting the PATROL agent:
%PSL pconfig("REPLACE", "/Runtime/VVM/VVMRlinkCollectorExecTime", 1);
Once enabled, this parameter runs everyminute and triggers a warning when thecollector runs for more than the observedmaximum time.
To overwrite the maximum time, run the PSLcommand below: %PSL pconfig("REPLACE", "/Runtime/VVM/VVMRlinkCollectorWarn", 3600);
where 3600 must be replaced by the numberof seconds required
seconds Warningwhen >presetvalue orobservedmaximum(default)
Collection Status
VVMRlinkDetails Displays all data returned to the standardoutput (stdout) from commands executed bythe data collector
n/a None Collection Status
VVMRvgCollectorExecTime
Monitors the execution time of the RVGcollector. Inactive by default, this parametercan be enabled by running the PSL commandbelow and restarting the PATROL agent:
%PSL pconfig("REPLACE", "/Runtime/VVM/VVMRvgCollectorExecTime", 1);
Once enabled, this parameter runs everyminute and triggers a warning when thecollector runs for more than the observedmaximum time.
seconds None Collection Status
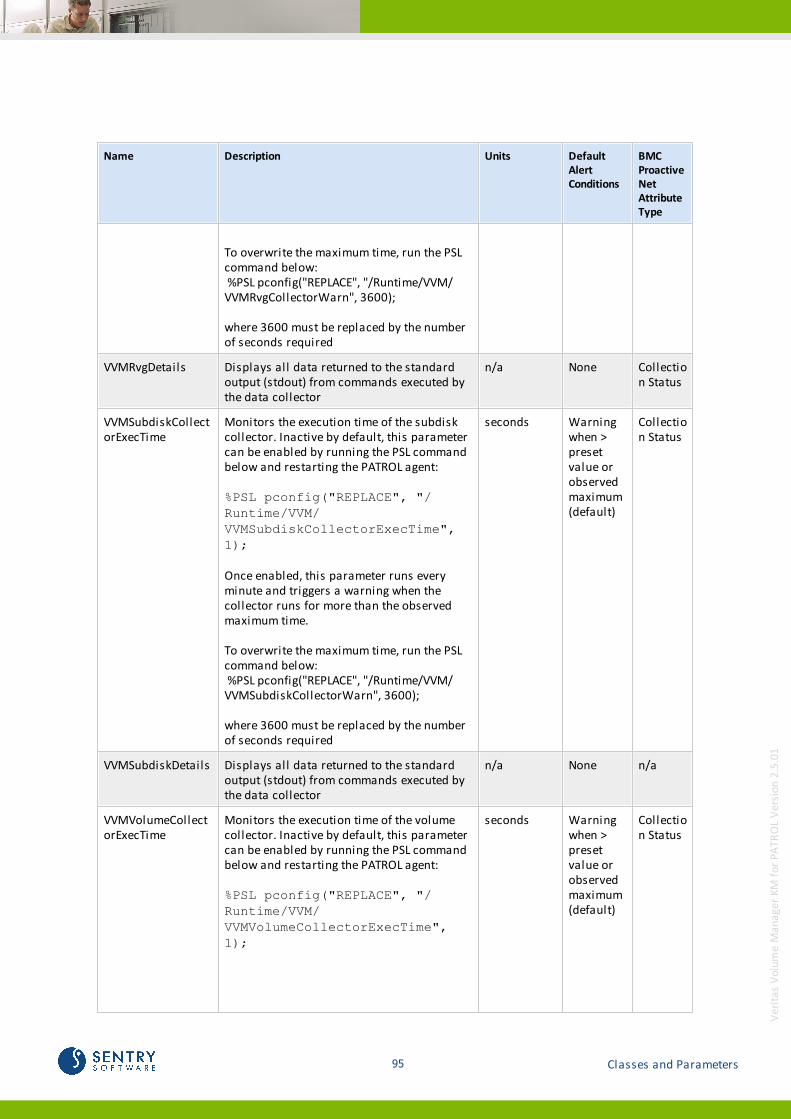
95 Classes and Parameters
Ver
itas
Vol
ume
Man
age
r K
M f
or
PA
TRO
L V
ersi
on 2
.5.0
1
Name Description Units DefaultAlertConditions
BMCProactiveNetAttributeType
To overwrite the maximum time, run the PSLcommand below: %PSL pconfig("REPLACE", "/Runtime/VVM/VVMRvgCollectorWarn", 3600);
where 3600 must be replaced by the numberof seconds required
VVMRvgDetails Displays all data returned to the standardoutput (stdout) from commands executed bythe data collector
n/a None Collection Status
VVMSubdiskCollectorExecTime
Monitors the execution time of the subdiskcollector. Inactive by default, this parametercan be enabled by running the PSL commandbelow and restarting the PATROL agent:
%PSL pconfig("REPLACE", "/Runtime/VVM/VVMSubdiskCollectorExecTime",1);
Once enabled, this parameter runs everyminute and triggers a warning when thecollector runs for more than the observedmaximum time.
To overwrite the maximum time, run the PSLcommand below: %PSL pconfig("REPLACE", "/Runtime/VVM/VVMSubdiskCollectorWarn", 3600);
where 3600 must be replaced by the numberof seconds required
seconds Warningwhen >presetvalue orobservedmaximum(default)
Collection Status
VVMSubdiskDetails Displays all data returned to the standardoutput (stdout) from commands executed bythe data collector
n/a None n/a
VVMVolumeCollectorExecTime
Monitors the execution time of the volumecollector. Inactive by default, this parametercan be enabled by running the PSL commandbelow and restarting the PATROL agent:
%PSL pconfig("REPLACE", "/Runtime/VVM/VVMVolumeCollectorExecTime",1);
seconds Warningwhen >presetvalue orobservedmaximum(default)
Collection Status

96Classes and Parameters
Ver
itas
Vol
ume
Man
age
r K
M f
or
PA
TRO
L V
ersi
on 2
.5.0
1
Name Description Units DefaultAlertConditions
BMCProactiveNetAttributeType
Once enabled, this parameter runs everyminute and triggers a warning when thecollector runs for more than the observedmaximum time.
To overwrite the maximum time, run the PSLcommand below: %PSL pconfig("REPLACE", "/Runtime/VVM/VVMVolumeCollectorWarn", 3600);
where 3600 must be replaced by the numberof seconds required
VVMVolumeDetails Displays all data returned to the standardoutput (stdout) from commands executed bythe data collector
n/a None n/a
InfoBox
Name Description
Collector Name Name of the data collector that sets variables and parameters under thisapplication instance.
Collector Last Start Date & time when the last data collection cycle started.
Collector Last End Date & time at the completion of the last data collection cycle.
Collector Next Start Date & time when the next data collection cycle is expected to start.
Collector Status Data collector execution status (Idle or Running).
Menu Commands
Function Description
Reports > VeritasVolume ManagerTopology Report
Reports all Veritas Volume Manager topology objects.
Configuration > Diskgroups
Accesses the global configuration dialog for specifying which diskgroups are to bemonitored by the VVM KM.By default, all diskgroups are monitored.Type [default] to reset to the default configuration.
Configuration > Diskgroups Status
Accesses the global configuration dialog for determining the diskgroup status formonitored diskgroup instances.
By default, the following VVMDiskgroupState to VVMDiskgroupStatus mapping ruleis used on Unix platforms:

97 Classes and Parameters
Ver
itas
Vol
ume
Man
age
r K
M f
or
PA
TRO
L V
ersi
on 2
.5.0
1
Function Description
By default, the following VVMDiskgroupStateNT to VVMDiskgroupStatus mappingrule is used on Windows platforms:
Select [default] to reset to the default diskgroup status mapping rule.
Configuration > Disk Devices
Accesses the global configuration dialog for specifying which diskdevices are to bemonitored by the VVM KM.By default, all diskdevices are monitored.
Type [default] to reset to the default configuration.
Configuration > Disk Devices Status
Accesses the global configuration dialog for determining the diskdevice status formonitored diskdevice instances.By default, the following VVMDiskdeviceState to VVMDiskdeviceStatus mapping ruleis used on Unix platforms:
By default, the following VVMDiskdeviceStateNT to VVMDiskdeviceStatus mappingrule is used on Windows platforms:
Select [default] to reset to the default diskdevice status mapping rule.
Configuration > Disk Paths
Accesses the global configuration dialog for configuring all monitored disk pathinstances.By default, all disk paths are monitored.
Type [default] to reset to the default configuration.
Configuration > Disk Paths KernelStatus
Accesses the global configuration dialog for determining the Disk Paths Kernelstatus for monitored disk paths instances.
By default, the global VVMDiskpathKernelState[NT] to VVMDiskpathkKernelStatusmapping rule, or the inherited custom settings configured at a higher level, is used.Select [default] to inherit the custom settings or to reset to the default statusmapping rule.
Configuration > Volumes
Accesses the global configuration dialog for specifying which volumes are to bemonitored by the VVM KM.
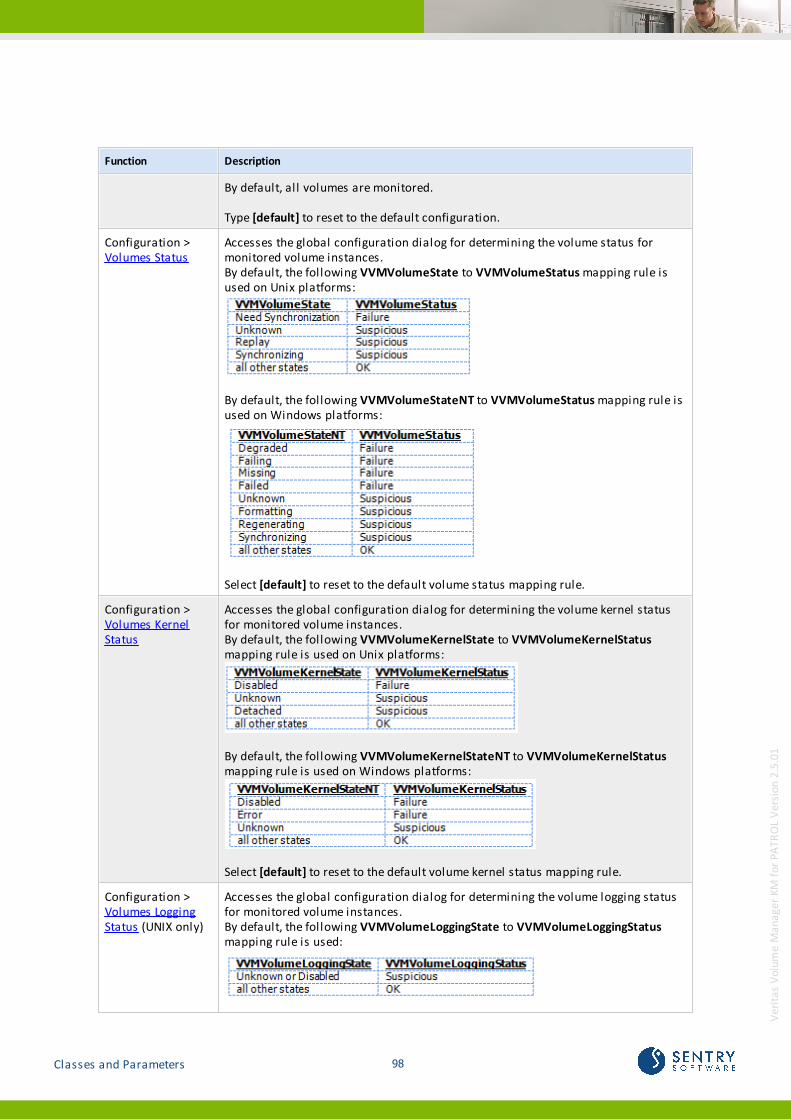
98Classes and Parameters
Ver
itas
Vol
ume
Man
age
r K
M f
or
PA
TRO
L V
ersi
on 2
.5.0
1
Function Description
By default, all volumes are monitored.
Type [default] to reset to the default configuration.
Configuration > Volumes Status
Accesses the global configuration dialog for determining the volume status formonitored volume instances.By default, the following VVMVolumeState to VVMVolumeStatus mapping rule isused on Unix platforms:
By default, the following VVMVolumeStateNT to VVMVolumeStatus mapping rule isused on Windows platforms:
Select [default] to reset to the default volume status mapping rule.
Configuration > Volumes KernelStatus
Accesses the global configuration dialog for determining the volume kernel statusfor monitored volume instances.By default, the following VVMVolumeKernelState to VVMVolumeKernelStatusmapping rule is used on Unix platforms:
By default, the following VVMVolumeKernelStateNT to VVMVolumeKernelStatusmapping rule is used on Windows platforms:
Select [default] to reset to the default volume kernel status mapping rule.
Configuration > Volumes LoggingStatus (UNIX only)
Accesses the global configuration dialog for determining the volume logging statusfor monitored volume instances.By default, the following VVMVolumeLoggingState to VVMVolumeLoggingStatusmapping rule is used:
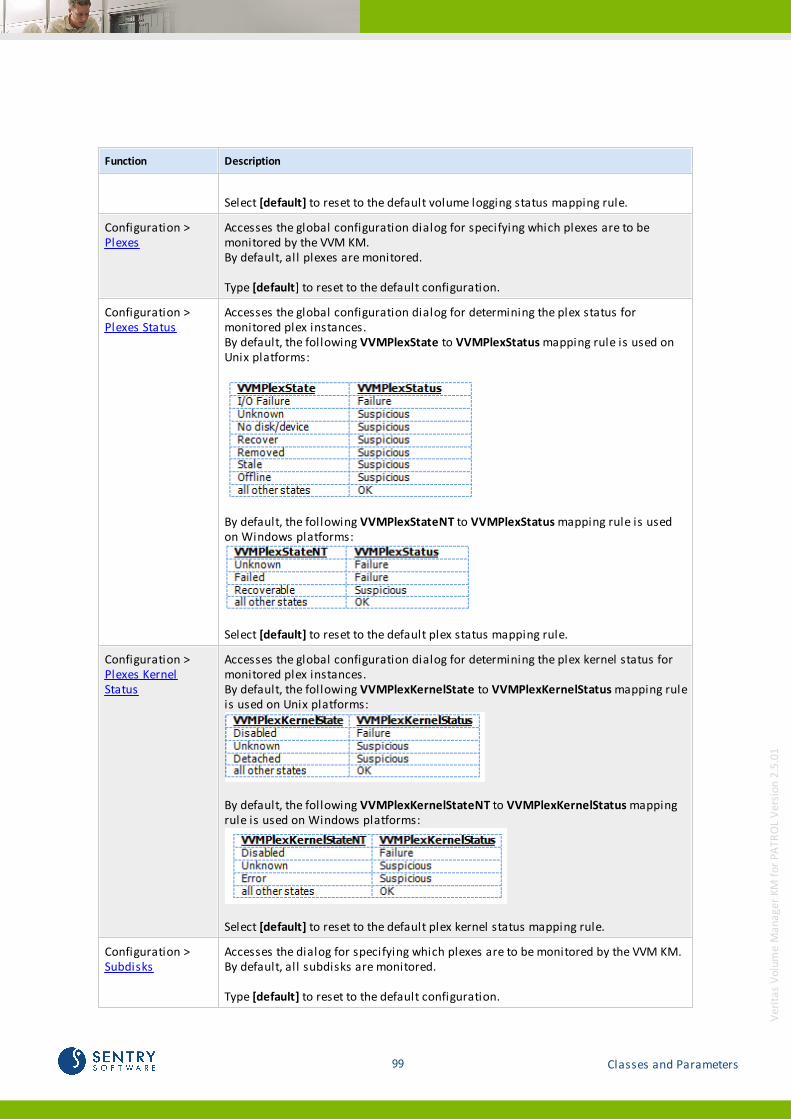
99 Classes and Parameters
Ver
itas
Vol
ume
Man
age
r K
M f
or
PA
TRO
L V
ersi
on 2
.5.0
1
Function Description
Select [default] to reset to the default volume logging status mapping rule.
Configuration > Plexes
Accesses the global configuration dialog for specifying which plexes are to bemonitored by the VVM KM.By default, all plexes are monitored.
Type [default] to reset to the default configuration.
Configuration > Plexes Status
Accesses the global configuration dialog for determining the plex status formonitored plex instances.By default, the following VVMPlexState to VVMPlexStatus mapping rule is used onUnix platforms:
By default, the following VVMPlexStateNT to VVMPlexStatus mapping rule is usedon Windows platforms:
Select [default] to reset to the default plex status mapping rule.
Configuration > Plexes KernelStatus
Accesses the global configuration dialog for determining the plex kernel status formonitored plex instances.By default, the following VVMPlexKernelState to VVMPlexKernelStatus mapping ruleis used on Unix platforms:
By default, the following VVMPlexKernelStateNT to VVMPlexKernelStatus mappingrule is used on Windows platforms:
Select [default] to reset to the default plex kernel status mapping rule.
Configuration > Subdisks
Accesses the dialog for specifying which plexes are to be monitored by the VVM KM.By default, all subdisks are monitored.
Type [default] to reset to the default configuration.
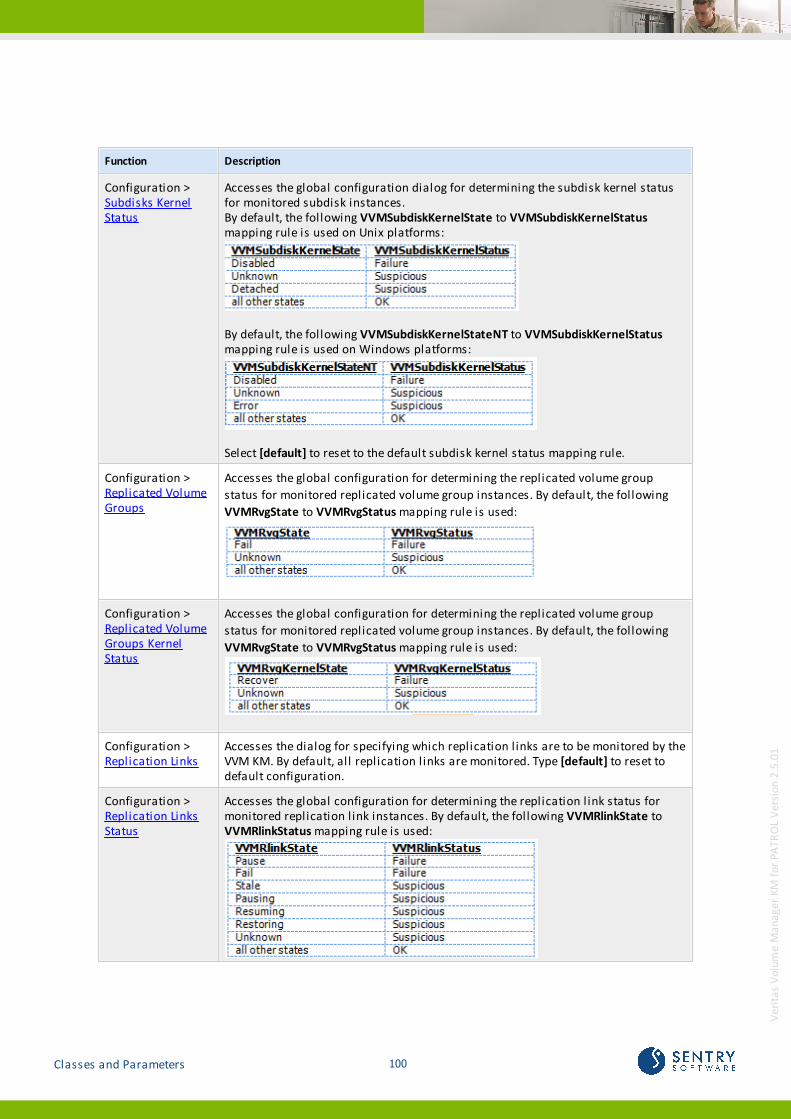
100Classes and Parameters
Ver
itas
Vol
ume
Man
age
r K
M f
or
PA
TRO
L V
ersi
on 2
.5.0
1
Function Description
Configuration > Subdisks KernelStatus
Accesses the global configuration dialog for determining the subdisk kernel statusfor monitored subdisk instances.By default, the following VVMSubdiskKernelState to VVMSubdiskKernelStatusmapping rule is used on Unix platforms:
By default, the following VVMSubdiskKernelStateNT to VVMSubdiskKernelStatusmapping rule is used on Windows platforms:
Select [default] to reset to the default subdisk kernel status mapping rule.
Configuration >Replicated VolumeGroups
Accesses the global configuration for determining the replicated volume group
status for monitored replicated volume group instances. By default, the following
VVMRvgState to VVMRvgStatus mapping rule is used:
Configuration > Replicated VolumeGroups KernelStatus
Accesses the global configuration for determining the replicated volume group
status for monitored replicated volume group instances. By default, the following
VVMRvgState to VVMRvgStatus mapping rule is used:
Configuration > Replication Links
Accesses the dialog for specifying which replication links are to be monitored by theVVM KM. By default, all replication links are monitored. Type [default] to reset todefault configuration.
Configuration >Replication LinksStatus
Accesses the global configuration for determining the replication link status formonitored replication link instances. By default, the following VVMRlinkState toVVMRlinkStatus mapping rule is used:

101 Classes and Parameters
Ver
itas
Vol
ume
Man
age
r K
M f
or
PA
TRO
L V
ersi
on 2
.5.0
1
Function Description
Configuration > Replication LinksKernel Status
Accesses the global configuration for determining the replication link kernel statusfor monitored replication link instances. By default, the followingVVMRlinkKernelState to VVMRlinkKernelStatus mapping rule is used:

102Classes and Parameters
Ver
itas
Vol
ume
Man
age
r K
M f
or
PA
TRO
L V
ersi
on 2
.5.0
1
VVM_DISKPATHIcon
Parameters
Name Description Units Default AlertConditions
BMCProactiveNetAttributeType
VVMDiskpathKernelState
Indicates the kernel state of thediskpath on Unix platforms
{0 = Enabled; 1 = Detached; 2 = Disabled;-1 = Unknown}
None Availability
VVMDiskpathKernelStateNT
Indicates the kernel state of thesubdisk on Windows platforms.
{0 = Enabled; 1 =Unreported/Undefined;2 = Error; 3 = Disabled; -1 = Unknown}
None Availability
VVMDiskpathKernelStatus
Monitors the kernel status of thedisk paths. This status isdetermined by the subpath statusmapping rule defined in the KMcommand Configuration > DiskPath(s) Kernel Status. If thisstatus parameter changes towarning or alarm state, therecovery action will trigger anevent and annotate the last datapoint.
{0 = OK;1 = Suspicious;2 = Failure}
Warning = 1Alarm = 2
Availability
VVMDiskpathSummary
Summarizes the diskpathinformation as reported bycommands executed by the datacollector.
n/a None n/a
InfoBox
Name Description
Path Veritas Volume Manage disk path.
Kernel State Kernel state of the Veritas Volume Manage disk path.
Group Diskgroup name of the Veritas Volume Manager diskdevice.
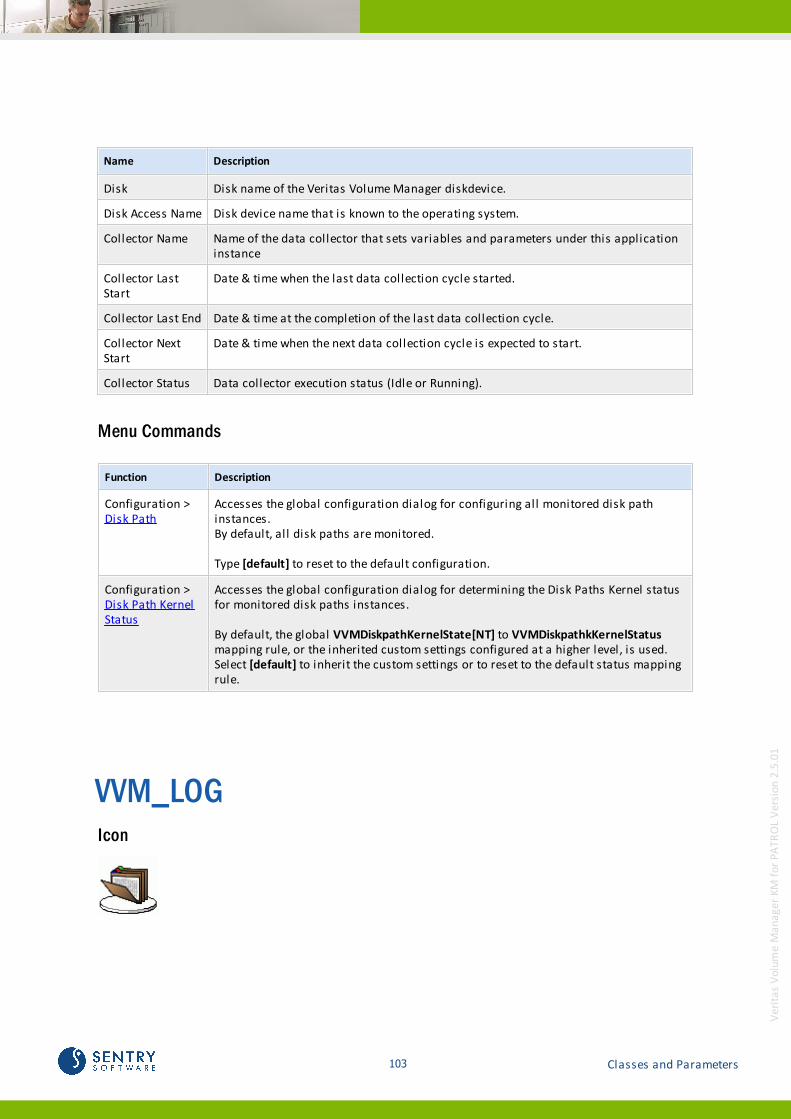
103 Classes and Parameters
Ver
itas
Vol
ume
Man
age
r K
M f
or
PA
TRO
L V
ersi
on 2
.5.0
1
Name Description
Disk Disk name of the Veritas Volume Manager diskdevice.
Disk Access Name Disk device name that is known to the operating system.
Collector Name Name of the data collector that sets variables and parameters under this applicationinstance
Collector LastStart
Date & time when the last data collection cycle started.
Collector Last End Date & time at the completion of the last data collection cycle.
Collector NextStart
Date & time when the next data collection cycle is expected to start.
Collector Status Data collector execution status (Idle or Running).
Menu Commands
Function Description
Configuration > Disk Path
Accesses the global configuration dialog for configuring all monitored disk pathinstances.By default, all disk paths are monitored.
Type [default] to reset to the default configuration.
Configuration > Disk Path KernelStatus
Accesses the global configuration dialog for determining the Disk Paths Kernel statusfor monitored disk paths instances.
By default, the global VVMDiskpathKernelState[NT] to VVMDiskpathkKernelStatusmapping rule, or the inherited custom settings configured at a higher level, is used.Select [default] to inherit the custom settings or to reset to the default status mappingrule.
VVM_LOGIcon

104Classes and Parameters
Ver
itas
Vol
ume
Man
age
r K
M f
or
PA
TRO
L V
ersi
on 2
.5.0
1
Parameters
Name Description Units DefaultAlertConditions
BMCProactiveNetAttributeType
VVMLogAlarmCount*
Monitors the number of alarm messages set inthe parameter VVMLogAlarmText. If thisparameter changes to alarm state, the recoveryaction will trigger an event.
Count Alarmwhen > 1and < 100
Statistics
VVMLogAlarmText
Displays all alarm messages in the log filewhich have not been acknowledged. The filterused by the data collector to determine alarmmessages can be customized using the KMcommand Configuration > Log(s) Filter.
These alarm messages can be acknowledgedautomatically (default) or manually, dependingon the configuration in the KM commandConfiguration > Log(s) Alert Acknowledgement.Manual acknowledgement is available under
the KM sub-menuAcknowledgement.
n/a None n/a
VVMLogFSSpaceUsedPercent*
Monitors the percentage of space used by thefile system (where the log file resides).If this parameter changes to warning or alarmstate, the recovery action will trigger an event.
Percentage (%) Warningwhen > 95and < 98Alarmwhen > 98and < 100
Statistics
VVMLogSpaceAvailable
Monitors the available space for the log file touse (this is also the available space on the filesystem).If this parameter changes to warning or alarmstate, the recovery action will trigger an event.
Megabytes(MB)
Warningwhen > 2 and < 5Alarmwhen > -1and < 2
Availability
VVMLogSpaceGrowthRate
Displays the growth rate of the amount of spaceused by the log file.
Kilobytes perseconds (KB/s)
None Statistics
VVMLogSpaceUsed
Displays the amount of space used by the logfile.
Kilobytes (KB) None Statistics
VVMLogSpaceUsedPercent*
Monitors the percentage of capacity used by thelog file.If this parameter changes to warning or alarmstate, the recovery action will trigger an event.Note that the total capacity is the used space(VVMLogSpaceUsed) plus available space(VVMLogSpaceAvailable).
Percentage (%) Warningwhen > 95and < 98Alarmwhen > 98
Statistics
VVMLogSummary
Summarizes the log file information as reportedby commands executed by the data collector.
n/a None n/a
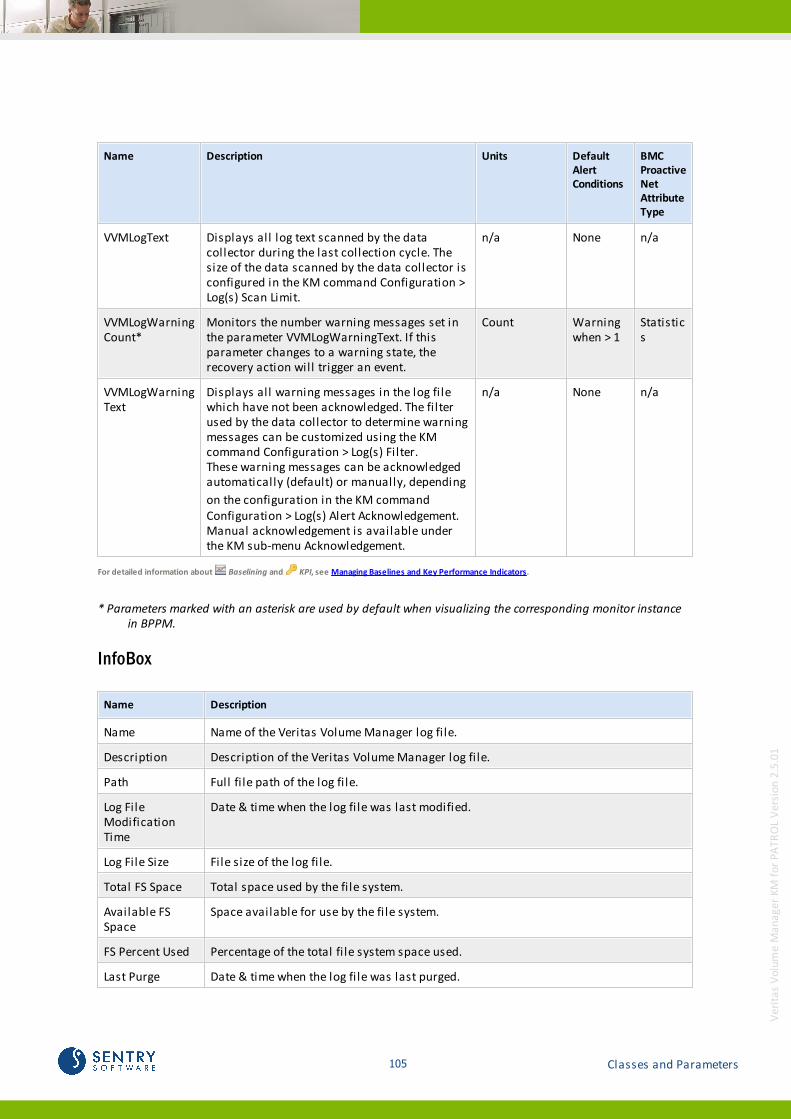
105 Classes and Parameters
Ver
itas
Vol
ume
Man
age
r K
M f
or
PA
TRO
L V
ersi
on 2
.5.0
1
Name Description Units DefaultAlertConditions
BMCProactiveNetAttributeType
VVMLogText Displays all log text scanned by the datacollector during the last collection cycle. Thesize of the data scanned by the data collector isconfigured in the KM command Configuration >Log(s) Scan Limit.
n/a None n/a
VVMLogWarningCount*
Monitors the number warning messages set inthe parameter VVMLogWarningText. If thisparameter changes to a warning state, therecovery action will trigger an event.
Count Warningwhen > 1
Statistics
VVMLogWarningText
Displays all warning messages in the log filewhich have not been acknowledged. The filterused by the data collector to determine warningmessages can be customized using the KMcommand Configuration > Log(s) Filter.These warning messages can be acknowledgedautomatically (default) or manually, depending
on the configuration in the KM commandConfiguration > Log(s) Alert Acknowledgement.Manual acknowledgement is available underthe KM sub-menu Acknowledgement.
n/a None n/a
For detailed information about Baselining and KPI, see Managing Baselines and Key Performance Indicators.
* Parameters marked with an asterisk are used by default when visualizing the corresponding monitor instancein BPPM.
InfoBox
Name Description
Name Name of the Veritas Volume Manager log file.
Description Description of the Veritas Volume Manager log file.
Path Full file path of the log file.
Log FileModificationTime
Date & time when the log file was last modified.
Log File Size File size of the log file.
Total FS Space Total space used by the file system.
Available FSSpace
Space available for use by the file system.
FS Percent Used Percentage of the total file system space used.
Last Purge Date & time when the log file was last purged.

106Classes and Parameters
Ver
itas
Vol
ume
Man
age
r K
M f
or
PA
TRO
L V
ersi
on 2
.5.0
1
Name Description
Collector Name Name of the data collector that sets variables and parameters under this applicationinstance.
Collector LastStart
Date & time when the last data collection cycle started.
Collector LastEnd
Date & time at the completion of the last data collection cycle.
Collector NextStart
Date & time when the next data collection cycle is expected to start.
Collector Status Data collector execution status (Idle or Running).
Menu Commands
Function Description
Acknowledgement > Warnings
Allows acknowledgement of warning messages detected on the selected log fileinstance.This dialog allows selective acknowledgement of "suspicious" error messages detectedin the log file and sent to the text parameter VVMLogWarningText.
Acknowledgement > Alarms
Allows acknowledgement of alarm messages detected on the selected log file instance.This dialog allows selective acknowledgement of "failure" error messages detected inthe log file and sent to the text parameter VVMLogAlarmText.
Acknowledgement > All
Allows acknowledgement of all alarm and warning messages detected on the selectedlog file instance.This dialog allows acknowledgement of all error messages detected in the log file andsent to the text parameter VVMLogWarningText or VVMLogAlarmText.
Configuration > Log
Accesses the individual configuration for monitoring the selected log file instance.This dialog allows the selected log file instance to enabled or disabled for monitoringby the VVM KM.
Configuration > Log Filter
Accesses the individual configuration of the log error filter for the selected log fileinstance.By default, the global log filter is used, as configured at the container level.
Type [default] to reset to the log filter configured at the global/container level.
Configuration > Log Scan Limit
Accesses the individual configuration of the data scanning limit for the selected logfile instance.By default, the global log file scanning limit is used, as configured at the containerlevel.
Configuration > Log AlertAcknowledgement
Accesses the individual configuration of the method of acknowledgement for alerts onthe selected log file instance.By default, the global method of log error acknowledgement is used, as configured atthe container level.
Refer to the User Guide for Veritas Volume Manager KM for PATROL by Sentry Softwarefor more details.
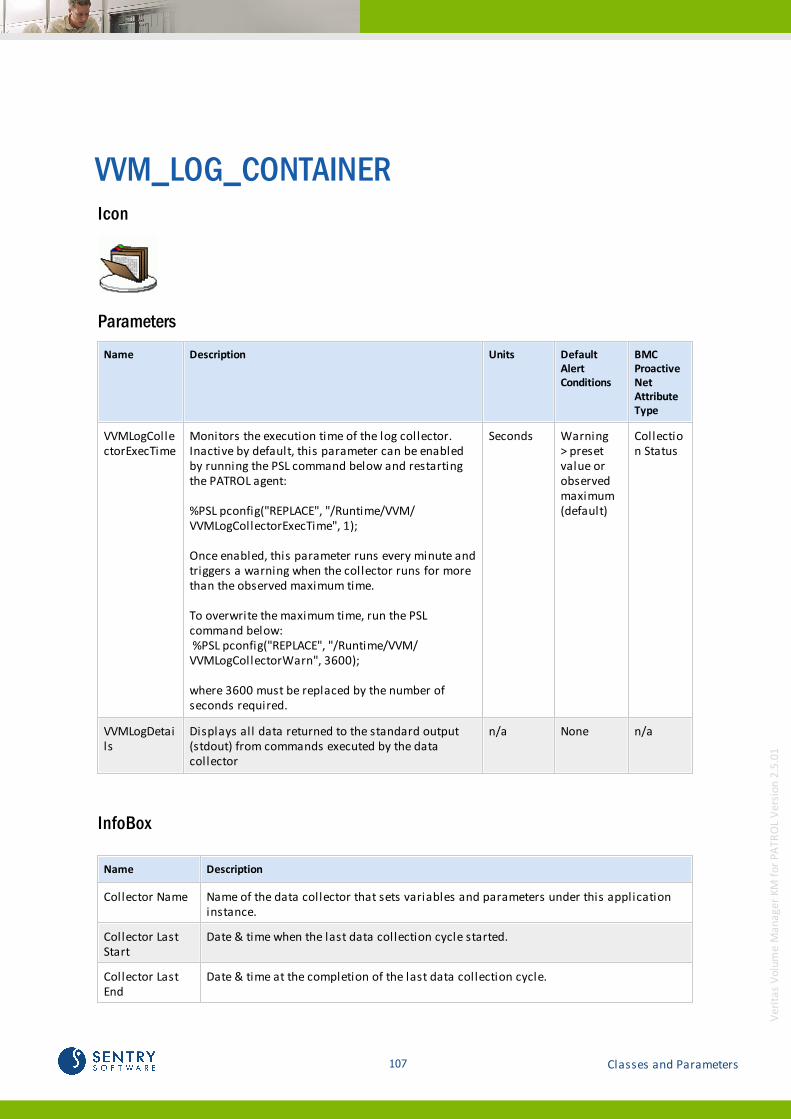
107 Classes and Parameters
Ver
itas
Vol
ume
Man
age
r K
M f
or
PA
TRO
L V
ersi
on 2
.5.0
1
VVM_LOG_CONTAINERIcon
Parameters
Name Description Units DefaultAlertConditions
BMCProactiveNetAttributeType
VVMLogCollectorExecTime
Monitors the execution time of the log collector.Inactive by default, this parameter can be enabledby running the PSL command below and restartingthe PATROL agent:
%PSL pconfig("REPLACE", "/Runtime/VVM/VVMLogCollectorExecTime", 1);
Once enabled, this parameter runs every minute andtriggers a warning when the collector runs for morethan the observed maximum time.
To overwrite the maximum time, run the PSLcommand below: %PSL pconfig("REPLACE", "/Runtime/VVM/VVMLogCollectorWarn", 3600);
where 3600 must be replaced by the number ofseconds required.
Seconds Warning > presetvalue orobservedmaximum(default)
Collection Status
VVMLogDetails
Displays all data returned to the standard output(stdout) from commands executed by the datacollector
n/a None n/a
InfoBox
Name Description
Collector Name Name of the data collector that sets variables and parameters under this applicationinstance.
Collector LastStart
Date & time when the last data collection cycle started.
Collector LastEnd
Date & time at the completion of the last data collection cycle.

108Classes and Parameters
Ver
itas
Vol
ume
Man
age
r K
M f
or
PA
TRO
L V
ersi
on 2
.5.0
1
Name Description
Collector NextStart
Date & time when the next data collection cycle is expected to start.
Collector Status Data collector execution status (Idle or Running).
Menu Commands
Function Description
Reports > Messages List
Reports the last 100 lines logged in the associated log file.
Configuration > Logs
Accesses the dialog for specifying which log files are to be monitored by the VVM KM.By default, following log files are monitored. These log file paths are relative to theVeritas Volume Manager installation directory (for example /opt/VRTSvxvm on HP-UX),unless the path is fully qualified as for the system log on Solaris and HP-UX.
Type [default] to reset to the default configuration.
Configuration > Logs Filter
Accesses the global configuration of the filter for expressions used for detecting errormessages in the monitored log file instances.By default, the following "Included" expressions are looked for in each log file. Ifdetected, the message containing the expression is added to the appropriate textparameter, unless the message also contains an "Excluded" expression for the samefilter.
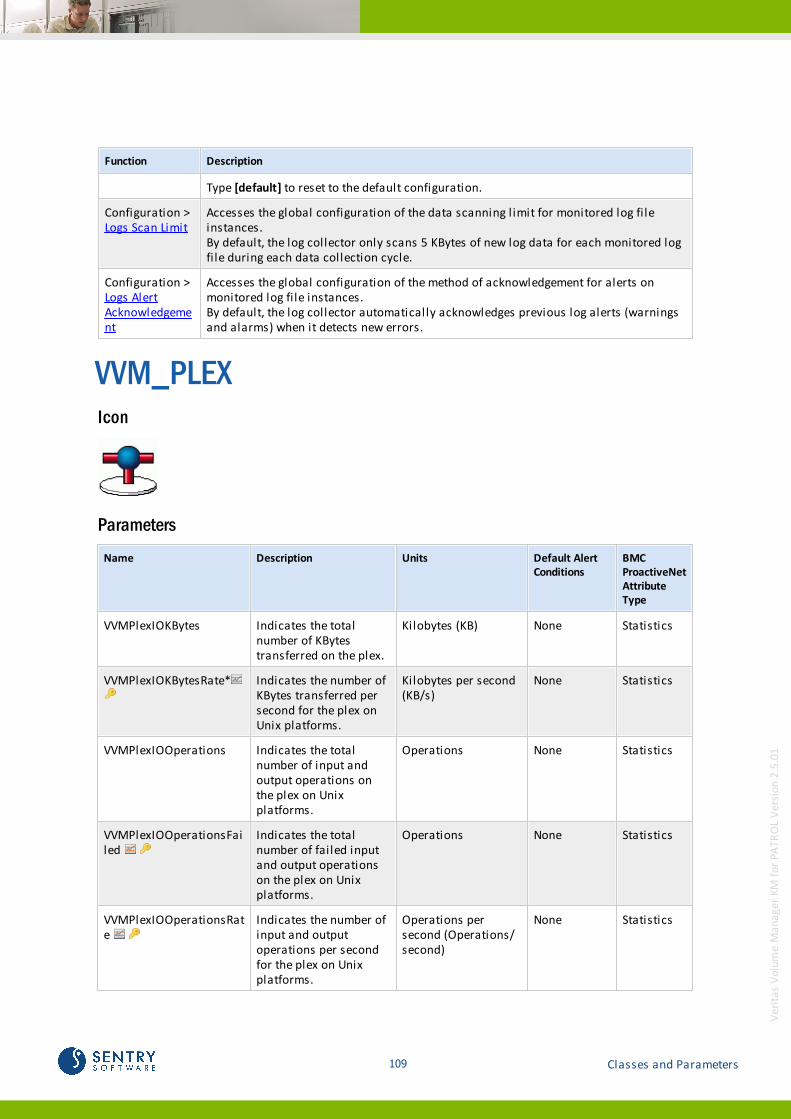
109 Classes and Parameters
Ver
itas
Vol
ume
Man
age
r K
M f
or
PA
TRO
L V
ersi
on 2
.5.0
1
Function Description
Type [default] to reset to the default configuration.
Configuration > Logs Scan Limit
Accesses the global configuration of the data scanning limit for monitored log fileinstances.By default, the log collector only scans 5 KBytes of new log data for each monitored logfile during each data collection cycle.
Configuration > Logs AlertAcknowledgement
Accesses the global configuration of the method of acknowledgement for alerts onmonitored log file instances.By default, the log collector automatically acknowledges previous log alerts (warningsand alarms) when it detects new errors.
VVM_PLEXIcon
Parameters
Name Description Units Default AlertConditions
BMCProactiveNetAttributeType
VVMPlexIOKBytes Indicates the totalnumber of KBytestransferred on the plex.
Kilobytes (KB) None Statistics
VVMPlexIOKBytesRate* Indicates the number ofKBytes transferred persecond for the plex onUnix platforms.
Kilobytes per second(KB/s)
None Statistics
VVMPlexIOOperations Indicates the totalnumber of input andoutput operations onthe plex on Unixplatforms.
Operations None Statistics
VVMPlexIOOperationsFailed
Indicates the totalnumber of failed inputand output operationson the plex on Unixplatforms.
Operations None Statistics
VVMPlexIOOperationsRate
Indicates the number ofinput and outputoperations per secondfor the plex on Unixplatforms.
Operations persecond (Operations/second)
None Statistics
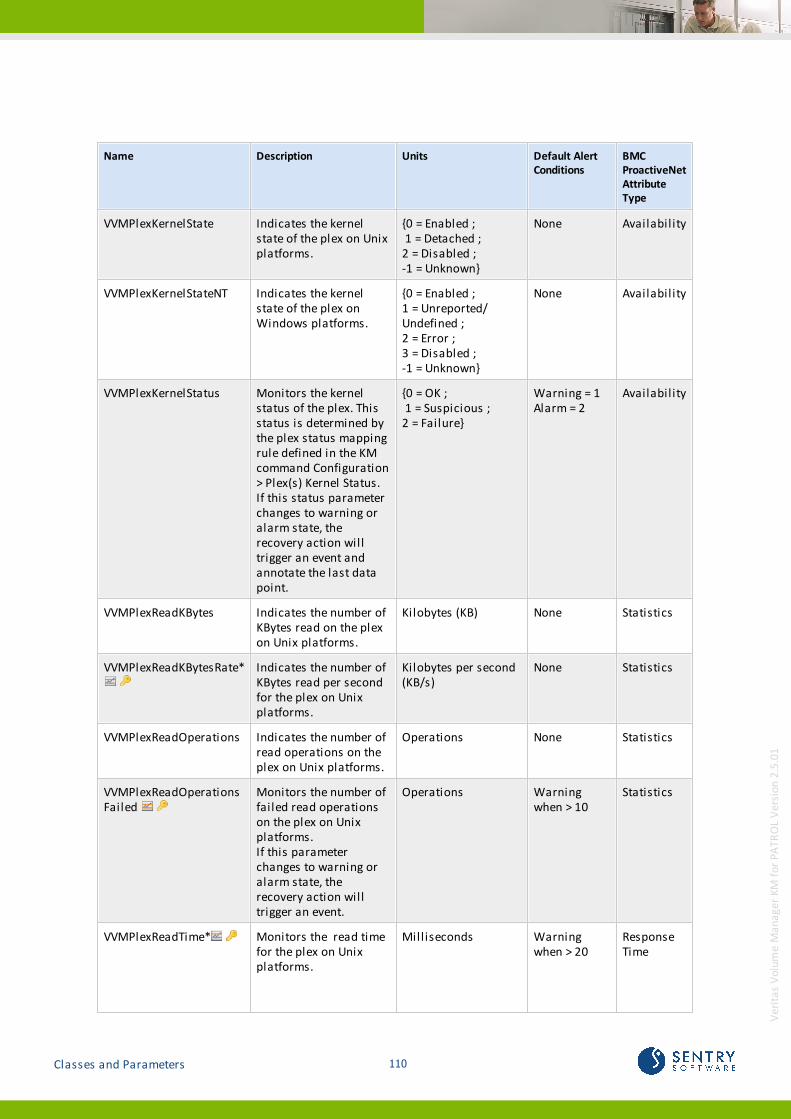
110Classes and Parameters
Ver
itas
Vol
ume
Man
age
r K
M f
or
PA
TRO
L V
ersi
on 2
.5.0
1
Name Description Units Default AlertConditions
BMCProactiveNetAttributeType
VVMPlexKernelState Indicates the kernelstate of the plex on Unixplatforms.
{0 = Enabled ; 1 = Detached ; 2 = Disabled ;-1 = Unknown}
None Availability
VVMPlexKernelStateNT Indicates the kernelstate of the plex onWindows platforms.
{0 = Enabled ;1 = Unreported/Undefined ;2 = Error ; 3 = Disabled ;-1 = Unknown}
None Availability
VVMPlexKernelStatus Monitors the kernelstatus of the plex. Thisstatus is determined bythe plex status mappingrule defined in the KMcommand Configuration> Plex(s) Kernel Status.If this status parameterchanges to warning oralarm state, therecovery action willtrigger an event andannotate the last datapoint.
{0 = OK ; 1 = Suspicious ; 2 = Failure}
Warning = 1Alarm = 2
Availability
VVMPlexReadKBytes Indicates the number ofKBytes read on the plexon Unix platforms.
Kilobytes (KB) None Statistics
VVMPlexReadKBytesRate*
Indicates the number ofKBytes read per secondfor the plex on Unixplatforms.
Kilobytes per second(KB/s)
None Statistics
VVMPlexReadOperations Indicates the number ofread operations on theplex on Unix platforms.
Operations None Statistics
VVMPlexReadOperationsFailed
Monitors the number offailed read operationson the plex on Unixplatforms.If this parameterchanges to warning oralarm state, therecovery action willtrigger an event.
Operations Warningwhen > 10
Statistics
VVMPlexReadTime* Monitors the read timefor the plex on Unixplatforms.
Milliseconds Warningwhen > 20
ResponseTime

111 Classes and Parameters
Ver
itas
Vol
ume
Man
age
r K
M f
or
PA
TRO
L V
ersi
on 2
.5.0
1
Name Description Units Default AlertConditions
BMCProactiveNetAttributeType
If this parameterchanges to warning oralarm state, therecovery action willtrigger an event.
VVMPlexReadTimeAverage*
Monitors the averageread time for the plex onUnix platforms.If this parameterchanges to warning oralarm state, therecovery action willtrigger an event.
Milliseconds None Statistics
VVMPlexState Displays the state of theplex on Unix platforms.
{0 = Active; 1 = Clean;2 = Empty;3 = Log Plex;4 = Temporary Plex;5 = Snapshot Plex;6 = No Disk/Device;7 = Recover;8 = Removed;9= Stale;10= Offline;11 = I/O Failure;-1 = Unknown}
None Availability
VVMPlexStateNT Displays the state of theplex on Windowsplatforms.
{0 = Active/Attached; 1 = Recoverable;2 = Failed;-1 = Unknown}
None Availability
VVMPlexStatus Monitors the status ofthe plex. This status isdetermined by the plexstatus mapping ruledefined in the KMcommand Configuration> Plex(s) Status.If this status parameterchanges to warning oralarm state, therecovery action willtrigger an event andannotate the last datapoint.
{0 = OK;1 = Suspicious; 2 = Failure}
Warning = 1Alarm = 2
Availability
VVMPlexSummary Summarizes the plexinformation as reportedby commands executedby the data collector.
n/a None n/a

112Classes and Parameters
Ver
itas
Vol
ume
Man
age
r K
M f
or
PA
TRO
L V
ersi
on 2
.5.0
1
Name Description Units Default AlertConditions
BMCProactiveNetAttributeType
VVMPlexWriteKBytes Indicates the number ofKBytes written on theplex on Unix platforms.
Kilobytes (KB) None Statistics
VVMPlexWriteKBytesRate*
Indicates the number ofKBytes written persecond for the plex onUnix platforms.
Kilobytes per second(KB/s)
None Statistics
VVMPlexWriteOperations Indicates the number ofwrite operations on theplex on Unix platforms.
Operations None Statistics
VVMPlexWriteOperationsFailed
Monitors the number offailed write operationson the plex on Unixplatforms.If this parameterchanges to warning oralarm state, therecovery action willtrigger an event.
Operations Warning = 10-100Alarm if outof [0 to 100]range.
Statistics
VVMPlexWriteTime* Monitors the write timefor the plex on Unixplatforms. If thisparameter changes towarning or alarm state,the recovery action willtrigger an event.
Milliseconds Warning = 20-100Alarm if outof [0 to 100]range.
ResponseTime
VVMPlexWriteTimeAverage*
Monitors the averagewrite time for the plexon Unix platforms. Ifthis parameter changesto warning or alarmstate, the recoveryaction will trigger anevent.
Milliseconds None Statistics
For detailed information about Baselining and KPI, see Managing Baselines and Key Performance Indicators.
* Parameters marked with an asterisk are used by default when visualizing the corresponding monitor instancein BPPM.
InfoBox
Name Description
Plex Name of the Veritas Volume Manager plex.
Status Status of the Veritas Volume Manager plex.
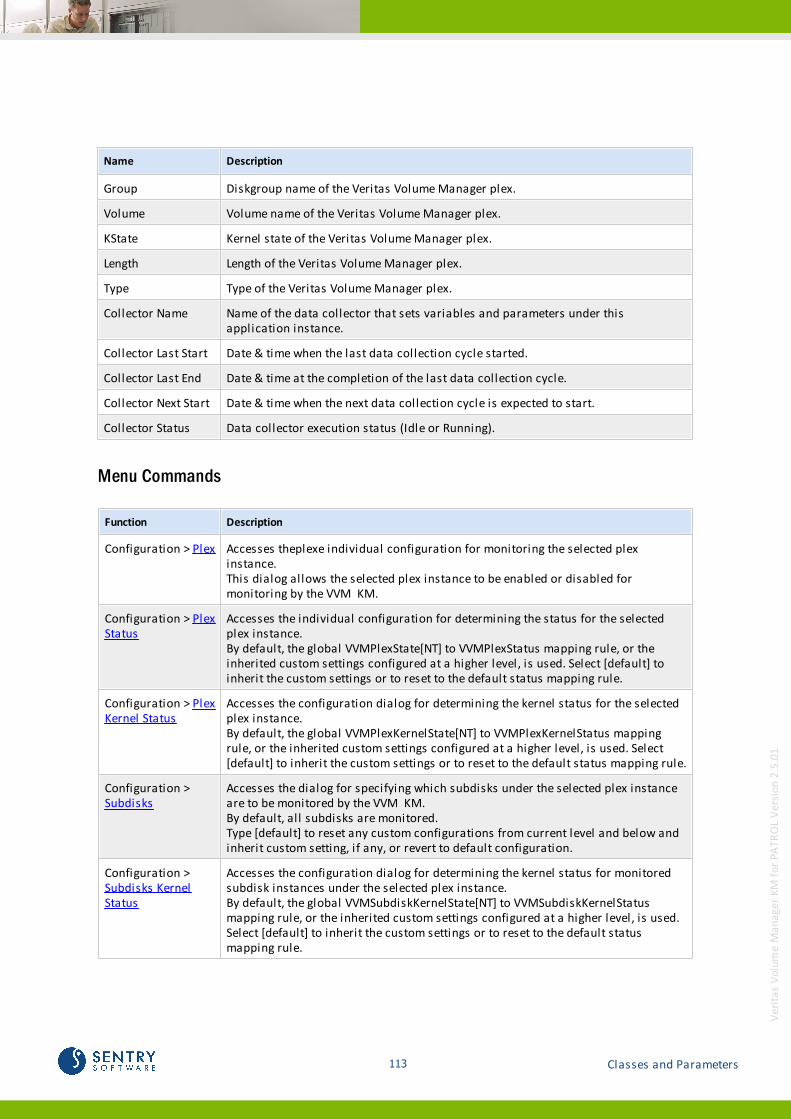
113 Classes and Parameters
Ver
itas
Vol
ume
Man
age
r K
M f
or
PA
TRO
L V
ersi
on 2
.5.0
1
Name Description
Group Diskgroup name of the Veritas Volume Manager plex.
Volume Volume name of the Veritas Volume Manager plex.
KState Kernel state of the Veritas Volume Manager plex.
Length Length of the Veritas Volume Manager plex.
Type Type of the Veritas Volume Manager plex.
Collector Name Name of the data collector that sets variables and parameters under thisapplication instance.
Collector Last Start Date & time when the last data collection cycle started.
Collector Last End Date & time at the completion of the last data collection cycle.
Collector Next Start Date & time when the next data collection cycle is expected to start.
Collector Status Data collector execution status (Idle or Running).
Menu Commands
Function Description
Configuration > Plex Accesses theplexe individual configuration for monitoring the selected plexinstance.This dialog allows the selected plex instance to be enabled or disabled formonitoring by the VVM KM.
Configuration > PlexStatus
Accesses the individual configuration for determining the status for the selectedplex instance.By default, the global VVMPlexState[NT] to VVMPlexStatus mapping rule, or theinherited custom settings configured at a higher level, is used. Select [default] toinherit the custom settings or to reset to the default status mapping rule.
Configuration > PlexKernel Status
Accesses the configuration dialog for determining the kernel status for the selectedplex instance.By default, the global VVMPlexKernelState[NT] to VVMPlexKernelStatus mappingrule, or the inherited custom settings configured at a higher level, is used. Select[default] to inherit the custom settings or to reset to the default status mapping rule.
Configuration > Subdisks
Accesses the dialog for specifying which subdisks under the selected plex instanceare to be monitored by the VVM KM.By default, all subdisks are monitored.Type [default] to reset any custom configurations from current level and below andinherit custom setting, if any, or revert to default configuration.
Configuration > Subdisks KernelStatus
Accesses the configuration dialog for determining the kernel status for monitoredsubdisk instances under the selected plex instance.By default, the global VVMSubdiskKernelState[NT] to VVMSubdiskKernelStatusmapping rule, or the inherited custom settings configured at a higher level, is used.Select [default] to inherit the custom settings or to reset to the default statusmapping rule.
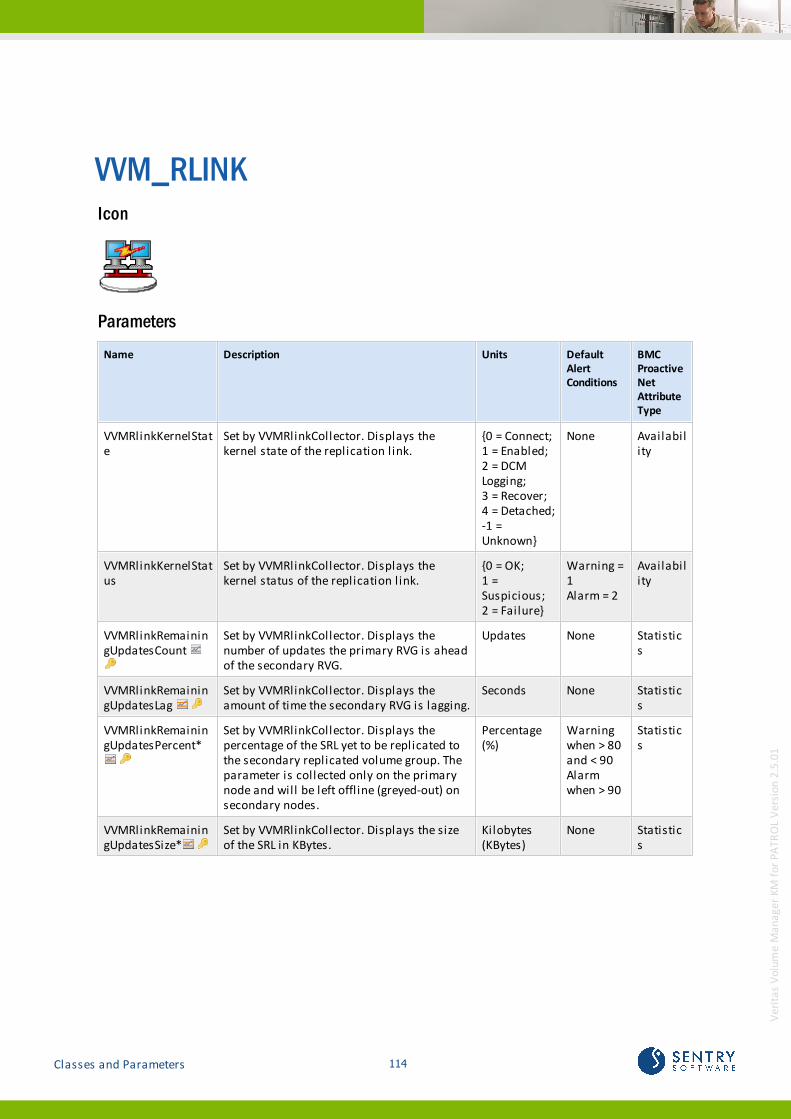
114Classes and Parameters
Ver
itas
Vol
ume
Man
age
r K
M f
or
PA
TRO
L V
ersi
on 2
.5.0
1
VVM_RLINKIcon
Parameters
Name Description Units DefaultAlertConditions
BMCProactiveNetAttributeType
VVMRlinkKernelState
Set by VVMRlinkCollector. Displays thekernel state of the replication link.
{0 = Connect;1 = Enabled;2 = DCMLogging;3 = Recover;4 = Detached;-1 =Unknown}
None Availability
VVMRlinkKernelStatus
Set by VVMRlinkCollector. Displays thekernel status of the replication link.
{0 = OK;1 =Suspicious;2 = Failure}
Warning =1Alarm = 2
Availability
VVMRlinkRemainingUpdatesCount
Set by VVMRlinkCollector. Displays thenumber of updates the primary RVG is aheadof the secondary RVG.
Updates None Statistics
VVMRlinkRemainingUpdatesLag
Set by VVMRlinkCollector. Displays theamount of time the secondary RVG is lagging.
Seconds None Statistics
VVMRlinkRemainingUpdatesPercent*
Set by VVMRlinkCollector. Displays thepercentage of the SRL yet to be replicated tothe secondary replicated volume group. Theparameter is collected only on the primarynode and will be left offline (greyed-out) onsecondary nodes.
Percentage(%)
Warningwhen > 80and < 90Alarmwhen > 90
Statistics
VVMRlinkRemainingUpdatesSize*
Set by VVMRlinkCollector. Displays the sizeof the SRL in KBytes.
Kilobytes(KBytes)
None Statistics

115 Classes and Parameters
Ver
itas
Vol
ume
Man
age
r K
M f
or
PA
TRO
L V
ersi
on 2
.5.0
1
Name Description Units DefaultAlertConditions
BMCProactiveNetAttributeType
VVMRlinkState Set by VVMRlinkCollector. Displays the stateof the replication link.
{0 = Active;1 = Unassoc;2 = Stale;3 = Pausing;4 =Resuming;5 = Restoring;6 =Pause;7 = Fail;-1 =Unknown}
None Availability
VVMRlinkStatus Set by VVMRlinkCollector. Displays thestatus of the replication link.
{0 = OK;1 =Suspicious;2 = Failure}
None Availability
VVMRlinkSummary Summarizes the Rlink information asreported by commands executed by the datacollector.
n/a n/a
For detailed information about Baselining and KPI, see Managing Baselines and Key Performance Indicators.
* Parameters marked with an asterisk are used by default when visualizing the corresponding monitor instancein BPPM.
InfoBox
Name Description
Rlink Name of the Veritas Volume Manager Replication Link.
Type Type of the Replicated Volume Group (Primary/Secondary).
Status Status of the Replication Link.
RVG Name of the RVG the Replication Link belongs to.
Group Name of the disk group name the Replication Link belongs to.
Kernel State Kernel state of the Replication Link.
Synchronous Synchronous settings for the Replication Link.
Latency Protection Latency Protection for the Replication Link.
SRL OverflowProtection
SRL overflow protection for the Replication Link.
Local Host Name of the local host.
Remote Host Name of the remote host.
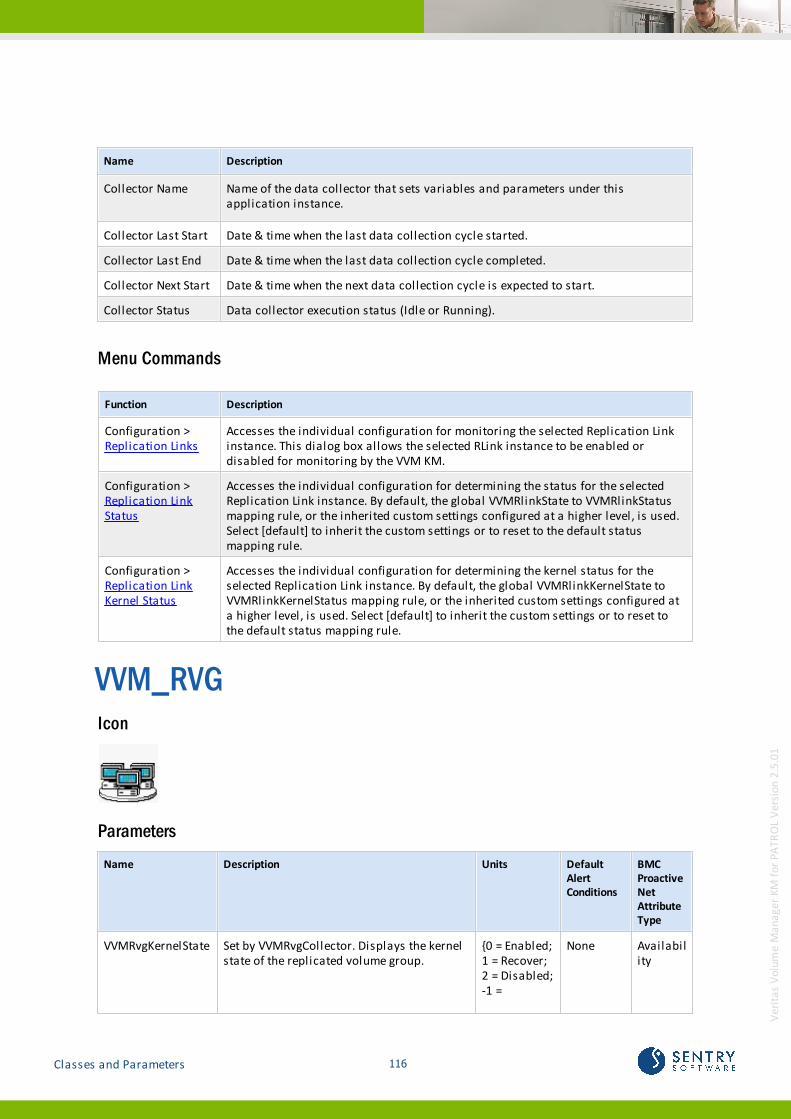
116Classes and Parameters
Ver
itas
Vol
ume
Man
age
r K
M f
or
PA
TRO
L V
ersi
on 2
.5.0
1
Name Description
Collector Name Name of the data collector that sets variables and parameters under thisapplication instance.
Collector Last Start Date & time when the last data collection cycle started.
Collector Last End Date & time when the last data collection cycle completed.
Collector Next Start Date & time when the next data collection cycle is expected to start.
Collector Status Data collector execution status (Idle or Running).
Menu Commands
Function Description
Configuration >Replication Links
Accesses the individual configuration for monitoring the selected Replication Linkinstance. This dialog box allows the selected RLink instance to be enabled ordisabled for monitoring by the VVM KM.
Configuration > Replication LinkStatus
Accesses the individual configuration for determining the status for the selectedReplication Link instance. By default, the global VVMRlinkState to VVMRlinkStatusmapping rule, or the inherited custom settings configured at a higher level, is used.Select [default] to inherit the custom settings or to reset to the default statusmapping rule.
Configuration > Replication LinkKernel Status
Accesses the individual configuration for determining the kernel status for theselected Replication Link instance. By default, the global VVMRlinkKernelState toVVMRlinkKernelStatus mapping rule, or the inherited custom settings configured ata higher level, is used. Select [default] to inherit the custom settings or to reset tothe default status mapping rule.
VVM_RVGIcon
Parameters
Name Description Units DefaultAlertConditions
BMCProactiveNetAttributeType
VVMRvgKernelState Set by VVMRvgCollector. Displays the kernelstate of the replicated volume group.
{0 = Enabled;1 = Recover;2 = Disabled;-1 =
None Availability

117 Classes and Parameters
Ver
itas
Vol
ume
Man
age
r K
M f
or
PA
TRO
L V
ersi
on 2
.5.0
1
Name Description Units DefaultAlertConditions
BMCProactiveNetAttributeType
Unknown}
VVMRvgKernelStatus
Set by VVMRvgCollector. Displays the kernelstatus of the replicated volume group.
{0 = OK;1 =Suspicious;2 = Failure}
Warning =1Alarm = 2
Availability
VVMRvgRlinkCount*
Set by VVMRvgCollector. Displays the numberof replication links in the replicated volumegroup.
rlinks None Availability
VVMRvgState Set by VVMRvgCollector. Displays the state ofthe replicated volume group.
{0 = Active;1 = Empty;2 = Clean;3 = Fail;-1 =Unknown}
None Availability
VVMRvgStatus Set by VVMRvgCollector. Displays the statusof the replicated volume group.
{0 = OK;1 =Suspicious;2 = Failure}
Warning =1Alarm = 2
Availability
VVMRvgSummary Summarizes the replicated volume groupinformation as reported by commandsexecuted by the data collector.
n/a None Availability
VVMRvgVolumeCount*
Set by VVMRvgCollector. Displays the numberof replicated data volumes.
volumes None Availability
For detailed information about Baselining and KPI, see Managing Baselines and Key Performance Indicators.
* Parameters marked with an asterisk are used by default when visualizing the corresponding monitor instancein BPPM.
InfoBox
Name Description
RVG Name of the Veritas Volume Manager Replicated Volume Group.
Type Type of the Replicated Volume Group (Primary/Secondary).
Status Status of the Replicated Volume Group.
Group Name of the disk group the Replicated Volume Group belongs to.
Kernel State Kernel state of the Replicated Volume Group.
Data Volumes Names of the data volumes in the Replicated Volume Group.
SRL Name of the Storage Replicator Log.
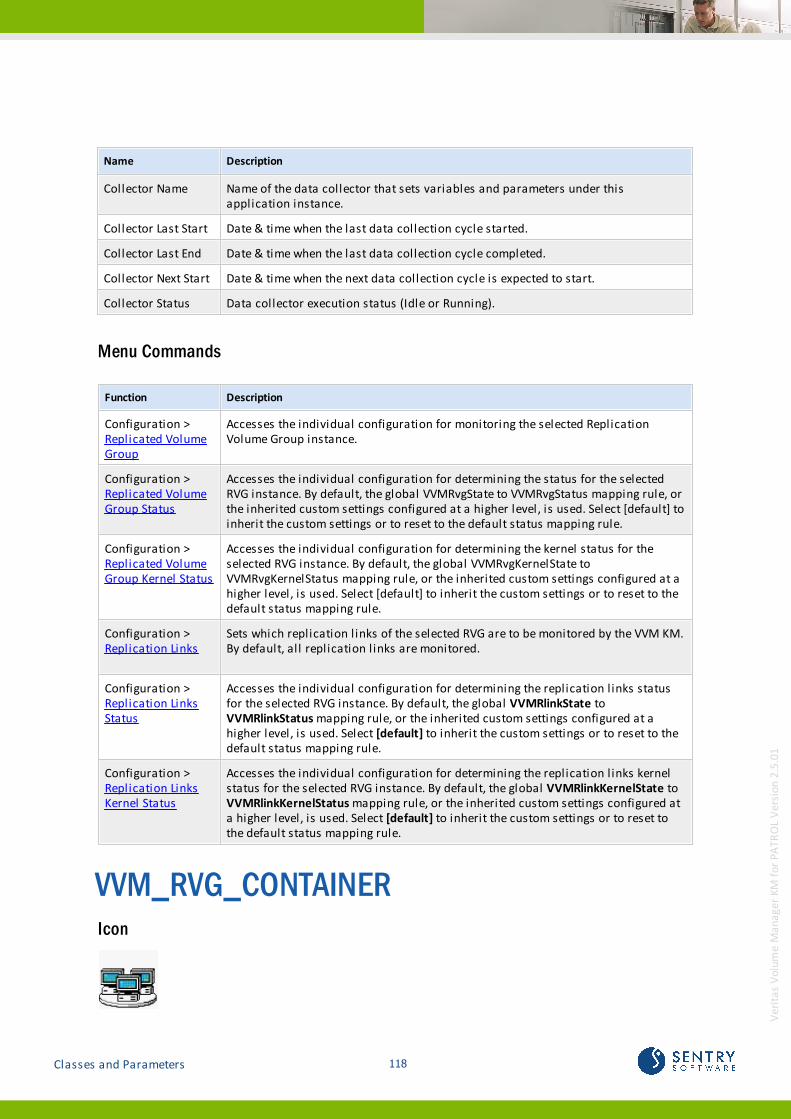
118Classes and Parameters
Ver
itas
Vol
ume
Man
age
r K
M f
or
PA
TRO
L V
ersi
on 2
.5.0
1
Name Description
Collector Name Name of the data collector that sets variables and parameters under thisapplication instance.
Collector Last Start Date & time when the last data collection cycle started.
Collector Last End Date & time when the last data collection cycle completed.
Collector Next Start Date & time when the next data collection cycle is expected to start.
Collector Status Data collector execution status (Idle or Running).
Menu Commands
Function Description
Configuration > Replicated VolumeGroup
Accesses the individual configuration for monitoring the selected ReplicationVolume Group instance.
Configuration > Replicated VolumeGroup Status
Accesses the individual configuration for determining the status for the selectedRVG instance. By default, the global VVMRvgState to VVMRvgStatus mapping rule, orthe inherited custom settings configured at a higher level, is used. Select [default] toinherit the custom settings or to reset to the default status mapping rule.
Configuration >Replicated VolumeGroup Kernel Status
Accesses the individual configuration for determining the kernel status for theselected RVG instance. By default, the global VVMRvgKernelState toVVMRvgKernelStatus mapping rule, or the inherited custom settings configured at ahigher level, is used. Select [default] to inherit the custom settings or to reset to thedefault status mapping rule.
Configuration > Replication Links
Sets which replication links of the selected RVG are to be monitored by the VVM KM.By default, all replication links are monitored.
Configuration >Replication LinksStatus
Accesses the individual configuration for determining the replication links statusfor the selected RVG instance. By default, the global VVMRlinkState toVVMRlinkStatus mapping rule, or the inherited custom settings configured at ahigher level, is used. Select [default] to inherit the custom settings or to reset to thedefault status mapping rule.
Configuration >Replication LinksKernel Status
Accesses the individual configuration for determining the replication links kernelstatus for the selected RVG instance. By default, the global VVMRlinkKernelState toVVMRlinkKernelStatus mapping rule, or the inherited custom settings configured ata higher level, is used. Select [default] to inherit the custom settings or to reset tothe default status mapping rule.
VVM_RVG_CONTAINERIcon
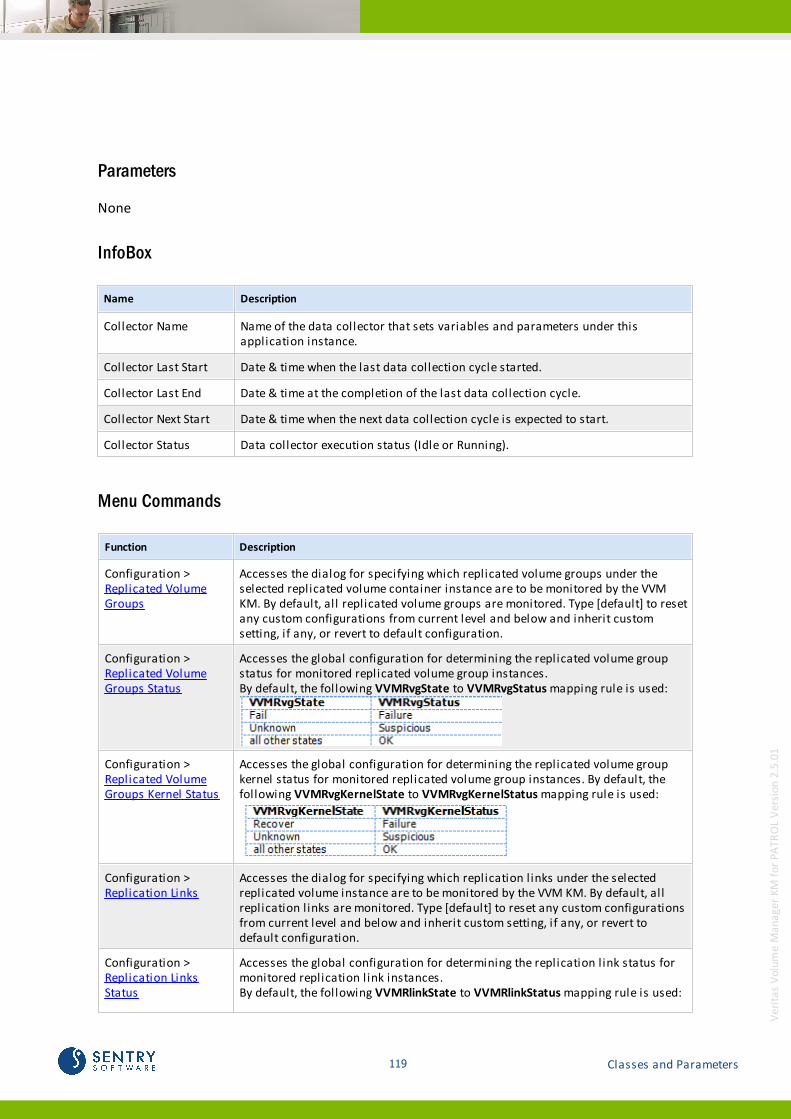
119 Classes and Parameters
Ver
itas
Vol
ume
Man
age
r K
M f
or
PA
TRO
L V
ersi
on 2
.5.0
1
Parameters
None
InfoBox
Name Description
Collector Name Name of the data collector that sets variables and parameters under thisapplication instance.
Collector Last Start Date & time when the last data collection cycle started.
Collector Last End Date & time at the completion of the last data collection cycle.
Collector Next Start Date & time when the next data collection cycle is expected to start.
Collector Status Data collector execution status (Idle or Running).
Menu Commands
Function Description
Configuration > Replicated VolumeGroups
Accesses the dialog for specifying which replicated volume groups under theselected replicated volume container instance are to be monitored by the VVMKM. By default, all replicated volume groups are monitored. Type [default] to resetany custom configurations from current level and below and inherit customsetting, if any, or revert to default configuration.
Configuration > Replicated VolumeGroups Status
Accesses the global configuration for determining the replicated volume groupstatus for monitored replicated volume group instances.By default, the following VVMRvgState to VVMRvgStatus mapping rule is used:
Configuration > Replicated VolumeGroups Kernel Status
Accesses the global configuration for determining the replicated volume groupkernel status for monitored replicated volume group instances. By default, thefollowing VVMRvgKernelState to VVMRvgKernelStatus mapping rule is used:
Configuration > Replication Links
Accesses the dialog for specifying which replication links under the selectedreplicated volume instance are to be monitored by the VVM KM. By default, allreplication links are monitored. Type [default] to reset any custom configurationsfrom current level and below and inherit custom setting, if any, or revert todefault configuration.
Configuration > Replication LinksStatus
Accesses the global configuration for determining the replication link status formonitored replication link instances.By default, the following VVMRlinkState to VVMRlinkStatus mapping rule is used:

120Classes and Parameters
Ver
itas
Vol
ume
Man
age
r K
M f
or
PA
TRO
L V
ersi
on 2
.5.0
1
Function Description
Configuration >Replication LinksKernel Status
Accesses the global configuration for determining the replication link kernelstatus for monitored replication link instances.By default, the following VVMRlinkKernelState to VVMRlinkKernelStatus mappingrule is used:
VVM_SERVERIcon
Collectors
Name Description
VVMCreateDistribution Is automatically activated during KM debugging and deactivatedwhen the debug zip or tar file is created.Default polling interval: 1 minute.
VVMDaemonCollector Collects Veritas Volume Manager daemon related information. Itsets all consumer parameters in VVM_DAEMON_CONTAINER andVVM_DAEMON application classes.Default polling interval: 5 minutes.
VVMDiskdeviceCollector Collects Veritas Volume Manager diskdevice related information. Itsets all consumer parameters in VVM_DISKDEVICE_CONTAINER andVVM_DISKDEVICE application classes.Default polling interval: 10 minutes.
VVMDiskgroupCollector Collects Veritas Volume Manager diskgroup related information. Itsets all consumer parameters in VVM_DISKGROUP_CONTAINER, andVVM_DISKGROUP application classes.Default polling interval: 10 minutes.
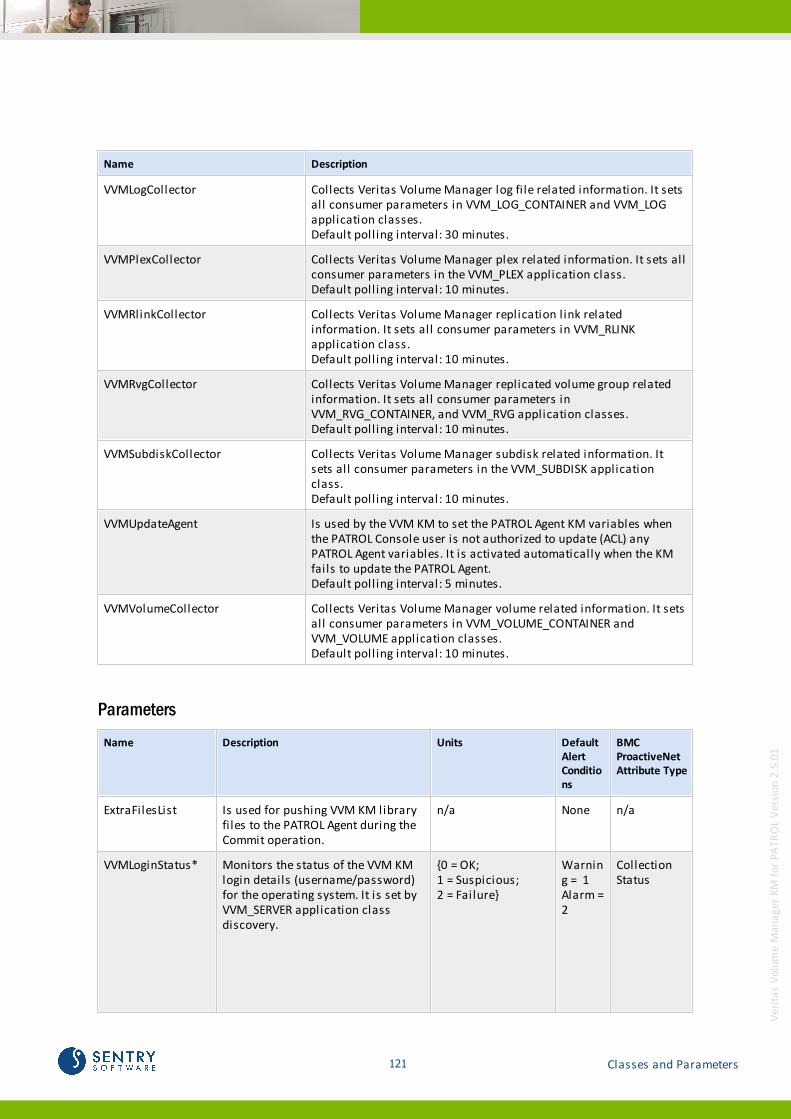
121 Classes and Parameters
Ver
itas
Vol
ume
Man
age
r K
M f
or
PA
TRO
L V
ersi
on 2
.5.0
1
Name Description
VVMLogCollector Collects Veritas Volume Manager log file related information. It setsall consumer parameters in VVM_LOG_CONTAINER and VVM_LOGapplication classes.Default polling interval: 30 minutes.
VVMPlexCollector Collects Veritas Volume Manager plex related information. It sets allconsumer parameters in the VVM_PLEX application class.Default polling interval: 10 minutes.
VVMRlinkCollector Collects Veritas Volume Manager replication link relatedinformation. It sets all consumer parameters in VVM_RLINKapplication class.Default polling interval: 10 minutes.
VVMRvgCollector Collects Veritas Volume Manager replicated volume group relatedinformation. It sets all consumer parameters inVVM_RVG_CONTAINER, and VVM_RVG application classes.Default polling interval: 10 minutes.
VVMSubdiskCollector Collects Veritas Volume Manager subdisk related information. Itsets all consumer parameters in the VVM_SUBDISK applicationclass.Default polling interval: 10 minutes.
VVMUpdateAgent Is used by the VVM KM to set the PATROL Agent KM variables whenthe PATROL Console user is not authorized to update (ACL) anyPATROL Agent variables. It is activated automatically when the KMfails to update the PATROL Agent.Default polling interval: 5 minutes.
VVMVolumeCollector Collects Veritas Volume Manager volume related information. It setsall consumer parameters in VVM_VOLUME_CONTAINER andVVM_VOLUME application classes.Default polling interval: 10 minutes.
Parameters
Name Description Units DefaultAlertConditions
BMCProactiveNetAttribute Type
ExtraFilesList Is used for pushing VVM KM libraryfiles to the PATROL Agent during theCommit operation.
n/a None n/a
VVMLoginStatus* Monitors the status of the VVM KMlogin details (username/password)for the operating system. It is set byVVM_SERVER application classdiscovery.
{0 = OK;1 = Suspicious;2 = Failure}
Warning = 1Alarm =2
CollectionStatus

122Classes and Parameters
Ver
itas
Vol
ume
Man
age
r K
M f
or
PA
TRO
L V
ersi
on 2
.5.0
1
Name Description Units DefaultAlertConditions
BMCProactiveNetAttribute Type
If no valid username/password isdetected for the operating system,this parameter will be set to"Failure" state. If there are anysuspicious command exits, thisparameter will be set to "Suspicious"state.If this status parameter changes towarning or alarm state, the recoveryaction will trigger an event andannotate the last data point.
VVMMonitoringMode*
Indicates the VVM monitoring mode. {0 = PermanentSingle-node Mode;1 = TemporarySingle-node Mode;2 = Active Multi-node Mode;3 = Passive Multi-node Mode;-1 = Unknown}
None CollectionStatus
VVMNodeStatus* Monitors error messages for theVeritas Volume Manager applicationon this managed system. It is set byVVM_SERVER application classdiscovery.If any of the Veritas Volume Managerapplication daemons is not running,this parameter will be set to"Failure" state. The list of criticalVeritas Volume Manager daemonscan be customized using the KMcommand Configuration > NodeStatus from the Veritas VolumeManager icon. If there are anysuspicious command exits due to anerror, this parameter will be set to"Suspicious" state.If this status parameter changes towarning or alarm state, the recoveryaction will trigger an event andannotate the last data point.
{0 = OK;1 = Suspicious;2 = Failure}
Warning = 1Alarm =2
Availability
* Parameters marked with an asterisk are used by default when visualizing the corresponding monitor instancein BPPM.
InfoBox
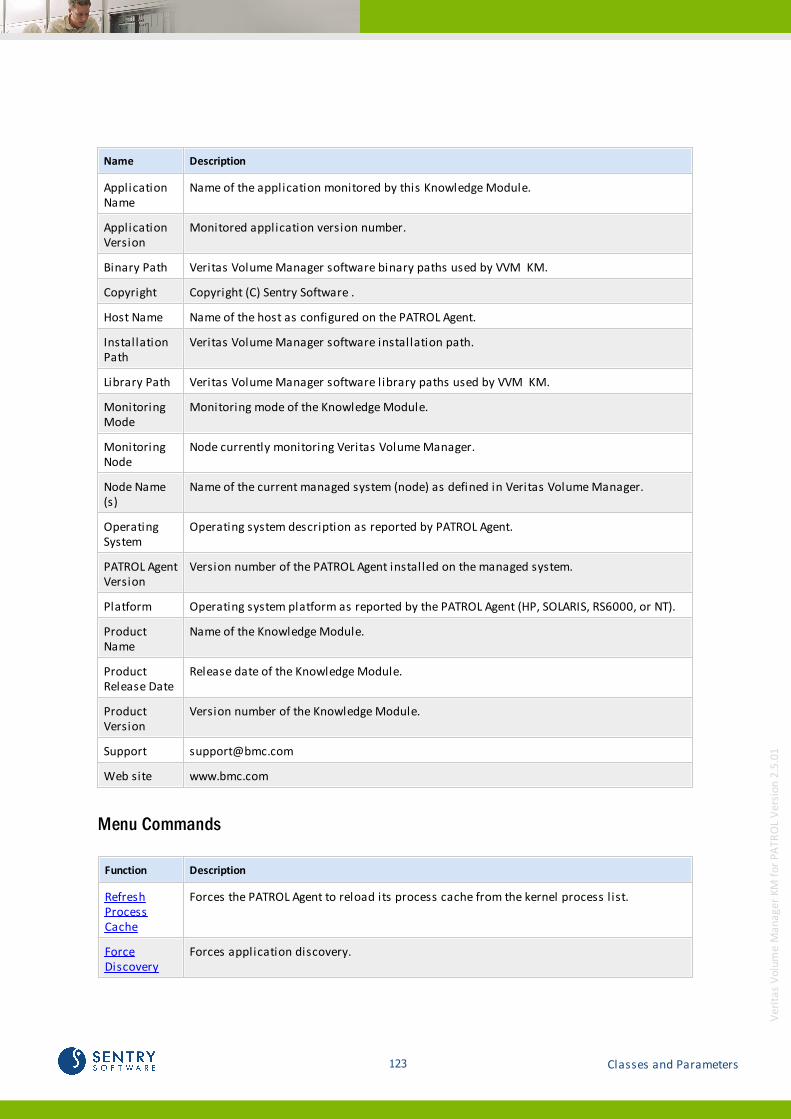
123 Classes and Parameters
Ver
itas
Vol
ume
Man
age
r K
M f
or
PA
TRO
L V
ersi
on 2
.5.0
1
Name Description
ApplicationName
Name of the application monitored by this Knowledge Module.
ApplicationVersion
Monitored application version number.
Binary Path Veritas Volume Manager software binary paths used by VVM KM.
Copyright Copyright (C) Sentry Software .
Host Name Name of the host as configured on the PATROL Agent.
InstallationPath
Veritas Volume Manager software installation path.
Library Path Veritas Volume Manager software library paths used by VVM KM.
MonitoringMode
Monitoring mode of the Knowledge Module.
MonitoringNode
Node currently monitoring Veritas Volume Manager.
Node Name(s)
Name of the current managed system (node) as defined in Veritas Volume Manager.
OperatingSystem
Operating system description as reported by PATROL Agent.
PATROL AgentVersion
Version number of the PATROL Agent installed on the managed system.
Platform Operating system platform as reported by the PATROL Agent (HP, SOLARIS, RS6000, or NT).
ProductName
Name of the Knowledge Module.
ProductRelease Date
Release date of the Knowledge Module.
ProductVersion
Version number of the Knowledge Module.
Support [email protected]
Web site www.bmc.com
Menu Commands
Function Description
RefreshProcessCache
Forces the PATROL Agent to reload its process cache from the kernel process list.
ForceDiscovery
Forces application discovery.
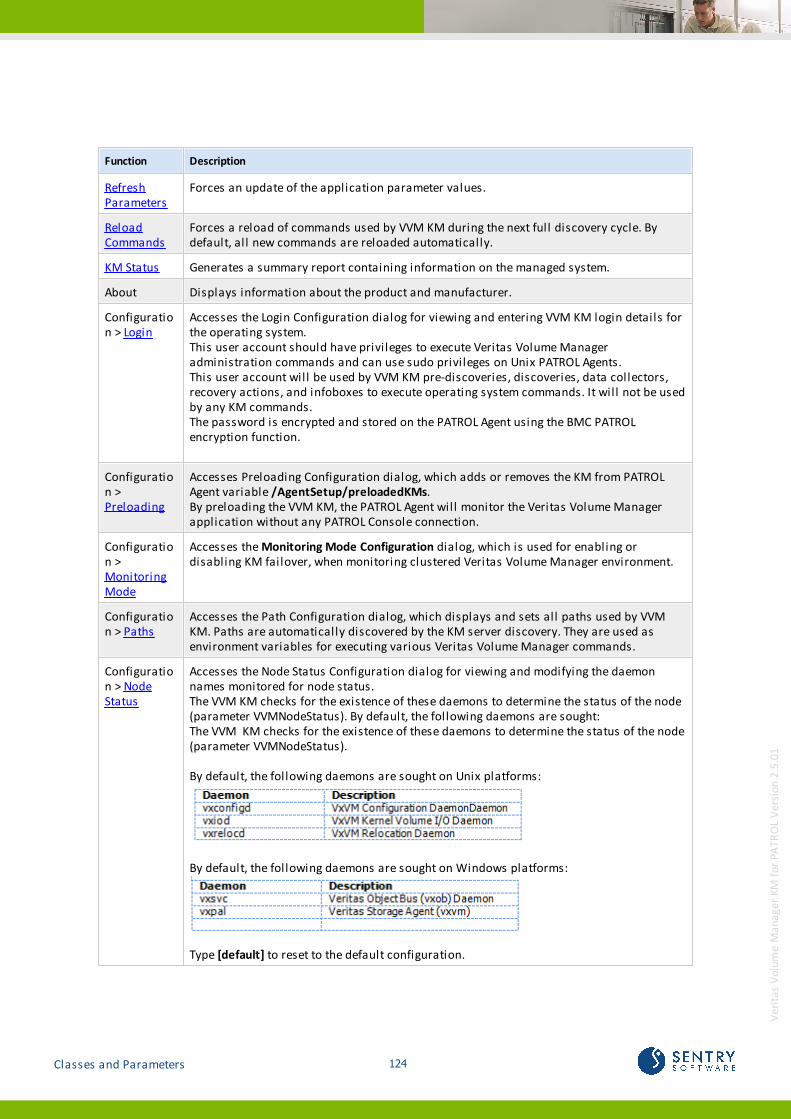
124Classes and Parameters
Ver
itas
Vol
ume
Man
age
r K
M f
or
PA
TRO
L V
ersi
on 2
.5.0
1
Function Description
RefreshParameters
Forces an update of the application parameter values.
ReloadCommands
Forces a reload of commands used by VVM KM during the next full discovery cycle. Bydefault, all new commands are reloaded automatically.
KM Status Generates a summary report containing information on the managed system.
About Displays information about the product and manufacturer.
Configuration > Login
Accesses the Login Configuration dialog for viewing and entering VVM KM login details forthe operating system.This user account should have privileges to execute Veritas Volume Manageradministration commands and can use sudo privileges on Unix PATROL Agents.This user account will be used by VVM KM pre-discoveries, discoveries, data collectors,recovery actions, and infoboxes to execute operating system commands. It will not be usedby any KM commands.The password is encrypted and stored on the PATROL Agent using the BMC PATROLencryption function.
Configuration > Preloading
Accesses Preloading Configuration dialog, which adds or removes the KM from PATROLAgent variable /AgentSetup/preloadedKMs.By preloading the VVM KM, the PATROL Agent will monitor the Veritas Volume Managerapplication without any PATROL Console connection.
Configuration > MonitoringMode
Accesses the Monitoring Mode Configuration dialog, which is used for enabling ordisabling KM failover, when monitoring clustered Veritas Volume Manager environment.
Configuration > Paths
Accesses the Path Configuration dialog, which displays and sets all paths used by VVMKM. Paths are automatically discovered by the KM server discovery. They are used asenvironment variables for executing various Veritas Volume Manager commands.
Configuration > NodeStatus
Accesses the Node Status Configuration dialog for viewing and modifying the daemonnames monitored for node status.The VVM KM checks for the existence of these daemons to determine the status of the node(parameter VVMNodeStatus). By default, the following daemons are sought:The VVM KM checks for the existence of these daemons to determine the status of the node(parameter VVMNodeStatus).
By default, the following daemons are sought on Unix platforms:
By default, the following daemons are sought on Windows platforms:
Type [default] to reset to the default configuration.

125 Classes and Parameters
Ver
itas
Vol
ume
Man
age
r K
M f
or
PA
TRO
L V
ersi
on 2
.5.0
1
Function Description
Configuration > InstanceLimits
Accesses the Instance Limits Configuration dialog to view and modify the maximumnumber of VVM KM application instances allowed for each application class.
Configuration > Debug
Accesses the Debug Configuration dialog for enabling/disabling the VVM KM debugswitches.By default, all KM debug messages are sent to a set of files and a task window.
VVM_SUBDISKIcon
Parameters
Name Description Units Default AlertConditions
BMCProactiveNetAttributeType
VVMSubdiskIOKBytes Indicates the total numberof KBytes transferred onthe subdisk.
Kilobytes (KB) None Statistics
VVMSubdiskIOKBytesRate*
Indicates the number ofKBytes transferred persecond for the subdisk.
Kilobytes persecond (KB/s)
None Statistics
VVMSubdiskIOOperations
Indicates the total numberof input and outputoperations on the subdisk.
Operations None Statistics
VVMSubdiskIOOperationsFailed
Indicates the total numberof failed input and outputoperations on the subdiskon Unix platforms.
Operations None Statistics
VVMSubdiskIOOperationsRate
Indicates the number ofinput and outputoperations per second forthe subdisk.
Operations persecond(Operations/second)
None Statistics
VVMSubdiskKernelState Indicates the kernel stateof the subdisk on Unixplatforms.
{0 = Enabled;2 = Detached; 3 = Disabled;-1 = Unknown}
None Availability

126Classes and Parameters
Ver
itas
Vol
ume
Man
age
r K
M f
or
PA
TRO
L V
ersi
on 2
.5.0
1
Name Description Units Default AlertConditions
BMCProactiveNetAttributeType
VVMSubdiskKernelStateNT
Indicates the kernel stateof the subdisk on Windowsplatforms.
{0 = Enabled;1 = Unreported/Undefined;2 = Error;3 = Disabled;-1 = Unknown}
None Availability
VVMSubdiskKernelStatus
Monitors the kernel statusof the subdisk. This statusis determined by thesubdisk status mappingrule defined in the KMcommand Configuration >Subdisk(s) Kernel Status.If this status parameterchanges to warning oralarm state, the recoveryaction will trigger an eventand annotate the last datapoint.
{0 = OK;1 = Suspicious;2 = Failure}
Warning = 1Alarm = 2
Availability
VVMSubdiskReadKBytes Indicates the number ofKBytes read on thesubdisk.
Kilobytes (KB) None Statistics
VVMSubdiskReadKBytesRate*
Indicates the number ofKBytes read per second forthe subdisk.
Kilobytes persecond (KB/s)
None Statistics
VVMSubdiskReadOperations*
Indicates the number ofread operations on thesubdisk.
Operations None Statistics
VVMSubdiskReadOperationsFailed
Monitors the number offailed read operations onthe subdisk on Unixplatforms.If this parameter changesto warning or alarm state,the recovery action willtrigger an event.
Operations Warning when> 10
Statistics
VVMSubdiskReadTime*
Monitors the read time forthe subdisk.If this parameter changesto warning or alarm state,the recovery action willtrigger an event.
Milliseconds Warning when> 20
ResponseTime
VVMSubdiskReadTimeAverage*
Monitors the average readtime for the subdisk.If this parameter changesto warning or alarm state,the recovery action willtrigger an event.
Milliseconds None Statistics
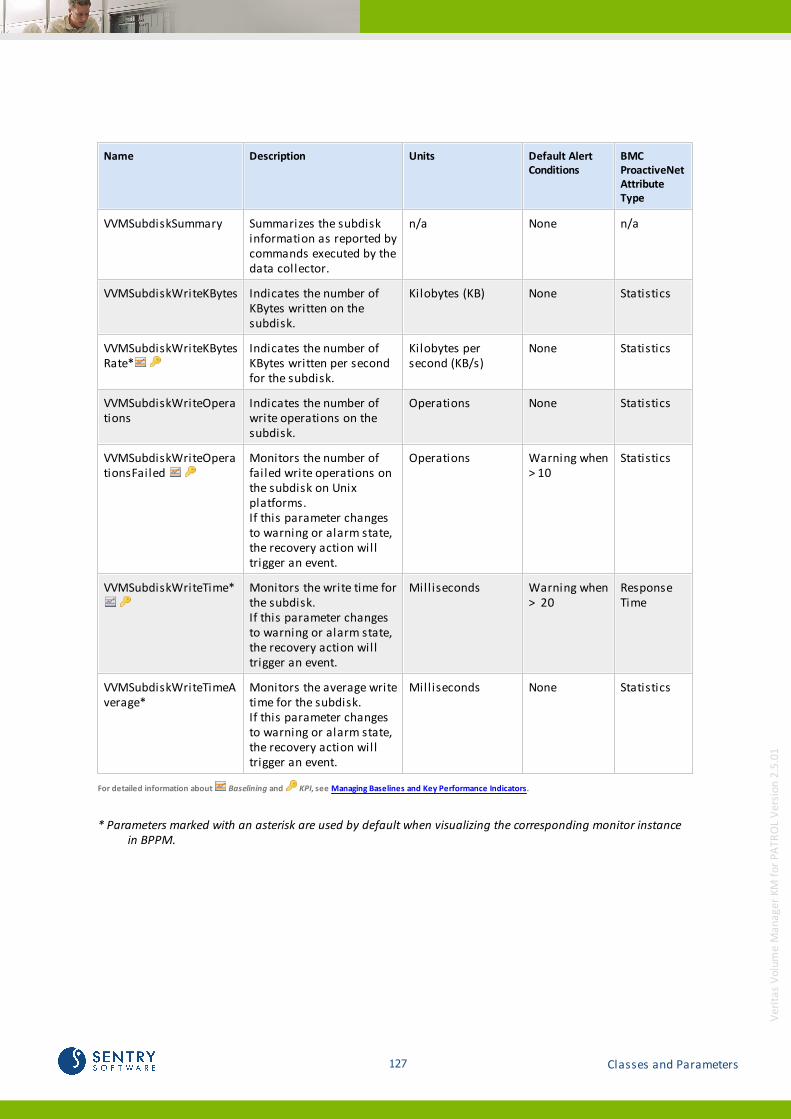
127 Classes and Parameters
Ver
itas
Vol
ume
Man
age
r K
M f
or
PA
TRO
L V
ersi
on 2
.5.0
1
Name Description Units Default AlertConditions
BMCProactiveNetAttributeType
VVMSubdiskSummary Summarizes the subdiskinformation as reported bycommands executed by thedata collector.
n/a None n/a
VVMSubdiskWriteKBytes Indicates the number ofKBytes written on thesubdisk.
Kilobytes (KB) None Statistics
VVMSubdiskWriteKBytesRate*
Indicates the number ofKBytes written per secondfor the subdisk.
Kilobytes persecond (KB/s)
None Statistics
VVMSubdiskWriteOperations
Indicates the number ofwrite operations on thesubdisk.
Operations None Statistics
VVMSubdiskWriteOperationsFailed
Monitors the number offailed write operations onthe subdisk on Unixplatforms.If this parameter changesto warning or alarm state,the recovery action willtrigger an event.
Operations Warning when> 10
Statistics
VVMSubdiskWriteTime*
Monitors the write time forthe subdisk.If this parameter changesto warning or alarm state,the recovery action willtrigger an event.
Milliseconds Warning when> 20
ResponseTime
VVMSubdiskWriteTimeAverage*
Monitors the average writetime for the subdisk.If this parameter changesto warning or alarm state,the recovery action willtrigger an event.
Milliseconds None Statistics
For detailed information about Baselining and KPI, see Managing Baselines and Key Performance Indicators.
* Parameters marked with an asterisk are used by default when visualizing the corresponding monitor instancein BPPM.

128Classes and Parameters
Ver
itas
Vol
ume
Man
age
r K
M f
or
PA
TRO
L V
ersi
on 2
.5.0
1
InfoBox
Name Description
Subdisk Name of the Veritas Volume Manager subdisk.
Group Diskgroup name of the Veritas Volume Manager subdisk.
Volume Volume name of the Veritas Volume Manager subdisk.
Plex Plex name of the Veritas Volume Manager subdisk.
Disk Disk name of the Veritas Volume Manager subdisk.
Device Device name of the Veritas Volume Manager subdisk.
KState Kernel state of the Veritas Volume Manager subdisk.
Length Length of the Veritas Volume Manager subdisk.
Collector Name Name of the data collector that sets variables and parameters under thisapplication instance.
Collector Last Start Date & time when the last data collection cycle started.
Collector Last End Date & time at the completion of the last data collection cycle.
Collector Next Start Date & time when the next data collection cycle is expected to start.
Collector Status Data collector execution status (Idle or Running).
Menu Commands
Function Description
Configuration > Subdisk
Accesses the individual configuration for monitoring the selected subdisk instance.This dialog allows the selected subdisk instance to be enabled or disabled formonitoring by the VVM KM.
Configuration > Subdisk KernelStatus
Accesses the configuration dialog for determining the kernel status for the selectedsubdisk instance.By default, the global VVMSubdiskKernelState[NT] to VVMSubdiskKernelStatusmapping rule, or the inherited custom settings configured at a higher level, is used.Select [default] to inherit the custom settings or to reset to the default statusmapping rule.
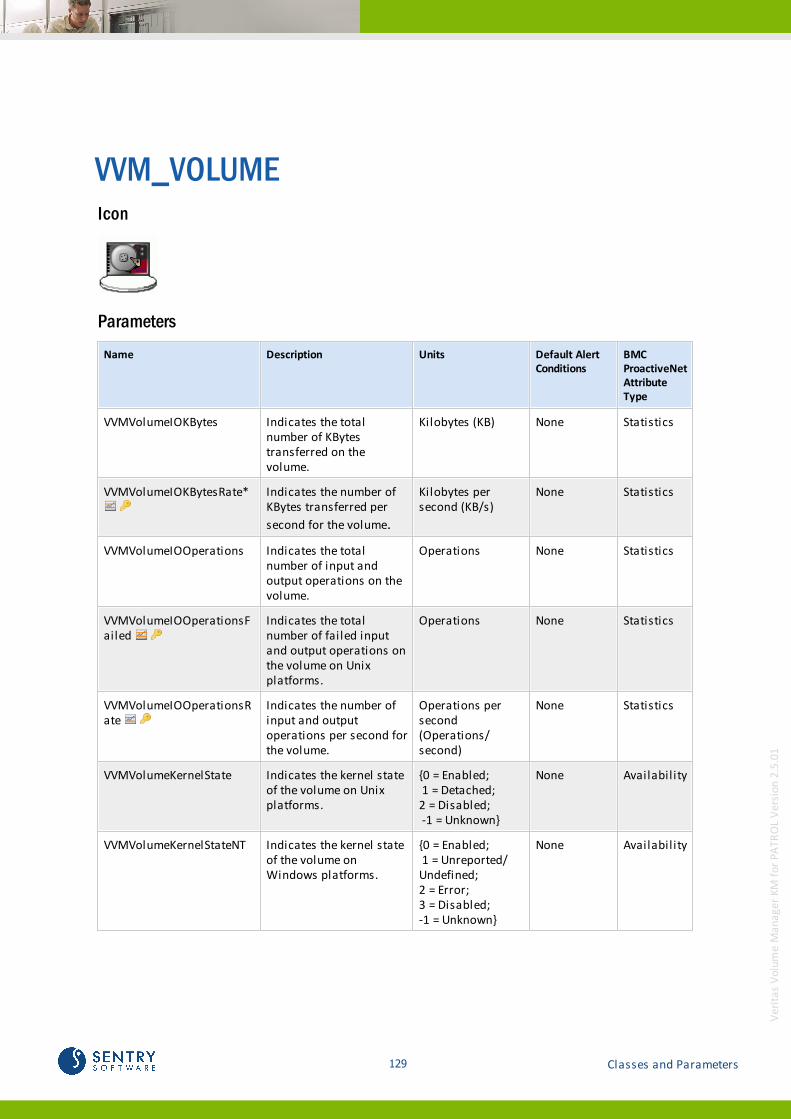
129 Classes and Parameters
Ver
itas
Vol
ume
Man
age
r K
M f
or
PA
TRO
L V
ersi
on 2
.5.0
1
VVM_VOLUMEIcon
Parameters
Name Description Units Default AlertConditions
BMCProactiveNetAttributeType
VVMVolumeIOKBytes Indicates the totalnumber of KBytestransferred on thevolume.
Kilobytes (KB) None Statistics
VVMVolumeIOKBytesRate*
Indicates the number ofKBytes transferred per
second for the volume.
Kilobytes persecond (KB/s)
None Statistics
VVMVolumeIOOperations Indicates the totalnumber of input andoutput operations on thevolume.
Operations None Statistics
VVMVolumeIOOperationsFailed
Indicates the totalnumber of failed inputand output operations onthe volume on Unixplatforms.
Operations None Statistics
VVMVolumeIOOperationsRate
Indicates the number ofinput and outputoperations per second forthe volume.
Operations persecond(Operations/second)
None Statistics
VVMVolumeKernelState Indicates the kernel stateof the volume on Unixplatforms.
{0 = Enabled; 1 = Detached; 2 = Disabled; -1 = Unknown}
None Availability
VVMVolumeKernelStateNT Indicates the kernel stateof the volume onWindows platforms.
{0 = Enabled; 1 = Unreported/Undefined; 2 = Error; 3 = Disabled;-1 = Unknown}
None Availability

130Classes and Parameters
Ver
itas
Vol
ume
Man
age
r K
M f
or
PA
TRO
L V
ersi
on 2
.5.0
1
Name Description Units Default AlertConditions
BMCProactiveNetAttributeType
VVMVolumeKernelStatus Monitors the kernelstatus of the volume. Thisstatus is determined bythe volume statusmapping rule defined inthe KM commandConfiguration > Volume(s) Kernel Status.If this status parameterchanges to warning oralarm state, the recoveryaction will trigger anevent and annotate thelast data point.
{0 = OK; 1 = Suspicious; 2 = Failure}
Warning = 1Alarm = 2
Availability
VVMVolumeLoggingState Indicates the loggingstate of the volume on
Unix platforms.
{0 = Enabled; 1 = Disabled; -1 = Unknown}
None Availability
VVMVolumeLoggingStatus Monitors the loggingstatus of the volume onUnix platforms. Thisstatus is determined bythe volume statusmapping rule defined inthe KM commandConfiguration > Volume(s) Logging Status.If this status parameterchanges to warning oralarm state, the recoveryaction will trigger anevent and annotate thelast data point.
{0 = OK;1 = Suspicious;2 = Failure}
Warning = 1Alarm = 2
Availability
VVMVolumeReadKBytes Indicates the number ofKBytes read on thevolume.
Kilobytes (KB) None Statistics
VVMVolumeReadKBytesRate*
Indicates the number ofKBytes read per secondfor the volume.
Kilobytes persecond (KB/s)
None Statistics
VVMVolumeReadOperations
Indicates the number ofread operations on thevolume.
Operations None Statistics
VVMVolumeReadOperationsFailed
Monitors the number offailed read operations onthe volume on Unixplatforms.
Operations Warningwhen > 10
Statistics

131 Classes and Parameters
Ver
itas
Vol
ume
Man
age
r K
M f
or
PA
TRO
L V
ersi
on 2
.5.0
1
Name Description Units Default AlertConditions
BMCProactiveNetAttributeType
If this parameter changesto warning or alarmstate, the recovery actionwill trigger an event.
VVMVolumeReadTime* Monitors the read timefor the volume.If this parameter changesto warning or alarmstate, the recovery actionwill trigger an event.
Milliseconds Warningwhen > 20
ResponseTime
VVMVolumeReadTimeAverage*
Monitors the averageread time for the volume.If this parameter changesto warning or alarmstate, the recovery actionwill trigger an event.
Milliseconds None Statistics
VVMVolumeState Indicates the state of thevolume on Unixplatforms.
{0 = Active;1 = Clean;2 = Empty;3 = Invalid;4 = Replay;5 = Synchronizing;6 = NeedSynchronization;-1 = Unknown}
None Availability
VVMVolumeStateNT Indicates the state of thevolume on Windowsplatforms.
{0 = Active/Healthy;1 = Stopped;2 = Formatting;3 = Regenerating;4 = Synchronizing;5 = Degraded;6 = Failing;7 = Missing;8 = Failed;-1 = Unknown}
None Availability
VVMVolumeStatus Monitors the status of thevolume. This status isdetermined by the volumestatus mapping ruledefined in the KMcommand Configuration >Volume(s) Status.If this status parameterchanges to warning oralarm state, the recoveryaction will trigger anevent and annotate thelast data point.
{0 = OK;1 = Suspicious;2 = Failure}
Warning = 1Alarm = 2
Availability
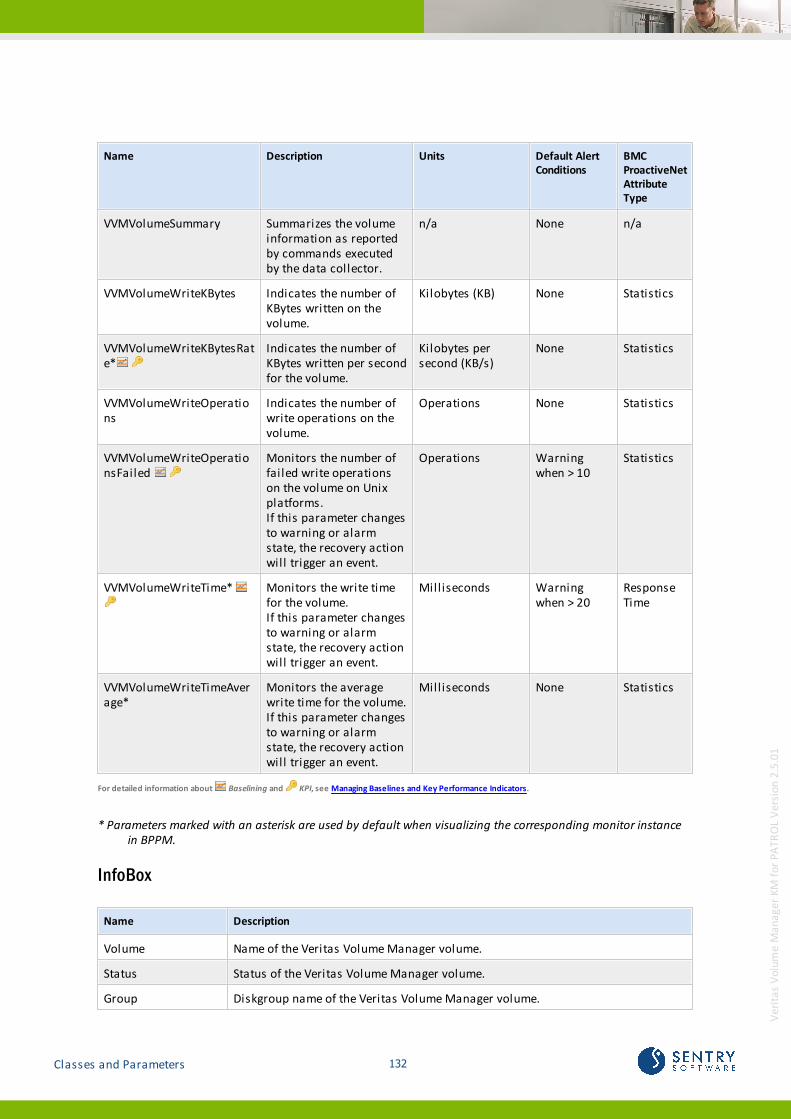
132Classes and Parameters
Ver
itas
Vol
ume
Man
age
r K
M f
or
PA
TRO
L V
ersi
on 2
.5.0
1
Name Description Units Default AlertConditions
BMCProactiveNetAttributeType
VVMVolumeSummary Summarizes the volumeinformation as reportedby commands executedby the data collector.
n/a None n/a
VVMVolumeWriteKBytes Indicates the number ofKBytes written on thevolume.
Kilobytes (KB) None Statistics
VVMVolumeWriteKBytesRate*
Indicates the number ofKBytes written per secondfor the volume.
Kilobytes persecond (KB/s)
None Statistics
VVMVolumeWriteOperations
Indicates the number ofwrite operations on thevolume.
Operations None Statistics
VVMVolumeWriteOperationsFailed
Monitors the number offailed write operationson the volume on Unixplatforms.If this parameter changesto warning or alarmstate, the recovery actionwill trigger an event.
Operations Warningwhen > 10
Statistics
VVMVolumeWriteTime* Monitors the write timefor the volume.If this parameter changesto warning or alarmstate, the recovery actionwill trigger an event.
Milliseconds Warningwhen > 20
ResponseTime
VVMVolumeWriteTimeAverage*
Monitors the averagewrite time for the volume.If this parameter changesto warning or alarmstate, the recovery actionwill trigger an event.
Milliseconds None Statistics
For detailed information about Baselining and KPI, see Managing Baselines and Key Performance Indicators.
* Parameters marked with an asterisk are used by default when visualizing the corresponding monitor instancein BPPM.
InfoBox
Name Description
Volume Name of the Veritas Volume Manager volume.
Status Status of the Veritas Volume Manager volume.
Group Diskgroup name of the Veritas Volume Manager volume.
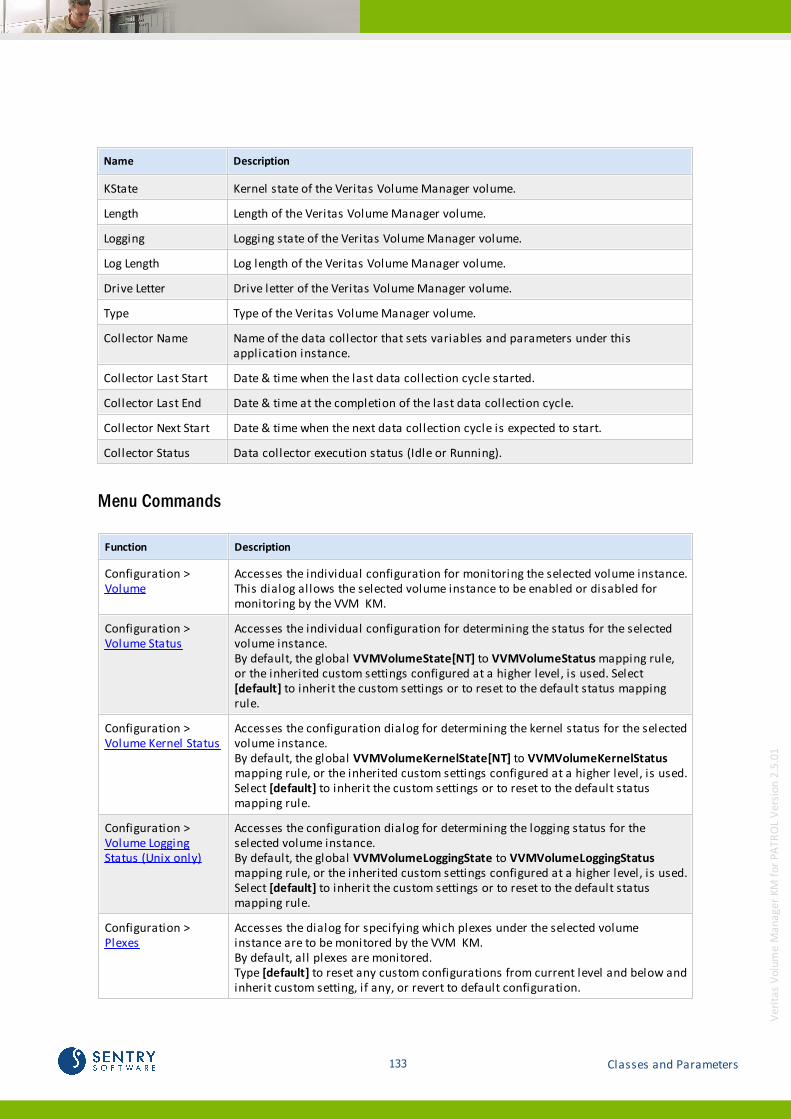
133 Classes and Parameters
Ver
itas
Vol
ume
Man
age
r K
M f
or
PA
TRO
L V
ersi
on 2
.5.0
1
Name Description
KState Kernel state of the Veritas Volume Manager volume.
Length Length of the Veritas Volume Manager volume.
Logging Logging state of the Veritas Volume Manager volume.
Log Length Log length of the Veritas Volume Manager volume.
Drive Letter Drive letter of the Veritas Volume Manager volume.
Type Type of the Veritas Volume Manager volume.
Collector Name Name of the data collector that sets variables and parameters under thisapplication instance.
Collector Last Start Date & time when the last data collection cycle started.
Collector Last End Date & time at the completion of the last data collection cycle.
Collector Next Start Date & time when the next data collection cycle is expected to start.
Collector Status Data collector execution status (Idle or Running).
Menu Commands
Function Description
Configuration > Volume
Accesses the individual configuration for monitoring the selected volume instance.This dialog allows the selected volume instance to be enabled or disabled formonitoring by the VVM KM.
Configuration > Volume Status
Accesses the individual configuration for determining the status for the selectedvolume instance.By default, the global VVMVolumeState[NT] to VVMVolumeStatus mapping rule,or the inherited custom settings configured at a higher level, is used. Select [default] to inherit the custom settings or to reset to the default status mappingrule.
Configuration > Volume Kernel Status
Accesses the configuration dialog for determining the kernel status for the selectedvolume instance.By default, the global VVMVolumeKernelState[NT] to VVMVolumeKernelStatusmapping rule, or the inherited custom settings configured at a higher level, is used.Select [default] to inherit the custom settings or to reset to the default statusmapping rule.
Configuration > Volume LoggingStatus (Unix only)
Accesses the configuration dialog for determining the logging status for theselected volume instance.By default, the global VVMVolumeLoggingState to VVMVolumeLoggingStatusmapping rule, or the inherited custom settings configured at a higher level, is used.Select [default] to inherit the custom settings or to reset to the default statusmapping rule.
Configuration > Plexes
Accesses the dialog for specifying which plexes under the selected volumeinstance are to be monitored by the VVM KM.By default, all plexes are monitored.Type [default] to reset any custom configurations from current level and below andinherit custom setting, if any, or revert to default configuration.

134Classes and Parameters
Ver
itas
Vol
ume
Man
age
r K
M f
or
PA
TRO
L V
ersi
on 2
.5.0
1
Function Description
Configuration > Plexes Status
Accesses the configuration dialog for determining the status for monitored plexinstances under the selected volume instance.By default, the global VVMPlexState[NT] to VVMPlexStatus mapping rule, or theinherited custom settings configured at a higher level, is used. Select [default] toinherit the custom settings or to reset to the default status mapping rule.
Configuration > Plexes Kernel Status
Accesses the configuration dialog for determining the kernel status for monitoredplex instances under the selected volume instance.By default, the global VVMPlexKernelState[NT] to VVMPlexKernelStatus mappingrule, or the inherited custom settings configured at a higher level, is used. Select[default] to inherit the custom settings or to reset to the default status mappingrule.
Configuration > Subdisks
Accesses the dialog for specifying which subdisks under the selected volumeinstance are to be monitored by the VVM KM.By default, all subdisks are monitored.Type [default] to reset any custom configurations from current level and below andinherit custom setting, if any, or revert to default configuration.
Configuration > Subdisks KernelStatus
Accesses the configuration dialog for determining the kernel status for monitoredsubdisk instances under the selected volume instance.By default, the global VVMSubdiskKernelState[NT] to VVMSubdiskKernelStatusmapping rule, or the inherited custom settings configured at a higher level, is used.Select [default] to inherit the custom settings or to reset to the default statusmapping rule.
VVM_VOLUME_CONTAINERIcon
Parameters
None
InfoBox
Name Description
Collector Name Name of the data collector that sets variables and parameters under thisapplication instance.
Collector Last Start Date & time when the last data collection cycle started.
Collector Last End Date & time at the completion of the last data collection cycle.
Collector Next Start Date & time when the next data collection cycle is expected to start.
Collector Status Data collector execution status (Idle or Running).
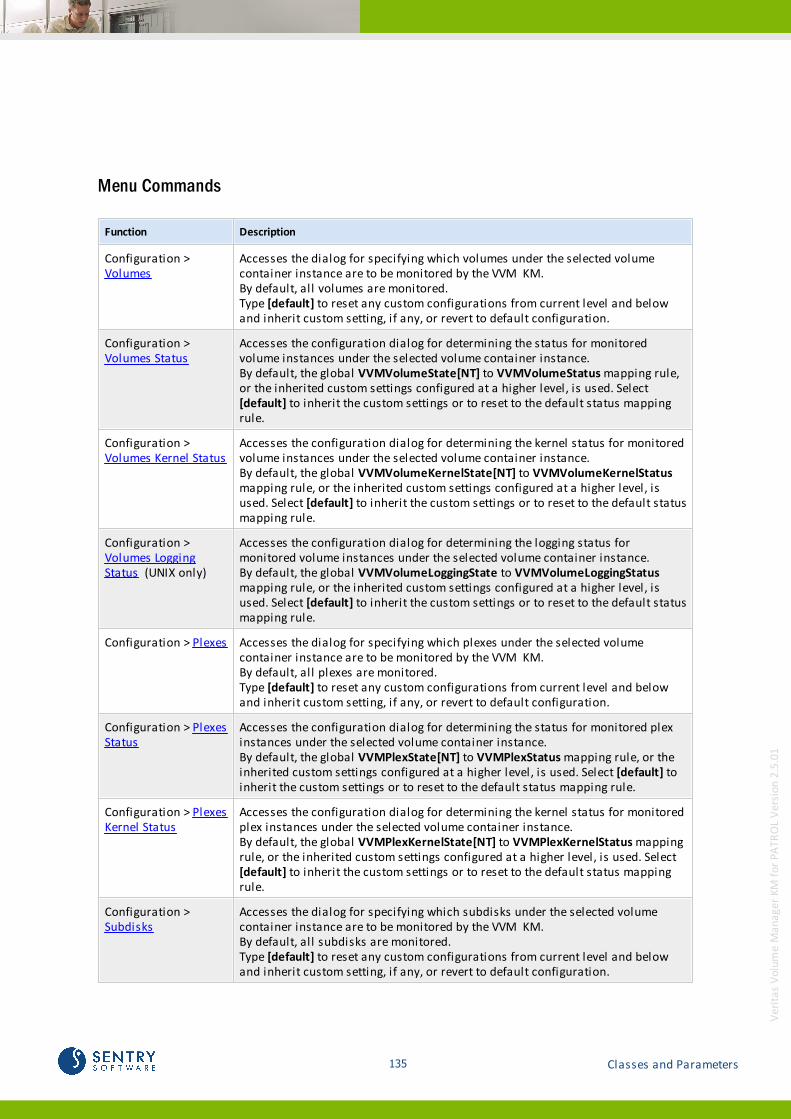
135 Classes and Parameters
Ver
itas
Vol
ume
Man
age
r K
M f
or
PA
TRO
L V
ersi
on 2
.5.0
1
Menu Commands
Function Description
Configuration > Volumes
Accesses the dialog for specifying which volumes under the selected volumecontainer instance are to be monitored by the VVM KM.By default, all volumes are monitored.Type [default] to reset any custom configurations from current level and belowand inherit custom setting, if any, or revert to default configuration.
Configuration > Volumes Status
Accesses the configuration dialog for determining the status for monitoredvolume instances under the selected volume container instance.By default, the global VVMVolumeState[NT] to VVMVolumeStatus mapping rule,or the inherited custom settings configured at a higher level, is used. Select [default] to inherit the custom settings or to reset to the default status mappingrule.
Configuration > Volumes Kernel Status
Accesses the configuration dialog for determining the kernel status for monitoredvolume instances under the selected volume container instance.By default, the global VVMVolumeKernelState[NT] to VVMVolumeKernelStatusmapping rule, or the inherited custom settings configured at a higher level, isused. Select [default] to inherit the custom settings or to reset to the default statusmapping rule.
Configuration > Volumes LoggingStatus (UNIX only)
Accesses the configuration dialog for determining the logging status formonitored volume instances under the selected volume container instance.By default, the global VVMVolumeLoggingState to VVMVolumeLoggingStatusmapping rule, or the inherited custom settings configured at a higher level, isused. Select [default] to inherit the custom settings or to reset to the default statusmapping rule.
Configuration > Plexes Accesses the dialog for specifying which plexes under the selected volumecontainer instance are to be monitored by the VVM KM.By default, all plexes are monitored.Type [default] to reset any custom configurations from current level and belowand inherit custom setting, if any, or revert to default configuration.
Configuration > PlexesStatus
Accesses the configuration dialog for determining the status for monitored plexinstances under the selected volume container instance.By default, the global VVMPlexState[NT] to VVMPlexStatus mapping rule, or theinherited custom settings configured at a higher level, is used. Select [default] toinherit the custom settings or to reset to the default status mapping rule.
Configuration > PlexesKernel Status
Accesses the configuration dialog for determining the kernel status for monitoredplex instances under the selected volume container instance.By default, the global VVMPlexKernelState[NT] to VVMPlexKernelStatus mappingrule, or the inherited custom settings configured at a higher level, is used. Select [default] to inherit the custom settings or to reset to the default status mappingrule.
Configuration > Subdisks
Accesses the dialog for specifying which subdisks under the selected volumecontainer instance are to be monitored by the VVM KM.By default, all subdisks are monitored.Type [default] to reset any custom configurations from current level and belowand inherit custom setting, if any, or revert to default configuration.
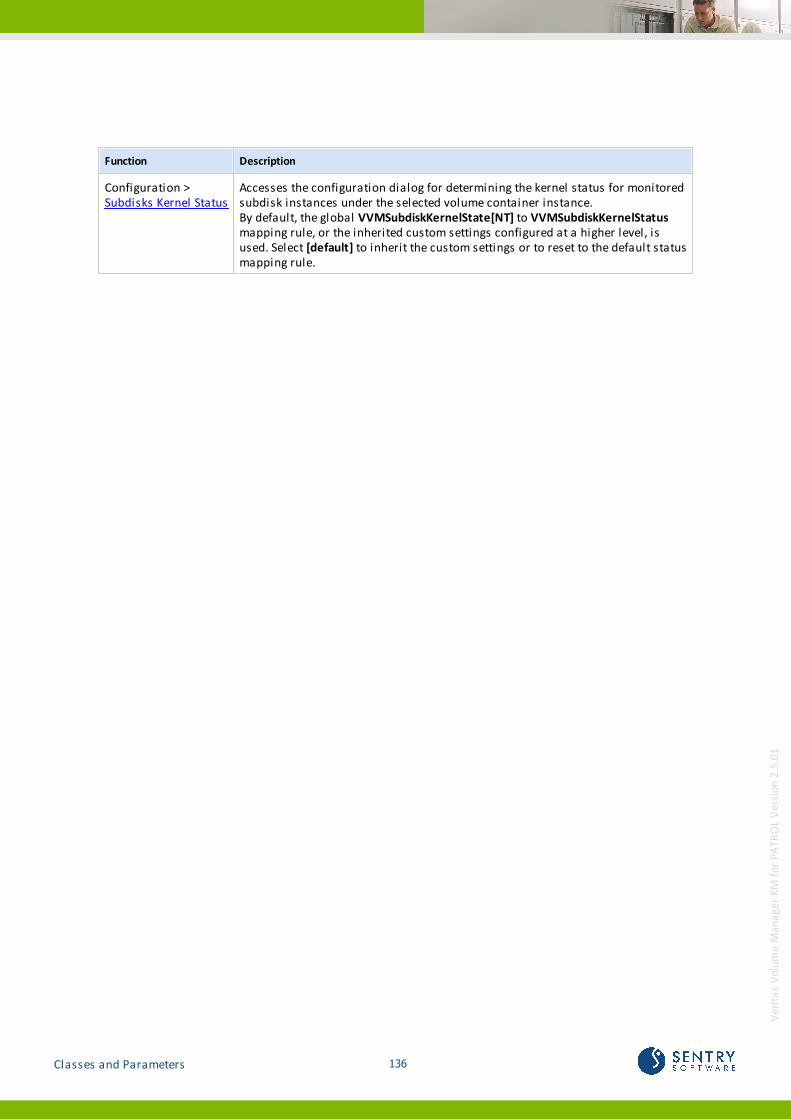
136Classes and Parameters
Ver
itas
Vol
ume
Man
age
r K
M f
or
PA
TRO
L V
ersi
on 2
.5.0
1
Function Description
Configuration > Subdisks Kernel Status
Accesses the configuration dialog for determining the kernel status for monitoredsubdisk instances under the selected volume container instance.By default, the global VVMSubdiskKernelState[NT] to VVMSubdiskKernelStatusmapping rule, or the inherited custom settings configured at a higher level, isused. Select [default] to inherit the custom settings or to reset to the default statusmapping rule.

Additional Information andSupport
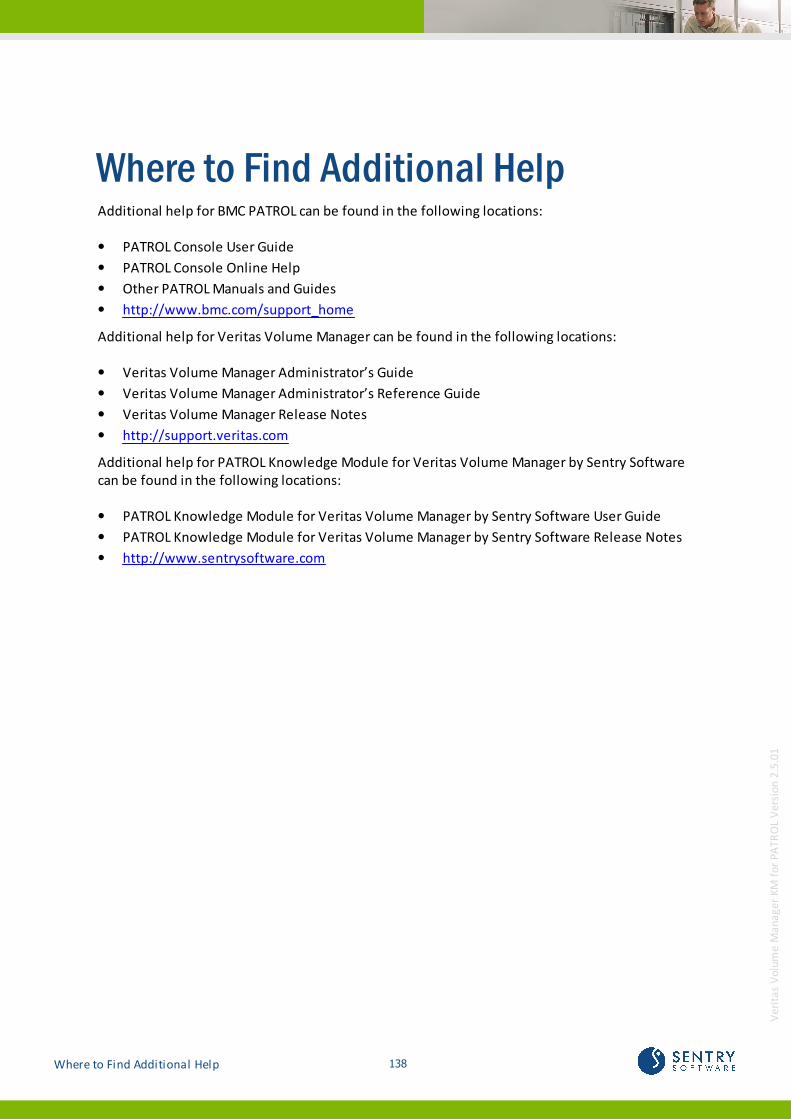
138Where to Find Additional Help
Ver
itas
Vol
ume
Man
age
r K
M f
or
PA
TRO
L V
ersi
on 2
.5.0
1
Where to Find Additional HelpAdditional help for BMC PATROL can be found in the following locations:
PATROL Console User Guide
PATROL Console Online Help
Other PATROL Manuals and Guides
http://www.bmc.com/support_home
Additional help for Veritas Volume Manager can be found in the following locations:
Veritas Volume Manager Administrator’s Guide
Veritas Volume Manager Administrator’s Reference Guide
Veritas Volume Manager Release Notes
http://support.veritas.com
Additional help for PATROL Knowledge Module for Veritas Volume Manager by Sentry Softwarecan be found in the following locations:
PATROL Knowledge Module for Veritas Volume Manager by Sentry Software User Guide
PATROL Knowledge Module for Veritas Volume Manager by Sentry Software Release Notes
http://www.sentrysoftware.com
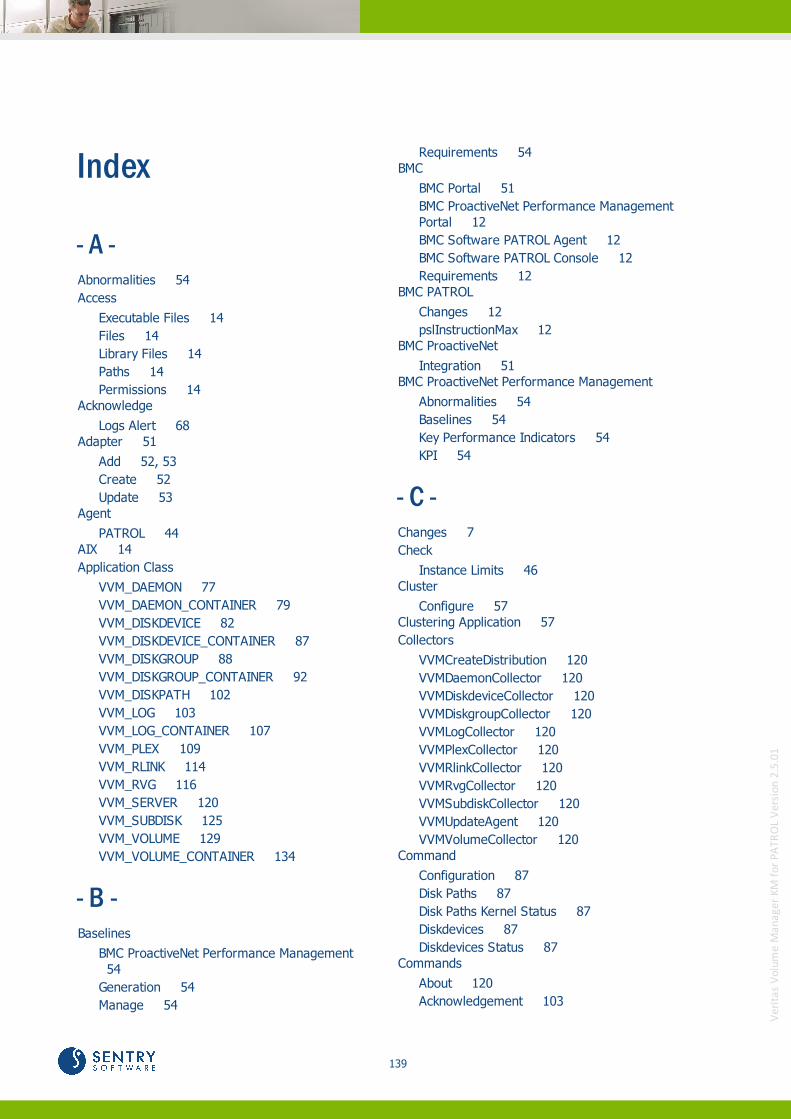
139
Ver
itas
Vol
ume
Man
age
r K
M f
or
PA
TRO
L V
ersi
on 2
.5.0
1
Index
- A -Abnormalities 54
Access
Executable Files 14
Files 14
Library Files 14
Paths 14
Permissions 14Acknowledge
Logs Alert 68Adapter 51
Add 52, 53
Create 52
Update 53Agent
PATROL 44AIX 14
Application Class
VVM_DAEMON 77
VVM_DAEMON_CONTAINER 79
VVM_DISKDEVICE 82
VVM_DISKDEVICE_CONTAINER 87
VVM_DISKGROUP 88
VVM_DISKGROUP_CONTAINER 92
VVM_DISKPATH 102
VVM_LOG 103
VVM_LOG_CONTAINER 107
VVM_PLEX 109
VVM_RLINK 114
VVM_RVG 116
VVM_SERVER 120
VVM_SUBDISK 125
VVM_VOLUME 129
VVM_VOLUME_CONTAINER 134
- B -Baselines
BMC ProactiveNet Performance Management 54
Generation 54
Manage 54
Requirements 54BMC
BMC Portal 51
BMC ProactiveNet Performance ManagementPortal 12
BMC Software PATROL Agent 12
BMC Software PATROL Console 12
Requirements 12BMC PATROL
Changes 12
pslInstructionMax 12BMC ProactiveNet
Integration 51BMC ProactiveNet Performance Management
Abnormalities 54
Baselines 54
Key Performance Indicators 54
KPI 54
- C -Changes 7
Check
Instance Limits 46Cluster
Configure 57Clustering Application 57
Collectors
VVMCreateDistribution 120
VVMDaemonCollector 120
VVMDiskdeviceCollector 120
VVMDiskgroupCollector 120
VVMLogCollector 120
VVMPlexCollector 120
VVMRlinkCollector 120
VVMRvgCollector 120
VVMSubdiskCollector 120
VVMUpdateAgent 120
VVMVolumeCollector 120Command
Configuration 87
Disk Paths 87
Disk Paths Kernel Status 87
Diskdevices 87
Diskdevices Status 87Commands
About 120
Acknowledgement 103

140
Ver
itas
Vol
ume
Man
age
r K
M f
or
PA
TRO
L V
ersi
on 2
.5.0
1
Commands
Alarms 103
All 103
Configuration 77, 79, 82, 88, 92, 102, 103,107, 109, 114, 116, 120, 125, 129, 134
Daemon 77
Daemon List 79
Daemon Status 77
Daemons 79
Daemons Status 79
Debug 120
Disk Devices 88, 92
Disk Devices Status 88, 92
Disk Path 102
Disk Path Kernel Status 102
Disk Paths 82, 88, 92
Disk Paths Kernel Status 82, 88, 92
Diskdevice 82
Diskdevice Status 82
Diskgroup 88
Diskgroup Status 88
Diskgroup Topology Report 88
Diskgroups 92
Diskgroups Status 92
Force Discovery 120
Instance Limits 120
KM Status 120
Log 103
Log Alert Acknowledgement 103
Log Filter 103
Log Scan Limit 103
Login 120
Logs 107
Logs Alert Acknowledgement 107
Logs Filter 107
Logs Scan Limit 107
Messages List 107
Monitoring Mode 120
Node Status 120
Paths 120
Plex 109
Plex Kernel Status 109
Plex Status 109
Plexes 88, 92, 129, 134
Plexes Kernel Status 88, 92, 129, 134
Plexes Status 88, 92, 129, 134
Preloading 120
Refresh Parameters 120
Refresh Process Cache 120
Reload Commands 120
Replicated Volume Group 116
Replicated Volume Group Kernel Status 116
Replicated Volume Group Status 116
Replicated Volume Groups 88
Replicated Volume Groups Kernel Status 88
Replicated Volume Groups Status 88
Replication Link Kernel Status 114
Replication Link Status 114
Replication Links 88, 114, 116
Replication Links Kernel Status 88, 116
Replication Links Status 88, 116
Reports 79, 88, 92, 107
Subdisk 125
Subdisk Kernel Status 125
Subdisks 88, 92, 109, 129, 134
Subdisks Kernel Status 88, 92, 109, 129,134
Veritas Volume Manager Topology Report 92
Volume 129
Volume Kernel Status 129
Volume Logging Status 129
Volume Status 129
Volumes 88, 92, 134
Volumes Kernel Status 88, 92, 134
Volumes Logging Status 88, 92, 134
Volumes Status 88, 92, 134
Warnings 103Configure
Cluster 57
Daemons 62
Disk Devices 62
Disk Groups 62
Disk Paths Kernel 62
KM User Account 44
Log Error Filter 65
Log Scan Limit 67
Logs Alert Acknowledgement 68
Multi-Node Monitoring Mode 57
Node Status 64
PATROL Agent 42
Plex 62
Plex Kernel 62
Status 62
Volume 62
Volume Kernel 62
Volume Logging 62
141
Ver
itas
Vol
ume
Man
age
r K
M f
or
PA
TRO
L V
ersi
on 2
.5.0
1
- D -Daemons
Delete 59
Disable 59
Enable 59Data Collectors
Force 73Debug
Disable 70
Enable 70Delete
Daemons 59
Disk Devices 59
Disk Paths 59
Diskgroups 59
Logs 59
Plexes 59
Subdisks 59
Volumes 59Disable
Daemons 59
Debug 70
Disk Devices 59
Disk Paths 59
Diskgroups 59
Logs 59
Plexes 59
Subdisks 59
Volumes 59Discoveries
Force 73Discovery
Verify 46Disk Devices
Delete 59
Disable 59
Enable 59Disk Paths
Delete 59
Disable 59
Enable 59Disk Space
Requirements 18Diskgroups
Delete 59
Disable 59
Enable 59
- E -Enable
Daemons 59
Debug 70
Disk Devices 59
Disk Paths 59
Diskgroups 59
Logs 59
Plexes 59
Subdisks 59
Volumes 59
- F -Failover Group Name 57
Files 19
ins_ALL_<version>.tar 19
ins_WINDOWS_<version>.exe 19
Setup 20
setup.exe 22
setup.sh 22
uninstall.exe 35
uninstall.sh 35Force
All Data Collectors 73
All Discoveries 73
Selected Data Collectors 73
- G -Generate
Baselines 54
Reports 73
- H -help 138
HP-UX 14
- I -Improvement 7
InfoBox
Application Name 120

142
Ver
itas
Vol
ume
Man
age
r K
M f
or
PA
TRO
L V
ersi
on 2
.5.0
1
InfoBox
Application Version 120
Available FS Space 103
Available Space 82
Binary Path 120
Collector Last End 77, 79, 82, 87, 88, 92,102, 103, 107, 109, 114, 116, 125, 129, 134
Collector Last Start 77, 79, 82, 87, 88, 92,102, 103, 107, 109, 114, 116, 125, 129, 134
Collector Name 77, 79, 82, 87, 88, 92, 102,103, 107, 109, 114, 116, 125, 129, 134
Collector Next Start 77, 79, 82, 87, 88, 92,102, 103, 107, 109, 114, 116, 125, 129, 134
Collector Status 77, 79, 82, 87, 88, 92,102, 103, 107, 109, 114, 116, 125, 129, 134
Command 77
Copyright 120
Data Volumes 116
Description 77, 103
Device 82, 125
Disk 82, 102, 125
Disk Access Name 102
Diskdevice 82
Drive Letter 129
FS Percent Used 103
Group 82, 102, 109, 114, 116, 125, 129
Host Name 120
ID 88
Installation Path 120
Kernel State 102, 114, 116
KState 109, 125, 129
Last Purge 103
Latency Protection 114
Length 109, 125, 129
Library Path 120
Local Host 114
Log File Modification Time 103
Log File Size 103
Log Length 129
Logging 129
Monitoring Mode 120
Monitoring Node 120
Name 77, 88, 103
Node Name(s) 120
Offset 82
Operating System 120
Owner 77
Path 102, 103
PATROL Agent Version 120
PID 77
Platform 120
Plex 109, 125
PPID 77
Product Name 120
Product Release Date 120
Product Version 120
Remote Host 114
Rlink 114
RVG 114, 116
SRL 116
SRL Overflow Protection 114
Status 77, 82, 88, 109, 114, 116, 129
Subdisk 125
Support 120
Synchronous 114
Tag 82
Total FS Space 103
Type 82, 88, 109, 114, 116, 129
Volume 109, 125, 129
Web site 120Install / Un-install 22, 35
BMC Software Installation Utility 19
Log 22
Packages 19
Procedure 22
Setup Files 20Instance Limits
Check 46Integration
BMC ProactiveNet 51Integration Service Agent 52
Introduction 22
Issues
Fixed 7
- K -Key Performance Indicators
BMC ProactiveNet Performance Management 54
Manage 54KM
Configure 44
Initial Setup 48
Load 40, 41, 51
Preload 42
Preloaded 43, 44
143
Ver
itas
Vol
ume
Man
age
r K
M f
or
PA
TRO
L V
ersi
on 2
.5.0
1
KM
Prepare to Load 41
Unload 42, 43, 44
User Account 44KPI
BMC ProactiveNet Performance Management 54
Manage 54
- L -Linux 14
Load
KM 40, 41, 51
PATROL Central 41
Prepare 41Log Error Filter
Configure 65Log Scan Limit
Configure 67Logs
Delete 59
Disable 59
Enable 59Logs Alert
Acknowledge 68
- M -Manage
Baselines 54
Key Performance Indicators 54
KPI 54Monitor Type 52
Multi-Node Monitoring Mode
Configure 57
- N -New features 7
Node Status
Configure 64
- O -Operating Systems
Linux 19, 22, 35
Unix 19, 35
Windows 19, 22, 35Options
Common services 22
Console Systems role 22
Managed System 22
View Log 22Oracle Solaris Cluster 57
Overview 10
- P -Parameter
NBULoginStatus 44Parameters
ExtraFilesList 120
Refresh 73
VVMDaemonCPUDuration 77
VVMDaemonCPUUtilization 77
VVMDaemonDetails 79
VVMDaemonMemorySize 77
VVMDaemonProcessCount 77
VVMDaemonState 77
VVMDaemonStatus 77
VVMDaemonSummary 77
VVMDiskdeviceDetails 92
VVMDiskdeviceIOKBytes 82
VVMDiskdeviceIOKBytesRate 82
VVMDiskdeviceIOOperations 82
VVMDiskdeviceIOOperationsFailed 82
VVMDiskdeviceIOOperationsRate 82
VVMDiskdeviceQueueDepth 82
VVMDiskdeviceReadKBytes 82
VVMDiskdeviceReadKBytesRate 82
VVMDiskdeviceReadOperations 82
VVMDiskdeviceReadOperationsFailed 82
VVMDiskdeviceReadTime 82
VVMDiskdeviceReadTimeAverage 82
VVMDiskdeviceSpaceAvailable 82
VVMDiskdeviceState 82
VVMDiskdeviceStateNT 82
VVMDiskdeviceStatus 82
VVMDiskdeviceSummary 82
VVMDiskdeviceWriteKBytes 82
VVMDiskdeviceWriteKBytesRate 82
VVMDiskdeviceWriteOperations 82
VVMDiskdeviceWriteOperationsFailed 82
VVMDiskdeviceWriteTime 82

144
Ver
itas
Vol
ume
Man
age
r K
M f
or
PA
TRO
L V
ersi
on 2
.5.0
1
Parameters
VVMDiskdeviceWriteTimeAverage 82
VVMDiskgroupDetails 92
VVMDiskgroupSpaceAvailable 88
VVMDiskgroupState 88
VVMDiskgroupStateNT 88
VVMDiskgroupStatus 88
VVMDiskgroupSummary 88
VVMDiskpathEnabled 82
VVMDiskpathKernelState 102
VVMDiskpathKernelStateNT 102
VVMDiskpathKernelStatus 102
VVMDiskpathNonEnabled 82
VVMDiskpathSummary 102
VVMLogAlarmCount 103
VVMLogAlarmText 103
VVMLogDetails 107
VVMLogFSSpaceUsedPercent 103
VVMLoginStatus 120
VVMLogSpaceAvailable 103
VVMLogSpaceGrowthRate 103
VVMLogSpaceUsed 103
VVMLogSpaceUsedPercent 103
VVMLogSummary 103
VVMLogText 103
VVMLogWarningCount 103
VVMLogWarningText 103
VVMMonitoringMode 120
VVMNodeStatus 120
VVMPlexDetails 92
VVMPlexIOKBytes 109
VVMPlexIOKBytesRate 109
VVMPlexIOOperations 109
VVMPlexIOOperationsFailed 109
VVMPlexIOOperationsRate 109
VVMPlexKernelState 109
VVMPlexKernelStateNT 109
VVMPlexKernelStatus 109
VVMPlexReadKBytes 109
VVMPlexReadKBytesRate 109
VVMPlexReadOperations 109
VVMPlexReadOperationsFailed 109
VVMPlexReadTime 109
VVMPlexReadTimeAverage 109
VVMPlexState 109
VVMPlexStateNT 109
VVMPlexStatus 109
VVMPlexSummary 109
VVMPlexWriteKBytes 109
VVMPlexWriteKBytesRate 109
VVMPlexWriteOperations 109
VVMPlexWriteOperationsFailed 109
VVMPlexWriteTime 109
VVMPlexWriteTimeAverage 109
VVMRlinkKernelState 114
VVMRlinkKernelStatus 114
VVMRlinkRemainingUpdatesCount 114
VVMRlinkRemainingUpdatesLag 114
VVMRlinkRemainingUpdatesPercent 114
VVMRlinkRemainingUpdatesSize 114
VVMRlinkState 114
VVMRlinkStatus 114
VVMRlinkSummary 114
VVMRvgKernelState 116
VVMRvgKernelStatus 116
VVMRvgRlinkCount 116
VVMRvgState 116
VVMRvgStatus 116
VVMRvgSummary 116
VVMRvgVolumeCount 116
VVMSubdiskDetails 92
VVMSubdiskIOKBytes 125
VVMSubdiskIOKBytesRate 125
VVMSubdiskIOOperations 125
VVMSubdiskIOOperationsFailed 125
VVMSubdiskIOOperationsRate 125
VVMSubdiskKernelState 125
VVMSubdiskKernelStateNT 125
VVMSubdiskKernelStatus 125
VVMSubdiskReadKBytes 125
VVMSubdiskReadKBytesRate 125
VVMSubdiskReadOperations 125
VVMSubdiskReadOperationsFailed 125
VVMSubdiskReadTime 125
VVMSubdiskReadTimeAverage 125
VVMSubdiskSummary 125
VVMSubdiskWriteKBytes 125
VVMSubdiskWriteKBytesRate 125
VVMSubdiskWriteOperations 125
VVMSubdiskWriteOperationsFailed 125
VVMSubdiskWriteTime 125
VVMSubdiskWriteTimeAverage 125
VVMVolumeDetails 92
VVMVolumeIOKBytes 129
VVMVolumeIOKBytesRate 129
VVMVolumeIOOperations 129
VVMVolumeIOOperationsFailed 129
VVMVolumeIOOperationsRate 129

145
Ver
itas
Vol
ume
Man
age
r K
M f
or
PA
TRO
L V
ersi
on 2
.5.0
1
Parameters
VVMVolumeKernelState 129
VVMVolumeKernelStateNT 129
VVMVolumeKernelStatus 129
VVMVolumeLoggingState 129
VVMVolumeLoggingStatus 129
VVMVolumeReadKBytes 129
VVMVolumeReadKBytesRate 129
VVMVolumeReadOperations 129
VVMVolumeReadOperationsFailed 129
VVMVolumeReadTime 129
VVMVolumeReadTimeAverage 129
VVMVolumeState 129
VVMVolumeStateNT 129
VVMVolumeStatus 129
VVMVolumeSummary 129
VVMVolumeWriteKBytes 129
VVMVolumeWriteKBytesRate 129
VVMVolumeWriteOperations 129
VVMVolumeWriteOperationsFailed 129
VVMVolumeWriteTime 129
VVMVolumeWriteTimeAverage 129PATROL
Agent 44
PATROL Agent 42, 43
PATROL Agent system 18
PATROL Central Console 42, 44
PATROL Central Console Server system 18
PATROL Central Web Server system 18
PATROL Console 42, 43
PATROL Console system 18PATROL Agent
Configure 42
Restart 48PATROL Console 41
Restart 48Permissions
Access 14Platform
Upgrade 49Platforms
Unix 44Plexes
Delete 59
Disable 59
Enable 59Preload
KM 42Preloaded
KM 43, 44ProactiveNet 52
PW Commands 53
- R -Refresh
Parameters 73Release Notes 7
remote PATROL Agent Checking 57
Reports
Generate 73Requirements
Additional 12
BMC ProactiveNet Performance ManagementPortal 12
BMC Software PATROL Agent 12
BMC Software PATROL Console 12
Disk Space 18
Security 14
Software 12
Symantec NetBackup™ 12
System 12Restart
PATROL Agent 48
PATROL Console 48
- S -Security
Requirements 14Setup
Check 48
Initial 48
KM 48Solaris 14
Status
Configure 62Subdisks
Delete 59
Disable 59
Enable 59Sudo 44
User 14System
HP-UX 12
IBM AIX 12
Microsoft Windows 12
146
Ver
itas
Vol
ume
Man
age
r K
M f
or
PA
TRO
L V
ersi
on 2
.5.0
1
System
Oracle Solaris 12
Red Hat Linux 12
Requirements 12
- T -Thresholds
Customize 53
Import 53
- U -Unix 44
Unload
KM 42, 43, 44Upgrade
Platform 49
- V -Verify
Application Discovery 46Veritas Cluster File System 57
Veritas Cluster Server 57
Volumes
Delete 59
Disable 59
Enable 59VVM_DAEMON
Application Class 77VVM_DAEMON_CONTAINER
Application Class 79VVM_DISKDEVICE
Application Class 82VVM_DISKDEVICE_CONTAINER
Application Class 87VVM_DISKGROUP
Application Class 88VVM_DISKGROUP_CONTAINER
Application Class 92VVM_DISKPATH
Application Class 102VVM_LOG
Application Class 103VVM_LOG_CONTAINER
Application Class 107
VVM_PLEX
Application Class 109VVM_RLINK
Application Class 114VVM_RVG
Application Class 116VVM_SERVER
Application Class 120VVM_SUBDISK
Application Class 125VVM_VOLUME
Application Class 129VVM_VOLUME_CONTAINER
Application Class 134
- W -What's new 7

About Sentry Software™Sentry Software, a strategic Technology Alliance Partner of BMC Software, providescomprehensive multi-platform monitoring solutions that enable management of thehardware and software aspects of all servers and SANs and covering up to 100 % ofcustom applications within the BMC ProactiveNet Performance Managementenvironment. Sentry Software also develops adapters for BMC Atrium Orchestrator thatenables IT administrators to automate the execution of common requests and tasksthat occur in the daily course of IT operations. Combined with BMC’s servers andnetwork automation tools, the adapters allow IT administrators to implementprovisioning and decommissioning workflows that cover all layers of their ITinfrastructure. Finally, Sentry Software designs connectors that bring storage capacitymetrics into BMC TrueSight Capacity Optimization to ensure IT administrators that theirstorage infrastructure is properly sized for their current and future needs.
Like us on Facebook:facebook.com/sentrysoftware
Follow us on Twitter:
twitter.com/sentrysoftware
LEARN MORE
To learn more about our solutions, please visit :www.sentrysoftware.com/solutions
© BMC Software, Inc. All rights reserved.
ABOUT MARKETZONE DIRECT PRODUCTS
The BMC MarketZone Directprogram sells and supportsthird-party products thatcomplement and/or augment BMCsolutions. MarketZone Directproducts are available under BMClicense and support terms.
About BMC Software™BMC Software helps leading companies around the world put technology at the forefrontof business transformation, improving the delivery and consumption of digital services.From mainframe to cloud to mobile, BMC delivers innovative IT management solutionsthat have enabled more than 20,000 customers to leverage complex technology intoextraordinary business performance—increasing their agility and exceeding anythingthey previously thought possible. For more information about BMC Software, visit
www.bmc.com.
Bus ines s thrives when IT runs s marter,fas ter and s tronger. That’s why the mos tdemanding IT organizations in the worldrely on BMC Software acros s dis tributed,mainframe, virtual and cloudenvironments . Recognized as the leader inBus ines s Service Management, BMC offersa comprehens ive approach and unifiedplatform that helps IT organizations cutcos t , reduce ris k and drive bus ines sprofit . For the four fis cal quarters endedSeptember 30,2011, BMC revenue wasapproximately $2.2 billion.
BUSINESS RUNS ON I.T .
I.T . RUNS ON BMC SOFT WARE