veritas™ cluster server installation and upgrade guide · pdf fileveritas™ cluster...
TRANSCRIPT

Veritas™ Cluster ServerInstallation and UpgradeGuide
Windows Server 2003, Windows Server2008
5.1 Service Pack 2
Veritas Cluster Server Installation and ConfigurationGuide
The software described in this book is furnished under a license agreement andmay be usedonly in accordance with the terms of the agreement.
Product version: 5.1 SP2
Document version: 5.1.SP2.3
Legal NoticeCopyright © 2010 Symantec Corporation. All rights reserved.
Symantec, the Symantec logo, Veritas, Veritas Storage Foundation, CommandCentral,NetBackup, Enterprise Vault, and LiveUpdate are trademarks or registered trademarks ofSymantec corporation or its affiliates in the U.S. and other countries. Other names may betrademarks of their respective owners.
The product described in this document is distributed under licenses restricting its use,copying, distribution, and decompilation/reverse engineering. No part of this documentmay be reproduced in any form by any means without prior written authorization ofSymantec Corporation and its licensors, if any.
THEDOCUMENTATIONISPROVIDED"ASIS"ANDALLEXPRESSORIMPLIEDCONDITIONS,REPRESENTATIONS AND WARRANTIES, INCLUDING ANY IMPLIED WARRANTY OFMERCHANTABILITY, FITNESS FOR A PARTICULAR PURPOSE OR NON-INFRINGEMENT,ARE DISCLAIMED, EXCEPT TO THE EXTENT THAT SUCH DISCLAIMERS ARE HELD TOBELEGALLYINVALID.SYMANTECCORPORATIONSHALLNOTBELIABLEFORINCIDENTALOR CONSEQUENTIAL DAMAGES IN CONNECTION WITH THE FURNISHING,PERFORMANCE, OR USE OF THIS DOCUMENTATION. THE INFORMATION CONTAINEDIN THIS DOCUMENTATION IS SUBJECT TO CHANGE WITHOUT NOTICE.
The Licensed Software andDocumentation are deemed to be commercial computer softwareas defined in FAR12.212 and subject to restricted rights as defined in FARSection 52.227-19"Commercial Computer Software - Restricted Rights" and DFARS 227.7202, "Rights inCommercial Computer Software or Commercial Computer Software Documentation", asapplicable, and any successor regulations. Any use, modification, reproduction release,performance, display or disclosure of the Licensed Software andDocumentation by theU.S.Government shall be solely in accordance with the terms of this Agreement.

Symantec Corporation350 Ellis StreetMountain View, CA 94043
http://www.symantec.com

Technical SupportSymantec Technical Support maintains support centers globally. TechnicalSupport’s primary role is to respond to specific queries about product featuresand functionality. TheTechnical Support group also creates content for our onlineKnowledge Base. The Technical Support group works collaboratively with theother functional areas within Symantec to answer your questions in a timelyfashion. For example, theTechnical Support groupworkswithProductEngineeringand Symantec Security Response to provide alerting services and virus definitionupdates.
Symantec’s support offerings include the following:
■ A range of support options that give you the flexibility to select the rightamount of service for any size organization
■ Telephone and/or Web-based support that provides rapid response andup-to-the-minute information
■ Upgrade assurance that delivers software upgrades
■ Global support purchased on a regional business hours or 24 hours a day, 7days a week basis
■ Premium service offerings that include Account Management Services
For information about Symantec’s support offerings, you can visit our Web siteat the following URL:
www.symantec.com/business/support/index.jsp
All support services will be delivered in accordance with your support agreementand the then-current enterprise technical support policy.
Contacting Technical SupportCustomers with a current support agreement may access Technical Supportinformation at the following URL:
www.symantec.com/business/support/contact_techsupp_static.jsp
Before contacting Technical Support, make sure you have satisfied the systemrequirements that are listed in your product documentation. Also, you should beat the computer onwhich theproblemoccurred, in case it is necessary to replicatethe problem.
When you contact Technical Support, please have the following informationavailable:
■ Product release level

■ Hardware information
■ Available memory, disk space, and NIC information
■ Operating system
■ Version and patch level
■ Network topology
■ Router, gateway, and IP address information
■ Problem description:
■ Error messages and log files
■ Troubleshooting that was performed before contacting Symantec
■ Recent software configuration changes and network changes
Licensing and registrationIf yourSymantecproduct requires registrationor a licensekey, access our technicalsupport Web page at the following URL:
www.symantec.com/business/support/
Customer serviceCustomer service information is available at the following URL:
www.symantec.com/business/support/
Customer Service is available to assist with non-technical questions, such as thefollowing types of issues:
■ Questions regarding product licensing or serialization
■ Product registration updates, such as address or name changes
■ General product information (features, language availability, local dealers)
■ Latest information about product updates and upgrades
■ Information about upgrade assurance and support contracts
■ Information about the Symantec Buying Programs
■ Advice about Symantec's technical support options
■ Nontechnical presales questions
■ Issues that are related to CD-ROMs or manuals

DocumentationYour feedback on product documentation is important to us. Send suggestionsfor improvements and reports on errors or omissions. Include the title anddocument version (located on the second page), and chapter and section titles ofthe text on which you are reporting. Send feedback to:
Support agreement resourcesIf youwant to contact Symantec regarding an existing support agreement, pleasecontact the support agreement administration team for your region as follows:
[email protected] and Japan
[email protected], Middle-East, and Africa
[email protected] America and Latin America

Technical Support . . . . . . . . . . . . . . . . . . . . . . . . . . . . . . . . . . . . . . . . . . . . . . . . . . . . . . . . . . . . . . . . . . . . . . . . . . . . . . . . . . . . . . . . . . . . . . . 4
Chapter 1 Pre-installation and planning . . . . . . . . . . . . . . . . . . . . . . . . . . . . . . . . . . . . . . . . . . . . . 9
Installation requirements ... . . . . . . . . . . . . . . . . . . . . . . . . . . . . . . . . . . . . . . . . . . . . . . . . . . . . . . . . . . . . . 9Prerequisites ... . . . . . . . . . . . . . . . . . . . . . . . . . . . . . . . . . . . . . . . . . . . . . . . . . . . . . . . . . . . . . . . . . . . . . . . 9Hardware requirements ... . . . . . . . . . . . . . . . . . . . . . . . . . . . . . . . . . . . . . . . . . . . . . . . . . . . . . . . 10Network requirements ... . . . . . . . . . . . . . . . . . . . . . . . . . . . . . . . . . . . . . . . . . . . . . . . . . . . . . . . . . 10Supported operating systems and application versions .... . . . . . . . . . . . . . 12Licensing .... . . . . . . . . . . . . . . . . . . . . . . . . . . . . . . . . . . . . . . . . . . . . . . . . . . . . . . . . . . . . . . . . . . . . . . . . . . 21
Installation planning .... . . . . . . . . . . . . . . . . . . . . . . . . . . . . . . . . . . . . . . . . . . . . . . . . . . . . . . . . . . . . . . . . 22About Symantec Product Authentication Service ... . . . . . . . . . . . . . . . . . . . . . . 23About notification .... . . . . . . . . . . . . . . . . . . . . . . . . . . . . . . . . . . . . . . . . . . . . . . . . . . . . . . . . . . . . . . 23About global clusters ... . . . . . . . . . . . . . . . . . . . . . . . . . . . . . . . . . . . . . . . . . . . . . . . . . . . . . . . . . . . 24
Best practices ... . . . . . . . . . . . . . . . . . . . . . . . . . . . . . . . . . . . . . . . . . . . . . . . . . . . . . . . . . . . . . . . . . . . . . . . . . . . 24Recovery tools ... . . . . . . . . . . . . . . . . . . . . . . . . . . . . . . . . . . . . . . . . . . . . . . . . . . . . . . . . . . . . . . . . . . . . . . . . . . 25
Chapter 2 Installing and Configuring Veritas ClusterServer . . . . . . . . . . . . . . . . . . . . . . . . . . . . . . . . . . . . . . . . . . . . . . . . . . . . . . . . . . . . . . . . . . . . . . . . . . . . . . . 27
About installing VCS .... . . . . . . . . . . . . . . . . . . . . . . . . . . . . . . . . . . . . . . . . . . . . . . . . . . . . . . . . . . . . . . . . . 27Installing VCS using the product installer ... . . . . . . . . . . . . . . . . . . . . . . . . . . . . . . . . . . . . . . 27
Before installing VCS .... . . . . . . . . . . . . . . . . . . . . . . . . . . . . . . . . . . . . . . . . . . . . . . . . . . . . . . . . . . 28Installing VCS .... . . . . . . . . . . . . . . . . . . . . . . . . . . . . . . . . . . . . . . . . . . . . . . . . . . . . . . . . . . . . . . . . . . . 28After installing VCS .... . . . . . . . . . . . . . . . . . . . . . . . . . . . . . . . . . . . . . . . . . . . . . . . . . . . . . . . . . . . . 31
Installing VCS using the command line .... . . . . . . . . . . . . . . . . . . . . . . . . . . . . . . . . . . . . . . . . 31Repairing the installation .... . . . . . . . . . . . . . . . . . . . . . . . . . . . . . . . . . . . . . . . . . . . . . . . . . . . . . . . . . . 35About reinstalling VCS .... . . . . . . . . . . . . . . . . . . . . . . . . . . . . . . . . . . . . . . . . . . . . . . . . . . . . . . . . . . . . . . 36Adding or removing features ... . . . . . . . . . . . . . . . . . . . . . . . . . . . . . . . . . . . . . . . . . . . . . . . . . . . . . . . 37About configuring VCS cluster ... . . . . . . . . . . . . . . . . . . . . . . . . . . . . . . . . . . . . . . . . . . . . . . . . . . . . . 38
Chapter 3 Uninstalling Veritas Cluster Server . . . . . . . . . . . . . . . . . . . . . . . . . . . . . . . . . 39
Uninstalling using the product installer ... . . . . . . . . . . . . . . . . . . . . . . . . . . . . . . . . . . . . . . . . 39Uninstalling from the command line .... . . . . . . . . . . . . . . . . . . . . . . . . . . . . . . . . . . . . . . . . . . . 41
Uninstall command examples ... . . . . . . . . . . . . . . . . . . . . . . . . . . . . . . . . . . . . . . . . . . . . . . . . 43
Contents

Chapter 4 Upgrading Veritas Cluster Server . . . . . . . . . . . . . . . . . . . . . . . . . . . . . . . . . . . . 45
Upgrading the VCS cluster to VCS 5.1 SP2 .... . . . . . . . . . . . . . . . . . . . . . . . . . . . . . . . . . . . . 45Before you upgrade the cluster ... . . . . . . . . . . . . . . . . . . . . . . . . . . . . . . . . . . . . . . . . . . . . . . 45Upgrading the cluster ... . . . . . . . . . . . . . . . . . . . . . . . . . . . . . . . . . . . . . . . . . . . . . . . . . . . . . . . . . 48After you upgrade the cluster to 5.1 SP2 .... . . . . . . . . . . . . . . . . . . . . . . . . . . . . . . . . . 54
Upgrading an Exchange server cluster ... . . . . . . . . . . . . . . . . . . . . . . . . . . . . . . . . . . . . . . . . . . 56Upgrade scenarios ... . . . . . . . . . . . . . . . . . . . . . . . . . . . . . . . . . . . . . . . . . . . . . . . . . . . . . . . . . . . . . . . 56
Upgrading a SQL server cluster ... . . . . . . . . . . . . . . . . . . . . . . . . . . . . . . . . . . . . . . . . . . . . . . . . . . . 57Upgrade scenarios ... . . . . . . . . . . . . . . . . . . . . . . . . . . . . . . . . . . . . . . . . . . . . . . . . . . . . . . . . . . . . . . . 58Upgrading from Microsoft SQL Server 2000 to SQL Server
2005 .... . . . . . . . . . . . . . . . . . . . . . . . . . . . . . . . . . . . . . . . . . . . . . . . . . . . . . . . . . . . . . . . . . . . . . . . . . . 58Upgrading fromMicrosoft SQLServer 2000or2005 toSQLServer
2008 or SQL Server 2008 R2 .... . . . . . . . . . . . . . . . . . . . . . . . . . . . . . . . . . . . . . . . . . . . 60Upgrading from Microsoft SQL Server 2008 or SQL Server 2008
SP1 to SQL Server 2008 R2 .... . . . . . . . . . . . . . . . . . . . . . . . . . . . . . . . . . . . . . . . . . . . . . 64Upgrading an Oracle cluster ... . . . . . . . . . . . . . . . . . . . . . . . . . . . . . . . . . . . . . . . . . . . . . . . . . . . . . . . . 70
Upgrade scenarios ... . . . . . . . . . . . . . . . . . . . . . . . . . . . . . . . . . . . . . . . . . . . . . . . . . . . . . . . . . . . . . . . 70Upgrading Oracle in a VCS cluster ... . . . . . . . . . . . . . . . . . . . . . . . . . . . . . . . . . . . . . . . . . . 70
Upgrading the Microsoft service packs ... . . . . . . . . . . . . . . . . . . . . . . . . . . . . . . . . . . . . . . . . . . 76Upgrading to Microsoft Exchange 2003 SP2 in a VCS
environment .... . . . . . . . . . . . . . . . . . . . . . . . . . . . . . . . . . . . . . . . . . . . . . . . . . . . . . . . . . . . . . . . 77Upgrading to Microsoft Exchange Server 2007 SP3 in a VCS
environment .... . . . . . . . . . . . . . . . . . . . . . . . . . . . . . . . . . . . . . . . . . . . . . . . . . . . . . . . . . . . . . . . 78Upgrading fromMicrosoft Exchange 2010 to Exchange 2010SP1
in a VCS environment .... . . . . . . . . . . . . . . . . . . . . . . . . . . . . . . . . . . . . . . . . . . . . . . . . . . . 81Upgrading Microsoft SQL 2000 to SP4 in a VCS
environment .... . . . . . . . . . . . . . . . . . . . . . . . . . . . . . . . . . . . . . . . . . . . . . . . . . . . . . . . . . . . . . . . 82Upgrading Microsoft SQL 2005 to SP1 in a VCS
environment .... . . . . . . . . . . . . . . . . . . . . . . . . . . . . . . . . . . . . . . . . . . . . . . . . . . . . . . . . . . . . . . . 83Upgrading Microsoft SQL 2005 to 2005 SP2 or later in a VCS
environment .... . . . . . . . . . . . . . . . . . . . . . . . . . . . . . . . . . . . . . . . . . . . . . . . . . . . . . . . . . . . . . . . 85UpgradingMicrosoft SQL 2008 or 2008R2with the latest service
packs in a VCS environment .... . . . . . . . . . . . . . . . . . . . . . . . . . . . . . . . . . . . . . . . . . . . 89
Appendix A Services and ports used by VCS . . . . . . . . . . . . . . . . . . . . . . . . . . . . . . . . . . . . . . . 93
About VCS services and ports ... . . . . . . . . . . . . . . . . . . . . . . . . . . . . . . . . . . . . . . . . . . . . . . . . . . . . . . 93
Index . . . . . . . . . . . . . . . . . . . . . . . . . . . . . . . . . . . . . . . . . . . . . . . . . . . . . . . . . . . . . . . . . . . . . . . . . . . . . . . . . . . . . . . . . . . . . . . . . . . . . . . . . . . . . . . . . . . . 95
Contents8
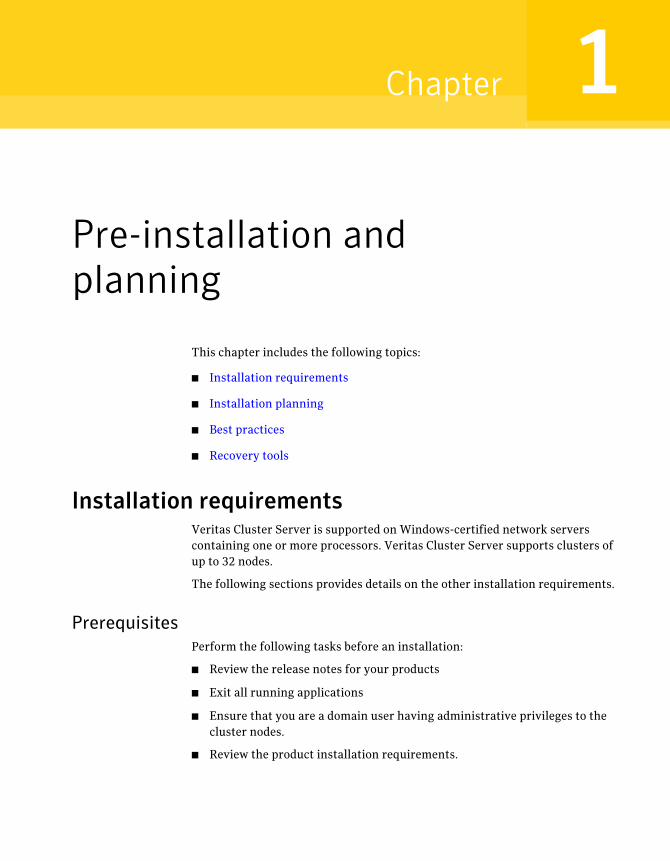
Pre-installation andplanning
This chapter includes the following topics:
■ Installation requirements
■ Installation planning
■ Best practices
■ Recovery tools
Installation requirementsVeritas Cluster Server is supported on Windows-certified network serverscontaining one or more processors. Veritas Cluster Server supports clusters ofup to 32 nodes.
The following sections provides details on the other installation requirements.
PrerequisitesPerform the following tasks before an installation:
■ Review the release notes for your products
■ Exit all running applications
■ Ensure that you are a domain user having administrative privileges to thecluster nodes.
■ Review the product installation requirements.
1Chapter

Hardware requirementsTo determine the approved hardware refer to, the Hardware Compatibility Liston the Symantec Support Web site.
http://www.symantec.com/docs/TECH138719
Table 1-1 provides the details on some of basic hardware requirements.
Table 1-1 Hardware requirements
■ Minimum required: 1GB
■ Recommended: 2GB
Memory
1 GBDisk space
■ Minimum required: 300 MHz Pentium II
■ Recommended: 550 MHz Pentium III or higher
System processor
■ Recommended: 1024 x 768 pixels or higher
VCS Cluster Manager (Java Console) requires an 8-bit (256 color)display and a graphics card able to render 2D images.
Display resolution
■ Shared disks to support applications that migrate betweennodes in the cluster. Campus clusters require more than onearray for mirroring. Disaster recovery configurations requireone array for each site.
■ SCSI or Fibre Channel Host Bus Adapters (HBAs), or iSCSIInitiator supported NICs to access shared storage.
■ Two NICs: one shared public and private, and one exclusivelyfor the private network; Symantec recommends three NICs:one public and two for the VCS private network.
System requirememts
Network requirementsEnsure that youhaveperformed the following tasks andkept the requirednetworkinformation handy, before you install Veritas Cluster Server.
■ Verify that the systemsonwhich you install the software are part of aWindowsActive Directory domain.
■ Ensure that the static IP addresses are available for the following purposes:
■ One IP address per site for each virtual server.
■ One IP address for each physical node in the cluster
■ One IP address per cluster when configuring Notification. The same IPaddress can be used for other options, such as GCO.
Pre-installation and planningInstallation requirements
10

■ Configure name resolution for each node.
■ Verify that the DNS Services are available. AD-integrated DNS or BIND 8.2 orhigher are supported. Make sure a reverse lookup zone exists in the DNS.Refer to the application documentation for instructions on creating a reverselookup zone.
■ DNS scavenging affects virtual servers configured inVCS, because the Lanmanagent uses Dynamic DNS (DDNS) to map virtual names with IP addresses. Ifyou use scavenging, then you must set the DNSRefreshInterval attribute forthe Lanman agent. This will enable the Lanman agent to refresh the resourcerecords on the DNS servers.Refer to the Lanman agent description in the Veritas Cluster Server BundledAgents Reference Guide for more information.
■ Make sure that the NetApp filers and the systems on which you plan to installVCS reside in the same domain.
■ Make sure that the NetApp filers are reachable; ensure that you can ping thefilers using the DNS name.
■ If you plan to set up a disaster recovery configuration, make sure that:
■ The volumes at both sites are of the same size.
■ The NetApp filers can replicate in both directions.
■ If you plan to use Fibre Channel (FC) for connecting the LUNs, type hba_infoon the command prompt, and verify that the FC initiators are displayed.If FC initiators are not displayed, install themini port driver provided by yourvendor and run the command again to verify that the FC initiators aredisplayed.
■ Ensure that the LUNs aremounted. In case ofMulti Pathing I/O (MPIO), ensurethat the LUNs are mounted using the required initiators.
Note:MPIO support is available only with FC.
■ Donot install VCS on servers that are assigned the role of aDomain Controller.Configuring a cluster on a domain controller is not supported.
■ If the domain controller and the computer running the installation programare on different subnets, the installer may be unable to locate the computersselected for installation. In this situation, after the installation programdisplays an error message, type the host names and the IP addresses of themissing computers manually.
11Pre-installation and planningInstallation requirements

Supported operating systems and application versionsThis section provides details on the supported application versions and theoperating systems.
You must install the operating system in the same path on all systems. Forexample, if you install Windows 2003 on C:\WINDOWS of one node, installationson all other nodesmust be on C:\WINDOWS.Make sure that the same drive letteris available on all nodes and that the system drive has adequate space for theinstallation.
Note: All VCS nodes must run the same Windows operating system and servicepack level as well as the same VCS version and service pack level.
Supported operating systemsVCS supports the following Windows operating systems.
For the latest information on supported software, also see the SoftwareCompatibility list at:
http://www.symantec.com/docs/TECH138722
Your server must run one of the following operating systems to install the VCSserver components:
■ Windows Server 2003 (32-bit): Standard Edition, Enterprise Edition, orDatacenter Edition (SP2 required for all editions)
■ Windows Server 2003 R2 (32-bit): Standard Edition, Enterprise Edition, orDatacenter Edition (SP2 required for all editions)
■ Windows Server 2003 (32-bit): Web Edition: fully supports SFW and supportsonly file share for SFW HA (SP2 required for all editions)
■ Windows Server 2003 for 64-bit Itanium (IA64): Enterprise Edition orDatacenter Edition (SP2 required for all editions)
■ Windows Server 2003 x64 Editions (for AMD64 or Intel EM64T): Standard x64Edition, Enterprise x64 Edition, or Datacenter x64 Edition (SP2 required forall editions)
■ Windows Server 2003 x64 R2 Editions (for AMD64 or Intel EM64T): Standardx64 R2 Edition, Enterprise x64 R2 Edition, or Datacenter x64 R2 Edition (SP2required for all editions)
■ Windows Server 2008 x86, x64: Standard Edition, Enterprise Edition,Datacenter Edition, Web Edition, Small Business Sever (SP1 or SP2 requiredfor all editions)
Pre-installation and planningInstallation requirements
12
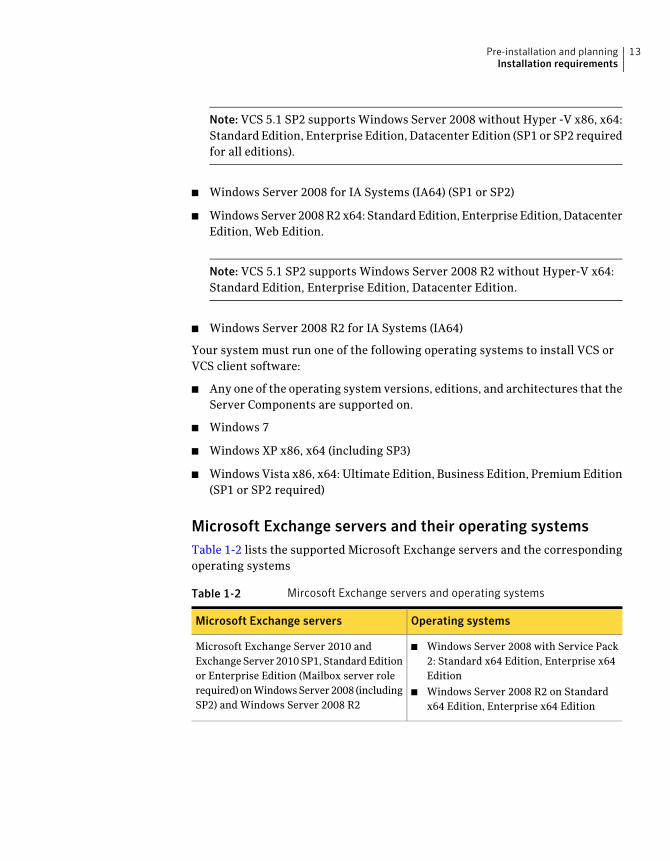
Note: VCS 5.1 SP2 supports Windows Server 2008 without Hyper -V x86, x64:Standard Edition, Enterprise Edition, Datacenter Edition (SP1 or SP2 requiredfor all editions).
■ Windows Server 2008 for IA Systems (IA64) (SP1 or SP2)
■ WindowsServer 2008R2x64: StandardEdition, Enterprise Edition,DatacenterEdition, Web Edition.
Note: VCS 5.1 SP2 supports Windows Server 2008 R2 without Hyper-V x64:Standard Edition, Enterprise Edition, Datacenter Edition.
■ Windows Server 2008 R2 for IA Systems (IA64)
Your system must run one of the following operating systems to install VCS orVCS client software:
■ Any one of the operating system versions, editions, and architectures that theServer Components are supported on.
■ Windows 7
■ Windows XP x86, x64 (including SP3)
■ Windows Vista x86, x64: Ultimate Edition, Business Edition, PremiumEdition(SP1 or SP2 required)
Microsoft Exchange servers and their operating systemsTable 1-2 lists the supported Microsoft Exchange servers and the correspondingoperating systems
Table 1-2 Mircosoft Exchange servers and operating systems
Operating systemsMicrosoft Exchange servers
■ Windows Server 2008 with Service Pack2: Standard x64 Edition, Enterprise x64Edition
■ Windows Server 2008 R2 on Standardx64 Edition, Enterprise x64 Edition
Microsoft Exchange Server 2010 andExchangeServer 2010SP1, StandardEditionor Enterprise Edition (Mailbox server rolerequired) onWindowsServer2008 (includingSP2) and Windows Server 2008 R2
13Pre-installation and planningInstallation requirements

Table 1-2 Mircosoft Exchange servers and operating systems (continued)
Operating systemsMicrosoft Exchange servers
■ Windows Server 2003 x64 (StandardEdition, Enterprise Edition, DatacenterEdition) including SP1 andSP2 for all theeditions.
■ Windows Server 2003 R2 x64 (StandardEdition, Enterprise Edition, DatacenterEdition) including SP1 and SP2 for alleditions.
■ Windows Server 2008 x64 Editions (forAMD64 or Intel EM64T): Standard x64Edition, Enterprise x64 Edition, orDatacenter x64 Edition
■ Windows Server 2008 x64 R2 withoutHyper-V on Standard, Enterprise,Datacenter Editions
■ Windows Server 2008 R2 for IA Systems- IA64
■ Windows Server 2008 x64 R2 WebEdition
Microsoft Exchange Server 2007 StandardEdition or Enterprise Edition on WindowsServer 2003 (including SP1, SP2 and SP3)and Windows Server 2008 (including SP1and SP2)
■ Windows Server 2003 (32-bit) (StandardEdition, EnterpriseEdition, orDatacenterEdition) including SP1 and SP2 for alleditions.
■ Windows Server 2003 R2 (32-bit)(Standard Edition, Enterprise Edition, orDatacenter Edition) including SP1 andSP2 for all editions.
Microsoft Exchange Server 2003 StandardEdition or Enterprise Edition on WindowsServer 2003 (including SP1 and SP2) andWindows Server 2008 (including SP1 andSP2)
Microsoft SQL servers and their operating systemsTable 1-3 lists the supported Microsoft SQL servers and the correspondingoperating systems
Pre-installation and planningInstallation requirements
14
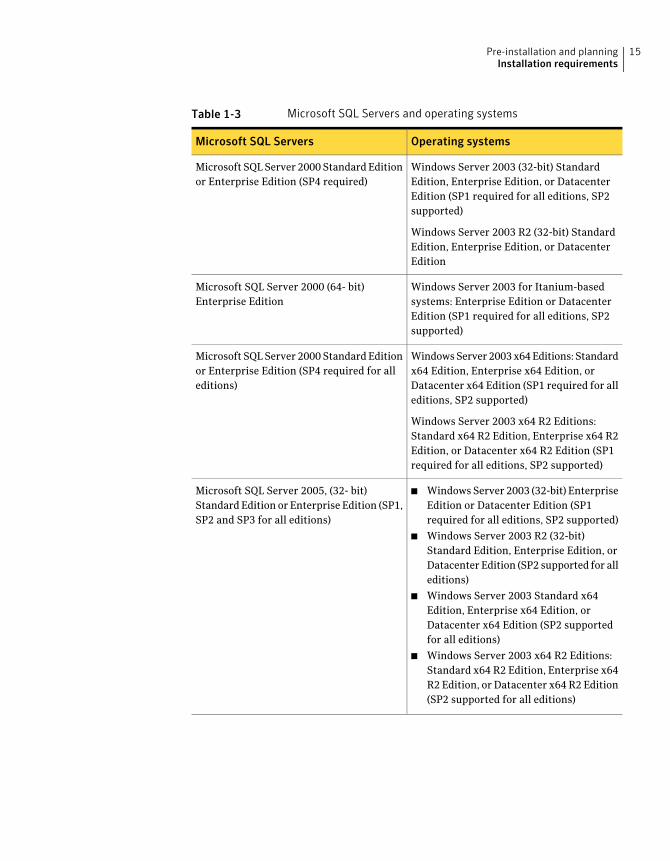
Table 1-3 Microsoft SQL Servers and operating systems
Operating systemsMicrosoft SQL Servers
Windows Server 2003 (32-bit) StandardEdition, Enterprise Edition, or DatacenterEdition (SP1 required for all editions, SP2supported)
Windows Server 2003 R2 (32-bit) StandardEdition, Enterprise Edition, or DatacenterEdition
Microsoft SQLServer 2000StandardEditionor Enterprise Edition (SP4 required)
Windows Server 2003 for Itanium-basedsystems: Enterprise Edition or DatacenterEdition (SP1 required for all editions, SP2supported)
Microsoft SQL Server 2000 (64- bit)Enterprise Edition
WindowsServer2003x64Editions: Standardx64 Edition, Enterprise x64 Edition, orDatacenter x64 Edition (SP1 required for alleditions, SP2 supported)
Windows Server 2003 x64 R2 Editions:Standard x64 R2 Edition, Enterprise x64 R2Edition, or Datacenter x64 R2 Edition (SP1required for all editions, SP2 supported)
Microsoft SQLServer 2000StandardEditionor Enterprise Edition (SP4 required for alleditions)
■ WindowsServer 2003 (32-bit) EnterpriseEdition or Datacenter Edition (SP1required for all editions, SP2 supported)
■ Windows Server 2003 R2 (32-bit)Standard Edition, Enterprise Edition, orDatacenter Edition (SP2 supported for alleditions)
■ Windows Server 2003 Standard x64Edition, Enterprise x64 Edition, orDatacenter x64 Edition (SP2 supportedfor all editions)
■ Windows Server 2003 x64 R2 Editions:Standard x64 R2 Edition, Enterprise x64R2 Edition, or Datacenter x64 R2 Edition(SP2 supported for all editions)
Microsoft SQL Server 2005, (32- bit)Standard Edition or Enterprise Edition (SP1,SP2 and SP3 for all editions)
15Pre-installation and planningInstallation requirements

Table 1-3 Microsoft SQL Servers and operating systems (continued)
Operating systemsMicrosoft SQL Servers
■ Windows Server 2008 including SP1 andSP2 (32-bit) Standard Edition, EnterpriseEdition, or Datacenter Edition
■ Windows Server 2008 x64 R2 withoutHyper-V on Standard, Enterprise,Datacenter Editions
■ Windows Server 2008 R2 for IA Systems- IA64
■ Windows Server 2008 x64 R2 WebEdition
Microsoft SQL Server 2005, (32- bit)Standard Edition or Enterprise Edition (SP2and SP3 for all editions)
■ Windows Server 2003 for Itanium-basedsystems:EnterpriseEditionorDatacenterEdition (SP1 required for all editions, SP2supported)
■ Windows Server 2003 Standard x64Edition, Enterprise x64 Edition, orDatacenter x64 Edition (SP2 supportedfor all editions)
■ Windows Server 2003 x64 R2 Editions:Standard x64 R2 Edition, Enterprise x64R2 Edition, or Datacenter x64 R2 Edition(SP2 supported for all editions)
■ Windows Server 2008 for 64-bit Itanium(IA64)
■ Windows Server 2008 x64 Editions (forAMD64 or Intel EM64T): Standard x64Edition, Enterprise x64 Edition, orDatacenter x64 Edition
■ Windows Server 2008 x64 R2 withoutHyper-V on Standard, Enterprise,Datacenter Editions
■ Windows Server 2008 R2 for IA Systems- IA64
■ Windows Server 2008 x64 R2 WebEdition
Microsoft SQL Server 2005, (64- bit)Standard Edition or Enterprise Edition (SP1,SP2 and SP3 for all editions)
Pre-installation and planningInstallation requirements
16

Table 1-3 Microsoft SQL Servers and operating systems (continued)
Operating systemsMicrosoft SQL Servers
■ Windows Server 2003 (32-bit) StandardEdition, Enterprise Edition orDatacenterEdition (SP2 required)
■ Windows Server 2003 R2 (32-bit)Standard Edition, Enterprise Edition, orDatacenter Edition (SP2 required)
■ Windows Server 2003 for Itanium-basedSystemsEnterpriseEditionorDatacenterEdition (SP2 required for both)
■ Windows Server 2003 Standard x64Edition, Enterprise x64 Edition, orDatacenter x64 Edition (SP2 required)
■ Windows Server 2003 x64 Editions (forAMD64 or Intel EM64T): Standard x64R2 Edition, Enterprise x64 R2 Edition, orDatacenter x64R2Edition (SP2 required)
■ Windows Server 2008 (32-bit) StandardEdition, Enterprise Edition, DatacenterEdition, or Web Edition (SP2 required)
■ Windows Server 2008 x64 R2 withoutHyper-V on Standard, Enterprise,Datacenter Editions
■ Windows Server 2008 R2 for IA Systems- IA64
■ Windows Server 2008 x64 R2 WebEdition
Microsoft SQL Server 2008, 32-bit StandardEdition or Enterprise Edition orWebEdition(including SP1)
17Pre-installation and planningInstallation requirements

Table 1-3 Microsoft SQL Servers and operating systems (continued)
Operating systemsMicrosoft SQL Servers
■ Windows Server 2003 for Itanium-basedSystemsEnterpriseEditionorDatacenterEdition (SP2 required for both)
■ Windows Server 2003 Standard x64Edition, Enterprise x64 Edition, orDatacenter x64 Edition (SP2 required)
■ Windows Server 2003 x64 Editions (forAMD64 or Intel EM64T): Standard x64R2 Edition, Enterprise x64 R2 Edition, orDatacenter x64R2Edition (SP2 required)
■ Windows Server 2008 (32-bit) StandardEdition, Enterprise Edition, DatacenterEdition, or Web Edition (SP2 required)
■ Windows Server 2008 x64 R2 withoutHyper-V on Standard, Enterprise,Datacenter Editions
■ Windows Server 2008 R2 for IA Systems- IA64
■ Windows Server 2008 x64 R2 WebEdition
Microsoft SQL Server 2008 (64-bit StandardEdition or Enterprise Edition or EnterpriseIA64 Edition orWeb Edition (including SP1)
■ Windows Server 2003 for Itanium-basedSystemsEnterpriseEditionorDatacenterEdition (SP2 required for both)
■ Windows Server 2003 Standard x64Edition, Enterprise x64 Edition, orDatacenter x64 Edition (SP2 required)
■ Windows Server 2003 x64 Editions (forAMD64 or Intel EM64T): Standard x64R2 Edition, Enterprise x64 R2 Edition, orDatacenter x64R2Edition (SP2 required)
■ Windows Server 2008 (32-bit) StandardEdition, Enterprise Edition, DatacenterEdition, or Web Edition (SP2 required)
■ Windows Server 2008 x64 R2 withoutHyper-V on Standard, Enterprise,Datacenter Editions
■ Windows Server 2008 R2 for IA Systems- IA64
■ Windows Server 2008 x64 R2 WebEdition
Microsoft SQL Server 2008 R2
Pre-installation and planningInstallation requirements
18

Note:Microsoft SQL Server 2000 and Microsoft SQL Server 2005 can exist in thesame cluster and operate on or fail over to the same systems. However, only onedefault instance can exist on a system at one time. Additional instances thatoperate on or fail over to that system must be named instances. The number ofnamed instances is limited only by the normal limit of instances for that versionof SQL Server.
Note: Similarly, Microsoft SQL Server 2005 and Microsoft SQL Server 2008 canexist in the same cluster and operate on or fail over to the same systems.However,only one default instance can exist on a system at one time. Additional instancesthat operate on or fail over to that system must be named instances. The numberof named instances is limited only by the normal limit of instances for that versionof SQL Server.
Oracle versions and their operating systemsTable 1-4 lists the supported Oracle versions and the corresponding operatingsystems
Table 1-4 Oracle versions and operating systems
Operating systemsOracle versions
■ Windows Server 2003 (32-bit) StandardEdition, EnterpriseEdition, orDatacenterEdition (SP2 required for all editions)
■ Windows Server 2003 (32-bit) R2Standard Edition, Enterprise Edition, orDatacenter Edition (SP2 required for alleditions)
■ Windows Server 2003 for Itanium-basedSystemsEnterpriseEditionorDatacenterEdition (SP2 required for both)
Oracle 9i, Release 2 (9.2.0.2) StandardEdition, Enterprise Edition
Oracle 10g, Release 1 (10.1.0.2) StandardEdition, Enterprise Edition
19Pre-installation and planningInstallation requirements

Table 1-4 Oracle versions and operating systems (continued)
Operating systemsOracle versions
■ Windows Server 2003 (32-bit) StandardEdition, EnterpriseEdition, orDatacenterEdition (SP2 required for all editions)
■ Windows Server 2003 (32-bit) R2Standard Edition, Enterprise Edition, orDatacenter Edition (SP2 required for alleditions)
■ Windows Server 2003 for Itanium-basedSystemsEnterpriseEditionorDatacenterEdition (SP2 required for both)
■ Windows Server 2003 (64-bit) StandardEdition, EnterpriseEdition, orDatacenterEdition (SP2 required for all editions)
■ Windows Server 2003 (64-bit) R2Standard Edition, Enterprise Edition, orDatacenter Edition (SP2 required for alleditions)
Oracle 10g, Release 2 (10.2.0.1.0) StandardEdition, Enterprise Edition
■ Windows Server 2008 R2 (64-bit)Standard Edition, Enterprise Edition, orDatacenter Edition
Oracle 10g, Release 2 (10.2.0.5) StandardEdition, Enterprise Edition
■ Windows Server 2003 (32-bit, 64-bit)Standard Edition, Enterprise Edition, orDatacenter Edition (SP2 required for alleditions)
■ Windows Server 2003 (32-bit, 64-bit) R2Standard Edition, Enterprise Edition, orDatacenter Edition (SP2 required for alleditions)
Oracle 11g, Release 1 (11.1.0.6.0)
■ Windows Server 2008 (32-bit, 64-bit)Standard Edition, Enterprise Edition, orDatacenter Edition (SP2 required for alleditions)
Oracle 11g, Release 1 (11.1.0.7.0)
■ Windows Server 2008 (32-bit, 64-bit)Standard Edition, Enterprise Edition, orDatacenter Edition (SP2 required for alleditions)
■ Windows Server 2008 R2 (64-bit)Standard Edition, Enterprise Edition, orDatacenter Edition
Oracle 11g Release 2 (11.2.0.1)
Pre-installation and planningInstallation requirements
20

Supported applicationsThe supported versions of Network Appliance applications and other otherapplications are as follows:
■ NetworkAppliance SnapManager for Exchange 3.2withExchangeServer 2003
■ Network Appliance SnapManager for Exchange 4.0, 5.0, 6.0 with ExchangeServer 2007
■ Network Appliance SnapManager for SQL 2.0, 2.1, and 5.0
■ Network Appliance Data ONTAP 7.3, 7.3.3
■ Network Appliance SnapDrive 4.1, 4.2.1, 5.0, 6.0, 6.1, and 6.2When installing SnapDrive, youmust specify a user account in the SnapDriveService Credentials dialog box. The user account must be a domain user andpart of the Administrators group of the local system and the filer.
■ Data ONTAP DSM for Windows MPIO 3.1, 3.2, 3.3, 3.3.1
■ Microsoft iSCSI software initiator version 2.03 or later versions
LicensingEach copy of Veritas Cluster Server including all options and agents, whetherused on a physical server or within a virtual machine, must be licensed accordingto the conditions set forth in the sections below. Each Licensed Software licensespecifies the number of instances of the licensed software you may run on aparticular server at one time.
Table 1-5 lists Veritas Cluster Server editions and the additional licensing termsthat apply.
Table 1-5 Veritas Cluster Server licensing terms
Veritas Cluster Server licensing termsMicrosoft Operating System Edition
A separate license for the licensed softwareis required for each virtual or physicalserver, where the software is installed.
■ Server Edition
■ Standard Edition
■ Web Edition
For each license, you may run one instanceof the licensed software on one physicalserver andup to four simultaneous instancesof the licensed software on virtual serverslocated on the physical server.
■ Advanced Edition
■ Enterprise Edition
21Pre-installation and planningInstallation requirements

Table 1-5 Veritas Cluster Server licensing terms (continued)
Veritas Cluster Server licensing termsMicrosoft Operating System Edition
For each license, you may run one instanceof the licensed software on one physicalserver and an unlimited number of virtualservers located on the physical server.
Datacenter Edition
Evaluation license keyAn evaluation license key is embedded in the product. To use this key, click Nextat the license key entry screen of the product installer. This license key is validfor a period of two months only.
Virtual Server license policyEach copy of the Veritas Cluster Server including all options and agents, whetherused on a physical server orwithin a virtualmachinemust be separately licensed.Each Licensed Software license specifies the number of instances of the LicensedSoftware you may run on a particular server at one time.
License managementThe product installer lets you add and remove specific licenses. Adding a licensefor an option does not install the option. Use the Add/Remove function to installan option. License keys support installation on multiple systems.
Note: License keys for releases 4.x of VCS are not supported. A default evaluationlicense key is supplied for your use. This license key is valid for a period of twomonths only. You must purchase the product to obtain a permanent license key.
Installation planningYou can install VCS and the other applicable options using the product installerand the CLI. During the installation you can choose to simultaneously install theproduct on more than one system.
After the installation is complete, run the Veritas Cluster Server ConfigurationWizard to complete the VCS cluster configuration. The Veritas Cluster ServerConfigurationWizardpresents the opportunity to configure optionalVCS featuresincluding security options, notification, and theglobal clusterwide-area connectionresource.
Pre-installation and planningInstallation planning
22

Depending on your environment you may choose to configure the SymantecProduct Authentication Service on systems outside the cluster.
Review the following sections and decide how you want to configure yourenvironment:
■ About Symantec Product Authentication Service
■ About upgrading VCS while in co-existence with Veritas NetBackup
■ About notification
■ About global clusters
About Symantec Product Authentication ServiceSymantec Product Authentication Service allows the security administrator toconfigure authentication for domain and local users to work with VCS such thatthese users can logon to the java console without providing a password.
The Authentication Service provides the ability to configure a cluster in a securemode. It also secures communication between cluster nodes and clients, includingthe Java console, by using digital certificates for authentication andSSL to encryptcommunication over the public network.
To configure the cluster in securemode, VCS requires you to specify and configurea system in your environment as a root broker and all nodes in the cluster asauthentication brokers.
Table 1-6 defines the root broker and authentication broker.
Table 1-6 Root and authentication broker definitions
DescriptionBroker type
A root broker serves as the main registration and certificationauthority.
It is the single authoritywhich validates requests fromauthenticationbrokers that are installed on the (cluster) systems.
Root broker
Authentication brokers serve as intermediate registration andcertification authorities. Authentication brokers have certificates thatare signed by the root. Each node in the cluster serves as anauthentication broker.
Authenticationbroker
About notificationYou can configure VCS to send event notification either through SMTP emailnotification or SNMP traps.
23Pre-installation and planningInstallation planning

Configuring the notifier process may be done during initial cluster configurationor at a later time using the VCS Configuration Wizard.
For additional information, refer to the Veritas Cluster Server Administrator’sGuide.
About global clustersA global cluster consists of two or more clusters linked together. Global clustersprovide the ability to fail over applications between geographically distributedclusters when disaster occurs.
Global clusters may be configured using the Global Group Configuration Wizard(that can be accessed through VCS Cluster Manager-Java Console). This requiresa wide-area connector (WAC) resource for inter-cluster communication. Thisresource can be optionally configured using the VCS Configuration Wizard.
For information about theGlobalGroupConfigurationWizard andVeritas ClusterServerConfigurationWizard, refer toVeritasClusterServerAdministrator’sGuide.
Best practicesSymantec recommends that you perform the following tasks before you begin toinstall VCS:
■ Verify that you have at least three network adapters (with at least two NICsexclusively for the private network and one for the public network). Whenusing only two NICs, lower the priority of one NIC and use the low-priorityNIC for public and private communication.
■ Route eachprivateNIC through a separate hub or switch to avoid single pointsof failure.
■ NIC teaming is not supported for the private network.
■ Verify that you have set the Dynamic Update option for the DNS server toSecure Only.
■ Configure Microsoft Exchange Server and Microsoft SQL Server on separatefailover nodes within a cluster.
■ In case ofWindows Server 2008, if User Access Control is enabled ensure thatyou perform the steps mentioned in the following Microsoft KB, before youbegin to install VCS.http://support.microsoft.com/kb/957307
Pre-installation and planningBest practices
24

Recovery toolsSymantec provides a cleanup script and 'vxexplorer' recovery tool for the failedVCS 5.1 SP2 installs, uninstalls, or upgrades. This script and recovery tool can bedownloaded from the following Symantec link:
http://www.symantec.com/docs/TECH76129
25Pre-installation and planningRecovery tools

Pre-installation and planningRecovery tools
26

Installing and ConfiguringVeritas Cluster Server
This chapter includes the following topics:
■ About installing VCS
■ Installing VCS using the product installer
■ Installing VCS using the command line
■ Repairing the installation
■ About reinstalling VCS
■ Adding or removing features
■ About configuring VCS cluster
About installing VCSThis chapter describes the process for installing Veritas Cluster Server 5.1 SP2.
You can install VCS using either the product installer or the command lineinterface (CLI).
Installing VCS using the product installerThis section outlines the tasks for installing VCS, using the product installer.
2Chapter

Note: Before installing Veritas Cluster Server, make sure you have uninstalledany previous versions of SFW or SFW HA.
For installing VCS 5.1 SP2 over any previous version of VCS, refer to See“Upgrading the VCS cluster to VCS 5.1 SP2” on page 45.
Before installing VCSBefore installing the software on remote systems running Windows 2003, youmustmodify thedriver signingoptions to ignorewarningmessages about softwareauthentication.
To modify the driver signing options
1 Open the Driver Signing Options dialog box by using either of the followingmethods:
■ FromWindows Explorer, right-click MyComputer, and click Properties.On the Hardware tab, click Driver Signing.
■ Open the Control Panel and double-click System. On the Hardware tab,click Driver Signing .
2 In the Driver Signing Options dialog box, select Ignore, and click OK.
Installing VCSTo install the product using the installer
1 Insert the product software disc into your disc drive and allow the autorunfeature to start the installation or from the Windows Explorer, navigate tothe root directory of the Veritas Cluster Server installation media anddouble-click Setup.exe.
2 Under Install Veritas Cluster Server, click Complete/Custom.
The Complete/Custom installation installs server components and optionalclient components. Click Administrative Console if you wish to install onlythe client components. This will install the VCS Java Console.
3 Review the information on the Welcome panel and click Next.
4 On the License Agreement panel, review the License Agreement and select Iaccept the terms of License Agreement. Click Next.
Installing and Configuring Veritas Cluster ServerInstalling VCS using the product installer
28

5 On the License panel, select Enter license key(s), type the license key, clickAdd, and then click Next. The License key details section displays moreinformation about the selected key.
If you do not have a license key, select Use embedded 2-month evaluationkey and click Next.
To delete a license key, select the key from the key list and click Remove.
6 On the Option Selection panel, select any of the following product optionsand click Next:
■ Veritas Cluster Server 5.1 SP2 for Windows (Server Components)
■ Global Clustering OptionSelect this option if youplan to configure a disaster recovery environment.
■ High Availability Hardware Replication Agents
■ Veritas Cluster Server Hardware Replication Agent for NetApp
■ High Availability Application Agents
■ Veritas Cluster Server Application Agent for Exchange 2003This option is available only on 32-bit machines.
■ Veritas Cluster Server Application Agent for Exchange 2007This option is available only on 64-bit machines.
■ Veritas Cluster Server Database Agent for Exchange 2010This option is available only on 64-bit machines.
■ High Availability Database Agents
■ Veritas Cluster Server Database Agent for SQLThis installs the VCS agent for both, SQL Server 2005 and SQL Server2008
■ Veritas Cluster Server Database Agent for Oracle
■ Enterprise Vault (EV) Cluster Setup Wizard
■ Product Documentation
■ Veritas Cluster Server 5.1 SP2 for Windows (Client Components)This installs the VCS Java Console on the same nodes where the servercomponents are installed.
7 On the System Selection panel, add the systems on which you want to installthe product.
29Installing and Configuring Veritas Cluster ServerInstalling VCS using the product installer

Note:Ensure that all the nodes have the same platform type (x86 or x64). TheWindows operating systems can be different though.
You can select the systems in one of the following ways:
■ In the System Name text box, manually type the system name andclickAdd.
■ Alternatively, browse to select the systems.On the Select Systems panel, the systems that belong to the domain inwhich you have logged in are listed in the Available Systems list. Selectone ormore systemsand click the right arrow tomove them to theSelectedSystems list. Click OK.Once you add or select a system, the wizard performs the verificationchecks and notes the verification details. To review the details, click thecorresponding information icon.By default the wizard uses %ProgramFiles%\Veritas as the installationdirectory. However, you can customize your installation directory. Tocustomize the installation directory, click the adjacent browse icon andselect the desired location. Click OK.
8 After the installer validates the systems for the installation, click Next.
Note that the installer fails to proceed with the installation, unless all theselected systems have passed the verification checks and are ready forinstallation. In case the verification checks have failed on any of the system,review the details and rectify the issue. Before you choose to proceed withthe installation click Re-verify to re-initiate the verification checks for thissystem.
9 On the Pre-install Summary panel, review the summary and click Next.
Note that the Automatically reboot systems after installer completesoperation check box is selected by default. This will reboot all the selectedremote systems immediately after the installation is complete on therespective system. If you do not want the wizard to initiate this auto reboot,clear the selection ofAutomaticallyrebootsystemsafterinstallercompletesoperation check box.
10 On the Installation panel, review the progress of installation and clickNextafter the installation is complete.
If an installation is not successful on any of the systems, the status screenshows a failed installation. If a security alert asks you to accept the Veritasdriver software, click Yes.
Installing and Configuring Veritas Cluster ServerInstalling VCS using the product installer
30

11 On the Post-install Summary panel, review the installation result and clickNext.
If the installation has failed on any of the system, refer to the log file fordetails.
12 On the Finish panel, click Finish.
If you had chose to initiate the auto reboot, a confirmationmessage to rebootthe local system appears. Click Yes to reboot immediately or No to rebootlater.
In case you had not selected to initiate the auto reboot, ensure that youmanually reboot these systems.
After installing VCSToensurea secure systemenvironment, after completing the installation sequence,reset the driver signing options on each computer to the original state of Warnor Block.
To reset the driver signing options
1 Open the Control Panel and click System.
2 Select the Hardware tab and click Driver Signing.
3 In the Driver Signing Options dialog box, reset the option to Warn or Block.
4 Click OK to close the Driver Signing Options dialog box, and then click OKagain to close the System window.
5 Repeat for each computer.
Installing VCS using the command lineYou can perform a silent installation from the command prompt using theSetup.exe command. A silent installation can be performed only on one node ata time. See the examples at the end of this section for reference.
To start the installation from the command window
1 Insert the product software disc into a drive connected to the system.
2 Click Start > Run.
3 Enter cmd in the Open field and click OK.
31Installing and Configuring Veritas Cluster ServerInstalling VCS using the command line

4 From the command window, navigate to the root directory of the productsoftware disc.
5 Use the following command to install the software:
Setup.exe /s Solutions=<"SolutionID,[SolutionID]">
Install_mode=<InstallMode>
Installdir=<"InstallDirPath"> Reboot=<RebootMode>
target=<”machine name”> Licensekey=<"LicenseKey">
options=<"a,b,c,...">
where the maximum length of the argument string is 512 characters.
Parameters for setup.exe
Table 2-1 lists the information about the possible parameter values for thesetup.exe.
Table 2-1 Possible parameter values
Set for silent mode./s
Set to indicate an install or uninstall.
1 = To install
4 = To repair
5 = To uninstall
The default setting is 1.
Example: Install_mode=1
Install_mode
Set to the type of installation.
6 = VCS Server Components
7 = VCS Client Components
Example: Solutions="6,7"
Solutions
Installing and Configuring Veritas Cluster ServerInstalling VCS using the command line
32

Table 2-1 Possible parameter values (continued)
Set the installation directory path. The pathmust start and end with a quotation mark.
Note: If you are upgrading to VCS 5.1SP2,the installation directory path used duringexisting VCS installation is used by default.Newpathprovided, if any, is not considered.
Thedefault setting isSystemDrive: \Programfiles\Veritas
Example:
INSTALLDIR="C:\InstallationDirectory"
Note: This is an optional parameter.
Install_dir
Set for the automatic reboot of the systemat the completion of the installation.
0 = No reboot
1 = Reboot
The default setting is 0 for no system reboot.
Example: Reboot=1
Note: This is an optional parameter.
Reboot
Set the node name. Specify only one node ata time.
The local node is the default setting whenthe node is unspecified.
Example: Node=”PC177VM-3”
Node
Specify the machine name for the systemwhere youwant to install the software.Makesure you place the machine name betweenquotes.
Local node is the default setting.
Example: “PC177VM-3”
This is an optional parameter.
Target
33Installing and Configuring Veritas Cluster ServerInstalling VCS using the command line

Table 2-1 Possible parameter values (continued)
Set the license key for the installation. Entermultiple keys by separating them with acomma (e.g. 123-345-567-789-123,321-543-765-789-321, etc.) The license keymust start and end with a quotation mark(").
LicenseKey has no default setting.
Example:LICENSEKEY="123-234-123-234-345"
Note: If the license key is not specified, anembedded 60 days demo license key is set bydefault.
LicenseKey
Set the desired options, if any. The optionmust start and end with a quotation mark("). Multiple options can be entered, use acomma as a separator.
There are no default settings.
The options for VCS are:
■ ntap
■ GCO
■ exchange
■ sql
■ oracle
■ ev
Example: OPTIONS="GCO"
Options
Setup.exe example: Client installation
This sample command installs the client components at the specified installationpath and tells the system not to reboot at the end of the installation.
Setup.exe /s Solutions=7 Install_mode=1
Installdir="C:\InstallationDirectory"
Setup.exe example: Server installation
This sample command installs the server components in thedirectoryC:\InstallationDirectory and tells the system to reboot at the end ofthe installation. It also installs with a license key of 123-234-123-234-345, andwith the GCO option.
Installing and Configuring Veritas Cluster ServerInstalling VCS using the command line
34

Setup.exe /s Solutions=6 Install_mode=1
INSTALLDIR="C:\InstallationDirectory" REBOOT=1
licensekey="123-234-123-234-345" options="GCO,SQL"
Repairing the installationThe product installer can repair an existing installation of the VCS client andserver components.
The Repair option restores the installation to its original state. This option fixesmissing or corrupt files, shortcuts, and registry entries on the local computer.
Note: Before you proceed to repair the installation, you must save yourconfiguration to another system and failover the service groups for yourapplications to another node.
Note: You can repair the installation only on the local system. Also, you mustrepair the client and server components separately.
To repair the installation
1 Open the Windows Control Panel and click Add or Remove Programs.
In case you are working on Windows Server 2008, go to Programs andFeatures. (Start > Settings > Control Panel > Programs and Features)
2 Scroll to Veritas Cluster Server 5.1 SP2 for Windows and select it.
For example, select Veritas Cluster Server 5.1 SP2 for Windows (ServerComponents) or Veritas Cluster Server 5.1 SP2 For Windows (ClientComponents).
3 Click Change.
The Symantec Product Installer screen appears.
4 On the Mode Selection panel, select Repair. Click Next.
35Installing and Configuring Veritas Cluster ServerRepairing the installation

5 On the System Selection panel, installer performs the verification checks.Click Next once the status is "Ready for repair".
Note:Wizard displays the verification check results only for one of thecomponent, in case during the installation you have installed the server andclient components on different drives but have now chose to repair both thecomponents. Proceed with the steps to repair the installation of both thecomponents.
In case the verification checks have failed on any of the system, review thedetails and rectify the issue. Before you choose toproceedwith the installation,click Re-verify to re-initiate the verification checks for this system.
6 On the Pre-install Summary panel, review the information and click Next tobegin the repair process.
Note that the Automatically reboot systems after installer completesoperation check box is selected by default. This will reboot the nodeimmediately after the repair operation is complete. If you do not want thewizard to initiate this auto reboot, clear the selection ofAutomaticallyrebootsystems after installer completes operation check box.
7 On the Installation panel, review the installation progress and click Nextafter the installation is complete.
If the installation fails, clickNext to review the report and address the reasonfor failure. You may have to uninstall and reinstall the software.
8 On the Post-install Summary panel, review the summary and click Next.
9 On the Finish panel, click Finish.
In case you had not selected to initiate the auto reboot, ensure that youmanually reboot the node.
About reinstalling VCSIf your VCS installation has failed due to some reason, you can choose to reinstallit without uninstalling the components that were installed during the failedattempt.
Note: You must reboot your system before you begin to reinstall VCS.
To reinstall VCS launch the product installer, possibly after you have rectifiedthe cause of failure and follow the wizard steps for installation.
Installing and Configuring Veritas Cluster ServerAbout reinstalling VCS
36
See “Installing VCS using the product installer” on page 27.
During installation, wizard displays a confirmation message on the SystemSelection panel. Click Yes to proceed with the installation.
Adding or removing featuresAfter you have installed VCS, you may need to add or remove features to yourapplication. The product installer lets you add or remove features.
Note: You can add or remove features on the local system only.
To add or remove features
1 Open the Windows Control Panel and click Add or Remove Programs.
In case of a Windows Server 2008 node, go to Programs and Features.
2 SelectVeritasClusterServer5.1SP2forWindows(ServerComponents) andclick Change.
3 On the Product Installer's Mode Selection panel, select Add or Remove andthen click Next.
4 On the Option Selection panel, select or clear the option check boxes in thetree navigation structure to add or remove a component respectively.
Note that only the options included in your product license, will be enabledfor selection. To select any other option, you must first enter the requiredlicense details. For details, refer to,
In case the verification checks have failed, review the details and rectify theissue. Before you choose to proceed with the installation click Re-verify tore-initiate the verification checks.
5 On the Pre-install Summary panel, review the summary and click Next.
Note that the Automatically reboot systems after installer completesoperation check box is selected by default. This will reboot all the selectedremote systems immediately after the installation is complete on therespective system. If you do not want the wizard to initiate this auto reboot,clear the selection ofAutomaticallyrebootsystemsafterinstallercompletesoperation check box.
37Installing and Configuring Veritas Cluster ServerAdding or removing features

6 On the Installation panel, review the progress of installation and click Nextafter the installation is complete.
If an installation is not successful, the status screen shows a failed installation.Refer to thePost-install summary formore details. Rectify the issue and thenproceed to re-install the component.
If a security alert asks you to accept the Veritas driver software, click Yes.
7 On the Post-install Summary panel, review the installation result and clickNext.
If the installation has failed, refer to the log file for details.
8 On the Finish panel, click Finish.
If you had chose to initiate the auto reboot, a confirmationmessage to rebootthe local system appears. Click Yes to reboot immediately or No to rebootlater.
In case you had not selected to initiate the auto reboot, ensure that youmanually reboot these systems.
About configuring VCS clusterAfter installing the software, set up the components required to runVeritasClusterServer. TheVCSConfigurationWizard sets up the cluster infrastructure, includingLLT and GAB, and provides an option of configuring the Symantec ProductAuthenticationService in the cluster. Thewizardalso configures theClusterServicegroup, which contains resources for notification, and global clusters.
■ If you plan to set up a disaster recovery environment, configure the wideareaconnector process for global clusters.
■ When configuring a user account for the VCS Helper service, choose theadministrative account set up on the filer
For instructions, see the chapter onGetting StartedwithVCS in theVeritasClusterServer Administrator’s Guide.
Installing and Configuring Veritas Cluster ServerAbout configuring VCS cluster
38

Uninstalling Veritas ClusterServer
This chapter includes the following topics:
■ Uninstalling using the product installer
■ Uninstalling from the command line
Uninstalling using the product installerThe Symantec Product Installer enables you to uninstall the product software.You can simultaneously uninstall the product from multiple remote nodes. Touninstall the product from remote nodes, ensure that the product is installed onthe local node.
If you have installed both, the Server and the Client components, then you arepresented with both the options in the Windows Add or Remove Programs touninstall the software. Uninstallation of Server components is independent ofthe client unstallation. You can however choose to uninstall the client whileuninstalling the Server components.
Note: For uninstallingVCS, youmust first unconfigure the cluster. Use theVeritasCluster Wizard (VCW) to unconfigure the cluster. See the Veritas Cluster ServerAdministrator’s Guide for more information.
The following procedure describes the steps required to completely uninstall theproduct software (Server and Client components). If you want to uninstall anyone of the other installed options, you must choose the Add or Remove feature.
See “Adding or removing features” on page 37.
3Chapter

To uninstall using the product installer
1 In the Windows Control Panel, select Add or Remove Programs.
In case you are working on Windows Server 2008, go to Programs andFeatures.
2 Click Veritas Cluster Server 5.1 SP2 for Windows (Server Components).
Note: If you select Veritas Cluster Server 5.1 SP2 for Windows (ClientComponents), it will uninstall the client components only.
3 Click Remove.
In case of Windows Server 2008, click Uninstall.
4 Review the information on the Welcome panel and then click Next.
5 On the Options Selection panel, select the options you want to uninstall.
Click Next.
6 OntheSystemSelectionpanel, add thenodes fromwhichyouwant touninstallthe product software.
Note: By default the local system is selected for un-installation. In case youare performing a remote un-installation and do not want to uninstall thesoftware from the local system, click the corresponding X icon to remove thenode from the list.
You can add the nodes this in one of the following ways:
■ In the SystemName text box,manually type the node name and clickAdd.
■ Alternatively, browse to select the nodes.Thenodes that belong to the domain inwhich youhave logged in are listedin the Available Systems list. Select one ormore nodes and click the rightarrow to move them to the Selected Systems list. ClickOK. Once you addor select a node, wizard performs the verification checks and notes theverification details. To review the details, click the correspondinginformation icon.
Uninstalling Veritas Cluster ServerUninstalling using the product installer
40
7 Click Next.
Note that the wizard fails to proceed with the un-installation, unless all theselected nodes have passed the verification checks and are ready foruninstallation. In case the verification checkshave failed onanyof the system,review the details and rectify the issue. Before you choose to proceed withthe un-installation click Re-verify to re-initiate the verification checks forthis node.
Note:Wizard displays the verification check results only for one of thecomponent, in case during the installation you have installed the server andclient components on different drives but have now chose to uninstall boththe components. Proceed with the uninstallation to uninstall both thecomponents.
8 On the Pre-install Summary panel, review the summary and click Next.
Note that the Automatically reboot systems after installer completesoperation checkbox is selected bydefault. Thiswill reboot the remote systemsimmediately after the installation is complete on the respective system. Ifyou do not want the wizard to initiate this auto reboot, clear the selection ofAutomatically reboot systems after installer completes operation checkbox.
9 On the Installation panel, review the uninstallation progress and click Nextwhen the uninstallation is complete.
10 On the Post-uninstall Summary panel, review the uninstallation results andclick Next.
If the un-installation has failed on any of the system, review its summaryreport and check the log file for details.
11 On the Finish panel, click Finish.
In case you had not selected to initiate the auto reboot for the remote nodes,ensure that you manually reboot these nodes.
Uninstalling from the command lineYou can silently uninstall the VCS software from the command prompt using thesetup.exe command.
The setup.exe command syntax is as follows:
41Uninstalling Veritas Cluster ServerUninstalling from the command line
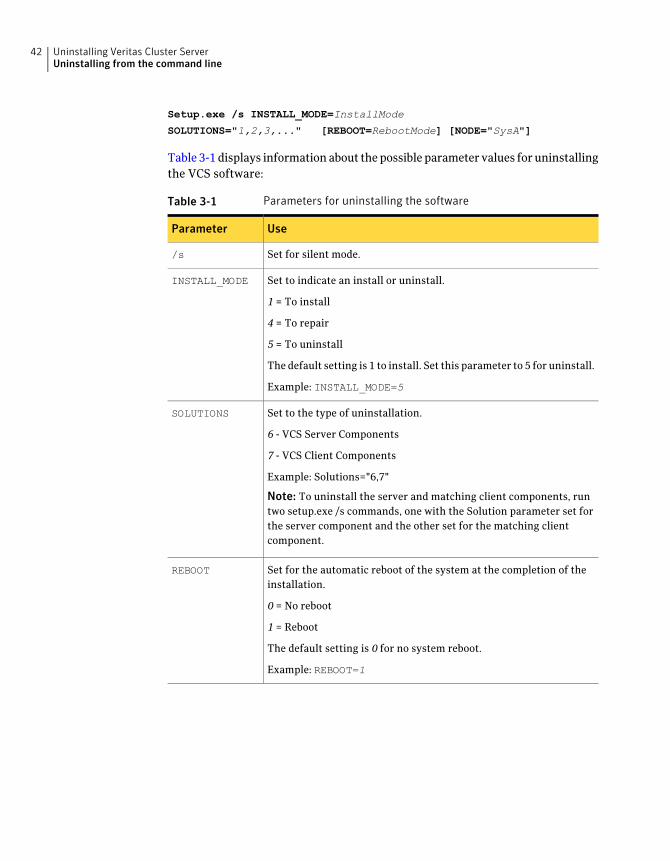
Setup.exe /s INSTALL_MODE=InstallMode
SOLUTIONS="1,2,3,..." [REBOOT=RebootMode] [NODE="SysA"]
Table 3-1displays informationabout thepossible parameter values foruninstallingthe VCS software:
Table 3-1 Parameters for uninstalling the software
UseParameter
Set for silent mode./s
Set to indicate an install or uninstall.
1 = To install
4 = To repair
5 = To uninstall
The default setting is 1 to install. Set this parameter to 5 for uninstall.
Example: INSTALL_MODE=5
INSTALL_MODE
Set to the type of uninstallation.
6 - VCS Server Components
7 - VCS Client Components
Example: Solutions="6,7"
Note: To uninstall the server and matching client components, runtwo setup.exe /s commands, one with the Solution parameter set forthe server component and the other set for the matching clientcomponent.
SOLUTIONS
Set for the automatic reboot of the system at the completion of theinstallation.
0 = No reboot
1 = Reboot
The default setting is 0 for no system reboot.
Example: REBOOT=1
REBOOT
Uninstalling Veritas Cluster ServerUninstalling from the command line
42

Table 3-1 Parameters for uninstalling the software (continued)
UseParameter
Set the node name.
You can enter only one node at a time.
The local node is the default setting when the node is unspecified.
The machine name of the node must start and end with a quotationmark (").
Example: Node="SysA"
Note: Reboot the system at the end of uninstallation to ensure thatthe VCS drivers for the server component are installed correctly. Youdo not have to reboot after uninstalling the client.
NODE
The followingproceduredescribeshowtouninstall the software fromthecommandprompt.
To uninstall from the command prompt
1 Open a command window by clicking Start > Run.
2 Enter cmd in the Open field and click OK.
3 In the command window, navigate to the root directory of the product DVD.
4 Use the following command syntax to silently uninstall VCS:
Setup.exe /s INSTALL_MODE=InstallMode
SOLUTIONS="1,2,3,..."
[REBOOT=RebootMode] [NODE="SysA"]
Uninstall command examplesThe following uninstall command example completely uninstalls the VCS clientcomponents, and reboots the system at the end of the uninstall process:
Setup.exe /s Solutions=7 Install_mode=5 Reboot=0
The following uninstall command example completely uninstalls the VCS servercomponents, and reboots the system at the end of the uninstall process:
Setup.exe /s Solutions=6 Install_mode=5 Reboot=1
43Uninstalling Veritas Cluster ServerUninstalling from the command line

Uninstalling Veritas Cluster ServerUninstalling from the command line
44

Upgrading Veritas ClusterServer
This chapter includes the following topics:
■ Upgrading the VCS cluster to VCS 5.1 SP2
■ Upgrading an Exchange server cluster
■ Upgrading a SQL server cluster
■ Upgrading an Oracle cluster
■ Upgrading the Microsoft service packs
Upgrading the VCS cluster to VCS 5.1 SP2This sectiondescribes the tasks to be carried outwhenupgrading toVeritas ClusterServer 5.1 SP2.
Note: Before upgrading to VCS 5.1 SP2, verify the version of Snapdrive installed.If you have Snapdrive 3.2 or 4.x installed and you upgrade to VCS 5.1 SP2, all thewizards thatwereworkingbefore theupgrade,will stopworking.Youmustupgradeto VCS 5.1 SP2 first and then upgrade the Snapdrive installation to version 6.0 orabove.
Before you upgrade the clusterEnsure that you perform the pre-upgrade tasks as mentioned in the followingsections, before you proceed with the actual upgrade steps.
4Chapter

General preparationsWhen upgrading the product, perform the following general pre-upgrade tasks:
■ Ensure that your cluster nodes have version 5.0RP1a or higher of VCS alreadyinstalled. The previously installed versions of VCS must meet this minimumproduct version, which the product installer checks before it upgrades.If your current installation does not meet the minimum level required by theinstaller, you must manually apply the appropriate product upgrades to meettheminimumproduct level required before proceedingwith the installer. Youcan get the intermediate versions of the products on the Symantec Supportsite:
■ Back up all your data.
■ Back up the system state.
■ Check the hardware requirements for the software upgrade.
■ Check to see if you need to update the Microsoft Active Directory to supportthe upgrade software.
■ Test the systemafter eachupgrade, especially after applying product upgradesto meet the minimum version required. An incremental upgrade eases thetroubleshooting process.
Saving and closing the cluster configurationBefore starting the upgrade process, use the VCS Java Console to "save and close"the VCS configuration. This operation involves saving the latest configuration todisk and changing the configuration state to read-only mode. You must also stopVCS before attempting the upgrade process.
To save and close the cluster configuration
◆ Perform one of the following tasks:
■ From the VCS Java Console, click Save and Close Configuration on theCluster Explorer toolbar.
■ From the command prompt, type the following command.C:\>haconf -dump -makero
Taking the service groups offlineTake all service groups offline before the upgrade.
Note: This task is applicable only in case of parallel upgrade.
Upgrading Veritas Cluster ServerUpgrading the VCS cluster to VCS 5.1 SP2
46

To take the service groups offline
1 From the command prompt, type:
C:\>hagrp -offline group_name -sys system_name
where group_name is the name of the service group and system_name is thenode on which the group is online.
2 Repeat this command for all service groups that are online.
Closing VCS clientsExit all instances of the Cluster Manager (Java Console) before the upgrade. Toclose VCS clients, click File > Logout from the Cluster Manager (Java Console)and then click File > Exit on the Cluster Monitor window.
About upgrading VCS while in co-existence with VeritasNetBackupIf you are running Veritas NetBackup™ version 6.0 or 6.5 on systems where youare upgrading VCS then you must shut down the OpsCenterServer service beforean upgrade.
BothNetBackup andVCS share the sameATbroker and client, and for this reasonthe OpsCenterServer service must by shut down before an upgrade.
Changing the driver signing optionsWhen upgrading on systems running Windows Server 2003, you must set theWindows driver signing option to ignore software authentication warningmessages.
To change the driver signing options
1 Open the Control Panel and click System.
2 Click the Hardware tab and click Driver Signing.
3 In the Driver Signing Options dialog box, note the current setting, and selectIgnore.
4 Click OK.
5 Repeat on each cluster node.
Note: If you donot change these options, the installer rejects the node at validationand halts the upgrade. After you complete the upgrading, you should reset thedriver signing options to their previous state.
47Upgrading Veritas Cluster ServerUpgrading the VCS cluster to VCS 5.1 SP2

Upgrading the clusterUse theVCSproduct installer to upgrade the cluster. You can upgrade the producton multiple remote nodes.
When upgrading on multiple nodes, ensure that all the nodes have the sameplatform type (x86 or x64). The Windows operating systems can be differentthough.
During the upgrade, ensure that you select all the installed options. If you do notwant to include any of the installed option in the upgraded cluster, uninstall thesame from the cluster before upgrading. Also, when upgrading multiple nodes,the selected options should be the same on all the nodes. However, if a supersetof options is selected, then theupgrade proceeds as normal and all selected options(superset of options) are installed on all the nodes.
Note: The installer removes all hotfixes installed on the existing version beforeperforming the upgrade. Some of those hotfixes are already part of this servicepack. However, after performing the upgrade you may want to re-install thehotfixes that are not included in the service pack. Please refer to the followingtechnote for a list of hotfixes that are not part of this service pack:
http://entsupport.symantec.com/docs/358408
You can upgrade the cluster in any one of the following ways:
■ Parallel upgradeSee “About the parallel upgrade” on page 48.
■ Rolling upgradeSee “About the rolling upgrade” on page 51.
About the parallel upgradeTo perform a parallel upgrade you must bring the application service groupsoffline on all the cluster nodes and then run the product installer to begin theupgrade. This requires a considerable amount of downtime for the clusteredapplications.
Additionally, ensure that you have performed all the pre-upgrade tasks.
See “Before you upgrade the cluster” on page 45.
Performing a parallel upgradeFollow the steps below to upgrade VCS parallely on all the cluster nodes.
Upgrading Veritas Cluster ServerUpgrading the VCS cluster to VCS 5.1 SP2
48

To upgrade VCS
1 Insert the DVD containing the installation software into your system's discdrive or download the installation software from the Symantec website.
2 Allow the autorun feature to start the installation or fromWindows Explorer,navigate to the root directory of theVeritas Cluster Server installationmediaand double-click Setup.exe.
3 Under Install Veritas Cluster Server, click Complete/Custom.
The Complete/Custom installation installs server components and optionalclient components. Click Administrative Console if you wish to install onlythe client components. This will install the VCS Java Console.
4 On the Welcome panel, review the welcome message and click Next.
5 On the License Agreement panel, review the terms of license agreement andselect I accept the terms of License Agreement. click Next.
6 On the License panel, select Enter license key(s), type the license key,clickAdd, and then click Next. The License key details section displays moreinformation about the selected key.
The License key details section displaysmore information about the selectedkey.
If you do not have a license key, select Use embedded evaluation licensekeyand click Next.
To delete a license key, select the key from the key list and click Remove.
7 On the Option Selection panel, select the appropriate product options andclick Next.
If any previous VCS agents and options are installed on the node, make sureyou select the same agents and options while upgrading. If you do not wantto include the agents and options in the upgraded cluster, uninstall themfrom the cluster before proceeding.
8 On the System Selection panel, add the systems on which you want to installthe product. You can perform this in one of the following ways:
■ In the System Name text box, manually type the system name and clickAdd.
■ Alternatively, browse to select the systems.
On the Select Systems panel, the systems that belong to the domain in whichyou have logged in are listed in the Available Systems list. Select one ormoresystems and click the right arrow to move them to the Selected Systems list.Click OK.
49Upgrading Veritas Cluster ServerUpgrading the VCS cluster to VCS 5.1 SP2

Once you add or select a system, the wizard performs the verification checksand notes the verification details. To review the details, click thecorresponding information icon.
The installation directory used during the installation is selected by default.
9 After the installer validates the systems for the installation, click Next.
Note that the installer fails to proceed with the installation, unless all theselected systems have passed the verification checks and are ready forinstallation. In case the verification checks have failed on any of the system,review the details and rectify the issue. Before you choose to proceed withthe installation click Re-verify to re-initiate the verification checks for thissystem.
10 On the Pre-upgrade Summary panel, review the summary, selectAutomatically reboot systems after installer completes the operation toreboot the systems after the installation is complete. click Next.
11 On the Pre-upgrade Tasks panel, review the progress of pre-upgrade tasksand click Next, after the tasks are complete on all the systems.
If the pre-upgrade tasks fail on any of the system, clickRetry to run the taskson the systemagain. ClickRetryAll to run the tasks on all the systems again.
Note that the installer fails to proceed with the installation unless thepre-upgrade tasks are complete on all the systems.
If the tasks continue to fail even after attemting to rectify and retry to runthe tasks, you may have to remove the affected systems from the list tocontinue with the installation.
12 On the Installation panel, review the progress of installation and clickNextwhen the installation is complete.
If an installation is not successful on any of the systems, the status screenshows a failed installation. If a security alert asks you to accept the Veritasdriver software, click Yes.
Upgrading Veritas Cluster ServerUpgrading the VCS cluster to VCS 5.1 SP2
50

13 On the Post-upgrade Summary panel, review the installation result and clickNext.
If the installation has failed on any of the system, refer to the log file fordetails.
14 On the Finish panel, click Finish.
If you had chose to initiate the auto reboot, a confirmationmessage to rebootthe local system appears. Click Yes to reboot immediately or No to rebootlater.
In case you had not selected to initiate the auto reboot, ensure that youmanually reboot these systems.
About the rolling upgradePerform a rolling upgrade to minimize the downtime for the cluster. Dependingon the situation, you can calculate the approximate downtime as follows:
Downtime equals the time that is taken to offline andonline the service groups.
You can fail over all your servicegroups to the nodes that are up.
Downtime for that service group equals the time thatis taken to perform an upgrade and restart the node.
You have a service group that youcannot fail over to a node that runsduring upgrade.
Planning for rolling upgrade
Plan out the movement of the service groups from node-to-node to minimize thedowntime for any particular service group.
Some rough guidelines include:
■ Split the cluster in half. If the cluster has an odd number of nodes, calculate(n+1)/2, and start the upgrade with the even number of nodes.
■ Split the cluster so that your high priority service groups remain online duringthe upgrade of the first subcluster.
Rolling upgrade limitations
The following limitations may apply during the phased upgrade:
■ While you perform the upgrades, do not add or remove service groups to anyof the nodes.
■ Depending on your configuration, you may find that you cannot upgrademultiple nodes at the same time. You may only be able to upgrade one nodeat a time.
51Upgrading Veritas Cluster ServerUpgrading the VCS cluster to VCS 5.1 SP2
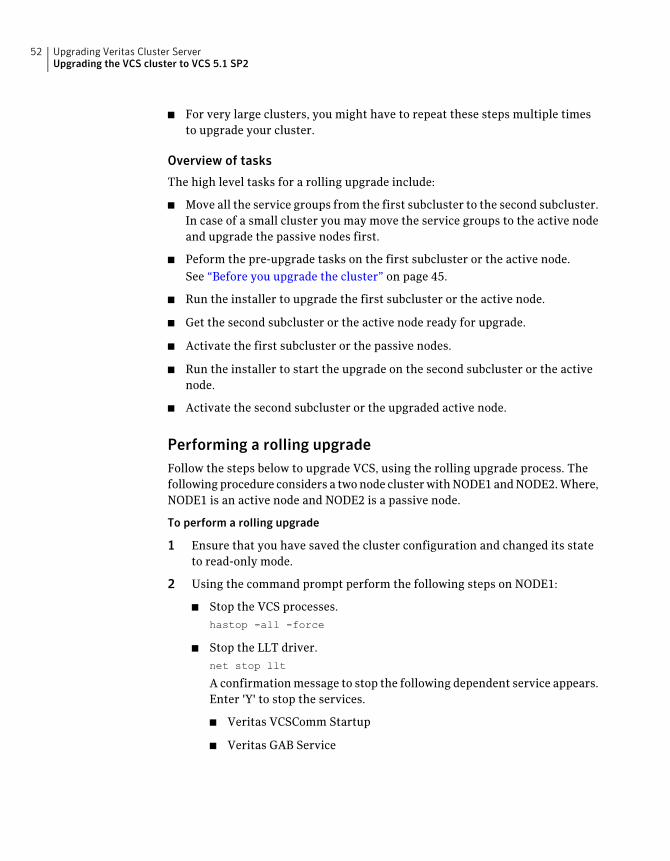
■ For very large clusters, you might have to repeat these steps multiple timesto upgrade your cluster.
Overview of tasks
The high level tasks for a rolling upgrade include:
■ Move all the service groups from the first subcluster to the second subcluster.In case of a small cluster you may move the service groups to the active nodeand upgrade the passive nodes first.
■ Peform the pre-upgrade tasks on the first subcluster or the active node.See “Before you upgrade the cluster” on page 45.
■ Run the installer to upgrade the first subcluster or the active node.
■ Get the second subcluster or the active node ready for upgrade.
■ Activate the first subcluster or the passive nodes.
■ Run the installer to start the upgrade on the second subcluster or the activenode.
■ Activate the second subcluster or the upgraded active node.
Performing a rolling upgradeFollow the steps below to upgrade VCS, using the rolling upgrade process. Thefollowingprocedure considers a twonode clusterwithNODE1andNODE2.Where,NODE1 is an active node and NODE2 is a passive node.
To perform a rolling upgrade
1 Ensure that you have saved the cluster configuration and changed its stateto read-only mode.
2 Using the command prompt perform the following steps on NODE1:
■ Stop the VCS processes.hastop -all -force
■ Stop the LLT driver.net stop llt
A confirmationmessage to stop the following dependent service appears.Enter 'Y' to stop the services.
■ Veritas VCSComm Startup
■ Veritas GAB Service
Upgrading Veritas Cluster ServerUpgrading the VCS cluster to VCS 5.1 SP2
52

3 On NODE2, run the VCS product installer and follow the wizard steps toupgrade VCS and other installed options.
This stops all the VCS services.
Ensure that you reboot the node after the installation is complete.
See “To upgrade VCS” on page 49.
4 On NODE1, start the vcscomm service.
net start vcscomm
5 On NODE2, check the status of HAD.
hasys -state
When HAD enters a running state, stop it using the following command:
hastop -all
6 Perform the following on NODE1.
■ Start HADhastart
■ Check the status of the application service groups.hagrp -state
Once the application service group is fully probed as 'online', bring itoffline, using the VCS Cluster Manager (Java Console).
■ Stop HADhastop -local
7 Perform the following on NODE2.
■ Start HADhastart
■ Using the VCS Cluster Manager (Java Console), bring the applicationservice groups online
■ Stop HADhastop -all -force
■ Stop LLT drivernet stop llt
A confirmationmessage to stop the following dependent service appears.Enter 'Y' to stop the services.
■ Veritas VCSComm Startup
■ Veritas GAB Service
53Upgrading Veritas Cluster ServerUpgrading the VCS cluster to VCS 5.1 SP2

8 On NODE1, run the VCS product installer and follow the wizard steps toupgrade VCS and the installed options.
This stops all the VCS services.
After the upgrade is complete, ensure that you reboot the node.
9 Start HAD on all the nodes. From any one node run the following command:
hastart -all
10 Ensure that all the service groups are probed as online.
After you upgrade the cluster to 5.1 SP2Perform the following after you upgrade the cluster to 5.1 SP2:
Resetting the driver signing optionsAfter completing the installation sequence, reset the drive signing options oneach computer.
Resetting the driver signing option procedure
1 Open the Control Panel, and click System.
2 Click the Hardware tab and click Driver Signing.
3 In the Driver Signing Options dialog box, reset the option to Warn or Block.
4 Click OK.
5 Repeat this procedure for each computer.
Bringing the print share service group online after the upgrade
Note: You need not perform this task if you are upgrading from VCS 5.1 SP1.
For VCS 5.1 SP2, the PrintSpool agent (for VCS) has been enhanced to meetscalability andperformance requirements. ThePrintSpool agentno longerdependson the RegRep agent for operation. The dependency between the PrintSpool andthe RegRep resource in a print share service group has been eliminated.
This affects print share service groups configured in earlier versions of VCS. Ifyou have configured a print share and you upgrade VCS, then the existing printshare service group will fail to come online, after the upgrade.
After the upgrade is complete, youmust run thePrint Share ConfigurationWizardto modify the print share service group. This will allow the wizard to make therequired changes to the service group configuration.
Upgrading Veritas Cluster ServerUpgrading the VCS cluster to VCS 5.1 SP2
54
Note: In case of an upgrade, do not add or remove any resources, or modify anyother attributes in the print share service group for the first time you run thePrint Share Configuration Wizard to modify the service group.
Before you modify the existing print share service group:
■ Make sure that the VCS engine (HAD) is running on the cluster node.
■ Mount the drives or LUNs that contain the spooler and the registry replicationdirectories on the system on which you will run the wizard.
To modify the print share service group after an upgrade
1 Start thePrint ShareConfigurationWizard. (Start>AllPrograms>Symantec>VeritasClusterServer>ConfigurationTools>PrintShareConfigurationWizard)
2 Read the information on the Welcome panel and click Next.
3 On theWizardOptions panel, clickModifyservicegroup, select your existingprint share service group, and then click Next.
4 Click Next on the subsequent wizard panels and complete the wizard steps.You can now bring the printshare service group online.
Importing the VCS Management PackThis rollup patch contains fixes for the VCS Management Pack. If you havedeployed the VCS Management Pack for Microsoft Operations Manager 2005 inyour cluster environment, you can re-import the updated VCSManagement Packafter installing the rollup patch.
The updated VCS Management Pack is included with the rollup patch software.Import the appropriate VCS Management Pack (.akm file) using the MOM 2005SP1 Administrator Console.
While importing themanagement pack, ensure that you select theUpdateexistingManagement Pack option in the Management Pack Import/Export Wizard.
Changing the type definition default valuesThe cluster type definitions are reset to their default values after the upgrade.Refer to the backup copyof the types.cf file.Use theClusterManager (JavaConsole)to change the type definition default values with the values from the types.cfbackup file.
55Upgrading Veritas Cluster ServerUpgrading the VCS cluster to VCS 5.1 SP2

Note:Do not replace the types.cf file with the backup copy after the upgrade. Thebackup copy must be used only as a reference for the customized type definitionvalues in the cluster.
Removing the VRTSWebApp resource from the configurationSupport for the VCS Cluster Management Console (Single Cluster Mode) isdiscontinued in 5.1 SP2. The VCS VRTSWebApp agent has been deprecated andis uninstalled during the upgrade. Also, the VCS Cluster Configuration Wizard(VCW) no longer provides the option to configure the Cluster Manager servicecomponents.
If VRTSWebApp resource is configured in ClusterService group, after upgradingto 5.1SP2 the resource fails to get probed and the ClusterService group fails tocome online in the cluster. Youmustmanually delete the VRTSWebApp resourcefrom the ClusterService group. Use the Cluster Manager (Java Console), thecommand line (hares -delete), or the Veritas Operations Manager (VOM) toremove the resource.
Upgrading an Exchange server clusterThis section describes the upgrade scenarios for upgrading to VCS 5.1 SP2 in anExchange 2003 or Exchange 2007 cluster.
For details on upgrading to VCS 5.1 SP2,
See “Upgrading the VCS cluster to VCS 5.1 SP2” on page 45.
During the upgrade you may want to update Exchange with a service pack afterupgrading VCS. For information on updating Exchange service packs,
See “Upgrading to Microsoft Exchange Server 2007 SP3 in a VCS environment”on page 78.
See “Upgrading to Microsoft Exchange 2003 SP2 in a VCS environment”on page 77.
See “Upgrading from Microsoft Exchange 2010 to Exchange 2010 SP1 in a VCSenvironment” on page 81.
Upgrade scenariosTable 4-1 table presents possible scenarios for upgrading to a VCS 5.1 SP2 clusterwith Microsoft Exchange.
Upgrading Veritas Cluster ServerUpgrading an Exchange server cluster
56

Table 4-1 Upgrade matrix for Exchange cluster
Upgrade to cluster configuration...Upgrade from clusterconfiguration...
VCS — 5.1SP2
Operating System — Windows Server 2003 (SP1,SP2, R2)
Exchange Server — 2003 (SP2)
VCS— 5.0RP1a, 5.0 RU1, 5.1, 5.1AP1,5.1SP1
Operating System—WindowsServer2003
Exchange Server — 2003
VCS — 5.1SP2
Operating System — Windows Server 2003 (SP1,SP2, R2) x64 only
Exchange Server — 2007 (SP1, SP2, SP3)
VCS— 5.0RP1a, 5.0 RU1, 5.1, 5.1AP1,5.1SP1
Operating System—WindowsServer2003 (x64 only)
Exchange Server — 2007
Upgrading a SQL server clusterThis section provides information about upgrading toVCS 5.1 SP2 in a SQLServercluster.
During the cluster upgrade you may also want to upgrade SQL Server.
See “Upgrading fromMicrosoft SQL Server 2000 to SQL Server 2005” on page 58.
See “Upgrading from Microsoft SQL Server 2000 or 2005 to SQL Server 2008 orSQL Server 2008 R2” on page 60.
Additionally, you may want to update SQL Server with a service pack. Forinformation on upgrading SQL server service packs,
See “Upgrading Microsoft SQL 2000 to SP4 in a VCS environment” on page 82.
See “Upgrading Microsoft SQL 2005 to SP1 in a VCS environment” on page 83.
See “Upgrading Microsoft SQL 2005 to 2005 SP2 or later in a VCS environment”on page 85.
See “Upgrading Microsoft SQL 2008 or 2008 R2 with the latest service packs in aVCS environment” on page 89.
See “Upgrading from Microsoft SQL Server 2008 or SQL Server 2008 SP1 to SQLServer 2008 R2” on page 64.
Note: If you are upgrading both Microsoft SQL Server and VCS, then you mustupgrade VCS first and then proceed to upgrade SQL Server.
57Upgrading Veritas Cluster ServerUpgrading a SQL server cluster

Upgrade scenariosTable 4-2 presents possible scenarios for upgrading to a VCS 5.1 SP2 cluster withSQL Server.
Table 4-2 Upgrade matrix for SQL Server cluster
Upgrade to cluster configuration...Upgrade from clusterconfiguration...
VCS — 5.1SP2
OperatingSystem—WindowsServer2003 (includingSP1, SP2, R2)
SQL Server — 2005 (including SP2), 2008 (includingSP1 and R2)
VCS— 5.0RP1a, 5.0RU1, 5.1, 5.1AP1,5.1SP1
OperatingSystem—WindowsServer2003
SQL Server — 2000 SP4
VCS — 5.1SP2
OperatingSystem—WindowsServer2003 (includingSP1, SP2, R2)
SQLServer— 2005SP2, 2008 (including SP1 andR2)
VCS— 5.0RP1a, 5.0RU1, 5.1, 5.1AP1,5.1SP1
OperatingSystem—WindowsServer2003
SQL Server — 2000 SP4, 2005
VCS — 5.1SP2
OperatingSystem—WindowsServer2003 (includingSP1, SP2, R2)
SQL Server — 2008 SP1, 2008 R2
VCS — 5.1AP1, 5.1SP1
OperatingSystem—WindowsServer2003
SQL Server — 2008
Upgrading from Microsoft SQL Server 2000 to SQL Server 2005The following steps describe how toupgrade your existing SQLServer 2000 clusterto SQL Server 2005. Complete these steps on all the cluster nodes that are part ofthe SQL service group, one node at a time.
At a high level, upgrading to SQL Server 2005 involves the following tasks:
■ Upgrade SQL Server on the first node
■ Upgrade SQL Server on each additional node
■ Create the SQL Server 2005 service group
Upgrading Veritas Cluster ServerUpgrading a SQL server cluster
58

To upgrade SQL Server on the first node
1 Using theVCSClusterManager (Java Console), on any one of the cluster nodeonwhichyouwant toupgradeSQLServer, take all the SQLServer 2000 servicegroup resources (except the storage resources) offline and delete them.
If the resources are already offline, bring only the storage resources online.To bring the storage resources online, from the VCS Cluster Manager (JavaConsole), right-click each of the storage resource and selectOnline. ClickYesin the confirmation pop-up to bring the resource online.
2 Take a backup of the SQL Server 2000 data directories from the shared diskand store them in a temporary location.
You will need the backed-up directories while upgrading SQL Server on theadditional failover nodes.
3 Launch the Microsoft SQL Server 2005 installer and proceed through theinstallation process.
Make sure that you select the option to upgrade the existing instance(s)whenprompted to do so. This action automatically places the data files in the properlocation.
4 Reboot the node if requested to do so when the installation completes.
5 Take the service group offline on the first node, if you did not reboot.(Rebooting automatically takes the service group offline.)
Once you have completed the upgrade procedure on the first node, you mustperform the following steps on each additional node in the cluster.
To upgrade SQL Server on each additional node
1 Bring the SQL Server 2000 service group storage resources online. From theVCS Cluster Manager (Java Console), right-click each of this resource andselect Online. Click Yes in the confirmation pop-up to bring the resourceonline.
2 From the shared disks, delete the original RegRep folder, if any, and renamethe SQL Server 2000 data directories.
3 Copy the backed-up SQL Server 2000 data directories from the temporarylocation to the shared disks.
The backed-up directories are the same that you had backed up earlier whileupgrading SQL Server on the first cluster node.
59Upgrading Veritas Cluster ServerUpgrading a SQL server cluster

4 Launch the Microsoft SQL Server 2005 installer and proceed through theinstallation process.
Make sure that you select the option to upgrade the existing instance(s)whenprompted to do so. This action automatically places the data files in the properlocation.
Refer to your Microsoft SQL Server 2005 documentation for more detailedinstructions on installing Microsoft SQL Server.
5 Reboot the node if requested to do so when the installation completes.
6 Take the entire service groupoffline, if youdidnot reboot thenode. (Rebootingautomatically takes the service group offline.)
Note: If there are no additional nodes to upgrade, you need not offline theservice group.
Once you have completed upgrading all of the nodes in the SQL Server cluster,continue with creating the service group.
To create the SQL Server 2005 service group
1 On the last node, ensure that only the storage resources (from the SQLServer2000 service group) are online. If offline, from theVCSClusterManager (JavaConsole), right-click each of this resource and select Online.
2 From the Java Console, delete the existing SQL Server 2000 service group(from the treeview). Right-click the service group and selectDelete. ClickYeswhen asked to confirm if you want to delete the service group.
3 Create the SQLServer 2005 service groupusing the SQLServer ConfigurationWizard. Click Start >All Programs > Symantec > SQLServerConfigurationWizard.
4 Test switch the service group to another node in the cluster. Right-click theservice group in treeview, select Switch To, and select any additional nodein the cluster.
Upgrading from Microsoft SQL Server 2000 or 2005 to SQL Server2008 or SQL Server 2008 R2
The following steps describe how to upgrade your existing clustered SQL Server2000 or SQL Server 2005 setup to SQL Server 2008 or SQL Server 2008 R2.Complete these steps on all the cluster nodes that are part of the SQL servicegroup, one node at a time.
Upgrading Veritas Cluster ServerUpgrading a SQL server cluster
60

Note: These steps are applicable only if you already have SQL Server 2000 or SQLServer 2005 set up in your cluster environment.
At a high level, upgrading to SQL Server 2008 or 2008 R2 involves the followingtasks:
■ Upgrade SQL Server on the first cluster node.
■ Upgrade SQL Server on each additional failover node.
■ In caseof aDisasterRecovery configuration, repeat theSQLupgradeprocedureson the nodes at the secondary site. First upgrade the first cluster node at theDR site, and then the additional failover nodes.
■ Delete the existingSQLServer 2000or 2005 service group, including the servicegroup at the DR site, if applicable.
■ Create a SQLServer 2008 or SQL Server 2008R2 service groups, using the SQLServer 2008ConfigurationWizard. In case of aDR setup, create a service groupat the secondary site also.
To configure a new HA and DR environment for SQL Server 2000 or SQL Server2005, refer to the Veritas Cluster Server Implementation Guide forMicrosoft SQL.
To configure a new HA and DR environment for SQL Server 2008 or SQL Server2008 R2, refer to theVeritas Cluster Server Implementation Guide for MicrosoftSQL Server 2008.
Note: In case of a Disaster Recovery setup, you must first upgrade SQL on thecluster nodes at the primary site and thenproceedwith the nodes at the secondarysite. Youmust follow the same upgrade sequence at both sites, upgrade first nodeand then the additional nodes, as described in the procedures in this section.
Ensure that you perform the following before the upgrade:
■ Take a backup of the SQL databases.
■ In case of a Disaster Recovery environment, ensure that the databases on theprimary and secondary sites are synchronized and then stop the replicationbetween the sites.
■ Ensure that you have installedVCS 5.1 SP2 forWindows on all the SQL servicegroup cluster nodes that you wish to upgrade.See “About installing VCS” on page 27.
■ Make anote of the SQLvirtual server nameand all the IP addresses configuredat both the primary and the secondary site, for the SQL setup in the DRenvironment. You will need these details later.
61Upgrading Veritas Cluster ServerUpgrading a SQL server cluster

Upgrading SQL on the first cluster nodeThese steps assume a single SQLServer instance configured in a two-node clusterconfiguration.
To upgrade SQL Server on the first cluster node
1 On any one of the cluster node on which you want to upgrade SQL Server,take all the SQL Server 2000 or SQL Server 2005 service group resources(excluding the storage resources) offline and delete the same.
If the resources are already offline, bring the storage resources online. Tobring the resource online, from the VCS Cluster Manager (Java Console),right-click each of the resource and select Online. Click Yes in theconfirmation pop-up to bring the resource online.
2 Take a backup of the SQL Server 2000 or SQL Server 2005 database from theshared disk and store them in a temporary location.
You will need the backed-up directories while upgrading SQL Server on theadditional failover nodes.
3 Launch the Microsoft SQL Server 2008 installer and install SQL Server 2008on the node.Make sure that you select the option to upgrade the existing SQLServer instance(s), when prompted to do so. The SQL Server 2008 installerthen automatically places the SQL data files in the appropriate location.
Refer to the Microsoft SQL Server 2008 documentation for instructions.
4 Take the entire service group offline on the node.
This completes the upgrade steps on the first cluster node. Proceed toupgrading SQL on the additional failover nodes.
Upgrading SQL on the additional failover nodePerform the following steps on each additional failover node that is part of theSQL service group.
To upgrade SQL Server on the additional node
1 Bring the storage resources online. From the VCS Cluster Manager (JavaConsole), right-click each of the resource and select Online. Click Yes in theconfirmation pop-up box to bring the resource online.
2 Rename the SQLServer data directories on the shared disks. These directoriesare updatedwhenSQLServer is installed on the first node. You can also deletethese directories, if desired.
Upgrading Veritas Cluster ServerUpgrading a SQL server cluster
62

3 Copy the backed-up SQL Server 2000 or SQL Server 2005 data directoriesfrom the temporary location to the shared disks.
The backed-up directories are the same that you had backed up earlier whileupgrading SQL Server on the first cluster node.
4 Launch the Microsoft SQL Server 2008 installer and install SQL Server 2008on the node.Make sure that you select the option to upgrade the existing SQLServer instance(s), when prompted to do so. The SQL Server 2008 installerthen automatically places the SQL data files in the appropriate location.
Refer to the Microsoft SQL Server 2008 documentation for instructions.
5 Take the entire service group offline on the node.
Note: If there are no additional nodes for upgrade, you need not offline theservice group.
This completes the upgrade steps on the additional failover node. Delete theexisting SQL Server 2000 or 2005 service group and proceed to create SQLServer 2008 or 2008R2 service group in the cluster.
Create SQL Server 2008 or 2008 R2 service groupFrom the last upgraded node, run the SQL Server 2008 Configuration Wizard toconfigure the SQL 2008 or 2008 R2 service group. Refer to Veritas Cluster ServerImplementation Guide for Microsoft SQL Server 2008 for instructions.
Note: In case of a Disaster Recovery setup, repeat these steps on the first clusternode at the secondary site and then reconfigure the DR components. Refer to theVeritas Cluster Server Implementation Guide for Microsoft SQL Server 2008 forinstructions.
To create the SQL Server 2008 or 2008 R2 service group
1 Rename the Registry (RegRep) directory, if present, on the shared disk.
2 Create the SQL Server 2008 or 2008 R2 service group using the SQL Server2008 Configuration Wizard.
Refer toVeritasCluster Server ImplementationGuide forMicrosoft SQLServer2008 for detailed instructions on how to create the service group using theSQL Server 2008 Configuration Wizard.
63Upgrading Veritas Cluster ServerUpgrading a SQL server cluster
3 After creating the SQL Server service group, verify the configuration byswitching the service group to another node in the cluster.
4 Delete the RegRep directory that you renamed in the first step.
Upgrading from Microsoft SQL Server 2008 or SQL Server 2008 SP1to SQL Server 2008 R2
The following steps describe how toupgrade your existing SQLServer 2008 clusterto SQL Server 2008 R2. Complete these steps on all the cluster nodes that are partof the SQL service group, one node at a time.
Note:These steps are applicable only if you already have SQL 2008 set up in aVCS5.1 SP2 for Windows cluster environment.
At a high level, upgrading to SQL Server 2008 R2 involves the following tasks:
■ Ensure that you have installedVCS 5.1 SP2 forWindows on all the SQL servicegroup cluster nodes that you wish to upgrade.
■ Take a backup of the SQL databases.
■ Upgrade SQL Server on the first cluster node.
■ Upgrade SQL Server on each additional failover node.
■ In case of a Disaster Recovery configuration, ensure that the databases on theprimary and secondary sites are synchronized and then proceed to upgradethe cluster.You can upgrade the cluster using one of the following method:
■ Adding a temporary disk and creating the volumes similar to that on theprimary site.To upgrade the cluster using this method, perform the set of pre-upgradetasks and then proceed to upgrade the cluster on both the sites. You mustfollow the sameupgrade sequence parallel at both sites, upgrade first nodeand then the additional nodes, as described in the procedures.See “Preupgrade tasks for disaster recovery” on page 65.
■ Deleting the service group and re-creating the setup.Follow this method only if the data size is small. After you re-create theservice groups and setup replication across the two sites, the entire datawill be replicated. This involves a considerable amount of time.See “Deleting the service group and re-creating the setup” on page 69.
■ Run the SQL Server 2008 configuration wizard in the modify mode, to modifythe SQL Server 2008 service group.
Upgrading Veritas Cluster ServerUpgrading a SQL server cluster
64
To configure a new HA and DR environment for SQL Server 2008 R2, refer totheVeritas Cluster Server Implementation Guide for Microsoft SQL Server 2008.
Preupgrade tasks for disaster recoveryBefore you proceed to upgrade the cluster nodes in case of a disaster recoverysetup, ensure that you perform the following tasks on the secondary site for theSQL instances you want to upgrade.
■ Freeze the service group using the VCS Cluster Manager (Java Console).
■ Obtain the drive letter on which the system database and the analysis servicereside, using the following command:hadiscover -discover SQLServer2008 StartUpParams:INSTANCE2K8
The sample output is similar to the following:
<Discovery>
<Attr_Name>
StartUpParams:INSTANCE2K8
</Attr_Name>
<Discover_value>
<Scalar_value>
SQLDataPath: E:\Program Files\Microsoft SQL Server\
MSSQL10.INSTANCE2K8\MSSQL\DATA\
</Scalar_value>
</Discover_value>
<Discover_value>
<Scalar_value>
SQLErrLogPath: E:\Program Files\Microsoft SQL Server\
MSSQL10.INSTANCE2K8\MSSQL\LOG\ERRORLOG
</Scalar_value>
</Discover_value>
<Discover_value>
<Scalar_value>
OLAPDataPath: E:\Program Files\Microsoft SQL Server\
MSAS10.INSTANCE2K8\OLAP\Data
</Scalar_value>
</Discover_value>
</Discovery>
■ Attach a temporary disk and create a volumewith the drive letter same as thatfor the instance on which the system database resides.
65Upgrading Veritas Cluster ServerUpgrading a SQL server cluster
Note: If you are upgrading more than one instance having system databasepath and the OLAP data path on separate volumes, you must complete theupgrade of each instance on both the sites and then proceed to upgrade thenext instance.
■ Review the SQLDataPath, SQLErrLogPath and the OLAPDataPath directoryand create the same on the temporary disk.
Note: In case the directory path exists on different volumes, ensure that youcreate similar volumes and then create the required directory paths.
■ Copy the following files from the primary site to the data path created on thesecondary site.
■ master.mdf
■ mastlog.ldf
■ model.mdf
■ modellog.ldf
■ MSDBData.mdf
■ MSDBLog.ldf
■ tempdb.mdf
■ templog.ldf
Upgrading SQL Server on the first cluster nodeThese steps assume a single SQLServer instance configured in a two-node clusterconfiguration.
Upgrading Veritas Cluster ServerUpgrading a SQL server cluster
66

To upgrade SQL Server on the first cluster node
1 On the node on which the SQL service group is online, take all the resources(excluding the storage resources) offline.
From the VCS Cluster Manager (Java Console), right-click the resource andselect Offline. Click Yes in the confirmation pop-up box to take the resourceoffline.
2 Take a backup of the SQL Server 2008 directories from the shared disk andstore them in a temporary location.
Youwill need the backed-updirectorieswhile upgradingSQLon the additionalfailover nodes, later.
3 Delete the RegRep resource.
4 Freeze the SQL service group using the VCS Cluster Manager (Java Console).
From the VCS Cluster Manager (Java Console), right-click the SQL Serverservice group in tree view on the left pane, and click Freeze > Persistent.
5 Launch the Microsoft SQL Server 2008 R2 installer and install SQL Server2008 R2 on the node. Make sure that you select the option to upgrade theexisting SQL Server instance(s), when prompted to do so. Also, ensure thatthe instance name or id is the same on all the cluster nodes.
The SQLServer 2008R2 installer then automatically places the SQLdata filesin the appropriate location.
Refer to the Microsoft SQL Server 2008 documentation for instructions.
6 Unfreeze and then take the SQL Server service group offline. From the VCSCluster Manager (Java Console), right-click the SQL Server service group intree view on the left pane and clickUnfreeze, and then take the entire servicegroup offline on the node.
This completes the upgrade steps on the first cluster node. Proceed toupgrading SQL on the additional failover nodes.
Upgrading SQL on additional failover nodePerform the following steps on each additional failover node that is a part of theSQL service group.
67Upgrading Veritas Cluster ServerUpgrading a SQL server cluster

To upgrade SQL Server on the additional node
1 Bring the storage resources online. From the VCS Cluster Manager (JavaConsole), right-click the resource and select Online. Click Yes in theconfirmation pop-up box to bring the resource online.
2 Delete the original RegRep folder and rename the SQLServer data directorieson the shared disks. These directories are updated when SQL Server 2008 R2is install on the first node. You can also delete these directories, if desired.
3 Copy the backed-up SQL Server 2008 databases from the temporary locationto the shared disks. The backup directories are the same that you had backedup earlier while upgrading SQL on the first cluster node.
4 Freeze the SQL service group.
From the VCS Cluster Manager (Java Console), right-click the SQL Serverservice group in tree view on the left pane and click Freeze > Persistent.
5 Launch the Microsoft SQL Server 2008 R2 installer and install SQL Server2008 R2 on the node. Make sure that you select the option to upgrade theexisting SQL Server instance(s), when prompted to do so. The SQL Server2008 R2 installer then automatically places the SQL data files in theappropriate location.
Refer to the Microsoft SQL Server 2008 documentation for instructions.
6 From the VCS Cluster Manager (Java Console), right-click the SQL Serverservice group in tree view on the left pane and click Unfreeze, and then takethe entire service group offline on the node.
Note: If there are no additional nodes for upgrade, you need not offline theservice group.
This completes the upgrade steps on the additional failover node. Proceed tomodify the SQL Server service group configuration.
Modifying the SQL Server 2008 service group configurationFrom the last upgraded node, run the SQL Server 2008 Configuration Wizard inmodify mode to modify the SQL Server 2008 service group configuration.
Note: In case of a Disaster Recovery setup, repeat these steps on the first clusternode at the secondary site and then reconfigure the DR components.
Refer to Veritas Cluster Server Implementation Guide for Microsoft SQL Server2008 for instructions.
Upgrading Veritas Cluster ServerUpgrading a SQL server cluster
68

To modify the SQL Server configuration
1 Rename the Registry (RegRep) directory on the shared disk.
2 On the first cluster node, bring the storage resources of the SQL service group,online.
3 Run the SQL Server 2008 wizard in the modify mode and follow the wizardsteps.
When asked for, provide the location for the RegRep resource. This createsa new RegRep for SQL Server 2008 R2.
Refer to the Veritas Cluster Server Implementation Guide for Microsoft SQLServer 2008 for detailed instructions onhow to create the service group usingthe SQL Server 2008 Configuration Wizard.
4 After modifying the SQL Server service group, verify the configuration byswitching the service group to another node in the cluster.
5 Delete the RegRep directory that you renamed in the first step.
Deleting the service group and re-creating the setupPerform these tasks only if you are upgrading the cluster in a disaster recoverysetup and have chosen to follow the upgrade by deleting the service group andthe re-creating the setup.
■ Using the VCS Cluster Manager (Java Console), offline and delete the servicegroup for the instance you want to upgrade, on both the sites.
■ Stop the replication between the primary and the secondary site.
■ For the selected instance mount the created volumes and LUNs on any one ofthe cluster node, on both the sites.
Note:Ensure that the instance name and id is the same on all the cluster nodes.
■ Launch the Microsoft SQL Server 2008 R2 installer and install SQL Server2008 R2 on the node. Make sure that you select the option to upgrade theexisting SQL Server instance(s), when prompted to do so.
■ To upgrade the additional nodes, dismount the volumes on the upgraded nodeand mount them on the node to be upgraded. Launch the SQL Server 2008 R2installer to install SQL Server 2008 R2.Repeat this task for each additional node.
■ Create the SQL Service group, reconfigure the DR components and the set therequired resource dependency.
69Upgrading Veritas Cluster ServerUpgrading a SQL server cluster

For details refer to,Veritas Cluster Server ImplementationGuide forMicrosoftSQL Server 2008
Upgrading an Oracle clusterThis section describes the upgrade scenarios for upgrading to VCS 5.1 SP2 in anOracle cluster.
Note: If you are upgrading both Oracle and VCS, then youmust upgrade VCS firstand then proceed to upgrade Oracle.
Upgrade scenariosTable 4-3 table possible scenarios for upgrading toVCS5.1 SP2 in anOracle cluster.
Table 4-3 Upgrade matrix for Oracle cluster
Upgrade to cluster configurationUpgrade from clusterconfiguration...
VCS 5.1SP2
Windows Server 2003 SP1, SP2, R2
Oracle 9.2x, 10g R1, 10g R2, 11g R1 (11.1.0.6.0)
VCS — 5.0RP1a, 5.0 RP2, 5.0 RU1,5.1, 5.1 AP1, 5.1SP1
Operating System — WindowsServer 2003
Oracle — 9.0.1, 9.0.2, 9.1x
VCS 5.1 SP2
Windows Server 2003 SP1, SP2, R2
Oracle 11g R1 (11.1.0.6.0)
VCS — 5.0RP1a, 5.0 RP2, 5.0 RU1,5.1, 5.1 AP1, 5.1SP1
Operating System — WindowsServer 2003
Oracle — 10.1, 10.2
Upgrading Oracle in a VCS clusterThis section describes the tasks necessary to upgrade Oracle in a VCS cluster.
Note: For information about supportedOracle upgrade paths, refer to yourOracledocumentation.
Upgrading Veritas Cluster ServerUpgrading an Oracle cluster
70

Upgrading the Oracle applicationUpgrading Oracle involves the following steps:
■ Upgrading the Oracle binaries.
■ Upgrading the Oracle database.
Perform the following tasks before upgrading the Oracle database:
■ Bring the Oracle service group online.
■ Stop HAD using the hastop -local -force command.
Additional tasks after upgrading OraclePerform the following tasks to configure Oracle in a VCS environment:
■ Associate the updated database with the listener for Oracle 10g and 11g.See “Associating the updated database with the listener” on page 71.
■ Configure the database and listener to use the virtual IP address.See “Configuring the database and listener to use the virtual IP address”on page 72.
■ Configure Oracle and listener services.See “Configuring Oracle and listener services” on page 75.
■ Modify the ServiceName attribute for the Netlsnr resource.See “Modifying the ServiceNameattribute for thenetlsnr resource” onpage 76.
Associating the updated database with the listenerThe following procedures describe how to associate databases with listeners.
Prerequisites to associate databases with listeners
Ensure that the initialization parameter file contains the following entries:
■ SERVICE_NAMES (the name of the database service)
■ INSTANCE_NAME (the name of the database instance)
These parameters are created during installation or database creation.
Associate the database with the listener
The following procedure associates the database with the listener.
71Upgrading Veritas Cluster ServerUpgrading an Oracle cluster

To associate the database with the listener
1 Use one of the following procedures to configure the new attributelistener_alias:
Run the following SQL command:
SQL> ALTER SYSTEM SET LOCAL_LISTENER=’<listener_alias>’ scope=spfile;
OR
Add the following entry to the initialization parameter file (pfile or spfile):
LOCAL_LISTENER = <listener_alias>
2 Define the parameter listener_alias. If yourOracle configuration uses the filetnsnames.ora, edit the file as instructed below. The default location oftnsnames.ora is %ORACLE_HOME%\NETWORK\ADMIN.
Add the following to tnsnames.ora file:
<listener_alias>=
(DESCRIPTION =
(ADDRESS=(Protocol=TCP)(HOST=virtual_IP_address)(Port=1521))
)
3 Stop and restart the database.
The listener_alias parameter gets appended by the default domain name thatis specified in the file sqlnet.ora.
Configuring the database and listener to use the virtual IPaddressAll databases and listeners configured must use the same virtual IP. Update theOracle files to set the virtual IP address.
Setting the virtual IP address involves the following tasks:
■ Creating a virtual IP address.
■ Verifying the initialization file settings.
■ Updating the Oracle configuration files.
Use the following procedures to configure the Oracle database and listener.
To create a virtual IP address
1 Open the Network Connections (Start > Settings > Network Connections).
2 Right-click the public network connection to be used and click Properties.
Upgrading Veritas Cluster ServerUpgrading an Oracle cluster
72

3 Select Internet Protocol (TCP/IP) and click Properties.
4 Click Advanced.
5 In the IPSettings tab, click Add to add a virtual IP address and subnetmask.
To verify the initialization file settings, if a PFILE is used
1 Open the Registry Editor.
From the Start menu, choose Run. In the Open field, enter regedit and clickOK.
2 Double-click the ORA_SID_PFILE registry key atHKEY_LOCAL_MACHINE\SOFTWARE\ORACLE\HOME_ID\.
The variable SID represents the database instance.
3 Verify that the Value data field specifies the correct path at which theinitialization file, init.ora, is located.
To verify the initialization file settings, if an SPFILE is used
1 Run sqlplus.exe.
2 Connect to the database.
3 Verify the following query returns the correct path of the SPFILE.
select value from v$parameter where name = ‘spfile’
73Upgrading Veritas Cluster ServerUpgrading an Oracle cluster
To update the Oracle configuration files
1 In the listener.ora and tnsnames.ora files, change the host name for alltheTCPprotocol address databases to the virtual IP address that you created.
Replace
HOSTNAME=machine_name
with
HOSTNAME=virtual_IP_address
2 In the initialization file, change the dispatchers parameter.
Oracle requires an initialization file, a PFILE or an SPFILE, to start databaseinstances. Choose the appropriate reference depending on the initializationfile you use.
See “Setting the dispatchers parameter in PFILE” on page 74.
See “Setting the dispatchers parameter in SPFILE” on page 74.
3 Restart the Oracle and listener services.
Setting the dispatchers parameter in PFILE
In the PFILE, set the host name for all TCP protocol address dispatchers to thevirtual IP address that you created.
Edit the dispatchers parameter only for the host name and leave the rest of theconfiguration as it is. Set the value as:
dispatchers = ‘(ADDRESS = (Protocol=TCP)
(HOST=virtual_IP_address)
(any other previously existing entry))’
The variable virtual_IP_address represents the virtual IP address that you created.
For example:
dispatchers = ‘(ADDRESS = (Protocol=TCP)(HOST=10.210.100.110)
(SERVICE=Data1XDB)’
Setting the dispatchers parameter in SPFILE
Use the following steps to set the dispatchers parameter in SPFILE.
Upgrading Veritas Cluster ServerUpgrading an Oracle cluster
74

To set the dispatchers parameter in SPFILE
1 Convert the SPFILE to PFILE.
2 Modify the PFILE.
See “Setting the dispatchers parameter in PFILE” on page 74.
3 Convert the PFILE to SPFILE.
4 Save the SPFILE to the original location on the shared disk.
Refer to the Oracle documentation for specific information on converting aPFILE or an SPFILE.
Configuring Oracle and listener servicesConfiguring the Oracle and Listener services involves the following tasks:
■ Making the Oracle and Netlsnr services manual.
■ Configuring log on properties for Oracle services.
Use the following procedures to configure Oracle and listener services.
To make services manual
1 Open the Services applet (Start > Programs > Administrative Tools >Services).
2 Double-click the service. In the SCM, the following appears:
■ Oracle services appear as OracleServiceSID, where SID represents thedatabase instance.
■ Listener services appear as OracleOra_HomeTNSListenerName, whereOra_Home represents theOracle home directory and ListenerName is thename of the listener set during the installation.
3 In the Properties window, click the General tab.
4 From the Startup Type drop-down list, select Manual.
5 Click OK.
To configure the log on properties for oracle services
1 Open the Services applet (Start > Programs > Administrative Tools >Services).
2 Double-click the Oracle service. In the SCM, the names of Oracle servicesappear as OracleServiceSID, where SID represents the database instance.
3 In the General tab of the Properties window, click Stop to stop the service.
4 Click the Log On tab.
75Upgrading Veritas Cluster ServerUpgrading an Oracle cluster
5 Choose This Account.
6 Enter the credentials of the user in whose context Oracle was installed.
7 Click the General tab and click Start to start the service with the new Log Onproperties. Click OK.
Modifying the ServiceName attribute for the netlsnr resourcePerform the following steps to modify the ServiceName attribute for the Netlsnrresource.
To modify the ServiceName attribute
1 Start HAD. Type the following on the command prompt:
C:\> hastart
2 Offline the Netlsnr resource. Type the following on the command prompt:
C:\> hares -offline resource_name -sys system_name
3 Modify theServiceNameattribute for theNetlsnr resource. Type the followingon the command prompt:
C:\> hares -modify resource_name attribute_name attribute_value
For example, to modify the ServiceName attribute of the Netlsnr resource,Netlsnr_res, type:
C:\> hares -modify Netlsnr_res ServiceName attribute_value
where, attribute_value is the name of the listener service in Oracle 9i or 10gversions.
4 Online the Netlsnr resource. Type the following on the command prompt:
C:\> hares -online resource_name -sys system_name
Upgrading the Microsoft service packsThis section describes how to upgrade Microsoft SQL and Microsoft Exchangeservers to their corresponding service packs. The outlined procedures areapplicable only if you already have your SQL or Exchange setup in a VCS clusterenvironment.
Upgrading Veritas Cluster ServerUpgrading the Microsoft service packs
76
Upgrading to Microsoft Exchange 2003 SP2 in a VCS environmentThis section describes the procedure to upgrade the Microsoft Exchange 2003that is already configured in a VCS environment.
Using this procedure you can upgrade Exchange 2003 to Exchange 2003 SP2.
Before upgrading to Microsoft Exchange 2003 SP2, make sure to set the"DetailMonitor" attribute of all "ExchService" type resources to zero.
Perform the following steps to upgrade an Exchange 2003 installation on a nodethat is part of the Exchange service group.Make sure that all the nodes which arepart of the Exchange service group have the same version and service pack levelof Microsoft Exchange.
To upgrade to Microsoft Exchange 2003 SP2
1 Make sure that you do not mount the Exchange databases on the failovernodes. Bring the Exchange service group online on the node where you areupgrading the Exchange installation.
2 Stop HAD on the node where the service group was brought online. At thecommand prompt, type:
C:\> hastop -local -force
3 Install Microsoft Exchange 2003 SP2 on the node where the service groupwas brought online.
If prompted to install the hotfix for Internet Information Services (IIS) 6.0,refer to the Microsoft Knowledge Base Article: 831464.
4 Start HAD on the node. At the command prompt, type:
C:\> hastart
5 After the Exchange 2003 SP2 installation is complete, take the Exchangeservice group offline.
6 Restart the Windows Management Instrumentation (WMI) service from theServices snap-in.
7 Repeat step 1 through step 6 on all remaining nodes that are part of theExchange service group.
8 Update theExchConfig registry informationon every systemwhereExchangeis upgraded.
77Upgrading Veritas Cluster ServerUpgrading the Microsoft service packs

9 To update the registry on the local system, navigate to%vcs_home%\bin\ExchSetup folder and type the following at the commandprompt:
Setup.exe /UpdateExchVersion
10 To update the registry on more than one node simultaneously, navigate to%vcs_home%\bin\ExchSetup folder and type the following at the commandprompt:
Setup.exe /UpdateExchVersion system_name1 system_name2...
Here, system_name1, system_name2 are the cluster node names.
11 This completes the upgrade. You can now bring the Exchange service grouponline in the cluster.
12 For a disaster recovery environment, repeat this procedure at the secondary(DR) site.
Upgrading to Microsoft Exchange Server 2007 SP3 in a VCSenvironment
This section describes how to upgrade Exchange 2007 to Exchange 2007 SP3,using theExchange2007UpgradeWizard. It is applicable only if you alreadyhaveExchange 2007 set up in a VCS cluster environment.
Note: The procedure given below describes how to upgrade Exchange 2007 toExchange 2007 SP1. This procedure can also be used to upgrade Exchange 2007SP1 or SP2 to Exchange 2007 SP3.
To configure a new HA and DR environment for Exchange 2007, refer to,
Veritas Cluster Server Implementation Guide for Microsoft Exchange 2007
Before you proceed to upgrade the Exchange Server service pack, note thefollowing:
■ Ensure that the Exchange 2007 service group is offline in the cluster.
■ While performing the upgrade the Exchange 2007 Upgrade Wizard renamesand then restarts the cluster node. Exit all the other programs before you runthe wizard on a cluster node.
Complete the following steps on all cluster nodes that are part of the Exchange2007 service group, one node at a time.
Upgrading Veritas Cluster ServerUpgrading the Microsoft service packs
78
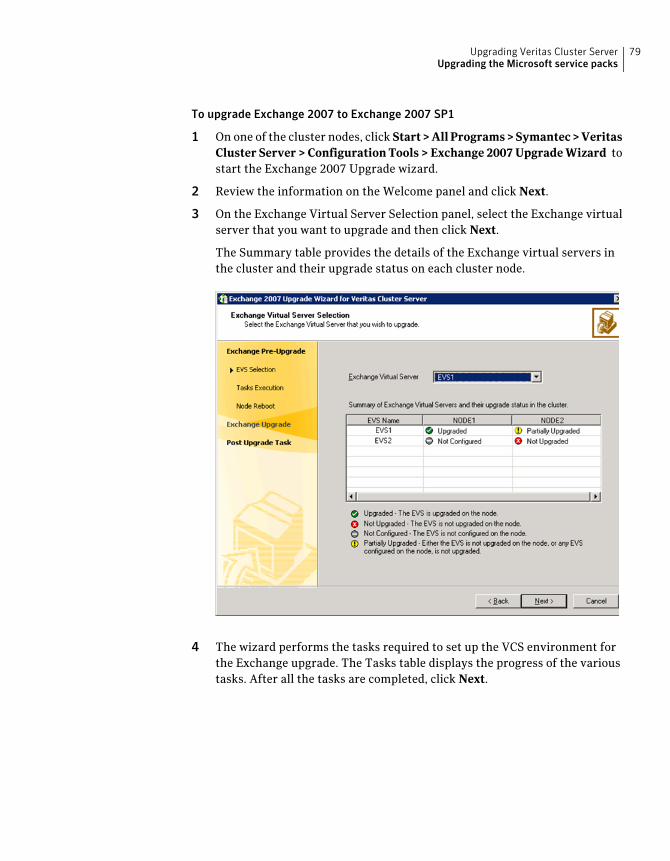
To upgrade Exchange 2007 to Exchange 2007 SP1
1 On one of the cluster nodes, click Start>AllPrograms>Symantec>VeritasCluster Server > Configuration Tools > Exchange 2007 Upgrade Wizard tostart the Exchange 2007 Upgrade wizard.
2 Review the information on the Welcome panel and click Next.
3 On the Exchange Virtual Server Selection panel, select the Exchange virtualserver that you want to upgrade and then click Next.
The Summary table provides the details of the Exchange virtual servers inthe cluster and their upgrade status on each cluster node.
4 The wizard performs the tasks required to set up the VCS environment forthe Exchange upgrade. The Tasks table displays the progress of the varioustasks. After all the tasks are completed, click Next.
79Upgrading Veritas Cluster ServerUpgrading the Microsoft service packs

5 Review the information on the Cluster Node Reboot panel and then clickReboot. The wizard prompts you to reboot the node. Click Yes to reboot thenode.
TheExchange virtual server name is temporarily assigned to the cluster node.On rebooting the node, the Exchange 2007 Upgrade Wizard is launchedautomatically with a message that the Exchange pre-upgrade tasks arecomplete. Do not click Continue at this time. Wait until after the Exchangeupgrade is complete.
6 Run the Exchange 2007 SP1 installer to upgrade Exchange 2007 on the node.Type the following at the command prompt:
<drive letter>:\setup.com /mode:Upgrade
Here <drive letter> is the drivewhere theExchange SP1 installer is located.
Note: You can also run Setup.exe to launch the installer GUI for upgradingExchange. If using the installer GUI, ensure that you do not select any otherExchange 2007 server role. Only the Mailbox server role must be upgraded.
Verify that the upgrade has completed successfully. In case there are errorsor if the upgrade has partially succeeded or has failed, resolve the errors andensure that the upgrade is successful.
Refer to the Microsoft Exchange documentation for more information.
7 Return to the Exchange 2007 Upgrade Wizard and click Continue.
If thewizard is not running, click Start>AllPrograms>Symantec>VeritasCluster Server > Configuration Tools > Exchange 2007 Upgrade Wizard tostart the wizard and then click Next.
8 The wizard performs the tasks required to set up the VCS environment afterthe Exchange upgrade. The Tasks table displays the progress of the varioustasks. After all the tasks are completed, click Next.
9 Review the information on the completion panel and then click Finish.
The wizard displays the status of the Exchange virtual server upgrade. TheSummary table provides the details of the Exchange virtual servers in thecluster and their upgrade status on each cluster node.
Upgrading Veritas Cluster ServerUpgrading the Microsoft service packs
80

10 Repeat these steps on the remaining cluster nodes. After you have upgradedall the cluster nodes that are configured to host the Exchange virtual server,bring the Exchange 2007 service group online in the cluster.
Note: Do not bring the Exchange 2007 service group online until you havecompleted the upgrade on all the cluster nodes that are part of the servicegroup.
11 For a disaster recovery environment, repeat this procedure at the secondary(DR) site.
Upgrading from Microsoft Exchange 2010 to Exchange 2010 SP1 in aVCS environment
This section describes how to upgrade Exchange 2010 to Exchange 2010 SP1. Itis applicable only if you already have Exchange 2010 setup in a VCS clusterenvironment.
Before you proceed to upgrade the Exchange Server service pack, ensure that youhave met the following pre-requisites:
■ You have met all the necessary pre-requisites for installing Exchange 2010SP1 on all the cluster nodes where you are upgrading Exchange.For details refer to Microsoft documentation.
■ Ensure that you have upgraded VCS to 5.1 SP2, on all the cluster nodes.See “Upgrading the VCS cluster to VCS 5.1 SP2” on page 45.
To upgrade Exchange 2010 to Exchange 2010 SP1
1 Using the VCS Cluster Manager (Java Console), bring the Exchange servicegroup online.
2 Stop HAD on all the cluster nodes where you want to upgrade the Exchangeinstallation. At the command prompt, type:
hastop -local -force
3 Launch the Exchange 2010 SP1 installer and install the service pack.
You can install the service pack parallel on all the nodes, where you areupgrading Exchange. In case of disaster recovery, you can simultaneouslyupgrade both the sites.
81Upgrading Veritas Cluster ServerUpgrading the Microsoft service packs

Upgrading Microsoft SQL 2000 to SP4 in a VCS environmentThis section describes how to upgrade SQL 2000 to SQL 2000 SP4. It is applicableonly if you already have SQL 2000 set up in a VCS cluster environment.
Consider the following points before applying Microsoft SQL 2000 SP4 to aproduction server:
■ Review your Microsoft documentation for the requirements for a MicrosoftSQL 2000 Server SP4 installation.Make sure that your system meets these requirements.
■ Make sure that you have a recent backup of your system and user databases.
■ Server down time is required for this procedure.
To install Microsoft SQL 2000 Server SP4
1 From theCluster Explorer, right-click the SQLServer service group and selectOffline on all nodes.
2 On the node where the SQL Server service group was taken offline, onlinethe MountV resource for the shared drive containing the SQL databases (forexample, S:\MSSQL$SQL2000).
3 On the shared disk, make a copy of your recent MSSQL data files directory(S:\MSSQL$SQL2000) and rename it, for example to S:\MSSQL$2000.SP3A.
4 From the Cluster Explorer, right-click the SQL Server service group which isnow partially online, and select Freeze >Persistent.
5 Install Microsoft SQL 2000 Service Pack 4 on the active node (where the SQLServer service group is online), using the instructions provided byMicrosoft.
6 Repeat step 5 for each additional SQL instance in this service group, if youhave more than one instance in this service group.
7 From the Cluster Explorer, right-click the SQL Server service group which isstill online and select Unfreeze.
8 From theCluster Explorer, right-click the SQLServer service group and selectOffline on the node where it was online.
9 In a Disaster Recovery environment, switch the Replication service group toone of the other additional or failover nodes in this cluster.
10 On the failover node, online the MountV resource for the shared drivecontaining the SQL databases (for example, S:\MSSQL$SQL2000).
11 On the shared disk, rename the S:\MSSQL$SQL2000 directory toS:\MSSQL$SQL2000.SP4. If S:\MSSQL$SQL2000.SP4 already exists on theshareddisk, thendelete it before renaming theS:\MSSQL$SQL2000directory.
Upgrading Veritas Cluster ServerUpgrading the Microsoft service packs
82

12 On the shared disk, rename the S:\MSSQL$SQL2000.SP3A directory toS:\MSSQL$SQL2000. If there are additional nodes in this cluster to beupdated,copy the S:\MSSQL$SQL2000.SP3Adirectory to S:\MSSQL$SQL2000 insteadof renaming the directory.
13 From the Cluster Explorer, right-click the SQL Server service group which isnow partially online and select Freeze >Persistent.
14 Install Microsoft SQL 2000 Service Pack 4 on the active node (where the SQLServer service group is online), using the instructions provided byMicrosoft.
15 Repeat step 14 for each additional SQL instance in this service group, if youhave more than one instance in this service group.
16 From the Cluster Explorer, right-click the SQL Server service group which isstill online and select Unfreeze.
17 From theCluster Explorer, right-click the SQLServer service group and selectOffline on the node where it was online.
18 Repeat step 9 through step 17 on each additional node if more than two SQL2000 nodes are in use.
19 For aDisaster Recovery environment, repeat this procedure at the secondarysite.
20 WhenMicrosoft SQL2000Server ServicePack4has been completely installedon all nodes, test user connectivity to the instances.
21 Test the SQL Server service group by bringing it online and failing it overfrom node to node. When testing is complete, the upgrade is complete.
22 If more than one SQL Server service group is present, repeat this entireprocedure for each SQL Server service group.
Upgrading Microsoft SQL 2005 to SP1 in a VCS environmentThis section describes how to upgrade SQL 2005 to SQL 2005 SP1. It is applicableonly if you already have SQL 2005 set up in a VCS cluster environment.
Consider the following points before applying Microsoft SQL 2005 Server SP1 toa production server:
■ Review your Microsoft documentation for the requirements for a MicrosoftSQL 2005 Server SP1 installation.Make sure that your system meets these requirements.
■ Make sure that you have a recent backup of your system and user databases.
■ Server down time is required for this procedure.
83Upgrading Veritas Cluster ServerUpgrading the Microsoft service packs

To install Microsoft SQL 2005 Server SP1
1 From theCluster Explorer, right-click the SQLServer service group and selectOffline on all nodes.
2 On the node where the SQL Server service group was taken offline, onlinethe SQL 2005 resource for the shared drive containing the SQL databases.
3 From the Cluster Explorer, right-click the SQL Server service group which isnow partially online, and select Freeze >Persistent.
4 If a VVR RVG service group is present, verify that it is online on the nodewhere Microsoft SQL 2005 Service Pack 1 is to be installed.
5 Install Microsoft SQL 2005 Service Pack 1 on the active node (where the SQLServer service group is online), using the instructions provided byMicrosoft.
6 Repeat step 5 for each additional SQL instance in this service group, if youhave more than one instance in this service group.
7 From the Cluster Explorer, right-click the SQL Server service group which isstill online and select Unfreeze.
8 From theCluster Explorer, right-click the SQLServer service group and selectOffline on the node where it was online.
9 On the failover node, online the SQL 2005 resource for the shared drivecontaining the SQL databases.
10 From the Cluster Explorer, right-click the SQL Server service group which isnow partially online and select Freeze >Persistent.
11 Install Microsoft SQL 2005 Service Pack 1 on the active node (where the SQLServer service group is online), using the instructions provided by MicrosoftSQL Server 2005 Service Pack 1 Setup.
12 Repeat step 11 for each additional SQL instance in this service group, if youhave more than one instance in this service group.
13 From the Cluster Explorer, right-click the SQL Server service group which isstill online and select Unfreeze
14 From theCluster Explorer, right-click the SQLServer service group and selectOffline on the node where it was online
15 Optionally reboot andonline each service group to verify the database connectfor each node.
16 Repeat step 9 through step 17 on each additional node if more than two SQL2005 nodes are in use.
17 For aDisaster Recovery environment, repeat this procedure at the secondarysite.
Upgrading Veritas Cluster ServerUpgrading the Microsoft service packs
84

18 WhenMicrosoft SQL2005Server ServicePack1has been completely installedon all nodes, test user connectivity to the instances.
19 Test the SQL Server service group by bringing it online and failing it overfrom node to node. When testing is complete, the upgrade is complete.
20 If more than one SQL Server service group is present, repeat this entireprocedure for each SQL Server service group.
Upgrading Microsoft SQL 2005 to 2005 SP2 or later in a VCSenvironment
This section describes how to upgrade SQL 2005 to SQL 2005 SP2 or later. It isapplicable only if you already have SQL 2005 set up in aVCS cluster environment.
Note: Do not follow the installation steps provided in this section to install SQLServer 2005 Service Pack 1 and all other hotfixes released before Service Pack 2.
Also, if you are performing the upgrade in a disaster recovery environment youmust first upgrade all the cluster nodes at the secondary site and then upgradethe passive nodes at the primary site.
After all the primary site passive nodes are upgraded, youmust upgrade the activenodes.
While you upgrade the cluster nodes on the secondary site, you may or may notchoose to stop the replication. Replication does not affect the SQL upgrade.
PrerequisitesConsider the following points before applying Microsoft SQL 2005 Server SP2 orlater service pack version to a production server:
■ You must be a domain user having administrative privileges to the clusternodes.
■ You must have administrative privileges to the SQL instance that you want toupgrade.
■ You must back up the SQL Server 2005 databases.
■ Refer to the Microsoft documentation for prerequisites related to SQL Server2005 Service Pack installation.
Preliminary installation informationTypically,multiple SQL instances are configured in aVCS cluster. EachSQL servicegroup is configured to fail over on one or more nodes in the cluster. The node on
85Upgrading Veritas Cluster ServerUpgrading the Microsoft service packs

which the SQL service group is online is called as the Active node for that SQLinstance. Thenode onwhich the SQL service group is offline is called as thePassivenode for that SQL instance. The procedure for applying service packs, patches,or hotfixes for SQL instances varies depending on whether it is an active or apassive node. This document describes procedures for both the cases in detail.
Use the procedure that applies to the type of setup you have.
Toprovide context, the installationprocedures described in this document assumetwo SQL Server 2005 instances configured in a three-node VCS cluster.
Table 4-4 lists the configuration objects referenced in the following procedures.
Table 4-4 SQL Server 2005 SP upgrade configuration objects
DescriptionObject
Cluster node namesNode1, Node2, Node3
SQL Server 2005 instance namesSQLinst1, SQLinst2
SQL Server 2005 SP2 installer for 32-bitSQLServer2005SP2-KB921896-x86-ENU.exe
The configuration is as follows:
■ SQLinst1 can fail over on Node1 and Node2, and SQLinst2 can fail over onNode3 and Node2.So, Node2 is the common failover node for SQLinst1 and SQLinst2.
■ The SQL service group for SQLinst1 is online on Node1, and the SQL servicegroup for SQLinst2 is online on Node3.So, Node1 and Node3 are the “active” nodes for SQLinst1 and SQLinst2respectively. Node2 is the “passive” node for both SQL instances.Youwill first install the service pack onNode2 (passive node) and then proceedto install on Node1 and Node3.
Installing the Service Pack on “passive” cluster nodesPerform these steps on all the nodes where the SQL service group is configuredto fail over but is not online. You can either perform the installation at one timefor all the SQL instances that are configured to fail over on the node, or repeatthe steps for each SQL instance separately.
Do not run these steps for SQL instances whose corresponding service groups areonline on the nodes (active nodes). For installation on active nodes,
See “Installing the Service Pack on “active” cluster nodes” on page 88.
Upgrading Veritas Cluster ServerUpgrading the Microsoft service packs
86

Note: You can install SQL Server 2005 Service Pack in an unattended mode fromthe command prompt using the /quiet switch to suppress the setup dialog boxes.Refer to the Microsoft documentation for more information.
To install the Service Pack on passive cluster nodes
1 Ensure that service groups for SQL instances SQLinst1 and SQLinst2 areoffline on Node2.
Note: This upgrade procedure will not upgrade the SQL instance whosecorresponding service group is online on the node.
2 On Node2, copy the SQL Server 2005 Service Pack installer or map a drive tothe directory where the installer is located.
3 From the command prompt on Node2, navigate to the directory where theinstaller is located.
4 From the command prompt, run the Service Pack installer command withthe appropriate options.
For example,
The command format for running the installer is as follows:
SQLServer2005SP2-KB921896-x86-ENU.exe [options] /passive=1
You can use the following options for the command:
■ /allinstancesThis option upgrades all SQL Server 2005 instances and sharedcomponents to the desired SQL Server 2005 SP.
■ /instancename = “<instance1>, <instance2>, ...”This option upgrades only the specified SQL Server 2005 instances andshared components to the desired SQL Server 2005 SP.
You can run any of the following commands on Node2:
SQLServer2005SP2-KB921896-x86-ENU.exe /allinstances /passive=1
or
SQLServer2005SP2-KB921896-x86-ENU.exe /instancename = SQLinst1,
SQLinst2 /passive=1
87Upgrading Veritas Cluster ServerUpgrading the Microsoft service packs

Note that in case ofmultiple SQL instances, there should beno spaces betweeninstance names in the command.
5 Follow the upgrade wizard to complete the installation.
Once the installation is complete on the passive nodes, proceed to install onthe active nodes.
Installing the Service Pack on “active” cluster nodesPerform these steps on all the nodes on which the SQL service group is online.You can either perform the installation at one time for all the SQL instances thatare configured to fail over and are online on the node, or repeat the steps for eachSQL instance separately.
Do not run these steps for SQL instances whose corresponding service groups areoffline on the nodes (passive nodes). For installation on passive nodes,
See “Installing the Service Pack on “passive” cluster nodes” on page 86.
Referring to the configuration example described earlier, run these steps onNode1and Node3 where the SQL service groups for SQLinst1 and SQLinst2 are online.
To install the Service Pack on active cluster nodes
1 Ensure that the SQL service group for SQLinst1 is online on Node1.
2 In the SQL service group for SQLinst1, take all resources of typeSQLServer2005 offline on Node1.
If there are other SQL Server 2005 instances configured on the node that youwant to upgrade, take SQLServer2005 resources of the respective servicegroups offline as well.
3 From the Services snap-in, stop the SQL server Full Text Search service andthe Analysis service, if they are not configured as part of the SQL servicegroups.
4 Freeze the SQL service group for SQLinst1 on Node1.
From the Cluster Manager (Java Console), right-click the SQL service group,select Freeze and click Temporary.
or
Type the followingon the commandprompt: hagrp -freeze service_group
5 If the SQL Server Reporting Services is installed for a particular instance,start the SQL Server Database Service of the respective instance using theServices snap-in.
Upgrading Veritas Cluster ServerUpgrading the Microsoft service packs
88

6 Run the SQL Server 2005 Service Pack installer.
Double-click SQLServer2005SP2-KB921896-x86-ENU.exe to launch the SPinstallation wizard.
7 Follow the upgrade wizard to complete the installation.
8 After the installation is complete, stop the SQL Server services, if startedbefore applying the patch.
Note: SQLServer2005 resources may go in UNKNOWN state if we start theservices outside the VCS cluster. Ignore this and probe the resources afterinstallation is completed and all the services are stopped.
9 Unfreeze the SQL service group and probe the resources for SQLinst1 onNode1.
From the Cluster Manager (Java Console), right-click the SQL service group,select Unfreeze.
or
Type the following on the command prompt: hagrp -unfreeze
service_group
10 From the Services snap-in, start the SQL server Full Text Search service andthe Analysis service, if they are not configured as part of the SQL servicegroups.
11 Ensure that all the services related to the SQL Server 2005 instance are instopped state
12 Apart fromtheSQLBrowser service, set the startup type of all theSQL servicesto manual.
13 Bring the SQLServer2005 resources in the SQL service group for SQLinst1online on Node1.
14 Repeat step 1 to step 13 for SQLinst2 on Node3.
Upgrading Microsoft SQL 2008 or 2008 R2 with the latest service packsin a VCS environment
Use this procedure to perform the following upgrades:
■ SQL Server 2008 to SQL Server 2008 SP1, SQL Server 2008 SP2, or SQL Server2008 SP3.
■ SQL Server 2008 R2 to SQL Server 2008 R2 SP1
89Upgrading Veritas Cluster ServerUpgrading the Microsoft service packs

Consider the following points before proceeding with the upgrade:
■ You must have administrative privileges to the SQL instance that you want toupgrade.
■ Make sure that you have a recent backup of your system and user databases.
■ Make sure that the VCS version installed is VCS 5.1 SP2 or later.
■ Refer to the Microsoft documentation for prerequisites related to SQL Server2008 or 2008 R2 Service Pack installation.
Consider a twonode cluster, NodeAandNodeB. TheSQL service group isONLINEon Node A, and Node B is the passive node.
You can upgrade SQL Server in any of the following ways:
■ Upgrade SQL Server on all the nodes parallely.See “To parallely upgrade SQL Server on all the cluster nodes” on page 90.
■ Upgrade SQL Server on the passive node first and then upgrade the activenodes.See “To upgrade SQL Server on the passive nodes first” on page 90.
Use the following procedure to parallely upgrade SQL Server on all the clusternodes:
To parallely upgrade SQL Server on all the cluster nodes
1 Freeze the service group on Node A (active node).
2 Upgrade the SQL 2008 instance on Node A and Node B.
3 Reboot the nodes, if it prompts for.
4 Unfreeze the service group on Node A.
Use the following procedure to upgrade SQL Server on the passive node first andsubsequently on the active node.
To upgrade SQL Server on the passive nodes first
1 Freeze the service group on Node A (active node).
2 Confirm all SQL services are stopped on Node B.
3 Upgrade the SQL Server 2008 instance on Node B.
4 Reboot node B.
5 Unfreeze the service group on node A.
6 Fail over the service group to Node B.
7 After the service group comes online, freeze the service group on Node B.
8 Confirm all SQL services are stopped on Node A.
Upgrading Veritas Cluster ServerUpgrading the Microsoft service packs
90

9 Upgrade the SQL Server 2008 instance on Node A.
10 Reboot Node A.
11 Unfreeze the service group on node B.
12 Fail back the service group to Node A.
91Upgrading Veritas Cluster ServerUpgrading the Microsoft service packs

Upgrading Veritas Cluster ServerUpgrading the Microsoft service packs
92

Services and ports used byVCS
This appendix includes the following topics:
■ About VCS services and ports
About VCS services and portsIf youhave configured theWindows firewall, then ensure that the firewall settingsallow access to the services or ports used by VCS.
Table A-1 displays the services and ports used by VCS .
Note: The following port numbers that appear in bold are mandatory forconfiguring VCS: 2148, 14150, 14141, and 7419.
Table A-1 VCS services and ports
ProcessDescriptionProtocolPort Number
cmdServer.exeVeritas Command ServerTCP14150
had.exeVeritas High Availability Engine
Veritas Cluster Manager (Javaconsole) (ClusterManager.exe)
VCS Agent driver(VCSAgDriver.exe)
TCP14141
AAppendix

Table A-1 VCS services and ports (continued)
ProcessDescriptionProtocolPort Number
pluginHost.exeSymantec Plugin Host Service
Solutions Configuration Center(SFWConfigPanel.exe)
CCF Engine (CEngineDriver.exe)
TCP7419
pbx_exchange.exeSymantec Private BranchExchange
TCP/UDP1556
vxatd.exeSymantec ProductAuthentication Service (VxSS)
TCP/UDP2821
vras.dllVolume ReplicatorAdministrative Service
TCP8199
vxio.sysVCS Cluster HeartbeatsUDP4145
VxSchedService.exeVeritas Scheduler Service
Use to launch the configuredschedule.
TCP4888
User configurableports created at kernellevel by vxio .sys file
Volume Replicator PacketsTCP/UDP49152-65535
Notifier.exeVCS NotificationTCP/UDP14144
hasim.exeVCS Cluster SimulatorTCP/UDP14153, 15550- 15558
wac.exeVCSGlobal Cluster Option (GCO)TCP/UDP14155
Services and ports used by VCSAbout VCS services and ports
94
AAbout
notification 23product reinstallation 36upgrade VCS; co-existing with Veritas
NetBackup 47After installing 31After upgrading to 5.1 SP2 54
changing the type definition default values 55importing the VCS management pack 55
BBefore installing 28Before upgrading the cluster
changing the driver signing options 47general preparations 46
EExchange cluster
upgrade matrix 57
Ffeatures
adding 37removing 37
firewallsservices and ports used 93
Gglobal clusters 24
HHardware requirements 10
Iinstallation
adding or removing features 37license management 22repair 35
Installation planning 22Installation requirements 9Installing
using product installer 27VCS 28
Installing VCSusing command line 31
Llicensing 21
adding or removing 22management 22
MMicrosoft Exchange 2003
service pack 2configuring in a VCS environment 77
Microsoft Exchange 2007service pack upgrade 78
Modifying driver signing options 28
NNetwork requirements 10
OOracle cluster
upgrade matrix 70Oracle cluster upgrading 70
Pprint share service group
bringing online after upgrade 54product installer
uninstalling 39
RRecovery tools 25repairing installation 35
Index

Requirementshardware 10installation 9network 10
Resetting the driver signing options 31
SService Pack Upgrade
Microsoft SQL 2008 or 2008 R2 89service pack upgrades
Microsoft Exchange 2003 SP2 77Microsoft Exchange 2007 78Microsoft SQL 2000 SP4 82Microsoft SQL 2005 SP1 83
setup.exe parametersnode 41Reboot 41Solution 41
SQL Server Clusterupgrade matrix 58
SupportedMicrosoft Exchange servers and the
corresponding operating systems 13Microsoft SQL servers and the corresponding
operating systems 14Network Appliance applications 21Operating systems 12operating systems and application versions 12Oracle versions and the correspondingoperating
systems 19Symantec Product Authentication Service 23
Uuninstalling
using command line 41using product installer 39
UpgradeExchange server cluster 56
upgrade scenarios 56Microsoft 2000 to SP4 82Oracle cluster 70
upgrade scenarios 70SQL 2005 to 2005 SP2 or later 85SQL Server 2000 or 2005 to SQL Server 2008 or
2008 R2 on the additional failover node 62SQL Server 2000 or 2005 to SQL Server 2008 or
2008 R2 on the first node 62
Upgrade (continued)SQL Server 2000 or 2005 to SQL Server 2008 or
SQL Server 2008 R2 60Create SQL Server 2008 or 2008 R2 service
group 63SQL Server 2000 to SQL Server 2005 58SQL Server 2008 to SQL Server 2008 R2 64
additional failover node 67first cluster node 66modify SQL 2008 service group
configuration 68SQL Server cluster 57
Upgrade scenarios 58upgrade
Exchange 2010 to Exchange 2010 SP1; VCSenvironment 81
upgrading SFW HAbring print share service group online 54
Upgrading the cluster to 5.1 SP2 45
Index96