verbatim generic user manual english · • opening the verbatim hard drive will void the warranty....
TRANSCRIPT

USER MANUAL
VERBATIM HARD DRIVE
1710

2
EN Dear user!
Thank you for selecting the Verbatim Hard Drive as your external data storage device.For optimal use and performance we advise you to read this manual carefully before usingthis product.Please note: this manual is a general manual which is used for several Verbatim products.Product pictures shown in this manual may differ from the device you bought.
Contents of the box
Please check the contents of the box. All articles included in this box are listed on theback side of the packaging.
Need assistance? Have questions?
In case you have a question about the use of this product, need information about other Verbatim products or need technical assistance, please contact the Verbatim Service Center for your country. See www.verbatim.com/support for details.
Warning !
All rights reserved. The products named in this manual are only used for identificationpurposes and may be trademarks or registered trademarks of the respectivecompanies. This device was designed for home or office use.Warning! This device is equipment complying with EN55022 class A. This equipmentcan cause radio disturbances in a residential area. If this is the case, the user hasto take appropriate measures and assume all responsibility and costs for. It maynot be used near or with any life-sustaining systems. Verbatim cannot be made liable for any damages, loss of data or damage followingthereof -whatsoever (including, without limitation, damages for loss of businessprofits, business interruption, loss of business information, or other pecuniary loss)arising out of the use of or inability to use this Verbatim product, even if Verbatimhas been advised of the possibility of such damages.We reserve the right to upgrade our products in keeping with technological advances.
3
EN Table of Contents
General Information .................................................................................page 4
Precautionary measures ...........................................................................page 5
Verbatim Hard Drive ................................................................................page 6
Chapter
Hardware Installation ...............................................................................page 7
Chapter
Driver Installation ...................................................................................page 7
Chapter
Installation of the application software .......................................................page 8
Chapter
Partitioning your Verbatim Hard Drive ........................................................page 11
Chapter
Limited Warranty Terms ...........................................................................page 20
Rights ....................................................................................................page 20
FCC Compliance ......................................................................................page 21
WEEE Notice ...........................................................................................page 21
CE Declaration ........................................................................................page 22
RoHS Compliance ....................................................................................page 22
© 2012 Verbatim
4
EN General Information
The following hardware and software requirements must be fulfilled to ensure trouble-freeoperation.
System requirements
In order to use the Verbatim Hard Drive, following components are needed:
PC:
• Intel Pentium III / AMD Duron 900 MHz or higher
• 512 MB RAM or higher
• Available USB 3.0/2.0 port* or
• Available Firewire 800- or Firewire 400- port* or
• Available eSATA- port*
• Internet connection for online warranty registration, software updates and downloads
• Operating system: Windows 7, 8, 10
Mac:
• PowerPC G5 or Intel Mac
• 256 MB RAM or higher
• Available USB 2.0/3.0 port* or
• Available Thunderbolt port* or
• Available Firewire 800- or Firewire 400- port* or
• Available eSATA- port*
• Internet connection for online warranty registration, software updates and downloads
• Operating system: Mac OS X v10.4.6 or higher
* Please use the interface cables that come with your device (e.g. USB, Thunderbolt, eSATA, Firewire, LAN) for connecting the device to your PC/Mac.
5
EN Precautionary measures
To ensure that your Verbatim Hard Drive functions properly, please take note of the following precautions. If these are not followed, you may void your warranty and damage the Verbatim Hard Drive.
• Safely remove the Verbatim Hard Drive via your operating system (the "unplug or eject hardware" option in the Windows taskbar) before disconnecting the USB cable. Failing to do so may result in data loss.
• Do not drop the Verbatim Hard Drive or expose it to other kinds of sudden mechanical shocks as this may result in data loss and damage to the Verbatim Hard Drive.
• Do not use the Verbatim Hard Drive when the ambient temperature is below 10°C or above 35°C.
• If the Verbatim Hard Drive is moved from a cool environment to a warmer environment, please allow the drive to acclimatize to the ambient temperature before operating the device. Failing to do so may lead to condensation within the drive enclosure, which in turn may cause the drive to malfunction.
• Do not place liquids or drinks on the Verbatim Hard Drive. When liquids are spilled and get in contact with the electronics within the drive enclosure, it will damage the drive and will cause the drive to malfunction.
• Do not use the Verbatim Hard Drive in a dusty environment. Dust inside the enclosure may damage the internal electronics and result in drive malfunction.
• Opening the Verbatim Hard Drive will void the warranty.
• Since USB 3.0 is backwards compatible with USB 2.0, the Verbatim Hard Drive can be connected to all USB ports. When connected to a USB 2.0 port, however, the performance (data transfer rate) of the Verbatim Hard Drive will be much lower than when the drive is connected to a USB 3.0 port.
If at any point during installing and/or configuring your Verbatim Hard Drive you need assistance or have questions, please contact the Verbatim Support Center for your country. See www.verbatim.com/support for details.

6
EN Verbatim Hard Drive
The hi-speed data transfer through the (e.g. USB, Thunderbolt, eSATA, Firewire, LAN)interface makes it ideally suitable for data-storage, file sharing, backup, archiving, audioplayback and all applications that need fast file access. The Verbatim drive comes preformatted in FAT32 (for drives with a capacity of 1TB and2TB) or NTFS (for drives with a capacity of 3TB and 4TB or higher). FAT32 format allowsoperation with either Windows or Mac OS. NTFS format is only compatible with Windows7, 8 and 10, and only readable for Mac OS. If you want to use your drive on a Mac systemplease reformat the drive in HFS+ format. Reformatting the drive will delete all the dataon the drive so be sure to save them before.
7
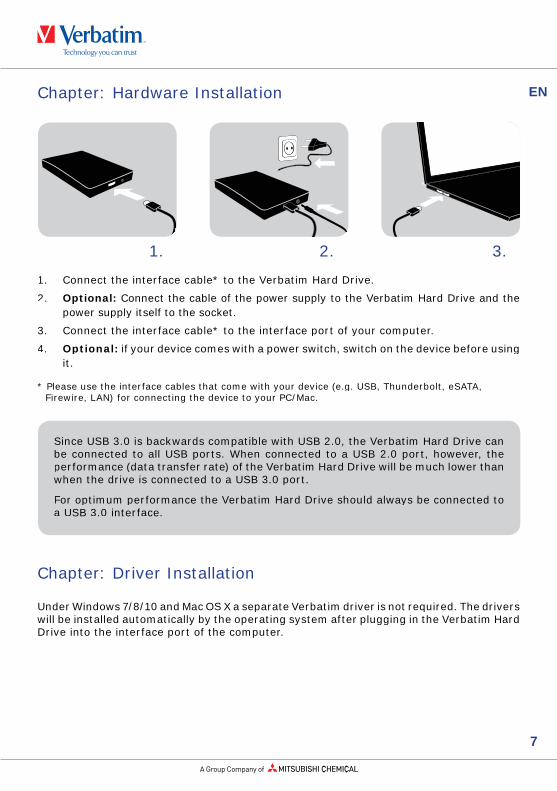
ENChapter: Hardware Installation
1. Connect the interface cable* to the Verbatim Hard Drive.
2. Optional: Connect the cable of the power supply to the Verbatim Hard Drive and the power supply itself to the socket.
3. Connect the interface cable* to the interface port of your computer.
4. Optional: if your device comes with a power switch, switch on the device before using it.
* Please use the interface cables that come with your device (e.g. USB, Thunderbolt, eSATA, Firewire, LAN) for connecting the device to your PC/Mac.
Chapter: Driver Installation
Under Windows 7/8/10 and Mac OS X a separate Verbatim driver is not required. The drivers will be installed automatically by the operating system after plugging in the Verbatim Hard Drive into the interface port of the computer.
Since USB 3.0 is backwards compatible with USB 2.0, the Verbatim Hard Drive canbe connected to all USB ports. When connected to a USB 2.0 port, however, theperformance (data transfer rate) of the Verbatim Hard Drive will be much lower thanwhen the drive is connected to a USB 3.0 port.
For optimum performance the Verbatim Hard Drive should always be connected toa USB 3.0 interface.
1. 2. 3.
8
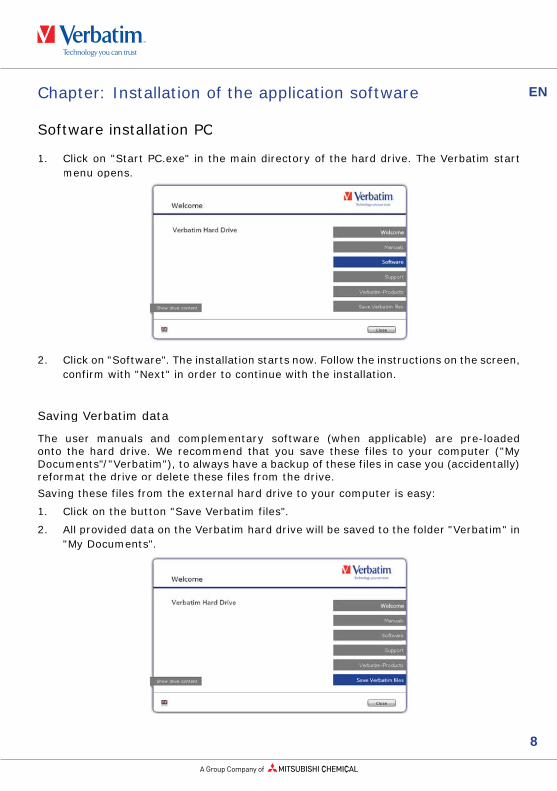
EN Chapter: Installation of the application software
Software installation PC
1. Click on "Start PC.exe" in the main directory of the hard drive. The Verbatim start menu opens.
2. Click on "Software". The installation starts now. Follow the instructions on the screen, confirm with "Next" in order to continue with the installation.
Saving Verbatim data
The user manuals and complementary software (when applicable) are pre-loaded onto the hard drive. We recommend that you save these files to your computer ("My Documents"/"Verbatim"), to always have a backup of these files in case you (accidentally) reformat the drive or delete these files from the drive.Saving these files from the external hard drive to your computer is easy:
1. Click on the button "Save Verbatim files".
2. All provided data on the Verbatim hard drive will be saved to the folder "Verbatim" in "My Documents".

9
ENSoftware installation Mac
1. Click on "Start MAC" in the main directory of the hard drive. The Verbatim start menu opens.
2. Click on "Software". The installation starts now. Follow the instructions on the screen, confirm with "Next" in order to continue with the installation.
Saving Verbatim data
The user manuals and complementary software (when applicable) are pre-loaded onto the hard drive. We recommend that you save these files to your computer ("Documents"/ "Verbatim"), to always have a backup of these files in case you (accidentally) reformat the drive or delete these files from the drive.Saving these files from the external hard drive to your computer is easy:
1. Click on "Start MAC" in the main directory of the hard drive. The Verbatim start menu opens.
2. Click on the button "Save Verbatim files".
3. All provided data on the Verbatim hard drive will be saved to the folder "Verbatim" in "Documents".

10
ENUsing Time Machine with your Verbatim Hard Drive
Time Machine allows you making automated backups of your complete system under Mac OS X 10.5 and Mac OS 10.6 or higher.
1. Connect your Verbatim Hard Drive via the interface to your Mac. If you did not specify a backup volume yet, Time Machine will ask you when connecting the Verbatim Hard Drive for the first time if the device shall be used as backup drive.
2. After your Verbatim Hard Drive appeared on the desktop, click on “Use as Backup Disk” to confirm that you want to use your Verbatim Hard Drive for Time Machine backups. In the Time Machine preferences you can configure your backup settings further.
Time Machine now automatically creates backups of your Mac. Time Machine will keep hourly backups for the last 24 hours, daily backups for the last month and weekly backups until your Verbatim Hard Drive is full.
The first backup can take some time, so you should set up Time Machine, for example, in the evening, so the first backup can be created overnight.
Remark: If your Verbatim Hard Drive is formatted in NTFS or FAT 32 format, you need to format your hard dive in Mac OS Extended (Journaled) format. Doing so will delete ALL your data!

11
EN Chapter: Partitioning your Verbatim Hard Drive
General information
The Verbatim drive comes preformatted in FAT32 (for drives with a capacity of 1TB and 2TB) or NTFS (for drives with a capacity of 3TB and 4TB or higher). FAT32 format allows operation with either Windows or Mac OS. NTFS format is only compatible with Windows 7, 8 and 10, and only readable for Mac OS. If you want to use your drive on a Mac system please reformat the drive in HFS+ format. Reformatting the drive will delete all the data on the drive so be sure to save them before. It is recommended not to change the current configuration of your Verbatim Hard Drive.For some users another file system might fit better for their needs. This manual describes current limitations of most common file systems and Instructions to enable you to adapt the Verbatim Hard Drive to your needs.
File System features
Please refer to the tables below for an overview:
File systems supported by different operating systems
File system
Operating systemFAT FAT32 NTFS HFS+
Windows 7/8/10 yes yes yes no
Mac OS X yes yes yes (only read)
yes
File system
Operating systemFAT FAT32 NTFS HFS+
Windows 7/8/10 4 GB* 32 GB 16 TB -
Mac OS X 10.1.x - 128 GB - 2 TB
Mac OS X 10.2.x - 128 GB - 8 TB
Mac OS X 10.3.x or higher
- ( -> 128 GB) - 16 TB
12
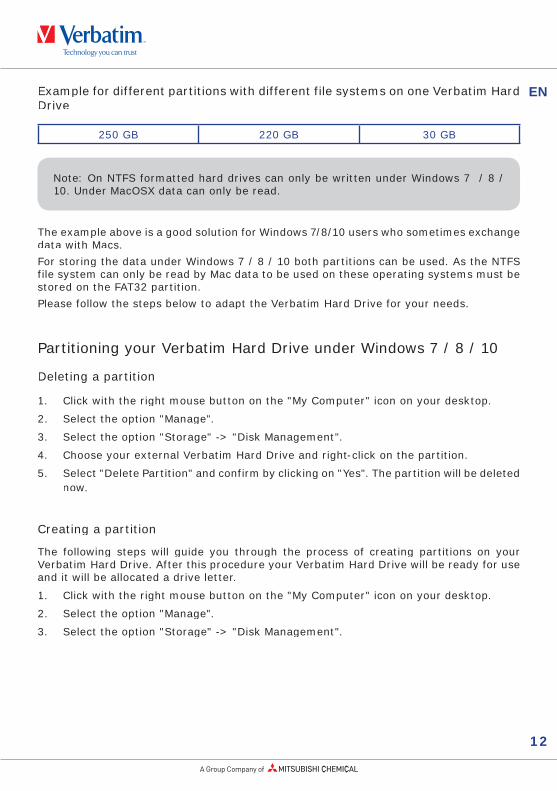
ENExample for different partitions with different file systems on one Verbatim Hard Drive
250 GB 220 GB 30 GB
The example above is a good solution for Windows 7/8/10 users who sometimes exchange data with Macs.For storing the data under Windows 7 / 8 / 10 both partitions can be used. As the NTFS file system can only be read by Mac data to be used on these operating systems must be stored on the FAT32 partition.Please follow the steps below to adapt the Verbatim Hard Drive for your needs.
Partitioning your Verbatim Hard Drive under Windows 7 / 8 / 10
Deleting a partition
1. Click with the right mouse button on the "My Computer" icon on your desktop.
2. Select the option "Manage".
3. Select the option "Storage" -> "Disk Management".
4. Choose your external Verbatim Hard Drive and right-click on the partition.
5. Select "Delete Partition" and confirm by clicking on "Yes". The partition will be deleted now.
Creating a partition
The following steps will guide you through the process of creating partitions on your Verbatim Hard Drive. After this procedure your Verbatim Hard Drive will be ready for use and it will be allocated a drive letter.
1. Click with the right mouse button on the "My Computer" icon on your desktop.
2. Select the option "Manage".
3. Select the option "Storage" -> "Disk Management".
Note: On NTFS formatted hard drives can only be written under Windows 7 / 8 / 10. Under MacOSX data can only be read.

13
EN4. Choose the hard drive, which is "unallocated". Ensure that the entire drive is "unallocated".
5. Click with the right mouse button on the "unallocated" area and select the option "New Partition". The "New Partition Wizard" opens. Click on "Next".

14
EN6. Select "Primary partition" and click on "Next". (Windows XP)
7. Now you can adjust the size of your partition. Click on "Next" if only one partition is to be created. See next chapter (Creating two or more partitions on the Verbatim Hard Drive under Windows 7/8/10) how to create more than one partition.
8. Assign a drive letter to your hard drive. Normally you can use the default options. Click on "Next".

15
EN9. Select the formatting option "Format this partition with the following settings". Chooseeither "FAT32" (< 32 GB) or "NTFS", the "Allocation unit size" should remain on "Default".Finally select "Perform a quick format" and click on "Next".
10. Click on "Finish" to complete the partitioning of your Verbatim Hard Drive. Your Verbatim Hard Drive will be formatted now and is ready-to-use afterwards.
16
ENCreating two or more partitions on the Verbatim Hard Drive under Windows 7 / 8 / 10
1. Repeat the steps from the previous chapter (Creating a partition on the Verbatim Hard Drive under Windows 7/8/10) for creating the first partition.
2. Click with the right mouse button on the "My Computer" icon on your desktop.
3. Select the option "Manage".
4. Select the option "Storage" -> "Disk Management".
5. Right-click on the unallocated space of your Verbatim Hard Drive and select the option "New partition". The "New Partition Wizard" opens. Click on "Next".
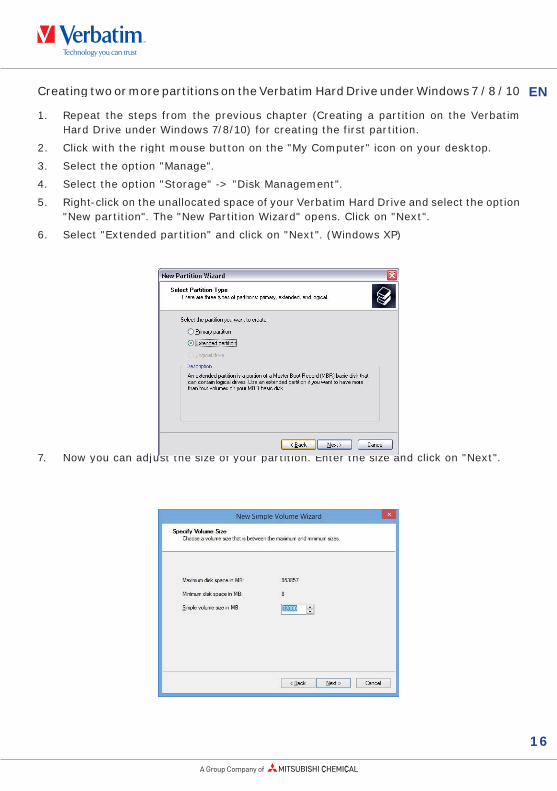
6. Select "Extended partition" and click on "Next". (Windows XP)
7. Now you can adjust the size of your partition. Enter the size and click on "Next".uststtst ththththe se se siizeizeize fofofof yoyoyourur parparpartittittittitiionionion EEEE tntentente tr tr tr thhehehe isizsizsize ae ae aaa

17
EN8. Click on "Finish" to create the "Extended partition". The unallocated space now changed to "Free space".
18
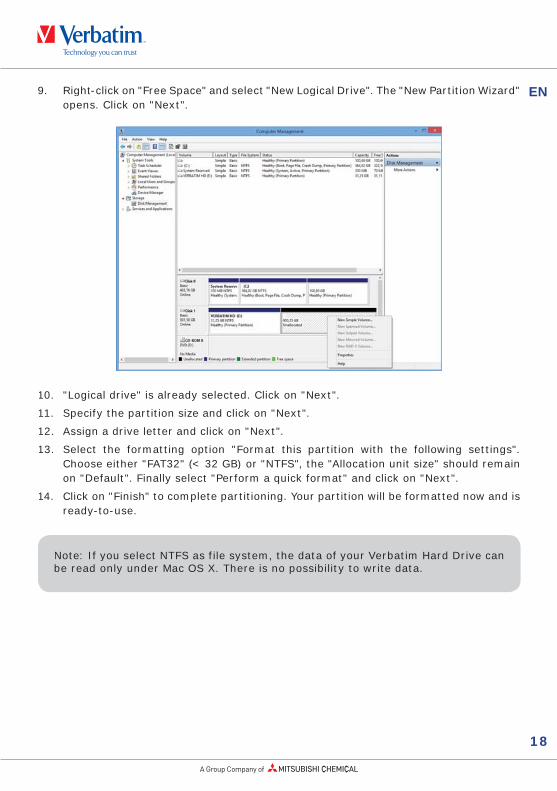
EN9. Right-click on "Free Space" and select "New Logical Drive". The "New Partition Wizard"opens. Click on "Next".
10. "Logical drive" is already selected. Click on "Next".
11. Specify the partition size and click on "Next".
12. Assign a drive letter and click on "Next".
13. Select the formatting option "Format this partition with the following settings".Choose either "FAT32" (< 32 GB) or "NTFS", the "Allocation unit size" should remainon "Default". Finally select "Perform a quick format" and click on "Next".
14. Click on "Finish" to complete partitioning. Your partition will be formatted now and isready-to-use.
Note: If you select NTFS as file system, the data of your Verbatim Hard Drive canbe read only under Mac OS X. There is no possibility to write data.
19
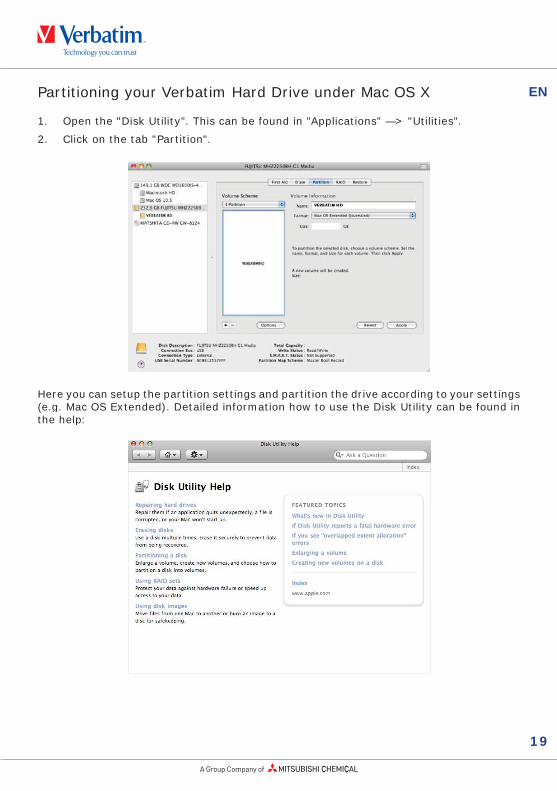
ENPartitioning your Verbatim Hard Drive under Mac OS X
1. Open the "Disk Utility". This can be found in "Applications" —> "Utilities".
2. Click on the tab "Partition".
Here you can setup the partition settings and partition the drive according to your settings(e.g. Mac OS Extended). Detailed information how to use the Disk Utility can be found inthe help:

20
ENLimited Warranty Terms
Verbatim GmbH warrants this product to be free from defects in material and workmanship for a period of 2 years from date of purchase. This warranty excludes batteries. If this product is found to be defective within the warranty period, it will be replaced at no cost to you. You may return it with your original cash register receipt to the place of purchase or contact Verbatim.
Product replacement is your sole remedy under this warranty, and this warranty does not apply to normal wear or to damage resulting from abnormal use, misuse, abuse, neglect or accident, or to any incompatibility or poor performance due to the specific computer software or hardware used.VERBATIM WILL NOT BE LIABLE FOR DATA LOSS OR ANY INCIDENTAL, CONSEQUENTIAL OR SPECIAL DAMAGES, HOWEVER CAUSED, FOR BREACH OF WARRANTIES OR OTHERWISE. This warranty gives you specific legal rights and you may also have other rights which vary from state to state or country to country.
Rights
Copyright © 2011 Verbatim GmbH. No part of this document may be reproduced in any form or by any means, for any purpose, without the express written permission of Verbatim GmbH. All rights reserved.
All other brands and product names referenced herein are property of their respective owners.
NOTE: Verbatim GmbH may at any time revise the content of this user guide without further notice.
21
ENFCC Compliance
This equipment has been tested and found to comply with the limits for a Class B digital device, pursuant to Part 15 of the FCC Rules. These limits are designed to provide reasonable protection against harmful interference in a residential installation. This equipment generates, uses and can radiate radio frequency energy and, if not installed and used in accordance with the instructions, may cause harmful interference to radio communications. However, there is no guarantee that interference will not occur in a particular installation. If this equipment does cause harmful interference to radio or television reception, which can be determined by turning the equipment off and on, the user is encouraged to try to correct the interference by one or more of the following measures:
• Reorient or relocate the receiving antenna.
• Increase the separation between the equipment and receiver.
• Connect the equipment into an outlet on a circuit different from that to which the receiver is connected.
• Consult the dealer or an experienced radio/TV technician for help
WEEE Notice
The Directive on Waste Electrical and Electronic Equipment (WEEE), which entered into force as European law on 13th February 2003, resulted in a major change in the treatment of electrical equipment at end-of-life.
The WEEE logo (shown at the left) on the product or on its box indicates that this product must not be disposed of or dumped with your other household waste. For more information about electronic and electrical waste equipment disposal, recovery, and collection points, please contact your local municipal household waste disposal service or shop from where you purchased the equipment.

22
ENCE Declaration
EC Declaration of Conformity
Complied the requirements set out in the Council Directive on the Approximation of the Laws of the Member States relating to Electromagnetic Compatibility (2014/30/EC) and Low Voltage Protection 2006/95/EC.
This declaration applies to all specimens manufactured identical to the model submitted for testing/evaluation.
EN 55032:2012+ AC:2013 (Class B)EN 61000-3-2:2014EN 61000-3-3:2013AS/NZS CISPR 32:2013EN 55024:2010IEC 61000-4-2: 2008IEC 61000-4-3: 2006+ A1:2007+ A2:2010IEC 61000-4-4: 2013IEC 61000-4-5: 2014IEC 61000-4-6: 2013IEC 61000-4-8: 2009IEC 61000-4-11: 2004
RoHS Compliance
This product is in compliance with Directive 2011/65/EU of the European Parliament and of the Council of 18 December 2006 , on the restriction of the use of certain hazardous substances in electrical and electronic equipment (RoHS) and its amendments. Substances of Very High Concern (SVHC) including 169 substances contained in Candidate List of June 20th 2016 are not present in this product range above permitted levels.