vc 874xx76
DESCRIPTION
jvc recorder instructions manualTRANSCRIPT

HR-J700EHR-J658E/EH
VIDEO CASSETTE RECORDER
INSTRUCTIONS
LPT0047-001A
SEE AUTO SET UPON REAR SIDE
SEE AUTO SET UPON REAR SIDE
PAL
DISPLAY
COUNTER RESET
REC LINK
TV PROG
TV PROG
TIMER
STANDBY/ON
SP/LP
PUSH JOG
REVIEWSP
VCRVPS/PDC
TV PROG +
TV PROG –
TV
– TV
+
0000
STARTDEBUT
STOPFIN
DATE
MENU OK
TVPROG
TV/VCR
DAILY/QTDN.VPS/PDC
AUX
WEEKLY/HEBDO
PROG 30 SEC
– –:– –AUDIO
1 2 3
4 5 6
7 8 9
0
2
4
1
3
EXPRESS
VCR TV SAT
EN
CONTENTSSAFETY FIRST 2Safety Precautions ............................. 2
INSTALLING YOUR NEW RECORDER 3Basic Connections ............................ 3
INITIAL SETTINGS 4Auto Set Up ...................................... 4Language .......................................... 7On-Screen Displays .......................... 8Power Save Mode[J658E, J700E only] ........................... 9
INFORMATION ON COLOUR SYSTEM 10Colour System Set ........................... 10
PLAYBACK 11Basic Playback................................ 11Playback Features ........................... 12
RECORDING 15Basic Recording .............................. 15Recording Features ......................... 16B.E.S.T. Picture System.................... 18
TIMER RECORDING 20SHOWVIEW Timer Programming .......20Express Timer Programming ............ 22Automatic SatelliteProgramme Recording .................... 26
SPECIAL FEATURES 27Remote Control Functions .............. 27
EDITING 30Edit To Or From Another VideoRecorder ......................................... 30Edit From A Camcorder ................... 32
SYSTEM CONNECTIONS 33Connecting/Using A Decoder ......... 33Connection To A Satellite Tuner ......34Connecting/Using A Stereo System ....36
SUBSIDIARY SETTINGS 37Video Channel Set .......................... 37Tuner Set ......................................... 38SHOWVIEW Setup............................. 45Clock Set ........................................ 46
TROUBLESHOOTING 48QUESTIONS AND ANSWERS 50INDEX 51SPECIFICATIONS 54
ENGLISH
The recorder illustrations appearing in this instruction manual are of theHR-J658E/EH.

2 EN SAFETY FIRST
Failure to heed the following precautions may result indamage to the recorder, remote control or videocassette.1. DO NOT place the recorder . . .
... in an environment prone to extreme temperatures orhumidity.
... in direct sunlight.
... in a dusty environment.
... in an environment where strong magnetic fields aregenerated.
... on a surface that is unstable or subject to vibration.
2. DO NOT block the recorder’s ventilation openings.3. DO NOT place heavy objects on the recorder or remote
control.4. DO NOT place anything which might spill on top of the
recorder or remote control.5. AVOID violent shocks to the recorder during transport.
MOISTURE CONDENSATIONMoisture in the air will condense on the recorder when youmove it from a cold place to a warm place, or under extremelyhumid conditions—just as water droplets form in the surface ofa glass filled with cold liquid. Moisture condensation on thehead drum will cause damage to the tape. In conditions wherecondensation may occur, keep the recorder turned on for a fewhours to let the moisture dry.
ABOUT HEAD CLEANINGAccumulation of dirt and other particles on the video headsmay cause the playback picture to become blurred or inter-rupted. Be sure to contact your nearest JVC dealer if suchtroubles occur.
IMPORTANT
n Please read the various precautions on this page beforeinstalling or operating the recorder.
n It should be noted that it may be unlawful to re-recordpre-recorded tapes, records, or discs without the consentof the owner of copyright in the sound or video record-ing, broadcast or cable programme and in any literary,dramatic, musical, or artistic work embodied therein.
Safety Precautions
The STANDBY/ON button does not completely shutoff mains power from the unit, but switches operatingcurrent on and off. " " shows electrical power standbyand " " shows ON.
Video tapes recorded with this video recorder in the LP(Long Play) mode cannot be played back on a single-speedvideo recorder.
n Cassettes marked "VHS" (or "S-VHS") can be used with thisvideo cassette recorder, however, only VHS signals can beplayed back and recorded.
n HQ VHS is compatible with existing VHS equipment.n SHOWVIEW is a registered trademark of Gemstar Development
Corporation. The SHOWVIEW system is manufactured underlicence from Gemstar Development Corporation.
CAUTIONn When you are not using the recorder for a long period of
time, it is recommended that you disconnect the powercord from the mains outlet.
n Dangerous voltage inside. Refer internal servicing toqualified service personnel. To prevent electric shock orfire hazard, remove the power cord from the mainsoutlet prior to connecting or disconnecting any signallead or aerial.
WARNINGThere are two different types of SECAM colour systems:SECAM-L, used in FRANCE (also called SECAM-West), andSECAM-B, used in Eastern European countries (also calledSECAM-East).1.This recorder can also receive SECAM-B colour
television signals for recording and playback.2.Recordings made of SECAM-B television signals produce
monochrome pictures if played back on a video recorderof SECAM-L standard, or do not produce normal colourpictures if played back on a PAL video recorder withSECAM-B system incorporated (even if the TV set isSECAM-compatible).
3.SECAM-L prerecorded cassettes or recordings made witha SECAM-L video recorder produce monochromepictures when played back with this recorder.
4.This recorder cannot be used for the SECAM-L standard.Use a SECAM-L recorder to record SECAM-L signals.
For Italy:"It is declared that this product, brand JVC, conforms to theMinistry Decree n. 548 of 28 Aug.'95 published in theOfficial Gazette of the Italian Republic n. 301 of 28 Dec.'95"
The rating plate and the safety caution are on the rear of the unit.
WARNING: DANGEROUS VOLTAGE INSIDEWARNING: TO PREVENT FIRE OR SHOCK HAZARD, DO NOT EXPOSE THIS UNIT TO RAIN OR
MOISTURE.
PAL

EN 3
BasicConnections CHECK CONTENTS
1 Make sure the package contains all of the accessorieslisted in “Specifications” (Z pg. 54).
SITUATE RECORDER
2 Place the recorder on a stable, horizontal surface.
CONNECT RECORDER TOTV
3 The connection method you use depends on the type ofTV you have.
RF CONNECTION● To Connect To A TV With NO AV Input Terminals . . .
a– Disconnect the TV aerial cable from the TV.b– Connect the TV aerial cable to the ANT. IN jack
on the rear panel of the recorder.c– Connect the provided RF cable between the RF
OUT jack on the rear panel of the recorder and theTV’s aerial terminal.
AV CONNECTION● To Connect To A TV With AV Input Terminals . . .
a– Connect the aerial, recorder and TV as per “RFCONNECTION”.
b– Connect an optional SCART cable between theAV1 IN/OUT socket on the rear panel of therecorder and the TV’s 21-pin SCART connector.
CONNECT RECORDER TOMAINS
4 Plug the end of the mains power cord into a mainsoutlet.
It's essential that your video recorder be properly connected.Follow these steps carefully. THESE STEPS MUST BE COMPLETEDBEFORE ANY VIDEO OPERATION CAN BE PERFORMED.
INSTALLING YOUR NEW RECORDER
21-pin SCART Cable
21-pin SCARTconnector
Back of TV
Mains PowerCord
Aerial terminal
Rear view
Mains outlet AV1 IN/OUT
RF Cable(provided)
TV AerialCable
After you plug the mains power cord into a mains outlet, theCountry Set display appears on the TV screen and/or on therecorder's front display panel when the button on therecorder/remote control is pressed for the first time to poweron the recorder; go to page 4 to perform Auto Set Up.
Make AV connection if your TV has a 21-pin AV inputconnector (SCART) in order to reduce the possibility ofinterference. And if you are using a stereo TV, you will needthis cable in order to enjoy stereo playback of videotapes.

4 EN INITIAL SETTINGS
When the button on the recorder/remote control is pressedfor the first time to power on the recorder after you plug themains power cord into a mains outlet, the Country Set displaywill appear on the TV screen and the recorder's front displaypanel. By simply selecting your country*, the Auto Set Upfunction sets the tuner channels, clock, Guide Program numbersand video channel** automatically.** If you live in Belgium (BELGIUM) or Switzerland (SUISSE), you also
need to select your area.** Useful if you have connected the video recorder to your TV via RF
connection (Z pg. 3). Video Channel (RF output channel) is thechannel on which your TV receives picture and sound signals fromthe video recorder through the RF cable.
You can refer to the front display panel and/or the on-screendisplay to perform this procedure.
Auto Set UpAuto Channel Set/AutoClock Set/Auto GuideProgram Number Set/AutoVideo Channel Set
TURN ON THE RECORDER
1 Press on the recorder or remote control. TheCountry Set display appears on the front display paneland/or on the screen.
NOTE:If you have connected yourTV to the recorder with RFconnection and the on-screen display appearingon UHF channel 36 looksdistorted, perform thisprocedure referring to thefront display panel.
SELECT COUNTRY
2 If you are referring to the front display panelPress %fi to select your international telephone country codeof your country referring to the chart in the left column.● If you have selected a country code other than 32
(BELGIUM) or 41 (SUISSE), go to step 4.● If you have selected 32 (BELGIUM) or 41 (SUISSE), go
to step 3.
If you are referring to the on-screen displayPress %fi to move the highlight bar (pointer) to yourcountry's name.
● If you have selected a country other than BELGIUM orSUISSE, go to step 4.
● If you have selected BELGIUM or SUISSE, go to step 3.
ATTENTIONOnce you have performed Auto Set Up, even if therecorder's memory backup has expired, all the storedstations and their Guide Program numbers remain in therecorder's memory and the recorder will not perform AutoSet Up again. You only need to set the clock. (Z pg. 46)
If you have moved to a different area, perform each settingas required.● Video Channel setting (for RF connection users) Z pg. 37● Tuner setting Z pg. 38● Clock setting Z pg. 46
If a new station starts broadcasting in your area, performtuner setting (Z pg. 38) and, if necessary, video channelsetting (Z pg. 37).
– –:– –
1 2 3
4 5 6
7 8 9
0
2
4
1
3 OK
International Telephone Country Code
SUISSE : 41 SUOMI : 358ITALIA : 39 PORTUGAL : 351ESPAÑA : 34 DEUTSCHLAND : 49BELGIUM : 32 NORGE : 47NEDERLAND : 31 SVERIGE : 46GREECE : 30 DANMARK : 45OTHERS : - - ÖSTERREICH : 43 (Ex.) DEUTSCHLAND is selected
Before starting, make sure of the following:● The TV aerial cable should be connected to the recorder.● The recorder's mains power cord should be connected to
a mains outlet. Z pg. 3● If you want to use the on-screen display, the TV should
be set to its AV mode (with AV connection Z pg. 3) orUHF channel 36 (with RF connection Z pg. 3).
PREVIOUS PAGESUISSEITALIAESPAÑABELGIUMTNEDERLANDGREECEOTHERS
[5∞] = [MENU] : EXIT
PREVIOUS PAGESUISSEITALIAESPAÑABELGIUMTNEDERLANDGREECEOTHERS
[5∞] = [MENU] : EXIT
SUOMIPORTUGALDEUTSCHLANDNORGETSVERIGEDANMARKÖSTERREICHNEXT PAGE
[5∞] = [MENU] : EXIT

EN 5CONFIRM/SET VIDEO CHANNEL
5 If you have connected the video recorder to your TVvia an RF cable only (RF connection)The channel that is shown on the display panel is yourVideo Channel.To view picture signals from the video recorder, setyour TV to the Video Channel. — Refer to theinstructions supplied with your TV set for how to dothis.
c If you have connected the video recorder to your TVvia both an RF cable and a 21-pin SCART cable (AVconnection)You do not need the video channel so you have to setthe video channel to off.Press TV PROG – until the display panel shows"_OUT– –" to set the Video Channel to off.To view picture signals from the video recorder, setyour TV to its AV mode. — Refer to the instructionssupplied with your TV set for how to do this.
FINISH AUTO SET UP
6 Press OK and refer to page 6 to check the results.
SELECT LANGUAGE
3 Press OK. The Language Set display appears on thefront display panel and/or on the screen.
If you are referring to the front display panelPress %fi to select your language code.
If you are referring tothe on-screen displayPress %fi to move thehighlight bar (pointer) tothe language of yourchoice.
PERFORM AUTO SET UP
4 Press OK.
"Auto" appears on the display panel and blinks; doNOT press any button on the recorder or remotecontrol until the display panel shows either thedisplay as illustrated in step 5 or "– –:– –".
● If "– –:– –" appears on the display panel, refer topage 6.
● If you are using the on-screen display, theAUTO SET screen willappear. As Auto Set Upprogresses, the " "mark on the screenmoves from left toright.
NOTES:● Auto channel set function takes place first; it assigns automatically all receivable stations in your area.● Auto clock set function sets the clock automatically by reading the clock setting data from a station transmitting a PDC signal while
auto channel set is being performed.● During auto channel set, the recorder recognizes each station name of the detected stations and stores them in the recorder's
memory, then automatically sets SHOWVIEW assigned Guide Program number for those stations according to the broadcast area.● In the area where no TV station transmits a PDC signal, the recorder can perform neither auto clock set nor auto Guide Program
number set.● For RF connection users: The video recorder detects the channels which are not occupied by local stations and selects one
channel automatically for your Video Channel that is located in the middle of more than 5 vacant channels.● If there is a power cut, or if you press or MENU while Auto Set Up is in progress, Auto Set Up will be interrupted; be sure to turn
off the recorder power once and try again from step 1.
AUTO SET
PLEASE WAIT
[MENU] : EXIT
0 ++ +
Beginning End
(Ex.) DEUTSCH is selected for SUISSE
(Ex.) DEUTSCH is selected
DANSKSUOMINORSKSVENSKANEDERLANDSCASTELLANOITALIANOFRANCAISDEUTSCHENGLISH
[5∞] = [MENU] : ENDE
International telephonecountry code
Language code
Language Code
ENGLISH : 01 NEDERLANDS : 06DEUTSCH : 02 SVENSKA : 07FRANCAIS : 03 NORSK : 08ITALIANO : 04 SUOMI : 09CASTELLANO : 05 DANSK : 10

6 EN INITIAL SETTINGS (cont.)
If both auto channel set and auto clock set have been performed successfully:1 Turn on the TV and select its VIDEO channel or AV mode, then make sure that all necessary stations have been stored in
the recorder's memory by using the TV PROG button(s).● If station names (ID — Z pg. 43) have also been stored in the recorder's memory, the station name will be displayed at
the top left corner of the screen for about 5 seconds when the recorder is tuned to a different station.● If you want to set the tuner manually such as to add or skip channels, to change channel positions, or to set or change
station names, see pages 40 – 44.
If auto channel set has succeeded but auto clock set has not:1 Turn on the TV and select its VIDEO channel or AV mode, then make sure that all necessary stations have been stored in
the recorder's memory by using the TV PROG button(s).● If station names (ID — Z pg. 43) have also been stored in the recorder's memory, the station name will be displayed at
the top left corner of the screen for about 5 seconds when the recorder is tuned to a different station.● If you want to set the tuner manually such as to add or skip channels, to change channel positions, or to set or change
station names, see pages 40 – 44.2 Perform "Clock Set" on page 46.
If both auto channel set and auto clock set have failed:1 Make sure the TV aerial cable is connected properly to the recorder and turn off the recorder power once, then turn the
recorder power back on again.● The Country Set display appears on the front display panel and/or on the screen; perform steps 2 – 6 on pages 4 – 5 again.
IMPORTANTn In certain reception conditions, station names may not be stored correctly, and auto Guide Program Number Set may not
work properly. If the Guide Program numbers are not set properly, when you timer-record a TV programme using SHOWVIEW,the recorder will record a TV programme of a different station. When programming the timer using SHOWVIEW, be sure tocheck whether the channel position on which your recorder receives the broadcasting station you wish to record is selected(Z pg. 20, "SHOWVIEW Timer Programming").
n Your video recorder memorizes all detected stations even if reception of some of them is poor. In these cases picture qualitymay be poor. To delete those stations with an unacceptable picture Z "Delete A Channel" on page 41.
n For RF connection users: In certain reception conditions, the Video Channel may not be set correctly and interference mayappear in the TV picture while the recorder's power is on. Set your Video Channel manually. Z pg. 37, "Video Channel Set".
A
B
C
When auto channel set has beencompleted successfully but auto clock sethas not, "1" (channel position) will bedisplayed after the OK button is pressed instep 6 on page 5.
When neither auto channel set nor autoclock set has been completed success-fully, "– –:– –" will be displayed.
When both auto channel set and autoclock set have been completed success-fully the correct current time will bedisplayed after the OK button is pressed instep 6 on page 5.
You can check if the Guide Program numbers have been set correctly when you perform SHOWVIEW Timer Programming(Z pg. 20); if the correct channel position number is displayed in step 3, this confirms that the Guide Program number for theSHOWVIEW number you enter in step 2 has been set correctly.
Auto Set Up results appear on the front display panel
INFORMATIONLanguage for the on-screen displayAuto Set Up also selects the language automatically for the on-screen display depending on the Country setting you have madein step 2 on page 4 (unless you have selected BELGIUM or SUISSE), as shown below.
SUOMI [ SUOMI SVERIGE [ SVENSKA ESPAÑA [ CASTELLANOPORTUGAL [ ENGLISH DANMARK [ DANSK NEDERLAND [ NEDERLANDSDEUTSCHLAND [ DEUTSCH ÖSTERREICH [ DEUTSCH GREECE [ ENGLISHNORGE [ NORSK ITALIA [ ITALIANO OTHERS [ ENGLISHIf you want to change the language setting manually, Z "Language" on page 7.
Just ClockYour recorder is equipped with the Just Clock function which provides accurate time keeping through automatic adjustments atregular intervals, by reading data from a PDC signal. If you want to take advantage of this function, simply set it to "ON".Z "Just Clock" on page 46.
A B C

EN 7
– –:– –
1 2 3
4 5 6
7 8 9
0
2
4
1
3
LanguageThis recorder offers you the choice to view on-screen messagesin 10 different languages. Though Auto Set Up selects thelanguage automatically (Z pg. 6), you can change the languagesetting manually using this procedure as required.
TURN ON THE RECORDER
1 Press .
ACCESS MAIN MENU
2 Press MENU.
ACCESS COUNTRY SETSCREEN
3 Press %fi to move thehighlight bar (pointer) to"AUTO CH SET", thenpress OK or .
SELECT COUNTRY
4 Press %fi to move the highlight bar (pointer) to yourcountry's name, then press OK or .
SELECT LANGUAGE
5 Press %fi to move thehighlight bar (pointer) tothe language of yourchoice.
● You do not have to pressOK; pressing OK startsAuto Channel Set.
RETURN TO NORMALSCREEN
6 Press MENU.
Turn on the TV and select the VIDEO channel (or AV mode).
%
%
OKMENU
MAIN MENU
MODE SETAUTO CH SETMANUAL CH SETINITIAL SETT
[5∞] = [MENU] : EXIT
DANSKSUOMINORSKSVENSKANEDERLANDSCASTELLANOITALIANOFRANCAISDEUTSCHENGLISH
[5∞] = [MENU] : EXIT
8 EN
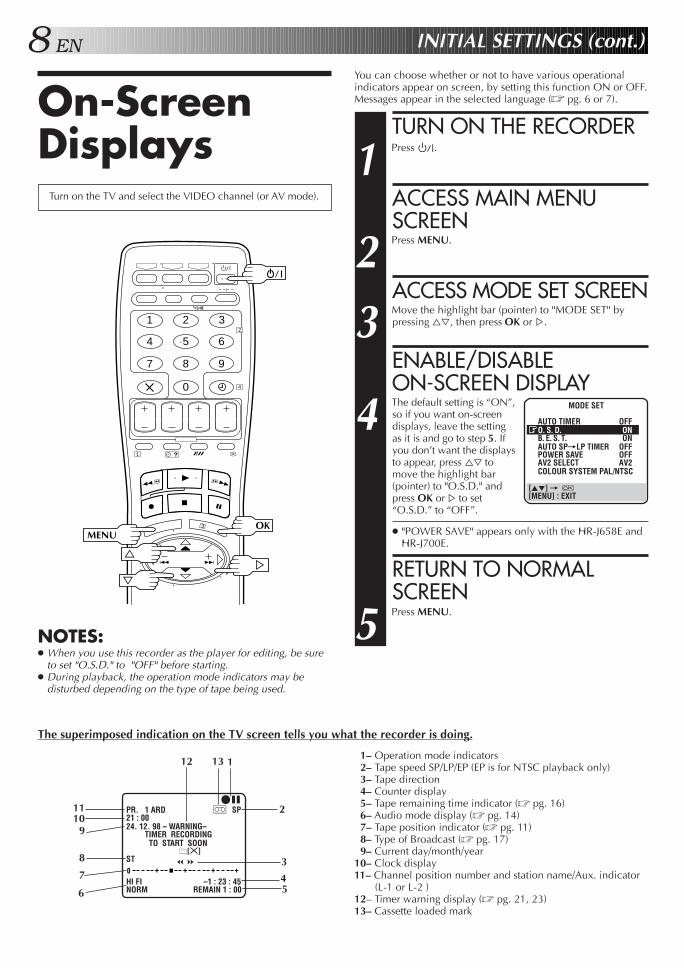
On-ScreenDisplays
You can choose whether or not to have various operationalindicators appear on screen, by setting this function ON or OFF.Messages appear in the selected language (Z pg. 6 or 7).
Turn on the TV and select the VIDEO channel (or AV mode).
INITIAL SETTINGS (cont.)
TURN ON THE RECORDER
1 Press .
ACCESS MAIN MENUSCREEN
2 Press MENU.
ACCESS MODE SET SCREEN
3 Move the highlight bar (pointer) to "MODE SET" bypressing %fi, then press OK or .
ENABLE/DISABLEON-SCREEN DISPLAY
4 The default setting is “ON”,so if you want on-screendisplays, leave the settingas it is and go to step 5. Ifyou don’t want the displaysto appear, press %fi tomove the highlight bar(pointer) to "O.S.D." andpress OK or to set“O.S.D.” to “OFF”.
● "POWER SAVE" appears only with the HR-J658E andHR-J700E.
RETURN TO NORMALSCREEN
5 Press MENU.
1– Operation mode indicators 2– Tape speed SP/LP/EP (EP is for NTSC playback only) 3– Tape direction 4– Counter display 5– Tape remaining time indicator (Z pg. 16) 6– Audio mode display (Z pg. 14) 7– Tape position indicator (Z pg. 11) 8– Type of Broadcast (Z pg. 17) 9– Current day/month/year10– Clock display11– Channel position number and station name/Aux. indicator
(L-1 or L-2 )12– Timer warning display (Z pg. 21, 23)13– Cassette loaded mark
%
The superimposed indication on the TV screen tells you what the recorder is doing.
%
MODE SET
AUTO TIMER OFFO. S. D. ONB. E. S. T. ONAUTO SP=LP TIMER OFFPOWER SAVE OFFAV2 SELECT AV2COLOUR SYSTEM PAL/NTSC
[5∞] = [MENU] : EXIT
q6PR. 1 ARD ] SP21 : 0024. 12. 98 – WARNING– TIMER RECORDING TO START SOON
[ ]ST
HI FI –1 : 23 : 45NORM REMAIN 1 : 00
0 + + + +
113
1110
9
8
7
645
3
2
12
NOTES:● When you use this recorder as the player for editing, be sure
to set "O.S.D." to "OFF" before starting.● During playback, the operation mode indicators may be
disturbed depending on the type of tape being used.
– –:– –
1 2 3
4 5 6
7 8 9
0
2
4
1
3 OKMENU

EN 9
Power SaveMode(HR-J658E andHR-J700E only)
Turn on the TV and select the VIDEO channel (or AV mode).
You can reduce the power consumption while the recorder isturned off.
TURN ON THE RECORDER
1 Press .
ACCESS MAIN MENUSCREEN
2 Press MENU.
ACCESS MODE SET SCREEN
3 Press %fi to move thehighlight bar (pointer) to"MODE SET", then pressOK or .
SELECT POWER SAVEMODE
4 Press %fi to move thehighlight bar (pointer) to"POWER SAVE", then pressOK or to set to "ON".
RETURN TO NORMALSCREEN
5 Press MENU.
%%
MAIN MENU
MODE SETAUTO CH SETMANUAL CH SETINITIAL SET
[5∞] = [MENU] : EXIT
MODE SET
AUTO TIMER OFFO. S. D. ONB. E. S. T. ONAUTO SP=LP TIMER OFFPOWER SAVE ONAV2 SELECT AV2COLOUR SYSTEM PAL/NTSC
[5∞] = [MENU] : EXIT
NOTES:● During Power Save, the display panel will be turned off.● The Just Clock function (Z pg. 46) does not work while the
Power Save mode is engaged.● While the recorder is in the Power Save mode, the picture
may be distorted momentarily when you turn on/off therecorder.
● Power Save does not work when ... ... the recorder is in the Timer mode. ... the recorder's power is turned off after timer-recording (or
Instant Timer Recording). ... the Auto Satellite Prog Recording mode is engaged
(Z pg. 26).... "AV2 SELECT" is set to "DECODER" (Z pg. 31).
– –:– –
1 2 3
4 5 6
7 8 9
0
2
4
1
3 OKMENU

10 EN
ColourSystem Set
INFORMATION ON COLOUR SYSTEM
TURN ON THE RECORDER
1 Press .
ACCESS MAIN MENUSCREEN
2 Press MENU.
ACCESS MODE SET SCREEN
3 Press %fi to move thehighlight bar (pointer) to"MODE SET", then pressOK or .
SELECT COLOUR SYSTEMMODE
4 Press %fi to move thehighlight bar (pointer) to"COLOUR SYSTEM", thenpress OK or to select theappropriate colour system.
a- PAL/NTSC: To record PAL signals, or play back aPAL or NTSC tape.
b- MESECAM: To record SECAM signals, or play back aMESECAM tape.
● "POWER SAVE" appears only with the HR-J658E andHR-J700E.
RETURN TO NORMALSCREEN
5 Press MENU.
%
%
NOTES:About NTSC Playback● Some TVs shrink the picture vertically and place black bars at
the top and bottom of the screen. This is not a malfunction onthe part of either the video recorder or the TV.
● The picture may roll up and down. This can be correctedusing the V-HOLD control found on some TVs. (This cannotbe corrected if the TV does not have a V-HOLD control.)
● The counter and tape remaining time readings will beincorrect.
● During search, still, or frame-by-frame playback, the picturewill be distorted, and there may be a loss of colour.
● Depending on the type of TV, the top and bottom portions ofsuperimposed displays may be cut off during NTSC playback.
You can play back PAL, NTSC and MESECAM tapes, or recordPAL and SECAM* signals on this recorder. Follow the procedurebelow to select the appropriate colour system.* SECAM signals will be recorded as MESECAM on this recorder;
MESECAM is the designation for tapes with SECAM signals that havebeen recorded on a MESECAM-compatible PAL video cassetterecorder.
MAIN MENU
MODE SETAUTO CH SETMANUAL CH SETINITIAL SET
[5∞] = [MENU] : EXIT
MODE SET
AUTO TIMER OFFO. S. D. ONB. E. S. T. ONAUTO SP=LP TIMER OFFPOWER SAVE OFFAV2 SELECT AV2COLOUR SYSTEM PAL/NTSC
[5∞] = [MENU] : EXIT
– –:– –
1 2 3
4 5 6
7 8 9
0
2
4
1
3 OKMENU

EN 11PLAYBACK
BasicPlayback
The easiest, most basic operation possible with your videorecorder is tape playback. Already-recorded signals on a videotape are read by your video recorder and displayed on your TVjust like a TV programme.
Usable cassettes
LOAD A CASSETTE
1 Make sure the window side is up, the rear label side isfacing you and the arrow on the front of the cassette ispointed toward the recorder. Don’t apply too muchpressure when inserting.
● The recorder power comes on automatically and thecounter is reset to 0:00:00.
● If the record safety tab has been removed, playbackbegins automatically.
FIND PROGRAMME STARTPOINT
2 If the tape is advanced past the start point, press REW.To go forward, press FF.
START PLAYBACK
3 Press PLAY. “BEST” appears blinking in the recorder'sdisplay panel during automatic tracking. (Z pg. 18)
STOP PLAYBACK
4 Press STOP on the remote or STOP/EJECT on therecorder’s front panel. Then press STOP/EJECT toremove the cassette.
● Compact VHS camcorder recordings can be played onthis video recorder. Simply place the recorded cassetteinto a VHS Cassette Adapter and it can be used just likeany full-sized VHS cassette.
● This video recorder can record on regular VHS andSuper VHS cassettes. However, it will record and playback regular VHS signals only. It is not possible to playback a recorded Super VHS tape.
1
3
REWFF
PLAY
Turn on the TV and select the VIDEO channel (or AV mode).
STOP
STO
P/EJ
ECT
Tape Position IndicatorThe tape position indicatorappears on screen when,from the Stop mode, youpress FF, REW or perform anIndex Search. The positionof “5” in relation to “0”(beginning) or “+” (end)shows you where you areon the tape.
”O.S.D.” (Z pg. 8) mustbe set to “ON”, or theindicator will not appear.
NOTE:Depending on the type of tape used, there may be timeswhen the indication is not correct.
3
1:23:45REMAIN 2:35
0 ++ +
Beginning End
PLAYFFREW

12 EN
Variable-Speed Search
ACTIVATE VARIABLE-SPEEDSEARCH
1 During playback, press or (™ or £).
● The more times you press, the faster the playbackpicture moves.
● To decrease speed, press the button for the oppositedirection.
To resume normal playback, press PLAY.
%
%
PLAYBACK (cont.)
Slow MotionACTIVATE SLOW-MOTIONPLAYBACK
1 During still picture, press and hold PAUSE for 2seconds, then release. Press and release again to returnto still picture.
ORDuring still picture, press and hold or (™ or£). Release to return to still picture.
To resume normal playback, press PLAY.
%
%
Still Picture/Frame-By-FramePlayback
PAUSE DURING PLAYBACK
1 Press PAUSE. If there is vertical jitter, use the TV PROGbuttons to correct the picture.
ACTIVATE FRAME-BY-FRAMEPLAYBACK
2 Press PAUSE.
ORPress or (™ or £).
To resume normal playback, press PLAY.
%
%
– –:– –
1 2 3
4 5 6
7 8 9
0
2
4
1
3
High-Speed Search
ACTIVATE HIGH-SPEEDSEARCH
1 During playback or still picture, press FF for forwardhigh-speed search, or REW for reverse high-speedsearch.
To resume normal playback, press PLAY.
NOTE:For short searches, press and hold FF or REW for over 2 secondsduring playback or still picture. When released, normal playbackresumes.
PAUSE
PLAY
REWFF
TV PROG
ATTENTIONIn the search, still, slow-motion or frame-by-frameplayback mode,● the picture will be distorted.● the noise bars will appear.● there will be a loss of colour with an LP-recorded tape.
TV PR
OG
PAUSEPL
AY
REVIEW
REW
30 SEC
REVIEW
FF
™ £
PlaybackFeatures

EN 13Manual TrackingYour video recorder is equipped with automatic trackingcontrol. During playback, you can override this and adjust thetracking manually by pressing the TV PROG buttons.
OVERRIDE AUTOMATICTRACKING
1 Press on the remote to engage manual tracking.
ADJUST TRACKINGMANUALLY
2 Press TV PROG + or – to adjust tracking.
RETURN TO AUTOMATICTRACKING
3 Press on the remote to re-engage automatictracking.
NOTE:When a new tape is inserted, the recorder enters the automatictracking mode automatically.
Instant ReViewSimply by pressing a single button, the recorder power comeson, rewinds, and begins playback of the last timer-recordedprogramme. If you have several programmes recorded, you caneasily access any of them.
NOTE:Before starting, make sure that the recorder is off and that theTimer mode is disengaged.
ACTIVATE INSTANTREVIEW
1 Press REVIEW. The recorder power comes on and therecorder searches for the index code indicating the startof the last timer-recorded programme. Once it’s found,playback begins automatically.
● The front display panel tells you how many programmeshave been timer-recorded. If you have, for example, 3programmes, “REVIEW” and "3" appear and blink. Towatch the first of the 3 programmes, press REVIEW threetimes. The recorder searches and begins playbackautomatically. You can access a programme as far as 9index codes away from the current tape position.
NOTES:● Instant ReView is not possible while the recorder is in the
Timer mode.● The number of recorded programmes will not be displayed on
the front display panel after Auto Satellite Prog recording(Z pg. 26).
Index SearchYour recorder automatically marksindex codes at the beginning ofeach recording. This function givesyou quick access to any one of 9index codes in either direction.
NOTE:Before starting, make sure therecorder is in the Stop mode.
ACTIVATE INDEX SEARCH
1 Press or (™ or £). “™ 1” or “£ 1” isdisplayed on screen and search begins in the corre-sponding direction.
● To access index codes 2 through 9, press orrepeatedly until the correct index number is displayed.Ex.: To locate the beginning of B from the current
position, press twice.To locate the beginning of D from the currentposition, press once.
● When the specified index code is located, playbackbegins automatically.
Current position
Index number
%fi
%fi
fi%
A B C D E F
–2 –1 1 2 3
%
%
£ 2
SKIP OVER UNWANTEDSECTIONS
1 Press 30 SEC 1 to 4 times during playback. Each pressinitiates a 30-second period of fast-motion playback.Normal playback resumes automatically.
NOTE:To return to normal playback during a Skip Search, press PLAY.
Skip Search
Next Function MemoryYou can set your recorder's power to go off automatically afterthe tape is fully rewound. Before starting, make sure therecorder is in the Stop mode.For Automatic Power Off After Tape Rewind . . .. . . press REW, then press within 2 seconds.

14 EN
– –:– –
1 2 3
4 5 6
7 8 9
0
2
4
1
3
Repeat PlaybackYour video recorder can automatically play back the whole tape50 times repeatedly.
START PLAYBACK
1 Press PLAY.
ACTIVATE REPEAT PLAYBACK
2 Press PLAY and hold for over 5 seconds, then release.
● The Play indicator ( ) on the display panel blinksslowly.
● The tape plays 50 times automatically, and thenstops.
STOP PLAYBACK
3 Press STOP at any time to stop playback.
NOTE:Pressing PLAY, REW, FF or PAUSE also stops Repeat Playback.
PLAY
PLA
YST
OP
STOP
Soundtrack SelectionYour video recorder is capable of recording three soundtracks (HI-FI L, HI-FI R and NORM) and will play back the one you select.
During PlaybackPressing AUDIO on the remote control changes the soundtrack being played back as follows:
TRACK
On-Screen DisplayUSE
HI FI For Hi-Fi stereo tapesL RHI FI For main audio of Bilingual tapesLHI FI For sub audio of Bilingual tapes R
NORM For audio-dubbed tapes
HI FI For audio-dubbed tapesNORM
NOTES:● "HIFI L R" should normally be selected. In this mode,
Hi-Fi stereo tapes are played back in stereo, and the normalaudio track is played back automatically for tapes with onlynormal audio.
● For instructions on recording stereo and bilingualprogrammes, refer to page 17.
● "O.S.D." must be set to "ON" or the on-screen displayswill not appear (Z pg. 8).
PLAYBACK (cont.)
AUDIO

EN 15TV signals being received by the recorder’s built-in tuner can berecorded onto a video tape. You can “capture” a TV programmeusing your video recorder.
RECORDING
BasicRecording
– –:– –
1 2 3
4 5 6
7 8 9
0
2
4
1
3
PAUSE
STO
P
PLAY
Turn on the TV and select the VIDEO channel (or AV mode).
LOAD A CASSETTE
1 Insert a cassette with the record safety tab intact.
● The counter is reset to 0:00:00 and the recorderpower comes on automatically.
CHOOSE A PROGRAMME
2 Press TV PROG +/– or the NUMBER keys to select thechannel you wish to record.
SET TAPE SPEED
3 Press SP/LP ( ). Check the SP/LP indicator on therecorder display panel to confirm the selected tapespeed.
START RECORDING
4 Press and hold RECORD and press PLAY on the remotecontrol, or press RECORD on the recorder.
PAUSE/RESUMERECORDING
5 Press PAUSE. Press PLAY to resume recording.
STOP RECORDING
6 Press STOP on the remote control or STOP/EJECT onthe recorder. Then press STOP/EJECT to remove thecassette.
● To prevent accidental recording on a recorded cassette,remove its safety tab. To record on it later, cover the holewith adhesive tape.
Record safety tab
Accidental erasure prevention
RECORD
STO
P/EJ
ECT
SP/LP
RECORD
B.E.S.T. takes place at the beginning of both thefirst SP and the first LP recording after inserting thecassette (Z pg. 18).
Recording Resume FunctionIf there is a power outage during recording (or InstantTimer Recording or timer recording), the recording willresume automatically when power is restored to therecorder unless the recorder's memory backup has expired.
PAUSE
TV PR
OG
NUMBER
TV PROG
PLA
Y
SP/L
P

16 EN RECORDING (cont.)
RecordingFeatures
Record One ProgrammeWhile Watching AnotherIf your recorder is connected to the TV via AV connection, . . .. . . press TV/VCR. The recorder's VCR indicator and the TVbroadcast being recorded disappear.
SELECT CHANNEL TOWATCH
1 Once recording is in progress, all you need to do is toset the channel controls on the TV for the station youwish to view.
● The programme selected with the TV’s channelcontrols appears on the TV screen while the oneselected with the recorder's TV PROG buttons isrecorded on the tape.
● If a decoder is connected to the recorder (Z pg. 33),you can select a scrambled channel as well with theTV channel controls.
Elapsed Recording TimeIndicationYou can check the exact time of a recording.
SET COUNTER DISPLAY
1 Press DISPLAY or – –:– – until a counter readingappears on the dispay panel.
RESET COUNTER
2 Press COUNTER RESET or 0000 before startingrecording or playback.
● The counter is reset to “0:00:00” and shows the exactelapsed time as the tape runs.
– –:– –
1 2 3
4 5 6
7 8 9
0
2
4
Tape Remaining Time
DISPLAY REMAINING TIME
1 Press DISPLAY or – –:– – until the time remaining onthe tape appears.
● The display panel shows the tape remaining timewith " " displayed.
● By pressing the – –:– – button, you can change thedisplay to show the counter reading, channelposition*, clock time or tape remaining time.* channel position is not displayed during playback.
NOTE:Depending on the type of tape used, there may be times whenthe tape remaining time reading may not appear right away, oris not correct. "– –:– –" may sometimes appear, or the displaymay blink on occasion.
TV PR
OG
– –:– –
0000
TV PROG
Instant Timer Recording (ITR)This easy method lets you record for from 30 minutes to 6 hours(selectable in 30-min. increments), and shuts the recorder offafter recording is finished.
START RECORDING
1 Press RECORD on the recorder.
ENGAGE ITR MODE
2 Press RECORD again. " " blinks and 0:30 appears onthe front display panel.
SET RECORDING DURATION
3 If you want to record for more than 30 minutes, pressRECORD to extend the time. Each press extendsrecording time by 30 minutes.
NOTE:You can only perform ITR using the RECORD button on therecorder's front panel.
RECORD
TV/VCR
DISPLA
Y
COUNTER RESET

EN 17Receiving Stereo AndBilingual ProgrammesYour recorder is equipped with a Sound-Multiplex decoder (A2) and,if you own the HR-J658EH, a Digital stereo sound decoder(NICAM) as well, making reception of stereo and bilingual broad-casts possible.
When the channel is changed, the type of broadcast beingreceived will be displayed on the TV screen for a few seconds.
To Record Stereo AndBilingual Programmes (A2)● Stereo programmes are automatically recorded in stereo on
the Hi-Fi audio track (with the normal audio track recordingmixed L and R channel sound).
● Bilingual programmes are automatically recorded in bilingualon the Hi-Fi audio track. The main soundtrack will be recordedon the normal audio track.
● To listen to a stereo programme, press AUDIO until"HIFI L R" appears on the screen.
● To listen to a bilingual programme, press AUDIO until"HIFI L " or "HIFI R" appears on the screen (as required).
● To listen to the Standard (regular monaural) audio whilereceiving a NICAM broadcast, press AUDIO until "NORM"appears on the screen. (HR-J658EH only)
NOTE:"O.S.D." must be set to "ON" or the on-screen displays will notappear (Z pg. 8).
Type of Broadcast On-screen DisplayBeing Received
A2 Stereo STA2 Bilingual BILRegular Monaural (none)*NICAM Stereo ST NICAM*NICAM Bilingual BIL NICAM*NICAM Monaural NICAM
*Available with HR-J658EH only.
To Record NICAM Stereo AndBilingual Programmes(HR-J658EH only)The NICAM audio programme will be recorded on the Hi-Fiaudio track, and the Standard audio programme on the normalaudio track.
NOTES:● If the quality of stereo sound being received is poor, the
broadcast will be received in monaural with better quality.● Before playing back a programme recorded in stereo, or a
bilingual programme, refer to "Soundtrack Selection" (Z pg. 14).
– –:– –
1 2 3
4 5 6
7 8 9
0
2
4
1
3
AUDIO

18 EN
– –:– –
1 2 3
4 5 6
7 8 9
0
2
4
1
3
B.E.S.T. PictureSystem
The B.E.S.T. (Biconditional Equalised Signal Tracking) systemchecks the condition of the tape in use during recording andplayback, and compensates to provide the highest-possiblerecording and playback pictures. The default setting for bothrecording and playback is “ON”.
Preparation
RECORDING (cont.)
Turn on the TV and select the VIDEO channel (or AV mode).PL
AY
RECORD
TURN ON THE RECORDER
1 Press .
ACCESS MAIN MENUSCREEN
2 Press MENU.
ACCESS MODE SET SCREEN
3 Press %fi to move thehighlight bar (pointer) to"MODE SET", then pressOK or .
SELECT B.E.S.T. MODE
4 Press %fi to move thehighlight bar (pointer) to"B.E.S.T.", then press OK or to set to "ON" or "OFF".
● "POWER SAVE" appearsonly with the HR-J658Eand HR-J700E.
RETURN TO NORMALSCREEN
5 Press MENU.
%
%
PAUSE
PLA
Y
RECORD
OKMENU
PAUSE
MODE SET
AUTO TIMER OFFO. S. D. ONB. E. S. T. ONAUTO SP=LP TIMER OFFPOWER SAVE OFFAV2 SELECT AV2COLOUR SYSTEM PAL/NTSC
[5∞] = [MENU] : EXIT
MAIN MENU
MODE SETAUTO CH SETMANUAL CH SETINITIAL SET
[5∞] = [MENU] : EXIT

EN 19Recording
START RECORDING
1 Press and hold RECORD and press PLAY on the remote,or press RECORD on the recorder.DURING B.E.S.T.
B.E.S.T. COMPLETE
● The recorder spends approximately 7 secondsassessing the condition of the tape, then beginsrecording.
NOTES:● The B.E.S.T. system works for both SP and LP modes only after
a tape has been inserted and the Record mode is firstinitiated. It does not work during recording.
● The B.E.S.T. system does not work while Auto Satellite Progrecording is in progress (Z pg. 26).
● In the case of timer recording, the B.E.S.T. system worksbefore recording is initiated.
● Once the cassette is ejected, the B.E.S.T. data is cancelled.The next time the cassette is used for recording, B.E.S.T. is re-performed.
● Pressing the recorder's RECORD button while "BEST" isdisplayed does not start Instant Timer Recording (Z pg. 16).
PlaybackThe recorder assesses the quality of the tape once you initiateplayback.
START PLAYBACK
1 Press PLAY.
● The recorder adjusts the playback picture qualitybased on the quality of the tape in use.
● B.E.S.T. is active during Auto Tracking. “BEST”appears blinking on the recorder’s display panel.
NOTES:● When watching a tape recorded with “B.E.S.T.” set to “ON”,
it is recommended that you leave B.E.S.T. on during playbackas well.
● When watching a rental tape or one recorded on anothervideo recorder, or when using this recorder as the player forediting, set B.E.S.T. to your preference by performing steps 1through 5 on page 18.
● "BEST" only appears at the beginning of automatic tracking.Even though it doesn't appear after that, the B.E.S.T. functionis operative.
ATTENTIONSince the B.E.S.T. system works before recording actuallystarts, there is a delay of approximately 7 seconds afterRECORD and PLAY on the remote are pressed, or RECORDon the recorder is pressed. To make sure you record thedesired scene or programme in its entirety, first perform thefollowing steps:1) Press and hold PAUSE and press RECORD to engage the
RECORD PAUSE mode.● The recorder then automatically checks the condition
of the tape and, after approximately 7 seconds, re-enters RECORD PAUSE.
2) Press PLAY to start recording.● If you want to bypass the B.E.S.T. system and begin
recording immediately, set “B.E.S.T.” to “OFF” in step4 on page 18.

20 EN
ACCESS SHOWVIEW SCREEN
1 Press PROG.
The front display panel looks like this:
ENTER SHOWVIEW NUMBER
2 Press the NUMBER keys toenter the SHOWVIEW
number of a programmeyou wish to record.
● If you make a mistake,press and input thecorrect number.
The SHOWVIEW number you enter appears on the frontdisplay panel:
The display panel can show only a 4-digit number.
ACCESS SHOWVIEW PROGRAMSCREEN
3 Press OK, and theSHOWVIEW Program screenappears (if you’re juststarting out, “P1” appears).
The display panel shows theprogramme start time.Pressing changes thedisplay to the programmestop time, then the date andchannel position.
IMPORTANTMake sure the channel position number you wishto record is displayed; if not, see "SHOWVIEW Setup"on page 45 and set the Guide Program number forthat SHOWVIEW number correctly.
● If the number you entered is invalid, "ERROR" appearson the screen and "Err" appears on the display panel.Press and input a valid SHOWVIEW number.
● If the "GUIDE PROG SET" screen appears, see"ATTENTION – Regarding Guide Program NumberSet" on page 21.
SP
SHOWVIEWTimerProgramming
Before performing SHOWVIEW Timer Programming:● Make sure that the recorder's built-in clock is set
properly.● Insert a cassette with the safety tab in place. The recorder
will come on automatically.● Turn on the TV and select the VIDEO channel (or AV mode).
With SHOWVIEW, timer programming is greatly simplifiedbecause each TV programme has a corresponding code numberwhich your recorder is able to recognize.
TIMER RECORDING
– –:– –
1 2 3
4 5 6
7 8 9
0
2
4
1
3 OK
PROG
NUMBER
SHOWVIEW
[0 – 9] = [+/–] : EXPRESS PROGRAMING[PROG] : EXIT
SHOWVIEW1 2 3 4 5 6 7 8
[0 – 9] = [ ] : DELETE[PROG] : EXIT
– P1 –SHOWVIEW 123456789
START STOP21:00 = 22:00
SP VPS/PDC OFF
DATE TV PROG25.12 1
ARD
: OK

EN 21
– –:– –
1 2 3
4 5 6
7 8 9
0
2
4
1
3
SET TAPE SPEED
4 Press SP/LP ( ) to set the tape speed.
SET VPS/PDC MODE
5 Press VPS/PDC to select "ON" or "OFF".If "VPS/PDC ON" is displayed on the screen or "VPS/PDC" is lit on the display panel, VPS/PDC is set to ON.If "VPS/PDC OFF" is displayed on the screen or "VPS/PDC"is not lit on the display panel, VPS/PDC is set to OFF.Z "VPS/PDC Recording" on page 23.
RETURN TO NORMAL SCREEN
6 Press PROG or OK. "PROGRAM COMPLETED" appearson the screen for about 5 seconds, then normal screenappears.
● Repeat steps 1 – 6 for each additional programme.
ENGAGE RECORDER’S TIMER MODE
7 Press ‰ (TIMER). The recorder turns off automaticallyand ‰ appears on the display panel.
● To disengage the timer, press ‰ (TIMER) again.
NOTES:● To Change The Stop Time . . .
. . . press STOP +/– after pressing OK in step 3. You cancompensate for anticipated programme schedule delays thisway.
● To Timer-Record Weekly Or Daily Serials . . .. . . after pressing OK in step 3, press WEEKLY (NUMBER key“9”) for weekly serials or DAILY (NUMBER key “8”) for dailyserials (Monday – Friday). Either "WEEKLY" or "DAILY"appears on the screen. Pressing the button again makes thecorresponding indication disappear.
● You can programme this recorder to timer-record as many as 8programmes. If you try to programme the recorder to record aninth, "PROGRAM FULL" appears on screen and "FULL" appearson the front display panel. To record the extra programme, youmust first cancel any unnecessary programmes (Z pg. 24).
● It is not possible to timer-record a TV programme with aSHOWVIEW number which starts with "0".
ATTENTIONRegarding Guide Program Number Set"GUIDE PROG SET" appears after performing step 3 if theGuide Program number for the SHOWVIEW number youentered has not been set.● Press the NUMBER keys or %fi to input the channel
position number on which your recorder receives thatstation, then press OK or . The SHOWVIEW programscreen appears.
(Ex.) To timer-record a ZDFprogramme with SHOWVIEW.* If your recorder receives
ZDF on the channelposition 2, press OK orafter entering "2".
Satellite Tuner UsersTo timer-record a satellite broadcast using SHOWVIEW:1 Set "AV2 SELECT" to "AV2" (Z pg. 31).2 Perform steps 1 – 7.3 Set the satellite tuner to the appropriate channel before
the selected programme begins.4 Leave the satellite tuner's power on.
%
%
SP/LP
WEEKLY
DAILY
VPS/PDC
PROG
OK
STOP+/–
GUIDE PROG SET
GUIDE PROG TV PROG
2 – –
[5∞] = [PROG] : EXIT
Timer WarningIf you have programmed yourrecorder to timer-record aprogramme or a series ofprogrammes, a warningappears on screen to tell youthat the recording is to start in5 minutes.
NOTES:● The warning only appears if
you’re not in the Timer mode at that time.● If this recorder is being used as the player for tape
dubbing, the warning screen is recorded on the tape inthe other video recorder.
The warning blinks for the entire 5 minutes leading up tothe start of timer recording. To clear the display, press .
– WARNING– TIMER RECORDING TO START SOON
[ ]
22 EN
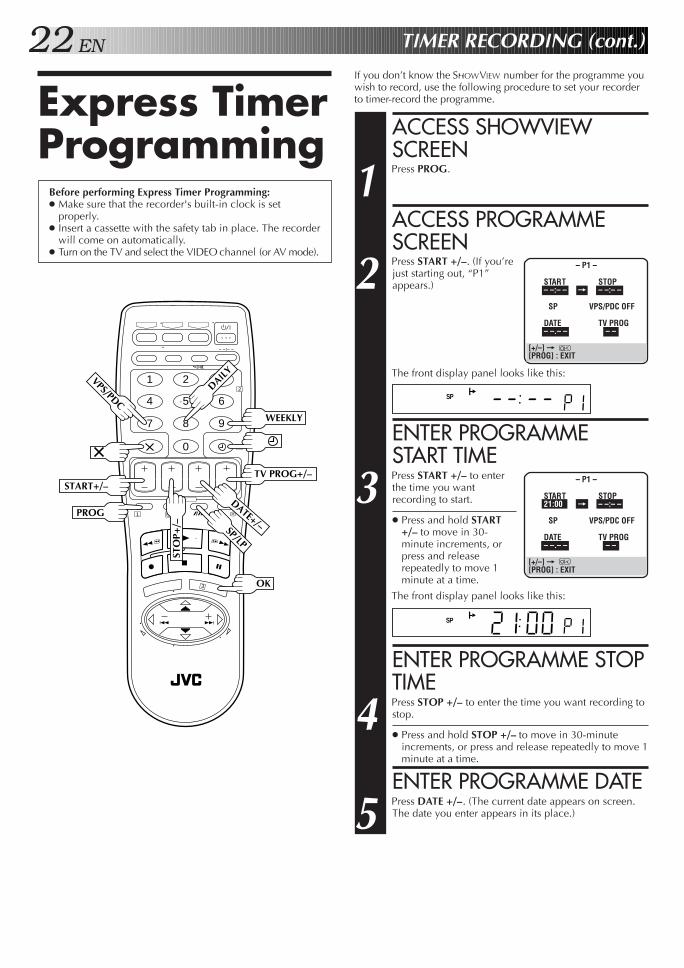
Express TimerProgramming
TIMER RECORDING (cont.)
If you don’t know the SHOWVIEW number for the programme youwish to record, use the following procedure to set your recorderto timer-record the programme.
ACCESS SHOWVIEWSCREEN
1 Press PROG.
ACCESS PROGRAMMESCREEN
2 Press START +/–. (If you’rejust starting out, “P1”appears.)
The front display panel looks like this:
ENTER PROGRAMMESTART TIME
3 Press START +/– to enterthe time you wantrecording to start.
● Press and hold START+/– to move in 30-minute increments, orpress and releaserepeatedly to move 1minute at a time.
The front display panel looks like this:
ENTER PROGRAMME STOPTIME
4 Press STOP +/– to enter the time you want recording tostop.
● Press and hold STOP +/– to move in 30-minuteincrements, or press and release repeatedly to move 1minute at a time.
ENTER PROGRAMME DATE
5 Press DATE +/–. (The current date appears on screen.The date you enter appears in its place.)
SP
SP
Before performing Express Timer Programming:● Make sure that the recorder's built-in clock is set
properly.● Insert a cassette with the safety tab in place. The recorder
will come on automatically.● Turn on the TV and select the VIDEO channel (or AV mode).
– –:– –
1 2 3
4 5 6
7 8 9
0
2
4
1
3 OK
WEEKLY
DAILY
START+/–
PROG
STO
P+/–
TV PROG+/–
DATE+/–
VPS/PDC
SP/LP
– P1 –
START STOP– –:– – = – –:– –
SP VPS/PDC OFF
DATE TV PROG– –.– – – –
[+/–] = [PROG] : EXIT
– P1 –
START STOP21:00 = – –:– –
SP VPS/PDC OFF
DATE TV PROG– –.– – – –
[+/–] = [PROG] : EXIT

EN 23ENTER CHANNEL POSITION
6 Press TV PROG +/–.
SET TAPE SPEED
7 Press SP/LP ( ) to set the tape speed.
SET VPS/PDC MODE
8 Press VPS/PDC to select "ON" or "OFF".If "VPS/PDC ON" is displayed on the screen or "VPS/PDC" is lit on the display panel, VPS/PDC is set to ON.If "VPS/PDC OFF" is displayed on the screen or "VPS/PDC"is not lit on the display panel, VPS/PDC is set to OFF.Z "VPS/PDC Recording" in the right column.
RETURN TO NORMALSCREEN
9 After confirming all information is correct, press PROGor OK. "PROGRAM COMPLETED" appears on thescreen for about 5 seconds, then normal screenappears.
● Repeat steps 1 – 9 for each additional programme.
ENGAGE RECORDER’STIMER MODE
10 Press ‰ (TIMER). The recorder turns off automaticallyand ‰ appears on the display panel.
● To disengage the timer, press ‰ (TIMER) again.
To Timer-Record Weekly Or Daily Serials . . .. . . anytime during steps 2 through 9, press WEEKLY (NUMBERkey “9”) for weekly serials or DAILY (NUMBER key “8”) fordaily serials (Monday – Friday). Either "WEEKLY" or "DAILY"appears on the screen. Pressing the button again makes thecorresponding indication disappear.
SP
Satellite Tuner UsersTo timer-record a satellite broadcast using Express TimerProgramming:1 Set "AV2 SELECT" to "AV2" (Z pg. 31).2 Perform steps 1 – 10. Enter "L-2" for the channel
position in step 6.3 Set the satellite tuner to the appropriate channel before
the selected programme begins.4 Leave the satellite tuner's power on.
NOTE:You can programme this recorder to timer-record as many as 8programmes. If you try to programme the recorder to record aninth, "PROGRAM FULL" appears on screen and "FULL" appearson the front display panel. To record the extra programme, youmust first cancel any unnecessary programmes (Z pg. 24).
VPS/PDC RecordingNow available from some TV stations, PDC (ProgrammeDelivery Control) and VPS (Video Programme System) areservice designed to assure safe, accurate timer recording.With this system, special code signals are transmittedtogether with the audio/video signals. These code signalscontrol your video recorder and have precedence over theadvertised times you may have preset into the timer. Thismeans that your recorder will start and stop recording whenthe preset TV programmes actually start and end — even ifthe broadcast time of a preset TV programme is changed.
NOTES:● When you use Express Timer Programming, set the start
time (VPS or PDC time) exactly as advertised in the TVlisting. A different time than advertised will result in norecording.
● VPS/PDC recording is also possible when a satellite tuneror a cable system is connected to AV2 IN/DECODER onyour recorder.
● VPS/PDC recording is also possible via the AV1 IN/OUTconnector.
How to check if the station being received transmitsa VPS/PDC signal1 Press – –:– – until the channel position appears on the
display panel.2 Hold down START+ for about 5 seconds.
● "VPS/PDC" appears blinking on the display panel.If a VPS/PDC signal is detected from the station, "VPS/PDC" will stop blinking.If no VPS/PDC signal is detected from the station, "VPS/PDC" will blink at a slower rate.
3 Press – –:– – or START+ again to return to normal display.
– P1 –
START STOP21:00 = 22:00
SP VPS/PDC OFF
DATE TV PROG25.12 1
ARD[+/–] = [PROG] : EXIT
Timer WarningIf you have programmed yourrecorder to timer-record aprogramme or a series ofprogrammes, a warningappears on screen to tell youthat the recording is to start in5 minutes.
NOTES:● The warning only appears if
you’re not in the Timer mode at that time.● If this recorder is being used as the player for tape
dubbing, the warning screen is recorded on the tape inthe other video recorder.
The warning blinks for the entire 5 minutes leading up tothe start of timer recording. To clear the display, press .
– WARNING– TIMER RECORDING TO START SOON
[ ]

24 EN
Check, Cancel And ReplaceProgrammes
DISENGAGE TIMER MODE
1 Press ‰ (TIMER), then press .
ACCESS PROGRAM CHECKSCREEN/DISPLAY
2 Press .
ACCESS PROGRAM SCREEN/DISPLAY
3 Press again to checkmore information. Eachtime you press , thenext programme'sinformation appears.
● The display panel shows the programme start time.Pressing OK changes the display to the programmestop time, then the date and the channel position.
SP
To cancel or replace a programme...
CANCEL OR REPLACE APROGRAMME
4 Press to cancel a programme. To replace aprogramme, press the appropriate button: START+/–,STOP+/–, DATE+/–, TV PROG+/–, VPS/PDC, SP/LP( ).
RETURN TO NORMAL SCREEN/DISPLAY
5 Press as many times as necessary. If there are stillsome programmes remaining, go on to step 6.
RETURN TO TIMER MODE
6 Press ‰ (TIMER).
NOTE:You can also check the programmes on the display panel evenif the recorder's power is off (unless the recorder is in the PowerSave mode Z pg. 9) or the recorder is in the Timer mode;however, it is not possible to cancel or replace the programmes.
– –:– –
1 2 3
4 5 6
7 8 9
0
2
4
1
3
PROG
SP/LP
START+/–TV PROG+/–
DATE+/–
STO
P+/–
TIMER RECORDING (cont.)
OKMENU
VPS/PDCPR START STOP CH DATE1 8:00 10:00 3 24.122 10:00 10:45 2 25.123 11:30 13:00 1 25.1245678
[ ] : NEXT
– P1 –
START STOP8:00 = 10:00
SP VPS/PDC OFF
DATE TV PROG24.12 3
WDR
[ ] : NEXT

EN 25Auto TimerWhen the Auto Timer is set to ON the timer is automaticallyengaged when the recorder power is turned off and automati-cally disengaged when the recorder is powered back on.
ACCESS MAIN MENU SCREEN
1 Press MENU.
ACCESS MODE SET SCREEN
2 Press %fi to move thehighlight bar (pointer) to"MODE SET", then pressOK or .
SELECT MODE
3 Press OK or to selecteither "ON" or "OFF".
● "POWER SAVE" appearsonly with the HR-J658Eand HR-J700E.
RETURN TO NORMAL SCREEN
4 Press MENU.
NOTE:For safety, when Auto timer is set to "OFF", all other recorderfunctions are disabled while the Timer mode is engaged. Todisengage the timer, press ‰ (TIMER).
%
Auto SP→LP TimerIf, when timer-recording in SP mode, there is not enough tape torecord the entire programme, the recorder automaticallyswitches to LP mode to allow complete recording.For Example . . .Recording a programme of 210 minutes in length onto a 180-minute tape
NOTES:● If you have programmed the recorder to timer-record 2 or
more programmes, the second programme and thosethereafter may not fit on the tape if you set "AUTO SP→LPTIMER" to "ON". In this case, make sure the mode is notengaged, then set the tape speed manually during timerprogramming.
● In order to ensure that the recording fits on the tape, thisfeature may leave a slight non-recorded section at the end ofthe tape.
● There may be some noise and sound disturbance at the pointon the tape where the recorder switches from SP to LP mode.
● The Auto SP→LP Timer feature is not available during ITR(Instant Timer Recording), and the feature will not workproperly with any tapes longer than E-180 or with some tapesof shorter lengths.
● If you perform timer recording with both VPS/PDC and theAuto SP→LP Timer activated, and the programme goesbeyond its originally scheduled length, there may be timeswhen the programme cannot be recorded in its entirety.
Total 210 minutes
Approximately 150 minutes Approximately 60 minutes
SP mode LP mode
%
Make sure you set "AUTO SP→LP TIMER" to "ON" at the ModeSet screen before the timer-recording starts.
ACCESS MAIN MENU SCREEN
1 Press MENU.
ACCESS MODE SET SCREEN
2 Press %fi to move the highlight bar (pointer) to "MODESET", then press OK or .
SELECT MODE
3 Press %fi to move thehighlight bar (pointer) to"AUTO SP→LP TIMER",then press OK or to select"ON".
● "POWER SAVE" appearsonly with the HR-J658Eand HR-J700E.
RETURN TO NORMAL SCREEN
4 Press MENU.
%
%
MODE SET
AUTO TIMER OFFO. S. D. ONB. E. S. T. ONAUTO SP=LP TIMER ONPOWER SAVE OFFAV2 SELECT AV2COLOUR SYSTEM PAL/NTSC
[5∞] = [MENU] : EXIT
MAIN MENU
MODE SETAUTO CH SETMANUAL CH SETINITIAL SET
[5∞] = [MENU] : EXIT
MODE SET
AUTO TIMER OFFO. S. D. ONB. E. S. T. ONAUTO SP=LP TIMER OFFPOWER SAVE OFFAV2 SELECT AV2COLOUR SYSTEM PAL/NTSC
[5∞] = [MENU] : EXIT
26 EN
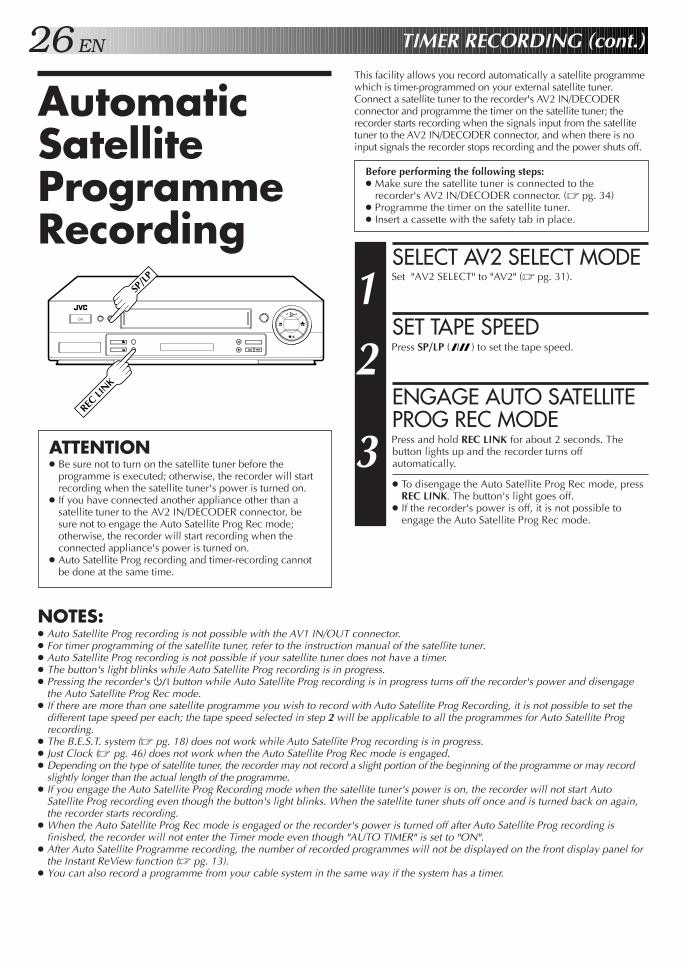
This facility allows you record automatically a satellite programmewhich is timer-programmed on your external satellite tuner.Connect a satellite tuner to the recorder's AV2 IN/DECODERconnector and programme the timer on the satellite tuner; therecorder starts recording when the signals input from the satellitetuner to the AV2 IN/DECODER connector, and when there is noinput signals the recorder stops recording and the power shuts off.
AutomaticSatelliteProgrammeRecording
ATTENTION● Be sure not to turn on the satellite tuner before the
programme is executed; otherwise, the recorder will startrecording when the satellite tuner's power is turned on.
● If you have connected another appliance other than asatellite tuner to the AV2 IN/DECODER connector, besure not to engage the Auto Satellite Prog Rec mode;otherwise, the recorder will start recording when theconnected appliance's power is turned on.
● Auto Satellite Prog recording and timer-recording cannotbe done at the same time.
Before performing the following steps:● Make sure the satellite tuner is connected to the
recorder's AV2 IN/DECODER connector. (Z pg. 34)● Programme the timer on the satellite tuner.● Insert a cassette with the safety tab in place.
SELECT AV2 SELECT MODE
1 Set "AV2 SELECT" to "AV2" (Z pg. 31).
SET TAPE SPEED
2 Press SP/LP ( ) to set the tape speed.
ENGAGE AUTO SATELLITEPROG REC MODE
3 Press and hold REC LINK for about 2 seconds. Thebutton lights up and the recorder turns offautomatically.
● To disengage the Auto Satellite Prog Rec mode, pressREC LINK. The button's light goes off.
● If the recorder's power is off, it is not possible toengage the Auto Satellite Prog Rec mode.
NOTES:● Auto Satellite Prog recording is not possible with the AV1 IN/OUT connector.● For timer programming of the satellite tuner, refer to the instruction manual of the satellite tuner.● Auto Satellite Prog recording is not possible if your satellite tuner does not have a timer.● The button's light blinks while Auto Satellite Prog recording is in progress.● Pressing the recorder's button while Auto Satellite Prog recording is in progress turns off the recorder's power and disengage
the Auto Satellite Prog Rec mode.● If there are more than one satellite programme you wish to record with Auto Satellite Prog Recording, it is not possible to set the
different tape speed per each; the tape speed selected in step 2 will be applicable to all the programmes for Auto Satellite Progrecording.
● The B.E.S.T. system (Z pg. 18) does not work while Auto Satellite Prog recording is in progress.● Just Clock (Z pg. 46) does not work when the Auto Satellite Prog Rec mode is engaged.● Depending on the type of satellite tuner, the recorder may not record a slight portion of the beginning of the programme or may record
slightly longer than the actual length of the programme.● If you engage the Auto Satellite Prog Recording mode when the satellite tuner's power is on, the recorder will not start Auto
Satellite Prog recording even though the button's light blinks. When the satellite tuner shuts off once and is turned back on again,the recorder starts recording.
● When the Auto Satellite Prog Rec mode is engaged or the recorder's power is turned off after Auto Satellite Prog recording isfinished, the recorder will not enter the Timer mode even though "AUTO TIMER" is set to "ON".
● After Auto Satellite Programme recording, the number of recorded programmes will not be displayed on the front display panel forthe Instant ReView function (Z pg. 13).
● You can also record a programme from your cable system in the same way if the system has a timer.
REC LI
NK
TIMER RECORDING (cont.)
SP/L
P

EN 27Remote A/B Code SwitchingThe remote control is capable of controlling two JVC videorecorders independently; one set to respond to the remotecontrol’s A code control signals and another set to respond to Bcode control signals. The remote control is preset to send Acode signals because your video recorder is initially set torespond to A code signals. You can easily modify your videorecorder to respond to B code signals.
REMOVE POWER SUPPLY
1 Unplug the mains power cord from the mains outlet.
SET REMOTE CONTROLCODE
2 While holding down VCR on the remote control, pressthe NUMBER key "2" and then press STOP.
RE-SUPPLY POWER
3 Plug the mains power cord back into the mains outlet.
TURN THE RECORDER ON
4 Press on the remote control. The recorder will nowonly respond to B code signals.
NOTES:● Some TV sets may malfunction in response to the B code. If
this happens, switch back to the A code.● To set the recorder back to respond to A code signals, repeat
the same procedure as shown above except pressingNUMBER key "1" instead of "2" in step 2.
SPECIAL FEATURES
RemoteControlFunctions
– –:– –
1 2 3
4 5 6
7 8 9
0
2
4
1
3
NUMBER
"2"
VCR
STOP
NUMBER "1"

28 EN SPECIAL FEATURES (cont.)
Control Your TV UsingAdditional ButtonsUse the NUMBER keys, and the button, button or ‰button to select the TV’s channel.● With televisions under Code 01, 02, 03, 04, 05, 06, 07,
09, 10, 13, 14, 22, 23 or 25, the button correspondsto the 1-digit/2-digit entry switching button (often labelled– /– –) of your TV’s remote control.
● With televisions under Code 01, 11 or 12, the buttoncorresponds to the 10 + button, and the ‰ button corre-sponds to the 20 + button of your TV’s remote control.
NOTE:The way these buttons are used is determined by your TV.Use these buttons as instructed for your TV’s remote control.
SET TV BRAND CODE
1 Refer to the chart below. While holding down TV onthe recorder's remote control, enter your TV’s brandcode using the NUMBER keys, then press STOP.Check if the TV's power goes off as it should. If it does,try other operations (Z step 2)
● Once you have set the remote control to operate theTV, you don't have to repeat this step until youreplace your remote control's battteries.
● JVC or SAMSUNG has more than one code. If the TVdoes not function with one code, try entering another.
OPERATE TV
2 First, press TV to set the remote control to TV mode, thenpress the corresponding button: , TV PROG +/–,TV/VCR, TV +/– (Volume), (Muting), NUMBERkeys.
● For some brands of TV, you must press OK afterhaving pressed the NUMBER keys.
IMPORTANTAlthough the provided remote control unit is compatible withJVC televisions, as well as many other models, it may not workwith your TV, or in some instances, may have limited functioncapability.
TV BRAND NAME CODE
JVC 01, 02, 03, 04BRANDT 05NORDMENDE 05SABA 05TELEAVIA 05TELEFUNKEN 05THOMSON 05FERGUSON 06PHILIPS 07SAMSUNG 07, 19, 23, 24, 25BLAUPUNKT 08GRUNDIG 08SONY 09PANASONIC 10GRAETZ 11ITT 11LUXOR 11SALORA 11SELECO 11MIVAR 12HITACHI 13TOSHIBA 14MITSUBISHI 15FINLUX 16NOKIA 17SHARP 18FUNAI 20GOLDSTAR 21NEC 22
TV Multi-brand RemoteControlYour remote control can operate the basic functions of your TV set.In addition to JVC TVs, other manufacturer’s TVs can also becontrolled.
Before you start . . .● Turn on the TV using its remote control.
– –:– –
1 2 3
4 5 6
7 8 9
0
2
4
1
3
TV
VCR
NUMBER
OK
STOP
TV PROG+/–
TV/VCR
TV +/–
ATTENTIONThe remote control can operate not only the video recorderbut also some of your TV and satellite tuner's functions.● To operate your video recorder, first press the VCR button
to set the remote control to the Video mode.● To operate your TV, first press the TV button to set the
remote control to the TV mode.● To operate your satellite tuner, first press the SAT button to
set the remote control to the Satellite tuner mode.
SAT

EN 29Satellite Tuner Multi-BrandRemote ControlYour remote control can operate the basic functions of yoursatellite tuner set. In addition to JVC satellite tuners, othermanufacturer’s satellite tuners can also be controlled.Before you start . . .● Turn on the satellite tuner using its remote control.
SET SATELLITE TUNERBRAND CODE
1 Refer to the chart below. While holding down SAT on therecorder's remote control, enter your satellite tuner’sbrand code using the NUMBER keys, then press STOP.Check if the satellite tuner's power goes off as it should.If it does, try other operations (Z step 2).
● Once you have set the remote control to operate thesatellite tuner, you don't have to repeat this step untilyou replace your remote control's battteries.
● Some satellite tuner brands have more than one code.If the satellite tuner does not function with one code,try entering another.
OPERATE SATELLITE TUNER
2 First, press SAT to set the remote control to satellite tunermode, then press the corresponding button: , TVPROG +/–, NUMBER keys.
● For VIDEOWAY or some brands of satellite tuner, youmust press after having pressed the NUMBERkeys.
● The NUMBER buttons may not function with somesatellite tuners.
IMPORTANTAlthough the provided remote control unit is compatible withJVC satellite tuners, as well as many other models, it may notwork with your satellite tuner, or in some instances, may havelimited function capability.
SATELLITE TUNER BRAND CODE
JVC 13, 14AMSTRAD 01, 02, 03, 04GRUNDIG 05, 06HIRSCHMANN 05SIEMENS 05WISI 05KATHREIN 05, 11, 12PACE 06, 08PHILIPS 07FINLUX 09ITT 09NOKIA 09SALORA 09RFT 10SKYMASTER 10MASPRO 11BT 13PANASONIC 15JERROLD 16VIDEOWAY 17
– –:– –
1 2 3
4 5 6
7 8 9
0
2
4
1
3
NUMBER
STOP
TV PROG+/–
VCR
ATTENTIONThe remote control can operate not only the video recorderbut also some of your TV and satellite tuner's functions.● To operate your video recorder, first press the VCR button
to set the remote control to the Video mode.● To operate your TV, first press the TV button to set the
remote control to the TV mode.● To operate your satellite tuner, first press the SAT button to
set the remote control to the Satellite tuner mode.
TV
SAT

30 EN EDITING
Edit To OrFrom AnotherVideoRecorder
You can use your video recorder as the source player or therecording deck.
MAKE CONNECTIONS
1 Connect the player’s 21-pin SCART (AV) connector tothe recorder’s 21-pin SCART (AV) connector asillustrated on page 31.
When Using Your Video Recorder As The SourcePlayer . . .. . . connect its AV1 IN/OUT connector to the recordingdeck.When Using Your Video Recorder As The RecordingDeck . . .
. . . . connect its AV2 IN/DECODER or AV1 IN/OUTconnector to the source player.
SET RECORDING DECK’SINPUT MODE
2 Set to AUX. With this video recorder, press NUMBERkey "0" and/or TV PROG to select depending on theconnector being used — “L-1” for the AV1 IN/OUTconnector, or “L-2” for the AV2 IN/DECODER connector.
● When using the AV2 IN/DECODER connector, makesure "AV2 SELECT" is set to "AV2" (Z pg. 31).
START SOURCE PLAYER
3 Engage its Play mode.
START RECORDING DECK
4 Engage its Record mode.
NOTES:● All necessary cables can be obtained from your dealer.● When you use this recorder as the player for editing, be sure
to set "O.S.D." to "OFF" before starting (Z pg. 8).
– –:– –
1 2 3
4 5 6
7 8 9
0
2
4
1
3
NUMBER "0"
TV PROG
OKMENU

EN 31
Another recorder
RF Cable(provided)
Another recorder
Recorder
21-pin SCART Cable(not provided)
Player Your recorder Recorder Your recorderTV Receiver TV Receiver
RF Cable(provided)
21-pin SCART Cable(not provided)
Player
VIDEOCHAN-NEL orAV mode
VIDEOCHAN-NEL orAVmode
AV2 SELECT Setting1 Press MENU to access the Main Menu screen.2 Press %fi to move the highlight bar (pointer) to "MODE SET", then press OK or .3 Press %fi to move the highlight bar (pointer) to "AV2 SELECT".4 Press OK or to select "AV2" or "DECODER"
a–AV2 : To use this recorder as the recording deck with the player connected to theAV2 IN/DECODER connector.ORTo record a satellite programme through a satellite tuner connected to theAV2 IN/DECODER connector.
b–DECODER : To use a decoder connected to the AV2 IN/DECODER connector.5 Press MENU to return to normal screen.
● If you have a decoder, be sure to set "AV2 SELECT" back to "DECODER" after editing.● If you're not using a decoder, leave "AV2 SELECT" set to "AV2".● The default setting is "AV2"; if the recorder's memory backup has expired due to a power cut or because the AC was removed
from the recorder, "AV2" will be automatically selected when the power is restored to the recorder. If you are using a decoder,be sure to set "AV2 SELECT" back to "DECODER".
NOTE:On the Mode Set screen ..."POWER SAVE" appears only with the HR-J658E and HR-J700E.
fi
fi MODE SET
AUTO TIMER OFFO. S. D. ONB. E. S. T. ONAUTO SP=LP TIMER ONPOWER SAVE OFFAV2 SELECT AV2COLOUR SYSTEM PAL/NTSC
[5∞] = [MENU] : EXIT

32 EN
– –:– –
1 2 3
4 5 6
7 8 9
0
2
4
1
3
Edit From ACamcorder
EDITING (cont.)
NUMBER "0"
TV PROG
You can use a camcorder as the source player and your videorecorder as the recorder.
MAKE CONNECTIONS
1 Connect the camcorder’s AUDIO/VIDEO OUT connec-tors to the recorder’s AV2 IN/DECODER or AV1 IN/OUTconnector via the cable adapter.
SET RECORDER’S INPUTMODE
2 Press NUMBER key "0" and/or TV PROG to selectdepending on the connector being used — “L-1” for theAV1 IN/OUT connector, or “L-2” for the AV2 IN/DECODER connector.
● When using the AV2 IN/DECODER connector, makesure "AV2 SELECT" is set to "AV2" (Z pg. 31).
START CAMCORDER
3 Engage its Play mode.
START RECORDER
4 Engage its Record mode.
Camcorder
Player
AUDIO OUT
VIDEO OUT
Cable adapter(not provided)
Your recorder
Audio/Video cable(not provided)

EN 33The AV2 IN/DECODER connector can be used as an inputterminal for an external decoder (descrambler). Simply connecta decoder and you can enjoy the variety of programming that isavailable through scrambled channels.
SELECT INPUT MODE
1 Set "AV2 SELECT" to "DECODER". (Z pg. 31)
CONNECT DECODER
2 Connect your recorder's AV2 IN/DECODER connectorto the decoder's Euroconnector using a 21-pin SCARTcable.
SET TUNER
3 Perform the procedure as described in "When ReceivingA Scrambled Broadcast" on page 41.
NOTE:When Connecting A Satellite Tuner . . .. . . if you don't have a decoder connect the satellite tunerdirectly to the video recorder's AV2 IN/DECODER connector.. . . if you have a decoder, first connect the decoder to thedecoder input of the satellite tuner, then connect the satellitetuner's output to the recorder's AV2 IN/DECODER connector.Refer to the instruction book for the satellite tuner and decoder.. . . set "AV2 SELECT" to "AV2". (Z pg. 31). . . to view a programme via the satellite tuner, select L-2 modeby pressing NUMBER keys and/or TV PROG so that"L-2" appears on the display panel.
Connecting/Using ADecoder
TV Receiver
TVAerialCable
RF Cable (provided)
AV1 IN/OUT
Satelliteantenna
Satellite tuner
Decoder
AV2 IN/DECODER
SYSTEM CONNECTIONS

34 EN
AV1 IN/OUT
AV2 IN/DECODER
DECODER VCR TV
Connection ToA SatelliteTuner
The AV2 IN/DECODER connector on the rear panel of yourrecorder allows simple connection to a satellite tuner.
NOTE:For details, check your satellite tuner’s instruction manual.
Mains outlet
TV Aerial cable
Satellite Tuner Unit
Satellite Cable
Outdoor UnitAerial
RF OUT
ANT. IN
Back of Recorder
SYSTEM CONNECTIONS (cont.)

EN 35
R LAUDIO
ANT. IN
RF OUT
OUT
EXT.2 EXT.1
Aerial connector
Back of TV
21-pin AV input connectors (SCART)

36 EN
IIII
II
II
II
II
II
I
I I I I I I I I I I I I I II
II
II
II
II
II
I
II
AV1 IN/OUT
AV2 IN/DECODER
R LAUDIO
ANT. IN
RF OUT
OUT
Connecting/Using A StereoSystem
These instructions enable you to connect your video recorder toyour Hi-Fi stereo system (if you have one) and listen to thesoundtrack through the stereo.
TelevisionSpeaker Speaker
AUDIO OUT
FM Tuner
CD Player
Stereo Amplifier
AUX IN or TAPE MONITOR
Audio Cable (not provided)
Mains outlet
Rear View
MAKE CONNECTIONS
1 Connect the AUDIO OUT L and R connectors on yourvideo recorder to the AUX IN or TAPE MONITORterminals on your stereo system’s receiver or amplifier.
NOTES:● When connecting your recorder’s audio output connectors to
a stereo amplifier, make sure you connect L and R correctly.● If stereo or bilingual TV broadcasts are receivable in your
area, this recorder can record them independently of the TVset and play them back through the connected stereo system.
● When listening to sound through the connected stereo system,turn the TV’s volume down completely.
CAUTIONS:● This recorder has a dynamic range of more than 80 dB with
regards to its Hi-Fi audio capability. It is recommended thatyou check the maximum level if you are going to listen to theHi-Fi audio signals through a stereo amplifier. A sudden surgein the input level to the speakers may damage them.
● Some speakers and televisions are specially shielded toprevent television interference. If both are of the non-shieldedtype, do not place the speakers adjacent to the TV set as thiscan adversely affect the video playback picture.
SYSTEM CONNECTIONS (cont.)

EN 37
Video Channel (RF Output Channel) is the channel on which your TV receives picture and sound signals from the video recorderthrough the RF cable.
If you have connected the video recorder to your TV via both the RF cable and a 21-pin SCART cable (AV connec-tion), since you do not need the video channel you have to set the video channel to off.
If you have connected the video recorder to your TV via the RF cable only (RF connection), you have to set the correctvideo channel.
Before performing the following steps, make sure the recorder's power is off and there is no cassette inserted in the recorder.
ACCESS VIDEO CHANNELSET MODE
1 Hold down STOP (5/8) on the recorder until thedisplay panel shows the following.
SET VIDEO CHANNEL
2 With AV ConnectionPress TV PROG – until the display panel shows"–OUT– –".
● Now the video channel is set to off.
With RF ConnectionPress TV PROG + or – to set the video recorder to avacant channel between 22 and 69 which is notoccupied by any local station in your area.
Then set your TV to UHF channel 50.● If the two vertical white bars
appear clearly on the screenas shown to the right, go tostep 3.
● If the two vertical white barsdo not appear clearly, re-setthe video recorder to anothervacant channel and try again.
(Ex.) If channel 50 is available in your area
With AV Connection:To view picture signals from the video recorder, set yourTV to its AV mode.
With RF Connection:The channel on which the screen in step 2 appears clearlyis your video channel.To view picture signals from the video recorder, set yourTV to the Video Channel.
NOTES:● If you set the video recorder to a channel which is
occupied by a local station or has neighbouringchannels that are occupied by local stations, thepicture reception quality will be affected and someinterference noise will appear on the TV screen. Besure to select a vacant channel which has nobroadcast on neighbouring channels.
● If you cannot obtain the two vertical white barsclearly with any channel between 22 and 69, consultyour JVC dealer.
EXIT VIDEO CHANNEL SETMODE
3 Press OK on the remote control.
SUBSIDIARY SETTINGS
IMPORTANTPerform the following steps only if —— Video Channel Set has not been done correctly by the Auto Set Up function (Z pg. 4).— interference appears in the TV picture after you have moved to a different area or a new station has started broadcasting in
your area.— you change the connection between your recorder and TV from RF connection to AV connection, or vice versa.
Video Channel Set

38 EN
– –:– –
1 2 3
4 5 6
7 8 9
0
2
4
1
3
SUBSIDIARY SETTINGS (cont.)
Tuner Set IMPORTANTPerform the following steps only if —— Auto Channel Set has not been set correctly by Auto Set
Up function (Z pg. 4).— you have moved to a different area or if a new station
starts broadcasting in your area.Turn on the TV and select the VIDEO channel (or AV mode).
Your recorder needs to memorize all necessary stations inchannel positions in order to record TV programmes. AutoChannel Set automatically assigns all receivable stations in yourarea to call them up by using the TV PROG buttons withoutgoing through any vacant channel.
TURN ON THE RECORDER
1 Press .
ACCESS MAIN MENUSCREEN
2 Press MENU.
ACCESS COUNTRY SETSCREEN
3 Press %fi to move thehighlight bar (pointer) to"AUTO CH SET", thenpress OK or .
SELECT COUNTRY
4 Press %fi to move the highlight bar (pointer) to yourcountry's name, then press OK or .
SELECT LANGUAGE
5 Press %fi to move the highlight bar (pointer) to thelanguage of your choice.
%
Auto Channel Set
TV PROG
%
OKMENU MAIN MENU
MODE SETAUTO CH SETMANUAL CH SETINITIAL SET
[5∞] = [MENU] : EXIT

EN 39
%
PERFORM AUTO CHANNELSET
6 Press OK or .
● The Auto Set screenappears, and remainson screen while therecorder searches forreceivable stations.As Auto ChannelSet progresses, the" " mark on thescreen moves fromleft to right.Wait until the screen as shown in step 7 appears.
VIEW CONFIRMATIONSCREEN
7 After "SCAN COMPLETED"is displayed on the screenfor about 5 seconds, theConfirmation screenlooking like the one to theright appears. The stationsyour recorder locatedappear on a Confirmationscreen — channelpositions (PR), channels(CH) and station names(ID – Z pg. 43). The blueback screen and theprogramme currently being broadcast by the blinkingstation appear alternately for 8 seconds each.To view the next page, use the %fi button on theremote control.
● The stations located in the selected country appear atthe top of the list.
● The Guide Program numbers will also be setautomatically during Auto Channel Set.
RETURN TO NORMALSCREEN
8 Press MENU.
● Using the Confirmation screen, you can skip or addchannel positions, enter station names and performother operations. Refer to pages 40 – 44 for theprocedures.
● Depending on reception conditions, the stations maynot be stored in order, and the station names may notbe stored correctly.
● For information on scrambled broadcasts, refer topage 41.
IMPORTANT● In certain reception conditions, station names may not be
stored correctly, and auto Guide Program Number Set maynot work properly. If the Guide Program numbers are not setproperly, when you timer-record a TV programme usingSHOWVIEW, the recorder will record a TV programme of adifferent station. When programming the timer usingSHOWVIEW, be sure to check whether the channel positionon which your recorder receives the broadcasting stationyou wish to record is selected (Z pg. 20, "SHOWVIEW TimerProgramming").
● Your video recorder memorizes all detected stations even ifreception of some of them is poor. In these cases picturequality may be poor. To delete those stations with anunacceptable picture Z "Delete A Channel" on page 41.
NOTES:● Fine tuning is performed automatically during Auto Channel
Set. If you want to perform it manually, refer to page 44.● If you perform Auto Channel Set when the aerial cable is not
connected properly, "SCAN COMPLETED -NO SIGNAL-"appears on the screen in step 7. When this happens, makesure of the aerial connection and press OK; Auto Channel Setwill take place again.
– –:– –
1 2 3
4 5 6
7 8 9
0
2
4
1
3
C: Cable
0 ++ +
EndBeginning
OK
MENU
%%
AUTO SET
PLEASE WAIT
[MENU] : EXIT
PR CH ID PR CH ID01 25 ARD 08 C26 E-SP02 C08 SKY1 09 55 WEST03 10 ZDF 10 C24 SAT104 C65 RAI1 11 C23 OSF05 C31 BBC1 12 – –␣ – –06 C32 BBC2 13 – –␣ – –07 C33 3SAT 14 – –␣ – –[5∞ ]= : EDIT= [X] : DELETE[MENU] : EXIT
∞ ∞

40 EN
– –:– –
1 2 3
4 5 6
7 8 9
0
2
4
1
3
SUBSIDIARY SETTINGS (cont.)
ATTENTIONAfter you have stored channels manually, be sure toperform Guide Program Number Set (Z pg. 45) in order toget proper results from SHOWVIEW timer recording.
NUMBER
Storing Channels ManuallyStore channels that were not stored during Auto Set Up (Z pg. 4)or Auto Channel Set (Z pg. 38).
SELECT BAND
4 Press %fi to change theband between CH (regular)and CC (cable), thenpress .
INPUT CHANNEL
5 Press the NUMBER keys to input the channel number youwant to store.
● Input "0" before any single number entries.● To input the registered station name (ID – Z pg. 43),
press until "----" (ID setting) begins blinking, thenpress %fi.
● For fine tuning adjustment, press until "+/–" beginsblinking, then press %fi. While tuning, “+” or “–”appears.
● When storing a channel that sends scrambledbroadcasts, press until "OFF" (Decoder setting)blinks, then press %fi to set "DECODER" to "ON"("OFF" is the default setting).
● When "AV2 SELECT" is set to "AV2", the "DECODER"setting cannot be changed (Z pg. 31).
ENTER NEW CHANNELINFORMATION
6 Press OK and the Confirmation screen appears.
● Repeat steps 3 through 6 as necessary.
CLOSE CONFIRMATIONSCREEN
7 Press MENU.
● To change positions, see "Change Station ChannelPosition" (Z pg. 41).
● If you wish to set station names other than the onesregistered in your recorder, Z "Set Stations (B)" onpage 42.
%
%
The blueback screen and theprogramme currently beingbroadcast by the selected channelappear alternately for 8 secondseach.
The blueback screen and theprogramme currently beingbroadcast by the selected channelappear alternately for 8 secondseach.
ACCESS MAIN MENU
1 Press MENU.
ACCESS CONFIRMATIONSCREEN
2 Press %fi to move the highlight bar (pointer) to“MANUAL CH SET”, then press OK or . The Confir-mation screen appears.
SELECT POSITION
3 Press %fi until anopen position in whichyou want to store achannel begins blinking,then press OK. TheManual Channel Setscreen appears.
%
(Ex.) To store in position 12.
%
%
%%
∞ ∞
PR CH ID PR CH ID01 25 ARD 08 C26 E-SP02 CDB SKY1 09 55 WEST03 10 ZDF 10 C24 SAT104 C65 RAI1 11 C23 OSF05 C31 BBC1 12 – –␣ – –06 C32 BBC2 13 – –␣ – –07 C33 3SAT 14 – –␣ – –[5∞ ]= : EDIT= [X] : DELETE[MENU] : EXIT
PR CH ID FINE DECODER12 CH01 – –␣ – – +/– OFF
[5∞] : SELECT[ ] : CURSOR +=
: OK[MENU] : EXIT
∞∞
OK
MENU
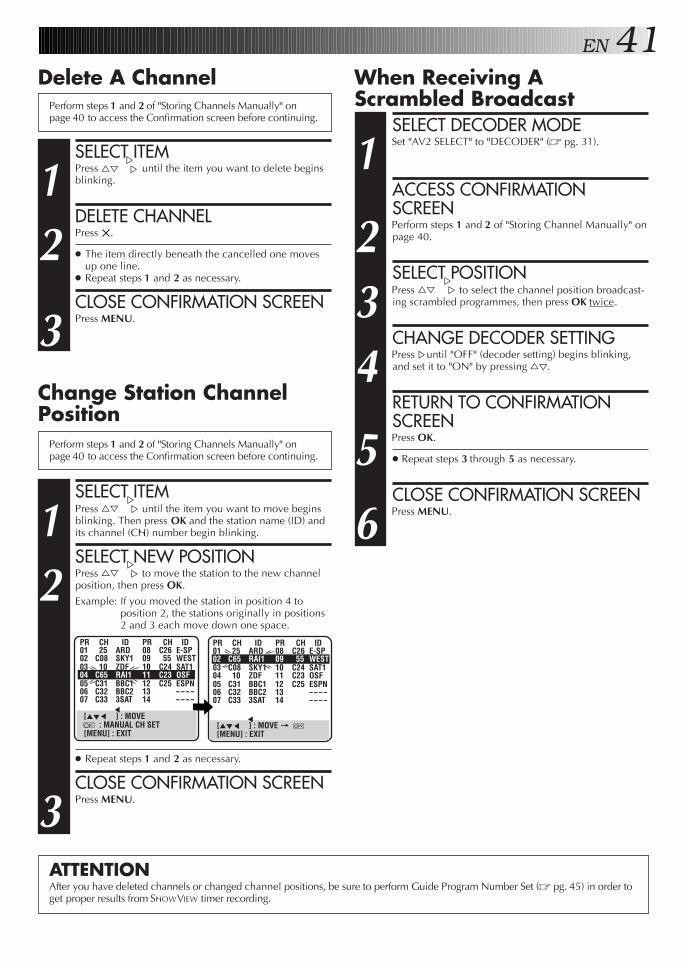
EN 41
Perform steps 1 and 2 of "Storing Channels Manually" onpage 40 to access the Confirmation screen before continuing.
Change Station ChannelPosition
SELECT ITEM
1 Press %fi until the item you want to move beginsblinking. Then press OK and the station name (ID) andits channel (CH) number begin blinking.
SELECT NEW POSITION
2 Press %fi to move the station to the new channelposition, then press OK.
Example: If you moved the station in position 4 toposition 2, the stations originally in positions2 and 3 each move down one space.
● Repeat steps 1 and 2 as necessary.
CLOSE CONFIRMATION SCREEN
3 Press MENU.
SELECT ITEM
1 Press %fi until the item you want to delete beginsblinking.
DELETE CHANNEL
2 Press .
● The item directly beneath the cancelled one movesup one line.
● Repeat steps 1 and 2 as necessary.
CLOSE CONFIRMATION SCREEN
3 Press MENU.
Delete A Channel
ATTENTIONAfter you have deleted channels or changed channel positions, be sure to perform Guide Program Number Set (Z pg. 45) in order toget proper results from SHOWVIEW timer recording.
Perform steps 1 and 2 of "Storing Channels Manually" onpage 40 to access the Confirmation screen before continuing.
SELECT DECODER MODE
1 Set "AV2 SELECT" to "DECODER" (Z pg. 31).
ACCESS CONFIRMATIONSCREEN
2 Perform steps 1 and 2 of "Storing Channel Manually" onpage 40.
SELECT POSITION
3 Press %fi to select the channel position broadcast-ing scrambled programmes, then press OK twice.
CHANGE DECODER SETTING
4 Press until "OFF" (decoder setting) begins blinking,and set it to "ON" by pressing %fi.
RETURN TO CONFIRMATIONSCREEN
5 Press OK.
● Repeat steps 3 through 5 as necessary.
CLOSE CONFIRMATION SCREEN
6 Press MENU.
When Receiving AScrambled Broadcast
%
%%
%%
%%
%%
PR CH ID PR CH ID01 25 ARD 08 C26 E-SP02 C08 SKY1 09 55 WEST03 10 ZDF 10 C24 SAT104 C65 RAI1 11 C23 OSF05 C31 BBC1 12 C25 ESPN06 C32 BBC2 13 – –␣ – –07 C33 3SAT 14 – –␣ – –
[5∞ ] : MOVE : MANUAL CH SET
[MENU] : EXIT
PR CH ID PR CH ID01 25 ARD 08 C26 E-SP02 C65 RAI1 09 55 WEST03 C08 SKY1 10 C24 SAT104 10 ZDF 11 C23 OSF05 C31 BBC1 12 C25 ESPN06 C32 BBC2 13 – –␣ – –07 C33 3SAT 14 – –␣ – –
[5∞ ] : MOVE = [MENU] : EXIT
∞ ∞
∞ ∞

42 EN SUBSIDIARY SETTINGS (cont.)
%
SELECT STATION NAMECHARACTER
1 Press until the first letterof the station name beginsblinking.
ENTER NEW CHARACTER
2 Press %fi to cycle through the characters (A–Z, 0–9, –,
*, +, (space) ) and stop when the desired characteris indicated, then press to enter. Enter the remainingcharacters the same way (maximum of 4).After entering all characters, press OK.
● The Confirmation screen appears.● If you make a mistake, press until the incorrect
character begins blinking. Then enter the correctcharacter by pressing %fi.
CLOSE CONFIRMATIONSCREEN
3 Press MENU.
[ %
%
Set Stations (B)
Perform steps 1 and 2 of "Storing Channels Manually" onpage 40 to access the Confirmation screen before continuing.
SELECT ITEM
1 Press %fi until the item you want begins blinking.
ACCESS MANUALCHANNEL SET SCREEN
2 Press OK twice.
SELECT NEW STATION
3 Press until the stationname (ID) begins blinking,then press %fi until thenew station’s name (ID)you want to store beginsblinking.Registered station names(Z pg. 43) appear as youpress %fi.
SWITCH STATIONS
4 Press OK.
● The Confirmation screen appears.● Repeat steps 1 through 4 as necessary.
CLOSE CONFIRMATIONSCREEN
5 Press MENU.
Set Stations (A)Set station names that are registered in your recorder.
%
Perform steps 1 and 2 of "Storing Channels Manually" onpage 40 to access the Confirmation screen and then performstep 1 and 2 of "Set Stations (A)" on the left before continuing.
Set station names other than the ones registered in your recorder.
%%
PR CH ID FINE DECODER06 CH45 – –␣ – – +/– OFF
[5∞] : CHANGE ID[ ] : CURSOR +=
: OK[MENU] : EXIT
∞∞
PR CH ID FINE DECODER06 CH45 ARD +/– OFF
[5∞] : A-Z, 0-9[ ] : CURSOR +=
: OK[MENU] : EXIT
∞∞

EN 43TV Station And ID List
ID* STATION NAME
1000 TV10003SAT 3SATADLT ADULTANT3 ANTENA3ARD ARDARTE ARTEBBC BBC GROUPBBC1 BBC1BBC2 BBC2BR3 BAYERN3C+ CANAL PLUSC1 PORTUGUSESCAN5 CANALE5CH4 CHANNEL4CH5 CHANNEL5CHLD CHILDCINE CINEMACLUB TELECLUBCMT CMTCNN CNNCSUR ANDALUCIADISC DISCOVERYDR DR TVDRS DRSDSF DSFETB1 ETB1ETB2 ETB2EURO EURONEWSEUSP EUROSPORTSFEMM FEMMANFILM FILMFNET FILMNETFR2 France2FR3 France3GALA GALAVISIONHR3 HESSEN3INFO INFO-KANALITA1 ITALIA1ITA7 ITALIA7ITV ITVJSTV JSTVKA2 KA2KAB1 KABEL1KAN2 KANAL2LOCA LOCALM6 M6MBC MBRMCM MCMMDR MDRMOVE MOVIEMTV MTVMTV3 MTV3N3 NORD3N-TV N-TVNBC NBC SUPERNDR3 NDR3NED1 NED1NED2 NED2NED3 NED3NEWSNICK NICKELODEONNRK NRKNRK2 NRK2ODE ODEONORF1 ORF1
ID* STATION NAME
ORF2 ORF2ORF3 ORF3OWL3 OWL3PREM PREMIEREPRO7 PRO7RAI1 RAI1RAI2 RAI2RAI3 RAI3RET4 RETE421 TELE21RTBF RTBF1 or 2RTL RTLRTL2 RTL2RTL4 RTL4RTL5 RTL5RTP RTPS4 SCHWEIZ4SAT1 SAT1SBS SBSSHOW SHOWSIC SOCIEDADESKY SKY CHANNELSKYN SKY NEWSSPRT SPORTSRTL SUPER RTLSTAR STAR-TVSVT1 SVT1SVT2 SVT2SW3 SUEDWEST3TCC TCCTELE TELETEL5 TELE5TF1 TF1TM3 TM3TMC TELEMONTECARLOTNT TNT INTTRT TRT INTTSI TSITSR TSRTV1 BRTN TV1TV2 BRTN TV2TV3 TV3TV4 TV4TV5 TV5TV6 TV6TVE1 TVE1TVE2 TVE2TVG TV GALICIATVI TV INDEPENDENTTVN TV NORGEVCR VIDEOVERO VERONICAVH-1 VH-1VIVA VIVAVIV2 VIVA2VMTV VIDEO MUSICVOX VOXVT4 VT4VTM VTMWDR1 West1WDR3 West3YLE1 YLE1YLE2 YLE2ZDF ZDFZTV ZTV
* The "ID" abbreviation is what is shown on-screen in lieu of thestation name. The "ID" abbreviation is listed in the Confirma-tion screen and is displayed on the TV screen when therecorder is tuned to a different station.

44 EN
Perform steps 1 and 2 of "Storing Channels Manually" onpage 40 to access the Confirmation screen before continuing.
SELECT CHANNEL TOFINE-TUNE
1 Press %fi until the channel you want to tunebegins blinking.
ACCESS MANUALCHANNEL SET SCREEN
2 Press OK twice. The Manual Channel Set screenappears.
PERFORM TUNING
3 Press until "+/–" begins blinking, then press %fi untilthe picture is its clearest. Then press OK.
● The Confirmation screen appears.● Repeat steps 1 through 3 as necessary.
CLOSE CONFIRMATIONSCREEN
4 Press MENU.
Fine-Tuning ChannelsAlready Stored
%
SUBSIDIARY SETTINGS (cont.)
%%
– –:– –
1 2 3
4 5 6
7 8 9
0
2
4
1
3 OK
MENU

EN 45
SHOWVIEW SetupIMPORTANTNormally, Auto Set Up (Z pg. 4) or Auto Channel Set (Z pg. 38) sets the Guide Program Numbers automatically. You need to setthe Guide Program Numbers manually only in the following cases.● When timer-programming with SHOWVIEW, the channel position, where the station you wish to record is received on your
recorder, is not selected.— Set the Guide Program Number for that station manually.● When you add/delete a channel or change channel positions manually after Auto Set Up or Auto Channel Set has taken place.— Set the Guide Program Numbers for all the receivable stations manually.● When you wish to timer-record a satellite programme with SHOWVIEW.— Set the Guide Program Numbers for all satellite broadcasts received on your satellite tuner.
Turn on the TV and select the VIDEO channel (or AV mode).
Guide Program Number SetACCESS MAIN MENUSCREEN
1 Press MENU.
ACCESS INITIAL SETSCREEN
2 Press %fi to move the highlight bar (pointer) to"INITIAL SET", then press OK or .
ACCESS GUIDE PROG SETSCREEN
3 Press %fi to move the highlight bar (pointer) to "GUIDEPROG SET", then press OK or .
ENTER GUIDE PROGNUMBER
4 Press %fi or NUMBER keysto enter the Guide Programnumber for the desiredstation as shown in the TVlistings. Then pressOK or .
%
(Ex.) When inputting theGuide Programnumber 2 for ZDF.
%
ENTER RECEIVINGCHANNEL POSITIONNUMBER
5 Press %fi or NUMBERkeys to input the numberof the recorder's channelposition on which theGuide Program number'sbroadcast is received.Then press OK or .
● If the satellite broadcastis received on yourrecorder's auxiliarychannel "L-2", select"L-2" for the channel position.
● Repeat steps 4 and 5 as necessary.
RETURN TO NORMALSCREEN
6 Press MENU.
(Ex.) If ZDF is received onchannel position 2.
Guide Program Number"Guide Program (GUIDE PROG) number" refers to theassigned TV station numbers, according to broadcast area, forSHOWVIEW timer recording. The Guide Program numbers canbe found in most TV listings.
%
%
GUIDE PROG SET
GUIDE PROG TV PROG
2 5
[5∞] = [MENU] : EXIT
GUIDE PROG SET
GUIDE PROG TV PROG
2 2ZDF
[5∞] = [MENU] : EXIT

46 EN SUBSIDIARY SETTINGS (cont.)
Just ClockThe Just Clock function provides accurate time keepingthrough automatic adjustments at regular intervals, byreading data from a PDC signal.The Just Clock option can be set "ON" or "OFF" at the ClockSet screen (the default setting is "OFF"). Press OK until theJust Clock setting begins blinking, then press %fi to changethe setting.IMPORTANT: If you turn off Just Clock, the accuracy of yourrecorder's built-in clock may be reduced, which couldadversely effect timer recording. We recommend you tokeep Just Clock on. In cases where the clock setting datafrom a PDC signal is incorrect, however, you are advised tokeep Just Clock set to "OFF".
TURN THE RECORDER ON
1 Press .
ACCESS MAIN MENUSCREEN
2 Press MENU.
ACCESS INITIAL SETSCREEN
3 Move the highlight bar (pointer) to "INITIAL SET" bypressing %fi, then press OK or .
ACCESS CLOCK SETSCREEN
4 Move the highlight bar (pointer) to "CLOCK SET" bypressing %fi, then press OK or . The Clock Set screenappears.
SET DATE AND TIME
5 Press %fi to set the time, then press OK or . The"date" display begins blinking. Repeat the sameprocedure to set the date and year.
● When you set the time, press and hold %fi tochange the time by 30 minutes.
● When you set the date, press and hold %fi tochange the date by 15 days.
Clock SetTurn on the TV and select the VIDEO channel (or AV mode).
%
IMPORTANTIf you performed Auto Set Up (Z pg. 4) or Auto ChannelSet (Z pg. 38), without ever having set the clock previ-ously, the recorder's built-in clock is also set automatically.Perform the following steps only if —— Auto Clock Set has not been performed correctly by
Auto Set Up or Auto Channel Set.or
— the recorder's memory backup has expired.or
— you want to change Just Clock setting (Z "Just Clock"in the left column).
%
%
INITIAL SET
CLOCK SETGUIDE PROG SET
[5∞] = [MENU] : EXIT
CLOCK SET
TIME DATE YEAR 0: 00 01 . 01 98
JUST CLOCK : OFFTV PR. : 1
[5∞] = [MENU] : EXIT
– –:– –
1 2 3
4 5 6
7 8 9
0
2
4
1
3 OKMENU

EN 47
NOTES:● Just Clock (when set to "ON") adjusts the recorder's built-in
clock every hour, except for 23:00, 0:00, 1:00 and 2:00.● Just Clock is not effective when . . .
– the recorder’s power is on.– the recorder is in the Timer mode.– a difference of more than 3 minutes exists between the
built-in clock’s time and the actual time.– the recorder is in the Auto Satellite Prog Rec mode
(Z pg. 26).– the recorder is in the Power Save mode (Z pg. 9).
● If Just Clock is set to "ON", the recorder’s clock is automati-cally adjusted at the start/end of Summer Time.
● Just Clock may not function properly depending on thereception condition.
SET JUST CLOCK
6 The default setting is “OFF”. Set as desired by pressing%fi, then press OK or .
● For the Just clock function, Z "Just Clock" on page46.
● If you set to “OFF”, you can disregard the next step asyou won’t be able to receive regular clock adjustments.
SET CLOCK DATA SOURCECHANNEL POSITION
7 The recorder is preset to receive clock setting andadjustment data from channel position 1. Press %fi to setthe channel position to the number representing thestation transmitting clock setting data, then press OK or .
START CLOCK OPERATION
8 Press MENU.
%
%
– –:– –
1 2 3
4 5 6
7 8 9
0
2
4
1
3 OKMENU

48 EN TROUBLESHOOTING
Before requesting service for a problem, use this chart and see if you can repair the trouble yourself. Small problems are often easilycorrected, and this can save you the trouble of sending your video recorder off for repair.
POSSIBLE CAUSE● The mains power cord is discon-
nected.
● “‰“ is displayed on the displaypanel with Auto Timer set to "OFF".
● The batteries are discharged.
SYMPTOM1. No power is applied to the
recorder.
2. The clock is functioning properly,but the recorder cannot be powered.
3. The remote control won't function.
CORRECTIVE ACTIONConnect the mains power cord.
Press the ‰ button to turn the “‰“indicator off.
Replace the dead batteries with newones.
SYMPTOM1. The tape does not run during
recording.
2. The tape will not rewind or fast-forward.
CORRECTIVE ACTIONPress PLAY to turn the “ “ indicatoroff.
Check the cassette.
SYMPTOM1. The playback picture does not
appear while the tape is running.
2. Noise appears during visual search.
3. Noise appears during normalplayback.
4. The playback picture is blurred orinterrupted while TV broadcasts areclear.
5. Breaks are noticeable in Hi-Fisoundtrack.
POSSIBLE CAUSE● If you’re using the RF OUT connec-
tion . . .. . . the TV receiver’s channel selectoris not set to the VIDEO channel.. . . the recorder's VIDEO channelhas not been correctly set.
● If you’re using the AV connection, theTV receiver is not set to the AV mode.
● This is normal.
● The automatic tracking mode isengaged.
● The video heads may be dirty.
● Automatic tracking is engaged.
CORRECTIVE ACTIONIf you are using the RF OUT connec-tion . . .. . . set the TV receiver to the VIDEOchannel. (Z pg. 5). . . perform "Video Channel Set".(Z pg. 37)If you are using the AV connection,set the TV to its AV mode.
Try manual tracking. (Z pg. 13)
Consult your JVC dealer.
Engage and adjust tracking manually.(Z pg. 13)
POSSIBLE CAUSE● “ “ is displayed on the display
panel.
● The tape is already fully rewound orfast-forwarded.
CORRECTIVE ACTIONInsert a cassette, or using adhesivetape, reseal the slot where the tabwas removed.
Set to the desired channel.
Confirm that the source is properlyconnected.
Confirm that all units’ power switchesare turned on.Set the input mode to “L-1” or “L-2”.
Confirm that the camcorder isproperly connected.Set the input mode to “L-1” or “L-2”.
POSSIBLE CAUSE● There is no cassette loaded, or the
cassette loaded has had its RecordSafety tab removed.
● “L-1” or “L-2” has been selected asthe input mode.
● The source (another video recorder,camcorder) has not been properlyconnected.
● All necessary power switches havenot been turned on.
● The input mode is not correct.
● The camcorder has not beenproperly connected.
● The input mode is not correct.
SYMPTOM1. Recording cannot be started.
2. TV broadcasts cannot be recorded.
3. Tape-to-tape editing is not possible.
4. Camcorder recording is notpossible.
POWER
PLAYBACK
RECORDING
TAPE TRANSPORT

EN 49
CORRECTIVE ACTIONRe-perform the clock and/or timersettings.Press ‰ and confirm that “‰“ isdisplayed on the display panel.
Timer programming can’t beperformed while a timer recording isin progress. Wait until it finishes.
Load a cassette with the RecordSafety tab intact, or cover the holeusing adhesive tape.
Remove the cassette and cover thehole with adhesive tape, or insert acassette with the Record Safety tabintact.
Check the programmed data and re-program as necessary, then press ‰again.
The programme may not have beenrecorded in its entirety. Next timemake sure you have enough time onthe tape to record the entireprogramme.
Refer to "Guide Program Number Set"and re-perform the procedure(Z pg. 45).
SYMPTOM1. Timer recording won’t work.
2. Timer programming is not possible.
3. “‰“ and “]“ on the displaypanel won’t stop blinking.
4. The cassette is automaticallyejected, and “‰“ and “]“ on thedisplay panel won’t stop blinking.
5. “‰“ blinks for 10 seconds and theTimer mode is disengaged.
6. The cassette is automaticallyejected, the power shuts off and“‰“ and “]“ won’t stopblinking.
7. SHOWVIEW does not timer-recordproperly.
POSSIBLE CAUSE● The clock and/or the timer have
been set incorrectly.● The timer is not engaged.
● Timer recording is in progress.
● The timer is engaged but there’s nocassette loaded.
● The loaded cassette has had itsRecord Safety tab removed.
● ‰ has been pressed when there areno programs in memory, or the timerrecord information has beenprogrammed incorrectly.
● The end of the tape was reachedduring timer recording.
● The recorder’s channel positionshave been set incorrectly.
CORRECTIVE ACTIONPosition the camcorder so itsmicrophone is away from the TV.Turn the TV’s volume down.
If you need the skipped channels,restore them (Z pg. 40).
Press PAUSE to pause the recording,change channels, then press PLAY toresume recording.
Perform manual setting again.
Connect the TV aerial cable to therecorder properly and turn off therecorder power once, then turn therecorder power back on again. Therecorder will try Auto Set Up again(Z pg. 4).
Re-set the remote control to thecorrect brand (Z pg. 28, 29).
SYMPTOM1. Whistling or howling is heard from
the TV during camcorder record-ing.
2. When scanning channels, some ofthem are skipped over.
3. The channel cannot be changed.
4. Channel settings that were mademanually seem to have changed ordisappeared.
5. No channels are stored in therecorder's memory.
6. The remote control won’t operatethe TV or satellite tuner.
POSSIBLE CAUSE● The camcorder’s microphone is too
close to the TV.● The TV’s volume is too high.
● Those channels have been desig-nated to be skipped.
● Recording is in progress.
● After the manual settings weremade, Auto Channel Set wasperformed.
● The TV aerial cable was notconnected to the recorder whenAuto Set Up was performed.
● The remote control brand setting isincorrect.
TIMER RECORDING
OTHER PROBLEMS

50 EN QUESTIONS AND ANSWERS
PLAYBACKQ. What happens if the end of the tape is reached
during playback or search?
○ ○ ○ ○ ○ ○ ○ ○ ○ ○ ○ ○ ○ ○ ○ ○ ○ ○ ○ ○ ○ ○ ○ ○ ○ ○ ○ ○
A. The tape is automatically rewound to the beginning.
Q. Can the video recorder indefinitely remain in thestill mode?
A. No. It stops automatically after 5 minutes to protect
○ ○ ○ ○ ○ ○ ○ ○ ○ ○ ○ ○ ○ ○ ○ ○ ○ ○ ○ ○ ○ ○ ○ ○ ○ ○ ○ ○
the heads.
Q. During search, slow, still and frame-by-frameplayback, I can’t hear any audio. What’s theproblem?
○ ○ ○ ○ ○ ○ ○ ○ ○ ○ ○ ○ ○ ○ ○ ○ ○ ○ ○ ○ ○ ○ ○ ○ ○ ○ ○ ○
A. This is normal.
Q. When returning from multi-speed search to normalplayback, the picture is disturbed. Should I beconcerned about this?
○ ○ ○ ○ ○ ○ ○ ○ ○ ○ ○ ○ ○ ○ ○ ○ ○ ○ ○ ○ ○ ○ ○ ○ ○ ○ ○ ○
A. No, it is normal.
Q. Noise bars appear during multi-speed search. What’sthe problem?
○ ○ ○ ○ ○ ○ ○ ○ ○ ○ ○ ○ ○ ○ ○ ○ ○ ○ ○ ○ ○ ○ ○ ○ ○ ○ ○ ○
A. This is normal.
Q. Other than preventing further recording, what effectdoes removing the Record Safety tab have?
○ ○ ○ ○ ○ ○ ○ ○ ○ ○ ○ ○ ○ ○ ○ ○ ○ ○ ○ ○ ○ ○ ○ ○ ○ ○ ○ ○
A. It disables marking of index codes.
Q. Sometimes, during Index Search, the video recordercan’t find the programme I want to see. Why not?
○ ○ ○ ○ ○ ○ ○ ○ ○ ○ ○ ○ ○ ○ ○ ○ ○ ○ ○ ○ ○ ○ ○ ○ ○ ○ ○ ○
A. There may be index codes too close together.
RECORDINGQ. When I pause and then resume a recording, the end
of the recording before the pause is overlapped bythe beginning of the continuation of recording. Whydoes this happen?
A. This is normal. It reduces distortion at the pause and
○ ○ ○ ○ ○ ○ ○ ○ ○ ○ ○ ○ ○ ○ ○ ○ ○ ○ ○ ○ ○ ○ ○ ○ ○ ○ ○ ○
resume points.
Q. Can the video recorder indefinitely remain in theRecord-Pause mode?
A. No. The video recorder goes to its Stop mode auto-
○ ○ ○ ○ ○ ○ ○ ○ ○ ○ ○ ○ ○ ○ ○ ○ ○ ○ ○ ○ ○ ○ ○ ○ ○ ○ ○ ○
matically after 5 minutes to protect the heads.
Q. What happens if the tape runs out during recording?A. The video recorder automatically rewinds it to the
○ ○ ○ ○ ○ ○ ○ ○ ○ ○ ○ ○ ○ ○ ○ ○ ○ ○ ○ ○ ○ ○ ○ ○ ○ ○ ○ ○
beginning.
TIMER RECORDING
Q. " " and "‰" remain lit on the display panel. Is therea problem?
A. No. This is a normal condition for a timer recording in
○ ○ ○ ○ ○ ○ ○ ○ ○ ○ ○ ○ ○ ○ ○ ○ ○ ○ ○ ○ ○ ○ ○ ○ ○ ○ ○ ○
progress.
Q. Can I programme the timer while I’m watching atape or a TV broadcast?
A. You won’t see the picture as it is replaced by the on-screen menu, but the audio from the programme or
○ ○ ○ ○ ○ ○ ○ ○ ○ ○ ○ ○ ○ ○ ○ ○ ○ ○ ○ ○ ○ ○ ○ ○ ○ ○ ○ ○
tape you’re viewing can be heard.
Q. Is it possible to timer-record a TV programmebroadcast in 2000?
○ ○ ○ ○ ○ ○ ○ ○ ○ ○ ○ ○ ○ ○ ○ ○ ○ ○ ○ ○ ○ ○ ○ ○ ○ ○ ○ ○
A. Yes, it is possible.
ATTENTIONThis recorder contains microcomputers. External electronic noise or interference could cause malfunctioning. In such cases,switch the recorder off and unplug the mains power cord. Then plug it in again and turn the recorder on. Take out the cassette.After checking the cassette, operate the unit as usual.

EN 51INDEX
FRONT VIEW
DISPLAY
COUNTER RESET
REC LINK
TV PROG
TV PROG
TIMER
STANDBY/ON
SP/LP
PUSH JOG
REVIEWSP
VCRVPS/PDC
1 2 3
# &^%$! 8 09
4 5 6 7
* @
1 STANDBY/ON Button Z pg. 42 TIMER Button Z pg. 21, 233 SP/LP Button Z pg. 154 Cassette Loading Slot5 Instant REVIEW Button Z pg. 136 PLAY Button Z pg. 117 PUSH JOG ™£ Button Z pg. 12, 138 TV PROG +/– Buttons Z pg. 159 REC LINK Button Z pg. 26
0 COUNTER RESET Button Z pg. 16! Display Panel Z pg. 52@ Infrared Beam Receiving Window# RECORD Button Z pg. 15$ PAUSE Button Z pg. 12% Rewind [REW] Button Z pg. 11, 12^ Fast Forward [FF] Button Z pg. 11, 12& DISPLAY Button Z pg. 16* STOP/EJECT Button Z pg. 11

52 EN INDEX (cont.)
AV1 IN/OUT
AV2 IN/DECODER
R LAUDIO
ANT. IN
RF OUT
OUT
2 4
5 6
1 3
4 ANT. IN Connector Z pg. 35 AV2 IN/DECODER Connector Z pg. 31, 33, 346 RF OUT Connector Z pg. 3
1 Mains Power Cord Z pg. 32 AV1 IN/OUT Connector Z pg. 3, 313 AUDIO OUT (L/R) Connectors Z pg. 36
REAR VIEW
DISPLAY PANEL
1 B.E.S.T. Picture System Display Z pg. 182 Symbolic Mode Indicators
3 Tape Speed Indicators Z pg. 15* EP is only for NTSC playback.
4 Programme Time Indicators Z pg. 22
5 "Timer" Indicator Z pg. 21, 236 Tape Remaining Time Indicator Z pg. 167 Channel/Clock Display Z pg. 68 Instant REVIEW Indicator Z pg. 139 VPS/PDC Indicator Z pg. 21, 230 VCR Indicator Z pg. 16! "Cassette Loaded" Mark@ Counter/Remain Display# Mode Display (L-1 or L-2)
REVIEWSP
VCRVPS/PDC
09 ! @
2 7 81 3 5 64
VPS/PDC
#
STILL:SLOW:
RECORD:
RECORD PAUSE:
PLAY:FF/REW VARIABLESHUTTLE SEARCH:

EN 53REMOTE CONTROL
Buttons with a small dot on the left side of the name can alsobe used to operate your TV Z pg 28.
1 TV Button Z pg. 282 VCR Button Z pg. 283 TV/VCR Button Z pg. 16, 284 REVIEW Button Z pg. 135 NUMBER Keys Z pg. 15, 206 VPS/PDC Button Z pg. 21, 237 Button Z pg. 24
0000 Button Z pg. 168 STOP +/– Button Z pg. 229 START +/– Button Z pg. 220 PROG Button Z pg. 20! Button Z pg. 24@ Rewind [REW] Button Z pg. 11, 12# Record Button Z pg. 15$ Stop Button Z pg. 11, 15% MENU Button Z pg. 7^ %fi Button Z pg.4
TV PROG +/– Z pg. 28, 29& SAT Button Z pg. 29* STANDBY/ON Button Z pg. 4( AUDIO Button Z pg. 14
(TV Muting) Button Z pg. 28) DISPLAY Button Z pg. 16q DAILY Button Z pg. 21, 23w WEEKLY Button Z pg. 21, 23e AUX Button Z pg. 30r ‰ Button Z pg. 21, 23t DATE +/– Button Z pg. 22y TV PROG +/– Button Z pg. 15u 30 SEC Button Z pg. 13i Auto Tracking Button Z pg. 13
SP/LP Button Z pg. 15o Play Button Z pg. 11p Fast Forward [FF] Button Z pg. 11, 12Q Pause Button Z pg. 12W OK Button Z pg. 5E Button Z pg. 12, 13
TV +/–Button Z pg. 28
TV PROG +
TV PROG –
TV
– TV
+
0000
STARTDEBUT
STOPFIN
DATE
MENU OK
TVPROG
TV/VCR
DAILY/QTDN.VPS/PDC
AUX
WEEKLY/HEBDO
PROG 30 SEC
– –:– –AUDIO
1 2 3
4 5 6
7 8 9
0
2
4
1
3
EXPRESS
VCR TV SAT
io
u
)
W
1
3
876
2
9
4
0
5
!@#$%
&*(
rewq
ty
Qp
^E
%
%
How To UseThe remote control can operate most of your video recorder'sfunctions, as well as basic functions of TV sets and satellitetuners of JVC and other brands. Z pg. 28, 29.● Point the remote control toward the sensor window.● The maximum operating distance of the remote control is
about 8 m.
NOTES:● When inserting the batteries, be sure to insert in the correct
directions as indicated under the battery cover.● If the remote control doesn't work properly, remove its batteries,
wait a short time, replace the batteries and then try again.
ATTENTIONThe remote control can operate not only the video recorder but also some of your TV and satellite tuner's functions.● To operate your video recorder, first press the VCR button to set the remote control to the Video mode.● To operate your TV, first press the TV button to set the remote control to the TV mode (Z pg. 28).● To operate your satellite tuner, first press the SAT button to set the remote control to the Satellite tuner mode (Z pg. 29).

54 EN SPECIFICATIONS
GENERALPower requirement : AC 220 – 240 V`, 50/60 HzPower consumption
Power on : 24 WPower off : 5.5 WPower save(HR-J658E andHR-J700E only) : 3 W
Temperature Operating : 5°C to 40°C Storage : –20°C to 60°COperating position : Horizontal onlyDimensions (WxHxD) : 400 x 94 x 340 mmWeight : 3.8 kgFormat : VHS PAL standardMaximum recording time
(SP) : 240 min. with E-240 videocassette
(LP) : 480 min. with E-240 videocassette
VIDEO/AUDIOSignal system : PAL-type colour signal and
CCIR monochromesignal,625 lines50 fields
Recording system : DA4 (Double Azimuth) headhelical scan system
Signal-to-noise ratio : 45 dBHorizontal resolution : 250 linesFrequency range : 70 Hz to 10,000 Hz
(Normal audio)20 Hz to 20,000 Hz(Hi-Fi audio)
Input/Output : 21-pin scart connectors :IN/OUT x 1, IN/DECODER x 1RCA connector:AUDIO OUT x 1
TUNER/TIMERTV channel storagecapacity : 99 positions
(+AUX position)Tuning system : Frequency synthesized tunerChannel coverage : VHF 47 – 89/104 – 300/
302 – 470MHzUHF 470 – 862MHz
Aerial output : UHF channels 22 – 69(Adjustable)
Memory backup time : Approx. 10 min.
ACCESSORIESProvided accessories : RF cable,
Infrared remote control unit,"R6" battery x 2
Specifications shown are for SP mode unless otherwisespecified.E.& O.E. Design and specifications subject to change withoutnotice.

EN 55MEMO

HR
-J7
00
E/J
65
8E
/EH
COPYRIGHT © 1998 VICTOR COMPANY OF JAPAN, LTD. E/EH Printed in Japan0598HOV*UN*VP
VICTOR COMPANY OF JAPAN, LIMITED
Auto Set Up – referring to the display panelThe Auto Set Up function sets the tuner channels, clock, Guide Program numbers and video channel*automatically.
BEFORE YOU START PLEASE MAKE SURE THAT:n The TV aerial cable is connected to the ANT.IN jack on the rear panel of the video recorder.n The video recorder's mains power cord is connected to a mains outlet.n The video recorder is turned off.n Load batteries into the remote control.
1 Press (recorder/remote).
2 Press %fi (remote) to select the international telephone country code.
● If you have selected a country code other than 32(BELGIUM) or 41 (SUISSE), go to step 3.
● If you have selected 32 (BELGIUM) or 41 (SUISSE), press OK (remote) and select the language code bypressing %fi (remote), then go to step 3.
(Ex.) DEUTSCHLAND is selected. International Telephone Country CodeSUISSE : 41 SUOMI : 358ITALIA : 39 PORTUGAL : 351ESPAÑA : 34 DEUTSCHLAND : 49BELGIUM : 32 NORGE : 47NEDERLAND : 31 SVERIGE : 46GREECE : 30 DANMARK : 45OTHERS : - - ÖSTERREICH : 43
Language CodeENGLISH : 01 NEDERLANDS : 06DEUTSCH : 02 SVENSKA : 07FRANCAIS : 03 NORSK : 08ITALIANO : 04 SUOMI : 09CASTELLANO : 05 DANSK : 10Language Code
(Ex.) FRANCAIS is selected for BELGIUM
International TelephoneCountry Code
3 Press OK (remote). Do NOT press any button on the video recorder or remote control until the display panelshows as follows.
● If you have connected the video recorder to your TV via RF connection, press OK to finish the Auto Set Up.To view picture signals from the video recorder, set your TV to the Video Channel.
● If you have connected the video recorder to your TV via AV connection, press TV PROG – until the display panelshows "–OUT– –" to set the Video Channel to off, then press OK to finish the Auto Set Up.To view picture signals from the video recorder, set your TV to its AV mode.
* Once you have performed Auto Set Up, even if the recorder's memory backup has expired, the recorder willnot perform Auto Set Up again. Perform tuner setting (Z pg. 38), clock setting (Z pg. 46) and/or Video Chan-nel setting (Z pg. 37) as required.
● If "– –:– –" appears on thedisplay panel, see page 6of the instructions.
FOR MORE INFORMATION SEE INSTRUCTIONS/P4
EN
* Useful for RF connection users.
Video Channel