varian viista hc process chamber pm technique · this document for reference only varian viista hc...
TRANSCRIPT
www.foamtecintlwcc.com This Document For Reference Only
Varian VIISta HC Process Chamber PM 100708.docx 1
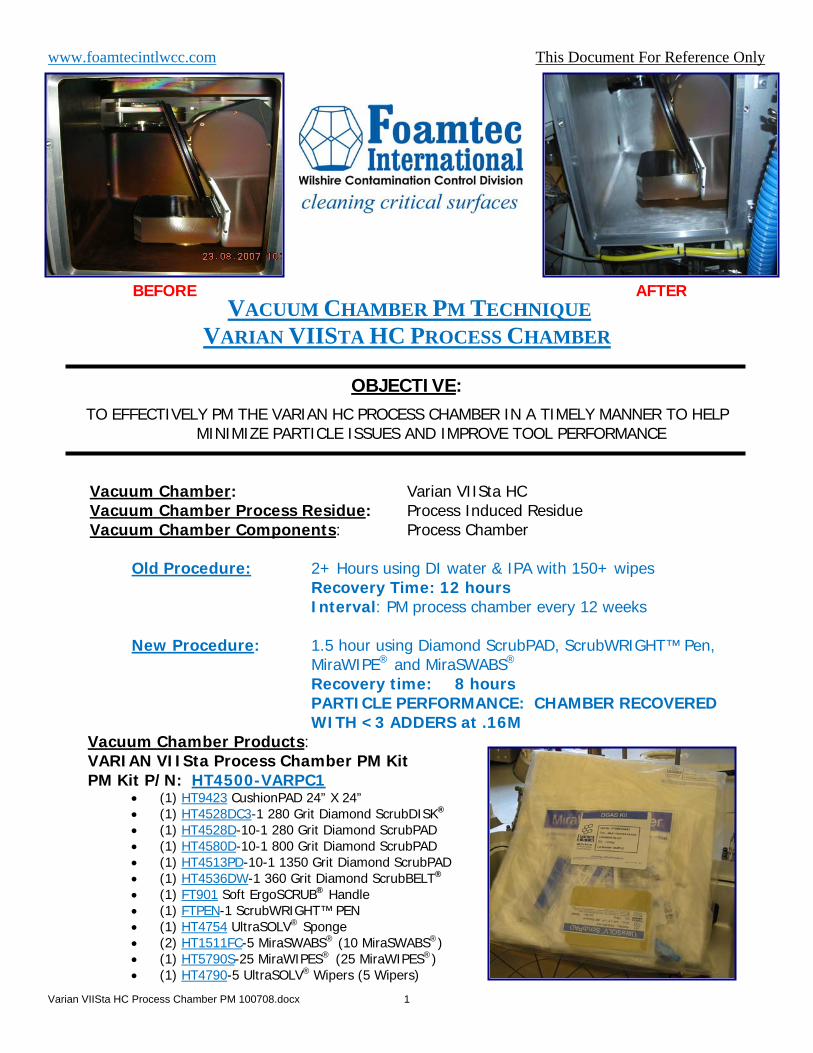
VACUUM CHAMBER PM TECHNIQUE
VARIAN VIISTA HC PROCESS CHAMBER
OBJECTIVE: TO EFFECTIVELY PM THE VARIAN HC PROCESS CHAMBER IN A TIMELY MANNER TO HELP
MINIMIZE PARTICLE ISSUES AND IMPROVE TOOL PERFORMANCE
Vacuum Chamber: Varian VIISta HC Vacuum Chamber Process Residue: Process Induced Residue Vacuum Chamber Components: Process Chamber
Old Procedure: 2+ Hours using DI water & IPA with 150+ wipes Recovery Time: 12 hours Interval: PM process chamber every 12 weeks
New Procedure: 1.5 hour using Diamond ScrubPAD, ScrubWRIGHT™ Pen, MiraWIPE® and MiraSWABS®
Recovery time: 8 hours PARTICLE PERFORMANCE: CHAMBER RECOVERED
WITH <3 ADDERS at .16M Vacuum Chamber Products: VARIAN VIISta Process Chamber PM Kit PM Kit P/N: HT4500-VARPC1
• (1) HT9423 CushionPAD 24” X 24” • (1) HT4528DC3-1 280 Grit Diamond ScrubDISK® • (1) HT4528D-10-1 280 Grit Diamond ScrubPAD • (1) HT4580D-10-1 800 Grit Diamond ScrubPAD • (1) HT4513PD-10-1 1350 Grit Diamond ScrubPAD • (1) HT4536DW-1 360 Grit Diamond ScrubBELT® • (1) FT901 Soft ErgoSCRUB® Handle • (1) FTPEN-1 ScrubWRIGHT™ PEN • (1) HT4754 UltraSOLV® Sponge • (2) HT1511FC-5 MiraSWABS® (10 MiraSWABS®) • (1) HT5790S-25 MiraWIPES® (25 MiraWIPES®) • (1) HT4790-5 UltraSOLV® Wipers (5 Wipers)
AFTER BEFORE

www.foamtecintlwcc.com This Document For Reference Only VARIAN VIISTA HC PROCESS CHAMBER PM PROCEDURE:
Varian VIISta HC Process Chamber PM 100708.docx 2
View “How to” instructional videos on http://www.foamtecintlwcc.com/flash/ Process Chamber Door Assembly Procedure (20 Minutes): Step 1: Using proper procedures and safety guidelines prepare Varian VIISta HC
Process Chamber for wet clean Step 2: Take the HT9423 CushionPAD and place onto a stable working area such as a
workbench or clean area on the floor (See Fig 1) Step 3: Place the chamber door onto the CushionPAD and remove the o-ring in
preparation for wet clean
Fig 1: HT9423 CushionPAD onto stable working area
VARIAN VIISTA HC PROCESS CHAMBER
DOOR AFTER
VARIAN VIISTA HC PROCESS CHAMBER
DOOR BEFORE
www.foamtecintlwcc.com This Document For Reference Only
VARIAN VIISTA HC PROCESS CHAMBER PM PROCEDURE (CONT’D):
Varian VIISta HC Process Chamber PM 100708.docx 3
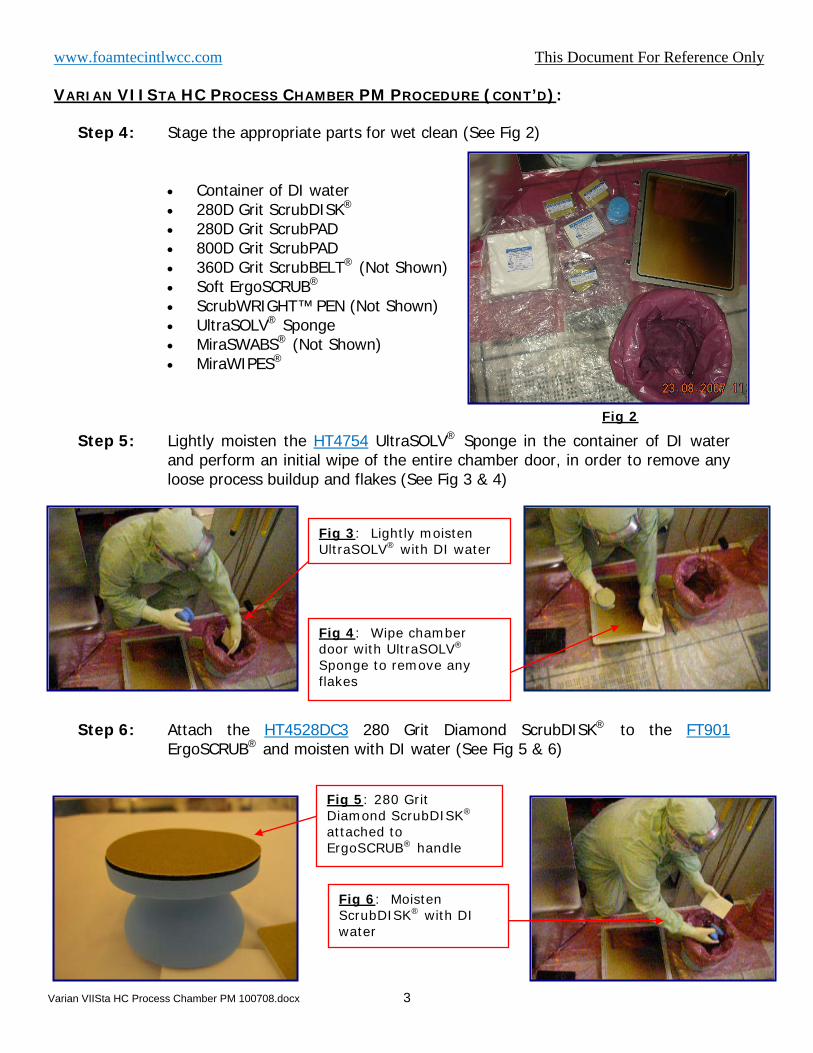
Step 4: Stage the appropriate parts for wet clean (See Fig 2)
• Container of DI water • 280D Grit ScrubDISK® • 280D Grit ScrubPAD • 800D Grit ScrubPAD • 360D Grit ScrubBELT® (Not Shown) • Soft ErgoSCRUB® • ScrubWRIGHT™ PEN (Not Shown) • UltraSOLV® Sponge • MiraSWABS® (Not Shown) • MiraWIPES®
Step 5: Lightly moisten the HT4754 UltraSOLV® Sponge in the container of DI water
and perform an initial wipe of the entire chamber door, in order to remove any loose process buildup and flakes (See Fig 3 & 4)
Step 6: Attach the HT4528DC3 280 Grit Diamond ScrubDISK® to the FT901
ErgoSCRUB® and moisten with DI water (See Fig 5 & 6)
Fig 5: 280 Grit Diamond ScrubDISK® attached to ErgoSCRUB® handle
Fig 3: Lightly moisten UltraSOLV® with DI water
Fig 4: Wipe chamber door with UltraSOLV® Sponge to remove any flakes
Fig 6: Moisten ScrubDISK® with DI water
Fig 2

www.foamtecintlwcc.com This Document For Reference Only
VARIAN VIISTA HC PROCESS CHAMBER PM PROCEDURE (CONT’D):
Varian VIISta HC Process Chamber PM 100708.docx 4
Step 7: Using the 280 Grit Diamond ScrubDISK® attached to the ErgoSCRUB®, scrub the deposition off a small 6” X 6” area on the chamber door (See Fig 7)
Step 8: Use the lightly dampened UltraSOLV® Sponge to remove the excess deposition
from the chamber door (See Fig 8 & 9) Step 9: Unload the deposition from the Diamond ScrubDISK® by pulling and twisting
across the UltraSOLV® Sponge (See Fig 10, 11 & 12)
Fig 7: Use ErgoSCRUB® with ScrubDISK® and scrub a small area on chamber door
Fig 8 & 9: Lightly dampened UltraSOLV® Sponge wiping away excess deposition
Fig 10: ScrubDISK® loaded with deposition
Fig 11: Pull & twist ScrubDISK® across UltraSOLV® Sponge
Fig 12: Unloaded ScrubDISK®
www.foamtecintlwcc.com This Document For Reference Only
VARIAN VIISTA HC PROCESS CHAMBER PM PROCEDURE (CONT’D):
Varian VIISta HC Process Chamber PM 100708.docx 5
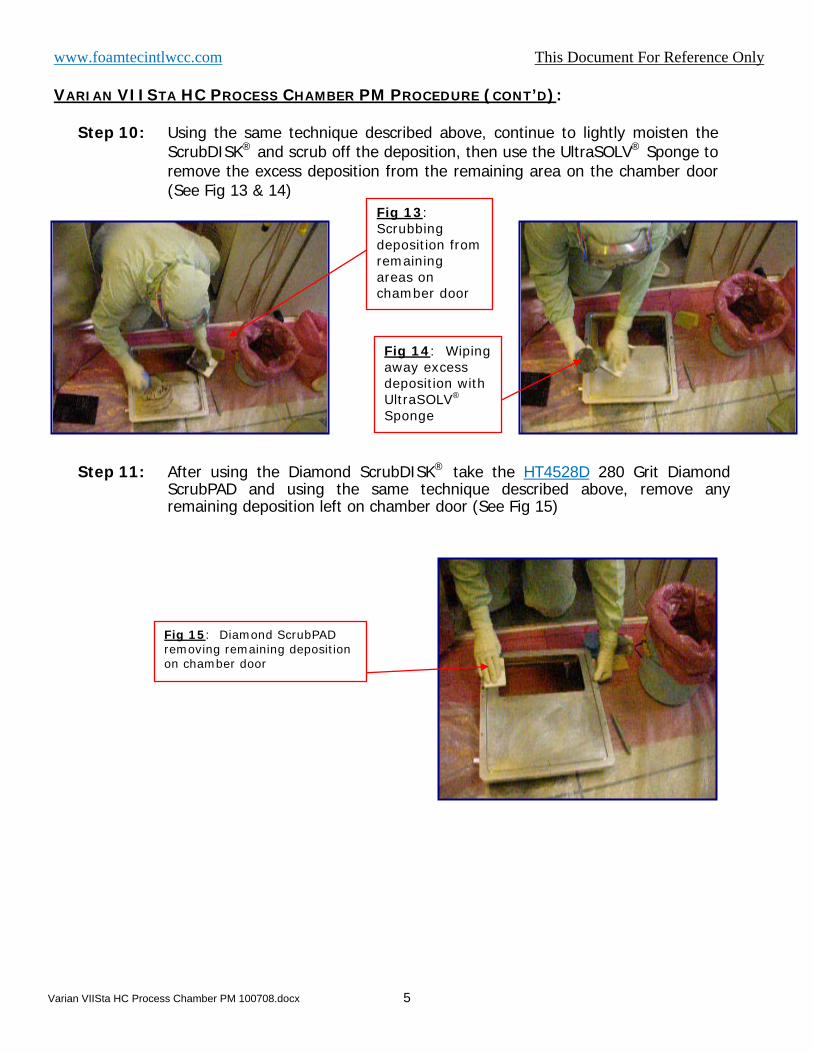
Step 10: Using the same technique described above, continue to lightly moisten the ScrubDISK® and scrub off the deposition, then use the UltraSOLV® Sponge to remove the excess deposition from the remaining area on the chamber door (See Fig 13 & 14)
Step 11: After using the Diamond ScrubDISK® take the HT4528D 280 Grit Diamond
ScrubPAD and using the same technique described above, remove any remaining deposition left on chamber door (See Fig 15)
Fig 13: Scrubbing deposition from remaining areas on chamber door
Fig 14: Wiping away excess deposition with UltraSOLV® Sponge
Fig 15: Diamond ScrubPAD removing remaining deposition on chamber door
www.foamtecintlwcc.com This Document For Reference Only
VARIAN VIISTA HC PROCESS CHAMBER PM PROCEDURE (CONT’D):
Varian VIISta HC Process Chamber PM 100708.docx 6
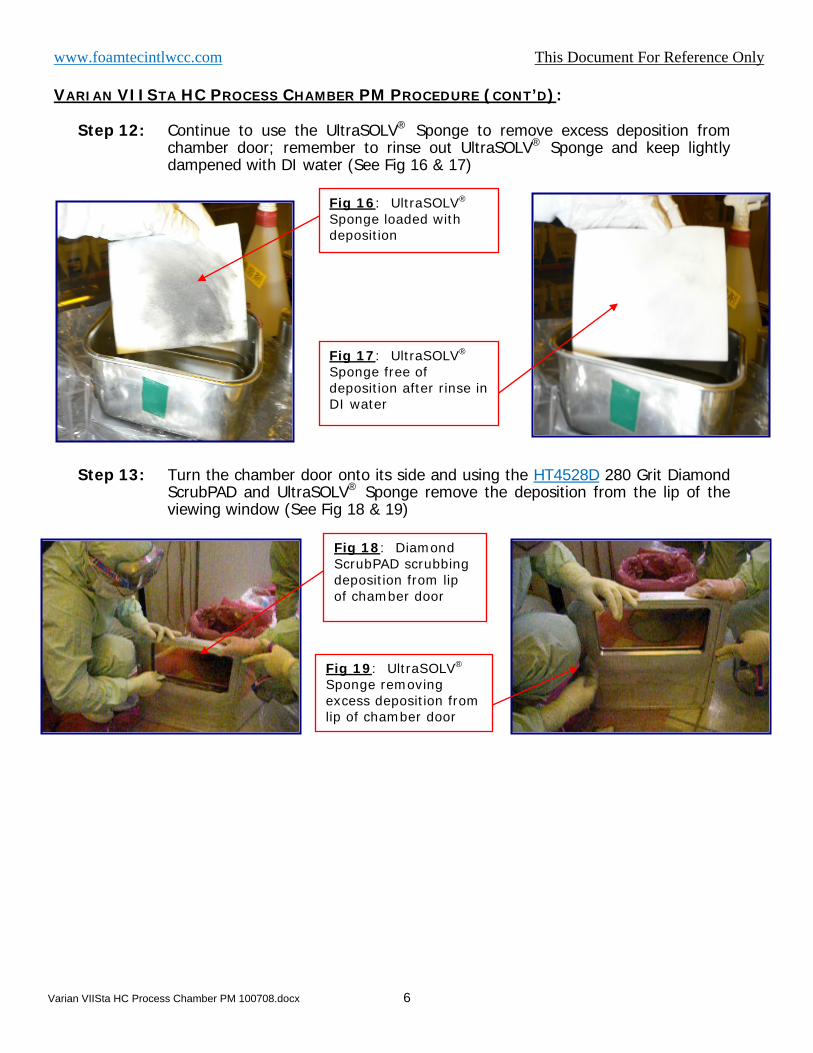
Step 12: Continue to use the UltraSOLV® Sponge to remove excess deposition from chamber door; remember to rinse out UltraSOLV® Sponge and keep lightly dampened with DI water (See Fig 16 & 17)
Step 13: Turn the chamber door onto its side and using the HT4528D 280 Grit Diamond
ScrubPAD and UltraSOLV® Sponge remove the deposition from the lip of the viewing window (See Fig 18 & 19)
Fig 18: Diamond ScrubPAD scrubbing deposition from lip of chamber door
Fig 19: UltraSOLV®
Sponge removing excess deposition from lip of chamber door
Fig 17: UltraSOLV® Sponge free of deposition after rinse in DI water
Fig 16: UltraSOLV® Sponge loaded with deposition
www.foamtecintlwcc.com This Document For Reference Only
VARIAN VIISTA HC PROCESS CHAMBER PM PROCEDURE (CONT’D):
Varian VIISta HC Process Chamber PM 100708.docx 7
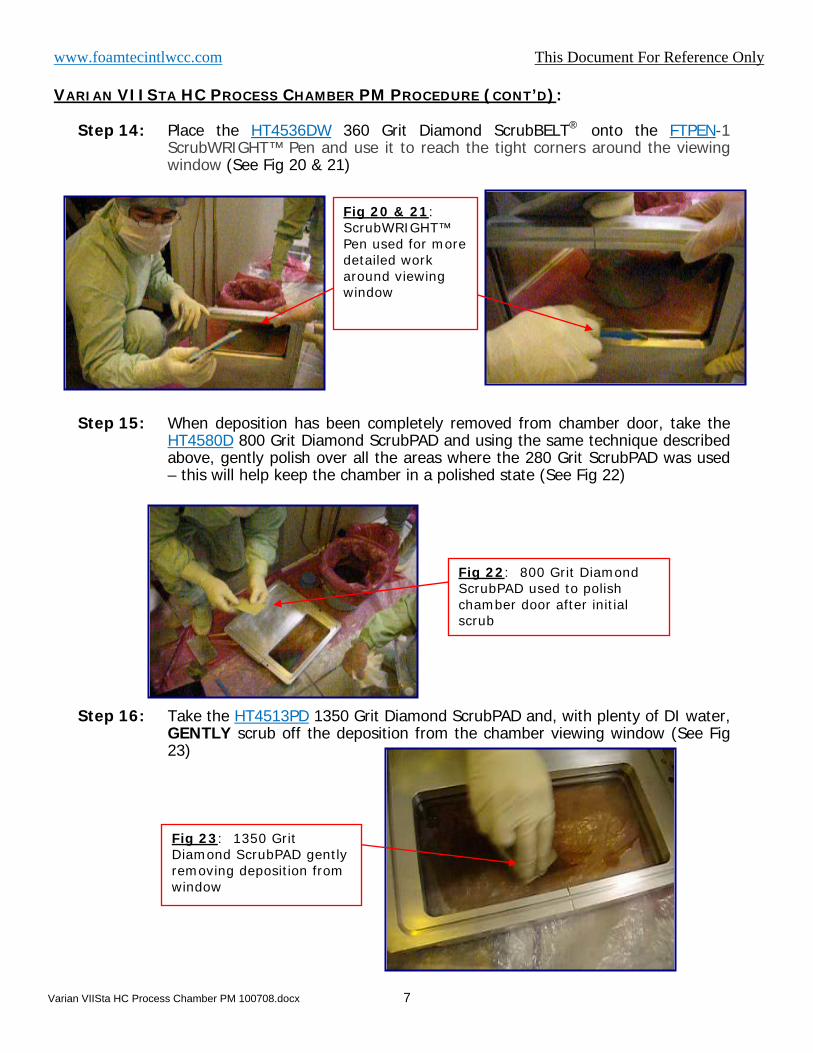
Step 14: Place the HT4536DW 360 Grit Diamond ScrubBELT® onto the FTPEN-1 ScrubWRIGHT™ Pen and use it to reach the tight corners around the viewing window (See Fig 20 & 21)
Step 15: When deposition has been completely removed from chamber door, take the
HT4580D 800 Grit Diamond ScrubPAD and using the same technique described above, gently polish over all the areas where the 280 Grit ScrubPAD was used – this will help keep the chamber in a polished state (See Fig 22)
Step 16: Take the HT4513PD 1350 Grit Diamond ScrubPAD and, with plenty of DI water,
GENTLY scrub off the deposition from the chamber viewing window (See Fig 23)
Fig 23: 1350 Grit Diamond ScrubPAD gently removing deposition from window
Fig 20 & 21: ScrubWRIGHT™ Pen used for more detailed work around viewing window
Fig 22: 800 Grit Diamond ScrubPAD used to polish chamber door after initial scrub
www.foamtecintlwcc.com This Document For Reference Only
VARIAN VIISTA HC PROCESS CHAMBER PM PROCEDURE (CONT’D):
Varian VIISta HC Process Chamber PM 100708.docx 8
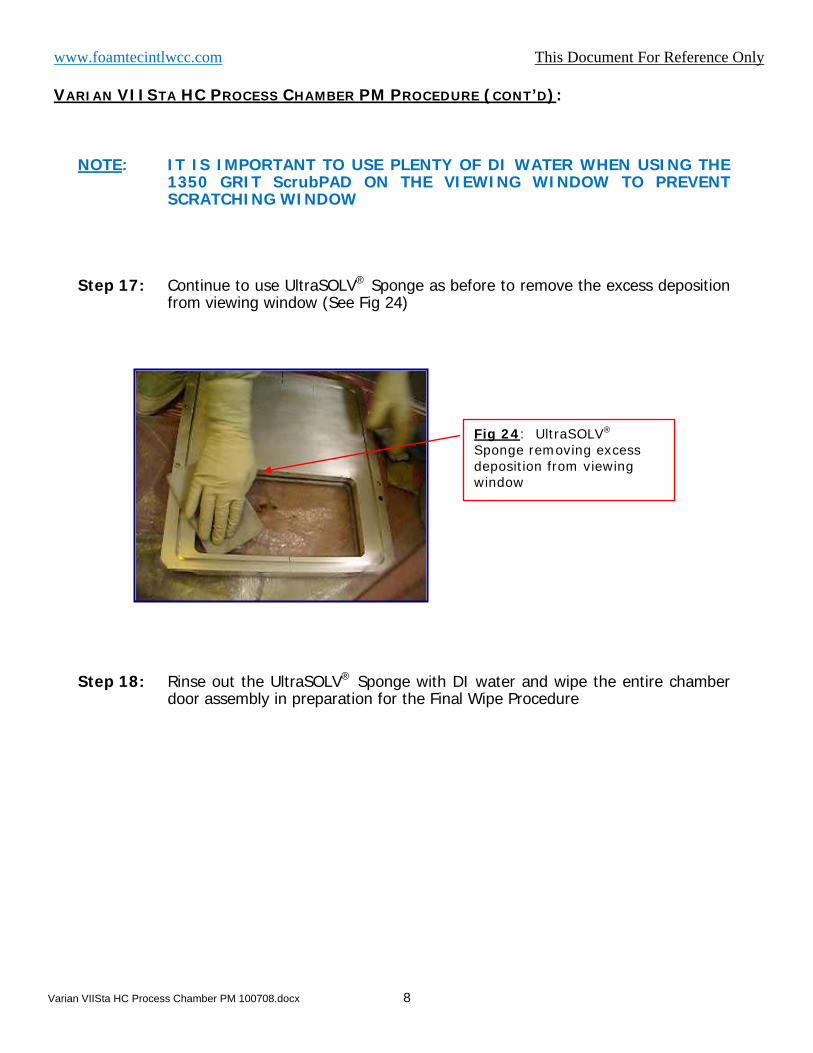
NOTE: IT IS IMPORTANT TO USE PLENTY OF DI WATER WHEN USING THE
1350 GRIT ScrubPAD ON THE VIEWING WINDOW TO PREVENT SCRATCHING WINDOW
Step 17: Continue to use UltraSOLV® Sponge as before to remove the excess deposition
from viewing window (See Fig 24) Step 18: Rinse out the UltraSOLV® Sponge with DI water and wipe the entire chamber
door assembly in preparation for the Final Wipe Procedure
Fig 24: UltraSOLV® Sponge removing excess deposition from viewing window

www.foamtecintlwcc.com This Document For Reference Only
VARIAN VIISTA HC PROCESS CHAMBER PM PROCEDURE (CONT’D):
Varian VIISta HC Process Chamber PM 100708.docx 9
FINAL WIPE PROCEDURE OF CHAMBER DOOR:
VERY IMPORTANT NOTE
THE USE OF HT5790S MiraWIPES® AND HT1511FC MiraSWABS® DURING THE FINAL WIPE PROCEDURE IS A CRITICAL STEP TO EFFECTIVELY REMOVE PARTICLE DEFECTS
FROM PROCESS CHAMBER DOOR
NOTE: BELOW IS AN EXAMPLE OF THE PARTICLES LEFT BEHIND IN A PROCESS
CHAMBER AFTER THE FINAL WIPE PORTION OF THE PM WAS PERFORMED USING THE CURRENT FAB WIPER (SEE FIG 25a & 25b)
Step 19: Saturate the HT5790S MiraWIPE® with IPA and perform an initial wipe of the
chamber door (See Fig 26 & 27)
Fig 25a: Current fab wiper after completely wiping chamber
Fig 25b: Particles picked up using HT5790S MiraWIPES® after completely wiping with current fab wiper
MiraWIPES® are the KEY STEP for DEFECT REDUCTION and IMPROVED TOOL RECOVERY
Fig 26: Saturating HT5790S MiraWIPES® with IPA
Fig 27: Performing an initial wipe of chamber door

www.foamtecintlwcc.com This Document For Reference Only
VARIAN VIISTA HC PROCESS CHAMBER PM PROCEDURE (CONT’D):
Varian VIISta HC Process Chamber PM 100708.docx 10
Step 20: Take the HT1511FC MiraSWAB® and place on a HT5790S MiraWIPE®, and then
saturate the MiraSWAB® with IPA (See Fig 28) Step 21: Take the saturated MiraSWAB® and wipe deposition out of all the tight corners
and hard to reach areas, such as o-ring grooves (See Fig 29, 30 & 31)
Fig 29 & 30: MiraSWABS® cleaning out tight areas and grooves along Process Chamber Door
Fig 28: Saturating HT1511FC MiraSWABS® with IPA
Fig 31: EXTRA DEPOSITION THE MiraSWABS® ARE ABLE TO REMOVE FROM AREAS ON CHAMBER DOOR
www.foamtecintlwcc.com This Document For Reference Only
VARIAN VIISTA HC PROCESS CHAMBER PM PROCEDURE (CONT’D):
Varian VIISta HC Process Chamber PM 100708.docx 11
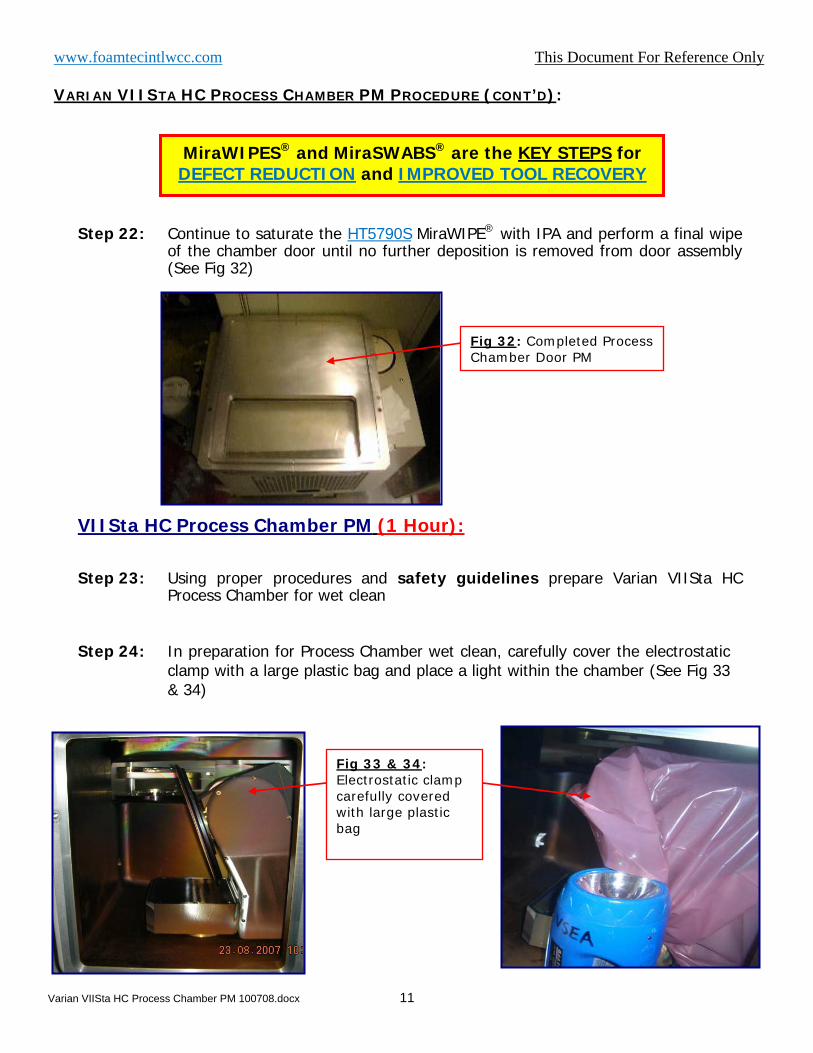
Step 22: Continue to saturate the HT5790S MiraWIPE® with IPA and perform a final wipe
of the chamber door until no further deposition is removed from door assembly (See Fig 32)
VIISta HC Process Chamber PM (1 Hour):
Step 23: Using proper procedures and safety guidelines prepare Varian VIISta HC
Process Chamber for wet clean Step 24: In preparation for Process Chamber wet clean, carefully cover the electrostatic
clamp with a large plastic bag and place a light within the chamber (See Fig 33 & 34)
MiraWIPES® and MiraSWABS® are the KEY STEPS for DEFECT REDUCTION and IMPROVED TOOL RECOVERY
Fig 32: Completed Process Chamber Door PM
Fig 33 & 34: Electrostatic clamp carefully covered with large plastic bag

www.foamtecintlwcc.com This Document For Reference Only
VARIAN VIISTA HC PROCESS CHAMBER PM PROCEDURE (CONT’D):
Varian VIISta HC Process Chamber PM 100708.docx 12
Step 25: Stage the appropriate parts needed for Process Chamber PM, most of the parts will be the same parts used for the Chamber Door PM
• Container of DI Water • 280D Grit ScrubDISK® • 280D Grit ScrubPAD • 800D Grit ScrubPAD • Soft ErgoSCRUB® • UltraSOLV® Sponge • MiraSWABS® (Not Shown) • MiraWIPES®
NOTE: THE PROCESS CHAMBER PM WILL FOLLOW THE SAME TECHNIQUE DESCRIBED ABOVE FOR THE PROCESS CHAMBER DOOR PM
Step 26: Lightly moisten the UltraSOLV® Sponge in the container of DI water and
perform an initial wipe of the area that will be cleaned inside the Process Chamber, in order to remove any loose process buildup and flakes
Step 27: Attach the HT4528DC3 280 Grit Diamond ScrubDISK® to the FT901
ErgoSCRUB® and moisten with DI water (See Fig 35)
Fig 35: 280 Grit Diamond ScrubDISK® attached to ErgoSCRUB®

www.foamtecintlwcc.com This Document For Reference Only
VARIAN VIISTA HC PROCESS CHAMBER PM PROCEDURE (CONT’D):
Varian VIISta HC Process Chamber PM 100708.docx 13
Step 28: Using the 280 Grit Diamond ScrubDISK® attached to the ErgoSCRUB®, scrub the deposition off a small 6” X 6” area within the process chamber (See Fig 36)
Step 29: Use the lightly dampened UltraSOLV® Sponge and proceed to remove the
excess deposition from the scrubbed area within the process chamber Step 30: Unload the deposition from the Diamond ScrubDISK® by pulling and twisting
across the UltraSOLV® Sponge (See step 9 of Chamber Door Procedure) Step 31: Using the same technique described above, continue to lightly moisten the
ScrubDISK®, scrub off the deposition, and use the UltraSOLV® Sponge to wipe the excess deposition from the remaining areas in the process chamber
Step 32: After using the Diamond ScrubDISK® take the HT4528D 280 Grit Diamond
ScrubPAD and using the same technique described above, remove any remaining deposition left in the area to be scrubbed in the process chamber (See Fig 37)
Fig 36: 280 Grit Diamond ScrubDISK® scrubbing deposition from Process Chamber
Fig 37: ScrubPAD cleaning all remaining areas within process chamber

www.foamtecintlwcc.com This Document For Reference Only
VARIAN VIISTA HC PROCESS CHAMBER PM PROCEDURE (CONT’D):
Varian VIISta HC Process Chamber PM 100708.docx 14
Step 33: When deposition has been completely removed from the area to be cleaned in the chamber, take the HT4580D 800 Grit Diamond ScrubPAD and, using the same technique described above, gently polish over all the areas where the 280 Grit Diamond ScrubPAD was used – this will help keep the process chamber in a polished state (See Fig 38)
FINAL WIPE PROCEDURE OF PROCESS CHAMBER:
VERY IMPORTANT NOTE
THE USE OF HT5790S MiraWIPES® AND HT1511FC MiraSWABS® DURING THE FINAL WIPE PROCEDURE IS A CRITICAL STEP TO EFFECTIVELY REMOVE PARTICLE DEFECTS
FROM PROCESS CHAMBER
NOTE: BELOW IS AN EXAMPLE OF THE PARTICLES LEFT BEHIND IN A PROCESS CHAMBER AFTER THE FINAL WIPE PORTION OF THE PM WAS PERFORMED USING THE CURRENT FAB WIPER (SEE FIG 39A & 39b)
Fig 38: 800 Grit Diamond ScrubPAD polishing process chamber
Fig 39a: Current fab wiper after completely wiping chamber
Fig 39b: Particles picked up using HT5790S MiraWIPES® after completely wiping with current fab wiper
MiraWIPES® are the KEY STEP for DEFECT REDUCTION and IMPROVED TOOL RECOVERY.
www.foamtecintlwcc.com This Document For Reference Only
VARIAN VIISTA HC PROCESS CHAMBER PM PROCEDURE (CONT’D):
Varian VIISta HC Process Chamber PM 100708.docx 15
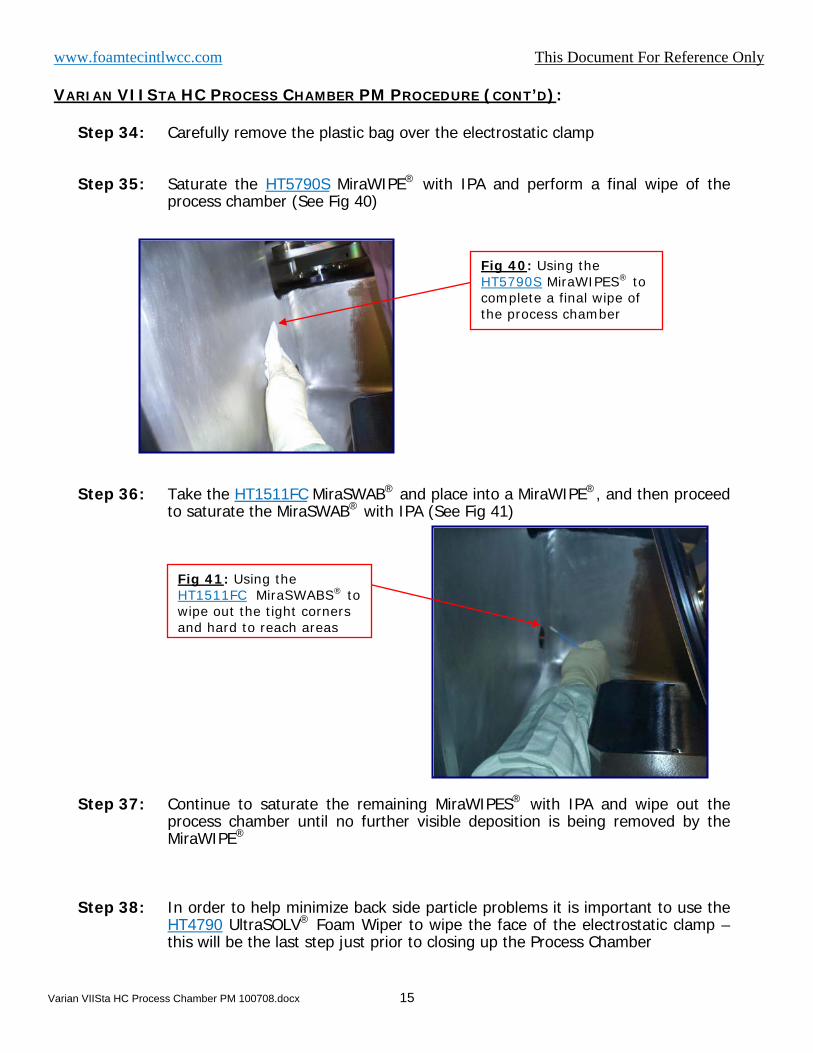
Step 34: Carefully remove the plastic bag over the electrostatic clamp Step 35: Saturate the HT5790S MiraWIPE® with IPA and perform a final wipe of the
process chamber (See Fig 40) Step 36: Take the HT1511FC MiraSWAB® and place into a MiraWIPE®, and then proceed
to saturate the MiraSWAB® with IPA (See Fig 41) Step 37: Continue to saturate the remaining MiraWIPES® with IPA and wipe out the
process chamber until no further visible deposition is being removed by the MiraWIPE®
Step 38: In order to help minimize back side particle problems it is important to use the
HT4790 UltraSOLV® Foam Wiper to wipe the face of the electrostatic clamp – this will be the last step just prior to closing up the Process Chamber
Fig 40: Using the HT5790S MiraWIPES® to complete a final wipe of the process chamber
Fig 41: Using the HT1511FC MiraSWABS® to wipe out the tight corners and hard to reach areas

www.foamtecintlwcc.com This Document For Reference Only
VARIAN VIISTA HC PROCESS CHAMBER PM PROCEDURE (CONT’D):
Varian VIISta HC Process Chamber PM 100708.docx 16
Step 39: Take a dry HT4790 UltraSOLV® Foam Wiper and fold into quarters, then wipe the face of the electrostatic clamp by pulling the foam wiper from the back to the front of the face (See Fig 42)
Step 40: Refold the UltraSOLV® Foam Wiper exposing a clean side of the wiper and
continue to wipe the remaining areas of the electrostatic clamp Step 41: Using the approved safety procedures and guidelines close the process
chamber and return the tool back to production
Fig 42: Using the HT4790 UltraSOLV® Foam Wiper to wipe the face of the ESC from BACK to FRONT