valve junior modification - dominocs.com · valve junior modification rob marshall ... of the...
TRANSCRIPT

Valve Junior Modification
Rob MarshallSpring 2010
Physics of Musical Instruments

Table of Contents
Pages 12................................................Information about the amplifier
Pages 34................................................Modifications made
Page 57..................................................Replacement of the output transformer
Page 89..................................................Replacement of the audio potentiometer
Page 10....................................................Fixing of the voltage divider
Page 1112..............................................Dropping the resistance of R2
Page 13...................................................Addition of grid stopper resistor
Page 1417..............................................Addition of “bright” switch
Page 1821..............................................Addition of “fat” switch
Page 22...................................................Addition of preamp tube shield
Page 23...................................................Measurements taken
Page 2427..............................................Frequency response and noise floor graphs
Page 28...................................................Sources
Table of Contents

Information about the amplifier
The Epiphone Valve Junior head features:• 5 Watts RMS Power• Singleended ClassA tube circuit• Two tubes:
◦ 12AX7 preamp tube◦ EL84 power tube
• Outputs for 4, 8, and 16 ohm speaker loads• One input jack• One volume knob
(See next page for premodification schematic)


Modifications made
1. Replacement of the output transformer
2. Replacement of audio potentiometer (volume pot)
3. Fixing of the voltage divider between R2 and R1
4. Dropping of R2 from 68K to 34K
5. Addition of gridstopper resistor
6. Addition of “bright” switch
7. Addition of “fat” switch
8. Addition of preamp tube shield
(See next page for postmodification schematic)


1. Replacement of the output transformer• The first modification made to the amplifier was the replacement of the stock output
transformer with a Hammond DSE125 output transformer.• The way output transformers work is as follows:
◦ Tubes are high voltage, low current devices (high impedance devices) while speakers are high current, low voltage devices (low impedance devices). The output transformer is responsible for transforming the high impedance of the tube to match the lower impedance of the speaker.
◦ Transformers are essentially pairs of electrically insulated windings that are magnetically coupled to each other. It turns out that the ratio of the number of primary windings to the number of secondary windings equals the ratio of the input AC voltage to the output AC voltage, the ratio of the output current to the input current, and (by Ohm's law) the square root of the ratio of the resistance of the secondary to the resistance of the primary.▪ Power in = Power out▪ V in * I in = V out * I out▪ V in / V out = I out / I in = number of primary turns / number of secondary
turns = n▪ n^2 = R secondary / R primary
◦ The impedance matching can therefore be made by determining the proper ratio of primary turns to secondary turns.
• The reason for replacing the stock output transformer with the higher quality Hammond DSE125 output transformer was because the Hammond can handle a larger amount of power, so any breakup heard from the amplifier would be 100% from the tubes breaking up, as opposed to the output transformer.
• It should be noted that the drilling of an extra hole in the chassis is necessary to make this modification as the Hammond is slightly wider than the stock transformer.
• It should also be noted that the coloring of the wires to and from the stock transformer ARE DIFFERENT than those on the Hammond. See the following page for the diagrams of both.


The new (left) and old (right) output transformers:

2. Replacement of the audio potentiometer• The next modification made to the amplifier was to replace the existing 1 megaohm
audio potentiometer with a higher quality, PEC 1 megaohm audio pot.• The way the potentiometer works is as follows:
◦ The potentiometer is essentially a variable resistor. It has three terminals and a wiper. The outer most terminals are connected by a carbon trace ring. When used as a volume control (as it is in this case), one of these terminals is to be connected to ground and the other to the input. The wiper is connected to the middle terminal as well as the carbon trace. Provided the proper terminals are chosen for the input and ground, sweeping the wiper clockwise will produce an output that becomes less and less attenuated, until the wiper is completely clockwise. In that case, the output will be directly connected to the input, and no attenuation will occur. Sweeping the wiper counterclockwise will produce an output that becomes more and more attenuated until the wiper is completely counterclockwise. In that case, the output will be directly connected to ground, and (in theory) no signal will be passed through. The way this happens inside of the potentiometer is directly related to the idea that it is a variable resistor. When the wiper is swept fully clockwise, the input and output are literally connected. As it is swept counterclockwise, a greater and greater amount of carbon trace exists between the input and the output, and the resistance increases, causing an attenuated input to be passed. Once the wiper is swept fully counterclockwise, the output is directly connected to ground.
• The reason for replacing the potentiometer with a higher quality one is to be sure that the pot can handle the power going through it along with the concern that the carbon trace in the original, poor quality pot can burn up and the pot could be easily destroyed.
• See the following page for the diagram of the potentiometer.


3. Fixing the voltage divider
• As can be seen in the premodification schematic, the 68K and 1M resistors early on in the signal path (R1 and R2) look like:
• which can be redrawn as:
• which is a voltage divider. With this in place, the input signal will be cut down to 1*10^6/(1*10^6 + 68*10^3) = 93.6% of its initial value. This isn't an enormous drop, but in a situation where you want to throw away as little of your signal as possible, it is in no way desirable. The third modification made to the amplifier was to fix this design flaw. The wiring was changed so that this area now looks like:

4. Dropping the resistance of R2
• One of the first resistors in the signal path is R2, which, stock, is 64 kiloohms. As can be seen by Ohms law, when this resistance is lowered, the voltage drop across it will decrease. The resistance can effectively be dropped to zero so that no voltage drop occurs. This presents the risk of introducing a large amount of high frequency signals into the signal path (such as TV or radio waves). To prevent this, but still attain a smaller voltage drop to keep a hotter input signal, the resistance of R2 was decreased to half of its original value. Instead of physically replacing the resistor, a resistor of equal value was soldered in parallel with it.
• Since the effective resistance of two resistors in parallel is: R1R2/(R1+R2), the effective resistance of the two 64 kiloohm resistors is:◦ (64000*64000)/(64000+64000) = 32 kiloohms (half the original value).
=64K 64K 32K

The fixed voltage divider and the doubling of the 64K resistor:

5. Addition of gridstopper resistor
• As mentioned earlier, there exists the possibility of high frequency signals being introduced to the signal path. This most often occurs in the preamp stage of the amplifier. To prevent these high frequencies from getting amplified and sent to the power amp section of the amplifier, a 10K resistor was placed before the second triode of the preamp tube in order to block them out.

6. Addition of “bright” switch
• The next modification made to the amplifier was the addition of a “bright” switch. The way the bright switch works is as follows:◦ When the bright switch is engaged, a capacitor (in this case, a 120 picofarad silver
mica capacitor) is strapped in parallel over the volume potentiometer. ◦ The expression for the impedance of a capacitor is:
▪ Zcap = 1/(jѡC), where is the frequency in radians/sec and C is theѡ capacitance in farads.
◦ This makes it clear that as the frequency increases, the impedance decreases. Therefore, the capacitor will allow high frequencies which would have otherwise been blocked out by the 1Meg volume pot to pass through. This will make the overall sound “brighter”, as there will be a larger high frequency content than before.
◦ When the bright switch is disengaged, the amplifier acts normally (as if the capacitor is not there).
• In order to maintain a healthy signal and prevent unwanted noise from getting into the signal path, this switch was wired with shielded coaxial cable.
• The bright switch is wired using a DPDT On/Off Mini Toggle. Note: extra holes must be drilled for the toggles.
• See the following pages for the wiring schematic of the bright switch and the DPDT On/Off Toggle
120 pF


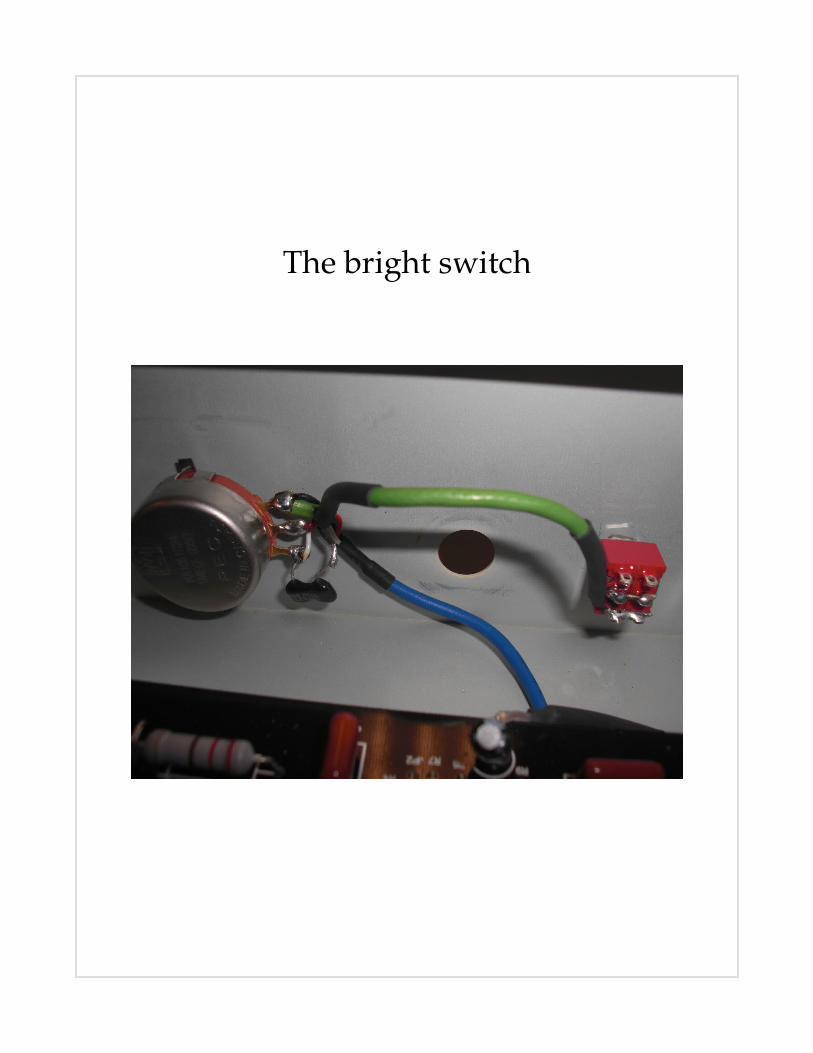
The bright switch

7. Addition of a “fat” switch
• The next modification made to the amplifier was the addition of a “fat” switch. The way the fat switch works is as follows:◦ When the fat switch is engaged (in this situation, when the switch is in the “off”
position, the fat switch is actually engaged), a 10 megaohm resistor is placed in series with the 22 microfarad capacitor underneath the second triode of the preamp tube. This essentially takes the capacitor completely out of the circuit, and holds the minimum of the AC voltage across the tube to a constant, which results in a doubling of the gain of achieved by the tube. When the fat switch is disengaged, the amplifier acts normally (as if the resistor is not there).
• In order to maintain a healthy signal and prevent unwanted noise from getting into the signal path, this switch was also wired with shielded coaxial cable.
• The fat switch is also wired using a DPDT On/Off Mini Toggle.
• See the following page for the schematic of the fat switch.
10 Megaohm


The fat switch

The fat switch and the DPDT mini toggles

8. Addition of preamp tube shield
• The final modification made to the amplifier was the addition of a preamp tube shield. It was put in out of necessity due to oscillations that occurred after all the other modifications were put in. The shield was put in right above the preamp tube, the area which appeared to be the source of the oscillations. Its purpose is to ground those oscillations before they can get into the signal path.

Measurements TakenVAC Line = 120.1 VAC RMS
VAC Main Secondary = 279.5 VAC RMS
VAC Heater = 6.77 VAC RMS
VB+ = 358 VDC
VA = 347.7 VDC
VB = VEL84 Screen = 318 VDC
VC = 297.1 VDC
DC Voltages:Grid Cathode Plate Current (I) Power Dissipated
V 1A 0 VDC 1.464 VDC 198.8 VDC .976 mA .1926 W
V 1B 0 VDC 1.571 VDC 191.4 VDC 1.047 mA .1988 W
V 2 .01 VDC 9.73 VDC 342.3 VDC 44.227 mA 14.709 W*Power Dissipated=(VPlate – VCathode)*I
*I = V/R where R under V1 is 1.5K and R under V2 is 220 ohms
AC Voltages:Grid Cathode Plate Voltage Gain
V 1A 70.7mVRMS 0 VRMS 3.39VRMS 55.57
V 1B Fat Switch Off 43.8 mVRMS 24.2 mVRMS 1.091 VRMS 24.9
V 1B Fat Switch On 43.8 mVRMS 0 VRMS 2.345 VRMS 55.54
V 2 Fat Switch Off 1.088 VRMS 81.7 mVRMS 99.9 VRMS 91.81
V 2 Fat Switch On 2.322 VRMS 168.4mVRMS 194.7VRMS 83.85*Voltage Gain = Vplate/VGrid


Sources
• Jones, Morgan. Valve Amplifiers. 3rd ed. Oxford: Newnes, 2003. Print.
• 1, Aug. "How Transformers Work." Electrical Construction and Maintenance | Power Quality, National Electric Code, Construction, V/D/V, Ops, Equipment Rental Industry Resource. Web. 13 May 2010. <http://ecmweb.com/ops/electric_basics_transformers_2/>.
• Steve Errede