vacon 100 - motorcontrol
TRANSCRIPT

vacon 100ac drives
installation manual


vacon • 0
INDEX
Document: DPD00873COrder code: DOC-INS04123+DLUK
Rev. CVersion release date: 3.5.12
1. Approvals ......................................................................................................... 21.1 EC Declaration of conformity ............................................................................................. 21.2 UL approval ........................................................................................................................ 21.3 C-tick approval ................................................................................................................... 2
2. Safety ............................................................................................................... 42.1 Danger ................................................................................................................................ 42.2 Warnings ............................................................................................................................ 52.3 Earthing and earth fault protection ................................................................................... 62.4 Electro-magnetic compatibility (EMC)............................................................................... 7
3. Receipt of delivery............................................................................................ 83.1 Type designation code........................................................................................................ 93.2 Unpacking and lifting the AC drive .................................................................................. 103.2.1 Lifting frames MR8 and MR9 ........................................................................................... 103.3 Accessories ...................................................................................................................... 123.3.1 Frame MR4....................................................................................................................... 123.3.2 Frame MR5....................................................................................................................... 123.3.3 Frame MR6....................................................................................................................... 133.3.4 Frame MR7....................................................................................................................... 133.3.5 Frame MR8....................................................................................................................... 133.3.6 Frame MR9....................................................................................................................... 143.4 ‘Product modified’ sticker................................................................................................ 153.5 Disposal ............................................................................................................................ 15
4. Mounting......................................................................................................... 164.1 Dimensions....................................................................................................................... 164.1.1 Wall mount ....................................................................................................................... 164.1.2 Flange mount ................................................................................................................... 234.2 Cooling.............................................................................................................................. 27
5. Power cabling................................................................................................. 295.1 UL standards on cabling .................................................................................................. 315.1.1 Cable dimensioning and selection................................................................................... 315.2 Brake resistor cables....................................................................................................... 365.3 Cable installation ............................................................................................................. 365.3.1 Frames MR4 to MR7......................................................................................................... 375.3.2 Frames MR8 and MR9...................................................................................................... 435.4 Installation in corner-grounded network ........................................................................ 53
6. Control unit .................................................................................................... 546.1 Control unit cabling.......................................................................................................... 556.1.1 Control cable sizing.......................................................................................................... 556.1.2 Control terminals and DIP switches................................................................................ 566.2 Fieldbus connection ......................................................................................................... 586.2.1 Prepare for use through ethernet ................................................................................... 596.2.2 Prepare for use through RS485 ....................................................................................... 606.3 Option board installation.................................................................................................. 646.4 Battery installation for Real Time Clock (RTC)................................................................ 676.5 Galvanic isolation barriers ............................................................................................... 68
24-hour support +358 (0)201 212 575 • Email: [email protected]

vacon • 1
7. Commissioning ............................................................................................... 697.1 Commissioning of the drive ............................................................................................. 707.2 Running the motor ........................................................................................................... 707.2.1 Cable and motor insulation checks ................................................................................. 717.3 Installation in it system.................................................................................................... 727.3.1 Frames MR4 to MR6......................................................................................................... 727.3.2 Frames MR7 and MR8...................................................................................................... 737.3.3 Frame MR9....................................................................................................................... 747.4 Maintenance ..................................................................................................................... 76
8. Technical data ................................................................................................ 778.1 AC drive power ratings..................................................................................................... 778.1.1 Mains voltage 208-240 V .................................................................................................. 778.1.2 Mains voltage 380-500 V .................................................................................................. 788.1.3 Definitions of overloadability ........................................................................................... 798.1.4 Brake resistor ratings...................................................................................................... 808.2 Vacon 100 - technical data ............................................................................................... 828.2.1 Technical information on control connections ................................................................ 85
Tel. +358 (0) 201 2121 • Fax +358 (0)201 212 205

Approvals vacon • 2
1. APPROVALS
Approvals granted to this Vacon product are listed on the following pages.
1.1 EC Declaration of conformity
Find the EC Declaration of Conformity on the next page.
1.2 UL approval
cULus approval file number E171278.
1.3 C-tick approval
C-tick approval file number N16307.
24-hour support +358 (0)201 212 575 • Email: [email protected]
1
1
vacon • 3 Approvals
EC DECLARATION OF CONFORMITYWe
Manufacturer's name: Vacon Oyj
Manufacturer's address: P.O.Box 257eitnirosnuR
asaaV18356-NIFdnalniF
hereby declare that the product
Product name: Vacon 100 AC drive
Model designation: Vacon 0100-3L-0003-5...0310-5
has been designed and manufactured in accordance with the following standards:
Safety: EN 61800-5-1 (2007))tnavelersa()9002(1-40206NE
EMC: EN61800-3 (2004)21-3-00016NE
and conforms to the relevant safety provisions of the Low Voltage Directive(2006/95/EC) and EMC Directive 2004/108/EC.
It is ensured through internal measures and quality control that the productconforms at all times to the requirements of the current Directive and the relevantstandards.
In Vaasa, 29th of February, 2012Vesa Laisi
tnediserP
The year the CE marking was affixed: 2012
9226.emf
Vacon 0100-3L-0003-2...0310-2
Tel. +358 (0) 201 2121 • Fax +358 (0)201 212 205
Safety vacon • 4
2. SAFETY
This manual contains clearly marked cautions and warnings which are intended for your per-sonal safety and to avoid any unintentional damage to the product or connected appliances.
Please read the information included in cautions and warnings carefully.
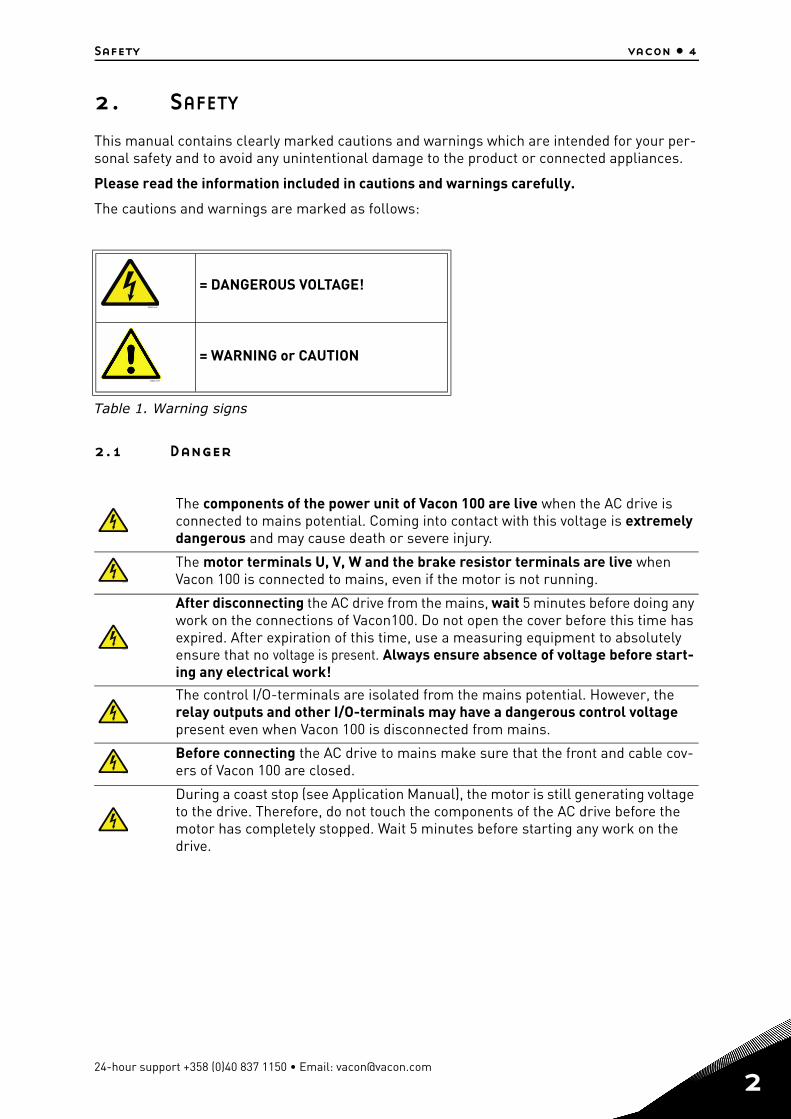
The cautions and warnings are marked as follows:
Table 1. Warning signs
2.1 Danger
= DANGEROUS VOLTAGE!
= WARNING or CAUTION
The components of the power unit of Vacon 100 are live when the AC drive is connected to mains potential. Coming into contact with this voltage is extremely dangerous and may cause death or severe injury.
The motor terminals U, V, W and the brake resistor terminals are live when Vacon 100 is connected to mains, even if the motor is not running.
After disconnecting the AC drive from the mains, wait 5 minutes before doing any work on the connections of Vacon100. Do not open the cover before this time has expired. After expiration of this time, use a measuring equipment to absolutely ensure that no voltage is present. Always ensure absence of voltage before start-ing any electrical work!
The control I/O-terminals are isolated from the mains potential. However, the relay outputs and other I/O-terminals may have a dangerous control voltage present even when Vacon 100 is disconnected from mains.
Before connecting the AC drive to mains make sure that the front and cable cov-ers of Vacon 100 are closed.
During a coast stop (see Application Manual), the motor is still generating voltage to the drive. Therefore, do not touch the components of the AC drive before the motor has completely stopped. Wait 5 minutes before starting any work on the drive.
9000.emf
13006.emf
9000.emf
9000.emf
9000.emf
9000.emf
9000.emf
9000.emf
24-hour support +358 (0)40 837 1150 • Email: [email protected]
2
2
vacon • 5 Safety
2.2 Warnings
Vacon 100 AC drive is meant for fixed installations only.
Do not perform any measurements when the AC drive is connected to the mains.
The touch current of Vacon 100 AC drives exceeds 3.5mA AC. According to stan-dard EN61800-5-1, a reinforced protective ground connection must be ensured. See chapter 2.3.
If the AC drive is used as a part of a machine, the machine manufacturer is responsible for providing the machine with a supply disconnecting device (EN 60204-1).
Only spare parts delivered by Vacon can be used.
At power-up, power brake or fault reset the motor will start immediately if the start signal is active, unless the pulse control for Start/Stop logic has been selected.Futhermore, the I/O functionalities (including start inputs) may change if param-eters, applications or software are changed.Disconnect, therefore, the motor if an unexpected start can cause danger.
The motor starts automatically after automatic fault reset if the autoreset func-tion is activated. See the Application Manual for more detailed information.
Prior to measurements on the motor or the motor cable, disconnect the motor cable from the AC drive.
Do not touch the components on the circuit boards. Static voltage discharge may damage the components.
Check that the EMC level of the AC drive corresponds to the requirements of your supply network. See chapter 7.3.
In a domestic environment, this product may cause radio interference in which case supplementary mitigation measures may be required.
The AC drives are suitable for use on a circuit capable of delivering not more than 100,000 rms symmetrical amperes, 600V maximum.
13006.emf
13006.emf
13006.emf
13006.emf
13006.emf
13006.emf
13006.emf
13006.emf
13006.emf
13006.emf
13006.emf
13006.emf
Tel. +358 (0) 201 2121 • Fax +358 (0)201 212 205

Safety vacon • 6
2.3 Earthing and earth fault protection
The Vacon 100 AC drive must always be earthed with an earthing conductor connected to the earthing terminal marked with .
The touch current of Vacon 100 exceeds 3.5mA AC. According to EN61800-5-1, one or more of the following conditions for the associated protective circuit shall be satisfied:
A fixed connection and
a) the protective earthing conductor shall have a cross-sectional area of at least 10 mm2 Cu or 16 mm2 Al.
or
b) an automatic disconnection of the supply in case of discontinuity of the protective earthing conductor. See chapter 5.
or
c) provision of an additional terminal for a second protective earthing conductor of the same cross-sectional area as the original protective earthing conductor.
Table 2. Protective earthing conductor cross-section
The cross-sectional area of every protective earthing conductor which does not form a part of the supply cable or cable enclosure shall, in any case, be not less than
• 2.5 mm2 if mechanical protection is provided or• 4 mm2 if mechanical protection is not provided. For cord-connected equipment, provi-
sions shall be made so that the protective earthing conductor in the cord shall, in the case of failure of the strain-relief mechanism, be the last conductor to be interrupted.
However, always follow the local regulations for the minimum size of the protective earthing conductor.
NOTE: Due to the high capacitive currents present in the AC drive, fault current protective switches may not function properly.
CAUTION!
Cross-sectional area of phase conductors (S)[mm2]
Minimum cross-sectional area of the cor-responding protective earthing conductor
[mm2]
S 1616 S 35
35 < S
S16S/2
The values above are valid only if the protective earthing conductor is made of the same metal as the phase conductors. If this is not so, the cross-sectional area of the protective earthing conductor shall be determined in a manner which produces a conductance equivalent to that which results from the application of this table.
13006.emf
24-hour support +358 (0)40 837 1150 • Email: [email protected]
2
2
vacon • 7 Safety
2.4 Electro-magnetic compatibility (EMC)
Vacon 100 AC drives comply with IEC 61000-3-12 provided that the short-circuit power SSC is greater than or equal to 120 RSCE at the interface point between the user’s supply and the pub-lic system. It is the responsibility of the installer or user of the equipment to ensure, by con-sultation with the distribution network operator if necessary, that the equipment is connected only to a supply with a short-circuit power SSC greater than or equal to 120 RSCE.
Do not perform any voltage withstand tests on any part of Vacon 100. There is a certain procedure according to which the tests shall be performed. Ignoring this procedure may result in damaged product.
13006.emf
Tel. +358 (0) 201 2121 • Fax +358 (0)201 212 205
Receipt of delivery vacon • 8
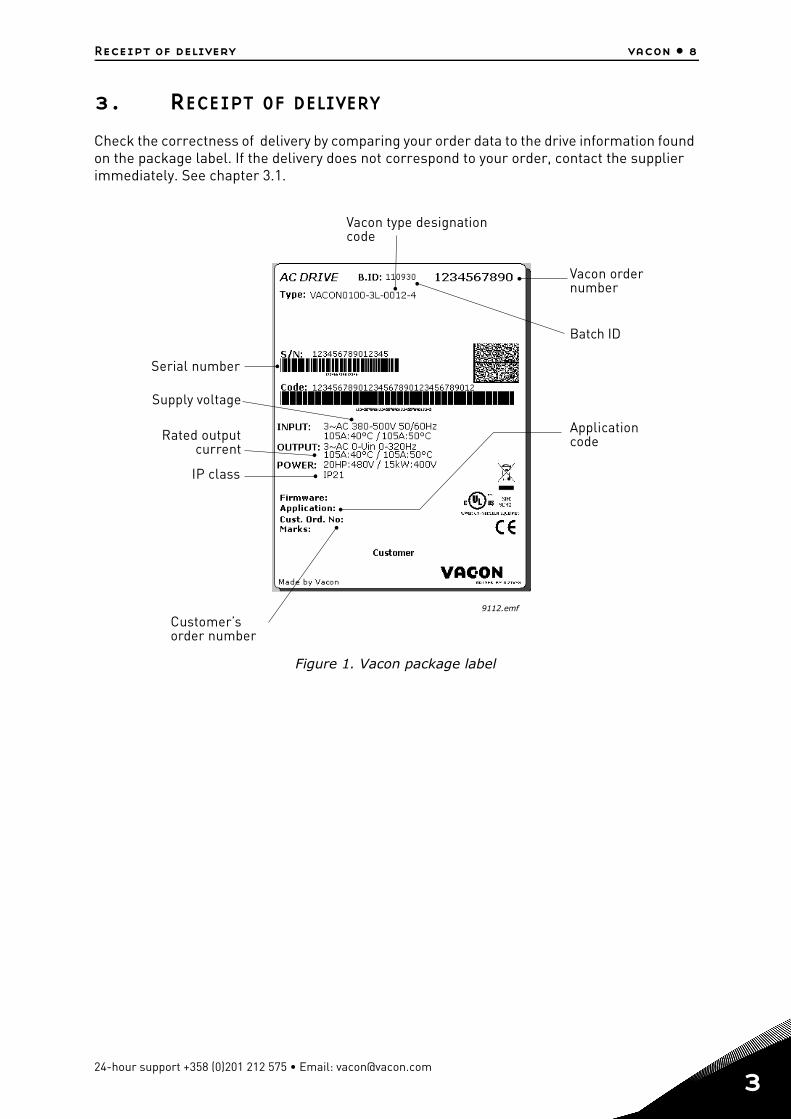
3. RECEIPT OF DELIVERY
Check the correctness of delivery by comparing your order data to the drive information found on the package label. If the delivery does not correspond to your order, contact the supplier immediately. See chapter 3.1.
Figure 1. Vacon package label
9112.emf
Vacon type designationcode
Rated outputcurrent
Applicationcode
IP class
Serial number
Customer’sorder number
Vacon ordernumber
Batch ID
Supply voltage
24-hour support +358 (0)201 212 575 • Email: [email protected]
3

3
vacon • 9 Receipt of delivery
3.1 Type designation code
Vacon type designation code is formed of a nine-segment code and optional +codes. Each seg-ment of the type designation code uniquely corresponds to the product and options you have ordered. The code is of the following format:
VACON0100-3L-0061-5 +xxxx +yyyy
VACON
This segment is common for all products.
0100
Product range:
0100 = Vacon 100
3L
Input/Function:
3L = Three-phase input
0061
Drive rating in ampere; e.g. 0061 = 61 A
5
Supply voltage:
2 = 208-240 V5 = 380-500 V
+xxxx +yyyy
Additional codes. (Several options possible)
Examples of additional codes:
+IP54
AC drive with IP protection class IP54
Tel. +358 (0) 201 2121 • Fax +358 (0)201 212 205
Receipt of delivery vacon • 10
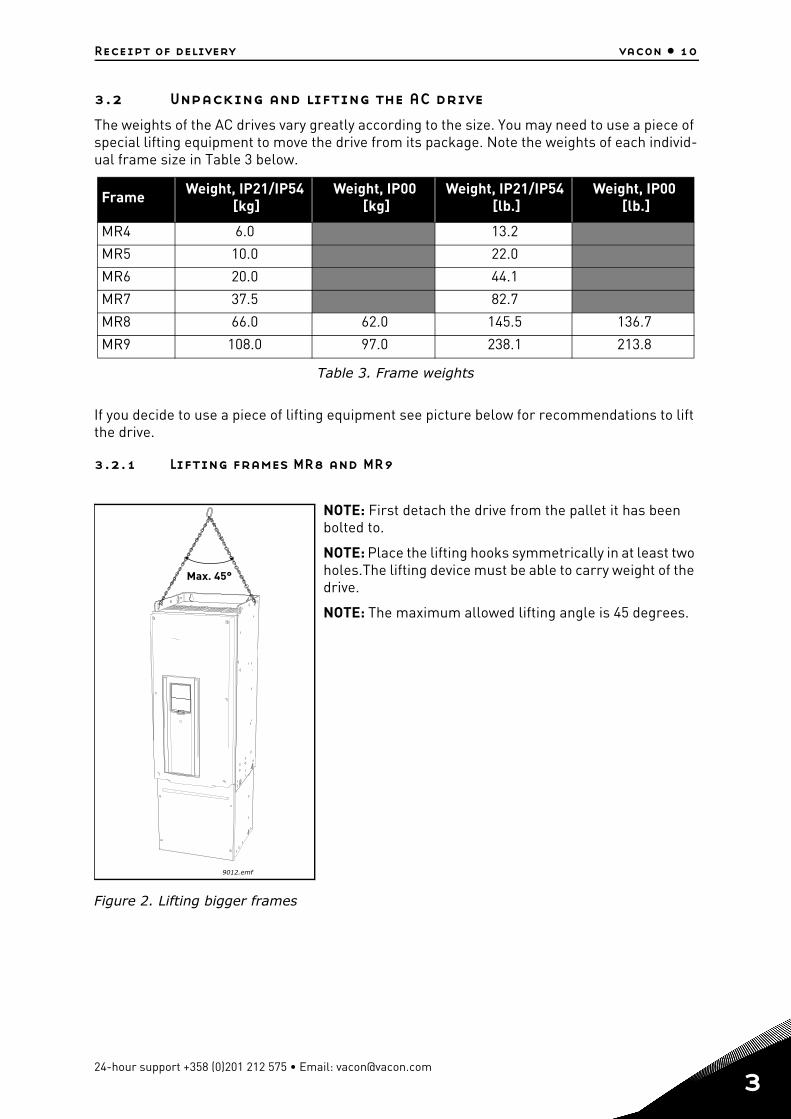
3.2 Unpacking and lifting the AC drive
The weights of the AC drives vary greatly according to the size. You may need to use a piece of special lifting equipment to move the drive from its package. Note the weights of each individ-ual frame size in Table 3 below.
Table 3. Frame weights
If you decide to use a piece of lifting equipment see picture below for recommendations to lift the drive.
3.2.1 Lifting frames MR8 and MR9
Figure 2. Lifting bigger frames
Frame Weight, IP21/IP54 [kg]
Weight, IP00 [kg]
Weight, IP21/IP54 [lb.]
Weight, IP00 [lb.]
MR4 6.0 13.2
MR5 10.0 22.0
MR6 20.0 44.1
MR7 37.5 82.7
MR8 66.0 62.0 145.5 136.7
MR9 108.0 97.0 238.1 213.8
Max. 45°
9012.emf
NOTE: First detach the drive from the pallet it has been bolted to.
NOTE: Place the lifting hooks symmetrically in at least two holes.The lifting device must be able to carry weight of the drive.
NOTE: The maximum allowed lifting angle is 45 degrees.
24-hour support +358 (0)201 212 575 • Email: [email protected]
3

3
vacon • 11 Receipt of delivery
Vacon 100 AC drives have undergone scrupulous tests and quality checks at the factory before they are delivered to the customer. However, after unpacking the product, check that no signs of transport damages are to be found on the product and that the delivery is complete.
Should the drive have been damaged during the shipping, please contact primarily the cargo insurance company or the carrier.
Tel. +358 (0) 201 2121 • Fax +358 (0)201 212 205

Receipt of delivery vacon • 12
3.3 Accessories
After having opened the transport package and lifted the drive out, check immediately that these various accessories were included in the delivery. The contents of the accessories bag differ by drive size and IP protections class:
3.3.1 Frame MR4
Table 4. Contents of accessories bag, MR4
3.3.2 Frame MR5
Table 5. Contents of accessories bag, MR5
Item Quantity Purpose
M4x16 screw 11Screws for power cable clamps (6), control cable clamps (3), grounding clamps (2)
M4x8 screw 1 Screw for optional groundingM5x12 screw 1 Screw for drive external groundingControl cable grounding lamella 3 Control cable groundingEMC cable clamps, size M25 3 Clamping power cablesGrounding clamp 2 Power cable grounding‘Product modified’ label 1 Information about modificationsIP21: Cable grommet 3 Cable run-through sealingIP54: Cable grommet 6 Cable run-through sealing
Item Quantity Purpose
M4x16 screw 13Screws for power cable clamps (6), control cable clamps (3), grounding clamps (4)
M4x8 screw 1 Screw for optional groundingM5x12 screw 1 Screw for drive external groundingControl cable grounding lamella 3 Control cable groundingEMC cable clamps, size M25 1 Clamping brake resistor cableEMC cable clamps, size M32 2 Clamping power cablesGrounding clamp 2 Power cable grounding‘Product modified’ label 1 Information about modificationsIP21: Cable grommet, hole diameter 25.3 mm 1 Cable run-through sealingIP54: Cable grommet, hole diameter 25.3 mm 4 Cable run-through sealingCable grommet, hole diameter 33.0 mm 2 Cable run-through sealing
24-hour support +358 (0)201 212 575 • Email: [email protected]
3

3
vacon • 13 Receipt of delivery
3.3.3 Frame MR6
Table 6. Contents of accessories bag, MR6
3.3.4 Frame MR7
Table 7. Contents of accessories bag, MR7
3.3.5 Frame MR8
Table 8. Contents of accessories bag, MR8
Item Quantity Purpose
M4x20 screw 10 Screws for power cable clamps (6) and grounding clamps (4)
M4x16 screw 3 Screws for control cable clampsM4x8 screw 1 Screw for optional groundingM5x12 screw 1 Screw for drive external groundingControl cable grounding lamella 3 Control cable groundingEMC cable clamps, size M32 1 Clamping brake resistor cableEMC cable clamps, size M40 2 Clamping power cablesGrounding clamp 2 Power cable grounding‘Product modified’ label 1 Information about modificationsCable grommet, hole diameter 33.0 mm 1 Cable run-through sealingCable grommet, hole diameter 40.3 mm 2 Cable run-through sealingIP54: Cable grommet, hole diameter 25.3 mm 3 Cable run-through sealing
Item Quantity Purpose
M5x30 slotted nut 6 Nuts for power cable clampsM4x16 screw 3 Screws for control cable clampsM6x12 screw 1 Screw for drive external groundingControl cable grounding lamella 3 Control cable groundingEMC cable clamps, size M50 3 Clamping power cablesGrounding clamp 2 Power cable grounding‘Product modified’ label 1 Information about modificationsCable grommet, hole diameter 50.3 mm 3 Cable run-through sealingIP54: Cable grommet, hole diameter 25.3 mm 3 Cable run-through sealing
Item Quantity Purpose
M4x16 screw 3 Screws for control cable clampsControl cable grounding lamella 3 Control cable groundingCable lugs KP34 3 Clamping power cablesCable insulator 11 Avoiding contact between cablesCable grommet, hole diameter 25.3 mm 4 Control cable run-through sealingIP00: Touch protection shield 1 Avoiding contact with live partsIP00: M4x8 screw 2 Fixing the touch protection shield
Tel. +358 (0) 201 2121 • Fax +358 (0)201 212 205

Receipt of delivery vacon • 14
3.3.6 Frame MR9
Table 9. Contents of accessories bag, MR9
Item Quantity Purpose
M4x16 screw 3 Screws for control cable clampsControl cable grounding lamella 3 Control cable groundingCable lugs KP40 5 Clamping power cablesCable insulator 10 Avoiding contact between cablesCable grommet, hole diameter 25.3 mm 4 Control cable run-through sealingIP00: Touch protection shield 1 Avoiding contact with live partsIP00: M4x8 screw 2 Fixing the touch protection shield
24-hour support +358 (0)201 212 575 • Email: [email protected]
3

3
vacon • 15 Receipt of delivery
3.4 ‘Product modified’ sticker
In the Accessories bag included in the delivery you will find a silver Product modified sticker. The purpose of the sticker is to notify the service personnel about the modifications made in the AC drive. Attach the sticker on the side of the AC drive to avoid losing it. Should the AC drive be later modified mark the change on the sticker.
Figure 3. ‘Product modified’ sticker
3.5 Disposal
When the device reaches the end of its operating life do not dispose of it as a part of standard household garbage. Main components of the product can be recycled, but some need to be fragmented to separate different types of materials and components that need to be treated as special waste from electrical and elec-tronic components. To ensure environmentally sound and safe recycling treat-ment, the product can be taken to appropriate recycling center or returned to the manufacturer.
Observe local and other applicable laws as they may mandate special treatment for specific components or special treatment may be ecologically sensible.
Product modified
Date:Date:
Date:
9004.emf
13064.
em
f
Tel. +358 (0) 201 2121 • Fax +358 (0)201 212 205

Mounting vacon • 16
4. MOUNTING
The AC drive must be mounted in vertical position on the wall or on the back plane of a cubicle. Ensure that the flatness variation shall not exceed 3 mm. Should the conditions of the mount-ing place require horizontal mounting, the functionalities within the given nominal values stat-ed in chapter 8 cannot be guaranteed.
The AC drive shall be fixed with the screws and other possible components included in the de-livery.
4.1 Dimensions
4.1.1 Wall mount
Figure 4. Vacon AC drive dimensions, MR4, wall mount
128
100Ø7
Ø13
313
100
328
190
IP21
Ø25
151
112
IP54
Ø25
112 14
7
9080.emf
24-hour support +358 (0)201 212 575 • Email: [email protected]
4

4
vacon • 17 Mounting
Figure 5. Vacon AC drive dimensions, MR5, wall mount
Figure 6. Vacon AC drive dimensions, MR6, wall mount
*Optional mounting holes (for NX replacement)
214
144115
Ø7Ø14 Ø7
100*
419
406
115
Ø7100*
IP21
39
130
134
Ø33 Ø33Ø25
IP54
37,5
130
134
Ø25
9081.emf
195
148
Ø 15,5Ø9
557
541
Ø9 148
229
43,7
148
151
IP21
Ø40 Ø33 Ø40
42
148
151
IP54Ø25Ø25
9082.emf
Tel. +358 (0) 201 2121 • Fax +358 (0)201 212 205

Mounting vacon • 18
Figure 7. Vacon AC drive dimensions, MR7, wall mount
259
Ø20
660
645
237190 Ø9
Ø16
Ø51
IP21
160 21
1
IP54Ø25
Ø50
160 21
7
9083.emf
24-hour support +358 (0)201 212 575 • Email: [email protected]
4
4
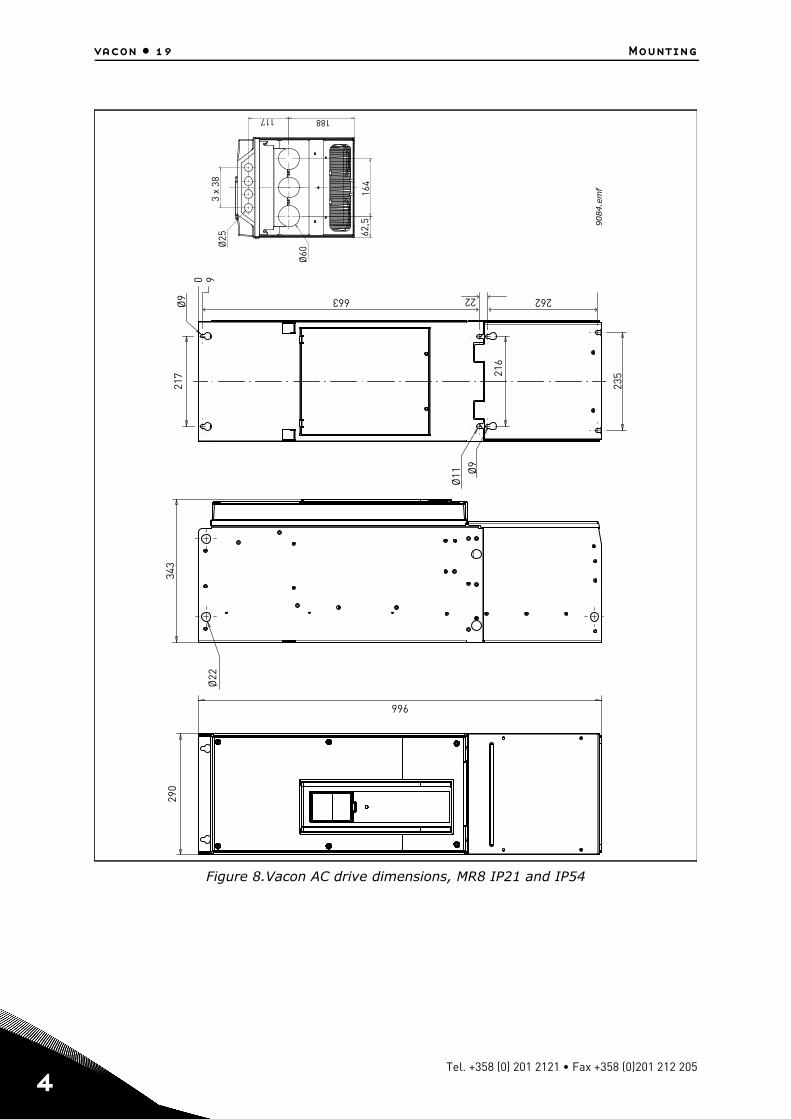
vacon • 19 Mounting
Figure 8.Vacon AC drive dimensions, MR8 IP21 and IP54
9084.e
mf
Ø25
3 x
38
Ø60
117 188
62,5
164
290
Ø22
343
966
Ø11 Ø
9
216
663 22 262
235
217
Ø9
0 9
Tel. +358 (0) 201 2121 • Fax +358 (0)201 212 205

Mounting vacon • 20
Figure 9. Vacon AC drive dimensions, MR8 IP00
9227.e
mf
9.3
290
186.
5
255
217
Ø22
Ø9
Ø9
794
683
663
18
171.
5 343
215.
7
10.8
15.1
24-hour support +358 (0)201 212 575 • Email: [email protected]
4
4
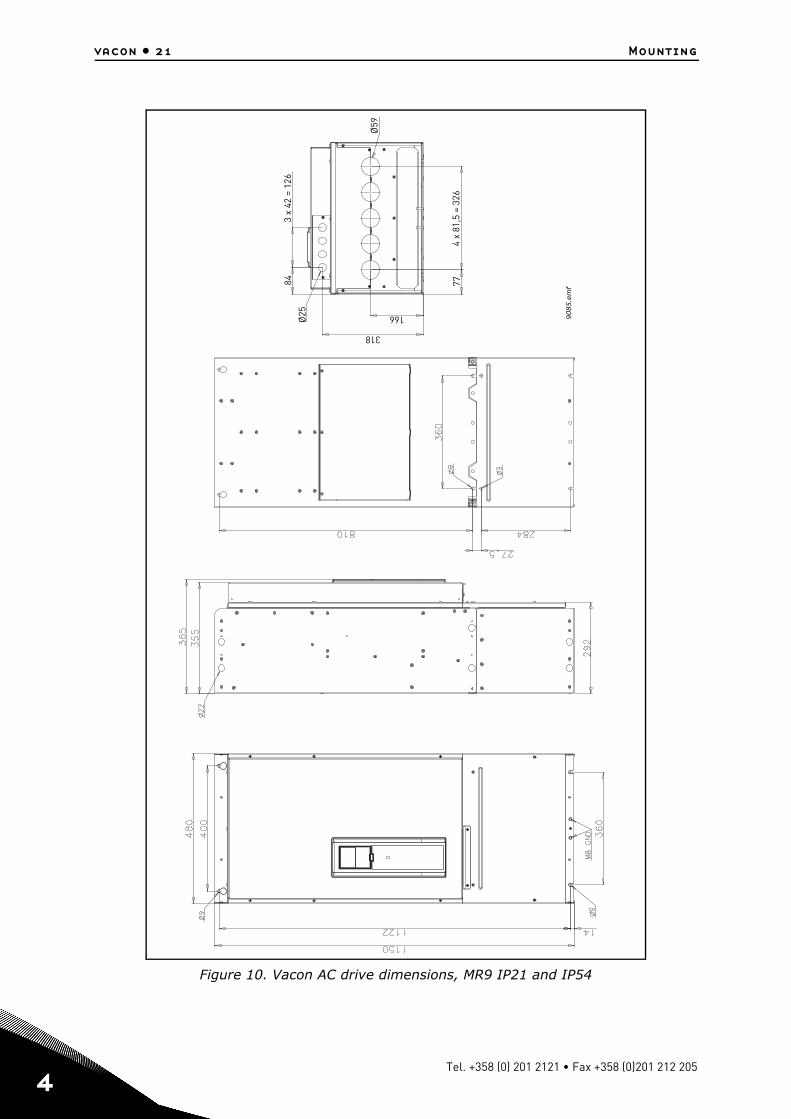
vacon • 21 Mounting
Figure 10. Vacon AC drive dimensions, MR9 IP21 and IP54
9085.e
mf
843
x 42
= 1
26
Ø25
318
166
774
x 81
,5 =
326
Ø59
Tel. +358 (0) 201 2121 • Fax +358 (0)201 212 205

Mounting vacon • 22
Figure 11. Vacon AC drive dimensions, MR9 IP00
9114.e
mf
Option
al m
ain c
onnec
tor
cove
rfo
r ca
bin
et
inst
alla
tion
s
24-hour support +358 (0)201 212 575 • Email: [email protected]
4
4
vacon • 23 Mounting
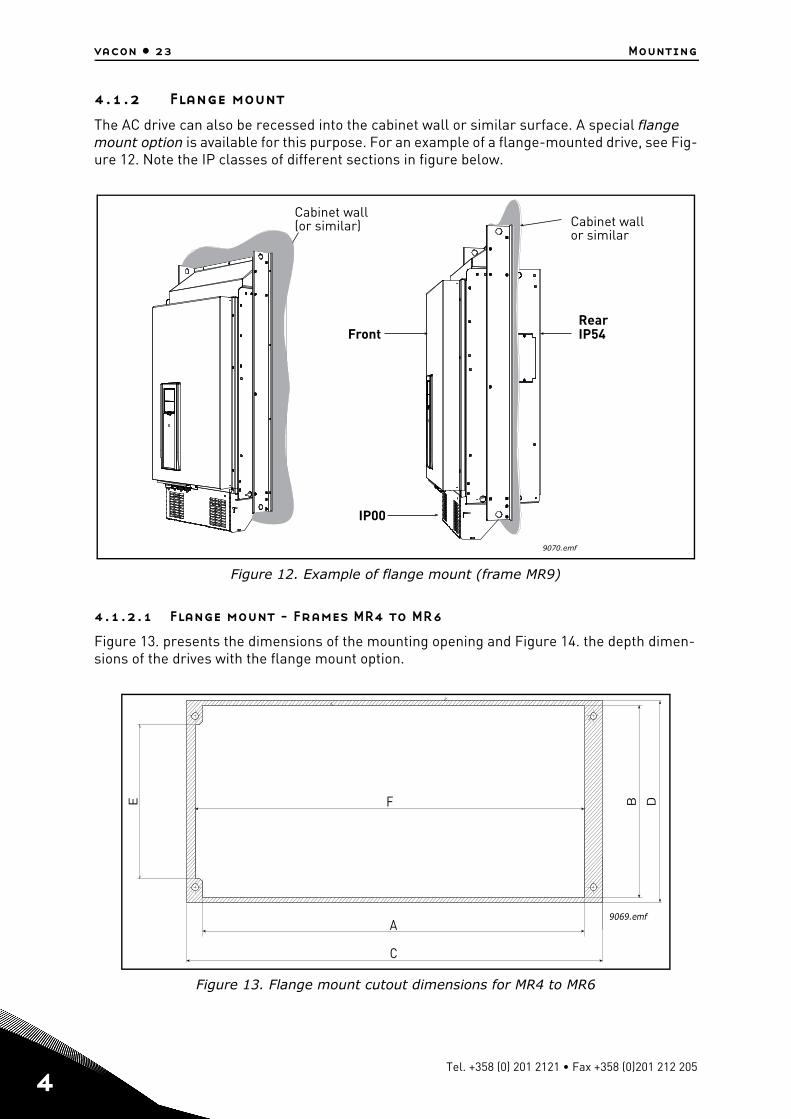
4.1.2 Flange mount
The AC drive can also be recessed into the cabinet wall or similar surface. A special flange mount option is available for this purpose. For an example of a flange-mounted drive, see Fig-ure 12. Note the IP classes of different sections in figure below.
Figure 12. Example of flange mount (frame MR9)
4.1.2.1 Flange mount - Frames MR4 to MR6
Figure 13. presents the dimensions of the mounting opening and Figure 14. the depth dimen-sions of the drives with the flange mount option.
Figure 13. Flange mount cutout dimensions for MR4 to MR6
9070.emf
IP54
IP00
Cabinet wall(or similar)
FrontRear
Cabinet wallor similar
A
C
B DE F
9069.emf
Tel. +358 (0) 201 2121 • Fax +358 (0)201 212 205

Mounting vacon • 24
Table 10. Flange mount cutout dimensions for MR4 to MR6 [mm]
Figure 14. MR4 to MR6, flange mount, depth dimensions
Frame A B C D E F
MR4 310 137 337 144 110 316
MR5 408 152 434 160 132 414
MR6 534 203 560 211 184 541
MR4 MR5 MR6
9074.ai
24-hour support +358 (0)201 212 575 • Email: [email protected]
4

4
vacon • 25 Mounting
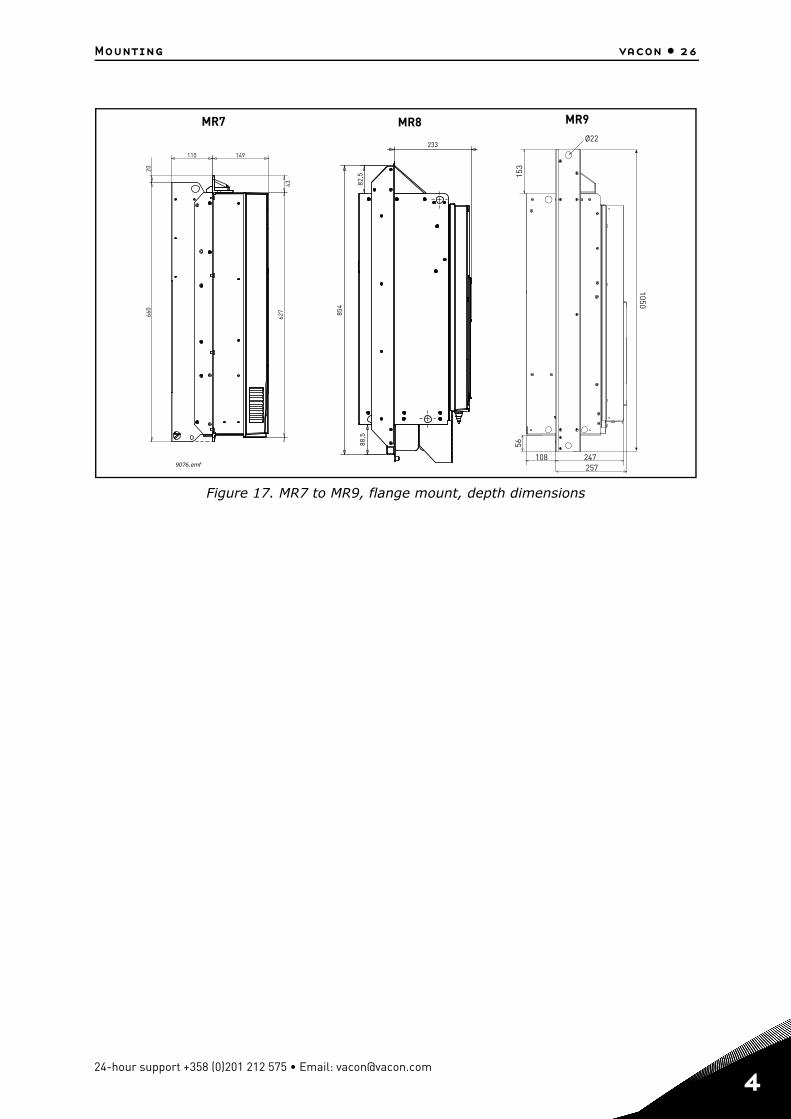
4.1.2.2 Flange mount MR7 to MR9
Figure 15. presents the dimensions of the mounting opening and Figure 17. the dimensions of the drives with the flange mount option.
Remember to seal the contact surface between the flange and the cutout with the gasket tape provided. If the parts or the drive delivered are already equipped with a sealing no action is required. See Figure 16.
Figure 15. Flange mount cutout dimensions for MR7 to MR9
Table 11. Flange mount cutout dimensions for MR7 to MR9
Figure 16. Sealing the cutout
Frame A B C D E
MR7 655 240 682 268 13.5
MR8 859 298 888 359 17
MR9 975 485 1050 530 54
B D
C
A E
9075.emf
Drive outline
Opening outline
TOP
9254.emf
Drive
Gasket tape ( )Opening outline ( )TOP
Tel. +358 (0) 201 2121 • Fax +358 (0)201 212 205
Mounting vacon • 26
Figure 17. MR7 to MR9, flange mount, depth dimensions
20110 149
43
660
627
MR7 MR8
233
82,5
88,5
854
MR9
153
Ø22
56
108 247257
1050
9076.emf
24-hour support +358 (0)201 212 575 • Email: [email protected]
4
4
vacon • 27 Mounting
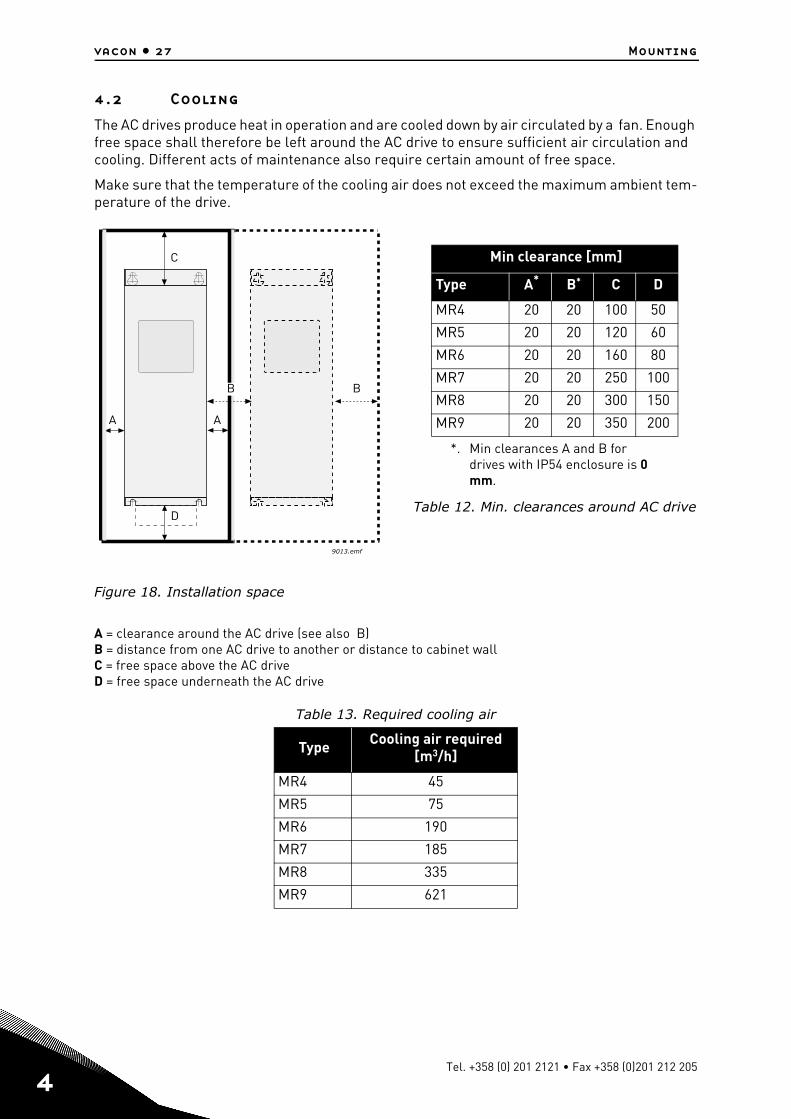
4.2 Cooling
The AC drives produce heat in operation and are cooled down by air circulated by a fan. Enough free space shall therefore be left around the AC drive to ensure sufficient air circulation and cooling. Different acts of maintenance also require certain amount of free space.
Make sure that the temperature of the cooling air does not exceed the maximum ambient tem-perature of the drive.
Table 12. Min. clearances around AC drive
Figure 18. Installation space
A = clearance around the AC drive (see also B)B = distance from one AC drive to another or distance to cabinet wallC = free space above the AC driveD = free space underneath the AC drive
Table 13. Required cooling air
Min clearance [mm]
Type A*
*. Min clearances A and B for drives with IP54 enclosure is 0 mm.
B* C D
MR4 20 20 100 50
MR5 20 20 120 60
MR6 20 20 160 80
MR7 20 20 250 100
MR8 20 20 300 150
MR9 20 20 350 200
Type Cooling air required [m3/h]
MR4 45
MR5 75
MR6 190
MR7 185
MR8 335
MR9 621
C
A
9013.emf
D
B
A
B
Tel. +358 (0) 201 2121 • Fax +358 (0)201 212 205

Mounting vacon • 28
Note that if several units are mounted above each other the required free space equals C + D (see Figure 19.). Moreover, the outlet air used for cool-ing by the lower unit must be directed away from the air intake of the upper unit by means of e.g. a piece of metal plate fixed to cabinet wall between the drives as shown in Figure 19.
Figure 19. Installation space when drives aremounted on top of each other
C+D
9014.emfFRONT SIDE
24-hour support +358 (0)201 212 575 • Email: [email protected]
4

5
vacon • 29 Power cabling
5. POWER CABLING
The mains cables are connected to terminals L1, L2 and L3 and the motor cables to terminals marked with U, V and W. See principal connection diagram in Figure 20. See also Table 14 for the cable recommmendations for different EMC levels.
Figure 20. Principal connection diagram
Use cables with heat resistance of at least +70°C. The cables and the fuses must be dimen-sioned according to the AC drive nominal OUTPUT current which you can find on the rating plate.
Keypad
Control
U/T1
V/T2
W/T3M
L1
L2
L3
Power unit
DC
-
DC
+/R
+
R- 9050.emf
Tel. +358 (0) 201 2121 • Fax +358 (0)201 212 205
Power cabling vacon • 30
Table 14. Cable types required to meet standards
1 = Power cable intended for fixed installation and the specific mains voltage. Shielded cable not required. (MCMK or similar recommended).
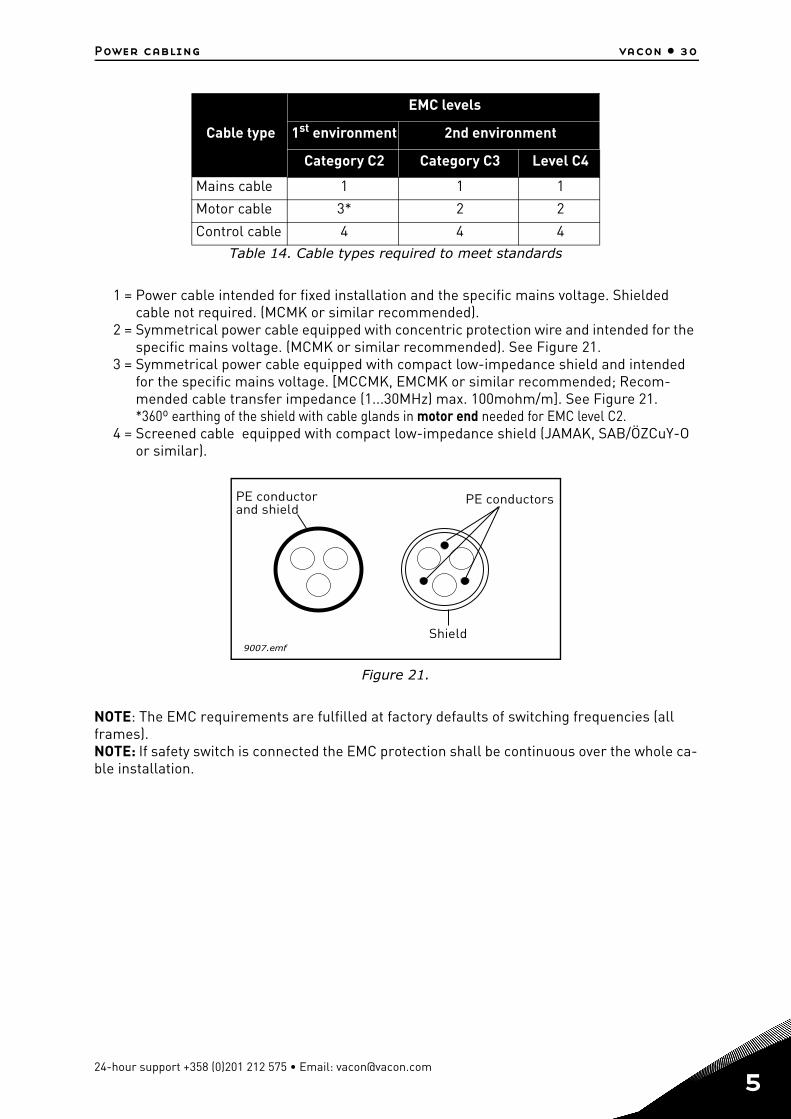
2 = Symmetrical power cable equipped with concentric protection wire and intended for the specific mains voltage. (MCMK or similar recommended). See Figure 21.
3 = Symmetrical power cable equipped with compact low-impedance shield and intended for the specific mains voltage. [MCCMK, EMCMK or similar recommended; Recom-mended cable transfer impedance (1...30MHz) max. 100mohm/m]. See Figure 21.*360º earthing of the shield with cable glands in motor end needed for EMC level C2.
4 = Screened cable equipped with compact low-impedance shield (JAMAK, SAB/ÖZCuY-O or similar).
Figure 21.
NOTE: The EMC requirements are fulfilled at factory defaults of switching frequencies (all frames).NOTE: If safety switch is connected the EMC protection shall be continuous over the whole ca-ble installation.
Cable type
EMC levels
1st environment 2nd environment
Category C2 Category C3 Level C4
Mains cable 1 1 1
Motor cable 3* 2 2
Control cable 4 4 4
PE conductorand shield
PE conductors
Shield9007.emf
24-hour support +358 (0)201 212 575 • Email: [email protected]
5

5
vacon • 31 Power cabling
5.1 UL standards on cabling
To meet the UL (Underwriters Laboratories) regulations, use a UL-approved copper cable with a minimum heat-resistance of +60/75°C. Use Class 1 wire only.
The units are suitable for use on a circuit capable of delivering not more than 100,000 rms sym-metrical amperes, 600V maximum.
5.1.1 Cable dimensioning and selection
Table shows the minimum dimensions of the Cu/Al-cables and the corresponding fuse sizes. Recommended fuse types are gG/gL.
These instructions apply only to cases with one motor and one cable connection from the AC drive to the motor. In any other case, ask the factory for more information.
Tel. +358 (0) 201 2121 • Fax +358 (0)201 212 205

Power cabling vacon • 32
5.1.1.1 Cable and fuse sizes
The recommended fuse types are gG/gL (IEC 60269-1) or class T (UL & CSA). The fuse voltage rating should be selected according to the supply network. The final selection should be made according to local regulations, cable installation conditions and cable specification. Bigger fus-es than what is recommended below shall not be used.
Check that the fuse operating time is less than 0.4 seconds. Operating time depends on used fuse type and impedance of the supply circuit. Consult the factory about faster fuses. The man-ufacturer offers recommendations also for high speed J (UL & CSA ), aR (UL recognized, IEC 60269-4) and gS (IEC 60269-4) fuse ranges.
Table 15. Cable and fuse sizes for Vacon 100
Frame Type IL[A]
Fuse(gG/gL)
[A]
Mains, motor and brake
resistor* cableCu [mm2]
Terminal cable size
Main terminal[mm2]
Earth terminal
[mm2]
MR4
0003 2—0004 20003 4—0004 4
3.7—4.83.4—4.8 6 3*1.5+1.5 1—6 solid
1—4 stranded 1—6
0006 2—0008 20005 4—0008 4
6.6—8.05.6—8.0 10 3*1.5+1.5 1—6 solid
1—4 stranded 1—6
0011 2—0012 20009 4—0012 4
11.0—12.59.6—12.0 16 3*2.5+2.5 1—6 solid
1—4 stranded 1—6
MR5
0018 20016 4
18.016.0 20 3*6+6 1—10 Cu 1—10
0024 20023 4
24.023.0 25 3*6+6 1—10 Cu 1—10
0031 20031 4
31.031.0 32 3*10+10 1—10 Cu 1—10
MR6
0038 4 38.0 40 3*10+10 2.5—50 Cu/Al 2.5—35
0048 20046 4
48.046.0 50 3*16+16 (Cu)
3*25+16 (Al) 2.5—50 Cu/Al 2.5—35
0062 20061 4
62.061.0 63 3*25+16 (Cu)
3*35+10 (Al) 2.5—50 Cu/Al 2.5—35
MR7
0075 20072 4
75,072,0 80 3*35+16 (Cu)
3*50+16 (Al) 6-70 mm2 Cu/Al 6-70 mm2
0088 20087 4
88,087,0 100 3*35+16 (Cu)
3*70+21 (Al) 6-70 mm2 Cu/Al 6-70 mm2
0105 20105 4 105,0 125 3*50+25 (Cu)
3*70+21 (Al) 6-70 mm2 Cu/Al 6-70 mm2
MR8
0140 20140 4 140,0 160 3*70+35 (Cu)
3*95+29 (Al) Bolt size M8 Bolt size M8
0170 20170 4 170,0 200 3*95+50 (Cu)
3*150+41 (Al) Bolt size M8 Bolt size M8
0205 20205 4 205,0 250 3*120+70 (Cu)
3*185+57 (Al) Bolt size M8 Bolt size M8
24-hour support +358 (0)201 212 575 • Email: [email protected]
5

5
vacon • 33 Power cabling
The cable dimensioning is based on the criteria of the International Standard IEC60364-5-52:Cables must be PVC-isolated; Max ambient temperature +30°C, max temperature of cable surface +70°C; Use only cables with concentric copper shield; Max number of parallel cables is 9. When using cables in parallel, NOTE HOWEVER that the requirements of both the cross-sectional area and the max number of cables must be observed.For important information on the requirements of the earthing conductor, see chapter Earthing and earth fault protection of the standard.
For the correction factors for each temperature, see International Standard IEC60364-5-52.
MR9
0261 20261 4 261,0 315 3*185+95 (Cu)
2*3*120+41 (Al) Bolt size M8 Bolt size M8
0310 20310 4 310,0 350 2*3*95+50 (Cu)
2*3*120+41 (Al) Bolt size M8 Bolt size M8
*. If you use a multi-conductor cable, NOTE that one of the conductors of the brake resistor cable remains unconnected. Use of single cable is also allowed provided that the minimum cable cross-sectional area given in this table is observed.
Table 15. Cable and fuse sizes for Vacon 100
Frame Type IL[A]
Fuse(gG/gL)
[A]
Mains, motor and brake
resistor* cableCu [mm2]
Terminal cable size
Main terminal[mm2]
Earth terminal
[mm2]
Tel. +358 (0) 201 2121 • Fax +358 (0)201 212 205

Power cabling vacon • 34
5.1.1.2 Cable and fuse sizes, North America
The recommended fuse types are gG/gL (IEC 60269-1) or class T (UL & CSA). The fuse voltage rating should be selected according to the supply network. The final selection should be made according to local regulations, cable installation conditions and cable specification. Bigger fus-es than what is recommended below shall not be used.
Check that the fuse operating time is less than 0.4 seconds. Operating time depends on used fuse type and impedance of the supply circuit. Consult the factory about faster fuses. Vacon of-fers recommendations also for high speed J (UL & CSA ), aR (UL recognized, IEC 60269-4) and gS (IEC 60269-4) fuse ranges.
Table 16. Cable and fuse sizes for Vacon 100
Frame Type IL[A]
Fuse(class T)
[A]
Mains, motor, brake resistor*
and ground cable, Cu
Terminal cable size
Main terminal Earth terminal
MR4
0003 20003 4
3,73.4 6 AWG14 AWG24-AWG10 AWG17-AWG10
0004 20004 4 4.8 6 AWG14 AWG24-AWG10 AWG17-AWG10
0006 20005 4
6.65.6 10 AWG14 AWG24-AWG10 AWG17-AWG10
0008 20008 4 8.0 10 AWG14 AWG24-AWG10 AWG17-AWG10
0011 20009 4
11.09.6 15 AWG14 AWG24-AWG10 AWG17-AWG10
0012 20012 4
12.512.0 20 AWG14 AWG24-AWG10 AWG17-AWG10
MR5
0018 20016 4
18.016.0 25 AWG10 AWG20-AWG5 AWG17-AWG8
0024 20023 4
24.023.0 30 AWG10 AWG20-AWG5 AWG17-AWG8
0031 20031 4 31.0 40 AWG8 AWG20-AWG5 AWG17-AWG8
MR6
0038 4 38.0 50 AWG4 AWG13-AWG0 AWG13-AWG2
0048 20046 4
48.046.0 60 AWG4 AWG13-AWG0 AWG13-AWG2
0062 20061 4**
62.061.0 80 AWG4 AWG13-AWG0 AWG13-AWG2
MR7
0075 20072 4
75,072,0 100 AWG2 AWG9-AWG2/0 AWG9-AWG2/0
0088 20087 4
88,087,0 110 AWG1 AWG9-AWG2/0 AWG9-AWG2/0
0105 20105 4 105,0 150 AWG1/0 AWG9-AWG2/0 AWG9-AWG2/0
24-hour support +358 (0)201 212 575 • Email: [email protected]
5

5
vacon • 35 Power cabling
The cable dimensioning is based on the criteria of the Underwriters’ Laboratories UL508C:Cables must be PVC-iso-lated; Max ambient temperature +30°C, max temperature of cable surface +70°C; Use only cables with concentric copper shield; Max number of parallel cables is 9. When using cables in parallel, NOTE HOWEVER that the requirements of both the cross-sectional area and the max number of cables must be observed.For important information on the requirements of the earthing conductor, see standard Underwriters’ Laboratories UL508C. For the correction factors for each temperature, see the instructions of standard Underwriters’ Laborato-ries UL508C.
MR8
0140 20140 4 140,0 200 AWG3/0 AWG1-350
kcmilAWG1-350 kcmil
0170 20170 4 170,0 225 250 kcmil AWG1-350
kcmilAWG1-350 kcmil
0205 20205 4 205,0 250 350 kcmil AWG1-350
kcmilAWG1-350 kcmil
MR9
0261 20261 4 261,0 350 2*250 kcmil AWG1-350
kcmilAWG1-350 kcmil
0310 20310 4 310,0 400 2*350 kcmil AWG1-350
kcmilAWG1-350 kcmil
*. If you use a multi-conductor cable, NOTE that one of the conductors of the brake resistor cable remains unconnected. Use of single cable is also allowed provided that the minimum cable cross-sec-tional area given in this table is observed.
**. The 460V models require 90-degree wire to meet UL regulations
Table 16. Cable and fuse sizes for Vacon 100
Frame Type IL[A]
Fuse(class T)
[A]
Mains, motor, brake resistor*
and ground cable, Cu
Terminal cable size
Main terminal Earth terminal
Tel. +358 (0) 201 2121 • Fax +358 (0)201 212 205
Power cabling vacon • 36
5.2 Brake resistor cables
Vacon 100 AC drives are equipped with terminals for an optional external brake resistor. These terminals are marked with R+ and R- (MR4-MR6) or DC+/R+ and R- (MR7 and bigger). The rec-ommended sizes for the brake resistor cables are listed in tables on pages 32 to 34.
See brake resistor ratings on page 80.
5.3 Cable installation
• Before starting, check that none of the components of the AC drive is live. Read care-fully the warnings in chapter 2.
• Place the motor cables sufficiently far from other cables• Avoid placing the motor cables in long parallel lines with other cables.• If the motor cables run in parallel with other cables note the minimum distances
between the motor cables and other cables given in table below.
• The given distances also apply between the motor cables and signal cables of other sys-tems.
• The maximum lengths of motor cables (shielded) are 100 m (MR4), 150 m (MR5 and MR6) and 200 m (MR7 to MR9).
• The motor cables should cross other cables at an angle of 90 degrees. • If cable insulation checks are needed, see chapter Cable and motor insulation checks.
Start the cable installation according to the instructions below:
If you use a multi-conductor cable, NOTE that one of the conductors of the brake resistor cable remains unconnected! Cut off the remaining conductor in order to avoid contact with a conducting component.
Distance between cables, [m]
Shielded cable, [m]
0.3 50
1.0 200
9000.emf
24-hour support +358 (0)201 212 575 • Email: [email protected]
5

5
vacon • 37 Power cabling
5.3.1 Frames MR4 to MR7
Figure 22. Stripping of cables
Table 17. Cables stripping lengths [mm]
1 Strip the motor, mains and brake resistor cables as advised below.
Frame A1 B1 C1 D1 C2 D2 E
MR4 15 35 10 20 7 35Leave
as short as pos-
sible
MR5 20 40 10 30 10 40
MR6 20 90 15 60 15 60
MR7 20 80 20 80 20 80
9019.e
mf
D1B1
C1A1
D2
C2
E
Earth conductor
MAINS MOTOR
Earth conductor
Tel. +358 (0) 201 2121 • Fax +358 (0)201 212 205

Power cabling vacon • 38
Figure 23. Opening cover
Figure 24. Removing screws
2 Open the cover of the AC drive.
3 Remove the screws of the cable protection plate. Do not open the cover of the power unit!
M4x55
9174.emf
M4x8
9228.emf
24-hour support +358 (0)201 212 575 • Email: [email protected]
5

5
vacon • 39 Power cabling
Figure 25. Examples of cable entry plates with grommets, IP21
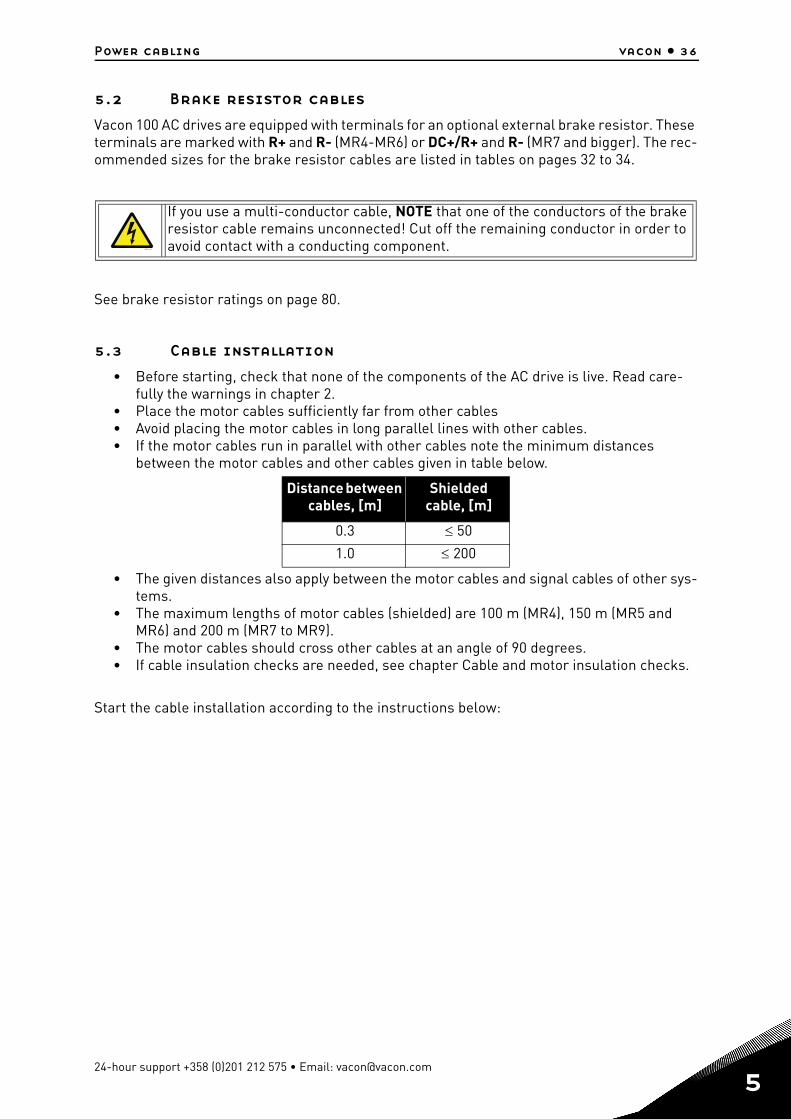
4Insert the cable grommets (included in the delivery) in the openings of the cable entry plate (included) as shown in the picture (upper pictures EU version, lower pictures US version).
5
• Insert the cables - supply cable, motor cable and optional brake cable - in the openings of the cable entry plate.
• Then cut the rubber grommets open to slide the cables through. Should the grommets fold in while inserting the cable, just draw the cable back a bit to straighten the grommets up.
• Do not cut the grommet openings wider than what is necessary for the cables you are using.
IMPORTANT NOTE FOR IP54 INSTALLATION:To meet the requirements of the enclosure class IP54, the connection between the grommet and the cable must be tight. Therefore, lead the first bit of the cable out of the grommet straight before letting it bend. If this is not possible, the tight-ness of the connection must be ensured with insulation tape or a cable tie.
9017.emf
Tel. +358 (0) 201 2121 • Fax +358 (0)201 212 205
Power cabling vacon • 40
Figure 26. Grommet cutting and sealing
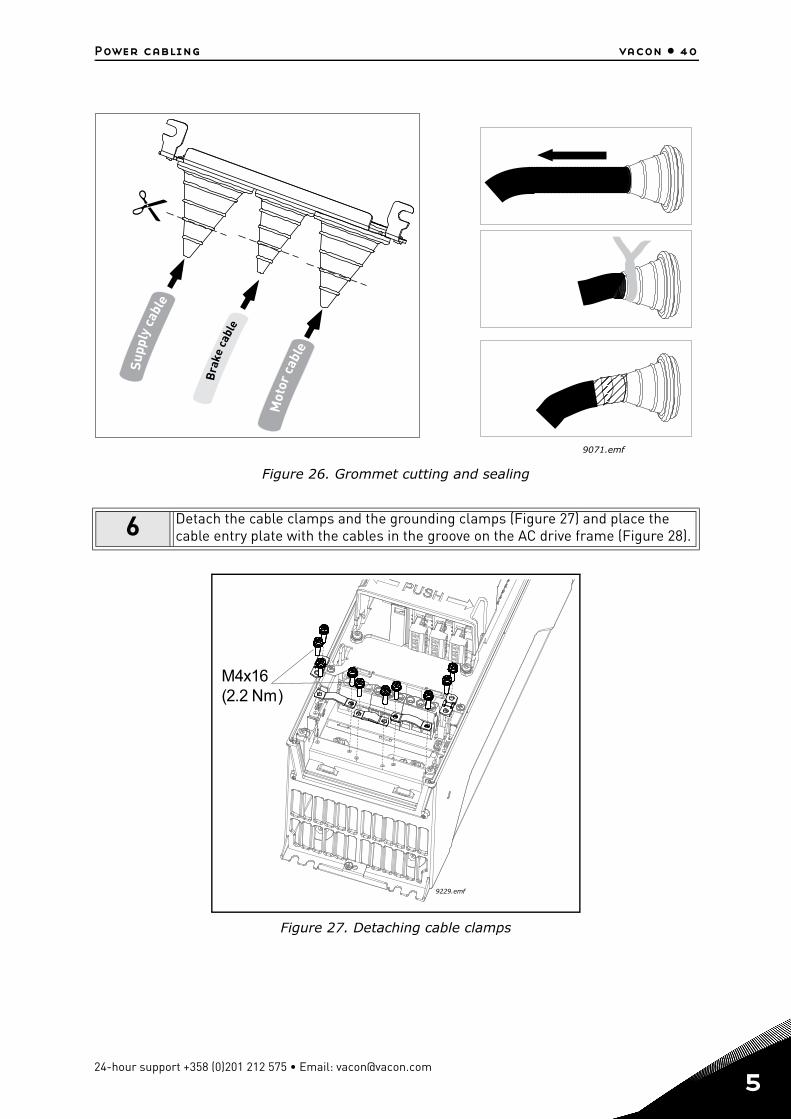
Figure 27. Detaching cable clamps
6 Detach the cable clamps and the grounding clamps (Figure 27) and place the cable entry plate with the cables in the groove on the AC drive frame (Figure 28).
9071.emf
M4x16(2.2 Nm)
9229.emf
24-hour support +358 (0)201 212 575 • Email: [email protected]
5

5
vacon • 41 Power cabling
Figure 28. Cable entry plate and cables
Figure 29. Cable connection
7
Connect the stripped cables (see Figure 22 and Table 17) as shown in Figure 29. • Expose the shield of all three cables in order to make a 360-degree con-
nection with the cable clamp (1). • Connect the (phase) conductors of the supply, brake and motor cables into
their respective terminals (2).• Form the rest of the cable shield of all three cables into “pigtails” and
make a grounding connection with a clamp as shown in Figure 29 (3). Make the pigtails just long enough to reach and be fixed to the terminal - not longer.
U V WR+ R-
9232.emf
L1L2L3 R+R- U V W
123 3
Supplycable
Brake
cable
Motorcable
Brake
resistors
9230.emf
Tel. +358 (0) 201 2121 • Fax +358 (0)201 212 205
Power cabling vacon • 42
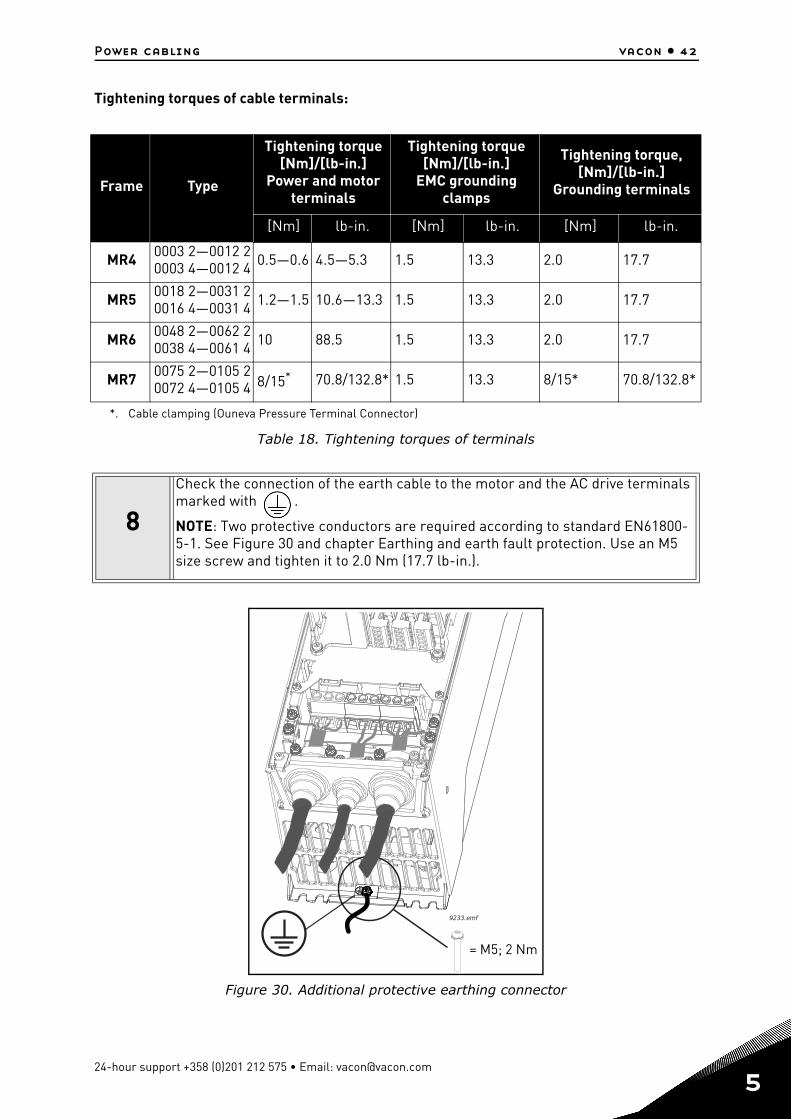
Tightening torques of cable terminals:
Table 18. Tightening torques of terminals
Figure 30. Additional protective earthing connector
Frame Type
Tightening torque [Nm]/[lb-in.]
Power and motor terminals
Tightening torque [Nm]/[lb-in.]
EMC grounding clamps
Tightening torque, [Nm]/[lb-in.]
Grounding terminals
[Nm] lb-in. [Nm] lb-in. [Nm] lb-in.
MR4 0003 2—0012 20003 4—0012 4 0.5—0.6 4.5—5.3 1.5 13.3 2.0 17.7
MR5 0018 2—0031 20016 4—0031 4 1.2—1.5 10.6—13.3 1.5 13.3 2.0 17.7
MR6 0048 2—0062 20038 4—0061 4 10 88.5 1.5 13.3 2.0 17.7
MR7 0075 2—0105 20072 4—0105 4 8/15*
*. Cable clamping (Ouneva Pressure Terminal Connector)
70.8/132.8* 1.5 13.3 8/15* 70.8/132.8*
8
Check the connection of the earth cable to the motor and the AC drive terminals marked with .
NOTE: Two protective conductors are required according to standard EN61800-5-1. See Figure 30 and chapter Earthing and earth fault protection. Use an M5 size screw and tighten it to 2.0 Nm (17.7 lb-in.).
9233.emf
= M5; 2 Nm
24-hour support +358 (0)201 212 575 • Email: [email protected]
5

5
vacon • 43 Power cabling
Figure 31. Re-mounting of cover components
5.3.2 Frames MR8 and MR9
Figure 32.Stripping of cables
9 Re-mount the cable protection plate (Figure 31) and the cover of the AC drive.
1 Strip the motor, mains and brake resistor cables as advised below.
9234.emf
1,5Nm
9019.e
mf
D1B1
C1A1
D2
C2
E
Earth conductor
MAINS MOTOR
Earth conductor
Tel. +358 (0) 201 2121 • Fax +358 (0)201 212 205

Power cabling vacon • 44
Table 19. Cables stripping lengths [mm]
Figure 33. Removing main cover (MR9)
Frame A1 B1 C1 D1 C2 D2 E
MR8 40 180 25 300 25 300 Leave as short as possibleMR9 40 180 25 300 25 300
2 MR9 only: Remove the main cover of the AC drive.
9046.emf
M4 x 10
24-hour support +358 (0)201 212 575 • Email: [email protected]
5

5
vacon • 45 Power cabling
Figure 34. Removing cable cover and cable fitting plate (MR8).
Figure 35. Removing cable cover and cable fitting plate (MR9).
3 Remove the cable cover (1) and the cable fitting plate (2).
19029.emf
M4x8
29039.emf
M4 x 8
12
9041.emf
M4 x 8
M5 x 10
Tel. +358 (0) 201 2121 • Fax +358 (0)201 212 205
Power cabling vacon • 46
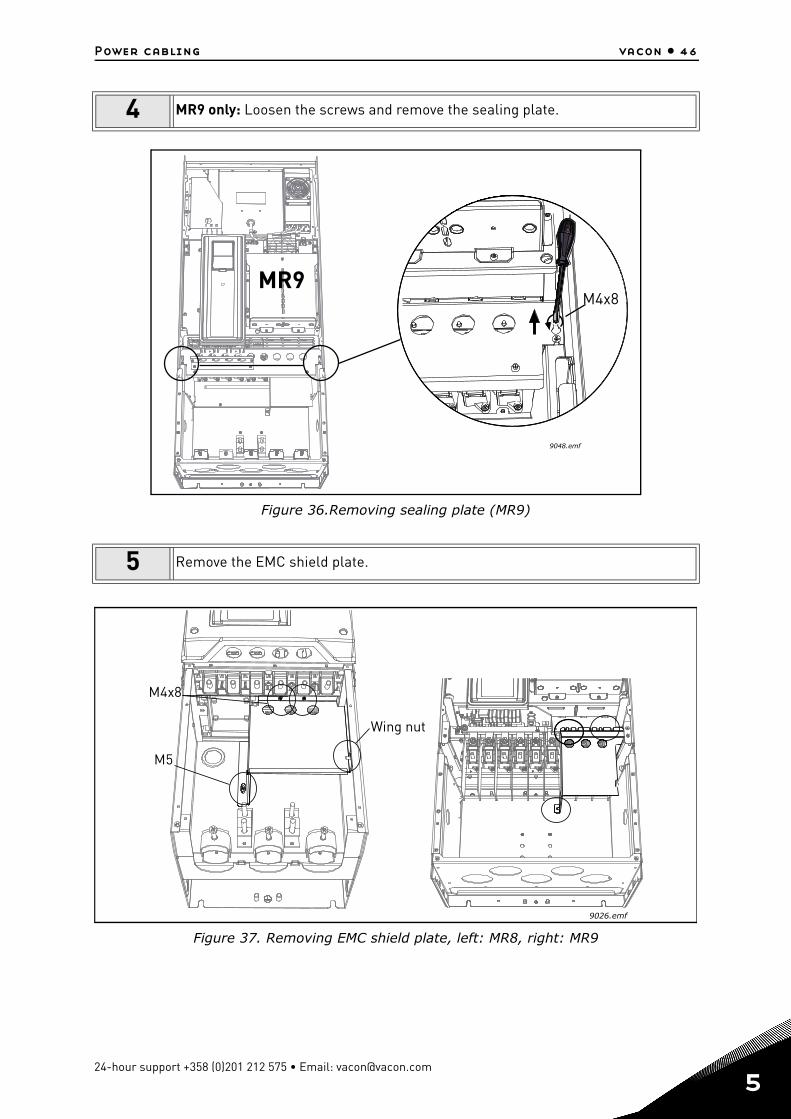
Figure 36.Removing sealing plate (MR9)
Figure 37. Removing EMC shield plate, left: MR8, right: MR9
4 MR9 only: Loosen the screws and remove the sealing plate.
5 Remove the EMC shield plate.
MR9M4x8
9048.emf
M5
M4x8
Wing nut
9026.emf
24-hour support +358 (0)201 212 575 • Email: [email protected]
5

5
vacon • 47 Power cabling
Figure 38.Power terminals, left: MR8, right: MR9
Figure 39.Cutting the cable grommets
6 Locate the terminals. OBSERVE the exceptional placement of motor cable termi-nals especially in frame MR8!
7Cut the rubber grommets open to slide the cables through. Should the grom-mets fold in while inserting the cable, just draw the cable back a bit to straighten the grommets up. Do not cut the grommet openings wider than what is neces-sary for the cables you are using.
L1 L2 L3 DC-DC+R+ R-
U V W
L1 L2 L3 DC-DC+R+
R- U V W
9027.emf
9030.emf
Tel. +358 (0) 201 2121 • Fax +358 (0)201 212 205
Power cabling vacon • 48
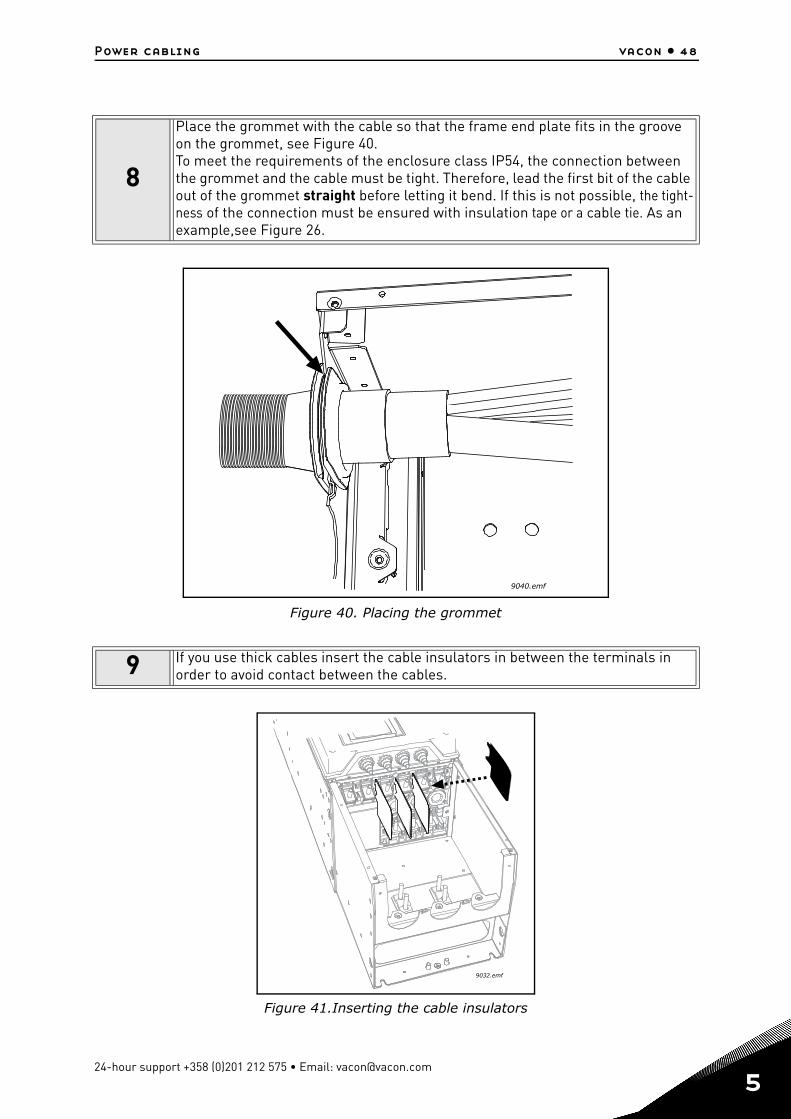
Figure 40. Placing the grommet
Figure 41.Inserting the cable insulators
8
Place the grommet with the cable so that the frame end plate fits in the groove on the grommet, see Figure 40.To meet the requirements of the enclosure class IP54, the connection between the grommet and the cable must be tight. Therefore, lead the first bit of the cable out of the grommet straight before letting it bend. If this is not possible, the tight-ness of the connection must be ensured with insulation tape or a cable tie. As an example,see Figure 26.
9 If you use thick cables insert the cable insulators in between the terminals in order to avoid contact between the cables.
9040.emf
9032.emf
24-hour support +358 (0)201 212 575 • Email: [email protected]
5

5
vacon • 49 Power cabling
Figure 42. Connecting power cables, left: MR8, right: MR9
Figure 43. Placing two cable lugs on top of each other
10
Connect the cables stripped as shown in Figure 32. • Connect the (phase) conductors of the supply, brake and motor cables into
their respective terminals (a).• Form the rest of the cable shield of all cables into “pigtails” and make a
grounding connection as shown in Figure 42 (b) using the clamp from the Accessories bag.
• NOTE: If you use several cables on one connector observe the position of cable lugs on top of each other. See Figure 43 below.
L1 L2 L3 DC-DC+R+ R-
b
a
a
b
a
b
9025.emf
U WV
L1 L2 L3 DC-DC+R+
R- U V W
9015.emf
Cable lug Cable lug
Connector
Tel. +358 (0) 201 2121 • Fax +358 (0)201 212 205
Power cabling vacon • 50
Tightening torques of cable terminals:
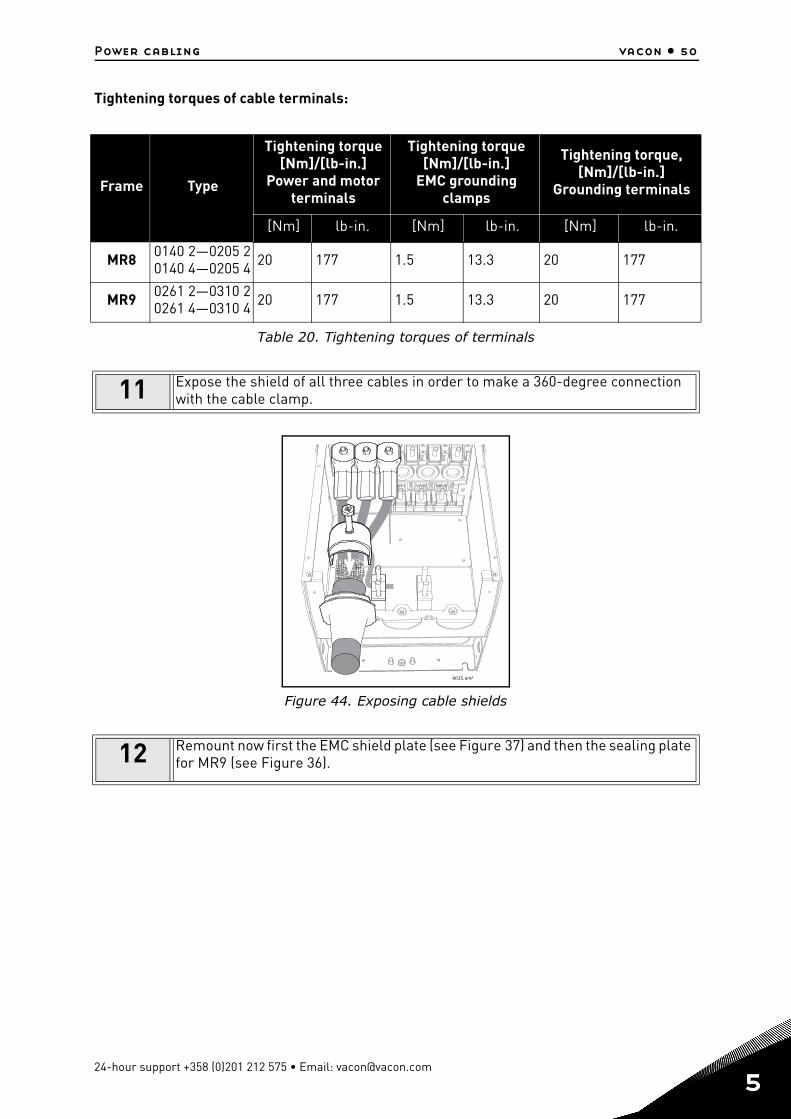
Table 20. Tightening torques of terminals
Figure 44. Exposing cable shields
Frame Type
Tightening torque [Nm]/[lb-in.]
Power and motor terminals
Tightening torque [Nm]/[lb-in.]
EMC grounding clamps
Tightening torque, [Nm]/[lb-in.]
Grounding terminals
[Nm] lb-in. [Nm] lb-in. [Nm] lb-in.
MR8 0140 2—0205 20140 4—0205 4 20 177 1.5 13.3 20 177
MR9 0261 2—0310 20261 4—0310 4 20 177 1.5 13.3 20 177
11 Expose the shield of all three cables in order to make a 360-degree connection with the cable clamp.
12 Remount now first the EMC shield plate (see Figure 37) and then the sealing plate for MR9 (see Figure 36).
9035.emf
24-hour support +358 (0)201 212 575 • Email: [email protected]
5

5
vacon • 51 Power cabling
Figure 45. Reattaching cable fitting plate and cover
Figure 46. Re-mounting the main cover (MR9)
13 Re-attach then the cable fitting plate and then the cable cover.
14 MR9 only: Now re-mount the main cover (unless you want to make the control connections first).
M4x8
M4x8
9034.emf
9047.emf
M4x10
Tel. +358 (0) 201 2121 • Fax +358 (0)201 212 205
Power cabling vacon • 52
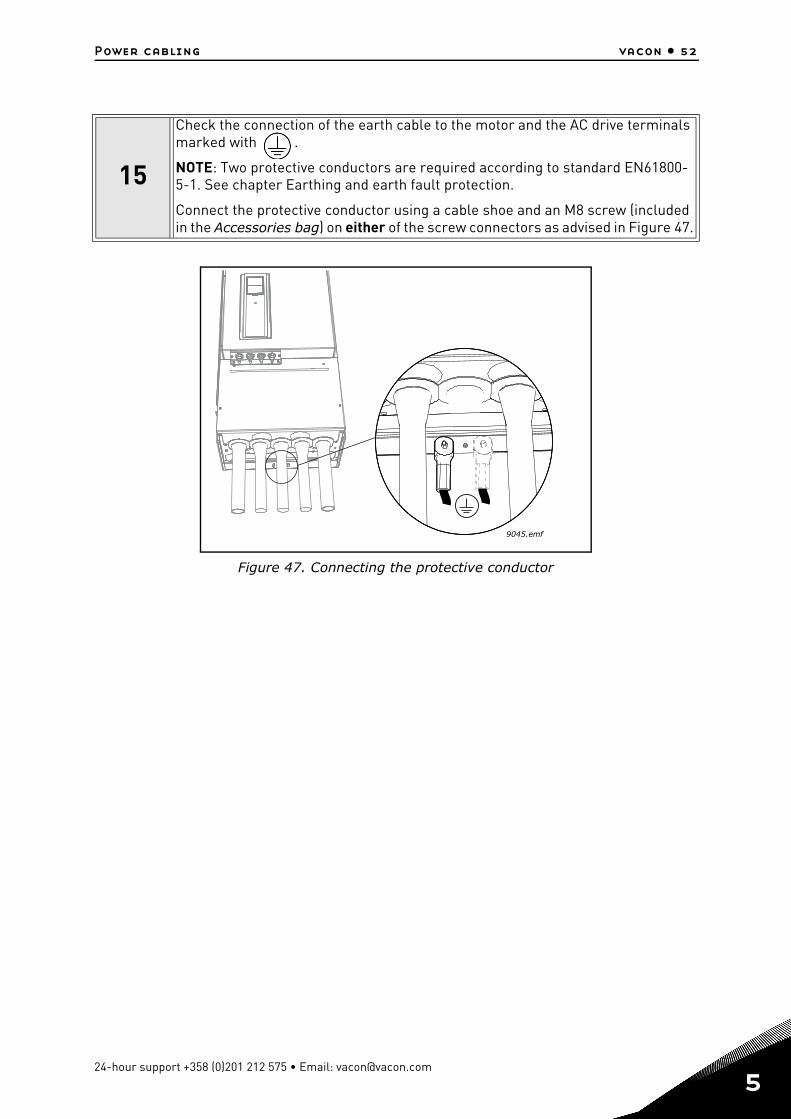
Figure 47. Connecting the protective conductor
15
Check the connection of the earth cable to the motor and the AC drive terminals marked with .
NOTE: Two protective conductors are required according to standard EN61800-5-1. See chapter Earthing and earth fault protection.
Connect the protective conductor using a cable shoe and an M8 screw (included in the Accessories bag) on either of the screw connectors as advised in Figure 47.
9045.emf
24-hour support +358 (0)201 212 575 • Email: [email protected]
5

5
vacon • 53 Power cabling
5.4 Installation in corner-grounded network
Corner grounding is allowed for the drive types rating from 72 A to 310 A at 380…480 V supply and from 75 A to 310 A at 208…240 V supply.
In these circumstances the EMC protection class must be changed to level C4 following the in-structions in chapter 7.3 of this manual.
Corner grounding is not allowed for the drive types with rating from 3.4 A to 61 A at 380…480 V supply and 3.7 A to 62 A with 208…240 V supply.
Tel. +358 (0) 201 2121 • Fax +358 (0)201 212 205

Control unit vacon • 54
6. CONTROL UNIT
The control unit of the AC drive consists of the standard boards and additional boards (option boards, see chapter 6.3) connected to the slot connectors of the control board.
Figure 48. Location of control unit components
Locations of essential control unit components:
1 = Terminals for standard I/O connections; See chapter 6.1.
2 = Ethernet connection
3 = Terminals for three relays connections (or optionally two relays and a termistor); See chapter 6.1.
4 = Optional boards; See chapter 6.3
5 = DIP switch for RS485 bus termination; See chapter 6.2.2
6 = DIP switch for Analogue output signal selection; See chapter 8.2.1
7 = DIP switch for isolating digital inputs from ground, see chapter 6.1.2.2
8 = DIP switch for Analogue input 2 signal selection; See chapter 8.2.1
9 = DIP switch for Analogue input 1 signal selection; See chapter 8.2.1
10 = RTC Battery
11 = Fan (in frames MR4 and MR5 and protection class IP54 only)
12 = Ethernet led status
When delivered from the factory, the control unit of the AC drive contains the standard control-ling interface - the control terminals of the control board and the relay board - unless other-wise specifically ordered. On the next pages you will find the arrangement of the control I/O and the relay terminals, the general wiring diagram and the control signal descriptions.
9117.emf
5678
9
1
1011
43
2
12
24-hour support +358 (0)201 212 575 • Email: [email protected]
6
6
vacon • 55 Control unit
The control board can be powered externally (+24VDC, 1000mA, ±10%) by connecting the ex-ternal power source to terminal #30, see page 56. This voltage is sufficient for parameter set-ting and for keeping the control unit active. Note however that the measurements of the main circuit (e.g. DC-link voltage, unit temperature) are not available when the mains is not connect-ed.
6.1 Control unit cabling
The standard control unit connections are presented in Figure 49 below. The control board is equipped with 22 fixed control I/O terminals and the relay board with 8. All signal descriptions are given in Figure 49.
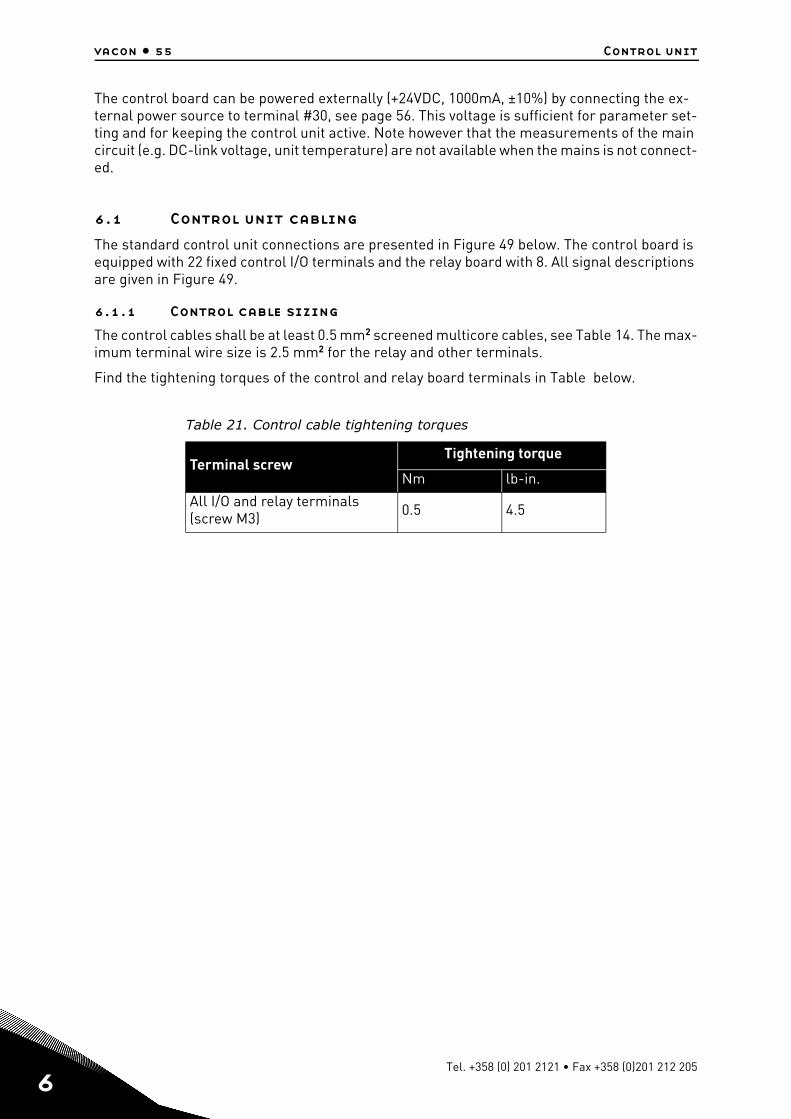
6.1.1 Control cable sizing
The control cables shall be at least 0.5 mm2 screened multicore cables, see Table 14. The max-imum terminal wire size is 2.5 mm2 for the relay and other terminals.
Find the tightening torques of the control and relay board terminals in Table below.
Table 21. Control cable tightening torques
Terminal screwTightening torque
Nm lb-in.
All I/O and relay terminals(screw M3) 0.5 4.5
Tel. +358 (0) 201 2121 • Fax +358 (0)201 212 205

Control unit vacon • 56
6.1.2 Control terminals and DIP switches
The terminals of the Basic I/O board and the Relay boards are described below. For more in-formation on the connections, see chapter 8.2.1.
The terminals shown on shadowed background are assigned for signals with optional functions selectable with DIP switches. See more information in chapter 6.1.2.1 on page 57.
Figure 49. Control I/O terminal signals on basic I/O board and connection example
*Digital inputs can be isolated from ground with a DIP switch, see chapter 6.1.2.2.
RUN
FAULT
READY
*)
*)
Reference output+10 Vref1
24V auxiliary voltage24Vout6
Analogue input,voltage or current
Referencepotentiometer 1...10kΩ
Actual value
2-wire transmitter
I = (0)4...20mA
AI1+2
Analogue inputcommon, (current)AI1-3
Analogue input,voltage or currentAI2+4
Analogue inputcommon, (current)AI2-5
Analogue signal(+output)AO1+
RUN
18
Analogue outputcommonAO1-/GND19
24V auxiliaryinput voltage+24Vin30
24V auxiliary voltage24Vout12
I/O groundGND7
I/O groundGND13
Digital input 1DI18
Digital input 2DI29
Digital input 3DI310
Digital input 4DI414
Digital input 5DI515
Digital input 6DI616
Relay output 1RO1/1 NC21
22 RO1/2 CM
RO1/3 NO23
Common for DI1-DI6CM11
Common for DI1-DI6CM17
Serial bus, negativeRS485A
Serial bus, positiveRS485B
Relay output 2
Relay output 3
RO2/1 NC24
25 RO2/2 CM
RO2/3 NO26
32 RO3/2 CM
RO3/3 NO33
9111.emf
Frequency reference
Frequency reference
Start forward
Start reverse
External fault
DI4 DI5 Freq. ref.OpenClosedOpenClosed
OpenOpenClosedClosed
Analog input 1Preset Freq. 1Preset Freq. 2Preset Freq. 3
Fault reset
Output frequency
Modbus RTU
mA
24-hour support +358 (0)201 212 575 • Email: [email protected]
6

6
vacon • 57 Control unit
6.1.2.1 Selection of terminal functions with dip switches
The shadowed terminals in Figure 49 allow for three functional selections each with the so-called dip switches. The switches have two positions, up and down. See figure to locate the switches and make appropriate selections for your requirements.
Figure 50. Dip switches
6.1.2.2 Isolating digital inputs from ground
The digital inputs (terminals 8-10 and 14-16) on the basic I/O board can be isolated from ground by changing the position of a dip switch on the control board. See Figure 51.
Figure 51. Change position of this jumper to isolate the digital inputs from ground.
AI2U = Voltage signalI = Current signal (Default!)
AI1U = Voltage signal (Default!)I = Current signal
RS-485 bus terminationOFF (Default!)ON
9108.emf
AO1U = Voltage signalI = Current signal (Default!)
9109.emf
Digital inputsFloatingConnected to GND (Default!)
Tel. +358 (0) 201 2121 • Fax +358 (0)201 212 205

Control unit vacon • 58
6.2 Fieldbus connection
The AC drive can be connected to fieldbus either through RS485 or Ethernet. The connection for RS485 is on the basic I/O board (terminals A and B) and the connection for Ethernet is under the drive cover, left to the control keypad. See Figure 52.
Figure 52. Ethernet and RS485 connections
17 18 19 30Ethernetconnector
DIPswitches
Groundingbar
I/Oterminals
RS485 terminalsA = Data- B = Data+
9113.emf
24-hour support +358 (0)201 212 575 • Email: [email protected]
6
6
vacon • 59 Control unit
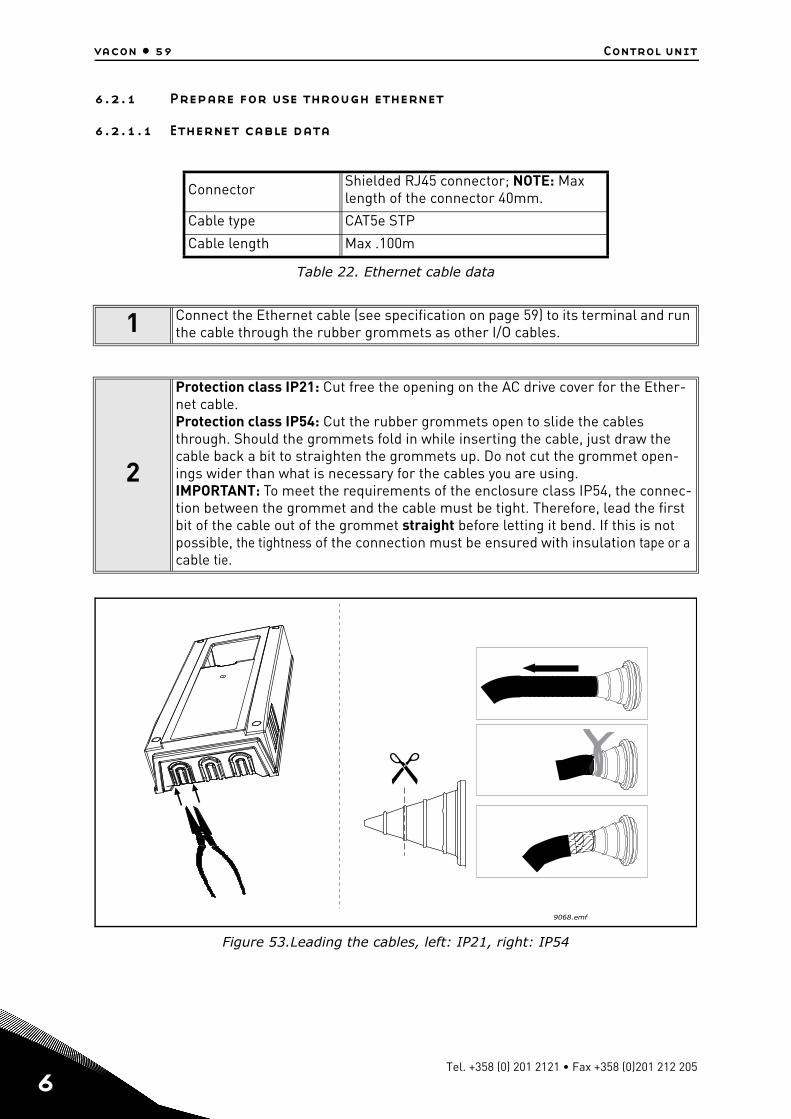
6.2.1 Prepare for use through ethernet
6.2.1.1 Ethernet cable data
Table 22. Ethernet cable data
Figure 53.Leading the cables, left: IP21, right: IP54
Connector Shielded RJ45 connector; NOTE: Max length of the connector 40mm.
Cable type CAT5e STP
Cable length Max .100m
1 Connect the Ethernet cable (see specification on page 59) to its terminal and run the cable through the rubber grommets as other I/O cables.
2
Protection class IP21: Cut free the opening on the AC drive cover for the Ether-net cable.Protection class IP54: Cut the rubber grommets open to slide the cables through. Should the grommets fold in while inserting the cable, just draw the cable back a bit to straighten the grommets up. Do not cut the grommet open-ings wider than what is necessary for the cables you are using.IMPORTANT: To meet the requirements of the enclosure class IP54, the connec-tion between the grommet and the cable must be tight. Therefore, lead the first bit of the cable out of the grommet straight before letting it bend. If this is not possible, the tightness of the connection must be ensured with insulation tape or a cable tie.
9068.emf
Tel. +358 (0) 201 2121 • Fax +358 (0)201 212 205
Control unit vacon • 60
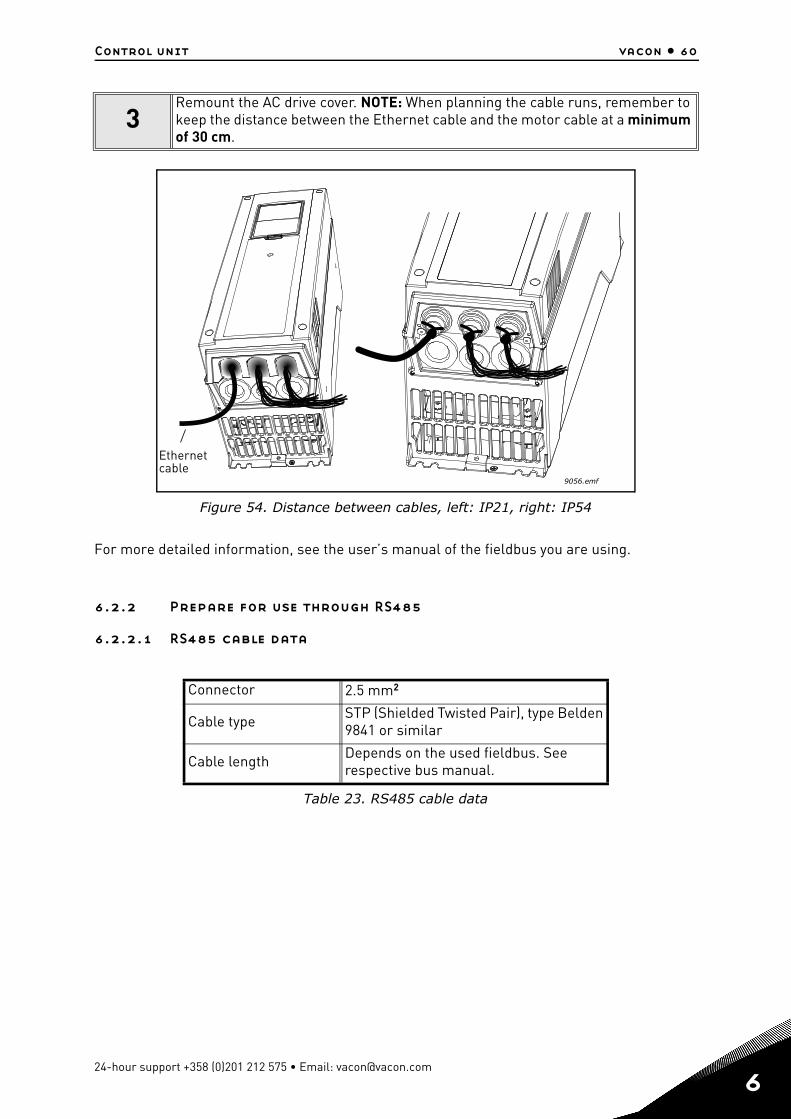
Figure 54. Distance between cables, left: IP21, right: IP54
For more detailed information, see the user’s manual of the fieldbus you are using.
6.2.2 Prepare for use through RS485
6.2.2.1 RS485 cable data
Table 23. RS485 cable data
3Remount the AC drive cover. NOTE: When planning the cable runs, remember to keep the distance between the Ethernet cable and the motor cable at a minimum of 30 cm.
Connector 2.5 mm2
Cable type STP (Shielded Twisted Pair), type Belden 9841 or similar
Cable length Depends on the used fieldbus. See respective bus manual.
9056.emf
Ethernetcable
24-hour support +358 (0)201 212 575 • Email: [email protected]
6
6
vacon • 61 Control unit
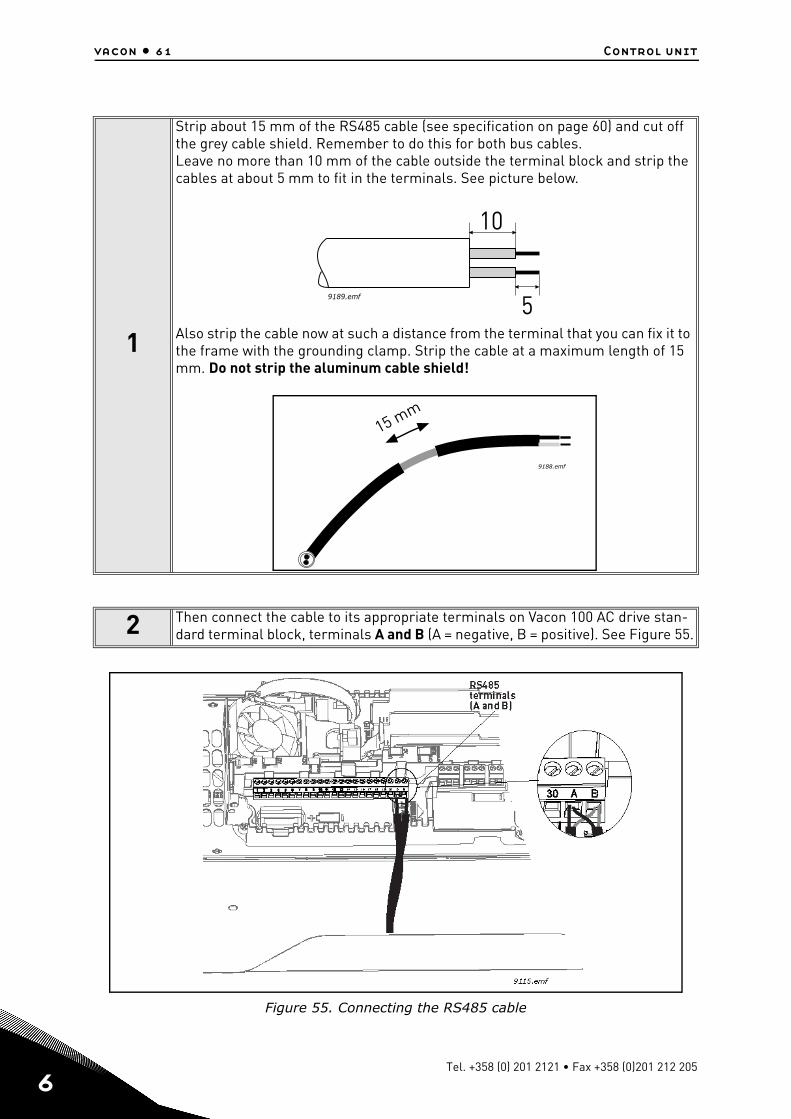
Figure 55. Connecting the RS485 cable
1
Strip about 15 mm of the RS485 cable (see specification on page 60) and cut off the grey cable shield. Remember to do this for both bus cables.Leave no more than 10 mm of the cable outside the terminal block and strip the cables at about 5 mm to fit in the terminals. See picture below.
Also strip the cable now at such a distance from the terminal that you can fix it to the frame with the grounding clamp. Strip the cable at a maximum length of 15 mm. Do not strip the aluminum cable shield!
2 Then connect the cable to its appropriate terminals on Vacon 100 AC drive stan-dard terminal block, terminals A and B (A = negative, B = positive). See Figure 55.
9189.emf
10
5
15 mm
9188.emf
Tel. +358 (0) 201 2121 • Fax +358 (0)201 212 205
Control unit vacon • 62
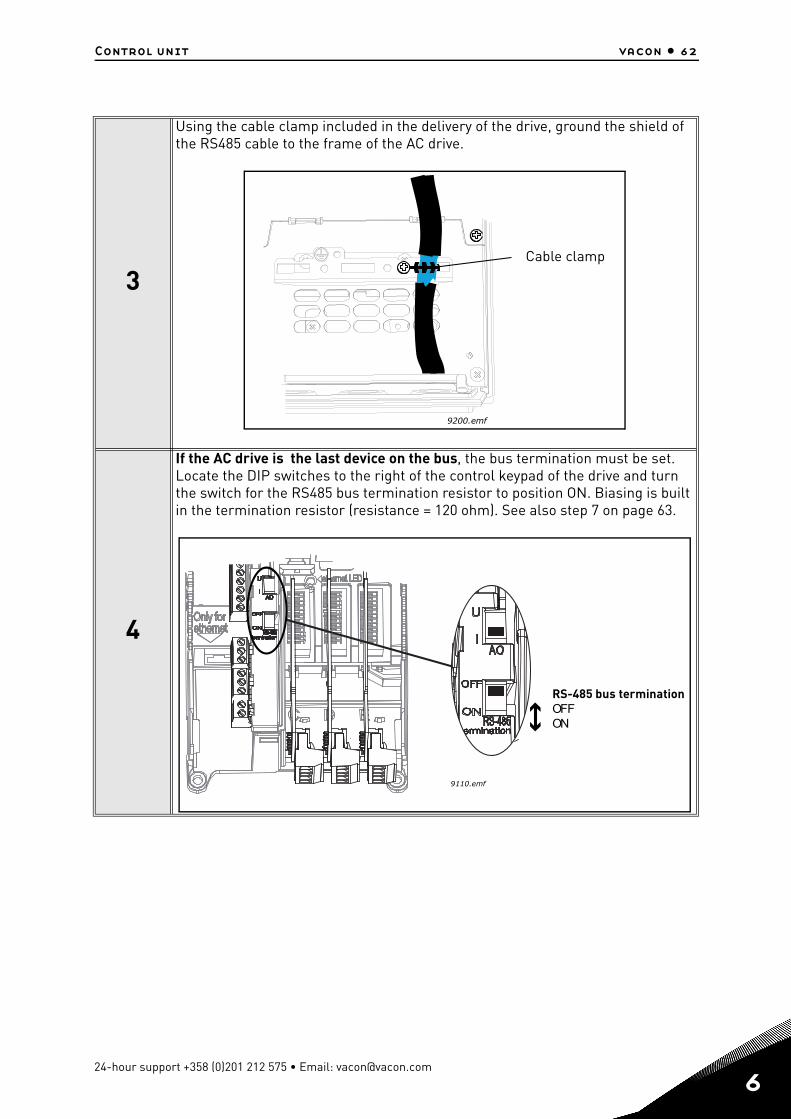
3
Using the cable clamp included in the delivery of the drive, ground the shield of the RS485 cable to the frame of the AC drive.
4
If the AC drive is the last device on the bus, the bus termination must be set. Locate the DIP switches to the right of the control keypad of the drive and turn the switch for the RS485 bus termination resistor to position ON. Biasing is built in the termination resistor (resistance = 120 ohm). See also step 7 on page 63.
9200.emf
Cable clamp
RS-485 bus terminationOFFON
9110.emf
24-hour support +358 (0)201 212 575 • Email: [email protected]
6
6
vacon • 63 Control unit
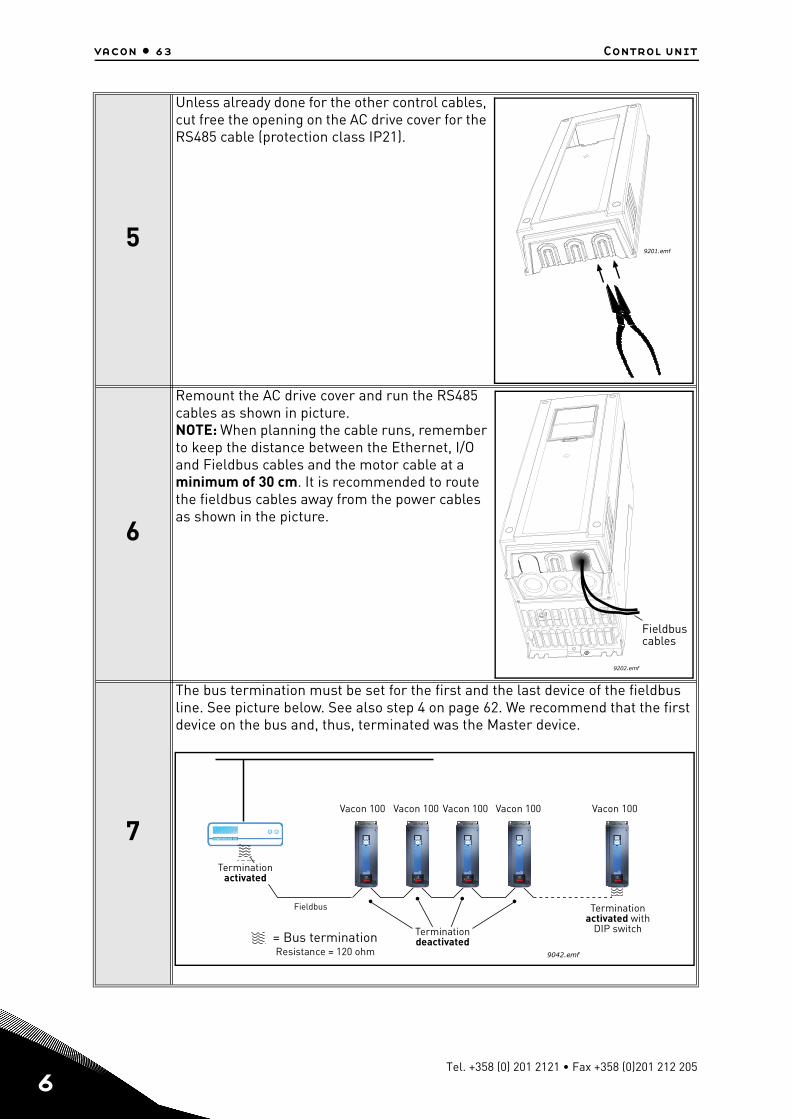
5
Unless already done for the other control cables, cut free the opening on the AC drive cover for the RS485 cable (protection class IP21).
6
Remount the AC drive cover and run the RS485 cables as shown in picture.NOTE: When planning the cable runs, remember to keep the distance between the Ethernet, I/O and Fieldbus cables and the motor cable at a minimum of 30 cm. It is recommended to route the fieldbus cables away from the power cables as shown in the picture.
7
The bus termination must be set for the first and the last device of the fieldbus line. See picture below. See also step 4 on page 62. We recommend that the first device on the bus and, thus, terminated was the Master device.
9201.emf
9202.emf
Fieldbuscables
9042.emf
Fieldbus
= Bus terminationResistance = 120 ohm
Terminationactivated
Terminationactivated with
DIP switchTerminationdeactivated
Vacon 100 Vacon 100 Vacon 100 Vacon 100 Vacon 100
Tel. +358 (0) 201 2121 • Fax +358 (0)201 212 205

Control unit vacon • 64
6.3 Option board installation
The option boards are placed in the board slots on the drive.
The table below gives information about which option board can be placed in which board slot on the drive.
NOTE! It is not allowed to add or replace option boards or fieldbus boards on an AC drive with the power switched on. This may damage the boards.
Table 24. Option board compatibilities for board slots
Option board type Board description Insertable in slots
OPTB1 I/O expander board C, D, E
OPTB2 Thermistor relay board C, D, E
OPTB4 I/O expander board C, D, E
OPTB5 Relay board C, D, E
OPTB9 I/O expander board C, D, E
OPTBF I/O expander board C, D, E
OPTBH Temperature measurement board C, D, E
OPTBJ Safe Torque-Off board E
OPTC4 LonWorks fieldbus board D, E
OPTCP Ethernet, Profinet I/O option board D, E
OPTE3 Profibus DPV1 fieldbus board D, E
OPTE5 Profibus DPV1 fieldbus board (D type connector) E
OPTE6 CanOpen fieldbus board D, E
OPTE7 DeviceNet fieldbus board D, E
13006.emf
24-hour support +358 (0)201 212 575 • Email: [email protected]
6

6
vacon • 65 Control unit
Figure 56.Opening the main cover
1 Open the cover of the AC drive.
The relay outputs and other I/O-terminals may have a dangerous control voltage present even when the drive is disconnected from mains.
2
Make sure that the sticker on the connector of the board says “dv” (dual voltage). This indicates that the board is compatible with Vacon 100. See below:
NOTE: Incompatible boards cannot be installed on Vacon 100. Compatible boards have a slot coding that enable the placing of the board (see above)
DANGER
M4x55
9174.emf
Slot coding
OPT
dv
9116.emf
Tel. +358 (0) 201 2121 • Fax +358 (0)201 212 205

Control unit vacon • 66
3
To reveal the option board slots, open the control unit cover as shown in picture below.
4
Install the option board into the appropriate slot C, D or E (see Table 24 on page 64 and Figure below).Close the cover of the control unit and remount the keypad.
9235.emf
D E
3024.emf
24-hour support +358 (0)201 212 575 • Email: [email protected]
6

6
vacon • 67 Control unit
6.4 Battery installation for Real Time Clock (RTC)
Enabling the functions of the Real Time Clock (RTC) requires that an optional battery is in-stalled in the Vacon 100 drive.
Use ½ AA battery with voltage of 3.6V and capacity of 1000...1200 mAh (e.g. Panasonic BR-1/2 AA or Vitzrocell SB-AA02). The battery will last approximately ten years.
The place for the battery can be found in all frames left to the control keypad (see Figure 48).
Detailed information on the functions of the Real Time Clock (RTC) can be found in the Vacon 100 Application Manual.
Tel. +358 (0) 201 2121 • Fax +358 (0)201 212 205
Control unit vacon • 68
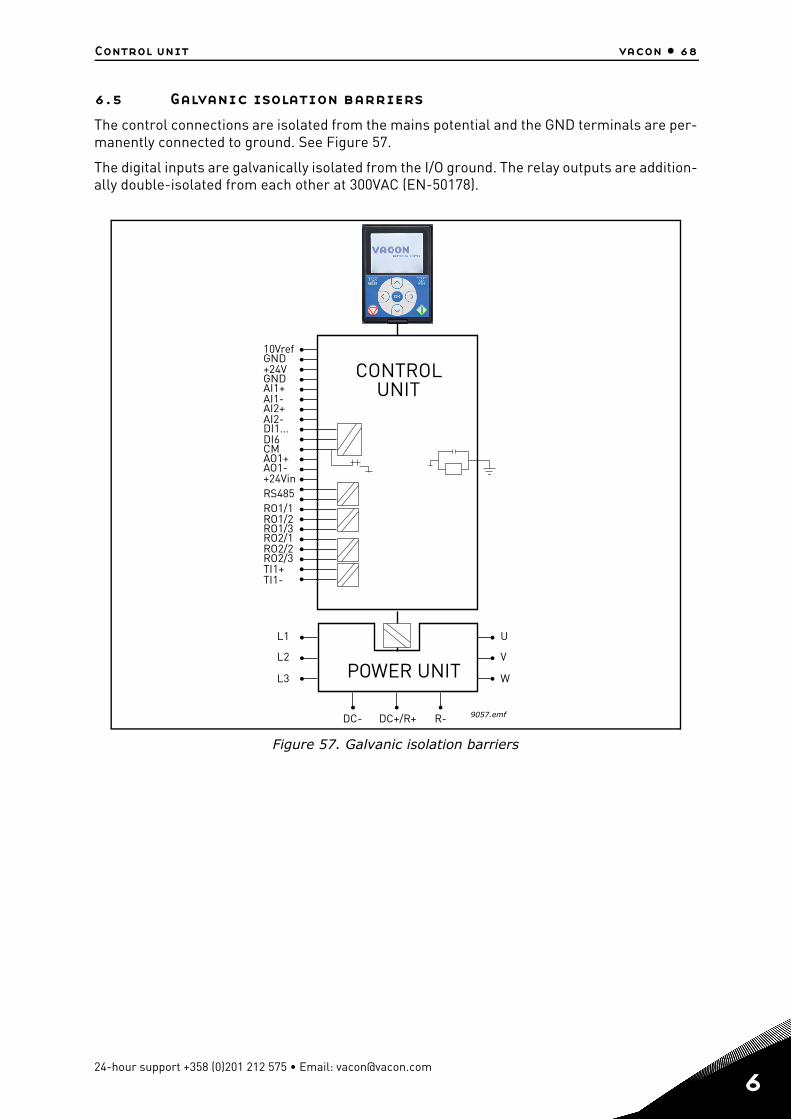
6.5 Galvanic isolation barriers
The control connections are isolated from the mains potential and the GND terminals are per-manently connected to ground. See Figure 57.
The digital inputs are galvanically isolated from the I/O ground. The relay outputs are addition-ally double-isolated from each other at 300VAC (EN-50178).
Figure 57. Galvanic isolation barriers
CONTROLUNIT
10VrefGND+24VGNDAI1+AI1-AI2+AI2-DI1...DI6CMAO1+AO1-+24VinRS485RO1/1RO1/2RO1/3RO2/1RO2/2RO2/3TI1+TI1-
POWER UNIT
L1
L2
L3
DC- DC+/R+ R-
U
V
W
9057.emf
24-hour support +358 (0)201 212 575 • Email: [email protected]
6
7
vacon • 69 Commissioning
7. COMMISSIONING
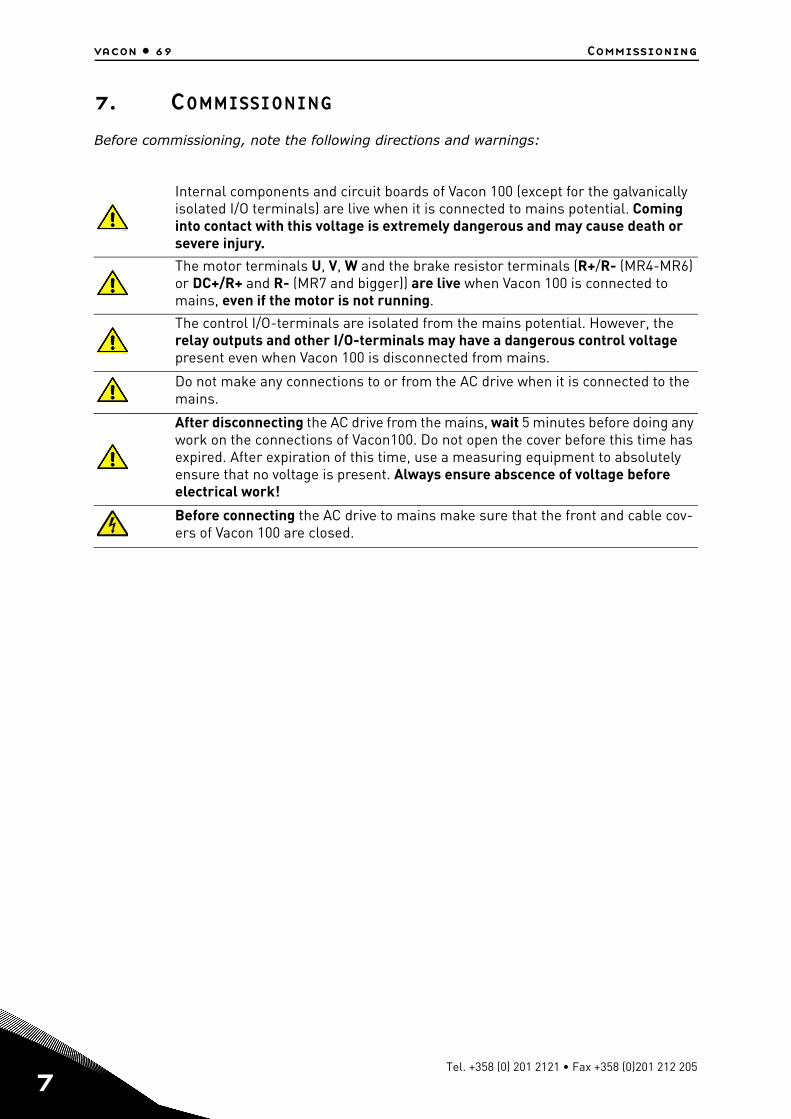
Before commissioning, note the following directions and warnings:
Internal components and circuit boards of Vacon 100 (except for the galvanically isolated I/O terminals) are live when it is connected to mains potential. Coming into contact with this voltage is extremely dangerous and may cause death or severe injury.
The motor terminals U, V, W and the brake resistor terminals (R+/R- (MR4-MR6) or DC+/R+ and R- (MR7 and bigger)) are live when Vacon 100 is connected to mains, even if the motor is not running.
The control I/O-terminals are isolated from the mains potential. However, the relay outputs and other I/O-terminals may have a dangerous control voltage present even when Vacon 100 is disconnected from mains.
Do not make any connections to or from the AC drive when it is connected to the mains.
After disconnecting the AC drive from the mains, wait 5 minutes before doing any work on the connections of Vacon100. Do not open the cover before this time has expired. After expiration of this time, use a measuring equipment to absolutely ensure that no voltage is present. Always ensure abscence of voltage before electrical work!
Before connecting the AC drive to mains make sure that the front and cable cov-ers of Vacon 100 are closed.
13006.emf
13006.emf
13006.emf
13006.emf
13006.emf
9000.emf
Tel. +358 (0) 201 2121 • Fax +358 (0)201 212 205

Commissioning vacon • 70
7.1 Commissioning of the drive
Read carefully the safety instructions in Chapter 1 and above and follow them.
After the installation:
Check that both the AC drive and the motor are grounded. Check that the mains, brake and motor cables comply with the requirements given in
chapter 5.1.1. Check that the control cables are located as far as possible from the power cables, see
chapter 5.3. Check that the shields of the shielded cables are connected to protective earth marked
with . Check the tightening torques of all terminals Check that the wires do not touch the electrical components of the drive. Check that the common inputs of digital input groups are connected to +24V or ground
of the I/O terminal or the external supply. Check the quality and quantity of cooling air (chapter 4.2 and Table 13). Check the inside of the AC drive for condensation. Check the installation space for foreign objects. Check that all Start/Stop switches connected to the I/O terminals are in Stop-posi-
tion. Before connecting the AC drive to mains: Check mounting and condition of all fuses
and other protective devices. Run the Startup Wizard (see the Application Manual).
7.2 Running the motor
MOTOR RUN CHECK LIST
Before starting the motor, check that the motor is mounted properly and ensure that the machine connected to the motor allows the motor to be started.
Set the maximum motor speed (frequency) according to the motor and the machine connected to it.
Before reversing the motor make sure that this can be done safely.
Make sure that no power correction capacitors are connected to the motor cable.
Make sure that the motor terminals are not connected to mains potential.
13006.emf
13006.emf
13006.emf
13006.emf
13006.emf
24-hour support +358 (0)201 212 575 • Email: [email protected]
7

7
vacon • 71 Commissioning
7.2.1 Cable and motor insulation checks
1. Motor cable insulation checksDisconnect the motor cable from terminals U, V and W of the AC drive and from the motor. Measure the insulation resistance of the motor cable between each phase conductor as well as between each phase conductor and the protective ground conductor. The insula-tion resistance must be >1M at ambient temperature of 20°C.
2. Mains cable insulation checksDisconnect the mains cable from terminals L1, L2 and L3 of the AC drive and from the mains. Measure the insulation resistance of the mains cable between each phase conduc-tor as well as between each phase conductor and the protective ground conductor. The insulation resistance must be >1Mat ambient temperature of 20°C
3. Motor insulation checksDisconnect the motor cable from the motor and open the bridging connections in the motor connection box. Measure the insulation resistance of each motor winding. The measurement voltage must equal at least the motor nominal voltage but not exceed 1000 V. The insulation resistance must be >1M at ambient temperature of 20°C. Always follow the instructions of the motor manufacturer.
Tel. +358 (0) 201 2121 • Fax +358 (0)201 212 205

Commissioning vacon • 72
7.3 Installation in it system
If your supply network is an IT (impedance-grounded) system but your AC drive is EMC-pro-tected according to class C2 you need to modify the EMC protection of the AC drive to EMC-level C4. This is done by removing the built-in EMC jumpers with a simple procedure described below:
7.3.1 Frames MR4 to MR6
Figure 58. Locations of the EMC-jumpers in frames MR4 to MR6
Figure 59. Removing the jumper, MR6 as example
Warning! Do not perform any modifications on the AC drive when it is con-nected to mains.
1 Remove the main cover of the AC drive (see page 38) and locate the jumpers con-necting the built-in RFI-filters to ground. See Figure 58.
2Disconnect the RFI-filters from ground by removing the EMC-jumpers. NOTE! The cable cover must be removed in MR4 and MR5 before the jumper(s) can be reached. See Figure 59.
13006.emf
MR59236.emf
MR49237.emf
MR69238.emf
9060.emf
24-hour support +358 (0)201 212 575 • Email: [email protected]
7
7
vacon • 73 Commissioning
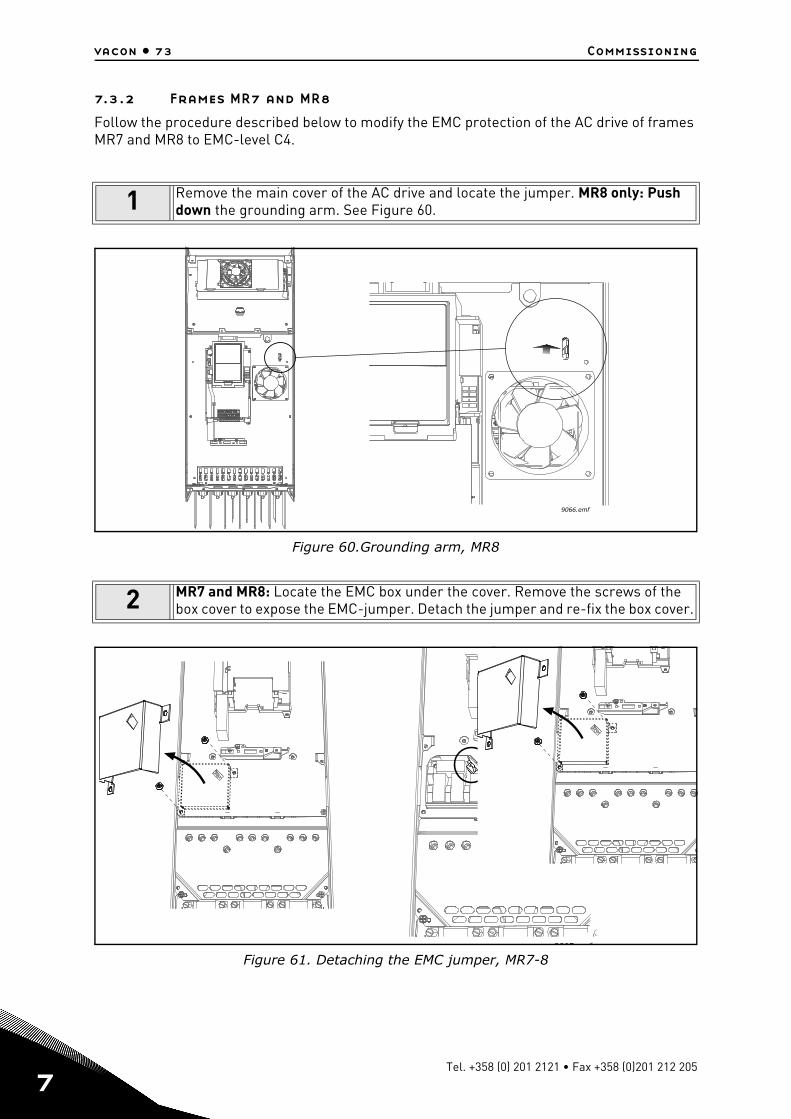
7.3.2 Frames MR7 and MR8
Follow the procedure described below to modify the EMC protection of the AC drive of frames MR7 and MR8 to EMC-level C4.
Figure 60.Grounding arm, MR8
Figure 61. Detaching the EMC jumper, MR7-8
1 Remove the main cover of the AC drive and locate the jumper. MR8 only: Push down the grounding arm. See Figure 60.
2 MR7 and MR8: Locate the EMC box under the cover. Remove the screws of the box cover to expose the EMC-jumper. Detach the jumper and re-fix the box cover.
9066.emf
9065 emf
Tel. +358 (0) 201 2121 • Fax +358 (0)201 212 205
Commissioning vacon • 74
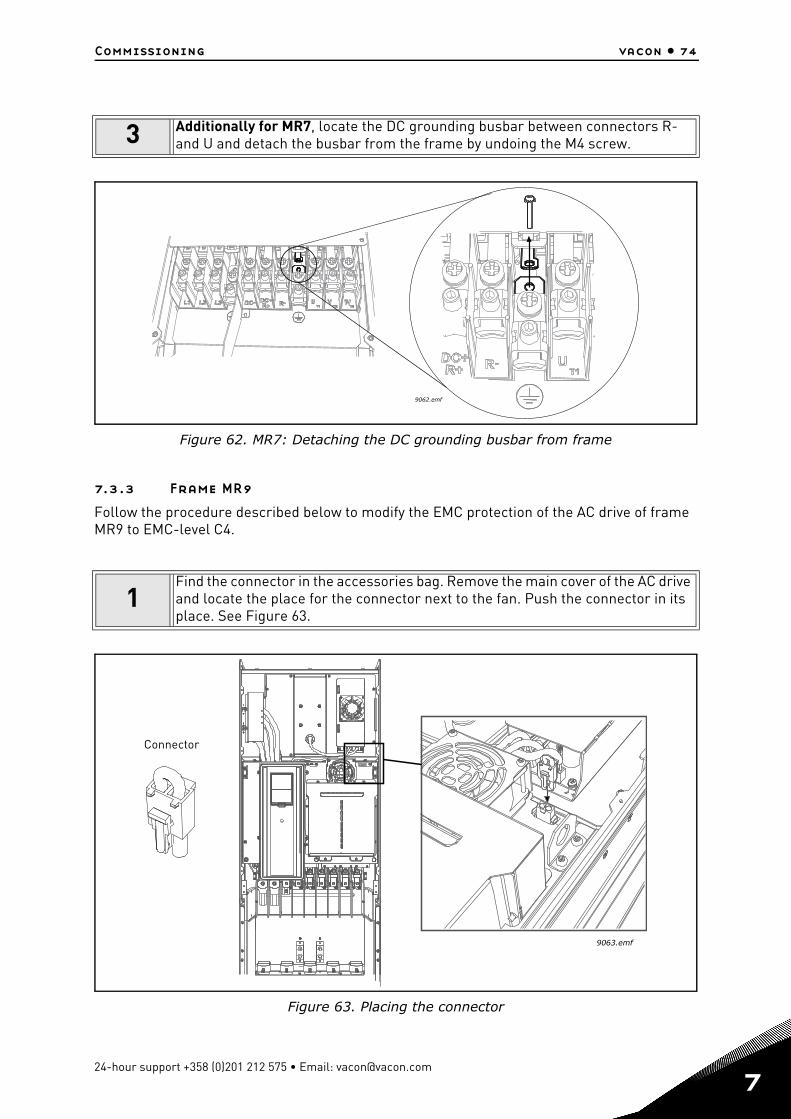
Figure 62. MR7: Detaching the DC grounding busbar from frame
7.3.3 Frame MR9
Follow the procedure described below to modify the EMC protection of the AC drive of frame MR9 to EMC-level C4.
Figure 63. Placing the connector
3 Additionally for MR7, locate the DC grounding busbar between connectors R- and U and detach the busbar from the frame by undoing the M4 screw.
1Find the connector in the accessories bag. Remove the main cover of the AC drive and locate the place for the connector next to the fan. Push the connector in its place. See Figure 63.
9062.emf
Connector
9063.emf
24-hour support +358 (0)201 212 575 • Email: [email protected]
7

7
vacon • 75 Commissioning
Figure 64. Removing the EMC jumper
2Further remove the extension box cover, the touch shield and the I/O plate with I/O grommet plate. Locate the EMC jumper on the EMC board (see magnification below) and remove it.
CAUTION! Before connecting the AC drive to mains make sure that the EMC pro-tection class settings of the drive are appropriately made.NOTE! After having performed the change write ‘EMC level modified’ on the sticker included in the Vacon 100 delivery (see below) and note the date. Unless already done, attach the sticker close to the name plate of the AC drive.
9067.emf
Product modified
Date:Date:
Date:
9004.emf
EMC-level modified C2->T DDMMYY9005.emf
Tel. +358 (0) 201 2121 • Fax +358 (0)201 212 205

Commissioning vacon • 76
7.4 Maintenance
In normal conditions, the AC drive is maintenance-free. However, regular maintenance is rec-ommended to ensure a trouble-free operation and a long lifetime of the drive. We recommend to follow the table below for maintenance intervals.
NOTE: Because of capacitor type (thin film capacitors), reforming of capacitors is not neces-sary.
NOTE! See the service manual for information on cleaning tools.
Maintenance interval Maintenance action
Regularly and according to general maintenance interval
• Check tightening torques of terminals• Check filters
6...24 months (depending on environment)
• Check input and output terminals and control I/O terminals.
• Check operation of cooling fan• Check for corrosion on terminals,
busbars and other surfaces• Check door filters in case of cabinet
installation
24 months (depending on the environment)
• Clean heatsink and cooling tunnel
3...6 years • Change internal IP54 fan
6...10 years • Change main fan
10 years • Replace the RTC battery
24-hour support +358 (0)201 212 575 • Email: [email protected]
7
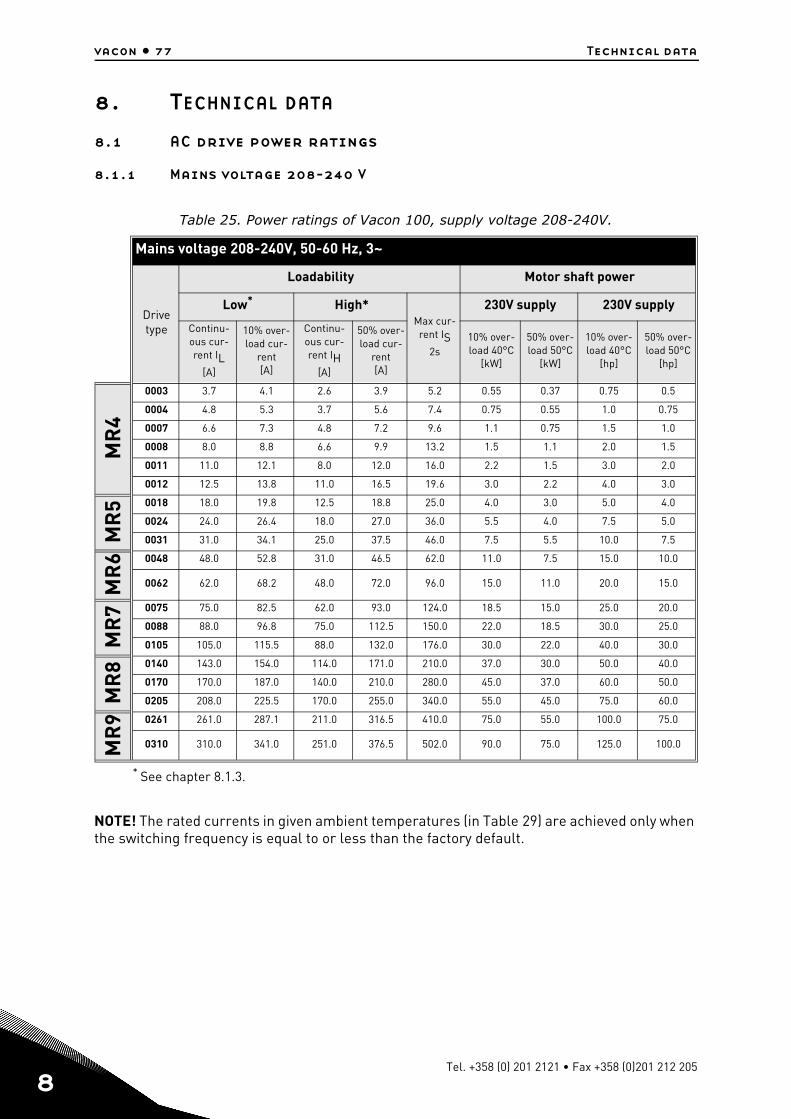
8
vacon • 77 Technical data
8. TECHNICAL DATA
8.1 AC drive power ratings
8.1.1 Mains voltage 208-240 V
NOTE! The rated currents in given ambient temperatures (in Table 29) are achieved only when the switching frequency is equal to or less than the factory default.
Table 25. Power ratings of Vacon 100, supply voltage 208-240V.
Mains voltage 208-240V, 50-60 Hz, 3~
Drive type
Loadability Motor shaft power
Low*
* See chapter 8.1.3.
High*Max cur-rent IS
2s
230V supply 230V supply
Continu-ous cur-rent IL
[A]
10% over-load cur-
rent[A]
Continu-ous cur-rent IH
[A]
50% over-load cur-
rent[A]
10% over-load 40°C
[kW]
50% over-load 50°C
[kW]
10% over-load 40°C
[hp]
50% over-load 50°C
[hp]
MR
4
0003 3.7 4.1 2.6 3.9 5.2 0.55 0.37 0.75 0.5
0004 4.8 5.3 3.7 5.6 7.4 0.75 0.55 1.0 0.75
0007 6.6 7.3 4.8 7.2 9.6 1.1 0.75 1.5 1.0
0008 8.0 8.8 6.6 9.9 13.2 1.5 1.1 2.0 1.5
0011 11.0 12.1 8.0 12.0 16.0 2.2 1.5 3.0 2.0
0012 12.5 13.8 11.0 16.5 19.6 3.0 2.2 4.0 3.0
MR
5 0018 18.0 19.8 12.5 18.8 25.0 4.0 3.0 5.0 4.0
0024 24.0 26.4 18.0 27.0 36.0 5.5 4.0 7.5 5.0
0031 31.0 34.1 25.0 37.5 46.0 7.5 5.5 10.0 7.5
MR
6 0048 48.0 52.8 31.0 46.5 62.0 11.0 7.5 15.0 10.0
0062 62.0 68.2 48.0 72.0 96.0 15.0 11.0 20.0 15.0
MR
7 0075 75.0 82.5 62.0 93.0 124.0 18.5 15.0 25.0 20.0
0088 88.0 96.8 75.0 112.5 150.0 22.0 18.5 30.0 25.0
0105 105.0 115.5 88.0 132.0 176.0 30.0 22.0 40.0 30.0
MR
8 0140 143.0 154.0 114.0 171.0 210.0 37.0 30.0 50.0 40.0
0170 170.0 187.0 140.0 210.0 280.0 45.0 37.0 60.0 50.0
0205 208.0 225.5 170.0 255.0 340.0 55.0 45.0 75.0 60.0
MR
9 0261 261.0 287.1 211.0 316.5 410.0 75.0 55.0 100.0 75.0
0310 310.0 341.0 251.0 376.5 502.0 90.0 75.0 125.0 100.0
Tel. +358 (0) 201 2121 • Fax +358 (0)201 212 205

Technical data vacon • 78
8.1.2 Mains voltage 380-500 V
NOTE! The rated currents in given ambient temperatures (in Table 29) are achieved only when the switching frequency is equal to or less than the factory default.
Table 26. Power ratings of Vacon 100, supply voltage 380-500V.
Mains voltage 380-500V, 50-60 Hz, 3~
Drive type
Loadability Motor shaft power
Low*
* See chapter 8.1.3.
High*Max cur-rent IS
2s
400 V supply 480 V supply
Continu-ous cur-rent IL
[A]
10% over-load cur-
rent[A]
Continu-ous cur-rent IH
[A]
50% over-load cur-
rent[A]
10% over-load 40°C
[kW]
50% over-load 50°C
[kW]
10% over-load 40°C
[hp]
50% over-load 50°C
[hp]
MR
4
0003 3.4 3.7 2.6 3.9 5.2 1.1 0.75 1.5 1.0
0004 4.8 5.3 3.4 5.1 6.8 1.5 1.1 2.0 1.5
0005 5.6 6.2 4.3 6.5 8.6 2.2 1.5 3.0 2.0
0008 8.0 8.8 5.6 8.4 11.2 3.0 2.2 4.0 3.0
0009 9.6 10.6 8.0 12.0 16.0 4.0 3.0 5.0 4.0
0012 12.0 13.2 9.6 14.4 19.2 5.5 4.0 7.5 5.0
MR
5 0016 16.0 17.6 12.0 18.0 24.0 7.5 5.5 10.0 7.5
0023 23.0 25.3 16.0 24.0 32.0 11.0 7.5 15.0 10.0
0031 31.0 34.1 23.0 34.5 46.0 15.0 11.0 20.0 15.0
MR
6 0038 38.0 41.8 31.0 46.5 62.0 18.5 15.0 25.0 20.0
0046 46.0 50.6 38.0 57.0 76.0 22.0 18.5 30.0 25.0
0061 61.0 67.1 46.0 69.0 92.0 30.0 22.0 40.0 30.0
MR
7 0072 72.0 79.2 61.0 91.5 122.0 37.0 30.0 50.0 40.0
0087 87.0 95.7 72.0 108.0 144.0 45.0 37.0 60.0 50.0
0105 105.0 115.5 87.0 130.5 174.0 55.0 45.0 75.0 60.0
MR
8 0140 140.0 154.0 105.0 157.5 210.0 75.0 55.0 100.0 75.0
0170 170.0 187.0 140.0 210.0 280.0 90.0 75.0 125.0 100.0
0205 205.0 225.5 170.0 255.0 340.0 110.0 90.0 150.0 125.0
MR
9 0261 261.0 287.1 205.0 307.5 410.0 132.0 110.0 200.0 150.0
0310 310.0 341.0 251.0 376.5 502.0 160.0 132.0 250.0 200.0
24-hour support +358 (0)201 212 575 • Email: [email protected]
8

8
vacon • 79 Technical data
8.1.3 Definitions of overloadability
Low overload = Following continuous operation at rated output current, 110% rated output current (IL) for 1 min, followed by a period of load current less than rated current, and of such du-ration that the r.m.s output current, over the duty cycle, does not exceed rated output current (IL).
Example: If the duty cycle requires 110% rated current for 1 min in every 10min, the remaining 9 min must be at approximately 98% rated current or less to maintain an r.m.s value >=100%.
Figure 65. Low overload
High overload = Following continuous operation at rated output current, 150 % rated output current (IH) for 1 min, followed by a period of load current less than rated current, and of such du-ration that the r.m.s output current, over the duty cycle, does not exceed rated output current (IH).
Example: If the duty cycle requires 150% rated current for 1 min in every 10min, the remaining 9 min must be at approximately 92% rated current or less to maintain an r.m.s value >=100%.
Figure 66. High overload
NOTE! For more information, please refer to standard IEC61800-2, chapter 5.2.2 (IEC: 1998)
IL
IL*110%
1 min 9 min
IL*110%
9011.emf
Current
Time
IH
IH*150%
1 min 9 min
IH*150%
9009.emf
Current
Time
Tel. +358 (0) 201 2121 • Fax +358 (0)201 212 205

Technical data vacon • 80
8.1.4 Brake resistor ratings
Make sure that the resistance is higher than the minimum resistance defined. The power han-dling capacity must be sufficient for the application.
Recommended brake resistor types and calculated resistances for Vacon 100 AC drives:
Figure 67. LD and HD pulse shapes
Frame Duty cycle Type of brake resistor Resistance[ohm]
MR4Light duty*
* Light duty cycle for brake resistor cyclic use (one LD pulse within 120-second period). The light duty resistor is rated for a 5-second ramp from full power to zero;Heavy duty cycle for brake resistor cyclic use (one HD pulse within 120-second period). The heavy duty resistor is rated for a 3-second full power braking with a 7-second ramp to zero
BRR 0022 LD 5 63.0
Heavy duty* BRR 0022 HD 5 63.0
MR5Light duty BRR 0031 LD 5 41.0
Heavy duty BRR 0031 HD 5 41.0
MR6Light duty BRR 0045 LD 5 21.0
Heavy duty BRR 0045 HD 5 21.0
MR7Light duty BRR 0061 LD 5 14.0
Heavy duty BRR 0061 HD 5 14.0
MR8Light duty BRR 0105 LD 5 6.5
Heavy duty BRR 0105 HD 5 6.5
MR9Light duty BRR 0300 LD 5 3.3
Heavy duty BRR 0300 HD 5 3.3
9252.emf
Predefined power pulses
Rel
ativ
e po
wer
Time
Heavy dutyLight duty
24-hour support +358 (0)201 212 575 • Email: [email protected]
8

8
vacon • 81 Technical data
Figure 68. Duty cycles of LD and HD pulses
Table 27. Minimum resistance value and braking power with recommended resistor types, mains voltage 208-240V
Mains voltage 208-240 V, 50/60 Hz, 3~
Frame Brake min. resistance[ohm]
Brake power* @405 Vdc[kW]
* With recommended resistor types
MR4 30.0 2.6
MR5 20.0 3.9
MR6 10.0 7.8
MR7 5.5 11.7
MR8 3.0 25.2
MR9 1.4 49.7
Table 28. Minimum resistance value and braking power with recommended resistor types, mains voltage 380-500V
Mains voltage 380-500 V, 50/60 Hz, 3~
Type Brake min. resistance[ohm]
Brake power* @845 Vdc[kW]
* With recommended resistor types
MR4 63.0 11.3
MR5 41.0 17.0
MR6 21.0 34.0
MR7 14.0 51.0
MR8 6.5 109.9
MR9 3.3 216.4
9253.emf
0
0
3 5 10
100
Brake power [%]
Time [s]
120
123 125 130 240
Tel. +358 (0) 201 2121 • Fax +358 (0)201 212 205

Technical data vacon • 82
8.2 Vacon 100 - technical data
Table 29. Vacon 100 technical data
Mains connection
Input voltage Uin 208...240V; 380…500V; -10%…+10%
Input frequency 50...60 Hz -5...+10%
Connection to mains Once per minute or less
Starting delay 4 s (MR4 to MR6); 6 s (MR7 to MR9)
Motor connection
Output voltage 0-Uin
Continuous output current
IL: Ambient temperature max. +40°C over-load 1.1 x IL (1 min./10 min)IH: Ambient temperature max. +50°C over-load 1.5 x IH (1 min./10 min)
Output frequency 0…320 Hz (standard)
Frequency resolution 0.01 Hz
Control characteris-tics
Switching frequency(see parameter P3.1.2.3)
1.5…10 kHz; Defaults: MR4-6: 6 kHz (except 0012 2, 0031 2, 0062 2, 0012 4, 0031 4 and 0061 4: 4 kHz)MR7: 4 kHzMR8-9: 3 kHzAutomatic switching frequency derating in case of overload.
Frequency referenceAnalogue inputPanel reference
Resolution 0.1% (10-bit), accuracy ±1%Resolution 0.01 Hz
Field weakening point 8…320 Hz
Acceleration time 0.1…3000 sec
Deceleration time 0.1…3000 sec
24-hour support +358 (0)201 212 575 • Email: [email protected]
8

8
vacon • 83 Technical data
Ambient conditions
Ambient operating temperature
IL current: -10°C (no frost)…+40°CIH current: -10°C (no frost)…+50°CMax. operating temperature: +50°C
Storage temperature -40°C…+70°C
Relative humidity 0...95% RH, non-condensing, non-corrosive
Air quality:• chemical vapours• mechanical particles
Tested according to IEC 60068-2-60 Test Ke: Flowing mixed gas corrosion test, Method 1 (H2S [hydrogen sulfide] and SO2 [sulfur dioxide])Designed according to:IEC 60721-3-3, unit in operation, class 3C2IEC 60721-3-3, unit in operation, class 3S2
Altitude
100% load capacity (no derating) up to 1,000m1-% derating for each 100m above 1,000mMax. altitudes:208...240V: 4,000m (TN and IT systems)380...500V: 4,000m (TN and IT systems)Voltage for relay outputs:Up to 3,000m : Allowed up to 240V3,000m...4,000m: Allowed up to 120VCorner-grounding: up to 2,000m only (see chapter 5.4.)
Ambient conditions (cont.)
VibrationEN61800-5-1/EN60068-2-6
5…150 HzDisplacement amplitude 1 mm (peak) at 5…15.8 Hz (MR4…MR9)Max acceleration amplitude 1 G at 15.8…150 Hz (MR4…MR9)
ShockEN61800-5-1EN60068-2-27
UPS Drop Test (for applicable UPS weights)Storage and shipping: max 15 G, 11 ms (in package)
Enclosure class
IP21/Type 1 standard in entire kW/HP rangeIP54/Type 12 optionNOTE! Keypad or panel adapter required for IP54/Type 12
EMC (at default set-tings)
Immunity Fulfils EN61800-3 (2004), first and second environment
Emissions+EMC2: EN61800-3 (2004), Category C2The drive can be modified for IT-networks. See chapter 7.3 on page 72.
Noise levelAverage noise level (min...max) sound pressure level in dB(A)
MR4: 45...56 MR7: 43...73MR5: 57...65 MR8: 58...73MR6: 63...72 MR9: 54...75Sound pressure depends on the cooling fan speed which is controlled in accordance with the drive temperature.
Safety EN 61800-5-1 (2007), CE; (see unit name-plate for more detailed approvals)
Table 29. Vacon 100 technical data
Tel. +358 (0) 201 2121 • Fax +358 (0)201 212 205

Technical data vacon • 84
Protections
Overvoltage trip limit 240-volt drives: 456 V500-volt drives: 911 V
Undervoltage trip limit
Depends on supply voltage (0,8775*supply voltage):Supply voltage 240 V: Trip limit 211 VSupply voltage 400 V: Trip limit 351 VSupply voltage 500 V: Trip limit 421 V
Earth fault protection Yes
Mains supervision Yes
Motor phase supervision Yes
Overcurrent protection Yes
Unit overtemperature protection Yes
Motor overload protection Yes
Motor stall protection Yes
Motor underload pro-tection Yes
Short-circuit protec-tion of +24V and +10V reference voltages
Yes
Table 29. Vacon 100 technical data
24-hour support +358 (0)201 212 575 • Email: [email protected]
8

8
vacon • 85 Technical data
8.2.1 Technical information on control connections
Table 30. Technical information on standard I/O board
Standard I/O board
Terminal Signal Technical information
1 Reference output +10V, +3%; Maximum current 10 mA
2 Analogue input, voltage or current
Analogue input channel 10- +10V (Ri = 200 k)4-20 mA (Ri =250 )Resolution 0.1 %, accuracy ±1 %Selection V/mA with dip-switches (see page 57)Short-circuited protected.
3 Analogue input common (current)
Differential input if not connected to ground; Allows ±20V differential mode voltage to GND
4 Analogue input, voltage or current
Analogue input channel 2Defauit: 4-20 mA (Ri =250 )
0-10 V (Ri=200k)Resolution 0.1 %, accuracy ±1 %Selection V/mA with dip-switches (see page 57)Short-circuited protected.
5 Analogue input common (current)
Differential input if not connected to ground; Allows 20V differential mode voltage to GND
6 24V aux. voltage+24V, ±10%, max volt. ripple < 100mVrms; max. 250mAShort-circuit protected.
7 I/O groundGround for reference and controls (connected internally to frame earth through 1M)
8 Digital input 1 Positive or negative logicRi = min. 5k0...5V = “0”15…30V = "1"
9 Digital input 2
10 Digital input 3
11 Common A for DIN1-DIN6 Digital inputs can be disconnected from ground, see chapter 6.1.2.2.
12 24V aux. voltage+24V, ±10%, max volt. ripple < 100mVrms; max. 250mAShort-circuit protected
13 I/O groundGround for reference and controls (connected internally to frame earth through 1M)
14 Digital input 4 Positive or negative logicRi = min. 5k0...5V = “0”15…30V = "1"
15 Digital input 5
16 Digital input 6
17 Common A for DIN1-DIN6 Digital inputs can be isolated from ground, see chapter 6.1.2.2.
18 Analogue signal (+output) Analogue output channel 1, selection 0 -20mA, load <500 Default: 0-20 mA
0-10VResolution 0.1 %, accuracy ±2 %Selection V/mA with dip-switches (see page 57)Short-circuited protected.
19 Analogue output common
30 24V auxiliary input voltage Can be used as external power backup for the control unit.
A RS485 Differential receiver/transmitterSet bus termination with dip switches (see page 57). Termination resis-tance = 220 ohm.B RS485
Tel. +358 (0) 201 2121 • Fax +358 (0)201 212 205

Technical data vacon • 86
Standard relay board (+SBF3)
Terminal Signal Technical information
21Relay output
1*
* If 230VAC is used as control voltage from the output relays, the control circuitry must be powered with a separate isolation transformer to limit short circuit current and overvoltage spikes. This is to prevent welding on the relay contacts. Refer to standard EN 60204-1, section 7.2.9
Change-over contact (SPDT) relay. 5,5 mm isolation between channels.Switching capacity 24VDC/8A
250VAC/8A125VDC/0.4A
Min.switching load 5V/10mA
22
23
24 Relay output2*
Change-over contact (SPDT) relay. 5,5 mm isolation between channels.Switching capacity 24VDC/8A
250VAC/8A125VDC/0.4A
Min.switching load 5V/10mA
25
26
32
Relay output 3*
Normally-open (NO or SPST) contact relay. 5,5 mm isolation between channels.Switching capacity 24VDC/8A
250VAC/8A125VDC/0.4A
Min.switching load 5V/10mA
33
Optional relay board (+SBF4)
Terminal Signal Technical information
21
Relay output 1*
* If 230VAC is used as control voltage from the output relays, the control circuitry must be powered with a separate isolation transformer to limit short circuit current and overvoltage spikes. This is to prevent welding on the relay contacts. Refer to standard EN 60204-1, section 7.2.9
Change-over contact (SPDT) relay. 5,5 mm isolation between channels.Switching capacity 24VDC/8A
250VAC/8A125VDC/0.4A
Min.switching load 5V/10mA
22
23
24
Relay output 2*
Change-over contact (SPDT) relay. 5,5 mm isolation between channels.Switching capacity 24VDC/8A
250VAC/8A125VDC/0.4A
Min.switching load 5V/10mA
25
26
28 TI1+TI1- Thermistor input. Rtrip = 4.7 k (PTC); Measuring voltage 3.5V
29
24-hour support +358 (0)201 212 575 • Email: [email protected]
8

Document ID:
Order code:
Rev. C
Manual authoring:[email protected]
Vacon Plc.Runsorintie 765380 VaasaFinland
Subject to change without prior notice© 2012 Vacon Plc.
Find your nearest Vacon office on the Internet at:
www.vacon.com
Find your nearest Vacon service centre on the Extranet at:
www.extra.vacon.com