uv/vis excellence - mettler toledo · design and function3 the uv/vis excellence spectrophotometers...
TRANSCRIPT

UV/VIS ExcellenceUV7/UV5/UV5Bio
User
Man
ual
30258694D 7/18/2017 5:48 PM - Schema ST4 PDF engine - Layout by Victor Mahler
UV/V
IS E
xcel
lenc
e


Table of Contents
1 Introduction 3
2 Safety information 42.1 Definition of signal words and warning symbols ................................................. 42.2 Product specific safety notes ............................................................................. 4
3 Design and Function 63.1 Type definition and compatibility ....................................................................... 63.2 Overview ........................................................................................................ 6
3.2.1 1 cm Cuvette holder .......................................................................... 73.3 Rear panel connections .................................................................................... 73.4 User Interface .................................................................................................. 8
3.4.1 Homescreen ..................................................................................... 83.4.2 Menu structure.................................................................................. 93.4.3 General navigation ............................................................................ 113.4.3.1 Keypads ..................................................................................... 113.4.3.2 Abbreviations............................................................................... 11
4 Installation 124.1 Scope of delivery ............................................................................................. 124.2 Unpack the spectrophotometer .......................................................................... 124.3 Position the spectrophotometer.......................................................................... 134.4 Connecting the terminal.................................................................................... 134.5 Connect the spectrophotometer to the power supply............................................. 134.6 Installing cuvette holder and inserting a cuvette ................................................... 14
5 Operating the Instrument 165.1 Start up and shut down the spectrophotometer .................................................... 165.2 Performing a measurement............................................................................... 16
5.2.1 Performing a measurement using a cuvette.......................................... 165.3 Methods ......................................................................................................... 17
5.3.1 Running a method ............................................................................ 185.3.2 Configuration.................................................................................... 19
5.4 Direct measurement ......................................................................................... 205.4.1 Kinetics (not UV5)............................................................................. 205.4.2 Fixed wavelength .............................................................................. 215.4.3 Scanning ......................................................................................... 235.4.4 Bio applications (UV5Bio only)........................................................... 245.4.5 Quant .............................................................................................. 245.4.5.1 Define and select standards .......................................................... 25
5.5 Create and handle shortcuts.............................................................................. 265.5.1 Parameters ...................................................................................... 27
6 Maintenance and Care 296.1 Cleaning cuvette holders and cuvettes................................................................ 296.2 Cleaning the housing ....................................................................................... 296.3 Transporting the instrument............................................................................... 30
7 Disposal 31
8 Technical Data 328.1 Spectrophotometer ........................................................................................... 328.2 Measurement .................................................................................................. 328.3 Terminal ......................................................................................................... 33
Table of Contents 1UV/VIS Excellence

Table of Contents2 UV/VIS Excellence

1 IntroductionThank you for choosing a METTLER TOLEDO UV/VIS Excellence spectrophotometer. The UV/VIS Excellencespectrophotometer is an easy-to-operate instrument for measuring molecular absorbance or transmittance inthe ultra-violet (UV) and visible (VIS) range of analytical samples.
About this documentThis document provides you with the information you need to get started with your METTLER TOLEDOspectrophotometer.
For a comprehensive description of the spectrophotometer and its functions, refer to theOperating Instructions.
The instructions in this document refer to UV7, UV5 and UV5Bio spectrophotometers running firmwareversion 2.0 or higher.
If you have any additional questions, contact your authorized METTLER TOLEDO dealer or service represen-tative.
u www.mt.com/contact
Conventions and symbols
Refers to an external document.
Note for useful information about the product.
Elements of instructions
§ Prerequisites
1 Steps2 ...
ð Intermediate resultsð Results
Introduction 3UV/VIS Excellence

2 Safety information• Read and understand the information in this User Manual before you use the instrument.• Keep this User Manual for future reference.• Include this User Manual if you pass on the instrument to other parties.If the instrument is not used according to the information in the Operating Instructions or if it is modified, thesafety of the instrument may be impaired and Mettler-Toledo GmbH assumes no liability.
For a comprehensive description of the spectrophotometer and its functions, refer to theOperating Instructions.
2.1 Definition of signal words and warning symbolsSafety notes are marked with signal words and warning symbols. These show safety issues and warnings.Ignoring the safety notes may lead to personal injury, damage to the instrument, malfunctions and falseresults.
Signal words
WARNING for a hazardous situation with medium risk, possibly resulting in death or severeinjury if not avoided.
CAUTION for a hazardous situation with low risk, resulting in minor or moderate injury if notavoided.
NOTICE for a hazardous situation with low risk, resulting in damage to the instrument, othermaterial damage, malfunctions and erroneous results, or loss of data.
Warning symbols
Electrical shock Ultraviolet light beam Hot surface
2.2 Product specific safety notesIntended useThis instrument is designed to be used in analytical laboratories by trained staff. The instrument is suitablefor measuring molecular absorbance or transmittance in the ultra-violet (UV) and visible (VIS) range ofanalytical samples.
Any other type of use and operation beyond the limits of technical specifications without written consent fromMettler-Toledo GmbH is considered as not intended.
Responsibilities of the instrument ownerThe instrument owner is the person that uses the instrument for commercial use or places the instrument atthe disposal of the staff. The instrument owner is responsible for product safety and the safety of staff, usersand third parties.
METTLER TOLEDO assume that the instrument owner provides the necessary protective gear, appropriatetraining for the daily work and for dealing with potential hazards in their laboratory.
Safety notes
WARNINGDanger of death or serious injury due to electric shock!Contact with parts that contain a live current can lead to injury and death.1 Only use a METTLER TOLEDO power cable and AC adapter designed for your instrument.2 Connect the power cable to a grounded power outlet.3 Keep all electrical cables and connections away from liquids.4 Replace damaged power cables and AC adapters immediately.
Safety information4 UV/VIS Excellence

CAUTIONRisk of eye damage from exposure to ultraviolet light beamThe light beam emitted from the UV/VIS instrument contains ultraviolet radiation and cancause eye damage.− Never look directly into the light source.
NOTICEDanger of damage to the instrument due to incorrect parts!Using incorrect parts with the instrument can damage the Instrument or cause the instrumentto malfunction.− Only use parts supplied with the instrument, listed accessories and spare parts from
METTLER TOLEDO.
Safety information 5UV/VIS Excellence
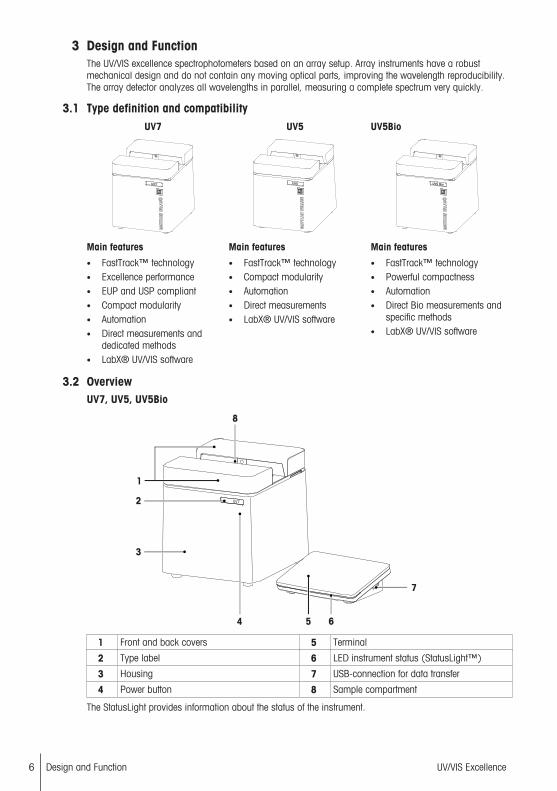
3 Design and FunctionThe UV/VIS excellence spectrophotometers based on an array setup. Array instruments have a robustmechanical design and do not contain any moving optical parts, improving the wavelength reproducibility.The array detector analyzes all wavelengths in parallel, measuring a complete spectrum very quickly.
3.1 Type definition and compatibilityUV7 UV5 UV5Bio
UV7 UV5 UV5 Bio
Main features
• FastTrack™ technology• Excellence performance• EUP and USP compliant• Compact modularity• Automation• Direct measurements and
dedicated methods• LabX® UV/VIS software
Main features
• FastTrack™ technology• Compact modularity• Automation• Direct measurements• LabX® UV/VIS software
Main features
• FastTrack™ technology• Powerful compactness• Automation• Direct Bio measurements and
specific methods• LabX® UV/VIS software
3.2 OverviewUV7, UV5, UV5Bio
1 Front and back covers 5 Terminal
2 Type label 6 LED instrument status (StatusLight™)
3 Housing 7 USB-connection for data transfer
4 Power button 8 Sample compartment
The StatusLight provides information about the status of the instrument.
Design and Function6 UV/VIS Excellence

StatusLight Instrument status
Green, steady light The instrument is ready for operation.
Green, blinking light The instrument is performing a task.
Orange, steady light The instrument waits for the user to perform an action.
3.2.1 1 cm Cuvette holderA precision holder for positioning standard 1 cm cuvettes.
1 Magnets
4
2 Alignment grooves3 Base plate4 Aperture for light channel5 Cuvette clamping plate
3.3 Rear panel connections
1 RS232 standard port 2 Ethernet connection
3 Terminal port 4 1x USB B port(connection to a PC with LabX™)
5 2x USB A ports(printer, flash drives, keyboard, mouse)
6 Power cable(24 V power supply)
7 Mini-Din port (6-pin)(FillPalMini)
Design and Function 7UV/VIS Excellence
3.4 User Interface
3.4.1 Homescreen
1 2 3
456
7
Task
Log out
Methods
User data Start
Home
Results
Setup
Directmeasurements
Tests &Manual
Scan
Administrator 10/12/2015 11:45
Bradford Pump
PumpScanBradford
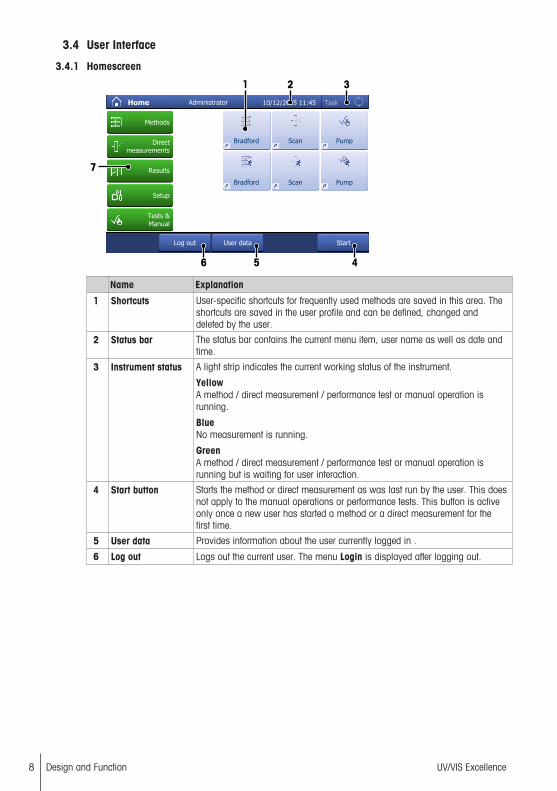
Name Explanation
1 Shortcuts User-specific shortcuts for frequently used methods are saved in this area. Theshortcuts are saved in the user profile and can be defined, changed anddeleted by the user.
2 Status bar The status bar contains the current menu item, user name as well as date andtime.
3 Instrument status A light strip indicates the current working status of the instrument.
YellowA method / direct measurement / performance test or manual operation isrunning.
BlueNo measurement is running.
GreenA method / direct measurement / performance test or manual operation isrunning but is waiting for user interaction.
4 Start button Starts the method or direct measurement as was last run by the user. This doesnot apply to the manual operations or performance tests. This button is activeonly once a new user has started a method or a direct measurement for thefirst time.
5 User data Provides information about the user currently logged in .
6 Log out Logs out the current user. The menu Login is displayed after logging out.
Design and Function8 UV/VIS Excellence

Name Explanation
7 Menus MethodsCreate, adapt and save measuring methods. This can be done for everymeasurement type.
Direct measurementsMeasure a sample easily as a direct measurement. Direct measurementsinclude the measurement types fixed wavelength, scan, quant and kinetics, aswell as ready to use bio applications, such as DNA and protein concentrationdetermination.
ResultsDisplay, print or export measurement results. Here you can also accessdetailed information for all results.
SetupChoose all system settings in this menu, e.g. hardware settings, usermanagement or user preferences. These settings are usually defined during theinstallation of the instrument.
Tests & ManualEntry point for editing and starting the performance tests and manualoperations.
See also
2 Create and handle shortcuts } Page 26
3.4.2 Menu structure
MethodsMethods has the following submenus:
• Fixed wavelength• Scanning• Bio applications (only UV5Bio)• Quant• Kinetics (only UV7 and UV5Bio)
Direct measurementDirect measurement has the following submenus:
Fixed wavelength –
Scanning –
Bio applications (only UV5Bio) Protein
Protein dye
Protein assay
Nucleic acid
Nucleic acid dye
Others
Quant –
Kinetics (only UV7 and UV5Bio) –
ResultsResults has no submenus.
SetupSetup has the following submenus:
Design and Function 9UV/VIS Excellence

Quant calibrations – –
User settings Language –
Screen –
Audio signal –
StatusLight –
Shortcuts –
Keyboards –
Auxiliary valuesDyes & Values (only UV5Bio)
Auxiliary values –
Dyes (only UV5Bio) –
Hardware Automation –
Peripherals Printer
Data export
Network settings
Network storage
PC settings
Barcode reader / Keyboard
Fingerprint reader
USB stick
CertiRef Information
Test sequence configuration
Monitoring (only UV7)
Performance test results –
Performance test results –
Performance test history –
Auxiliary instrument –
Global settings System Identification
Date/Time
Data storage
User management Users
Account policies
Analysis and resources behavior –
Maintenance & Service MT-Service –
Import / Export –
Reset to factory settings –
Firmware –
Update –
Hardware / Firmware summary –
Tests & ManualTests & Manual has the following submenus:
• Performance test• Automation
Design and Function10 UV/VIS Excellence
3.4.3 General navigation
3.4.3.1 Keypads
Alphabetic keypad
Cancel Preview OK
Enter method ID
41 2 3
5
7
8
9
6
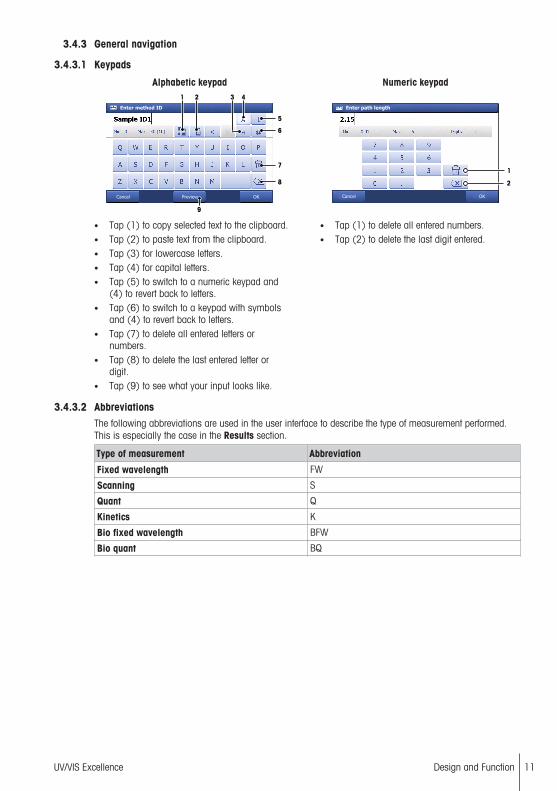
• Tap (1) to copy selected text to the clipboard.• Tap (2) to paste text from the clipboard.• Tap (3) for lowercase letters.• Tap (4) for capital letters.• Tap (5) to switch to a numeric keypad and
(4) to revert back to letters.• Tap (6) to switch to a keypad with symbols
and (4) to revert back to letters.• Tap (7) to delete all entered letters or
numbers.• Tap (8) to delete the last entered letter or
digit.• Tap (9) to see what your input looks like.
Numeric keypad
Cancel OK
Enter path length
1
2
• Tap (1) to delete all entered numbers.• Tap (2) to delete the last digit entered.
3.4.3.2 AbbreviationsThe following abbreviations are used in the user interface to describe the type of measurement performed.This is especially the case in the Results section.
Type of measurement Abbreviation
Fixed wavelength FW
Scanning S
Quant Q
Kinetics K
Bio fixed wavelength BFW
Bio quant BQ
Design and Function 11UV/VIS Excellence

4 Installation
4.1 Scope of deliveryDescription Order number
UV70
• Spectrophotometer UV7
• Spectrophotometer UV5
• Spectrophotometer UV5Bio
• Spectrophotometer bundle UV5 A (includes CuvetteChanger)
30254726
30254725
30254728
30254727
Cuvette holder 1 cm precision 30236314
Terminal 30248720
External power supply 100-240VAC 51105795
Power cable(Country specific)
-
Terminal cable 30249491
User manual(Country specific)
-
Memo Card(Country specific)
-
4.2 Unpack the spectrophotometer1 Remove the spectrophotometer (and accessories) from the protective packing material.
Installation12 UV/VIS Excellence
2 Store the packing material for later transport over long distances.3 Check if you have received all parts listed in the scope of delivery.4 Inspect the parts visually for flaws or damage.5 If parts are missing or damaged, report it immediately and file a freight claim if needed.
See also
2 Scope of delivery } Page 12
4.3 Position the spectrophotometerThe instrument has been developed for indoor operation in a well-ventilated area. The following siterequirements apply:
• The ambient conditions are within the limits specified in the technical data.• No powerful vibrations• No direct sunlight• No corrosive gas atmosphere• No explosive atmosphere• No powerful electric or magnetic fields
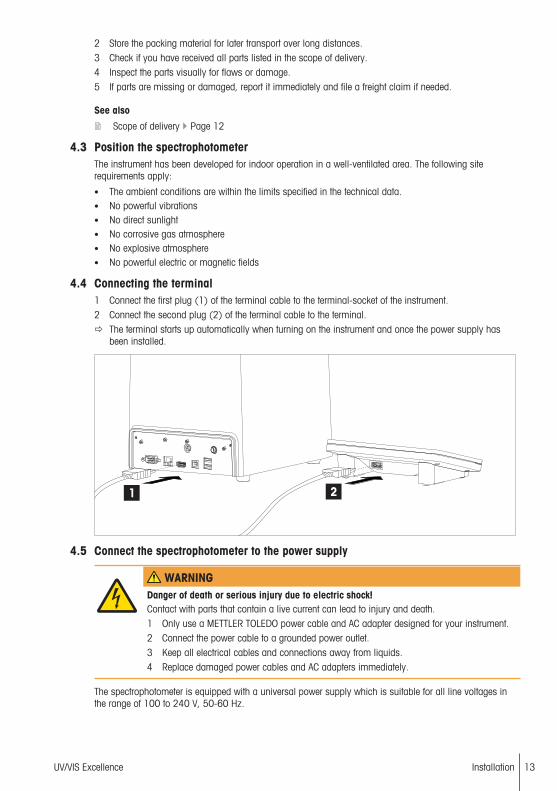
4.4 Connecting the terminal1 Connect the first plug (1) of the terminal cable to the terminal-socket of the instrument.2 Connect the second plug (2) of the terminal cable to the terminal.ð The terminal starts up automatically when turning on the instrument and once the power supply has
been installed.
4.5 Connect the spectrophotometer to the power supply
WARNINGDanger of death or serious injury due to electric shock!Contact with parts that contain a live current can lead to injury and death.1 Only use a METTLER TOLEDO power cable and AC adapter designed for your instrument.2 Connect the power cable to a grounded power outlet.3 Keep all electrical cables and connections away from liquids.4 Replace damaged power cables and AC adapters immediately.
The spectrophotometer is equipped with a universal power supply which is suitable for all line voltages inthe range of 100 to 240 V, 50-60 Hz.
Installation 13UV/VIS Excellence
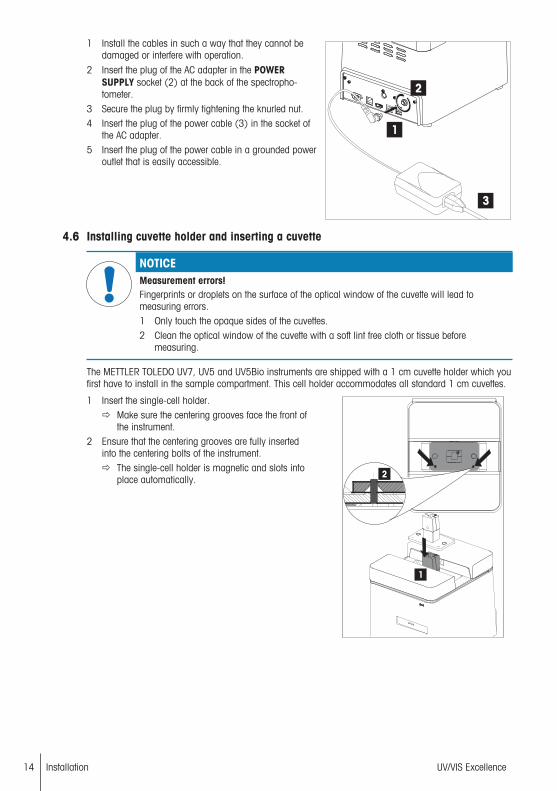
1 Install the cables in such a way that they cannot bedamaged or interfere with operation.
2 Insert the plug of the AC adapter in the POWERSUPPLY socket (2) at the back of the spectropho-tometer.
3 Secure the plug by firmly tightening the knurled nut.4 Insert the plug of the power cable (3) in the socket of
the AC adapter.5 Insert the plug of the power cable in a grounded power
outlet that is easily accessible.
4.6 Installing cuvette holder and inserting a cuvette
NOTICEMeasurement errors!Fingerprints or droplets on the surface of the optical window of the cuvette will lead tomeasuring errors.1 Only touch the opaque sides of the cuvettes.2 Clean the optical window of the cuvette with a soft lint free cloth or tissue before
measuring.
The METTLER TOLEDO UV7, UV5 and UV5Bio instruments are shipped with a 1 cm cuvette holder which youfirst have to install in the sample compartment. This cell holder accommodates all standard 1 cm cuvettes.
1 Insert the single-cell holder.ð Make sure the centering grooves face the front of
the instrument.2 Ensure that the centering grooves are fully inserted
into the centering bolts of the instrument.ð The single-cell holder is magnetic and slots into
place automatically.
Installation14 UV/VIS Excellence

1 Insert the cuvette into the single-cell holder.2 Always place the cell so that translucent side of the
cuvette is in the path of the light beam passingthrough the aperture of the cell holder!
3
Installation 15UV/VIS Excellence

5 Operating the Instrument
5.1 Start up and shut down the spectrophotometerStart up the spectrophotometer− Press the power button.
ð The spectrophotometer starts up and detects connected devices.ð The spectrophotometer is ready for use when the StatusLight is steady and green.
Shut down the spectrophotometer from the touch screen− Tap Home > Log out > Shut down.
ð The spectrophotometer stops running tasks and shuts down.ð The AC adapter and the control circuit for the power button are energized. The rest of the spectropho-
tometer is no longer energized.
Shut down the spectrophotometer using the power button− Press the power button for less than 1 s.
ð The spectrophotometer stops running tasks and shuts down.ð The AC adapter and the control circuit for the power button are energized. The rest of the spectropho-
tometer is no longer energized.
Shut down of the spectrophotometer in emergency situations− Pull the plug of the power cable out of the power outlet.
5.2 Performing a measurement
NOTICEMeasuring errors!Before use, rinse the cuvette with deionized or ultra pure water, inside and outside, severaltimes. Foreign particles in the cell deflect the light beam, which leads to poor results. You canalso rinse the cell with the sample or blank solution.There should be no droplets on the outside of the cuvette before measuring. Pat the outside ofthe cell dry with an optical cleaning cloth or cuvette lens tissue to avoid scratches on thesurface.Take care not to touch the surface of the optical window of the cell. Fingerprints leave a UVactive film on the surface that, even if it appears to have been wiped off, can result inmeasuring errors.Handle the cuvettes with care. Keep them in their storage box.
See also
2 Running a method } Page 18
5.2.1 Performing a measurement using a cuvette
§ Do not use glass pipettes. They can scratch the quartz cuvettes.
§ All measurements in the UV range should, as a rule, be done with quartz cuvettes. Regular plasticcuvettes are not transparent to UV light.
§ If using UV-transparent disposable plastic cuvettes, take care to select the appropriate cuvette for yourapplication. The various types of UV-transparent disposable plastic cuvettes cover a specific pre-definedrange, e.g. 230 nm to 900 nm.
1 Switch on the instrument.2 Configure the Direct measurement or Method to be performed. You will first be prompted to perform a
blank measurement.3 Lean the plastic tip of the pipette on the side of the cuvette and slowly load the blank solution to avoid
bubbles forming. The blank solution is usually the pure solvent.
Operating the Instrument16 UV/VIS Excellence

4 Hold the top of the cuvette on the opaque non-measuring side.ð Be careful not to touch the transparent walls as any marks or fingerprints can significantly affect the
measurement.ð If necessary, clean the walls with a lint-free tissue.
5 Gently insert the cuvette vertically into the sample holder to avoid scratching or marking the glass.6 Tap Start to start your measurement.
ð Tap Measure blank.7 Remove the cuvette when the measurement is complete, being careful to hold it vertically, and rinse
thoroughly.8 Load the sample solution into the cuvette (see steps 3 to 5 above) and tap Measure sample.9 Remove the cuvette when the measurement is complete, being careful to hold it vertically, and rinse
thoroughly.ð Repeat the steps above until the analysis is completed. Tap End series for a method or End direct
measurement.
5.3 MethodsOn the UV excellence instruments analyses can be run using editable methods. A method consists of asequence of method functions that are executed consecutively when a method is processed. Running ananalysis consists of four steps.
• Configuration of the method by the user• Performance of the measurements• Calculation of the results• Creation of a reportTo overcome the complexity of the parameters, the UV7 and UV5Bio have pre-programmed METTLERTOLEDO methods for running measurements commonly performed in different laboratories. METTLERTOLEDO methods define the sequence of method functions including meaningful values for all of theparameters of the method functions suitable for a specific application.You can also create your own method based on a METTLER TOLEDO method.
The instrument distinguishes between the following method types:
• Fixed wavelength (1)• Scanning (2)• Bio applications: Bio fixed wavelength and Bio quant (3)• Quant (4)• Kinetics (5)
Operating the Instrument 17UV/VIS Excellence

Fixed wavelength
Scanning
Bio applications
Quant
Methods
Kinetics
Task
Back
1
2
3
4
5
Methods
The number of methods and the availability of method types depend on the instrument type.
UV7 UV5 UV5Bio
Fixed wavelength (FW) • • •
Scanning • • •
Quant • • •
Kinetics • – •
Bio fixed wavelength – – •
Bio quant – – •
Number of methods 100 20 50
5.3.1 Running a methodMETTLER TOLEDO methods are only available on UV7 and UV5Bio.
Creating a new methodNavigation: Home > Method > method type e.g. Fixed wavelength
1 Tap New to create a new method on the basis of a template.
ð The method function Configuration opens.2 Configure the method as required.
ð See section below Configuration.
3 Tap OK.4 Define the all relevant parameters for the new method.5 Tap Save.You can also insert additional method functions between the standard method functions. This is possibleeither when creating a new method or by editing an existing method:
1 Go to Method > method type e.g. Fixed wavelength.2 Choose the method you want to edit or create a new method.3 Tap Insert.
ð Blue tags appear between each method function.4 Tap an Insert tag where you want to insert an additional method function.
ð A window with Method function opens showing a list of possible method functions.
5 Tap on the method function you want to insert (e.g. Instruction).6 Define your method parameters.7 Tap OK.
8 Tap Save.
Operating the Instrument18 UV/VIS Excellence

Running a METTLER TOLEDO methodNavigation: Home > Method > method type e.g. Fixed wavelength
1 Go to Method > method type e.g. Fixed wavelength.2 Select a pre-programmed METTLER TOLEDO method.
ð Tap Start to run the analysis.ð All METTLER TOLEDO methods have the parameter “METTLER TOLEDO” as their author.
Adapting a METTLER TOLEDO method1 Go to Method > method type e.g. Fixed wavelength2 Select a pre-programmed METTLER TOLEDO method.3 Tap the Title.
ð The method function Title opens.
4 Change the parameter setting Method ID to your own user defined ID.
ð Enter a new method ID and tap OK.
5 Edit the parameters settings as required (see Create a new method above).
6 Tap Save to save the method.ð Tap Start to run the analysis.
5.3.2 Configuration
Common parameters
Parameters Description Values
Multiple deter-mination
Define if only one or more than one sample shall be measuredwith this method.
Active | Inactive
Multiple deter-mination mode
Define if the number of samples is fixed after starting themethod or if samples can be added during the measurement.
Only if Multiple determination is active.
Fixed number ofsamples | Opennumber of samples
Automation Defines the automated-sampling device used in the method. Available automated-sampling devices
Path length Defines the path length for the measurement in [cm]. 0.0001…5.000
Measurementduration
Define how long the blank, sample and standard will bemeasured.
1…1000
Kinetics stages Define the number of stages for a kinetic measurement withdifferent duration and intervals.
Only in Method > Kinetics.
1 | 2
Kinetics timeunit
Define the unit for the interval, duration and evaluation times.
Only in Method > Kinetics.
s | min
Kineticsduration 1
Kineticsduration 2
Define the time span of a stage in which measurement pointsare taken with the defined interval. The total number of datapoints for a kinetic reaction must be smaller or equal to 2000.
Only in Method > Kinetics.
1…500
Kinetics interval1
Kinetics Interval2
Define the time interval between the measurement points of akinetics measurement. The interval must be smaller than orequal to the duration. It can happen that the actual timeinterval exceeds the time interval defined by the user, e.g. thechanging of cuvettes with the FillPalMini and the measurementtime together take longer than the interval defined. In this casethe next measurement point is taken as soon as possible.
Only in Method > Kinetics.
1…10000
Operating the Instrument 19UV/VIS Excellence

Color Defines whether colors can be calculated in the Calculationmethod function.
Active | Inactive
Observer The chromatic response of each observer (2° CIE 1931; 10°CIE 1964) is described by a set of three color matchingfunctions each. They describe the spectral sensitivity of thethree different light detectors.
2° | 10°
Illuminant The illuminants are the spectral power distributions oftheoretical light sources. In simple terms: The emission spectraof different light sources. These spectra are available from theCIE. Illuminant A mimics a tungsten-filament lamp, C mimicsdaylight, the D series are also approximations of daylightwhere the number behind the D is one hundredth of the CCT(correlated color temperature) or the temperature of thePlanckian radiator.
A | C | D50 | D55 |D65 | D75
5.4 Direct measurementDirect measurements provide an easy, reliable and fast way to do measurements. All parameters relevant tothe measurement are quickly configured and once the settings have been chosen in direct measurementsthey can be saved in a OneClick shortcut. The measurement can then be started with just one click on thehomescreen. No automation is possible when performing direct measurements. Should a CuvetteChanger beattached, all measurements will be done in position 1.
Tapping Start on the homescreen initiates an analysis with the same settings as the measurement lastdone.
You can find more information on the different types of direct measurements in the chapter Method types.
5.4.1 Kinetics (not UV5)To perform a kinetics direct measurement, follow these steps:
Preparing a measurement1 Go to Direct measurement > Method list: Kinetics.
ð The measurement configuration menu opens.2 Define the measurement parameters (see the parameters below).
3 To create a shortcut on the homescreen for this direct measurement, tap AddToHome.
ð The menu Shortcut parameters opens. For more information see section [Create and handleshortcuts } Page 26]
4 Tap Start.ð The measurement screen appears.
Starting a measurement1 Insert the blank into the cuvette holder.2 Tap Measure blank to start blank measurement.3 Remove the blank.4 Insert the sample into the cuvette holder.5 Tap Measure sample.
Viewing the resultsThe screen displays the measurement of the kinetic reaction as it occurs, as a graph of absorbance versustime. It also displays the summary of the results, namely:
• vInit1 = initial rate• R2(vInit1) = coefficient of determination for vInit1• k1 (250nm) = first order absorbance rate constant (at the zero or first order rate constant at the chosen
wavelength)• R2(k1) = coefficient of determination of k1)1 Tap Results to see the results of the current measurement across the whole screen.
Operating the Instrument20 UV/VIS Excellence
2 Tap Kinetics curveto go back to the results overview screen.
Further measurementsTo perform further direct measurements, follow these steps:
1 To start a new measurement, tap Measure blank or Measure sampleð The Sample data entry screen appears.
2 Tap Start to start measuring the sample.
3 Tap End direct measurement to stop and return directly to the homescreen.ð The results of each measurement are listed individually in the Results menu.
5.4.2 Fixed wavelength
Further measurementsTo perform further direct measurements, follow these steps:
1 To start a new measurement, tap Measure blank or Measure sampleð The Spectrum screen appears (if activated).
2 Tap End direct measurement to stop and return directly to the homescreen.ð The results of each measurement are listed individually in the Results menu.
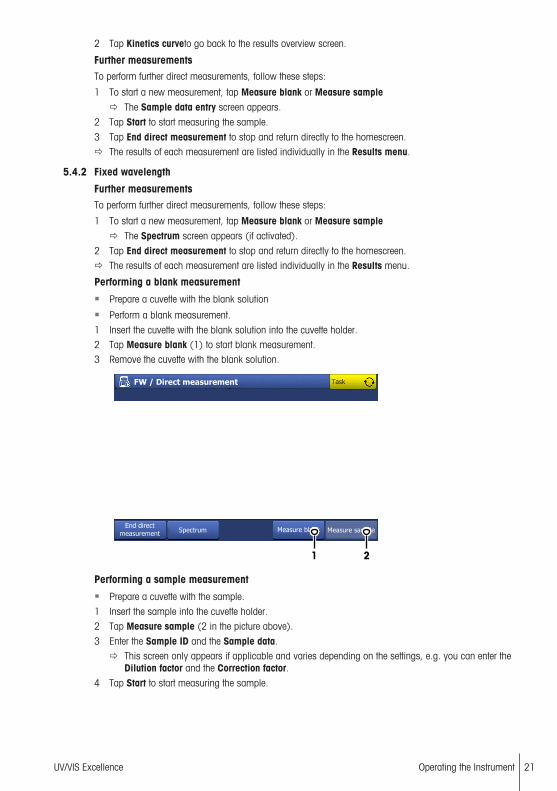
Performing a blank measurement
§ Prepare a cuvette with the blank solution
§ Perform a blank measurement.
1 Insert the cuvette with the blank solution into the cuvette holder.2 Tap Measure blank (1) to start blank measurement.3 Remove the cuvette with the blank solution.
Direct measurement
Measure blank Measure sampleEnd direct
measurement Spectrum
TaskFW /
1 2
Performing a sample measurement
§ Prepare a cuvette with the sample.
1 Insert the sample into the cuvette holder.2 Tap Measure sample (2 in the picture above).
3 Enter the Sample ID and the Sample data.ð This screen only appears if applicable and varies depending on the settings, e.g. you can enter the
Dilution factor and the Correction factor.4 Tap Start to start measuring the sample.
Operating the Instrument 21UV/VIS Excellence

Starting a measurement
§ Start the instrument.
§ Prepare the sample and clean the cuvette.
1 Go to Direct measurement > Fixed wavelength.ð The measurement configuration menu opens.
2 Define the measurement parameters (see parameters below).
3 To create a shortcut on the homescreen for this direct measurement, tap AddToHome.
ð The menu Shortcut parameters opens. For more information see [Create and handleshortcuts } Page 26]
4 Tap Start (1).ð The measurement screen appears.
Fixed wavelength
AddToHome Start
Wavelength 1
Number of wavelengths
Unit
Path length
Sample ID
Sample ID entry
Task
Back
1
Viewing the results
§ Tap Spectrum to see the spectrum of the measurement.
1 Zoom in on spectrum details by pinching or stretching the touchscreen with two fingers.2 To label a peak press and hold a finger on the touchpanel for a few seconds.
ð A cursor appears allowing you to label a peak.3 Return to the results by toggling between the Results and the Spectrum buttons.ð The results of each measurement are listed individually in the Results menu and can be looked up at a
later stage.ð You can view the results after each sample measured.
Operating the Instrument22 UV/VIS Excellence

Direct measurement
Measure sample
Task
Measure blankSpectrumEnd direct
measurement
1
FW /
5.4.3 ScanningTo perform a scanning direct measurement, follow these steps:
Preparing a measurement1 Go to Direct measurement > Scanning.
ð The measurement configuration menu opens.2 Define the measurement parameters (see the parameters below).
3 To create a shortcut on the homescreen for this direct measurement, tap AddToHome.
ð The menu Shortcut parameters opens. For more information see [Create and handleshortcuts } Page 26]
4 Tap Start.ð The measurement screen appears.
Starting a measurement1 Insert the blank into the cuvette holder.2 Tap Measure blank to start blank measurement.3 Remove the blank.4 Insert the sample into the cuvette holder.5 Tap Measure sample.
ð Enter the Sample ID and the Sample data. This screen only appears if applicable and variesdepending on the settings.
Viewing the results
§ At the end of the analysis the screen displays the Spectrum and the Peak values of the measurement.
1 Tap Maximize spectrum to see the spectrum across the whole screen. For a closer look, stretching orpinching the touchscreen with two fingers zooms in and out of spectrum details.ð Tapping Minimize spectrum returns you to the results overview screen.
2 Tap Peak table to see the complete peak table.
ð Tapping Back returns you to the results overview screen.ð The results of each measurement are listed individually in the Results menu.
Further measurementsTo perform further direct measurements, follow these steps:
1 To start a new measurement, tap Measure blank or Measure sampleð The measurement screen appears (if activated).
2 Tap End direct measurement to stop and return directly to the homescreen.ð The results of each measurement are listed individually in the Results menu.
Operating the Instrument 23UV/VIS Excellence

5.4.4 Bio applications (UV5Bio only)A large collection of commonly used life science applications are found in the Bio applications' menu.These include, amongst others, qualitative and quantitative analyses of DNA, RNA and proteins, colorimetricprotein assays, pre-configured dyes, OD600 for cell density and an oligomer calculator for the concentrationdetermination of DNA and RNA oligomers. A list of all the bio applications can be found in the description ofthe menu structure, see Menu structure.
The calculations of the molar mass for DNA and RNA oligomers are described below:
Calculation of molar mass for DNA and RNA oligomersThe molar mass for DNA and RNA is calculated as follows in the applications:
1. DNA (Sodium salt, assuming there is no 5’ monophosphate):M = An*313.21+Tn*304.2+Cn*289.18+Gn*329.21-61.96
2. RNA (for RNA transcript, assuming there is a 5’ monophosphate):M = An*329.21+Un*306.17+Cn*305.18+Gn*345.21+159.0
Where
• M = molecular mass of the nucleic acid in g/mol• An = number of adenine bases• Tn = number of thymine bases• Gn = number of guanine bases• Cn = number of cytosine bases• Un = number of uracil bases
Performing a Bio applications direct measurement
§ See the operating instructions for a comprehensive description of these applications.
1 Go to Direct measurement > Bio applications.
2 Choose your specific category (Protein, Protein dye, Protein assay, Nucleic acid, Nucleic acid dye,Others).
3 Choose your specific sub-category > See the table below.ð The measurement configuration menu opens.
4 Define your parameters.ð For a description of the parameters please see the general parameters as well as your respective
application category.5 Tap Start to start the measurement.
ð To create a shortcut on the homescreen for this direct measurement, tap AddToHome. The menuShortcut parameters opens.
See also
2 Create and handle shortcuts } Page 26
5.4.5 QuantTo perform a quantitative direct measurement, follow these steps:
Preparing a measurement1 Go to Direct measurement > Method list: Quant.
ð The measurement configuration menu opens.2 Define the measurement parameters (see Parameters below) and define your standards. (See Define
and select standards).3 To create a shortcut on the homescreen for this direct measurement, tap AddToHome.
ð The menu Shortcut parameters opens. For more information see [Create and handleshortcuts } Page 26]
4 Tap Start.ð The measurement screen appears.
Operating the Instrument24 UV/VIS Excellence

Starting a measurement1 Insert the blank into the cuvette holder.2 Tap Measure blank to start blank measurement.3 Remove the blank.4 Insert the first standard into the cuvette holder.5 Tap Measure standard to start measuring the standards.6 Remove the standard and repeat the procedure with the next standard. The list of the standards defined
can be seen at any time by tapping the Standards button.ð Measure all the standards defined to obtain a calibration curve.
7 Insert the sample into the cuvette holder.8 Tap Measure sample.
Viewing the results− At the end of the analysis the screen displays a summary of the results. You can also see the Spectrum
and the Calibration curve of the measurement by tapping on their respective buttons.
Further measurements
§ All new measurements are based on the same calibration curve as before.
§ For a new calibration curve, end the direct measurement and start again.
1 Insert your blank/sample in to the cuvette holder and tap Measure blank or Measure sampleð The measurement starts.
2 Tap End direct measurement to stop and return directly to the homescreen.ð The results of each measurement are listed individually in the Results menu.
5.4.5.1 Define and select standardsThe standards that will be used for the calibration curve in a direct measurement first have to be defined.They are stored in a list in the order in which they will be used in a measurement. This list can be modifiedor deleted as required.
Create a standard list1 Tap the footer button Define standards to see and edit the list of standards.
ð Note: This screen is empty if no standards have yet been defined or all standards have been deleted.Only saved standards are shown in this list.
2 Fill in the Standard data fields as described in the table below.
3 Save to see the defined list of standards.
ð If you chose to add more than one standard in the Standards to add field, you can now edit each IDand concentration by tapping on each standard in turn. The standards will be used in the order inwhich they appear in the list.
ð Tap Save to save the changes.
Parameters Description Values
Standards toadd
Select the number of standards to add to the list. 1…30
Standard ID Define an arbitrary ID for the standard. Any
Concentration Enter the concentration of the standard. 0…100’000
Edit a standard1 Tap Define standards.
ð The Standard list is shown with all standards previously defined.2 Tap on the standard you wish to edit.
ð The Standard data window opens.
Operating the Instrument 25UV/VIS Excellence

3 Edit the name and concentration of the standard.ð Tap Save to save the changes.
Adding a standard
§ You can save a maximum of 30 standards in the Standard list.1 Tap Define standards.
ð The Standard list is shown with all standards previously defined.
2 Tap Insert to edit the list.
ð Insert tags appear between each standard. Note: The number of the standard in the list defines the sequence of execution during themeasurement, starting with No. 1.
3 Tap the Insert tag where you wish to add one or more new standards.
ð The Standard data window opens.4 Fill in the standard data fields as described above.ð Tap Save to save the changes.
Delete a standard1 Tap the footer button Define standards.
ð The Standard list is shown with all standards previously defined.2 Tap on the standard you wish to delete.
ð The Standard data window opens.
3 Tap Delete.ð The standards selected are deleted from the list.To clear the entire list of standards, tap Delete all in the Standard list.
5.5 Create and handle shortcutsOne Click™ Shortcuts allow you to start measurements, performance tests, and manual operations directly,without first going to the menus Methods, Direct measurement or Tests & Manual to select the requiredtask.
• Shortcuts can be created for methods, direct measurements, performance tests (CertiRef) and for themanual operation of automation units.
• With a One-Click™ indirect shortcut (1) you can open the start window of the task directly from thehomescreen.
• With a One-Click™ direct shortcut (2) you can start a task directly from the homescreen.• You can save a maximum of 24 shortcuts on the homescreen.• Users that belong to the user groups Technician, Expert or Administrator can manage the shortcuts that
they have created themselves.
Home
User data StartLog out
Methods
Directmeasurement
Results
Setup
Tests &Manual
Task
1Bradford PumpScan
2PumpBradfordScan
Operating the Instrument26 UV/VIS Excellence
Create a shortcut for a method1 Go to Methods and select your method category.
2 Create a New method or choose an existing method in the list.
3 Tap Start.ð The analysis dialog opens. Here you can change some parameters and add information to the
method, however, the changes will not be saved in the shortcuts!ð Exception: In Quant and Bio quant the parameters Use previous calibration and Omit sample
measurement are saved.
4 Tap AddToHome to create a shortcut.5 Define the shortcut parameters.6 Tap Save.ð The shortcut is now set on the homescreen.
Create a shortcut for a direct measurement
§ This description also applies to manual operations and performance tests.
1 Go to Direct measurement and select the type of analysis you wish to perform.2 Configure the measurement parameters as required.3 Tap AddToHome to create a shortcut.4 Define the shortcut parameters.5 Tap Save.ð The shortcut now appears on the homescreen.
Delete a shortcut1 Go to Setup > User settings > Shortcuts.2 Select the shortcut that you want to delete from the list.3 Tap Delete.ð The shortcut is deleted.
Change the shortcut parameters1 Go to Setup > User settings > Shortcuts.2 Select the shortcut that you want to change in the list.3 Change the parameters.4 Tap Save.ð The new shortcut parameters are saved.
Changing the measuring parametersYou can only change the measuring parameters of indirect shortcuts. Changes to the measuring parametersare executed but are not saved to the shortcut. The only exceptions are changes to the parameters Useprevious calibration and Omit sample measurement in Quant and Bio quant that are saved to theshortcut.
To permanently change the measuring parameters of a shortcut, you need to create a new shortcut.
5.5.1 Parameters
Parameters Description Values
Type Describes what type of shortcut will be created. Tests & Manual |Method | Directmeasurement
Description Write a description for the shortcut that will appear on thehomescreen.
Arbitrary
Operating the Instrument 27UV/VIS Excellence

Immediate start Executing a shortcut with Immediate start takes you to thecorresponding online screen without any further prompting.This is providing that:
• The resources are available,• The parameter “Show required resource at start” is not
selected,• and that validation has not failed.
Yes | No
Homescreenposition
Select where the shortcut should appear on the home screen. Position 1…24
Created by Indicates which user created the shortcut. This cannot beedited.
-
Operating the Instrument28 UV/VIS Excellence

6 Maintenance and CareIn this chapter you find descriptions of the maintenance tasks you should perform on your instrument. Anyother maintenance tasks need to be performed by a service technician that has been qualified by METTLERTOLEDO.
Do not open the housing of the instrument; it does not contain any parts that can be maintained, repaired orreplaced by the user. If you experience problems with your instrument, contact your authorized METTLERTOLEDO dealer or service representative.
METTLER TOLEDO recommends that a preventive maintenance and calibration certification is done at leastonce a year through your authorized METTLER TOLEDO dealer or service representative.
u www.mt.com/contact
6.1 Cleaning cuvette holders and cuvettes
NOTICEDanger of damage to the cuvette wrong cleaning methods!Cuvettes can be scratched, damaged by heat or vibration.1 Always use a wood-free optical polishing cloth to clean cuvettes so as to avoid scratching
the optical surface of the cuvette.2 Do not place your cuvettes in an ultrasonic cleaning bath.3 Do not heat glass cuvettes above 35 °C.4 Do not heat quartz cuvettes above 60 °C.
Cleaning the inside of the cuvette1 Hold the cuvette on its opaque non-measuring side when cleaning it.2 Rinse the cuvette under warm running water.3 Rinse the inside of the cuvette with deionized or ultra pure water.4 If the cuvette is still dirty, use an appropriate optical cell cleaning solution taking care to follow the
instructions of the supplier.
Cleaning the outside of the cuvette1 Hold the cuvette on its opaque non-measuring side when cleaning it.2 Moisten the outside of the cuvette with spectroscopy grade isopropanol and rub up and down the vertical
length of the cuvette with an optical cleaning cloth.3 Rub up and down the vertical length of the cuvette with a dry optical cleaning cloth.
Note• Store your cuvettes in their original packaging or in an appropriate cuvette holder.
Cleaning cuvette holders1 Clean cuvette holders with deionized water.2 Depending on the origin of the contamination, the holder can also be cleaned with ethanol or
isopropanol.
6.2 Cleaning the housing
NOTICEWater can cause damage to the instrument!The instrument is not waterproof. Water or other liquids seeping into the instrument maycause damage.1 Do not immerse the instrument.2 Wipe off any spills.
Maintenance and Care 29UV/VIS Excellence
The housing is made of coated polypropylene (PP). This material is sensitive to certain acids and organicsolvents, such as toluene, xylene and methyl ethyl ketone (MEK).
− Clean the housing of the instrument using a soft cloth dampened with water. If necessary use ethanol orisopropanol.
6.3 Transporting the instrumentIf you have questions about transporting your instrument, contact your authorized METTLER TOLEDO dealeror service representative.
u www.mt.com/contact
1 Shut down the instrument.2 Disconnect the instrument from the power supply.3 Remove all cuvettes.4 Disconnect and uninstall any accessories from the instrument.5 Mount the front and back covers back on the instrument.6 Clean the instrument.7 If you transport the spectrophotometer over long distances, use the original packaging.8 Keep the spectrophotometer upright while you transport it.
Maintenance and Care30 UV/VIS Excellence

7 DisposalIn conformance with the European Directive 2012/19/EU on Waste Electrical andElectronic Equipment (WEEE) this device may not be disposed of in domestic waste. Thisalso applies to countries outside the EU, per their specific requirements.
Please dispose of this product in accordance with local regulations at the collecting pointspecified for electrical and electronic equipment. If you have any questions, pleasecontact the responsible authority or the distributor from which you purchased this device.Should this device be passed on to other parties (for private or professional use), thecontent of this regulation must also be related.
Thank you for your contribution to environmental protection.
Disposal 31UV/VIS Excellence
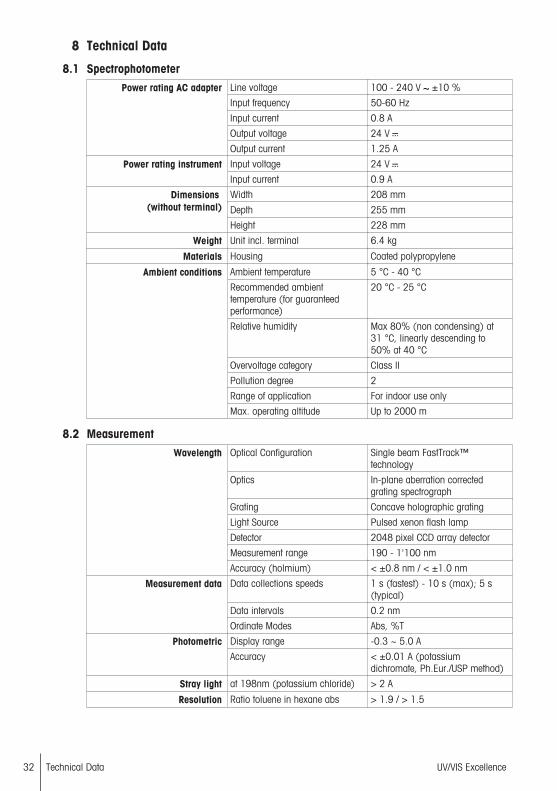
8 Technical Data
8.1 SpectrophotometerPower rating AC adapter Line voltage 100 - 240 V ±10 %
Input frequency 50-60 Hz
Input current 0.8 A
Output voltage 24 V
Output current 1.25 A
Power rating instrument Input voltage 24 V
Input current 0.9 A
Dimensions (without terminal)
Width 208 mm
Depth 255 mm
Height 228 mm
Weight Unit incl. terminal 6.4 kg
Materials Housing Coated polypropylene
Ambient conditions Ambient temperature 5 °C - 40 °C
Recommended ambienttemperature (for guaranteedperformance)
20 °C - 25 °C
Relative humidity Max 80% (non condensing) at31 °C, linearly descending to50% at 40 °C
Overvoltage category Class II
Pollution degree 2
Range of application For indoor use only
Max. operating altitude Up to 2000 m
8.2 MeasurementWavelength Optical Configuration Single beam FastTrack™
technology
Optics In-plane aberration correctedgrating spectrograph
Grating Concave holographic grating
Light Source Pulsed xenon flash lamp
Detector 2048 pixel CCD array detector
Measurement range 190 - 1'100 nm
Accuracy (holmium) < ±0.8 nm / < ±1.0 nm
Measurement data Data collections speeds 1 s (fastest) - 10 s (max); 5 s(typical)
Data intervals 0.2 nm
Ordinate Modes Abs, %T
Photometric Display range -0.3 ~ 5.0 A
Accuracy < ±0.01 A (potassiumdichromate, Ph.Eur./USP method)
Stray light at 198nm (potassium chloride) > 2 A
Resolution Ratio toluene in hexane abs > 1.9 / > 1.5
Technical Data32 UV/VIS Excellence

8.3 TerminalDimensions Width 194 mm
Depth 129.5 mm
Height 56.7 mm
Weight 638.4 g
Angle adjustment Mechanical 2-stage
Materials Top housing EN ZL-ZnAl4Cu1 (EN Zl-0410)
Lower housing Crastin SO653
Cover glas Gorilla glas
Technical Data 33UV/VIS Excellence

Technical Data34 UV/VIS Excellence


Mettler-Toledo GmbHIm Langacher 448606 Greifensee, Switzerlandwww.mt.com/contact
Subject to technical changes.© Mettler-Toledo GmbH 07/201730258694D
For more informationwww.mt.com/uv-vis
30258694
30258694D 7/18/2017 5:48 PM - Schema ST4 PDF engine - Layout by Victor Mahler