using upsi ontra t - uocpres.uillinois.edu · using upsi ontra t reference guide university office...
TRANSCRIPT

USING UPSIDE CONTRACT
Reference Guide
Last Updated: 07/24/18
UNIVERSITY OF ILLINOIS
Office of Business and Financial Services University Office of Capital Programs & Real Estate Services
University Office of Capital Programs and Real Estate Services Page 2 of 123
www.uocpres.uillinois.edu Support: [email protected]
Introduction ........................................................................................................................................................ 6
Get Started .......................................................................................................................................................... 7
Log On to Upside ............................................................................................................................................................................. 7
Enterprise Application Login ....................................................................................................................................................... 7
Establish Your EnterpriseID & Password ................................................................................................................................ 7
Change or Reset Passwords ........................................................................................................................................................ 8
Support ................................................................................................................................................................ 8
Troubleshoot Log On: .................................................................................................................................................................... 8
AITS Service Desk ............................................................................................................................................................................. 8
An Overview of Upside ...................................................................................................................................10
Purpose ............................................................................................................................................................................................. 10
Elements of Upside Contract Software ................................................................................................................................ 11
Upside Software Interface ..............................................................................................................................13
Elements of the Upside Interface ........................................................................................................................................... 13
Navigate the Interface ................................................................................................................................................................ 14
Contract Listing View................................................................................................................................................................... 16
Configure a Saved Search in the Contract Listing View: ............................................................................................... 18
New Project .......................................................................................................................................................20
Create a Project ............................................................................................................................................................................. 20
Project Form: General .....................................................................................................................................23
Complete the Project (General) Form: .................................................................................................................................. 24
Project Form: Professional Services .............................................................................................................26
Complete the Professional Services Project Form: .......................................................................................................... 26
Project Form: Construction Manager ..........................................................................................................30
Complete the Construction Manager Form: ...................................................................................................................... 31
Project Form: Bidding ....................................................................................................................................34
Complete the Bidding Form: .................................................................................................................................................... 34
Project Form: Contractor ...............................................................................................................................39
Complete the Contractor Form: .............................................................................................................................................. 39
Initiate a Contract Request .............................................................................................................................42
Create a Contract Request: ....................................................................................................................................................... 42
Add Notes to a Contract Request: ......................................................................................................................................... 45
University Office of Capital Programs and Real Estate Services Page 3 of 123
www.uocpres.uillinois.edu Support: [email protected]
Exit and Resume a Contract Request: ................................................................................................................................... 46
Delete a Contract Request: ....................................................................................................................................................... 46
Professional Services Advertisement ............................................................................................................47
Create a Professional Services Advertisement: ................................................................................................................. 47
Professional Services Agreement Contract Request ..................................................................................50
Create a Professional Services Agreement Contract Request: .................................................................................... 50
Main Document ................................................................................................................................................53
Edit a Main Document: ............................................................................................................................................................... 54
Navigation Tips .............................................................................................................................................................................. 57
Professional Services Agreement ..................................................................................................................59
Complete a Professional Services Agreement: .................................................................................................................. 59
Professional Service Consultant Award Letter ............................................................................................64
Create a PSC Award Letter: ....................................................................................................................................................... 64
Construction Manager Contract ....................................................................................................................67
Complete a Construction Manager Agreement: .............................................................................................................. 67
Front End Documents ......................................................................................................................................71
Create Front End Documents: .................................................................................................................................................. 73
Add and View Document Attachments ........................................................................................................76
Add Contract Document Attachments: ................................................................................................................................ 76
Sequence Contract Document Attachments: .................................................................................................................... 77
View Individual Attachments to the Contract Document: ............................................................................................ 78
Print Preview the Contract Document with its Attachments: ...................................................................................... 78
Construction Bid Advertisement ...................................................................................................................79
Create a Construction Bid Advertisement Contract Request: ..................................................................................... 79
Construction Contract .....................................................................................................................................81
Create a Construction Contract: .............................................................................................................................................. 82
Modify a Contract Document ........................................................................................................................85
Modify or Correct an Existing Contract Document or Letter: ..................................................................................... 86
Delete a Contract Document: .................................................................................................................................................. 86
Construction Letters ........................................................................................................................................87
Create a Construction Notice Letter: ..................................................................................................................................... 87
Forward a Contract Document .......................................................................................................................90

University Office of Capital Programs and Real Estate Services Page 4 of 123
www.uocpres.uillinois.edu Support: [email protected]
Forward a Contract Document: ............................................................................................................................................... 90
Review a Forwarded Document .....................................................................................................................92
Review a Document in Upside: ................................................................................................................................................ 92
Document Notes ..............................................................................................................................................94
View Notes about a Document: ........................................................................................................................... 94
Release Documents into the Workflow ........................................................................................................96
Workflow Approvals by Document ...................................................................................................................... 96
Release a Contract Document into the Workflow: .............................................................................................. 97
Review Workflow Approval Status ...................................................................................................................... 98
Review the Main Document ...........................................................................................................................99
Compare Documents ................................................................................................................................................................ 100
Compare Versions of a Document: .................................................................................................................... 100
In-line Redlining .......................................................................................................................................................................... 102
Perform In-Line Redlining: ................................................................................................................................. 102
View Versions ............................................................................................................................................................................... 104
Compare Versions:............................................................................................................................................. 105
Select an Approval Candidate: ........................................................................................................................... 106
Use Search to Find Projects ......................................................................................................................... 107
Use the Project Listing Search: .......................................................................................................................... 107
Use the Inquiry Feature ................................................................................................................................ 108
Search Using Inquiry: ......................................................................................................................................... 110
Using Folders ................................................................................................................................................................................ 112
Create a Folder: ................................................................................................................................................. 112
Add Documents to a Folder: .............................................................................................................................. 112
Approve Contract Documents .................................................................................................................... 114
Review the Document Prior to Approval: .......................................................................................................... 114
Approve or Reject a Contract Document:.......................................................................................................... 115
View the Status of a Contract Document in the Workflow: .............................................................................. 115
Appendix A: Upside Roles and Permissions ............................................................................................ 116
Appendix B: Optional and Editable Fields in the Professional Services Agreement ......................... 117
Optional ............................................................................................................................................................. 117
Editable .............................................................................................................................................................. 117
Appendix C: Field Character Limits ........................................................................................................... 118
To Count Characters Using Microsoft Word 2010: ............................................................................................ 118
Appendix D: Upside Email Notifications .................................................................................................. 119

University Office of Capital Programs and Real Estate Services Page 5 of 123
www.uocpres.uillinois.edu Support: [email protected]
Appendix E: Approval Workflow Diagram............................................................................................... 121
Appendix F: Upside Input Worksheet ....................................................................................................... 122
Appendix G: Available Interactive Forms ................................................................................................. 123
Additional Support ....................................................................................................................................... 123

University Office of Capital Programs and Real Estate Services Page 6 of 123
www.uocpres.uillinois.edu Support: [email protected]
Introduction
Upside Contract Project Contracts Listing (for a UIUC Project)
UOCP&RES selected Upside Contract to replace the Contract Document System (CDS). The purpose of the change is to increase compatibility with other capital systems and make system integration possible. Upside Contract and its companion software, Upside Forms, allows end-users to provide necessary contract information through simple forms-based data entry. Users can review contracts in Upside or through a PDF preview. Initial contract document review and approval will occur electronically. Final wet signatures are still required. Professional Services firms can no longer view or edit documents. By the end of 2009, CDS was phased out. Except for contracts already started in CDS, Campus Construction Units generate all new contract documents within Upside as of January 1, 2010. Upside software allows for creation, approval, and management of all capital-related contract documents, including Professional Services agreements, Front End Documents, letters to professional services consultants, construction contracts, letters to contractors, such as Notice of Award, Notice of Intent to Award, and Notice to Proceed, along with an internal approvals workflow. A set of worksheets and forms are available from the UOCP&RES website for information on appropriate form input in Upside.

University Office of Capital Programs and Real Estate Services Page 7 of 123
www.uocpres.uillinois.edu Support: [email protected]
Get Started You will need to logon to Upside using your Enterprise Application Services (EAS) logon and password. If you do not have an Enterprise ID or understand the EAS logon system, see the next section.
Log On to Upside
1. Navigate to www.uocpres.uillinois.edu. 2. Land on the Applications tab. 3. Select the Upside Contract option. 4. Enter your production EAS credentials.
Enterprise Application Login
Establish Your EnterpriseID & Password
To confirm that you have a valid EnterpriseID and password, log into the Employee Self Service application. If you’ve successfully logged in, there’s nothing more to do. You will be able log into Upside using your EnterpriseID. Your EnterpriseID and NetID are separate, as are the passwords associated with the IDs. If you do not know your EnterpriseID or are unsure if you have an EnterpriseID, visit: https://www.aits.uillinois.edu/access/get_access/get_access_to_enterprise_applications/

University Office of Capital Programs and Real Estate Services Page 8 of 123
www.uocpres.uillinois.edu Support: [email protected]
You must know your Bluestem ID or NetID to logon and establish an EnterpriseID. Follow the instructions under the Obtain your Enterprise ID section. This process will use Bluestem to assist you in setting your password. You will be supplying your Bluestem NetID and password to set your Enterprise password. NOTE: This process does NOT update your Bluestem password.
Change or Reset Passwords
If you have an EnterpriseID and know your password, but would like to change it, visit http://www.aits.uillinois.edu/access/get_access/ and select the Change Your Passwords link. If you have forgotten your EnterpriseID password, you may also reset it in this section. This process uses Bluestem to update your Enterprise password. NOTE: This process does NOT update your Bluestem password.
Support
Troubleshoot Log On:
1. Try resetting your Enterprise ID password as explained above. If that does not work, continue to step 2.
2. Call the AITS Service Desk. Since you will use your Enterprise ID as your Upside logon, only AITS can help reset this password.
AITS Service Desk UIC: (312) 996-4806 UIS: (217) 333-3102 UIUC: (217) 333-3102 Email: [email protected]
3. If resetting your password does not solve the problem, call the AITS Service Desk and log an initial request for Upside Support.
4. If you are able to logon to Upside but get an error once you are there, please call UOCP&RES and ask for Upside Support.
AITS Service Desk
The focus of the AITS Service Desk is handling questions about administrative systems, accounts and passwords. It can also assist with basic PC desktop issues and direct users to appropriate campus or departmental resources for problems with networks or business processes.

University Office of Capital Programs and Real Estate Services Page 9 of 123
www.uocpres.uillinois.edu Support: [email protected]
E-mailing AITS will generate a case in Clarify, their problem tracking system. You will receive an automated response with a case number for reference on any follow-up. The AITS Service Desk is staffed from 7:00 AM to 5:00 PM, Monday through Friday. Outside of these hours, calls are forwarded to the AITS Network Operations Center, enabling them to provide client support 24 hours-a-day, seven days-a-week. Visit their website at http://www.aits.uillinois.edu/get_help/ for more information and frequently asked questions. If you are experiencing a network problem, call the respective campus Help Desk: UIC – Academic Computing and Communications Center (ACCC) Phone: (312) 413-0003 Web page: http://accc.uic.edu/contact#QUICK-HELP UIS – Technology Services Center (TSC) Phone: (217) 206-7357 Web page: http://www.uis.edu/informationtechnologyservices UIUC – Technology Services Phone: (217) 244-7000 Web page: https://techservices.illinois.edu/get-help

University Office of Capital Programs and Real Estate Services Page 10 of 123
www.uocpres.uillinois.edu Support: [email protected]
An Overview of Upside
Purpose
The aging of the internally-developed Contract Documents System (CDS) necessitated an upgrade to a more compatible platform for a new system. Upside Contract was selected and customized for the University’s use across all campuses. Upside partially automates the creation of contract documents and creates a single location for storage of both the system-generated contract and its signed and scanned fully-executed contract. It also includes the option to bring together other documents, such as certification letters and MAFBE certifications. Upside currently1 contains the following templates from which to create advertisements, contract documents, and letters:
Professional Services o Professional Services Advertisement. o Professional Services RFP Consultant Advertisement.
1 Future Upside development may include additional contracts. Future development requirements and schedule have not been determined as of the publication of this guide.
Executed Contract
Printing and Signatures
Approvals Worksflow
Contract Review
Upload Documentation
Contract Generation
Contract Request
Project Form

University Office of Capital Programs and Real Estate Services Page 11 of 123
www.uocpres.uillinois.edu Support: [email protected]
o Professional Services Agreement (PSA) with Attachments A-D. o Professional Services Agreement (PSA) Short Form. o Professional Services Retainer Agreement. o Professional Services Amendment. o Construction Management Agreement. o Construction Management Amendment.
Front End Documents.
Construction o Construction Bid Advertisement. o Construction Pre-Bid Meeting Information. o Construction Contract – Contractor with No Assignment. o Construction Contract – Contractor with Assignment. o Construction Contract – Assigned Subcontractor.
Letters, including: o Professional Services Award Letter. o Professional Services Retainer Renewal Letter. o Notice of Intent to Award (NOIA) Letter. o Notice of Award (NOA) Letter. o Notice to Proceed (NTP) Letter. o Notice of Award / Notice to Proceed (Combined) Letter.
NOTE: A template contains the document’s boilerplate text, optional text, and field placeholders. When a new contract is generated the user-entered information combines with a copy of the selected contract document template to create the contract.
Elements of Upside Contract Software
Home Page and Dashboard. Upon first logon to Upside, the Home Page will appear, which includes a navigational pane, a menu pane, and a panel of task areas. Upside Forms and Wizards. Wizards walk the contract creator and editor through the required and optional information necessary for the system to generate contract documents. There are two types of wizards:
Project Forms Each contract will be associated with information from a Project. Information entered into the Project Forms will feed the automatically generated contract with such standard information as the generating department’s name, campus, and address; the professional services consultant’s name and address; and other formerly repeated information relevant to many contracts.
Contract Request Wizard The Contract Request Wizard offers selection criteria for the contract creator and subsequently interacts with the Project Form data behind the scenes to create the selected type of contract.

University Office of Capital Programs and Real Estate Services Page 12 of 123
www.uocpres.uillinois.edu Support: [email protected]
Contract Documents. In addition, contract editors can view the contract documents in their native formats. Professional Services Agreements and Letters may be edited to include elements not available in the wizards. Document Attachments. Upside allows users to upload document attachments, such as prevailing wages and other documents as needed. Document Review. All contract documents may be converted to PDF format and reviewed and/or forwarded to others for review. Versions of documents may be compared either side-by-side or using inline redlining. Approval Workflow. Once a contract has been created, it enters an approvals workflow. During the workflow, reviewers and approvers verify the contract’s details and certify that they agree that the contract is ready to be printed and sent out for signatures. The contract may not be edited during the workflow approval process, except when modifications have been requested and then only by UOCP&RES.

University Office of Capital Programs and Real Estate Services Page 13 of 123
www.uocpres.uillinois.edu Support: [email protected]
Upside Software Interface
Summary Screen
Default
Panel
Search
Menu
Pane
Toolbar Pane
Elements of the Upside Interface
The Home Page is the first screen that is displayed when logging into Upside Contract. It contains several areas that are used to navigate through the application: The Global Search area is used to search through all (or specific areas) of the application for the entered criteria. The Menu Pane contains links to the available areas within Upside Contract. The menus displayed are based on the modules that have been purchased by the University of Illinois, as well as on the role you play within Upside. The Default Panel contains the recent history of areas and items that you have visited and the Tasks, Documents and Recovered Documents folders of the application. The Summary Screen displays a Dashboard of frequently used task, reports, and announcement items. It contains:
Getting Started. The Getting Started area lists tasks you are authorized to perform, such as create a Contract Request, if you’re an editor.
University Office of Capital Programs and Real Estate Services Page 14 of 123
www.uocpres.uillinois.edu Support: [email protected]
NOTE: On the Summary Screen, in the Getting Started quadrant, you may see the Create a Contract option. Do NOT use this option.
Announcements. The Announcements area displays system announcements and other updates.
My Tasks. The My Tasks area displays a link to a view of the tasks that need to be completed as well as any approvals you have waiting for your review. The My Tasks link will gather together the following types of tasks:
o Contract Request items that are not finished. o Contracts that are in edit mode but not released into the workflow. o Approval tasks awaiting your review.
Reports. The Reports area contains links to standard and ad hoc reporting capabilities.
The primary Upside Toolbar displays and hides icons in a context-sensitive fashion, depending upon your activities. When working within Upside, use the Upside toolbar rather than the browser’s toolbar.
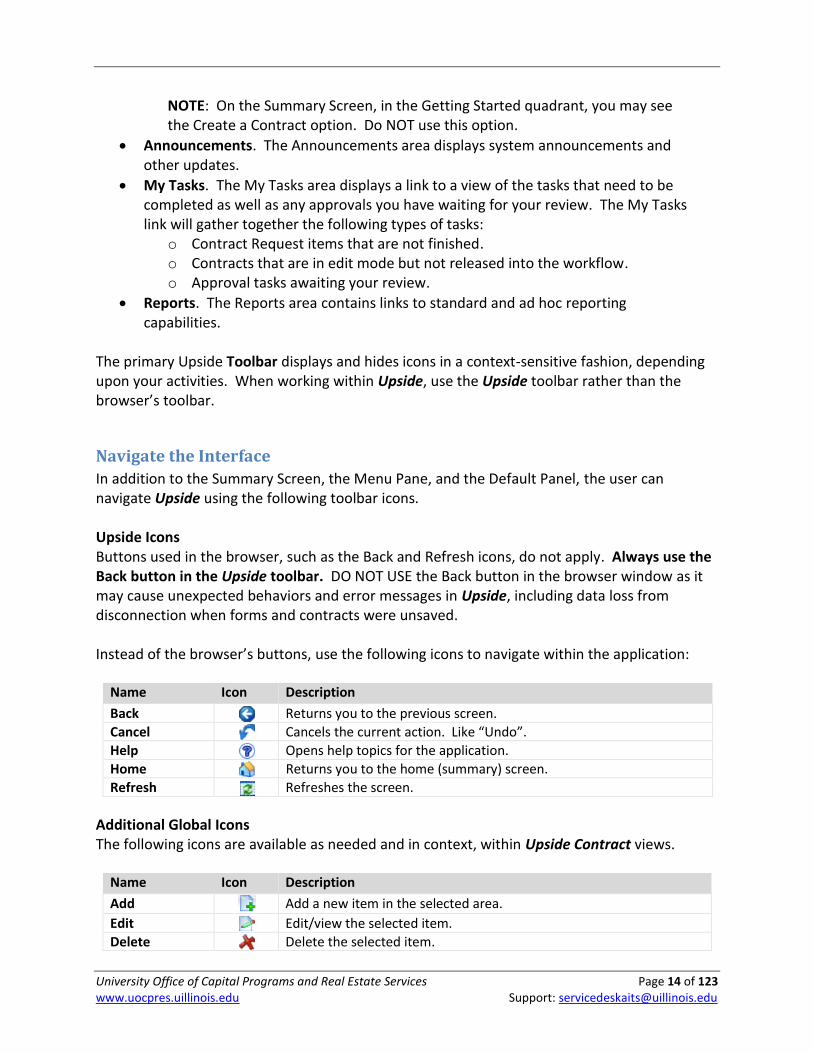
Navigate the Interface
In addition to the Summary Screen, the Menu Pane, and the Default Panel, the user can navigate Upside using the following toolbar icons. Upside Icons Buttons used in the browser, such as the Back and Refresh icons, do not apply. Always use the Back button in the Upside toolbar. DO NOT USE the Back button in the browser window as it may cause unexpected behaviors and error messages in Upside, including data loss from disconnection when forms and contracts were unsaved. Instead of the browser’s buttons, use the following icons to navigate within the application:
Name Icon Description
Back
Returns you to the previous screen.
Cancel
Cancels the current action. Like “Undo”.
Help
Opens help topics for the application.
Home
Returns you to the home (summary) screen.
Refresh
Refreshes the screen.
Additional Global Icons The following icons are available as needed and in context, within Upside Contract views.
Name Icon Description
Add
Add a new item in the selected area.
Edit
Edit/view the selected item.
Delete
Delete the selected item.

University Office of Capital Programs and Real Estate Services Page 15 of 123
www.uocpres.uillinois.edu Support: [email protected]
Name Icon Description
Save
Save the selected item.
Select
Select an item from a listing screen.
Audit Log
View the history of status changes for the selected item.
Print Preview
Preview the selected item. A window will open from which you can select the format for the preview.
Check Out
Check the selected item out. When a document is checked out to you, it cannot be worked on by any other users.
Check In
Check the selected item back into the repository.
Summary
View a summary page for the selected item.
Add Document to Folder
Opens a menu that shows a list of folders from the Inbox Pane. From the drop-down menu, click a folder to add the selected item to it.
Important Notes Use Internet Explorer. Because Upside Contract is a web-based application, you’ll need to view it in a web browser. Internet Explorer is the preferred browser. If your default browser is Firefox or other popular web browser, the application may not display correctly. It’s safest to bookmark Upside in Internet Explorer and return to it using only Internet Explorer. Allow Pop-Up Windows in Upside. To use Upside Contract effectively, you will need to allow pop-up windows from the entire Upside Contract web-based application.

University Office of Capital Programs and Real Estate Services Page 16 of 123
www.uocpres.uillinois.edu Support: [email protected]
Contract Listing View
Upside contains useful views for finding and interacting with contract documents as needed. The Contract Listing View allows the user to view the contracts which exist in the system and to filter that listing to pull together just the contracts desired for viewing. There are a number of filtered views available from a drop-down menu. If sufficient permissions exist, the user may even be able to create a customized filtered view of Contract Listings. Filter the View Filter the Contract Listing View using the Saved Views drop-down field, as illustrated below. The saved views are also listed below.
The user can also filter the ContractsbyProjectCode view by entering a project number in the Project Code field and clicking the Search command button.

University Office of Capital Programs and Real Estate Services Page 17 of 123
www.uocpres.uillinois.edu Support: [email protected]
Provided you have the correct permissions, you can also create your own Saved Search. See the next section, Saved Searches, for the procedure. Navigate Search Results Once you have a subset of projects or contracts, you can navigate through multiple pages using the page numbers at the bottom of the listing. Select a Contract Click on the desired row in the view. An arrow appears to the left of the item you’ve selected. Check-out a Contract Document In order to work with a contract document, it’s wise to check it out. If you have editor rights, you will not be able to edit the contract unless it is checked out. Click the Check Out icon in the toolbar. View Contract Summary Details To quickly review a summary of a contract, click the Summary icon in the toolbar. A new window opens with more detail about the item selected, including any contract notes and workflow approvals the item has undergone.
Use the Breadcrumb Menu The user can navigate using the breadcrumb menu of the Toolbar Pane. Click on any item in the list to navigate to that option. For example, in the illustration below, go to the Summary
Screen by clicking on Home.

University Office of Capital Programs and Real Estate Services Page 18 of 123
www.uocpres.uillinois.edu Support: [email protected]
Preview a Document To preview a document in PDF format, click the Print Preview icon in the toolbar. Click the Prepare Document button. The document opens as a PDF document in Adobe Acrobat. NOTE: If you are using a pop-up blocker, you may need to give the browser permission to open the document. Item and Notes Icons in the Contract Listing View The following icons are used to help identify if a contract has been checked out and by whom, and if the contract has any notes attached.
Name Icon Description
Checked out by you The document icon with a green check mark indicates that the contract is currently checked out to the user who is logged in.
Checked out by Another User
The document icon with a red check mark indicates that the contract has been checked out by another user in the system. Rest your mouse pointer on the icon to see which user has the document checked out.
Checked in The document icon without a check mark indicates that the contract has been checked into the repository.
Blank Note There are no notes attached to this contract.
Note Present Notes are attached to the contract and can be viewed by clicking on this icon.
Saved Searches Saved Searches can be configured in the Contract Listing View, to display only those projects desired at a given time.
Configure a Saved Search in the Contract Listing View:
1. From the Contract Listing View, in the Saved Views area, click the Configure command button.
2. Click the New command button.
3. Enter the name in the View Name field.
NOTE: Do not use spaces in the view name.
4. In the Add New Criteria drop-down field, select the criteria to add to the view.
5. In the Expose as search criteria checkbox, select if you wish to have the search criteria viewable.
Use this option if your criteria will necessitate the end-user searching for a criterion (such as Contract Manager) to filter the view.

University Office of Capital Programs and Real Estate Services Page 19 of 123
www.uocpres.uillinois.edu Support: [email protected]
6. Click the Configure Grid command button.
7. Select the columns in the grid to have in your new view.
8. Click the Save command button.

University Office of Capital Programs and Real Estate Services Page 20 of 123
www.uocpres.uillinois.edu Support: [email protected]
New Project
All contracts within Upside have relationships to projects. Upside pulls Project form information into the Contract Request and thereafter the Contract Document itself. The user must first create a Project before creating its related contracts. All contracts will use at least some of the data entered into the Project forms. In order to create a Project, the user will need a minimal amount of information:
Project Number.
Project Title.
Project Manager.
Project Start Date.
Project End Date
Create a Project
1. Click the plus sign (+) to expand the Contracts menu item.
2. Select the Projects menu item (as illustrated above).
NOTE: The Projects listing screen displays no projects by default. Search for the project(s) to display.
3. Select All from the Start Date drop-down list, and then click the Search command button.

University Office of Capital Programs and Real Estate Services Page 21 of 123
www.uocpres.uillinois.edu Support: [email protected]
NOTE: If you are creating a new project, you can safely ignore the list of projects.
4. Click the Add icon in the toolbar.
5. Complete the Project Header fields at the bottom of the screen (as illustrated below).
NOTE: In the event this information needs to be modified later, navigate to the Header item in the Menu Pane.
a. In the Project Code field, enter the Project Number.
b. In the Description field, fill in the Project Title. Abbreviate as needed since this field may only contain 100 characters.
c. In the Start Date and End Date fields, fill in the approximate start date of the project and the approximate date of substantial completion.
d. To select the Project Manager, click the magnifying glass icon.
e. Click the Search command button in the bottom right of the blue band.
f. Select the project manager’s name.
g. Click the Select icon (√) in the toolbar.
h. In the Budget Amount field, type 999,999,999 (nine nines).
NOTE: Do not enter the project’s budget amount because Upside will not allow creation of contracts beyond the amount entered into this field. If the project’s scope or budget should change, the user might not be able to enter additional contracts.
6. Click the Save icon.
7. Click on Forms under Projects.
8. Click the Add icon in the toolbar.
9. Click on the Select Form at the bottom of the page.
10. Select Proj_Project (Version 16).
11. Click the Save icon.
The project shell has been created. Go on to enter data into the Project Form using Form Entry.

University Office of Capital Programs and Real Estate Services Page 22 of 123
www.uocpres.uillinois.edu Support: [email protected]

University Office of Capital Programs and Real Estate Services Page 23 of 123
www.uocpres.uillinois.edu Support: [email protected]
Project Form: General
Before creating any agreement or contract, the user must first complete some information about the contracts’ related project. In one sense, creating the project is similar to creating a binder in the Contract Documents System (CDS) because a relationship is built between the project and its contracts. The Project Form collects information used in multiple places in the agreement(s), contract(s), and letters you will eventually generate in Upside. For any contract, the General Project Form must first be completed. Before proceeding, gather preliminary project information, such as:
Project Number.
Project Title.
Project Description.
Total Construction Budget. This information can be modified later if necessary. NOTE: The following characters may NOT be used in any form field:
Left angle bracket < OR Right angle bracket >

University Office of Capital Programs and Real Estate Services Page 24 of 123
www.uocpres.uillinois.edu Support: [email protected]
Complete the Project (General) Form:
1. Click on the Project menu again to see the new project in the list.
NOTE: It is possible that you may have to search again. (See Using Search to Find Projects, later in this guide.)
2. Highlight the project just created and select the Forms menu item. OR
If you are in the Funding view after creating the project, select the Forms item in the Menu Pane (see illustration on previous page).
3. Click the Add icon to activate the Forms drop-down list.
4. In the Select Form drop-down field at the bottom of the view, select Project Form.
5. Click the Save icon.
6. Click the Enter Form Data command button.
NOTE: Enter data in this view about the Project which will feed fields in the contracts created later.
7. In the Total Estimated Construction Budget field, type in the Project’s estimated total construction budget.
8. In the Project Location drop-down field, select the campus or other location.
9. In the Agreement Location drop-down field, select the appropriate location.
10. In the Will Project Use PRZM? drop-down field, select whether PRZM will be used during this project.

University Office of Capital Programs and Real Estate Services Page 25 of 123
www.uocpres.uillinois.edu Support: [email protected]
11. In the Project Location field, type in a short description (<750 characters).
12. In the Short Project Description field, type in a short description (<1,750 characters).
13. In the Project Organizational Unit drop-down field, select the appropriate unit.
14. In the Project Manager drop-down field, select the name of the Project Manager.
15. In the Project Manager Title field, type in the project manager’s or planner’s title.
NOTE: The Project Manager’s or Planner’s name and Title fields may be altered if assignment of the project changes.
16. In the Owner Office for Notices drop-down field, select the appropriate office.
NOTE: The Owner Address for Notices field will automatically populate with the related address.
17. In the Contact Name for Notices field, type the name of the person who should receive notices.
18. Save the data by clicking the Save icon.
NOTE: Remember to save your data often. It is not necessary to Submit the data until you wish to create agreements, front-end documents, letters, notices, and/or contracts. However, if you do not submit your data, you will not be able to create any of the above mentioned documents.
19. When all the necessary forms are complete, click the Submit command button at the bottom of the screen.
Submitting the data makes it available to the contracts to be created.
NOTE – Multiple Users Working in the Same Form(s): It is possible for two individuals to be working within the same form at the same time. When this happens, if:
There are two different users, other than the person who created the most recent version, then:
o The first person to save the form will create a new version. o The second person to save the form will get an error and not be able to save it.
One of the users is the person who create the most recent version, then: o The order of who saves it doesn’t matter. o The user who created the most recent version will update that version. o The other user will create a new version.

University Office of Capital Programs and Real Estate Services Page 26 of 123
www.uocpres.uillinois.edu Support: [email protected]
Project Form: Professional Services
The Professional Services Project form feeds fields in the Professional Services Agreement (PSA). Some of this information may need to come from the Professional Services Consultant. A special Upside input form for this purpose is available through the UOCP&RES website.
Complete the Professional Services Project Form:
1. Navigate to the Project Forms.
OR
If you have just completed the Project’s General form, continue to the next step.
2. Click the Professional Services command button.

University Office of Capital Programs and Real Estate Services Page 27 of 123
www.uocpres.uillinois.edu Support: [email protected]
3. In the Filter for PSC Company Drop-Down field, type the first letter or the first word of the PSC firm’s name.
NOTE: This field is case sensitive. Be sure to use appropriate capitalization.
4. Click the Populate Drop-Down command button.
5. For the PSC Company listed, in the PSC Company drop-down field, select the name of the PSC.
NOTE: If the PSC name is not found or resulting address is incorrect, the PSC must register or update their information in the Vendor Services Application (VSA) system for Upside to receive the correct information. In order to refresh the data after the PSC has made the appropriate change in VSA, you must select a different PSC and then reselect the correct PSC to have the changed information from VSA be populated in Upside.
6. In the PSC Contact Name for Notices field, type the professional services consultant’s contact name (use the format Firstname Lastname, e.g., John Doe).
7. In the Business Entity Type drop-down field, select the contractor’s type of business.
8. In the Laws of the State of drop-down field, select the state.
NOTE: To jump down the menu, type the first few characters of the State’s name.
9. In the Registered Agent Name, Registered Agent Address, City, State and Zip fields, appropriate information should be populated from what is contained in VSA. If any of this information is incorrect have the PSC update the VSA information as discussed above NOTE below step 5 above.
NOTE: To verify registered agent information, go to http://www.ilsos.gov/corporatellc
10. In the Is this a Feasibility Study or Master Plan? drop-down field, select Yes or No.
NOTE: Selecting Yes or No determines insurance requirements for the professional services consultant firm.
11. In the LEED Criteria and Sustainable Planning drop-down field, select one of the following:
N/A.
LEED Non Certified.
LEED Certified.
12. In the PSC Contract Type drop-down field, select the contract type: Amendment, Retainer, Short Form, Standard Form, or Energy Audit Agreement.
NOTE: Contracts over $25,000 must use the standard form.
13. If you selected Retainer, SKIP to step 18.
14. If you selected Amendment, SKIP to step 21.
15. If you selected Energy Audit Agreement, enter the Energy Audit Agreement total contract amount; skip to step 19 and follow the steps for the PSC to complete the ESCO Subconsultant Work Summary.
16. If you selected Short Form, continue below.
a. In the PSC Compensation area, in the Compensation Type drop-down field, select the type of compensation: Hourly NTE or Fixed Fee.

University Office of Capital Programs and Real Estate Services Page 28 of 123
www.uocpres.uillinois.edu Support: [email protected]
b. In the Compensation field, type in the amount of compensation.
c. In the Reimbursables field, type in the amount of reimbursables.
d. Click the Sum command button.
e. SKIP to step 18.
17. If you selected Standard Form, the Professional Services Compensation area of the form will resemble the following illustration.
a. Enter the Fixed Fee or Hourly rates for each of the Basic and Supplemental Services.
b. In the Reimbursables field, type the amount of reimbursables.
c. Click the Sum command button.
d. In the Interior Design Requirements drop-down field, select the correct option: None, Full, or Partial.
e. In the Construction On-Site Average Hrs/Wk field, type in the number of hours.
f. In the Construction On-Site # of Weeks field, type the number of weeks.
18. Continue to the Hourly Rates Schedule area of the form, as illustrated below.
NOTE: Refer to the Capital Professional Services Scope and Fee Negotiation Policy at the UOCP&RES website for further information on completing the table.

University Office of Capital Programs and Real Estate Services Page 29 of 123
www.uocpres.uillinois.edu Support: [email protected]
a. In the Position Title/Function field, type in the name of the first position and the function that position will perform.
b. Type in the Actual Hourly Rate for that position.
c. If the Overhead and Burden rate differs from the default, type in the new rate.
NOTE: If you have overhead and burden rates that differ by company, include the PSC firm’s here and add any differing subconsultant(s) rate(s) when you edit the Main Document. For further information on this topic, see Completing a Professional Services Agreement, later in this guide.
d. If the Negotiated Fixed Fee differs from the default, type in the new fee.
e. To insert another position, click the Insert Another Position command button.
f. Continue adding Positions and Actual Hourly Rates until the entire list is complete.
g. Click the Calculate Total Hourly Rate command button.
19. Continue to the Time of Completion area of the form.
a. Type in the Phase Title, Projected Start Date and Projected Completion Date.
b. Select Add a Phase Date for each additional phase that is to be added.
20. Continue to the PSC/Subconsultant Work Summary area of the form.
a. Type in the PSC/Subconsultant(s) Name/Address, Service(s) Provided and Total Contract Value.
b. Totals and percentages will automatically be calculated after you click on the Calculate Subconsultant Totals command button.
c. Select Add Subconsultant for each additional subconsultant that is to be added.
d. The acronyms TBD and N/A in the Total Contract Value and Percentage of PSC Agreement may be used for Retainers since these values may not be known at the time of contract.
21. When initiating an Amendment, the PSA Amendment Summary of Contractual Services area must be completed.
a. Type in the appropriate information in the following areas for each Amendment generated: Phase Title, Original PSA value for each phase, Previous Amendment(s) amounts and Current Amendment amounts.
b. The Revised Professional Service Agreement amount will automatically calculate as well as the Totals area. Steps number 17, 18 and 19 above may also need to be referenced and information changed if the Amendment affects any of these areas.
22. Click the Save icon in the toolbar to save your work.
23. If you wish to create any of the Professional Services’ Documents now, click the Submit command button.
24. To create the Professional Services Document, continue on to Initiating a Contract Request, later in this guide.

University Office of Capital Programs and Real Estate Services Page 30 of 123
www.uocpres.uillinois.edu Support: [email protected]
Project Form: Construction Manager
When the project involves a Construction Manager, fill in the Construction Manager details on the Construction Manager tab. If the project is not going to use a Construction Manager, enter Not Applicable into the CM Contact Name for Notices field. NOTE: If the Construction Manager firm is not listed, contact AITS Upside Support to have the firm’s information added to Upside.

University Office of Capital Programs and Real Estate Services Page 31 of 123
www.uocpres.uillinois.edu Support: [email protected]
Complete the Construction Manager Form:
1. Click the Construction Manager command button.
2. In the Filter for CM Company Drop-Down text box, type the first letter or the first word of the Contractor firm’s name.
NOTE: This field is case sensitive. Be sure to use appropriate capitalization.
3. Click the Populate Drop-Down command button.
4. For the CM Company listed, in the CM Company drop-down field, select the name of the CM.
NOTE: If the CM name is not found or resulting address is incorrect, the CM must register or update their information in the Vendor Services Application (VS) system for Upside to receive the correct information. In order to refresh the data after the CM has made the appropriate change in VSA, you must select a different CM and then reselect the correct CM to have the changed information from VSA be populated in Upside.
5. In the CM Contact Name for Notices field, type the name of the CM contact in the FirstName Lastname format.
6. In the PSC Company drop-down field, select the firm.
7. In the PSC Contact Name for Notices field, type the professional services consultant’s contact name (use the format Firstname Lastname, e.g., John Doe).
8. In the Business Entity Type drop-down field, select the contractor’s type of business.
9. In the Laws of the State of drop-down field, select the state.
NOTE: To jump down the menu, type the first few characters of the State’s name.
10. In the Registered Agent Name field, type the name of the registered agent.
11. In the Registered Agent Address field, type the registered agent’s street address.
12. In the Registered Agent City, St, ZIP field, type the registered agent’s city, state, and zip code.
NOTE: To verify registered agent information, go tohttp://www.ilsos.gov/corporatellc
13. In the Does the project involve new construction or add square footage to an existing building drop-down field, select either Yes or No.
NOTE: If Yes, the form refreshes. If No, SKIP to step 17.
14. In the Additional Builder’s Risk Insurance section, choose the checkbox for each of the types of additional insurance that applies to the project:
Delay in Completion (in the textbox add the dollar amount for this insurance).
Flood.
Earthquake.
If none apply, and you verified this within FCPWeb, click in the checkbox next to None Apply per FCPWeb PDS.
15. In the CM Contract Type drop-down, select Amendment or Standard Form.

University Office of Capital Programs and Real Estate Services Page 32 of 123
www.uocpres.uillinois.edu Support: [email protected]
16. If you selected Amendment, SKIP to step 22.
17. If you selected Contract Type Standard Form in the PSC Compensation area, enter the Fixed Fee and/or Hourly amounts in each of the relevant Basic Services fee areas including Reimbursables.
18. When all the fees are entered, click the Sum command button.
19. Continue to the Hourly Rates Schedule area of the form, as illustrated below.
NOTE: Refer to the Capital Professional Services Scope and Fee Negotiation Policy at the UOCP&RES website for further information on completing the table.
a. In the Name field, type the name of the individual.
b. In the Position Title/Function field, type in the name of the first position and the function that position will perform.
c. Type in the Total Hourly Rate for that person/position.
20. Continue to the Time of Completion area of the form.
a. Type in the Phase Title, Projected Start Date and Projected Completion Date.
b. Select Add a Phase Date for each additional phase that is to be added.
21. Continue to the Construction Manager/Subconsultant Work Summary area of the form.
a. Type in the Construction Manager/Subconsultant(s) Name/Address, Service(s) Provided and Total Contract Value.
b. Totals and percentages will automatically be calculated after you click on the Calculate Subconsultant Totals command button.
c. Select Add Subconsultant for each additional subconsultant that is to be added.
d. The acronyms TBD and N/A in the Total Contract Value and Percentage of PSC Agreement may be used for Retainers since these values may not be known at the time of contract.
22. When initiating an Amendment, the CM Amendment Summary of Contractual Services area must be completed.
a. Type in the appropriate information in the following areas for each Amendment generated: Phase Title, Original CM value for each phase, Previous Amendment(s) amounts and Current Amendment amounts.
b. The Revised Professional Service Agreement amount will automatically calculate as well as the Totals area. Steps number 19, 20 and 21 above may also need to

University Office of Capital Programs and Real Estate Services Page 33 of 123
www.uocpres.uillinois.edu Support: [email protected]
be referenced and information changed if the Amendment affects any of these areas.
23. Click the Save icon in the toolbar.
24. Click the Submit icon at the bottom of the page.

University Office of Capital Programs and Real Estate Services Page 34 of 123
www.uocpres.uillinois.edu Support: [email protected]
Project Form: Bidding
Form fields populate areas within the Front End Documents including 00 10 00 and 00 40 00. Some of the information entered into the Bidding tab will eventually populate construction contracts.
Complete the Bidding Form:
1. Click the Bidding command button.
2. In the Builder’s risk insurance provided by drop-down field, select the Division of Work which will provide the builder’s risk insurance for the project.
NOTE: If builder’s risk insurance is not required, such as for parking lot striping, select the No builder’s risk insurance option at the bottom of the list. When this option is selected, the reason why it’s not required must be given. Selecting this option will automatically trigger additional approvals during the workflow process.
3. In the Owner purchased permanent equipment field, type the value for Owner purchased permanent equipment.

University Office of Capital Programs and Real Estate Services Page 35 of 123
www.uocpres.uillinois.edu Support: [email protected]
4. In the Review Set Deposit Amount field, type the dollar amount for review sets.
5. In the Number of days to substantial completion from notice to proceed field, type in the number.
6. In the Liquidated Damages field:
a. If there will not be liquidated damages in the contract, accept the default, No.
b. If there will be liquidated damages in the contract, select Yes.
c. Since a deviation from standard contract language has been requested, a field appears which requires the justification for the change. Type in the reason for liquidated damages and damage amounts. Selecting this option will automatically trigger additional approvals during the workflow process.
7. In the Request fixed dates to the contract field:
a. If there will not be fixed dates, accept the default, No.
b. If the contract will require fixed dates, select Yes.
c. Since a deviation from standard contract language has been requested, a field appears which requires the justification for the change. Type in the reason for fixed dates in the contract. Selecting this option will automatically trigger additional approvals during the workflow process.
d. In the Provide the requested alternate contract fixed date language below, type in the necessary dates for the construction schedule.
8. In the Estimated Construction Costs (including contingency) drop-down field, select one of the following options, as illustrated below.
Less than $250k.
Between $250k and $2 million.
Greater than or equal to $2 million.
NOTE: Estimated Construction Costs (including contingency) determines whether the mandatory pre-bid meeting language will appear in the contract. For projects under $1 million, select whether you will have mandatory pre-bid meeting language in the contract. For projects over $1 million, pre-bid meeting language is required.
9. If the estimated construction cost is less than $2 million, the pre-bid meeting option will appear. Select Yes if a mandatory pre-bid meeting is desired. If not, select No.
10. In the Will project specific MBE/FBE goals deviate from baseline? field, only select Yes if the goals are different from your campus’ goals (UIC = 22%; all other campuses = 15%).

University Office of Capital Programs and Real Estate Services Page 36 of 123
www.uocpres.uillinois.edu Support: [email protected]
11. If you selected Yes in the previous step, the Combined MBE/FBE (%) and Split Goals Applicable? fields and listing the Divisions of Work will activate.
a. Type in the new goals.
b. If split goals are applicable, choose the Yes checkbox.
IMPORTANT NOTE: As of February 2011, baseline goals are the only goals to be used. Split goals are reserved for future implementations.
12. In the Contract Type field, select one:
Single.
Multiple.
13. If Single was selected, in the Division of Work drop-down field, select the related division of work. SKIP to Step 11.
a. Click the Add Another Division of Work command button to add another Division of Work.
OR
Click the down arrow to the left of the Assignment field to add or delete items.
b. Continue adding divisions of work, with their assignments, as necessary, until all
assignments and divisions of work have been added.
c. SKIP to Step 11.
14. If Multiple was selected:
a. In the Assignment drop-down field, select the assignment type: Assigned, Non-Assigned, or Contractor with Assigned.

University Office of Capital Programs and Real Estate Services Page 37 of 123
www.uocpres.uillinois.edu Support: [email protected]
b. In the Division of Work drop-down field, select the related division of work.
c. Click the Add Another Division of Work command button to add another Division of Work.
OR
Click the down arrow to the left of the Assignment field to add or delete items.
d. Continue adding divisions of work, with their assignments, as necessary, until all assignments and divisions of work have been added.
15. If there are Alternates:
a. In the Alternate Work Item Description field, type the Alternate number followed by the description of the alternate.
EXAMPLES:
Alternate No. 1 – Provide oak chair rail.
Alternate No. 2 – Install acrylic floor covering.
b. In the Alternate Division of Work drop-down fields, all Divisions of Work will automatically populate for each Bid Alternate displayed. The checkbox to the left must remain checked for that Division of Work to be incorporated into all applicable Upside documents.

University Office of Capital Programs and Real Estate Services Page 38 of 123
www.uocpres.uillinois.edu Support: [email protected]
16. If there are Unit Prices:
a. In the Unit Price Description field, type the Unit Price number and descriptions.
b. In the Unit Price Division of Work drop-down field, select the unit price’s related Division(s) of Work.
NOTE: Select more than one division by holding the CTRL key while making selections.
c. To add additional unit prices, click the Add Another Unit Price command button.
OR
Click the down arrow to the left of the Unit Price Description field to add or delete items.
17. Complete the remaining following areas of the Bidding are of the Project Form:
Detailed Project Description.
Detailed Description of Project Location.
Publish Date.
Bid set purchase information.
Pre-bid Conference meeting area.
Pre-bid Conference date and time.
Project-Specific Contractor Prequalification selection and appropriate information (if applicable).
Contract Type – Select Multiple or Single and then identify Contractor and Assigned Subcontractor (if applicable) bid deadlines, bid opening locations and bid times.
18. Click the Save icon in the toolbar to save your work.
19. If creation of Front End Documents is next, click the Submit command button.
20. To create the Front End Documents, continue on to Initiating a Contract Request, later in this guide.

University Office of Capital Programs and Real Estate Services Page 39 of 123
www.uocpres.uillinois.edu Support: [email protected]
Project Form: Contractor
Fields in the Contractor area are partially populated through the Bidding area. The additional information entered here will partially populate the construction contracts. The final contract will pull information from other areas on the Project form as well.
Complete the Contractor Form:
1. Click the Contractor command button.
2. If there are Addenda:
NOTE: If you issued Addenda prior to bid opening, you will need to include all issued addenda dates in this area so that they will be reflected in construction contracts later.
a. In the Addenda section, add the addendum number and its related date.
NOTE: Either type the date (using the date format M/D/YYYY) or use the date navigator by clicking the calendar icon.
TIP: To add today’s date, click the up arrow next to the calendar icon. To go back one month, click the down arrow next to the calendar icon.

University Office of Capital Programs and Real Estate Services Page 40 of 123
www.uocpres.uillinois.edu Support: [email protected]
b. Click the Add Another Addenda command button to add additional addenda.
OR
Click the down arrow to the left of the Addenda Number field to add or delete items.
3. If some of the items were not awarded, change the default statuses from Awarded to
Not Awarded.
4. Scroll down the page to the Begin Section for Division of Work area.
NOTE: Fields in this illustration are already filled in.
5. In the Filter for Contractor Drop-Down field, type the first letter or the first word of the Contractor firm’s name.
NOTE: This field is case sensitive. Be sure to use appropriate capitalization.
6. Click the Populate Drop-Down command button.
7. For the Division of Work listed, in the Contractor Name drop-down field, select the name of the contractor for that division of work.

University Office of Capital Programs and Real Estate Services Page 41 of 123
www.uocpres.uillinois.edu Support: [email protected]
NOTE: If the Contractor name is not found or resulting address is incorrect, the Contractor must register or update their information in the Vendor Services Application (VSA) system for Upside to receive the correct information. In order to refresh the data after the Contractor has made the appropriate change in VSA, you must select a different Contractor and then reselect the correct Contractor to have the changed information from VSA be populated in Upside.
8. In the Contractor Contact Name for Notices field, type the name of the Contractor’s contact in the form FirstName LastName.
9. In the Business Entity Type drop-down field, select the contractor’s type of business.
10. In the Laws of the State of drop-down field, select the state.
NOTE: To jump down the list, type the first few characters of the State’s name.
11. In the Registered Agent Name, Registered Agent Address, City, State and Zip fields, appropriate information should be populated from what is contained in VSA. If any of this information is incorrect have the Contractor update the VSA information as discussed above NOTE below step 7 above.
Verify registered agent information at http://www.ilsos.gov/corporatellc
12. In the Surety Name text box, type the name of the Contractor’s Surety.
13. In the Surety Address text box, type the type the street address of the Surety.
14. In the Surety City, St, ZIP text box, type the Surety’s city, state and zip code.
15. In the Surety – Laws Of The State Of drop-down field, select the Surety’s state.
16. In the Base Bid field, type in the Contractor’s base bid amount.
17. For each awarded alternate, type in the amount.
18. In Contract Sum area, click the Sum command button.
19. For each additional Division of Work, repeat steps 4-18.
20. Click the Save icon in the toolbar to save your work.
NOTE: To create a contract for a contractor with assigned sub-contractors, all information about all contractors must be added to the Contractor form.
21. If creation of contractor contracts is next, click the Submit command button.
22. To create the contractor contracts, continue on to Initiating a Contract Request, the next topic in this guide.

University Office of Capital Programs and Real Estate Services Page 42 of 123
www.uocpres.uillinois.edu Support: [email protected]
Initiate a Contract Request
A Contract Request is a wizard to assemble data from the Project forms and from the Template boilerplate text, based on the selections made and data input provided when the wizard is run. Once the Contract Request is finished, the Contract Document, containing all of the selections, is generated automatically. The Contract Document may need to be edited depending upon the contract type. NOTE: The user can create and subsequently resume a Contract Request. Once the Finish button is clicked for a Contract Request, however, it can no longer be edited. The following procedure is a generic one. Options may vary, depending upon which type of document or letter is being requested. To learn more about a specific Contract Request type, see the individualized procedure for that type, later in this guide.
Create a Contract Request:
1. From the Summary Screen, in the Documents area, select the Create a Contract Request link.
OR
In the Menu Pane, select the Contract Requests menu item and click the Add icon in the toolbar.

University Office of Capital Programs and Real Estate Services Page 43 of 123
www.uocpres.uillinois.edu Support: [email protected]
2. On the Request Type Questionnaire, choose the New Contract radio button.
3. Click the Next Question command button.
4. On the Contract Type Questionnaire, select the contract type and then click the Next Question command button.
5. In the What type of contract? area, choose the appropriate type.
6. Click the Next Question command button.
7. Confirm the Request Header Entry information.
8. Click the Next command button.
9. On the Project Selection page, drop down the Project Code field and select the project.
OR
In the Filter for drop-down list field, type in the project number and click the Apply Filter command button. Select the project from the drop-down list.
NOTE: Up until this point, a Contract Request can be exited and will not be saved. If a project is selected and the Next button is clicked, the Contract Request will be saved when exiting.

University Office of Capital Programs and Real Estate Services Page 44 of 123
www.uocpres.uillinois.edu Support: [email protected]
10. Click the Next command button.
NOTE: If the following error message appears, return to the Project Forms area and submit the previously entered data by clicking the Submit command button.
The read only Project Form will now appear for the selected project. Verify that sufficient project information has been entered to create the current contract.
11. Click the Next command button to continue.
12. Review the READ ONLY version of the project form.
NOTE: If errors are discovered on the contract request version of the project form, exit the Contract Request process, return to the project form and modify it, and then re-submit to import the corrected information.
13. Click the Next command button.
14. Depending on the contract type, the user may be required to edit the Contract Request Input page and add additional information. The table below summarizes the information to provide, with the exception of the Front End Documents.
Contract Type Variable Information
Professional Services Advertisement If CDB project*
Professional Services Agreement N/A*
Professional Services Amendment Select appropriate PSA attachments to be included*
Professional Services Award Letter N/A*
Professional Services – Retainer N/A*
Professional Services – Retainer Renewal Letter N/A*
Professional Services – RFP Consultant Advertisement
N/A*
Construction Management Agreement N/A*
Construction Management Amendment N/A*
Front End Documents Multiple fields
Bid Advertisement N/A*
Construction – Pre-Bid Meeting Information N/A*
Contractor with No Assignment Division of Work
Contractor with Assigned Divisions of Work
Assigned Subcontractor Division of Work
Notice of Award Letter Division of Work
Notice to Proceed Letter Contract Type (Single/Multiple) Division(s) of Work
Notice of Intent to Award Letter Division of Work
Notice of Award/Proceed (combined) Letter Contract Type (Single/Multiple) Division(s) of Work

University Office of Capital Programs and Real Estate Services Page 45 of 123
www.uocpres.uillinois.edu Support: [email protected]
*NOTE: Add variable information for these documents directly into the Main Document while editing, rather than during the Contract Request.
15. Click the Next command button.
16. Attach any documents as necessary.
NOTES:
For some contract types, this option is not available.
Only attach PDF files. Do not attach other file types.
a. Click the Add icon in the toolbar.
b. Near the bottom of the screen, in the Document Title text box, type a name for the attachment.
c. In the Document Date text box, type the date of the document, or use the date navigator to navigate to the appropriate date.
d. In the Type area, choose the Attached radio button.
e. Click the Select command button and navigate to the folder where the file resides.
f. Select the filename.
g. Click the Open command button.
h. To have the file appear as part of the contract, choose the Print and Include in Document checkboxes.
NOTE: If the attachment is just for reference, do not choose these options. To view all attachments to a contract, see Adding and Viewing Document Attachments.
17. Click the Finish command button.
IMPORTANT: Make a note of the Contract Number from the listing on the Contract Request screen. You definitely will need to know this later. If you exit the Contract Request before you click the Finish button, make a note of the Request ID so that you may return to it later.
IMPORTANT: If you complete a Contract Request and subsequently notice errors in the contract, you will NOT be able to modify the contract request. Follow the instructions in the topic Modifying a Contract Document, later in this guide.
Add Notes to a Contract Request:
1. From the Contracts menu, select Contract Requests.
2. Select the record that requires a note.
3. Click the Notes icon in the toolbar.
4. Click the Add icon to add a note to the Contract Request.
5. Enter note text in the Notes field.

University Office of Capital Programs and Real Estate Services Page 46 of 123
www.uocpres.uillinois.edu Support: [email protected]
NOTE: A note cannot exceed 2,000 characters.
Exit and Resume a Contract Request:
A Contract Request can be exited at any time. If exited after the Project Selection page, the request will be saved. If exited before that, the request will not be saved.
1. To exit a contract request, at any stage, click the Exit command button.
If the request was saved, it will appear with a Request ID but without a contract number.
NOTE: The contract number is not assigned until the Finish button is clicked. Until that time, it will have a Request ID assigned to it.
2. To resume work on a Contract Request:
a. In the Contract Requests view, select the Contract Request to resume.
b. Click the View/Edit icon in the toolbar.
c. Continue the contract request.
d. Click the Finish command button when ready to generate the contract.
The Contract Request Listing screen appears, displaying both the Contract Request ID and the Contract Number.
IMPORTANT: Write down the above numbers for future reference.
Delete a Contract Request:
Occasionally you may wish to delete a contract request. Only an incomplete Contract Request may be deleted (the Finish button has not been clicked).
1. In the Contract Requests view, select the Contract Request to delete.
2. Check out the Contract Request.
3. Click the Delete icon in the toolbar.
4. Click the OK command button in the confirmation dialog box which asks: “Are you sure you wish to delete the selected record?”
5. Type a brief note about the deletion.
6. Click the Save icon.
The record is deleted from the view.

University Office of Capital Programs and Real Estate Services Page 47 of 123
www.uocpres.uillinois.edu Support: [email protected]
Professional Services Advertisement
Before a Professional Services Advertisement can be completed, the user must already have:
Created a Project in Upside.
Completed the General view in the Project Form.
Submitted the Project Form.
Create a Professional Services Advertisement:
1. Begin a Contract Request. See Initiating a Contract Request, earlier in this guide.
2. In the “What type of contract?” area, choose the Professional Services – Advertisement selection.
3. Click the Next Question command button.
4. Confirm the Request Header Entry information.
5. Click the Next command button.
6. On the Project Selection page, drop down the Project Code field and select the project.
OR
In the Filter for drop-down list field, type in the project number and click the Apply Filter command button. Select the project from the drop-down list.
NOTE: The user may exit a Contract Request and resume it later. See Exiting and Resuming a Contract Request, earlier in this guide.

University Office of Capital Programs and Real Estate Services Page 48 of 123
www.uocpres.uillinois.edu Support: [email protected]
7. Click the Next command button.
8. Review the READ ONLY version of the project form.
NOTE: If errors are discovered on the contract request version of the project form, exit the Contract Request process, return to the project form and modify it, and then re-submit to import the corrected information.
9. Click the Next command button.
10. Read the Contract Request Input page.
11. In the Is this project a CDB Project? drop-down field, select either Yes or No.
12. In the Request a modification to non-editable contract text drop-down field:
If no modifications are needed, accept the default answer, No, and SKIP to step 15.
If modifications are needed, select Yes.
a. In the first text box illustrated above, type justification for the changes to be made.
b. In the second text box illustrated above, type the contract text modification to appear in the contract. Include the section in which the change should appear.
OR
On the Attached Documents Entry screen of the Contract Request, attach a document which explains the justification for the change and its additional contract text.
NOTE: Both of the above fields are limited to 4,000 characters.
NOTE: If attaching a document to justify a change of contract language, remember NOT to choose the Include in Document and Print checkboxes.
13. Click the Next command button.
14. To attach a document:
a. Click the Add icon in the toolbar.
b. Near the bottom of the screen, in the Document Title text box, type a name for the attachment.
c. In the Document Date text box, type the date of the document, or use the date navigator to navigate to the appropriate date.
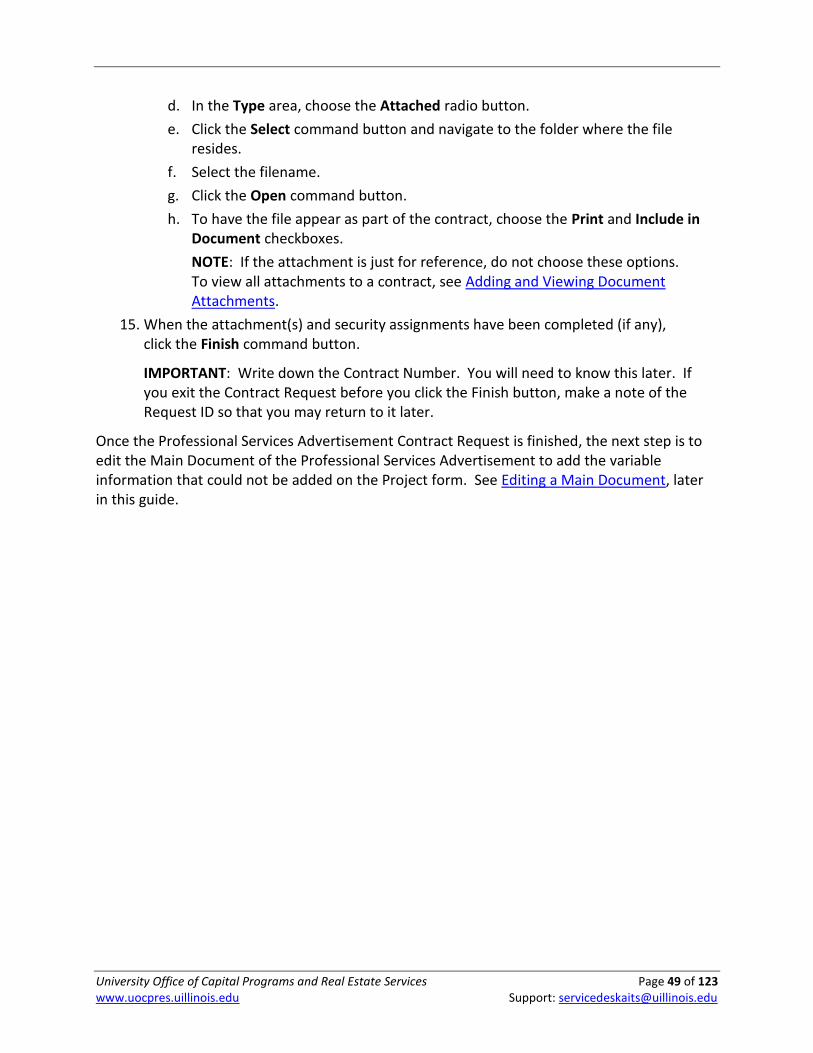
University Office of Capital Programs and Real Estate Services Page 49 of 123
www.uocpres.uillinois.edu Support: [email protected]
d. In the Type area, choose the Attached radio button.
e. Click the Select command button and navigate to the folder where the file resides.
f. Select the filename.
g. Click the Open command button.
h. To have the file appear as part of the contract, choose the Print and Include in Document checkboxes.
NOTE: If the attachment is just for reference, do not choose these options. To view all attachments to a contract, see Adding and Viewing Document Attachments.
15. When the attachment(s) and security assignments have been completed (if any), click the Finish command button.
IMPORTANT: Write down the Contract Number. You will need to know this later. If you exit the Contract Request before you click the Finish button, make a note of the Request ID so that you may return to it later.
Once the Professional Services Advertisement Contract Request is finished, the next step is to edit the Main Document of the Professional Services Advertisement to add the variable information that could not be added on the Project form. See Editing a Main Document, later in this guide.
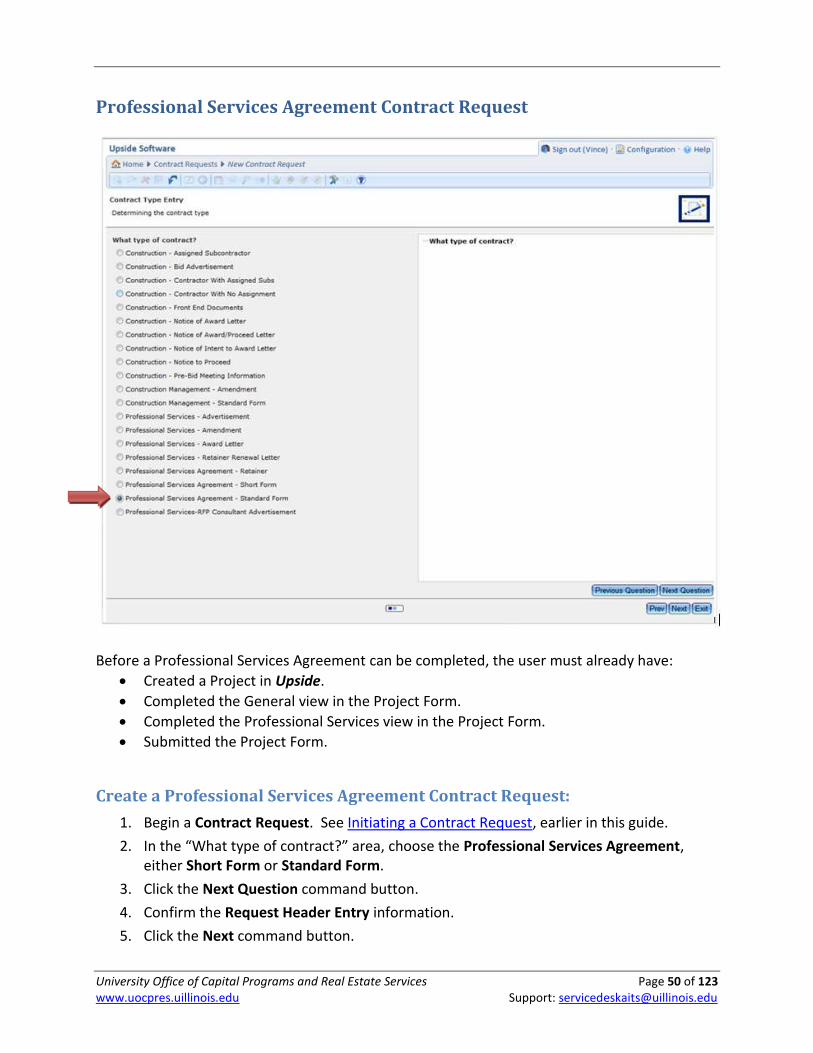
University Office of Capital Programs and Real Estate Services Page 50 of 123
www.uocpres.uillinois.edu Support: [email protected]
Professional Services Agreement Contract Request
Before a Professional Services Agreement can be completed, the user must already have:
Created a Project in Upside.
Completed the General view in the Project Form.
Completed the Professional Services view in the Project Form.
Submitted the Project Form.
Create a Professional Services Agreement Contract Request:
1. Begin a Contract Request. See Initiating a Contract Request, earlier in this guide.
2. In the “What type of contract?” area, choose the Professional Services Agreement, either Short Form or Standard Form.
3. Click the Next Question command button.
4. Confirm the Request Header Entry information.
5. Click the Next command button.

University Office of Capital Programs and Real Estate Services Page 51 of 123
www.uocpres.uillinois.edu Support: [email protected]
6. On the Project Selection page, drop down the Project Code field and select the project.
OR
In the Filter for drop-down list field, type in the project number and click the Apply Filter command button. Select the project from the drop-down list.
NOTE: The user may exit a Contract Request and resume it later. See To Exit and Resume a Contract Request, earlier in this guide.
7. Click the Next command button.
8. Review the READ ONLY version of the project form.
NOTE: If errors are discovered on the contract request version of the project form, exit the Contract Request process, return to the project form and modify it, and then re-submit to import the corrected information.
9. Click the Next command button.
10. Read the Contract Request Input page.
11. In the Request a modification to non-editable contract text drop-down field:
If no modifications are needed, accept the default answer, No, and SKIP to step 14.
If modifications are needed, select Yes.
a. In the first text box illustrated above, type justification for the changes to be made.
b. In the second text box illustrated above, type the contract text modification to appear in the contract. Include the section in which the change should appear.
OR
On the Attached Documents Entry screen of the Contract Request, attach a document which explains the justification for the change and its additional contract text.
NOTE: Both of the above fields are limited to 4,000 characters.
NOTE: If attaching a document to justify a change of contract language, remember NOT to choose the Include in Document and Print checkboxes.
12. Click the Next command button.
13. To attach a document:

University Office of Capital Programs and Real Estate Services Page 52 of 123
www.uocpres.uillinois.edu Support: [email protected]
a. Click the Add icon in the toolbar.
b. Near the bottom of the screen, in the Document Title text box, type a name for the attachment.
c. In the Document Date text box, type the date of the document, or use the date navigator to navigate to the appropriate date.
d. In the Type area, choose the Attached radio button.
e. Click the Select command button and navigate to the folder where the file resides.
f. Select the filename.
g. Click the Open command button.
h. To have the file appear as part of the contract, choose the Print and Include in Document checkboxes.
NOTE: If the attachment is just for reference, do not choose these options. To view all attachments to a contract, see Adding and Viewing Document Attachments.
14. When the attachment(s) and security assignments have been completed (if any), click the Finish command button.
IMPORTANT: Write down the Contract Number. You will need to know this later. If you exit the Contract Request before you click the Finish button, make a note of the Request ID so that you may return to it later.
Once the Professional Services Agreement (PSA) Contract Request is finished, the next step is to edit the Main Document of the PSA. See the next topic.

University Office of Capital Programs and Real Estate Services Page 53 of 123
www.uocpres.uillinois.edu Support: [email protected]
Main Document
The Professional Services Advertisement Main Document, opened, checked out, with placeholders displayed
The Main Document is the combination of static text from a contract document’s template and the variable information entered into the project form. In addition, the Main Document may contain blank fields ready for manual input. When opening a Main Document of any type of contract, notice several fields that are grayed out. These fields will contain the variable information entered into the project form, or they are placeholders as reminders that variable information must be entered into the Main Document itself. These types of information are displayed, including a table into which variable information can be entered manually, denoted with the red arrow in the above illustration. To enter information into the contract, in the Navigator, denoted by the red box, note several areas that are prefaced with five Xs (XXXXX). It is best to expand the entire Navigator to view all of those areas and navigate the document using the document outline. Once the necessary information has been added, the line with the Xs turns blue in the Navigator. (NOTE: The blue color does not alter the final contract itself.) See also Tips and Tricks for Navigating and Editing the Main Document, later in this guide.

University Office of Capital Programs and Real Estate Services Page 54 of 123
www.uocpres.uillinois.edu Support: [email protected]
Edit a Main Document:
1. In the Menu Pane, expand the Contracts group.
2. Select the Contracts sub-menu option.
3. In the Saved Views drop-down field, select ContractsByProjectCode.
4. Enter the desired project number in the Project Code field.
5. Click the Search command button.
6. Select the contract to edit.
NOTE: If selected, the contract will display a black arrow next to it.
7. Edit the contract:
a. In the Menu Pane, expand the Header group.
b. Under the Header group, expand the Documents group.
c. Select the Main Document option.

University Office of Capital Programs and Real Estate Services Page 55 of 123
www.uocpres.uillinois.edu Support: [email protected]
NOTE: The highlighted text displays field placeholders by default. To toggle between the field placeholder text and the entered data which was transferred into the contract, click the Show Placeholder Values (red flag) icon in the contract toolbar.
8. Click the Check Out icon to check out the document.
NOTE: A document cannot be edited until it is checked out.
9. Edit those sections prefixed by the blue XXXXX text in the Navigator.
NOTE: Expand all the items to ensure that all necessary text editing is completed. To expand all, click the plus icon in the toolbar. To collapse all, click the minus icon.
NOTE: Get help for any item by hovering over the question mark icons in the margin area.
10. To add or delete a clause, such as a Construction On-Site Service, select the section to be edited in the Navigator (or scroll down the document) where the clause should be added and follow the directions below.
NOTE: If you add or delete clauses in the document, the agreement may require additional administrative review(s). See Releasing Documents into the Workflow.
a. Right-click on the highlighted clause.
b. To insert a new clause below the selected clause, select Insert Item, then Text, and type the text of the new clause into the space provided.
NOTE: To add a line within a clause (not a new clause), use SHIFT+ENTER. Simply pressing ENTER will add a new clause.
c. To delete, select Delete Item and click the OK command button in the warning dialog box.
NOTE: If a clause is accidentally added or deleted, click the Cancel icon in the toolbar to undo the mistake.
IMPORTANT: A deleted clause cannot be restored without manually retyping it.
11. To complete an editable table in a document:
a. To add additional lines to the table, select the last row and click the Insert Below icon in the table toolbar. Additional positions may be entered in these lines.
NOTE: Be sure to calculate and enter the Total Hourly Rate. It will not auto-calculate in this document.
b. To delete unused rows, select the row’s left border to highlight the row, then click the Delete Row icon in the table toolbar.
NOTE: To select more than one row, hold down the CTRL button while clicking. See also Tips and Tricks for Navigating and Editing the Main Document, later in this guide.
12. To spell check the edited clauses, click the Spelling icon in the toolbar.
NOTE: Because only a small number of clauses need changing in the document, the spell checker checks the document clause by clause. Highlight the clause to be checked first, and then click the Spelling icon. To continue on to the next clause, click the Continue Spell Check icon in the margin.

University Office of Capital Programs and Real Estate Services Page 56 of 123
www.uocpres.uillinois.edu Support: [email protected]
13. When editing all of the necessary fields is complete, click the Save command button to save the document.
14. Click the Print Preview icon in the toolbar to begin the Print Preview process.
15. Click the Prepare Document command button.
NOTE: If you are using a pop-up blocker, you may need to give the browser permission to open the document.
16. Review the document as a PDF.
17. Click the Check In icon in the toolbar to check in the document.
NOTE: Remember to check in the document or it can’t be released into the workflow.
18. To forward the document for review, in the Workflow Response drop-down field, select Forward.
NOTE: See Forwarding a Contract Document, later in this guide.
IMPORTANT: If you Release instead of Forward the document, by mistake, the document enters the approval workflow. In order to recover and forward as intended, ask the next approver (most likely the Director) to reject the approval to make the Forward option available to you.
19. To release it into the workflow, in the Workflow Response drop-down field, select Release.
NOTE: See To Release a Contract Document into the Workflow, later in this guide.

University Office of Capital Programs and Real Estate Services Page 57 of 123
www.uocpres.uillinois.edu Support: [email protected]
Navigation Tips
Navigation and Display Do this:
To Expand the Navigator Tree: To expand all, click the plus icon in the Toolbar, above the Navigator.
To Collapse the Navigator Tree:
To collapse all, click the minus icon in the Toolbar, above the Navigator.
To Open the Navigator Tree: Drop down the menu and select Navigator Tree.
To Close the Navigator Tree: Click the Close icon
To Open the Properties Pane: Drop down the menu and select Properties.
To Close the Properties Pane: Click the Close icon
To Maximize the Document Window:
Click the Maximize Editor icon.
This action closes the Navigator Tree.
NOTE: When you Maximize the Editor, the Upside Navigator minimizes.
To Restore the Document Window:
Click the Maximize Editor icon again.

University Office of Capital Programs and Real Estate Services Page 58 of 123
www.uocpres.uillinois.edu Support: [email protected]
To Restore the Upside Navigator:
Click on the small arrow in the thin line near the left edge of the window.
To Find Text Requiring Editing: Select the XXXXX prefix within the Navigator Tree.
OR
Scroll down the document and look for the Question Mark icon.
To Edit: Select the clauses marked with XXXXX within the document.
Type the desired text in the space provided.
Go to the top of the Main Document:
Click on Document Header in the Navigator Tree.
Go to the bottom of the Main Document:
Click on the last item in the Navigator Tree.
Table Editing Do this:
To Perform Tasks in a Table: To activate the Table Toolbar, click anywhere in the table.
To Insert a Table Row, Above: Click in the correct row and click the Insert Above icon.
To Insert a Table Row, Below: Click in the correct row and click the Insert Below icon.
To Delete a Table Row: Click in the correct row or select the row’s left border to highlight the row and click the Delete Row icon.
To Select Multiple Rows: Hold down the CTRL key while clicking.

University Office of Capital Programs and Real Estate Services Page 59 of 123
www.uocpres.uillinois.edu Support: [email protected]
Professional Services Agreement
Almost all of the information necessary to complete the Professional Services Agreement will have been provided when the Project form Professional Services tab and the Contract Request are completed. Additional information is required to complete the agreement. Some Basic and Supplemental services may need to be added or deleted as appropriate. To complete the contract, add specific information as noted in Appendix B: Optional and Editable Fields in the Professional Services Agreement. Before a Professional Services Agreement can be completed, the user must already have:
Completed a Contract Request for the Professional Services Agreement.
Complete a Professional Services Agreement:
1. In the Menu Pane, expand the Contracts group.
2. Select the Contracts sub-menu option.
3. In the Saved Views drop-down field, select AllContracts or select the campus-appropriate saved view.

University Office of Capital Programs and Real Estate Services Page 60 of 123
www.uocpres.uillinois.edu Support: [email protected]
4. Select the contract to edit.
5. Edit the Professional Services Agreement (PSA):
a. In the Menu Pane, expand the Header group.
b. Under the Header group, expand the Documents group.
c. Select the Main Document option.
NOTE: The highlighted text displays field placeholders by default. To toggle between the field placeholder text and the entered data which was transferred into the contract, click the Show Placeholder Values (red flag) icon in the contract toolbar.

University Office of Capital Programs and Real Estate Services Page 61 of 123
www.uocpres.uillinois.edu Support: [email protected]
6. Click the Check Out icon to check out the document.
NOTE: A document cannot be edited until it is checked out.
7. Edit those sections prefixed by the blue XXXXX text in the Navigator.
NOTE: Expand all the items to ensure that all necessary text editing is completed. To expand all, click the plus icon in the toolbar. To collapse all, click the minus icon.
NOTE: To view a list of all editable areas in the Professional Services Agreement Main Document, see Appendix B: Optional and Editable Fields in the Professional Services Agreement.
NOTE: Get help for any item by hovering over the question mark icons in the margin area.
8. To add or delete a clause, such as a Construction On-Site Service, select the section to be edited in the Navigator (or scroll down the document) where the clause should be added and follow the directions below.
NOTE: If you add or delete clauses in the document, the agreement may require additional administrative review(s). See Releasing Documents into the Workflow.
a. Right-click on the highlighted clause.
b. To insert a new clause below the selected clause, select Insert Item, then Text, and type the text of the new clause into the space provided.
c. NOTE: To add a line within a clause (not a new clause), use SHIFT+ENTER. Simply pressing ENTER will add a new clause.
d. To delete, select Delete Item and click the OK command button in the warning dialog box.
NOTE: If a clause is accidentally added or deleted, click the Cancel icon in the toolbar to undo the mistake.
IMPORTANT: A deleted clause cannot be restored without manually retyping it.
9. To complete Attachment B – Hourly Rate Schedules:
a. To ensure auto-calculation of rates, the first 20 positions should be added using the Project Form, not the Main Document.
NOTE: If you add positions to the Hourly Rate Schedule, the Total Hourly Rate will not auto-calculate. You must calculate that rate and enter the amount manually.
b. To add additional lines to the table, select the last row and click the Insert Below icon in the table toolbar. Additional positions may be entered in these lines.
NOTE: Be sure to calculate and enter the Total Hourly Rate. It will not auto-calculate in this document.
c. To delete unused rows, select the row’s left border to highlight the row, then click the Delete Row icon in the table toolbar.
NOTE: To select more than one row, hold down the CTRL button while clicking. See also Tips and Tricks for Navigating and Editing the Main Document, earlier in this guide.

University Office of Capital Programs and Real Estate Services Page 62 of 123
www.uocpres.uillinois.edu Support: [email protected]
10. To complete Attachment C – Time of Completion:
a. Type in the dates for the phases that will be used in the agreement.
NOTE: Use the date format MM/DD/YYYY. Tab through the cells in the table.
b. Delete any phase(s) that will not be used in the agreement by deleting the row(s) in the table. (See Tips and Tricks for Navigating and Editing the Main Document, earlier in this guide.)
11. To complete Attachment D – PSC / Subconsultant Work Summary:
a. In the PSC Subconsultant(s) Name column, type in the name of the Professional Services Subconsultant.
b. In the Service(s) Provided (See Note 1) column, type in the Service for each Name listed in the first column.
NOTE: Be sure to follow the directions in Note 1, as quoted below:
Note 1: PSC and Subconsultant(s) shall be entered separately and all applicable services for each firm identified. This will require the PSC/Subconsultant name listed once for each firm, but list multiple services if participating in more than one service.
NOTE: Services may be added, edited, combined, or deleted, as necessary.
c. In the Total Contract Value, type in the total contract value for the row’s firm and service.
d. In the Percentage of PSC Agreement column, type in the percentage of the entire Professional Services Agreement that the service’s amount reflects.
e. In the CMS MAFBE Status (MBE, FBE, FMB, PBE, VOSB, SDVOSB, or N/A ) column, type in the appropriate designation:
MBE.
FBE.
FMB.
PBE.
VOSB.
SDVOSB.
N/A.
f. Repeat steps a through e for each named firm.
g. To add additional lines to the table, select the last row and click the Insert Below icon in the table toolbar. Additional positions may be entered in these lines.
h. To delete unused rows, select the row’s left border to highlight the row, then click the Delete Row icon in the table toolbar.
NOTE: To select more than one row, hold down the CTRL button while clicking. See also Tips and Tricks for Navigating and Editing the Main Document, earlier in this guide.
12. To spell check the edited clauses, click the Spelling icon in the toolbar.

University Office of Capital Programs and Real Estate Services Page 63 of 123
www.uocpres.uillinois.edu Support: [email protected]
NOTE: Because only a small number of clauses need changing in the document, the spell checker checks the document clause by clause. Highlight the clause to be checked first, and then click the Spelling icon. To continue on to the next clause, click the Continue Spell Check icon in the margin.
13. When editing all of the necessary fields is complete, click the Save command button to save the document.
14. Click the Print Preview icon in the toolbar to begin the Print Preview process.
15. Click the Prepare Document command button.
NOTE: If you are using a pop-up blocker, you may need to give the browser permission to open the document.
16. Review the document as a PDF.
17. Click the Check In icon in the toolbar to check in the document.
NOTE: Remember to check in the document or it can’t be released into the workflow.
18. To forward the document for review, in the Workflow Response drop-down field, select Forward.
NOTE: See Forwarding a Contract Document, later in this guide.
IMPORTANT: If you Release instead of Forward the document, by mistake, the document enters the approval workflow. In order to recover and forward as intended, ask the next approver (most likely the Director) to reject the approval to make the Forward option available to you.
19. To release it into the workflow, in the Workflow Response drop-down field, select Release.
NOTE: See To Release a Contract Document into the Workflow, later in this guide.
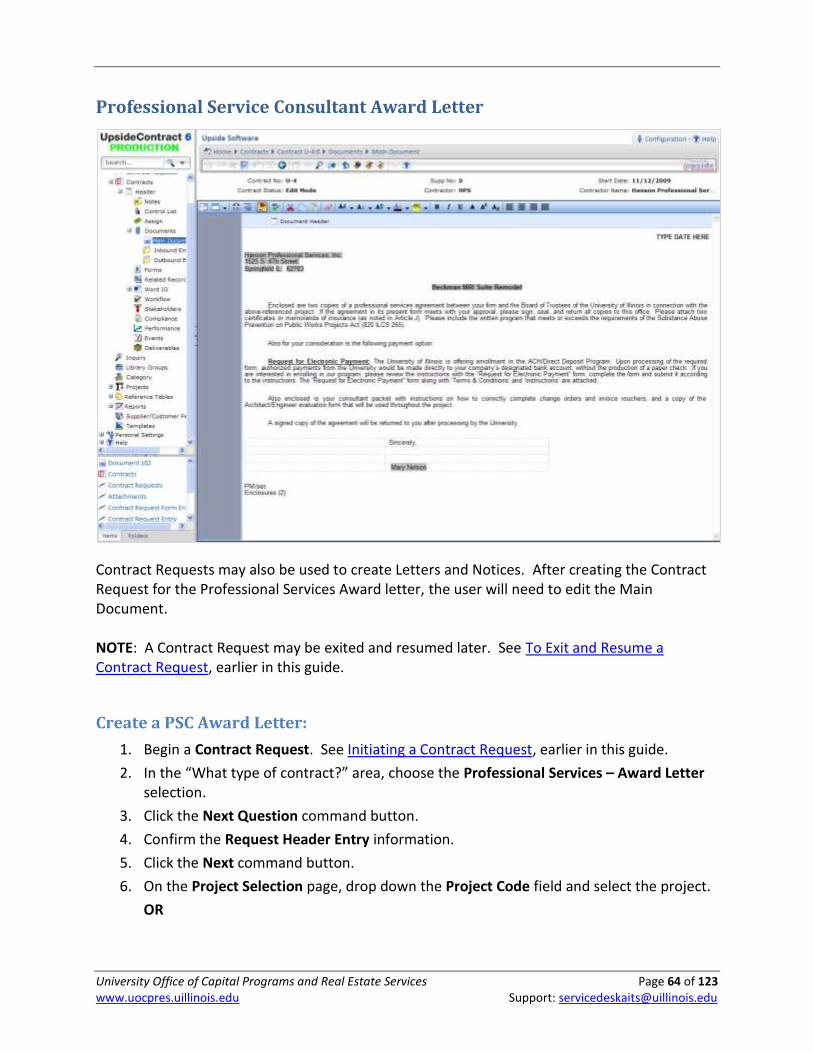
University Office of Capital Programs and Real Estate Services Page 64 of 123
www.uocpres.uillinois.edu Support: [email protected]
Professional Service Consultant Award Letter
Contract Requests may also be used to create Letters and Notices. After creating the Contract Request for the Professional Services Award letter, the user will need to edit the Main Document. NOTE: A Contract Request may be exited and resumed later. See To Exit and Resume a Contract Request, earlier in this guide.
Create a PSC Award Letter:
1. Begin a Contract Request. See Initiating a Contract Request, earlier in this guide.
2. In the “What type of contract?” area, choose the Professional Services – Award Letter selection.
3. Click the Next Question command button.
4. Confirm the Request Header Entry information.
5. Click the Next command button.
6. On the Project Selection page, drop down the Project Code field and select the project.
OR

University Office of Capital Programs and Real Estate Services Page 65 of 123
www.uocpres.uillinois.edu Support: [email protected]
In the Filter for drop-down list field, type in the project number and click the Apply Filter command button. Select the project from the drop-down list.
7. Click the Next command button.
NOTE: If the following error message appears, return to the Project Forms area and submit the previously entered data by clicking on Submit command button.
The read only Project Form will now appear for the selected project. Verify that sufficient project information has been entered to create the current contract.
8. Click the Next command button.
9. Review the READ ONLY version of the project form.
NOTE: If errors are discovered on the contract request version of the project form, exit the Contract Request process, return to the project form and modify it, and then re-submit to import the corrected information.
10. Click the Next command button.
11. Read the Contract Request Input page.
NOTE: Be aware of the following sentence: “When you finish the Contract Request, go to the Contracts view to locate and complete any editing of the contract document before releasing for approval.”
12. Click the Next command button.
13. Click the Finish command button.
IMPORTANT: Write down the Contract Number for future reference.
14. Edit the letter, to add the correct date.
a. In the Menu Pane, expand the Header group.
b. Under the Header group, expand the Documents group.
c. Select the Main Document option.
d. To give more screen space, close the Properties pane by clicking its Close icon.
e. Click the Check Out icon in the toolbar to check out the document.
f. Click the clause at the top of the letter that says TYPE DATE HERE to highlight it.
OR
Select the blue word Text in the Navigator and the clause will be highlighted in yellow.
g. Highlight the words TYPE DATE HERE, and type the letter’s date.
h. Click the Save icon in the toolbar.
15. Click the Print Preview icon in the toolbar.
16. Click the Prepare Document command button.
NOTE: If you are using a pop-up blocker, you may need to give the browser permission to open the document.

University Office of Capital Programs and Real Estate Services Page 66 of 123
www.uocpres.uillinois.edu Support: [email protected]
17. Review the document as a PDF.
18. Click the Check In icon in the toolbar to check in the document.
NOTE: Remember to check in the letter or it can’t be released into the workflow.
19. To release the letter into the workflow for approval, in the Workflow Response drop-down field, select Release.
NOTE: See Releasing Documents into the Workflow, later in this guide.
NOTE: Check the status of any item released in the workflow by viewing the Status column in the Contracts view.
20. When approval has occurred, follow steps 14-16 to view the PDF and print the letter.
a.

University Office of Capital Programs and Real Estate Services Page 67 of 123
www.uocpres.uillinois.edu Support: [email protected]
Construction Manager Contract
Almost all of the information necessary to complete the Construction Manager Agreement will have been provided when the Project form Construction Manager tab and the Contract Request are completed. Additional information, required to complete the agreement, should be provided by the Project Manager. Before a Construction Manager Agreement can be completed, the user must already have:
Completed a Contract Request for the Construction Manager Agreement.
Variable information about the CM company, such as personnel, project schedule, and CM subconsultant data.
Complete a Construction Manager Agreement:
1. In the Menu Pane, expand the Contracts group.
2. Select the Contracts sub-menu option.
3. In the Saved Views drop-down field, select AllContracts or select the campus-appropriate saved view.
4. Select the contract to edit.
5. Edit the Construction Manager Agreement:
a. In the Menu Pane, expand the Header group.

University Office of Capital Programs and Real Estate Services Page 68 of 123
www.uocpres.uillinois.edu Support: [email protected]
b. Under the Header group, expand the Documents group.
c. Select the Main Document option.
NOTE: The highlighted text displays field placeholders by default. To toggle between the field placeholder text and the entered data which was transferred into the contract, click the Show Placeholder Values (red flag) icon in the contract toolbar.
6. Click the Check Out icon to check out the document.
NOTE: A document cannot be edited until it is checked out.
7. Edit those sections prefixed by the blue XXXXX text in the Navigator.
NOTE: Expand all the items to ensure that all necessary text editing is completed. To expand all, click the plus icon in the toolbar. To collapse all, click the minus icon.
NOTE: Get help for any item by hovering over the question mark icons in the margin area.
8. To add or delete a clause, such as a Construction On-Site Service, select the section to be edited in the Navigator (or scroll down the document) where the clause should be added and follow the directions below.
NOTE: If you add or delete clauses in the document, the agreement may require additional administrative review(s). See Releasing Documents into the Workflow.
a. Right-click on the highlighted clause.
b. To insert a new clause below the selected clause, select Insert Item, then Text, and type the text of the new clause into the space provided.
NOTE: To add a line within a clause (not a new clause), use SHIFT+ENTER. Simply pressing ENTER will add a new clause.
c. To delete, select Delete Item and click the OK command button in the warning dialog box.
NOTE: If a clause is accidentally added or deleted, click the Cancel icon in the toolbar to undo the mistake.
IMPORTANT: A deleted clause cannot be restored without manually retyping it.

University Office of Capital Programs and Real Estate Services Page 69 of 123
www.uocpres.uillinois.edu Support: [email protected]
9. To complete Attachment B – Hourly Rate Schedules:
a. To ensure auto-calculation of rates, the first 20 positions should be added using the Project Form, not the Main Document.
b. To add additional lines to the table, select the last row and click the Insert Below icon in the table toolbar. Additional positions may be entered in these lines.
NOTE: Be sure to calculate and enter the Total Hourly Rate. It will not auto-calculate in this document.
c. To delete unused rows, select the row’s left border to highlight the row, then click the Delete Row icon in the table toolbar.
NOTE: To select more than one row, hold down the CTRL button while clicking. See also Tips and Tricks for Navigating and Editing the Main Document, earlier in this guide.
10. To complete Attachment C – Time of Completion:
a. Type in the dates for the phases that will be used in the agreement.
NOTE: Use the date format MM/DD/YYYY. Tab through the cells in the table.
b. Delete any phase(s) that will not be used in the agreement by deleting the row(s) in the table. (See Tips and Tricks for Navigating and Editing the Main Document, earlier in this guide.)
11. To complete Attachment D – PSC / Subconsultant Work Summary:
a. In the PSC Subconsultant(s) Name column, type in the name of the Professional Services Subconsultant.
b. In the Service(s) Provided (See Note 1) column, type in the Service for each Name listed in the first column.
NOTE: Be sure to follow the directions in Note 1, as quoted below:
Note 1: PSC and Subconsultant(s) shall be entered separately and all applicable services for each firm identified. This will require the PSC/Subconsultant name listed once for each firm, but list multiple services if participating in more than one service.
NOTE: Services may be added, edited, combined, or deleted, as necessary.
c. In the Total Contract Value, type in the total contract value for the row’s firm and service.
d. In the Percentage of PSC Agreement column, type in the percentage of the entire Professional Services Agreement that the service’s amount reflects.
e. In the CMS MAFBE Status (MBE, FBE, FMB, PBE, VOSB, SDVOSB or N/A ) column, type in the appropriate designation:
MBE.
FBE.
FMB.
PBE.

University Office of Capital Programs and Real Estate Services Page 70 of 123
www.uocpres.uillinois.edu Support: [email protected]
VOSB.
SDVOSB.
N/A.
f. Repeat steps a through e for each named firm.
g. To add additional lines to the table, select the last row and click the Insert Below icon in the table toolbar. Additional positions may be entered in these lines.
h. To delete unused rows, select the row’s left border to highlight the row, then click the Delete Row icon in the table toolbar.
NOTE: To select more than one row, hold down the CTRL button while clicking. See also Tips and Tricks for Navigating and Editing the Main Document, earlier in this guide.
12. To spell check the edited clauses, click the Spelling icon in the toolbar.
NOTE: Because only a small number of clauses need changing in the document, the spell checker checks the document clause by clause. Highlight the clause to be checked first, and then click the Spelling icon. To continue on to the next clause, click the Continue Spell Check icon in the margin.
13. When editing all of the necessary fields is complete, click the Save command button to save the document.
14. Click the Print Preview icon in the toolbar to begin the Print Preview process.
15. Click the Prepare Document command button.
NOTE: If you are using a pop-up blocker, you may need to give the browser permission to open the document.
16. Review the document as a PDF.
17. Click the Check In icon in the toolbar to check in the document.
NOTE: Remember to check in the document or it can’t be released into the workflow.
18. To forward the document for review, in the Workflow Response drop-down field, select Forward.
NOTE: See Forwarding a Contract Document, later in this guide.
IMPORTANT: If you Release instead of Forward the document, by mistake, the document enters the approval workflow. In order to recover and forward as intended, ask the next approver (most likely the Director) to reject the approval to make the Forward option available to you.
19. To release it into the workflow, in the Workflow Response drop-down field, select Release.
NOTE: See Releasing Documents into the Workflow, later in this guide.

University Office of Capital Programs and Real Estate Services Page 71 of 123
www.uocpres.uillinois.edu Support: [email protected]
Front End Documents
Contract Request – Front End Documents – Contract Request Input Page, with variable information illustrated
The Front End Documents include, depending on whether they’re single or multiple (S or M), the following specifications (CSI MasterFormat 2004):2
Section 00 10 00S – Notice to Bidders (Single Contract). Section 00 10 00M – Notice to Bidders (Multiple Contract). Section 00 20 00 – General Instructions to Bidders. Section 00 40 00S – Proposal (Single Contract). Section 00 40 00M – Proposal (Multiple Contract). Section 00 45 00 – Annual Prequalification Statement. Section 00 46 00 – Prequalification Statement. Section 00 50 00S – Standard Contract Execution Forms (Single). Section 00 50 00M – Standard Contract Execution Forms (Multiple). Section 00 60 00S – Standard Contract Administration Forms (Single) [interactive forms].
o Index to the Standard Contract Administration Forms. o Contractor's Schedule of Values.
2 If you are using the electronic form of this guide, the displayed links to these specifications, will go directly to the UOCP&RES website and open the sample specification.

University Office of Capital Programs and Real Estate Services Page 72 of 123
www.uocpres.uillinois.edu Support: [email protected]
o Payment Application: Part IA – Payment Certificate for Contractor without Assigned Subcontractor.
o Contractor's Payment Application: Part II – Schedule of Work. o Contractor's Payment Application: Part III – Affidavit and Partial Lien Waiver. o Contractor's Payment Application: Part IV – Employee Utilization Report. o Construction Contract Change Order for Contractor (no assignment). o Emergency Work Authorization (EWA) / Field Directive (FD). o Contractor's Affidavit for Reduction in Retainage. o Contractor's Affidavit for Final Payment. o Contractor's Final Release and Waiver of Lien. o Final Release and Waiver of Lien for Subcontractors/Vendors/Suppliers. o Certificate of Substantial Completion. o Contractor/Subcontractor Request for Proposal Breakdown Summary. o Professional Services Billing Form.
Section 00 60 00M – Standard Contract Administration Forms (Multiple) [interactive forms] o Index to the Standard Contract Administration Forms. o Contractor's Schedule of Values. o Payment Application: Part I – Payment Certificate. o Contractor's Payment Application: Part II – Schedule of Work. o Contractor's Payment Application: Part III – Affidavit and Partial Lien Waiver. o Contractor's Payment Application: Part IV – Employee Utilization Report. o Construction Contract Change Order for Contractor (assigned subcontractors). o Construction Contract Change Order for Contractor (with assigned
subcontractors). o Emergency Work Authorization (EWA) / Field Directive (FD). o Contractor's Affidavit for Reduction in Retainage. o Contractor's Affidavit for Final Payment. o Contractor's Final Release and Waiver of Lien. o Final Release and Waiver of Lien for Subcontractors/Vendors/Suppliers. o Certificate of Substantial Completion. o Contractor/Subcontractor Request for Proposal Breakdown Summary. o Professional Services Billing Form
Section 00 70 00 – General Conditions. Section 00 90 00 – Addenda and Modifications.
These bidding documents, forms, General Conditions, and all other non-construction contract documents are now contained in a single document. Attachments will be added to the Front End Document, including, but not limited to, Prevailing Wages, and place them appropriately within it. Before beginning:
Ensure the Professional Services and Bidding portions of the Project Form are complete.
Ensure the Project Forms have been submitted.

University Office of Capital Programs and Real Estate Services Page 73 of 123
www.uocpres.uillinois.edu Support: [email protected]
Create Front End Documents:
1. Begin a Contract Request. See Initiating a Contract Request, earlier in this guide.
2. In the “What type of contract?” area, choose the Construction – Front End Documents selection.
3. Click the Next Question command button.
4. Confirm the Request Header Entry information.
5. Click the Next command button.
6. On the Project Selection page, drop down the Project Code field and select the project.
OR
In the Filter for drop-down list field, type in the project number and click the Apply Filter command button. Select the project from the drop-down list.
7. Click the Next command button.
NOTE: If the following error message appears, return to the Project Forms area and submit the previously entered data by clicking on Submit command button.
The read only Project Form will now appear for the selected project. Verify that sufficient project information has been entered to create the current contract.
8. Click the Next command button.
9. Review the READ ONLY version of the project form.
NOTE: If errors are discovered on the contract request version of the project form, exit the Contract Request process, return to the project form and modify it, and then re-submit to import the corrected information.
10. Click the Next command button.
NOTE: The Contract Request Input page for Front End Documents requires that all fields be completed before moving to the next page. If you are not prepared to do that today, you can had placeholder text, such as TBD, to each text box and today’s date to the date fields, but remember to review all fields for accuracy when you return to complete the Contract Request.
11. In the Site Examination Contact Name field, type the name of the contact.
12. In the Phone field, type the phone number of the site examination contact.
13. In the Professional Service Consultant Project documents date issued: (Reference 00 40 00 Section 5.0) field, provide the date the documents were issued.
14. In the Request a modification to contract text drop-down field:
If no modifications are needed, accept the default answer, No, and SKIP to step 17.
If modifications are needed, select Yes.

University Office of Capital Programs and Real Estate Services Page 74 of 123
www.uocpres.uillinois.edu Support: [email protected]
a. In the first text box illustrated above, type justification for the changes to be made.
b. In the second text box illustrated above, type the contract text modification to appear in the contract. Include the section in which the change should appear.
OR
On the Attached Documents Entry screen of the Contract Request, attach a document which explains the justification for the change and its additional contract text.
NOTE: Both of the above fields are limited to 4,000 characters.
NOTE: If attaching a document to justify a change of contract language, remember NOT to choose the Include in Document and Print checkboxes.
15. Click the Next command button.
16. To attach a document:
a. Click the Add icon in the toolbar.
b. Near the bottom of the screen, in the Document Title text box, type a name for the attachment.
c. In the Document Date text box, type the date of the document, or use the date navigator to navigate to the appropriate date.
d. In the Type area, choose the Attached radio button.
e. Click the Select command button and navigate to the folder where the file resides.
f. Select the filename.
g. Click the Open command button.
h. To have the file appear as part of the contract, choose the Print and Include in Document checkboxes.
NOTE: If the attachment is just for reference, do not choose these options. To view all attachments to a contract, see Adding and Viewing Document Attachments.
17. When the attachment(s) have been completed (if any), click the Finish command button.
IMPORTANT: Write down the Contract Number. You will need to know this later.

University Office of Capital Programs and Real Estate Services Page 75 of 123
www.uocpres.uillinois.edu Support: [email protected]
18. In the Menu Pane, expand the Contracts group.
19. Select the Contracts sub-menu option.
20. If necessary, select a different view from the Saved Views drop-down field.
21. Select the item just created.
22. Click the Print Preview icon in the toolbar.
23. Click the Prepare Document command button.
NOTE: If you are using a pop-up blocker, you may need to give the browser permission to open the document.
24. Review the document as a PDF.
25. Click the Check In icon in the toolbar to check in the document.
NOTE: Remember to check in the document or it can’t be released into the workflow.
26. To forward the front end documents for review, in the Workflow Response drop-down field, select Forward.
NOTE: See Forwarding a Contract Document, later in this guide.
27. To release the front end documents into the workflow for approval, in the Workflow Response drop-down field, select Release.
NOTE: See Releasing Documents into the Workflow, later in this guide.
NOTE: To correct an error after the Front End Document has been reviewed, see Modifying a Contract Document, later in this guide.

University Office of Capital Programs and Real Estate Services Page 76 of 123
www.uocpres.uillinois.edu Support: [email protected]
Add and View Document Attachments
The Documents view, with the contract document (front end documents) and attachments listed
Documents may be attached to:
Contract Requests.
Contracts. The following procedure describes how to work with attachments to Contracts. To attach documents to Contract Requests, see Initiating a Contract Request, earlier in this guide. To add, view, or delete an attachment to a Contract Document, the user can do so from the Documents view.
Add Contract Document Attachments:
1. From the Contracts listing view, select the document.
2. Click the Check Out icon in the toolbar to check out the document.
3. In the Menu Pane, expand the Header group.
4. Under the Header group, expand the Documents group.
5. Click the Add icon in the toolbar.

University Office of Capital Programs and Real Estate Services Page 77 of 123
www.uocpres.uillinois.edu Support: [email protected]
6. In the Type drop-down field, select Attached.
7. In the Uploads area, click the Select command button.
8. Navigate to the file to upload and select it.
9. In the Title field, enter a title for the uploaded document.
10. In the Folder drop-down field, select Corporate.
11. To have the file appear as part of the contract, choose the Print and Include in Document checkboxes.
NOTE: If the attachment is just for reference, do not choose these options. To view all attachments to a contract, see Adding and Viewing Document Attachments.
12. Click the Save icon in the toolbar.
The uploaded documents appear in the view.
13. To add another attachment, repeat steps 8 through 12.
NOTE: As uploads are added, the option to add an additional attachment appears.
14. To include the attachments in the document:
a. Click the row to select the attachment.
Near the bottom of the screen, the Attachments area appears.
b. Click the View/Edit icon in the toolbar.
c. To have the file appear as part of the contract, choose the Print and Include in Document checkboxes.
NOTE: If the attachment is just for reference, do not choose these options.
d. Click the Save icon in the toolbar.
If the attachment is to be included in the document and printed, a Y (for Yes) appears in the table for each option. The attachments are included as part of the contract document.
Sequence Contract Document Attachments:
1. To sequence the attachments so they appear in the correct order:
a. Click the row to select the attachment to move.

University Office of Capital Programs and Real Estate Services Page 78 of 123
www.uocpres.uillinois.edu Support: [email protected]
b. To make the document appear earlier, in the columns at the left, click the Move Attachment Up icon.
c. To make the document appear later, in the columns at the left, click the Move Attachment Down icon.
View Individual Attachments to the Contract Document:
1. From the Documents view, click the View (magnifying glass) icon.
The document attempts to open in a new window.
2. Depending on the attachment document type, it may be necessary to click the Open command button in the dialog box.
Print Preview the Contract Document with its Attachments:
1. From the Documents view, click the Main Document icon.
2. Click the Print Preview icon in the toolbar.
3. Click the Prepare Document command button.
NOTE: If you are using a pop-up blocker, you may need to give the browser permission to open the document.
4. Click the Open command button.
5. Review the document to ensure the attachments were included.

University Office of Capital Programs and Real Estate Services Page 79 of 123
www.uocpres.uillinois.edu Support: [email protected]
Construction Bid Advertisement
Before a Construction Bid Advertisement can be completed, the user must already have:
Created a Project in Upside.
Completed the Project Form’s General, Professional Services, and Bidding tabs.
Submitted the Project Form.
Create a Construction Bid Advertisement Contract Request:
1. Begin a Contract Request. See Initiating a Contract Request, earlier in this guide.
2. In the “What type of contract?” area, choose the Construction – Bid Advertisement selection.
3. Click the Next Question command button.
4. Confirm the Request Header Entry information.
5. Click the Next command button.
6. On the Project Selection page, drop down the Project Code field and select the project.
OR
In the Filter for drop-down list field, type in the project number and click the Apply Filter command button. Select the project from the drop-down list.
NOTE: The user may exit a Contract Request and resume it later. See To Exit and Resume a Contract Request, earlier in this guide.

University Office of Capital Programs and Real Estate Services Page 80 of 123
www.uocpres.uillinois.edu Support: [email protected]
7. Click the Next command button.
8. Review the READ ONLY version of the project form.
NOTE: If errors are discovered on the contract request version of the project form, exit the Contract Request process, return to the project form and modify it, and then re-submit to import the corrected information.
9. Click the Next command button.
10. Read the Contract Request Input page.
11. Click the Next command button.
12. To attach a document:
a. Click the Add icon in the toolbar.
b. Near the bottom of the screen, in the Document Title text box, type a name for the attachment.
c. In the Document Date text box, type the date of the document, or use the date navigator to navigate to the appropriate date.
d. In the Type area, choose the Attached radio button.
e. Click the Select command button and navigate to the folder where the file resides.
f. Select the filename.
g. Click the Open command button.
h. To have the file appear as part of the contract, choose the Print and Include in Document checkboxes.
NOTE: If the attachment is just for reference, do not choose these options. To view all attachments to a contract, see Adding and Viewing Document Attachments.
13. When the attachment(s) and security assignments have been completed (if any), click the Finish command button.
IMPORTANT: Write down the Contract Number. You will need to know this later. If you exit the Contract Request before you click the Finish button, make a note of the Request ID so that you may return to it later.
Once the Construction Bid Advertisement Contract Request is finished, the next step is to edit the Main Document of the Advertisement to add the variable information that could not be added on the Project form. See Editing a Main Document, earlier in this guide.

University Office of Capital Programs and Real Estate Services Page 81 of 123
www.uocpres.uillinois.edu Support: [email protected]
Construction Contract
Information entered on the Project forms combines with boilerplate text from the selected contract type during the Contract Request process. Once a Contract Request has been created for a construction contract, unless changes to contract language have been requested, the contract may be reviewed and sent into the workflow. Both single and multiple contracts may be created. The following construction contracts are available within Upside:
Construction – Contractor with No Assignment.
Construction – Contractor with Assigned Subs.
Construction – Contractor with Assigned Subcontractor. Before beginning:
Ensure all portions of the Project Forms are complete.
Ensure the Project Forms have been submitted.

University Office of Capital Programs and Real Estate Services Page 82 of 123
www.uocpres.uillinois.edu Support: [email protected]
Create a Construction Contract:
1. Begin a Contract Request. See Initiating a Contract Request, earlier in this guide.
2. In the “What type of contract?” area, choose one of the following selections:
Construction – Assigned Subcontractor.
Construction – Contractor with Assigned Subs.
Construction – Contractor with No Assignment.
3. Click the Next Question command button.
4. Confirm the Request Header Entry information.
5. Click the Next command button.
6. On the Project Selection page, drop down the Project Code field and select the project.
OR
In the Filter for drop-down list field, type in the project number and click the Apply Filter command button. Select the project from the drop-down list.
NOTE: The user may exit a Contract Request and resume it later. See To Exit and Resume a Contract Request, earlier in this guide.
7. Click the Next command button.
NOTE: If the following error message appears, return to the Project Forms area and submit the previously entered data by clicking on Submit command button.
The read only Project Form will now appear for the selected project. Verify that sufficient project information has been entered to create the current contract.
8. Click the Next command button.
9. Review the READ ONLY version of the project form.
NOTE: If errors are discovered on the contract request version of the project form, exit the Contract Request process, return to the project form and modify it, and then re-submit to import the corrected information.
10. Click the Next command button.
11. On the Contract Request Input page:
a. If working with an Assigned Subcontractor contract:
Drop down the menu and select the contractor’s Division of Work.
b. If working with a Contractor with Assigned Subs contract:
Drop down the menu and select the contractor’s Division of Work.
Choose the checkboxes for each assigned subcontractor.
c. If working with a Contractor with No Assignment contract:
Drop down the menu and select the contractor’s Division of Work.

University Office of Capital Programs and Real Estate Services Page 83 of 123
www.uocpres.uillinois.edu Support: [email protected]
12. To request a change to the contract language, in the Request a modification to the contract text drop-down field:
If no modifications are needed, accept the default answer, No, and SKIP to step 15.
If modifications are needed, select Yes.
a. In the first text box illustrated above, type justification for the changes to be made.
b. In the second text box illustrated above, type the contract text modification to appear in the contract. Include the section in which the change should appear.
OR
On the Attached Documents Entry screen of the Contract Request, attach a document which explains the justification for the change and its additional contract text.
NOTE: Both of the above fields are limited to 4,000 characters.
NOTE: If attaching a document to justify a change of contract language, remember NOT to choose the Include in Document and Print checkboxes.
13. Click the Next command button.
14. To attach a document:
a. Click the Add icon in the toolbar.
b. Near the bottom of the screen, in the Document Title text box, type a name for the attachment.
c. In the Document Date text box, type the date of the document, or use the date navigator to navigate to the appropriate date.
d. In the Type area, choose the Attached radio button.
e. Click the Select command button and navigate to the folder where the file resides.
f. Select the filename.
g. Click the Open command button.
h. To have the file appear as part of the contract, choose the Print and Include in Document checkboxes.
University Office of Capital Programs and Real Estate Services Page 84 of 123
www.uocpres.uillinois.edu Support: [email protected]
NOTE: If the attachment is just for reference, do not choose these options. To view all attachments to a contract, see Adding and Viewing Document Attachments.
15. Click the Finish command button.
IMPORTANT: Write down the Contract Number for future reference.
16. In the Menu Pane, click the Contracts menu item.
17. Select the row of the contract to view and a black arrow will appear.
18. Click the Print Preview icon in the toolbar.
19. Click the Prepare Document command button.
NOTE: If you are using a pop-up blocker, you may need to give the browser permission to open the document.
20. Review the document as a PDF.
21. Click the Check In icon in the toolbar to check in the document.
NOTE: Remember to check in the letter or it can’t be released into the workflow.
22. To forward the document for review, in the Workflow Response drop-down field, select Forward.
NOTE: See Forwarding a Contract Document, later in this guide.
IMPORTANT: If you Release instead of Forward the document, by mistake, the document enters the approval workflow. In order to recover and forward as intended, ask the next approver (most likely the Director) to reject the approval to make the Forward option available to you.
23. To release the letter into the workflow for approval, in the Workflow Response drop-down field, select Release.
NOTE: See Releasing Documents into the Workflow, later in this guide.
NOTE: To correct an error after the document has been reviewed, see Modifying a Contract Document, the next topic in this guide.

University Office of Capital Programs and Real Estate Services Page 85 of 123
www.uocpres.uillinois.edu Support: [email protected]
Modify a Contract Document
Occasionally, once a contract request has been completed, some data that appears in the contract may need to be modified. For example, some of the following contract details might need to be added, modified, or deleted:
Bid Opening information has changed.
A Division of Work was entered incorrectly.
A Division of Work was originally entered but then not awarded.
An additional Division of Work needs to be added, to the Front End Documents or to a construction contract.
An Alternate or Unit Price needs to be added or deleted.
A modification to the construction contract text is required now but was not prior to the Contract Request.
Under those and a few other circumstances, the user might consider returning to the project form, modifying the data, and then re-submitting. This is the solution if a contract request has not yet been created. However, if the Contract Request and the contract have been generated, the contract took the information provided on the Project form previously. The Contract Request will not pull in the new information. Instead, a few additional steps are necessary to correct the contract.

University Office of Capital Programs and Real Estate Services Page 86 of 123
www.uocpres.uillinois.edu Support: [email protected]
Modify or Correct an Existing Contract Document or Letter:
1. Correct the missing or incorrect information on the Project Form.
2. Submit the Project Form.
3. Verify that the new data is correct by print-previewing the contract.
a. Click the Print Preview icon in the toolbar.
b. Click the Prepare Document command button.
NOTE: If you are using a pop-up blocker, you may need to give the browser permission to open the document.
c. Click the Open command button.
d. Review the document.
e. Close the Adobe Acrobat document.
4. Continue with contract review and/or approvals.
See Forwarding a Contract Document, later in this guide.
See Releasing Documents into the Workflow, later in this guide.
NOTE: Submitting the Project form will automatically import the changes to any and all documents that are in edit mode for the associated project.
Delete a Contract Document:
A contract document that has not entered the workflow can be deleted.
1. From the Contract listing view, select the contract to delete.
2. Click the Check Out icon to check out the contract.
3. Click the Delete icon.
4. Click OK in the warning dialog box asking “Do you want to delete this record?”
5. Add a brief note about the deletion.
NOTE: A note is required in order to delete the item.
6. Click the Save icon in the toolbar.

University Office of Capital Programs and Real Estate Services Page 87 of 123
www.uocpres.uillinois.edu Support: [email protected]
Construction Letters
The following Construction Notice Letters can be generated within Upside:
Construction – Notice of Award Letter.
Construction – Notice to Proceed Letter.
Construction – Notice of Intent to Award Letter.
Construction – Notice of Award / Notice to Proceed Letter. Just like the Professional Services Agreement Award letter, Construction Notices will be created using the Contract Request process and edit the variable fields in the Main Document.
Create a Construction Notice Letter:
1. Begin a Contract Request. See Initiating a Contract Request, earlier in this guide.
2. In the “What type of contract?” area, choose one of the following selections:
Construction – Notice of Award Letter.
Construction – Notice to Proceed Letter.
Construction – Notice of Intent to Award Letter.
Construction – Notice of Award / Notice to Proceed Letter.
3. Click the Next Question command button.

University Office of Capital Programs and Real Estate Services Page 88 of 123
www.uocpres.uillinois.edu Support: [email protected]
4. Confirm the Request Header Entry information.
5. Click the Next command button.
6. On the Project Selection page, drop down the Project Code field and select the project.
OR
In the Filter for drop-down list field, type in the project number and click the Apply Filter command button. Select the project from the drop-down list.
NOTE: The user may exit a Contract Request and resume it later. See To Exiting and Resume a Contract Request, earlier in this guide.
7. Click the Next command button.
8. Review the READ ONLY version of the project form.
9. Click the Next command button.
10. On the Contract Request Input page:
a. In the Contract Type? drop-down field, select one:
Single.
Multiple.
b. For Single,
Select the appropriate Division of Work.
c. For Multiple,
Select the Contractor with Assigned Division of Work.
Choose the checkboxes for each assigned Division of Work.
11. Click the Next command button.
12. Click the Finish command button.
IMPORTANT: Write down the Contract Number for future reference.
13. In the Menu Pane, click the Contracts menu item.
14. Select the row of the notice to view and a black arrow will appear.
15. Edit the letter, to add the correct date.
a. In the Menu Pane, expand the Header group.
b. Under the Header group, expand the Documents group.
c. Select the Main Document option.
d. To give more screen space, close the Properties pane by clicking its Close icon.
e. Click the Check Out icon in the toolbar to check out the document.
f. Click each clause containing the word Text.
g. Edit the words in all caps, such as DATE, and type the required information.
NOTE: If the cursor turns into a circle with a slash through it, the clause may not be edited. Make sure the notice is checked out.

University Office of Capital Programs and Real Estate Services Page 89 of 123
www.uocpres.uillinois.edu Support: [email protected]
h. If there are alternate clauses within the document, delete the unused clause(s):
Highlight the clause to be deleted.
Right-click and select Delete Item.
i. Click the Save icon in the toolbar.
NOTE: Get help for any item by hovering over the question mark icons in the margin area.
j. If the person who will sign the letter isn’t the same person indicated in the signature field, click on the name and press the Delete key. Type in the correct person’s name in the table cell above the cell where the image appeared.
k. Click the Save icon in the toolbar.
16. Click the Print Preview icon in the toolbar.
17. Click the Prepare Document command button.
NOTE: If you are using a pop-up blocker, you may need to give the browser permission to open the document.
18. Review the document as a PDF.
19. Click the Check In icon in the toolbar to check in the document.
NOTE: Remember to check in the letter or it can’t be released into the workflow.
20. To forward the document for review, in the Workflow Response drop-down field, select Forward.
NOTE: See Forwarding a Contract Document, the next topic in this guide.
IMPORTANT: If you Release instead of Forward the document, by mistake, the document enters the approval workflow. In order to recover and forward as intended, ask the next approver (most likely the Director) to reject the approval to make the Forward option available to you.
21. To release the letter into the workflow for approval, in the Workflow Response drop-down field, select Release.
NOTE: See Releasing Documents into the Workflow, later in this guide.
NOTE: To correct an error after the document has been reviewed, see Modifying a Contract Document, earlier in this guide.

University Office of Capital Programs and Real Estate Services Page 90 of 123
www.uocpres.uillinois.edu Support: [email protected]
Forward a Contract Document
If any contract document needs to be forwarded to someone else for review, the user can easily do that in Upside and capture comments as well.
Forward a Contract Document:
1. Click the Check In icon to check in the document.
2. To forward the letter for review, in the Workflow Response drop-down field, select Forward.
IMPORTANT: If you Release instead of Forward the document, by mistake, the document enters the approval workflow. In order to recover and forward as intended, ask the next approver (most likely the Director) to reject the approval to make the Forward option available to you.
3. In the User field, click the magnifying glass icon.
4. In the Type field, select Individual.
5. Click the Search command button.
6. Click the username to whom the document should be forwarded.
7. Click the Select icon in the toolbar.
8. In the Note field, type any message to send to the person along with the forwarded document.
NOTE: You will be able to review your notes as well as those of the person who returned the document to you in the Notes view. See Reviewing Document Notes later in this guide.
9. Click the Save icon in the toolbar.

University Office of Capital Programs and Real Estate Services Page 91 of 123
www.uocpres.uillinois.edu Support: [email protected]
NOTE: Notice that the workflow response menu is no longer available. It will reactivate when the person to whom you forwarded the document returns it to you.
10. To view whether the individual still has the document, with the contract selected, expand the Header option in the Menu Pane and select the Workflow option.
From this view, you can see when the contract was forwarded, to whom it was forwarded and the assigned task.

University Office of Capital Programs and Real Estate Services Page 92 of 123
www.uocpres.uillinois.edu Support: [email protected]
Review a Forwarded Document
When a contract is forwarded to you for your review, you will receive an email alerting you to its availability, with a link to Upside. Note the Contract number from the email before you log in, in case you have a number of tasks to perform. That will help you determine which document requires review. IMPORTANT: There are three ways to review a contract: as a PDF document, using Document Compare, and using Inline Redlining. This procedure includes PDF document review. For the other two types of review, see Reviewing the Main Document, later in this guide.
Review a Document in Upside:
1. Logon to Upside with your credentials.
NOTE: If already logged into Upside, the contract’s Header view appears. SKIP to step 4.
2. In the My Tasks area, select the Tasks link.
NOTE: The Project Number will appear in the Code column.
NOTE: A document that has been forwarded to you will be described in the Task column as Review Document, as illustrated above.
3. Select the task Description link.
NOTE: On the Header that opens, confirm that you’re in the right place by noting the Read-Only fields, such as Contract Number, Project Description, Project Number, and Vendor Name.
4. Click the Print Preview icon in the toolbar.
5. Click the Prepare Document command button.
NOTE: If you are using a pop-up blocker, you may need to give the browser permission to open the document.
6. Click the Open command button.
7. Review the document.
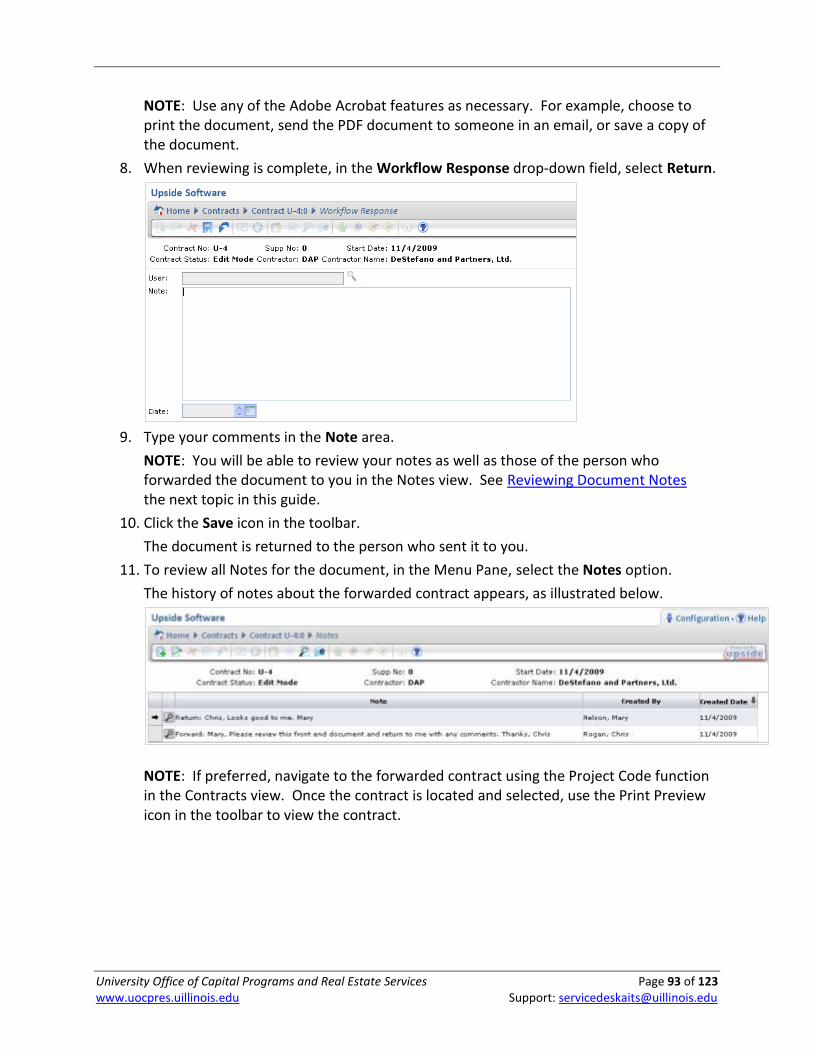
University Office of Capital Programs and Real Estate Services Page 93 of 123
www.uocpres.uillinois.edu Support: [email protected]
NOTE: Use any of the Adobe Acrobat features as necessary. For example, choose to print the document, send the PDF document to someone in an email, or save a copy of the document.
8. When reviewing is complete, in the Workflow Response drop-down field, select Return.
9. Type your comments in the Note area.
NOTE: You will be able to review your notes as well as those of the person who forwarded the document to you in the Notes view. See Reviewing Document Notes the next topic in this guide.
10. Click the Save icon in the toolbar.
The document is returned to the person who sent it to you.
11. To review all Notes for the document, in the Menu Pane, select the Notes option.
The history of notes about the forwarded contract appears, as illustrated below.
NOTE: If preferred, navigate to the forwarded contract using the Project Code function in the Contracts view. Once the contract is located and selected, use the Print Preview icon in the toolbar to view the contract.

University Office of Capital Programs and Real Estate Services Page 94 of 123
www.uocpres.uillinois.edu Support: [email protected]
Document Notes
When documents have been forwarded to someone and Notes are available about a document’s review, view them in Upside.
View Notes about a Document:
Method 1
1. In the Menu Pane, under Contracts, select the Contracts sub-menu item.
2. Select the contract whose notes you wish to read.
3. Click the Note icon.
NOTE: If a contract has a blank Note icon, it has no notes associated with it.
OR
Method 2
1. In the Menu Pane, under Contracts, select the Contracts sub-menu item.
2. Select the contract whose notes you wish to read.
3. In the Menu Pane, expand the Header item.
4. Select the Notes menu item.
NOTE: If a contract has a blank Note icon, it has no notes associated with it.

University Office of Capital Programs and Real Estate Services Page 95 of 123
www.uocpres.uillinois.edu Support: [email protected]
5. Click the Note to view.
6. If the Note is long, or to get a better view of it, click the View icon.
NOTE: From the new window, if desired, select all and copy the Notes into another program.

University Office of Capital Programs and Real Estate Services Page 96 of 123
www.uocpres.uillinois.edu Support: [email protected]
Release Documents into the Workflow
NOTE: A larger version of the above diagram appears in Appendix E. Once a contract document has been completed and is ready for internal approvals, release it into the workflow. Workflow approvals without modification (in the contracts) proceed in a straightforward fashion. The table below notes which levels of approval are necessary by contract document.
Workflow Approvals by Document
Document Condition 1: Planner/PM 2: CCU Director 3: UOCP* 4: Legal*
Professional Services Agreement
No Language Changes x x x x
Language Changes x x x x
PSA Award Letter N/A x x
Front End Documents
No Language Changes x x x
Language Changes x x x x

University Office of Capital Programs and Real Estate Services Page 97 of 123
www.uocpres.uillinois.edu Support: [email protected]
Construction Contract
No Language Changes x x x x
Language Changes x x x x
Construction Letters N/A x x
*NOTE: Based on authorized signature approvals.
Release a Contract Document into the Workflow:
1. In the Menu Pane, select the Contracts menu item.
2. Select the row of the contract to view.
3. Click the Print Preview icon in the toolbar.
4. Click the Prepare Document command button.
NOTE: If you are using a pop-up blocker, you may need to give the browser permission to open the document.
5. Click the Open command button.
6. Review the document.
7. Close the Adobe Acrobat PDF document.
8. When the contract is ready to release into the workflow, in the Workflow Response drop-down field, select Release.
OR
If the document is NOT ready for the approvals workflow, forward it to someone else. See Forwarding a Contract Document, earlier in this guide.
NOTE: A document may no longer be edited once it is released into the workflow.
NOTE: If you try to release a document into the workflow and receive the following error,
submit the Project form, then click the Finish button on the Contract Request.

University Office of Capital Programs and Real Estate Services Page 98 of 123
www.uocpres.uillinois.edu Support: [email protected]
Review Workflow Approval Status
The status of a document in the workflow may be reviewed at any time. The Status and State columns in the tables below help to identify which workflow step the selected contract is in.
Status Description
Edit Mode Contract is in the process of being created. The user has full access to change document structure, details and items (as long as the user has the contract checked out).
Pending Director Approval Awaiting review and approval by the unit Director.
Pending UOCP Approval Awaiting review and approval by UOCP&RES.
Pending Legal Approval Awaiting review and approval by Legal.
Pending Contractor Wet Signature / Compliance
The hard copy contract is being routed for external wet signatures. It must be reviewed for compliance items before the originator can Approve the document within Upside.
Pending UI Wet Signature The hard copy contract is being routed for internal wet signatures. When all signatures have been completed, the contract must be scanned and uploaded to the Upside electronic contract before the originator can Approve it in Upside.
Executed Contract has successfully gone through and completed the approval workflow. Edits can no longer be made to the contract.
State Description
Active Available for editing and managing contracts.
Forwarded Contract has been forwarded to another user for review. Note that this does not indicate that the contract has entered the Approval workflow.

University Office of Capital Programs and Real Estate Services Page 99 of 123
www.uocpres.uillinois.edu Support: [email protected]
Review the Main Document
Each time a contract document is saved, a new document version is created. When a new Professional Services Agreement is created and subsequently edited, the basic or supplemental services that are added or deleted, the fields that require editing, and so forth can be compared with the original document. If you are the document editor, you can track how you’ve modified the document from the original. If you are an approver, you can view changes that have been made in order to perform your approval task. There are three methods for reviewing the Contract Document:
Document compare -- Using this feature, documents to be compared are displayed side by side, as illustrated above. Different versions of the same document can be compared, as with inline redlining. There is no option to jump to the next change, but the user can navigate by clause heading.
Inline redlining – Splits the document-editing window horizontally. Two versions of the document can be compared with the current version. Changes are highlighted with redlining. The user can skip to the next changed area by hitting a button. The current version may also be edited.

University Office of Capital Programs and Real Estate Services Page 100 of 123
www.uocpres.uillinois.edu Support: [email protected]
View Versions – All clause versions are tracked. First, select a clause, and then view the different versions of the clause, when the change was made, and who made the change. Two clause versions can be selected and compared. The changes will show up with redlining. The clause text can be replaced by selecting a version and clicking the Set Approval Candidate button.
No matter which type of document comparison is used, the user may wish to know how to gain more screen to view the comparisons. Many of the navigational panes in the view can be closed and restored later. See Tips and Tricks for Navigating the Main Document, earlier in this guide.
Compare Documents
The Compare Documents feature allows the comparison of two different versions of a document and redlines the changes that have been made. Added text is colored green and underlined, deleted text is colored red and has a strikethrough along the text.
Compare Documents improves the editing process by identifying the changes that are made. If a document is forwarded to another user in the application or sent to an external third party, the entities are able to make changes to the existing document and return it to the originator. The originator can use the Compare Documents feature to track the changes between the versions they submitted and what was edited and returned to them.
Compare Documents identifies the changes made between two different versions of a document. A document version is an instance of the document in a certain point of its life cycle. A document version is created when the document is forwarded to another user. The Compare Documents feature allows users to perform a ‘side by side’ comparison to track and identify the changes made when the document was reviewed.
Compare Versions of a Document:
While using the Compare Documents feature, users can only view the differences between two documents or document versions. Editing is not allowed.
1. From the Contracts menu, navigate to the Documents view.
a. From the Menu Pane, select Contracts.
b. Select the document that requires comparison.
c. In the Menu Pane, expand the Header option.
d. Select the Documents view.
e. Select the Main Document option.
2. Click the Compare Documents icon in the editing toolbar.
NOTE: While the Compare window is open, the Main Document cannot be edited.
NOTE: The current version appears in the right pane by default.

University Office of Capital Programs and Real Estate Services Page 101 of 123
www.uocpres.uillinois.edu Support: [email protected]
3. In the left pane, in the Version drop-down field, select the version to compare with the current version.
4. Compare the current document to different document versions.
NOTE: The changes identified are the text added, deleted or modified 'compared to' the version selected from the right field.
5. Select the version to 'compare from' in the right side Version field.
NOTE: The changes identified are the text added, deleted or modified 'compared from' the version selected from the left field.
6. Adjust the document comparison by selecting different versions from the Version fields.
7. To unlock scrolling, uncheck the Lock Scrolling checkbox, which is selected by default.
8. To navigate the document, either scroll through it using the scroll bar or use the Jump to drop-down field to move through the document by clauses.
9. When done viewing the changes made to the document, close the Compare window by clicking the document Close icon.

University Office of Capital Programs and Real Estate Services Page 102 of 123
www.uocpres.uillinois.edu Support: [email protected]
In-line Redlining
The Inline Redlining feature allows the comparison of two different versions of a document to the current version and to identify the differences. When using the Inline Redlining feature, the screen is split horizontally. The current version is displayed in the bottom half and is editable. The two versions being compared appear in the top half of the screen. This feature helps streamline the editing process by providing the option to view modifications made to previous versions while updating the current version.
Perform In-Line Redlining:
1. From the Contracts menu, navigate to the Documents view.
a. From the Menu Pane, select Contracts.
b. Select the document that requires Inline Redlining.
c. In the Menu Pane, expand the Header option.
d. Select the Documents view.
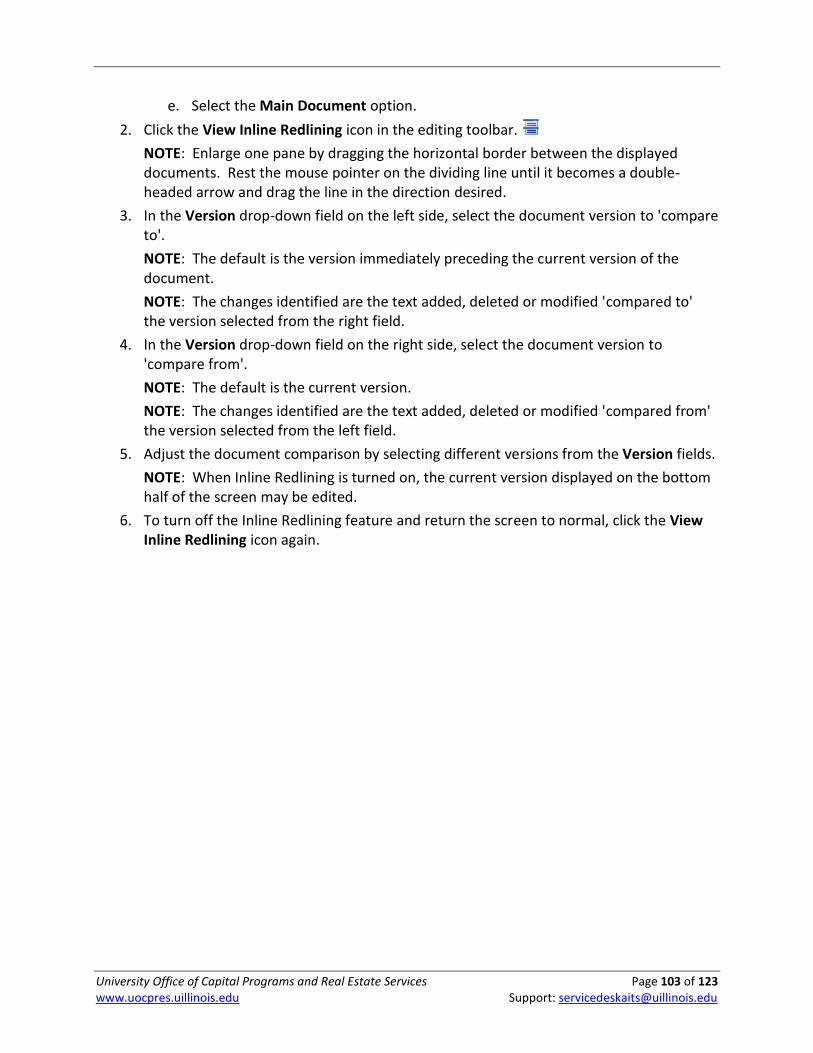
University Office of Capital Programs and Real Estate Services Page 103 of 123
www.uocpres.uillinois.edu Support: [email protected]
e. Select the Main Document option.
2. Click the View Inline Redlining icon in the editing toolbar.
NOTE: Enlarge one pane by dragging the horizontal border between the displayed documents. Rest the mouse pointer on the dividing line until it becomes a double-headed arrow and drag the line in the direction desired.
3. In the Version drop-down field on the left side, select the document version to 'compare to'.
NOTE: The default is the version immediately preceding the current version of the document.
NOTE: The changes identified are the text added, deleted or modified 'compared to' the version selected from the right field.
4. In the Version drop-down field on the right side, select the document version to 'compare from'.
NOTE: The default is the current version.
NOTE: The changes identified are the text added, deleted or modified 'compared from' the version selected from the left field.
5. Adjust the document comparison by selecting different versions from the Version fields.
NOTE: When Inline Redlining is turned on, the current version displayed on the bottom half of the screen may be edited.
6. To turn off the Inline Redlining feature and return the screen to normal, click the View Inline Redlining icon again.

University Office of Capital Programs and Real Estate Services Page 104 of 123
www.uocpres.uillinois.edu Support: [email protected]
View Versions
A version of an item is created every time changes are made to the textual content of an item and the item is saved. To view a clause that has been edited more than once, and to compare the modifications over time, the View Versions view can prove useful. The View Versions panel is used to compare two different versions of a clause. When the versions are being compared, only content differences in text are compared. Changes to text such as Font Style or Font Color are not tracked. Changes compared are additions and/or deletions from the Original Version (Source) field and are compared to the version selected in the Modified Document (Target) field. When comparing two different item versions, text that has been added to an item is colored blue and underlined. Text that has been deleted from an item is displayed in red strikethrough. Note that deleted clauses are NOT displayed in this comparison view. Only two versions can be compared at once. When an item is being compared, the text in the item cannot be edited.

University Office of Capital Programs and Real Estate Services Page 105 of 123
www.uocpres.uillinois.edu Support: [email protected]
Compare Versions:
1. From the Contracts menu, navigate to the Documents view.
a. From the Menu Pane, select Contracts.
b. Select the document that requires comparison.
c. In the Menu Pane, expand the Header option.
d. Select the Documents view.
e. Select the Main Document option.
2. Click the View Versions Panel icon.
3. Select the View Versions (magnifying glass) icon.
NOTE: When first navigating to the View Versions Panel, the version that has the enabled magnifying glass is the current selected version of the item.
4. Select an Original Version (Source) and a Modified Document (Target) by clicking magnifying glass that is located to the right of each version.
NOTE: The oldest selected version automatically loads into the Original Version (Source) field and the most recent selected version automatically loads into the Modified Document (Target) field.
5. Click the Compare command button.
NOTE: When an item is being compared, a Cancel icon appears in the margin beside it. Clicking the Cancel icon clears the comparison.

University Office of Capital Programs and Real Estate Services Page 106 of 123
www.uocpres.uillinois.edu Support: [email protected]
Select an Approval Candidate:
1. Once versions of a clause have been compared, the user may wish to accept one version.
2. In the View Versions pane, click the version to activate as the current version to de-select it.
NOTE: The selected version is highlighted, and the Set Approval Candidate command button is enabled.
NOTE: Place a check in the Reverse Order field to switch the display of version fields. The version that is currently in the Original Version (Source) field is switched with the version in the Modified Document (Target).
3. Click the Set Approval Candidate command button.
4. Click the OK command button in the confirmation dialog box.
OR
Click the Cancel command button to end the process.
NOTE: If the wrong version is accidentally accepted, click the Cancel icon in the toolbar. Click the OK command button in the warning dialog box. The document reverts to its previous state.

University Office of Capital Programs and Real Estate Services Page 107 of 123
www.uocpres.uillinois.edu Support: [email protected]
Use Search to Find Projects
The Project Listing View can be used to Search for projects.
Use the Project Listing Search:
1. Using the Menu Pane, expand the Contracts menu.
2. Select the Projects menu item.
NOTE: The Projects listing screen may appear to be empty. The user must search for the project(s) to display.
3. (Optional) In the Project Code field, type in the Project number.
4. (Optional) In the Description field, type in the most unique identifying word(s) from the project title.
5. In the Start Date drop-down field, select an appropriate date range.
6. Click the Search command button.
NOTE: The search may need to be refined if it yields too many or too few results.

University Office of Capital Programs and Real Estate Services Page 108 of 123
www.uocpres.uillinois.edu Support: [email protected]
Use the Inquiry Feature
The Inquiry feature allows searching for documents by text, contract manager, project code, vendor, and other aspects of the contract. The following table describes the criteria that may be searched:
Search Criterion Description
Document Type* In order to begin a search, first select a Document Type. (A Document Type describes where the documents were created.) There are three different types that can be selected:
Internal Documents – Any documents created within the application such as Templates or Contracts.
External Documents – Any document that has been uploaded into the application such as an attachment on a contract. (NOTE: Currently, our ability to search attachments is disabled but may be enabled in the future.)
Both – Allows searching for Internal and External Documents.
Once selected, choose which area, Contracts or Templates, contains the desired text.
*NOTE: This field is required for any search.

University Office of Capital Programs and Real Estate Services Page 109 of 123
www.uocpres.uillinois.edu Support: [email protected]
Search Text Enter a word or phrase that the application should search for.
Exact Determines whether or not the application searches for grammatical variances of the Search Text. If the checkbox Exact is selected, the application does not search for grammatical variances of the entered word. If the checkbox is not selected, the application searches for grammatical variances.
For example, search text ‘testing’ and the Exact checkbox is checked, the application only returns instances of the word testing. Search text ‘testing’ and the Exact checkbox is not checked, the application returns grammatical variances of the word testing (i.e., test, tests, tested, etc.).
Document Created Date
Used to filter search results by the date that the document was created. If the exact date of the document is not known, the user may also select 'Equals', 'Between', 'Greater Than', or 'Less Than' to broaden the search results.
Document Created By
Used to search for and select the user who created the document.
Document Status Used to select the status of the documents that filters the search results. Users can search for documents of the following statuses: 'All', 'Approved' or 'Not Approved'.
Include Child Org Unit
Select this checkbox to search through all Child Org Units that are associated with any contracts. The checkbox only appears when the Document Type 'Contracts' is selected.
Language Used to filter search results by Language. The Language is defined on the Header tab.
Current Version Checkbox indicates that the search results should only contain the most current version of text. This checkbox is automatically selected by default.
Document ID Used to enter the Contract Number of the desired record.
Supplement No NOTE: Supplements are not being used within Upside, so this field cannot be used to search.
Document Description
Used to enter the document description to help narrow the search results to the specific document.
Document Amount
Used to enter the amount of the document of the desired record. This helps narrow the search results to documents that contain the specified amount. Document Amount only appears when 'Contracts' are selected in the Document Type field.
Start Date Used to search by the record's start date. Manually enter the Start Date or click the calendar icon to select a specific date.
End Date Used to search by the record's end date.
Document Party Used to search by the Business Entity that was selected as the Vendor of the record. To filter the search results by Vendor, enter the Contractor or External Party name.
Contract Manager
Used to filter the search results by Contract Manager. Contract Manager only appears when 'Contracts' is selected as the Document Type.
Contract Type Used to select a specific Contract Type that may relate to the desired document.

University Office of Capital Programs and Real Estate Services Page 110 of 123
www.uocpres.uillinois.edu Support: [email protected]
Project CD The Project Code that is associated with the record being searched for. It is the same as the Project Number.
Search Using Inquiry:
NOTE: Use any combination of fields in the Inquiry form as criteria for searching. Only the Document Type field (step 3, below) is required.
1. In the Menu Pane, expand the Contracts group.
2. Select the Inquiry option.
3. In the Document Type drop-down field, select the type of document that contains the desired text:
Internal Document (Upside contract document).
External Document (attachments).
Both (e.g., both internal and external documents).
4. Choose the Contract checkbox.
NOTE: Do not choose Template, since specific contracts cannot be found using the boilerplate text.
5. In the Search Text field, enter the desired text to search for.
6. To exclude grammatical variances of the text, choose the Exact checkbox. To include grammatical variances of the text, choose the Exact checkbox to remove the checkmark.
7. To search for specific text by date, manually enter the Document Created Date or click the calendar icon and select a date.
8. To search by Document Creator, in the Document Created By field, click the magnifying glass icon.
NOTE: The Type field and the Business Relationship field are not configurable.
a. To search by User Role, select the desired role.
b. To search by a specific user, type in the user’s net ID in the User Code field.
c. Click the Search command button.
d. Select the Document Creator’s record and an arrow will appear to the left.

University Office of Capital Programs and Real Estate Services Page 111 of 123
www.uocpres.uillinois.edu Support: [email protected]
e. Click the Select icon in the toolbar.
f. If the wrong individual was accidentally selected, click the Delete icon and search again.
9. In the Document Status field, select one radio button:
All.
Approved.
Not Approved.
10. In the Org Unit drop-down field, select the org unit field.
NOTE: Child Org Units are currently NOT being used.
NOTE: English is the only Language option and is the default.
11. To search for the most current version of the text, choose the Current Version checkbox.
12. Enter the Document ID, if applicable.
NOTE: Supplement No are currently NOT being used.
13. Enter the Document Description, if applicable.
14. Enter the Document Amount, if applicable.
15. In the Start Date field, type the Start Date or click the calendar icon to select the Start Date from a calendar, if applicable.
16. In the End Date field, type the End Date or click the calendar icon to select the End Date from a calendar, if applicable.
17. In the Document Party field, enter the name of the vendor.
18. To search for the Contract Manager, type the name in the Contract Manager field.
OR
Select the magnifying glass icon to search for a Contract Manager.
NOTE: The Type field and the Business Relationship field are not configurable.
a. To search by User Role, select the desired role.
b. To search by a specific user, type in the user’s net ID in the User Code field.
c. Click the Search command button.
d. Select the Contract Manager’s record and an arrow will appear to the left.

University Office of Capital Programs and Real Estate Services Page 112 of 123
www.uocpres.uillinois.edu Support: [email protected]
e. Click the Select icon in the toolbar.
f. If the wrong individual was accidentally selected, click the Delete icon and search again.
19. In the Contract Type drop-down field, select the appropriate type.
20. In the Project CD field, type in the project number (i.e., project code).
21. Click the Search command button.
22. If the results are undesirable, click the Back icon to refine the search.
23. To scroll through multiple pages to find the contract, click the page numbers at the bottom of the screen or click the next page button.
24. To view a contract listed on the first screen, click the View (magnifying glass) icon.
NOTE: In the Main Document, click the magnifying glass icon to print preview a PDF form of the document at any time.
Using Folders
To gather a set of contracts together for quick access, create a folder in the Documents area of the Default Pane.
Create a Folder:
1. In the Default Panel below the Menu Pane, select the Folders tab.
2. Right-click on the Documents option and select Insert Folder.
3. Right-click on the new folder and select Rename Folder.
4. Type in the new name for the folder.
Add Documents to a Folder:
1. Navigate to an item to add to the folder.
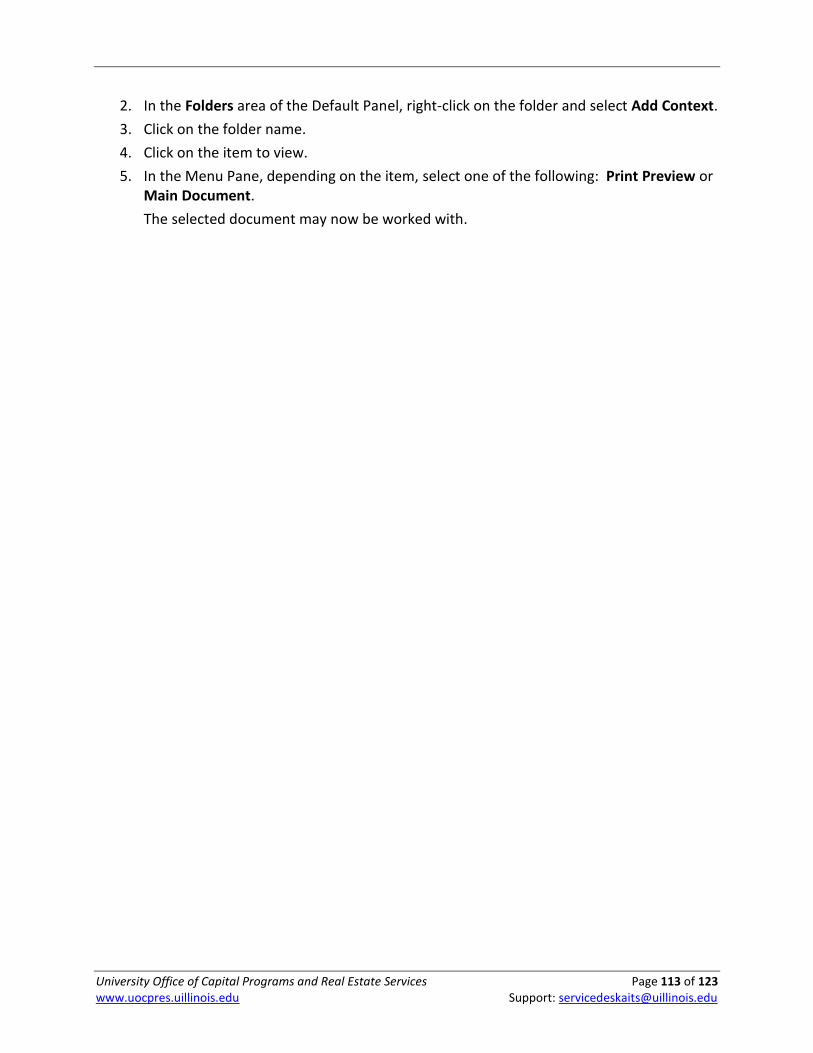
University Office of Capital Programs and Real Estate Services Page 113 of 123
www.uocpres.uillinois.edu Support: [email protected]
2. In the Folders area of the Default Panel, right-click on the folder and select Add Context.
3. Click on the folder name.
4. Click on the item to view.
5. In the Menu Pane, depending on the item, select one of the following: Print Preview or Main Document.
The selected document may now be worked with.

University Office of Capital Programs and Real Estate Services Page 114 of 123
www.uocpres.uillinois.edu Support: [email protected]
Approve Contract Documents
Before approving a document, the user will want to review it. Once the document has been reviewed, it is time to approve or reject it.
Review the Document Prior to Approval:
1. Logon to Upside with your credentials.
NOTE: If already logged into Upside, the contract’s Header view appears. SKIP to step 5.
2. In the My Tasks area, select the Tasks link.
NOTE: A document that has been forwarded to you will be described in the Task column as Review Document, as illustrated above.
3. Select the task Description link.
NOTE: On the Header that opens, confirm that you’re in the right place by noting the Read-Only fields, such as Contract Number, Project Description, Project Number, and Vendor Name.
NOTE: See Reviewing the Main Document, earlier in this guide, to review the Main Document.
4. Click the Print Preview icon in the toolbar.
5. Click the Prepare Document command button.
NOTE: If you are using a pop-up blocker, you may need to give the browser permission to open the document.
6. Click the Open command button.
7. Review the document.

University Office of Capital Programs and Real Estate Services Page 115 of 123
www.uocpres.uillinois.edu Support: [email protected]
Approve or Reject a Contract Document:
1. In the My Tasks area, select the Tasks link.
2. Select the task Description link.
NOTE: Confirm that you’re in the right place by reviewing the Read-Only fields, such as Contract Number, Project Description, Project Number, and Vendor Name.
3. In the Workflow Response drop-down field, select one of the following options:
Forward. Forwards the record to another user for review. You cannot approve or reject the document until the selected user returns it to you. For further information on this task, see Forwarding a Contract Document.
Approve. Select this operation after reviewing the record. The record continues to the next approver in the approval workflow.
Reject. Select this option to reject the record. A note is required with further instructions and/or the reason for the rejection. The contract is returned to the contract originator.
View the Status of a Contract Document in the Workflow:
1. From the Contract listing view, find the desired contract.
2. Observe the Status column.
3. Click on the Status column heading once to sort ascending and twice to sort descending.
NOTE: An arrow appears next to the column heading to indicate the direction of the sort.
Status* Description
1. Edit Mode Contract is in the process of being created. The user has full access to change document structure, details and items (as long as the user has the contract checked out).
2. Pending Director Approval Awaiting review and approval by the unit Director.
3. Pending UOCP Approval Awaiting review and approval by UOCP&RES.
4. Pending Legal Approval Awaiting review and approval by Legal.
5. Pending Contractor Wet Signature / Compliance
Awaiting review and approval by the contract originator. At this stage the contract has been sent to the vendor and will return with wet signatures. It must be reviewed for compliance items before the originator can Approve the document within Upside.
6. Pending UI Wet Signature The contract is being routed for internal wet signatures. When all signatures have been completed, the contract must be scanned and uploaded before it can be marked Approved in Upside and moved to the next status.
7. Executed Contract has successfully gone through and completed the approval workflow. Edits can no longer be made to the contract.
*NOTE: Numbers before each status name simply indicate the sequence of approvals. They are not part of the displayed status in Upside.

University Office of Capital Programs and Real Estate Services Page 116 of 123
www.uocpres.uillinois.edu Support: [email protected]
Appendix A: Upside Roles and Permissions
Roles Tasks Approvals
Ad
d P
roje
ct
Edit
Pro
ject
Vie
w P
roje
ct
Cre
ate
Co
ntr
act
Req
ues
t
Edit
Co
ntr
act
Req
ues
t
Vie
w C
on
trac
t R
equ
est
Edit
Co
ntr
act
Vie
w C
on
trac
t
Cam
pu
s A
pp
rova
l
OC
P&
RES
Ap
pro
val
Spec
ial C
lau
se In
sert
ion
Lega
l Ap
pro
val
Contract Processor X X X X X X X X
Unit Director X X X X
UOCP&RES X X X X X
Legal X X X X
Campus Business Mgr X X X
Viewer X X X

University Office of Capital Programs and Real Estate Services Page 117 of 123
www.uocpres.uillinois.edu Support: [email protected]
Appendix B: Optional and Editable Fields in the Professional Services
Agreement The Main Document of any contract, Front End Document, or letter contains clause security. The three security levels for clauses are:
Required – Clauses which are required and may not be edited or deleted.
Optional – Clauses which may be modified or deleted.
Editable – Clauses which may be edited.
For most contract documents, all clauses are required and therefore may not be edited or deleted. However, in the Professional Services Agreement, many clauses are optional and a few clauses are editable. The list below provides guidance on those clauses.
Optional
All Basic and Supplemental Services are optional clauses which may be modified or removed if inapplicable.
Editable
Introduction: Furniture, Fixtures and Equipment (FFE) Budget $__________.
A. 1. f. Design Presentation(s) to: ___________________________.
A. 5. x. 2. a. On-Site Inspections: Number of visits per division of work.
F. Compensation tables.
O. Personnel: Names and Functions table.
Attachment B: Hourly Rate Schedules.
Attachment C: Time of Completion.
Attachment D: PSC/Subconsultant Work Summary table.

University Office of Capital Programs and Real Estate Services Page 118 of 123
www.uocpres.uillinois.edu Support: [email protected]
Appendix C: Field Character Limits Some fields in Upside have character limitations, particularly in the Front End Documents Contract Request. The table below indicates which document, form, request, and fields have those limitations and what those limits are. To count characters, use the procedure below.
Document/Form Field Name Character Limit
Project Header Project Title (Abbreviated) 50
Project Header Budget Amount 12
Project Bidding Form Alternates First 10 alternates = 1,000
All others = 255
Project Bidding Form Unit Prices First 10 unit prices = 500
All others = 255
Any Project Short Project Description 1,750
Front End Documents Detailed Project Description 1,750
Detailed Description of Project Location(s) 750
Location(s) for each Bid Opening 500
Bid Document Procurement Clause 1,000
PreBid Conference 500
Reference Set Address Locations 3,000
Project-Specific Prequalification Information 5000
Site Examination Contact Name 255
Contractor with Assigned Bid will be opened in 255
Assigned Subcontractor(s) Bid(s) will be opened in
255
Non Assigned Contractor(s) Bid(s) will be opened in
255
Any Contract Request Text Change Justification 4,000
Contract Modification Text 4,000
Contract Forwarding Notes 2,000
To Count Characters Using Microsoft Word 2010:
1. Copy the text to count into a blank Microsoft Word document.
2. On the Review tab, click Word Count.
3. Note the number of characters (with spaces). This is the character count for that block when pasted into an Upside text box.
4. Click the Close command button.

University Office of Capital Programs and Real Estate Services Page 119 of 123
www.uocpres.uillinois.edu Support: [email protected]
Appendix D: Upside Email Notifications During workflow, email notifications are occasionally sent automatically by Upside, depending on specific triggers. The following table outlines the conditions under which an email notification may be received. In general, email notifications are sent when a contract has been:
Released into the workflow for your review.
Approved or rejected.
Forwarded for review and returned to you after review.
Approval Stage Reason Receiver Email Subject Line*
Any stage Contract Forwarded for Review
Anyone to which the contract is forwarded
Contract Review for Upside Contract # concerning…
After a contract is returned from being forwarded
Contract Returned from Forwarded Review
Everyone who has edit rights to the contract, meaning they are members of the contract org
Contract Returned From Forwarding for Upside Contract # concerning…
Campus Director Approval (no language changes / additions)
Contract Approved – Campus/UA Directors
Campus Director Campus/UA Dir Approval for Upside Contract # concerning…
UOCP Approval (no language changes / additions)
Contract Requires UOCP Approval
Users with UOCP role UOCP Approval for Upside Contract # concerning…
Legal Approval (no language changes / additions)
Contract Requires Legal Approval
Users with Legal Role Legal Approval for Upside Contract # concerning…
Executed Contract: Executed Status
User who submitted the contract, CBM for campus of the project org unit
Contract Executed for Upside Contract # concerning…
After Contractor wet signature
Contract Fully Executed with Wet Signatures
User who submitted contract
University Wet Signature for Upside Contract # concerning…
Any approval step by UOCP, Legal, Campus Directors
Contract Rejection User who submitted the contract, users in any previous approval group (Campus Director, UOCP)
Contract Rejected for Upside Contract # concerning…

University Office of Capital Programs and Real Estate Services Page 120 of 123
www.uocpres.uillinois.edu Support: [email protected]
Approval Stage Reason Receiver Email Subject Line*
First two approval steps for contracts with language changes / additions – Campus Director, UOCP
Contract has Language Change/Addition Requested
Campus Director, UOCP
Contract Change Approval for Upside Contract # concerning…
Last two approval steps for contracts with language changes / additions – Campus Director, Legal
Contract Review and Approval with Language Change/Addition Made
Legal, Campus Director Contract Change Approval for Upside Contract # concerning…
*Document subject line will be specific to the project and contract, often including the project number, contract type and division of work (if relevant).

University Office of Capital Programs and Real Estate Services Page 121 of 123
www.uocpres.uillinois.edu Support: [email protected]
Appendix E: Approval Workflow Diagram

University Office of Capital Programs and Real Estate Services Page 122 of 123
www.uocpres.uillinois.edu Support: [email protected]
Appendix F: Upside Input Worksheet
The PSC Agreement Worksheet is an Excel file that can be used by the Campus Construction Unit to obtain information needed to complete the Project Form and Contract Request Input page (for Front End Documents), since the Professional Services Consultant cannot access contract documents directly (as they did in CDS). The above illustration shows instructions for using the file and the tabs corresponding to the Project Form areas. This file is available for download from the UOCP&RES website: https://www.uocpres.uillinois.edu/UserFiles/Servers/Server_7758/file/UI/ProjDocs/forms/upside_input_worksheet.xls

University Office of Capital Programs and Real Estate Services Page 123 of 123
www.uocpres.uillinois.edu Support: [email protected]
Appendix G: Available Interactive Forms
Additional interactive electronic forms are available on the UOCP&RES website: http://www.uocpres.uillinois.edu/ Page 2 of Attachment D is illustrated above. The PSC/Subconsultant MAFBE Certification form is one such form.
Additional Support For support, please contact the AITS Service Desk. UIC: 312-996-4806 UIS and UIUC: 217-333-3102 [email protected]