using the student information systemitdportal.iium.edu.my/advise/advise_manual.pdf · requirement...
TRANSCRIPT
HOW TO USE THE STUDENT INFORMATION SYSTEM ON THE WEB
Table of Content
Title Page No. Section 1: Requirement prior to accessing the Student Information System (SIS). Section 2: Installing or downloading SIS for client server application. Section 3: SIS menu selection:
i. Class List ii. Academic History
a. Undergradute b. Postgraduate
iii. Lecturer Slip a. Individual b. Kulliyyah
iv. Student Record v. Ascii Class List
vi. Download vii. Mark Sheet
a. Result Entry b. Draft Validation Mark Sheet c. Validation Sheet d. CAM Entry e. CAM Sheet
viii. Change Password ix. Student Confirmation’s Slip x. Course Schedule
xi. Evaluation for Admission xii. Block Engine Students
xiii. SASC Monitoring System

Requirement prior to accessing the Student Information System (SIS). Basic Requirement: Hardware 1. Personal Computer or notebook at least minimum Pentium 100. 2. 32 MB RAM. 3. The personal computer or notebook must be connected to network. 4. The personal computer or notebook must be connected to printer, if you need to print reports. Software 1. Operating system must be Windows 95 or above. 2. Suggested browser – IE 5, IE 5.5, IE 6 and above & Netscape 3. Acrobat Reader 4.0 (for printing purpose) Access Privilege 1. Username and Password for Student Information System of Admission and Record Division. **If you have a problem please refer FAQ at http://itdportal.iiu.edu.my/advise or kuliyyah’s technical personal.
SECTION 1

Installing the latest SIS Application. SIS application in download menu: 1. Academic System for Kuliyyah(Undergraduate) 2. Icon for Academic System for Kuliyyah(Undergraduate) 3. Postgraduate Report for Kulliyyah The SIS application may be upgraded from time to time. When and upgrade has been made, the system will prompt you to download the latest version of the SIS application. Please take note of the download address given by the system. You may then use any browser, preferably Netscape Communicator 4.5 or above, to do the downloading. If you go to download address, you will be prompted with the web-version of the Student Information System. Please follow these steps: a) Choose ‘Download’ from the menu selection on the left. b) Click on the three above of SIS application. c) Enter your ORACLE username. d) Press tab or click on the password entry. e) Enter your ORACLE password then press enter. f) Click on ‘Save File’ button. g) You may save your file on the desktop. Use the default file name given by the system. h) You may exit your web browser. i) Go to your desktop and double-click on the icon you download just now. j) Click install. k) Your installation is complete when the computer screen is showing the desktop and a folder
is opened and displaying the icon. l) You may delete the icon that you have downloaded. Others in download menu: 1. Download Accelerator - to allow a Faster and more Reliable download experience. 2. Acrobat Reader - to print or view reports 3. Oracle Java Initiator – 4. Microsoft Java Virtual Machine for IE 5.0.- 5. FORM SDU-ITD-5 (Word Document) – get access username & password 6. Warning Form (Word Document) – 7. Barring Form (Word Document) – 8. Barring Table (Word Document) – 9. J2RE for EDMS –
SECTION 2

SIS menu selection 1. Class List
Step 1: Key-In username & password
Step 2: Key-In session, semester Step 3: Select print by Course or Course and Section Step 4: Key-In subject Step 5: Select output type and order by. Step 6: Click button submit query.
SECTION 3

2. Academic History
a. Undergraduate
Step 1: Key-In matric no Step 2: Select output type Step 3: Click button submit query.
b. Postgraduate
Step 1: Key-In matric no
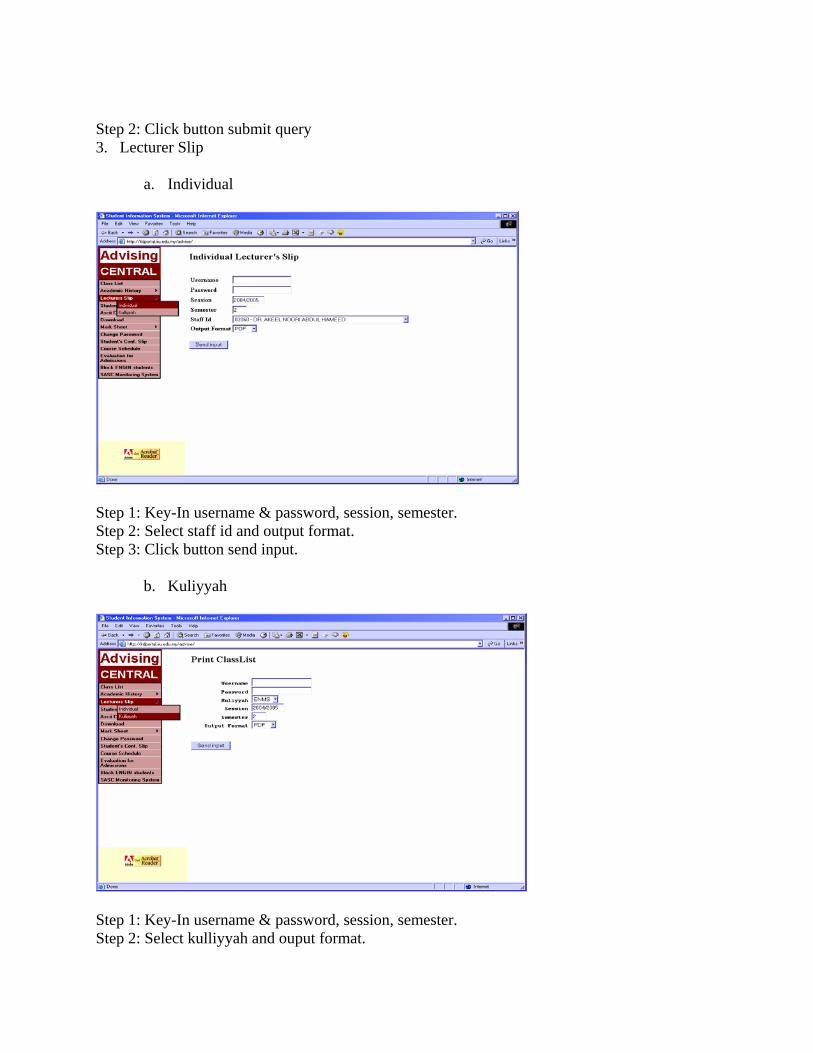
Step 2: Click button submit query 3. Lecturer Slip
a. Individual
Step 1: Key-In username & password, session, semester. Step 2: Select staff id and output format. Step 3: Click button send input.
b. Kuliyyah
Step 1: Key-In username & password, session, semester. Step 2: Select kulliyyah and ouput format.

Step 3: Click button send input. 4. Student Record
Step 1: Key-In username, password and database
Step 2: Query option by matric no or name like %MOHD%

View 1: Biodata Screen
View 2: Registration Screen

View 3: Examination Form
View 4: Education Screen

View 4: Accommodation Screen

5. Ascii Class List
Step 1: Key-In matric no, password and database
Step 1: Key-In subject code, then press enter. Step 2: Key-In section, then press enter. Step 3: List of student will appear.

Step 4: Press download button, if you to list in Ascii file. Step 5: Press Enter Query button to query another subject code, then press Execute Query to view list of student. OR Step 1: Key-In subject code Step 2: Press Execute Query
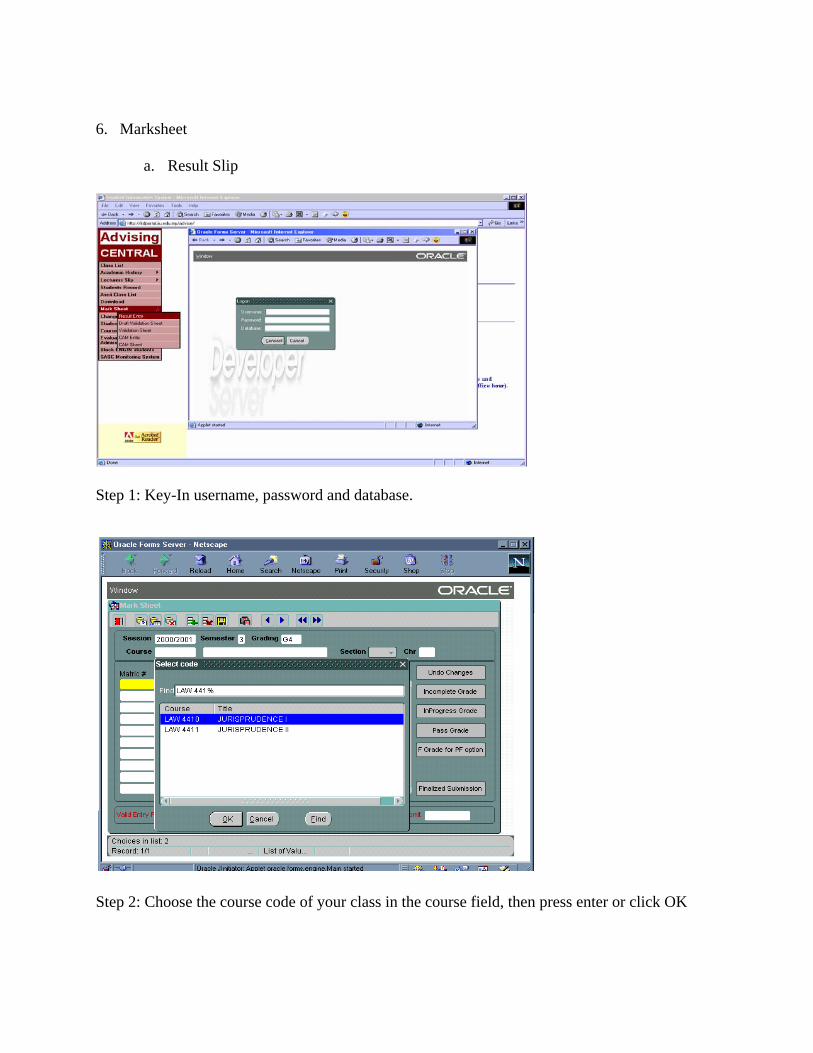
6. Marksheet
a. Result Slip
Step 1: Key-In username, password and database.
Step 2: Choose the course code of your class in the course field, then press enter or click OK

Step 3: List of students will be displayed. Step 4: Enter the score for the columns CAM and Final Exam for each student. The Total Score and Grade will be automatically be computed. Step 5: Please Save your entries by pressing F10 or by clicking button on the save button (diskette Symbol). Step 6: If you have more than one course, please click on the course field to enter the results for the next course. Step 7: If you have more than one section, please click on the section field to enter the results for the next section. Addition: 1. You are not allowed to change the Grade column.For I (Incomplete ) and IP ( In Progress )
grades, please click on the Incomplete Grade and Inprogress Grade buttons. Before you click on any of these buttons, please make sure that the record which you wish to set to I or IP is highlighted first.
2. If you want to print the Draft Validation Sheet you can choose Mark sheet, then Draft Validation Sheet from the menu selection on the left of the screen. Please take note that the Draft Validation Sheet is for your own reference only, even if you have not complete key-in some of the students’ result.
3. When you have finalized the data entry process, please confirm this process by clicking on the Finalized Submission button. The data when you clicked on this button will be considered as the official submission of result date. If it is not done, ANR will not record
the official submission of result date in the database.
4. Please take note that the Finalized Submission button cannot be click unless all student record has a grade assigned (no Grades Not Available ). Please take note on the ‘ Deadline of Valid Data Entry and Date of Submission of Examination Results’ as mentioned in the letter on the Online Data Entry of Examination Results.
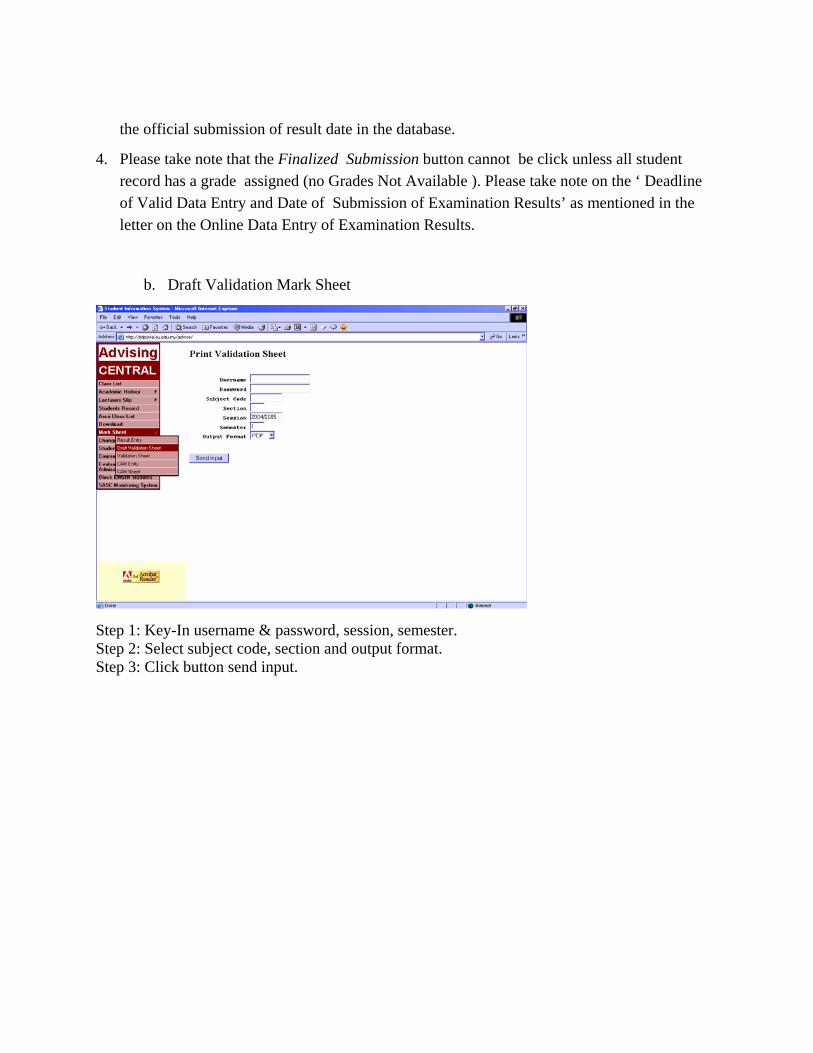
b. Draft Validation Mark Sheet
Step 1: Key-In username & password, session, semester. Step 2: Select subject code, section and output format. Step 3: Click button send input.

c. Validation Sheet
Same as draft validation sheet. Only print after you have finalized the submission.
d. CAM Entry
Step 1: Enter your username, password and database. Press Connect.

Step 2: You will see your list of classes on the top of the screen
Step 3: Define the course schema for each section that you teach. Step 4: Choose list of scheme

Step 5: Key in field Max/Pct Score. Step 6: Click button on the save button (diskette Symbol) or press F10.
Step 7: Click display to display scheme details in the Details Page.
Tick this column to display schema details in the Details Page
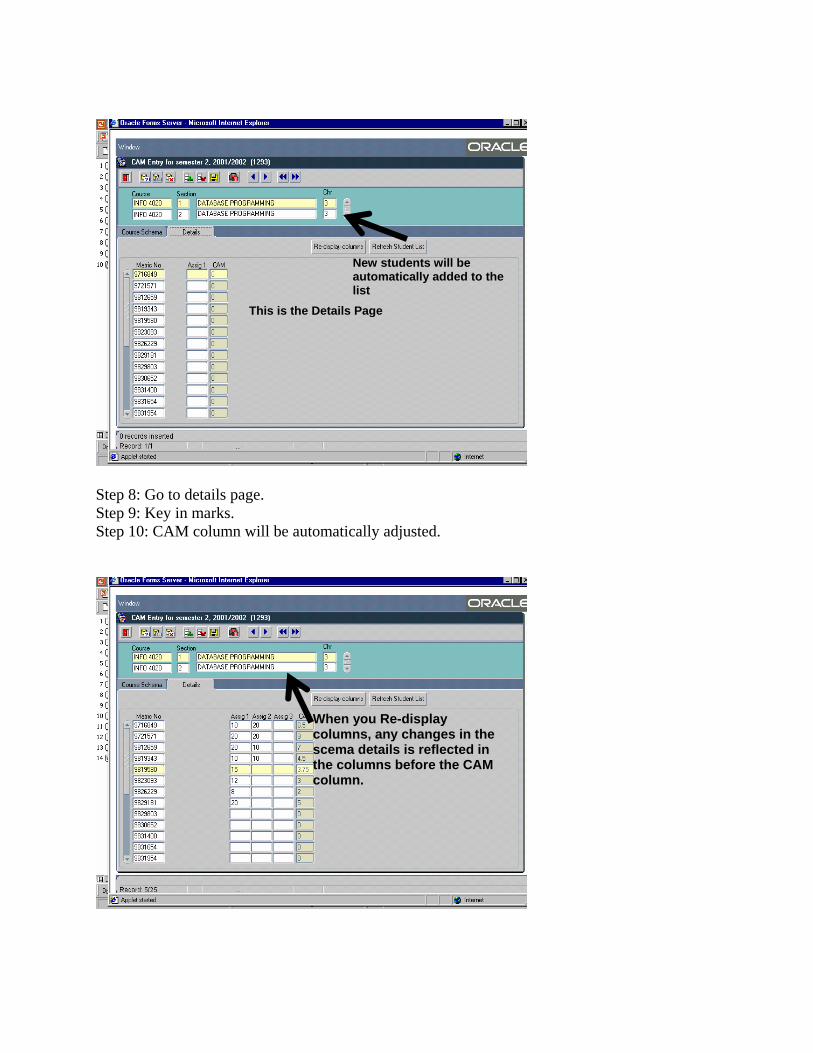
Step 8: Go to details page. Step 9: Key in marks. Step 10: CAM column will be automatically adjusted.
This is the Details Page
New students will be automatically added to the list
When you Re-display columns, any changes in the scema details is reflected in the columns before the CAM column.
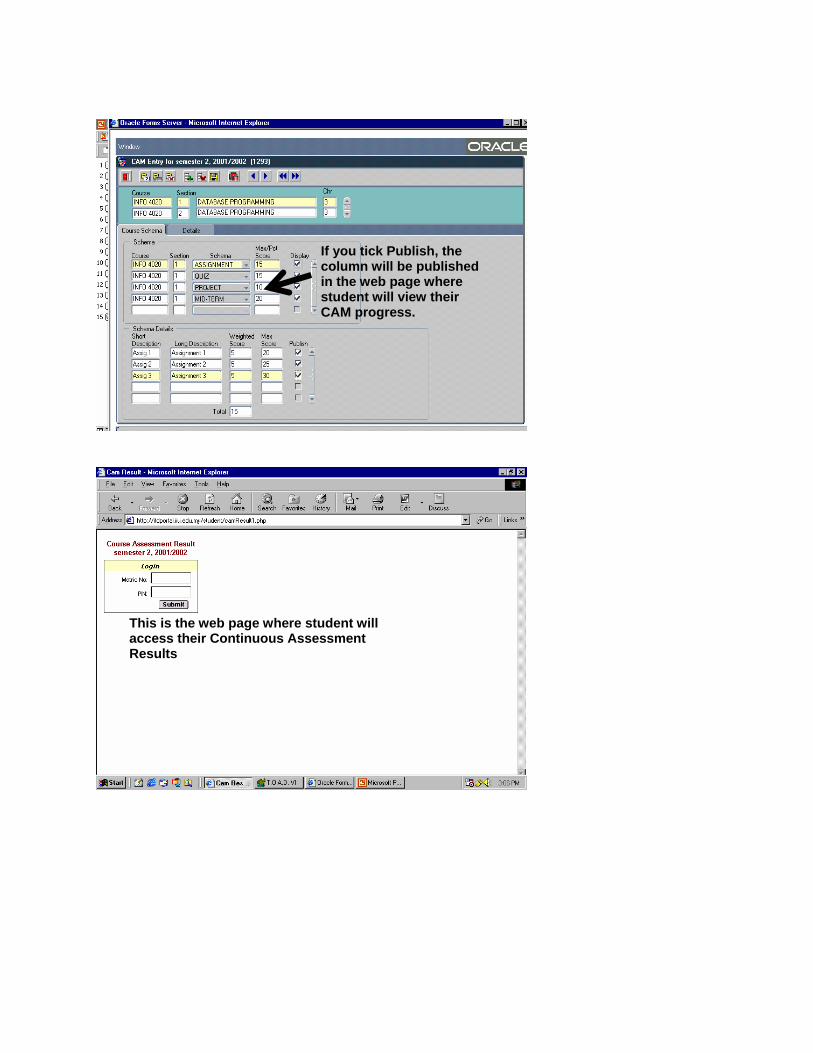
If you tick Publish, the column will be published in the web page where student will view their CAM progress.
This is the web page where student will access their Continuous Assessment Results

e. CAM Sheet
Step 1: Key-In username & password Step 2: Key-In Subject Code and Section Step 3: Select output type and order by. Step 4: Click send input button.

7. Change Password
Step 1: Key-In username and password.
Step 2: Enter old password. Step 3: Enter new password and re-type new password. Step 4: Click submit button.

8. Student’s Confirmation Slip
Step 1: Key-In username & password Step 2: Key-In student matric no. Step 3: Select session, semester Step 4: Select output format. Step 5: Click send input button.

9. Course Schedule
Step 1: Key-In username, password and database
Step 2: Select kuliyyah and department, the output automatically appear.

10. Evaluation for Admission
Step 1: Key-In username, password and database
An error message will appear if the user is not authorized to use the system and will be exited from the system automatically.

Step 2: Click the Enter Query button or press F11 for query. Step 3: Enter the student registration number at the Application field.
Step 4: To execute query, click the Execute Query button or press CTRL + F11
Step 5: To cancel query at any time, click the Cancel Query button . Example: PI9310088 PM9420020 PI021% (whereby query with % will display all student info staring with PI021
After executing the query, student information will appear on the screen.
Step 6: To view student biodata, click the BIODATA button .
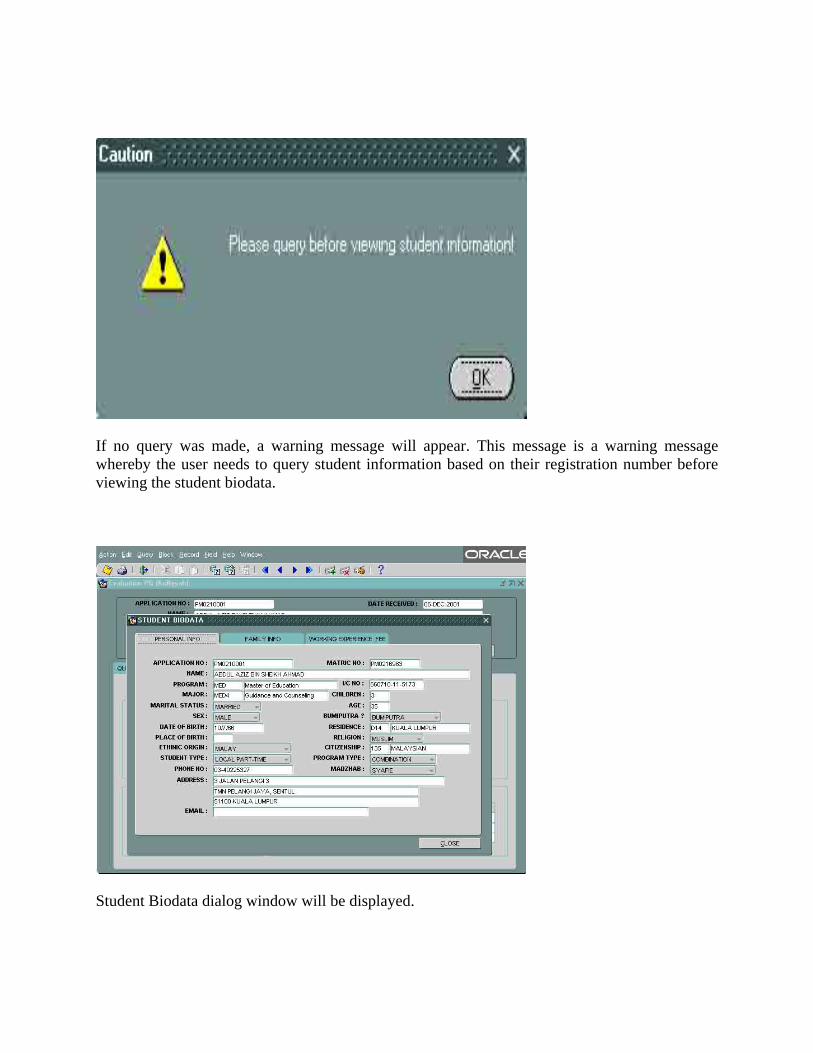
If no query was made, a warning message will appear. This message is a warning message whereby the user needs to query student information based on their registration number before viewing the student biodata.
Student Biodata dialog window will be displayed.

Step 7: Select the ANALYSIS tab to view the analysis made for that particular student.
Step 8: Select the KULLIYYAH RECOMMENDATION tab to view the recommendation information.

An error message will pop up if the user is trying to edit the update any of the field as the information are protected and can only be edited by Admissions and Records personnel.
Step 9: At the KULLIYYAH RECOMMENDATION tab, there is a KULLIYYAH RECOMMENDATION box. This information needs to be entered by authorized kulliyyah representative.
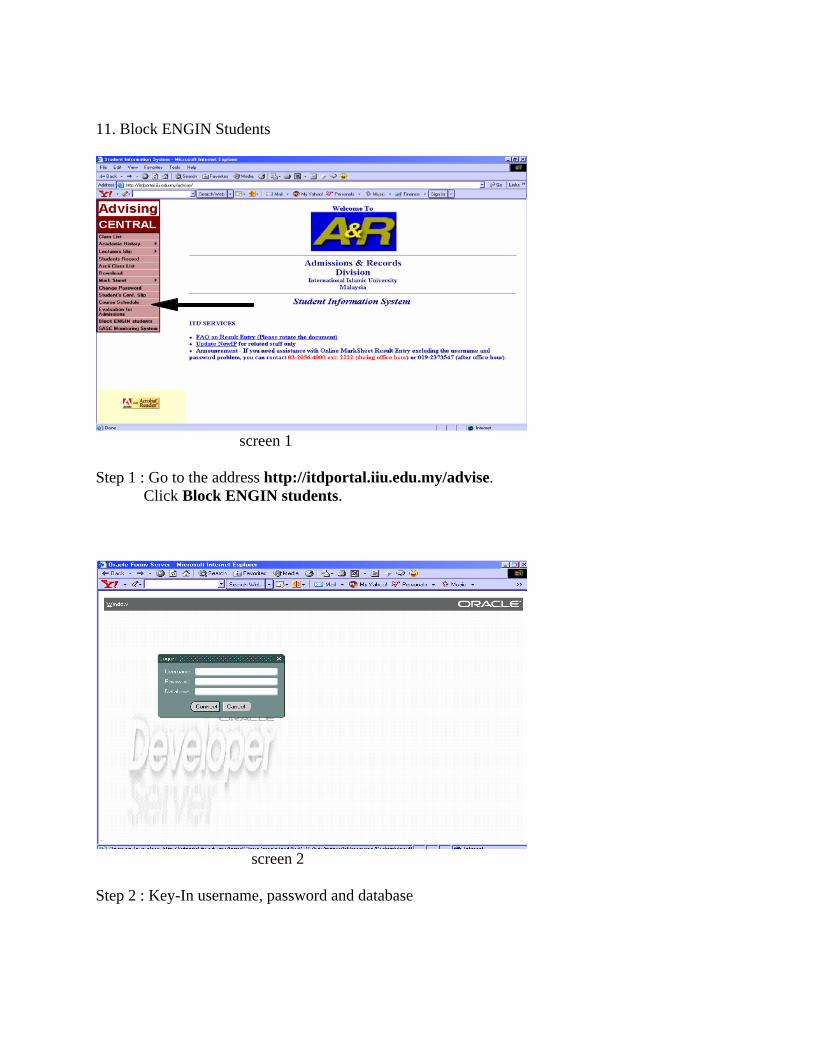
11. Block ENGIN Students
screen 1 Step 1 : Go to the address http://itdportal.iiu.edu.my/advise.
Click Block ENGIN students.
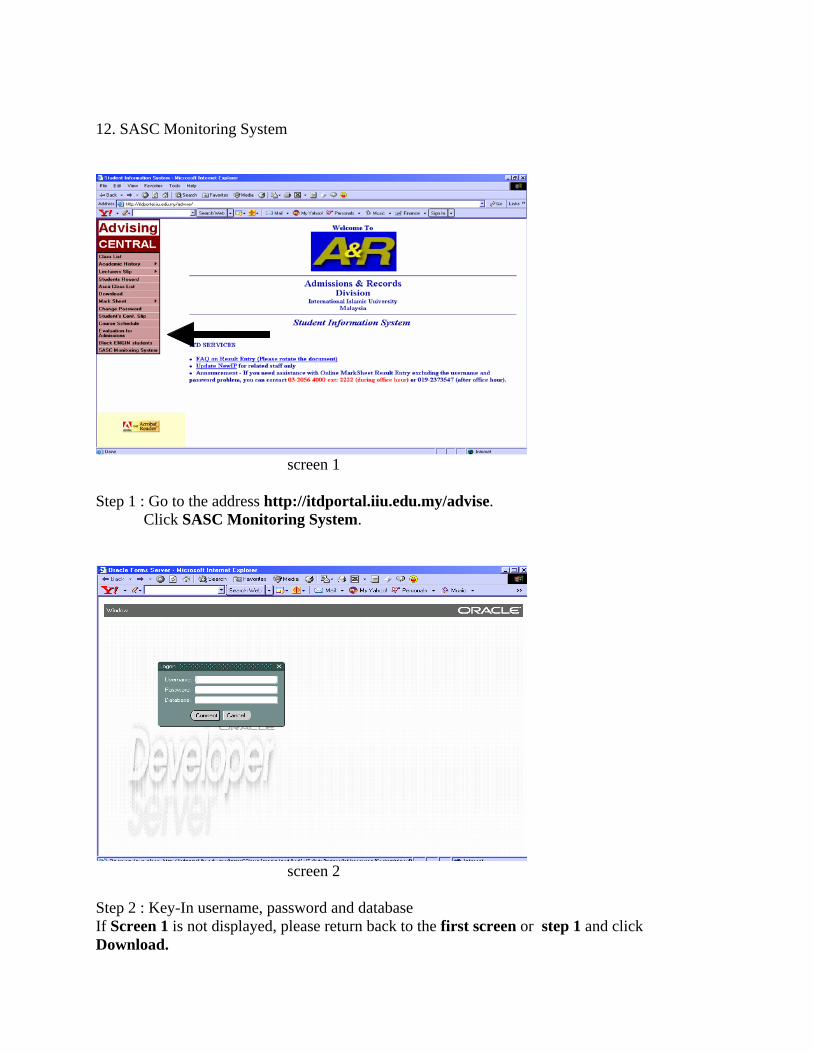
screen 2 Step 2 : Key-In username, password and database

If Screen 1 is not displayed, please return back to the first screen or step 1 and click Download.
screen 3 Step 3: You have to install the Oracle Java Initiator and Microsoft Java Virtual
Machine if you have problems in accessing the Block ENGIN students or any of the applications through the Advising Central. Please follow the instruction carefully and contact your technical personnel at your respective Kulliyyah if you face any problems when installing these 2 files.
screen 4 Step 4: After you have finish installing the 2 files, please repeat the step 1 and 2.
Screen 4 will be displayed. Key-in your student’s Matric.No and press Enter to proceed.

screen 5 Step 5: a) The button Block is automatic labeled as Block if the student has not yet being
blocked. But if the student is already being blocked the button will be automaticl labeled as Unblock
b) If you want to block the student, just click at the Block button and the student will be blocked from doing the Pre-Registration of Courses.
c) And if you want to unblock the student, just click at the Unblock button and the student will has the privilege to do the Pre-Registration of Courses.
d) You can also view all the registered courses for the previous semester. If you want to print the course registration slip , just click at the Print button.
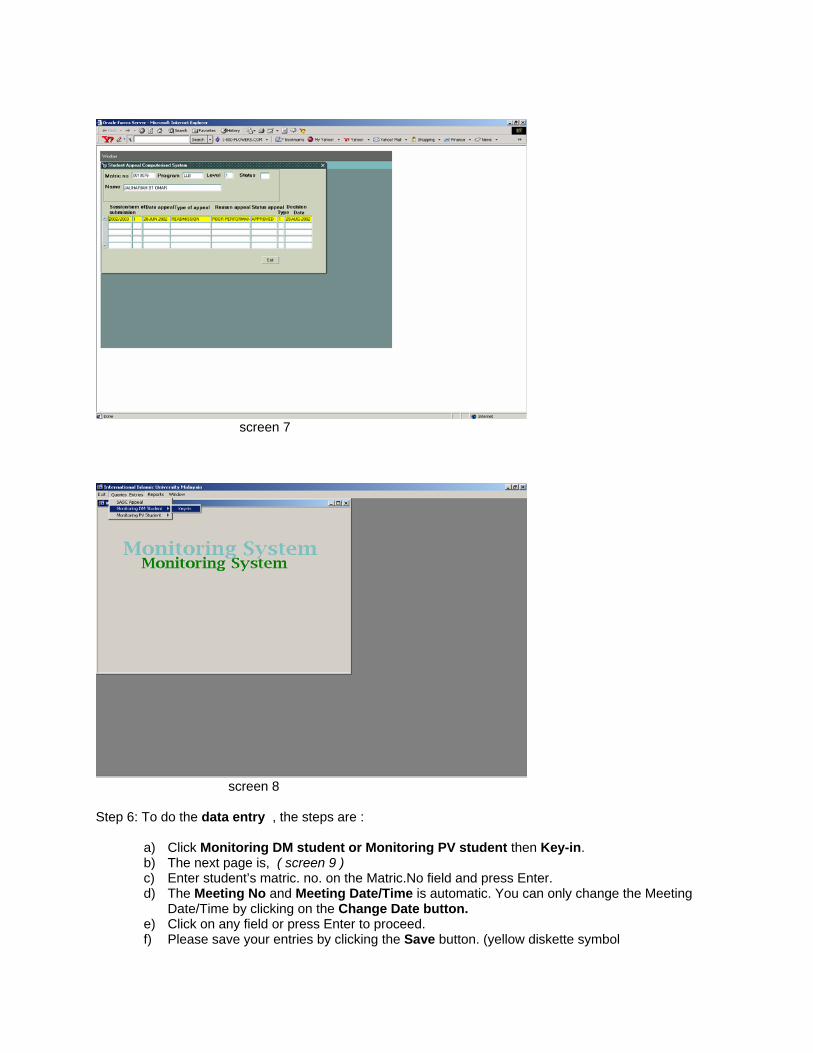
12. SASC Monitoring System
screen 1 Step 1 : Go to the address http://itdportal.iiu.edu.my/advise.
Click SASC Monitoring System.
screen 2 Step 2 : Key-In username, password and database If Screen 1 is not displayed, please return back to the first screen or step 1 and click Download.

screen 3 Step 3: You have to install the Oracle Java Initiator and Microsoft Java Virtual
Machine if you have problems in accessing the Block ENGIN students or any of the applications through the Advising Central. Please follow the instruction carefully and contact your technical personnel at your respective Kulliyyah if you face any problems when installing these 2 files.
screen 4 After you have successfully key-in your username, password and database ( Figure 4 ) will be displayed.

screen 5 Step 4: Click on Entries/Queries and you can see 3 more choices.
a) SASC Appeal. b) Monitoring DM student c) Monitoring PV student
screen 6 Step 5: The steps to access the SASC Appeal are :
a) Click at SASC Appeal b) Key-in student’s matric. no and press Enter. c) The next page is screen 7 d) To exit , click the Exit button.
screen 7
screen 8 Step 6: To do the data entry , the steps are :
a) Click Monitoring DM student or Monitoring PV student then Key-in. b) The next page is, ( screen 9 ) c) Enter student’s matric. no. on the Matric.No field and press Enter. d) The Meeting No and Meeting Date/Time is automatic. You can only change the Meeting
Date/Time by clicking on the Change Date button. e) Click on any field or press Enter to proceed. f) Please save your entries by clicking the Save button. (yellow diskette symbol

g) Click the New Record button if you want to continue key-in for the next student. h) Click the Exit button (red door symbol) to exit from the page.
screen 9
screen 10 Step 7: All records can be viewed through reports , click Reports, DM PV Students. ( Screen 10 ) Step 8: To print the report, click on the traffic light button. ( Screen 11) Step 9: Report can be printed by session/semester, kuliyyah and type of monitoring ( DM or PV )
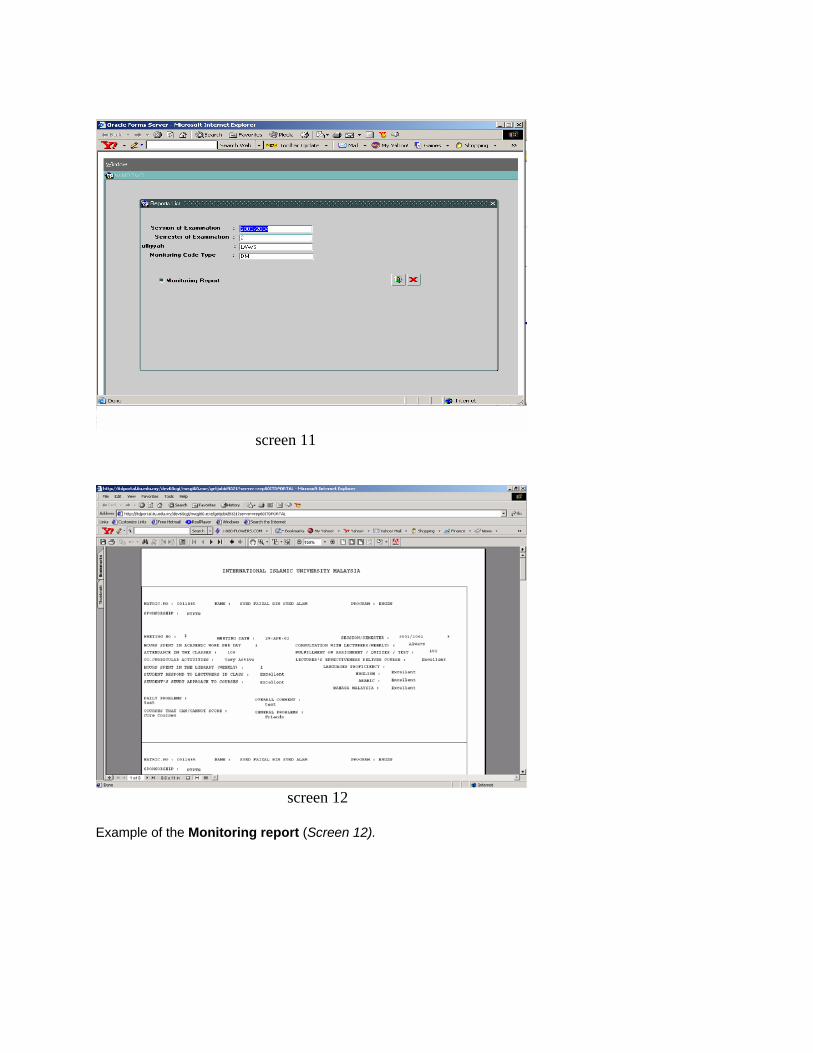
screen 11
screen 12 Example of the Monitoring report (Screen 12).