using templates in flash
DESCRIPTION
Using Templates in FlashTRANSCRIPT

1
Using Templates in Flash
Flash is a multimedia authoring tool used to develop interactive animated graphics for Web sites as well as for desktop presentations and games. All major browsers include the Flash plug-in and Flash has become almost as commonplace on the Web as HTML pages. Flash has the abilitiy to add animation, sound, and video to a static HTML page. Many Websites contain Flash movies as an introduction to the main site content, while other sites use Flash technology for their entire content. Using a Template Flash has built-in templates with all the ActionScripting included and ready for you to add your own graphics and design elements. Templates contain Flash components, which are self-contained objects in Flash that have customizable properties. You can spend your time designing instead of figuring out the code to make your movie work! You can choose from such templates as presentation, photo slideshows and quizzes. This tutorial has been written using Flash MX 2004. Instructions for Flash MX are in parentheses or in a separate section. Photo Slideshow Template
• Click on Photo Slideshows in the left column of the Start Page in Flash MX 2004 or hit ⌘N. (Go to File > New From Template.)
• Choose Photo Slideshows in the Category column. • There is only one template option in this category, so
click the Okay (Create) button on the bottom right. • The Slideshow template opens. (In Flash MX, you will
see instructions on top of the template. They will not be seen in the final template because they are written in a guide layer. Click on the eye icon in the instructions layer to hide the instructions when you are done reading them.)
• Slide the lower frame of the timeline to see all the layers. • If you need to, resize the Stage to see it entirely by clicking on the pop-up
arrows on the right hand side of the information bar and choosing Show Frame.
• Photographs that you plan to use in your slideshow will need to be prepared prior to using the template. JPEGs will generally work best for saving your photographs. They should be saved at a size of 640 X 480 and named in a numbered sequence to make it easy to add them to your document.
• Click the layer named ‘picture layer’ (‘Old Photos’) on the bottom layer of the Timeline and click on the trash can to delete the layer.
• Click on the new layer icon to make a layer to contain your new photos. Double click on the name and rename it ‘new photos’. Make sure this layer appears at the bottom of the layer list. You will probably have to drag it to the bottom of the list.
• Select the first blank keyframe in this new layer.

2
• Go to File > Import >Import to Stage. (Go to File > Import…) • Navigate to your photo folder. Select photo1.jpg, or whatever you named the
first image in the series. • Click Open. Macromedia Flash will recognize that your image is part of a
series and ask if you’d like to import them all. Click Yes. • Now your photo layer will have more frames than the other layers if you
imported more than four photos. • Open your Library, ⌘L. Once you see your new photos in the Library, you
can delete the old ones. • Using the Shift key, select the last frames in all the remaining layers. • Go to Insert > Timeline > Frame (Insert > Frame) or press F5. • At this point you may want to change other elements of your template to
match a new color scheme. If you want to change elements in a template, you might have to unlock and ungroup items to change them because the original author has locked them.
Editing the Elements in Flash MX 2004:
• Begin by editing the background color. Double click on the pale blue edge of the background. The element ‘rectangle’ will open and if you click the blue border again, you will see that it is simply a shape. Change the color in the property inspector. TIP – click on the first photo of your slide show in the Library and you can choose colors from that photo with the eyedropper tool.
• Click on ‘Scene’ to go back to Scene 1.
• Double click on the top Title bar to open the symbol ‘Header fill’. Change the color. TIP - If you have the Color Mixer Panel open, the color you chose for the background should still be there. Use the eyedropper tool again to select a color. Go back to Scene 1. You’ll find that changing the top header fill symbol also changed the fill in the caption area.
• To accommodate a larger font size in the title, you will need to make your title background and border taller. Using the pointer, select both the inside color and the border – make sure that the text boxes are NOT selected.
• Using the transform tool, resize the title background elements. TIP – you can also change the height number in the Property Inspector.
• You can now edit the Title text. Get the pointer tool and click on text box. Make sure that the text box is the only element selected. In the Property Inspector, change the size of the font. Highlight the text and type a new appropriate title.
• You may resize the text in the dynamic text box on the right, but don’t change the text. This box shows the slide numbers when your slideshow plays.
• Editing the actual control panel area is more difficult because they are built into the component. You will have to edit each individual element by accessing them in the Library.
• Open the _templateAssets folder in the Library. There are many individual elements that are a part of the template.

3
• The elements to edit in this template are: o auto button fill o auto button frame o back button fill o back button frame o controller bg o gfx, light off o gfx, light on o pause fill o pause outline
• Double click on the assets in the Library to open them and edit them. You’ll be using the color mixer to choose your new colors.
• TIP – write down the hexidecimal numbers of the colors you choose so you can quickly type them in.
• TIP – click on elements in the Library so that they appear in the Library window so you can choose appropriate colors – i.e. the border element that you already changed.
• You can adjust the alpha and tint properties on the controller bg element. • With the gfx elements, you will need to enlarge them to 800% to see them to
edit them. You do not have to ungroup in Flash MX 2004 to edit the parts of the symbol.
Editing the Elements in Flash MX:
• Get the Pointer tool and click on the lock on the _overlay layer. • Click on the black background on the top text line. • In the Properties Inspector, notice that it indicates a grouped
item. • Go to Modify > Ungroup. • The blue line around the group changes to indicate the black background
shape is selected. • The Properties Inspector now shows a shape and size. To
widen the black area, adjust the bottom height number. • Click on the gray background of the Title area. • Again adjust the height. • Click on the Title background again to position it. If you are
having trouble placing the object where you want it, go to View > Snap to Objects to uncheck that option.
• Do the same for the Date background and the Photo background. • Click on the text box that reads “Visiting the aquarium”. Pick a new font if
you wish and make the font larger. Double click the text box to see the text cursor. Drag to highlight the text and type in a new title.
• Change the date and change the font and size. • Leave the Photo field alone. That is a dynamic text box that will change as
the photos are viewed in the .swf file.
To edit the text and size in the Caption box… • Using the Pointer tool, click on the black bottom overlay. • Make sure you select the entire grouping, not just the text area. • Go to Modify > Ungroup. • Change the height to 30.

4
• Before deselecting, move the black background up to fit at the bottom of the Stage.
• Click on the gray text background. • Change the height to 20 and center it in the black area. • Move the text box to the center. • Double click in the text box, highlight the text, change the font, and change
the size. • Editing the actual control panel area is more difficult because they are built
into the component. You will have to edit each individual element by accessing them in the Library.
Editing for both Flash MX and MX 2004
• The bottom text area holds the captions to go with the pictures as they change.
• Keyframes will need to be added to each frame in the captions layer. • You could change each caption, text size and position for each slide, but I’ve
found that the most efficient way is to adjust the caption area in the first keyframe on the captions layer, clear the remaining three keyframes on that layer and THEN add keyframes to each frame in that layer.
• Press F6 until all frames have keyframes. All of your caption text boxes will now be the right size, position and color.
• Using the Text tool, change the rest of the captions. • Go to File > Save. • Go to Control > Test movie. • The controls for the show are built into the template. There is even a button
for the show to play automatically! • Close the .swf file. • You can also Save as a Template if you want to be able to use your new color
scheme in a different slideshow. Adjusting the Component
If you want to change the time that the slides stay on the screen in Auto Play, you will have to adjust the parameters of the movie control component. • In Flash MX, click on the lock icon on the _controller layer to unlock it. • With the Pointer tool, click on the controller area. • The Properties Inspector will tell you it is a Component. Click on the
Parameters tab at the bottom right, and the window will read “delay 4”. • This indicates that each slide will stay on the screen for four seconds. • Click on the four to change the number of seconds you want the slide to stay
on the screen.
5
• Clicking on the Properties tab will allow you to adjust brightness, tint and alpha for the controller.
• Save and Control > Test your movie. • You now have an awesome slide show that you can
publish for the Internet or as a stand-alone show that you can burn to a CD.
Flash Quiz Template Instructions are for Flash MX 2004, but the basics are the same for Flash MX. Another template available to you is a quiz template. The hardest part of making a Flash quiz is planning your questions and answers! Included in this template are several components such as True or False, Drag and Drop, Fill in the Blank, Hotspot, and Multiple Choice. The movie clips contain all the elements that make up each interaction. The key to using these clips is to first break them apart to edit all the parts of the interaction.
• In the start window, click on Photo Slideshows in the left column of the Start Page in Flash MX 2004 or hit ⌘N.
• Choose Quiz in the Category column. • Choose a template style and click OK. • Start by saving and testing the movie to see how each quiz component
works. • The easiest thing to edit on the quiz
template is the color… all you have to do is change the background color in the Property Inspector.
• If you want to add a graphic to only the first page of your quiz, add a new layer and insert the graphic on the first frame. You will have to clear the remaining frames on that layer so the graphic does not appear on all the quiz frames.
• The first frame on the timeline is used for the introduction to your quiz and the last frame is used to display the student’s score.
• Frames 2-7 contain the various interaction types available in this template.
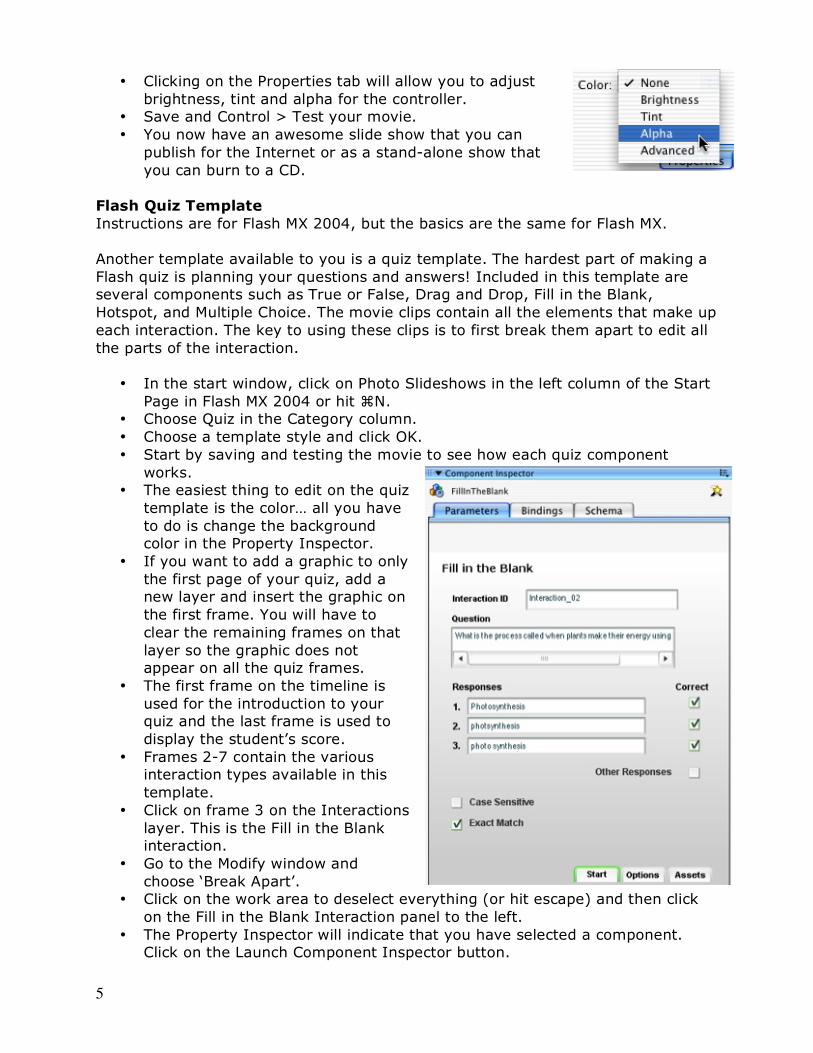
• Click on frame 3 on the Interactions layer. This is the Fill in the Blank interaction.
• Go to the Modify window and choose ‘Break Apart’.
• Click on the work area to deselect everything (or hit escape) and then click on the Fill in the Blank Interaction panel to the left.
• The Property Inspector will indicate that you have selected a component. Click on the Launch Component Inspector button.

6
• The Component Inspector will open in the palettes area on the right side of your screen.
• You will see the parameter choices for the Fill in the Blank component. • Rename the Interaction ID. I often name it to match the frame it is on. • Type in the question you wish to have the student respond to.
• In the responses area, type in the applicable responses. I try to anticipate how a student might misspell an answer so that they are not incorrect because of only a spelling error – but I have learned that I don’t always get it right!
• You may choose if the response should be case sensitive and/or and exact match. If exact match is deselected, an answer is considered correct if it contains the correct word.
In the Options tab, you will have the option of adding the feedback you wish the student to see.
• For the navigation and scoring to work properly, leave Knowledge Track checked and Navigation off.
• You will not need to use the Assets tab.
The other interactions work much the same way, however you’ll have to do some planning and graphic editing to use the Drag and Drop, Hot Spot and Hot Objects interactions. To edit the Drag and Drop interaction:
• Click on frame 2 in the interactions layer of the timeline. • Go to Modify > Break Apart (⌘B) • Press Escape to deselect all. • You will obviously need to modify the graphics for this interaction. • Press ⌘L to open the Library. • Import your prepared graphics to the Library – go to File > Import > Import
to Library. • Go to Insert > New Symbol. • Give the symbol a name and make sure you choose the Movie Clip behavior
button. • Insert the proper graphic into the symbol window. Use the center target
guide. • Repeat for each graphic that you imported. • Make sure the drag and drop frame (frame 2) on the interactions layer is
selected. • Arrange your drag and target movie clips on the Stage.

7
• Select each movie clip, and in the Property Inspector, give each one a unique Instance name.
• Click on the Drag and Drop component panel on the left to select it. • Launch the Component Parameter panel. • Type in new directions. Type in the drag instance names and the target
names in the Components Inspector panel. • In the Options tab, edit the feedback text.
Working across the Timeline To add a new interaction to the timeline:
• Select a frame across all layers of the timeline (except the layers with items that are supposed to appear only on specific frames such as the opening graphic). Using the command key is helpful for this.
• Select Insert > Timeline > Frame (F5). The new frames will appear after the frames that you selected.
• Insert a new blank keyframe on the interactions layer. • Drag an interaction movie clip from the Library to the Stage – Quiz files >
Learning Interactions. • Select Modify > Break Apart (⌘B). • Edit the component in the Component Parameter panel. • Edit the graphics as desired.
To remove an interaction from the timeline:
• Select the frame that holds the interaction across all layers. • Select Edit > Timeline > Remove Frames (Shift+F5).
Further Tips
• Each Drag Object, Target Object, Hot Spot or Hot Object must be uniquely named in the Property Inspector for each interaction.
• You can change the dynamic text field properties such as font, color and size normally in the Property Inspector…
• However, text values must be entered in the Component Parameter panel, not on the Stage.
• You may publish your movie for tracking scores in the HTML tab of the Publish Settings if you use SCORM (Sharable Content Object Reference Model) or AICC (Aviation Industry Computer Based Training Committee) compliant scoring management systems.
Enjoy using Flash templates – I’m sure your kids will enjoy them too! It’s much more fun to take a quiz on the Web than on paper!
Sherry Ziolkowski Engaged Learning Facilitator/Webmaster Arlington Heights School District 25 [email protected]