using radius with g6 devices - microsens · example 1: access control with ... it is relatively...
TRANSCRIPT
Application Note
Using RADIUS with G6
Devices
MICROSENS GmbH & Co. KG
Küferstr. 16
59067 Hamm/Germany
Tel. +49 2381 9452-0
FAX +49 2381 9452-100
E-Mail [email protected]
Web www.microsens.de

- 2 -
©2016 MICROSENS GmbH & Co. KG All Rights Reserved
Application Note
Using RADIUS with G6 Devices
Summary
This Application Note helps to configure and operate RADIUS functionality of a MICROSENS
G6 switch. It explains the basic RADIUS concept and then concentrates on particular
RADIUS aspects.
The content of the document builds on information provided with the Quick Installation
Guide that is shipped together with MICROSENS G6 devices. Additionally, familiarity with
the concept of Authentication over RADIUS is required to take advantage out of this
Application Note.
For further information about RADIUS facilities, standards, parameters and options please
refer to the chapter “RADIUS Servers” in [1] (see page 5).
Glossary
Terms, acronyms and abbreviations used in the document.
Term Description
802.1X IEEE Std. 802.1X-2004 (Port-Based Network Access Control)
Authentication
Server
Definition of authentication component, that stores the users
credentials for network access
Authenticator Definition of network access component, that grants or denies
network access to the user (supplicant)
CHAP Challenge Handshake Authentication Protocol (RFC 1994)
EAP Extensible Authentication Protocol (RFC 3748)
EAPOL EAP over LAN
LAN Local Area Network
MAC Media Access Control
MACC Management Access Control
MD5 Message-Digest Algorithm 5 (RFC 1321)
MTU Maximum Transmission Unit
NAS Network Access Server – the authenticator or RADIUS client
PACC Port-based Network Access Control
RADIUS Remote Authentication Dial-In User Service
Supplicant Definition of a user or client, who requests network access

- 3 -
©2016 MICROSENS GmbH & Co. KG All Rights Reserved
Application Note
Using RADIUS with G6 Devices
Table of Contents
SUMMARY ................................................................................................ 2
GLOSSARY ............................................................................................... 2
TABLE OF CONTENTS ............................................................................... 3
TYPOGRAPHICAL CONVENTIONS ............................................................. 4
INFORMATION AVAILABLE FROM THE MICROSENS WEBSITE .................. 5
BIBLIOGRAPHY ....................................................................................... 5
1 INTRODUCTION TO RADIUS ................................................................ 6
Methods of Network Access Control with RADIUS ............................................. 7
1.1.1 Access Control via IEEE 802.1X ............................................................... 7
1.1.2 Access Control via MAC Authentication ..................................................... 7
Management Access Control with RADIUS ....................................................... 8
RADIUS Shared Secret.................................................................................. 8
2 CONFIGURING ACCESS CONTROL FOR RADIUS .................................. 10
Example 1: Access Control with 802.1X Authentication ....................................10
2.1.1 Procedure of 802.1X Authentication ........................................................10
2.1.2 Prerequisites ........................................................................................11
2.1.3 802.1X Authentication Configuration Steps ..............................................11
Example 2: Access Control with RADIUS MAC Authentication ............................14
2.2.1 Procedure of RADIUS MAC Authentication ................................................14
2.2.2 Prerequisites ........................................................................................15
2.2.3 RADIUS MAC Authentication Configuration Steps ......................................15
3 RADIUS ATTRIBUTES ......................................................................... 20
Attribute Basics ..........................................................................................20
RADIUS Attribute Support of MICROSENS G6 Devices ......................................20
3.2.1 RADIUS Access Request Attributes ..........................................................20
3.2.2 RADIUS Access Accept Attributes ............................................................22
3.2.3 RADIUS Access Reject Attributes ............................................................24
3.2.4 RADIUS Access Challenge Attributes .......................................................25
Example 3: RADIUS Message Exchange .........................................................26
DISCLAIMER .......................................................................................... 28
- 4 -
©2016 MICROSENS GmbH & Co. KG All Rights Reserved
Application Note
Using RADIUS with G6 Devices
Typographical Conventions
The following typographical elements are used in this document:
Typographical
Elements Explanation
● List element, 1st order
◦ List element, 2nd order
www.microsens.de Hyperlink to a website or email address
Note: A note tags an important fact
□ Work step
<…> Placeholder for a real value. Replace <IP Address> with e.g.
192.168.1.2.
{…|…} Choose one of the values offered, e.g. from {Disabled|Enabled},
choose Enabled.
Visualisation A string that appears in the Web Manager
Command A string to enter in the Command Line Interface
» Output A string output by the Command Line Interface
Work step(s) in the Web Manager (GUI)
Work step(s) in the Command Line Interface (CLI)
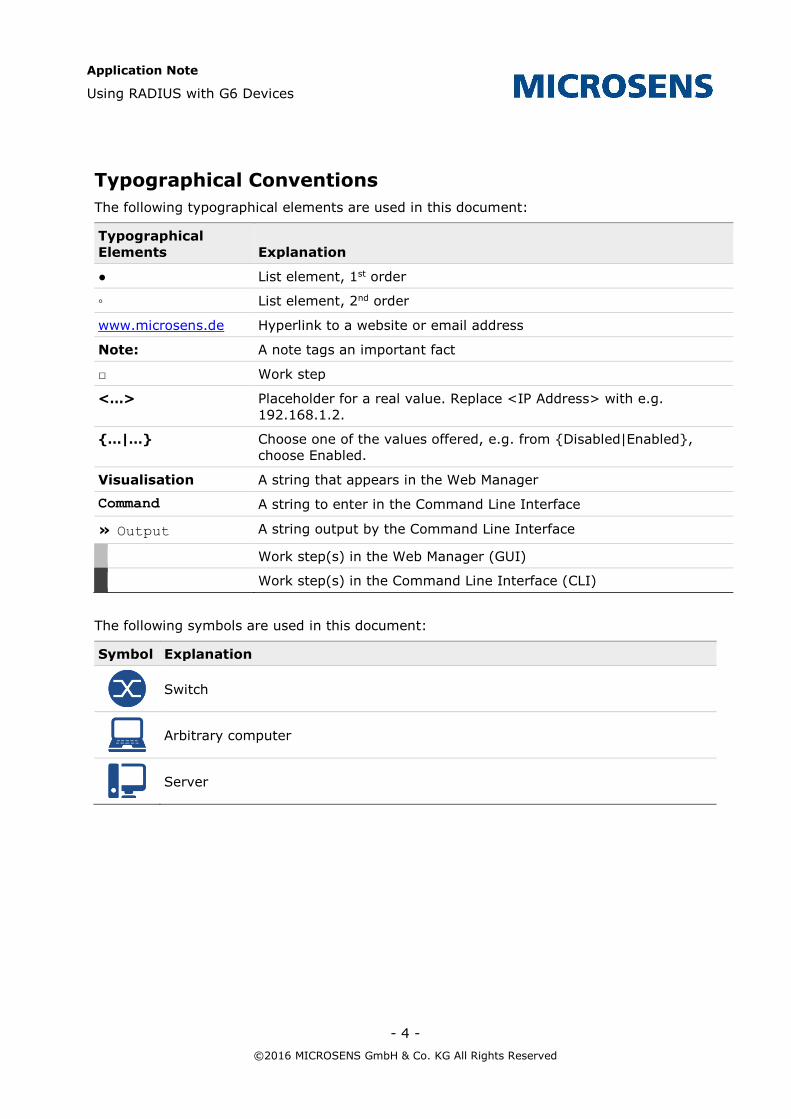
The following symbols are used in this document:
Symbol Explanation
Switch
Arbitrary computer
Server
- 5 -
©2016 MICROSENS GmbH & Co. KG All Rights Reserved
Application Note
Using RADIUS with G6 Devices
Information available from the MICROSENS Website
Registered users can find the latest firmware versions as well as further information on our
web site:
Registration: www.microsens.de > Partner-Login > Follow the link ’Please register
here’ > Fill in the online registration form and submit it
o You will receive an email from MICROSENS with a user name and a password
Login: www.microsens.de > Partner-Login > Enter user name and password > Click
the ’Login’ button
o Firmware images: Navigate to your device and select the tab ’Services’
o For further information select one of the other tabs
Note:
Make sure your browser allows the execution of scripts.
Bibliography
[1] Product Manual Firmware Generation 6
This manual is included in each software archive containing Firmware G6. It can also be
downloaded from the link “Documentation” in the firmwares’ Web Manager navigation bar.
- 6 -
©2016 MICROSENS GmbH & Co. KG All Rights Reserved
Application Note
Using RADIUS with G6 Devices
1 Introduction to RADIUS
RADIUS is an acronym for Remote Authentication Dial-In User Service. This protocol is used
for user management in the context of authentication and authorisation of users in complex
network infrastructures. Therefore it is widely known as “AAA” or “Triple A” system.
Instead of maintaining all registered users on every network access device, every users’
login and access data is handled by a central server, the so-called RADIUS server.
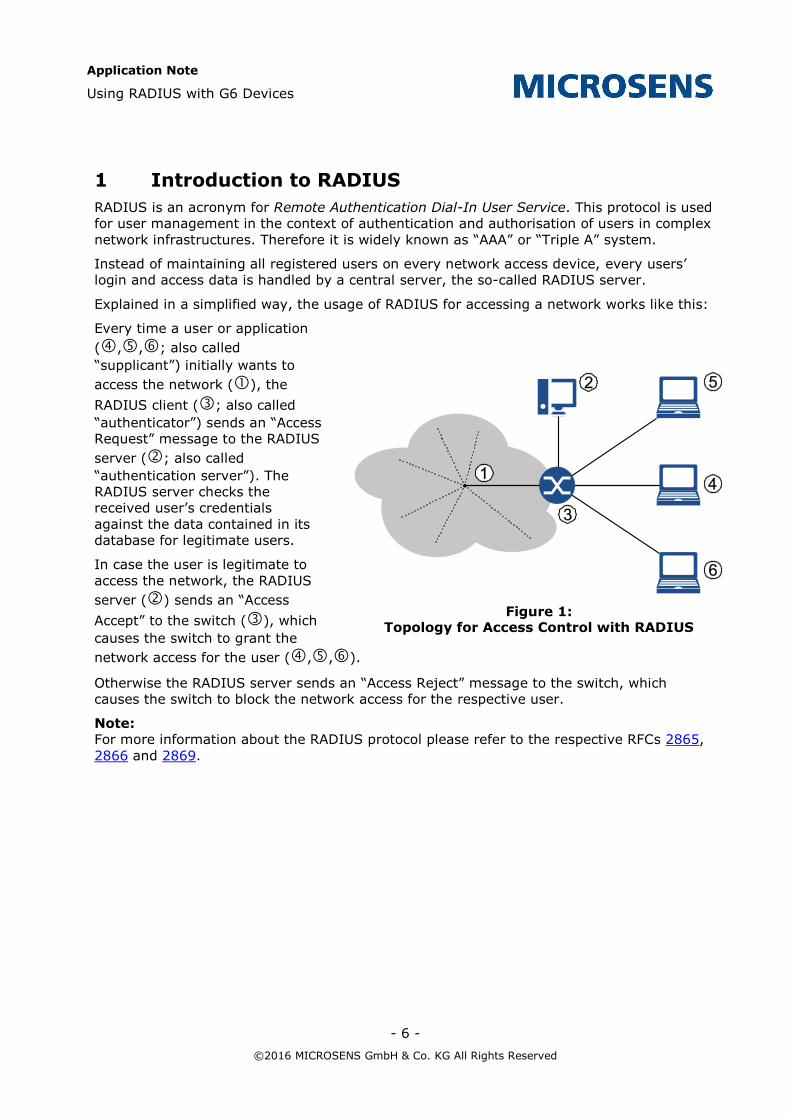
Explained in a simplified way, the usage of RADIUS for accessing a network works like this:
Every time a user or application
(,,; also called
“supplicant”) initially wants to
access the network (), the
RADIUS client (; also called
“authenticator”) sends an “Access
Request” message to the RADIUS
server (; also called
“authentication server”). The
RADIUS server checks the
received user’s credentials
against the data contained in its
database for legitimate users.
In case the user is legitimate to
access the network, the RADIUS
server () sends an “Access
Accept” to the switch (), which
causes the switch to grant the
network access for the user (,,).
Otherwise the RADIUS server sends an “Access Reject” message to the switch, which
causes the switch to block the network access for the respective user.
Note:
For more information about the RADIUS protocol please refer to the respective RFCs 2865,
2866 and 2869.
Figure 1: Topology for Access Control with RADIUS

- 7 -
©2016 MICROSENS GmbH & Co. KG All Rights Reserved
Application Note
Using RADIUS with G6 Devices
Methods of Network Access Control with RADIUS
Even without a successful server login, actually the access to the network can become a
security threat (Denial-of-Service attacks, spoofing etc.). To address these security issues,
the IEEE defined a standard to already secure network ports at the port level, thus
preventing unauthorised access directly at the edge.
MICROSENS switches are designed to support two different methods of port-based network
access control (PACC):
Access Control via IEEE 802.1X
Access Control via MAC Authentication.
Note:
If the supplicant does not support IEEE 802.1X authentication, an automatic fallback to
authentication via MAC Authentication only is possible.
1.1.1 Access Control via IEEE 802.1X
A user (supplicant ,,) requests network access (using EAPOL1) via the switch it is
connected to (authenticator ) by presenting his credentials (username/password or
certificate) to a RADIUS server (authentication server ). When successfully authenticated
by the RADIUS server, and if the user is authorised, the switch port is opened, otherwise
the network access remains blocked or limited.
The client must implement an IEEE 802.1X compliant supplicant which handles the
communication during the authentication process.
The authenticator not necessarily needs to understand EAPOL. He just forwards EAPOL
packets encapsulated in the RADIUS protocol to the authentication server. So during the
authentication process, supplicant and authentication server are communicating indirectly
via the authenticator. If the user is successfully authenticated, the RADIUS server finally
sends an RADIUS “Access-Accept” message to the authenticator. This causes the
authenticator to grant the supplicant access to the network. The authenticator confirms the
authorisation to the supplicant by sending an “EAP-Success” message. The authentication
process terminates.
1.1.2 Access Control via MAC Authentication
A user is identified by the MAC address of his network device only, given he uses a non-
802.1X device (like a VoIP phone etc.). This MAC address is checked by a RADIUS server.
When successfully verified by the RADIUS server, the switch port the user is connected to is
opened, otherwise the network access remains blocked or limited.
To authenticate a MAC address on a RADIUS server, the MAC address is treated as
username by the RADIUS client. The format of the MAC address field and the value used for
the password can be configured.
A maximum of 250 MAC addresses is permitted for the whole system with a range of 1 to 9
MAC addresses per port. If the maximum number of permitted users is exceeded, the whole
port becomes unauthorised for all users.
1 EAPOL: Extensible Authentication Protocol (RFC 3748) over LAN

- 8 -
©2016 MICROSENS GmbH & Co. KG All Rights Reserved
Application Note
Using RADIUS with G6 Devices
As long as the MAC discovery phase is not finalised, the network port is blocked to prevent
any network interference.
Note:
Authenticating a supplicant based on its MAC address only is not as strong as the use of
IEEE 802.1X authentication protocols. MAC addresses can be copied easily, so an intruder
can get network access if he is able to clone an authorised MAC address.
Note:
For more information about using IEEE 802.1X or MAC Authentication with MICROSENS
switches please refer to the chapter “Port-based Access Control” in [1].
Management Access Control with RADIUS
Imagine your network administrator leaving your company, a former employee with
comprehensive management access rights to all the network’s configuration and
management devices like routers, switches, file servers etc.
Depending on your company’s network infrastructure it will be a great deal of time and
effort to block all his credentials on all respective devices. This is, when RADIUS joins the
game.
The RADIUS server not only manages the user’s access to the company network. It can
store the credentials and therefore the access rights for every network management device
(called “Management Access Control”, MACC).
E.g., when the user opens the login dialog of a switch to gain access to the management
backend, the device sends the user’s credentials to the respective RADIUS server inside an
“Access Request” message. As shown in chapter 1, the RADIUS server checks whether the
user is legitimate to access the switch and, if successful, responds with an “Access Accept”
message to the switch. But instead of granting access to the network the switch now opens
its management backend to the user.
So when an employee with unwanted management access to network devices has to be
blocked, it is relatively simple and inexpensive to change his status in the RADIUS server’s
user database once and for all, instead of for every single device.
RADIUS Shared Secret
Within the communication between RADIUS server and RADIUS authenticator the shared
secret is used for message authentication and user password encryption.
To ensure that the “Access Request” message originates from the legitimate RADIUS client
(since it is easy to spoof the respective IP address deceiving a legitimate RADIUS client),
both the RADIUS client and server use an identical text string as “shared secret”.
The RADIUS client uses the shared secret to calculate an MD5 hash of the entire “Access
Request” message and sends the resulting value as RADIUS attribute 80 (“Message
Authenticator”) to the RADIUS server (see section 3 “RADIUS Attributes” on page 20).
The RADIUS server verifies this “Message Authenticator” by calculating the MD5 hash of the
request with his shared secret. If the “Message Authenticator” appears inside an “Access
Request” message and both MD5 hashes comply, the RADIUS server responds to the
RADIUS client. Otherwise he will silently ignore the request message.
- 9 -
©2016 MICROSENS GmbH & Co. KG All Rights Reserved
Application Note
Using RADIUS with G6 Devices
Note:
In order to use strong shared secrets, the string should be at least 22 characters long,
randomly comprising upper and lower case letters, numbers and punctuation. Do not use
the same shared secret for all RADIUS client/server pairs used in your company network as
it is not feasible to change the shared secrets on all devices, once the shared secret is
compromised.

- 10 -
©2016 MICROSENS GmbH & Co. KG All Rights Reserved
Application Note
Using RADIUS with G6 Devices
2 Configuring Access Control for RADIUS
As described in section 1.1 “Methods of Network Access Control with RADIUS”, MICROSENS
switches support both 802.1X and MAC authentication for RADIUS authentication of
legitimate users.
This section containes two examples for configuring each of those authentication methods.
Figure 1 “Topology for Access Control with RADIUS” on page 6 serves as a basis for these
examples.
Note:
For more information about the configuration of RADIUS with MICROSENS G6 devices
please refer to the chapter “RADIUS Servers” in [1].
Example 1: Access Control with 802.1X Authentication
2.1.1 Procedure of 802.1X Authentication
In general, a successful 802.1X authentication process occurs as follows:
Step a: The client () requests
network access () via a specific port
of the switch (). This causes the
switch to block this port for LAN
access instantly.
Note:
Alternatively, depending on its
configuration the switch can forward
the unauthorised user to a special
VLAN. Subsequently, the procedure
with a blocked port is described.
Step b: The switch afterwards asks
the client to reveal its credentials
(“EAP Identity Request”).
Step c: The client responds with its
credentials (“EAP Identity Response”).
Step d: The Switch forwards the EAP Identity Response in an Access Request to the
RADIUS server () as a “RADIUS Access Request” message.
Note:
Depending on the kind of authentication method, RADIUS server (), switch () and
client () exchange various messages to secure the connection and authentication
(“Challenge”) in case the user is stored as legitimate user in the RADIUS database.
Step e: After the client has passed the challenge successfully, the RADIUS server sends
a “RADIUS Access Accept” to the switch.
Step f: The switch forwards an “EAP Success” message to the client and opens the
respective port, possibly with restricted access based on the attributes that the RADIUS
server sent inside the “RADIUS Access Accept” message.
Step g: Now the client is able to connect to LAN services or the internet.
Figure 2: 802.1X Authentication

- 11 -
©2016 MICROSENS GmbH & Co. KG All Rights Reserved
Application Note
Using RADIUS with G6 Devices
Note:
For a more detailed description of the 802.1X communication flow, refer to the chapter
“Port-based Access Control” in [1].
2.1.2 Prerequisites
In order to ensure the communcation between client, switch and RADIUS server some basic
measures must be put into place:
The client must be able to use EAP for authentication (see your client’s manual for
respective 802.1X configuration).
Port-based access control must be generally enabled on the switch and the respective
port’s authorised mode has to be set to 802.1X.
The switch knows the IP address of the RADIUS server (and for good measure the IP
address of a fallback RADIUS server).
The user must be stored in the RADIUS database as legitimate user with respective
access rights (see the RADIUS manual for management of permitted users and their
access control rights).
2.1.3 802.1X Authentication Configuration Steps
Note:
The following steps describe a basic 802.1X authentication setting. For a more complex
configuration please refer to the chapter “Port-based Access Control” in [1].
Using the Web Manager:
Configuration Steps for Example 1
□ Open the Web Manager of the respective switch.
□ Select the Authentication Server screen.
□ Click on add table entry to create a new RADIUS server entry.
Note:
A maximum of 8 RADIUS server entries is possible.
□ Define the following values for the new entry:
Name: Choose a meaningful name for the RADIUS server. This is the symbolic
name you have to use for PACC later on.
Type: Leave the default type “RADIUS” as it is. The alternative type “TACACS+” is
also possible but not relevant for this example.
Address: Enter the IP address of the RADIUS server.
UDP Port: Leave the default port “1812” as it is. This port is commonly used for
RADIUS authentication.
shared secret: Enter the shared secret. This entry must correspond to the shared
secret that is configured for this RADIUS client in the RADIUS server.
For more information about the shared secret see chapter 1.3 “RADIUS Shared
Secret” on page 8.
Interim interval: This value is only important for RADIUS accounting. Leave the
default value “0” as it is (accounting function is disabled).
- 12 -
©2016 MICROSENS GmbH & Co. KG All Rights Reserved
Application Note
Using RADIUS with G6 Devices
Configuration Steps for Example 1
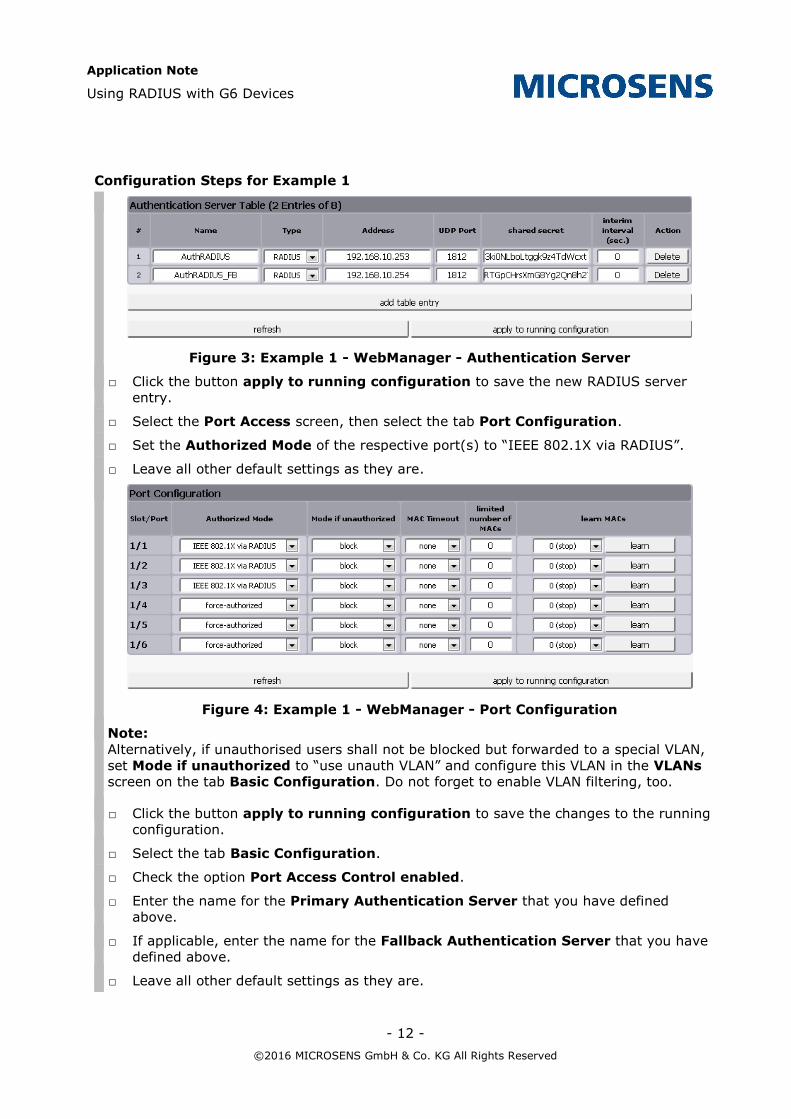
Figure 3: Example 1 - WebManager - Authentication Server
□ Click the button apply to running configuration to save the new RADIUS server
entry.
□ Select the Port Access screen, then select the tab Port Configuration.
□ Set the Authorized Mode of the respective port(s) to “IEEE 802.1X via RADIUS”.
□ Leave all other default settings as they are.
Figure 4: Example 1 - WebManager - Port Configuration
Note:
Alternatively, if unauthorised users shall not be blocked but forwarded to a special VLAN,
set Mode if unauthorized to “use unauth VLAN” and configure this VLAN in the VLANs
screen on the tab Basic Configuration. Do not forget to enable VLAN filtering, too.
□ Click the button apply to running configuration to save the changes to the running
configuration.
□ Select the tab Basic Configuration.
□ Check the option Port Access Control enabled.
□ Enter the name for the Primary Authentication Server that you have defined
above.
□ If applicable, enter the name for the Fallback Authentication Server that you have
defined above.
□ Leave all other default settings as they are.
- 13 -
©2016 MICROSENS GmbH & Co. KG All Rights Reserved
Application Note
Using RADIUS with G6 Devices
Configuration Steps for Example 1
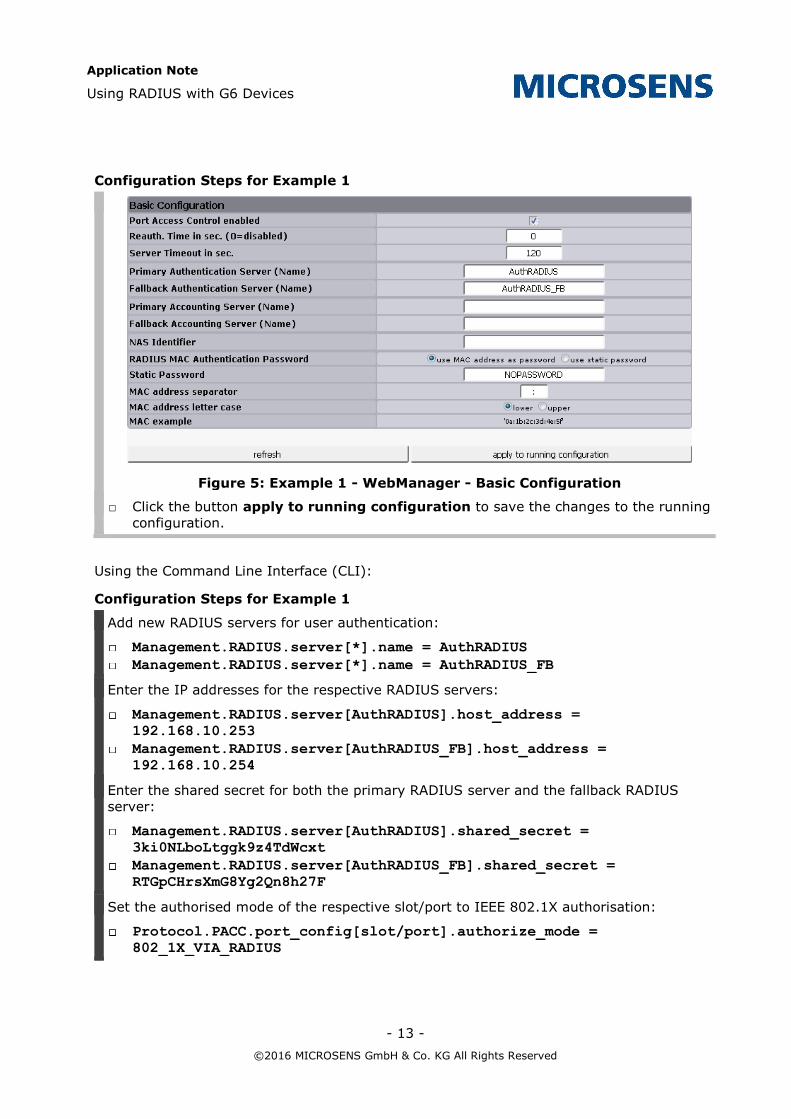
Figure 5: Example 1 - WebManager - Basic Configuration
□ Click the button apply to running configuration to save the changes to the running
configuration.
Using the Command Line Interface (CLI):
Configuration Steps for Example 1
Add new RADIUS servers for user authentication:
Management.RADIUS.server[*].name = AuthRADIUS
Management.RADIUS.server[*].name = AuthRADIUS_FB
Enter the IP addresses for the respective RADIUS servers:
Management.RADIUS.server[AuthRADIUS].host_address =
192.168.10.253
Management.RADIUS.server[AuthRADIUS_FB].host_address =
192.168.10.254
Enter the shared secret for both the primary RADIUS server and the fallback RADIUS
server:
Management.RADIUS.server[AuthRADIUS].shared_secret =
3ki0NLboLtggk9z4TdWcxt
Management.RADIUS.server[AuthRADIUS_FB].shared_secret =
RTGpCHrsXmG8Yg2Qn8h27F
Set the authorised mode of the respective slot/port to IEEE 802.1X authorisation:
Protocol.PACC.port_config[slot/port].authorize_mode =
802_1X_VIA_RADIUS

- 14 -
©2016 MICROSENS GmbH & Co. KG All Rights Reserved
Application Note
Using RADIUS with G6 Devices
Configuration Steps for Example 1
If necessary, change the unauthorised mode to VLAN forwarding, configure the respective
VLAN and enable VLAN filtering:
Protocol.PACC.port_config[slot/port].unauthorized_mode =
USE_UNAUTHORIZED_VLAN
Protocol.VLAN.vlan_id_config.unauthorized_vlan_id = {0…4095}
Protocol.VLAN.enable_vlan_filtering = {Enable|Disable}
Set the entries for the RADIUS servers:
Protocol.PACC.primary_auth_server_name = AuthRADIUS
Protocol.PACC.fallback_auth_server_name = AuthRADIUS_FB
Enable the port access control:
Protocol.PACC.enable_port_access_control = Enabled
Example 2: Access Control with RADIUS MAC Authentication
2.2.1 Procedure of RADIUS MAC Authentication
If a client is not capable of 802.1X authentication (or 802.1X authentication is disabled on
the device), it is possible to authenticate via its MAC address.
In general, a successful RADIUS MAC authentication process occurs as follows:
Step a: The client () tries to send a
frame to the network () via a specific
port of the switch (). This causes the
switch to block this port for LAN access
instantly.
Note:
Alternatively, depending on its
configuration, the switch can forward the
unauthorised user to a special VLAN.
Subsequently, the procedure with a
blocked port is described.
Step b: In a combined MAC-802.1X-
authentication mode the switch asks the
client to reveal its credentials via EAP
(“EAP Identity Request”) following step a.
Because the client does not support
802.1X, he will not respond. The switch
then repeats the request for a specific time.
Note:
In a pure MAC authentication mode, the request to the RADIUS server is sent directly
instead, so that this step b is skipped.
Step c: After expiration of this term, without the client’s EAP response, the switch
accepts only one data packet for extracting the source MAC address and “learning” it (i.e.
storing it inside its configuration).
Figure 6: RADIUS MAC Authentication
- 15 -
©2016 MICROSENS GmbH & Co. KG All Rights Reserved
Application Note
Using RADIUS with G6 Devices
Note:
This scenario assumes that the switch’s ports are configured for authentication via both
802.1X and MAC address. If the configuration is determined to authentication by MAC
address only, the repeated request is omitted and the switch immediately takes the source
MAC from the first data packet for authentication at the RADIUS server.
Step d: The switch generates the access request to the RADIUS server () as a
“RADIUS Access Request” message.
Inside this message, the switch will send the MAC address as “User Name” (RADIUS
attribute 1), “Password” (RADIUS attribute 2, encrypted using the shared secret) and
“Calling-Station-ID” (RADIUS attribute 31). According to its configuration, the RADIUS
server uses one or more of these attributes for authenticating the user against its database
entries.
Step e: After the user verification is successfully completed, the RADIUS server sends a
“RADIUS Access Accept” to the switch. The switch then opens the respective port, possibly
with restricted access based on the attributes that the RADIUS server sent inside the
“RADIUS Access Accept” message.
Step f: Now the client is able to connect to LAN services or the internet.
Note:
It is possible to add MAC addresses of known clients manually to skip the RADIUS
authentication process. This procedure known as “MAC Locking” is out of the scope of this
example.
2.2.2 Prerequisites
In order to ensure the communication between client and switch and the communication
between switch and RADIUS server some basic measures must be put into place:
Port-based access control must be generally enabled on the switch and the respective
port’s authorised mode has to be set to RADIUS MAC Authentication.
The switch knows the IP address of the RADIUS server (and for good measure the IP
address of a fallback RADIUS server).
The switch must be configured to recognise the MAC address in an appropriate format
(MAC separator, letter case) and whether the MAC address should be sent as
password too.
The client’s MAC address must be stored in the RADIUS database as legitimate user
with respective access rights (see the RADIUS manual for management of permitted
users and their access control rights).
2.2.3 RADIUS MAC Authentication Configuration Steps
Note:
The following steps describe a basic MAC authentication setting. For a more complex
configuration please refer to the chapter “Port-based Access Control” in [1].
Using the Web Manager:
Configuration Steps for Example 2
□ Open the Web Manager of the respective switch.
□ Select the Authentication Server screen.
□ Click on add table entry to create a new RADIUS server entry.

- 16 -
©2016 MICROSENS GmbH & Co. KG All Rights Reserved
Application Note
Using RADIUS with G6 Devices
Configuration Steps for Example 2
□ Define the following values for the new entry:
Name: Choose a meaningful name for the RADIUS server. This is the symbolic
name you have to use later for PACC.
Type: Leave the default type “RADIUS” as it is.
Address: Enter the IP address of the RADIUS server.
UDP Port: Leave the default port “1812” as it is.
shared secret: Enter the shared secret. This entry must correspond to the shared
secret that is configured in the RADIUS server.
For more information about the shared secret see chapter 1.3 “RADIUS Shared
Secret” on page 8.
Interim interval: This value is only important for RADIUS accounting. Leave the
default value “0” as it is (function is disabled).
Figure 7: Example 2 - WebManager - Authentication Server
□ Click the button apply to running configuration to save the new RADIUS server
entry.
□ Select the Port Access screen, then select the tab Port Configuration.
□ Set the Authorized Mode of the respective port(s) to “MAC via RADIUS”.
□ Leave all other default settings as they are.
Figure 8: Example 2 - WebManager - Port Configuration

- 17 -
©2016 MICROSENS GmbH & Co. KG All Rights Reserved
Application Note
Using RADIUS with G6 Devices
Configuration Steps for Example 2
Note:
In this example the ports are configured for authentication by MAC address only. So the
switch assumes that the connected device does not support 802.1X by default and
therefore ignores any incoming 802.1X EAPOL messages. If that is not assured, you
should set the Authorized Mode to “MAC or 802.1X via RADIUS”.
Note:
Alternatively, if unauthorised users shall not be blocked but forwarded to a special VLAN,
set Mode if unauthorized to “use unauth VLAN” and configure this VLAN in the VLANs
screen on the tab Basic Configuration. Do not forget to enable VLAN filtering as well.
□ If necessary, you can set the following options:
MAC Timeout: Defines how long authorised (i.e. learned) MAC addresses are valid
after inactivity.
limited number of MACs: Limits the number of permitted MAC addresses on this
port. Default is “0” for unlimited number of MAC addresses. This option works
independently from the selected authorisation mode.
learn MACs: The respective value from the drop-down-list determines the number
of next incoming MAC addresses to be learned manually. Clicking on learn starts
the learning process. This action fills the MAC database for the authorisation mode
“MAC Locking”.
□ Click the button apply to running configuration to save the changes to the running
configuration.
□ Select the tab Basic Configuration.
□ Check the option Port Access Control enabled.
□ Enter the name for the Primary Authentication Server that you have defined
above.
□ If applicable, enter the name for the Fallback Authentication Server that you have
defined above.
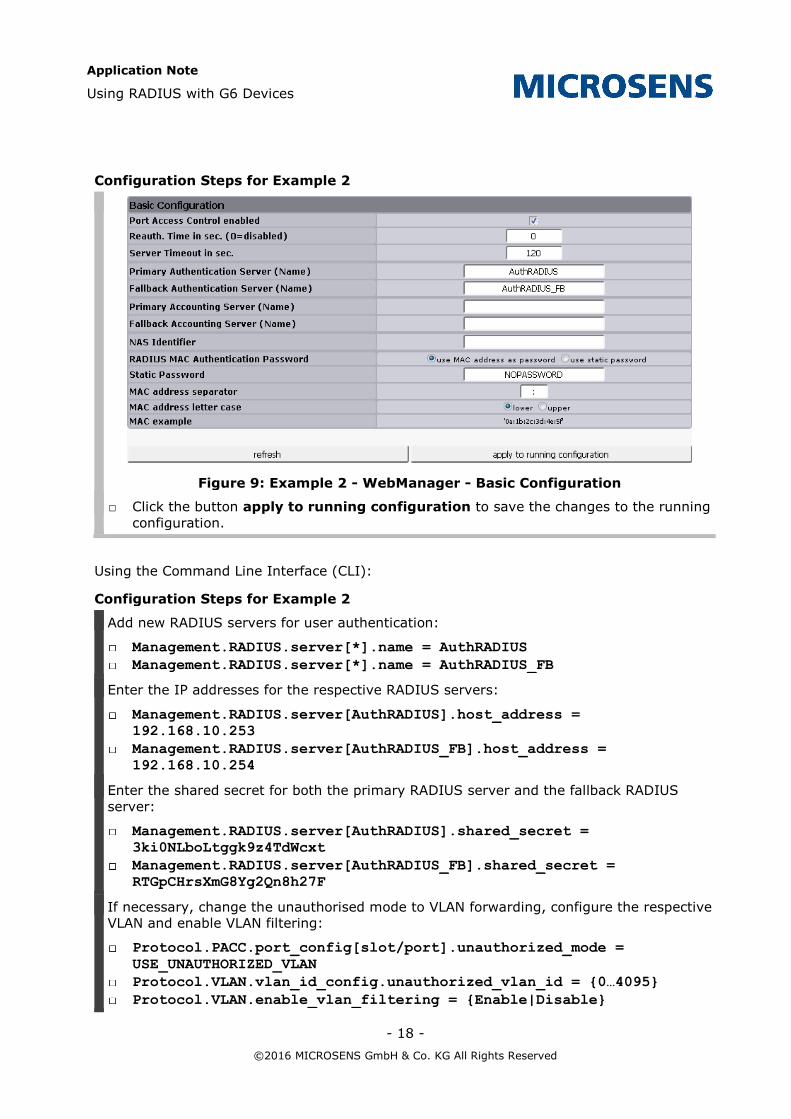
□ If necessary, set the MAC address related values:
RADIUS MAC Authentication Password: The switch uses the client’s MAC
address as user name. If the RADIUS server needs the MAC address sent as
password, set the respective option.
Static Password: If the RADIUS server demands a password other than the MAC
address, enter it here.
MAC address separator: To recognise the correct source MAC address, the
switch must know the valid separator.
MAC address letter case: To recognise the correct source MAC address, the
switch must know the correct letter case.
- 18 -
©2016 MICROSENS GmbH & Co. KG All Rights Reserved
Application Note
Using RADIUS with G6 Devices
Configuration Steps for Example 2
Figure 9: Example 2 - WebManager - Basic Configuration
□ Click the button apply to running configuration to save the changes to the running
configuration.
Using the Command Line Interface (CLI):
Configuration Steps for Example 2
Add new RADIUS servers for user authentication:
Management.RADIUS.server[*].name = AuthRADIUS
Management.RADIUS.server[*].name = AuthRADIUS_FB
Enter the IP addresses for the respective RADIUS servers:
Management.RADIUS.server[AuthRADIUS].host_address =
192.168.10.253
Management.RADIUS.server[AuthRADIUS_FB].host_address =
192.168.10.254
Enter the shared secret for both the primary RADIUS server and the fallback RADIUS
server:
Management.RADIUS.server[AuthRADIUS].shared_secret =
3ki0NLboLtggk9z4TdWcxt
Management.RADIUS.server[AuthRADIUS_FB].shared_secret =
RTGpCHrsXmG8Yg2Qn8h27F
If necessary, change the unauthorised mode to VLAN forwarding, configure the respective
VLAN and enable VLAN filtering:
Protocol.PACC.port_config[slot/port].unauthorized_mode =
USE_UNAUTHORIZED_VLAN
Protocol.VLAN.vlan_id_config.unauthorized_vlan_id = {0…4095}
Protocol.VLAN.enable_vlan_filtering = {Enable|Disable}

- 19 -
©2016 MICROSENS GmbH & Co. KG All Rights Reserved
Application Note
Using RADIUS with G6 Devices
Configuration Steps for Example 2
Set the authorised mode of the respective slot/port to IEEE 802.1X authorisation:
Protocol.PACC.port_config[slot/port].authorize_mode =
MAC_VIA_RADIUS
Note:
In this example the ports are configured for authentication by MAC address only. So the
switch assumes that the connected device does not support 802.1X by default and
therefore ignores any incoming 802.1X EAPOL messages. If that is not assured, you should
set the Authorized Mode to “MAC or 802.1X via RADIUS”:
Protocol.PACC.port_config[slot/port].authorize_mode =
MAC_OR_802_1X_VIA_RADIUS
Set the entries for the RADIUS servers:
Protocol.PACC.primary_auth_server_name = AuthRADIUS
Protocol.PACC.fallback_auth_server_name = AuthRADIUS_FB
If necessary, set the MAC address related values:
Protocol.PACC.mac_password_source = {USE_MAC|USE_PASSWORD}
Protocol.PACC.mac_password_string = <password>
Protocol.PACC.mac_separator_char = <character>
Protocol.PACC.mac_spelling = {LOWER_CASE|UPPER_CASE}
Enable the port access control:
Protocol.PACC.enable_port_access_control = Enabled
- 20 -
©2016 MICROSENS GmbH & Co. KG All Rights Reserved
Application Note
Using RADIUS with G6 Devices
3 RADIUS Attributes
Attribute Basics
As described in section 1, the MICROSENS switch works as the RADIUS client and therefore
exchanges messages with the RADIUS server e.g. in order to allow or reject network access
to the user.
These messages contain so-called RADIUS attributes with special types of detailed
information about the user, e.g. regarding authentication or additional configuration values.
The RADIUS attribute format is designed as follows:
Type: Contains an RFC-assigned number, that represents the respective attribute.
Length: Defines the complete bit length of this attribute.
Value: Contains the information for this attribute, that RADIUS client or server need
for further procedures.
A RADIUS message is not limited to only one attribute but contains a collection of
attributes, describing e.g. the user’s unique credentials, his remote IP address or even some
vendor specific attributes for detailed authentication or configuration.
Note:
For more information about RADIUS attributes please refer to the respective RFCs 2865,
2868 and 2869.
RADIUS Attribute Support of MICROSENS G6 Devices
Note:
MICROSENS switches do not support vendor specific attributes (attribute type 26). They
ignore vendor specific attributes in RADIUS response messages.
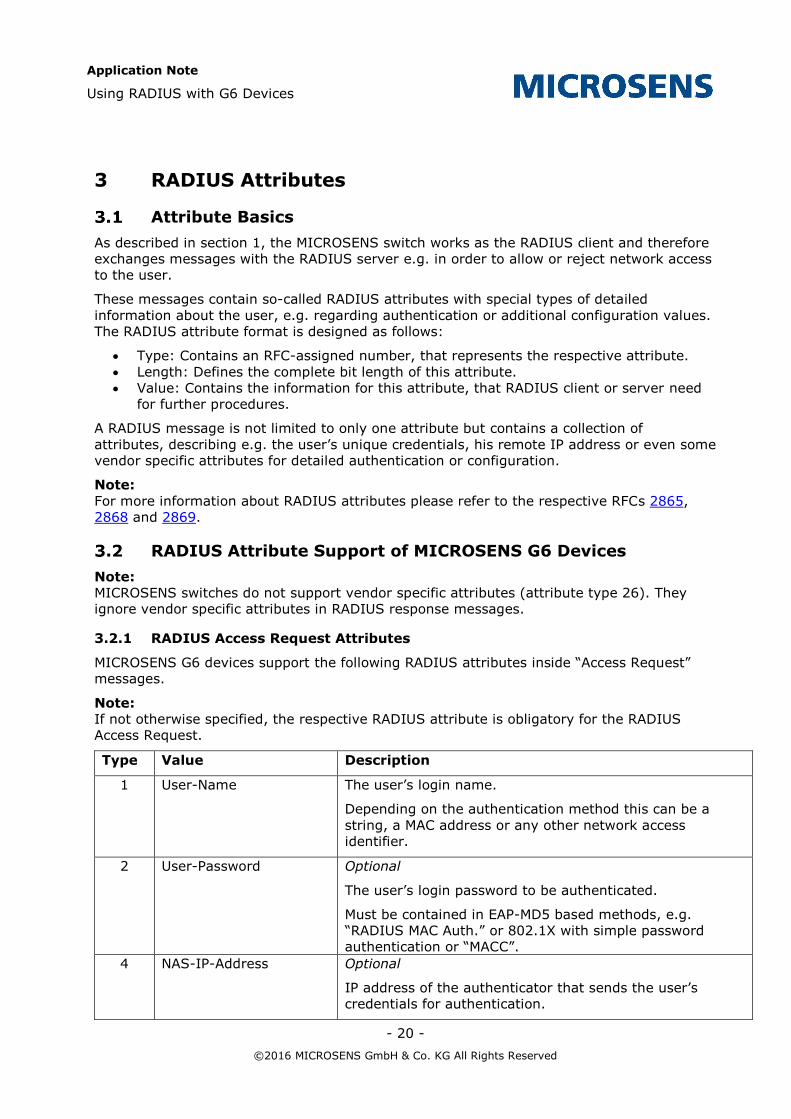
3.2.1 RADIUS Access Request Attributes
MICROSENS G6 devices support the following RADIUS attributes inside “Access Request”
messages.
Note:
If not otherwise specified, the respective RADIUS attribute is obligatory for the RADIUS
Access Request.
Type Value Description
1 User-Name The user’s login name.
Depending on the authentication method this can be a
string, a MAC address or any other network access
identifier.
2 User-Password Optional
The user’s login password to be authenticated.
Must be contained in EAP-MD5 based methods, e.g.
“RADIUS MAC Auth.” or 802.1X with simple password
authentication or “MACC”.
4 NAS-IP-Address Optional
IP address of the authenticator that sends the user’s
credentials for authentication.
- 21 -
©2016 MICROSENS GmbH & Co. KG All Rights Reserved
Application Note
Using RADIUS with G6 Devices
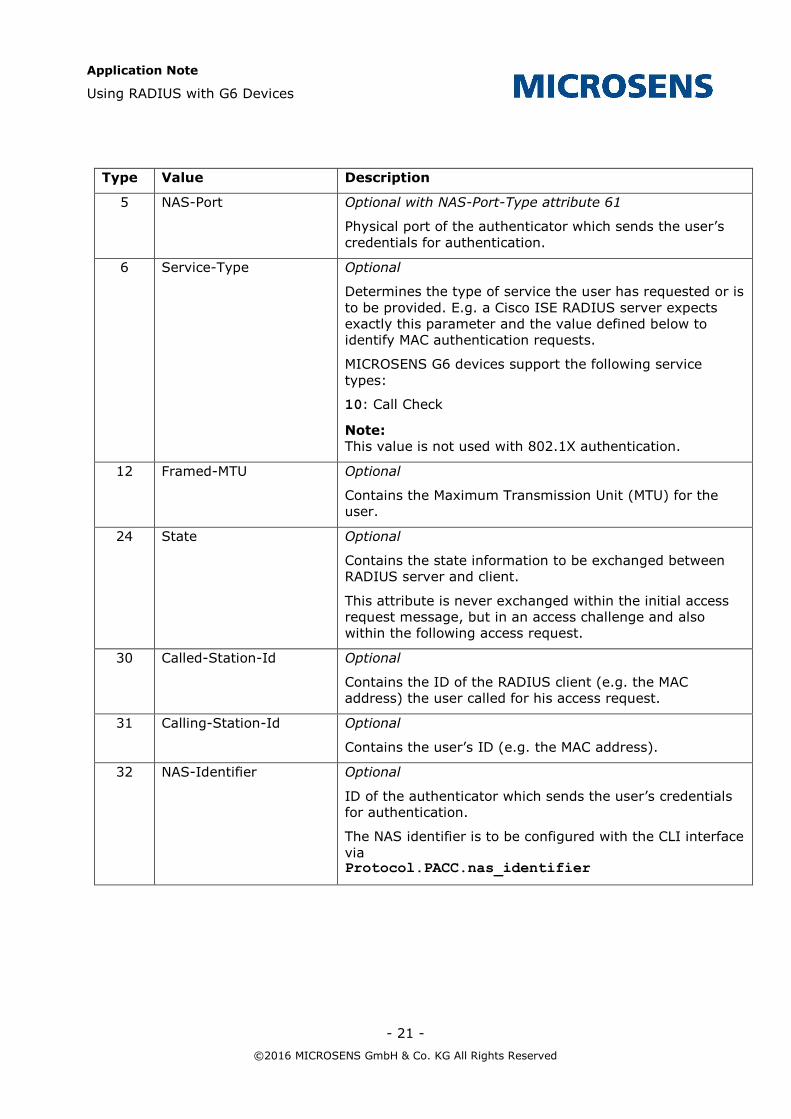
Type Value Description
5 NAS-Port Optional with NAS-Port-Type attribute 61
Physical port of the authenticator which sends the user’s
credentials for authentication.
6 Service-Type Optional
Determines the type of service the user has requested or is
to be provided. E.g. a Cisco ISE RADIUS server expects
exactly this parameter and the value defined below to
identify MAC authentication requests.
MICROSENS G6 devices support the following service
types:
10: Call Check
Note:
This value is not used with 802.1X authentication.
12 Framed-MTU Optional
Contains the Maximum Transmission Unit (MTU) for the
user.
24 State Optional
Contains the state information to be exchanged between
RADIUS server and client.
This attribute is never exchanged within the initial access
request message, but in an access challenge and also
within the following access request.
30 Called-Station-Id Optional
Contains the ID of the RADIUS client (e.g. the MAC
address) the user called for his access request.
31 Calling-Station-Id Optional
Contains the user’s ID (e.g. the MAC address).
32 NAS-Identifier Optional
ID of the authenticator which sends the user’s credentials
for authentication.
The NAS identifier is to be configured with the CLI interface
via Protocol.PACC.nas_identifier
- 22 -
©2016 MICROSENS GmbH & Co. KG All Rights Reserved
Application Note
Using RADIUS with G6 Devices
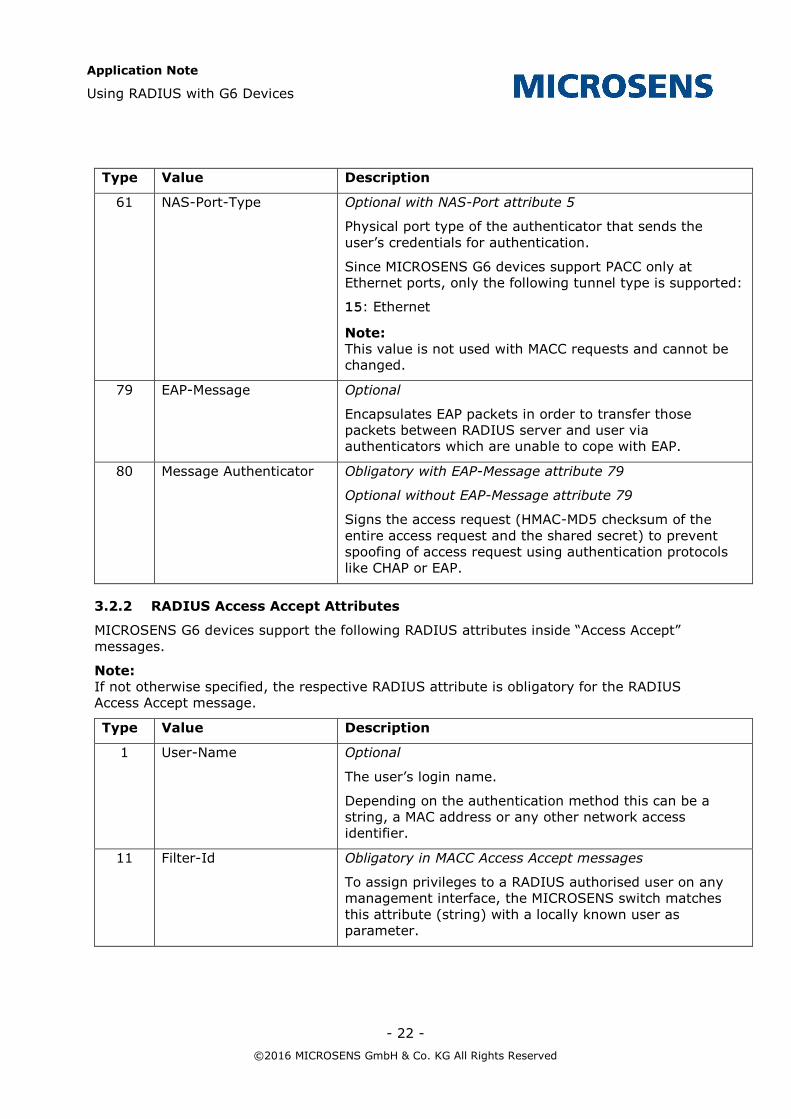
Type Value Description
61 NAS-Port-Type Optional with NAS-Port attribute 5
Physical port type of the authenticator that sends the
user’s credentials for authentication.
Since MICROSENS G6 devices support PACC only at
Ethernet ports, only the following tunnel type is supported:
15: Ethernet
Note:
This value is not used with MACC requests and cannot be
changed.
79 EAP-Message Optional
Encapsulates EAP packets in order to transfer those
packets between RADIUS server and user via
authenticators which are unable to cope with EAP.
80 Message Authenticator Obligatory with EAP-Message attribute 79
Optional without EAP-Message attribute 79
Signs the access request (HMAC-MD5 checksum of the
entire access request and the shared secret) to prevent
spoofing of access request using authentication protocols
like CHAP or EAP.
3.2.2 RADIUS Access Accept Attributes
MICROSENS G6 devices support the following RADIUS attributes inside “Access Accept”
messages.
Note:
If not otherwise specified, the respective RADIUS attribute is obligatory for the RADIUS
Access Accept message.
Type Value Description
1 User-Name Optional
The user’s login name.
Depending on the authentication method this can be a
string, a MAC address or any other network access
identifier.
11 Filter-Id Obligatory in MACC Access Accept messages
To assign privileges to a RADIUS authorised user on any
management interface, the MICROSENS switch matches
this attribute (string) with a locally known user as
parameter.
- 23 -
©2016 MICROSENS GmbH & Co. KG All Rights Reserved
Application Note
Using RADIUS with G6 Devices
Type Value Description
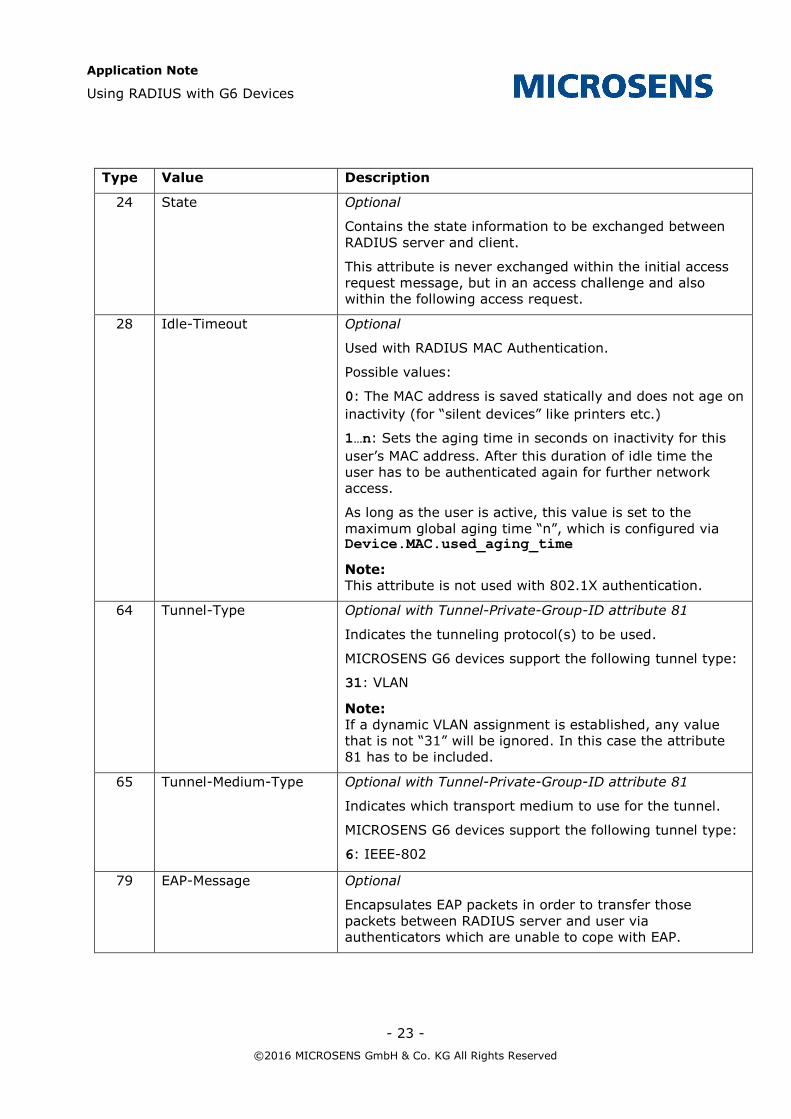
24 State Optional
Contains the state information to be exchanged between
RADIUS server and client.
This attribute is never exchanged within the initial access
request message, but in an access challenge and also
within the following access request.
28 Idle-Timeout Optional
Used with RADIUS MAC Authentication.
Possible values:
0: The MAC address is saved statically and does not age on
inactivity (for “silent devices” like printers etc.)
1…n: Sets the aging time in seconds on inactivity for this
user’s MAC address. After this duration of idle time the
user has to be authenticated again for further network
access.
As long as the user is active, this value is set to the
maximum global aging time “n”, which is configured via Device.MAC.used_aging_time
Note:
This attribute is not used with 802.1X authentication.
64 Tunnel-Type Optional with Tunnel-Private-Group-ID attribute 81
Indicates the tunneling protocol(s) to be used.
MICROSENS G6 devices support the following tunnel type:
31: VLAN
Note:
If a dynamic VLAN assignment is established, any value
that is not “31” will be ignored. In this case the attribute
81 has to be included.
65 Tunnel-Medium-Type Optional with Tunnel-Private-Group-ID attribute 81
Indicates which transport medium to use for the tunnel.
MICROSENS G6 devices support the following tunnel type:
6: IEEE-802
79 EAP-Message Optional
Encapsulates EAP packets in order to transfer those
packets between RADIUS server and user via
authenticators which are unable to cope with EAP.
- 24 -
©2016 MICROSENS GmbH & Co. KG All Rights Reserved
Application Note
Using RADIUS with G6 Devices
Type Value Description
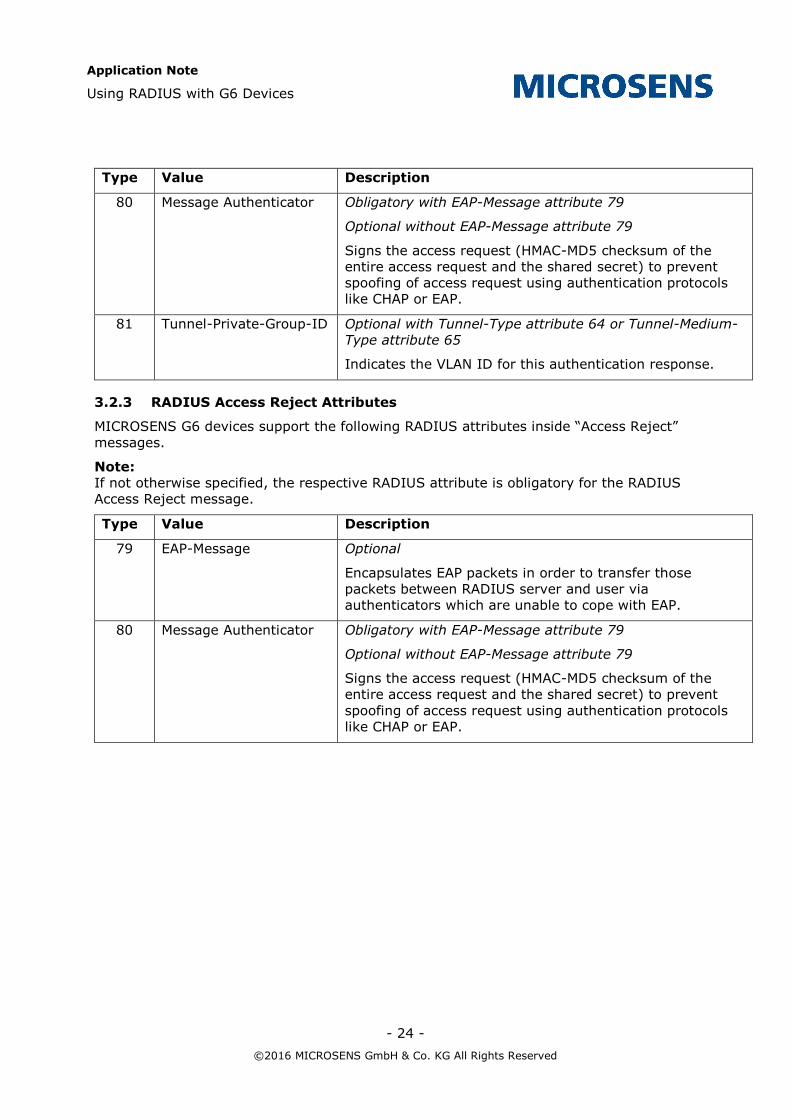
80 Message Authenticator Obligatory with EAP-Message attribute 79
Optional without EAP-Message attribute 79
Signs the access request (HMAC-MD5 checksum of the
entire access request and the shared secret) to prevent
spoofing of access request using authentication protocols
like CHAP or EAP.
81 Tunnel-Private-Group-ID Optional with Tunnel-Type attribute 64 or Tunnel-Medium-
Type attribute 65
Indicates the VLAN ID for this authentication response.
3.2.3 RADIUS Access Reject Attributes
MICROSENS G6 devices support the following RADIUS attributes inside “Access Reject”
messages.
Note:
If not otherwise specified, the respective RADIUS attribute is obligatory for the RADIUS
Access Reject message.
Type Value Description
79 EAP-Message Optional
Encapsulates EAP packets in order to transfer those
packets between RADIUS server and user via
authenticators which are unable to cope with EAP.
80 Message Authenticator Obligatory with EAP-Message attribute 79
Optional without EAP-Message attribute 79
Signs the access request (HMAC-MD5 checksum of the
entire access request and the shared secret) to prevent
spoofing of access request using authentication protocols
like CHAP or EAP.
- 25 -
©2016 MICROSENS GmbH & Co. KG All Rights Reserved
Application Note
Using RADIUS with G6 Devices
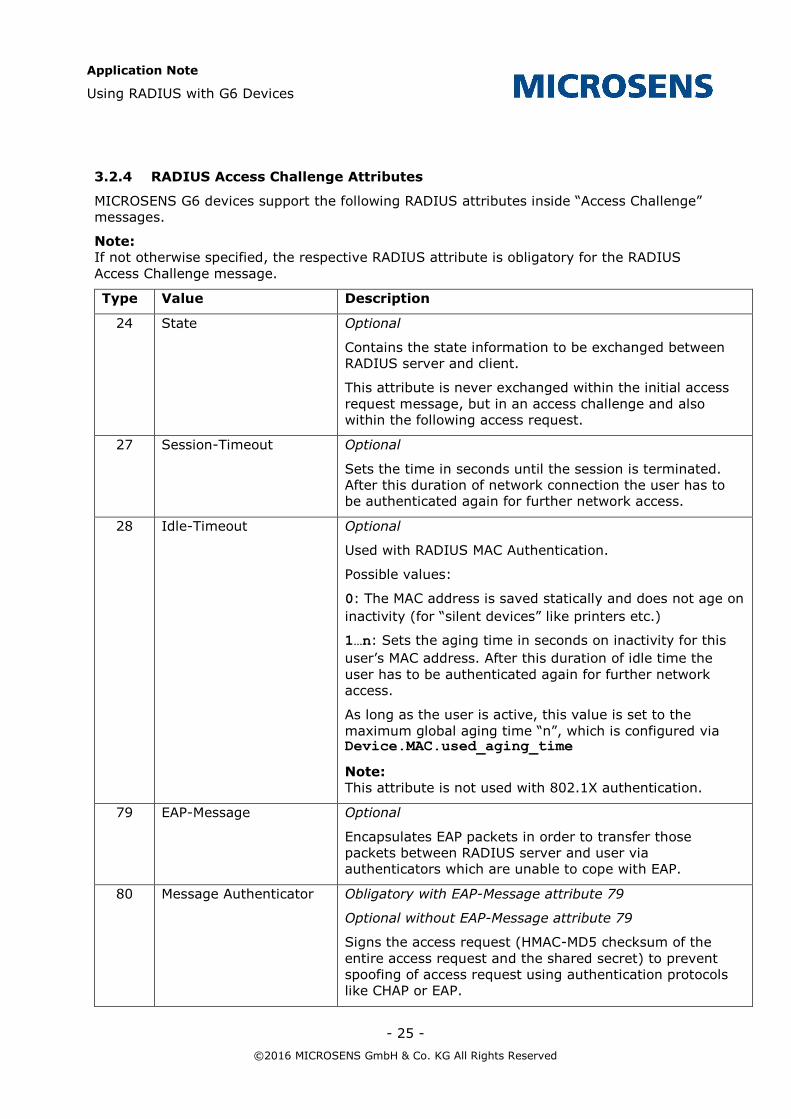
3.2.4 RADIUS Access Challenge Attributes
MICROSENS G6 devices support the following RADIUS attributes inside “Access Challenge”
messages.
Note:
If not otherwise specified, the respective RADIUS attribute is obligatory for the RADIUS
Access Challenge message.
Type Value Description
24 State Optional
Contains the state information to be exchanged between
RADIUS server and client.
This attribute is never exchanged within the initial access
request message, but in an access challenge and also
within the following access request.
27 Session-Timeout Optional
Sets the time in seconds until the session is terminated.
After this duration of network connection the user has to
be authenticated again for further network access.
28 Idle-Timeout Optional
Used with RADIUS MAC Authentication.
Possible values:
0: The MAC address is saved statically and does not age on
inactivity (for “silent devices” like printers etc.)
1…n: Sets the aging time in seconds on inactivity for this
user’s MAC address. After this duration of idle time the
user has to be authenticated again for further network
access.
As long as the user is active, this value is set to the
maximum global aging time “n”, which is configured via Device.MAC.used_aging_time
Note:
This attribute is not used with 802.1X authentication.
79 EAP-Message Optional
Encapsulates EAP packets in order to transfer those
packets between RADIUS server and user via
authenticators which are unable to cope with EAP.
80 Message Authenticator Obligatory with EAP-Message attribute 79
Optional without EAP-Message attribute 79
Signs the access request (HMAC-MD5 checksum of the
entire access request and the shared secret) to prevent
spoofing of access request using authentication protocols
like CHAP or EAP.
- 26 -
©2016 MICROSENS GmbH & Co. KG All Rights Reserved
Application Note
Using RADIUS with G6 Devices
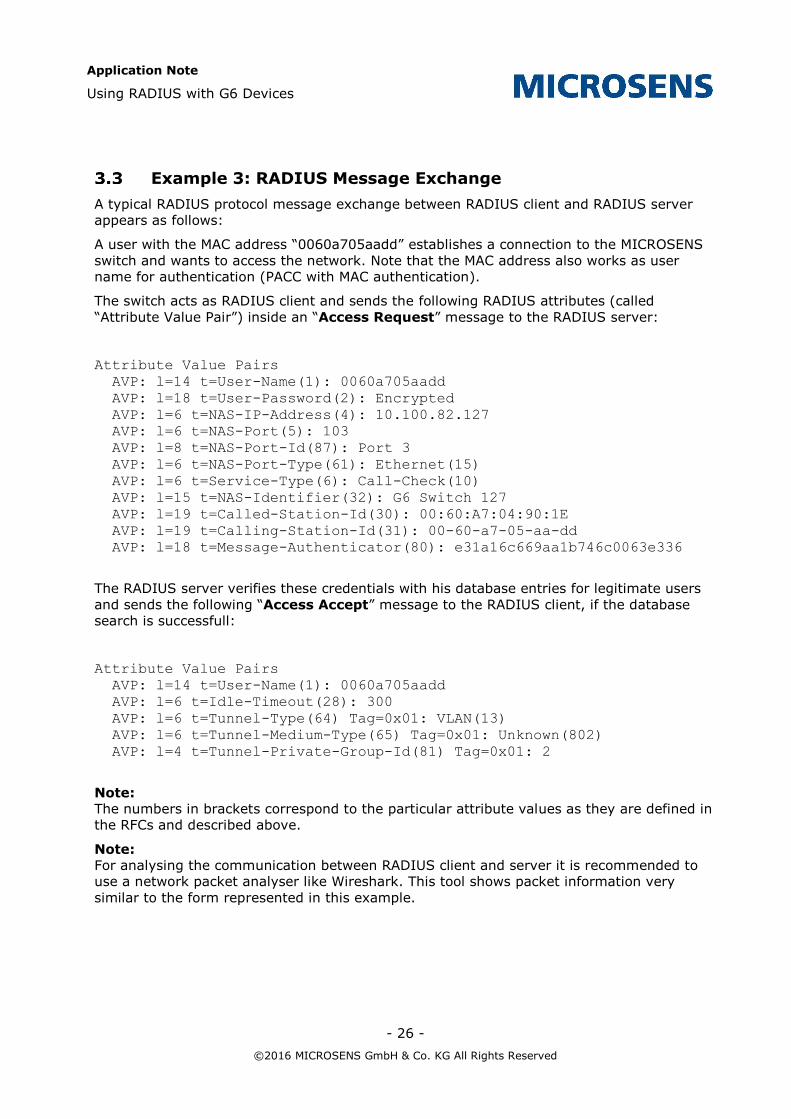
Example 3: RADIUS Message Exchange
A typical RADIUS protocol message exchange between RADIUS client and RADIUS server
appears as follows:
A user with the MAC address “0060a705aadd” establishes a connection to the MICROSENS
switch and wants to access the network. Note that the MAC address also works as user
name for authentication (PACC with MAC authentication).
The switch acts as RADIUS client and sends the following RADIUS attributes (called
“Attribute Value Pair”) inside an “Access Request” message to the RADIUS server:
Attribute Value Pairs
AVP: l=14 t=User-Name(1): 0060a705aadd
AVP: l=18 t=User-Password(2): Encrypted
AVP: l=6 t=NAS-IP-Address(4): 10.100.82.127
AVP: l=6 t=NAS-Port(5): 103
AVP: l=8 t=NAS-Port-Id(87): Port 3
AVP: l=6 t=NAS-Port-Type(61): Ethernet(15)
AVP: l=6 t=Service-Type(6): Call-Check(10)
AVP: l=15 t=NAS-Identifier(32): G6 Switch 127
AVP: l=19 t=Called-Station-Id(30): 00:60:A7:04:90:1E
AVP: l=19 t=Calling-Station-Id(31): 00-60-a7-05-aa-dd
AVP: l=18 t=Message-Authenticator(80): e31a16c669aa1b746c0063e336
The RADIUS server verifies these credentials with his database entries for legitimate users
and sends the following “Access Accept” message to the RADIUS client, if the database
search is successfull:
Attribute Value Pairs
AVP: l=14 t=User-Name(1): 0060a705aadd
AVP: l=6 t=Idle-Timeout(28): 300
AVP: l=6 t=Tunnel-Type(64) Tag=0x01: VLAN(13)
AVP: l=6 t=Tunnel-Medium-Type(65) Tag=0x01: Unknown(802)
AVP: l=4 t=Tunnel-Private-Group-Id(81) Tag=0x01: 2
Note:
The numbers in brackets correspond to the particular attribute values as they are defined in
the RFCs and described above.
Note:
For analysing the communication between RADIUS client and server it is recommended to
use a network packet analyser like Wireshark. This tool shows packet information very
similar to the form represented in this example.
- 27 -
©2016 MICROSENS GmbH & Co. KG All Rights Reserved
Application Note
Using RADIUS with G6 Devices
Intentionally left blank

- 28 -
©2016 MICROSENS GmbH & Co. KG All Rights Reserved
Application Note
Using RADIUS with G6 Devices
Disclaimer
All information in this document is provided ’as is’ and subject to change without notice. MICROSENS GmbH & Co. KG disclaims any liability for the correctness, completeness or quality of the information provided, fitness for a particular purpose or consecutive damage. Any product names mentioned herein may be trademarks and/or registered trademarks of their respective companies.
©2016, MICROSENS GmbH & Co. KG, Küferstr. 16, 59067 Hamm, Germany. All rights reserved. This document in whole or in part may not be duplicated, reproduced, stored or retransmitted without prior written permission of MICROSENS GmbH & Co. KG.
Document ID: AN-16009_2016_09_22/2