using ajax in your application - oracle.com · ajax (asynchronous javascript and xml) uses...
TRANSCRIPT
Using AJAX into your Application
Purpose
This tutorial shows you how to implement some AJAX examples into your application.
Time to Complete
Approximately 30 minutes
Topics
This tutorial covers the following topics:
OverviewPrerequisitesCreating a New Page and Region Adding a Dependent Select List Setting Multiple Items Based on Another ItemAdding Rollover Item HelpSummary
Viewing Screenshots
Place the cursor over this icon to load and view all the screenshots for this tutorial. (Caution: This action loads all screenshots simultaneously, so response time may be slow depending on your Internet connection.)
Note: Alternatively, you can place the cursor over an individual icon in the following steps to load and view only the screenshot associated with that step. You can hide an individual screenshot by clicking it.
Overview
AJAX (Asynchronous JavaScript and XML) uses JavaScript to communicate with the XMLHttpRequest object that communicates with an APEX On Demand process. It can send and receive information in a variety of formats, including XML, HTML, JSON and text content. Because AJAX is “asynchronous”, you can use the content as a data source or you can update portions of the page itself.
JavaScript and AJAX are used throughout the Oracle Application Express product itself. One example of where JavaScript is used is when deleting an object. When you receive the alert to confirm your deletion, this action uses JavaScript. An example of where AJAX is used is when changing the pagination on the Application Builder page. When you change the number of rows to show and then click Go. This action uses AJAX to render the page without submitting the page.
In this tutorial, you use AJAX to incorporate some new capabilities into your application.
Back to Topic List
Prerequisites
Before you perform this tutorial, you should:
1. Install Oracle Database 11g. 2. Install and configure Oracle Application Express. See documentation on OTN.
3. Download and unzip the apexweb20.zip into your working directory. 4. Import the Project Tasks Application in Application Builder using the projtasks_app.sql file located in the
directory where you unzipped the file in the previous step.
Back to Topic List
Creating a New Page and Region
In this tutorial, you create a page and region which will be used to build the AJAX Examples. Perform the following steps:
1. Enter the following URL to log in to Oracle Application Express (change the <hostname> to localhost, your specific hostname or apex.oracle.com).
http://<hostname>:8080/apex
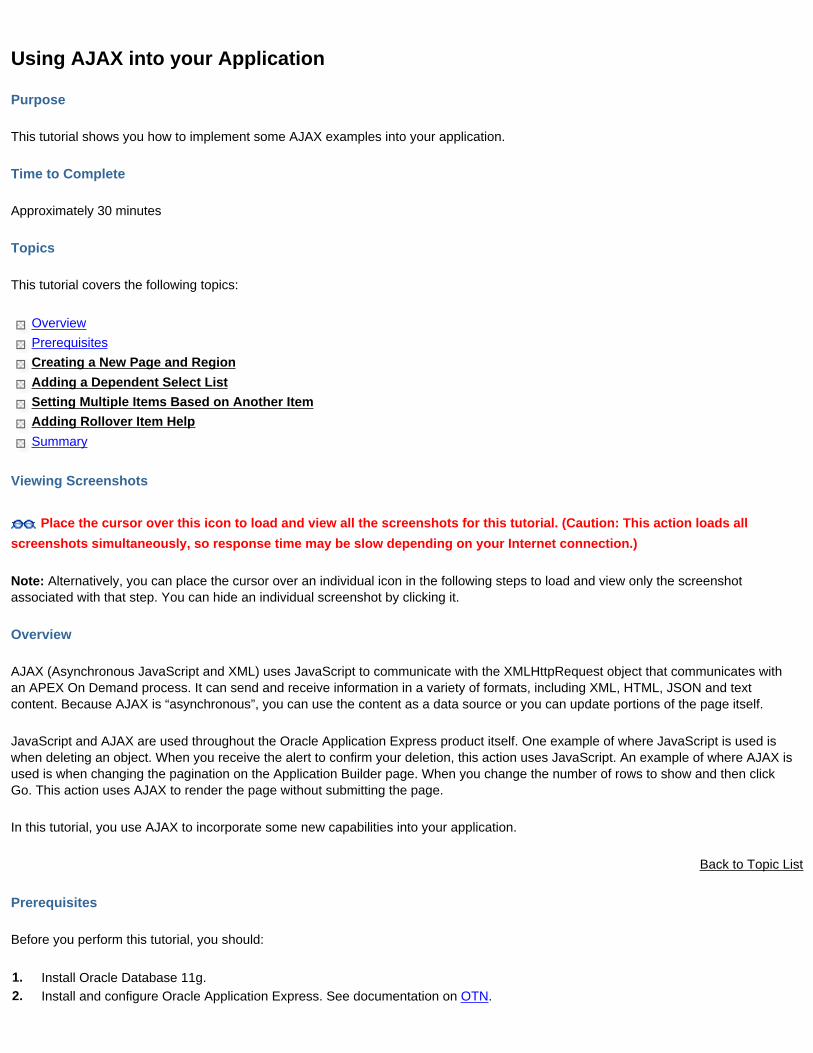
2. To log in to Oracle Application Express, enter the following details, and click Login.
Workspace: <your workspace name> Username: <your username> Password: <your password>

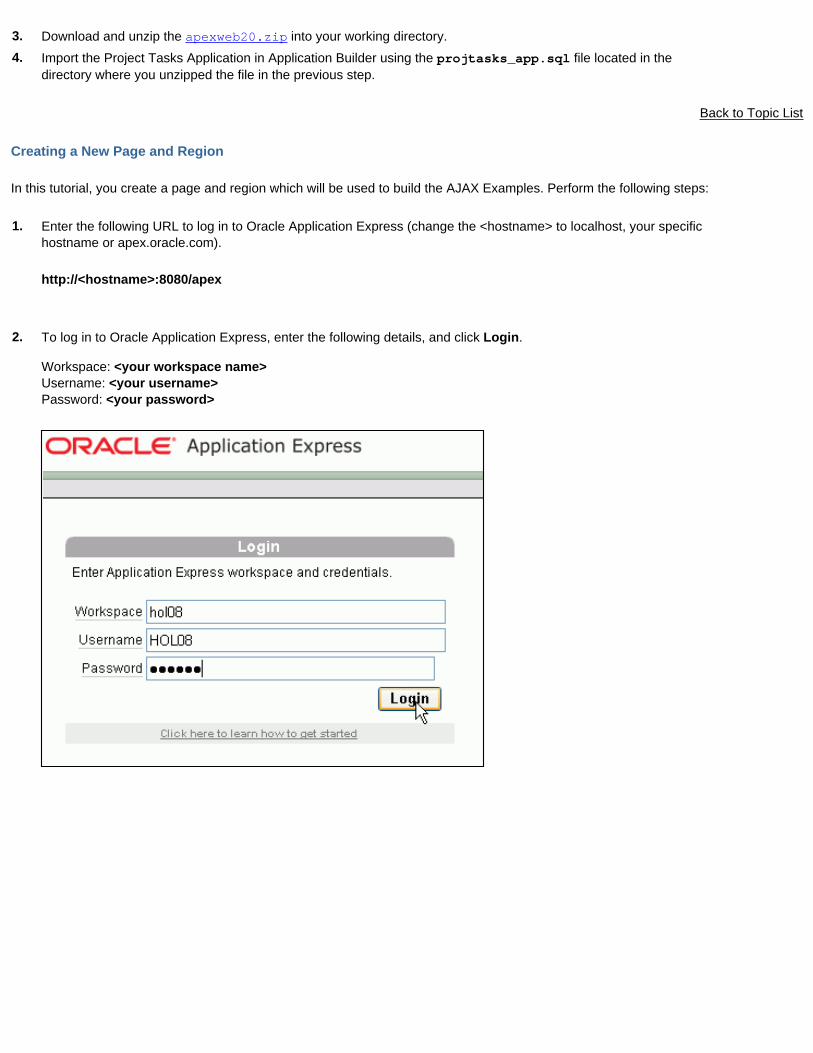
3. On the Workspace home page, click Application Builder.
4. Select Project Tasks Application.
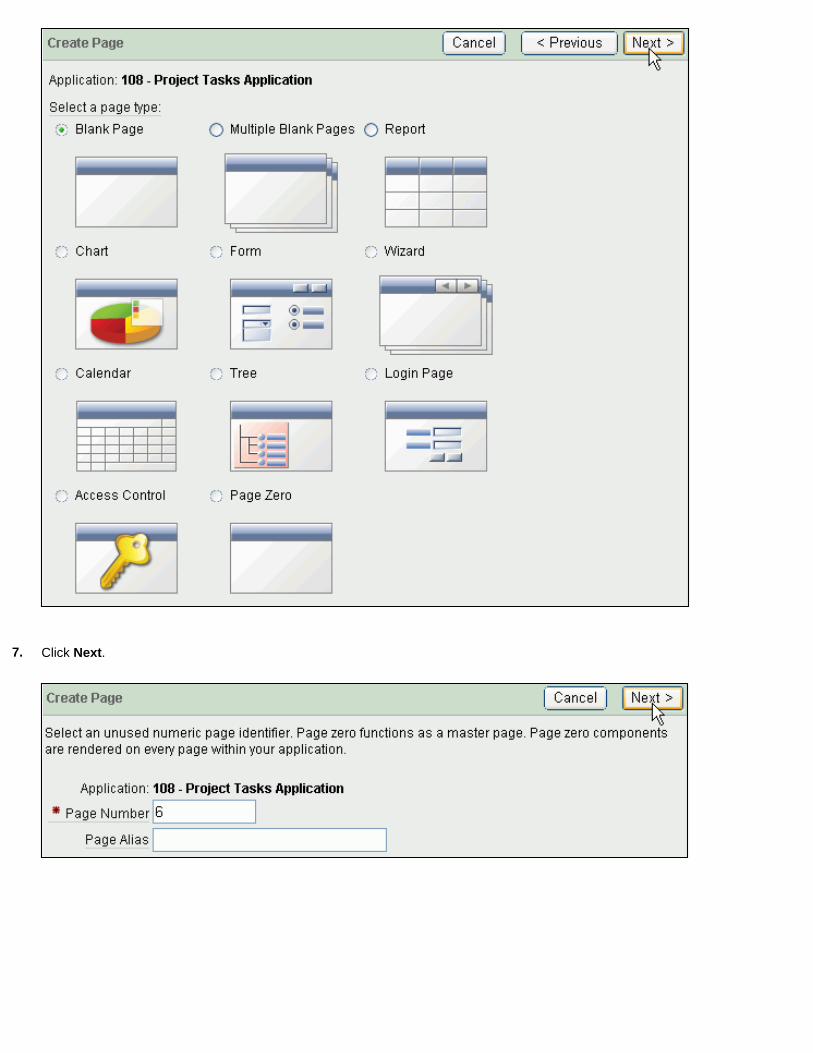
5. Create a new blank page. Click Create Page.
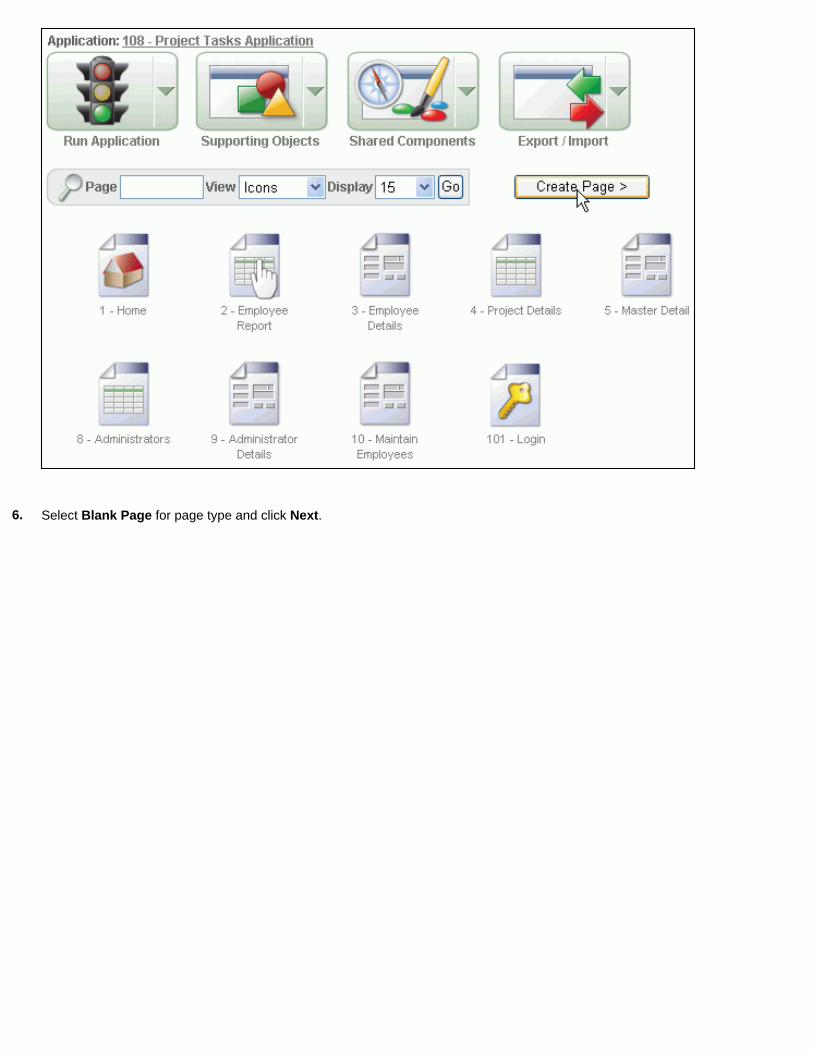
6. Select Blank Page for page type and click Next.
7. Click Next.

8. Enter AJAX Examples for Name and click Next.
9. Click Next.
10. Click Finish.
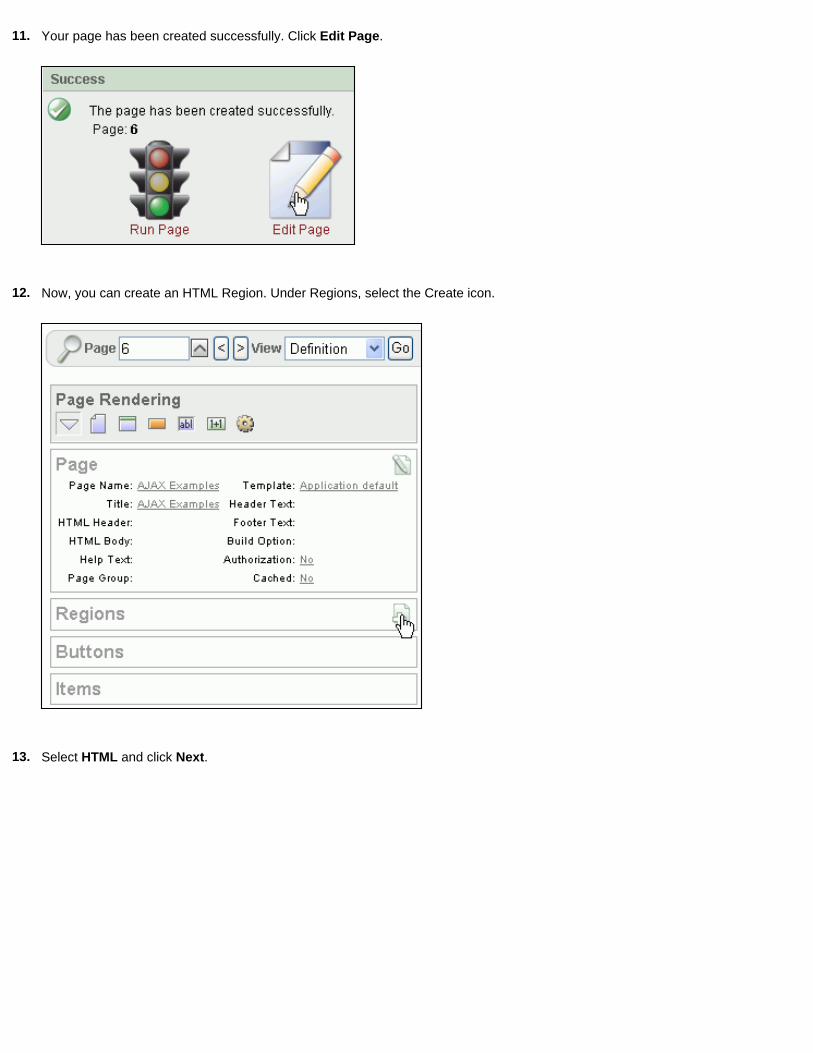
11. Your page has been created successfully. Click Edit Page.
12. Now, you can create an HTML Region. Under Regions, select the Create icon.
13. Select HTML and click Next.

14. Select HTML again and click Next.
15. Enter AJAX Examples for the Title and click Create.

Your page and region were created successfully.
Back to Topic List
Adding a Dependent Select List
In this section, you create two select lists to show a list of departments and then the employees in that department. Perform the following tasks:
Create Select List Items Create an On Demand ProcessInvoke the On Demand Process When Department Name is Selected
Back to Topic List
Create Select List Items
In this section, you create Select List items for DEPARTMENT_NAME and EMPLOYEE_NAME. Perform the following steps:
1. From the Page Definition page, under Items, select the Create icon.

2. Select Select List and click Next.
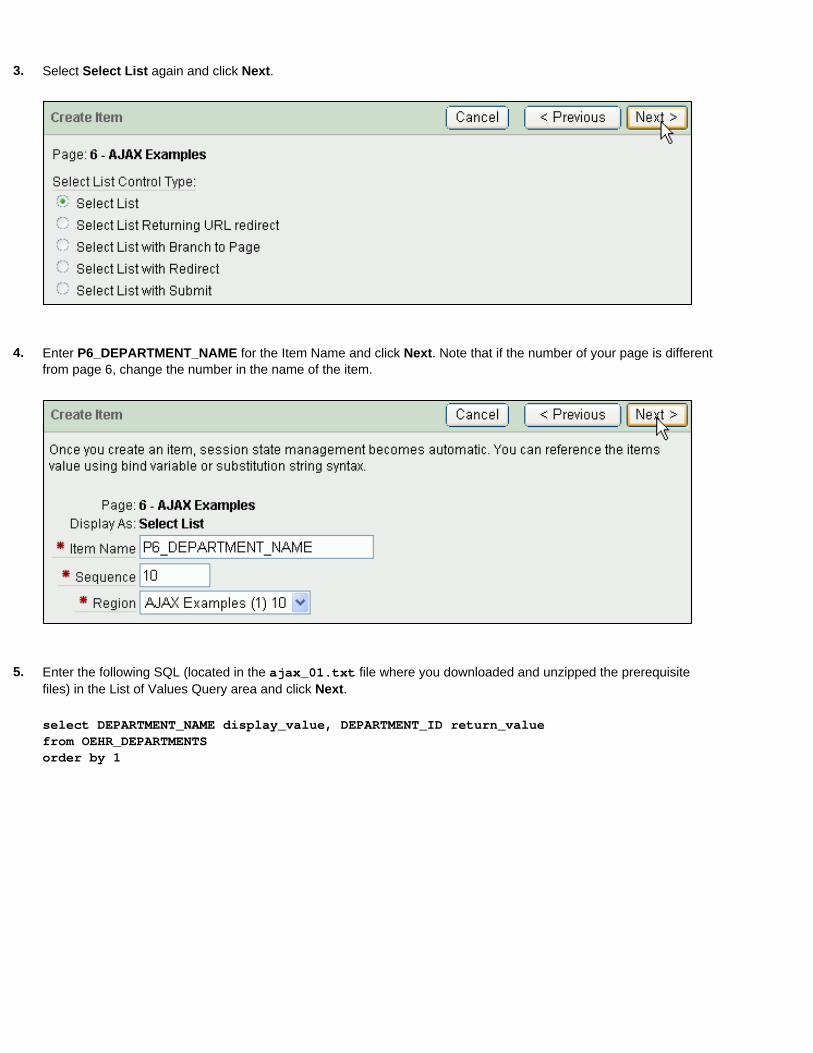
3. Select Select List again and click Next.
4. Enter P6_DEPARTMENT_NAME for the Item Name and click Next. Note that if the number of your page is different
from page 6, change the number in the name of the item.
5. Enter the following SQL (located in the ajax_01.txt file where you downloaded and unzipped the prerequisite
files) in the List of Values Query area and click Next.
select DEPARTMENT_NAME display_value, DEPARTMENT_ID return_value from OEHR_DEPARTMENTSorder by 1
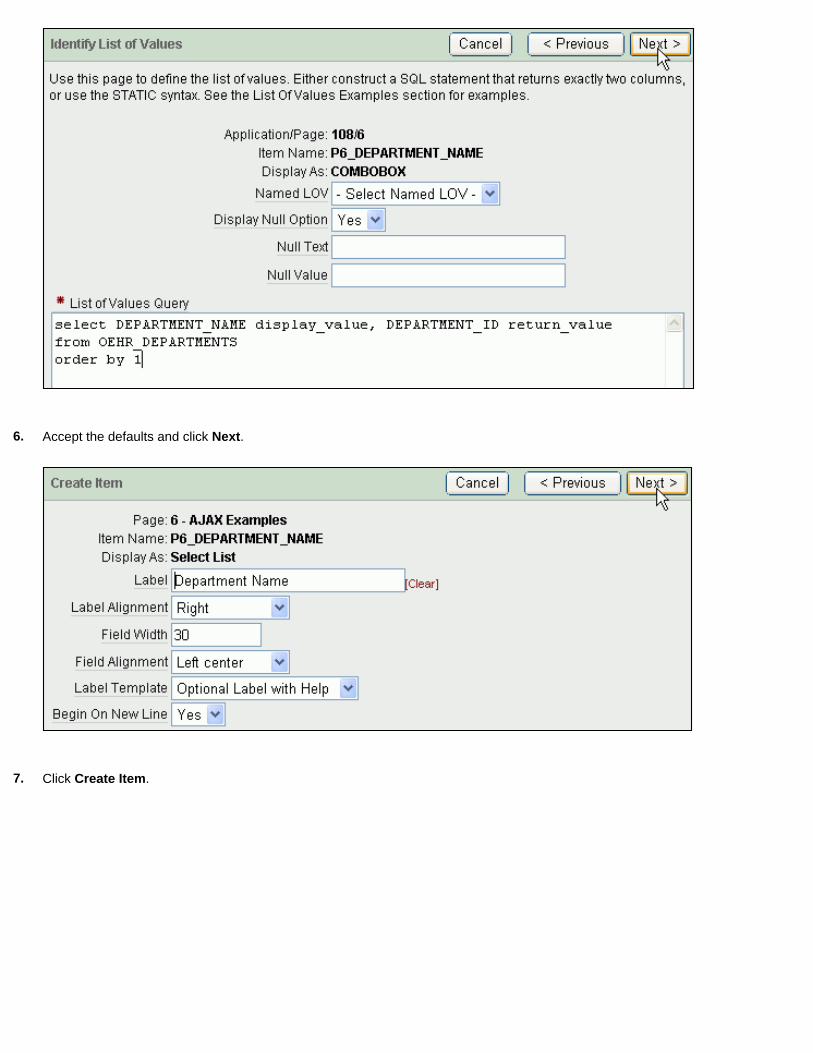
6. Accept the defaults and click Next.
7. Click Create Item.

8. You need to create another item for EMPLOYEE_NAME. Under Items, select the Create icon.

9. Select Select List and click Next.
10. Select Select List again and click Next.
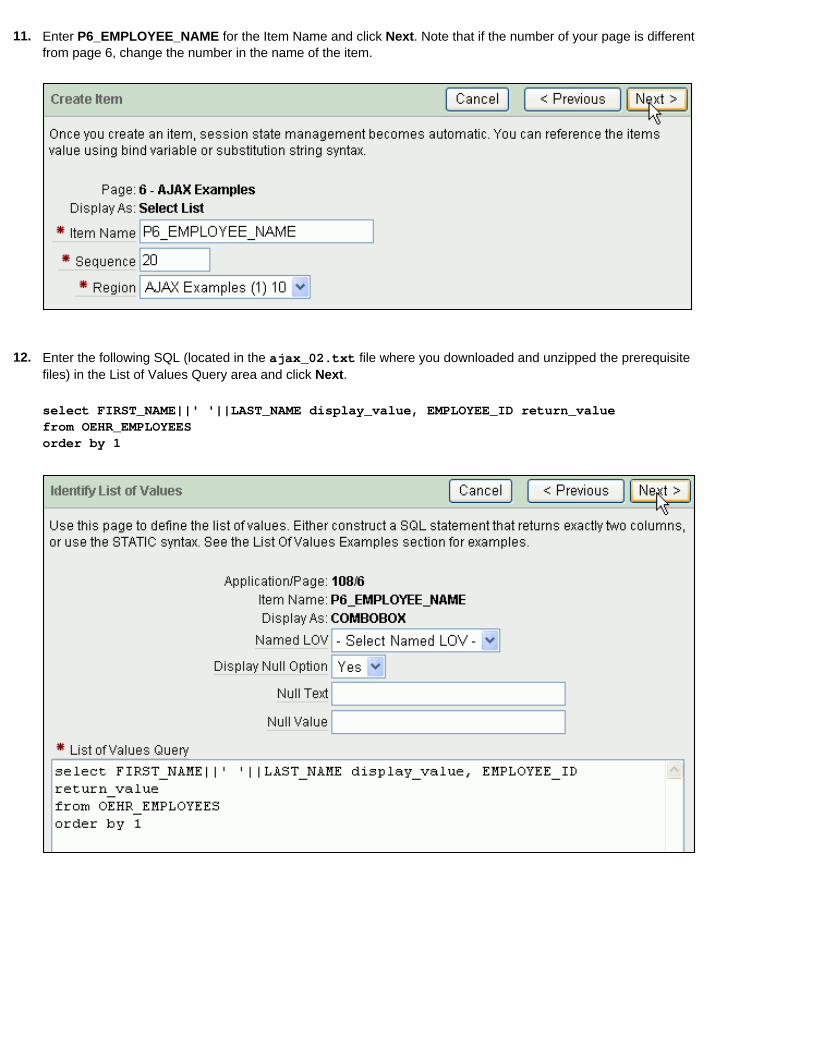
11. Enter P6_EMPLOYEE_NAME for the Item Name and click Next. Note that if the number of your page is different from page 6, change the number in the name of the item.
12. Enter the following SQL (located in the ajax_02.txt file where you downloaded and unzipped the prerequisite
files) in the List of Values Query area and click Next.
select FIRST_NAME||' '||LAST_NAME display_value, EMPLOYEE_ID return_value from OEHR_EMPLOYEESorder by 1

13. Accept the default and click Next.
14. Click Create Item.
The Select List items were created successfully.
Back to Topic
Create an On Demand Process
In this section, you create an on-demand process that dynamically shows the values of another item without submitting the page. Perform the following steps:

1. From the Page Definition for AJAX Examples page, select the Shared Components icon.
2. Under Logic, select Application Processes.
3. Click Create.
4. Enter POPULATE_SELECT for the Name and select On Demand: Run this application process when
requested by a page process for Point and click Next.

5. Enter the following code (located in the ajax_03.txt file where you downloaded and unzipped the prerequisite files) in the Process Text area and click Next.
DECLARE l_counter number; l_o_name varchar2(2000); l_emp_id varchar2(4000);BEGIN l_emp_id := wwv_flow.g_x01; owa_util.mime_header('text/xml', FALSE ); htp.p('Cache-Control: no-cache'); htp.p('Pragma: no-cache'); owa_util.http_header_close;htp.prn('<select>');FOR rec IN ( SELECT "FIRST_NAME"||' '||"LAST_NAME" as "NAME","DEPARTMENT_ID", "EMPLOYEE_ID" as "ID" FROM "OEHR_EMPLOYEES" WHERE "DEPARTMENT_ID" = l_emp_id) LOOP htp.prn('<option value="' || rec.ID || '">' || rec.NAME || '</option>'); END LOOP; htp.prn('</select>');END;

6. Click Create Process.
7. The process was created successfully. In the next section, you invoke the process from a javascript function that is
called from the P6_DEPARTMENT_NAME item. Click the Edit Page icon.
Back to Topic
Invoke the On Demand Process When Department Name is Selected
In this section, you add the javascript function that invokes the On Demand process and then invoke the function from the P6_DEPARTMENT_NAME item. Perform the following steps:
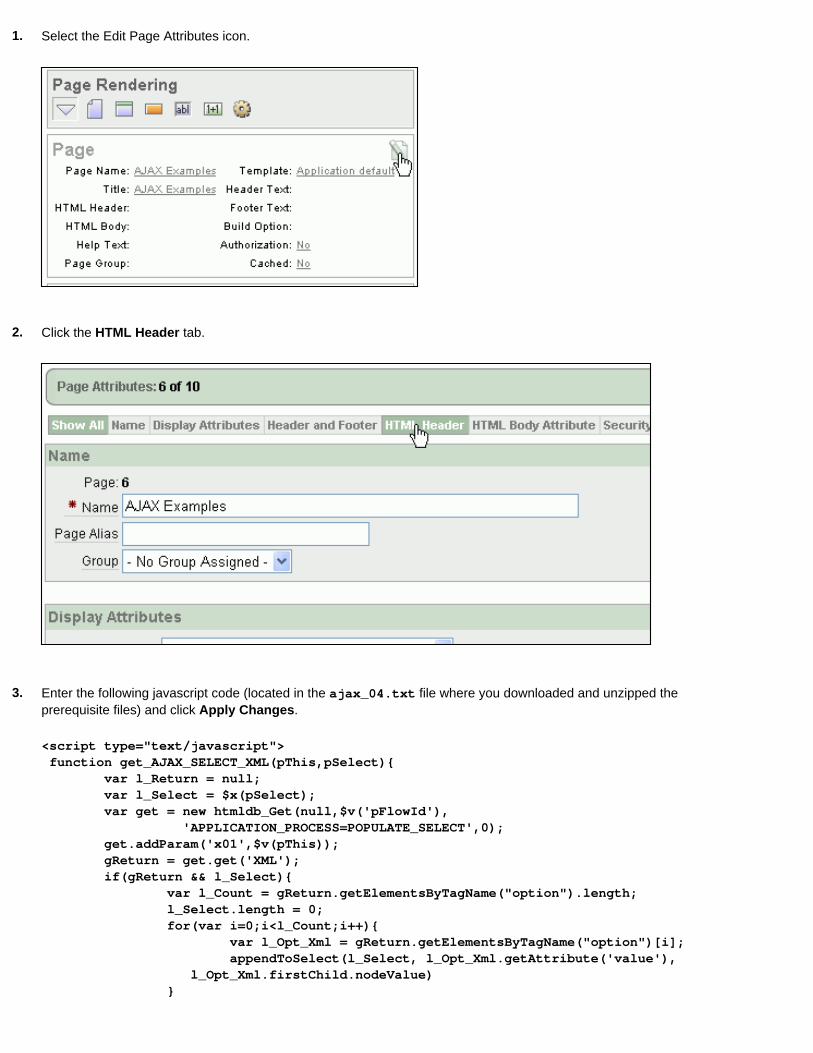
1. Select the Edit Page Attributes icon.
2. Click the HTML Header tab.
3. Enter the following javascript code (located in the ajax_04.txt file where you downloaded and unzipped the
prerequisite files) and click Apply Changes.
<script type="text/javascript"> function get_AJAX_SELECT_XML(pThis,pSelect){ var l_Return = null; var l_Select = $x(pSelect); var get = new htmldb_Get(null,$v('pFlowId'), 'APPLICATION_PROCESS=POPULATE_SELECT',0); get.addParam('x01',$v(pThis)); gReturn = get.get('XML'); if(gReturn && l_Select){ var l_Count = gReturn.getElementsByTagName("option").length; l_Select.length = 0; for(var i=0;i<l_Count;i++){ var l_Opt_Xml = gReturn.getElementsByTagName("option")[i]; appendToSelect(l_Select, l_Opt_Xml.getAttribute('value'), l_Opt_Xml.firstChild.nodeValue) }

} get = null; } function appendToSelect(pSelect, pValue, pContent) { var l_Opt = document.createElement("option"); l_Opt.value = pValue; if(document.all){ pSelect.options.add(l_Opt); l_Opt.innerText = pContent; }else{ l_Opt.appendChild(document.createTextNode(pContent)); pSelect.appendChild(l_Opt); }}</script>
4. Now you want to invoke the get_AJAX_SELECT_XML function from your item. Under Items, select the
P6_DEPARTMENT_NAME item.
5. Enter the following code in the HTML Form Element Attribute field and click Apply Changes.
onchange="get_AJAX_SELECT_XML(this,'P6_EMPLOYEE_NAME')"

6. You can now run the page. Click Run.

7. If you receive the login window, enter your username and password and click Login.
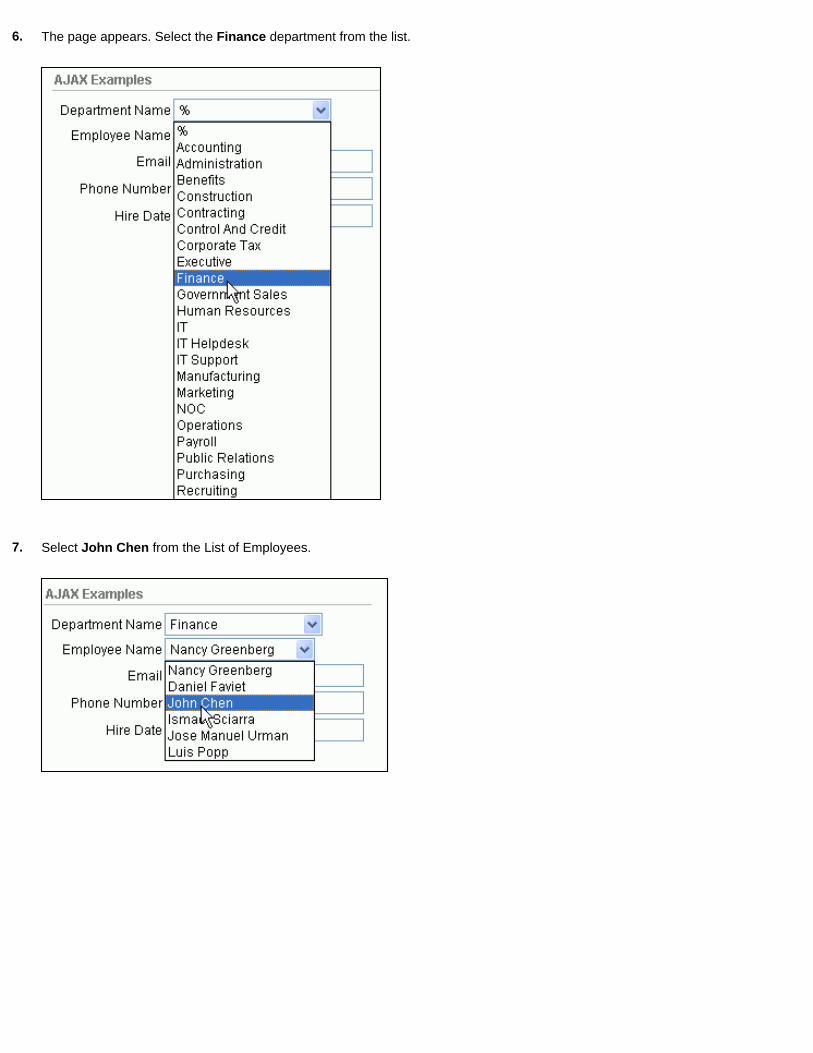
8. The page appears. Select the Finance department from the list.
9. Notice that the list of Employees only shows a list of the employees in the Finance department.
Back to Topic
Setting Multiple Items Based on Another Item
In this section, you select a value from a select list item, which dynamically populates the values of multiple other items on the page. Perform the following tasks:
Create Text Items Create an On Demand ProcessInvoke the On Demand Process When Employee Name is Selected
Back to Topic List
Create Text Items
In this section, you create Text items for EMAIL, PHONE_NUMBER and HIRE_DATE. Perform the following steps:

1. From the Page Definition page, under Items, select the Create icon.
2. Select Create multiple items using tabular form.
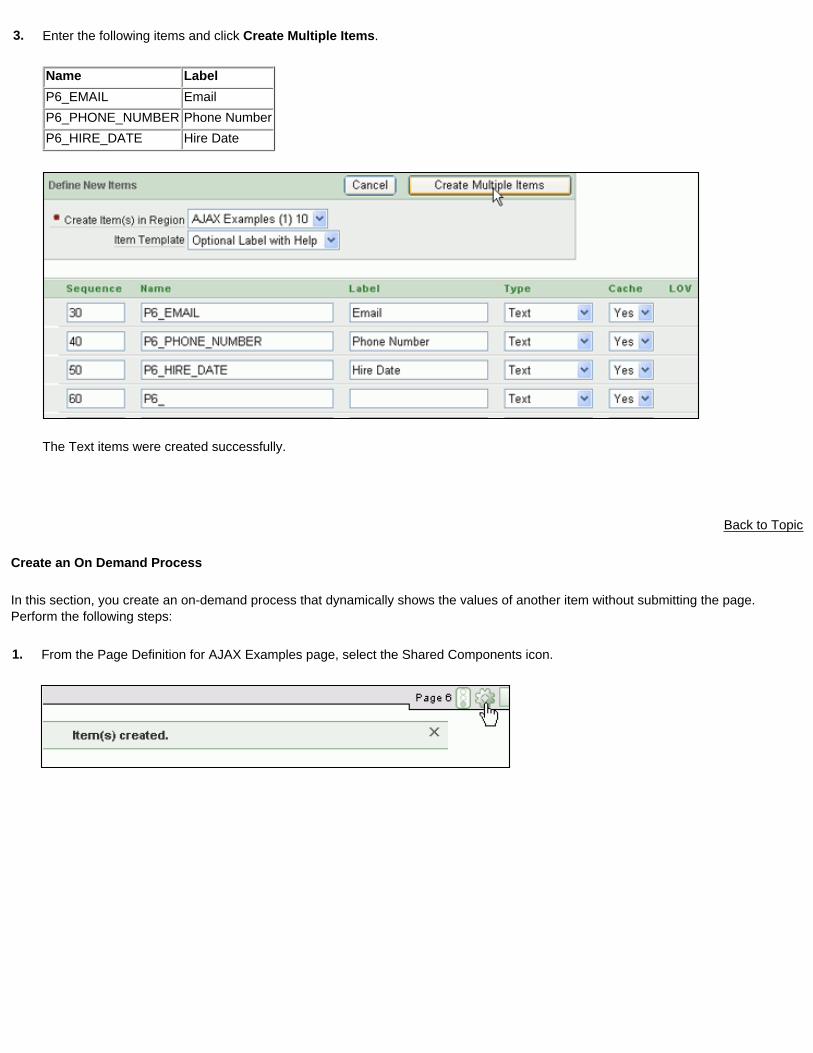
3. Enter the following items and click Create Multiple Items.
Name LabelP6_EMAIL EmailP6_PHONE_NUMBER Phone NumberP6_HIRE_DATE Hire Date
The Text items were created successfully.
Back to Topic
Create an On Demand Process
In this section, you create an on-demand process that dynamically shows the values of another item without submitting the page. Perform the following steps:
1. From the Page Definition for AJAX Examples page, select the Shared Components icon.
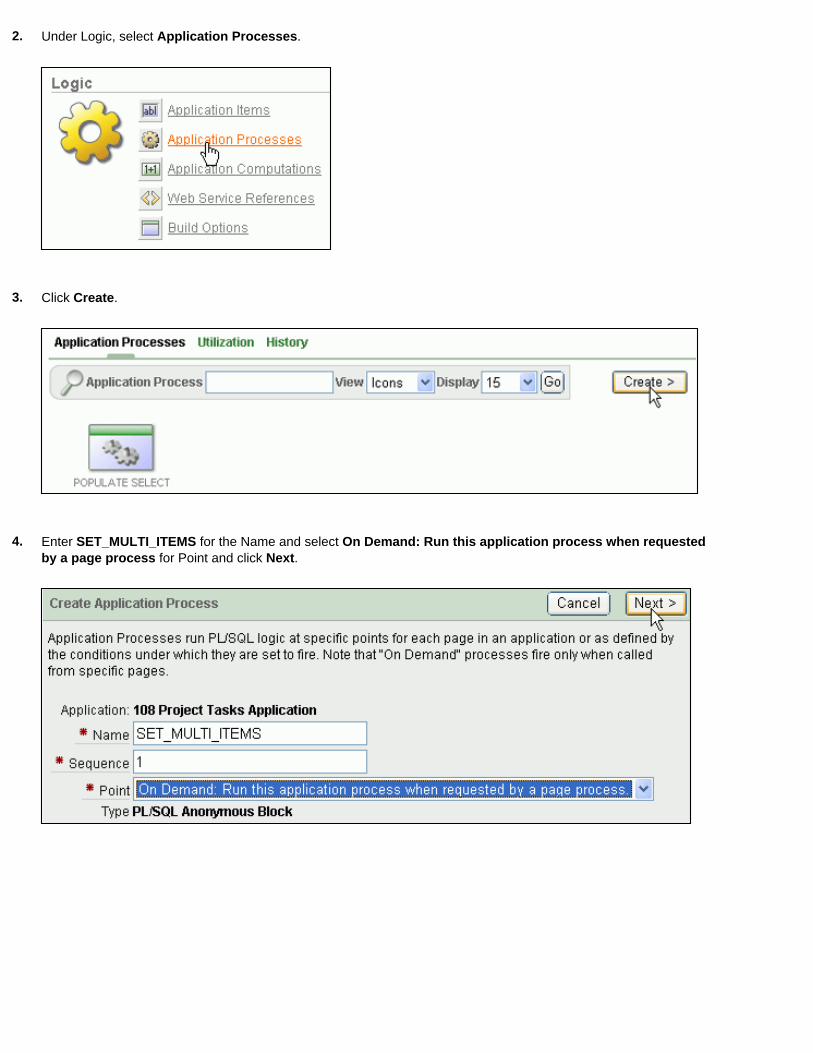
2. Under Logic, select Application Processes.
3. Click Create.
4. Enter SET_MULTI_ITEMS for the Name and select On Demand: Run this application process when requested
by a page process for Point and click Next.

5. Enter the following code (located in the ajax_05.txt file where you downloaded and unzipped the prerequisite files) in the Process Text area and click Next.
DECLARE l_emp_id varchar2(4000); l_email varchar2(4000); l_phone varchar2(4000); l_hire_date varchar2(4000);BEGIN l_emp_id := wwv_flow.g_x01;SELECT EMAIL,PHONE_NUMBER,HIRE_DATEINTO l_email,l_phone,l_hire_dateFROM OEHR_EMPLOYEESWHERE EMPLOYEE_ID = l_emp_id; apex_util.set_session_state('P6_EMPLOYEE_NAME',l_emp_id); apex_util.set_session_state('P6_EMAIL',l_email); apex_util.set_session_state('P6_PHONE_NUMBER',l_phone); apex_util.set_session_state('P6_HIRE_DATE',l_hire_date); apex_util.json_from_items('P6_EMAIL:P6_PHONE_NUMBER:P6_HIRE_DATE');END;

6. Click Create Process.
7. The process was created successfully. In the next section, you invoke the process from a javascript function that is
called from the P6_EMPLOYEE_NAME item. Click the Edit Page icon.
Back to Topic
Invoke the On Demand Process When Department Name is Selected
In this section, you add the javascript function that invokes the On Demand process and then invoke the function from the P6_EMPLOYEE_NAME item. Perform the following steps:

1. Under Page, select the link next to HTML Header.
2. Enter the following javascript code (located in the ajax_06.txt file where you downloaded and unzipped the
prerequisite files) to the end of the HTML Header code already in this field and click Apply Changes.
<script type="text/javascript"><!--function f_TestOnDemand(pValue){ var lRequest = new apex.ajax.ondemand('SET_MULTI_ITEMS', function(){ /* start the return function */ var l_s = p.readyState; if(l_s == 1||l_s == 2||l_s == 3){ }else if(l_s == 4){ gReturn = p.responseText; (gReturn)?json_SetItems(gReturn):null; }else{return false;} /* end the return function */ } ); lRequest.ajax.addParam('x01',(!!pValue)?pValue:$v('P6_EMPLOYEE_NAME')); lRequest._get();}//--></script>

3. Now you want to invoke the f_TestOnDemand function from your item. Under Items, select the
P6_EMPLOYEE_NAME item.
4. Enter the following code in the HTML Form Element Attribute field and click Apply Changes.
onchange="f_TestOnDemand(this.value)"
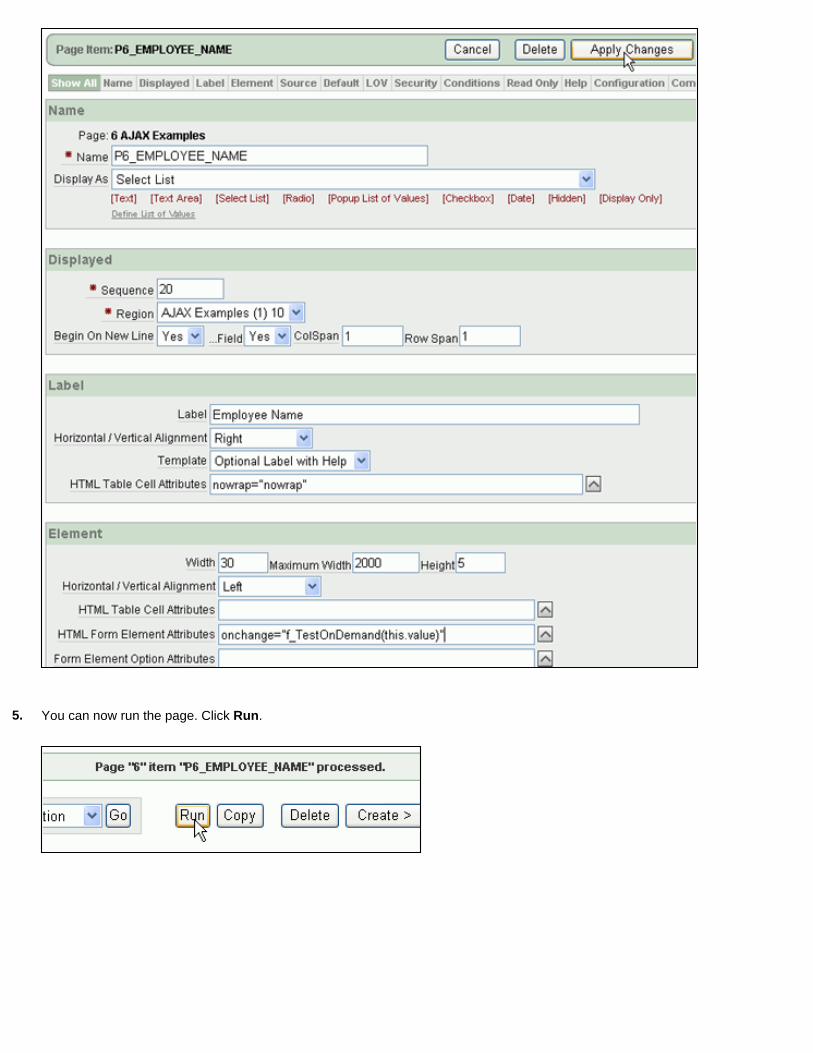
5. You can now run the page. Click Run.
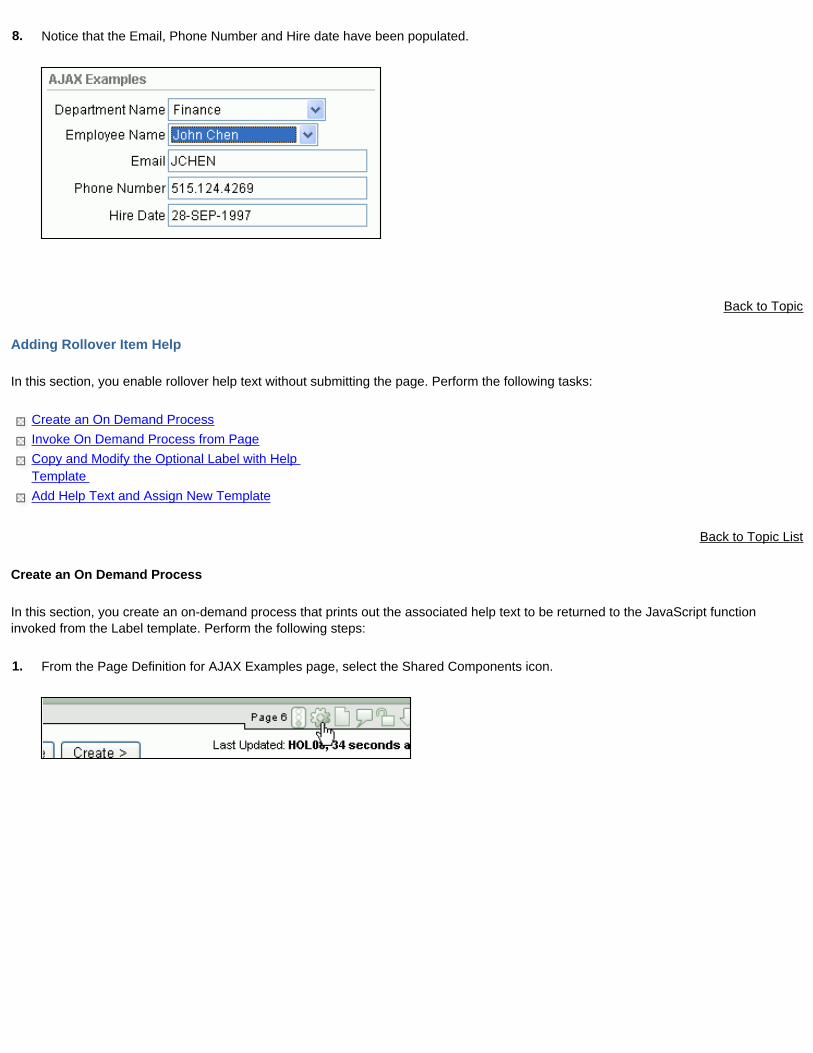
6. The page appears. Select the Finance department from the list.
7. Select John Chen from the List of Employees.
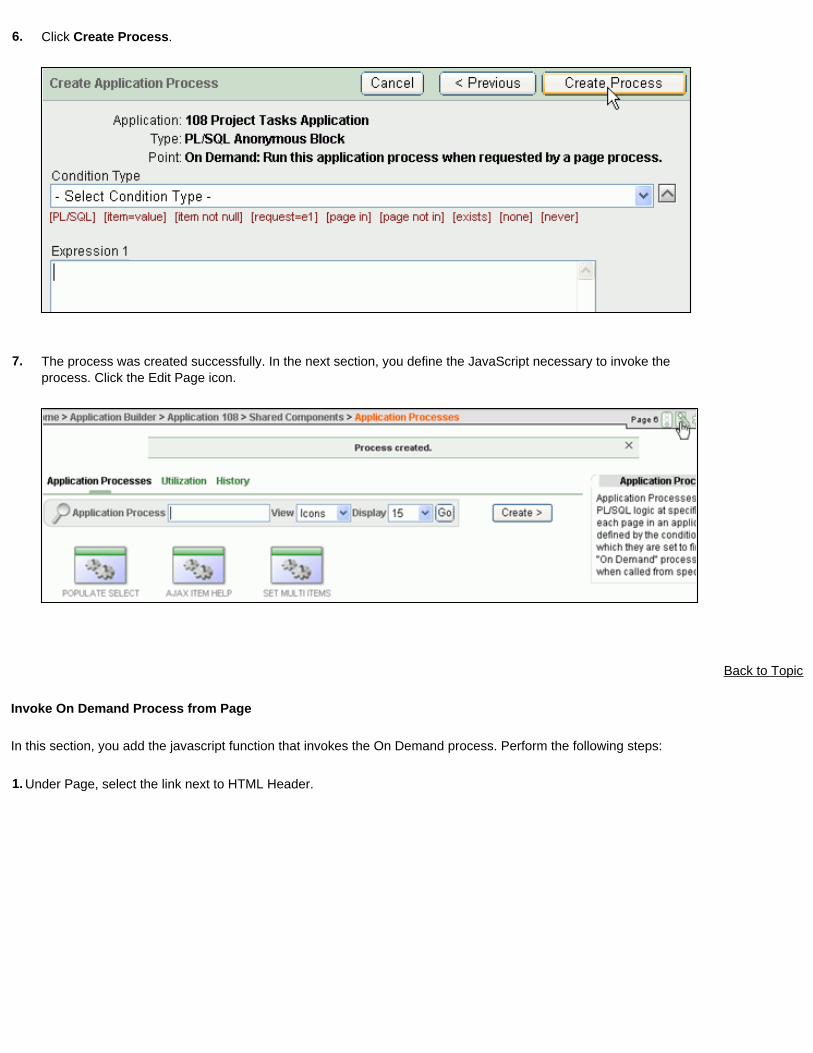
8. Notice that the Email, Phone Number and Hire date have been populated.
Back to Topic
Adding Rollover Item Help
In this section, you enable rollover help text without submitting the page. Perform the following tasks:
Create an On Demand ProcessInvoke On Demand Process from PageCopy and Modify the Optional Label with Help Template Add Help Text and Assign New Template
Back to Topic List
Create an On Demand Process
In this section, you create an on-demand process that prints out the associated help text to be returned to the JavaScript function invoked from the Label template. Perform the following steps:
1. From the Page Definition for AJAX Examples page, select the Shared Components icon.

2. Under Logic, select Application Processes.
3. Click Create.
4. Enter AJAX_ITEM_HELP for the Name and select On Demand: Run this application process when requested
by a page process for Point and click Next.

5. Enter the following code (located in the ajax_07.txt file where you downloaded and unzipped the prerequisite files) in the Process Text area and click Next.
DECLARE l_counter number; l_help varchar2(4000); l_item_id varchar2(4000); l_page_id varchar2(4000);BEGIN l_item_id := wwv_flow.g_x01; l_page_id := wwv_flow.g_x02; select ITEM_HELP_TEXT into l_help from APEX_APPLICATION_PAGE_ITEMS where APPLICATION_ID = &APP_ID. and PAGE_ID = l_page_id and ITEM_ID = l_item_id; htp.prn(''); htp.prn(l_help); htp.prn('');END;
6. Click Create Process.
7. The process was created successfully. In the next section, you define the JavaScript necessary to invoke the
process. Click the Edit Page icon.
Back to Topic
Invoke On Demand Process from Page
In this section, you add the javascript function that invokes the On Demand process. Perform the following steps:
1. Under Page, select the link next to HTML Header.

2. Enter the following javascript code (located in the ajax_08.txt file where you downloaded and unzipped the prerequisite files) and
click the Header and Footer tab.
<script type="text/javascript">function AJAX_HELP(pThis,pId){ this.dTimeout; clearTimeout(this.dTimeout); this.dGet = dGet; this.dCancel = dCancel; this.dGet(); return; function dGet(){ this.dTimeout = setTimeout("this.dCancel()",5000); var lRequest = new apex.ajax.ondemand('AJAX_ITEM_HELP', function(){ /* start the return function */ var l_s = p.readyState; if(l_s == 1||l_s == 2||l_s == 3){ }else if(l_s == 4){ $s('rollover_content',p.responseText); $x_Show('rollover'); htmldb_IE_Select_Item_Fix($x('rollover')); $x_Style('rollover','left',findPosX(pThis)+pThis.offsetWidth+5); $x_Style('rollover','top',findPosY(pThis)-($x('rollover').offsetHeight/2)+($x(pThis).offsetHeight/2)); document.onclick = function(e){ dCheckClick(e); } }else{return false;} /* end the return function */ } ); lRequest.ajax.addParam('x01',pId); lRequest.ajax.addParam('x02',$v('pFlowStepId')); lRequest._get(); } function dCheckClick(e){ var elem = html_GetTarget(e); try{ var lTable = $x_UpTill(elem,"DIV"); if(lTable.id!='rollover_content'){dCancel();} else{} }catch(err){dCancel();}

} function dCancel(){ $x_Hide('rollover'); document.onclick = null; get = null; }}</script>
3. To identify how you want the help text to be shown when it appears, enter the following (located in the ajax_09.txt file where you
downloaded and unzipped the prerequisite files) in the Footer Text area and click Apply Changes.
<div id="rollover" style="display:none;background:#FFF;width:150px;position:absolute;z-index:9999"><div id="rollover_content" style="padding:4px;border:2px solid #369;"></div></div>

In the next section you copy and modify the Label template that invoke the javaScript you just added to the page.
Back to Topic
Copy and Modify the Optional Label with Help Template
In this section, you copy the Optional Label with Help template and change the Before Label to invoke the javascript function AJAX_HELP which will display the rollover text. Perform the following steps:
1. On the current page, under Shared Components in the Templates section, select the Copy icon.

2. Select the link for Optional Label with Help.
3. Enter Optional Label with Help Custom for the New template Name and click Copy.
4. Your template was copied. Select the template Optional Label with Help Custom from the list.
5. Enter the following code (located in the ajax_10.txt file where you downloaded and unzipped the prerequisite
files) in the Before Label area and click Apply Changes.
<label for="#CURRENT_ITEM_NAME#" tabindex="999"><a class="t200OptionalLabelwithHelp" href="javascript:void(return false);" onmouseover="AJAX_HELP(this,'#CURRENT_ITEM_ID#')" id="#CURRENT_ITEM_ID#_label">
6. The template was update successfully. In the next section, you add the help text for each item and assign the new
template.
Back to Topic
Add Help Text and Assign New Template
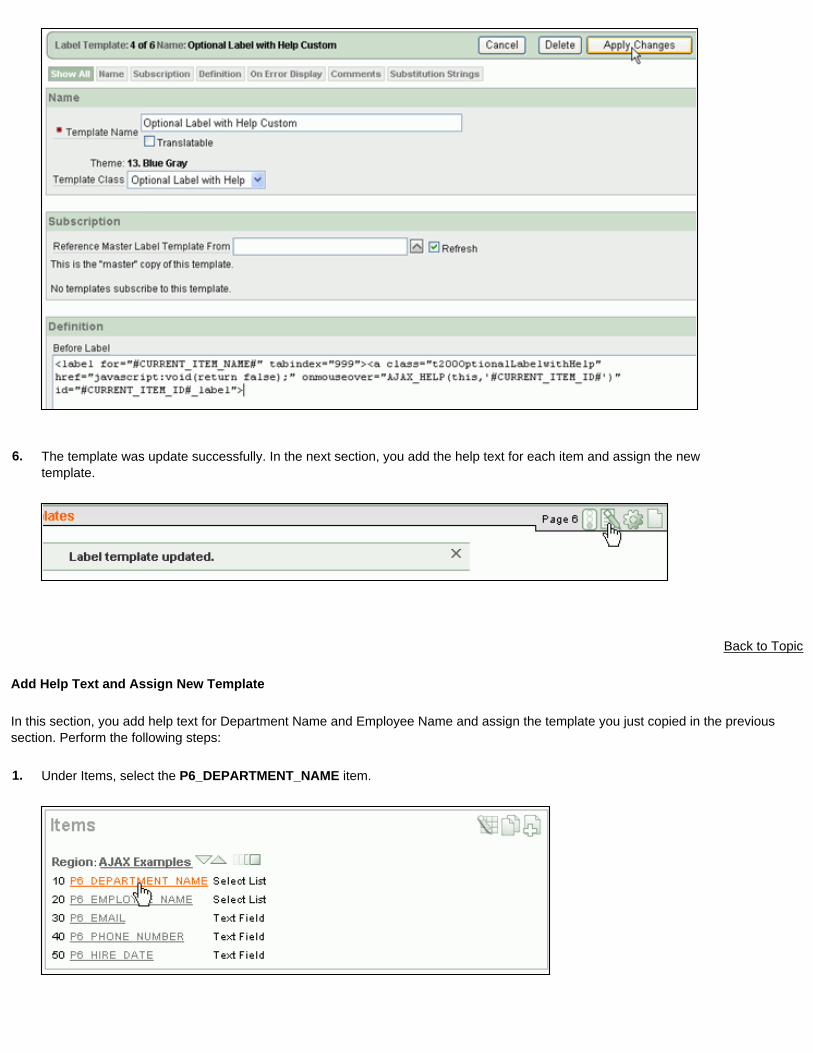
In this section, you add help text for Department Name and Employee Name and assign the template you just copied in the previous section. Perform the following steps:
1. Under Items, select the P6_DEPARTMENT_NAME item.

2. Under Label, select Optional Label with Help Custom for Template and then click the Help tab.
3. Enter some text in the Help text area and click Apply Changes.
4. Under Items, select the P6_EMPLOYEE_NAME item.

5. Enter some text in the Help text area and click the Label tab.
6. Select Optional Label with Help Custom for Template and then click Apply Changes.
7. You can now run the page. Click Run.
8. Place your cursor over the Department Name Label to see the rollover help.
Back to Topic
Summary
In this tutorial, you learned how to:
Add a dependent select listSet multiple items based on another itemAdd rollover item help
Back to Topic List
Place the cursor over this icon to hide all screenshots.